

Page 1

Introduction
Thank you for buying a Mitsubishi Motors product.
In order to fully utilize the functionality of this product and ensure safe and correct operation,
please read the “User Manual” carefully before operation.
After reading the “User Manual”, ensure this is kept readily available, and refer to it again if you
do not understand any points, or in the event of problems.
Page 2

Table of contents
Introduction
Before Use 5
Disclaimers .................................................... 5
Important Points on Usage ............................ 6
FCC NOTE .................................................... 6
FCC CAUTION .............................................. 6
Restrictions on Operations while the Vehicle Is Driving .........
How to Clean ................................................. 7
Trademarks.................................................... 7
Important Points on Safety for the Customer .........
How to Read This Manual ............... 11
Basic Operation 12
This Product .................................... 12
Main Unit Panel ........................................... 12
Start ............................................................. 13
SD Cards ..................................................... 14
Insert an SD Card ........................................ 15
Remove the SD Card .................................. 16
How to Perform Touch Operations .....
When Touching ___ ..................................... 17
Searching Items from a List ......................... 17
How to Input Characters ................ 18
Keyboard for Character Input ...................... 18
Keyboard for Number Input ......................... 19
Input assist for searches .............................. 19
Top Menu ......................................... 20
Display Types .............................................. 20
Destination Menu ......................................... 21
Navi Menu ................................................... 22
Mode ............................................................ 23
INFO Menu .................................................. 24
SETTINGS Menu ......................................... 25
17
NAVI
Basic Operation 26
Navigation Functions ...................... 26
What is Navigation? ..................................... 26
GPS Antenna ............................................... 26
Map Data ..................................................... 27
7
Position Measurement ................................. 27
Route Search Methods ................................ 28
Route Guidance ........................................... 28
Precautions for operating the navigation ..... 28
9
Navigation Screen .......................... 29
Map Display Contents ................................. 29
Display the Destination Menu ...................... 31
Display the Scroll Menu ............................... 31
Display the Sub-menu ................................. 32
Display the Current Location Screen ........... 32
Select the Map Screen ................... 33
Types of Maps ............................................. 33
Map Reference Orientation ......................... 35
Change the P side P Display Information ......
Guidance Display ............................ 37
Junction Guidance Map ............................... 37
Toll Booth Guidance Map ............................ 37
Ferry/Car Train Guidance Map .................... 37
Lane Guidance ............................................ 37
Junction View .............................................. 38
Curve Guidance ........................................... 38
Speed Indicator Guidance ........................... 38
Operate the Map ............................. 39
Switch the Scale .......................................... 39
Scroll the Map .............................................. 39
Operations from the Scroll Menu ....
Set as the Destination ................................. 41
Set as the Waypoint..................................... 41
Set in the Address Book .............................. 42
Search for Nearby Establishments .............. 42
Check the Location of Your Car. .................. 43
Freeway Information ....................... 44
Display Contents ......................................... 44
Information on Establishments .................... 44
Displaying .................................................... 45
Check Area Information ............................... 45
Destination Settings 46
Set Your Home as the Destination .....
Set the Searched for Location as the Destination........
Search for a Location ..................... 48
Load from the Address Book ....................... 48
Load a Frequently Used Location from the Address Book ........
Use the Search History ................................ 49
Search from Address ................................... 49
Search by Inputting an Establishment Name .....
Search for Nearby Establishments .............. 52
Search from Telephone Number .................. 54
Search from Zip Code ................................. 54
Search by Latitude and Longitude ............... 55
Set the Start Location as the Destination .....
36
Guidance Start Screen ................... 56
Show Route ................................................. 56
Route Checking and Changing 57
Route Checking ...............................57
Check the Next Junction to Turn ................. 57
Check the Route .......................................... 57
Check the Entire Route ............................... 58
View a Demo Trip ........................................ 59
41
46
47
48
50
55
Page 3

Change the Route ........................... 60
Change Search Conditions .......................... 60
Set and Change a Waypoint ........................ 60
Select from Four Routes .............................. 63
Search for a Detour Route ........................... 63
Searching for a Different Route ................... 64
Pause Route Guidance ............................... 64
Delete a Route ............................................. 64
Select the DRG route .................................. 65
Register an Avoid Area ................................ 65
Set an Address in the Address Book
Register a Home Location .............. 67
Change the Home Location ......................... 68
Erase Your Home Registration .................... 68
Set a Frequently Used Location in the Address Book .........
Change a Frequently Used Location ........... 70
Delete a Frequently Used Location ............. 70
Set an Address in the Address Book ......
Register the Current Location ...................... 71
Register a Searched for Location ................ 71
Change the List Order ................................. 72
Delete an Address from the Address Book ......
Change Address Book Information ....
Address Book Information Screen ............... 73
RTT 75
RTT .................................................. 75
Display Contents ......................................... 76
Checking the RTT Trafc Messages .....
Registering the RTT Surveillance Map .....
Registering from RTT Trafc Messages ...... 78
Registering from Scroll Menu ...................... 78
67
69
71
72
73
77
78
AV
Audio Functions 79
Basic Operation .............................. 79
Switch Audio ON/OFF ................................. 79
Adjust Volume ..............................................79
Insert/Eject Discs ......................................... 80
AV Icons ......................................................81
Steering Remote Control Switch Operation ......
Handling of Discs ............................ 83
Types of Disc That Can Be Played Back ..... 84
Audio Files(MP3/WMA/AAC/WAV) .....
Folder Structure ........................................... 86
What Is MP3? .............................................. 87
What Is WMA? ............................................. 88
What Is AAC? .............................................. 89
What Is WAV? .............................................. 90
Radio 91
Listen to Radio ................................ 91
Display Contents ......................................... 92
Register Your Favorite Broadcast Stations ......
Search for Broadcast Stations
with Strong Signals ...................................... 94
Search for Broadcast Stations from the Station List .......
Emergency Broadcasts ............................... 96
Set Reception Mode .................................... 96
P side P Display Screen .............................. 96
Listen to Satellite Radio ................. 97
Display Contents ......................................... 98
Search for Your Favorite Channel. .............. 99
Register Your Favorite Channel ................. 100
Setting Listening Restrictions .................... 100
Set the channel skip. ................................. 103
The SIRIUS ID is displayed. ...................... 104
Updating Broadcast Information ................ 104
P side P Display Screen ............................ 104
82
85
94
95
DISC 105
Listen to CDs ................................. 105
Display a List ............................................. 105
Display Contents ....................................... 106
Switch Playback Mode .............................. 107
P side P Display Screen ............................ 107
Listen to Audio Files on a Disc ..... 108
Display a List ............................................. 108
Display Contents ....................................... 109
Switch Playback Mode ...............................110
P side P Display Screen .............................111
iPod/USB/SD 112
Play iPod ....................................... 112
Switch Playback Mode ...............................113
Display Contents ........................................114
Search by List .............................................115
P side P Display Screen .............................116
Listen to Audio Files on
a USB Device/SD Card .................. 117
Switch Playback Mode ...............................118
Display Contents ........................................119
Display a List ............................................. 120
Display the Music Menu ............................ 121
P side P Display Screen ............................ 122
External Input Devices 123
Use Bluetooth Audio ..................... 123
Connect a Bluetooth-capable
Audio Device ............................................. 124
Listen to a Bluetooth-capable
Audio Device ............................................. 124
Display Contents ....................................... 125
Switch Playback Mode .............................. 126
P side P Display Screen ............................ 126
Use AUX ........................................ 128
Outputting Audio ........................................ 128
Page 4

INFO/SETTINGS
INFO 129
Calendar ........................................ 129
Displaying .................................................. 129
Setting Special Days ................................. 130
Setting Anniversaries ................................. 132
User SD ......................................... 134
Displaying .................................................. 134
Update the Map Database ............ 135
Trip ................................................ 136
Displaying .................................................. 136
Changing the Reset Mode ......................... 137
Check the History ...................................... 138
Lap Time .................................................... 138
Air Conditioner .............................. 140
Displaying .................................................. 140
GPS Information ............................ 141
Displaying .................................................. 141
P side P Display Screen ............................ 142
Mobile Phone ................................. 143
Connect Your Mobile Phone ...................... 143
Display the Phonebook .............................. 143
Register in Phonebook .............................. 143
Edit a Phonebook ...................................... 145
Dial a Telephone ........................................ 146
Incoming Calls ........................................... 148
Setting Passcode ....................................... 149
Camera .......................................... 150
Displaying .................................................. 150
Environment .................................. 151
Displaying .................................................. 151
Maintenance ................................. 152
Displaying .................................................. 152
Set Maintenance Information ..................... 153
Update Maintenance Information .............. 155
Set Maintenance Information Guidance .... 155
HD Radio Data Information ........... 157
Displaying .................................................. 157
Fuel price Information Screen ................... 158
Check the Location of Gas Stations .......... 158
Weather Information Screen ...................... 160
Check the Weather Information ................. 161
P side P Display Screen ............................ 162
Version Info ................................... 163
Displaying .................................................. 163
Version Updating Method .......................... 163
Voice Operation 165
Voice Control ................................ 165
About the Learning Function ..................... 166
Skip Audio Guide ....................................... 166
End Voice Control ...................................... 166
Navigation Function Operation .... 167
Operating the Map ..................................... 167
Creating a Route ....................................... 168
Search for a Location ................................ 170
Checking and Changing the Route ............ 172
Audio Function Operation ............. 173
Selecting and Playing Media ..................... 173
Repeating Playback ................................... 173
Selecting and Playing Tracks .................... 173
Switch to Other Functions ............ 174
Displaying Information ............................... 174
Telephone (Hands-free) ............................. 174
List of Audio Commands ............... 175
Navigation Function Operation .................. 175
Searchable Genre Names in the Surroundings ....
Audio Function Operation .......................... 191
Check the Voice Control Help ......194
184
SETTINGS 195
Navi Settings ................................. 195
Guidance ................................................... 196
Screen ....................................................... 197
RTT Options .............................................. 199
Route Options ............................................ 201
Navi Voice/Others ...................................... 202
Personal .................................................... 204
Adjust Audio Sound Quality .......... 205
Balance/Fader ........................................... 205
Equalizer Settings ...................................... 205
Surround Settings ...................................... 206
Other Settings ............................................ 206
System Settings ............................ 208
Time ........................................................... 208
Language ................................................... 208
A/C Cutin ................................................... 209
Units .......................................................... 209
Bluetooth Setting ....................................... 209
Keyboard Layout ....................................... 212
Voice control settings .................................212
Other Settings ............................... 213
Display Off ................................................. 213
Picture Control ........................................... 213
Vehicle Settings ......................................... 213
Clock Screen ............................................. 218
Other
Troubleshooting ............................ 219
If This Message Appears... ........................ 219
If You Think Something Is Not Working Properly... ....
After the Car Battery Has Been Replaced ...
If This Product Does Not Start Up ............. 224
END USER LICENSE
AGREEMENT OF THE NAVTEQ DATABASE ....
221
224
225
Page 5

Introduction
The followings are what you need to know before using this product.
Before Use
Disclaimers
• Mitsubishi Motors will in no way be held
responsible for losses resulting from re,
earthquake, tsunami, ood, or other natural
disasters; from actions of third parties; from
other accidents; or from inappropriate or
abnormal usage conditions utilized by the
customer, be said conditions deliberate or
unintentional.
• There will be no indemnication for alteration
or loss of any information stored upon
this product (address book etc.) by the
customer or a third party resulting from
improper use of this product, the inuence
of static electricity or electric noise, or at
the time of malfunction or repair or similar
circumstances. We recommend that you
create backups of important information as a
precautionary measure.
• Some personal information (addresses in
address book, telephone numbers etc.) input
into this product may remain in memory even
if this product is removed. The customer
is responsible for proper handling and
management (including deleting) of personal
information to protect privacy when handing
this product over to anyone else or disposing
of it. Mitsubishi Motors will in no way be held
responsible.
• Mitsubishi Motors will in no way be held
responsible for any collateral losses (loss
of business prots, alteration or loss of
recorded data) resulting from the usage or
inability to use this product.
• Please be aware that the map displayed
is from when the data was prepared, so it
may differ from current conditions. Also,
Mitsubishi Motors will in no way be held
responsible for any losses resulting from
map data inadequacies.
• This product contains data on trafc
regulations, but due to changes in trafc
rules, this data may differ from the actual
trafc rules. Always obey the actual trafc
regulations. Also, Mitsubishi Motors will in
no way be held responsible for any losses
resulting from trafc accidents or trafc
rule violations due to trafc regulation data
inadequacies.
• Returns, refunds, exchange, or conversion
for reasons of map data inadequacy or the
like are not possible. There may be times
when the map data does not match the
specic objective of the user. The contents of
the map data are subject to change without
notice. The map data may contain wrong or
missing characters, incorrect locations etc.
• The rule guidance and audio guidance,
for example when to turn, may sometimes
differ from the actual trafc signs or trafc
regulations. Always obey the actual trafc
signs and actual trafc regulations.
• For the purpose of product improvement,
specications and external appearance may
be subject to change without advance notice.
Accordingly, while the contents of the User
Manual may differ, please be aware that
returns, refunds, exchange, or conversion
are not possible.
• This User Manual explains details for
multiple vehicle models together. Depending
on the vehicle model, there may be functions
that may be described but not available,
or requirements for separately purchasedproducts. Thank you for your understanding.
• Images and illustrations used in the
User Manual are either those used in
development, or used for explanations.
Please be aware that these may differ from
the actual images and illustrations used in
the product.
• Please be aware that Mitsubishi Motors,
including after-sales service departments,
will in no way be held responsible for any
losses or detriment resulting from alteration
or loss of any information stored in this
product, including customer registration
information.
Introduction Before Use
5
Page 6

Important Points on Usage
Common
• During operation, ensure that the vehicle is
not stationary in a garage or other conned
area with bad ventilation while the engine
is running. Doing so may result in gas
poisoning.
• For safety, the driver is not to operate this
product while the vehicle is moving. The
driver should also minimize as much as
possible the time spent viewing the screen.
Being distracted by the screen can result in
an accident.
• Do not turn the volume up to the extent that
you cannot hear sounds from outside the
vehicle while driving. Driving without being
able to hear sounds from outside the vehicle
can result in an accident.
• Do not disassemble or modify the product.
This may lead to malfunction, smoking, or
re.
• Avoid relying on this product for guidance
to emergency facilities (hospitals, re
departments, police, etc.). Contact such
emergency facilities directly.
• When operating, ensure that the vehicle is
stopped in a safe area in which stopping is
permitted.
• Continued usage of this product without
the engine running may deplete the vehicle
battery, meaning that the engine may not be
able to start.
Ensure this product is used while the engine
is running.
• The following phenomena are characteristic
of LCD screens. They do not indicate a
malfunction.
- Small black dots or bright dots (red, blue,
green) on the screen.
- Screen movement is slow during cold
weather.
- The screen is sometimes dark during hot
weather.
- The color tones and brightness vary with
the viewing angle.
• It is a characteristic of LCD screens that the
picture quality varies with the viewing angle.
When using this product for the rst time,
adjust the picture quality.
• If you paste an commercially-available LCD
protective lm or the like on the screen, it
may interfere with touch panel operation.
• If you operate the touch panel with a sharp
object (pen tip, nger nail, etc.), the screen
may be scratched and this unit may be
damaged, leading to faulty operation.
• Operating the touch panel with gloves on
may cause faulty operation.
• When cleaning the screen, wipe it with a soft
cloth. Do not use benzene, paint thinners,
anti-static agents, or other chemical wipes.
They could scratch the screen.
iPod/iPhone Playback
Function
• This product supports audio playback from
iPod/iPhone devices, however differing
versions mean that playback cannot be
guaranteed.
• Please be aware that depending on the
iPod/iPhone model or version, operation
may differ.
(Option)
FCC NOTE
This device complies with part 15 of the FCC
Rules.
Operation is subject to the following two
conditions : (1) This device may not cause
harmful interference, and (2) this device must
accept any interference received, including
interference that may cause undesired
operation.
FCC CAUTION
Changes or modications not expressly
approved by the party responsible for
compliance could void the user’s authority to
operate the equipment.
6
Page 7
Restrictions on Operations
while the Vehicle Is Driving
Some operations are restricted while the
vehicle is driving. The driver should refrain
from operating this product while the vehicle
is moving. First stop the vehicle in a safe
location, then operate this product.
How to Clean
• If the product becomes dirty, wipe with a soft
cloth.
• If very dirty, use a soft cloth dipped in neutral
detergent diluted in water, and then wrung
out. Do not use benzene, thinners, or other
chemical wipes. This may harm the surface.
Trademarks
• Product names and other proper names are the trademarks
or registered trademarks of their respective owners.
• Furthermore, even if there is no specic denotation of
trademarks or registered trademarks, these are to be
observed in their entirety.
Manufactured under license
from Dolby Laboratories.
Dolby and the double-D
symbol are trademarks of
Dolby Laboratories.
Manufactured under license
from DTS Licensing Limited.
DTS, the Symbol, & DTS
and the Symbol together
are registered trademarks
& DTS Neural Surround is
a trademark of DTS, Inc.
Product includes software.
© DTS, Inc. All Rights
Reserved.
“PremiDIA HD” and
“PremiDIA WIDE” is a
trademark of Mitsubishi
Electric Corporation whose
registration is pending.
SDHC Logo is a trademark
of SD-3C, LLC.
The Bluetooth® word mark
and logos are owned by the
Bluetooth SIG, Inc.
Other trademarks
and trade names are those
of their respective owners.
HD Radio Technology
manufactured under
license from iBiquity Digital
Corporation. U.S. and
Foreign Patents. HD Radio
and the HD, HD Radio, and
“Arc” logos are proprietary
trademarks of iBiquity Digital
Corp.
©2010 siRiUs XM Radio
inc. siRiUs, XM and all
related marks and logos are
trademarks of siRiUs XM
Radio inc.
and its subsidiaries. all other
marks, channel names and
logos are the property of their
respective owners.
all rights reserved.
TM
Introduction Before Use
©2012 NAVTEQ. All rights
reserved.
Continued on the next page
7
Page 8
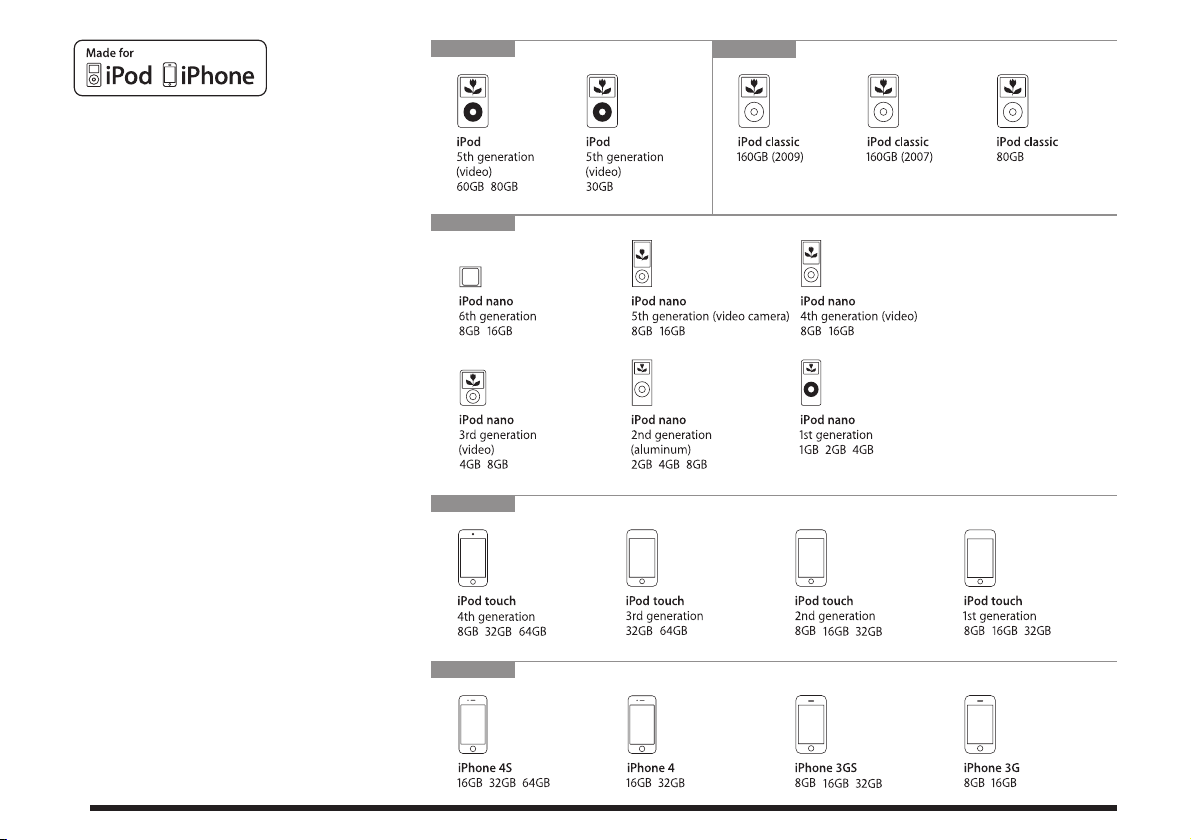
iPodclassic
iPod
iPodnano
iPodtouch
iPhone
“Made for iPod,” “Made for iPhone” mean that an electronic
accessory has been designed to connect specically to
iPod or iPhone, respectively, and has been certied by the
developer to meet Apple performance standards.
iPhone, iPod, iPod classic, iPod nano, and iPod touch are
trademarks of Apple Inc., registered in the U.S. and other
countries.
Apple is not responsible for the operation of this device or its
compliance with safety and regulatory standards
* This product is compatible with iOS5 on the “iPod touch”
and “iPhone”.
* iPod and iTunes licensing allows individual users to privately
reproduce and play back non-copyrighted material as well
as material that may be legally copied and reproduced.
Infringement of copyright is prohibited.
* The supported devices for vehicles with a Bluetooth
interface vary. For details, refer to the vehicle's user manual.
®
2.0
8
Page 9

Important Points
WARNING
CAUTION
WARNING
WARNING
on Safety for the
Customer
This product features a number of pictorial
indications as well as points concerning
handling so that you can use the product
correctly and in a safe manner, as well as
prevent injury or damage to yourself, other
users, or property.
This indicates details
regarding handling of the
product that if ignored, could
be expected to result in death
or serious injury.
This indicates details
regarding handling of the
product that if ignored, could
be expected to result in
personal injury or property
loss.
• The driver should not pay close
attention to the images on the
screen while driving.
This may prevent the driver looking where
they are going, and cause an accident.
• The driver should not perform
complicated operations while
driving.
Performing complicated operations while
driving may prevent the driver looking
where they are going, and cause an
accident.
Therefore stop the vehicle in a safe
location before performing such
operations.
• Do not use during malfunctions,
such as when the screen does
not light up or no sound is
audible.
This may lead to accident, re, or electric
shock.
• Do not place anything on the
open display.
This may lead to accident, re, electric
shock, or malfunction.
• Ensure water or other foreign
objects do not enter the product.
This may lead to smoking, re, electric
shock, or malfunction.
• Do not insert foreign objects into
the disc slot or card slot.
This may lead to re, electric shock, or
malfunction.
• Always obey all actual trafc
regulations, even when following
route guidance from this
navigation system.
Due to changes in trafc rules, this
data may differ from the actual trafc
regulations.
Always obey the actual trafc regulations.
• In the event of abnormalities
occurring when foreign objects
or water enter the product,
resulting in smoke or a strange
smell, immediately stop using the
product, and consult with your
dealer.
Continuing to use the product may result
in accident, re, or electric shock.
• Do not disassemble or modify the
product.
This may lead to malfunction, re, or
electric shock.
During thunderstor ms, do not
touch the antenna or the front
panel.
This may lead to electrical shock from
lightning.
Introduction Before Use
Continued on the next page
Important Points on Safety for the Customer
9
Page 10

CAUTION
• Do not block ventilation holes or
heat sinks on the product.
Blocking ventilation holes or heat sinks
may prevent heat from escaping from
within the product, leading to re or
malfunction.
• Do not turn the volume up to
the extent that you cannot hear
sounds from outside the vehicle
while driving.
Driving without being able to hear sounds
from outside the vehicle may result in an
accident.
• If opening or closing the monitor
panel interferes with gear shift
lever operation etc., stop your
car in a safe location before
performing such operations.
• Do not insert your hand or ngers
into the disc slot or card slot.
This may result in injury.
• Do not leave the monitor panel
open when you are not using the
product.
This may result in injury.
• Be careful that your hand or
ngers are not pinched when you
open or close the monitor panel.
This may result in injury.
10
Important Points on Safety for the Customer
Page 11

How to Read This Manual
1)
2)
3)
4)
7)
5)
6)
8)
9)
10)
The notation used in this manual and what it means are as follows.
9)
(P000)
Shows the page to refer to. It contains
relevant explanations etc.
10)
Continued on the next page
Used when the explanation of operations
is continued.
Introduction Before Use
1) Volume Header
Classied by main functions.
2) Chapter Header
Classies more nely the main functions
in the volume header. A chapter header
appears at the head of each chapter.
You can also check the index on the right
edge.
3) Major Header
Classies the main operations and
functions in a chapter.
4) Intermediate Header
Classies the operations and functions
under the major header.
5) Minor Header
Classies more nely the operations and
functions classied under the intermediate
header.
6) Operation procedure
These are numbers that shows the
operation procedure. Perform the
procedure in the order of these numbers.
○○○
7)
8)
key or [○○○] key
Shows an operation key on the panel.
○○○
or [○○○]
Shows a touch switch displayed on the
screen.
How to Read This Manual
11
Page 12
Basic Operation
1)
2) 9)
3)
4)
5)
6)
7)
8)
10)
11)
12)
13)
14)
This Product
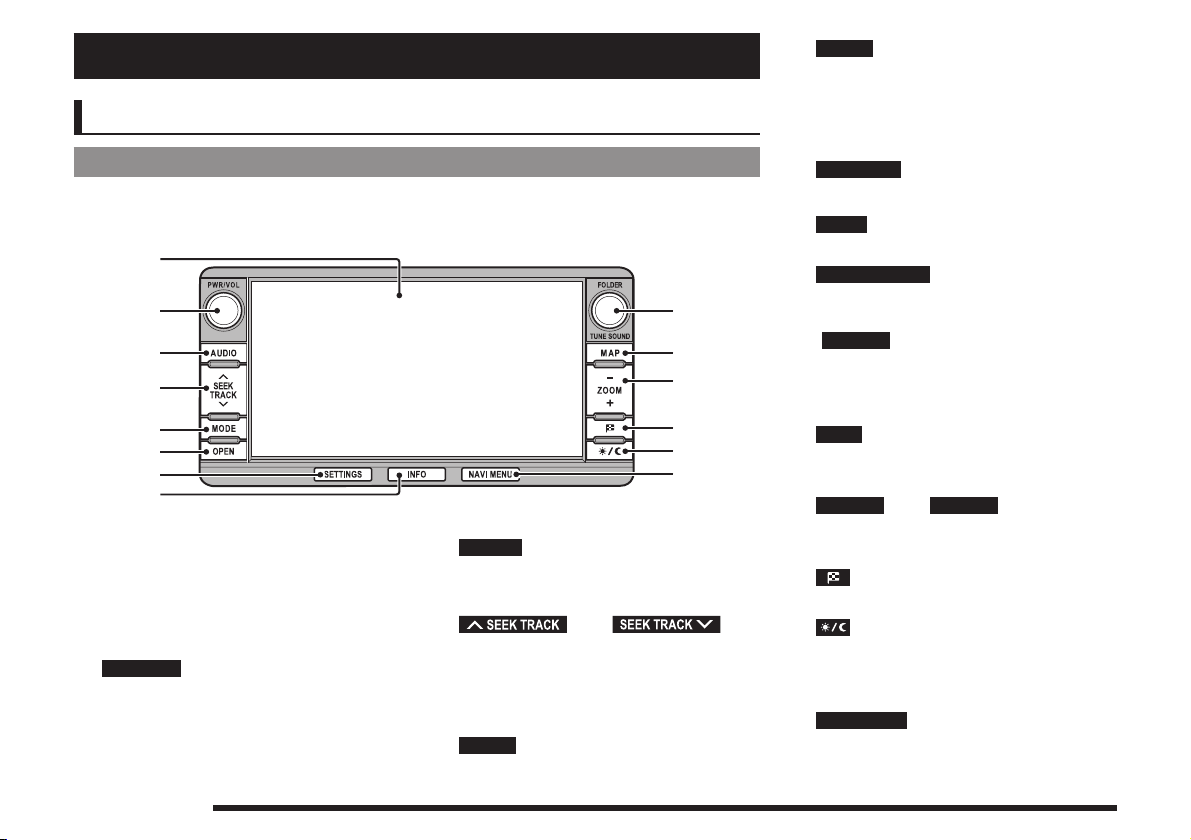
Main Unit Panel
This gives the names of each section of the main unit panel and explains their functions.
When the panel is closed
1) Display
Operations can be performed by touching
the touch switches.
→“How to Perform Touch
Operations”(P17)
PWR/VOL
2)
Allows you to adjust the volume for the
audio function and telephone function.
It also allows you to switch the audio
function ON/OFF.
This Product
12
key
(P79)
AUDIO
3)
Displays the audio source screen (for the
last source used).
4)
Allows you to select a CD or radio station.
Also, holding down either of these keys
allows you to fast-forward/fast-rewind a
CD or to seek a radio station.
5)
Used to select an audio source.
MODE
key
key/ key
key
(P23)
OPEN
6)
7)
8)
Used to check information.
9)
10)
11)
key
Displays the monitor panel open/close
screen.
Used to open/close the monitor panel or
insert or remove a disc
SETTINGS
Used to make settings.
INFO
FOLDER/TUNE
Allows to select an audio le folder or a
radio station by turning.
SOUND
Pressing the key displays the sound
quality setting screen.
Used to adjust the sound quality.
MAP
Used to display the current location
screen of the navigation
- ZOOM
Zooms in or zooms out the map.
key
key
key/
key
(P24)
key
(P195)
key
(P205)
ZOOM +
(P80)
(P29)
key
.
.
→“Switch the Scale”(P39)
12) key
Used to set a navigation destination.
13)
Allows you to switch the map screen color
Auto, Daytime, and Nighttime according to
the car lighting state.
NAVI MENU
14)
Used to make navigation settings.
key
(P46)
key
(P22)
Page 13
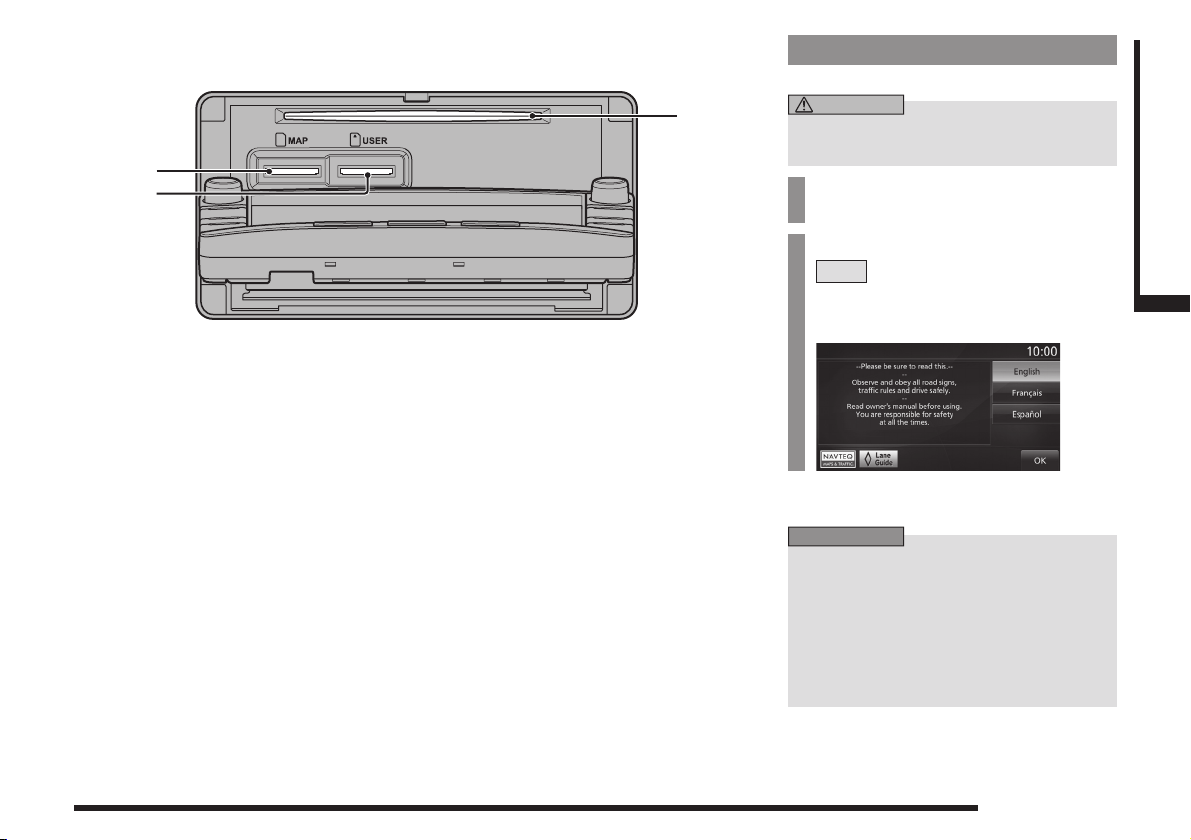
When the panel is open
CAUTION
ADVICE
1)
2)
1) Map slot
The map card that contains the map data
for the navigation functions is inserted
here.
3)
2) User slot
An audio SD card is inserted here. Audio
SD cards can be played
data can be updated.
→“Update the Map Database”(P135)
3) Disc slot
When a disc is inserted that can be played
by this product, starts playback.
→“Inserting the Disc”(P80)
(P119)
. Also, map
Start
Start the system.
• This system cannot be started unless a
map card is inserted.
Switch the vehicle's ignition
1
key to “ACC” or “ON”.
Check the message, then touch
2
OK
.
If the audio function was used last the
previous time, the display switches to the
audio screen (the last screen).
▼
This switches to the navigation screen.
• Immediately after the ignition key
is switched to “ACC” or “ON”, if the
navigation functions are used, some
functions are not available immediately
after the map screen is displayed
because data is being read in from the
map card. Please wait until the reading is
completed.
Introduction Basic Operation
This Product
13
Page 14
SD Cards
WARNING
CAUTION
NOTE
This product supports two types of SD cards:
map cards used with the navigation function
and audio SD cards used with audio functions.
• In order to prevent an accident,
keep the SD card out of the reach
of small children.
If a child does swallow an SD card, seek
immediate medical attention.
• Do not insert the map card anywhere
other than the map slot in this product.
Doing so may lead to malfunction. Data
might be destroyed and the map card
might become unusable.
• When inserting and removing an SD card,
rst ensure that your car is stopped in a
safe area in which stopping is permitted.
• Do not remove a SD card or switch OFF
the power while data is being read from
or written to the SD card.
The recorded data might be lost or
damaged.
• Do not insert foreign objects into the
SD card slot. This may lead to injury,
smoking, or re.
• There are two SD card slots, the map slot
and the user slot. Be sure to insert the
SD card into the correct slot.
• Mitsubishi Motors will in no way be held
responsible for any losses resulting from
SD card data loss.
• SD cards formatted using standard
computer functions may not operate
correctly.
• SD cards have a nite service life. After
being written repeatedly, writing, erasing,
etc. may become impossible.
Important Points on Handling
• Fingerprints or other marks on the terminals
of an SD card may result in its content being
more difcult to read. When holding an SD
card, do not touch its terminals.
• Do not afx paper or stickers to an SD card
and do not damage it.
• Do not forcefully insert an SD card if an SD
card is already within the device. Doing so
may lead to malfunction.
• Do not insert anything other than an SD card
into an SD card slot. Inserting anything other
than an SD card may cause damage or get
the object stuck in the slot.
Important Points on Storage
When you take an SD card out of this product,
store it out of direct sunlight.
14
This Product
Page 15
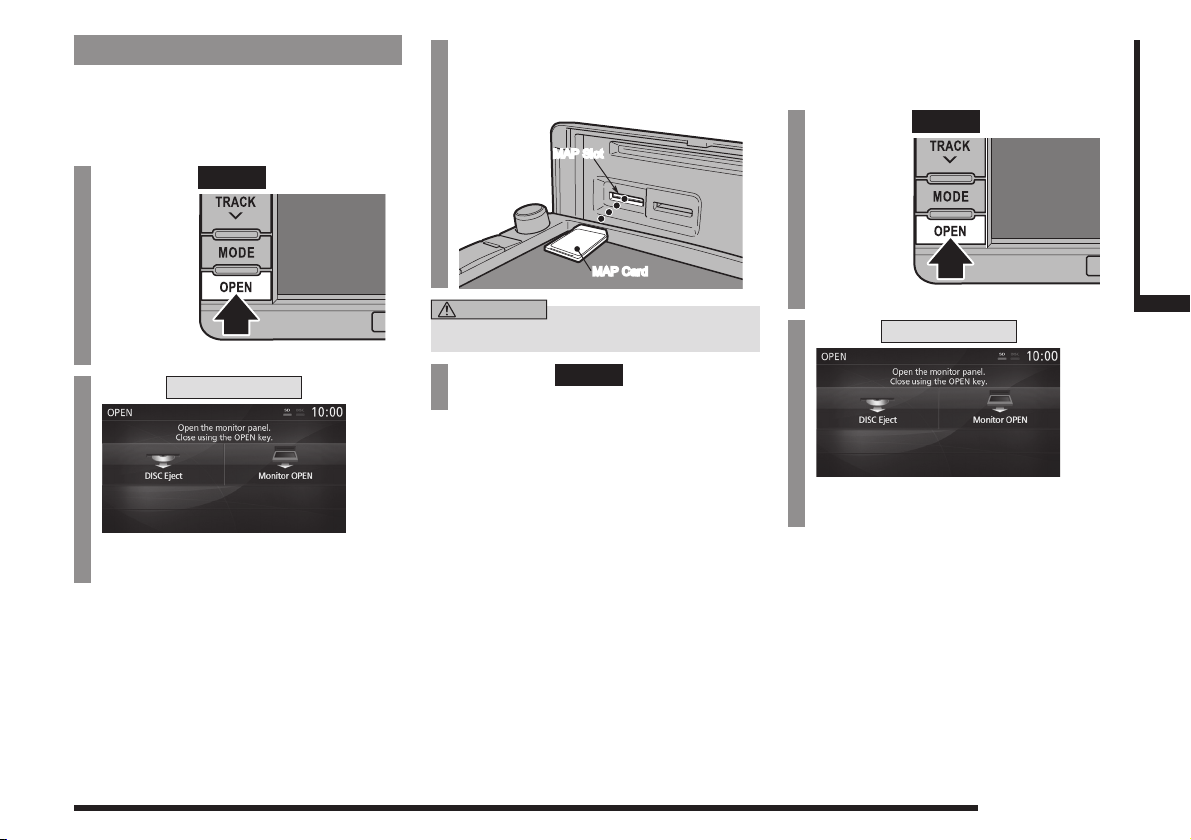
Insert an SD Card
CAUTION
Map Card
Insert the map card that contains the map
data for the navigation functions.
Press the
1
OPEN
key.
Insert the map card into
3
the map slot.
Insert until you hear the “click”.
MAP SlotMAP Slot
MAP Card
MAP Card
Audio SD Card
Insert the audio SD card used for the audio
functions.
Press the
1
OPEN
key.
Introduction Basic Operation
2
Touch
▼
The monitor panel opens.
Monitor OPEN
.
• Do not insert into the user slot.
Press the
4
OPEN
key to close
the monitor panel.
▼
You can now use the navigation function.
Touch
2
▼
The monitor panel opens.
Monitor OPEN
Continued on the next page
This Product
.
15
Page 16
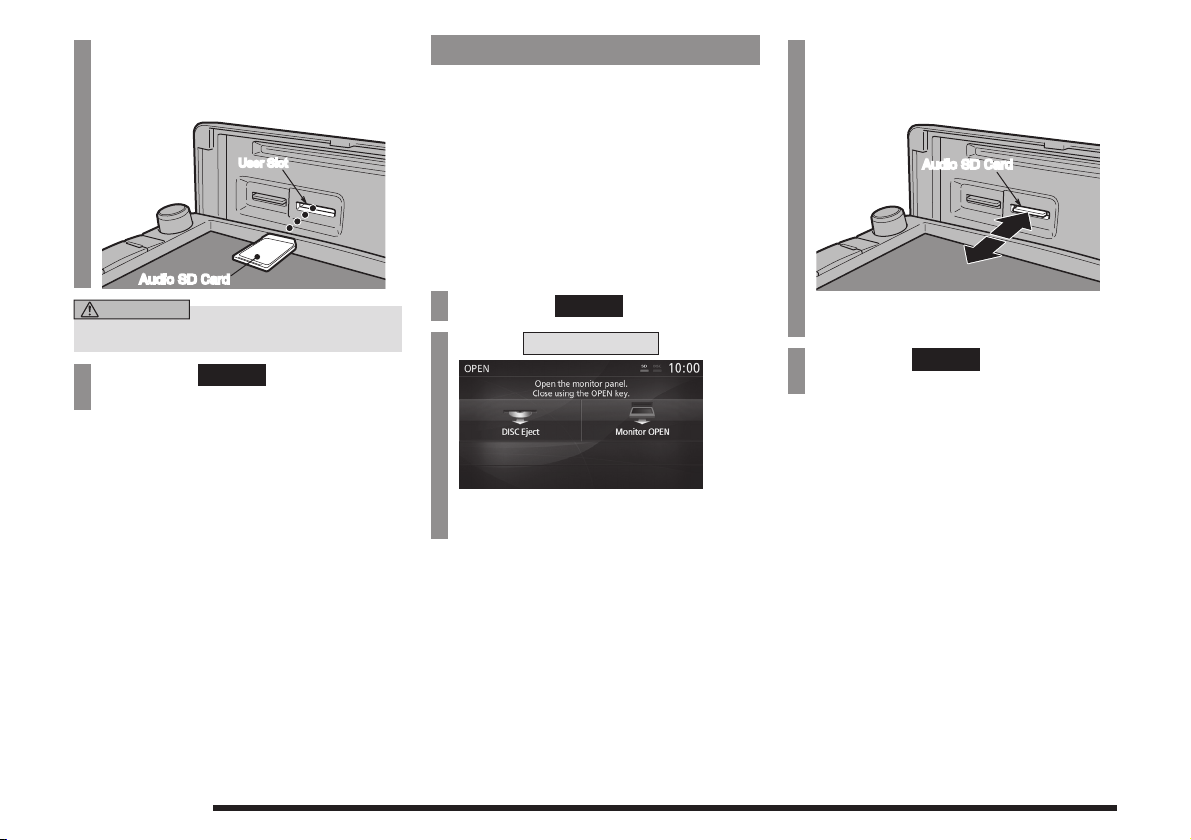
Insert the audio SD card into
CAUTION
3
the user slot.
Insert until you hear the “click”.
User SlotUser Slot
Remove the SD Card
Map Card
The map card that contains the map data
for the navigation functions is inserted. This
device cannot be used if the map card is
removed.
Push the audio SD card in the
3
user slot
until you hear a “click”.
AudioSDCard
AudioSDCard
AudioSDCard
AudioSDCard
• Do not insert into the map slot.
Press the
4
OPEN
key to close
the monitor panel.
▼
You can now use the SD card with the audio
functions.
This Product
16
Audio SD Card
Eject the audio SD card used for the audio
functions.
Press the
1
Touch
2
▼
The monitor panel opens.
OPEN
key.
Monitor OPEN
.
1
2
The audio SD card jumps out and can
now be removed. Gently remove it.
Press the
4
OPEN
key to close
the monitor panel.
Page 17
How to Perform
CAUTION
Touch Operations
This system uses a touch panel that is
operated by touching the display directly.
When Touching ___
This manual indicates the operation of
touching the screen to “Enter” with “Touch
___”.
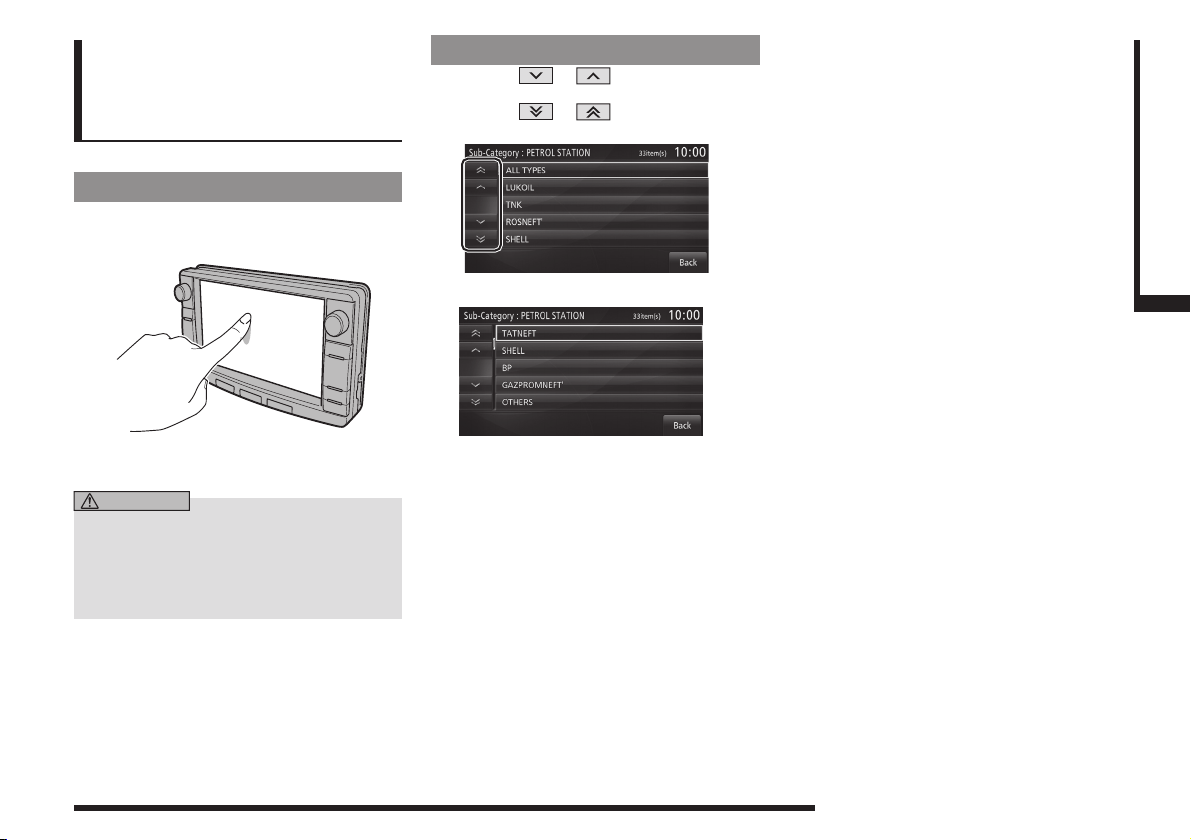
Searching Items from a List
By touching or , you can select one
item at a time from the list.
By touching or , you can move the
display one page.
▼
Introduction Basic Operation
Also, the menu of operations executed by
touch is indicated as “Touch Switch”.
• The surface of the display scratches
easily. Do not push on it too hard or rub it
with a stiff cloth.
• If the screen is dirty, wipe it gently with an
eyeglass wipe or other soft cloth.
When the item you are searching for is
displayed, touch it directly.
How to Perform Touch Operations
17
Page 18
How to Input Characters
ADVICE
This section explains the menu items for the character input keyboard.
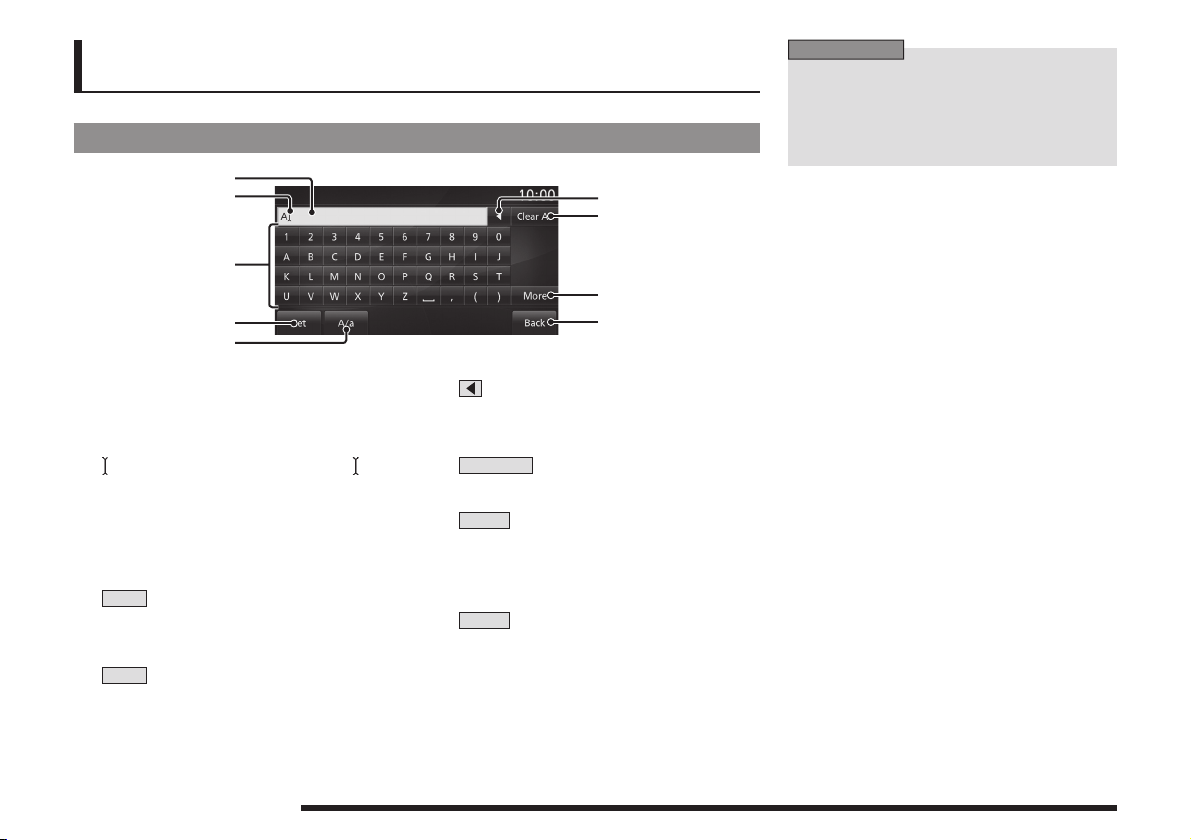
Keyboard for Character Input
1)
2)
3)
4)
5)
• For some functions and character types,
some touch switches may either not be
displayed or changed into some other
touch switch. For details, refer to the
explanations of individual functions.
6)
7)
8)
9)
1) Input character display section
Displays the input characters.
2) The cursor
is displayed with and to the left of ,
characters are input.
3) Input keyboard
Displayed characters can be input by
touch.
Set
4)
5)
18
This nalizes all the input characters and
ends character input mode.
A/a
Switches the characters displayed on
the input keyboard in the order of capital
letters, small letters, and Capital letters.
How to Input Characters
6)
Clears one character among the
characters being input.
Clear All
7)
Clears all the characters being input.
More
8)
Switches the characters displayed on
the input keyboard to “Numbers” and
“Symbols”.
Back
9)
Returns to the previous screen.
Page 19
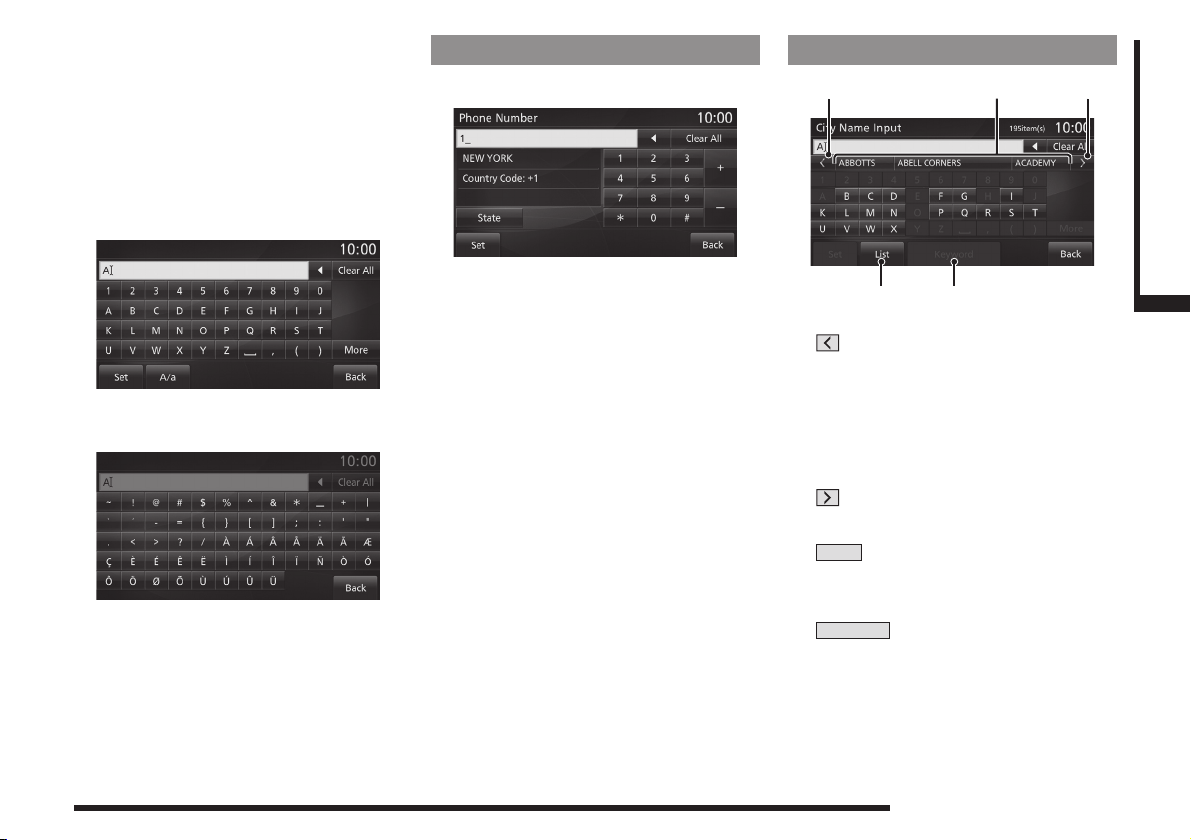
Types of Characters That Can
4) 5)
1) 3)2)
Be Input
The input keyboard is capable of inputting
various characters.
Character input is displayed when it becomes
necessary during the operation of functions.
However, some functions limit the characters
that can be input.
Letters/numbers
Symbols
Keyboard for Number Input
The input keyboard makes it possible to input
house numbers and latitude/longitude.
Input assist for searches
1)
Displays the previous candidate list.
2) Search candidate list
Displays characters and candidates that
follow the input characters.
Touching this completes the input.
3)
Displays the next candidate list.
List
4)
5)
Displays the search results for the input
characters.
Keyword
Keywords can be input.
Introduction Basic Operation
How to Input Characters
19
Page 20
Top Menu
NOTE
By pressing the corresponding key, you can
use various functions from the top menus.
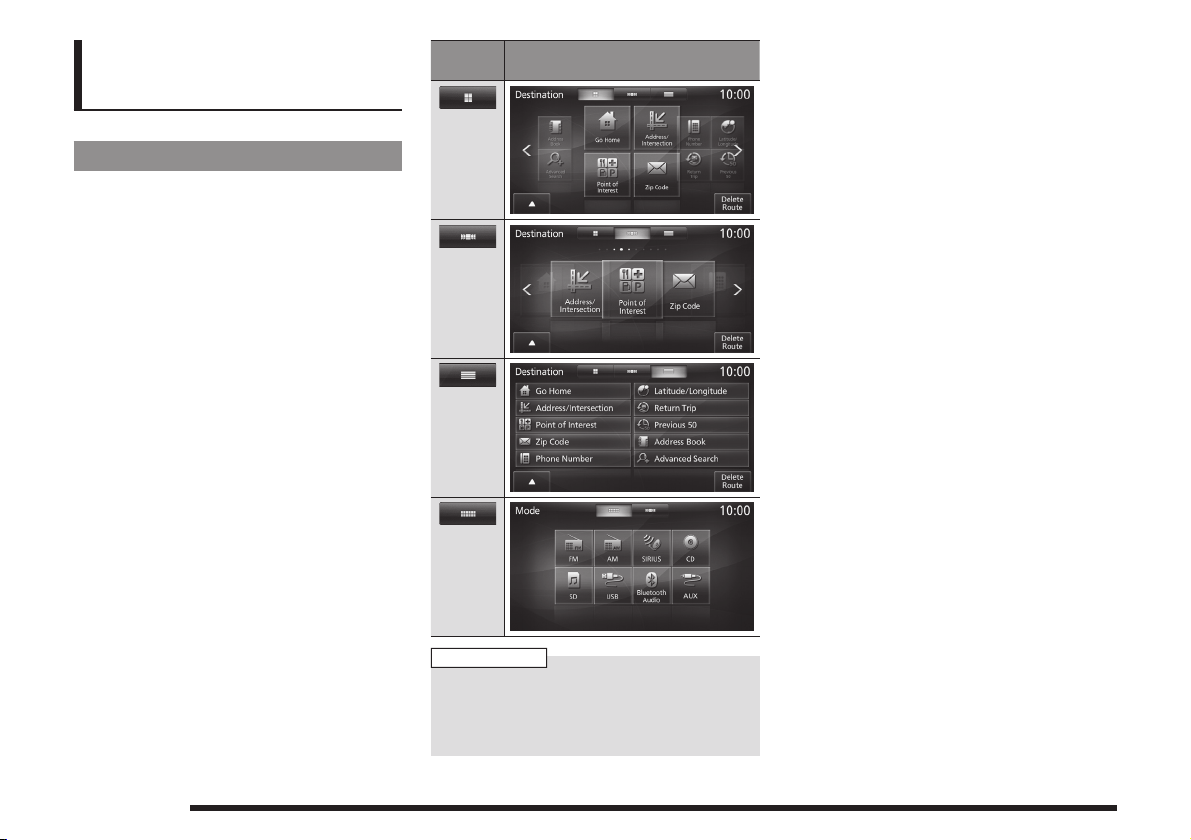
Display Types
The top menus have a number of display
methods. You can use the one you like best.
You can switch by touching the display switch
menu at the top of each top menu.
Touch
switch
Display contents
20
• The types that can be displayed depend
on the top menu. There are also menus
that do not allow you to switch the display
type.
Top Menu
Page 21
Destination Menu
2)
3)
4)
5)
6)
1)
14)
8)
9)
10)
11)
12)
13)
7)
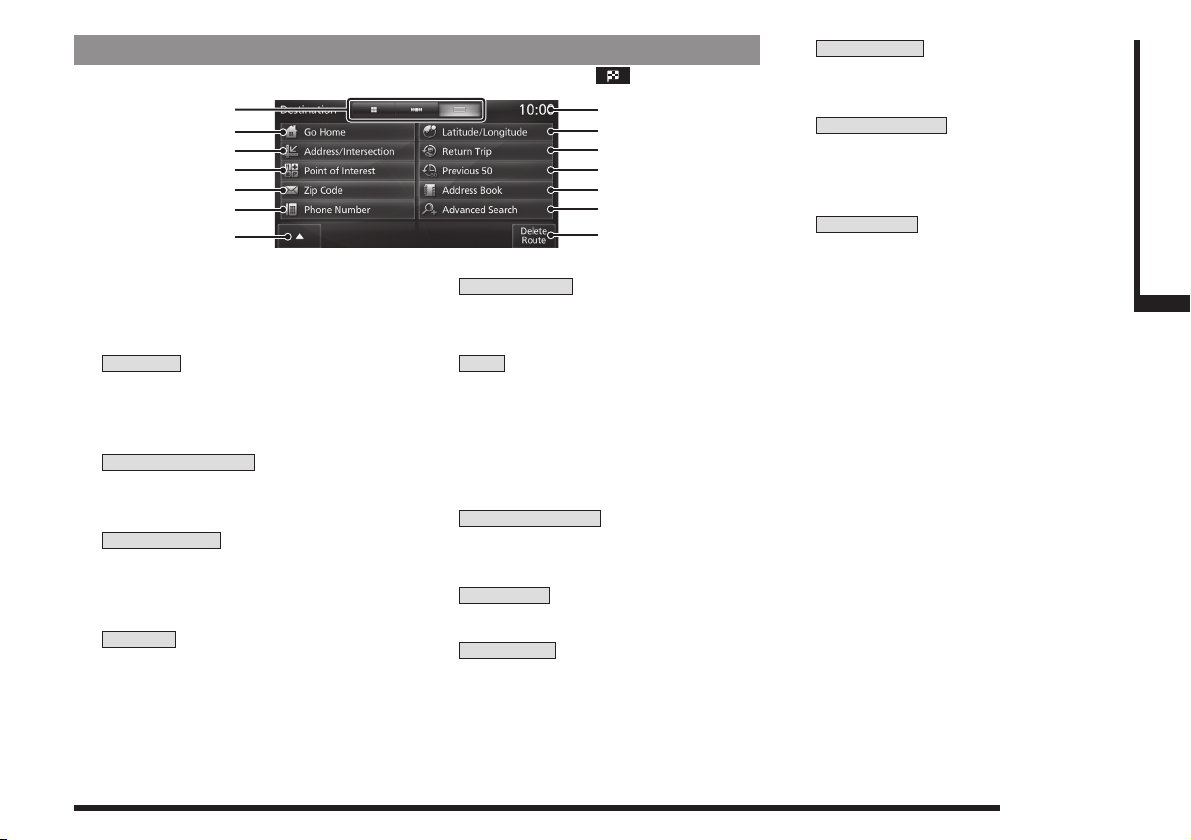
This section explains the destination menu displayed when you press the key.
Address Book
12)
(P48)
Allows you to select a location from the
address book.
Advanced Search
13)
(P52)
Allows you to search for an establishment
around the current location or destination,
along the route, etc.
14)
Delete Route
(P64)
Deletes the set route.
Introduction Basic Operation
1) Display switch menu
(P20)
Allows you to switch the menu display
type.
2)
Go Home
Allows you to register a home location.
(P67)
Also allows you to set your
registered home as the destination.
Address/Intersection
3)
(P49)
(P46)
Allows you to search for a location from
an address.
Point of Interest
4)
(P50)
Allows you to input the name of
an establishment to search for the
establishment.
Zip Code
5)
(P93)
Allows you to input the zip code to search
for its location.
Phone Number
6)
(P54)
Allows you to input the telephone number
to search for its location.
▲
7)
Displays the numbers for frequently used
(P48)
locations
.
8) Clock
Displays the current time using 12- or 24hour time.
Latitude/Longitude
9)
(P55)
Allows you to input the latitude and
longitude to search for its location.
Return Trip
10)
(P55)
Sets the start location as the destination.
Previous 50
11)
(P49)
Allows you to select a location for which
a map of the surroundings has been
displayed by using the search function.
Top Menu
21
Page 22
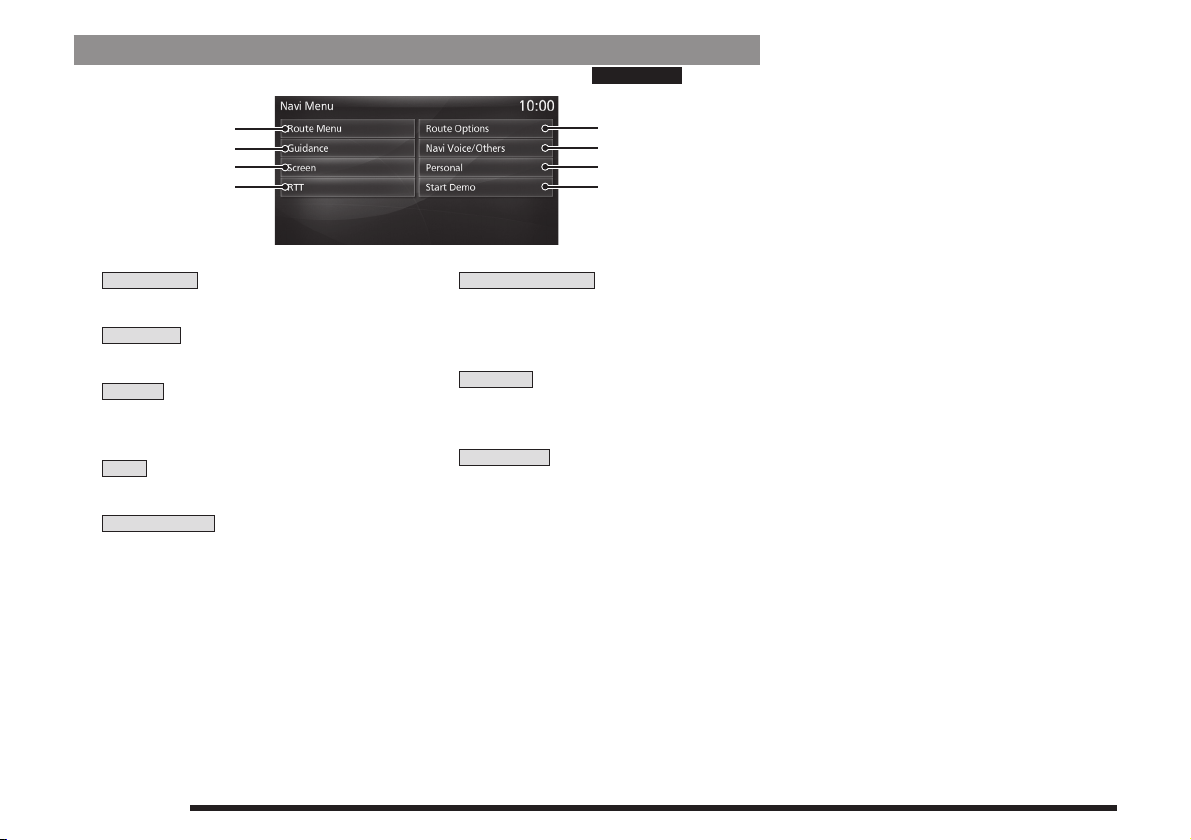
Navi Menu
2)
3)
4)
1)
5)
6)
7)
8)
This section explains the navigation menu displayed when you press the
NAVI MENU
key.
Route Menu
1)
(P57)
Allows you to check and edit the set route.
Guidance
2)
(P196)
Allows you to set up the guidance display.
Screen
(P197)
3)
Allows you to set up the navigation
display.
RTT
(P75)
4)
Allows you to set up the RTT.
Route Options
5)
(P201)
Allows you to set up the default values for
route search conditions.
Top Menu
22
Navi Voice/Others
6)
(P202)
Allows you to set up the navigation audio
guidance. Also allows you to check vehicle
signals.
(P203)
Personal
7)
(P204)
Allows you to manage address book,
home location, and other information.
8)
Start Demo
(P59)
Starts a demo trip.
Page 23
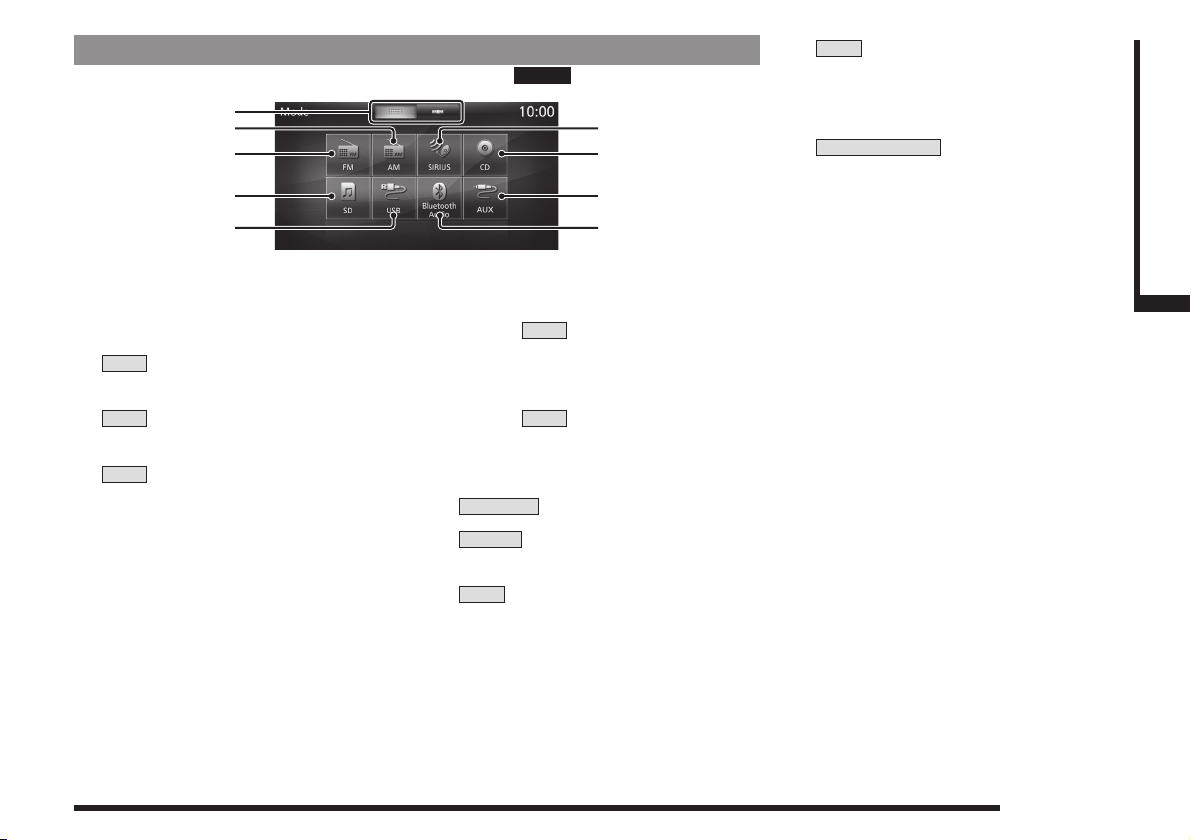
Mode
2)
3)
4)
5)
1)
6)
7)
8)
9)
This section explains the Mode displayed when you press the
1) Display switch menu
(P20)
Allows you to switch the menu display
type.
AM
2)
(P91)
Allows you to use the AM radio function.
FM
(P91)
3)
Allows you to use the FM radio function.
SD
4)
(P117)
Allows you to play back audio les (MP3/
WMA/AAC/WAV) on an SD card.
5) USB/iPod menu
When an iPod is connected to this
product,
touch it, the iPod screen is displayed.
(→ P112)
When a USB memory is connected to this
product,
touch it, the USB screen is displayed.
(→ P117)
When nothing is connected to this product,
USB/iPod
SIRIUS
6)
Allows you to use satellite radio.
CD
7)
Plays media inserted into this product.
Audio CD
Audio les (MP3/WMA/AAC/WAV)
MODE
iPod
USB
is displayed.
*4
(P97)
(→ P105)
key.
*1
is displayed. When you
is displayed. When you
(→ P108)
8)
(P128)
*1, *2
AUX
When an external input device is
connected to this product, the audio from
the external input device is played.
Bluetooth Audio
9)
*3
(P123)
When a Bluetooth-capable audio device
is connected to this product, the Bluetooth
audio function can be used.
*1 This is equipment that only some vehicle types have. This
also requires the external input device and a cable.
*2 [AUX] is displayed even if no separately-purchased
external input/output cable and external input device is
connected to this product.
*3 This is equipment that only some vehicle types have. This
requires an audio device that is Bluetooth capable. No
cable is required.
*4 This is equipment that only some vehicle types have.
Requires satellite tuner connection.
Introduction Basic Operation
Top Menu
23
Page 24
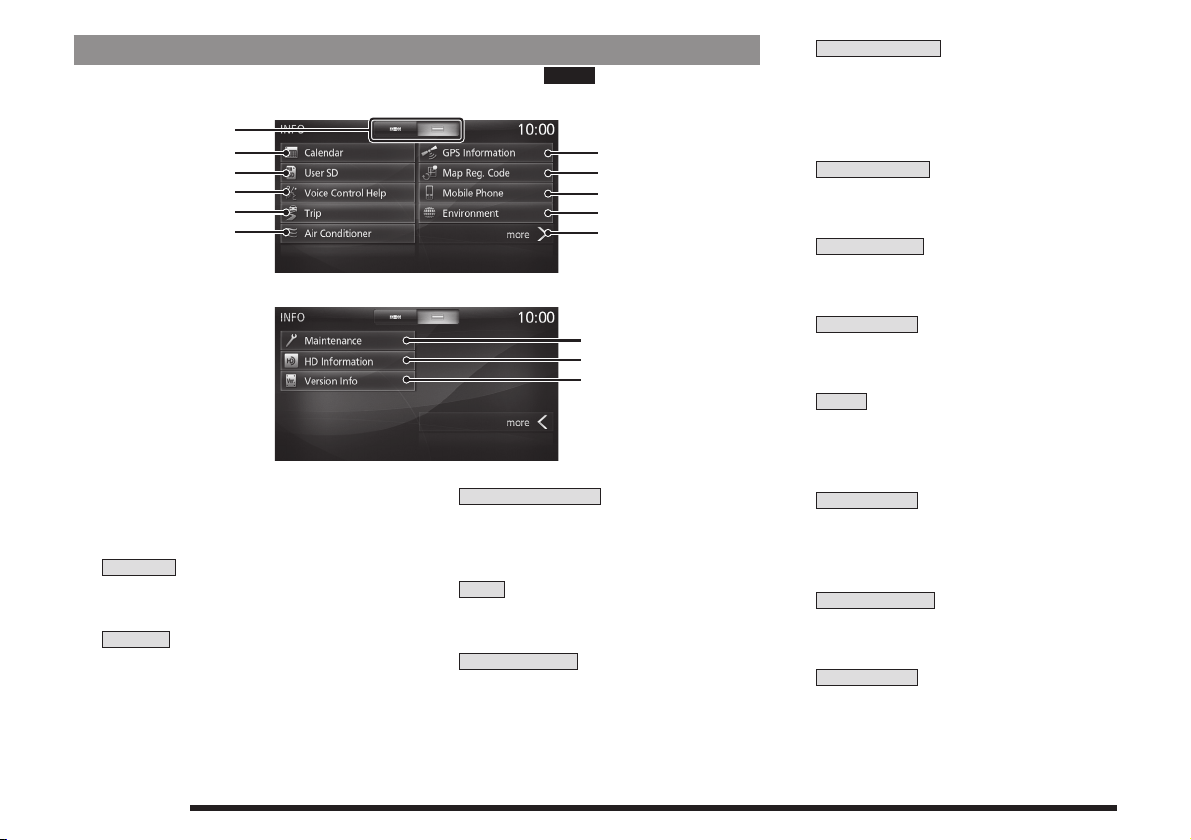
INFO Menu
2)
3)
4)
5)
6)
1)
Menu 1
7)
8)
9)
10)
11)
12)
Menu2
13)
14)
This section explains the info menu displayed when you press the
1) Display switch menu
(P20)
Allows you to switch the menu display
type.
2)
Calendar
(P129)
Displays the calendar. Allows you to check
and set special days and anniversaries.
User SD
3)
Allows you to check the SD card capacity
and available space.
Also allows you to update the map
database
(P134)
(P135)
.
Top Menu
24
Voice Control Help
4)
Allows you to check a list of voice
commands, the usage for voice control,
etc.
5)
(P136)
*
Trip
Allows you to check and set trip
information.
Air Conditioner
6)
Allows you to check the air conditioner
status.
INFO
key.
*
(P140)
(P194)
GPS Information
7)
(P141)
Allows you to check the name of the
current location, its latitude/longitude,
and the number of GPS satellites being
received.
Map Reg. Code
8)
(P135)
Allows you to check the request code
required for updating the map.
Mobile Phone
9)
*
(P143)
Allows you to make and receive telephone
calls.
10)
Environment
*
(P151)
Allows you to check the outside air
temperature, altitude, and air pressure.
more
11)
When there are many items, you can
move forward/back by page. This is not
displayed when there are few items.
12)
Maintenance
*
(P152)
Allows you to make settings for
notications when engine oil, oil lter, and
other maintenance is due.
HD Information
13)
(P157)
Allows you to check Fuel prices and
weather information.
Version Info.
14)
(P163)
Allows you to check the program version,
map version, etc.
* This is displayed when your car is equipped with the
equipment.
Page 25
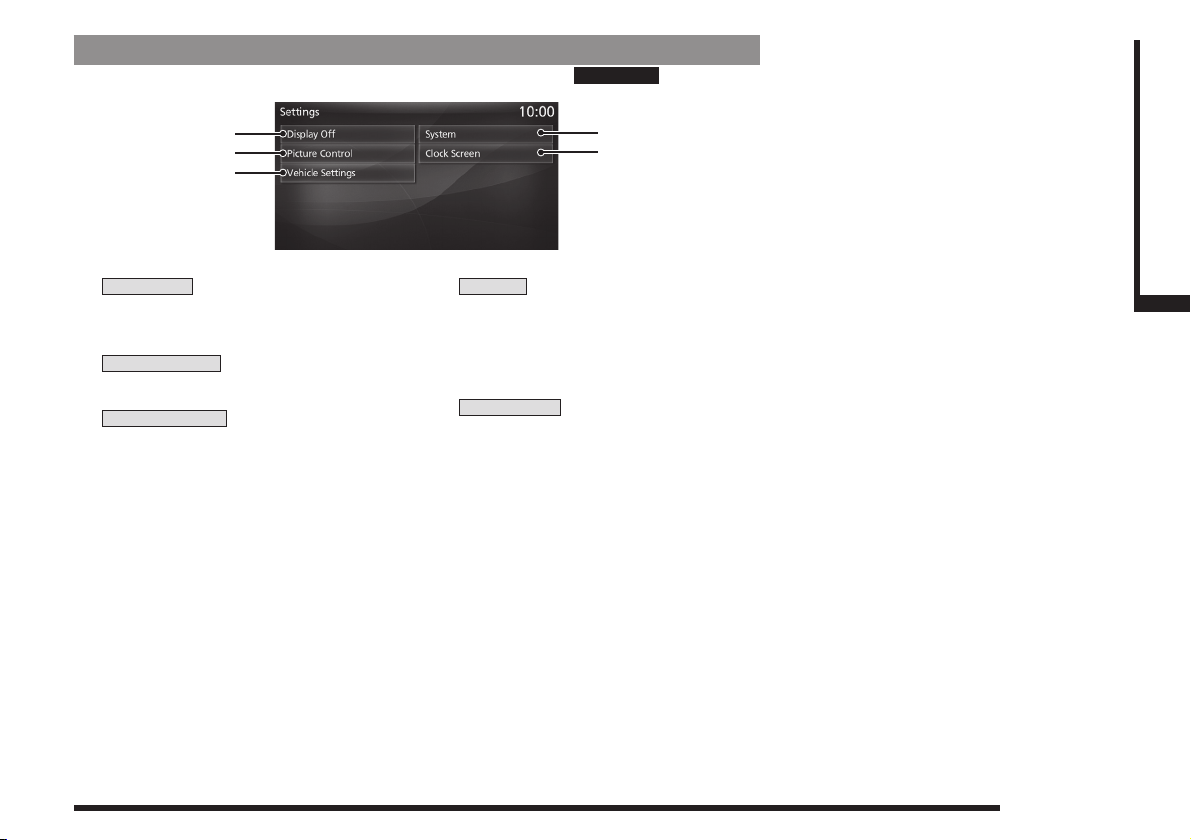
SETTINGS Menu
2)
1)
3)
5)
4)
This section explains the settings menu displayed when you press the
SETTINGS
key.
Introduction Basic Operation
Display Off
1)
(P213)
Allows you to switch OFF the screen
display.
Picture Control
2)
(P213)
Allows you to adjust the picture quality.
Vehicle Settings
3)
*1
(P213)
Allows you to make settings for vehicle
equipment.
4)
System
*2
Allows you to make settings for the Time
(P208)
A/C Cut-in
(P209)
Clock Screen
5)
, Language
, Keyboard Layout
(P209)
(P208)
, Units
(P218)
, Camera
(P209)
(P212)
(P150)
, Pairing
, etc.
Displays the clock.
*1 This is displayed when your car is equipped with the
equipment.
*2 Depending on the equipment, some of the items in
[System] may not be displayed.
,
Top Menu
25
Page 26

NAVI
CAUTION
ADVICE
This chapter explains navigation function operations.
Basic Operation
GPS Antenna
Navigation
Functions
What is Navigation?
Navigation is a system that measures the
location of your car and guides you along the
route to the set destination. Your car's location
displayed on the map is measured with the
“GPS” and “Map matching” functions.
GPS(Global Positioning
System)
The system that uses GPS satellites to detect
the location is called “GPS”. The radio signals
from these GPS satellites are received and
the location of one's own car is measured to
within about 30 to 200 meters.
• Measuring your car's location takes about 2
minutes in a location with a good view. The
rst time this product is used or it is used
after a long while, it takes about 5 minutes to
measure your car's location.
• The GPS satellites are managed by the
Department of Defense of the United States
of America, which sometimes deliberately
reduces the location precision. When that
happens, the location of your car may not be
displayed in the correct location.
Map Matching
“Map matching” is a function that compares
the route tracking data for your car with the
road conguration in the map data, estimates
the road you are driving on, and displays this
on the map.
• The map displayed for navigation and
the trafc rule information were prepared
based on various types of information
when the map data was prepared, so
they may differ from the actual roads
and trafc regulations. Always follow the
actual roads and obey the actual trafc
regulations.
GPSantenna
The location of your car is measured by
receiving weak radio signals from GPS
satellites with the “GPS antenna”.
If the radio signals from the GPS satellite
are blocked, the location of your car may
not be displayed in the correct location, so
observe the following rules.
• Do not paste a mirror type lm or shade
lm that contains carbon onto the
windshield.
• Do not place anything on or near the
GPS antenna.
• Do not use a mobile phone, PHS,
computer, etc. near the GPS antenna.
26
Navigation Functions
Page 27

Map Data
The map data may contain wrong or missing
characters, incorrect locations etc.
Position Measurement
When Accurate Position
Measurement Is Not Possible
Radio signals from GPS satellites cannot be
received in locations such as in tunnels, indoor
parking garages, locations surrounded by high
buildings, mountains or trees, under freeways
and elevated train lines. In such cases, the
position measurement uses autonomous
navigation based on the gyro sensor and
speed sensor, so accurate measurement of
your car's location may become impossible.
Measurement Error
When radio signals cannot be received from
GPS satellites, measurement error occurs
easily and the location of your car may not be
displayed correctly.
If you keep on driving, when it becomes
possible to receive radio signals from GPS
satellites, the error in the current location will
be automatically corrected.
Reasons Why the Location of Your
Car Is Not Displayed Correctly
• When a freeway and general road are near
each other
• When driving roads laid out in a grid
• When driving on a mountain road with a
sharp slope
• When turning left or right after having driven
a long while on a straight road
• Immediately after the engine is switched ON
• When driving at slow speed, for example on
a congested road or in a parking lot (Because
some cars do not output a vehicle speed
signal when driving too slow)
• When traveling with chains on the tires
• When the vehicle was turned on a turntable
or the like
• When driving through a fork in the road with
a small angle between the two branches
• After the vehicle has been moved by ferry or
the like
• When driving in a multi-level parking garage
or on a spiral road
• When zig-zagging on a wide road
• When a tire has been replaced with the
emergency spare
• When driving on snow, sand, or other
slippery road
3D Position Measurement
When effective radio signals for which
positional precision can be expected can be
received from four or more GPS satellites, the
3D position of latitude, longitude, and altitude
can be calculated.
“GPS Information”(P141)
NAVI Basic Operation
2D Position Measurement
When effective radio signals for which
positional precision can be expected can be
received from three or more GPS satellites
but not enough for 3D position measurement,
the altitude is assumed to have remained
the same since the last time it could be
measured and only the 2D of latitude and
longitude can be calculated. In this case, the
positional precision is less than for 3D position
measurement.
“GPS Information” (P141)
Non-measurable Position
When effective radio signals from GPS
satellites for which positional precision can be
expected can not be received, the position is
not measured.
“GPS Information”(P141)
Navigation Functions
27
Page 28

Route Search Methods
• The route displayed in the route guidance
is a reference route to the destination. It
is not necessarily the shortest route. This
route guidance also does not take trafc
congestion information into account.
• Not all roads are used in route guidance.
• Routes using ferries are set to be less
recommended than normal roads. Therefore,
even when a ferry provides a quicker route
to the destination, a route not using the ferry
may be displayed.
• When a toll road interchange, parking area,
or service area is set as the destination or
as a waypoint, select from an establishment
search or from a freeway simplied map and
set without scrolling the map.
• Sometimes, the route is not the same as the
one prepared previously even though the
same locations were set as the destination
and waypoints.
• Sometimes routes are displayed that include
pedestrian ways, stairs, etc. that are not
passable by vehicle.
• If there is no road to the destination or only
narrow roads, a route may be displayed
that goes to some place apart from the
destination.
• Because searches are carried out passing
alongside establishments, depending on the
road conguration, roundabout routes may
be displayed.
• Sometimes routes are searched that take
trafc rule information into account.
• Sometimes, some temporary rules are not
taken into account or the time for which
they are applied differs from when they are
actually in effect.
Route Guidance
• When your car is driving on the searched
route, this displays the distance until the
destination or the next waypoint.
• When your car is driving off the searched
route, this displays the distance from the
point where you left the route until the
destination or the next waypoint.
• The display of the estimated time of arrival
at the destination is calculated based on the
remaining time data in the map data and
learning trip information.
• Sometimes even though you need to turn
at a junction, the junction name is not in the
guidance and the junction is not covered in
the audio guidance.
• Sometimes left and right turn guidance
differs from the actual road conguration.
• When you go off the route, for example by
turning one junction too early, sometimes the
audio guidance continues for the route you
had been on.
• Sometimes the distance in the guidance is
slightly too high or too low.
Precautions for operating the
navigation
• During route guidance, always obey the
actual trafc regulations. Failure to do so
may cause a trafc accident.
• The route is searched using the map data on
the map card. Sometimes it may differ from
actual restrictions for construction, one-way
rules, and other trafc rules. Always obey
the actual trafc regulations.
• Trafc rules that depend on the time of
day reect the time at which the route was
searched. When driving the route, always
obey the actual trafc regulations.
• The distance your car has traveled is
measured with the speed sensor (and this
speed is proportional to the rotation rate of
the tires).When the tires are new, if you have
non-standard tires, or if the tire air pressure
is not correct, error inputs the distance
measurement more easily and the location
of your car may not be displayed correctly.
• The route is a reference route to around the
destination. It is not the shortest route or the
route most free of trafc congestion.
• While you are driving, the amount of road
information displayed is restricted and some
roads may not be displayed.(For example,
narrow streets)
• If the distance to the destination is extremely
short or extremely long, route search may be
impossible.
• Even if you travel off the route, the route is
automatically recalculated.
• The estimated time of arrival varies with the
road conditions and how you drive.
Navigation Functions
28
Page 29
Navigation Screen
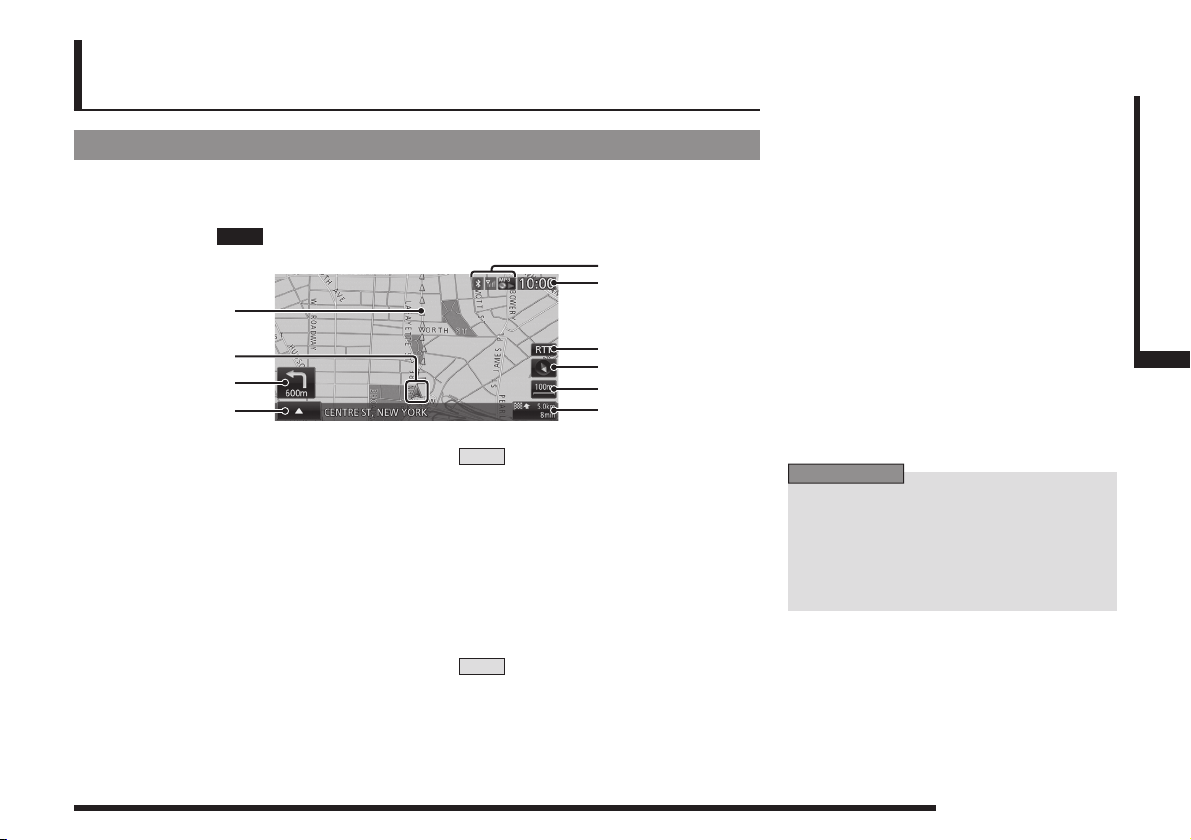
3)
4)
1)
6)
5)
8)
7)
2)
9)
10)
ADVICE
This section explains the navigation map screen and the display contents for the menu
screens.
Map Display Contents
The map screens include the current location screen and scroll screens
Current Location Screen
This section explains the contents displayed on the current location screen, which is displayed
when you press the
1) Route guidance mark
The road you are to drive is indicated by
an arrow.
With the [Screen] “Searched Root”, you
can select [Arrow] or [Line].
→“Navi Settings”(P195)
2) Car's location mark
The arrow shows the location of your car
and the direction of the arrow shows the
direction you are traveling in.
3) Junction guidance icon
Shows the distance until the next junction
to turn and which way to turn. Touching
this displays the junction guidance map.
→“Check the Next Junction to Turn”(P57)
MAP
key.
▲
4)
Displays a sub-menu.
5) Icons
Displays the current telephone and audio
6) Clock
Displays the current time using 12- or 24-
7)
(P32)
(P31)
status.
hour time.
RTT
Displays trafc congestion information and
trafc rule information etc. Touching RTT
symbol allows you to check the detailed
information.
→ “Checking the RTT Trafc Messages” (P77)
(P30)
.
8) Direction icon
Touching this displays the map switching
screen.
→“Select the Map Screen”(P33)
9) Scale icon
Shows the scale of the displayed map.
Touching this changes the scale.
→“Switch the Scale”(P39)
10) Destination/waypoint information
Shows the time, direction, and distance
to the destination or waypoint. Each time
you touch this, the display switches to the
estimated time of arrival, time remaining,
and local time. The time and distance at
this time are the expected time of arrival,
time remaining, or local time and distance
to the destination or waypoint from a
location off the route.
• The menu items vary with the navigation
settings and travel status. Some items
may not be displayed.
• To make the explanation clearer, the
navigation images in this manual leave
out some landmarks.
Navigation Screen
NAVI Basic Operation
29
Page 30
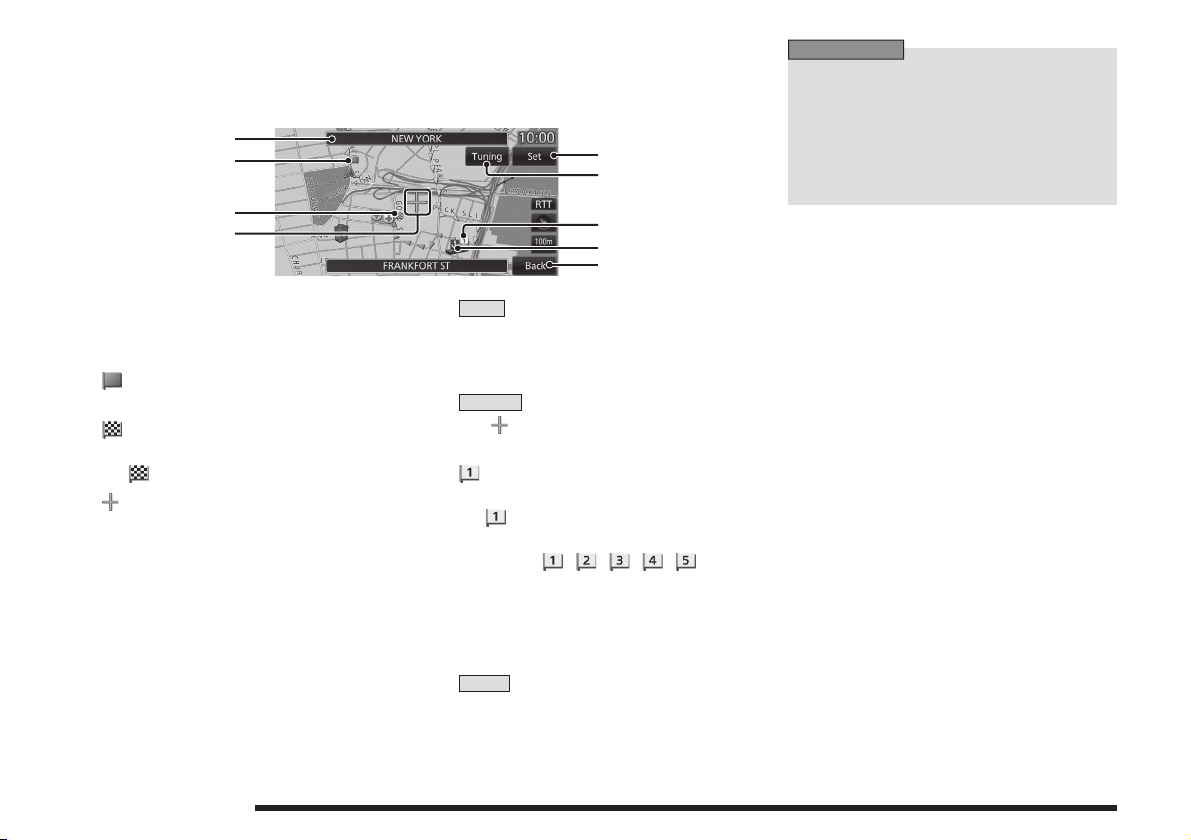
Scroll Screens
2)
3)
4)
1)
6)
5)
7)
9)
8)
ADVICE
This section explains the contents displayed on the scroll screens displayed when the map is
scrolled or after a search is performed
(P39)
.
• The display of 7) POI icons can be
removed from the map screen by setting
[Hide All] for [Screen] “POI icons”.
→“Navi Settings”(P195)
• You can select which 7) POI icon types to
display and which not to display.
→“POI Icons on Map”(P198)
1) City name
2)
3)
4)
30
If there is a city name for the cursor
position, this city name is displayed.
mark
Shows the starting point with the mark.
mark
The set destination
mark.
the
mark
The Cursor mark is displayed at the center
point of the location scrolled to.
Navigation Screen
(P46)
is shown with
Set
5)
6)
Displays the scroll menu
Allows you to set the destination,
waypoints, and address book.
Tuning
The
mark position can be ne tuned.
(P31)
.
→“Scroll Fine Adjustment”(P40)
7) mark
The set waypoints
mark.
the
Up to 5 waypoints can be set. They are
shown with , , , , in the
order in which they are passed.
8) POI icons
Trademarks, sight-seeing areas, etc. are
shown with these marks.
Back
9)
Returns to the previous screen.
(P60)
are shown with
Page 31

Individual Icons
ADVICE
This section explains the icons displayed on
the current location screen
Displayed when connected to
Bluetooth.
→“Bluetooth Setting”(P209)
AV icon Displays the status of the audio
Displays the signal strength
and whether or not the phone is
roaming.
Displayed when the phone is
used.
Redisplays the phone operation
panel
source currently being used.
Touching this switches to the
audio screen.
For details, see
Whether or not to display can
be selected with [Screen] “Other
Indicator Icons”.
→“Navi Settings”(P195)
(P148)
(P29)
.
.
“AV Icons”(P81)
Display the Destination Menu
You can set the destination and erase routes
from this menu screen.
Press the key.
1
▼
.
This displays the destination menu.
Display the Scroll Menu
You can set the location scrolled
as the destination or set it in the address
book.
• You can also display the scroll menu from
the map screen displayed with search
results by touching [Adjust], and then
[Set].
On the scroll screen, touch
1
Set
.
▼
The scroll menu is displayed.
(P39)
to
NAVI Basic Operation
Continued on the next page
Navigation Screen
31
Page 32

Set as Dest.
ADVICE
ADVICE
Address Book
POI nearby
Location
check
Set as RTT
surveillance
Back Returns to the previous screen.
location can be set as the
The
destination.
→“Set as the Destination”(P41)
location can be
The
registered.
Book”(P42)
Establishments around the
location can be searched for.
→“Search for Nearby
Establishments”(P42)
The position of
relative to the current location can
be checked.
→“Check the Location of Your
Car.”(P43)
Areas (around the
can be registered to check trafc
messages.
RTT Surveillance Map”(P78)
→“Set in the Address
→“Registering the
location
location)
Display the Sub-menu
This section explains how to display the submenu displayed from the current location
screen
(P29)
.
On the current location screen,
1
touch
▼
This displays the sub-menu.
• In this manual, the touch switch for
displaying a sub-menu is shown as
▲
• On a screen on which
you can display sub-menus for each
function by touching that.
▲
.
.
▲
is displayed,
Display the Current Location
Screen
You can display the current location screen
(P29)
from the scroll screen
menu
(P31)
, scroll menu
• You can also display the current location
screen from the AV screen, the info
screen, and other functions.
Press the
1
MAP
▼
This displays the current location screen of
the navigation screen.
(P30)
(P31)
key.
, destination
, etc.
Navigation Screen
32
Page 33

Direction icon
Reference orientation
Type
ADVICE
ADVICE
Select the Map
Screen
You can change the map type and reference
orientation.
Touch the “Direction icon”.
1
Touch either “Type” or
2
“Reference orientation”.
Touch
3
▼
The map type or reference orientation is
changed.
Set
.
• You can select the map type and the
reference orientation separately.
• To change the right screen for Two Maps
display, touch the direction icon on the
right screen side.
However, it is not possible to display a 3D
view map on the left screen.
Types of Maps
This section explains the types of maps you
can change to.
One Map
You can display the standard map on one
screen.
NAVI Basic Operation
Two Maps
You can display two maps with different scales
at the same time.
• You can make the right screen a 3D view
map.
Select the Map Screen
33
Page 34

Freeway Info
ADVICE
This displays a list of freeway exit service
areas with the current location as the starting
point.
Turn List
This displays a list of the locations for route
guidance on the left screen.
Arrow Guide
The location for the next route guidance is
displayed with an arrow on the left screen.
• You can check various information on the
freeway simplied map
→“Freeway Information”(P44)
• To select a freeway simplied map, it is
necessary to be driving on a freeway.
• It cannot be displayed on one screen
(entire screen).
• You can nd out the distance to various
establishments and other information.
Select the Map Screen
34
P side P
Displays a sub-screen and displays the audio
status, trip information, etc. at the same time
as the map. You can change the information
displayed on the sub-screen.
→“Change the P side P Display
Information”(P36)
Page 35

Map Reference Orientation
(Red)
(Red)
(Blue)
ADVICE
This section explains the map reference
orientation, which you can change.
2D(H-up)
This displays a map with the direction in which
your car is moving as up.
2D(N-up)
This displays a map with north as up.
2D(Auto)
This automatically changes between “H-up”
and “N-up” linked with the map scale. For
scales of 100 m and less, changes to “H-up”
and for scales of 250 m and more, changes to
“N-up”.
3D
This displays a map as seen looking down
from above.
NAVI Basic Operation
• On the 3D view map, if you touch [Navi
Menu], [Screen], and [Change 3D point of
view], you can change the point of view.
Select the Map Screen
35
Page 36

Change the P side P Display
Direction icon
Information
Change the information displayed on the P
side P sub-screen.
Touch the “Direction icon”.
1
Touch the “item” to display.
5
▼
Touch
2
Touch
3
Touch
4
Select the Map Screen
36
PsideP
Set
PsideP
.
The screen for the selected item is displayed
.
on the left screen.
.
Page 37

Guidance Display
ADVICE
CAUTION
ADVICE
This product displays various guidance
according to the situation.
Junction Guidance Map
When you are traveling the route, as you
approach a guidance point, this map is
displayed together with the voice guidance.
It shows the distance to the junction, the name
of the junction, and the name of the area.
• To display manually, touch the “Junction
guidance icon”.
Toll Booth Guidance Map
Displayed when you approach a toll booth.
• Car's location mark is not displayed.
• Guidance is not given for all toll booths.
Ferry/Car Train Guidance Map
Displayed when you approach the boarding
point while you are traveling a route that uses
a ferry or car train.
Lane Guidance
Displayed when there is lane information for
the junction ahead.
NAVI Basic Operation
• This is not displayed while the freeway
simplied map is displayed.
• While you are traveling the route, the
recommended route is displayed in
yellow and the lane you can travel along
the route is displayed in light blue.
• There is also audio lane guidance.
• Lane information is displayed for the
junction indicated with the arrow.
• Guidance is not given for all lanes.
• Sometimes the actual lanes differ from
the guidance.
Junction guidance icon
Guidance Display
37
Page 38

Junction View
CAUTION
CAUTION
ADVICE
When you approach a junction on a freeway,
the actual junction conguration, which way to
go, the junction name, etc. are displayed.
Speed Indicator Guidance
Displayed if there is speed indicator
information while you are driving.
• Car's location mark is not displayed.
• Sometimes the actual junction
conguration differs from the guidance.
Curve Guidance
Warnings are given by audio and with an icon
if you try to take a curve too fast.
It is necessary to set the [Guidance] “Curve
Guidance” [On].
→“Navi Settings”(P195)
Guidance Display
38
• Sometimes the actual speed indicators
differ from the guidance.
• Guidance is not given for all speed
indicators along roads.
• It is necessary to set the [Screen] “Speed
Indicator” “On”.
→“Navi Settings”(P195)
Page 39

Operate the Map
Scale Icon
ADVICE
ADVICE
ADVICE
This section explains how to perform such
operations as changing the scale and
scrolling the map.
• By holding down or , you can
use the free zoom function displaying
gradually in four steps to the next scale.
Touch the location to view.
1
Switch the Scale
You can view a wide range or a detailed
range.
Touch the “scale icon”.
1
▼
This displays the scale change bar.
Touch .
2
Each time you touch this, the map is
displayed in more detail.
Touch .
3
Each time you touch this, the map is
displayed wider.
Scroll the Map
This is used to move from the current location
screen to another location and check the map.
• While you are scrolling, sometimes part
of the map is not displayed. They do not
indicate a malfunction.
• With [Screen] “2 Screen Scroll”, when
you scroll while displaying “Two Maps”,
you can select whether to continue to
display two screens or to switch to one
screen.
→“Navi Settings”(P195)
• With [Screen] “3D Scroll”, when you scroll
while displaying in “3D”, you can select
whether to continue to display in 3D or to
switch to 2D.
→“Navi Settings”(P195)
▼
The mark is aligned with the location
you are searching.
• Touching [Back] returns the display to the
current location screen
• Holding this down lets you scroll
continuously.
• Touching [Set] displays the scroll menu.
You can set the destination, waypoints,
and address book.
→“Display the Scroll Menu”(P31)
(P29)
.
NAVI Basic Operation
Operate the Map
39
Page 40

Scroll Fine Adjustment
This nely adjusts the scroll position.
After scrolling, touch
1
Tuning
Touch the direction.
2
Touch a few times to nely adjust.
.
Touch
3
▼
This completes the ne adjustment.
Operate the Map
40
Tuning Off
.
Page 41

Operations from the
ADVICE
ADVICE
ADVICE
Scroll Menu
When you display the scroll menu, you can
set the destination, waypoints, address
book, etc.
Touch
3
▼
Start
.
Set as the Waypoint
Set the scroll screen
waypoint.
• It is necessary to set a destination.
(P30)
location as a
Set as the Destination
Set the scroll screen
destination.
• If a route has already been set, that
route is erased and
destination.
Display the scroll menu
1
Touch
2
▼
This displays the guidance start screen
(P56)
.
(P30)
is set as the new
Set as Dest.
location as the
.
(P31)
The search for the route to the destination is
complete and route guidance starts.
• If there is establishment information
for the
establishments is displayed for you to
.
select from.
location, a list of these
Display the scroll menu
1
Touch
2
Itinerary List
Touch
3
Set as Dest.
.
Add
for the location to
(P31)
, and then
.
add.
Touch
4
▼
The search for the route to the destination via
the waypoints is complete and route guidance
starts.
Start
.
NAVI Basic Operation
Operations from the Scroll Menu
41
Page 42

Set in the Address Book
ADVICE
ADVICE
Set the scroll screen
address in the address book.
Display the scroll menu
1
Touch
2
▼
(P30)
location as an
Address Book
.
(P31)
Search for Nearby
Establishments
Search for establishments around
location on the scroll screen.
.
Here, as an example, petrol stations are
searched for around the location.
Display the scroll menu
1
(P30)
(P31)
Touch any “type”.
4
.
The mark is displayed at the searched
for location and the address book
information screen
Touch
3
Set to Addr. Book
(P73)
▼
Registration of the location is complete.
• You can change the address book
information displayed here.
→“Change Address Book
Information”(P73)
Operations from the Scroll Menu
42
is displayed.
.
2
3
Touch
Touch
Nearby POI
GAS STATION
Categories”.
My
Categories
Last 5 Allows you to select from the
All Allows you to select from all
Allows you to select from the
pre-registered, frequently
used categories.
My Categories”(P51)
ve most recently searched
items.
categories.
When [All] has been touched,
you can sort in order of genre
or by alphabetical order of
name by touching [Sort by
Genre] or [Sort by Alphabet].
.
in “My
→“Editing
• Touching [info] displays a map of the
surroundings and related information.
• Touching [Refresh] start a search again.
Touch the “establishment” you
5
are searching for.
▼
This displays a map of the surroundings
and related information for the selected
establishment.
Page 43

Check the Location of Your
ADVICE
Car.
You can check the relationship between
the scroll screen
current location.
(P30)
location and your
Display the scroll menu
1
Touch
2
▼
You can check the relationship between your
current location and the cursor location.
• The location with the mark is the cursor
location.
Location check
(P31)
.
.
NAVI Basic Operation
Operations from the Scroll Menu
43
Page 44

Freeway Information
3)
1)
2)
4)
ADVICE
This displays information on the establishment.
(Up to for 4 establishments can be displayed.)
When you drive on a Freeway, “Freeway Info”
and parking area establishment information and junction information.
1) Route number and route name
Displays the route number and route
name for the freeway current displayed in
“freeway Info”.
2) Information display
Displays SA, PA, IC, and JCT names and
establishment information with icons.
For a freeway exit, displays information on
establishments in the surrounding area.
Touching this displays a map of
the surroundings for the selected
establishment.
(P34)
is displayed. You can check service area
Display Contents
3) Distance display
Displays the distance from your car's
location.
4) Your car display
Displayed when a list of the
establishments closest to the current
location is displayed.
The abbreviations related to freeways used
in this manual are as follows.
• SA: Service area
• PA: Parking area
• IC: Interchange
• JCT: Junction
Information on
Establishments
Icon Explanation of marks
GAS STATION
RESTAURANT
REST AREA
HOTEL
BANK MACHINE
BANK
Freeway Information
44
Page 45

Displaying
ADVICE
ADVICE
ADVICE
With the factory settings, when you drive on
a freeway, “freeway Info”
automatically, so no operation is required.
• If you set the [Screen] “Freeway
Simplied Map Automatic Display” to [Not
Display], this operation is performed.
→“Navi Settings”(P195)
• If your car is not on a Freeway, “Freeway
Info” cannot displayed.
Touch the “Direction icon”.
1
2
Touch
SET
FWY Info
.
▼
(P34)
is displayed
, and then
Check Area Information
You can check information on SA, PA, IC,
and JCT and you can display maps of their
surroundings.
Touch or .
1
▼
You can move forward and back through
the “Freeway Info”. Establishment
information is also displayed.
• You cannot go back farther than the
location of your car.
Touch the “establishment to
2
check.”
• Touching [Set] displays the scroll menu.
You can set the destination, waypoints,
and address book.
→“Display the Scroll Menu”(P31)
NAVI Basic Operation
This displays “Freeway Info”.
▼
This displays a map of the surroundings for
the selected establishment.
Freeway Information
45
Page 46

Destination Settings
ADVICE
NOTE
Set Your Home as
the Destination
You can set your pre-registered home
as the destination.
Press the key.
1
This displays the destination menu.
.
Go Home
→“Register a Home
.
Touch
2
▼
This displays the guidance start screen
(P56)
• If you have not registered your home,
this displays a screen asking if you
want to register it, then the setting
screen is displayed.
Location”(P67)
(P67)
Touch
3
▼
The search for the route with your home as
the destination is complete and route guidance
starts.
• If a route using the HOV lane is in the
search result with set conditions, a telop
that conrms the use of the HOV lane is
displayed.
[Yes]: Search for a HOV lane route.
[No]: Search for a non-HOV lane route.
Start
.
Set Your Home as the Destination
46
Page 47
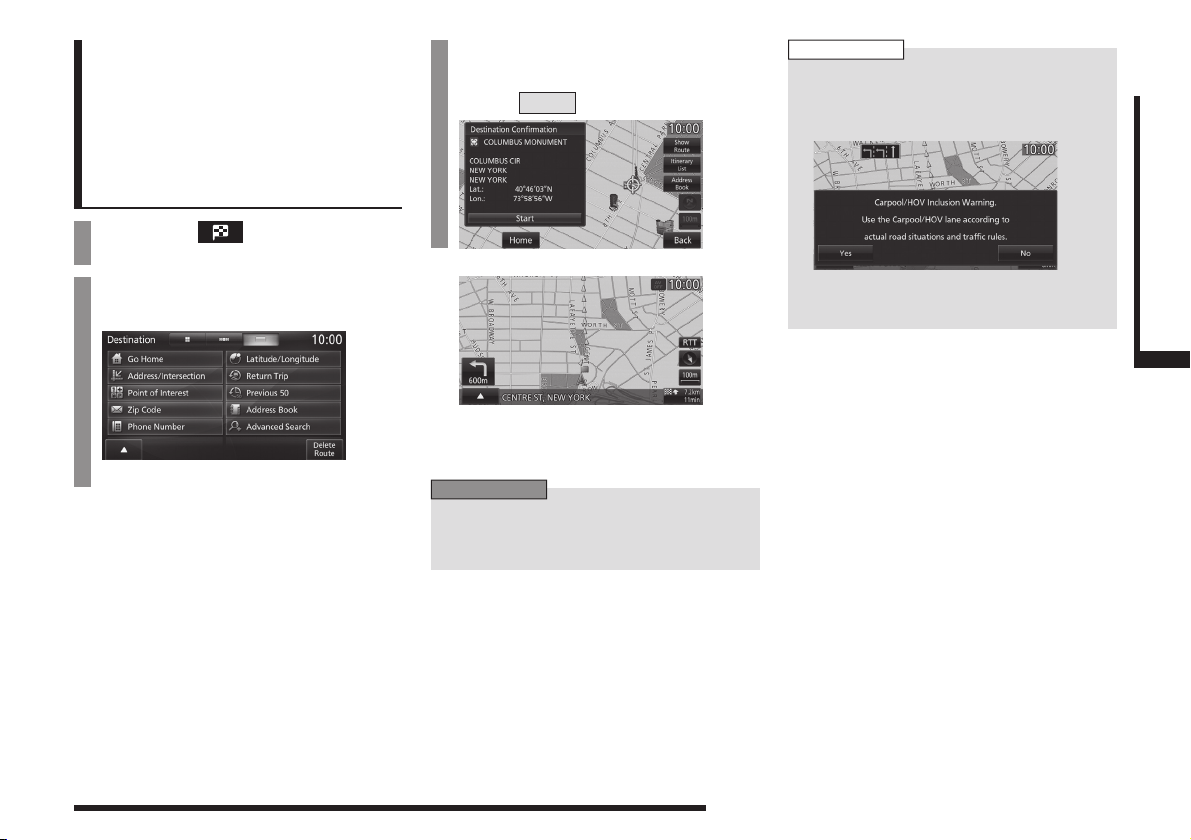
Set the Searched
ADVICE
NOTE
for Location as the
Destination
This section explains the series of
operations for setting the location searched
for with
“Search for a Location”(P48)
destination.
Press the key.
1
This displays the destination menu.
Touch any “search method”
2
and search for the location.
→“Search for a Location”(P48~P55)
as the
When the location you
3
searched for is displayed,
Start
touch
▼
The search for the route that has the searched
for location as its destination is complete and
route guidance starts.
• Depending on the search method, the
establishment name and telephone
number may not be displayed.
.
• If a route using the HOV lane is in the
search result with set conditions, a telop
that conrms the use of the HOV lane is
displayed.
[Yes]: Search for a HOV lane route.
[No]: Search for a non-HOV lane route.
NAVI Destination Settings
Set the Searched for Location as the Destination
47
Page 48

Search for a
ADVICE
Location
With this product, you can use various
methods to search for locations.
The location searched for here is used when
setting the destination
(P60)
, or an address in the address book
(P67)
.
This section explains the method for
searching from the destination menu
Load from the Address Book
Loads Address Book.
Press the key.
1
This displays the destination menu.
Touch
2
This displays the address book list.
Touch the “location” to load.
3
▼
This displays the guidance start screen
Address Book
(P46)
, a waypoint
(P21)
.
(P56)
• Touching [info] displays a map of the
surroundings and related information.
• While the guidance start screen is
displayed, touching [Address Book]
allows you to set a location in the address
book.
→“Set an Address in the Address
Book”(P71)
.
.
Load a Frequently Used
Location from the Address
Book
Press the key.
1
This displays the destination menu.
Touch
2
Touch the “number” to load.
3
▼
This displays the guidance start screen
▲
.
(P56)
.
Search for a Location
48
Page 49

Use the Search History
ADVICE
ADVICE
ADVICE
You can use the search history of locations
that were set as the destination and display
again a map of the surroundings.
• The search history contains the most
recent 50 items.
Press the key.
1
This displays the destination menu.
Touch
2
Touch the “location” you are
3
Previous 50
.
searching for.
Deleting from the Search
History
You can delete a registered search history.
Press the key.
1
This displays the destination menu.
Touch
2
Touch
3
Touch the “location” to delete.
4
Previous 50
Delete
.
.
Search from Address
Searches for a location from an address.
Press the key.
1
This displays the destination menu.
Touch
2
Touch the item, then input the
3
Address/Intersection
“address”.
.
NAVI Destination Settings
▼
This displays the guidance start screen
• Touching [info] displays a map of the
surroundings and related information.
(P56)
Select All Selects all the registered
Clear All Cancels all the selected
Touch
5
.
Touch
6
▼
The search history deletion is complete.
items. Touch to delete all.
items.
Done
.
Yes
.
Touch
4
▼
This displays the guidance start screen
• Touching [Last 5] allows you to select
from among the last 5 searches.
• [All Intersections] can be selected when
the street is input.
• Depending on the state of the information
recorded in the map data, representative
locations for that area may be displayed.
Set
.
Search for a Location
(P56)
.
49
Page 50

Search by Inputting an
Establishment Name
The name of an establishment can be input to
search for its location.
Press the key.
1
This displays the destination menu.
Touch
2
Touching [Last 5] allows you to select from
among the last 5 searches.
Touch
3
Point of Interest
All Cities
, then input
.
the “city name”.
4
Touch
All Categories
input the “category name”.
You can skip the category input and
perform the operation in Step 4.
My
Categories
Last 5 Allows you to select from the
All Allows you to select from all
Allows you to select from the
pre-registered, frequently
used categories.
My Categories”(P51)
ve most recently searched
items.
categories.
When [All] has been touched,
you can sort in order of genre
or by alphabetical order of
name by touching [Sort by
Genre] or [Sort by Alphabet].
, then
→“Editing
5
Touch
All POIs
, then input the
“name of the establishment”
you are searching for.
→“Input assist for searches”(P19)
You can search without inputting the entire
establishment name.
Touch
6
When you have input the rst few
characters of the establishment name, if
there is only one candidate left, proceed
to Step 7.
If there are 5 or less candidates, a list is
displayed automatically.
Touch the “establishment” you
7
List
.
are searching for.
Search for a Location
50
Page 51

ADVICE
• If the list has the “+” mark, touch [Sub
ADVICE
POI], select the detailed establishment
name.
Editing My Categories
Registers a frequently used establishment
category in “My Categories”.
Up to 6 entries can be registered in “My
Categories”.
Press the key.
1
This displays the destination menu.
2
Touch
Point of Interest
.
Touch
6
Returns to the previous screen.
• You can also edit by touching [NAVI
MENU] key, [Personal], and [My
Categories] in “Edit”.
Back
.
→“Personal”(P204)
NAVI Destination Settings
A list is displayed and you can select the
detailed establishment.
8
Touch
Set
.
▼
This displays the guidance start screen
(P56)
Touch
3
Touch
4
Touch the “category”
5
All Categories
Edit
.
.
to register.
.
The registered category is displayed
inverted.
Default Restores the factory settings.
Clear All Cancels all the registered
Sort by
Alphabet
or
Sort by Genre
categories.
Sorts by genre or in
alphabetical order by name.
Search for a Location
51
Page 52

Search for Nearby
ADVICE
Establishments
You can search for establishments near the
current location and destination and along the
route.
Touch the “establishment” you
6
are searching for.
Searching for Establishments
near the Route
Press the key.
1
This displays the destination menu.
Searching for Establishments
around the Current Location
As an example, search for petrol stations.
Press the key.
1
This displays the destination menu.
Touch
2
Touch
3
Touch
4
Touch any “Sub-Category”.
5
Advanced Search
Nearby POI
GAS STATION
.
.
.
▼
This displays the guidance start screen
• Touching [info] displays a map of the
surroundings and related information.
• Touching [Refresh] start a search again.
• From the map screen, you can touch
▲
, and then [Nearby POI] to search
the surroundings.
(P56)
Touch
2
Touch
3
▼
.
The rest of the procedure is the same
as from Step 3 onward in
for Establishments around the Current
Location”(P52)
Advanced Search
POI along Route
“Searching
.
.
.
Search for a Location
52
Page 53

Searching for Establishments
ADVICE
near the Destination or a
Waypoint
Press the key.
1
This displays the destination menu.
Touch
2
Touch
3
Touch the “location” to search
4
Advanced Search
POI by Dest./Inter.dest.
.
.
for.
▼
The rest of the procedure is the same
as from Step 3 onward in
for Establishments around the Current
Location”(P52)
.
“Searching
Searching for Establishments
near a Street
This searches for establishments near any
desired street.
Press the key, then touch
1
Advanced Search
Touch
2
Touch an item, then input the
3
POI along a Street
.
.
“location”.
• Touching [Last 5] allows you to select
from among the last 5 searches.
• If there are no establishments near
the input location, “No POI found.” is
displayed, so touch [OK] and set a
different location.
Input the “category” for
4
the establishment you are
searching for.
Input the “name of the
5
establishment” you are
searching for.
→“Input assist for searches”(P19)
You can search without inputting the entire
establishment name.
Touch
6
When you have input the rst few
characters of the establishment name, if
there is only one candidate left, proceed
to Step 8.
If there are 5 or less candidates, a list is
displayed automatically.
Touch the “establishment” you
7
List
.
are searching for.
NAVI Destination Settings
Touch
8
▼
This displays the guidance start screen
Set
.
Search for a Location
(P56)
.
53
Page 54

Searching for Establishments
ADVICE
along a Freeway or near an
Exit
This searches for establishments along a
freeway or near an exit. You can only use this
when you are driving on a freeway.
Press the key.
1
This displays the destination menu.
Touch
2
Touch
3
Touch the “establishment” you
4
Advanced Search
POI at FWY
.
.
are searching for.
Search from Telephone
Number
Used when you know the telephone number
of the location you are searching for.
Press the key.
1
This displays the destination menu.
Touch
2
Input the “telephone number”.
3
Phone Number
.
Search from Zip Code
Used when you know the zip code of the
location you are searching for.
Press the key.
1
This displays the destination menu.
Touch
2
Touch
3
Besides searching by “Zip code”, you can
also narrow the search by inputting the
“street”, “House#”, or “Intersection”.
Input the “zip code”.
4
→“Input assist for searches”(P19)
Zip Code
All Zip Codes
.
.
If there are multiple establishments, is
displayed for you to select from by touch.
Touch
5
▼
This displays the guidance start screen
Search for a Location
54
Set
.
(P56)
Touch
4
▼
This displays the guidance start screen
• Private homes cannot be searched for.
.
Set
.
(P56)
.
Touch
5
▼
This displays the guidance start screen
Set
.
(P56)
.
Page 55

Search by Latitude and
Longitude
You can set the destination by specifying the
latitude and longitude.
Press the key.
1
This displays the destination menu.
Touch
2
Touch
3
Input the “latitude” or
4
Latitude/Longitude
Latitude
or
Longitude
.
“longitude” you are searching
for.
→“Keyboard for Number Input”(P19)
Set the Start Location as the
Destination
You can set the start location set for the route
as a new destination.
Press the key.
1
This displays the destination menu.
Touch
2
▼
.
This displays the guidance start screen
Return Trip
.
(P56)
NAVI Destination Settings
.
Touch
5
▼
This displays the guidance start screen
Set
.
(P56)
.
Search for a Location
55
Page 56

Guidance Start Screen
1)
3)
5)
6)
7)
8)
4)
2)
This is the screen displayed when the location to set as the destination is decided.
This section explains the operations you can do on this screen.
1) Location information
When such location information as the
“establishment name”, “street name”,
“city name”, “country name”, “latitude”,
“longitude”, or “telephone number” has
been obtained, it is displayed.
Start
2)
The search is executed and route
guidance is started.
Dial
3)
If a mobile phone is connected, you can
call the establishment.
→“Call a Telephone NumberRegistered
on the Map”(P147)
Home
4)
If your home is not registered, you can
register the searched for location as your
home.
Guidance Start Screen
56
Show Route
5)
Sets the currently searched for location as
the destination and shows a simple sketch
of the route. You can check the route and
change the search conditions.
→“Show Route”(P56)
Itinerary List
6)
You can change the destination, add
waypoints, and change the route search
conditions.
→“Set and Change a Waypoint”(P60)
Address Book
7)
Registers the search for location in the
address book.
→“Set an Address in the Address
Book”(P71)
8)
You can scroll the map and change the
location.
* When the destination setting is set when scrolling the map,
it is not displayed.
*
Adjust
Show Route
This section explains the screen displayed
when you touch [Show Route].
Start Starts route guidance.
Modify Displays the Itinerary List screen.
Preview Scrolls the map along the route.
Rt.Outline Displays a list of junctions at
4 Routes Displays the overall route to
Options Detailed settings can be set
Info mark Touching the mark displayed
→“Check the Route”(P57)
which turns must be made on the
route to the destination.
→“Route Outline”(P59)
check four routes and allows you
to change the search conditions.
→“Select from Four Routes”(P63)
concerning the route.
→“Change Search
Conditions”(P60)
at “Info” will display a map of
the surroundings and related
information.
Page 57

Route Checking and Changing
ADVICE
ADVICE
Route Checking
If a route has been set, you can check it.
Check the Next Junction to
Turn
When the route you are traveling has a
junction ahead where you must turn left or
right, you can have audio guidance and
junction guidance map display provided ahead
of time.
On the current location screen,
1
touch the “junction guidance
icon”.
▼
Check the Route
You can scroll along the route to check and
check maps of the surroundings.
• During checking, the map type displayed
is One Map 2D (N-up).
• The same operations can also be carried
out on
“Show Route”(P56)
[Preview].
Press the
1
This displays the navi menu.
Touch
2
NAVI MENU
Route Menu
by touching
key.
.
NAVI Route Checking and Changing
• You must be traveling a route.
• For some maps, only audio guidance is
provided.
This displays an expanded map of the junction
to turn next.
Touch
3
Touch
4
Touch the route “check
5
View Route
Preview
.
.
method”.
▼
The map changes to match the check method
selected.
Route Checking
57
Page 58

Types of Check Methods
ADVICE
Backward Scrolls from the destination
Stop Stops scrolling for going
Forward Scrolls from the start location
Back Ends scrolling.
toward the start location.
backward or forward.
toward the destination.
Check the Entire Route
This displays the map at a scale that allows
you to check the route from the start location
to the destination.
On the current location screen,
1
▲
touch
.
Remaining
This displays the map at a scale that can
display all of the route that has not been
traveled yet.
Press the
1
This displays the navi menu.
Touch
2
Touch
3
NAVI MENU
Route Menu
View Route
key.
.
.
Route Checking
58
2
3
Touch
Touch
Conrm Route
Entire Route
.
.
▼
This displays a map screen showing the entire
route.
Types of Icons on Map
Shows the start location.
Shows the location of your car.
Shows the destination.
Shows the waypoints that have been
set.
4
Touch
Remaining
.
▼
This displays the remaining route.
• When the current location screen is
displayed, you can also perform the same
operations by touching
Route], and [Remaining Route].
▲
, [Conrm
Page 59

Route Outline
ADVICE
ADVICE
ADVICE
This displays a list of junctions at which turns
must be made on the route to the destination.
Press the
1
This displays the navi menu.
Touch
2
Touch
3
Touch
4
▼
This displays a list of junctions at which turns
must be made.
• If you touch one of the junctions in
the list, a map of the area around that
junction is displayed.
NAVI MENU
Route Menu
View Route
Rt.Outline
key.
.
.
.
View a Demo Trip
You can travel the prepared route virtually to
check.
• Once you have actually driven the route
and arrived at the destination, you cannot
run the demo trip.
Press the
1
This displays the navi menu.
Touch
2
▼
This displays “Demo” and starts the demo trip.
NAVI MENU
Start Demo
key.
.
Ending
During the demo trip, press the
1
NAVI MENU
This displays the navi menu.
Touch
2
▼
This ends the demo trip.
Besides this operation, the demo trip also
ends if any of the following conditions is
met.
• The trip is actually started.
• The destination or a waypoint is changed.
Or deleted.
• The ignition key is switched to “OFF”.
• A search condition is changed.
• On the itinerary list screen, [Show Route]
is touched.
key.
Stop Demo
.
NAVI Route Checking and Changing
Route Checking
59
Page 60

Change the Route
ADVICE
ADVICE
A detour route or a different route can be
set for the route currently set. The route
search method can also be changed.
Press the
1
This displays the navi menu.
Touch
2
Itinerary
▼
This displays the itinerary list.
NAVI MENU
Route Menu
.
key.
, and then
Change Search Conditions
You can change the route search conditions.
On the itinerary list screen,
1
touch
Touch the “search condition”
2
Options
.
to set.
→“Route Options”(P201)
Touch
3
Touch
4
▼
Back
Start
.
.
Set and Change a Waypoint
• Set the destination before setting any
waypoint.
• Up to 5 waypoints can be set.
Setting a Waypoint
This section explains the method for setting a
waypoint when none has been set yet.
• You can also set a waypoint from the
scroll menu
On the itinerary list screen,
1
touch
Touch any “search method”
2
(P31)
Add
.
.
and search for the location.
Change the Route
60
The search using the set condition is
complete.
→“Search Method Selection Screen”(P61)
3
Touch
Itinerary List
.
Page 61

4
Touch
Add
for the location to
add.
▼
This sets the waypoint and displays the
itinerary list screen
(P60)
.
Search Method Selection
Screen
Address/
Intersection
Point of
Interest
Advanced
Search
Previous 50 Uses the search history. The
Address
Book
Home
Zip Code Used when you know the zip
Searches for a location from an
address. The procedure is the
same as from Step 2 onward in
“Search from Address”(P49)
The name of an establishment
can be entered to search for its
location. The procedure is the
same as from Step 2 onward
in
“Search by Inputting an
Establishment Name”(P50)
Searches for establishments
near the current location and
destination and near the route.
→“Search for Nearby
Establishments”(P52)
procedure is the same as from
Step 2 onward in
History”(P49)
Loads Address Book. The
*1
procedure is the same as from
Step 2 onward in
Address Book”(P48)
*2
Loads own home.
code of the location you are
searching for. The procedure is
the same as from Step 2 onward
in
“Search from Zip Code”(P54)
.
“Use the Search
“Load from the
.
Phone
Number
Map Point The location scrolled to on the
Latitude/
Longitude
Return Trip Loads the start location used for
.
.
*1 When you set an address in the address book
is displayed in the menu.
*2 When you register your home
the menu.
.
Used when you know the
telephone number of the location
you are searching for. The
procedure is the same as from
Step 2 onward in
Telephone Number”(P54)
map
(P39)
The latitude and longitude can be
entered to search for the location.
The procedure is the same as
from Step 2 onward in
Latitude and Longitude”(P55)
route setting.
“Search from
can be set.
(P67)
, this is displayed in
.
“Search by
.
(P71)
, this
NAVI Route Checking and Changing
Change the Route
61
Page 62
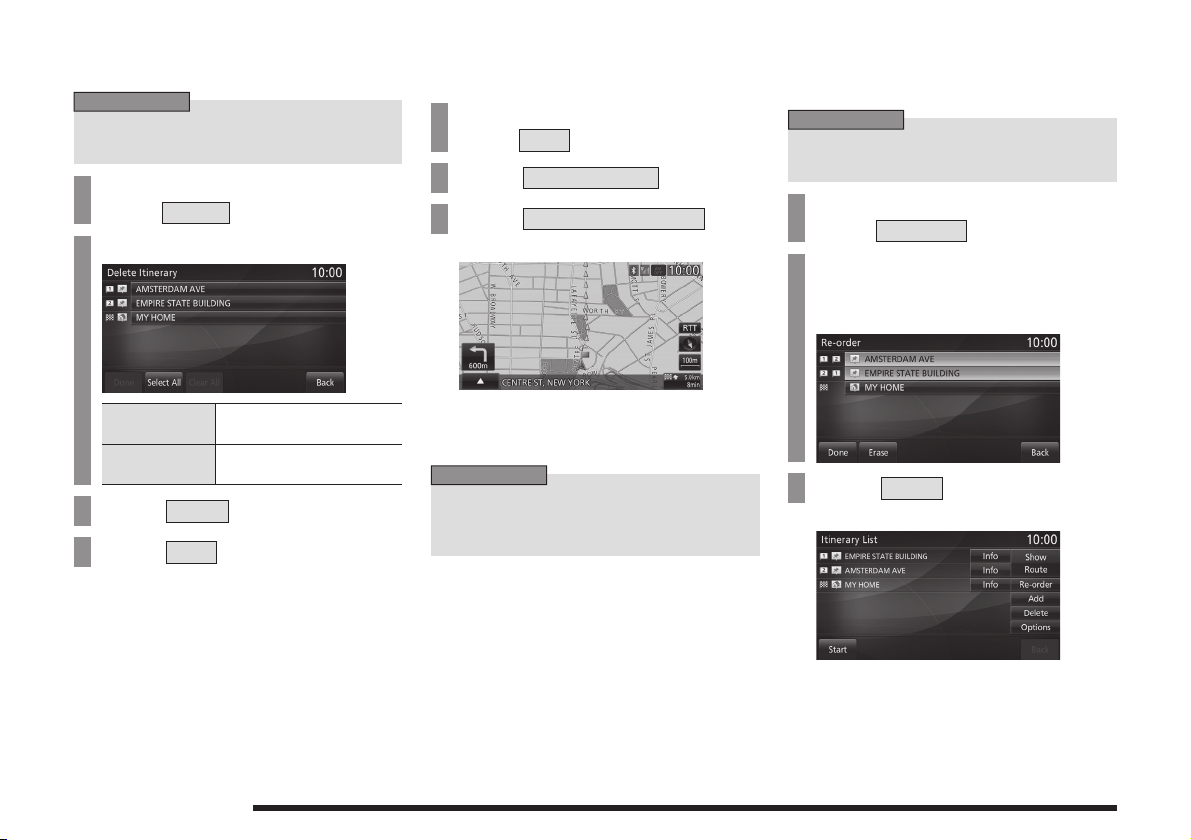
Deleting a Waypoint
ADVICE
ADVICE
ADVICE
Delete a set waypoint.
• Waypoints that you have already passed
cannot be deleted.
On the itinerary list screen,
1
touch
Touch the “waypoint” to delete.
2
Delete
.
Operating from a Sub-menu
You can delete the next waypoint you are
scheduled to pass through.
On the current location screen,
1
▲
touch
Touch
2
Touch
3
▼
.
Change Route
Clear Transit Route
.
.
Re-ordering waypoints
The order for reaching the destination and
waypoints is changed.
• Waypoints that you have already passed
through cannot be re-ordered.
On the itinerary list screen,
1
touch
Touch “locations” in the order
2
Re-order
.
that you want to pass through
them.
Select All Selects all the registered
Clear All Cancels all the selected
Touch
3
Touch
4
▼
This deletes the waypoint and displays the
itinerary list screen
Change the Route
62
items. Touch to delete all.
items.
Done
.
Yes
.
(P60)
.
This deletes the next waypoint you are
scheduled to pass through and starts the
route search.
• When you have passed through all the
waypoints, [Delete Point] is grayed out
and cannot be selected.
Touch
3
▼
The re-ordering of waypoints is complete and
the itinerary list screen
Done
.
(P60)
is displayed.
Page 63

Select from Four Routes
ADVICE
ADVICE
NOTE
You can simultaneously search for routes with
four different conditions, then select one of
them.
• Depending on the road conditions, it
may not be possible to search for all four
routes.
On the itinerary list screen,
1
touch
and
Touch the “search condition”
2
Show Route
4Routes
.
to set.
The search conditions are the same as for
“Route Options”(P201)
▼
“Route Priority”.
Search for a Detour Route
You can search for a route that detours ahead
the distance you specify.
• This operation is not possible if the distance
to the destination is less than 1 km.
Press the
1
This displays the navi menu.
Touch
2
Detour
Touch the “distance” to detour.
3
If you touched [Avoid Street], refer to
“Selecting a detouring road”(P63)
▼
The search for the route detouring the set
distance is complete and route guidance
starts.
NAVI MENU
Route Menu
.
key.
, and then
.
Selecting a detouring road
Select the street that will be the starting point
and the street that will be the ending point,
then set a route that detours that range.
Execute up to Step 2 in
1
for a Detour Route”(P63)
Touch
2
Touch the “street” you want to
3
Avoid Street
“Search
.
.
set to the starting point.
If you are detouring only one street,
proceed to Step 5.
Touch the “street” you want to
4
set to the ending point.
NAVI Route Checking and Changing
This displays the route with the changed
search conditions.
• You can change the distance unit with
[System] [Units].
→“System Settings”(P208)
Touch
5
▼
The search for the route detouring the
set range of streets is complete and route
guidance starts.
Set
.
Change the Route
63
Page 64

Searching for a Different
ADVICE
ADVICE
Route
This repeats the searches for the route.
On the current location screen,
1
▲
touch
Touch
2
Touch
3
▼
The search for a different route is complete
and route guidance starts.
.
Change Route
Alternative Route
.
.
Pause Route Guidance
This pauses route guidance.
On the current location screen,
1
▲
touch
Touch
2
▼
This pauses route guidance.
• While the route guidance is paused, you
can change the destination, waypoints,
and search conditions. If you change
anything, the search is repeated, then the
route guidance starts.
.
Stop Guidance
.
Restarting Guidance
This restarts paused route guidance
On the current location screen,
1
▲
touch
Touch
2
▼
The route is searched for again and route
guidance starts.
.
Start Guidance
(P64)
.
Delete a Route
This deletes the input destination and
waypoint and deletes the route.
Press the
1
This displays the navi menu.
Touch
2
Delete Route
Touch
3
▼
The deletion of the route is complete and the
current location screen
• You can also delete the route by touching
the
.
NAVI MENU
Route Menu
.
Yes
.
(P29)
key, and then [Delete Route].
Operating from a Sub-menu
On the current location screen,
1
▲
touch
Touch
2
Touch
3
▼
The deletion of the route is complete.
.
Change Route
Delete Route
key.
, and then
is displayed.
.
.
Change the Route
64
Page 65

Select the DRG route
ADVICE
ADVICE
NOTE
ADVICE
When the RTT message is detected, a route
based on the detected information is searched
and DRG (Dynamic Route Guidance) route
can be selected.
Register an Avoid Area
You can register and edit areas you want to
avoid passing through for route searches.
• Up to 5 avoid areas can be registered.
Touch an item, then input the
5
“location”.
• It is necessary to set the [RTT Options]
“Dynamic Route Guidance” to [On].
“Navi Settings” (P195)
When the search for a new
1
→
route based on RTT messages
is complete...
The audio guide will announce the search
of a new route, and the [Show Route] is
displayed.
Touch
2
Touch
3
▼
This shows the new route.
• Touching [Current] keeps the route
currently selected.
Show Route
New
.
.
Press the
1
This displays the navi menu.
Touch
2
Avoid Areas
Touch any
3
▼
This displays the current location screen.
Touch
4
To register the displayed location, proceed
to Step 6.
• You can change the name of the avoid
area by touching [Name].
→“How to Input Characters”(P18)
NAVI MENU
Route Menu
.
Empty
Search
.
key.
, and then
.
Touching [Last 5] allows you to select from
among the last 5 searches.
Touch
6
If you do not want to adjust the area,
proceed to Step 12.
Touch
7
This adjusts the area range.
You can change the location by touching
the map screen.
Touch
8
Touch , , , or to
9
Set
.
Adjust
Adjust Size
.
.
adjust the range.
NAVI Route Checking and Changing
Continued on the next page
Change the Route
65
Page 66

Touch
ADVICE
10
Touch
11
Touch
12
▼
This displays the avoid area list screen.
Set Area
Set Area
Set
.
.
again.
Editing an Avoid Area
You can change and set avoid areas.
Execute up to Step 2 in
1
“Register an Avoid Area”(P65)
Touch
2
Inactive
Touch the “avoid area” to edit.
3
▼
Active
or
for the set area.
Active Sets that route guidance
Inactive Sets that route guidance
does not take you through
the registered area.
does take you through the
registered area.
Deleting an Avoid Area
This deletes a registered area.
Execute up to Step 2 in
1
.
“Register an Avoid Area”(P65)
Touch
2
Touch the “area” to delete.
3
Delete
Select All Selects all the registered
Clear All Cancels all the selected
items. Touch to delete all.
items.
.
.
Change the Route
66
This displays the area to edit.
• You can change the avoid area
information displayed here.
Execute the procedure for Steps
4 through 10 in
Area”(P65)
Touch
4
▼
The editing is complete.
“Register an Avoid
.
Set
.
Touch
4
Touch
5
▼
The deletion of the selected area is complete.
Done
Yes
.
.
Page 67

Set an Address in the Address Book
ADVICE
ADVICE
ADVICE
Touch any “search method”
Register a Home
Location
If you register your home, it is simple to set
a route going home from the location you
have gone out to.
• For information on how to set a route
returning to your home, refer to
Home as the Destination”(P46)
• For information on how to delete the
registration of your home, refer to
Your Home Registration”(P68)
• You can only register one home.
Press the key.
1
This displays the destination menu.
2
3
Touch
Touch
Go Home
Yes
.
“Set Your
.
“Erase
.
.
5
and search for the location.
→“Search Method Selection Screen”(P61)
• If the current location is your home, you
can register it by simply touching [Map
Point].
When the location you
6
searched for is displayed,
Set
touch
▼
.
• You can change the address book
information displayed here.
Execute the procedure for Steps 5
and beyond in
Information”(P73)
Touch
7
▼
Registration of your home is complete.
“Change Address Book
.
Set as Home
.
NAVI Set an Address in the Address Book
Touch
4
Location”.
New
in “Home
This displays the mark at the searched
for location and the home address
information
(P73)
.
Register a Home Location
67
Page 68

Change the Home Location
ADVICE
You can edit your home information.
Press the
1
This displays the navi menu.
Touch
2
Touch
3
NAVI MENU
Personal
Edit
in “Home
key.
.
Location”.
▼
This displays the information in the
address book for your home
• You can change the address book
information displayed here.
Execute the procedure for Steps 5
and beyond in
Information”(P73)
“Change Address Book
.
(P73)
Erase Your Home Registration
This deletes your home registration.
Execute up to Step 2
1
in
“Change the Home
Location”(P68)
2
Touch
Delete
.
in “Home
Location”.
Touch
3
▼
Deletion of your home registration is complete.
.
Yes
.
Touch
4
▼
Editing of your home is complete.
Register a Home Location
68
Set as Home
.
Page 69

Set a Frequently
ADVICE
ADVICE
ADVICE
Used Location in
the Address Book
You can register locations frequently used
as a destination or waypoint.
Touch any “search method”
5
and search for the location.
• You can change the address book
information displayed here.
Execute the procedure for Steps 5
and beyond in
Information”(P73)
“Change Address Book
.
• Up to 5 frequently used locations.
Press the key.
1
This displays the destination menu.
Touch the “number” to register.
2
If no “number” is displayed, touch
• If you touch a number for which a
frequently used location has already
been registered, that location is loaded.
To make a new registration, select a
number for which no location has been
registered.
Touch
3
Touch the “unregistered list”.
4
Yes
.
Set as Location
.
NAVI Set an Address in the Address Book
→“Search Method Selection Screen”(P61)
When the location you
6
Touch
7
▼
Frequently used location registration is
complete.
searched for is displayed,
Set
.
▼
This displays the mark at the searched
for location and the frequently used
location information
▲
touch
.
(P73)
.
Set a Frequently Used Location in the Address Book
69
Page 70

Change a Frequently Used
ADVICE
Location
You can edit frequently used locations.
Press the
1
This displays the navi menu.
Touch
2
Touch
3
NAVI MENU
Personal
Edit
in “Special
key.
.
Location”.
▼
Delete a Frequently Used
Location
Execute up to Step 2 in
1
“Change a Frequently Used
Location”(P70)
2
Touch
Delete
.
in “Special
Location”.
Touch the “frequently used
3
location” to delete.
4
Touch
Done
.
This displays the information in the
address book for frequently used locations
(P73)
.
• You can change the address book
information displayed here.
Execute the procedure for Steps 5
and beyond in
Information”(P73)
Touch
4
▼
Frequently used location editing is complete.
Set a Frequently Used Location in the Address Book
70
“Change Address Book
.
Set as Location
Touch
5
▼
Frequently used location deletion is complete.
Yes
.
.
Page 71

Set an Address in
ADVICE
ADVICE
ADVICE
ADVICE
ADVICE
the Address Book
Setting a location you have gone to, a
location you want to go see, or the like
in the address book makes route setting
simple.
• Up to 200 addresses can be registered in
the address book.
Register the Current Location
This registers the location where you are now
(your car's location) from the current location
screen.
On the current location screen,
1
▲
touch
Touch
2
▼
Registration of the current location is complete.
• The address book information screen is
not displayed and the address is set in
the address book with the name blank.
• Fill in the blank column of the address
book information according to the
objective.
→“Change Address Book
Information”(P73)
.
Set Location
.
Register a Searched for
Location
This section explains the series of operations
for registering a location searched for from the
destination menu
• You can also register by touching
key, [Address Book], and [New].
Press the key.
1
This displays the destination menu.
Touch any “search method”
2
(P21)
in the address book.
and search for the location.
→“Destination Menu”(P21)
When the location you
3
searched for is displayed,
touch
Address Book
.
• Depending on the search method, the
establishment name and telephone
number may not be displayed.
4
Touch
Set to Addr. Book
.
▼
This displays the mark at the searched
for location
and the address book information screen
(P73)
.
▼
Registration of the search for location is
complete.
• You can change the address book
information displayed here.
Execute the procedure for Steps 5
and beyond in
Information”(P73)
“Change Address Book
.
NAVI Set an Address in the Address Book
Set an Address in the Address Book
71
Page 72

Change the List Order
You can change the order of items in the
address book list.
Press the key.
1
This displays the destination menu.
Touch
2
This displays the address book list.
Touch the “order” to change to.
3
▼
The list is changed to the selected order.
Address Book
.
Types of Order
Icon Sorts the list of marks in order
Name The marks are displayed in order
Date The marks are displayed in order
Use Sorts the list of marks in order
from the top left.
of the names in the Address
Book.
of the newest registration.
of marks recently used for route
searches and searches using the
Address Book.
Delete an Address from the
Address Book
Delete an address registered in the address
book.
Press the
1
This displays the navi menu.
Touch
2
Touch
3
NAVI MENU
Personal
Delete
key.
.
in “Address
Book”.
Touch the “address in the
4
address book” to delete.
Select All Selects all the registered
Clear All Cancels all the selected
Touch
5
Touch
6
▼
Deletion of the selected address is complete.
items. Touch to delete all.
items.
Done
.
Yes
.
Set an Address in the Address Book
72
Page 73

Change Address
ADVICE
ADVICE
ADVICE
Book Information
You can change and delete addresses from
the address book.
• The location must already be registered.
Press the key.
1
This displays the destination menu.
Touch
2
This displays the address book list.
Touch
3
Book”.
Touch the “address in the
4
address book” to change.
Touch the “information” to
5
change.
Address Book
Edit
in “Address
.
Address Book Information
Screen
This section explains the address book
information you can change.
Icon
You can change the mark for the registered
address displayed on the map screen.
• You cannot change the location mark for
your home.
On the address book
1
information screen, touch
Change
Touch the “icon” to change.
2
▼
The icon change is complete.
• There are 49 icons to choose from.
• Touching
mark on the map screen.
in “icon”.
eliminates display of the
Adjust
You can change the location in the address
book.
On the address book
1
information screen,
touch
Scroll the map
2
Adjust
line up the
.
(P39)
and
mark with the
“location” to change.
Touch
3
▼
The location change is complete.
Set
.
NAVI Set an Address in the Address Book
Change Address Book Information
73
Page 74

Name
ADVICE
NOTE
You can change the name of the location mark
for the location in the address book displayed
on the map screen.
• You can select to display or not display
the name of the location in the address
book on the map with [Screen] “Address
Book Names”.
→“Navi Settings”(P195)
On the address book
1
information screen,touch
“Name”.
Input the “name” to change,
2
Set
then touch
→“How to Input Characters”(P18)
▼
The name change is complete.
.
Street or City
You can change the street name or city name.
On the address book
1
information screen, touch
“street” or “city”.
Input the “name” to change,
2
Set
then touch
→“How to Input Characters”(P18)
▼
The street name or city name change is
complete.
.
Tel
You can register the telephone number in the
address book.
On the address book
1
information screen,touch
“TEL”.
Input telephone number by
2
touching “numbers”, then
Set
touch
▼
The telephone number change is complete.
• Telephone numbers up to 24 digits long
can be input.
.
Change Address Book Information
74
Page 75

RTT
ADVICE
ADVICE
RTT
You can use the real-time trafc message.
DRG (Dynamic Route
Guidance)
When the RTT messages or trafc rule
information is detected, the best route
is calculated automatically based on the
detected information and guidance is
provided.
→ “Select the DRG route” (P65)
• It is necessary to set the [RTT Options]
“Dynamic Route Guidance” to [On].
“Navi Settings” (P195)
RTT Surveillance Map
RTT is a service that provides trafc message
using FM HD Radio signal (FM Radio waves).
Areas can be registered to check the trafc
rules and trafc messages of the registered
area.
→ “Registering the RTT Surveillance Map” (P78)
→
RTT Switches
You can receive or check trafc messages.
On the current location screen,
1
RTT
touch
▼
This displays RTT messages with RTT Event
Icons.
.
• If a broadcast station is not received, the
below screen is displayed.
NAVI RTT
In this case, touch [Yes].
If a station is found, the following screen
is displayed.
RTT
75
Page 76

RTT Event Icons
ADVICE
1)
2)
4)
3)
Each trafc message is displayed with the
following marks on the map.
• Whether or not to display “RTT Event
Icons” can be selected with [RTT] → [RTT
Icons on Map].
→ “RTT Icons on Map” (P199)
Trafc
Closed/Blocked Contra ow
Accident Diversion
Congestion
Road Work Slippery Road
Other
Other Hazards Parking Information
Information
Trafc Congestion Information
Red
Orange Congestion
Cyan Favorable route
*1 This is displayed when [RTT] is touched and there is an
icon to display.
*2 This may not be displayed depending on the region.
*1
*1
Road closures
Trafc jams
Narrow Road
*2
Display Contents
This section explains the RTT messages displayed on the map.
1) Trafc Congestion Information
Trafc congestion (red line), crowded
(orange line), and no trafc (cyan line) is
displayed with lines to check the trafc
congestion information.
The favorable route (Cyan line) may not
be displayed depending on the region.
2) Trafc rule information
Allows you to check the road closures and
lane regulations with RTT Event Icons.
Trafc
3)
Only Trafc icons can be displayed.
Other
4)
Only Other icons can be displayed.
* This is not displayed when there are no icons to display.
*
*
76
RTT
Page 77

Checking the RTT
ADVICE
ADVICE
Trafc Messages
You can check the trafc messages using
RTT.
On the current location screen,
1
RTT
touch
Touch the “RTT Event Icons” to
2
check.
.
• When “RTT Event Icons” are displayed
overlapped, a list is displayed to select
the icon.
▼
This displays the trafc message screen.
NAVI RTT
• You can check the previous and next
information by touching
• Touching [Map] displays a map of the
surroundings.
or .
Checking the RTT Trafc Messages
77
Page 78
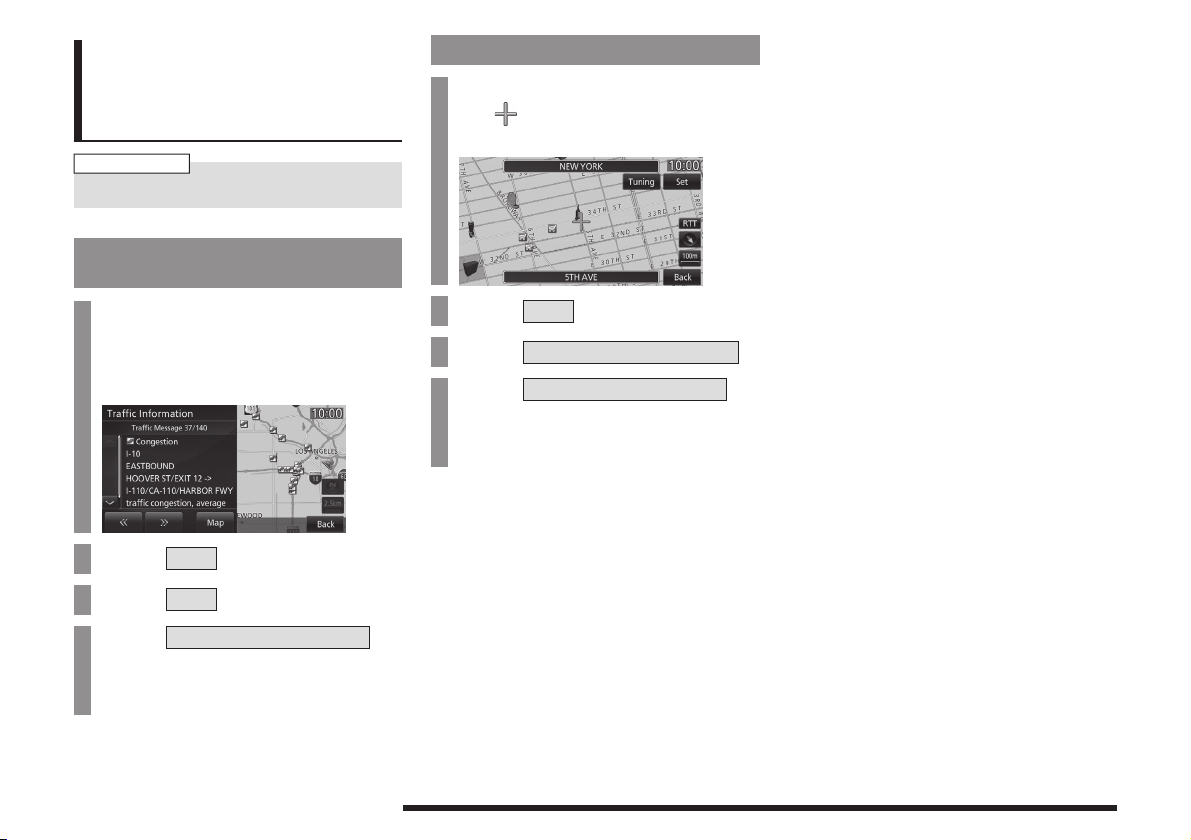
Registering the RTT
NOTE
Surveillance Map
Areas can be registered to check trafc
messages.
• Up to 3 areas can be registered.
Registering from RTT Trafc
Messages
Registering from Scroll Menu
Scroll the map
1
mark with the “location”
the
(P39)
and line up
to register.
Execute up to Step 2 in
1
“Checking the RTT Trafc
Messages” (P77)
▼
2
3
4
Touch
Touch
Touch
Map
Set
RTT Surveillance Map
.
.
.
to register.
If you select the registered [RTT
Surveillance Map], it is overwritten.
▼
Registration of the RTT Surveillance Map is
complete.
Registering the RTT Surveillance Map
78
2
3
4
Touch
Touch
Touch
Set
.
Set as RTT Surveillance
RTT Surveillance Map
.
to register.
If you select the registered [RTT
Surveillance Map], it is overwritten.
▼
Registration of the RTT Surveillance Map is
complete.
Page 79

AV
NOTE
ADVICE
Volume display
The following explains audio function operations.
Audio Functions
Adjust Volume
Adjust the audio function volume.
During audio play, turn the
1
PWR/VOL
key counter-
clockwise.
Basic Operation
• The album names, titles, etc. in the title
information in pictures used with the
audio functions and related functions
of this manual were prepared for these
explanations. They have no relationship
whatsoever with actual title information.
Switch Audio ON/OFF
You can switch the audio function ON/OFF.
• Hold down the steering [MODE] key to
also turn the audio function ON/OFF.
Press the
1
▼
This switches the audio function OFF.
Press the
2
▼
The audio function comes ON.
PWR/VOL
PWR/VOL
key.
key.
▼
The volume is lowered.
Turn the
2
PWR/VOL
key
clockwise.
▼
The volume is raised.
Basic Operation
AV Audio Functions
79
Page 80

Insert/Eject Discs
CAUTION
Disc
*Label side
Disc SlotDisc Slot
The following explains how to insert a disc into
this product.
• When replacing discs, rst ensure that
the vehicle is stopped in an area in which
stopping is permitted.
• Do not insert your hand, ngers, or
foreign objects into the disc slot. This
may lead to injury, smoking, or re.
• Do not place anything (juice or anything
else) on the panel.
• Be careful that your hand or ngers are
not pinched when you open or close the
panel.
• Some discs cannot be detected in the
disc slot, for example discs that cannot
be played back. Check that the panel can
close before trying to close it.
Inserting the Disc
Press the
1
Touch
2
▼
The monitor panel opens.
Insert the disc into the disc slot
3
OPEN
key.
Monitor OPEN
.
with the label surface up.
Push the disc in a certain amount, and the
product will pull the disc in.
Ejecting the Disc
Press the
1
Touch
2
▼
The monitor panel opens and the disc is
ejected from the product, so remove it.
Press the
3
▼
The panel closes.
OPEN
DISC Eject
OPEN
key.
.
key.
Basic Operation
80
Press the
4
▼
The monitor panel closes and playback starts.
OPEN
key.
Page 81

Forcing Disc Ejection
AV Icon
ADVICE
Usually, when the disc loading ends normally,
the inserted disc can be ejected with the
method in the
loading fails and the playback information
screen can be displayed, you can forcibly
eject the disc with the following method.
To start this product,
1
hold down the
“Ejecting the Disc”
OPEN
, but if disc
key.
▼
The disc is forcibly ejected from this product.
AV Icons
During audio playback, an icon is displayed
on the navigation screen as below in order to
show the audio source being played back.
Icon Audio source
Audio OFF state
Radio (Example: FM)
Disc (Example: MP3)
Audio le on SD card (Example: MP3)
iPod/iPhone
Audio le on USB memory (Example:
MP3)
Bluetooth Audio
AUX
AV Audio Functions
• Touching AV icon displays the audio
source screen being played back.
Basic Operation
81
Page 82

Steering Remote Control Switch Operation
A type C type D typeB type
MODE
6)
key
Hold down to turn the audio function
ON/OFF. Additionally, each time this is
pressed, this switches the audio source.
The order of switching is as shown below.
If devices are not connected, then these
are to be skipped, and the next source
selected.
4)
5)
6)
4)
+
6)
−
MODE
∧
5)
∧
1)
2)
3)
1) 3)2)
1) “SPEECH” key
Starts voice control of this product.
2) “OFF HOOK” key
*1
Used to receive a telephone call.
Other than during incoming calls, voice
control (hands-free) for Bluetooth ® 2.0
interface will start.
3) “ON HOOK” key
*1
Used to end a telephone call.
Basic Operation
82
4)
5)
4)
6)
1)
2)
3)
4) Vol key, key
Adjust audio functions and the telephone
function volume.
5)
key, key
Allows you to select CD and other audio
source tracks and radio stations.
Hold down for fast forward and rewind.
6)
5)
iPod
3)1) 2)
*1 Can be used with vehicles equipped with a Bluetooth® 2.0
interface.
*2 First, it is necessary to insert an audio SD card into this
product.
*3 An iPod or USB connection cable (available separately) is
required.
*4 This requires an audio device that is Bluetooth capable
(available separately).
*5 This is equipment that only some vehicle types have. It
cannot be used with vehicles that do not support AUX
devices.
*6 Can be used with vehicles equipped with a Satellite tuner.
AM
*6
Sirius
CD
*2
SD
*3
or USB device
Bluetooth Audio
*5
AUX
*3
*1,*4
FM
Page 83

Handling of Discs
This explains care that should be taken in
the handling of discs.
Important Points on Handling
• Fingerprints or other marks on the read
surface of the disc may result in its content
being more difcult to read. When holding
the disc, grip both edges, or one edge
and the center hole, in order that the read
surface is not touched.
• Do not afx paper or stickers,
or otherwise damage the disc.
• Do not forcefully insert a disc if a disc is
already within the device. This can result in
damage to discs, or malfunction.
Important Points on Storage
• When not using discs, ensure these are kept
in cases, and stored out of direct sunlight.
• If discs are not going to be used for a long
period of time, remove these from the
product.
Disc Playback Environment
In cold environments such as in mid-winter
when the interior of the vehicle is cold, turning
the heater on and immediately trying to use
the product may cause condensation (water
droplets) to form on the disc and internal
optical components, and this may prevent the
product from operating correctly.
In these conditions, remove the disc, and wait
a short time before use.
AV Audio Functions
Cleaning
• Periodically clean the read surface of the
disc. When cleaning, do not wipe in a circular
motion. Instead, wipe gently outwards from
the center of the disc to the outer edge.
• New discs may have burring around the
outer edge or in the hole in the center.
Ensure you check for these. If there are
burrs, these may lead to faulty operation,
therefore ensure these are removed.
Copyright
Actions such as unauthorized reproduction,
broadcast, public performance, or rental of
discs that comprise other than personal use
are prohibited by law.
Handling of Discs
83
Page 84

Types of Disc That Can Be Played Back
The following marks are printed on the disc label, package, or jacket.
Type Size Maximum
CD-DA
CD-TEXT
CD-R/RW
5 inches
(12 cm)
5 inches
(12 cm)
5 inches
(12 cm)
playback time
74 minutes ―
74 minutes ―
― • Disc containing MP3/WMA/AAC les
Comments
Discs That May Not Be Played Back
• Playback of discs other than those described in “Types of Disc That Can Be Played Back” is
not guaranteed.
• 3 inches(8 cm) discs may not be used.
• Do not insert irregularly-shaped discs (for example, heart-shaped), as these may result in
malfunction.
Additionally, discs that have transparent portions may not be played back.
• Discs that have not been nalized cannot be played back.
• Even if recorded using the correct format on a recorder or computer, application software
settings and environments; disc peculiarities, damage, or marking; or dirt or condensation on
the lens inside the product may render the disc unplayable.
• Depending on the disc, some functions may not be used, or the disc may not play back.
• Do not use discs with cracks or warps.
• If the disc has stickers afxed, remains from removed stickers, or afxed adhesive, then do not
use the disc.
• Discs that have decorative labels or stickers may not be used.
Nonstandard CDs
This product will play back audio CDs,
however please be aware of the following
points regarding CD standards.
• Ensure that you use discs with
label surface.
• Playback of other than standard CDs is
not guaranteed. Even if the audio can be
played back, the audio quality cannot be
guaranteed.
• When playing back other than standard CDs,
the following may occur.
● There may be noise during playback.
● There may be jumping in the audio.
● The disc may not be recognized.
● The rst track may not be played back.
● It may take longer than usual until start of
playback of tracks.
● Playback may start from within the track.
● Some parts may not be played back.
● Tracks may freeze during playback.
● Tracks may be displayed erroneously.
on the
Handling of Discs
84
Page 85

Audio Files(MP3/
CAUTION
ADVICE
WMA/AAC/WAV)
This product can play back MP3/WMA/
AAC/WAV format*2 audio les recorded on
CD-ROM, CD-R/RW, USB devices, and SD
cards *1.
*1 SD card inserted into user slot
*2 WAV les recorded on CD-ROMs and audio les in
AAC format that have “.aac” le extension cannot be
played.
There are limitations on the les and media
that can be used, therefore read the following
prior to recording MP3/WMA/AAC/WAV format
audio les on any medium.
Additionally, ensure you read the user
manuals for your CD-R/RW drive and the
writing software, and ensure these are used
correctly.
If the MP3/WMA/AAC/WAV format audio les
include title information or other data, then this
can be displayed.
• Actions such as copying audio CDs or
les and either distributing these to others
for free or for charge, or uploading les
via the Internet or other means to servers
is an infringement of the law.
• Do not append the le extensions “.mp3”,
“.wma”, “.m4a”, “.aac”, or “.wav” to other
than MP3/WMA/AAC/WAV format les.
Playing back discs with les whose
contents do not match their le extension
may cause the les to be incorrectly
identied for playback, which may lead to
loud noise, resulting in speaker damage
or accident.
• Depending on the condition of the disc
recorder or recording software used,
correct playback may not be possible. In
these cases, refer to the user manual for
your product or software.
• Depending on your computer's operating
system, version, software, or settings,
les may not have a le extension
appended. In these cases, append the
le extensions “.mp3”, “.wma”, “.m4a”,
“.aac”, or “.wav” when copying the les to
the medium.
• Files larger than 2GB in size cannot be
played back.
• This product can also play back discs
that mix audio les in different formats,
MP3, WMA, and AAC.
AV Audio Functions
Audio Files(MP3/WMA/AAC/WAV)
85
Page 86

Folder Structure
Folder
Audio file
♪
♪
♪
♪
1 level 2 level 3 level 4 level 5 level
ROOT
NOTE
Up to 8 folder levels can be recognized.
You can create a folder structure such as
Genre - Artist - Album - Track (MP3/WMA/
AAC/WAV format audio les) for management
of tracks.
Name Specication Explanation
Format
specications
Multisession Not supported (only rst session supported)
Maximum number
of levels
Maximum folder
number
Maximum le
number
File name and
folder name
restrictions
USB, SD card
supported
formats
*1 Do not include other than MP3/WMA/AAC/WAV les. However, if storing many tracks within the same
folder, these may not be recognized even if less than the maximum number of tracks. In these cases,
divide the tracks up into multiple folders.
ISO9660 Level 1 Maximum 8 character le name, and 3 character le
ISO9660
extension
8 levels (if the root is the 1st level)
100 folders (including root)
255 les (total number on media. Other than MP3, WMA, AAC, and WAV les not
*1
included)
Maximum 128 bytes (for Unicode, 64 characters), les/folders with le/folder names
longer than this will not be displayed or played back.
The recommended le system is FAT32.
1 partition only
The maximum supported capacity for an SD card is 32GB (SDHC standard
supported).
The recommended class for an SD card is Class 4 or higher.
Joliet Files names up to a maximum 64 characters can be used.
extension.
(single-byte alphanumeric capital letters, numerals, “_” may
be used)
Audio Files(MP3/WMA/AAC/WAV)
86
• The order in which folders and audio les are displayed on this product may be different to
how they are displayed on a computer.
Page 87

What Is MP3?
CAUTION
MP3 is an abbreviation of “MPEG-1 Audio
Layer 3”. MPEG is an abbreviation of “Motion
Picture Experts Group”, and this is a video
compression standard used in video CDs, etc.
MP3 is one of the audio compression methods
contained in the MPEG audio standard, and
reduces the quality of sounds that are beyond
the auditory resolution of the human ear
and that are hidden by louder sounds, thus
creating high-quality data with a lower data
size.
Because this can compress CD audio to
approximately 1/10 its original data size
without perceptible loss, approximately 10
CDs can be written to a single CD-R/RW disc.
• MP3 les different to the standards at
right may not play back correctly, or
le/folder names may not be displayed
correctly.
Standards for MP3 Files That Can Be Played Back
Specications for MP3 les that can be played are as below.
* For vehicles with the Bluetooth® 2.0 interface, refer to the vehicle's user manual (Bluetooth® 2.0 interface).
Item Details
Specication MPEG-1 AUDIO LAYER3
MPEG-2 AUDIO LAYER3
Sampling frequency [kHz] MPEG-1:32/44.1/48
MPEG-2:16/22.05/24
Bit rate [kbps] MPEG-1:32~320
MPEG-2:32~160
VBR (variable bit rate) Support
Channel mode Stereo/Joint stereo/Dual channel/Monaural
File extension mp3
Supported tag information ID3 tag Ver. 1.0, Ver. 1.1, Ver. 2.2, Ver. 2.3, Ver. 2.4
Maximum number of characters
that can be indicated on the source
Maximum number of characters
that can be indicated in a list
*1 Depending on the characters used, you may not be able to input the maximum number of characters.
plate
*1
(ISO-8859-1, UTF-16 (Unicode)),
Titles, Artist name, Album name
Album names: 41 single-byte characters (20 double-byte characters)
Title names: 18 single-byte characters (9 double-byte characters)
Folder names : 46 single-byte characters (23 double-byte characters)
*1
Files names : 34 single-byte characters (17 double-byte characters)
When folder list
displayed
When track list
displayed
48 single-byte characters (24 double-byte characters)
* In the 2nd level (the root being the 1st level)
* The number of characters displayed depends on the
level. Each level down has 2 single-byte characters
(1 double-byte character) less.
Files names: 49 single-byte characters (24 double-
byte characters)
AV Audio Functions
Audio Files(MP3/WMA/AAC/WAV)
87
Page 88

What Is WMA?
CAUTION
WMA is an abbreviation of Windows Media
Audio, and this is an audio compression
format from Microsoft. This is a compression
format that has a higher compression ratio
than MP3.
* Microsoft, Windows Media, and Windows are registered
trademarks of Microsoft Corporation (USA) and in other
countries.
• WMA supports digital rights management
(DRM). This product cannot play back
WMA les protected using this system.
• WMA les different to the standards
at right may not play back correctly, or
le/folder names may not be displayed
correctly.
• “Pro”, “Lossless”, and “Voice” are not
supported.
Standards for WMA Files That Can Be Played Back
Specications for WMA les that can be played are as below.
* For vehicles with the Bluetooth® 2.0 interface, refer to the vehicle's user manual (Bluetooth® 2.0 interface).
Item Details
Specication Windows Media Audio Version2~9
Sampling frequency [kHz] 16/22.05/32/44.1/48
Bit rate [kbps] 32~192
VBR (variable bit rate) Support
Channel mode Stereo/Monaural
File extension wma
Supported tag information WMA tags
Maximum number of characters
that can be indicated on the source
Maximum number of characters
that can be indicated in a list
*1 Depending on the characters used, you may not be able to input the maximum number of characters.
plate
*1
Title name, Artist name, Album name
Album names: 41 single-byte characters (20 double-byte characters)
Title names: 18 single-byte characters (9 double-byte characters)
Folder names : 46 single-byte characters (23 double-byte characters)
*1
Files names : 34 single-byte characters (17 double-byte characters)
When folder list
displayed
When track list
displayed
48 single-byte characters (24 double-byte characters)
* In the 2nd level (the root being the 1st level)
* The number of characters displayed depends on the
level. Each level down has 2 single-byte characters
(1 double-byte character) less.
Files names: 49 single-byte characters (24 double-
byte characters)
88
Audio Files(MP3/WMA/AAC/WAV)
Page 89

What Is AAC?
CAUTION
AAC is an abbreviation of Advanced Audio
Coding, and this is an audio compression
standard used in “MPEG-2” and “MPEG-4”.
This features 1.4x the compression of MP3,
with comparable audio quality.
• AAC supports digital rights management
(DRM). This product cannot play back
AAC les protected using this system.
• AAC les different to the standards at
right may not play back correctly, or
le/folder names may not be displayed
correctly.
Standards for AAC Files That Can Be Played Back
Specications for AAC les that can be played are as below.
* For vehicles with the Bluetooth® 2.0 interface, refer to the vehicle's user manual (Bluetooth® 2.0 interface).
Item Details
Specication Advanced Audio Coding
Sampling
frequency [kHz]
Bit rate
[kbps]
VBR (variable bit rate) Support
Channel mode Stereo/Monaural
File extension m4a,aac (Only “.m4a” is supported on discs)
Supported tag information AAC tags or ID3 tags
Maximum number of characters
that can be indicated on the source
Maximum number of characters
that can be indicated in a list
*1 Depending on the characters used, you may not be able to input the maximum number of characters.
plate
MPEG4 8/11.025/12/16/22.05/24/32/44.1/48/64/88.2/96
MPEG2 8/11.025/12/16/22.05/24/32/44.1/48/64/88.2/96
MPEG4 16~576
MPEG2 16~576
*1
MPEG4/AAC-LC
MPEG2/AAC-LC
Title, Artist name, Album name
Files names: 18 single-byte characters (9 double-byte characters)
Folder names: 41 single-byte characters (20 double-byte characters)
Playlist names : 46 single-byte characters (23 double-byte characters)
*1
Title names : 34 single-byte characters (17 double-byte characters)
When folder list
displayed
When track list
displayed
48 single-byte characters (24 double-byte characters)
* In the 2nd level (the root being the 1st level)
* The number of characters displayed depends on the
level. Each level down has 2 single-byte characters
(1 double-byte character) less.
Files names: 49 single-byte characters (24 double-
byte characters)
AV Audio Functions
Audio Files(MP3/WMA/AAC/WAV)
89
Page 90

What Is WAV?
CAUTION
WAV is an abbreviation of “RIFF wave
form Audio Format” and is mostly used
on Windows. This audio data format was
developed by Microsoft and IBM. Normally
WAV les are not compressed and that is the
only type of WAV le that this product can
handle.
• WAV les different from the standards
above may not be played back correctly
or le/folder names may not be displayed
correctly.
Standards for WAV Files That Can Be Played Back
Specications for WAV les that can be played are as below.
* For vehicles with the Bluetooth® 2.0 interface, refer to the vehicle's user manual (Bluetooth® 2.0 interface).
Item Details
Specication RIFF wave form Audio Format
Sampling frequency [kHz] 8/11.025/16/22.025/32.44.1
Number of quantization bits [bit] 16
Bit rate [kbps] 128 to 1411.2
Channel mode Stereo/Monaural
File extension wav
Maximum number of characters
that can be indicated on the source
Maximum number of characters
that can be indicated in a list
*1 Depending on the characters used, you may not be able to input the maximum number of characters.
plate
*1
Files names: 18 single-byte characters (9 double-byte characters)
Folder names: 41 single-byte characters (20 double-byte characters)
Folder names: 46 single-byte characters (23 double-byte characters)
*1
File names: 34 single-byte characters (17 double-byte characters)
When folder list
displayed
When track list
displayed
48 single-byte characters (24 double-byte characters)
* In the 2nd level (the root being the 1st level)
* The number of characters displayed depends on the
level. Each level down has 2 single-byte characters
(1 double-byte character) less.
Files names: 49 single-byte characters (24 double-
byte characters)
90
Audio Files(MP3/WMA/AAC/WAV)
Page 91

Radio
ADVICE
Listen to Radio
This explains how to listen to FM and AM
radio broadcasts.
HD Radio TM broadcast or analog broadcast
can be received.
FM
MODE
or
key.
AM
.
Press the
1
This displays the mode.
Touch
2
▼
The radio broadcast information screen is
displayed.
Turn the
3
FOLDER/TUNE
key to
select a station.
▼
The station at the selected frequency is
played.
• By pressing the [AUDIO] key, you can
display the navigation screen while using
the audio function.
Pressing the [AUDIO] key again returns
the display to the audio screen.
Digital, CD-quality sound. HD Radio
Technology enables local radio
stations to broadcast a clean digital
signal. AM sounds like today’s FM
and FM sounds like a CD.
Program Service Data: Contributes
to the superior user experience of
HD Radio Technology. Presents
song name, artist, station IDs, HD2/
HD3 Channel Guide, and other
relevant data streams.
Adjacent to traditional main stations
are extra local FM channels. These
HD2/HD3 Channels provide new,
original music as well as deep cuts
into traditional genre.
Real-Time Trafc reports, alerts,
and ow data displayed on screen
via interactive trafc maps and/or
data.
AV Radio
Listen to Radio
91
Page 92

FM Radio Broadcast Information Screen
5)
3)
4)
1)
11)
9)
8)
10)
7)
6)
2)
15)
13)
16)
14)
12)
*
)
Display Contents
1) Source plate
Displays the name of the currently
selected source, preset channel number,
reception frequency, and station name.
2) Sub Channel Indicator
This is displayed if the station being
received digitally has a sub channel.
Channel numbers with broadcasts are
displayed in white. Channel numbers with
no broadcasts are displayed in grey.
Channel numbers currently receiving
signals will be displayed in blue.
3) Switch page
Switches between Page 1 and Page 2 to
view the title, artist name, and album title.
4) Album
Displays the acquired album name.
Radio Setting
5)
Allows you to set Reception Mode.
→ “Set Reception Mode” (P96)
Listen to Radio
92
Station List
6)
Displays a list of the stations that can
be received.
→ “Search for Broadcast
Stations from the Station List” (P95)
7) HD Radio
TM
indicator
Digital broadcasts are displayed as they
are received.
A white icon is displayed during analog
audio output, and an orange icon is
displayed during digital audio output.
8) Live indicator
Live event broadcasts are displayed as
they are received.
9) Title
Displays the acquired title name.
10) Artist
Displays the acquired artist name.
SCAN
11)
Allows you to search for stations that can
be received.
→“Starting the Scan”(P94)
12) PTY
Displays the PTY (Program Type) being
received.
13) Preset switch
Allows you to register your favorite
broadcast stations.
Touch and hold the switch for the desired
preset channel number until you hear
the “beep”. This registers the broadcast
station currently being received.
→ “Register Your Favorite Broadcast
Stations” (P94)
14) RBDS indicator
RBDS data is displayed as it is received.
15)
FM1
,
FM2
Allows you to register your favorite 6
stations for each band.
16) Radio Text
Displays the acquired radio text.
* This may not be displayed depending on the region.
Page 93

AM Radio Broadcast Information Screen
5)
3)
4)
1)
11)
9)
10)
8)
7)
6)
2)
12)
*
)
1) Source plate
Displays the name of the currently
selected source, preset channel number,
reception frequency, and station name.
2) PTY
Displays the PTY (Program Type) being
received.
3) Switch page
Switches between Page 1 and Page 2 to
view the title, artist name, and album title.
4) Album
Displays the acquired album name.
Radio Setting
5)
Allows you to set Reception Mode.
→ “Set Reception Mode” (P96)
Station List
6)
Displays a list of the stations that can be
received.
→“Search for Broadcast Stations from the
Station List”(P95)
7) HD Radio
Digital broadcasts are displayed as they
are received.
A white icon is displayed during analog
audio output, and an orange icon is
displayed during digital audio output.
8) Live indicator
Live event broadcasts are displayed as
they are received.
9) Title
Displays the acquired title name.
TM
indicator
10) Artist
Displays the acquired artist name.
SCAN
11)
Allows you to search for stations that can
be received.
→“Starting the Scan”(P94)
12) Preset switch
Allows you to register your favorite
broadcast stations.
Touch and hold the switch for the desired
preset channel number until you hear
the “beep”. This registers the broadcast
station currently being received.
→“Register Your Favorite Broadcast
Stations”(P94)
* This may not be displayed depending on the region.
AV Radio
Listen to Radio
93
Page 94

Register Your Favorite
Broadcast Stations
You can register your favorite 6 stations for
each band, FM1, FM2, and AM.
On the radio broadcast
1
information screen, turn the
FOLDER/TUNE
key
to search for the “broadcast
station” to register.
Touch and hold the “preset
2
switch” to register to until you
hear the “beep”.
Preset switch
▼
This registers the selected broadcast station
to the preset channel number whose switch
you touched.
Search for Broadcast
Stations with Strong Signals
This is handy for searching for broadcast
stations you can receive when you drive to a
different area, for example for vacation.
Starting the Seek
A receivable station can be searched one at a
time.
On the radio broadcast
1
information screen, touch and
hold the
key or
key until you
hear the “beep”.
▼
When a receivable station is found, it is
played.
Starting the Scan
This searches for stations that can be
received.
On the radio broadcast
1
information screen, touch
SCAN
.
▼
When a station is received, this is played for
10 seconds, then the product searches for the
next station.
Canceling a Scan
During the scan, touch
1
SCAN
again.
▼
The scan is canceled.
Listen to Radio
94
Page 95

Search for Broadcast
NOTE
ADVICE
Stations from the Station List
You can select a station from the list of
receivable broadcast stations.
On the radio broadcast
1
information screen, touch
Station List
The station list is displayed.
• For FM, a station list that is maintained
by the current tuner is displayed.
• For AM, the last searched station list is
displayed.
If the station list has not been acquired,
the list will not be displayed, so update
the list.
(P95)
Select the broadcast stations
2
.
you want from the station list
and touch it.
Touch
3
▼
The display returns to the original radio
broadcast information screen.
Preset
.
Narrowing Down the Station
List
You can narrow down the station list by genre.
On the station list, touch
1
PTY Filter
The genre list is displayed.
Touch the “genre” you want.
2
▼
A station list for just the selected genre is
displayed.
• The ltering is canceled when [Filter
OFF] on the station list is touched.
.
Updating the Station List
You can manually update the station list.
On the station list, touch
1
Update
Updating starts.
▼
The updated station list is displayed.
.
AV Radio
▼
Reception of the selected broadcast
station starts.
Listen to Radio
95
Page 96

Emergency Broadcasts
ADVICE
6)5) 7)
3)2) 4)1)
If an emergency broadcast starts, it will begin
to be received automatically.
If on the map screen, the FM radio source
plate is displayed. If on the audio screen, the
screen automatically switches over to the FM
radio broadcast information screen.
Exiting the emergency broadcast returns the
display to the original screen.
• When emergency broadcast is received,
“ALARM!” is displayed on the source
plate.
• This device cannot be operated while
emergency broadcast is being received.
Listen to Radio
96
Set Reception Mode
You can set Reception Mode to digital or
analog.
On the radio broadcast
1
information screen, touch
Radio Setting
Touch your favorite “Reception
2
.
Mode”.
Touch
3
▼
The Reception Mode settings are complete.
Back
.
P side P Display Screen
This section explains the screens displayed
when selecting the [AV] (radio) in the P side P
display information
1) Received frequency, preset
channel
Displays the frequency being received
and the preset channel number.
2) Radio Text
Displays the acquired radio text.
3) Station name
Displays the station name being received.
4) HD Radio
Digital broadcasts are displayed as they
are received.
5) SCAN mode display
Displayed during SCAN.
▲
6)
Touching this displays the submenu.
7)
Change the information displayed on the
PsideP
P side P sub-screen.
TM
(P36)
.
indicator
(P32)
Page 97

Equipment by type
Listen to Satellite
NOTE
Radio
This section explains how to listen to
SIRIUS radio.
• A subscription is required to listen to
SIRIUS radio.
For details, please consult your Mitsubishi
Motors Dealer.
Press the
1
This displays the mode.
Touch
2
▼
This displays SIRIUS broadcast
information screen.
MODE
SIRIUS
key.
.
Turn the
3
FOLDER/TUNE
key to
select a station.
▼
The selected station is played.
AV Radio
Listen to Satellite Radio
97
Page 98
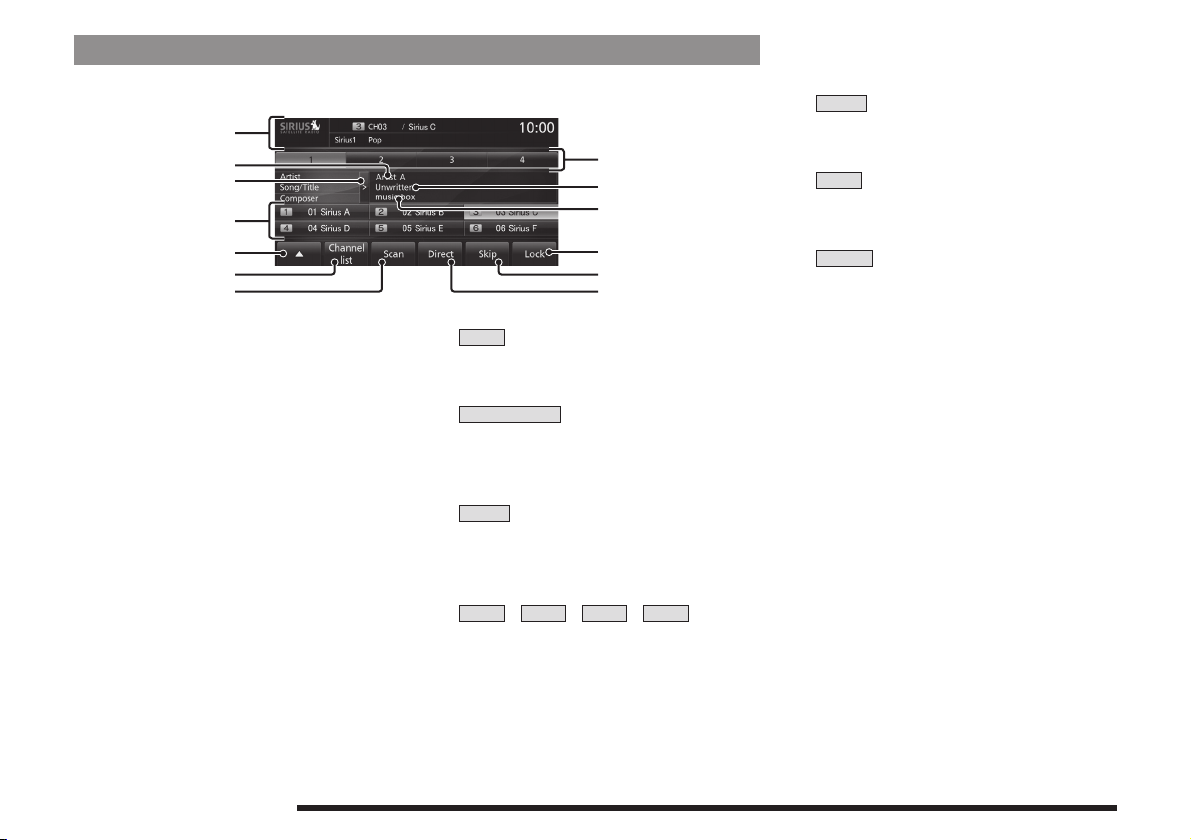
Display Contents
SIRIUS Broadcast Information Screen
1)
2)
3)
4)
5)
6)
7)
1) Source plate
Displays the name of the source, preset
channel number, received channel/
channel name, band, and received
category.
2) Artist name
Displays the acquired artist name.
3) Switch page
Switches between Page 1 and Page 2 to
view the artist name, song/program title,
and composer name.
4) Preset switch
Allows you to register your favorite
channels.
Touch and hold the switch for the desired
preset channel number until you hear
the “beep”. This registers the channel
currently being received.
→ “Register Your Favorite Channel” (P100)
5)
Touching it displays the sub-menu. It
allows you to check [Sirius ID]
Channel List
6)
Displays a list of the channels that can be
received.
→ “Searching from a Channel List” (P99)
Scan
7)
Allows you to search for channels that
can be received.
Channels” (P99)
8)
Allows you to register your favorite 6
channels for each band.
9) Song/program title
Displays the acquired song name and
program title.
10) Composer name
Displays the acquired composer name.
Lock
11)
Allows you to set Lock on a channel being
received.
8)
9)
10)
11)
12)
13)
▲
(P104)
.
12)
Allows you to set Skip on a channel being
13)
Allows you to enter the channel number
→ “Setting Listening Restrictions” (P100)
Skip
received.
and receive the channel directly.
→ “Set the channel skip.” (P103)
Direct
→
“Selecting Channels Directly” (P99)
→ “Begin Scanning All
1
,
2
,
3
,
4
Listen to Satellite Radio
98
Page 99

Search for Your Favorite
ADVICE
Channel.
Searching from a Channel List
On the SIRIUS broadcast
1
information screen, touch
Channel List
Touch the “channel” you want.
2
▼
The selected channel is received.
.
Selecting Channels Directly
On the SIRIUS broadcast
1
information screen, touch
Direct
.
Enter the “channel number”,
2
Enter
then touch
▼
The channel of the input number is received.
.
Begin Scanning All Channels
All channels are received in order and take 10
seconds each.
On the SIRIUS broadcast
1
information screen, touch
SCAN
.
▼
Begin Scanning Channels by
Category
Channels in the category are received in order
and take 10 seconds each.
On the SIRIUS broadcast
1
information screen, touch
Channel List
The channel list screen is displayed.
Touch
2
Touch the “category” you want.
3
Only channels in a category will be
displayed.
Touch
4
.
Category Filter
Scan List
.
.
AV Radio
Receives one channel in 10 seconds, then
moves on to the next channel.
▼
Receives a channel in the channel list in 10
seconds, then moves on to the next channel.
• Touching “FilterOff” cancels the search
ltered by category.
Listen to Satellite Radio
99
Page 100

Canceling a Scan
ADVICE
ADVICE
During the scan, touch
1
Scan List
or
▼
The scan is canceled.
• Channel operations will also cancel scan.
again.
Scan
Register Your Favorite
Channel
You can save up to 6 of your favorite channels
for each band (1, 2, 3, 4).
Receive the “channel” you
1
want.
→ “Search for Your Favorite Channel.” (P99)
Touch and hold the “preset
2
switch” to register to until you
hear the “beep”.
Preset switch
▼
This registers the channel to the preset
channel number whose switch you touched.
Setting Listening Restrictions
You can set listening restrictions on channels
and categories.
If a channel that has listening restrictions is
received, the sound will be muted, and no text
information will be displayed.
(The factory set passcode is “0000”)
Setting on Received Channel
Sets listening restrictions on the current
channel being received.
On the SIRIUS broadcast
1
information screen, touch
Lock
.
Enter the “passcode”, then
2
Enter
touch
▼
The listening restrictions settings are complete,
and the sound is muted.
.
Listen to Satellite Radio
100
• “Channel locked” is displayed in the
channel name on the source plate.
• “CH Locked” is displayed in the preset
switch and the channel list.
 Loading...