

Mitsubishi Electric OL-XL2550MZ Replacement Manual
オプションレンズ
OL-XL2550MZ
レンズ交換要領書
このオプションレンズは三菱電機(株)製 LVP-MH2850 に使用できます。レンズ交換は、必ず教育を受けた専門業者に依頼してください。その他の
機種について、またはご不明な点がありましたら、販売店にご相談ください。
● レンズ交換する前には、必ず電源を切り、電源プラグをコンセントから抜いてください。
● 電源を切ってから1時間以内にはレンズ交換を行わないでください。
● レンズ交換時には、ゴミが内部に入らないように注意してください。
レンズ交換のしかた
以下の手順にしたがってレンズ交換を行ってください。
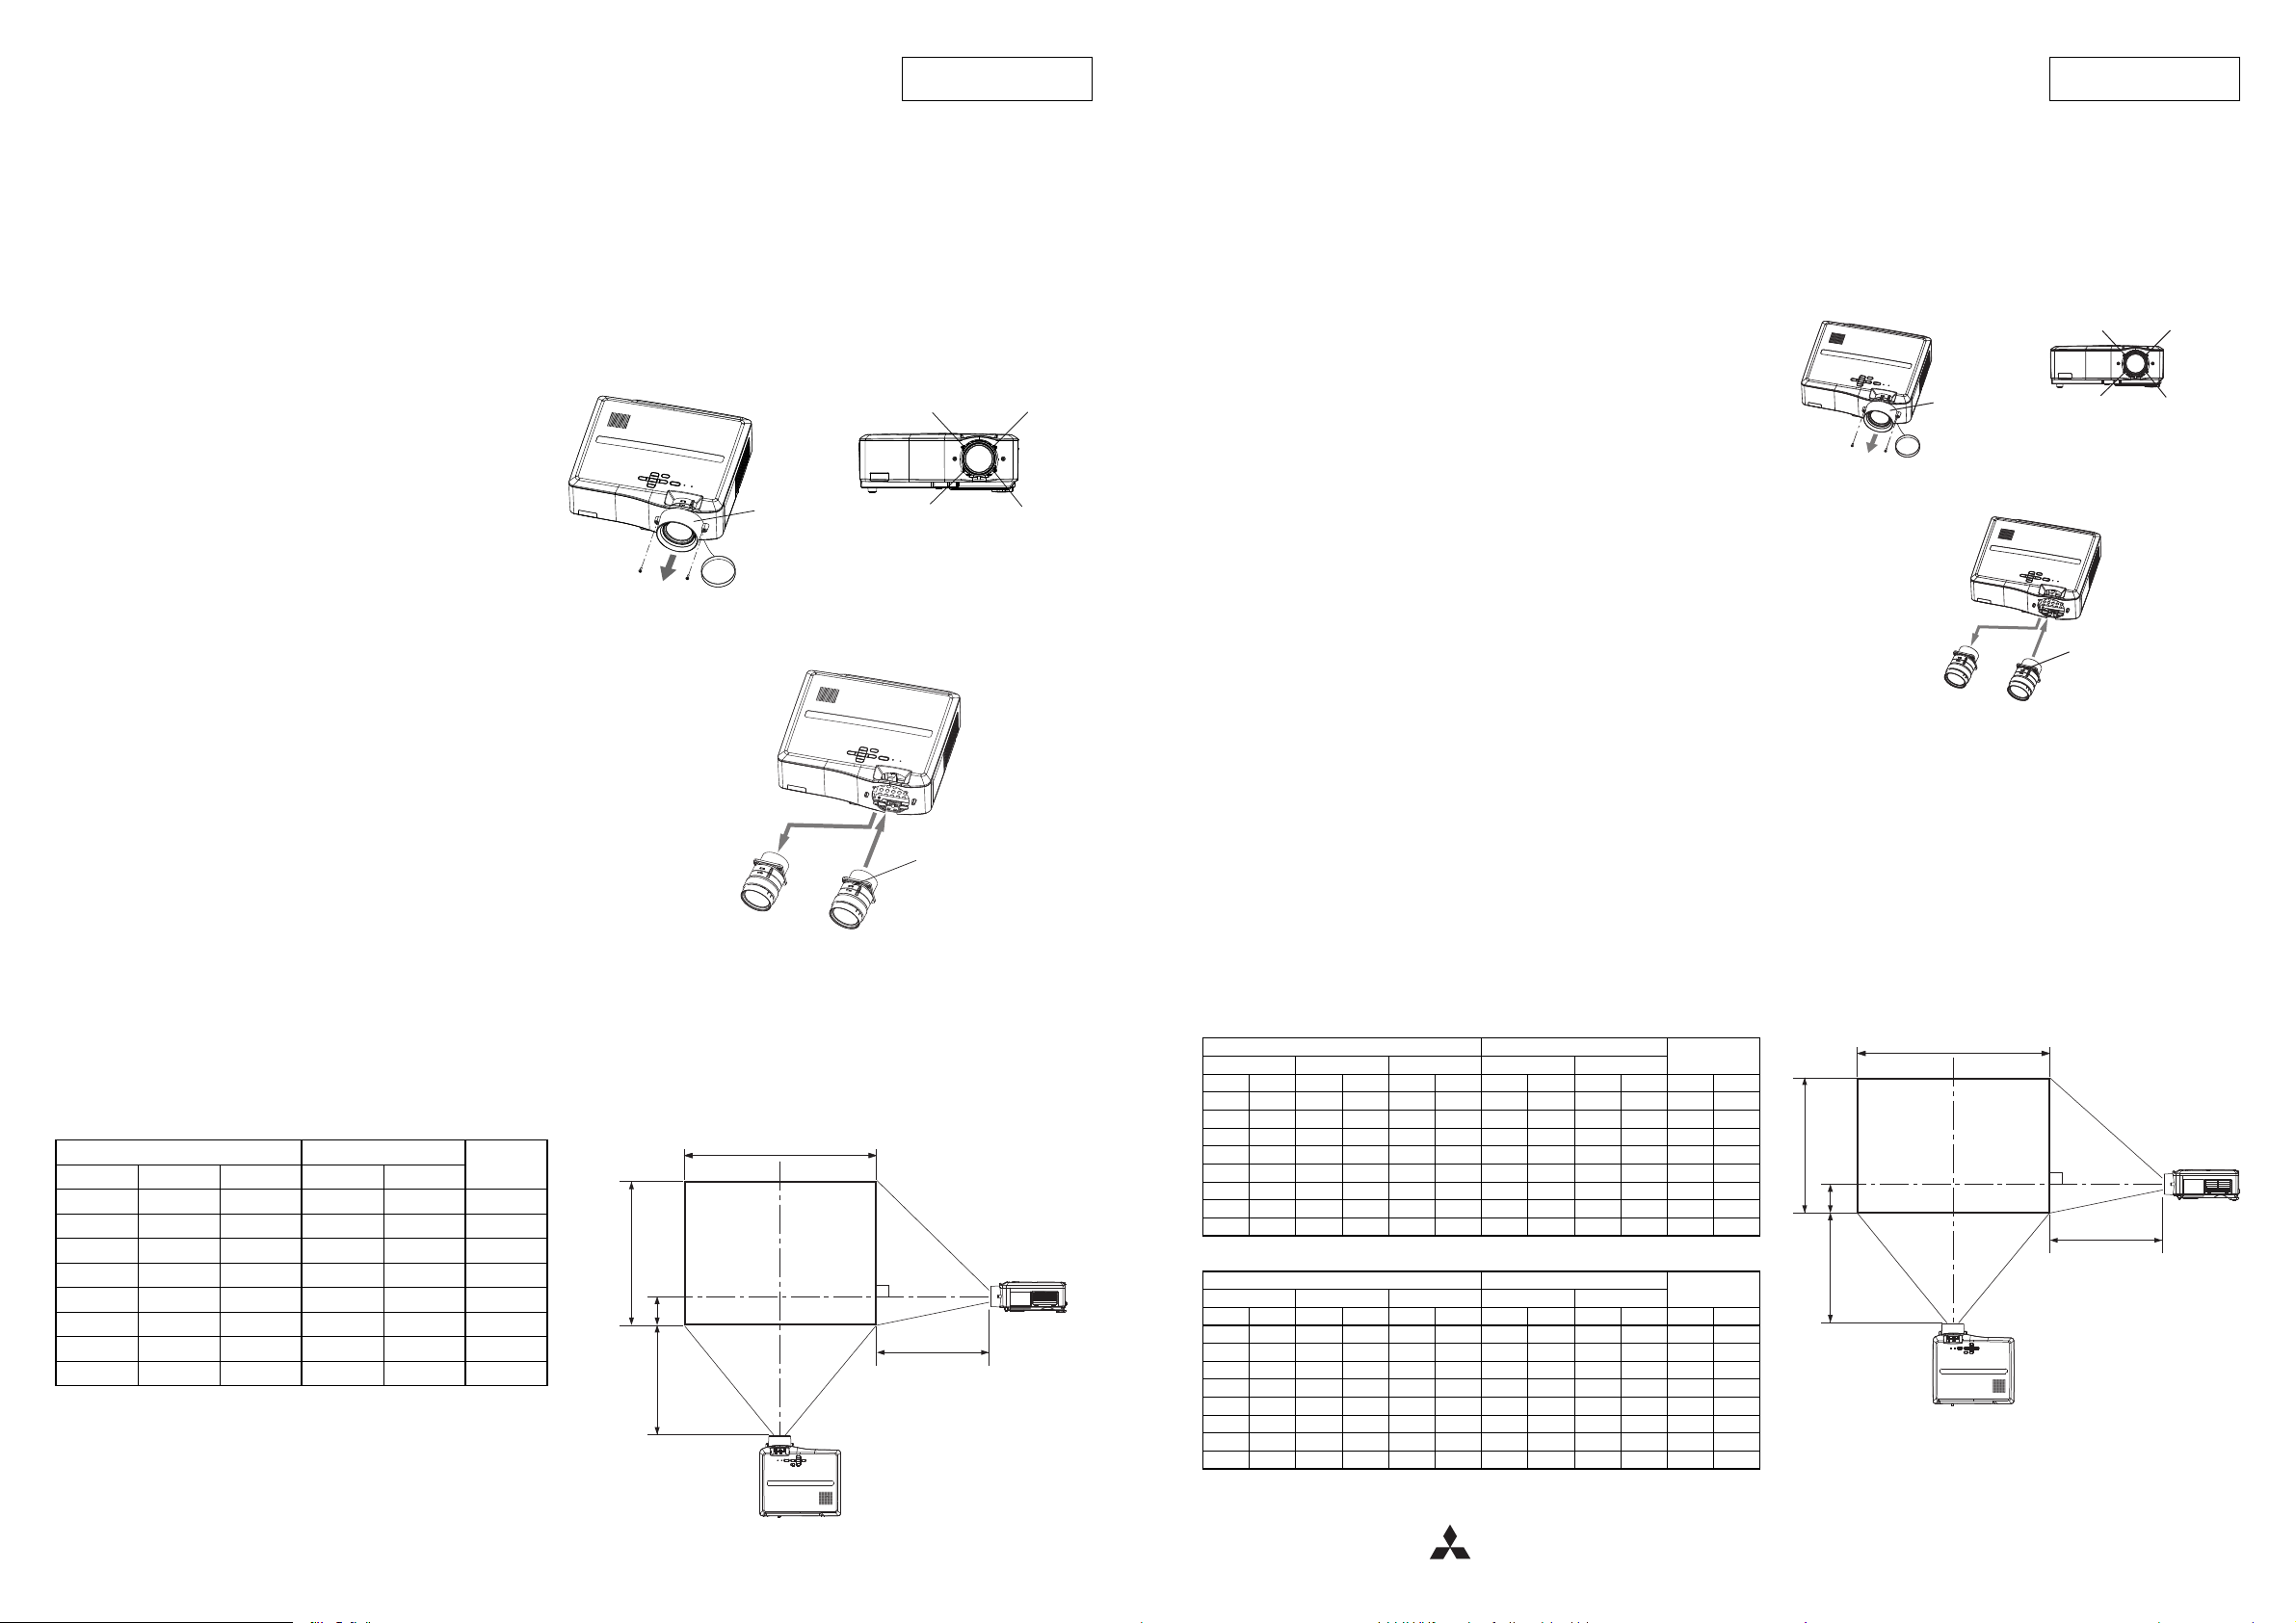
A. レンズカバーの取りはずしかた
1. レンズキャップ A をはずす
2. ネジ B(2 本)をはずす
3. レンズカバー C をはずす
B. レンズの取りはずしかた
1. ネジ D(4 本)をレンズを保持しながらゆるめる
2. 矢印 E の方向にレンズをはずす
C. 交換レンズの取り付けかた
1. 矢印 F の方向にレンズを取り付ける
2. ネジ D(4 本)をレンズを保持しながら締める
D. レンズカバーの取り付けかた
はずしたときと反対の手順で取り付ける
レンズ交換後の確認について
● すべての部品が確実に取り付けられているか確認してください。
● 投写映像にゴミが映っていないか確認してください。ゴミが映ってい
る場合は、ゴミを清掃してください。
レンズ交換後の注意点
● レンズ交換後は、プロジェクター本体の輸送はしないでください。
プロジェクター本体が破損するおそれがあります。
● レンズ交換後は、投写映像の明るさ、解像度、色均一性が標準レンズ
装着時と異なることがあります。
● レンズ交換後の台形補正は、補正角度の範囲が標準レンズ装着時と異
なることがあります。
● レンズ交換後の台形補正は、画面が正しいアスペクト比にならないこ
とがあります。
仕様
対応機種 三菱電機(株)製LVP-MH2850
F 値 F1.7 〜 F2.0
焦点距離 f = 29 〜 37mm
ズーム/フォーカス 手動(ズーム比 1.3:1)
投写画面 40形(81cm × 61cm)〜 300 形(610cm × 457cm)
画面サイズ 投写距離 L
高さ H1
(cm)
(形) 幅 W(cm)
高さ H(cm)
最短(m) 最長(m)
40 81 61 1.4 1.8 6
60 122 91 2.1 2.7 9
80 163 122 2.9 3.7 12
100 203 152 3.6 4.6 15
150 305 229 5.4 6.9 23
200 406 305 7.3 9.3 31
250 508 381 9.1 − 38
300 610 457 10.9 − 46
● 表示値は、実際とは数%誤差が生じることがあります。
日本語
DD
DD
B-1,C-2A-1,2,3
B
B
A
C
B-2,C-1
OPTION LENS
OL-XL2550MZ
Lens Replacement Manual
This option lens is available for the Mitsubishi HL2750U, MH2850U and WL2650U. Lens replacement must be performed by service
personnel. For all other models or product related questions, contact your local dealer.
• Be sure to turn off the projector and unplug the power cord from the wall outlet before the lens replacement.
• Do not replace the lens for at least 1 hour after power off.
• When replacing the lens, be careful not to allow dust to enter inside.
Lens replacement procedure
To replace the lens from the projector, carefully follow steps A through D.
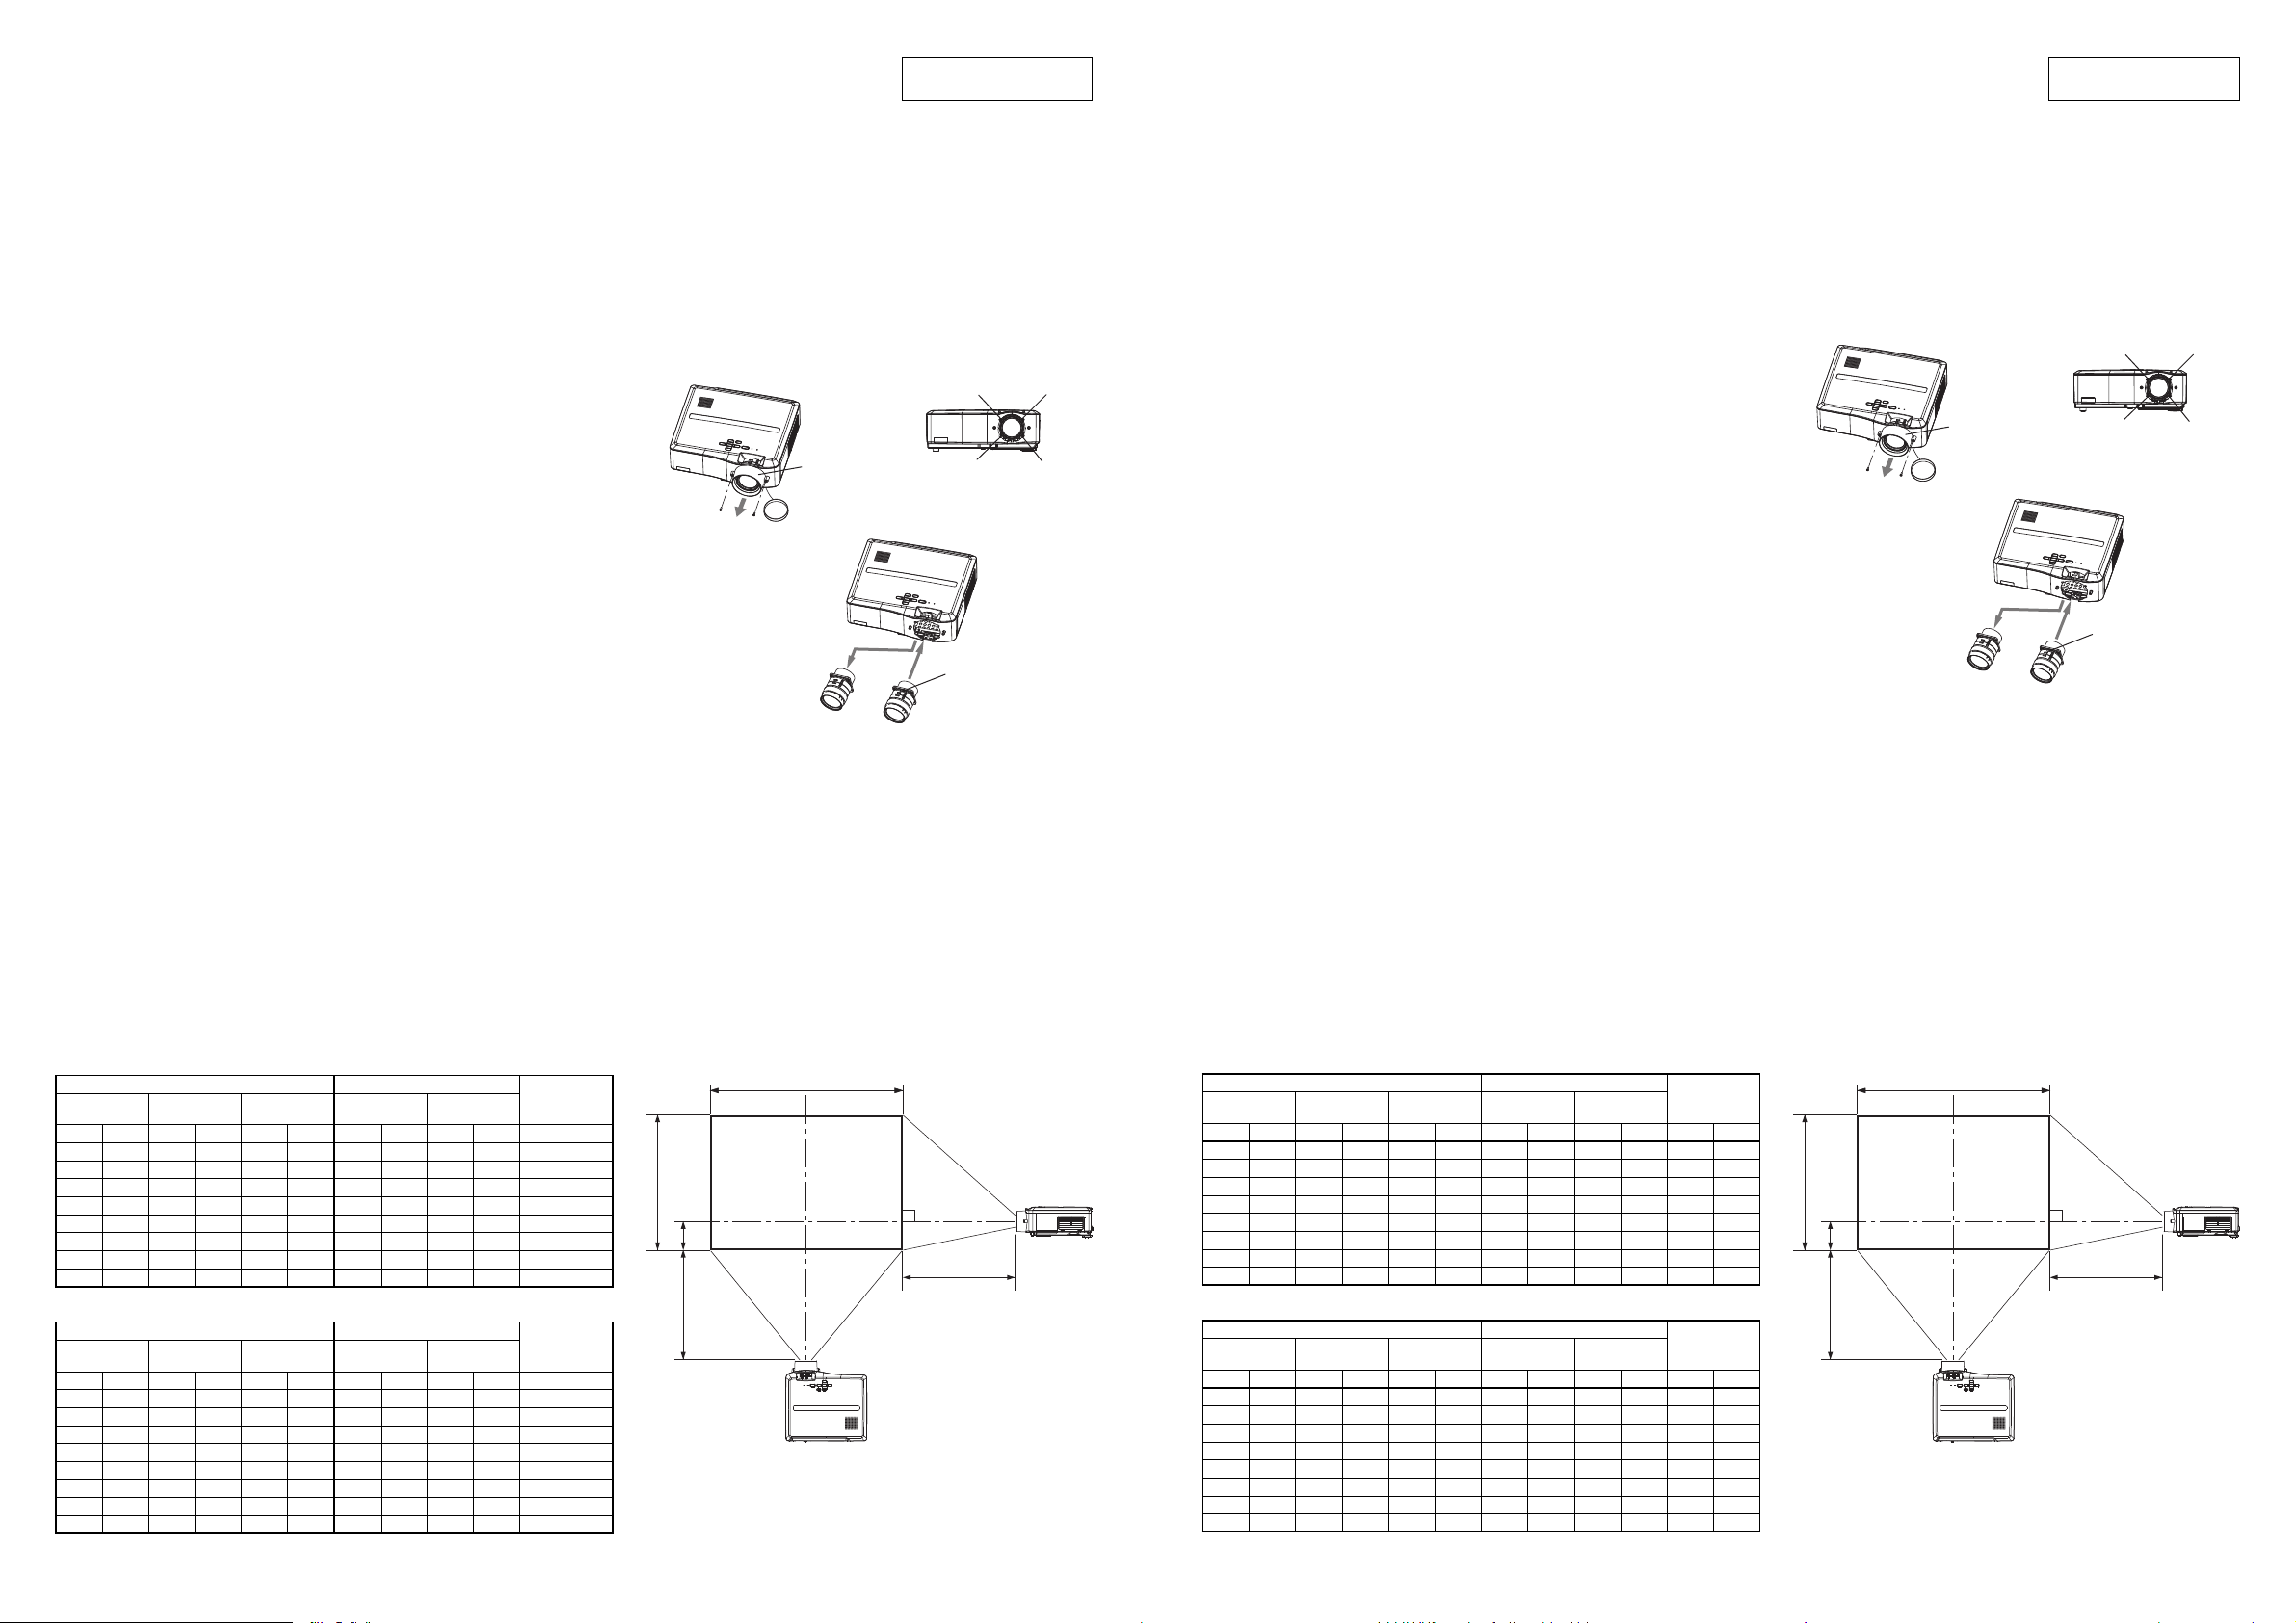
A. Remove the lens cover
1. Remove the lens cap A.
2. Remove the screws B (2 screws) on the front cabinet.
3. Remove the lens cover C from the front cabinet.
B. Remove the lens
1. Loosen the screws D (4 screws) while holding the lens.
2. Remove the lens in the direction of arrow E.
C. Mount the lens
1. Mount the lens in the direction of arrow F.
2. Tighten the screws D (4 screws) while holding the lens.
D. Mount the lens cover
Mount the lens cover in the reverse procedure of removal.
Check and confi rm after the lens replacement
• There should be no missing parts, or any loose mounting parts.
• Make sure that there is no visible dust on the projected image. Clean it, if any.
Cautions after lens replacement
• Do not transport the projector after replacing the lens. The projector may be broken.
•
Brightness, resolution, and color uniformity in the projected image with a new lens may be different from those with the standard lens.
•
The adjustable angle in the keystone adjustment with a new lens may differ from that with the old lens.
• In the keystone adjustment after lens replacement, the proper aspect ratio may not be obtained.
Specifi cations
Applicable models Mitsubishi HL2750U, MH2850U, WL2650U
F No. F1.7 - F2.0
Focal distance f = 29 - 37 mm
Zoom/focus Manual drive (zoom ratio 1.3 : 1)
Picture size
40 inch (81 cm X 61 cm) - 300 inch (610 cm X 457 cm) (HL2750U, MH2850U)
40 inch (86 cm X 54 cm) - 300 inch (646 cm X 404 cm) (WL2650U)
Screen size and projection distance
(1) HL2750U, MH2850U
Screen size Projection distance (L)
Height (H1)
Diagonal size Width (W) Height (H) Shortest (Wide) Longest (Tele)
inch cm inch cm inch cm inch m inch m inch cm
40 102 32 81 24 61 55 1.4 71 1.8 2.4 6
60 152 48 122 36 91 84 2.1 108 2.7 3.6 9
80 203 64 163 48 122 113 2.9 145 3.7 4.8 12
100 254 80 203 60 152 142 3.6 182 4.6 6.0 15
150 381 120 305 90 229 214 5.4 274 6.9 9.0 23
200 508 160 406 120 305 285 7.3 366 9.3 12.0 31
250 635 200 508 150 381 357 9.1 - - 15.0 38
300 762 240 610 180 457 429 10.9 - - 18.0 46
(2) WL2650U
Screen size Projection distance (L)
Height (H1)
Diagonal size Width (W) Height (H) Shortest (Wide) Longest (Tele)
inch cm inch cm inch cm inch m inch m inch cm
40 102 34 86 21 54 58 1.5 75 1.9 0.5 1
60 152 51 129 32 81 89 2.3 114 2.9 0.8 2
80 203 68 172 42 108 119 3.0 152 3.9 1.1 3
100 254 85 215 53 135 149 3.8 191 4.9 1.3 3
150 381 127 323 79 202 224 5.7 287 7.3 2.0 5
200 508 170 431 106 269 300 7.6 384 9.8 2.6 7
250 635 212 538 132 337 375 9.5 - - 3.3 8
300 762 254 646 159 404 453 11.5 - - 3.9 10
• The above numbers are approximate, and may be slightly different from the actual measurements.
ENGLISH
B
-1, C-2
A
-1, 2, 3
B
B
A
C
1 Zusho Baba, Nagaokakyo-City, Kyoto Japan
N
B
-2, C-1
Attach the option
lens with its label up.
E
F
ラベルが貼ってある側を上に
して取り付 けてください 。
E
DD
DD
F
W
H
H1
L
L
M
ITSUBISHI
H
H1
L
ELECTRIC CORPORATIO
W
L
OBJECTIF EN OPTION
OL-XL2550MZ
Instructions pour le Remplacement de l’Objectif
Cet objectif optionnel est disponible pour le Mitsubishi HL2750U, MH2850U et WL2650U. Le remplacement de l’objectif doit être
effectué par un technicien qualifi é. Pour tous les autres modèles ou questions relatives au produit, contactez votre revendeur local.
• Assurez-vous d’avoir éteint le projecteur et d’avoir débranché le cordon d’alimentation de la prise murale avant de
remplacer l’objectif.
• Attendez au moins une heure après l’extinction de l’appareil avant de remplacer l’objectif.
• Lors du remplacement de l’objectif, veillez à ce que la poussière ne pénètre pas dans l’appareil.
Procedure de remplacement de l’objectif
Pour remplacer l’objectif du projecteur, suivez scrupuleusement les étapes de A à D.
A. Retirez le cache objectif
1. Retirez le cache de l’objectif A.
2. Retirez les vis B (2 vis) du coffret avant.
3. Retirez le cache objectif C du coffret avant.
B. Retirer l’objectif
1. Desserrez les vis D (4 vis) tout en maintenant l’objectif.
2. Retirez l’objectif dans le sens de la fl èche E.
C. Monter l’objectif
1. Montez l’objectif dans le sens de la fl èche F.
2. Serrez les vis D (4 vis) tout en maintenant l’objectif.
D. Montez le cache objectif
Montez le cache objectif en suivant la procédure inverse de celle utilisée pour le démontage.
Vérifi ez et confi rmez après le remplacement de l’objectif
• Aucun élément ne doit manquer, et les éléments montés doivent être bien fi xés.
• Assurez-vous qu’il n’y ait pas de poussière visible sur l’image projetée. S’il y en a,
nettoyez l’objectif.
Attention après le remplacement de l’objectif
• Ne pas transporter le projecteur après le remplacement de l’objectif. Cela pourrait endommager le projecteur.
• La luminosité, la défi nition et l’homogénéité des couleurs des images projetées avec un nouvel objectif peuvent être différents de
ceux obtenus avec un objectif ordinaire.
• Avec un nouvel objectif, l’angle ajustable du réglage de la distorsion trapézoïdale peut différer de celui avec l’ancien objectif.
•
Il se peut que le format d’image ne soit pas correct dans le réglage de la distorsion trapézoïdale après le remplacement de l’objectif.
Caractéristiques techniques
Modèles applicables Mitsubishi HL2750U, MH2850U, WL2650U
F No F1,7 - F2,0
Distance focale f = 29 - 37 mm
Zoom/mise au point Actionnement manuel (rapport de zoom 1,3 : 1)
Taille de l’image 40 pouces (81 cm X 61 cm) - 300 pouces (610 cm X 457 cm) (HL2750U, MH2850U)
40 pouces (86 cm X 54 cm) - 300 pouces (646 cm X 404 cm) (WL2650U)
Distance de projection et taille d’écran
(1) HL2750U, MH2850U
Taille de l’écran Distance de projection (L)
Hauteur (H1)
Taille de la
diagonale
Largeur (W) Hauteur (H)
Le plus court
(Large)
Le plus long
(Télescopique)
pouces cm pouces cm pouces cm pouces m pouces m pouces cm
40 102 32 81 24 61 55 1,4 71 1,8 2,4 6
60 152 48 122 36 91 84 2,1 108 2,7 3,6 9
80 203 64 163 48 122 113 2,9 145 3,7 4,8 12
100 254 80 203 60 152 142 3,6 182 4,6 6,0 15
150 381 120 305 90 229 214 5,4 274 6,9 9,0 23
200 508 160 406 120 305 285 7,3 366 9,3 12,0 31
250 635 200 508 150 381 357 9,1 - - 15,0 38
300 762 240 610 180 457 429 10,9 - - 18,0 46
(2) WL2650U
Taille de l’écran Distance de projection (L)
Hauteur (H1)
Taille de la
diagonale
Largeur (W) Hauteur (H)
Le plus court
(Large)
Le plus long
(Télescopique)
pouces cm pouces cm pouces cm pouces m pouces m pouces cm
40 102 34 86 21 54 58 1,5 75 1,9 0,5 1
60 152 51 129 32 81 89 2,3 114 2,9 0,8 2
80 203 68 172 42 108 119 3,0 152 3,9 1,1 3
100 254 85 215 53 135 149 3,8 191 4,9 1,3 3
150 381 127 323 79 202 224 5,7 287 7,3 2,0 5
200 508 170 431 106 269 300 7,6 384 9,8 2,6 7
250 635 212 538 132 337 375 9,5 - - 3,3 8
300 762 254 646 159 404 453 11,5 - - 3,9 10
•
Les chiffres ci-dessus correspondent aux chiffres de la conception et peuvent être légèrement différents par rapport aux chiffres réels.
ZUSATZLINSE
OL-XL2550MZ
Handbuch zum Austausch der Linse
Diese optionale Linse ist für den Mitsubishi HL2750U, MH2850U und WL2650U im Handel erhältlich. Der Austausch der Linse muss
durch den Kundendienst durchgeführt werden. Hinsichtlich Fragen bezüglich sämtlicher anderer Modelle oder Produkte nehmen Sie bitte
Kontakt zu Ihrem örtlichen Händler auf.
• Stellen Sie sicher, dass Sie den Projektor ausschalten und das Netzkabel von der Wandsteckdose abtrennen, bevor Sie die
Linse austauschen.
• Tauschen Sie die Linse nicht aus, bevor nicht mindestens 1 Stunde nach dem Ausschalten des Projektors verstrichen ist.
• Beim Austauschen des Objektivs sollte vermieden werden, dass Staub in das Gerät eindringt.
Verfahren zum Austauschen der Linse
Folgen Sie sorgfältig den Schritten A bis D, um die Linse auszutauschen.
A. Entfernen Sie die Linsenabdeckung
1. Nehmen Sie den Objektivdeckel A ab.
2. Entfernen Sie die Schrauben B (2 Schrauben) vom vorderen Gehäuse.
3. Entfernen Sie die Linsenabdeckung C vom vorderen Gehäuse.
B. Entfernen Sie die Linse
1. Lösen Sie die Schrauben D (4 Schrauben), während Sie die Linse fest halten.
2. Entfernen Sie die Linse in Pfeilrichtung E.
C. Befestigen Sie die Linse
1. Befestigen Sie die Linse in Pfeilrichtung F.
2. Ziehen Sie die Schrauben D (4 Schrauben) an, während Sie die Linse fest halten.
D. Befestigen Sie die Linsenabdeckung
Befestigen Sie die Linsenabdeckung indem Sie das Verfahren zum Entfernen in umgekehrter
Reihenfolge anwenden.
Überprüfen und bestätigen Sie nach dem Austausch der
Linse die folgenden Punkte
• Es sollten keinerlei Teile fehlen oder nur lose befestigt sein.
• Stellen Sie sicher, dass sich kein sichtbarer Staub auf dem Objekt befi ndet. Reinigen Sie es, falls notwendig.
Vorsichtsmaßnahmen nach dem Austausch der Linse
• Transportieren Sie den Projektor nicht nach dem Austausch der Linse. Der Projektor könnte beschädigt werden.
•
Die Helligkeit, die Aufl ösung und die Einheitlichkeit der Farbe des projizierten Bildes kann sich bei der neuen Linse von denen mit der
Standard-Linse unterscheiden.
• Mit einem neuen Objektiv kann sich der einstellbare Winkel für die Trapezkorrektur von dem des alten Objektivs unterscheiden.
• Wird nach dem Austauschen des Objektivs eine Trapezkorrektur durchgeführt, kann das korrekte Seitenverhältnis ggf. nicht
beibehalten werden.
Technische Daten
Geeignete Modelle Mitsubishi HL2750U, MH2850U, WL2650U
F-Nr. F1,7 - F2,0
Fokus-Abstand f = 29 - 37 mm
Zoom/Fokus Manueller Antrieb (Zoomverhältnis 1,3 : 1)
Bildgröße 40 Zoll (81 cm X 61 cm) - 300 Zoll (610 cm X 457 cm) (HL2750U, MH2850U)
40 Zoll (86 cm X 54 cm) - 300 Zoll (646 cm X 404 cm) (WL2650U)
Projektionswand und Projektionsdistanz
(1) HL2750U, MH2850U
Größe der Leinwand Abstand der Projektionswand (L)
Höhe (H1)
Diagonale Breite (W) Höhe (H)
Am kürzesten
(Breit)
Am längsten
(Teleskop)
Zoll cm Zoll cm Zoll cm Zoll m Zoll m Zoll cm
40 102 32 81 24 61 55 1,4 71 1,8 2,4 6
60 152 48 122 36 91 84 2,1 108 2,7 3,6 9
80 203 64 163 48 122 113 2,9 145 3,7 4,8 12
100 254 80 203 60 152 142 3,6 182 4,6 6,0 15
150 381 120 305 90 229 214 5,4 274 6,9 9,0 23
200 508 160 406 120 305 285 7,3 366 9,3 12,0 31
250 635 200 508 150 381 357 9,1 - - 15,0 38
300 762 240 610 180 457 429 10,9 - - 18,0 46
(2) WL2650U
Größe der Leinwand Abstand der Projektionswand (L)
Höhe (H1)
Diagonale Breite (W) Höhe (H)
Am kürzesten
(Breit)
Am längsten
(Teleskop)
Zoll cm Zoll cm Zoll cm Zoll m Zoll m Zoll cm
40 102 34 86 21 54 58 1,5 75 1,9 0,5 1
60 152 51 129 32 81 89 2,3 114 2,9 0,8 2
80 203 68 172 42 108 119 3,0 152 3,9 1,1 3
100 254 85 215 53 135 149 3,8 191 4,9 1,3 3
150 381 127 323 79 202 224 5,7 287 7,3 2,0 5
200 508 170 431 106 269 300 7,6 384 9,8 2,6 7
250 635 212 538 132 337 375 9,5 - - 3,3 8
300 762 254 646 159 404 453 11,5 - - 3,9 10
• Die Zahlen oben sind Designzahlen und können von den aktuellen Zahlen abweichen.
DEUTSCHFRANÇAIS
B
-1, C-2
B
-1, C-2
A
-1, 2, 3
A
-1, 2, 3
B
-2, C-1
Montez l’objectif
en option avec son
étiquette sur le
dessus.
B
-2, C-1
Befestigen Sie die
optionale Linse mit
dem Aufkleber nach
oben.
C
B
A
B
E
H
H1
L
W
DD
DD
F
L
C
B
A
B
E
H
H1
L
W
DD
DD
F
L
 Loading...