

Page 1
Table of Contents
IMPORTANT SAFETY INSTRUCTIONS…………………………….3
CHAPTER 1 INTRODUCTION
DV174BP
1.1 Product Description…..………………………………………….………..4
1.2 Product Features……………………………………...………….……….4
1.3 Package Contents………………………………………………......…….4
1.4 Product Care………………………………………………………..……..4
1.5 Product Dimensions………………………………...……………...……5
1.6 Caution…………………………………………………………………......5
CHAPTER 2 OPERATING INSTRUCTIONS
2.1 Front Control Panel……………………………………………….….…...7
2.2 OSD Menu……….…………………..………………………….……….8
Colour TFT LCD Monitor
17” (43 cm) LCD Panel Size
User’s Manual
2.3 OSD Function Table.….…………………………………………...….....9
2.4 Input Signal Icon…………………...…………………………..…...…10
2.5 Hot Key Icon…...…………………………………………………………10
CHAPTER 3 SIGNAL CONNECTORS………………………..….11
CHAPTER 4 VIEWING ANGLE…………………………….…………12
CHAPTER 5 PRODUCT SPECIFICATIONS………..………….…13
CHAPTER 6 WARRANTY………………………….……………….…..14
Page 2
IMPORTANT SAFETY INSTRUCTIONS
1. Read these instructions.
2. Keep these instructions.
3. Note all warnings.
4. Follow all instructions.
5. Do not use this device near water.
6. Clean only with dry cloth.
7. Do not block any ventilation openings. Install in accordance with the manufacturer’s
instructions.
8. Do not install near any heat sources such as radiators, heat registers, stoves, or other
device (including amplifiers) that produce heat.
9. Protect the power cord from being walked on or pinched particularly at plugs, convenience
receptacles, and the point where they exit from the device.
10. Only use attachments/accessories specified by the manufacturer.
11. Use only with the cart, stand, tripod, bracket, or table specified by the manufacturer, or
sold with the device. When a cart is used, use caution when moving the cart / device
combination to avoid injury from tip-over.
12. Unplug this device during lightning storms or when unused for a long period of time.
13. Refer all servicing to qualified service personnel. Servicing is required when the devic e
has been damaged in any way, such as power-supply cord or plug is damaged, liquid has
been spilled or objects have fallen into the device, the device has been exposed to rain or
moisture, does not operate normally, or has been dropped.
14. WARNING: T o reduce the risk of fire or electric shock, do not expose this device to rain or
moisture.
15. The device shall not be exposed to dripping or splashing and no objects filled with liquids,
such as vases, shall be placed on the device.
3
CHAPTER 1 INTRODUCTION
Thank you for choosing our new generation LCD monitor. This lightweight, slim
design LCD monitor includes many outstanding features and combines the benefit
of a high resolution display. Your LCD monitor is safe to use and completely free
from any X-ray radiation. We hope you enjoy using our product, and would like to
provide the following additional information to assist you in obtaining the best
results, using the product safely and in complete comfort.
Please follow ALL instru ctions and cautions carefully before u sing this product. And
keep this user manual carefully for future reference.
1.1 Product Description
This product uses 17" colour active matrix TFT (thin-film transisto r) monitor,
providing high quality displayed images. The maximum achievable resolution is
1280 x 1024, which enables the display of complex and high quality images. In
addition, the monitor also provides access to the new OSD (On Screen Display)
controls and has a built-in multi-media speaker.
1.2 Product Features
1. High contrast colour TFT LCD monitor, with protective screen,
supports VGA resolution up to 1280 x 1024.
2. Embedded video signal BNC terminal, S-Video terminal and Audio signal RCA
Jack.
3. OSD functionality to optimise the picture.
1.3 Package Contents
Standard package includes the following:
1. 17" TFT LCD Monitor.
2. External Power Adapter.
3. Signal Cable. (VGA Cabl e)
4. User Manual.
1.4 Product Care
1. To remove dust or dirt from the screen, use a soft clean cotton cloth and wipe
gently.
2. Do not apply pressure to the screen surface while wiping.
3. Do not use any water or chemical detergent to clean the surface. Chemical
detergents may damage the surface of the LCD.
4
Page 3
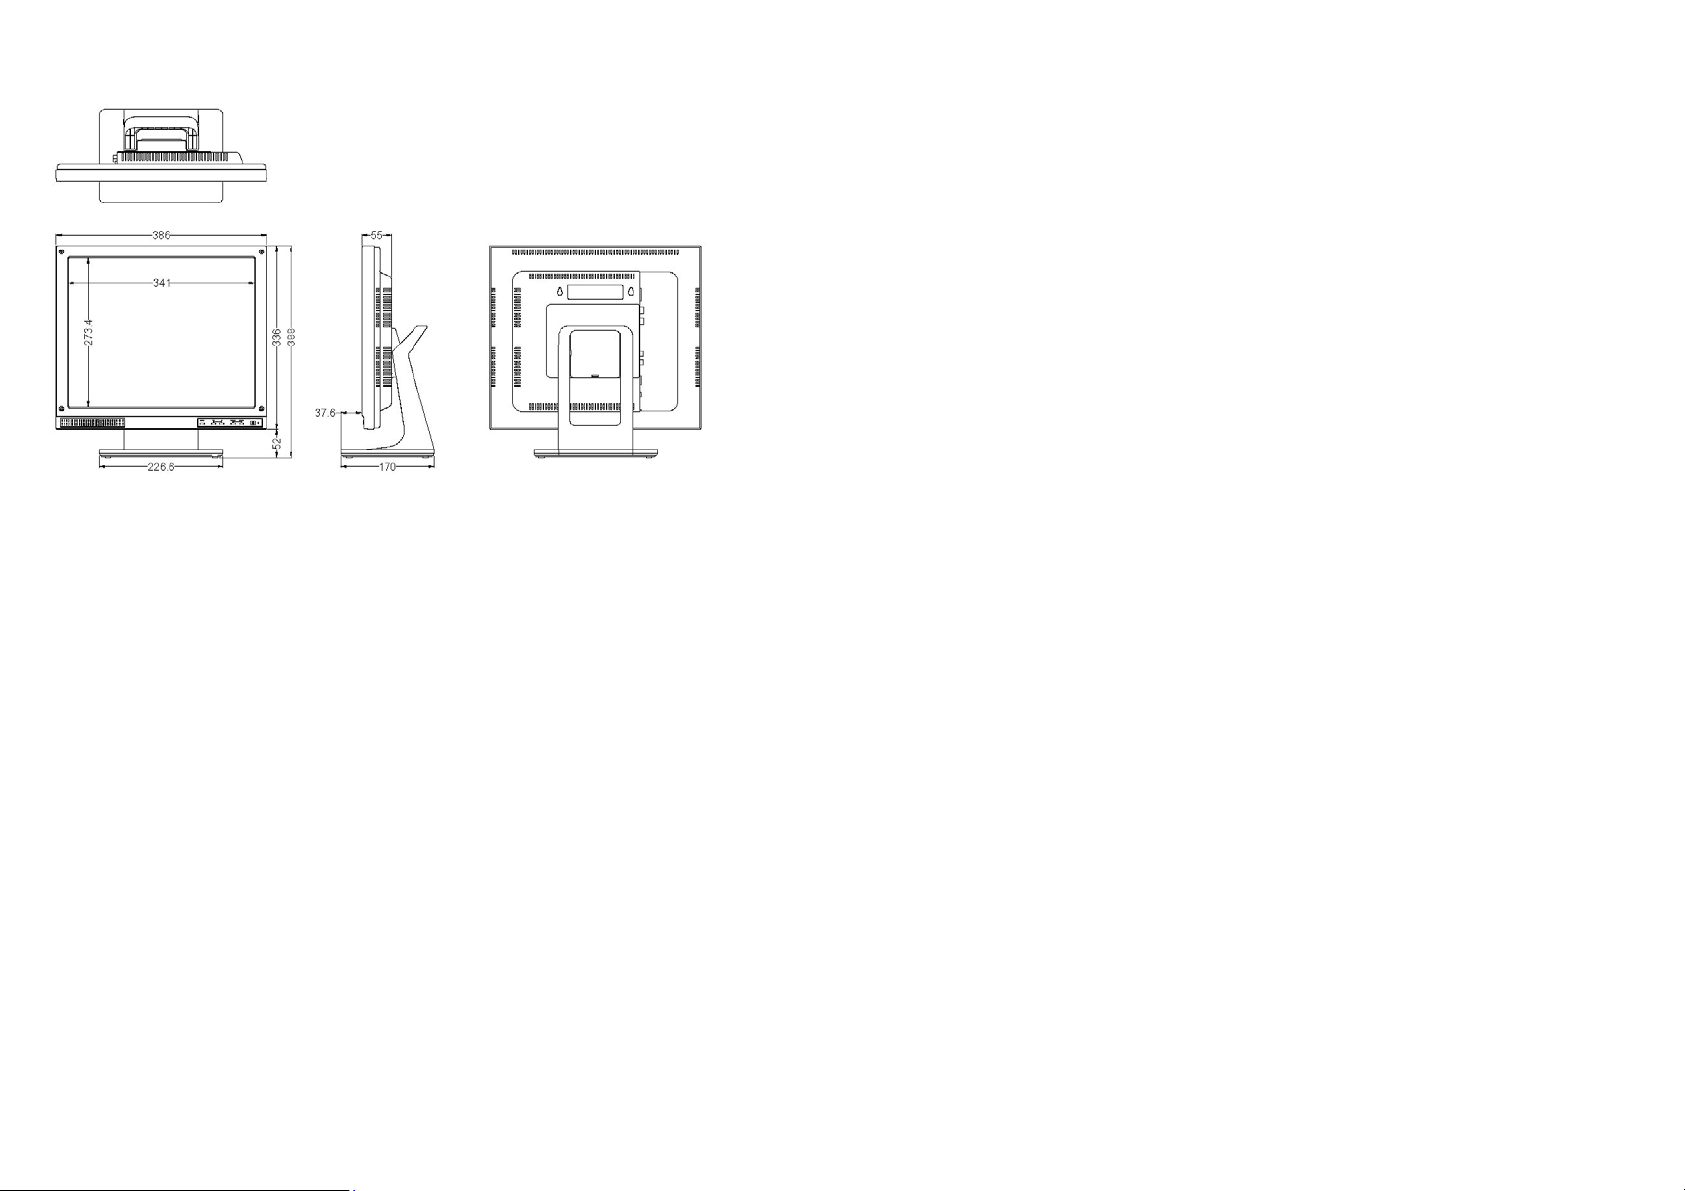
1.5 Product Dimensions
1.6 Caution
● PRODUCT
1. Do not cover or block the ventilation holes in the back of the monitor case.
2. Do not insert any metal objects into the ventilation holes of the monitor ca se and
be careful not to spill liquids over this product as this could result in severe injury
and damage.
3. Unplug the monitor’s power cable if not to be used for a long period of time.
4. Do not attempt to dismantle this product. Any attempt to dismantle or remove the
covers from this product will invalidate the warranty and may also result in
serious injury and damage.
5. Do not touch the screen directly with fingers. The oils from your skin may leave
marks on the surface of the screen, which are difficult to remove and may
damage the screen permanently.
6. Do not apply pressure to the LCD screen. The LCD is a very delicate and fragile
component.
● MAINS PLUG (2Pin / 3Pin)
1. Do not remove the grounding or earth connection from the power supply / mains
plug.
2. Always remember to unplug the L C D Monitor from the power supply under the
following circumstances:
5
- If the monitor will not be used for a long period of time.
- If the power supply cable or plug / connector is damaged.
(Please refer to the "User Manual" when connecting and disconnecting the LCD
Monitor from any power supply or other systems and before making any
adjustments to the Monitor. In the event of any unexpected situation occurring
while operating the Monitor please switch off the power supply and remove the
power cable. If the problem is not explained in the User Manual, please cont act
your local dealer or our customer service department.)
- If the monitor housing is damaged or broken.
● POWER CORD AND SIGNAL CABLE
1. Do not put anything on the power cord or signal cable.
2. Do not allow any cables from the monitor to lie on the floor in an area where
pedestrians are likely to trip causing injury.
3. This product is supplied with a 3 line-grounding plug. The grounding plug
provides an additional safety feature for anyone using this equipment and
should not be removed. Please contact a qualified electrician for assistance if
the grounding plug and electrical connections appear to differ from the local
supply provided. Do NOT throw away this safety-grounding plug.
4. Do not overload the power cord or adapter.
5. Do not put the power cord or signal cable in humid places.
● ALLOCATION ENVIRONMENT
1. DO NOT place this product on any unstable trolleys, shelves or tables as it may
fall and cause severe injury and damage.
2. Always ensure that the monitor is located in a well-ventilated area to prevent the
unit from overheating.
3. AVOID operating or placing the monitor in the following environments:
- Extreme temperatures, both hot and cold.
- High humidity.
- Direct sunlight.
- Excessively dusty surroundings.
- Avoid close proximity to other equipments that generate a strong magnetic
field.
6
Page 4

CHAPTER 2 OPERATING INSTRUCTIONS
2.1 Front Control Panel
1. Power Switch: Press to switch monitor on / off.
2. LED Indicator: Power indicator .
3. + / Mode:
1
○
Press to select next input signal.
2
Press to increase the value of OSD option selected.
○
4. - / Auto:
1
○
VGA signal auto adjustm ent.
2
Press to decrease the value of OSD option selected.
○
5.
1
○
Select OSD options upwards.
2
Press "+" or " - " button to adjust contrast value.
○
6.
1
○
Select OSD options downwards.
2
Press "+" or " - " button to adjust brightness value.
○
7. OSD Menu: recall or close OSD display, enter or return selection.
7
2.2 OSD Menu
■ VGA Signal
※ Above Values / data is for reference only.
■ VIDEO (S-Video) Signal
1. Brightness 26
2. Contrast 26
3. H-Position 25
4. V-Position 31
5. Clock 25
6. Phase 13
7. Colour Temp. User Colour
8. User Colour R 51
9. User Colour G 51
10. User Colour B 51
11. OSD H-Pos. 25
12. OSD V-Pos. 25
13. Volume 30
14. Language English
15. Recall
1. Color
2. Tint 26
3. Brightness 26
4. Contrast 26
5. Sharpness 7
6. Volume
7. Language English
8. Color Temp 9300oK
9. Recall
30
30
8
Page 5

2.3 OSD Function Table
■ VGA
1. Brightness Adjust back ground black level of the screen image.
2. Contrast Adjust fore ground white level of the screen image.
3. H-Position Adjust the left or right position of the screen image.
4. V-Position Adjust the up or down position of the screen image.
5. Clock Adjust the horizontal sync width of the screen image.
6. Phase Adjust the clarity of the screen image.
7. Colour Temp.
8. User Colour R Adjust the red colour’s intensity of the screen image.
9. User Colour G Adjust the green colour’s intensity of the screen image.
10. User Colour B Adjust the blue colour’s intensity of the screen image.
11. OSD H-Pos. Adjust the left or right position of the OSD.
12. OSD V-Pos. Adjust the up or down position of the OSD.
13. Volume Adjust the volume control.
14. Language
15. Recall
■
VIDEO (S-Video)
1. Color Adjust the color density.
2. Tint Adjust the color tint. (NTSC only)
3. Brightness Adjust back ground black level of the screen image.
4. Contrast Adjust fore ground white level of the screen image.
5. Sharpness Adjust the clarity and focus of the screen image.
6. Volume Adjust the volume control.
7. Language
8. Color Temp.
9. Recall
Press (+) or (-) to choose three types of colour temperature 9300°K ,
6500°K , User Colour.
Select languages : English, Chinese, French, German, Spanish, Italian
or Japanese.
Press (+) or (-) recall the default value.
Select languages : English, Chinese, French, German, Spanish, Italian
or Japanese.
Press (+) or (-) to choose three types of color temperature 9300°K ,
6500°K , Standard.
Press (+) or (-) recall the default value.
9
2.4 Input Signal Icons
VGA Signal
2.5 Hot Key Icons
Video Signal
S-Video Signal
Contrast adjustment
Brightness adjustment
10
Page 6

CHAPTER 3 SIGNAL CONNECTORS
Input / Output Interface
1. DC connector: Power input.
2. VGA IN: Analogue video signal input
3. Audio output / input (RCA Jack): audio output / input terminal.
Note :
※ When you choose a Video signal screen without connecting any video signal,
"No Signal" will be shown on the screen. If the video signal is lost during video
playback, "Video Loss" will be displayed on the screen.
※ It takes about 2~3 seconds to change Mode.
Caution :
Avoid directly pulling any cables when disconnecting devices from the monitor.
Always disconnect devices carefully by firmly gripping the metal or plastic connector
body and gently easing the connector from its socket.
11
CHAPTER 4 VIEWING ANGLE
The LCD display may be tilted according to viewing requirements. The display can
be tilted forward up to 5 degrees or backward up to 40 degrees.
12
Page 7

CHAPTER 5 PRODUCT
SPECIFICATION
Active Matrix TFT LCD Monitor
ITEM SPECIFICATIONS
Pixel pitch (mm) 0.264 (H) x 0.264 (V).
Max. Resolution VGA 1280 x 1024 pixe ls.
VIDEO 500 TVL
Protective Screen Anti-reflective tempered glass screen
Scratch Resistance Resists scratching with a 8H pencil
Impact Resistance A 56g steal ball dropped in free fall from a height of 140 cm onto the
Dimensions (mm) 386.0 (W) x 388.0 (H) x 170.0 (D).
Packing Dimensions (mm) 519.0 (W) x 507.0 (H) x 244.0 (D).
Display Modes VGA
Signal Connectors VGA, BNC In/Out, Audio In / Out.
Front Control Panel
Buttons
OSD Menu
Power Input DC Input : 12V / 4.16A.
Operating Conditions
Storage Conditions
Power Consumption 40W ( Max. ).
Weight Net Weight : 5.2kgs, Gross Weight : 7.2kgs.
centre of the screen will result in no breakage of the screen or damage
to the LCD panel.
Power on / off, +/Mode, - / Auto, Up (Contrast Adjust),
Down (Brightness Adjust), Menu.
Brightness, Contrast, H-Position, V-Position, Clock, Phase,
VGA
Colour Temp, User Colour R, User Colour G, User Colour B,
OSD H-Pos, OSD V-Pos, Volume, Language, Recall.
Temperature : 0℃ ~ 40℃, Humidity : 20% ~ 85%.
Temperature : -20℃ ~ 60℃, Humidity : 10% ~ 90%.
13
CHAPTER 6 WARRANTY
After Sales Service
After this product is unpacked, keep the carton and packing materials to ensure
safe transportation in case of any after sales service.
The warranty is covered by a 36 months limited warranty, subject to normal
conditions of use. If you experience any problems with this product, please contact
your local dealer or visit the Customer Support section of Mitsubishi Electric
Australia’s web site at
www.mitsubishielectric.com.au
Warranty Does NOT Include:
※ Any damage resulting from incorrect use or careless operation or handling of
the equipment.
※ Any damage caused by not operating the equipment in accordance with the
manufacturer’s instructions detailed in the "User Manual".
※ Any tampering or removal of the Monitor housing will invalidate the warranty.
※ Damages resulting from natural disasters e.g. flood, fire and earthquake.
※ Any damages caused by inappropriate transportati on or storage of the
equipment.
14
 Loading...