

Page 1

Air-Conditioners
SLZ-KA25, KA35, KA50VA
KA25, KA35, KA50VAL
SEZ-KA35, KA50, KA60, KA71VA
OPERATION MANUAL
For safe and correct use, please read this operation manual thoroughly before operating the air-conditioner unit.
BEDIENUNGSHANDBUCH
Zum sicheren und einwandfreien Gebrauch der Klimaanlage dieses Bedienungshandbuch vor Inbetriebnahme
gründlich durchlesen.
MANUEL D’UTILISATION
Pour une utilisation correcte sans risques, veuillez lire le manuel d’utilisation en entier avant de vous servir du
climatiseur.
BEDIENINGSHANDLEIDING
Voor een veilig en juist gebruik moet u deze bedieningshandleiding grondig doorlezen voordat u de
airconditioner gebruikt.
MANUAL DE INSTRUCCIONES
Lea este manual de instrucciones hasta el final antes de poner en marcha la unidad de aire acondicionado
para garantizar un uso seguro y correcto.
ISTRUZIONI DI FUNZIONAMENTO
Leggere attentamente questi istruzioni di funzionamento prima di avviare l’unità, per un uso corretto e sicuro
della stessa.
E°XEIPI¢IO O¢H°IøN XPH™Eø™
°И· ·ЫК¿ПВИ· О·И ЫˆЫЩ‹ ¯Ъ‹ЫЛ, ·Ъ·О·ПВ›ЫЩВ ‰И·‚¿ЫВЩВ ЪФЫВ¯ЩИО¿ ·˘Щfi ЩФ ВБ¯ВИЪ›‰ИФ ¯Ъ‹ЫВˆ˜ ЪИУ ı¤ЫВЩВ ЫВ
ПВИЩФ˘ЪБ›· ЩЛ МФУ¿‰· ОПИМ·ЩИЫМФ‡.
MANUAL DE OPERAÇÃO
Para segurança e utilização correctas, leia atentamente o manual de operação antes de pôr a funcionar a
unidade de ar condicionado.
FOR USER
FÜR BENUTZER
POUR L’UTILISATEUR
VOOR DE GEBRUIKER
Nederlands
PARA EL USUARIO
PER L’UTENTE
°π∞ ∆√¡ Ã∏™∆∏
PARA O UTILIZADOR
Português
English
Deutsch
Français
Español
Italiano
∂ППЛУИО¿
DRIFTSMANUAL
Läs denna driftsmanual noga för säkert och korrekt bruk innan luftkonditioneringen används.
FÖR ANVÄNDAREN
Svenska
Page 2

Contents
1. Safety Precautions ................................................................ 2
2. Parts Names ......................................................................... 2
3. Screen Configuration ............................................................ 5
4. Setting the Day of the Week and Time .................................. 5
5. Operation .............................................................................. 5
6. Timer ..................................................................................... 7
Note (Marking
for WEEE)
This symbol mark is for EU countries only.
This symbol mark is according to the directive 2002/96/EC Article 10 Information for users and Annex IV.
Your MITSUBISHI ELECTRIC product is designed and manufactured with high quality materials and components which can be
recycled and reused.
This symbol means that electrical and electronic equipment, at their end-of-life, should be disposed of separately from your household waste.
Please, dispose of this equipment at your local community waste collection/recycling centre.
In the European Union there are separate collection systems for used electrical and electronic product.
Please, help us to conserve the environment we live in!
1. Safety Precautions
s Before installing the unit, make sure you read all the “Safety
Precautions”.
s The “Safety Precautions” provide very important points regard-
ing safety. Make sure you follow them.
s Please report to or take consent by the supply authority be-
fore connection to the system.
7. Other Functions .................................................................. 10
8. Function Selection .............................................................. 11
9. Emergency Operation for Wireless Remote-controller ....... 15
10. Care and Cleaning ............................................................ 15
11. Trouble Shooting ............................................................... 16
12. Installation, relocation and inspection ............................... 17
13. Specifications .................................................................... 18
Symbols used in the text
Warning:
Describes precautions that should be observed to prevent danger of
injury or death to the user.
Caution:
Describes precautions that should be observed to prevent damage
to the unit.
Symbols used in the illustrations
: Indicates a part which must be grounded.
Warning:
• The unit must not be installed by the user. Ask the dealer or an
authorized company to install the unit. If the unit is installed improperly, water leakage, electric shock or fire may result.
• Do not stand on, or place any items on the unit.
• Do not splash water over the unit and do not touch the unit with
wet hands. An electric shock may result.
• Do not spray combustible gas close to the unit. Fire may result.
• Do not place a gas heater or any other open-flame appliance where
it will be exposed to the air discharged from the unit. Incomplete
combustion may result.
• Do not remove the front panel or the fan guard from the outdoor
unit when it is running.
Caution:
• Do not use any sharp object to push the buttons, as this may damage the remote controller.
• Never block or cover the indoor or outdoor unit’s intakes or outlets.
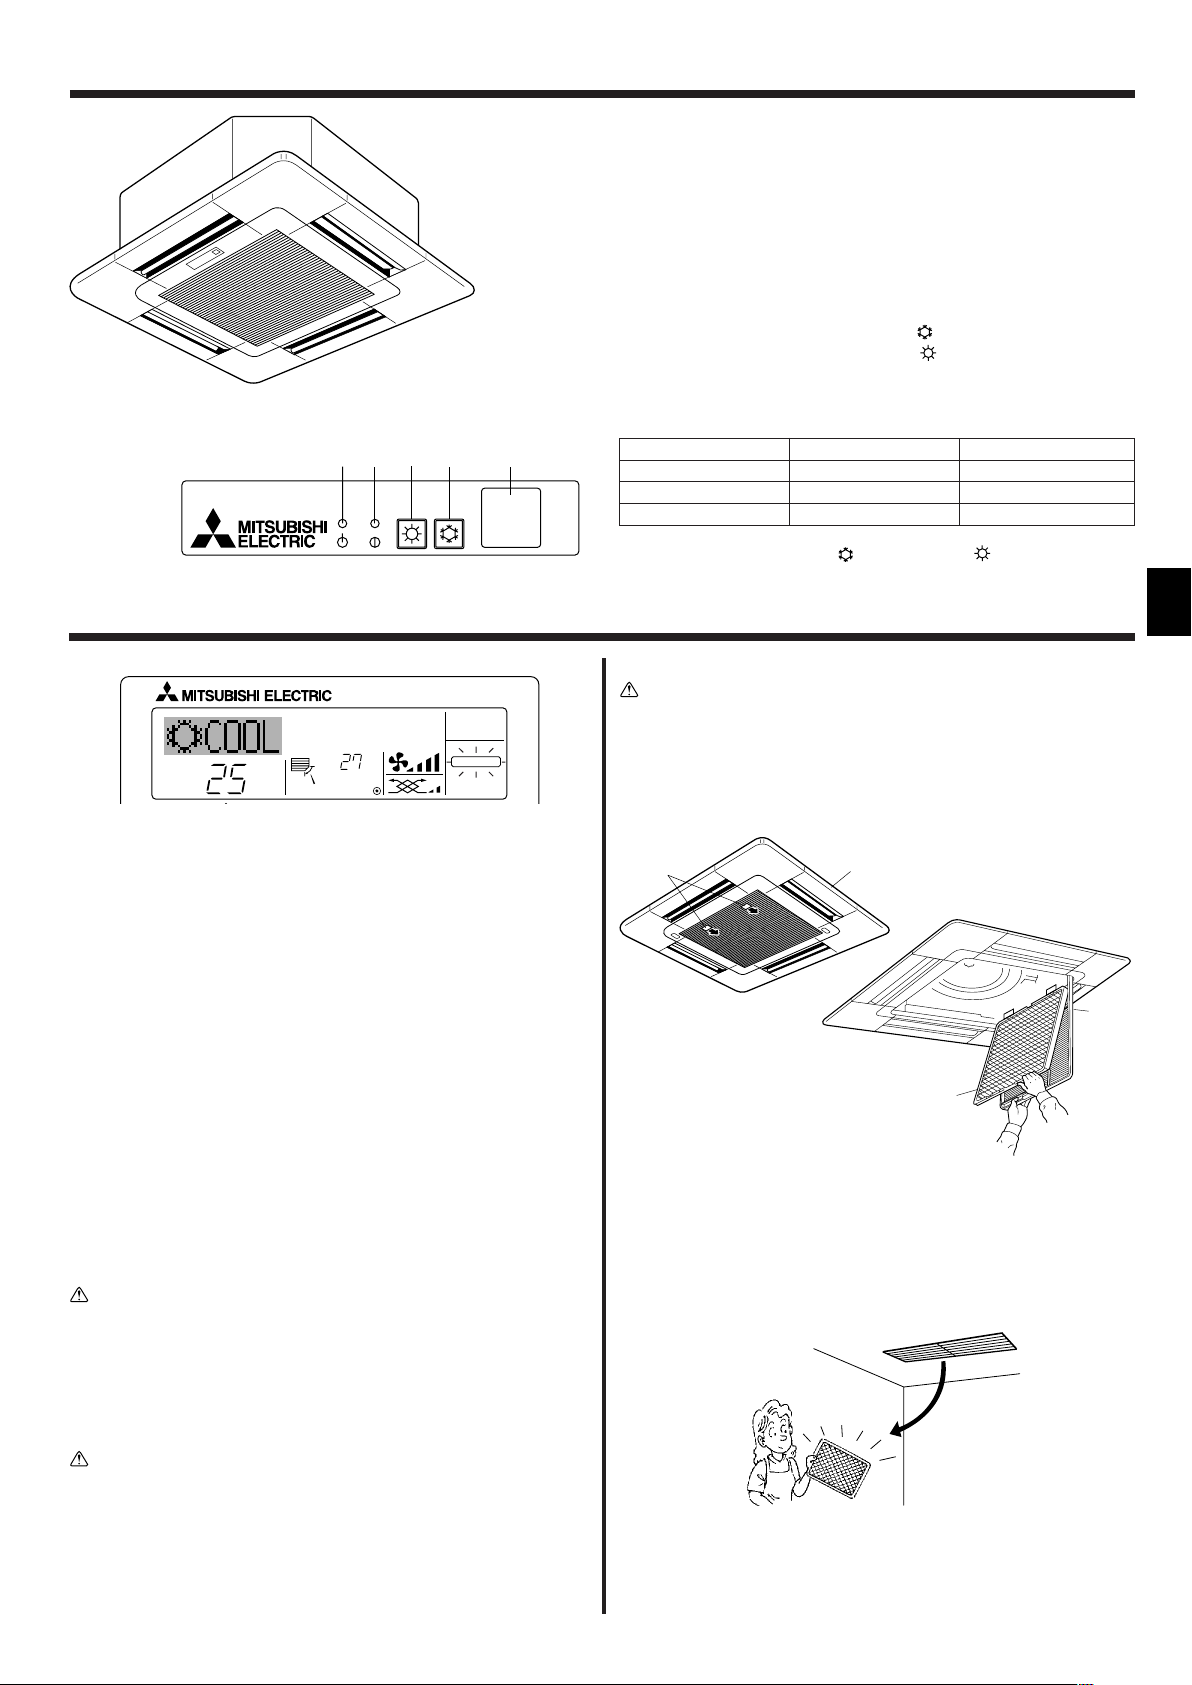
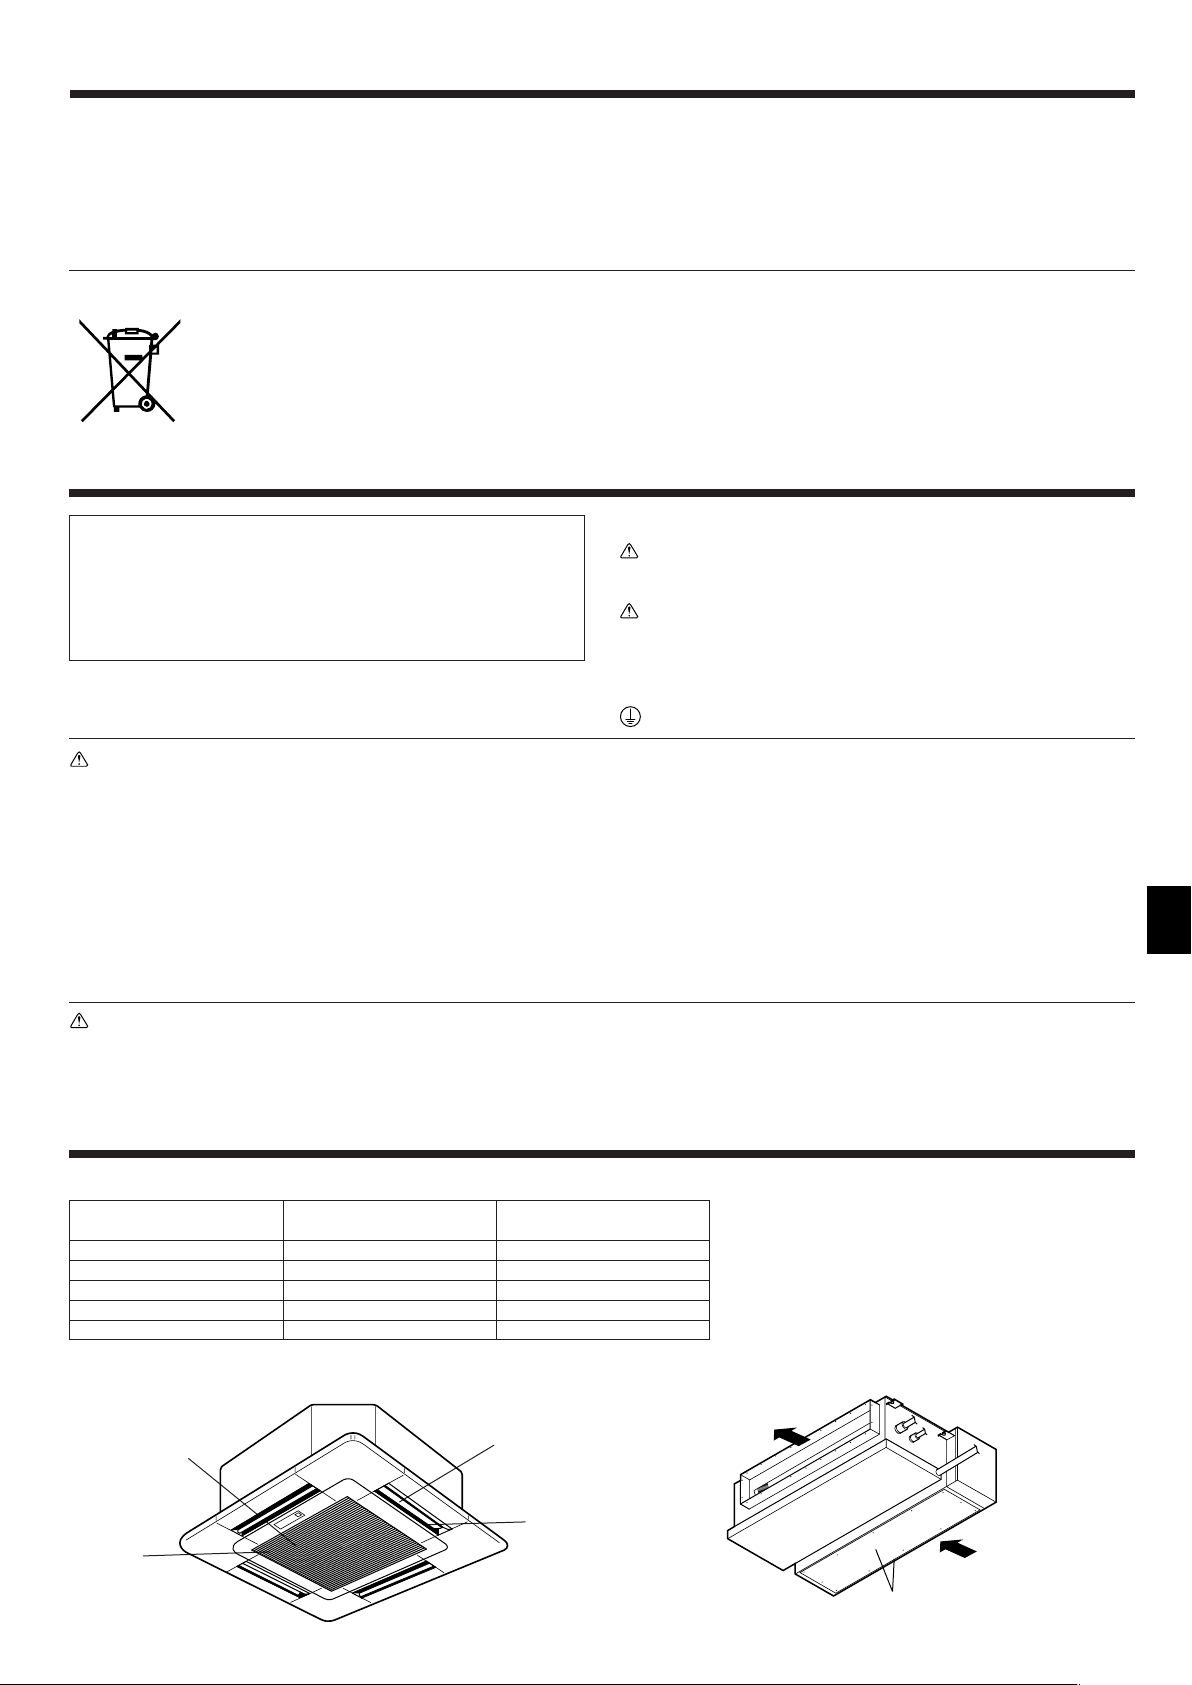
2. Parts Names
■ Indoor Unit
SLZ-KA·VA
SLZ-KA·VAL
Fan steps 3 steps 2 steps
Vane Auto with swing –
Louver – –
Filter Long-life Normal
Filter cleaning indication 2,500 hr –
SEZ-KA·VA
• When you notice exceptionally abnormal noise or vibration, stop
operation, turn off the power switch, and contact your dealer.
• Never insert fingers, sticks etc. into the intakes or outlets.
• If you detect odd smells, stop using the unit, turn off the power
switch and consult your dealer. Otherwise, a breakdown, electric
shock or fire may result.
• This air conditioner is NOT intended for use by children or infirm
persons without supervision.
• Young children must be supervised to ensure that they do not play
with the air conditioner.
•
If the refrigeration gas blows out or leaks, stop the operation of the
air conditioner, thoroughly ventilate the room, and contact your dealer.
Disposing of the unit
When you need to dispose of the unit, consult your dealer.
■ SLZ-KA·VA/SLZ-KA·VAL
4-way Ceiling Cassette
Filter
Air intake
2
■ SEZ-KA·VA
Ceiling Concealed
Air outlet
Vane
Air outlet
Air intake
Filter (Bottom or Rear)
Page 3
PAR-21MAA
ON/OFF
FILTER
CHECK
OPERATION
CLEAR
TEST
TEMP.
MENU
BACK DAY
MONITOR/SET
CLOCK
ON/OFF
2. Parts Names
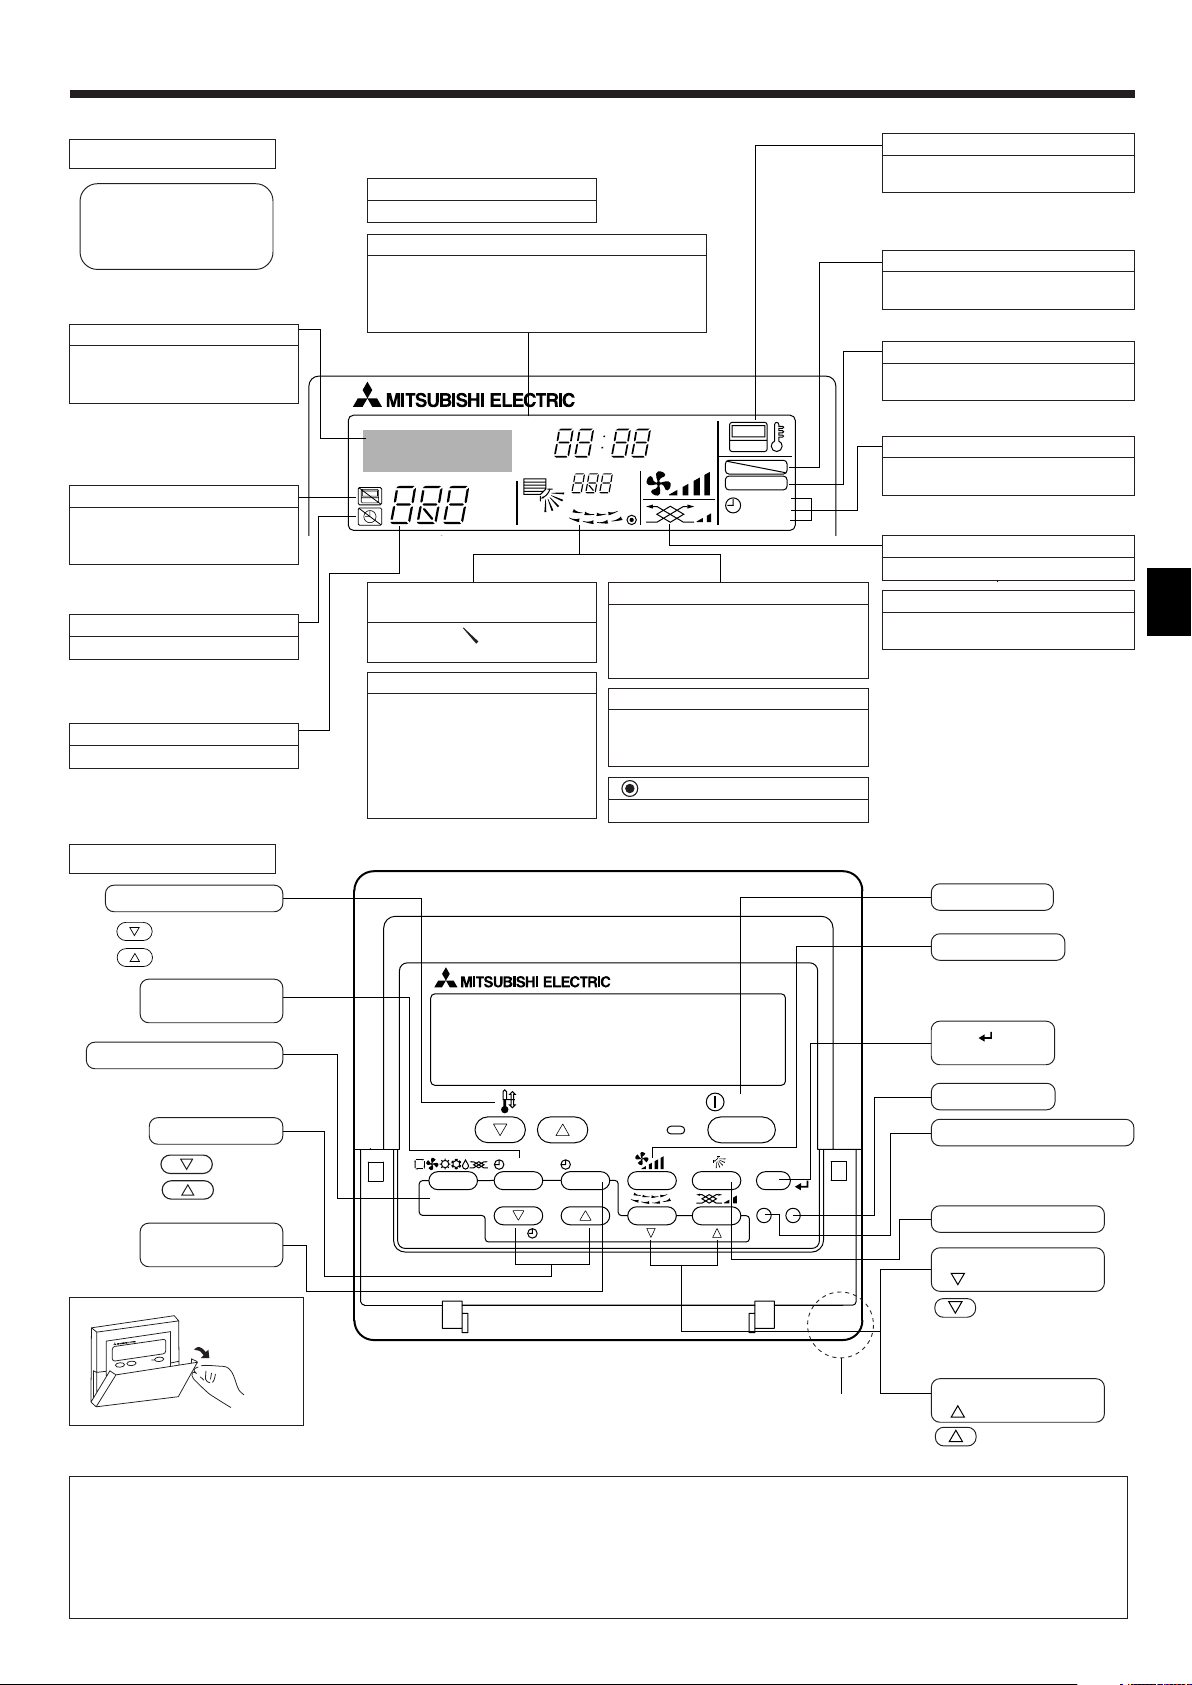
■ Wired Remote-Controller
Display Section
For purposes of this explanation,
all parts of the display are shown
as lit. During actual operation, only
the relevant items will be lit.
Identifies the current operation
Shows the operating mode, etc.
* Multilanguage display is sup-
ported.
“Centrally Controlled” indicator
Indicates that operation of the remote controller has been prohibited by a master controller.
“Timer is Off” indicator
Indicates that the timer is off.
Temperature Setting
Shows the target temperature.
Day-of-Week
Shows the current day of the week.
Time/Timer Display
Shows the current time, unless the simple or Auto Off
timer is set.
If the simple or Auto Off timer is set, shows the time
remaining.
TIME SUN MON TUE WED THU FRI SAT
TIMER
AFTER
ERROR CODE
˚F˚C
Hr
AFTER
˚F˚C
ONLY1Hr.
Up/Down Air Direction indicator
The indicator shows the direction of the outcoming airflow.
“One Hour Only” indicator
Displayed if the airflow is set to
weak and downward during COOL
or DRY mode. (Operation varies
according to model.)
The indicator goes off after one
hour, at which time the airflow direction also changes.
Room Temperature display
Shows the room temperature. The room
temperature display range is 8–39°C.
The display flashes if the temperature
is less than 8 °C or 39 °C or more.
Louver display
Indicates the action of the swing louver.
Does not appear if the louver is stationary.
(Power On indicator)
Indicates that the power is on.
ON
OFF
FUNCTION
FILTER
WEEKLY
SIMPLE
AUTO OFF
“Sensor” indication
Displayed when the remote controller
sensor is used.
“Locked” indicator
Indicates that remote controller buttons have been locked.
“Clean The Filter” indicator
Comes on when it is time to clean the
filter.
Timer indicators
The indicator comes on if the corresponding timer is set.
Fan Speed indicator
Shows the selected fan speed.
Ventilation indicator
Appears when the unit is running in
Ventilation mode.
Operation Section
Set Temperature buttons
Down
Up
Timer Menu button
(Monitor/Set button)
Mode button (Return button)
Set Time buttons
Back
Ahead
Timer On/Off button
(Set Day button)
Opening the
door.
Note:
● “PLEASE WAIT” message
This message is displayed for approximately 3 minutes when power is supplied to the indoor unit or when the unit is recovering from a power failure.
Built-in temperature sensor
● “NOT AVAILABLE” message
This message is displayed if a button is pressed to operate a function that the indoor unit does not have.
If a single remote controller is used to simultaneously operate multiple indoor units that are different models, this message will not be displayed if
any of the indoor units is equipped with the function.
ON/OFF button
Fan Speed button
Filter button
(<Enter> button)
Test Run button
Check button (Clear button)
Airflow Up/Down button
Louver button
(
Operation button)
To preceding operation
number.
Ventilation button
Operation button)
(
To next operation
number.
3
Page 4
1
2
3
2. Parts Names
AUTO
COOL
DRY
HEAT
FAN
VANE
SELECT
TIME
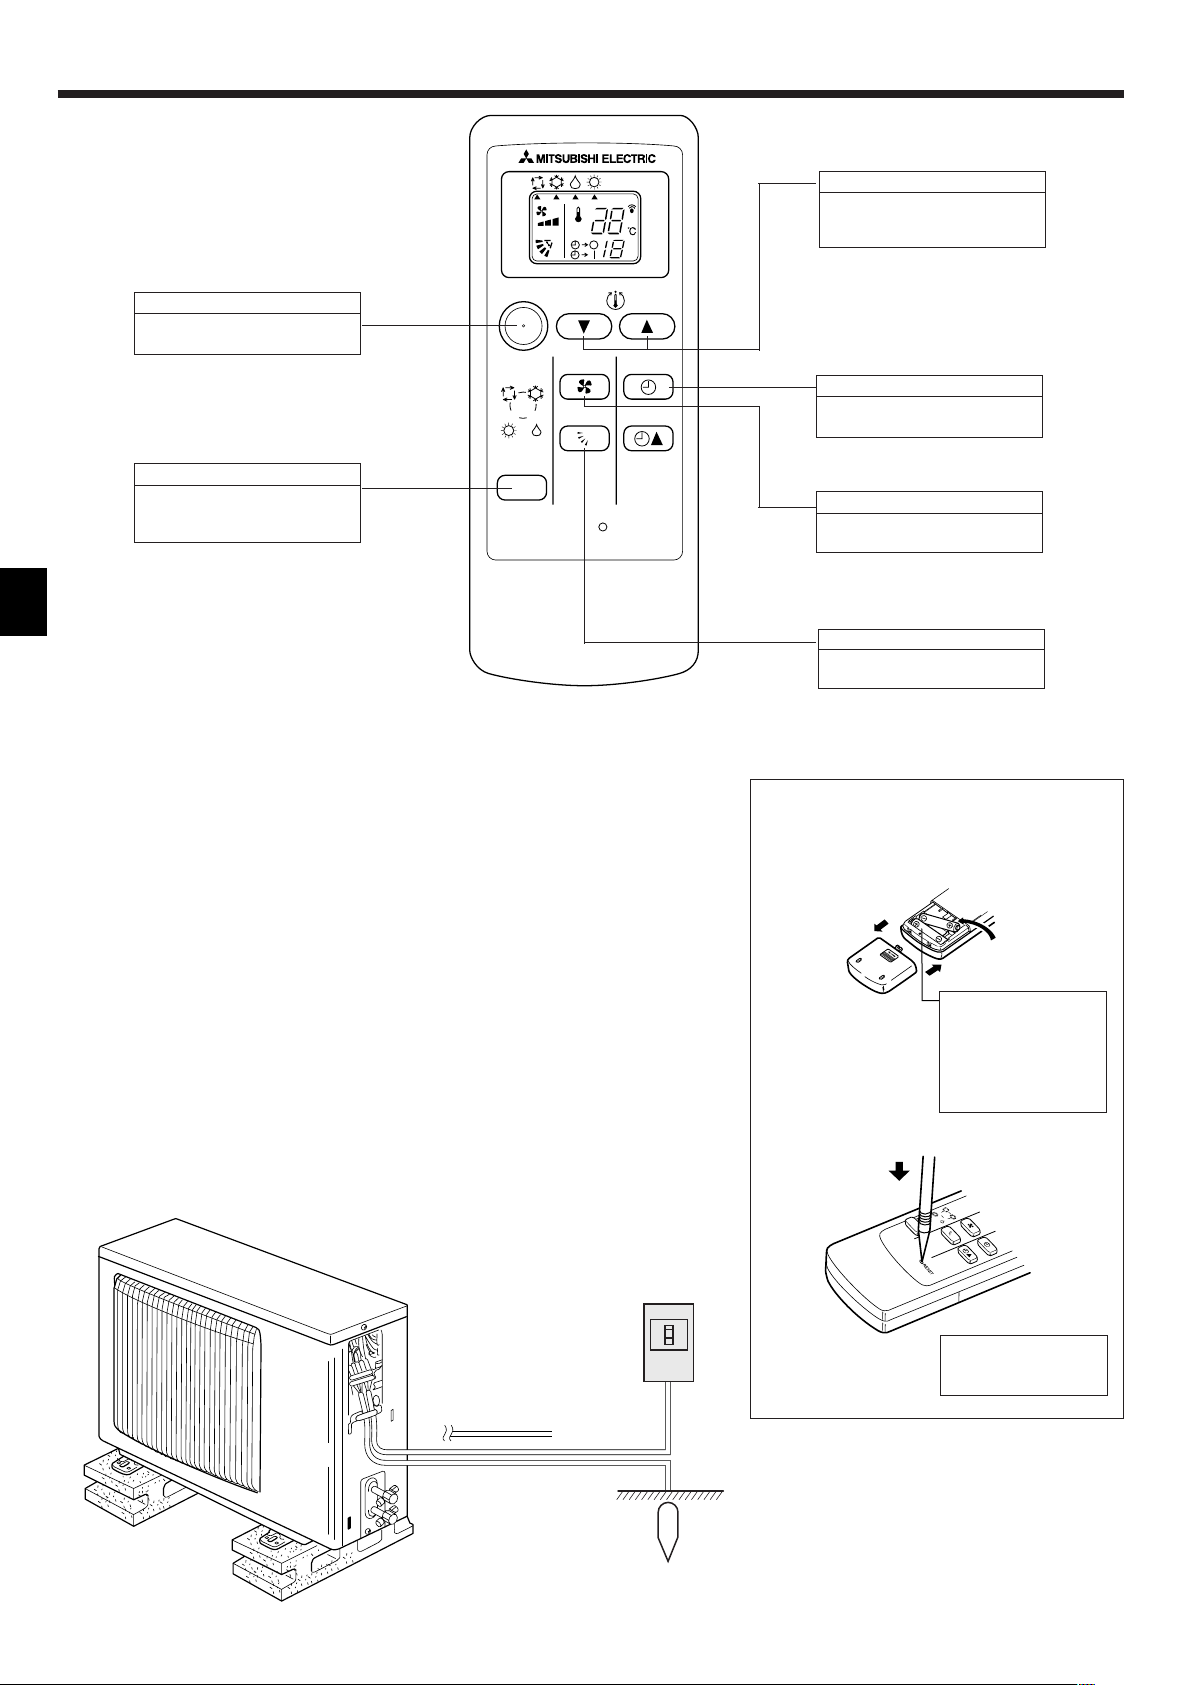
■ Wireless Remote-Controller [SLZ-KA·VAL only]
SET TEMPERATURE button
SET TEMPERATURE button sets
and any desired room tempera-
h
ture.
ON / OFF button
Pushing button starts operation.
Pushing again stops operation.
MODE SELECT button
This button is used to change between auto, cooling, heating and
drying operation modes. (SLZ)
ON/OFF
AUTO COOL
HEAT
MODE
DRY
TOO
WARM
FAN
VANE
TOO
COOL
SELECT
TIME
RESET
■ When using the wireless remote controller, point it towards the receiver on the indoor unit.
■ If the remote controller is operated within approximately two minutes after power is supplied
to the indoor unit, the indoor unit may beep twice as the unit is performing the initial automatic check.
■ The indoor unit beeps to confirm that the signal transmitted from the remote controller has
been received. Signals can be received up to approximately 7 meters in a direct line from
the indoor unit in an area 45° to the left and right of the unit. However, illumination such as
fluorescent lights and strong light can affect the ability of the indoor unit to receive signals.
■ If the operation lamp near the receiver on the indoor unit is flashing, the unit needs to be
inspected. Consult your dealer for service.
■ Handle the remote controller carefully! Do not drop the remote controller or subject it to
strong shocks. In addition, do not get the remote controller wet or leave it in a location with
high humidity.
■ To avoid misplacing the remote controller, install the holder included with the remote controller on a wall and be sure to always place the remote controller in the holder after use.
TIMER SELECT button
Used for selecting timed starting
or stopping.
FAN SPEED button
This button is used to set fan
speed to low, medium or high.
VANE CONTROL button
Used to change the airflow direction.
Battery installation/replacement
[SLZ-KA·VAL only]
1. Remove the top cover, insert two AAA batteries, and then install the top cover.
Top cover
2. Press the Reset button.
Two AAA batteries
Insert the negative (–)
end of each battery
first. Install the batteries in the correct directions (+, –)!
■ Outdoor unit
4
Power
Press the Reset button
with an object that has
Ref. Pipes
a narrow end.
Indoor-Outdoor
Connection wire
Earth
Page 5

˚C
˚C
TIME SUN
PAR-21MAA
ON/OFF
FILTER
CHECK
OPERATION
CLEAR
TEST
TEMP.
MENU
BACK DAY
MONITOR/SET
CLOCK
ON/OFF
2
4
9
1
A
TIME SUN
2
3
4
˚C
˚C
PAR-21MAA
ON/OFF
FILTER
CHECK
OPERATION
CLEAR
TEST
TEMP.
MENU
BACK DAY
MONITOR/SET
CLOCK
ON/OFF
2
7
2
3
3
8
6
4
5
8
7
1
1
5
6
˚F˚C
TIMER
MON
OFF
WEEKLY
SUN MON TUE WED THU FRI SAT
WEEKLY
˚F˚C
˚C
TIME SUN
3. Screen Configuration
ON/OFF
RESET
TOO
WARM
TOO
COOL
MODE
AUTO COOL
DRY
HEAT
FAN
VANE
SELECT
TIME
h
1
2
5
6
3
3
5
6
2
Function Selection of remote controller
ADC
Standard Control Screens
OFF ON
BC
Timer Monitor Timer Setup
B
Set Day/Time
4. Setting the Day of the Week and Time
<Screen Types>
For details on setting the language for the remote controller display, refer
to section 8. Function Selection.
The initial language setting is English.
● Function Selection of remote controller:
Set the functions and ranges available to the remote controller (timer functions, operating restrictions, etc.)
● Set Day/Time: Set the current day of the week or time.
● Standard Control Screens:
View and set the air conditioning system’s operating status
● Timer Monitor: View the currently set timer (weekly timer, sim-
ple timer, or Auto Off timer)
● Timer Setup: Set the operation of any of the timers (weekly
timer, simple timer, or Auto Off timer).
<How to change the screen>
A :Hold down both the Mode button and the Timer On/Off button for 2
seconds.
B :Press the Timer Menu button.
C :Press the Mode (Return) button.
D :Press either of the Set Time buttons ( or ).
Day of the Week &
Time display
Note:
● The day and time will not appear if clock use has been disabled at Function
Selection of remote controller.
● After the power supply returns, the indoor unit does not operate for three
minutes. Above operation is normal.
5. Operation
Day of the Week Setting
Time Setting
1. Press the or Set Time button A to show display 2.
2. Press the Timer On/Off (Set Day) button 9 to set the day.
* Each press advances the day shown at 3 : Sun → Mon → ... → Fri →
Sat.
3. Press the appropriate Set Time button A as necessary to set the time.
* As you hold the button down, the time (at 4) will increment first in
minute intervals, then in ten-minute intervals, and then in one-hour intervals.
4. After making the appropriate settings at Steps 2 and 3, press the Filter
button 4 to lock in the values.
5.1. Turning ON/OFF
<To Start Operation>
■ Press the ON/OFF button 1.
• The ON lamp 1 and the display area come on.
Note:
● When the unit is restarted, initial settings are as follows.
Mode
Temperature setting
Fan speed
Airflow up/down
Remote Controller settings
Last operation mode
Last set temperature
Last set fan speed
COOL or DRY
Mode HEAT
FAN
Horiz. outlet
Last setting
Horiz. outlet
5
Page 6
5. Operation
51234
<To Stop Operation>
■ Press the ON/OFF button 1 again.
• The ON lamp 1 and the display area go dark.
Note:
Even if you press the ON/OFF button immediately after shutting down the operation is progress, the air conditioner will not start for about three minutes.
This is to prevent the internal components from being damaged.
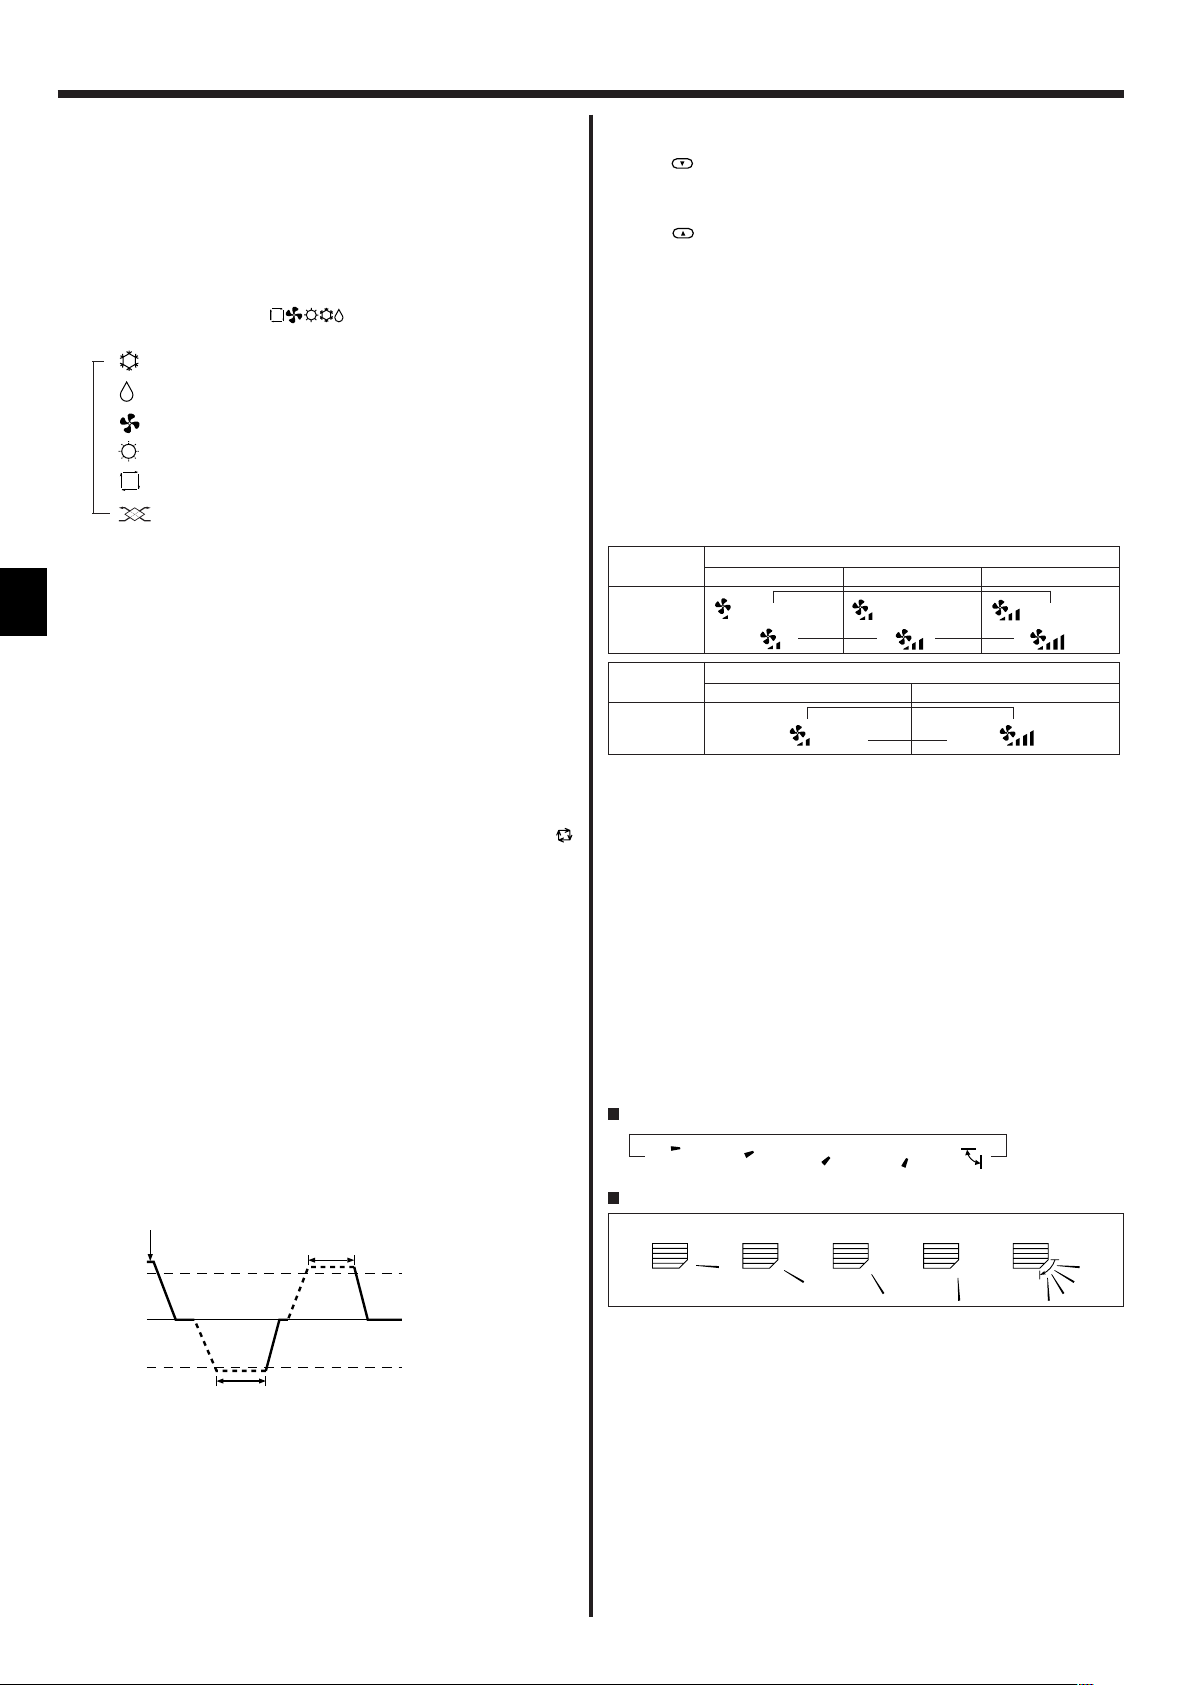
5.2. Mode select
■ Press the operation mode ( ) button 2 and select the opera-
tion mode 2.
s
Cooling mode
Drying mode
Fan mode
Heating mode
Automatic (cooling/heating) mode
Ventillation mode
Only indicated on the following condition
Wired remote controller used
LOSSNAY connected
Information for multi system air conditioner (Outdoor
unit: MXZ series)
ss
sMulti system air conditioner (Outdoor unit: MXZ series) can con-
ss
nect two or more indoor units with one outdoor unit. According to
the capacity, two or more units can operate simultaneously.
• When you try to operate two or more indoor units with one outdoor unit
simultaneously, one for the cooling and the other for heating, the operation mode of the indoor unit that operates earlier is selected. The other
indoor units that will start the operation later cannot operate, indicating
an operation state in flashing.
In this case, please set all the indoor units to the same operation mode.
• There might be a case that the indoor unit, which is operating in
(AUTO) mode. Cannot change over to the operating mode (COOL ↔
HEAT) and becomes a state of standby.
• When indoor unit starts the operation while the defrosting of outdoor
unit is being done, it takes a few minutes (max. about 15 minutes) to
blow out the warm air.
• In the heating operation, though indoor unit that does not operate may
get warm or the sound of refrigerant flowing may be heard, they are not
malfunction. The reason is that the refrigerant continuously flows into it.
Automatic operation
■ According to a set temperature, cooling operation starts if the room temperature is too hot and heating operation starts if the room temperature
is too cold.
■ During automatic operation, if the room temperature changes and remains 2 °C or more above the set temperature for 15 minutes, the air
conditioner switches to cooling mode. In the same way, if the room temperature remains 2 °C or more below the set temperature for 15 minutes, the air conditioner switches to heating mode.
Cooling mode
15 minutes (switches
from heating to cooling)
Set temperature +2°C
5.3. Temperature setting
ss
sTo decrease the room temperature:
ss
Press button 3 to set the desired temperature.
The selected temperature is displayed 3.
ss
sTo increase the room temperature:
ss
Press button 3 to set the desired temperature.
The selected temperature is displayed 3.
• Available temperature ranges are as follows:
Cooling/Drying: 19 - 30 °C
Heating: 17 - 28 °C
Automatic: 19 - 28 °C
• The display flashes either 8 °C - 39 °C to inform you if the room tem-
perature is lower or higher than the displayed temperature.
5.4. Fan speed setting
■ Press the Fan Speed button 5 as many times as necessary while the
system is running.
• Each press changes the force. The currently selected speed is shown
at 5.
• The change sequence, and the available settings, are as follows.
Fan speed
3-stage
Fan speed
2-stage
Low Medium High
( )
Remote controller display
▼
( )
▼
Remote controller display
Low High
▼
▼
( )
▼
• Display for the wireless remote controller are shown in parentheses.
Note:
● The number of available fan speeds depends on the type of unit connected.
Note also that some units do not provide an “Auto” setting.
● In the following cases, the actual fan speed generated by the unit will differ
from the speed shown the remote controller display.
1. While the display is showing “STAND BY” or “DEFROST”.
2. When the temperature of the heat exchanger is low in the heating mode.
(e.g. immediately after heating operation starts)
3. In HEAT mode, when room temperature is higher than the temperature
setting.
4. When the unit is in DRY mode.
5.5. Airflow direction setting [For SLZ]
<To Change the Airflow’s Up/Down Direction>
■ With the unit running, press the Airflow Up/Down button 6 as necessary.
• Each press changes the direction. The current direction is shown at 6.
• The change sequence, and the available settings, are as follows.
For wireless remote controller
s
1 → 2 → 3 → 4 → 5
For wired remote controller
Set temperature
Set temperature -2°C
15 minutes (switches
from cooling to heating )
■ Because the room temperature is automatically adjusted in order to
maintain a fixed effective temperature, cooling operation is performed a
few degrees warmer and heating operation is performed a few degrees
cooler than the set room temperature once the temperature is reached
(automatic energy-saving operation).
6
1 Horizontal airfrow 30° 4 Downword airfrow 70°
2 Downword airfrow 45° 5 Swing
3 Downword airfrow 55°
* Note that during swing operation, the directional indication on the
screen does not change in sync with the directional vanes on the unit.
* Some models do not support directional settings.
Note:
● Available directions depend on the type of unit connected. Note also that
some units do not provide an “Auto” setting.
● In the following cases, the actual air direction will differ from the direction
indicated on the remote controller display.
1. While the display is showing “STAND BY” or “DEFROST”.
2. Immediately after starting heater mode (while the system is waiting for
the mode change to take effect).
3.
In heat mode, when room temperature is higher than the temperature setting.
Page 7
˚C
SUN
ON
WEEKLY
PAR-21MAA
ON/OFF
FILTER
CHECK
OPERATION
CLEAR
TEST
TEMP.
MENU
BACK DAY
MONITOR/SET
CLOCK
ON/OFF
2
42 3
A9 78
0
4
1
3
B
1
5. Operation
˚C
SUN
ON
WEEKLY
6
7
5
<To Change the Right/Left Air Direction>
■ Press the louver button 7 as necessary.
• The louver image 7 appears.
Each press of the button switches the setting as follows.
No display
(Stop)
(ON) (OFF)
During swing operation, the arrow display move to the left and right.
5.6. Ventillation
ss
sFor LOSSNAY combination
ss
5.6.1. For Wired Remote-controller
● To run the ventilator together with the indoor unit:
■ Press the ON/OFF button 1.
• The Vent indication appears on the screen (at 8). The ventilator will
now automatically operate whenever the indoor unit is running.
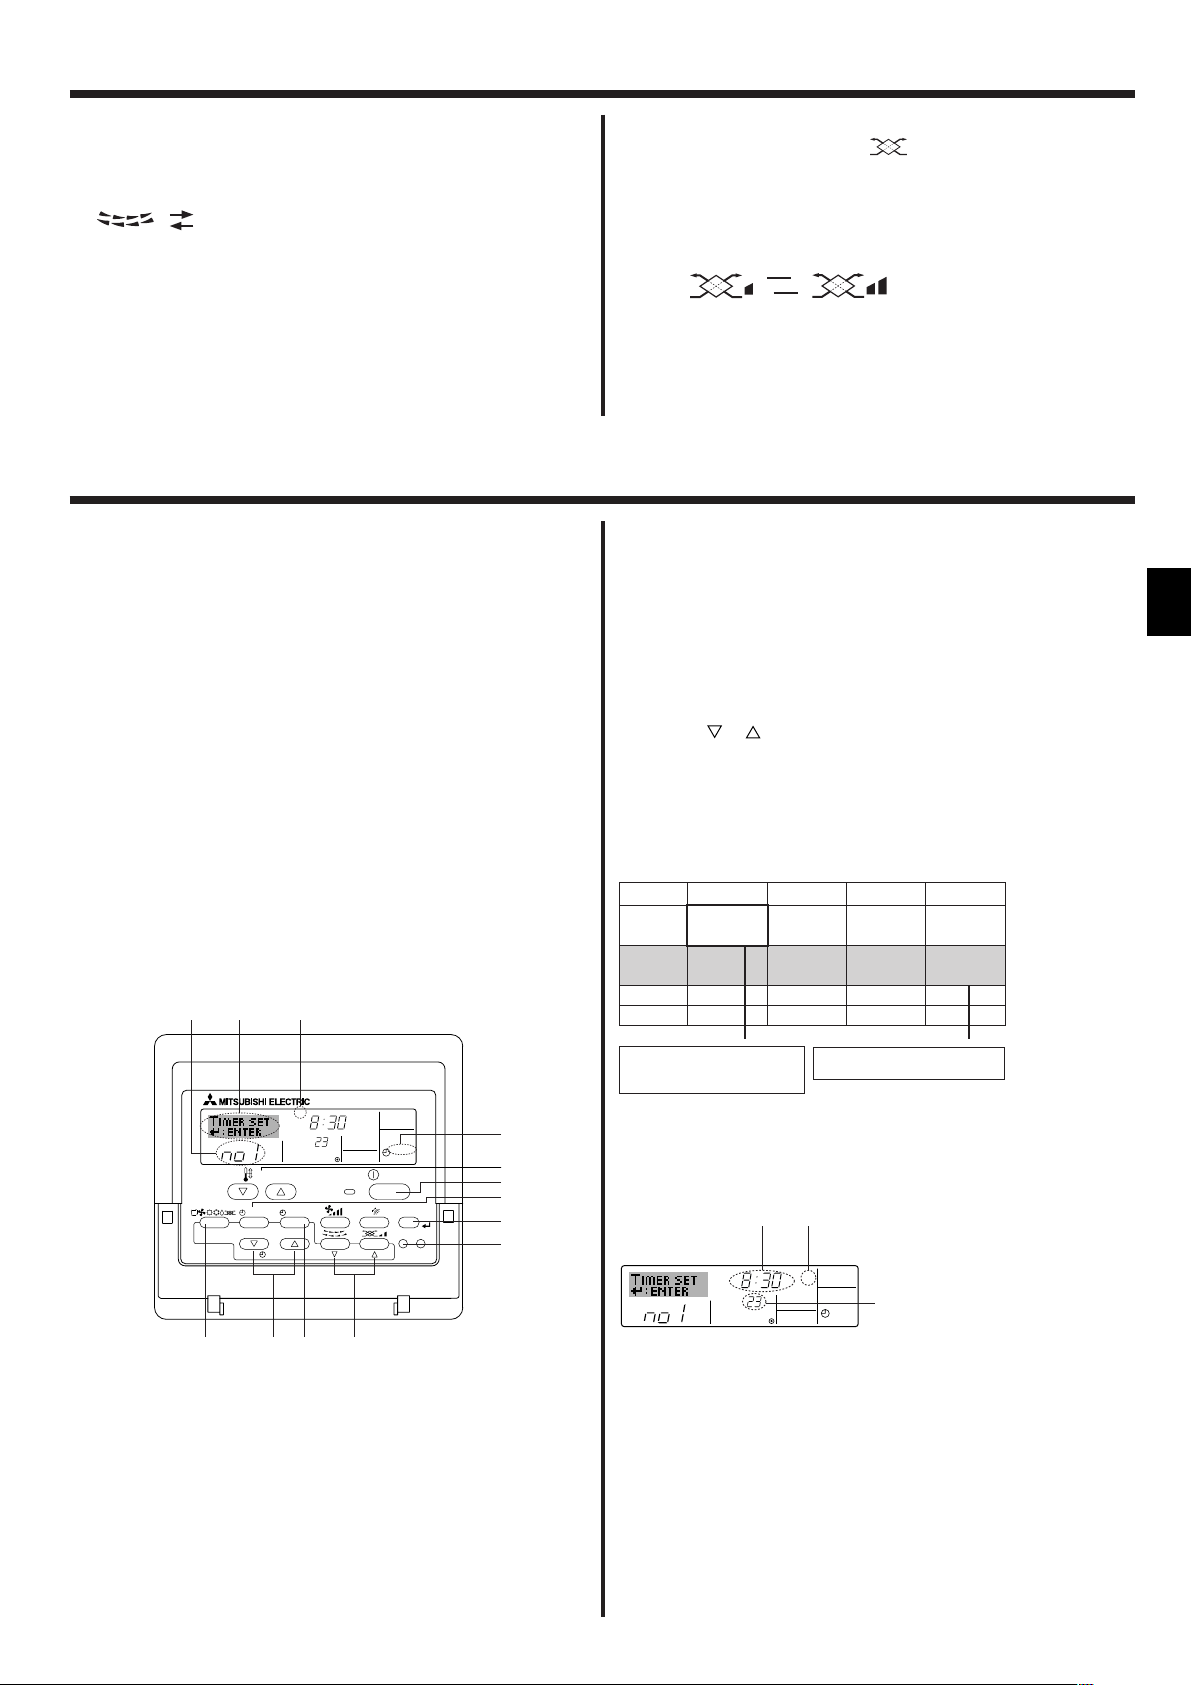
6. Timer
6.1. For Wired Remote-controller
You can use Function Selection of remote controller to select which of
three types of timer to use: 1 Weekly timer, 2 Simple timer, or 3 Auto Off
timer.
6.1.1. Weekly Timer
■ The weekly timer can be used to set up to eight operations for each day
of the week.
• Each operation may consist of any of the following: ON/OFF time
together with a temperature setting, or ON/OFF time only, or temperature setting only.
• When the current time reaches a time set at this timer, the air
conditioner carries out the action set by the timer.
■ Time setting resolution for this timer is 1 minute.
Note:
*1. Weekly Timer/Simple Timer/Auto Off Timer cannot be used at the same time.
*2. The weekly timer will not operate when any of the following conditions is in
effect.
The timer feature is off; the system is in an malfunction state; a test run is
in progress; the remote controller is undergoing self-check or remote controller check; the user is in the process of setting a function; the user is in
the process of setting the timer; the user is in the process of setting the
current day of the week or time; the system is under central control. (Specifically, the system will not carry out operations (unit on, unit off, or temperature setting) that are prohibited during these conditions.)
Operation No.
Day Setting
● To run the ventilator independently:
■ Press the Mode button 2 until appears on the display. This will
cause the ventilator to start.
● To change the ventilator force:
■ Press the Ventilation button 8 as necessary.
• Each press toggles the setting, as shown below.
▲
▲
Low High
5.6.2. For Wireless Remote-controller
● The ventillator will automatically operate when the indoor unit turns on.
● No indication on the wireless remote controller.
<How to Set the Weekly Timer>
1. Be sure that you are at a standard control screen, and that the weekly
timer indicator 1 is shown in the display.
2. Press the Timer Menu button B, so that the “Set Up” appears on the
screen (at 2). (Note that each press of the button toggles the display
between “Set Up” and “Monitor”.)
3. Press the Timer On/Off (Set Day) button 9 to set the day. Each press
advances the display at 3 to the next setting, in the following sequence:
“Sun Mon Tues Wed Thurs Fri Sat” → “Sun” → ... → “Fri” → “Sat” → “Sun
Mon Tues Wed Thurs Fri Sat”...
4. Press the or Operation button (7 or 8) as necessary to select the
appropriate operation number (1 to 8) 4.
* Your inputs at Steps 3 and 4 will select one of the cells from the matrix
illustrated below.
(The remote-controller display at left shows how the display would
appear when setting Operation 1 for Sunday to the values indicated
below.)
Setup Matrix
Op No. Sunday Monday … Saturday
• 8:30
• ON
No. 1
• 23 °C
• 10:00
No. 2
• OFF
…
No. 8
<Operation 1 settings for Sunday>
Start the air conditioner at 8:30, with
the temperature set to 23 °C.
Note:
By setting the day to “Sun Mon Tues Wed Thurs Fri Sat”, you can set the same
operation to be carried out at the same time every day.
(Example: Operation 2 above, which is the same for all days of the week.)
• 10:00
• OFF
▲
• 10:00
• OFF
• 10:00
• OFF
▲
<Operation 2 settings for every day>
Turn off the air conditioner at 10:00.
<Setting the Weekly Timer>
Shows the time
setting
Shows the selected operation (ON or OFF)
* Does not appear if operation is not set.
Shows the temperature setting
* Does not appear if temperature is not
set.
5. Press the appropriate Set Time button A as necessary to set the
desired time (at 5).
* As you hold the button down, the time first increments in minute inter-
vals, then in ten-minute intervals, and then in one-hour intervals.
6. Press the ON/OFF button 1 to select the desired operation (ON or
OFF), at 6.
* Each press changes the next setting, in the following sequence:
No display (no setting) → “ON” → “OFF”
7
Page 8

ONHr
AFTER
SIMPLE
PAR-21MAA
ON/OFF
FILTER
CHECK
OPERATION
CLEAR
TEST
TEMP.
MENU
BACK DAY
MONITOR/SET
CLOCK
ON/OFF
2A9
0
4
1
B
ONHr
AFTER
SIMPLE
4
1
3
2
˚C
TIMER
SUN
ON
OFF
WEEKLY
1
9
8
˚C
˚C
TIME SUN
WEEKLY
0
˚C
˚C
TIME SUN
WEEKLY
0
6. Timer
7. Press the appropriate Set Temperature button 3 to set the desired
temperature (at 7).
* Each press changes the setting, in the following sequence: No
display (no setting) ⇔ 24 ⇔ 25 ⇔ ... ⇔ 29 ⇔ 30 ⇔ 12 ⇔ ... ⇔ 23
⇔ No display.
(Available range: The range for the setting is 12 °C to 30 °C. The
actual range over which the temperature can be controlled, however, will vary according to the type of the connected unit.)
8. After making the appropriate settings at Steps 5, 6 and 7, press the
Filter button 4 to lock in the values.
To clear the currently set values for the selected operation, press
and quickly release the Check (Clear) button 0 once.
* The displayed time setting will change to “—:—”, and the On/Off
and temperature settings will all disappear.
(To clear all weekly timer settings at once, hold down the Check
(Clear) button 0 for two seconds or more. The display will begin
flashing, indicating that all settings have been cleared.)
Note:
Your new entries will be cancelled if you press the Mode (Return) button
2 before pressing the Filter
button 4.
If you have set two or more different operations for exactly the same
time, only the operation with the highest Operation No. will be carried
out.
9. Repeat Steps 3 to 8 as necessary to fill as many of the available cells
as you wish.
10.Press the mode (Return) button 2 to return to the standard control
screen and complete the setting procedure.
11.To activate the timer, press the Timer On/Off button 9, so that the
“Timer Off” indication disappears from the screen. Be sure that the
“Timer Off” indication is no longer displayed.
* If there are no timer settings, the “Timer Off” indication will flash on
the screen.
6.1.2. Simple Timer
■ You can set the simple timer in any of three ways.
• Start time only:
The air conditioner starts when the set time has elapsed.
• Stop time only:
The air conditioner stops when the set time has elapsed.
• Start & stop times:
The air conditioner starts and stops at the respective elapsed times.
■ The simple timer (start and stop) can be set only once within a 72-hour
period.
The time setting is made in hour increments.
Note:
*1. Weekly Timer/Simple Timer/Auto Off Timer cannot be used at the same time.
*2. The simple timer will not operate when any of the following conditions is in
effect.
The timer is off; the system is in malfunction state; a test run is in progress;
the remote controller is undergoing self-check or remote controller check;
the user is in the process of selecting a function; the user is in the process
of setting the timer; the system is under central control. (Under these conditions, On/Off operation is prohibited.)
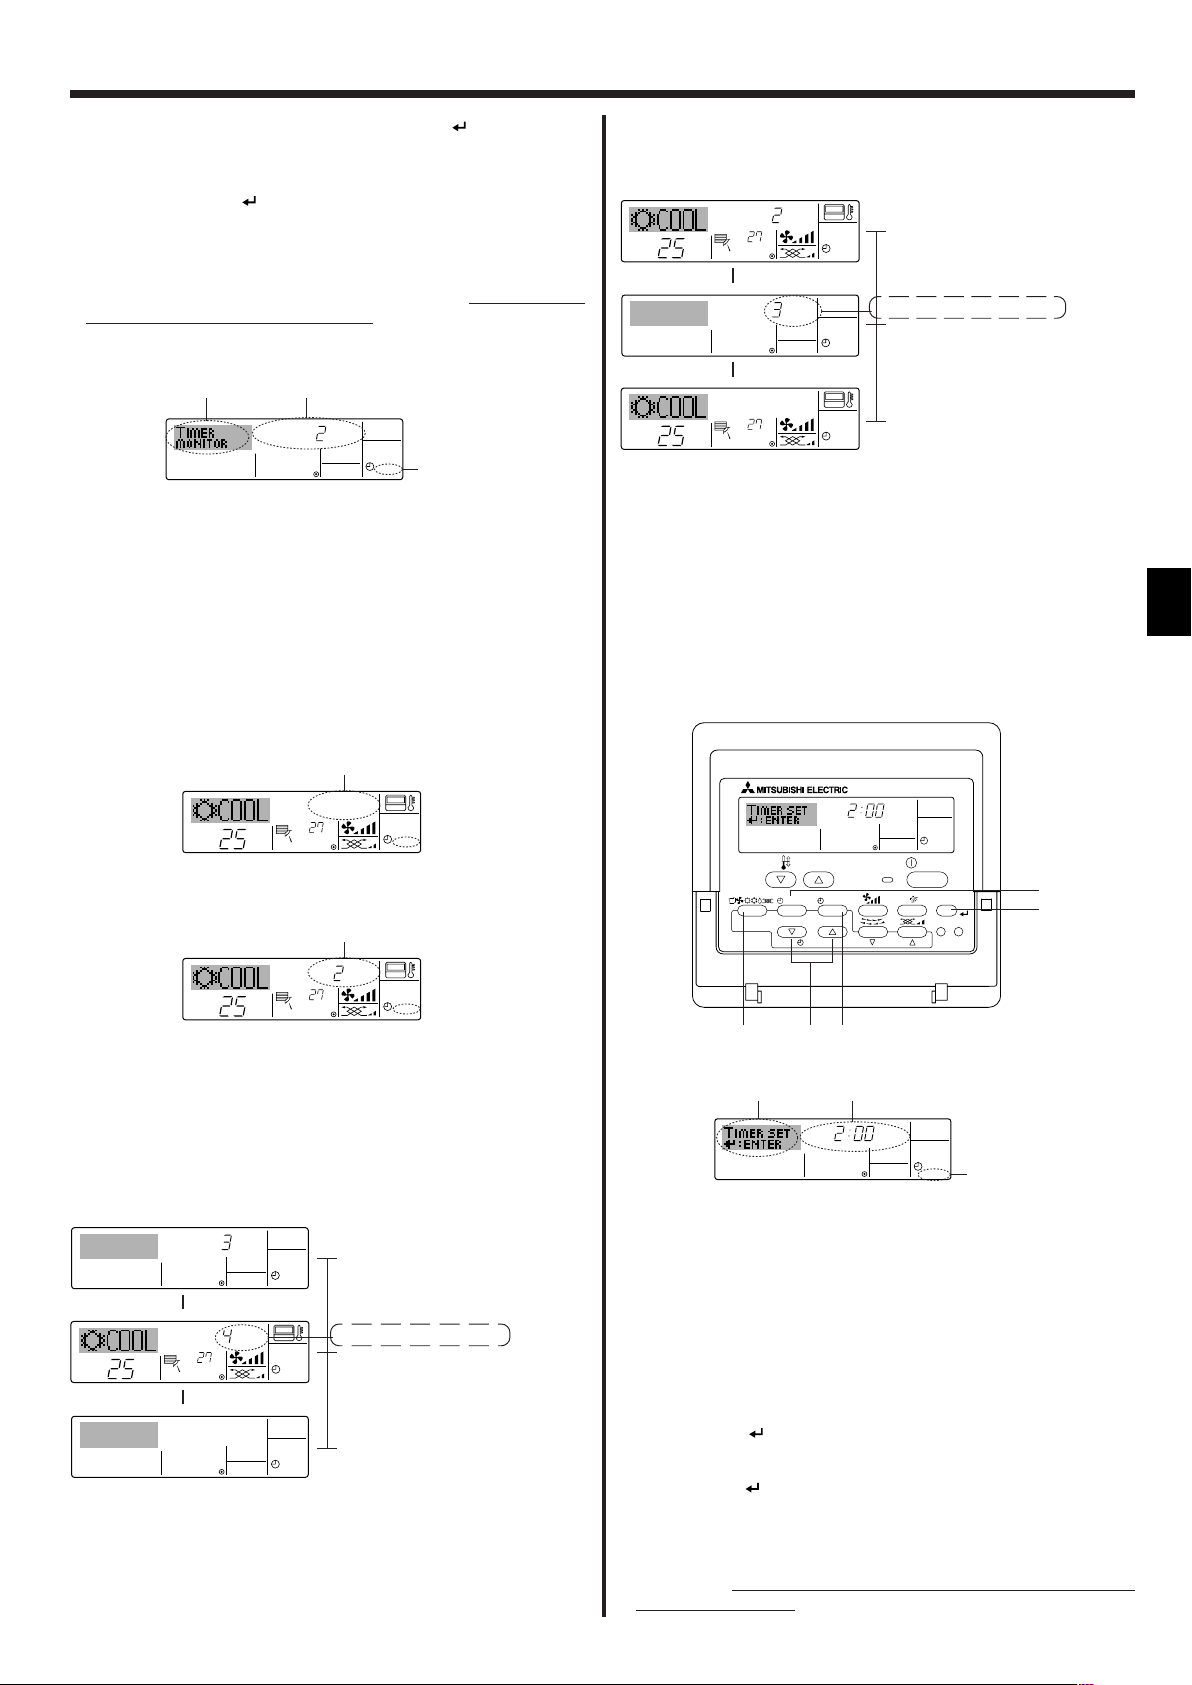
<How to View the Weekly Timer Settings>
Timer Settings
1.
Be sure that the weekly timer indicator is visible on the screen (at 1).
2. Press the Timer Menu button B so that “Monitor” is indicated on the
screen (at 8).
3. Press the Timer On/Off (Set Day) button 9 as necessary to select
the day you wish to view.
4. Press the or Operation button (7 or 8) as necessary to change
the timer operation shown on the display (at 9).
* Each press will advance to the next timer operation, in order of
time setting.
5. To close the monitor and return to the standard control screen, press
the Mode (Return) button 2.
<To Turn Off the Weekly Timer>
Press the Timer On/Off button 9 so that “Timer Off” appears at 0.
<To Turn On the Weekly Timer>
Press the Timer On/Off button 9 so that the “Timer Off” indication (at 0)
goes dark.
8
<How to Set the Simple Timer>
Timer Setting
Action (On or Off)
* “— —” is displayed if there is no
setting.
1. Be sure that you are at a standard control screen, and that the simple
timer indicator is visible in the display (at 1).
When something other than the Simple Timer is displayed, set it to
SIMPLE TIMER using the function selection of remote controller (see
8.[4]–3 (3)) timer function setting.
2. Press the Timer Menu button B, so that the “Set Up” appears on the
screen (at 2). (Note that each press of the button toggles the display
between “Set Up” and “Monitor”.)
3. Press the ON/OFF button 1 to display the current ON or OFF simple
timer setting. Press the button once to display the time remaining to ON,
and then again to display the time remaining to OFF. (The ON/OFF
indication appears at 3).
•“ON” timer:
The air conditioner will start operation when the specified number of
hours has elapsed.
•“OFF” timer:
The air conditioner will stop operation when the specified number of
hours has elapsed.
4. With “ON” or “OFF” showing at 3: Press the appropriate Set Time button
A as necessary to set the hours to ON (if “ON” is displayed) or the hours
to OFF (if “OFF” is displayed) at 4.
• Available Range: 1 to 72 hours
5. To set both the ON and OFF times, repeat Steps 3 and 4.
* Note that ON and OFF times cannot be set to the same value.
6. To clear the current ON or OFF setting: Display the ON or OFF setting
(see step 3) and then press the Check (Clear) button 0 so that the time
setting clears to “—” at 4. (If you want to use only an ON setting or only
an OFF setting, be sure that the setting you do not wish to use is shown
as “—”.)
Page 9
TIMER ON
OFFHrAFTER
SIMPLE
1
6
5
˚C
˚C
SIMPLE
7
˚C
˚C
ONHr
AFTER
SIMPLE
7
ONHr
AFTER
SIMPLE
˚C
˚C
OFFHrAFTER
SIMPLE
SIMPLE
˚C
˚C
OFFHrAFTER
SIMPLE
ONHr
AFTER
SIMPLE
˚C
˚C
SIMPLE
AFTER OFF
AUTO OFF
PAR-21MAA
ON/OFF
FILTER
CHECK
OPERATION
CLEAR
TEST
TEMP.
MENU
BACK DAY
MONITOR/SET
CLOCK
ON/OFF
2A9
4
B
AFTER OFF
AUTO OFF
3
1
2
6. Timer
7. After completing steps 3 to 6 above, press the Filter button 4 to lock
in the value.
Note:
Your new settings will be cancelled if you press the Mode (Return) button 2
before pressing the Filter
button 4.
8. Press the Mode (Return) button 2 to return to the standard control
screen.
9. Press the Timer On/Off button 9 to start the timer countdown. When the
timer is running, the timer value is visible on the display. Be sure that the
timer value is visible and appropriate.
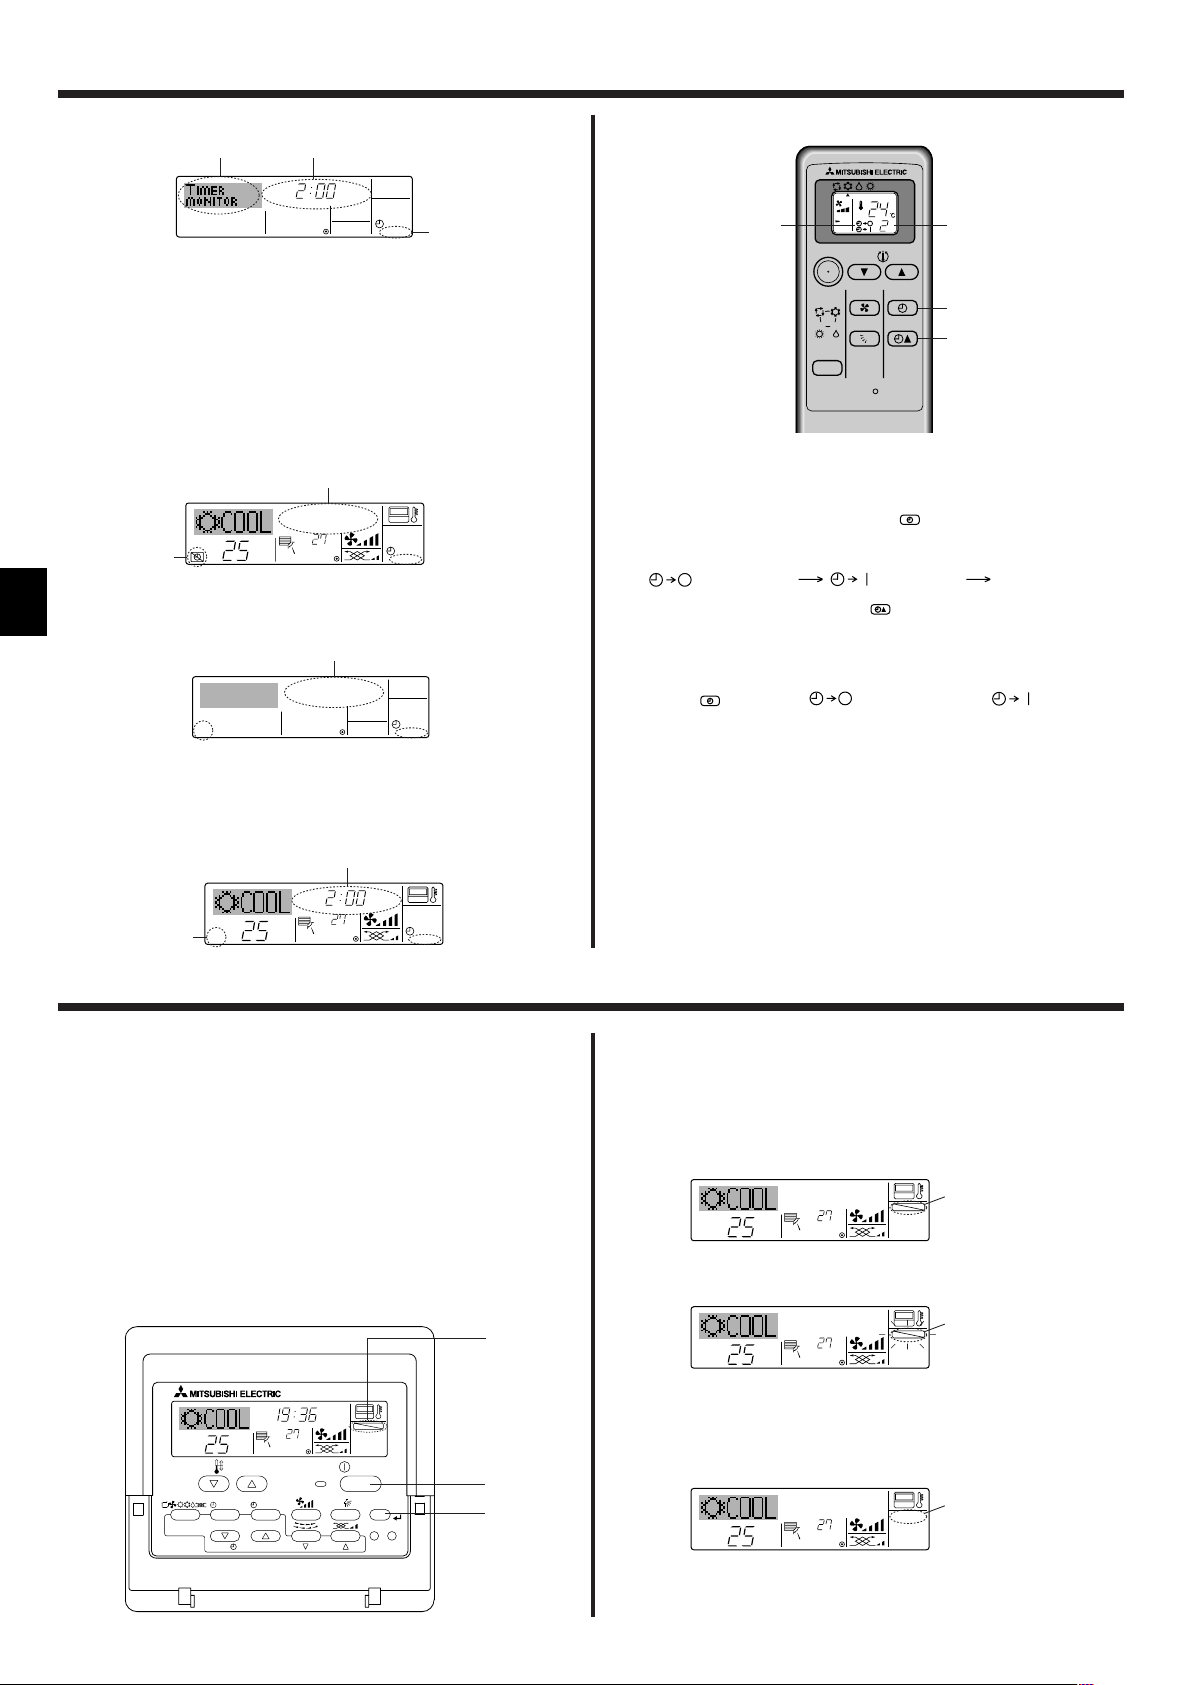
<Viewing the Current Simple Timer Settings>
Timer Setting
1. Be sure that the simple timer indicator is visible on the screen (at 1).
2. Press the Timer Menu button B, so that the “Monitor” appears on the
screen (at 5).
• If the ON or OFF simple timer is running, the current timer value will
appear at 6.
• If ON and OFF values have both been set, the two values appear
alternately.
3. Press the Mode (Return) button 2 to close the monitor display and return
to the standard control screen.
<To Turn Off the Simple Timer...>
Press the Timer On/Off button 9 so that the timer setting no longer appears on the screen (at 7).
Example 2:
Start the timer, with OFF time is sooner than ON time
ON Setting: 5 hours
OFF Setting: 2 hours
At Timer Start
Display shows the timer’s OFF setting (hours
▲
remaining to OFF).
At 2 hours after timer start
Display changes to show the timer’s ON setting
(hours remaining to ON).
▲
The time displayed is ON setting (5 hours) –
OFF setting (2 hours) = 3 hours.
At 5 hours after timer start
The air conditioner comes on, and will continue
to run until someone turns it off.
6.1.3. Auto Off Timer
■ This timer begins countdown when the air conditioner starts, and shuts
the air conditioner off when the set time has elapsed.
■ Available settings run from 30 minutes to 4 hours, in 30-minute intervals.
Note:
*1. Weekly Timer/Simple Timer/Auto Off Timer cannot be used at the same time.
*2. The Auto Off timer will not operate when any of the following conditions is
in effect.
The timer is off; the system is in malfunction state; a test run is in progress;
the remote controller is undergoing self-check or remote controller check;
the user is in the process of selecting a function; the user is in the process
of setting the timer; the system is under central control. (Under these conditions, On/Off operation is prohibited.)
<To Turn On the Simple Timer...>
Press the Timer On/Off button 9 so that the timer setting becomes visible
at 7.
Examples
If ON and OFF times have both been set at the simple timer, operation and
display are as indicated below.
Example 1:
Start the timer, with ON time set sooner than OFF time
ON Setting: 3 hours
OFF Setting: 7 hours
At Timer Start
Display shows the timer’s ON setting (hours
remaining to ON).
At 3 hours after timer start
Display changes to show the timer’s OFF setting (hours remaining to OFF).
The time displayed is OFF setting (7 hours) –
ON setting (3 hours) = 4 hours.
At 7 hours after timer start
The air conditioner goes off, and will remain off
until someone restarts it.
▲
▲
<How to Set the Auto Off Timer>
Timer Setting
1. Be sure that you are at a standard control screen, and that the Auto Off
timer indicator is visible in the display (at 1).
When something other than the Auto Off Timer is displayed, set it to
AUTO OFF TIMER using the function selection of remote controller (see
8.[4]–3 (3)) timer function setting.
2. Hold down the Timer Menu button B for 3 seconds, so that the “Set Up”
appears on the screen (at 2).
(Note that each press of the button toggles the display between “Set Up”
and “Monitor”.)
3. Press the appropriate Set Time button A as necessary to set the OFF
time (at 3).
4. Press the Filter button 4 to lock in the setting.
Note:
Your entry will be cancelled if you press the Mode (Return) button 2 before
pressing the Filter
button 4.
5. Press the Mode (Return) button 2 to complete the setting procedure and
return to the standard control screen.
6. If the air conditioner is already running, the timer starts countdown
immediately. Be sure to check that the timer setting appears cor-
rectly on the display.
9
Page 10
AFTER
TIMER
OFF
AUTO OFF
5
1
4
˚C
˚C
AUTO OFF
6
7
AUTO OFF
7
˚C
˚C
AFTER OFF
AUTO OFF
6
7
SELECT
TIME
SELECT
˚C
˚C
TIME SUN
FUNCTION
PAR-21MAA
ON/OFF
FILTER
CHECK
OPERATION
CLEAR
TEST
TEMP.
MENU
BACK DAY
MONITOR/SET
CLOCK
ON/OFF
4
1
1
˚C
˚C
FUNCTION
1
˚C
˚C
FUNCTION
1
˚C
˚C
1
6. Timer
ON/OFF
RESET
TOO
WARM
TOO
COOL
MODE
AUTO COOL
DRY
HEAT
FAN
VANE
SELECT
TIME
h
1
B
A
2
<Checking the Current Auto Off Timer Setting>
Timer Setting
1. Be sure that the “Auto Off” is visible on the screen (at 1).
2. Hold down the Timer Menu button B for 3 seconds, so that “Monitor” is
indicated on the screen (at 4).
• The timer remaining to shutdown appears at 5.
3. To close the monitor and return to the standard control screen, press the
Mode (Return) button 2.
<To Turn Off the Auto Off Timer...>
● Hold down the Timer On/Off button 9 for 3 seconds, so that “Timer Off”
appears (at 6) and the timer value (at 7) disappears.
● Alternatively, turn off the air conditioner itself. The timer value (at 7) will
disappear from the screen.
<To Turn On the Auto Off Timer...>
● Hold down the Timer On/Off button 9 for 3 seconds. The “Timer Off”
indication disappears (at 6), and the timer setting comes on the display
(at 7).
● Alternatively, turn on the air conditioner. The timer value will appear at 7.
6.2. For wireless remote controller
It is convenient to set the timer when you go to bed, when you get home,
when you get up, etc.
1Select the timer mode by pressing the
A Each time this button is pressed, the timer mode is changed in se-
quence:
(OFF TIMER) (ON TIMER) TIMER RELEASE
2Set the time of the timer using the
B Each time this button is pressed, the set time increases by 1 hour to
12 hours.
To release the timer:
• Press the
button until (OFF TIMER) and (ON TIMER)
are not displayed.
Note:
The OFF TIMER and the ON TIMER cannot be set at the same time.
button during operation.
button.
7. Other Functions
7.1. Locking the Remote Controller Buttons (Operation
function limit controller)
■ If you wish, you can lock the remote controller buttons. You can use the
Function Selection of remote controller to select which type of lock to use.
(For information about selecting the lock type, see section 8, item [4]–2
(1)).
Specifically, you can use either of the following two lock types.
1Lock All Buttons:
Locks all of the buttons on the remote controller.
2Lock All Except ON/OFF:
Locks all buttons other than the ON/OFF button.
Note:
The “Locked” indicator appears on the screen to indicate that buttons are currently locked.
10
<How to Lock the Buttons>
1. While holding down the Filter button 4 , press and hold down the ON/OFF
button 1 for 2 seconds. The “Locked” indication appears on the screen
(at 1), indicating that the lock is now engaged.
* If locking has been disabled in Function Selection of remote controller,
the screen will display the “Not Available” message when you press the
buttons as described above.
• If you press a locked button, the “Locked” indication (at 1) will blink on
the display.
Lock Indicator
<How to Unlock the Buttons>
1. While holding down the Filter button 4, press and hold down the ON/
OFF button 1 for 2 seconds—so that the “Locked” indication disappears
from the screen (at 1).
Page 11
ON/OFF
TEMP.
˚C
˚C
ON/OFF
TEMP.
˚C
˚C
ON/OFF
ERROR CODE
7. Other Functions
ON/OFF
˚C
˚C
ERROR CODE
ON/OFF
CALL:XXXX
XXX:XXX
7.2. Other indications
7.2.1. Centrally Controlled
● Displayed when operation is controlled by central controller, etc.
Restricted operations are shown below.
• ON/OFF (including timer operation)
• Operation mode
• Set temperature
Note:
May also be individually restricted.
7.2.2. Flashing Mode Indicator
■ When flashes continuously
Displayed when another indoor unit connected to the outdoor unit is
already operating in a different operation mode.
Match with the operation mode of the other indoor unit.
■ When mode switched after display flashes
Displayed when operation mode is restricted for each season by central
controller, etc.
Use another operation mode.
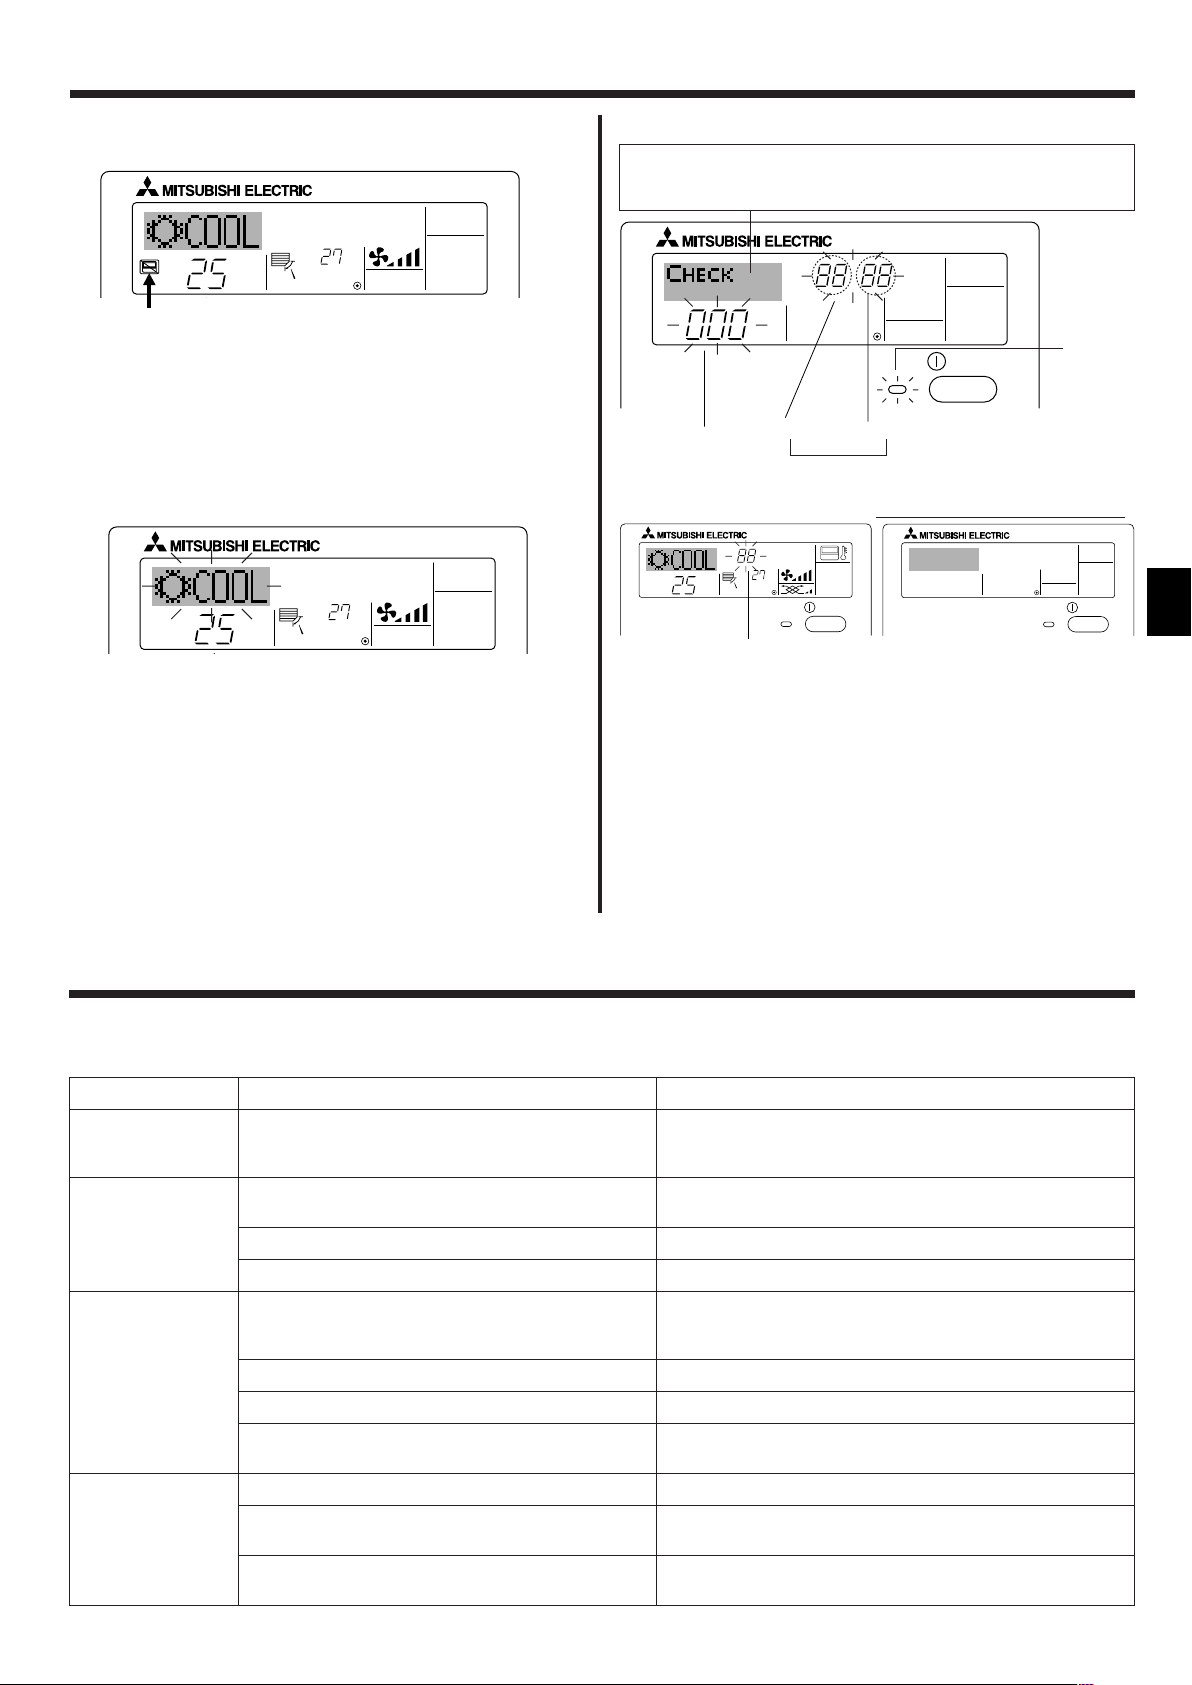
7.2.3. Error Codes indication
If you have entered contact number to be called in the event of a problem, the screen displays this number. (You can set this up under Function Selection of remote controller. For information, refer to section 8.)
ON lamp
(Flashing)
Indoor Unit’s
Error Code
Refrigerant
Address
Error Code
● If the ON lamp and error code are both flashing: This means that the air
conditioner is out of order and operation has been stopped (and cannot
resume). Take note of the indicated unit number and error code, then
switch off the power to the air conditioner and call your dealer or servicer.
● If only the error code is flashing (while the ON lamp remains lit): Operation is continuing, but there may be a problem with the system. In this
case, you should note down the error code and then call your dealer or
servicer for advice.
* If you have entered contact number to be called in the event of a
problem, push the Check button to display it on the screen. (You can
set this up under Function Selection of remote controller. For information, refer to section 8.)
Indoor Unit No.
Alternating
Display
When the Check button is pressed:
8. Function Selection
Function selection of remote controller
The setting of the following remote controller functions can be changed using the remote controller function selection mode. Change the setting when
needed.
Item 3 (Setting content)
1. Change Language
2. Function limit
3. Mode selection
4. Display change
Item 1
(“CHANGE
LANGUAGE”)
(“FUNCTION
SELECTION”)
(“MODE SELECTION”)
(“DISP MODE
SETTING”)
Item 2
Language setting to display
(1) Operation function limit setting (operation lock) (“LOCKING
FUNCTION”)
(2) Use of automatic mode setting (“SELECT AUTO MODE”)
(3) Temperature range limit setting (“LIMIT TEMP FUNCTION”)
(1) Remote controller main/sub setting (“CONTROLLER MAIN/
SUB”)
(2) Use of clock setting (“CLOCK”)
(3) Timer function setting (“WEEKLY TIMER”)
(4) Contact number setting for error situation (“CALL.”)
(1) Temperature display °C/°F setting (“TEMP MODE °C/°F”)
(2) Suction air temperature display setting (“ROOM TEMP DISP
SELECT”)
(3) Automatic cooling/heating display setting (“AUTO MODE
DISP C/H”)
• Display in multiple languages is possible
• Setting the range of operation limit (operation lock)
• Setting the use or non-use of “automatic” operation mode
• Setting the temperature adjustable range (maximum, minimum)
• Selecting main or sub remote controller
* When two remote controllers are connected to one group, one controller
must be set to sub.
• Setting the use or non-use of clock function
• Setting the timer type
• Contact number display in case of error
• Setting the telephone number
• Setting the temperature unit (°C or °F) to display
• Setting the use or non-use of the display of indoor (suction) air tempera-
ture
• Setting the use or non-use of the display of “Cooling” or “Heating” display
during operation with automatic mode
11
Page 12

OFF
on1
on2
OFF
ON
OFF
ON
OFF
OFF
CALL-
ON
OFF
ON
OFF
°C
°F
PAR-21MAA
ON/OFF
FILTER
CHECK
OPERATION
CLEAR
TEST
TEMP.
MENU
BACK DAY
MONITOR/SET
CLOCK
ON/OFF
F
E
G
C
D
H
B
A
I
G
G
G
G
G
G
E
E
G
G
G
G
G
E
G
E
G
G
G
G
D
D
D
D
D
D
D
D
D
D
D
D
D
D
D
D
D
D
D
D
D
D
D
D
D
D
D
D
D
D
English
Germany
Spanish
Russian
Italy
Chinese
French
Japanese
8. Function Selection
[Function selection flowchart]
Setting language (English)
Item1 Item2
Change
Language
Function
selection
Normal display
(Display when the air condition is not running)
Hold down the E button and press the D button for 2 seconds.
Remote controller function selection mode
Item3
Hold down the E button and press the D button for 2 seconds.
E Press the operation mode button.
G Press the TIMER MENU button.
D Press the TIMER ON/OFF button.
Dot display
Operation lock setting is not used.
(Initial setting value)
Operation lock setting is except On/Off button.
Operation lock setting is All buttons.
The automatic mode is displayed when the operation mode is
selected. (Initial setting value)
The automatic mode is not displayed when the operation mode
is selected.
The temperature range limit is not active. (Initial setting value)
The temperature range can be changed on cooling/dry mode.
The temperature range can be changed on heating mode.
Mode
selection
Display
mode setting
The temperature range can be changed on automatic mode.
The remote controller will be the main controller. (Initial setting value)
The remote controller will be the sub controller.
The clock function can be used. (Initial setting value)
The clock function can not be used.
Weekly timer can be used. (Initial setting value)
Auto off timer can be used.
Simple timer can be used.
Timer mode can not be used.
The set contact numbers are not displayed in case of error.
(Initial setting value)
The set contact numbers are displayed in case of error.
The temperature unit °C is used. (Initial setting value)
The temperature unit °F is used.
Room air temperature is displayed. (Initial setting value)
Room air temperature is not displayed.
One of “Automatic cooling” and “Automatic heating” is displayed
under the automatic mode is running. (Initial setting value)
Only “Automatic” is displayed under the automatic mode.
12
Page 13
8. Function Selection
[Detailed setting]
[4]–1. CHANGE LANGUAGE setting
The language that appears on the dot display can be selected.
• Press the [ MENU] button G to change the language.
1 English (GB), 2 German (D), 3 Spanish (E), 4 Russian (RU),
5 Italian (I), 6 Chinese (CH), 7 French (F), 8 Japanese (JP)
Refer to the dot display table.
[4]–2. Function limit
(1) Operation function limit setting (operation lock)
• To switch the setting, press the [ ON/OFF] button D.
1 no1: Operation lock setting is made on all buttons other than the
[ ON/OFF] button.
2 no2: Operation lock setting is made on all buttons.
3 OFF (Initial setting value): Operation lock setting is not made.
* To make the operation lock setting valid on the normal screen, it is
necessary to press buttons (Press and hold down the [FILTER] and
[ ON/OFF] buttons at the same time for two seconds.) on the
normal screen after the above setting is made.
(2) Use of automatic mode setting
When the remote controller is connected to the unit that has automatic
operation mode, the following settings can be made.
• To switch the setting, press the [ ON/OFF] button D.
1 ON (Initial setting value):
The automatic mode is displayed when the operation mode is
selected.
2 OFF:
The automatic mode is not displayed when the operation mode
is selected.
(3) Temperature range limit setting
After this setting is made, the temperature can be changed within the
set range.
• To switch the setting, press the [ ON/OFF] button D.
1 LIMIT TEMP COOL MODE:
The temperature range can be changed on cooling/dry mode.
2 LIMIT TEMP HEAT MODE:
The temperature range can be changed on heating mode.
3 LIMIT TEMP AUTO MODE:
The temperature range can be changed on automatic mode.
4 OFF (initial setting): The temperature range limit is not active.
* When the setting, other than OFF, is made, the temperature range
limit setting on cooling, heating and automatic mode is made at the
same time. However, the range cannot be limited when the set
temperature range has not changed.
• To increase or decrease the temperature, press the [ TEMP. ( )
or ( )] button F.
• To switch the upper limit setting and the lower limit setting, press the
[ ] button H. The selected setting will flash and the temperature
can be set.
• Settable range
Cooling/Dry mode:
Lower limit:19°C ~ 30°C Upper limit:30°C ~ 19°C
Heating mode:
Lower limit:17°C ~ 28°C Upper limit:28°C ~ 17°C
Automatic mode:
Lower limit:19°C ~ 28°C Upper limit:28°C ~ 19°C
[4]–3. Mode selection setting
(1) Remote controller main/sub setting
• To switch the setting, press the [ ON/OFF] button D.
1 Main: The controller will be the main controller.
2 Sub: The controller will be the sub controller.
(2) Use of clock setting
• To switch the setting, press the [ ON/OFF] button D.
1 ON: The clock function can be used.
2 OFF: The clock function cannot be used.
(3) Timer function setting
• To switch the setting, press the [ ON/OFF] button D (Choose one
of the followings.).
1 WEEKLY TIMER (initial setting value):
The weekly timer can be used.
2 AUTO OFF TIMER:
The auto off timer can be used.
3 SIMPLE TIMER:
The simple timer can be used.
4 TIMER MODE OFF:
The timer mode cannot be used.
* When the use of clock setting is OFF, the “WEEKLY TIMER” cannot
be used.
(4) Contact number setting for error situation
• To switch the setting, press the [ ON/OFF] button D.
1 CALL OFF:
The set contact numbers are not displayed in case of error.
2 CALL **** *** ****:
The set contact numbers are displayed in case of error.
CALL_:
The contact number can be set when the display is as shown on
the left.
• Setting the contact numbers
To set the contact numbers, follow the following procedures.
Move the flashing cursor to set numbers. Press the [ TEMP.
( ) and ( )] button F to move the cursor to the right (left). Press
the [ CLOCK ( ) and ( )] button C to set the numbers.
[4]–4. Display change setting
(1) Temperature display °C/°F setting
• To switch the setting, press the [ ON/OFF] button D.
1 °C: The temperature unit °C is used.
2 °F: The temperature unit °F is used.
(2) Suction air temperature display setting
• To switch the setting, press the [ ON/OFF] button D.
1 ON: The suction air temperature is displayed.
2 OFF: The suction air temperature is not displayed.
(3) Automatic cooling/heating display setting
• To switch the setting, press the [ ON/OFF] button D.
1 ON:
One of “Automatic cooling” and “Automatic heating” is displayed
under the automatic mode is running.
2 OFF:
Only “Automatic” is displayed under the automatic mode.
13
Page 14
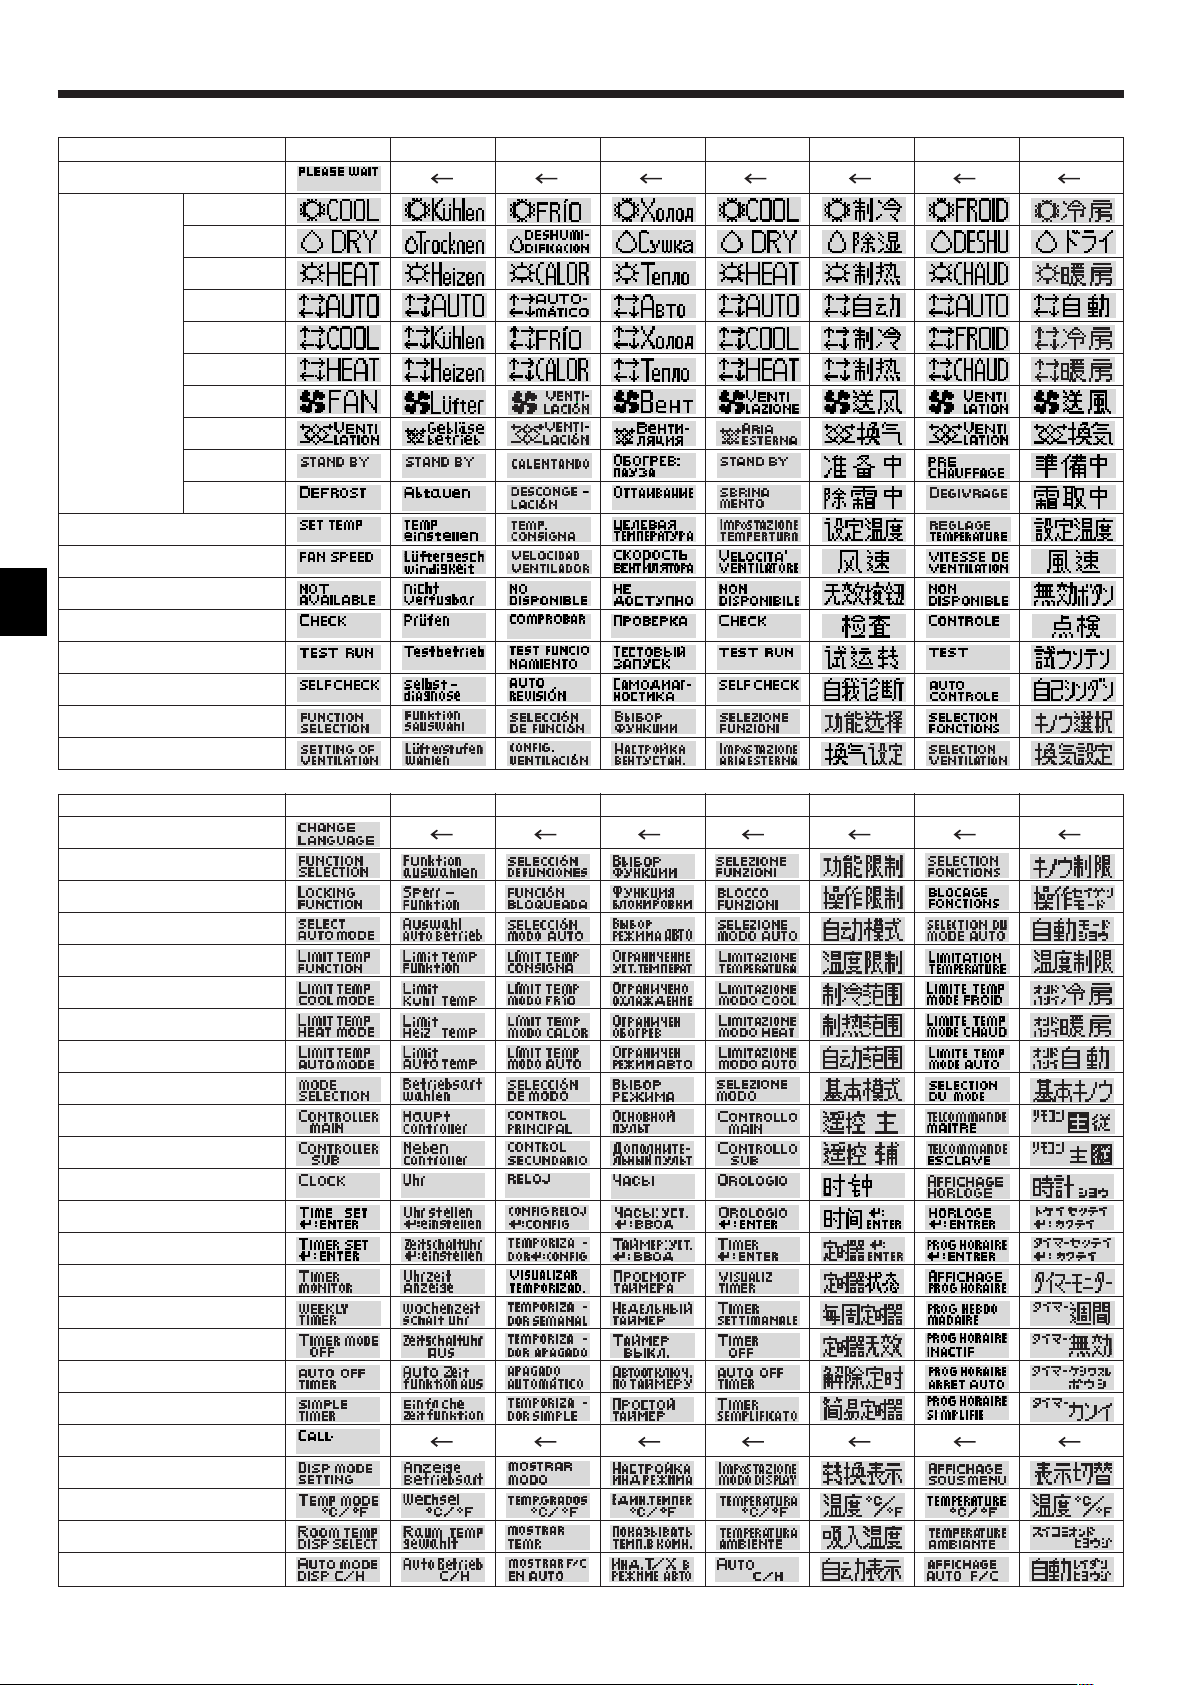
8. Function Selection
[Dot display table]
Selecting language
Waiting for start-up
Operation mode Cool
Dry
Heat
Auto
Auto(Cool)
Auto(Heat)
Fan
Ventilation
Stand by
(Hot adjust)
Defrost
Set temperature
Fan speed
Not use button
Check (Error)
Test run
Self check
Unit function selection
Setting of ventilation
English Germany Spanish Russian Italy Chinese French Japanese
Selecting language
CHANGE LANGUAGE
Function selection
Operation function limit setting
Use of automatic mode setting
Temperature range limit setting
Limit temperature cooling/day
mode
Limit temperature heating mode
Limit temperature auto mode
Mode selection
Remote controller setting MAIN
Remote controller setting SUB
Use of clock setting
Setting the day of the week and
time
Timer set
Timer monitor
Weekly timer
Timer mode off
Auto off timer
Simple timer
Contact number setting of error
situation
Display change
Temperature display °C/°F setting
Room air temperature display
setting
Automatic cooling/heating display
setting
English Germany Spanish Russian Italy Chinese French Japanese
14
Page 15
9. Emergency Operation for Wireless Remote-controller
ON/OFF
TEMP.
˚C
˚C
FILTER
B
A
D
C
A B C D E
A
B
When the remote controller cannot be used
When the batteries of the remote controller run out or the remote controller
malfunctions, the emergency operation can be done using the emergency
buttons on the grille.
ADEFROST/STAND BY lamp
BOperation lamp
CEmergency operation switch (heating)
DEmergency operation switch (cooling)
EReceiver
Starting operation
• To operate the cooling mode, press the button D.
• To operate the heating mode, press the button C.
Note:
• Details of emergency mode are as shown below.
Details of EMERGENCY MODE are as shown below.
Operation mode COOL HEAT
Set temperature 24°C24°C
Fan speed High High
Airflow direction Horizontal Downward 4
Stopping operation
• To stop operation, press the button D or the button C.
SLP-2AL (For SLZ-KA25/KA35/KA50VAL)
10. Care and Cleaning
■ Indicates that the filter needs cleaning.
Clean the filter.
■ When resetting “FILTER” display
When the [FILTER] button is pressed two times successively after
cleaning the filter, the display goes off and is reset.
Note:
● When two or more different types of indoor unit are controlled, the cleaning
period differs with the type of filter. When the master unit cleaning period
arrives, “FILTER” is displayed. When the filter display goes off, the cumulative time is reset.
● “FILTER” indicates the cleaning period when the air conditioner was used
under general indoor air conditions by criteria time. Since the degree of dirtiness depends on the environmental conditions, clean the filter accordingly.
● The filter cleaning period cumulative time differs with the model.
● This indication is not available for wireless remote controller.
ss
sCleaning the filters
ss
• Clean the filters using a vacuum cleaner. If you do not have a vacuum
cleaner, tap the filters against a solid object to knock off dirt and dust.
• If the filters are especially dirty, wash them in lukewarm water. Take care
to rinse off any detergent thoroughly and allow the filters to dry completely before putting them back into the unit.
Caution:
• Do not dry the filters in direct sunlight or by using a heat source,
such as an electric heater: this may warp them.
• Do not wash the filters in hot water (above 50°C), as this may warp
them.
• Make sure that the air filters are always installed. Operating the
unit without air filters can cause malfunction.
ss
sFilter removal
ss
Caution:
• In removing the filter, precautions must be taken to protect your
eyes from dust. Also, if you have to climb up on a stool to do the
job, be careful not to fall.
• When the filter is removed, do not touch the metallic parts inside
the indoor unit, otherwise injury may result.
■ SLZ-KA·VA(L)
1 Pull the knob on the intake grille in the direction indicated by the
arrow and it should open.
2 Open the intake grille.
3 Release the knob on the center edge of the intake grille and pull the
filter forward to remove the filter.
A Knob B Grille C Intake grille D Filter
■ SEZ-KA·VA
Caution:
• Before you start cleaning, stop operation and turn OFF the power
supply.
• Indoor units are equipped with filters to remove the dust of sucked-in
air. Clean the filters using the methods shown in the following sketches.
• Be sure to check on the location and the way of setting with the
contractor when the unit perform a trial run. (Example) The air filter
should be attached to the indoor unit’s air intake (rear side or bottom side of unit).
A Air intake B Filter
15
Page 16
WEEKLY
SIMPLE
AUTO OFF
11. Trouble Shooting
Having trouble?
Air conditioner does not heat or cool well.
When heating operation starts, warm air does not blow from the indoor unit
soon.
During heating mode, the air conditioner stops before the set room temperature is reached.
Airflow direction changes during operation or airflow direction cannot be
set.
When the airflow direction is changed, the vanes always move up and down
past the set position before finally stopping at the position.
A flowing water sound or occasional hissing sound is heard.
A cracking or creaking sound is heard.
The room has an unpleasant odor.
A white mist or vapor is emitted from the indoor unit.
Water or vapor is emitted from the outdoor unit.
The operation indicator does not appear in the remote controller display.
“ ” appears in the remote controller display.
When restarting the air conditioner soon after stopping it, it does not operate even though the ON/OFF button is pressed.
Air conditioner operates without the ON/OFF button being pressed.
Air conditioner stops without the ON/OFF button being pressed.
Remote controller timer operation cannot be set.
“PLEASE WAIT” appears in the remote controller display.
An error code appears in the remote controller display.
Draining water or motor rotation sound is heard.
Here is the solution. (Unit is operating normally.)
■ Clean the filter. (Airflow is reduced when the filter is dirty or clogged.)
■ Check the temperature adjustment and adjust the set temperature.
■ Make sure that there is plenty of space around the outdoor unit. Is the
indoor unit air intake or outlet blocked?
■ Has a door or window been left open?
■ Warm air does not blow until the indoor unit has sufficiently warmed up.
■ When the outdoor temperature is low and the humidity is high, frost may
form on the outdoor unit. If this occurs, the outdoor unit performs a defrosting operation. Normal operation should begin after approximately
10 minutes.
■ During cooling mode, the vanes automatically move to the horizontal
(down) position after 1 hour when the down (horizontal) airflow direction
is selected. This is to prevent water from forming and dripping from the
vanes.
■ During heating mode, the vanes automatically move to the horizontal
airflow direction when the airflow temperature is low or during defrosting
mode.
■ When the airflow direction is changed, the vanes move to the set position after detecting the base position.
■ These sounds can be heard when refrigerant is flowing in the air conditioner or when the refrigerant flow is changing.
■ These sounds can be heard when parts rub against each due to expansion and contraction from temperature changes.
■ The indoor unit draws in air that contains gases produced from the walls,
carpeting, and furniture as well as odors trapped in clothing, and then
blows this air back into the room.
■ If the indoor temperature and the humidity are high, this condition may
occur when operation starts.
■ During defrosting mode, cool airflow may blow down and appear like a
mist.
■ During cooling mode, water may form and drip from the cool pipes and
joints.
■ During heating mode, water may form and drip from the heat exchanger.
■ During defrosting mode, water on the heat exchanger evaporates and
water vapor may be emitted.
■
Turn on the power switch. “ ” will appear in the remote controller display.
■ During central control, “ ” appears in the remote controller display and
air conditioner operation cannot be started or stopped using the remote
controller.
■ Wait approximately three minutes.
(Operation has stopped to protect the air conditioner.)
■ Is the on timer set?
Press the ON/OFF button to stop operation.
■ Is the air conditioner connected to a central remote controller?
Consult the concerned people who control the air conditioner.
■ Does “ ” appear in the remote controller display?
Consult the concerned people who control the air conditioner.
■ Has the auto recovery feature from power failures been set?
Press the ON/OFF button to stop operation.
■ Is the off timer set?
Press the ON/OFF button to restart operation.
■ Is the air conditioner connected to a central remote controller?
Consult the concerned people who control the air conditioner.
■ Does “ ” appear in the remote controller display?
Consult the concerned people who control the air conditioner.
■ Are timer settings invalid?
If the timer can be set,
the remote controller display.
■ The initial settings are being performed. Wait approximately 3 minutes.
■ The protection devices have operated to protect the air conditioner.
■ Do not attempt to repair this equipment by yourself.
Turn off the power switch immediately and consult your dealer. Be sure
to provide the dealer with the model name and information that appeared
in the remote controller display.
■ When cooling operation stops, the drain pump operates and then stops.
Wait approximately 3 minutes.
,
, or
appears in
16
Page 17
11. Trouble Shooting
Having trouble? Here is the solution. (Unit is operating normally.)
Noise is louder than specifications.
■ The indoor operation sound level is affected by the acoustics of the particular room as shown in the following table and will be higher than the
noise specification, which was measured in an echo-free room.
Location
examples
Noise levels
High soundabsorbing rooms
Broadcasting
studio, music
room, etc.
3 to 7 dB
Normal rooms
Reception room,
hotel lobby, etc.
6 to 10 dB
Low soundabsorbing rooms
Office, hotel
room
9 to 13 dB
Nothing appears in the wireless remote controller display, the display is
faint, or signals are not received by the indoor unit unless the remote controller is close.
The operation lamp near the receiver for the wireless remote controller on
the indoor unit is flashing.
12. Installation, relocation and inspection
Installation place
Avoid installing the air conditioner in the following places.
• Where flammable gas could leak.
Caution:
Do not install the unit where flammable gas could leak.
If gas leaks and collects around the unit, it may cause an explosion.
• Where there is much machine oil.
• Salty place such as the seaside.
• Where sulfide gas is generated such as a hot spring.
• Where there is oil splashing or much oily smoke.
Warning:
If the air conditioner operates but does not cool or heat (depending
on model) the room, consult your dealer since there may be a refrigerant leak. Be sure to ask the service representative whether there is
refrigerant leakage or not when repairs are carried out.
The refrigerant charged in the air conditioner is safe. Refrigerant normally does not leak, however, if refrigerant gas leaks indoors, and
comes into contact with the fire of a fan heater, space heater, stove,
etc., harmful substances will be generated.
■ The batteries are low.
Replace the batteries and press the Reset button.
■ If nothing appears even after the batteries are replaced, make sure that
the batteries are installed in the correct directions (+, –).
■ The self diagnosis function has operated to protect the air conditioner.
■ Do not attempt to repair this equipment by yourself.
Turn off the power switch immediately and consult your dealer. Be sure
to provide the dealer with the model name.
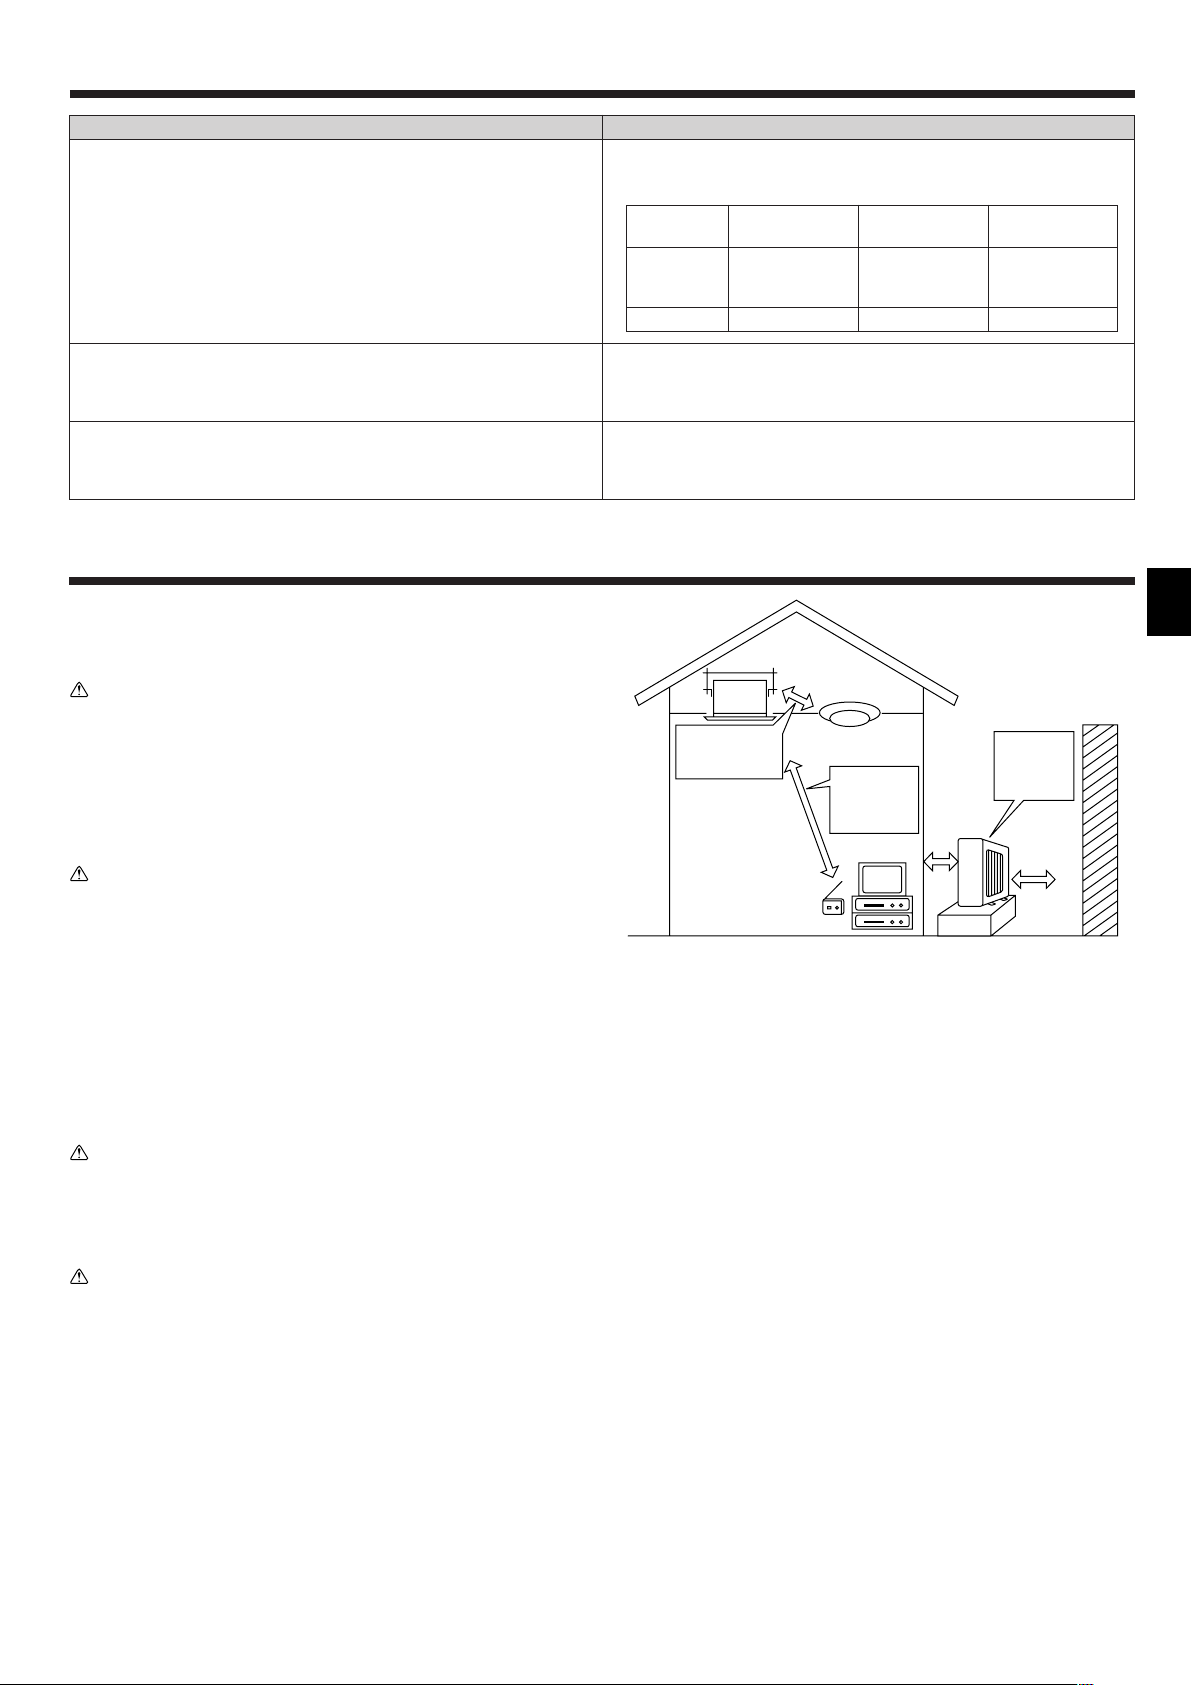
Inverter type
fluorescent lamp
Wall, etc.
To prevent the effect
of a fluorescent lamp,
keep it away as far
apart as possible.
Radio
To prevent picture
distortion or
noise, keep 1 m
or more apart.
TV
100 mm or more
Wellventilated dry
place
400 mm or more
Electrical work
• Provide an exclusive circuit for power supply of the air conditioner.
• Be sure to observe the breaker capacity.
Warning:
• The customer should not install this unit. If the unit is installed incorrectly, fire, electric shock, injury due to a falling unit, water leakage, etc.
may result.
• Do not connect using branched outlet or an extension cord, and do not attach many loads to one electric outlet.
A fire or electric shock may result from poor contact, poor insulation, exceeding the permissible current, etc.
Consult your dealer.
Caution:
• Apply grounding
Do not connect a grounding wire to a gas pipe, water pipe, lightning rod or ground wire of a telephone.
If a grounding is incorrect, it may cause an electric shock.
• Install an earth leakage breaker depending on the place where the air conditioner is to be installed (humid place, etc.).
If the earth leakage breaker is not installed, it may cause an electric shock.
Inspection and maintenance
• When the air conditioner is used for several seasons, the capacity may be lowered due to dirt inside the unit.
• Depending upon the conditions of use, an odor may be generated or dirt, dust, etc. may prevent proper drainage.
• It is recommended to apply inspection and maintenance (charged) by a specialist in addition to normal maintenance. Consult your dealer.
17
Page 18
12. Installation, relocation and inspection
Also consider operation sound
• Do not put an object around the air outlet of the outdoor unit. It may cause lowering of capacity or increase operating sound.
• If abnormal sound is heard during operation, consult your dealer.
Relocation
• When the air conditioner is to be removed or reinstalled because of rebuilding, moving, etc., special techniques and work are required.
Warning:
Repair or relocation should not be done by the customer.
If this is done incorrectly, it may cause a fire, electric shock, injury by dropping of the unit, water leakage, etc. Consult your dealer.
Disposal
• To dispose of this product, consult your dealer.
If you have any question, consult your dealer.
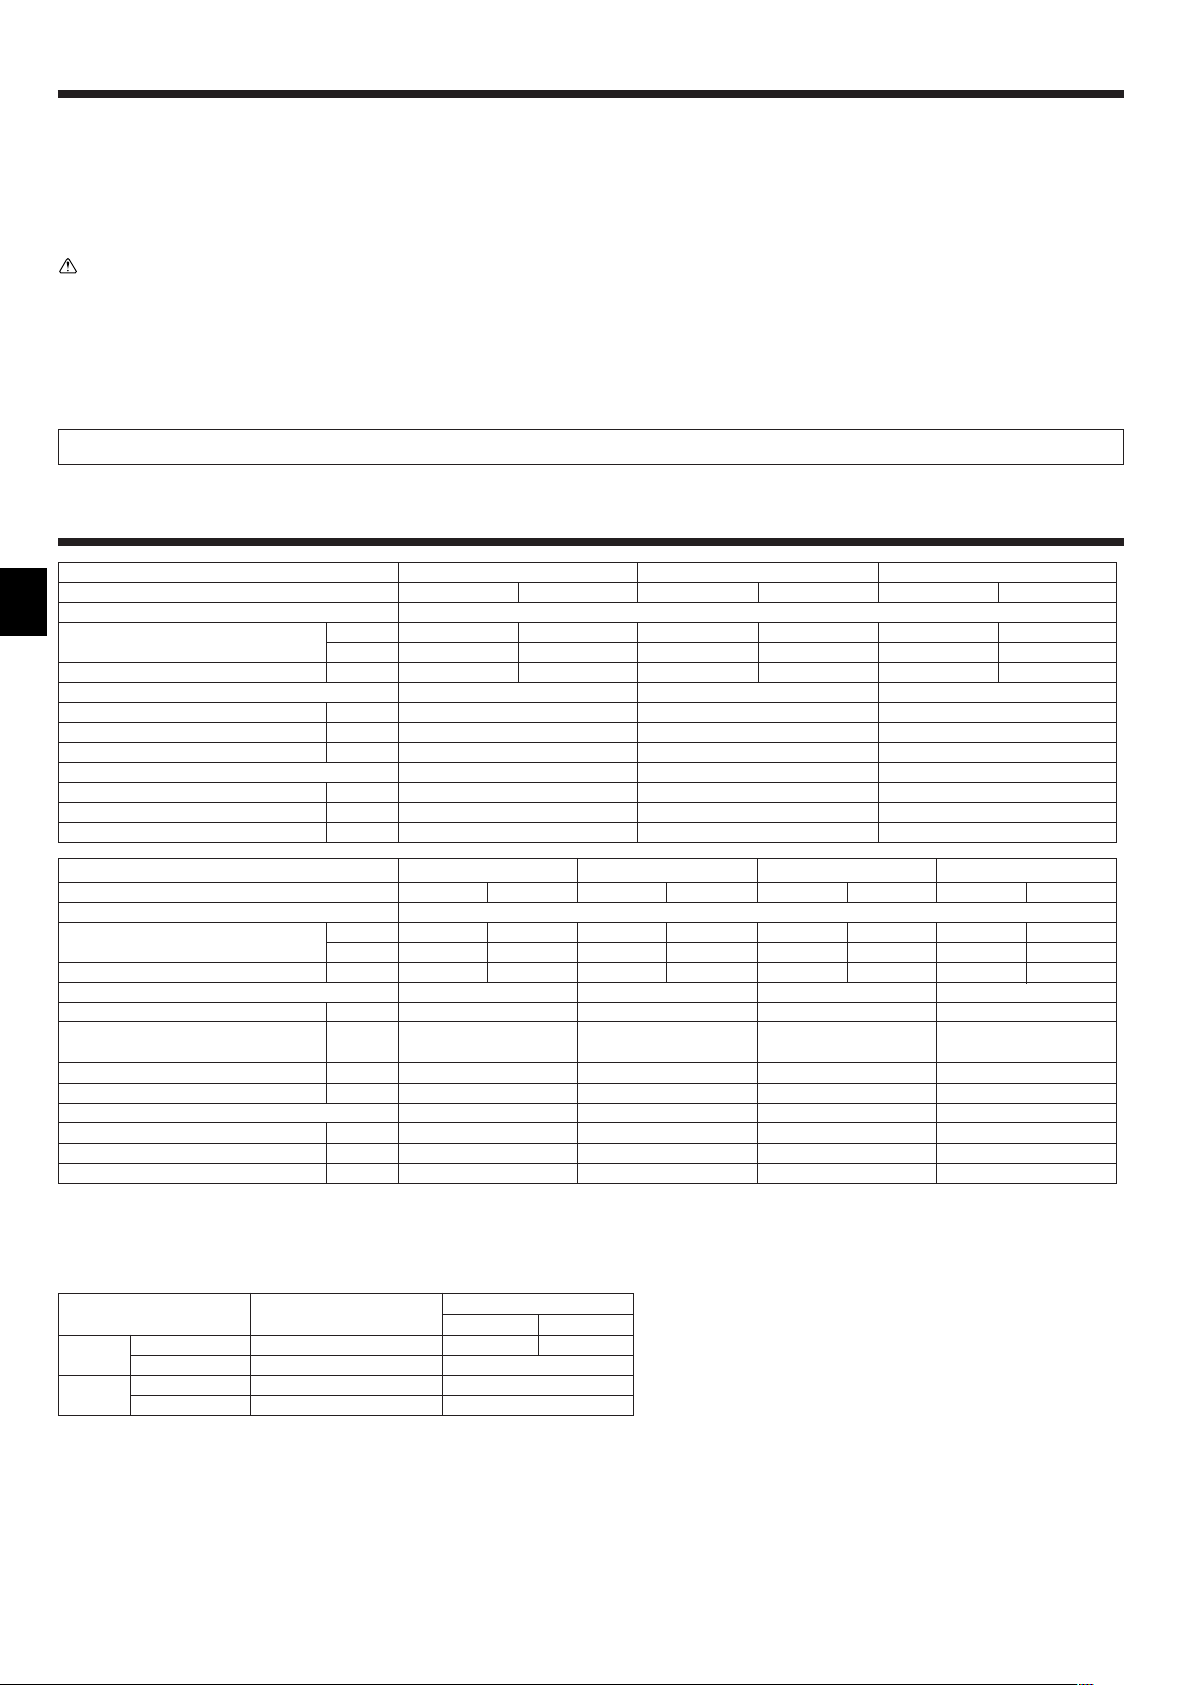
13. Specifications
Function
Power supply
Capacity
Input kW
Indoor unit
Airflow (Lo-Me-Hi) CMM
Noise level (Lo-Me-Hi) dB
Weight kg
Outdoor unit
Noise level dB
Refrigerant R410A kg
Weight kg
Function
Power supply
Capacity
Input kW
Indoor unit
Airflow (Lo-Hi) CMM
Ext. static
pressure
Noise level (Lo-Hi) dB (A)
Weight kg
Outdoor unit
Noise level dB (A)
Refrigerant R410A kg
Weight kg
Notes: 1. Rating conditions (cooling) Indoor : 27°C DB, 19°C WB Outdoor : 35°C DB
2. Rating conditions (heating) Indoor : 20°C DB Outdoor : 7°C DB, 6°C WB
3. Specifications subject to change without notice.
Model
kW
BTU/h
Model
kW
BTU/h
Pa (mmAq)
SLZ-KA25VA (L)
Cooling Heating
2.5 3.0
8,500 10,200
0.69 0.83
SLZ-KA25VA (L)
8-9-10
28-31-37
16.5 + Grille 3
SUZ-KA25VA
46
0.90
33
SEZ-KA35VA
Cooling Heating
3.5 4.0
11,900 13,600
1.06 1.10
SEZ-KA35VA
10-13
Std. : 30 (3)
Max. : 50 (5)
30-35
33.5
SUZ-KA35VA
48
1.05
35
SEZ-KA50VA
Cooling Heating
5.0 5.9
17,100 20,100
1.78 1.84
SEZ-KA50VA
12-17
Std. : 30 (3)
Max. : 50 (5)
31-39
33.5
SUZ-KA50VA
55
1.6
53
SLZ-KA35VA (L)
Cooling Heating
~/N, 230V, 50Hz
3.5 4.0
11,900 13,600
1.06 1.10
SLZ-KA35VA (L)
8-9-11
29-33-38
16.5 + Grille 3
SUZ-KA35VA
48
1.05
35
SEZ-KA60VA
Cooling Heating
~/N, 230V, 50Hz
5.5 6.9
18,800 23,500
1.96 2.45
SEZ-KA60VA
12-20
Std. : 30 (3)
Max. : 50 (5)
32-43
SUZ-KA60VA
33.5
55
1.8
53
SLZ-KA50VA (L)
Cooling Heating
4.6 5.0
15,700 17,100
1.63 1.55
SLZ-KA50VA (L)
8-9-11
30-34-39
16.5 + Grille 3
SUZ-KA50VA
55
1.6
53
SEZ-KA71VA
Cooling Heating
7.1 8.1
24,200 27,600
2.46 2.36
SEZ-KA71VA
12-20
Std. : 30 (3)
Max. : 50 (5)
32-43
35
SUZ-KA71VA
55
2.0
58
Guaranteed operating range
Indoor
Cooling
Heating
Units should be installed by licensed electric contractor accordingly to local code requirement.
Upper limit 32°C DB, 23°C WB 46°C DB, – 43°C DB, –
Lower limit 21°C DB, 15°C WB -10°C DB, –
Upper limit 27°C DB, – 24°C DB, 18°C WB
Lower limit 20°C DB, – -10°C DB, -11°C WB
KA25, KA35
Outdoor
KA50, KA60, KA71
18
Page 19
Inhaltsverzeichnis
1. Sicherheitsvorkehrungen .................................................... 19
2. Bezeichnungen der Teile ..................................................... 19
3. Bildschirmkonfiguration ....................................................... 22
4. Einstellen des Wochentags und der Zeit............................. 22
5. Bedienung ........................................................................... 22
6. Timer ................................................................................... 24
Hinweis (Kennzeichnung f r WEEE)
Dieses Symbolzeichen ist nur für EU-Länder bestimmt.
Dieses Symbolzeichen entspricht der Richtlinie 2002/96/EG Artikel 10 Informationen für die Nutzer und Anhang IV.
Ihr MITSUBISHI ELECTRIC-Produkt wurde unter Einsatz von qualitativ hochwertigen Materialien und Komponenten konstruiert und gefertigt, die für
Recycling geeignet sind.
Dieses Symbol bedeutet, dass elektrische und elektronische Geräte am Ende ihrer Nutzungsdauer von Hausmüll getrennt zu entsorgen sind.
Bitte entsorgen Sie dieses Gerät bei Ihrer kommunalen Sammelstelle oder im örtlichen Recycling-Zentrum.
In der Europäischen Union gibt es unterschiedliche Sammelsysteme für gebrauchte Elektrik- und Elektronikgeräte.
Bitte helfen Sie uns, die Umwelt zu erhalten, in der wir leben!
1. Sicherheitsvorkehrungen
s Vor dem Einbau der Anlage vergewissern, daß Sie alle Infor-
mationen über “Sicherheitsvorkehrungen” gelesen haben.
s Die “Sicherheitsvorkehrungen” enthalten sehr wichtige
Sicherheitsgesichtspunkte. Sie sollten sie unbedingt befolgen.
s Vor Anschluß an das System Mitteilung an Stromversorgungs-
unternehmen machen oder dessen Genehmigung einholen.
7. Weitere Funktionen ............................................................. 27
8. Funktionsauswahl ............................................................... 28
9. Notbetrieb bei schnurloser Fernbedienung ......................... 32
10. Pflege und Reinigung ........................................................ 32
11. Fehlerbehebung ................................................................ 33
12. Einbau, Umsetzen und Inspektion .................................... 34
13. Technische daten .............................................................. 35
Im Text verwendete Symbole
Warnung:
Beschreibt Vorkehrungen, die beachtet werden sollten, um den Benutzer vor
der Gefahr von Verletzungen oder tödlicher Unfälle zu bewahren.
Vorsicht:
Beschreibt Vorkehrungen, die beachtet werden sollten, damit an der Anlage
keine Schäden entstehen.
In den Abbildungen verwendete Symbole
: Verweist auf einen Teil der Anlage, der geerdet werden muß.
Warnung:
• Die Anlage sollte nicht vom Benutzer eingebaut werden. Bitten Sie Ihren Händler
oder eine Vertragswerkstatt, die Anlage einzubauen. Wenn die Anlage unsachgemäß eingebaut wurde, kann Wasser auslaufen, können Stromschläge erfolgen,
oder es kann Feuer ausbrechen.
• Nicht auf die Anlage stellen oder Gegenstände darauf ablegen.
• Kein Wasser über die Anlage spritzen und die Anlage auch nicht mit nassen Händen berühren. Dies kann zu Stromschlägen führen.
• Kein brennbares Gas in der Nähe der Anlage versprühen. Es kann Feuer ausbrechen.
• Keine Gasheizung oder sonstige Geräte mit offenen Flammen in Bereichen abstellen, an denen Luft aus der Anlage ausströmt. Unvollständige Verbrennung
kann die Folge sein.
• Wenn die Anlage läuft, nicht die Frontplatte oder den Gebläseschutz von der Außenanlage abnehmen.
Vorsicht:
• Zum Drücken der Tasten keine scharfen Gegenstände benutzen, da dadurch
die Fernbedienung beschädigt werden kann.
• Die Ansaug- oder Austrittsöffnungen weder der Innen- noch der Außenanlage blockieren oder abdecken.
2. Bezeichnungen der Teile
■ Inneneinheit
SLZ-KA·VA
SLZ-KA·VAL
Lüfterstufen 3 Stufen 2 Stufen
Klappe Auto mit Schwingen –
Luftklappe – –
Filter Langlebig Normal
Reinigungsempfehlung für Filter 2.500 Std. –
SEZ-KA·VA
• Wenn das Geräusch oder die Vibrationen anders als normal oder besonders stark
sind, den Betrieb einstellen, den Hauptschalter ausschalten, und das Verkaufsgeschäft um Hilfe bitten.
• Niemals die Finger, Stöcke etc. in de Ansaug- oder Austrittsöffnungen stekken.
• Wenn Sie merkwürdige Gerüche feststellen, sollten Sie die Anlage nicht mehr
benutzen, den Strom abschalten und sich an Ihren Kundendienst wenden, da
sonst schwere Defekte an der Anlage, ein Stromschlag oder ein Brand verursacht
werden können.
• Diese Klimaanlage darf NICHT von Kindern oder unsicheren Personen ohne Aufsicht benutzt werden.
• Kleine Kinder müssen beaufsichtigt werden, um sicherzustellen, daß sie nicht an
der Klimaanlage herumspielen.
• Wenn gasförmiges oder flüssiges Kühlmittel entweicht, die Klimaanlage abstellen, den Raum ausreichend lüften und das Verkaufsgeschäft benachrichtigen.
Die Anlage entsorgen
Zum Entsorgen des Gerätes wenden Sie sich an Ihren Kundendienst.
■ SLZ-KA·VA/SLZ-KA·VAL
4-Wege-Deckenkassette
Filter
Lufteinlass
■ SEZ-KA·VA
Decke verborgen
Luftauslaß
Klappe
Luftauslaß
Lufteinlass
Filter (Unterseite oder Rückseite)
19
Page 20
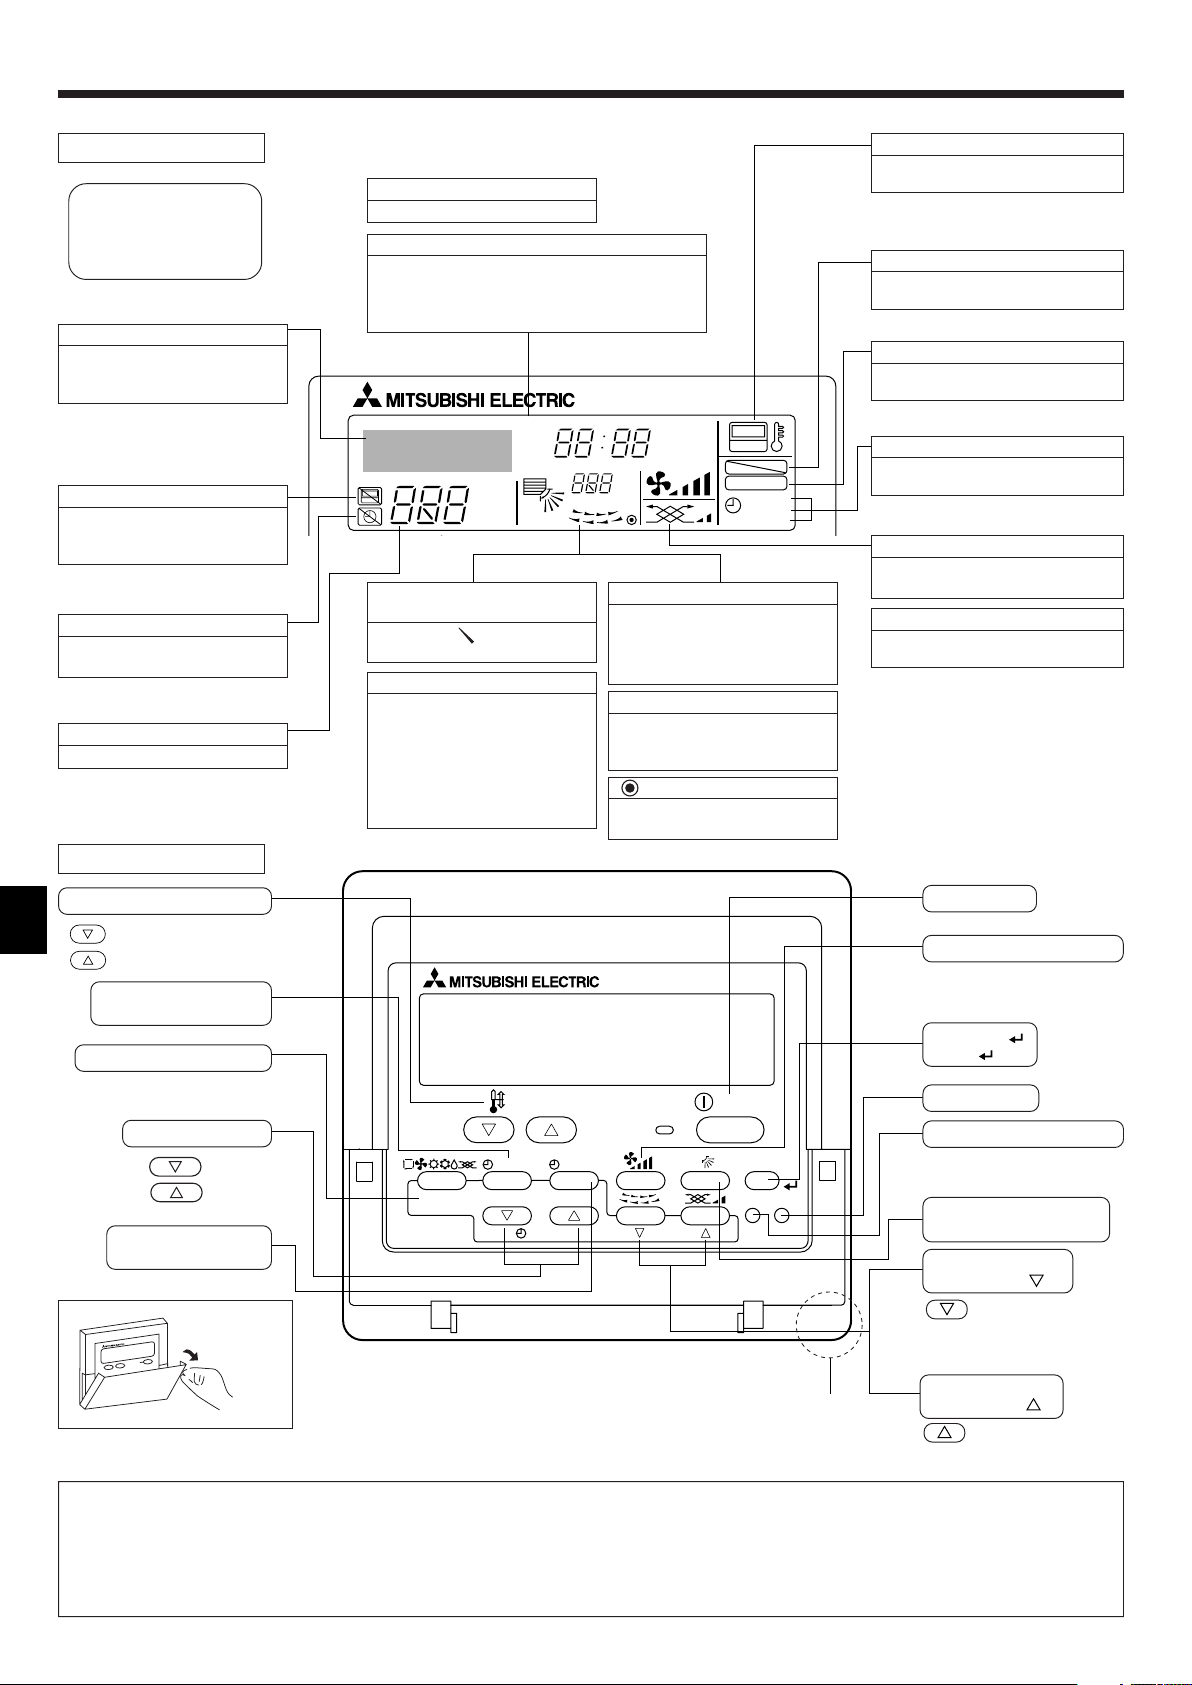
PAR-21MAA
ON/OFF
FILTER
CHECK
OPERATION
CLEAR
TEST
TEMP.
MENU
BACK DAY
MONITOR/SET
CLOCK
ON/OFF
2. Bezeichnungen der Teile
■ Für verdrahteter Fernbedienung
Display-Bereich
Für diese Erklärung werden alle
Teile des Displays als beleuchtet
dargestellt. Während dem tatsächlichen Betrieb sind nur die relevanten Elemente beleuchtet.
Zeigt den aktuellen Betrieb
Zeigt den Betriebsmodus, usw.
* Anzeige in mehreren Sprachen
wird unterstützt.
Anzeige “Centrally Controlled”
Gibt an, daß der Betrieb der Fernbedienung durch eine MasterSteuerung deaktiviert wurde.
Anzeige “Timer is Off”
Gibt an, daß der Timer ausgeschaltet ist.
Temperatureinstellung
Zeigt die Zieltemperatur an.
Wochentag
Zeigt den aktuellen Wochentag an.
Zeit-/Timer-Anzeige
Zeigt die aktuelle Zeit an, außer der einfache oder der
Auto-Off-Timer ist eingestellt.
Falls der einfache oder der Auto-Off-Timer eingestellt ist, wird die Restzeit angezeigt.
TIME SUN MON TUE WED THU FRI SAT
TIMER
AFTER
ERROR CODE
˚F˚C
Hr
AFTER
˚F˚C
ONLY1Hr.
Anzeige der Luftrichtung nach
oben/nach unten
Die Anzeige gibt die Richtung
der herausströmenden Luft an.
Anzeige “One Hour Only”
Wird angezeigt, wenn der Luftstrom
im Modus COOL oder DRY auf
schwach und abwärts eingestellt ist.
(Der Betrieb unterscheidet sich je
nach Modell.)
Die Anzeige schaltet sich nach einer
Stunde aus, wenn sich die Richtung
des Luftstroms ebenfalls ändert.
Anzeige der Umgebungstemperatur
Zeigt die Umgebungstemperatur an.
Der Anzeigebereich für die Umgebungstemperatur ist 8–39 °C. Die Anzeige
blinkt, wenn die Temperatur weniger als
8 °C oder mehr als 39 °C beträgt.
Anzeige der Luftklappen
Gibt die Aktion der Schwingluftklappen an. Erscheint nicht,
wenn die Luftklappe stationär ist.
(Netz-Ein-Anzeige)
Gibt an, daß der Netzschalter eingeschaltet ist.
ON
OFF
FUNCTION
FILTER
WEEKLY
SIMPLE
AUTO OFF
Anzeige “Sensor”
Wird angezeigt, wenn die Fernbedienung verwendet wird.
Anzeige “Locked”
Gibt an, daß die Tasten der Fernbedienung gesperrt wurden.
Anzeige “Clean The Filter”
Erscheint, wenn der Filter gereinigt
werden muß.
Timer-Anzeigen
Die Anzeige erscheint, wenn der entsprechende Timer eingestellt ist.
Anzeige der Lüftergeschwindigkeit
Zeigt die ausgewählte Lüftergeschwindigkeit an.
Belüftungsanzeige
Erscheint, wenn das Gerät im
Belüftungsmodus läuft.
Kontrollbereich
Tasten zum Einstellen der Temperatur
Nach unten
Nach oben
Taste Timer-Menü
(Taste Monitor/Einstellen)
Taste Modus (Taste Zurück)
Taste Zeit einstellen
Zurück
Vorwärts
Taste Timer Aus/Ein
(Taste Tag einstellen)
Öffnen der
Tür.
Hinweis:
● Meldung “PLEASE WAIT” (BITTE WARTEN)
Diese Meldung wird etwa 3 Minuten lang angezeigt, wenn das Innengerät mit Strom versorgt wird oder wenn das Gerät nach einem Stromausfall wieder warmläuft.
Eingebauter Temperatursensor
● Meldung “NOT AVAILABLE” (NICHT VERFÜGBAR)
Diese Meldung wird angezeigt, wenn eine Taste für eine Funktion gedrückt wird, über die das Innengerät nicht verfügt.
Wenn zur Bedienung mehrerer Innengeräte verschiedener Modelle gleichzeitig eine einzige Fernbedienung benutzt wird, wird diese Meldung nicht angezeigt, wenneines der Geräte über die Funktion verfügt.
Taste ON/OFF
Taste Lüftergeschwindigkeit
Taste Filter
(Taste )
Taste Testlauf
Taste Check (Taste Löschen)
Taste Luftstrom nach oben/
nach unten
Taste Luftklappe
(Taste Betrieb
Zur vorherigen
Betriebsnummer.
Taste Belüftung
(Taste Betrieb
Zur nächsten Betriebsnummer.
)
)
20
Page 21
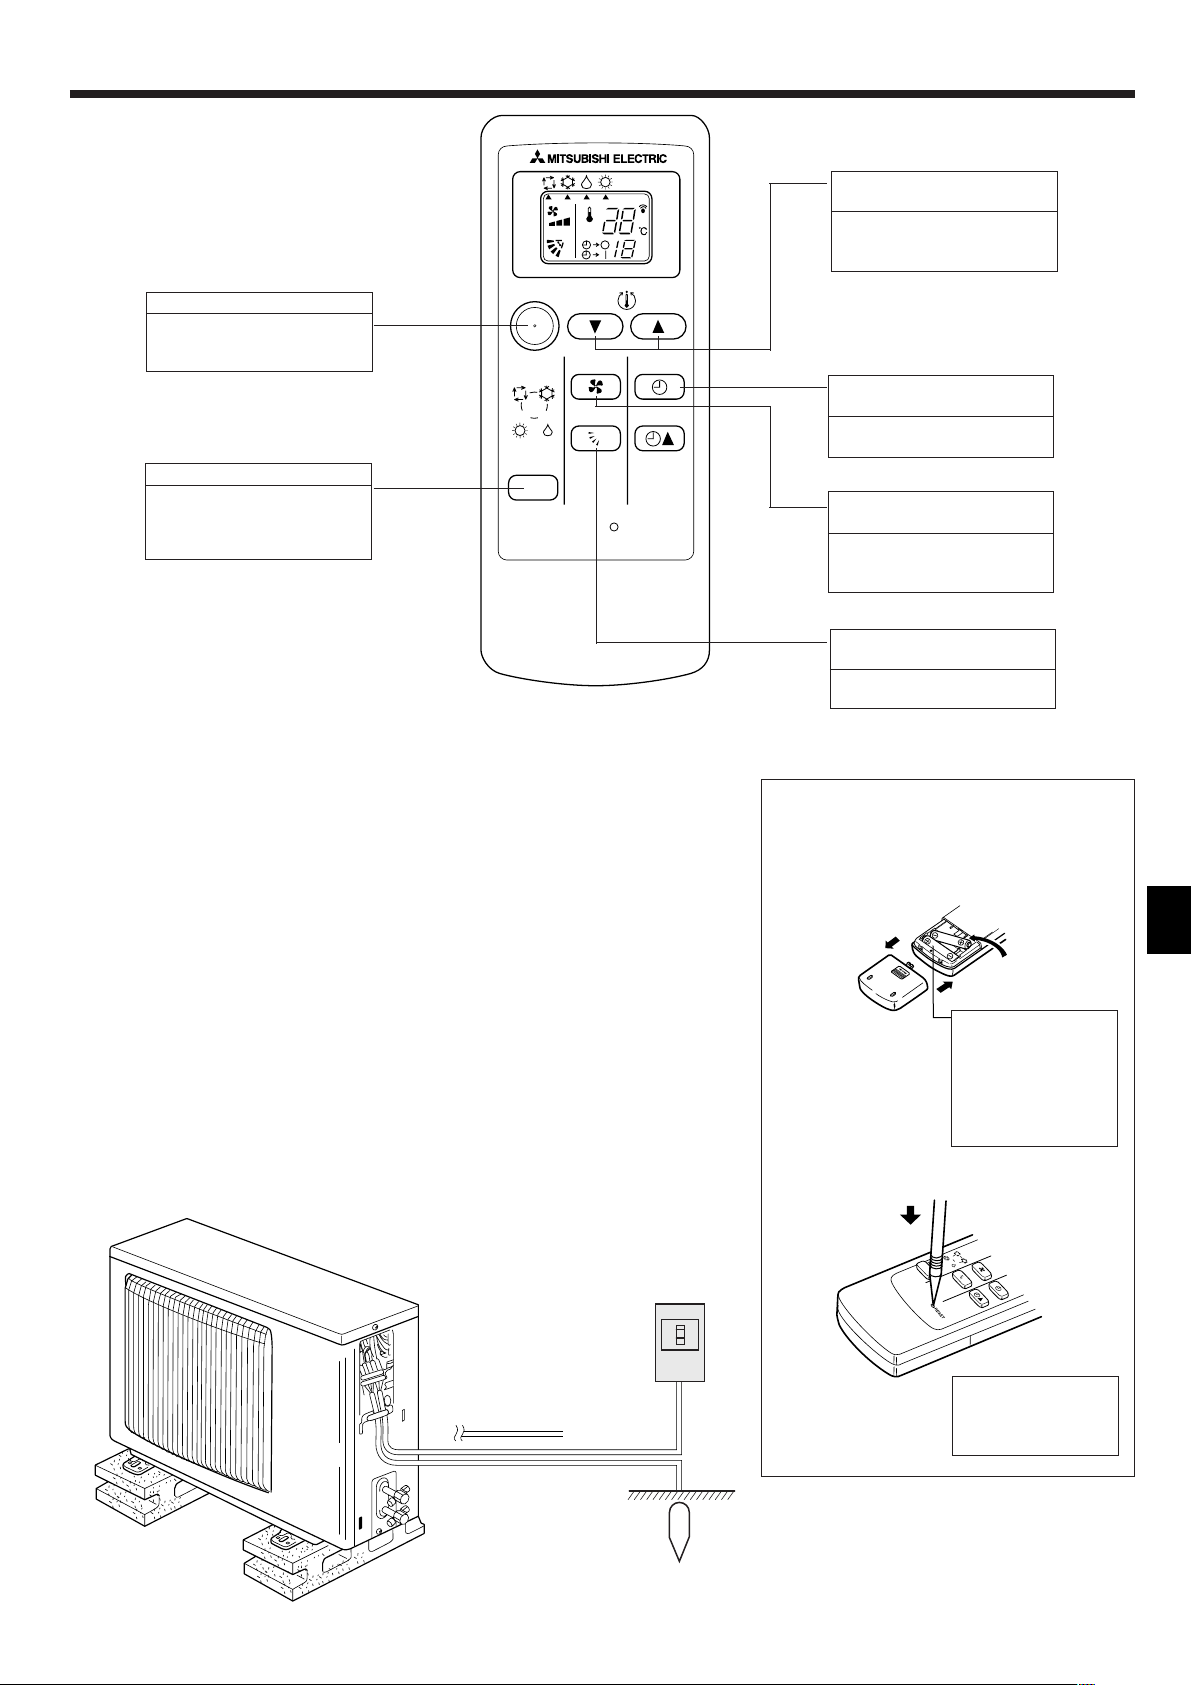
1
2
3
AUTO
COOL
DRY
HEAT
FAN
VANE
SELECT
TIME
2. Bezeichnungen der Teile
■ Für die schnurlose Fernbedienung [Nur SLZ-KA·VAL]
Taste SET TEMPERATURE
(temperatur einstellen)
Die Taste SET TEMPERATURE
h
dient zum Einstellen der gewünschten Raumtemperatur.
Taste ON/OFF (ein/aus)
ON/OFF
TOO
WARM
TOO
COOL
Betriebsstart nach Drücken der
Taste. Erneutes Drücken stoppt
den Betrieb.
Taste MODE SELECT (modus)
AUTO COOL
DRY
HEAT
MODE
FAN
VANE
SELECT
TIME
Diese Taste dient zum Hin- und
Herschalten zwischen den Betriebsarten Automatik, Kühlen,
RESET
Heizen und Trocknen. (SLZ)
■ Zur Benutzung der schnurlosen Fernbedienung diese auf den Empfänger am Innengerät richten.
■ Wird die Fernbedienung innerhalb von etwa zwei Minuten betätigt, nachdem das Innengerät eingeschal-
tet wurde, erklingt unter Umständen zweimal ein Piepton während das Gerät die automatische Anfangsprüfung durchführt.
■ Das Innengerät piept zur Bestätigung, dass das Signal, das von der Fernbedienung übertragen wird,
empfangen wurde. Signale können bis zu etwa 7 Meter Sichtlinie vom Innengerät in einem Winkel von
45° nach links und rechts vom Gerät empfangen werden. Jedoch kann der Empfang des Innengeräts
durch Beleuchtung wie Leuchtstofflampen oder starkes Licht beeinträchtigt werden.
■ Wenn die Betriebsanzeige in der Nähe des Empfängers am Innengerät blinkt, muss das Gerät geprüft
werden. Wenden Sie sich an Ihren Händler für Service.
■ Behandeln Sie die Fernbedienung pfleglich! Lassen Sie sie nicht fallen und schützen Sie sie vor starken
Erschütterungen. Schützen Sie die Fernbedienung darüber hinaus vor Wasser und hoher Luftfeuchtigkeit.
■ Um ein Verlegen der Fernbedienung zu vermeiden, montieren Sie den Halter, der mit der Fernbedienung
geliefert wurde, an einer Wand und legen Sie die Fernbedienung nach Gebrauch stets in den Halter
zurück.
Taste TIMER SELECT
(timer-menü)
Für die Auswahl von Start und
Stop des Timers.
Taste FAN SPEED
(lüftergeschwindigkeit)
Diese Taste dient zum Einstellen
der Lüftergeschwindigkeit auf
niedrig, mittel oder hoch.
Taste VANE CONTROL
(luftstrom)
Dient zum Ändern der Luftstromrichtung.
Einsetzen/Austausch der Batterien
[Nur SLZ-KA·VAL]
1. Nehmen Sie die obere Abdeckung ab und legen Sie
zwei AAA-Batterien ein. Schließen Sie dann die obere
Abdeckung wieder.
Obere
Abdeckung
Zwei AAA-Batterien
Legen Sie den negativen
(–) Pol der Batterien zuerst ein. Setzen Sie die
Batterien in die richtige
Richtung (+, –) zeigend
ein!
■ Außeneinheit
2. Drücken Sie die Taste Reset (Zurücksetzen).
Netzstrom
Kühlrohre
Innen-Außen
Anschlussleitung
Drücken Sie die Taste
Reset (Zurücksetzen) mit
einem spitzen Gegenstand.
Erde
21
Page 22
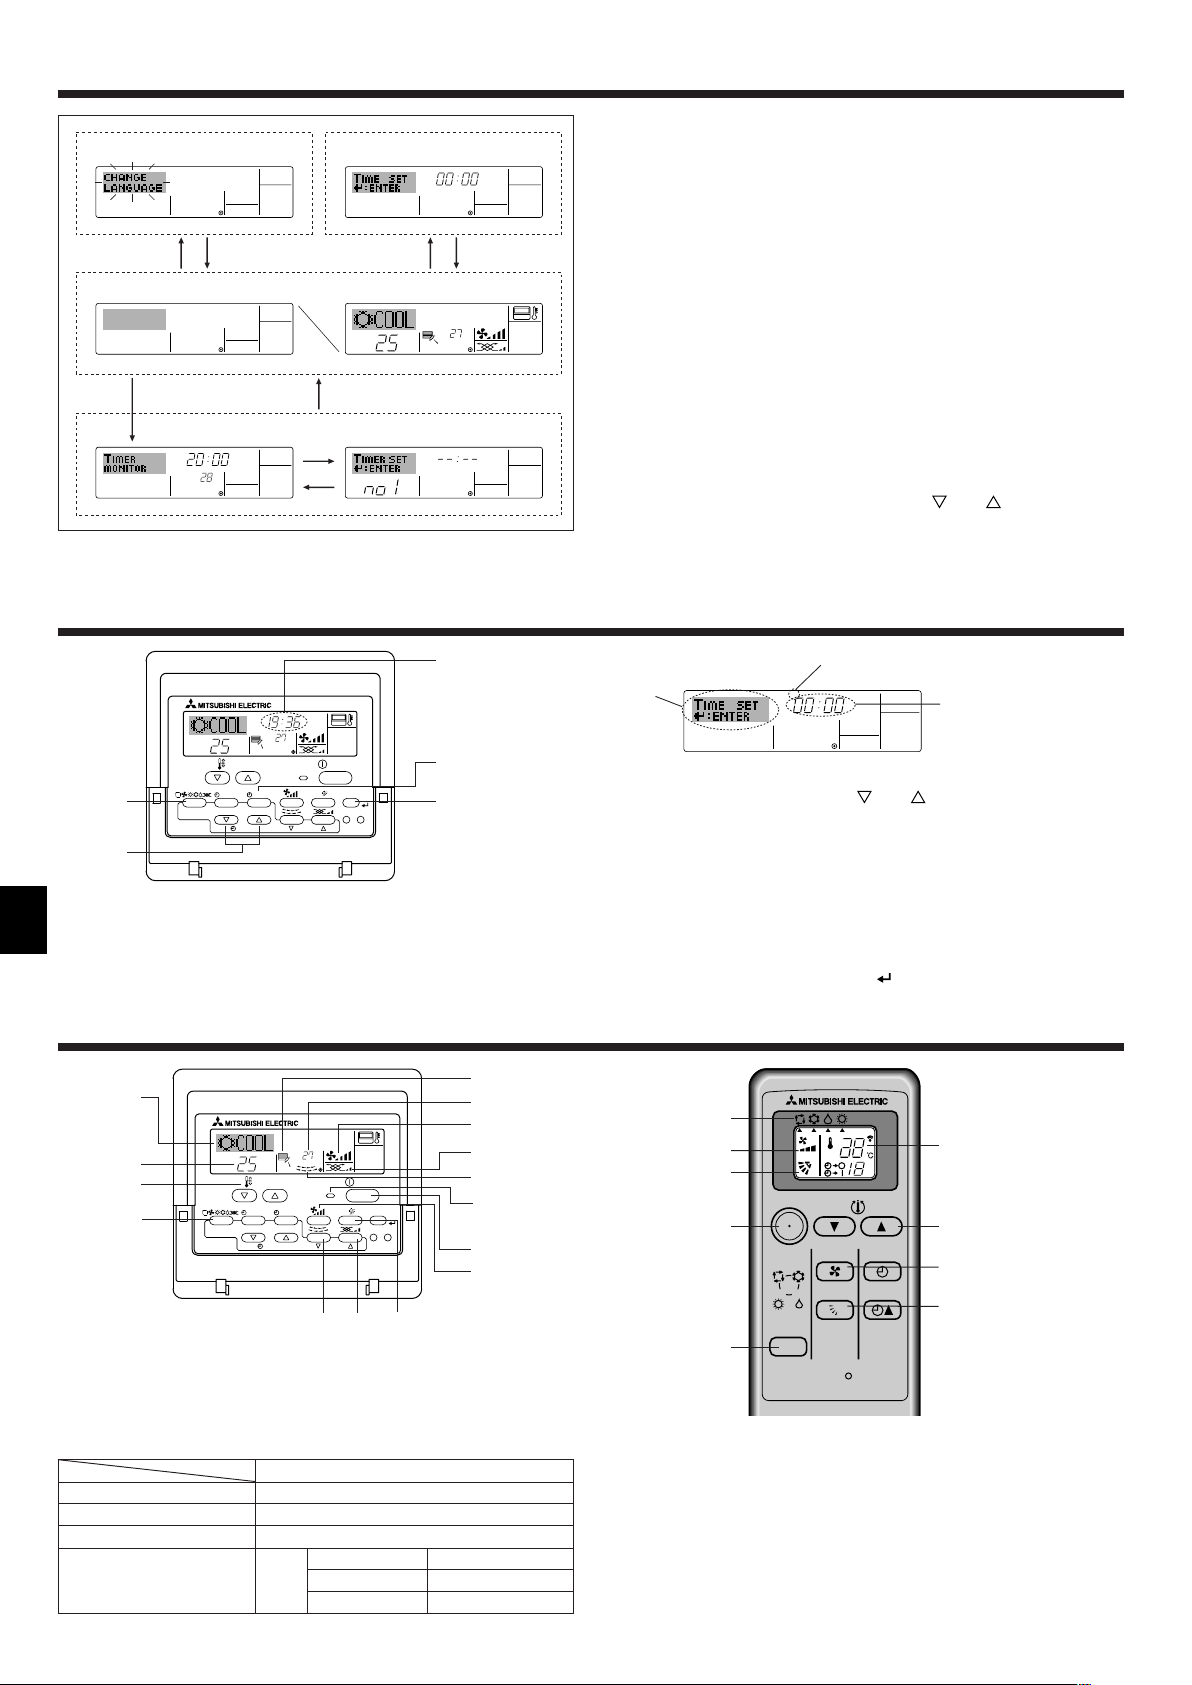
˚C
˚C
TIME SUN
PAR-21MAA
ON/OFF
FILTER
CHECK
OPERATION
CLEAR
TEST
TEMP.
MENU
BACK DAY
MONITOR/SET
CLOCK
ON/OFF
2
4
9
1
A
TIME SUN
2
3
4
˚C
˚C
PAR-21MAA
ON/OFF
FILTER
CHECK
OPERATION
CLEAR
TEST
TEMP.
MENU
BACK DAY
MONITOR/SET
CLOCK
ON/OFF
2
7
2
3
3
8
6
4
5
8
7
1
1
5
6
˚F˚C
TIMER
MON
OFF
WEEKLY
SUN MON TUE WED THU FRI SAT
WEEKLY
˚F˚C
˚C
TIME SUN
3. Bildschirmkonfiguration
ON/OFF
RESET
TOO
WARM
TOO
COOL
MODE
AUTO COOL
DRY
HEAT
FAN
VANE
SELECT
TIME
h
1
2
5
6
3
3
5
6
2
Funktionsauswahl Tag/Zeit einstellen
ADC
Standardkontrollbildschirme
OFF ON
BC
Timer-Monitor Timer-Setup
B
4. Einstellen des Wochentags und der Zeit
<Bildschirmtypen>
Mit der Funktionsauswahl der Fernbedienung kann die Spracheinstellung des Displays auf German (Deutsch) umgestellt werden. In Abschnitt 8, Punkt [4]–1 sehen
Sie, wie Sie die Spracheinstellung ändern.
Die anfängliche Einstellung ist Englisch.
● Funktionsauswahl: Stellt die verfügbaren Funktionen und Bereiche auf der Fern-
bedienung ein (Timer-Funktionen, Betriebsbeschränkungen,
usw.).
● Tag/Zeit einstellen: Stellt den aktuellen Wochentag oder die Zeit ein.
● Standard-Kontrollbildschirme:
Zeigt den Betriebsstatus des Klimaanlagensystems und stellt
ihn ein.
● Timer-Monitor: Zeigt den aktuell eingestellten Timer an (wöchentlicher Timer,
einfacher Timer oder Auto-Off-Timer).
● Timer-Setup: Stellt den Betriebs eines der Timer ein (wöchentlicher Timer,
einfacher Timer oder Auto-Off-Timer).
<So wechseln Sie den Bildschirm>
Zu A : Halten Sie sowohl die Taste Modus als auch die Taste Timer Ein/Aus 2 Se-
kunden lang gedrückt.
Zu B :Drücken Sie die Taste Timer-Menü.
Zu C :Drücken Sie die Taste Modus (Zurück).
Zu D :Drücken Sie eine der Tasten Zeit einstellen (
oder ).
Anzeige des Wochentags und der Zeit
Hinweis:
● Der Tag und die Zeit erscheinen nicht, wenn die Uhr in der Funktionsauswahl
deaktiviert wurde.
● Nachdem der Strom zurückgekehrt ist, wird die Inneneinheit noch für drei
Minuten außer Betrieb sein. Der o.g. Betrieb ist normal.
5. Bedienung
Einstellung des Wochentags
Zeit-Einstellung
1. Drücken Sie die Taste Zeit einstellen oder A, um 2 anzuzeigen.
2. Drücken Sie die Taste Timer Ein/Aus (Tag einstellen) 9, um den Tag einzustellen.
* Mit jedem Drücken rückt die Anzeige unter 3 einen Tag vor: Sun → Mon → ...
→ Fri → Sat.
3. Drücken Sie die entsprechenden Taste Zeit einstellen A nach Bedarf, um die Zeit
einzustellen.
* Wenn Sie die Taste gedrückt halten, rückt die Zeit (unter 4) zuerst in Minuten-
intervallen vor, dann in Zehn-Minuten-Intervallen und dann in Ein-Stunden-Intervallen.
4. Nachdem Sie die entsprechenden Einstellungen unter Schritt 2 und 3 durchgeführt haben, drücken Sie die Taste Filter
4, um die Werte zu speichern.
5.1. ON/OFF (Ein-/Ausschalten)
<So starten Sie den Betrieb>
■ Drücken Sie die Taste ON/OFF 1.
• Die Lampe EIN 1 und der Anzeigebereich erscheinen.
Hinweis:
● Wenn das Gerät neu gestartet wird, sind die Anfangseinstellungen wie folgt.
Modus
Temperatureinstellung
Lüftergeschwindigkeit
Luftstrom nach oben/nach unten
22
Fernbedienungseinstellungen
Letzte Einstellung
Letzte Einstellung
Letzte Einstellung
Modus HEAT
COOL oder DRY
FAN
Horiz. Auslaß
Letzte Einstellung
Horiz. Auslaß
Page 23
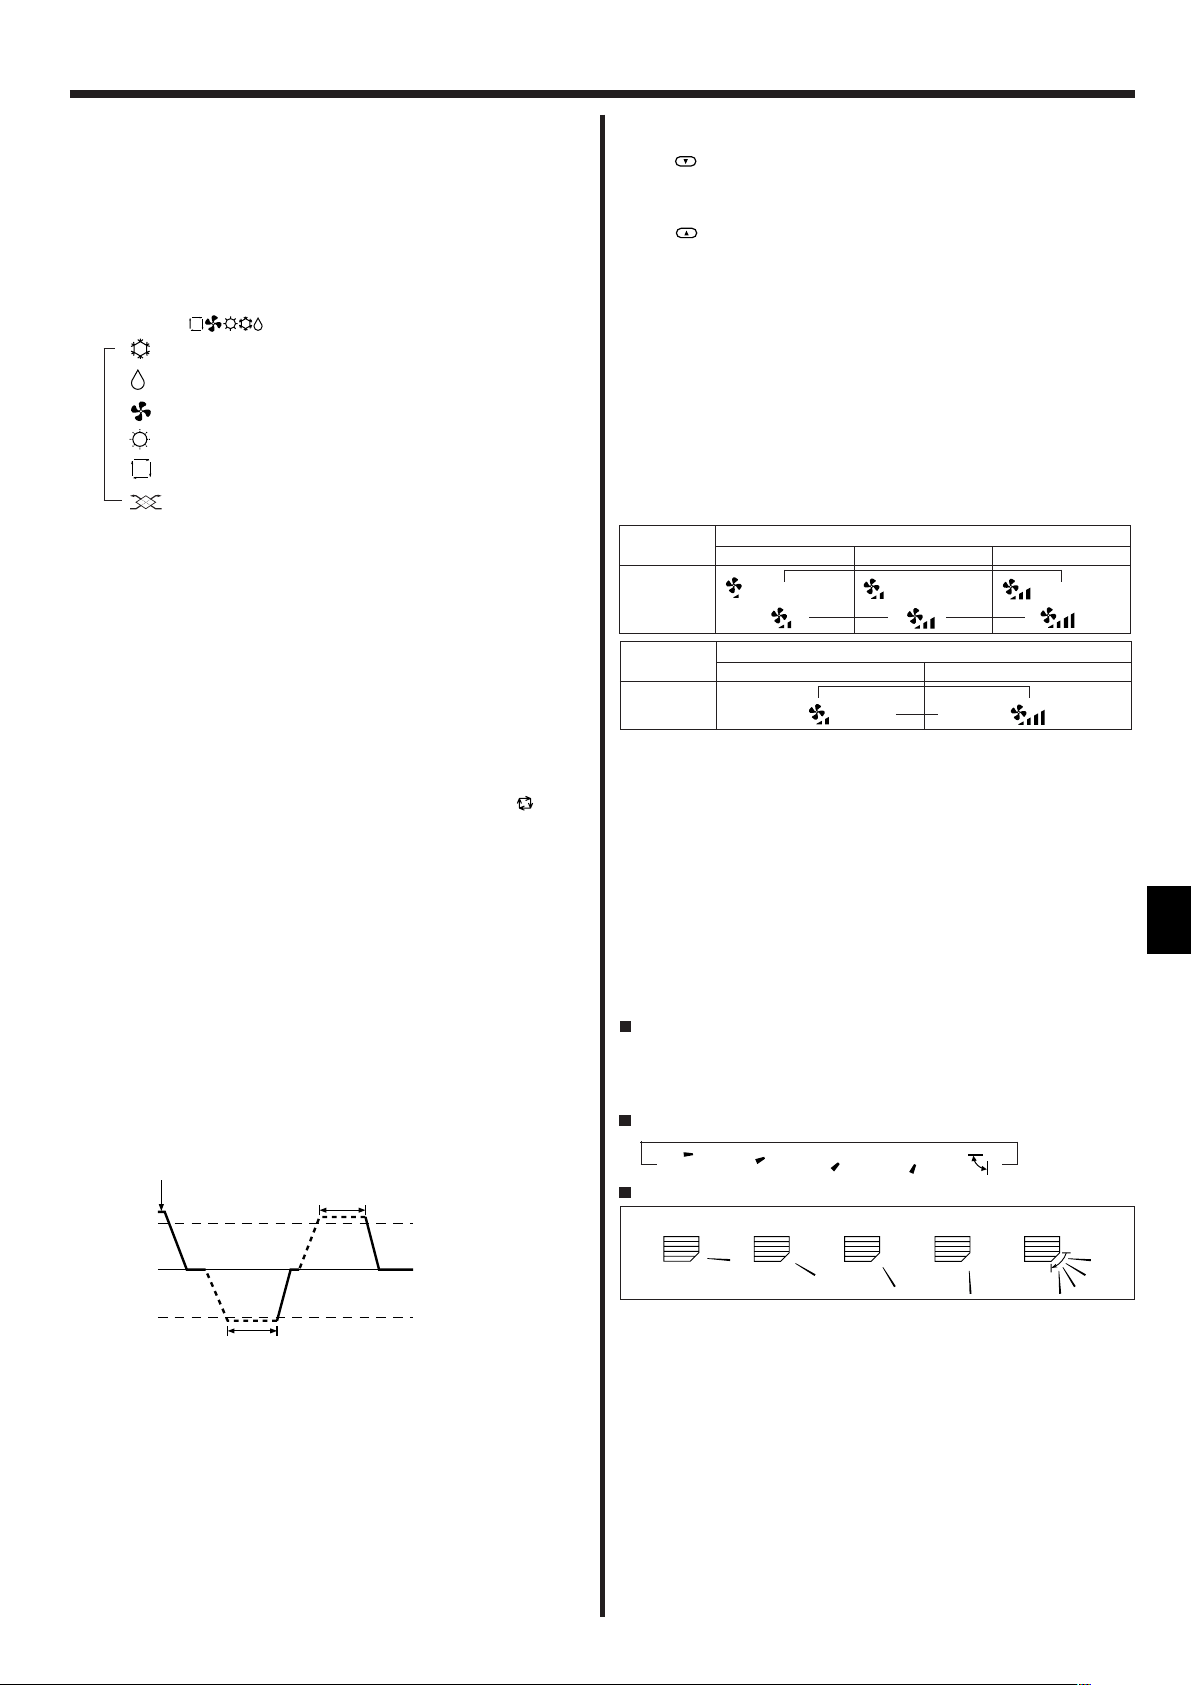
5. Bedienung
51234
<So stoppen Sie den Betrieb>
■ Drücken Sie die Taste ON/OFF 1 erneut.
• Die Lampe EIN 1 und der Display-Bereich verschwinden.
Hinweis:
Selbst wenn Sie die ON/OFF (NETZSTROM EIN/AUS-) Taste unmittelbar nach
Abschaltung des in Gang befindlichen Betriebs drücken, beginnt die Klimaanlage etwa drei Minuten lang nicht zu laufen. Dadurch wird verhindert, daß Teile
im Inneren der Anlage beschädigt werden.
5.2. Betriebsart wählen
■ Die Betriebsart ( )-Taste 2 drücken und die Betriebsart wählen 2.
s
Kühlen
Trocknen
Gebläse
Heizen
Automatik (Kühlen/Heizen)
Betriebsart Belüftung
Wird nur angezeigt, wenn
Kabelfernbedienung benutzt wird
LOSSNAY angeschlossen ist
Informationen über Multisystem-Klimaanlagen (Aussen-
anlage: Baureihe MXZ)
ss
s Multiystem-Klimaanlagen (Außenanlage: Baureihe MXZ) können zwei oder
ss
mehr Innenanlagen mit einer Außenanlage verbinden. Je nach Leistungsvermögen können mehr als zwei Anlagen gleichzeitig betrieben werden.
• Wenn Sie versuchen, zwei oder mehr Innenanlagen mit einer Außenanlage gleichzeitig zu betreiben - eine zum Kühlen und die andere zum Heizen - wird die Betriebsart der Innenanlage, die zuerst arbeitet, gewählt. Die anderen Innengeräte,
die später starten, können nicht betrieben werden und zeigen den Betriebsstatus
blinkend an.
In diesem Falle bitte alle Innenanlagen auf die gleiche Betriebsart einstellen.
• Es könnte der Fall eintreten, daß das Innengerät, das in der Betriebsart
läuft, nicht in die Betriebsart (KÜHLEN ↔ HEIZEN) überwechseln kann und in den
Zustand der Betriebsbereitschaft eintritt.
• Wenn die Innenanlage während der Enteisung der Außenanlage ihren Betrieb
beginnt, dauert es einige Minuten (max. 15 Minuten) bis die Warmluft ausgeblasen wird.
• Im Heizbetrieb liegt keine Fehlfunktion vor, wenn sich möglicherweise die Innenanlage, obgleich sie nicht arbeitet, erwärmt oder das Geräusch von strömendem
Kältemittel hörbar wird. Die Ursache liegt darin, daß das Kältemittel kontinuierlich
durch die Anlage strömt.
Automatischer Betrieb
■ Eine Temperatur wird eingestellt und der Kühlbetrieb beginnt, wenn die Umgebungs-
temperatur zu hoch ist bzw. der Heizbetrieb beginnt, wenn sie zu niedrig ist.
■ Im automatischen Betrieb schaltet die Klimaanlage in die Betriebsart Kühlen, wenn
die Umgebungstemperatur sich ändert und 15 Minuten lang 2 °C oder mehr über
der eingestellten Temperatur liegt. Ebenso schaltet die Klimaanlage in die Betriebsart Heizen, wenn die Umgebungstemperatur 15 Minuten lang 2 °C oder mehr
unter der eingestellten Temperatur liegt.
(AUTO)
5.3. Temperatureinstellung
ss
s Zum Absenken der Raumtemperatur:
ss
Taste
ss
s Zur Erhöhung der Raumtemperatur:
ss
Taste
• Folgende Temperaturbereiche sind verfügbar:
• Die Anzeige blinkt bei 8 °C bis 39 °C und informiert so darüber ob die Raum-
temperatur höher oder niedriger als die angezeigte Temperatur ist.
drücken 3, um die gewünschte Raumtemperatur einzustellen.
Die eingestellte Raumtemperatur wird angezeigt 3.
drücken 3, um die gewünschte Raumtemperatur einzustellen.
Die eingestellte Temperatur wird angezeigt 3.
Kühlen und Trocknen: 19 - 30 °C
Heizen: 17 - 28 °C
Automatik: 19 - 28 °C
5.4. Einstellung der Lüftergeschwindigkeit
■ Drücken Sie die Taste Lüftergeschwindigkeit 5 so oft wie nötig, während das
System läuft.
• Jedes Drücken ändert die Stärke. Die aktuell ausgewählte Geschwindigkeit ist
unter 5 dargestellt.
• Die Änderungsreihenfolge und die verfügbaren Einstellungen sind wie folgt.
Gebläse-
leistung
3-Vierstufig
Gebläse-
leistung
2-Vierstufig
• Anzeigen der kabellosen Fernbedienung sind zwischen Klammern angegeben.
Hinweis:
● Die Anzahl der verfügbaren Lüftergeschwindigkeiten hängt von der Art des
angeschlossenen Geräts ab. Beachten Sie außerdem, daß einige Geräte die
Einstellung “Auto” nicht haben.
● In den folgenden Fällen unterscheidet sich die vom Gerät erzeugte tatsäch-
liche Lüftergeschwindigkeit von der auf der Fernbedienungsanzeige angezeigten Geschwindigkeit:
1. Während das Display “STAND BY” oder “DEFROST” anzeigt.
2. Wenn die Temperatur des Wärmetauschers in der Betriebsart Heizen zu
niedrig ist. (z.B. direkt nach dem Heizbeginn)
3. Im HEAT-Modus, wenn die Raumtemperatur höher als die Temperaturein-
stellung ist.
4. Wenn sich das Gerät im DRY-Modus befindet.
Langsam Mittel Schnell
▼
( )
Fernbedienungsanzeige
)
(
▼
Fernbedienungsanzeige
Langsam Schnell
▼
(
▼
▼
)
5.5. Einstellung der Luftstromrichtung [Für SLZ]
<So ändern Sie die Richtung des Luftstroms (nach oben/nach unten)>
Drücken Sie, während das Gerät läuft, die Taste Luftstrom nach oben/nach unten
6 nach Bedarf.
• Jedes Drücken ändert die Richtung. Die aktuelle Richtung wird unter 6 ange-
zeigt.
• Die Änderungsreihenfolge und die verfügbaren Einstellungen sind wie folgt:
Für Fernbedienung
Kühlen
15 Minuten (schaltet von
Kühlen auf Heizen)
■ Da die Umgebungstemperatur automatisch angepasst wird, um eine festgelegte
tatsächliche Temperatur beizubehalten, wird das Kühlen einige Grade wärmer und
das Heizen einige Grade kühler ausgeführt als die eingestellte Umgebungstemperatur, sobald die Temperatur erreicht ist (automatisches Energiesparen).
15 Minuten (schaltet von
Heizen auf Kühlen)
Eingestellte
Temperatur +2°C
Eingestellte Temperatur
Eingestellte
Temperatur -2°C
s
1
→ 2 → 3 → 4 → 5
Für verdrahteter Fernbedienung
1 Horizontaler Luftstrom 30° 4 Luftstrom abwärts 70°
2 Luftstrom abwärts 45° 5 Schwenken
3 Luftstrom abwärts 55°
* Beachten Sie, daß sich während dem Schwingbetrieb die Richtungsanzeige auf
dem Bildschirm nicht synchron mit den Richtungsklappen am Gerät ändert.
* Einige Modelle unterstützen Richtungseinstellungen nicht.
Hinweis:
● Die verfügbaren Richtungen hängen von der Art des angeschlossenen Ge-
räts ab. Beachten Sie außerdem, daß einige Geräte die Einstellung “Auto”
nicht haben.
● In den folgenden Fällen unterscheidet sich die tatsächliche Luftrichtung von
der Richtung, die auf der Fernbedienungsanzeige angezeigt wird:
1. Während das Display “STAND BY” oder “DEFROST” anzeigt.
2. Sofort nach Starten des Heizmodus (während das System darauf wartet,
daß sich der Modus ändert).
3. Im Heizmodus, wenn die Raumtemperatur höher als die Temperaturein-
stellung ist.
23
Page 24
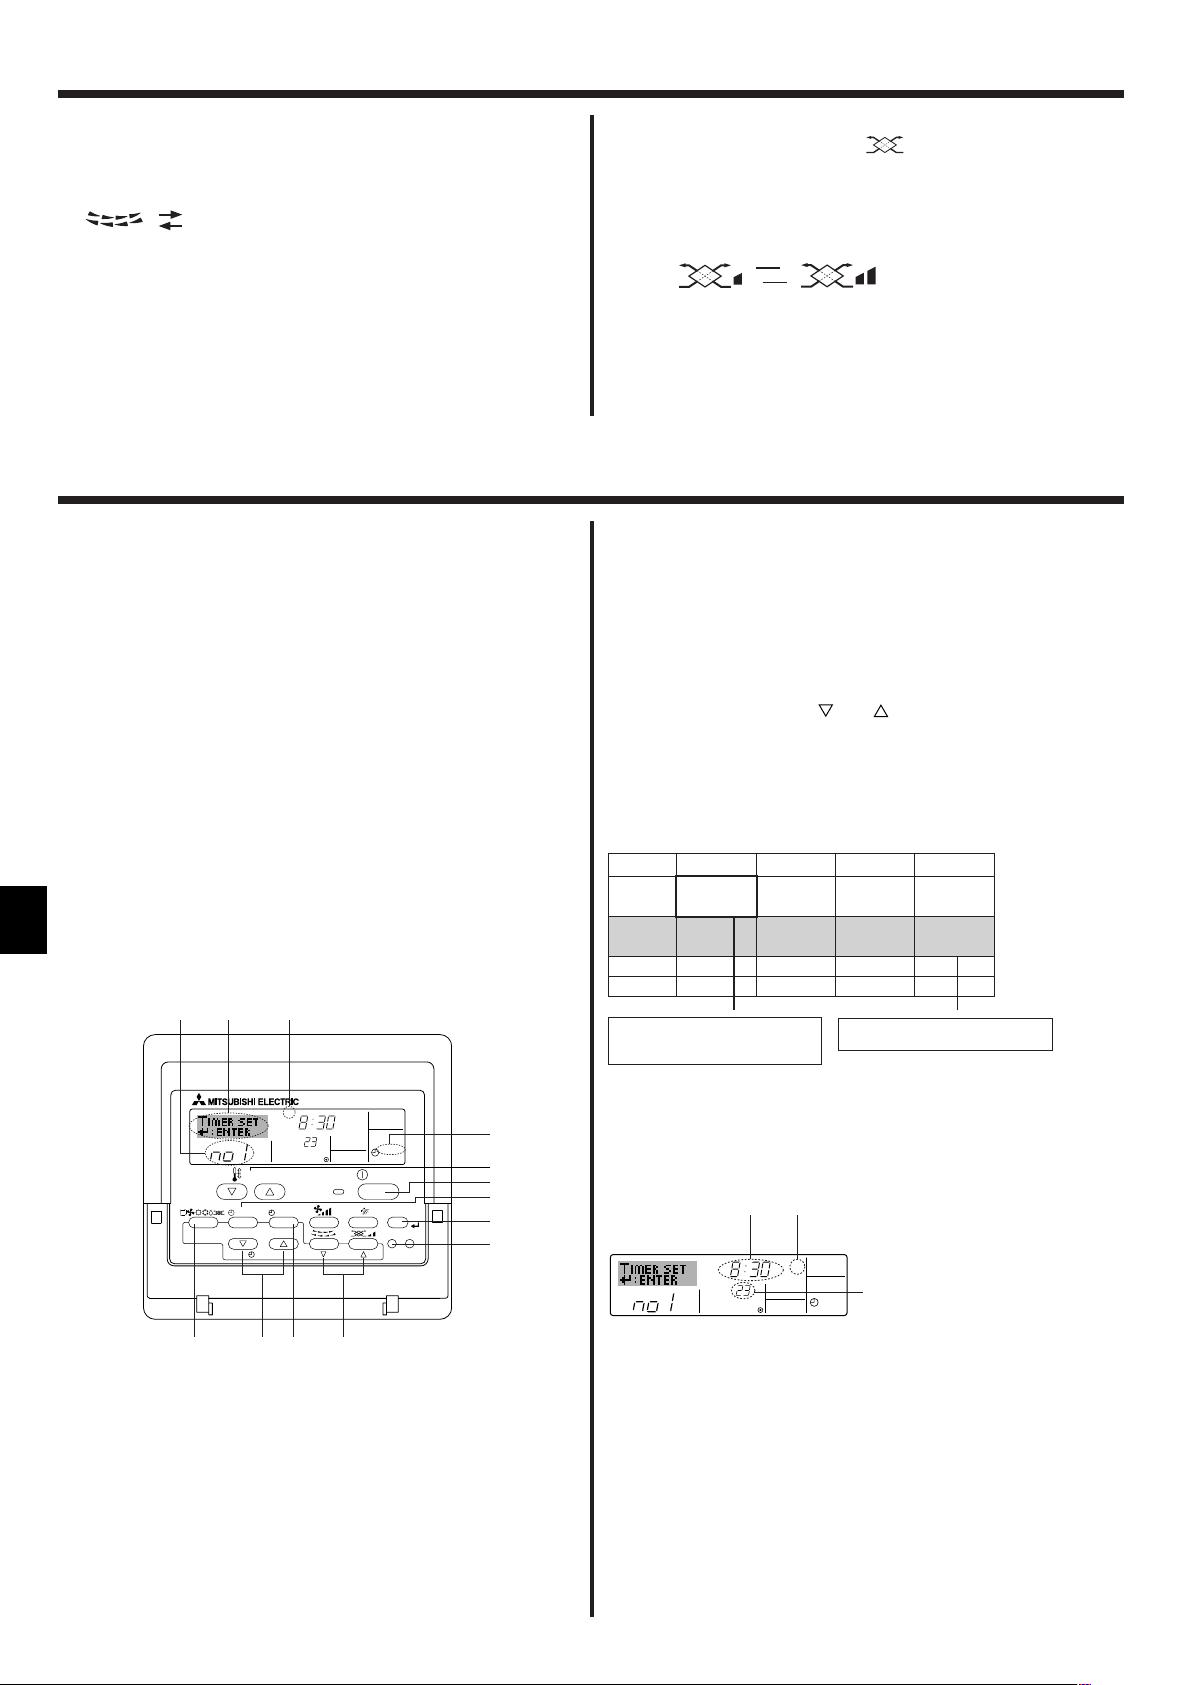
˚C
SUN
ON
WEEKLY
PAR-21MAA
ON/OFF
FILTER
CHECK
OPERATION
CLEAR
TEST
TEMP.
MENU
BACK DAY
MONITOR/SET
CLOCK
ON/OFF
2
42 3
A9 78
0
4
1
3
B
1
5. Bedienung
˚C
SUN
ON
WEEKLY
6
7
5
<So ändern Sie die Luftrichtung (nach links/nach rechts)>
■ Drücken Sie die Taste Luftklappe 7 nach Bedarf.
• Das Bild Luftklappe 7 erscheint.
Mit jedem Drücken der Taste wird die Einstellung wie folgt umgeschaltet.
Keine Anzeige
(Stop)
(ON ) (OFF)
Während dem Schwingbetrieb bewegt sich
die Pfeilanzeige von links nach rechts.
5.6. Belüftung
ss
s Für LOSSNAY-Kombination
ss
5.6.1. Für verdrahteter Fernbedienung
● So betreiben Sie den Ventilator zusammen mit dem Innengerät:
■ Drücken Sie die Taste ON/OFF 1.
• Die Anzeige Vent erscheint auf dem Bildschirm (unter 8). Der Ventilator
arbeitet jetzt immer automatisch, wenn das Innengerät läuft.
6. Timer
6.1. Für verdrahteter Fernbedienung
Sie können die Funktionsauswahl verwenden, um auszuwählen, welchen der drei
Timer Sie verwenden möchten: 1 Wöchentlicher Timer, 2 Einfacher Timer oder 3
Auto-Off-Timer.
6.1.1. Wöchentlicher Timer
■ Der wöchentliche Timer kann verwendet werden, um bis zu acht Betriebsarten für
jeden Tag der Woche einzustellen.
• Jede Betriebsart kann aus Folgendem bestehen: EIN/AUS-Zeit zusammen mit
einer Temperatureinstellung oder nur EIN/AUS-Zeit oder nur Temperatureinstellung.
• Wenn die aktuelle Zeit eine vom Timer eingestellte Zeit erreicht, führt die
Klimaanlage die vom Timer eingestellte Aktion durch.
■ Die Einteilung der Zeiteinstellung für diesen Timer ist 1 Minute.
Hinweis:
*1. Der wöchentliche Timer/einfache Timer/Auto-Off-Timer können nicht gleich-
zeitig eingestellt werden.
*2. Der wöchentliche Timer funktioniert nicht, wenn eine der folgenden Bedin-
gungen wirksam ist.
Die Timerfunktion ist ausgeschaltet; das System befindet sich in einem
unnormalen Zustand; ein Testlauf wird durchgeführt; die Fernbedienung
führt einen Selbstcheck oder einen Fernbedienungscheck durch; der Benutzer stellt gerade eine Funktion ein; der Benutzer stellt gerade einen Timer
ein; der Benutzer stellt gerade den aktuellen Wochentag oder die Zeit ein;
das System wird zentral gesteuert. (Das System führt insbesondere dann
keine Betriebsarten durch (Gerät ein, Gerät aus oder Temperatureinstellung),
die während diesen Bedingungen deaktiviert sind.)
Betriebsart Nr.
Tageseinstellung
● So lassen Sie den Ventilator unabhängig laufen:
■ Drücken Sie die Taste Modus 2, bis
auf dem Display erscheint. Dadurch
startet der Ventilator.
● So ändern Sie die Ventilatorstärke:
■ Drücken Sie die Taste Belüftung 8 nach Bedarf.
• Mit jedem Drücken wird die Einstellung wie unten dargestellt umgeschaltet.
▲
▲
Niedrig Hoch
5.6.2. Für die schnurlose Fernbedienung
● Der Ventilator schaltet sich automatisch ein, wenn das Innengerät sich einschal-
tet.
● Keine Anzeige auf der schnurlosen Fernbedienung.
<So stellen Sie den wöchentlichen Timer ein>
1. Achten Sie darauf, daß Sie sich im Standardkontrollbildschirm befinden und daß
die Anzeige für den wöchentlichen Timer 1 auf dem Display angezeigt wird.
2. Drücken Sie die Taste Timer-Menü B, so daß “Set Up” auf dem Bildschirm er-
scheint (unter 2). (Beachten Sie, daß mit jedem Tastendruck die Anzeige
zwischen“Set Up” und “Monitor” umgeschaltet wird.)
3. Drücken Sie die Taste Timer Ein/Aus (Tag einstellen) 9, um den Tag einzustellen.
Mit jedem Drücken geht die Anzeige unter 3 zur nächsten Einstellung in der
folgenden Reihenfolge: “Sun Mon Tues Wed Thurs Fri Sat” → “Sun” → ... → “Fri”
→ “Sat” → “Sun Mon Tues Wed Thurs Fri Sat”...
4. Drücken Sie die Taste Betrieb
entsprechende Betriebsnummer auszuwählen (1 bis 8) 4.
* Mit Ihren Eingaben unter Schritt 3 und 4 wählen Sie eine der Zellen aus der unten
dargestellten Matrix.
(Die Fernbedienungsanzeige auf der linken Seite zeigt, wie das Display aussieht, wenn Betrieb 1 für Sonntag auf die unten angegebenen Werte eingestellt ist.)
Setup-Matrix
Betr.-Nr. Sunday Monday … Saturday
<Einstellungen von Betrieb 1 für Sonntag>
Klimaanlage um 8.30 Uhr mit auf 23 °C
eingestellter Temperatur starten.
No. 1
No. 2
…
No. 8
• 8:30
• ON
• 23 °C
• 10:00
• OFF
• 10:00
• OFF
▲
oder (7 oder 8) so oft wie nötig, um die
• 10:00
• OFF
• 10:00
• OFF
▲
<Einstellung von Betrieb 2 für jeden Tag>
Klimaanlage um 10.00 Uhr ausschalten.
24
Hinweis:
Durch Einstellen des Tags auf “Sun Mon Tues Wed Thurs Fri Sat”, können Sie
festlegen, daß derselbe Betrieb jeden Tag zur selben Zeit durchgeführt wird.
(Beispiel: Betrieb 2 oben, der für jeden Tag der Woche gleich ist.)
<Einstellen des wöchentlichen Timers>
Zeigt die
Zeiteinstellung an
Zeigt die ausgewählte Betriebsart an (EIN oder AUS)
* Erscheint nicht, wenn die Betriebsart nicht einge-
stellt ist.
Zeigt die Temperatureinstellung an
* Erscheint nicht, wenn die Tempera-
tur nicht eingestellt ist.
5. Drücken Sie die entsprechende Taste Zeit einstellen A so oft wie nötig, um die
gewünschte Zeit einzustellen (unter 5).
* Wenn Sie die Taste gedrückt halten, rückt die Zeit zuerst in Minuten-
intervallen, dann in Zehn-Minuten-Intervallen und dann in Ein-Stunden-Intervallen vor.
6. Drücken Sie die Taste ON/OFF 1, um die gewünschte Betriebsart auszuwäh-
len (EIN oder AUS) unter 6.
* Jedes Drücken ändert die nächste Einstellung in der folgenden Reihenfol-
ge: keine Anzeige (keine Einstellung) → “ON” → “OFF”.
Page 25
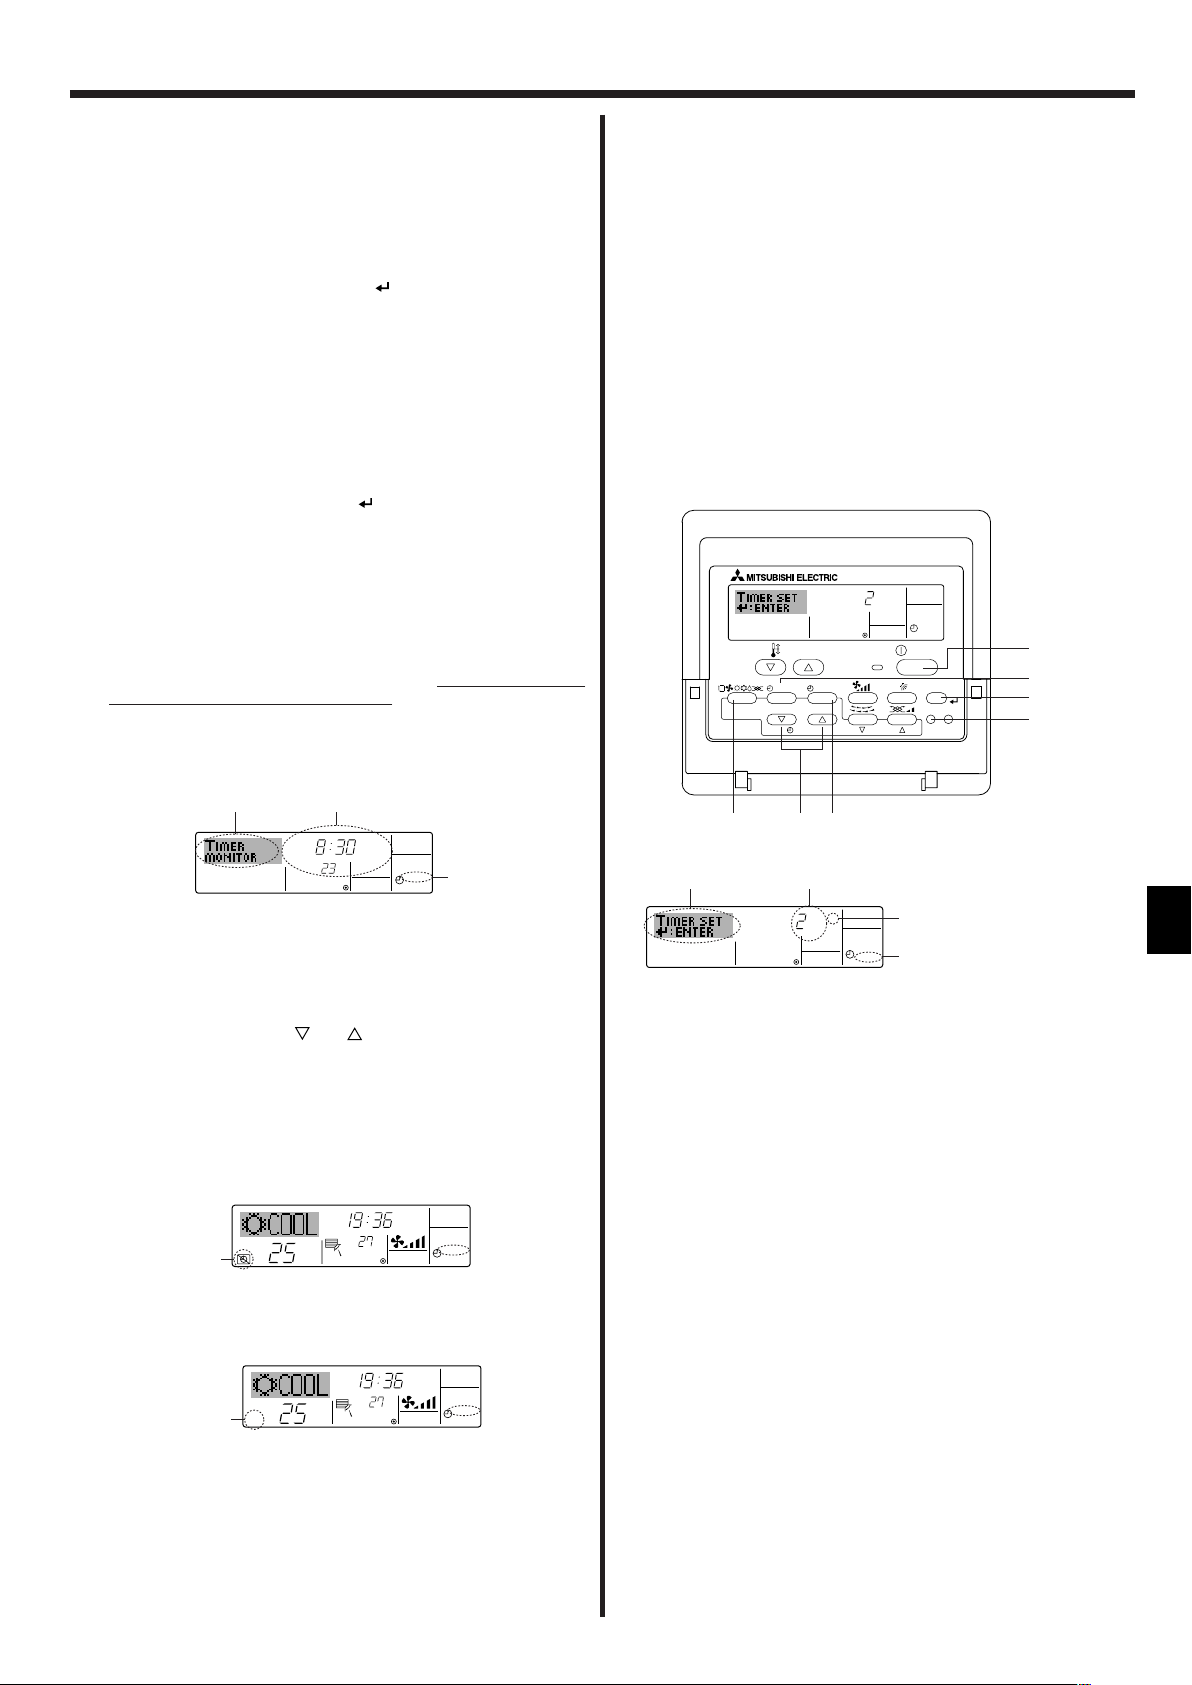
ONHr
AFTER
SIMPLE
PAR-21MAA
ON/OFF
FILTER
CHECK
OPERATION
CLEAR
TEST
TEMP.
MENU
BACK DAY
MONITOR/SET
CLOCK
ON/OFF
2A9
0
4
1
B
ONHr
AFTER
SIMPLE
4
1
3
2
˚C
TIMER
SUN
ON
OFF
WEEKLY
1
9
8
˚C
˚C
TIME SUN
WEEKLY
0
˚C
˚C
TIME SUN
WEEKLY
0
6. Timer
7. Drücken Sie die entsprechende Taste Temperatur einstellen 3, um die ge-
wünschte Temperatur einzustellen (unter 7).
* Jedes Drücken ändert die Einstellung in der folgenden Reihenfolge: keine
Anzeige (keine Einstellung) ⇔ 24 ⇔ 25 ⇔ ... ⇔ 29 ⇔ 30 ⇔ 12 ⇔ ... ⇔ 23
⇔ keine Anzeige.
(Verfügbarer Bereich: Der Bereich für die Einstellung ist 12 °C bis 30 °C.
Der tatsächliche Bereich, über den die Temperatur gesteuert werden kann,
variiert jedoch entsprechend des Typs des angeschlossenen Geräts.)
8. Nachdem Sie die entsprechenden Einstellungen unter Schritt 5, 6 und 7 durchgeführt haben, drücken Sie die Taste Filter
4, um die Werte zu speichern.
Um die aktuell eingestellten Werte für den ausgewählten Betrieb einzustellen,
drücken Sie die Taste Check (Löschen) 0 einmal kurz.
* Die angezeigte Zeiteinstellung ändert sich zu “—:—” und die Ein/Aus- und
Temperatureinstellungen verschwinden.
(Um alle wöchentlichen Timer-Einstellungen gleichzeitig zu löschen, halten
Sie die Taste Check (Löschen) 0 mindestens zwei Sekunden lang gedrückt.
Das Display beginnt zu blinken, wodurch angezeigt wird, daß alle Einstellungen gelöscht wurden.)
Hinweis:
Ihre neuen Einträge werden storniert, wenn Sie die Taste Modus (Zurück)
2 drücken, bevor Sie die Taste Filter
4 drücken.
Wenn Sie zwei oder mehr unterschiedliche Betriebsarten für genau dieselbe Zeit eingestellt haben, wird nur die Betriebsart mit der höchsten
Betriebsart-Nr. ausgeführt.
9. Wiederholen Sie die Schritte 3 bis 8 nach Bedarf, um so viele der verfügbaren
Zellen auszufüllen, wie Sie möchten.
10. Drücken Sie die Taste Modus (Zurück) 2, um zum Standardkontrollbildschirm
zurückzukehren und den Einstellvorgang zu beenden.
11. Um den Timer zu aktivieren, drücken Sie die Taste Timer Ein/Aus 9, so daß
die Anzeige “Timer Off” vom Bildschirm verschwindet.
Achten Sie darauf, daß
die Anzeige “Timer Off” verschwunden ist.
* Wenn es keine Timer-Einstellungen gibt, blinkt die Anzeige “Timer Off” auf
dem Bildschirm.
6.1.2. Einfacher Timer
■ Sie haben drei Möglichkeiten, den einfachen Timer einzustellen.
• Nur Startzeit:
Die Klimaanlage startet, wenn die eingestellte Zeit vergangen ist.
• Nur Stopzeit:
Die Klimaanlage stoppt, wenn die eingestellte Zeit vergangen ist.
• Start- und Stopzeiten:
Die Klimaanlage startet und stoppt, wenn die entsprechenden Zeiten vergangen sind.
■ Der einfache Timer (Start und Stop) kann nur einmal innerhalb eines Zeitraums von
72 Stunden eingestellt werden. Die Zeiteinstellung erfolgt in Stunden-Schritten.
Hinweis:
*1. Der wöchentliche Timer/einfache Timer/Auto-Off-Timer können nicht gleich-
zeitig eingestellt werden.
*2. Der einfache Timer funktioniert nicht, wenn eine der folgenden Bedingun-
gen wirksam ist:
Die Timerfunktion ist ausgeschaltet; das System befindet sich in einem
unnormalen Zustand; ein Testlauf wird durchgeführt; die Fernbedienung
führt einen Selbstcheck oder eine Diagnose durch; der Benutzer wählt gerade eine Funktion aus; der Benutzer stellt gerade den Timer ein; das System wird zentral gesteuert. (Unter diesen Bedingungen ist der Ein/AusBetrieb deaktiviert.)
<So zeigen Sie den wöchentlichen Timer an>
1. Achten Sie darauf, daß die wöchentliche Timer-Anzeige auf dem Bildschirm
2. Drücken Sie die Taste Timer-Menü B, so daß “Monitor” auf dem Bildschirm
3. Drücken Sie die Taste Timer Ein/Aus (Tag einstellen) 9 so oft wie nötig, um
4. Drücken Sie die Taste Betrieb
5. Um den Monitor zu schließen und zum Standardkontrollbildschirm zurückzu-
<So schalten Sie den wöchentlichen Timer aus>
Drücken Sie die Taste Timer Ein/Aus 9, so daß “Timer Off” unter 0 erscheint.
<So schalten Sie den wöchentlichen Timer ein>
Drücken Sie die Taste Timer Ein/Aus 9, so daß die Anzeige “Timer Off” (unter 0)
verschwindet.
Timer-Einstellungen
sichtbar ist (unter 1).
erscheint (unter 8).
den Tag einzustellen, den Sie anzeigen möchten.
oder (7 oder 8) so oft wie nötig, um den
auf dem Display angezeigten Timer-Betrieb zu ändern (unter 9).
* Mit jedem Drücken gelangen Sie zur nächsten Timer-Betriebsart in der Rei-
henfolge der Zeiteinstellung.
kehren, drücken Sie die Taste Modus (Zurück) 2.
<So stellen Sie den einfachen Timer ein>
Timer-Einstellung
Aktion (Ein oder Aus)
* “— —” wird angezeigt, wenn
es keine Einstellung gibt.
1. Achten Sie darauf, daß Sie sich im Standardkontrollbildschirm befinden und daß die
Anzeige des einfachen Timers auf dem Display angezeigt wird (unter 1).
Wenn etwas anderes als der einfache Timer angezeigt wird, stellen Sie den SIMPLE TIMER mit Hilfe der Timer-Funktionseinstellung der Funktionsauswahl ein
(siehe 8.[4]–3 (3)).
2. Drücken Sie die Taste Timer-Menü B, so daß “Set Up” auf dem Bildschirm er-
scheint (unter 2). (Beachten Sie, daß mit jedem Tastendruck die Anzeige zwischen “Set Up” und “Monitor” umgeschaltet wird.)
3. Drücken Sie die Taste ON/OFF 1, um die aktuelle EIN- oder AUS-Einstellung des
einfachen Timers anzuzeigen. Drücken Sie die Taste einmal, um die restliche Zeit
unter EIN anzuzeigen, und dann noch einmal, um die restliche Zeit unter AUS
anzuzeigen. (Die Anzeige EIN/AUS erscheint unter 3.)
•“EIN”-Timer: Die Klimaanlage startet den Betrieb, wenn die angegebene An-
zahl Stunden vergangen ist.
•“AUS”-Timer: Die Klimaanlage stoppt den Betrieb, wenn die angegebene An-
zahl Stunden vergangen ist.
4. Wenn “ON” oder “OFF” unter 3 angezeigt wird: Drücken Sie die entsprechende
Taste Zeit einstellen A so oft wie nötig, um die Stunden auf EIN (falls “ON”
angezeigt wird) oder die Stunden auf AUS (falls “OFF” angezeigt wird) unter 4
einzustellen.
• Verfügbarer Bereich: 1 bis 72 Stunden
5. Um sowohl die Zeiten für EIN als auch für AUS einzustellen, wiederholen Sie die
Schritte 3 und 4.
* Beachten Sie, daß die AUS- und EIN-Zeiten nicht auf denselben Wert eingestellt
werden können.
6. So löschen Sie die aktuelle EIN- oder AUS-Einstellung: Zeigen Sie die EIN- oder
AUS-Einstellung (siehe Schritt 3) an und drücken Sie dann die Taste Check
(Löschen) 0, so daß die Zeiteinstellung zu “—” unter 4 zurückkehrt. (Wenn Sie nur
eine EIN-Einstellung oder nur eine AUS-Einstellung verwenden wollen, achten Sie
darauf, daß die Einstellung, die Sie nicht verwenden möchten, als “—” angezeigt
wird.)
25
Page 26

TIMER ON
OFFHrAFTER
SIMPLE
1
6
5
˚C
˚C
SIMPLE
7
˚C
˚C
ONHr
AFTER
SIMPLE
7
ONHr
AFTER
SIMPLE
˚C
˚C
OFFHrAFTER
SIMPLE
SIMPLE
˚C
˚C
OFFHrAFTER
SIMPLE
ONHr
AFTER
SIMPLE
˚C
˚C
SIMPLE
AFTER OFF
AUTO OFF
PAR-21MAA
ON/OFF
FILTER
CHECK
OPERATION
CLEAR
TEST
TEMP.
MENU
BACK DAY
MONITOR/SET
CLOCK
ON/OFF
2A9
4
B
AFTER OFF
AUTO OFF
3
1
2
6. Timer
7. Nach Durchführung der oben angegebenen Schritte 3 bis 6 drücken Sie die Taste
Filter
4, um den Wert zu speichern.
Hinweis:
Ihre neuen Einstellungen werden storniert, wenn Sie die Taste Modus (Zurück)
2 drücken, bevor Sie die Taste Filter
4 drücken.
8. Drücken Sie die Taste Modus (Zurück) 2, um zum Standardkontrollbildschirm
zurückzukehren.
9. Drücken Sie die Taste Timer Ein/Aus 9, um den Timer-Countdown zu starten.
Wenn der Timer läuft, wird der Timer-Wert auf dem Display angezeigt.
Achten Sie
darauf, ob der Timer-Wert sichtbar und richtig ist.
<Anzeigen der aktuellen Einstellungen des einfachen Timers>
Timer-Einstellung
1. Achten Sie darauf, daß die Anzeige des einfachen Timers auf dem Bildschirm
sichtbar ist (unter 1).
2. Drücken Sie die Taste Timer-Menü B, so daß “Monitor” auf dem Bildschirm er-
scheint (unter 5).
• Falls der einfache EIN- oder AUS-Timer läuft, erscheint der aktuelle Timer-Wert
unter 6.
• Falls die EIN- und AUS-Werte beide eingestellt wurden, erscheinen beide Werte
abwechselnd.
3. Drücken Sie die Taste Modus (Zurück) 2, um die Monitoranzeige zu schließen und
zum Standardkontrollbildschirm zurückzukehren.
<So schalten Sie den einfachen Timer aus...>
Drücken Sie die Taste Timer Ein/Aus 9, so daß die Timer-Einstellung nicht mehr auf
dem Bildschirm erscheint (unter 7).
Beispiel 2:
Starten Sie den Timer, wobei die AUS-Zeit vor der EIN-Zeit liegt.
EIN-Einstellung: 5 Stunden
AUS-Einstellung: 2 Stunden
Beim Timer-Start
Das Display zeigt die AUS-Einstellung des
▲
Timers (Stunden bleiben AUS).
2 Stunden nach dem Timer-Start
Das Display wechselt zur Anzeige der EINEinstellung des Timers (Stunden bleiben EIN).
▲
Die angezeigte Zeit entspricht der Einstellung
EIN (5 Stunden) – Einstellung AUS (2 Stunden)
= 3 Stunden.
5 Stunden nach dem Timer-Start
Die Klimaanlage schaltet sich ein und läuft weiter, bis sie jemand ausschaltet.
6.1.3. Timer für automatisches Ausschalten
■ Dieser Timer beginnt den Countdown, wenn die Klimaanlage startet, und schaltet
die Klimaanlage aus, wenn die eingestellte Zeit abgelaufen ist.
■ Die verfügbaren Einstellungen gehen in 30-Minuten-Intervallen von 30 Minuten bis
zu 4 Stunden.
Hinweis:
*1. Der wöchentliche Timer/einfache Timer/Auto-Off-Timer können nicht gleich-
zeitig eingestellt werden.
*2. Der Auto-Off-Timer funktioniert nicht, wenn eine der folgenden Bedingun-
gen wirksam ist:
Die Timerfunktion ist ausgeschaltet; das System befindet sich in einem
unnormalen Zustand; ein Testlauf wird durchgeführt; die Fernbedienung
führt einen Selbstcheck oder eine Diagnose durch; der Benutzer wählt gerade eine Funktion aus; der Benutzer stellt gerade den Timer ein; das System wird zentral gesteuert. (Unter diesen Bedingungen ist der Ein/AusBetrieb deaktiviert.)
<So starten Sie den einfachen Timer...>
Drücken Sie die Taste Timer Ein/Aus 9, so daß die Timer-Einstellungen unter 7
sichtbar sind.
Beispiele
Falls die EIN- und AUS-Zeiten beide im einfachen Timer eingestellt wurden, werden
der Betrieb und die Anzeige wie unten dargestellt.
Beispiel 1:
Starten Sie den Timer, wobei die EIN-Zeit früher als die AUS-Zeit eingestellt ist.
EIN-Einstellung: 3 Stunden
AUS-Einstellung: 7 Stunden
Beim Timer-Start
Das Display zeigt die EIN-Einstellung des
▲
Timers (Stunden bleiben EIN).
3 Stunden nach dem Timer-Start
Die Anzeige wechselt zur Anzeige der AUSEinstellung des Timers (Stunden bleiben AUS).
▲
Die angezeigte Zeit entspricht der Einstellung
AUS (7 Stunden) – Einstellung EIN (3 Stunden)
= 4 Stunden.
7 Stunden nach dem Timer-Start
Die Klimaanlage schaltet sich aus und bleibt
26
aus, bis sie von jemandem erneut gestartet
wird.
<So stellen Sie den Auto-Off-Timer ein>
Timer-Einstellung
1. Achten Sie darauf, daß Sie sich im Standardkontrollbildschirm befinden und daß die
Anzeige “Auto Off Timer” auf dem Display angezeigt wird (unter 1).
Wenn etwas anderes als der Auto-Off-Timer angezeigt wird, stellen Sie den AUTOOFF-TIMER mit Hilfe der Timer-Funktionseinstellung der Funktionsauswahl ein
(siehe 8.[4]–3 (3)).
2. Halten Sie die Taste Timer-Menü B 3 Sekunden lang gedrückt, so daß “Set Up”
auf dem Bildschirm erscheint (unter 2).
(Beachten Sie, daß mit jedem Tastendruck die Anzeige zwischen “Set Up” und
“Monitor” umgeschaltet wird.)
3. Drücken Sie die entsprechende Taste Zeit einstellen A so oft wie nötig, um die
OFF-Zeit einzustellen (unter 3).
4. Drücken Sie die Taste Filter
4, um die Einstellung zu speichern.
Hinweis:
Ihr Eintrag wird storniert, wenn Sie die Taste Modus (Zurück) 2 drücken, bevor
Sie die Taste Filter
4 drücken.
5. Drücken Sie die Taste Modus (Zurück) 2, um den Einstellvorgang zu beenden und
zum Standardkontrollbildschirm zurückzukehren.
6. Falls die Klimaanlage bereits läuft, beginnt der Timer sofort mit dem Countdown.
Achten Sie darauf, zu überprüfen, ob die Timer-Einstellung richtig auf dem
Display erscheint.
Page 27
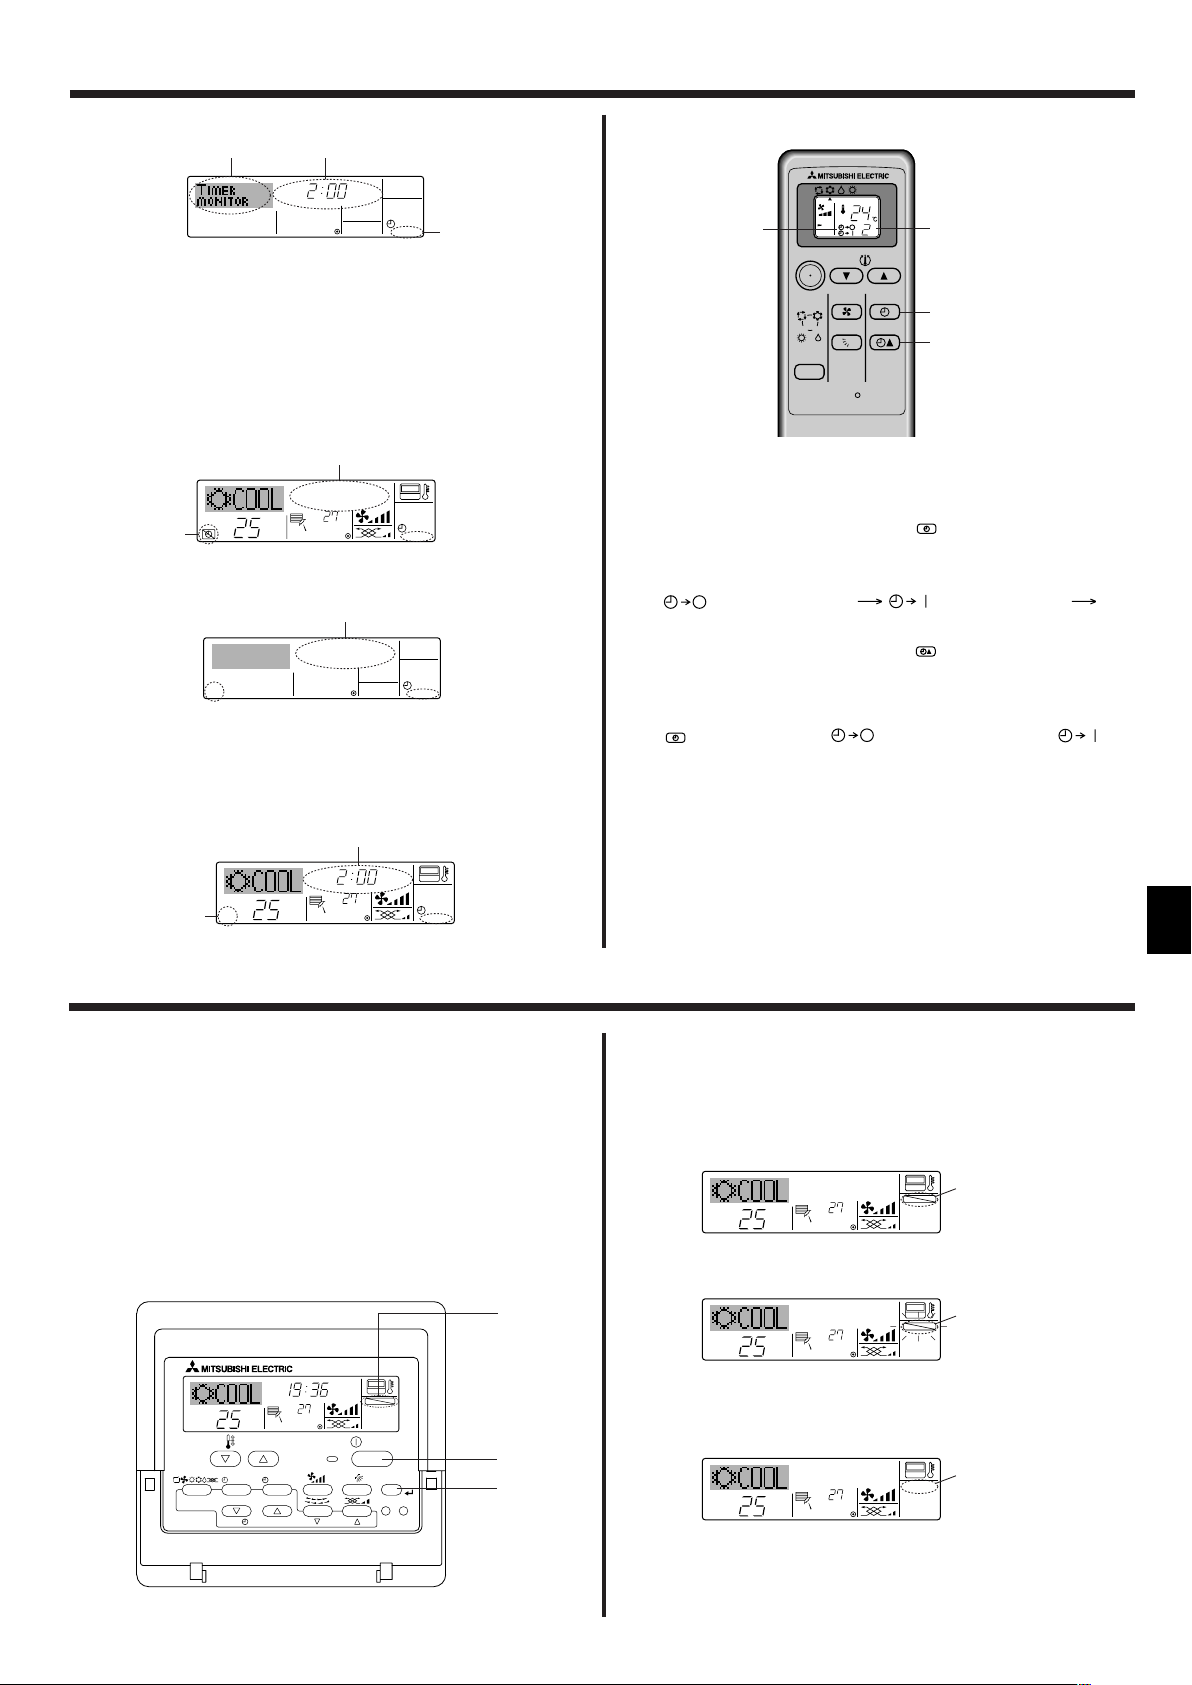
ON/OFF
RESET
TOO
WARM
TOO
COOL
MODE
AUTO COOL
DRY
HEAT
FAN
VANE
SELECT
TIME
h
1
B
A
2
AFTER
TIMER
OFF
AUTO OFF
5
1
4
˚C
˚C
AUTO OFF
6
7
AUTO OFF
7
˚C
˚C
AFTER OFF
AUTO OFF
6
7
SELECT
TIME
SELECT
˚C
˚C
TIME SUN
FUNCTION
PAR-21MAA
ON/OFF
FILTER
CHECK
OPERATION
CLEAR
TEST
TEMP.
MENU
BACK DAY
MONITOR/SET
CLOCK
ON/OFF
4
1
1
˚C
˚C
FUNCTION
1
˚C
˚C
FUNCTION
1
˚C
˚C
1
6. Timer
<Überprüfen der aktuellen Einstellung des Auto-Off-Timers>
Timer-Einstellung
1. Achten Sie darauf, daß “Auto Off” auf dem Bildschirm sichtbar ist (unter 1).
2. Halten Sie die Taste Timer-Menü B 3 Sekunden lang gedrückt, so daß “Monitor”
auf dem Bildschirm angegeben wird (unter 4).
• Der Timer, der noch beendet werden muß, erscheint unter 5.
3. Um den Monitor zu schließen und zum Standardkontrollbildschirm zurückzukeh-
ren, drücken Sie die Taste Modus (Zurück) 2.
<So schalten Sie den Auto-Off-Timer aus...>
● Halten Sie die Taste Timer Ein/Aus 9 3 Sekunden lang gedrückt, so daß “Timer Off”
erscheint (unter 6) und der Timer-Wert (unter 7) verschwindet.
● Oder schalten Sie die Klimaanlage selbst aus. Der Timer-Wert (unter 7) verschwin-
det vom Bildschirm.
<So starten Sie den Auto-Off-Timer...>
● Halten Sie die Taste Timer Aus/Ein 9 3 Sekunden lang gedrückt. Die Anzeige
“Timer Off” erscheint (unter 6) und die Timer-Einstellung erscheint auf dem Dis-
play (unter 7).
● Oder schalten Sie die Klimaanlage ein. Der Timer-Wert erscheint unter 7.
6.2. Für die schnurlose Fernbedienung
Sie können den Timer für die Zeit, wenn Sie zu Bett gehen, wenn Sie nach Hause
kommen, wenn Sie aufstehen usw. einstellen.
1 Der Timer-Betrieb wird durch Eindrücken der
wählt.
A Bei jedem Tastendruck ändert sich der Timer-Betrieb in nachstehender Rei-
henfolge:
(AUSSCHALT-TIMER) (EINSCHALT-TIMER)
TIMER FREIGABE (TIMER RELEASE)
2 Die Einstellung der Timer-Zeit erfolgt mit der
B Bei jedem Eindrücken dieser Taste erhöht sich die eingestellte Zeit um 1 Stun-
de bis zu 12 Stunden.
Den Timer freigeben:
• Die
Taste eindrücken bis (AUSSCHALT-TIMER) und (EIN-
SCHALT-TIMER) nicht mehr angezeigt werden.
Hinweis:
Der AUSSCHALT-TIMER und der EINSCHALT- TIMER können nicht gleichzeitig
eingestellt werden.
Taste während des Betriebs ge-
Taste.
7. Weitere Funktionen
7.1. Sperren der Fernbedienungstasten (Beschränkung
der Betriebsfunktionen)
■ Wenn Sie möchten, können Sie die Tasten der Fernbedienung sperren. Sie kön-
nen die Funktionsauswahl der Fernbedienung verwenden, um auszuwählen, welche Art von Sperre Sie verwenden möchten. (Informationen zur Auswahl des Sperrtyps finden Sie in Abschnitt 8, Punkt [4]–2 (1).)
Sie können eine der zwei folgenden Sperrarten verwenden:
1 Alle Tasten sperren: Sperrt alle Tasten auf der Fernbedienung.
2 Alle außer EIN/AUS sperren: Sperrt alle Tasten außer der Taste ON/OFF.
Hinweis:
Die Anzeige “Locked” erscheint auf dem Bildschirm, um anzugeben, daß die
Tasten zur Zeit gesperrt sind.
Sperr-Anzeige
<So sperren Sie die Tasten>
1. Halten Sie die Taste Filter 4 zusammen mit der Taste ON/OFF 1 2 Sekunden lang
gedrückt. Die Anzeige “Locked” erscheint auf dem Bildschirm (unter 1) und zeigt
an, daß die Sperre jetzt aktiv ist.
* Wenn das Sperren in der Funktionsauswahl deaktiviert wurde, zeigt der Bild-
schirm die Meldung “Not Available” an, wenn Sie die Tasten wie oben beschrieben drücken.
• Wenn Sie eine gesperrte Taste drücken, blinkt die Anzeige “Locked” (unter 1)
auf dem Display.
<So entsperren Sie die Tasten>
1. Halten Sie die Taste Filter 4 zusammen mit der Taste ON/OFF 1 2 Sekunden
lang gedrückt – die Anzeige “Locked” verschwindet vom Bildschirm (unter 1).
27
Page 28
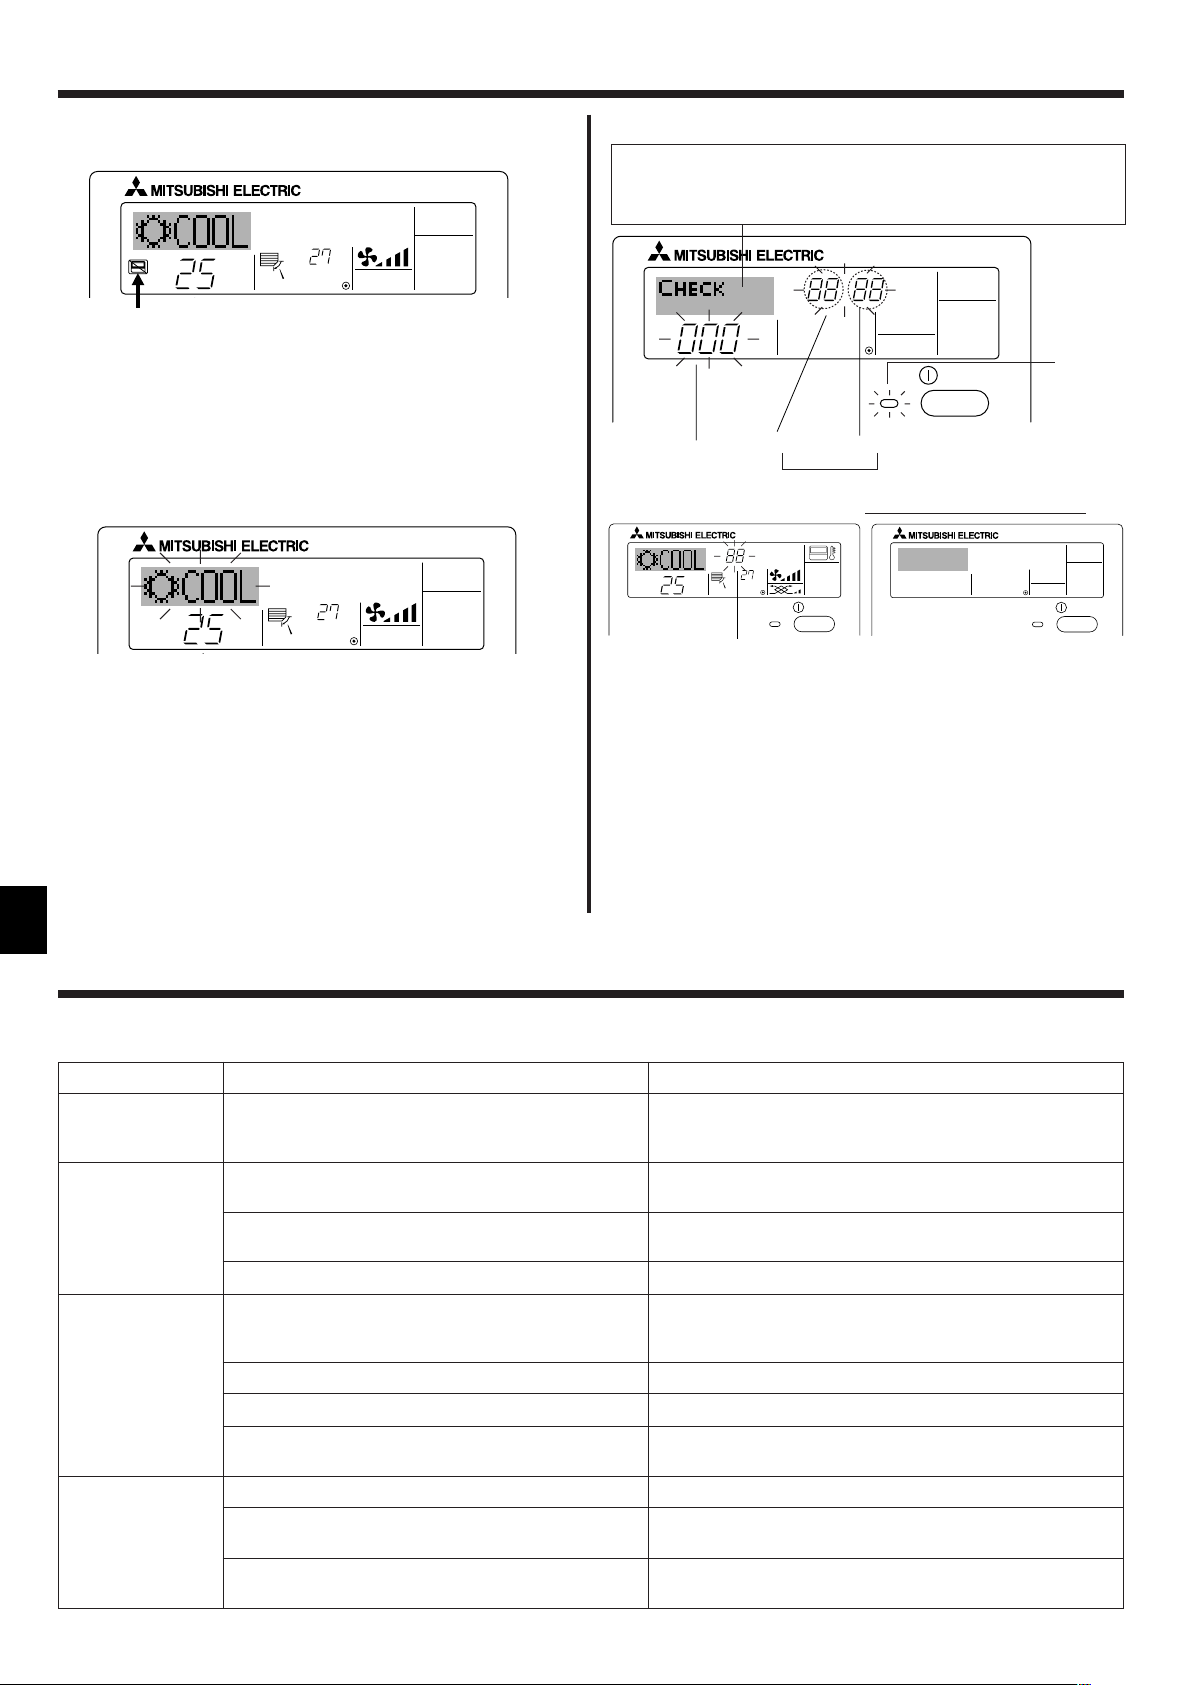
ON/OFF
TEMP.
˚C
˚C
ON/OFF
TEMP.
˚C
˚C
ON/OFF
˚C
˚C
ERROR CODE
ON/OFF
CALL:XXXX
XXX:XXX
7. Weitere Funktionen
ON/OFF
ERROR CODE
7.2. Weitere Anzeigen
7.2.1. Zentral gesteuert
● Angezeigt, wenn der Betrieb von der Zentralsteuerung usw. kontrolliert wird.
Nachfolgend werden eingeschränkte Operationen gezeigt.
• EIN/AUS (inkl. Timerbetrieb)
• Betriebsart
• Temperatureinstellung
Hinweis:
Kann auch individuell eingeschränkt sein.
7.2.2. Blinkende Modus-Anzeige
■ Bei Dauerblinken
Wird angezeigt, wenn eine andere Innenanlage an eine Außenanlage angeschlossen ist, die bereits in einer anderen Betriebsart arbeitet.
Abstimmung mit der Betriebsart der anderen Innenanlage.
■ Wenn Modus geschaltet wird, nachdem die Anzeige blinkt
Angezeigt, wenn die Betriebsart für jede Saison durch die Zentralsteuerung usw.
eingeschränkt wird.
Andere Betriebsart benutzen.
7.2.3. Anzeige von Fehlercodes
Wenn Sie eine Telefonnummer eingegeben haben, die bei Auftreten eines Problems angerufen werden sollte, zeigt der Bildschirm diese Nummer an. (Sie kön-
nen dies in der Funktionsauswahl einrichten. Informationen dazu finden Sie in
Abschnitt 8.)
Lampe EIN
(blinkt)
Kältemitteladresse des
Innengeräts
● Falls sowohl die Lampe EIN als auch der Fehlercode blinken: Dies bedeutet, daß
die Klimaanlage gestört ist und der Betrieb gestoppt wurde (und nicht wiederaufgenommen werden kann). Notieren Sie sich die angegebene Gerätenummer und
den Fehlercode und schalten Sie dann die Netztaste der Klimaanlage aus und
rufen Sie Ihren Händler oder Servicetechniker.
● Wenn nur der Fehlercode blinkt (während die Lampe EIN leuchtet): Der Betrieb
läuft weiter, es kann jedoch ein Problem mit dem System vorliegen. In diesem Fall
sollten Sie den Fehlercode notieren und Ihren Händler oder Servicetechniker um
Rat fragen.
* Falls Sie eine Telefonnummer eingegeben haben, die bei Auftreten eines Pro-
blems angerufen werden soll, drücken Sie die Taste Check und die Nummer
wird auf dem Bildschirm angezeigt. (Sie können dies in der Funktionsauswahl
einrichten. Informationen dazu finden Sie in Abschnitt 8.)
Fehlercode
Wechselnde Anzeige
Fehlercode
Innengerät-Nr.
Wenn die Taste Check gedrückt ist:
8. Funktionsauswahl
Funktionsauswahl an der Fernbedienung
Die Einstellung der folgenden Fernbedienungsfunktionen kann mit dem Auswahlmodus der Fernbedienungsfunktion geändert werden. Ändern Sie die Einstellung nach Bedarf.
1. Sprache ändern
(“CHANGE
LANGUAGE”)
2. Funktionsgrenzen
(“Funktion
auswahlen”)
3. Auswahl der
Betriebsart
(“Betriebsart
wahlen”)
4. Änderung der
Anzeige (“Anzeige
betriebsart”)
28
Eintrag 1
Eintrag 2
Einstellung der angezeigten Sprache
(1) Einstellung der Funktionsgrenzen bei der Bedienung (Operati-
on Lock) (“Sperr-Funktion”)
(2) Einstellung der Benutzung der Betriebsart Automatisch (“Aus-
wahl autobetrieb”)
(3) Einstellung der Temperaturgrenzen (“Limit temp Funktion”)
(1) Haupt-/Nebenfunktion der Fernbedienung (“Haupt/Neben
controller”)
(2) Benutzung der Uhreinstellung (“Uhr”)
(3) Einstellung der Timer-Funktion (“Wochenzeit schalt uhr”)
(4) Kontaktnummer für den Fall von Fehlfunktionen (“CALL.”)
(1) Temperatureinstellung in °C/°F (“Wechsel °C/°F”)
(2) Einstellung der Anzeige der Luftansaugtemperatur (“Raum
TEMP gewahlt”)
(3) Einstellung der automatischen Kühl-/Heizanzeige (“Auto Betrieb
C/H”)
• Anzeige in mehreren Sprachen ist möglich
• Einstellung der Funktionsgrenzen bei der Bedienung (Operation Lock)
• Einstellung, ob die Betriebsart “Automatisch” benutzt wird oder nicht
• Einstellung des Temperaturbereichs (Maximum, Minimum)
• Auswahl der Funktion als Haupt-/Nebenfernbedienung
* Wenn zwei Fernbedienungen in einer Gruppe angeschlossen sind, muss
eine der beiden als Nebengerät arbeiten.
• Einstellung, ob die Zeitfunktionen benutzt werden oder nicht
• Einstellen des Timer-Typs
• Anzeige der Kontaktnummer für den Fall von Fehlfunktionen
• Einstellen der Telefonnummer
• Einstellen der Temperatureinheit der Anzeige (°C oder °F)
• Einstellung, ob die Temperatur der (angesaugten) Innenluft angezeigt wird
oder nicht
• Einstellung, ob “Cooling” oder “Heating” (Kühlen/Heizen) in der Betriebsart Automatisch angezeigt werden oder nicht
Eintrag 3 (Inhalt der Einstellungen)
Page 29
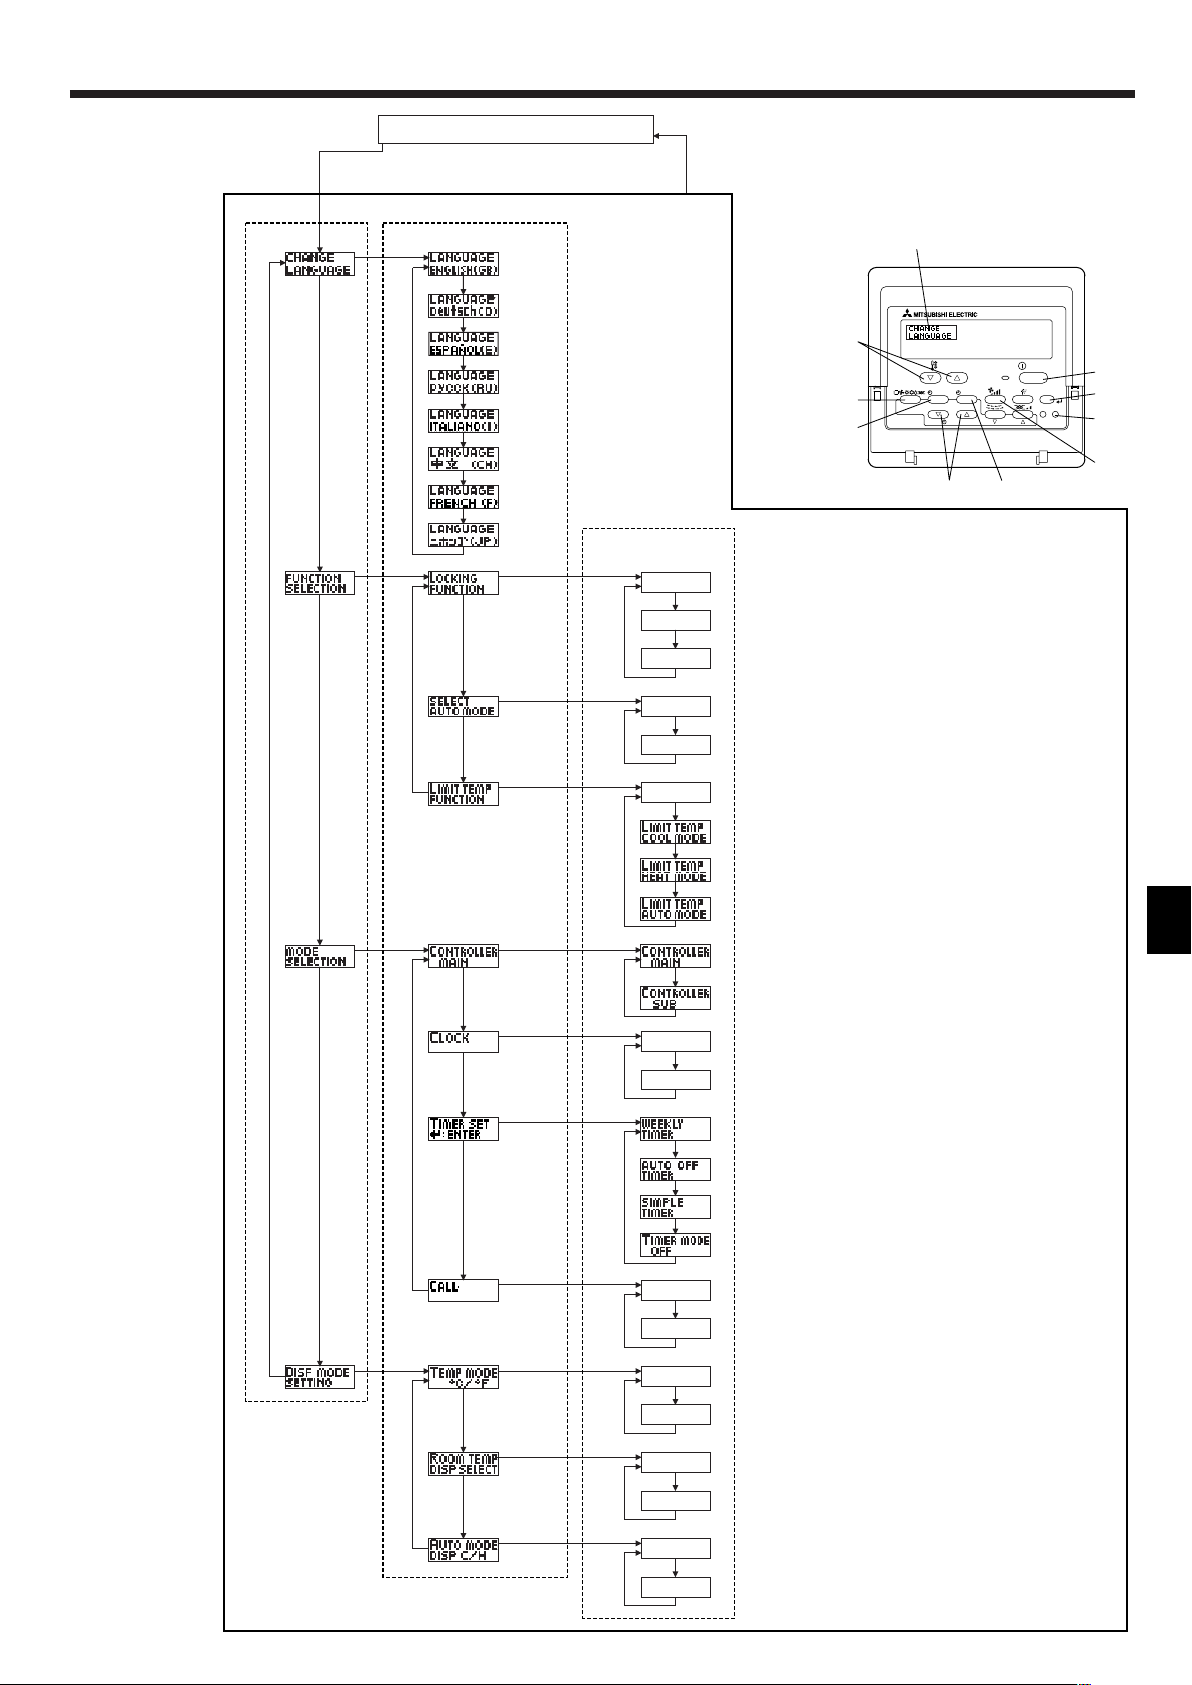
OFF
on1
on2
OFF
ON
OFF
ON
OFF
OFF
CALL-
ON
OFF
ON
OFF
°C
°F
PAR-21MAA
ON/OFF
FILTER
CHECK
OPERATION
CLEAR
TEST
TEMP.
MENU
BACK DAY
MONITOR/SET
CLOCK
ON/OFF
F
E
G
C
D
H
B
A
I
G
G
G
G
G
G
E
E
G
G
G
G
G
E
G
E
G
G
G
G
D
D
D
D
D
D
D
D
D
D
D
D
D
D
D
D
D
D
D
D
D
D
D
D
D
D
D
D
D
D
English
Germany
Spanish
Russian
Italy
Chinese
French
Japanese
8. Funktionsauswahl
[Flussdiagramm der Funktionsauswahl]
Spracheinstellung (Englisch)
Eintrag 1 Eintrag 2
Sprache
ändern
Funktion
auswahlen
Betriebsart
wahlen
Normalbetriebsanzeige
(Anzeige bei deaktivierter Klimaanlage)
Halten Sie die Taste E gedrückt und drücken Sie Taste D zwei
Sekunden lang.
Funktionsauswahlmodus der Fernbedienung
Eintrag 3
Halten Sie die Taste E gedrückt und drücken Sie Taste D zwei Sekunden lang.
E Drücken Sie die Taste für die Betriebsart.
G Drücken Sie die Taste TIMER MENU (TIMER-MENÜ).
D Drücken Sie die Taste TIMER ON/OFF (TIMER EIN/AUS).
Punktmatrixanzeige
Einstellung für die Bedienungssperre wird nicht benutzt.
(Anfänglicher Einstellungswert)
Bedienungssperre außer für Taste On/Off (Ein/Aus).
Bedienungssperre für alle Tasten.
Die Betriebsart Automatisch wird angezeigt, wenn die Betriebsart
gewählt wird. (Anfänglicher Einstellungswert)
Die Betriebsart Automatisch wird nicht angezeigt, wenn die Betriebsart gewählt wird.
Die Temperaturbereichsgrenzen sind nicht aktiv. (Anfänglicher Einstellungswert)
Der Temperaturbereich kann in der Betriebsart Kühlen/Trocken geändert werden.
Der Temperaturbereich kann in der Betriebsart Heizen geändert
werden.
Der Temperaturbereich kann in der Betriebsart Automatisch geändert
werden.
Die Fernbedienung fungiert als Hauptfernbedienung. (Anfänglicher
Einstellungswert)
Die Fernbedienung fungiert als Nebenfernbedienung.
Anzeige
betriebsart
Die Uhrfunktion kann benutzt werden. (Anfänglicher Einstellungswert)
Die Uhrfunktion kann nicht benutzt werden.
Der wöchentliche Timer kann benutzt werden. (Anfänglicher Einstellungswert)
Der Timer für automatisches Ausschalten kann benutzt werden.
Der einfache Timer kann benutzt werden.
Betriebsart Timer kann nicht benutzt werden.
Die eingestellten Kontaktnummern werden im Falle von Fehlern nicht
angezeigt. (Anfänglicher Einstellungswert)
Die eingestellten Kontaktnummern werden im Falle von Fehlern
angezeigt.
Die Temperatureinheit °C wird verwendet. (Anfänglicher Einstellungswert)
Die Temperatureinheit °F wird verwendet.
Die Umgebungstemperatur wird angezeigt. (Anfänglicher Einstellungswert)
Die Umgebungstemperatur wird nicht angezeigt.
Entweder “Automatic cooling” (automatisches Kühlen) oder “Automatic
heating” (automatisches Heizen) wird angezeigt, wenn die Betriebsart Automatisch gewählt wurde. (Anfänglicher Einstellungswert)
Nur “Automatic” (automatisch) wird in der Betriebsart Automatisch
angezeigt.
29
Page 30
8. Funktionsauswahl
[Genaue Einstellung]
[4]–1. Einstellung CHANGE LANGUAGE (Sprache ändern)
Die Sprache des Punktmatrix-Displays kann eingestellt werden.
• Drücken Sie die Taste [
1 Englisch (GB), 2 Deutsch (D), 3 Spanisch (E), 4 Russisch (RU),
5 Italienisch (I), 6 Chinesisch (CH), 7 Französisch (F), 8 Japanisch (JP)
Siehe Punktmatrix-Tabelle.
[4]–2. Funktionsgrenzen
(1) Einstellung der Funktionsgrenzen bei der Bedienung (Operation Lock)
• Zur Umschaltung der Einstellung drücken Sie die Taste [
1 no1 : Die Einstellung der Bedienungssperre (Operation Lock) gilt für alle
Tasten außer der [
2 no2 : Die Einstellung der Bedienungssperre gilt für alle Tasten.
3 OFF (Anfängliche Einstellungswert): Die Einstellung der Bedienungs-
* Damit die Bedienungssperre (Operation Lock) in der normalen Anzeige gül-
tig ist, müssen Sie die [FILTER]-Taste gedrückt halten und währenddessen
die Taste [
ge Einstellung durchgeführt haben.
(2) Einstellung der Benutzung der Betriebsart Automatisch
Wenn die Fernbedienung an einem Gerät angeschlossen ist, bei dem ein automatischer Betrieb möglich ist, können die folgenden Einstellungen vorgenommen werden.
• Zur Umschaltung der Einstellung drücken Sie die Taste [
1 ON (Anfängliche Einstellungswert):
2 OFF: Die Betriebsart Automatisch wird nicht angezeigt, wenn diese
(3) Einstellung der Temperaturgrenzen
Nach dieser Einstellung kann die Temperatur im eingestellten Bereich verän-
dert werden.
• Zur Umschaltung der Einstellung drücken Sie die Taste [
1 Limit Kuhl Temp : Der Temperaturbereich kann in der Betriebsart Küh-
2 Limit Heiz Temp : Der Temperaturbereich kann in der Betriebsart Hei-
3 Limit Auto Temp : Der Temperaturbereich kann in der Betriebsart Auto-
4 OFF (Anfangseinstellung):
* Wenn eine andere Einstellung als OFF gewählt wird, werden die Temperatur-
bereichsgrenzen für Kühlen, Heizen und automatischen Betrieb gleichzeitig eingestellt. Der Bereich kann jedoch nicht begrenzt werden, wenn der
eingestellte Temperaturbereich sich nicht geändert hat.
• Um die Temperatur zu erhöhen oder zu verringern, drücken Sie die Taste
[
• Um die Obergrenze und die Untergrenze einzustellen, drücken Sie die Taste [
und die Temperatur kann eingestellt werden.
• Einstellbarer Bereich
Betriebsart Kühlen/Trocknen:
Betriebsart Heizen:
Betriebsart Automatisch:
ON/OFF] zwei Sekunden lang drücken, nachdem Sie die obi-
Die Betriebsart Automatisch wird angezeigt, wenn diese Betriebsart ausgewählt wird.
Betriebsart ausgewählt wird.
TEMP. ( ) oder ( )] F.
] H (Gebläsegeschwindigkeit). Die ausgewählte Einstellung blinkt,
Untergrenze: 19°C bis 30°C Obergrenze: 30°C bis 19°C
Untergrenze: 17°C bis 28°C Obergrenze: 28°C bis 17°C
Untergrenze: 19°C bis 28°C Obergrenze: 28°C bis 19°C
MENU], G um die Sprache einzustellen.
ON/OFF]-Taste.
sperre wird nicht vorgenommen.
len/Trocknen geändert werden.
zen geändert werden.
matisch geändert werden.
Die Temperaturbereichsgrenzen sind nicht aktiv.
ON/OFF] D.
ON/OFF] D.
ON/OFF] D.
[4]–3. Einstellen der Auswahl der Betriebsart
(1) Haupt-/Nebenfunktion der Fernbedienung
• Zur Umschaltung der Einstellung drücken Sie die Taste [
1 Haupt : Die Fernbedienung fungiert als Hauptfernbedienung.
2 Neben: Die Fernbedienung fungiert als Nebenfernbedienung.
(2) Benutzung der Uhreinstellung
• Zur Umschaltung der Einstellung drücken Sie die Taste [
1 ON : Die Clock-Funktion kann benutzt werden.
2 OFF : Die Clock-Funktion kann nicht benutzt werden.
(3) Einstellung der Timer-Funktion
• Zur Umschaltung der Einstellung drücken Sie die Taste [
(Wählen Sie einen der folgenden Einträge aus.).
1 Wochenzeit schalt uhr (Anfängliche Einstellungswert):
2 Auto Zeit funktion Aus : Der Auto-Off-Timer kann benutzt werden.
3 Einfnche zeit funktion : Der einfache Timer kann benutzt werden.
4 Zeitschaltuhr Aus : Der Timer-Modus kann nicht benutzt werden.
* Wenn die Verwendung der Clock-Einstellung auf OFF steht, kann “Wochen-
zeit schalt uhr” nicht benutzt werden.
(4) Kontaktnummer für den Fall von Fehlfunktionen
• Zur Umschaltung der Einstellung drücken Sie die Taste [
1 CALL OFF : Die eingestellten Kontaktnummern werden im Falle
2 CALL **** *** **** : Die eingestellten Kontaktnummern werden im Falle
CALL_ : Die Kontaktnummer kann eingegeben werden, wenn
• Eingabe der Kontaktnummern
Zur Eingabe der Kontaktnummern gehen Sie wie folgt vor.
Bewegen Sie den blinkenden Cursor auf die eingestellten Nummern.
Drücken Sie die Taste [
nach rechts (links) zu bewegen. Drücken Sie die Taste [
und (
)] C, um die Nummern einzustellen.
[4]–4. Einstellung der Anzeige
(1) Temperatureinstellung in °C/°F
• Zur Umschaltung der Einstellung drücken Sie die Taste [
1 °C:Für die Temperatur wird die Einheit Celsius (°C) verwendet.
2 °F:Für die Temperatur wird die Einheit Fahrenheit (°F) verwendet.
(2) Einstellung der Anzeige der Luftansaugtemperatur
• Zur Umschaltung der Einstellung drücken Sie die Taste [
1 ON : Die Temperatur der Ansaugluft wird angezeigt.
2 OFF : Die Temperatur der Ansaugluft wird nicht angezeigt.
(3) Einstellung der automatischen Kühl-/Heizanzeige
• Zur Umschaltung der Einstellung drücken Sie die Taste [
1 ON : Entweder “Automatic cooling” (Automatisches Kühlen) oder
“Automatic heating” (Automatisches Heizen) wird in der Betriebs-
art Automatisch angezeigt.
2 OFF : Nur “Automatic” wird in der Betriebsart Automatisch angezeigt.
Der Wochen-Timer kann benutzt werden.
von Fehlfunktionen nicht angezeigt.
von Fehlfunktionen angezeigt.
das Display so aussieht wie links gezeigt.
TEMP. ( ) und ( )] F, um den Cursor
ON/OFF] D.
ON/OFF] D.
ON/OFF] D
ON/OFF] D.
CLOCK ( )
ON/OFF] D.
ON/OFF] D.
ON/OFF] D.
30
Page 31

8. Funktionsauswahl
[Tabelle Punktmatrix]
Spracheinstellung
Warten auf Start
Betriebsart Kühlen
Trocknen
Heizen
Automatik
Automatik
(Kühlen)
Automatik
(Heizen)
Gebläse
Belüftung
Stand By
(Voreinstellungen möglich)
Abtauen
Eingestellte Temperatur
Lüftergeschwindigkeit
Nicht verwendete Taste
Prüfen (Fehler)
Testlauf
Selbsttest
Auswahl der Gerätefunktion
Lüfterstufen wählen
English Germany Spanish Russian Italy Chinese French Japanese
Spracheinstellung
Sprache ändern
Funktion auswahlen
Einschränkung der Bedienungsfunktionen
Betriebsart Automatisch wählen
Temperaturbereichsgrenzen einstellen
Temperatur in Betriebsart Kühlen/
Tag begrenzen
Temperatur in Betriebsart Heizen
begrenzen
Temperatur in Betriebsart Automatisch begrenzen
Betriebsart auswählen
Fernbedienung auf MAIN (HAUPT)
einstellen
Fernbedienung auf SUB (NEBEN)
einstellen
Uhreinstellung benutzen
Wochentag und Zeit einstellen
Timer einstellen
Timer anzeigen
Wöchentlicher Timer
Betriebsart Timer aus
Timer für automatisches Ausschalten
Einfacher Timer
Kontaktnummer bei Fehlern
Änderung anzeigen
Einstellung °C/°F für Temperaturanzeige
Einstellung für Anzeige der
Umgebungstemperatur
Einstellung für Anzeige bei automatischem Kühlen/Heizen
English Germany Spanish Russian Italy Chinese French Japanese
31
Page 32

ON/OFF
TEMP.
˚C
˚C
FILTER
B
A
D
C
A B C D E
A
B
9. Notbetrieb bei schnurloser Fernbedienung
SLP-2AL (Für SLZ-KA25/KA35/KA50VAL)
10. Pflege und Reinigung
Wenn die Fernbedienung nicht benutzt werden kann.
Wenn die Batterien der Fernbedienung leer sind oder bei Fehlfunktionen der Fernbedienung, kann mit den Nottasten am Gitter der Notbetrieb erfolgen.
A DEFROST/STAND BY
(Enteisen/Betriebsbereitschaft)-Kontrollampe
B Betriebskontrollampe
C Notbetriebsschalter (heizen)
D Notbetriebschalter (kühlen)
E Empfänger
Den Betrieb starten
• Zur Ausführung des Kühlbetriebs die
• Zur Ausführung des Heizbetriebs die
Hinweis:
• Einzelheiten über den notbetrieb sind nachstehend dargestellt.
Einzelheiten über den NOTBETRIEB sind nachstehend dargestellt.
Betriebsart KÜHLEN HEIZEN
Eingestellte Temperatur 24°C24°C
Gebläsedrehzahl Schnell Schnell
Luftstromrichtung Horizontal Abwärts 4
Ausschalten des Betriebs
• Zum Ausschalten des Betriebs die
Taste D drücken.
Taste C drücken.
-Taste D oder die -Taste C drücken.
■ Anzeige, daß der Filter gereinigt werden muß.
Filter reinigen.
■ “FILTER”-Anzeige zurücksetzen
Wird nach dem Reinigen des Filters die Taste [FILTER] zweimal hintereinander
gedrückt, wird die Anzeige gelöscht und zurückgesetzt.
Hinweis:
● Werden zwei oder mehr Innenanlagen gesteuert, kann die Reinigungsperiode
entsprechend der Filtertypen unterschiedlich sein. Wird die Reinigungsperiode der Hauptanlage erreicht, wird “FILTER” angezeigt. Ist die Anzeige
Filter ausgeschaltet, ist die kumulierte Zeit zurückgesetzt.
● “FILTER” zeigt die Reinigungsperiode an, in der die Klimaanlage unter allge-
meinen inneren Luftbedingungen in einer bestimmten Zeit betrieben wurde.
Da der Grad der Verunreinigung von den Umgebungskonditionen abhängig
ist, muß der Filter entsprechend gereinigt werden.
● Die kumulative Zeit der Reinigungsperiode der Filter unterscheidet sich nach
den entsprechenden Modellen.
● Diese Anzeige ist bei schnurlosen Fernbedienungen nicht verfügbar.
ss
s Reinigung der Filter
ss
• Die Filter mit einem Staubsauger reinigen. Wenn Sie keinen Staubsauger besitzen, den Schmutz und Staub durch Klopfen der Filter auf einen harten Gegenstand hinaus befördern.
• Wenn die Filter besonders schmutzig sind, diese in lauwarmem Wasser auswaschen. Sorgfältig darauf achten, das Waschmittel gründlich auszuspülen und die
Filter vor dem Wiedereinsetzen in die Anlage vollständig trocknen lassen.
Vorsicht:
• Die Filter nicht in direktem Sonnenlicht oder unter Verwendung einer Wärmequelle, wie etwa einer Elektroheizung, trocknen: sie können sich dadurch
verformen.
• Die Filter nicht in heißem Wasser (mehr als 50°C) waschen, da sie sich sonst
verformen können.
• Dafür sorgen, daß die Luftfilter immer installiert sind. Der Betrieb der Anlage
ohne Luftfilter kann zu Fehlfunktionen führen.
ss
s Filter entfernen
ss
Vorsicht:
• Bei Entfernen des Filters Vorsichtsmaßnahmen treffen, um die Augen vor
dem Staub zu schützen. Außerdem darauf achten, nicht zu fallen, falls für
diese Aufgabe ein Hocker benutzt werden muß.
• Wenn der Filter entfernt ist, die metallenen Bauteile im Inneren der Innenanlage nicht berühren; andernfalls können Sie sich verletzen.
■ SLZ-KA·VA(L)
1 Den Knopf am Ansauggitter in der durch den Pfeil gekennzeichneten Richtung
ziehen und das Gitter sollte sich öffnen.
2 Das Ansauggitter öffnen.
3 Zum Herausnehmen des Filters den Knopf an der mittleren Kante des An-
sauggitters lösen und den Filter nach vorne ziehen.
A Knopf B Gitter C Ansauggitte D Filter
■ SEZ-KA·VA
Vorsicht:
• Zur Reinigung muß unbedingt der Betrieb eingestellt und die Strom-
• Jede Inneneinheit hat Filter, um Staub aus der angesaugten Luft zu entfer-
versorgung ausgeschaltet werden.
nen. Reinigen Sie die Filter unter Bezug auf die folgende Abbildung.
32
• Bei Durchführung des Testlaufs darauf achten, den Standort und die Art der
Installation des Luftfilters mit der durchführenden Firma zu überprüfen. (Beispiel) Der Luftfilter sollte am Lufteinlass der Inneneinheit angebracht werden (Rück- oder Unterseite der Einheit).
A Lufteinlaß B Filter
Page 33

WEEKLY
SIMPLE
AUTO OFF
11. Fehlerbehebung
Probleme?
Klimaanlage heizt bzw. kühlt schlecht.
Beim Anlaufen des Heizvorgangs dauert es eine Zeit, bis warme Luft vom Innengerät
abgegeben wird.
In der Betriebsart Heizen stoppt die Klimaanlage, bevor die eingestellte Umgebungstemperatur erreicht wurde.
Richtung des Luftstroms ändert sich bei laufendem Betrieb oder die Richtung des
Luftstroms kann nicht eingestellt werden.
Wenn die Luftstromrichtung geändert wird, bewegen sich die Klappen auf und ab
über die eingestellte Position hinaus, bevor sie schließlich in der eingestellten Position stoppen.
Gelegentlich ist ein Geräusch wie fließendes Wasser oder ein Zischen zu hören.
Ein Knarren oder Quietschen ist zu hören.
Der Raum wird von einem unangenehmen Geruch durchströmt.
Das Innengerät strömt einen weißen Nebel oder Dampf aus.
Das Außengerät strömt Wasser oder Dampf aus.
Die Betriebsanzeige erscheint nicht im Display der Fernbedienung.
” erscheint im Display der Fernbedienung.
“
Wenn die Klimaanlage erneut gestartet wird kurz nachdem sie ausgeschaltet wurde,
lässt sie sich auch durch Drücken auf die Taste ON/OFF (EIN/AUS) nicht einschalten.
Die Klimaanlage schaltet sich ein, ohne dass die Taste ON/OFF (EIN/AUS) gedrückt
wurde.
Die Klimaanlage schaltet sich aus, ohne dass die Taste ON/OFF (EIN/AUS) gedrückt
wurde.
Timerfunktion der Fernbedienung kann nicht eingestellt werden.
“PLEASE WAIT” (BITTE WARTEN) erscheint im Display der Fernbedienung.
Ein Fehlercode erscheint im Display der Fernbedienung.
Ablaufendes Wasser oder das Geräusch eines sich drehenden Motors sind zu hören.
Hier ist die Lösung. (Gerät arbeitet normal.)
■ Reinigen Sie den Filter. (Bei verschmutztem oder blockiertem Filter wird der Luftstrom behindert.)
■ Prüfen Sie die Temperaturanpassung und passen Sie die eingestellte Temperatur an.
■ Stellen Sie sicher, dass um das Außengerät herum genügend Freiraum ist. Ist der
Luftein- oder Luftauslass des Innengeräts blockiert?
■ Wurde eine Tür oder ein Fenster offen stehen gelassen?
■ Erst wenn das Innengerät sich ausreichend erwärmt hat, bläst es warme Luft.
■ Wenn die Außentemperatur gering ist und die Feuchtigkeit hoch, kann sich Eis auf
dem Außengerät bilden. Wenn dies geschieht, führt das Außengerät einen Abtauvorgang aus. Normaler Betrieb sollte nach ungefähr 10 Minuten beginnen.
■ In der Betriebsart Kühlen werden die Klappen nach 1 Stunde automatisch in hori-
zontale Stellung (nach unten) gebracht, wenn die Luftstromrichtung nach unten
(horizontal) gewählt wurde. Dies soll verhindern, dass sich Wasser an den Klappen bildet und heruntertropft.
■ In der Betriebsart Heizen werden die Klappen automatisch in horizontale Luftstromrichtung gebracht, wenn die Luftstromtemperatur zu niedrig ist oder in der Betriebsart
Abtauen.
■ Wenn die Luftstromrichtung geändert wird, bewegen sich die Klappen in die einge-
stellte Position, nachdem die Grundstellung erkannt wurde.
■ Diese Geräusche entstehen, wenn Kältemittel in der Klimaanlage fließt oder wenn
sich der Kältemitteldurchfluss ändert.
■ Diese Geräusche werden durch Teile verursacht, die aneinander reiben aufgrund
von Ausdehnung und Zusammenziehen bei Temperaturänderungen.
■ Das Innengerät saugt Luft ein, die mit den Ausdünstungen der Wände, Teppiche
und Möbel durchsetzt ist, sowie mit Gerüchen, die sich in Kleidung befinden, und
bläst diese Luft anschließend zurück in den Raum.
■ Wenn Innentemperatur und Feuchtigkeit hoch sind, kann es bei Betriebsbeginn zu
dieser Erscheinung kommen.
■ In der Betriebsart Abtauen kann ein kühler Luftstrom nach unten blasen und wie
Nebel erscheinen.
■ In der Betriebsart Kühlen kann sich Wasser bilden und von kalten Rohren und
Verbindungen tropfen.
■ In der Betriebsart Heizen kann sich Wasser bilden und vom Wärmetauscher her-
untertropfen.
■ In der Betriebsart Abtauen verdunstet Wasser auf dem Wärmetauscher und Was-
serdampf kann ausströmen.
■ Schalten Sie den Netzschalter ein. “
■ Bei Zentralsteuerung erscheint “
Klimaanlagenbetrieb kann mit der Fernbedienung weder aufgenommen noch gestoppt werden.
■ Warten Sie etwa drei Minuten.
(Der Betrieb wurde zum Schutz der Klimaanlage eingestellt.)
■ Ist der Timer zum Einschalten gesetzt?
Drücken Sie auf ON/OFF, um das Gerät auszuschalten.
■ Ist die Klimaanlage an eine zentrale Fernbedienung angeschlossen?
Wenden Sie sich an die betreffenden Personen, die die Klimaanlage steuern.
■ Erscheint “
Wenden Sie sich an die betreffenden Personen, die die Klimaanlage steuern.
■ Wurde die automatische Wiederherstellung nach Stromausfällen eingestellt?
Drücken Sie auf ON/OFF, um das Gerät auszuschalten.
■ Ist der Timer zum Ausschalten gesetzt?
Drücken Sie auf ON/OFF, um das Gerät wieder einzuschalten.
■ Ist die Klimaanlage an eine zentrale Fernbedienung angeschlossen?
Wenden Sie sich an die betreffenden Personen, die die Klimaanlage steuern.
■ Erscheint “
Wenden Sie sich an die betreffenden Personen, die die Klimaanlage steuern.
■ Sind die Timereinstellungen unzulässig?
Wenn der Timer eingestellt werden kann, erscheint
■ Die anfänglichen Einstellungen werden vorgenommen. Warten Sie etwa 3 Minu-
ten.
■ Die Schutzvorrichtungen haben zum Schutz der Klimaanlage eingegriffen.
■ Versuchen Sie nicht, das Gerät selbst zu reparieren.
Schalten Sie den Netzschalter sofort aus und wenden Sie sich an Ihren Händler.
Teilen Sie dem Händler den Modellnamen und die Informationen mit, die im Display der Fernbedienung angezeigt wurden.
■ Wenn der Kühlvorgang stoppt, läuft die Entleerungspumpe und stoppt dann. War-
ten Sie etwa 3 Minuten.
” im Display der Fernbedienung?
” im Display der Fernbedienung?
im Display der Fernbedienung.
” erscheint im Display der Fernbedienung.
” im Display der Fernbedienung und der
,
oder
33
Page 34

11. Fehlerbehebung
Probleme? Hier ist die Lösung. (Gerät arbeitet normal.)
Es wird mehr Lärm erzeugt als in den technischen Daten angegeben.
■ Der Geräuschpegel im Innenbetrieb wird durch die akustischen Eigenschaften des
einzelnen Raumes wie in der nachfolgenden Tabelle aufgeführt beeinflusst und
kann höher sein als die Spezifikation, die in einem Raum ohne Hall gemessen
wurde.
Aufstellbeispiele
Geräuschpegel
Schallschluckende
Räume
Sendesaal,
Musikraum etc.
3 bis 7 dB
Normale Räume
Empfangszimmer,
Hotellobby etc.
6 bis 10 dB
Nicht schallschlukkende Räume
Büro, Hotelzimmer
9 bis 13 dB
Es wird nichts im Display der Fernbedienung angezeigt, das Display leuchtet nur
schwach oder Signale werden vom Innengerät nur empfangen, wenn die Fernbedienung sehr nahe ist.
Die Betriebsanzeige in der Nähe des Empfängers für die schnurlose Fernbedienung
am Innengerät blinkt.
12. Einbau, Umsetzen und Inspektion
Einbauort
Vermeiden Sie den Einbau der Klimaanlage an Orten.
• Wo entzündliche Gase austreten können.
Vorsicht:
Anlage nicht an Orten aufstellen, an denen brennbares Gas austreten kann.
Wenn Gas austritt und sich in der Nähe der Anlage ansammelt, besteht Explosionsgefahr.
• Wo es ölig ist.
• Mit salzhaltiger Luft (z.B. Meeresufer).
• Wo schwefelhaltige Dämpfe vorkommen, z.B. in der Nähe von heißen Quellen.
• Wo Öl austreten kann oder Öldunst in der Luft liegt.
Warnung:
Wenn die Klimaanlage zwar läuft, aber den Raum (je nach Modell) nicht kühlt
oder heizt, ziehen Sie bitte Ihren Fachhändler zu Rate, da möglicherweise Käl-
temittel austritt. Bei der Ausführung von Reparaturarbeiten darauf achten, den
Kundendiensttechniker zu fragen, ob Kältemittel austritt oder nicht.
Das Kältemittel, das in die Klimaanlage gefüllt wurde, ist sicher. Kältemittel
tritt normalerweise nicht aus. Wenn Kältemittel aber in Innenräumen austritt
und mit den Flammen eines Heizgebläses, einer Raumheizung, eines Ofens
etc in Kontakt kommt, entstehen schädliche Substanzen.
■ Die Batterien sind schwach.
Tauschen Sie die Batterien aus und drücken Sie die Reset-Taste.
■ Wenn auch nach Austausch der Batterien nichts angezeigt wird, stellen Sie sicher,
dass die Batterien richtig herum (+, –) eingelegt sind.
■ Die Selbstdiagnosefunktion wurde zum Schutz der Klimaanlage aktiviert.
■ Versuchen Sie nicht, das Gerät selbst zu reparieren.
Schalten Sie den Netzschalter sofort aus und wenden Sie sich an Ihren Händler.
Teilen Sie dem Händler den Modellnamen mit.
Elektronisch gesteu-
Um Wechselwirkungen mit
Leuchtsstoffröhren zu vermeiden,
halten Sie einengrößmöglichen
Abstand ein.
Radio
erte Leuchtstoffröhre
Um Bildstörungen
oder Rauschen zu
vermeiden, halten Sie
einen Abstand von
mindestens 1 m ein.
TV
Mindestens
100 mm
Gut belüfteter,
trockener Ort.
Mindestens
400 mm
Mauer, etc.
Elektrische Arbeiten
• Legen Sie einen unabhängigen Stromkreis für die Netzversorgung der Klimaanlage.
• Achten Sie auf ausreichende Kapazität der Sicherung.
Warnung:
• Der Kunde sollte die Anlage nicht selbst aufstellen. Wenn die Aufstellung unsachgemäß erfolgt, besteht Feuergefahr, können Stromschläge und Verletzungen
durch Tropfen der Anlage, austretendes Wasser etc. erfolgen.
• Anschluß nicht durch verzweigte Ausgänge oder ein Verlängerungskabel vornehmen. Auch nicht mehrere Geräte an eine Netzsteckdose anschließen.
Durch schlechte Kontakte, schlechte Isolierung, Überschreiten der zulässigen Stromstärke und -spannung etc. besteht Brand- und Stromschlaggefahr.
Den Händler/Kundendienst zu Rate ziehen.
Vorsicht:
• Erdung vornehmen
Erdleitung nicht an eine Gas-, Wasserrohrleitung, einen Beleuchtungsstab oder Erdungsleitung eines Telefons anschließen.
Bei unsachgemäßer Erdung besteht Stromschlaggefahr.
• Je nach Betriebsbedingungen (Feuchtigkeit etc.) am Aufstellort der Klimaanlage einen Erdschlußunterbrecher anbringen.
Wenn der Erdschlußunterbrecher nicht angebracht wird, besteht Stromschlaggefahr.
Inspektion und Wartung
• Wenn die Klimaanlage über mehrere Jahreszeiten hinweg benutzt werden soll, kann die Leistungsfähigkeit durch Schmutzablagerungen im Innern der Anlage abnehmen.
• Je nach Betriebsbedingungen können sich Gerüche bilden oder Abwasser kann wegen Schmutz, Staub etc. nicht ordnungsgemäß ablaufen. Es wird empfohlen, Inspektion
und Wartung (gegen Bezahlung) zusätzlich zur normalen Wartung von Fachleuten durchführen zu lassen. Ihren Händler/Kundendienst zu Rate ziehen.
• Es wird empfohlen, die Anlage zusätzlich zur normalen Wartung von einem Fachhändler (gegen Bezahlung) inspizieren und warten zu lassen. Wenden Sie sich an Ihren
Fachhändler.
34
Page 35

12. Einbau, Umsetzen und Inspektion
Achten Sie auch auf die Betriebsgeräusche
• Stellen Sie keine Gegenstände in die Nähe des Luftaustritts der Außenanlage. Sie verringern damit die Leistungsfähigkeit der Anlage und machen die Betriebsgeräusche
lauter.
• Wenn Sie während des Betriebs ein abnormales Geräusch hören, wenden Sie sich an Ihren Fachhändler.
Umsetzen
• Wenn die Klimaanlage wegen Bauarbeiten, Umzugs, etc. abgebaut oder neu installiert werden soll, sind spezielle Arbeiten notwendig.
Warnung:
Reparaturen oder Verlagerungen der Anlage dürfen nicht vom Kunden selbst vorgenommen werden.
Bei unsachgemäßer Vornahme bestehen Brand- und Stromschlaggefahr sowie die Gefahr von Verletzungen durch Tropfen der Anlage, austretendes Wasser etc.
Ihren Händer /Kundendienst zu Rate ziehen.
Entsorgung
• Wenden Sie sich für eine korrekte Entsorgung der Anlage an Ihren Fachhändler.
Wenn Sie irgendwelche Fragen haben, wenden Sie sich an Ihren Fachhändler.
13. Technische daten
Funktion
Stromversorgung
Kapazität
Eingang kW
Innenanlage
Durchfluß (Langsam-Mittel-Schnell) CMM
Geräuschpegel (Langsam-Mittel-Schnell) dB
Gewicht kg
Außenanlage
Geräuschpegel Ho-Ni dB
Kühlmittel R410A kg
Gewicht kg
Funktion
Stromversorgung
Kapazität
Eingang kW
Innenanlage
Durchfluß (Langsam-Schnell) CMM
Äußerer
statischer Druck
Geräuschpegel (Langsam-Schnell) dB (A)
Gewicht kg
Außenanlage
Geräuschpegel dB (A)
Kühlmittel R410A kg
Gewicht kg
Hinweise: 1. Werte der Betriebszustände (Kühlung) Innen : 27°C DB, 19°C WB, Außen : 35°C DB
2. Werte der Betriebszustände (Heizung) Innen : 20°C DB, Außen : 7°C DB, 6°C WB
3. Technische Daten unterliege-n Änderungen ohne Vorankündigung.
Modell
kW
BTU/h
Modell
kW
BTU/h
Pa (mmAq)
SLZ-KA25VA (L)
Kühlung Heizung
2,5 3,0
8.500 10.200
0,69 0,83
SLZ-KA25VA (L)
8-9-10
28-31-37
16,5 + Gitter 3
SUZ-KA25VA
46
0,90
33
SEZ-KA35VA
Kühlung Heizung
3,5 4,0
11.900 13.600
1,06 1,10
SEZ-KA35VA
10-13
Std. : 30 (3)
Max. : 50 (5)
30-35
33,5
SUZ-KA35VA
48
1,05
35
SLZ-KA35VA (L)
Kühlung Heizung
~/N, 230V, 50Hz
3,5 4,0
11.900 13.600
1,06 1,10
SLZ-KA35VA (L)
16,5 + Gitter 3
SUZ-KA35VA
SEZ-KA50VA
Kühlung Heizung
~/N, 230V, 50Hz
5,0 5,9
17.100 20.100
1,78 1,84
SEZ-KA50VA
12-17
Std. : 30 (3)
Max. : 50 (5)
31-39
33,5
SUZ-KA50VA
55
1,6
53
8-9-11
29-33-38
48
1,05
35
SEZ-KA60VA
Kühlung Heizung
5,5 6,9
18.800 23.500
1,96 2,45
SEZ-KA60VA
Max. : 50 (5)
SUZ-KA60VA
12-20
Std. : 30 (3)
32-43
33,5
55
1,8
53
SLZ-KA50VA (L)
Kühlung Heizung
4,6 5,0
15.700 17.100
1,63 1,55
SLZ-KA50VA (L)
8-9-11
30-34-39
16,5 + Gitter 3
SUZ-KA50VA
55
1,6
53
SEZ-KA71VA
Kühlung Heizung
7,1 8,1
24.200 27.600
2,46 2,36
SEZ-KA71VA
12-20
Std. : 30 (3)
Max. : 50 (5)
32-43
35
SUZ-KA71VA
55
2,0
58
Garantierter Betriebsbereich
Innen
Kühlung
Heizung
Anlagen müssen von zugelassenen Elektrounternehmen gemäß gesetzlichen Vorschriften installiert werden.
Maximum 32°C DB, 23°C WB 46°C DB, – 43°C DB, –
Minimum 21°C DB, 15°C WB -10°C DB, –
Maximum 27°C DB, – 24°C DB, 18°C WB
Minimum 20°C DB, – -10°C DB, -11°C WB
KA25, KA35
Außen
KA50, KA60, KA71
35
Page 36

Index
1. Consignes de sécurité ........................................................ 36
2. Nomenclature ...................................................................... 36
3. Configuration d’écran .......................................................... 39
4. Régler le jour de la semaine et l’heure ............................... 39
5. Fonctionnement .................................................................. 39
6. Minuterie ............................................................................. 41
Remarque (Marquage WEEE)
Ce symbole est utilisé uniquement pour les pays de l’UE.
Ce symbole est conforme à la directive 2002/96/EC Article 10 Informations à l’attention des usagers et Annexe IV.
Votre produit Mitsubishi Electric est conçu et fabriqué avec des matèriels et des composants de qualité supérieure qui peuvent être recyclés et réutilisés.
Ce symbole signifie que les équipements électriques et électroniques, à la fin de leur durée de service, doivent être éliminés séparément des ordures ménagères.
Nous vous prions donc de confier cet équipement à votre centre local de collecte/recyclage.
Dans l’Union Européenne, il existe des systèmes sélectifs de collecte pour les produits électriques et électroniques usagés.
Aidez-nous à conserver l’environnement dans lequel nous vivons !
Les machines ou appareils électriques et électroniques contiennent souvent des matières qui, si elles sont traitées ou éliminées de manière inappropriée, peuvent
s’avérer potentiellement dangereuses pour la santé humaine et pour l’environnement.
Cependant, ces matières sont nécessaires au bon fonctionnement de votre appareil ou de votre machine. Pour cette raison, il vous est demandé de ne pas vous
débarrasser de votre appareil ou machine usagé avec vos ordures ménagères.
1. Consignes de sécurité
s Avant d’installer le climatiseur, lire attentivement toutes les
“Consignes de sécurité”.
s Les “Consignes de sécurité” reprennent des points très im-
portants concernant la sécurité. Veillez bien à les suivre.
s Veuillez consulter ou obtenir la permission votre compagnie
d’électricité avant de connecter votre système.
7. Autres fonctions .................................................................. 44
8. Sélection des fonctions ....................................................... 45
9. Fonctionnement d’urgence de la télécommande sans fil .... 49
10. Entretien et nettoyage ....................................................... 49
11. Guide de dépannage ......................................................... 50
12. Installation, deplacement et inspection ............................. 51
13. Spécifications techniques ................................................. 52
Symboles utilisés dans le texte
Avertissement:
Précautions à suivre pour éviter tout danger de blessure ou de décès de l’utilisateur.
Précaution:
Décrit les précautions qui doivent être prises pour éviter d’endommager l’appareil.
Symboles utilisés dans les illustrations
: Indique un élément qui doit être mis à la terre.
Avertissement:
• Cet appareil ne doit pas être installé par l’utilisateur. Demander au revendeur
ou à une société agréée de l’installer. Si l’appareil n’est pas correctement installé il peut y avoir un risque de fuite d’eau, d’électrocution ou d’incendie.
• Ne pas marcher sur l’appareil ni y déposer des objets.
• Ne jamais éclabousser l’appareil ni le toucher avec des mains humides. Il
pourrait en résulter un risque d’électrocution.
• Ne pas vaporiser de gaz inflammable à proximité de l’appareil sous risque
d’incendie.
• Ne pas placer de chauffage au gaz ou tout autre appareil fonctionnant avec
une flamme vive là où il serait exposé à l’échappement d’air du climatiseur.
Cela risquerait de provoquer une mauvaise combustion.
• Ne pas retirer la face avant ou la protection du ventilateur de l’appareil extérieur pendant son fonctionnement.
Précaution:
• Ne pas utiliser d’objet pointu pour enfoncer les boutons car cela risquerait
d’endommager la commande à distance.
• Ne jamais obstruer les entrées et sorties des appareils extérieurs et intérieurs.
2. Nomenclature
■ Unité interne
SLZ-KA·VA
SLZ-KA·VAL
Modes du ventilateur 3 modes 2 modes
Ailette Auto avec variation –
Louvre – –
Filtre Longue durée Normal
Témoin de nettoyage du filtre 2.500 heures –
SEZ-KA·VA
• Si vous remarquez des vibrations ou des bruits particulièrement anormaux,
arrêter l’appareil, éteindre l’interrupteur et prendre contact avec le revendeur.
• Ne jamais mettre des doigts, des bâtons, etc. dans les entrées et sorties d’air.
• Si vous sentez des odeurs étranges, arrêter l’appareil, le mettre hors tension
et contacter le revendeur. Si vous ne procédez pas de cette façon, il pourrait y
avoir risque de panne, d’électrocution ou d’incendie.
• Ne JAMAIS laisser des enfants ou des personnes handicapées utiliser le climatiseur sans surveillance.
• Toujours surveiller que les jeunes enfants ne jouent pas avec le climatiseur.
• Si le gaz de réfrigérant fuit, arrêter le fonctionnement du climatiseur, aérer
convenablement la pièce et prendre contact avec le revendeur.
Rangement de l’appareil
Lorsque vous devez ranger l’appareil, veuillez consulter votre revendeur.
■ SLZ-KA·VA/SLZ-KA·VAL
Plafonnier à Cassette 4 volets
F
iltre
Admission d’air
36
Ailette
Grille de
refoulement
d’air
■ SEZ-KA·VA
Dissimulé dans le plafond
Grille de
refoulement d’air
Admission d’air
F
iltre
(Par le Bas ou par l’Arrière)
Page 37

PAR-21MAA
ON/OFF
FILTER
CHECK
OPERATION
CLEAR
TEST
TEMP.
MENU
BACK DAY
MONITOR/SET
CLOCK
ON/OFF
2. Nomenclature
■ Pour la télécommande à fil
Section de l’affichage
Pour cette explication, toutes les
parties de l’affichage sont montrées allumées. Lors du fonctionnement réel, seuls les éléments
correspondants seront allumés.
Indique l’opération en cours
Montre le mode de fonctionnement, etc.
* les affichages peuvent être en
plusieurs langues.
Témoin “Commande centrale”
Indique que le fonctionnement de
la commande à distance a été
désactivée par une commande
maîtresse.
Témoin “Programmateur éteint”
Indique que le programmateur est
éteint.
Réglage de température
Indique la température souhaitée.
Jour de la semaine
Indique le jour de la semaine.
Affichage heure/programmateur
Affiche l’heure, à moins que le programmateur simple ou arrêt auto soit activé.
Si le programmateur simple ou arrêt auto est en
activé, l’affichage indique le temps restant.
TIME SUN MON TUE WED THU FRI SAT
TIMER
AFTER
ERROR CODE
˚F˚C
Hr
AFTER
˚F˚C
ONLY1Hr.
Témoin de montée/descente
d’air
Ce témoin indique dans quelle
direction souffle l’air sortant.
Témoin “une heure seulement”
Il s’affiche si le courant d’air est
réglé sur faible et descendant, lors
des modes FROID ou SEC. (L’opé-
ration varie en fonction du modèle.)
Le témoin s’éteint au bout d’une
heure, et à ce moment-là le flux
d’air change aussi.
Affichage de température
ambiante
Donne la température ambiante. La plage
d’affichage de la température de la pièce
est comprise entre 8–39 °C. L’affichage
clignote si la température descend au-dessous de 8 °C ou monte au-dessus de 39 °C.
Affichage du louvre
Montre l’action de la grille de transfert.
N’apparaît pas si la grille reste stationnaire.
(Témoin de marche)
Indique que l’appareil est en marche.
ON
OFF
FUNCTION
FILTER
WEEKLY
SIMPLE
AUTO OFF
Témoin “Capteur”
S’affiche lors de l’utilisation du capteur
de la télécommande.
Indicateur “Verrouillé”
Indique que les boutons de la commande à distance ont été bloqués.
Témoin “Nettoyer le filtre”
S’allume quand il est temps de nettoyer le filtre.
Témoins du programmateur
Ce témoin s’allume quand le programmateur correspondant est en fonction.
Témoin de vitesse du ventilateur
Montre la vitesse sélectionnée pour le
ventilateur.
Témoin de ventilation
Apparaît quand l’unité fonctionne en
mode Ventilation.
Section de commandes
Boutons de réglage de température
Baisser
Monter
Bouton de menu du programmateur
(Bouton Monitor/Set)
Bouton de mode
(bouton d’entrée)
Boutons de réglage horaire
Reculer
Avancer
Bouton marche/arrêt du programmateur
(Bouton de réglage de la date)
Ouvrir la
porte.
Remarque :
● Message “PLEASE WAIT” (VEUILLEZ PATIENTER)
Ce message s’affiche pendant 3 minutes environ lorsque l’appareil intérieur est alimenté ou suite à une coupure d’électricité.
Capteur de température intégré
● Message “NOT AVAILABLE” (INDISPONIBLE)
Ce message s’affiche quand vous appuyez sur une touche pour lancer une fonction qui est indisponible pour cet appareil intérieur.
Si une télécommande unique est utilisée pour contrôler simultanément plusieurs appareils intérieurs de modèle différent, ce message ne s’affichera pas si l’un des
appareils intérieurs présente cette fonction.
Bouton ON/OFF
Bouton de vitesse du ventilateur
Bouton du filtre
(Bouton )
Bouton de test de
fonctionnement
Bouton Check
(bouton d’effacement)
Bouton de ventilation montante/descendante
Bouton de louvre
(Bouton opération
pour la précédente
opération
Bouton de ventilation
(bouton opération
pour l’opération suivante
)
)
37
Page 38

AUTO
COOL
DRY
HEAT
FAN
VANE
SELECT
TIME
2. Nomenclature
1
2
3
■ Pour la télécommande sans fil [SLZ-KA·VAL uniquement]
Touche SET TEMPERATURE
(reglage de temperature)
La touche SET TEMPERATURE
h
permet de régler la température
désirée dans la pièce.
Touche ON/OFF
ON/OFF
TOO
WARM
TOO
COOL
Une pression sur cette touche
lance le fonctionnement de l’ap-
pareil. Une nouvelle pression arrête le fonctionnement de l’appareil.
Touche MODE SELECT
AUTO COOL
DRY
HEAT
MODE
FAN
VANE
SELECT
TIME
(selection de mode)
Cette touche permet d’alterner
entre les modes de fonctionne-
RESET
ment auto, refroidissement, chauffage et séchage. (SLZ)
■ Pour utiliser la télécommande sans fil, pointez-la vers le récepteur de l’appareil intérieur.
■ Si la télécommande est utilisée dans les deux minutes qui suivent l’alimentation de l’appareil intérieur,
l’appareil peut émettre deux bips successifs indiquant que le contrôle automatique initial est en cours.
■ L’appareil intérieur émet des bips pour confirmer que le signal transmis par la télécommande a été reçu.
Les signaux peuvent être reçus jusqu’à 7 mètres environ en ligne droite à partir de l’appareil intérieur et
dans une zone de 45° vers la gauche ou la droite de l’appareil. Cependant, une lumière vive ou fluorescente peut gêner la réception de signaux de l’appareil intérieur.
■ Si le témoin de fonctionnement situé près du récepteur de l’appareil intérieur clignote, ceci signifie que
l’appareil doit être inspecté. Consultez votre revendeur pour connaître les modalités d’entretien.
■ Manipulez la télécommande avec précaution ! Ne la faites pas tomber et ne lui infligez pas de chocs
violents. De plus, évitez de mouiller la télécommande et ne la laissez pas dans un endroit humide.
■ Pour éviter de chercher la télécommande, placez le support fourni avec la télécommande sur un mur et
veillez à replacer la télécommande dans le support après chaque utilisation.
Touche TIMER SELECT
(selection de la minuterie)
Permet de régler les heures de
début et de fin du fonctionnement
de l’appareil.
Touche FAN SPEED
(vitesse du ventilateur)
Cette touche permet de régler la
vitesse du ventilateur sur lente,
moyenne ou élevée.
Touche VANE CONTROL
(commande des ailettes)
Permet de modifier la direction du
débit d’air.
Insertion/remplacement de la pile
[SLZ-KA·VAL uniquement]
1. Retirez le couvercle supérieur, insérez deux piles AAA,
puis reposer le couvercle.
Couvercle
supérieur
Deux piles AAA
Insérez d’abord le pôle
(–) négatif de chaque pile.
Insérez les piles en respectant la polarité indiquée (+, –)!
■ Unité externe
38
2. Appuyez sur la touche “Reset” (Réinitialiser).
Alimentation
Appuyez sur la touche
“Reset” (Réinitialiser)
Tuyaux de réf.
Intérieur-Extérieur
avec un objet dont l’extrémité est étroite.
Câble de
raccordement
Masse
Page 39

ON/OFF
RESET
TOO
WARM
TOO
COOL
MODE
AUTO COOL
DRY
HEAT
FAN
VANE
SELECT
TIME
h
1
2
5
6
3
3
5
6
2
˚C
˚C
TIME SUN
PAR-21MAA
ON/OFF
FILTER
CHECK
OPERATION
CLEAR
TEST
TEMP.
MENU
BACK DAY
MONITOR/SET
CLOCK
ON/OFF
2
4
9
1
A
TIME SUN
2
3
4
˚C
˚C
PAR-21MAA
ON/OFF
FILTER
CHECK
OPERATION
CLEAR
TEST
TEMP.
MENU
BACK DAY
MONITOR/SET
CLOCK
ON/OFF
2
7
2
3
3
8
6
4
5
8
7
1
1
5
6
˚F˚C
TIMER
MON
OFF
WEEKLY
SUN MON TUE WED THU FRI SAT
WEEKLY
˚F˚C
˚C
TIME SUN
3. Configuration d’écran
Sélection des fonctions Règle date / heure
ADC
Filtres de contrôle standards
OFF ON
BC
Moniteur du programmateur Configuration du programmateur
B
4. Régler le jour de la semaine et l’heure
<Types d’écrans>
Le paramétrage de la langue d’affichage peut être modifié pour que le français devienne la langue par défaut en sélectionnant la fonction appropriée sur la télécom-
mande. Voyez la section 8, paragraphe [4]-1 pour modifier la langue.
La langue de base est l’Anglais.
● Sélection des fonctions : Règle les fonctions et les plages disponibles
pour la télécommande (fonctions du programmateur, restrictions de fonctionnement, etc.)
● Régler date / heure : Règle le jour de la semaine et l’heure.
● Écrans de contrôle standards : Visualise et règle le fonctionnement du système
de conditionnement.
● Moniteur du programmateur : Affiche le programmateur en place (hebdoma-
daire, simple ou arrêt automatique)
● Configuration du programmateur : Règle le fonctionnement des programmateurs
(hebdomadaire, simple ou arrêt automatique)
<Comment changer d’écran>
Pour aller à A : Appuyer sur les boutons Mode et On/Off du programmateur durant
2 secondes.
Pour aller à B : Appuyez sur le bouton Menu du programmateur.
Pour aller à C : Appuyez sur le bouton Mode (Entrée).
Pour aller à D : Appuyez sur l’un ou l’autre des boutons de réglage horaire (
ou
).
Affichage du jour de la
semaine et de l’heure
Remarque :
● Le jour et l’heure n’apparaîtront pas si l’horloge a été déconnectée dans la
sélection des fonctions.
● Au retour de l’alimentation, l’appareil intérieur ne fonctionnera pas pendant
trois minutes. Le fonctionnement décrit ci-dessus est normal.
5. Fonctionnement
Réglage du jour de la semaine
Réglage de l’heure
1. Appuyez sur le bouton de réglage horaire A ou pour appeler l’affichage 2.
2. Appuyez sur le bouton 9 Timer On/Off pour régler le jour.
* À chaque fois que vous appuyez, vous avancez le jour affiché en 3 : Dim →
Lun → … → Ven → Sam.
3. Appuyez sur le bouton de réglage correspondant A afin de régler l’heure.
* À chaque fois que vous maintenez le bouton appuyé, l’heure (en 4) augmen-
tera d’abord toutes les minutes, puis toutes les 10 minutes, puis toutes les heures.
4. Après avoir effectué les réglages nécessaires des étapes 2 et 3, appuyez sur le
bouton 4 Filter
pour valider ces informations.
5.1. MARCHE/ARRET
<Pour commencer l’opération>
■ Appuyez sur le bouton ON/OFF 1.
• Le témoin de marche 1 et la zone d’affichage s’allument.
Remarque :
● Quand l’unité est relancée, les réglages de base sont les suivants.
Mode
Réglage de température
Vitesse de ventilateur
Air montant/descendant
Réglages de télécommande
Dernier réglage
Dernier réglage
Dernier réglage
COOL ou DRY
Mode HEAT
FAN
Sortie horiz.
Dernier réglage
Sortie horiz.
39
Page 40

51234
5. Fonctionnement
<Pour arrêter le fonctionnement>
■ Appuyez de nouveau sur le bouton ON/OFF 1.
• Le témoin de marche 1 et la zone d’affichage s’éteignent.
Remarque :
Même si vous appuyez sur le bouton ON/OFF immédiatement après avoir arrêté la fonction en cours, le climatiseur ne se remettra en route que trois minutes plus tard. Ceci est une précaution pour éviter l’endommagement de tout
composant interne.
5.2. Choix du mode
■ Appuyer sur la touche du mode de fonctionnement ( ) 2 pour sélec-
tionner le mode de fonctionnement souhaité 2.
s
Mode de refroidissement
Mode de assèchement
Mode de soufflerie
Mode de chauffage
Mode automatique (refroidissement/chauffage)
Mode de ventilation
Indiqué uniquement dans les conditions suivantes
Télécommande reliée utilisée
Avec un appareil LOSSNAY branché
Informations concernant les climatiseurs multisystemes (Appareil exterieur de la serie MXZ)
ss
s Les climatiseurs multi-systèmes (avec un appareil extérieur de la série MXZ)
ss
permettent de raccorder deux ou davantage d’appareils intérieurs à un appareil extérieur. En fonction de la capacité, plusieurs appareils intérieurs
peuvent ainsi fonctionner simultanément.
• Lorsque vous essayez de faire fonctionner simultanément deux ou davantage d’appareils intérieurs reliés à un seul appareil extérieur, un pour le refroidissement et
l’autre pour le chauffage, le mode de fonctionnement sélectionné sera celui de
l’appareil intérieur qui a été mis en fonctionnement en premier. Les autres appareils intérieurs qui doivent se mettre en marche ultérieurement ne fonctionnent
pas ; un voyant clignotant indique un état de fonctionnement.
Dans ce cas, régler tous les appareils intérieurs sur le même mode de fonctionnement.
• Il se peut que l’unité intérieure, qui fonctionne en mode
passer en mode (REFROIDISSEMENT ↔ CHAUFFAGE) et se mette en veille.
• Lorsque l’appareil intérieur se met en fonctionnement alors que le dégivrage de
l’appareil extérieur est en cours, il faut laisser passer quelques minutes (max.
environ 15 minutes) avant que l’appareil ne souffle de l’air chaud.
• Lorsque l’appareil fonctionne en mode chauffage, si le dessus de l’appareil chauffe
ou que vous entendez le flux de gaz à l’intérieur, cette situation n’a rien d’anormal.
Le gaz réfrigérant circule en effet de manière continue dans l’appareil intérieur
même si celui-ci ne fonctionne pas.
Fonctionnement automatique
■ En fonction de la température définie préalablement, l’opération de refroidisse-
ment débutera si la température de la pièce est trop élevée; à l’inverse, l’opéra-
tion de chauffage débutera si la température de la pièce est trop basse.
■ En mode de fonctionnement automatique, le climatiseur passera en mode de refroidissement si la température de la pièce varie et affiche 2 °C ou plus au-dessus
de la température définie pendant 15 minutes. De la même façon, le climatiseur
passera en mode de chauffage si la température de la pièce affiche 2 °C ou plus
au-dessous de la température définie pendant 15 minutes.
Mode de refroidissement
15 minutes (passage du mode de
chauffage au mode de refroidissement)
(AUTO), ne puisse
Température définie +2°C
5.3. Réglage de la température
ss
s Pour réduire la température ambiante:
ss
Appuyer sur le bouton
La température sélectionnée est affichée 3.
ss
s Pour augmenter la température ambiante:
ss
Appuyer sur le bouton
La température sélectionnée est affichée 3.
• Plages de températures à votre disposition:
Rafraichissement et Assèchement: 19 - 30 °C
Chauffage: 17 - 28 °C
Automatique: 19 - 28 °C
• L’affichage clignote sur 8 °C ou 39 °C pour signaler que la température de la pièce
est inférieure ou supérieure à la température affichée.
3 pour sélectionner la température désirée.
3 pour sélectionner la température désirée.
5.4. Réglage de la vitesse du ventilateur
■ Appuyez sur le bouton de vitesse du ventilateur 5 autant de fois que nécessaire
alors que le système est en fonction.
•À chaque fois que vous appuyez sur le bouton, vous changez la force. La vitesse actuelle est indiquée en 5.
• La séquence de changement, et les réglages disponibles sont les suivants.
Vitesse de
ventilateur
3 vitesses
Vitesse de
ventilateur
2 vitesses
• Les affichages de la télécommande sans fil sont donnés entre parenthèses.
Remarque :
● Le nombre de ventilateurs disponible dépend du type d’unité connectée. Notez
aussi que certaines unités ne permettent que le réglage “Auto”.
● Dans les cas suivants, la vitesse de ventilation actuelle générée par l’unité
différera de la vitesse indiquée au niveau de la commande à distance.
1. Quand l’affichage indique “ATTENTE” ou “DEGIVRE”.
2. Lorsque la température de l’échangeur thermique est basse en mode de
chauffage. (par ex. immédiatement après le lancement de l’opération de
chauffage)
3. En mode CHAUFFAGE, quand la température ambiante dans la pièce est
supérieure à la température réglée.
4. Quand l’unité est en mode SEC.
5.5.
Réglage de la direction du débit d’air [Pour le modèle SLZ]
<Pour changer la direction de l’air (montant/descendant)>
■ Quand l’unité est en fonction, appuyez sur le bouton 6 de ventilation montante/
descendante autant de fois que nécessaire.
•À chaque fois que vous appuyez sur le bouton, vous changez la direction. La
direction actuelle est affichée sur 6.
• La séquence de changement, et les réglages disponibles sont les suivants :
Pour la télécommande sans fil
s
1
Pour la télécommande à fil
Faible (Low) Moyenne Elevée (High)
( )
→ 2 → 3 → 4 → 5
Affichage de la télécommande
▼
Faible (Low) Elevée (High)
(
)
▼
Affichage de la télécommande
▼
▼
)
(
▼
Température définie
Température définie -2°C
15 minutes (passage du mode de refroidissement au mode de chauffage)
■ La température de la pièce étant ajustée automatiquement de façon à rester sta-
ble, l’opération de refroidissement se met en marche à quelques degrés au-dessus, et l’opération de chauffage à quelques degrés au-dessous, de la température
définie lorsque cette dernière est atteinte (fonction automatique d’économie d’éner-
gie).
40
1 Soufflerie horizontale 30° 4 Soufferie vers le bas 70°
2 Soufferie vers le bas 45° 5 Pivotement
3 Soufferie vers le bas 55°
* Notez que lors de l’opération de basculement, l’indication directionnelle à l ’écran
ne change pas en synchronisation avec les ailettes de l’unité.
* Certains modèles n’acceptent pas les réglages directionnels.
Remarque :
● Les directions disponibles dépendent du type d’unités connectées. Notez
aussi que certaines unités ne permettent que le réglage “Auto”.
● Dans les cas suivants, la direction actuelle de l’air différera de la direction
indiquée au niveau de la commande à distance.
1. Quand l’affichage indique “ATTENTE” ou “DEGIVRE”.
2. Immédiatement après le démarrage du mode CHAUFFAGE (alors que le
système attend que le changement de mode se fasse).
3. En mode chauffage, quand la température ambiante dans la pièce est su-
périeure à la température réglée.
Page 41

˚C
SUN
ON
WEEKLY
PAR-21MAA
ON/OFF
FILTER
CHECK
OPERATION
CLEAR
TEST
TEMP.
MENU
BACK DAY
MONITOR/SET
CLOCK
ON/OFF
2
42 3
A9 78
0
4
1
3
B
1
5. Fonctionnement
˚C
SUN
ON
WEEKLY
6
7
5
<Pour changer la direction de l’air Droite/gauche>
■ Appuyez sur le bouton du louvre 7 autant de fois que nécessaire.
• L’image du louvre 7 apparaît.
À chaque fois que vous appuyez sur le bouton, vous changez le réglage comme
suit.
Pas d’affichage
(Stop)
(ON) (OFF)
Lors de l’opération de bascule, l’affichage de
la flèche passe à gauche ou à droite.
5.6. Ventilation
ss
s Pour les appareils combinés LOSSNAY
ss
5.6.1. Pour la télécommande à fil
● Pour lancer le ventilateur conjointement à l’unité intérieure :
■ Appuyez sur le bouton ON/OFF 1.
• Quand l’indication de ventilation apparaît à l’écran (en 8). Le ventilateur
sera désormais lancé automatiquement à chaque fois que l’unité intérieure
démarrera.
6. Minuterie
6.1. Pour la télécommande à fil
Vous pouvez utiliser la sélection des fonctions pour sélectionner le type de programmateur, entre les trois disponibles. 1 Hebdomadaire, 2 Simple, ou 3 Arrêt auto.
6.1.1. Minuterie hebdomadaire
■ Le programmateur hebdomadaire peut servir à régler les huit opérations pour
chaque jour de la semaine.
• Chaque opération permet l’une ou l’autre des fonctions suivantes : Program-
mateur Marche/Arrêt avec un réglage de température ou programmateur Marche/Arrêt seulement, ou réglage de température seulement.
•À l’heure dite, le conditionneur d’air effectue l’action programmée.
■ La précision horaire de ce programmateur est de 1 minute.
Remarque :
*1. Les programmateurs hebdomadaire / simple / Arrêt auto ne peuvent être
utilisés en même temps.
*2. Le programmateur hebdomadaire ne fonctionne pas dans les conditions
suivantes.
La fonction de temporisateur est désactivée ; le système est dans un état
anormal ; une exécution de test est en cours ; la télécommande est soumise à un auto-diagnostic ou à un diagnostic externe ; l’utilisateur est en
train de définir une fonction ; l’utilisateur est en train de régler le temporisateur ; l’utilisateur est en train de régler l’heure ou le jour de la semaine ;
le système est sous commande centralisée. (Précisément, le système n’exé-
cute pas les opérations (allumage, extinction ou réglage de la température)
désactivées dans ces situations.)
N° de fonctionnement
Réglage du jour
● Pour faire fonctionner le ventilateur indépendamment :
■ Appuyez sur le bouton Mode 2 jusqu’à ce que
apparaisse à l’affichage.
Cela lancera le ventilateur.
● Changer la force du ventilateur :
■ Appuyez sur le bouton de ventilation 8 autant que nécessaire.
•À chaque fois que vous appuyez sur le bouton, vous changez le réglage
comme indiqué ci-dessous.
▲
▲
Faible Forte
5.6.2. Pour la télécommande sans fil
● Le ventilateur se met automatiquement en marche lorsque l’appareil intérieur est
allumé.
● Aucune indication sur la télécommande sans fil.
<Comment régler le programmateur hebdomadaire>
1. Assurez-vous que vous êtes sur l’écran de contrôle standard, et que le témoin du
programmateur hebdomadaire 1 s’affiche.
2. Appuyez sur le bouton Menu du programmateur B, de manière à ce que le “Ré-
glage” apparaisse à l’écran (en 2). (Notez qu’à chaque fois que vous appuyez
sur le bouton, vous passez de “Réglage” à “Moniteur” (moniteur).)
3. Appuyez sur le bouton On/Off du programmateur 9 pour régler le jour. À chaque
fois que vous appuyez, vous changez le réglage en 3, selon la séquence suivante : “Dim Lun Mar Mer Jeu Ven Sam” → “Dim” → … → “Ven ” → “Sam” →
“Dim Lun Mar Mer Jeu Ven Sam”…
4. Appuyez sur le bouton (7 ou 8) d’opération
saire pour sélectionner le numéro d’opération approprié (1 à 8) 4.
* Vos choix aux étapes 3 et 4 sélectionneront l’une des cellules de la matrice
affichée ci-dessous.
(l’affichage de la commande à distance à gauche montre comment l’affichage
devrait apparaître lors du réglage de l’opération 1 pour dimanche aux valeurs
indiquées ci-dessous).
Matrice de réglage
N ° d’op. Sunday Monday … Saturday
<Réglage de l’opération 1 pour dimanche>
Démarrer le conditionneur d’air à 8:30, avec la
température à 23 °C.
No. 1
No. 2
…
No. 8
• 8:30
• ON
• 23 °C
• 10:00
• OFF
• 10:00
• OFF
• 10:00
• OFF
▲
ou autant de fois que néces-
• 10:00
• OFF
▲
<Réglage de l’opération 2 pour tous les jours>
Éteindre le conditionneur d’air à 10:00.
Remarque :
En réglant le jour sur “Dim Lun Mar Mer Jeu Ven Sam”, vous pouvez régler la
même opération à effectuer au même moment tous les jours.
(Exemple : L’opération 2 ci-dessus, qui est la même pour tous les jours de la
semaine.)
<Régler le programmateur hebdomadaire>
Affiche le réglage de
l’heure
Affiche l’opération choisie (Marche ou Arrêt)
*N’apparaît pas si l’opération n’est pas réglée.
Affiche le réglage de la température
*N’apparaît pas si la température n’est pas
réglée.
5. Appuyez sur le bouton de réglage de l’heure A approprié autant de fois que né-
cessaire pour régler l’heure choisie (en 5).
* Quand vous maintenez le bouton appuyé, l’heure augmentera d’abord toutes
les minutes, puis toutes les 10 minutes, puis toutes les heures.
6. Appuyez sur le bouton ON/OFF 1 pour sélectionner l’opération choisie (Marche
ou Arrêt : marche ou arrêt), en 6.
* À chaque fois que vous appuyez vous passez au réglage suivant, selon la sé-
quence suivante : aucun affichage (pas dé réglage) → “MARCHE” → “ARRET”
41
Page 42

ONHr
AFTER
SIMPLE
PAR-21MAA
ON/OFF
FILTER
CHECK
OPERATION
CLEAR
TEST
TEMP.
MENU
BACK DAY
MONITOR/SET
CLOCK
ON/OFF
2A9
0
4
1
B
ONHr
AFTER
SIMPLE
4
1
3
2
˚C
TIMER
SUN
ON
OFF
WEEKLY
1
9
8
˚C
˚C
TIME SUN
WEEKLY
0
˚C
˚C
TIME SUN
WEEKLY
0
6. Minuterie
7. Appuyez sur le bouton de réglage de température 3 approprié pour régler la
température choisie (en 7).
* À chaque fois que vous appuyez vous changez le réglage, selon la sé-
quence suivante : aucun affichage (pas de réglage) ⇔ 24 ⇔ 25 ⇔ ... ⇔ 29
⇔ 30 ⇔ 12 ⇔ ... ⇔ 23 ⇔ pas d’affichage.
(Plage disponible : La plage disponible pour ce réglage va de 12 °C à 30 °C.
La plage réelle au-delà de laquelle la température peut être contrôlée, toutefois, peut changer en fonction du type d’unité connectée.)
8. Après avoir effectué les réglages nécessaires des étapes 5, 6 et 7, appuyez
sur le bouton 4 Filter
pour valider ces informations.
pour effacer les valeurs actuelles de l’opération choisie, appuyez et relâchez
rapidement le bouton 0 Check (Clear) une fois.
* Le réglage du temps affiché devient “—:—”, et les réglages de température
et On/Off s’éteignent tous.
(Pour effacer tous les réglages du programmateur hebdomadaire d’un coup,
appuyez sur le bouton 0 Check (Clear) pendant 2 secondes ou plus. L’affi-
chage commencera à clignoter, ce qui indiquera que tous les réglages ont
été effacés.)
Remarque :
Vos nouvelles informations seront effacées si vous tapez le bouton 2
Mode (Entrée) avant d’appuyer sur le bouton 4 Filter
.
Si vous avez réglé deux opérations différentes ou plus pour le même
temps exactement, seule l’opération ayant le n °le plus élevé sera effectuée.
9. Répétez les étapes 3 à 8 autant de fois que nécessaire pour remplir les cellu-
les disponibles que vous souhaitez.
10. Appuyez sur le bouton 2 Mode (Retour) pour revenir à l’écran de contrôle
standard et terminer la procédure de réglage.
11. Pour activer le programmateur, appuyez sur le bouton Timer On/Off (programmateur Marche/arrêt) 9, de manière à ce que l’indication “Timer Off” (arrêt
programmateur) disparaisse de l’écran.
Veillez à ce que l’indication “Timer
Off” ne s’affiche plus.
* Si le programmateur n’est pas réglé, l’indication “arrêt programmateur” cli-
gnote à l’écran.
6.1.2. Minuterie simple
■ Vous pouvez régler le programmateur simple de trois manières possible.
• Heure de démarrage uniquement : Le conditionneur d’air démarre quand le
temps indiqué s’est écoulé.
• Heure d’arrêt uniquement : Le conditionneur d’air s’arrête quand le
temps indiqué s’est écoulé.
• Horaires de marche & d’arrêt : Le conditionneur d’air démarre et s’arrête
quand les temps indiqués se sont écoulés.
■ Le programmateur simple (démarrage et arrêt) peut être régler une fois seulement
sur une période de 72 heures. Le réglage se fait heure par heure.
Remarque :
*1. Les programmateurs hebdomadaire / simple / Arrêt auto ne peuvent être
utilisés en même temps.
*2. Le programmateur simple n’opérera pas dans les cas suivants.
La fonction programmateur est éteinte ; anomalie du système ; un test est
en cours ; la commande à distance effectue un auto-test ou un diagnostic ;
l’utilisateur est en train de sélectionner une fonction ; l’utilisateur est en
train de régler le programmateur ; le système est sous contrôle central.
(Dans ces conditions, l’opération Marche/Arrêt est désactivée.)
<Comment visualiser les réglages du programmateur hebdomadaire>
Réglage du programmateur
1. Assurez-vous que l’indication du programmateur hebdomadaire apparaisse à
l’écran (en 1).
2. Appuyez sur le bouton Menu du programmateur B, de manière à ce que l’écran
affiche “Moniteur” (en 8).
3. Appuyez sur le bouton Marche/Arrêt du programmateur 9 tant qu’il faut pour
choisir le jour.
4. Appuyez sur le bouton (7 ou 8) d’opération
ou autant que nécessaire
pour changer l’opération du programmateur à l’affichage (en 9).
* À chaque fois que vous appuyez, vous passez à l’opération du programma-
teur suivante, dans l’ordre du réglage horaire.
5. Pour fermer le moniteur et retourner à l’écran de contrôle standard, appuyez
sur le bouton Mode (Entrée) 2.
<Pour éteindre le programmateur hebdomadaire>
Appuyez sur le bouton Marche/Arrêt du programmateur 9, de manière à ce que
l’indication “arrêt programmateur” apparaisse en 0.
<Pour allumer le programmateur hebdomadaire>
Appuyez sur le bouton Marche/Arrêt du programmateur 9, de manière à ce que
l’indication “arrêt programmateur” s’éteigne en 0.
42
<Comment régler le programmateur simple>
Réglage du programmateur
Action (Marche ou Arrêt)
* “— —” s’affiche s’il n’ y a pas de
réglage.
1. Assurez-vous que vous êtes sur un écran de contrôle standard, et que le témoin
du programmateur simple s’affiche (en 1).
Lorsque qu’une fonction autre que le temporisateur simple est affichée, réglez la
télécommande sur SIMPLE TIMER en utilisant le paramètre de fonction temporisateur de la sélection des fonctions (voir 8.[4]–3 (3)).
2. Appuyez sur le bouton Menu B, de manière à ce que le “Réglage” apparaisse à
l’écran (en 2). (Notez qu’à chaque fois que vous appuyez sur le bouton, vous
passez de “Réglage” à “Moniteur”.)
3. Appuyez sur le bouton ON/OFF 1 pour afficher le réglage du programmateur
simple (Marche ou Arrêt : marche ou arrêt). Appuyez une fois sur le bouton pour
afficher le temps restant sur Marche, et une fois encore pour afficher le temps
restant sur Arrêt (l’indication Marche/Arrêt apparaît en 3):
• Programmateur “Marche” : Le conditionneur d’air démarre quand le nombre
d’heures indiqué s’est écoulé.
• Programmateur “Arrêt” : Le conditionneur d’air s’arrête quand le nombre
d’heures indiqué s’est écoulé.
4. Avec l’indication “Marche” ou “Arrêt” en 3: Appuyez sur le bouton de réglage
d’heure A approprié autant de fois que nécessaire pour régler l’heure sur Marche
(si “Marche” s’affiche) ou sur Arrêt (si “Arrêt” s’affiche en 4).
• Plage disponible : 1 à 72 heures
5. Pour régler à la fois pour Marche et pour Arrêt, répéter les étapes 3 et 4.
* Notez que les temps pour Marche et Arrêt ne peuvent avoir la même valeur.
6. Pour effacer le réglage Marche ou Arrêt actuel : Afficher le réglage Marche ou
Arrêt (voir étape 3) puis appuyer sur le bouton Check (Clear) 0 de manière à ce
que le réglage passe à “—” en 4. (Si vous souhaitez utiliser un réglage Marche ou
Arrêt uniquement, assurez-vous que le réglage dont vous ne voulez pas est bien
sur “—”.)
Page 43

TIMER ON
OFFHrAFTER
SIMPLE
1
6
5
˚C
˚C
SIMPLE
7
˚C
˚C
ONHr
AFTER
SIMPLE
7
ONHr
AFTER
SIMPLE
˚C
˚C
OFFHrAFTER
SIMPLE
SIMPLE
˚C
˚C
OFFHrAFTER
SIMPLE
ONHr
AFTER
SIMPLE
˚C
˚C
SIMPLE
AFTER OFF
AUTO OFF
PAR-21MAA
ON/OFF
FILTER
CHECK
OPERATION
CLEAR
TEST
TEMP.
MENU
BACK DAY
MONITOR/SET
CLOCK
ON/OFF
2A9
4
B
AFTER OFF
AUTO OFF
3
1
2
6. Minuterie
7. Après avoir effectué les étapes 3 à 6, appuyez sur le bouton 4 Filter pour
valider ces informations.
Remarque :
Vos nouvelles informations seront effacées si vous tapez le bouton 2 Mode
(Entrée) avant d’appuyer sur le bouton 4 Filter
.
8. Appuyez sur le bouton 2 Mode (Entrée) pour retourner à l’écran de contrôle
standard.
9. Appuyez sur le bouton Marche/Arrêt du programmateur 9 pour lancer le compte
à rebours. Pendant que le programme s’exécute, l’affichage indique l’état du programmateur.
Veillez à ce que la valeur du programmateur soit visible et con-
venable.
<Afficher les réglages actuels du programmateur simple>
Réglage du programmateur
1. Assurez-vous que l’indication du programmateur simple apparaisse à l’écran (sur
1).
2. Appuyez sur le bouton Menu B, de manière à ce que le “Moniteur” apparaisse à
l’écran (en 5).
• Si le programmateur simple Marche ou Arrêt est en fonction, son état actuel
apparaîtra en 6.
• Si les valeurs Marche et Arrêt ont été réglées toutes les deux, les deux valeurs
apparaîtront alternativement.
3. Appuyez sur le bouton 2 Mode (Entrée) pour fermer le moniteur et retourner à
l’écran de contrôle standard.
<Pour éteindre le programmateur simple...>
Appuyez sur le bouton Marche/Arrêt du programmateur 9, de manière à ce que le
réglage du programmateur n’apparaisse plus à l’écran (en 7).
Exemple 2 :
Démarrer le programmateur, avec l’heure d’arrêt avant l’heure de démarrage
Réglage Marche : 5 heures
Réglage Arrêt : 2 heures
Au démarrage du programmateur
Affiche le réglage d’arrêt du programmateur (les
▲
heures restant avant l’arrêt).
2 heures après le démarrage du programmateur
l’Affichage change pour montrer le réglage de démar-
rage du programmateur (les heures restant avant le
▲
démarrage).
L’affichage indique l’horaire de la manière suivante :
MARCHE (5 heures) – ARRÊT (2 heures) = 3 heures.
5 heures après le démarrage du programmateur
Le conditionneur d’air s’allume, et restera allumé jusqu’à ce que quelqu’un l’éteigne.
6.1.3. Minuterie “Auto Off” (Arrêt auto)
■ Ce programmateur commence le compte à rebours au démarrage du conditionneur
d’air, et éteint le conditionneur quand le temps indiqué s’est écoulé.
■ les réglages possibles vont de 30 minutes à 4 heures, par tranches de 30 minutes.
Remarque :
*1. Les programmateurs hebdomadaire / simple / Arrêt auto ne peuvent être
utilisés en même temps.
*2. Le programmateur Arrêt Auto n’opérera pas quand l’une des conditions
suivantes est en fonction.
La fonction programmateur est éteinte ; anomalie du système ; un test est
en cours ; la commande à distance effectue un auto-test ou un diagnostic ;
l’utilisateur est en train de sélectionner une fonction ; l’utilisateur est en
train de régler le programmateur ; le système est sous contrôle central.
(Sous ces conditions, l’opération Marche/Arrêt est désactivée.)
<Pour lancer le programmateur simple…>
Appuyez sur le bouton Marche/Arrêt du programmateur 9, de manière à ce que le
réglage du programmateur apparaisse en 7.
Exemples
Si les horaires de marche et d’arrêt ont été réglés pour le programmateur simple,
l’opération et l’affichage sont comme indiqués comme ci-dessous.
Exemple 1 :
Démarrer le programmateur, avec l’heure de démarrage avant l’heure d’arrêt
Réglage Marche : 3 heures
Réglage Arrêt : 7 heures
Au démarrage du programmateur
Affiche le réglage de démarrage du program-
▲
mateur (les heures restant avant le démar-
rage).
3 heures après le démarrage du programmateur
l’Affichage change pour montrer le réglage d’arrêt du
programmateur (les heures restant avant l’arrêt).
L’affichage indique l’horaire de la manière suivante :
ARRÊT (7 heures) – MARCHE (3 heures) = 4
heures.
7 heures après le démarrage du programmateur
Le conditionneur d’air s’éteint, et restera éteint
jusqu’à ce que quelqu’un le relance.
▲
<Comment régler le programmateur Arrêt Auto>
Réglage du programmateur
1. Assurez-vous que vous êtes sur un écran de contrôle standard, et que le témoin du
programmateur Arrêt Auto s’affiche (en 1).
Lorsque qu’une fonction autre que le temporisateur à extinction automatique est
affichée, réglez la télécommande sur AUTO OFF TIMER en utilisant le paramètre
de fonction temporisateur de la sélection des fonctions (voir 8.[4]–3 (3)).
2. Appuyez sur le bouton Menu du programmateur B pendant 3 secondes, de ma-
nière à ce que le “Réglage” apparaisse à l’écran (en 2).
(Notez qu’à chaque fois que vous appuyez sur le bouton, vous passez de “Ré-
glage” à “Moniteur”.)
3. Appuyez sur le bouton de réglage d’heure A approprié autant de fois que néces-
saire pour régler l’heure d’arrêt (en 3).
4. Appuyez sur le bouton 4 Filter
pour enregistrer le réglage.
Remarque :
Vos informations seront effacées si vous tapez le bouton 2 Mode (Entrée) avant
d’appuyer sur le bouton 4 Filter
.
5. Appuyez sur le bouton 2 Mode (Entrée) pour terminer la procédure de réglage et
retourner à l’écran de contrôle standard.
6. Si le conditionneur d’air est déjà en fonction, le programmateur démarre le compte
à rebours immédiatement.
Veillez à vérifier que le réglage du programmateur
apparaisse correctement à l’écran.
43
Page 44

ON/OFF
RESET
TOO
WARM
TOO
COOL
MODE
AUTO COOL
DRY
HEAT
FAN
VANE
SELECT
TIME
h
1
B
A
2
AFTER
TIMER
OFF
AUTO OFF
5
1
4
˚C
˚C
AUTO OFF
6
7
AUTO OFF
7
˚C
˚C
AFTER OFF
AUTO OFF
6
7
SELECT
TIME
SELECT
˚C
˚C
TIME SUN
FUNCTION
PAR-21MAA
ON/OFF
FILTER
CHECK
OPERATION
CLEAR
TEST
TEMP.
MENU
BACK DAY
MONITOR/SET
CLOCK
ON/OFF
4
1
1
˚C
˚C
FUNCTION
1
˚C
˚C
FUNCTION
1
˚C
˚C
1
6. Minuterie
<Vérifier le réglage actuel du programmateur Arrêt Auto>
Réglage du programmateur
1. Assurez-vous que l’indication “Arrêt Auto” apparaisse à l’écran (sur 1).
2. Appuyez sur le bouton Menu du programmateur B pendant 3 secondes, de ma-
nière à ce que “Moniteur” apparaisse à l’écran (en 4).
• Le temps restant avant l’extinction apparaît en 5.
3. Pour fermer le moniteur et retourner à l’écran de contrôle standard, appuyez sur le
bouton Mode (Entrée) 2.
<Pour éteindre le programmateur Arrêt Auto...>
● Appuyez sur le bouton Marche/Arrêt du programmateur 9 pendant 3 secondes,
de manière à ce que l’indication “Arrêt programmateur” apparaisse en 6 et que la
valeur du programmateur (en 7) disparaisse.
● Sinon, il est possible d’éteindre le conditionneur d’air lui-même. La valeur du
programmateur (en 7) disparaîtra de l’écran.
6.2. Pour la télécommande sans fil
La minuterie présente un avantage certain lorsqu’elle est réglée pour le moment où
vous vous mettez au lit, où vous rentrez à la maison, où vous vous levez, etc.
1 Sélectionnez le mode minuterie en appuyant sur la touche
est en fonctionnement.
A A chaque fois que vous pressez cette touche, le mode minuterie change selon
la séquence suivante:
(MINUTERIE ARRÊT) (MINUTERIE MARCHE) AR-
RET DE LA MINUTERIE
2 Régler l’heure de la minuterie en utilisant la touche
B A chaque fois que vous pressez cette touche, l’heure définie augmente de 1 à
12.
quand l’appareil
.
<Pour démarrer le programmateur Arrêt Auto...>
● Appuyez sur le bouton Marche/Arrêt du programmateur 9 pendant 3 secondes.
L’indication “Arrêt programmateur” disparaît (en 6), et le réglage du programmateur apparaît (en 7).
● Sinon, il est possible d’allumer le conditionneur d’air lui-même. La valeur du pro-
grammateur apparaît en 7.
7. Autres fonctions
7.1. Verrouiller les boutons de la télécommande (limite
de fonctionnement d’opération)
■ Vous pouvez verrouillez les boutons de la télécommande si vous le souhaitez.
Vous pouvez utiliser la sélection de fonction de la télécommande pour sélection-
ner le type de verrouillage. (Pour de plus amples informations sur comment sélec-
tionner ce verrouillage, voyez la section 8, paragraphe [4]–2 (1).)
Vous pouvez utiliser spécifiquement l’un ou l’autre des verrouillages ci-dessous.
1 Blocage de tous les boutons : Bloque tous les boutons de la télécommande.
2 Blocage de tout sauf ON/OFF (Marche/Arrêt) :
Bloque tous les boutons autres que ON/OFF.
Remarque :
L’indicateur “verrouillé” apparaît à l’écran pour indiquer que les boutons sont
actuellement bloqués.
Pour arrêter la minuterie:
• Appuyez sur la touche
jusqu’à ce que (MINUTERIE ARRÊT) et
(MINUTERIE MARCHE) ne s’affichent plus.
Remarque:
Vous ne pouvez pas régler la MINUTERIE ARRÊT et la MINUTERIE MARCHE en
même temps.
<Comment bloquer les boutons>
1. Tout en pressant le bouton Filter 4, maintenez appuyé le bouton ON/OFF 1
pendant 2 secondes. L’indicateur “verrouillé” apparaît à l’écran (en 1), indiquant
que le verrouillage est enclenché.
* Si le verrouillage a été désactivé pour la sélection des fonctions, l’écran affi-
chera le message “indisponible” quand vous appuyez sur les boutons de la
manière indiquée ci-dessus.
• Si vous appuyez sur un bouton bloqué, l’indication “Verrouillé” (en 1) clignotera
à l’écran.
44
Indicateurs de
blocage
<Comment débloquer les boutons>
1. Tout en pressant le bouton Filter 4, maintenez appuyé le bouton ON/OFF 1
pendant 2 secondes—de manière à ce que l’indication “verrouillé” disparaisse de
l’écran (en 1).
Page 45

ON/OFF
TEMP.
˚C
˚C
ON/OFF
TEMP.
˚C
˚C
ON/OFF
˚C
˚C
ERROR CODE
ON/OFF
CALL:XXXX
XXX:XXX
7. Autres fonctions
ON/OFF
ERROR CODE
7.2. Autres indications
7.2.1. Commande centralisée
● S’affiche lorsque le fonctionnement est contrôlé par un contrôleur central, etc.
Les fonctionnements réduits sont illustrés ci-dessous.
• ON/OFF (y compris le fonctionnement de la minuterie)
• Mode de fonctionnement
• Réglage de la température
Remarque:
Peut aussi être réduit de manière individuelle.
7.2.2. Indicateur de mode clignotant
■ Lorsqu’il clignote de manière continue
S’affiche lorsqu’un autre appareil intérieur connecté à l’appareil extérieur fonc-
tionne déjà dans un autre mode.
Correspond au mode de fonctionnement de l’autre appareil intérieur.
■ Si le mode est activé après le clignotement de l’affichage
S’affiche si le mode de fonctionnement est réduit pour chaque saison par un contrôleur central, etc.
Utilisez un autre mode de fonctionnement.
7.2.3. Indication des codes d’erreur
Si vous avez entré un numéro de téléphone à appeler en cas de problème, l’écran
affiche ce numéro. (Vous pouvez effectuer ce réglage sous la sélection des fonctions. Pour de plus amples informations, reportez-vous section 8.)
Témoin de
marche
(clignotant)
Adresse du réfri-
gérant de l’unité
intérieure
● Si le témoin de marche et le code d’erreur clignotent tous les deux : Cela signifie
que le conditionneur d’air est hors service et que le fonctionnement est arrêté (et
qu’il ne peut être relancé). Notez le numéro d’unité et le code d’erreur, puis éteignez l’alimentation du conditionneur et appelez votre fournisseur ou votre technicien de maintenance.
● Si seul le code d’erreur clignote (alors que le témoin de marche reste allumé):
L’opération continue, mais il se peut que le système ait un problème. Dans ce cas,
vous devez noter le code d’erreur, puis appeler votre fournisseur ou votre technicien pour lui demander son avis.
* Si vous avez entré un numéro de téléphone à appeler en cas de problème,
appuyez sur le bouton Check pour l’afficher à l’écran. (Vous pouvez effectuer
ce réglage sous la sélection des fonctions. Pour de plus amples informations,
reportez-vous section 8.)
Code d’erreur
Affichage alternant
Code d’erreur
N° d’unité intérieure
Quand on appuie sur le bouton Check :
8. Sélection des fonctions
Sélection des fonctions de la commande à distance
Le réglage des fonctions de la commande suivantes peut être modifié à l’aide du mode de sélection des fonctions de la commande à distance. Modifiez le réglage au besoin.
1. Modification de la
langue
(“CHANGE LANGUAGE”)
2. Limitation des
fonctions
(“SELECTION
FONCTIONS”)
3. Sélection des modes
(“SELECTION DU
MODE”)
4. Modification de
l’affichage
(“AFFICHAGE SOUS
MENU”)
Elément 1
Elément 2
Réglage des langues d’affichage
(1) Réglage de la limitation des fonctions de fonctionnement (ver-
rouillage de fonctionnement) (“BLOCAGE FONCTIONS”)
(2) Utilisation du réglage du mode automatique (“SELECTION DU
MODE AUTO”)
(3) Réglage de la limitation de la plage de températures (“LIMITA-
TION TEMPERATURE”)
(1) Réglage de la commande à distance principale/secondaire
(“TELCOMMANDE MAITRE/ESCLAVE”)
(2) Utilisation du réglage de l’horloge (“AFFICHAGE HORLOGE”)
(3) Réglage de la fonction de minuterie (“PROG HEBDO MADAIRE”)
(4) Réglage du numéro à contacter en cas d’erreur (“CALL.”)
(1) Réglage de l’affichage de la température °C/°F (“TEMPERA-
TURE °C/°F”)
(2) Réglage de l’affichage de la température de l’air d’aspiration
(“TEMPERATURE AMBIANTE”)
(3) Réglage de l’affichage du refroidissement/chauffage automati-
que (“AFFICHAGE AUTO F/C”)
• L’affichage en plusieurs langues est possible
• Réglage de la plage de limitation de fonctionnement (verrouillage de fonc-
tionnement)
• Activation ou désactivation du mode de fonctionnement “automatique”
• Réglage de la plage de températures ajustable (maximum, minimum)
• Sélection de la commande à distance principale ou secondaire
* Lorsque deux commandes à distance sont connectées à un groupe,
l’une des deux doit être réglée en tant que commande secondaire.
• Activation ou désactivation de la fonction d’horloge
• Réglage du type de minuterie
• Affichage du numéro à contacter en cas d’erreur
• Réglage du numéro de téléphone
• Réglage de l’unité de température (°C ou °F) à afficher
• Activation ou désactivation de l’affichage de la température de l’air (d’as-
piration) intérieur
• Activation ou désactivation de l’affichage “Cooling” (Refroidissement) ou
“Heating” (Chauffage) pendant le fonctionnement en mode automatique
Elément 3 (contenu de réglage)
45
Page 46

OFF
on1
on2
OFF
ON
OFF
ON
OFF
OFF
CALL-
ON
OFF
ON
OFF
°C
°F
PAR-21MAA
ON/OFF
FILTER
CHECK
OPERATION
CLEAR
TEST
TEMP.
MENU
BACK DAY
MONITOR/SET
CLOCK
ON/OFF
F
E
G
C
D
H
B
A
I
G
G
G
G
G
G
E
E
G
G
G
G
G
E
G
E
G
G
G
G
D
D
D
D
D
D
D
D
D
D
D
D
D
D
D
D
D
D
D
D
D
D
D
D
D
D
D
D
D
D
English
Germany
Spanish
Russian
Italy
Chinese
French
Japanese
8. Sélection des fonctions
[Organigramme de sélection des fonctions]
Langue par défaut (Anglais)
Maintenez la touche E enfoncée et appuyez sur la touche D
pendant deux secondes.
Mode de sélection des fonctions de la commande à distance
Elément 1 Elément 2
Modification
de la langue
Sélection des
fonctions
Affichage normal (affichage lorsque le climatiseur
ne fonctionne pas)
Elément 3
Maintenez la touche E enfoncée et appuyez sur la touche D pendant deux secondes.
E Appuyez sur la touche “operation mode” (mode de fonctionnement).
G Appuyez sur la touche “TIMER MENU” (MENU DE LA MINUTERIE).
D
Appuyez sur la touche “TIMER ON/OFF” (MINUTERIE MARCHE/ARRET).
Ecran à pixels
Le paramétrage de verrouillage des opérations est inactif.
(Valeur de paramétrage initiale)
Le paramétrage de verrouillage des opérations est actif sauf pour les
touche “On/Off” (Marche/Arrêt).
Le paramétrage de verrouillage des opérations concerne toutes les
touches.
Le mode automatique s’affiche lorsque le mode de fonctionnement
est sélectionné. (Valeur de paramétrage initiale)
Le mode automatique ne s’affiche pas lorsque le mode de fonctionnement est sélectionné.
Les limites de la plage de température sont inactives. (Valeur de
paramétrage initiale)
La plage de température peut être modifiée en mode de refroidissement/séchage.
La plage de température peut être modifiée en mode de chauffage.
46
Sélection des
modes
Modification
de l’affichage
La plage de température peut être modifiée en mode automatique.
La télécommande deviendra alors la commande principale. (Valeur
de paramétrage initiale)
La télécommande deviendra alors la commande auxiliaire.
La fonction horloge peut être utilisée. (Valeur de paramétrage initiale)
La fonction horloge ne peut pas être utilisée.
La minuterie hebdomadaire peut être utilisée. (Valeur de paramétrage
initiale)
La minuterie “Auto off” (Arrêt auto) peut être utilisée.
La minuterie simple peut être utilisée.
Le mode minuterie ne peut pas être utilisé.
Les numéros programmés ne s’affichent pas en cas d’erreur.
(Valeur de paramétrage initiale)
Les numéros programmés s’affichent en cas d’erreur.
La température de l’appareil est affichée en °C. (Valeur de paramétrage
initiale)
La température de l’appareil est affichée en °F.
La température de l’air de la pièce est affichée. (Valeur de paramétrage
initiale)
La température de l’air de la pièce n’est pas affichée.
Le mode “Automatic cooling” (refroidissement auto) ou “Automatic
heating” (chauffage auto) s’affiche en mode automatique. (Valeur de
paramétrage initiale)
Seul “Automatic” s’affiche en mode automatique.
Page 47

8. Sélection des fonctions
[Réglage détaillé]
[4]–1. Réglage CHANGE LANGUAGE (Modification de la langue)
La langue d’affichage de l’écran à pixels peut être sélectionnée.
• Appuyez sur la touche [
1 Anglais (GB), 2 Allemand (D), 3 Espagnol (E), 4 Russe (RU),
5 Italien (I), 6 Chinois (CH), 7 Français (F), 8 Japonais (JP)
Consultez le tableau d’affichage par point.
[4]–2. Limitation des fonctions
(1) Réglage de la limitation des fonctions de fonctionnement (verrouillage de fonc-
tionnement)
• Pour commuter le réglage, appuyez sur la touche [
1 no1 : Le réglage du verrouillage de fonctionnement est appliqué à tou-
tes les touches autres que la touche [
2 no2 : Le réglage du verrouillage de fonctionnement est appliqué à tou-
tes les touches.
3 OFF (valeur de réglage initial) :
* Pour appliquer le réglage du verrouillage de fonctionnement à l’écran nor-
(2) Utilisation du réglage du mode automatique
Lorsque la commande à distance est connectée à l’appareil disposant du mode
de fonctionnement automatique, les réglages suivants peuvent être effectués.
• Pour commuter le réglage, appuyez sur la touche [
(3) Réglage de la limitation de la plage de températures
Une fois ce réglage effectué, la température peut être modifiée dans la plage
définie.
• Pour commuter le réglage, appuyez sur la touche [
* Lorsqu’un réglage autre que OFF est sélectionné, le réglage de la limitation
• Pour augmenter ou diminuer la température, appuyez sur la touche
• Pour commuter entre le réglage maximal et minimal, appuyez sur la touche
• Plage réglable
Le réglage du verrouillage de fonctionnement n’est pas appliqué.
mal, il est nécessaire d’appuyer sur les touches (Appuyez simultanément
sur les touches [FILTER] et [
enfoncées pendant deux secondes.) sur l’écran normal après avoir effectué
le réglage ci-dessus.
1 ON (valeur de réglage initial) : Le mode automatique s’affiche lorsque ce
2 OFF : Le mode automatique ne s’affiche pas
1 LIMITE TEMP MODE FROID :
Le mode de la plage de températures peut être modifié en mode refroidissement/déshumidification.
2 LIMITE TEMP MODE CHAUD :
Le mode de la plage de températures peut être modifié en mode chauffage.
3 LIMITE TEMP MODE AUTO :
Le mode de la plage de températures peut être modifié en mode automatique.
4 OFF (programmation initiale) :
La limitation de la plage de températures n’est pas active.
de la plage de températures des modes refroidissement, chauffage et automatique s’effectue en même temps. Toutefois, la plage ne peut pas être
limitée lorsque la plage de températures réglée n’a pas été modifiée.
[
TEMP. ( ) ou ( )] F.
[
] H. Le réglage sélectionné clignote et la température peut être ré-
glée.
Mode refroidissement/déshumidification :
ULimite inférieure : 19°C à 30°C Limite supérieure : 30°C à 19°C
Mode chauffage :
Limite inférieure : 17°C à 28°C Limite supérieure : 28°C à 17°C
Mode automatique :
Limite inférieure : 19°C à 28°C Limite supérieure : 28°C à 19°C
MENU] G pour modifier la langue.
ON/OFF] D.
ON/OFF].
ON/OFF] en même temps et les maintenir
ON/OFF] D.
mode de fonctionnement est sélectionné.
lorsque ce mode de fonctionnement est
sélectionné.
ON/OFF] D.
[4]–3. Réglage de la sélection des modes
(1) Réglage de la commande à distance principale/secondaire
• Pour commuter le réglage, appuyez sur la touche [
1 Maitre : La commande devient la commande principale.
2 Esclave : La commande devient la commande secondaire.
(2) Utilisation du réglage de l’horloge
• Pour commuter le réglage, appuyez sur la touche [
1 ON : La fonction d’horloge peut être utilisée.
2 OFF : La fonction d’horloge ne peut pas être utilisée.
(3) Réglage de la fonction de minuterie
• Pour commuter le réglage, appuyez sur la touche [
sez l’une des fonctions suivantes.).
1 PROG HEBDO MADAIRE (Valeur de réglage initial):
La minuterie hebdomadaire peut être utilisée.
2 PROG HORAIRE ARRET AUTO:
L’arrêt différé automatique peut être utilisé.
3 PROG HORAIRE SIMPLIFIE:
La minuterie simple peut être utilisée.
4 PROG HORAIRE INACTIF:
Le mode de minuterie ne peut pas être utilisé.
* Lorsque l’utilisation du réglage de l’horloge est définie sur OFF, la fonction
“PROG HEBDO MADAIRE” ne peut pas être utilisée.
(4) Réglage du numéro à contacter en cas d’erreur
• Pour commuter le réglage, appuyez sur la touche [
1 CALL OFF : Les numéros à contacter définis ne s’affichent pas
2 CALL **** *** **** : Les numéros à contacter définis s’affichent en cas
CALL_ : Le numéro à contacter peut être réglé lorsque l’affi-
• Réglage des numéros à contacter
Pour régler les numéros à contacter, effectuez la procédure suivante.
Déplacez le curseur clignotant sur les numéros réglés. Appuyez sur la
touche [
(gauche). Appuyez sur la touche [
les numéros.
[4]–4. Réglage de l’affichage
(1) Réglage de l’affichage de la température °C/°F
• Pour commuter le réglage, appuyez sur la touche [
1 °C:L’unité de température °C est utilisée.
2 °F:L’unité de température °F est utilisée.
(2) Réglage de l’affichage de la température de l’air d’aspiration
• Pour commuter le réglage, appuyez sur la touche [
1 ON : La température de l’air d’aspiration s’affiche.
2 OFF : La température de l’air d’aspiration ne s’affiche pas.
(3) Réglage de l’affichage du refroidissement/chauffage automatique
• Pour commuter le réglage, appuyez sur la touche [
1 ON : L’une des fonctions “Automatic cooling” (Refroidissement automa-
tique) ou “Automatic heating” (Chauffage automatique) s’affiche
en mode automatique.
2 OFF: Seule la fonction “Automatic” (Automatique) s’affiche en mode
automatique.
en cas d’erreur.
d’erreur.
chage est tel qu’illustré à gauche.
TEMP. ( ) et ( )] F pour déplacer le curseur vers la droite
CLOCK ( ) et ( )] C pour régler
ON/OFF] D.
ON/OFF] D.
ON/OFF] D (Choisis-
ON/OFF] D.
ON/OFF] D.
ON/OFF] D.
ON/OFF] D.
47
Page 48

8. Sélection des fonctions
[Tableau d’affichage par point]
Langue par défaut
Attendre le démarrage
Mode de
fonctionnement
Température définie
Vitesse du ventilateur
Touche indisponible
Contrôle (Erreur)
Marche d’essai
Auto-contrôle
Sélection des fonctions
Réglage de la ventilation
Refroidissement
Assèchement
Chauffage
Automatique
Automatique
(Refroidissement)
Automatique
(Chauffage)
Soufflerie
Ventilation
Attente
(Pré-chauffage)
Dégivrage
English Germany Spanish Russian Italy Chinese French Japanese
Langue par défaut
Modification de la langue
Sélection des fonctions
Blocage des fonctions
Sélection du mode automatique
Limites de la plage de température
Limites de température mode refroidissement
Limites de température mode chauffage
Limites de température mode auto
Sélection du mode
Réglage télécommande PRINCIPALE
Réglage télécommande AUXILIAIRE
Réglage de l’horloge
Réglage jour/heure
Réglage minuterie
Contrôle minuterie
Minuterie hebdomadaire
Mode de minuterie “off” (Arrêt)
Minuterie “Auto Off” (Arrêt auto)
Minuterie simple
Paramétrage des numéros en situation d’erreur
Modification de l’affichage
Réglage de l’affichage de la température en °C/°F
Réglage de l’affichage de la température de l’air de la pièce
Réglage de l’affichage refroidissement/chauffage automatique
English Germany Spanish Russian Italy Chinese French Japanese
48
Page 49

ON/OFF
TEMP.
˚C
˚C
FILTER
B
A
D
C
A B C D E
A
B
9. Fonctionnement d’urgence de la télécommande sans fil
Lorsqu’il n’est pas possible d’utiliser la télécommande
Lorsque les piles de la télécommande sont usées ou lorsque la télécommande ne
fonctionne pas correctement, vous pouvez activer le mode de fonctionnement d’ur-
gence à l’aide des touches d’urgence situées sur la grille.
A Témoin DEFROST/STAND BY (dégivrage/veilleuse)
B Témoin de fonctionnement
C Interrupteur de fonctionnement d’urgence (chauffage)
D Interrupteur de fonctionnement d’urgence (refroidissement)
E Capteur
Opération de mise en marche
• Pour utiliser le mode de refroidissement, appuyer sur la touche
• Pour utiliser le mode de chauffage, appuyez sur la touche
Remarque:
• Les détails concernant le mode d’urgence sont tels qu’indiqués ci-dessous.
Les détails concernant le mode de refroidissement d’urgence sont tels qu’indiqués
ci-dessous.
Mode de fonctionnement Refroidissement (COOL) Chauffage (HEAT)
Température programmée24°C24°C
Vitesse de ventilation Elevée (High) Elevée (High)
Sens de la soufflerie Horizontal Vers le bas 4
Pour arrêter le fonctionnement
SLP-2AL (Pour le modèle SLZ-KA25/KA35/KA50VAL)
• Pour arrêter l’appareil, appuyer sur la touche
10. Entretien et nettoyage
D.
C.
D ou sur la touche C.
■ Affiche qu’il faut nettoyer le filtre.
Nettoyez le filtre.
■ Pour réinitialiser l’affichage “FILTER” (filtre)
Si vous appuyez deux fois successives sur la touche [FILTER] (filtre) après avoir
nettoyé le filtre, l’affichage s’éteint puis est réinitialisé.
Remarque :
● Si deux types d’appareils intérieurs (ou plus) sont contrôlés, la période en-
tre les nettoyages dépend du type de filtre. Si vous devez nettoyer le filtre de
l’appareil principal, “FILTER” (filtre) s’affiche. Si l’affichage s’éteint, la période cumulée est réinitialisée.
● “FILTER” (filtre) indique la période entre les nettoyages en heure si le clima-
tiseur est utilisé dans des conditions d’air intérieur normales. Toutefois, le
degré d’encrassement du filtre dépend des conditions environnementales ;
nettoyez-le donc en conséquence.
● La période cumulée avant le nettoyage du filtre varie selon les modèles.
● Cette indication est indisponible pour la télécommande sans fil.
ss
s Nettoyage des filtres
ss
• Nettoyer les filtres avec un aspirateur. Si vous ne possédez pas d’aspirateur, battre les filtres contre un objet dur afin de les secouer et de retirer toutes les saletés
et la poussière.
• Si les filtres sont particulièrement sales, les laver à l’eau tiède. Veiller à rincer
soigneusement toute trace de détergent et laisser sécher les filtres complètement
avant de les remonter dans le climatiseur.
ss
s Retrait du filtre
ss
Précaution:
• Lors du retrait du filtre, se protéger les yeux de la poussière. Si vous devez
monter sur le rebord d’une fenêtre pour effectuer l’opération, attention de ne
pas tomber.
• Une fois le filtre retiré, ne pas toucher les pièces métalliques internes de
l’appareil intérieur sous peine de blessure.
■ SLZ-KA·VA(L)
1 Tirer le bouton de la grille d’aspiration dans le sens indiqué par la flèche pour
ouvrir la grille.
2 Ouvrir la grille d’aspiration.
3 Dégager le bouton situé au centre du bord de la grille d’aspiration et tirer le
filtre vers l’avant pour l’extraire.
A Bouton B Grille C Grille d’aspiration D Filtre
Précaution:
• Ne jamais laisser sécher les filtres au soleil ni les sécher en utilisant une
source de chaleur comme un chauffage électrique : vous risqueriez de les
déformer.
• Ne jamais laver les filtres à l’eau chaude (au-dessus de 50°C) car vous risqueriez de les faire gondoler.
• Veiller à ce que les filtres à air soient toujours en place. La mise en marche
de l’appareil alors que les filtres sont retirés pourrait en effet être à l’origine
d’un mauvais fonctionnement.
Précaution:
• Avant de commencer le nettoyage, arrêter l’appareil et couper l’alimentation.
• Les appareils intérieurs sont équipés de filtres servant à extraire les poussières de l’air aspiré. Nettoyer les filtres selon les méthodes illustrées ciaprès.
■ SEZ-KA·VA
• Vérifier l’emplacement et le mode d’installation du filtre à air auprès du four-
nisseur lorsque le climatiseur effectue un essai. (Exemple) Le filtre à air doit
être fixé sur l’admission d’air de l’appareil intérieur (à l’arrière ou en-des-
sous de l’appareil).
A Arrivée d’air B Filtre
49
Page 50

11. Guide de dépannage
WEEKLY
SIMPLE
AUTO OFF
En cas de problème :
Le climatiseur ne chauffe ni ne refroidit correctement.
Lorsque l’opération de chauffage débute, de l’air chaud n’est pas expulsé immédiate-
ment de l’appareil intérieur.
En mode de chauffage, le climatiseur s’arrête avant que la température définie pour la
pièce soit atteinte.
La direction du débit d’air varie pendant l’opération ou la direction ne peut être définie.
Lorsque la direction du débit d’air est modifiée, les ailettes se déplacent toujours vers
le haut et vers le bas au-delà de la position déterminée avant de s’arrêter sur la position souhaitée.
Un bruit d’eau qui ruisselle ou plus rarement un souffle peut être perçu.
Un craquement ou un grincement peut être perçu.
La pièce a une odeur désagréable.
Une buée ou vapeur blanche sort de l’appareil intérieur.
De l’eau ou de la vapeur sort de l’appareil extérieur.
Le témoin de fonctionnement n’apparaît pas sur l’écran de la télécommande.
Le signe “
Lorsque le climatiseur est redémarré immédiatement après avoir été éteint, son fonctionnement est bloqué même si la touche “ON/OFF” (Marche/Arrêt) est sollicitée.
Le climatiseur fonctionne sans que la touche “ON/OFF” (Marche/Arrêt) soit sollicitée.
Le climatiseur s’arrête sans que la touche “ON/OFF” (Marche/Arrêt) soit sollicitée.
Le fonctionnement de la minuterie de la télécommande ne peut pas être réglé.
Le message “PLEASE WAIT” (VEUILLEZ PATIENTER) apparaît sur l’écran de la télé-
commande.
Un code d’erreur apparaît sur l’écran de la télécommande.
Un bruit de goutte à goutte ou de moteur qui tourne peut être perçu.
” apparaît sur l’écran de la télécommande.
Voici la solution. (L’appareil fonctionne normalement.)
■ Nettoyez le filtre. (Le débit d’air est réduit lorsque le filtre est sale ou colmaté.)
■ Contrôlez la température et ajustez la température définie en conséquence.
■ Assurez-vous qu’il y a suffisamment d’espace autour de l’appareil extérieur. L’ad-
mission ou la sortie d’air de l’appareil intérieur est-elle bloquée ?
■ Une porte ou une fenêtre a-t-elle été laissée ouverte ?
■ De l’air chaud est expulsé uniquement lorsque l’appareil intérieur est suffisamment
chaud.
■ Lorsque la température extérieure est basse et l’humidité de l’air importante, du
givre peut se former sur l’appareil extérieur. Dans ce cas, l’appareil extérieur procède à une opération de dégivrage. Un fonctionnement normal de l’appareil devrait débuter au bout de 10 minutes environ.
■ En mode de refroidissement, les ailettes se placent automatiquement en position
horizontale (basse) au bout d’une (1) heure lorsqu’une direction de débit d’air basse
(horizontale) est sélectionnée. Ceci évite la formation d’eau sur les ailettes et pré-
vient tout suintement.
■ En mode de chauffage, les ailettes se placent automatiquement en position horizontale lorsque la température du débit d’air est basse ou pendant le mode de
dégivrage.
■ Lorsque la direction du débit d’air est modifiée, les ailettes se placent sur la posi-
tion déterminée après être passées par la position de base.
■ Ces bruits peuvent être perçus lorsque le réfrigérant circule dans le climatiseur ou
lorsque le flux du réfrigérant a été modifié.
■ Ces bruits peuvent être perçus lorsque les pièces du climatiseur frottent les unes
contre les autres en raison de l’expansion et de la contraction qui résultent des
variations de température.
■ L’appareil intérieur aspire de l’air qui contient des gaz produits par les murs, les
moquettes et les meubles ainsi que des odeurs véhiculées par les vêtements, puis
il les expulse à nouveau dans la pièce.
■ Si la température intérieure et l’humidité de l’air sont élevées, cette situation peut
se produire en début d’opération.
■ En mode de dégivrage, de l’air froid peut être expulsé et avoir l’apparence de la
buée.
■ En mode de refroidissement, de l’eau peut se former et suinter des tuyaux et des
raccords froids.
■ En mode de chauffage, de l’eau peut se former et suinter de l’échangeur thermi-
que.
■ En mode de dégivrage, l’eau présent sur l’échangeur thermique s’évapore provo-
quant ainsi une émission de vapeur d’eau.
■ Mettez l’appareil sous tension. Le signe “
mande.
■ Lors du contrôle centralisé, le signe “ ” apparaît sur l’écran de la télécommande
et le fonctionnement du climatiseur ne peut être lancé ou arrêté à l’aide de la télé-
commande.
■ Patientez trois minutes environ.
(Le fonctionnement s’est arrêté pour protéger le climatiseur.)
■ La fonction de marche de la minuterie a-t-elle été réglée ?
Appuyez sur la touche “ON/OFF” (Marche/Arrêt) pour l’arrêter.
■ Le climatiseur est-il relié à une télécommande centralisée ?
Veuillez consulter les personnes responsables du contrôle du climatiseur.
■ Le signe “
Veuillez consulter les personnes responsables du contrôle du climatiseur.
■ La fonction de recouvrement auto en cas de coupure d’électricité a-t-elle été réglée ?
Appuyez sur la touche “ON/OFF” (Marche/Arrêt) pour l’arrêter.
■ La fonction d’arrêt de la minuterie a-t-elle été réglée ?
Appuyez sur la touche “ON/OFF” (Marche/Arrêt) pour relancer l’opération.
■ Le climatiseur est-il relié à une télécommande centralisée ?
Veuillez consulter les personnes responsables du contrôle du climatiseur.
■ Le signe “
Veuillez consulter les personnes responsables du contrôle du climatiseur.
■ Les paramétrages de la minuterie sont-ils invalides ?
Si la minuterie peut être réglée, les signes
doivent apparaître sur l’écran de la télécommande.
■ Les paramétrages initiaux sont en cours d’exécution. Patientez trois minutes envi-
ron.
■ Les dispositifs de protection ont fonctionné pour protéger le climatiseur.
■ N’essayez pas de réparer cet appareil vous-même.
Mettez l’appareil hors tension immédiatement et consultez votre revendeur. Vous
devrez fournir au revendeur le nom du modèle et les informations qui apparaissent
sur l’écran de la télécommande.
■ A l’arrêt de l’opération de refroidissement, la pompe de vidange se met en marche
puis s’arrête. Patientez 3 minutes environ.
” apparaît-il sur l’écran de la télécommande ?
” apparaît-il sur l’écran de la télécommande ?
” apparaîtra sur l’écran de la télécom-
,
, ou
50
Page 51

11. Guide de dépannage
En cas de problème : Voici la solution. (L’appareil fonctionne normalement.)
Le bruit perçu est supérieur aux caractéristiques sonores.
■ Le niveau sonore du fonctionnement intérieur dépend de l’acoustique de la pièce
dans laquelle l’appareil est installé (voir tableau suivant), et sera supérieur aux
caractéristiques sonores (mesurées dans une pièce sans écho).
Exemples de
pièce
Niveaux sonores
Pièces présentant une
absorption phonique élevée
Studio de
radiodiffusion, salle
de musique, etc.
3 à 7 dB
Pièces présentant une
absorption phonique normale
Salle de réception,
Pièces présentant une
absorption phonique faible
Bureau, chambre
entrée d’hôtel, etc.
6 à 10 dB
9 à 13 dB
d’hôtel
Rien n’apparaît sur l’écran de la télécommande sans fil, l’écran est flou, ou l’appareil
intérieur ne reçoit aucun signal sauf si la télécommande est éteinte.
Le témoin de fonctionnement situé près du récepteur de la télécommande sans fil sur
l’appareil intérieur clignote.
12. Installation, deplacement et inspection
Conseils concernant l’emplacement
Evitez d’installer le climatiseur dans les endroits suivants.
• Où il y a risque de fuite de gaz inflammable.
Précaution:
N’installez pas l’appareil dans un endroit où il pourrait y avoir une fuite de gaz
combustible.
Si le gaz fuit et s’accumule autour de l’appareil, il y aura un risque d’explosion.
• Où il y a grande quantité d’huile pour machines.
• Dans un endroit à haute teneur en sel, par exemple au bord de la mer.
• Près d’une source chaude émanant du soufre.
• Où il pourrait y avoir des éclaboussements d’huile ou de la fumée de graisse.
Avertissement:
Si le climatiseur fonctionne sans refroidir ou sans chauffer la pièce (en fonction
du modèle), contacter le revendeur car il pourrait alors y avoir une fuite de gaz
réfrigérant. Toujours demander au représentant du service technique s’il n’y a
pas de fuite de réfrigérant après une intervention technique.
Le réfrigérant présent dans le climatiseur est sûr et normalement il ne doit pas y
avoir de fuite. Néanmoins, en cas de fuite à l’intérieur, si le gaz réfrigérant entre
en contact avec la partie chauffante d’un chauffage à ventilation, d’un chauffage
d’appoint, d’un poêle, etc., il dégagera des substances toxiques.
■ Les piles sont faibles.
Remplacez les piles et appuyez sur la touche “Reset” (Réinitialiser).
■ Si rien n’apparaît suite au remplacement des piles, assurez-vous que les piles sont
insérées conformément à la polarité indiquée (+, –).
■ La fonction d’auto-diagnostic a fonctionné pour protéger le climatiseur.
■ N’essayez pas de réparer cet appareil vous-même.
Mettez l’appareil hors tension immédiatement et consultez votre revendeur. Veuillez
fournir au revendeur le nom du modèle.
Lampe á
modèle de tube
Pour éviter les effets dûs
à une lampe fluorescente,
le mettre dans un endroit
le plus éloigné possible.
fluorescent onduleur
Radio
Pour éviter la distorsion de l’image ou
les parasites, placez
à 1 m de distance ou
plus.
TV
100 mm ou plus
Endroit sec et
bien ventilé
400 mm ou
plus
mur, etc.
Installation électrique
• Installez un circuit électrique réservé exclusivement au climatiseur.
• Respectez la capacité du disjoncteur.
Avertissement:
• Le client ne doit pas installer l’appareil. Si l’installation n’est pas effectuée correctement, il y aura risque d’incendie, de choc électrique, de blessure (si l’appareil
tombe), de fuite d’eau, etc.
• N’utilisez pas de dérivation ou de rallonge pour le connecter, et ne branchez pas plusieurs appareils à la même prise.
Un incendie ou un choc électrique pourrait être le résultat d’un mauvais contact, une mauvais isolation, trop de courant, etc.
Veuillez consulter votre concessionnaire.
Précaution:
• Mettez à la terre.
Ne connectez pas un fil de mise à la terre à un tuyau de gaz, un tuyau d’eau, un paratonnerre ou au fil de mise à la terre d’un téléphone.
Une mauvaise mise à la terre pourrait être la cause d’un choc électrique.
• Installez un disjoncteur différentiel selon l’endroit où le climatiseur sera installé (endroit humide, etc.)
Si le disjoncteur différentiel n’est pas installé, il y aura risque de choc électrique.
Inspection et entretien
• Quand le climatiseur est utilisé pendant plusieurs saisons, sa performance peut être amoindrie du fait de saletés se trouvant à l’intérieur de l’appareil.
• Suivant les conditions d’utilisation, il se peut qu’il y ait une odeur ou que l’eau accumulée durant l’assèchement ne s’évacue pas correctement à cause de la saleté, la
poussière, etc.
• Il est recommandé de faire inspecter et réviser l’appareil (à vos frais) par un spécialiste en plus de l’entretien normal. Veuillez consulter votre concessionnaire.
51
Page 52

12. Installation, deplacement et inspection
Bruit de l’appareil
• Ne placez pas d’objet près de la sortie d’air de l’appareil extérieur. Cela pourrait en amoindrir la performance ou augmenter le bruit durant le fonctionnement.
• Si un bruit anormal est entendu pendant la marche, veuillez consulter votre concessionnaire.
Entsorgung
• Quand le climatiseur doit être enlevé ou réinstallé à cause de travaux, d’un déménagement, etc., cela doit être fait par un technicien qualifié.
Avertissement:
Le client ne doit pas réparer ou déplacer l’appareil lui-même.
Si cela est fait incorrectement, il y aura risque d’incendie, de choc électrique, de blessure (si l’appareil tombe), de fuite d’eau, etc. Veuillez consulter votre
concessionnaire.
Pour s’en débarrasser
• Pour jeter ce produit, veuillez consulter votre concessionnaire.
Si vous avez d’autres questions, veuillez consulter votre concessionnaire.
13. Spécifications techniques
Fonction
Alimentation principale
Puissance
EntréekW
Appareil intérieur
Débit d’air (Faible-Moyenne-Elevée) CMM
Niveau de bruit (Faible-Moyenne-Elevée) dB
Poids kg
Appareil extérieur
Niveau de bruit dB
Réfrigérant R410A kg
Poids kg
Fonction
Alimentation principale
Puissance
EntréekW
Appareil intérieur
Débit d’air (Faible-Elevée) CMM
Pression statique
extérieure
Niveau de bruit (Faible-Elevée) dB (A)
Poids kg
Appareil extérieur
Niveau de bruit dB (A)
Réfrigérant R410A kg
Poids kg
Remarques: 1. Conditions de tension (refroidissement) A l’intérieur : 27˚C DB (BS), 19˚C WB (BH) A l’extérieur : 35˚C DB (BS)
Modèle
kW
BTU/h
Modèle
Refroidissement
kW
BTU/h
Pa (mmAq)
2. Conditions de tension (chauffage) A l’intérieur : 20˚C DB (BS) A l’extérieur : 7˚C DB (BS), 6˚C WB (BH)
3. Spécifications sujettes à modifications sans avis préalable.
SLZ-KA25VA (L)
Refroidissement Chauffage
2,5 3,0
8.500 10.200
0,69 0,83
SLZ-KA25VA (L)
8-9-10
28-31-37
16,5 + Grille 3
SUZ-KA25VA
46
0,90
33
SEZ-KA35VA
Chauffage
3,5 4,0
11.900 13.600
1,06 1,10
SEZ-KA35VA
10-13
Std. : 30 (3)
Max. : 50 (5)
30-35
33,5
SUZ-KA35VA
48
1,05
35
Refroidissement
Refroidissement Chauffage
SLZ-KA35VA (L)
~/N, 230V, 50Hz
3,5 4,0
11.900 13.600
1,06 1,10
SLZ-KA35VA (L)
8-9-11
29-33-38
16,5 + Grille 3
SUZ-KA35VA
SEZ-KA50VA
Chauffage
~/N, 230V, 50Hz
5,0 5,9
17.100 20.100
1,78 1,84
SEZ-KA50VA
12-17
Std. : 30 (3)
Max. : 50 (5)
31-39
33,5
SUZ-KA50VA
55
1,6
53
48
1,05
35
SEZ-KA60VA
Refroidissement
5,5 6,9
18.800 23.500
1,96 2,45
SEZ-KA60VA
Std. : 30 (3)
Max. : 50 (5)
SUZ-KA60VA
Refroidissement Chauffage
Chauffage
12-20
32-43
33,5
55
1,8
53
SLZ-KA50VA (L)
4,6 5,0
15.700 17.100
1,63 1,55
SLZ-KA50VA (L)
8-9-11
30-34-39
16,5 + Grille 3
SUZ-KA50VA
55
1,6
53
SEZ-KA71VA
Refroidissement
7,1 8,1
24.200 27.600
2,46 2,36
Chauffage
SEZ-KA71VA
12-20
Std. : 30 (3)
Max. : 50 (5)
32-43
35
SUZ-KA71VA
55
2,0
58
Fourchette de fonctionnement garantie
A l’intérieur
Refroidissement
Chauffage
Les appareils doivent être installés par un électricien professionnel agréé en fonction des normes locales.
Maximum 32°C DB, 23°C WB 46°C DB, – 43°C DB, –
Minimum 21°C DB, 15°C WB -10°C DB, –
Maximum 27°C DB, – 24°C DB, 18°C WB
Minimum 20°C DB, – -10°C DB, -11°C WB
A l’extérieur
KA25, KA35
KA50, KA60, KA71
52
Page 53

Inhoud
1. Veiligheidsvoorschriften ...................................................... 53
2. Onderdelen ......................................................................... 53
3. Schermconfiguratie ............................................................. 56
4. De dag van de week en de tijd instellen ............................. 56
5. Gebruik................................................................................ 56
6. Timer ................................................................................... 58
Opmerking
(AEEA-symbool)
Dit symbool is alleen van toepassing voor EU-landen.
Dit symbool voldoet aan Richtlijn 2002/96/EG, artikel 10 (Informatie voor gebruikers) en bijlage IV.
Mitsubishi Electric producten zijn ontwikkeld en gefabriceerd uit eerste kwaliteit materialen. De onderdelen kunnen worden gerecycled
en worden hergebruikt.
Het symbool betekent dat de elektrische en elektronische onderdelen op het einde van de gebruiksduur gescheiden van het huishoudelijk afval moeten worden ingezameld.
Breng deze apparatuur dan naar het gemeentelijke afvalinzamelingspunt.
In de Europese Unie worden elektrische en elektronische producten afzonderlijk ingezameld.
Help ons mee het milieu te beschermen!
1. Veiligheidsvoorschriften
s Lees alle “Veiligheidsvoorschriften” voordat u het ap-
paraat installeert.
s In de “Veiligheidsvoorschriften” staan belangrijke in-
structies met betrekking tot de veiligheid. Volg ze zorgvuldig op.
s Stel de aanleverende instantie op de hoogte of vraag
om toestemming voordat u het systeem aansluit op het
net.
7. Andere functies ................................................................... 61
8. Functiekeuze ....................................................................... 62
9. Noodbedrijf voor draadloze afstandsbediening ................... 66
10. Onderhoud en schoonmaken ............................................ 66
11. Problemen en oplossingen ................................................ 67
12. Installeren, verplaatsen en controleren ............................. 68
13. Specificaties ...................................................................... 69
Symbolen die in de tekst worden gebruikt
Waarschuwing:
Beschrijft maatregelen die genomen moeten worden om het risico
van verwonding of dood van degebruiker te voorkomen.
Voorzichtig:
Beschrijft maatregelen die genomen moeten worden om schade aan
het apparaat te voorkomen.
Symbolen die in de afbeeldingen worden gebruikt
: Geeft een onderdeel aan dat geaard moet worden.
Waarschuwing:
• Het apparaat mag niet door de gebruiker zelf worden geïnstalleerd. Vraag de
zaak waar u het apparaat gekocht heeft of een erkend bedrijf om het apparaat te installeren. Als het apparaat niet juist is geïnstalleerd, kan dit lekkage, elektrische schokken of brand tot gevolg hebben.
• Ga niet op het apparaat staan en plaats geen voorwerpen op het apparaat.
• Zorg ervoor dat u geen water op het apparaat knoeit en raak het apparaat
nooit met natte handen aan. Dit kan elektrische schokken tot gevolg hebben.
• Spuit niet met brandbaar gas in de buurt van het apparaat. Dit kan brand tot
gevolg hebben.
• Zet geen gasverwarmingstoestel of een ander toestel met open vuur op een
plaats waar het blootstaat aan de lucht die het apparaat uitblaast. Dit kan
onvolledige verbranding tot gevolg hebben.
• Verwijder nooit de beschermkap van de ventilator in het buitenapparaat terwijl het apparaat aan staat.
Voorzichtig:
• Gebruik geen scherpe voorwerpen om de toetsen in te drukken - hiermee
kunt u het bedieningspaneel beschadigen.
• Zorg ervoor dat de toevoer- en afvoeropeningen van het binnen- of buitenapparaat nooit verstopt raken of afgedekt worden.
2. Onderdelen
■ Binnenunit
SLZ-KA·VA
SLZ-KA·VAL
Ventilatorstappen 3 stappen 2 stappen
Klep Auto, zwenkend –
Lamellen – –
Filter Met lange levensduur Normaal
Indicatie filter reinigen 2.500 uur –
SEZ-KA·VA
• Wanneer u uitzonderlijk ongewone geluiden of vibraties bemerkt, zet dan
het apparaat stil, schakel de elektriciteit uit en neem contact op met uw dealer.
• Steek nooit uw vingers, stokjes of iets dergelijks in de toever- en afvoeropeningen.
• Als u iets vreemds ruikt, dient u het apparaat niet meer te gebruiken. Draai
de schakelaar uit en raadpleeg uw dealer. Doet u dat niet, dan loopt u het
risico van stroomonderbreking, elektrische schokken of brand.
• Deze airconditioner is NIET bedoeld voor gebruik door kinderen of onbekwame personen die niet onder toezicht staan.
• Jonge kinderen moeten onder toezicht staan om te voorkomen dat ze met de
airconditioning gaan spelen.
• Als het koelgas uit het apparaat geblazen wordt of lekt, zet dan de airconditioner stil, ventileer de kamer goed en neem contact op met uw dealer.
Het apparaat verwijderen
Raadpleeg de zaak waar u het apparaat gekocht heeft indien u zich van
het apparaat wilt ontdoen.
■ SLZ-KA·VA/SLZ-KA·VAL
4-weg-plafondcassette
Filter
Luchtinlaat
■ SEZ-KA·VA
Plafond verborgen
Luchtuitlaat
Klep
Luchtuitlaat
Luchtinlaat
Filter (Onder of achter)
53
Page 54

PAR-21MAA
ON/OFF
FILTER
CHECK
OPERATION
CLEAR
TEST
TEMP.
MENU
BACK DAY
MONITOR/SET
CLOCK
ON/OFF
2. Onderdelen
■ Voor de snoer afstandsbediening
Weergave
In deze uitleg worden alle
oplichtendelen van het display
weergegeven. Tijdens de werking
van het apparaat branden alleen
de relevante onderdelen.
Huidige werking
Toont de werkingsmodus, enz.
* Weergave in meerdere talen
wordt ondersteund.
Indicator “Centrally Controlled”
(Centrale bediening)
Geeft aan dat de werking van de
afstandsbediening is uitgeschakeld door een centrale regeling.
Indicatie “Timer Is Off” (Timer
staat uit)
Geeft aan dat de timer is uitgeschakeld.
Temperatuurinstelling
Toont de doeltemperatuur.
Dag van de week
Toont de huidige dag van de week.
Weergave Tijd/Timer
Toont de huidige tijd, tenzij de simple timer (enkelvoudige
timer) of de Auto Off timer (automatische uitschakeling) is
ingesteld.
Als de enkelvoudige timer of automatische uitschakeling
is ingesteld, wordt de resterende tijd weergegeven.
TIME SUN MON TUE WED THU FRI SAT
TIMER
AFTER
ERROR CODE
˚F˚C
Hr
AFTER
˚F˚C
ONLY1Hr.
Indicator Luchtrichting naar
boven/beneden
De indicator geeft de richting
van de luchtuitstroom aan.
Indicator “One Hour Only”
(Slechts een uur)
Wordt weergegeven als de luchtstroom is
ingesteld op zwak en neerwaarts in de
modus COOL of DRY (de werking verschilt al naargelang het model).
De indicator schakelt na een uur uit, waarna
de luchtstroomrichting ook verandert.
Weergave omgevingstemperatuur
Toont de omgevingstemperatuur.
De kamertemperatuur wordt getoond tussen 8–39 °C. Het display
gaat knipperen bij temperaturen
lager dan 8 °C of hoger dan 39 °C.
Weergave lamellen
Toont de stand van het uitblaasrooster. Wordt niet weergegeven
als het uitblaasrooster niet beweegt.
(Indicator On)
Geeft aan dat de stroom is ingeschakeld.
ON
OFF
FUNCTION
FILTER
WEEKLY
SIMPLE
AUTO OFF
Indicatie “Sensor”
Wordt weergegeven als de sensor op
de afstandsbediening wordt gebruikt.
Indicator “Locked” (Vergrendeld)
Geeft aan dat de knoppen of de afstandsbediening zijn vergrendeld.
Indicator “Filter”
Gaat branden als het filter moet worden gereinigd.
Timerindicatoren
De indicator gaat branden als de bijbehorende timer is ingesteld.
Indicator Ventilatorsnelheid
Toont de gekozen ventilatorsnelheid.
Indicator Ventilatie
Verschijnt als de unit in de Ventilatiemodus draait.
Bediening
Knoppen voor instellen temperatuur
Lager
Hoger
Knop Timermenu
(Knop Monitor/Set)
Knop Mode (Knop Return)
Knoppen voor instellen tijd
Achteruit
Vooruit
Knop Timer On/Off
(Knop Set Day)
Deur
openen.
Ingebouwde
temperatuursensor
Opmerking:
● Boodschap “PLEASE WAIT” (wachten a.u.b.)
Als het binnenapparaat op de voeding wordt aangesloten of als het apparaat na een spanningsonderbreking herstelt, wordt deze boodschap ongeveer 3 minuten
getoond.
● Boodschap “NOT AVAILABLE” (niet beschikbaar)
Deze boodschap wordt getoond als een toets wordt ingedrukt voor een functie die niet op het binnenapparaat beschikbaar is.
Indien een enkele afstandsbediening voor meerdere binnenapparaten van verschillende modellen tegelijk wordt gebruikt, wordt deze boodschap niet getoond indien
minstens één van de binnenapparaten over die functie beschikt.
Knop ON/OFF
Knop Ventilatorsnelheid
Knop Filter
(knop )
Knop Test Run
Knop Check
(Knop Clear)
Knop Luchtstroom naar
boven/beneden
Knop Uitblaasrooster
(knop Werking
Vorige werkingsnummer.
Knop Ventilatie
(knop Operation
Volgende werkingsnummer.
)
)
54
Page 55

1
2
3
2. Onderdelen
AUTO
CO
OL
DRY
HEAT
FAN
VANE
SELECT
TIME
■ Voor de draadloze afstandsbediening
[Alleen voor SLZ-KA·VAL]
Knop SET TEMPERATURE
(temperatuur instellen)
Met deze knop stelt u de gewenste
h
kamertemperatuur in.
Knop ON/OFF (aan/uit)
Wanneer u op deze knop drukt,
wordt de werking gestart. Druk
nogmaals op deze knop om de
werking te stoppen.
Knop MODE SELECT (modus)
Met deze knop wisselt u tussen de
bedrijfsstanden auto, cool, heat,
dry (automatisch, koelen, verwarmen en drogen). (SLZ)
ON/OFF
AUTO COOL
HEAT
MODE
DRY
TOO
WARM
FAN
VANE
TOO
COOL
SELECT
TIME
RESET
■ Indien u de draadloze afstandsbediening gebruikt, dient u deze in de richting te houden van
de ontvanger op het binnenapparaat.
■ Als u de afstandsbediening bedient binnen ongeveer twee minuten nadat het binnenapparaat
op de voeding is aangesloten, laat het binnenapparaat mogelijk 2 keer een piepsignaal
horen ten teken dat het apparaat de initiële automatische controle aan het uitvoeren is.
■ Het binnenapparaat laat een piepsignaal horen om te bevestigen dat het uitgezonden signaal van de afstandsbediening is ontvangen. De signalen kunnen tot ongeveer 7 meter in
een rechte lijn van het binnenapparaat worden ontvangen, binnen 45° links en rechts van
het apparaat. Fluorescerende lampen en sterke verlichting kunnen het vermogen van het
binnenapparaat om signalen te ontvangen echter verminderen.
■ Als het bedrijfslampje bij de ontvanger op het binnenapparaat knippert, dient het apparaat
te worden geïnspecteerd. Neem voor onderhoud contact op met uw leverancier.
■ Wees voorzichtig met de afstandsbediening! Laat hem niet vallen en stel hem niet bloot aan
harde schokken. Laat de afstandsbediening ook niet nat worden en laat hem ook niet in
ruimtes met een hoog vochtigheidsgehalte.
■ Om te voorkomen dat de afstandsbediening kwijt raakt, kunt u de houder die bij de afstandsbediening wordt meegeleverd aan een wand monteren en de afstandsbediening hier
na gebruik steeds in terug plaatsen.
Knop TIMER SELECT
Met deze knop start of stopt u de
timer.
Knop FAN SPEED
(ventilatorsnelheid)
Met deze knop stelt u de ventilatorsnelheid in (laag, gemiddeld,
hoog).
Knop VANE CONTROL
(luchtstroom)
Met deze knop verandert u de
richting van de luchtstroom.
Aanbrengen/vervangen van de batterijen
[Alleen voor SLZ-KA·VAL]
1. Verwijder de bovenste kap, breng twee AAAbatterijen aan en breng de bovenste kap weer
aan.
Bovenste kap
Twee AAA-batterijen
Breng eerst de nega-
tieve pool (–) van de
batterijen in de houder.
Plaats de batterijen in
de juiste richting (+, –)!
■ Buitenunit
2. Druk op reset.
Voeding
Koelpijpen
binnen-buiten
Gebruik een voorwerp
met een smalle punt
om op reset te drukken.
Verbindingskabel
Aarde
55
Page 56

˚C
˚C
TIME SUN
PAR-21MAA
ON/OFF
FILTER
CHECK
OPERATION
CLEAR
TEST
TEMP.
MENU
BACK DAY
MONITOR/SET
CLOCK
ON/OFF
2
4
9
1
A
TIME SUN
2
3
4
˚C
˚C
PAR-21MAA
ON/OFF
FILTER
CHECK
OPERATION
CLEAR
TEST
TEMP.
MENU
BACK DAY
MONITOR/SET
CLOCK
ON/OFF
2
7
2
3
3
8
6
4
5
8
7
1
1
5
6
˚F˚C
TIMER
MON
OFF
WEEKLY
SUN MON TUE WED THU FRI SAT
WEEKLY
˚F˚C
˚C
TIME SUN
3. Schermconfiguratie
ON/OFF
RESET
TOO
WARM
TOO
COOL
MODE
AUTO COOL
DRY
HEAT
FAN
VANE
SELECT
TIME
h
1
2
5
6
3
3
5
6
2
Function Selection (Functie selecteren)
ADC
Standaard bedieningsschermen
OFF ON
BC
Timermonitor Timer instellen
B
Dag/tijd instellen
4. De dag van de week en de tijd instellen
<Schermtypen>
De displaytaal kan niet worden ingesteld op Nederlands. Daarom wordt de
oorspronkelijk ingestelde taal, Engels, weergegeven op de displays in deze
handleiding.
● Function Selection (Functie selecteren):
de beschikbare functies en bereiken instellen op de
afstandsbediening (timerfuncties, beperkingen, enz.).
● Dag/tijd instellen: de huidige dag van de week of tijd instellen.
● Standaard bedieningsschermen:
de werkingsstatus van het airconditioningssysteem
weergeven en instellen.
● Timermonitor: de momenteel ingestelde timer weergeven (schakel-
klok, enkelvoudige timer of automatisch uitschakelen).
● Timer instellen: de werking van de timers instellen (schakelklok, en-
kelvoudige timer of automatisch uitschakelen).
<Het scherm wijzigen>
Naar A : houd zowel de knop Mode als Timer On/Off twee seconden lang
ingedrukt.
Naar B : druk op de knop Timer Menu.
Naar C : druk op de knop Mode (Return).
Naar D : druk op een van de knoppen Set Time ( of ).
Weergave dag van de
week en tijd
Opmerking:
● De dag en tijd worden niet weergegeven als de klok is uitgeschakeld bij
Function Selection.
● Nadat de stroomvoeding weer is ingeschakeld, duurt het 3 minuten voordat
de binnenunit gaat werken. Dit is normaal.
5. Gebruik
Dag van de week instellen
Tijd instellen
1. Druk op of op van Set Time A zodat 2 wordt weergegeven.
2. Druk op Timer On/Off (Set Day) 9 om de dag in te stellen.
* Met elke druk op de knop schuift de weergegeven dag bij 3 een dag
op: Sun → Mon → ... → Fri → Sat (Zo, ma, …. vr, za).
3. Druk zo vaak als nodig is op Set Time A om de tijd in te stellen.
* Als u de knop ingedrukt houdt, neemt de tijd (bij 4) eerst toe in minu-
ten, dan met een interval van tien minuten en tenslotte met een interval van een uur.
4. Nadat u bij de stappen 2 en 3 de juiste instellingen hebt ingevoerd, drukt
u op Filter 4 om de waarden te vergrendelen.
5.1. ON/OFF (AAN/UIT)-zetten
<De werking starten>
■ Druk op ON/OFF 1.
• Het ON-lampje 1 gaat aan en het schermgebied licht op.
Opmerking:
● Nadat de unit opnieuw is gestart, zijn dit de begininstellingen.
Modus
Temperatuurinstelling
Ventilatorsnelheid
Luchtstroom naar boven/
beneden
56
Instellingen op de afstandsbediening
Last setting (Laatste instelling)
Last setting (Laatste instelling)
Last setting (Laatste instelling)
Modus
COOL of DRY
HEAT
FAN
Horiz. Outlet (Hor. Uitblazen)
Last setting (Laatste instelling)
Horiz. Outlet (Hor. Uitblazen)
Page 57

5. Gebruik
51234
<De werking stoppen>
■ Druk nogmaals op ON/OFF 1.
• Het ON-lampje 1 gaat uit en het schermgebied wordt donker.
Opmerking:
Zelfs als u direct op de ON/OFF (AAN/UIT)-toets drukt nadat u de air-conditioner
net uitgeschakeld hebt, zal het apparaat voor ongeveer drie minuten niet starten. Dit is om te voorkomen dat interne onderdelen schade oplopen.
5.2. Kiezen van de werkingsstand
■ Druk op knop Operation mode ( ) 2 en kies de gewenste
werkingsstand 2.
s
Koelen
Drogen
Ventileren
Verwarmen
Automatisch (koelen/verwarmen)
Ventilatiestand
Wordt alleen aangegeven als het volgende geldt
Er wordt een afstandsbediening met kabel gebruikt
Die is aangesloten op LOSSNAY
Informatie over de multi system-airconditioner (Buitenunit: MXZ-LIJN)
ss
sBij de Multi-System-airconditioner (buitenunit: MXZ-lijn) kunt u twee of
ss
meer binnenuniten op één buitenunit aansluiten. Afhankelijk van de capaciteit kunt u meer dan twee binnenuniten tegelijk in werking hebben.
• Wanneer u probeert meer dan twee binnenuniten, aangesloten op één
buitenunit, te gelijk te gebruiken, een voor koelen en een andere voor te
verwarmen, wordt de werkstand gekozen van het binnenunit dat als
eerste in werking werd gesteld. De andere binnenapparaten die later
zullen starten kunnen niet werken, hetgeen wordt aangegeven door een
knipperende bedrijfsindicator.
In dit geval dient u alle binnenuniten op dezelfde werkstand in te stellen.
• Als de binnenunit is ingeschakeld in de automatische modus (AUTO),
is het mogelijk dat de bedieningsmodus (COOL ↔ HEAT) niet kan worden gewijzigd. In plaats hiervan wordt de unit dan stand-by gezet.
• Wanneer het binnenunit in werking treedt terwijl het buitenunit bezig is
met ontdooien, duurt het enkele minuten (maximaal 15) voordat het
warme lucht begint uit te blazen.
• In de verwarmingsstand kan de binnenunit warm worden of kan het geluid van stromende koelvloeistof worden gehoord, terwijl de binnenunit
niet functioneert. In deze gevallen is er geen sprake van een storing. De
oorzaak ligt in het feit dat de koelvloeistof voortdurend door de binnenunit stroomt.
Automatisch bedrijf
■ Uitgaande van een ingestelde temperatuur, begint het koelbedrijf als de
ruimtetemperatuur te hoog is en begint het verwarmingsbedrijf als de
ruimtetemperatuur te laag is.
■ Bij automatisch bedrijf schakelt de airconditioner over naar koelbedrijf
als de ruimtetemperatuur verandert en 15 minuten lang minstens 2 °C
boven de ingestelde temperatuur blijft. Op dezelfde wijze schakelt de
airconditioner over naar verwarmingsbedrijf als de ruimtetemperatuur
15 minuten lang minstens 2 °C onder de ingestelde temperatuur blijft.
Koelen
15 minuten (schakelt van
koelen over naar verwarmen)
■ Aangezien de ruimtetemperatuur automatisch wordt geregeld om een
vaste effectieve temperatuur te behouden, wordt het koelbedrijf een paar
graden hoger en het verwarmingsbedrijf een paar graden lager uitgevoerd dan de ingestelde ruimtetemperatuur, zodra die temperatuur is
bereikt (automatisch energiebesparend bedrijf).
15 minuten (schakelt van
verwarmen over naar koelen)
Ingestelde temperatuur
+2°C
Ingestelde temperatuur
Ingestelde temperatuur
-2°C
5.3. Temperatuurinstelling
ss
sOm de kamertemperatuur te verlagen:
ss
Druk op 3 om de gewenste temperatuur in te stellen.
De ingestelde temperatuur wordt weergegeven 3.
ss
sOm de kamertemperatuur te verhogen:
ss
Druk op 3 om de gewenste temperatuur in te stellen.
De ingestelde temperatuur wordt weergegeven 3.
• Het beschikbare temperatuurbereik dat ingesteld kan worden is:
Koelen & Drogen: 19 - 30 °C
Verwarmen: 17 - 28 °C
Automatisch: 19 - 28 °C
• Het display knippert op 8 °C of op 39 °C ten teken dat de kamertempe-
ratuur onder 8 °C of boven 39 °C ligt.
5.4. Instelling ventilatorsnelheid
■ Druk, als de unit is ingeschakeld, zo vaak op de knop voor de ventilatie-
snelheid 5 als nodig is.
• Met elke druk op de knop wijzigt u de kracht. De momenteel geselecteerde snelheid wordt weergegeven bij 5.
• Dit is de wijzigingsvolgorde en de beschikbare instellingen.
Ventilator-
snelheid
3-staps
Vitesse de
ventilateur
2-staps
( )
Display van de afstandsbediening
Laag Medium Hoog
▼
( )
( )
▼
▼
Display van de afstandsbediening
Laag Hoog
▼
▼
• Displayweergaven van de draadloze afstandsbediening worden tussen haakjes weergegeven.
Opmerking:
● Het aantal ventilatorsnelheden is afhankelijk van het type unit dat is aangesloten. Sommige units bevatten geen instelling “Auto”.
● In de volgende gevallen verschilt de daadwerkelijke ventilatorsnelheid van
de snelheid die op het display van de afstandsbediening wordt aangegeven.
1. Als op het display “STAND BY” of “DEFROST” wordt getoond.
2. Als de temperatuur van de warmtewisselaar in de verwarmingsstand laag
is. (bijvoorbeeld onmiddellijk na het starten van het verwarmingsbedrijf)
3. In de modus HEAT, als de omgevingstemperatuur hoger is dan de ingestelde temperatuur.
4. Als de unit in de modus DRY staat.
5.5. Instelling van de richting van de luchtstroom [Voor SLZ]
<De richting van de luchtuitstroom wijzigen naar beneden of naar boven>
■ Druk, als de unit is ingeschakeld, zo vaak op Airflow Up/Down 6 als
nodig is.
• Met elke druk op de knop wijzigt u de richting. De huidige richting
wordt weergegeven bij 6.
• Dit is de wijzigingsvolgorde en de beschikbare instellingen.
Voor de draadloze afstandsbediening
1 → 2 → 3 → 4 → 5
s
Voor de snoer afstandsbediening
1 Horizontale blaasrichting 30°
2 Naar beneden gerichte blaasrichting 45°
3 Naar beneden gerichte blaasrichting 55°
* Tijdens de “swing”-handeling wijzigt de richtingsindicatie op het scherm
niet synchroon met de richting van de ventilatorbladen.
* Op sommige modellen worden richtingsaanduidingen niet ondersteund.
Opmerking:
● De beschikbare richtingen zijn afhankelijk van het type unit dat is aangeslo-
ten. Sommige units bevatten geen instelling “Auto”.
● In de volgende gevallen verschilt de daadwerkelijke luchtrichting van de rich-
ting die op het display van de afstandsbediening wordt aangegeven.
1. Als op het display “STAND BY” of “DEFROST” wordt getoond.
2. Direct na het starten van de modus HEAT (als het systeem wacht tot de
moduswijziging van kracht wordt).
3. In de modus HEAT, als de omgevingstemperatuur hoger is dan de inge-
stelde temperatuur.
4 Naar beneden gerichte
blaasrichting 70°
5 Zwenken
57
Page 58

˚C
SUN
ON
WEEKLY
PAR-21MAA
ON/OFF
FILTER
CHECK
OPERATION
CLEAR
TEST
TEMP.
MENU
BACK DAY
MONITOR/SET
CLOCK
ON/OFF
2
42 3
A9 78
0
4
1
3
B
1
5. Gebruik
˚C
SUN
ON
WEEKLY
6
7
5
<De richting van de luchtuitstroom wijzigen naar links of naar rechts>
■ Druk indien nodig op de knop voor het uitblaasrooster 7.
• De afbeelding met het uitblaasrooster 7 verschijnt.
Met elke druk op de knop wijzigt u de instelling als volgt.
Geen weergave
(Stop)
(ON) (OFF)
Als de swingfunctie actief is, bewegen de pijlen op het display van links
naar rechts.
5.6. Ventilatie
ss
sVoor de LOSSNAY-combinatie
ss
5.6.1. Voor de snoer afstandsbediening
● De ventilator in combinatie met de binnenunit laten werken:
■ Druk op ON/OFF 1.
• De indicatie Vent wordt weergegeven op het scherm (bij 8). De
ventilator werkt nu automatisch als de binnenunit is ingeschakeld.
6. Timer
6.1. Voor de snoer afstandsbediening
Met behulp van Function Selection kunt u aangeven welk van de drie typen timers u wilt gebruiken: 1 Weekly timer (schakelklok), 2 Simple timer
(enkelvoudige timer) of 3 Auto Off timer (automatisch uitschakelen).
6.1.1. Weekly Timer (Schakelklok)
■ Met de schakelklok kunt u maximaal acht handelingen opgeven voor
elke dag van de week.
• Elke handeling kan bestaan uit: aan/uit-tijd in combinatie met een
temperatuur, alleen de aan/uit-tijd of alleen de temperatuur.
• Als de huidige tijd op de ingestelde tijd van deze timer komt, wordt de
op de timer ingestelde handeling op de airconditioner uitgevoerd.
■ De minimale tijd die u kunt instellen op de timer is 1 minuut.
Opmerking:
*1. De schakelklok, enkelvoudige timer en automatisch uitschakelen kunnen
niet tegelijkertijd worden gebruikt.
*2. De schakelklok werkt niet als aan een van de volgende voorwaarden is
voldaan.
De timerfunctie is uitgeschakeld; het systeem bevindt zich in een abnormale staat; er is een testrun gaande; op de afstandsbediening wordt een
zelftest of controle uitgevoerd; de gebruiker schakelt op dit moment een
functie of timer in of stelt de huidige dag van de week of de tijd in; het
systeem wordt centraal bestuurd. (Op het systeem worden met name geen
handelingen uitgevoerd (unit aan, unit uit, temperatuur instellen) die tijdens deze omstandigheden zijn uitgeschakeld.)
Werkingsnummer (No.)
Dag instellen
● De ventilator onafhankelijk laten werken:
■ Druk op Mode 2 totdat op het display wordt weergegeven.
Daardoor start de ventilator.
● De ventilatorkracht wijzigen:
■ Druk, voor zover nodig, op Ventilation 8.
• Met elke druk op de knop schakelt u tussen de verschillende instellingen, zoals hieronder vermeld.
▲
▲
Low
(Laag)
High
(Hoog)
5.6.2. Voor de draadloze afstandsbediening
● Als het binnenapparaat wordt ingeschakeld gaat de ventilator automatisch draaien.
● Geen aanwijzing op de draadloze afstandsbediening.
<Schakelklok instellen>
1. Zorg dat u het standaard bedieningsscherm voor u hebt en dat de
indicator van de schakelklok 1 op het display wordt weergegeven.
2. Druk op Timer Menu B, zodat “Set Up” op het scherm verschijnt (bij 2).
(Met elke druk op de knop schakelt u tussen “Set Up” en “Monitor”.)
3. Druk op Timer On/Off (Set Day) 9 om de dag in te stellen. Met elke druk
op de knop schuift de weergegeven dag bij 3 een dag op, in de onderstaande volgorde: “Sun Mon Tues Wed Thurs Fri Sat” → “Sun” → … →
“Fri” → “Sat” → “Sun Mon Tues Wed Thurs Fri Sat” …
4. Druk zo vaak als nodig op of voor Operation (7 of 8) om het
juiste werkingsnummer te selecteren (1 tot en met 8) 4.
* Door middel van uw keuze bij de stappen 3 en 4 wordt een van de
cellen uit de onderstaande matrix geselecteerd (op het display van de
afstandsbediening links wordt weergegeven wat op het display komt
te staan als u Operation 1 voor Sunday (Werking 1 voor zondag) op
de onderstaande warden instelt).
Instellingsmatrix
Op No.
No. 1
No. 2
No. 8
<Operation 1-instellingen voor zondag>
Start de airconditioner om 8.30 uur, met een
ingestelde temperatuur van 23 °C.
Opmerking:
Als u de dag instelt op “Sun Mon Tues Wed Thurs Fri Sat”, kunt u elke dag
dezelfde handelingen laten uitvoeren op dezelfde tijd.
(Bijvoorbeeld: Operation 2 hierboven, die voor alle dagen van de week gelijk
is.)
Sunday Monday … Saturday
• 8:30
• ON
• 23 °C
• 10:00
• OFF
…
• 10:00
• OFF
• 10:00
• OFF
▲
<Operation 2-instellingen voor elke dag>
Zet de airconditioner uit om 10.00 uur.
• 10:00
• OFF
▲
58
<Schakelklok instellen>
De ingestelde tijd
De geselecteerde handeling (ON of OFF)
* Wordt niet weergegeven als de handeling niet is inge-
steld.
De ingestelde temperatuur
* Wordt niet weergegeven als de tempe-
ratuur niet is ingesteld.
5. Druk zo vaak als nodig op de betreffende Set Time-knop A om de
gewenste tijd in te stellen (bij 5).
* Als u de knop ingedrukt houdt, neemt de tijd eerst toe in minuten,
dan met een interval van tien minuten en tenslotte met een interval van een uur.
6. Druk op ON/OFF 1 om de gewenste handeling te selecteren (ON of
OFF), bij 6.
* Met elke druk op de knop wijzigt de volgende instelling, in de on-
derstaande volgorde: geen weergave (geen instelling) → “ON” →
“OFF”
Page 59

ONHr
AFTER
SIMPLE
PAR-21MAA
ON/OFF
FILTER
CHECK
OPERATION
CLEAR
TEST
TEMP.
MENU
BACK DAY
MONITOR/SET
CLOCK
ON/OFF
2A9
0
4
1
B
ONHr
AFTER
SIMPLE
4
1
3
2
˚C
TIMER
SUN
ON
OFF
WEEKLY
1
9
8
˚C
˚C
TIME SUN
WEEKLY
0
˚C
˚C
TIME SUN
WEEKLY
0
6. Timer
7. Druk zo vaak als nodig op de betreffende Set Temperature-knop 3
om de gewenste temperatuur in te stellen (bij 7).
* Met elke druk op de knop wijzigt u de instelling, in de onderstaande
volgorde: geen weergave (geen instelling) ⇔ 24 ⇔ 25 ⇔ ... ⇔ 29
⇔ 30 ⇔ 12 ⇔ ... ⇔ 23 ⇔ geen weergave.
(Beschikbaar bereik: het instellingsbereik varieert van 12 °C tot
30 °C. Het daadwerkelijke bereik voor de temperatuurregeling is
echter afhankelijk van het type unit dat is aangesloten.)
8. Nadat u bij de stappen 5, 6 en 7 de juiste instellingen hebt ingevoerd,
drukt u op Filter 4 om de waarden te vergrendelen.
Als u de huidige reeks waarden voor de geselecteerde handeling
wilt verwijderen, drukt u eenmaal op Check (Clear) 0 en laat deze
snel weer los.
* De weergegeven tijd verandert in “—:—” en de instellingen On/Off
en temperatuur verdwijnen allemaal.
(Als u alle schakelklokinstellingen in een keer wilt wissen, houdt u
Check (Clear) 0 twee seconden of langer ingedrukt. Het display
begint te knipperen ter aanduiding dat alle instellingen zijn gewist.)
Opmerking:
De nieuwe waarden worden geannuleerd als u op Mode (Return) 2 drukt
voordat u op Filter 4 hebt gedrukt.
Als u twee of meer verschillende handelingen voor precies dezelfde tijd
hebt ingesteld, wordt alleen de handeling met het hoogste Operation No.
uitgevoerd.
9. Herhaal, indien nodig, de stappen 3 tot en met 8, om alle gewenste
cellen te vullen.
10.Druk op Mode (Return) 2 om terug te keren naar het standaard
bedieningsscherm en de instelprocedure te voltooien.
11.Voor het activeren van de timer drukt u op Timer On/Off 9, zodat de
indicatie “Timer Off” van het scherm verdwijnt. Controleer of de in-
dicatie “Timer Off” niet langer wordt weergegeven.
* Als er geen timerinstellingen meer zijn, knippert de indicatie “Timer
Off” op het scherm.
6.1.2. Simple Timer (Enkelvoudige timer)
■ U kunt de enkelvoudige timer op drie manieren instellen.
• Alleen begintijd:
de airconditioner wordt ingeschakeld als de ingestelde tijd is verstreken.
• Alleen eindtijd:
de airconditioner wordt uitgeschakeld als de ingestelde tijd is verstreken.
• Begin- en eindtijden:
de airconditioner wordt in- en uitgeschakeld als de ingestelde tijdstippen zijn verstreken.
■ De enkelvoudige timer (starten en stoppen) kan slechts eenmaal binnen een periode van 72 uur worden ingesteld. De tijd kan worden ingesteld in intervallen van een uur.
Opmerking:
*1. De schakelklok, enkelvoudige timer en automatisch uitschakelen kunnen
niet tegelijkertijd worden gebruikt.
*2. De enkelvoudige timer werkt niet als aan een van de volgende voorwaar-
den is voldaan.
De timerfunctie is uitgeschakeld; het systeem bevindt zich in een abnormale staat; er is een testrun gaande; op de afstandsbediening wordt een
zelftest of diagnose uitgevoerd; de gebruiker stelt op dit moment een functie in; het systeem wordt centraal bestuurd. (Onder deze voorwaarden is de
On/Off-handeling uitgeschakeld.)
<Schakelklokinstellingen weergeven>
1. Controleer dat de schakelklokindicator zichtbaar is op het scherm
2. Druk op Timer Menu B, zodat “Monitor” op het scherm verschijnt (bij
3. Druk zo vaak als nodig op Timer On/Off (Set Day) 9 om de dag weer
4. Druk zo vaak als nodig op of voor Operation (7 of 8) om het
5. Als u de monitor wilt sluiten en terug wilt keren naar het standaard
<De schakelklok uitschakelen>
Druk op Timer On/Off 9, zodat de indicatie “Timer Off” verschijnt bij 0.
<De schakelklok inschakelen >
Druk op Timer On/Off 9, zodat de indicatie “Timer Off” donker wordt (bij
0).
Timerinstellingen
(bij 1).
8).
te geven waarvan u de instellingen wilt bekijken.
juiste werkingsnummer op het display weer te geven (bij 9).
* Met elke druk op de knop wordt geschakeld naar de volgende
timerhandeling, in volgorde van de ingestelde tijd.
bedieningsscherm drukt u op Mode (Return) 2.
<Enkelvoudige timer instellen>
Timer instellen
Handeling (On of Off)
* “— —” wordt weergegeven als er niets
is ingesteld.
1. Zorg dat u het standaard bedieningsscherm voor u hebt en dat de indicator
van de enkelvoudige timer 1 op het display wordt weergegeven.
Als niet de enkelvoudige timer wordt weergegeven, maar iets anders,
stelt u de SIMPLE TIMER in via Function Selection (zie 8.[4]–3 (3))
timerfunctie inschakelen.
2. Druk op Timer Menu B, zodat “Set Up” op het scherm verschijnt (bij 2).
(Met elke druk op de knop schakelt u tussen “Set Up” en “Monitor”.)
3. Druk op ON/OFF 1 om de huidige instelling van de enkelvoudige timer
weer te geven (ON of OFF). Druk eenmaal op de knop om de resterende tijd voor ON weer te geven en druk dan nogmaals op de knop om
de resterende tijd voor OFF weer te geven. (de indicatie ON/OFF ziet u
bij 3).
•“ON”-timer: de airconditioner wordt ingeschakeld als het opgegeven
aantal uren is verstreken.
•“OFF”-timer: de airconditioner wordt uitgeschakeld als het opgege-
ven aantal uren is verstreken.
4. “ON” of “OFF” wordt weergegeven bij 3: Druk zo vaak als nodig op de
betreffende Set Time-knop A om de uren ON in te stellen (als “ON”
wordt weergegeven) of de uren OFF (als “OFF” wordt weergegeven bij
4).
• Beschikbaar bereik: 1 tot 72 uur
5. Als u zowel de ON- als de OFF-tijden wilt instellen, herhaalt u de stappen 3 en 4.
* De ON- en OFF-tijden kunnen echter niet op dezelfde waarde wor-
den ingesteld.
6. Zo wist u de huidige ON- of OFF-instelling: Geef de ON- of OFF-instelling weer (zie stap 3) en druk vervolgens op Check (Clear) 0 zodat de
tijd op “—” komt te staan bij 4. (Wilt u alleen een ON-instelling of alleen
een OFF-instelling gebruiken, controleer dan of de instelling die u niet
wilt gebruiken als “—” wordt weergegeven.)
59
Page 60

TIMER ON
OFFHrAFTER
SIMPLE
1
6
5
˚C
˚C
SIMPLE
7
˚C
˚C
ONHr
AFTER
SIMPLE
7
ONHr
AFTER
SIMPLE
˚C
˚C
OFFHrAFTER
SIMPLE
SIMPLE
˚C
˚C
OFFHrAFTER
SIMPLE
ONHr
AFTER
SIMPLE
˚C
˚C
SIMPLE
AFTER OFF
AUTO OFF
PAR-21MAA
ON/OFF
FILTER
CHECK
OPERATION
CLEAR
TEST
TEMP.
MENU
BACK DAY
MONITOR/SET
CLOCK
ON/OFF
2A9
4
B
AFTER OFF
AUTO OFF
3
1
2
6. Timer
7. Nadat u de stappen 3 tot en met 6 hebt ingevoerd, drukt u op Filter 4
om de waarden te vergrendelen.
Opmerking:
De nieuwe waarden worden geannuleerd als u op Mode (Return) 2 drukt voordat u op Filter
4 hebt gedrukt.
8. Druk op Mode (Return) 2 om terug te keren naar het standaard
bedieningsscherm.
9. Druk op Timer On/Off 9 om het aftellen te starten. Als de timer aftelt, is
de waarde zichtbaar op het display. Controleer of de timerwaarde zicht-
baar en goed wordt weergegeven.
<De huidige instellingen van de enkelvoudige timer weergeven>
Timer instellen
1. Controleer dat de indicator van de enkelvoudige timer zichtbaar is op
het scherm (bij 1).
2. Druk op Timer Menu B, zodat “Monitor” op het scherm verschijnt (bij
5).
• Als de ON- of OFF-enkelvoudige timer wordt uitgevoerd, verschijnt
de huidige timerwaarde bij 6.
• Als zowel de ON- als de OFF-waarden zijn ingesteld, worden de beide
warden om en om weergegeven.
3. Druk op Mode (Return) 2 om de monitorweergave te sluiten en terug te
keren naar het standaard bedieningsscherm.
<De enkelvoudige timer uitschakelen...>
Druk op Timer On/Off 9, zodat de timerinstelling niet meer op het scherm
wordt weergegeven (bij 7).
Voorbeeld 2:
Start de timer, waarbij de OFF-tijd vroeger is dan de ON-tijd
ON-instelling: 5 uur
OFF-instelling: 2 uur
Bij het starten van de timer
Display toont de OFF-instelling van de timer
▲
(resterende uren tot OFF).
2 uur na het starten van de timer
Display toont de ON-instelling van de timer
(resterende uren tot ON).
▲
De weergegeven tijd is ON (5 uur) – OFF (2 uur)
= 3 uur.
5 uur na het starten van de timer
De airconditioner wordt ingeschakeld en blijft
ingeschakeld totdat iemand anders deze uitschakelt.
6.1.3. Auto Off Timer (Automatisch-uitschakelen)
■ Deze timer begint met aftellen als de airconditioner wordt ingeschakeld
en schakelt de airconditioner uit als de ingestelde tijd is verstreken.
■ De beschikbare instellingen variëren van 30 minuten tot 4 uur, met in-
tervallen van 30 minuten.
Opmerking:
*1. De schakelklok, enkelvoudige timer en automatisch uitschakelen kunnen
niet tegelijkertijd worden gebruikt.
*2. De Auto Off-timer werkt niet als aan een van de volgende voorwaarden is
voldaan.
De timerfunctie is uitgeschakeld; het systeem bevindt zich in een abnormale staat; er is een testrun gaande; op de afstandsbediening wordt een
zelftest of diagnose uitgevoerd; de gebruiker stelt op dit moment een functie in; het systeem wordt centraal bestuurd. (Onder deze voorwaarden is de
On/Off-handeling uitgeschakeld.)
<De enkelvoudige timer starten…>
Druk op Timer On/Off 9, zodat de timerinstelling verschijnt bij 7.
Voorbeelden
Als zowel de ON- als de OFF-tijden zijn ingeschakeld voor de enkelvoudige timer, is de werking en weergave als volgt.
Voorbeeld 1:
Start de timer, waarbij de ON-tijd vroeger is dan de OFF-tijd
ON-instelling: 3 uur
OFF-instelling: 7 uur
Bij het starten van de timer
Display toont de ON-instelling van de timer
(resterende uren tot ON).
3 uur na het starten van de timer
Display toont de OFF-instelling van de timer
(resterende uren tot OFF).
De weergegeven tijd is OFF (7 uur) – ON (3 uur)
= 4 uur.
7 uur na het starten van de timer
De airconditioner wordt uitgeschakeld en blijft
uitgeschakeld totdat iemand anders deze opnieuw inschakelt.
60
▲
▲
<Auto Off-timer instellen>
Timer instellen
1. Zorg dat u het standaard bedieningsscherm voor u hebt en dat de indicator
van de Auto Off-timer (bij 1) op het display wordt weergegeven.
Als automatisch uitschakelen niet wordt weergegeven, maar iets anders,
stelt u de AUTO OFF TIMER in via Function Selection (zie 8.[4]–3 (3))
timerfunctie inschakelen.
2. Houd Timer Menu B drie seconden lang ingedrukt, zodat “Set Up” op
het scherm verschijnt (bij 2).
(Met elke druk op de knop schakelt u tussen “Set Up” en “Monitor”.)
3. Druk zo vaak als nodig op de betreffende Set Time-knop A om de OFF-
tijd in te stellen (bij 3).
4. Druk op Filter 4 om de instelling te vast te zetten.
Opmerking:
De nieuwe waarde wordt geannuleerd als u op Mode (Return) 2 drukt voordat
u op Filter
4 hebt gedrukt.
5. Druk op Mode (Return) 2 om de instelprocedure af te sluiten en terug
te keren naar het standaard bedieningsscherm.
6. Als de airconditioner al aan staat, begint de timer direct met aftellen.
Controleer dat de instelling van de timer correct wordt weergegeven op het display.
Page 61

ON/OFF
RESET
TOO
WARM
TOO
COOL
MODE
AUTO COOL
DRY
HEAT
FAN
VANE
SELECT
TIME
h
1
B
A
2
AFTER
TIMER
OFF
AUTO OFF
5
1
4
˚C
˚C
AUTO OFF
6
7
AUTO OFF
7
˚C
˚C
AFTER OFF
AUTO OFF
6
7
SELECT
TIME
SELECT
˚C
˚C
TIME SUN
FUNCTION
PAR-21MAA
ON/OFF
FILTER
CHECK
OPERATION
CLEAR
TEST
TEMP.
MENU
BACK DAY
MONITOR/SET
CLOCK
ON/OFF
4
1
1
˚C
˚C
FUNCTION
1
˚C
˚C
FUNCTION
1
˚C
˚C
1
6. Timer
<De instelling van de Auto Off-timer controleren>
Timer instellen
1. Controleer dat “Auto Off” zichtbaar is op het scherm (bij 1).
2. Houd Timer Menu B drie seconden lang ingedrukt, zodat “Monitor” op
het scherm verschijnt (bij 4).
• De tijd tot uitschakeling ziet u staan bij 5.
3. Als u de monitor wilt sluiten en terug wilt keren naar het standaard
bedieningsscherm drukt u op Mode (Return) 2.
<De Auto-Off timer uitschakelen...>
● Houd Timer On/Off 9 drie seconden lang ingedrukt, zodat “Timer Off”
op het scherm verschijnt (bij 6) en de timerwaarde (bij 7) verdwijnt.
● Of zet de airconditioner zelf uit. De timerwaarde (bij 7) verdwijnt van
het scherm.
<De Auto-Off timer starten...>
● Houd Timer On/Off 9 drie seconden lang ingedrukt. De indicatie “Timer
Off” verdwijnt (bij 6) en de timerinstelling licht (bij 7) op het display op.
● Of zet de airconditioner aan. De timerwaarde wordt weergegeven bij 7.
6.2. Voor de draadloze afstandsbediening
Het kan gemakkelijk zijn om de timer in te stellen voor als u naar bed gaat,
thuis komt, opstaat, enz.
1Selecteer de timer door tijdens bedrijf op de
A Elke keer dat u op deze knop drukt, wordt de timerstand als volgt
gewijzigd:
(TIMER UIT) (TIMER AAN) VRIJGAVE TIMER
2Stel de tijd in met de
-knop.
B Elke keer dat u op deze knop drukt, wordt de ingestelde tijd met 1
uur verhoogd tot maximaal 12 uur.
Uitschakelen van de timer:
• Druk op de
-knop totdat (TIMER UIT) of (TIMER AAN)
niet meer worden getoond.
Opmerking:
TIMER UIT en TIMER AAN kunnen niet tegelijkertijd worden ingesteld.
-knop te drukken.
7. Andere functies
7.1. De knoppen van de afstandsbediening vergren-
delen (functiebeperking van Operation)
■ Als u dat wilt, kunt u de knoppen van de afstandsbediening vergrendelen.
Met behulp van Function Selection of de afstandsbediening kunt u aangeven welk type vergrendeling u wilt gebruiken. (Zie paragraaf 8 onder [4]–2
(1) als u meer wilt weten over het selecteren van het type vergrendeling.)
U hebt met name de keuze uit de onderstaande twee vergrendelingstypen.
1Lock All Buttons:
hiermee vergrendelt u alle knoppen op de afstandsbediening.
2Lock All Except ON/OFF:
hiermee vergrendelt u alle knoppen op de afstandsbediening, behalve
de knoppen On en Off.
Opmerking:
De indicatie “Locked” (Vergrendeld) verschijnt op het scherm om aan te geven
dat de knoppen momenteel zijn vergrendeld.
Vergrendelingsindicator
<De knoppen vergrendelen>
1. Druk, terwijl u de knop Filter 4 ingedrukt houdt, op ON/OFF 1 en houd
deze twee seconden ingedrukt. De indicatie “Locked” (Vergrendeld)
verschijnt op het scherm (bij 1) om aan te geven dat de vergrendeling
actief is.
* Als de vergrendeling is uitgeschakeld in Function Selection verschijnt
op het scherm de melding “Not Available” (Niet beschikbaar) als u op
de hierboven genoemde knoppen drukt.
• Als u op een vergrendelde knop drukt, knippert de indicatie “Locked”
(Vergrendeld) op het display (bij 1).
<De knoppen ontgrendelen>
1. Druk, terwijl u de knop Filter 4 ingedrukt houdt, op ON/OFF 1 en houd
deze twee seconden ingedrukt, zodat de indicatie “Locked” (Vergrendeld) verdwijnt van het scherm (bij 1).
61
Page 62

ON/OFF
TEMP.
˚C
˚C
ON/OFF
TEMP.
˚C
˚C
ON/OFF
˚C
˚C
ERROR CODE
ON/OFF
CALL:XXXX
XXX:XXX
7. Andere functies
ON/OFF
ERROR CODE
7.2. Andere indicaties
7.2.1. Centrally Controlled (Centrale besturing)
● Wordt weergegeven als er een bedieningshandeling wordt uitgevoerd
via het bedieningspaneel CENTRAAL REGELEN.
Hieronder treft u een overzicht aan van de handelingen die niet kunnen
worden uitgevoerd.
• In-/uitschakelen met [AAN/UIT]-knop (inclusief bediening van de timer)
• Werkstandkeuze
• Temperatuur instellen
Opmerking:
Kunnen ook afzonderlijk worden geblokkeerd.
7.2.2. Indicator Knipperende modus
■ Als de aanduiding blijft knipperen
De aanduiding verschijnt als een ander binnenapparaat dat op het buitenapparaat is aangesloten al in werking is, maar in een andere werkstand staat.
Zorg dat de beide binnenapparaten in dezelfde werkstand komen te
staan.
■ Als u de werkstand wijzigt nadat de aanduiding is gaan knipperen
Verschijnt als een werkstand is geblokkeerd voor een bepaald seizoen,
via de centrale bedieningseenheid, etc.
Stel in op een andere werkstand.
7.2.3. Foutcode-aanwijzingen
Als u een telefoonnummer hebt opgegeven dat moet worden gebeld in geval van
problemen, wordt dit nummer op het scherm weergegeven. (U kunt dit nummer
instellen onder Function Selection. Zie paragraaf 8. voor meer informatie.)
ONlampje
(knippert)
Adres koelmiddel
binnenunit
Foutcode
Wisselende weergave
Foutcode
● Het ON-lampje en de foutcode knipperen allebei: dit betekent dat de
airconditioner defect is en de werking is onderbroken (kan niet worden
hervat). Schrijf het aangegeven unitnummer en de foutcode op, schakel
de stroom van de airconditioner uit en bel de leverancier of de
onderhoudstechnicus.
● Alleen de foutcode knippert (terwijl het ON-lampje blijft branden): het
apparaat blijft werken, hoewel er mogelijk een probleem is ontstaan.
Schrijf in dit geval de foutcode op en bel de leverancier of de onderhoudstechnicus voor advies.
* Als u een telefoonnummer hebt opgegeven dat moet worden gebeld
in geval van problemen, drukt u op Check om dit nummer op het
scherm weer te geven. (U kunt dit nummer instellen onder Function
Selection. Zie paragraaf 8. voor meer informatie.)
Nummer binnenunit
Na het drukken op de Check-knop:
8. Functiekeuze
Functiekeuze van de afstandsbediening
De instelling van de volgende functies van de afstandsbediening kan in de functiekeuzestand van de afstandsbediening worden gewijzigd. Wijzig de
instelling indien nodig.
1. De taal wijzigen
(“CHANGE
LANGUAGE”)
2. Functiebegrenzing
(“FUNCTION
SELECTION”)
3. Standkeuze
(“MODE
SELECTION”)
4. Display wijzigen
(“DISP MODE
SETTING”)
62
Item 1
Item 2
Instelling displaytaal
(1) Instelling begrenzing bedrijfsfuncties (bedrijfsblokkering)
(“LOCKING FUNCTION”)
(2) Instelling gebruik van de automatische stand (“SELECT AUTO
MODE”)
(3) Instelling van de temperatuurbegrenzingen (“LIMIT TEMP
FUNCTION”)
(1) Instelling hoofd/sub-afstandsbediening (“CONTROLLER MAIN/
SUB”)
(2) Instelling klok gebruiken (“CLOCK”)
(3) Instelling van de timerfunctie (“WEEKLY TIMER”)
(4) Instelling contactnummer bij storingen (“CALL.”)
(1) Instelling temperatuurweergave °C/°F (“TEMP MODE °C/°F”)
(2) Instelling weergave afzuigluchttemperatuur (“ROOM TEMP DISP
SELECT”)
(3) Instelling weergave automatisch koelen/verwarmen (“AUTO
MODE DISP C/H”)
• Weergave is mogelijk in meerdere talen
• Het instellen van de begrenzing van bedrijfsfuncties (bedrijfsblokkering)
• Instelling van het wel of niet gebruiken van de “automatische” bedrijfs-
stand
• Instellen van het instelbare temperatuurbereik (maximum, minimum)
• Keuze van de hoofd- of subafstandsbediening
* Indien op één groep twee afstandsbedieningen zijn aangesloten, dient
één afstandsbediening als “sub” te worden ingesteld.
• Instelling van het wel of niet gebruiken van de klokfunctie
• Instelling van het type timer
• Weergave van het te bellen nummer bij storingen
• Instelling van het telefoonnummer
• Instelling van de weer te geven temperatuureenheid (°C of °F)
• Instelling van het wel of niet gebruiken van het display van de binnen-
(aanzuig)-luchttemperatuur
• Instelling van het wel of niet gebruiken van het display voor “koelen” of
“verwarmen” tijdens bedrijf in de automatische stand
Item 3 (betekenis van de instelling)
Page 63

OFF
on1
on2
OFF
ON
OFF
ON
OFF
OFF
CALL-
ON
OFF
ON
OFF
°C
°F
PAR-21MAA
ON/OFF
FILTER
CHECK
OPERATION
CLEAR
TEST
TEMP.
MENU
BACK DAY
MONITOR/SET
CLOCK
ON/OFF
F
E
G
C
D
H
B
A
I
G
G
G
G
G
G
E
E
G
G
G
G
G
E
G
E
G
G
G
G
D
D
D
D
D
D
D
D
D
D
D
D
D
D
D
D
D
D
D
D
D
D
D
D
D
D
D
D
D
D
English
Germany
Spanish
Russian
Italy
Chinese
French
Japanese
8. Functiekeuze
[Stroomdiagram functiekeuze]
Insteltaal (Engels)
Item1 Item2
De taal
wijzigen
Functiekeuze
Standkeuze
Normaal display
(display als de airconditioner niet in bedrijf is)
Houd toets E ingedrukt en druk gedurende twee seconden op toets D.
Functiekeuzestand van de afstandsbediening
Item3
Houd toets E ingedrukt en druk gedurende twee seconden op toets D.
E Druk op de bedrijfsstandtoets.
G Druk op de TIMER MENU-toets.
D Druk op de TIMER ON/OFF-toets (TIMER AAN/UIT).
Matrixdisplay
De bedrijfsblokkeringsinstelling wordt niet gebruikt.
(initiële instelwaarde)
De instelling van de bedrijfsblokkering geldt niet bij On/Off (Aan/Uit)toets.
De instelling van de bedrijfsblokkering is All buttons (alle toetsen).
Als de bedrijfsstand wordt geselecteerd wordt de automatische stand
weergegeven. (initiële instelwaarde)
De automatische stand wordt niet weergegeven als de bedrijfsstand
wordt geselecteerd.
De begrenzing van het temperatuurbereik is niet actief. (initiële
instelwaarde)
Het temperatuurbereik kan worden gewijzigd in de koel/droog-stand.
Het temperatuurbereik kan worden gewijzigd in de verwarmingsstand.
Het temperatuurbereik kan worden gewijzigd in de automatische
stand.
De afstandsbediening zal de hoofdbediening zijn. (initiële instelwaarde)
De afstandsbediening zal de sub-bediening zijn.
Display
wijzigen
De klokfunctie kan worden gebruikt. (initiële instelwaarde)
De klokfunctie kan niet worden gebruikt.
De Weekly timer (schakelklok) kan worden gebruikt. (initiële instelwaarde)
De Auto off timer (automatisch-uitschakelen) kan worden gebruikt.
De Simple timer (enkelvoudige timer) kan worden gebruikt.
De timerstand kan niet worden gebruikt.
Bij een fout worden de ingestelde contactnummers niet weergegeven.
(initiële instelwaarde)
Bij een fout worden de ingestelde contactnummers weergegeven.
°C wordt als eenheid van temperatuur gebruikt. (initiële instelwaarde)
°F wordt als eenheid van temperatuur gebruikt.
De ruimtetemperatuur wordt weergegeven. (initiële instelwaarde)
De ruimtetemperatuur wordt niet weergegeven.
Bij automatisch bedrijf wordt “Automatic cooling” (automatisch koelen) of “Automatic heating” (automatisch verwarmen) weergegeven.
(initiële instelwaarde)
In de automatische stand wordt alleen “Automatic” (automatisch)
weergegeven.
63
Page 64

8. Functiekeuze
[Details van de instellingen]
[4]–1. Instelling CHANGE LANGUAGE (taal wijzigen)
De taal in het matrixdisplay kan worden geselecteerd.
• Druk op de [ MENU]-toets G om de taal te wijzigen.
1 Engels (GB), 2 Duits (D), 3 Spaans (E),4 Russisch (RU),
5 Italiaans (I), 6 Chinees (CH), 7 Frans (F), 8 Japans (JP)
Zie de tabel van het matrix-display.
[4]–2. Functiebegrenzing
(1) Instelling begrenzing bedrijfsfuncties (bedrijfsblokkering)
• Om de instelling te wijzigen drukt u op de [ ON/OFF]-knop D.
1 no1: Voor de instelling van de bedrijfsblokkering worden alle
toetsen behalve de [ ON/OFF]-knop gebruikt.
2 no2: De bedrijfsblokkering wordt via alle toetsen ingesteld.
3 OFF (Initiële instelling) : De bedrijfsblokkering wordt niet inge-
steld.
* Om de instelling van de bedrijfsblokkering op het normale scherm
van kracht te laten worden, moeten de [FILTER]- en de [ ON/
OFF]-knoppen gedurende twee seconden tegelijkertijd worden ingedrukt, bij het normale scherm en nadat de bovenstaande instelling is uitgevoerd.
(2) Instelling gebruik van de automatische stand
Indien de afstandsbediening aangesloten is op een unit met automatische bedrijfsstand, kunnen de volgende instellingen worden uitgevoerd.
• Om de instelling te wijzigen drukt u op de [ ON/OFF]-knoppen
D.
1 ON (Initiële instelling) :
Als de bedrijfsstand wordt geselecteerd, wordt de automatische
stand getoond.
2 OFF :
Als de bedrijfsstand wordt geselecteerd, wordt de automatische
stand niet getoond.
(3) Instelling van de temperatuurbegrenzingen
Nadat deze instelling is gemaakt, kan de temperatuur binnen het
ingestelde bereik worden gewijzigd.
• Om de instelling te wijzigen drukt u op de [ ON/OFF]-knoppen
D.
1LIMIT TEMP COOL MODE :
Het temperatuurbereik kan in de koel/droogstand worden gewijzigd.
2LIMIT TEMP HEAT MODE :
Het temperatuurbereik kan in de verwarmingsstand worden gewijzigd.
3LIMIT TEMP AUTO MODE :
Het temperatuurbereik kan in de automatische stand worden
gewijzigd.
4OFF (initiële instelling) :
De begrenzing van het temperatuurbereik is niet geactiveerd.
* Indien de instelling wordt gemaakt (behalve bij OFF (uit)), wordt
tegelijkertijd de temperatuurbegrenzing bij koelen, verwarmen en
automatisch ingesteld. Het bereik kan echter niet worden begrensd
als het ingestelde temperatuurbereik niet is gewijzigd.
• Om de temperatuur hoger of lager te maken, drukt u op [ TEMP.
( ) of ( )] F.
• Om naar de instelling van de bovenste en onderste begrenzing te
schakelen, drukt u op [ ] H. De geselecteerde instelling zal
knipperen waarna het temperatuurbereik kan worden ingesteld.
• Instelbaar bereik
Koel/droogstand :
Ondergrens: 19°C t/m 30°C Bovengrens: 30°C t/m 19°C
Verwarmingsstand :
Ondergrens: 17°C t/m 28°C Bovengrens: 28°C t/m 17°C
Automatische stand :
Ondergrens: 19°C t/m 28°C Bovengrens: 28°C t/m 19°C
[4]–3. Standkeuze-instelling
(1) Instelling hoofd/sub-afstandsbediening
• Om de instelling te wijzigen drukt u op de [ ON/OFF]-knop D.
1Main : De afstandsbediening is de hoofd-afstandsbediening.
2Sub : De afstandsbediening is de sub-afstandsbediening.
(2) Instelling klok gebruiken
• Om de instelling te wijzigen drukt u op de [ ON/OFF]-knop D.
1ON : De klokfunctie kan worden gebruikt.
2OFF : De klokfunctie kan niet worden gebruikt.
(3) Instelling van de timerfunctie
• Om de instelling te wijzigen drukt u op de [ ON/OFF]-knop D
(Kies één van de volgende.)
1WEEKLY TIMER (Initiële instelling) :
De weektimer kan worden gebruikt.
2AUTO OFF TIMER : De auto-uit-timer kan worden gebruikt.
3SIMPLE TIMER : De eenvoudige timer kan worden ge-
bruikt.
4TIMER MODE OFF : De timer kan niet worden gebruikt.
* Indien de instelling voor het gebruik van de klok OFF (uit) is, kan
de “WEEKLY TIMER” niet worden gebruikt.
(4) Instelling contactnummer bij storingen
• Om de instelling te wijzigen drukt u op de [ ON/OFF]-knop D.
1CALL OFF : De ingestelde te bellen nummers worden
bij een storing niet getoond.
2CALL **** *** **** : De ingestelde te bellen nummers worden
bij een storing getoond.
CALL_ : Het te bellen nummer kan worden ingesteld
als het display verschijnt dat links wordt getoond.
• Het instellen van de te bellen nummers
Om de te bellen nummers in te stellen dient u de onderstaande
procedures te volgen.
Verplaats de knipperende cursor naar de in te stellen nummers.
Druk op [ TEMP. ( ) en ( )]-knoppen F om de cursor naar
rechts of links te verplaatsen. Druk op [ CLOCK ( ) en ( )]knoppen C om de nummers in te stellen.
[4]–4. Displayweergave-instelling
(1) Instelling temperatuurweergave °C/°F
• Om de instelling te wijzigen drukt u op de [ ON/OFF]-knop D.
1 °C : Voor de temperatuur wordt de eenheid °C gebruikt.
2 °F : Voor de temperatuur wordt de eenheid °F gebruikt.
(2) Instelling weergave afzuigluchttemperatuur
• Om de instelling te wijzigen drukt u op de [ ON/OFF]-knop D.
1 ON : De afzuigluchttemperatuur wordt weergegeven.
2 OFF : De afzuigluchttemperatuur wordt niet weergegeven.
(3) Instelling weergave automatisch koelen/verwarmen
• Om de instelling te wijzigen drukt u op de [ ON/OFF]-knop D.
1 ON : Bij automatisch bedrijf wordt “automatisch koelen” of “au-
tomatisch verwarmen” weergegeven.
2 OFF : Bij automatisch bedrijf wordt alleen “automatisch” ge-
toond.
64
Page 65

8. Functiekeuze
[Matrix-display-tabel]
Insteltaal
Wacht op het opstarten
Bedrijfsstand Koelen
Drogen
Verwarmen
Automatisch
Automatisch
(Koelen)
Automatisch
(Verwarmen)
Ventileren
Ventilatie
Stand-by
(Warmte-instelling)
Ontdooien
Ingestelde temperatuur
Ventilatorsnelheid
Toets niet in gebruik
Controle (fout)
Proefdraaien
Zelf-controle
Functiekeuze van het apparaat
Ventilatie instellen
English Germany Spanish Russian Italy Chinese French Japanese
De taal wijzigen
Insteltaal
Functiekeuze
Instelling begrenzing bedrijfsfunctie
Instelling gebruik van automatische
stand
Instelling begrenzing temperatuurbereik
Stand begrenzing temperatuurkoeling/dag
Begrenzing temperatuur
verwarmingsstand
Begrenzing temperatuur autostand
Standkeuze
Instelling afstandsbediening als
hoofd-afstandsbediening
Instelling afstandsbediening als
sub-afstandsbediening
Gebruik van de klokinstelling
Instelling van de dag van de week
en van de tijd
Timerinstelling
Weergave timer
Schakelklok
Timerstand uit
Timer Automatisch uitschakelen
Enkelvoudige timer
Contactnummerinstelling van de
foutsituatie
Display wijzigen
Temperatuurweergave-instelling °C/
°F
Instelling weergave ruimtetemperatuur
Instelling weergave automatisch
koelen/verwarmen
English Germany Spanish Russian Italy Chinese French Japanese
65
Page 66

ON/OFF
TEMP.
˚C
˚C
FILTER
B
A
D
C
A B C D E
A
B
9. Noodbedrijf voor draadloze afstandsbediening
Wanneer de afstandsbediening niet kan worden gebruikt
Als de batterijen van de afstandsbediening leeg zouden raken, of als de
afstandsbediening niet goed zou functioneren, kunt u via de noodknoppen
op het rooster overgaan op noodbedrijf.
Noodbedrijf starten
• Druk op de -knop D om naar de koelstand te gaan.
• Druk op de -knop C om naar de verwarmingsstand te gaan.
Opmerking:
• De details voor noodbedrijf worden onderstaand getoond.
De details voor NOODBEDRIJF worden onderstaand getoond.
Bedrijfsstand KOELEN VERWARMEN
Ingestelde temperatuur
Ventilatorsnelheid Hoog Hoog
Blaasrichting Horizontaal Naar beneden 4
Bedrijf stoppen
SLP-2AL (Voor SLZ-KA25/KA35/KA50VAL)
• Om het bedrijf te stoppen drukt u op de -knop D of de -knop C.
10. Onderhoud en schoonmaken
A DEFROST/STAND BY-lamp
B Bedrijfslamp
C Noodbedrijfschakelaar (verwarmen)
D Noodbedrijfschakelaar (koelen)
E Ontvanger
24°C24°C
■ Hiermee wordt aangegeven dat het filter moet worden schoongemaakt.
Reinig het filter.
■ De aanduiding “FILTER” uitschakelen
Druk, nadat u het filter heeft schoongemaakt, de [FILTER]-knop tweemaal achter elkaar in. De aanduiding verdwijnt.
Opmerking:
● Als er twee of meer verschillende soorten binnenapparaten worden bediend,
verschilt dit schoonmaakinterval, afhankelijk van het soort filter. Op het tijdstip dat het filter van het hoofdapparaat moet worden schoongemaakt, verschijnt de aanduiding “FILTER”. Als de aanduiding weer verdwijnt, begint
de telling opnieuw.
● “FILTER” geeft het schoonmaakinterval aan dat wordt gehanteerd als het
binnenapparaat onder normale omstandigheden wordt gebruikt. Er wordt
alleen rekening gehouden met de verstreken gebruiksduur. Als het filter wordt
gebruikt in situaties waar de lucht vervuild is, dient u het filter vaker schoon
te maken.
● Het schoonmaakinterval voor het filter verschilt van model tot model.
● Deze aanwijzing is voor de draadloze afstandsbediening niet beschikbaar.
ss
sReinigen van de filters
ss
• Maak de filters schoon met behulp van een stofzuiger. Als u niet de
beschikking heeft over een stofzuiger, klop de filters dan lichtjes tegen
een hard voorwerp zodat al het stof en vuil eruit valt.
• Als de filters heel erg vuil zijn, was deze dan in lauw water. Als u wasmiddel gebruikt, zorg dan dat dit hierna grondig wordt weggespoeld en
laat de filters goed drogen voordat u deze weer plaatst.
Voorzichtig:
• Droog de filters nooit in direct zonlicht of met behulp van een warmtebron zoals een straalkacheltje of een haardroger; hierdoor kunnen de filters kromtrekken.
• Was de filters nooit in heet water (meer dan 50°C); hierdoor kunnen de filters kromtrekken.
• Let erop dat de filters altijd zijn geïnstalleerd als u het apparaat
gebruikt. Gebruik van het apparaat zonder de filters kan leiden tot
beschadiging ervan.
Voorzichtig:
• Voordat u begint met schoonmaken, moet u het apparaat stoppen
• Binnenapparaten zijn uitgerust met filters om stof uit ingezogen
en de stroomvoorziening UITzetten.
lucht te verwijderen. Reinig de filters volgens de hieronder aangegeven methodes.
66
ss
sHet filter verwijderen
ss
Voorzichtig:
• U dient bij het verwijderen van het filter voorzorgsmaatregelen te
treffen om uw ogen te beschermen tegen stof. Ook moet u op een
krukje gaan staan om het karwei uit te voeren. Zorg ervoor dat u
niet valt.
• Als het filter is verwijderd, dient u de metalen delen van het apparaat voor binnengebruik niet aan te raken, om letsel te voorkomen.
■ SLZ-KA·VA(L)
1 Trek de knop op de gril van de inlaatrooster in de richting die wordt
aangegeven door de pijl om de gril te kunnen openen.
2 Open het inlaatrooster.
3 Zet de knop aan de middelste rand van de inlaatrooster los en trek
het filter naar voren om dit te verwijderen.
A Knop B Rooster C Inlaatrooster D Filter
■ SEZ-KA·VA
• Tijdens de proefwerking van de airconditioner, moet u uw leveran-
cier raadplegen over de installatieplaats en -methode van het luchtfilter. (Voorbeeld) Het luchtfilter moet aan de luchtinlaatzijde (aan
de achterzijde of onderzijde) van de binnenunit worden bevestigd.
A Luchtinlaat B Filter
Page 67

WEEKLY
SIMPLE
AUTO OFF
11. Problemen en oplossingen
Heeft u een probleem?
De airconditioner verwarmt of koelt niet goed.
Als het verwarmingsbedrijf start wordt de warme lucht niet snel uit het binnenapparaat geblazen.
Tijdens de verwarmingsstand stopt de airconditioner voordat de ingestelde
ruimtetemperatuur is bereikt.
Tijdens bedrijf verandert de richting van de luchtstroom of kan de richting
van de luchtstroom niet worden ingesteld.
Als de luchtstroomrichting wordt veranderd, gaan de kleppen altijd voorbij
de instelpositie omhoog en omlaag voordat ze uiteindelijk bij de eindpositie
stoppen.
Er klinkt een geluid van stromend water of zo nu en dan een sissend geluid.
Er klinkt een krakend of knarsend geluid.
De ruimte heeft een onaangename geur.
Uit het binnenapparaat wordt een witte mist of damp uitgestoten.
Er komt water of damp uit het buitenapparaat.
Het bedrijfssymbool verschijnt niet in het display van de afstandsbediening.
“ ” verschijnt in het display van de afstandsbediening.
Als u de airconditioner kort nadat deze is gestopt opnieuw start, zal deze
niet functioneren, ook al hebt u de hoofdschakelaar ingedrukt.
De airconditioner werkt zonder dat de hoofdschakelaar is ingedrukt.
De airconditioner stopt zonder dat de hoofdschakelaar is ingedrukt.
Het timerbedrijf van de afstandsbediening kan niet worden ingesteld.
“PLEASE WAIT” (wachten a.u.b.) verschijnt in het display van de afstandsbediening.
Er verschijnt een foutcode in het display van de afstandsbediening.
Er klinkt een geluid van water dat wordt afgetapt of het draaien van een
motor.
Hier is de oplossing. (Het apparaat functioneert normaal.)
■ Reinig het filter. (De luchtstroom wordt verminderd als het filter vuil of
verstopt is.)
■ Controleer de temperatuurafstelling en stel de temperatuur in.
■ Let erop dat er rond het buitenapparaat voldoende ruimte is. Is de luchtin-
of –uitlaat van het binnenapparaat geblokkeerd?
■ Staat er een deur of raam open?
■ Er wordt pas warme lucht geblazen als het binnenapparaat voldoende is
opgewarmd.
■ Bij een lage buitentemperatuur en een hoge luchtvochtigheid kan er op
het buitenapparaat ijsafzetting ontstaan. Als dit het geval is, voert het
buitenapparaat het ontdooiingsbedrijf uit. Na ongeveer 10 minuten dient
normaal bedrijf te beginnen.
■ Tijdens de koelstand bewegen de kleppen zich automatisch na 1 uur
naar de horizontale stand (naar beneden), als de richting van de luchtstroom is ingesteld naar beneden (horizontaal). Dit is om te voorkomen
dat er water langs de kleppen naar beneden kan druppelen.
■ Bij lage luchtstroomtemperatuur of tijdens het ontdooien gaan in de
verwarmingsstand de kleppen automatisch naar de horizontale
luchtstroomstand.
■ Als de luchtstroomrichting wordt veranderd, gaan de kleppen na het
detecteren van de basispositie naar de ingestelde positie.
■ Deze geluiden kunnen worden gehoord als er koelstof in de airconditioner
stroomt, of als de stroom van de koelstof verandert.
■ Deze geluiden kunnen worden gehoord als er ten gevolge van
temperatuursveranderingen delen uitzetten of inkrimpen en daardoor
langs elkaar gaan wrijven.
■ Het binnenapparaat zuigt lucht aan die gassen afkomstig uit wanden,
tapijt en meubilair bevat en tevens geuren uit kleding, en blaast deze
dampen in de ruimte terug.
■ Indien de binnentemperatuur en de luchtvochtigheid hoog zijn, kan deze
omstandigheid zich bij het begin van het bedrijf voordoen.
■ Tijdens het ontdooien kan een koele luchtstroom naar beneden worden
geblazen die eruitziet als mist.
■ Tijdens het koelen kan er water worden gevormd en van de koelpijpen
en –verbindingen druppelen.
■ Tijdens het verwarmen kan er op de warmtewisselaar water ontstaan en
naar beneden druppelen.
■ Tijdens het ontdooien kan het water op de warmtewisselaar verdampen,
waardoor er waterdamp wordt uitgestoten.
■ Zet de hoofdschakelaar aan. In het scherm van de afstandsbediening
verschijnt nu “ ”.
■ Tijdens centrale besturing verschijnt “ ” in het display van de afstands-
bediening en kan de airconditioner met de afstandsbediening worden
gestart of gestopt.
■ Wacht ongeveer drie minuten.
(Het bedrijf is gestopt om de airconditioner te beschermen.)
■ Is de aan-timer ingesteld?
Druk op de hoofdschakelaar om het bedrijf te stoppen.
■ Is de airconditioner aan een centrale afstandsbediening gekoppeld?
Raadpleeg de personen die de airconditioner bedienen.
■ Verschijnt “ ” in het display van de afstandsbediening?
Raadpleeg de personen die de airconditioner bedienen.
■ Is de automatische herstelvoorziening bij spanningsonderbrekingen ingesteld?
Druk op de hoofdschakelaar om het bedrijf te stoppen.
■ Is de uit-timer ingesteld?
Druk op de hoofdschakelaar om het bedrijf opnieuw te starten.
■ Is de airconditioner aan een centrale afstandsbediening gekoppeld?
Raadpleeg de personen die de airconditioner bedienen.
■ Verschijnt “ ” in het display van de afstandsbediening?
Raadpleeg de personen die de airconditioner bedienen.
■ Zijn de timerinstellingen ongeldig?
Als de timer kan worden ingesteld, verschijnt
in het display van de afstandsbediening.
■ De initiële instellingen worden uitgevoerd. Wacht ongeveer 3 minuten.
■ De beveiligingen zijn aangesproken om de airconditioner te beveiligen.
■ Probeer deze apparatuur niet zelf te repareren.
Zet onmiddellijk de hoofdschakelaar uit en raadpleeg uw leverancier.
Stel de leverancier op de hoogte van de modelnaam en de informatie die
in het display van de afstandsbediening verscheen.
■ Als het koelbedrijf stopt, treedt de aftappomp in werking, die vervolgens
weer stopt. Wacht ongeveer 3 minuten.
,
, of
67
Page 68

11. Problemen en oplossingen
Heeft u een probleem? Hier is de oplossing. (Het apparaat functioneert normaal.)
Het geluid is harder dan vermeld in de specificaties.
■ Het bedrijfsgeluid in de ruimte wordt door de akoestiek van de desbetreffende ruimte beïnvloed, zoals getoond in de volgende tabel, en zal hoger zijn dan de geluidsspecificaties, die werden bepaald door meting in
een echovrije ruimte.
Voorbeelden
van locaties
Geluidsniveau’s
Sterk geluidsabsorberende ruimten
Zendstudio,
muziekruimten,
enz.
Normale ruimten
Ontvangstruimte,
hotellobby, enz..
3 t/m 7 dB
6 t/m 10 dB
Gering geluidsabsorberende ruimten
Kantoor,
hotelkamer
9 t/m 13 dB
Er verschijnt niets in het display van de draadloze afstandsbediening, het
display is zwak, of de signalen worden alleen door het binnenapparaat ontvangen als de afstandsbediening dichtbij wordt gehouden.
Op het binnenapparaat knippert het bedrijfslampje bij de ontvanger voor de
draadloze afstandsbediening.
12. Installeren, verplaatsen en controleren
Installatieplaats
Vermijd installatie van de airconditioner op de volgende plaatsen:
• Waar ontvlambaar gas kan lekken.
Voorzichtig:
Installeer de airconditioner niet op plaatsen waar mogelijk ontvlambaar
gas lekt.
Gelekt gas rond de airconditioner veroorzaakt mogelijk een ontploffing.
• In de buurt van machineolie.
• In zoute gebieden, bijvoorbeeld aan de kust.
• In de buurt van sulfidegas, bijvoorbeeld bij hete bronnen.
• Bij oliespatten of olieachtige rook.
Waarschuwing:
Indien de airconditioner draait maar de ruimte niet koelt of verwarmt
(afhankelijk van het model), neem dan contact op met uw dealer aangezien er mogelijk koelstof lekt. Vraag de monteur of er koelstoflekkage
is wanneer er reparaties worden uitgevoerd.
De in de airconditioner gebruikte koelstof is veilig. Normaal gesproken
treedt er geen koelstoflekkage op. Indien er binnen echter koelgas lekt
en dit in aanraking komt met de warmtebron van een ventilatorkachel,
straalkachel, fornuis, etc., zullen schadelijke stoffen worden gevormd.
■ De batterijen zijn bijna leeg.
Breng nieuwe batterijen aan en druk op reset.
■ Indien er ook nadat nieuwe batterijen zijn geplaatst niets verschijnt, controleer dan of de batterijen in de juiste richting zijn aangebracht (+, –).
■ De zelfdiagnose-functie is uitgevoerd om de airconditioner te beveiligen.
■ Probeer deze apparatuur niet zelf te repareren.
Zet onmiddellijk de hoofdschakelaar uit en raadpleeg uw leverancier.
Geef de modelnaam aan de leverancier door.
Invertertype
Vermijd invloed van
neonlampen en houd
derhalve uit de buurt
van neonlampen
neonlamp
Radio
Om vervorming van
het beeld of ruis te
voorkomen, dient u
minimaal 1 meter afstand aan te houden.
TV
100 mm of
meer
Goed geventileerde droge
plaats
400 mm of
meer
Muur, etc.
Elektrische voorzieningen
• Zorg voor een apart, gescheiden spanningscircuit voor de airconditioner.
• Neem de capaciteit van het circuit in acht.
Waarschuwing:
• De klant dient de airconditioner niet zelf te installeren. Indien de installatie niet juist wordt uitgevoerd, bestaat er kans op brand, een
elektrische schok, letsel als het apparaat zou vallen, waterschade, enz.
• Gebruik geen afgetakt stopcontact of een verlengsnoer en sluit nooit teveel apparaten op hetzelfde stopcontact aan.
Slechte contacten, slechte isolatie, overschrijding van het toelaatbare vermogen, enz. kunnen brand of een elektrische schok tot gevolg
hebben.
Raadpleeg uw dealer.
Voorzichtig:
• Sluit het apparaat aan op aarde.
Gebruik voor de aarding geen gas- of waterleidingen, bliksemafleiding of telefoonaarding.
Slecht uitgevoerde aarding kan een elektrische schok tot gevolg hebben.
• Installeer, afhankelijk van de installatieplaats, een aardelekschakelaar (bijvoorbeeld bij installatie op een vochtige plaats).
Indien er in dit geval geen aardelekschakelaar is geplaatst, kan dit een elektrische schok veroorzaken.
Inspecteren en onderhoud
• Als u de airconditioner gedurende enkele seizoenen heeft gebruikt, is het mogelijk dat de capaciteit vermindert wegens stof of vuil binnenin de
airconditioner.
• Afhankelijk van de omstandigheden wordt er mogelijk een geur opgewekt of kunnen vuil, stof, enz. een goede afvoer tegenhouden.
• Behalve het normale onderhoud bevelen wij u aan dat u de airconditioner door een specialist laat inspecteren en onderhouden (tegen betaling).
Raadpleeg uw dealer.
68
Page 69

12. Installeren, verplaatsen en controleren
Let op geluidsoverlast
• Plaats geen voorwerpen rond de luchtuitlaat van de buitenunit. Dit kan de capaciteit verlagen of het geluid doen toenemen.
• Raadpleeg uw dealer indien de airconditioner tijdens gebruik abnormaal veel lawaai maakt.
Verplaatsen
• Wanneer de airconditioner vanwege renovatie, verhuizing of dergelijke moet worden verplaatst, moet u dit door een erkend installateur laten uitvoeren
omdat er namelijk speciale kennis en werkzaamheden voor zijn vereist.
Waarschuwing:
Reparatie of het verplaatsen dient niet door de klant zelf te worden uitgevoerd.
Als dit verkeerd wordt uitgevoerd, kunnen brand, een elektrische schok, letsel door een vallend apparaat, waterschade, enz. het gevolg zijn.
Raadpleeg uw dealer.
Weggooien
• Raadpleeg uw handelaar wanneer u dit toestel wilt weggooien.
Raadpleeg uw handelaar indien u verdere vragen heeft.
13. Specificaties
Functie
Stroomtoevoer
Capaciteit
Invoer kW
Binnenapparaat
Luchtstrom (Laag-Medium-Hoog) CMM
Geluidsniveau (Laag-Medium-Hoog) dB
Gewicht kg
Buitenapparaat
Geluidsniveau dB
Koelstof R410A kg
Gewicht kg
Functie
Stroomtoevoer
Capaciteit
Invoer kW
Binnenapparaat
Luchtstrom (Laag-Hoog) CMM
Externe statische
druk
Geluidsniveau (Laag-Hoog) dB (A)
Gewicht kg
Binnenapparaat
Geluidsniveau dB (A)
Koelstof R410A kg
Gewicht kg
Model
kW
BTU/h
Model
kW
BTU/h
Pa (mmAq)
SLZ-KA25VA (L)
Koelen Verwarmen
2,5 3,0
8.500 10.200
0,69 0,83
SLZ-KA25VA (L)
8-9-10
28-31-37
16,5 + Rooster 3
SUZ-KA25VA
46
0,90
33
SEZ-KA35VA
Koelen Verwarmen
3,5 4,0
11.900 13.600
1,06 1,10
SEZ-KA35VA
10-13
Std. : 30 (3)
Max. : 50 (5)
30-35
33,5
SUZ-KA35VA
48
1,05
35
SLZ-KA35VA (L)
Koelen Verwarmen
~/N, 230V, 50Hz
3,5 4,0
11.900 13.600
1,06 1,10
SLZ-KA35VA (L)
29-33-38
16,5 + Rooster 3
SUZ-KA35VA
SEZ-KA50VA
Koelen Verwarmen
~/N, 230V, 50Hz
5,0 5,9
17.100 20.100
1,78 1,84
SEZ-KA50VA
12-17
Std. : 30 (3)
Max. : 50 (5)
31-39
33,5
SUZ-KA50VA
55
1,6
53
8-9-11
48
1,05
35
SEZ-KA60VA
Koelen Verwarmen
5,5 6,9
18.800 23.500
1,96 2,45
SEZ-KA60VA
12-20
Std. : 30 (3)
Max. : 50 (5)
32-43
33,5
SUZ-KA60VA
55
1,8
53
SLZ-KA50VA (L)
Koelen Verwarmen
4,6 5,0
15.700 17.100
1,63 1,55
SLZ-KA50VA (L)
8-9-11
30-34-39
16,5 + Rooster 3
SUZ-KA50VA
55
1,6
53
SEZ-KA71VA
Koelen Verwarmen
7,1 8,1
24.200 27.600
2,46 2,36
SEZ-KA71VA
12-20
Std. : 30 (3)
Max. : 50 (5)
32-43
35
SUZ-KA71VA
55
2,0
58
Opmerkingen: 1. Bedrijfsvoorwaarden (koelen) : Binnen : 27°C DB, 19°C WB Buiten : 35°C DB
Gegarandeerd gebruiksbereid
Koelen
Verwarmen
De apparaten moeten worden geïnstalleerd door een erkend elektricien, in overeenstemming met de plaatselijke eisen.
2. Bedrijfsvoorwaarden (verwarmen) : Binnen : 20°C DB Buiten : 7°C DB, 6°C WB
3. Specificaties kunnen zonder voorafgaand bericht gewijzigd worden.
Binnen
Hoogste limiet 32°C DB, 23°C WB 46°C DB, – 43°C DB, –
Laagste limiet 21°C DB, 15°C WB -10°C DB, –
Hoogste limiet 27°C DB, – 24°C DB, 18°C WB
Laagste limiet 20°C DB, – -10°C DB, -11°C WB
KA25, KA35
Buiten
KA50, KA60, KA71
69
Page 70

Contenido
1. Medidas de Seguridad ........................................................ 70
2. Nombres de las piezas ....................................................... 70
3. Configuración de la pantalla ............................................... 73
4. Configuración de día de la semana y hora ......................... 73
5. Manejo ................................................................................ 73
6. Temporizador ...................................................................... 75
7. Otras funciones ................................................................... 78
Nota
(marca WEEE)
Este símbolo sólo es aplicable para la UE.
Este símbolo es de conformidad con la Directiva 2002/96/CE, Artículo 10: Información para los usuarios, y el Anexo IV.
Su producto MITSUBISHI ELECTRIC está diseñado y fabricado con materiales y componentes de alta calidad que pueden ser
reciclados y reutilizados.
Este símbolo significa que el aparato eléctrico y electrónico, al final de su ciclo de vida, se debe tirar separadamente del resto de sus
residuos domésticos.
Por favor, deposite este aparato en el centro de recogida/reciclado de residuos de su comunidad local cuando quiera tirarlo.
En la Unión Europea existen sistemas de recogida específicos para productos eléctricos y electrónicos usados.
i Ayúdenos a conservar el medio ambiente!
1. Medidas de Seguridad
s Antes de instalar la unidad, asegúrese de haber leído el
capítulo de “Medidas de seguridad”.
s Las “Medidas de seguridad” señalan aspectos muy im-
portantes sobre seguridad. Es importante que se cumplan todos.
s Antes de conectar el sistema, informe al servicio de su-
ministro o pídale permiso para efectuar la conexión.
8. Selección de función ........................................................... 79
9. Funcionamiento de emergencia del controlador
remoto inalámbrico ............................................................. 83
10. Mantenimiento y limpieza ................................................. 83
11. Localización de fallos ........................................................ 84
12. Instalación, reubicación e inspección ............................... 85
13. Especificaciones ............................................................... 86
Símbolos utilizados en el texto
Atención:
Describe precauciones que deben tenerse en cuenta para evitar el
riesgo de lesiones o muerte del usuario.
Cuidado:
Describe las precauciones que se deben tener para evitar daños en
la unidad.
Símbolos utilizados en las ilustraciones
: Indica una pieza que debe estar conectada a tierra.
Atención:
• La unidad no debe ser instalada por el usuario. Pida a su distribuidor o a una empresa debidamente autorizada que se lo instale. La
incorrecta instalación de la unidad puede dar lugar a goteo de agua,
descarga eléctrica o fuego.
• No se suba encima ni coloque objetos sobre la unidad.
• No vierta agua sobre la unidad ni la toque con las manos húmedas.
Puede producirse una descarga eléctrica.
• No rocíe gases combustibles en las proximidades de la unidad.
Puede haber riesgo de incendio.
• No coloque calentadores de gas o cualquier otro aparato de llama
abierta expuestos a la corriente de aire descargada por la unidad.
Puede dar lugar a una combustión incompleta.
• No extraiga el panel frontal del ventilador de la unidad exterior mientras esté en funcionamiento.
Cuidado:
• No utilice objetos puntiagudos para apretar los botones ya que
podría dañarse el controlador remoto.
• No bloquee ni cubra nunca las tomas y salidas de las unidades
interior y exterior.
2. Nombres de las piezas
■ Unidad interior
SLZ-KA·VA
Pasos del ventilador 3 pasos 2 pasos
Deflector Automático oscilante –
Rejilla – –
F
iltro
Indicación de limpieza de filtro
■ SLZ-KA·VA/SLZ-KA·VAL
Modelo empotrado en techo de 4 direcciones
SLZ-KA·VAL
Larga duración Normal
2.500 horas –
SEZ-KA·VA
• Cuando note ruidos o vibraciones que no sean normales, pare la
unidad, desconecte la fuente de alimentación y póngase en contacto con su proveedor.
• No inserte nunca dedos, palos, etc. en las tomas o salidas de aire.
• Si detecta olores raros pare la unidad, desconecte el interruptor de
red y consulte con su distribuidor. De lo contrario puede haber
una rotura, una descarga eléctrica o fuego.
• Este aparato de aire acondicionado NO debe ser utilizado por niños ni por personas inválidas sin el control de una persona adulta.
• Los niños pequeños deben estar vigilados por personas adultas
para impedir que jueguen con el equipo de aire acondicionado.
• Si se producen fugas de gas refrigerante, pare la unidad, ventile
bien la habitación y avise a su proveedor.
Eliminación de la unidad
Cuando deba eliminar la unidad, consulte con su distribuidor.
■ SEZ-KA·VA
Modelo empotrado en techo
Entrada
de aire
70
Salida de aire
F
iltro
Deflector
Salida de
aire
Entrada de aire
F
iltro
(parte inferior o trasera)
Page 71

PAR-21MAA
ON/OFF
FILTER
CHECK
OPERATION
CLEAR
TEST
TEMP.
MENU
BACK DAY
MONITOR/SET
CLOCK
ON/OFF
2. Nombres de las piezas
■ Para controlador remoto cableado
Sección de pantalla
Para esta explicación, se muestran iluminadas todas las partes
de la pantalla. Durante el funcionamiento real, sólo estarán iluminados los elementos relevantes.
Identifica el funcionamiento
actual.
Muestra el modo de funcionamiento, etc.
* Admite visualización en múlti-
ples idiomas.
Indicador “Centrally
Controlled”
Indica que el mando principal ha
desactivado el funcionamiento del
mando a distancia.
Indicador “Timer Is Off”
Indica que el temporizador está
desactivado.
Configuración de temperatura
Muestra la temperatura objetivo.
Día de la semana
Muestra el día de la semana actual.
Pantalla Time/Timer
Muestra la hora actual, a menos que se haya configurado el temporizador simple o de apagado automático, en cuyo caso, muestra el tiempo restante.
TIME SUN MON TUE WED THU FRI SAT
TIMER
AFTER
ERROR CODE
˚F˚C
Hr
AFTER
˚F˚C
ONLY1Hr.
Indicador de dirección de aire
Arriba/Abajo
El indicador muestra la dirección
de circulación del aire de salida.
Indicador “One Hour Only”
Se muestra si la circulación del aire se
ha fijado en débil y hacia abajo durante
el modo COOL o DRY. (El funcionamiento varía según el modelo).
El indicador se apaga después de una
hora, momento en que cambia también la dirección de circulación del aire.
Pantalla de temperatura ambiente
Muestra la temperatura ambiente. El
rango de temperatura ambiente que
muestra la pantalla va de 8 a 39 °C.
La pantalla parpadea si la temperatura no llega a 8 °C o supera los 39 °C.
Pantalla de rejilla
Indica la acción de la rejilla basculante. No aparece si la rejilla se
encuentra fija.
(Indicador Power On)
Indica que está encendido.
ON
OFF
FUNCTION
FILTER
WEEKLY
SIMPLE
AUTO OFF
Indicador “Sensor”
Aparece cuando se utiliza el sensor
del mando a distancia.
Indicador “Locked”
Indica que se han bloqueado los botones del mando a distancia.
Indicador “Clean The Filter”
Se enciende cuando debe limpiarse el
filtro.
Indicadores del temporizador
El indicador se enciende si se ha configurado el temporizador correspondiente.
Indicador de velocidad del ventilador
Muestra la velocidad del ventilador
seleccionada.
Indicador de ventilación
Aparece cuando la unidad funciona en
modo Ventilación.
Sección de control
Botones Set Temperature
Down (Abajo)
Up (Arriba)
Botón Timer Menu
(botón Monitor/Set )
Botón Mode (botón Return)
Botones Set Time
Back (Atrás)
Ahead (Adelante)
Botón Timer On/Off
(botón Set Day)
Apertura de
la puerta.
Nota:
● Mensaje “PLEASE WAIT” (POR FAVOR, ESPERE)
Este mensaje aparece durante aprox. 3 minutos cuando la unidad interior recibe alimentación o cuando la unidad se está recuperando de una
caída de tensión.
Sensor de temperatura integrado
● Mensaje “NOT AVAILABLE” (NO DISPONIBLE)
Este mensaje aparece si se pulsa un botón para activar una función que la unidad interior no presenta.
Si está utilizando un controlador remoto para controlar simultáneamente distintos modelos de unidades interiores, este mensaje no aparecerá si
alguna de las unidades interiores dispone de la función.
Botón ON/OFF
Botón Fan Speed
Botón Filter
(Botón
)
Botón Test Run
Botón Check (botón Clear)
Botón Airflow Up/Down
Botón Louver
(Botón
Operation)
Al número de funcionamiento anterior.
Botón Ventilation
(botón Operation)
Al número de funcionamiento posterior.
71
Page 72

2. Nombres de las piezas
1
2
3
AUTO
C
OOL
DRY
HEAT
FAN
VANE
SELECT
TIME
■ Para controlador remoto inalámbrico
[sólo SLZ-KA·VAL]
Botón SET TEMPERATURE
El botón SET TEMPERATURE
ajusta la temperatura deseada en
h
la sala.
Botón ON/OFF
Al pulsar el botón se inicia el funcionamiento. Si se vuelve a pulsar, se detiene el funcionamiento.
Botón MODE SELECT
Este botón se utiliza para cambiar
entre los modos de funcionamiento automático, refrigeración, calefacción y secado. (SLZ)
ON/OFF
AUTO COOL
HEAT
MODE
DRY
TOO
WARM
FAN
VANE
TOO
COOL
SELECT
TIME
RESET
■ Cuando utilice el controlador remoto inalámbrico, apunte hacia el receptor de la unidad
interior.
■ Si el controlador remoto se utiliza unos dos minutos después de encender la unidad inte-
rior, esta puede pitar dos veces, ya que estará realizando la comprobación automática
inicial.
■ La unidad interior pitará para confirmar que ha recibido la señal transmitida desde el con-
trolador remoto. La unidad interior puede recibir señales emitidas a un máximo de 7 metros
en línea recta en un rango de 45° a derecha e izquierda de la unidad. Sin embargo, ciertos
sistemas de iluminación, con fluorescentes o luces fuertes, pueden afectar a la capacidad
de recepción de señal de la unidad interior.
■ Si la luz de funcionamiento situada cerca del receptor de la unidad interior parpadea, será
necesario inspeccionar la unidad. Consulte a su representante del servicio técnico.
■ Trate el controlador remoto con cuidado. Procure que no se le caiga ni sufra golpes. Además, no lo moje ni lo deje en un lugar con un alto grado de humedad.
■ Para impedir que el controlador remoto se pierda, instale el soporte incluido con el controlador remoto en una pared y asegúrese de colocar el mando en su soporte tras su uso.
Botón TIMER SELECT
Se utiliza para seleccionar programar la hora de inicio o parada.
Botón FAN SPEED
Este botón se utiliza para ajustar
la velocidad del ventilador a baja,
media o alta.
Botón VANE CONTROL
Cambia la dirección del flujo de
aire.
Instalación/sustitución de pilas
[sólo SLZ-KA·VAL]
1. Retire la cubierta superior, inserte dos pilas AAA
y vuelva a colocar la cubierta.
Cubierta
superior
Dos pilas AAA
Inserte las pilas co-
menzando por el polo
negativo (–). Al insertar las pilas, respete la
polaridad (+, –).
■ Unidad exterior
72
2. Pulse el botón Reset (Restablecer).
Alimentación
Pulse el botón Reset
Ref. tuberías
Cable de conexión
unidad interior/
(Restablecer) con un
objeto terminado en
punta.
exterior
Tierra
Page 73

ON/OFF
RESET
TOO
WARM
TOO
COOL
MODE
AUTO COOL
DRY
HEAT
FAN
VANE
SELECT
TIME
h
1
2
5
6
3
3
5
6
2
˚C
˚C
TIME SUN
PAR-21MAA
ON/OFF
FILTER
CHECK
OPERATION
CLEAR
TEST
TEMP.
MENU
BACK DAY
MONITOR/SET
CLOCK
ON/OFF
2
4
9
1
A
TIME SUN
2
3
4
˚C
˚C
PAR-21MAA
ON/OFF
FILTER
CHECK
OPERATION
CLEAR
TEST
TEMP.
MENU
BACK DAY
MONITOR/SET
CLOCK
ON/OFF
2
7
2
3
3
8
6
4
5
8
7
1
1
5
6
˚F˚C
TIMER
MON
OFF
WEEKLY
SUN MON TUE WED THU FRI SAT
WEEKLY
˚F˚C
˚C
TIME SUN
3. Configuración de la pantalla
Selección de Función Set Day/Time
ADC
Pantallas Standard Control
OFF ON
BC
Timer Monitor Timer Setup
B
4. Configuración de día de la semana y hora
<Tipos de pantallas>
El ajuste de idioma de la pantalla se puede cambiar a español utilizando la
selección de función del controlador remoto. Consulte la sección 8, punto
[4]-1 para cambiar el ajuste de idioma.
El ajuste inicial es inglés.
● Selección de Función:
configure las funciones y rangos disponibles para el
mando a distancia (funciones de temporizador, restricciones de funcionamiento, etc.).
● Set Day/Time: configure el día de la semana u hora actual.
● Pantallas Standard Control:
visualice y configure el estado de funcionamiento del sistema de acondicionamiento de aire.
● Timer Monitor: visualice el temporizador configurado actualmente (semanal, temporizador simple o apagado automático).
● Timer Setup: configure el funcionamiento de cualquiera de los
temporizadores (semanal, simple o apagado automático).
<Cómo cambiar la pantalla>
Para dirigirse a A : mantenga pulsado el botón Mode y el botón Timer On/
Off durante 2 segundos.
Para dirigirse a B : presione el botón Timer Menu.
Para dirigirse a C : presione el botón Mode (Return).
Para dirigirse a D : presione cualquiera de los botones Set Time ( o ).
Visualización de día
de la semana y hora
Nota:
● El día y la hora no aparecerán si se ha desactivado la utilización del reloj en
la Selección de Función.
● Una vez restablecida la alimentación, la unidad interior tarda tres minutos
en comenzar a funcionar. Esto es normal.
5. Manejo
Configuración del día de la semana
Configuración de la hora
1. Pulse o del botón Set Time A para que muestre el indicador 2.
2. Pulse el botón Timer On/Off (Set Day) 9 para fijar el día.
* Cada pulsación avanza el día que se muestra en 3: Sun → Mon →
... → Fri → Sat.
3. Pulse el botón Set Time apropiado A según sea necesario para confi-
gurar la hora.
* Mientras mantiene presionado el botón, la hora (en 4) avanzará pri-
mero en intervalos de minutos, luego en intervalos de diez minutos y
después en intervalos de una hora.
4. Después de realizar las configuraciones apropiadas en los Pasos 2 y 3,
pulse el botón Filter 4 para fijar los valores.
5.1. Encendido y apagado
<Para poner en marcha>
■ Pulse el botón ON/OFF 1.
• Se encienden la lámpara de encendido 1 y la pantalla.
Nota:
● Cuando se reinicia la unidad, las configuraciones iniciales son las siguientes.
Modo
Configuración de la temperatura
Veloc
Circulación del aire hacia
Arriba/Abajo
idad del ventilador
Configuraciones del Mando a distancia
Último valor configurado
Último valor configurado
Último valor configurado
Modo HEAT
COOL o DRY
FAN
Salida horiz.
Último valor configurado
Salida horiz.
73
Page 74

5. Manejo
51234
<Para detener el funcionamiento>
■ Pulse de nuevo el botón ON/OFF 1.
• Se oscurecen la lámpara de encendido 1 y la pantalla.
Nota:
Aunque pulse una vez más el botón de encendido ON/OFF inmediatamente
después de apagar el aparato, el acondicionador de aire no se pondrá en marcha hasta pasados tres minutos. Esto tiene como fin evitar daños en los componentes internos.
5.2. Selección de modo
■ Pulse el botón de modos de funcionamiento ( ) 2 y seleccio-
ne el modo de funcionamiento 2.
s
Modo de enfriamiento
Modo secado
Modo de ventilador
Modo de calefacción
Modo automático (enfriamiento/calefacción)
Modo de ventilación
Sólo indicado si se cumple lo siguiente
Uso de controlador remoto cableado
Combinación LOSSNAY conectada
Información sobre los equipos de aire acondicionado
multisistema (Unidad exterior: serie MXZ)
ss
sLos equipos de aire acondicionado multisistema (unidad exterior de la
ss
serie MXZ) permiten conectar dos o más unidades interiores a una
sola unidad exterior. Estas unidades interiores (dos o más) podrán
funcionar simultáneamente, dependiendo de la capacidad del equipo.
• Si intenta poner en funcionamiento de manera simultánea dos o más
unidades interiores conectadas a una sola unidad exterior, una para la
refrigeración y otra para la calefacción, el equipo selecciona el modo de
funcionamiento de la unidad interior que ha de funcionar en primer tér-
mino. Las demás unidades interiores, que tendrán que ponerse en funcionamiento posteriormente, no pueden activarse y mostrarán un estado de funcionamiento que parpadeará.
En este caso, seleccione el mismo modo de funcionamiento en todas
las unidades interiores.
• Puede darse el caso de que la unidad interior, que esté funcionando en
modo (AUTO), no pueda cambiar entre los modos (FRÍO ↔ CALOR)
y quede en estado de espera.
• Si la unidad interior empieza a funcionar al mismo tiempo que la unidad
exterior está eliminando la escarcha, tardará unos minutos (Máx. 15
minutos aproximadamente) en generar aire caliente.
• En el modo de calefacción, aunque la unidad interior no esté en funcionamiento, es posible que dicha unidad se caliente o se oiga el ruido del
refrigerante, pero esto no supone ninguna anomalía. Lo que sucede es
que el refrigerante circula continuamente dentro de la unidad interior.
Funcionamiento automático
■ De acuerdo con la temperatura ajustada, el funcionamiento de refrigeración comenzará si la temperatura de la sala es demasiado alta. El modo de
calefacción comenzará si la temperatura de la sala es demasiado baja.
■ Durante el funcionamiento automático, si la temperatura de la sala cam-
bia y permanece 2 °C o más por encima de la temperatura ajustada
durante 15 minutos, el acondicionador de aire cambiará a modo de refrigeración. Asimismo, si la temperatura permanece 2 °C o más por debajo de la temperatura ajustada durante 15 minutos, el acondicionador
de aire cambiará a modo de calefacción.
Modo de enfriamiento
15 minutos (cambio de refrigeración a calefacción)
15 minutos (cambio de
calefacción a refrigeración)
Temperatura ajustada
+2°C
Temperatura ajustada
Temperatura ajustada
-2°C
■ Como la temperatura ambiente se ajusta automáticamente para mante-
ner una temperatura efectiva fija, el modo de refrigeración se activa un
par de grados por encima de la temperatura ajustada (y el modo de
calefacción, un par de grados por debajo) una vez alcanzada dicha temperatura (modo automático de ahorro de energía).
74
5.3. Ajuste de la temperatura
ss
sPara disminuir la temperatura de la habitación:
ss
Pulse el botón 3 para fijar la temperatura deseada.
En el visor aparecerá la temperatura seleccionada 3.
ss
sPara aumentar la temperatura de la habitación:
ss
Pulse el botón 3 para fijar la temperatura deseada.
En el visor aparecerá la temperatura seleccionada 3.
• Las gamas de ajuste de temperaturas disponibles son las siguientes:
Enfriamiento y secado: 19 - 30 °C
Calefacción: 17 - 28 °C
Automático: 19 - 28 °C
• La pantalla parpadea 8 °C -39 °C para informar si la temperatura de la
habitación es inferior o superior a la temperatura que se visualiza.
5.4. Ajuste de la velocidad del ventilador
■ Pulse el botón Fan Speed 5 tantas veces como sea necesario con el
sistema en funcionamiento.
• Cada pulsación cambia la potencia. La velocidad seleccionada actualmente se muestra en 5.
• La secuencia de cambio y las configuraciones disponibles son las
siguientes.
Velocidad del
ventilador
de 3 fases
Vitesse de
ventilateur
de 2 fases
( )
Pantalla del controlador remoto
Baja Media Alta
▼
( )
( )
▼
▼
Pantalla del controlador remoto
Baja Alta
▼
▼
• Las indicaciones del controlador remoto inalámbrico aparecen entre
paréntesis.
Nota:
● El número de velocidades del ventilador disponibles depende del tipo de
unidad conectada. Recuerde, además, que algunas unidades no ofrecen ajuste “Automático”.
● En los siguientes casos, la velocidad real del ventilador generada por la unidad diferirá de la velocidad mostrada en la pantalla del mando a distancia.
1. Mientras la pantalla muestra “STAND BY” o “DEFROST”.
2. Cuando la temperatura del intercambiador de calor es baja en modo de
calefacción (por ejemplo, inmediatamente después de que se active el
modo de calefacción).
3. En modo HEAT, cuando la temperatura ambiente de la habitación es su-
perior al valor de configuración de la temperatura.
4. Cuando la unidad esté en modo DRY.
5.5. Ajuste de la dirección del flujo de aire [Para SLZ]
<Para cambiar la dirección de circulación del aire hacia Arriba/Abajo>
■ Con la unidad en funcionamiento, pulse el botón Airflow Up/Down 6
tantas veces como sea necesario.
• Cada pulsación cambia la dirección. La dirección actual se muestra en 6.
• La secuencia de cambio y las configuraciones disponibles son las
siguientes.
Para controlador remoto inalámbrico
s
1 → 2 → 3 → 4 → 5
Para controlador remoto cableado
1 Circulación del aire horizontal 30° 4 Circulación del aire hacia abajo 70°
2 Circulación del aire hacia abajo 45° 5 Vaivén
3 Circulación del aire hacia abajo 55°
* Recuerde que durante el funcionamiento oscilante (Swing), la indica-
ción direccional en la pantalla no cambia en sincronización con los
álabes direccionales en la unidad.
* Algunos modelos no admiten configuraciones direccionales.
Nota:
● Las direcciones disponibles dependen del tipo de unidad conectada. Re-
cuerde, además, que algunas unidades no ofrecen una configuración “Auto”.
● En los siguientes casos, la dirección real del aire diferirá de la dirección
indicada en la pantalla del mando a distancia.
1. Mientras la pantalla muestra “STAND BY” o “DEFROST”.
2. Inmediatamente después de iniciar el modo calentador (durante la espera
para la realización del cambio).
3. En modo calentador, cuando la temperatura ambiente de la sala sea supe-
rior a la configuración de la temperatura.
Page 75

˚C
SUN
ON
WEEKLY
PAR-21MAA
ON/OFF
FILTER
CHECK
OPERATION
CLEAR
TEST
TEMP.
MENU
BACK DAY
MONITOR/SET
CLOCK
ON/OFF
2
42 3
A9 78
0
4
1
3
B
1
5. Manejo
˚C
SUN
ON
WEEKLY
6
7
5
<Para cambiar la dirección del aire Derecha/Izquierda>
■ Pulse el botón Louver 7 según sea necesario.
• Aparece la imagen de la rejilla 7.
Cada pulsación del botón, cambia la configuración según se muestra
a continuación.
Sin indicador
(ON) (OFF)
(Stop)
Durante el funcionamiento basculante, la visualización de la flecha se
mueve a izquierda y derecha.
5.6. Ventilación
ss
sPara combinación LOSSNAY
ss
5.6.1. Para controlador remoto cableado
● Para hacer funcionar el renovador de aire junto con la unidad interior:
■ Pulse el botón ON/OFF 1.
• El indicador Vent aparece en la pantalla (en 8). Ahora el renova-
dor de aire funcionará automáticamente cuando funcione la unidad interior.
6. Temporizador
6.1. Para controlador remoto cableado
Puede utilizar la Selección de Función para seleccionar cuál de los tres
tipos de temporizador utilizar: 1 temporizador semanal, 2 temporizador
simple o 3 temporizador automático.
6.1.1. Temporizador semanal
■ El temporizador semanal puede utilizarse para configurar hasta ocho
funciones para cada día de la semana.
• Cada función puede consistir en cualquiera de las siguientes: hora
de encendido y apagado junto a una configuración de la temperatura, sólo hora de encendido y apagado o sólo configuración de la temperatura.
• Cuando la hora actual alcanza la hora configurada en este
temporizador, el acondicionador de aire realiza la acción configurada
por el temporizador.
■ El tiempo necesario para la configuración de la hora para este
temporizador es de 1 minuto.
Nota:
*1. El temporizador semanal, el temporizador simple y el temporizador auto-
mático no pueden utilizarse al mismo tiempo.
*2. El temporizador semanal no funcionará si se da alguna de las siguientes
condiciones.
La función de temporizador está desactivada; el sistema se encuentra en un
estado anómalo; hay una sesión de prueba en curso; se está llevando a
cabo una autoprueba o una prueba del mando a distancia; el usuario está
configurando una función; el usuario está configurando el temporizador; el
usuario está configurando el día actual de la semana o la hora; el sistema se
encuentra bajo el control central. En concreto, el sistema no llevará a cabo
operaciones (encendido o apagado de la unidad, configuración de la temperatura) que estén desactivadas cuando se produzcan estas condiciones.
N° de Funcionamiento
Configuración del día
● Para hacer funcionar el renovador de aire de modo independiente:
■ Pulse el botón Mode 2 hasta que aparezca en la pantalla . Esto
hará que el renovador de aire comience a funcionar.
● Para cambiar la potencia del renovador de aire:
■ Pulse el botón Ventilation 8 según sea necesario.
• Cada pulsación cambia la configuración según se muestra a continuación.
▲
▲
Baja Alta
5.6.2. Para controlador remoto inalámbrico
● El ventilador se activará automáticamente al encenderse la unidad inte-
rior.
● No aparecerá ninguna indicación en el controlador remoto inalámbrico.
<Cómo configurar el temporizador semanal>
1. Asegúrese de que se encuentra en la pantalla de control estándar y de
que el indicador del temporizador semanal 1 se muestra en la pantalla.
2. Pulse el botón Timer Menu B, de modo que aparezca en la pantalla
“Set Up” (en 2). (Recuerde que cada pulsación del botón cambia la
pantalla entre “Set Up” y “Monitor”).
3. Pulse el botón Timer On/Off (Set Day) 9 para configurar el día. Cada
pulsación avanza la pantalla 3 a la próxima configuración en la secuencia que se indica a continuación: “Sun Mon Tues Wed Thurs Fri
Sat” → “Sun” → … (Domingo Lunes Martes Miércoles Jueves Viernes
Sábado → Domingo) → “Fri” → “Sat” → “Sun Mon Tues Wed Thurs Fri
Sat”… (Viernes → Sábado → Domingo Lunes Martes Miércoles Jueves Viernes Sábado).
4. Pulse el botón o Operation (7 o 8) según sea necesario para
seleccionar el número de operación apropiado (1 a 8) 4.
* La información introducida en los Pasos 3 y 4 seleccionará una de
las celdas de la matriz ilustrada a continuación.
(La pantalla del mando a distancia en la izquierda muestra cómo se
mostraría la pantalla cuando se configura Operación 1 para el domingo con los valores indicados a continuación).
Matriz de configuración
N° de op.
No. 1
No. 2
…
No. 8
<Valores de Operación 1 para el domingo>
Iniciar el funcionamiento del acondicionador de aire
a las 8:30, con la temperatura fijada en 23 °C.
Nota:
Configurando el día a “Sun Mon Tues Wed Thurs Fri Sat”, puede configurar la
misma operación a la misma hora todos los días.
(Por ejemplo: la Operación 2 arriba mencionada es la misma para todos los
días de la semana).
Sunday Monday … Saturday
• 8:30
• ON
• 23 °C
• 10:00
• OFF
• 10:00
• OFF
• 10:00
• OFF
• 10:00
• OFF
▲
<Valores de Operación 2 para todos los días>
Apagar el acondicionador de aire a las 10:00.
▲
<Configuración del temporizador semanal>
Muestra la configuración de la hora
5. Pulse el botón Set Time apropiado A según sea necesario para fijar la
hora deseada (en 5).
* Durante su pulsación, la hora avanza primero en intervalos de un
minuto, luego en intervalos de diez minutos y finalmente en intervalos de una hora.
6. Pulse el botón ON/OFF 1 para seleccionar la operación deseada (en-
cendido o apagado), en 6.
Muestra la operación seleccionada (encendido o apagado)
* No aparece si no se ha configurado la operación.
Muestra la temperatura fijada
* No aparece si no se ha fijado la temperatura.
* Cada pulsación cambia al siguiente valor en la secuencia que se indi-
ca a continuación: sin indicación (sin configuración) → “ON” → “OFF”.
75
Page 76

ONHr
AFTER
SIMPLE
PAR-21MAA
ON/OFF
FILTER
CHECK
OPERATION
CLEAR
TEST
TEMP.
MENU
BACK DAY
MONITOR/SET
CLOCK
ON/OFF
2A9
0
4
1
B
ONHr
AFTER
SIMPLE
4
1
3
2
˚C
TIMER
SUN
ON
OFF
WEEKLY
1
9
8
˚C
˚C
TIME SUN
WEEKLY
0
˚C
˚C
TIME SUN
WEEKLY
0
6. Temporizador
7. Pulse el botón Set Temperature apropiado 3 para fijar la temperatu-
ra deseada (en 7).
* Cada pulsación cambia la configuración en la secuencia que se
indica a continuación: sin indicación (sin configuración) ⇔ 24 ⇔
25 ⇔ ... ⇔ 29 ⇔ 30 ⇔ 12 ⇔ ... ⇔ 23 ⇔ sin indicación.
(Rango disponible: el rango de configuración es de 12 °C a 30 °C.
El rango real de control de temperatura, sin embargo, variará según el tipo de unidad conectada).
8. Después de realizar las configuraciones apropiadas en los Pasos 5,
6 y 7, pulse el botón Filter 4 para guardar los valores.
Para borrar los valores actualmente configurados para la operación
seleccionada, pulse y suelte rápidamente el botón Check (Clear) 0
una vez.
* El valor de la hora mostrada cambiará a “—:—” y desaparecerán
tanto los valores de encendido/apagado como el de temperatura.
(Para borrar todas las configuraciones del temporizador semanal
de una vez, mantenga pulsado el botón Check (Clear) 0 durante
dos o más segundos. La pantalla comenzará a parpadear, indicando que se han borrado todos los valores fijados).
Nota:
Sus datos nuevos se cancelarán si pulsa el botón Mode (Return) 2 antes
de pulsar el botón
Si ha configurado dos o más operaciones diferentes para la misma hora
exactamente, sólo se realizará la operación con el número más elevado.
Filter 4.
9. Repita los Pasos 3 a 8 según sea necesario para completar tantas
celdas disponibles como desee.
10.Pulse el botón Mode (Return) 2 para regresar a la pantalla de con-
trol estándar y completar el procedimiento de configuración.
11.Para activar el temporizador, pulse el botón Timer On/Off 9, de modo
que el indicador “Timer Off” desaparezca de la pantalla. Asegúrese
de que ya no se muestre el indicador “Timer Off”.
* Si no hay valores fijados del temporizador, el indicador “Timer Off”
parpadeará en la pantalla.
6.1.2. Temporizador simple
■ Puede configurar el temporizador simple de cualquiera de las tres formas
siguientes.
• Sólo hora de puesta en marcha:
el acondicionador de aire comenzará a funcionar cuando haya
transcurrido el tiempo fijado.
• Sólo hora de parada:
el acondicionador de aire se detendrá cuando haya transcurrido
el tiempo fijado.
• Horas de puesta en marcha y de parada:
el acondicionador de aire comienza a funcionar y se detiene cuando hayan transcurrido las horas respectivas.
■ El temporizador simple (puesta en marcha y parada) puede configurarse sólo una vez en un periodo de 72 horas. La configuración de la hora
se realiza en aumentos de una hora.
Nota:
*1. El temporizador semanal, el temporizador simple y el temporizador auto-
mático no pueden utilizarse al mismo tiempo.
*2. El temporizador simple no funcionará si se da cualquiera de las condicio-
nes siguientes.
El temporizador está desactivado, el sistema está en estado anómalo, está rea-
lizándose una prueba de funcionamiento, el mando a distancia está realizando
una autoevaluación o diagnóstico, el usuario está seleccionando una función o
configurando el temporizador, el sistema está bajo control central. (En estas
condiciones, la operación de encendido y apagado está deshabilitada).
<Cómo visualizar los valores fijados del temporizador semanal>
Valores fijados del temporizador
1. Asegúrese de que se muestra en la pantalla el indicador del
temporizador semanal (en 1).
2. Pulse el botón Timer Menu B de modo que se indique en la pantalla
“Monitor” (en 8).
3. Pulse el botón Timer On/Off (Set Day) 9 según sea necesario para
seleccionar el día que desea visualizar.
4. Pulse el botón Operation o (7 o 8) según sea necesario para
cambiar el funcionamiento del temporizador mostrado en la pantalla
(en 9).
* Cada pulsación, avanzará a la próxima operación del temporizador,
en el orden de configuración de la hora.
5. Para cerrar el monitor y regresar a la pantalla Standard Control, pulse el botón Mode (Return) de 2.
<Para desactivar el temporizador semanal>
Pulse el botón Timer On/Off 9 de modo que aparezca “Timer Off” en 0.
<Para activar el temporizador semanal>
Pulse el botón Timer On/Off 9 de modo que el indicador “Timer Off” (en
0) se oscurezca.
76
<Cómo configurar el temporizador simple>
Configuración del temporizador
Acción (encendido o apagado)
* Se muestra “— —” si no hay confi-
guración.
1. Asegúrese de que se encuentra en una pantalla de control estándar y de
que el indicador de temporizador simple se muestra en la pantalla (en 1).
Cuando aparezca una indicación distinta de la del temporizador simple,
cámbielo a SIMPLE TIMER (TEMPORIZADOR SIMPLE) utilizando la selección de funciones de la configuración de funciones del temporizador del
mando a distancia (véase 8.[4]–3 (3)).
2. Pulse el botón Timer Menu B, de modo que aparezca en la pantalla
“Set Up” (en 2). (Recuerde que cada pulsación del botón cambia la
pantalla entre “Set Up” y “Monitor”).
3. Pulse el botón ON/OFF 1 para mostrar los valores configurados actuales
de encendido o apagado del temporizador simple. Pulse el botón una vez
para ver el tiempo restante hasta el encendido y luego de nuevo para ver el
tiempo restante hasta el apagado. (El indicador ON/OFF aparece en 3).
• Temporizador “ON”: el acondicionador de aire comenzará a funcionar cuando haya transcurrido el número de
horas especificado.
• Temporizador “OFF”: el acondicionador de aire se detendrá cuando haya
transcurrido el número de horas especificado.
4. Mostrando “ON” u “OFF” en 3: pulse el botón Set Time A apropiado
según sea necesario para fijar las horas hasta el encendido (si se muestra
“ON”) o las horas hasta el apagado (si se muestra “OFF” en 4).
• Rango disponible: 1 a 72 horas
5. Para fijar las horas hasta el encendido y el apagado, repita los Pasos 3 y 4.
* Recuerde que las horas de encendido y apagado no pueden fijarse
en el mismo valor.
6. Para borrar la configuración de encendido o apagado actual: Muestre el
valor configurado de encendido o apagado (véase el paso 3) y luego
pulse el botón Check (Clear) 0 para borrar la configuración de la hora
a “—” en 4. (Si desea utilizar sólo un valor de configuración de encendido o una configuración de apagado, asegúrese de que la configuración que no desea utilizar se muestra como “—”).
Page 77

TIMER ON
OFFHrAFTER
SIMPLE
1
6
5
˚C
˚C
SIMPLE
7
˚C
˚C
ONHr
AFTER
SIMPLE
7
ONHr
AFTER
SIMPLE
˚C
˚C
OFFHrAFTER
SIMPLE
SIMPLE
˚C
˚C
OFFHrAFTER
SIMPLE
ONHr
AFTER
SIMPLE
˚C
˚C
SIMPLE
AFTER OFF
AUTO OFF
PAR-21MAA
ON/OFF
FILTER
CHECK
OPERATION
CLEAR
TEST
TEMP.
MENU
BACK DAY
MONITOR/SET
CLOCK
ON/OFF
2A9
4
B
AFTER OFF
AUTO OFF
3
1
2
6. Temporizador
7. Después de completar los Pasos 3 y 6 arriba mencionados, pulse el
botón Filter 4 para fijar el valor.
Nota:
Sus configuraciones nuevas se cancelarán si pulsa el botón Mode (Return) 2
antes de pulsar el botón Filter 4.
8. Pulse el botón Mode (Return) 2 para regresar a la pantalla de control
estándar.
9. Pulse el botón Timer On/Off 9 para iniciar la cuenta atrás del
temporizador. Cuando el temporizador está funcionando, su valor es
visible en la pantalla. Asegúrese de que el valor del temporizador
sea visible y apropiado.
<Visualización de las configuraciones actuales del temporizador simple>
Configuración del temporizador
1. Asegúrese de que el indicador del temporizador simple está visible en
la pantalla (en 1).
2. Pulse el botón Timer Menu B, para que aparezca “Monitor” en la panta-
lla (en 5).
• Si el temporizador simple de encendido o apagado está funcionando,
su valor actual aparecerá en 6.
• Si se han fijado ambos valores, encendido y apagado, aparecen al-
ternativamente ambos valores.
3. Pulse el botón Mode (Return) 2 para cerrar la pantalla del monitor y
regresar a la pantalla de control estándar.
<Para desactivar el temporizador simple...>
Pulse el botón Timer On/Off 9 para que la configuración del temporizador
ya no aparezca en la pantalla (en 7).
Ejemplo 2:
Inicie el temporizador, con la hora de apagado fijada más temprano que
la hora de encendido
Configuración de encendido: 5 horas
Configuración de apagado: 2 horas
Al inicio del temporizador
La pantalla muestra el valor de apagado del
▲
temporizador (las horas restantes para el apagado).
2 horas después del inicio del temporizador
La pantalla cambia para mostrar el valor de
encendido del temporizador (las horas restan-
▲
tes para el encendido).
La hora indicada es el valor configurado de
encendido (5 horas) “- el valor” configurado de
apagado (2 horas) = 3 horas.
5 horas después del inicio del
temporizador
El acondicionador de aire comienza a funcionar y
continuará funcionando hasta que alguien lo detenga.
6.1.3. Temporizador de apagado automático
■ Este temporizador comienza la cuenta atrás cuando el acondicionador
de aire comienza a funcionar y apaga el acondicionador cuando haya
transcurrido el tiempo fijado.
■ Los valores disponibles abarcan desde 30 minutos a 4 horas, en intervalos de 30 minutos.
Nota:
*1. El temporizador semanal, el temporizador simple y el temporizador auto-
mático no pueden utilizarse al mismo tiempo.
*2. El temporizador Auto Off no funcionará si se dan cualquiera de las siguien-
tes condiciones.
El temporizador está desactivado, el sistema está en estado anómalo, está
realizándose una prueba de funcionamiento, el mando a distancia está realizando una autoevaluación o diagnóstico, el usuario está seleccionando
una función o configurando el temporizador, el sistema está bajo control
central. (En estas condiciones, la operación de encendido y apagado está
deshabilitada).
<Para iniciar el temporizador simple…>
Pulse el botón Timer On/Off 9 para que la configuración del temporizador
sea visible en 7.
Ejemplos
Si se han configurado las horas de encendido y apagado en el temporizador
simple, el funcionamiento y la pantalla son según se indica a continuación.
Ejemplo 1:
Inicie el temporizador, con la hora de encendido fijada más temprano
que la hora de apagado.
Configuración de encendido: 3 horas
Configuración de apagado: 7 horas
Al inicio del temporizador
La pantalla muestra la configuración de encendido del temporizador (las horas restantes para
llegar al encendido).
3 horas después del inicio del temporizador
La pantalla cambia para mostrar el valor de
apagado del temporizador (las horas restantes
para el apagado).
La hora mostrada es el valor configurado de
apagado (7 horas) “- el valor” configurado de
encendido (3 horas) = 4 horas.
7 horas después del inicio del
temporizador
El acondicionador de aire se desactiva y permanecerá desactivado hasta que alguien lo reinicie.
▲
▲
<Cómo configurar el temporizador de apagado automático>
Configuración del temporizador
1. Asegúrese de que usted se encuentre en una pantalla de control estándar y
que el indicador del temporizador de apagado automático Auto Off se muestre en la pantalla (en 1).
Cuando aparezca una indicación distinta de la del temporizador de apagado
automático, cámbielo a AUTO OFF TIMER (TEMPORIZADOR DE APAGADO AUTOMÁTICO) utilizando la selección de funciones de la configuración
de funciones del temporizador del mando a distancia (véase 8.[4]–3 (3)).
2. Mantenga pulsado el botón Timer Menu B durante 3 segundos, para que
aparezca “Set Up” en la pantalla (en 2).
(Recuerde que cada pulsación del botón cambia la pantalla entre “Set Up”
y “Monitor”).
3. Pulse el botón Set Time apropiado A según sea necesario para configurar
la hora de apagado (en 3).
4. Pulse el botón Filter 4 para fijar la configuración.
Nota:
Los datos introducidos se cancelarán si pulsa el botón Mode (Return) 2 antes
de pulsar el botón Filter 4.
5. Pulse el botón Mode (Return) 2 para completar el procedimiento de
configuración y regresar a la pantalla de control estándar.
6. Si el acondicionador de aire ya está funcionando, el temporizador comienza inmediatamente la cuenta atrás. Asegúrese de comprobar que el
valor fijado del temporizador aparece correctamente en la pantalla.
77
Page 78

AFTER
TIMER
OFF
AUTO OFF
5
1
4
˚C
˚C
AUTO OFF
6
7
AUTO OFF
7
˚C
˚C
AFTER OFF
AUTO OFF
6
7
SELECT
TIME
SELECT
˚C
˚C
TIME SUN
FUNCTION
PAR-21MAA
ON/OFF
FILTER
CHECK
OPERATION
CLEAR
TEST
TEMP.
MENU
BACK DAY
MONITOR/SET
CLOCK
ON/OFF
4
1
1
˚C
˚C
FUNCTION
1
˚C
˚C
FUNCTION
1
˚C
˚C
1
6. Temporizador
ON/OFF
RESET
TOO
WARM
TOO
COOL
MODE
AUTO COOL
DRY
HEAT
FAN
VANE
SELECT
TIME
h
1
B
A
2
<
Comprobación de la configuración actual del temporizador de apagado automático
Configuración del temporizador
1. Asegúrese de que “Auto Off” esté visible en la pantalla (en 1).
2. Mantenga pulsado el botón Timer Menu B durante 3 segundos, para
que se indique en la pantalla “Monitor” (en 4).
• El tiempo restante para el apagado aparece en 5.
3. Para cerrar el monitor y regresar a la pantalla Standard Control, pulse el
botón Mode (Return) de 2.
<Para desactivar temporizador de apagado automático...>
● Mantenga pulsado el botón Timer On/Off 9 durante 3 segundos para
que aparezca “Timer Off” (en 6) y desaparezca el valor del temporizador
(en 7).
● Alternativamente, desconecte el acondicionador de aire. El valor del
temporizador (en 7) desaparecerá de la pantalla.
<Para iniciar el temporizador de apagado automático...>
● Mantenga pulsado el botón Timer On/Off 9 durante 3 segundos. Des-
aparece la indicación “Timer Off” (en 6 ) y la configuración del
temporizador aparece en la pantalla (en 7).
● Alternativamente, encienda el acondicionador de aire. El valor del
temporizador aparecerá en 7.
>
6.2. Para controlador remoto inalámbrico
Resulta muy cómodo configurar el temporizador para la hora de irse a
dormir, de llegar a casa o de levantarse.
1Seleccione el modo de temporizador pulsando el botón
funcionamiento.
A Cada vez que este botón es pulsado, el modo de temporizador cam-
biará de orden:
(OFF TIMER-temporizador apagado) (ON TIMERtemporizador encendido) TIMER RELEASE (paro del
temporizador)
2Seleccione la hora del temporizador usando el botón
B Cada vez que este botón es pulsado, la hora seleccionada aumen-
tará de 1 hora a 12 horas.
Para desactivar el temporizador:
• Pulse el botón
hasta que (OFF TIMER-temporizador apagado) y (ON TIMER- temporizador encendido) no aparezcan en pantalla.
Nota:
El OFF TIMER (temporizador apagado) y el ON TIMER (temporizador encendido) no se pueden seleccionar a la vez.
durante el
.
7. Otras funciones
7.1. Bloqueo de los botones del mando a distancia (lí-
mite de función de Operación)
■ Si lo desea, puede bloquear los botones del mando a distancia. Puede
utilizar la selección de funciones del mando a distancia para elegir el
tipo de bloqueo que desea usar. (Para más información sobre selección
del tipo de bloqueo, consulte la sección 8, punto [4]–2 (1)).
Específicamente, puede utilizar cualquiera de los dos tipos de bloqueo
que se indican a continuación.
1 Bloquear todos los botones:
2 Bloquear todo excepto ON/OFF (encendido/apagado):
Nota:
Aparece en la pantalla el indicador “Locked” (bloqueado) para indicar que los
botones están bloqueados en este momento.
78
bloquea todos los botones en el mando a distancia.
bloquea todos los botones excepto el botón ON/OFF.
<Cómo bloquear los botones>
1. Mientras pulsa el botón Filter 4, pulse y mantenga pulsado el botón
ON/OFF 1 durante 2 segundos. Aparece en la pantalla el indicador
“Locked” (en 1) indicando que está activado el bloqueo.
* Si el bloqueo se ha deshabilitado en Function Selection, la pantalla
mostrará el mensaje “Not Available” (no disponible) cuando pulse los
botones según se describe anteriormente.
• Si pulsa un botón bloqueado, parpadeará en la pantalla el indicador
“Locked” (en 1).
Indicador
de bloqueo
<Cómo desbloquear los botones>
1. Mientras pulsa el botón Filter 4, pulse y mantenga pulsado el botón
ON/OFF 1 durante 2 segundos para que el indicador “Locked” desaparezca de la pantalla (en 1).
Page 79

ON/OFF
TEMP.
˚C
˚C
ON/OFF
TEMP.
˚C
˚C
ON/OFF
˚C
˚C
ERROR CODE
ON/OFF
CALL:XXXX
XXX:XXX
7. Otras funciones
ON/OFF
ERROR CODE
7.2. Otras indicaciones
7.2.1. Centrally Controlled
● Aparece cuando el funcionamiento se controla desde el controlador
central o sistema similar.
A continuación se muestra el funcionamiento restringido.
• ON/OFF (incluyendo el funcionamiento del temporizador)
• Modo de funcionamiento
• Ajuste de temperatura
Nota:
Es posible que se restrinjan de forma individual.
7.2.2. Indicador de modo parpadeante
■ Cuando parpadea de forma continua
Aparece cuando otra unidad interior conectada a la unidad exterior está
en funcionamiento en un modo de funcionamiento distinto.
Iguale con el modo de funcionamiento de la unidad interior.
■ Cuando cambia el modo después de que parpadee el indicador
Aparece cuando el modo de funcionamiento se restringe para cada estación mediante el controlador central o sistema similar.
Utilice otro modo de funcionamiento.
8. Selección de función
7.2.3. Indicación de códigos de error
Si ha introducido un número telefónico al cual llamar en caso de problemas, la pantalla mostrará este número. (Puede configurarlo en la
Selección de Función. Para más información, consulte la sección 8.)
Lámpara
ON
(parpadeando)
Dirección del proveedor de refrigerante de la unidad interior
Código de error
Pantalla alternante
N° de unidad interior
Cuando se pulsa el botón Check:
Código de error
● Si parpadean la lámpara ON y el código de error: esto significa que el
acondicionador de aire está estropeado y su funcionamiento se ha detenido (y no puede reanudarse). Tome nota del número de unidad indicado
y del código de error; luego desconecte la alimentación del acondicionador de aire y llame a su distribuidor o proveedor de servicio técnico.
● Si sólo parpadea el código de error (mientras la lámpara ON permanece
encendida): continúa el funcionamiento, pero puede existir un problema
en el sistema. En este caso, debe anotar el código de error y luego llamar
a su distribuidor o proveedor de servicio técnico para asesoramiento.
* Si ha introducido un número de teléfono al cual llamar en caso de
problemas, pulse el botón Check para mostrarlo en la pantalla. (Puede
configurarlo en la Selección de Función. Para más información, consulte la sección 8.)
Selección de funciones del controlador remoto
El ajuste de las siguientes funciones del controlador remoto se puede cambiar utilizando el modo Selección de función del controlador remoto. Cambie
el ajuste cuando sea necesario.
1. Cambio de idioma
(“CHANGE
LANGUAGE”)
2. Límite de funciones
(“SELECCIÓN DE
FUNCIÓNES”)
3. Selección de modo
(“SELECCIÓN DE
MODO”)
4. Cambio de indicador
(“MOSTRAR
MODO”)
Ítem 1
Ítem 2
Ajuste del idioma que aparece en el indicador
(1) Ajuste del límite de funciones (bloqueo de funciones) (“FUN-
CIÓN BLOQUEADA”)
(2) Uso del ajuste de modo automático (“SELECCIÓN MODO
AUTO”)
(3) Ajuste del límite de rango de temperatura (“LIMIT TEMP CON-
SIGNA”)
(1) Ajuste del controlador remoto principal/secundario (“CONTROL
PRINCIPAL/SECUNDARIO”)
(2) Uso del ajuste del reloj (“RELOJ”)
(3) Ajuste de la función de temporizador (“TEMPORIZA-DOR SE-
MANAL”)
(4) Ajuste de número de contacto en caso de error (“CALL.”)
(1) Ajuste del indicador de temperatura °C/°F (“TEMP. GRADOS
°C/°F”)
(2) Ajuste del indicador de temperatura del aire de aspiración
(“MOSTRAR TEMP.”)
(3) Ajuste del indicador de refrigeración/calefacción automática
(“MOSTRAR F/C EN AUTO”)
• El indicador puede aparecer en distintos idiomas
• Ajuste del rango de límite de funcionamiento (bloqueo de funcionamiento)
• Ajuste del uso (o no) del modo de funcionamiento “automático”
• Ajuste del rango de temperatura (máximo, mínimo)
• Selección del controlador remoto principal o secundario
* Si se conectan dos controladores remotos a un grupo, uno de los
controladores debe seleccionarse como secundario.
• Ajuste del uso (o no) de la función de reloj
• Ajuste del tipo de temporizador
• Indicador del número de contacto en caso de error
• Ajuste del número de teléfono
• Ajuste de la unidad de temperatura (°C o °F) que debe aparecer en el
indicador
• Ajuste del uso (o no) del indicador de temperatura del aire (aspiración)
del interior
• Ajuste del uso (o no) del indicador de “Cooling” (Refrigeración) o “Heating”
(Calefacción) durante el funcionamiento en modo automático
Ítem 3 (Contenido de ajuste)
79
Page 80

OFF
on1
on2
OFF
ON
OFF
ON
OFF
OFF
CALL-
ON
OFF
ON
OFF
°C
°F
PAR-21MAA
ON/OFF
FILTER
CHECK
OPERATION
CLEAR
TEST
TEMP.
MENU
BACK DAY
MONITOR/SET
CLOCK
ON/OFF
F
E
G
C
D
H
B
A
I
G
G
G
G
G
G
E
E
G
G
G
G
G
E
G
E
G
G
G
G
D
D
D
D
D
D
D
D
D
D
D
D
D
D
D
D
D
D
D
D
D
D
D
D
D
D
D
D
D
D
English
Germany
Spanish
Russian
Italy
Chinese
French
Japanese
8. Selección de función
[Diagrama de flujo de selección de función]
Idioma ajustado (inglés)
Mantenga pulsado el botón E y presione el botón D durante dos
segundos.
Modo de selección de función del controlador remoto
Ítem 1 Ítem 2
Cambio de
idioma
Selección de
función
Indicador normal (Indicador que aparece cuando el
acondicionador de aire está apagado)
Ítem 3
Mantenga pulsado el botón E y presione el botón D durante dos segundos.
E Pulse el botón de modo de funcionamiento.
G Pulse el botón TIMER MENU (MENÚ DE TEMPORIZADOR).
D Pulse el botón TIMER ON/OFF (ACTIVAR/DESACTIVAR
TEMPORIZADOR).
Indicador de puntos
El ajuste de función bloqueada no se utiliza
(valor de ajuste inicial).
El bloqueo de funcionamiento está ajustado excepto para los botón
On/Off (encendido y apagado).
El bloqueo de funcionamiento está ajustado para todos los botones.
El modo automático aparece al seleccionar el modo de funcionamiento (valor de ajuste inicial).
El modo automático no aparece al seleccionar el modo de funcionamiento.
El límite de rango de temperatura no está activo (valor de ajuste
inicial).
El rango de temperatura se puede cambiar en modo de refrigeración/
secado.
El rango de temperatura se puede cambiar en modo de secado.
80
Selección de
modo
Cambio de
indicador
El rango de temperatura se puede cambiar en modo automático.
El controlador remoto será el controlador principal (valor de ajuste
inicial).
El controlador remoto será el controlador secundario.
Se puede utilizar la función de reloj (valor de ajuste inicial).
La función de reloj no se puede utilizar.
Se puede utilizar el temporizador semanal (valor de ajuste inicial).
Se puede utilizar el temporizador de apagado automático.
Se puede utilizar el temporizador simple.
No se puede utilizar el modo de temporizador.
Los números de contacto ajustados no aparecen en caso de error
(valor de ajuste inicial).
Los números de contacto ajustados aparecen en caso de error.
Se utiliza la unidad de temperatura °C (valor de ajuste inicial).
Se utiliza la unidad de temperatura °F.
Aparece la temperatura del aire de la habitación (valor de ajuste
inicial).
No aparece la temperatura del aire de la habitación.
“Automatic cooling” (Refrigeración automática) o “Automatic heating”
(Calefacción automática) aparece cuando está en funcionamiento el
modo automático (valor de ajuste inicial).
En el modo automático, sólo aparece “Automatic” (Automático).
Page 81

8. Selección de función
[Ajuste detallado]
[4]–1. Ajuste de Cambio de idioma
Se puede seleccionar el idioma que aparece en el indicador de puntos.
• Presione el botón [ MENU] G para cambiar el idioma.
1 Inglés (GB), 2 Alemán (D), 3 Español (E), 4 Ruso (RU),
5 Italiano (I), 6 Chino (CH), 7 Francés (F), 8 Japonés (JP)
Consulte la tabla del indicador de puntos.
[4]–2. Límite de funciones
(1) Ajuste del límite de funciones (bloqueo de funciones)
• Para cambiar el ajuste, presione el botón [ ON/OFF] D.
1 no1: Se realiza el ajuste de bloqueo de funcionamiento en to-
dos los botones salvo en el botón [ ON/OFF].
2 no2: Se realiza el ajuste de bloqueo de funcionamiento en to-
dos los botones.
3 OFF (Valor del ajuste inicial):
No se realiza el bloqueo de funcionamiento.
* Para que el bloqueo de funcionamiento sea válido en la pantalla
normal, hay que presionar los botones (Presione y mantenga pulsados a la vez los botones [FILTER] y [ ON/OFF] durante dos
segundos) en la pantalla normal una vez que se ha realizado el
ajuste anterior.
(2) Uso del ajuste de modo automático
Cuando se conecta el controlador remoto a la unidad que tiene ajustado el modo funcionamiento automático, se pueden realizar los siguientes ajustes.
• Para cambiar el ajuste, presione el botón [ ON/OFF] D.
1 ON (Valor del ajuste inicial):
Aparece el modo automático cuando se selecciona el
modo de funcionamiento.
2 OFF: No aparece el modo automático cuando se selecciona el
modo de funcionamiento.
(3) Ajuste del límite de rango de temperatura
Una vez que se realiza el ajuste, se puede cambiar la temperatura
dentro del rango establecido.
• Para cambiar el ajuste, presione el botón [ ON/OFF] D.
1LIMIT TEMP MODO FRÍO:
El rango de temperatura se puede cambiar en modo refrigeración/secado.
2LIMIT TEMP MODO CALOR:
El rango de temperatura se puede cambiar en modo calefacción.
3LIMIT TEMP MODO AUTO:
El rango de temperatura se puede cambiar en modo automático.
4OFF (ajuste inicial):
No está activo el límite de rango de temperatura.
* Cuando se ajusta una posición distinta de la de desactivación
(OFF), se ajusta a la vez el límite de rango de temperatura en
modo refrigeración, calefacción y automático. No obstante, no se
puede limitar el rango cuando no ha cambiado el rango de temperatura establecido.
• Para disminuir o aumentar la temperatura, presione el botón
[ TEMP. ( ) o ( )] F.
• Para cambiar el ajuste de límite superior y el ajuste de límite inferior, presione el botón [ ] H. El ajuste seleccionado parpadeará y ya se puede ajustar la temperatura.
• Rango ajustable
Modo Refrigeración/Secado:
Límite inferior: 19°C a 30°CLímite superior: 30°C a 19°C
Modo Calefacción:
Límite inferior: 17°C a 28°CLímite superior: 28°C a 17°C
Modo Automático:
Límite inferior: 19°C a 28°CLímite superior: 28°C a 19°C
[4]–3. Ajuste de selección de modo
(1) Ajuste del controlador remoto principal/secundario
• Para cambiar el ajuste, presione el botón [ ON/OFF] D.
1Principal: El controlador será el principal.
2Secundario:El controlador será el secundario.
(2) Uso del ajuste del reloj
• Para cambiar el ajuste, presione el botón [ ON/OFF] D.
1ON: Se puede usar la función de reloj.
2OFF: No se puede usar la función de reloj.
(3) Ajuste de la función de temporizador
• Para cambiar el ajuste, presione el botón [ ON/OFF] D (Elija
una de las siguientes funciones).
1TEMPORIZADOR SEMANAL (Valor del ajuste inicial):
Se puede usar el temporizador semanal.
2APAGADO AUTOMÁTICO:
Se puede usar el temporizador de desactivación automática.
3TEMPORIZADOR SIMPLE:
Se puede usar el temporizador simple.
4TEMPORIZADOR APAGADO:
No se puede usar el modo temporizador.
* Cuando el uso del ajuste de reloj está desactivado (OFF), no se
puede usar el “TEMPORIZADOR SEMANAL”.
(4) Ajuste de número de contacto en caso de error
• Para cambiar el ajuste, presione el botón [ ON/OFF] D.
1CALL OFF:
Los números de contacto establecidos no aparecen en el indicador en caso de error.
2CALL **** *** ****:
Los números de contacto establecidos aparecen en el indicador en caso de error.
CALL_:
El número de contacto se puede ajustar cuando el indicador
aparece según se muestra a la izquierda.
• Ajuste de los números de contacto
Para ajustar los números de contacto, proceda del siguiente
modo.
Mueva el cursor parpadeante para ajustar los números. Presione el botón [ TEMP. ( ) y ( )] F para mover el cursor a la
derecha (izquierda). Presione el botón [ CLOCK ( ) y ( )]
(Reloj) C para ajustar los números.
[4]–4. Ajuste del cambio de indicador
(1) Ajuste del indicador de temperatura °C/°F
• Para cambiar el ajuste, presione el botón [ ON/OFF] D.
1 °C: Se utiliza la unidad de temperatura en °C.
2 °F: Se utiliza la unidad de temperatura en °F.
(2) Ajuste del indicador de temperatura del aire de aspiración
• Para cambiar el ajuste, presione el botón [ ON/OFF] D.
1 ON: Aparece la temperatura del aire de aspiración.
2 OFF: No aparece la temperatura del aire de aspiración.
(3) Ajuste del indicador de refrigeración/calefacción automática
• Para cambiar el ajuste, presione el botón [ ON/OFF] D.
1 ON: Aparece la posición “Automatic cooling” (Refrigeración
automática) o “Automatic heating” (Calefacción automática) en el modo automático.
2 OFF: Sólo aparece la posición “Automatic” (Automático) en el
modo automático.
81
Page 82

8. Selección de función
[Tabla del indicador de puntos]
Idioma ajustado
Tiempo de espera de arranque
Modo de
funcionamiento
Temperatura ajustada
Velocidad del ventilador
Botón no disponible
Comprobación (error)
Prueba de funcionamiento
Auto-revisión
Selección de función en la unidad
Ajuste de ventilación
Enfriamiento
Secado
Calefacción
Automático
Automático
(Enfriamiento)
Automático
(Calefacción)
Ventilador
Ventilación
Espera
(calentando)
Descongelación
English Germany Spanish Russian Italy Chinese French Japanese
Idioma ajustado
Cambio de idioma
Selección de función
Ajuste de límite de funcionamiento
de una operación
Utilización del ajuste de modo automático
Ajuste de límite de rango de temperatura
Límite de temperatura modo refrigeración/día
Límite de temperatura modo de calefacción
Límite de temperatura modo automático
Selección de modo
Ajuste de controlador remoto MAIN
(PRINCIPAL)
Ajuste de controlador remoto SUB
(SECUNDARIO)
Utilización del ajuste del reloj
Ajuste del día de la semana y la
hora
Ajuste del temporizador
Visualización del temporizador
Temporizador semanal
Modo de temporizador apagado
Temporizador de apagado automá-
tico
Temporizador simple
Ajuste de número de contacto en
caso de avería
Cambio de indicación
Ajuste de visualización de temperatura °C/°F
Ajuste de visualización de la temperatura del aire de la habitación
Ajuste de visualización de refrigeración/calefacción automática
English Germany Spanish Russian Italy Chinese French Japanese
82
Page 83

ON/OFF
TEMP.
˚C
˚C
FILTER
B
A
D
C
A B C D E
A
B
9. Funcionamiento de emergencia del controlador remoto inalámbrico
Cuando no puede utilizar el controlador remoto
Cuando se agoten las pilas del controlador remoto o éste tenga algún
fallo, puede llevar a cabo el funcionamiento de emergencia mediante los
botones de emergencia que se encuentran en la rejilla del controlador.
A Luz DEFROST/STAND BY (DESCONGELACIÓN/RESERVA)
B Luz de funcionamiento
C Interruptor de funcionamiento de emergencia (calefacción)
D Interruptor de funcionamiento de emergencia (refrigeración)
E Receptor
Inicio del funcionamiento
• Para accionar el modo de enfriamiento, pulse el botón D.
• Para accionar el modo de calefacción, pulse el botón C.
Nota:
• Los detalles correspondientes al modo de emergencia aparecen a continuación.
Los detalles correspondientes al MODO DE EMERGENCIA aparecen a
continuación.
Modo de funcionamiento
REFRIGERACIÓN CALEFACCIÓN
Temperatura 24°C24°C
SLP-2AL (Para SLZ-KA25/KA35/KA50VAL)
Velocidad del ventilador
Dirección del flujo de aire
Parada del funcionamiento
Alta Alta
Horizontal Hacia abajo 4
• Para detener el funcionamiento, pulse el botón D o el botón C.
10. Mantenimiento y limpieza
■ Indica que el filtro necesita una limpieza.
Limpie el filtro.
■ Cuando restablezca el indicador “FILTER” (Filtro)
Cuando presiona el botón [FILTER] (Filtro) dos veces sucesivamente después de haber limpiado el filtro, el indicador se apagará y se restablecerá.
Nota:
● Cuando se controlan dos o más tipos diferentes de unidad interior, el perio-
do de limpieza difiere con el tipo de filtro. Cuando llega el momento de limpiar la unidad principal, aparece “FILTER” (Filtro). Cuando se apague el indicador del filtro, el tiempo acumulado se reajustará.
● “FILTER” (Filtro) indica el periodo de limpieza en que se usó el acondiciona-
dor de aire bajo las condiciones generales de aire interior por tiempo. Ya que
el grado de suciedad depende de las condiciones ambientales, limpie el filtro de acuerdo con las circunstancias.
● El periodo acumulado de limpieza del filtro difiere según el modelo.
● Esta indicación no está disponible en el controlador remoto inalámbrico.
ss
sLimpieza de los filtros
ss
• Limpie los filtros con ayuda de una aspiradora. Si no tiene aspiradora,
golpee suavemente los filtros contra un objeto sólido para desprender
el polvo y la suciedad.
• Si los filtros están especialmente sucios, lávelos con agua tibia. Tenga
cuidado de aclarar bien cualquier resto de detergente y deje que los filtros se sequen completamente antes de volver a ponerlos en la unidad.
Cuidado:
• No seque los filtros colocándolos al sol o con una fuente de calor
como el de una estufa eléctrica; podrían deformarse.
• No lave los filtros en agua caliente (más de 50°C) ya que se deformarían.
• Cerciórese de que los filtros están siempre instalados. El funcionamiento de la unidad sin filtros puede provocar un mal funcionamiento.
ss
sRetirada del filtro
ss
Cuidado:
• Al retirar el filtro, tenga cuidado de protegerse los ojos del polvo.
Asimismo, si para hacerlo tiene que subirse a un taburete, tenga
cuidado de no caerse.
• Una vez retirado el filtro, no toque las partes metálicas que hay en
la unidad interior, ya que puede causarle heridas.
■ SLZ-KA·VA(L)
1 Tire del pomo de la rejilla de admisión en la dirección indicada por la
flecha y la rejilla se abrirá.
2 Abra la rejilla de admisión.
3 Suelte la perilla del borde central de la rejilla de admisión y tire del
filtro hacia delante para extraerlo.
A Perilla B Rejilla C Rejilla de admisión D Filtro
■ SEZ-KA·VA
Cuidado:
• Antes de empezar la limpieza, apague la fuente de alimentación.
• Las unidades interiores están equipadas con un filtro que elimina
el polvo del aire aspirado. Limpie el filtro usando los métodos indicados en las ilustraciones siguientes.
• Confirme con el instalador la ubicación y el método de instalación
del filtro de aire durante la prueba de funcionamiento del acondicionador de aire. (Ejemplo) El filtro de aire se debe acoplar a la toma de
aire de la unidad interior (parte posterior o inferior de la unidad).
A Toma de aire B Filtro
83
Page 84

WEEKLY
SIMPLE
AUTO OFF
11. Localización de fallos
¿Problemas?
El acondicionador de aire no calienta o refrigera bien.
Cuando comienza el modo de calefacción, al principio no sale aire caliente
de la unidad interior.
Durante el modo de calefacción, el acondicionador de aire se detiene antes de alcanzar la temperatura ajustada para la habitación.
La dirección del aire cambia durante el funcionamiento o no es posible
cambiar la dirección del flujo de aire.
Cuando cambia la dirección del flujo de aire, los deflectores siempre se
mueven arriba y abajo antes de detenerse en la posición ajustada.
Se oye un sonido de agua fluyendo o, en ocasiones, una especie de silbido.
Se oye un traqueteo o un chirrido.
Hay un olor desagradable en la sala.
La unidad interior expulsa un vaho o humo blanco.
La unidad exterior expulsa agua o vapor.
El indicador de operación no aparece en la pantalla del controlador remoto.
En la pantalla del controlador remoto aparece “ ”.
Al reiniciar el acondicionador de aire poco después de apagarlo, no funciona al pulsar el botón ON/OFF (ENCENDIDO/APAGADO).
El acondicionador de aire funciona sin haber pulsado el botón ON/OFF
(ENCENDIDO/APAGADO).
El acondicionador de aire se detiene sin haber pulsado el botón ON/OFF
(ENCENDIDO/APAGADO).
No es posible ajustar el funcionamiento del temporizador del controlador
remoto.
En la pantalla del controlador remoto aparece “PLEASE WAIT” (POR FAVOR, ESPERE).
En la pantalla del controlador remoto aparece un código de error.
Se oye un ruido de drenaje de agua o rotación de motor.
Aquí tiene la solución. (La unidad funciona normalmente).
■ Limpie el filtro (el flujo de aire se reduce cuando el filtro está sucio o
atascado).
■ Compruebe el ajuste de temperatura y modifique la temperatura ajustada.
■ Asegúrese de que hay espacio suficiente alrededor de la unidad exte-
rior. ¿Está bloqueada la entrada o la salida de aire de la unidad interior?
■ ¿Ha dejado abierta una puerta o ventana?
■ El aire caliente no empieza a salir hasta que la unidad interior se ha
calentado lo suficiente.
■ Cuando la temperatura exterior es baja y la humedad es alta, puede
formarse escarcha en la unidad exterior. Si esto sucede, la unidad exterior iniciará la operación de descongelación. Una vez transcurridos unos
10 minutos, se reanudará el funcionamiento normal.
■ Durante el modo de refrigeración, los deflectores se mueven
automáticamente a la posición horizontal (inferior) tras 1 hora cuando se
ha seleccionado la dirección de flujo de aire inferior (horizontal). De esta
forma se evita que se acumule agua y caiga desde los deflectores.
■ Durante el modo de calefacció n, los deflectores se mueven
automáticamente a la posición de flujo de aire horizontal si la temperatura del flujo de aire es baja o durante el modo de descongelación.
■ Cuando cambia la dirección del flujo de aire, los deflectores se mueven
a la posición ajustada tras haber detectado la posición base.
■ Estos sonidos se pueden oír cuando el refrigerante fluye por el acondi-
cionador de aire o cuando cambia el flujo del refrigerante.
■ Estos ruidos se oyen cuando las piezas rozan entre sí debido a la ex-
pansión y contracción provocadas por los cambios de temperatura.
■ La unidad interior recoge aire que contiene gases producidos por las
paredes, moquetas y muebles, así como olores atrapados en las ropas
y después lo devuelve a la sala.
■ Si la temperatura y la humedad de la unidad interior son altas, esto puede
suceder inmediatamente tras encender el acondicionador de aire.
■ Durante el modo de descongelación, el aire frío puede salir hacia abajo
con la apariencia de vaho.
■ Durante el modo de refrigeración, puede acumularse agua y gotear de
las tuberías y juntas de refrigeración.
■ Durante el modo de calefacción, puede acumularse agua y gotear del
intercambiador de calor.
■ Durante el modo de descongelación, el agua del intercambiador de ca-
lor se evapora, por lo que se emite vapor de agua.
■ Encienda el equipo. En la pantalla del controlador remoto aparecerá el
indicador “ ”.
■ Durante el control central, “ ” aparece en la pantalla del controlador
remoto. El funcionamiento del acondicionador de aire no se puede iniciar ni detener con el controlador remoto.
■ Espere unos tres minutos.
(El funcionamiento se ha detenido para proteger el acondicionador de aire).
■ ¿Está ajustado el temporizador de encendido?
Pulse el botón ON/OFF (ENCENDIDO/APAGADO) para detener el funcionamiento.
■ ¿El acondicionador de aire está conectado a un controlador remoto central?
Consulte a la persona encargada de controlar el acondicionador de aire.
■ ¿Aparece “ ” en la pantalla del controlador remoto?
Consulte a la persona encargada de controlar el acondicionador de aire.
■ ¿Se ha ajustado la función de auto-recuperación para caídas de tensión?
Pulse el botón ON/OFF (ENCENDIDO/APAGADO) para detener el funcionamiento.
■ ¿Está ajustado el temporizador de apagado?
Pulse el botón ON/OFF (ENCENDIDO/APAGADO) para reiniciar el funcionamiento.
■ ¿El acondicionador de aire está conectado a un controlador remoto central?
Consulte a la persona encargada de controlar el acondicionador de aire.
■ ¿Aparece “ ” en la pantalla del controlador remoto?
Consulte a la persona encargada de controlar el acondicionador de aire.
■ ¿Los ajustes del temporizador no son válidos?
Si el temporizador se puede ajustar,
aparecerán en la pantalla del controlador remoto.
■ Se han realizado los ajustes iniciales. Espere unos 3 minutos.
■ Los dispositivos de protección se han activado para proteger el acondi-
cionador de aire.
■ No intente reparar el equipo usted mismo.
Apague inmediatamente el acondicionador de aire y póngase en contacto
con su distribuidor. Asegúrese de indicar al distribuidor el nombre del modelo y la información que aparecía en la pantalla del controlador remoto.
■ Cuando se detiene el funcionamiento de refrigeración, la bomba de dre-
naje se activa y luego se detiene. Espere unos 3 minutos.
,
o
84
Page 85

11. Localización de fallos
¿Problemas? Aquí tiene la solución. (La unidad funciona normalmente).
El ruido es mayor de lo indicado en las especificaciones.
■ El nivel de ruido del funcionamiento interior depende de la acústica de la
sala en cuestión tal y como se indica en la siguiente tabla, por lo que
puede ser superior a los valores de las especificaciones, que se midieron en salas sin eco.
Ejemplos de
lugares
Niveles de ruido
Salas de alta
absorbencia del sonido
Estudio de
radiotransmisión, salas
Salas normales
Sala de recep-
ción, hall de un
de mezclas, etc.
3 a 7 dB
hotel, etc.
6 a 10 dB
Salas de baja
absorbencia del sonido
Oficina, habita-
ción de hotel
9 a 13 dB
No aparece nada en la pantalla del controlador remoto inalámbrico, las
indicaciones apenas se ven o la unidad interior no recibe las señales a
menos que el controlador remoto esté muy cerca.
La luz de funcionamiento situada junto al receptor del controlador remoto
inalámbrico de la unidad interior parpadea.
12. Instalación, reubicación e inspección
Lugar para la instalación
Evite instalar el acondicionador de aire en los siguientes lugares:
• Donde pudiera gotear gas inflamable.
Cuidado:
No instale la unidad en lugares en los que pueda haber fugas de gas
inflamable.
Si se producen fugas de gas y éste se acumula se podría producir una
explosión.
• Donde haya mucho aceite de máquinas.
• Lugar de mucha sal como en la costa.
• Donde se genere gas sulfúrico, tal como aguas termales.
• Donde se salpique aceite o haya mucho humo graso.
Atención:
Si el acondicionador de aire funciona pero no genera fresco ni calefacción en la habitación (dependiendo del modelo), consulte con su distribuidor ya que puede tratarse de una fuga de refrigerante. Debe preguntar
al responsable del mantenimiento si existe o no una fuga de refrigerante
cuando se lleve a cabo la reparación.
El refrigerante cargado en el acondicionador de aire es seguro y normalmente no tiene fugas. No obstante, si existe pérdida de gas refrigerante en
el interior y entra en contacto con las llamas del calentador de un ventilador, calentador, horno o aparato similar, se generarán sustancias nocivas.
■ Las pilas apenas tienen carga.
Sustitúyalas y pulse el botón Reset (Restablecimiento).
■ Si la situación no cambia al sustituir las pilas, asegúrese de que están
colocadas con la polaridad correcta (+, –).
■ La función de autodiagnóstico se ha activado para proteger el acondi-
cionador de aire.
■ No intente reparar el equipo usted mismo.
Apague inmediatamente el acondicionador de aire y póngase en contacto con su distribuidor. Asegúrese de indicar al distribuidor el nombre
del modelo.
Lámpara
fluorescente tipo
inversor
Pared, etc.
Para evitar el efecto de
la lámpara fluorescente, manténgalo lo más
alejado posible.
Radio
Para evitar distorsión de las imágenes o ruidos,
manténgalo como
mínimo a 1 m.
Televisor
100 mm o más
Lugar seco
bien ventilado
400 mm o más
Partes eléctricas
• Facilite un circuito exclusivo para el suministro de corriente del condicionador de aire.
• Asegúrese de observar la potencia del interruptor.
Atención:
• No instale la unidad por su cuenta. Si la instalación es incorrecta podrían producirse incendios, descargas eléctricas, fugas de agua, podría
resultar herido de caerse el acondicionador de aire, etc.
• No haga la conexión mediante un conector múltiple o un alargo y no acople demasiados cables de alimentación a un mismo enchufe, ya que
podrían producirse descargas eléctricas por mala conexión, mal aislamiento, exceso de corriente, etc.
Póngase en contacto con su proveedor.
Cuidado:
• Conexión de la toma de tierra:
No conecte el cable de tierra a una tubería de gas o de agua, a un pararrayos o a la toma de tierra de un teléfono. Si la conexión a tierra no
se efectúa correctamente podrían producirse descargas eléctricas.
• Instale el interruptor contra tierras según el lugar en el que va a instalar la unidad de aire acondicionado (en un lugar húmedo, etc...). Si no
se instala el interruptor contra tierras se podrían producir descargas eléctricas.
Inspección y mantenimiento
• Si usa el acondicionador durante varias temporadas, es posible que su potencia se reduzca por acumulación de suciedad dentro de la unidad.
• Según las condiciones de uso, es posible que se produzcan algunos olores o que el agua de la deshumidificación no se desagüe correctamente debido
a la suciedad, el polvo, etc.
• Además del mantenimiento habitual se recomienda que solicite a un especialista la inspección y el mantenimiento (a su cargo) del acondicionador de
aire. Póngase en contacto con su proveedor.
85
Page 86

12. Instalación, reubicación e inspección
Observe también el sonido del funcionamiento
• No coloque nada sobre la salida de aire de la unidad exterior, ya que podría reducirse la potencia o aumentar el sonido producido por el funcionamiento.
• Si oye un ruido anormal mientras funciona, consulte a su proveedor.
Reubicación
• Cuando se ha de extraer o reinstalar el condicionador de aire debido a nueva construcción, cambio de casa, etc. se requieren técnicas y trabajos
especiales.
Atención:
No repare ni cambie de lugar el acondicionador de aire por su cuenta.
Si no se hace correctamente podrían producirse incendios, descargas eléctricas, fugas de agua, podría resultar herido de caerse el acondicionador de aire, etc. Póngase en contacto con su proveedor.
Cuando quiera deshacerse de la unidad
• Antes de tirar este artículo, consulte a su proveedor.
Ante cualquier duda, consulte a su proveedor
13. Especificaciones
Modelo
Función
Tensión
Portencia
Entrada kW
Unidad interior
Caudal (Baja-Media-Alta) CMM
Nivel de ruidos (Baja-Media-Alta) dB
Peso kg
Unidad exterior
Nivel de ruidos dB
Refrigerante R410A kg
Peso kg
Modelo
Función
Tensión
Portencia
Entrada kW
Unidad interior
Caudal (Baja-Alta) CMM
Presión estática
exterior
Nivel de ruidos (Baja-Alta) dB (A)
Peso kg
Unidad exterior
Nivel de ruidos dB (A)
Refrigerante R410A kg
Peso kg
kW
BTU/h
kW
BTU/h
Pa (mmAq)
SLZ-KA25VA (L)
Frío Calor
2,5 3,0
8.500 10.200
0,69 0,83
SLZ-KA25VA (L)
8-9-10
28-31-37
16,5 + Skyddsgaller 3
SUZ-KA25VA
46
0,90
33
SEZ-KA35VA
Frío Calor
3,5 4,0
11.900 13.600
1,06 1,10
SEZ-KA35VA
10-13
Std. : 30 (3)
Màx. : 50 (5)
30-35
33,5
SUZ-KA35VA
48
1,05
35
SLZ-KA35VA (L)
Frío Calor
~/N, 230V, 50Hz
3,5 4,0
11.900 13.600
1,06 1,10
SLZ-KA35VA (L)
16,5 + Skyddsgaller 3
SUZ-KA35VA
SEZ-KA50VA
Frío Calor
~/N, 230V, 50Hz
5,0 5,9
17.100 20.100
1,78 1,84
SEZ-KA50VA
12-17
Std. : 30 (3)
Màx. : 50 (5)
31-39
33,5
SUZ-KA50VA
55
1,6
53
8-9-11
29-33-38
48
1,05
35
Frío Calor
5,5 6,9
18.800 23.500
1,96 2,45
SEZ-KA60VA
SEZ-KA60VA
12-20
Std. : 30 (3)
Màx. : 50 (5)
32-43
33,5
SUZ-KA60VA
55
1,8
53
SLZ-KA50VA (L)
Frío Calor
4,6 5,0
15.700 17.100
1,63 1,55
SLZ-KA50VA (L)
8-9-11
30-34-39
16,5 + Skyddsgaller 3
SUZ-KA50VA
55
1,6
53
SEZ-KA71VA
Frío Calor
7,1 8,1
24.200 27.600
2,46 2,36
SEZ-KA71VA
12-20
Std. : 30 (3)
Màx. : 50 (5)
32-43
35
SUZ-KA71VA
55
2,0
58
Notas: 1. Condiciones de evaluación (frío) Interior : 27°C DB, 19°C WB Fuera : 35°C DB
2. Condiciones de evaluación (calor) Interior : 20°C DB Fuera : 7°C DB, 6°C WB
3. Especificaciones sujetas a cambios sin previo aviso.
Gama de funcionamiento garantizado
Interior
Frío
Calor
La instalación de las unidades la realizará un técnico electricista autorizado según la normativa local.
Máximo 32°C DB, 23°C WB 46°C DB, – 43°C DB, –
Mínimo 21°C DB, 15°C WB -10°C DB, –
Máximo 27°C DB, – 24°C DB, 18°C WB
Mínimo 20°C DB, – -10°C DB, -11°C WB
KA25, KA35
Fuera
KA50, KA60, KA71
86
Page 87

Indice
1. Misure di sicurezza ............................................................. 87
2. Nomenclatura delle parti ..................................................... 87
3. Configurazione schermo ..................................................... 90
4. Impostazione del giorno della settimana e dell’ora ............. 90
5. Funzionamento ................................................................... 90
6. Timer ................................................................................... 92
Nota (Marcatura per
la direttiva WEEE)
Questo simbolo è destinato solo ai paesi dell’UE.
Questo simbolo è conforme alla direttiva 2002/96/CE, Articolo 10, Informazioni per gli utenti, e all’Allegato IV.
Questo prodotto MITSUBISHI ELECTRIC è stato fabbricato con materiali e componenti di alta qualità, che possono essere riciclati e
riutilizzati.
Questo simbolo significa che i prodotti elettrici ed elettronici devono essere smaltiti separatamente dai rifiuti casalinghi alla fine della
loro vita di servizio.
Per disfarsi di questo prodotto, portarlo al centro di raccolta/riciclaggio dei rifiuti solidi urbani locale.
Nell’Unione Europea ci sono sistemi di raccolta differenziata per i prodotti elettrici ed elettronici usati.
Aiutateci a conservare l’ambiente in cui viviamo!
1. Misure di sicurezza
s Leggere attentamente la sezione “Misure di sicurezza”
prima di far funzionare l’unità.
s La sezione “Misure di sicurezza” contiene informazioni
importanti sulla sicurezza di funzionamento dell’unità.
Accertarsi che vengano seguite perfettamente.
s Prima di collegare l’equipaggiamento alla rete di alimen-
tazione, contattare o chiedere l’autorizzazione dell’autorità competente.
7. Altre funzioni ....................................................................... 95
8. Selezione delle funzioni ...................................................... 96
9. Funzionamento d’emergenza per il telecomando senza fili ..... 100
10. Cura e pulizia .................................................................. 100
11. Ricerca dei guasti ............................................................ 101
12. Installazione, spostamento e controllo ............................ 102
13. Specifiche tecniche ......................................................... 103
Simboli utilizzati nel testo
Avvertenza:
Descrive le precauzioni da prendere per evitare il rischio di lesioni,
anche mortali, per l’utente.
Cautela:
Descrive le precauzioni da prendere per evitare il danneggiamento
dell’unità.
Simboli utilizzati nelle illustrazioni
: Indica la necessità di collegare un componente a massa.
Avvertenza:
• L’unità non deve essere installata dall’utente. Richiedere al distributore o ad
una società autorizzata di installare l’unità. Se l’unità non è installata correttamente, vi è il rischio di perdite d’acqua, di scosse elettriche o di incendio.
• Non salire e non appoggiare alcun oggetto sull’unità.
• Non spruzzare acqua sull’unità e non toccarla con le mani bagnate. Ciò può
provocare una scossa elettrica.
• Non spruzzare gas combustibile nei pressi dell’unità, per evitare il rischio di
un incendio.
• Non piazzare un riscaldatore a gas o qualsiasi altro apparecchio a fiamma
aperta in un luogo esposto all’aria scaricata dall’unità. Ciò può essere alla
base di una combustione incompleta.
• Non rimuovere il pannello anteriore o la griglia di protezione del ventilatore
dalla sezione esterna durante il funzionamento dell’unità.
Cautela:
• Non usare alcun oggetto appuntito per premere i pulsanti, in modo da non
danneggiare il comando a distanza.
• Non bloccare o coprire gli ingressi o le uscite interni od esterni dell’unità.
2. Nomenclatura delle parti
■ Unità interna
SLZ-KA·VA
SLZ-KA·VAL
Livello ventilatore 3 livelli 2 livelli
Deflettore Auto con oscillazione –
Aletta – –
Filtro Lunga durata Normale
Indicazione di pulizia filtro 2.500 ore –
■ SLZ-KA·VA/SLZ-KA·VAL
Cassetta a 4 vie per installazione a soffitto
SEZ-KA·VA
• Qualora vengano notati rumori o vibrazioni di intensità eccezionale, arrestare il funzionamento, spegnere l'unità e contattare il proprio rivenditore.
• Non inserire le dita, oggetti appuntiti, ecc, nei fori di entrata o di uscita dell’unità.
• In presenza di odori particolari, arrestare il funzionamento dell’unità, spegnere l’interruttore di alimentazione e contattare il proprio distributore. Ciò
per evitare un’interruzione di corrente, una scossa elettrica od un incendio.
• Il climatizzatore NON può essere usato da bambini o persone inferme senza
la sorveglianza appropriata.
• È opportuno sorvegliare i bambini piccoli affinché non giochino con il
climatizzatore.
• In caso di fuoriuscita del gas refrigerante, arrestare il funzionamento dell'unità, ventilare completamente la stanza e contattare il proprio rivenditore.
Eliminazione dell’unità
Se occorre eliminare l’unità, contattare il proprio distributore.
■ SEZ-KA·VA
A controsoffitto
Ingresso
aria
Filtro
Uscita d’aria
Deflettore
Uscita
d’aria
Ingresso aria
Filtro (fondo o retro)
87
Page 88

PAR-21MAA
ON/OFF
FILTER
CHECK
OPERATION
CLEAR
TEST
TEMP.
MENU
BACK DAY
MONITOR/SET
CLOCK
ON/OFF
2. Nomenclatura delle parti
■ Per il regolatore a distanza con fili
Sezione display
In questa spiegazione, tutte le parti
del display sono raffigurate illuminate. Durante il normale funzionamento saranno illuminate soltanto le parti appropriate.
Identifica la modalità di
funzionamento corrente
Visualizza la modalità di funzionamento, ecc.
* È supportato il display
multilingue.
Indicatore “Centrally
controlled”
Indica che il funzionamento del
telecomando è stato disattivato da
un dispositivo di controllo master.
Indicatore “Timer Is Off”
Indica che il timer è spento.
Impostazione temperatura
Visualizza la temperatura di riferimento.
Giorno della settimana
Visualizza il giorno corrente della settimana.
Display ora/timer
Visualizza l’ora corrente, a meno che non sia impostato il timer semplice o di arresto automatico.
Se è impostato il timer semplice o di arresto automatico, viene visualizzato il tempo rimanente.
TIME SUN MON TUE WED THU FRI SAT
TIMER
AFTER
ERROR CODE
˚F˚C
Hr
AFTER
˚F˚C
ONLY1Hr.
Indicatore “Up/Down Air
Direction”
L’indicatore visualizza la direzione del flusso d’aria in uscita.
Indicatore “One Hour Only”
Viene visualizzato se il flusso d’aria è impo-
stato per essere ridotto e direzionato verso
il basso in modalità COOL (Raffreddamento) o DRY (Deumidificazione). (Il funzionamento varia a seconda del modello).
L’indicatore si spegne dopo un’ora, e al suo
spegnimento cambia anche la direzione
del flusso d’aria.
Display Temperatura
ambiente
Visualizza la temperatura ambiente.
La gamma di visualizzazione della temperatura ambiente è 8–39 °C. Se la
temperatura è inferiore a 8 °C o supe-
riore a 39 °C, il display lampeggia.
Display deflettore
Indica l’azione del deflettore. Non viene visualizzato se il deflettore è fermo.
(Indicatore “Power on”)
Indica l’accensione dell’apparecchio.
ON
OFF
FUNCTION
FILTER
WEEKLY
SIMPLE
AUTO OFF
Indicatore “Sensore”
Visualizzata quando il sensore telecomando viene utilizzato.
Indicatore “Locked”
Segnala che i tasti del telecomando
sono stati bloccati.
Indicatore “Clean The Filter”
Si accende quando è richiesta una
pulizia del filtro.
Indicatori del timer
L’indicatore si accende se è impostato
il timer corrispondente.
Indicatore “Fan Speed”
Visualizza la velocità selezionata per
la ventola.
Indicatore “Ventilation”
Viene visualizzato quando l’unità funziona in modalità di Ventilazione.
Sezione di controllo
Pulsanti per l’impostazione della temperatura
Giù
Su
Pulsante “Timer menu”
(Pulsante “Monitor/Set”)
Pulsante “Mode”
(Pulsante “Return”)
Pulsanti per l’impostazione dell’ora
Avanti
Indietro
Pulsante “Timer On/Off”
(Pulsante “Set Day”)
Apertura dello
sportellino.
Sensore di temperatura
incorporato
Nota:
● Messaggio “PLEASE WAIT” (attendere prego)
Questo messaggio appare per circa 3 minuti quando l’unità interna viene alimentata o quando l’unità riprende a funzionare dopo un’interruzione di
corrente.
● Messaggio “NOT AVAILABLE” (non disponibile)
Questo messaggio compare se è stato premuto il pulsante di attivazione di una funzione di cui l’unità non dispone.
Se viene utilizzato un solo telecomando per attivare simultaneamente più unità interne di diversi modelli, questo messaggio non sarà visualizzato se
una delle unità interne è dotata della funzione in questione.
Pulsante “ON/OFF”
Pulsante “Fan Speed”
Pulsante “Filter”
(pulsante )
Pulsante “Test Run”
Pulsante “Check”
(Pulsante “Clear”)
Pulsante “Airflow Up/Down”
Pulsante “Louver”
(Pulsante “Operation”
Al numero di operazione precedente.
Pulsante “Ventilation”
(Pulsante “Operation”
Al numero di operazione successivo.
)
)
88
Page 89

2. Nomenclatura delle parti
1
2
3
AUTO
COOL
DRY
HEAT
FAN
VANE
SELECT
TIME
■ Per il regolatore a distanza senza fili
[Solo SLZ-KA·VAL]
Pulsante ON/OFF
Premendo questo pulsante si avvia il funzionamento. Premendolo
di nuovo si arresta il funzionamento.
Pulsante MODE SELECT
(selezione modo)
Questo pulsante consente di selezionare le modalità automatico,
raffreddamento, riscaldamento e
deumidificazione. (SLZ)
ON/OFF
AUTO COOL
DRY
HEAT
MODE
TOO
WARM
FAN
VANE
h
TOO
COOL
SELECT
TIME
RESET
Pulsante SET TEMPERATURE (regolazione della temperatura)
Il pulsante SET TEMPERATURE
consente di impostare qualsiasi
temperatura desiderata.
Pulsante TIMER SELECT
(selezione timer)
Serve a selezionare l’avvio o l’ar-
resto preprogrammati.
Pulsante FAN SPEED
(velocità del ventilatore)
Questo pulsante consente di impostare la velocità del ventilatore
su un valore basso, medio o alto.
Pulsante VANE CONTROL
(controllo del deflettore)
Serve a modificare la direzione
del flusso d’aria.
■ Quando si utilizza il telecomando senza fili, puntarlo verso il ricevitore dell’unità interna.
■ Se si aziona il telecomando entro circa due minuti dall’accensione dell’unità interna, l’unità
potrebbe emettere due segnali acustici per segnalare che è occupata ad eseguire il controllo automatico iniziale.
■ L’unità interna emette i segnali sonori per confermare la ricezione del segnale trasmesso
dal telecomando. L’unità interna può ricevere segnali entro un raggio di circa 7 metri in linea
diretta ad un’angolazione di circa 45° verso sinistra e verso destra. Tuttavia, la presenza di
luci fluorescenti ed altre luci intense può compromettere la capacità di ricezione dei segnali
dell’unità interna.
■ Se la spia di funzionamento accanto al ricevitore dell’unità interna lampeggia, è necessario
sottoporre l’unità ad un controllo. Rivolgersi al concessionario.
■ Maneggiare il telecomando con cura! Non farlo cadere né sottoporlo a forti urti. Fare inoltre
attenzione a non bagnare il telecomando e a non lasciarlo in luoghi molto umidi.
■ Per evitare di lasciare il telecomando in luoghi inadatti, montare alla parete il supporto
fornito con il telecomando e ricordare di inserire sempre il telecomando nel supporto dopo
l’uso.
■ Unità esterna
Alimentazione
Tubi ref.
Filo di collegamento
interno-esterno
Installazione/sostituzione delle batterie
[Solo SLZ-KA·VAL]
1. Togliere il coperchio superiore, inserire due batterie AAA e rimettere il coperchio superiore.
Coperchio
superiore
2. Premere il pulsante Reset.
Due batterie AAA
Inserire prima l’estre-
mità negativa (–) di
ciascuna delle batterie. Inserire le batterie
nelle direzioni giuste
(+, –)!
Premere il pulsante
Reset con un oggetto
dall’estremità
appuntita.
Terra
89
Page 90

ON/OFF
RESET
TOO
WARM
TOO
COOL
MODE
AUTO COOL
DRY
HEAT
FAN
VANE
SELECT
TIME
h
1
2
5
6
3
3
5
6
2
˚C
˚C
TIME SUN
PAR-21MAA
ON/OFF
FILTER
CHECK
OPERATION
CLEAR
TEST
TEMP.
MENU
BACK DAY
MONITOR/SET
CLOCK
ON/OFF
2
4
9
1
A
TIME SUN
2
3
4
˚C
˚C
PAR-21MAA
ON/OFF
FILTER
CHECK
OPERATION
CLEAR
TEST
TEMP.
MENU
BACK DAY
MONITOR/SET
CLOCK
ON/OFF
2
7
2
3
3
8
6
4
5
8
7
1
1
5
6
˚F˚C
TIMER
MON
OFF
WEEKLY
SUN MON TUE WED THU FRI SAT
WEEKLY
˚F˚C
˚C
TIME SUN
3. Configurazione schermo
<Tipi di schermate>
Selezione funzioni Imposta giorno/ora
Per la lingua del display è possibile impostare l’italiano utilizzando la selezione della funzione del telecomando. Per modificare la lingua, vedere la
sezione 8, elemento [4]-1.
L'impostazione iniziale è inglese.
● Selezione funzioni: Impostazione delle funzioni e degli intervalli dispo-
ADC
Schermate di controllo standard
OFF ON
BC
● Imposta giorno/ora: Impostazione del giorno corrente della settimana.
● Schermate di controllo standard:
● Controllo timer: Visualizzazione del timer correntemente impostato
● Impostazione timer:Impostazione del funzionamento di qualsiasi timer
Controllo timer Impostazione timer
B
<Come modificare la schermata>
Per andare su A : Tenere premuti per 2 secondi il pulsante “Mode” e il
Per andare su B : Premere il pulsante “Timer Menu”.
Per andare su C : Premere il pulsante “Mode” (“Return”).
Per andare su D : Premere uno dei due pulsanti “Set Time” ( o ).
4. Impostazione del giorno della settimana e dell’ora
nibili sul telecomando (funzioni del timer, limitazioni
di funzionamento, ecc.)
Visualizzazione e impostazione dello stato di funzionamento dell’impianto di condizionamento
(timer settimanale, timer semplice, o timer di arresto automatico)
(timer settimanale, timer semplice, o timer di arresto automatico)
pulsante “Timer On/Off”.
Display Giorno della
settimana e ora
Nota:
● Il giorno e l’ora non saranno visualizzati se in Selezione funzioni è stato
disattivato l’uso dell’orologio.
● Al ritorno della corrente, l’unità interna resta inattiva per tre minuti. Il funzio-
namento sopra descritto è normale.
5. Funzionamento
Impostazione del giorno della settimana
Impostazione dell’ora
1. Premere il pulsante “Set Time” o A per visualizzare il display 2.
2. Premere il pulsante “Timer On/Off” (Set Day) 9 per impostare il giorno.
* Ad ogni pressione del pulsante si passa al giorno successivo a quello
visualizzato in 3 : Dom → Lun → ... → Ven → Sab.
3. Premere il pulsante “Set Time” appropriato A per regolare l’ora nel modo
desiderato.
* Tenendo premuto il pulsante, l’ora (v. 4) aumenterà prima ad inter-
valli di un minuto, poi ad intervalli di dieci minuti, e quindi ad intervalli
di un’ora.
4. Dopo aver effettuato le impostazioni appropriate ai passaggi 2 e 3 premere il pulsante 4 “Filter” per confermare i valori.
5.1. Accensione/Spegnimento
<Per avviare il funzionamento>
■ Premere il pulsante “ON/OFF” 1.
• L’indicatore ON 1 e l’area display sono illuminate.
Nota:
● Quando si riavvia l’unità, sono attive le seguenti impostazioni.
Modalità
Impostazione della temperatura
Velocità della ventola
Flusso d’aria verso l’alto/il
basso
90
Impostazioni del telecomando
Ultima impostazione
Ultima impostazione
Ultima impostazione
Modalità
COOL o DRY
HEAT
FAN
Uscita orizz.
Ultima impostazione
Uscita orizz.
Page 91

5. Funzionamento
51234
<Interrompere il funzionamento>
■ Premere nuovamente il pulsante “ON/OFF” 1.
• L’indicatore ON 1 e l’area display si spegneranno.
Nota:
Anche se viene premuto il pulsante ON/OFF immediatamente dopo lo spegnimento dell’unità, il condizionatore non si avvierà durante tre minuti. Ciò serve
ad evitare che i componenti interni rimangano danneggiati.
5.2. Selezione della modalità
■ Premere il pulsante della modalità di funzionamento ( ) 2 e
selezionare la modalità desiderata 2.
s
Modalità di raffreddamento
Modalità di deumidificazione
Modalità di ventilazione
Modalità di riscaldamento
Modalità automatica (raffreddamento/riscaldamento)
Modo Ventilazione
Indicato solo alla condizione seguente
Telecomando con filo utilizzato
LOSSNAY collegato.
Informazioni relative al condizionatore dell’aria multi
system (Sezione esterna: serie MXZ)
ss
sCondizionatore dell’aria Multi System (sezione esterna: serie MXZ)
ss
può collegare più di due unità ad una singola sezione esterna. Conformemente alla capacità, è possibile far funzionare simultaneamente più di due sezioni interne.
• Quando si cerca di far funzionare più di due sezioni interne simultaneamente ad una singola sezione esterna, una per il raffreddamento e l’al-
tra per il riscaldamento, viene selezionata la modalità di funzionamento
della sezione interna che funziona per prima. Le altre unità interne che
inizieranno a funzionare più tardi non potranno ancora funzionare; il loro
stato sarà indicato dal lampeggiamento.
In questo caso, si prega di impostare tutte le sezioni interne nella stessa
modalità di funzionamento.
• Quando l’unità interna funziona in modalità (AUTO), può accadere
che non riesca a passare alla modalità di funzionamento (RAFFREDDAMENTO ↔ RISCALDAMENTO); in questo caso l’unità entrerà in stato
di attesa (standby).
• Quando la sezione interna inizia a funzionare una volta completata la
fase di sbrinamento della sezione esterna, ci vorranno alcuni minuti (max.
circa 15 minuti) prima che venga soffiata aria calda.
• In modalità riscaldamento, se la parte superiore della sezione interna
diventa calda o viene percepito il rumore causato dal flusso di gas, non
si è in presenza, nei due casi, di un malfunzionamento. Il motivo è da
ricercarsi nel fatto che il gas refrigerante scorre continuamente all’inter-
no della sezione interna anche questa non sta funzionando.
Funzionamento automatico
■ Sulla base della temperatura impostata, se la temperatura ambiente è
troppo alta si avvia il funzionamento in raffreddamento; se è invece troppo bassa, si avvia il funzionamento in riscaldamento.
■ Durante il funzionamento automatico, se la temperatura ambiente cambia e per 15 minuti supera di almeno 2 °C la temperatura impostata, il
condizionatore passa al modo raffreddamento. Analogamente, se la temperatura ambiente resta per 15 minuti inferiore di almeno 2 °C alla temperatura impostata, il condizionatore passa al modo riscaldamento.
Modalità di raffreddamento
15 minuti (passaggio dal raffreddamento al riscaldamento)
■ Poiché la temperatura ambiente viene automaticamente regolata in modo
da mantenere costante una temperatura prestabilita, al raggiungimento della temperatura prestabilita il raffreddamento viene eseguito con qualche grado
in più ed il riscaldamento con qualche grado in meno rispetto alla temperatura ambiente impostata (funzionamento in risparmio energia automatico).
15 minuti (passaggio dal
riscaldamento al raffreddamento)
Temperatura impostata
+2°C
Temperatura impostata
Temperatura impostata
-2°C
5.3. Impostazione della temperatura
ss
sPer abbassare la temperatura della stanza:
ss
Premere il pulsante 3 per impostare la temperatura desiderata.
Verrà visualizzata la temperatura selezionata 3.
ss
sPer aumentare la temperatura della stanza:
ss
Premere il pulsante 3 per impostare la temperatura desiderata.
Verrà visualizzata la temperatura selezionata 3.
• I campi di valori della temperatura disponibili sono:
Raffreddamento e deumidificazione: 19 - 30 °C
Riscaldamento: 17 - 28 °C
Automatico: 19 - 28 °C
• Sul display lampeggia sia 8 °C - 39 °C per informarvi se la temperatura
della stanza è inferiore o superiore a quella visualizzata.
5.4. Impostazione della velocità ventilatore
■ Premere il pulsante “Fan Speed” 5 il numero di volte necessario quando
l’impianto è in funzione.
• Ad ogni pressione sarà modificata la potenza. La velocità correntemente selezionata è illustrata in 5.
• Di seguito sono riportate le sequenze di cambiamento e le impostazioni
disponibili.
Velocità del
ventilatore
( )
3 modalità
Velocità del
ventilatore
2 modalità
Display del regolatore a distanza
Bassa Media Alta
▼
( )
( )
▼
▼
Display del regolatore a distanza
Bassa Alta
▼
▼
• I valori visualizzati per il telecomando senza fili sono indicati tra parentesi.
Nota:
● Il numero di velocità ventola disponibili dipende dal tipo di unità collegata.
Tenere presente anche che su alcune unità non è disponibile l’impostazione
“Auto”.
● Nei seguenti casi, la velocità effettiva della ventola generata dall’unità sarà
diversa dalla velocità visualizzata sul display del telecomando.
1. Quando sul display sono visualizzati i messaggi “STAND BY” o
“DEFROST” (Sbrinamento).
2. Quando la temperatura dello scambiatore di calore è bassa nel modo riscaldamento (ad es. subito dopo l’avvio del funzionamento in riscaldamento)
3. Nella modalità HEAT (Riscaldamento), quando la temperatura ambiente è
superiore a quella impostata.
4. Quando sull’unità è attiva la modalità DRY (deumidificazione).
5.5. Impostazione della direzione del flusso d’aria [Per SLZ]
<Per modificare la direzione verso l’alto/il basso del flusso d’aria>
■ Quando l’unità è in funzione, premere il pulsante “Airflow Up/Down” 6 il
numero di volte necessario.
• Ad ogni pressione sarà modificata la direzione. La direzione attual-
mente impostata è visualizzata in 6.
• Di seguito sono riportate le sequenze di cambiamento e le impostazioni
disponibili.
Per il regolatore a distanza senza fili
1 → 2 → 3 → 4 → 5
s
Per il regolatore a distanza con fili
1 Portata d’aria orizzontale 30° 4 Portata d’aria verso il basso 70°
2 Portata d’aria verso il basso 45° 5 Oscillazione
3 Portata d’aria verso il basso 55°
*
Tenere presente che durante l’oscillazione, l’indicazione direzionale sulla schermata
non viene modificata in sincronia con la posizione dei deflettori sull’unità.
* Alcuni modelli non supportano le impostazioni direzionali.
Nota:
● Le direzioni disponibili dipendono dal tipo di unità collegata. Tenere presen-
te anche che su alcune unità non è disponibile l’impostazione “Auto”.
● Nei seguenti casi, la direzione effettiva dell’aria sarà diversa da quella indi-
cata sul display del telecomando.
1. Quando sul display sono visualizzati i messaggi “STAND BY” o
“DEFROST” (Sbrinamento).
2. Subito dopo aver avviato la modalità di riscaldamento (quando il sistema
è in attesa dell’attivazione della nuova modalità).
3. Nella modalità di riscaldamento, quando la temperatura ambiente è supe-
riore a quella impostata.
91
Page 92

˚C
SUN
ON
WEEKLY
PAR-21MAA
ON/OFF
FILTER
CHECK
OPERATION
CLEAR
TEST
TEMP.
MENU
BACK DAY
MONITOR/SET
CLOCK
ON/OFF
2
42 3
A9 78
0
4
1
3
B
1
5. Funzionamento
˚C
SUN
ON
WEEKLY
6
7
5
<Per modificare l’orientamento a destra/sinistra del flusso d’aria>
■ Premere il pulsante “Louver” 7 secondo necessità.
• Viene visualizzata l’immagine corrispondente al deflettore 7.
Ad ogni pressione del pulsante le impostazioni saranno modificate
nel modo seguente.
Nessun display
(Stop)
(ON) (OFF)
Durante l’oscillazione, la freccia sul
display si sposta da sinistra a a destra.
5.6. Ventilazione
ss
sPer la combinazione LOSSNAY
ss
5.6.1. Per il regolatore a distanza con fili
● Per far funzionare il ventilatore insieme all’unità interna:
■ Premere il pulsante “ON/OFF” 1.
• L’indicatore “Vent” viene visualizzato sullo schermo (in 8). Ora il
ventilatore si attiverà automaticamente ogni volta che l’unità interna è in funzione.
6. Timer
6.1. Per il regolatore a distanza con fili
Si può usare la Selezione funzioni per scegliere quale utilizzare tra i tre tipi
di timer: 1 Timer settimanale, 2 Timer semplice, o 3 Timer di arresto
automatico.
6.1.1. Timer settimanale
■ Il timer settimanale può essere utilizzato per impostare un massimo di
otto operazioni per ciascun giorno della settimana.
• Si può scegliere tra le seguenti operazioni: Accensione/arresto timer
con impostazione della temperatura, solo Accensione/arresto timer,
oppure solo Impostazione della temperatura.
• Quando viene raggiunto l’orario impostato per il timer, il condizionato-
re d’aria esegue l’azione impostata dal timer.
■ La risoluzione per l’impostazione di questo timer è di 1 minuto.
Nota:
*1. Il Timer settimanale/Timer semplice/Timer di arresto automatico non pos-
sono essere usati contemporaneamente.
*2. Il timer settimanale non funzionerà in presenza di una qualsiasi delle se-
guenti condizioni:
La funzione timer è disattivata; il sistema presenta malfunzionamenti; un
ciclo di prova è in esecuzione; il telecomando è sottoposto a un ciclo di
verifica o autoverifica; l’utente sta impostando una funzione; l’utente sta
impostando il timer; l’utente sta impostando il giorno della settimana o
l’ora; il sistema è sottoposto a controllo centrale. (In particolare, il sistema
non eseguirà operazioni (accensione unità, spegnimento unità o
impostazione della temperatura) disabilitate in queste condizioni).
N. operazione
Impostazione del giorno
● Per far funzionare il ventilatore in modo autonomo:
■ Premere il pulsante “Mode” 2 fino a visualizzare sul display. Il
ventilatore entrerà in funzione.
● Per modificare la potenza del ventilatore:
■ Premere il pulsante “Ventilation” 8 secondo necessità.
• Ad ogni pressione vengono attivate in sequenza le seguenti
impostazioni.
▲
▲
Low
(Bassa)
High
(Alta)
5.6.2. Per il regolatore a distanza senza fili
● Il ventilatore si attiverà automaticamente all’attivazione dell’unità inter-
na.
● Nessuna indicazione sul telecomando senza fili.
<Come impostare il timer settimanale>
1. Assicurarsi che sia visualizzata la schermata di controllo standard e che
l’indicatore corrispondente al timer settimanale 1 sia visualizzato sul display.
2. Premere il pulsante “Timer Menu” B per visualizzare il messaggio “Set
Up” sullo schermo (in 2). (Tenere presente che ad ogni pressione del
pulsante sul display si alterneranno i messaggi “Set Up” e “Monitor”).
3. Premere il pulsante “Timer On/Off (Set Day)” 9 per impostare il giorno. Ad
ogni pressione del pulsante in 3 viene visualizzata l’impostazione successiva, in base alla seguente sequenza: “Dom Lun Mar Mer Gio Ven Sab” →
“Dom” → … → “Ven” → “Sab” → “Dom Lun Mar Mer Gio Ven Sab”…
4. Premere il pulsante “Operation” o (7 o 8) il numero di volte necessario per selezionare il numero di operazione desiderato (da 1 a 8) 4.
* Con le scelte effettuate ai passaggi 3 e 4 si selezionerà una delle
celle della matrice illustrata di seguito.
(Il display del telecomando illustrato a sinistra mostra l’aspetto del
display quando si imposta l’Operazione 1 per Domenica con i valori
riportati di seguito).
Matrice di impostazione
N. op.
No. 1
No. 2
No. 8
<Impostazioni Operazione 1 per Domenica>
Avviare il condizionatore alle 8.30, ad una tem-
peratura di 23 °C.
Nota:
Impostando come giorno “Dom Lun Mar Mer Gio Ven Sab”, si può fare in modo
che la stessa Operazione sia eseguita ogni giorno alla stessa ora.
(Esempio: L’Operazione 2 descritta in precedenza, uguale per tutti i giorni della settimana).
Sunday Monday … Saturday
• 8:30
• ON
• 23 °C
• 10:00
• OFF
…
• 10:00
• OFF
• 10:00
• OFF
▲
• 10:00
• OFF
▲
<Impostazioni Operazione 2 per tutti i giorni>
Spegnere il condizionatore alle 10.00.
92
<Impostazione del timer settimanale>
Visualizza l’ora impostata
Visualizza l’operazione selezionata (ON o OFF)
* Non viene visualizzato se non si è impostata un’opera-
zione.
Visualizza la temperatura impostata
* Non viene visualizzato se non si è impo-
stata la temperatura.
5. Premere il pulsante “Set Time” A appropriato fino a impostare l’ora de-
siderata (in 5).
* Tenendo premuto il pulsante, l’ora aumenta prima ad intervalli di un
minuto, poi ad intervalli di dieci minuti, e quindi ad intervalli di un’ora.
6. Premere il pulsante “ON/OFF” 1 per selezionare l’operazione deside-
rata (ON o OFF) in 6.
* Ad ogni pressione del pulsante si passa all’impostazione successiva,
in base alla seguente sequenza: nessun display (nessuna
impostazione) → “ON” → “OFF”
Page 93

ONHr
AFTER
SIMPLE
PAR-21MAA
ON/OFF
FILTER
CHECK
OPERATION
CLEAR
TEST
TEMP.
MENU
BACK DAY
MONITOR/SET
CLOCK
ON/OFF
2A9
0
4
1
B
ONHr
AFTER
SIMPLE
4
1
3
2
˚C
TIMER
SUN
ON
OFF
WEEKLY
1
9
8
˚C
˚C
TIME SUN
WEEKLY
0
˚C
˚C
TIME SUN
WEEKLY
0
6. Timer
7. Premere il pulsante “Set Temperature” 3 appropriato fino a imposta-
re la temperatura desiderata (in 7).
* Ad ogni pressione del pulsante si passa all’impostazione succes-
siva, in base alla seguente sequenza: nessun display (nessuna
impostazione) ⇔ 24 ⇔ 25 ⇔ ... ⇔ 29 ⇔ 30 ⇔ 12 ⇔ ... ⇔ 23 ⇔
nessun display.
(Intervallo disponibile: L’intervallo disponibile per questa
impostazione è compreso tra 12 °C e 30 °C. Tuttavia l’intervallo
effettivo per il controllo della temperatura varia a seconda del tipo
di unità collegata).
8. Dopo aver effettuato le impostazioni appropriate ai passaggi 5, 6 e 7,
premere il pulsante 4 “Filter” per confermare i valori.
Per cancellare i valori correntemente impostati per l’operazione selezionata, premere una volta e rilasciare rapidamente il pulsante
“Check (Clear)” 0.
*L’impostazione dell’ora visualizzata diventerà “—:—”, e le
impostazioni di accensione/spegnimento (on/off) e di temperatura
si spegneranno.
(Per annullare in una sola operazione tutte le impostazioni del timer settimanale, tenere premuto il pulsante “Check (Clear)” 0
per due o più secondi. Il display inizierà a lampeggiare per segnalare la cancellazione di tutte le impostazioni).
Nota:
Le nuove impostazioni immesse saranno cancellate se si preme il pulsante “Mode” (Return) 2 prima di premere il pulsante 4 “Filter” .
Se si sono impostate due o più operazioni diverse per la stessa ora, sarà
eseguita soltanto l’operazione corrispondente al N. Operazione più alto.
9. Ripetere i passaggi da 3 a 8 fino a riempire tutte le celle disponibili
desiderate.
10.Premere il pulsante “Mode” (Return) 2 per tornare alla schermata di
controllo standard e completare la procedura di impostazione.
11.Per attivare il timer, premere il pulsante “Timer On/Off” 9 per far scom-
parire dallo schermo l’indicatore “Timer Off”. Assicurarsi che l’indi-
catore “Timer Off” non sia più visualizzato.
* Se non sono attive delle impostazioni timer, l’indicatore “Timer Off”
inizierà a lampeggiare sullo schermo.
<Come visualizzare le impostazioni del timer settimanale>
Impostazioni del timer
6.1.2. Timer semplice
■ Il timer semplice può essere impostato in uno dei tre modi seguenti.
• Start time only (Solo ora di avvio):
Il condizionatore d’aria si mette in funzione all’ora impostata.
• Stop time only (Solo ora di spegnimento):
Il condizionatore d’aria smette di funzionare all’ora impostata.
• Start & stop times (Ore di accensione e spegnimento):
Il condizionatore d’aria si avvia e si spegne agli orari rispettiva-
■ Il timer semplice (avvio e arresto) può essere impostato soltanto una
Nota:
*1. Il Timer settimanale/Timer semplice/Timer di arresto automatico non pos-
*2. Il timer semplice non funzionerà in presenza di una qualsiasi delle seguenti
<Come impostare il timer semplice>
mente impostati.
volta nell’arco di 72 ore.
L’impostazione dell’ora viene effettuata con incrementi di un’ora.
sono essere usati contemporaneamente.
condizioni:
Il timer è disattivato; presenza di una condizione anomala dell’impianto; è
in corso un test; il telecomando sta effettuando un controllo o una diagnosi; l’utente sta selezionando una funzione; l’utente sta impostando il timer;
sull’impianto è impostato il controllo centralizzato. (In presenza di queste
condizioni, l’operazione “On/Off” viene disattivata).
Impostazione del timer
Azione (On o Off)
* “— —” viene visualizzato se non si
sono effettuate impostazioni.
1. Assicurarsi che l’indicatore corrispondente al timer settimanale sia
2. Premere il pulsante “Timer Menu” B per visualizzare il messaggio
3. Premere il pulsante “Timer On/Off (Set Day)” 9 il numero di volte
4. Premere il pulsante “Operation” o (7 o 8) per modificare
5. Per chiudere il monitor e tornare alla schermata di controllo standard,
<Per disattivare il timer settimanale>
Premere il pulsante “Timer On/Off” 9 per visualizzare il messaggio “Timer
Off” 0.
<Attivare il timer settimanale>
Premere il pulsante “Timer On/Off” 9 per spegnere l’indicatore “Timer Off”
(in 0).
visibile sullo schermo (in 1).
“Monitor” sullo schermo (in 8).
necessarie per selezionare il giorno desiderato.
l’operazione timer visualizzata sul display (in 9).
* Ad ogni pressione del pulsante si passerà all’operazione timer suc-
cessiva, seguendo l’ordine di impostazione.
premere il pulsante “Mode” (Return) 2.
1. Assicurarsi che sia visualizzata la schermata di controllo standard e che
l’indicatore corrispondente al timer semplice 1 sia visualizzato sul display.
Se il display visualizza informazioni diverse da Simple Timer, impostare su
SIMPLE TIMER utilizzando la selezione delle funzioni (vedi 8.[4]–3 (3)) per
l’impostazione della funzione timer.
2. Premere il pulsante “Timer Menu” B per visualizzare il messaggio “Set
Up” sullo schermo (in 2). (Tenere presente che ad ogni pressione del
pulsante sul display si alterneranno i messaggi “Set Up” e “Monitor”).
3. Premere il pulsante “ON/OFF” 1 per visualizzare le impostazioni cor-
renti per l’accensione (ON) o lo spegnimento (OFF) del timer semplice.
Premere una volta il pulsante per visualizzare quanto tempo rimane prima dell’accensione (ON), e premerlo nuovamente per visualizzare quanto
tempo rimane prima dello spegnimento (OFF). (L’indicatore “ON/OFF”
viene visualizzata in 3).
• Timer di accensione (ON): Il condizionatore d’aria si metterà in fun-
zione una volta trascorso il numero di
ore specificato.
• Timer di spegnimento (OFF):Il condizionatore d’aria smetterà di fun-
zionare una volta trascorso il numero di
ore specificato.
4. Con “ON” o “OFF” visualizzati in 3: Premere il pulsante “Set Time” A
appropriato per impostare l’orario di accensione (se è visualizzato “ON”)
o l’orario di spegnimento (se in 4 è visualizzato “OFF”).
• Intervalli disponibili: da 1 a 72 ore
5. Per impostare l’orario di accensione (ON) e spegnimento (OFF), ripete-
re i passaggi 3 e 4.
* Tenere presente che non si può impostare lo stesso valore come ora-
rio di accensione e spegnimento.
6. Per annullare le impostazioni di accensione e spegnimento correnti:
Visualizzare l’impostazione di accensione (ON) o spegnimento (OFF)
(v. passaggio 3) e quindi premere il pulsante “Check (Clear)” 0 ;
l’impostazione dell’ora sarà cancellata e sarà visualizzato “—” in 4. (Per
usare soltanto un’impostazione di accensione (ON) o spegnimento (OFF),
assicurarsi che per l’impostazione che non si desidera utilizzare sia
visualizzato “—” sul display).
93
Page 94

TIMER ON
OFFHrAFTER
SIMPLE
1
6
5
˚C
˚C
SIMPLE
7
˚C
˚C
ONHr
AFTER
SIMPLE
7
ONHr
AFTER
SIMPLE
˚C
˚C
OFFHrAFTER
SIMPLE
SIMPLE
˚C
˚C
OFFHrAFTER
SIMPLE
ONHr
AFTER
SIMPLE
˚C
˚C
SIMPLE
AFTER OFF
AUTO OFF
PAR-21MAA
ON/OFF
FILTER
CHECK
OPERATION
CLEAR
TEST
TEMP.
MENU
BACK DAY
MONITOR/SET
CLOCK
ON/OFF
2A9
4
B
AFTER OFF
AUTO OFF
3
1
2
6. Timer
7. Dopo aver completato i passaggi da 3 a 6, premere il pulsante 4 “Filter”
per confermare il valore.
Nota:
Le nuove impostazioni immesse saranno cancellate se si preme il pulsante
“Mode” (Return) 2 prima di premere il pulsante 4 “Filter”
.
8. Premere il pulsante 2 “Mode” (Return) per tornare alla schermata di con-
trollo standard.
9. Premere il pulsante “Timer On/Off” 9 per avviare il conto alla rovescia
del timer. Quando il timer è in funzione, il valore del timer viene
visualizzato sul display. Assicurarsi che il valore del timer sia visibile
e corretto.
<Visualizzazione delle impostazioni correnti del timer semplice>
Impostazione del timer
1. Assicurarsi che l’indicatore corrispondente al timer semplice sia visibile
sullo schermo (in 1).
2. Premere il pulsante “Timer Menu” B per visualizzare il messaggio “Mo-
nitor” sullo schermo (in 5).
• Se è in funzione il timer semplice di accensione (ON) o spegnimento
(OFF), il valore del timer corrente sarà visualizzato in 6.
• Se si sono impostati entrambi i valori di accensione e spegnimento
(ON/OFF), i due valori vengono visualizzati in sequenza.
3. Premere il pulsante “Mode” (Return) 2 per chiudere il display del moni-
tor e tornare alla schermata di controllo standard.
<Per disattivare il timer semplice...>
Premere il pulsante “Timer On/Off” 9 in modo che l’impostazione timer
non sia più visualizzata sullo schermo (in 7).
Esempio 2:
Avvio del timer, con orario di spegnimento (OFF) impostato prima dell’orario di accensione (ON)
Impostazione di accensione (ON): 5 ore
Impostazione di spegnimento (OFF): 2 ore
All’avvio del timer
Sul display viene visualizzata l’impostazione di
▲
spegnimento (OFF) del timer (il numero di ore
che manca allo spegnimento).
2 ore dopo l’avvio del timer
Sul display viene visualizzata l’impostazione di
accensione (ON) del timer (il numero di ore che
▲
manca all’accensione).
L’ora visualizzata è l’impostazione di avvio (ON
- 5 ore) – di spegnimento (OFF - 2 ore) = 3 ore.
5 ore dopo l’avvio del timer
Il condizionatore d’aria si accende e rimane
acceso fino a quando qualcuno lo spegne.
6.1.3. Timer di arresto automatico
■ Questo timer inizia il conto alla rovescia quando il condizionatore d’aria
si mette in funzione, e lo spegne all’orario impostato.
■ Le impostazioni disponibili vanno da 30 minuti a 4 ore, in intervalli di 30
minuti.
Nota:
*1. Il Timer settimanale/Timer semplice/Timer di arresto automatico non pos-
sono essere usati contemporaneamente.
*2. Il timer di arresto automatico non funzionerà in presenza di una qualsiasi
delle seguenti condizioni:
Il timer è disattivato; presenza di una condizione anomala dell’impianto; è
in corso un test; il telecomando sta effettuando un controllo o una diagnosi; l’utente sta selezionando una funzione; l’utente sta impostando il timer;
sull’impianto è impostato il controllo centralizzato. (In presenza di queste
condizioni, l’operazione “On/Off” viene disattivata).
<Per avviare il timer del semplice…>
Premere il pulsante “Timer On/Off” 9 per visualizzare l’impostazione timer in 7.
Esempi
Se gli orari di accensione (ON) e spegnimento (OFF) sono stati impostati
sul timer semplice, l’operazione e il display si presenteranno nel modo
seguente.
Esempio 1:
Avvio del timer, con orario di accensione (ON) impostato prima dell’ora-
rio di spegnimento (OFF)
Impostazione di accensione (ON): 3 ore
Impostazione di spegnimento (OFF): 7 ore
All’avvio del timer
Sul display viene visualizzata l’impostazione di
accensione (ON) del timer (il numero di ore che
manca all’accensione del timer).
3 ore dopo l’avvio del timer
Sul display viene visualizzata l’impostazione di
spegnimento (OFF) del timer (il numero di ore
che manca allo spegnimento)
L’ora visualizzata è l’impostazione di spegni-
mento (OFF - 7 ore) – di avvio (ON - 3 ore) = 4 ore.
7 ore dopo l’avvio del timer
Il condizionatore d’aria si spegne e rimane spento
fino a quando qualcuno lo riaccende.
94
▲
▲
<Come impostare il timer di arresto automatico>
Impostazione del timer
1. Assicurarsi che sia visualizzata la schermata di controllo standard e che
l’indicatore corrispondente al timer di arresto automatico 1 sia visualizzato
sul display.
Se il display visualizza informazioni diverse da Auto Off Timer, impostare su AUTO OFF TIMER utilizzando la selezione delle funzioni (vedi
8.[4]–3 (3)) per l’impostazione della funzione timer.
2. Premere il pulsante “Timer Menu” B per 3 secondi, fino a visualizzare il
messaggio “Set Up” sullo schermo (in 2).
(Tenere presente che ad ogni pressione del pulsante sul display si alterneranno i messaggi “Set Up” e “Monitor”).
3. Premere il pulsante “Set Time” A appropriato fino a impostare l’ora di
spegnimento (OFF) desiderata (in 3).
4. Premere il pulsante 4 “Filter” per confermare le impostazioni.
Nota:
Le impostazioni immesse saranno cancellate se si preme il pulsante “Mode”
(Return) 2 prima di premere il pulsante 4 “Filter”
.
5. Premere il pulsante “Mode” (Return) 2 per completare la procedura
d’impostazione e tornare alla schermata di controllo standard.
6. Se il condizionatore d’aria è già in funzione, il timer inizierà immediata-
mente il conto alla rovescia. Verificare che le impostazioni timer sia-
no visualizzate correttamente sul display.
Page 95

AFTER
TIMER
OFF
AUTO OFF
5
1
4
˚C
˚C
AUTO OFF
6
7
AUTO OFF
7
˚C
˚C
AFTER OFF
AUTO OFF
6
7
SELECT
TIME
SELECT
˚C
˚C
TIME SUN
FUNCTION
PAR-21MAA
ON/OFF
FILTER
CHECK
OPERATION
CLEAR
TEST
TEMP.
MENU
BACK DAY
MONITOR/SET
CLOCK
ON/OFF
4
1
1
˚C
˚C
FUNCTION
1
˚C
˚C
FUNCTION
1
˚C
˚C
1
6. Timer
ON/OFF
RESET
TOO
WARM
TOO
COOL
MODE
AUTO COOL
DRY
HEAT
FAN
VANE
SELECT
TIME
h
1
B
A
2
<Controllo delle impostazioni del timer di arresto automatico>
Impostazione del timer
1. Assicurarsi che l’indicatore corrispondente al timer di arresto automati-
co sia visibile sullo schermo (in 1).
2. Premere il pulsante “Timer Menu” B per 3 secondi, fino a visualizzare il
messaggio “Monitor” sullo schermo (in 4).
• In 5 viene visualizzato il tempo che rimane prima dell’arresto dell’ap-
parecchio.
3. Per chiudere il monitor e tornare alla schermata di controllo standard,
premere il pulsante “Mode” (Return) 2.
<Disattivare il timer di arresto automatico...>
● Tenere premuto il pulsante “Timer On/Off” 9 per 3 secondi, fino a quando
viene visualizzato “Timer Off” (in 6) e scompare il valore timer (in 7).
● In alternativa, spegnere il condizionatore d’aria. Il valore timer (in 7)
scomparirà dallo schermo.
6.2. Per il regolatore a distanza senza fili
Il timer è conveniente per programmare una funzione del climatizzatore
per quando si va a letto, si torna a casa, ci si alza, ecc.
1Selezionare la modalità timer premendo il pulsante
namento dell’unità.
A Ogni volta che si preme questo pulsante, la modalità timer viene
modificata secondo la sequenza: (SPEGNIMENTO TIMER)
(ACCENSIONE TIMER) DISATTIVAZIONE TIMER
2Impostare l’orario del timer tramite il pulsante
B Ad ogni pressione di questo pulsante, l’orario impostato aumenta di
un’ora sino a 12 ore.
durante il funzio-
.
<Avviare il timer di arresto automatico...>
● Tenere premuto il pulsante “Timer On/Off” 9 per 3 secondi. L’indicazio-
ne “Timer off” scompare (in 6), e l’impostazione timer viene visualizzata
sul display (in 7).
● In alternativa, accendere il condizionatore d’aria. Il valore timer sarà
visualizzato in 7.
7. Altre funzioni
7.1. Blocco dei pulsanti del telecomando (limite di fun-
zionamento)
■ Se lo si desidera, è possibile bloccare i pulsanti del telecomando. È
possibile usare la Selezione Funzioni del telecomando per scegliere il
tipo di blocco da utilizzare. (Per informazioni sulla selezione del tipo di
blocco, vedere la sezione 8, punto [4]–2 (1)).
Più precisamente, si possono usare i seguenti due tipi di blocco.
1Blocca tutti i pulsanti: Blocca tutti i pulsanti del telecomando.
2Blocca tutti tranne ON/OFF: Blocca tutti i pulsanti tranne il pulsante
ON/OFF.
Nota:
L’indicatore “Locked” viene visualizzato sullo schermo per segnalare il blocco
dei pulsanti.
Per disattivare il timer:
• Premere il pulsante
sino a che (OFF TIMER) e (ON
TIMER) non saranno visualizzati.
Nota:
Le funzioni OFF TIMER e ON TIMER non possono essere impostate allo stesso
orario.
<Come bloccare i pulsanti>
1. Tenendo premuto il pulsante “Filter” 4, premere e tenere premuto il
pulsante ON/OFF 1 per 2 secondi. L’indicazione “Locked” si accende
sullo schermo (in 1), per segnalare l’attivazione del blocco.
• Se il blocco è stato disattivato in Selezione funzioni, quando si pre-
meranno i pulsanti nel modo descritto in precedenza sullo schermo
sarà visualizzato il messaggio “Not available”.
• Se si preme un pulsante bloccato, l’indicazione “Locked” (in 1) lam-
peggerà sul display.
Indicatore
“Lock”
<Come sbloccare i pulsanti>
1. Tenendo premuto il pulsante “Filter” 4, premere e tenere premuto il
pulsante ON/OFF 1 per 2 secondi; l’indicazione “Locked” scomparirà
dallo schermo (in 1).
95
Page 96

ON/OFF
TEMP.
˚C
˚C
ON/OFF
TEMP.
˚C
˚C
ON/OFF
˚C
˚C
ERROR CODE
ON/OFF
CALL:XXXX
XXX:XXX
7. Altre funzioni
ON/OFF
ERROR CODE
7.2. Altre indicazioni
7.2.1. Centrally Controlled (Controllo centralizzato)
● Viene visualizzato quando il funzionamento è controllato dal sistema di
controllo centrale, ecc.
Le operazioni limitate sono indicate sotto.
• ON/OFF (incluso il funzionamento del timer).
• Modalità di funzionamento
• Temperatura impostata
Nota:
Si possono anche limitare individualmente.
7.2.2. Indicatore “Mode” lampeggiante
■ Lampeggiamento continuo
Viene visualizzato quando un’altra sezione interna collegata alla sezione esterna è già in funzione in una diversa modalità operativa.
Far corrispondere con la modalità di funzionamento dell’altra sezione
interna.
■ Lampeggiamento display “Modalità modificata dopo”
Viene visualizzato quando la modalità di funzionamento è limitata in
ogni stagione dal sistema di controllo centrale, ecc.
Utilizzare un’altra modalità di funzionamento.
8. Selezione delle funzioni
7.2.3. Indicazione dei codici di errore
Se si è fornito un recapito telefonico di riferimento per eventuali problemi, il numero viene visualizzato sullo schermo. (Questa impostazione può essere effettuata in Selezione funzioni. Per informazioni, fare riferimento alla sezione 8.)
Indicatore
ON (Lampeggiante)
Indirizzo refrigerante
unità interna
Codice di errore
Display alternato
Codice di errore
● Se lampeggiano sia l’indicatore ON, sia il codice di errore: Significa che
il condizionatore d’aria è guasto e il funzionamento è stato interrotto (e
non può essere ripristinato). Prendere nota del numero unità indicato e
del codice di errore, quindi togliere l’alimentazione al condizionatore d’aria
e contattare il proprio rivenditore o tecnico.
● Se lampeggia soltanto il codice di errore (e l’indicatore ON rimane acce-
so): L’apparecchio continua a funzionare, ma c’è un problema nell’im-
pianto. In questo caso, prendere nota del codice di errore e contattare il
proprio rivenditore o tecnico per una consulenza.
* Se si è immesso un recapito telefonico di riferimento per eventuali
problemi, premere il pulsante “Check” per visualizzarlo sullo schermo. (Questa impostazione può essere effettuata in Selezione funzioni. Per informazioni, fare riferimento alla sezione 8.)
N. unità interna
Quando è abbassato il pulsante “Check”:
Selezione delle funzioni del comando a distanza
L’impostazione delle funzioni del comando a distanza elencate di seguito può essere modificata mediante la modalità di selezione delle funzioni del
comando a distanza. Modificare l’impostazione se necessario.
Elemento 1
1. Modifica lingua
(“CHANGE
LANGUAGE”)
2. Limite funzioni
(“SELEZIONE
FUNZIONI”)
3. Selezione modalità
(“SELEZIONE
MODO”)
4. Modifica display
(“IMPOSTAZIONE
MODO DISPLAY”)
96
Elemento 2
Impostazione lingua visualizzata sul display
(1) Impostazione limite funzioni di funzionamento (blocco funzio-
namento) (“BLOCCO FUNZIONI”)
(2) Uso impostazione modalità automatica (“SELEZIONE MODO
AUTO”)
(3) Impostazione limite intervallo temperatura (“LIMITAZIONE
TEMPAERATURA”)
(1) Impostazione comando a distanza principale/asservito (“CON-
TROLLO MAIN/SUB”)
(2) Uso impostazione orologio (“OROLOGIO”)
(3) Impostazione funzione timer (“TIMER SETTIMANALE”)
(4) Impostazione numero da chiamare in caso di errore (“CALL.”)
(1) Impostazione display temperatura °C/°F (“TEMPERATURA °C/
°F”)
(2) Impostazione display temperatura aria aspirata (“TEMPERA-
TURA AMBIENTE”)
(3) Impostazione display raffreddamento/riscaldamento automati-
co (“AUTO C/H”)
• La visualizzazione in più lingue è possibile
• Impostazione dell’intervallo del limite di funzionamento (blocco funziona-
mento)
• Impostazione dell’uso o meno della modalità di funzionamento “automatica”
• Impostazione dell’intervallo regolabile della temperatura (massima, minima)
• Selezione del comando a distanza principale o asservito
* Se due comandi a distanza sono collegati a un unico gruppo, un co-
mando a distanza deve essere impostato come asservito.
• Impostazione dell’uso o meno della funzione orologio
• Impostazione del tipo di timer
• Visualizzazione del numero da chiamare in caso di errore
• Impostazione del numero di telefono
• Impostazione dell’unità di temperatura (°C o °F) visualizzata
• Impostazione dell’uso o meno del display della temperatura dell’aria in-
terna (aspirata)
• Impostazione dell’uso o meno del display “Cooling” (Raffreddamento) o
“Heating” (Riscaldamento) durante il funzionamento nella modalità auto-
matica
Elemento 3 (descrizione dell’impostazione)
Page 97

OFF
on1
on2
OFF
ON
OFF
ON
OFF
OFF
CALL-
ON
OFF
ON
OFF
°C
°F
PAR-21MAA
ON/OFF
FILTER
CHECK
OPERATION
CLEAR
TEST
TEMP.
MENU
BACK DAY
MONITOR/SET
CLOCK
ON/OFF
F
E
G
C
D
H
B
A
I
G
G
G
G
G
G
E
E
G
G
G
G
G
E
G
E
G
G
G
G
D
D
D
D
D
D
D
D
D
D
D
D
D
D
D
D
D
D
D
D
D
D
D
D
D
D
D
D
D
D
English
Germany
Spanish
Russian
Italy
Chinese
French
Japanese
8. Selezione delle funzioni
[Flusso di selezione delle funzioni]
Impostazione della lingua (inglese)
Elemento 1 Elemento 2
Modifica
lingua
Selezione
funzioni
Selezione
modo
Display normale
(quando il climatizzatore non è in funzione)
Tenere premuto il pulsante E, quindi premere il pulsante D per due
secondi.
Modalità di selezione delle funzioni del comando a distanza
Elemento 3
Tenere premuto il pulsante E, quindi premere il pulsante D per due secondi.
E Premere il pulsante del modo di funzionamento.
G Premere il pulsante TIMER MENU (menu timer).
D Premere il pulsante TIMER ON/OFF (timer avvio/arresto).
Display a matrice di punti
L’impostazione del blocco funzionamento non è utilizzata
(valore impostazione iniziale).
L’impostazione del blocco funzionamento è “Salvo i pulsante On/Off”.
L’impostazione del blocco funzionamento è “Tutti i pulsanti”.
Quando si seleziona il modo funzionamento, viene visualizzato il
modo automatico (valore impostazione iniziale).
Quando si seleziona il modo funzionamento, il modo automatico non
viene visualizzato.
Il limite intervallo di temperatura non è attivo (valore impostazione
iniziale).
L’intervallo di temperatura può essere modificato nel modo raffreddamento/deumidificazione.
L’intervallo di temperatura può essere modificato nel modo riscaldamento.
L’intervallo di temperatura può essere modificato nel modo automatico.
Il telecomando sarà il comando principale (valore impostazione
iniziale).
Il telecomando sarà il comando secondario.
Impostazione
modo display
È possibile utilizzare la funzione orologio (valore impostazione iniziale).
Non è possibile utilizzare la funzione orologio.
È possibile utilizzare il timer settimanale (valore impostazione iniziale).
È possibile utilizzare il timer di arresto automatico.
È possibile utilizzare il timer semplice.
Non è possibile utilizzare il modo timer.
I numeri da chiamare impostati non vengono visualizzati in caso di
errore (valore impostazione iniziale).
I numeri da chiamare impostati vengono visualizzati in caso di errore.
L’unità di temperatura utilizzata sono i °C (valore impostazione
iniziale).
L’unità di temperatura utilizzata sono i °F.
La temperatura ambiente viene visualizzata (valore impostazione
iniziale).
La temperatura ambiente non viene visualizzata.
Nel modo automatico vengono visualizzati “Automatic cooling” (raffreddamento automatico) o “Automatic heating” (riscaldamento automatico) (valore impostazione iniziale).
Nel modo automatico è visualizzata solo l’indicazione “Automatic”.
97
Page 98

8. Selezione delle funzioni
[Impostazione dettagliata]
[4]–1. Impostazione CHANGE LANGUAGE (Cambia lingua)
La lingua visualizzata nel display a matrice di punti può essere selezionata.
• Per cambiare lingua, premere il pulsante [ MENU] G.
1 Inglese (GB), 2 Tedesco (D), 3 Spagnolo (E), 4 Russo (RU),
5 Italiano (I), 6 Cinese (CH), 7 Francese (F), 8 Giapponese (JP)
Consultare la tabella del display a matrice di punti.
[4]–2. Limite funzioni
(1) Impostazione limite funzioni di funzionamento (blocco funzionamen-
to)
• Per attivare o disattivare l’impostazione, premere il pulsante [ ON/
OFF] D.
1 no1: L’impostazione di blocco del funzionamento viene esegui-
ta per tutti i pulsanti, tranne il pulsante [ ON/OFF].
2 no2: L’impostazione di blocco del funzionamento viene esegui-
ta per tutti i pulsanti.
3 OFF (Impostazione iniziale) :L’impostazione di blocco del fun-
zionamento non viene eseguita.
* Per rendere effettiva l’impostazione di blocco del funzionamento
nel display normale, è necessario premere e tenere premuti contemporaneamente per due secondi i pulsanti [FILTER] e [ ON/
OFF] sul display normale dopo avere eseguito la suddetta
impostazione.
(2) Uso impostazione modalità automatica
Quando il comando a distanza è collegato a un’unità che funziona in
modalità automatica, è possibile eseguire le impostazioni seguenti.
• Per attivare o disattivare l’impostazione, premere il pulsante [ ON/
OFF] D.
1 ON (Impostazione iniziale) :Quando viene selezionata la mo-
dalità di funzionamento, la modalità automatica viene visualizzata.
2 OFF : Quando viene selezionata la mo-
dalità di funzionamento, la modalità automatica non viene
visualizzata.
(3) Impostazione limite intervallo temperatura
Una volta eseguita questa impostazione, è possibile modificare la
temperatura entro l’intervallo impostato.
• Per attivare o disattivare l’impostazione, premere il pulsante [ ON/
OFF] D.
1LIMITAZIONE MODO COOL :
L’intervallo di temperatura può essere modificato nella
modalità di raffreddamento/deumidificazione.
2LIMITAZIONE MODO HEAT :
L’intervallo di temperatura può essere modificato nella
modalità di riscaldamento.
3LIMITAZIONE MODO AUTO :
L’intervallo di temperatura può essere modificato nella
modalità automatica.
4OFF (impostazione iniziale) :
Il limite dell’intervallo di temperatura non è attivo.
* Quando viene eseguita un’impostazione diversa da OFF, contem-
poraneamente viene impostato il limite dell’intervallo di temperatura nelle modalità di raffreddamento, riscaldamento e automatica. Tuttavia, tale intervallo non può essere limitato se l’intervallo di
temperatura impostato non è stato modificato.
• Per aumentare o ridurre la temperatura, premere il pulsante
[ TEMP. ( ) o ( )] F.
• Per impostare il limite superiore e il limite inferiore, premere il pulsante [ ] H. L’impostazione selezionata lampeggia ed è possibile impostare la temperatura.
• Intervallo impostabile
Modalità di raffreddamento/deumidificazione :
Limite inferiore: 19°C a 30°C Limite superiore: 30°C a 19°C
Modalità di riscaldamento :
Limite inferiore: 17°C a 28°C Limite superiore: 28°C a 17°C
Modalità automatica :
Limite inferiore: 19°C a 28°C Limite superiore: 28°C a 19°C
[4]–3. Selezione della modalità
(1) Impostazione comando a distanza principale/asservito
• Per attivare o disattivare l’impostazione, premere il pulsante [ ON/
OFF] D.
1Main : Il comando a distanza viene impostato come principale.
2Sub : Il comando a distanza viene impostato come asservito.
(2) Uso impostazione orologio
• Per attivare o disattivare l’impostazione, premere il pulsante [ ON/
OFF] D.
1ON : La funzione orologio può essere utilizzata.
2OFF : La funzione orologio non può essere utilizzata.
(3) Impostazione funzione timer
• Per attivare o disattivare l’impostazione, premere il pulsante [ ON/
OFF] D (Scegliere una delle impostazioni seguenti.)
1TIMER SETTIMANALE (Impostazione iniziale) :
È possibile utilizzare il timer settimanale.
2AUTO OFF TIMER :
È possibile utilizzare il timer a disattivazione automatica.
3TIMER SEMPLIFICATO :
È possibile utilizzare il timer semplice.
4TIMER OFF :
Non è possibile utilizzare la modalità timer.
* Se l’orologio è impostato in modo da non essere usato (OFF), non
è possibile utilizzare il “TIMER SETTIMANALE”.
(4) Impostazione numero da chiamare in caso di errore
• Per attivare o disattivare l’impostazione, premere il pulsante [ ON/
OFF] D.
1CALL OFF : I numeri da chiamare impostati non vengo-
no visualizzati in caso di errore.
2CALL **** *** **** : I numeri da chiamare impostati vengono
visualizzati in caso di errore.
CALL_ : Quando il display è come quello mostrato a
sinistra, è possibile impostare i numeri da
chiamare.
• Impostazione dei numeri da chiamare
Per impostare i numeri da chiamare, attenersi alla procedura
seguente.
Spostare il cursore lampeggiante per impostare i numeri. Premere i pulsanti [ TEMP. ( ) e ( )] F per spostare il cursore
verso destra e verso sinistra. Premere i pulsanti [ CLOCK ( )
e ( )] C per impostare i numeri.
[4]–4. Impostazione del display
(1) Impostazione display temperatura °C/°F
• Per attivare o disattivare l’impostazione, premere il pulsante [ ON/
OFF] D.
1 °C : Viene utilizzata l’unità di temperatura °C.
2 °F : Viene utilizzata l’unità di temperatura °F.
(2) Impostazione display temperatura aria aspirata
• Per attivare o disattivare l’impostazione, premere il pulsante [ ON/
OFF] D.
1 ON : La temperatura dell’aria aspirata viene visualizzata.
2 OFF : La temperatura dell’aria aspirata non viene visualizzata.
(3) Impostazione display raffreddamento/riscaldamento automatico
• Per attivare o disattivare l’impostazione, premere il pulsante [ ON/
OFF] D.
1 ON : Nella modalità automatica vengono visualizzati
“Automatic cooling” (Raffreddamento automatico) e
“Automatic heating” (Riscaldamento automatico).
2 OFF : Nella modalità automatica viene visualizzato solo
“Automatic” (Automatica).
98
Page 99

8. Selezione delle funzioni
[Tabella del display a matrice di punti]
Impostazione della lingua
In attesa di avvio
Modo di
funzionamento
Temperatura impostata
Velocità del ventilatore
Pulsante non disponibile
Controllare (Errore)
Prova di funzionamento
Autoanalisi
Selezione delle funzioni unità
Impostazione della ventilazione
Raffreddamento
Deumidificazione
Riscaldamento
Automatica
Automatica
(Raffreddamento)
Automatica
(Riscaldamento)
Ventilazione
Ventilazione
In attesa
(regolazione calore)
Sbrinamento
English Germany Spanish Russian Italy Chinese French Japanese
Impostazione della lingua
Modifica lingua
Selezione funzion
Impostazione della limitazione funzioni
Impostazione uso del modo automatico
Impostazione limite intervallo temperature
Limitazione temperatura in modo
raffreddamento/giorno
Limitazione temperatura in modo
riscaldamento
Limitazione temperatura in modo
automatico
Selezione modo
Impostazione MAIN del telecomando (principale)
Impostazione SUB del telecomando (secondario)
Impostazione uso orologio
Impostazione del giorno della settimana e dell’ora
Impostazione timer
Controllo timer
Timer settimanale
Disattivazione modo timer
Timer arresto automatico
Timer semplice
Impostazione del numero da chiamare in caso di errore
Modifica display
Impostazione visualizz. temp. in °C/
°F
Impostazione visualizzazione temperatura ambiente
Impostazione visualizzazione
raffredd./riscald. automatici
English Germany Spanish Russian Italy Chinese French Japanese
99
Page 100

ON/OFF
TEMP.
˚C
˚C
FILTER
B
A
D
C
A B C D E
A
B
9. Funzionamento d’emergenza per il telecomando senza fili
Quando non si può utilizzare il comando a distanza
Quando le batterie del telecomando si esauriscono oppure il telecomando
si guasta, è possible utilizzare l’apparecchio in modalità di emergenza
mediante i tasti di emergenza sulla griglia.
ASpia DEFROST/STAND BY
B Spia di funzionamento
C Interruttore del funzionamento di emergenza (riscaldamento)
D Interruttore del funzionamento di emergenza (raffreddamento)
E Ricevitore
Avvio del funzionamento
• Per utilizzare la modalità di raffreddamento, premere il tasto D.
• Per utilizzare la modalità di riscaldamento, premere il tasto C.
Nota:
• I dettagli sulla modalità di emergenza sono indicati sotto.
I dettagli della MODALITÀ DI EMERGENZA sono indicati sotto.
Modo di funzionamento
Temperatura impostata
Velocità del ventilatore Alta Alta
Direzione flusso d’aria Orizzontale Verso il basso 4
Arresto del funzionamento
SLP-2AL (Per SLZ-KA25/KA35/KA50VAL)
• Per arrestare il funzionamento, premere il tasto D o il tasto C.
10. Cura e pulizia
Raffreddamento Riscaidamento
24°C24°C
■ Indica che il filtro deve essere pulito.
Pulire il filtro.
■ Reset display “FILTER” (FILTRO)
Quando si preme due volte successivamente il pulsante [FILTER] (FILTRO) dopo la pulizia del filtro, il display si spegne e viene ripristinato.
Nota:
● Quando vengono controllati due o più tipi di sezioni interne, il periodo di
pulizia differisce a seconda del tipo di filtro. Quando arriva il momento di
pulire l’unità principale, viene visualizzato “FILTER” (FILTRO). Quando si spegne il display del filtro, viene ripristinato il periodo di tempo cumulativo.
● “FILTER” (FILTRO) indica il periodo di pulizia quando è stato utilizzato il
climatizzatore secondo le condizioni generali dell’aria interna. Poiché il grado di sporcizia dipende dalle condizioni ambientali, pulire il filtro in conseguenza.
● Il periodo di tempo cumulativo per la pulizia del filtro varia a seconda del
modello.
● Questa indicazione non è disponibile per il telecomando senza fili.
ss
sPulizia dei filtri
ss
• Pulire i filtri utilizzando un aspirapolvere. Qualora questo non sia disponibile, battere i filtri contro un oggetto solido per far partire la sporcizia e
la polvere.
• Se i filtri sono particolarmente sporchi, lavarli in acqua tiepida. Accertarsi di sciacquare via completamente qualsiasi traccia di detergente e far
asciugare completamente i filtri prima di rimetterli nell’unità.
ss
sRimozione del filtro
ss
Cautela:
• Prima di rimuovere il filtro, prendere le necessarie precauzioni al
fine di proteggere gli occhi dalla polvere. Qualora sia necessario
salire su una sedia per eseguire l’operazione, fare attenzione a non
cadere.
• Una volta rimosso il filtro, non toccare le parti metalliche situate
nell’apparecchio interno al fine di evitare lesioni.
■ SLZ-KA·VA(L)
1 Tirare la maniglia posta sulla griglia di ingresso nella direzione indi-
cata dalla freccia: la griglia dovrebbe aprirsi.
2 Aprire la griglia di ingresso
3 Sganciare la maniglia posta sul centro del bordo della griglia e pro-
cedere all’estrazione del filtro.
A Manopola B Griglia C Griglia di ingresso D Filtro
Cautela:
• Non far asciugare i filtri alla luce diretta del sole o usando una sorgente di calore, come un elettroriscaldatore: questo potrebbe deformarli.
• Non lavare i filtri in acqua calda (sopra i 50°C), per non deformarli.
• Accertarsi che i filtri dell’aria siano sempre installati. La mancanza
di detti filtri nell’unità può causare un cattivo funzionamento della
stessa.
Cautela:
• Prima di pulire l’unità, arrestare il funzionamento e staccare la cor-
• Le sezioni interne sono dotate di filtri destinati a rimuovere la pol-
rente.
vere dall’aria aspirata. Pulire i filtri usando i metodi mostrati nelle
seguenti figure.
100
■ SEZ-KA·VA
• Prima di effettuare una prova di funzionamento del condizionatore d’aria,
chiedere al rivenditore conferma riguardo alla posizione ed all’installazione del filtro. (Esempio) Il filtro aria deve essere fissato alla presa
d’aria dell’unità interna (sul retro o sulla parte inferiore dell’unità).
A Presa d’aria B Filtro
 Loading...