

Page 1
Mitsubishi Electric Building
Air Conditioning Control System
Wireless Remote Controller PAR-FL32MA
INSTRUCTION BOOK
• Read this manual thoroughly before using the remote controller.
• For those who carry out the installation work.
After completing all the work, explain how to operate the remote controller to the customer referring to this manual, then hand the manual over to him.
BEDIENUNGSHANDBUCH
• Bitte lesen Sie diese Anleitung genau, bevor Sie die Fernbedienung verwenden.
• Hinweis für den Techniker, der die Installationsarbeiten durchführt.
Erklären Sie nach Abschluß der Arbeiten dem Endbenutzer anhand dieser Anleitung die Benutzung der Fernbedienung, und händigen Sie ihm die Anleitung
danach aus.
MANUEL D’UTILISATION
• Veuillez lire attentivement le présent manuel avant d’utiliser la télécommande.
• Pour les personnes chargées des travaux d’installation.
Lorsque les travaux sont terminés, expliquer le fonctionnement de la télécommande au client en se reportant au présent manuel puis lui remettre le manuel.
MANUAL DE INSTRUCCIONES
• Lea este manual detenidamente antes de utilizar el controlador remoto.
• Para aquellos que llevan a cabo la tarea de instalación.
Después de completar la tarea, explique al cliente cómo utilizar el controlador remoto siguiendo este manual y después entréguele el manual.
ISTRUZIONI DI FUNZIONAMENTO
• Leggere attentamente il presente manuale prima di utilizzare il telecomando.
• Per i tecnici incaricati dell’installazione.
Al termine dell’intervento, illustrare al cliente il funzionamento del telecomando facendo riferimento al presente manuale, quindi consegnargli il manuale.
BEDIENINGSHANDLEIDING
• Lees deze handleiding aandachtig door voordat u de afstandsbediening gebruikt.
• Voor wie het installatiewerk uitvoert.
Leg na voltooiing van het werk aan de klant uit hoe de afstandsbediening gebruikt moet worden, met verwijzing naar deze handleiding. Geef daarna de handleiding aan hem of haar.
ON/OFF
TEMP
NOT AVAILABLE
MODEL SELECT
TEST RUN
CHECK
Page 2
2
Contents Page
1. Safety Precautions .................................................................................................................................................. 5 ~ 10
2. Name of Component ............................................................................................................................................... 11 ~ 13
2.1. Wireless remote controller............................................................................................................................. 11
2.2. Signal receiving unit ...................................................................................................................................... 13
3. Before Operation ..................................................................................................................................................... 14 ~ 16
3.1. Installing the remote controller ...................................................................................................................... 14
3.2. Replacing the batteries and how to set the current time ............................................................................... 15
3.3. Setting the display ......................................................................................................................................... 16
4. Operation ................................................................................................................................................................. 17 ~ 24
4.1. Switching the unit on/off ................................................................................................................................ 17
4.2. Mode select ................................................................................................................................................... 18
4.3. Selecting a temperature ................................................................................................................................ 19
4.4. Selecting a fan speed (FAN)................................................................................................................... 20
4.5. Adjusting vertical airflow direction (VANE) .............................................................................................. 21
4.6. Adjusting vertical airflow direction (LOUVER) ..................................................................................... 22
4.7. Using the timer .............................................................................................................................................. 23
1) Set the current time ............................................................................................................................... 23
2) Set the time to start the unit as follows .................................................................................................. 24
3) Set the time to stop the unit as follows .................................................................................................. 24
4) Changing the set times .......................................................................................................................... 24
5. Test Run .................................................................................................................................................................. 25
6. Self Check ............................................................................................................................................................... 26 ~ 27
7. Centrally Controlled ................................................................................................................................................. 28
8. Troubleshooting ....................................................................................................................................................... 29
GB
Contents
D
Indice
Inhalt Seite
1. Sicherheitsvorkehrungen ......................................................................................................................................... 5 ~ 10
2. Bezeichnung der Komponenten .............................................................................................................................. 11 ~ 13
2.1. Drahtlose Fernbedienung .............................................................................................................................. 11
2.2. Signalempfangseinheit .................................................................................................................................. 13
3. Vor dem Betrieb ....................................................................................................................................................... 14 ~ 16
3.1. Fernbedienung installieren ............................................................................................................................ 14
3.2. Batterien ersetzen und die Uhrzeit einstellen ................................................................................................ 15
3.3. Display einrichten .......................................................................................................................................... 16
4. Betrieb ..................................................................................................................................................................... 17 ~ 24
4.1. Anlage ein- und ausschalten ......................................................................................................................... 17
4.2. Betriebsart wählen ........................................................................................................................................ 18
4.3. Temperatur wählen ........................................................................................................................................ 19
4.4. Ventilatorgeschwindigkeit wählen (Ventilator)......................................................................................... 20
4.5. Vertikale Luftstromrichtung einstellen (Flügelzellen) ............................................................................... 21
4.6. Vertikale Luftstromrichtung einstellen (Lamellen) ................................................................................ 22
4.7. Timer verwenden ........................................................................................................................................... 23
1) Aktuelle Uhrzeit einstellen ..................................................................................................................... 23
2) Stellen Sie die Uhrzeit, zu der die Anlage anspringen soll, wie folgt ein ............................................... 24
3) Stellen Sie die Uhrzeit, zu der die Anlage ausschalten soll, wie folgt ein .............................................. 24
4) Eingestellte Zeiten ändern ..................................................................................................................... 24
5. Test .......................................................................................................................................................................... 25
6. Selbsttest ................................................................................................................................................................. 26 ~ 27
7. Zentralsteuerung ..................................................................................................................................................... 28
8. Problemlösungen ..................................................................................................................................................... 29
Page 3
3
Table des matières Page
1. Consignes de Sécurité ............................................................................................................................................ 5 ~ 10
2. Nom des Composants ............................................................................................................................................. 11 ~ 13
2.1. Télécommande sans fil ................................................................................................................................. 11
2.2. Unité de réception des signaux ..................................................................................................................... 13
3. Avant de faire Fonctionner l’Appareil ....................................................................................................................... 14 ~ 16
3.1. Installation de la télécommande.................................................................................................................... 14
3.2. Remplacement des piles et mise à l’heure.................................................................................................... 15
3.3. Réglage de l’affichage................................................................................................................................... 16
4. Fonctionnement ....................................................................................................................................................... 17 ~ 24
4.1. Pour allumer/éteindre le climatiseur .............................................................................................................. 17
4.2. Choix du mode .............................................................................................................................................. 18
4.3. Sélection d’une température ......................................................................................................................... 19
4.4. Sélection d’une vitesse de ventilateur (VENTILATEUR) ........................................................................ 20
4.5. Réglage de la direction du flux d’air vertical (AILEETTE) ....................................................................... 21
4.6. Réglage de la direction verticale du flux d’air (SORTIE D’AIR) ........................................................... 22
4.7. Utilisation de la minuterie .............................................................................................................................. 23
1) Réglez l’heure actuelle .......................................................................................................................... 23
2) Réglez l’heure de démarrage de l’appareil comme suit ......................................................................... 24
3) Réglez l’heure d’arrêt de l’appareil comme suit ..................................................................................... 24
4) Modification des heures réglées ............................................................................................................ 24
5. Essai de Fonctionnement ........................................................................................................................................ 25
6. Auto-Contrôle .......................................................................................................................................................... 26 ~ 27
7. Contrôle Centralisé .................................................................................................................................................. 28
8. Dépannage .............................................................................................................................................................. 29
F
Table des matières
E
Contenido
Contenido Página
1. Medidas de Seguridad ............................................................................................................................................ 5 ~ 10
2. Nombre de los Componentes .................................................................................................................................. 11 ~ 13
2.1. Controlador remoto inalámbrico .................................................................................................................... 11
2.2. Receptor de señal ......................................................................................................................................... 13
3. Antes del Funcionamiento ....................................................................................................................................... 14 ~ 16
3.1. Instalación del controlador remoto ................................................................................................................ 14
3.2. Sustitución de las pilas y cómo establecer la hora actual ............................................................................. 15
3.3. Ajuste del indicador ....................................................................................................................................... 16
4. Funcionamiento ....................................................................................................................................................... 17 ~ 24
4.1. Encendido/apagado de la unidad.................................................................................................................. 17
4.2. Selección del modo ....................................................................................................................................... 18
4.3. Selección de temperatura ............................................................................................................................. 19
4.4. Selección de la velocidad del ventilador (VENTILADOR) ...................................................................... 20
4.5. Ajuste de la dirección del flujo de aire vertical (ALETA) .......................................................................... 21
4.6. Ajuste de la dirección del flujo de aire vertical (REJILLA) ................................................................... 22
4.7. Utilización del temporizador .......................................................................................................................... 23
1) Ajuste de la hora actual ......................................................................................................................... 23
2) Ajuste de la hora de inicio de la unidad como se indica ........................................................................ 24
3) Ajuste de la hora de parada de la unidad como se indica ..................................................................... 24
4) Cambio de las horas establecidas ......................................................................................................... 24
5. Prueba de Funcionamiento ..................................................................................................................................... 25
6. Autocomprobación................................................................................................................................................... 26 ~ 27
7. Control Centralizado ................................................................................................................................................ 28
8. Solución de Problemas............................................................................................................................................ 29
Page 4

4
Indice Pagina
1. Misure di Sicurezza ................................................................................................................................................. 5 ~ 10
2. Nome dei Componenti ............................................................................................................................................. 11 ~ 13
2.1. Telecomando wireless ................................................................................................................................... 11
2.2. Unità di ricezione del segnale ....................................................................................................................... 13
3. Prima di mettere in Funzione il Dispositivo.............................................................................................................. 14 ~ 16
3.1. Installazione del telecomando ....................................................................................................................... 14
3.2. Sostituzione delle batterie e impostazione dell’ora corrente ......................................................................... 15
3.3. Impostazione del display ............................................................................................................................... 16
4. Funzionamento ........................................................................................................................................................ 17 ~ 24
4.1. Accensione/spegnimento dell’unità ............................................................................................................... 17
4.2. Selezione della modalità di funzionamento ................................................................................................... 18
4.3. Selezione di una temperatura ....................................................................................................................... 19
4.4. Selezione di una velocità della ventola (VENTILATORE) ....................................................................... 20
4.5. Regolazione della direzione verticale del flusso d’aria (ALETTA) ........................................................... 21
4.6. Regolazione della direzione verticale del flusso d’aria (DEFLETTORE) ............................................. 22
4.7. Utilizzo del timer ............................................................................................................................................ 23
1) Impostare l’ora corrente ......................................................................................................................... 23
2) Impostare l’ora di attivazione dell’unità come segue ............................................................................. 24
3) Impostare l’ora di disattivazione dell’unità come segue ......................................................................... 24
4) Modifica degli orari impostati ................................................................................................................. 24
5. Prova di Funzionamento.......................................................................................................................................... 25
6. Autodiagnosi ............................................................................................................................................................ 26 ~ 27
7. Controllo Centralizzato ............................................................................................................................................ 28
8. Risoluzione dei Problemi ......................................................................................................................................... 29
I
Indice
NL
Inhoudsopgave
Inhoudsopgave Blz
1. Veiligheidsvoorschriften ........................................................................................................................................... 5 ~ 10
2. Namen van Componenten....................................................................................................................................... 11 ~ 13
2.1. Draadloze afstandsbediening ........................................................................................................................ 11
2.2. Signaalontvangsteenheid .............................................................................................................................. 13
3. Voordat u het Apparaat in Gebruik neemt ............................................................................................................... 14 ~ 16
3.1. De afstandsbediening installeren .................................................................................................................. 14
3.2. Batterijen vervangen en de huidige tijd instellen ........................................................................................... 15
3.3. Het display instellen ...................................................................................................................................... 16
4. Gebruik van het Apparaat........................................................................................................................................ 17 ~ 24
4.1. In- en uitschakelen ........................................................................................................................................ 17
4.2. Standkeuze ................................................................................................................................................... 18
4.3. Een temperatuur kiezen ................................................................................................................................ 19
4.4. Een ventilatorsnelheid kiezen (VENTILATOR) ....................................................................................... 20
4.5. Verticale luchtstroomrichting wijzigen (BLAD) ......................................................................................... 21
4.6. Verticale luchtstroomrichting wijzigen (SCHOEPEN) .......................................................................... 22
4.7. Gebruik van de timer ..................................................................................................................................... 23
1) De huidige tijd instellen .......................................................................................................................... 23
2) Stel de tijd waarop het apparaat start als volgt in .................................................................................. 24
3) Stel de tijd waarop het apparaat stopt als volgt in ................................................................................. 24
4) De ingestelde tijden veranderen ............................................................................................................ 24
5. Proefdraaien ............................................................................................................................................................ 25
6. Zelftest ..................................................................................................................................................................... 26 ~ 27
7. Centrale Besturing ................................................................................................................................................... 28
8. Storingen Verhelpen ................................................................................................................................................ 29
Page 5
5
1. Safety Precautions
• Be sure to read these Safety precautions thoroughly and install the remote controller correctly.
• The following two symbols are used to denote dangers that may be caused by incorrect use. They are classified according to the degree of danger.
WARNING:
This symbol denotes what could lead to serious injury or death if you misuse the controller.
CAUTION:
This symbol denotes what could lead to personal injury or damage to your property if you misuse the controller.
• After reading this manual, be sure to forward it, together with the operation manual accompanying the indoor unit, to the user.
Together with the operation manual for the indoor unit, this manual should be kept in a place where it can be referred to at anytime by the user. When the user changes,
be sure to forward the manual to the final user.
WARNING
■ Check the installation conditions.
• In order to prevent the controller falling down, make sure that it is installed in a place strong enough to withstand its weight.
■ Do not dispose of the controller by yourself.
• Consult your dealer in case of disposal.
■ Stop operation when an abnormality occurs.
• Continuing to operate under abnormal conditions can result in breakdown, electric shock or fire. When an abnormality occurs (burning smell etc.), stop operations,
turn off the power switch and consult your dealer.
■ Never modify or repair the controller by yourself.
• Any deficiency caused by your modification or repair may result in an electric shock or fire. Consult your dealer about repairs.
■ Stop operation if the operation lamp on the controller’s receiver blinks or if an abnormality occurs.
• Leaving the controller in these conditions can lead to fire or breakdown. Report such conditions to your dealer.
■ Never allow the alkaline batteries to short-circuit. Never disassemble, heat or place them in fire.
• Doing so can cause the strong alkaline liquid to leak and possibly enter your eyes or cause the batteries to explode or heat up, resulting in personal injuries,
burning or mechanical breakdowns. If strong alkaline liquid comes in contact with your skin or clothes, wash it off with clean water. If it gets in to your eyes, wash
them with clean water and consult a doctor immediately.
GB
1. Safety Precautions
D
1. Sicherheitsvorkehrungen
1. Sicherheitsvorkehrungen
• Lesen Sie diese Sicherheitsvorkehrungen genau, und installieren Sie die Fernbedienung ordnungsgemäß.
• Die folgenden zwei Symbole weisen auf Gefahren hin, die durch fehlerhafte Anwendung auftreten können. Sie unterscheiden nach der Größe der Gefahr.
WARNUNG:
Dieses Symbol weist auf schwerwiegende Gefahren oder Tod hin, die durch fehlerhafte Anwendung der Fernbedienung entstehen können.
VORSICHT:
Dieses Symbol weist auf persönliche Verletzungen oder Beschädigung an Ihrem Eigentum hin, die durch fehlerhafte Anwendung der
Fernbedienung entstehen können.
• Händigen Sie nach dem Lesen diese Betriebsanleitung und die Bedienungsanleitung der Innenanlage dem Endbenutzer aus. Der Endbenutzer sollte diese Betriebsanleitung und die Bedienungsanleitung der Innenanlage an einem sicheren Ort aufbewahren, um jederzeit nachschlagen zu können. Bei einem Benutzerwechsel muß
sichergestellt werden, daß die Bedienungsanleitung an den neuen Benutzer weitergegeben wird.
WARNUNG
■ Prüfen Sie die Installationsbedingungen.
• Um zu verhindern, daß die Fernbedienung zu Boden fällt, muß sie an einer Stelle installiert werden, die für ihr Gewicht stabil genug ist.
■ Entsorgen Sie die Fernbedienung nicht selbst.
• Ziehen Sie für die Entsorgung Ihren Händler zu Rate.
■ Stoppen Sie den Betrieb, sobald eine Anomalie auftritt.
• Bei Fortsetzung des Betriebs bei anormalen Bedingungen kann zu einer Fehlfunktion, Stromschlägen oder Bränden führen. Sobald eine Anomalie auftritt (Brandgeruch o. ä.), muß der Betrieb eingestellt und der Netzschalter ausgeschaltet werden; ziehen Sie dann Ihren Händler zu Rate.
■ Verändern oder reparieren Sie die Fernbedienung niemals eigenhändig.
• Alle Mängel, die durch eigenhändige Veränderungen oder Reparaturen entstehen, können zu Stromschlägen oder Bränden führen. Ziehen Sie zu Reparaturen
Ihren Händler zu Rate.
■ Stoppen Sie den Betrieb, sobald die Betriebslampe auf dem Fernbedienungsempfänger blinkt oder eine Anomalie auftritt.
• Wird die Fernbedienung in einem solchen Zustand belassen, kann dies zu einem Brand oder einer Fehlfunktion führen. Melden Sie solche Zustände bei Ihrem
Händler.
■ Die Alkali-Batterien dürfen niemals kurzgeschlossen werden. Sie dürfen nicht geöffnet, erhitzt oder ins Feuer geworfen werden.
• Andernfalls kann ätzende alkalische Flüssigkeit austreten und möglicherweise in Ihre Augen geraten, oder aber die Batterie kann zur Explosion gebracht oder
überhitzt werden, was zu Verletzungen, Verbrennungen oder zu technischem Versagen führen kann. Sollte ätzende alkalische Flüssigkeit in Kontakt mit Haut oder
Kleidung kommen, waschen Sie sie mit klarem Wasser ab. Sollte sie in die Augen geraten, waschen Sie die Augen mit klarem Wasser aus, und wenden Sie sich
unverzüglich an einen Arzt.
Page 6
6
F
1. Consignes de Sécurité
E
1. Medidas de Seguridad
1. Medidas de Seguridad
• Lea estas Medidas de seguridad detenidamente e instale el controlador remoto de forma adecuada.
• Los dos símbolos siguientes se utilizan para determinar posibles daños debidos al uso incorrecto de la unidad. Se clasifican según el grado de peligro.
ADVERTENCIA:
Este símbolo indica lo que podría provocar serias lesiones o la muerte en caso de un mal uso del controlador.
PRECAUCIÓN:
Este símbolo indica lo que podría provocar lesiones personales o daños materiales en caso de un mal uso del controlador.
• Después de haber leído este manual, entréguelo, junto con el manual de funcionamiento de la unidad interior, al usuario.
El usuario debe guardar este manual, junto con el manual de funcionamiento de la unidad interior, en un lugar donde esté localizable en cualquier momento. Cuando
cambie el usuario, asegúrese de que el manual sea entregado al usuario final.
ADVERTENCIA
■ Compruebe las condiciones de instalación.
• Para evitar que se caiga el controlador, asegúrese de que se instale en un lugar lo suficientemente fuerte como para soportar su peso.
■ No deseche el controlador usted mismo.
• Para ello póngase en contacto con su distribuidor.
■ Detenga el funcionamiento si se producen anomalías.
• Si continúa el funcionamiento bajo condiciones anómalas, puede producirse una avería, una descarga eléctrica o un incendio. Cuando se produzca una anomalía
(olor a quemado, etc.), detenga el funcionamiento, apague la unidad y póngase en contacto con su distribuidor.
■ Nunca modifique o repare usted mismo el controlador.
• Cualquier deficiencia causada por una modificación o reparación realizada por usted mismo podría causar una descarga eléctrica o incendio. Consulte a su
distribuidor sobre cualquier tipo de reparaciones.
■ Detenga el funcionamiento si la luz de funcionamiento del receptor del controlador parpadea o si se producen anomalías.
• Si no lo hace podría producirse una avería o un incendio. Informe a su distribuidor.
■ Nunca permita que las pilas alcalinas establezcan un cortocircuito. Nunca las desmonte, caliente o coloque en el fuego.
• Si lo hace, podría provocar que gotee el fuerte líquido alcalino y le pueda entrar en los ojos, o que las pilas exploten o se incendien, provocando lesiones
personales, quemaduras o averías mecánicas. Si el líquido alcalino entra en contacto con la piel o la ropa, lávela con agua. Si entra en contacto con los ojos,
lávelos con agua y consulte al médico inmediatamente.
1. Consignes de Sécurité
• Veuillez lire attentivement ces Consignes de sécurité et veillez à installer la télécommande correctement.
• Les deux symboles suivants sont utilisés pour avertir l’utilisateur des dangers qu’il encourt suite à une mauvaise utilisation de la télécommande. Ils sont classés en
fonction de la gravité du danger encouru.
AVERTISSEMENT:
Ce symbole avertit l’utilisateur du risque de blessures graves, voire du danger de mort auxquels il s’expose en cas d’utilisation
incorrecte de la télécommande.
PRÉCAUTION:
Ce symbole avertit l’utilisateur des blessures corporelles auxquelles il s’expose ou des détériorations que pourrait subir son
domicile en cas d’utilisation incorrecte de la télécommande.
• Après avoir pris connaissance du contenu de ce manuel, veuillez le remettre, accompagné du mode d’emploi de l’appareil intérieur, à l’utilisateur.
Ce manuel, ainsi que le mode d’emploi de l’appareil intérieur, doit être conservé dans un endroit où il pourra être facilement consulté à tout moment.
En cas de changement d’utilisateur, veillez à remettre le manuel au nouvel utilisateur.
AVERTISSEMENT
■ Contrôlez les conditions d’installation.
• Afin d’éviter toute chute de la télécommande, veillez à l’installer dans un endroit suffisamment solide pour supporter son poids.
■ Ne jetez pas la télécommande vous-même.
• Consultez votre revendeur si vous désirez jeter la télécommande.
■ Arrêtez la télécommande en cas d’anomalie de fonctionnement.
• Si vous continuez à utiliser la télécommande en cas d’anomalie de fonctionnement, une panne, un choc électrique ou un incendie pourraient en résulter. En cas
d’anomalie (odeur de brûlé etc.), arrêtez le fonctionnement de la télécommande, mettez-la hors tension et consultez votre revendeur.
■ Ne tentez aucune modification ou réparation de la télécommande par vous-même.
• Toute défaillance causée par vos tentatives de modification ou de réparation de la télécommande pourraient provoquer un choc électrique ou un incendie.
Consultez votre revendeur pour toute réparation.
■ Arrêtez la télécommande si le témoin de fonctionnement du récepteur de la télécommande clignote ou si une anomalie survient.
• Si vous continuez à utiliser la télécommande dans ces conditions, vous pourriez provoquer un incendie ou une panne de l’appareil. Faites part de ces anomalies
à votre revendeur.
■ Evitez tout court-circuit des piles alcalines. Ne démontez jamais les piles, ne les exposez pas à la chaleur et ne les jetez pas au feu.
• Vous pourriez provoquer la fuite du liquide alcalin ; les piles pourraient exploser ou surchauffer et tout contact avec les yeux se traduirait par des blessures
corporelles graves, des brûlures ou des pannes fonctionnelles de la télécommande. Si une du liquide alcalin entre en contact avec votre peau ou vos vêtements,
rincez-les abondamment à l’eau claire. En cas de contact avec les yeux, rincez-les abondamment à l’eau claire et consultez un médecin immédiatement.
Page 7

7
1. Misure di Sicurezza
• Leggere attentamente le presenti misure di sicurezza e installare correttamente il telecomando.
• Un uso scorretto può provocare situazioni di pericolo che vengono indicate con i due simboli seguenti e sono classificate in base al grado di pericolo che comportano.
AVVERTENZA:
Questo simbolo indica pericoli che potrebbero causare infortuni gravi o morte in caso di uso errato del telecomando.
CAUTELA:
Questo simbolo indica pericoli che potrebbero provocare lesioni personali o danni materiali in caso di uso errato del telecomando.
• Dopo la lettura del presente manuale, accertarsi di consegnarlo all’utilizzatore, insieme alle Istruzioni di funzionamento dell’unità interna.
Conservare il presente manuale insieme con le Istruzioni di funzionamento dell’unità interna in un posto che ne consenta la consultazione in qualsiasi momento. Nel
caso in cui l’apparecchio venga utilizzato da un’altra persona, accertarsi di consegnare il manuale al nuovo utilizzatore.
AVVERTENZA
■ Verificare le condizioni di installazione.
• Per evitare la caduta del telecomando, accertarsi che venga installato in una posizione abbastanza solida da sopportarne il peso.
■ Non gettare via il telecomando.
• Nel caso in cui ci si voglia liberare del telecomando, rivolgersi al proprio rivenditore.
■ Interrompere il funzionamento in caso di anomalie.
• L’utilizzo del dispositivo nonostante anomalie di funzionamento può provocare guasti, scosse elettriche o incendio. In caso di anomalie (odore di bruciato ecc.)
sospendere l’utilizzo, spegnere l’interruttore di alimentazione e rivolgersi al proprio rivenditore.
■ Non eseguire in proprio tentativi di modifica o riparazione del telecomando.
• Eventuali difetti dovuti a modifiche o riparazioni eseguite in proprio potrebbero causare scosse elettriche o incendio. Rivolgersi al proprio rivenditore per le
riparazioni.
■ Sospendere l’utilizzo se la spia di funzionamento del ricevitore del telecomando lampeggia o se si verifica un’anomalia.
• L’utilizzo del telecomando in queste condizioni può provocare un incendio o un guasto. Riferire le anomalie al proprio rivenditore.
■ Evitare cortocircuiti delle batterie alcaline. Non smontarle, riscaldarle o esporle al fuoco in nessun caso.
• Tali azioni possono provocare una fuoriuscita di liquido altamente alcalino che potrebbe entrare in contatto con gli occhi o possono determinare il rischio di
esplosione o surriscaldamento delle batterie con conseguenti lesioni personali, ustioni o guasti meccanici del telecomando. In caso di contatto del liquido fortemente
alcalino con la pelle o con i vestiti, lavarlo abbondantemente con acqua corrente. Se il contatto avviene con gli occhi, lavarli abbondantemente con acqua corrente
e rivolgersi immediatamente a un medico.
I
1. Misure di Sicurezza
NL
1. Veiligheidsvoorschriften
1. Veiligheidsvoorschriften
• Lees deze veiligheidsvoorschriften zorgvuldig door en installeer de afstandsbediening op de juiste wijze.
• De volgende twee symbolen worden gebruikt om u te wijzen op gevaar dat door verkeerd gebruik kan ontstaan. Ze geven elk een bepaalde mate van gevaar aan.
WAARSCHUWING:
Dit symbool geeft aan dat de kans op ernstige verwondingen of dood aanwezig is bij verkeerd gebruik van de afstandsbediening.
VOORZICHTIG:
Dit symbool geeft aan dat er kans op persoonlijke verwondingen of beschadiging van het apparaat is bij verkeerd gebruik van de
afstandsbediening.
• Als u deze handleiding gelezen heeft, geef hem dan samen met de bedieningshandleiding van het binnenapparaat aan de gebruiker.
Deze handleiding dient samen met die van het binnenapparaat bewaard te worden op een plaats waar de gebruiker ze altijd kan raadplegen. Als iemand anders de
gebruiker wordt, geef de handleiding dan door aan de nieuwe gebruiker.
WAARSCHUWING
■ Controleer de plaats van installatie.
• Installeer de afstandsbediening op een plaats die sterk genoeg is om het gewicht ervan te dragen, om te voorkomen dat de afstandsbediening valt.
■ Gooi de afstandsbediening niet zelf weg.
• Neem contact op met uw dealer als u hem wilt weggooien.
■ Schakel het apparaat uit indien iets abnormaals gebeurt.
• Het apparaat aan laten staan onder abnormale omstandigheden kan leiden tot storingen, elektrische schokken of brand. Als zich iets abnormaals voordoet
(brandlucht e.d.), schakel dan het apparaat uit, zet de netschakelaar uit en neem contact op met uw dealer.
■ Probeer nooit de afstandsbediening zelf aan te passen of te repareren.
• Elke tekortkoming die wordt veroorzaakt door uw aanpassingen of reparaties kan elektrische schokken of brand tot gevolg hebben. Neem contact op met uw
dealer voor reparaties.
■ Schakel het apparaat uit indien de werkingslamp op de ontvanger van de afstandsbediening knippert of als er iets abnormaals gebeurt.
• De afstandsbediening in deze omstandigheden laten kan leiden tot brand of storingen. Meld zulke situaties aan uw dealer.
■ Zorg ervoor dat de alkalinebatterijen nooit kortgesloten worden. U mag ze nooit uit elkaar halen, verwarmen of in een vuur gooien.
• Als u dat doet kan er sterke alkalinevloeistof uit de batterij lekken die mogelijk in uw ogen komt of de batterij doet ontploffen of opwarmen, met als resultaat
persoonlijke verwondingen, verbrandingen of mechanische storingen. Indien de sterke alkalinevloeistof in contact komt met uw huid of kleding, was de vloeistof
dan af met schoon water. Als de vloeistof in uw ogen komt, was uw ogen dan met schoon water en ga onmiddellijk naar een dokter.
Page 8
8
VORSICHT
■ Lassen Sie die Fernbedienung nicht fallen.
• Andernfalls kann das Gehäuse zerbrechen und so die Bedienung unmöglich machen.
■ Plazieren Sie keine gefährlichen Substanzen nahe der Fernbedienung.
• Installieren Sie sie nicht an Orten, wo sie austretenden entzündlichen Gasen ausgesetzt ist. Eine Ansammlung entzündlicher Gase an der Fernbedienung kann
einen Brand oder eine Explosion verursachen.
■ Reinigen Sie das Gerät nicht mit Wasser.
• Andernfalls können Stromschläge oder eine Fehlfunktion die Folge sein.
■ Berühren Sie die Fernbedienungstasten nicht mit nassen Händen.
• Andernfalls können Stromschläge oder eine Fehlfunktion die Folge sein.
■ Demontieren Sie die Fernbedienung nicht.
• Ein Berühren der internen Schaltungen kann einen Brand oder eine Fehlfunktion zur Folge haben.
■ Verwenden Sie das Gerät nicht unter schwierigen Umgebungsbedingungen.
• Eine Verwendung an Or ten, die Öl (auch Maschinenöl), Dampf oder schwefelhaltigen Gasen ausgesetzt sind, kann die Leistung beeinträchtigen oder Schäden an
den Komponenten verursachen.
■ Verwenden Sie keine Insektensprays oder andere entzündliche Sprays.
• Plazieren Sie keine entzündlichen Sprays in der Nähe der Fernbedienung, und sprühen Sie nicht direkt auf die Fernbedienung. Andernfalls kann ein Brand oder
eine Explosion die Folge sein.
■ Reinigen Sie die Fernbedienung nicht mit Benzin, Verdünner oder chemischen Tüchern usw.
• Andernfalls können Verfärbungen oder Fehlfunktionen die Folge sein. Sollte die Fernbedienung extrem verschmutzt sein, feuchten Sie ein Tuch mit einem in
Wasser gelösten milden Reinigungsmittel an, und wischen Sie die Fernbedienung damit sauber; trocknen Sie sie danach mit einem Tuch.
■ Betätigen Sie die Tasten nicht mit spitzen Gegenständen.
• Andernfalls können Stromschläge oder eine Fehlfunktion die Folge sein.
■ Achten Sie darauf, daß die Temperatur im spezifizierten Bereich bleibt.
• Setzen Sie die Fernbedienung nur innerhalb des spezifizierten Temperaturbereichs ein. Ein Einsatz bei Umgebungstemperaturen außerhalb dieses Bereichs kann
zur schwerwiegenden Fehlfunktionen führen.
• Den spezifizierten Temperaturbereich finden Sie in den technischen Daten in der Bedienungsanleitung.
■ Verwenden Sie die Fernbedienung nicht für Sonderzwecke.
• Die Fernbedienung ist nur ausgelegt für die Verwendung mit dem MITSUBISHI Electric Building Air Conditioning Control System. Verwenden Sie sie nicht für
andere Zwecke wie beispielsweise die Steuerung anderer Klimaanlagen. Andernfalls kann eine Fehlfunktion die Folge sein.
■ Eine falsche Handhabung von Batterien kann zu Flüssigkeitsaustritt, Explosionen oder Überhitzung führen, was Fehlfunktionen oder Verletzungen zur
Folge haben kann. Halten Sie sich unbedingt an die folgenden Maßgaben.
(1) Laden Sie die Batterie nicht auf.
(2) Legen Sie die Batterien richtig ein.
(3) Verwenden Sie nicht eine neue gemeinsam mit einer alten Batterie oder Batterien verschiedenen Typs.
(4) Nehmen Sie die Batterien unverzüglich heraus, sobald sie leer sind.
CAUTION
■ Do not drop the controller.
• Doing so may cause the case to crack and may disable control.
■ Do not place any dangerous substances near the controller.
• Do not install in any place exposed to leakage of flammable gas. Flammable gases accumulated around the controller may cause fire or an explosion.
■ Do not wash with water.
• Doing so may cause an electric shock or breakdown.
■ Do not touch any control button with wet hands.
• Doing so may cause an electric shock or breakdown.
■ Do not disassemble the controller.
• Contact with internal circuitry may cause fire or breakdown.
■ Do not use in special environments.
• Using in places exposed to oil (including machine oil), steam or sulfur gas can reduce the performance or can cause damage to the components.
■ Do not spray insecticide or other flammable sprays.
• Do not place flammable sprays near the controller or spray directly at the controller. Doing so may result in fire or explosion.
■ Do not wipe the controller with benzine, thinner or chemical cloths etc.
• Doing so may cause discoloration or breakdowns. If the controller becomes extremely dirty, dampen a cloth with water-diluted neutral detergent and wipe the
controller with it, then wipe with a dry cloth.
■ Do not press any control button with a sharp object.
• Doing so may cause an electric shock or breakdown.
■ Keep the temperature within the specified range.
• Use the controller within the specified operating temperature range. Using in temperature outside that range can cause serious breakdowns.
• For the specified operating temperature range, refer to the specifications given on the operation manual.
■ Do not use for other special purposes.
• The controller has been designed for use with the MITSUBISHI Electric Building Air Conditioning Control System only. Do not use for other purposes such as
controlling other air conditioners. Doing so may result in breakdown.
■ Incorrect use of batteries can cause liquid leakage, explosion or heating and may result in breakdown or personal injury. Adhere to the following.
(1) Do not recharge the batteries.
(2) Insert the batteries in the correct direction.
(3) Do not mix a new battery with an old battery or batteries of different types.
(4) Remove the batteries immediately when they have run out.
GB
1. Safety Precautions
D
1. Sicherheitsvorkehrungen
Page 9

9
PRECAUCIÓN
■ No deje caer el controlador.
• Podría romperse la cubierta y quedar desactivado el control.
■ No coloque ninguna sustancia peligrosa cerca del controlador.
• No lo instale en cualquier lugar expuesto a escapes de gas inflamable. Los gases inflamables acumulados alrededor del controlador pueden causar un incendio
o una explosión.
■ No lo lave con agua.
• Al hacerlo podría provocar una descarga eléctrica o un funcionamiento defectuoso.
■ No pulse ningún botón de control con las manos mojadas.
• Al hacerlo podría provocar una descarga eléctrica o un funcionamiento defectuoso.
■ No desmonte el controlador.
• El contacto con el circuito interno podría provocar un incendio o un funcionamiento defectuoso.
■ No lo utilice en ningún entorno especial.
• Al utilizarlo en un lugar expuesto a aceite (incluido el aceite de máquina), vapor o gas sulfúrico podría disminuir el rendimiento o provocar daños en sus
componentes.
■ No utilice aerosoles insecticidas o inflamables.
• No coloque aerosoles inflamables cerca del controlador ni los utilice directamente sobre el mismo. Al hacerlo podría provocar un incendio o una explosión.
■ No limpie el controlador con bencina, disolventes o productos químicos.
• Al hacerlo podría producir una decoloración o un funcionamiento defectuoso. Si el controlador está muy sucio, empape un paño con agua y detergente neutro y
límpielo con dicho paño, secándolo posteriormente con un paño seco.
■ No pulse ningún botón de control utilizando un objeto punzante.
• Al hacerlo podría provocar una descarga eléctrica o un funcionamiento defectuoso.
■ Mantenga la temperatura dentro del rango especificado.
• Utilice el controlador dentro del rango de temperatura de funcionamiento especificado. Si utiliza el controlador fuera de este rango de temperatura, podría
provocar averías importantes.
• Para conocer el rango de temperatura de funcionamiento especificado, consulte las especificaciones del manual de funcionamiento.
■ No lo utilice con ningún otro propósito especial.
• El controlador ha sido diseñado para ser utilizado únicamente con el Sistema eléctrico de control de acondicionadores de aire MITSUBISHI (MITSUBISHI Electric
Building Air Conditioning Control System) para edificios. No lo utilice con ningún otro propósito como, por ejemplo, para controlar otros acondicionadores de aire.
Al hacerlo podría provocar un funcionamiento defectuoso.
■ El uso incorrecto de las pilas podría provocar la pérdida de líquido, una explosión o un sobrecalentamiento, dando como resultado un funcionamiento
defectuoso o daños personales. Tenga en cuenta lo siguiente.
(1) No recargue las pilas.
(2) Introduzca las pilas en la dirección correcta.
(3) No mezcle pilas nuevas con pilas usadas o pilas de distintos tipos.
(4) Retire las pilas inmediatamente cuando se hayan gastado.
PRÉCAUTION
■ Evitez de faire tomber la télécommande.
• Le boîtier pourrait se fendre ou casser et la télécommande pourrait ne plus fonctionner.
■ Ne placez pas de substances dangereuses près de la télécommande.
• Ne placez pas la télécommande dans un endroit exposé à des fuites de gaz inflammable. Si des gaz inflammables s’accumulent autour de la télécommande, ceci
pourrait provoquer un incendie ou une explosion.
■ Ne nettoyez pas la télécommande avec de l’eau.
• Vous pourriez provoquer un choc électrique ou une panne de l’appareil.
■ N’appuyez pas sur les touches de la télécommande avec les mains mouillées.
• Vous pourriez provoquer un choc électrique ou une panne de l’appareil.
■ Ne démontez pas la télécommande.
• Tout contact avec les circuits internes de la télécommande pourrait provoquer un choc électrique ou une panne.
■ N’utilisez pas la télécommande dans des environnements à hauts risques.
• L’utilisation de la télécommande dans des endroits exposés à des projections d’huile (huile de machine incluse), à de la vapeur ou du gaz sulfureux pourrait réduire
les performances de l’appareil ou endommager ses composants.
■ Ne vaporisez pas d’insecticide ou tout autre substance inflammable sur ou autour de la télécommande.
• Ne placez pas de vaporisateur inflammable près de la télécommande ou ne vaporisez aucune substance inflammable directement sur la télécommande. Vous
pourriez provoquer un incendie ou une explosion.
■ Ne nettoyez pas la télécommande avec de la benzine, un diluant ou un chiffon imprégné d’une substance chimique etc.
• Vous pourriez provoquer une décoloration ou une panne de l’appareil. Si la télécommande devient extrêmement sale, humidifiez un chiffon avec un détergent
neutre dilué avec de l’eau et nettoyez la télécommande, puis essuyez-la avec un chiffon sec.
■ N’appuyez pas sur les touches de la télécommande avec un objet pointu.
• Vous pourriez provoquer un choc électrique ou une panne de l’appareil.
■ Conservez la télécommande dans les limites de température recommandées.
• Utilisez la télécommande dans les limites de température de fonctionnement recommandées. Si vous utilisez la télécommande à des températures situées en
dehors des limites recommandées, vous pourriez provoquer une panne sérieuse de l’appareil.
• Pour connaître les limites de température de fonctionnement recommandées, reportez-vous aux caractéristiques données dans le mode d’emploi.
■ N’utilisez pas la télécommande à des fins autres que celles pour lesquelles elle est destinée.
• La télécommande a été conçue pour être utilisée uniquement avec le Système de Contrôle du Climatiseur Intérieur Electrique MITSUBISHI (MITSUBISHI Electric
Building Air Conditioning Control System). N’utilisez pas la télécommande à des fins autres telles que le contrôle d’autres climatiseurs. Vous pourriez provoquer
une panne de l’appareil.
■ Une utilisation incorrecte des piles pourrait provoquer une fuite du liquide alcalin, une explosion ou une surchauffe et se traduire par une panne de
l’appareil ou des blessures corporelles. Suivez les recommandations suivantes.
(1) Ne rechargez pas les piles.
(2) Insérez les piles correctement selon les indications situées à l’intérieur du boîtier.
(3) Ne mélangez pas des piles neuves avec des piles usagées ou des piles de type différent.
(4) Retirez les piles immédiatement lorsqu’elles sont déchargées.
F
1. Consignes de Sécurité
E
1. Medidas de Seguridad
Page 10
10
ATTENZIONE
■ Evitare di far cadere il telecomando.
• La custodia potrebbe rompersi e mettere fuori uso il telecomando.
■ Non collocare sostanze pericolose in prossimità del telecomando.
• Non collocarlo in luoghi esposti a perdite di gas infiammabili. L’accumulo di gas infiammabili in prossimità del telecomando può provocare un incendio o un’esplo-
sione.
■ Non pulire il telecomando con acqua.
• L’acqua potrebbe provocare scosse elettriche o guasti.
■ Non toccare alcun tasto di controllo con le mani bagnate.
• L’acqua potrebbe provocare scosse elettriche o guasti.
■ Non smontare il telecomando.
• Il contatto con i circuiti interni potrebbe provocare un incendio o un guasto.
■ Non utilizzare il telecomando in ambienti a rischio.
• L’utilizzo in ambienti esposti a olio (olio di macchina compreso), vapore o gas solforici potrebbe compromettere le prestazioni del telecomando o danneggiarne i
componenti.
■ Non vaporizzare insetticidi o altri spray infiammabili.
• Non collocare spray infiammabili in prossimità del telecomando o vaporizzarli direttamente sul telecomando. Altrimenti si potrebbero causare incendi o esplosioni.
■ Non pulire il telecomando con benzene, diluente o panni impregnati di sostanze chimiche ecc.
• Si potrebbero provocare scolorimenti o guasti. Se il telecomando diventa estremamente sporco, umidificare un panno con un detergente neutro diluito in acqua e
utilizzarlo per pulire il telecomando, quindi asciugarlo con un panno asciutto.
■ Non premere i tasti di controllo con oggetti appuntiti.
• Si potrebbero provocare scosse elettriche o guasti.
■ Conservare il telecomando entro i limiti di temperatura indicati.
• Utilizzare il telecomando entro i limiti di temperatura indicati. L’utilizzo a temperature al di fuori di questi limiti può provocare seri guasti.
• Per i limiti di temperatura consigliati, consultare le specifiche riportate nel manuale operativo.
■ Non utilizzare il telecomando per scopi diversi da quelli previsti.
• Il telecomando è stato progettato per essere utilizzato esclusivamente con il sistema elettrico di controllo di climatizzazione per edifici MITSUBISHI (MITSUBISHI
Electric Building Air Conditioning Control System). Non utilizzarlo per altri scopi, quali il controllo di condizionatori di altro tipo. Si potrebbe provocare una guasto.
■ Un uso errato delle batterie può provocare fuoriuscite di liquido, esplosioni o surriscaldamento e potrebbe causare un guasto o lesioni personali.
Attenersi alle seguenti raccomandazioni.
(1) Non ricaricare le batterie.
(2) Inserire le batterie secondo l’orientamento corretto.
(3) Non utilizzare contemporaneamente batterie nuove e usate o batterie di tipo differente.
(4) Rimuovere immediatamente le batterie scariche.
VOORZICHTIG
■ Laat de afstandsbediening niet vallen.
• Daardoor kan de behuizing breken en de afstandsbediening defect raken.
■ Plaats geen gevaarlijke substanties in de buurt van de afstandsbediening.
• Installeer de afstandsbediening niet op een plaats waar lekkage van ontvlambaar gas is. Door ontvlambare gassen die zich rond de afstandsbediening ophopen
kan brand of een ontploffing ontstaan.
■ Reinig de afstandsbediening niet met water.
• Dit kan elektrische schokken of storingen veroorzaken.
■ Raak de bedieningsknoppen niet met natte handen aan.
• Dit kan elektrische schokken of storingen veroorzaken.
■ Haal de afstandsbediening niet uit elkaar.
• Als u contact maakt met de schakelingen binnenin kan dit brand of storingen veroorzaken.
■ Gebruik de afstandsbediening niet in een speciale omgeving.
• Door gebruik in een omgeving met olie (met inbegrip van machineolie), stoom of zwavelgas kan de werking verslechteren of kunnen onderdelen beschadigd
raken.
■ Spuit niet met insecticide of een andere ontvlambare spray.
• Plaats geen ontvlambare spray bij de afstandsbediening en spuit er niet rechtstreeks op. Daardoor kan brand of een ontploffing ontstaan.
■ Veeg niet over de afstandsbediening met wasbenzine, thinner of doekjes met chemicaliën e.d.
• Dit kan verkleuring of storingen veroorzaken. Is de afstandsbediening erg vuil, bevochtig dan een doek met in water opgelost neutraal reinigingsmiddel, veeg
daarmee de afstandsbediening schoon en veeg na met een droge doek.
■ Gebruik geen scherp voorwerp om op de bedieningsknoppen te drukken.
• Dit kan elektrische schokken of storingen veroorzaken.
■ Houd de temperatuur binnen het voorgeschreven bereik.
• Gebruik de afstandsbediening binnen het voorgeschreven bedrijfstemperatuurbereik. Door gebruik bij temperaturen buiten dat bereik kunnen ernstige storingen
ontstaan.
• Het voorgeschreven bedrijfstemperatuurbereik vindt u bij de specificaties in de bedieningshandleiding.
■ Gebruik de afstandsbediening niet voor andere doeleinden.
• De afstandsbediening is alleen bestemd voor gebruik bij het MITSUBISHI Electric Building Air Conditioning Control System. Gebruik de afstandsbediening niet
voor andere doeleinden, zoals het bedienen van andere airconditioners. Dit kan leiden tot storingen.
■ Verkeerd gebruik van batterijen kan vloeistoflekkage, ontploffing of opwarming veroorzaken en resulteren in storingen of persoonlijke verwondingen.
Houd u zich aan het volgende.
(1) Laad de batterijen niet opnieuw op.
(2) Plaats de batterijen in de juiste richting.
(3) Gebruik geen combinatie van een nieuwe en een oude batterij of van twee verschillende types.
(4) Verwijder de batterijen meteen zodra ze leeg zijn geraakt.
I
1. Misure di Sicurezza
NL
1. Veiligheidsvoorschriften
Page 11

11
I
2. Nome dei Componenti
NL
2. Namen van Componenten
F
2. Nom des Composants
E
2. Nombre de los Componentes
GB
2. Name of Component
D
2. Namen der Komponenten
ON/OFF
TEMP
NOT AVAILABLE
MODEL SELECT
TEST RUN
CHECK
1
2
4
3
7
5
6
2. Name of Component
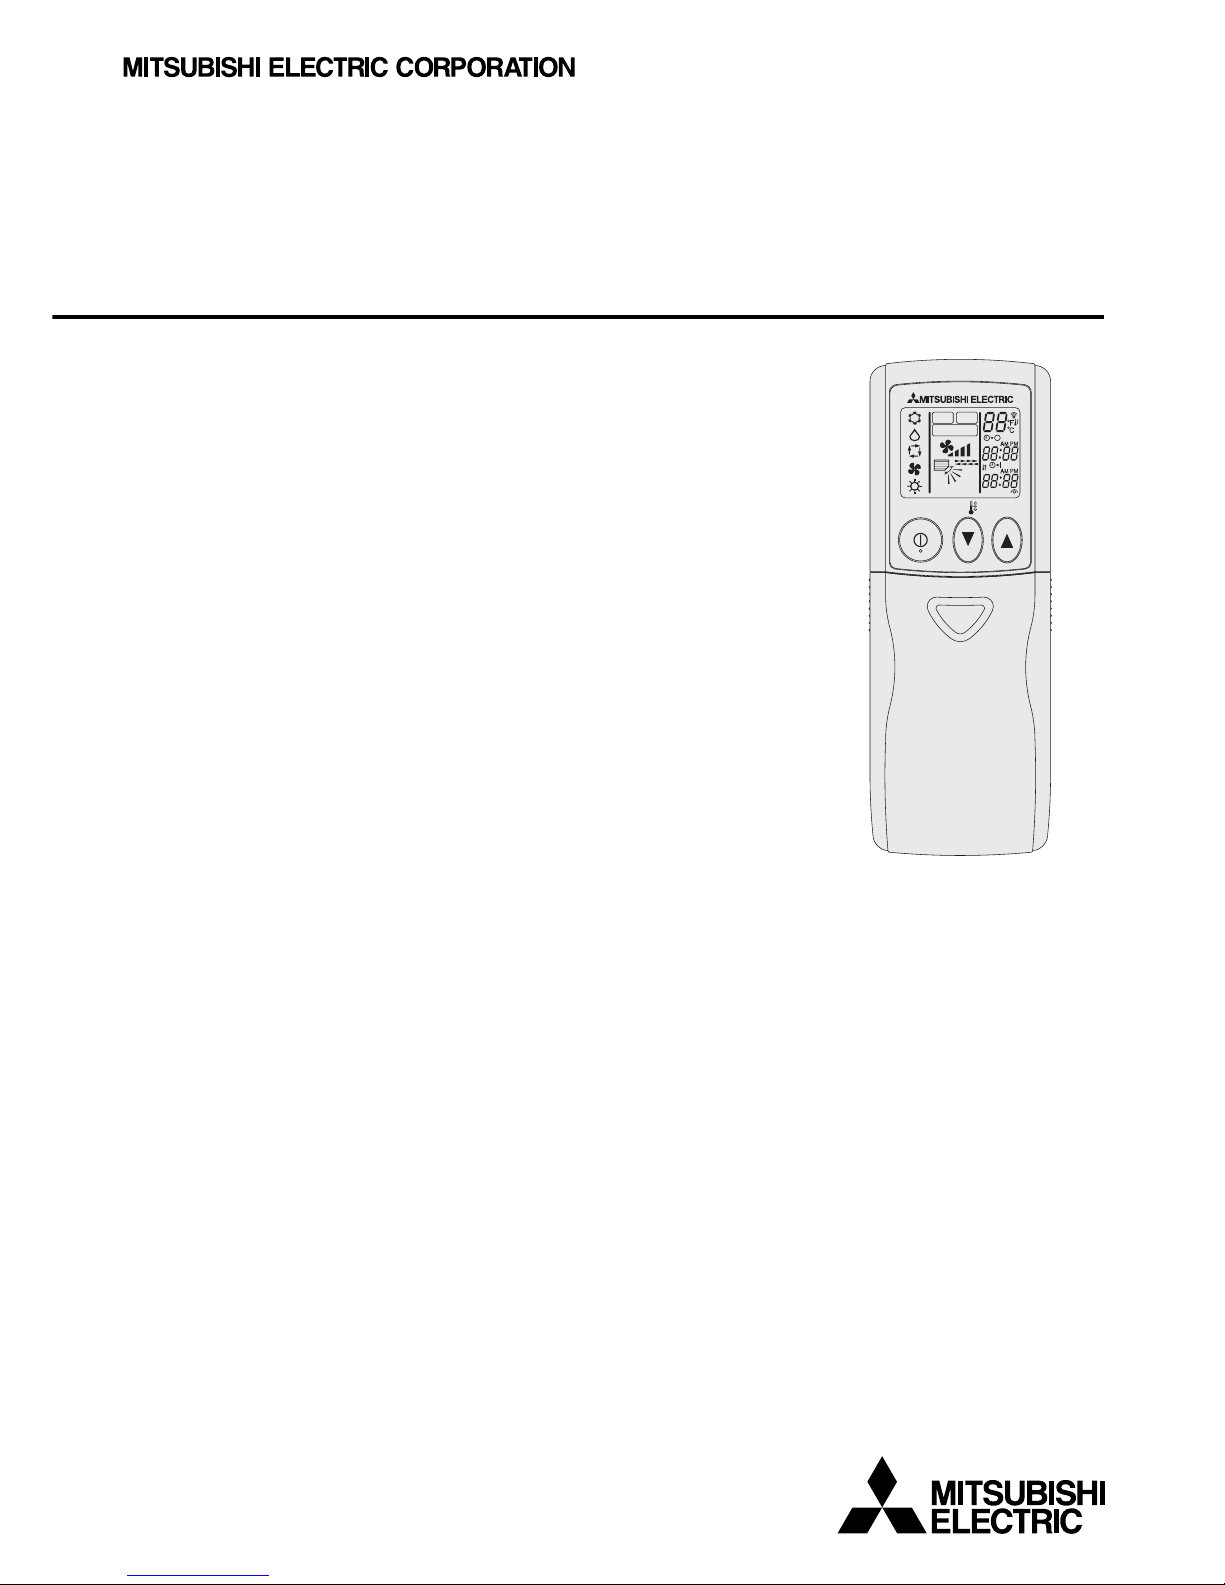
2.1. Wireless remote controller
* The following example is for explanatory purposes only and shows the operat-
ing section when all the LCD displays are lit. It differs from the actual display.
The LCD will remain dark while the remote controller is not in operation.
1 Transmitter ...................................................... Point this section to the Signal
Receiving Unit
2 Operation mode .............................................. P. 18
3 Pre-set temperature ........................................ P. 19
4 Fan
.......................................................... P. 20
5 Vane
.......................................................... P. 21
6 Louver
.................................................. P. 22
7 Current time .................................................... P. 15, P. 23
Timer time ....................................................... P. 24
display ............................................... P. 24
2. Nom des Composants
2.1. Télécommande sans fil
* L’exemple suivant est donné à titre d’information uniquement et montre l’écran
de fonctionnement lorsque tous les affichages LCD sont allumés. L’affichage
réel est différent.
L’écran LCD reste noir lorsque la télécommande n’est pas en fonctionnement.
1 Transmetteur ................................................... Pointez cette partie vers l’unité
de réception des signaux
2 Mode de fonctionnement ................................ P. 18
3 Température prédéfinie ................................... P. 19
4 Ventilateur
............................................... P. 20
5 Ailette
........................................................ P. 21
6 Sortie d’air
............................................ P. 22
7 Heure actuelle ................................................. P. 15, P. 23
Heure de la minuterie ..................................... P. 24
affichage ............................................ P. 24
2. Nome dei Componenti
2.1. Telecomando wireless
* L’esempio qui di seguito è fornito esclusivamente a titolo esplicativo e mostra la
sezione operativa con tutti i display LCD illuminati. Il display reale è differente.
Lo schermo LCD rimane spento quando il telecomando non è in funzione.
1 Trasmettitore ................................................... Puntare questo lato verso l’uni-
tà di ricezione del segnale
2 Modalità di funzionamento .............................. P. 18
3 Temperatura predefinita .................................. P. 19
4 Ventilatore
............................................... P. 20
5 Aletta
......................................................... P. 21
6 Deflettore
............................................. P. 22
7 Ora corrente .................................................... P. 15, P. 23
Ora del timer ................................................... P. 24
display ............................................... P. 24
2. Namen der Komponenten
2.1. Drahtlose Fernbedienung
* Das folgende Beispiel dient nur der Erläuterung und zeigt den Bedienbereich
in einem Zustand, im dem alle Displays auf dem LCD aktiv sind. Dies stimmt
nicht mit der tatsächlichen Erscheinung überein. Das LCD bleibt dunkel, solange die Fernbedienung nicht in Betrieb ist.
1 Geber .............................................................. Zeigen Sie damit auf die Signal-
empfangseinheit
2 Betriebsart ...................................................... P. 18
3 Vorgewählte Temperatur ................................. P. 19
4 Ventilator
................................................. P. 20
5 Flügelzellen
............................................... P. 21
6 Lamellen
.............................................. P. 22
7 Aktuelle Uhrzeit ............................................... P. 15, P. 23
Timer-Zeit ....................................................... P. 24
Display ............................................... P. 24
2. Nombre de los Componentes
2.1. Controlador remoto inalámbrico
* El siguiente ejemplo únicamente explica y muestra la sección de funciona-
miento cuando todos los indicadores LCD estén encendidos. Difiere del indicador actual. El LCD permanecerá apagado mientras el controlador remoto no
esté en funcionamiento.
1 Transmisor ...................................................... Esta sección se encuentra en
el Receptor de señal
2 Modo de funcionamiento ................................ P. 18
3 Temperatura preestablecida ........................... P. 19
4 Ventilador
................................................ P. 20
5 Aleta
.......................................................... P. 21
6 Rejilla
................................................... P. 22
7 Hora actual ..................................................... P. 15, P. 23
Hora del temporizador .................................... P. 24
Indicador
............................................ P. 24
2. Namen van Componenten
2.1. Draadloze afstandsbediening
* Het volgende voorbeeld dient alleen voor uitleg en toont het bedieningsgedeelte
terwijl alle LCD-displaysymbolen oplichten. In werkelijkheid wordt dit niet zo
weergegeven. De LCD blijft donker wanneer de afstandsbediening niet gebruikt
wordt.
1 Zender ............................................................ Richt dit gedeelte op de
Signaalontvangsteenheid
2 Bedrijfsstand ................................................... P. 18
3 Ingestelde temperatuur ................................... P. 19
4 Ventilator
................................................. P. 20
5 Blad
........................................................... P. 21
6 Schoepen
............................................. P. 22
7 Huidige tijd ...................................................... P. 15, P. 23
Timertijd .......................................................... P. 24
Displaysymbolen
............................... P. 24
Page 12

12
I
2. Nome dei Componenti
NL
2. Namen van Componenten
F
2. Nom des Composants
E
2. Nombre de los Componentes
GB
2. Name of Component
D
2. Namen der Komponenten
AAA
CLOCK
CHECK
RESET
SET
TEST RUN
MODE
FAN
VANE
LOUVER
min
h
AUTO START
AUTO STOP
NOT AVAILABLE
ON/OFF
TEMP
2
3
1
4
7
8
9
0
6
5
BCA
(When the Cover is Open.)
1 Power ON/OFF button ........................................... P. 17
2 Temperature adjusting button ................................ P. 19
3 MODE button ......................................................... P. 18
4 FAN button ............................................................. P. 20
5 VANE button .......................................................... P. 21
6 LOUVER button ..................................................... P. 22
7 AUTO STOP button................................................ P. 24
8 AUTO START button .............................................. P. 24
9 hour button ............................................................. P. 23
0 minute button ......................................................... P. 23
A SET button .............................................................P. 15
B RESET button ........................................................ P. 15
C CLOCK button ....................................................... P. 15, P. 23
(Lorsque le Couvercle est Ouvert.)
1 Touche ON/OFF (marche/arret) ............................. P. 17
2 Touche de réglage de la température .................... P. 19
3 Touche MODE (mode) ........................................... P. 18
4 Touche FAN (ventilateur) ....................................... P. 20
5 Touche VANE (ailette) ............................................ P. 21
6 Touche LOUVER (sortie d’air) ............................... P. 22
7 Touche AUTO STOP (arret auto) ........................... P. 24
8 Touche AUTO START (demarrage auto)................ P. 24
9 Touche des heures ................................................ P. 23
0 Touche des minutes ............................................... P. 23
A Touche SET (regler) ............................................... P. 15
B Touche RESET (reinitialiser) .................................. P. 15
C Touche CLOCK (horloge) ...................................... P. 15, P. 23
(Met geopend deksel.)
1 ON/OFF-knop (aan-/uitzetten) ............................... P. 17
2 Temperatuurinstelknoppen .................................... P. 19
3 MODE-knop (stand) ............................................... P. 18
4 FAN-knop (ventilator) ............................................. P. 20
5 VANE-knop (blad) .................................................. P. 21
6 LOUVER-knop (schoepen) .................................... P. 22
7 AUTO STOP-knop ................................................. P. 24
8 AUTO START-knop ................................................ P. 24
9 Urenknop ............................................................... P. 23
0 Minutenknop .......................................................... P. 23
A SET-knop (Instellen)............................................... P. 15
B RESET-knop (uitschakelen) ................................... P. 15
B CLOCK-knop (klok) ................................................ P. 15, P. 23
(Mit geöffneter Abdeckung.)
1 Einschalttaste ON/OFF .......................................... P. 17
2 Temperatureinstelltaste .......................................... P. 19
3 Taste MODE .......................................................... P. 18
4 Taste FAN .............................................................. P. 20
5 Taste VANE ............................................................ P. 21
6 Taste LOUVER ...................................................... P. 22
7 Taste AUTO STOP ................................................. P. 24
8 Taste AUTO START ............................................... P. 24
9 Stundentaste .......................................................... P. 23
0 Minutentaste .......................................................... P. 23
A Taste SET .............................................................. P. 15
B Taste RESET ......................................................... P. 15
C Taste CLOCK ......................................................... P. 15, P. 23
(Cuando la cubierta esté abierta.)
1 Botón ON/OFF ....................................................... P. 17
2 Botón de ajuste de la temperatura ......................... P. 19
3 Botón MODE .......................................................... P. 18
4 Botón FAN.............................................................. P. 20
5 Botón VANE ........................................................... P. 21
6 Botón LOUVER ...................................................... P. 22
7 Botón AUTO STOP ................................................ P. 24
8 Botón AUTO START .............................................. P. 24
9 Botón de la hora .................................................... P. 23
0 Botón de los minutos ............................................. P. 23
A Botón SET ............................................................. P. 15
B Botón RESET ........................................................ P. 15
C Botón CLOCK ........................................................ P. 15, P. 23
(Quando il coperchio è aperto.)
1 Pulsante di ON/OFF (accensione/spegnimento) ... P. 17
2 Pulsante di regolazione della temperatura ............ P. 19
3 Pulsante MODE (modalità di funzionamento) ........ P. 18
4 Pulsante FAN (ventilatore) ..................................... P. 20
5 Pulsante VANE (aletta) .......................................... P. 21
6 Pulsante LOUVER (deflettore) ............................... P. 22
7 Pulsante AUTO STOP (arresto automatico) .......... P. 24
8 Pulsante AUTO START (avvio automatico)............ P. 24
9 Pulsante delle ore .................................................. P. 23
0 Pulsante dei minuti ................................................ P. 23
A Pulsante SET (impostazione) ................................ P. 15
B Pulsante RESET (azzeramento) ............................ P. 15
C Pulsante CLOCK (orologio) ................................... P. 15, P. 23
Page 13

13
I
2. Nome dei Componenti
NL
2. Namen van Componenten
F
2. Nom des Composants
E
2. Nombre de los Componentes
GB
2. Name of Component
D
2. Namen der Komponenten
21
ON/OFF
HEAT COOL
2
1
2.2. Signal receiving unit
1 ON/OFF lamp (lit when unit is operating; unlit when unit is not operating)
2 Emergency operation
In cases where the remote control unit does not operate properly, use either
the
COOL or HEAT button on the wireless remote control signal receiver
to toggle the unit on or off. On cooler only units, pushing the
HEAT button
toggles the fan on and off.
Pressing the COOL or HEAT button selects the following settings.
Operation mode COOL HEAT
Preset temperature 24 °C/75 °F 24 °C/75 °F
Fan speed High High
Air Direction Horizontal Down
2.2. Signaalontvangsteenheid
1 ON/OFF-lamp (brandt als apparaat in werking is; uit als apparaat niet in wer-
king is)
2 Noodbediening
Mocht de afstandsbediening niet goed werken, dan kunt u het apparaat aan- of
uitzetten met de
COOL-knop (koelen) of de HEAT-knop (verwarmen) op
de signaalontvangsteenheid van de draadloze afstandsbediening. Bij apparaten met alleen koeling zet u met de
HEAT-knop de ventilator aan en uit.
Door op de
COOL-knop of de HEAT-knop te drukken kiest u de volgende
instellingen.
Bedrijfsstand COOL (KOELEN) HEAT (VERWARMEN)
Ingestelde temperatuur 24 °C/75 °F 24 °C/75 °F
Ventilatorsnelheid Hoog Hoog
Luchtstroomrichting Horizontaal Omlaag
2.2. Unité de réception des signaux
1 Témoin ON/OFF (allumé lorsque l’appareil fonctionne ; éteint lorsque l’appa-
reil ne fonctionne pas)
2 Fonctionnement d’urgence
Si la télécommande ne fonctionne correctement, utilisez la touche
COOL
(refroidir) ou la touche
HEAT (chauffer) du récepteur de signaux de la télé-
commande sans fil pour allumer ou éteindre l’appareil. Sur les appareils de
refroidissement uniquement, des pressions successives sur la touche
HEAT
vous permettront d’allumer et d’éteindre le ventilateur.
Si vous appuyez sur les touches
COOL ou HEAT, les réglages suivants
seront sélectionnés.
Mode de fonctionnement
COOL (REFROIDIR) HEAT (CHAUFFER)
Température prédéfinie 24 °C/75 °F 24 °C/75 °F
Vitesse du ventilateur Haut Haut
Direction du flux d’air Horizontal Bas
2.2. Unità di ricezione del segnale
1 Spia ON/OFF (accesa quando l’unità è in funzione; spenta quando non è in
funzione)
2 Funzionamento di emergenza
Se il telecomando non funziona correttamente, utilizzare i pulsanti
COOL
(raffreddamento) o
HEAT (riscaldamento) del ricevitore del segnale del telecomando wireless per accendere o spegnere l’unità. Sulle unità di solo raffreddamento, il pulsante
HEAT consente di accendere e spegnere il ventilatore.
La pressione del pulsante
COOL o HEAT consente di selezionare le
seguenti impostazioni.
Modalità di funzionamento
COOL (raffreddamento) HEAT (riscaldamento)
Temperatura predefinita
24 °C/75 °F 24 °C/75 °F
Velocità del ventilatore
Elevata Elevata
Direzione del flusso d’aria
Orizzontale Verso il basso
2.2. Signalempfangseinheit
1 Lampe ON/OFF (Sie leuchtet, wenn die Anlage in Betrieb ist; sie leuchtet nicht,
wenn die Anlage nicht in Betrieb ist.)
2 Notbetrieb
In Fällen, in denen die Fernbedienung nicht richtig arbeitet, können Sie mit
den Tasten
COOL bzw. HEAT auf dem Signalempfänger für die drahtlose
Fernbedienung die Anlage ein- oder ausschalten. Bei Anlagen, die nur kühlen,
wird mit der Taste
HEAT der Ventilator ein- und ausgeschaltet.
Mit den Tasten
COOL oder HEAT werden die folgenden Einstellungen
gewählt.
Betriebsart KÜHLEN HEIZEN
Vorgewählte
Temperatur
24 °C/75 °F 24 °C/75 °F
Ventilatorgeschwindigkeit
Hoch Hoch
Luftrichtung Horizontal Abwärts
GB : Sold separately Type
D :Gesondert erhältlich Typ
F : De Type vendu séparément
E :Tipo vendido por separado
I : Tipo venduto separatamente
NL : Apart verkocht Type
GB : Indoor unit Type
D :Innenanlagentyp
F : De Type appareil intérieur
E :Tipo unidad interior
I : Tipo unità interna
NL : Type van binnenapparaat
2.2. Receptor de señal
1 Luz ON/OFF (encendido cuando la unidad esté en funcionamiento; apagado
cuando la unidad no esté en funcionamiento)
2 Funcionamiento de emergencia
En el caso de que la unidad de control remoto no funcione correctamente,
utilice el botón
COOL o el botón HEAT del receptor de señal de control
remoto inalámbrico para encender o apagar la unidad. Para las unidades con
refrigeración únicamente, pulse el botón
HEAT para encender o apagar el
ventilador.
Pulse el botón
COOL o HEAT para seleccionar los siguientes ajustes.
Modo de funcionamiento
REFRIGERACIÓN CALEFACCIÓN
Temperatura preestablecida
24 °C/75 °F 24 °C/75 °F
Velocidad del ventilador
Alta Alta
Dirección del aire Horizontal Hacia abajo
Page 14

14
GB
3. Before Operation
D
3. Vor dem Betrieb
F
3. Avant de faire Fonctionner l’Appareil
E
3. Antes del Funcionamiento
I
3. Prima di mettere in Funzione il Dispositivo
NL
3. Voordat u het Apparaat in Gebruik neemt
B
1
C
A
2
3. Before Operation
3.1. Installing the remote controller
1) Installation area
• Area in which the remote controller is not exposed to direct sunshine.
• Area in which there is no nearby heating source.
• Area in which the remote controller is not exposed to cold (or hot) winds.
• Area in which the remote controller can be operated easily.
• Area in which the remote controller is beyond the reach of children.
2) Installation method
1 Attach the remote controller holder to the desired location using two tapping
screws 2.
2 Insert the remote controller into the holder.
A Remote controller B Wal l C Display panel
• The signal can travel up to approximately 5 m/16.5 feet (in a straight line) within
45 degrees to both right and left of the center line of the unit.
Note:
The remote control signal may not be received in a room which has a fluorescent lamp equipped with cycle-ignition stabilizer using high-voltage pulse or
intermittent oscillation.
3. Avant de faire Fonctionner l’Appareil
3.1. Installation de la télécommande
1) Zone d’installation
• Zone où la télécommande n’est pas exposée aux rayons directs du soleil.
• Zone éloignée de toute source de chaleur.
• Zone où la télécommande n’est pas exposée à des courants d’air froid (ou chaud).
• Zone où la télécommande est accessible et peut être utilisée facilement.
• Zone où la télécommande est hors de portée des enfants.
2) Méthode d’installation
1 Fixez le support de la télécommande à l’endroit désiré à l’aide de vis
autotaraudeuses 2.
2 Insérez la télécommande dans son support.
A Télécommande B Mur C Panneau d’affichage
• Le signal peut parcourir jusqu’à 5 m/16,5 pieds environ (en ligne droite) dans
un espace de 45 degrés à gauche et à droite de la ligne médiane de l’appareil.
Remarque:
Le signal de la télécommande peut ne pas être reçu dans une pièce où se
trouve une lampe fluorescente munie d’un stabilisateur d’allumage de cycle
à impulsion haute tension ou à oscillation intermittente.
3. Voordat u het Apparaat in Gebruik neemt
3.1. De afstandsbediening installeren
1) Plaats van installatie
• Een plaats waar geen direct zonlicht op de afstandsbediening valt.
• Een plaats zonder warmtebron in de buurt.
• Een plaats waar geen koude (of warme) wind op de afstandsbediening staat.
• Een plaats waar de afstandsbediening gemakkelijk te bedienen is.
• Een plaats waar de afstandsbediening buiten het bereik van kinderen is.
2) Installatiemethode
1 Bevestig de houder van de afstandsbediening op de gewenste plaats met twee
zelftappende schroeven 2.
2 Plaats de afstandsbediening in de houder.
A Afstandsbediening B Muur C Display
• Het signaal kan maximaal een afstand van ongeveer 5 m/16,5 voet afleggen
(in rechte lijn) tot op 45 graden naar links en naar rechts vanuit de middenlijn
van de afstandsbediening.
Opmerking:
Het afstandsbedieningssignaal wordt mogelijk niet ontvangen in een ruimte
waarin zich TL-verlichting bevindt met een voorschakelapparaat dat werkt
met hogespanningspulsen of intermitterende oscillatie.
3.
Prima di mettere in Funzione il Dispositivo
3.1. Installazione del telecomando
1) Zona di installazione
• Zona in cui il telecomando non sia esposto a luce solare diretta.
• Zona non situata in prossimità di sorgenti di calore.
• Zona in cui il telecomando non sia esposto a correnti d’aria fredda (o calda).
• Zona accessibile che consenta di utilizzare il telecomando con facilità.
• Zona al di fuori della portata dei bambini.
2) Metodo d’installazione
1 Fissare il supporto del telecomando nella posizione prescelta tramite viti
autofilettanti 2.
2 Inserire il telecomando nel supporto.
A Telecomando B Parete C Pannello del display
• Il segnale può viaggiare fino a circa 5 m/16,5 piedi (in linea retta) entro un
angolo di 45 gradi a destra e a sinistra della linea mediana dell’unità.
Nota:
È possibile che il segnale del telecomando non venga ricevuto all’interno di
una stanza in cui è presente una lampada fluorescente dotata di stabilizzatore di accensione ciclica con impulso ad alta tensione o oscillazione
intermittente.
3. Vor dem Betrieb
3.1. Fernbedienung installieren
1) Installationsort
• Ort, an dem die Fernbedienung nicht direktem Sonnenlicht ausgesetzt ist.
• Ort, der nicht unmittelbarer Nähe einer Heizung ist.
• Ort, an dem die Fernbedienung nicht kalten (oder heißen) Winden ausgesetzt ist.
• Ort, an dem Fernbedienung leicht betätigt werden kann.
• Ort, an dem sich die Fernbedienung außerhalb der Reichweite von Kindern befindet.
2) Installationsverfahren
1
Montieren Sie den Halter der Fernbedienung am gewünschten Ort mit zwei Blechschrauben
2
.
2
Setzen Sie die Fernbedienung in den Halter.
A Fernbedienung B Wand C Anzeige
• Das Signal kann bis zu ca. 5 m/16,5 fuß (in gerader Linie) zurücklegen innerhalb eines
Winkels von 45 Grad sowohl rechts als auch links von der Mittellinie der Anlage.
Hinweis:
Das Signal der Fernbedienung kann möglicherweise nicht in einem Raum
empfangen werden, in dem eine Leuchtstofflampe betrieben wird, die mit
einem Cycle-Ignition-Stabilisator ausgerüstet ist, der mit Hochspannungspulsen oder intermittierender Oszillation arbeitet.
3. Antes del Funcionamiento
3.1. Instalación del controlador remoto
1) Área de instalación
• Área en la que el controlador remoto no esté expuesto directamente al sol.
• Área en la que no haya una fuente de calor cercana.
• Área en la que el controlador remoto no esté expuesto al aire frío (o caliente).
• Área en la que el controlador remoto pueda manejarse fácilmente.
• Área en la que el controlador remoto esté fuera del alcance de los niños.
2) Método de instalación
1 Coloque el soporte del controlador remoto en la ubicación deseada mediante
los dos tornillos roscados 2.
2 Inserte el controlador remoto en el soporte.
A Controlador remoto B Pared C Panel de visualización
• La señal puede viajar una distancia de aproximadamente 5 m/16,5 pies (en
línea recta) en un ángulo de 45 grados a la derecha y a la izquierda de la línea
central de la unidad.
Nota:
Es posible que no se reciba la señal de control remoto en una habitación que
tenga una luz fluorescente equipada con estabilizador de ciclo de encendido
y utilice un pulso de alto voltaje o una oscilación intermitente.
Page 15

15
GB
3. Before Operation
D
3. Vor dem Betrieb
F
3. Avant de faire Fonctionner l’Appareil
E
3. Antes del Funcionamiento
I
3. Prima di mettere in Funzione il Dispositivo
NL
3. Voordat u het Apparaat in Gebruik neemt
FAN
VANE
TEST RUN
AUTO STOP
AUTO START
h
min
LOUVER
MODE
CHECK
RESETSET CLOCK
5
1
2
3
4
6
3.2. Replacing the batteries and how to set the
current time
If no signal is transmitted and the indoor unit’s lamp does not light up even if the
remote controller is operated, the batteries may have run out, so replace them with
new ones as described below.
1 Remove the front lid.
2 Replace the batteries with alkali batteries (size AAA). Make sure that the bat-
teries are installed in the correct direction. (Insert the minus pole of the batteries first.)
3 Reattach the front lid.
4 Press the RESET button using a pointed but not sharp object.
5 Press the
h
and
min
button to set the current time.
6 Press the CLOCK button using a thin stick and close the front lid.
If you are not going to use the unit for a long period of time, remove the batteries to
prevent damage which may occur due to leakage of electrolyte.
3.2. Remplacement des piles et mise à l’heure
Lorsqu’aucun signal n’est pas transmis et que le voyant de l’appareil intérieur ne
s’allume pas même quand la télécommande est utilisée, il est possible que les
piles ne marchent plus et aient besoin d’être remplacées suivant les instructions
ci-dessous.
1 Déposer le couvercle avant.
2 Remplacer les piles avec de nouvelles piles alcalines (type AAA). Assurez-
vous que les piles sont mises dans le bon sens. (Insérer tout d’abord le côté
négatif (-) des piles.)
3 Remettre le couvercle avant en place.
4 Appuyez sur la touche RESET à l’aide d’un objet pointu non coupant.
5 Appuyer sur les touches
h
et
min
pour mettre l’horloge à l’heure.
6 Appuyer sur la touche CLOCK à l’aide d’un objet pointu puis refermer le cou-
vercle avant.
Si vous ne pensez pas utiliser cet appareil pendant une période de temps prolongée, enlevez les piles pour éviter tout dégât qui pourrait être causé par une fuite
d’électrolyte.
3.2. Batterijen vervangen en de huidige tijd instellen
Als geen signaal wordt overgedragen en de lamp op het binnenapparaat niet oplicht wanneer de afstandsbediening wordt gebruikt, dan kunnen de batterijen leeg
zijn. Vervang ze door nieuwe zoals hieronder omschreven.
1 Verwijder het voordeksel.
2 Vervang de batterijen door alkalinebatterijen (maat AAA). Let erop dat u de
batterijen in de juiste richting plaatst. (Breng van de batterijen eerst de minpool
op zijn plaats.)
3 Breng het voordeksel weer aan.
4 Druk op de RESET-knop met een voorwerp dat puntig maar niet scherp is.
5 Druk op de knoppen
h
en
min
om de huidige tijd in te stellen.
6 Druk op de CLOCK-knop met een dun voorwerp en sluit het voordeksel.
Indien u het apparaat gedurende een lange tijd niet gaat gebruiken, verwijder dan
de batterijen om te voorkomen dat schade kan ontstaan door lekkage van elektrolyt.
3.2. Batterien ersetzen und die Uhrzeit einstellen
Wird kein Signal gesendet, und leuchtet die Lampe der Innenanlage auch dann
nicht, wenn die Fernbedienung betätigt wird, sind möglicherweise die Batterien
leer, so daß Sie neue einsetzen sollten, wie im folgenden beschrieben.
1 Nehmen Sie die Frontabdeckung ab.
2 Ersetzen Sie die Batterien durch neue Alkali-Batterien (Größe AAA). Achten
Sie darauf, die Batterie in der richtigen Ausrichtung einzulegen. (Setzen Sie
die Minuspole der Batterie zuerst ein.)
3 Setzen Sie die Frontabdeckung wieder auf.
4 Drücken Sie die Taste RESET mit einem dünnen, aber nicht spitzen Gegen-
stand.
5 Stellen Sie die aktuelle Uhrzeit mit den Tasten
h
und
min
ein.
6 Drücken Sie die Taste CLOCK mit einem dünnen Stab und schließen Sie die
Frontabdeckung.
Sollten Sie das Anlage für längere Zeit nicht benutzen, nehmen Sie die Batterien
heraus, um Schäden vorzubeugen, die durch austretendes Elektrolyt verursacht
werden können.
3.2. Sustitución de las pilas y cómo establecer la
hora actual
Si no se transmite señal y la luz de la unidad interior no se enciende aunque el
controlador remoto esté en funcionamiento, es posible que las pilas estén gastadas por lo que deberá reemplazarlas por unas nuevas tal y como se describe a
continuación.
1 Retire la tapa delantera.
2 Reemplace las pilas por unas alcalinas (tamaño AAA). Asegúrese de que las
pilas estén instaladas en la dirección correcta. (Introduzca el polo negativo de
las pilas en primer lugar.)
3 Vuelva a colocar la tapa delantera.
4 Pulse el botón RESET utilizando un objeto con punta pero no afilado.
5 Pulse el botón
h
y
min
para establecer la hora actual.
6 Pulse el botón CLOCK utilizando una punta fina y cierre la tapa delantera.
Si no va a utilizar la unidad durante un periodo prolongado de tiempo, retire las
pilas para evitar daños que podrían producirse debido a la pérdida del electrolito.
3.2. Sostituzione delle batterie e impostazione
dell’ora corrente
Se non viene trasmesso alcun segnale e la spia dell’unità interna non si accende
nonostante il telecomando sia in funzione, potrebbero essersi scaricate le batterie.
Occorre quindi sostituirle come descritto qui di seguito.
1 Rimuovere il coperchio superiore.
2 Sostituire le batterie con batterie alcaline (misura AAA). Accertarsi che le bat-
terie vengano inserite secondo l’orientamento corretto. (Inserire prima il polo
negativo.)
3 Rimettere in posizione il coperchio superiore.
4 Premere il pulsante RESET utilizzando un oggetto appuntito ma non acumina-
to.
5 Premere i pulsanti
h
e
min
per impostare l’ora corrente.
6 Premere il pulsante CLOCK con un oggetto sottile e chiudere il coperchio su-
periore.
Se l’unità non verrà utilizzata per un lungo periodo di tempo, rimuovere le batterie
per evitare eventuali danni causati dalla fuoriuscita di elettroliti..
Page 16

16
GB
3. Before Operation
D
3. Vor dem Betrieb
F
3. Avant de faire Fonctionner l’Appareil
E
3. Antes del Funcionamiento
I
3. Prima di mettere in Funzione il Dispositivo
NL
3. Voordat u het Apparaat in Gebruik neemt
3.3. Setting the display
It is necessary to set the display before using this remote control unit.
• The remote control unit will not operate properly unless the display settings are
correct.
• Customers should not perform the setting themselves, but rather should request that the settings been made during installation by qualified personal.
• Refer to the installation manual for more information on the setting method.
3.3. Réglage de l’affichage
L’affichage doit être réglé avant de pouvoir utiliser cette télécommande.
• La télécommande ne fonctionnera pas correctement si le réglage de l’affichage
n’est pas correct.
• Le réglage ne doit pas être effectué par les clients eux-mêmes, nous recom-
mandons plutôt qu’il soit effectué pendant l’installation par du personnel qualifié.
3.3. Het display instellen
Voordat u deze afstandsbediening gebruikt, moet het display ingesteld worden.
• De afstandsbediening werkt alleen naar behoren als de displayinstellingen juist
zijn.
• Klanten dienen het display niet zelf in te stellen, maar te vragen of een deskundige van de installateur dit tijdens de installatie doet.
• Meer informatie over de methode van instellen staat in de installatiehandleiding.
• Consultez le manuel d’utilisation pour obtenir davantage d’informations sur la
méthode de réglage.
3.3. Display einrichten
Vor der Benutzung dieser Fernbedienung muß das Display eingerichtet werden.
• Die Fernbedienung arbeitet nicht ordnungsgemäß, bevor die Display-Einstel-
lungen nicht korrekt sind.
• Endkunden sollten die Einstellungen nicht selbst vornehmen, sondern sie im
Rahmen der Installation durch einen qualifizierten Techniker vornehmen lassen.
• Weitere Informationen zum Einstellungsverfahren finden Sie in der Installationsanleitung.
3.3. Impostazione del display
Prima di utilizzare il telecomando occorre impostare il display.
• Il telecomando non funzionerà regolarmente se le impostazioni del display non
risulteranno corrette.
• Non conviene che i clienti eseguano da sé le impostazioni, è opportuno invece
che queste vengano realizzate durante l’installazione da personale qualificato.
• Consultare il manuale di installazione per ulteriori informazioni sul metodo di
impostazione.
3.3. Ajuste del indicador
Es necesario ajustar el indicador antes de utilizar la unidad de control remoto.
• La unidad de control remoto no funcionará correctamente a menos que los
ajustes del indicador sean correctos.
• Los usuarios no deberán realizar estos ajustes por sí mismos; deben solicitar
que lo haga el personal cualificado durante la instalación.
• Consulte el manual de instalación para obtener más información sobre la forma de ajuste.
Page 17

17
GB
4. Operation
D
4. Betrieb
F
4. Fonctionnement
E
4. Funcionamiento
I
4. Funzionamento
NL
4. Gebruik
CLOCK
CHECK
RESET
SET
TEST RUN
MODE
FAN
VANE
LOUVER
min
h
AUTO START
AUTO STOP
1
A
ON/OFF
TEMP
4. Operation
4.1. Switching the unit on/off
• The power supply should not be turned off while the air conditioner is in use.
This can cause the unit to break down.
1 Press the ON/OFF
button.
A The ON indicator will be displayed.
• Do not operate multiple signal receiving units at the same time.
The transfer symbol
is displayed every time the ON/OFF signal is transferred. The signal receiving unit makes a sound when it receives a signal. When
no sound is made, transfer the signal again.
• Even if you press the ON/OFF
button immediately after shutting down the
operation in progress, the air conditioner will not start for about three minutes.
This is to prevent the internal components from being damaged.
• If the operation stops due to a power failure, the unit will not automatically
restart until the power has been restored. Press the ON/OFF
button to re-
start.
4. Betrieb
4.1. Anlage ein- und ausschalten
• Die Stromversorgung sollte nicht ausgeschaltet werden, während die Klimaanlage läuft. Das kann zu Fehlfunktionen des Geräts führen.
1 Drücken Sie die Taste ON/OFF
.
A Die Anzeige ON wird angezeigt.
• Verwenden Sie nicht mehrere Signalempfangseinheit gleichzeitig.
• Das Übertragungssymbol
wird immer dann angezeigt, wenn das ON/OFFSignal übertragen wird. Die Signalempfangseinheit läßt einen Ton erklingen,
wenn sie ein Signal empfängt. Erklingt kein Ton, übertragen Sie das Signal
nochmals.
• Auch dann, wenn Sie die Taste ON/OFF
sofort nach Abschalten des Betriebs erneut drücken, startet die Klimaanlage erst nach Ablauf von ca. drei
Minuten wieder. Dadurch wird verhindert, daß interne Komponenten Schaden
nehmen.
• Stoppt der Betrieb wegen eines Stromausfalls, springt die Anlage nicht automatisch an, bis die Stromversorgung wieder hergestellt ist. Starten Sie den
Betrieb mit der Taste ON/OFF
erneut.
4. Fonctionnement
4.1. Pour marche/arret le climatiseur
• L’alimentation ne doit pas être interrompue lorsque le climatiseur est en marche. Autrement, l’appareil pourrait tomber en panne.
1 Appuyer sur le bouton ON/OFF
.
A Le voyant ON devrait s’afficher.
• Ne faites pas fonctionner plusieurs unités de réception des signaux en même
temps. Le symbole de transfert
s’affiche à chaque transfert du signal ON/
OFF. L’unité de réception des signaux émet un son lorsqu’elle reçoit un signal.
Si l’unité de réception des signaux n’émet aucun son, transférez à nouveau le
signal.
• Même si vous appuyez sur le bouton ON/OFF
immédiatement après avoir
arrêté la fonction en cours, le climatiseur ne se remettra en route que trois
minutes plus tard. Ceci est une précaution pour éviter l’endommagement de
tout composant interne.
• Si la fonction s’arrête à cause d’une coupure de courant, l’appareil ne se remettra automatiquement en marche qu’une fois le courant revenu. Appuyer sur
le bouton ON/OFF
pour le remettre en marche.
4. Funzionamento
4.1. Accensione/spegnimento dell’unità
• Non interrompere l’alimentazione elettrica mentre il condizionatore è in uso.
L’unità potrebbe subire danni.
1 Premere il pulsante ON/OFF
.
A Verrà visualizzato l’indicatore ON.
• Non inviare più segnali contemporaneamente.
Il simbolo di trasferimento
viene visualizzato ogni volta che viene inviato il
segnale ON/OFF. Quando riceve il segnale, l’unità di ricezione del segnale
emette un segnale acustico. Se ciò non avviene, inviare nuovamente il segnale.
• Anche se il pulsante ON/OFF
viene premuto subito dopo aver spento il
condizionatore, questo non si rimetterà in funzione prima di tre minuti circa.
Tale meccanismo serve a evitare danni ai componenti interni.
• Se il funzionamento viene sospeso a causa di un’interruzione della corrente
elettrica, l’unità non rientrerà in funzione automaticamente al ripristino dell’alimentazione. Occorrerà premere il pulsante ON/OFF
per riavviarla.
4. Funcionamiento
4.1. Encendido/apagado de la unidad
• No debe desconectarse el suministro eléctrico mientras se esté utilizando el
acondicionador de aire. Esto puede provocar una funcionamiento defectuoso
de la unidad.
1 Pulse el botón ON/OFF
.
A Aparecerá el indicador ON.
• No utilice varios receptores de señal al mismo tiempo.
Aparecerá el símbolo de transferencia
cada vez que se transfiera la señal
ON/OFF. El Receptor de señal emite un sonido al recibir la señal. Cuando no
se produzca ningún sonido, transfiera nuevamente la señal.
• Cada vez que pulse el botón ON/OFF
inmediatamente después de apagar
el funcionamiento en uso, el acondicionador de aire no arrancará durante tres
minutos. Esto evita que se dañen los componentes internos.
• Si el funcionamiento se detiene debido a un fallo de alimentación, la unidad no
arrancará automáticamente hasta restablecerse el suministro eléctrico. Pulse
el botón ON/OFF
para la puesta en marcha.
4. Gebruik
4.1. In- en uitschakelen
• Zet de netspanning niet uit terwijl de airconditioner in gebruik is. Hierdoor kan
het apparaat defect raken.
1 Druk op de ON/OFF-knop
.
A De ON-indicator wordt weergegeven
• Gebruik niet gelijktijdig meerdere signaalontvangsteenheden.
Iedere keer als een ON/OFF-signaal wordt verzonden, wordt het verzendsymbool
weergegeven. De signaalontvangsteenheid maakt een geluid als
hij een signaal ontvangt. Als u geen geluid hoort, verzend het signaal dan opnieuw.
• Als u direct na het uitzetten van het apparaat weer op de ON/OFF-knop
drukt, duurt het toch nog ongeveer drie minuten voordat de airconditioner weer
start. Dit voorkomt dat inwendige onderdelen beschadigd raken.
• Indien het apparaat stopt doordat de netspanning uitvalt, dan start het pas
automatisch opnieuw als de netspanning weer hersteld is. Druk op de ON/
OFF-knop
om opnieuw te starten.
Page 18

18
GB
4. Operation
D
4. Betrieb
F
4. Fonctionnement
E
4. Funcionamiento
I
4. Funzionamento
NL
4. Gebruik
CLOCK
CHECK
RESET
SET
TEST RUN
MODE
FAN
VANE
LOUVER
min
h
AUTO START
AUTO STOP
ON/OFF
TEMP
1
2
B
A
4.2. Mode select
1 If the unit is off, press the ON/OFF button to turn it on.
A The ON indicator will be displayed.
2 Press the operation mode ( ) button and select the operation mode.
B
Note:
The heating display and the automatic display does not appear in models
that operate exclusively as cooling only air-conditioner.
Cooling mode
Automatic (cooling/heating) mode
Fan mode
Heating mode
Drying mode
4.2. Selección del modo
1 Si la unidad está apagada, pulse el botón ON/OFF para encenderla
A Aparecerá el indicador ON.
2 Pulse el botón de modo de funcionamiento ( ) y seleccione el modo
de funcionamiento.
B
Nota:
El indicador de calefacción y el indicador de modo automático no aparecen
en los modelos que funcionan exclusivamente como acondicionadores de
aire sólo refrigeración.
Modo Refrigeración
Modo Automático (refrigeración/calefacción)
Modo Ventilador
Modo Calefacción
Modo Secado
4.2. Standkeuze
1 Als het apparaat uit staat, druk dan op de ON/OFF-knop om het aan te
zetten.
A De ON-indicator wordt weergegeven.
2 Druk op de bedrijfsstandknop ( ) en kies de bedrijfsstand.
B
Opmerking:
De symbolen van het verwarmingsdisplay en het automatische display verschijnen niet bij modellen airconditioners die alleen koelen.
4.2. Choix du mode
1 Si l’appareil est éteint, appuyer sur le bouton ON/OFF pour l’allumer.
A Le voyant ON devrait s’afficher.
2 Appuyer sur la touche du mode de fonctionnement ( ) pour sélec-
tionner le mode de fonctionnement souhaité.
B
Remarque:
L’affichage de chauffage et l’affichage automatique n’apparaissent pas sur
les modèles fonctionnant uniquement comme climatiseurs pour le refroidissement.
Mode de refroidissement
Mode automatique (refroidissement/chauffage)
Mode de soufflerie
Mode de chauffage
Mode de assèchement
4.2. Betriebsart wählen
1 Wenn die Anlage ausgeschaltet ist, schalten Sie es mit der Taste ON/OFF
ein.
A Die Anzeige ON wird angezeigt.
2 Wählen Sie die Betriebsart mit der Betriebsart-Taste ( ).
B
Hinweis:
Das Heiz- und Automatikdisplay erscheinen nicht bei Modellen, die ausschließlich kühlen können.
Kühlmodus
Automatikmodus (Kühlen/Heizen)
Ventilatormodus
Heizmodus
Trocknungsmodus
4.2. Selezione della modalità di funzionamento
1 Se l’unità non è in funzione, premere il pulsante ON/OFF per avviarla.
A Verrà visualizzato l’indicatore ON.
2 Premere il pulsante modalità di funzionamento ( ) per selezionare
la modalità di funzionamento desiderata.
B
Nota:
Il display riscaldamento e il display automatico non vengono visualizzati nei
modelli che presentano unicamente la funzione raffreddamento.
Modalità raffreddamento
Modalità automatica (raffreddamento/riscaldamento)
Modalità ventilatore
Modalità riscaldamento
Modalità deumidificazione
Koelstand
Automatische stand (koelen/verwarmen)
Ventilatorstand
Verwarmingsstand
Droogstand
Page 19

19
GB
4. Operation
D
4. Betrieb
F
4. Fonctionnement
E
4. Funcionamiento
I
4. Funzionamento
NL
4. Gebruik
CLOCK
CHECK
RESET
SET
TEST RUN
MODE
FAN
VANE
LOUVER
min
h
AUTO START
AUTO STOP
ON/OFF
TEMP
A
1
4.3. Selecting a temperature
ss
ss
s To lower the room temperature:
1 Press
button to set the desired temperature.
A The selected temperature is displayed.
• Each time you press the button, the temperature lowers by 1 °C/2 °F or 1 °F.
ss
ss
s To raise the room temperature:
1 Press button to set the desired temperature.
A The selected temperature is displayed.
• Each time you press the button, the temperature raises by 1 °C/2 °F or 1 °F.
• Available temperature ranges are as follows:
(In case of standard units) (In case of medium temperature units)
Cooling & Drying: 19 - 30 °C/65 - 87 °F 14 - 30 °C/57 - 87 °F
Heating: 17 - 28 °C/61 - 83 °F 17 - 28 °C /63 - 83 °F
Automatic: 19 - 28 °C/65 - 87 °F 17 - 28 °C/63 - 83 °F
Circulation: — (Not available) — (Not available)
The temperature ranges vary depending on which unit is selected by the
remote controller.
4.3. Sélection d’une température
ss
ss
s Pour réduire la température ambiante :
1 Appuyer sur le bouton
pour sélectionner la température désirée.
A La température sélectionnée est affichée.
• A chaque fois que vous appuyez sur le bouton, la valeur de la température
baisse de 1 °C/2 °F ou 1 °F.
ss
ss
s Pour augmenter la température ambiante :
1 Appuyer sur le bouton
pour sélectionner la température désirée.
A La température sélectionnée est affichée.
• A chaque fois que vous appuyez sur le bouton, la valeur de la température
augmente de 1 °C/2 °F ou 1 °F.
• Plages de températures à votre disposition:
(Pour les appareils standard) (Pour les appareils à températures moyennes)
Refroidir
et Assèchement:
19 - 30 °C/65 - 87 °F 14 - 30 °C/57 - 87 °F
Chauffage: 17 - 28 °C/61 - 83 °F 17 - 28 °C /63 - 83 °F
Automatique: 19 - 28 °C/65 - 87 °F 17 - 28 °C/63 - 83 °F
Circulation: — (ne peut être utilisée) — (ne peut être utilisée)
Les plages de température peuvent varier en fonction de l’appareil qui est
sélectionné par la télécommande.
4.3. Een temperatuur kiezen
ss
ss
s Om de kamertemperatuur te verlagen:
1 Druk op de knop
om de gewenste temperatuur in te stellen.
A De gewenste temperatuur wordt weergegeven.
• Door iedere druk op de knop verlaagt u de temperatuur met 1 °C / 2 °F of met
1 °F.
ss
ss
s Om de kamertemperatuur te verhogen:
1 Druk op de knop
om de gewenste temperatuur in te stellen.
A De gewenste temperatuur wordt weergegeven.
• Door iedere druk op de knop verhoogt u de temperatuur met 1 °C / 2 °F of met
1 °F.
• Voor het temperatuurbereik zijn er de volgende mogelijkheden:
(Bij standaardapparaten) (Bij mediumtemperatuurapparaten)
Koelen en drogen: 19 - 30 °C/65 - 87 °F 14 - 30 °C/57 - 87 °F
Verwarmen: 17 - 28 °C/61 - 83 °F 17 - 28 °C /63 - 83 °F
Automatisch: 19 - 28 °C/65 - 87 °F 17 - 28 °C/63 - 83 °F
Circulatie: — (Niet mogelijk) — (Niet mogelijk)
Een temperatuurbereik varieert, afhankelijk van welk apparaat met de afstandsbediening gekozen wordt.
4.3. Temperatur wählen
ss
ss
s Raumtemperatur senken:
1 Stellen Sie die gewünschte Temperatur mit der Taste
ein.
A Die gewählte Temperatur wird angezeigt.
• Bei jedem Tastendruck wird die Temperatur um 1 °C/2 °F oder 1 °F verringert.
ss
ss
s Raumtemperatur erhöhen:
1 Stellen Sie die gewünschte Temperatur mit der Taste ein.
A Die gewählte Temperatur wird angezeigt.
• Bei jedem Tastendruck wird die Temperatur um 1 °C/2 °F oder 1 °F erhöht.
• Die verfügbaren Temperaturbereiche sind wie folgt:
(Im Falle von Standardanlagen) (Im Falle von Mitteltemperaturanlagen)
Kühlen & Trocknen: 19 - 30 °C/65 - 87 °F 14 - 30 °C/57 - 87 °F
Heizen: 17 - 28 °C/61 - 83 °F 17 - 28 °C /63 - 83 °F
Automatik: 19 - 28 °C/65 - 87 °F 17 - 28 °C/63 - 83 °F
Zirkulation: — (Nicht verfügbar) — (Nicht verfügbar)
Der Temperaturbereich hängt davon ab, welche Anlage mit der Fernbedienung eingestellt ist.
4.3. Selezione di una temperatura
ss
ss
s Per ridurre la temperatura ambiente:
1 Premere il pulsante per impostare la temperatura desiderata.
A Viene visualizzata la temperatura selezionata.
• Ad ogni pressione del pulsante la temperatura si riduce di 1 °C/2 °F o 1 °F.
ss
ss
s Per aumentare la temperatura ambiente:
1 Premere il pulsante
per impostare la temperatura desiderata.
A Viene visualizzata la temperatura selezionata.
• Ad ogni pressione del pulsante la temperatura aumenta di 1 °C/2 °F o 1 °F.
• Intervalli di temperatura disponibili:
(Per unità standard) (Per unità a temperatura media)
Raffreddamento
e deumidificazione:
19 - 30 °C/65 - 87 °F 14 - 30 °C/57 - 87 °F
Riscaldamento: 17 - 28 °C/61 - 83 °F 17 - 28 °C /63 - 83 °F
Automatico: 19 - 28 °C/65 - 87 °F 17 - 28 °C/63 - 83 °F
Circolazione: — (Non disponibile) — (Non disponibile)
Gli intervalli di temperatura variano in base all’unità selezionata dal telecomando.
4.3. Selección de temperatura
ss
ss
s Para bajar la temperatura de la sala:
1 Pulse el botón
para establecer la temperatura deseada.
A Aparecerá la temperatura seleccionada.
• Cada vez que pulse el botón, la temperatura descenderá 1 °C/2 °F ó 1 °F.
ss
ss
s Para subir la temperatura de la sala:
1 Pulse el botón
para establecer la temperatura deseada.
A Aparecerá la temperatura seleccionada.
• Cada vez que pulse el botón, la temperatura subirá 1 °C/2 °F ó 1 °F.
• Los rangos de temperatura disponibles son los siguientes:
(Para las unidades estándar) (Para las unidades de temperatura media)
Refrigeración y Secado:
19 - 30 °C/65 - 87 °F 14 - 30 °C/57 - 87 °F
Calefacción: 17 - 28 °C/61 - 83 °F 17 - 28 °C /63 - 83 °F
Automático: 19 - 28 °C/65 - 87 °F 17 - 28 °C/63 - 83 °F
Circulación: — (No disponible) — (No disponible)
Los rangos de temperatura varían dependiendo de la unidad seleccionada
por el controlador remoto.
Page 20

20
GB
4. Operation
D
4. Betrieb
F
4. Fonctionnement
E
4. Funcionamiento
I
4. Funzionamento
NL
4. Gebruik
CLOCK
CHECK
RESET
SET
TEST RUN
MODE
FAN
VANE
LOUVER
min
h
AUTO START
AUTO STOP
ON/OFF
TEMP
1
A
4.4. Selecting a fan speed
(FAN)
1 Press
FAN
button to select a desired fan speed.
• Each time you press the button, available options change with the display A on the remote
controller, as shown below.
The wind speeds that can be selected depend on the model.
Note that some units do not provide an “Auto” setting.
The display and the fan speed of the unit will differ in the following situations:
• When the unit is in STAND BY mode or in DEFROST mode.
• Just after the heating mode (while waiting to change to another mode).
• When the temperature of the room is higher than the temperature setting of the unit operat-
ing in the heating mode.
• In the dry operation, the indoor fan automatically turns to low-speed operation. Switching of
fan speed is impossible.
Fan speed
Remote controller display
(Auto) Low Middle 2 Middle 1 High
4-stage
3-stage
2-stage
( )
(
)
(
)
(Middle)
4.4.
Ventilatorgeschwindigkeit wählen (Ventilator)
1 Wählen Sie mit der Taste
FAN
die gewünschte Ventilatorgeschwindigkeit.
• Bei jedem Tastendruck wechseln die verfügbaren Optionen auf dem Display A auf der Fern-
bedienung, wie unten gezeigt.
Die wählbaren Luftgeschwindigkeiten sind vom Modell abhängig.
Beachten Sie, daß einige Anlagen nicht über eine Einstellung “Auto” verfügen.
Die angezeigte und die tatsächliche Ventilatorgeschwindigkeit des Anlage weichen in folgenden
Situationen voneinander ab:
• Wenn sich die Anlage in einer der Betriebsarten STAND BY oder DEFROST befindet.
• Unmittelbar nach dem Heizmodus (während des Wartens auf eine andere Betriebsart).
• Wenn die Raumtemperatur höher ist als die Temperatureinstellung der Anlage im Heizmodus.
• Im Trocknungsbetrieb schaltet der Innenanlagenventilator automatisch in die niedrige Ge-
schwindigkeit. Ein Umschalten der Ventilatorgeschwindigkeit ist dann nicht möglich.
Ventilator-
geschwindigkeit
Fernbedienungs-Display
(Auto) Niedrig Mittel 2 Mittel 1 Hoch
4 Stufen
3 Stufen
2 Stufen
( )
(
)
(
)
(Mittel)
4.4.
Selección de la velocidad del ventilador (VENTILADOR)
1 Pulse el botón
FAN
para seleccionar la velocidad del ventilador deseada.
• Cada vez que pulsa este botón, las opciones disponibles cambian con el indicador A del
controlador remoto tal y como se muestra a continuación.
La velocidad del aire puede seleccionarse dependiendo del modelo.
Tenga en cuenta que algunas unidades no proporcionan un ajuste “Auto”.
El indicador y la velocidad del ventilador de la unidad variarán en las siguientes situaciones:
• Cuando la unidad esté en modo STAND BY o en modo DEFROST.
• Justo después del modo calefacción (mientras espera a cambiar a otro modo).
• Cuando la temperatura de la sala sea mayor que la temperatura establecida en la unidad
mientras funcione en modo calefacción.
• En el secado, el ventilador de la unidad interior cambiará automáticamente al funciona-
miento a baja velocidad. No es posible apagar la velocidad del ventilador.
Velocidad del
ventilador
Indicador del controlador remoto
(Automático) Baja Media 2 Media 1 Alta
Fase 4
Fase 3
Fase 2
( )
(
)
(
)
(Media)
4.4.
Selezione di una velocità della ventola (VENTILATORE)
1 Premere il pulsante
FAN
per selezionare la velocità della ventola desiderata.
• Ad ogni pressione del pulsante cambiano le opzioni disponibili così come il display A sul
telecomando, come illustrato qui di seguito.
La velocità del flusso d’aria che è possibile selezionare dipende dal modello.
Tenere presente che in alcuni modelli l’impostazione “Auto” non è disponibile.
Il display e la velocità della ventola non corrisponderanno nelle situazioni seguenti:
• Quando l’unità si trova in modalità STAND BY (attesa) o in modalità DEFROST (sbrinamento).
• Subito dopo la modalità riscaldamento (in attesa di passare a un’altra modalità).
• Quando la temperatura ambiente è superiore alla temperatura impostata con l’unità in fun-
zione in modalità riscaldamento.
• Durante la deumidificazione la ventola interna passa automaticamente alla velocità bassa.
Non è possibile modificarne la velocità.
Velocità della
ventola
Display del telecomando
(Auto) Bassa Media 2 Media 1 Elevata
4 velocità
3 velocità
( )
(
)
(
)
(Middle)
4.4.
Een ventilatorsnelheid kiezen (VENTILATOR)
1 Druk op de knop
FAN
om een ventilatorsnelheid naar wens te kiezen.
• Bij iedere druk op de knop ziet u op het display bij A een andere mogelijkheid verschijnen,
in de volgorde hieronder:
Welke snelheden te kiezen zijn hangt af van het model.
Let erop dat sommige apparaten geen instelling “Auto” hebben.
De weergave op het display en de ventilatorsnelheid van het apparaat zijn in de volgende situaties verschillend:
• Wanneer het apparaat in de stand STAND BY (gereed) of DEFROST (ontdooien) staat.
• Meteen na de verwarmingsstand (in afwachting van de overgang naar een andere stand).
• Wanneer de kamertemperatuur hoger is dan de ingestelde temperatuur terwijl het apparaat in
de verwarmingsstand werkt.
• In de droogstand, waarbij de binnenventilator automatisch op de lage snelheid gaat draaien.
Veranderen van de ventilatorsnelheid is dan onmogelijk.
Ventilator-
snelheid
Display van de afstandsbediening
(Auto) Laag Middel 2 Middel 1 Hoog
4-traps
3-traps
2-traps
( )
(
)
(
)
(Middel)
4.4.
Sélection d’une vitesse de ventilateur
(VENTILATEUR)
1 Appuyer sur le bouton
FAN
pour sélectionner la vitesse du ventilateur désirée.
• A chaque fois que vous appuyez sur le bouton, les options disponibles changent en même
temps que l’affichage A sur la télécommande, de la manière suivante.
Les vitesses du flux d’air peuvent être sélectionnées en fonction du modèle.
Veuillez noter que certains appareils n’offrent pas de réglage “Auto”.
L’affichage et la vitesse de ventilation de l’appareil différeront dans les cas suivants:
• Lorsque l’appareil est en mode STAND BY (veilleuse) ou DEFROST (dégivrage).
• Juste après la mise en marche du mode de chauffage (en attendant de passer à un autre
mode).
• Lorsque la température de la pièce est supérieure au réglage de température de l’appareil
qui fonctionne en mode de chauffage.
• Lors de l’opération de déshumidification, le ventilateur intérieur se met automatiquement
sur faible vitesse et il est alors impossible de changer de vitesse.
Vitesse de
ventilateur
Affichage de la télécommande
(Auto) Faible Moyenne 2 Moyenne 1 Haut
4 vitesses
3 vitesses
2 vitesses
( )
(
)
(
)
(
Moyenne
)
2 velocità
Page 21

21
GB
4. Operation
D
4. Betrieb
F
4. Fonctionnement
E
4. Funcionamiento
I
4. Funzionamento
NL
4. Gebruik
CLOCK
CHECK
RESET
SET
TEST RUN
MODE
FAN
VANE
LOUVER
min
h
AUTO START
AUTO STOP
ON/OFF
TEMP
1
A~E
ABCDE
4.5. Adjusting vertical airflow direction (VANE)
The vertical air vane helps select the vertical direction of the airflow.
1 Press
VANE
button to select the vertical airflow direction.
• Each time you press the button, the option changes are displayed on the remote controller, as shown below.
A (swing) → B → C → D → E → A
• If the room temperature is higher than the temperature set on the remote controller while the unit is defrosting or preparing for heating, the vertical air vane
will move to the horizontal airflow position (B).
• In either cooling or dry mode, if you select C, D or E when the fan speed is
low, middle 2.
After one hour, the air conditioner will switch automatically to horizontal air
mode B.
• When the heating thermostat is OFF, the louver automatically turns horizontally during defrosting or preparation for heating.
* There may not be an airflow function, depending on the model.
4.5.
Réglage de la direction du flux d’air vertical
(AILEETTE)
L’ailette verticale permet de sélectionner la direction verticale du flux d’air.
1 Appuyer sur le bouton
VANE
pour sélectionner la direction verticale du flux d’air.
• A chaque fois que vous appuyez sur le bouton, les options disponibles sont
affichées sur la télécommande, de la manière suivante.
A (Changement de direction) → B → C → D → E → A
• Si, lorsque l’appareil est en cours de dégivrage ou lorsqu’il se prépare pour le
chauffage, la température de la pièce est supérieure à la température programmée sur la télécommande, le volet de la soufflerie verticale se met sur la
position horizontale (B).
• En mode de refroidissement ou de assèchement, si vous sélectionnez C, D
ou E lorsque la vitesse de ventilation est réglée sur Faible, Medium2. Après
une heure de fonctionnement, le climatiseur passe automatiquement au mode
de soufflerie horizontale B.
• Lorsque le thermostat du chauffage est arrêté OFF, la fonction de pivotement
se met automatiquement à l’horizontale pendant le dégivrage et pendant la
préparation au chauffage.
* La fonction de flux d’air n’est pas disponible sur tous les modèles.
4.5. Verticale luchtstroomrichting wijzigen (BLAD)
Met behulp van het verticale blad bepaalt u de verticale richting van de luchtstroom.
1 Druk op de knop
VANE
om de verticale luchtstroomrichting te kiezen.
• Na iedere druk op de knop wordt op de afstandsbediening een andere mogelijkheid weergegeven, in de volgorde hieronder.
A (zwenken) → B → C → D → E → A
• Indien de kamertemperatuur hoger is dan de met de afstandsbediening ingestelde temperatuur terwijl het apparaat aan het ontdooien is of zich voorbereidt
op verwarmen, dan beweegt het verticale blad naar de positie voor een horizontale luchtstroom (B).
• Als u in de koel- of droogstand C, D of E kiest terwijl de ventilatorsnelheid
laag of middel 2 is, dan schakelt de airconditioner na een uur automatisch over
op de horizontale luchtstroomstand B.
• Wanneer de verwarmingsthermostaat op OFF staat, gaat het blad tijdens ontdooien of voorbereiden voor verwarming automatisch naar de horizontale positie.
* Afhankelijk van het model kan een luchtstroomregeling ontbreken.
4.5.
Vertikale Luftstromrichtung einstellen (FLÜGEZELLEN)
Die vertikalen Luftflügelzellen helfen bei der Einstellung der vertikalen Richtung
des Luftstroms.
1 Wählen Sie mit der Taste
VANE
die vertikale Luftstromrichtung.
• Bei jedem Tastendr uck werden die Optionsänderungen auf der Fernbedienung
angezeigt, wie unten gezeigt.
A (Schwingen) → B → C → D → E → A
• Wenn die Raumtemperatur höher ist als die auf der Fernbedienung gewählte
Temperatur, während die Anlage sich im Defrost-Betrieb befindet oder sich auf
den Heizbetrieb vorbereitet, bewegen sich die vertikalen Luftflügelzellen auf
die horizontale Luftstromposition (B).
• Sowohl im Kühl- als auch im Trocknen-Modus, wenn Sie C, D oder E wählen,
wenn die Ventilatorgeschwindigkeit niedrig, mittel 2 ist.
Nach einer Stunde wechselt die Klimaanlage automatisch in den horizontalen
Luftmodus B.
• Wenn der Heizthermostat ausgeschaltet OFF ist, wechseln die Lamellen automatisch in die horizontale Richtung beim Defrost-Betrieb oder bei der Vorbereitung des Heizbetriebs.
* Je nach Modell ist möglicherweise keine Luftstromfunktion verfügbar.
4.5. Regolazione della direzione del flusso d’aria
verticale (ALETTA)
L’aletta verticale dell’aria aiuta a selezionare la direzione verticale del flusso d’aria.
1 Premere il tasto
VANE
per selezionare la direzione del flusso d’aria verticale.
• Ad ogni pressione del pulsante vengono visualizzate sul telecomando le opzio-
ni disponibili, come illustrato qui di seguito.
A (mutamento di direzione) → B → C → D → E → A
• Se, durante lo sbrinamento o mentre l’unità sta effettuando i preparativi per la
modalità riscaldamento, la temperatura ambiente è superiore alla temperatura
selezionata sul telecomando, l’aletta verticale si sposterà in posizione di flusso
d’aria orizzontale (B).
• In modalità raffreddamento o deumidificazione, se vengono selezionati C, D o
E quando la velocità della ventola è bassa, media 2, il condizionatore passerà
automaticamente alla posizione di flusso orizzontale B dopo un’ora.
• Quando il termostato del riscaldamento non è in funzione OFF, il deflettore si
dispone automaticamente in posizione orizzontale durante lo sbrinamento o i
preparativi per la modalità riscaldamento.
* La funzione flusso d’aria non è disponibile su tutti i modelli.
4.5.
Ajuste de la dirección del flujo de aire vertical (ALETA)
La aleta vertical ayuda a seleccionar la dirección de aire vertical del flujo de aire.
1 Pulse el botón
VANE
para seleccionar la dirección de flujo de aire vertical.
• Cada vez que pulsa este botón, aparecen los cambios de opción en el controlador remoto tal y como se muestra a continuación.
A (giro) → B → C → D → E → A
• Si la temperatura de la sala es superior a la temperatura establecida en el
controlador remoto mientras la unidad esté desescarchando o preparándose
para calefacción, la aleta de aire vertical se moverá a la posición de flujo de
aire horizontal (B).
• En los modos de refrigeración y secado, si selecciona C, D o E cuando la
velocidad del ventilador sea baja, media 2.
Transcurrida una hora, el acondicionador de aire cambiará automáticamente
al modo de aire horizontal B.
• Cuando el termostato de calefacción esté en la posición OFF, la aleta girará
horizontalmente de forma automática durante el desescarchado o la preparación para el modo calefacción.
* Dependiendo del modelo, es posible que no exista la función de flujo de aire.
Page 22

22
GB
4. Operation
D
4. Betrieb
F
4. Fonctionnement
E
4. Funcionamiento
I
4. Funzionamento
NL
4. Gebruik
CLOCK
CHECK
RESET
SET
TEST RUN
MODE
FAN
VANE
LOUVER
min
h
AUTO START
AUTO STOP
ON/OFF
TEMP
1
A
4.6.
Adjusting vertical airflow direction
(LOUVER)
To Change the Right/Left Air Direction
1 Press
LOUVER
button to select the vertical direction of the airflow.
* Each press of the button switches the setting as follows.
During swing operation, the arrow display move to the left and right.
* There may not be an airflow function, depending on the model.
A
No display
(ON) (OFF)
4.6.
Verticale luchtstroomrichting wijzigen
(SCHOEPEN)
Om de links/rechts-richting van de luchtstroom te veranderen.
1 Druk op de knop
LOUVER
om de verticale luchtstroomrichting te kiezen.
* Met iedere druk op de knop verandert u de instelling als volgt.
Als het zwenken aan staat, beweegt het weergegeven pijldisplay naar links en
rechts.
* Afhankelijk van het model kan een luchtstroomregeling ontbreken.
A
Geen display
(AAN) (UIT)
4.6.
Réglage de la direction verticale du flux d’air
(SORTIE D’AIR)
Pour modifier la direction droite/gauche du flux d’air
1 Appuyez sur la touche
LOUVER
pour sélectionner la direction verticale du flux d’air.
* Chaque pression sur cette touche modifie le réglage comme suit.
Pendant l’oscillation, l’affichage de la flèche se déplace de gauche à droite.
* La fonction de flux d’air n’est pas disponible sur tous les modèles.
A
Aucun affichage
(MARCHE) (ARRET)
4.6.
Vertikale Luftstromrichtung einstellen (LAMELLEN)
Luftrichtung rechts/links ändern
1 Wählen Sie mit der Taste
LOUVER
die vertikale Richtung des Luftstroms.
* Bei jedem Tastendruck wird die Einstellung umgeschaltet wie folgt.
Während des Schwingen-Betriebs bewegt sich die Displaypfeil nach links und rechts.
* Je nach Modell ist möglicherweise keine Luftstromfunktion verfügbar.
A
Keine Anzeige
(Ein) (Aus)
4.6.
Regolazione della direzione verticale del flusso
d’aria (DEFLETTORE)
Per modificare la direzione destra/sinistra del flusso d’aria
1 Premere il tasto
LOUVER
per selezionare la direzione verticale del flusso d’aria.
* Ad ogni pressione del pulsante, l’impostazione cambia come illustrato qui di
seguito.
Durante l’oscillazione, la freccia sul display si sposta da sinistra a destra.
* La funzione flusso d’aria non è disponibile su tutti i modelli.
A
Non visualizzato
(ACCENSIONE) (SPEGNIMENTO)
4.6. Ajuste de la dirección del flujo de aire vertical
(REJILLA)
Para cambiar la dirección de aire derecha/izquierda
1 Pulse el botón
LOUVER
para seleccionar la dirección de flujo de aire vertical.
* Cada vez que pulse el botón, cambiará el ajuste como se indica a continua-
ción.
Durante el funcionamiento de giro, el indicador de flecha se moverá a la izquierda
y a la derecha.
* Dependiendo del modelo, es posible que no exista la función de flujo de aire.
A
Sin indicador
(ON) (OFF)
Page 23

23
GB
4. Operation
D
4. Betrieb
F
4. Fonctionnement
E
4. Funcionamiento
I
4. Funzionamento
NL
4. Gebruik
CLOCK
CHECK
RESET
SET
TEST RUN
MODE
FAN
VANE
LOUVER
min
h
AUTO START
AUTO STOP
ON/OFF
TEMP
A
13
2
4.7. Using the timer
1) Set the current time
1 Press the CLOCK button using a thin stick and blink the time A.
2 Press the
h
and
min
button to set the current time.
3 Press the CLOCK button using a thin stick.
4.7. Utilisation de la minuterie
1) Réglez l’heure actuelle
1 Appuyez sur la touche CLOCK avec un objet fin ; l’heure A clignote.
2 Appuyez sur les touches
h
et
min
pour régler l’heure actuelle.
3 Appuyez sur la touche CLOCK à l’aide d’un objet fin.
4.7. Gebruik van de timer
1) De huidige tijd instellen
1 Druk op de CLOCK-knop met een dun voorwerp zodat de tijd A gaat knippe-
ren.
2 Druk op de knoppen
h
en
min
om de huidige tijd in te stellen.
3 Druk op de CLOCK-knop met een dun voorwerp.
4.7. Timer verwenden
1) Aktuelle Uhrzeit einstellen
1 Drücken Sie die Taste CLOCK mit einem dünnen Stab; die Zeit A blinkt.
2 Stellen Sie die aktuelle Uhrzeit mit den Tasten
h
und
min
ein.
3 Drücken Sie die Taste CLOCK erneut mit einem dünnen Stab.
4.7. Utilizzo del timer
1) Impostare l’ora corrente
1 Premere il pulsante CLOCK con un oggetto appuntito, l’ora A lampeggerà.
2 Premere i pulsanti
h
e
min
per impostare l’ora corrente.
3 Premere il pulsante CLOCK con un oggetto appuntito.
4.7. Utilización del temporizador
1) Ajuste de la hora actual
1 Pulse el botón CLOCK utilizando una punta fina y parpadeará la hora A.
2 Pulse el botón
h
y
min
para establecer la hora actual.
3 Pulse el botón CLOCK utilizando una punta fina.
Page 24

24
GB
4. Operation
D
4. Betrieb
F
4. Fonctionnement
E
4. Funcionamiento
I
4. Funzionamento
NL
4. Gebruik
CLOCK
CHECK
RESET
SET
TEST RUN
MODE
FAN
VANE
LOUVER
min
h
AUTO START
AUTO STOP
ON/OFF
TEMP
B
C
13
2
A
2) Set the time to start the unit as follows
1 Press the
AUTO START
button.
• Time can be set while the following symbol is blinking.
On time: B START is blinking.
• The start times is displayed at A.
2 Use the
h
and
min
buttons to set the desired time.
3 To cancel the ON timer, press the
AUTO START
button.
3) Set the time to stop the unit as follows
1 Press the
AUTO STOP
button.
• Time can be set while the following symbol is blinking.
Off time: C STOP is blinking.
• The stop times is displayed at A.
2 Use the
h
and
min
buttons to set the desired time.
3 To cancel the OFF timer, press the
AUTO STOP
button.
4) Changing the set times
Press the
AUTO START
or
AUTO STOP
to cancel the timer and repeat from 2) or 3).
2) Stellen Sie die Uhrzeit, zu der die Anlage anspringen soll, wie
folgt ein
1 Drücken Sie die Taste
AUTO START
.
• Die Zeit kann eingestellt, solange das folgende Symbol blinkt.
Einschaltzeit: B START blinkt.
• Die Startzeiten werden bei A angezeigt.
2 Stellen Sie die gewünschte Zeit mit den Tasten
h
und
min
ein.
2 Drücken Sie zum Löschen der ON-Timer-Einstellung die Taste
AUTO START
.
3) Stellen Sie die Uhrzeit, zu der sich die Anlage ausschalten soll,
wie folgt ein
1 1Drücken Sie die Taste
AUTO STOP
.
• Die Zeit kann eingestellt warden, solange das folgende Symbol blinkt.
Ausschaltzeit: C STOP blinkt.
• Die Ausschaltzeiten werden bei A angezeigt.
2 Stellen Sie die gewünschte Zeit mit den Tasten
h
und
min
ein.
3 Drücken Sie zum Löschen der OFF-Timer-Einstellung die Taste
AUTO STOP
.
4) Eingestellte Zeiten ändern
Löschen Sie den Timer mit
AUTO START
oder
AUTO STOP
und wiederholen Sie die Schritte ab 2)
oder 3).
2) Réglez l’heure de démarrage de l’appareil comme suit
1 Appuyez sur la touche
AUTO START
.
• L’heure peut être réglée lorsque le symbole suivant clignote.
Heure de démarrage: B START clignote.
• L’heure de démarrage s’affiche en A.
2 Utilisez les touches
h
et
min
pour régler l’heure désirée.
3 Pour annuler la minuterie ON, appuyez sur la touche
AUTO START
.
3) Réglez l’heure d’arrêt de l’appareil comme suit
1 Appuyez sur la touche
AUTO STOP
.
• L’heure peut être réglée lorsque le symbole suivant clignote.
Heure d’ARRET: C STOP clignote.
• L’heure d’arrêt s’affiche en A.
2 Utilisez les touches
h
et
min
pour régler l’heure désirée.
3 Pour annuler la minuterie OFF, appuyez sur la touche
AUTO STOP
.
4) Modification des heures réglées
Appuyez sur les touches
AUTO START
ou
AUTO STOP
pour annuler la minuterie et reprenez à l’étape
2) ou 3).
2) Stel de tijd waarop het apparaat start als volgt in
1 Druk op de knop
AUTO START
.
• U kunt de tijd instellen zolang het volgende symbool knippert.
Tijdstip aan: B START knippert.
• De starttijd wordt weergegeven bij A.
2 Stel de gewenste tijd in met de knoppen
h
en
min
.
3 Om de AAN-timer te annuleren drukt u op de knop
AUTO START
.
3) Stel de tijd waarop het apparaat stopt als volgt in
1 Druk op de knop
AUTO STOP
.
• U kunt de tijd instellen zolang het volgende symbool knippert.
Tijdstip uit: C STOP knippert.
• De stoptijd wordt weergegeven bij A.
2 Stel de gewenste tijd in met de knoppen
h
en
min
.
3 Om de UIT-timer te annuleren drukt u op de knop
AUTO STOP
.
4) De ingestelde tijden veranderen
Druk op
AUTO START
of
AUTO STOP
om de timer te annuleren en herhaal 2) of 3).
2) Impostare l’ora di attivazione dell’unità come segue
1 Premere il pulsante
AUTO START
.
• Mentre il simbolo qui di seguito lampeggia è possibile impostare l’ora.
Ora di avvio: B START lampeggia.
• L’ora di avvio viene visualizzata in A.
2 Utilizzare i pulsanti
h
e
min
per impostare l’ora desiderata.
3 Per cancellare l’ora di avvio impostata nel timer premere il pulsante
AUTO START
.
3) Impostare l’ora di disattivazione dell’unità come segue
1 Premere il tasto
AUTO STOP
.
• Mentre il simbolo qui di seguito lampeggia è possibile impostare l’ora.
Ora di arresto: C STOP lampeggia.
• L’ora di arresto viene visualizzata in A.
2 Utilizzare i pulsanti
h
e
min
per impostare l’ora desiderata.
3 Per cancellare l’ora di arresto impostata nel timer premere il pulsante
AUTO STOP
.
4) Modifica degli orari impostati
Premere i pulsanti
AUTO START
o
AUTO STOP
per annullare il timer e ripetere i passaggi dal punto 2)
o 3).
2) Ajuste de la hora de inicio de la unidad como se indica
1 Pulse el botón
AUTO START
.
• Puede establecer la hora mientras esté parpadeando el siguiente símbolo.
Hora activada On: parpadea B START.
• Las horas de inicio aparecen en A.
2 Utilice el botón
h
y
min
para establecer la hora deseada.
3 Para cancelar el temporizador ON, pulse el botón
AUTO START
.
3) Ajuste de la hora de parada de la unidad como se indica
1 Pulse el botón
AUTO STOP
.
• Puede establecer la hora mientras esté parpadeando el siguiente símbolo.
Hora desactivada Off: parpadea C STOP.
• Las horas de parada aparecen en A.
2 Utilice el botón
h
y
min
para establecer la hora deseada.
3 Para cancelar el temporizador OFF, pulse el botón
AUTO STOP
.
4) Cambio de las horas establecidas
Pulse
AUTO START
o
AUTO STOP
para cancelar el temporizador y repetir desde los pasos 2) ó 3).
Page 25

25
GB
5. Test Run
D
5. Testlauf
F
5. Essai de Fonctionnement
E
5. Prueba de Funcionamiento
I
5. Prova di Funzionamento
NL
5. Proefdraaien
CLOCK
CHECK
RESET
SET
TEST RUN
MODE
FAN
VANE
LOUVER
min
h
AUTO START
AUTO STOP
TEST RUN
ON/OFF
TEMP
3
26
1
4
5
5. Test Run
1 Stop the air conditioner using the wireless remote controller ON/OFF but-
ton.
2 Press the
TEST RUN
button twice continuously.
•
TEST RUN
and current operation mode are displayed.
• Start this operation from the status of remote controller display turned off.
3 Press the
MODE
button.
• Operation mode switches between cooling mode and heating mode.
Cooling mode ....... Check outlet of cool airflow.
Heating mode ....... Check outlet of warm airflow. (This action takes some time.)
4 Press the
FAN
button.
• Check if the fan speed changes.
5 Press the
VANE
button.
• Check if the automatic vane is working.
6 Press the ON/OFF
button or press the
TEST RUN
button twice continuously.
• Test run will be canceled.
5. Essai de Fonctionnement
1 Arrêtez le climatiseur à l’aide de la touche ON/OFF de la télécommande
sans fil.
2 Appuyez sur la touche
TEST RUN
deux fois de suite.
•
TEST RUN
et le mode de fonctionnement actuel s’affichent.
• Lancez ce mode de fonctionnement à partir du statut d’affichage de la télécommande éteinte.
3 Appuyez sur la touche
MODE
.
• Le mode de fonctionnement alterne entre refroidissement et chauffage.
Mode de refroidissement ........ Contrôlez la sor tie du flux d’air froid.
Mode de chauffage ................ Contrôlez la sortie du flux d’air chaud. (Ceci peut
prendre un certain temps.)
4 Appuyez sur la touche
FAN
.
• Vérifiez si la vitesse du ventilateur varie.
5 Appuyez sur la touche
VANE
.
• Contrôlez le fonctionnement de l’ailette automatique.
6 Appuyez sur la touche ON/OFF
ou
TEST RUN
deux fois de suite.
• Le mode d’essai sera annulé.
5. Proefdraaien
1 Zet de airconditioner uit met de ON/OFF-knop van de draadloze afstands-
bediening.
2 Druk tweemaal gedurende enige tijd op de knop
TEST RUN
.
•
TEST RUN
en de actuele bedrijfsstand worden weergegeven.
• Zorg dat het display van de afstandsbediening uit staat wanneer u deze actie
gaat uitvoeren.
3 Druk op de knop
MODE
.
• De bedrijfsstand is afwisselend de koelstand en de verwarmingsstand.
Koelstand .................... Controleer of koude lucht uitstroomt.
Verwarmingsstand....... Controleer of warme lucht uitstroomt. (Deze actie kan
enige tijd in beslag nemen.)
4 Druk op de knop
FAN
.
• Controleer of de ventilatorsnelheid verandert.
5 Druk op de knop
VANE
.
• Controleer of het automatische blad werkt.
6 Druk op de ON/OFF-knop
of druk tweemaal gedurende enige tijd op de
knop
TEST RUN
.
• Het proefdraaien wordt geannuleerd.
5. Testlauf
1 Stoppen Sie die Klimaanlage mit der Taste ON/OFF auf der drahtlosen
Fernbedienung.
2 Drücken Sie zweimal nacheinander die Taste
TEST RUN
.
•
TEST RUN
und die aktuelle Betriebsart werden angezeigt.
• Starten Sie diesen Vorgang bei abgeschaltetem Fernbedienungs-Display.
3 Drücken Sie die Taste
MODE
.
• Die Betriebsart wechselt zwischen Kühl- und Heizmodus.
Kühlmodus ........ Prüfen Sie, ob kalte Luft austritt.
Heizmodus ........ Prüfen Sie, ob warme Luft austritt. (Dieser Vorgang dauert
einige Zeit.)
4 Drücken Sie die Taste
FAN
.
• Prüfen Sie, ob sich die Ventilatorgeschwindigkeit ändert.
5 Drücken Sie die Taste
VANE
.
• Prüfen Sie, ob die automatischen Flügelzellen arbeiten.
6 Drücken Sie die Taste ON/OFF
oder die Taste
TEST RUN
zweimal nacheinander.
• Der Testlauf wird beendet.
5. Prova di Funzionamento
1 Interrompere il funzionamento del climatizzatore utilizzando il pulsante ON/
OFF
sul telecomando wireless.
2 Premere il pulsante
TEST RUN
due volte di seguito.
• Vengono visualizzati
TEST RUN
e la modalità di funzionamento attuale.
• Iniziare l’operazione con il display del telecomando spento.
3 Premere il pulsante
MODE
.
• La modalità di funzionamento passa alternativamente da raffreddamento a
riscaldamento.
Modalità raffreddamento ........ Verificare l’uscita del flusso d’aria fredda.
Modalità riscaldamento .......... Verificare l’uscita del flusso d’aria calda. (L’ope-
razione può richiedere un certo tempo.)
4 Premere il pulsante
FAN
.
• Verificare che la velocità della ventola si modifichi.
5 Premere il pulsante
VANE
.
• Verificare il funzionamento dell’aletta automatica.
6 Premere il pulsante ON/OFF
o premere il pulsante
TEST RUN
due volte di seguito.
• La modalità prova di funzionamento verrà annullata.
5. Prueba de Funcionamiento
1 Detenga el acondicionador de aire utilizando el botón ON/OFF del contro-
lador remoto inalámbrico.
2 Pulse el botón
TEST RUN
dos veces sucesivamente.
• Aparecerá
TEST RUN
y el modo de funcionamiento actual.
• Inicie esta operación con el estado del indicador del controlador remoto
desactivado.
3 Pulse el botón
MODE
.
• El modo de funcionamiento cambiará entre el modo de refrigeración y el de
calefacción.
Modo Refrigeración ........ Compruebe la toma del flujo de aire frío.
Modo Calefacción .......... Compruebe la toma del flujo de aire caliente. (Esto
le puede llevar algún tiempo.)
4 Pulse el botón
FAN
.
• Compruebe si cambia la velocidad del ventilador.
5 Pulse el botón
VANE
.
• Compruebe si la aleta automática está funcionando.
6 Pulse el botón ON/OFF
o pulse el botón
TEST RUN
dos veces sucesivamente.
• Se cancelará la prueba de funcionamiento.
Page 26

26
GB
6. Self Check
D
6. Selbsttest
F
6. Auto-Contrôle
E
6. Autocomprobación
I
6. Autodiagnosi
NL
6. Zelftest
CLOCK
CHECK
RESET
SET
TEST RUN
MODE
FAN
VANE
LOUVER
min
h
AUTO START
AUTO STOP
CHECK
ON/OFF
TEMP
2
15
4
3
6. Self Check
1 Stop the air conditioner using the wireless remote controller ON/OFF but-
ton.
2 Press the
CHECK
button twice continuously.
•
CHECK
begins to light and address display, “00” begins to blink.
• Start this operation from the status of remote controller display turned off.
3 Press the TEMP
, buttons.
• Set the address of the indoor unit that is to be self-diagnosed.
4 While pointing the remote controller toward the signal receiver, press the
h
button.
• The operation cannot be performed when the unit is in trouble.
• The check code will be indicated by the number of times that the buzzer sounds
from the receiver section and the number of blinks of the operation lamp.
5 While pointing the remote controller toward the unit’s receiver, press the ON/
OFF
button.
• Self-check mode is canceled.
6. Auto-Contrôle
1 Arrêtez le climatiseur à l’aide de la touche ON/OFF de la télécommande
sans fil.
2 Appuyez sur la touche
CHECK
deux fois de suite.
•
CHECK
s’allume sur l’affichage, “00” se met à clignoter.
• Lancez ce mode de fonctionnement à partir du statut d’affichage de la télécommande éteinte.
3 Appuyez sur les touches TEMP
, .
• Réglez l’adresse de l’appareil intérieur qui doit subir un auto-contrôle.
4 Tout en pointant la télécommande vers le récepteur de signaux, appuyez sur la
touche
h
.
•
L’opération ne pourra pas être exécuté si l’appareil présente un dysfonctionnement.
• Le code de contrôle sera indiqué par le nombre de fois que l’avertisseur sonore
retentit à partir du récepteur et le nombre de clignotements du témoin de fonctionnement.
5 Tout en pointant la télécommande vers le récepteur de l’appareil, appuyez sur
la touche ON/OFF
.
• Le mode d’auto-contrôle est annulé.
6. Zelftest
1 Zet de airconditioner uit met de ON/OFF-knop van de draadloze afstands-
bediening.
2 Druk tweemaal gedurende enige tijd op de knop
CHECK
.
•
CHECK
licht op in het display en “00” begint te knipperen.
• Zorg dat het display van de afstandsbediening uit staat wanneer u deze actie
gaat uitvoeren.
3 Druk op de TEMP-knoppen
, .
• Stel het adres in van het binnenapparaat waarmee u de zelftest wilt uitvoeren.
4 Druk op de knop
h
terwijl u met de afstandsbediening naar de signaal-
ontvangsteenheid wijst.
• Deze actie kan niet uitgevoerd worden als er problemen met het apparaat zijn.
• De controlecode wordt aangegeven door het aantal zoemergeluiden dat de
signaalontvangsteenheid maakt en door het aantal keren dat de werkingslamp
knippert.
5 Druk op de ON/OFF-knop
terwijl u met de afstandsbediening naar de signaal-
ontvangsteenheid wijst.
• De zelfteststand wordt geannuleerd.
6. Selbsttest
1 Stoppen Sie die Klimaanlage mit der Taste ON/OFF auf der drahtlosen
Fernbedienung.
2 Drücken Sie zweimal nacheinander die Taste
CHECK
.
•
CHECK
leuchtet auf und das Adreßdisplay “00” blinkt.
• Starten Sie diesen Vorgang bei abgeschaltetem Fernbedienungs-Display.
3 Drücken Sie die Tasten TEMP
, .
• Stellen Sie die Adresse derjenigen Innenanlage ein, die einen Selbsttest durchführen soll.
4 Zeigen Sie mit der Fernbedienung auf den Signalempfänger, und drücken Sie
die Taste
h
.
• Dieser Vorgang kann nur durchgeführt werden, wenn das Anlage störungsfrei
arbeitet.
• Der Prüfkode wird angezeigt durch die Anzahl der Signaltöne der Empfängereinheit und die Anzahl der Blinksignale der Betriebslampe.
5 Zeigen Sie mit der Fernbedienung auf den Signalempfänger, und drücken Sie
die Taste ON/OFF
.
• Der Selbsttest wird beendet.
6. Autocomprobación
1 Detenga el acondicionador de aire utilizando el botón ON/OFF .
2 Pulse el botón
CHECK
dos veces sucesivamente.
•
CHECK
se enciende y el indicador de dirección, “00” comienza a parpadear.
• Inicie esta operación con el estado del indicador del controlador remoto
desactivado.
3 Pulse los botones TEMP
, .
• Ajuste la dirección de la unidad interior que será autodiagnosticada.
4 Mientras apunta el controlador remoto hacia el receptor de la señal, pulse el
botón
h
.
• No puede llevarse a cabo esta operación cuando la unidad tiene un problema.
• Se indicará el código de comprobación mediante el número de veces que sue-
na el timbre desde la sección de recepción y el número de parpadeos de la luz
de funcionamiento.
5 Mientras apunta el controlador remoto hacia el receptor de la señal, pulse el
botón ON/OFF
.
• Se cancela el modo de autocomprobación.
6. Autodiagnosi
1 Disattivare il climatizzatore utilizzando il pulsante ON/OFF sul telecoman-
do.
2 Premere il pulsante
CHECK
due volte di seguito.
•
CHECK
si illumina sul display e “00” inizia a lampeggiare.
• Iniziare l’operazione con il display del telecomando spento.
3 Premere i pulsanti TEMP
, .
• Impostare l’identificazione dell’unità interna su cui si intende eseguire
l’autodiagnosi.
4 Puntare il telecomando verso il ricevitore del segnale e premere il pulsante
h
.
• Non è possibile eseguire l’operazione quando l’unità presenta dei problemi.
• Il codice del risultato della diagnosi è indicato dal numero di volte che il ricevi-
tore emette il segnale acustico e dal numero di volte che la spia di funzionamento lampeggia.
5 Puntare il telecomando verso il ricevitore del segnale e premere il pulsante
ON/OFF
.
• La modalità autodiagnosi verrà annullata.
GB
6. Self Check
D
6. Selbsttest
F
6. Auto-Contrôle
E
6. Autocomprobación
I
6. Autodiagnosi
NL
6. Zelftest
Page 27

27
GB
6. Self Check
D
6. Selbsttest
F
6. Auto-Contrôle
E
6. Autocomprobación
I
6. Autodiagnosi
NL
6. Zelftest
* Check code table
* Refer to service handbook of outdoor unit for the detail.
Check code Operation lamp Buzzer sound
0000 ~ 0999 1 Sec. Flash × 8 Single beep × 8
1000 ~ 1999 1 Sec. Flash × 1 Single beep × 1
2000 ~ 2999 1 Sec. Flash × 2 Single beep × 2
3000 ~ 3999 1 Sec. Flash × 3 Single beep × 3
4000 ~ 4999 1 Sec. Flash × 4 Single beep × 4
5000 ~ 5999 1 Sec. Flash × 5 Single beep × 5
6000 ~ 6999 1 Sec. Flash × 6 Single beep × 6
7000 ~ 7999 1 Sec. Flash × 7 Single beep × 7
8000 over 1 Sec. Flash × 9 Single beep × 9
* Tabella dei codici di diagnosi
* Consultare il manuale di manutenzione dell’unità esterna per informazioni det-
tagliate.
Codice di diagnosi Spia di funzionamento Segnale acustico
0000 ~ 0999 1 Sec. lampeggiamento × 8 Bip singolo × 8
1000 ~ 1999 1 Sec. lampeggiamento × 1 Bip singolo × 1
2000 ~ 2999 1 Sec. lampeggiamento × 2 Bip singolo × 2
3000 ~ 3999 1 Sec. lampeggiamento × 3 Bip singolo × 3
4000 ~ 4999 1 Sec. lampeggiamento × 4 Bip singolo × 4
5000 ~ 5999 1 Sec. lampeggiamento × 5 Bip singolo × 5
6000 ~ 6999 1 Sec. lampeggiamento × 6 Bip singolo × 6
7000 ~ 7999 1 Sec. lampeggiamento × 7 Bip singolo × 7
Oltre 8000 1 Sec. lampeggiamento × 9 Bip singolo × 9
* Tabla de códigos de comprobación
* Consulte la guía de servicio de la unidad interior para obtener más informa-
ción.
Código de comprobación
Luz de funcionamiento Sonido del timbre
0000 ~ 0999 Parpadea 1 seg. × 8 Un solo pitido × 8
1000 ~ 1999 Parpadea 1 seg. × 1 Un solo pitido × 1
2000 ~ 2999 Parpadea 1 seg. × 2 Un solo pitido × 2
3000 ~ 3999 Parpadea 1 seg. × 3 Un solo pitido × 3
4000 ~ 4999 Parpadea 1 seg. × 4 Un solo pitido × 4
5000 ~ 5999 Parpadea 1 seg. × 5 Un solo pitido × 5
6000 ~ 6999 Parpadea 1 seg. × 6 Un solo pitido × 6
7000 ~ 7999 Parpadea 1 seg. × 7 Un solo pitido × 7
Más de 8000 Parpadea 1 seg. × 9 Un solo pitido × 9
* Controlecodetabel
* Raadpleeg het serviceboekje van het buitenapparaat voor meer informatie.
Controlecode Werkingslamp Zoemergeluid
0000 ~ 0999 1 sec. aan × 8 Enkele piep × 8
1000 ~ 1999 1 sec. aan × 1 Enkele piep × 1
2000 ~ 2999 1 sec. aan × 2 Enkele piep × 2
3000 ~ 3999 1 sec. aan × 3 Enkele piep × 3
4000 ~ 4999 1 sec. aan × 4 Enkele piep × 4
5000 ~ 5999 1 sec. aan × 5 Enkele piep × 5
6000 ~ 6999 1 sec. aan × 6 Enkele piep × 6
7000 ~ 7999 1 sec. aan × 7 Enkele piep × 7
8000 en meer 1 sec. aan × 9 Enkele piep × 9
* Tableau des codes de contrôle
* Consultez le manuel d’entretien de l’appareil extérieur pour de plus amples
informations.
Code de contrôle
Témoin de fonctionnement
Avertisseur sonore
0000 ~ 0999 Clignotement 1 s × 8 Bip simple × 8
1000 ~ 1999 Clignotement 1 s × 1 Bip simple × 1
2000 ~ 2999 Clignotement 1 s × 2 Bip simple × 2
3000 ~ 3999 Clignotement 1 s × 3 Bip simple × 3
4000 ~ 4999 Clignotement 1 s × 4 Bip simple × 4
5000 ~ 5999 Clignotement 1 s × 5 Bip simple × 5
6000 ~ 6999 Clignotement 1 s × 6 Bip simple × 6
7000 ~ 7999 Clignotement 1 s × 7 Bip simple × 7
Au-delà de 8000 Clignotement 1 s × 9 Bip simple × 9
*Prüfcodetabelle
* Einzelheiten finden Sie im Wartungsanleitung der Außenanlage.
Prüfcode Betriebslampe Signaltöne
0000 ~ 0999 1 Sek. Aufblinken × 8 Signalton × 8
1000 ~ 1999 1 Sek. Aufblinken × 1 Signalton × 1
2000 ~ 2999 1 Sek. Aufblinken × 2 Signalton × 2
3000 ~ 3999 1 Sek. Aufblinken × 3 Signalton × 3
4000 ~ 4999 1 Sek. Aufblinken × 4 Signalton × 4
5000 ~ 5999 1 Sek. Aufblinken × 5 Signalton × 5
6000 ~ 6999 1 Sek. Aufblinken × 6 Signalton × 6
7000 ~ 7999 1 Sek. Aufblinken × 7 Signalton × 7
8000 und höher 1 Sek. Aufblinken × 9 Signalton × 9
GB
6. Self Check
D
6. Selbsttest
F
6. Auto-Contrôle
E
6. Autocomprobación
I
6. Autodiagnosi
NL
6. Zelftest
Page 28

28
GB
7. Centrally Controlled
D
7. Zentralsteuerung
F
7. Contrôle Centralisé
E
7. Control Centralizado
I
7. Controllo Centralizzato
NL
7. Centrale Besturing
7. Centrally Controlled
1. In cases where local operation by wireless remote controller is prohibited.
™ When remote operation is prohibited due to centralized control, the prohib-
ited operations cannot be performed using a wireless remote controller.
• There are 3 types of remote operation that are prohibited, starting and
stopping, operating mode and temperature setting.
• Operations other than the prohibited items are enabled.
2. In cases where wireless remote controller are operated during Centrally
Controlled.
™ Signal Receiving Unit will respond as follows.
• Unit will beep twice.
• ON/OFF lamp will flash three times at 0.25 second intervals if the unit is
ON or two times if it is OFF.
Note:
In this case the operation of the air-conditioner and the display of the remote
control may differ.
7. Contrôle Centralisé
1. Lorsque le fonctionnement local n’est pas autorisé via la télécommande
sans fil.
™ Lorsque le fonctionnement à distance n’est pas autorisé en raison du con-
trôle centralisé, les opérations interdites peuvent être effectuées à l’aide de
la télécommande sans fil.
• 3 types de commandes à distance ne sont pas autorisées, le démarrage et l’arrêt, le réglage du mode de fonctionnement et de la température.
• Les commandes autres que celles qui sont interdites sont autorisées.
2. Lorsque la télécommande sans fil est utilisée pendant le fonctionnement
du contrôle centralisé.
™ L’unité de réception des signaux répondra comme suit.
• L’unité de réception des signaux émettra deux bips.
• Le témoin ON/OFF clignotera trois fois à un intervalle de 0,25 seconde
si l’appareil est MARCHE ou deux fois s’il est ARRET.
Remarque:
Dans ce cas, le fonctionnement du climatiseur et l’affichage de la télécommande seront différents.
7. Controllo Centralizzato
1. In casi in cui il funzionamento locale tramite telecomando wireless non è
consentito.
™ Quando l’uso del telecomando non è consentito a causa del controllo cen-
tralizzato, non è possibile effettuare le operazioni non autorizzate con il
telecomando wireless.
• Esistono tre tipi di comandi a distanza non autorizzati, accensione e
spegnimento, impostazione della modalità di funzionamento e
impostazione della temperatura.
• I restanti comandi sono autorizzati.
2. In casi in cui si utilizza il telecomando sena fili durante il funzionamento
del controllo centralizzato.
™ L’unità di ricezione del segnale risponderà come segue.
• Emetterà due segnali acustici.
• La spia ON/OFF lampeggerà tre volte con intervalli di 0,25 secondi se
l’unità è in funzione ACCENSIONE oppure due volte se non è in funzione SPEGNIMENT.
Nota:
In tal caso il funzionamento del condizionatore non rifletterà quanto
visualizzato sul display del telecomando.
7. Centrale Besturing
1. Indien lokale bediening met de draadloze afstandsbediening geblokkeerd
is.
™ Als bediening op afstand geblokkeerd is vanwege gecentraliseerde bestu-
ring, dan kunnen de geblokkeerde acties niet uitgevoerd worden met een
draadloze afstandsbediening.
• Er zijn 3 soorten bedieningsacties die geblokkeerd worden: starten en
stoppen, bedrijfsstand instellen en temperatuur instellen.
• Andere acties dan de geblokkeerde zijn wel mogelijk.
2. Indien de draadloze afstandsbediening te gebruiken is tijdens centrale
besturing.
™ De Signaalontvangsteenheid reageert dan als volgt.
• De eenheid piept tweemaal.
• De ON/OFF-lamp knippert driemaal met tussenpozen van 0,25 seconde
wanneer het apparaat AAN is, en tweemaal wanneer het UIT staat.
Opmerking:
In deze situatie kan de werking van de airconditioner anders zijn dan het
display van de afstandsbediening aangeeft.
7. Zentralsteuerung
1. Für Fälle, in denen die lokale Bedienung durch eine drahtlose Fernbedienung eingeschränkt ist.
™ Wenn die Bedienung aus der Ferne auf Grund einer Zentralsteuerung ein-
geschränkt ist, können unzulässige Bedienschritte nicht mittels einer drahtlosen Fernbedienung vorgenommen werden.
• Es gibt 3 Vorgänge, die aus der Ferne nicht ausgeführt werden dürfen:
Start und Stopp, Änderung der Betriebsart und die Temperaturwahl.
• Alle anderen Vorgänge dürfen ausgeführ t werden.
2. Für Fälle, in denen drahtlose Fernbedienungen bei aktiver Zentralsteuerung verwendet werden.
™ Die Signalempfangseinheit reagiert wie folgt.
• Die Anlage läßt zwei Signaltöne erklingen.
• Die Lampe ON/OFF blinkt dreimal in Intervallen von 0,25 Sekunden,
wenn die Anlage eingeschaltet EIN ist, bzw. zweimal, wenn sie ausgeschaltet AUS ist.
Hinweis:
In einem solchen Fall korrespondiert die Anzeige der Fernbedienung möglicherweise nicht mit dem tatsächlichen Betriebszustand der Klimaanlage.
7. Control Centralizado
1. Para los casos en los que no está permitido el funcionamiento local mediante el controlador remoto inalámbrico.
™ Cuando no está permitido el funcionamiento remoto debido al control cen-
tralizado, las operaciones restringidas no podrán llevarse a cabo utilizando
un controlador remoto inalámbrico.
• Hay 3 tipos de funcionamiento remoto restringido, arranque y parada,
modo de funcionamiento y ajuste de temperatura.
• El resto de operaciones están permitidas.
2. Para los casos en los que se utiliza el controlador remoto inalámbrico
durante el Control Centralizado.
™ El Receptor de señal responderá como se indica a continuación.
• El receptor emitirá dos veces un sonido.
• La luz ON/OFF parpadeará tres veces en intervalos de 0,25 segundos
si la unidad está encendida, o dos veces si está apagada.
Nota:
Para el caso de que varíe el funcionamiento del acondicionador de aire y el
indicador del control remoto.
GB
7. Centrally Controlled
D
7. Zentralsteuerung
F
7. Contrôle Centralisé
E
7. Control Centralizado
I
7. Controllo Centralizzato
NL
7. Centrale Besturing
Page 29

29
GB
8. Troubleshooting
D
8. Fehlerbehebung
F
8. Guide de Dépannage
E
8. Localizacion de fallos
I
8. Ricerca dei guasti
NL
8. Problemen en oplossingen
8. Troubleshooting
<When the operation lamp of the Signal Receiving Unit is blinking>
This means that an abnormality has occurred with the air conditioner. In this case,
turn the power off and consult your dealer. Do not try to repair by yourself.
8. Guide de Dépannage
<Lorsque l’unité de réception des signaux clignote>
Ceci signifie qu’une anomalie est survenue dans le fonctionnement du climatiseur.
Dans ce cas, éteignez l’appareil et consultez votre revendeur. Ne tentez pas de
réparer l’appareil vous-même.
8. Ricerca dei guasti
<Quando la spia di funzionamento dell’unità di ricezione del segnale lampeggia>
Significa che si è verificata un’anomalia nel funzionamento del climatizzatore. In
tal caso, disattivare il climatizzatore e rivolgersi al proprio rivenditore. Non tentare
di eseguire riparazioni in proprio.
8. Problemen en oplossingen
<Wanneer de werkingslamp van de signaalontvangsteenheid knippert>
Dit betekent dat er iets abnormaals aan de hand is met de airconditioner. Schakel
in dat geval de netspanning uit en neem contact op met uw dealer. Probeer het
apparaat niet zelf te repareren.
8. Fehlerbehebung
<Wenn die Betriebslampe der Signalempfangseinheit blinkt>
Das bedeutet, daß in der Klimaanlage eine Anomalie aufgetreten ist. Schalten Sie
in einem solchen Fall das Gerät aus, und ziehen Sie Ihren Händler zu Rate. Versuchen Sie nicht, das Gerät selbst instand zu setzen.
8. Localizacion de fallos
<Cuando parpadea la luz de funcionamiento del Receptor de señal>
Esto indica que se ha produce un error con el acondicionador de aire. En este
caso, apague el aparato y consulte con su distribuidor. No intente repararlo usted
mismo.
Page 30

Page 31

Page 32

HEAD OFFICE: TOKYO BLDG., 2-7-3, MARUNOUCHI, CHIYODA-KU, TOKYO 100-8310, JAPAN
WT04760X01
This product is designed and intended for use in a residential, commercial or light-industrial environment.
The product at hand is based on the following EU regulations:
• Electromagnetic Compatibility Directive 89/336/EEC
 Loading...