

Mitsubishi Electric Apricot VS, Apricot LS Owner's Manual
OWNER’S HANDBOOK
VS + LS
apricot
MITSUBISHI ELECTRIC

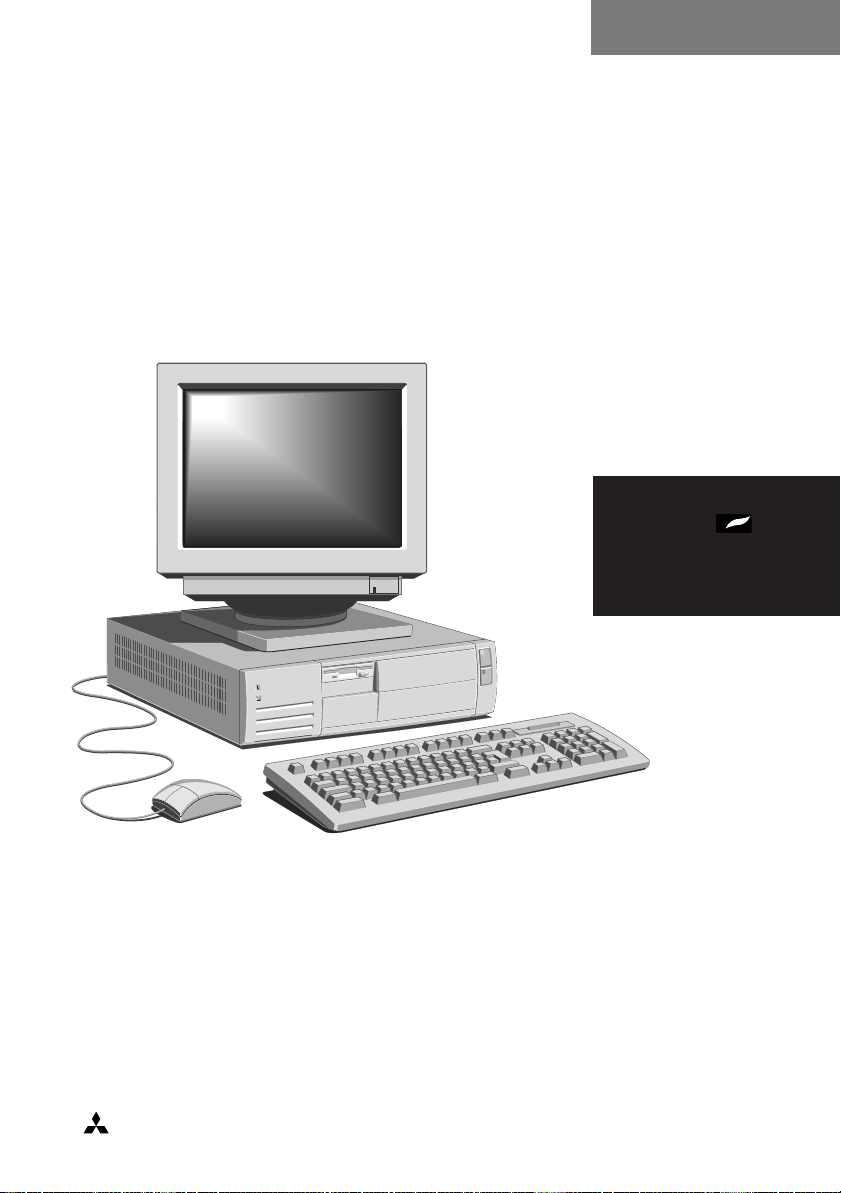
Apricot VS and LS Systems
Owner’s Handbook
MITSUBISHI ELECTRIC

Intel and Pentium are registered trademarks of Intel Corporation.
Microsoft
U.S. and other countries.
Soundblaster is a registered trademark of Creative Labs Inc.
Any other trademarks referred to within this document but not listed above
are hereby recognised and acknowledged.
Apricot Computers Ltd. have a policy of continuous research and development
and therefore reserve the right to amend or modify this handbook, or parts
thereof that are subject to specification change, without notice.
Any software described in this manual that has been furnished with the
computer is supplied subject to a license agreement. The software may be used
or copied only in accordance with the terms of this agreement. It may be an
offence punishable by law to copy any disk or part of a disk supplied for any
purpose other than the purchaser’s personal use unless specifically authorised
within the licence agreement.
All rights reserved. No use or disclosure or reproduction in any form of this
manual in part or whole is permitted without prior written consent from the
publishers.
®
and Windows
® 95 are registered trademarks of Microsoft in the
Copyright © Apricot Computers Limited 1995
Published by
Apricot Computers Limited
3500 Parkside
Birmingham Business Park
Birmingham B37 7YS
MITSUBISHI ELECTRIC
Printed in the United Kingdom

Safety and Regulatory Notices
Read the separate Power Connection Guide before using the computer for the
first time.
The computer uses a safety ground and must be earthed. The system unit
AC power cord is its ‘disconnect device’. Ensure that the system unit is
positioned close to the AC power outlet and that the plug is easily
accessible. The power cord packed with the computer complies with the
safety standards applicable in the country in which it is first sold. Use only
this power cord. Do not substitute a power cord from any other equipment.
It is imperative that the system unit is set to the correct voltage range before
use. If not, the machine may be irreparably damaged.
To prevent fire and electric shock, do not expose any part of the computer
to rain or moisture.
When positioning the system unit, monitor and keyboard, take into account
any local or national regulations relating to ergonomic requirements.
Microphone, headphone and speaker cables should be less than 2 metres
long.
SAFETY NOTICE
Replace a discharged configuration (CMOS) battery with one of the same
type. Dispose of the battery in accordance with the manufacturer's
recommended instructions. Do not attempt to recharge, disassemble or
incinerate. Keep away from children.
Any CD-ROM drive fitted in this system is
classified as a CLASS 1 LASER PRODUCT
according to IEC825 Radiation Safety of Laser
Products (Equipment Classification: Requirements
and User's Guide).. The CLASS 1 LASER
PRODUCT label is located on the under side
of the system unit.
Use the CD-ROM drive only as described in
this manual. Failure to do so may result in
exposure to hazardous radiation.
Refer to the labels on the computer to establish
which of the following applies.
SAFETY/1

SAFETY NOTICE
E.E.C.
This equipment complies with the relevant clauses of following European directives:
89/836/EEC and 73/23/EEC, and is able to bear the CE mark.
U.S.A
FCC Class A
Warning - this equipment has been tested and found to comply with the limits for a Class A computing
device, pursuant to Subpart J of Part 15 of FCC rules. Only peripherals (computer input/output devices,
terminals, printer, etc.) certified to comply with the Class A limits may be attached to this computer.
Operation of this equipment in a residential area may cause unacceptable interference to radio and television
reception requiring the operator to take whatever steps are necessary to correct the interference.
FCC Class B
Warning - this equipment has been certified to comply with the limits for a Class B computing device,
pursuant to Subpart J of Part 15 of FCC rules. Only peripherals (computer input/output devices, terminals,
printer, etc.) certified to comply with the Class B limits may be attached to this computer. Operation with
non-certified peripherals is likely to result in interference with radio and TV reception.
Radio and television interference
The computer described in this manual generates and uses radio frequency energy for its operation. If it is not
installed and used properly, in strict accordance with the manual, it may cause interference with radio and
television reception.
The computer has been tested and found to comply with the RF emission limits for an FCC Class B
computing device which is intended to provide reasonable protection against such interference in a
residential installation. However, there is no guarantee that interference will not occur in a particular
installation.
If this equipment does cause interference with radio or television reception, which can be determined by
turning the equipment off and on, the user is encouraged to try to correct the interference by one or more of
the following measures:
• Move the computer away from the receiver being interfered with.
• Turn the computer with respect to the receiver.
• Turn the receiver with respect to the computer.
• Plug the computer into an outlet that is on a different branch circuit from the receiver.
• Disconnect and remove any I/O cables that are not being used.
• Unplug and remove any expansion cards that are not being used. Replace the relevant blanking
plates.
• Make sure that the computer is plugged into a grounded outlet
If you need additional help, consult your supplier. You may find the following booklet helpful, How to
Identify and Resolve Radio-TV Interference Problems. This booklet is available from the US Government
Printing Office: Washington DC 20402 - Stock No. 004-000-000345-4.
SAFETY/2

PREFACE
There are many variants within the Apricot VS and LS range. The
basic difference being a Soundblaster 16 bit audio system, integrated
into the computer’s motherboard.
Some systems also may be supplied for the networking environment
and therefore may not have a hard disk fitted. These systems would
probably have a network card installed in an available slot.
®
Similarly, some systems may be supplied with Windows
of DOS and Windows
guide will be supplied for the software.
This handbook is intended to give advice and guidance on the use of
your computer and include details on some of the optional drives
and upgrades that you may have chosen to be fitted into it.
Many of these will have been fitted prior to supply, during
manufacture at the factory. Others may be installed by your supplier
or Apricot dealer.
®
as their operating system. The appropriate
95 instead
PREFACE

CONTENTS
1 THE BEGINNING
Connections 1/1
Turning on and booting 1/2
Energy saving features 1/3
Turning the power off 1/3
Cleaning and transporting 1/4
2 THE SYSTEM DRIVES
Using the floppy drive 2/1
Using a CD-ROM drive 2/2
The Hard disk drive 2/4
Software backup 2/6
Copying pre-installed software 2/7
Using an FTD (tape drive) 2/7
3 SYSTEM EXPANSION
Configuring a card 3/2
Installing a card 3/6
4 SYSTEM UPGRADES
Adding system memory 4/1
Adding cache memory 4/5
Adding video memory 4/7
Upgrading the processor 4/9
5 MULTIMEDIA FEATURES
The device drivers 5/1
The CD-ROM drive 5/2
The sound connections 5/3
CONTENTS/1

6 TROUBLESHOOTING
Problems when starting 6/1
Troubleshooting checklist 6/3
System disk drives 6/4
Software security 6/5
A THE SYSTEM UNIT
Anti-static precautions A/1
Opening the system unit A/2
The components inside A/3
Drive specification A/4
Physical characteristics A/5
Fitting a new drive A/6
B SYSTEM MOTHERBOARD
General specification B/1
Board layout B/3
System ports B/4
Jumper configurations B/6
Replacing CMOS battery B/8
CONTENTS
C SYSTEM BIOS AND SET-UP
Entering set-up C/1
Control keys C/1
Set-up starts on its own C/2
Opening screen C/3
Sub-menu pages C/4
Error messages C/11
CONTENTS/2
1 THE BEGINNING. . .
1
10101
2
2
11
1
6
7
8
9
10
4
5
3
You should read this chapter even if you do not read any other. It
provides important basic information to help you in using your
computer. It is the minimum you need to know in order to start
work straight away.
Note particularly the information given in the section
‘Energy Saving Features’.
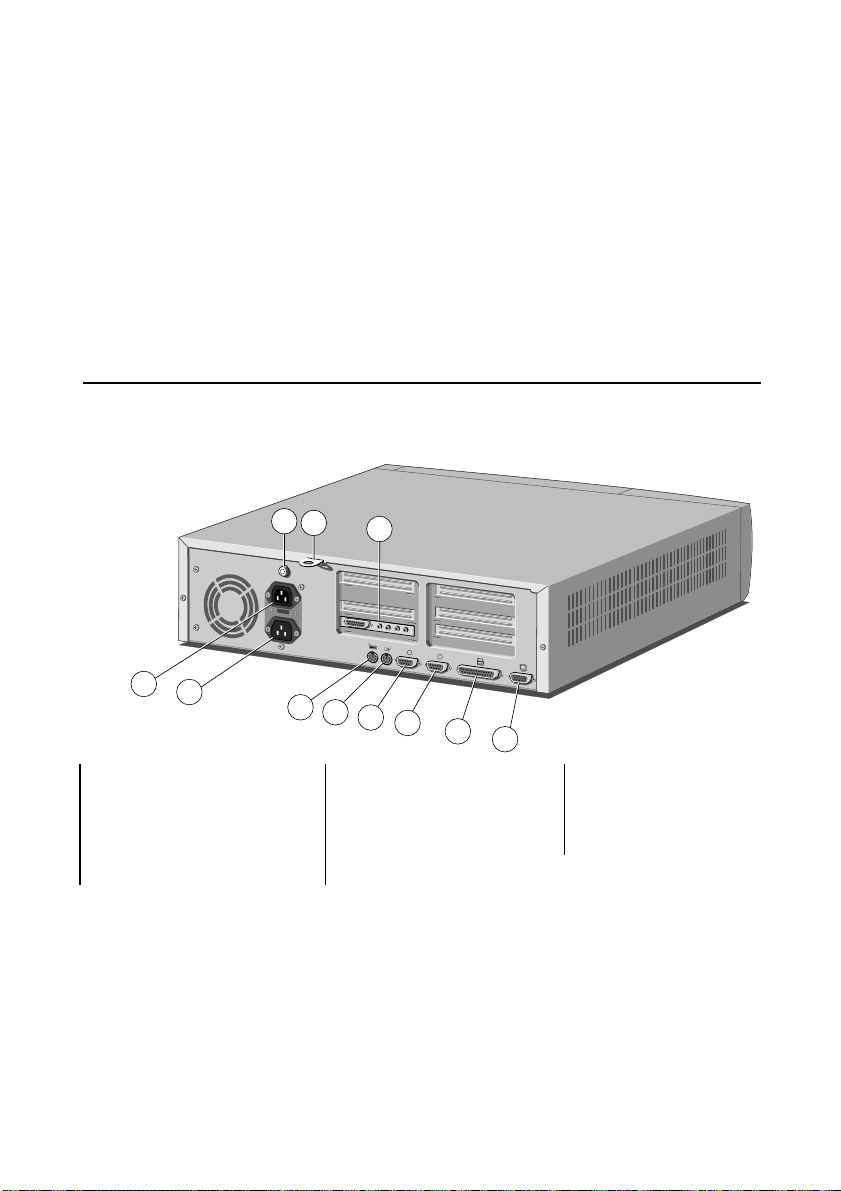
Connections
Individual details of the rear port connections are shown in the
appendix B ‘System Motherboard’, but an overall view is given here.
THE BEGINNING
1 Mains in socket 2 Power out to monitor 3 Optional case lock
4 System security loop 5 Rear audio panel *a 6 Keyboard port
7 PS/2 mouse port 8 Serial port (COM1) 9 Serial port (COM2)
10 Parallel/printer port 11 Monitor connection
The optional Security case-lock (3), can help prevent unauthorised removal
of the cover, while the security loop, (4) above, can be used for an alarmed
loop cable or a padlocking mechanism. This will help deter theft of the
system, or removal of its cover if the case-lock, (3), is not fitted.
*a If fitted. See chapter ‘Multimedia’ for details on connections.
1/1

THE BEGINNING
Turning on and booting the computer
Turning the power on
To turn on the computer, press the lower P
POWER
powered. Remember that the monitor has its own power control (see
the monitor’s User’s Guide for details) and that it may take a few
moments to warm up. Do not touch the purple button yet.
If nothing happens when the P
the system unit and monitor power cords are securely connected and
that the AC power supply is switched on. See also the chapter on
‘Troubleshooting’.
Power-on self-test
Whenever the computer is turned on, the ‘power-on self test’ (POST)
routine checks the actual set-up of the computer against that
recorded in its internal configuration memory. During this time,
various messages are displayed. Further information on the
computer’s Basic In/Out System (BIOS) and its setting up can be
found in Appendix C, ‘System BIOS and set-up’.
The boot sequence
Provided that POST succeeds without any serious errors, the
computer attempts to find its operating system to start it going, that
is, it attempts to boot. By default, the computer will first look for a
system diskette, then for a bootable hard disk partition or area.
OWER
button. The green
ON light should come on to show that the system unit is
OWER
button is pressed, check that
1/2
System diskette
A system diskette is a diskette bearing at least the rudiments of an
operating system. If the computer finds such a diskette in the
diskette drive, it boots from it. If it finds a non-system diskette, the
computer will ask you to replace it.
Bootable Hard disk
Most computers with a hard disk containing pre-installed software
arrive set up with a single ‘partition’. The operating system already
in place or pre-installed on this, the C: drive, and it is usually made
‘active’, i.e. the bootable hard disk.

Energy Saving features
If the system is left unattended for more than a predetermined length
of time, energy saving features will come into play. The screen will
blank, components will slow down, software will still run, but very
slowly. This is meant to happen. A flashing light on the front will
warn you that ‘Low power’ mode is operative.
Warning
The energy saving features built into this computer are designed to be used with
the monitor supplied with the system. If you wish to use another, or older
monitor it may not be compatible and permanent damage may be caused.
Check with your Apricot dealer.
To restart the system, just move the mouse or press a keyboard key.
Everything will return to the exact state in which it was left.
You may also press the purple button, just above the power switch.
This button can also be pressed while you are using the system, to
override the BIOS timer and force the system into the ‘low power’
mode.
THE BEGINNING
The power management section of the system BIOS gives access to
the control settings of the ‘low power’ mode, see appendix C, ‘System
BIOS and set-up’. You may also disable the features if required.
Turning the power off
Before turning off the computer, run through the following simple
checklist:
• Quit or exit from all the applications you are running, making
sure to save any files you have altered or created. Unless you save
it, information held in the computer’s memory will be lost
when you turn off the computer.
• Always close down Windows. This procedure will close down all
your applications in an orderly manner and will prompt you to
save any unsaved work in the process.
1/3

THE BEGINNING
• You should always turn off any attached peripherals first.
However, there is no need to turn off the monitor (if it is
powered from the system unit).
• To turn off the computer, simply press the P
The power indicator on the system goes out. If the monitor is
powered from the system unit, it will be turned off at the same
time.
• After you turn the computer off, wait at least 5 seconds before
turning it on again. The computer may not initialise itself
properly if you turn it off and on again in quick succession.
Cleaning and Transporting
Your Apricot computer requires little physical maintenance other
than occasional cleaning, but you must take care when transporting
it to avoid damage to some of its more delicate components,
particularly the hard disk.
Warning
Turn off the system unit and unplug all power cords before cleaning or moving
the computer.
Cleaning the computer
Do not use solvents or abrasives, they might damage the system
unit surfaces.
OWER
button again.
1/4
Do not use aerosols or sprays near any part of the system, in
particular, air vents or grills, ports, or removable-media drives, as
microscopic droplets can remain in the air for some time and then
penetrate and cause irreparable damage.
The system unit
• Occasionally wipe the system unit with a soft, slightly damp,
lint-free cloth.

THE BEGINNING
• Occasionally wipe the air vents on the rear and sides of the
system unit. Dust and fluff can block the vents and limit the
airflow. A small, clean, soft brush may be useful.
• Occasionally clean the removable media drives using a special
disk cleaning kit. These are available from many sources
including your Apricot dealer.
The monitor
Occasionally wipe the monitor with a soft, slightly damp, lint-free
cloth. It is best to use anti-static glass cleaner on the monitor screen.
Do not spray glass cleaner directly onto the screen, it could run
down inside the case and damage the circuitry.
The keyboard
When necessary, clean the keycaps with a slightly damp cloth and a
minimum amount of a non-abrasive cleaning agent.
Regularly check the keyboard cable for wear and tear, particularly
near table or shelf edges.
Take care not to spill any liquid or drop small objects, e.g. paper
clips or staples, onto the keyboard. Follow these steps if this should
happen to the keyboard and it stops working:
1. Switch off and unplug the keyboard.
2. If the liquid is sticky or viscous, unplug the keyboard and call
your supplier or an authorised maintainer.
3. If the liquid is thin and clear, try unplugging the keyboard,
turning it upside down to let the liquid drain out, and drying it
for at least 24 hours at room temperature. If the keyboard does
not work, call your supplier or an authorised maintainer.
4. If a solid object drops between the keys, turn the keyboard
upside down and shake it gently. Do not probe between the
keys as this may cause serious damage.
1/5

THE BEGINNING
The mouse
The mouse tends to be used heavily and so is susceptible to damage,
but a little care should minimise this.
Dust and fluff often accumulates in the ball tracking mechanism of
the mouse and should be checked for regularly. To clean the mouse
follow this procedure:
1. Unplug the mouse, turn it upside down and locate the plastic
2. Remove the cover and set it aside.
3. Cupping one hand over the underside, turn the mouse back the
4. Blow gently into the mouse to remove any dust that has
5. Inside the mouse there are three small rollers. Using a cotton
cover that holds the ball in place. Depending on the model, the
plastic cover can be removed either by rotating it counterclockwise or by sliding it forward slightly.
right way up. The ball should drop into your hand.
collected there.
swab moistened with a solvent cleaner, gently wipe off any oil or
dust that has collected on the rollers, rotating them to reach all
of their surfaces.
6. Use clear water, or water with a mild detergent, to clean the ball.
Then dry it with a clean, lint-free cloth.
7. Put the ball back in its socket and replace the plastic cover. It
should click into place.
The mouse cable should also be regularly checked for wear and tear,
especially near table or shelf edges.
Transporting the computer
Use common sense when handling the computer. Hard disks in
particular can be damaged if the computer is dropped or handled
roughly. As a precaution, back up your data from the hard disks to
tape or floppy disks before moving the computer. (See the Hard disk
section of the chapter ‘System drives’).
1/6

THE BEGINNING
Do not try to move the computer while it is plugged into the AC
power supply or with any other cables, network, printer etc., still
attached.
When lifting and carrying the computer, grip the metal underside of
the system unit. Do not lift the unit by the front bezel. Never
attempt to use a drive door as a carrying handle. Never attempt to
lift the system with a monitor on top.
Do not leave floppy disks or CDs in the drives while moving the
system as irreparable damage could occur to either drives or disks.
If you need to transport the computer any great distance, use the
original packing materials.
Warning
If you intend to use the computer in another country, read the information in
the Power Connection Guide before connecting the computer to a different
power supply or electrical system.
1/7
2 THE SYSTEM DRIVES
This chapter contains information about the drives that are currently
fitted in your computer, plus some of the optional drives that you
may choose to add. If a new 5.25 inch size drive is to be fitted on
site, see appendix A, ‘The system unit’, for further details.
Using the floppy disk drive
The floppy disk drive is usually configured in the system BIOS as
drive A:, with a capacity of 1.44 Mbytes.
Floppy disks should be kept away from bright sunlight, dust,
moisture and any strong magnetic fields, e.g. do not place them on
the monitor, printer, or near a telephone. It is common to store them
in a lockable “disk-box”, away from the computer itself. Avoid
opening the metal window on the disk as this exposes the magnetic
surface to contamination which could damage the data or cause the
disk to become useless.
THE SYSTEM DRIVES
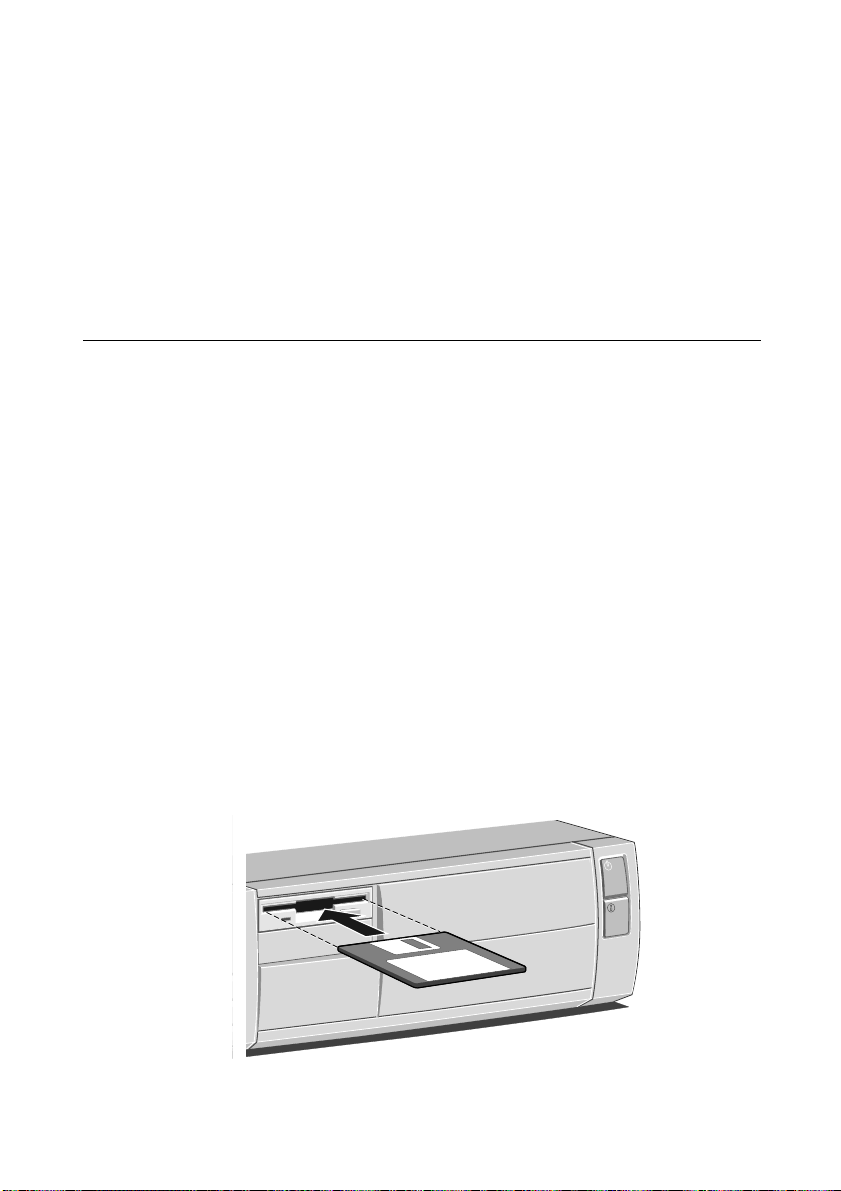
Inserting a floppy disk
1. First test the eject button to ensure there are no disks in the
drive.
1. Insert the disk with the metal window first, with the label side
uppermost into the drive. This will push open the drive door,
which will stay open, leaving the disk just visible.
2/1
THE SYSTEM DRIVES
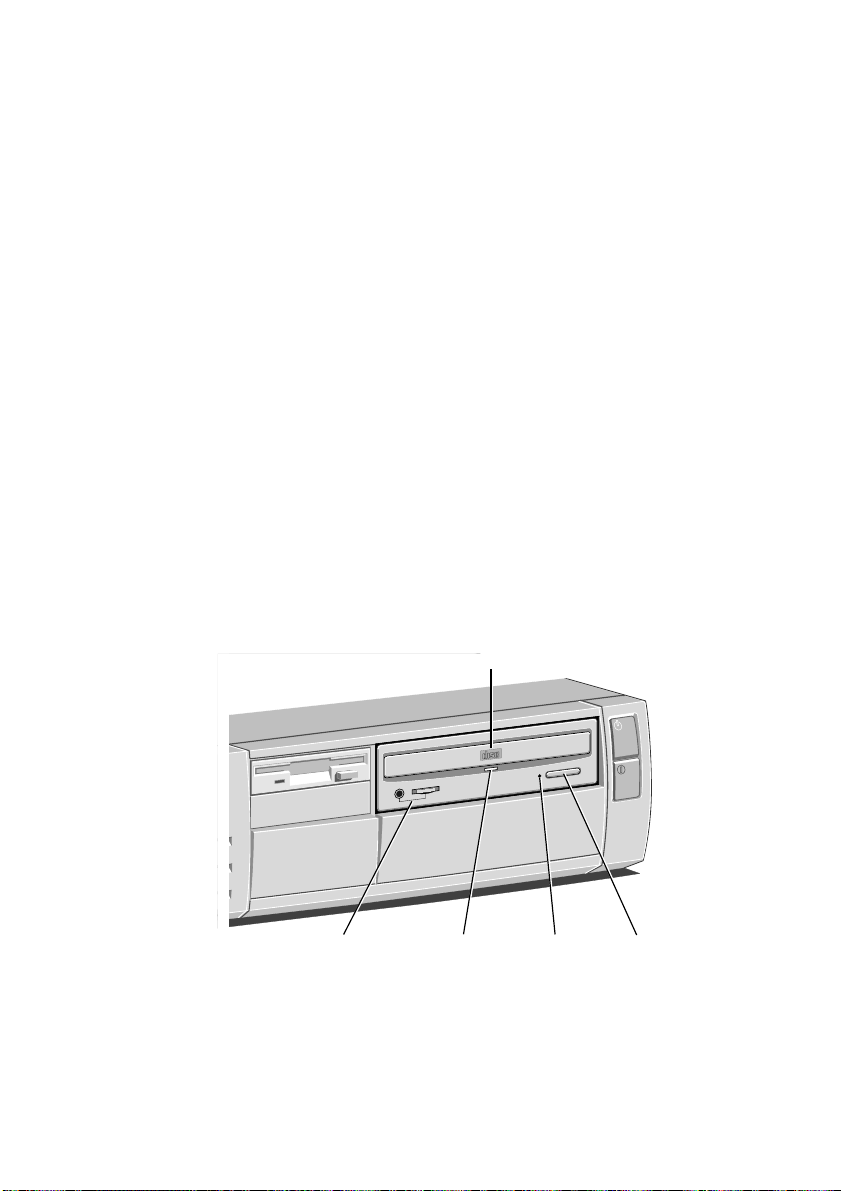
EMERGENCY
EJECT HOLE
BUSY
INDICATOR
EJECT
BUTTON
COMPACT
DISC DRAWER
HEADPHONE JACK
AND HEADPHONE LEVEL
2. Push the disk gently home until it “clicks” into place. The drive
button will also move outwards slightly.
3. The system should now be able to access the disk and the
information it may contain. While the system is accessing the
disk, the “drive in use” LED should be lit.
Pressing the button, when the drive is not in use, will eject the
floppy disk. Use only the ‘High Density’ type of floppy disk which
has a formatted capacity of 1.44 Mbytes and is readily identified by
the HD logo.
Using a CD-ROM drive
One of the popular options is the fitting of a CD-ROM drive to a
system. A great deal current software is supplied on this format,
mainly due to the large capacity of the CD-ROM disk.
A CD-ROM drive is available either as an upgrade kit from your
supplier, or may have been pre-installed for you at our factory.
Unless either a second hard drive has been installed, or the existing
hard drive has been given more than one partition, a CD-ROM
drive will usually become drive D:.
2/2
The drive has its own headphone jack, with associated volume level
control, for use in playing audio CD’s, It is also possible if you wish,
to link the headphone socket via a cable, to your Hi-fi system, and
COMPACT
play CDs at higher power.
With the appropriate software, a CD-ROM drive can retrieve
multimedia data from CD-ROM discs, pictures from Multisession
Photo-CD discs and also play commercial audio CDs.
Warning
The laser beam inside the CD-ROM drive is harmful to the eyes if looked at
directly. Do not attempt to remove the drive cover or otherwise disassemble the
CD-ROM drive. If a fault occurs, call an authorised maintainer.
Keep CDs well away from dust, moisture and temperature extremes
and avoid touching the surface of the CD. Store them in solid
containers wherever possible. Replacement plastic CD containers are
available from most large record stores.
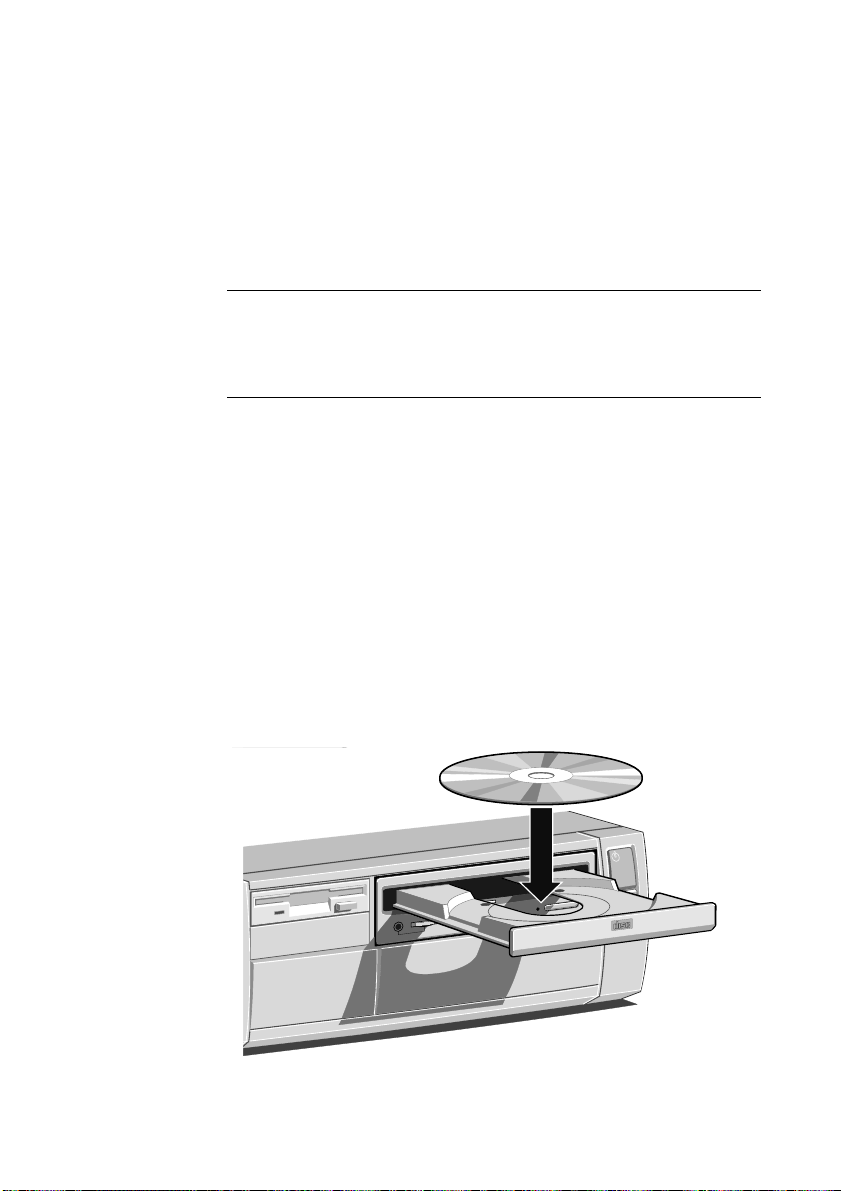
Inserting a compact disc
1. Press the
EJECT
button on the front of drive.
THE SYSTEM DRIVES
2. Place the CD centrally face up on the platter.
1. If the platter ejected fully, push the
EJECT
button again, or gently
push the front of the platter, and it will be drawn back into the
drive.
2/3
THE SYSTEM DRIVES
COMPACT
Note
Wait a few seconds for the CD to spin up to full speed before attempting either
to play the audio tracks or to read data from it.
To remove a compact disc, press the eject button and then lift out
the CD. It is best to close the drawer, to prevent dust getting in,
unless you intend to put in a new CD.
Do not attempt to move the computer while a CD is in the drive, as
serious damage may be caused to both the CD and the drive,
especially if the drive is active at the time.
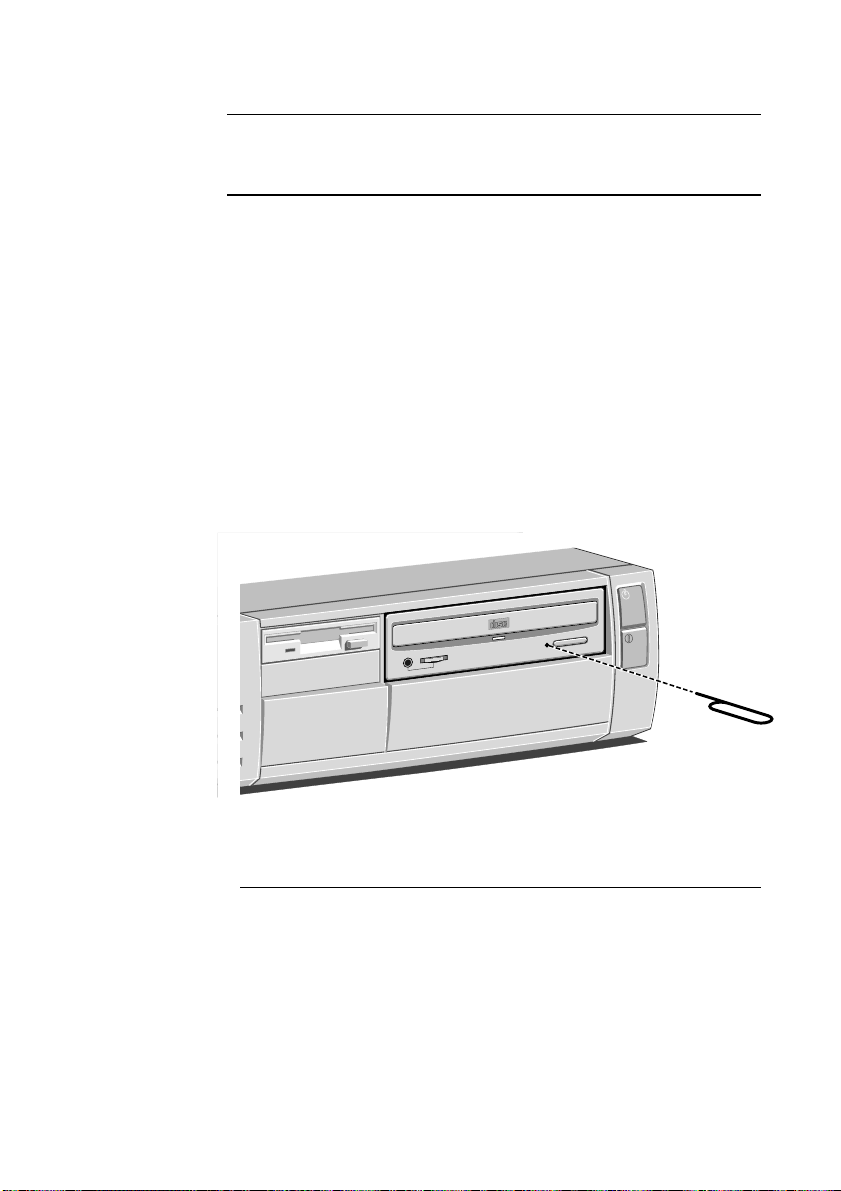
To remove a CD manually (for example, during a power failure) you
must first ensure that the computer is turned off. Insert a thin metal
rod (such as an unwound paper clip) into the emergency eject hole.
Push carefully and firmly (see below).
The hard disk drive
All modern computers are fitted with a ‘hard’ disk drive (HDD).
These can have very large capacities. They have delicate, sealed and
air-tight, mechanisms. They operate within microscopic tolerances
and spin at high speed.
2/4

Caution
Try not to jar or move the computer while the system is powered up as this
could cause irreparable damage to the delicate drive surface.
The primary hard drive
Your Apricot computer is supplied with one internal or ‘primary’
hard disk drive (HDD) designated as the C: drive. The operating
system will normally be installed on this drive.
Data is stored on the HDD in Directories and Subdirectories, often
referred as ‘folders’. More details on directories and folders will be
found in the Windows guide, as will information on Windows
utilities.
The HDD will have only one partition and this will have been made
‘active’ i.e. the bootable disk. Partitions are like dividing panels or
false walls in a large office, they cut the area into smaller sections,
each one then becomes almost independent.
A secondary hard drive
Caution
Apricot Computers Limited test many types of hard disks from a wide variety
of manufacturers and all of our upgrade parts are fully guaranteed. The
quality or compatibility of components supplied from any other source cannot
be guaranteed.
THE SYSTEM DRIVES
Computers can have two HDDs, the primary drive being designated
as the Master and the new drive becoming the Slave. The Apricot
system BIOS is capable of handling this.
Any slave drive will be supplied completely blank, with only a few
instructions. Fitting and setting up a second hard drive is not
difficult, but there can be many issues to be resolved, only one of
which is drive type. There are these issues to consider:
• Handling and fixing the delicate module
• Master to slave compatibility
2/5

THE SYSTEM DRIVES
• Jumpers and links on the drives
• Partitioning and formatting
• Existing ribbon cable re-connection and/or extension
If you do not feel confident about installing a second hard drive you
may wish to have your supplier or an authorised engineer complete
this task for you.
Software backup
Within Windows you will find Help on numerous topics including
backing up, or making a security copy, of your software. It is vital to
maintain a discipline of regular backup of your data. Power cuts or
hard disk failure are just two reasons.
Your operating system or applications e.g. word processing software,
can be simply reinstalled from your master floppy disks or CD’s.
The letters or files you have created would be lost permanently. Your
files may not be very large, but they will be impossible to replace
once lost.
2/6
Copy your data files to floppy disks, or use proprietary utilities
designed to do software backups, such as the one in Windows. Do
this regularly and then keep the back-up in a safe place. It is good
practice to perform a back-up regularly using two or more sets of
disks, rotated for safety.
There are several companies that manufacture backup units,
accompanied by dedicated software, some of which can backup your
complete hard disk two or three times over on to one small tape
cassette, in a comparatively short time.
These are mostly used in networked office environments, but there
are more simple, economic versions designed for personal or home
use, such as the FTD drive, described in a following section.

Copying the pre-installed software
A disk imaging utility is included with all pre-installations of
DOS/Windows. It can be found within the Apricot group. This
allows you to create installation diskettes for DOS, Windows, and
the other software, from disk images pre-installed on the hard disk.
See the utility’s on-line help for more information. If your system is
supplied with Windows 95, a similar utility will be included.
To back up other software, you can use MSbackup for DOS or the
program within Windows. More information is given in the
DOS/Windows guide.
Note
Any copy you make of pre-installed software must be used only as a back-up
copy, in case the pre-installed version is lost or needs re-installing or
reconfiguring. In particular, you are not allowed to use installation diskettes
created from disk images to install the software onto another computer. This is
an infringement of the copyright and is illegal.
THE SYSTEM DRIVES
Using an FTD (tape drive)
The FTD (floppy tape drive) is so called because it uses the internal
floppy disk interface and so does not require any additional drive
controller card like some other tape drives. It would be fitted in one
of the system’s 5.25 inch drive bays.
As with the CD-ROM drive, they are available as an upgrade kit, or
could be pre-installed at our factory.
The software required to control the tape drive is normally supplied
with the drive, but will also be dependant upon your operating
system. Check first with your supplier for details.
The tape cartridge and drive have delicate mechanisms. In particular
the drive can be damaged by incorrect insertion or removal of
cartridges, so always observe the following procedures.
2/7
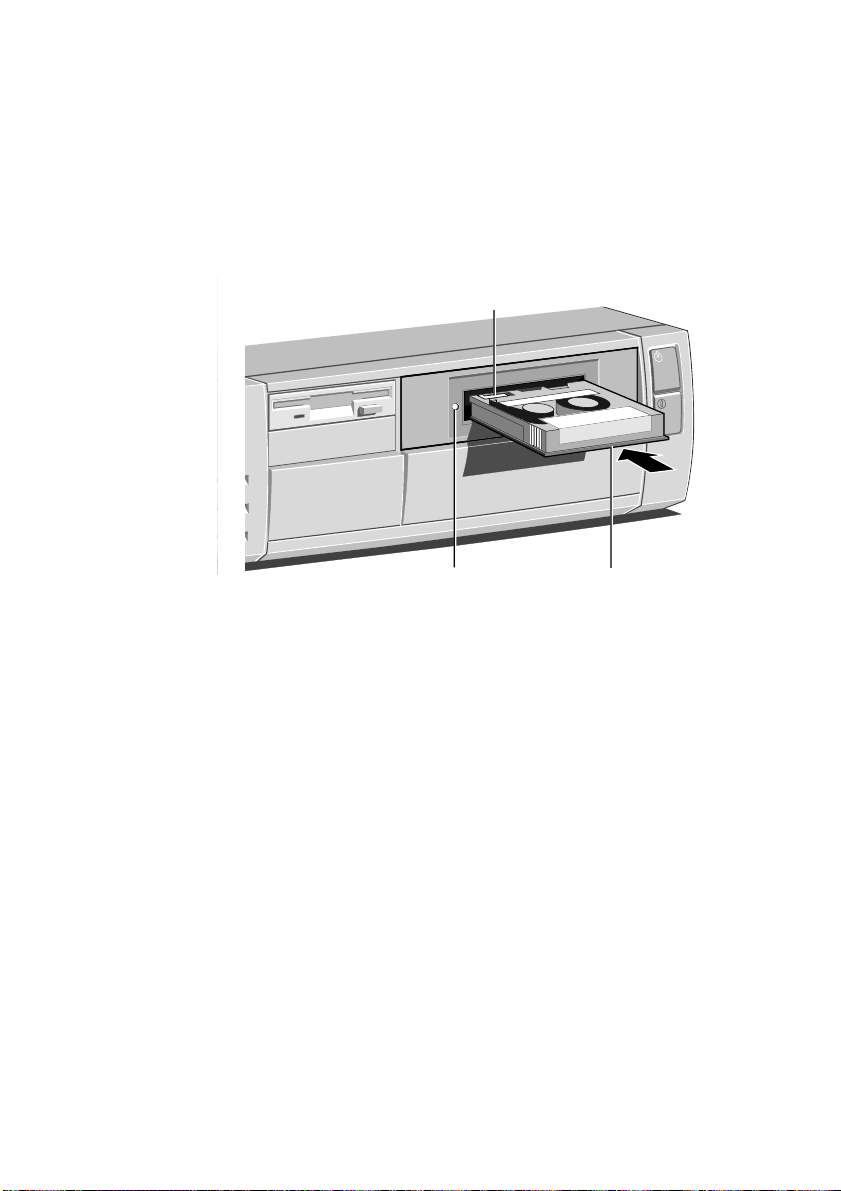
THE SYSTEM DRIVES
METAL PLATE
ACTIVITY INDICATOR
WRITE-PROTECT
TAB
Inserting a cartridge
1. Remove the cartridge from its plastic holder.
2. Hold the cartridge so that the metal plate faces downwards, as
shown below. Slide the cartridge into the drive slot until you
feel a slight resistance.
3. Carefully push the cartridge in a bit further until it engages
Removing a cartridge
1. Check that the cartridge is not being accessed by the computer
2. Pull the cartridge carefully out of the drive slot, holding it
3. Return the cartridge to its plastic holder. This protects the
Keep tape cartridges well away from magnetic objects, and
equipment that generates magnetic fields. Avoid extremes of
temperature and exposure to direct sunlight; otherwise, the data
recorded on the tape may become corrupted.
2/8
with the drive mechanism.
(the drive’s activity indicator must be unlit).
between thumb and forefinger.
cartridge and prevents dust from collecting on the surface of the
tape.
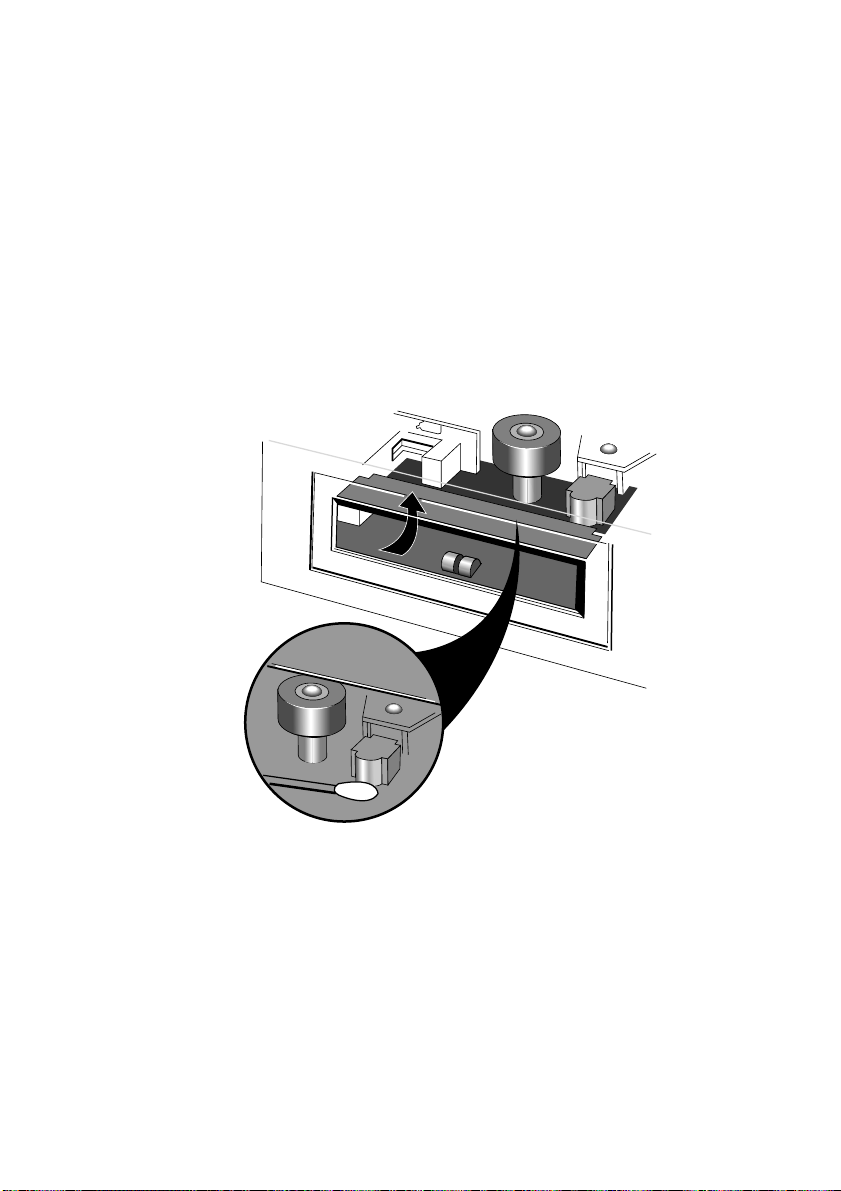
Cleaning the drive
THE SYSTEM DRIVES
You should clean the read/write head and the capstan of the FTD
frequently to prevent the accumulation of dust and metallic particles
which can accumulate from the coating on the tape.
If you notice read or write errors, or many bad blocks when using
the drive, be sure to clean the head and capstan thoroughly before
concluding that the drive or your tapes are defective.
The read/write head and the capstan are accessible through the flipup drive door, as shown below.
Although it is possible to use special kits to clean the drive, you can
use 90% isopropyl alcohol and several non-abrasive, lint free swabs,
as follows:
1. Turn off the system unit and unplug all power cords.
2. Gently rub an alcohol-dampened swab against the surface of the
read/write head. If the swab becomes too discoloured, use
additional swabs until there is no further discoloration.
2/9

THE SYSTEM DRIVES
3. Rub an alcohol-dampened swab against the surface of the
capstan using an up and down motion. Gently rotate the capstan
and continue rubbing until the entire surface is clean.
4. Wait for at least one minute before using the tape drive. This
allows any residual alcohol to evaporate.
Take care at all times and avoid excessive force.
If you clean the read/write head first, and the swab is not too
discoloured, you may use the same swab to clean the capstan. But if
you clean the capstan first, you must not use the same swab to clean
the read/write head.
Remember to keep your tape cartridges in a safe place.
2/10
 Loading...