

Mitsubishi Electric MS, Apricot MS Owner's Manual
Apricot
MS SERIES
Owner’s Handbook
T
C
A
P
M
O
C
including
Guide
Quick Start
QUICK START GUIDE
APRICOT MS SERIES QUICK START GUIDE
For your own safety
Read through the Safety & Regulatory Notices section at the
start of the Owner’s Handbook before using the computer
for the first time.
COMPACT
1
QUICK START GUIDE
Using the Welcome Mat
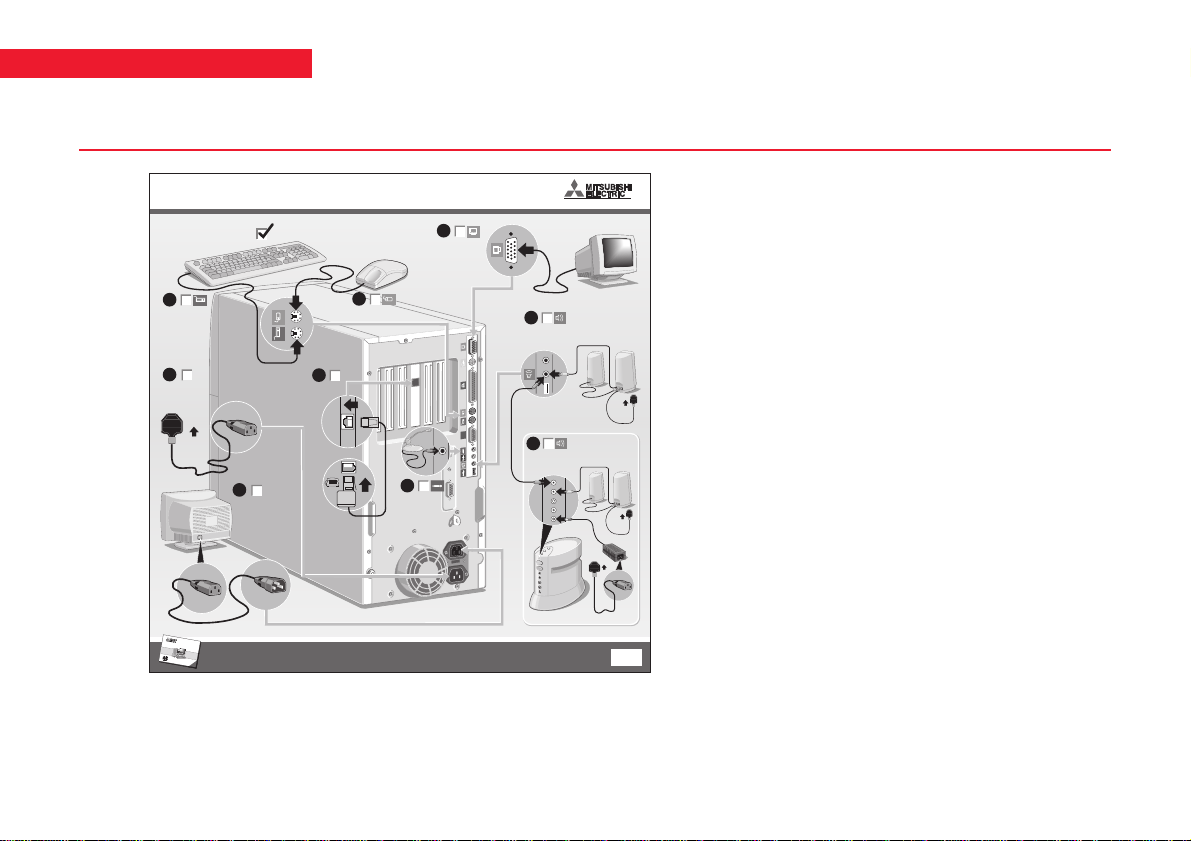
Connecting up your computer
Mouse
5
Microphone
3
Monitor
signal
cable
10101
Connecting items
6
Modem
2
Keyboard
1
8
Mains
cable
AC
outlet
7
Monitor
power cord
Apricot
MS
S
E
R
IE
S
Owner’s Handbook
C
O
M
P
A
C
T
Now follow the QUICK START GUIDE in the Owner's Handbook.
including
Quick Start
Guide
4a
4b
APRICOT MULTIMEDIA PCsAPRICOT MULTIMEDIA PCs
Separately powered
speakers
Remember, this speaker set has its
own power supply cable.
AC
outlet
Optional Subwoofer
with separately
powered speakers
AC
outlet
AC
outlet
Use the Welcome Mat to help you unpack and connect
the components of your new personal computer. The
recommended order is:
1. Keyboard
2. Mouse
3. Monitor signal cable
4. Stereo speakers (and optional sub-woofer)
5. Modem cable
6. Microphone (optional)
7. Monitor power cord
8. System unit power cord
Once your computer is connected, switch on the power
at the wall socket. The Power Mode light (near the top
left of the front panel) should glow red to show that the
computer is ready to start.
2
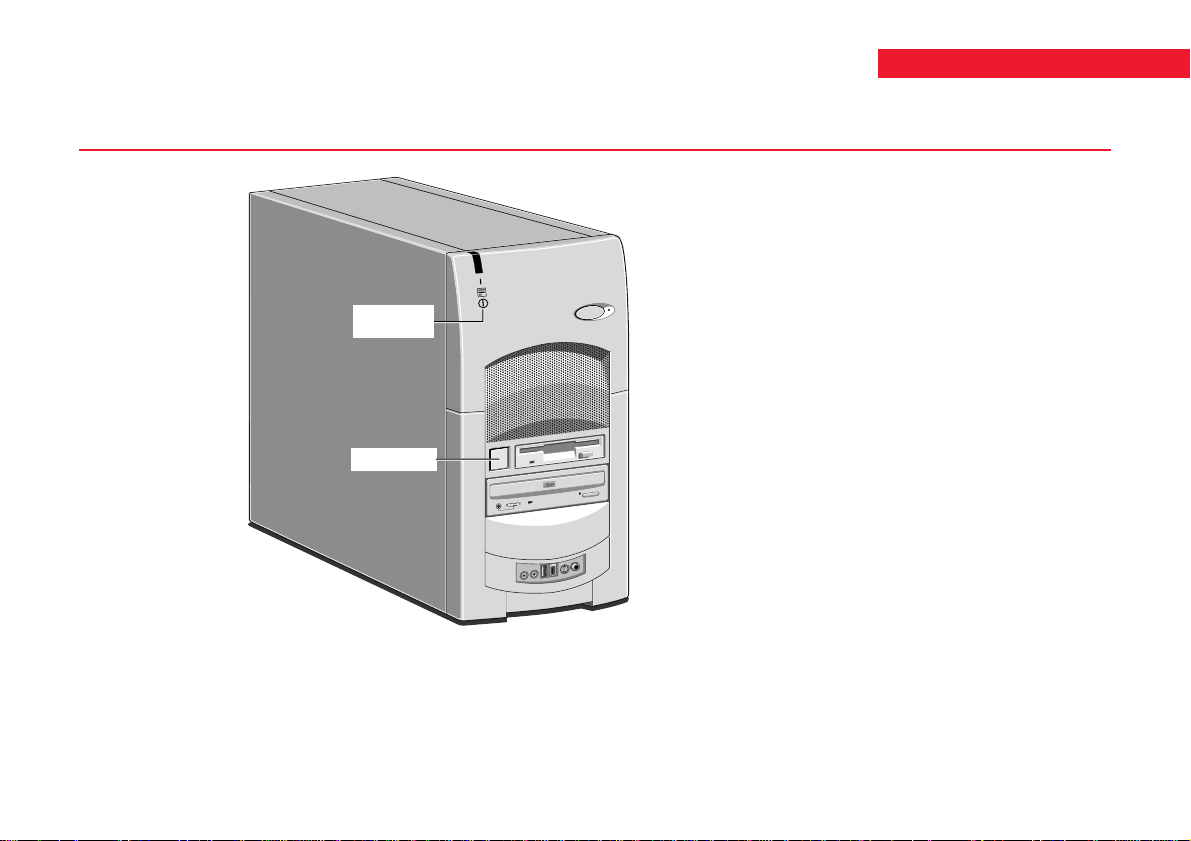
The Power button and Power Mode light
Power Mode
Light
QUICK START GUIDE
Press the POWER button to turn on the computer, to put
it to sleep, and to wake it up.
The colour of Power Mode light shows whether the
computer is in Off [red], On or Standby [green] or
Suspend [yellow] mode.
The monitor has its own power button or switch; see the
monitor’s User Guide to find out where it is.
Power Button
COMPACT
3

QUICK START GUIDE
Starting the computer
♦ Press the P
OWER button to turn on the computer.
♦ Turn on the monitor as described in its User Guide.
The colour of the Power Mode light turns from red to
green to show that the computer is now working.
Suspending the computer
Once Windows has started, you can give the P
OWER
button a brief press to suspend the computer when you
aren’t using it. Alternatively, you can click the Start button
in the Windows taskbar, then click Suspend.
To wake up the computer, you have to press the P
OWER
button again – just moving the mouse or using the
keyboard won’t work.
While the computer is suspended its processor stops, its
hard disk stops spinning and the monitor goes blank,
but none of your files are lost.
In Suspend mode the Power Mode light is yellow.
Note
Future versions of Windows will allow you to redefine the
P
OWER button so that when you press it the operating system
shuts down and the PC goes directly into Off mode.
Automatic power saving
During periods of inactivity the computer automatically
reduces the power consumption of idle components. For
example, the monitor screen may go blank. This powerreduced state is known as Standby mode (the Power Mode
light stays green). If the inactivity is prolonged the
computer goes into full Suspend mode (the Power Mode
light is yellow).
While in Standby mode you can move the mouse or press
any keyboard key to resume working. Once the computer
goes into Suspend mode only the P
OWER button can wake
it.
You can adjust automatic power saving with the Power
Management program, which is provided as part of the
Easy Manager software collection.
4

QUICK START GUIDE
Shutting down the computer
To shut down the computer safely, do the following:
1. Wait until all the activity indicators on the front
bezel show ‘not busy’.
2. Turn off any attached peripherals, except for the
monitor and other peripherals that are designed to
be kept on permanently.
3. Click the Start button in the Windows taskbar, then
click Shut Down. Select Shutdown the computer
and click Yes.
The Power Mode light goes from green to red.
Note that you do not have to press the P
OWER button if
Windows is running.
You don’t have to turn off the monitor
Because the monitor gets its power from the computer, once
you turn the monitor on you should never need to turn it
off, except to move or open up the computer.
Emergency shut down
In exceptional circumstances, you can shut down your
PC without shutting down Windows first. To do this,
press and hold down the P
OWER button for at least four
seconds.
The computer also shuts itself down if you press the
POWER button in MS-DOS or before Windows starts.
Make sure it is an emergency!
In an emergency shut down, you may lose any recent changes
made to the files you are currently working on. The Microsoft
ScanDisk program will run automatically when the
computer next starts, to check for disk errors.
Energy Star
The aim of these various power modes is to cut your
electricity bill and conserve resources. Energy Star is an
internationally recognised standard for such energyefficient computer systems.
Your computer will always meet the Energy Star standard
in Suspend mode, when the Power Mode light is yellow.
5

QUICK START GUIDE
Registering Windows 95
Your computer has the Microsoft Windows 95 operating
system already in place or pre-installed, so that it is ready
for you when you turn on the computer.
The first time you turn on the computer you must tell
Windows 95 your name (and the name of the company
for which you work, if applicable) and agree to the legal
terms and conditions of the Windows 95 Licence
Agreement.
Windows 95 then spends a few minutes analysing your
computer and configuring itself to take full advantage of
your computer’s components.
During the process, you will need to enter your unique
Windows 95 serial number. You will find this on the
Microsoft Certificate of Authenticity which forms part
of your Windows documentation. Remember to keep
this certificate safe for future use.
Windows 95 also offers you the opportunity to install a
printer. However, you do not have to install a printer at
this time if you don’t want to.
You only register once
All of this only happens the first time you turn on your
computer. After that Windows 95 starts normally, except
that you may be reminded if you haven’t made any back-up
diskettes yet.
6

Electronic Fingerprinting
QUICK START GUIDE
Electronic Fingerprinting allows you to ‘brand’ your
computer by storing personal information in its
permanent memory. If you include your name, address
and phone number this will aid the police if your
computer is stolen.
The Apricot Electronic Fingerprinting program appears
every time you start Windows 95 until you have branded
the computer. If you don’t brand your computer
promptly, someone else might do it before you!
After you have entered your details you are prompted to
set a branding password. This password will be requested
if you ever need to run the Electronic Fingerprinting
program again to change the branding information (for
example, if you change address).
Optionally, for extra security, you can decide that this
same password is requested every time the computer is
turned on, or every time the mains power supply is
interrupted.
If you forget your branding password, you can use a
special fall-back password instead. The fall-back password
is a 12-digit number that is unique to your computer. It
is displayed only once, the first time you set a branding
password.
Click the Help button in Electronic Fingerprinting for
more information.
Be careful
Do not turn off the computer while using the Electronic
Fingerprinting program. It might corrupt your computer’s
memory.
Write down the fall-back password
The fall-back password is displayed only once. You must make
a note of the password immediately, because you will never
see it again. There is a page at the end of this manual where
you can write it down.
7

QUICK START GUIDE
Increasing the resolution and colours displayed by your monitor
At first, Windows 95 is configured for a standard
monitor setting (640 by 480 pixels in a maximum of
256 different colours) so that Windows 95 is sure to
display correctly whatever monitor you have.
However, Mitsubishi Electric’s Apricot monitors can
do much better than this standard setting. You should
therefore change the display setting to get the best
performance from your system.
1. Right-click with the mouse while pointing at
the background of the Windows 95 desktop,
then select Properties from the pop-up menu.
2. Click the Settings tab of the Display Properties
dialog.
3. You can now select the Display Area (resolution)
and Colour Palette (number of colours). We
suggest at least 800 by 600 pixels in 256 colours.
Tips
You may have to specify the make and model of your monitor
before you can increase the resolution. In this case, click the
Advanced Properties button on the Settings tab.
You can get an even better display by upgrading your
computer’s video memory from 2 to 4 Mbytes. Ask your
Mitsubishi Electric PC supplier for details.
8

Infotrade Internet - The Internet service from Mitsubishi Electric
QUICK START GUIDE
By connecting your computer to the phone network,
you can use your computer as an answerphone and fax
machine. You can also access the Internet, and in
particular the World Wide Web (WWW).
To get you started, we have provided the Infotrade
Internet service (this offer applies only in the United
Kingdom). Infotrade is a subsidiary of Mitsubishi
Electric, the makers of your Apricot PC.
Details of the Infotrade Internet offer are given on the
promotional leaflet that came with your computer.
Infotrade also offers a variety of personal finance services.
These services are entirely optional and separate from
the Internet service. To find out more, double-click the
Infotrade Internet Help icon on the Windows 95
desktop.
Hint
Although we recommend the Infotrade Internet service, and
have made it very easy for Apricot PC users to subscribe to
it, there are other possibilities. On the Windows 95 desktop
is an icon for The Microsoft Network, which is the on-line
service provided by Microsoft itself. You can find setup
programs for other on-line service providers in the On-line
Services folder (also on the desktop).
9

QUICK START GUIDE
Setting up Infotrade Internet and Fax
If you decide to take advantage of the Infotrade Internet
offer, you will need the Infotrade Internet leaflet that
came with your computer.
Hint
You should run Infotrade Internet and Fax Setup even if
you don’t want to subscribe to Infotrade Internet, as it also
sets up the Microsoft Fax service.
1. Double-click the Infotrade Internet and Fax Setup
icon on the Windows desktop.
2. Follow the instructions on the screen, together with
the information provided on the Infotrade Internet
leaflet. When the setup is complete, you are
prompted to restart your computer.
Once your computer has restarted, you are ready
to connect to the Internet and register your new
account with Infotrade.
3. Make sure the modem cable is connected from the
back of the computer to your phone socket.
4. Double-click on The Internet icon on the
Windows desktop to start Microsoft’s Internet
Explorer.
5. Follow the instructions on the screen to register
with Infotrade.
Once you’ve finished the registration process, you can
either exit from Internet Explorer, or go on to explore or
“surf” the World-Wide Web.
In the future
You only have to register once, but whenever you use Internet
Explorer subsequently, you have to log on to the Internet
with your Infotrade user name and your Infotrade password.
10
Easy Manager
QUICK START GUIDE
Easy Manager is a collection of software from Mitsubishi
Electric, designed to make life easier for new computer
users.
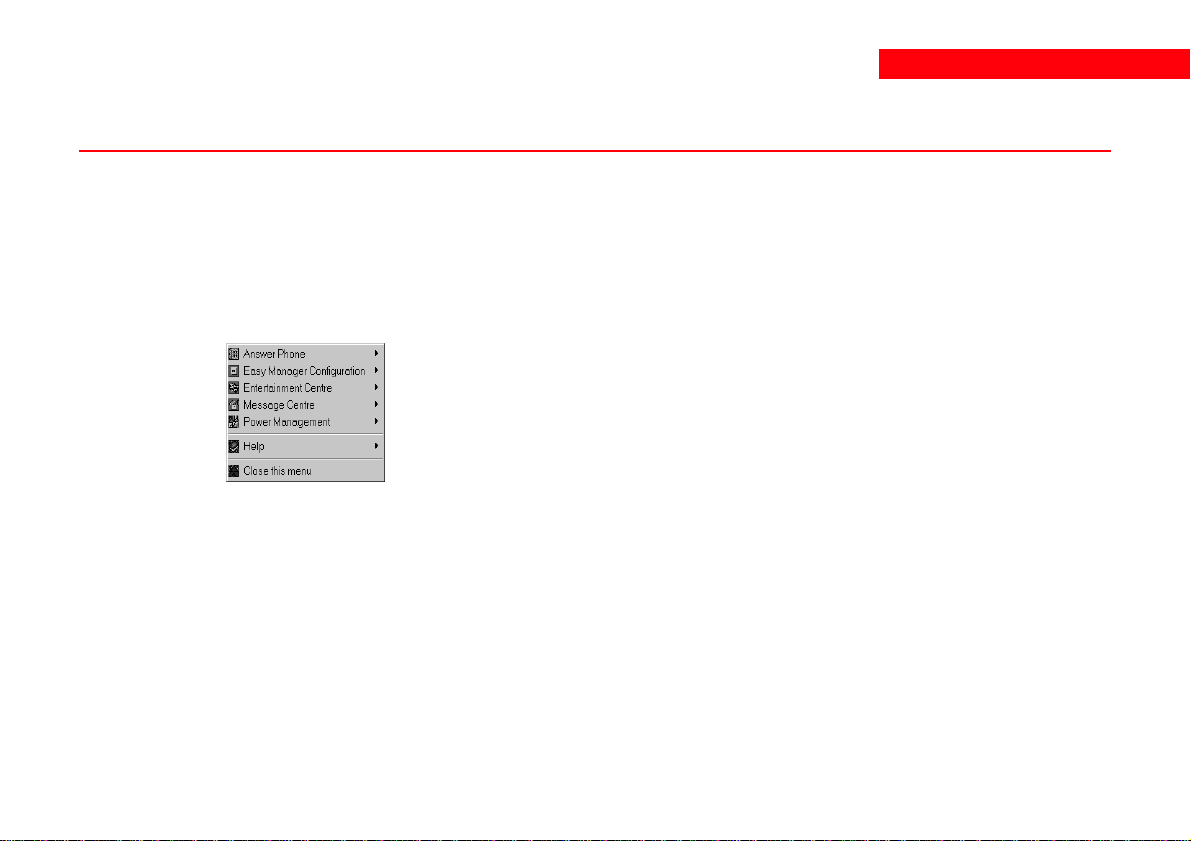
In the Windows taskbar is a Mitsubishi Electric symbol.
If you click it a pop-up menu appears listing all the
elements of Easy Manager.
Use the Help option to learn how to use the Easy
Manager software.
Answerphone answers your incoming telephone calls
automatically. Calls may be either voice messages (voice
mail) or fax messages.
Easy Manager Configuration allows you to say which
parts of the Easy Manager collection you want to use.
Entertainment Centre offers easy access to a range of
games, reference and productivity programs, some of
which may be pre-installed on your computer’s hard disk
or supplied on CD.
Message Centre is the place where incoming electronic
mail (e-mail), voice and fax messages are available for
you to review, and where you can create and send your
own outgoing e-mail and fax messages. You can also set
up short “reminders” for yourself, family members, and
friends who use your computer.
Power Management allows you to program the automatic
power saving features of your computer.
11
QUICK START GUIDE
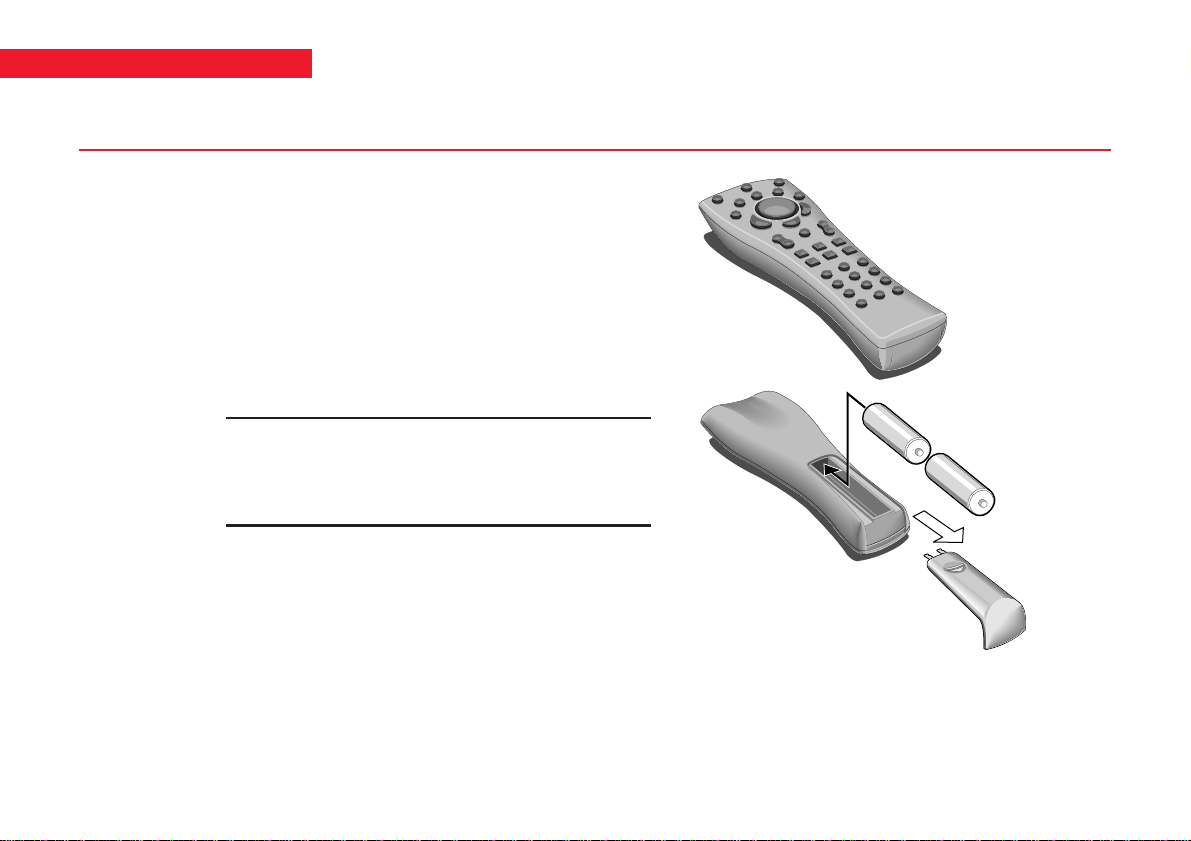
The Remote Control
The optional infra-red remote control makes your
computer easier to use.
It works with all Easy Manager programs, and also with
the audio CD Player and Microsoft Internet Explorer.
The remote will only work with TV tuner cards that are
approved by Mitsubishi Electric PC Division.
The remote control operates on two AA batteries, which
are provided. Insert the batteries as shown on the right.
-
12
Hint
To find out more about the remote control, click on the
Mitsubishi Electric symbol in the Windows taskbar, then
click Help.
+
+

APRICOT MS SERIES OWNER’S HANDBOOK
T
C
A
P
M
O
C
INITOWER
M
(MV
AND
MY) E
DITION

Microsoft, MS-DOS, and Windows are registered trademarks of Microsoft Corporation in the US and other countries.
FireWire and the FIREWIRE logo are trademarks of Apple Computer, Inc., registered in the US and other countries.
Other trademarks mentioned within this document and not listed above are the properties of their respective owners.
Information contained in this document is subject to change without notice and does not represent a commitment on the
part of Apricot Computers Limited. Any software described in this manual is furnished under a license agreement. The
software may be used or copied only in accordance with the terms of this agreement. It is against the law to copy any disk
supplied for any purpose other than the purchaser’s personal use.
No part of this manual may be reproduced or transmitted in any form or by any means electronic or mechanical including
photocopying and recording, for any purpose, without the express written permission of the publishers.
Copyright © Apricot Computers Limited 1997. All rights reserved.
Published by:
Apricot Computers Limited
3500 Parkside
Birmingham Business Park
Birmingham, England
B37 7YS
http://www.mitsubishi-computers.com
Printed in the United Kingdom
Safety and Regulatory Notices
SAFETY & REGULATORY NOTICES
Electrical
The computer uses a safety ground and must be earthed.
The system unit AC power cord is its ‘disconnect device’. Ensure
that the system unit is positioned close to the AC power outlet and
that the plug is easily accessible.
The power cord packed with the computer complies with the safety
standards applicable in the country in which it is first sold. Use
only this power cord. Do not substitute a power cord from any
other equipment.
To prevent fire and electric shock, do not expose any part of the
computer to rain or moisture. Turn off the computer and unplug
all power cords before moving or cleaning the system unit, or removing
the system unit top cover.
Battery
This product contains a lithium battery.
Do not use a metal or other conductive implement to remove the
battery. If a short-circuit is made between its positive and negative
terminals the battery may explode.
Replace a discharged battery with one of the same type; another
type may explode or ignite. Follow the instructions contained in
the Owner’s Handbook to replace the battery.
Dispose of a discharged battery promptly and in accordance with
the battery manufacturer’s recommended instructions. Do not
recharge, disassemble or incinerate the discharged battery. Keep
away from children.
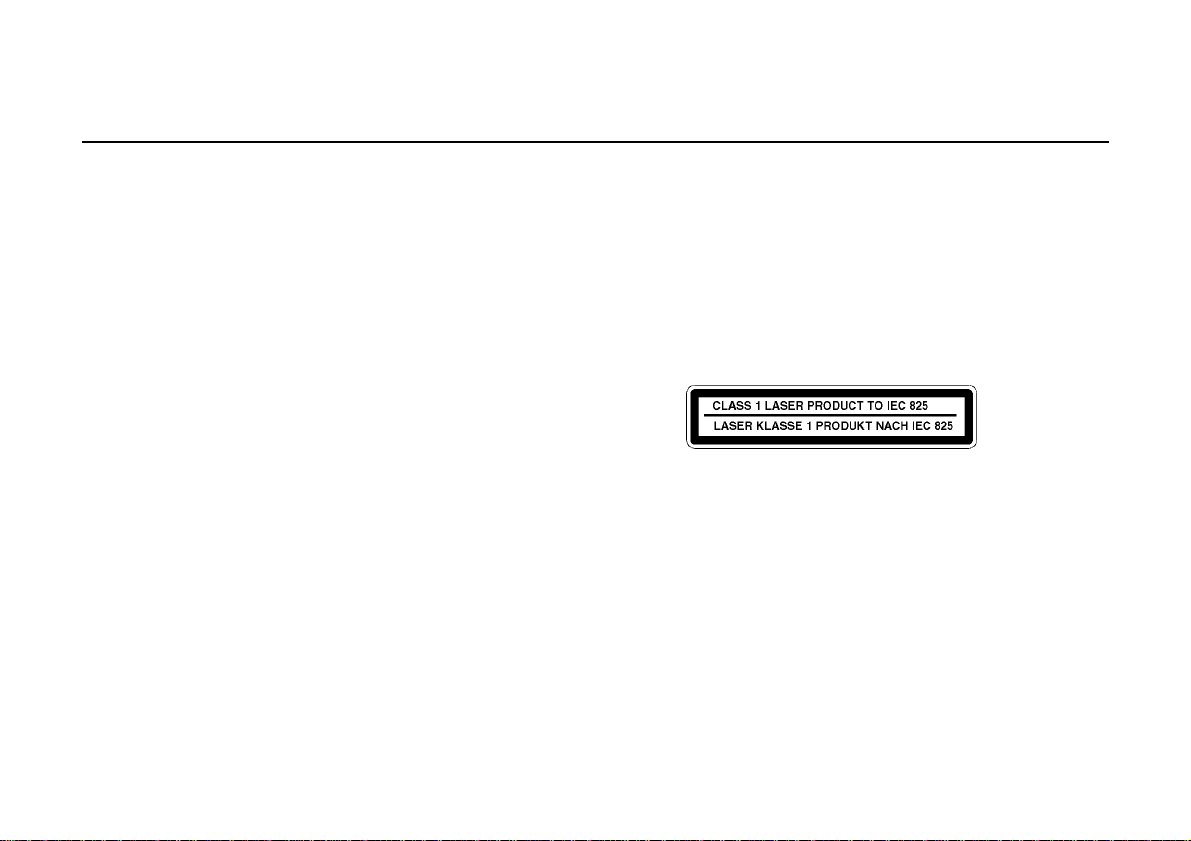
Laser products
Any CD-ROM drive fitted in this system is classified as a CLASS 1
LASER PRODUCT according to IEC825 Radiation Safety of Laser
Products (Equipment Classification: Requirements and User's Guide).
The CLASS 1 LASER PRODUCT label is located on the
underside of the system unit.
The CD-ROM drive contains a laser system which is harmful to
the eyes if exposed. Do not attempt to disassemble the CD-ROM
drive; if a fault occurs, call an authorised maintainer.
Use the CD-ROM drive only as described in this manual. Failure
to do so may result in exposure to hazardous radiation.
Ergonomic
When positioning the system unit, monitor and keyboard, take
into account any local or national regulations relating to ergonomic
requirements.
I

SAFETY & REGULATORY NOTICES
Anti-static precautions
Static electricity can cause permanent damage to electronic
components. You should be aware of this risk, and take precautions
against the discharge of static electricity into the computer.
Anyone can generate static electricity by moving on a chair,
brushing against desks or walls, or simply walking across an
ordinary carpet. Items handed from one person to another, or being
wrapped or unwrapped, can acquire a static charge. Air
conditioning systems can also result in ambient static. Clothing
made of synthetic fibres is particularly likely to generate static
electricity; this static electricity is often completely unnoticed by the
wearer, but can be sufficient to cripple or impair an electronic
component.
The computer is at risk from static discharge while the top cover is
off. This is because the electronic components of the motherboard
are exposed. Memory modules, expansion cards and replacement
processors are other examples of electrostatic sensitive devices
(ESSDs).
All work that involves removing the cover must be done in an area
completely free of static electricity. We recommend using a Special
Handling Area (SHA) as defined by EN 100015-1: 1992. This
means that working surfaces, floor coverings and chairs must be
connected to a common earth reference point, and you should wear
an earthed wrist strap and anti-static clothing. It is also a good idea
to use an ionizer or humidifier to remove static from the air.
When installing any upgrade, be sure you understand what the
installation procedure involves before you start. This will enable
you to plan your work, and so minimise the amount of time that
sensitive components are exposed.
Do not remove the system unit cover, nor the anti-static bag or
wrapping of any upgrade, until you need to.
Handle static-sensitive items with extreme care. Hold expansion
cards and add-on components only by their edges, avoiding their
electrical contacts. Never touch the components or electrical
contacts on the motherboard or on expansion cards. In general, do
not handle static-sensitive items unnecessarily.
Keep all conductive material, and food and drink, away from your
work area and the open computer.
Thermalcote bonding compound
The thermal bonding compound used between the system
processor and its heat sink can cause skin irritation and stain
clothing. Avoid prolonged or repeated contact with skin. Wash
thoroughly with soap and water after handling. Avoid contact with
eyes and inhalation of fumes. Do not ingest.
II

SAFETY & REGULATORY NOTICES
Transporting
Use common sense when handling the computer; hard disks in
particular can be damaged if the computer is dropped or handled
roughly. As a precaution, back up the contents of the hard disks to
tape or diskettes before moving the computer.
Don’t try to move the computer while it is plugged into the AC
power supply or with any other cables, including network cables,
still attached.
When lifting and carrying the computer, grip the metal underside
of the system unit. Never attempt to lift the system unit with a
monitor on top.
If you need to transport the computer any great distance, use the
original packing materials.
Maintenance
Do not use sprays, solvents or abrasives that might damage the
system unit surface. Do not use cleaning fluids or sprays near air
vents, ports, or the diskette and CD-ROM drives.
Occasionally wipe the system unit with a soft, slightly damp, lintfree cloth.
Occasionally wipe over the air vents on the rear and sides of the
system unit. Dust and fluff can block the vents and limit the
airflow.
Occasionally clean the diskette and CD-ROM drives using a
proprietary head cleaner.
Occasionally wipe the monitor with a soft, slightly damp, lint-free
cloth. It is best to use anti-static glass cleaner on the monitor
screen, but do not spray glass cleaner directly onto the screen; it
could run down inside the case and damage the circuitry.
III
SAFETY & REGULATORY NOTICES
E
N
L
125V
250V
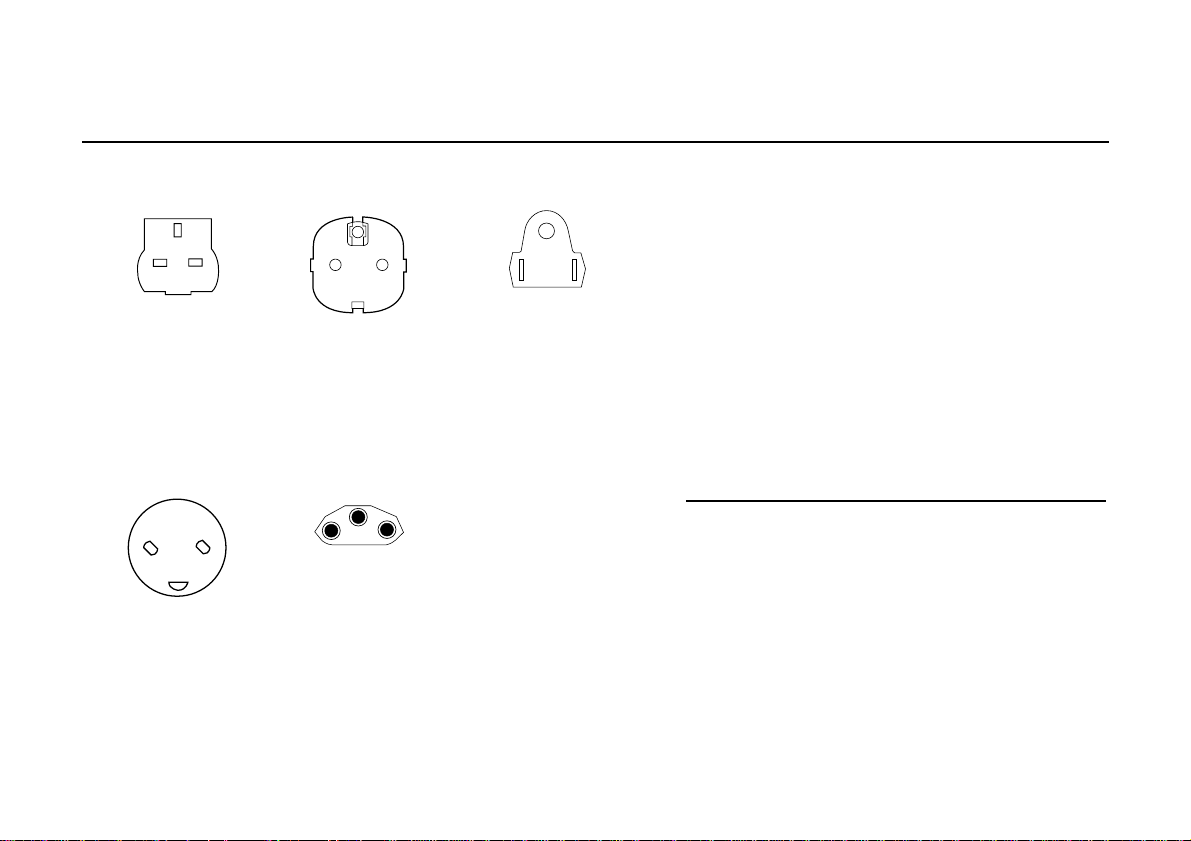
Power Connection
Typical AC plugs
250V
E
LN
250V
E
NL
BS1363A SHUCO NEMA 5-15P
U. K. Austria Belgium Taiwan
Finland France Thailand
Italy Germany Japan
Sweden Norway USA
Holland Canada
250V
L
N
E
SRAF 1962/DB16/87 ASE 1011
Denmark Switzerland
IV
Checking the AC power supply
When this product is delivered, it is ready for the commercial AC
power supply generally available in the country in which it is first
sold. It has been set for the correct voltage range, and is supplied
with an AC power cord and plug which comply with the relevant
safety standards. Before using the product in a country other than
that in which it was originally sold, you must check the voltage and
frequency of that country’s AC power supply, and the type of
power cord required there. Check the power rating labels on the
rear of the computer’s system unit and its monitor to ensure that
they are compatible with the AC power supply.
The computer can function within two alternative AC power
supply ranges, according to the position of the voltage selection
switch on the rear of the system unit:
Switch setting AC power supply (voltage and frequency)
115 100 - 120 volt AC, 50 - 60 Hz
230 200 - 240 volt AC, 50 - 60 Hz
The voltage setting of the monitor must always be the same as the
voltage setting of the system unit. See the User Guide that
accompanies the monitor or consult your supplier to find out how
to change the voltage setting.
It is imperative that the computer is set to the correct voltage range
before use. If not, the machine may be irreparably damaged.

SAFETY & REGULATORY NOTICES
Connecting to the AC power supply
Important
Any peripheral equipment that requires an AC power cord must be
earthed.
Use the following guidance to connect the components together. It
is important that you take each step in the order indicated.
1. Before connecting any components, ensure that the AC
power supply is switched off or disconnected, and that the
system unit, the monitor, and any peripherals are turned off.
2. Connect the components’ signal cables to their respective
ports on the system unit: keyboard, mouse, monitor, audio
(where appropriate) and any other peripherals. Where
appropriate, connect the computer to the network.
3. Connect the components’ power cords: monitor to system
unit, and system unit and any other peripherals to nearby,
grounded AC power outlets. Then switch on or connect the
AC power supply.
4. Turn on the system unit first, then the monitor, then other
peripherals.
External speakers (where supplied)
Always switch off or disconnect the AC supply before
disconnecting any of the speaker leads, whether audio or power.
Disconnect the AC supply from the speaker power unit when not
in use for any period of time.
To prevent the risk of electric shock, do not remove speaker covers.
Connecting the speaker power cord to any other cords or joining
cords together can cause fire and risk of electric shock.
Power Cable Connections - UK ONLY
This equipment is supplied with an AC power cord that has a nonremovable moulded plug.
Always replace the fuse with one of the same type and rating which
is BSI or ASTA approved to BS1362. Always refit the fuse cover,
never use the plug with the fuse cover omitted.
V

SAFETY & REGULATORY NOTICES
Standards
Legalities
Safety
This product complies with the International safety standard
IEC950 and the European safety standard EN60950 which will,
when applicable, include the national deviations for the country in
which it is first sold.
Electro-magnetic Compatibility (EMC)
This product complies with the following European EMC
standards:
Immunity EN50082-1
Emissions EN50022 Class B
This product also complies with the following International EMC
standard:
VCCI Level 2 (Japan)
This equipment complies with the relevant clauses of the following
European Directives (and all subsequent amendments):
Low Voltage Directive 73/23/EEC
EMC Directive 89/336/EEC
Telecommunications Directive 91/263/EEC
CE Marking Directive 93/68/EEC
Notes
All interconnecting cables (for example, microphone, headphones
or external speakers) and communication cables should be less than
2 metres in length.
If cable extensions are used, ensure adequate earth connections are
provided and screened cables are used.
If the system unit top cover, or any other metal part, is removed
and then replaced, all parts must be correctly re-assembled and all
screws tightened.
Important
This system complies with the CE Marking Directive and its strict legal
requirements. Use only parts tested and approved by Mitsubishi Electric
PC Division. Failure to do so may result in invalidating both the
compliance and your warranty. All expansion cards, drives and
peripherals must carry the CE mark to ensure continued compliance.
VI

CONTENTS
OWNER’S HANDBOOK
1 Welcome
Pictorial guide to the system unit .......................... 1/2
Removing panels................................................... 1/7
The Remote Control............................................. 1/9
General advice..................................................... 1/10
2 Diskettes and CDs
Diskette drive........................................................ 2/1
CD-ROM drive .................................................... 2/3
3 Multimedia
4 Expansion Cards
Configuring the card............................................. 4/2
Installing the card.................................................. 4/5
Reserving ISA legacy resources .............................. 4/6
Telling Windows about the new hardware ............ 4/7
5 Motherboard Features & Upgrades:
Pentium Systems
Motherboard jumper settings................................ 5/3
Motherboard IRQs and DMA channels................ 5/5
Adding more memory........................................... 5/7
Adding more video memory................................ 5/10
Upgrading the processor...................................... 5/11
Replacing the configuration battery..................... 5/15
6 Motherboard Features & Upgrades:
Pentium II Systems
Motherboard jumper settings................................ 6/4
Motherboard IRQs and DMA channels................ 6/7
Adding more memory........................................... 6/9
Contents i

OWNER’S HANDBOOK
Adding more video memory................................ 6/12
The processor assembly ....................................... 6/13
Replacing the configuration battery..................... 6/16
7 Hard Disk Upgrades
Configuring the drive............................................ 7/2
Installing in the forward drive bay......................... 7/3
Installing in the rear drive bay ............................... 7/4
Partitioning and formatting the drive.................... 7/5
8 Removable Media Drive Upgrades
Configuring the drive............................................ 8/1
Installing the drive ................................................ 8/2
9 BIOS Setup & POST
BIOS Setup........................................................... 9/2
Power-on self-test.................................................. 9/5
10 Troubleshooting
Problems when starting....................................... 10/2
Common problems............................................. 10/4
Equipment Log
ii Contents

1 WELCOME
OWNER’S HANDBOOK
This first chapter gives you a quick tour of your new
Apricot MS Series Personal Computer. It lists the
special features of the computer and has pictorial
guides to help you identify the various parts.
If you want to get started working with your Apricot
PC straight away, unpack and assemble it as shown on
the accompanying Welcome Mat, then read the Quick
Start Guide at the front of this manual.
After unpacking your computer, keep all the cartons,
boxes and packaging materials; you will need them
again if you have to transport the computer elsewhere.
Use the page at the end of this manual to make a note
of the manufacturer’s data recorded on the various
components (product codes, serial numbers, etc.). A
service engineer may need this information if the
computer develops a fault.
For your own safety
Read the Safety & Regulatory Notices section at the start
of this manual before using the computer for the first
time.
Standard features
♦ Pentium MMX or Pentium II MMX processor
♦ At least 16 Mbytes of main memory
♦ 512 Kbyte memory cache
♦ ATI 3D Rage Pro video system
♦ At least 2 Mbytes of video memory
♦ CD-ROM drive
♦ Sound Blaster Pro-compatible audio system
♦ Stereo, line-in and line-out audio sockets
♦ MIDI/Joystick port
♦ Two USB ports
♦ Serial and ECP Parallel ports
♦ Stereo speakers (and optional sub-woofer)
♦ Easy Manager software
Enhanced features (factory options)
♦ FireWire, S-Video and Composite Video ports
♦ Wavetable or DSP audio enhancement
♦ SPDIF digital audio port
♦ Infra-red remote control
Welcome 1/1
OWNER’S HANDBOOK
COMPACT
2
3
1
18
17
15
16
14
4
5
6
7
8
9
10
11
12
13
8
9
10
11
13
12
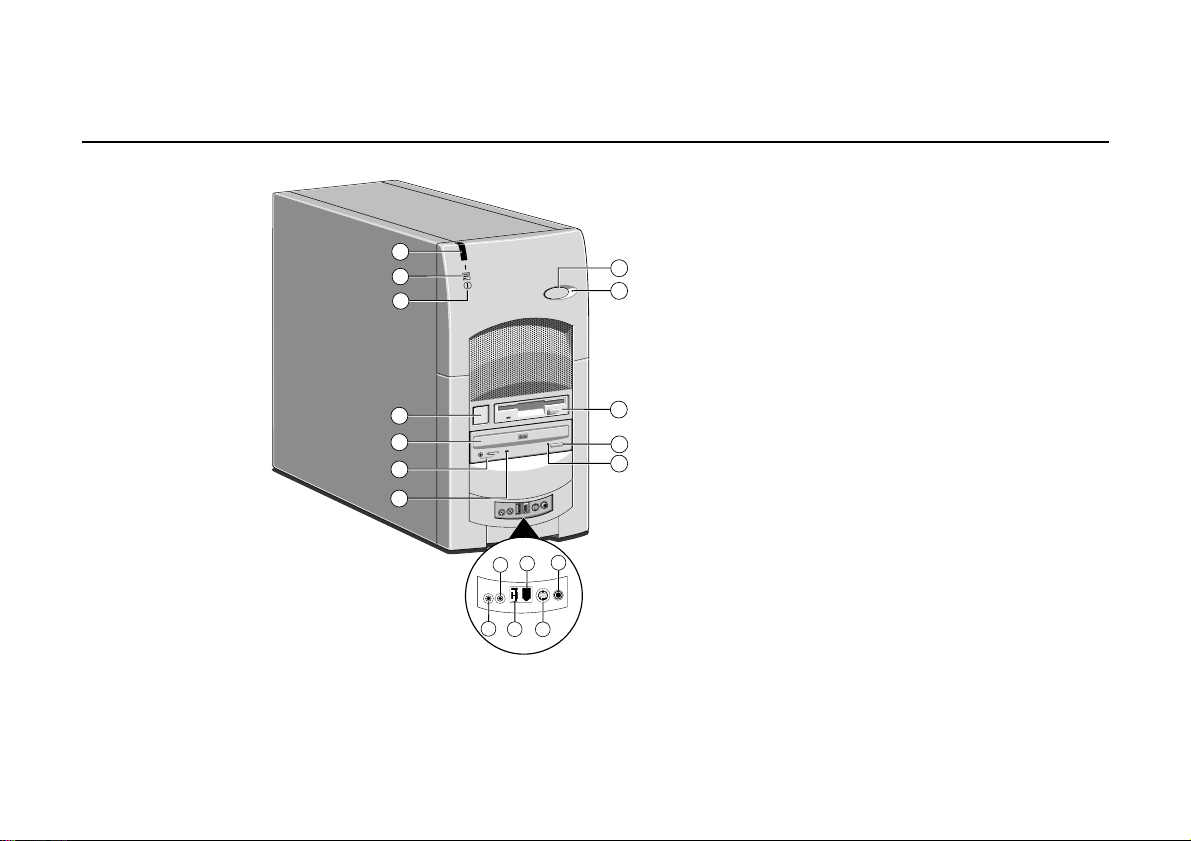
Pictorial guide to the system unit
Key
1 Infrared sensor
2 Hard disk activity indicator
3 Power Mode light
4 POWER button
5 CD-ROM disc drawer (platter)
6 CD headphone jack & volume control
7 CD activity indicator
8 Line In socket for audio input
9 Headphones socket
10 Universal Serial Bus (USB) port
11 FireWire port (factory option)
12 S-Video In port (factory option)
13 Composite Video In port (factory option)
14 CD emergency eject hole
15 CD EJECT button
16 Diskette drive
17 Message LED alerts you that you have an
unread message
18 Message Cancel button clears the Message
LED alert
1/2 Welcome

OWNER’S HANDBOOK
Press the P
button to turn the computer on, put
OWER
it to sleep or wake it up.
The Power Mode light changes colour to show the
current state of the computer.
♦ Off. [red] Your computer is turned off, but is
still connected to the AC power supply.
♦ Suspend. [yellow] Your computer is “sleeping”
to conserve electricity. Briefly pressing the
P
button wakes it up again.
OWER
♦ On or Standby. [green] Your computer is awake
and working, but may reduce power during idle
moments (Standby mode). Move the mouse or
press any keyboard key to activate it again.
See the Quick Start Guide for more information.
The M
light flashes when the Message Centre
ESSAGE
program (part of the Easy Manager collection) has
one or more unread e-mails, faxes or reminders for
you. Either read the messages or press the button to
extinguish the light.
Welcome 1/3
OWNER’S HANDBOOK
Key
A
1
A
A
19
10101
18
17
16
B
A
15
2
3
4
5
6
7
8
9
10
B
11
A
12
13
14
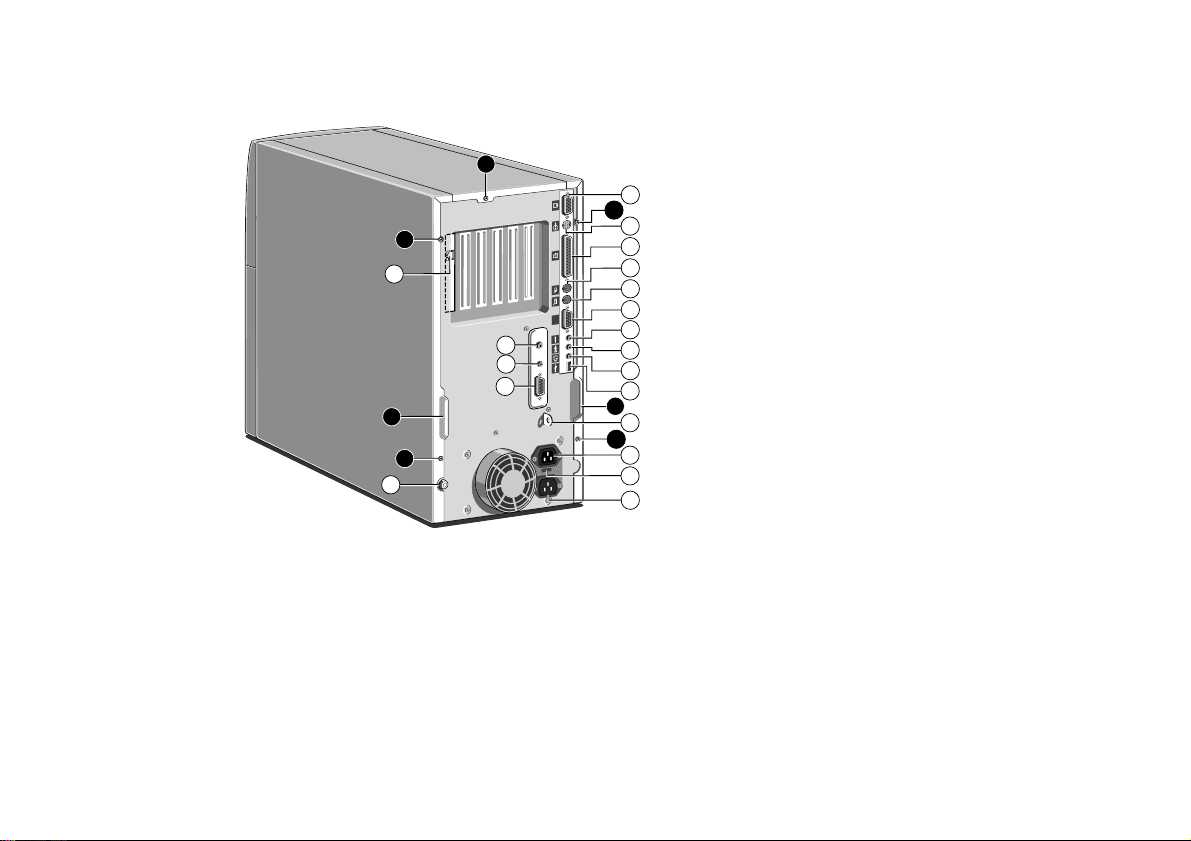
For more information about the various audio, video,
and multimedia options, see the Multimedia chapter.
1 Monitor port
2 S-Video Out port for displaying the monitor
image on a television (factory option)
3 Parallel (printer) port
4 Mouse port
5 Keyboard port
6 Serial port
7 Microphone socket
8 Line Out socket for audio output
9 Speaker socket
10 Universal Serial Bus (USB) port
11 Security loop for cable or padlock
12 AC power outlet for monitor
13 Voltage selection switch
14 AC power inlet from AC supply
15 Caselock
16 MIDI/Joystick port
17 Auxiliary Line In socket (factory option)
18 SPDIF digital audio output for sending digital
audio to an external audio amplifier (factory
option)
19 Modem port
A Side panel fixing screws
B Handles to assist side panel removal
1/4 Welcome

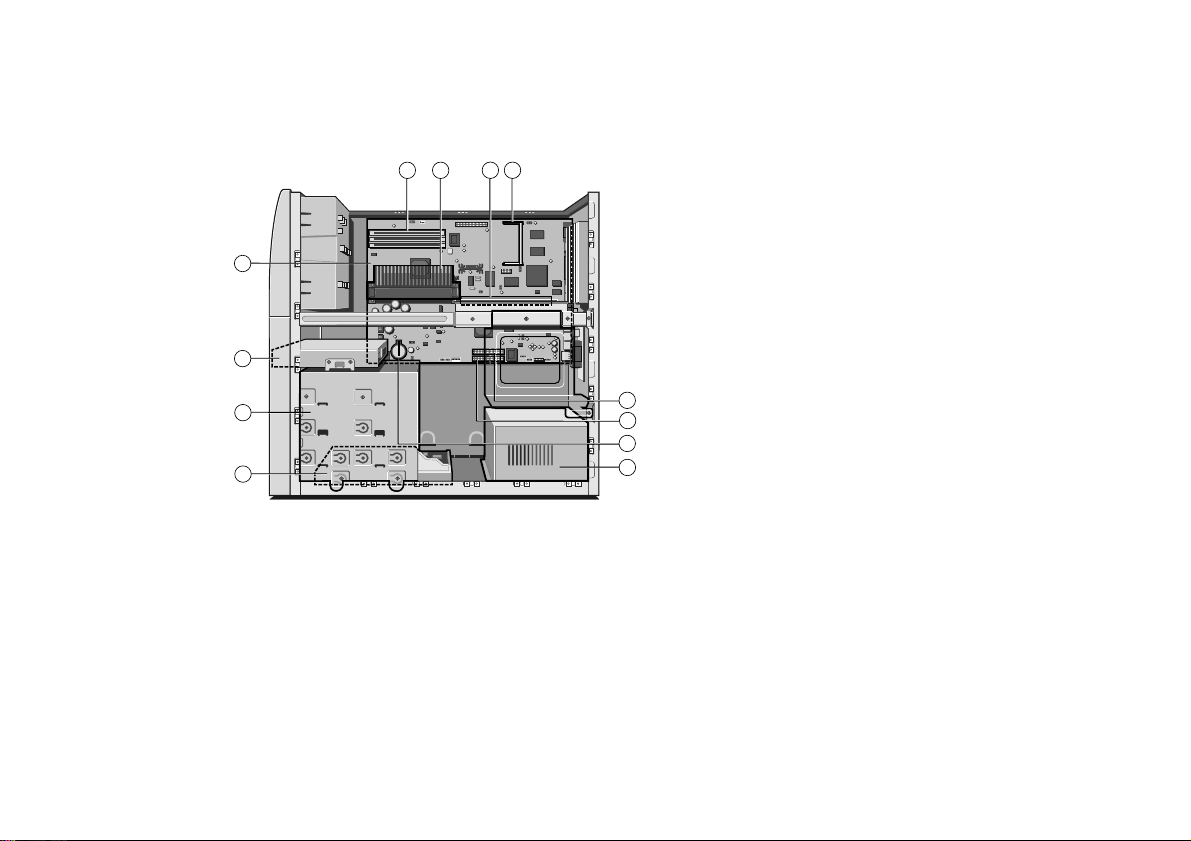
OWNER’S HANDBOOK
Pentium systems
5
4
3
2
Key
9
7
6
8
10
1 Power supply unit (PSU)
2 Master hard disk drive (HDD)
3 Forward drive bay for removable media drives
and/or a second HDD
4 Diskette drive
5 Motherboard
6 Processor socket; Zero Insertion Force (ZIF)
“Socket 7”-type
7 Main jumper block
11
12
13
1
8 DIMM sockets for system memory upgrades
9 Expansion card riser
10 Video memory upgrade socket (factory
option)
11 Secondary E-IDE interface connector for the
CD-ROM drive
12 Primary E-IDE interface connector for hard
disk drives
13 CMOS battery
Welcome 1/5
OWNER’S HANDBOOK
Pentium II systems
5
4
3
2
6 7
Key
8
9
1 Power supply unit (PSU)
2 Master hard disk drive (HDD)
3 Forward drive bay for removable media drives
and/or a second HDD
4 Diskette drive
5 Motherboard
6 DIMM sockets for system memory upgrades
7 Processor
8 Expansion card riser
9 Video memory upgrade socket (factory
10
11
12
1
option)
10 Secondary E-IDE interface connector for the
CD-ROM drive
11 Primary E-IDE interface connector for hard
disk drives
12 CMOS battery
1/6 Welcome

Removing panels
OWNER’S HANDBOOK
For normal access to the interior of the system unit,
only the right side panel, and possibly the top panel,
need to be removed. The left side panel must be
removed in order to install additional removablemedia or hard disk drives in the forward drive bay.
Warning
Never carry out any work inside the computer with AC
power applied. Always shut down the computer and
unplug all power cords before removing the top cover.
Take effective anti-static precautions while the covers
are off, as explained in the Safety & Regulatory
Notices at the start of this manual.
Right side panel
1. Shut down the computer and turn off the
monitor.
2. If your AC power outlets have switches, set
them to their off positions.
3. Unplug all power cords from the rear of the
system unit.
4. Remove the panel’s two fixing screws.
5. Turn the caselock key to the unlocked
position.
6. Slide the panel carefully towards the rear of
the system using the handle provided. After
about 2 to 3 cm of movement it is possible to
lift the panel vertically, clear of the system.
See the appropriate chapter on Motherboard Features
& Upgrades for more information about the
motherboard.
Top panel
1. Remove the main side panel as described
above.
2. Remove the top panel’s fixing screw.
3. Slide the panel rearwards, then lift it off.
Welcome 1/7
 Loading...