

Page 1

MITEL® EXPRESS MESSENGER
SYSTEM ADMINISTRATION MANUAL
Page 2

NOTICE
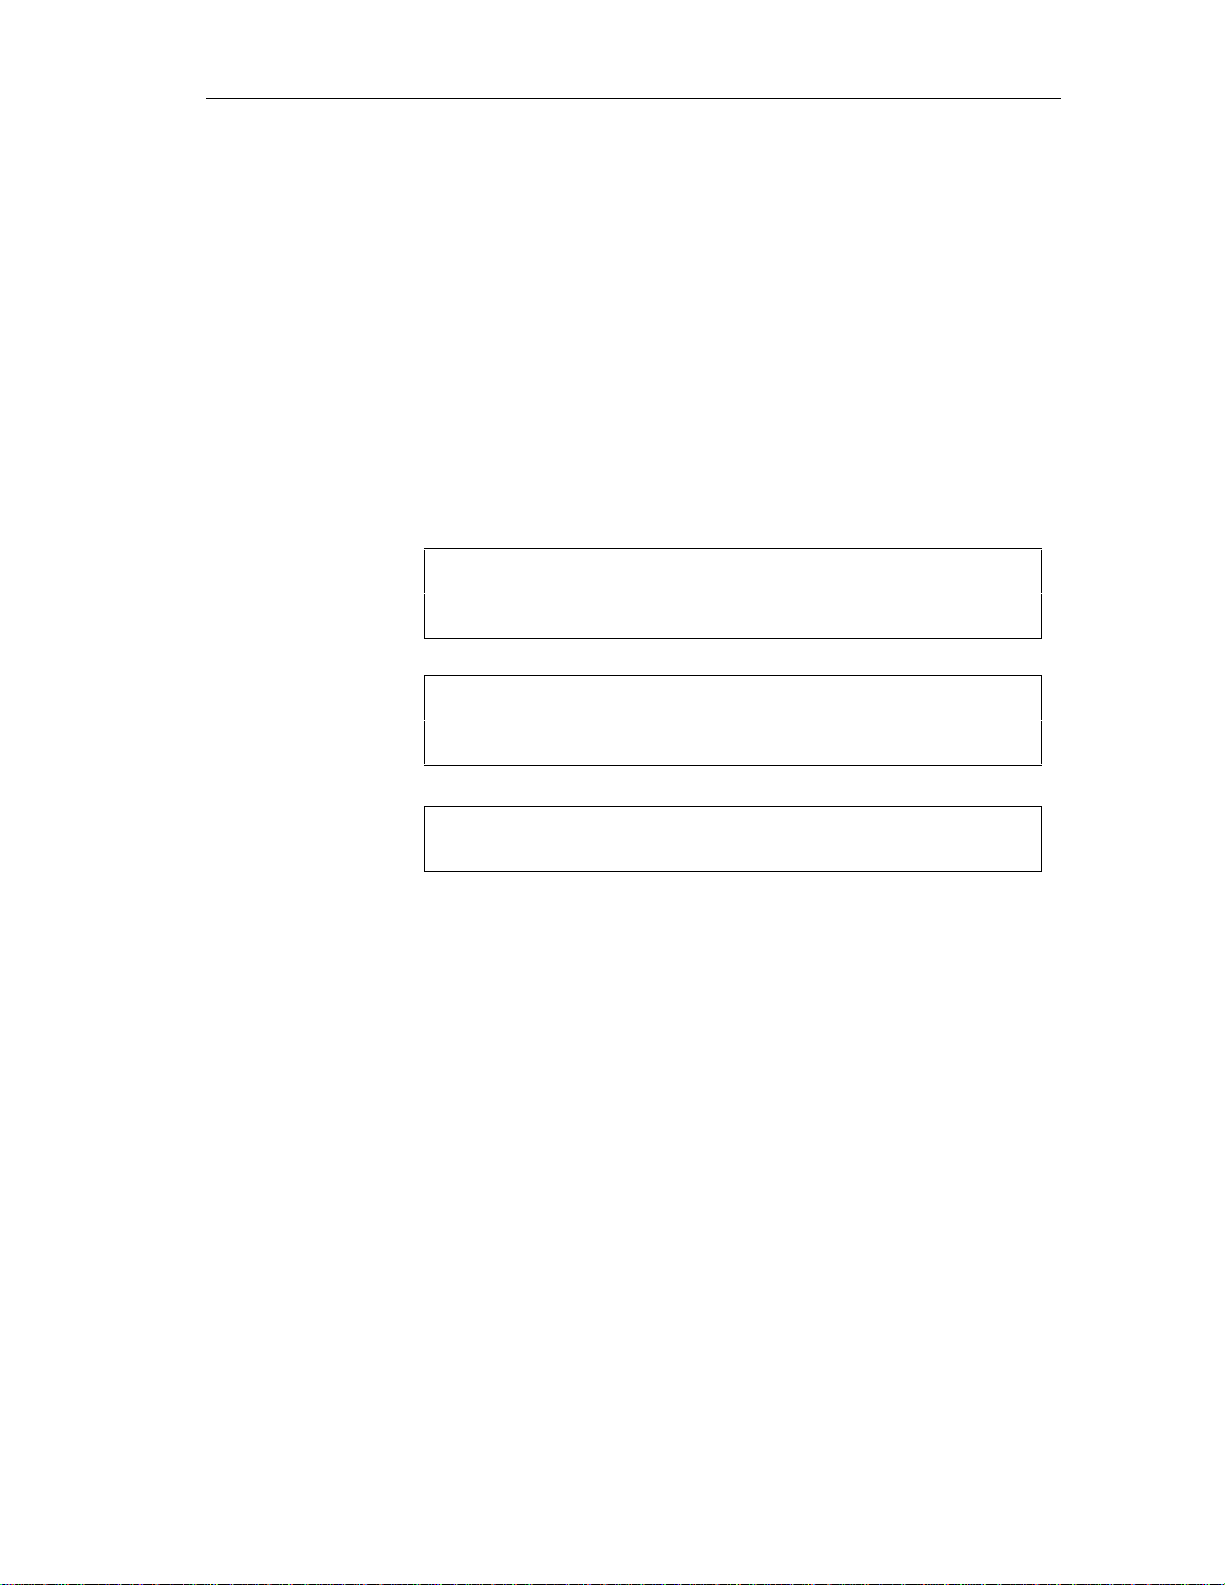
The information contained in this document is believed to be accurate in all respects but is not
warranted by Mitel Corporation (MITEL). The information is subject to change without notice and
should not be construed in any way as a comm itm ent by M IT EL or any of its affiliates or s ubs idiaries.
MITEL and its aff iliates and subsidiari es assume no respons ibility for any err or or omissions in this
document. Revisions of this docum ent or new editions of it ma y be issued to incorporate an y such
changes.
Nothing in this document may be reproduced in any manner, either wholly or in part for any use
whatsoever, without written permission from Mitel Corporatio n.
TRADEMARKS
Mitel design is a registered trademark of Mitel Corporation.
SX-200 is a registered trademark of Mitel Corporation.
This product contains software licensed from Annabooks.
Portions of software copyright 1994 Datalight, Inc.
All other product names specified in this document are trademarks of their corresponding owners.
Mitel Express Messenger Syste m Adm inistr a tio n Manua l Rel eas e 4.0
9109-080-025-NA
December 2002, Issue 5
£,¥, Trademark of Mitel Corporation.
¤ Copyright 2002, Mitel Corporation.
All rights reserved.
Printed in Canada.
*
www.mitel.com/messaging
Page 3

Table of Contents
SECTION 1: INTRODUCTION........................................................................... 4
Intended Audience.................................................................................... 5
How to use this Document........................................................................ 6
Useful Tips ................................................................................................7
Additional References.............................................................................11
Testing Mitel Express Messenger.......................................................... 12
Setting Up Express Messenger for the First Time ............................... 12
SECTION 2: SETTING UP MITEL EXPRESS MANAGER.............................. 15
Installing Express Manager onto a PC.................................................. 15
Connecting your PC to Express Messenger........................................... 16
Starting Mitel Express Manager ........................................................... 18
Logging In To Express Messenger From Express Manager ................19
About the Login Passcodes..................................................................... 20
Table of Contents
SECTION 3: ABOUT MAILBOXES .................................................................. 21
Reserved Mailboxes ................................................................................21
General Usage Mailboxes....................................................................... 22
Single-Digit Mailboxes............................................................................ 26
Menu Tree Maiboxes (Multi-Level Auto Attendant) ............................29
Hospitality Mailboxes............................................................................. 32
About the Auto Attendant...................................................................... 33
SECTION 4: CHANGING MAILBOX PARAMETERS ...................................... 35
Accessing the System Administrator’s Mailbox.................................... 36
New (or Repeat) Installation.................................................................. 38
Add, Edit, or Delete a Mailbox from a Telephone................................. 39
Add, Edit, or Delete a Mailbox from Express Manager........................ 45
SECTION 5: PERFORMING SYSTEM ADMINISTRATION FROM A
TELEPHONE....................................................................................................53
Setting Date, Time, and Business Hours.............................................. 53
Recording System Greetings .................................................................. 54
Setting or Changing System Parameters.............................................. 60
Setting and Changing Passcodes ........................................................... 64
Creating Distribution Lists.................................................................... 65
Message Notification............................................................................... 67
Using FAX Finder...................................................................................73
i
Page 4

Table of Contents
SECTION 6: PERFORMING SYSTEM ADMINISTRATION FROM
EXPRESS MANAGER ..................................................................................... 75
Setting the Date, Time, and Business Hours........................................ 75
Selecting Alternate Greetings................................................................76
Setting the FAX parameters .................................................................. 77
Setting and Displaying Site Information .............................................. 78
Changing Passcodes................................................................................ 79
Setting Up Notification........................................................................... 80
Using FAX Finder...................................................................................82
Setting FAX Parameters ........................................................................83
Selecting the Directory Prompt (First or Last Name).......................... 84
Enabling Softkey Support ......................................................................84
Enabling Auto attendant Transfer to Any PBX Extension.................. 85
Setting the Automatic Route Select Code ............................................. 85
Setting the Account Code Access Code.................................................. 85
Enabling or Disabling Personal Contact Numbers............................... 86
Setting the Voice Prompt Language......................................................86
Setting the Language Change Mailbox Number ..................................87
Setting up RAD Ports ............................................................................. 88
Setting up a DID Server......................................................................... 91
Enabling the Bilingual Voice Prompts Option...................................... 94
Enabling the Hospitality Option............................................................ 95
Enabling the PMS Option ......................................................................96
Enabling Express Messenger Release 4.0 Options............................... 98
Performing Backups ...............................................................................99
Performing Restores .............................................................................101
Performing Upgrades............................................................................ 102
Upgrading from Release 1.0 to Release 2.0 Software......................... 105
Upgrading from Release 1.0 to Release 2.1 Software......................... 106
Upgrading from Release 2.0 to Release 2.1 Software......................... 106
Upgrading to Release 3.0 Software...................................................... 107
Upgrading an Express Messenger Card to Support
Additional Ports or Release 3.0 Software Features............................110
Upgrading to Release 4.0 Software Features...................................... 112
Viewing System Logs............................................................................ 112
ii
Page 5

Table of Contents
SECTION 7: PERFORMING MAINTENANCE AND TROUBLESHOOTING. 113
APPENDIX A: MITEL EXPRESS MANAGER MENUS.................................. 121
APPENDIX B: GLOSSARY............................................................................ 133
APPENDIX C: EXPRESS MANAGER SYSTEM MESSAGES ...................... 135
APPENDIX D: EXPRESS MANAGER SYSTEM LOG MESSAGES
(DIAG.DAT) ....................................................................................................145
APPENDIX E: PMS PROTOCOL SUPPORT ................................................ 171
INDEX............................................................................................................. 173
iii
Page 6

Section 1: Introduction
Welcome to Mitel£ Express Messenger, the complete voice messaging system
designed to improve communication between your company, clients, customers,
and employees.
Features provided by Express Messenger include:
x An Automated Attendant that plays different greetings during open
and closed business hours, provides a company directory that uses
extension numbers or names as the dialing method, and allows
single-digit option selection.
x Subscriber mailboxes that are passcode protected.
x A tutorial that assi sts new subscribers wi th mailbox setup.
Introduction
x Simple message retrieval.
x Easy to use menus that allow subscribers to send urgent, private, or
certified messages.
x Notification of waiting messages whether subscr ibers are in or out
of the office.
Express Messenger’s Automated Attendant provides two immediate benefits for
your company:
x Your receptionist has more time for calls that require special
assistance and other activities within your business.
x All telephone calls are answered automatically. Even when an
employee is not available, callers can leave a message before
hanging up.
4
Page 7

Introduction
Express Messenger includes tools to help get your voice mail up and running quickly.
After th at, you can custom iz e the syst em to meet your spec if ic busines s needs.
Two important topics are at the end of Section 1:
x Testing Express Messenger
x Setting Up Express Messenger for the First Time.
Intended Audience
This document is written for the Syste m Administrator responsible for the Express
Messenger voic e mail s yste m.
Typical System Administrator duties include:
x Adding and changing mailboxes. Mailboxes are where employees
send and listen to messages.
x Recording company greetings and announcements.
x Setting up outside notification numbers for pagers, cellular phones,
and so forth.
x Backing up the system.
x Answering employee questions.
x Maintaining the voice mail system.
5
Page 8
Introduction
How to use this Document
An Express Messenger dealer has already installed Express Messenger on your
PBX and performed the necessary system programming to make it work for you.
Read the System Administration Manual fro m beginning to end to fi nd out how to
optimize Express Messenger to your business requirements.
Use the glossary in Appendix B if you are unsure of any terminology used here.
Conventions
This System Administration Manual uses the following conventions.
x Voice Prompts and Responses
Italics represent references to the spoken word, such as examples of the
company and mailbox greetings.
x Boxes
NOTE: A box surrounds impor tant notes that provide additional
information about a topic or refer you to other material.
CAUTION: Cautions alert you to the possibility of damage to
equipment or software.
WARNING: Warnings alert you to the possibility of personal inj ury.
x Telephone Keys
Square brackets always surround numbers or letters that you enter from the
telephone keypad. For example:
[1] [2] ... [0] [#] [*]
If you need to press several keys in succession, the square brackets surround
all the numbers. For example:
[1234]
x Mailbox Numbers
Depending on your PBX dial plan, mailbox numbers can be
2, 3, 4, or 5 digits.
x Buttons and Flexible Buttons
Angle brackets always surround telephone button names and flexible button
functions. Fo r example:
¢Message² ¢Microphone² ¢Hold²
6
Page 9

Introduction
Useful Tips
Some people are reluctant to use their telephone for anything other than making
calls. Encourage users to experiment with different options offered by Mitel
Express Messenger.
Here are so me ti ps to help everyone benefit from having a voice mail system.
x Explaining Mitel Express Messenger to Customers
The best way to make customers feel comfortable about Express Messenger is
through employees who are enthusiastic about it customers will sense their
positive attitude. If employees use their mailboxes and return calls in a timely
fashion, customers will feel secure about the new system.
Encourage employees to keep their mailbox greeting current and to check for
messages frequently, particularly if their telephone doesn’t have a message
light or if they have been away from their office. Respond to messages
promptly not two or three days later.
x Mailbox Greetings
Employee mailboxes us e two types of greetings: "perm anent" and "tem porary". Callers
always hear the perm anent greeting unles s you record a tem porary greetin g. A permanent
greeting should be general enough to cover all situations. A temporary greeting describes
a specific situation and las ts for a user-s pecified num ber of days.
Here are examples of both types of greetings:
Permanent greeting:
"You have reached Christ ine Conner. I can’t answer your call right now, so pl ease leave
your name, number, and a s hort message I will get back to you as soon as possible. If yo u
need immediate assistance, pr ess [0] and ask to be transferred to m y associate, Julie Jones. "
Temporary greeting:
"Hi! You have reached Julie Jones. I will be on vacation from Friday, June 18,
through Friday, June 25. I’ll be back on Monday, June 28, so please leave a
message and I’ll get back to you as soon as possible. If you require immediate
assistance, press [0] and ask to be transferred to Christine Conner."
The mailbox user specifies the number of days for the temporary greeting to
last, from 01 to 99, expiring at midnight of the last day. If specified to last only
one day, the message starts immediately and expires at midnight of the day the
user records it.
Employees who create a new temporary greeting every day show callers that
they are really using Express Messenger.
7
Page 10

Introduction
x Duration of Messages in a Mailbox
Express Messenger saves messa ges for 15 days. A S ystem Administra tor can
change the number of days, on a mailbox-by-mailbox basis, by using Express
Manager. Express Messenger deletes each saved message as soon as the
message is older than the specified number of days.
x Saved Messages and System Size
If too many messages are saved on Express M essenger at any one t ime, the sy stem
will become full an d not be able to take new messag es.
If Express Messenger’s storage space is 90% full, users will hear this
warning when they log into their mailboxes:
“The system is nearly full. Please erase any unnecessary messages.”
If Express Messenger’s storage space is 98% full, its limit has been
reached and it will stop taking messages. Users will hear:
“I’m sorry, bu t th e sys tem is f ull . Pl ease tr y agai n at a l ater time . ”
x “Reply” and “Forward”
“Reply” and “Forward” options in the “Listen” menu only work with other
mailboxes within this Express Messenger. Users cannot reply to a message
that originates from an outside line or forward a message to an outside
telephone number.
x Type Ahead
Callers always hear a menu when Expr ess Messenger answers the telephone.
If you know which keys to use , press them immediately and move through the
system as fast as you wish. Although the menus are brief, voice prompts are
only for convenience. Occasionally, when interrupting prompts, the system
may not detect the key. In this case, press the key again.
x Message Length and Conditions
Expre ss Messen ger does not limit the length of any message. H owever, after
five minutes, Express Messenger interrupts the caller and asks if they wish to
continue recording. If there is no reply, Express Messenger stops recording
and disconnects the line. Similarly, if the caller stops talking for more than
four seconds or has a very faint connection, Express Messenger gives them
the option to continue recording.
8
Page 11

Introduction
x Phantom Messages
To eliminate unwanted or unintended messages, Express Messe nger
automatically stops recording a message if it hears a steady, non-voice tone,
such as dial tone. Express Messenger may interpret background noise, such as
in a factory, as a steady tone and mistakenly disconnect the caller. Using a car
telephone when the car windows are open can also cause an unwanted
disconnection. The caller should try again from a quieter location.
x Music-on-Hold
There is always a delay between the time Expr ess Messenger answers an
outside call and the time someone answers the telephone or Express
Messenger sends the call to a mailbox. On most telephone systems, the caller
hears nothing while Express Messenger transfers the call unless you install
Music-on-Hold. Music can be alternated with product advertisements to keep
callers interested while they wait for an answer to their call.
Note: Express Messenger ports can operate as Recorded Announcement
Devices (RAD) to provide Music-on-Hold or other audio. For more
information, see page 88.
x The Operator’s Mailbox
Messages left in the operator’s mailbox (mailbox 0) need to be checked
regularly. Assign someone the task of frequently checking the operator’s
mailbox and forwarding any messages to the appropriate persons.
If the operator is aw ay from the teleph one or unable to an swer (such as at night or w hen
the business is closed), callers may become irritated if they have to wait through too many
rings before being transferred t o the ope rator’s mailbox. To avoid irritating callers in this
manner, either set the call forwarding on th e operator’s telephone to Express Messenger
or set a shorter transf er-recall time.
The default passcode for the operator's mailbox is [99, 999, or 9999].
x The Operator's Telephone
A special feature of Express Messenger is that the auto attendant attempts to
transfer calls to the operator even if the console is busy. This allows the
operator an opportunity to put the current call on hold and answer the new call.
x Message Notification to Extensions
If a subscriber's telephone does not have a message light, Express Messenger
can use the Message Notification feature to inform the subscriber when
messages arrive in their mailbox.
One of the five available notification methods is to ring any internal extension
number. If you enter the mailbox owner's extension as the alternate number,
that extension will ring when a message arrives. Re fer to Message Notification
in the Section 4, Changing Mailbox Parameters for more information.
9
Page 12
Introduction
x Bilingual Prompts
Express Messenger can be set up to play voice mail prompts in two of three
languages: English, French or Spanish. Outside callers choose the language
they want when prompted by the auto attendant. Subscribers can request their
preferred language from the system administrator.
NOTE: Support for bilingual voice prompts is an optional feature of
Mitel Express Messenger Release 3.0.
x Record A Call
Subscribers can use Express Messenger to record their telephone
conversations. The recordings are stored in the subscriber’s mailbox separated
from regular voice mail messages.
NOTE: Record A Call is an optional feature of SX-200 EL/ML
LIGHTWARE 18, Release 1. For more information, see the SX-200
EL/ML Tec hnical Documentation. Instructions on using Record A
Call are included in the telephone user guides produced with Superset
Manual Maker (PN 9132-900-000-NA, Issue 8).
IMPORTANT: Record a Call should only be used in conjunction
with the laws of the jurisdiction where the call is placed from and/or
the laws of the jurisdiction of the place being called. MITEL is not
liable for misuse of this feature in a manner that does not conform
with the applicable law; for example: laws involving wiretapping,
eavesdropping, electronic surveillance, call recording etc. Dealers
should warn the customer in writing that they are responsible to use
this feature in accordance with the law and that in many jurisdictions
both parties must be made aware that the call is being recorded in
order to comply.
10
Page 13

Introduction
Additional References
Installation Guide
Your Express Messenger dealer used an Installation Guide to install Express
Messenger into your PBX. An Installation Worksheet is included with the
Installation Guide. Ask your dealer for a copy of the Installation Guide.
User Guide
Each Express Messenger subscriber should have a User Guide for daily message
manageme nt . It provides step-by-st ep instructions on how to call Express
Messenger, set up a personal mailbox, and send or retrieve messages. The guide is
on the Documentation diskettes included with the Express Messenger card and on
the Manual Maker web site at http://edocs.mitel.com/manual /maker.
User Guide information is not repeated in this manual. Keep a copy of the User
Guide with this manual.
Instructions on using Record A Call are included in the telephone user guides
produced with Manual Maker.
Wallet Card
Each subscriber should also have a Wallet Card for quick reference to the Express
Messenger Menu system.
Front Desk User Guide & Guest User Guide
In hotel or motel applications, the front desk attendant should have a front desk
user guide. This guide provides instructions on ho w to administer guest mailboxes.
A guide on using Express Messenger from a guest phone should be left in each
guest room. The guide can be ordered by calling Mitel Networks Customer
Service. Specify part number 51001140A for the English/French version or
51001154A for the English/Spanish version. PDF versions of the guide are also
available for downloading from the Manual Maker web site at
http://edocs.mitel.com/manual /maker.
11
Page 14

Introduction
Testing Mitel Express Messenger
Perform the following tests to verify that Mitel Expr ess Messenger is working
properly.
Because PBX programming frequently blocks users from accessing an outside line
and then dialing back in to the main number (tying up two Central Office trunks in
the process), parts of this test may need to be performed from off-site. The System
Administrator could call in from home and then verify the message upon arrival.
1. Call the business using an outside line. Verify that you hear the
company open or closed greeting (as appropriate) and that the message
is clear and understandable.
2. Call the business using several outside lines. Verify the number of rings
allowed before Express Messenger answers.
3. Call the business using an outside line. When Express Messenger
answers, press 0 and verify that Express Messenger transfers the call to
the attendant.
4. Call the Express Messenger hunt group using an internal line . Verify
that you do not hear the company greeting. Verify the number of rings
allowed before answer.
5. Call the Express Messenger hunt group using an internal line. Verify that
you do not hear the company greeting. When Express Messenger answers,
press 0 and verify that Express Messenger transfers the call to the
attendant.
Setting Up Express Messenger for the First Time
When first setting up Express Messenger, perform the following activities (detailed
procedures for each activity are elsewhere in this manual). Do all activities from a
telephone first (some activities cannot be performed from Express Manager). Keep
the Installation Worksheet in front of you because much of the information you
will be prompted for is on that sheet.
You can set up Express Messenger to operate either as a unilingual or biling ual
system. A unilingual system prompts users in English ( the default language),
French or Spanish. A bilingual system provides prompts in two of the three
available languages.
NOTE: Spanish prompts are only available on MEM Release 2.1 systems
or later and French prompts on MEM Release 3.0 or later. Bilingual
operation is an optional feature of MEM Release 3.0. For more
information, see Enabling the Bilingual Prompts Option on page 94.
12
Page 15

Introduction
Unilingual Systems
To set up a system with greetings and prompts in one language:
1. Enter the necessary information onto the Express Messenger
Installation Worksheet.
2. Identify the Message Center number for accessing Express Messenger
ports (provided by the PBX installer).
3. To log in, dial the Express Messenger message center number.
Express Messenger answers and prompts you for a mailbox number.
4. Enter the system administrator mailbox number: default is [99, 999, or 9999].
5. To set up a system to prompt in the current language (default English), press
1, and then skip to step 7.
OR
6. To set up a sys t em to prompt in another language:
dial the Technician’s passcode (default 8642), followed by 9. Express
Messenger prompts you for a Technician’s Function Co de.
dial 20001 for English, 20002 for Spanish, or 20003 for French. You are
prompted for another Function Code.
dial 10281. The system resets.
After the system resets, log into the administrator’s mailbox again. The
system is now prompting in the selected language. Continue the set up a t
step 7.
7. Express Messenger prompts you for a passcode.
8. Enter the default passcode [1234].
9. Enter [1] for a new installation.
10. Set the number of digits for mailbox length to 2, 3, or 4 digits (default is 3
digits).
11. Enter current date and time in 24-hour format.
12. Program the opening and closing time for each day of the week.
13. Enter the Operator’s extension number.
14. Create a mailbox for each user’s extension.
15. Create the required single digit mailboxes.
16. Prepare and record primary company greetings for open hours and closed
hours.
17. Set the Send Message access code (the code is provided by the PBX installer
on the Installation Worksheet as Feature Access Code 41).
13
Page 16

Introduction
Bilingual Systems
To set up a system with greetings and prompts in two languages:
1. Follow the above procedure to set up the system to operate in one
language.
2. Log into the administrator mailbox.
3. When prompted for a passcode, dial the Technician’s passccode
(default 8642).
4. Dial 9.
Express Messenger prompts for another Technician’s function code.
5. Dial 20272 followed by the 11-digit code required to enable the Bilingual
Voice Prompts option. You must call the Mitel Corpor ation order desk to
get the code. For more information on enabling the Bilingual Voice
Prompts language, see page 94.
Express Messenger responds with “Enabled.”
6. Set the default language (if different than the language specified in step
1) by dialing 20001 for English, 20002 for Spanish, or 20003 for
French.
7. Set the alternate language by dialing 20011 for English, 20012 for
Spanish, or 20013 for French.
8. Dial 10281 to reset the system.
9. After the system resets, log into the System Ad ministr ator Mailbox
again.
10. When prompted, enter the default passcode (1234).
11. Using the Greetings menu (press 4 from the main menu) to verify
existing greetings and then record new greetings in the alternate
language, including the bilingual welcome greeting.
14
Page 17

Setting up Mitel Express Manager
Section 2: Setting up Mitel Express Manager
For optimum performance, install the Mitel Express Manager program on your
PC’s hard drive. You do not need to shut down your voice mail system while
installing Express Manager on your comput er.
Installing Express Manager onto a PC
The following software must be resident on your PC to install and run Express
Manager:
x DOS versio n 3.3 or higher
x Windows 3.1 or higher.
To install the Express Mana ger software on your PC’s hard drive:
1. Place the disk labeled Mitel Express Manager into your 3 1/2" floppy
drive.
2. At the DOS prompt, change to the drive in which you placed the disk.
For example,
C!a: [Enter]
3. At the DOS prompt, run the install program.
A:\!install [Enter]
Installation of Express Manager will continue automatically until completion.
Carefully read and follow any notification about software o r documentation
changes that display on your screen.
Installation is complete when the DOS prompt returns to your screen. You can now
use Express Ma nager to mainta in your company’s voic e mail syste m.
15
Page 18

Setting up Mitel Express Manager
Connecting your PC to Express Messenger
You Run Express Manager from DOS on your PC. You can connect
your PC
x directly to a port on the Express Messenger Card, or
x remotely through a modem connection that allows you to
communicate to Express Messenger using your telephone system.
Express Manager requires the following hardware:
x IBM or IBM-compatible 286 computer (PC) or higher with a
minimum of 2 MB of disk space and 640 KB of memory (RAM).
x VGA monito r (color or monochrome).
x Express Messenger voice mail card installed in the PBX.
x Internal or external modem.
Connecting your PC Directly to the Express Messenger Card
1. Plug one end of the custom RS-232 cable into an unused COM port on
the PC.
2. Plug the other end of the cable into the Express Messenger card
connector. You must open the PBX door to connect the cable.
The custom RS-232 cable is a PC-to-PC cable with 9-pin female DB9
connectors on each end. Wires between pines 1 and 4 and between 2
and 3 of the connectors cross over within the cable; that is, it is a null
modem cable.
Note that Mitel Corporation does not suppl y the cable. Two recommended
cables are
Belkin F3B207-06 (6 feet)
Belkin F3B207-10 (10 feet).
16
Page 19

Setting up Mitel Express Manager
3. Access a DOS prompt.
Navigate to the directory that contains the Express Messenger application by
typing
CD EXPRESS [Enter]
4. To start Express Manager, type
EXPRESS [Enter]
The Express Manager Login screen appears after several seconds.
5. Select Login from the File menu and enter the Administrator passcode
(default [1234]).
6. Program Express Messenger as described in this manual.
7. After you have completed your programming session, remove the cable
and replace the PBX front door.
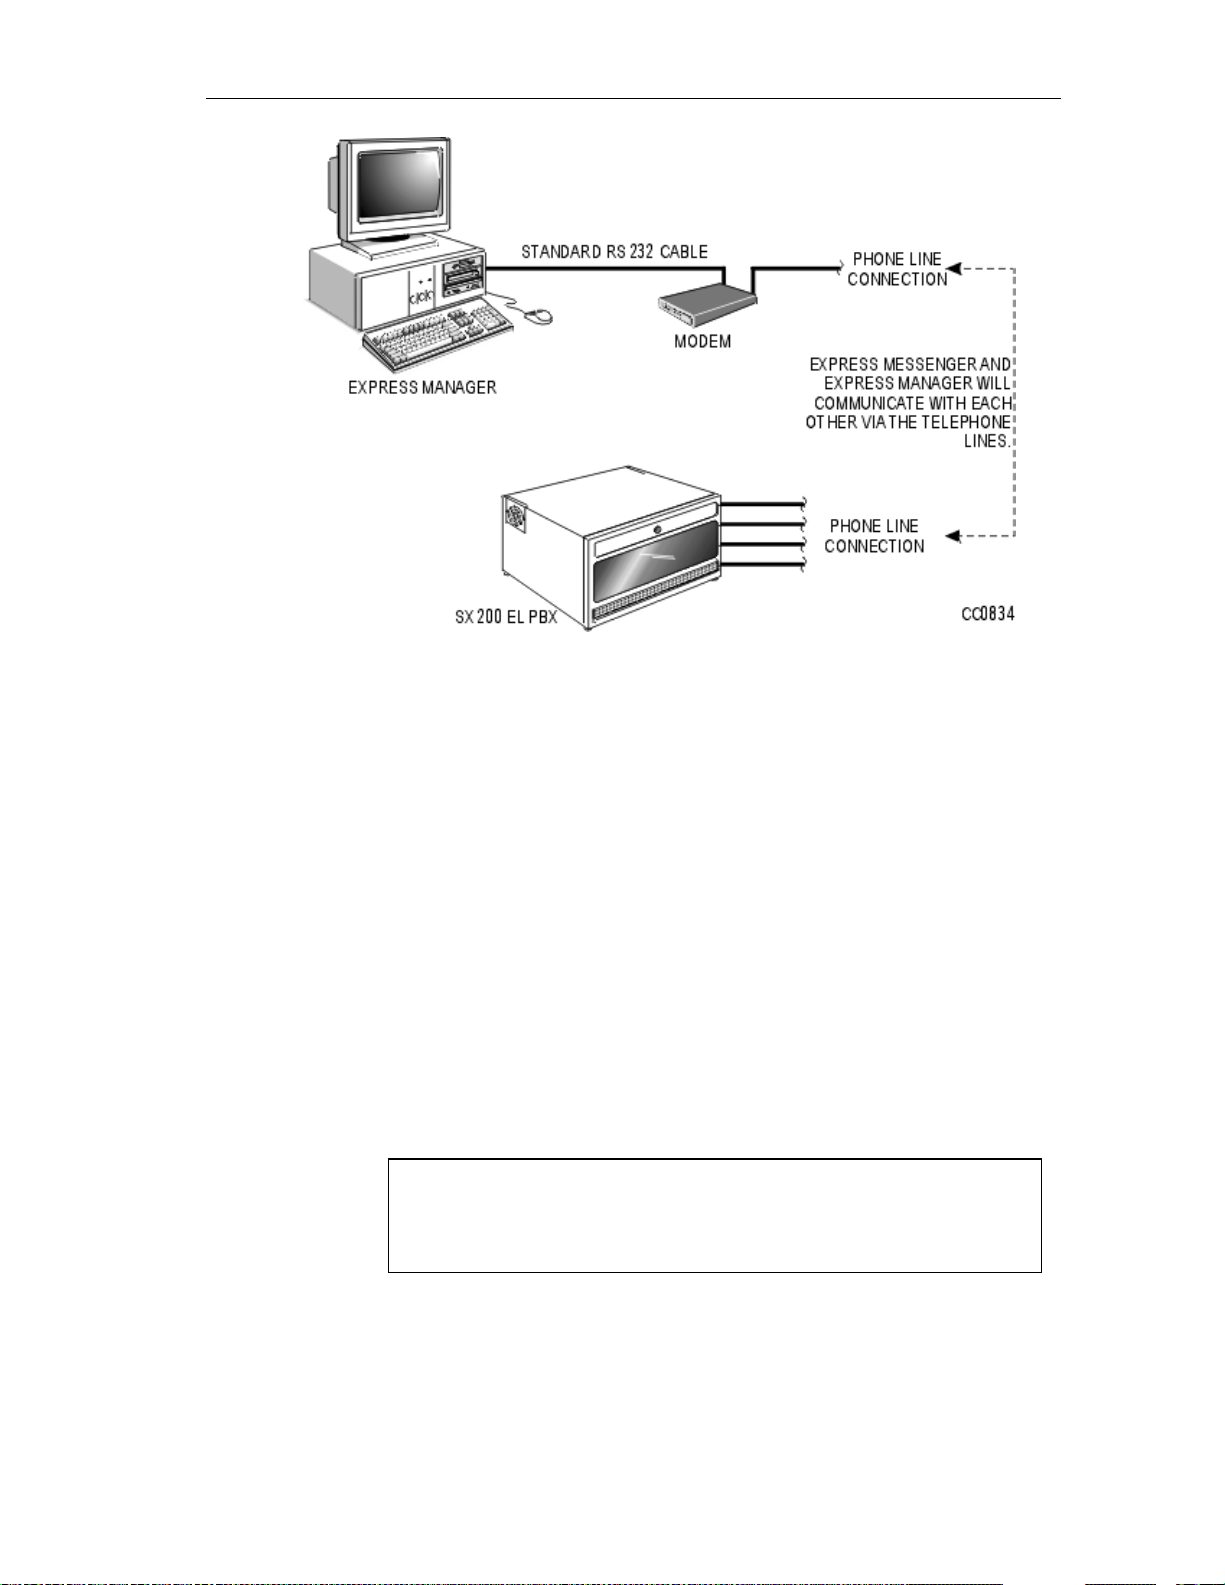
Connecting your PC Remotely
Figure 1 illustrates the proper connection for remote access to Express Messenger.
A serial port on your remote PC connects through a modem to the voice mail
system.
To connect a PC remotely
1. Connect a PC directly to the Express Messenger card and login to
Express Manager application (see Connecting Your PC Directly to the
Express Messeng er Card on page 16 for instructions).
2. Select the Options menu, then Communications, and then complete the
Serial Port Setup window according to the requirements of the remotely
located PC port that is connected to your modem. Refer to
Communications on page 125 for instructions on how to complete this
window.
3. Disconnect the local PC from the Express Manager card and replace the
PBX front door.
4. Connect your remotely located PC to a modem.
5. Access a DOS prompt.
6. Navigate to the directory that contains the Express Manager application
by typing
CD EXPRESS [Enter]
7. To start Express Manager, type
EXPRESS [Enter]
8. Select Login from the File menu.
9. Enter the Administrator passcode ([1234] unless changed during
installation) and the telephone number of the voice mail system (auto
attendant) in the initial login window.
17
Page 20
Setting up Mitel Express Manager
Figure 1 - Remote Connection to Express Messenger
Starting Mitel Express Manager
Follow the steps below to start the Express Manager program on your PC.
1. Using DOS, change to the EXPRESS directory created on your hard
drive during the installation process.
CD EXPRESS [Enter]
2. At your DOS prompt, run the EXPRESS program.
EXPRESS [Enter]
Your screen now displays an Initial Menu Bar, which allows you to change port
setups, log in to Express Messenger as a System Administra tor, or return to the
DOS prompt. Standard DOS prompts and menu options are not described in this
document.
NOTE: You can also star t Express Manager from Windows by addin g t he
program to your Windows desktop. See the your Windows documentation
for more information.
To exit from a menu, press <Esc>.
Before Express Manager can communicate with Express Messenger, set up the
Communications Serial Port Setup window to corresp ond to the requirements of
your COM port and your modem. Refer to your PC and modem manuals.
18
Page 21

Setting up Mitel Express Manager
Logging In To Express Messenger From Express Manager
Follow these steps to log in to Express Manager, after Express Manager has been
started as just described. Each screen is described following this procedure.
1. From the initial screen (Figure 45), click on Ok, in the About window.
2. From the File menu, shown in Figure 46, click on File.
3. From the Login window (Fi gure 47), e nt er the Administrator’s password;
If you are connecting through a modem, enter the telephone number of the
voice mail system (auto attendant), and then click Ok.
CAUTION: Always wait at least 10 seconds between logins.
4. From the seven available menus, select the menu and window for the
activities to be performed.
5. At the end of a session, log out from the File menu.
19
Page 22

Setting up Mitel Express Manager
About the Login Passcodes
The passcode you use to log in to the Express Manager determines which menu
items are available to you. There are two types of passcodes:
x Manager
Log in using the Manager p asscode to pe rform all the system adminis t ration,
mailbox management, and maintenance functions except, installing (or reinstalling) Express Messenger, accessing Remote Files and changing the
Administrator Passcode or passcode length.
x Administrator
Log in using the Administrator passcode to allow all manager functions plus
authority to install (or re-installing) Express Messenger, and access to Remote
Files and Administra tive Passcodes functions.
IMPORTANT: Give the Manager passcode to the person that performs
the day-to-day operations, such as adding mailboxes and changing
greetings. The Manager passcode provides limited access to the database
thereby reducing the likelihood of novice users causing serious disruptions
to the system. (Note that users are still prompted to begin a new
installation when they enter the Manager Passcode but get the response
“Invalid Selection” when they attempt to do so.)
To protect system security, keep the passcodes confidential.
20
Page 23

Section 3: About Mailboxes
Mitel Express Messenger uses different types of mailboxes. Some are reserved for
system functions and others are available for general use. Each mailbox type has
different characteristics and uses. Mailbox numbers normally correspond to a
telephone’s extension number.
This section describes the different mailbox types. It also describes how the Auto
Attendant handles a mailbox number that is not the same as the extension number.
Read this section to determine how to use the different mailbox features. Refer to
the next section, Changing Mailbox Parameters, for step-by-ste p instructions on
how to add, edit, or delete mailboxes and how to enable or disable other Express
Messenger feat ures.
About Mailboxes
Reserved Mailboxes
The Operator
Mailbox 0 is reserved for the Operator's mailbox. Callers will leave messa ges in
this mailbox if they,
x do not know who to contact,
x are calling from a rotary dial telephone and cannot access menus or
mailboxes.
Check for messages left in the Operator’s mailbox several times each day. The
default passcode for the operator's mailbox is [99, 999, or 9999]. If the passcode
length has been changed, add the appropriate number of zeros to the end of the
passcode; for example, [123400].
The Directory
Mailbox 9 is reserved for the personnel directory. It cannot take messages. Callers
use it to reach an employee by dialing the first six letters of the employee’s first or
last name (as defined).
Administrative Functions
Mailboxes 90 through 97 or 990 through 997 or 9990 through 9997 are reserved
for Express Messenger self-administrative functions.
The Modem
Mailbox 98 is reserved for the Express Messenger built-in modem used for remote
administration or maintenance.
21
Page 24

About Mailboxes
The System Admi nistrator’s Mailbox
Mailbox 99 or 999 or 9999 is reserved for the system administrator. It is not
associated with an extension and does not take message s. Any touch-tone
telephone in your company can access this mailbox. The default passcode is
[1234]. To maintain system security, change this passcode at first login.
General Usage Mailboxes
Express Messenger has four types of mailboxes:
x Extension
x Message-Only
x Transfer-Only
x Information-Only
The system administrator assigns mailbox types. Each type serves a different
purpose and has its own characteristics. Mailbox types are described on the
following pages.
NOTE: These examples assume that your PBX is programmed so that
the Express Messenger Auto Attendant answers your primary business
number(s). If that is not true, then the Operator sends calls to Express
Messenger only when the caller wants to leave a voice message.
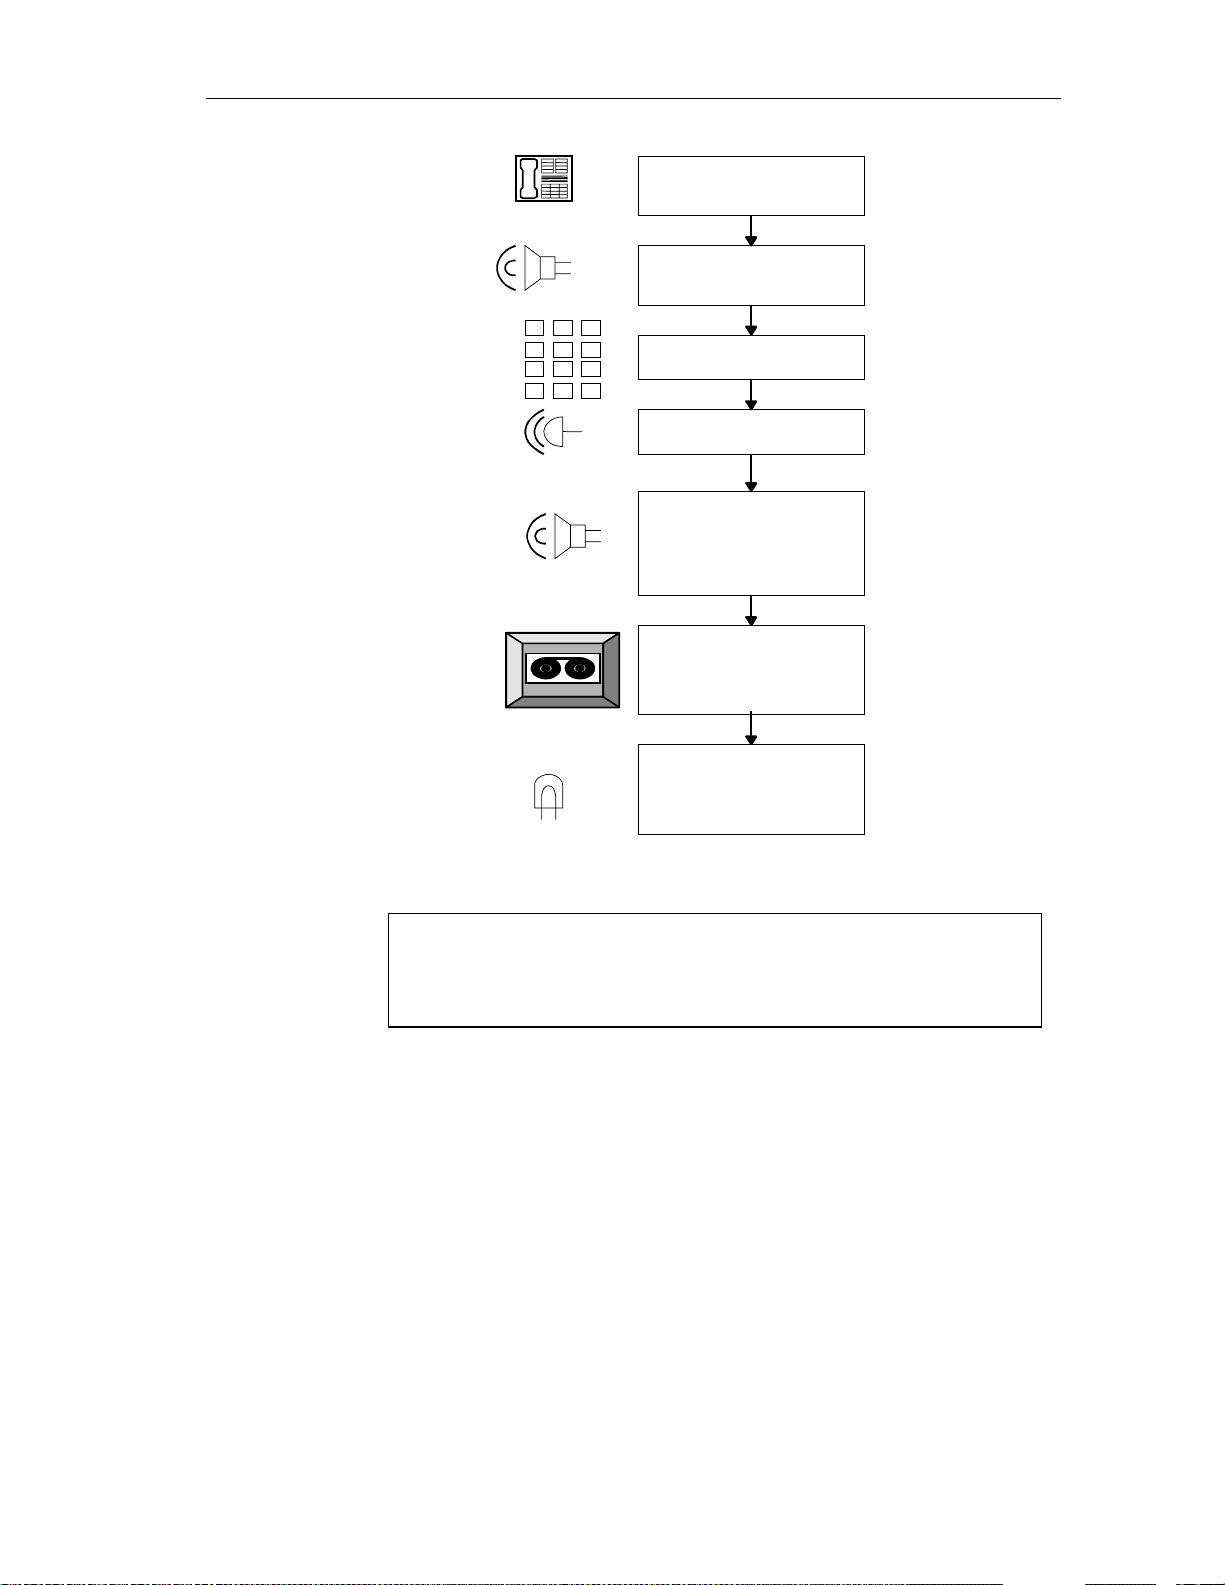
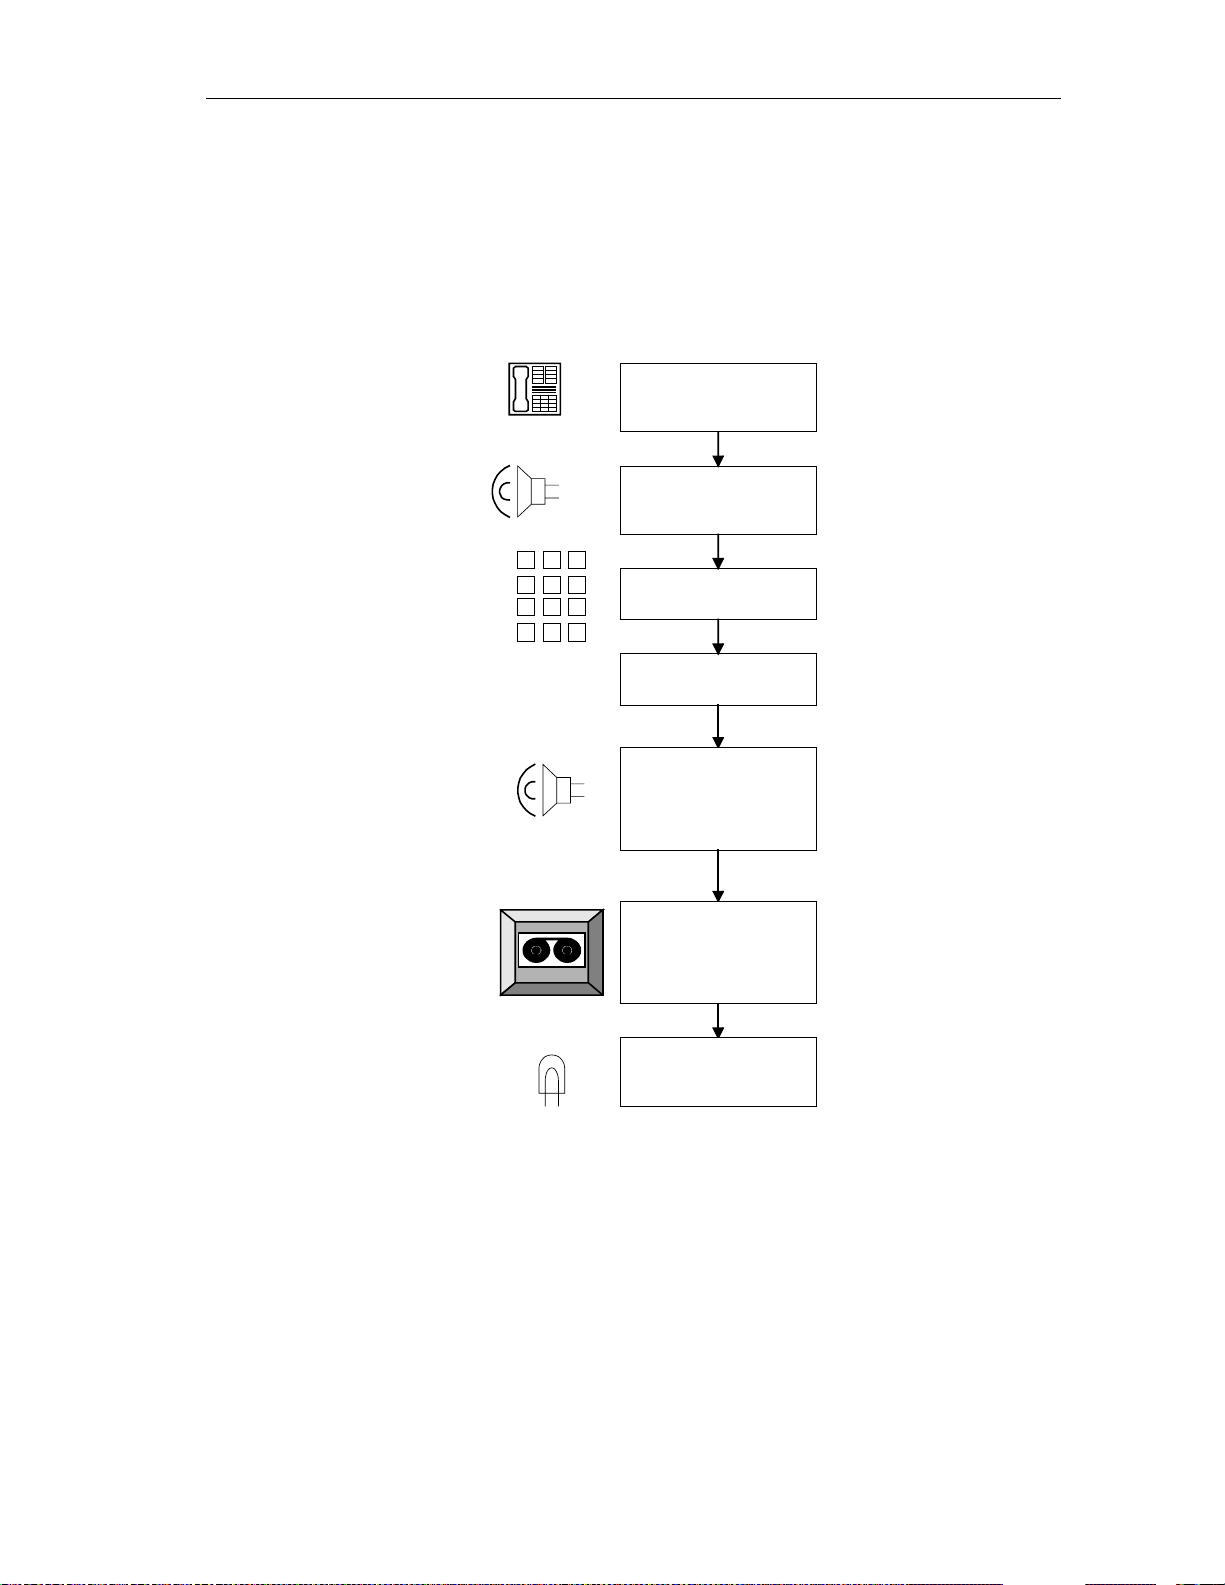
Extension Mailbox
An extension mailbox is the default mailbox type. The mailbox number is usually
the same as the subscriber’s extension number. Figure 2 shows the calling
sequence for an Extension mailbox.
22
Page 25
Telephone
K
1 2 3
E
Y
4 5 6
P
7 8 9
A
* 0 #
Device
Storage
BELL
An outside caller calls the
company telephone number
Express Messenger answers
an outside caller with the
company greeting
The caller enters an
extension number on the keypad
The extension rings
If the line is busy or
unanswered, Express
Messenger asks the caller if
they wish to leave a
message
Express Messenger records
a message in the associated
mailbox
About Mailboxes
Light
Express Messenger turns on
the telephone message light
(if available)
Figure 2 - Extension Mailbox Calling Sequence
NOTE: For telephones without message lights, you can set up message
notification to the subscriber’s extension number. See Message
Notification on page 67.
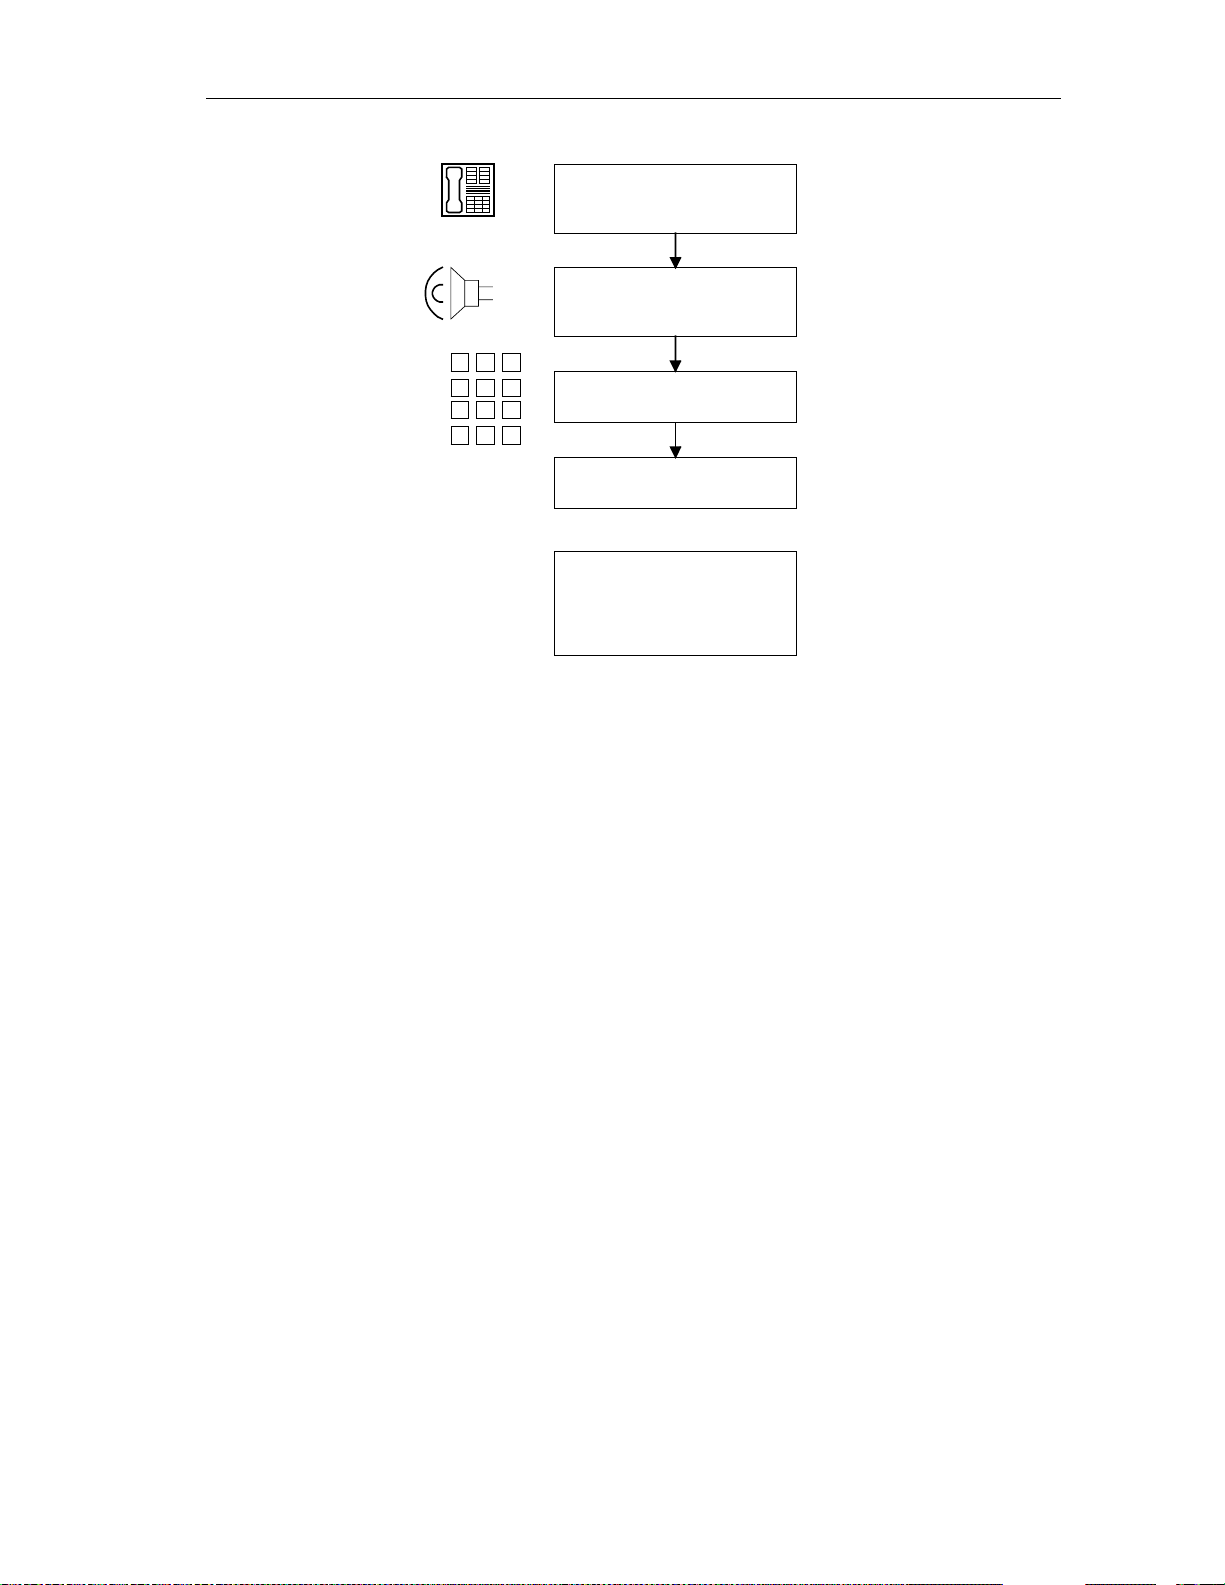
Message-Only Mailbox
A message-only mailbox takes messages and turns on the message light of the
associated extension. Unlike an extension mailbox, the phone does not ring after
the caller enters the extension number. Instead, Express Messenger immediately
asks the caller to leave a message.
A message-only mailbox does not require an associated extension. In this case,
Express Messenger cannot turn on a message light; instead, the mailbo x owner
must periodically check for messages.
Message-only mailboxes are for people who do not have telephones or who are not
in the office very often.
23
Page 26
Examples:
Out-of-town sales representatives
Delivery drivers
Part-time and seasonal employees
Frequent customers.
Figure 3 illustrates how a message-on ly mailbox works.
About Mailboxes
Telephone
1 2 3
4 5 6
7 8 9
KEYPAD
* 0 #
Device
Storage
Light
Outside caller initiates the
call
Express Messenger
answers an outside caller
with the company greeting
The caller enters an
extension number on the
keypad
The caller bypasses the
telephone and goes directly
to Express Messenger
Express Messenger asks
the caller if they wish to
leave a message
Express Messenger
records a message in the
associated mailbox
Express Messenger turns
on the telephone message
light (if available)
Figure 3 - Message-only Mailbox Calling Sequence
24
Page 27

About Mailboxes
Transfer-Only Mailbox
A transfer-only mailbox is associated with an extension but do e s not take
messages. When a caller dials this extension he will hear, "You are being
transferred to <mailbox name>." If the extension is busy or unanswered, Express
Messenger returns the caller to the company greeting. No message is taken.
Add transfer-only mailboxes for areas in your company where you need a
telephone but don’t wa nt mes sa ge s taken.
Figure 4 shows a Transfer-only mailbox calling sequence.
Telephone
1 2 3
4 5 6
7 8 9
KEYPAD
* 0 #
BELL
Outside caller initiates the
Express Messenger answers
an outside caller with the
extension number on the
unanswered, no message is
taken - Express Messenger
returns the caller to the
call
company greeting
The caller enters an
keypad
The station rings
If the line is busy or
company greeting
Figure 4 - Transfer-only Mailbox Calling Sequence
Examples:
Conference rooms
FAX machines
Modem hookups
Lab areas.
Information-Only Mailbo x
An information-only mailbox, also referred to as a bulletin board, is not associated
with a specific extension number and does not take messages. Instead, it plays a
greeting that provides information to callers. The information could be any
message that your company wants customers to hear but does not need a person to
say.
Figure 5 shows an Information-only mailbox calling sequence.
25
Page 28
Telephone
1 2 3
4 5 6
7 8 9
KEYPAD
* 0 #
About Mailboxes
Outside caller initiates the call
Express Messenger answers an
outside caller with the company
greeting
The caller enters an extension
number on the keypad
Express Messenger plays the
mailbox greeting, which is
information for the caller.
After listening to the information,
the caller can hang up, dial 0 to
reach the Operator, or dial
another extension number.
Figure 5 - Information-only Mailbox Calling Sequence
Examples:
Business hours
The company address
General announcements
Product updates.
Single-Digit Mailboxes
Mailboxes 1 through 8 are referred to as single-digit mailboxes, and can be any one
of the four types of general use mailboxes.
They are most effective when referenced in the company greeting, so that the caller
needs to enter only one number to receive the information they want or to reach the
most frequently dialed extensions.
Three typical uses for single-digit mailboxes follow. For the first two, assume
callers hear this company greeting, in which the numbers 1 and 2 refer to singledigit mailboxes.
"Thank you for calling ABC Industries. If you know the number o f t he person
you wish to reach, enter it now. For a personnel directory, press 9. For business
hours, press 1. To reach customer service, press 2. If you wish to speak to an
operator, press 0 or hold on the line."
26
Page 29
About Mailboxes
Example 1:
Mailbox 1 is an Information-Only mailbox. A typical greeting for mailbox 1 could
be:
"ABC Industries is open for business Monday through Friday from 9 am to 6 p.m.
and on Saturdays from 9am to 1 p.m.”
The caller listens to the information and hangs up when they are done.
Example 2:
Mailbox 2 is an Extension mailbox. For this example, we’ll assume extension 214
is the Customer Service telephone.
When the caller presses 2, extension 214 rings. The caller might hear the following
greeting if the telephone is busy or not answered.
"All of our Customer Service representatives are busy at the moment. Please leave
your name, telephone number and a brief message. Someone will get back to you
as soon as possible."
You need to record the appropriate name and greeting for mailbox 2 for this setup
to work correctly.
If extension 214 also belongs to a subscriber, such as th e customer service secretary,
callers can dial 214 directly to reach that person. The secretary can have a personal
greeting i dentif y ing him self or h erse lf as the own er of the mail box bu t only if Mai l box
2 is programmed as a Transfer-Only mailbox. Express Messenger saves all department
and personal messages in mailbox 214.
A subscriber can serve as the destination for any number of single-digit mailboxes.
NOTE: Always add a new single digit mailbox first before changing the
company greeting to refer to it.
Figure 6 shows the calling sequence for a Single-digit mailbox.
27
Page 30

About Mailboxes
Telephone
Device
Storage
2
Customer S ervice
Department
Mai lbox type: Transfe r-Only
Extension 214 rings
If line is busy or
unanswered, Express
Messenger asks the caller if
they wish to leave a
message
Express Messenger records
a message in the associated
mailbox (
214
)
214
Customer Service
Secretary
Light
Express Messe nger t urns on
the telephone message light
(if available)
Figure 6 - Single-digit Mailbox Calling Sequence
After a caller enters a single digit at the greeting, Express Messenger will wait to
see if another digit follows. To prevent this slight pause, assign single-digit
mailbox numbers that are not the first digit of other mailbox or extension numbers.
Example 3:
Mailbox 8 is programmed as the Language Change mailbox, a special mailbox
used to present callers with auto attendant voice prompts in a second language. In
this example, when a caller presses 8, all subsequent auto atte ndant prompts the
caller hears will be in French.
"Thank you for calling ABC Industries. For service in French, press 8."
You need to record pro mpts for mailbo x 2 in the appropriate language for this
setup to work correctly. For more information, see Recording System Greetings on
page 54.
28
Page 31

About Mailboxes
NOTES:
1) The language change applies to the current auto attendant se ssion only.
If the caller is returned to the voice mail system during the same call, the
system will again prompt the caller to select a language.
2) Bilingual prompts require Mitel Express Messenger Release 3.0 or later.
For more information, see Enabling the Bilingual Prompts Option on pag e 94 .
Menu Tree Maiboxes (Multi-Level Auto Attendant)
Menu Tree Mailboxes allow you to set up Multi-Level Auto Attendant (MLAA)—
a hierarchical menu structure that provides callers with better self-service access to
the department or person they're seeking. In an MLAA system, callers reaching the
Auto Attendant are routed from the main menu through to one or more additional
sub menus until their call is answered.
You can pro gram up to 10 menu levels with e ach level having its own greeting and
prompts. The greeting at the top level (called the main menu) is the primary
company greeting with the usual prompts to dial an extension number, “0” for a
live operator, and other digits to reach destinations such as Sales or Technical
Support. At the subsequent levels (the sub menus) the greetings prompt callers to
make further selections. The greeting for a Technical Support node might offer
choices based on product type as follows:
"For Express Messenger technical support, press 1. For NuPoint Messenger
technical support, press 2. For all other products, press 3. To return to the
previous menu, press star. To repeat the choices, press pound."
From this menu, dialing 1 or 2 transfers the caller to a technical support
representative. Dialing 3 might route the caller to yet another sub menu node with
more choices.
Note: The star and pound prompts help make the system easy to use. Be sure to
include them in your greetings, particularly the star prompt if you have multiple
menu levels.
An example:
The illustration on the next page shows a typical MLAA implementation. The
greeting at the top level is the main company greeting with the usual prompts to
dial an extension number, 0 for a live operator, and other digits to reach
destinations such as Sales (1) or Customer Support (2).
Mailbox 1 is a transfer-only mailbox that takes the caller to the Sales Manager who
has mailbox 2345.
Mailbox 2 is a Menu Tree mailbox. It takes the caller to a sub menu that plays the
following greeting:
"For Mitel Express Messenger, press 1. For NuPoint Messenger, pre ss 2. For all
other products, press 3. To return to the previous menu, press star.
choices, press pound
"
To repeat the
29
Page 32

About Mailboxes
“1” is an extension mailbox belonging to the Express Messenger
technical support phone (Extension 3456). The greeting for this mailbox
might be
"All of our technical support representatives are busy at the moment. Please leave
your name, telephone number and a brief message. Someone will get back to you
as soon as possible."
NOTE: If extension 3456 belonged to a subscriber, such as the secretary for the
technical support department, Mailbox 1 could be made a Transfer-Only mailbox
instead of an Extension mailbox. Callers could then dial 3456 to reach the secretary and
leave m essages f o r him or h e r . For more in formati on on setting up a Transfer- O n ly
mailbox for such an application, see Example 2 on page 27.
“2” is also an extension mailbox. It belongs to the NuPo int Messenger technical
support phone (extension 4567) and has a greeting similar to Mailbox 1.
“3” is a Menu Tree mailbox that takes the caller to another sub menu of choices.
The number for this Menu Tree mailbox is 5678. A single-digit mailbox could be
used but because there are so few on them, a regular extension mailbox is used
instead.
See page 40 for instructions on using a telephone to add Menu Tree Mailboxes and
page 45 for instructions on using Express Manager to adding the mail boxes.
30
Page 33

MLAA Call Processing
reach the Operator
extension number.
Transfer-Only
Outside caller initiates the call
About Mailboxes
Main Menu
Sub Menu
Express Messenger Auto Attendant answers
an outside call caller and plays the company
greeting – e.g., "Thank you for calling ABC
company. If you know the extension of the
person you are calling, enter it now. For
sales, press 1, for customer support, press
2, for assistance press 0, or stay on the
line."
The caller dials digits (actually
a mailbox number) on the
keypad.
Callers dial 2 for
Customer Support
Menu Tree
Mailbox 2
Caller hears greeting for sub menu
mailbox – e.g., "For Mitel Express
Messenger, press 1. For NuPoint
Messenger, press 2. For all other
products, press 3. To return to the
previous menu, press star."
Callers dial 1 for
Sales
Mailbox
Call transfers to associated
extension number – Sales
Manager, mailbox 2345 .
Caller enters 0 to
Call is transferred
to the Operator
Caller enters an
Extension Mailbox
Call transfers to associated extension
number, reverting to mailbox if extension busy or not answering.
Callers dial 1 for
Express Messenger
Extension
Mailbox 3456
Call transfers to extension 3456,
reverting to mailbox 3456 if the
extension is busy or not
answering.
Figure 6 – Multi-level Auto Attendant Call Processing Sequence
Callers dial 2 for
NuPoint Messenger
Extension
Mailbox 4567
Call transfers to extension 4567,
reverting to mailbox 4567 if the
extension is busy or not
answering.
Callers dial 3 for all
other products.
Menu Tree
Mailbox 5678
Caller hears greeting for sub
menu mailbox.
31
Page 34

About Mailboxes
Hospitality Mailboxes
The Hospitality Option for hotel or motel applicatio ns pr ovides two new types of
mailboxes: guest mailbox and front desk mailbox. These mailbox types are only
available if the Hospitality Option or PMS Option is enabled. See Enabling the
Hospitality Option on page 95 or Enabling the PMS Option on page 96.
Front Desk Mailbox
The front desk attendant uses the front desk mailbox to ad minister the guest
mailboxes. From the front desk mailbox, an attendant can
x help guests access their messages
x set the status of a guest mailbox to checked-in or checked-out
x set the language for the mailbox voice prompts (available in
systems with Mitel Express Messenger Release 3. 0 or later)
x move a guest’s messages to another mailbox
x access a guest’s mailbox
x access the standard voice mail features (the front desk mailbox
provides access to the Main Menu options for the front desk
extension mailbox).
Guest Mailboxes
Guest mailboxes are assigned to the telephone extension in each guest room. Guest
mailboxes provide guests with basic voice mail functionality. Guests can
x play messages that they have received
x create their own greetings
x set their own wake-up calls.
32
Page 35

About Mailboxes
About the Auto Attendant
Figure 7 illustrates the call processing steps that t he Auto Attendant uses. Some
important points of information follow:
x Callers dial a mailbox number even though they are prompted to
dial an extension or extension number. The mailbox’s associated
extension number is used to transfer the call. By default, a mailbox
extension number is the same as the mailbox number. You can
change the extension number by entering the mailbox see Edit
Mailbox on page 40.
x Single-digit mailboxes provide callers with easy to remember
numbers that get them to their party quickly. When callers press a
single-digit, they are accessing a mailbox number which is
associated with an extension number. Each extension is
programmed with a mailbox number to use for message storage
and retrieval. Therefore, messages for single-digit mailboxes are
routed to the mailbox number programmed on the phone.
33
Page 36

1 2 3
4 5 6
7 8 9
* 0 #
KEYPAD
BELL
Auto Attendant
Call Processing
Outside caller initiates the call
Express Messenger Auto
Attendant a nswers an outside
caller and plays the company
greeting
The ca ller d ials digits (a ctually
a mailbox numb er) on the
keypad
The statio n r ings
About Mailboxes
Any incoming external call that is made
Notes:
from a rotary phone to th e auto attendant is
automatically routed to the o p erator.
Any intern al ca ll that is made from a rotary
phone to the auto attendant is disconnected
after hearing the programmed greeting followed
by “Thank you for calling. Goodbye”.
Caller enters 0 to
reach the Operator
Call is tra nsferred
to the Operator
Call transfers to associated extension
number. When busy or no answer, call
rev erts to the mail box n u mber
programmed for the exte nsion
Extension Only
Information Only
Caller hears greeting for
mailbox number dialed.
Call sent directly to mail box numb er
Message Only
dialed
Transfer Only
Call transfers to associated
exte n sion number. When busy
or no answer, cal ler dial s 0 or
another mailbox number
Figure 7 - Auto Attendant Call Processing
34
Page 37

Changing Mailbox Parameters
Section 4: Changing Mailbox Parameters
You can modify any mailbox parameters that were set during initial installation.
This section tells you how to add, edit, and delete mailboxes, and perform general
Express Messenger maintenance.
The Mitel Express Messenger system is designed ar ound the functionality of the
mailbox, and much of its power comes from the flexibility you have in c us tomizing
mailboxes. The table below summarizes each mailbox type and the functions it
supports.
Many mailbox parameters can also be modified from a PC running Express
Manager. Within this section, access from a DTMF telephone is described first,
followed by access from Express Manager.
Function Extension Message
Only
Transfers caller
to the
associated
extension
Allows
transfers to the
operator
Plays the
mailbox
greeting or
information
Records a
message
Notifies users
of messages
Yes No Yes No Yes Yes Yes
Yes Yes Yes Yes Yes Yes Yes
Yes Yes No Yes Yes Yes Yes
Yes Yes No No No Yes Yes
Yes Yes No No No Yes Yes
Transfer
Only
Mailbox Type
Information
Only
Menu
Tree
Guest Front
Desk
35
Page 38

Changing Mailbox Parameters
Accessing the System Administrator’s Mailbox
You must log in to the administrator’s mailbox to modify Express Messenger
settings. Follow these steps to log in to the ad ministr a tor’s mailbox.
1. From any internal DTMF telephone, lift the handset and obtain dial
tone.
2. Dial the Express Messenger message center number. Express
Messenger answers and plays the greeting.
3. Press [*] when you hear the greeting.
4. Express Messenger prompts you for a mailbox number.
5. Enter the system administrator mailbox number: [99 or 999 or 9999].
6. Express Messenger prompts you for a passcode.
7. Enter the passcode for the System Administrator’s mailbox.
8. See Setting and Changing Passcodes on page 64 to change the
passcode or passcode length. You are now logged in to the system
administrator's mailbox. Follow the voice p r ompts for instructions or
use this section of the manual for reference.
Figure 8 shows the full system administrator menu.
36
Page 39

RAD GreetingsRAD Greetings
Changing Mailbox Parameters
RAD Greetings
Record RAD Greetings
Configure RAD
Greeting Set
Figure 8 - System Administrator Menu
37
Page 40

Changing Mailbox Parameters
New (or Repeat) Installation
Figure 9 shows the New Installation menu.
Main Menu
Add, Edit, Delete Mailbox -
Change Business Hours/
New Installation -
Set Date/Time -
System Greetings -
System Parameters -
Passcodes -
Distribution Lists -
Exit -
[]
*
Figure 9 - New Installation
When you perform a new installation, the only system parameter you must
overwrite is the FAX extension number. Note that if you are logged in as Manager,
the New Installation [1] option is not available.
All other system parameters, greetings, mailbox setups, date and time settin gs,
passcode length, and business hours are preserved. This allows you to upgrade the
PBX without having to re -enter greetings and mailboxes.
[1]
[2]
[3]
[4]
[5]
[6]
[7]
New Installation
Exit -
[]
*
Do not use the New Installation procedure to change your mailboxes. Instead, use
the Add Mailbox, Edit Mailbox, and Delete Mailbox procedures.
To re-install Express Messenger, follow these directio ns.
1. Access the System Administrator’s mailbox.
2. Select option number
[1] from the main administration menu, then
follow the prompts.
NOTE: If you had your dealer install Express Messenger initially, you
may want to have him or her perform the re-installation as well. If you did
the initial installation, then follow the original Insta llation Worksheets for
the new installation.
38
Page 41

Changing Mailbox Parameters
Add, Edit, or Delete a Mailbox from a Telephone
Add Mailbox
Add a mailbox when you need a new mailbox; if the mailbox already exists and
you want to change it, use the Edit Mailbox function. Figure 10 shows the Add
Mailbox menu.
NOTE: No one can use a mailbox until the system administrator adds it.
Mailbox Menu
Add Mailbox Edit Mailbox -
Delete Mailbox -
Exit -
Figure 10 - Add Mailbox Menu
To add a mailbox, follow this procedure:
[]
*
[1]
[2]
[3]
Add Mailbox
Enter Mailbox Number to add:
When Done -
[(n)(n)nn]
[#]
1. Access the System Administrator’s mailbox.
2. Enter
3. Enter
[2] for the Mailbox menu.
[1] for the Add Mailbox menu.
4. Enter the mailbox number to add.
5. Use the keypad to enter the first five letters of the first name or last
name (as defined) of the person assigned to this mailbox. Use 7 for Q
and 9 for Z.
If you do not want to include the mailbox in the directory, press [#] instead.
6. Press
[#] when finished.
To add single-digit mailboxes
1. Decide which single-digit mailboxes to use for what purpose.
2. Access the System Administrator's mailb ox.
3. Add each single-digit mailbox using the Add Mailbox procedure but do
not attach a name to the mailbox. When prompted for a name, press #
to skip to the next prompt.
39
Page 42

Changing Mailbox Parameters
NOTE: After you enter a single-digit , Express Messenger pauses to make
sure you are not entering more digits. Wait until Express Messenger
prompts you for the mailbox name before pressing [#].
4. Edit the mailbox using the Edit Mailbox procedure to associate it with
the proper extension number and to specify the mailbox type as either
extension or message only.
5. For each single-digit mailbox, create the proper greeting.
6. Create or change the company greeting, if desired, to include the
single-digit mailboxes.
To add a Menu Tree mailbox:
1. Access the System Administrator’s mailbox.
2. Add a mailbox for each sub-level menu using the procedure on the
previous page for adding mailboxes.
Using the following greeting as an example,
"Thank you for calling ABC company. If you know the extension of the person
you are calling, enter it now. For sales, press 1, for customer support, press 2,
for assistance press 0, or stay on the line."
create two mailboxes: one for sales and one for customer support.
Note: You do not ne ed to assign an extension to Me nu Tree mailbo xes.
3. Edit the mailbox using the Edit Mailbox procedure below to specify the
mailbox type as Menu Tree.
4. Log into each Menu Tree mailbox, using the mailbox’s number and
passcode.
5. Record a greeting with the required prompts – for example, “For Mitel
Express Messenge r, press 1. For NuPoint Messenger, press 2. For all
other products, press 3. To return to the previous menu, press star. To
repeat the choices, press pound ."
6. Assign the next level mailboxes to the digits specified in the greeting.
Continuing with the above example, assign digit 1 to the mailbox
belonging to the Express Messenger technical support phone and the
digit 3 to the mailbox belonging to the NuPoint Messenger technical
support phone.
40
Page 43

Changing Mailbox Parameters
Edit Mailbox
Edit an exi sting mail box t o chan ge one or m ore of the par amete rs that dete rm ine wh at
type of mailbox it is and how it functions. Figure 11 shows the Edit Mailbox menu.
NOTE: You cannot edit the System Administrator’s mailbox, number 99
or 999 or 9999.
The following chart lists the mailbox parameters you can change.
You cannot select an individual parameter to change; Express Messenger prompts
you through each one. Use the
[#] key to either end a numerical entry (telephone
and extension numbers) or to skip to the next parameter.
If nothing is entered after 4 seconds, Express Messenger repeats the prompt (up to
three times). Express Messenger exits the menu if you do not press a key by the
third prompt.
Mailbox Parameters
Parameter Description Length Remarks
Name Changes the mailbox name
used in the directory.
Passcode Resets the passcode on any
of the mailboxes.
Extension Associates a mailbox with
an extension number.
Notification
Type
There are five locations to
which you can send
notification to a user that
messages are waiting: to
any extension number, to
an outside number, and to
3 different types of pagers.
6 digits The 6 digits correspond to the first six
letters of the person’s name. Use the
correct name corresponding to the
directory (mailbox 9) listing selection
of either first name or last name.
If [*] is entered, the name will not be
listed in the directory.
3-6 digits If someone forgets their passcode, this
function resets it to the default code of
[999] or to a new code. You cannot
find out what the existing passcode is.
Note: When you reset a passc ode,
inform the user about it and remind
him or her to change it to change it to
secure his or her mailbox.
1-20 digits Enter the extension number of the
associated phone. Express Messenger
uses this to transfer calls and turn the
message waiting light on or off.
1 digit Express Messenger lists t he
notification types in a series of
prompts.
To disable notification, press [*].
For more information on this topic,
see the Setting Notification section.
41
Page 44

Changing Mailbox Parameters
Notification
Number
Notification
Access
Mailbox Type Sets mailboxes to be
Language Sets the lang uage for the
Sets the telephone number
to be dialed when a
message is received.
Allows the user to set their
own notific ation type and
number.
extension, message-only,
transfer-only, informationonly, menu tree, guest, or
front desk.
voice mail prompts that the
user of this mailbox hears.
This option applies only to
bilingual systems. For
more information, see
Setting the Voice Prompt
Language on page 84. See
also, Enabling the
Bilingual Prompts Option
on page 94.
1-35 digits This parameter will only be asked for
if notification is enabled.
To disable notification, press [*].
1 digit To enable user access, press [1].
To disable user access, press [2].
1 digit If [*] is entered, an extension mailbox
is automatically set.
The guest and front desk mailboxes
are only available if the Hospitality
Option is enabled.
1 digit Express Messenger lists the languages
in a series of prompts.
42
Page 45

Figure 11 - Edit Mailbox Menu
To edit a mailbox, follow these steps:
1. Access the System Administrator’s mailbox.
Changing Mailbox Parameters
2. Press
3. Press
[2] for the Mailbox menu.
[2] for the Edit Mailbox menu.
4. Enter the mailbox number to edit.
5. Follow the prompts and enter the changes for each parameter.
NOTE: Press
[#] if you do not need to change a parameter. Press [*] if
you want to reset to the default parameter.
6. Express Messenger returns you to the Mailbox menu after you have
altered or skipped the parameters.
An example of mailbox editing follows.
Example:
If Harry Smith forgets his passcode, do the following:
1. Access the Edit Mailbox menu.
2. Enter his mailbox number.
3. Press [#] to skip to the Passcode parameter.
4. Press [*] to reset his passcode to the default (all 9's).
5. Press [#] at each remaining parameter to skip it.
43
Page 46

Changing Mailbox Parameters
Delete Mailbox
When you delete a mailbox, you delete all messages, greetings, and the mailbox
name. Express Messenger does not inform you if there are still messages in the
mailbox. You would delete a mailbox belonging to an employee who has left your
company, an information-only mailbox you wish to discontinue, and so forth.
Figure 12 shows the Delete Mailbox menu.
Figure 12 - Delete Mailbox Menu
NOTE: You cannot delete the operator’s mailbox or the system
administrator’s mailbox.
Follow these steps to delete a mailbox:
1. Access the System Administrator’s mailbox.
2. Press
3. Press
[2] for the Mailbox menu.
[3] for the Delete Mailbox menu.
4. Enter the mailbox number to delete.
5. Press
[#] when done.
44
Page 47

Changing Mailbox Parameters
Add, Edit, or Delete a Mailbox from Express Manager
This provides a submenu, shown in Figure 13, allowing you to view the entire
mailbox directory or to change the settings of individual mailboxes.
Figure 13 - Mailboxes Menu
Display the Directory
Select System / Mailboxes / Directory to displa y a list of all mailboxes, displayed
in numerical order. Figure 14 shows an example of a company’s mailbox directory.
You cannot change mailbox information from within this directory.
Figure 14 - Mailbox Directory
NOTE: Some field values on the mailbox directory screen, such as user
names, may not appear in their entirety. Restricting the displayed length of
longer names allows display of other fields.
45
Page 48

Changing Mailbox Parameters
Add, Edit, or Delete a Mailbox
1. Select System / Mailboxes / Add, Edit, or Delete from the menu. Enter
the mailbox number to delete:
2. Enter the number of the mailbox and click Ok (see Figure 15).
Figure 15 - Specifying the Mailbox Number
A second window (Figure 16) appears. For Delete, the window in Figure 17
appears.
Figure 16 - Individual Mailbox Data Entry
3. Complete the entry fields using the following chart as a guide. Default
values display in some fields (you can change any of the default
values).
46
Page 49

Changing Mailbox Parameters
Add or Edit a Mailbox
Field: Enter as follows:
Directory Name Type up to a 21-character name to identify the user of the new mailbox. Enter the
name in the format you choose. Express Manager takes only the first two
characters for the directory in mailbox 9. Enter the name (first name first or last
name first) according to the option selected in the System Miscellaneous window.
This name also displays on the MAILBOX DIRECTORY windo w.
Passcode Type a 3 to 6-digit passcode. Express Messenger requires users to enter their
current passcode to retrieve their messages. The passcode is always displayed as
asterisks.
Note: The default passcode is all 9s. Only the user of each mailbox should change
it. Express Messenger automatically prompts subscribers to record their name and
permanent greeting the first time that they access their mailbox Express
Messenger continues to prompt subscrib er s until they change the default passcode.
If a user forgets his or her passcode, reset it entering all 9s. Tell the user the new
code and remind he or she to change it to secure his or her mailbox.
Extension Enter the extension number where you want Express Messenger to direct the calls
for this user mailbox. This is normally a 2 to 4-digit extension number but can be
up to 13 characters long. Do not use the following numbers: 0 (reserved for
operator), 9 (reserved for directory listing) or any other mailbox beginning with
the number 9 (reserved for system use). Default is extension number.
Operator
Extension
Sets the location to which calls are directed when a caller presses “0” while
listening to a mailbox greeting and recording prompt. A location can be any PBX
destination from 1 to 20 digits including extensions, external telephone numbers,
hunt group access codes and system abbreviated speed dialing numbers.
The default setting sends calls to Mailbox 0, the mailbo x usually reserved for the
company-wide operator. Specifying a destination other than the company-wide
operator is useful in multi-tenant applications where a voice mail system services
two or more businesses. With flexible Dial “0” destinations, each business can
redirect their calls to separate locations. The feature also enables you to
accommodate users who want callers to transfer to a departmental secretary, rather
than a company-wide operator.
NOTE: The Operator Extension cannot be set from the System
Administrator’s mailbox.
47
Page 50

Changing Mailbox Parameters
Add or Edit a Mailbox
Mailbox Type Click on the down arrow to the right of the field to display a menu, and then select
the type of mailbox to set up:
Extension: This is the typical mailbox type associated with an
extension. Express Messenger takes messages for a
busy or unanswered extension.
Information: This mailbox is for audio information for the caller to
only hear. The caller cannot leave a message. For
example, the message (or greeting) for this mailbox
could recite the company’s business hours or driving
directions to your location.
Message Only: Express Messenger does not transfer calls to this type
of mailbox. Express Messenger immediately plays the
mailbox greeting and prompts the caller to leave a
message.
Transfer Only: Callers transferred to this mailbox cannot leave a
message. They may hear a prerecorded informational
announcement or instructi on.
Menu Tree: Menu Tree M ailboxes allow you to set up a
hierarchical menu structure for multi-level auto
attendant (MLAA) operation. In an MLAA system,
callers reaching the Auto Attendant are routed from
the main menu through to one or more additional sub
menus until their call is answered. Express Messenger
plays greetings for this type of mailbox and transfers
callers to and from the mailbox.
Guest: A Guest mailbox provides hotel or motel guests with
basic voice mail features. Guests can play messages,
record their own greetings, and set up their own wakeup calls. This mailbox type is only available if the
Hospitality Option is enabled. See Enabling the
Hospitality Option on page 95 or Enabling the PMS
Option on page 96.
Front Desk Callers transferred to this mailbox cannot leave a
message. They may hear a prerecorded informational
announcement or instruction. This mailbox type is
only available if the Hospitality Option or PMS
Option is enabled. See Enabling the Hospitality
Option on page 95 or Enabling the PMS Option on
page 96.
48
Page 51

Changing Mailbox Parameters
Add or Edit a Mailbox
Language Click on the down arrow to the right of the field to display a menu, and then select
a language for the voice mail prompts that the user of this mailbox hears. Select
System Default to set the language to whatever was specified for the entire system
during installation.
Support for multilingual prompts requires MEM Release 3.0 or later. For
informatio n on upgrading your system, see Performing Upgrades on page 102.
(Messages)
A read-only field that displays the number of new messages in the user’s mailbox.
New
(Messages)
Saved
Max Number (of
messages)
A read-only field that displays the number of saved messages in the user’s
mailbox.
Enter a number up to 100 to specify the maximum number of messages that you
want Express Messenger to save in the mailbox.
(Message) Life Enter a number up to 99 specifying the number of days a saved message can
remain in the mailbox before Express Messenger automatically deletes it.
Use 0 to revert to the system default.
Use 99 to indicate that Express Messenger should never delete messages.
NOTE: New messages can remain in the mailbox indefinitely.
(Messages)
Envelope
Click on the field to display a menu. Select Play or No play if you want the user to
hear the priority, date and time, plus caller ID information for each message.
Play: Automatically plays the message envelope with each message;
no user input r equired.
No play: Suppresses the message envelope; the user must press a key to
hear the envelope.
49
Page 52

Changing Mailbox Parameters
Add or Edit a Mailbox
(Notification)
Type
Click on the arrow to the right of the field to display a menu. Select the device on
which Express Messenger calls the user (the system must have the Notification
function turned on to activate paging for any mailbox). Double click the required
device.
Digital Pager: Tells Express Messenger to notify the subscriber at a digital-
type pager.
Disabled: Express Messenger should not notify the subscriber.
Extension: Tells Express Messenger to notify the subscriber at an inside
extension.
Message Pager: Tells Express Messenger to notify the subscriber at a
message-type pager.
Telephone: Tells Express Messenger to notify the subscriber at an outside
telephone number.
Tone Pager: Tells Express Messenger to notify the subscriber at a tone-
type pager.
NOTE: If there is no number in the Notification Number field,
notification cannot occur even if you enable it.
(Notification)
Schedule
(Notification)
User Access
(Notification)
Number
Click on the down arrow next to the field to display a menu. Select when you
want Express Messenger to notify the user.
Around The Clock: Express Messenger notifies the subscriber whenever a
message arrives.
Disabled: Express Messenger does not notify the subscriber.
Closed: Express Messenger notifies the subscriber only during
closed business hours.
Open: Express Messenger notifies the subscriber only during
open business hours.
Enabled: User can change his or her pager number.
Disabled: User cannot change his or her pager number. The system
administrator must change it.
Enter the telephone number (up to 35 digits) for Express Messenger to call for
user notification. Valid digits include 0 to 9, and the [*], [#], and [,] keys.
50
Page 53

Changing Mailbox Parameters
Add or Edit a Mailbox
Personal Contact
or Menu Node
Routing
Numbers
Personal Contact Enter numbers (cell phone, pager, fax, extension
Numbers: etc.) where callers can contact a mailbox owner instead of
leaving a message. Callers reaching the owner’s mailbox
will hear the owner’s greeting followed by prompts such as
"...to reach this person’s cell phone, press C, the 2 key."
Callers responding to a prompt will be transferred to the
corresponding number.
Extension-type mailboxes can be programmed with up to
ten contact numbers, one to each digit key [0] through [9].
Key [2] is reserved for cellular phone numbers, key [3] for
fax numbers, and key [7] for pager numbers. The prompts
for the reserved keys are predefined (i.e., “canned”) and
play in the language specified for the mailbox. The [0] key
is normally the ‘transfer to operator’ key. If it is
reprogrammed as a personal contact key, and you later
wish to return it to a “transfer to operator” key, then delete
the entry in the 0 field, leaving it blank.
Guest-type mailboxes are limited to two contact numbers:
one for cell phone, the other for pager.
NOTE: The Personal Contact Numbers feature can
be enabled or disabled system-wide. For more
information see page 86.
Menu Node Applies to Menu Tree mailboxes used for Multi-level auto
attendant. Enter the mailbox number where calls should go
when a caller presses the associated key. The greeting
recorded for the Menu Node mailbox prompts callers for
the key, as in the following greeting:
For Mitel Express Mes se nger, press 1. For NuPoint
Messenger, press 2. For all other products, press 3.
NOTE: Once you have added a mailbox to Express Messenger, instruct the
new user to access the mailbox and record his or her name and personal
greeting. This is a good time to give the user a User Guide and to let the
user follow step-by-step instructions on how to per so nalize a mailbox.
51
Page 54

Changing Mailbox Parameters
Deleting a Mailbox
Select Delete from the System / Mailboxes menu; the window in Figure 17
appears.
1. Enter the number of the mailbox you want to delete in the Delete
Mailbox window.
Do not delete the following mailboxes:
0 (reserved for operator)
9 (reserved for directory listing)
Any mailbox beginning with the number 9 (reserved for system use).
Figure 17 - Deleting a Mailbox
2. Select Ok to delete the mailbox. A confirmation window (Figure 18)
appears to verify the mailbox you want to delete.
Figure 18 - Confirmation Window
52
Page 55

Performing System Administration from a Telephone
Section 5: Performing System Administration
from a Telephone
Setting Date, Time, and Business Hours
During Express Messenger installation, your Express Messenger dealer should
have set the date and time. You have the option to allow Express Messenger to
monitor the PBX system time so that date and time changes you make on your
PBX will be automatically inherited by Express Messenger, thereby keeping the
two system times in synchronization. In this case, you should not have to rep eat the
process of updating the date an time on Express Messenger.
Business hours are the opening and closing times for your company. They can be
different for each day of the week. Figure 19 shows the Date/Business Hours
menu.
Figure 19 - Date/Business Hours Menu
Setting Date and Time
Follow these steps to set the date and time:
1. Access the System Administrator’s mailbox.
2. Press
3. Press
4. Enter the month, day, and year, using two digits for each:
5. Enter the current time, using four digits, in the 24-hour format:
Express Messenger returns you to the Date/Business Ho urs menu.
[3] for the Date/Business Hours menu.
[1] for the Set Date/Time menu.
- for example, 061100 = June 11, 2000.
The date format for French is
[hhmm] – for example, 1420 = 2:20 PM.
[ddmmyy].
[mmddyy] -
53
Page 56

Performing System Administration from a Telephone
Checking Date and Time
Follow these steps to check the date and time:
1. Access the System Administrator’s mailbox.
2. Press
3. Press
4. Press
Express Messenger returns you to the main Date/Business Hours menu.
Setting Business Hours
Follow these steps to set business hours:
1. Access the System Administrator’s mailbox.
2. Press
3. Press
4. Express Messenger cycles through the days of the week asking you to
[3] for the Date/Business Hours menu.
[1] for the Set Date/Time menu.
[#] to skip the entry of the date, then again to skip entry of the
time. Express Messenger then reports the date and time currently
entered on the system.
[3] for the 'Date/Business Hours' menu.
[2] for the 'Set Business Hours' menu.
input the opening and closing times for each day, beginning with
Sunday. If your business will not be open on the day listed, enter
[0000] for both the opening and closing times.
Enter the opening time (in 24-hour format):
[hhmm].
Enter the closing time (in 24-hour format): [hhmm].
Express Messenger returns you to the Date/Business Ho urs menu.
Recording System Greetings
In the System Greetings menu, you record a company greeting for Express
Messenger to use when answering the telephone. For hotel/motel applications, you
also record a greeting that guests hear when they call Express Messenger to
retrieve messages or set wake-up calls. There are three types of greetings: a
primary greeting set, an alternate greeting set and a RAD greeting set (RAD stands
for Recorded Announcement Device. Express Messenger can provide RAD
functionality on any of its ports. For more information, see pa ge 88.) Each of these
sets has an open greeting, a closed greeting, and a temporary greeting.
shows the System Gre etings menu.
For bilingual systems, you record a welcome greeting and a set of primary,
alternate, and temporary greetings in the two languages—for example, English and
French.
Figure 20
54
Page 57

Performing System Administration from a Telephone
Open Greeting –
Open Greeting –
For All Greetings
x
Record Greeting:
Re-record –
For Temporary Greetings
x
Enter number of days:
x
Record Greeting
For Bilingual Greetings
Record Greeting:
In default language –
In alternate language –
Accept –
Review –
Cancel – [
[n] or [nn]
[1]
[2]
[3]
]
[1]
[2]
System Greeti ngs
Primary Greeting –
Alternate Greeting –
(assign number)
Guest Login Greeting –
]
Exit – [
[1]
[n]
[9]*
Primary G reeting
Closed Greeting –
Temporary Greeting –
Bilingual Welcome Greeting –
]
Exit – [
Alternate Greeting
Closed Greeting –
Temporary Greeting –
Bilingual Welcome Greeting –
]
Exit – [
[1]
[2]
[3]
[4]**
[1]
[2]
[3]
[4]**
* Requires Hospitality Option or PMS Option
** Requires Bilingual Voice Prompts Option
Figure 20 - The Greetings Menu
The Primary greeting set contains the greetings recorded during installation, which
Express Messenger uses until you record and assign an Alternate greeting set.
You can record up to 8 alternate greeting sets (numbered 2 through 9), and assign
each set to a different Express Messenger port. This feature provides flexibility.
For example, two or more businesses can share a single PBX and Express
Messenger unit, or a single business can have specialized greetings for 800
numbers. Assigning alternate greeting sets to Express Messenger ports is done
through the System Parameters menu. However, determining which outside lines
each Express Messenger port should answer is done through PBX programming.
Call your Express Messenger deal e r for assistance.
Both the primary and alternate greeting sets have open, closed, and temporary
greetings. Selection of the proper greeting occurs as follows:
x If the PBX Night/Day Switching mode is set to Day service and
you enable synchronization of the PBX system time, the system
plays the open greeting to callers.
x If the PBX Night/Day switching mode is set to Night1 or Night2
service and you enable synchronization of the PBX system time,
the auto attendant plays the closed greeting to callers. For example,
if someone forgets to activate Night mode before closing the office
when Night/Day Switching is enabled, the auto attendant plays the
open greeting to all callers regardless of the system time. If you do
not enable synchronization with PBX time, Express Messenger
references the business hours specified during initial installation. It
plays the open greeting when your company is open and the closed
greeting when your company is closed.
x The temporary greeting overrides both the Night/Day Switching
mode and System Business Hours and plays to all callers for the
number of days you specify.
55
Page 58

Performing System Administration from a Telephone
For bilingual systems, you must record a bilingual welcome greeting that includes
an instruction to dial the Language Change Mailbox number. When callers dial the
number, all subsequent prompts Express Messenger plays will be in the alternate
language.
Primary Greeting Set
Follow these steps to record the primary greeting set:
1. Access the System Administrator’s mailbox.
2. Press
3. Press
[4] for the System Greetings menu.
[1] to set the primary greeting.
4. If prompted, press [1] to assign greetings in the default system
language or [2] for the alternate language.
5. Follow the instructions on the next page(s) for assigning Open, Closed
or Temporary greetings for your primary greeting set.
Alternate Greeting Set
Follow these steps to record an alternate greeting set:
1. Access the System Administrator’s mailbox.
2. Press
[4] for the System Greetings menu.
3. Select a number, 2 through 9, for an alternate greeting set.
4. Follow the instructions on the next page(s) for making Open, Closed, or
Temporary greetings for your alternate greeting set.
56
Page 59

Performing System Administration from a Telephone
Open or Closed Greetings
To set open or closed greetings for a primary or alternate greeting set:
1. After making your selection for either a primary or an alternate greeting
(from the previous page):
2. Press
[1] for an Open greeting.
-or-
3. Press
[2] for a Closed greeting.
4. If prompted, press [1] to assign greetings in the default system
language or [2] for the alternate language.
5. Record the greeting speaking clearly into a handset, not a speaker
phone.
6. Press any key to stop recording.
7. After recording, select one of the following options:
[1] Accept
[2] Review
[3] Re-record
[*] Cancel
Express Messenger returns you to the ’System Greetings’ menu.
If you are recording bilingual greetings, repeat the above procedure beginning at
step 2 for the other language.
Temporary Greetings
Temporary greetings are used during the holidays or vacation periods, which last
only a few days or weeks. A temporary greeting overrides both the open and closed
greetings. An example of a t emporary gr eeting is given below.
"Happy Holidays from all of us at ABC Company. We are closed from Friday,
December 23 until Monday, January 2. To leave a message, enter the number of
the person you wish to reach or press 9 for the directory."
You are first prompted for the number of days, between 01 and 99, that the
greeting should play. After that, follow the same sequence as the open and closed
greetings: record the greeting, then select from the available options. To cancel an
existing temporary greeting, enter 00 for the number of days.
To set temporary greetings for a primary or alternate greeting set:
1. Choose the primary or alternate greeting set and then press
[3] to create
a temporary greeting.
2. Enter the number of days for the greeting to play:
[nn]
3. Enter a 2-digit number between 01 and 99. If you enter 00, the greeting
is canceled.
4. If prompted, press [1] to assign greetings in the default system
language or [2] for the alternate language.
57
Page 60

Performing System Administration from a Telephone
5. Record the greeting, speaking clearly into a handset, not a speaker
phone.
6. Press any key to stop recording.
7. After finishing, select one of the following options:
[1] Accept
[2] Review
[3] Re-record
[*] Cancel
Express Messenger returns you to the ’System Greetings’ menu.
To disable an existing temporary greeting, first record something over the current
greeting, then select ‘00’ for the number of days.
If you are recording bilingual greetings, repeat the above procedure beginning at
step 2 for the other language.
Bilingual Welcome Greeting
The Bilingual Welcome Greeting is the fi rst greeting that the Expre ss Messenger
Auto Attendant plays when it answers an outside call. You record the greeting in
the two languages specified during installation of Express Messenger. Include in
the greeting an instruction to callers to dial the Language Change Mailbox number
for service in the alternate language. The default Language Change Mailbox
number is 8.
The Bilingual Welcome Greeting is only available if the Bilingual Voice Prompts
Option is enabled. See page 94 for more information.
Follow these steps to record the Bilingual Welcome Greeting:
1. Access the System Administrator’s mailbox.
2. Press
3. Press
4. Press
[4] for the System Greetings menu.
[1] to set the primary greeting.
[4] to set the bilingual welcome greeting.
5. Record the greeting, speaking clearly into a handset, not a speaker
phone. The following, is a typical bilingual in English and French:
“Thank you for calling ABC Industries. Merci d’appeler les Industries ABC.
Pour le service en francais, composez 8.”
6. Press any key to stop recording.
7. After finishing, select one of the following options:
[1] Accept
[2] Review
[3] Re-record
[*] Cancel
Express Messenger returns you to the ’System Greetings’ menu.
58
Page 61

Performing System Administration from a Telephone
Guest Login Greeting
The Guest Login Greeting plays when Express Messenger answers a call from a
telephone assigned to a guest mailbox.
The Guest Login Greeting is only available if the Hospitality Option ( with or
without PMS Support). See page 95 for more information.
Follow these steps to record the Guest Login Greeting:
1. Access the System Administrator’s mailbox.
2. Press
3. Press
[4] for the System Greetings menu.
[9] to set the Guest Login greeting.
Record the greeting, speaking clearly into a handset, not a speaker phone. For
bilingual systems, record the greeting in both languages.
4. Press any key to stop recording.
5. After finishing, select one of the following options:
[1] Accept
[2] Review
[3] Re-record
[*] Cancel
Express Messenger returns you to the 'System Greetings' menu.
59
Page 62

Performing System Administration from a Telephone
Setting or Changing System Parameters
The System Parameters menu allows you to set the FAX extension, port greetings,
access codes for the Send Message and Wake-up features, synchronization with the
PBX clock and Day/Night Service mode, the Language Change Mailbox number,
and the function of the Serial Port on the Express Messenger card. Figure 21 shows
the System Parameters menu.
Figure 21 - System Parameters Menu
Setting the FAX Extension
FAX Finder instructs Express Messenger to direct an incoming FAX tone to the
FAX machine at the selected extension, eliminating the need for a dedicated
outside line.
Identify the extension number to which your FAX machine is connected, as
follows:
1. Access the System Administrator’s mailbox.
2. Press
3. Press
4. Express Messenger asks if you want the FAX feature enabled.
5. To enable the FAX feature, press
6. If you enable the FAX feature, Express Messenger asks you to enter the
[5] for the System Parameters menu.
[1] for the Set FAX Extension menu.
[1]; otherwise, press [2].
extension number of the FAX machine. Enter the extension number.
NOTE: Express Messenger will not allow you to set the FAX
extension to either the operator, 0, or the system administrator, 99 or
999 or 9999.
Express Messenger returns you to the System Parameters menu.
60
Page 63

Performing System Administration from a Telephone
Setting Port Greetings
You can assign different greetings for each Express Messenger voice mail port,
either the primary greeting set or one of eight alternate greeting sets. For example,
if you have a 4-port system, you can assign one set of gr eetings for the first two
ports and a different set of greetings for the last two ports.
The System Parameters menu assigns alternate greeting sets to Express Messenger
ports. However, PBX programming determines which outside lines each Express
Messenger port should answer.
To assign greetings to Express Messe nger ports:
1. Access the System Administrator’s mailbox.
2. Press
3. Press
[5] for the System Parameters menu.
[2] for the Assign Greetings menu.
4. For each port, Express Messenger asks if the caller should hear the
primary greeting or an alternate greeting.
For the primary greeting set, enter:
[1]
For an alternate greeting, enter the greeting set number: [n]
After you respond for each port, Express Messenger returns to the Sy st em
Parameters menu.
Setting the Send Message Feature Access Code
The PBX requires a Send Message Feature Access Code to allow Express
Messenger to send a command to light or extinguish the Message Lamp at the
selected extension, eliminating the need for a dedicated outside line.
1. Access the System Administrator’s mailbox.
2. Press [5] for the System Parameters menu.
3. Press [3] for the Set Send Message Feature Access Code menu.
4. Express Messenger asks you to enter the Send Message Feature Access
Code.
5. Enter the feature access code, as provided by the PBX installer.
61
Page 64

Performing System Administration from a Telephone
Synchronizing Express Messenger with the PBX Time
You can use either the PBX clock or the Express Messenger internal clock as the
time source for the Express Messenger system. By default, the system uses its
internal clock.
1. Access the System Administrator’s mailbox.
2. Press [5] for the System Parameters menu.
3. Press [4] for the Set Clock Source menu.
4. Press [1] to set the PBX clock as the time source
or
Press [2] to set the Express Messenger internal clock as the time source.
Synchronizing Express Messenger Greetings with the PBX Day/Night Setting
You can set the system to use the open or closed greeting based on the PBX
Day/Night mode settings or based on the Express Messenger business hours. By
default, the system uses the E xpress Messenger business hours.
The PBX installer must set the PBX clock to the correct format for the PBX
Day/Night mode to function. See the Installation Worksheet (Form 04: Clock
Format) for the required PBX programming.
1. Access the System Administrator’s mailbox.
2. Press [5] for the System Parameters menu.
3. Press [5] for the Set Greeting Control menu.
4. Press [1] to select the PBX Day/Night mode settings
or
Press [2]
to select the Express M essenger business hours.
Setting the Wake-up Feature Access Cod e
This feature access code applies to systems that have the Hospitality Option
enabled. Guests dial the access code to set and cancel automatic wake-up calls. The
code must match the code that you programmed in Form 02 of the PBX (refer to
the Installation Worksheet).
1. Access the System Administrator’s mailbox.
2. Press [5] for the System Parameters menu.
3. Press [6] for the Wake-up Feature Access Code menu.
4. Enter the feature access code, as provided by the PBX installer.
62
Page 65

Performing System Administration from a Telephone
Setting the Language Change Mailbox Number
You can program the system to provide voice prompts in a second language. When
callers reach the auto attendant or a subscriber’s mailbox, they can dial the
Language Change Mailbox number spe cified in the greeting to hear subsequent
prompts in the second language.
NOTE: Bilingual voice prompts is a feature of Mitel Express Messenger
Release 3.0. For information on enabling bilingual prompts, see page 94.
1. Access the System Administrator’s mailbox.
2. Press [5] for the System Parameters menu.
3. Press [7] for the Language Change Mailbox menu.
4. Press [1] to enable the Language Change mailbox or Press [2] to
disable it.
5. Enter the mailbox number.
Setting the Serial Port Function
The serial port on the Express Messenger card can be set to communicate with a
PC running Express Manage r or a Hyatt Encore or HIS Property Manage ment
System (PMS). Connecting a PMS to Express Messenger requires the PMS Option;
for more information, see page 96.
You can switch the port from PMS to Express Manager to make changes to the
voicemail system at any time. When communication with the PMS is restored,
Express Messenger will automatically update its database with mailbox status
changes made from the PMS.
NOTE: Because Express Messenger cannot indicate check-ins and check-
outs to the PMS, guests should always be checked in and out from the
PMS. For a complete list of PMS functions supported, see Appendix E.
1. Access the System Administrator’s mailbox.
2. Press [5] for the System Parameters menu.
3. Press [8] for the Serial Port Function menu.
4. Press [1] to set the serial port function to Express Ma nager, [2] to set
the port to Hyatt Encore PMS, or [3] to set the port to HIS PMS.
5. Set the communications parameters on the PMS terminal to match the
Express Messenger card.
Hyatt Encore HIS
Baud Rate: 1200 2400
Parity: Even Even
Character length: 7 7
Number of stop bits: 1 1
63
Page 66

Performing System Administration from a Telephone
Setting and Changing Passcodes
The default setting for the Administrator Passcode is [1234]. To preserve system
security, change the administrator passcode so only you and your bac kup person
know wh at it is.
You can change the passcode length, system-wide, to any length between three and
six digits (Default is 4 digits). You may also assign a second Manager p asscode to
the system administrator’s mailbox to provide limited administratio n privileges.
Figure 22 shows the Passcode menu.
Main Menu
New Installation-
Add, Edit, Delete Mailbox -
Change BusinessHours/
Set Date/Time -
System Greetings-
System Parameters-
Passcodes-
Distribution Lists -
Exit -
[]
*
[1]
[2]
[3]
[4]
[5]
[6]
[7]
Set Passcode-
Change Length-
Set ManagerPasscode -
Exit -
[]
*
[1]
[2]
[3]
Figure 22 - The Administrator Passcode Menu
NOTE: You can also re set passcodes for users that ha ve forgotten t hem.
See page 41 for information on doing this from a telephone, or page 46 to
do it from Express Manager.
Changing the Administrator Passcode
To change the administrator passcode:
1. Access the System Administrator’s mailbox.
2. Press [6] for the Passcode menu.
3. Press [1] to change the passcode.
4. Express Mes s enger asks fo r the new passc ode. You may use any keys
on the keypad except [
] and [#].
*
Enter your new passcode: [nn...n]
5. Express Messenger asks you to confirm the new passcode.
6. Enter the passcode again: [nn...n]
Express Messenger returns you to the Passcode menu.
Changing the Passcode Length
The passcode length can be between three and six digits. If passcode length is
changed, all existing passcodes will either be truncated (right-most digits cut off)
or lengthened (zeroes added as right-most digits).
64
Page 67

Performing System Administration from a Telephone
To change the administrator passcode l ength:
1. Access the System Administrator’s mailbox.
2. Press [6] for the Passcode menu.
3. Press [2] to change the passcode length.
4. Express Messenger asks for the new passcode length; valid choices are
between 3 and 6 digits.
Enter the new passcode length: [n]
NOTE: All passcodes on the s ys tem will be this new length, the
administrator passcode as well as user passcodes. Notify all
subscribers before making this change.
Express Messenger will confirm the new length and return you to the
Passcode menu.
Changing the Manager Passcode
You may assign a second passcode (called the Manager Passcode) to the system
administrator’s mailbox. This passcode allows the user to perform all system
administration functions except the following:
x Installing a new Express Messenger
x Changing the system administrator or manager passcode
x Changing the system passcode length
To change the manager passc ode:
1. Access the System Administrator’s mailbox.
2. Press [6] for the Passcode menu.
3. Press [3] to change the manager passcode.
4. Express Mes s enger asks fo r the new passc ode. You may use any keys
on the keypad except [*] and [#].
5. Enter your new passcode:
Express Messenger asks you to confi rm the new p asscode.
6. Enter the passcode again:
Express Messenger returns you to the Administrat io n Pa ssco d e me n u.
[nn...n]
[nn...n]
Creating Distribution Lists
Both you and your subscribers can set up distributio n list s co ns isting of multiple
mailbox numbers. This feature makes it easier to send or forward a message to a
group of people.
65
Page 68

Performing System Administration from a Telephone
Distribution list number 00 is alread y set up to allow subscribers to broadcast a
message to every mailbox in the system. As a System Administrator, you can set
up global distribution lists, numbered 01to 04, which all subscribers can use but
cannot change. In addition, distribution lists numbered between 05 and 09 may be
set up by subscriber to broadcast a message to each mailbox in the
respective list.
Figure 23 shows the ’Distribution Lists’ menu.
Distribution Lists
Select Dist List No. -
Exit -
[]
*
[nn]
AddtoList-
Review List -
Delete from List -
Name List -
Exit -
[]
*
[1]
[2]
[3]
[4]
Enter Mailbox Number
to Add:
[(n)(n)nn]
When Done -
Enter Mailbox Number
to Delete:
[(n)(n)nn]
[#]
Figure 23 - The Distribution Lists Menu.
Add To A Distribution List
To create a new distribution list or to add mailbox numbers to an existing list:
1. Access the System Administrator’s mailbox.
2. Press
[7] for the Distribution Lists menu.
3. Enter a 2-digit distribution list number, 01 to 04.
4. Press
[1] to add mailbox numbers to this list.
After you enter each mailbox number, Express Messenger confirms that the
number has been added. Continue to add mailbox numbers until all are
entered.
If you enter a mailbox number that already exists, Express Messenger tells you
the number is a duplicate but Express Messenger does not enter the number
twice.
5. Press [#] when you enter the last mailbox number to stop adding.
Review A Distribution List
To review an existing distribution list:
1. Access the System Administrator’s mailbox.
2. Press [7] for the Distri bution Lists menu.
3. Enter a 2-digit distribution list number, 01 to 04.
66
Page 69

Performing System Administration from a Telephone
4. Press [2] to review the mailbox numbers in this list.
Provided the list contains mailbox numbers, Express Messenger itemizes the
mailboxes contained in the list by speaking the name associated with each
mailbox. If no personal names are recorded, Express Messenger reads all the
mailbox numbe r s to you.
5. Press any key to interrupt the review and return to the Dist ribution Lists m enu.
Delete From Distribution List
To delete a mailbox from an existing distribution list:
1. Access the System Administrator’s mailbox.
2. Press
3. Enter a 2-digit distribution list number, 01 to 04.
4. Press
5. Enter the number of the mailbox to be deleted. Express Messenger
Name A Distribution List
To record a name for a distribution list:
1. Access the System Administrator’s mailbox.
2. Press
3. Enter a 2-digit distribution list number, 01 to 04.
4. Press
5. Press any key to stop recording. Express Messenger returns you to the
[7] for the Distribution Lists menu.
[3] to delete a mailbox number from this list.
confirms that the mailbox number is deleted and returns you to the
Distribution Lists menu.
[7] for the Distribution Lists menu.
[4] to record a name for this list.
Distribution Lists menu.
Message Notification
This feature allows users to be notified whenever messages arrive in their mailbox.
Express Messenger supports five types of notification:
x To an internal extension (that does not have a message indicator).
x To an outside telephone number.
x To a message pager.
x To a tone-only pager (or beeper).
x To a digital pager.
A notification number can be assigned for each Express Messenger mailbox
subscriber.
67
Page 70

Performing System Administration from a Telephone
How It Works
For internal extension numbers and outside phone numbers:
1. Express Messenger calls the notification number when the subscriber’s
mailbox receives its first new message. It does not call for subsequent
messages.
2. Express Messenger action depends on the response at that number:
If the notification number is busy or does not answer, Express Messenger
tries calling again at each quarter hour (hh:00, hh:15, hh:30, or hh:45).
This procedure is repeated twice for no answer status, three times for busy
status. The message light on the user’s phone remains lit until the user
saves or deletes a ll new messages.
If the phone is answered, Express Messenger prompts for the user’s
passcode. The user can listen to their message immediately.
For pagers:
Every time the subscriber’s mailbox receives a new message, Express Messenger
calls the notification number.
If the notification number is busy or does not answer, Express Messenger
tries calling again at each quarter hour (hh:00, hh:15, hh:30, or hh:45).
This procedure is repeated twice for no answer status, three times for busy
status. The message light on the user’s phone remains lit until the user
saves or deletes a ll new messages.
Express Messenger starts the paging procedure again every time a new
message arrives.
68
Page 71

Performing System Administration from a Telephone
Using Pagers
x Pager Types
There are three types of pagers Express Messenger can use: a beeper (or toneonly), a messaging type, and a digital type. The following table describes, in
general, how Express Messenger works with each page r type. The process can
change depending on the pager number parameters you enter for individual
mailboxes.
Pager Type How Express Messenger Works
Tone-only Dials the phone number of the pager.
Message Dials the phone number of the pager and announces:
"(Name) ... You have new messages. Please access your
mailbox through the pager speaker.”
Digital Dials the phone number of the pager and displays:
(remainder of pager number) 555*1212* (mailbox
number)
Change ‘555-1212’ to your company’s telephone
number using Express Manager.
x Pager Number Parameters
Pager numbers can vary in length, but so me pagers require pauses or other
actions to occur within the pager number. The [
specific actions as shown in the following chart.
Command Function Audio
Playback
*1 Pause 1 second “comma” ,
*3 Dials the [#] key “pound” #
*4 Wait for dial tone “star 4” W
*5 Wait for answer “star 5” X
*6 Do not wait fo r
answer
*7n Pause n seconds,
where n is between
1 and 9 seconds
“star 6” Y
“star 7
(1-9)”
] key plus a digit define these
*
Displays in
Express
Manager as...
P(1-9)
**
Dials the [*] key “star” *
69
Page 72

Performing System Administration from a Telephone
x Helpful Tips for Setting Up Pager Notification
Each pager needs its own distinct number sequence to work correctly.
When you set up the pager number in a mailbox, the subscriber should
supply you with the characteristics and requirements of their pager.
There is a 35-character limit to the total number of digits in a pager
number.
The *5 (wait for answer) parameter takes affect at the point where Express
Messenger first encounters it in the pager number. Any subsequent *5
parameters are ignored. If the call is answered and the pager is digital,
Express Messenger dials the remainder of the pager number followed by
the call back number (555-1212 unless changed) and mailbox number.
Use the *6 (do not wait for answer) parameter for time-based pagers.
Express Messenger does not wait for any signals to perform the action
dictated by the pager type: play a prompt or display the call back number.
You must place the *6 parameter at the end of the pager number.
In the absence of a *5 or *6 parameter in the pager number, Express
Messenger dials the entire mailbox pager number and waits for an answer.
If the call is answered, it performs the action dictated by the pager type:
plays a prompt or displays the call back number.
If you have a digital pager and decide to put the callback number and
mailbox number in the mailbox notification number, include a ‘Do not
wait for answer’ command (*6) in the notification number and make it a
beeper type (‘tone-only’) pager. Doing this prevents Express Messenger
from dialing the system-wide callback number.
70
Page 73

Performing System Administration from a Telephone
x Pager Examples
Assume that the pager number is 123-4567, the subscriber’s pin number is
54321, and the mailbox number is 201.
To specify this action on a
digital pager...
Dial the pager number
Wait for an answer
Display the call back number and
mailbox numb er
Dial the pager number
Wait for an answer
Pause 2 seconds
Dial a pin number
Pause 3 seconds
Display the call back number and
mailbox numb er
Dial 9 for outside line
Dial the pager number
Do not wait for an answer but wait
three seconds
Enter this pager number... Subscriber sees...
1234567 5551212*201
1234567*5*7254321*73 5551212*201
91234567*73201*72201*72201*6
20120101551212*201
Display the mailbox number three
times separated by a two second
delay
Display the call back number and
mailbox numb er
71
Page 74

Performing System Administration from a Telephone
Setting Up Notification
Before notification can take place, either:
1. Edit the mailbox associated with each user requiring notification and
enter the notification type and number. This process causes notification
to be on 24 hours a day for the user.
NOTE: Each user can turn their notification off or adjust the
notification schedule as needed. Refer users to their Express
Messenger User Guide for these procedures.
OR
You can allow individual users to modify their own mailbox type and number.
Refer to the Edit Mailbox section for information on Notificatio n Access.
2. Enter the notification type and number. Refer to Edit Mailbo x on page
40 for a description of the notification parameters.
a. Notification Type. Indicate where notification is to take place:
internal extensi on [1]
outside phone number [2]
message pager [3]
tone-only pager (beeper) [4]
digital pager [5]
b. Notification Number. The user supplies this number to you. If
the number is a pager number, use the information given in
Pager Number Parameters, for entering pager numbers.
c. Notification Access. Give the user the ability to modify his or
her own notification type and number.
72
Page 75

Performing System Administration from a Telephone
Using FAX Finder
Using Express Messenger, your PBX can receive FAXs, eliminating the need for a
dedicated outside FAX line.
When adding FAX capability, Express Messenger asks to which extension the
FAX is connected and automatically configures that extension to a ’transfer-only’
mailbox. When a FAX tone comes in, Express Messenger transfers the call to that
extension. If the receiving FAX machine is busy when a new FAX call comes in,
the sending FAX machine hears a busy signal.
Some older FAX machines do not generate the t ones necessary for triggering the
FAX transfer function. In this case, the person sending the FAX has to manually
dial the extension number of your FAX machine after they reach the Auto
Attendant. To let callers know which extension the FAX machine is on, give the
extension nu mbe r in yo ur company greeti ng.
Example:
If your FAX machine is at extension 217, your company greeting might read:
"Thank you for calling the CBA company. If you know the number of the party you
would like to reach, enter it now. For a personnel directory, enter 9. To reach our
FAX machine, enter 217. For assistance, press 0 or remain on the line."
Enabling FAX Finder
To enable the FAX Finder:
1. Access the System Administrator’s mailbox.
2. Press
3. Press
4. Express Messenger asks if you want the FAX feature enabled.
5. If you enable the FAX feature, Express Messenger asks you to enter
Express Messenger now retur ns you to the ' System Parameters' menu.
[5] for the 'System Parameters' menu.
[3] for the 'Set FAX Extension' menu.
To enable the FAX feature, press [1].
Otherwise, press [2].
the extension num b er the FAX machine is on.
Enter the extension number:
NOTE: Express Messenger will not allow you to set the FAX
extension to either the operator (0) or the system administrator (9 9 or
999 or 9999).
73
Page 76

Performing System Administration from a Telephone
For An Incoming FAX
Whenever Express Messenger detects FAX tone on an outside line, it directs the
signal to a selected extension. A transfer-only mailbox is associated with the FAX
extension; if a caller using a FAX machine tries to enter that mailbox, Express
Messenger pl ays the following message :
"...Please hold while I try the FAX machine..."
If the caller stays on the line and the FAX machine answers, they would hear the
customary FAX tone.
For An Outgoing FAX
To send an outbound FAX, dial the destination number.
Example: If the destination FAX number is 636-1234 and 9 is a prefix for
outgoing calls, enter the following numbers on your FAX machine: [96361234].
74
Page 77

Performing System Administration from Express Manager
Section 6: Performing System Administration
from Express Manager
Setting the Date, Time, and Business Hours
The System / Date / Time window lets you adjust the current date and time for
Express Messe nger. It also le t s you make chan ges to the company business hours.
Figure 24 - Date/Time Window
Complete the fields in the Date/Time window using the following
as a guide.
NOTE: Express Messenger greetings can correspond to your company’s
business hours, so it’s important to update any date or time changes.
75
Page 78

Field: Enter as follows:
Date (Month)
Date (Day)
Enter 1 or 2 digits between 01 and 12 to indicate the current month. (01 for
January; 12 for December.)
Enter 1 or 2 digits between 01 and 31 to indicate the current day within the month.
Performing System Administration from Express Manager
Setting Date an d Time
Date (Year)
Synchronize
Date/Time with
PBX
Time
Open
Close
Greetings Based
on Night Mode
of PBX
Enter 2 digits to indicate the current year. Values between 93 and 99 indicate
1993-1999. All other values indicate the year 2000 and beyond.
Select this checkbox to synchronize Express Messenger date and time to that of
the PBX.
Enter 1 or 2 digits to set the current hour. Specify a value between 0 and 23 to
indicate 24-hour time. (Zero indicates 12:00 midnight; 6 indicates 6:00 a.m.; 23
indicates 11:00 p.m.) Press [o] and type 2 digits between 00 and 59 to set the
minutes.
For each day, Sunday through Saturday, specify when the company opens. Type 1
or 2 digits between 0 and 23 to set the hour. Press [o] and type 2 digits between
00 and 59 to set the minutes.
For each day, Sunday through Saturday, specify the beginning of non-business
hours for the company. Type 1 or 2 digits between 0 and 23 to set the hour. Press
[o] and type 2 digits between 00 and 59 to set the minutes.
00:00 in both the Open and Close fields indicates that the company is closed that
day.
Select this checkbox to synchronize Express Messenger greetings to the PBX
Night Mode setting.
Selecting Alternate Greetings
You can select different greeting sets for different Express Messenger ports,
allowing your business to have multiple greetings. First record alter nate greeting
sets by calling Express Messenger from a telephone via the System Administrator’s
mailbox.
1. Select the Alternate Greetings window (Figure 25) from the System
menu.
2. Assign the required greeting to each port by deleting the current
greeting number and entering the new greeting number.
76
Page 79

Performing System Administration from Express Manager
Figure 25 - Alternate Greetings Window
By default, Greeting set number 1 is the primary greeting set. Express Messenger
plays the primary greeting set to every caller unless you instruct it to use an
alternate greeting set.
Setting the FAX parameters
You can assign one extension number on your PBX as a Fax extension so that a
dedicated outside line is not required for your FAX machine. When Express
Messenger detects a FAX tone on an incoming call, it directs the call to the FAX
extension.
1. Select FAX Settings from the ’System’ menu to display the System Fax
Settings window.
Figure 26 - System FAX Settings Window
2. Complete the fields in this window by using the following information
as a guide.
77
Page 80

Performing System Administration from Express Manager
System FAX Settings
Field: Enter as follows:
Status Click the appropriate field to indicate whether or not Express
Messenger should direct calls to a facsimile machine.
Enabled: Allows Express Messenger to direct calls to the
FAX extension.
Disabled: Prevents Express Messenger from directing calls to
the FAX extension.
When you set the Status field to Disabled, the Extension field
defaults to 0.
Extension Enter the extension n umber to which the fax machine is
connected.
Setting and Displaying Site Information
The System / Site Information window displays the company name, Express
Messenger serial number, Hour Capacity of the disk drive for messages, and the
number of configured ports.
Enter a company name and select Ok. The remaining fields are display only.
Figure 27 - Site Information Window
78
Page 81

Performing System Administration from Express Manager
Changing Passcodes
From the Administration menu select either Administrato r passcode or Manager
Passcode to change the Administrator passcode or the Manager passcode. The
Administrator passcode also allows the user to set t he lengt h of all Express
Messenger passc odes.
Figure 28 - Passcode Window
Change either Administrator or Manager passcode (or both) by completing the
fields in the passcode window using the following information as a guide. The
Manager Passcode window is the same excluding the Passcode Lengt h: field.
Administrator Passcode
Field: Enter as follows:
Passcode
Length
Enter the following information only for the passcode that you want to change.
Make no entry for a passcode that is to remain the same.
New
Passcode
Verify New
Passcode
Enter a number from 3 to 6 indicating how many digits a
passcode should contain. This number dictates the length for all
passcodes in the system. Make no entry if passcode length is to
remain the same.
Enter the new 3 to 6-digit passcode to replace the current
passcode.
Enter the new passcode again to confirm your keystroke s .
79
Page 82

Performing System Administration from Express Manager
Setting Up Notification
1. Edit the Notification parameters in the user’s mailbox. See page 50 for
a description of the notification parameters.
Click on the down-arrow to the right of the Type parameter to disp lay a
menu. Click the desired notification type.
Figure 29 - Notification Type
Click on the down-arrow to the right of the Schedule parameter to display
a menu. Click the desired notification schedule.
Figure 30 - Notification Schedule
Enter the telephone number (up to 35 digits) that the Express Messenger
should call to notify the user. Valid digits include 0 to 9, and the [*], [#],
and [,] keys.
Click OK.
2. Select Notification from the System drop-down menu to open the
System Notification window (see Figure 31).
80
Page 83

Performing System Administration from Express Manager
Enable the Notification Calls parameter. If enabled here and for a
subscriber’s mailbox, notification takes place when a message is left in a
subscriber’s mailbox.
Specify the telephone number that Express Messenger should display on
digital pagers. Express Messenger automatically attaches *<mailb ox#> to
the dial setting to display the mailbox that received the message.
Subscribers dial this number to call Express Messenger and hear their
messages.
Enter the access code for Feature Access Code 41, Send Message, as
programmed on the PBX.
Click OK.
Figure 31 - System Notification Window
81
Page 84

Performing System Administration from Express Manager
System Notification
Field: Enter as follows:
Digital Pager
Callback No.
MWI Feature
Access Code
Wakeup
Feature
Access Code
Notification
Calls
Enter up to 20 characters for the telephone number that is to
display on digital paging devices when Express Messenger
notifies a subscriber. Valid digits include 0 to 9, and the [*],
[#], and [,] keys.
Enter the code for Feature Access Code 41, Send Message, as
programmed in the PBX (refer to the Installation Worksheet).
Enter the code for Feature Access Code 02, Automatic Wakeup, as programmed in the PBX (refer to the Installation
Worksheet). This feature access code is required by the
Hospitality Option and PMS Option to allo w guest s to set
automatic wake-up calls.
Select either:
Enabled: Turns the notification feature on for all Express
Messenger mailbo xes.
Disabled: Turns notification off for all Express Messenger
mailboxes.
Using FAX Finder
Using Express Messenger, your PBX can receive FAXs, eliminating the need for a
dedicated outside FAX line.
When adding FAX capability, Express Messenger asks to which extension the
FAX is connected and automatically configures that extension to a ’transfer-only’
mailbox. When a FAX tone comes in, Express Messenger transfers the call to that
extension. If the receiving FAX machine is busy when a new FAX call comes in,
the sending FAX machine hears a busy signal.
Some older FAX machines do not generate the t ones necessary for triggering the
FAX transfer function. In this case, the person sending the FAX has to manually
dial the extension number of your FAX machine after they reach the Auto
Attendant. To let callers know which extension the FAX machine is on, give the
extension nu mbe r in yo ur company greeti ng.
Example:
If your FAX machine is at extension 217, your company greeting might read:
"Thank you for calling the CBA company. If you know the number of the party you
would like to reach, enter it now. For a personnel directory, enter 9. To reach our
FAX machine, enter 217. For assistance, press 0 or remain on the line."
82
Page 85

Performing System Administration from Express Manager
Setting FAX Parameters
Select Fax Settings from the System menu to display the window.
You can assign one extension number on your telephone system as a Fax
extension. When Express Messenger detects a FAX tone on an incoming call, it
directs the call to the FAX extension. A dedicated outside line for your FAX
machine is not needed. Complete the fields in this window using the following
information as a guide.
1. Set the Status to Enabled.
2. Enter the number of the extension where the FAX machine is
connected, and then select Ok.
Figure 32 - System FAX Settings Screen
System FAX Settings
Field: Enter as follows:
Status Click the appropriate field to indicate whether or not
Express Messenger should direct calls to a facsimile
machine.
Enabled: Allows Express Messenger to direct calls
to the FAX extension.
Disabled: Prevents Express Messenger from directing
calls to the FAX extension.
When you set the Status field to Disabled, the Extension
field defaults to 0.
Extension Enter the extension n umber to which the fax machine is
connected.
83
Page 86

Performing System Administration from Express Manager
Selecting the Directory Prompt (First or Last Name)
Express Messenger can prompt callers who call the directory (Mailbox 9) by either
their first name or their last name. To select the directory prompt
1. From the System menu select System Miscellaneous.
The System Miscellaneous Window opens (see Figure 33).
2. In the Mailbox Name Directory By field select FIRST NAME or LAST
NAME.
3. Click Ok.
Figure 33 - System Miscellaneous Window
Enabling Softkey Support
The SX-200 EL/ML PBX provides voice mail softkeys on SUPERSET 4025,
SUPERSET 4125, and SUPERSET 4150 telephones. Instead of dialing single-digit
codes to select Mitel Express Messenger menu options, users can press softkeys. For
example, to li st en to m ess age, a us er can p ress th e Pl ay Mess ag e sof tk ey inst ead of
dialing the digit 7. Note that softkeys are not available for all menu options.
The SX-200 EL/ML PBX requires LIGHTWARE 17, Release 3.1, UR1 software or
later, and you must enable Option 97 "Support Softkey Access to Voice mail" in Form
4 (System Options). Refer to the SX-200 EL/ML Technical Documentation for
instructions on how to program voice mail softkey support on the SX-200 EL/ML
PBX. You require a Mitel Options Password to enable this option on the PBX.
To enable softkey support on the Express Messenger system,
1. From the System menu, select System Miscellaneous.
The System Miscellaneous Window opens (see Figure 33).
2. In the Softkey Support field select ENABLED.
3. Click Ok.
84
Page 87

Performing System Administration from Express Manager
Enabling Auto attendant Transfer to Any PBX Extension
The Express Messenger Auto Attendant can transfer incoming calls to any
extension whether programmed with a mailbox or not. For this to work, the PBX
dial plan and mailbox numbers must have the same number of digits. To prevent
callers from accessing PBX trunks, you can program the system to deny transfers
when the leading digit dialed matches the first digit of a trunk group access code.
1. From the System menu select Language.
The System Miscellaneous Window opens (see Figure 34).
2. Set Dial Any Extension Support to Enabled.
3. In the Block Ext.That Begins With field, enter the leading digit of the
trunk group access codes you want to restrict.
You can enter up to 12 digits to restrict access to 12 different trunk
groups. Separate each digit with a comma.
4. Click OK.
Setting the Automatic Route Select Code
The Automatic Route Selection (ARS) code is used to access outside lines for
message notification calls and personal contact calls. ARS codes are programmed
by the PBX technician.
1. From the System menu select Miscellaneous.
The System Miscellaneous Window opens (see Figure 33).
2. Enter the Automatic Route Select Cod e.
3. Click OK.
Setting the Account Code Access Code
Account codes are used by the PBX to register personal contact calls in the SMDR
logs. The PBX generates these logs for call accounting purposes. Account codes
can range from 4 to 12 digits and cannot contain an * or #.
Note: If extension numbers are less than three digits in length, SMDR logging of
personal contact calls will not work unless additional digit s ar e added to the
account code access code. The combined length of the extension number and the
access code must be four digits or more. Enter the required access code length in
PBX Form 4, Option 55.
1. From the System menu select Miscellaneous.
The System Miscellaneous Window opens (see Figure 33).
2. Enter the Account Code Access Code.
3. Click OK.
85
Page 88

Performing System Administration from Express Manager
Enabling or Disabling Personal Contact Numbers
Mailbox owners can program alternate numbers (cell phone, pager, fax etc.) where
callers can contact them instead of leaving a message. Callers reaching the owner’s
mailbox will hear the owner’s greeting followed by prompts such as "...to reach this
person’s cellular phone, press C, the 2 key."
Use of this feature can be enabled or disabled for the entire system
To enable/disable Personal Contact Numbers using Express Manager
1. From the System menu, select Miscellaneous.
The System Miscellaneous Window opens (see Figure 34).
2. In the Personal Contact Numbers field select ENABLED or
DISABLED.
3. Click Ok.
To enable/disable Personal Contact Numbers using a telephone
1. Log into the administrator mailbox.
2. When prompted for a passcode, dial the Technician’s passccode
(default 8642).
3. Dial 9.
Express Messenger prompts for another Technician’s function code.
4. Dial 20105 to enable Personal Contact Numbers feature. To disable it,
dial 20106.
Express Messenger responds with “Enabled.”
5. Hang up.
Setting the Voice Prompt Language
Express Messenger can prompt callers in English, French and Spanish. MEM
Release 3.0 or later systems can also provide b ilingual pr ompts in any combination
of the supported languages. Bilingual prompts are only available if the Bilingual
Voice Prompts Option is enabled. For more information, see Enabling Bilingual
Voice Prompts Option on page 94.
Note that Spanish prompts require MEM Release 2.1 systems or later; French
prompts require MEM Release 3.0 or later.
Selection of language(s) is done during installation of Express Mes senger.
Thereafter, you can use Express Manager to change the languages and to disable
bilingual prompts as follows.
1. From the System menu select Language.
The Language Settings Window opens (see Figure 34).
2. From the Default Language list, select the language you want to use as
the primary language for auto attendant greetings and mailbox prompts.
3. For bilingual systems, select the other language from the Alternate
Language l ist.
86
Page 89

Performing System Administration from Express Manager
4. Select Bilingual to enable the alternate language prompts.
5. Click Ok.
Figure 34 – Language Settings Window
Setting the Language Change Mailbox Number
The Language Change Mailbox applies to systems with the Bilingual Voice
Prompts Options enabled. Callers reaching the auto attendant or a subscriber’s
mailbox can dial the Language Change Mailbox number to hear subsequent
prompts in the alternate language.
To set the Language Change Mailbox number,
1. From the System menu select Language.
The Language Settings Window opens (see Figure 34).
2. In the Language Change Mailbox field, enter a single-digit number.
The default is 8.
87
Page 90

Performing System Administration from Express Manager
Setting up RAD Ports
Express Messenger can provide recorded announcement device (RAD)
functionality, eliminating the need for external tape machines or other audioplaying devices. RADs are commonly used to automatically answer lines and
deliver pre-recorded messages such as, “All of our representatives are busy helping
other callers, please continue to hold to maintain your call priority.” When the
RAD message finishes playing, the cal l er usually hears music-on -hold while
waiting for an agent to become available. RAD messages may also give the caller
information, which answers their questions, thus resulting in a 'good’ abandoned
call. They may also provide advertising or promotional information to callers while
they’re waiting for someone to take their call.
Any number of Express Messenger ports can function as RAD ports. (See the next page
for considerations concerning RAD-only cards.) Each RAD port is assigned a set of up
to five messages (call e d “greetings”) tha t play on e af te r anoth er . Wh en the enti re
greeting set has p layed, the p o rt w ill either hang up or r eplay the en tire set th e n u mber
of times specified. Up to 16 RAD greeting sets can be recorded for a total of 80
greetings (16 sets multiplied by 5 greetings per set). RAD greetings can be recorded in
multiple languages, although callers cannot choose the language they want to hear as
they can for other greetings in systems that are set up for bilingual operation.
Two or more ports can share the same set or subset of greetings. Shared greetings
are common in ACD applications. For instance, ACD groups, each serviced by a
separate RAD port, can all use the RAD message “Please hold to maintain your
call priority,” By comparison, only a Sales ACD group can use the RAD message
“Please hold to speak with a sales representative.” Combining gener ic and
application-specific messages from different greeting sets in this fashion
effectively reduces the number of RAD ports required.
NOTE: Determining which outside lines the RAD ports should answer is
done through PBX programming. For help setting up lines, contact your
Mitel Networks dealer.
Setting up RAD ports is a 3-step process:
1. Record RAD greetings.
You can record up to 80 individual greetings that can be then be configured as
RAD greetin g sets.
2. Configure RAD greetings sets.
In this step you define up to five RAD gre etings which constitute t he RAD
greeting set and define how many times the set should play. You may
configure up to 16 RAD greeting sets.
3. Assign RAD greeting sets to voice mail por ts.
In this step you specify which RAD greeting set plays when a call arrives on a
particular voice mail port.
Step 1: Record RAD Greetings
Express Messenger has no restriction on the length of the RAD messages;
however, the PBX does. It has timers that need to be set to the length of the longest
RAD greeting set. Contact your Mitel Networks dealer for assistance.
To record RAD greetings,
88
Page 91

Performing System Administration from Express Manager
1. Access the System Administrator’s mailbox.
2. Press
3. Press
[8] to select the RAD Greetings menu.
[1] to record a greeting.
4. Select the number of the RAD greeting to record (1- 80).
If the selected RAD greeting already exists, you will hear it along
with prompts to accept, review or re-record it.
5. Record the greeting, speaking clearly into a handset, not a speaker phone.
6. Follow the voice prompts to record each additional greeting set.
Step 2: Configure RAD Greeting Sets
You can configure RAD greeting sets before recording the RAD greetings.
However, it’s a good idea to script and number the greetings first to avoid mistakes
when it ’s time to confi gure RAD greet ing sets.
To configure RAD greetings sets using a telephone,
1. Access the System Administrator’s mailbox.
2. Press
3. Press
[8] to select the RAD Greetings menu.
[2] to configure a RAD greeting set.
4. Select the number of the RAD greeting set to configure (10 – 25).
The first of the five greetings in the set plays (if previously recorded)
followed by prompts to assign a different first greetin g or to skip to the
next greeti ng in the set.
5. When prompted, specify the number of times from 1 to 99 that you
want the greeting set to play. Enter 99 to play the set continuously
until the caller hangs up.
Step 3: Assign RAD greeting sets to voice mail ports
You can use either a telephone or Express Manager to assign RAD greetings to
voice mail ports.
To assign RAD greeting sets to ports from a telephone,
1. Access the System Administrator’s mailbox.
2. Press
3. Press
[5] to select the System Parameters menu.
[2] to assign greeting sets to be used by each port
4. When prompted, for each port enter a System Greeting number from 1
to 9 or a RAD greeting set number from 10 to 25.
To assign RAD greeting sets to ports from Express Manager ,
1. From the System menu, select System Greetings followed by
Configure.
2. Select a RAD greeting set from the Set column.
89
Page 92

Performing System Administration from Express Manager
3. In each Greetings column, enter the number (1 - 80) of the individual
greetings that this port should play.
Greetings play in order from left to right. Leave boxes empty if you require
less than the maximum five greetings per set.
4. In the Times to Play column, enter a number from 1 to 99 to specify
how many times you want the greeting set to play. Enter 99 to play the
set continuously until the caller hangs up.
5. Repeat steps 2 to 4 for each greeting set.
RAD-only cards
All ports on an Express Messenger card can operate as dedicated RAD ports.
However, a least one non-RAD port is required to record RAD greetings and
administer the voice mail system by telephone. To get around this requireme nt,
temporarily assign a System greeting set to one of the ports. Then, log into the
administrator’s mailbox and record the RAD greetings by telephone. After the
greetings are recorded, use Express Manager or the telephone to reassign a RAD
greeting to the port.
90
Page 93

Performing System Administration from Express Manager
Setting up a DID Server
Express Messenger 4.0 provides a built-in DID server for use in hospitali ty
environments. The server manages DID numbers within t he PBX, which all ows the
hotel-keeper to easily assign personal DID to guests for the duration of their stay.
With DID service, outside callers can reach guests without having to go through
the front desk.
NOTES:
1) The DID Server is an optional feature of Express Messenger Release
4.0. For information on enabling the feature, see page 98.
2) The PMS Option must be enabled to use the DID Server (see Enabling
the PMS Option on page 96).
3) The DID server requires special integration with your PBX and DID
phone lines from your local telephone company. Contact your Mitel
Dealer for assistance.
DID Server features
x DID number assignment is by PMS terminal only – i.e, assignment
by telephone through the Front Desk mailbox is not supported.
NOTE: Express Messenger provides an option that automatically assigns
DID numbers on check-in. Use this option if the PMS system does not
support manual assignment. See the next page for details.
x Assignment of num bers is done eith er autom ati cally by the sy ste m on a
“first-in, fi rst-out ” (FIFO) basis, or manually by Front Desk staff using
the PMS term inal . Manua l as sig nm ent m eans gu ests can g et s peci fic
numbers if requested. FIFO assignment takes numbers out of service for
as long as possible before re-assigning them, which helps prevent guests
from receiving unw ante d calls on thei r D ID n umber .
x Each guest mailbox is permitted one DID number.
x DID numbers follow guests if they change rooms during the same
stay – no manual re-assignment required.
x Currently assigned DID numbers can be temporarily disabled
without having to check out the guest.
x Guest r o om s can be as signed a fax extension that shares a mailb ox and
a DID number with the room phone. The server relies on FAX tone
detection to route incoming fax calls to the fax extension.
x Guests logging into their mailboxes for the first time hear, as part
of the tutorial, the message, “The direct number to reach your
room is …..” The system automatically inserts the correct number,
which the guest can replay at any time by pressing a key.
91
Page 94

Performing System Administration from Express Manager
Enabling or disabling the DID Server
The DID server can be enabled or disabled by telephone or by using Express
Manager as described in Setting up the DID server later in this section.
To enable or disable the DID server by telephone
1. Log into the administrator mailbox.
2. When prompted for a passcode, dial the Technician’s passccode
(default 8642).
3. Dial 9.
Express Messenger prompts for another Technician’s function code.
4. Dial 20101 to enable the DID Server. To disable it, dial 20102.
Express Messenger responds with “Enabled” or “Disabled.”
5. Hang up.
Enabling or disabling Automatic DID Number Assignment
Automatic DID Number Assignment is a feature designed for PMS systems that do
not support manual number assignment. The feature, when enabled, automatically
assigns a DID number to a guest room upon check-in and returns the number to the
DID pool upon check-out.
To enable or disable Automatic DID Number Assignment by telephone
1. Log into the administrator mailbox.
2. When prompted for a passcode, dial the Technician’s passccode
(default 8642).
3. Dial 9.
Express Messenger prompts for another Technician’s function code.
4. Dial 20103 to enable the Automatic DID Number Assignment. To disable
it, dial 20104.
Express Messenger responds with “Enabled” or “Disabled.”
5. Hang up.
92
Page 95

Performing System Administration from Express Manager
Setting up the DID Server
Setting up the DID Server is done using Express Manager. You may need to
temporarily configure the serial port on the Express Messenger card to
communicate with Express Manager. For more information, see Setting the Serial
Port Function on page 63.
Note: The DID server also requires PBX programming. See the Express
Messenger Installation Guide for details.
To set up the DID server
1. From the Expre ss Manager Syste m menu, select DID Server.
The DID Server window opens (see Figure 35).
2. Set DID Server to ENABLED.
3. In the Constant Portion of DID numbers field, enter the leading digits
common to all the DID numbers.
For example, if your DID numbers range from 716-639-3200 to 716639-3399, enter 7166393 as the constant portion. Valid characters are
digits 0 through 9 (spaces are not accepted). Refer to the Installation
Worksheet if you are unsure of the digits to enter.
4. In the DID Ranges field, enter the trailing digits of the DID (refer to the
Installation Worksheet).
Separate the first and last numbers in the range by a dash (e.g, 2000-2010)
and each individual range by a comma (e.g., 2000-2010, 2060-3010). You
may enter a m axi mum of 2 00 cha ract ers in th is fi el d en com pass in g n o m ore
than 750 individual DID numbers.
5. Click OK.
6. If necessary, reconfigure the Express Messenger serial port for PMS
terminal use.
Figure 35 - DID Server Window
93
Page 96

Performing System Administration from Express Manager
NOTE: The “Remove existing assignment to mailboxes” option clears
DID numbers from all mailboxes. This option is rarely used as the P M S
system handles clearing DID numbers from guest mailboxes at check-out
time. Use the option when ALL mailboxes need to be cleared at the same
time—for example, following changes to the DID numbers.
Enabling the Bilingual Voice Prompts Option
This option provides simultaneous prompts in two of the three available languages:
English, French, and Spanish. Callers reaching the auto attendant or a subscriber’s
mailbox can dial 8 (the Language Change Mailbox number) to hear subsequent
prompts in the alternate language.
NOTE: This option requires Mitel Express Messenger Release 3.0 system
software or later. The SX-200 EL/ML PBX must have LIGHTWARE 16,
Release 1.1, UR1 software or later.
1. If required, upgrade the card to Release 3.0 system software. See
Performing Upgrades on page 102.
2. Obtain the card’s model and serial number. See Obtain the Cards
model and serial number on page 110 for instructions.
3. Call the Mitel Corporation order desk. The part number for the E xpr ess
Messenger Bilingual Prompts option is 9109-542-104-NA.
4. Give the operator the serial number and model number of your card.
5. The operator will give you an 11-digit passcode. Record this code:
_________________.
6. From any internal DTMF telephone, obtain dial tone.
7. Dial the Express Messenger message center number. Express
Messenger answers and plays a greeting.
8. Dial when you hear the greeti ng. Expr e ss Me sse n ger pro mpts yo u fo r
a mailbox number.
9. Dial the system administrator mailbox number: 99 or 999 or 9999.
Express Messenger prompts you for a passcode.
10. Dial the technician’s passcode: 8642
11. Dial 9 to access a menu of options. Express Messenger responds with,
“Please enter a Technician’s function code”.
12. Dial 20272. Express Messenger responds with, “Please enter a
Technician’s function code”. Enter the 11-digit passcode. Express
Messenger responds with “Enabled.”
94
Page 97

Performing System Administration from Express Manager
13. Set the default language (if different than the installation language) by
dialing 20001 for English, 20002 for Spanish, or 20003 for French.
14. Set the alternate language by dialing 20011 for English, 20012 for
Spanish, or 20013 for French.
15. Dial 10281 to reset the system.
16. After the system resets, log into the System Administrator Mailbox
again.
17. When prompted, enter the default passcode (1234).
18. Using the Greetings menu (press 4 from the main menu) record the
Bilingual Welcome greeting and new greetings in the alternate
language. Also, verify the default la nguage greet i ngs and reco rd again
if necessary.
19. Choose a different Language Change Mailbox number if the default number
(8) is already in use. To perform this task from a telephone, see page 63. To
perform this task from Express Manager, see page 87.
Enabling the Hospitality Option
This option provides guest mailboxes and front desk mailboxes for hotel and motel
applications.
NOTE: This option requires Mitel Express Messenger Release 2.1 system
software or later. The SX-200 EL/ML PBX must have LIGHTWARE 17,
Release 3.1, UR1 software or later.
1. If required, upgrade the card to Release 2.1system software. See
Performing Upgrades on page 102.
2. Obtain the card’s model and serial number. See Obtain the Cards
model and serial number on page 110 for instructions.
3. Call the Mitel Corporation order desk. The part number for the E xpr ess
Messenger Hospitality option is 9109-542-100-NA.
4. Give the operator the serial number and model number of your card.
5. The operator will give you an 11-digit passcode. Record this code:
_________________.
6. From any internal DTMF telephone, obtain dial tone.
7. Dial the Express Messenger message center number. Express
Messenger answers and plays a greeting.
8. Dial when you here the greeti ng. Expr e ss Me sse n ger pro mpts yo u fo r
a mailbox number.
9. Dial the system administrator mailbox number: 99 or 999 or 9999.
Express Messenger prompts you for a passcode.
95
Page 98

Performing System Administration from Express Manager
10. Dial the technician’s passcode: 8642
11. Dial 9 to access a menu of options. Express Messenger responds with,
“Please enter a Technician’s function code”.
12. Dial 20272. Express Messenger responds with, “Please enter a
Technician’s function code”. Enter the 11-digit passcode. Express
Messenger responds with “Enabled.”
13. Dial 10281 to reset the Express Messenger card with the Hospitality
Option software.
14. Hang up. After the card resets, the Hospitality Option is enabled.
15. Set the mailbox type for the front desk extension to “Front Desk” and set
the mailbox type of the guest room extensions to “Guest”. To perform these
tasks from a telephone, see Edit Mailbox on page 40 for instructions. To
perform these tasks from Express Manager, see on page 45.
16. Select Notification from the System menu. Enter the Automatic Wake-Up
feature access code in the System Notification window (see Figure 31). This
feature access code must match the code that you programmed in Form 02 of
the PBX.
Enabling the PMS Option
This option adds support for Property Management System integration to the
hospitality options described in the previous sectio n.
NOTE: This option requires Mitel Express Messenger Release 3.0 system
software or later. The SX-200 EL/ML PBX must have LIGHTWARE 17,
Release 3.1, UR1 software or later.
1. If required, upgrade the card to Release 3.0 system software. See
Performing Upgrades on page 102.
2. Obtain the card’s model and serial number. See Obtain the Cards
model and serial number on page 110 for instructions.
3. Call the Mitel Corporation order desk. The part number for the E xpr ess
Messenger Hospitality option with PMS Support is 9109-542-101-NA.
4. Give the operator the serial number and model number of your card.
5. The operator will give you an 11-digit passcode. Record this code:
_________________.
6. From any internal DTMF telephone, obtain dial tone.
7. Dial the Express Messenger message center number. Express
Messenger answers and plays a greeting.
96
Page 99

Performing System Administration from Express Manager
8. Dial when you here the greeti ng. Expr e ss Me sse n ger pro mpts yo u fo r
a mailbox number.
9. Dial the system administrator mailbox number: 99 or 999 or 9999.
Express Messenger prompts you for a passcode.
10. Dial the technician’s passcode: 8642
11. Dial 9 to access a menu of options. Express Messenger responds with,
“Please enter a Technician’s function code”.
12. Dial 20272. Express Messenger responds with, “Please enter a
Technician’s function code”. Enter the 11-digit passcode. Express
Messenger responds with “Enabled.”
13. Dial 10281 to reset the Express Messenger card.
14. Hang up. After the card resets, the Hospitality option with PMS Support is
enabled.
15. Set the mailbox type for the front desk extension to “Front Desk” and set
the mailbox type of the guest room extensions to “Guest”. To perform these
tasks from a telephone, see Edit Mailbox on page 40 for instructions. To
perform these tasks from Express Manager, see on page 45.
16. Select Notification from the System menu. Enter the Automatic Wake-Up
feature access code in the System Notification window (see Figure 31). This
feature access code must match the code that you programmed in Form 02 of
the PBX.
17. Exit Express Messenger, and then disconnect the PC from the Express
Messenger card.
18. Connect the PMS to the Express Messenger card. For instructions, see the
Express Messenger Installation Guide. See also the SX-200 Technical
Reference for information on connecting a PMS to the
SX-200.
19. Set the serial port on the Express Messenger card to PMS function. This task is perform ed
from a telephone. For instructions, see page 63.
97
Page 100

Performing System Administration from Express Manager
Enabling Express Messenger Release 4.0 Options
The following are optional features in Express Messenger Release 4.0:
x Personal Contact Numbers – allows mailbox owners to program
alternate numbers (cell phone, pager or fax) where they can be
contacted while away from their desk or room. Callers reaching the
owner's mailbox will hear the owner's greeting followed by
prompts such as "...to reach this guest's cellular phone, press C, the
2 key." This feature is available to both extension-type and guesttype mailboxes, although the latter is limited to two numbers only:
cell phone and pager.
x DID Server – manages DID numbers within the PBX, which
allows the hotel-keeper to assign personal DID to guests for the
duration of their stay. With DID service, outside callers can reach
guests without having to go through the front desk.
To enable Release 4.0 options,
1. If you have not already done so, upgrade the card to Release 4.0 system
software. See Performing Upgrades on page 102.
2. Obtain the card’s model and serial number. See Obtain the Cards
model and serial number on page 110 for instructions.
3. Call the Mitel Corporation order d e sk and specify which options you want to
enable. Each option has a separate part number as follows:
Personal Contact Numbers: 54000620.
DID Server: 54000614.
4. Give the operator the serial number and model number of your card.
5. The operator will give you a separate 11-digit passcode for each option.
Record the codes
Personal Contact Numbers: ________________________________
Hospitality Enhancements: ________________________________
6. From any internal DTMF telephone, obtain dial tone.
7. Dial the Express Messenger message center number. Express
Messenger answers and plays a greeting.
8. Dial when you here the greeti ng. Expr e ss Me sse n ger pro mpts yo u fo r
a mailbox number.
9. Dial the system administrator mailbox number: 99 or 999 or 9999.
Express Messenger prompts you for a passcode.
10. Dial the technician’s passcode: 8642
11. Dial 9 to access a menu of options. Express Messenger responds with,
“Please enter a Technician’s function code”.
98
 Loading...