

Page 1
Page 2

Table of Contents
Introduction ........................................................................................................... 3
MioSMART app .................................................................................................... 4
Downloading the MioSMART app ................................................................... 4
Logging in ........................................................................................................ 5
General functions and settings ........................................................................ 6
Grouping your devices ............................................................................... 7
Using the camera ................................................................................................. 8
Getting to know your device ............................................................................ 8
Mounting the device ................................................................................... 9
Inserting a memory card ...........................................................................11
Turning the device on .................................................................................... 12
Resetting the device ................................................................................. 12
Managing from the MioSMART app .............................................................. 13
Connecting the device .............................................................................. 13
Watching the live video ............................................................................ 15
Using the toolbar ...................................................................................... 16
Accessing the event list ............................................................................ 17
Accessing the captured media ................................................................. 18
Changing the camera settings ................................................................. 18
Using the personal cloud gateway ..................................................................... 20
Getting to know your device .......................................................................... 20
Connecting an external storage device ......................................................... 20
Turning the device on .................................................................................... 21
Connecting to the network............................................................................. 21
Managing from the MioSMART app .............................................................. 22
Adding the device ..................................................................................... 22
Recording videos remotely ....................................................................... 23
File management ..................................................................................... 24
Changing the gateway settings ................................................................ 25
1
Page 3

Using the hub and sensors ................................................................................. 26
Getting to know your device .......................................................................... 26
Turning the device on .................................................................................... 27
Setting up the sensor .................................................................................... 28
Managing from the MioSMART app .............................................................. 30
Connecting to the network ....................................................................... 30
Pairing the sensors .................................................................................. 33
Viewing the event list ............................................................................... 35
Upgrading the devices ........................................................................................ 36
For more information .......................................................................................... 37
Troubleshooting ............................................................................................. 37
Online support ............................................................................................... 38
Mio Advantage............................................................................................... 38
Regulatory information .................................................................................. 38
CE ............................................................................................................ 38
WEEE ....................................................................................................... 40
Safety precautions......................................................................................... 40
About charging ......................................................................................... 40
About the charger ..................................................................................... 40
Caring for your device ................................................................................... 41
2
Page 4
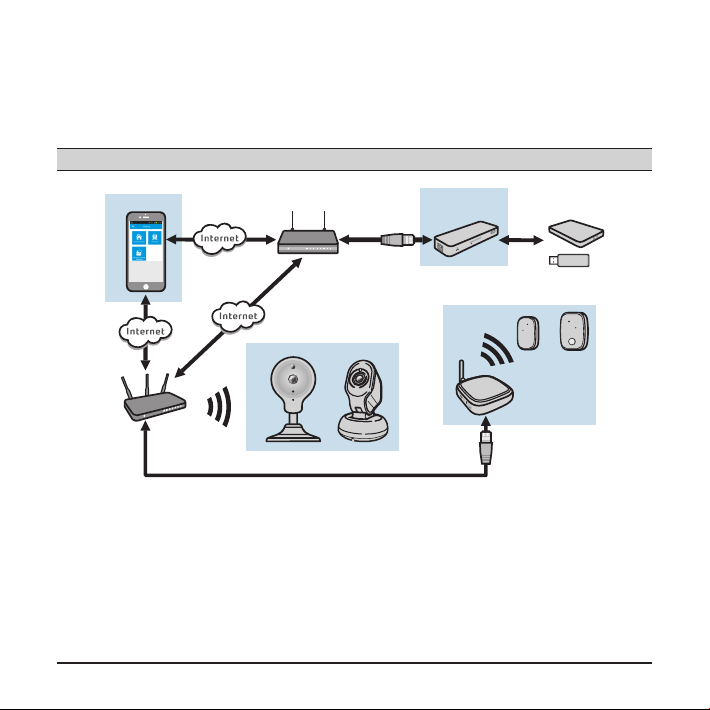
Introduction
The MioSMART solution provides you with various Smart Home products that can
be integrated into an enhanced surveillance system.
Note: Depending on your region, certain MioSMART models may not be available.
a.
d.
c.
b.
a. MioSMART app on your mobile device
b. VixCam
c. Hub and sensors
d. Personal Cloud Gateway
3
Page 5
MioSMART app
The MioSMART app is an integrated application that allows you to manage and
control your camera, personal cloud gateway, hub and sensors. You can download
the MioSMART app for free from Apple Store and Google Play Store.
Note:
l
The MioSMART app is compatible with iOS 8.0 - 9.3 and Android 4.4 - 6.0 devices.
l
Make sure that your mobile device is connected to the wireless network.
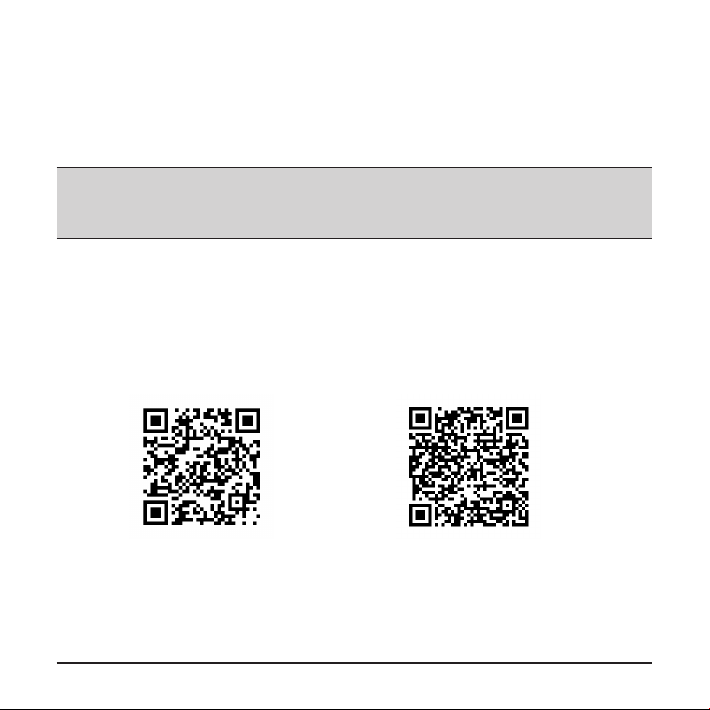
Downloading the MioSMART app
Download and install the MioSMART app, using one of the following methods:
l
Search for "MioSMART" in Apple App Store or in Google Play Store.
l
S
can the QR code as shown below if you have a QR code reader app installed on
the mobile device.
iOS Android
4
Page 6
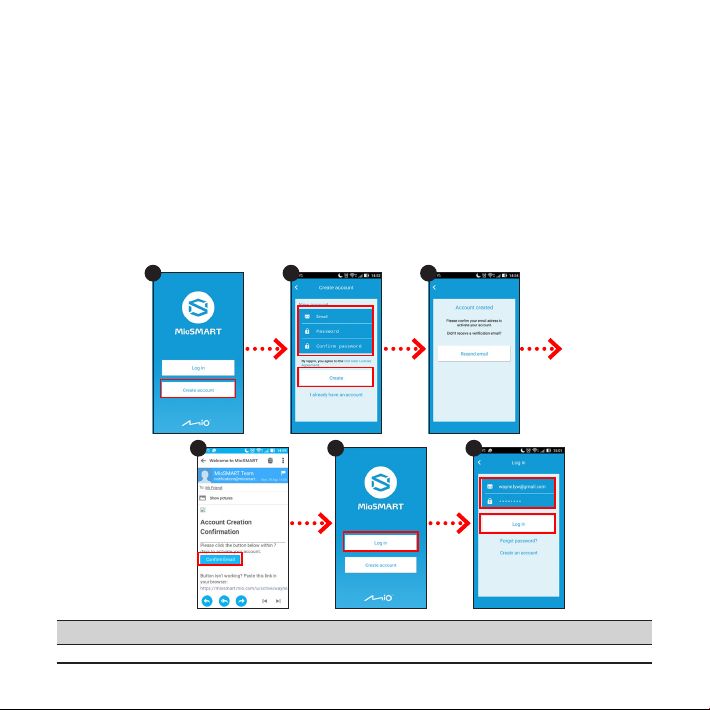
Logging in
Start the MioSMART app and follow the on-screen instructions to set up your
account. When done, log in to the system.
1. Tap Create account.
2. Enter a valid email address and password, and then tap Create.
3. A conrmation email will be sent to your email address.
4. Click Conrm Email in the email to activate the account.
5. Once the account is activated, tap Log in in the MioSMART app.
6. Enter your email address and password, and then tap Log in.
1 2 3
4 5 6
Note: The password must be 8 to 20 characters (letters and numbers only; one letter is mandatory).
5
Page 7
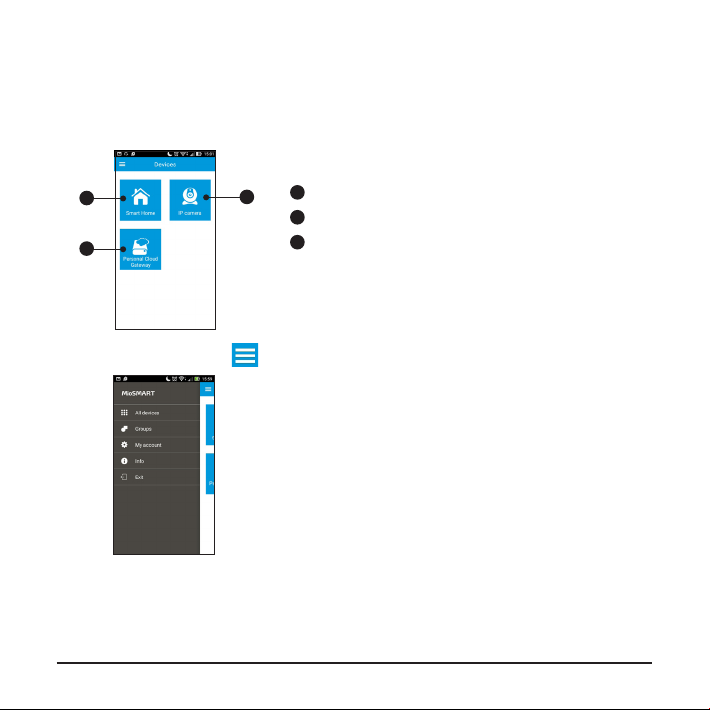
General functions and settings
The main screen of the MioSMART app provides the access to connecting the
MioSMART devices. For the information on connecting the devices, see the
following chapters in this manual.
1
1
2
3
On the main screen, tap to access the settings menu.
Connecting the hub and sensors
2
Connecting the personal cloud gateway
3
Connecting the camera
l
Tap All devices to access the connected devices.
l
Tap Groups to access the connected devices in the
dened group.
l
Tap My account to access the account's
information.
l
Tap Change password to change the
You can do the followings:
password of the account. Enter the old
password and the new password twice. When
done, tap Update.
l
Tap Log out to log out of the account.
l
Tap Info to view the software information.
l
Tap Exit to close the app.
6
Page 8

Grouping your devices
Follow the procedure to group the connected devices in your account:
1. Tap > Groups to access the Group screen.
2. On the Group screen, tap .
3. On the Settings screen, tap Group name to enter the group's name, and then
tap Add device to select the devices for the group. When done, tap OK to return
to the Settings screen.
4. Tap Save to save the created group
5. To customise the group, tap and repeat the steps above.
7
Page 9
Using the camera
Getting to know your device
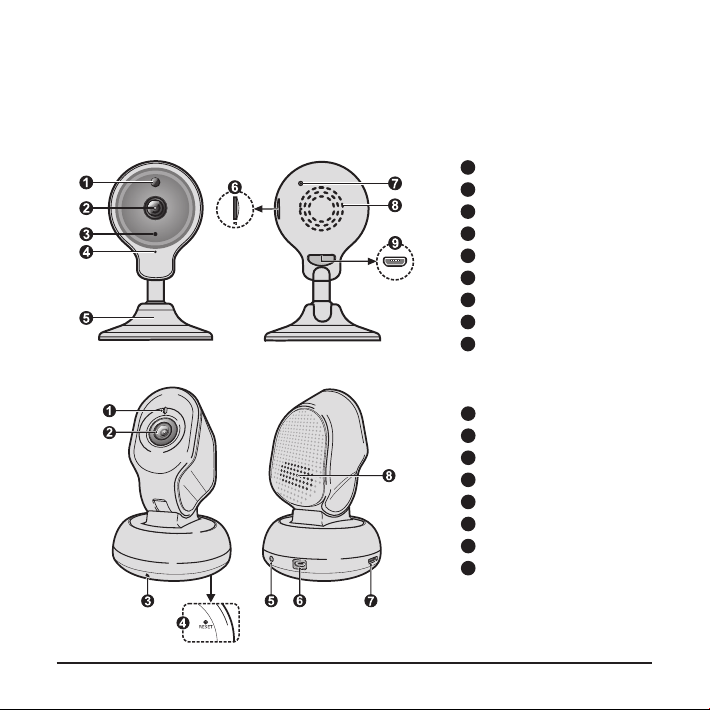
VixCam C10
VixCam C12
1
Light sensor
2
Camera lens
3
LED indicator
4
Microphone
5
Camera stand
6
Memory card slot
7
RESET button
8
Speaker
9
Micro-USB connector
1
Light sensor
2
Camera lens
3
Microphone
4
RESET button
5
LED indicator
6
Micro-USB connector
7
Memory card slot
8
Speaker
8
Page 10
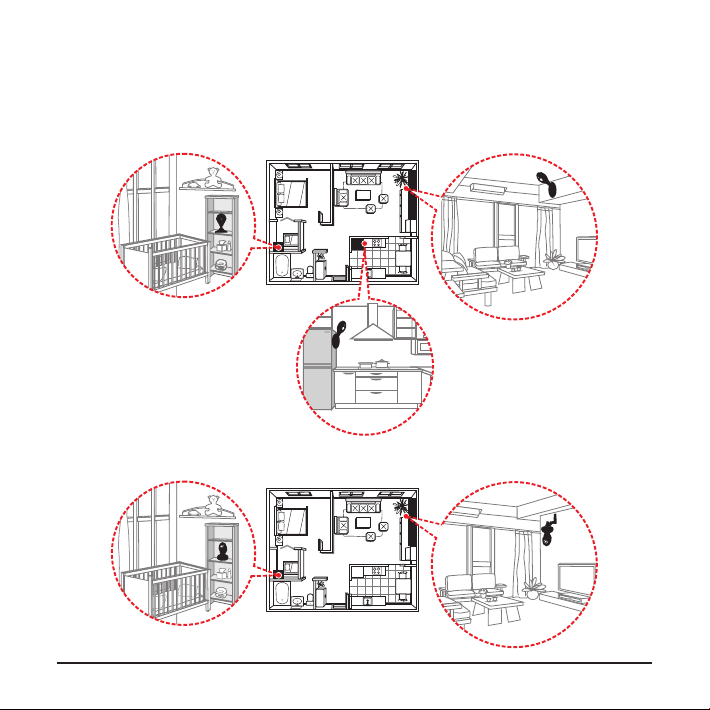
Mounting the device
The VixCam C10 is designed with a magnetic stand that allows you to install it in
various locations, such as the level surface of any object, the wall or ceiling, or an
object with metal surface.
The VixCam C12 can be placed on a level surface or mounted on the wall.
9
Page 11
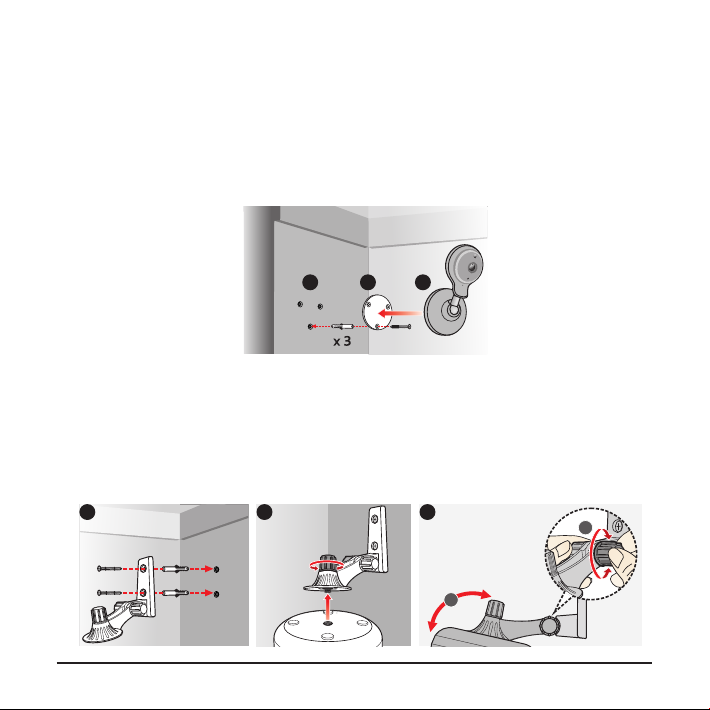
Follow the illustrations to mount the camera on a concrete surface by using the
provided accessory and screw kit.
VixCam C10
1. Drill 3 holes on the surface and hammer the wall plugs into the holes.
2. Lock the metal plate securely by fastening the screws.
3. Attach the camera to the metal plate properly.
321
VixCam C12
1. Drill 2 holes on the surface and hammer the wall plugs into the holes. Lock the
camera holder securely by fastening the screws.
2. Attach the camera to the holder securely by fastening the xing bolt.
3. Adjust the lens position by loosing and then fastening the xing bolt on the
camera holder.
1 2 3
b
a
10
Page 12
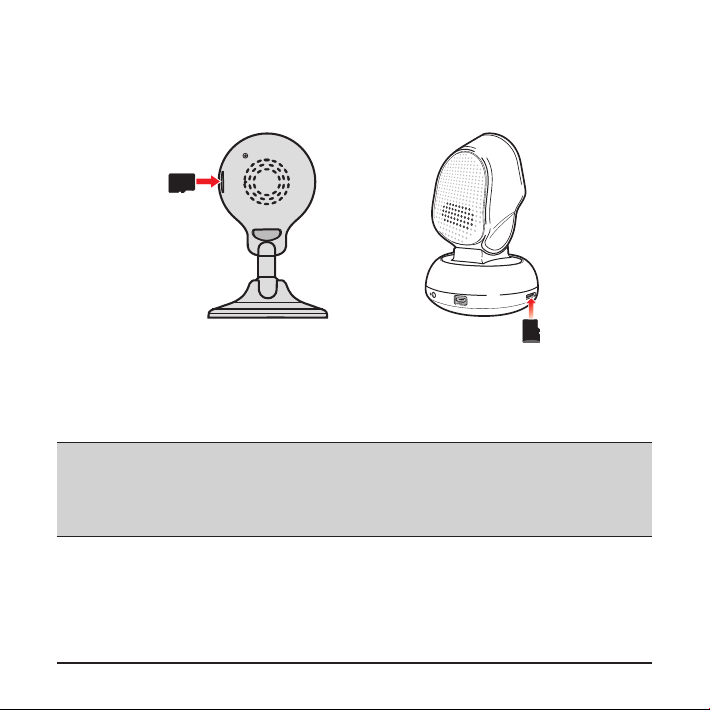
Inserting a memory card
You can record the video locally once a memory card is inserted in the camera. The
camera supports the Class 10 memory cards with 8 GB - 32 GB capacity.
l
Hold the card by the edges and gently insert it into the slot as shown in the
illustration.
l
To remove a card, gently push the top edge of the card inwards to release it and
pull it out of the slot.
Note:
l
Disconnect from the AC power before inserting or removing the card.
l
Do not apply pressure to the centre of the memory card.
l
MiTAC does not guarantee the product’s compatibility with memory cards from all manufacturers.
11
Page 13
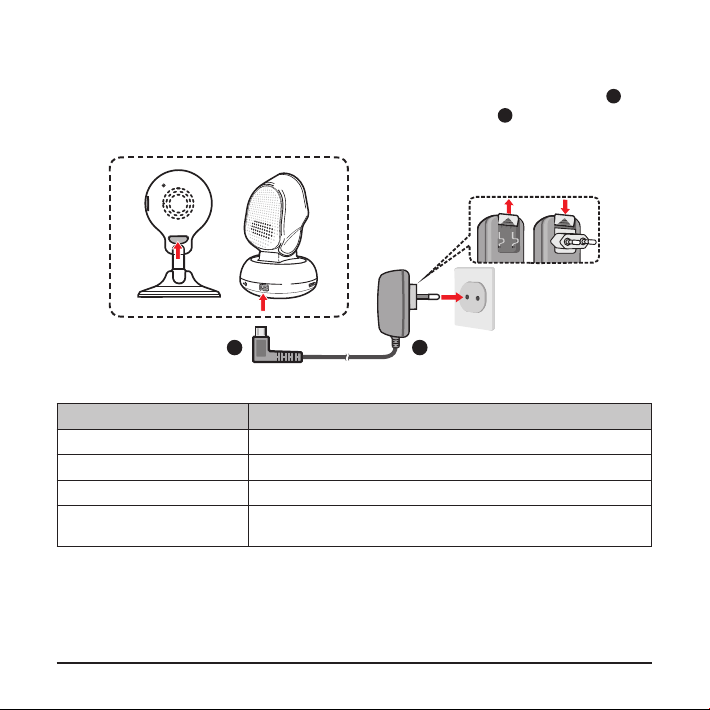
Turning the device on
Connect the home charger cable to the Micro-USB connector on the camera (1),
and the mains power charger to the power socket on the wall (2). The camera
automatically turns on when connected to the power source.
1 2
The LED indicator shows the system status:
Status Description
On The device is turned on.
Flashing quickly The device is connecting to the wireless network.
Flashing slowly The device enters the Access Point mode.
Off
Resetting the device
To restart the device and restore the factory default settings, press and hold the
RESET button (by inserting a small rod such as a straightened paper clip) until you
see the indicator light.
The device is connected to the wireless network
successfully.
12
Page 14

Managing from the MioSMART app
Connecting the device
Before using the device for the rst time, you need to connect the device to your
wireless network via the MioSMART app. Connect the camera to the power source.
The LED indicator lights up and then ashes slowly with notication sounds,
indicating that the camera is ready for connecting.
1. Start the MioSMART app, log in to the system, and then tap IP Camera.
2. Use your mobile device to scan the QR code that is located on the bottom of the
camera stand.
Note: If you cannot scan the QR code, tap
information, including:
l
UID: Enter the 20-digit UID displayed below the QR code.
l
Device password: Enter the password "miosmart" (default; case-sensitive).
l
Device name: Enter the device name to identify the device.
l
In the section, enter the device SSID (IPCAM-AP-###) that is displayed on your mobile
device's WIFI settings screen.
l
In the section, select the wireless network to connect the device to.
l
In the section, enter the password of your wireless network.
3. Enter the device name (to identify the device) and your wireless network
password. When done, tap .
4. Wait until a message indicates that the device has been added successfully.
For security purposes, it is strongly recommended to change the device's
default password. To complete, tap Change password to change the camera's
password.
Cannot use QR code? to manually enter the required
13
Page 15

1 2 3 4
Note: For iOS users, a pop-up notication screen will display during adding the device via wireless
mode. When prompted, follow the on-screen instructions to connect your mobile device's WIFI to the
device's SSID (as shown on the screen). When done, return to the MioSMART app and wait until the
connection is completed.
14
Page 16

5. When done, the screen will display the camera list.
l
The shortcuts next to the camera item allows you
to view the event list, preview photos/videos and
change the camera settings.
l
You can add up to 4 cameras to your account.
To add a new camera, tap
on the camera list.
Watching the live video
Tap the thumbnail on the camera list to watch the live video of the selected camera.
l
The screen displays the information of the camera,
including the number of users connected to the camera,
video quality and connection quality.
l
You can view the video in full-screen mode by turning
your mobile device sideways.
l
Zoom in or zoom out of the image by sliding your
ngertips apart or together on the screen.
l
Slide on the live video screen to pan or tilt the camera
lens. (For selected models only.)
15
Page 17

Using the toolbar
Use the toolbar at the bottom of the screen to change the settings for the video.
Note: When viewing the video in full-screen mode, tap on the screen to display or hide the toolbar.
1 2 3 4 5 6 7 9
1
Turns the speaker on/off. When it is turned on ( ), you can talk to the
8 10
others via the camera by using the Press to talk button ( ) button on the
screen.
2
Starts recording. Tap the button again ( ) to stop recording.
The recorded
les will be saved on your mobile device.
3
Captures and saves a still image on your mobile device.
4
Up to 4 preset positions can be set for the camera lens, allowing you to move
the camera lens to the desired angle easily. (For selected models only.)
1. Pan and tilt the camera lens to a desired angle.
2. Tap , and then tap and hold the / / / button to set the
preset angle.
3. You can now change to a preset angle of the camera lens by tapping >
/ / / .
5
Starts the Cruise mode. (For selected models only.)
1. Tap > Auto pan / Auto tilt and the camera will start patrolling
horizontally/vertically.
2. Tap Stop to exit the Cruise mode.
16
Page 18

6
When the camera is mounted on the ceiling, you can ip the image vertically.
7
Mirrors the image horizontally.
8
Sets the image quality (Medium or High) of the video.
9
Adjusts the brightness level of the image (Lowest / Low / Medium / High /
Highest).
10
Adjusts the contrast level of the image (Lowest / Low / Medium / High /
Highest).
Accessing the event list
Tap to access the event list to view the event recordings.
l
All event recordings are sorted chronologically.
l
Tap the desired item on the list for playback.
During playback, tap
l
To search for an event recording within a certain time
period, tap
at the bottom of the list and assign a
/ to pause/play the video.
time frame by selecting Withing an hour (or half a day
/ a day / a week) from the pop-up menu. To specify a
time period, select Customise > Done, and then select
the desired time period.
17
Page 19

Accessing the captured media
Tap to access the photos and videos taken by the camera from the app.
l
Tap the Photos tab to display the thumbnails of the
photos. Tap to view the desired item.
l
Tap the Videos tab to display the thumbnails of the
videos. Tap to view the desired item. During playback,
/ to pause/play the video.
tap
l
When viewing the photo/video, you can tap Edit and
then select
to share the le or to delete the le.
Changing the camera settings
Tap to access the camera settings.
l
Name: Displays the camera's name. Tap to edit the name.
l
Change password: Changes the password to log in to the camera.
l
WIFI network: Changes the wireless network for the camera.
l
Notication interval: Sets the time interval for the system to send one notication
when motion is detected. Select No limits to send notications whenever motion is
detected or Off to disable the alert function.
l
Recording mode: When the memory card is inserted into the camera, select 24-hr
recording to start continuous recording, or Event recording to start recording when
motion is detected. Select Off to disable the recording function. The recorded les
will be saved to the memory card.
Note: To use the event recording function, the Motion detection option must be enabled by
tapping > Event settings > Motion Switch > ON.
18
Page 20

l
Time zone: Selects the correct time zone of your location.
l
Format SD card: Formats the inserted memory card on the camera. (All data will be
erased.)
l
Event settings: Use the Motion Switch (ON / OFF) to enable or disable the motion
detection function. Once enabled, you can set the motion sensitivity level (Low /
Medium / High / Highest) for automatic triggering of the event recording.
l
Device information: Displays the information of the camera.
l
Reconnect: Tap to reconnect your mobile device to the camera when needed.
l
Remove camera: Remove the camera from this account.
19
Page 21

Using the personal cloud gateway
Getting to know your device
1
RJ-45 connector
2
RESET button
3
Power indicator
4
Network indicator
5
POWER button
6
USB port
7
Micro-USB connector
Connecting an external storage device
The device works as additional storage for the MioSMART system. It needs to
connect an external storage device (FAT32 and NTFS formats) for storage capacity
(up to 4 TB). Connect the external device to the USB port of the device before
turning the device on.
20
Page 22

Turning the device on
1. Connect the home charger cable to the Micro-USB connector on the device (1),
and the mains power charger to the power socket on the wall (2).
2
1
2. Briey press the POWER button to turn the device on. When the device is turned
on, the Power indicator glows in green.
Connecting to the network
Connect the device to the router/switch by using the provided Ethernet cable. When
the device is connected to the network, the Network indicator glows in blue.
21
Page 23

Managing from the MioSMART app
Adding the device
Follow the procedure to add the personal cloud gateway in the MioSMART app.
1. Start the MioSMART app, log in to the system, and then tap Personal Cloud
Gateway.
2. Tap the QR code icon.
3. Use your mobile device to scan the QR code that is located on the bottom of
the device.
Note: If you cannot scan the QR code,
l
Name: Enter the device name to identify the device.
l
UID: Enter the 20-digit UID displayed below the QR code.
l
Password: Enter the password "miosmart" (default; case-sensitive).
4. Enter the device name (to identify the device) and tap Conrm. When done,
the screen will display the personal cloud gateway list.
1 32 4
enter the required information manually, including:
22
Page 24

Recording videos remotely
With a MioSMART VixCam installed in the network, you can add the camera in the
personal cloud gateway to record videos remotely.
1. Tap on the main screen of personal cloud gateway list.
2. Tap .
3. Tap the QR code icon.
4. Use your mobile device to scan the camera's QR code.
Note: If you cannot scan the QR code,
l
UID: Enter the 20-digit UID displayed below the camera's QR code.
l
Password: Enter the password "miosmart" (default; case-sensitive).
enter the information of the camera manually, including:
5. Tap Conrm.
6. When done, the connected camera will appear on the screen.
2 31
23
Page 25

5
64
Note:
l
When you use the personal cloud gateway to connect the camera for remote video recording,
the length of the video clip may be shortened automatically in case of an unstable wireless
connection.
l
For iOS users, the video recorded remotely cannot be directly downloaded via the MioSMART
app for playback.
File management
Tap the desired item on the personal cloud gateway list to do the following:
l
Use the Search bar ( ) to search for les stored on
the storage device.
l
Tap the Menu icon ( ) to add a folder, sort les, select
les and upload les to the storage decice. When a le
is selected, you can delete/rename/download/move/copy
the le.
24
Page 26

Changing the gateway settings
Tap on the personal cloud gateway list to change the device's password, edit the
device's name, remove the device from your account, etc.
Note: For security purposes, it is strongly recommended to change the device's default password.
25
Page 27

Using the hub and sensors
Getting to know your device
Hub G10
1
2
3
4
5
6
7
Door/Window Sensor R12 Motion Sensor R14
LED indicator
RESET button
SD card slot
Antenna
RJ-45 connector
USB port
Micro-USB connector
1
Pair button
2
LED indicator
3
Sensing points
1
Pair button
2
LED indicator
26
Page 28

Turning the device on
Connect the home charger cable to the Micro-USB connector on the hub (1), and
the mains power charger to the power socket on the wall (2). The hub automatically
turns on when connected to the power source.
2
1
The LED indicator shows the system status:
Status Description
Solid red The device is turned on.
Flashing red and
green
Solid green
The device enters the Access Point mode.
The device is connected to the wireless network
successfully.
27
Page 29

Setting up the sensor
1. Open the cover of the sensor.
2. Insert the AAA batteries into the battery tray of the sensor.
3. Replace the cover.
Door/Window Sensor R12
Motion Sensor R14
28
Page 30

4. The sensor can be installed in various locations by an easy "peel-and-place"
setup. Follow the instructions to mount the sensor wherever you want.
While mounting the door/window sensor, ensure the sensing points are properly
aligned. The distance between the two points should be less than 1 cm.
< 1 cm
29
Page 31

Note:
l
It is not recommended to use Manganese/Ni-Cd/Ni-MH batteries for the device.
l
Conrm the polarities ( ) while inserting the batteries.
l
The MioSMART app will remind you of low battery power for the sensor. Once prompted, replace
the batteries immediately.
l
Use only the correct type of battery.
l
Do not heat, open, puncture, mutilate or dispose of batteries in re.
l
Dispose of batteries in accordance with local and national disposal regulations.
l
Remove the batteries if they are worn out or before storing your device for an extended period of
time.
Managing from the MioSMART app
Connecting to the network
Turn the hub on and connect it to the network via the MioSMART app using the
wired mode or wireless mode.
l
Wired mode: Connect the hub to the router/switch by using the provided Ethernet
cable.
30
Page 32

l
Wireless mode: The hub will automatically search the wireless network to connect
to.
Note: Do not connect the Ethernet cable if you want to connect the hub via the wireless mode.
Follow the procedure to connect the hub to your wireless network.
1. Start the MioSMART app, log in to the system, and then tap Smart Home.
2. Use your mobile device to scan the QR code that is located on the bottom of the
device.
Note: If you cannot scan the QR code, tap
Cannot use QR code? to manually enter the required
information, including:
l
UID: Enter the 20-digit UID displayed below the QR code.
l
Device password: Enter the password "miosmart" (default; case-sensitive).
l
Device name: Enter the device name to identify the device.
l
In the section, enter the device SSID (MioSMART-##########) that is displayed on your
mobile device's WIFI settings screen.
l
In the section, select the wireless network to connect the device to.
l
In the section, enter the password of your wireless network.
31
Page 33

3. Wired mode: Select Wired, and then enter the device name (to identify the
device).
Wireless mode: Select Wireless, and then enter the device name (to identify the
device) and the password of your wireless network. When done, tap .
4. Wait until a message indicates that the device has been added successfully.
For security purposes, it is strongly recommended to change the device's
default password. To complete, tap Change password to change the camera's
password.
1 2
3
32
4
Page 34

Note: For iOS users, a pop-up notication screen will display during adding the device via wireless
mode. When prompted, follow the on-screen instructions to connect your mobile device's WIFI to the
device's SSID (as shown on the screen). When done, return to the MioSMART app and wait until the
connection is completed.
Pairing the sensors
Before using a sensor for the rst time, you need to pair it with the MioSMART hub
(may be sold separately). During pairing, place the hub and the sensor closely
within 1 metre.
1. Start the MioSMART app, log in to the system, and then tap Smart Home.
2. Tap the hub icon ( ).
3. Tap to add a sensor.
4. Tap the Pair button ( ).
5. Use a small rod (such as a straightened paper clip) to press the sensor's Pair
button for 2 seconds. The sensor's LED indicator ashes in red, indicating that
the pairing is in progress.
6. When done, the connected sensor will be displayed on the sensor list.
33
Page 35

1 2 3 4
5 6
Note: If you want to remove a hub or a sensor, tap the icon on the hub list or the sensor list,
and then tap .
34
Page 36

Now you will receive alerts ( ) on your mobile device when the sensor is
triggered.
Viewing the event list
1. Start the MioSMART app, log in to the system, and then tap Smart Home.
2. Tap the hub icon ( ).
3. Tap the desired sensor icon.
4. The screen will display the event list of the triggered alerts.
1 2 3 4
35
Page 37

Upgrading the devices
Occasionally, Mio may offer free system updates to improve user experiences.
You can upgrade the device via OTA (over-the-air) updates. When a new rmware
version is available, you will be asked to upgrade your device when you log in to the
app. Tap Upgrade to upgrade your device.
Note: OTA updates may be interrupted if the wireless connection is unstable.
36
Page 38

For more information
Troubleshooting
Problem Solution
I have applied for an account on
the MioSMART app but I have
not received the conrmation
email.
I cannot connect the device by
scanning the QR code.
The device is connected to
the network successfully,
but I cannot add it using the
MioSMART app.
When I try to reconnect the
device due to networking issues,
I cannot nd it in the MioSMART
app.
I have changed the device's
password. What can I do if I
forget it?
I moved the device to another
location and nd that I cannot
add it using the MioSMART app.
Tap Resend email on the Account created
screen and check your email account again.
In some cases, the conrmation email may be
judged as a spam email by the email server.
Please check the junk email folder of your email
account.
You can connect the device by manually
entering the required settings, including the
device UID and password, device name,
wireless network SSID and password.
Please check whether the device and your
mobile device are connected to the same
network.
Reset the device and try again.
Reset the device to restore the default
password.
Reset the device before you connect it to a
different wireless network.
37
Page 39

Problem Solution
My USB ash drive is
unavailable when I connect it to
the device.
Please check the format of your USB ash
drive. The device only supports external storage
devices in the FAT32 and NTFS formats.
If a problem persists, contact our Technical Support for assistance.
Online support
For 24/7 help and support with Mio products, visit our Technical Support website at:
www.mio.com
Mio Advantage
If you have a faulty product or you would like to speak to a member of our Technical
Support team, register your Mio on Mio Advantage to obtain the Technical Support
phone numbers for your region.
Regulatory information
CE
For regulatory identication purposes:
l
MioSMART VixCam C10 is assigned a model number of N525_01.
l
MioSMART Hub G10 is assigned a model number of N525_02.
l
MioSMART Door/Window Sensor R12 is assigned a model number of N525_03.
l
MioSMART Motion Sensor R14 is assigned a model number of N525_04.
l
MioSMART Personal Cloud Gateway S10 is assigned a model number of
N525_05.
l
MioSMART VixCam C12 is assigned a model number of N525_06.
38
Page 40

Products with the CE marking comply with the Electromagnetic
Compatibility Directive (2014/30/EU) - issued by the Commission of the
European Community.
Compliance with these directives implies conformity to the following European
Standards:
EN55022: 2010 / AC:2011
EN61000-3-2:2014
EN61000-3-3:2013
EN55024: 2010
EN61000-4-2:2008
EN61000-4-3:2006 + A2: 2010
EN61000-4-4:2012
EN61000-4-5:2014
EN61000-4-6:2013
EN61000-4-8:2009
EN61000-4-11:2004
EN 300 328 V1.9.1: 2015
EN 301 489-1 V1.9.2: 2011
EN 301 489-17 V2.2.1: 2012
EN 60950-1: 2006
The manufacturer cannot be held responsible for modications made by the User
and the consequences thereof, which may alter the conformity of the product with
the CE Marking.
Declaration of conformity
Hereby, MiTAC declares that this N525_01/N525_02/N525_03/N525_04/N525_05/
N525_06 is in compliance with the essential requirements and other relevant
provisions of Directive 2014/30/EU.
39
Page 41

WEEE
This product must not be disposed of as normal household waste, in
accordance with the EU directive for waste electrical and electronic
equipment (WEEE – 2012/19/EU). Instead, it should be disposed of by
returning it to the point of sale, or to a municipal recycling collection point.
Safety precautions
About charging
l
Use only the charger supplied with your device. Use of another type of charger
may result in malfunction and/or danger.
l
This product is intended to be supplied by a LISTED Power Unit marked with
“LPS”, “Limited Power Source” and output rated + 5 V dc / 2 A.
l
Use a specied battery in the equipment.
About the charger
l
Do not use the charger in a high moisture environment. Never touch the charger
when your hands or feet are wet.
l
Allow adequate ventilation around the charger when using it to operate the
device or charge the battery. Do not cover the charger with paper or other objects
that will reduce cooling. Do not use the charger while it is inside a carrying case.
l
Connect the charger to a proper power source. The voltage requirements are
found on the product case and/or packaging.
l
Do not use the charger if the cord becomes damaged.
l
Do not attempt to service the unit. There are no serviceable parts inside. Replace
the unit if it is damaged or exposed to excess moisture.
40
Page 42

Caring for your device
Taking good care of your device will ensure trouble-free operation and reduce the
risk of damage.
l
Keep your device away from excessive moisture and extreme temperatures.
l
Avoid exposing your device to direct sunlight or strong ultraviolet light for
extended periods of time.
l
Do not place anything on top of your device or drop objects on your device.
l
Do not drop your device or subject it to severe shock.
l
Do not subject your device to sudden and severe temperature changes. This
could cause moisture condensation inside the unit, which could damage your
device. In the event of moisture condensation, allow the device to dry out
completely before use.
l
Never clean your device with it powered on. Use a soft, lint-free cloth to wipe the
screen and the exterior of your device.
l
Never attempt to disassemble, repair or make any modications to your device.
Disassembling, modifying or any attempt to repair could cause damage to your
device, may inict bodily harm or damage to property and will void any warranty.
l
Do not store or carry ammable liquids, gases or explosive materials in the same
compartment as your device, its parts or accessories.
l
To discourage theft do not leave the device and accessories in plain view in an
unattended place.
l
Overheating may damage the device.
41
Page 43

Revision: R00
(12/2016)
Disclaimer
The screenshots in this manual may differ between different operating systems
and software versions. You are recommended to download the latest User
Manual of your product from Mio website (www.mio.com).
Specications and documents are subject to change without notice. MiTAC does
not warrant this document is error-free. MiTAC assumes no liability for damage
incurred directly or indirectly from errors, omissions or discrepancies between the
device and the documents.
Notes
Not all models are available in all regions.
Depending upon the specic model purchased, the colour and look of your device
and accessories may not exactly match the graphics shown in this document.
MiTAC Europe Ltd
www.mio.com
 Loading...