

Page 1

OWNER'S MANUAL
From A to Z
Online Edition for Part No. 01 41 0 156 490 - © 11/01 BMW AG
RADIO BOOST CD
Page 2

Notes on this Owner's Manual
Online Edition for Part No. 01 41 0 156 490 - © 11/01 BMW AG
So that you can start enjoying your car
radio right away, you will find an overview
in the first chapter about the displays and
controls.
In the chapter called "Settings," you will
>
find all general information about the
radio and compact disc (CD)
You will find specific information for
>
listening to the radio in the chapter
"Reception"
In the chapter called "Playing," you will
>
find specific information on playing CDs.
The fastest way to find certain topics is by
using the index at the end.
Should you sell your MINI at a later date,
please remember to pass this Owner's
Manual on to the next owner – it is a legal
element of the vehicle.
© 2001 Bayerische Motoren Werke
Aktiengesellschaft
Munich, Germany
Reprints, including excerpts,
only with written consent of
BMW AG, Munich.
Order No. 01 41 0 156 490
US English XI/01
Printed in Germany
Printed on environmentally friendly paper
(bleached without chlorine, suitable for recycling).
Symbols used
Identifies precautions that must be
followed precisely in order to avoid
the possibility of personal injury and
serious damage to the vehicle or the car
radio.
<
Contains information that will assist
you in gaining the optimum benefit
from your car radio and enable you to care
more effectively for your car radio.
Marks the end of a specific item of
<
information.
*
Indicates special equipment, country-
specific equipment and optional extras.
If you have additional questions, please
consult the experts at your MINI center for
information and advice.
<
Editorial notice
The advanced technological features and
high quality standard of MINI equipment
are maintained by an ongoing development process. This may lead to discrepancies between the information in this
Owner's Manual and the actual equipment
installed in or on the vehicle. Nor can errors
and omissions be entirely ruled out. You are
therefore asked to appreciate that no legal
claims can be entertained on the basis of
the data, illustrations or descriptions in this
manual.
2
Page 3

OVERVIEW
Online Edition for Part No. 01 41 0 156 490 - © 11/01 BMW AG
SETTINGS
RECEPTION
PLAYING
OVERVIEWPLAYING RECEPTION SETTINGSINDEX
Overview
INDEX
3
Page 4

THE CAR RADIO AT A GLANCE
Online Edition for Part No. 01 41 0 156 490 - © 11/01 BMW AG
4
Page 5

THE CAR RADIO AT A GLANCE
Online Edition for Part No. 01 41 0 156 490 - © 11/01 BMW AG
Displays and controls
1 On/Off, volume control 10
Setting values
Speed-dependent volume
>
control 10
Volume for navigation*11
>
Sound quality 13
>
Harman Kardon*14
>
2 Audio source, changeover to
Radio 27
>
CD changer*25
>
CD 25
>
3 Compact disc slot 27
4 Ejecting the compact disc 27
5 Display of the function key (display
for RDS, PTY, Harman Kardon and
random sequence of music tracks)
6 Function key for controlling the
functions RDS, PTY, Harman Kardon,
regional programs and random
sequence of music tracks
7 Display (display for reception range/
memory level, station with RDS station,
program, frequency, MD and CD
changer functions and sound setting
and Harman Kardon)
8 Station keys for
Radio 23
>
CD changer 33
>
9 Station/track search
Selecting the station 19 20
>
Music selection search
>
CD 28
CD changer 33
10 Manual station selection 19
Scanning
Station 21
>
CD track 28, 34
>
11 FM and AM reception range/
memory levels 18, 23
12 Note symbol
>
Speed-dependent volume
control 10
Volume for navigation 11
>
>
Sound quality adjustment 13
Harman Kardon 14
>
OVERVIEWPLAYING RECEPTION SETTINGSINDEX
5
Page 6

CARE INSTRUCTIONS
Online Edition for Part No. 01 41 0 156 490 - © 11/01 BMW AG
Cleaning the unit
For cleaning, use a dampened cloth only.
Do not use chemical or household
cleaners. Never allow moisture or
liquids to come into contact with the unit.
They could damage surfaces and electrical
components.
<
Handling CDs
Although CDs have a protective coating on
both sides, you should still remember to
observe the following precautions:
Always hold CDs at the outer edge, and
>
avoid fingerprints or dust, scratches or
moisture on the reflective scanning side
of the CD
Do not write on CDs or affix labels to
>
them
If necessary, wipe the reflective (data)
>
side of the CD with a suitable cleaning
cloth (commercialy available), wiping in
straight lines from the center outward
CDs which have condensed moisture on
>
them (from large temperature differences, for instance) may not function
properly when they are played.
Never attempt to clean with solvents,
abrasive cleansers, or cleaning products and antistatic sprays intended for vinyl
records.
<
6
Page 7

ANTI-THEFT PROTECTION RADIO PASS
Online Edition for Part No. 01 41 0 156 490 - © 11/01 BMW AG
The device has automatic anti-theft protection. It is not necessary to enter a security
code manually.
The radio pass is a document. Please store
this pass in a safe place, because in the
event your radio unit is stolen, the data
entered therein has to be reported both to
your insurance and the police.
OVERVIEWPLAYING RECEPTION SETTINGSINDEX
7
Page 8

8
Online Edition for Part No. 01 41 0 156 490 - © 11/01 BMW AG
Page 9

OVERVIEW
Online Edition for Part No. 01 41 0 156 490 - © 11/01 BMW AG
SETTINGS
RECEPTION
PLAYING
OVERVIEWPLAYING RECEPTION SETTINGSINDEX
Settings
INDEX
9
Page 10
TURNING THE UNIT ON/OFF VARYING THE VOLUME
Online Edition for Part No. 01 41 0 156 490 - © 11/01 BMW AG
Press the knob.
The unit will select the audio source that
was last used (radio, CD changer or CD).
Listening to the radio with the ignition
shut off
The audio sources can still be accessed for
up to 20 minutes after the ignition has
been shut off (with the ignition key in position 0 or removed).
When the ignition is shut off, the unit shuts
off as well.
Switch the unit back on
Press the knob.
To save on the battery, you should
always turn the radio off when
leaving the vehicle.
<
Adjusting the volume
Turn the knob.
As soon as you begin talking on the
phone or accept a call, the radio
switches to mute.
<
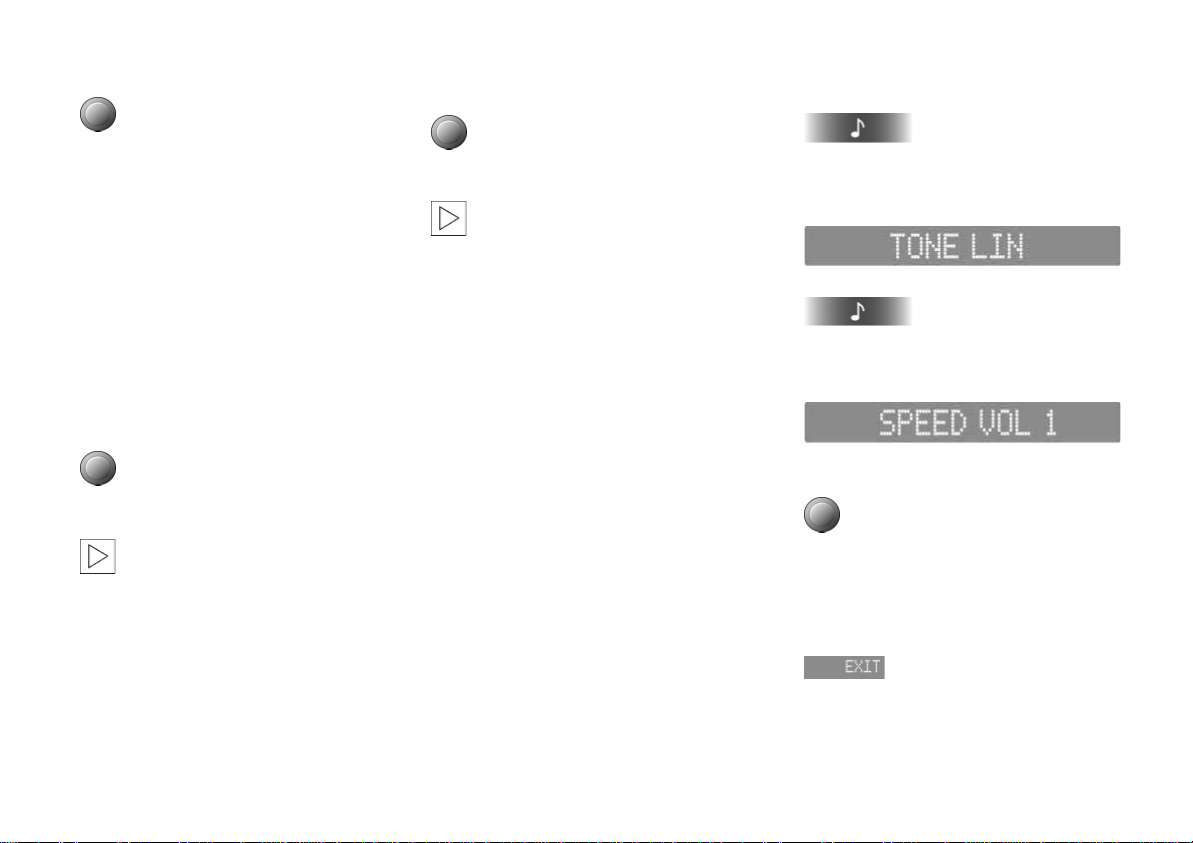
Adjusting the speed-dependent
volume
To compensate for increasing noise in the
passenger compartment with increased
vehicle speed, your unit is equipped with a
speed-dependent volume control (Speed
Volume). This function will increase volume
as speed likewise increases.
You can set the volume increase in 6 levels.
The higher the level you choose, the greater
the increase in volume.
1. Call up the current setting
Press and hold the key.
The display changes to the operating
display for TONE LIN:
2.
press repeatedly until the display
changes to the operating display for
SPEED VOL, e.g.:
3. Select level
Turn the knob.
The selected level will be indicated in the
display
4. Exit operating display
10
Page 11

VARYING THE VOLUME
Online Edition for Part No. 01 41 0 156 490 - © 11/01 BMW AG
Adjusting the volume for navigation*
If your vehicle is equipped with a navigation system, you can adjust the minimum
volume for announcements of this system
with the NAVI MIN function. You can select
a level between –9 and +9, where the
level 0 corresponds a moderate volume.
As the individual levels are fixed volumes,
you will hear all announcements, regardless of how soft you have set the current
volume for the radio, CD changer or CD.
1. Call up the current setting
Press and hold the key.
The display changes to the operating
display for TONE LIN:
2.
press repeatedly until the display
changes to the operating display for
NAVI MIN, e.g.:
3. Make adjustment
Turn until the desired volume is reached.
The selected level will be indicated in the
display
4. Exit operating display
The selected minimum volume is
retained for all navigation announcements.
If you have set the current volume for the
radio, CD changer or CD louder than the
NAVI MIN volume, then the volume does
not change during an announcement.
<
The volume of an announcement can be
adjusted in each individual case with the
volume knob. You can, for example,
decrease the volume if you have set a very
loud basic volume for the radio, CD changer
or CD, or if you increase it when, for
example, you have opened a window and
the interior noise level is very high.
Turn during a navigation announcement
until the desired volume is set.
OVERVIEWPLAYING RECEPTION SETTINGSINDEX
11
Page 12

VARYING THE VOLUME
Online Edition for Part No. 01 41 0 156 490 - © 11/01 BMW AG
Resetting the settings
The volume for navigation and the speeddependent volume can be reset to the
midrange setting.
The volume for navigation and the
speed-dependent volume cannot be
individually reset. When "RESET?" is
confirmed, the settings are reset or deactivated.
<
1. Call up the current setting
Press and hold the key.
The display changes to the operating
display for TONE LIN
2.
press repeatedly until "RESET?" appears
in the display
3. Reset the setting
The volume for navigation is reset to
level 0 and the speed-dependent volume
to level 3.
12
Page 13

ADJUSTING THE SOUND QUALITY
Online Edition for Part No. 01 41 0 156 490 - © 11/01 BMW AG
Sound and tone playback
You can choose from the following sound
settings:
>
Bass:
Amplify or reduce bass tones.
Treble:
>
Amplify or reduce higher tones.
Front/back volume distribution (Fader):
>
Front or rear, louder/softer
Right/left volume distribution (Balance):
>
Right or left louder/softer.
Harman Kardon
>
Various sound patterns, refer to page 14.
The sound setting for bass, treble and
Harman Kardon is source-dependent, i.e. can be adjusted separately for the
radio, CD changer and CD. Changing the
audio source will call up the last sound
setting used for this particular audio
source.
The sound setting of the front/rear and
right/left volume distribution applies to all
audio sources.
*
<
Changing the sound quality
1. Call up the sound setting
The display changes to the operating
display for BASS, e.g.:
2. Select a different sound setting (Treble,
Fader or Balance) if necessary
Press repeatedly until the desired operating display is reached
3. Change the desired sound setting
Turn until the desired setting is reached
4. Exit operating display
Resetting the sound settings
With TONE LIN (Tone Linear) you reset all
sound setting to the midrange setting.
Bass, treble and Harman Kardon are
reset for the current audio source,
and the front/rear and right/left volume
distribution is reset for all audio sources.
1. Call up the operating display for the
midrange setting
Press and hold the key.
The display changes to the operating
display for TONE LIN
2.
All settings are reset.
OVERVIEWPLAYING RECEPTION SETTINGSINDEX
<
13
Page 14

ADJUSTING THE SOUND QUALITY
Online Edition for Part No. 01 41 0 156 490 - © 11/01 BMW AG
Harman Kardon* (in preparation)
The Harman Kardon system offers optimal
listening pleasure with both sound simulations and 3D sound effects.
You can choose from the following sound
patterns:
>
Mini h/k
Spatial
>
Electronic
>
Instrumental
>
>
Festival.
An additional Driver function is also
offered for all sound patterns (except
Spatial and Festival), refer to page 15.
<
Selecting sound pattern
1. Call up Harman Kardon
Press repeatedly until the display
changes to the operating display for
MINI h/k:
2. Select a different sound pattern (Spatial,
Electronic, Instrumental or Festival) if
necessary
Turn until the desired sound pattern
appears in the display.
The selected sound pattern is applied to
the music playing
3. Exit operating display
14
Page 15

ADJUSTING THE SOUND QUALITY
Online Edition for Part No. 01 41 0 156 490 - © 11/01 BMW AG
Driver function
The Driver function can be activated via the
Harman Kardon system. The Driver function amplifies the acoustic pattern near the
steering wheel.
The Driver function is only offered
for the sound patterns Mini h/k,
Electronic and Instrumental.
The Driver function is only effective
when no other seat is occupied
beside the driver's seat.
<
<
Switching Driver function on/off
Switch on Driver function
1. Select sound pattern, refer to page 14
2. Switch on Driver function
or
"DRIVER" appears in the display.
Switch off Driver function
Displays and signals
The explanations below refer to the
displays in the right-hand display:
ON
*
Driver function is switched on.
OFF
*
Driver function is not switched on.
The Driver function is not offered by this
sound pattern (Spatial, Festival).
OVERVIEWPLAYING RECEPTION SETTINGSINDEX
15
Page 16

16
Online Edition for Part No. 01 41 0 156 490 - © 11/01 BMW AG
Page 17

OVERVIEW
Online Edition for Part No. 01 41 0 156 490 - © 11/01 BMW AG
SETTINGS
RECEPTION
PLAYING
OVERVIEWPLAYING RECEPTION SETTINGSINDEX
Reception
INDEX
17
Page 18

SELECTING THE FREQUENCY BAND
Online Edition for Part No. 01 41 0 156 490 - © 11/01 BMW AG
Select the waveband
areas FM1, FM2 and FMA (Autostore).
With touch actuations of AM you switch
between the AM memory areas AM and
AMA (Autostore).
With your car radio you can receive the
following reception ranges: FM and AM.
The frequency range AM allows the reception of distant stations because the broadcast signals not only travel along the
ground as surface waves, but also as waves
bounced back to earth from the ionosphere.
Frequency Modulation (FM) provides
substantially better sound quality than
Amplitude Modulation (AM). However,
because FM transmissions rely on lineof-sight broadcast waves, their effective
reception range is limited.
With touch actuations of FM you
switch between the FM memory
<
18
Page 19

SELECTING A STATION BY FREQUENCY
Online Edition for Part No. 01 41 0 156 490 - © 11/01 BMW AG
Selecting a station manually
1. Select "manual"
"MAN" (manual) appears in the display
next to the frequency display or the
station name
2. Set the frequency
press or keep pressed down.
Every actuation changes the frequency
in specifically defined increments.
Scanning the stations
Start scan
The scan mode begins with the frequency
that was last set.
The scan mode is stopped as soon as a
station is found.
OVERVIEWPLAYING RECEPTION SETTINGSINDEX
19
Page 20

SELECTING A STATION BY NAME
Online Edition for Part No. 01 41 0 156 490 - © 11/01 BMW AG
RDS – Radio Broadcast Data System
Thanks to specially designed systems, limitations inherent in mobile reception quality
have been partially minimized:
The Radio Broadcast Data System (RDS)
transmits supplementary information in
the FM range. RDS transmitters thus offer
the following characteristics:
Stations that broadcast at several
>
frequencies automatically change to
the frequency with the best reception
quality
The station name will be indicated in the
>
display after the RDS signals have been
evaluated
>
Additional information can be indicated
or called up in the display (e.g. text
broadcasts from the station, PTY).
However, the reception of RDS data is only
possible under favorable reception conditions. If there is weak or interrupted reception, it can take quite a while before the
station name appears in the display.
Station selection
1. Switch on RDS
"RDS ON" briefly appears in the display
and then the name of the current
station if the station transmits RDS
information
2. Start scan
The scan mode begins with the station
that was last set.
The scan mode is stopped as soon as a
station is found.
Switch off RDS
"RDS OFF" briefly appears in the display.
20
Page 21

AUDIO SAMPLING AND SELECTION (SCAN)
Online Edition for Part No. 01 41 0 156 490 - © 11/01 BMW AG
You can briefly play all of the stations that
you can receive.
1. Start play
Press and hold the key.
Display, e.g.:
2. Station selection
Press and hold the key.
The scan function will be interrupted,
the selected station will be retained.
OVERVIEWPLAYING RECEPTION SETTINGSINDEX
21
Page 22

TYPE OF PROGRAM (PTY)
Online Edition for Part No. 01 41 0 156 490 - © 11/01 BMW AG
You can receive even more information by
using RDS. Certain stations transmit signals
identifying the program type (PTY), suchas
news (NEWS), sports (SPORTS), pop (POP
MUSIC), culture (CULTURE), etc.
If there is weak or interrupted reception, it
can take quite a while before PTY is available.
PTY can also be used for catastrophe
warnings. If the station is broadcasting this type of program, then "ALERT"
will appear in the display.
The program type can only be
switched on or off in the radio
mode.
<
<
Querying the type of program
To display the program type via RDS:
Press briefly.
The program type appears in the display for
a few seconds.
If no PTY code is offered by the respective
radio station, "NO PTY" appears in the
display.
Automatic PTY display
Press and hold down until "PTY AUTO"
appears in the display.
Each time the station is changed or if the
station changes the program type, this is
automatically displayed for a few seconds,
e.g. "CULTURE" for a cultural station.
Switching off PTY
Press and hold down until "PTY MAN"
appears in the display.
22
Page 23

STORING AND CALLING UP A STATION
Online Edition for Part No. 01 41 0 156 490 - © 11/01 BMW AG
Memory locations
Your radio can store 30 stations:
In the FM reception range you can store
>
12 stations of your choice and in the AM
reception range you can store 6 stations
of your choice, refer to "Storing a station"
> In addition, the radio also automatically
stores the respective 6 strongest stations
in the FMA and AMA reception range,
refer to page 24.
The memory spaces of the individual
reception ranges are distributed
among the memory levels FM1, FM2, FMA,
AM and AMA.
The station buttons are each multiply
assigned due to the different memory
levels.
Select the reception range
Each time the key is touched, you switch
within the FM and AM memory levels.
The selected memory level will appear in
the left of the display.
<
Storing a station
1. Select the reception range
Each time the key is touched, you switch
within the FM and AM memory levels
2. Select a station, refer to page 19 or 20
3. Store the station
Maintain pressure on the desired preset
key (1…6) until you again hear the
station after a brief interruption. The
station has been stored.
The memory level and the selected key
number will appear in the left of the
diplay, e.g.:
Calling up a station
1. Select the reception range
Each time the key is touched, you switch
within the FM and AM memory levels
2. Select the stored station
Press the desired key (1...6).
OVERVIEWPLAYING RECEPTION SETTINGSINDEX
23
Page 24

STORING AND CALLING UP A STATION REGIONAL PROGRAMS
Online Edition for Part No. 01 41 0 156 490 - © 11/01 BMW AG
Automatic storing
Automatic data storage (AUTOSTORE) is
advantageous if you need quick access to
the strongest station in the area while you
are doing long-distance driving.
The 6 respectively strongest stations can
automatically be stored on the FMA and
AMA memory levels.
Select FMA memory level
Press and hold the key.
Display:
or
Select AMA memory level
Press and hold the key.
The radio automatically changes to the
FMA or AMA memory level. The 6 currently
strongest stations are automatically stored
and the station stored under station key 1
is set.
If no station can be stored due
to poor reception conditions,
"NO STATION" briefly appears in the display
and the last station selected is reset.
<
If you do not want to use
AUTOSTORE, you can individually
store six additional stations each on the
FMA or AMA memory level, refer to
page 23.
<
In the FM reception range some stations
transmit regional programs around the
clock or at certain times. These programs
can be received via the regional function.
Switch regional program on/off
Press and hold the key.
"REG ON" or "REG OFF" briefly appears in
the display.
If you have switched on this function and
the station switches over to a regional
program, the device remains tuned to the
regional program you have selected.
24
Page 25

SWITCHING OVER TO CD CHANGER OR CD
Online Edition for Part No. 01 41 0 156 490 - © 11/01 BMW AG
Press repeatedly until the mode display
switches over to the desired audio source
(CD changer or CD). With the CD magazine
loaded or a CD inserted, the sound output
changes to
> CD operation, refer to page 27
> CD Changer operation, refer to page 32.
OVERVIEWPLAYING RECEPTION SETTINGSINDEX
25
Page 26

OVERVIEW
Online Edition for Part No. 01 41 0 156 490 - © 11/01 BMW AG
SETTINGS
RECEPTION
PLAYING
OVERVIEWPLAYING RECEPTION SETTINGSINDEX
Playing
INDEX
26
Page 27

STARTING AND STOPPING THE CD MODE DISPLAYS
Online Edition for Part No. 01 41 0 156 490 - © 11/01 BMW AG
Starting
1. Switch the unit on, refer to page 10
2. Insert the CD into the CD slot with the
label side up.
Display indication:
If there is already a CD in the CD slot (CD
shown in display):
Start play
Press repeatedly until "TR" appears in the
display.
Stopping
The CD is pushed out of the CD slot somewhat and the device switches over to CD
changer or radio
or
Switch the unit off, refer to page 10
or
Switch over to radio or CD changer
Press repeatedly until the mode display
switches over to the desired audio source
(radio or CD changer).
The sound output changes directly or with
the CD magazine loaded to
> Radio operation, refer to page 18
> CD Changer operation, refer to page 32.
NO DISC
The CD slot is empty.
CD ERROR
The CD has been improperly inserted or
is demonstrating a mechanical defect.
27
Page 28

MUSIC SELECTION SEARCH
Online Edition for Part No. 01 41 0 156 490 - © 11/01 BMW AG
Skipping tracks
Select the direction
Press repeatedly until you get to the
desired title.
The CD will start playing at the title
selected.
Fast forward/reverse
1. Select the direction of play
Press and hold the key. The tracks can
be heard, but the quality is distorted
2. To interrupt the fast forward/reverse,
let go of the key.
The CD will start playing from the point
selected.
Hearing a sample and selecting (Scan)
All of the CD titles will be automatically
played one after the other for a brief
period.
1. Start playing tracks
Press and hold the key.
Display, e.g.:
2. Select a title
Press and hold the key.
The scan function will be interrupted,
and replay will start at the point of interruption.
OVERVIEWPLAYING RECEPTION SETTINGSINDEX
28
Page 29

RANDOM PLAY TRACK REPEAT
Online Edition for Part No. 01 41 0 156 490 - © 11/01 BMW AG
The CD music titles are played in random
order (Random Play).
Start Random Play
Display, e.g.:
You can still operate the keys for
skipping titles, fast forward/reverse
while using Random Play. If necessary, you
can skip a track you do not want to listen to
with this function.
<
Stop Random Play
The Random Play function will be interrupted, and replay will start at the point of
interruption.
The current music track is continuously
repeated (Repeat).
Start Repeat
Press and hold the key.
Display, e.g.:
Stop Repeat
Press and hold the key.
The following music tracks will be played.
29
Page 30

CD CHANGER*
Online Edition for Part No. 01 41 0 156 490 - © 11/01 BMW AG
Installed position
The CD changer for 6 CDs is located in the
luggage compartment at the right rear.
Removing the CD magazine
Take the CD magazine out of the CD
changer to either fill or empty it.
1. Slide the flap to the right
2. Press the key
The magazine will slide out and can then
be removed.
Filling/emptying the CD magazine
When adding CDs to or removing
them from the CD magazine, hold
them only at the edge. Do not touch the
reflective side from which the signal is
scanned.
The CD compartments in the changer have
the same numbers as the CD selector keys
on the radio.
Filling:
Put the CD into the CD cartridge written
side up.
Emptying:
As shown in the illustration, pull out the
slide desired and remove the proper CD.
<
OVERVIEWPLAYING RECEPTION SETTINGSINDEX
Inserting the CD magazine
1. Slide the flap to the right
2. With the arrow pointing toward the CD
changer, push the CD magazine fully in
3. Close the flap.
It is not recommended that you play
CD singles with an adapter. The CDs
or the adapter could jam.
Suitable magazines for CD singles can be
obtained from shops.
<
30
Page 31

CD CHANGER*
Online Edition for Part No. 01 41 0 156 490 - © 11/01 BMW AG
Operating temperatures
Only operate the CD changer at
temperatures from +5
+140
7 (+60 6), as otherwise malfunc-
tions may occur.
Even when the device is switched off, only
expose it to a temperature range of –13
(–25
6) to +185 7 (+85 6).<
7 (–15 6) to
7
Humidity
A high level of humidity inside the CD
changer may cause the laser beam focusing
lens to fog over and prevent the CD from
being played.
Precautions when using laser
equipment
The CD changer is a "Class 1" laser product.
Do not remove the cover from the
housing. Do not operate the unit with
a damaged cover. If you do so, there is a risk
of severe eye injuries from the invisible
laser beams.
Repair or maintenance work must only be
carried out by qualified service experts.
<
31
Page 32

STARTING AND STOPPING THE CD MODE DISPLAYS
Online Edition for Part No. 01 41 0 156 490 - © 11/01 BMW AG
Starting
Press repeatedly until the display changes
to the operating display for the CD changer,
e.g.:
After a few seconds, replay will begin at the
position where the CD was last interrupted.
If the CD magazine has been refilled,
replay begins with the CD in the
lowest filled compartment, e.g. CD 1,
track 1.
<
Malfunctions may occur (e.g. drop-
outs) when you play CDs you have
recorded yourself.
<
Stopping
Turn the unit off, refer to page 10
or
Switch over to radio or CD:
Press repeatedly until the mode display
switches over to the desired audio source
(CD or radio).
The sound output changes immediately or
when a CD is inserted to
> CD operation, refer to page 27
> Radio operation, refer to page 18.
NO DISC
There is no CD in the CD compartment,
or the CD has been inserted incorrectly.
NO DISCS
The magazine is empty.
NO MAGAZINE
No magazine has been inserted.
CD CHECK
The contents of the CD are currently being
read in.
HIGH TEMP
Operating temperature is too high.
Once normal operating temperature has
been reached again, replay will be automatically resumed.
OVERVIEWPLAYING RECEPTION SETTINGSINDEX
32
Page 33

MUSIC SELECTION SEARCH
Online Edition for Part No. 01 41 0 156 490 - © 11/01 BMW AG
Selecting a CD
Press the key on the left or right for the
desired CD number (1...6).
The corresponding CD number will be indicated in the display. Replay will start with
the first title. At the end of the last track,
the next CD will be selected.
Skipping tracks
Select the direction
Press repeatedly until you get to the
desired title.
The CD will start playing at the title
selected.
Fast forward/reverse
1. Select the direction of play
Press and hold the key. The tracks can be
heard, but the quality is distorted
2. To interrupt the fast forward/reverse,
let go of the key.
The CD will start playing from the point
selected.
33
Page 34

MUSIC SELECTION SEARCH RANDOM PLAY
Online Edition for Part No. 01 41 0 156 490 - © 11/01 BMW AG
Hearing a sample and selecting (Scan)
All of the CD titles will be automatically
played one after the other for a brief
period.
1. Start play
Press and hold the key.
Display, e.g.:
2. Select a title
Press and hold the key.
The scan function will be interrupted,
and replay will start at the point of interruption.
The music tracks of the CDs are played in
random order (Random Play).
Start Random Play
Display, e.g.:
You can still operate the keys for
skipping titles, fast forward/reverse
while using Random Play. If necessary, you
can skip a track you do not want to listen to
with this function.
<
Stop Random Play
The Random Play function will be interrupted, and replay will start at the point of
interruption.
OVERVIEWPLAYING RECEPTION SETTINGSINDEX
34
Page 35

35
Online Edition for Part No. 01 41 0 156 490 - © 11/01 BMW AG
Page 36

OVERVIEW
Online Edition for Part No. 01 41 0 156 490 - © 11/01 BMW AG
SETTINGS
RECEPTION
PLAYING
OVERVIEWPLAYING RECEPTION SETTINGSINDEX
Index
INDEX
36
Page 37

EVERYTHING FROM A TO Z
Online Edition for Part No. 01 41 0 156 490 - © 11/01 BMW AG
A
Abbreviations 41
ALERT 22
AM waverange 18
Automatic anti-theft
protection 7
AUTOSTORE 24
B
Balance BAL 13
Bass BASS 13
C
Care instructions 6
Cassette care 6
CD
CD ERROR 27
ejecting 5, 27
fast forward 28
music selection search 28
NO DISC 27
Random Play 29
reverse 28
scan 28
skipping tracks 28
starting 27
stopping 27
track repeat 29
CD care 6
CD changer 30
CD CHECK 32
fast forward 33
HIGH TEMP 32
humidity 31
installation location 30
music selection search 33
NO DISC 32
NO DISCS 32
NO MAGAZINE 32
operating temperatures 31
Random Play 34
reverse 33
scan 34
selecting a CD 33
self-recorded CDs 32
skipping tracks 33
starting 32
stopping 32
temperature range 31
CD CHECK 32
CD compartment 5
CD eject button 5
CD ERROR 27
Cleaning agents 6
Cleaning the unit 6
Controls 4
Copyright 2
D
Display 5
Display elements 4
Driver function
displays and signals 15
E
Eject button 5
ELECTRONIC 14
F
Fader FAD 13
FESTIVAL 14
FM waverange 18
H
Handling
cassettes 6
CDs 6
Harman Kardon
Driver function 15
ELECTRONIC 14
FESTIVAL 14
INSTRUMENTAL 14
MINI h/k 14
setting 14
sound pattern 14
SPATIAL 14
HIGH TEMP 32
I
Imprint 2
Installation location for the CD
changer 30
INSTRUMENTAL 14
K
Keys 4
L
Linear 13
Listening to radio with ignition
switched off 10
M
Manual station selection
MAN 19
Memory levels 23, 24
Midrange setting 13
MINI h/k 14
Minimum volume
NAVI MIN 11
Music track
Random Play 29, 34
scan 28, 34
search 28, 33
Page 38

EVERYTHING FROM A TO Z
Online Edition for Part No. 01 41 0 156 490 - © 11/01 BMW AG
N
NAVI MIN minimum
volume 11
Navigation
adjusting volume 11
NO DISC 27, 32
NO DISCS 32
NO MAGAZINE 32
Notes on the Owner's
Manual 2
O
On/Off 5
Operating temperatures 31
Overview 4
P
Presets 23
Program type PTY 22
PTY AUTO/MAN 22
R
Radio
mute 10
Radio Broadcast Data System
RDS 20
Radio pass 7
Random Play RND
CD 29
CD changer 34
RDS Radio Broadcast Data
System 20
Reception quality 20
REG ON/REG OFF 24
Regional programs REG 24
Repeat RPT 29
RESET? 12
RND Random Play
CD 29
CD changer 34
RPT track repeat 29
S
Safety
CD changer 31
Scan
station 20
Scan SC
CD 28
CD changer 34
Music track 28
music track 34
radio 21
station 21
Scanning
station 19
Search
music track 28, 33
Search mode key 5
Selecting the reception
range 18
Skipping tracks
CD 28
CD changer 33
Sound
midrange setting 13
Sound quality
setting 13
SPATIAL 14
SPEED VOL 10
Speed-dependent volume
adjustment 10
Station
calling up 23
scan 21
scanning 19
selecting via frequency 19
selecting via name 20
storing 23, 24
Station keys 23, 24
Switching Driver function on/
off 15
Symbols 2
T
TONE LIN 13
Track repeat RPT 29
Treble TREB 13
Turning the unit on/off 10
U
Unit, display 4
V
Volume
adjusting navigation
announcements 11
adjusting speeddependent 10
varying 10
Volume distribution
front/rear FAD 13
right/left BAL 13
Page 39

ABBREVIATIONS
Online Edition for Part No. 01 41 0 156 490 - © 11/01 BMW AG
Display Signifigance
1…6 Station number on the memory levels FM1, FM2 and AM, as well as FMA and AMA
AM/AMA AM reception range or AUTOSTORE memory level in AM reception range
BAL Balance – adjusting the volume distribution to the right/left
BASS Adjusting the bass
CD Compact Disc – appears with a CD inserted and during CD playback
FAD Fader – adjusting the volume distribution ot the front/rear
FM Frequency Modulation – FM reception range
FM1/FM2/FMA Memory levels 1, 2 and AUTOSTORE in the FM reception range
MAN Manual station selection
MINI h/k Sound pattern of the Harman Kardon system
N/A not applicable – the Driver function is not offered for the selected sound pattern
NAVI MIN Navigation minimum volume – adjusting the volume
PTY Program type (news, sports, pop, etc.) in FM waveband
PTY AUTO/MAN Program type – automatic display on/automatic display off
RDS Radio Data System in FM waveband
REG Regional program in the FM reception range
RND Random Play – random sequence of music tracks on the CD and CD changer
RPT Repeat – repetition of selected CD track
SC Scan – briefly listen to station or track
SPEED VOL Speed Volume – adjusting the volume depending on vehicle speed
ST Stereo – station is received in stereo quality
TONE LIN Tone Linear – resetting the sound settings to the midrange setting
TR Track – appears during CD playback from the radio unit
TREB Treble – adjusting the treble
Page 40

Online Edition for Part No. 01 41 0 156 490 - © 11/01 BMW AG
01 41 0 156 490 ue
HEAR ME.
 Loading...