

Page 1

Con|ctivity
XKM 2000 DA
de Gebrauchsanweisung
en Operating instructions
fr Mode d'emploi
it Istruzioni d'uso
es Instrucciones de manejo
nl Gebruiksaanwijzing
ru Инструкция по эксплуатации
DE, BE, CH, ES, FR, GB, IT, RU
M.-Nr. 07 301 130
Page 2

Inhalt
de - Funktionsbeschreibung. . . . . . . . . . . . . . . . . . . . . . . . . . . . . . . . . . . . . . . . . 4
de - Bedienung . . . . . . . . . . . . . . . . . . . . . . . . . . . . . . . . . . . . . . . . . . . . . . . . . . . . 6
Kochen im Automatikbetrieb ..........................................6
Nach dem Kochen..................................................7
Manueller Betrieb...................................................7
Zugeordnete Leistungsstufen .........................................8
en - How the Con|ctivity system works . . . . . . . . . . . . . . . . . . . . . . . . . . . . . . . 9
en - Operation. . . . . . . . . . . . . . . . . . . . . . . . . . . . . . . . . . . . . . . . . . . . . . . . . . . . 11
Cooking in automatic mode..........................................11
After cooking .....................................................12
Manual operation ..................................................12
Assigned power levels..............................................13
fr - description du fonctionnement . . . . . . . . . . . . . . . . . . . . . . . . . . . . . . . . . . 14
fr - Commande . . . . . . . . . . . . . . . . . . . . . . . . . . . . . . . . . . . . . . . . . . . . . . . . . . . 16
Cuisiner en mode automatique .......................................16
Après la cuisson ..................................................17
Commande manuelle...............................................17
Allure d'aspiration et niveau de puissance ..............................17
it - Descrizione delle funzioni . . . . . . . . . . . . . . . . . . . . . . . . . . . . . . . . . . . . . . . 19
it - Uso. . . . . . . . . . . . . . . . . . . . . . . . . . . . . . . . . . . . . . . . . . . . . . . . . . . . . . . . . . 21
Cottura in modalità automatica .......................................21
A fine cottura .....................................................22
Comando manuale ................................................22
Livelli di potenza abbinati ...........................................23
es - Descripción de funcionamiento . . . . . . . . . . . . . . . . . . . . . . . . . . . . . . . . . 24
es - Manejo . . . . . . . . . . . . . . . . . . . . . . . . . . . . . . . . . . . . . . . . . . . . . . . . . . . . . . 26
Cocinar con el funcionamiento automático ..............................26
Después del proceso de cocción.......................................27
Funcionamiento manual.............................................27
Niveles de potencia asignados .......................................27
2
Page 3

Inhalt
nl - Hoe werkt de communicatiemodule? . . . . . . . . . . . . . . . . . . . . . . . . . . . . . 29
nl - Bediening . . . . . . . . . . . . . . . . . . . . . . . . . . . . . . . . . . . . . . . . . . . . . . . . . . . . 31
Koken met automatische besturing ....................................31
Na het koken .....................................................32
Handmatige bediening .............................................32
Toegewezen vermogensstanden ......................................33
ru - Описание работы . . . . . . . . . . . . . . . . . . . . . . . . . . . . . . . . . . . . . . . . . . . . 34
ru - Эксплуатация . . . . . . . . . . . . . . . . . . . . . . . . . . . . . . . . . . . . . . . . . . . . . . . 36
Приготовление в автоматическом режиме............................36
После приготовления .............................................37
Ручная эксплуатация .............................................37
Назначенные уровни мощности .....................................38
3
Page 4
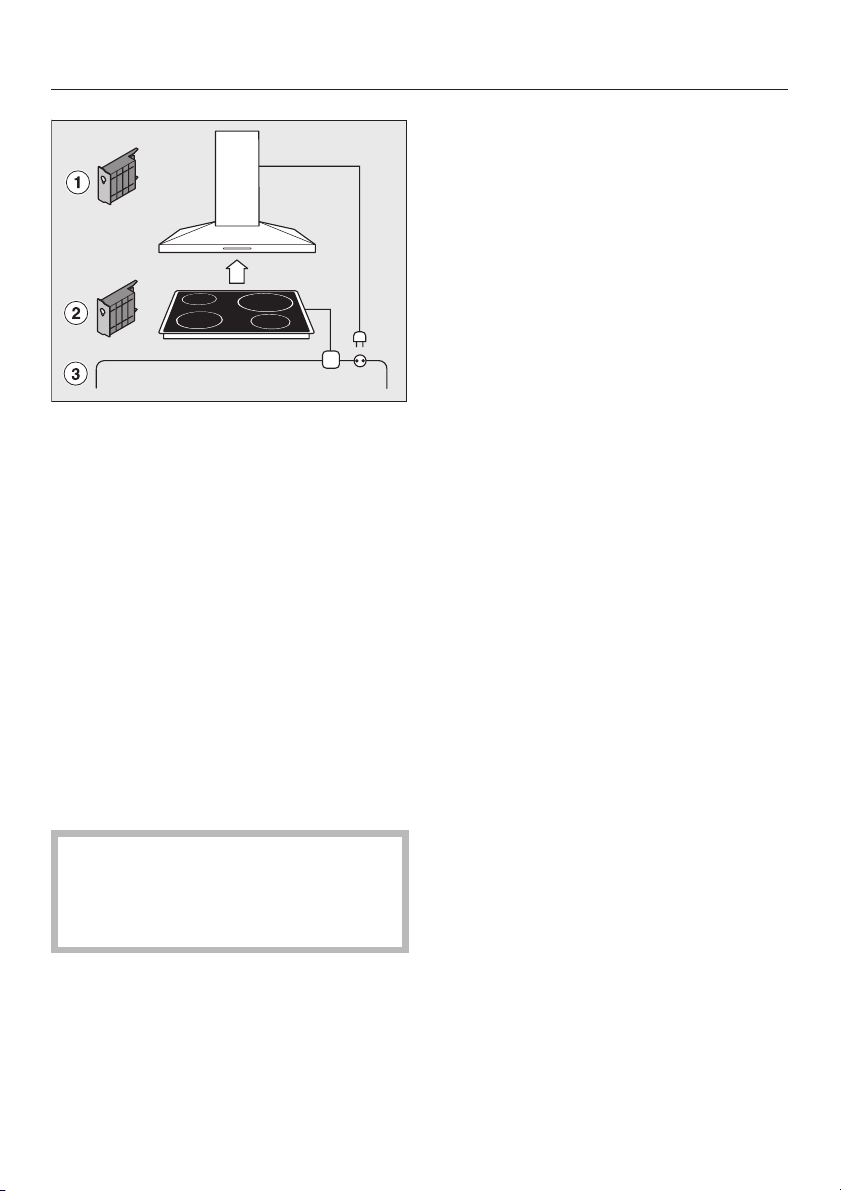
de - Funktionsbeschreibung
dai2385
+
+
Das Kommunikationsmodul
XKM 2000 DA a erlaubt die automatische Steuerung der Dunstabzugshaube in Abhängigkeit vom Betriebszustand eines autarken Miele Kochfeldes.
Voraussetzung für die Kommunikation
ist, dass auch das Kochfeld mit dem
zugehörigen Kommunikationsmodul
XKM 2000 KM b ausgestattet ist.
Für die Kochfelder KM 549 und KM 554
ist das Kommunikationsmodul XKM
2000 SV erforderlich.
Das Kochfeld übermittelt die Informationen zum Betriebszustand über das
Stromnetz (Powerline) c an die Dunstabzugshaube.
Beachten sie zum Gebrauch der
Dunstabzugshaube und des Kochfeldes die zugehörigen Gebrauchsanweisungen.
4
Page 5
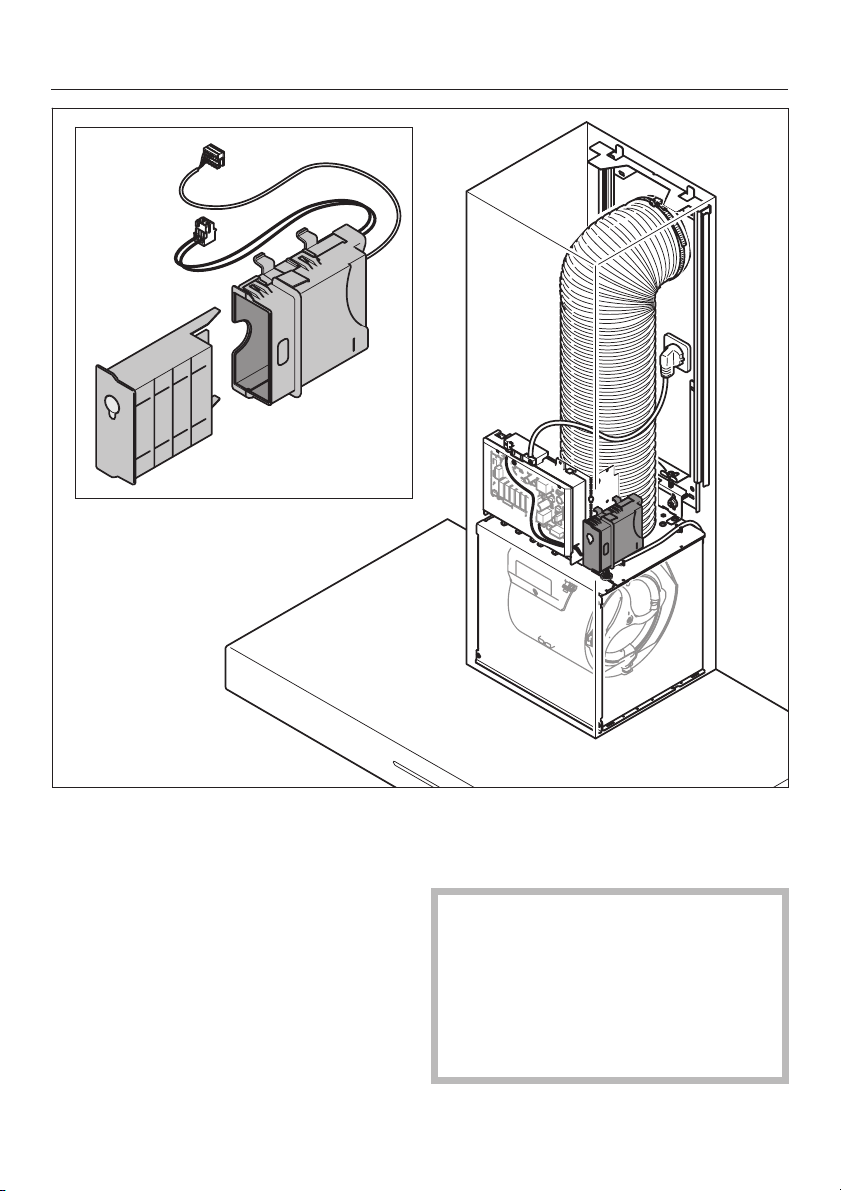
de - Funktionsbeschreibung
dai2338
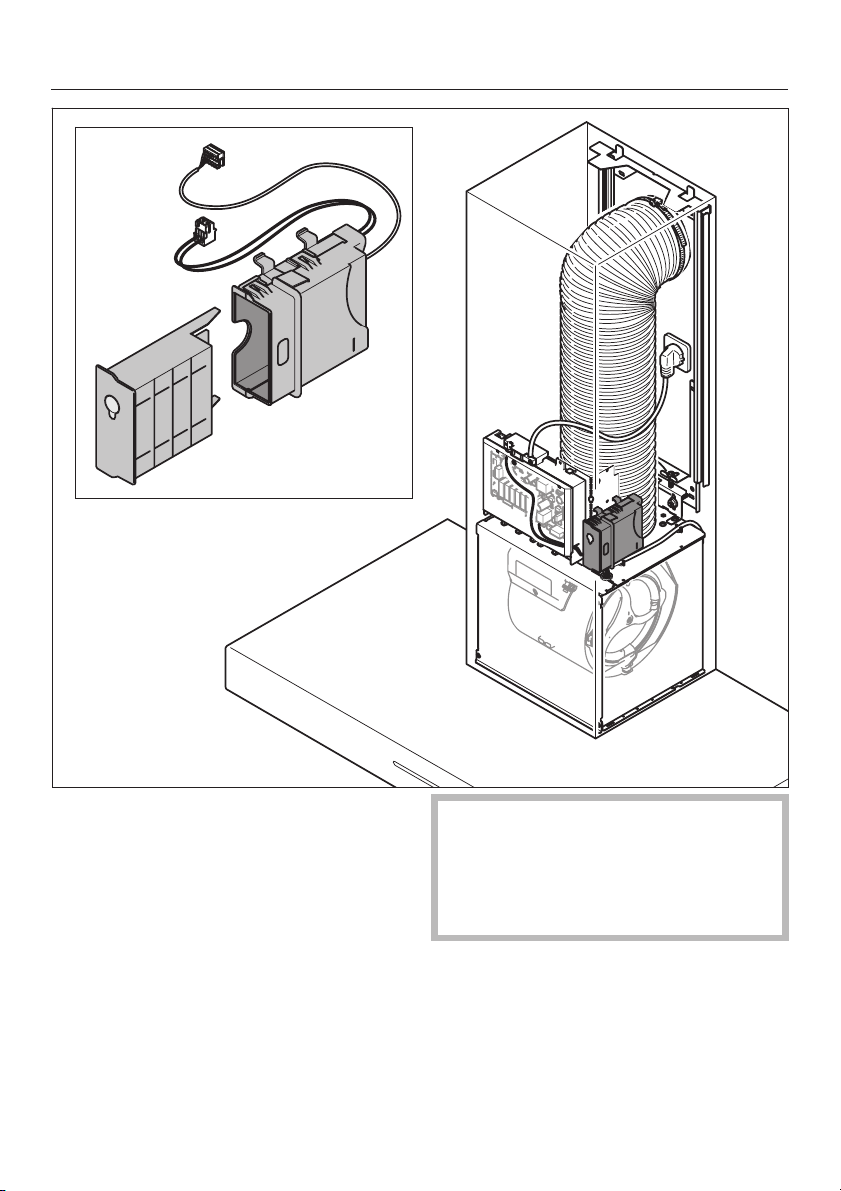
Das Set XKM 2000 DA beinhaltet das
Kommunikationsmodul, einen Montageschacht, in den das Modul eingeschoben wird und die Verbindungskabel
und -stecker zum Anschluss an die
Steuereinheit der Dunstabzugshaube.
Das Set wird in der Dunstabzugshaube
im Bereich des Gebläses montiert und
mit der Steuerung der Dunstabzugshaube verbunden.
Die Montage und der elektrische Anschluss ist in beiliegender Montageanweisung beschrieben.
Das Kommunikationsmodul darf nur
von einer Elektro-Fachkraft angeschlossen werden, die die landesüblichen Vorschriften und die Zusatzvorschriften der örtlichen Elektroversorgungsunternehmen genau
kennt und sorgfältig beachtet.
5
Page 6

de - Bedienung
Kochen im Automatikbetrieb
^ Schalten Sie eine Kochstelle mit be-
liebiger Stufe ein.
Nach einigen Sekunden schaltet sich
das Licht der Dunstabzugshaube ein.
Nach ca. 1 min. schaltet sich das Gebläse ein, zunächst kurz in Stufe "2",
dann sofort in Stufe "1".
Die Dunstabzugshaube wählt während
des Kochens die Gebläsestufe entsprechend der Anzahl der benutzten Kochstellen und der gewählten Leistungsstufe.
^ Wenn Sie am Kochfeld eine höhere
Leistungsstufe wählen oder mehrere
Kochstellen einschalten, schaltet
auch die Dunstabzugshaube in eine
höhere Gebläsestufe.
^ Wenn Sie die Leistungsstufe am
Kochfeld verringern oder Kochstellen
ausschalten, wird auch die Gebläsestufe angepasst.
Sie richtet sich dabei nach der insgesamt eingeschalteten Leistung des
Kochfeldes (siehe "Zugeordnete Leistungsstufen").
Die Dunstabzugshaube schaltet anschließend schrittweise auf Stufe "3"
und verbleibt in dieser Gebläsestufe
ca. 5 Minuten.
Anschließend wird die Gebläsestufe
wieder durch die Anzahl der benutzten
Kochstellen und gewählten Leistungsstufen des Kochfeldes bestimmt.
^ Sie können auch vorzeitig manuall
eine andere Gebläsestufe wählen.
Reaktionszeit
Die Dunstabzugshaube reagiert mit
Verzögerung, da das Ändern der Leistungsstufe am Kochfeld nicht unmittelbar zu weniger oder mehr Kochwrasen
führt.
Da das Kochfeld die Informationen in
Intervallen an die Dunstabzugshaube
sendet, kann auch dies zu Verzögerungen führen.
Die Reaktion erfolgt innerhalb weniger
Sekunden oder einiger Minuten.
Bratvorgang
^ Ein Bratvorgang wird erkannt, wenn
Sie eine Kochstelle auf höchster Stufe einschalten und in einem Zeitbereich von ca. 45 Sekunden bis 90 Sekunden (5 Minuten) danach auf eine
niedrigere Stufe zurückschalten.
Zeiten gelten für Induktionskochfelder (Klammerwerte gelten für Highlight-Kochfelder, falls abweichend).
6
Page 7

de - Bedienung
Nach dem Kochen
^ Wenn Sie alle Kochstellen ausschal-
ten, wird die Dunstabzugshaube zeitverzögert ebenfalls ausgeschaltet.
Damit wird die Küchenluft von verbliebenen Wrasen und Gerüchen gereinigt.
– Von der Intensivstufe schaltet das
Gebläse sofort zurück in Stufe "3".
– Läuft das Gebläse in Stufe "3", schal-
tet es nach ca. 1 Minute auf Stufe "2"
zurück.
– Von Stufe "2" schaltet es nach 2 Mi-
nuten zurück in Stufe "1".
– Nach 2 Minuten in Stufe "1" schaltet
sich das Gebläse aus.
– Nach weiteren 30 Sekunden wird das
Licht ausgeschaltet.
Manueller Betrieb
^ Wenn Sie die Dunstabzugshaube für
einen Kochvorgang manuell bedienen wollen, schalten Sie das Gebläse
der Dunstabzugshaube vor dem
Kochfeld ein.
Während die Automatik deaktiviert ist,
sind alle Funktionen der Dunstabzugshaube manuell zu bedienen.
Rückkehr in den Automatikbetrieb
^ Die Dunstabzugshaube kehrt wieder
in den Automatikbetrieb zurück,
wenn –
– Sie nach manueller Wahl einer Ge-
bläsestufe die Dunstabzugshaube
ca. 2 Minuten nicht bedienen.
– die manuell gewählte Gebläsestufe
wieder der automatischen entspricht.
– das Gebläse der Dunstabzugshaube
und das Kochfeld mindestens 20 Sekunden ausgeschaltet waren.
Beim nächsten Einschalten des
Kochfeldes startet wieder der Automatikbetrieb.
^ Sie können während des Kochens
den Automatikbetrieb verlassen,
wenn Sie –
– manuell eine andere Gebläsestufe
wählen.
– die Dunstabzugshaube manuell aus-
schalten.
– die Nachlauffunktion "–" der Dunst-
abzugshaube aktivieren.
Das Gebläse schaltet sich nach der
gewählten Nachlaufzeit aus.
Das Licht bleibt eingeschaltet.
7
Page 8
de - Bedienung
Zugeordnete Leistungsstufen
Die vier Gebläsestufen der Dunstabzugshaube werden entsprechend folgender Leistungen des Kochfeldes gewählt.
Die Werte gelten für Kochfelder mit
drei, vier, fünf und sechs Kochstellen.
Kochfelder mit 9-stufigen Kochstellen
^ Gebläsestufe "1":
Mindestens eine Kochstelle mindestens auf Stufe "1" eingeschaltet.
^ Gebläsestufe "2":
Summe aller eingeschalteter Leistungstufen = mindestens 4,
davon eine Kochstelle mindestens
auf Stufe "4".
^ Gebläsestufe "3":
Summe aller eingeschalteter Leistungstufen = mindestens 15 (17),
davon eine Kochstelle mindestens
auf Stufe "6".
Kochfelder mit 12-stufigen Kochstellen
^ Gebläsestufe "1":
Mindestens eine Kochstelle mindestens auf Stufe "1" eingeschaltet.
^ Gebläsestufe "2":
Summe aller eingeschalteter Leistungstufen = mindestens 5, davon
eine Kochstelle mindestens auf Stufe
"5".
^ Gebläsestufe "3":
Summe aller eingeschalteter Leistungstufen = mindestens 20 (23),
davon eine Kochstelle mindestens
auf Stufe "8".
^ Intensivstufe:
Summe aller eingeschalteter Leistungstufen = mindestens 32, davon
eine Kochstelle mindestens auf Stufe
"12" oder in Boosterfunktion.
(Klammerwerte gelten für Highlight-Kochfelder, falls abweichend)
^ Intensivstufe:
Summe aller eingeschalteter Leistungstufen = mindestens 25,
davon eine Kochstelle mindestens
auf Stufe "9" oder in Boosterfunktion.
(Klammerwerte gelten für Highlight-Kochfelder, falls abweichend)
Beispiele für die Gebläsestufen "1" bis "4"
8
Beispiele für die Gebläsestufen "1" bis "4"
Die Wahl der Gebläsestufen geschieht
mit Verzögerung, siehe "Reaktionszeit".
Page 9
en - How the Con|ctivity system works
Communication module XKM 2000 DA
a enables the operation of the cooker
hood to be automatically controlled by
the operating status of a Miele hob.
For communication to take place, the
hob must be fitted with communication
module XKM 2000 KM b.
Important: KM 549 and KM 554 must
be fitted with communication module
XKM 2000 SV.
The XKM 2000 DA a is fitted inside the
cooker hood and will get its power
supply from the cooker hood.
The XKM 2000 KM b has its own
electrical connection to the mains
independent from the hob and needs to
be connected to the same ring main
circuit that the cooker hood is
connected to for communication to take
place.
Please refer to the operating
instructions supplied with your Miele
hob and cooker hood for information
on how to use them.
The hob transmits information about its
operating status to the cooker hood via
the household power supply
(Powerline) c.
9
Page 10
en - How the Con|ctivity system works
dai2338
The XKM 2000 DA kit contains the
communication module, a shaft to fit the
module into and connection cables with
connectors for linking the
communication module to the cooker
hood control unit.
The kit is fitted to the cooker hood in the
area near the motor and is connected
to the cooker hood controls.
Installation and electrical connection
are described in the installation
instructions supplied.
10
The communication module may
only be connected by a qualified
and competent person in strict
accordance with current local and
national safety regulations.
Page 11

en - Operation
Cooking in automatic mode
^ Switch on the hob and select a setting.
After a few seconds the cooker hood
lighting will come on.
Approx. 1 minute later, the fan will
come on, initially at power level "2" for a
short while and then at power level "1".
During cooking, the fan power level of the
cooker hood is selected automatically
depending on the number of hob cooking
zones in use and the power levels
selected for the cooking zones.
^ If a higher setting for a hob cooking
zone is selected or more cooking
zones are switched on, the hood will
then operate at a higher fan power
level as well.
^ Similarly, if a lower setting is selected
for a cooking zone or cooking zones
are switched off, the fan power level
of the cooker hood will be adjusted
accordingly.
Adjustment is made according to the
total power settings at which the hob is
operating (see "Assigned power
settings").
The cooker hood will switch on and
increase the power levels step by step
to power level "3" and will remain at this
level for approx. 5 minutes.
After this time, the fan power levels will
revert to being determined by the
number of cooking zones in use and
the power levels selected for the hob.
^ You can also manually select another
fan power level early if you wish.
Reaction time
The cooker hood may appear to react
slowly to changed settings on the hob.
This is because altering the power
settings on the hob will not necessarily
result in an increase or decrease in
cooking vapours.
A delay in the time it takes the cooker
hood to react can also be because the
hob transmits information to the cooker
hood at intervals.
The cooker hood can react within
seconds or a few minutes.
Frying food
^ The cooker hood recognises that
food is being fried if a cooking zone
is switched on at the highest setting
and then is turned down to a lower
setting within approx. 45 to 90
seconds (5 minutes).
The times quoted apply to induction
hobs. The time in brackets is for
HiLight hobs, where the values are
different.
11
Page 12

en - Operation
After cooking
^ If you switch off all of the cooking
zones, the cooker hood will also
switch off after a slight time delay.
This delay will allow any lingering
vapours or odours in the air to be
removed.
– If the cooker hood is operating on
the "Intensive" setting it will revert to
power level "3" immediately.
– If it is operating on power level "3" it
will switch to power level "2" after
approx. 1 minute.
– From power level "2" it will switch to
power level "1" after 2 minutes.
– Then after 2 minutes operating at
power level "1", the fan will switch off.
– The lighting will go out 30 seconds
later.
Manual operation
While the automatic mode is
deactivated, you can operate all the
cooker hood functions manually.
Reverting to automatic mode
^ The cooker hood will revert to auto-
matic mode, if –
– after manually selecting a fan power
level, you do not operate the cooker
hood for approx. 2 minutes.
– the fan power level you have
selected manually is the same as the
power level which is selected
automatically.
– the cooker hood fan and the hob are
switched off for at least 20 seconds.
Automatic mode will start again the
next time the hob is switched on.
^ If you want to operate the cooker
hood manually, switch the cooker
hood fan on before switching on the
hob.
^ You can also come out of automatic
mode during cooking, by
– manually selecting a different fan
power level.
– manually switching off the cooker
hood.
– activating the run-on option "–"on
the cooker hood.
The fan will then switch off after the
run-on time selected.
The lighting will remain on.
12
Page 13

en - Operation
Assigned power levels
The four cooker hood fan power levels
are selected according to the hob
power settings.
The values are for hobs with three, four,
five and six cooking zones.
Hobs with cooking zones which have
9 power settings
^ Fan power level "1":
At least one cooking zone is switched
on at a power setting of at least "1".
^ Fan power level "2":
Total of all power settings selected
= at least 4, where power setting "4"
has been selected for at least one of
the cooking zones.
^ Fan power level "3":
Total of all power settings selected
= at least 15 (17), where power
setting "6" has been selected for at
least one of the cooking zones.
^ Intensive setting:
Total of all power settings selected
= at least 25, where power setting "9"
has been selected for at least one of
the cooking zones.
Hobs with cooking zones which have
12 power settings
^ Fan power level "1":
At least one cooking zone is switched
on at a power setting of at least "1".
^ Fan power level "2":
Total of all power settings selected
= at least 5, where one of the cooking
zones has a power setting of at least
"5".
^ Fan power level "3":
Total of all power settings selected
= at least 20 (23), where one of the
cooking zones has a power setting of
at least "8".
^ Intensive setting:
Total of all power settings selected
= at least 32, where one of the
cooking zones has a power setting of
at least "12" or the Booster function is
selected.
(The values given in brackets refer to
HiLight hobs, if these differ)
(The values given in brackets refer to
HiLight hobs, if these differ)
Examples for fan power levels "1" to "4"
Examples for fan power levels "1" to "4"
The selection of the fan power level will
be delayed, see "Reaction time".
13
Page 14

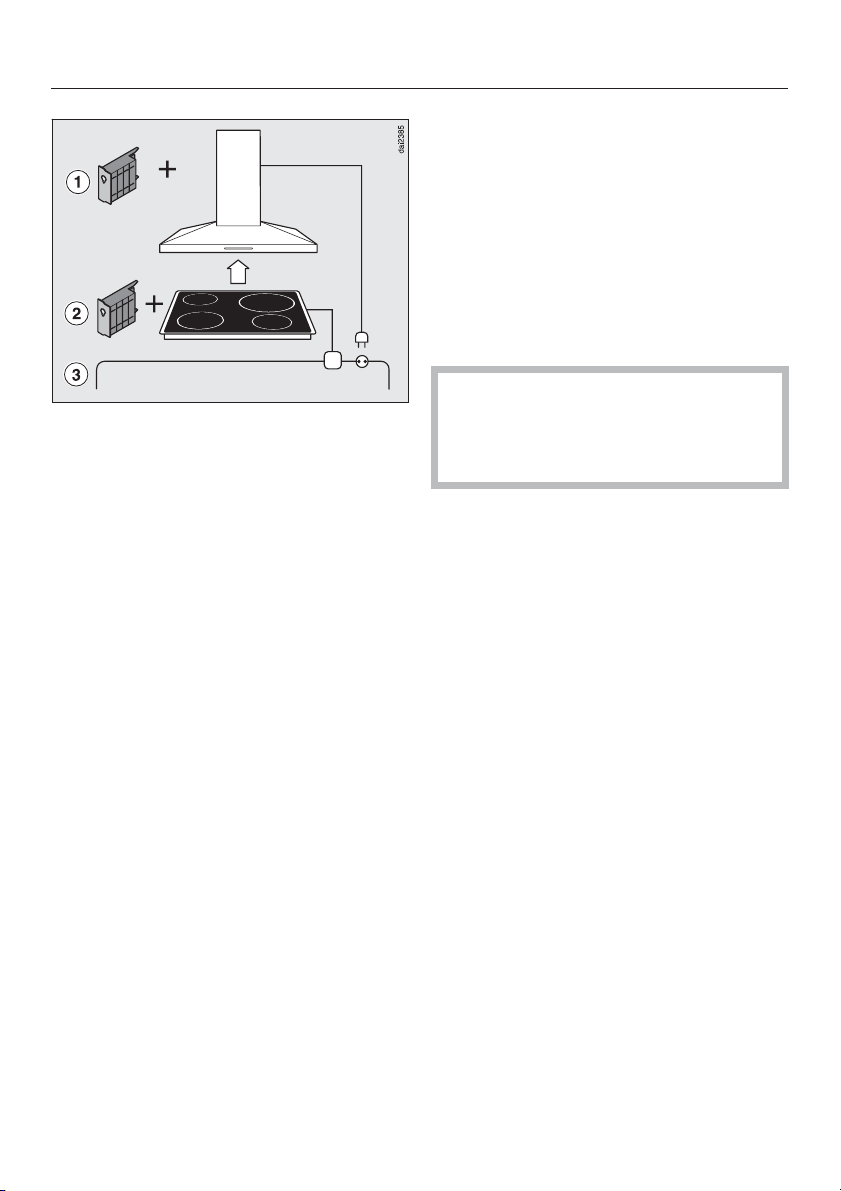
fr - description du fonctionnement
dai2385
+
+
Le module de communication
XKM 2000 DA a permet la commande
automatique de la hotte en fonction de
l'état de fonctionnement de la table de
cuisson.
La condition pour la communication est
que la table de cuisson soit également
équipée du module de communication
XKM 2000 KM b.
Pour les tables de cuisson KM 549 et
KM 554 le module de communication
XKM 2000 SV est nécessaire.
La table de cuisson transmet les informations sur son état de fonctionnement
par le réseau électrique (powerline) c
à la hotte.
Pour l'utilisation de la hotte et de la
table de cuisson, consultez leurs
modes d'emploi.
14
Page 15

fr - description du fonctionnement
dai2338
XKM 2000 DA est fourni avec le module
de communication, un étui de montage
dans lequel le module est inséré et le
câble de connexion avec connecteur
pour le raccordement à l'unité de commande de la hotte.
L'ensemble est monté dans la hotte
vers le moteur et relié à la commande
de la hotte.
Le montage et le raccordement électrique sont décrits dans la notice de
montage.
Ce module de communication doit
impérativement être installé par un
électricien qui connaît et respecte
les prescriptions nationales et recommandations de la compagnie
distributrice d'électricité.
15
Page 16

fr - Commande
Cuisiner en mode automatique
^ Enclenchez une zone de cuisson au
niveau de puissance de votre choix.
Après quelques secondes, la lumière
de la hotte s'active.
Après env. 1 minute, le moteur s'enclenche, d'abord à l'allure "2" puis immédiatement à l'allure "1".
Pendant la cuisson, la hotte sélectionne
l'allure en fonction du nombre de zones
de cuisson activées et de la puissance
sélectionnée.
^ Si vous sélectionnez un niveau de
puissance plus élevé ou que vous
activez plusieurs zones de cuisson,
la hotte passe également à un niveau
de puissance supérieur.
^ Si vous réduisez la puissance sur la
table de cuisson ou la zone de cuisson, l'allure du moteur de la hotte est
également adaptée.
Elle se base sur la puissance enclenchée totale de la table de cuisson
(voir "Allure et niveau de puissance").
La hotte passe ensuite progressivement à l'allure "3" et y reste 5 minutes.
Ensuite, l'allure d'aspiration est de nouveau déterminée par le nombre de zones de cuisson utilisées et les niveaux
de puissance sélectionnés.
^ Vous pouvez également anticiper et
sélectionner une autre allure d'aspiration manuellement.
Temps de réaction
La hotte réagit avec une temporisation
retard car la modification du niveau de
puissance au niveau de la table de
cuisson n'entraîne pas d'augmentation
ou de réduction immédiate des vapeurs
de cuisson.
Comme la table de cuisson envoie les
informations par intervalles à la hotte,
ceci peut entraîner une légère temporisation.
La réaction a lieu au bout de quelques
secondes ou minutes.
Saisie de viande
^ La saisie de viande est détectée
lorsque vous enclenchez la table de
cuisson au niveau le plus haut et
que vous repassez à un niveau de
puissance plus faible dans l'espace
de 45 voire 90 secondes (5 minutes).
Les temps valent pour les tables de
cuisson à induction (les parenthèses
sont valables pour les tables de cuisson Highlight, s'ils sont différents).
16
Page 17

fr - Commande
Après la cuisson
^ Lorsque vous arrêtez toutes les zones
de cuisson, la hotte est également désactivée, avec un décalage. L'air de
la cuisine sera ainsi débarrassé des
fumées et odeurs résiduelles.
– De l'allure "Intensive" l'aspiration
passe immédiatement à l'allure "3".
– Si l'allure est à "3" elle passe à "2"
après 1 minute.
– Puis de l'allure "2"à"l'allure "1" après
2 minutes.
– Après 2 minutes à l'allure "1" le venti-
lateur s'arrête.
– 30 secondes plus tard, la lumière
s'éteint.
Commande manuelle
^ Si vous souhaitez commander ma-
nuellement la hotte pour une cuisson,
enclenchez l'aspiration de la hotte
avant la table de cuisson.
^ Vous pouvez quitter le mode automa-
tique pendant la cuisson si vous –
Retour au mode automatique
^ La hotte retourne en mode automa-
tique, lorsque –
– après sélection manuelle d'une allure
vous ne faites aucun réglage au niveau de la hotte pendant 2 minutes.
– l'allure d'aspiration choisie manuelle-
ment correspond de nouveau à l'allure automatique.
– le moteur de la hotte et la table de
cuisson sont restés éteints 20 secondes minimum.
Au prochain enclenchement de la
table de cuisson, le mode automatique est réactivé.
Allure d'aspiration et niveau de
puissance
Les quatre allures d'aspiration de la
hotte sont sélectionnées en fonction du
niveau de puissance de la table de
cuisson.
Les valeurs sont valables pour des tables de cuisson comportant trois,
quatre, cinq et six zones de cuisson.
– sélectionnez manuellement une autre
allure.
– arrêtez manuellement la hotte.
– activez l'arrêt différé "–"dela
hotte.
Le moteur s'arrête après écoulement
de l'arrêt différé réglé.
La lumière reste activée.
Pendant que le mode automatique est
désactivé, toutes les fonctions de la
hotte peuvent être utilisées manuellement.
Tables de cuisson avec zones de
cuisson à 9 niveaux de puissance
^ Allure d'aspiration "1" :
Au moins une zone de cuisson est
réglée sur la puissance "1".
^ Allure d'aspiration "2" :
Somme de tous les niveaux de puissance activés = minimum 4,
dont une zone de cuisson minimum à
la puissance "4".
17
Page 18

fr - Commande
^ Allure d'aspiration "3" :
Somme de tous les niveaux de puissance activés = minimum 15 (17),
dont une zone de cuisson minimum à
la puissance "6".
^ Allure intensive :
Somme de tous les niveaux de puissance activés = minimum 25,
dont une zone de cuisson minimum à
la puissance "9" ou en fonction Booster.
(Les valeurs entre parenthèses sont valables pour les tables de cuisson HighLight, si elles sont différentes)
Exemples pour les allures "1" à "4"
^ Allure intensive :
Somme de tous les niveaux de puissance activés = minimum 32,
dont une zone de cuisson minimum à
la puissance "12" ou en fonction Booster.
(Les valeurs entre parenthèses sont valables pour les tables de cuisson HighLight, si elles sont différentes)
Exemples pour les allures "1" à "4"
L'allure est sélectionnée avec une petite temporisation, voir "Temps de réaction".
Tables de cuisson avec zones à 12 niveaux de puissance
^ Allure d'aspiration "1" :
Au moins une zone de cuisson est
réglée sur la puissance "1".
^ Allure d'aspiration "2" :
Somme de tous les niveaux de puissance activés = minimum 5, dont
une zone de cuisson minimum à la
puissance "5".
^ Allure d'aspiration "3" :
Somme de tous les niveaux de puissance activés = minimum 20 (23),
dont une zone de cuisson minimum à
la puissance "8".
18
Page 19

+
+
Mediante il modulo di comunicazione
XKM 2000 DA a una cappa aspirante
può essere regolata automaticamente
a seconda dello stato di funzionamento
di un piano di cottura con comandi integrati Miele.
Il presupposto perché vi sia comunicazione è che anche il piano di cottura sia
dotato del rispettivo modulo di comunicazione XKM 2000 KM b.
Per i piani di cottura KM 549 e KM 554
è necessario il modulo di comunicazione XKM 2000 SV.
it - Descrizione delle funzioni
dai2385
Il piano di cottura trasmette informazioni sullo stato di funzionamento alla cappa tramite la rete elettrica (Powerline)
c.
Osservare le istruzioni d'uso della
cappa aspirante e del piano di cottura.
19
Page 20

it - Descrizione delle funzioni
dai2338
Il set XKM 2000 DA comprende il modulo di comunicazione, la scatola
d'incasso per il modulo stesso e cavi e
spine per la connessione con l'unità comando della cappa.
Il set viene montato in corrispondenza
della ventola e collegato con i comandi
della cappa.
Montaggio e allacciamento elettrico
sono descritti nelle istruzioni di montaggio allegate.
20
Per l'allacciamento del modulo di
comunicazione rivolgersi a un elettricista che sia a conoscenza delle
normative locali e delle normative
supplementari emanate dall’azienda
elettrica di zona e che effettui il lavoro conformemente.
Page 21

it - Uso
Cottura in modalità automatica
^ Accendere una zona di cottura impo-
stando un qualsiasi livello.
Dopo qualche secondo si accende la
luce della cappa.
Dopo ca. 1 minuto si attiva la ventola,
prima brevemente al livello "2", poi subito al livello "1".
Durante la cottura la cappa aspirante
regola la ventola a seconda del numero
delle zone cottura attive e del relativo livello di potenza.
^ Aumentando il livello di potenza del
piano di cottura o attivando più zone
di cottura, anche la cappa aumenterà
il proprio livello di potenza.
^ Riducendo la potenza o spegnendo
le zone di cottura, anche la cappa ridurrà il livello.
Il livello di potenza della cappa verrà
adeguato alla potenza totale del piano di
cottura (v. "Livelli di potenza abbinati").
In seguito il livello di potenza della ventola viene definito in base al numero di
zone cottura attive e del livello di potenza impostato.
^ Un diverso livello di potenza della
ventola può comunque essere impostato già prima.
Tempo di reazione
La cappa reagisce con un certo ritardo
dato che la modifica del livello di potenza sul piano di cottura non determina
immediatamente la generazione di più
o meno fumane.
Il piano di cottura invia le informazioni
alla cappa con determinati intervalli.
Anche questo può determinare ritardi.
La cappa reagisce entro alcuni secondi
o anche minuti.
Arrostire
^ Un procedimento di arrostitura viene
rilevato se una zona di cottura è attivata alla massima potenza e il livello
viene ridotto dopo un lasso di tempo
compreso tra 45 e 90 secondi (5 minuti).
I tempi sono indicativi per piani a induzione (valori tra parentesi, se differenti, valgono per piani di cottura Hilight).
La cappa aspirante viene impostata
progressivamente al livello "3" e rimane
in questo stato per ca. 5 minuti.
21
Page 22

it - Uso
A fine cottura
^ Disattivando tutte le zone cottura, la
cappa aspirante si spegnerà solo
successivamente per eliminare ogni
odore e fumane residui.
– Dal livello "Intenso" la ventola passa
immediatamente al livello "3".
– Attiva al livello "3", la potenza della
ventola dopo 1 minuto passa al livel-
lo "2".
– Dal livello "2" dopo 2 minuti la poten-
za passa al livello "1".
– Dopo 2 minuti al livello "1" la ventola
si spegne del tutto.
– Dopo altri 30 secondi si spegne an-
che la luce.
Comando manuale
^ Per gestire la cappa manualmente,
accenderla prima di attivare il piano
di cottura.
Ripristino del funzionamento
automatico
^ Il funzionamento automatico della
cappa aspirante viene ripristinato se:
– dopo avere impostato manualmente
un livello di potenza della cappa
aspirante per ca. 2 minuti non si interviene
– il livello impostato corrisponde a
quello automatico
– la ventola della cappa e il piano di
cottura vengono spenti per almeno
20 secondi.
Al successivo uso, la cappa aspirante si avvierà nuovamente in modalità
automatica.
^ Durante la cottura è possibile uscire
dal funzionamento automatico se:
– si imposta manualmente un altro li-
vello di potenza
– la cappa viene spenta manualmente
– si attiva il funzionamento supplemen-
tare "–" della cappa aspirante.
La ventola si spegne trascorso il tem-
po supplementare desiderato.
La luce rimane accesa.
Se il sistema automatico è disattivato
tutte le funzioni della cappa possono
essere gestite manualmente.
22
Page 23

it - Uso
Livelli di potenza abbinati
I quattro livelli di potenza della cappa
aspirante vengono scelti in base ai seguenti livelli di potenza del piano di cottura.
I valori si riferiscono a piani di cottura con
tre, quattro, cinque e sei zone di cottura.
Piani di cottura con zone di cottura a
9 livelli di potenza
^ Livello ventola "1":
almeno una zona di cottura è impostata al livello "1".
^ Livello ventola "2":
potenza totale di tutte le zone di cottura attive = almeno 4,
di cui almeno una zona impostata al
livello "4".
^ Livello ventola "3":
potenza totale di tutte le zone di cottura attive = almeno 15 (17),
di cui almeno una zona impostata al
livello "6".
Piani di cottura con zone di cottura a
12 livelli di potenza
^ Livello ventola "1":
almeno una zona di cottura è impostata al livello "1".
^ Livello ventola "2":
potenza totale di tutte le zone di cottura attive = almeno 5, di cui almeno
una zona impostata al livello "5".
^ Livello ventola "3":
potenza totale di tutte le zone di cottura attive = almeno 20 (23), di cui almeno una zona impostata al livello
"8".
^ Livello intenso:
potenza totale di tutte le zone di cottura attive = almeno 32, di cui almeno
una zona impostata al livello "12" o in
modalità booster.
(i valori tra parentesi, se differenti, si riferiscono a piani di cottura Hilight)
Esempi per livelli di potenza della ventola
^ Livello intenso:
potenza totale di tutte le zone di cottura attive = almeno 25,
di cui almeno una zona impostata al
livello "9" o in modalità booster.
(i valori tra parentesi, se differenti, si riferiscono a piani di cottura Hilight)
Esempi per livelli di potenza della ventola
"1" - "4"
"1" - "4"
L'impostazione dei livelli di potenza del-
la ventola è ritardata, vedi "tempo di reazione".
23
Page 24

es - Descripción de funcionamiento
El módulo de comunicación
XKM 2000 DA a permite controlar automáticamente la campana extractora
en función del estado de funcionamiento de una placa de cocción independiente Miele.
Una condición indispensable para el
establecimiento de la comunicación es
que la placa de cocción esté equipada
con el correspondiente módulo de comunicación XKM 2000 KM b.
Para las placas de cocción KM 549 y
KM 554 es necesario el módulo de comunicación XKM 2000 SV.
La placa transmite la información acerca del estado de funcionamiento a través de la red eléctrica (Powerline) c a
la campana extractora.
Para manejar la campana extractora
y la placa de cocción observe las
instrucciones adjuntas.
24
Page 25

es - Descripción de funcionamiento
dai2338
El juego XKM 2000 DA contiene el módulo de comunicación, un cajón de
montaje en el que será introducido el
módulo, el cable y la clavija de conexión para la conexión a la unidad de
control de la campana extractora.
El juego se monta en la campana cerca
del extractor y se conecta al control de
la campana extractora.
El montaje y la conexión eléctrica están
descritos en las instrucciones de montaje adjuntas.
La conexión del módulo de comunicación únicamente podrá realizarla
un técnico electricista, que conozca
y se atenga exactamente a las normativas nacionales, así como a las
normas adicionales de las compañías eléctricas del lugar de emplazamiento del aparato.
25
Page 26

es - Manejo
Cocinar con el funcionamiento
automático
^ Conecte la placa de cocción en el ni-
vel que desee.
Transcurridos unos segundos, se encenderá la luz de la campana extractora.
Transcurrido aprox. 1 min. se conecta
el extractor, a continuación brevemente
en el nivel "2" e inmediatamente después en el nivel "1".
La campana extractora selecciona durante el proceso de cocción el nivel del
extractor en base al número de placas
de cocción utilizadas y los niveles de
potencia seleccionados.
^ Si selecciona en la placa de cocción
un nivel de potencia más alto o conecta varias placas, la campana extractora también conmutará el extractor a un nivel superior.
^ Si reduce el nivel de potencia de la
placa de cocción o desconecta placas de cocción, el nivel del extractor
se adaptará correspondientemente.
Se orienta en función de la potencia total de la placa de cocción conectada
(véase "Niveles de potencia asignados").
La duración es válida para placas de
inducción (los valores entre paréntesis en caso de diferir son aplicables
a placas de cocción Highlight).
A continuación, la campana extractora
conmuta paso a paso al nivel "3" y permanece en ese nivel de extractor durante aprox. 5 minutos.
A continuación, el nivel de extractor
será determinado nuevamente por el
número de placas de cocción en uso y
los niveles de potencia seleccionados.
^ Si lo desea, manualmente puede se-
leccionar anticipadamente otro nivel
de extractor.
Tiempo de reacción
La campana extractora reacciona con
retraso ya que la modificación del nivel
de potencia en la placa de cocción no
conlleva inmediatamente la formación
de más o menos vapor.
Como la placa de cocción envía la información en intervalos a la campana
extractora, también este factor puede
implicar retrasos.
La reacción siempre tiene lugar en pocos segundos o minutos.
Proceso de cocción
^ Un proceso de cocción será registra-
do si conecta una placa de cocción
al nivel más alto y en un periodo de
tiempo de entre 45 y 90 segundos
aprox. (5 minutos) reduce la potencia
a un nivel inferior.
26
Page 27

es - Manejo
Después del proceso de cocción
^ Si desconecta todas las placas de
cocción, la campana extractora se
desconecta con retardo. De esta forma se limpia el aire de la cocina, eliminado vahos y olores.
– Del nivel “intensivo” el extractor con-
muta inmediatamente al nivel “3”.
– Si el extractor funciona en el nivel "3",
transcurrido aprox. 1 minuto conmu-
ta al nivel "2".
– Del nivel "2" transcurridos 2 minutos
conmuta al nivel "1".
– Transcurridos 2 minutos en el nivel
"1" el extractor se desconecta.
– Transcurridos otros 30 segundos, la
luz se desconectará.
Funcionamiento manual
^ Si para llevar a cabo un proceso de
cocción desea manejar de forma manual la campana extractora, conecte
el extractor de la campana antes
que la placa de cocción.
^ Durante el proceso de cocción pue-
de abandonar el funcionamiento automático , si –
– selecciona manualmente otro nivel
del extractor.
– desconecta manualmente la campa-
na extractora.
– activa el funcionamiento posterior
"–" de la campana extractora.
El extractor se desconecta transcu-
rrido el tiempo de funcionamiento
posterior seleccionado.
La luz se mantiene encendida.
Mientras el funcionamiento automático
esté desactivado, todas las funciones
de la campana extractora deberán ser
manejadas automáticamente.
Volver al funcionamiento automático
^ La campana extractora vuelve al fun-
cionamiento automático, si –
– después de seleccionar manualmen-
te el nivel de extractor, no maneja la
campana extractora durante aprox.
2 minutos
– el nivel de extractor seleccionado
manualmente corresponde al automático.
– el extractor de la campana y la placa
de cocción han estado desconectados durante al menos 20 segundos.
La próxima vez que conecte la placa
de cocción, se iniciará nuevamente
el funcionamiento automático.
Niveles de potencia asignados
Los cuatro niveles de potencia de la
campana extractora serán seleccionados en función de los siguientes niveles
de potencia de la placa de cocción.
Los valores son aplicables a placas de
cocción de tres, cuatro, cinco y seis zonas de cocción.
Placas de cocción con zonas de cocción de 9 niveles
^ Nivel de extractor "1":
Al menos una placa de cocción conectada en el nivel "1".
27
Page 28

es - Manejo
^ Nivel de extractor "2":
Suma de todos los niveles de cocción conectados = al menos 4,
de los cuales al menos una placa de
cocción en el nivel "4".
^ Nivel de extractor "3":
Suma de todos los niveles de cocción conectados = al menos 15 (17),
de los cuales al menos una placa de
cocción en el nivel "6".
^ Nivel intensivo:
Suma de todos los niveles de cocción conectados = al menos 25,
de los cuales al menos una placa de
cocción en el nivel "9" o función
Booster.
(si difiriesen, los valores entre paréntesis se aplican a las placas de cocción
Highlight)
Placas de cocción con zonas de cocción de 12 niveles
^ Nivel de extractor "1":
Al menos una placa de cocción conectada en el nivel "1".
^ Nivel de extractor "2":
Suma de todos los niveles de cocción conectados = al menos 5, de
los cuales al menos una placa de
cocción en el nivel "5".
^ Nivel de extractor "3":
Suma de todos los niveles de cocción conectados = al menos 20 (23),
de los cuales al menos una placa de
cocción en el nivel "8".
^ Nivel intensivo:
Suma de todos los niveles de cocción conectados = al menos 32, de
los cuales al menos una placa de
cocción en el nivel "12" o función
Booster.
(si difiriesen, los valores entre paréntesis se aplican a las placas de cocción
Highlight)
Ejemplos para los niveles de extractor "1"
a "4"
28
Ejemplos para los niveles de extractor "1"
a "4"
La selección de los niveles de extractor
tiene lugar con retardo, véase "Tiempo
de reacción".
Page 29

nl - Hoe werkt de communicatiemodule?
+
+
Met de communicatiemodule
XKM 2000 DA a kan de wasemkap automatisch worden bestuurd en wordt de
ventilator afhankelijk van de ingestelde
vermogensstanden van een
niet-gecombineerd Miele kookvlak automatisch op een bepaalde stand gezet.
Om beide toestellen met elkaar te kunnen laten communiceren, moet ook het
kookvlak met de bijhorende communicatiemodule zijn uitgerust:
XKM 2000 KM b.
Voor de kookvlakken KM 549 en KM
554 is de communicatiemodule XKM
2000 SV noodzakelijk.
dai2385
Het kookvlak brengt de informatie over
de ingestelde vermogensstanden via
het elektriciteitsnet (Powerline) c over
naar de wasemkap.
Neem voor het gebruik van de wasemkap en het kookvlak de bijhorende gebruiksaanwijzingen in acht.
29
Page 30

nl - Hoe werkt de communicatiemodule?
dai2338
De communicatiemodule XKM 2000 DA
wordt geleverd met een montagekoker
waarin de module wordt geschoven en
een aansluitsnoer met stekker om de
communicatiemodule aan te sluiten op
de besturingseenheid van de wasemkap.
Het geheel wordt in de wasemkap vlak
bij de ventilator gemonteerd en aangesloten op de besturing van de wasemkap.
30
In de bijgevoegde montagehandleiding
vindt u meer informatie over de montage en de elektrische aansluiting.
De communicatiemodule mag uitsluitend door een elektricien worden
aangesloten. Hij is precies op de
hoogte van de voorschriften die van
toepassing zijn en houdt zich daar
strikt aan.
Page 31

nl - Bediening
Koken met automatische
besturing
^ Schakel op het kookvlak een kookzo-
ne in en stel die in op een bepaalde
vermogensstand.
Na enkele seconden wordt de verlichting van de wasemkap ingeschakeld.
Na ca. 1 minuut wordt ook de ventilator
ingeschakeld. Die staat eerst heel even
op stand "2" en wordt vervolgens op
stand "1" gezet.
Terwijl u aan het koken bent, wordt de
ventilator van de wasemkap afhankelijk
van het aantal kookzones dat u gebruikt
en de vermogensstand(en) die u instelt
automatisch op een bepaalde stand
gezet.
^ Wanneer u een hogere vermogens-
stand instelt op het kookvlak of meer
kookzones inschakelt, wordt de ventilator van de wasemkap automatisch
op een hogere stand gezet.
^ Stelt u een lagere vermogensstand in
op het kookvlak of schakelt u kookzones uit, dan wordt de stand van de
ventilator automatisch aangepast.
De stand van de ventilator is afhankelijk
van de som van de vermogensstanden
van alle ingeschakelde kookzones (zie
"Toegewezen vermogensstanden").
Braadproces
^ De automatische besturing
detecteert braadprocessen, doordat
u dan een kookzone op de hoogste
stand inschakelt en vervolgens na
ca. 45 seconden tot 90 seconden
(5 minuten) een lagere vermogensstand instelt.
Deze tijden gelden voor inductiekookvlakken (de afwijkende waarde
tussen haakjes geldt voor
highlight-kookvlakken).
De ventilator van de wasemkap wordt
vervolgens geleidelijk aan op stand "3"
gezet en blijft ca. 5 minuten in deze
stand.
De stand waarop de ventilator daarna
wordt gezet is weer afhankelijk van het
aantal gebruikte kookzones en de ingestelde vermogensstanden op het kookvlak.
^ Indien gewenst kunt u de ventilator
handmatig eerder op een andere
stand zetten.
Reactietijd
De wasemkap reageert met vertraging,
omdat het instellen van een andere vermogensstand op het kookvlak niet tot
een onmiddellijke af- of toename van
kookdampen leidt.
De vertraging is ook toe te schrijven
aan het feit dat het kookvlak de informatie met tussenpozen naar de wasemkap verzendt.
De reactie van de wasemkap volgt na
enkele seconden of enkele minuten.
31
Page 32

nl - Bediening
Na het koken
^ Wanneer u alle kookzones uitschakelt,
wordt de wasemkap pas even later ook
uitgeschakeld. Op die manier wordt de
lucht in de keuken van overgebleven
dampen en geurtjes gereinigd.
– Als de ventilator op stand "'intensief'"
staat, wordt die direct op stand "3"
gezet.
– Staat de ventilator op stand "3", dan
wordt die na ca. 1 minuut op stand
"2" gezet.
– Als de ventilator op stand "2" staat,
wordt die na 2 minuten op stand "1"
gezet.
– Na 2 minuten op stand "1" wordt de
ventilator uitgeschakeld.
– Dertig seconden later wordt de ver-
lichting uitgeschakeld.
Handmatige bediening
^ Wilt u de wasemkap voor een berei-
ding handmatig bedienen, dan schakelt u de ventilator van de wasemkap
in voordat u het kookvlak inschakelt.
schakeld.
De verlichting blijft ingeschakeld.
Als de automatische besturing uitgeschakeld is, kunt u alle functies van de
wasemkap handmatig bedienen.
Automatische besturing weer
inschakelen
^ De automatische besturing van de
wasemkap wordt weer ingeschakeld
wanneer -
– u de wasemkap ca. 2 minuten niet
bedient nadat u de ventilator van de
wasemkap handmatig op een bepaalde stand hebt gezet.
– de door u ingestelde ventilatorstand
overeenkomt met de stand die via de
automatische besturing zou worden
ingesteld.
– de ventilator van de wasemkap en
het kookvlak minstens 20 seconden
uitgeschakeld zijn.
De volgende keer dat u het kookvlak
inschakelt is de automatische besturing weer ingeschakeld.
^ Bent u aan het koken en wilt u de au-
tomatische besturing uitschakelen,
dan kunt u dit doen door –
– de ventilator handmatig op een an-
dere stand te zetten.
– de wasemkap handmatig uit te scha-
kelen.
– de nawerkfunctie "–" van de wa-
semkap te activeren.
Na afloop van de ingestelde
nawerktijd wordt de ventilator uitge-
32
Page 33

nl - Bediening
Toegewezen vermogensstanden
Afhankelijk van de ingestelde vermogensstanden op het kookvlak wordt de
ventilator van de wasemkap op een van
de vier standen gezet.
De waarden gelden voor kookvlakken
met drie, vier, vijf en zes kookzones.
Kookvlakken met kookzones met 9
vermogensstanden
^ Ventilatorstand "1": Minstens 1 kook-
zone ingeschakeld, ten minste op
vermogensstand "1".
^ Ventilatorstand "2": Som van de ver-
mogensstanden van alle ingeschakelde kookzones = minstens 4,
waarbij 1 kookzone ten minste op
vermogensstand "4" staat.
^ Ventilatorstand "3": Som van de ver-
mogensstanden van alle ingeschakelde kookzones = minstens 15 (17),
waarbij 1 kookzone ten minste op
vermogensstand "6" staat.
^ Intensieve stand: Som van de vermo-
gensstanden van alle ingeschakelde
kookzones = minstens 25, waarbij 1
kookzone ten minste op vermogensstand "9" of de boosterstand staat.
Kookvlakken met kookzones met 12
vermogensstanden
^ Ventilatorstand "1":
Minstens één kookzone "1" ingeschakeld, ten minste op vermogensstand
"1".
^ Ventilatorstand "2":
Som van de vermogensstanden van
alle ingeschakelde kookzones = minstens 5, waarbij 1 kookzone ten minste op vermogensstand "5" staat.
^ Ventilatorstand "3":
Som van de vermogensstanden van
alle ingeschakelde kookzones = minstens 20 (23), waarbij 1 kookzone ten
minste op vermogensstand "8" staat.
^ Intensieve stand:
Som van de vermogensstanden van
alle ingeschakelde kookzones = minstens 32, waarbij 1 kookzone ten minste op vermogensstand "12" of de
boosterstand staat.
(De afwijkende waarde tussen haakjes
geldt voor highlight-kookvlakken.)
(De afwijkende waarde tussen haakjes
geldt voor highlight-kookvlakken.)
Voorbeelden voor de ventilatorstanden
"1" tot "4"
Voorbeelden voor de ventilatorstanden
"1" tot "4"
Het automatisch instellen van de
ventilatorstanden gebeurt met
vertraging. Zie "Reactietijd".
33
Page 34

ru - Описание работы
+
+
Коммуникационный модуль
XKM 2000 DA a позволяет автоматическое управление кухонной вытяжкой в зависимости от рабочего состояния независимой варочной панели Miele.
Коммуникация осуществляется при
условии, что варочная панель также
оборудована своим
коммуникационным модулем
XKM 2000 KM b.
Для панелей конфорок KM 549 и KM
554 необходим коммуникационный
модуль XKM 2000 SV.
dai2385
Варочная панель передает в вытяжку по сети электропитания c информацию о своем рабочем состоянии.
При эксплуатации вытяжки и варочной панели принимайте во
внимание соответствующие инструкции по эксплуатации на эти
приборы.
34
Page 35

ru - Описание работы
dai2338
В комплект XKM 2000 DA входит
коммуникационный модуль, а также
монтажный бокс, в который вставляется модуль, и соединительный кабель с разъемом для подключения к
блоку управления вытяжки.
Комплект монтируется в вытяжке в
районе вентилятора и соединяется с
блоком управления вытяжки.
В прилагаемой инструкции по монтажу описан порядок монтажа и
электрического подключения прибора.
Коммуникационный модуль должен подключаться только
квалифицированным специалистом-электриком, который хорошо
знает и тщательно выполняет все
действующие инструкции предприятий энергоснабжения, а также дополнения к ним.
35
Page 36

ru - Эксплуатация
Приготовление в
автоматическом режиме
^ Включите варочную панель на лю-
бом уровне мощности.
Через несколько секунд включится
свет вытяжки.
Примерно через 1 мин. включится
вентилятор: сначала ненадолго на
ступень "2", затем сразу на ступень
"1".
Вытяжка сама выбирает в процессе
приготовления ступень работы вентилятора в зависимости от числа используемых конфорок и выбранных
уровней мощности.
^ Если Вы выбираете на варочной
панели более высокий уровень
мощности или включаете дополнительные конфорки, то вытяжка
также переключается на более
высокую ступень работы вентилятора.
^ Если Вы снижаете уровень мощ-
ности на варочной панели или выключаете конфорки, то в соответствии с этим будет также автоматически подобрана ступень работы
вентилятора.
При этом работа вентилятора следует общей мощности, включенной на
варочной панели (см. "Назначенные
уровни мощности").
Процесс жарения
^ Процесс жарения означает, что Вы
включаете какую-либо конфорку
на максимальном уровне мощности
на время от 45 секунд до 90 се-
кунд (5 минут), после чего переключаете ее на более низкий уровень.
Приведенные значения времени
относятся к индукционным конфоркам (значения в скобках (в
случае отличия) - к конфоркам
Highlight).
В итоге вытяжка включается шаг за
шагом на ступень "3" и остается работать на этой ступени в течение, примерно, 5 минут.
В заключение ступень работы вентилятора снова устанавливается в зависимости от числа используемых
конфорок и выбранных уровней мощности.
^ Вы можете также заблаговремен-
но выбрать вручную другую ступень работы вентилятора.
Время реакции
Вытяжка реагирует с задержкой, так
как изменение уровня мощности на
варочной панели не приводит сразу
к снижению или увеличению образования испарений от приготовления.
Так как варочная панель посылает
информацию в вытяжку с определенными интервалами, это также может приводить к задержке
реагирования.
Реакция может последовать в пределах от нескольких секунд и до нескольких минут.
36
Page 37

ru - Эксплуатация
После приготовления
^ Если Вы выключите все конфорки,
то вытяжка тоже выключится с определенной задержкой по времени. Благодаря этому воздух кухни будет очищен от оставшихся после приготовления испарений и запахов.
– С интенсивной ступени вентиля-
тор сразу переключается на сту-
пень "3".
– Если вентилятор работает на сту-
пени "3", то примерно через 1 ми-
нуту он переключается на ступень
"2".
– Со ступени "2" вентилятор через 2
минуты переключается на ступень
"1".
– После 2 минут работы на ступени
"1" вентилятор выключается.
– Еще через 30 секунд выключится
освещение.
– активируете функцию холостого
хода "–" вытяжки.
Вентилятор выключается по прошествии выбранного времени холостого хода.
Освещение остается включенным.
Когда автоматический режим выключен, управление всеми функциями вытяжки осуществляется
вручную.
Возврат в автоматический режим
^ Вытяжка возвращается снова к
работе в автоматическом режиме,
если
– после ручного выбора ступени ра-
боты вентилятора Вы в течение
примерно 2 минут не проводили
никаких действий по управлению
вытяжкой;
– выбранная вручную ступень рабо-
ты вентилятора снова соответствует автоматической;
Ручная эксплуатация
^ Если Вы хотите управлять вытяж-
кой в процессе приготовления
вручную, то включите вентилятор
вытяжки äî включения варочной
панели.
^ Вы можете в процессе приготов-
ления выйти из автоматического
режима, если
– вручную выберите другую ступень
работы вентилятора;
– вручную выключите вытяжку;
– вентилятор вытяжки и варочная
панель были выключены минимум
на 20 секунд.
При последующем включении варочной панели снова включается
автоматический режим.
37
Page 38

ru - Эксплуатация
Назначенные уровни
мощности
Четыре ступени работы вентилятора
вытяжки выбираются в соответствии
со следующими мощностями, установленными на варочной панели.
Значения относятся к варочным панелям с тремя, четырьмя, пятью и
шестью конфорками.
Варочные панели с 9-уровневыми
конфорками
^ Ступень работы вентилятора "1":
включена как минимум одна конфорка минимум на уровне мощности "1".
^ Ступень работы вентилятора "2":
сумма всех включенных уровней
мощности = минимум 4,
исходя из этого - одна конфорка
включена минимум на уровне мощности "4".
^ Ступень работы вентилятора "3":
сумма всех включенных уровней
мощности = минимум 15 (17),
исходя из этого - одна конфорка
включена минимум на уровне мощности "6".
^ Интенсивная ступень работы вен-
тилятора:
сумма всех включенных уровней
мощности = минимум 25,
исходя из этого - одна конфорка
включена минимум на уровне мощности "9" или включена функция
Booster.
38
(Значения в скобках (в случае отличия) относятся к конфоркам
Highlight)
Примеры для ступеней работы вентилятора от "1" до "4"
Page 39

ru - Эксплуатация
Варочные панели с 12-уровневыми
конфорками
^ Ступень работы вентилятора "1":
включена как минимум одна конфорка минимум на уровне мощности "1".
^ Ступень работы вентилятора "2":
сумма всех включенных уровней
мощности = минимум 5,
исходя из этого - одна конфорка
включена минимум на уровне мощности "5".
^ Ступень работы вентилятора "3":
сумма всех включенных уровней
мощности = минимум 20 (23),
исходя из этого - одна конфорка
включена минимум на уровне мощности "8".
^ Интенсивная ступень работы вен-
тилятора:
сумма всех включенных уровней
мощности = минимум 32,
исходя из этого - одна конфорка
включена минимум на уровне мощности "12" или включена функция
Booster.
Выбор ступеней работы вентилятора
происходит с задержкой, см. "Время
реакции".
(Значения в скобках (в случае отличия) относятся к конфоркам
Highlight)
Примеры для ступеней работы вентилятора от "1" до "4"
39
Page 40

Änderungen vorbehalten / 3912
M.-Nr. 07 301 130 / 03
 Loading...