

Miele W3048 Product Manual
Operating and Installation Instructions
Washer
To prevent accidents and appliance damage, read these instructions
before installation or use.
en-US M.-Nr. 10 210 820

Contents
IMPORTANT SAFETY INSTRUCTIONS ................................................................ 4
Caring for the environment .................................................................................. 7
Guide to the washer .............................................................................................. 8
Control panel........................................................................................................... 8
Display function....................................................................................................... 9
Before using for the first time ............................................................................ 10
Setting the display language ................................................................................. 10
1. Prepare the laundry......................................................................................... 11
2. Load the laundry.............................................................................................. 12
3. Select a program ............................................................................................. 13
4. Selecting program settings ............................................................................ 14
5. Add detergent .................................................................................................. 16
6. Start the program - Program end .................................................................. 19
Spin cycle ............................................................................................................. 21
Delay Start............................................................................................................ 22
Program guide ..................................................................................................... 23
Changing the programme sequence................................................................. 27
Canceling a program............................................................................................. 27
Interrupting a program........................................................................................... 27
Changing a program.............................................................................................. 27
Adding/removing laundry during a wash program................................................ 28
Preparing your appliance for an extended vacation.............................................. 28
Detergent ............................................................................................................. 29
Miele-recommended detergents........................................................................... 30
General detergent recommendations.................................................................... 31
Cleaning and care ............................................................................................... 32
Cleaning the drum................................................................................................. 32
Cleaning the exterior and control panel ................................................................ 32
Cleaning the detergent dispensing drawer ........................................................... 32
Cleaning the liquid detergent inserts..................................................................... 33
Cleaning the water inlet filter................................................................................. 34
2

Contents
Frequently asked questions ............................................................................... 35
Problem solving guide........................................................................................... 35
A wash program cannot be started....................................................................... 35
The following fault message appears in the display and the program
has been canceled ................................................................................................ 36
A message appears in the display at the end of the program .............................. 37
General problems with the washer........................................................................ 37
Poor wash results.................................................................................................. 38
The drum door cannot be opened ........................................................................ 39
Opening the drum door during a power failure ..................................................... 40
Draining the washing machine ......................................................................... 40
Opening the drum door.................................................................................... 41
After sales service............................................................................................... 42
Repairs .................................................................................................................. 42
Optional accessories............................................................................................. 42
MieleCare .............................................................................................................. 42
Installation............................................................................................................ 44
Front view.............................................................................................................. 44
Rear view............................................................................................................... 45
Installation site....................................................................................................... 46
Installation ............................................................................................................. 46
Removing the shipping struts ............................................................................... 46
Refitting the shipping struts .................................................................................. 48
Leveling the machine............................................................................................. 49
Screwing out and adjusting the feet...................................................................... 49
Water connection .................................................................................................. 50
The water protection system............................................................................ 50
Hot and cold water connection ........................................................................ 51
Reprogramming to cold water operation.......................................................... 52
Drainage ........................................................................................................... 52
Electrical connection ............................................................................................. 53
Setting the language ........................................................................................... 54
3

IMPORTANT SAFETY INSTRUCTIONS
WARNING
To reduce the risk of fire, electric shock or injury to persons while
using your appliance follow basic safety precautions, including the
following:
Read all instructions before using the appliance.
GROUNDING INSTRUCTIONS
This appliance must be grounded. In the event of a malfunction or
breakdown, grounding will reduce the risk of electric shock by
providing a path of least resistance for electric current. This
appliance is equipped with a cord having an equipmentgrounding
conductor and a grounding plug. The plug must be plugged into an
appropriate outlet that is properly installed and grounded in
accordance with all local codes and ordinances.
WARNING - Improper connection of the equipment-grounding
conductor may result in a risk of electric shock. Check with a
qualified electrician if you are in doubt as to whether the appliance is
properly grounded.
Do not modify the plug provided with the appliance - if it will not
fit the outlet, have a proper outlet installed by a qualified electrician.
Do not install or use a washer with visible damage.
Do not install or store this appliance where it will be exposed to
the weather.
Do not install your washing machine where temperatures below
freezing may occur. Frozen hoses may burst under pressure. The
reliability of the electronic control unit may be impaired at
temperatures below freezing.
4

IMPORTANT SAFETY INSTRUCTIONS
Before connecting the machine, ensure that the connection data
on the data plate (fusing, voltage and frequency) match the mains
electrical supply. If in doubt contact an electrician.
Do not use an extension cord to connect this appliance to the
power supply. Extension cords do not guarantee the required safety
of the appliance (e.g. danger of overheating).
This appliance is not designed for maritime use or for use in
mobile installations such as recreational vehicles or aircraft.
However, under certain conditions it may be possible for an
installation in these applications. Please contact the Miele Technical
Service Dept. with specific requirements.
Do not repair or replace any part of the appliance or attempt any
servicing unless specifically recommended in these operating
instructions.
If the power cord is damaged it must only be replaced by a Miele
Service technician with a genuine Miele power cord.
Under certain conditions, hydrogen gas may be produced in a hot
water system that has not been used for 2 weeks or more.
HYDROGEN GAS IS EXPLOSIVE. If the hot water system has not
been used for such a period, turn on all hot water faucets and let the
water flow from each for several minutes before using the washing
machine. This will release any built-up hydrogen gas. Do not smoke
or use an open flame during this time, the gas is flammable.
Before the appliance is removed for service or discarded, remove
the door.
5

IMPORTANT SAFETY INSTRUCTIONS
Use
Do not allow children to play on or in the appliance. Close
supervision is necessary when the appliance is used near children.
The drum door glass will be hot when washing at very high
temperatures. Do not touch the glass. Danger of burns! Keep
children away from the washer when in use.
Only use the washing machine to wash items which are specified
by the manufacturer to be machine washable on the fabric care
label. Any other applications may be dangerous.
Do not wash articles that have been previously cleaned, washed,
soaked or spotted with gasoline, dry-cleaning solvents or other
flammable substances. These articles give off vapors that could
ignite or explode. Do not add these items to the wash load.
Do not add gasoline, dry-cleaning solvents, or other flammable or
explosive substances to the wash water. These substances give off
vapors which could ignite or explode.
Do not use cleaning solvents on or near the machine or the
controls. Contact with cleaning solvents will damage the surface..
Do not reach into the appliance if the drum is moving.
Do not tamper with the controls.
SAVE THESE INSTRUCTIONS
6
Caring for the environment
Disposal of the packing material
The cardboard box and packing
materials protect the appliance during
shipping. They have been designed to
be biodegradable and recyclable.
Ensure that any plastic wrappings,
bags, etc. are disposed of safely and
kept out of the reach of children.
Danger of suffocation!
Disposal of your old appliance
Electrical and electronic appliances
contain valuable materials. They also
contain certain substances, compounds
and components which were essential
for the proper functioning and safe use
of the equipment. Handling these
materials improperly by disposing of
them in your household waste can be
harmful to your health and the
environment. Therefore, please do not
dispose of your old appliance with
regular household waste and follow
local regulations on proper disposal.
Consult with local authorities, dealers or
Miele in order to dispose of and recycle
electrical and electronic appliances.
Miele assumes no responsibility for
deleting any personal data left on the
appliance being disposed. Please
ensure that your old appliance is kept
away from children until removal.
Observe safety requirements for
appliances that may tip over or pose an
entrapment hazard.
7
Guide to the washer
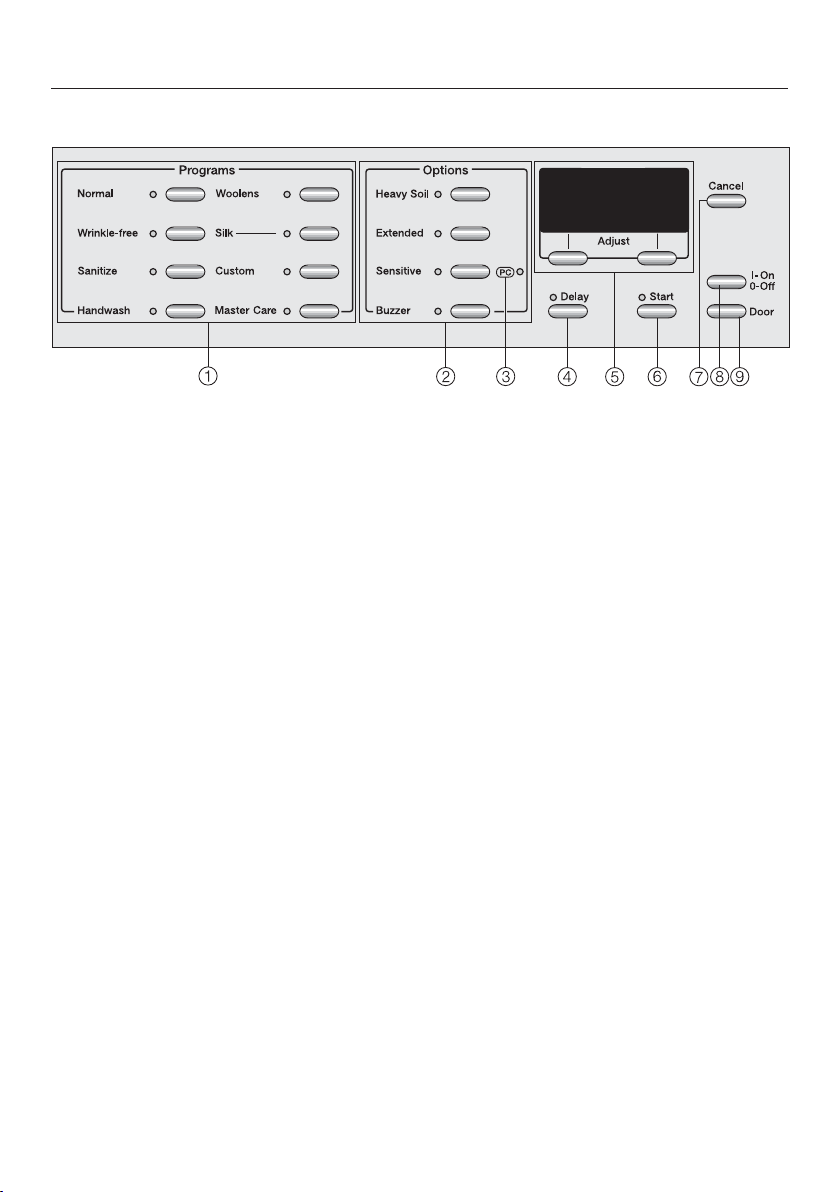
Control panel
a
Program buttons
To select a wash program
b
Option buttons
Special features to enhance a wash
program
c
PC Indicator
Allows a service technician to check
and update the wash programs
d
Delay Start button
To delay the start of a program
e
Display with Menu buttons
See more information on the
following pages
f
Start button
Starts the selected wash program
g
Cancel button
Switches back to the previous menu
during program selection or cancels
the running program
h
On/Off button
Turns the machine on and off
i
Door button
Opens the drum door
8
Guide to the washer
Duration: 1:02 h
Warm Max spin
MasterCare
OK
Extra White
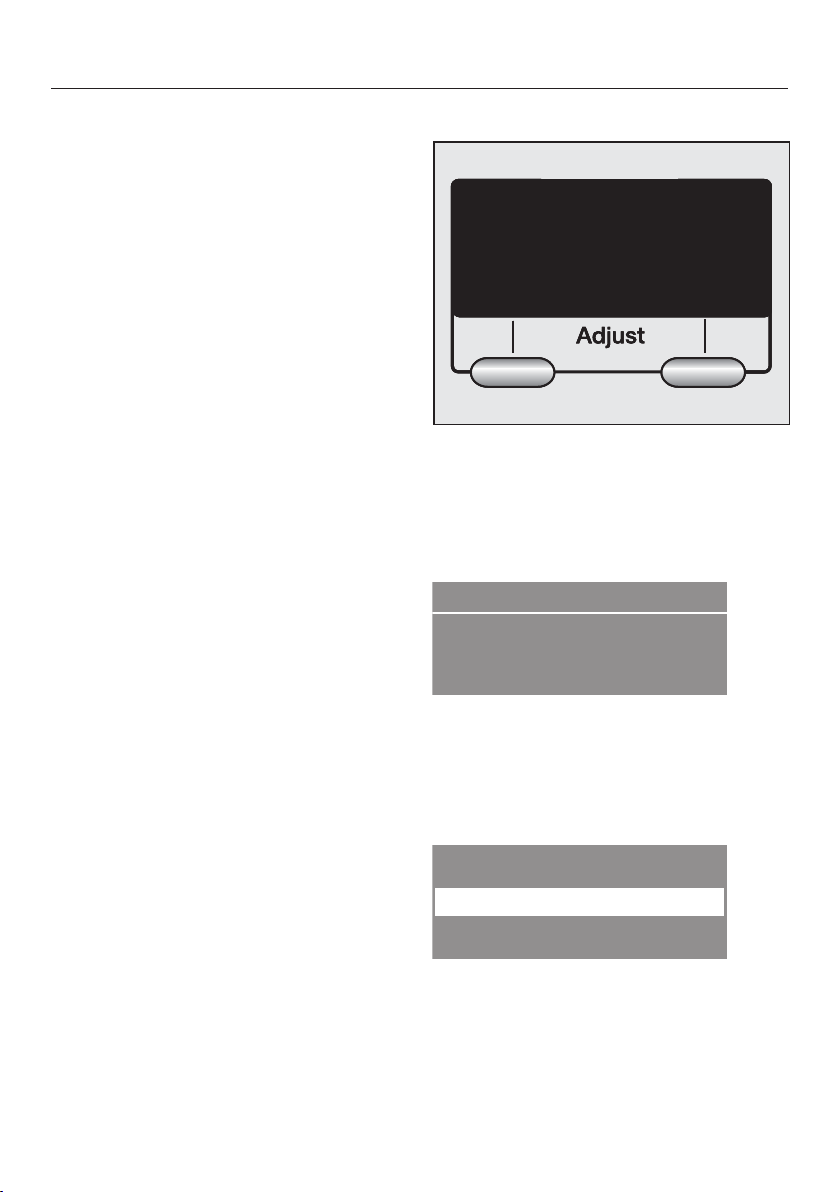
Display function
The display allows you to operate and
select various functions of the washer.
Selection and display of program settings
– Temperature selection
– Spin speed selection
– Delay start
– Display of an approximate program
running time
Program selection using the display
By pressing the MasterCare button, you
can select from the following programs:
– Extra White
– Delicates
– Denim / Jeans
– Dress shirts
– Pillows
Menu buttons
Various settings can be made with the
Menu buttons
The values above the vertical line can
be adjusted and/or confirmed.
Example:
– Outerwear
– Table linens
– Beach towels
– Express
– Drain / Spin
– Quick rinse
Pressing the left menu button Warm
allows to adjust the temperature. The
High spin button allows you to adjust
the spin speed.
Example:
With the button additional programs
can be selected and confirmed with the
OK button.
9

Before using for the first time
Language
OK
deutsch
Select program
The appliance must be correctly
installed and connected before the
first use. Please see the "Installation
instructions."
This washing machine has
undergone thorough testing in the
factory, there may be some residual
water in the drum from this process.
Running a spin cycle before the first use
is, for safety reasons, not possible. To
activate the spin cycle a wash program
must be run without laundry or
detergent.
Turn on the water supply.
Press the I-On / 0-Offbutton. The
washer is turned on.
The Welcome screen shows once the
washer is turned on for the first time.
The Welcome screen will not show after
the washer has run for more than 1
hour.
The display now shows the language
setting.
Setting the display language
The default setting for the display
language is German. The display
language can be adjusted.
Select the desired language by
pressing the left menu button
Confirm the setting with the right OK
button.
Shipping strut reminder
The shipping struts must be
removed before the first use to avoid
machine damage.
Confirm that the shipping struts have
been removed by pressing OK.
The washer is now ready for the first
use.
Starting the first wash program
10
Press the program button Sanitize.
Press the Start button.
Once the program has finished the first
use is complete. The washer can be
used.
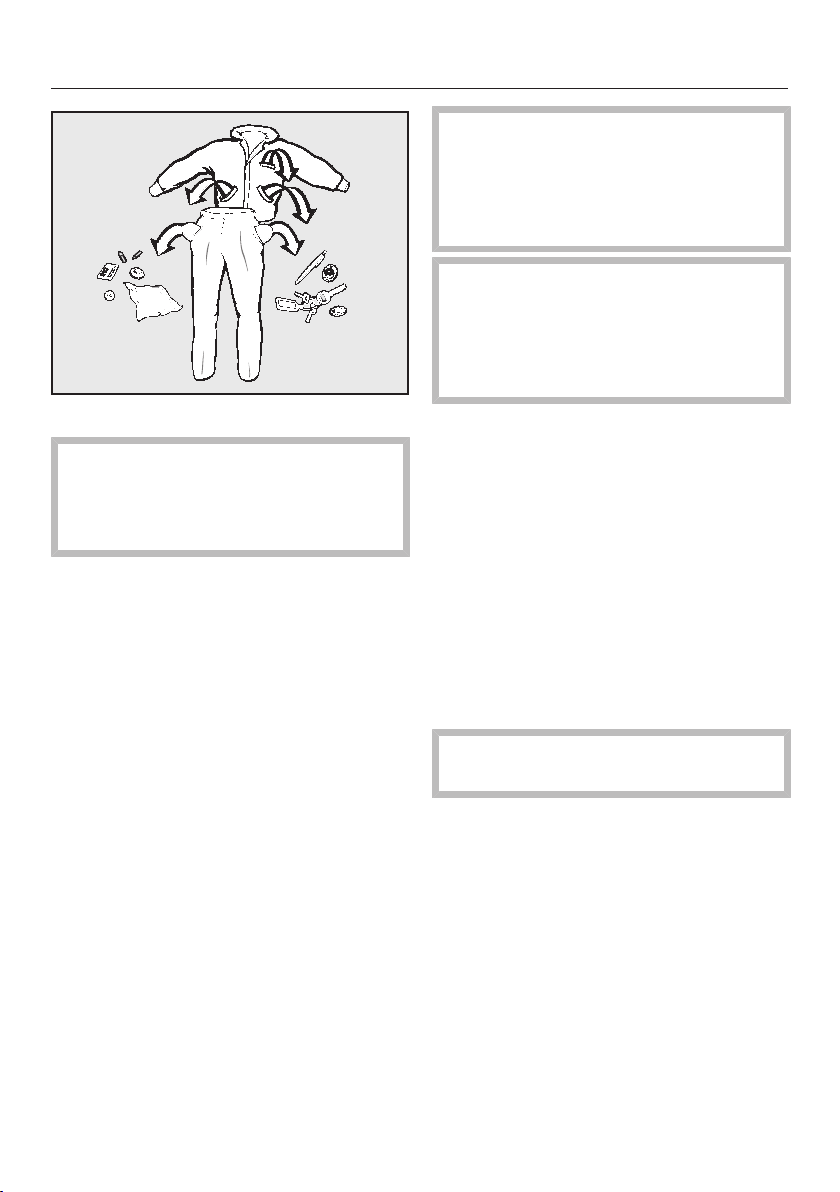
1. Prepare the laundry
Solvent-based cleaners (e.g.,
benzene) can damage plastic parts.
When pre-treating a stain, make sure
that plastic parts do not come into
contact with cleaning agent.
Chemical (solvent-based)
cleaning agents can cause damage
in the washing machine.
Never use such cleaning agents in
the washing machine!
Empty all pockets.
Foreign objects left in pockets
(e.g. nails, coins, paper clips, etc.)
can cause damage to clothes and
the machine.
Sort the laundry
Only wash items that are labeled
machine washable by the manufacturer.
Most garments have a fabric care label
in the collar or side seam.
Sort the laundry by care label and
color.
Tip: Dark fabrics often bleed the first
few times they are washed. They should
be washed separately several times
before being included in a mixed load.
Pre-treating stains
Badly soiled areas, stains etc. should
be cleaned as soon as possible,
preferably while still fresh. Dab stains
with a damp light colored cloth. Do
not rub!
General tips
– Curtains: Remove any lead weights
or strips before washing.
– Loose bra underwires should be
removed or sewn in place before
washing.
– Close zippers, hooks and eyelets
before washing.
– Comforter covers and pillowcases
should be fastened to prevent small
items from rolling inside of them.
Do not wash items with the
symbol on the fabric care label.
11
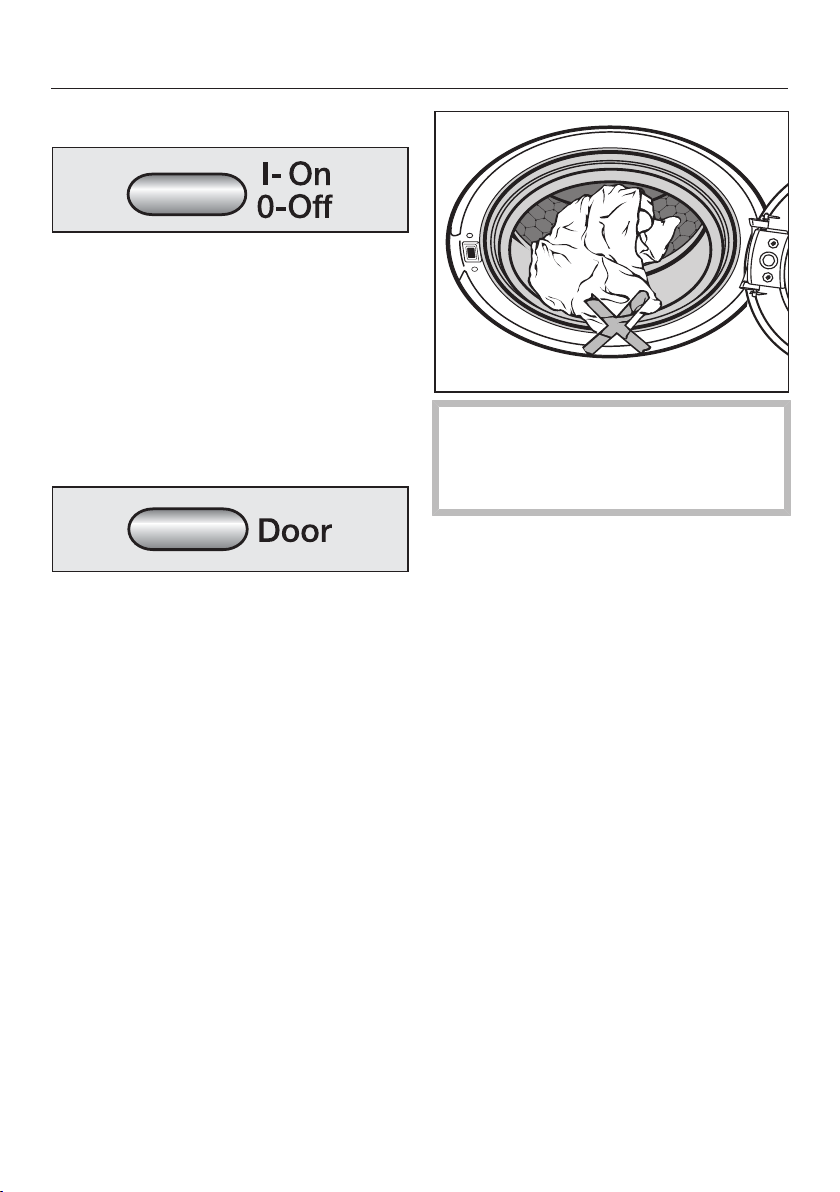
2. Load the laundry
Turn on the washer
Press the I-On / 0-Off button.
The washer is turned on and The drum
light is on.
Tip: The drum light turns off
automatically after five minutes. To turn
the light on again press the Door
button.
Load the laundry
Press the Door button.
The drum door is open.
To prevent damage to the door seal
and clothing, make sure that there
are no clothes caught between the
drum door and the seal.
Close the drum door.
Load the laundry loosely into the
drum.
For best results, wash mixed loads of
small and large items. This will improve
washing effectiveness and help
distribute the load evenly.
Water consumption and energy usage
are determined by the size of the load.
The washer automatically adjusts the
amount of water to conserve water and
energy when washing smaller loads.
The time remaining will automatically be
adjusted to reflect a shorter wash
program.
12
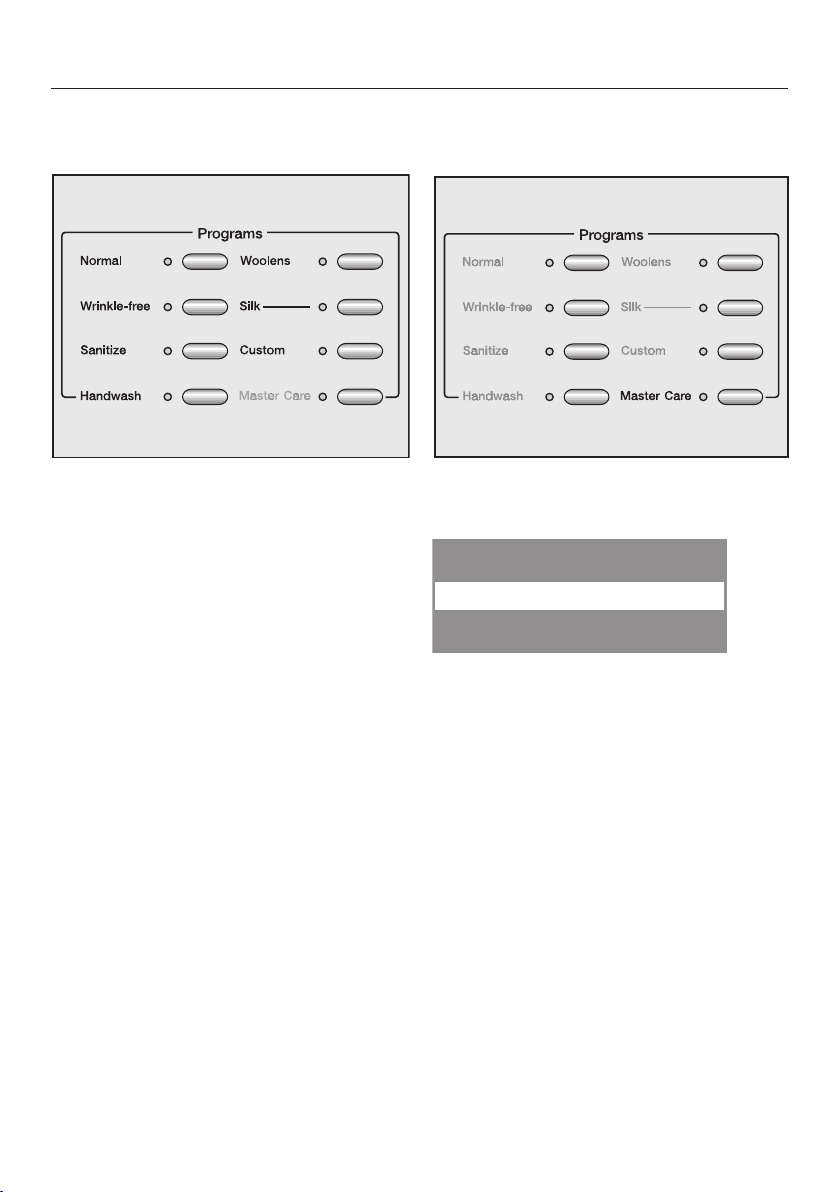
3. Select a program
MasterCare
OK
Extra White
A. Program selection using program buttons
Press the button to select the desired
washing program.
The relevant indicator light will light up.
B. Program selection via the MasterCare button
Press the MasterCare button.
The following appears in the display:
With the left button , page down
through the selection list.
The desired program is on the display:
Confirm the program with the right
button OK.
13

4. Selecting program settings
Duration: 1:02 h
Warm Max spin
Duration: 1:16 h
Hot Max spin
Extra White
Select a temperature and/or spin speed
Programs via program buttons
Press the left menu button Warm to
change the temperature and press
the right menu button Max. Spin to
change the spin speed.
Programs via the MasterCare button
Press the left menu button Hot to
change the temperature and press
the right menu button Max. Spin to
change the spin speed.
Select an option
Select the desired Option with the
respective button.
Once an Option is selected, the
indicator lights.
Tip: If an Option cannot be selected,
the wash program does not permit it.
See the "Program Guide" to determine
which Option is selectable for each
program.
Heavy Soil
For heavily soiled laundry or stubborn
dried on stains.
14
A pre-wash takes place and the wash
time for the main wash is extended.
Extended
For laundry with normal to heavy soiling
or stains
The main wash cycle time for the wash
program is extended.

4. Selecting program settings
Volume setting
OK
Sensitive
An additional final rinse washes away
detergent residue and scents.
An additional rinse takes place.
Buzzer
A buzzer signals the end of the wash
program or after Hold. The buzzer
sounds until the washer is turned off.
The buzzer volume can be adjusted.
Adjusting the buzzer volume
No program is selected.
Press the "Buzzer" button until the
display shows:
Press the left menu button to
adjust the buzzer volume.
Switching on delay start
The start of a program can be delayed
from 30 minutes up to 24 hours.
Switch on the delay start (if desired).
Please see "Delay start" for more
information.
Confirm with OK.
15

5. Add detergent
Front loading washing machines
require special high efficiency
detergents. Closely follow the
requirements of the detergent
manufacturer.
Use detergent according to the laundry
soiling.
Use less for smaller loads.
Light soiling
No soiling or stains are visible.
Normal soiling
Some visible soiling or a few light
stains.
Heavy soiling
Very visible soiling or stains.
Use the Heavy soil function and split the
detergent in the Heavy soil
compartment as described.
Too little detergent may cause:
– laundry to not be cleaned effectively
and become gray and stiff over time.
– grease to not be completely washed
from the laundry.
– calcium deposits on the heater.
Too much detergent may cause:
– oversudsing with poor wash, rinse
and spin results.
– a higher water usage, because of an
extra rinse which is automatically
added
– a higher environmental burden.
16
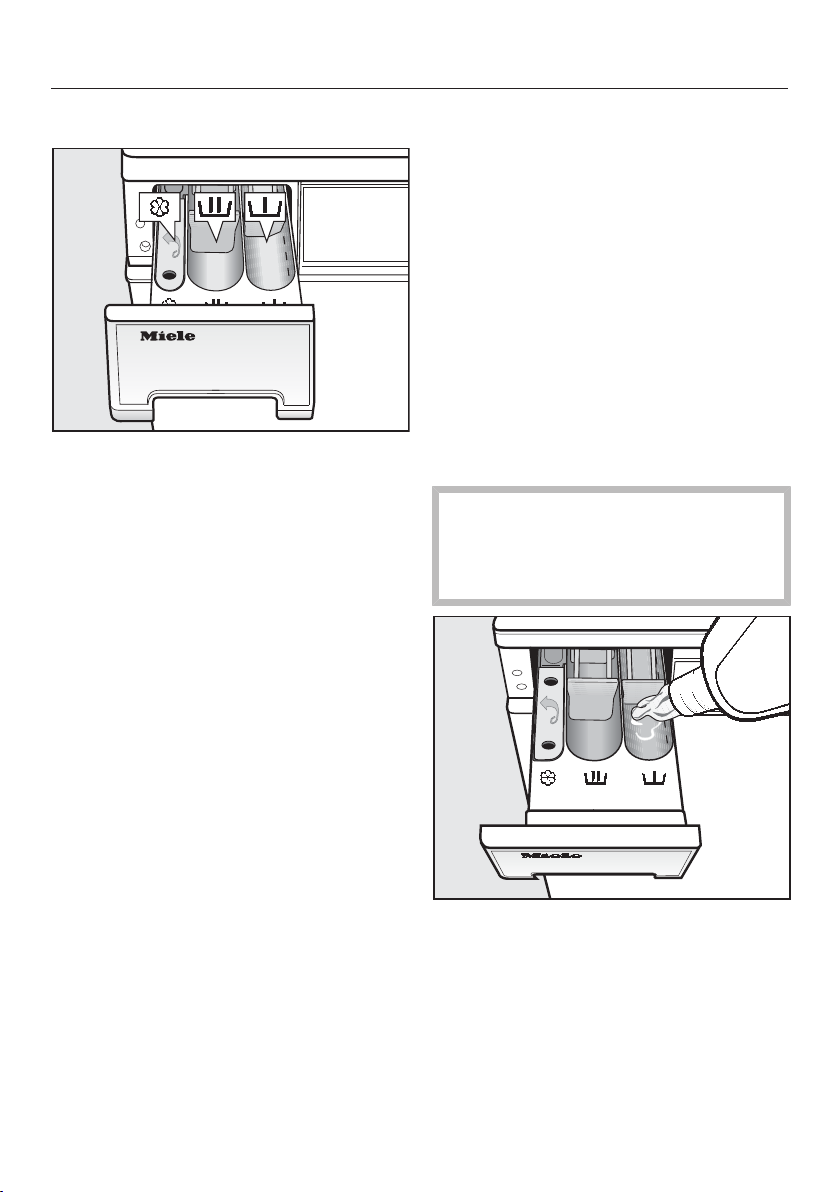
5. Add detergent
Using liquid detergent
Pull out the detergent dispenser
drawer and add detergent to the
compartments.
Detergent for Heavy Soil
Only add detergent (1/3 of the total
amount recommended) to the
compartment, if the Heavy Soil option is
selected
OR
Use of bleach
Bleach removes stubborn stains.
Observe the following prerequisites:
– Use liquid detergent.
Heavy-duty powder detergent
already contains a bleach and thus
the use of an additional liquid
bleaching agent is not
recommended.
– Do not select the Heavy Soil option.
If this option is selected, the bleach
will be prematurely added.
Dispensing of bleach
Only use when the insert for liquid
detergent is in place.
The Heavy Soil option may not be
selected.
Bleach
Add bleach to compartment as
described by the manufacturer.
Do not use the Heavy Soil option.
Once the main wash cycle has finished
the bleach will automatically be rinsed
from the compartment.
Detergent for the main wash
Fabric softener or liquid starch
Close the detergent drawer.
Fill the bleach in the compartment
according to the manufacturer's
specifications.
The bleach is added automatically after
the main wash.
17
 Loading...