


Operating instructions for the W 1930 Washing Machine
In order to protect yourself and avoid damage to your machine, it is absolutely necessary to read the operating instructions prior
to installation and operation.
]
M.-Nr. 05 226 250

Contents
Guide to the machine. . . . . . . . . . . . . . . . . . . . . . . . . . . . . . . . . . . . . . . . . . . . . . . 3
Important safety instructions . . . . . . . . . . . . . . . . . . . . . . . . . . . . . . . . . . . . . . . . 5
Preparation for use
Help protect our environment . . . . . . . . . . . . . . . . . . . . . . . . . . . . . . . . . . . . . . . . . 6 Economical usage . . . . . . . . . . . . . . . . . . . . . . . . . . . . . . . . . . . . . . . . . . . . . . . . . . 7 Preparing the Laundry . . . . . . . . . . . . . . . . . . . . . . . . . . . . . . . . . . . . . . . . . . . . . . . 8 End of programme . . . . . . . . . . . . . . . . . . . . . . . . . . . . . . . . . . . . . . . . . . . . . . . . . 10 Changing the programme sequence. . . . . . . . . . . . . . . . . . . . . . . . . . . . . . . . . . . 11 Adding detergent. . . . . . . . . . . . . . . . . . . . . . . . . . . . . . . . . . . . . . . . . . . . . . . . . . 12 Adding fabric softener or starch . . . . . . . . . . . . . . . . . . . . . . . . . . . . . . . . . . . . . . 13 Programmes. . . . . . . . . . . . . . . . . . . . . . . . . . . . . . . . . . . . . . . . . . . . . . . . . . . . . . 14 Textile care symbols. . . . . . . . . . . . . . . . . . . . . . . . . . . . . . . . . . . . . . . . . . . . . . . . 19 Additional options . . . . . . . . . . . . . . . . . . . . . . . . . . . . . . . . . . . . . . . . . . . . . . . . . 20 Delay start/Time remaining indicator . . . . . . . . . . . . . . . . . . . . . . . . . . . . . . . . . . . 21 Programmable functions . . . . . . . . . . . . . . . . . . . . . . . . . . . . . . . . . . . . . . . . . . . . 22
USER MAINTENANCE Instructions
Cleaning and care . . . . . . . . . . . . . . . . . . . . . . . . . . . . . . . . . . . . . . . . . . . . . . . . . 27 Problem solving guide . . . . . . . . . . . . . . . . . . . . . . . . . . . . . . . . . . . . . . . . . . . . . . 31 After sales service . . . . . . . . . . . . . . . . . . . . . . . . . . . . . . . . . . . . . . . . . . . . . . . . . 37
INSTALLATION INSTRUCTIONS . . . . . . . . . . . . . . . . . . . . . . . . . . . . . . . . . . . . . 38 Plumbing . . . . . . . . . . . . . . . . . . . . . . . . . . . . . . . . . . . . . . . . . . . . . . . . . . . . . . . . 44 Electrical connection . . . . . . . . . . . . . . . . . . . . . . . . . . . . . . . . . . . . . . . . . . . . . . . 45
Technical data. . . . . . . . . . . . . . . . . . . . . . . . . . . . . . . . . . . . . . . . . . . . . . . . . . . . 47
2
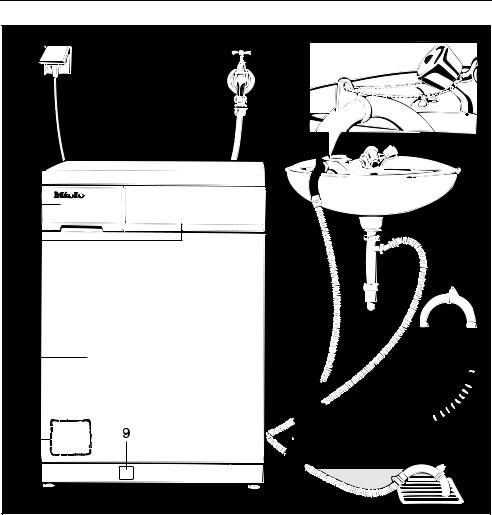
Guide to the machine
1 |
Electric supply cable |
6 |
Drum door |
2 |
High pressure inlet hoses |
7 |
Access panel for drain pump and filter |
3 |
Flexible drain hose, with detachable |
8 |
Four height adjustable feet |
|
swivel elbow |
9 |
Emergency door release and drainage |
|
|
4Detergent dispenser drawer
5Facia panel with controls
3
Guide to the machine
Detergent dispenser drawer
Compartment i - for the pre-wash.
Compartment j - for the main wash.
Compartment p (with lid) - for fabric softener or starch.
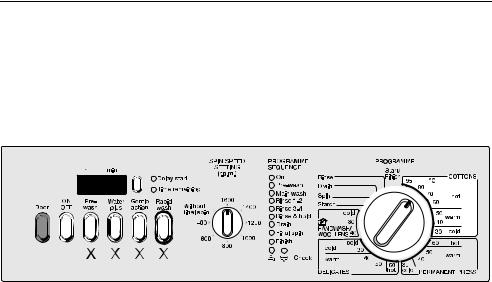
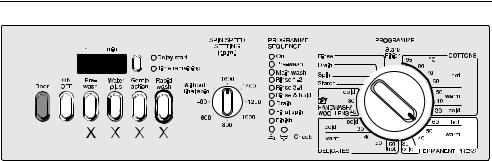
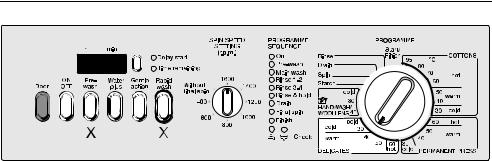
b “Delay start” button. |
f Pushbuttons for additional functions. |
c Time display “h mins”. |
g SPIN SPEED SETTING switch. |
d “Door” button; |
h PROGRAMME SEQUENCE indica- |
opens the drum door. |
tors (LED indicator lamps). |
e “ON/OFF” button; |
i Programme SELECTOR switch. |
to turn machine on or off or |
|
to interrupt a programme. |
|
The “On” lamp illuminates. |
|
4

Important safety instructions
WARNING – To reduce the risk of fire, electric shock, or injury to persons when using your appliance, follow basic precautions, including the following:
1.Read all instructions before using the appliance.
2.Do not wash articles that have been previously cleaned in, washed in or soaked in gasoline, dry-cleaning solvents, or other flammable or explosive substances. They give off vapors that could ignite or explode.
3.Do not allow children to play on or in the appliance. Close supervision is necessary when the appliance is used near children.
4.Before the appliance is removed from service or discarded, remove the door to the washing compartment.
5.Do not reach into the appliance if the drum is moving.
6.Do not install or store this appliance where it will be exposed to weather.
7.Do not tamper with the controls.
8.Do not repair or replace any part of the appliance, or attempt any servicing unless specifically recommended in the user-maintenance instructions or in published userrepair instructions that you understand and have the skills to carry out.
9.Do not add gasoline, dry-cleaning solvents, or other flammable or explosive substances to the wash water. These substances give off vapors that could ignite or explode.
10.Under certain conditions, hydrogen gas may be produced in a hot water system that has not been used for 2 weeks or more. HYDROGEN GAS IS EXPLOSIVE. If the hot water system has not been used for such a period, before using the washing machine, turn on all hot water faucets and let the water flow from each for several minutes. This will release any accumulated hydrogen gas. As the gas is flammable, do not smoke or use an open flame during this time.
SAVE THESE INSTRUCTIONS
Refer to the Electrical Connection Section for grounding and installation instructions.
5

Help protect our environment
Warning - To reduce the risk of fire, electric shock, or injury to persons, read the IMPORTANT SAFETY INSTRUCTIONS before operating this appliance.
Disposal of the packing material
The transport and protective packing is mostly manufactured from the following recycled or recyclable materials:
–corrugated paper/cardboard
–polystyrene - CFC-free
–polystyrene foil (transparent)
–Untreated wood
–Polypropylene (PP) strapping
Rather than throwing these materials away, please take them to your community recycling center.
Disposal of your old machine
Old machines contain materials which can be recycled. Please contact your recycling center or scrap merchant before disposing of the appliance.
6

Economical usage
The key to good wash results is finding the correct combination of detergent and temperature, and then allowing the washing machine to optimize their usage through its programming. Programme lengths can vary for this reason.
With the “Hydromatic” system, the drum can revolve at various speeds. Faster and slower agitation speeds, along with pauses for soaking, combine to ensure excellent results.
The automatic load control feature ensures the correct water level for the type of fabric and load being washed (even though it may appear as if there is too little water in the drum!).
Because of the accurately balanced drum and special sound insulation, machine noise is minimal while operating.
The fully electronic controls offer a combination of simple operation with many optional features.
For instance, since a main wash generally gives good results for a normal load, the pre-wash cycle has been made a user selectable option, saving time,water and energy over older full cycle machines.
Economy
For optimum economical usage, remember the following tips:
–The automatic load control feature will adjust the water level for loads between 1 and 5 kg. However, if possible, load the machine to its maximum capacity in order to use water and energy to the best advantage.
–Use only the correct amount of detergent required for the water hardness in your area. Miele recommends the use of low-sudsing detergents, as their characteristics allow them to perform better in front-loading machine than regular powder or liquid detergents.
If the wash is not heavily stained, select a lower temperature than indicated on the wash care label.
7
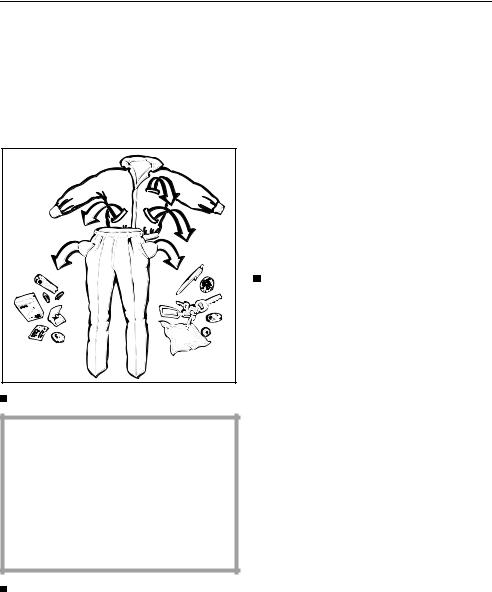
Preparing the Laundry
The headings numbered (1,2,3,...) show the operating sequence and can be used as a brief guide.
Before washing
1Prepare the wash load
Empty all pockets.
Foreign objects inadvertently left in pockets (e.g. nails, coins, paper clips, etc.) can cause damage to clothes and the machine. Damage to the machine can occur if wires from underwire bras come loose. Do not wash underwire bras in the machine without ensuring that wires are secure.
Sort the laundry
Most garments have a textile care label in the collar or side seam. Sort the laundry by care label and color.
Only wash items that are labeled machine washable by the manufacturer.
Dark fabrics often contain “excess dye” and should be washed separately several times before being included in a mixed load.
Delicate fabrics should be washed separately using a delicates programme.
Only wash wool or wool mixtures if they are labeled machine washable on the textile care label.
Pre-treat the laundry
Badly soiled areas (e.g. collars and cuffs) and water soluble stains can be pre-treated with bar soap, stain remover, or detergent mixed into a solution or paste.
Do not use detergents containing solvents in the machine.
8

Preparing the Laundry
2Press the “Door” button to open the door
3Load the machine
Unfold the laundry and place it in the drum. For best results we recommend washing mixed loads consisting of both large and small items. This improves the washing effectiveness and helps distribute the load evenly to keep the machine stable and reduce noise during spinning.
Recommended load sizes are noted below:
COTTONS . . . . . . . . . . . . . . . . . . 5.0 kg
PERMANENT PRESS . . . . . . . . . 2.5 kg
DELICATES . . . . . . . . . . . . . . . . . 1.0 kg
HANDWASH/WOOLLENS . . . . . . 1.5 kg
Rinse . . . . . . . . . . . . . . . . . . . . . . 5.0 kg
With curtains: Remove lead weights and strips and place in a laundry bag. Woollens and knitted garments should be turned inside out if recommended by the manufacturer.
4Close the machine door
To start a programme
1Turn the programme selector to Start / Finish
2Press the “ON/OFF” button
3Press any additional option buttons desired
(See the “Delay start” section if this feature is desired.)
4Select spin cycle speed
5Turn the programme selector to the desired programme
The programme selector can be turned to the left or the right.
Make sure there are no clothes caught between the drum door and seal.
5Add detergent
See section “Adding detergent” for details.
9
End of programme
After washing |
4 Remove the wash. |
1Turn the programme selector switch to “Start/Finish”
2 Press the “ON/OFF” button.
3 Press the “Door” button.
Do not attempt to remove laundry from the machine if the drum is turning. You may seriously injure yourself. If the drum turns with the door open, contact the Miele Service Department.
5 Check the folds in the door seal for any small articles such as buttons or nails which may be lodged there.
Make sure the drum is empty by manually turning it completely around or, during the next use, items may be damaged (e.g. shrink) or cause other laundry to discolor.
6 Close the drum door.
10
Changing the programme sequence
To cancel a programme:
Turn the programme selector to “Start/Finish”.
To interrupt a programme:
Press the “ON/OFF” buttton.
To continue the programme, turn the machine back on.
To change an incorrectly selected programme:
Turn the programme selector switch to “Start/Finish”.
When only the “On” lamp is lit, a new programme can be selected.
To change a programme which has been “locked” using the Child Safety feature, see the “programmable functions” section.
To omit a programme stage:
A programme stage must first be reached to be omitted:
Turn the programme selector to “Start/Finish”
As soon as the PROGRAMME SEQUENCE indicator lamp for the stage you wish starts flashing:
Turn the programme selector switch to the desired programme.
11

Adding detergent
Detergent should be added to compartment j at the beginning of each wash cycle.
Miele recommends the use of low-suds- ing detergents, as their characteristics allow them to perform better in frontloading machines than regular powder or liquid detergents.
Due to the Miele “Eco-System”, approximately 2/3 of the manufacturer’s recommended amount of detergent is generally sufficient for excellent wash results.
If you have difficulty finding a low-suds- ing detergent, contact Miele Limited.
Do not use chlorine bleach! Chlorine bleach will damage the machine.
For extremely hard water:
Water is taken in through compartment j in the main wash. If your water is extremely hard (above 400 ppm CaCO3) and the capacity of compartment j is insufficient for the amount of detergent needed, a Service Technician can reprogramme the machine so that water and detergent can also be taken in through compartment i.
For small loads:
–Gradually reduce the amount of detergent used with each small load.
–Check the wash results and the condition of the laundry.
–If the laundry is not clean or if it is grey or hard to the touch, add slightly more detergent the next time you use the machine.
It is important to add the correct amount of detergent, because...
...too little detergent can result in:
–grey laundry
–grease/stains not being removed
–lime deposits on the heater elements and drum.
...too much detergent can result in:
–excessive foam
–low level of agitation
–poor cleaning and rinsing results.
Water Softeners
If you wish to use a water softener to cut down on detergent usage in hard water areas:
–add the amount of detergent necessary for a soft water area.
–Following the manufacturer’s recommendations,add the specified amount of water softener.
Always add the detergent first, in compartments i and j followed by the softener, to ensure that both are properly dispensed.
12
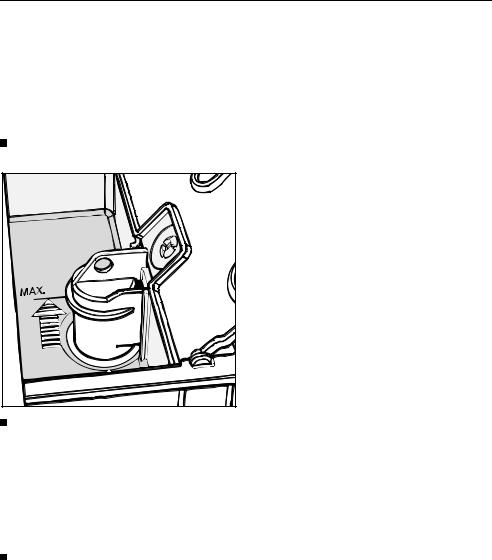
Adding fabric softener or starch
If fabric softener is desired, it will work more effectively and be gentler on the clothes if it is dispensed in the final rinse cycle of the wash, rather than in the tumble dryer through the use of softener sheets. To automatically dispense fabric softener:
Open the lid of compartment p.
At the end of the programme a small amount of water will normally remain in compartment p. A high water level in this compartment, however, may indicate that the siphon is clogged or the dispenser drawer was opened during the last rinse cycle, thereby interrupting the distribution of fabric softener. In this case, the siphon tube should be cleaned as described on Page 21.
Following the manufacturer’s recommendations, pour the specified amount of liquid fabric softener into compartment p. However, do not exceed the maximum fill level marked inside the compartment, as any excess will prematurely activate the siphon and be wasted.
Close the compartment lid and push in the dispenser drawer.
The conditioner will automatically be dispensed during the last rinse cycle.
Starch
If starch is used for shirts, blouses, table cloths, napkins, etc., pour the liquid starch into compartment p (use the some procedure as for fabric softener).
Never mix fabric softener and starch together in compartment p. This can lead to a blockage in the washer’s overflow system.
Using the “Starch” programme for dispensing liquid starch
–Prepare the starch solution in accordance with the manufacturer’s instructions and pour it into compartment i.
–Use the normal water level (Water Plus button “out”) when starching so that the solution will have the maximum effect.
“Without final spin” can be selected to reduce fabric creasing.
13
Programmes
The run time of front-loading machines is longer than that for most top-loading, vertical tub machines. This is because front-loading machines balance the 5 basic washing factors (mechanical action, water, detergent, temperature and time) diffently than do vertical tub machines. Miele’s front-loading machines use an advanced hydromatic washing action, precise and steady temperatures, less water and detergent than vertical tub machines but more time. The longer run time is part of the equation that produces Miele’s excellent wash results.
COTTONS
For cotton fabrics without special finishes. For most everyday loads, e.g. sheet, towels, jeans, sweatshirts, t- shirts underwear.
1) Water levels used: |
|
|
|
wash - |
low |
|
|
rinse - |
low |
|
|
2) Rinse cycles used: |
|
|
|
Normal programme |
- |
four |
|
Rapid wash |
- |
two |
|
X = additional options
Temperature guidelines:
30 – 40°C – dark coloured items.
40 – 50°C – light coloured items.
60 – 95°C – exclusively white items.
80°C – e.g. whites. such as socks, which would commonly be bleached in a top-loading, vertical tub machine.
95°C – e.g. diapers.
max/load: |
5.0 kg (11 lbs.) |
max/spin: |
1600 rpm |
Normal run time: |
1 h 48 min |
Rapid wash time: |
1 h 06 min |
14
Programmes
PERMANENT PRESS |
X = additional options |
|
|
||
For cotton blend fabrics, polyester |
Temperature guidelines: |
|
blends and other synthetics such as ac- |
30°C – dark fabrics which are a blend |
|
rylic, nylon and ramie. |
||
or 100% synthetic fabrics. |
||
|
1)Water levels used: wash - low
rinse - high (to reduce wrinkling)
2)Rinse cycles used:
Normal programme |
- |
three |
Rapid wash |
- |
two |
40°C – 50°C – light coloured cotton or synthetic items.
60°C – white polyester/cottons items.
max/load: |
2.0 kg (4.5 lbs.) |
max/spin: |
900 rpm |
Normal run time: |
1 h 07 min |
Rapid wash time: |
34 min |
15
Programmes
DELICATES
For synthetics, machine washable silks, fine washables commonly washed by hand (e.g. blouses, sweaters, but not wool or wool blends), lace or crocheted (non-woolen) items, curtains and knit garments.
1) Water levels used: |
|
|
|
wash - |
high |
|
|
rinse - |
high |
|
|
2) Rinse cycles used: |
|
|
|
Normal programme |
- |
three |
|
Rapid wash |
- |
two |
|
X = additional options
Temperature guidelines:
cold – 30°C – dark coloured silks and all synthetic items (lingerie)
40 – 50°C – light coloured silks and lace tableclothes.
60°C – white cotton lace and crocheted items.
For machine washable curtains, use cold – 30°C with a pre-wash. Load the drum loosely up to 1/3 full.
max/load: |
1.0 kg (2.2 lbs.) |
max/spin: |
600 rpm |
Normal run time: |
53 min |
Rapid wash time: |
32 min |
16
 Loading...