

機械人吸塵機操作說明
M.-Nr. 10 814 550
HS18
zh
en
Operating instructions Robot vacuum cleaner
目錄
注意事項及安全說明 3
環保須知 9
本機結構 10
機械人吸塵機的功能和特點 16
隨附配件 16
準備使用 16
使用 19
保養 24
訂購正確的配件 24
清空集塵盒 24
清潔集塵盒 24
清潔排氣濾網 25
清潔側刷 25
清潔滾輪塵刷 25
清潔集塵盒封邊 26
更換集塵盒封邊 27
清潔前輪 27
清潔感應器 27
更換遙控器中的電池 27
更換充電式電池 27
儲存 28
清潔與護理 28
售後服務 29
發生故障時聯絡 29
保用 29
解決問題指南 30
故障訊息 33
電力接駁(英國) 35
版權和授權 36
2
注意事項及安全說明
本機械人吸塵機符合當地及國家一切相關的安全規例。但使用不
當,會引致個人損傷,以及損壞財物。
首次使用本機械人吸塵機前,請先行閱讀本操作說明書,瞭解關於
本機械人吸塵機的安全注意事項,以及使用與維修的重要資料,防
止人身損傷或機械損壞。
請將本操作說明書存放在安全地方,並將它轉交給日後的使用者。
在進行任何維修工作和清潔之前以及長時間停用本機時,請關閉機
械人吸塵機。處理問題時也應關閉。如需關閉,將機械人吸塵機側
面的開關 I/0 滑動至 0 位置。如果您發現機械人吸塵機有任何不尋常
的行為,也應採用此方式關閉。
正確使用
機械人吸塵機適用於家居及類似的工作和住宅環境,
不得用於戶外用途。
本機械人吸塵機只可用於家居用途,為乾爽地面除塵。擅作其他用
途或擅自改裝或改動,可能會存在危險。
對於身體、感官或精神有殘障的人士或缺乏經驗及知識的人士,
只有他們在使用機械人吸塵機時獲得監督,或已向他們示範正確使用
方法,並了解和認識錯誤操作後果的情況下,方可使用本機械人吸塵
機。
3
注意事項及安全說明
注意兒童安全
以免因誤用而窒息。塑膠紙等包裝材料必須放置在遠離嬰幼兒處。
玩耍時,兒童可能會意外被包裝材料纏住,或誤將其套於頭上,引致
窒息。
在無人監管的情況下,請確保 8 歲以下兒童遠離本機械人吸塵機。
對於 8 歲及以上兒童,只有在向他們清楚講解機械人吸塵機的安全
操作方法後,並且在他們認識到誤用所涉及的危險時,方可在無監督
的情況下讓其使用。
切勿讓兒童在無人看管的情況下清潔機械人吸塵機或進行保養工
作。
請看管在本機附近活動的兒童,切勿讓兒童將本機當作玩具。
請將充電式電池和遙控器電池放置於兒童觸及的範圍之外。
技術安全
機械人吸塵機運行電壓為 14.4 伏特。
其被歸類為 III 類裝置。
該裝置由安全的超低電壓 (SELV) 電源供電,其電壓足夠低至保護使用
者免受電擊危險。II 類裝上式電源用於為機械人吸塵機充電。
在每次使用機械人吸塵機之前,請檢查吸塵機及其附帶的所有配件
是否有任何明顯的損壞跡象。本機或配件如有損壞,切勿使用。
4

注意事項及安全說明
將機械人吸塵機和電源數據牌上的接駁數據(電壓和頻率)與主電
源上的數據進行比較。此數據必須完全匹配。
主電源插頭必須配備合適的保險絲。
必須將基站接駁至主電源,才可確保安全可靠地操作本機械人吸塵
機。
機械人吸塵器在保用期內時,必須交由 Miele 認可的維修技師維
修。否則保用無效。
本機必須交由 Miele 認可的維修技師修理。由不合資格人員進行維
修和其他工序,可能會對使用者造成危險。
請確保主電源線並未損壞、彎曲或纏繞。請勿將任何重物放在機械
人吸塵機上。
請勿讓機械人吸塵器在主電源線或其他纜線上經過。
僅使用隨附的配件為充電式電池充電(適配器、電源基座和基
站)。
電池和充電式電池將隨著時間的推移而損耗,然後可洩露腐蝕性液
體,請避免讓此類液體接觸眼睛和皮膚。如有接觸,請用水徹底沖洗
並及時求醫。
不要在基站前面附上任何粘貼標籤,以免隱藏紅外線發射器。請勿
將任何物品置於其前。
機械人吸塵機配有感應器,以檢測步數和垂落高度。不要覆蓋這些
感應器或攝像鏡頭,並確保感應器的功能在吸塵器移動時不會被障礙
物阻礙。
5

注意事項及安全說明
請勿將機械人吸塵機或隨附部件浸入水中。請僅使用乾燥或稍微濕
潤的布清潔所有部件。
請勿將機械人吸塵機或隨附的任何配件浸入水中。出於安全原因,
不得使用曾垂落或損壞的配件。
正確使用
請勿在未安裝集塵盒、預濾網和排氣濾網的情況下使用機械人吸塵
機。
請將所有易打碎或重量輕的項目從地板上移除,並確保機械人吸塵
機不會絆到電線、窗簾、流蘇或類似物品。
應使動物遠離機械人吸塵機。請勿允許動物站在或坐在機械人吸塵
機上。
切勿用機械人吸塵機來吸附燃燒後的香煙、灰燼或煤炭,不論仍有
火光或已熄滅。請勿在火爐附近使用本機。
請勿使用機械人吸塵機吸附任何水、液體或潮濕的塵垢。剛清洗的
地氈或地板,必須乾透後,才可吸塵。
請勿使用機械人吸塵機吸附碳粉。打印機和影印機所用的炭粉,具
導電作用。
請勿使用機械人吸塵機吸附任何易燃液體或氣體,亦不要在儲存了
上述物質的區域內使用吸塵機。
6

注意事項及安全說明
當吸塵機運行時,不要坐在或躺在被清潔的表面上。防止穿著寬鬆
的衣服或長髮接觸機械人吸塵機滾輪刷或其他移動部件的風險。
處理充電式電池和遙控器電池:
發送充電式電池之前,請聯絡 Miele 維修服務部。
請勿拋擲或投擲充電式電池。為安全起見,請勿繼續使用曾垂落或
損壞的充電式電池。
請將充電式電池或電池遠離明火或其他熱源。請勿加熱充電式電池
或電池或將其放置在陽光直射的地方。
請勿拆卸充電式電池。
請勿無意或故意地橋接充電式電池或電池的觸點而引致短路。
請勿讓充電式電池或電池與液體接觸。
請勿嘗試為遙控器電池充電。
如果您發現異味,請勿繼續使用充電式電池,如果液體從中洩漏,
則其顯然過熱、變色或變形。立即處理充電式電池。
7
注意事項及安全說明
棄置電池和充電式電池:從機械人吸塵機中取出,將電池從遙控器
中取出。用膠帶隔離金屬觸點,防止短路。將電池和充電式電池棄置
到市政回收設施中。請勿將電池或充電式電池與普通家居垃圾一同棄
置。
配件
僅使用上面帶有「原廠 Miele」標示的原廠配件。否則製造商將無
法確保產品的安全性。
對於因錯誤使用或操作,或因不遵守這些警告和安全指示而造成的
損壞,Miele 概不負責。
8

環保須知
包裝材料的棄置
包裝專門設計用於在搬運過程中提供保
護,以免損壞本機。本機選用不損環境
的裝箱材料,這些材料一般可以循環再
用。
回收裝箱材料降低了製造過程中對原材
料的使用,也減少了垃圾填埋場的廢棄
物數量。
舊吸塵機的棄置
電器與電子產品通常含有價值的材料。
亦包含對其正常運作和安全起著至關重
要作用的特定材料、化合物及組件。如
與家居垃圾一同棄置或棄置不當,這些
材料可損害人體健康及危害環境。因
此,請不要將廢舊裝置與家居垃圾一同
棄置。
請將舊機棄置到您當地的社區廢物收集
中心/電氣與電子產品回收中心,或向經
銷商諮詢。根據法律要求(視乎各個國
家/地區而定),您亦有責任刪除儲存在
棄置舊機上的任何個人資料。請妥善存
放待棄置舊機,確保不會對兒童構成危
險。
處理舊電池和充電式電池
一些電氣和電子設備包含電池和充電式
電池,當耗盡時,不能與您的家庭廢物
一同丟棄。您需要依法移除任何可拆卸
的電池或充電式電池,並將其丟棄在合
適的電池回收箱中。此服務是免費的。
電池和充電式電池含有會損害人體健康
和環境的物質。
有關電池和充電式電池的進一步說明。
標有橫線的垃圾箱意味著電池或充電式
電池不能與您的家庭垃圾一起丟棄。標
有橫線的垃圾箱也有一個或幾個化學
符號,表示電池或充電式電池含有鉛
(Pb)、鎘 (Cd )和/或水銀 (Hg)。
3E&G+J
舊電池和充電式電池包含可重複使用的
重要原材料。單獨處理電池和充電式電
池使其更易於處理和回收。
9
本機結構
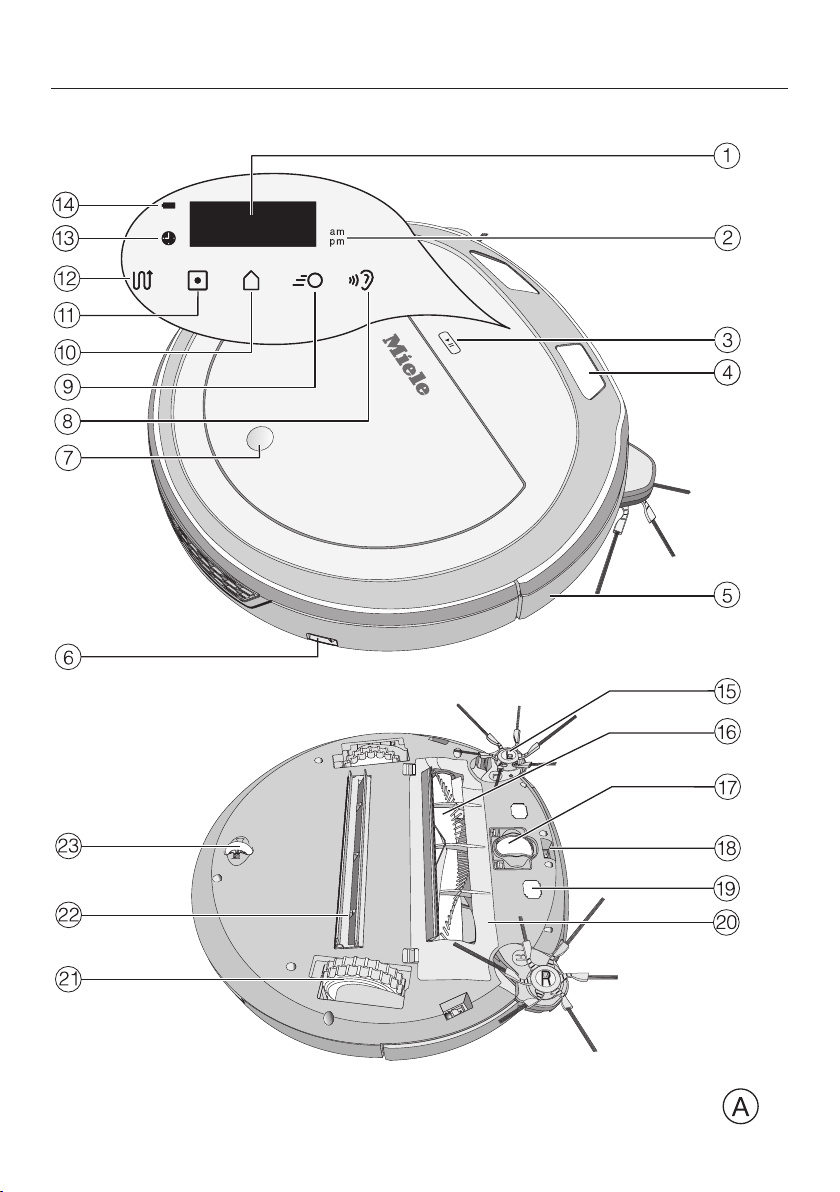
A –機械人吸塵機頂部和底部
10

顯示屏
a
時間模式顯示 (am/pm)
b
c
開始/暫停感應按鈕 ()
攝像鏡頭
d
撞擊保護
e
ON/OFF(開/關)掣 (I/0)
f
打開儲存倉的按掣
g
Silent(靜音)吸塵模式感應按鈕
h
Turbo(快速)吸塵模式感應按鈕
i
Base(基站)感應按鈕
j
Spot(定點)吸塵模式感應按鈕
k
本機結構
Auto(自動)標準吸塵模式感應按鈕
l
定時清潔顯示
m
充電式電池狀態顯示
n
側刷
o
滾輪塵刷
p
前輪
q
感應器(防墜保護)
r
充電觸點
s
11

本機結構
滾輪刷蓋
t
驅動輪
u
吸嘴,帶有封邊
v
後輪
w
12

B – 基站和遙控器
基站
本機結構
電線回捲
a
電線線路
b
電源插座(圖中未有顯示)
c
充電觸點
d
遙控器
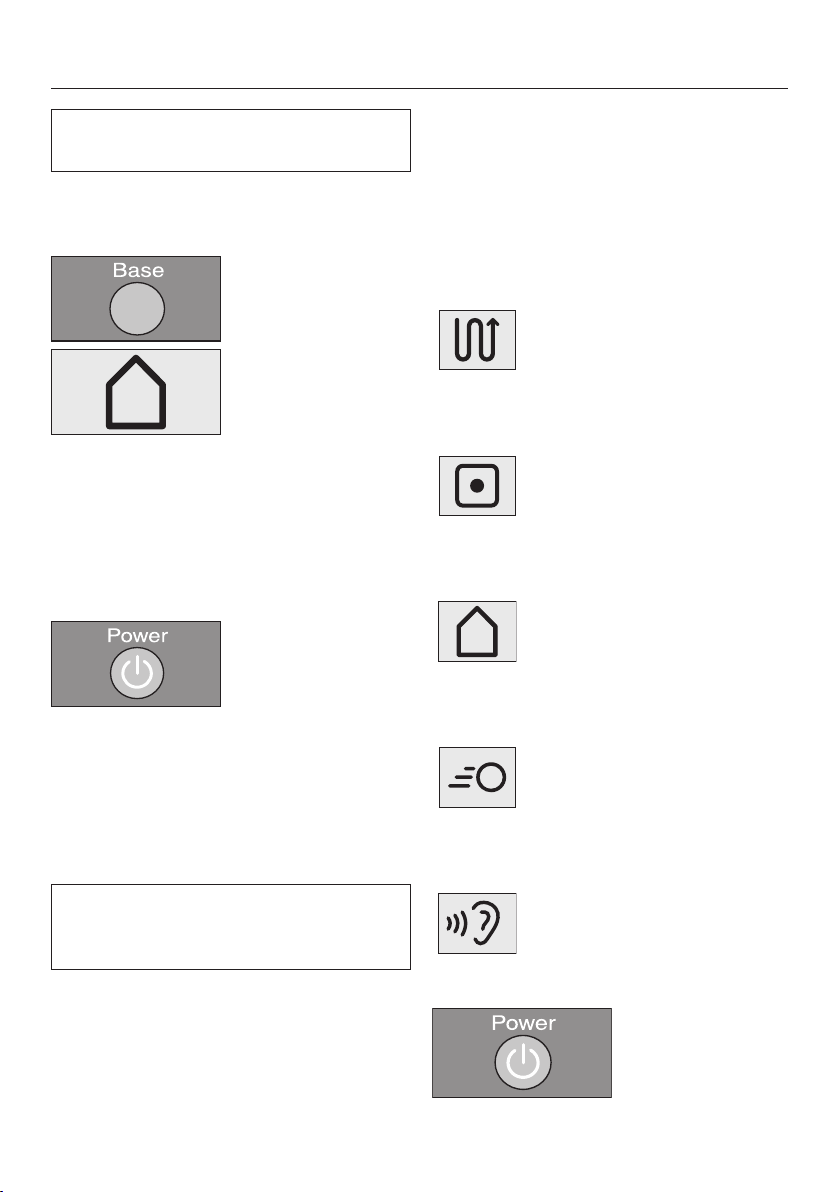
Power(電源)按鈕(開啟和關閉)
a
Base(基站)按鈕(將吸塵機導向基站)
b
「OK」(確定)按鈕,外圍是方向按鈕
c
d
開始/暫停按鈕 ()(開始/停止吸塵)
13
本機結構
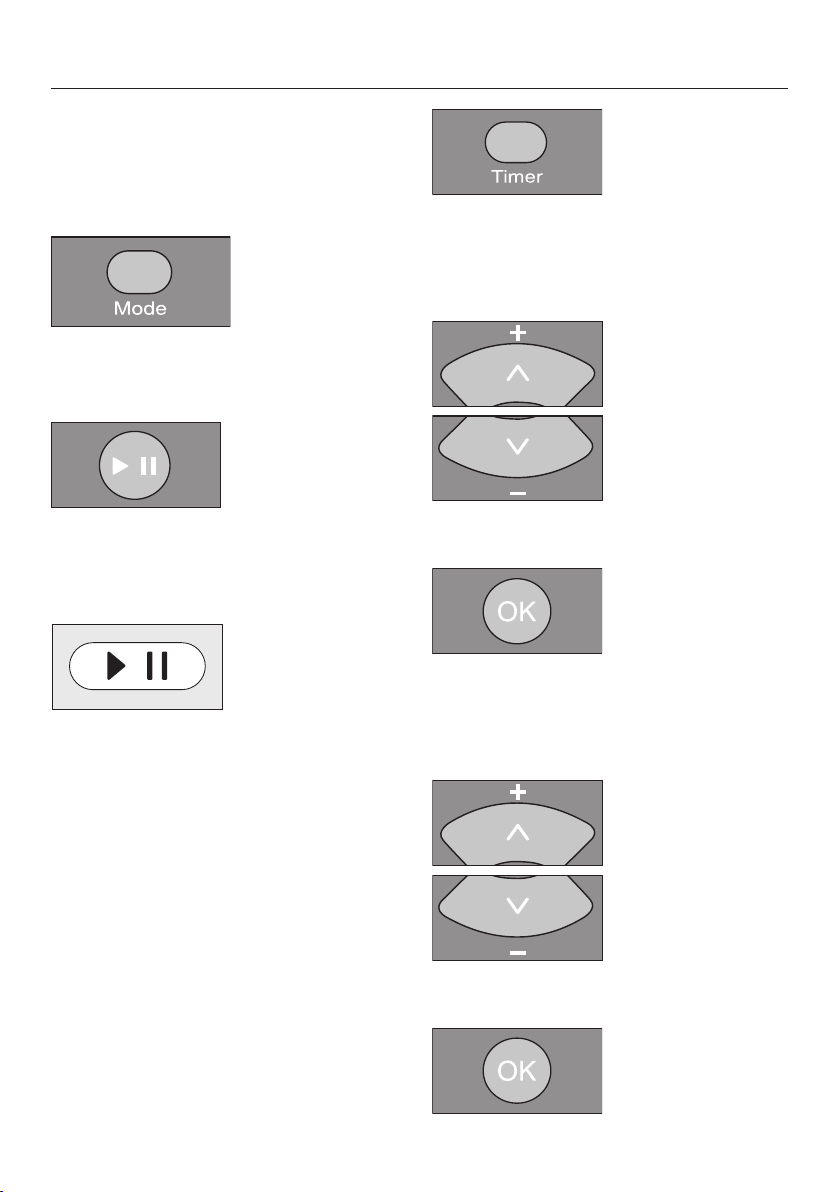
Mode(模式)按鈕(選擇吸塵模式)
e
Clock(時鐘)按鈕(設定時間)
f
Timer(定時清潔)按鈕(設定定時清潔)
g
Mute(靜音)按鈕(啟動/停用音訊訊號)
h
Climb(攀爬)按鈕(降低跨越高度)
i
電池倉(位於背部)
j
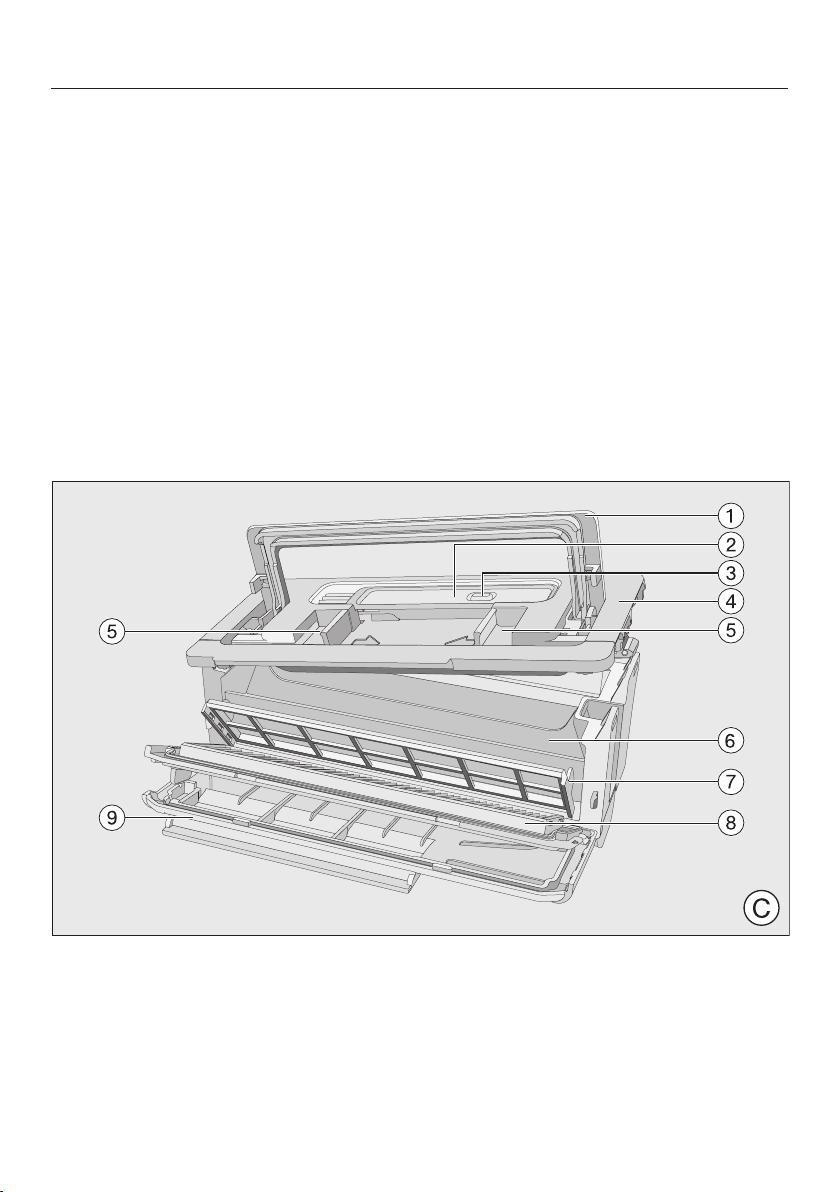
C –集塵盒
手柄
a
帶有擦拭器的清潔工具
b
擦拭器按鈕
c
14

蓋
d
鬆開蓋子的按鈕
e
集塵位置
f
預濾網
g
排氣濾網
h
排氣濾網倉蓋
i
本機結構
15
機械人吸塵機的功能和特點
機械人吸塵機適用於短絨地氈、滿鋪地
氈和硬地板的日常清潔工作。
請遵照地板製造商的清潔與護理說
明。
機械人吸塵機配有攝像鏡頭和感應器。
它不斷地儲存房間以及關於可以行走的
區域的資訊。機械人吸塵機利用這些資
料來建立及規劃待吸塵地面,使其能夠
自動吸塵。
移除保護貼
從基站上和機械人吸塵機頂部移除保
護貼。
隨附的配件
– 遙控器/兩節電池
– 兩個側刷
– 帶插頭的電源基座
– 特定的國家/地區電源適配器
– 基站
– 磁條
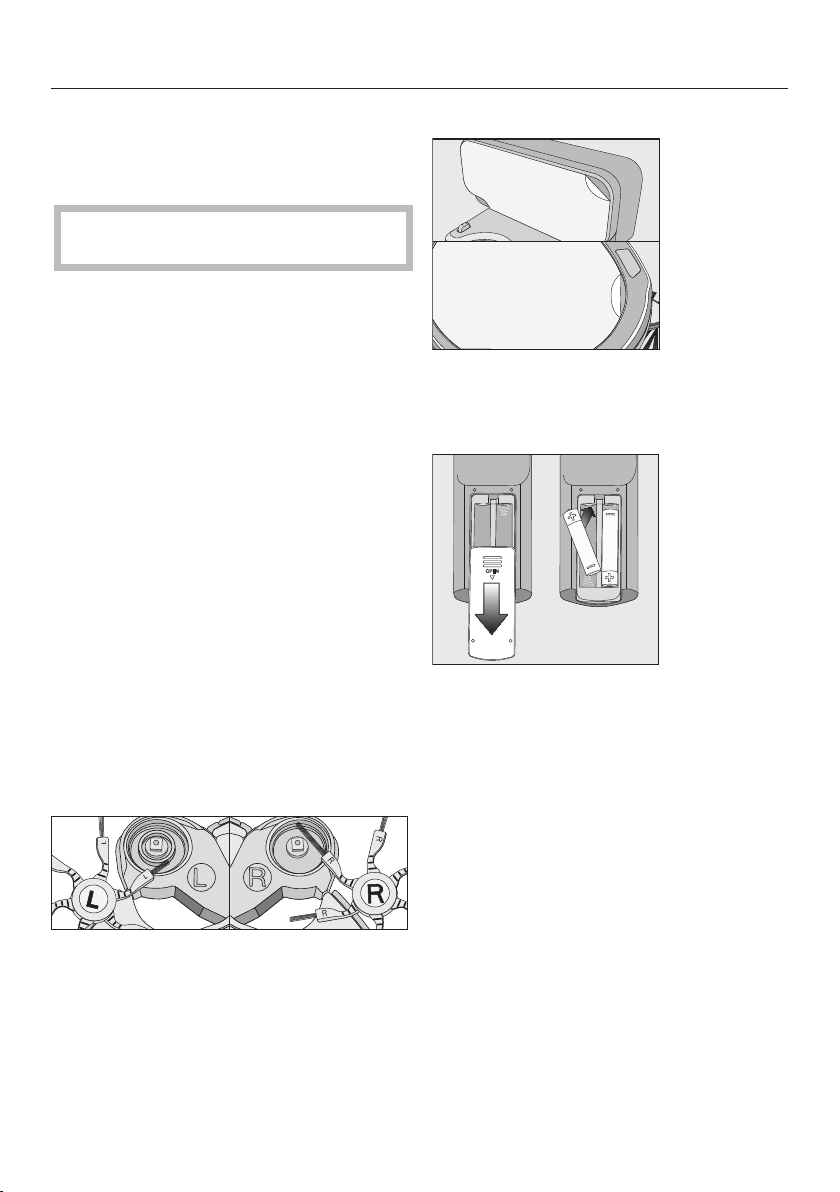
準備使用
裝上側刷
將機械人吸塵機翻過來放在水平、清
潔的表面上。
將兩個側刷小心地按至其鎖上,直至
聽得聲響。注意與 L 和 R 標記須一
致。
將電池放在遙控器中
移除電池倉蓋。
兩節隨附電池。注意極性。
關閉電池倉蓋。
16
開啟機械人吸塵機
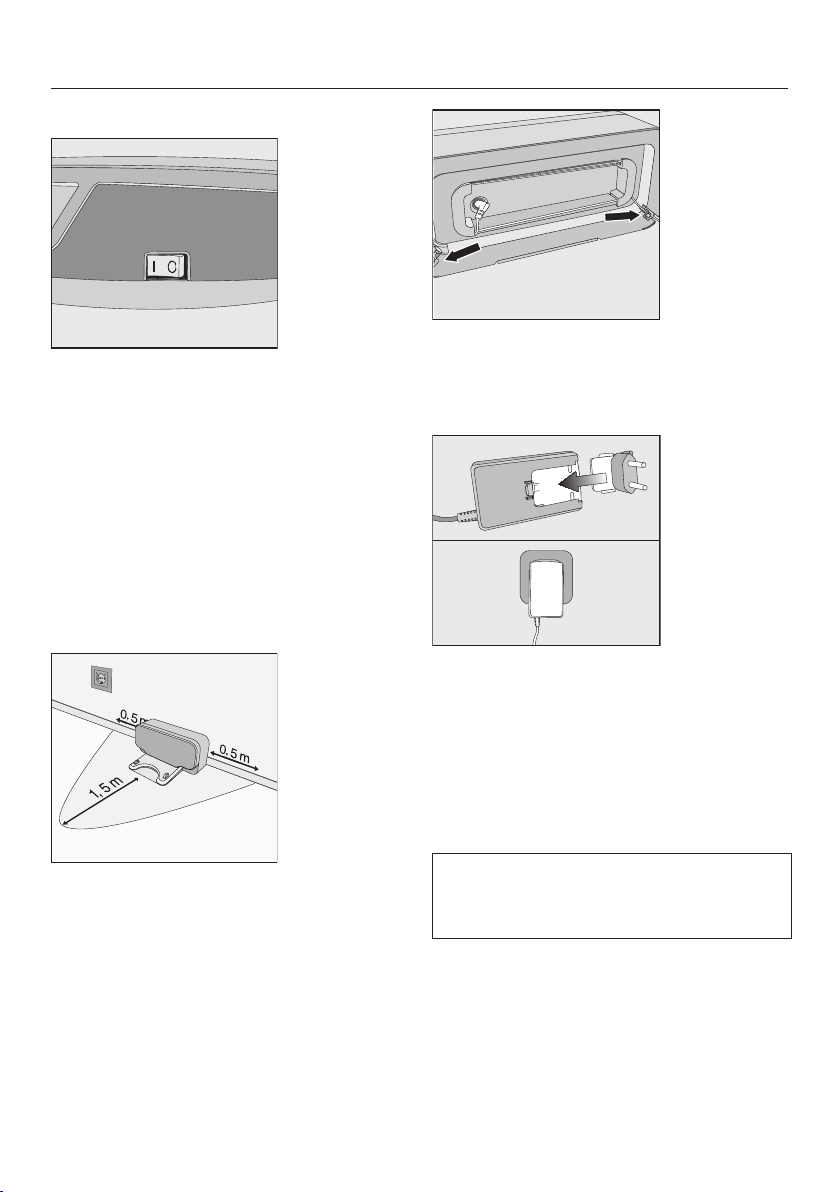
將機械人吸塵機側面的開關 I/0 滑動
至 I 位置。
顯示屏中的充電式電池狀態指示燈亮
起。
約 60 秒後,機械人吸塵機將切換至待機
狀態。電池狀態指示燈將繼續亮起。
按下遙控器上的任何按鈕或顯示屏上的
感應按鈕之一可再次重啟機械人吸塵
機。
連接基站
將隨附的電源插頭裝上基站背面的插
座。您可以繞著電線回捲盤纏繞多餘
的電線。將電線引導穿過兩條電線線
路中的一條。
將特定的國家/地區電源適配器裝上電
源,直到聽到聲響,然後將其裝上所
選的電源插座。
將基站放置在水平的表面上,靠近電
源插座。請確保基站前面至少有 1.5
米,左右兩側至少有 0.5 米的無障礙
距離。
給充電式電池充電
隨附的充電式電池電量並未完全充滿。
首次使用前,機械人吸塵機開機時必須
充滿電(開關 I/0 至 I)。
機械人吸塵機關閉時(開關從 / 0 至
0),也可以給充電式電池充電。在這
種情況下,吸塵機指示燈無反應。
17
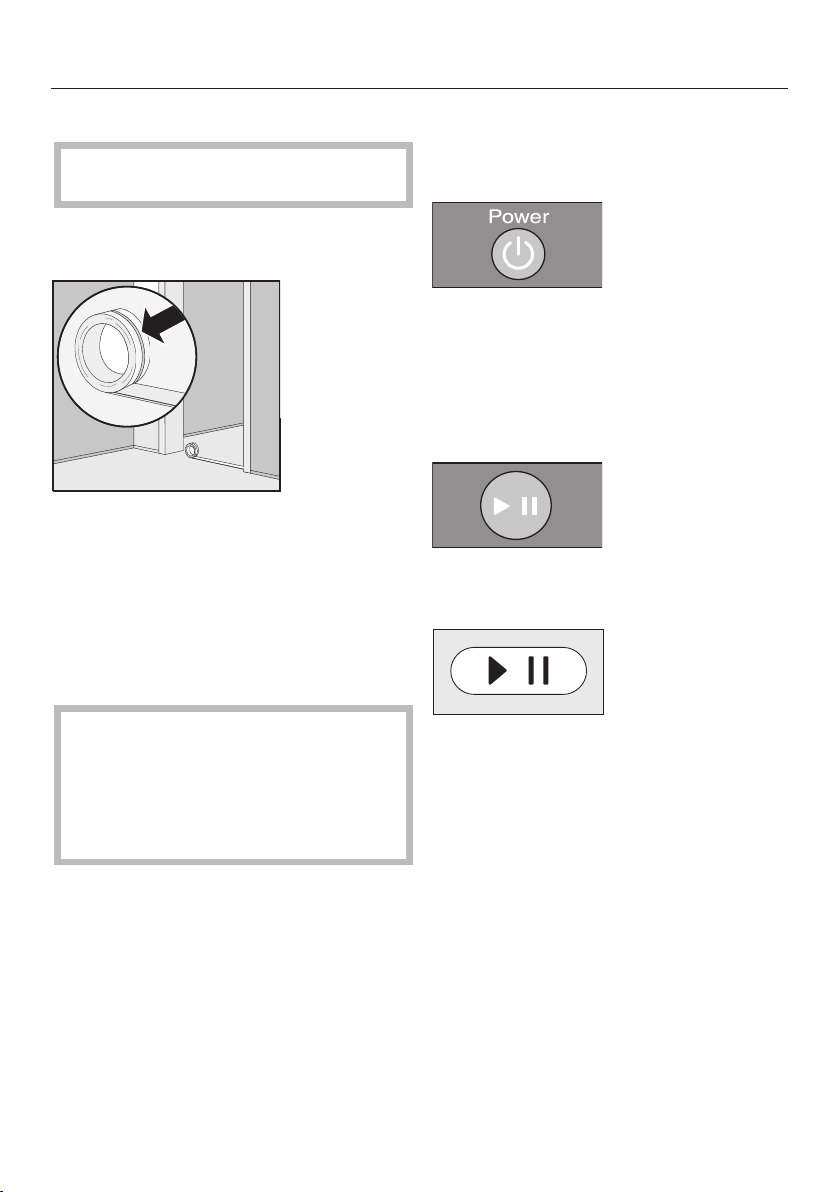
將機械人吸塵機正確連接至接駁基站
上的充電觸點上。
充電式電池在充電時,狀態指示燈在顯
示屏中閃動。
Scout RX2 的充電過程最多需要 150 分
鐘。當充電式電池狀態指示燈在顯示屏
中長期亮起綠燈時,則充電過程完成。
你隨後最長可以吸塵一個小時。
顯示屏中的充電式電池狀態指示燈
設定時間
請使用遙控器設定時間。
機械人吸塵機的預設出廠設定為 24 小時
時間顯示。
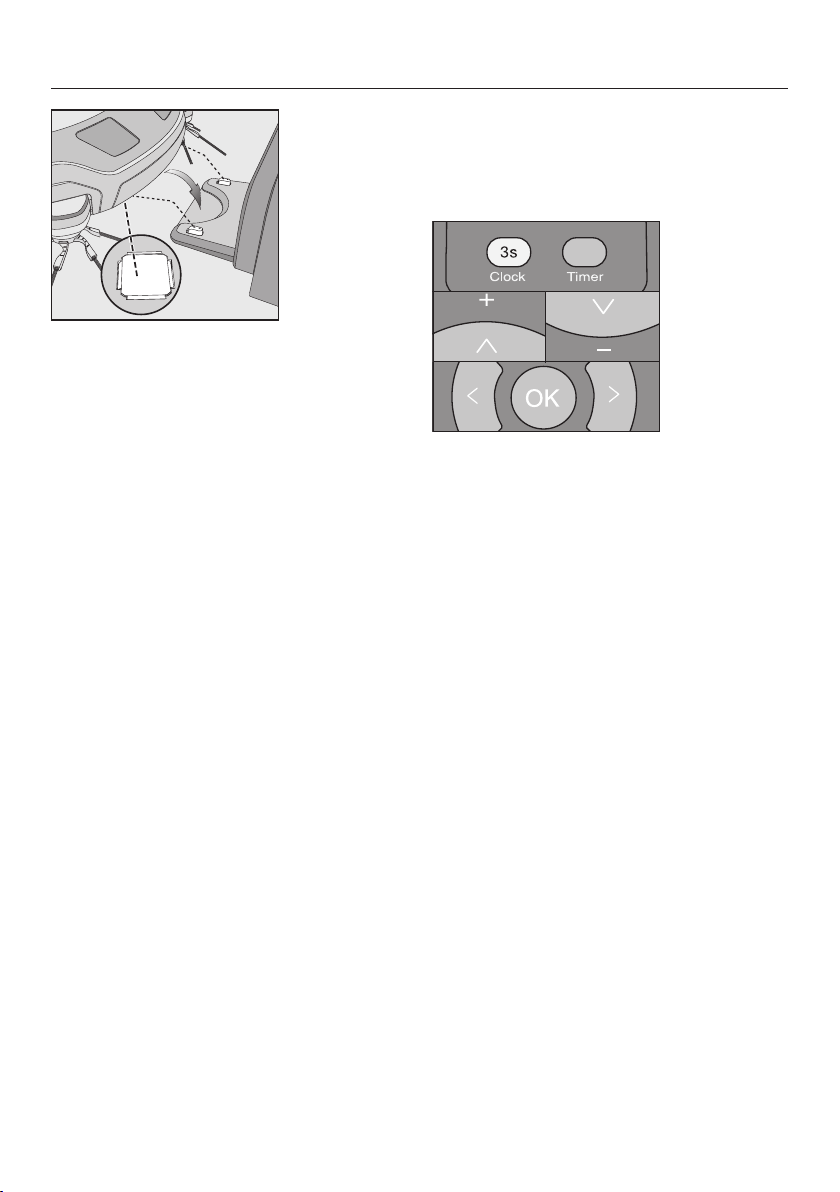
按住 Clock(時鐘)按鈕並保持至少
三秒鐘。
指示燈欄位在顯示屏中閃現。
按下 「OK」(確定)按扭。
指示燈欄位中的小時顯示閃爍。
紅色 已充電容量約 0% - 20%
橙色 已充電容量約 20% - 50%
綠色 已充電容量約 50% - 100%
18
按下 + 或 - 方向按鈕設定目前的小時
數。
按下 「OK」(確定)按鈕確定您的
選擇。
指示燈欄位中的分鐘顯示閃爍。
按下 + 或 - 方向按鈕設定目前的分鐘
數。
按下 「OK」(確定)按鈕確定您的
選擇。
如需變更時鐘時間,請按上文指示進
行。
定下待吸塵的區域
機械人吸塵機高 85 毫米。任何待吸塵
的空間應具有 87 毫米的最小高度。
您可以定下任何機械人吸塵機可能無法
進入的區域。
將隨附的磁條放在地板上,凹槽向下
放置。
機械人吸塵機將不會跨越磁條。
隨附的粘性磁條用於固定安裝。額外的
磁條可以從 Miele 網店訂購。
使用
透過顯示屏操作機械人吸塵機之步驟將
在後面的「使用」部分中描述。
啟動和關閉
按下遙控器上的 Power(電源)按
鈕,或顯示屏中的任何感應按鈕。
開始吸塵
開始吸塵有兩種方式。
選項 1(遙控器)
按下 按鈕。
選項 2(顯示屏)
在新的環境中第一次清潔期間,並在
家中進行更換後,請時刻注意監控。
從而您可以用磁條檢測並移除相關區
域中任何存在問題的障礙或部分。您
還必須檢查是否正確識別步數和垂落
高度。
按下 感應按鈕。
待吸塵的區域將進行清潔。
機械人吸塵機會清潔至少五分鐘,無論
要被吸塵的表面大小如何。
如果從基站開始吸塵,完成吸塵時
機械人吸塵機將返回基站並重新充電。
19
如電池電量過低,機械人吸塵機將返回
基站並重新充電。II 會出現在指示燈欄
位中。機械人吸塵機將在其停止的位置
繼續吸塵。
如果從房間的某個地方開始吸塵,完成
吸塵時
機械人吸塵機將返回至起點並在約 60 秒
後切換至待機狀態。
電池電量過低時,機械人吸塵機將靜止
不動。您應該讓其重新充電。
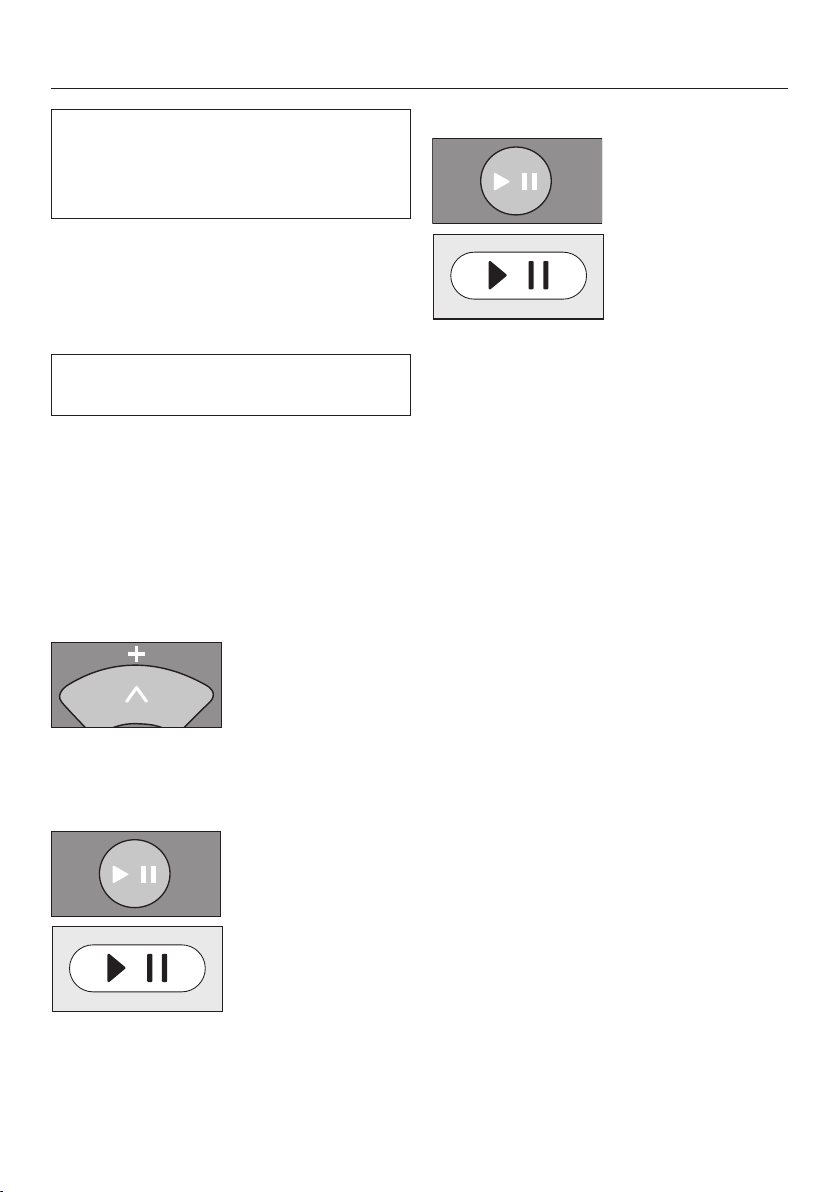
暫時停止吸塵
請按下遙控器上的 按鈕或顯示屏中
的 感應按鈕。
機械人吸塵機停止。
手動吸塵
您可以使用遙控器上的方向按鈕對房間
的特定區域吸塵。
機械人吸塵機正在吸塵時,按住其中
一個方向按鈕。
機械人吸塵機將轉向指定的方向,直到
您鬆開方向按鈕。
按下「+」方向按鈕。
機械人吸塵機將按指定的方向移動並繼
續吸塵。
再次按下此按鈕或感應按鈕繼續吸塵。
手動導覽(不執行吸塵)
您可以使用遙控器上的特定按鈕將機械
人吸塵機導向房間的特定區域。
按住其中一個方向按鈕。
機械人吸塵機將向指定的方向移動(不
執行吸塵)。
請按下遙控器上的 按鈕或顯示屏中
的 感應按鈕。
原來的吸塵過程將繼續運行。
20
您不能將機械人吸塵機手動導向基站以
重新充電。
使機械人吸塵機返回基站
(僅當從基站開始吸塵才可能實現)
按下遙控器上的 Base(基站)按鈕
或顯示屏中的 Base(基站)感應按
鈕。
按下遙控器上的任何按鈕或顯示屏上的
感應按鈕可重啟機械人吸塵機。
操作模式
有五種不同的操作選項。
Auto
(自動)
標準吸塵,用於清掃正常污
染的地板。
Spot
(定點)
對機械人吸塵機選定起點外
圍約 1.8 米 x 1.8 米的目標
吸塵區域進行吸塵。
機械人吸塵機將移動至基站並重新充
電。
手動完成吸塵
按下遙控器上的 Power(電源)按
鈕。
在約 60 秒後,機械人吸塵機將自動切換
至待機狀態。
顯示屏將停用,充電式電池狀態指示燈
繼續亮起。
未達到 60 秒之前,您可透過再次按下
Power(電源)按鈕將機械人吸塵機切
換至待機狀態。
Base
(基站)
將機械人吸塵機導向基站
Turbo
(快速)
可用較短的吸塵時間清掃輕
微污染的地板。
Silent
(靜音)
低噪音方式吸塵。
選擇吸塵模式
21
按下遙控器上的 Power(電源)按
鈕。
選擇吸塵模式有兩種方式。
選項 1(遙控器)
反復按下 Mode(模式)按鈕,直到
您想要的吸塵模式標誌在顯示屏中亮
起為止。
按下 按鈕開始吸塵。
選項 2(顯示屏)
按下所需吸塵模式的感應按鈕。
按下感應按鈕
開始吸塵。
設定定時清潔
(只有在時鐘已設定好後才可使用)
按住 Timer(定時清潔)按鈕並保持
至少三秒鐘。
定時清潔 指示燈在顯示屏內閃爍,小
時顯示在指示燈欄位中閃爍。
按下 + 或 - 方向按鈕設定您想要的小
時數。
按下 「OK」(確定)按鈕確定您的
選擇。
定時清潔 指示燈在顯示屏內閃爍,分
鐘顯示在指示燈欄位中閃爍。
如果您想要機械人吸塵機在每天相同的
時間啟動,您可以將啟動時間和您想要
的吸塵模式儲存到記憶體中。
機械人吸塵機也可以在黑暗中吸塵。但
是,請注意這種吸塵方式可能會較為不
仔細。攝像鏡頭需要光線才能暢通無阻
地移動。
請使用遙控器設定定時清潔。
22
按下 + 或 - 方向按鈕設定您想要的分
鐘數。

按下「OK」(確定)按鈕確定您的選
擇。
反復按下 Mode(模式)按鈕,直到
您想要的吸塵模式標誌在顯示屏中閃
動為止。
按下 「OK」(確定)按鈕確定您的
選擇。
設定會在顯示屏中顯示約 3 秒。機械人
吸塵機現在將開始每天在相同的時間吸
塵。
定時清潔 指示燈在顯示屏中亮起,
設定的開始時間在指示燈欄位中短暫顯
示。機械人吸塵機將在設定的時間開始
吸塵。
關閉音訊訊號
音訊訊號為標準設定。您可以關閉並再
次啟用它們。
短暫按遙控器上的 Mute(靜音)按
鈕。
OFF(關閉)將短暫出現在指示燈欄位
中。
無法停用故障訊息的音訊訊號。
如定時清潔 在顯示屏上亮起,則定
時清潔被啟動。
要變更項目,請按上述描述執行。
關閉定時清潔
短暫按遙控器上的 Timer(定時清
潔)按鈕。
定時清潔 指示燈在顯示屏上熄滅。
啟動定時清潔/顯示設定的開始時間
短暫按遙控器上的 Timer(定時清
潔)按鈕。
調低可跨越高度
機械人吸塵機的標準設定為跨越 17 毫米
的高差。因此,其能夠為地氈吸塵,跨
過門檻等。
如果您希望降低此高度(約降低 6 毫
米)以便保護椅子、桌子腿或檯燈,您
可以停用原廠預設值。
短暫按遙控器上的 Climb(攀爬)按
鈕。
LO(低) 會出現在指示燈欄位中。
如果您希望停用 17 毫米的最大跨越高
度,請再次短暫按住 Climb(攀爬)按
鈕。HI(高)會出現在指示燈欄位中。
23

保養
採購配件
Miele 原廠配件可從 Miele 網店、Miele
維修服務部和您的 Miele 供應商訂購。
在進行任何保養工作之前,請關閉
機械人吸塵機。 若需關閉,將機械人
吸塵機側面的開關 I/0 滑至 0 位置。
我們建議僅使用包裝上帶有「原廠
Miele」徽標的 Miele 原廠配件。只有
這樣,才能保證機械人吸塵機的最佳
性能和最佳的清潔效果。
訂購正確的配件
可依據包裝上的「原廠 Miele」徽標識別
Miele 原廠配件。
透過向上提起手柄來拉開集塵盒。
移除集塵盒。
按箭咀方向按下一個或兩個鬆開按
鈕,移除集塵盒。
清空集塵盒。
如果集塵盒中僅包含普通的家庭灰塵,
則可以和一般的家庭廢物一起棄置。
裝回集塵盒蓋,並關閉集塵盒,確保
其卡緊入位。
將手柄提起並將其向後推動將其卡入
到位,將集塵盒裝回機械人吸塵機。
清空集塵盒
每次使用後清空機械人吸塵機的集塵
盒,以達到最佳的清潔效果。
最後,當從底部到頂部運行的指示燈欄
位中出現 「 l_ _l」時,必須清空集塵
盒。
按下機械人吸塵機頂部的凹槽。
儲存倉的蓋子將打開。
24
關閉儲存倉蓋,然後向下按壓凹槽,
以鎖定它。
清潔集塵盒
根據需要清潔集塵盒。
清潔工具位於集塵盒蓋的頂部。
取下清潔工具。

使用清潔工具清潔集塵盒和蓋子的下
側。
清潔排氣濾網
根據需要清潔排氣濾網。
排氣濾網倉位於集塵盒中。
從集塵盒上移除蓋子。
折疊濾網裝置,直至從集塵盒中取
出。
取下預濾網,並使用清潔工具根據需
要進行清潔。
清潔側刷
根據需要清潔側刷。為此,您將需要位
於集塵盒蓋頂部的清潔工具。
將機械人吸塵機翻過來放在水平、清
潔的表面上。
使用雙手握住兩個相對的側刷,並將
其拉出。
使用位於清潔工具底部的擦拭器移除
線頭和頭髮。
將擦拭器固定在垃圾箱上。
按下擦拭器頂部的按鈕數次,直到所
有的線頭和頭髮掉落。
拉開排氣濾網,取出並用清潔工具清
潔。
將排氣濾網裝回蓋子上。
將預濾網裝回排氣濾網上。
濾網裝置安裝齊全。
小心地重新裝回濾網裝置,並將其卡
緊入位。
排氣濾網必須在大約六個月後更換,
以達到最佳的清潔效果。
將兩個清潔過的側刷小心地按至其銷
上,直至聽得聲響。注意與 L 和 R 標
記須一致。
為了持續實現最佳的清潔效果,請在
使用約一年後更換新的側刷。
清潔滾輪塵刷
根據需要清潔滾輪刷。為此,您將需要
位於集塵盒蓋頂部的清潔工具。
25

將機械人吸塵機翻過來放在水平、清
潔的表面上。
移除兩個側刷,請參閱之前的描述
「清潔側刷」。
拉開滾輪刷蓋,並移除。
移除滾輸刷。
按下擦拭器頂部的按鈕數次,直到所
有的線頭和頭髮掉落。
裝回滾輪刷。確保帶尖端的一側裝上
相應的插槽。
小心地裝回滾輪刷,確保其卡緊入
位。
使用剪刀剪掉捲繞在滾輪刷上的任何
線頭或頭髮。
使用位於清潔工具底部的擦拭器移除
線頭和頭髮。
將擦拭器固定在垃圾箱上。
26
重新裝回兩個側刷,請參閱之前的描
述「清潔側刷」。
為了持續實現最佳的清潔效果,請在
使用約一年後更換新的滾輪刷。
清潔集塵盒封邊
根據需要清潔集塵盒底部的封邊。
將機械人吸塵機翻過來放在水平、清
潔的表面上。

用濕布擦拭封邊,進行清潔。
為了持續實現最佳的清潔效果,請在
使用約一年後更換。
移除任何線頭和頭髮,並用清潔工具
清潔前輪、前輪蓋和凹槽。
裝回前輪並關閉蓋子,確保其卡緊入
位。
更換集塵盒封邊
移除集塵盒。
將封邊從集塵盒底側拉開,使箭頭指
向 符號。
移除封邊。
裝上新的封邊,使箭頭指向 符
號。
鎖緊封邊,確保其卡緊入位。
箭頭指向 符號。
清潔前輪
根據需要清潔前輪。為此,您將需要位
於集塵盒蓋頂部的清潔工具。
將機械人吸塵機翻過來放在水平、清
潔的表面上。
清潔感應器
根據需要清潔感應器。
將機械人吸塵機翻過來放在水平、清
潔的表面上。
請使用乾燥的棉棒仔細清潔感應器。
更換遙控器中的電池
遙控器需要兩節 1.5 V (AAA) 電池。
移除電池倉蓋。
更換電池並確保極性正確。
關閉電池倉蓋。
移除蓋子的夾子。
移除前輪。
請遵守本操作說明開頭部分的「注意
事項及安全說明」和「環保須知」中
的處理電池的特殊說明。
更換充電式電池
您將需要 Miele 原廠鋰離子充電式電
池:
– YCR-M05 適用於 Scout RX2
27

充電式電池倉位於機械人吸塵機的儲存
倉中。
移除集塵盒。
向上拉開蓋子,打開充電式電池倉。
請遵守本操作說明開頭部分的「注意
事項及安全說明」和「環保須知」中
的處理舊充電式電池的特殊說明。
儲存
如將於長時間內停用本機械人吸
塵機,請將其關閉。 若需關閉,將機
械人吸塵機側面的開關 I/0 滑至 0 位
置。
Scout RX2 (YCR-M05)
小心地拉出電線,使插頭連接從插槽
中拉出。
按下插頭連接上的閂鎖,鬆開插頭。
移除充電式電池。
將新的充電式電池的插頭裝上對應插
槽,確保其卡緊入位。
小心地裝上充電式電池,確保其位置
正確(參見圖片右側)。
將插頭連接存放在側面的插槽中。
如果您在較長的時間內不打算使用機械
人吸塵機,請確保將其儲存於通風良好
的陰涼地方。
為取得最佳護理效果,將機械人吸塵機
儲存在半充電容量(顯示屏上的充電式
電池狀態指示燈為橙色)。
清潔與護理
保養機械人吸塵機和配件
在進行任何維修工作之前,請關閉
機械人吸塵機。 若需關閉,將機械人
吸塵機側面的開關 I/0 滑至 0 位置。
可以用乾布或稍微潮濕的布清潔機械人
吸塵機和所有塑料配件,或使用適用於
塑料的專利清潔劑。
請勿使用磨蝕性清潔劑、玻璃清潔
劑、多用途清潔劑或油基性調節劑。
請勿將機械人吸塵機或任何隨配件
浸入水中。
小心地重新裝回充電式電池倉蓋並將
其關閉,確保其卡入到位。
28

售後服務
發生故障時聯絡
遇有任何無法自行修復的機件故障時,
請聯絡 Miele 經銷商或 Miele 維修服務
部。
Miele 維修服務部聯絡資訊載於本說明
書封底。
請注意,來電可能被監聽及錄音以作為
訓練之用,如問題本可依照操作說明書
中的說明自行解決,請求上門服務將收
取上門服務費。
保用期
在英國,自購買之日起,本設備享受 2
年的保用期。但是您必須撥打 0330 160
6640 或透過 www.miele.co.uk 網站線上
註冊啟用您的保用。
對於您所在國家地區的特定設備保用資
訊,請聯絡 Miele。請參閱手冊末頁獲取
聯絡詳情。
29

解決問題指南
日常操作中可能發生的許多故障可很容易地進行補救。由於不需要撥打服務電話,
將節省時間和金錢。
以下指南說明可助您找出故障原因並修正問題。
在處理任何問題之前,請關閉機械人吸塵機。 若需關閉,將機械人吸塵機側
面的開關 I/0 滑至 0 位置。
問題 可能原因及解決方法
使用 Power(電源)按鈕
將其啟動後,機械人吸塵
機將自動關閉。
機械人吸塵機無反應。
隨附的電池電量並未充分充電。
將機械人吸塵機正確連接至接駁基站上的充電觸點
上。
機械人吸塵機已關閉。
打開(將 I/0 滑至 I)。
遙控器中電池的放置不正確。
請確保極性正確。
遙控器中的電池已耗盡。
更換電池
機械人吸塵機上紅外線發射器與遙控器之間的訊號中
斷。
使用軟乾布仔細清潔機械人吸塵機的前部和遙控器
的頂部,並確保沒有物品阻礙訊號。
遙控器距離機械人吸塵機太近或太遠。
增加或減少該距離,並在使用遙控器時將其直接指
向機械人吸塵機。
30

問題 可能原因及解決方法
清潔效果太差。
集塵盒已滿。
清空並清潔集塵盒。
滾輪刷太髒或已磨損。
清潔滾輪刷。
更換滾輪刷。
集塵盒上的封邊太髒或已磨損。
清潔封邊和它們之間的吸入通道。
更換封邊。
排氣濾網太髒。
清潔排氣濾網。
更換排氣濾網。
側刷已磨損。
更換側刷。
機械人吸塵機未充電。 基站未正確連接。
請按照本操作說明的描述完全連接基站,請參閱
「準備使用 – 連接基站」部分。
31

問題 可能原因及解決方法
在吸塵之後,機械人吸塵
機未返回基站。
Auto(自動)標準吸塵模式已在房間的某處啟動。
機械人吸塵機將返回其起點。
Spot(定點)吸塵模式已被選定。
機械人吸塵機將返回其起點。
機械人吸塵機移動所需的光線不足。
提供足夠的光線。
基站未正確連接。
請按照本操作說明的描述完全連接基站,請參閱
「準備使用 – 連接基站」部分。
基站上的紅外線發射器與機械人吸塵機之間的訊號中
斷。
使用軟乾布仔細清潔基站和機械人吸塵機的前部,
並確保沒有物品阻礙訊號。
吸塵地板上的障礙物可能會妨礙吸塵機移動。
在吸塵時注意監控機械人吸塵機。
移除任何障礙物。
用磁條定下待吸塵的區域。
調低可跨越高度,請參閱「使用 – 調低可跨越高
度」部分。
32

故障訊息
在處理任何故障之前,請關閉機械人吸塵機。 若需關閉,將機械人吸塵機側
面的開關 I/0 滑至 0 位置。
故障訊息顯示在顯示屏的指示燈欄位中。
如從下到上出現「l_ _l」 - 「l- -l」,則必須清空並清潔集塵盒。
問題 可能原因及解決方法
F 1 「輪子抬起」故障
將機械人吸塵機放在水平地板的表面。
F 2 「感應器太髒」故障
清潔感應器。當您啟動機械人吸塵機並且碰撞感應
器位於空的空間之上時,也會顯示此故障訊息。將
機械人吸塵機從邊緣上移除。
F 3 「濾網無法識別」故障
請將集塵盒裝上機械人吸塵機,同時裝上排氣濾
網。
F 4 「驅動輪過載」故障
請檢查確認驅動輪是否過髒。移除任何線頭或頭
髮。如果機械人吸塵機被卡住,也會顯示此故障訊
息。
F 5 「刷子過載」故障
請檢查確認滾輪刷和側刷是否過髒。清潔滾輪刷和
側刷。如有物體卡入機械人吸塵機中,也會顯示此
故障訊息。
F 6 「風扇馬達過載」故障
清空並清潔集塵盒。清潔或更換排氣濾網。
33

問題 可能原因及解決方法
F 7 內部系統故障
關閉機械人吸塵機並重新打開(I/0 開關)。
F 8 「前輪過髒」故障
檢查前輪、蓋子或凹槽是否變髒。移除任何線頭和
頭髮,清潔前輪、前輪蓋和凹槽。
解決問題後重設故障訊息 您可透過以下方式重設上述故障訊息
– 關閉機械人吸塵機並重新打開(I/0 開關)。
– 按下遙控器上的 Power(電源)按鈕。
– 按下顯示屏上的 感應按鈕至少三秒。
34

電力接駁(英國)
所有電力接駁工作,必須由合資格人員
進行,並須嚴格遵守國家及當地的現有
安全規例(英國為 BS 7671)。吸塵機下
方的數據牌載有電壓和頻率。請確保這
些數值與家居中的電源吻合。保險絲額
定值見插頭標籤。隨吸塵機提供的電源
線及倒模插頭,供接駁至單相 230–240 伏
50 赫茲交流電源。
BS 1363 不可更換電源線插頭
在更換保險絲後,必須重新裝上原有保
險絲蓋。如遺失保險絲蓋,在取得原裝
配件前切勿使用插頭。保險絲蓋配件的
顏色應與插頭底部的顏色相同,或插頭
底部刻字標明的顏色一致(視乎插頭的
設計而定)。替換的保險絲應當獲 ASTA
認可為符合 BS 1362 標準且額定值適
合。替換的保險絲和保險絲蓋可向當地
電器供應商購買。
35

版權和授權
Miele 使用軟體操作和控制機械人吸塵機。
必須尊重 Miele 和其他相關軟體供應商的版權許可。
Miele 與其供應商保留對這些軟體元件的權利。
特別禁止以下行為:
– 複製與傳播
– 修改和衍生
– 反向編譯、反彙編及其他軟件削減行為
隸屬於 GNU 通用公共許可授權 (GNU General Public Licence) 和更多開啟來源授權
的元件已整合至該軟體中。
有關整合開啟來源元件的概覽和目前授權的副本可從 www.miele.com/device-
software-licences 獲取。
Miele 將提供根據 GNU 通用公共許可授權 (GNU General Public Licence) 和可比較
的開啟來源授權獲得授權軟體之所有元件的源代碼。
如有源代碼請求,請發送電子郵件至
info@miele.com。
您可以從 Miele 維修服務部獲取使用測試模式的詳細說明。
36


Contents
Warning and Safety instructions.......................................................................... 3
Caring for the environment .................................................................................. 9
Guide to the appliance........................................................................................ 10
Functions and features of the robot vacuum cleaner...................................... 14
Accessories supplied.......................................................................................... 14
Preparing for use................................................................................................. 14
Use........................................................................................................................ 17
Maintenance ........................................................................................................22
Ordering the correct accessories.......................................................................... 22
Emptying the dust box .......................................................................................... 22
Cleaning the dust box ........................................................................................... 23
Cleaning the exhaust filter..................................................................................... 23
Cleaning the side brushes..................................................................................... 23
Cleaning the roller brush ....................................................................................... 24
Cleaning the dust box seals .................................................................................. 25
Replacing the dust box seal unit........................................................................... 25
Cleaning the front wheel........................................................................................ 26
Cleaning the sensors............................................................................................. 26
Changing the batteries in the remote control........................................................ 26
Replacing the rechargeable battery ...................................................................... 26
Storage ................................................................................................................. 27
Cleaning and care ............................................................................................... 27
After sales service............................................................................................... 28
Contact in case of malfunction ............................................................................. 28
Guarantee.............................................................................................................. 28
Problem solving guide ........................................................................................29
Error messages ...................................................................................................32
Electrical connection for the UK........................................................................ 34
Copyright and licences ....................................................................................... 35
2

Warning and Safety instructions
This robot vacuum cleaner complies with all current local and national safety requirements. Incorrect use can, however, lead to personal injury and damage to property.
Please read the operating instructions before using the robot vacuum cleaner for the first time. They contain important information
on the safety, use and maintenance of the robot vacuum cleaner.
This prevents both personal injury and damage to the appliance.
Keep these operating instructions in a safe place and pass them
on to any future owner.
Switch the robot vacuum cleaner off before any maintenance work
and cleaning and if it is not going to be used for a longer period of
time. It should also be switched off when dealing with problems.
To do so slide switch I/0 on the side of the robot vacuum cleaner
to the 0 position. The same should be done if you notice any unusual behaviour with your robot vacuum cleaner.
Correct application
This robot vacuum cleaner is intended for cleaning flooring in do-
mestic households and similar working and residential environments.
The robot vacuum cleaner is not intended for outdoor use.
The robot vacuum cleaner must only be used for domestic house-
hold purposes to vacuum dry floor surfaces. Any other usage, modification or alteration is not supported by the manufacturer and could
be dangerous.
The robot vacuum cleaner can only be used by people with re-
duced physical, sensory or mental capabilities, or lack of experience
or knowledge, if they are supervised whilst using it or have been
shown how to use it in a safe way and understand and recognise the
consequences of incorrect operation.
3

Warning and Safety instructions
Safety with children
Danger of suffocation. Packaging, e.g. plastic wrappings, must be
kept out of the reach of babies and children. Whilst playing, children
could become entangled in packaging or pull it over their head and
suffocate.
Children under 8 years of age must be kept away from the robot
vacuum cleaner unless they are constantly supervised.
Children 8 years and older may only use the robot vacuum cleaner
unsupervised if they have been shown how to use it safely and recognise and understand the consequences of incorrect operation.
Children must not be allowed to clean or maintain the robot va-
cuum cleaner unsupervised.
Please supervise children in the vicinity of the robot vacuum
cleaner and do not let them play with it.
Keep the rechargeable battery and the batteries for the remote
control out of the reach of children.
Technical safety
The Robot vacuum cleaner operates at 14.4V.
It is classified as a class III appliance.
This appliance is supplied by a safety extra-low voltage (SELV)
power source where the voltage is low enough to protect users from
the risk of electrical shock. A Class II plug-in power supply is used
for supplying power to charge the robot vacuum cleaner.
Before each use of the robot vacuum cleaner check both the va-
cuum cleaner and all of the accessories supplied with it for any visible signs of damage. Do not use a damaged appliance or damaged
accessories.
4

Warning and Safety instructions
Compare the connection data on the data plate of the robot va-
cuum cleaner and the power supply (voltage and frequency) with
that of the mains electricity supply. This data must match exactly.
The mains electrical plug must be fitted with an appropriate fuse.
Reliable and safe operation of this robot vacuum cleaner can only
be assured if the base station has been connected to the mains
electricity supply.
While the robot vacuum cleaner is under guarantee, repairs should
only be undertaken by a Miele authorised service technician. Otherwise the guarantee will be invalidated.
Repairs should only be carried out by a Miele authorised service
technician. Repairs and other work by unqualified persons can cause
considerable danger to users.
Make sure that the mains electrical cable is not damaged, bent or
twisted. Do not place any heavy items on top of it.
Do not let the robot vacuum cleaner travel over the mains cable or
other cables.
Only use the parts supplied for charging the rechargeable battery
(adapter, power unit and base station).
Batteries and rechargeable batteries will deplete over time. They
can then leak corrosive fluids. Avoid contact with the eyes and skin.
In the event of contact, rinse thoroughly with water and seek medical
advice.
Do not attach any adhesive labels to the front of the base station
as this conceals an infrared transmitter. Do not place any items in
front of it.
The robot vacuum cleaner is fitted with sensors to detect steps
and drops in height. Do not cover these sensors or the camera, and
ensure that the function of the sensors is not hindered by obstacles
whilst the cleaner is moving.
5

Warning and Safety instructions
Do not immerse the robot vacuum cleaner or the parts supplied in
water. Clean all parts with a dry or slightly damp cloth only.
Do not drop the robot vacuum cleaner or any of the accessories
supplied with it. Items that have been dropped or damaged should
not be used for safety reasons.
Correct use
Do not use the robot vacuum cleaner without the dust box, pre-fil-
ter and exhaust filter fitted.
Remove all breakable or lightweight items from the floor and make
sure that the robot vacuum cleaner cannot become entangled in
cords, curtains, fringes, cables or similar.
Animals must be kept away from the robot vacuum cleaner. Do
not allow animals to stand or sit on the robot vacuum cleaner.
Do not use the robot vacuum cleaner to vacuum up anything
which has been burning or is still glowing e.g. cigarettes, ashes or
coal, whether glowing or apparently extinguished. Do not use it in
the vicinity of a fireplace.
Do not use the robot vacuum cleaner to vacuum up any water, li-
quid or damp dirt. Wait until any freshly cleaned or shampooed carpets or floor coverings are completely dry before attempting to vacuum.
Do not use the robot vacuum cleaner to vacuum toner dust. Toner,
such as that used in printers and photocopiers, can conduct electricity.
Do not use the robot vacuum cleaner to vacuum up any inflam-
mable or combustible liquids or gases and do not use it in areas
where such substances are stored.
6

Warning and Safety instructions
Do not sit or lie on the surface being cleaned whilst the vacuum
cleaner is running. This is to prevent the risk of loosely fitting clothes
or long hair coming into contact with the roller brush or other moving
parts of the robot vacuum cleaner.
Handling the rechargeable battery and remote control batteries:
Please contact Miele Service before sending the rechargeable
battery.
Do not drop or throw the rechargeable battery. For safety reasons
do not continue to use a rechargeable battery which has been
dropped or damaged.
Keep the rechargeable battery or the batteries away from naked
flames or other heat sources. Do not heat the rechargeable battery
or batteries or place them in direct sunlight.
Do not dismantle the rechargeable battery.
Do not cause a short circuit by bridging the contacts of the re-
chargeable battery or the batteries, either unintentionally or deliberately.
Do not allow the rechargeable battery or the batteries to come
into contact with liquids.
Do not attempt to recharge the remote control batteries.
Never continue to use the rechargeable battery if you notice an
unusual smell from it, if liquid is leaking from it, it is significantly overheating or if it is discoloured or deformed. Dispose of the rechargeable battery immediately.
7

Warning and Safety instructions
Disposing of the batteries and the rechargeable battery: remove
the rechargeable battery from the robot vacuum cleaner and the batteries from the remote control. Insulate the metal contacts with adhesive tape to prevent short circuits. Dispose of the batteries and the
rechargeable battery in a municipal recycling facility. Do not dispose
of batteries or the rechargeable battery with normal household
waste.
Accessories
Only use genuine accessories with the "ORIGINAL Miele" logo on
them. The manufacturer cannot otherwise guarantee the safety of
the product.
Miele cannot be held liable for damage caused by incorrect use or
operation or by non-compliance with these Warning and Safety instructions.
8

Caring for the environment
3E&G+J
Disposal of the packing material
The packaging is designed to protect
the appliance from damage during
transportation. The packaging materials
used are selected from materials which
are environmentally friendly for disposal
and should be recycled.
Recycling the packaging reduces the
use of raw materials in the manufacturing process and also reduces the
amount of waste in landfill sites.
Disposing of your old appliance
Electrical and electronic appliances often contain valuable materials. They
also contain specific materials, compounds and components, which were
essential for their correct function and
safety. These could be hazardous to human health and to the environment if
disposed of with your domestic waste
or if handled incorrectly. Please do not,
therefore, dispose of your old appliance
with your household waste.
Disposing of old batteries and rechargeable batteries
Some electrical and electronic appliances contain batteries and rechargeable batteries which, when depleted, must not be thrown away with
your household waste. You are required
by law to remove any removable batteries or rechargeable batteries and to dispose of them in a suitable recycling box
for batteries. This service is free of
charge. Batteries and rechargeable batteries contain substances which can
damage human health and the environment.
Further instructions regarding disposal
are given on batteries and rechargeable
batteries. A bin with a line through it
means that the battery or rechargeable
battery must on no account be disposed of with your household waste. A
bin with a line through it which also has
one or several chemical symbols on it,
indicates that the battery or rechargeable battery contains lead (Pb),
cadmium (Cd) and/or quicksilver (Hg).
Please dispose of it at your local community waste collection / recycling
centre for electrical and electronic appliances, or contact your dealer or
Miele for advice. You are also responsible (by law, depending on country) for
deleting any personal data that may be
stored on the appliance being disposed
of. Please ensure that your old appliance poses no risk to children while being stored prior to disposal.
Old batteries and rechargeable batteries
contain important raw materials which
can be recycled. Disposing of batteries
and rechargeable batteries separately
makes them easier to handle and recycle.
9

Guide to the appliance
A – Robot vacuum cleaner top and bottom
10

a
Display
b
Time mode display (am/pm)
c
Start/Pause sensor field ()
d
Cameras
e
Impact protection
f
On/Off switch (I/0)
g
Depression to open the storage compartment
h
Silent vacuuming mode sensor field
i
Turbo vacuuming mode sensor field
j
Base sensor field
k
Spot vacuuming mode sensor field
l
Auto standard vacuuming mode sensor field
m
Timer indicator
n
Rechargeable battery status indicator
o
Side brushes
p
Roller brush
q
Front wheel
r
Sensors (toppling protection)
s
Charging contacts
t
Roller brush cover
u
Drive wheels
v
Suction nozzle with sealing lip unit
w
Back wheel
Guide to the appliance
11

Guide to the appliance
B – Base station and remote control
Base station
a
Cable rewind
b
Cable runs
c
Socket for the power supply plug (not visible in the figure)
d
Charging contacts
Remote control
a
Power button (switch on and off)
b
Base button (direct vacuum cleaner to base station)
c
OK confirmation button with direction buttons around it
d
Start/Pause button () (start/stop vacuuming)
e
Mode button (select the vacuuming mode)
f
Clock button (set time of day)
g
Timer button (set the timer)
h
Mute button (activate/deactivate acoustic signals)
i
Climb button (reduce crossing over height)
12

j
Battery compartment (at the back)
C – Dust box
Guide to the appliance
a
Handle
b
Cleaning tool with wiper
c
Wiper button
d
Lid
e
Release buttons for the lid
f
Dust compartment
g
Pre-filter
h
Exhaust filter
i
Exhaust filter compartment lid
13

Functions and features of the robot vacuum cleaner
The robot vacuum cleaner is suitable for
the daily cleaning of short pile carpets
and fitted carpets, as well as hard flooring.
Please observe the flooring manufacturer's cleaning and care instructions.
The robot vacuum cleaner is fitted with
cameras and sensors. It continually
saves room plans as well as information
regarding areas it can access freely.
The robot vacuum cleaner uses this
data to create an efficient vacuuming
plan of the surfaces to be vacuumed,
which it can then vacuum autonomously.
Accessories supplied
– Remote control / two batteries
– Two side brushes
Press the two side brushes carefully
onto their pins until they audibly engage. Take care to comply with the
markings L and R.
Removing the protective foil
Remove the protective foil from the
base station and from the top of the
robot vacuum cleaner.
Placing the batteries in the remote control
– Power supply unit with plug
– Country-specific power adapter
– Base station
– Magnetic strip
Preparing for use
Inserting the side brushes
Place the robot vacuum cleaner up-
side down on a level, clean surface.
14
Remove the battery compartment
cover.
Insert the two batteries supplied.
Take care with the polarity.
Close the battery compartment cover.

Switching on the robot vacuum cleaner
Slide the I/0 switch on the side of the
robot vacuum cleaner to the I position.
The rechargeable battery status indicator lights up in the display.
After approx. 60 seconds, the robot vacuum cleaner will switch into standby.
The battery status indicator will continue to light up.
The robot vacuum cleaner is reactivated
by pressing any button on the remote
control or one of the sensor fields in the
display.
Connecting the base station
Insert the supplied power supply plug
into the socket at the back of the
base station. You can wind excess
cable around the cable rewind. Guide
the cable through one of the two
cable runs.
Insert the country-specific power ad-
apter into the power supply until it
audibly engages and then plug it into
the selected power socket.
Place the base station on a level sur-
face against a free wall within easy
access of a power socket. Ensure
that there is an obstacle-free distance
of at least 1.5m in front and 0.5m to
the right and left of the base station.
Charging the rechargeable battery
The rechargeable battery is supplied
not fully charged. Before using for the
first time, it must be fully charged while
the robot vacuum cleaner is switched
on (switch I/0 to I).
The battery can also be charged when
the robot vacuum cleaner is switched
off (switch I/0 to 0). In this case, the
vacuum cleaner indicators will not react.
15

Connect the robot vacuum cleaner
correctly to the charging contacts on
the connected base station.
As the rechargeable battery charges,
the status indicator flashes in the display.
The charging process takes up to 150
minutes for the Scout RX2. The process
is finished when the rechargeable battery status indicator lights up green permanently in the display.
You can then vacuum for up to one
hour with the Scout RX2.
Rechargeable battery status indicator in the display
Red charged capacity approx. 0%
- 20%
Orange
charged capacity approx.
20% - 50%
Green charged capacity approx.
50% - 100%
Setting the time of day
Use the remote control to set the time
of day.
The default factory setting for the robot
vacuum cleaner is the 24-hour time display.
Press the Clock button for at least
three seconds.
The indicator field flashes in the display.
Press the OK button.
The hour display flashes in the indicator
field.
Press the + or - direction button to
set the current hour.
Press the OK button to confirm your
selection.
The minute display flashes in the indicator field.
Press the + or - direction button to
set the current minutes.
Press the OK button to confirm your
selection.
If you want to alter the time of day, proceed as described above.
Defining the area to be vacuumed
The robot vacuum cleaner is 85mm
high. Any items under which vacuuming is required should have a minimum clearance of 87mm.
You can define any areas which the robot vacuum cleaner should not have
access to.
16

Place the magnetic strip supplied
with the groove facing downwards on
the floor.
The robot vacuum cleaner will not cross
over the magnetic strip.
Adhesive strips are supplied for permanent fixing. Additional magnetic
strips are available to order from the
Miele webshop.
Use
Always observe the robot vacuum
cleaner during the first cleaning session in a new environment and after
making changes in your home. This
way you will be able to detect and
remove any problematic obstacles or
section off the relevant areas with
the magnetic strip. You must also
check whether steps and drops in
height are recognised properly.
Press the Power button on the re-
mote control or any sensor field on
the display.
Starting vacuuming
There are two ways to start vacuuming.
Option 1 (Remote control)
Press the button.
Option 2 (Display)
Press the sensor field.
The area to be vacuumed will be
cleaned.
The robot vacuum cleaner always
cleans for at least five minutes, regardless of the size of the surface to be vacuumed.
Finishing vacuuming if vacuuming started from the base station
The robot vacuum cleaner will return to
the base station and recharge.
The operation of the robot vacuum
cleaner via display will be described
later in this "Use" section.
Switching on and off
If the battery is low, the robot vacuum
cleaner will return to the base station
and recharge. IIwill appear in the indicator field. The robot vacuum
cleaner will then carry on vacuuming
in the location where it had stopped.
17

Finishing vacuuming if vacuuming started from somewhere in the room
The robot vacuum cleaner will return to
its starting point and switch into
standby after approx. 60seconds.
The robot vacuum cleaner will stand
still when there is low battery capacity.
You should then recharge it.
Manually operated vacuuming
You can use the direction buttons on
the remote control to vacuum a particular area of the room.
While the robot vacuum cleaner is va-
cuuming, press and hold one of the
direction buttons.
The robot vacuum cleaner will turn in
the desired direction until you let go of
the direction button.
Press and hold the + direction button.
The robot vacuum cleaner will travel in
the desired direction and continue to
vacuum.
The original vacuuming process will
continue running.
Interrupting vacuuming
Press the button on the remote
control or the sensor field on the
display.
The robot vacuum cleaner stops.
Press the button or the sensor field
again to continue vacuuming.
Manual navigation (without vacuuming)
You can use the direction buttons on
the remote control to direct the robot
vacuum cleaner to a specific area of the
room.
Press and hold one of the direction
buttons.
The robot vacuum cleaner will travel in
the desired direction without vacuuming.
Press the button on the remote
control or the sensor field on the
display.
18
You cannot direct the robot vacuum
cleaner manually to the base station in
order to recharge it.
Directing the robot vacuum cleaner to the base station
(only possible when vacuuming was
started from the base station)

Press the Base button on the remote
control or the Base sensor field on
the display.
The robot vacuum cleaner will travel to
the base station and recharge.
Finishing vacuuming manually
Auto
Standard vacuuming for
normally soiled flooring.
Spot Targeted vacuuming of an
area approx. 1.8x1.8m
around the selected starting
point of the robot vacuum
cleaner.
Base
Directing the robot vacuum
cleaner to the base station.
Press the Power button on the re-
mote control.
The robot vacuum cleaner will switch
into standby after approx. 60seconds.
The display is deactivated, the rechargeable battery status indicator continues to light up.
You can switch the robot vacuum
cleaner into standby before
60seconds is up by pressing the
Power button again.
The robot vacuum cleaner is reactivated
by pressing any button on the remote
control or one of the sensor fields in the
display.
Operating modes
There are five different operating options.
Turbo
For vacuuming lightly soiled
flooring with a short vacuuming duration.
Silent
Vacuuming with low noise
development.
Selecting the vacuuming mode
Press the Power button on the re-
mote control.
There are two ways of selecting the vacuuming mode.
Option 1 (Remote control)
19

Press the Mode button repeatedly
until the symbol for the vacuuming
mode you want lights up on the display.
Press the button to start vacuum-
ing.
The timer indicator flashes in the display and the hour display flashes in the
indicator field.
Option 2 (Display)
Press the sensor field of the desired
vacuuming mode.
Press the sensor field in order to
start vacuuming.
Setting the timer
(only possible if the clock has been set)
If you would like the robot vacuum
cleaner to start at the same time every
day, you can save the start time and vacuuming mode you want to memory.
The robot vacuum cleaner can also vacuum in the dark. However, please be
aware that vacuuming may be less thorough. The cameras require light in order
to navigate unobstructed.
Use the remote control to set the timer.
Press the + or - direction button to
set the hour you want.
Press the OK button to confirm your
selection.
The timer indicator flashes in the display and the minute display flashes in
the indicator field.
Press the + or - direction button to
set the minutes you want.
Press the Timer button for at least
three seconds.
20
Press the OK button to confirm your
selection.

Press the Mode button repeatedly
until the symbol for the vacuuming
mode you want flashes on the display.
Press the OK button to confirm your
selection.
The settings are shown for approx.
three seconds on the display. The robot
vacuum cleaner will now start to vacuum at the same time each day.
Press the Timer button on the remote
control briefly.
The timer indicator lights up in the
display and the set start time is shown
briefly in the indicator field. The robot
vacuum cleaner will start to vacuum at
the set time.
Deactivating the acoustic signals
Acoustic signals are set as standard.
You can deactivate and then reactivate
them.
Press the Mute button on the remote
control briefly.
If the timer indicator is lit up in the
display, then the timer is activated.
To alter the entries, proceed as described above.
Deactivating the timer
Press the Timer button on the remote
control briefly.
The timer indicator goes out on the
display.
Activating the timer / displaying a set start time
OFF will appear in the indicator field
briefly.
Acoustic signals for error messages
cannot be deactivated.
Reducing the maximum crossing over height
The robot vacuum cleaner is set to
overcome height differences of up to
17mm as standard. It is therefore able
to vacuum carpets, move over door
thresholds, etc.
If you would like to reduce this height
(down to approx. 6mm) in order to protect the legs of chairs, tables or lamps,
for example, you can deactivate the
factory default setting.
21

Press the Climb button on the remote
control briefly.
LOwill appear in the indicator field.
Press the Climb button again briefly if
you want to reactivate the maximum
crossing over height of 17mm. HIwill
appear in the indicator field.
Maintenance
Purchasing accessories
Original Miele accessories are available
from the Miele Webshop, Miele Service
and your Miele supplier.
Switch the robot vacuum cleaner
off before doing any maintenance
work. To switch it off, slide the I/0
switch on the side of the robot vacuum cleaner to the 0 position.
We recommend using only genuine
Miele accessories bearing the "ORIGINAL Miele" logo on the packaging.
Only these will guarantee the optimum performance of your robot vacuum cleaner and the best possible
cleaning results.
Emptying the dust box
Empty the dust box of the robot vacuum cleaner after each use in order to
achieve the best possible cleaning results.
At the very latest, you must empty the
dust box when "l_ _l" appears in the indicator field running from bottom to top.
Press the depression at the top of the
robot vacuum cleaner.
The lid of the storage compartment will
open.
Unlatch the dust box by lifting the
handle upwards.
Remove the dust box.
Ordering the correct accessories
Original Miele accessories are identified
by the "ORIGINAL Miele" logo on the
packaging.
22
Press one or both release buttons in
the direction of the arrow and remove
the dust box lid.
Empty the dust box.
The contents of the container can be
disposed of with normal domestic
waste, providing they consist of general
household dust only.

Refit the lid and close the dust box
making sure it clicks into place.
Place the dust box into the robot va-
cuum cleaner with the handle lifted
up and latch it into place by pushing
the handle back down.
Fold out the filter unit from the dust
box.
Close the storage compartment lid
and press down on the depression in
order to lock it.
Cleaning the dust box
Clean the dust box as required.
A cleaning tool is located at the top of
the dust box lid.
Remove the cleaning tool.
Clean the dust box and the underside
of the lid using the cleaning tool.
Cleaning the exhaust filter
Clean the exhaust filter as required.
The exhaust filter compartment is located in the dust box.
Remove the lid from the dust box.
Remove the pre-filter and clean it as
required using the cleaning tool.
Unlatch the exhaust filter, remove it
and clean it using the cleaning tool.
Refit the exhaust filter into the cover.
Place the pre-filter onto the exhaust
filter.
The filter unit is complete.
Carefully refit the filter unit and clip it
into position.
The exhaust filter must be replaced
with a new one after approx. six
months in order to achieve the best
possible cleaning results.
Cleaning the side brushes
Clean the side brushes as required. For
this you will require the cleaning tool
which is located at the top of the dust
box lid.
Place the robot vacuum cleaner up-
side down on a level, clean surface.
23

Use both hands to grip two opposite
bunches of the side brushes and pull
them out.
Remove threads and hair using the
wiper which is located on the bottom
of the cleaning tool.
Hold the wiper over a bin.
Press the button at the top of the
wiper several times until all threads
and hair have fallen out.
Place the robot vacuum cleaner up-
side down on a level, clean surface.
Remove both side brushes, see pre-
vious description "Cleaning the side
brushes".
Unlatch the roller brush cover and re-
move the cover.
Remove the roller brush.
Press the two cleaned side brushes
carefully onto their pins until they
audibly engage. Take care to comply
with the markings L and R.
In order to continue to achieve the
best possible cleaning results replace the side brushes with new
ones after approx. one year.
Cleaning the roller brush
Clean the roller brush as required. For
this you will require the cleaning tool
which is located at the top of the dust
box lid.
24
Cut any threads or hairs that have
wound themselves around the roller
brush with a pair of scissors.
Remove the threads and hair using
the wiper which is located on the bottom of the cleaning tool.

Hold the wiper over a bin.
Press the button at the top of the
wiper several times until all threads
and hair have fallen out.
Refit the roller brush. Make sure that
the side with the pointed end is inserted into the corresponding slot.
Carefully refit the roller brush cover
making sure it clicks into position.
Cleaning the dust box seals
Clean the seals on the bottom of the
dust box as required.
Place the robot vacuum cleaner up-
side down on a level, clean surface.
Wipe the seals with a damp cloth to
clean them.
In order to continue to achieve the
best possible cleaning results, replace the seal unit with a new one
after approx. one year.
Replacing the dust box seal unit
Remove the dust box.
Refit both side brushes, see previous
description "Cleaning the side
brushes".
In order to continue to achieve the
best possible cleaning results, replace the roller brush with a new one
after approx. one year.
Unlatch the seal unit from the under-
side of the dust box so that the arrow
points to the symbol.
Remove the seal unit.
Insert the new seal unit so that the ar-
row points to the symbol.
Lock the seal unit, making sure it
clicks into position.
The arrow points to the symbol.
25

Cleaning the front wheel
Clean the front wheel as required. For
this you will require the cleaning tool
which is located at the top of the dust
box lid.
Place the robot vacuum cleaner up-
side down on a level, clean surface.
Unclip the cover.
Remove the front wheel.
Remove any threads and hair and
clean the front wheel, the cover and
the slot depression using the cleaning
tool.
Refit the front wheel and close the
cover making sure it clicks into position.
Cleaning the sensors
Clean the sensors as required.
Place the robot vacuum cleaner up-
side down on a level, clean surface.
Changing the batteries in the remote control
The remote control requires two 1.5V
(AAA) batteries.
Remove the battery compartment
cover.
Exchange the batteries. Take care
with the polarity.
Close the battery compartment cover.
Observe the special instructions re-
garding the handling and disposal of
batteries found in the sections "Warning and Safety" and "Caring for the
environment" at the beginning of
these operating instructions.
Replacing the rechargeable battery
You will require an original Miele lithiumion rechargeable battery:
– YCR-M05 for Scout RX2
The rechargeable battery compartment
is located in the robot vacuum cleaner's
storage compartment.
Remove the dust box.
Clean the sensors carefully using a
dry cotton wool bud.
26
Open the rechargeable battery com-
partment by unlatching the cover upwards.

Scout RX2 (YCR-M05)
and "Caring for the environment" at
the beginning of these operating instructions.
Storage
Carefully pull the cables so that the
plug connection is pulled out of the
slot.
Press the latch on the plug connec-
tion in order to release the plug.
Remove the rechargeable battery.
Insert the plug of the new re-
chargeable battery into the counterpart, making sure it clicks into place.
Insert the rechargeable battery care-
fully, making sure it is properly positioned (see right-hand side of picture).
Store the plug connection in the slot
at the side.
Switch the robot vacuum cleaner
off if it is not going to be used for a
long period of time. To switch it off,
slide the I/0 switch on the side of the
robot vacuum cleaner to the 0 position.
If the robot vacuum cleaner is not going
to be used for a long period of time,
make sure it is stored in a well ventilated, cool place.
For optimum care, store the robot vacuum cleaner at half charge capacity
(rechargeable battery status indicator
in the display is orange).
Cleaning and care
Maintaining the robot vacuum
cleaner and accessories
Switch the robot vacuum cleaner
off before doing any maintenance
work. To switch it off, slide the I/0
switch on the side of the robot vacuum cleaner to the 0 position.
Carefully refit the cover of the re-
chargeable battery compartment and
close it, making sure it clicks into
place.
Observe the special instructions re-
garding the handling and disposal of
the old rechargeable battery found in
the sections "Warning and Safety"
The robot vacuum cleaner and all
plastic accessories can be cleaned with
a dry or a slightly damp cloth, or with a
proprietary cleaner suitable for plastic.
Do not use abrasive cleaning
agents, glass cleaning agents, allpurpose cleaners or oil-based conditioning agents!
27

Do not immerse the robot va-
cuum cleaner or any accessories
supplied with it in water!
After sales service
Contact in case of malfunction
In the event of any faults which you
cannot remedy yourself, please contact
your Miele Dealer or Miele Service.
Contact information for Miele Service
can be found at the end of this document.
Please note that telephone calls may be
monitored and recorded for training
purposes and that a call-out charge will
be applied to service visits where the
problem could have been resolved as
described in this booklet.
Guarantee
In the U.K. the appliance is guaranteed
for 2 years from the date of purchase.
However, you must activate your cover
by calling 0330 160 6640 or registering
online at www.miele.co.uk.
For information on the appliance guarantee specific to your country please
contact Miele. See end of booklet for
contact details.
28

Problem solving guide
Many malfunctions and faults that can occur in daily operation can be easily
remedied. Time and money will be saved because a service call will not be
needed.
The following guide may help you to find the reason for a malfunction or a fault,
and to correct it.
Switch the robot vacuum cleaner off before dealing with any problems. To
switch it off, slide the I/0 switch on the side of the robot vacuum cleaner to the
0 position.
Problem Cause and remedy
The robot vacuum
cleaner switches itself
off after it has been
switched on using the
Power button.
The robot vacuum
cleaner does not react.
The rechargeable battery is not sufficiently charged.
Connect the robot vacuum cleaner correctly to the
charging contacts on the connected base station.
The robot vacuum cleaner is switched off.
Switch it on (slide I/0 to I).
The batteries in the remote control have been inserted
incorrectly.
Take care with the polarity.
The batteries in the remote control are dead.
Exchange the batteries.
The signal between the infrared transmitter on the vacuum cleaner and the remote control is broken.
Clean the front of the robot vacuum cleaner and
the top of the remote control carefully with a soft,
dry cloth and make sure that no items disrupt the
signal.
The remote control is too close to the robot vacuum
cleaner or too far away from it.
Increase or decrease the distance and when using
the remote control, direct it towards the robot vacuum cleaner.
29

Problem Cause and remedy
The cleaning result is
poor.
The dust box is full.
Empty and clean the dust box.
The roller brush is dirty or worn out.
Clean the roller brush.
Replace the roller brush.
The seals on the dust box are dirty or worn out.
Clean the seals and the suction channel between
them.
Replace the seal unit.
The exhaust filter is dirty.
Clean the exhaust filter.
Replace the exhaust filter.
The side brushes have worn out.
Replace the side brushes.
The robot vacuum
cleaner is not charging.
The base station is not connected correctly.
Connect the base station exactly as described in
these operating instructions, see section "Preparing for use – Connecting the base station".
The robot vacuum
cleaner does not return
to the base station after
vacuuming.
The Auto standard vacuuming mode was started
somewhere in the room.
The robot vacuum cleaner will return to its starting
point.
The Spot vacuuming mode has been selected.
The robot vacuum cleaner will return to its starting
point.
There is insufficient light for the robot vacuum cleaner
to navigate.
Provide sufficient lighting.
The base station is not connected correctly.
Connect the base station exactly as described in
these operating instructions, see section "Preparing for use – Connecting the base station".
The signal between the infrared transmitter on the
base station and the vacuum cleaner is broken.
30

Problem Cause and remedy
Clean the front of the base station and the front of
the robot vacuum cleaner carefully with a soft, dry
cloth and make sure that no items disrupt the signal.
Obstacles on the floor which is to be vacuumed can
impede navigation.
Watch the robot vacuum cleaner during vacuum-
ing.
Remove any problematic obstacles.
Section off the problematic area with the magnetic
strip.
Reduce the robot vacuum cleaner's maximum
crossing over height, see section "Use – Reducing
the maximum crossing over height".
31

Error messages
Switch the robot vacuum cleaner off before dealing with any errors. To
switch it off, slide the I/0 switch on the side of the robot vacuum cleaner to the
0 position.
Error messages are shown in the indicator field in the display.
If "l_ _l" - "l- -l" appears running from bottom to top, you must empty and clean
the dust box.
Problem Cause and remedy
F 1 "Wheel raised" error
Place the robot vacuum cleaner on a level floor
surface.
F 2 "Dirty sensors" error
Clean the sensors. This error message is also
shown when you start up the robot vacuum
cleaner and the collision sensor is located above
empty space. Remove the robot vacuum cleaner
from the edge.
F 3 "Filter not recognised" error
Insert the dust box into the robot vacuum cleaner
with an exhaust filter inserted.
F 4 "Drive wheels overloaded" error
Check whether the drive wheels have become
dirty. Remove any threads or hair. This error message is also shown if the robot vacuum cleaner is
stuck.
F 5 "Brushes overloaded" error
Check whether the roller brush and the side
brushes have become dirty. Clean the roller brush
and side brushes. This error message is also
shown if objects become caught in the robot vacuum cleaner.
F 6 "Fan motor overloaded" error
Empty and clean the dust box. Clean or replace
the exhaust filter.
32

Problem Cause and remedy
F 7 Internal system error
Switch the robot vacuum cleaner off and on again
(I/0 switch).
F 8 "Front wheel dirty" error
Check whether the front wheel, the cover or the
slot depression have become dirty. Remove any
threads and hair, and clean the front wheel, the
cover and the depression.
Resetting the error
message after fixing
the problem
You can reset the error messages described
above in the following ways
– Switch the robot vacuum cleaner off and on again
(I/0 switch).
– Press the Power button on the remote control.
– Press the sensor field in the display for at least
three seconds.
33

Electrical connection for the UK
All electrical work should be carried out
by a suitably qualified and competent
person in strict accordance with current
national and local safety regulations (BS
7671 in the UK). The voltage and frequency are given on the data plate located underneath the vacuum cleaner.
Please ensure that these match the
household mains supply. The fuse rating is quoted on the plug. The appliance is supplied with a cable and moulded plug ready for connection to a
230-240 V/50 Hz a.c. single phase supply.
Non-rewireable plugs BS 1363
The fuse cover must be re-fitted when
changing the fuse, and if the fuse cover
is lost the plug must not be used until a
suitable replacement is obtained. The
colour of the correct replacement cover
is that of the coloured insert in the base
of the plug, or the colour that is embossed in words on the base of the
plug, (as applicable to the design of
plug fitted). Replacement fuses should
be ASTA approved to BS1362 and have
the correct rating. Replacement fuses
and fuse covers may be purchased
from your local electrical supplier.
34

Copyright and licences
Miele uses software to operate and control the robot vacuum cleaner.
The copyright authorisation from Miele and other relevant software suppliers must
be respected.
Miele and their suppliers reserve the rights to the software components.
In particular the following are prohibited:
– Copying and distribution
– Modifications and derivations
– Decompilation, reverse engineering, disassembling and other such reductions of
software
Components which fall under GNU General Public Licence and further Open
Source licences are integrated into the software.
An overview of the integrated Open Source components and a copy of the current
licence can be obtained at www.miele.com/device-software-licences.
Miele will provide the source code for all components of software licensed under
the GNU General Public Licence and comparable Open Source licences.
For source code requests, please email
info@miele.com.
You can obtain detailed instructions for the use of test modes from Miele Service.
35

RX2 (SLQL0) M.-Nr. 10 814 550 / 00
United Kingdom
Miele Co. Ltd.
Fairacres, Marcham Road
Abingdon, Oxon, OX14 1TW
Customer Contact Centre Tel: 0330 160 6600
E-mail: mielecare@miele.co.uk
Internet: www.miele.co.uk
Australia
Miele Australia Pty. Ltd.
ACN 005 635 398
ABN 96 005 635 398
1 Gilbert Park Drive
Knoxfield, VIC 3180
Tel: 1300 464 353
Internet: www.miele.com.au
Miele (Shanghai) Trading Ltd.
1-3 Floor, No. 82 Shi Men Yi Road
Jing' an District
200040 Shanghai, PRC
Tel: +86 21 6157 3500
Fax: +86 21 6157 3511
E-mail: info@miele.cn,
Internet: www.miele.cn
China
41/F - 4101, Manhattan Place
23 Wang Tai Road
Kowloon Bay, Hong Kong
Tel: (852) 2610 1025
Fax: (852) 3579 1404
Email:
customerservices@miele.com.hk
Website: www.miele.hk
Miele (Hong Kong) Limited
Miele India Pvt. Ltd.
Ground Floor
Copia Corporate Suites
Plot No. 9, Jasola
New Delhi - 110025
Tel: 011-46 900 000
Fax: 011-46 900 001
E-mail: customercare@miele.in
Internet: www.miele.in
India
Miele Ireland Ltd.
2024 Bianconi Avenue
Citywest Business Campus
Dublin 24
Tel: (01) 461 07 10
Fax: (01) 461 07 97
E-Mail: info@miele.ie
Internet: www.miele.ie
Ireland
Malaysia
Miele Sdn Bhd
Suite 12-2, Level 12
Menara Sapura Kencana
Petroleum
Solaris Dutamas No. 1
Jalan Dutamas 1
50480 Kuala Lumpur, Malaysia
Phone: +603-6209-0288
Fax: +603-6205-3768
Miele New Zealand Limited
IRD 98 463 631
Level 2, 10 College Hill
Freemans Bay, Auckland 1011
New Zealand
Tel: 0800 464 353
Internet: www.miele.co.nz
New Zealand
Miele Pte. Ltd.
163 Penang Road
# 04 - 03 Winsland House II
Singapore 238463
Tel: +65 6735 1191
Fax: +65 6735 1161
E-Mail: info@miele.com.sg
Internet: www.miele.sg
Singapore
Miele (Pty) Ltd
63 Peter Place, Bryanston 2194
P.O. Box 69434, Bryanston 2021
Tel: (011) 875 9000
Fax: (011) 875 9035
E-mail: info@miele.co.za
Internet: www.miele.co.za
South Africa
Miele Appliances Ltd.
Gold & Diamond Park
Office No. 6-217
Sheikh Zayed Road
P.O. Box 11 47 82 - Dubai
Tel. +971 4 3044 999
Fax. +971 4 3418 852
800-MIELE (64353)
E-Mail: info@miele.ae
Website: www.miele.ae
United Arab Emirates
Manufacturer:
Miele & Cie. KG, Carl-Miele-Straße 29, 33332 Gütersloh, Germany
K.E. & Kingstone Co., Ltd.
6th Fl., No. 120, Sec. 2
Jianguo N. Rd.
Taipei, Taiwan
TEL: +886 2 2502-7256
FAX: +886 2 2502-3077
E-mail: kenk@kenk.com.tw
Website:
www.kenk.com.tw/ke/miele
Taiwan
Thailand
BHIRAJ TOWER at EmQuartier
43rd Floor Unit 4301-4303
689 Sukhumvit Road
North Klongton Sub-District
Vadhana District
Bangkok 10110, Thailand
 Loading...