

Page 1
Operating and installation instructions
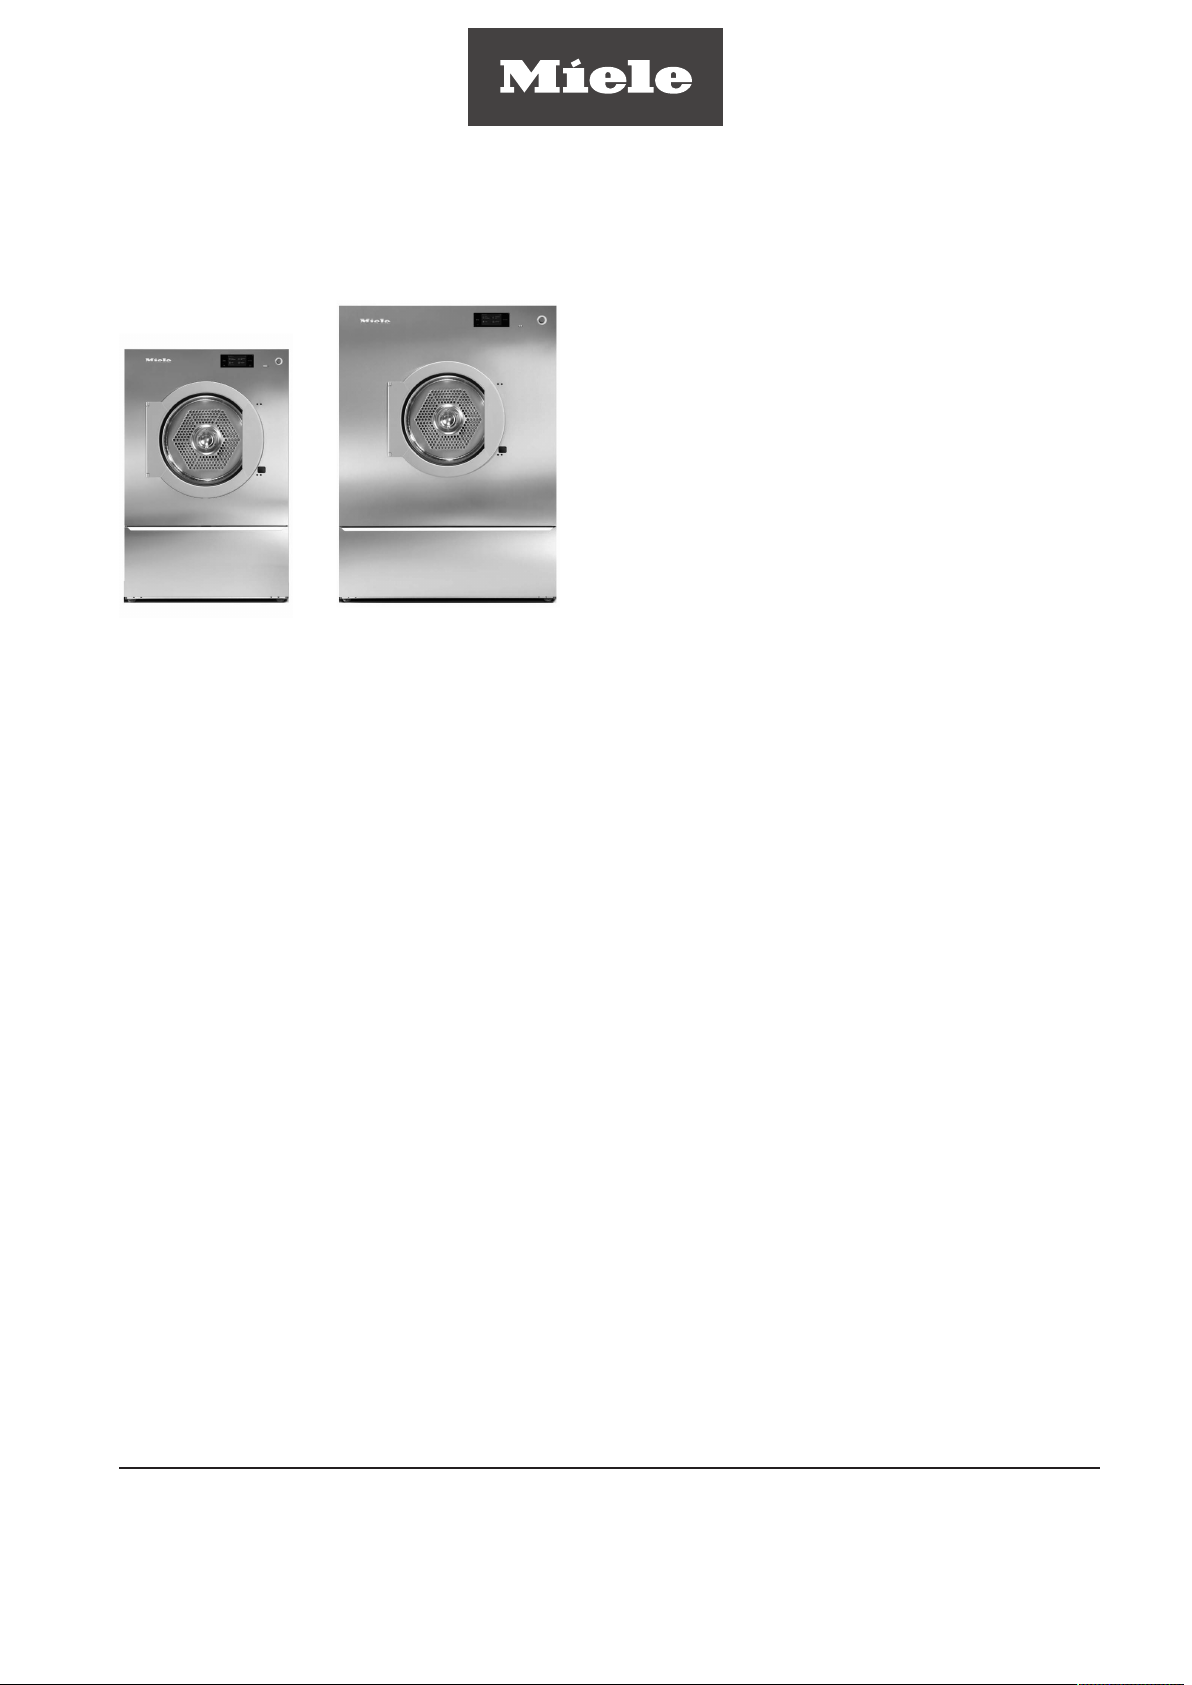
Commercial tumble dryers
PDR914/918/922/928/944
To avoid the risk of accidents or damage to the
machine, it is essential to read these instructions before it is installed and used for the first
time.
en-GB
M.-Nr. 11 840 480
Page 2

2
Page 3

Contents
Caring for the environment ............................................................................................ 7
Warning and Safety instructions ................................................................................... 8
Appropriate use................................................................................................................. 8
Foreseeable misuse........................................................................................................... 9
Technical safety................................................................................................................. 10
Gas-heated tumble dryers ............................................................................................ 11
Correct use........................................................................................................................ 12
Accessories ....................................................................................................................... 13
Operating the tumble dryer ............................................................................................ 14
Control panel..................................................................................................................... 14
Sensor controls and touch display with sensor controls .................................................. 15
Main menu......................................................................................................................... 15
“ Programmes” menu................................................................................................ 15
“Favourites” menu .................................................................................................... 15
“Supervisor” menu.................................................................................................. 15
Operating examples .......................................................................................................... 15
Selection lists ................................................................................................................ 15
Setting numerical values ............................................................................................... 16
Pull-down menu ............................................................................................................ 17
Exiting the menu............................................................................................................ 17
Help display................................................................................................................... 17
Initial commissioning ...................................................................................................... 18
Switching on the tumble dryer .......................................................................................... 18
Reference to optional external devices ............................................................................. 18
Setting the display brightness........................................................................................... 18
Setting the date................................................................................................................. 19
Confirming the time of day display query ......................................................................... 19
Selecting programme packages ....................................................................................... 20
Completing the initial commissioning process.................................................................. 20
Drying ............................................................................................................................... 22
1. Notes on correct laundry care....................................................................................... 22
Washing......................................................................................................................... 22
Drying ............................................................................................................................ 22
Care symbols ................................................................................................................ 22
2. Loading the tumble dryer .............................................................................................. 23
3. Selecting a programme ................................................................................................. 23
Switching on the tumble dryer ...................................................................................... 23
4. Selecting programme settings ...................................................................................... 24
Select the drying level ................................................................................................... 24
Selecting extra options.................................................................................................. 25
5.Starting a programme ................................................................................................... 25
Calling up current programme parameters .................................................................. 26
Programme running time/Time left estimation .............................................................. 26
End of the programme ...................................................................................................... 26
End of the programme .................................................................................................. 26
Removing the laundry ................................................................................................... 27
Care notes..................................................................................................................... 27
3
Page 4

Contents
Timer ................................................................................................................................. 27
Prerequisite for setting the timer ................................................................................... 27
Setting the timer............................................................................................................ 27
Cleaning and care ........................................................................................................... 28
Cleaning the fluff filter ....................................................................................................... 28
Cleaning the drum and the outside of the casing ............................................................. 29
Customer Service Department ...................................................................................... 30
Contact in case of malfunction ......................................................................................... 30
Optional accessories......................................................................................................... 30
Installation........................................................................................................................ 31
Installation requirements ................................................................................................... 31
General operating conditions ............................................................................................ 31
Transport ........................................................................................................................... 31
Installing the tumble dryer................................................................................................. 31
Securing the machine........................................................................................................ 33
Electrical connection ......................................................................................................... 33
Supply air/exhaust air........................................................................................................ 34
Steam connection (only for steam-heated variants).......................................................... 34
Hot water connection (only for hot water-heated variants) ............................................... 34
Gas connection (only for gas-heated variants).................................................................. 34
Optional accessories ...................................................................................................... 36
XCIbox.............................................................................................................................. 36
XKM3200.......................................................................................................................... 36
Data protection and data security................................................................................. 36
Factory default settings for network configuration........................................................ 36
Copyrights and licences................................................................................................ 36
Supervisor level ............................................................................................................... 38
Opening the Supervisor level ............................................................................................ 38
Access via code ................................................................................................................ 38
Change code..................................................................................................................... 38
Closing the settings menu................................................................................................. 38
4
Page 5

Contents
Controls / Display.............................................................................................................. 38
Language....................................................................................................................... 38
Language entry ............................................................................................................. 38
Set languages................................................................................................................ 39
Display brightness......................................................................................................... 39
Clock display................................................................................................................. 39
Date ............................................................................................................................... 39
Volume........................................................................................................................... 40
Res. moisture display.................................................................................................... 40
Visibility parameters ...................................................................................................... 40
“Display” off status........................................................................................................ 40
“Machine” off status...................................................................................................... 41
Delay start ..................................................................................................................... 41
Memory ......................................................................................................................... 41
Temperature unit............................................................................................................ 41
Weight unit .................................................................................................................... 41
Logo .............................................................................................................................. 42
Change code................................................................................................................. 42
Programme selection ........................................................................................................ 42
Controls......................................................................................................................... 42
Programme packages ................................................................................................... 43
Favourite progs.............................................................................................................. 43
Special programmes ..................................................................................................... 44
Sort programmes .......................................................................................................... 45
Prog. colour allocation .................................................................................................. 45
Process technology........................................................................................................... 45
Anti-crease .................................................................................................................... 45
Drying levels .................................................................................................................. 45
Further cooling .............................................................................................................. 46
Cooling down temp....................................................................................................... 46
Fan pulsed operation..................................................................................................... 46
Service............................................................................................................................... 46
Clean out the airways.................................................................................................... 46
Clean the filters ............................................................................................................. 47
Service interval .............................................................................................................. 47
External applications ......................................................................................................... 47
External exhaust flap..................................................................................................... 47
Additional fan ................................................................................................................ 48
Pressure sensor............................................................................................................. 48
Peak load signal ............................................................................................................ 48
Peak load prevention..................................................................................................... 49
COM module selection.................................................................................................. 49
Availability of Miele digital products.............................................................................. 49
WiFi / LAN ..................................................................................................................... 49
Network time ................................................................................................................. 50
Remote.......................................................................................................................... 50
RemoteUpdate .............................................................................................................. 50
SmartGrid ...................................................................................................................... 51
Machine parameters.......................................................................................................... 51
Legal information........................................................................................................... 51
Technical data.................................................................................................................. 52
5
Page 6

Contents
EU declaration of conformity ......................................................................................... 53
6
Page 7
Caring for the environment
Disposal of the packing material
The packaging is designed to protect the appliance from damage
during transportation. The packaging materials used are selected
from materials which are environmentally friendly for disposal and
should be recycled.
Recycling the packaging reduces the use of raw materials in the manufacturing process and also reduces the amount of waste in landfill
sites.
Disposal of your old appliance
Electrical and electronic appliances often contain valuable materials.
They also contain materials which, if handled or disposed of incorrectly, could be potentially hazardous to human health and to the environment. They are, however, essential for the correct functioning of
your appliance. Please do not therefore dispose of it with your household waste.
Please dispose of it at your local community waste collection / recycling centre.
Ensure that it presents no danger to children while being stored for
disposal.
7
Page 8
Warning and Safety instructions
It is essential to read these instructions.
This tumble dryer complies with all current local and national safety requirements. However, inappropriate use can lead to personal injury and damage to property.
Read the operating instructions carefully before using the tumble dryer. They contain important information on safety, installation, use and maintenance. This prevents both personal injury and damage to the tumble dryer.
In accordance with standard IEC60335-1, Miele expressly and strongly advises that you
read and follow the instructions in the chapter on installing the tumble dryer as well as
the safety instructions and warnings.
Miele cannot be held liable for damage caused by non-compliance with these instructions.
Keep these operating instructions in a safe place and pass them on to any future owner.
When instructing other people how to use the tumble dryer, they must be made aware of
these safety and warning instructions.
Appropriate use
The tumble dryer is intended for installation in a commercial environment.
This tumble dryer is only intended for drying fabrics which have been washed in a water
solution, and marked on the manufacturer's care label as being suitable for tumble drying.
“Dry cleaning kits” for freshening up garments in a tumble dryer are increasingly available
on the market. If using, do so at your own risk, and follow the instructions provided on the
packaging. Any other applications may be dangerous. Miele cannot be held liable for damage resulting from incorrect or improper use or operation.
The tumble dryer is not intended for outdoor use.
Do not install the tumble dryer in a room where there is a risk of frost. At temperatures
around freezing point, the tumble dryer may not be able to operate properly. The permitted
room temperature is between 2°C and 35°C.
If the machine is used in a commercial environment it may only be operated by instruc-
ted/trained personnel. If the machine is used in a publicly accessible area, the supervisor
must ensure that it can be operated safely without risk of danger.
This appliance can only be used by people with reduced physical, sensory or mental
capabilities, or lack of experience or knowledge, if they are supervised whilst using it or
have been shown how to use it in a safe way and understand and recognise the consequences of incorrect operation.
Children under 8 years of age must be kept away from the tumble dryer unless they are
constantly supervised.
Children 8 years and older may only use the tumble dryer unsupervised if they have
been shown how to use it safely and recognise and understand the consequences of incorrect operation.
8
Page 9

Warning and Safety instructions
Children must not be allowed to clean or maintain the tumble dryer unsupervised.
Please supervise children in the vicinity of the tumble dryer and do not let them play
with it.
This tumble dryer may also be operated in public areas.
Any uses other than those listed above are prohibited. The manufacturer accepts no li-
ability in such cases.
Foreseeable misuse
Do not make any alterations to the tumble dryer, unless authorised to do so by Miele.
Do not lean on the tumble-dryer door. Otherwise, the tumble dryer may tip over, causing
injury to yourself or others.
Do not use a pressure washer or water jet to clean the tumble dryer.
To ensure the correct performance of the tumble dryer and to prevent the risk of faults
and fire, it is important to carry out maintenance on a regular basis.
Benzine, petrol, paraffin, or any easily flammable liquid must not be stored or used near
the machine. Danger of explosion.
Do not expose the dryer to air which is contaminated with vapour of chlorine, fluorine or
other solvents. Danger of fire.
Fire hazard. This tumble dryer must not be connected to a controllable socket (e.g. a
timer). There is a risk of the laundry igniting if the tumble dryer’s safety cooling-down
phase is interrupted.
To prevent the risk of fire, the following items must not be dried in this tumble dryer:
- Items which have not been washed.
- Items which have not been thoroughly cleaned and are still soiled with grease, oil or
other deposits (such as kitchen linens or cosmetics cloths with cooking oils, grease, lotions, etc). If items have not been thoroughly cleaned, there is a danger that they might
ignite when heated, even after they have been removed from the tumble dryer at the
end of the programme.
- Items (e.g. mops and floor cloths) that have been treated with inflammable cleaning
agents or which contain residues of acetone, alcohol, benzene, petrol, kerosene, stain
remover, turpentine, wax and wax remover or other chemicals.
- Items which have been splashed with hair lacquer, hair spray, nail varnish remover or
similar substances.
Wash heavily soiled items thoroughly by increasing the amount of detergent and selecting
a high washing temperature. If in doubt, wash the items several times.
In many programmes, the heating phase is followed by a cooling down phase to ensure
that the items are not too hot to handle when you remove them (this also avoids the
danger of the laundry self-igniting). The programme is not finished until the cooling down
phase is complete. Ensure that you always wait until the end of the programme before removing the laundry.
9
Page 10

Warning and Safety instructions
Never operate the tumble dryer without the fluff filter or with a damaged fluff filter. This
could lead to malfunctions. Fluff can clog the air channels, heating elements and vent
ducting, which could result in a fire. In this case, stop the tumble dryer immediately and replace the damaged fluff filter.
Technical safety
Before setting up the tumble dryer, check it for any externally visible damage.
Do not install or use a damaged tumble dryer.
Do not connect the tumble dryer to the power supply by an extension lead (fire hazard
due to overheating).
The electrical safety of this tumble dryer can only be guaranteed when correctly earthed.
It is essential that this standard safety requirement is observed and regularly tested. If in
any doubt, please have the electrical installation inspected by a specialist. Miele cannot be
held liable for the consequences of an inadequate earthing system.
Unauthorised repairs could result in unforeseen dangers for the user, for which Miele
cannot accept liability. Repairs should only be undertaken by a Miele authorised technician, otherwise any subsequent damage will not be covered by the warranty.
Faulty components may only be replaced by genuine Miele spare parts. Miele can only
guarantee the safety standards of the appliance when Miele replacement parts are used.
In the event of a fault and for cleaning and maintenance purposes, the tumble dryer
must be disconnected from the power supply. The tumble dryer is only disconnected from
the power supply, if:
- It is switched off at the wall socket or the plug is withdrawn.
- The mains fuse is disconnected.
- The mains fuses have been completely removed.
See also “Installation – Electrical connection”.
The tumble dryer must not be used in non-stationary installation sites (e.g. on a ship).
Follow the instructions in “Installation” and “Technical data”.
The tumble dryer may only be operated when the ducting has been installed and the
room is sufficiently ventilated.
The vent ducting must never be installed in any of the following flues or shafts:
- Chimneys or smokestacks that are in use.
- Shafts that are used to ventilate installation rooms with fireplaces.
- Flues that are used by third parties.
Smoke or exhaust gas that is fed back into the flue or shaft may be toxic.
Regularly check all components in the vent ducting (e.g. wall pipe, external grille, bends,
elbows, etc.) to make sure air can move through them and to ensure that they are working
properly. Clean components when necessary. Fluff deposits in the vent ducting system will
prevent the air from being extracted properly and, as a result, will stop the tumble dryer
from working properly.
10
Page 11

Warning and Safety instructions
If existing vent ducting is due to be used, it must be checked before being connected to
the tumble dryer.
There is a risk of suffocation and poisoning due to exhaust gases being sucked back if
gas-powered flow heaters, gas-powered room heaters, coal-burning stoves with a flue
connection, etc., are installed in the same room, in the same flat or in neighbouring rooms
and the negative pressure is 4Pa or more.
The following measures for suitable room ventilation (examples) can help to prevent negative pressure in the installation area:
- Install vents that cannot be closed in the exterior walls.
- Use window switches so that the tumble dryer can only be switched on when a window
is open.
Please always seek approval from your building regulations inspector to confirm that the
appliance can be operated without risk and that negative pressure of over 4Pa can be prevented.
If multiple tumble dryers are to be connected to one vent ducting, a non-return flap must
be installed directly on the duct for each tumble dryer.
If this requirement is not observed, the tumble dryers may be damaged and their electrical
safety could be affected.
The plug must be easily accessible so that the tumble dryer can be disconnected from
the power supply.
If the appliance is hard wired, adequate provision must be made on site to switch off all
poles to disconnect the tumble dryer from the power supply.
Do not block the gap between the bottom of the tumble dryer and the floor with plinth
facings, deep pile carpet etc.
Ensure that no closeable door, sliding door or an oppositely hinged door is installed that
would hinder the drum door being opened in any way.
If the mains connection cable is faulty it must always be replaced by a Miele authorised
technician to protect the user from danger.
Gas-heated tumble dryers
In the event of a fault or when carrying out cleaning and maintenance, the manual gas
shut-off valve and the shut-off device on the gas meter must be closed.
Before completing commissioning, maintenance, conversion and repair work, all gas-
conducting components – from the manual shut-off valve to the burner jet – must be
checked for leaks. Particular attention must be paid to the measurement connections on
the gas valve and on the burner. Checks must be performed when the burner is both
switched on and switched off.
It is recommended that the product and its installation is annually inspected and tested
by a suitably qualified technician in conjunction with local and national regulations.
Take these safety precautions if you smell gas
- Extinguish all flames immediately.
11
Page 12

Warning and Safety instructions
- Open all windows and doors immediately.
- Close the gas shut-off device on the gas meter or the main gas shut-off device immediately.
- If there is the smell of gas in a room, never enter the room with a naked flame.
- Do not light matches or lighters.
- Do not smoke.
- Do not carry out any actions that will create electrical sparks (such as pulling out electrical plugs or pressing electrical switches or bells).
- Close the gas shut-off valve installed on site.
- If you cannot find the cause of the gas smell and all gas valves have been shut off,
please call the gas supply company immediately.
- If other persons are being shown how to operate the appliance, they must be given and/
or made aware of these important safety instructions.
Correct use
Always close the drum door after each drying cycle. This will prevent:
- Children climbing into the tumble dryer or hiding things in it.
- Pets or other small animals climbing into the tumble dryer.
Keep the room where the tumble dryer is located free from dust and fluff. If the air that is
taken into the machine contains dirt particles, this can cause blockages. A fault may then
occur and there is a risk of fire.
The fluff filter must be cleaned on a regular basis.
To ensure problem-free operation of the tumble dryer:
- Remove the fluff from the fluff filter surfaces after every drying cycle.
- Dry the fluff filter after wet cleaning. Wet or damp fluff filters/filters could cause operational faults while drying.
- In addition, the fluff filter and the air passages must be cleaned when prompted by the
display.
Remove all items from pockets (e.g. lighters, matches).
The programme ends when the cooling phase starts. Many programmes are followed by
the cooling phase to ensure that the items of laundry are kept at a temperature that will not
cause them damage (for instance to prevent the risk of the laundry self-igniting). Always remove all items of laundry from the tumble dryer immediately after the end of the programme/cooling phase.
Fabric conditioner and similar products must be used according to the instructions on
the manufacturer's packaging.
For tumble dryers with stainless steel surfaces:
The stainless steel surfaces must not come into contact with liquid cleaning and disinfecting agents which contain chlorine or sodium hypochlorite. These agents can have a corrosive effect on stainless steel.
Aggressive vapours containing chlorine can also be corrosive.
Do not store containers of these agents near the tumble dryer.
12
Page 13

Warning and Safety instructions
Accessories
Accessory parts may only be fitted when expressly approved by Miele. If other parts are
used, warranty, performance and product liability claims will be invalidated.
Miele cannot be held liable for damage caused by non-compliance with these Warning and Safety instructions.
13
Page 14
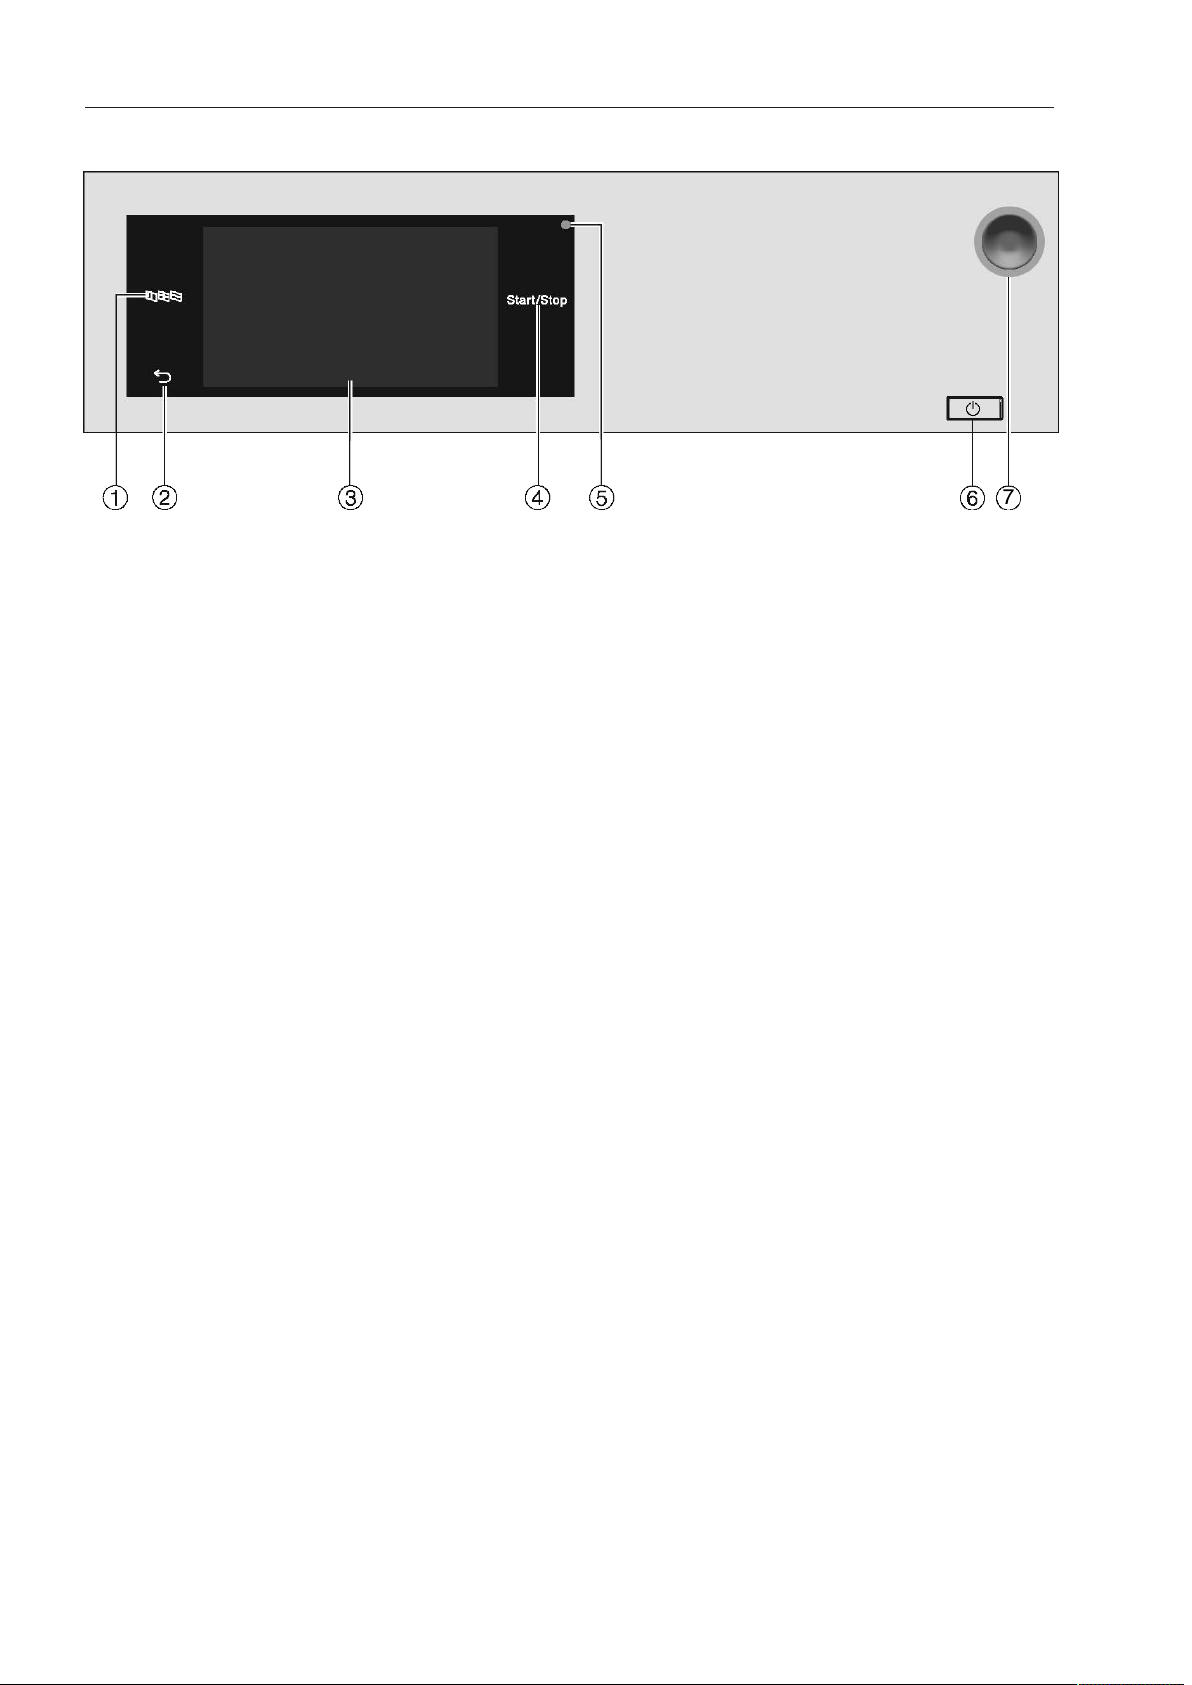
Operating the tumble dryer
7
Control panel
a
Sensor control
For selecting the current user language
At the end of the programme, the language is automatically reset to the language set at
the Supervisor level.
b
Sensor control
Takes you back one level in the menu.
c
Touch display
d
Sensor control/
For starting the selected drying programme and cancelling a programme once it has
started. The programme selected can be started as soon as the sensor control starts
flashing.
e
Optical interface
For the Customer Service Department
f
button
For switching the tumble dryer on and off. The tumble dryer switches off automatically
to save energy. It is switched off an adjustable time after the end of the programme/
Anti-crease phase, or after being switched on if no further selection is made.
g
Emergency off switch
It should only be activated in the event of danger or in order to prevent danger. When
this switch is activated, the machine is immediately switched off and put in a safe condition. Once the danger has been averted, the switch can be unlocked again by turning
the knurled dial to the right.
14
Page 15

Operating the tumble dryer
11:02
Programmes
Favourites
Supervisor
Help
11:02
Cottons
Programmes
Cottons PRO
Minimum iron Delicates
Cottons
Woollens
Sensor controls and touch display with sensor controls
The sensor controls, and Start/Stop and the sensor controls in the display respond to finger tip contact. Every touch of a sensor control is confirmed with an audible
keypad tone. You can adjust the volume of the keypad tone or switch it off (see “Supervisor level”).
The control field with sensor controls and the touch display can be scratched by pointed
or sharp objects, e.g. pens.
Only touch the control field with your fingers.
Main menu
After switching on the tumble dryer, the main menu will appear in the display. You can access all the important submenus from the main menu.
Touch the sensor control at any time to return to the main menu. Values set previously
are not saved.
Main menu
“ Programmes” menu
In this menu, you can select the drying programmes.
“Favourites” menu
In this menu, you can select 1favourite programme from a total of 12favourite programmes. The drying programmes can be set up and saved by the supervisor in the Fa-
vourites menu (see “Supervisor level” under “Favourite programmes”).
“Supervisor” menu
You can alter the tumble dryer's electronic module to suit changing requirements in the Supervisor level (see “Supervisor level”).
Operating examples
Selection lists
Scrolling through the “Programmes” menu (single selection)
15
Page 16

Operating the tumble dryer
11:02
Gentle tumble
Extras
OK
Anti-crease
10
11
13
14
12 00
59
58
01
02
Clock display
OK
12 00
11 59
10 58
13 01
14 02
Clock display
OK
To scroll through the menu, place your finger on the touch display and move it left or
right.
The orange scroll bar in the bottom display area shows that there are further options to
choose from.
To select the required drying programme, touch the programme name with your finger.
The display will now change to the standard menu for that programme.
“Extras” menu (multiple selection)
To select one or more Extras, touch the required Extras with your finger.
Currently selected Extras are marked orange. To deselect an Extra simply touch the Extra
again.
Setting numerical values
You can set numerical values in some menus. You can set the numerical values by swiping your finger up and down on the display.
Place your finger on the number that you want to change.
To set the required number, swipe your finger up or down on the display.
Confirm the set numerical value by touching the OKsensor control.
Tip: For some settings, depending on the value range and increments, the value can also
be set using a numerical keypad. Briefly touching the numbers will bring up the numerical
keypad. Once a valid number has been entered, the OKsensor control will be highlighted
green.
Briefly touch a number between the two lines with your finger.
16
Page 17

Operating the tumble dryer
12:00
3
4
21
5 6
7
8
0
9
Clock display
OK
11:02
Time left
h
2:27
Status
Cottons
Drying
The numeric block will appear.
To enter the numerical value, touch the numbers on the right-hand side and then confirm
with OK.
Pull-down menu
The pull-down menu can be used to display information (e.g. about a drying programme).
If an orange bar appears at the top of the screen in the middle of the display, you can open
the pull-down menu. Touch the bar and drag it down with your finger on the display.
To close the pull-down menu again, touch the orange bar and drag it up with your finger on
the display.
Exiting the menu
Touch the sensor control to return to the previous screen.
Entries made before this which have not been confirmed withOK will not be saved.
Help display
With some menus, Help appears along the bottom line of the display.
If you need more information about the current menu, touch the Helpsensor control.
The additional information is shown in the display.
Touch the sensor control to return to the previous screen.
17
Page 18

Initial commissioning
deutsch
english
(AU)
english
(CA)
español
english
(GB)
Language
OK
français
(F)
Risk of injury or damage to property due to improper installation.
Incorrect installation of the tumble dryer can lead to personal injury or damage to prop-
erty.
Before commissioning the tumble dryer for the first time, make sure it has been installed.
Connect the tumble dryer correctly.
Please observe the instructions in “Installation”.
Complete the initial commissioning process. During the initial commissioning process,
you will need to define the settings for daily use of the tumble dryer. Some settings can
only be modified during the initial commissioning process. After that, they can only be
changed by the Miele Customer Service Department.
These settings are also described under “Supervisor level”.
Switching on the tumble dryer
Press the button.
The welcome screen will light up.
Setting the display language
You will be asked to select the display language. You can change the language at any time
(see “Language” under “Supervisor level”).
Swipe left or right across the display with your finger until the language you want ap-
pears.
Briefly touch the required language with your finger.
The selected language will be highlighted in orange and the display will change to the next
setting.
Reference to optional external devices
Before initial commissioning, connect the XCI box or slide a communication module into
the slot on the back of the tumble dryer. For this purpose, the tumble dryer must be disconnected from the power supply. Then start the commissioning process.
A reference to optional external hardware appears. Confirm the information with the OK
sensor control.
Setting the display brightness
You will be asked to select the brightness of the display.
18
Page 19

Initial commissioning
Darker Brighter
Display brightness
OK
22
21
19
18
2022
2021
202020
2019
2018
Date
OK
September
August
July
June
May
10
11
13
14
12 00
59
58
01
02
Clock display
OK
Touch the segment bar for the required level of brightness.
The selected level of brightness is represented by the length of the segment bar.
Confirm with the OKsensor control.
The display will change to the next setting.
Setting the date
Place your finger on the value that you want to change and move your finger upwards or
downwards.
Once all values have been selected, confirm your entry with the OKsensor control.
The display will now change to the next setting.
Confirming the time of day display query
The following question appears in the display: Should the time of day display not be shown?
Touch the Yes or Nosensor control.
If you select Yes, the system will skip the Time settings menu.
If you select No, the display will switch to the Time settings menu.
Setting the time
Place your finger on the number that you want to change and move your finger upwards
or downwards.
Confirm with the OKsensor control.
The display will change to the next setting.
19
Page 20

Initial commissioning
11:02
Cottons
Cottons PRO
Label
Cottons
Minimum iron
Standard
Programme packages
Woollens
Delicates
OK
11:02
Cottons
Programmes
Cottons PRO
Minimum iron Delicates
Cottons
Woollens
11:02Programmes
Woollens
Timed drying
hygiene
Basket - Low
temperature
Delicates
Timed drying
cool air
Timed drying
warm air
Selecting programme packages
You can select various programmes from the programme packages. Any programmes
already active are highlighted in orange.
Swipe to the left with your finger until you reach a programme that is not highlighted in
orange.
Touch the programme to be activated.
The selected programme is now active and highlighted in orange.
You can select further programmes if required.
If you do not want to select any more programmes, confirm with OK.
The display will change to the next setting.
Tip: You can disable a selected programme by touching the programme again. Exception:
The Cottons and Cottons PRO programmes cannot be disabled.
Completing the initial commissioning process
The commissioning process is complete when a programme lasting longer than 20minutes
has been carried out in full.
If the power is interrupted prior to the start of the first drying programme (e.g. if the machine is switched off with the button), the initial commissioning process can be completed again. Once a drying programme has been running for over 20minutes, the initial
commissioning process cannot be performed again.
In the main menu, touch theProgrammessensor control.
Swipe to the left with your finger until the Timed drying cool airprogramme is displayed.
20
Page 21

Initial commissioning
0:10
11:02
0:108,0
Overview
Weight
kg h
Duration
Drying temp.
Without heat
Timed drying
cool air
00 20
02 59
01 58
01 21
02 22
11:02
h
Reset
Duration
OK
Touch the Timed drying cool airprogramme.
Touch the Durationsensor control.
Place your finger on the number that you want to change and move your finger upwards
or downwards.
Select a duration of 20minutes.
Touch OK to confirm.
Touch the flashing Start/Stop sensor control.
After this programme has finished, the tumble dryer is ready for use.
21
Page 22

Drying
1. Notes on correct laundry care
Washing
Heavily soiled laundry must be washed particularly thoroughly. Use sufficient detergent
and select a high wash temperature. If in doubt, wash the items several times.
New, coloured items must be washed thoroughly and separately. Do not dry these items
with light coloured garments. There is the risk of colours running and discolouring other
garments or even plastic components in the tumble dryer. Dark coloured fluff can also
settle on light coloured garments and vice versa.
Drying
Damage due to foreign objects which were not removed from the laundry.
Foreign objects in the laundry can melt, burn or explode.
Ensure that any foreign objects (e.g. detergent dispensing aids, lighters, etc.) have been
removed from the laundry.
Risk of fire due to incorrect use and operation.
The laundry can burn and destroy the tumble dryer and the surroundings.
See the section on “Warnings and safety notes” for further information.
- Check seams and stitching to ensure that the items of laundry are intact. This way you
will avoid the danger of fillings coming out and causing a fire.
- Sew in or remove underwiring from bras.
Care symbols
Drying
Normal/higher temperature
Reduced temperature*
* Select the Low temperature Extra.
Do not tumble dry
Ironing
Very hot
Hot
Warm
Do not iron
22
Page 23

Drying
2. Loading the tumble dryer
Loading laundry into the tumble dryer
Preventing textile damage.
Before loading, read chapter “1. Notes on correct laundry care” first.
Open the door.
Load laundry into the tumble dryer.
Risk of damage with laundry getting trapped.
Laundry can be damaged by getting trapped when closing the door.
When closing the door, make sure that laundry does not get trapped in the door open-
ing.
Do not overload the drum. Overloading can cause unnecessary wear and tear to the laundry and cause a disappointing drying result. It can also cause more creasing.
Closing the door
Damage caused by laundry getting trapped.
Laundry can be damaged by getting trapped when closing the door.
When closing the door, make sure that laundry does not get trapped in the door open-
ing.
Shut the door gently.
3. Selecting a programme
Switching on the tumble dryer
Press the button.
The welcome screen will light up.
There are different ways to select a drying programme in the main menu.
23
Page 24

Drying
11:02
Programmes
Favourites
Supervisor
Help
11:02
Cottons
Programmes
Cottons PRO
Minimum iron Delicates
Cottons
Woollens
11:02
Programmes
Favourites
Supervisor
Help
11:02
Favourites
Cottons
Cottons
Cottons
Delicates
Touch the Programmessensor control.
With your finger, swipe to the left until you reach the required programme.
Touch the sensor control for that programme.
The display will change to the standard menu for that drying programme.
Alternatively, you can select a programme from the Favourites list.
The preset programmes under Favourites cannot be changed via the Supervisor level.
Touch the Favouritessensor control.
With your finger, swipe to the left until you reach the required programme.
Touch the sensor control for the required programme.
The display will change to the standard menu for that drying programme.
4. Selecting programme settings
Select the drying level
With many programmes, you can change the preset drying level. Depending on the programme, you can select different drying levels.
24
Page 25

Drying
11:02
0:57
8,0
Drying temp. °CExtras
Weight
Normal
Drying level
Cottons
66 not selected
kg
Overview
11:02
Gentle tumble
Extras
OK
Anti-crease
Selecting extra options
The drying programmes can be augmented with various Extras. Some Extras can only be
selected for certain drying programmes.
Touch the Extrassensor control.
Touch the sensor control for the extra you want.
Only press OK when the extra appears on the display.
The relevant symbol for the required extra( or ) lights up.
Gentle tumble
Sensitive items are dried with less mechanical movement (fewer drum rotations).
Anti-crease
At the end of the programme, the drum will continue to rotate in a certain rhythm, depending on the selected programme. This helps to prevent creasing at the end of the programme.
The Anti-crease function is switched off as the factory default setting. The Anti-crease
function can be switched on in the Supervisor level with a variable duration of up to
12hours. You can find this setting in the Supervisor level under the Process technology/
Anti-crease menu.
5.Starting a programme
Starting the programme
The programme can be started as soon as the Start/Stopsensor control is flashing on and
off.
Touch the Start/Stopsensor control.
If a delay start period has been selected, this will appear in the display.
The drying programme will start either straight away or once the delay start period has
elapsed. The programme time left is shown in the display.
25
Page 26

Drying
11:02
Time left
h
2:27
Status
Cottons
Drying
kg
7,0
Parameter info
Normal
°C64
Calling up current programme parameters
During the programme running time, you can use the pull-down menu to view the parameters of the current drying programme (e.g. drying level, load capacity, selected Extras, drying temperature).
To call up the pull-down menu, swipe your finger from top to bottom during the pro-
gramme running time.
The pull-down menu displays the parameters of the drying programme.
To close the pull-down menu again, swipe your finger from bottom to top.
Programme running time/Time left estimation
The programme running time depends on the quantity of laundry, the type of fabric, the residual moisture in the laundry and the water hardness. The displayed programme running
time for drying-level programmes can therefore vary or “jump”. The tumble dryer’s electronic module adapts during the ongoing drying programme. The displayed programme
running time becomes more and more accurate.
When using the programmes for the first time, the displayed time sometimes deviates significantly from the real time left. The difference between the estimated and achieved time
becomes smaller if the corresponding programme is run more often. If different load sizes
are dried in one programme, the time left display can only show an approximate time.
End of the programme
End of the programme
The laundry will be cooled down shortly before the end of the programme. The message
Finish/Cool down will appear on the display during the cooling phase. The laundry can now
be removed.
After the cooling phase and the drying programme is completed, the message Finish is dis-
played.
The tumble dryer will switch off automatically after the set time after the end of a programme.
26
Page 27

Drying
If the Anti-crease * extra has been selected, the drum continues to rotate in intervals
after the end of the programme. This reduces creasing if the laundry cannot be removed
straight away.
*The Anti-crease function is switched off as the factory default setting and can be activated in the Supervisor level.
Removing the laundry
Open the door.
Remove everything from the drum.
Items left in the tumble dryer could be damaged by overdrying when the tumble dryer is
used the next time.
Always remove all items from the drum.
Switch the tumble dryer off by pressing the button.
Care notes
This tumble dryer requires regular maintenance, particularly if it is used on a continuous
basis. Please see “Cleaning and care” for details.
Timer
Prerequisite for setting the timer
TheDelay start must be activated in theSupervisor level in the Controls / Display menu so
that the Timer can be selected. Before the programme starts, the Timer can be used to select a programme start time or programme end time.
Setting the timer
Touch the Timersensor control.
Select the Finish at, Start in or Start at option.
Set the hours and the minutes and confirm your entry with the OKsensor control.
27
Page 28

Cleaning and care
Cleaning the fluff filter
Risk of fire if the tumble dryer is operated without a fluff filter.
If there is no fluff filter, the air channels, heating elements and vent ducting can become
clogged during drying and may catch fire.
The fluff filter must not be removed for cleaning.
Never operate the tumble dryer without the fluff filter in place.
Replace a damaged fluff filter immediately.
A fluff filter collects fluff released by textiles. The fluff filter must be cleaned at least once
per working day as well as in accordance with the corresponding message in the display.
In the event of a heavy build-up of fluff, the fluff filter should be cleaned several times per
day.
Open the fluff filter compartment cover.
Remove the fluff from the fluff filter using your hands.
Do not use pointed or sharp-edged objects to clean the fluff filter.
Otherwise, the fluff filter may become damaged.
Close the fluff filter compartment cover after cleaning the fluff filter.
28
Page 29

Cleaning and care
Cleaning the drum and the outside of the casing
Risk of death due to electric shock.
The tumble dryer must be completely disconnected from the power supply before per-
forming cleaning or maintenance work.
Before starting cleaning or maintenance work, always switch off the tumble dryer at the
main switch (on site).
Do not use a pressure washer or water jet to clean the tumble dryer.
Clean the tumble dryer casing, control panel and plastic parts with a mild cleaning agent
or with a soft, damp cloth only. Then rub the tumble dryer casing, control panel and
plastic parts dry.
Abrasive cleaning agents must not be used to clean the tumble dryer.
The tumble dryer drum must be wiped clean with a soft, damp cloth after drying items
that have been starched.
Check the seal.
Check the latches on the drum door and fluff filter compartment cover.
The air intake vent is located on the rear of the tumble dryer.
This vent must never be covered or blocked with objects.
Keep the area around the tumble dryer – in particular the air intake – clear of fluff.
29
Page 30

Customer Service Department
Contact in case of malfunction
In the event of any faults which you cannot remedy yourself, please contact your Miele
Dealer or Miele Service.
Contact information for Miele Service can be found at the end of this document.
Please note that telephone calls may be monitored and recorded for training purposes and
that a call-out charge will be applied to service visits where the problem could have been
resolved as described in this booklet.
Please quote the model and serial number of your appliance when contacting Miele. This
information can be found on the data plate.
Optional accessories
Optional accessories for this tumble dryer are available from your Miele Dealer or from the
Miele Spare Parts Department.
30
Page 31

*INSTALLATION*
Installation
Installation requirements
The tumble dryer must only be installed and commissioned by Miele Customer Service
Department or an authorised dealer.
The tumble dryer must be installed in accordance with all relevant regulations and
standards.
The dryer must only be operated in a room that has sufficient ventilation and which is
frost-free.
General operating conditions
This dryer is intended only for use in a commercial environment and must only be operated indoors.
Do not install the tumble dryer in a room where there is a risk of frost.
Depending on the nature of the installation site, sound emissions and vibrations may occur.
Tip: Have the installation site inspected and seek the advice of a professional in instances
where increased noise may cause a nuisance.
Transport
The tumble dryer must not be transported without a transport pallet.
Suitable transport aids must always be used during transportation.
At the installation site, the tumble dryer must be lifted from the transport pallet using suitable lifting gear.
Installing the tumble dryer
Place the tumble dryer on a perfectly level, secure and horizontal surface that is able to
withstand the specified floor load.
The floor load created by the tumble dryer is concentrated and transferred to the installation surface via the adjustable feet. A base is not required. However, an uneven floor surface must be compensated for.
31
Page 32

*INSTALLATION*
Installation
PDR514/518/522/914/918/922 PDR528/544/928/944
x 1400mm 1640mm
y 906mm 1206mm
z PDR514/914: 852mm
PDR518/918: 1035mm
PDR522/922: 1164mm
PDR528/928: 1018mm
PDR544/944: 1384mm
To facilitate any future maintenance work, a maintenance corridor with a width of at least
500mm must be set up behind the machine and must be accessible at all times. The
distance between the machine and any walls must not fall below the specified minimum
values.
Adjust the tumble dryer adjustable feet until the machine is level. Use a spirit level to en-
sure correct alignment.
32
Page 33

*INSTALLATION*
Installation
After the machine has been aligned, screw the nuts on the adjustable feet tightly to the
base plate using an open spanner.
Securing the machine
The tumble dryer must be secured to the floor by fitting the tensioning strips supplied
over the machine feet.
Fittings supplied are for bolting the machine to a concrete floor. For other types of flooring, please purchase suitable fastening materials separately.
Electrical connection
The electrical connection must be established by a qualified electrician.
The electrical connection may only be made to an electrical system provided in accord-
ance with all appropriate local and national legislation, regulations and guidelines. Please
also observe the regulations set out by your insurance provider and energy supplier, accident prevention regulations, as well as recognised codes of practice.
Reliable and safe operation of this tumble dryer is only ensured if it has been connected
to the mains electricity supply.
The required supply voltage, power rating and fuse rating can be found on the data plate
on the tumble dryer. Ensure that the supply voltage matches the voltage quoted on the
data plate before establishing the electrical connection to the tumble dryer.
Connection to a supply voltage other than the one quoted on the data plate can damage
the tumble dryer if the voltage is too high.
If more than one voltage is specified on the data plate, the tumble dryer can be conver-
ted for connection to the relevant input voltage. This conversion must be performed by the
Miele Customer Service Department or by an authorised dealer. During the conversion, the
wiring instructions given on the wiring diagram must be followed.
33
Page 34

*INSTALLATION*
Installation
The tumble dryer can either be hard-wired or connected using a plug-and-socket connection in accordance with IEC60309-1. For a hard-wired connection, an all-pole isolation
device must be available at the installation site.
An isolation device is a switch which ensures a contact opening of more than 3mm.
These include circuit breakers, fuses and contactors (IEC/EN60947).
If the mains supply cannot be permanently disconnected, the isolation device (including
plug and socket) must be safeguarded against being switched on either unintentionally or
without authorisation.
Tip: We recommend connecting the tumble dryer to the power supply via a plug and
socket so that it is easier to conduct electrical safety checks (e.g. during maintenance or
repair work).
The tumble dryer must not be connected to devices such as timers which would switch
it off automatically.
Once the electrical connection has been established, the rotation direction of the fan impeller must be checked. It must rotate clockwise. If the fan impeller rotates anti-clockwise,
two phases on the mains terminal must be swapped.
If it is necessary to install a residual current device (RCD) in accordance with local regu-
lations, a residual current device typeB (sensitive to universal current) must be used.
Supply air/exhaust air
The tumble dryer may only be operated when the ducting has been connected and the
room is sufficiently ventilated (see installation instructions).
Steam connection (only for steam-heated variants)
The steam connection must only be carried out by a registered installation technician. The
enclosed installation instructions must be observed as they are important for the steam
connection.
Hot water connection (only for hot water-heated variants)
The hot water connection may only be carried out by a registered installation technician.
The installation instructions must be observed as they are important for the hot water connection.
If a stopcock is desired, it must be fitted on site.
Gas connection (only for gas-heated variants)
The gas connection must only be carried out by a registered installation technician in accordance with the applicable national regulations (see installation instructions).
The use of a gas socket is not permitted at the specified heater rating as the flow rate is
too low.
The gas heating is configured at the factory in line with the gas specifications on the
sticker on the rear of the appliance.
34
Page 35

*INSTALLATION*
Installation
If the gas family is changed, a conversion kit must be requested from the Miele CustomerService Department (please specify the appliance type, serial number, gas family,
gas group, gas connection pressure and country of installation). Follow the installation instructions. This conversion may only be carried out by a registered specialist.
Risk of electric shock and injury due to using the tumble dryer without the complete
casing.
If the casing is dismantled, it is possible to come into contact with live or rotating machine parts.
Once the tumble dryer has been installed, replace all the casing parts that were removed.
35
Page 36

Optional accessories
Accessory parts may only be fitted when expressly approved by Miele. If other parts are
used, warranty, performance and product liability claims will be invalidated.
XCIbox
The optional XCI box allows external hardware from Miele and other suppliers to be connected to the MieleProfessional machine. External hardware includes, e.g. payment system, peak-load system, pressure sensor or an external vent flap.
The XCI box is supplied with mains voltage by the Miele Professional machine.
XKM3200
The optional Miele communication module can be used to establish a data connection
between a MieleProfessional machine and a data processor in accordance with the Ethernet or WiFi standard.
The communication module is intended exclusively for commercial use and is supplied
with mains voltage directly via the Miele Professional machine. No additional power connection is required. The Ethernet interface provided via the communication module complies with SELV (safety extra low voltage) requirements in accordance with EN60950.
Connected external machines must also comply with SELV.
Data protection and data security
When you activate the networking function and connect your appliance to the Internet,
your appliance sends the following data to the Miele Cloud:
- Appliance serial number
- Appliance model and technical features
- Appliance status
- Information about the software status of your appliance
Initially, this data cannot be assigned to a specific user and is not saved permanently. Data
cannot be saved permanently or assigned to a specific user until after you have linked your
appliance to a user. Data transmission and processing are governed by Miele’s strict security standards.
Factory default settings for network configuration
You can reset all of the settings on the communication module or your integrated WiFi
module to the factory default settings. The network configuration should be reset
whenever an appliance is being disposed of or sold, or if a used appliance is being put into
operation. This is the only way to ensure that all personal data has been removed and the
previous owner will no longer be able to access the appliance.
Copyrights and licences
For the purpose of operating and controlling the communication module, Miele uses proprietary or third-party software that is not covered by open source licensing terms. These
items of software/software components are protected by copyright. The copyright powers
of Miele and third parties must be respected.
Furthermore, this communication module contains software components which are distributed under open source licence conditions. The open source components contained in the
appliance along with the corresponding copyright notices, copies of the licensing terms
36
Page 37

Optional accessories
valid at the time and any further information can be accessed locally by IP using a web
browser (https://<IP address>/Licenses). The liability and warranty arrangements for the
open source licences displayed at this location only apply in relation to the respective
rights holders.
37
Page 38

Supervisor level
11:02
Programmes
Favourites
Supervisor
Help
Opening the Supervisor level
Touching the sensor control takes you to the Supervisor level.
Access via code
Supervisor level is accessed using a code.
Factory default: The code is 000.
Change code
You can alter the Supervisor level access code to protect the dryer from unauthorised access.
Be careful when entering a new code.
You will need to inform Miele Service if you forget your new code. Miele Service will have
to reset the code.
Make a note of your new code and store it in a safe place.
Closing the settings menu
Touch the sensor.
The display will then go back to the previous menu level.
Touch the sensor.
The display will change to the main menu.
Controls / Display
Language
The display can be set to appear in one of several different languages. To select the language you want, go to the Languages sub-menu.
You can change the language as follows:
- Permanently using the supervisor level (=“Supervisor language”).
- For the duration of the current programme only using the sensor control. The su-
pervisor language is displayed again at the end of the programme.
Language entry
The display can be set to one of several different user languages. This setting allows you
to determine how languages can be selected.
You can change the language as follows:
38
Page 39

Supervisor level
International
6 languages are available. The sensor control is not active. Note the setting Set lan-
guages.
Language setting
The sensor control can be used to select a language. All languages are available
(factory default).
You can change the order of the first 4 languages. These slots are allocated to the most
commonly used languages.
Standard language
The user language cannot be changed. The user language is the same as the supervisor
language. The sensor control is not active.
Set languages
The languages for the settingInternational lang. entry can be changed.
Six languages can be selected. All languages are available.
If you wish to add a new language to the language menu:
Six languages can be selected. All languages are available.
If you wish to add a new language to the language menu:
First select the language you want to replace.
All available languages are displayed.
Select and confirm the language to replace the previous language.
The new language appears instead of the old one.
Display brightness
The brightness of the display can be altered. The setting depends on the various lighting
conditions in the place of installation.
- It can be set to one of 10 different levels.
Clock display
After selecting the clock format, you can set the time of day.
Clock format
- Factory default: 24-hour display
- 12-hour display
- No clock
Set
- The time can be set.
Date
The date can be set after selecting the date format.
- Date format
39
Page 40

Supervisor level
The date can be shown starting with the day, month or year.
- Date
The date is set.
Volume
The volume for various sounds can be changed.
The volume can be changed.
- Finish tone
- Keypad tone
- Welcome tone
- Fault alarm
The acoustic signal that indicates a fault can be switched off. The volume cannot be
changed here.
Res. moisture display
In addition to displaying the drying level, the residual moisture can also be indicated as a
percentage.
- Factory default setting: Without % value
- With % value
Visibility parameters
Various parameters are offered/displayed when a programme is selected. You can decide
which parameters should not be displayed. These parameters can then not be edited during programme selection.
- Residual moisture
- Duration
- Low temperature
- Anti-crease
- Load size
- Drying temperature
“Display” off status
The display switches off to save energy; only the Start/Stopsensor flashes slowly. You
can change this setting.
Changing this setting leads to increased energy consumption.
- Off
No switching off
- On (10 min.) Not curr.prog.
The display will remain on during the programme sequence but will go out 10minutes
after the end of the programme.
40
Page 41

Supervisor level
- Logo (10 min.) Not curr.prog.
The display will remain on during the programme sequence but the logo will light up
10minutes after the end of the programme.
- Factory default: On after 10 min.
The display is switched off after 10minutes.
- On (30 min.) Not curr.prog.
The display will remain on during the programme sequence but will go out 30minutes
after the end of the programme.
- Logo (30 min.) Not curr.prog.
The display will remain on during the programme sequence but the logo will light up
30minutes after the end of the programme.
- On after 30 min.
The display will go out after 30minutes.
“Machine” off status
In order to save energy, the tumble dryer will switch off automatically after the end of the
programme or if no further selection is made. You can change this setting.
Changing this setting leads to increased energy consumption.
- No switch off
- Factory default: Switch off after 15minutes
- Switch off after 20minutes
- Switch off after 30minutes
Delay start
The delay start (timer) can be activated or deactivated.
- Factory default: Off
- On
Memory
The tumble dryer saves the settings that were last selected for a drying programme (drying stage and/or extra option, or the duration for some programmes).
- Factory default: Off
- On
Temperature unit
You can select the unit for the temperature display.
- Factory default: °C
- °F
Weight unit
You can decide whether load quantities are displayed in “kg” or “lbs”.
- Factory default: kg
41
Page 42

Supervisor level
- lb
Logo
You can choose whether the “Miele Professional” logo or your own logo appears in the
display.
For the setting Controls, the option Launderette ext. (12 prog), Launderette basic int. time or
Laundrette basic ext. time must be selected.
- Miele Professional logo
- Customer logo
Change code
You can alter the access code to the Supervisor level.
Enter the current code.
Enter a new code.
Programme selection
Controls
You can select whether the tumble dryer is operated as a “launderette” machine. Shortcuts are the easiest way to operate the machine. Operating staff are unable to change
pre-set programmes.
Tip: Start by configuring all necessary settings and changes to the tumble dryer before adjusting any of the options below.
Caution: When activating any of these options, the Supervisor level will no longer be
available.
You will no longer be able to access the Supervisor level via the display. Please follow
the instructions below if you wish to change any other settings.
Opening the Supervisor level (launderette version)
Switch the tumble dryer on and open the dryer door.
Touch the Start/Stopsensor and hold it down whilst carrying out steps -.
Close the dryer door.
Wait until the Start/Stopsensor, which will now be flashing quickly, lights up con-
stantly...
... and then release the Start/Stopsensor.
- Standard
Factory default: all (selected) programmes are available.
- Launderette, basic (4 prog)
4 programmes are available.
Under Favourite programmes, you can set which 4 programmes to select/modify.
- Launderette ext. (12 prog)
42
Page 43

Supervisor level
12 programmes are available.
Under Favourite programmes, you can set which 12 programmes to select/modify.
The first 3 programmes can be selected directly. The remaining programmes are selected via another list.
- Laundrette basic ext. time
4 time programmes* with different temperature levels are time-controlled via an external
payment system.
The set value indicates the programme running time and cannot be modified by the user.
This option is only available with an external payment system.
* The maximum programme running time is specified during initial commissioning.
- Launderette basic int. time
4 time programmes* with different temperature levels are time-controlled via the tumble
dryer electronic modules.
The set value indicates the maximum programme running time and can be modified by
the user.
* The maximum programme running time is specified during initial commissioning.
- External prog. selection
A communication module can be used to select the programme from an external terminal.
Programme packages
This allows you to specify the scope of the tumble dryer programme. You can select all of
the programmes or individual programmes from the relevant programme packages.
The tumble dryer's additional scope of programmes can be configured. The programmes
are listed under “Programme chart”.
Favourite progs.
After switching on, you can also select a programme via: Favourites.
12 programmes can be stored as favourites based on your own priorities and requirements.
These favourites will also be made available in the control options
- Launderette ext. (12 prog)
- Launderette, basic (4 prog) (the first 4 of the 12 favourites).
The control options can be defined under Controls.
Tip: You can assign a different colour to each programme. In this case, the Prog. colour allocation setting must be set to On.
Changing Favourite programmes
Select the programme you wish to change or replace.
Confirm the programme or the setting to be changed.
Another menu opens, enabling you to select a new programme or change the parameters.
43
Page 44

Supervisor level
Confirm using the Savesensor control.
Your selection is now active.
Special programmes
You can put together 5special residual moisture or time-controlled programmes and assign your own programme names.
First, enter the programme name.
Select the special programme you want to change.
The Save as menu opens.
Use the letters and symbols below the line to enter the name.
Touch the Savesensor control.
You can now enter the parameters for a Res. moisture programme or Timed drying.
The 5 special programmes are pre-programmed at the factory. You can change these special programmes.
The special programmes are added to the programme packages. Enter the name and settings of your special programme into the “Special programmes” table in the “Programme
overview” chapter.
Res. moisture programme:
- Final residual moisture:
-6%(dry) – 40%(damp)
- Extra drying time:
0–60minutes
- Temperature(Process air):
cold – 60°C
- Cooling down temperature(Process air):
40–55°C
- Anti-crease
– Drum rotation, main direction:
0–500seconds
– Pause:
100–3000seconds
– Drum reversal:
0–500seconds
Timed drying:
- Running time:
1–120minutes
- Temperature(Process air):
cold – 60°C
- Cooling down temperature(Process air):
40–55°C
44
Page 45

Supervisor level
- Anti-crease
– Drum rotation, main direction:
0–500seconds
– Drum reversal:
0–500seconds
– Pause:
100–3000seconds
Sort programmes
Programmes can be moved within the programme list and in the Favourites list.
- Factory default: Off
- On
Moving programmes/favourites
You can move/change the order of the programmes (programme menu – single option list).
You can also move and change the order of the favourites that you edit in the Supervisor
level under Favourite programmes.
Touch the programme that you wish to move.
Press and hold the sensor until the frame changes.
Drag the programme to the required place.
Prog. colour allocation
You can assign a specific colour to a favourite programme. In the list of favourites, each
favourite programme is given a coloured frame, which can be adjusted.
- Factory default: Off
- On
Process technology
Anti-crease
At the end of the programme, the drum will continue to rotate at intervals if the laundry is
not removed immediately.
Changing this setting leads to increased energy consumption.
The setting can be switched off or a time between 1 and 12 hours can be selected.
Factory default: Off
Drying levels
Changing this setting leads to increased energy consumption.
You can alter the drying levels for the Cottons, Minimum iron, Automatic plus and Machine
iron programmes.
Drying levels Cottons, Minimum iron and Automatic plus can be set to one of 7different
levels.
45
Page 46

Supervisor level
Factory default: normal
The residual moisture in drying level Machine iron can be set in 11levels from 16% (dryer)
to 26% (damper).
Factory default: 20%
Further cooling
Before the end of the programme, the temperature of the dried laundry is monitored and
the cooling phase at the end of the programme is extended if necessary.
Changing this setting leads to increased energy consumption.
- Factory default: off
- On
Cooling down temp.
The laundry will be cooled down automatically before the end of the programme. The
automatic cooling-down phase which takes place before the end of a programme can be
set at a cooler level for all programmes. This means that the cooling phase is extended.
Changing this setting leads to increased energy consumption.
The setting can be changed from 40°C–55°C.
Factory default: 55°C
Fan pulsed operation
The fan operates intermittently to release laundry that is stuck in front of the inner drum
door. With heat-pump dryers, the fan function operates intermittently to dry duvets.
The fan is switched on and off at certain intervals.
Service
Clean out the airways
The tumble dryer's electronics calculate the degree at which fluff or detergent residue in
the fluff filters and air ducts are impairing performance. A message to check the contamination appears. You can decide at what level of fluff this reminder should be emitted.
This prompt, which you can configure, is displayed: Clean the fluff filter and rinse the plinth
filter.
- Off
The reminder does not appear. However, if there is a very severe blockage in the ducting,
the programme will be cancelled and the reminder will appear in the display regardless of
this option.
- Heavy
The reminder only appears when there is a heavy build-up of fluff.
- Factory default: normal
- Sensitive
The reminder appears when there is only a small build-up of fluff.
46
Page 47

Supervisor level
Clean the filters
The fluff filter in the air duct area must be cleaned on a regular basis. You can set an
hourly interval for the reminder.
The selected hourly interval depends on how much fluff tends to build up and how often
you wish to clean the filter, e.g. for hygiene purposes.
You can adjust this reminder: Clean the filters
- Time interval of 5–55hours
- Factory default: after 55hours
- Off
Service interval
The tumble dryer shows a custom message at a selected interval to prompt you to undertake specific maintenance tasks.
Three different messages can be created: 1/2/3. Each message is created in the language
and alphabet of the current supervisor language.
Your message is displayed at the end of the programme and can be acknowledged with
OK. The same message appears at the end of the next programme.
Settings
This setting allows you to determine the interval (by hours or date) at which the message
appears.
- Factory default: Off
- By time
You can then select a time interval from 1–9999 hours.
- By date
You can enter a date.
Message text
Enter your message for your planned maintenance work. You can edit one, two or all three
of the 1/2/3 messages.
Reset display
The message appears until the display is permanently reset. The message then appears
again once the next interval is reached.
External applications
External exhaust flap
External hardware is connected via the Miele XCI box.
The time delay between the external exhaust air flap's activation point and the switch-on
time for the drum/fan motor is regulated.
A message appears in the display while the exhaust air flap is open.
- Factory default: Off
47
Page 48

Supervisor level
This option must always be selected if there is no exhaust air flap to activate. This prevents the programme from being cancelled.
- On
- 0 seconds
- 1 second
- 2 seconds
...
- 300 seconds
Additional fan
External hardware is connected via the Miele XCI box.
If an extra fan is connected, it must be switched on at the same time as the drive unit.
- Off
- On
Pressure sensor
External hardware is connected via the Miele XCI box.
When using a shared exhaust air duct, one tumble dryer may have to be switched off or
suppressed from the outset if certain pressure levels have built up in the ducting. Because the pressure sensor is an external unit, there is the option of reading in both a logical normally open contact or a normally closed contact.
A message appears in the display while the exhaust air flap is open.
- Off = Not active
- NO contact = Active
Responds to high potential
- NC contact = Active
Responds to low potential
Peak load signal
External hardware is connected via the Miele XCI box.
The peak-load negotiation function enables the tumble dryer to be connected to an energy management system. When a signal is registered, the tumble dryer's heater is
switched off for a short period or the appliance is prevented from being switched on.
The tumble dryer may only be operated with a peak-load system if this system is connected to the tumble dryer via the Miele XCI box.
- Factory default: no function
- Peak load with 230V
- Peak load with 0V
48
Page 49

Supervisor level
Peak load prevention
With this function, the application of a hygiene programme is not amended when a peak
load signal is in place. The heater stays switched on.
- Factory default: Off
- On
COM module selection
This tumble dryer is equipped with an integrated WiFi module. However, the dryer can
also be equipped with an external module.
- Off
- Internal module (factory default)
The internal WiFi module is used.
- External module
An XKM module or RS232 module is inserted into the module slot.
Availability of Miele digital products
The ability of Miele digital products depends on the availability of the services in your
country.
The different services are not available in all countries.
For information about availability, please visit www.miele.com.
WiFi / LAN
Control the networking of your tumble dryer.
- Setup
This message only appears if the tumble dryer has not yet been connected to a WiFi network.
- Deactivate (visible when the network is activated)
The network remains set up; the WiFi function is switched off.
- Activate (visible when the network is deactivated)
The WiFi function is reactivated.
- Connection status (visible when the network is activated)
The following values are displayed:
– The quality of WiFi reception
– The network name
– The IP address
- Reset (visible when set up)
Resets the WiFi login (network) to immediately re-establish a new connection.
- Reset (visible if already set up)
The network is no longer set up. A new connection has to be established in order to use
the network again.
– The WiFi is switched off
– The WiFi connection will be reset to the factory default setting
49
Page 50

Supervisor level
Network time
The date and time can be synchronised over the network.
- Off
The date and time are not synchronised over the network.
- As master
The machines are in a network but are not connected to the Internet. A machine is declared as the master and sends data to the slave devices.
- As slave
The machines are in a network and are connected to the Internet. All machines are configured as slaves. Data is synchronised over the Internet.
Remote
Programmes are selected on an external terminal.
Factory default: Off
RemoteUpdate
The RemoteUpdate function is used for updating the software in your tumble dryer.
The RemoteUpdate function is deactivated as standard.
If you do not install a RemoteUpdate, you can continue to use your tumble dryer in the
usual way. However, Miele recommends installing RemoteUpdates.
The RemoteUpdate menu option is only displayed and can only be selected if you have
added your tumble dryer to your WiFi network.
Miele’s RemoteUpdate function can only be used if the tumble dryer is connected to a WiFi
network and you have an account in the Miele Professional app. The tumble dryer must be
registered in the app.
See the Miele Professional app for terms and conditions of use.
Some software updates can only be carried out by Miele Service.
If a RemoteUpdate is available for your washing machine, it will be displayed automatically
when the Operator level is open.
You can choose to start the RemoteUpdate immediately or wait until later. If you select
“Start later”, the prompt to run the RemoteUpdate will be displayed again the next time you
switch on your washing machine.
The RemoteUpdate can take a few minutes.
Please note the following information about the RemoteUpdate function:
- You will only receive a message when a RemoteUpdate is available.
- Once a RemoteUpdate has been installed, it cannot be undone.
- Do not switch off the tumble dryer during a RemoteUpdate. Otherwise, the RemoteUpdate will be aborted and will not be installed.
50
Page 51

Supervisor level
SmartGrid
The SmartGrid setting is only visible if a WiFi network has been set up and activated. This
function can be used for starting your MieleProfessional machine automatically at a time
when your energy supplier’s electricity tariffs are most economical.
Activating SmartGrid gives the Timer sensor control a new function. Use the Timer sensor
control to set SmartStart. The tumble dryer will then start within the timeframe specified
when it receives a signal from the energy supplier. If it has not received a signal from the
energy supplier by the latest start time set, the tumble dryer will start automatically.
Factory default: off
Machine parameters
Legal information
Open source licences
You can view information here.
Copyrights and licences
For the purpose of operating and controlling the machine, Miele uses proprietary or thirdparty software that is not covered by open source licensing terms. These items of software/software components are protected by copyright. The copyrights held by Miele and
third parties must be respected.
Furthermore, this machine contains software components which are distributed under
open source licence conditions. Please refer to the menu option Settings/ Machine para-
meters/Legal information/Open source licences in the machine for the open source compon-
ents contained therein, together with the corresponding copyright notices, copies of the licensing conditions valid at the time and any further information. The liability and warranty
arrangements for the open source licences displayed in this location only apply in relation
to the respective rights holders.
51
Page 52

Technical data
PDR914 PDR918 PDR922 PDR928 PDR944
Height 1400mm 1400mm 1400mm 1640mm 1640mm
Width 906mm 906mm 906mm 1206mm 1206mm
Depth 852mm 1035mm 1162mm 1018mm 1385mm
Depth with door open 1456mm 1639mm 1768mm 1622mm 1988mm
Drum volume 250l 325l 400l 500l 800l
Maximum load size (dry weight) 14kg 18kg 22kg 28kg 44kg
Supply voltage See data plate
Fuse rating (on site) See data plate
Power rating See data plate
Test certifications awarded See data plate
Product safety standard IEC335-1, IEC335-2-11, IEC335-2-40
Sound pressure level, ENISO11204 <70dB(A)
Sound power level, ENISO9614-2 <80dB(A)
Frequency range 2.4000–2.4835GHz
Maximum transmission power <100mW
52
Page 53

EU declaration of conformity
Miele hereby declares that this PT013 tumble dryer complies with Directive2014/53/EU.
The complete text of the EU declaration of conformity is available from one of the following
Internet addresses:
- Under “Products”, “Download” at www.miele.de/professional/index.htm
- Or go to http://www.miele.de/professional/gebrauchsanweisungen-177.htm and enter
the name of the product or the serial number
53
Page 54

Malaysia
Miele Sdn Bhd
Suite 12-2, Level 12
Menara Sapura Kencana Petroleum
Solaris Dutamas No. 1, Jalan Dutamas 1
50480 Kuala Lumpur, Malaysia
Phone: +603-6209-0288
Fax: +603-6205-3768
Miele New Zealand Limited
IRD 98 463 631
8 College Hill
Freemans Bay, Auckland 1011, NZ
Tel: 0800 464 353
Internet: www.miele.com.au/professional
E-mail: sales@miele-professional.com.au
New Zealand
Miele Pte. Ltd.
29 Media Circle, #11-04 ALICE@Mediapolis
Singapore 138565
Tel: +65 6735 1191, Fax: +65 6735 1161
E-Mail: info@miele.com.sg
Internet: www.miele.sg
Singapore
Miele (Pty) Ltd
63 Peter Place, Bryanston 2194
P.O. Box 69434, Bryanston 2021
Tel: (011) 875 9000, Fax: (011) 875 9035
E-mail: info@miele.co.za
Internet: www.miele.co.za
South Africa
Miele Appliances Ltd.
Showroom 1, Eiffel 1 Building
Sheikh Zayed Road, Umm Al Sheif
P.O. Box 114782 - Dubai
Tel. +971 4 3044 999, Fax. +971 4 3418 852
800-MIELE (64353)
E-Mail: info@miele.ae, Website: www.miele.ae
United Arab Emirates
United Kingdom
Miele Co. Ltd., Fairacres, Marcham Road
Abingdon, Oxon, OX14 1TW
Professional Sales, Tel: 0845 365 6608
E-mail: professional@miele.co.uk
Internet: www.miele.co.uk/professional
Miele Australia Pty. Ltd.
ACN 005 635 398, ABN 96 005 635 398
1 Gilbert Park Drive, Knoxfield, VIC 3180
Tel: 1300 731 411
Internet: www.miele.com.au/professional
E-mail: sales@miele-professional.com.au
Australia
Miele Electrical Appliances Co., Ltd.
1-3 Floor, No. 82 Shi Men Yi Road
Jing' an District, 200040 Shanghai, PRC
Tel: +86 21 6157 3500, Fax: +86 21 6157 3511
E-mail: info@miele.cn, Internet: www.miele.cn
China Mainland
Miele (Hong Kong) Ltd.
41/F - 4101, Manhattan Place
23 Wang Tai Road, Kowloon Bay, Hong Kong
Tel: (852) 2610 1025, Fax: (852) 3579 1404
Email: customerservices@miele.com.hk
Website: www.miele.hk
Hong Kong, China
Miele India Pvt. Ltd.
1st Floor, Copia Corporate Suites,
Commercial Plot 9, Mathura Road, Jasola,
New Delhi - 110025
E-mail: customercare@miele.in, Website: www.miele.in
India
Miele Ireland Ltd.
2024 Bianconi Ave., Citywest Business Campus, Dublin 24
Tel: (01) 461 07 10, Fax: (01) 461 07 97
E-Mail: info@miele.ie, Internet: www.miele.ie
Ireland
Manufacturer: Miele & Cie. KG
Carl-Miele-Straße 29, 33332 Gütersloh, Germany
Alteration rights reserved / Publication date: 12.21 M.-Nr. 11 840 480 / 00
 Loading...