

Page 1
de Gebrauchsanweisung kabelloser Handstaubsauger
en Operating instructions Cordless stick vacuum cleaner
es Instrucciones de manejo Aspirador de escoba sin cable
fr Mode d'emploi Aspirateur balai sans fil
it Istruzioni d'uso Aspirapolvere senza filo
nl Gebruiksaanwijzing snoerloze steelstofzuiger
pt Instruções de utilização Aspirador vertical sem fios
HS19
M.-Nr. 11 290 910
Page 2

de ....................................................................................................................... 5
en ....................................................................................................................... 33
es ........................................................................................................................ 62
fr ......................................................................................................................... 91
it ......................................................................................................................... 119
nl ........................................................................................................................ 148
pt ........................................................................................................................ 175
2
Page 3

de - Inhalt
Sicherheitshinweise und Warnungen .................................................................. 5
Gerätebeschreibung............................................................................................ 14
Ihr Beitrag zum Umweltschutz........................................................................... 16
Abbildungsverweise............................................................................................ 17
Aufstellen und Anschließen................................................................................ 17
Staubsauger zusammensetzen ............................................................................ 17
Comfort-Handgriff aufstecken .............................................................................. 17
PowerUnit und Saugrohr verbinden ..................................................................... 17
Akku einsetzen ..................................................................................................... 18
Elektrobürste anschließen .................................................................................... 18
Allgemeine Hinweise zum Akku ............................................................................ 18
Akku laden (ohne Wandmontage) ........................................................................ 18
Akku laden (mit Wandmontage) ........................................................................... 19
Wandmontage ...................................................................................................... 19
Montageplatte befestigen .................................................................................... 19
Ladekabel in Wandhalterung befestigen .............................................................. 19
Zubehörhalter aufstecken (bei Bedarf) ................................................................. 19
Wandhalterung aufstecken ................................................................................... 19
Anzeige Akku-Ladezustand (beim Laden) ............................................................ 20
Anzeige Akku-Ladezustand (bei Gebrauch) ......................................................... 20
Verwendung des mitgelieferten Zubehörs ....................................................... 20
Elektrobürste Multi Floor XXL ............................................................................... 21
Handelektrobürste Electro Compact .................................................................... 21
Zusatzakku und Akku-Ladeschale ....................................................................... 21
Gebrauch.............................................................................................................. 21
Ein- und Ausschalten ........................................................................................... 21
Saugleistung wählen ............................................................................................. 22
Arbeitsbereich ausleuchten................................................................................... 22
Abstellfunktion für kurze Saugpausen................................................................... 22
Wartung................................................................................................................ 22
Staubbehälter leeren ............................................................................................ 22
Feinstaubfilter reinigen ......................................................................................... 23
Vorfilter reinigen .................................................................................................... 23
Staubbehälter reinigen .......................................................................................... 24
Elektrobürste/Handelektrobürste reinigen ............................................................ 24
Akku austauschen................................................................................................. 25
Was tun, wenn ... .................................................................................................26
3
Page 4

de - Inhalt
Fehlermeldungen................................................................................................. 28
Pflege.................................................................................................................... 29
Kundendienst....................................................................................................... 29
Kontakt bei Störungen .......................................................................................... 29
Garantie................................................................................................................. 29
Nachkaufbares Zubehör..................................................................................... 29
4
Page 5

de - Sicherheitshinweise und Warnungen
Dieser Staubsauger entspricht den vorgeschriebenen Sicherheitsbestimmungen. Ein unsachgemäßer Gebrauch
kann zu Schäden an Personen und Sachen führen.
Lesen Sie vor dem ersten Gebrauch des Staubsaugers
die Gebrauchsanweisung. Sie gibt wichtige Hinweise für
Sicherheit, Gebrauch und Wartung des Staubsaugers.
Dadurch schützen Sie sich und andere und vermeiden
Schäden.
Entsprechend der Norm IEC 60335-1 weist Miele ausdrücklich darauf hin, das Kapitel „Aufstellen und Anschließen“ sowie die Sicherheitshinweise und Warnungen unbedingt zu lesen und zu befolgen.
Miele kann nicht für Schäden verantwortlich gemacht
werden, die infolge von Nichtbeachtung dieser Hinweise
verursacht werden.
Bewahren Sie die Gebrauchsanweisung auf und geben
Sie diese an einen eventuellen Nachbesitzer weiter.
Schalten Sie den Staubsauger nach jedem Gebrauch, vor
jedem Zubehörwechsel, vor jeder Wartung, Pflege, Problembehebung und Fehlerbehebung aus. Nutzen Sie dazu den Ein-/Ausschalter am Comfort-Handgriff.
Bestimmungsgemäße Verwendung
Dieser Staubsauger ist für die Verwendung im Haushalt
und in haushaltsähnlichen Umgebungen bestimmt. Dieser
Staubsauger ist nicht für den Baustellenbetrieb geeignet.
Dieser Staubsauger ist nicht für den Gebrauch im Au-
ßenbereich bestimmt.
5
Page 6

de - Sicherheitshinweise und Warnungen
Dieser Staubsauger ist für das tägliche Saugen von Tep-
pichen, Teppichböden und unempfindlichen Hartböden geeignet.
Dieser Staubsauger ist für die Verwendung bis zu einer
Höhe von 4.000m über dem Meeresspiegel bestimmt.
Benutzen Sie den Staubsauger ausschließlich zum Auf-
saugen von trockenem Sauggut. Menschen und Tiere dürfen Sie nicht absaugen. Alle anderen Anwendungsarten,
Umbauten und Veränderungen sind unzulässig.
Personen, die aufgrund ihrer physischen, sensorischen
oder geistigen Fähigkeiten oder ihrer Unerfahrenheit oder
Unkenntnis nicht in der Lage sind, den Staubsauger sicher
zu bedienen, dürfen diesen Staubsauger nicht ohne Aufsicht oder Anweisung durch eine verantwortliche Person
benutzen.
Die Verpackung schützt den Staubsauger vor Transport-
schäden. Wir empfehlen, die Verpackung für Transportzwecke aufzubewahren.
Kinder im Haushalt
Kinder unter 8 Jahren müssen vom Staubsauger fernge-
halten werden, es sei denn, sie werden ständig beaufsichtigt.
Kinder ab 8 Jahren dürfen den Staubsauger nur ohne
Aufsicht bedienen, wenn ihnen der Staubsauger so erklärt
wurde, dass sie ihn sicher bedienen können. Kinder müssen mögliche Gefahren einer falschen Bedienung erkennen
und verstehen können.
6
Page 7

de - Sicherheitshinweise und Warnungen
Kinder dürfen den Staubsauger nicht ohne Aufsicht rei-
nigen oder warten.
Beaufsichtigen Sie Kinder, die sich in der Nähe des
Staubsaugers aufhalten. Lassen Sie Kinder niemals mit
dem Staubsauger spielen.
Erstickungsgefahr. Kinder können sich beim Spielen in
Verpackungsmaterial (z.B. Folien) einwickeln oder es sich
über den Kopf ziehen und ersticken. Halten Sie Verpackungsmaterial von Kindern fern.
Technische Sicherheit
Der Staubsauger wird mit 25,2 V betrieben.
Er ist ein Gerät der Schutzklasse III.
Er ist ein Gerät, bei dem der Schutz gegen elektrischen
Schlag durch Anschluss an Sicherheitskleinspannung gegeben ist und in dem Spannungen, die höher als Sicherheitskleinspannung sind, nicht erzeugt werden. Die Ladung
des Staubsaugers erfolgt über ein Ladegerät der Schutzklasse II.
Kontrollieren Sie den Staubsauger und alle Zubehörteile
vor der Benutzung auf sichtbare Schäden. Nehmen Sie
einen beschädigten Staubsauger nicht in Betrieb.
Vergleichen Sie die Anschlussdaten auf dem Typen-
schild des Ladegerätes (Netzspannung und Frequenz) mit
denen des Versorgungsnetzes. Diese Daten müssen unbedingt übereinstimmen. Das Ladegerät ist ohne Änderung
geeignet für 50Hz und 60Hz.
7
Page 8

de - Sicherheitshinweise und Warnungen
Die Netzsteckdose muss über eine Sicherung 16A oder
10A träge abgesichert sein.
Die Miele Elektrobürste Multi Floor XXL und die Miele
Handelektrobürste Electro Compact (je nach Modell) sind
motorisch angetriebene Zusatzgeräte, speziell für diesen
Miele Staubsauger. Das Betreiben des Staubsaugers mit
einer anderen Miele Elektrobürste/Handelektrobürste oder
einer Elektrobürste/Handelektrobürste eines anderen Herstellers ist aus Sicherheitsgründen nicht erlaubt.
Lagern Sie den Staubsauger bei einer Umgebungstem-
peratur von 0°C bis 45°C.
Eine Reparatur des Staubsaugers während der Garantie-
zeit darf nur von einem von Miele autorisierten Kundendienst ausgeführt werden, da sonst bei nachfolgenden
Schäden kein Garantieanspruch besteht.
Lassen Sie Reparaturen nur von einer von Miele autori-
sierten Fachkraft ausführen. Durch unsachgemäße Reparaturen können erhebliche Gefahren für den Benutzer entstehen.
Nur bei Originalersatzteilen gewährleistet Miele, dass sie
die Sicherheitsanforderungen erfüllen. Defekte Bauteile
dürfen nur gegen Originalersatzteile ausgetauscht werden.
Reinigung
Tauchen Sie den Staubsauger und die Zubehörteile nie-
mals in Wasser.
8
Page 9

de - Sicherheitshinweise und Warnungen
Die Elektrobürste/Handelektrobürste (je nach Modell),
die PowerUnit, das Saugrohr und der Comfort-Handgriff
enthalten elektrische Leitungen. Die Steckkontakte dürfen
nicht mit Wasser in Berührung kommen - eine feuchte Reinigung dieser Teile ist deshalb nicht erlaubt.
Reinigen Sie den Staubsauger und die Zubehörteile nur
trocken oder mit einem leicht feuchten Tuch. Ausnahme:
– Staubbehälter: Leeren Sie den Staubbehälter und ent-
nehmen Sie den Vorfilter. Reinigen Sie den Staubbehälter nur mit Wasser und mildem Spülmittel. Trocknen Sie
den Staubbehälter anschließend sorgfältig ab. Setzen
Sie den Vorfilter wieder ein.
Sachgemäßer Gebrauch
Benutzen Sie den Staubsauger nicht ohne Staubbehäl-
ter, Vorfilter, Feinstaubfilter und Motorschutzfilter.
Saugen Sie keine brennenden oder glühenden Gegen-
stände, wie z.B. Zigaretten oder scheinbar erloschene
Asche oder Kohle, auf.
Saugen Sie keine Flüssigkeiten und keinen feuchten
Schmutz auf. Lassen Sie feucht gereinigte oder schampunierte Teppiche und Teppichböden vor dem Absaugen vollständig trocknen.
Saugen Sie keinen Tonerstaub auf. Toner, der z.B. bei
Druckern oder Kopiergeräten verwendet wird, kann elektrisch leitfähig sein.
9
Page 10

de - Sicherheitshinweise und Warnungen
Saugen Sie keine leicht entflammbaren oder explosiven
Stoffe oder Gase auf und saugen Sie nicht an Orten, an
denen solche Stoffe gelagert sind.
Fassen Sie nicht in die laufende Bürstenwalze der Elek-
trobürste/Handelektrobürste (je nach Modell).
Saugen Sie mit der Elektrobürste/Handelektrobürste (je
nach Modell) nicht in Kopfnähe.
Vermeiden Sie, mit dem Saugstrom in Kopfnähe zu kom-
men.
Zubehör
Verwenden Sie nur Zubehör mit dem „ORIGINAL Miele“-
Logo auf der Verpackung. Nur dafür kann der Hersteller die
Sicherheit gewährleisten.
Sicherheitshinweise und Warnungen für Akku AP01, Ladegerät LG01, Ladeschale LS03 (je nach Modell)
Kinder im Haushalt
Personen (einschließlich Kinder), die aufgrund ihrer
physischen, sensorischen oder geistigen Fähigkeiten oder
ihrer Unerfahrenheit oder Unkenntnis nicht in der Lage
sind, das Ladegerät LG01/die Ladeschale LS03 sicher zu
bedienen, dürfen diesen Staubsauger nicht ohne Aufsicht
oder Anweisung durch eine verantwortliche Person benutzen.
Der Akku AP01 darf nicht in Kinderhände gelangen.
10
Page 11
de - Sicherheitshinweise und Warnungen
Kinder müssen von dem Ladegerät LG01 und der Lade-
schale LS03 ferngehalten werden, es sei denn, sie werden
ständig beaufsichtigt.
Technische Sicherheit
Der Akku AP01, das Ladegerät LG01 und die Ladescha-
le LS03 sind für diesen Miele Staubsauger HS19 zu verwenden. Das Betreiben dieses Staubsaugers mit einem
Akku, einem Ladegerät oder einer Ladeschale eines anderen Herstellers ist aus Sicherheitsgründen nicht erlaubt.
Benutzen Sie zum Laden des Akkus AP01 nur das mit-
gelieferte Ladegerät LG01/xx oder die mitgelieferte Ladeschale LS03/xx.
xx steht für 01, 02, 03 oder 04 und damit für die Ländervariante Ihres Ladegerätes LG01 und Ihrer Ladeschale LS03:
XX
01 AT, BE, BG, CH, CL, CZ, DE, DK, EE, ES, FI, FR, GR, HR, HU, IN, IT, KR,
KZ, LT, LU, LV, NL, NO, PL, PT, RO, RS, RU, SE, SI, SK, TR, UA, ZA
02 AE, GB, HK, IE, MY, SG
03 CA, JP, MX, US
04 AU, CN, NZ
Bei der Verwendung eines Netzsteckeradapters muss
dieser für den dauerhaften Betrieb zugelassen sein.
Der zuverlässige und sichere Betrieb dieses Staubsau-
gers ist nur dann gewährleistet, wenn das Ladegerät LG01/
die Ladeschale LS03 am öffentlichen Stromnetz angeschlossen ist.
Laden Sie den Staubsauger bei einer Umgebungstem-
peratur von 0°C bis 45°C.
11
Page 12

de - Sicherheitshinweise und Warnungen
Verwenden Sie den Akku AP01 auf keinen Fall weiter,
wenn Sie bemerken, dass von ihm ein ungewöhnlicher Geruch ausgeht, Flüssigkeit austritt, er sich stark erhitzt oder
dass er sich verfärbt oder verformt. Der Akku AP01 ist umgehend zu entsorgen (siehe Sicherheitshinweis „Entsorgung des Akkus AP01“ am Ende dieses Kapitels und Kapitel „Ihr Beitrag zum Umweltschutz“, Abschnitt „Rückgabe
von Altbatterien und Altakkus“).
Akkus können auslaufen. Vermeiden Sie Augen- und
Hautkontakt mit der ätzenden Flüssigkeit. Bei Kontakt mit
Wasser ausspülen und medizinische Hilfe in Anspruch
nehmen.
Kontaktieren Sie den Kundendienst, bevor Sie den Akku
AP01 versenden.
Sachgemäßer Gebrauch
Lassen Sie den Akku AP01 nicht fallen und werfen Sie
ihn nicht. Ein beschädigter Akku AP01 darf aus Sicherheitsgründen nicht weiter benutzt werden.
Bringen Sie den Akku AP01 nicht in Kontakt mit offenem
Feuer oder sonstigen Wärmequellen. Erhitzen Sie den Akku
AP01 nicht. Setzen Sie ihn nicht direkter Sonneneinstrahlung aus.
Nehmen Sie den Akku AP01 nicht auseinander.
Verursachen Sie keinen Kurzschluss des Akkus AP01,
indem Sie die Kontakte versehentlich oder absichtlich
brücken.
12
Page 13

de - Sicherheitshinweise und Warnungen
Bringen Sie den Akku AP01 nicht mit Flüssigkeit in Be-
rührung.
Entsorgung des Akkus AP01: Entnehmen Sie dem
Staubsauger den Akku AP01. Isolieren Sie metallene Kontakte durch Abkleben mit Klebeband, um Kurzschlüsse zu
vermeiden. Entsorgen Sie den Akku AP01 über das kommunale Sammelsystem. Werfen Sie den Akku AP01 nicht
in den Hausmüll.
13
Page 14
de - Gerätebeschreibung
14
Page 15

de - Gerätebeschreibung
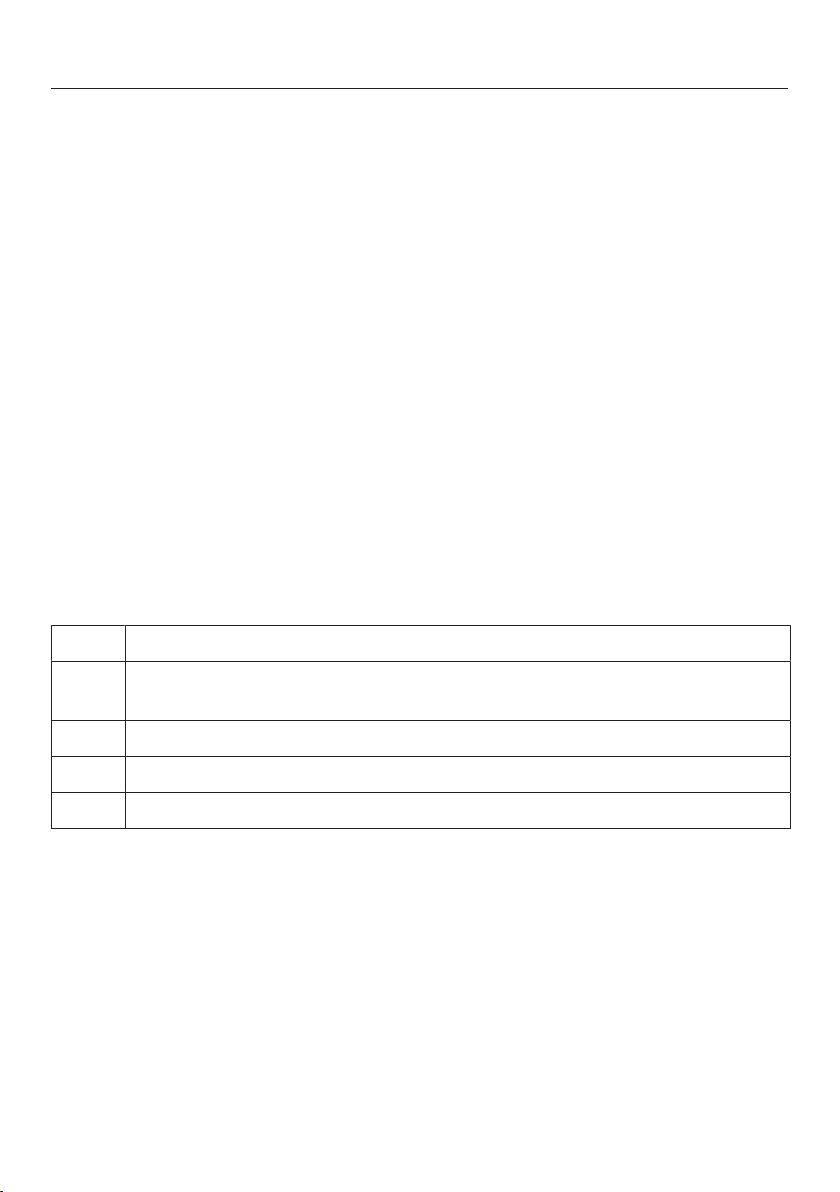
a
Comfort-Handgriff
b
Entriegelungstaste für Comfort-Handgriff (an der Rückseite)
c
Griff des Staubbehälters
d
Staubbehälter mit Vorfilter, Feinstaubfilter und Motorschutzfilter
e
PowerUnit mit Anschluss für Akku und Stutzen für Comfort-Handgriff, Saugrohr, Elektrobürste und Staubbehälter
f
Entriegelungstasten für Akku (an beiden Seiten des Akkus)
g
Ladebuchse (an der Unterseite des Akkus)
h
Li-Ion Akku AP01
i
Anschlussstutzen
j
Elektrobürste Multi Floor XXL (je nach Modell mit Beleuchtung BrillantLight)
k
Herausnehmbare Bürstenwalze
l
Klappe
m
Entriegelung zur Entnahme der Bürstenwalze
n
Entriegelungstasten
o
Anzeige Akku-Ladezustand
p
Saugrohr
q
Ein-/Ausschalter mit Saugleistungswähler
15
Page 16
de - Ihr Beitrag zum Umweltschutz
3E&G+J
Entsorgung der Transportverpackung
Die Verpackung schützt das Gerät vor
Transportschäden. Die Verpackungsmaterialien sind nach umweltverträglichen
und entsorgungstechnischen Gesichtspunkten ausgewählt und deshalb recycelbar.
Das Rückführen der Verpackung in den
Materialkreislauf spart Rohstoffe und
verringert das Abfallaufkommen. Ihr
Fachhändler nimmt die Verpackung zurück.
Entsorgung des Altgerätes
Entnehmen Sie vor der Entsorgung des
Staubsaugers den Feinstaubfilter und
geben Sie den Feinstaubfilter in den
Hausmüll.
Elektro- und Elektronikgeräte enthalten
vielfach wertvolle Materialien. Sie enthalten auch bestimmte Stoffe, Gemische und Bauteile, die für ihre Funktion
und Sicherheit notwendig waren. Im
Hausmüll sowie bei nicht sachgemäßer
Behandlung können sie der menschlichen Gesundheit und der Umwelt schaden. Geben Sie Ihren Staubsauger deshalb auf keinen Fall in den Hausmüll.
Nutzen Sie stattdessen die offiziellen,
eingerichteten Sammel- und Rücknahmestellen zur Abgabe und Verwertung
der Elektro- und Elektronikgeräte bei
Kommune, Händler oder Miele. Sorgen
Sie dafür, dass Ihr Staubsauger bis zum
Abtransport kindersicher aufbewahrt
wird.
16
Rückgabe von Altbatterien und Altakkus
Elektro- und Elektronikgeräte enthalten
vielfach Batterien und Akkus, die auch
nach dem Gebrauch nicht in den Hausmüll dürfen. Sie sind gesetzlich verpflichtet, nicht vom Staubsauger fest
umschlossene Altbatterien und Altakkus
zu entnehmen und zu einer geeigneten
Sammelstelle (z.B. Handelsgeschäft) zu
bringen, wo sie unentgeltlich abgegeben werden können. Batterien und Akkus enthalten möglicherweise Stoffe,
die der menschlichen Gesundheit und
der Umwelt schaden können.
Die Kennzeichnung der Batterie oder
des Akkus gibt weitere Hinweise. Die
durchgestrichene Mülltonne bedeutet,
dass Sie die Batterien und Akkus auf
keinen Fall in den Hausmüll werfen dürfen. Ist die durchgestrichene Mülltonne
mit einem oder mehreren der aufgeführten chemischen Zeichen gekennzeichnet, enthalten diese Blei (Pb), Cadmium
(Cd) und/oder Quecksilber (Hg).
Altbatterien und Altakkus enthalten
wichtige Rohstoffe und können wiederverwertet werden. Die getrennte Sammlung von Altbatterien und Altakkus erleichtert die Behandlung und das Recycling.
Page 17

de
Abbildungsverweise
Die in den Kapiteln angegebenen Abbildungen finden Sie auf den Ausklappseiten am Ende dieser Gebrauchsanweisung.
Aufstellen und Anschließen
Staubsauger zusammensetzen (Abb. 01 + 02)
Sie haben 2 Möglichkeiten, den Staubsauger komplett zusammenzusetzen.
Setzen Sie das Saugrohr oberhalb
oder unterhalb der PowerUnit ein.
Vorteile der PowerUnit unten am
Staubsauger:
- sichere Abstellfunktion möglich (siehe
Kapitel „Gebrauch“, Abschnitt „Betrieb
unterbrechen“)
- Ergonomie (Entlastung des Handgelenkes)
- komfortable Reinigung großer Flächen
Vorteile der PowerUnit oben am
Staubsauger:
- komfortable Reinigung unter flachen
Möbeln
- schnelle Entnahme der PowerUnit
möglich
PowerUnit Solo
Für das schnelle und gezielte Aufsaugen von Krümeln oder Fusseln eignet
sich die PowerUnit ohne Saugrohr und
Elektrobürste.
Tipp: Dieser Aufbau eignet sich besonders für den Einsatz des dreiteiligen Zubehörs (siehe Kapitel „Verwendung des
mitgelieferten Zubehörs“).
Comfort-Handgriff aufstecken (Abb. 03 + 04)
Abhängig von dem gewählten Aufbau
Ihres Staubsaugers können Sie den
Comfort-Handgriff auf das Saugrohr
oder auf die PowerUnit stecken.
Stecken Sie den Comfort-Handgriff
von oben auf den Stutzen des Saugrohres, bis der Comfort-Handgriff
deutlich einrastet (linker Bildausschnitt).
Führen Sie den Comfort-Handgriff
entlang der Führung am Griff des
Staubbehälters von oben auf den
Stutzen der PowerUnit, bis der Comfort-Handgriff deutlich einrastet (rechter Bildausschnitt).
Schalten Sie den Staubsauger mit
dem Ein-/Ausschalter an der Vorderseite des Comfort-Handgriffes aus,
wenn Sie die Teile voneinander trennen möchten.
Drücken Sie die Entriegelungstaste
und entnehmen Sie den ComfortHandgriff nach oben.
PowerUnit und Saugrohr verbinden (Abb. 05 + 06)
Abhängig von dem gewählten Aufbau
Ihres Staubsaugers befindet sich das
Saugrohr oberhalb oder unterhalb der
PowerUnit.
Führen Sie das Saugrohr entlang der
Führung am Griff des Staubbehälters
von oben auf den Stutzen der
PowerUnit, bis das Saugrohr deutlich
einrastet (linker Bildausschnitt).
17
Page 18

de
Stecken Sie den Stutzen der
PowerUnit von oben in das Saugrohr,
bis der Stutzen deutlich einrastet
(rechter Bildausschnitt).
Drücken Sie die Entriegelungstaste,
wenn Sie die Teile voneinander trennen möchten.
Akku einsetzen (Abb. 07, 08 + 09)
Entfernen Sie den Aufkleber vom Ak-
ku.
Schieben Sie den Akku entlang der
Führungen bis zum deutlichen Einrasten in die PowerUnit.
Drücken Sie die beiden Entriege-
lungstasten seitlich am Akku, wenn
Sie die Teile voneinander trennen
möchten, und entnehmen Sie den
Akku.
Elektrobürste anschließen (Abb. 10)
Abhängig von dem gewählten Aufbau
Ihres Staubsaugers stecken Sie den
Stutzen der PowerUnit oder den Stutzen des Saugrohres in die Elektrobürste.
Stecken Sie den Stutzen positioniert
von oben in die Elektrobürste, bis der
Stutzen deutlich einrastet.
Drücken Sie die Entriegelungstaste
an der Elektrobürste, wenn Sie die
Teile voneinander trennen möchten,
und ziehen Sie den Stutzen aus der
Elektrobürste (Abb. 06).
Allgemeine Hinweise zum Akku
Der Akku ist im Auslieferzustand nicht
vollständig geladen.
Laden Sie den Akku vor dem ersten Gebrauch vollständig. Planen Sie dafür ca.
4 Stunden ein.
Führen Sie dieses erste Laden unbedingt in der PowerUnit durch, um die
maximale Leistung des Akkus zu aktivieren.
Wenn der Akku voll geladen ist, schaltet
sich die Anzeige Akku-Ladezustand
nach 10 Minuten aus, um Energie zu
sparen.
Sie können bis zu 14 Minuten saugen,
wenn Sie den komplett zusammengesetzten Staubsauger nutzen und die
höchste Leistungsstufe wählen.
Wenn Sie jedoch die PowerUnit Solo
nutzen und die niedrigste Leistungsstufe wählen, können Sie bis zu 60 Minuten saugen.
Akku laden (ohne Wandmontage) (Abb. 11)
Sie können den Staubsauger stehend
lagern und den Akku direkt laden.
Stecken Sie die PowerUnit in die
Elektrobürste, um einen sicheren
Stand des Staubsaugers zu gewährleisten.
Schwenken Sie den Staubsauger
nach vorne, bis der Anschlussstutzen
der Elektrobürste deutlich einrastet.
18
Stecken Sie den Ladestecker des
beiliegenden Ladekabels in die Ladebuchse an der Unterseite des Akkus.
Stecken Sie das Ladegerät in eine
Netzsteckdose.
Page 19
de
Der Ladevorgang beginnt.
Lesen Sie im Abschnitt „Anzeige Akku-Ladezustand“ weiter.
Akku laden (mit Wandmontage) (Abb. 12 + 13)
Sie haben 2 Möglichkeiten, den Staubsauger in der mitgelieferten Wandhalterung zu lagern und zu laden.
Für die Wandmontage benötigen Sie
einen geeigneten Standort in der Nähe
einer freien Netzsteckdose.
Wandmontage (Abb. 14 + 15)
An der Rückseite der mitgelieferten
Wandhalterung ist eine Montageplatte
mit Schraubenbeutel angebracht.
Für die Wandmontage müssen Sie die
Montageplatte an der Wand des gewählten Standortes befestigen.
Entnehmen Sie den Schraubenbeutel.
Drücken Sie die Entriegelungstaste
an der Unterseite der Wandhalterung.
Entnehmen Sie die Montageplatte
nach unten von der Wandhalterung.
Montageplatte befestigen (Abb. 16 + 17)
Zur Befestigung der Montageplatte an
der Wand liegen 2 Dübel und 2 TORXSchrauben T20 bei.
Sie benötigen außerdem einen Akkuschrauber oder eine Bohrmaschine
(Bohrerdurchmesser 6 mm).
Abhängig von dem gewählten Aufbau
Ihres Staubsaugers wählen Sie einen
Abstand von 45 cm oder 98 cm vom
unteren Rand der Montageplatte zum
Fußboden.
Achten Sie darauf, dass Sie keine in
der Wand verlegten Leitungen beschädigen.
Befestigen Sie die Montageplatte an
der Wand.
Ladekabel in Wandhalterung befestigen (Abb. 18, 19 + 20)
An der Unterseite der Wandhalterung
befindet sich ein Kabelfach.
Drücken Sie die beiden Entriege-
lungstasten an der Unterseite der
Wandhalterung und entnehmen Sie
die Klappe des Kabelfachs.
Stecken Sie den Ladestecker des
beiliegenden Ladekabels von oben in
die Öffnung.
Verlegen Sie das Ladekabel in der
Kabelführung.
Setzen Sie die Klappe an und verrie-
geln Sie das Kabelfach.
Zubehörhalter aufstecken (bei Bedarf) (Abb. 21)
Zur Aufbewahrung des dreiteiligen Zubehörs liegt ein Zubehörhalter bei (siehe
Kapitel „Verwendung des mitgelieferten
Zubehörs“).
Stecken Sie den Zubehörhalter bis
zum Anschlag auf die Wandhalterung.
Wandhalterung aufstecken (Abb. 22 + 23)
Stecken Sie die Wandhalterung von
oben auf die Montageplatte, bis die
Wandhalterung deutlich einrastet.
19
Page 20

de
Stecken Sie die PowerUnit des zu-
sammengesetzten Staubsaugers mit
eingesetztem Akku von oben in die
Wandhalterung.
Stecken Sie das Ladegerät in die
Netzsteckdose.
Der Ladevorgang beginnt.
Anzeige Akku-Ladezustand (beim Laden) (Abb. 24)
Der Ladezustand des Akkus wird an der
PowerUnit angezeigt.
Ladekapazität Anzeige
ca. 0% - 34% blinkt unten lang-
sam
ca. 35% - 69% leuchtet unten,
blinkt mittig langsam
ca. 70% - 90% leuchtet unten
und mittig,
blinkt oben langsam
ca. 91% - 100% leuchtet unten,
mittig und oben
Wenn der Akku voll geladen ist, schaltet
sich die Anzeige Akku-Ladezustand
nach 10 Minuten aus, um Energie zu
sparen.
Sie können sich den Ladezustand dann
jederzeit für 4 Sekunden anzeigen lassen, indem Sie den Ein-/Ausschalter am
Comfort-Handgriff betätigen.
Wenn der Akku lange nicht genutzt
wurde und entladen ist, fällt er in einen
Sicherheitsmodus. Beim Laden in der
PowerUnit reagiert die Anzeige AkkuLadezustand dann erst nach ca. 30 60 Minuten.
Anzeige Akku-Ladezustand (bei Gebrauch) (Abb. 24)
Der Ladezustand des Akkus wird an der
PowerUnit angezeigt.
Ladekapazität Anzeige
ca. 100% - 70% leuchtet oben,
mittig und unten
ca. 69% - 35% leuchtet mittig
und unten
ca. 34% - 11% leuchtet unten
ca. 10% - 0% blinkt unten lang-
sam
Verwendung des mitgelieferten Zubehörs (Abb. 25)
Polsterdüse
Zubehörteil zum Absaugen von
Polstermöbeln, Matratzen und
Kissen.
Fugendüse
Zubehörteil zum Aussaugen von
Falten, Fugen und Ecken.
Saugpinsel
Zubehörteil zum Absaugen von
Profilleisten, verzierten oder geschnitzten Gegenständen.
Der Pinselkopf ist drehbar und
kann in die jeweils günstigste Stellung gedreht werden.
d Zubehörhalter
Zur Aufbewahrung des dreiteiligen
Zubehörs.
Die Positionierung der Zubehörteile ist
jeweils durch Symbole am Zubehörhalter gekennzeichnet.
Sie können den Zubehörhalter auf die
20
Page 21

de
Wandhalterung stecken (siehe Kapitel
„Aufstellen und Anschließen“, Abschnitt
„Zubehörhalter aufstecken“).
Elektrobürste Multi Floor XXL (Abb. 26)
Beachten Sie in erster Linie die Reinigungs- und Pflegeanweisungen Ihres
Bodenbelagherstellers.
Die Elektrobürste ist für das tägliche
Saugen von Teppichen, Teppichböden
und unempfindlichen Hartböden geeignet.
Tipp: Wenn Sie mit Teppichboden belegte Treppenstufen komfortabel absaugen möchten, verzichten Sie auf das
Saugrohr.
Das Miele Bodenpflegesortiment bietet passende Zubehörteile für viele
Spezialanwendungen (siehe Kapitel
„Nachkaufbares Zubehör“).
Handelektrobürste Electro Compact (Abb. 27)
(je nach Modell)
Beachten Sie in erster Linie die Reinigungs- und Pflegeanweisungen Ihres
Bodenbelagherstellers.
Durch Einsatz des Zusatzakkus können
Sie die Nutzungsdauer des Staubsaugers verdoppeln.
Beachten Sie vor dem ersten Ladevorgang unbedingt das Kapitel „Aufstellen und Anschließen“, Abschnitt „Allgemeine Hinweise zum Akku“.
Setzen Sie den Akku ab dem zweiten
Ladevorgang bis zum deutlichen Einrasten in die Akku-Ladeschale.
Stecken Sie den Netzstecker in eine
Netzsteckdose.
Der Ladevorgang beginnt. Die Anzeige
Akku-Ladezustand blinkt links.
Erklärungen zur Anzeige Akku-Ladezustand finden Sie im Kapitel „Aufstellen
und Anschließen“, Abschnitt „Anzeige
Akku-Ladezustand“
Wenn Sie den entladenen Akku direkt
nach dem Gebrauch in der Akku-Ladeschale laden, beginnt der Ladevorgang erst nach Abkühlung des Akkus.
Die Abkühlung kann bis zu 60 Minuten
dauern. Die Anzeige Akku-Ladezustand an der Akku-Ladeschale reagiert
in dieser Zeit nicht.
Gebrauch
Die Handelektrobürste ist besonders
geeignet zur intensiven Reinigung von
Polstermöbeln und Autositzen.
Tipp: Wenn Sie Polstermöbel oder Autositze komfortabel absaugen möchten,
verzichten Sie auf das Saugrohr.
Zusatzakku und Akku-Ladeschale (Abb. 28)
(je nach Modell)
Ein- und Ausschalten (Abb. 29)
Ziehen Sie den Ladestecker aus der
Ladebuchse des Akkus, wenn Sie
den Akku direkt geladen haben.
Nehmen Sie den Staubsauger aus
der Wandhalterung, wenn Sie den
Akku darin geladen haben.
Betätigen Sie den Ein-/Ausschalter
am Comfort-Handgriff .
21
Page 22
de
Saugleistung wählen
Sie können die Saugleistung der jeweiligen Saugsituation anpassen. Durch Reduzierung der Saugleistung verringern
Sie die Schiebekraft an der Elektrobürste.
Am Comfort-Handgriff sind 3 Leistungsstufen anwählbar:
1 niedrigste Leistungsstufe
für leichte Verschmutzung
2 mittlere Leistungsstufe
für normale Verschmutzung
max. höchste Leistungsstufe
für starke Verschmutzung
In der mittleren und höchsten Leistungsstufe ist eine Bodenbelagserkennung aktiviert.
Je nach Untergrund wird die Leistungsaufnahme der Elektrobürste automatisch optimal eingestellt, was zu einem
veränderten Betriebsgeräusch führen
kann.
Arbeitsbereich ausleuchten
(je nach Modell)
Zum Ausleuchten des Arbeitsbereiches
ist die Elektrobürste Ihres Staubsaugers
mit BrillantLight ausgestattet.
Abstellfunktion für kurze Saugpausen
(aus Sicherheitsgründen nur zu nutzen
mit der PowerUnit unten am Staubsauger)
Wenn Sie mit der PowerUnit unten am
Staubsauger saugen, können Sie den
Betrieb des eingeschalteten Staubsaugers bequem unterbrechen.
22
Schwenken Sie den Staubsauger
nach vorne, bis der Anschlussstutzen
der Elektrobürste deutlich einrastet.
Der Staubsauger steht sicher, die Elektrobürste schaltet sich aus und der Akku wird geschont.
Wenn Sie den Anschlussstutzen der
Elektrobürste wieder entriegeln, schaltet
sich die Elektrobürste wieder ein.
Wartung
Verletzungsgefahr durch rotie-
rende Bürstenwalze.
Sie können sich an der rotierenden
Bürstenwalze verletzen.
Schalten Sie den Staubsauger vor je-
der Wartung aus. Nutzen Sie dazu
den Ein-/Ausschalter am ComfortHandgriff.
Ersatzteile bekommen Sie bei Ihrem
Miele Fachhändler oder über den
Miele Kundendienst.
Staubbehälter leeren (Abb. 30 - 34)
Leeren Sie den Staubbehälter spätestens, wenn der Staub die Markierung
max in dem Staubbehälter erreicht hat.
Drehen Sie den Deckel des Staubbe-
hälters in Pfeilrichtung bis zum ersten
Anschlag.
Entnehmen Sie den Staubbehälter
nach oben.
Den Inhalt können Sie über den Hausmüll entsorgen, sofern kein im Hausmüll verbotener Schmutz enthalten ist.
Halten Sie den Staubbehälter tief
über einen Abfalleimer, damit möglichst wenig Staub aufwirbeln kann.
Page 23
de
Drehen Sie den Deckel des Staubbe-
hälters in Pfeilrichtung bis zum
nächsten Anschlag.
Die Klappe unten am Staubbehälter öffnet sich und der Staub fällt heraus.
Drehen Sie den Deckel des Staubbe-
hälters zurück in die Ausgangsposition.
Schließen Sie die Klappe bis zum
deutlichen Einrasten.
Führen Sie den Griff des Staubbehäl-
ters von oben entlang der Führung
auf den Stutzen der PowerUnit, bis
der Staubbehälter deutlich einrastet.
Feinstaubfilter reinigen (Abb. 35)
Im Staubbehälter befindet sich der Feinstaubfilter.
Reinigen Sie den Feinstaubfilter mindestens einmal monatlich.
Entnehmen Sie den Staubbehälter.
Entnehmen Sie den Feinstaubfilter
nach oben.
Drehen Sie den Feinstaubfilter dabei
leicht, so dass sich der Schmutz aus
allen Zwischenräumen lösen kann.
Setzen Sie den gereinigten Feinstaub-
filter positioniert zurück in den Staubbehälter.
Setzen Sie den Staubbehälter wieder
auf den Stutzen der PowerUnit.
Vorfilter reinigen (Abb. 36 - 39)
Im Staubbehälter befindet sich der Vorfilter.
Reinigen Sie den Vorfilter bei Bedarf.
Entnehmen Sie den Staubbehälter.
Entnehmen Sie den Feinstaubfilter
(Abb. 35).
Leeren Sie den Staubbehälter über ei-
nem Abfalleimer und entnehmen Sie
den Vorfilter nach oben.
Entriegeln Sie den Motorschutzfilter
entgegen dem Uhrzeigersinn und entnehmen Sie den Motorschutzfilter
nach oben.
Schäden durch Reinigungsfehler.
Der Feinstaubfilter kann beschädigt
werden und seine Wirkung verlieren.
Reinigen Sie den Feinstaubfilter nicht
von innen. Verwenden Sie zur Reinigung keine scharfkantigen oder spitzen Gegenstände. Bürsten Sie den
Feinstaubfilter nicht ab.
Halten Sie den Feinstaubfilter über
einen Abfalleimer.
Klopfen Sie den Feinstaubfilter mit
dem gummierten unteren Rand vorsichtig aus.
Schäden durch Reinigungsfehler.
Der Vorfilter kann beschädigt werden
und seine Wirkung verlieren.
Verwenden Sie zur Reinigung keine
scharfkantigen oder spitzen Gegenstände.
Klopfen Sie den Vorfilter über einem
Abfalleimer vorsichtig aus.
Tipp: Nutzen Sie eine feine Reinigungsbürste o. Ä., um den Vorfilter auch von
innen gründlich zu reinigen.
Den Motorschutzfilter müssen Sie nicht
reinigen. Er lässt sich entnehmen, damit
der Innenraum des Vorfilters besser zu
erreichen ist.
23
Page 24

de
Setzen Sie den Motorschutzfilter
nach der Reinigung des Vorfilters positioniert und fest im Vorfilter ein.
Verriegeln Sie den Motorschutzfilter
im Uhrzeigersinn bis zum Anschlag.
Setzen Sie den Vorfilter wieder in den
Staubbehälter.
Führen Sie dazu die Einführhilfen bei-
der Teile aufeinander zu und drehen
Sie den Deckel des Staubbehälters
zurück in die Ausgangsposition.
Schließen Sie die Klappe unten am
Staubbehälter bis zum deutlichen
Einrasten.
Setzen Sie den Feinstaubfilter wieder
ein.
Setzen Sie den Staubbehälter wieder
auf den Stutzen der PowerUnit.
Staubbehälter reinigen
Reinigen Sie den Staubbehälter bei Bedarf.
Entnehmen Sie den Staubbehälter.
Leeren Sie den Staubbehälter über ei-
nem Abfalleimer und entnehmen Sie
den Vorfilter nach oben (Abb. 36).
Reinigen Sie den Staubbehälter mit
Wasser und mildem Spülmittel.
Trocknen Sie den Staubbehälter sorg-
fältig ab.
Setzen Sie den Vorfilter wieder in den
Staubbehälter.
Setzen Sie den Staubbehälter wieder
auf den Stutzen der PowerUnit (Abb.
38 + 39).
Elektrobürste/Handelektrobürste reinigen (Abb. 06)
(Handelektrobürste je nach Modell)
Trennen Sie die Elektrobürste/Hand-
elektrobürste vom Stutzen des Staubsaugers.
Fäden und Haare entfernen (Abb. 40)
Legen Sie die Elektrobürste/Hand-
elektrobürste mit der Unterseite nach
oben auf eine ebene und saubere Fläche.
Zerschneiden Sie Fäden und Haare,
die sich um die Bürstenwalze gewickelt haben, mit einer Schere. Zum
Führen der Schere ist eine Führungsnut an der Bürstenwalze eingearbeitet.
Die zerschnittenen Fäden und Haare
werden anschließend beim Saugen vom
Staubsauger aufgesaugt.
Bürstenwalze entnehmen (Abb. 41)
(nicht möglich bei der Handelektrobürste)
Sie können die Bürstenwalze aus der
Elektrobürste entnehmen, um hartnäckige Verschmutzungen zu entfernen
und auch den Innenraum der Elektrobürste zu reinigen.
Entriegeln Sie die Klappe seitlich an
der Elektrobürste, so dass das Symbol sichtbar wird.
Klappen Sie die Klappe bis zum An-
schlag nach oben.
Entnehmen Sie die Bürstenwalze.
24
Page 25

Reinigen Sie die Bürstenwalze und
entfernen Sie alle festhaftenden
Schmutzteile aus dem Innenraum der
Elektrobürste.
Setzen Sie die Elektrobürste in umge-
kehrter Reihenfolge wieder zusammen.
Akku austauschen
Halten Sie einen Original Miele Li-Ion
Akku AP01 bereit (Bezeichnung: HX
LA).
Beachten Sie die Hinweise zum Umgang mit dem Akku und zur Entsorgung des Akkus in den Kapiteln „Sicherheitshinweise und Warnungen“,
„Ihr Beitrag zum Umweltschutz“ und
„Aufstellen und Anschließen“ (Abschnitt „Allgemeine Hinweise zum Akku“).
de
25
Page 26
de
Was tun, wenn ...
Sie können die meisten Störungen und Fehler, zu denen es im täglichen Betrieb
kommen kann, selbst beheben. In vielen Fällen können Sie Zeit und Kosten sparen, da Sie nicht den Kundendienst rufen müssen.
Die nachfolgenden Tabellen sollen Ihnen dabei helfen, die Ursachen einer Störung
oder eines Fehlers zu finden und zu beseitigen.
Verletzungsgefahr durch rotierende Bürstenwalze.
Sie können sich an der rotierenden Bürstenwalze verletzen.
Schalten Sie den Staubsauger vor jeder Problembehebung aus. Nutzen Sie da-
zu den Ein-/Ausschalter am Comfort-Handgriff.
Problem Ursache und Behebung
Die Reinigungsleistung
ist schlecht.
Die Reinigungsleistung
nimmt ab.
Die Elektrobürste schaltet selbsttätig ab.
Das Betriebsgeräusch
verändert sich beim
Saugen.
Der Staubbehälter ist voll.
Leeren und reinigen Sie den Staubbehälter.
Die Elektrobürste ist verschmutzt/verstopft.
Reinigen Sie die Bürstenwalze und den Innenraum
der Elektrobürste (siehe Kapitel „Wartung“, Abschnitt „Elektrobürste reinigen“).
Der Feinstaubfilter ist verschmutzt.
Reinigen Sie den Feinstaubfilter (siehe Kapitel
„Wartung“, Abschnitt „Feinstaubfilter reinigen“).
Der Vorfilter ist verschmutzt.
Reinigen Sie den Vorfilter (siehe Kapitel „Wartung“,
Abschnitt „Vorfilter reinigen“).
Die Elektrobürste ist überlastet, z.B. auf einem hochflorigen Teppich.
Schalten Sie den Staubsauger aus und bei redu-
zierter Saugleistung wieder ein. Nutzen Sie dazu
den Ein-/Ausschalter am Comfort-Handgriff.
In der mittleren und höchsten Leistungsstufe ist eine
Bodenbelagserkennung aktiviert. Je nach Untergrund
wird die Leistungsaufnahme der Elektrobürste automatisch optimal eingestellt.
Das Geräusch gehört zur normalen Funktionsweise
des Staubsaugers.
26
Page 27
Problem Ursache und Behebung
Der Staubsauger läuft
beim Einschalten nicht
an.
Es ist kein Akku eingesetzt oder der Akku ist nicht
richtig eingesetzt.
Setzen Sie den Akku ein oder prüfen Sie den Sitz
des Akkus (siehe Kapitel „Aufstellen und Anschließen“, Abschnitt „Akku einsetzen“).
Der Akku ist nicht ausreichend geladen.
Laden Sie den Akku exakt so, wie in dieser Ge-
brauchsanweisung beschrieben (siehe Kapitel
„Aufstellen und Anschließen“, Abschnitte „Akku laden“).
Es ist kein Original Miele Akku eingesetzt.
Setzen Sie einen Original Miele Li-Ion Akku AP01
ein (Bezeichnung: HX LA).
Der Ladestecker ist noch eingesteckt.
Ziehen Sie den Ladestecker aus der Ladebuchse
des Akkus.
de
27
Page 28
de
Fehlermeldungen
Verletzungsgefahr durch rotierende Bürstenwalze.
Sie können sich an der rotierenden Bürstenwalze verletzen.
Schalten Sie den Staubsauger vor jeder Fehlerbehebung aus. Nutzen Sie dazu
den Ein-/Ausschalter am Comfort-Handgriff.
Fehlermeldungen werden durch schnelles Blinken der Anzeige Akku-Ladezustand
an der PowerUnit angezeigt.
Problem Ursache und Behebung
Schnelles Blinken der
unteren Anzeige
Schnelles Blinken der
unteren und mittleren
Anzeige
Schnelles Blinken der
mittleren und oberen
Anzeige
Schnelles Blinken der
oberen Anzeige
Interner Systemfehler
Entnehmen Sie den Akku, warten Sie 10 Sekun-
den, setzen Sie den Akku wieder ein und laden Sie
ihn.
Fehler „Überhitzung Akku“
Warten Sie ca. 30 Minuten, bevor Sie den Staub-
sauger wieder einschalten.
Fehler „Akku nicht erkannt“
Setzen Sie einen Original Miele Li-Ion Akku AP01
ein (Bezeichnung: HX LA).
Fehler „Comfort-Handgriff nicht erkannt“
Entnehmen Sie den Comfort-Handgriff und ste-
cken Sie ihn wieder auf (siehe Kapitel „Aufstellen
und Anschließen“, Abschnitt „Comfort-Handgriff
aufstecken“).
Entnehmen Sie den Akku, warten Sie 10 Sekunden
und setzen Sie den Akku wieder ein.
28
Page 29
de
Pflege
Verletzungsgefahr durch rotie-
rende Bürstenwalze.
Sie können sich an der rotierenden
Bürstenwalze verletzen.
Schalten Sie den Staubsauger vor je-
der Reinigung aus. Nutzen Sie dazu
den Ein-/Ausschalter am ComfortHandgriff.
Staubsauger und Zubehörteile
Stromschlaggefahr durch Netz-
spannung.
Feuchtigkeit am Ladegerät birgt die
Gefahr eines elektrischen Schlages.
Tauchen Sie das Ladegerät niemals
in Wasser.
Beachten Sie die speziellen Reinigungshinweise für den Staubbehälter
im Kapitel „Wartung“.
Pflegen Sie den Staubsauger und alle
Zubehörteile aus Kunststoff mit einem
handelsüblichen Kunststoffreiniger.
Schäden durch ungeeignete Rei-
nigungsmittel.
Alle Oberflächen sind kratzempfind-
lich. Alle Oberflächen können sich
verfärben oder verändern, wenn sie
mit ungeeigneten Reinigungsmitteln
in Berührung kommen.
Verwenden Sie keine Scheuermittel,
keine Glas- oder Allzweckreiniger
und keine ölhaltigen Pflegemittel.
Kundendienst
Kontakt bei Störungen
Bei Störungen, die Sie nicht selbst beheben können, benachrichtigen Sie Ihren Miele Fachhändler oder den Miele
Kundendienst.
Die Telefonnummer des Miele Kundendienstes finden Sie am Ende dieses Dokumentes.
Garantie
Die Garantiezeit beträgt 2 Jahre.
Weitere Informationen zu den Garantie-
bedingungen in Ihrem Land erhalten Sie
beim Miele Kundendienst.
Nachkaufbares Zubehör
Beachten Sie in erster Linie die Reinigungs- und Pflegeanweisungen Ihres
Bodenbelagherstellers.
Wir empfehlen Ihnen, Zubehörteile mit
dem „ORIGINAL Miele“-Logo zu verwenden. Dann können Sie sicher sein,
dass die Saugleistung des Staubsaugers optimal ausgenutzt und das bestmögliche Reinigungsergebnis erreicht
werden kann.
Bitte beachten Sie, dass Störungen
und Schäden am Staubsauger, die ursächlich auf den Einsatz von Zubehörteilen zurückgehen, die nicht mit dem
„ORIGINAL Miele“-Logo gekennzeichnet sind, von der Garantie für den
Staubsauger nicht erfasst werden.
29
Page 30
de
Bezugsquellen für Zubehörteile
Original Miele Zubehörteile können Sie
über den Miele Webshop, den Miele
Kundendienst oder Ihren Miele Fachhändler beziehen.
Original Miele Zubehörteile erkennen
Sie an dem „ORIGINAL Miele“-Logo auf
der Verpackung.
Einzelne Modelle sind bereits serienmäßig mit einem oder mehreren der
folgenden Zubehörteile ausgestattet.
Handelektrobürste Electro Compact (HX SEB)
Zur intensiven Reinigung von Polstermöbeln und Autositzen.
Fugendüse, 560mm (SFD 20)
Flexible Fugendüse zum Aussaugen
schwer zugänglicher Stellen.
Polsterdüse, 190mm (SPD 10)
Breite Polsterdüse zum Absaugen von
Polstermöbeln, Matratzen und Kissen.
Zusatzakku AP01 (HX LA)
Zur Verdoppelung der Nutzungsdauer
des Staubsaugers.
Akku-Ladeschale LS03 (HX LS)
Zum geräteunabhängigen und zeitgleichen Laden des Zusatzakkus.
Saugpinsel mit Naturborsten (SSP 10)
Zum Absaugen von besonders empfindlichen Gegenständen.
Lamellen-/Heizkörperbürste (SHB 30)
Zum Entstauben von Heizkörperrippen,
schmalen Regalen oder Fugen.
Matratzendüse (SMD 10)
Zum bequemen Absaugen von Matratzen, Polstermöbeln und deren Fugen.
Fugendüse, 300mm (SFD 10)
Extralange Fugendüse zum Aussaugen
von Falten, Fugen und Ecken.
30
Page 31

en - Contents
Warning and Safety instructions........................................................................33
Guide to the appliance........................................................................................ 42
Caring for the environment ................................................................................44
Illustrations ..........................................................................................................45
Installation and connection ................................................................................ 45
Assembling the vacuum cleaner .......................................................................... 45
Connecting the Comfort handle........................................................................... 45
Connecting the PowerUnit and the suction tube ................................................. 45
Inserting the battery ............................................................................................. 46
Connecting the Electrobrush ................................................................................ 46
General battery information................................................................................... 46
Charging the battery (without wall mounting) ....................................................... 46
Charging the battery (with wall mounting) ............................................................ 47
Wall mounting ....................................................................................................... 47
Attaching the mounting plate ............................................................................... 47
Attaching the charging cable to the wall bracket ................................................. 47
Connecting the accessories holder (if required) ................................................... 47
Connecting the wall bracket ................................................................................. 47
Battery charging state indicator (while charging) ................................................. 48
Battery charging state indicator (while in use) ...................................................... 48
Using the accessories supplied ........................................................................ 49
ElectrobrushMultiFloorXXL ................................................................................ 49
ElectroCompact handheld brush ........................................................................ 49
Additional battery and charger cradle .................................................................. 49
Use........................................................................................................................50
Switching on and off ............................................................................................ 50
Regulating the suction power ............................................................................... 50
Illuminating the work area ..................................................................................... 50
Self-standing function for short pauses in vacuuming.......................................... 50
Maintenance ........................................................................................................51
Emptying the dust container ................................................................................ 51
Cleaning the fine dust filter ................................................................................... 51
Cleaning the pre-filter........................................................................................... 52
Cleaning the dust container .................................................................................. 52
Cleaning the Electrobrush/handheld brush .......................................................... 52
Replacing the rechargeable battery ...................................................................... 53
Problem solving guide ........................................................................................54
31
Page 32

en - Contents
Error messages ...................................................................................................56
Cleaning and care ...............................................................................................57
Service..................................................................................................................57
Contact in case of malfunction ............................................................................. 57
Warranty................................................................................................................ 57
Optional accessories ..........................................................................................58
Electrical connection for the UK........................................................................59
Electrical connection AU, NZ .............................................................................59
32
Page 33

en - Warning and Safety instructions
This vacuum cleaner conforms to current safety requirements. Inappropriate use can lead to personal injury and
damage to property.
Please read the operating instructions before using the
vacuum cleaner for the first time. They contain important
information on the safety, use and maintenance of the
vacuum cleaner. This will prevent both personal injury
and damage to the appliance.
In accordance with standard IEC60335-1, Miele expressly and strongly advises that you read and follow the
instructions in the “Installation and connection” chapter
as well as the safety instructions and warnings.
Miele cannot be held liable for injury or damage caused
by non-compliance with these instructions.
Keep these operating instructions in a safe place and
pass them on to any future owner.
Always disconnect the vacuum cleaner from the power
supply when you have finished using it, before changing
any accessories, as well as for maintenance work, cleaning and troubleshooting. Use the On/Off switch on the
Comfort handle to do this.
Correct application
This vacuum cleaner is intended for cleaning flooring in
domestic households and similar residential environments.
This vacuum cleaner is not suitable for use on construction
sites.
This vacuum cleaner is not intended for outdoor use.
33
Page 34

en - Warning and Safety instructions
This vacuum cleaner can be used for all normal cleaning
of carpets, rugs and robust hard flooring.
This vacuum cleaner is intended for use at altitudes of
up to 4000m above sea level.
The vacuum cleaner must only be used to vacuum dry
floor surfaces. Do not vacuum people or animals. Any
other types of use, modifications or alterations are not permitted.
This vacuum cleaner can only be used by people with
reduced physical, sensory or mental capabilities, or lack of
experience or knowledge, if they are supervised whilst using it or have been shown how to use it in a safe way and
understand and recognise the consequences of incorrect
operation.
The packaging material protects the vacuum cleaner
from transport damage. We recommend you keep the
packaging for transport purposes.
Safety with children
Children under 8 years of age must be kept away from
the vacuum cleaner unless they are constantly supervised.
Children aged 8 and older may only use the vacuum
cleaner without supervision if they have been shown how
to use it in a safe manner. Children must be able to understand and recognise the possible dangers caused by incorrect operation.
Children must not be allowed to clean or maintain the
vacuum cleaner unsupervised.
34
Page 35

en - Warning and Safety instructions
Please supervise children in the vicinity of the vacuum
cleaner and do not let them play with it.
Danger of suffocation. Packaging, e.g. plastic wrap-
pings, must be kept out of the reach of babies and children. Whilst playing, children could become entangled in
packaging or pull it over their head and suffocate.
Technical safety
The vacuum cleaner operates at 25.2V.
It is classified as a class III appliance.
This appliance is supplied by a safety extra-low voltage
(SELV) power source where the voltage is low enough to
protect users from the risk of electrical shock. A Class II
charger is used for supplying power to charge the vacuum
cleaner.
Before using the vacuum cleaner and its accessories,
check for any visible signs of damage. Do not use a damaged appliance.
Compare the connection data on the data plate of the
charger (voltage and frequency) with that of the mains
electricity supply. This data must match exactly. Without
modifications, the charger is suitable for 50Hz and 60Hz.
The mains electrical plug must be fitted with an appro-
priate fuse.
AUS/NZ: The mains electrical outlet must be fitted with
an appropriate circuit breaker.
35
Page 36

en - Warning and Safety instructions
The MieleMultiFloorXXLElectrobrush and the
MieleElectroCompacthandheldbrush (varies according
to the model) are additional motor-driven devices designed
specially for this Miele vacuum cleaner. For safety reasons,
the vacuum cleaner must not be used with a different
MieleElectrobrush/handheld brush or an Electrobrush/
handheld brush produced by another manufacturer.
Store the vacuum cleaner at an ambient temperature
between 0°C and 45°C.
While the vacuum cleaner is under warranty, repairs
should only be undertaken by a Miele authorised service
technician. Otherwise the warranty will be invalidated.
Repairs should only be carried out by a Miele authorised
service technician. Repairs and other work by unqualified
persons can cause considerable danger to users.
Miele can only guarantee the safety of the appliance
when genuine Miele replacement parts are used. Faulty
components must only be replaced with genuine Miele replacement parts.
Cleaning
Do not immerse the vacuum cleaner or any accessories
supplied with it in water.
The Electrobrush/handheld brush (depending on the
model), the PowerUnit, the suction tube, the body and the
Comfort handle contain electrical wires. The plug connectors must not come into contact with water. Danger of electric shock. They should only be cleaned with a dry cloth.
36
Page 37

en - Warning and Safety instructions
Clean the vacuum cleaner and accessories only with a
dry or slightly damp cloth when disconnected from the
power supply. Exception:
– Dust container: empty the dust container and remove
the pre-filter. Clean the dust container using water and
mild washing-up liquid only. Then dry the dust container
carefully. Replace the pre-filter in the dust container.
Correct use
Do not use the vacuum cleaner without the dust con-
tainer, pre-filter, fine dust filter and motor protection filter
fitted.
Do not vacuum up anything which has been burning or
is still glowing e.g. cigarettes, ashes or coal, whether glowing or apparently extinguished.
Do not use the vacuum cleaner to vacuum up any water,
liquid or damp dirt. Wait until any freshly cleaned or shampooed rugs or carpets are completely dry before attempting to vacuum.
Do not use the vacuum cleaner to vacuum toner dust.
Toner, such as that used in printers and photocopiers, can
conduct electricity.
Do not vacuum up any inflammable or combustible li-
quids or gases and do not vacuum in areas where such
substances are stored.
Never touch the Electrobrush/handheld brush (varies ac-
cording to the model) while it is rotating.
37
Page 38

en - Warning and Safety instructions
Do not use the Electrobrush/handheld brush (varies ac-
cording to the model) at head height.
Do not vacuum at head height and do not let the suction
get anywhere near a person's head.
Accessories
Only use genuine accessories with the “ORIGINAL
Miele” logo on the packaging. The manufacturer cannot
otherwise guarantee the safety of the product.
Safety instructions and warnings for AP01 battery, LG01 charger, LS03 charger cradle (depending on the model)
Safety with children
People (including children) with reduced physical, sens-
ory or mental capabilities, or lack of experience or knowledge, who are unable to use the LG01 charger/LS03 charger cradle safely may only use this vacuum cleaner if they
are supervised whilst using it or have been shown how to
use it in a safe way and understand and recognise the
consequences of incorrect operation.
Keep the AP01 battery out of the reach of children.
Children must be kept away from the LG01 charger/
LS03 charger cradle unless they are constantly supervised.
Do not let children play with the chargers.
38
Page 39

en - Warning and Safety instructions
Technical safety
The AP01 battery, the LG01 charger and the LS03 char-
ger cradle are designed for use with the Miele HS19 vacuum cleaner. For safety reasons, the vacuum cleaner
must not be used with a battery, charger or charger cradle
produced by another manufacturer.
Only the LG01/xx charger or the LS03/xx charger cradle
supplied with the vacuum cleaner can be used to charge
the AP01 battery.
Do not use the LG01/xx charger or LS03/xx charger cradle
to charge any other batteries.
xx stands for 01, 02, 03 or 04; these numbers identify the
country version of your LG01 charger and your LS03 charger cradle:
XX
01 AT, BE, BG, CH, CL, CZ, DE, DK, EE, ES, FI, FR, GR, HR, HU, IN, IT, KR,
KZ, LT, LU, LV, NL, NO, PL, PT, RO, RS, RU, SE, SI, SK, TR, UA, ZA
02 AE, GB, HK, IE, MY, SG
03 CA, JP, MX, US
04 AU, CN, NZ
If you are using a mains plug adapter, make sure that it
is approved for continuous operation.
Reliable and safe operation of this vacuum cleaner can
only be assured if the LG01 charger/LS03 charger cradle
has been connected to the mains electricity supply.
Charge the vacuum cleaner at an ambient temperature
between 0°C and 45°C. During charging, the AP01 battery must be placed in a well ventilated area.
39
Page 40

en - Warning and Safety instructions
Stop using the AP01battery immediately if you notice an
unusual smell from it, if liquid is leaking from it, if it is significantly overheating or if it is discoloured or deformed. Dispose of the AP01battery immediately (see safety notice
“Disposing of the AP01battery” at the end of this chapter
as well as “Caring for the environment” – “Disposing of old
batteries”).
Batteries will deplete over time. They can then leak cor-
rosive fluids. Avoid contact with the eyes and skin. In the
event of contact, rinse thoroughly with water and seek
medical advice.
AUS/NZ: To deal with leaking batteries, refer to the
Safety Data Sheet (contact Miele to request a copy).
Please contact Miele Service before sending the AP01
battery.
Correct use
Do not drop or throw the AP01battery. For safety reas-
ons, do not continue to use an AP01battery which has
been damaged.
Keep the AP01 battery away from naked flames or other
heat sources. Do not heat the AP01 battery. Do not expose
the rechargeable battery to direct sunlight.
Do not dismantle the AP01 battery.
Do not cause a short circuit by bridging the contacts of
the AP01 battery, either unintentionally or deliberately.
Do not allow the AP01battery to come into contact with
liquids.
40
Page 41

en - Warning and Safety instructions
Disposing of the AP01 battery: remove the AP01 battery
from the vacuum cleaner. Insulate the metal contacts with
adhesive tape to prevent short circuits. Dispose of the
AP01 battery in a municipal recycling facility. Do not dispose of the AP01 battery with your household waste.
The rechargeable battery must be removed before the
appliance is scrapped.
41
Page 42

en - Guide to the appliance42en - Guide to the appliance
Page 43

a
Comfort handle
b
Release catch for Comfort handle (on the back)
c
Dust container handle
d
Dust container with pre-filter, fine dust filter and motor protection filter
e
PowerUnit with battery connection and connections for Comfort handle, suction tube, Electrobrush and dust container
f
Release catches for battery (on both sides of the battery)
g
Charging socket (at the bottom of the battery)
h
AP01 lithium-ion battery
i
Connector
j
MultiFloorXXLElectrobrush (some models feature BrilliantLight lighting)
k
Removable roller brush
l
Cover
m
Release catch for removing the roller brush
n
Release catches
o
Battery charging state indicator
p
Suction tube
q
On/Off switch with suction power selector
43
Page 44

en - Caring for the environment
3E&G+J
Disposal of the packing material
The packaging is designed to protect
the appliance from damage during
transportation. The packaging materials
used are selected from materials which
are environmentally friendly for disposal
and should be recycled.
Recycling the packaging reduces the
use of raw materials in the manufacturing process and also reduces the
amount of waste in landfill sites.
Disposing of your old appliance
Before disposing of your old vacuum
cleaner, remove the fine dust filter and
dispose of it with your household
waste.
Electronic and electrical appliances
contain many valuable materials. They
also contain certain materials, compounds and components which were
essential for their correct functioning
and safety. These could be hazardous
to your health and to the environment if
disposed of with general waste or if
handled incorrectly. Please do not,
therefore, dispose of your old vacuum
cleaner with your household waste.
with Miele. Ensure that it presents no
danger to children while being stored
for disposal.
Disposing of old batteries
In many cases, electrical and electronic
appliances contain batteries which
must not be disposed of with household waste after use. You are legally obliged (depending on country) to remove
any old batteries which are not securely
enclosed by the vacuum cleaner and to
take them to a suitable collection point
(e.g. retailer) where they can be handed
in free of charge. Batteries may contain
substances which can be hazardous to
human health and the environment.
The labelling on the battery will provide
further information. The bin symbol with
a cross through it means that the batteries must not be disposed of in
household waste. A bin with a cross
through it which also has one or more
chemical symbols on it indicates that
the battery contains lead (Pb), cadmium
(Cd) and/or mercury (Hg).
Old batteries contain valuable raw materials which can be recycled. Disposing of batteries separately makes them
easier to handle and recycle.
Instead, please make use of officially
designated collection and disposal
points to dispose of and recycle electrical and electronic appliances in your
local community, with your dealer or
44
Page 45

en
Illustrations
The illustrations referred to in the text
are shown on the fold-out pages at
the end of these operating instructions.
Installation and connection
Assembling the vacuum
cleaner(Fig.01+02)
You can assemble the vacuum cleaner
in 2different ways.
You can place the suction tube either
above or below the PowerUnit.
The advantages of placing the
PowerUnit at the bottom of the vacuum cleaner are as follows:
- secure self-standing function possible
(see “Use” – “Self-standing function for
short pauses in vacuuming”)
- ergonomic (reduced strain on the
wrist)
- convenient cleaning of large surfaces
The advantages of placing the
PowerUnit at the top of the vacuum
cleaner are as follows:
- convenient cleaning underneath furniture
- PowerUnit can be removed quickly
PowerUnit solo
The PowerUnit can be used on its own
without the suction tube and Electrobrush as a quick way of vacuuming up
crumbs and lint in specific areas.
Tip: This configuration is particularly
suitable when using the three-piece accessory set (see “Using the accessories
supplied”).
Connecting the Comfort
handle(Fig.03+04)
Depending on how your vacuum
cleaner is configured, you can connect
the Comfort handle to either the suction
tube or the PowerUnit.
Push the Comfort handle down on to
the suction tube connector from
above until it audibly clicks into place
(left image detail).
Slide the Comfort handle along the
guide line on the dust container
handle and down on to the PowerUnit
connector from above until it audibly
clicks into place (right image detail).
Switch off the vacuum cleaner using
the On/Off switch on the front of the
Comfort handle before separating the
sections.
Press the release catch and remove
the Comfort handle by pulling upwards.
Connecting the PowerUnit and the
suction tube (Fig.05+06)
Depending on how your vacuum
cleaner is configured, the suction tube
is located either above or below the
PowerUnit.
Slide the suction tube along the guide
line on the dust container handle and
down on to the PowerUnit connector
from above until it audibly clicks into
place (left image detail).
Push the PowerUnit connector down
on to the suction tube from above until it audibly clicks into place (right image detail).
45
Page 46

en
Press the release catch to separate
the individual sections from each
other.
Inserting the battery (Fig.07,08+09)
Remove the sticker from the battery.
Push the battery along the guide lines
until it audibly clicks into place in the
PowerUnit.
If you want to separate the sections
again, press both release catches at
the side of the battery to remove the
battery.
Connecting the Electrobrush (Fig.10)
Depending on how your vacuum
cleaner is configured, you can connect
either the PowerUnit connector or the
suction tube connector to the Electrobrush.
Insert the connector down into the
Electrobrush from above until it audibly clicks into place.
To separate the individual sections
from each other, press the release
catch on the Electrobrush and pull
the connector out of the Electrobrush
(Fig.06).
General battery information
The rechargeable battery is supplied
not fully charged.
Charge the battery completely before
using it for the first time. Allow approximately 4hours for this.
It is essential to charge the battery for
the first time in the PowerUnit in order
to activate maximum power in the battery.
Once the battery is fully charged, the
battery charging state indicator
switches off after 10minutes to conserve energy.
You can use the vacuum cleaner for up
to 14minutes if you are using it in its
fully assembled state at the maximum
power level.
If, however, you are using the
PowerUnit on its own and select the
lowest power level, you can vacuum for
up to 60minutes.
Keep batteries out of the reach
of children.
A swallowed battery can cause injury
and even death. Even flat batteries
can still be dangerous. If you suspect
a child has swallowed a battery, seek
medical advice immediately*. Examine devices and make sure the battery compartment is correctly secured, e.g. that the screw or other
mechanical fastener is tightened. Do
not use if compartment is not secure.
* Australia: Poisons Information
Centre, Tel. 13 11 26;
NZ: National Poisons Centre,
Tel. 0800 764 766
Charging the battery (without wall
mounting) (Fig.11)
You can store the vacuum cleaner upright and charge the battery directly.
Connect the PowerUnit to the Elec-
trobrush to provide a secure base for
the vacuum cleaner.
Swing the vacuum cleaner forwards
until the Electrobrush connector audibly clicks into place.
46
Page 47

en
Plug the supplied charging cable into
the charging socket on the bottom of
the battery.
Plug the charger into a power socket.
The charging process will start.
You can read more about this in “Battery charging state indicator”.
Charging the battery (with wall
mounting) (Fig.12+13)
There are 2ways to store and charge
the vacuum cleaner in the supplied wall
bracket.
You will need a suitable location near
a free power socket for mounting the
appliance on the wall.
Wall mounting (Fig.14+15)
The supplied wall bracket has a mounting plate with a bag of screws attached
to the back.
Attach the mounting plate to the point
on the wall where you want the wall
mounting to be.
Remove the bag of screws.
Press the release catch at the bottom
of the wall bracket.
Remove the mounting plate from the
wall bracket by sliding it downwards.
Attaching the mounting plate
(Fig.16+17)
2plugs and 2T20 TORX screws are
supplied for attaching the mounting
plate to the wall.
You will also need a battery-operated
screwdriver or a drill (with a drilling diameter of 6mm).
Depending on how your vacuum
cleaner is configured, select a distance
of 45cm or 98cm between the bottom
edge of the mounting plate and the
floor.
Be careful not to damage any cables
laid in the wall.
Attach the mounting plate to the wall.
Attaching the charging cable to the
wall bracket (Fig.18,19+20)
A cable compartment is located on the
underside of the wall bracket.
Press both release catches on the un-
derside of the wall bracket and remove the cable compartment cover.
Plug the supplied charging cable into
the opening from above.
Lay the charging cable in its guide.
Refit the cover and close the cable
compartment.
Connecting the accessories holder
(if required) (Fig.21)
An accessories holder is supplied for
storing the three-piece accessory set
(see “Using the accessories supplied”).
Push the accessories holder on to the
wall bracket as far as it will go.
Connecting the wall bracket
(Fig.22+23)
Slide the wall bracket down into the
mounting plate from above until it
audibly clicks into place.
47
Page 48

en
Slide the PowerUnit of the fully as-
sembled vacuum cleaner, with the
battery inserted, down into the wall
bracket from above.
Plug the charger into the power
socket.
The charging process will start.
Battery charging state indicator
(while charging) (Fig.24)
The battery charging state is displayed
on the PowerUnit.
Charging capacity
Approx.0–34% Bottom light
Approx.35–69% Bottom light is lit
Approx.70–90% Bottom and
Display
flashes slowly
up; middle light
flashes slowly
middle lights are
lit up;
top light flashes
slowly
If the battery has not been used for a
long time and has run down, it will go
into a safe mode. As a result, the battery charging state indicator will only
respond after approximately 30–
60minutes when charging in the
PowerUnit.
Battery charging state indicator
(while in use) (Fig.24)
The battery charging state is displayed
on the PowerUnit.
Charging capacity
Approx.100–
70%
Approx.69–35% Middle and bot-
Approx.34–11% Bottom light is lit
Approx.10–0% Bottom light
Display
Top, middle and
bottom lights are
lit up
tom lights are lit
up
up
flashes slowly
Approx.91–
100%
Once the battery is fully charged, the
battery charging state indicator
switches off after 10minutes to conserve energy.
You can display the charging state for
4seconds at any time by pressing the
On/Off switch on the Comfort handle.
48
Bottom, middle
and top lights are
lit up
Page 49

en
Using the accessories supplied
(Fig.25)
Upholstery nozzle
Accessory for cleaning upholstery,
mattresses and cushions.
Crevice nozzle
Accessory for cleaning in folds,
crevices or corners.
Dusting brush
Accessory for vacuuming skirting
boards, carved furniture or ornaments.
The head can be swivelled to adjust the angle.
d Accessories holder
For storing the three-piece accessory set.
Symbols on the holder show where to
attach the different accessories.
You can fit the accessories holder to the
wall bracket (see “Installation and connection” – “Connecting the accessories
holder”).
ElectrobrushMultiFloorXXL (Fig.26)
Follow the flooring manufacturer’s
cleaning and care instructions.
ElectroCompact handheld brush
(Fig.27)
(depending on model)
Follow the flooring manufacturer’s
cleaning and care instructions.
The handheld brush is particularly suitable for intensive cleaning of upholstery
and car seats.
Tip: The suction tube is not a convenient option for cleaning upholstery or car
seats.
Additional battery and charger cradle
(Fig.28)
(depending on model)
Using the additional battery doubles the
amount of time the vacuum cleaner can
be used for.
Before charging for the first time,
please note the information in “Installation and connection” – “General battery information”.
Once the battery has been charged
twice, push it into the charger cradle
until it audibly clicks into place.
Insert the plug into a power socket.
The Electrobrush can be used for all
normal cleaning of carpets, rugs and
hard flooring which is not susceptible to
scratching.
Tip: The suction tube is not a convenient option for cleaning carpeted stairs.
Miele offers a range of suitable accessories for many special applications (see “Optional accessories”).
The charging process will start. The
battery charging state indicator flashes
on the left.
You can find out more about the battery
charging state indicator in “Installation
and connection” – “Battery charging
state indicator”.
49
Page 50

en
If you place the run-down battery in
the charger cradle straight after use, it
will only start charging once the battery has cooled down.
The cooling process can take up to
60minutes. The battery charging state
indicator on the charger cradle will not
respond during this time.
Use
Switching on and off (Fig.29)
Pull the charger out of the charging
socket on the battery if you have
charged the battery directly.
If you have charged the battery in the
wall bracket, take the vacuum cleaner
out of the wall bracket.
Press the On/Off switch on the Com-
fort handle.
Regulating the suction power
The suction power can be regulated to
suit the type of flooring being cleaned.
Reducing the suction power reduces
the amount of effort required to manoeuvre the Electrobrush.
There are 3power levels to choose from
on the Comfort handle:
1 Lowest power level
for slight soiling
The Electrobrush power output is automatically set to the optimum level
based on the type of flooring – this can
lead to a change in the operating noise.
Illuminating the work area
(depending on model)
The Electrobrush on your vacuum
cleaner is equipped with BrilliantLight to
illuminate the work area.
Self-standing function for short pauses in vacuuming
(For safety reasons, this function can
only be used when the PowerUnit is fitted at the bottom of the vacuum
cleaner)
If you are vacuuming with the
PowerUnit fitted at the bottom of the
vacuum cleaner, you can easily interrupt operation while the appliance is
switched on.
Swing the vacuum cleaner forwards
until the Electrobrush connector audibly clicks into place.
The vacuum cleaner stays securely upright, the Electrobrush switches itself off
and the battery is conserved.
If you then unlock the connector on the
Electrobrush, the Electrobrush will
switch on again.
2 Medium power level
for normal soiling
Max. Highest power level
for heavy soiling
The floor covering detection function is
activated in the medium and highest
power level.
50
Page 51

en
Maintenance
Risk of injury caused by rotating
roller brush.
You can injure yourself on the rotat-
ing roller brush.
Switch the vacuum cleaner off before
doing any maintenance work. Use
the On/Off switch on the Comfort
handle to do this.
Replacement parts are available from
your Miele dealer or from the Miele
Spare Parts Dept.
Emptying the dust container
(Fig.30–34)
Empty the dust container before the
dust has reached the max marking on
the dust container.
Turn the lid of the dust container in
the direction of the arrow as far as
the first stop.
Lift the dust container upwards to re-
move it.
The contents of the container can be
disposed of with normal domestic
waste, providing they consist of general household dust only.
Hold the dust container close to the
bin to prevent dust from billowing out.
Turn the lid of the dust container in
the direction of the arrow as far as
the next stop.
The cover at the bottom of the dust
container will open and the dust will fall
out.
Turn the lid of the dust container back
to its original position.
Close the cover making sure it clicks
into place.
Slide the dust container handle along
the guide line and down on to the
PowerUnit connector from above until
it audibly clicks into place.
Cleaning the fine dust filter (Fig.35)
The fine dust filter is located in the dust
container.
Clean the fine dust filter at least once a
month.
Remove the dust container.
Lift the fine dust filter upwards to re-
move it.
Risk of damage caused by incor-
rect cleaning.
The fine dust filter can become dam-
aged and be less effective as a result.
Do not clean the inside of the fine
dust filter. Do not use pointed or
sharp-edged objects to clean the filter. Do not brush the fine dust filter.
Hold the fine dust filter over a bin.
Carefully knock the fine dust filter
with the rubberised lower edge.
Turn the fine dust filter slightly while
you do this to free the dirt from all of
the crevices.
Once it is clean, replace the fine dust
filter in its position in the dust container.
Replace the dust container on the
PowerUnit connector.
51
Page 52

en
Cleaning the pre-filter(Fig.36–39)
The pre-filter is located in the dust container.
Clean the pre-filter when required.
Remove the dust container.
Remove the fine dust filter (Fig.35).
Empty the dust container over a bin
and lift the pre-filter upwards to re-
move it.
Unlock the motor protection filter by
turning it anti-clockwise and lift it up-
wards to remove it.
Risk of damage caused by incor-
rect cleaning.
The pre-filter can become damaged
and be less effective as a result.
Do not use pointed or sharp-edged
objects to clean the filter.
Carefully knock the dust out of the
pre-filter over a bin.
Tip: Use a tool like a fine cleaning brush
to clean the inside of the pre-filter thoroughly.
You do not need to clean the motor protection filter. It can be removed so that
the inside of the pre-filter is easier to
reach.
After cleaning the pre-filter, place the
motor protection filter back into the
pre-filter securely, making sure it is
properly positioned.
Lock the motor protection filter by
turning it clockwise as far as it will go.
Replace the pre-filter in the dust con-
tainer.
To do this, line up the guide lines on
the two sections and turn the dust
container lid back to its original position.
Close the cover at the bottom of the
dust container, making sure it clicks
into place.
Replace the fine dust filter.
Replace the dust container on the
PowerUnit connector.
Cleaning the dust container
Clean the dust container as required.
Remove the dust container.
Empty the dust container over a bin
and lift the pre-filter upwards to remove it (Fig.36).
Clean the dust container using water
and mild washing-up liquid.
Dry the dust container thoroughly.
Replace the pre-filter in the dust con-
tainer.
Replace the dust container on the
PowerUnit connector (Fig.38+39).
Cleaning the Electrobrush/handheld
brush (Fig.06)
(The availability of the handheld brush
depends on the model)
Separate the Electrobrush/handheld
brush from the vacuum cleaner connector.
Removing threads and hairs (Fig.40)
Place the Electrobrush/handheld
brush upside down on a level, clean
surface.
52
Page 53

Cut any threads or hairs that have
wound themselves around the roller
brush with a pair of scissors. To guide
the scissors, move along the guide
track on the roller brush.
Then run the vacuum cleaner to va-
cuum up the cut threads and hairs.
Removing the roller brush (Fig.41)
(Not possible with the handheld brush)
You can take the roller brush out of the
Electrobrush in order to remove stubborn soiling and clean the inside of the
Electrobrush.
Unlock the cover on the side of the
Electrobrush so that the symbol
becomes visible.
Lift the cover up as far as it will go.
Remove the roller brush.
Clean the roller brush and remove
any stubborn dirt inside the Electro-
brush.
en
Reassemble the Electrobrush in re-
verse order.
Replacing the rechargeable battery
An original Miele AP01 lithium-ion rechargeable battery (HXLA) is required.
Follow the instructions regarding the
handling and disposal of rechargeable
batteries found in the following sections: “Warning and safety”, “Caring
for the environment” and “Installation
and connection” (“General battery information”).
53
Page 54

en
Problem solving guide
Many malfunctions and faults that can occur in daily operation can be easily
remedied. Time and money will be saved because a service call will not be
needed.
The following guide may help you to find the reason for a malfunction or a fault,
and to correct it.
Risk of injury caused by rotating roller brush.
You can injure yourself on the rotating roller brush.
Switch the vacuum cleaner off before dealing with any problems. Use the On/
Off switch on the Comfort handle to do this.
Problem Cause and remedy
The cleaning performance is poor.
Cleaning performance
is reduced.
The Electrobrush
switches itself off.
The operating noise is
changing during vacuuming.
The dust container is full.
Empty and clean the dust container.
The Electrobrush is dirty/blocked.
Clean the roller brush and the inside of the Electro-
brush (see “Maintenance” – “Cleaning the Electrobrush”).
The fine dust filter is dirty.
Clean the fine dust filter (see “Maintenance” –
“Cleaning the fine dust filter”).
The pre-filter is dirty.
Clean the pre-filter (see “Maintenance” – “Cleaning
the pre-filter”).
The Electrobrush is overloaded – this can happen on
surfaces like deep-pile carpet.
Switch the vacuum cleaner off and switch it on
again at a reduced suction power level. Use the
On/Off switch on the Comfort handle to do this.
The floor covering detection function is activated in
the medium and hightest power level. The Electrobrush power output is automatically set to the optimum level based on the type of flooring.
The noise is not unusual – the vacuum cleaner is
functioning normally.
54
Page 55

Problem Cause and remedy
The vacuum cleaner
does not start when it is
switched on.
There is no battery inserted or the battery is inserted
incorrectly.
Insert the battery or check how the battery is posi-
tioned (see “Installation and connection” – “Inserting the battery”).
The rechargeable battery is not sufficiently charged.
Charge the battery exactly as described in these
operating instructions (see “Installation and connection” – “Charging the battery”).
An original Miele battery has not been inserted.
Insert an original Miele AP01 lithium-ion re-
chargeable battery (HXLA) .
The charger is still plugged in.
Pull the charger out of the charging socket on the
battery.
en
55
Page 56

en
Error messages
Risk of injury caused by rotating roller brush.
You can injure yourself on the rotating roller brush.
Switch the vacuum cleaner off before dealing with any problems. Use the On/
Off switch on the Comfort handle to do this.
Error messages are displayed with a quick flashing light on the battery charging
state indicator on the PowerUnit.
Problem Cause and remedy
Bottom light flashes
quickly
Bottom and middle
lights flash quickly
Middle and top lights
flash quickly
Top light flashes quickly “Comfort handle not recognised” error
Internal system error
Remove the battery, wait for 10seconds, reinsert
it and charge it.
“Battery overheating” error
Wait for approximately 30minutes before switch-
ing the vacuum cleaner back on again.
“Battery not recognised” error
Insert an original Miele AP01 lithium-ion re-
chargeable battery (HXLA) .
Remove the Comfort handle and reconnect it (see
“Installation and connection” – “Connecting the
Comfort handle”).
Remove the battery, wait for 10seconds and rein-
sert it.
56
Page 57

en
Cleaning and care
Risk of injury caused by rotating
roller brush.
You can injure yourself on the rotat-
ing roller brush.
Switch the vacuum cleaner off before
cleaning it. Use the On/Off switch on
the Comfort handle to do this.
Vacuum cleaner and accessories
Risk of electric shock from mains
voltage.
If moisture gets into the charger,
there is a risk of electric shock.
Do not let the charger get wet.
Follow the special cleaning instructions for the dust container in the
“Maintenance” section.
The vacuum cleaner and all plastic accessories can be cleaned with a proprietary cleaner suitable for plastic.
Damage due to unsuitable clean-
ing agents.
All surfaces are susceptible to
scratching. Contact with unsuitable
cleaning agents can alter or discolour the external surfaces.
Do not use abrasive cleaning agents,
glass cleaning agents, all-purpose
cleaners or oil-based conditioning
agents.
Service
Contact in case of malfunction
In the event of any faults which you
cannot remedy yourself, please contact
your Miele Dealer or Miele Service.
Contact information for Miele Service
can be found at the end of this document.
Please note that telephone calls may be
monitored and recorded for training
purposes and that a call-out charge will
be applied to service visits where the
problem could have been resolved as
described in this booklet.
Warranty
For information on the appliance warranty specific to your country, please
contact Miele. See back cover for address.
In the UK, your appliance warranty is
valid for 2 years from the date of purchase. However, you must activate your
cover by calling 0330 160 6640 or registering online at www.miele.co.uk.
57
Page 58

en
Optional accessories
Follow the flooring manufacturer’s
cleaning and care instructions.
We recommend using only genuine
Miele accessories bearing the “ORIGINAL Miele” logo on the packaging.
Only these will guarantee the optimum
performance of your vacuum cleaner
and the best possible cleaning results.
Please note that faults and damage
caused by use of accessories which
do not bear the “ORIGINAL Miele”
logo are not covered by the vacuum
cleaner warranty.
Purchasing accessories
Original Miele accessories are available
from the Miele webshop, the Miele Customer Service Department and from
your Miele dealer.
Original Miele accessories are identified
by the “ORIGINAL Miele” logo on the
packaging.
ElectroCompact handheld brush
(HXSEB)
For intensive cleaning of upholstery and
car seats.
Dusting brush with natural bristles (SSP 10)
(only available in selected countries)
For dusting particularly delicate items.
Radiator brush (SHB 30)
For dusting radiators, narrow shelves
and crevices.
Mattress nozzle (SMD 10)
For vacuuming upholstery, mattresses,
cushions, curtains, covers etc.
Crevice nozzle, 300mm (SFD 10)
Extra long crevice nozzle for cleaning in
folds, crevices and corners.
Crevice nozzle, 560mm (SFD 20)
Flexible crevice nozzle for vacuuming
hard to reach places.
Certain models are supplied as standard with one or more of the following
accessories.
58
Upholstery nozzle, 190mm (SPD 10)
Extra wide upholstery nozzle for cleaning upholstered furniture, mattresses
and pillows.
Additional battery AP01 (HXLA)
For doubling the amount of time the vacuum cleaner can be used for.
Charger cradle LS03 (HXLS)
For charging the additional battery independently of the appliance, i.e. while
the appliance is in use.
Page 59

en
Electrical connection for the UK
All electrical work should be carried out
by a suitably qualified and competent
person in strict accordance with current
national and local safety regulations (BS
7671 in the UK). The voltage and frequency are given on the data plate located underneath the vacuum cleaner.
Please ensure that these match the
household mains supply. The fuse rating is quoted on the plug. The appliance is supplied with a cable and moulded plug ready for connection to a
230-240 V/50 Hz a.c. single phase supply.
Non-rewireable plugs BS 1363
The fuse cover must be re-fitted when
changing the fuse, and if the fuse cover
is lost the plug must not be used until a
suitable replacement is obtained. The
colour of the correct replacement cover
is that of the coloured insert in the base
of the plug, or the colour that is embossed in words on the base of the
plug, (as applicable to the design of
plug fitted). Replacement fuses should
be ASTA approved to BS1362 and have
the correct rating. Replacement fuses
and fuse covers may be purchased
from your local electrical supplier.
Electrical connection AU, NZ
All work should be carried out by a suitably qualified and competent person in
strict accordance with national and
local safety regulations. The voltage
and rated load are given on the data
plate located underneath the vacuum
cleaner. Please ensure that these match
the household mains supply. The charger is supplied with a cable and moulded plug ready for connection to a
230V/50Hz AC single phase supply.
Test Marks Electrical safety
RCM Mark
Electrically suppressed
according to
CISPR 14.1
59
Page 60

es - Contenido
Advertencias e indicaciones de seguridad....................................................... 62
Descripción del aparato...................................................................................... 72
Su contribución a la protección del medio ambiente...................................... 74
Indicación respecto a las ilustraciones............................................................. 75
Instalación y conexión ........................................................................................ 75
Montar el aspirador .............................................................................................. 75
Encajar el mango Comfort ................................................................................... 75
Unir la PowerUnit con el tubo de aspiración ........................................................ 75
Colocar la batería ................................................................................................. 76
Conexión del cepillo eléctrico .............................................................................. 76
Advertencias generales para la batería ................................................................. 76
Cargar la batería (sin montaje en pared) .............................................................. 76
Cargar la batería (con montaje en pared) ............................................................. 76
Montaje en pared ................................................................................................. 77
Fijar la placa de montaje ...................................................................................... 77
Fijar el cable de carga a la pared ......................................................................... 77
Encajar el porta-accesorios (en caso necesario) ................................................. 77
Colocar el soporte de la pared ............................................................................. 77
Indicación del estado de carga de la batería (durante la carga) .......................... 77
Indicación del estado de carga de la batería (durante el uso) .............................. 78
Utilización de los accesorios suministrados ................................................... 78
Cepillo eléctrico MultiFloor XXL ........................................................................... 79
Cepillo eléctrico manual Electro Compact ........................................................... 79
Batería adicional y estación de carga para la batería adicional ........................... 79
Manejo..................................................................................................................79
Conexión y desconexión ...................................................................................... 79
Seleccionar la potencia de aspiración .................................................................. 79
Iluminación de la zona de trabajo ........................................................................ 80
Función parking para pausas breves de aspiración.............................................. 80
Mantenimiento.....................................................................................................80
Vaciar el depósito recogepolvo ............................................................................ 80
Limpieza del filtro para el polvo fino ..................................................................... 81
Limpieza del prefiltro ............................................................................................ 81
Limpiar el depósito recogepolvo........................................................................... 82
Limpiar el cepillo eléctrico/cepillo eléctrico de mano .......................................... 82
Sustituir la batería.................................................................................................. 83
¿Qué hacer si ...?................................................................................................. 84
60
Page 61

es - Contenido
Mensajes de anomalía ........................................................................................86
Servicio Post-venta ............................................................................................. 87
Contacto en caso de anomalías............................................................................ 87
Garantía................................................................................................................. 87
Accesorios especiales ........................................................................................ 87
61
Page 62

es - Advertencias e indicaciones de seguridad
Este aspirador cumple todas las normas de seguridad vigentes. El uso inadecuado puede causar daños personales y materiales.
Lea las instrucciones de uso del aspirador antes de ponerlo en funcionamiento. Estas le ofrecerán indicaciones
importantes en materia de seguridad, consumo y mantenimiento del aspirador. De esta forma se protegerá a sí
mismo y a otros y evitará daños.
Según la norma internacional IEC60335-1 Miele indica
explícitamente que deben leerse y seguirse las indicaciones incluidas en el capítulo «Emplazamiento y conexión»
así como las advertencias e indicaciones de seguridad.
Miele no se hace responsable de los daños causados
por no respetar estas indicaciones.
Guarde las instrucciones de manejo y entrégueselas al
nuevo propietario en caso de venta posterior del aparato.
Desconecte siempre el aspirador después de utilizarlo,
antes de cambiar accesorios y antes de realizar cualquier
tipo de intervención (limpieza, mantenimiento, solución
de anomalía). Para hacerlo, utilice el interruptor de Conexión/Desconexión del mango Comfort.
Uso apropiado
Este aspirador está concebido para ser utilizado con fi-
nes y en entornos domésticos. Este aspirador no es apto
para la limpieza de los residuos procedentes de obras/reformas.
62
Page 63

es - Advertencias e indicaciones de seguridad
Este aspirador no está diseñado para ser utilizado en
exteriores.
Este aspirador es válido para la limpieza diaria de alfom-
bras, moquetas y suelos duros resistentes.
Este aspirador es apto para el uso en alturas hasta
4000m sobre el nivel del mar.
Utilice el aspirador exclusivamente para eliminar sucie-
dad seca. No aspirar ni a personas ni a animales. El resto
de aplicaciones y modificaciones no están permitidos.
Aquellas personas que por motivo de una incapacidad
física, sensorial o mental, inexperiencia o desconocimiento
no estén en condiciones de manejar el aspirador de una
forma segura, no podrán hacer uso del mismo sin la supervisión o permiso de un responsable.
El embalaje evita que se produzcan daños en el aspira-
dor durante el transporte. Le recomendamos que guarde el
embalaje para su posterior transporte.
Niños en casa
Los niños menores de ocho años deben permanecer
alejados de la aspiradora, a no ser que estén vigilados en
todo momento.
Los niños a partir de ochoaños pueden manejar el aspi-
rador sin supervisión si se les ha explicado su manejo de
tal forma que puedan utilizarlo de manera segura. Los niños deben poder reconocer y comprender los posibles peligros originados por un manejo incorrecto.
63
Page 64

es - Advertencias e indicaciones de seguridad
Los niños no deben limpiar o conectar el aspirador sin
supervisión.
Preste continua atención a los niños que se encuentren
cerca del aspirador. No deje jamás que los niños jueguen
con él.
¡Peligro de ahogamiento! Al jugar, los niños podrían que-
dar enrollados en el material de embalaje (p.ej. plásticos)
o cubrirse la cabeza con él y ahogarse. Mantenga el material del embalaje fuera del alcance de los niños.
Seguridad técnica
La batería funciona a 25,2 V.
Aparato de la clase de protección III.
Aparato en el que la protección frente a descarga eléctrica
se obtiene mediante la conexión a tensión baja de seguridad y en el que no se generan tensiones superiores a la
tensión baja de seguridad. La recarga del aspirador tiene
lugar en el aparato de carga de la clase de protección II.
Antes de la puesta en servicio compruebe que el aspira-
dor y todos sus accesorios no presenten daños externos
visibles. No utilice nunca un aspirador defectuoso.
Compare los datos de conexión de la placa de caracte-
rísticas del aparato de carga (tensión de red y frecuencia)
con los de la red de suministro. Es imprescindible que estos datos coincidan. El aparato de carga es apto para
50Hz y 60Hz, salvo modificación.
64
Page 65

es - Advertencias e indicaciones de seguridad
Es imprescindible que la toma de corriente esté protegi-
da con un fusible de 16A o 10A como mínimo.
El cepillo eléctrico MultiFloor XXL de Miele y el cepillo
eléctrico Compact de mano (según el modelo) son aparatos adicionales que se accionan con motor, especiales para estos aspiradores de Miele. Por motivos de seguridad,
no está permitido poner en funcionamiento el aspirador
con otro cepillo eléctrico/cepillo eléctrico de mano de
Miele o con un cepillo eléctrico/cepillo eléctrico de mano
de otro fabricante.
Almacene el aspirador a una temperatura ambiente de
entre 0ºC y 45ºC.
Cualquier trabajo de reparación del aspirador durante el
período de garantía deberá ser realizado exclusivamente
por un servicio técnico autorizado por Miele, ya que, de lo
contrario, no podrá reclamarse el derecho de garantía por
daños posteriores.
Las reparaciones solo podrán ser realizadas por perso-
nal autorizado por Miele. ¡Una reparación inadecuada puede entrañar graves peligros para el usuario!
Miele garantiza que se cumplan los
requisitos de seguridad, solo con las piezas de sustitución
originales. Los componentes defectuosos solo podrán ser
sustituidos por piezas originales de Miele.
Limpieza
No sumerja nunca el aspirador ni los accesorios en
agua.
65
Page 66

es - Advertencias e indicaciones de seguridad
El cepillo eléctrico/cepillo eléctrico manual (según el
modelo), la PowerUnit, el tubo y el mango tienen conducciones eléctricas. Los contactos de conexión no pueden
entrar en contacto con el agua - no está permitido realizar
una limpieza húmeda de estas piezas.
Limpie el aspirador y los accesorios solo con un paño
seco o ligeramente húmedo. Excepción:
– Depósito recogepolvo: vacíelo y retire el prefiltro. Limpie
el depósito recogepolvo solo con agua y un producto de
limpieza suave. Seque cuidadosamente el depósito recogepolvo. Coloque el prefiltro de nuevo.
Uso apropiado
No utilice en ningún caso el aspirador sin depósito reco-
gepolvo, prefiltro, filtro para el polvo fino y filtro protector
del motor.
No aspire objetos encendidos o ascuas, p. ej. cigarrillos
ni ceniza o carbón aparentemente apagados.
No aspire líquidos o suciedad húmeda. Después de la
limpieza húmeda de alfombras o moquetas con limpiadores de espuma, cerciórese de que estén totalmente secas
antes de pasar el aspirador.
No aspire el polvo del tóner. El tóner que se utiliza, p. ej.,
en impresoras y fotocopiadoras puede ser conductor de
corriente eléctrica.
No aspire sustancias fácilmente inflamables o explosi-
vas ni gases y no pase el aspirador en los lugares donde
se encuentran almacenadas estas sustancias.
66
Page 67

es - Advertencias e indicaciones de seguridad
Durante la aspiración, no toque el rodillo del cepillo eléc-
trico/cepillo eléctrico manual (según el modelo) mientras
gira.
No aspire nunca en la proximidad de la cabeza con el
cepillo eléctrico/cepillo eléctrico manual (según el modelo).
En ningún caso aproxime la corriente de aspiración a la
cabeza.
Accesorios
Utilice exclusivamente accesorios con el logo «ORIGI-
NAL Miele» en su embalaje. Solo así el fabricante puede
garantizar su seguridad.
Consejos de seguridad y mantenimiento para batería AP01, aparato de carga LG01, estación de carga LS03 (según el modelo).
Niños en casa
Aquellas personas (especialmente niños) que por motivo
de una incapacidad física, sensorial o mental, inexperiencia o desconocimiento no estén en condiciones de manejar el aparato de carga LG01/la estación de carga LS03 de
una forma segura, no podrán hacer uso del mismo sin la
supervisión o permiso de un responsable.
No deje que los niños entren en contacto con la batería
AP01.
Los niños deben mantenerse alejados del aparato de
carga LG01 y de la estación de carga LS03, a menos que
estén continuamente bajo supervisión.
67
Page 68

es - Advertencias e indicaciones de seguridad
Seguridad técnica
En el aspirador HS19 deben utilizarse la batería AP01, el
aparato de carga LG01 y la estación de carga LS03. Por
motivos de seguridad, no está permitido poner en funcionamiento el aspirador con una batería, un aparato de carga
o una estación de carga de otro fabricante.
Para recargar la batería AP01 utilice exclusivamente el
aparato de carga LG 01/xx o la estación de carga LS03/xx
que se suministran con el aspirador.
indica para 01, 02, 03 o 04 y con ello para la variante del
país de su aparato de carga LG01 y su estación de carga
LS03:
XX
01 AT, BE, BG, CH, CL, CZ, DE, DK, EE, ES, FI, FR, GR, HR, HU, IN, IT, KR,
KZ, LT, LU, LV, NL, NO, PL, PT, RO, RS, RU, SE, SI, SK, TR, UA, ZA
02 AE, GB, HK, IE, MY, SG
03 CA, JP, MX, US
04 AU, CN, NZ
En caso de utilizar un adaptador de enchufe, este debe-
rá ser apto para un funcionamiento duradero.
El funcionamiento fiable y seguro del aspirador queda
garantizado solo si el aparato de carga LG01/la estación
de carga LS03 se conectan a la red eléctrica pública.
Cargue el aspirador a una temperatura ambiente de en-
tre 0ºC y 45ºC.
68
Page 69

es - Advertencias e indicaciones de seguridad
No siga utilizando la batería AP01 en caso de notar un
olor extraño, observar que sale líquido, que se calienta en
exceso o que se decolora o deforma. Deberá reciclarse la
batería AP01 (ver consejo de seguridad «Reciclaje de la
batería AP01» al final de este capítulo y el capítulo «Protección del medio ambiente», apartado «Entrega de baterías y acumuladores inservibles»).
Las baterías pueden descargarse. Evite que la piel o los
ojos entren en contacto con el líquido abrasivo. En caso de
entrar en contacto, aclárelos con agua y solicite ayuda sanitaria.
Póngase en contacto con el Servicio Post-venta antes
de enviar la batería AP01.
Uso apropiado
No deje caer la batería AP01 ni la arroje. Por motivos de
seguridad, no continúe utilizando una batería AP01 que
haya sufrido daños.
Evite que la batería AP01 entre en contacto con fuego u
otras fuentes de calor. No calienta la batería AP01. No la
ponga directamente en contacto con la luz solar.
No desmonte la batería AP01.
No provoque un cortocircuito de la batería AP01 ni de
las pilas puenteando los contactos, ya sea de forma accidental o deliberada.
Evite que la batería AP01 entre en contacto con líquidos.
69
Page 70

es - Advertencias e indicaciones de seguridad
Reciclaje de la batería AP01: retire la batería AP01 del
aspirador. Para evitar cortocircuitos, aísle los componente
de metal con cinta adhesiva. Deseche la batería AP01 en
el punto de recogida pertinente. No deseche la batería
AP01 en la basura común.
70
Page 71

71
Page 72

es - Descripción del aparato72es - Descripción del aparato
Page 73

a
Mango Comfort
b
Tecla de desbloqueo para el mango Comfort (en la parte posterior)
c
Asa del depósito recogepolvo
d
Depósito recogepolvo con antefiltro, filtro fino y filtro para la protección del motor
e
PowerUnit con conexión para la batería y boquilla para el mango Comfort, tubo
de aspiración, cepillo eléctrico y depósito recogepolvo
f
Teclas de desbloqueo para la batería (a ambos lados del aspirador)
g
Enchufe de carga (en la parte inferior de la batería)
h
Batería de litio AP01
i
Manguito
j
Cepillo eléctrico MultiFloor XXL (según el modelo, con iluminación BrilliantLight)
k
Rodillo con cerdas extraíble
l
Tapa
m
Desbloqueo para retirar el rodillo de cerdas
n
Teclas de desbloqueo
o
Indicación del estado de carga de la batería
p
Tubo aspirador
q
Interruptor conexión/desconexión con selector de potencia
73
Page 74

Su contribución a la protección del medio ambiente
3E&G+J
Eliminación del embalaje de transporte
El embalaje protege al aparato de daños durante el transporte. Los materiales del embalaje se han seleccionado
siguiendo criterios ecológicos y en función de su posterior tratamiento en
plantas de reciclaje.
La devolución del embalaje al ciclo de
reciclado contribuye al ahorro de materias primas y reduce la generación de
residuos. Por tanto, dichos materiales
no deberán tirarse a la basura, sino entregarse en un punto de recogida específica.
Reciclaje de aparatos inservibles
Antes de la desestimación del aspirador
inservible, retire el filtro para el polvo fino y deséchelo en la basura doméstica.
Los aparatos eléctricos y electrónicos
contienen multitud de materiales valiosos. También contienen sustancias,
mezclas y componentes concretos que
eran necesarios para su funcionamiento
y seguridad. En la basura doméstica,
así como si se manipulan de forma incorrecta, pueden ser perjudiciales para
la salud y causar daños en el medio
ambiente. En ningún caso tire su aspirador inservible en la basura doméstica.
distribuidores o Miele. Guarde el aspirador inservible fuera del alcance de los
niños hasta el momento de transportarlo al desguace.
Entrega de baterías y acumuladores inservibles
Los aparatos eléctricos y electrónicos
contienen multitud de pilas y baterías
que tampoco pueden desecharse en la
basura doméstica después del uso. Está legalmente obligado a retirar las baterías y acumuladores inservibles incluidos en el aspirador, así como depositarlos en un punto de recogida locales
correspondiente (p.ej. un negocio),
donde puedan desecharse gratuitamente. Las baterías y acumuladores pueden
contener sustancias perjudiciales para
la salud y dañinas en el medio ambiente.
El marcado de la batería o del acumulador proporciona más información. El
cubo de basura tachado significa que
las baterías y acumuladores no pueden
desecharse de ningún modo en la basura doméstica. Si el cubo de basura
tachado está marcado con uno o varios
de los símbolos químicos indicados,
entonces contienen plomo (Pb), cadmio
(Cd) y/o mercurio (Hg).
En su lugar, utilice para ello los puntos
de recogida y almacenamiento oficialmente establecidos para la entrega y
reciclaje de aparatos eléctricos y electrónicos disponibles en el municipio,
74
Las baterías y acumuladores inservibles
contienen importantes materias primas
y pueden reutilizarse. La recogida selectiva de baterías y acumuladores inservibles facilita el tratamiento y el reciclaje.
Page 75

es
Indicación respecto a las ilustraciones
Las ilustraciones que se indican en los
capítulos se encuentran al final de las
contracubiertas de las presentes instrucciones de uso.
Instalación y conexión
Montar el aspirador (fig. 01 + 02)
Existen 2 formas de montar el aspirador
por completo.
Es posible colocar el tubo de aspira-
ción por encima o por debajo de la
PowerUnit.
Ventajas de colocar la PowerUnit en la
parte inferior del aspirador:
- función parking segura (ver capítulo
«Manejo», apartado «Interrumpir el funcionamiento»)
- ergonomía (la muñeca no se carga)
- cómoda limpieza de las superficies
grandes
Encajar el mango Comfort (fig. 03 + 04)
Independientemente del tipo de montaje seleccionado para su aspirador, puede encajar el mango Comfort o bien en
el tubo de aspiración o bien en la
PowerUnit.
Hágalo desde arriba sobre la boca
del tubo de aspiración hasta que encaje claramente (parte izquierda de la
imagen).
Introduzca desde arriba el mango
Comfort a lo largo de la guía en el
mango del aspirador sobre el manguito de la PowerUnit hasta que haya
encajado por completo (ver detalle de
la derecha).
Desconecte el aspirador con el inte-
rruptor de conexión/desconexión de
la parte delante si desea separar las
piezas.
Presione la tecla de desbloquee y re-
tire el mango Comfort hacia arriba.
Ventajas de colocar la PowerUnit arri-
ba en el aspirador:
-limpieza cómoda por debajo de los
muebles planos
- es posible r
PowerUnit.
PowerUnit Solo
La PowerUnit sin tubo de aspiración y
cepillo eléctrico es apta para la aspiración rápida y concreta de pelusas y migas.
Consejo: Este montaje es especialmente adecuado para el uso del portaaccesorios (ver capítulo «Uso de los accesorios suministrados»).
etirar fácilmente la
Unir la PowerUnit con el tubo de aspiración (fig. 05 + 06)
Independientemente del montaje seleccionado, el tubo de aspiración se encuentra por encima o por debajo de la
PowerUnit.
Introduzca desde arriba el tubo de
aspiración a lo largo de la guía en el
mango del aspirador sobre el manguito de la PowerUnit hasta que haya
encajado por completo (ver detalle de
la izquierda).
75
Page 76

es
Encaje el manguito de la PowerUnit
desde arriba en el tubo de aspiración
hasta que el manguito esté correctamente encajado (ver detalle de la derecha).
Pulse la tecla de desbloqueo, si de-
sea separar una pieza de la otra.
Colocar la batería (fig. 07, 08 + 09)
Retire la pegatina de la batería.
Deslice la batería a lo largo de las
guías hasta que encaje perfectamente en la PowerUnit.
Presione las teclas de desbloqueo si-
tuadas en los laterales de la batería,
si desea separar las piezas, y extraiga
la batería.
Conexión del cepillo eléctrico (fig. 10)
Independientemente del tipo de montaje seleccionado, coloque los manguitos
de la PowerUnit o del tubo de aspiración en el cepillo eléctrico.
Coloque el manguito desde arriba de-
bidamente en el cepillo eléctrico hasta que encaje correctamente.
Presione la tecla de desbloqueo del
cepillo eléctrico, si desea separar las
piezas, y extraiga el manguito del cepillo eléctrico (fig. 06).
Advertencias generales para la batería
La batería no se suministra completamente cargada.
Cargue la batería por completo antes
de utilizarla por primera vez. Para hacerlo, necesitará aprox. 4 horas.
Lleve a cabo esta primera carga en la
PowerUnit para activar la máxima potencia de la batería.
Una vez está cargada la batería, la indicación de estado de carga se desconecta después de 10 minutos, para
ahorrar energía.
En caso de utilizar el aspirador completo a máxima potencia, la batería durará
14 minutos.
En caso de utilizar solo la PowerUnit
Solo al nivel mínimo, podrá aspirar hasta 60 minutos.
Cargar la batería (sin montaje en pared) (fig. 11)
Es posible almacenar el aspirador de
pie y cargar directamente la batería.
Coloque la PowerUnit en el cepillo
eléctrico para garantizar que el aspirador se sostiene adecuadamente.
Para hacerlo, mueva hacia delante el
aspirador hasta que encaje correctamente el soporte de conexión del cepillo eléctrico.
Introduzca la clavija del cable de car-
ga en el enchufe de carga situado en
la parte inferior de la batería.
Enchufe el aparato de carga a la red.
Comienza el proceso de carga.
Continúe leyendo el apartado «Indicación del estado de carga».
Cargar la batería (con montaje en pared) (fig. 12 + 13)
Existen dos posibilidades de almacenamiento y carga del aspirador en el soporte de pared suministrado.
76
Page 77

es
Para el montaje en pared es necesario
un lugar apto próximo a la clavija.
Montaje en pared (fig. 14 + 15)
En la parte posterior del soporte para la
pared suministrado se encuentra una
placa de montaje con una bolsa de tornillos.
Para el montaje en la pared deberá fijarse la placa de montaje en el lugar seleccionado de la pared.
Retire la bolsa de tornillos.
Presione la tecla de desbloqueo de la
parte inferior del soporte de pared.
Retire la placa de montaje de la pared
hacia abajo.
Fijar la placa de montaje (fig. 16 + 17)
Para fijar en la pared la placa de montaje se suministran 2 tacos y 2 tornillos
TORX T20.
Además, necesitará un destornillador o
un taladro (diámetro 6 mm).
Independientemente del montaje seleccionado para el aspirador, deje una distancia de 45 cm o 98 cm desde el borde inferior de la placa de montaje hasta
el suelo.
Tenga en cuenta que no resulten en
ningún caso dañadas las tuberías que
pasen por la pared.
Presione las teclas de desbloqueo si-
tuadas en la parte inferior del soporte
para la pared y retire la tapa del com-
partimento del cable.
Introduzca la clavija de carga del ca-
ble suministrado en la abertura desde
arriba.
Deslice el cable en la conducción del
cable.
Tape y bloquee el compartimento del
cable.
Encajar el porta-accesorios (en caso necesario) (fig. 21)
Existe un porta-accesorios para guardar el accesorio de tres piezas (ver capítulo «Uso de los accesorios suministrados»).
Encaje hasta el tope el porta-acceso-
rios en la pared.
Colocar el soporte de la pared (fig. 22 + 23)
Coloque el soporte sobre la placa de
montaje desde arriba, hasta que en-
caje perfectamente.
Coloque la PowerUnit del aspirador
montado con la batería colocada
desde arriba en el soporte de pared.
Enchufe el aparato de carga.
Comienza el proceso de carga.
Fijar la placa de montaje a la pared.
Fijar el cable de carga a la pared (fig. 18, 19 + 20)
En la parte inferior del soporte de la pared se encuentra el compartimento del
cable.
Indicación del estado de carga de la batería (durante la carga) (fig. 24)
El estado de carga de la batería se indica en la PowerUnit.
77
Page 78

es
Capacidad de
carga
aprox. 0% - 34% parpadeo inferior
aprox. 35% - 69% se ilumina abajo,
aprox. 70% - 90% se ilumina abajo y
aprox. 91% 100%
Una vez está cargada la batería, la indicación de estado de carga se desconecta después de 10 minutos, para
ahorrar energía.
Si pulsa el interruptor de conexión/desconexión del mango Comfort podrá ver
durante 4 segundos el nivel de carga.
En caso de no utilizar la batería durante un periodo de tiempo larga y de
que esté cargada, esta entrará en modo Seguridad. Al cargar en la
PowerUnit la indicación del nivel de
carga de la batería reacciona después
de 30-60 minutos.
Indicación del estado de carga de la batería (durante el uso) (fig. 24)
El estado de carga de la batería se indica en la PowerUnit.
Indicación
lento
parpadea en el
medio lentamente
en el centro,
parpadea arriba
lentamente
se ilumina abajo,
en el centro y arriba
Capacidad de
carga
aprox. 100% 70%
aprox. 69% - 35% se ilumina en el
aprox. 34% - 11% se ilumina abajo
aprox. 10% - 0% parpadeo inferior
Indicación
se ilumina arriba,
en el centro y
abajo
centro y abajo
lento
Utilización de los accesorios suministrados (fig. 25)
Tobera para tapizados
Para aspirar el polvo de los muebles tapizados, colchones y cojines.
Tobera plana
Para eliminar el polvo de pliegues,
ranuras y rincones.
Cepillo de cerdas
Para aspirar perfiles así como objetos tallados, adornos o aplicaciones delicadas similares.
La cabeza giratoria facilita la
adaptación a la posición más conveniente.
d Porta-accesorios
Para guardar el accesorio de tres
piezas.
La posición de los accesorios está marcada en el porta-accesorios con símbolos.
Es posible encajar el porta-accesorios
en el soporte de la pared (ver capítulo
«Emplazamiento y conexión», apartado
«Encajar el porta-accesorios»).
78
Page 79

es
Cepillo eléctrico MultiFloor XXL (fig. 26)
En primer lugar, tenga en cuenta las
instrucciones de limpieza y conservación del fabricante del suelo.
Este cepillo eléctrico es válido para la
aspiración diaria de alfombras, moquetas y suelos duros resistentes.
Consejo: Para aspirarlas cómodamente, prescinda del tubo de aspiración.
Miele le ofrece un amplio surtido de
accesorios para multitud de aplicaciones especiales (ver el capítulo «Accesorios opcionales [no suministrados]»).
Cepillo eléctrico manual Electro Compact (fig. 27)
(disponible según modelo)
En primer lugar, tenga en cuenta las
instrucciones de limpieza y conservación del fabricante del suelo.
Especialmente adecuado para la limpieza intensiva de moquetas y tapicerías
de coches.
Consejo: Para aspirarlos cómodamente, prescinda del tubo de aspiración.
Batería adicional y estación de carga para la batería adicional (fig. 28)
(disponible según modelo)
Al utilizar la batería adicional dobla la
duración de uso del aspirador.
Antes del primer proceso de carga
tenga en cuenta el capítulo «Emplazamiento y conexión», apartado «Advertencias generales para la batería».
A partir del segundo proceso encaje
la batería por completo en la estación
de carga.
Enchufe la clavija.
Comienza el proceso de carga. La indi-
cación de estado de carga de la batería
parpadea a la izquierda.
En el capítulo «Emplazamiento y conexión», apartado «Indicación del estado
de carga de la batería» se describen las
indicaciones respecto al estado de carga de la batería.
En caso de cargar la batería utilizada
inmediatamente después de su uso en
la estación de carga, el proceso de
carga comienza una vez se ha enfriado la batería.
Puede tardar hasta 60 minutos en enfriarse. Mientras tanto, la indicación
del estado de carga de la batería de la
estación de carga no reacciona.
Manejo
Conexión y desconexión (fig. 29)
En caso de haber cargado la batería
directamente, extraiga la clavija de
carga del enchufe de carga.
Retire el aspirador del soporte de la
pared, si desea cargar la batería den-
tro.
Pulse el interruptor de conexión/des-
conexión del mango Comfort .
Seleccionar la potencia de aspiración
Es posible adaptar la potencia de aspiración del aspirador a las necesidades
de cada caso. Reduciendo la potencia,
disminuirá notablemente la facilidad de
deslizamiento del cepillo eléctrico.
79
Page 80

es
En el mango Comfort es posible seleccionar 3 niveles de potencia:
1 nivel de potencia bajo
para poca suciedad
2 nivel de potencia medio
para suciedad normal
máx. nivel de potencia alto
para mucha suciedad
En los niveles de potencia medios y altos se activa el reconocimiento del pavimento.
Según el subsuelo se adapta automáticamente el consumo de potencia del
cepillo eléctrico, lo que afecta también
al ruido de funcionamiento.
Iluminación de la zona de trabajo
(disponible según modelo)
El cepillo eléctrico está dotado con Bri-
lliantLight para iluminar la zona de aspiración.
Función parking para pausas breves de aspiración
(por motivos de seguridad utilizar exclusivamente cuando la PowerUnit se encuentra colocada en la parte inferior del
aspirador)
Si aspira con la PowerUnit situada en la
parte inferior del aspirador, podrá interrumpir cómodamente su funcionamiento.
Para hacerlo, mueva hacia delante el
aspirador hasta que encaje correctamente el soporte de conexión del cepillo eléctrico.
El aspirador permanece en posición
vertical de forma segura, el cepillo eléctrico se desconecta y la batería queda
80
protegida.En caso de desbloquear de
nuevo los manguitos de conexión del
cepillo eléctrico, el cepillo eléctrico se
conecta.
Mantenimiento
Peligro de lesiones debido a la
rotación del rodillo de cerdas.
Podría dañarse con el cepillo girato-
rio de cerdas.
Desconecte el aspirador antes de
cada mantenimiento. Para hacerlo,
utilice el interruptor de Conexión/
Desconexión del mango Comfort.
También puede obtener las piezas de
recambio a través de su distribuidor
Miele o el Servicio Post-venta de
Miele.
Vaciar el depósito recogepolvo (fig. 30–34)
Vacíe el depósito recogepolvo como
muy tarde cuando el polvo alcance la
marca máx en el depósito recogepolvo.
Gire la tapa del depósito recogepolvo
en la dirección de la flecha hasta el
primer tope.
Retire el depósito recogepolvo hacia
arriba.
Puede depositar el contenido en la basura de casa, si no contiene nada que
no se pueda eliminar a través de esta.
Mantenga el depósito recogepolvo
tan cerca como pueda del cubo de
basura para que no se levante una
gran polvareda.
Page 81

es
Gire la tapa del depósito recogepolvo
en la dirección de la flecha hasta el
siguiente tope.
La tapa situada por debajo del depósito
recogepolvo se abre y el polvo cae.
Gire la tapa del depósito recogepolvo
a la posición inicial.
Cierre la tapa hasta que encaje clara-
mente.
Introduzca el mango del depósito re-
cogepolvo desde arriba en los manguitos de la PowerUnit a lo largo de la
guía, hasta que el depósito recogepolvo encaje a la perfección.
Limpieza del filtro para el polvo fino (fig. 35)
El filtro para el polvo fino se encuentra
en el depósito recogepolvo.
Es necesario limpiarlo al menos una vez
al mes.
Retire el depósito recogepolvo.
Retirar el filtro para el polvo fino hacia
arriba.
Daños producidos por una lim-
pieza errónea.
El filtro para el polvo fino podría re-
sultar dañado y perder efectividad.
No limpie el interior del filtro para el
polvo fino. Para su limpieza no utilice
objetos puntiagudos o con bordes
afilados. No cepille el filtro para el
polvo fino.
Sostenga el filtro para el polvo fino
sobre un cubo de basura.
Para hacerlo, gire suavemente el filtro
para el polvo fino de forma que la su-
ciedad acumulada en las esquinas se
suelte.
Coloque el filtro para el polvo fino
limpio de nuevo en el depósito reco-
gepolvo.
Coloque de nuevo el depósito reco-
gepolvo sobre los soportes de la
PowerUnit.
Limpieza del prefiltro (fig. 36–39)
En el depósito recogepolvo se encuentra el prefiltro.
En caso necesario, límpielo.
Retire el depósito recogepolvo.
Retirar el filtro para el polvo fino (fig.
35).
Vacíe el depósito recogepolvo sobre
un contenedor de basura común y re-
tire el prefiltro hacia arriba.
Desbloquee el filtro protector del mo-
tor en el sentido contrario a las agu-
jas del reloj y retire el filtro protector
del motor hacia arriba.
Daños producidos por una lim-
pieza errónea.
El prefiltro podría resultar dañado y
perder efectividad.
Para su limpieza no utilice objetos
puntiagudos o con bordes afilados.
Sacuda con precaución el prefiltro
sobre un contendor de basura co-
mún.
Sacuda con precaución el filtro para
el polvo fino con la rueda inferior de
goma.
81
Page 82

es
Consejo: Utilice un cepillo fino para la
limpieza profunda del prefiltro, también
de su interior.
No se debe limpiar el filtro protector del
motor. Es posible retirarlo para acceder
más fácilmente al interior del prefiltro.
Después de la limpieza del prefiltro,
coloque el filtro protector del motor y
encaje bien el prefiltro.
Bloquee el filtro protector del motor
hasta el tope en el sentido de las
agujas del reloj.
Coloque de nuevo el prefiltro en el
depósito recogepolvo.
Para ello deslice los dispositivos auxi-
liares de ambas piezas uno sobre el
otro y gire la tapa del depósito recogepolvo de nuevo a la posición de
salida.
Cierre la tapa inferior en el depósito
recogepolvo hasta que encaje claramente.
Vuelva a colocar el filtro para el polvo
fino.
Coloque de nuevo el depósito reco-
gepolvo sobre los soporte de la
PowerUnit.
Limpiar el depósito recogepolvo
Limpie el depósito recogepolvo cuando
sea necesario.
Retire el depósito recogepolvo.
Vacíe el depósito recogepolvo sobre
un contenedor de basura común y retire el prefiltro hacia arriba (fig. 36).
Limpie el depósito recogepolvo con
agua y un producto de limpieza suave.
Seque cuidadosamente el depósito
recogepolvo.
Coloque de nuevo el prefiltro en el
depósito recogepolvo.
Coloque de nuevo el depósito reco-
gepolvo sobre los soporte de la
PowerUnit (fig. 38 + 39).
Limpiar el cepillo eléctrico/cepillo eléctrico de mano (fig. 06)
(cepillo eléctrico de mano según modelo)
Retire el cepillo eléctrico/el cepillo
eléctrico de mano de la boquilla del
aspirador.
Retirar hilos y cabellos (fig. 40)
Colocar el cepillo eléctrico/el cepillo
eléctrico de mano con la parte supe-
rior hacia arriba sobre una superficie
plana y limpia.
Corte con unas tijeras los hilos y pe-
los que se hayan enrollado en el rodi-
llo con cerdas. El rodillo dispone de
una ranura para introducir la tijera.
Finalmente al aspirar el aspirador elimi-
na los pelos e hilos.
Retirar el rodillo de cerdas (fig. 41)
(no es posible en los cepillos eléctricos
manuales)
Es posible retirar el rodillo de cerdas del
cepillo eléctrico para eliminar la suciedad más resistente y limpiar el interior
del cepillo.
Desbloquee la tapa situada en el late-
ral del cepillo eléctrico para que que-
de visible el símbolo .
Levante la tapa hasta el tope.
82
Page 83

Retire el rodillo de cerdas.
Elimine la suciedad adherida al inte-
rior y al rodillo con cerdas.
Monte de nuevo el cepillo eléctrico en
el orden inverso.
Sustituir la batería
Tenga preparada una batería de litio
AP01 Original de Miele (nombre: HX
LA).
Para manejar la batería y desecharla,
tenga en cuenta los consejos que
aparecen en los capítulos «Advertencias e indicaciones de seguridad», «Su
contribución a la protección del medio
ambiente» y «Emplazamiento y conexión» (apartado «Advertencias generales para la batería»).
es
83
Page 84

es
¿Qué hacer si ...?
La mayor parte de las anomalías que se producen en el día a día las podrá solucionar usted mismo. En muchos casos se puede ahorrar tiempo y dinero, ya que
evitará la intervención del Servicio Post-venta.
Las siguientes tablas le ayudarán a encontrar las causas de un fallo o error, y corregirlo.
Peligro de lesiones debido a la rotación del rodillo de cerdas.
Podría dañarse con el cepillo giratorio de cerdas.
Antes de solucionar una anomalía, desconecte el aspirador. Para hacerlo, utilice
el interruptor de Conexión/Desconexión del mango Comfort.
Problema Causa y solución
La potencia de limpieza
no es lo suficientemente buena.
La potencia de limpieza
disminuye.
El cepillo eléctrico se
desconecta automáticamente.
El sonido de funcionamiento varía durante la
aspiración.
El depósito recogepolvo está lleno.
Vacíe y limpie el depósito recogepolvo.
El cepillo eléctrico está sucio/obstruido.
Limpie el rodillo de cerdas y el interior del cepillo
eléctrico (ver capítulo «Mantenimiento», apartado
«Limpieza del cepillo eléctrico»).
El filtro para el polvo fino está sucio.
Limpie el filtro para el polvo fino (véase el capítulo
«Mantenimiento», apartado «Limpieza del filtro para el polvo fino»).
El prefiltro está sucio.
Limpie el prefiltro (véase el capítulo «Mantenimien-
to», apartado «Limpieza del prefiltro»).
El cepillo eléctrico está sobrecargado, p. ej. sobre
una alfombra de pelo largo.
Desconecte el aspirador y conéctelo a un nivel de
potencia más bajo. Para hacerlo, utilice el interruptor de Conexión/Desconexión del mango Comfort.
En los niveles de potencia medios y altos se activa el
reconocimiento del pavimento. Según el subsuelo se
adapta automáticamente el consumo de potencia del
cepillo eléctrico.
El ruido es totalmente normal durante el funciona-
miento del aspirador.
84
Page 85

Problema Causa y solución
El aspirador no funciona al conectarlo.
No tiene colocada ninguna batería o bien la que está
colocada no lo está correctamente.
Coloque la batería o compruebe que esté correc-
tamente colocada (ver capítulo «Emplazamiento y
conexión», apartado «Colocar la batería»).
La batería no está lo suficientemente cargada.
Para cargar la batería, siga detenidamente las indi-
caciones que aparecen en este manual de instrucciones (ver capítulo «Emplazamiento y conexión»,
apartado «Cargar la batería»).
No se ha colocado una batería original de Miele.
Coloque una batería de litio AP01 original de Miele
(nombre: HX LA).
La clavija de carga no está enchufada.
Extraiga la clavija de carga del enchufe de carga
de la batería.
es
85
Page 86

es
Mensajes de anomalía
Peligro de lesiones debido a la rotación del rodillo de cerdas.
Podría dañarse con el cepillo giratorio de cerdas.
Antes de solucionar una anomalía, desconecte el aspirador. Para hacerlo, utilice
el interruptor de Conexión/Desconexión del mango Comfort.
Las anomalías se indican a través de parpadeos rápidos de la indicación del estado de carga de la batería en la PowerUnit.
Problema Causa y solución
Parpadeo rápido de la
indicación inferior
Parpadeo rápido de las
indicaciones inferior y
central
Parpadeo rápido de las
indicaciones central y
superior
Parpadeo rápido de la
indicación superior
Anomalía interna del sistema
Retire la batería, espere 10 segundos, colóquela
de nuevo y cárguela.
Anomalía «Sobrecalentamiento de la batería»
Espere aprox. 30 minutos antes de volver a conec-
tar el aspirador.
Anomalía «Batería no reconocida"
Coloque una batería de litio AP01 original de Miele
(nombre: HX LA).
Anomalía «Mango Comfort no reconocido»
Retire el mango Comfort y colóquelo de nuevo (ver
el capítulo «Emplazamiento y conexión», apartado
«Colocar el mango Comfort»).
Retire la batería, espere 10 segundos y colóquela
de nuevo.
86
Page 87

es
Mantenimiento
Peligro de lesiones debido a la
rotación del rodillo de cerdas.
Podría dañarse con el cepillo girato-
rio de cerdas.
Desconecte el aspirador antes de
cada limpieza. Para hacerlo, utilice el
interruptor de Conexión/Desconexión del mango Comfort.
Aspirador y accesorios
Peligro de descarga eléctrica de-
bido a la tensión de red.
La humedad en el aparato de carga
podría dar lugar a descargas eléctricas.
No lo introduzca en ningún caso en
agua.
Tenga en cuenta las indicaciones especiales del capítulo «Mantenimiento»
respecto al depósito recogepolvo.
Limpie el aspirador y todos los accesorios de plástico con un producto de limpieza común para plásticos.
Daños causados por el uso de
productos de limpieza inadecuados.
Todas las superficies son sensibles a
los arañazos. Todas las superficies
pueden desteñirse o modificarse si
entran en contacto con un detergente inadecuado.
No utilice productos de limpieza
abrasivos, limpiacristales, limpiadores multiuso ni productos de cuidado
que contengan aceites.
Servicio Post-venta
Contacto en caso de anomalías
En caso de anomalías, que no pueda
solucionar usted mismo, informe a su
distribuidor Miele o al Servicio Postventa de Miele.
Al final de este documento encontrará
el número de teléfono del Servicio
Post-venta de Miele.
Garantía
La duración de la garantía es de 2 años.
A través del Servicio Post-venta obten-
drá más información sobre las condiciones de garantía de su país.
Accesorios especiales
En primer lugar, tenga en cuenta las
instrucciones de limpieza y conservación del fabricante del suelo.
Le recomendamos que utilice exclusivamente accesorios con el logotipo
«ORIGINAL Miele». Solo así optimizará
la potencia del aspirador y conseguirá
el mejor resultado de limpieza.
Tenga en cuenta que las anomalías y
los daños que se hayan producido en
el aspirador derivados de la utilización
de accesorios que no estén marcados
como «ORIGINAL Miele» no se contemplarán en la garantía.
87
Page 88

es
Fuentes de referencia para accesorios
Los accesorios originales de Miele se
pueden adquirir a través de la tienda
online de Miele, del Servicio Post-venta
Miele o de un distribuidor Miele especializado.
Sabrá qué accesorios son originales de
Miele porque en su embalaje encontrará
el logo «ORIGINAL Miele».
Algunos modelos están equipados de
serie con uno o varios de los siguientes accesorios.
Cepillo eléctrico Electro Compact (HX SEB)
Para una limpieza exhaustiva de muebles tapizados y asientos del coche.
Tobera plana, 300mm (SFD 10)
Tobera plana extralarga para eliminar el
polvo de pliegues, ranuras y rincones.
Tobera plana, 560mm (SFD 20)
Tobera flexible para aspirar en lugares
de difícil acceso.
Tobera para tapizados, 190mm
(SPD 10)
Tobera para tapizados extra-ancha para
aspirar muebles tapizados, colchones o
cojines.
Batería adicional AP01 (HX LA)
Para duplicar el tiempo de funcionamiento del aspirador.
Estación de carga LS03 (HX LS)
Para cargar la batería adicional de forma totalmente independiente del aspirador.
Cepillo de cerdas naturales (SSP 10)
Para aspirar objetos especialmente delicados.
Cepillo para láminas / radiadores (SHB 30)
Para eliminar el polvo de los nervios de
los radiadores, estanterías estrechas o
ranuras.
Tobera para colchones (SMD 10)
Para aspirar cómodamente colchones y
muebles tapizados y sus ranuras.
88
Page 89

fr - Table des matières
Consignes de sécurité et mises en garde......................................................... 91
Description de l'appareil................................................................................... 100
Votre contribution à la protection de l'environnement .................................. 102
Références des croquis.................................................................................... 103
Installation et raccordement ............................................................................ 103
Assembler l'aspirateur ........................................................................................ 103
Monter la poignée Comfort ................................................................................ 103
Assembler le PowerUnit et le tube d'aspiration ................................................. 103
Mise en place de la batterie ............................................................................... 104
Raccordement de l'électrobrosse...................................................................... 104
Remarques générales concernant la batterie...................................................... 104
Charger la batterie (sans montage mural) .......................................................... 104
Charger la batterie (avec montage mural) .......................................................... 105
Montage mural ................................................................................................... 105
Fixer la plaque de montage ................................................................................ 105
Fixer le câble de chargement dans le système de fixation murale .................... 105
Monter le support pour accessoires (si nécessaire) ........................................... 105
Fixer le support mural ......................................................................................... 106
Témoin de charge de la batterie (en charge)...................................................... 106
Témoin de charge de la batterie (en utilisation).................................................. 106
Utilisation des accessoires fournis ................................................................. 107
Electrobrosse Multi Floor XXL ............................................................................ 107
Electrobrosse manuelle Electro Compact .......................................................... 107
Batterie supplémentaire et socle de chargement de batterie ............................ 107
Utilisation ...........................................................................................................108
Mise en marche et arrêt ...................................................................................... 108
Sélection de la puissance d’aspiration................................................................ 108
Eclairer la zone de travail .................................................................................... 108
Fonction d'arrêt en cas de courtes pauses d'aspiration..................................... 108
Maintenance ......................................................................................................109
Vider le collecteur............................................................................................... 109
Nettoyer le filtre à poussières fines .................................................................... 109
Nettoyer le préfiltre ............................................................................................. 110
Nettoyer le collecteur .......................................................................................... 110
Nettoyer l'électrobrosse/ l'électrobrosse manuelle ............................................ 111
Remplacer la batterie. ......................................................................................... 111
En cas d'anomalie ............................................................................................. 112
89
Page 90

fr - Table des matières
Messages d'erreur ...........................................................................................114
Entretien............................................................................................................. 115
Service après-vente .......................................................................................... 115
Contact en cas d'anomalies................................................................................ 115
Garantie............................................................................................................... 115
Accessoires en option ......................................................................................115
90
Page 91

fr - Consignes de sécurité et mises en garde
Cet aspirateur répond aux réglementations de sécurité
en vigueur. Toute utilisation non conforme peut entraîner
des dommages corporels et matériels.
Lisez attentivement ce mode d'emploi avant d'utiliser cet
aspirateur pour la première fois. Il contient des informations importantes sur la sécurité, l'utilisation et l'entretien
de votre aspirateur. Vous vous protégerez et éviterez ainsi de détériorer votre matériel.
Conformément à la norme CEI60335-1, Miele indique
expressément de lire impérativement le chapitre «Installation et raccordement» et de suivre les consignes de
sécurité et de mise en garde.
Miele ne peut être tenu pour responsable des dommages
dus au non-respect des consignes.
Conservez ce mode d'emploi et veuillez le remettre en
cas de cession de cet appareil.
Eteignez toujours l'aspirateur après utilisation et avant de
le nettoyer, de changer d'accessoire, de résoudre une
anomalie ou si vous souhaitez procéder à une opération
de maintenance. Utilisez pour ce faire le bouton Marche/
Arrêt sur la poignée Comfort.
Utilisation conforme
Cet aspirateur est destiné à une utilisation à la maison
ou de type domestique. Cet aspirateur ne doit pas être utilisé sur un chantier, en extérieur.
Cet aspirateur ne doit pas être utilisé en extérieur.
91
Page 92

fr - Consignes de sécurité et mises en garde
Cet aspirateur est conçu pour l'aspiration quotidienne
des tapis, moquettes et sols durs peu fragiles.
Cet aspirateur est conçu pour une utilisation jusqu'à
4000m d'altitude au-dessus du niveau de la mer.
N'utilisez l'aspirateur que dans le cadre domestique,
pour aspirer des poussières sèches. N'utilisez pas cet aspirateur sur les hommes et les animaux. Toute autre application, adaptation ou modification de l'aspirateur est interdite.
Les personnes qui ne sont pas en mesure d'utiliser l'as-
pirateur en toute sécurité en raison de déficiences physiques, sensorielles ou mentales, de leur inexpérience ou
de leur ignorance ne doivent pas l'utiliser sans la surveillance ou les instructions d'une personne responsable.
Nos emballages protègent votre aspirateur des dom-
mages qui peuvent survenir pendant le transport. Nous
vous conseillons de conserver votre emballage pour le
transport ultérieur.
Précautions à prendre avec les enfants
Tenez les enfants de moins de huit ans éloignés de l'ap-
pareil à moins qu'ils ne soient sous étroite surveillance.
Les enfants à partir de huit ans sont autorisés à utiliser
l'aspirateur sans surveillance uniquement si vous leur avez
expliqué comment l'utiliser sans danger. Les enfants
doivent être en mesure d'appréhender et de comprendre
les risques encourus en cas de mauvaise manipulation.
92
Page 93

fr - Consignes de sécurité et mises en garde
Les enfants ne doivent pas nettoyer ou intervenir sur
l'appareil sans être sous la surveillance d'un adulte.
Surveillez les enfants lorsqu'ils jouent à proximité de
l'aspirateur. Ne laissez jamais les enfants jouer avec l'aspirateur.
Risque d'asphyxie! Les enfants se mettent en danger en
s'enveloppant dans les matériaux d'emballage (film plastique, par exemple) ou en glissant leur tête à l'intérieur. Tenez les matériaux d'emballage hors de portée des enfants.
Sécurité technique
Cet appareil fonctionne avec une tension de 25,2V.
L'aspirateur est un appareil de la classe de protection III.
Appareil à très basse tension de sécurité (TBTS) avec dispositif de protection contre les chocs électriques et blocage des niveaux de tension supérieurs à la TBTS. Le
chargement de l'aspirateur s'effectue via un chargeur de la
classe de protectionII.
Avant toute utilisation, vérifiez que l'aspirateur ou les ac-
cessoires ne présentent aucun dommage apparent. N'allumez et n'utilisez jamais un aspirateur endommagé.
Comparez les données de raccordement indiquées sur
la plaque signalétique du chargeur (tension et fréquence)
avec celles du réseau. Ces données doivent absolument
coïncider. Le chargeur convient sans modification pour
50Hz et 60Hz.
93
Page 94

fr - Consignes de sécurité et mises en garde
La prise électrique doit être protégée par un fusible 10A
ou 16A.
L'électrobrosse Miele Multi Floor XXL et l'électrobrosse
manuelle Miele Electro Compact (en fonction du modèle)
sont des dispositifs supplémentaires motorisés, spécialement conçus pour ces aspirateurs Miele. Pour des raisons
de sécurité, toute utilisation de l'aspirateur avec une autre
électrobrosse/ électrobrosse manuelle Miele ou toute autre
électrobrosse/ électrobrosse manuelle d'une autre marque
est à proscrire.
Stockez l'aspirateur à une température ambiante com-
prise entre 0°C et 45°C.
Pendant la période de garantie, seul un service après-
vente agréé par le fabricant est habilité à réparer l'aspirateur, faute de quoi tout bénéfice de la garantie est perdu en
cas de panne ultérieure.
Les réparations ne doivent être effectuées que par des
techniciens Miele agréés. Les réparations non conformes
peuvent entraîner de graves dangers pour l’utilisateur.
Miele ne garantit le respect des consignes de sécurité
que si les pièces de rechange sont d’origine. Les pièces
défectueuses ne doivent être remplacées que par des
pièces de rechange d'origine Miele.
Nettoyage
Ne plongez jamais l'aspirateur et ses accessoires dans
l'eau.
94
Page 95

fr - Consignes de sécurité et mises en garde
L'électrobrosse/ l'électrobrosse manuelle (en fonction du
modèle), le tube d'aspiration, le PowerUnit et la poignée
Comfort contiennent des conducteurs électriques. Les
connecteurs ne doivent pas être mis au contact de l'eau!
N'humidifiez jamais ces éléments pendant le nettoyage.
Nettoyez l'aspirateur et tous les accessoires avec un
chiffon sec ou légèrement humide. Exception:
– Collecteur à poussière: Videz le collecteur à poussière
et enlevez le préfiltre. Nettoyez le collecteur uniquement
avec de l'eau et un détergent doux. Ensuite, séchez soigneusement le collecteur. Replacez le préfiltre.
Précautions d'utilisation
N'utilisez pas l'aspirateur sans le collecteur, le préfiltre,
le filtre à poussières fines et le filtre de protection moteur.
N'aspirez pas d'objets incandescents comme les
cendres, le charbon qui semblent éteints.
N'aspirez pas de liquides ou d'éléments humides! Lais-
sez sécher complètement les tapis et moquettes shampouinés avant de les aspirer.
N'aspirez pas de toner ! Le toner utilisé pour les impri-
mantes et les photocopieurs peut être conducteur.
N'aspirez pas de produits ni de gaz inflammables ou ex-
plosifs. N'utilisez pas l'aspirateur dans des locaux dans
lesquels sont stockés ces produits.
Ne touchez pas à la brosse cylindrique lorsque l'électro-
brosse/ l'électrobrosse manuelle (selon modèle) fonctionne.
95
Page 96

fr - Consignes de sécurité et mises en garde
N'approchez pas l'électrobrosse/ l'électrobrosse ma-
nuelle (selon modèle) à proximité d'un visage.
Lorsque vous aspirez avec le tube télescopique, évitez
de l'approcher de votre tête.
Accessoires
N'utilisez que des filtres et des accessoires portant le lo-
go «ORIGINAL Miele» sur l'emballage. Le fabricant peut
garantir votre sécurité dans ces conditions exclusivement.
Consignes de sécurité et mises en garde pour batterie AP01, chargeur LG01, socle de chargement LS03 (selon modèle)
Précautions à prendre avec les enfants
Les personnes (y compris les enfants) qui ne sont pas
en mesure d'utiliser le chargeur LG01/ le socle de chargement LS03 en toute sécurité en raison de déficiences physiques, sensorielles ou mentales, de leur inexpérience ou
de leur ignorance ne doivent pas utiliser l'aspirateur sans la
surveillance ou les instructions d'une personne responsable.
Tenez la batterie AP01 hors de portée des enfants.
Les enfants doivent être tenus à l'écart du chargeur
LG01 et du socle de chargement LS03 à moins d'être
constamment surveillés.
96
Page 97

fr - Consignes de sécurité et mises en garde
Sécurité technique
La batterie AP01, le chargeur LG01 et le socle de char-
gement LS03 doivent être utilisés pour cet aspirateur Miele
HS19. Pour des raisons de sécurité, toute utilisation de
l'aspirateur avec une batterie, un chargeur ou un socle de
chargement d'une autre marque est à proscrire.
Pour recharger la batterie AP01, utilisez uniquement le
chargeur LG01/ fourni xx ou le socle de chargement LS03/
fourni xx.
xx équivaut à 01, 02, 03 ou 04 et correspond ainsi au modèle du pays de votre chargeur LG01 et de votre socle de
chargement LS03:
XX
01 AT, BE, BG, CH, CL, CZ, DE, DK, EE, ES, FI, FR, GR, HR, HU, IN, IT, KR,
KZ, LT, LU, LV, NL, NO, PL, PT, RO, RS, RU, SE, SI, SK, TR, UA, ZA
02 AE, GB, HK, IE, MY, SG
03 CA, JP, MX, US
04 AU, CN, NZ
En cas d'utilisation d'un adaptateur secteur, celui-ci doit
être homologué pour un fonctionnement continu.
Seul un raccordement de l'aspirateur ou du chargeur
LG01/ du socle de chargement LS03 au réseau électrique
public permet de garantir un fonctionnement sûr et fiable
de l'appareil.
Chargez l'aspirateur à une température ambiante com-
prise entre 0°C et 45°C.
97
Page 98

fr - Consignes de sécurité et mises en garde
N'utilisez en aucun cas la batterie AP01 si vous vous
apercevez qu'une odeur inhabituelle s'en dégage, que du
liquide en ressort, qu'elle chauffe fortement ou qu'elle se
décolore ou se déforme. La batterie AP01 doit être immédiatement éliminée. (voir Consignes de sécurité «Elimination de la batterie AP01» à la fin de ce chapitre et chapitre
«Votre contribution à la protection de l'environnement»,
section «Reprise des piles et des accumulateurs usagés»).
Les piles peuvent fuir. Evitez tout contact de ce liquide
avec les yeux et la peau! En cas de contact, rincez à l'eau
claire puis appelez aussitôt les secours.
Contactez le service après-vente avant d'expédier la
batterie AP01.
Précautions d'utilisation
Ne laissez pas tomber la batterie AP01 et ne la jetez
pas. Pour des raisons de sécurité, une batterie endommagée AP01 ne doit plus être utilisée.
N'exposez pas la batterie AP01 au feu ou à d'autres
sources de chaleur. N'exposez pas la batterie AP01 à une
source de chaleur excessive. Ne l'exposez pas à la lumière
directe du soleil.
Ne démontez pas la batterie AP01.
Ne provoquez pas de court-circuit de la batterie AP01
en pontant les contacts intentionnellement ou par mégarde.
98
Page 99

fr - Consignes de sécurité et mises en garde
Ne placez pas la batterie AP01 en contact avec des li-
quides.
Elimination de la batterie AP01: Retirez la batterie AP01
de l'aspirateur. Avant de l'éliminer, isolez les contacts métalliques de la batterie avec du ruban adhésif pour éviter
tout court-circuit. Déposez la batterie AP01 dans un point
de collecte de votre commune. Ne jetez pas la batterie
AP01 dans les ordures ménagères.
99
Page 100

fr - Description de l'appareil
100
 Loading...