


Operating instructions
Rotary iron
HM 21-140
To prevent accidents
and machine damage
read these instructions
before
installation or use.
en - US, CA
M.-Nr. 07 660 861

Contents
Important Safety Instructions . . . . . . . . . . . . . . . . . . . . . . . . . . . . . . . . . . . . . . . . . . . . . . . . . . . . . . . . . . . . . . . . .3
Guide to the rotary iron . . . . . . . . . . . . . . . . . . . . . . . . . . . . . . . . . . . . . . . . . . . . . . . . . . . . . . . . . . . . . . . . . . . . . . 4
Use . . . . . . . . . . . . . . . . . . . . . . . . . . . . . . . . . . . . . . . . . . . . . . . . . . . . . . . . . . . . . . . . . . . . . . . . . . . . . . . . . . . . . . . 8
Correct dampness ...........................................................................8
Preparing the laundry .........................................................................8
Ironing tips .................................................................................8
Turning the rotary iron on ......................................................................9
Testing the finger guard ......................................................................10
Ironing....................................................................................11
Rotary iron with coin mechanism ...............................................................11
After ironing ...............................................................................11
Frequently asked questions . . . . . . . . . . . . . . . . . . . . . . . . . . . . . . . . . . . . . . . . . . . . . . . . . . . . . . . . . . . . . . . . .12
Power failure ...............................................................................12
Protecting the roller and iron cover .............................................................12
Motor protection ............................................................................12
Cleaning and Care . . . . . . . . . . . . . . . . . . . . . . . . . . . . . . . . . . . . . . . . . . . . . . . . . . . . . . . . . . . . . . . . . . . . . . . . . 13
Cleaning the heater plate .....................................................................13
Washing or replacing the ironing cover ..........................................................13
After sales service . . . . . . . . . . . . . . . . . . . . . . . . . . . . . . . . . . . . . . . . . . . . . . . . . . . . . . . . . . . . . . . . . . . . . . . . . 14
Guide to the data plate symbols . . . . . . . . . . . . . . . . . . . . . . . . . . . . . . . . . . . . . . . . . . . . . . . . . . . . . . . . . . . . . . 15
Installation instructions . . . . . . . . . . . . . . . . . . . . . . . . . . . . . . . . . . . . . . . . . . . . . . . . . . . . . . . . . . . . . . . . . . . . . 17
Electrical connection ........................................................................19
Help to protect the environment . . . . . . . . . . . . . . . . . . . . . . . . . . . . . . . . . . . . . . . . . . . . . . . . . . . . . . . . . . . . . . 20
2

Important Safety Instructions
Read the operating instructions carefully before
using this appliance for the first time. They contain
important information about the safety, use and
maintenance of the appliance. Please read them
carefully to prevent accidents and machine dama
ge.
Regard the national and local codes and stan
dards.
Keep these instructions in a safe place for referen
ce, and pass them on to any future user.
-
-
-
Proper use
This rotary iron is only intended for ironing fabrics
~
that were washed in water. Check fabric care labels
to verify that the articles can be machine-ironed.
Persons who lack physical, sensory or mental abi
~
lities, or experience with the appliance should not use
it without supervision or instruction by a responsible
person.
If the rotary iron is operated in an area accessible
~
to the public, the operator must ensure that the appliance can be used safely.
Only allow trained personnel to operate the machi-
~
ne.
Technical and electrical safety
Before setting up the rotary iron, check for any vi-
~
sible damage. Never use a damaged appliance. A
damaged rotary iron is dangerous!
If the power cord is damaged it must be replaced
~
by a Miele authorized service technician.
A damaged appliance is dangerous. Turn off the
~
rotary iron, unplug from the wall outlet and contact
Technical Service.
Do not operate a machine with an electrical fault
~
until repaired.
Before connecting the appliance, ensure that the
~
connection data on the data plate (fusing, voltage
and frequency) match the household electrical supp
ly. If in doubt, consult an electrician.
Before installation or service, disconnect the po
~
wer supply to the work area by removing the fuse or
"tripping" the circuit breaker to the unit.
Use only genuine Miele parts. Use of non-Miele
~
parts may impair performance and void any guaran
tees and product liability claims.
The appliance is completely isolated from the
~
electricity supply when:
it is turned off at the wall switch and unplugged, or
–
the circuit breaker has been "tripped".
–
Do not damage, remove or bypass the safety
~
components or control elements of the appliance.
Only operate the rotary iron when all removable
~
outer casings are in place so that it is impossible to
touch an electrical component or moving part.
-
-
Use
Be aware of loose fitting or hanging clothing when
-
-
~
using the rotary iron. Items such as wide sleeves or
apron strings could be wound in the roller.
Remove all jewelry and tie back long hair before
~
ironing.
Do not allow children to play on or near the rotary
~
iron, or to operate the controls or unit.
Danger of burns when the heater plate is touched.
~
Do not smooth an item between the heater plate and
the roller.
Never drape items over the heater plate when it is
~
heated. This is a fire hazard.
Hang laundry on the laundry bar.
~
The laundry bar is only intended for hanging laundry
on. Swing it back immediately after use. Take care
not to press down on the bar when it is swung out.
The rotary iron could tip over.
Turn the appliance off before pulling the plug from
~
the electrical outlet.
Pull only on the plug and not on the power cord.
~
Do not lay the power cord over the heater plate
~
when it is heated.
This could damage the cord - danger of electric shock!
Use the cable holders on the appliance to secure the
cord.
Do not modify the machine power cord or plug.
~
Be certain this appliance is properly installed and
~
grounded by an authorized technician. For electrical
safety this machine must be grounded. It is imperati
ve that this basic safety requirement be tested by a
qualified electrician. Consult a qualified electrician if
in doubt.
Installation, repair and maintenance work should
~
be performed by a Miele authorized service technici
an. Work by unqualified persons could be dangerous.
-
Accessories
Accessories should only be used if approved by
~
Miele. If other parts are used, warranty, performance
and product liability claims may be void.
SAVE THESE INSTRUCTIONS AND RE
-
VIEW THEM PERIODICALLY
-
3
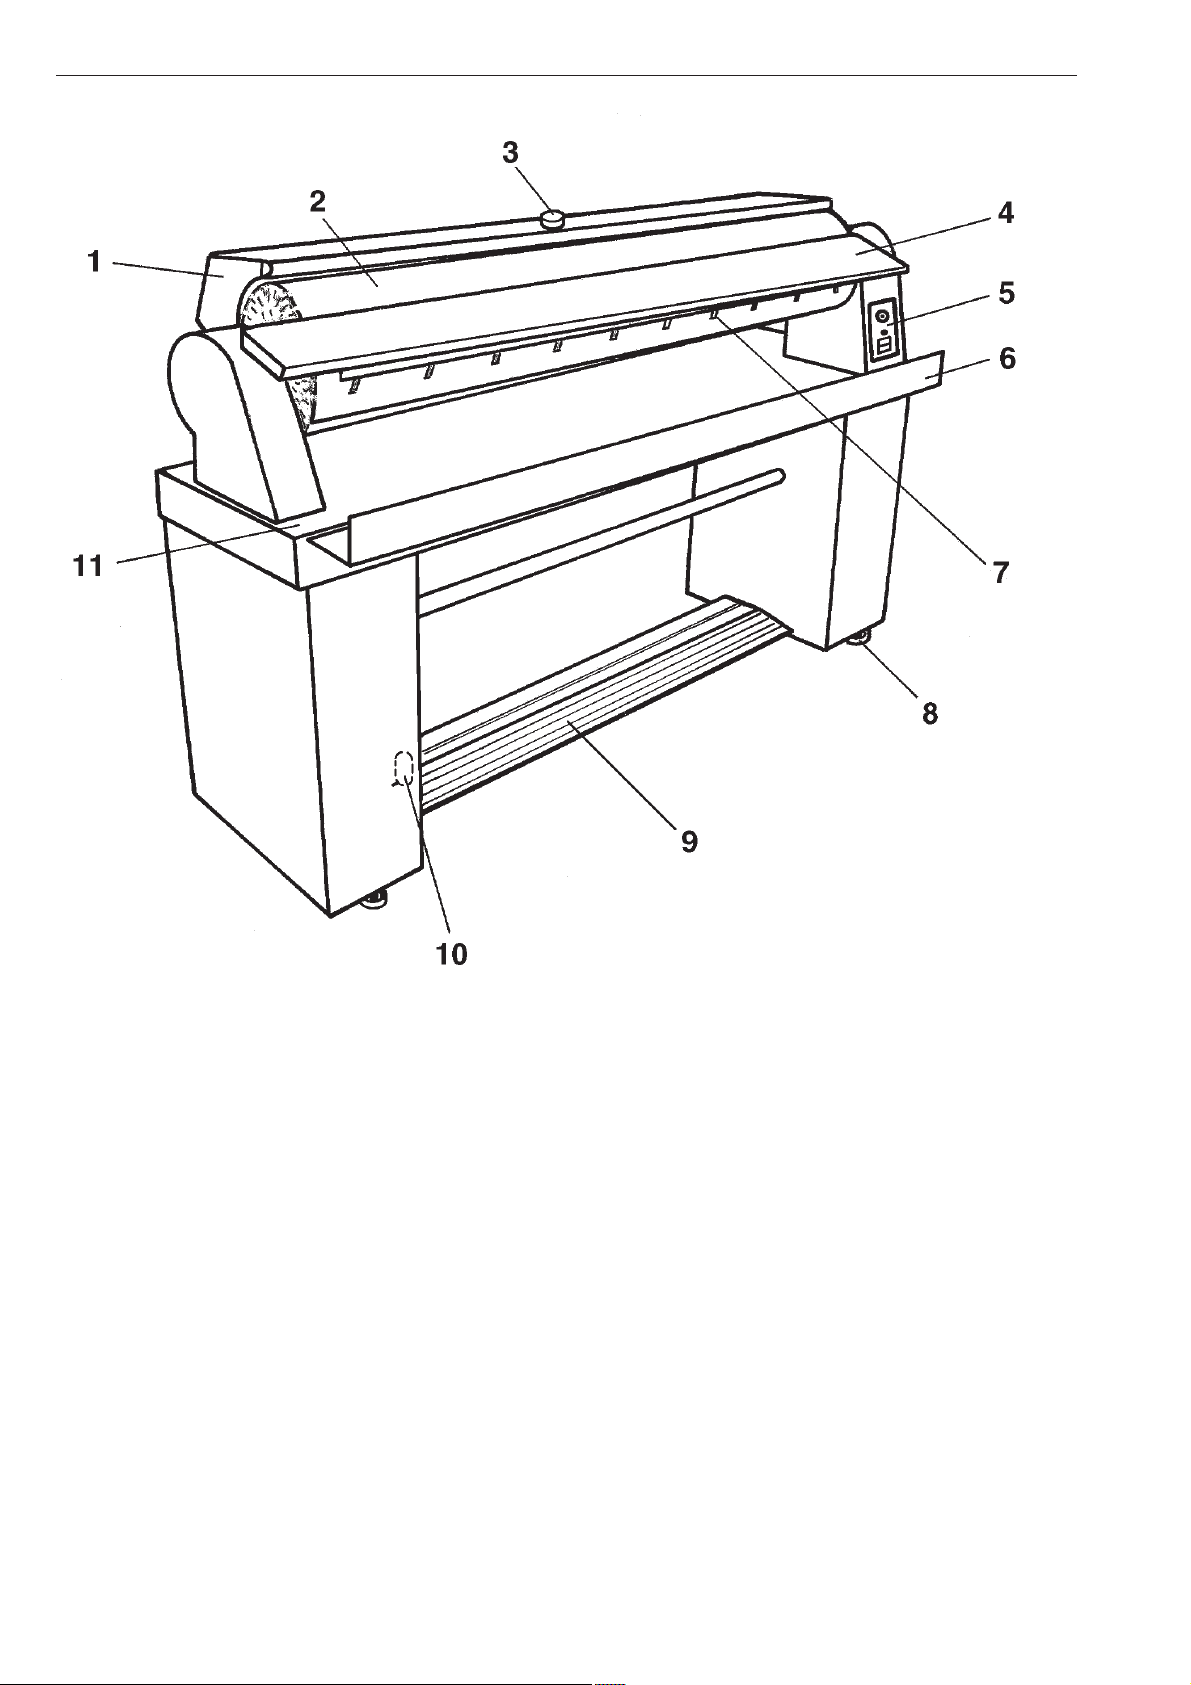
Guide to the rotary iron
a Heater plate with finger guard
b Roller
c Temperature selector
d Feed board
e Control panel
f Laundry compartment
g Laundry wipe off unit
h 4 height adjustable feet
i Foot pedal switch
j Emergency release (power failure)
k Ironing table
4
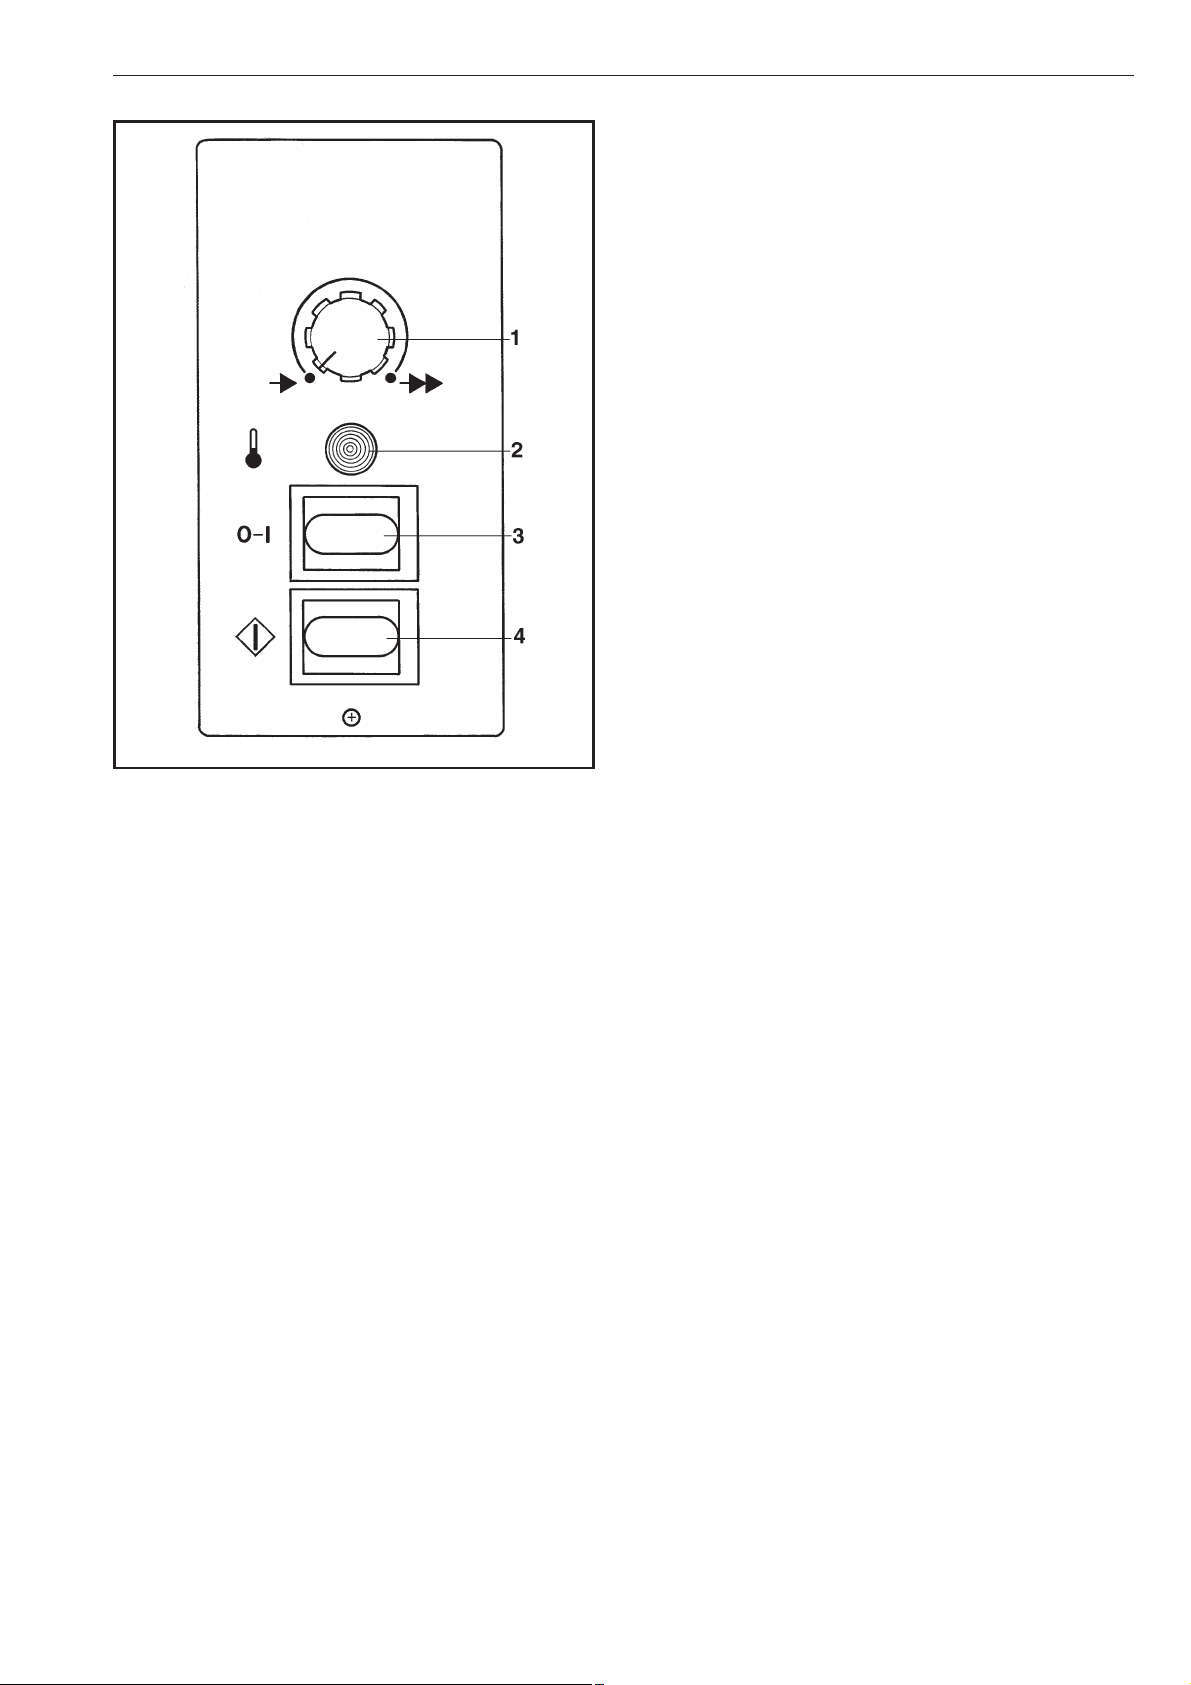
Guide to the rotary iron
a Roller speed selector
b % "Heating" indicator
c On/Off button
To turn the rotary iron on and off. The indicator lights
when the machine is turned on.
d h "Start" button
To start ironing. The heater plate lowers to the roller
and the roller turns.
5
Guide to the rotary iron
Roller speed selector
The roller speed can be increased by turning the se
lector clockwise and decreased by turning it counter
clockwise.
Temperature selector
Finger guard
-
-
The finger guard is a safety feature that should be
checked each time the rotary iron is used.
H = 104°F - 140°F (40°C - 60°C)
ß = low temperature
ßß = medium temperature
ßßß = high temperature
Caution! Do not reach between the heater pla-
,
te and the roller. Risk of burns - risk of crushing.
^ Press the h "Start" button. The heater plate lowers
and the roller turns.
When the finger guard is pushed upwards, the roller
stops and the heater plate rises off the roller.
^ Turn the iron on again by pressing the h "Start"
button.
Always test the finger guard before using
the appliance!
6
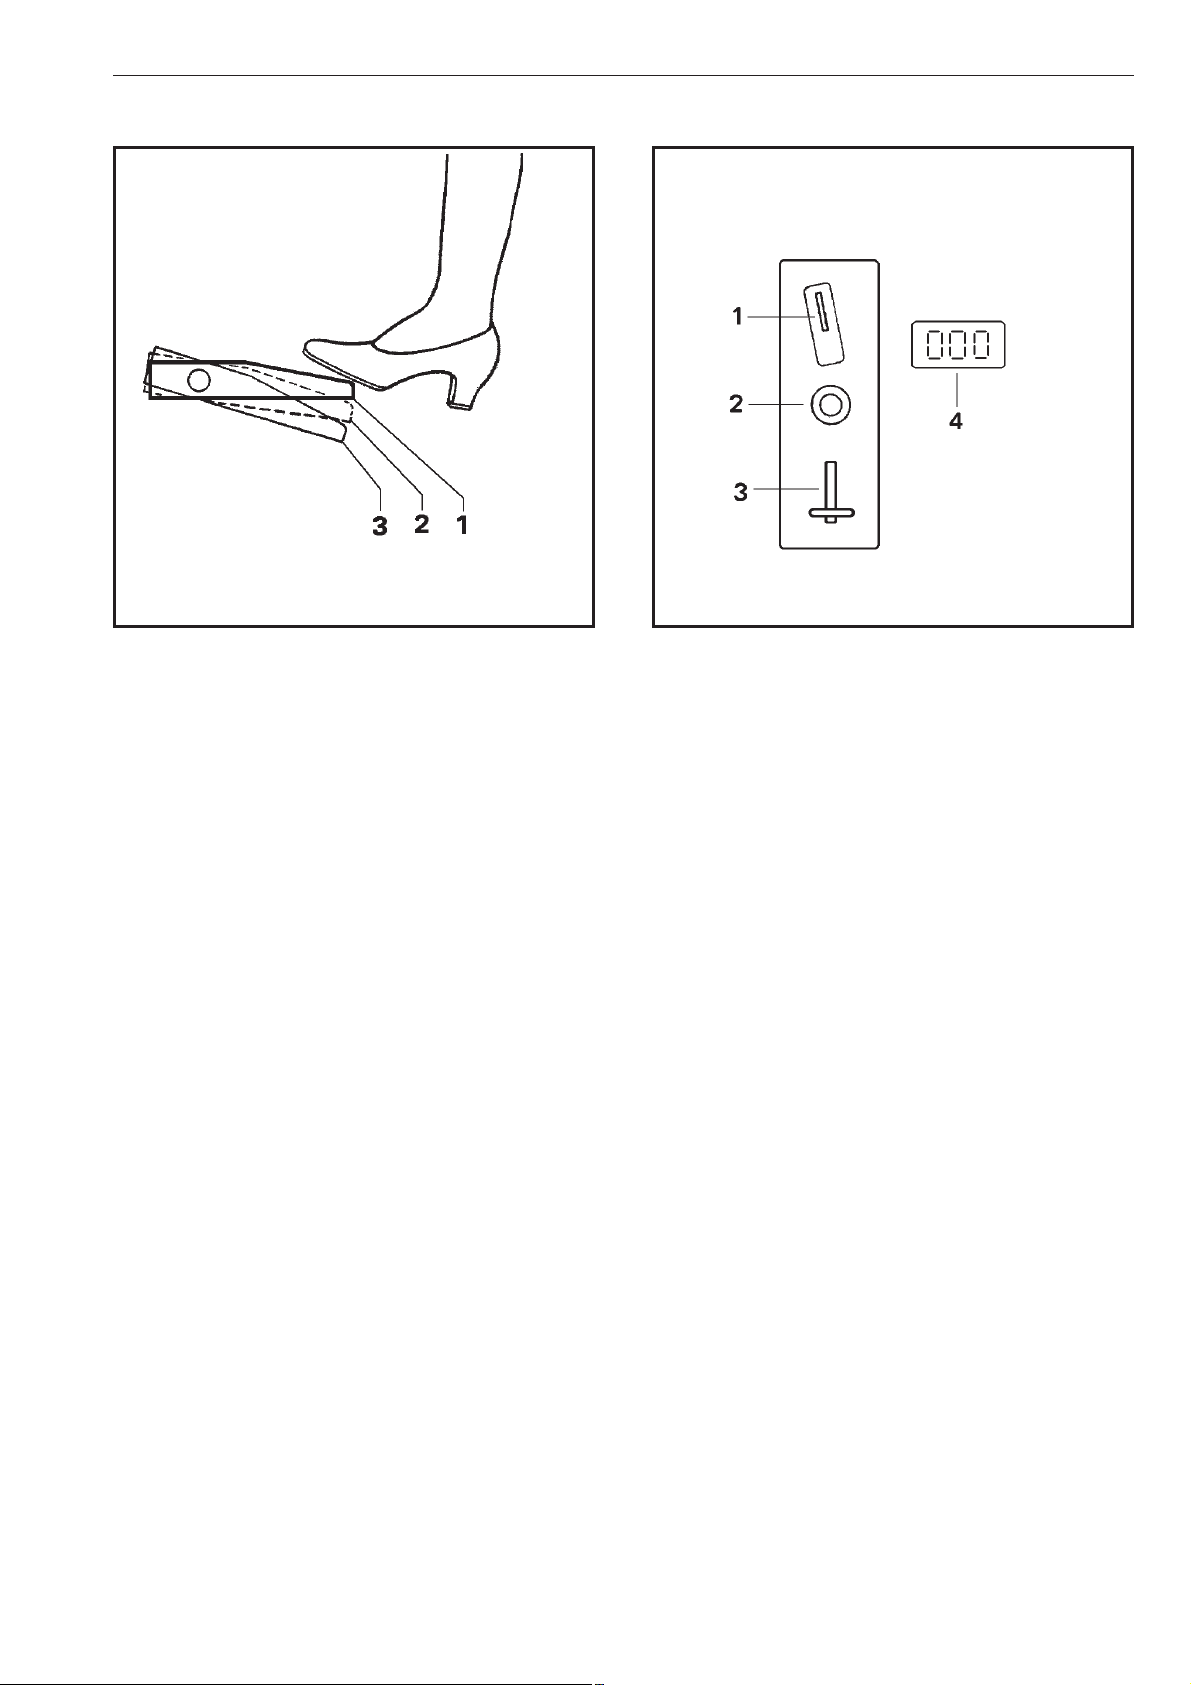
Guide to the rotary iron
Foot pedal switch
Switch position 1 (inactive) Ironing
Switch position 2 Steaming
Switch position 3 Lifting the heater plate
Coin mechanism
1 = Coin slot
After inserting a coin or token the preprogrammed
running time is displayed.
2 = Coin return button
3 = Coin return
4 = Running time display
7
Use
Correct dampness
For best results, the residual moisture of the laundry
should be 25%.
Laundry which contains more than 50% synthetic
fibers must not be ironed in this machine. The syn
thetics might melt at the high temperatures. Laun
dry with less synthetics can be ironed at a low
temperature.
Preparing the laundry
Sort the laundry according to how much heat is re
^
quired for ironing.
Check the fabric care label for the correct ironing
^
temperature of the laundry.
Care sym
bol
J Do not iron
G Polyester /
H Silk / Woo-
Fabric Dot sym
-
Rayon
lens
Temp.
-
bol
ß cool iron
(low temp.)
ßß medium hot
iron
(medium
temp.)
Ironing tips
To avoid creasing stop the roller, pull the item back
–
slightly and smooth out. If necessary, dampen
again with a wet cloth or spray bottle.
If possible, always use the whole length of the rol
–
-
-
-
ler, otherwise it will lose its elasticity.
For small items such as handkerchiefs, alternate
–
between the right and left hand sides of the roller.
Iron starched items last to avoid any starch transfer
–
to other items.
Items with buttons, zippers or holes should be iro
–
ned face down on to the roller so that they are
pressed into the cushioned surface.
Cover zippers, metal buttons, and metal hooks with
–
a cloth to protect the heater plate.
Buttons, zippers and trim that is not heat resistant
–
or very large buttons should not be ironed. They
may damage the heater plate.
Caution!
Before using for the first time clean the heater
plate by ironing an old cloth over the whole roller length.
-
-
I Cottons / Li-
nen
^ Start ironing at a low setting and gradually increase
the temperature according to the fabric being ironed.
^
If decreasing the temperature is necessary, it is
only reached, once the "Heating" indicator lights
again.
ßßß hot iron
(high temp.)
8

Turning the rotary iron on
Plug the machine in and press the 0-I(On/Off)
^
button.
The On/Off indicator lights.
Rotary iron with coin mechanism
Select the desired temperature with the temperatu
^
re selector.
Use
-
The running time display lights.
^
Insert coins or token. The respective running time is
displayed in minutes.
9

Use
Press the h "Start" button. The heater plate lowers
^
and the roller turns.
Testing the finger guard
The finger guard is a safety feature and should be
checked before each use of the rotary iron.
^ Select the roller speed slow or fast, depending on
dampness and type of laundry.
^
The rotary iron is ready to operate when the % "Hea
ting" indicator goes out.
^ Lift the finger guard.
The roller stops and the heater plate rises off the roller.
^ Turn the iron on again with the h "Start" button.
-
10

Use
Ironing
Insert the prepared laundry by feeding it over the
^
feed board.
Rotary iron with coin mechanism
At the end of the pre-programmed running time the
heater plate raises and the roller stops turning.
After ironing
^ Smooth the items during ironing from the middle to
the edges.
^
To steam laundry, press the foot pedal down to
switch point 2. The roller stops.
^
To dry the roller cover, turn the heating off H and
let the rotary iron run for 5 minutes with the heater
plate down.
^
Turn the rotary iron off.
^
Pull the plug.
^
To feed thicker items:
Press the foot pedal down to switch point 3. The
heater plate raises off the roller.
^
Release the foot pedal switch after feeding the item
in. The heater plate lowers down to the roller.
11

Frequently asked questions
Power failure
In the event of a power failure, pull the emer
gency release lever up.
If there is a power failure when the rotary iron is in
use, the heater plate will stay on the roller. The item
being ironed will be held there possibly becoming
scorched.
-
Protecting the roller and iron cover
During breaks and after ironing the heater plate
–
should be raised. The roller and the iron cover du
rability will be increased.
Avoid running the iron without laundry.
Use the whole roller width to iron small laundry
–
items. When used only on one side the roller and
iron cover is strained.
Motor protection
If the motor gets to hot due to an overload, the motor
shuts off automatically and the heater plate raises.
After the motor has sufficiently cooled, press the I
^
button and restart ironing.
-
^ Turn the rotary iron off.
^ Pull the emergency release lever up. The heater
plate raises.
When power has been restored
^
Turn the rotary iron on.
^
Press the h "Start" button. The heater plate lowers
and the roller turns.
12

Cleaning and Care
Cleaning the heater plate
Do not use abrasive cleaning agents, scrub
,
bing sponges or sand paper.
Lime and starch deposits can build up on the heater
plate.
Clean the heater plate1-3times per week using
^
an iron waxing cloth and cleanpaste.
For stubborn deposits use a cleaning cloth in addi
^
tion to the cleaning mat.
The heater plate should be waxed after each clea
^
ning.
Original cleaning cloths and ironing wax should only
be obtained from Miele.
See the "Miele Ironing Handbook" for further informati
on.
-
Washing or replacing the ironing cover
Before taking the ironing cover off (to wash or re
^
place it), turn the rotary iron off, pull the plug and
let the iron cool.
Remove the feed board and raise the heater plate
^
with the emergency lever.
When removing or replacing the ironing cover some
steel wool bits will fall onto the ironing table and may
-
-
-
get into the cut-outs of the heater plate supports.
Cover the cut-outs of the heater plate supports,
^
and clean the steel wool from the ironing table.
Wash the heavily soiled cover with a pre-wash, a
^
203°F (95°C) program and spin. It should not be
washed if only slightly discolored (yellowing nor
mal).
While still damp the ironing cover should be "iro
^
ned" back on to a moving, heated roller (ß setting)
with the heater plate in the ironing position.
To replace or renew the roller padding contact
Technical Service.
-
-
-
Discoloration of the ironing cover
A slight to heavily brown coloration of the ironing cover is normal.
To avoid the cover from turning black:
– Always use the complete roller width
– Space out smaller items, alternating from left to
right.
–
During breaks, raise the heater plate and lower the
temperature.
13

After sales service
In the event of a problem, please contact the Miele
Technical Service Department at the phone number
on the back of this booklet.
When contacting Technical Service please quote the
model and serial number of the machine. These can
be found on the silver data plate.
Only use original Miele spare parts for maintenance
or repairs on this machine.
14

Guide to the data plate symbols
a
b opq
c
drs
e
ft
g
u
i
hj v
k
lw
m
n
1 Model
2 Serial number
3 Item number
4 Material number
5 Voltage / Frequency
6 Control breaker
7 Motor
8 Drum data*
9 Drum diameter / Drum depth*
10 Spin speed*
11 Drum volume / Dry laundry weight*
12 Kinetic energy*
13 Acceleration time*
14 Deceleration time*
15 Heating
16 Name / Year of manufacture
17 Commissioning date
18 Electrical heating
19 Breaker at the building's electrical service panel
20 Steam heat indirect*
21 Steam heat direct*
22 Gas heating*
23 Certificates
* Does not apply to the Rotary Iron
Noise level
Noise level was rated A.
15

16

Installation Instructions

Installation instructions
The rotary iron should be installed by a Miele trai
ned installer.
Do not operate the rotary iron in a room where
,
cleaning machines are operated with solvents
containing CFC. These vapors could damage the
machine.
Installation site
Move the appliance on the wooden frame to the in
stallation location. At the installation location, lift the
appliance off the frame.
Ensure that the washer can not tip while mo
,
ving it.
-
Duct for venting steam
-
-
Regard the specifications for exhaust air, air intake
and ventilation cross-sections.
The on-site exhaust air duct must not lead into a
chimney used for gas, coal or oil heating. It must also
be separate from any dryer exhaust air duct.
The moist warm exhaust air must be vented to the
outdoors by the shortest route possible.
To ensure optimum air flow, the ducting should con
tain as few bends as possible and airtight connec
tions.
The connector for the steam vent is located on the
-
-
The rotary iron must not be moved without the woo
den frame (e.g. when moving to a new residence).
For the move, lift the rotary iron onto the wooden fra
me and secure it.
The machine does not require any special anchorage
or base installation.
Select a location which has sufficient light for comfortable operation.
^ With the adjustable feet, align the appliance so that
it is level.
Hold the level on the front and side columns.
-
-
rear of the right stand.
With an exhaust air duct leading upwards, to drain
the water a condensate drain hole 1/8" - 3/16" ø (3-5
mm ø) must be provided at the lowest point.
The exhaust air duct must have an inside diameter of
2 3/4" (70 mm).
Adequate ventilation of the installation room must be
ensured.
18
The open end of an exhaust air duct to the outdoors
must be protected against the effects of weather.
The on-site exhaust air duct and outlet to the out
doors must be regularly checked for lint deposits and
cleaned if necessary.
-

Electrical connection
All electrical work must be performed by a
,
qualified service technician in accordance with all
applicable codes and standards.
Regard the data plate, wiring diagram, conversion
^
and installation plan.
The wiring diagram is located under the cover of the
right side column.
Before installation, make sure that the voltage and
frequency listed on the data plate correspond with
the site’s electrical supply.
If converted to another voltage, mark an D on the
^
data plate.
Caution! The heater plate rises as soon as the
,
machine is connected to the mains.
Installation instructions
If the appliance is hard wired, a multiple-pole separa
tor must be installed. Separators with a contact gap
of more than 1/8" (3 mm) are valid as separators. All
components have to bear CSA or UL approval.
The plug connection or the separator must be accessible at all times.
You must be able to lock the separator or monitor it at
all times in case the appliance has to be disconnected from the power supply.
,
When the appliance has been installed and
connected, the grounding wires must be reconnected and the outer casings must be put back in
place.
-
19

Help to protect the environment
Disposal of the packing materials
The packing materials protect the appliance during
shipping. They have been designed to be biodegra
dable and recyclable.
To prevent suffocation, ensure that any plastic wrap
pings, bags, etc. are disposed of safely and kept out
of the reach of children.
Disposal of an old appliance
Old appliances may contain materials that can be re
-
-
cycled. Please contact your local recycling center
about the possibility of recycling these materials.
Ensure that the appliance presents no danger to chil
dren while being stored for disposal. Before discar
ding an old appliance, unplug it from the outlet, cut
off its power cord and remove any doors to prevent
hazards.
-
-
-
202122


23

Alteration rights reserved / 5209
M.-Nr. 07 660 861 / 00
 Loading...