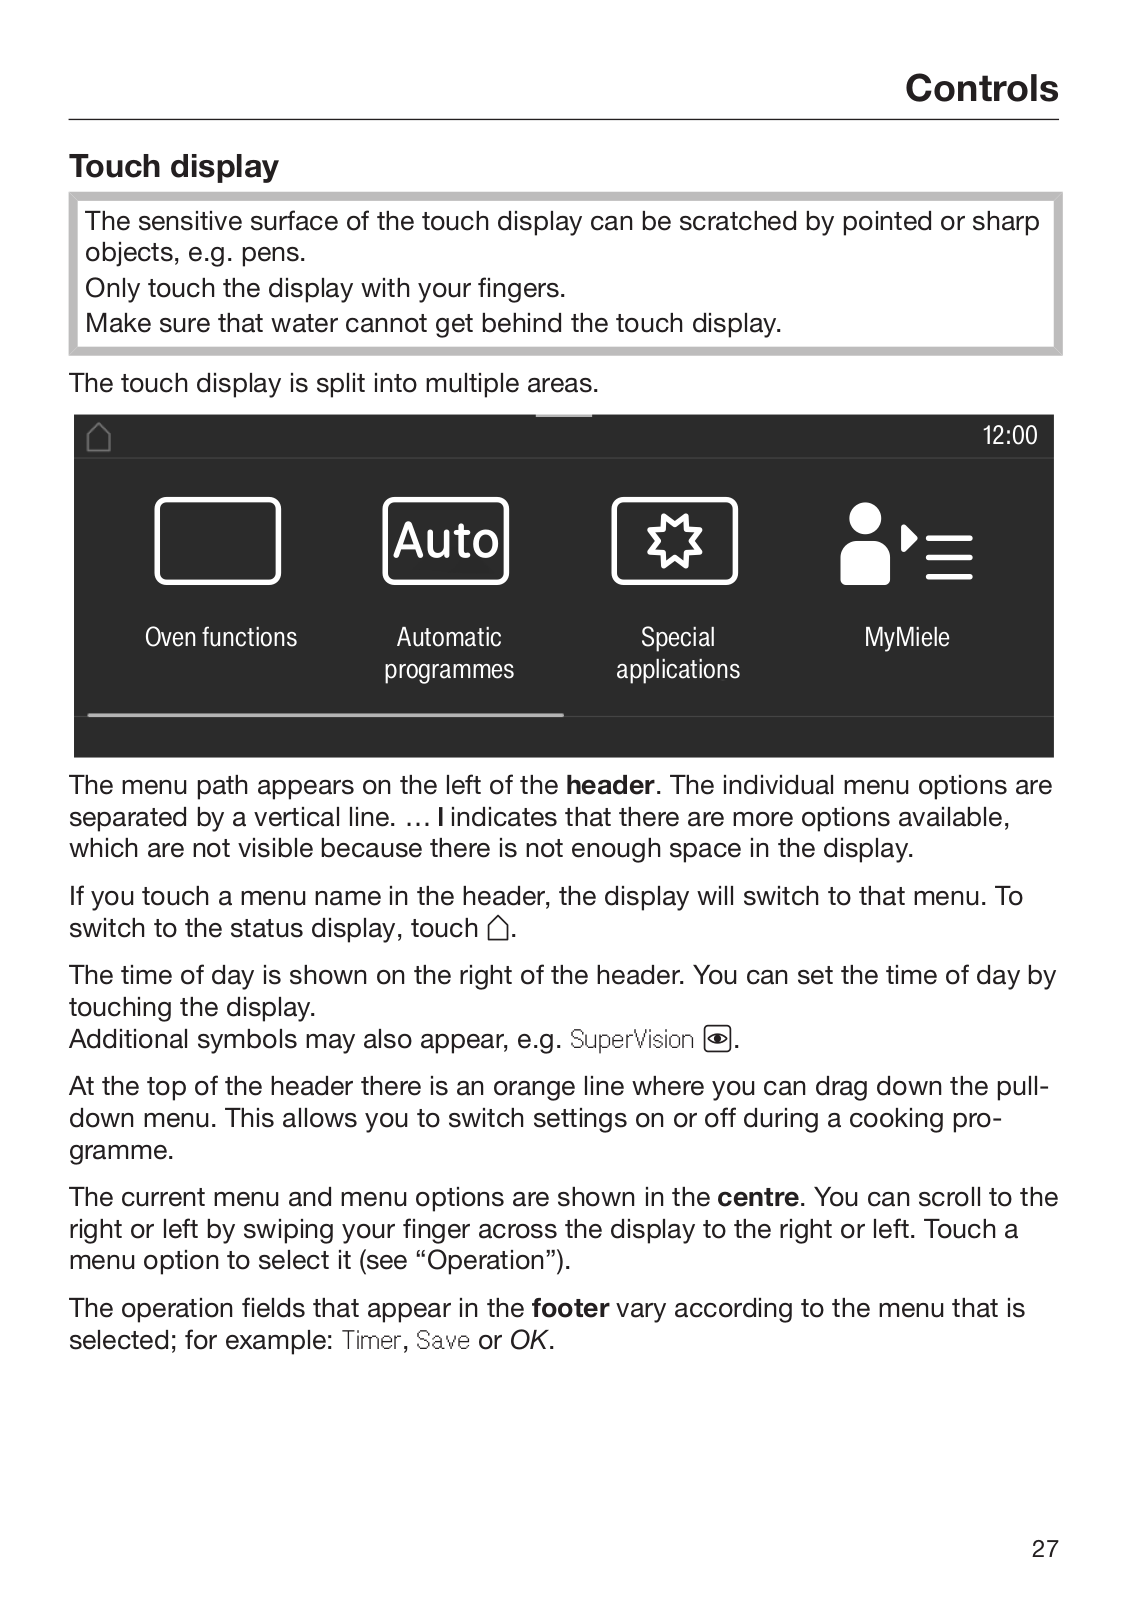
Operating and installation
instructions
Combi steam oven
To avoid the risk of accidents or damage to the appliance it is essential to read these instructions before it is installed and used for the first time.
en-GB |
M.-Nr. 11 181 180 |
Contents |
|
Warning and Safety instructions...................................................................... |
8 |
Caring for the environment .............................................................................. |
18 |
Guide to the appliance...................................................................................... |
19 |
Steam oven ......................................................................................................... |
19 |
Accessories supplied .......................................................................................... |
21 |
Controls.............................................................................................................. |
24 |
On/Off sensor control.......................................................................................... |
25 |
Movement sensor................................................................................................ |
25 |
Sensor controls ................................................................................................... |
26 |
Touch display ...................................................................................................... |
27 |
Symbols............................................................................................................... |
28 |
Using the appliance........................................................................................... |
29 |
Selecting a menu option ..................................................................................... |
29 |
Scrolling............................................................................................................... |
29 |
Exiting a menu..................................................................................................... |
29 |
Changing a value or setting................................................................................. |
29 |
Changing a setting in a list ............................................................................. |
29 |
Entering numbers with the roller .................................................................... |
29 |
Entering numbers using the numerical keypad.............................................. |
29 |
Changing the setting with a segment bar ...................................................... |
30 |
Entering letters .................................................................................................... |
30 |
Displaying the context menu............................................................................... |
30 |
Moving entries..................................................................................................... |
30 |
Displaying the pull-down menu........................................................................... |
31 |
Displaying Help .................................................................................................. |
31 |
Activating MobileStart ......................................................................................... |
31 |
Description of functions ................................................................................... |
32 |
Control panel....................................................................................................... |
32 |
Water container ................................................................................................... |
32 |
Food probe .......................................................................................................... |
32 |
Temperature/core temperature............................................................................ |
32 |
Moisture............................................................................................................... |
32 |
Cooking duration................................................................................................. |
33 |
Noises.................................................................................................................. |
33 |
Heating-up phase................................................................................................ |
33 |
Cooking phase .................................................................................................... |
33 |
Steam reduction .................................................................................................. |
34 |
Oven interior lighting ........................................................................................... |
34 |
2
|
Contents |
Before using for the first time .......................................................................... |
35 |
Miele@home ........................................................................................................ |
35 |
Basic settings...................................................................................................... |
36 |
Cleaning for the first time .................................................................................... |
37 |
Set the correct boiling point for water................................................................. |
38 |
Heating up the steam oven ................................................................................. |
39 |
Settings .............................................................................................................. |
40 |
Settings overview ................................................................................................ |
40 |
Opening the “Settings” menu.............................................................................. |
43 |
Language ......................................................................................................... |
43 |
Time..................................................................................................................... |
43 |
Date ..................................................................................................................... |
44 |
Lighting................................................................................................................ |
44 |
Start screen ......................................................................................................... |
45 |
Display................................................................................................................. |
45 |
Volume................................................................................................................. |
46 |
Units .................................................................................................................... |
46 |
Keeping warm ..................................................................................................... |
46 |
Steam reduction .................................................................................................. |
47 |
Recommended temperatures.............................................................................. |
47 |
Booster................................................................................................................ |
48 |
Automatic rinsing ................................................................................................ |
48 |
Water hardness ................................................................................................... |
49 |
Proximity/Movement sensor................................................................................ |
50 |
Safety .................................................................................................................. |
51 |
Furniture front recognition ................................................................................... |
52 |
Miele@home ........................................................................................................ |
52 |
Remote control.................................................................................................... |
53 |
Activating MobileStart .................................................................................... |
53 |
SuperVision ......................................................................................................... |
54 |
RemoteUpdate .................................................................................................... |
55 |
Software version.................................................................................................. |
56 |
Legal information................................................................................................. |
56 |
Showroom programme........................................................................................ |
56 |
Factory default..................................................................................................... |
56 |
Alarm + minute minder ..................................................................................... |
57 |
Using the Alarm function..................................................................................... |
57 |
Using the Minute minder function ....................................................................... |
58 |
Main and sub-menus ........................................................................................ |
59 |
Energy saving tips ............................................................................................. |
61 |
3
Contents |
|
Operation............................................................................................................ |
63 |
Changing values and settings for a cooking programme.................................... |
64 |
Changing the temperature and core temperature .......................................... |
65 |
Changing the Moisture ................................................................................... |
65 |
Setting cooking durations .............................................................................. |
65 |
Changing the set cooking durations .............................................................. |
66 |
Deleting the set cooking durations................................................................. |
66 |
Cancelling a cooking programme ....................................................................... |
67 |
Interrupting a cooking programme...................................................................... |
67 |
Pre-heating the oven compartment .................................................................... |
68 |
Booster........................................................................................................... |
68 |
Pre-heat.......................................................................................................... |
69 |
Crisp function ...................................................................................................... |
69 |
Releasing bursts of steam................................................................................... |
70 |
Changing the function ......................................................................................... |
71 |
General notes..................................................................................................... |
72 |
The advantages of cooking with steam .............................................................. |
72 |
Suitable containers.............................................................................................. |
72 |
Shelf level ............................................................................................................ |
73 |
Frozen food.......................................................................................................... |
73 |
Temperature ........................................................................................................ |
73 |
Cooking duration................................................................................................. |
73 |
Cooking with liquid.............................................................................................. |
73 |
Your own recipes - steam cooking...................................................................... |
73 |
Universal tray and combi rack............................................................................. |
74 |
Steam cooking................................................................................................... |
75 |
Eco Steam cooking ............................................................................................. |
75 |
Notes on the cooking tables ............................................................................... |
75 |
Vegetables........................................................................................................... |
76 |
Fish...................................................................................................................... |
79 |
Meat .................................................................................................................... |
82 |
Rice ..................................................................................................................... |
84 |
Grain .................................................................................................................... |
85 |
Pasta ................................................................................................................... |
86 |
Dumplings ........................................................................................................... |
87 |
Dried pulses ........................................................................................................ |
88 |
Hen's eggs ......................................................................................................... |
90 |
Fruit ..................................................................................................................... |
91 |
Sausages............................................................................................................. |
91 |
Shellfish ............................................................................................................... |
92 |
Mussels ............................................................................................................... |
93 |
Menu cooking (cooking whole meals) - manually ............................................... |
94 |
4
|
Contents |
Sous-vide (vacuum) cooking |
............................................................................ 96 |
Special applications .......................................................................................... |
104 |
Reheat ................................................................................................................. |
104 |
Defrost................................................................................................................. |
106 |
Mix & Match ........................................................................................................ |
109 |
Blanching............................................................................................................. |
120 |
Bottling ................................................................................................................ |
120 |
Bottling cakes...................................................................................................... |
123 |
Drying food.......................................................................................................... |
124 |
Prove dough ........................................................................................................ |
125 |
Menu cooking – automatic.................................................................................. |
125 |
Disinfect items .................................................................................................... |
126 |
Heat crockery ...................................................................................................... |
127 |
Keeping warm ..................................................................................................... |
127 |
Heating damp flannels ........................................................................................ |
128 |
Dissolve gelatine ................................................................................................. |
128 |
Decrystallise honey ............................................................................................. |
129 |
Melt chocolate..................................................................................................... |
129 |
Make yoghurt ...................................................................................................... |
130 |
Cook bacon......................................................................................................... |
131 |
Sweat onions....................................................................................................... |
131 |
Extracting juice with steam ................................................................................. |
132 |
Fruit preserve....................................................................................................... |
133 |
Skinning vegetables and fruit .............................................................................. |
134 |
Apple storage ..................................................................................................... |
135 |
Making eierstich .................................................................................................. |
135 |
Automatic programmes .................................................................................... |
136 |
Categories ........................................................................................................... |
136 |
Using automatic programmes ............................................................................. |
136 |
Usage notes ........................................................................................................ |
136 |
Search ................................................................................................................. |
137 |
MyMiele .............................................................................................................. |
138 |
User programmes.............................................................................................. |
139 |
Baking................................................................................................................. |
143 |
Baking tips........................................................................................................... |
143 |
Tips on baking..................................................................................................... |
144 |
Notes on the functions ........................................................................................ |
144 |
5
Contents |
|
Roasting ............................................................................................................. |
146 |
Tips for roasting .................................................................................................. |
146 |
Notes on the functions ........................................................................................ |
146 |
Food probe .......................................................................................................... |
148 |
Grilling ................................................................................................................ |
152 |
Grilling tips .......................................................................................................... |
152 |
Tips for grilling..................................................................................................... |
152 |
Notes on the functions ........................................................................................ |
153 |
Note for test institutes ...................................................................................... |
154 |
Cleaning and care ............................................................................................. |
156 |
Important information on cleaning and care ....................................................... |
156 |
Cleaning the steam oven front ............................................................................ |
157 |
PerfectClean........................................................................................................ |
158 |
Oven compartment ............................................................................................. |
159 |
Cleaning the water container .............................................................................. |
160 |
Accessories ......................................................................................................... |
161 |
Cleaning the side runners.................................................................................... |
162 |
Lowering the top heat/grill element..................................................................... |
163 |
Maintenance........................................................................................................ |
164 |
Soak ............................................................................................................... |
164 |
Drying ............................................................................................................. |
164 |
Rinsing............................................................................................................ |
164 |
Descaling the steam oven .............................................................................. |
164 |
Door removal....................................................................................................... |
166 |
Fitting the door .................................................................................................... |
167 |
Problem solving guide ...................................................................................... |
168 |
Optional accessories ........................................................................................ |
175 |
Containers ........................................................................................................... |
175 |
Other.................................................................................................................... |
175 |
Cleaning and care products ................................................................................ |
175 |
Service................................................................................................................ |
176 |
Contact in the event of a fault ............................................................................. |
176 |
Warranty .............................................................................................................. |
176 |
Installation.......................................................................................................... |
177 |
Safety instructions for installation ....................................................................... |
177 |
Installation notes ................................................................................................. |
178 |
6
|
Contents |
Building-in dimensions ....................................................................................... |
179 |
Installation in a tall unit................................................................................... |
179 |
Installation in a base unit................................................................................ |
180 |
Side view ........................................................................................................ |
181 |
Swivel range for control panel........................................................................ |
182 |
Connections and ventilation........................................................................... |
183 |
Installing the steam oven..................................................................................... |
184 |
Mains water connection ...................................................................................... |
185 |
Drainage .............................................................................................................. |
187 |
Electrical connection ........................................................................................... |
188 |
Conformity declaration ..................................................................................... |
190 |
Copyrights and Licences.................................................................................. |
191 |
7
The Combi steam oven is referred to in the following instructions as a steam
oven.
This steam oven complies with all applicable safety requirements. Inappropriate use can, however, lead to personal injury and material damage.
Read the operating and installation instructions carefully before using the steam oven. They contain important information on safety, installation, use and maintenance. This prevents both personal injury and damage to the steam oven.
In accordance with standard IEC/EN 60335-1, Miele expressly and strongly advises that you read and follow the instructions in the chapter on installing the steam oven as well as the safety instructions and warnings.
Miele cannot be held liable for injury or damage caused by noncompliance with these instructions.
Keep these instructions in a safe place and pass them on to any future owner.
8
Warning and Safety instructions
This steam oven is intended for use in domestic households and similar working and residential environments.
This steam oven is not intended for outdoor use.
The steam oven is intended for domestic use only to steam-cook, bake, roast, grill, defrost and reheat food.
All other types of use are not permitted.
The steam oven can only be used by people with reduced physical, sensory or mental capabilities, or lack of experience and knowledge, if they are supervised whilst using it, or have been shown how to use it in a safe way and recognise and understand the consequences of incorrect operation.
This steam oven is supplied with a special lamp to cope with particular conditions (e.g. temperature, moisture, chemical resistance, abrasion resistance and vibration). This special lamp must only be used for the purpose it is intended for. It is not suitable for room lighting. Replacement lamps may only be fitted by a Miele authorised person or by Miele Service.
9
Warning and Safety instructions
Activate the system lock to ensure that children cannot switch on the steam oven inadvertently.
Children under 8 years of age must be kept away from the steam oven unless they are constantly supervised.
Children aged 8 and older may only use the steam oven without supervision if they have been shown how to use it in a safe manner. Children must be able to understand and recognise the possible dangers caused by incorrect operation.
Children must not be allowed to clean the steam oven unsupervised.
Please supervise children in the vicinity of the steam oven and do not let them play with it.
Risk of suffocation due to packaging material. Whilst playing, children may become entangled in packaging material (such as plastic wrapping) or pull it over their head, presenting the risk of suffocation. Keep packaging material away from children.
Risk of injury caused by hot surfaces. Children’s skin is far more sensitive to high temperatures than that of adults. External parts of the steam oven such as the door glass, control panel and the vent become quite hot. Do not let children touch the steam oven when it is in operation.
Keep children well away from the steam oven until it has cooled down and there is no danger of injury.
Risk of injury from the open door.
The oven door can support a maximum weight of 10 kg. Children could injure themselves on an open door.
Do not let children sit on the open door, lean against it or swing on it.
10
Warning and Safety instructions
Unauthorised installation, maintenance and repairs can cause considerable danger for the user. Installation, maintenance and repairs must only be carried out by a Miele authorised technician.
Never use a damaged steam oven. It could be dangerous. Check it for visible signs of damage before using it.
Reliable and safe operation of this steam oven can only be assured if it has been connected to the mains electricity supply.
The electrical safety of this appliance can only be guaranteed when correctly earthed. It is essential that this standard safety requirement is met. If in any doubt please have the electrical installation tested by a qualified electrician.
Before connecting the appliance to the mains supply, ensure that the connection data on the data plate (voltage and frequency) match the mains electricity supply.
This data must correspond in order to avoid the risk of damage to the appliance. Consult a qualified electrician if in any doubt.
Do not connect the steam oven to the mains electricity supply by a multi-socket adapter or an extension lead. These do not guarantee the required safety of the appliance (fire hazard).
For safety reasons, this steam oven may only be used when it has been built in. This is necessary to ensure that all electrical components are shielded.
This steam oven must not be used in a non-stationary location (e.g. on a ship).
Risk of injury due to electric shock. Any contact with live connections or tampering with the electrical or mechanical components of the oven will endanger your safety and may lead to the steam oven malfunctioning.
Do not open the steam oven housing under any circumstances.
11
Warning and Safety instructions
While the appliance is under warranty, repairs should only be undertaken by a Miele authorised service technician. Otherwise the warranty is invalidated.
Miele can only guarantee the safety of the appliance when genuine original Miele replacement parts are used. Faulty components must only be replaced by Miele spare parts.
If the plug is removed from the connection cable or if the cable is supplied without a plug, the appliance must be connected to the electrical supply by a suitably qualified electrician.
If the mains connection cable is damaged, it must be replaced with a special mains connection cable (see “Electrical connection” in the “Installation” chapter).
During installation, maintenance and repair work, the appliance must be disconnected from the mains electricity supply.
If the steam oven is installed behind a furniture front (e.g. a door), do not close the furniture front while the steam oven is in use. Heat and moisture can build up behind the furniture front when closed.
This can result in damage to the steam oven, the housing unit and the floor. Leave the furniture door open until the steam oven has cooled down completely.
This steam oven must be plumbed in by a suitably qualified person.
The manufacturer cannot be held liable for damage caused by incorrect installation or connection.
The steam oven must be connected to the cold water supply only.
The stopcock must be easily accessible after the appliance has been installed.
Before connection, check the inlet and drain hoses for visible signs of damage.
12
Warning and Safety instructions
The integrated waterproof system offers protection from water
damage, provided that the following conditions are met:
-The steam oven is properly installed (electric and water connections).
-The steam oven is repaired if any damage is identified.
-The stopcock is turned off when the appliance is not in use for an extended period (e.g. during holidays).
In areas which may be subject to infestation by cockroaches or other vermin, pay particular attention to keeping the appliance and its surroundings clean at all times. Any damage caused by cockroaches or other vermin will not be covered by the warranty.
13
Warning and Safety instructions
Risk of injury caused by hot surfaces and steam. The steam oven gets hot during operation. You could burn yourself on the heater elements, oven compartment, side runners, accessories, food or steam. Use oven gloves when placing hot food in the appliance or removing it and when working in the hot oven compartment.
Risk of injury caused by hot food.
Food may spill or splash around when placing it into the oven or removing it. The food can cause burns.
When placing cooking containers into the oven or removing them, make sure that the hot food does not spill.
Do not use the steam oven to heat up or bottle food in sealed jars and tins.
Pressure will build up inside them and they can explode causing damage to the appliance, as well as the risk of injury and scalding.
Plastic containers which are not suitable for use in an oven melt at high temperatures and can damage the steam oven or catch fire. Only use plastic containers which are declared by the manufacturer as being suitable for use in an oven. Follow the manufacturer's instructions on use. If you want to use plastic containers for steaming food make sure that they are temperature resistant to 100 °C and steam resistant. Any other plastic containers could melt, become brittle or break when subjected to heat.
Food which is stored in the oven compartment can dry out and the moisture released can lead to corrosion damage in the steam oven. Do not leave food in the oven compartment and do not use any cooking containers which are susceptible to corrosion.
Risk of injury from the open door. You could bang into the open door or trip over it. Avoid leaving the door open unnecessarily.
14
Warning and Safety instructions
The door can support a maximum weight of 10 kg. Do not sit on or lean against an open door, and do not place heavy objects on it. Also make sure that nothing can get trapped between the door and the oven cavity. The steam oven could get damaged.
Oil and fat can ignite if overheated. Never leave the steam oven unattended when cooking with oil and fat.
If it does ignite do not put the flames out with water. Switch the steam oven off immediately and then suffocate the flames by keeping the oven door closed.
Due to the high temperatures radiated, objects left near the steam oven when it is in use could catch fire.
Do not use the steam oven to heat up the room.
Grilling food for excessively long cooking durations can cause it to dry out with the risk of catching fire. Do not exceed the recommended cooking durations.
Some types of food dry out quickly and can self-ignite if high grill temperatures are used.
Never use the grill to finish baking part-cooked rolls or bread or to dry flowers or herbs. Use Fan plus or Conventional heat for this type of procedure.
To avoid fuelling any flames, do not open the steam oven door if there is smoke inside the oven compartment. Interrupt operation by switching the steam oven off and disconnecting it from the mains electricity supply. Do not open the door until the smoke has dispersed.
If using alcohol in your recipes, please be aware that high temperatures can cause the alcohol to vaporise. The vapour can catch fire on hot heating elements.
15
Warning and Safety instructions
Never line the floor of the oven compartment with aluminium foil or oven liners. Do not place any crockery or any pans, pots or baking trays directly on the floor of the oven compartment.
If you want to use the floor of the oven compartment as an extra surface, place the rack on the floor of the oven compartment with the rack surface facing up and the cooking container on top. In doing so, ensure that the filter in the floor of the oven is not moved.
The oven compartment floor can become damaged by the rack being pushed around on it.
Do not push the rack around on the oven compartment floor.
Larger deposits of food can block the drain and pump. Always make sure that the filter in the floor of the oven is inserted.
When using a small electrical appliance, e.g. a hand-held blender, near the steam oven, care should be taken that the cable of the appliance cannot get trapped by the steam oven door. The insulation on the cable could become damaged, giving rise to an electric shock hazard.
Do not operate the steam oven without the lamp cover. Steam could could reach electrical components and cause a short circuit. Steam could also damage the electrical components.
16
Warning and Safety instructions
Risk of injury due to electric shock. The steam from a steam cleaning appliance could reach live electrical components and cause a short circuit. Do not use a steam cleaner to clean the appliance.
Scratches on the door glass can result in the glass breaking. Do not use abrasive cleaners, hard sponges, brushes or sharp metal tools to clean the door glass.
The side runners can be removed (see “Cleaning and care – Cleaning the side runners”).
Refit the side runners correctly.
Try to avoid the interior walls being splashed with food or liquids containing salt. If it does happen, wipe these away thoroughly to avoid corrosion to stainless steel surfaces inside the cabinet.
Only use genuine original Miele accessories and spare parts with this appliance. Using accessories or spare parts from other manufacturers will invalidate the warranty and Miele cannot accept liability.
Only use the Miele food probe supplied with this oven. If it is faulty, it must only be replaced with a suitable original Miele food probe.
The plastic on the food probe can melt at very high temperatures. Do not use the food probe when using the grill functions (exception: Fan Grill ). Do not store the food probe in the oven if it is not in use.
17
Disposal of the packing mater-
ial
The packaging is designed to protect the appliance from damage during transportation. The packaging materials used are selected from materials which are environmentally friendly for disposal and should be recycled.
Recycling the packaging reduces the use of raw materials in the manufacturing process and also reduces the amount of waste in landfill sites.
Disposing of your old appli-
ance
Electrical and electronic appliances often contain valuable materials. They also contain specific materials, compounds and components, which were essential for their correct function and safety. These could be hazardous to human health and to the environment if disposed of with your domestic waste or if handled incorrectly. Please do not, therefore, dispose of your old appliance with your household waste.
Please dispose of it at your local community waste collection / recycling centre for electrical and electronic appliances, or contact your dealer or Miele for advice. You are also responsible for deleting any personal data that may be stored on the appliance being disposed of. Please ensure that your old appliance poses no risk to children while being stored prior to disposal.
18
a Control elements b Ventilation outlet
c Top heat/grill element with wireless food probe antenna d Oven interior lighting
e Air inlet for the fan with ring heating element behind it
f Oven compartment floor with bottom heater element and floor filter underneath it
g Drip channel
h Temperature sensor i Moisture sensor
j Door seal
k Side runners with 4 shelf levels l Steam inlet
m Front frame with data plate n Door
19
Guide to the appliance
a Water container
b Compartment for water container
c Wireless food probe
20
Guide to the appliance
A list of the models described in these operating and installation instructions can be found on the back page.
The data plate is located on the front frame, visible when the door is open.
The data plate states the model number, the serial number as well as connection data (voltage, frequency and maximum rated load).
Please have this information to hand, should you need to contact Miele regarding any questions or problems.
The accessories supplied with your appliance as well as a range of optional ones are available to order from Miele (see “Optional accessories”).
DGG 20
1 solid cooking container
Gross capacity 2.4 l / Usable capacity 1.8 l
450 x 190 x 40 mm (W x D x H)
1 perforated cooking container
Gross capacity 2.4 litres / Usable capacity 1.8 litres
450 x 190 x 40 mm (W x D x H)
1 perforated cooking container
Gross capacity 5.4 litres / Usable capacity 3.3 litres
450 x 390 x 40 mm (W x D x H)
1 universal tray for baking, roasting and grilling
1 combi rack for baking, roasting and grilling
21
Guide to the appliance
Food probe for precise temperature controlled cooking. The food probe monitors the inner temperature of the meat (core temperature).
Special cleaning agent for removing stubborn soiling from the oven compartment, particularly after roasting.
For descaling the appliance
The FlexiClip runners can be attached to any shelf level.
Push the FlexiClip runners fully into the oven compartment before placing accessories on them.
The accessories will then automatically sit securely in between the stoppers at either end of each runner and be prevented from sliding off.
The FlexiClip runners can support a maximum load of 15 kg.
22
Guide to the appliance
Risk of injury caused by hot surfaces.
The steam oven gets hot during operation. You could burn yourself on the heater elements, oven compartment, side runners or accessories.
Allow the heater elements, oven compartment, side runners and the accessories to cool before fitting or removing the FlexiClip runners.
The FlexiClip runners are fitted in between the two rails that make up a shelf level.
The FlexiClip runner with the Miele logo should be fitted on the right.
When fitting or removing the FlexiClip runners, do not extend them.
Hook the FlexiClip runner onto the front of the lower rail of a shelf level (1.) and then push it along the rail into the oven compartment (2.).
Then secure the FlexiClip runner to the lower rail of the shelf level (3.).
If the FlexiClip runners are difficult to pull out after fitting, pull firmly on them once to release them.
To remove a FlexiClip runner, proceed as follows:
Push the FlexiClip runner in all the way.
Remove the FlexiClip runner by raising it at the front (1.) and then pulling it forwards along the rail of the shelf level and out (2.).
23
a Recessed On/Off sensor control For switching the steam oven on and off
b Optical interface
(For Miele Service only)
c sensor control
For controlling the steam oven via your mobile device
d Touch display
For displaying information and for operation
e Movement sensor
For switching on the oven interior lighting and the display, and to acknowledge the buzzer when movement is detected
f sensor control To go back a step
g Sensor control
For opening and closing the control panel
h sensor control
For setting the minute minder or alarms
i sensor control
For switching the oven interior lighting on and off
24
Controls
The On/Off sensor control is recessed and reacts to touch.
Use this sensor control to switch the steam oven on and off.
The movement sensor is located under the touch display next to the sensor control. The movement sensor detects when you approach the touch display, e.g. with your hand or body.
If you have activated the corresponding settings, you can switch on the oven interior lighting, switch on the steam oven or dismiss the buzzers (see “Settings – Proximity/Movement sensor”).
25
Controls
The sensor controls react to touch. Every touch of a sensor control is confirmed with an audible tone. This audible tone can be switched off by selecting
the Volume | Keypad tone | Off setting.
If you want the sensor controls to respond even when the steam oven is switched off, select the Display | QuickTouch | On setting.
Sensor conFunction trol
If you want to control the steam oven from your mobile device, you must have the Miele@home system, switch on the Remote control setting and touch this sensor control. The sensor control
then lights up orange and the MobileStart function is available.
As long as this sensor control is lit, you can control the steam oven via your mobile device (see “Settings – Miele@home”).
Depending on which menu you are in, this will take you back a level or back to the main menu.
Use this sensor control to open and close the control panel (see “Control panel” in the “Functional description” chapter).
If a menu appears in the display or if a cooking programme is in progress, you can use this sensor control to set a minute minder (e.g. when boiling eggs) or an alarm (a specific time) at any point (see “Alarm and minute minder”).
Select this sensor control to switch the oven interior lighting on and off.
Depending on the setting selected, the oven interior lighting switches off after 15 seconds or remains constantly switched on or off.
26
Controls
The sensitive surface of the touch display can be scratched by pointed or sharp objects, e.g. pens.
Only touch the display with your fingers.
Make sure that water cannot get behind the touch display.
The touch display is split into multiple areas.
12:00
Oven functions |
Automatic |
Special |
MyMiele |
programmes applications
The menu path appears on the left of the header. The individual menu options are separated by a vertical line. … indicates that there are more options available, which are not visible because there is not enough space in the display.
If you touch a menu name in the header, the display will switch to that menu. To switch to the status display, touch .
The time of day is shown on the right of the header. You can set the time of day by touching the display.
Additional symbols may also appear, e.g. SuperVision .
At the top of the header there is an orange line where you can drag down the pulldown menu. This allows you to switch settings on or off during a cooking programme.
The current menu and menu options are shown in the centre. You can scroll to the right or left by swiping your finger across the display to the right or left. Touch a menu option to select it (see “Operation”).
The operation fields that appear in the footer vary according to the menu that is selected; for example: Timer, Save or OK.
27
Controls
The following symbols may appear in the display:
Symbol |
Meaning |
|
This symbol indicates that there is additional information and ad- |
|
vice about using the appliance. Press the OK sensor control to |
|
confirm the information. |
… |
This indicates that there are more options available, which are |
|
not visible because there is not enough space in the display. |
|
Alarm |
|
Minute minder |
|
Some settings, e.g. display brightness and buzzer volume are se- |
|
lected using a bar chart. |
|
The system lock or sensor lock is on (see “Settings – Safety”). |
|
The controls are locked. |
|
Core temperature when using the food probe |
|
Remote control (only appears if you are in the Miele@home sys- |
|
tem and have selected the Remote control | On setting) |
|
SuperVision (only appears if you are in the Miele@home system |
|
and have selected the SuperVision | SuperVision display | On setting) |
28
You operate the steam oven via the touch display by touching the desired menu option.
Each time you touch a possible option, the relevant characters (word and/or symbol) light up orange.
Fields for confirming an operating step are highlighted in green (e.g. OK).
Touch the field or value you want in the display.
You can scroll left or right.
Swipe across the screen. To do this, place your finger on the touch display and swipe it in the direction you want.
The bar at the bottom shows you where you are in the current menu.
Touch the sensor control or touch the … symbol in the menu path.
Touch the symbol to switch to the status display.
Entries made before this which have not been confirmed with OK will not be saved.
The current setting is highlighted in orange.
Touch the desired setting.
The setting is now saved. This will take you back to the previous menu.
Swipe the roller up or down until the value you want is displayed in the centre.
Confirm with OK.
The changed number is now saved.
Tap on the value that is in the middle of the numerical keypad.
The numerical keypad will appear.
Touch the desired numbers.
As soon as you enter a valid value, OK turns green.
Use the arrow to delete the last entered number.
Confirm with OK.
The changed number is now saved.
29
Using the appliance
Some settings are represented by a bar
with seven segments. If all of the segments are illuminated, the maximum value is selected.
If none of the segments are illuminated or if only one is, the minimum value is selected or the setting is switched off altogether (e.g. buzzers).
Touch the corresponding segment on the segment bar to change the setting.
Select On or Off to switch the setting on or off.
Confirm your selection with OK.
The setting is now saved. This will take you back to the previous menu.
Letters are entered using a display keyboard. It is best to select short names.
Touch the desired letters or characters.
Tip: You can add a line break for longer programme names using the symbol.
Touch Save.
The name is now saved.
In some menus you can display a context menu, e.g. to rename User programmes or to move entries un-
der MyMiele.
For example, touch a User programme and keep your finger on it until the context menu opens.
To close the context menu, touch an area of the display located outside of the menu window.
You can change the order of User programmes or entries under MyMiele.
For example, touch a User programme and keep your finger on it until the context menu opens.
Select Move.
Keep your finger on the highlighted field and drag it to the desired location.
30