

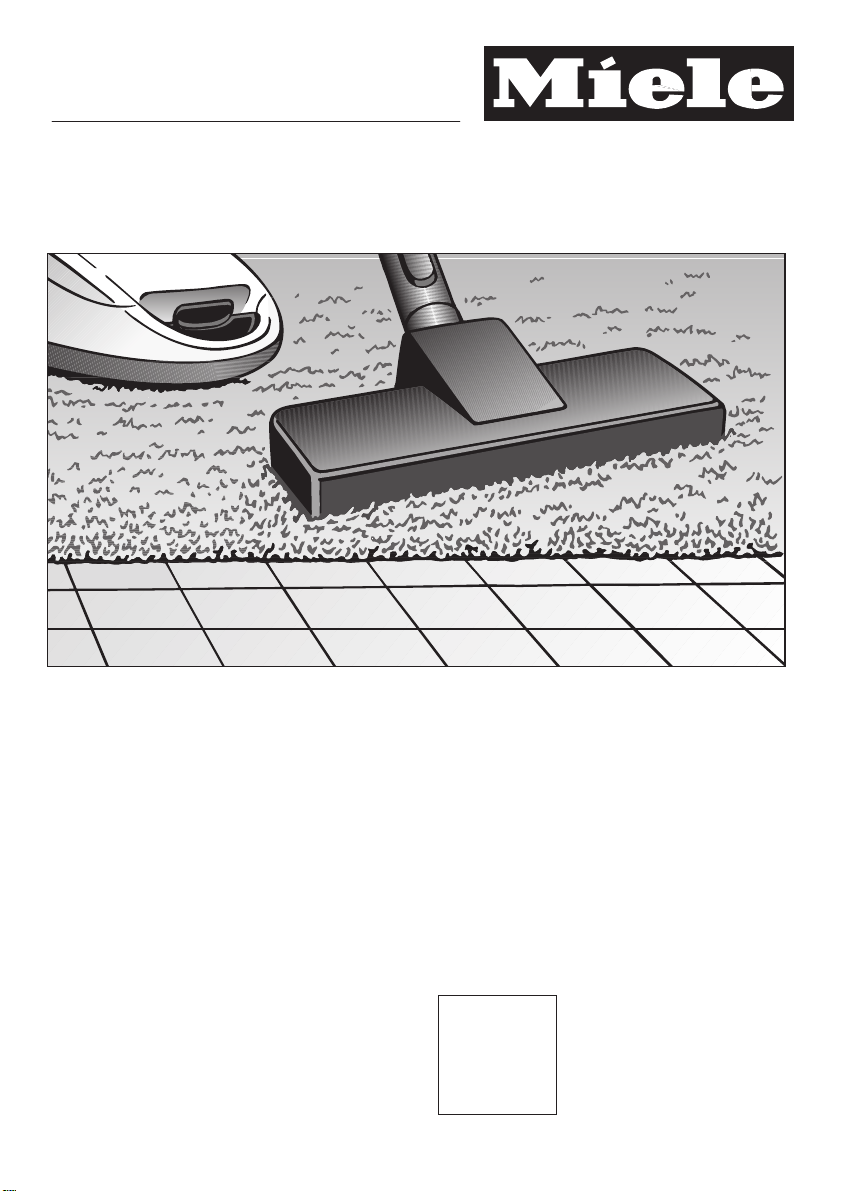
操作說明書
吸塵機
首次使用之前請務必閱讀
這些說明,以免發生意外或損壞本機。
本操作說明書適用於 BrilliantJ t J J t J
標準型號,以及其他只有名稱但沒有編號
的型號。
HS15
zh, en - HK
M.-Nr. 10 082 070

目錄
環保須知······················································································································3
吸塵機指南 ··················································································································4
注意事項及安全說明····································································································6
準備使用····················································································································11
使用附件····················································································································15
正確使用····················································································································18
電源線 ·······················································································································18
啟動和關閉 ················································································································18
調整吸力····················································································································19
照明工作區 ················································································································21
停放、搬運及收藏 ·····································································································22
暫停吸塵的停放系統··································································································22
用於儲存的停放系統··································································································23
維修與護理 ················································································································24
購買新塵袋及濾網 ·····································································································24
訂購適當的塵袋和濾網······························································································24
何時更換塵袋 ············································································································25
更換塵袋····················································································································26
何時更換塵格濾網(電動機防護裝置)·····································································27
如何更換塵格濾網 ·····································································································27
更換「HEPA 空氣清潔濾網 50 過濾網」···································································28
如何更換 HEPA 空氣清潔濾網 50 ·············································································29
改用另一類型排氣濾網······························································································30
更換 LED 手柄上的電池······························································································31
何時更換撿線器·········································································································33
更換撿線器 ················································································································33
清潔與護理 ················································································································34
解決問題指南 ············································································································35
售後服務····················································································································36
自選配件····················································································································37
電力接駁(英國) ·····································································································39
2
環保須知
包裝材料的棄置
包裝用於在運送過程中保護吸塵機防止
損壞。本裝置選用環保的包裝材料,這
些材料應循環再用。
確保所有的塑膠紙和塑膠袋均經安全處
理,並放置在遠離兒童的地方,以免因
誤用而窒息。
處理舊塵袋及濾網
這些是由環保材料製成。過濾網可連同
日常家居垃圾一同棄置。如果塵袋僅用
於吸收一般家居塵垢,便可用相同方式
棄置。
舊吸塵機的棄置
在棄置舊吸塵機前,請取出塵袋和所有濾
網,並將它們與日常家居垃圾一同棄置。
電氣與電子產品中通常包含有毒材料,如
處置不當可能會危害人體健康和環境。然
而,這些材料對本機的正常運作起著至關
重要的作用,因此,請不要將廢舊吸塵機
與家居垃圾一同棄置。
請將舊機棄置到您當地的社區廢物收集中
心或回收中心,或向經銷商咨詢。
確保妥善存放廢棄舊機,以免危及兒童。
3

吸塵機結構
4

吸喉
配件盒的脫扣按鈕
塵袋更換指示器
顯示屏
電源線自動回捲的腳踏開關
暫停吸塵的停放系統
啟動關閉腳踏控制按鈕
電源線
滾輪
排氣濾網 HEPA 空氣清潔濾網 50
發光停放插槽(位於吸塵機兩側)
塵格濾網(電動機防護裝置)
電動塵刷插座蓋板托架
Miele 原廠塵袋
手挽
AllTeQ 或 AirTeQ
脫扣按鈕
三節式吸管
塵格脫扣按鈕
三節式吸管的脫扣按鈕
電動塵刷插座
連接插座
電池盒
照明打開按鈕
LED 手柄
過熱警告燈
帶重設設定按鈕的維修指示燈
地板吸塵頭
吸塵機指南
5
注意事項及安全說明
本吸塵機規格符合所有相關法定安全規例。但使用不當,
會引致個人損傷,以及損傷財務。
請於首次使用之前仔細閱讀這些說明以防發生意外或損壞
吸塵機。本說明包含關於安全、使用與維修的重要資訊。
請將本操作說明書妥善存放,並確保新的使用者熟悉其中
內容。請將它轉交給日後的使用者。
正確使用
本吸塵機並非為商業用途而設。本機只適用於家居及類似
的工作和住宅環境。
本吸塵煙機並非戶外所用。
本吸塵機只可用於家居用途,為乾爽地面除塵。切勿對人
或動物使用本吸塵機。如作其他用途、改裝或改動,風險由
用者自負,同時會存在危險。
本機並非設計供身體、感官、精神有殘障的人士,
或缺乏
經驗及知識的人士使用,除非上述人士在他人陪同及監督下
操作本機,或該等人士已清楚了解正確及安全操作方法,並
且已理解不當操作可能引致的嚴重後果,方可操作本吸塵
機。
6

事項及安全說明
注意
注意兒童安全
在無監管的情況下,請確保任何 8 歲以下兒童遠離本吸塵
機。
對於 8 歲及以上兒童,只有在向他們清楚講解本吸塵機的
正確及安全操作方法,並且在他們已認識和理解到不當操作
之後果的情況下,方可操作本機。
切勿讓兒童在無人看管的情況下清潔或進行保養工作。
請看管在吸塵機附近活動的兒童。切勿讓兒童將本吸塵機
當作玩具使用。
切勿讓兒童接觸電池。
技術安全
使用吸塵機前,請先檢查是否有任何明顯損壞。如有損壞
則切勿使用。
為本機接駁電源前,先確定數據牌上的數據(保險絲、電
壓及頻率)與主電源完全吻合。
插頭必須配備 13 安保險絲(英國標準)。
在保用期內,本吸塵機必須交由 Miele 認可的維修技師進
行維修,否則保用將告無效。
7

注意事項及安全說明
切勿使用電線拉動或提起吸塵機,從插座拔出插頭時,請
務必小心不要損害電線。
電源線應遠離尖銳物件,同時不應任其被其他物件碾過,例
如不要讓門軋倒。
請避免讓吸塵機碾過任何電源線線段。這樣可能會損壞電源
線、插頭或插座。如發現任何上述部件出現損壞,切勿使用
本機。
如有電源線損壞,切勿使用吸塵機。
必須連同整個電線回捲盤一起更換。
如果電線破損,電線
為確保安全,此項操作
僅可由 Miele 維修服務部或 Miele 認可的維修技師進行。
吸塵機上插座(視乎型號而定),只適用於操作說明書上
所註明的 Miele 電動塵刷。
在抽吸細微塵粒如鋸屑、沙子、灰泥、面粉、滑石粉時,
靜電會自然積聚。在特定條件下這些靜電會自行釋放。為避
免靜電放電造成的不良後果,手柄下方安裝了一個金屬鑲嵌
物。於吸塵過程中,請確保您的手與此金屬帶始終保持接
觸。
使用完畢後、更換配件、維修及清潔吸塵機時,請務必切
斷電源。 關閉牆上插座的吸塵機開關,並拔出插頭。
8

事項及安全說明
注意
不要讓吸塵機受潮。切斷電源後,請用乾布或用布沾少許
水清潔吸塵機。
本機必須交由 Miele 認可的維修技師進行維修。由不合資
格的人員進行維修和其他工序,可能會有危險。
正確使用
為免吸塵機受損,必須裝妥塵袋、塵格濾網和排氣濾網
後,才使用吸塵機。
如果塵袋未裝妥,塵格蓋便合不攏,切勿強行把蓋合上。
切勿以本機吸取燃燒後仍有火光或看似已熄滅的香煙、灰
燼或煤炭。
切勿使用本機來吸取水、液體或潮濕的塵垢。剛清洗的地
氈或地板,必須乾透後,才可吸塵。
切勿用作吸炭粉。打印機和影印機所用的炭粉,是導電
體。
切勿用作吸易燃物質或氣體,亦不要在儲存上述物質的場
合下使用吸塵機。
地板吸塵頭、配件及吸管,切勿提高至身高的水平使用,
以免傷及眼、耳等部位。
9

注意事項及安全說明
重要的電池處置資訊︰
– 不要導致電池斷路或給電池再充電,或將其扔入火中。
– 電池的處理︰從 LED 手柄上取出電池,並將其扔到電池回
收筒。
請不要將其與家居垃圾一同棄置。
配件
為免引致損壞,在使用 Miele 電動塵刷或渦輪塵刷時,切
勿觸摸旋轉刷。
切勿直接用把手柄吸塵,即不裝上配件便吸塵,因為把手
的邊緣,很易破損並形成尖角傷人。
請僅使用含「 Miele 原廠」徽標的原廠塵袋、濾網、配件
及自選配件,以便令吸塵機發揮最大效能。
如因使用或操作不當或不遵守本「注意事項及安全說
明」而引致的損壞,Miele 概不負責。
10
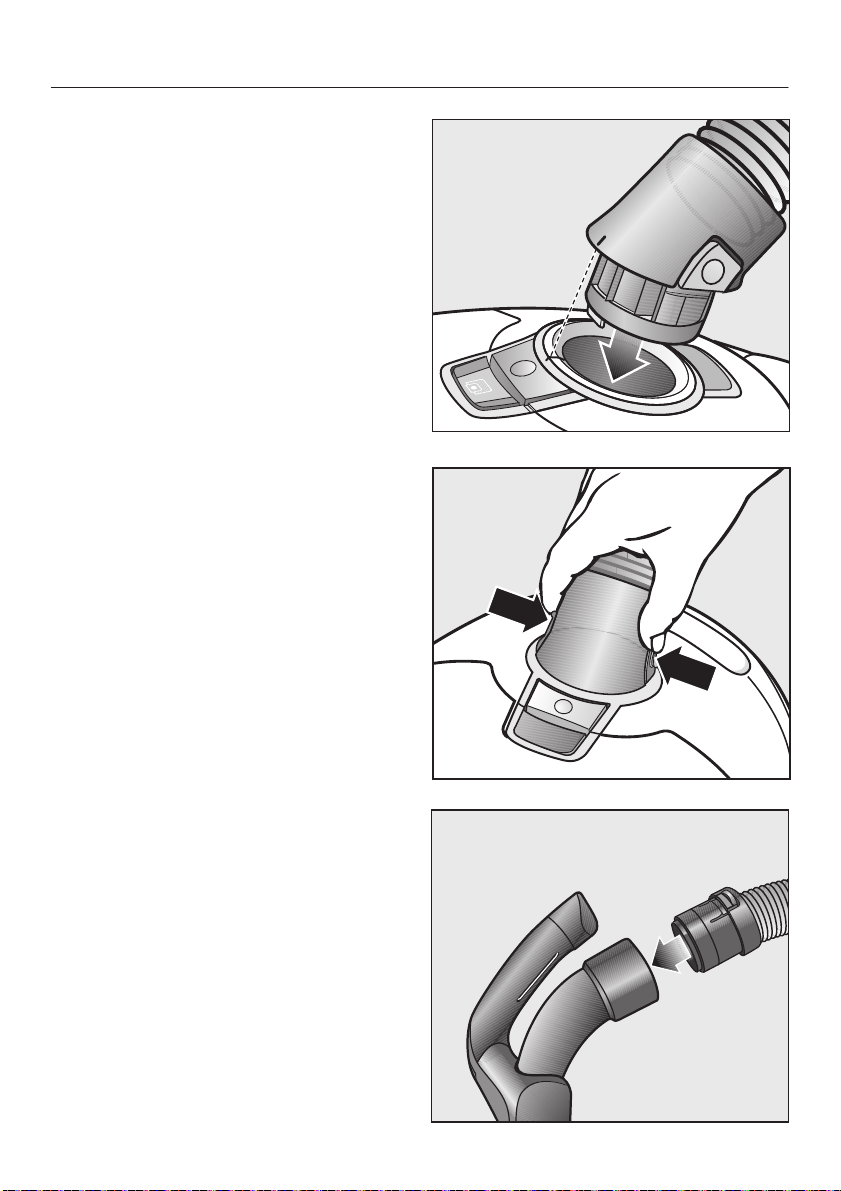
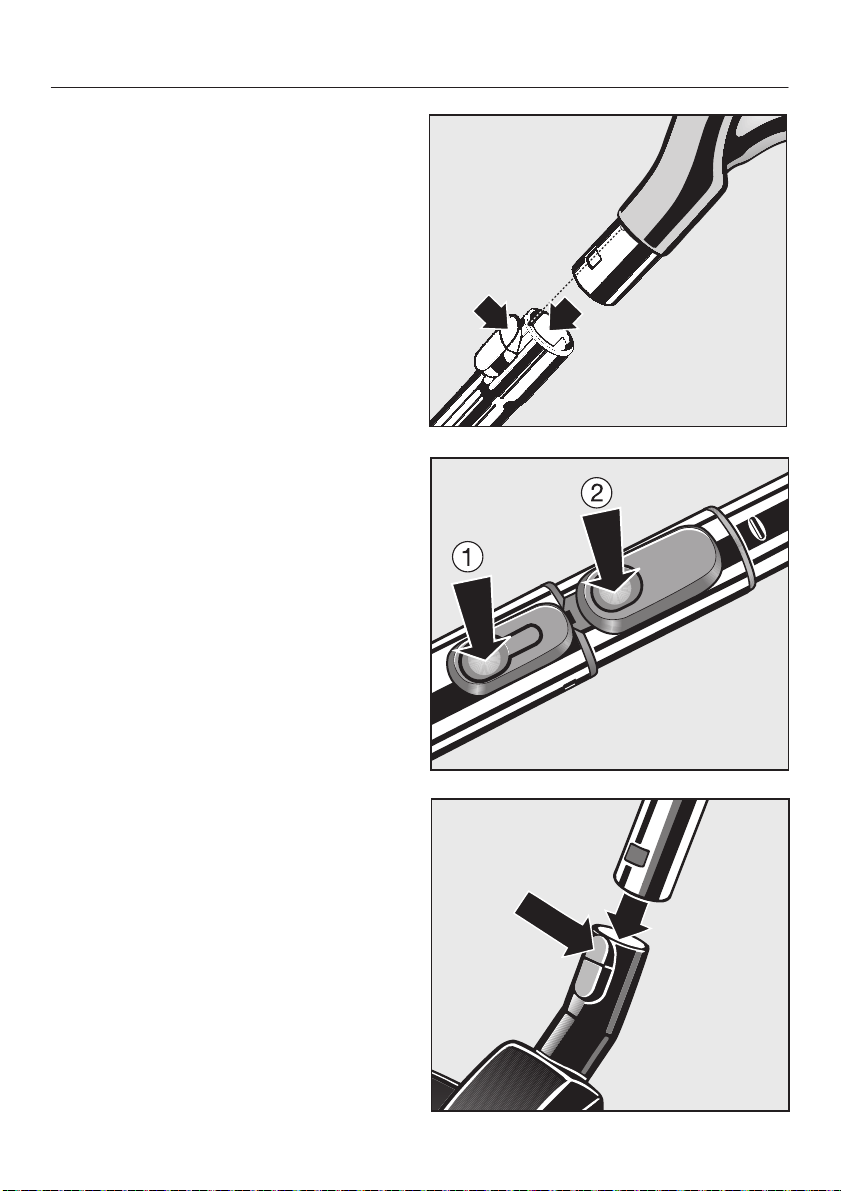
連接吸喉
將吸喉接頭插入吸座,直至咔嗒入
位。要做到這點,需要對齊二者的指
示符。
從吸塵機上拆下吸喉
按下吸喉接頭一側的脫扣按鈕,從吸
座中拉出吸喉。
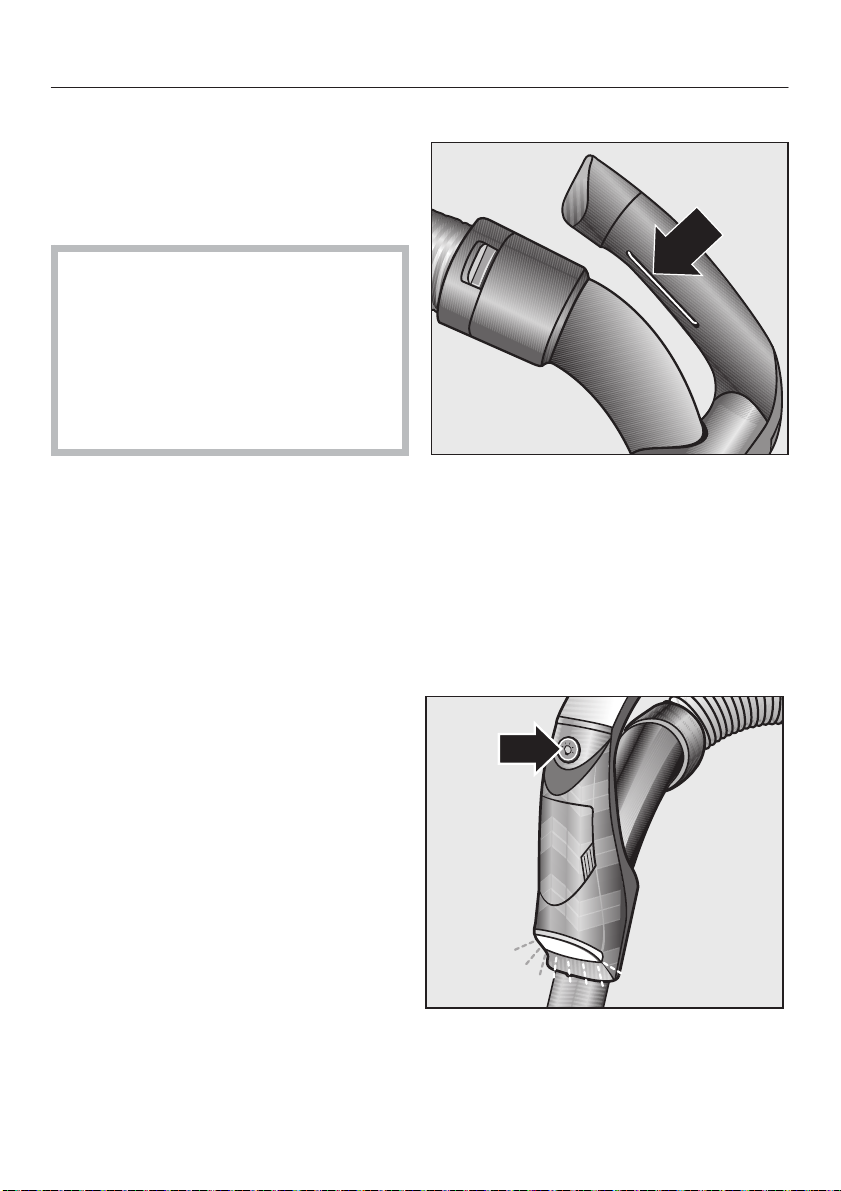
連接手柄和吸喉
將吸喉插入手柄,直至咔嗒入位。
準備使用
11
準備使用
連接手柄和吸管
將手柄插入吸管,直至咔嗒入位。要
做到這點,需要對齊二者的指示符。
若要從吸管中鬆出手柄,按下脫扣按
鈕,將手柄從吸管中拔出。
調整三節式吸管
三節式吸管有三節,其中兩節藏在第三
節的外管內。
按下脫扣按鈕(見箭咀 ),拉出
內藏的一節吸管,直至咔嗒入位。需
要縮回吸管時,再次按下按鈕。吸管
將咔嗒入位。
按下按鈕 並將可調校管拉至需要
的高度。
裝上標准地板吸塵頭
把吸管套入地板吸塵頭,然後順時針
或逆時針轉動,直至咔嗒入位。
從吸管上拆除地板吸塵頭時,請按下
脫扣按鈕(見箭咀),將吸管從地板
吸塵頭中拔出。
地板吸塵頭可用於所有一般性的清潔用
途,如清潔地氈及小氈。它亦可用於刷
吸硬地板。對於硬地板,如石面或鑲木
地板,建議採用特定的 Miele 地板刷
(請參閱「自選配件」部份)。
12
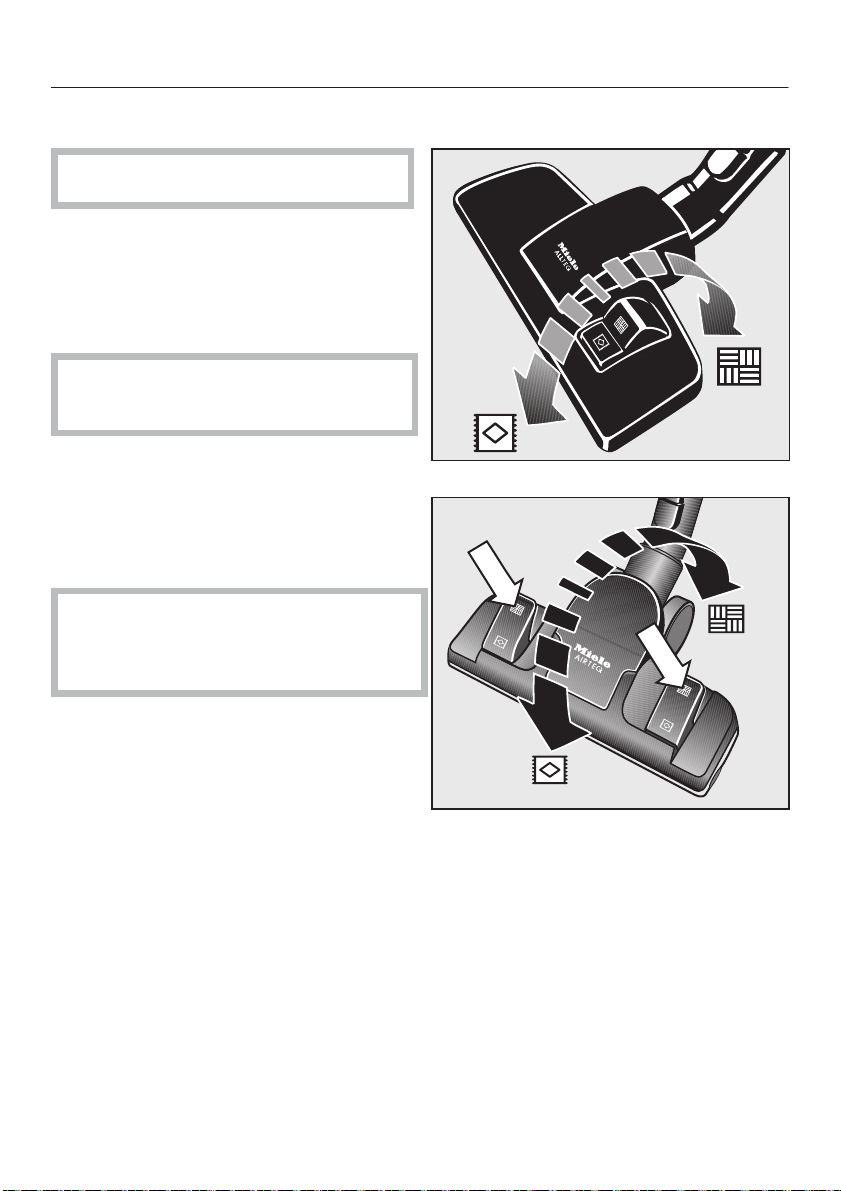
調校標准地板吸塵頭
請遵照地板製造商的清潔與護理說明。
為地氈及小氈吸塵時,縮起塵刷。
按下腳踏控制按鈕 。
為不易刮花的硬地板吸塵時,放出塵刷:
按下腳踏控制按鈕 。
為含有較深罅隙或凹槽的地板吸塵時,
放出塵刷。
AirTeQ 地板吸塵頭
該地板吸塵頭專為使用較低能量達到卓越
清潔效果而開發。
高吸力。
警告:如果 AirTeQ 地板吸頭吸力過大,
請降低吸力從而使吸頭更容易操作(請參
閱「正確使用 - 調整吸力」)。
其能耗特別低而具有
準備使用
13
準備使用
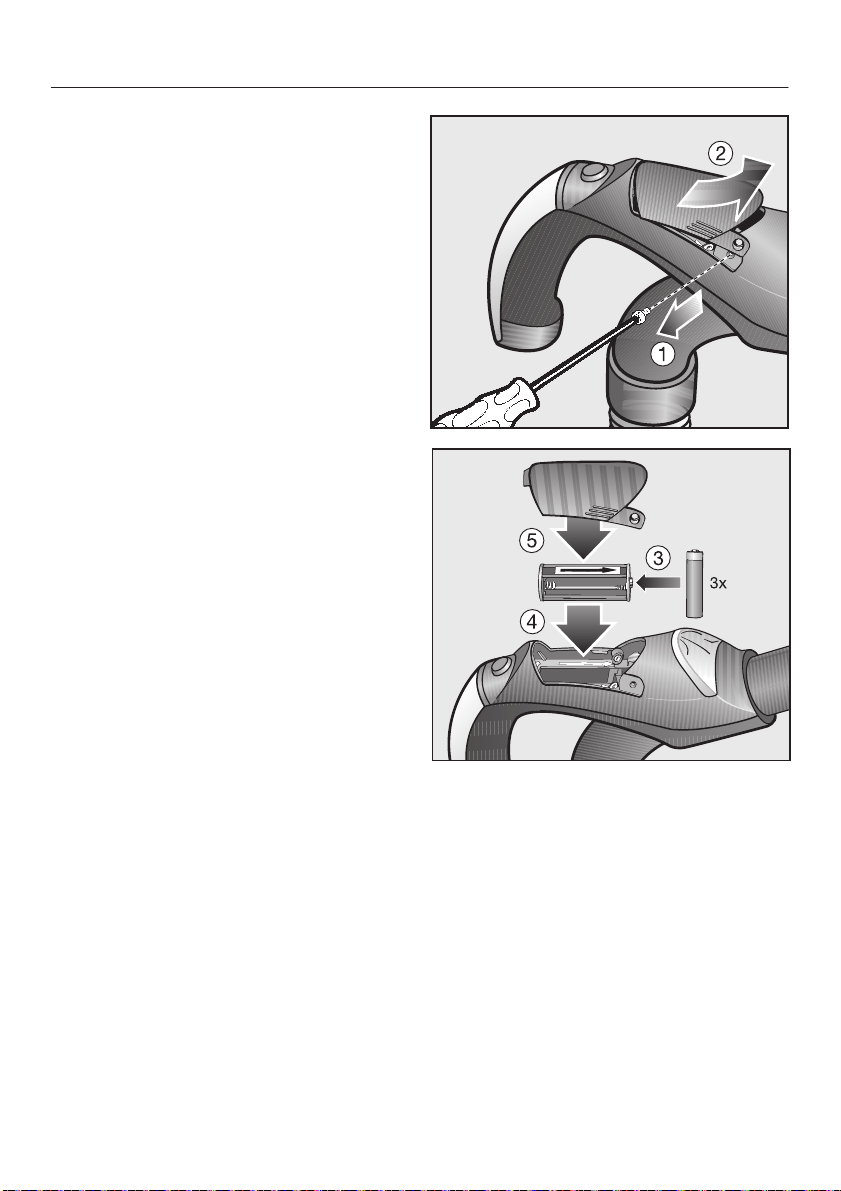
將電池插入 LED 手柄
擰鬆電池蓋上的螺絲。
按下電池蓋兩側取下。
取出電池匣並插入隨附的三節電池,
確保它們放置正確。
按電池匣和電池盒上的箭咀替換電池
室,從而使兩端對齊。
重新放回電池蓋並擰緊螺絲。
14
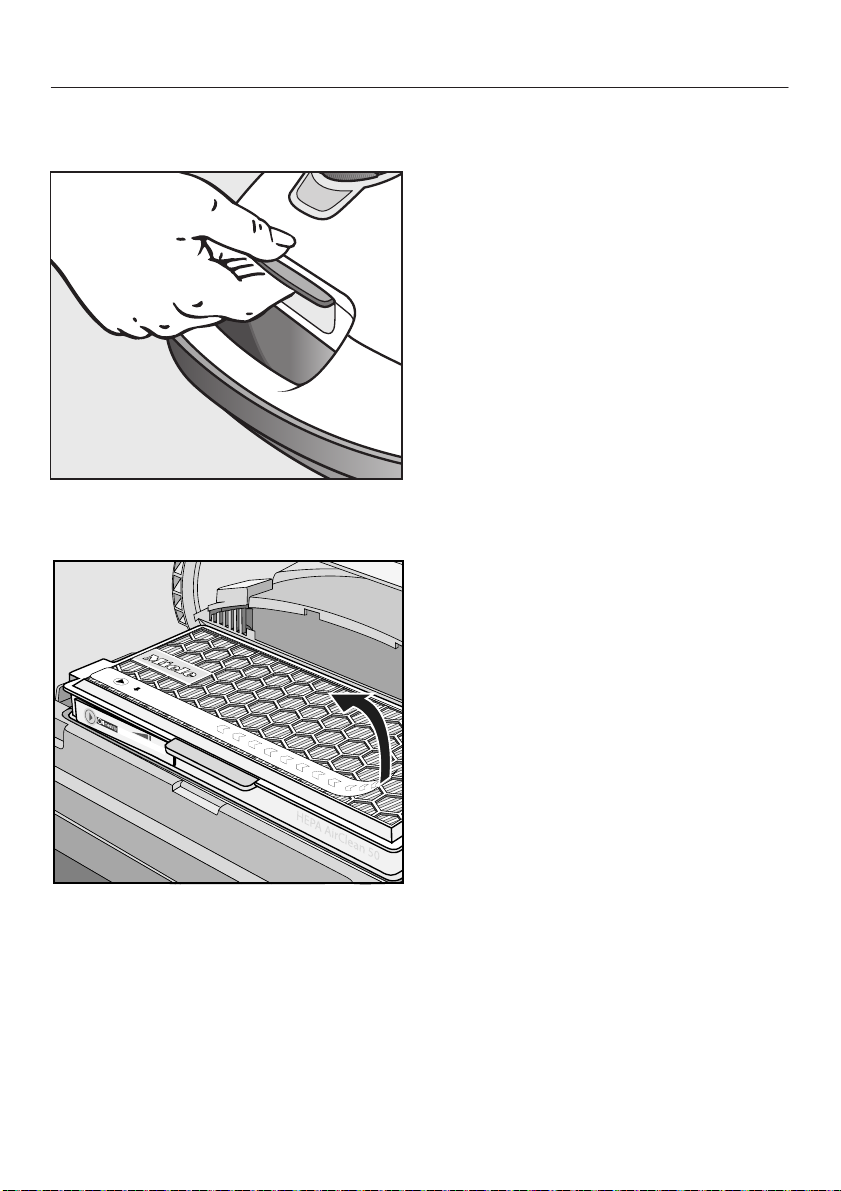
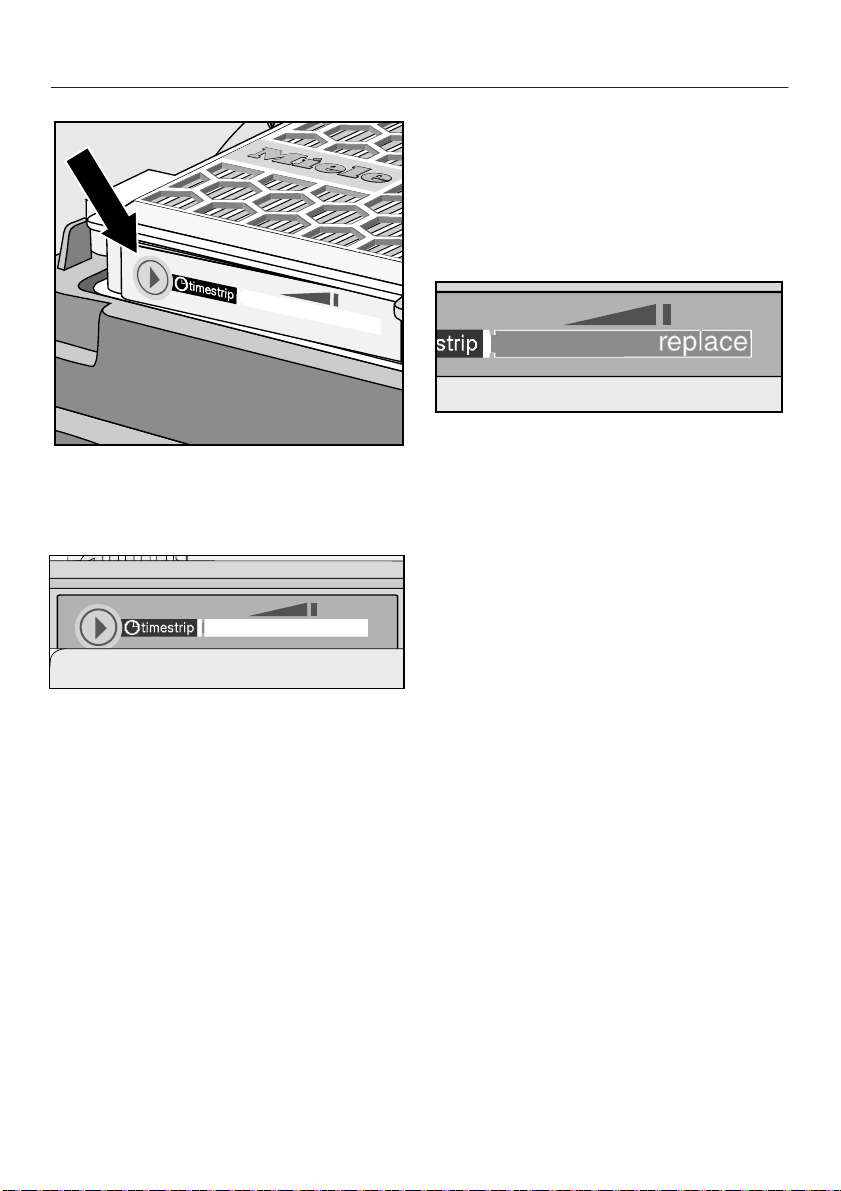
啟用排氣濾網更換指示器
提起塵格蓋脫扣,把蓋子完全掀起。
取出指示器帶。
使用附件
15
使用附件
按下排氣濾網更換指示器的重設按鈕
。
排氣濾網更換指示器
排氣濾網更換指示器顯示排氣濾網的剩餘
有效壽命。運行約 50 小時或平均使用約
一年後,顯示會被紅色完全填滿。
約 10 - 15 秒後,顯示左側將出現一條
紅色細紋。
閉緊塵格蓋,確保其卡緊入位。同時
注意不要卡住塵袋。
16
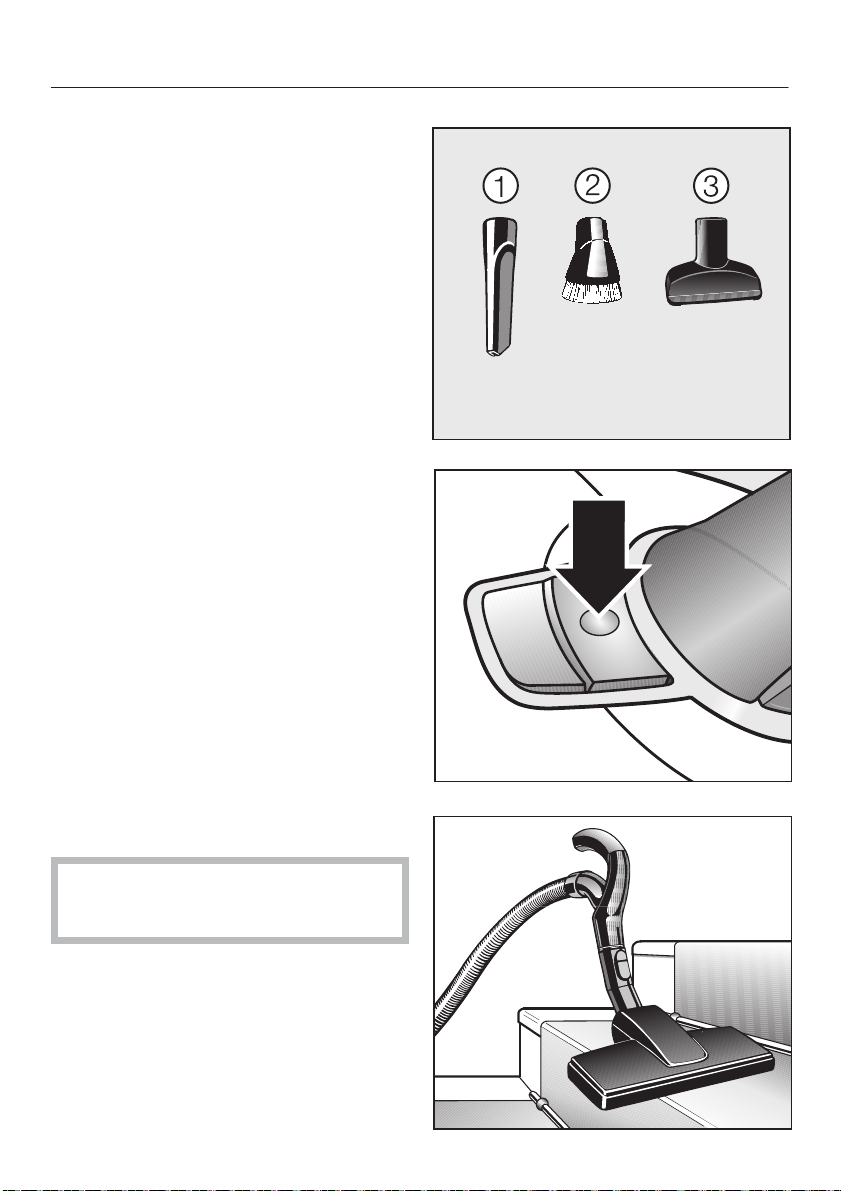
罅隙吸咀
用於清潔皺摺位、罅隙或角落。
天然馬鬃毛刷
用於去除架子、裝飾品或雕刻品或精
緻物品上的灰塵。塵刷的頭部可以旋
轉,以取得最佳清潔位置。
傢具吸咀
用來清潔傢具、床褥、墊子、窗簾、
罩布等。
打開配件盒
按下脫扣按鈕打開配件盒蓋。
取出您需要的配件。
向下緊按蓋子關緊。
地板吸塵頭
供作一般用途,也可用來清潔樓梯。
警告:為確保安全,清潔樓梯時最好
從底部開始向上清潔。
正確使用
17

正確使用
電源線
拉出電源線
拉出電源線至所需長度(最長約 7.5
米)。
將插頭正確插入插座。兩側的停放系
統照明亮起。
首次使用吸塵機時,兩分鐘後照明
開啟。
警告:若吸塵時間超過 30 分鐘,請
務必將電源線完全拉出,以免過熱引
致損壞。
回捲電源線
請關掉牆上的插座開關,並拔出插頭。
約 30 秒鐘後停放系統照明再次關閉。
短按回捲腳踏控制按鈕。電源線將自
動捲回。
啟動和關閉
按下啟動關閉腳踏控制按鈕 。
18
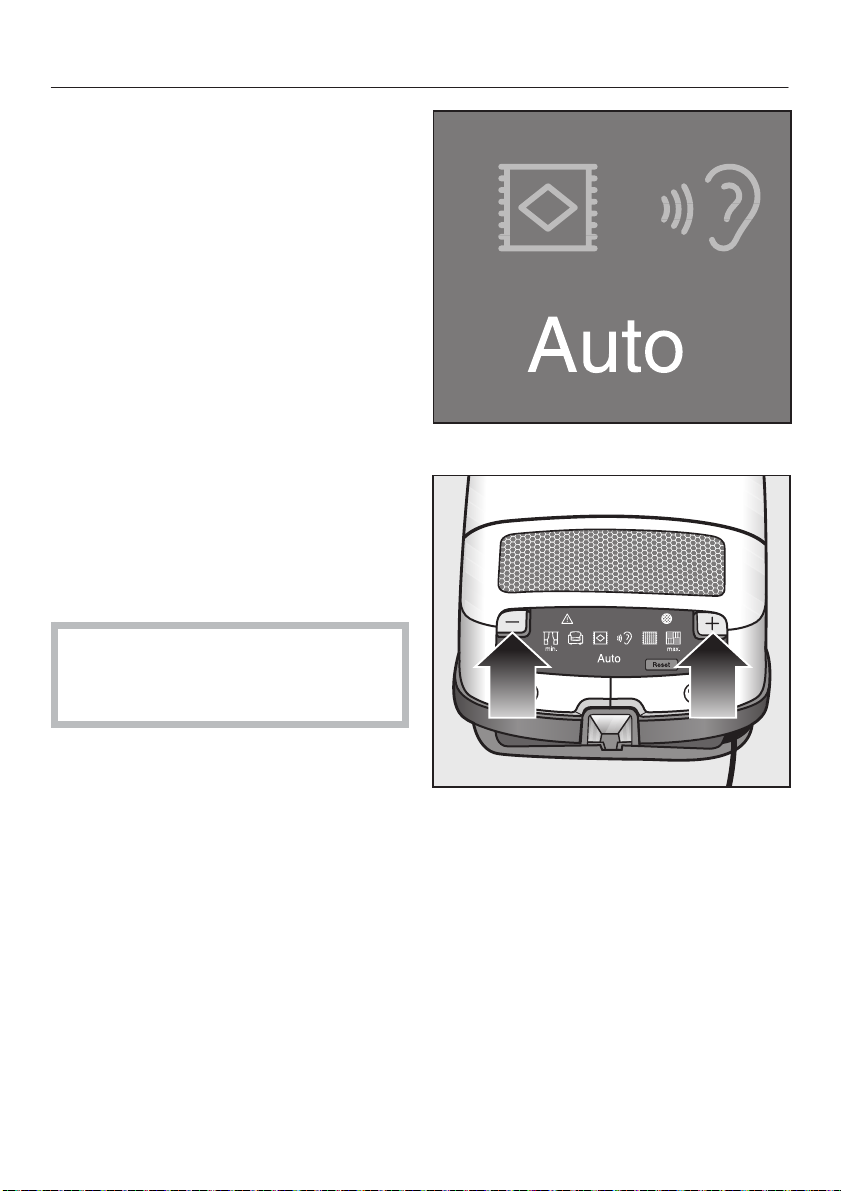
調整吸力
您可以根據清潔的各種地板類型調整吸
力。調低吸力可減少操控吸塵頭所需的
力量。
部份型號的控制裝置還標有符號,指示
該設定的適用類別。
- 窗廉、輕身布料
- 傢具、墊子
- 厚絨毛氈、小氈及長地氈
-
- 圈絨地氈
- 特別髒污的硬地板,以及用來
自動 = 吸力根據被吸塵的地板類型自
動調整
切勿使用「自動」設定為輕身布料或
窗簾吸塵,以免被吸進吸塵機而受
損。
日常節能吸塵
(此設定還超級靜音)
徹底清潔地氈
當使用 AirTeQ 地板吸頭時,如果吸
力過大,請降低吸力直致吸頭更容易
操作。
正確使用
19
正確使用
首次開啟吸塵機時,將自動選定「自
動」吸力設定。
按 + 腳踏控制按鈕選擇更高設定。
按 - 腳踏控制按鈕選擇更低設定。
之後,吸塵機將以之前使用過的設定
開啟。
切勿使用「自動」設定為輕身布料
或窗簾吸塵,以免被吸進吸塵機而
受損。
20
吸塵
吸塵機下設有滾輪,操作時可拉動吸
塵機。清潔樓梯和窗簾等時,可將吸
塵機豎起。
警告:吸細微塵粒如鋸屑、沙子、灰
泥、麵粉、滑石粉等時,靜電會自然
積聚。在特定條件下這些靜電會釋
放。為避免靜電放電造成的不良後
果,手柄下方安裝了一個金屬鑲嵌
物。吸塵過程中,請確保您的手與此
金屬帶始終保持接觸。
照明工作區
吸塵機手柄上裝配有用於照明工作區的
LED。
按下 LED 手柄上的 按鈕。
約 30 秒後它將自動關閉。
正確使用
21

停放、搬運及收藏
暫停吸塵的停放系統
(不能用於
停放系統的設計便於短暫停放吸管和地
板吸頭。
將吸塵頭卡入吸塵機後部插槽。
如果將吸塵機停放在傾斜表面上,
如斜坡,請完全縮回吸管。
用停放系統開機和關機
將地板刷頭通過停放插槽插入停放系統
的時,吸塵機會自動關閉。
當地板刷頭從停放系統取出時,吸塵機
再次開啟,吸力為最後選定的水平。
SEB
234 L 高級電動塵刷)
22

用於儲存的停放系統
使用完吸塵機後,必須切斷電源。請
關掉牆上的插座開關,並拔出插頭。
約 30 秒鐘後停放系統照明關閉。
在吸塵機停止操作及存放期間,使機
身保持垂直。
完全縮回伸縮吸管。
將地板吸頭向下插入吸塵機任意一側
的停放插槽上(停放插槽不能與
234 L 高級電動塵刷一起使用),
從而使吸塵機更易於搬運或存放。
SEB
停放、搬運及收藏
23

維修與護理
警告:維修及清潔吸塵機時,必須切
斷電源。關掉牆上的插座開關,
拔出插頭。
Miele 濾塵系統由三重濾塵設備組成,
這些設備必須不時更換,確保吸塵機有
效發揮性能。
– 塵袋
– 塵格濾網(電動機防護裝置)
– 排氣濾網
請使用附上「原廠 Miele」徽標識別
的原廠塵袋、濾網、配件及自選配
件。這樣才可確保維持吸塵機的吸力
獲得最佳的清潔效果。
警告︰使用採用紙或紙基材料製造的
塵袋,或帶紙板領的塵袋,或不含
「Miele 原廠」徽標的塵袋,均可嚴
重損壞吸塵機並導致保用失效。
購買新塵袋及濾網
可向 Miele 經銷商或 Miele 維修服務部及
透過以下網站訂購 Miele 原廠塵袋和濾
網︰
訂購適當的塵袋和濾網
僅使用有藍圈的原廠 Miele G/N 塵袋。使
用任何其他塵袋將損壞吸塵機。可依據包
裝或直接附於塵袋上的「Miele原廠」徽標
識別 Miele 原廠塵袋。
每包 Miele 塵袋均附有一個「空氣清潔濾
網」和一個塵格濾網。這些濾網亦可另行
訂購。
您可以視乎需要選用其他的 Miele 排氣濾
網替換本吸塵機隨附的排氣濾網(請參閱
「自選配件」部份)。
24

何時更換塵袋
當塵袋更換指示器中的彩色標記填滿顯
示時,表示需要更換塵袋,或不久將會
失效(請參閱以下可能原因)。
Miele 塵袋用後即棄,只供一次使
用。塵袋滿後即棄置。切勿重複使
用,否則會減弱吸力。
檢查塵袋更換指示器
連接 AllTeQ 或 AirTeQ 地板吸塵頭。
請勿使用任何其他地板吸塵頭或配
件,這將導致塵袋更換指示器作錯誤
顯示。
開動吸塵機,選擇最大吸力設定。
把吸塵頭微微提起至離開地面。如果
標記完全填滿塵袋更換指示器,您應
更換塵袋。
維修與護理
塵袋更換指示器工作原理
塵袋更換指示器針對一般家居塵垢。一
般的家居塵垢通常混合著灰塵、毛髮、
地氈絨毛、線頭和砂粒等。
但如果吸塵機用於吸除微細塵垢,如灰
泥、磚粉、水泥或麵粉,塵袋的氣孔將
迅速被阻塞。這會影響塵袋的透氣性,
即使塵袋未滿,也會使標記指示塵袋已
「滿」。如遇這種情形,您仍須更換塵
袋,因塵袋氣孔阻塞會使吸力大大減
弱。
另一種情況,塵袋可能滿是毛髮或地氈
絨毛,但透氣程度仍未減弱至使指示器
顯示塵袋已「滿」,此時,您仍應更換
塵袋。以上兩種極端均可能出現。
25

維修與護理
更換塵袋
按下塵格蓋脫扣按鈕,把蓋子完全
掀起。
塵袋配有一個閉合檔板,提起塵格蓋時
檔板將自動閉合,以免任何塵垢漏出。
握住袋口上自閉合檔板旁的把手,拉
出塵袋。
將新塵袋完全放入藍色夾座內。保持
折疊的狀態從包裝盒中取出塵袋。
塵袋必須在塵格內展開。
閉緊塵格蓋,確保其卡緊入位。同時
注意不要卡住塵袋。
警告:若未裝妥塵袋,則塵格蓋不能
閉合。請勿強行閉合﹗
26

7
何時更換塵格濾網(電動機防護
裝置)
塵格濾網應於每次使用新的一包 Miele
塵袋時更換。每包 Miele 塵袋均附有一
個塵格濾網。
如何更換塵格濾網
打開塵格蓋。
握住袋口上自閉合檔板旁的把手,拉
出塵袋。
提起藍色濾網架,直至聽到咔嗒一
聲,然後取出舊的濾網。握住清潔部
份取出濾網。
裝上新的塵格濾網。
合上濾網架。
將塵袋完全放入夾座內。
閉緊塵格蓋,確保其卡緊入位。同時
注意不要卡住塵袋。
維修與護理
2

維修與護理
更換「HEPA 空氣清潔濾網 50
過濾網」
若排氣濾網更換指示器顯示完全被紅色
填滿,請更換。運行約 50 小時或平均使
用約一年後會出現這種情況。排氣濾網
指示器亮起時吸塵機依然可以使用。如
果不及時更換,吸力及濾網效能會減
弱。
您可以視乎需要選用其他的 Miele 排氣濾
網替換本吸塵機隨附的「HEPA 空氣清潔
濾網 50」排氣濾網(請參閱「自選配
件」部份)。
28

如何更換 HEPA 空氣清潔濾網 50
切勿同時使用多個排氣濾網。
打開塵格蓋。
取下排氣濾網。
將新的排氣濾網裝妥入位。
1. 按下排氣濾網更換指示器的重設按鈕。
2. 約 10 - 15 秒後,顯示左側將出現一條
紅色細紋。
如果您想要使用「空氣清潔濾
網」,請參閱「改用另一類型排氣
濾網」部份。
閉緊塵格蓋,直至咔嗒入位。
維修與護理
29

維修與護理
改用另一類型排氣濾網
不同的吸塵機使用不同的排氣濾網:
a 空氣清潔濾網
b 活性空氣清潔濾網 50(黑色)
c HEPA 空氣清潔濾網 50(白色)
請注意
1.如果您想要使用「活性空氣清潔濾
網」b 或「活性 HEPA 濾網」c 替換
「空氣清潔濾網」a,裝上新類型濾網
前,必須取下濾網格柵,按下排氣濾
網更換指示器的重設按鈕。
2.如果您想要使用「空氣清潔濾網」a
替換「活性空氣清潔濾網 50 (黑
色)」b 或「HEPA 空氣清潔濾網 50
(白色)」c,則必須同時裝上濾網
格柵。
* 濾網格柵 - 請參閱「自選配件」部份。
切勿同時使用多個排氣濾網。
30

更換 LED 手柄上的電池
本機需要三節
1.5 V (AAA) 電池。
擰鬆電池蓋上的螺絲。
按下電池蓋兩側取下。
取出電池匣並插入隨附的三節電池,
確保它們放置正確。
按電池匣和電池盒上的箭咀替換電池
室,從而使兩端對齊。
重新放回電池蓋並擰緊螺絲。
維修與護理
31

維修與護理
帶重設設定按鈕的維修指示燈
此指示燈將在運行大約 50 小時
後亮起,相當於平均使用一年時
間。此時必須檢查塵格濾網和排
氣濾網的骯髒程度,如更換濾
網,則必須重設指示燈。為此,
您必須打開吸塵機。
按重設按鈕。
維修指示燈和重設按鈕將熄滅並
重設為零。
僅可在燈亮起後按重設按鈕來
重設此指示燈。在其他時候按
此按鈕將無效。
32

何時更換撿線器
地板吸塵頭進塵口上的撿線器可以更換。
撿線器必須經常檢查,如果毛絨已磨損
則替換。
更換撿線器
AllTeQ 地板吸塵頭
使用適當的螺絲起子從插槽中取出撿
線器。有兩處凹槽可用於幫助您拆出
撿線器。
裝上新的撿線器。
AirTeQ 地板吸塵頭
使用適當的螺絲起子從插槽中取出撿
線器。
裝上新的撿線器。
清潔 AllTeQ 地板吸塵頭上的滾輪
(
AirTeQ 地板吸塵頭則不需要
使用硬幣鬆開插銷(帶卡口裝置)。
按壓插銷將其取出。
取出滾輪。
清除線頭和頭髮,然後裝回滾輪和
插銷。
更換零件可向 Miele 經銷商或 Miele(請
參閱封底,獲取聯絡詳情)進行購買。
)
維修與護理
33

清潔與護理
進行清潔前必須切斷吸塵機電源。請
關掉牆上的插座開關,並拔出插頭。
用絨面布料清潔吸塵機
用塵刷或用布沾少許水清潔吸塵機。
吸塵機及配件
吸塵機及其配件的外部表面均可用乾布
或用布沾少許水或蘸上適用於塑膠的清
潔劑進行清潔。
切勿用磨蝕性的清潔劑、玻璃清潔
劑、多用途清潔劑或油質護理劑。
塵格箱
塵格箱可用乾燥的撣帚或塵刷清理,甚
至可用另一部吸塵機把灰塵吸出來。
警告:不要讓吸塵機受潮。吸塵機受
潮後,會有漏電危險。
34

吸塵機自動關機。
過熱警告燈也會亮起。
若機身過熱,限溫器會自動關掉吸塵
機。然後過熱警告燈 亮起指示過熱。
如有大件物件堵塞吸管,或塵袋已滿載
或盛有細微塵埃,都會引致過熱。排氣
濾網或塵格濾網太骯髒,亦會引致過
熱。立刻使用開/關腳踏控制按鈕 關
閉吸塵機。切斷電源。請關掉牆上的插
座開關,並拔出插頭。
解決過熱原因後,請等候 20 至 30 分
鐘,待吸塵機冷卻後,才可再開機使用。
解決問題指南
35

售後服務
如有任何使用者未能修理的故障,請
聯絡
–
Miele 代理商,或
–
Miele(請參閱封底,獲取聯絡詳情)。
請注意,來電可能被監聽及錄音以作
為訓練之用(僅在英國)。
36

請遵照地板製造商的清潔與護理說明。
可透過
Miele 經銷商、
購大量的吸塵機其他配件和地板吸塵頭︰
Miele 或以下網址訂
某些型號隨附的標準配件包括以下一種
或多種配件︰
電動塵刷
舒適電動塵刷
(SEB 216-3)
此電動塵刷
特別適用於深度清潔嚴重磨
蝕的地氈,對於去除頑固塵垢,防止經
常使用位置被踩踏出路徑特別有效。
高級電動塵刷
(SEB 234-L)
該電動塵刷比
為有力,很適合清潔大區域地板。
相對於
– 可調高度設定
– 照明吸塵區域的頭燈
– 多功能指示燈
SEB
216-3 寬 60 毫米且更
SEB
216-3 有以下額外功能︰
地板吸塵頭地板刷
經典 Allergotec
(SBDH 285-3)
此地板吸塵頭適合於所有地板表面的日常
衛生清潔。清潔時,地板的清潔程度將顯
示在彩色「紅綠燈」顯示屏中。
Turbo Comfort 渦輪刷
(STB 205-3)
此渦輪刷是清潔軟毛高級地毯的理想之選。
硬地板塵刷 (SBB 235-3)
此地板刷適用於清潔硬地板,如平鋪地板
或石地板。
鑲木地板塵刷 (SBB Parquet-3)
此地板刷採用天然馬鬃毛特製,用來清潔
鑲木地板及其他容易刮花的地板,如複合
木地板。
鑲木地板旋轉式地板塵刷 (SBB 300-3)
此地板刷適合於各種硬質地板表面,它具
有旋轉接頭,可清潔不便清潔的角落。
鑲木地板 XL 旋轉式地板塵刷
(SBB 400-3)
此地板刷造型超寬,適合清潔較大的地板
區域,它具有旋轉接頭,可清潔不便清潔
的角落。
地板吸塵頭
自選配件
37

自選配件
其他附件
MicroSet (SMC 20)
此配件專為清潔小件物品及難以觸及的
區域(如 PC 鍵盤、音響設備、雜雕傢
具以及裝飾器、模型等)。
CarCare Set (SCC 10)
用來清潔汽車內部。
Cat&Dog Set (SCD 10)
特別適合養寵物家庭。
HomeCare Set (SHC 10)
用於清潔家里生活區的配件。
迷你型渦輪手刷 (STB 20)
用來清潔傢具、床褥、汽車座椅等。
通用塵刷 SUB 30
用來刷除書本、架子等上的灰塵。
散熱器塵刷 (SHB 30)
用來清潔散熱器、窄長架子及罅隙。
床褥吸咀 (SMD 10)
用來清潔傢具、床褥、墊子、窗簾、罩
布等。
罅隙吸咀,300 毫米 (SFD 10)
用於清潔皺摺位、罅隙或角落的超長罅
隙吸咀。
罅隙吸咀,560 毫米 (SFD 20)
用於清潔不便清潔區域的可轉向罅隙吸
咀。
傢俱吸咀,190 毫米 (SPD 10)
用來清潔傢具、床褥、汽車座椅等。
可轉向延伸軟管 (SFS 10)
用來將吸喉延長約 1.5 米。
具有活性碳的衛生密封環
此配件可防止拆除吸喉時灰塵及臭味外
溢。
濾網
活性空氣清潔濾網 50 排氣濾網
(SF-AA 50)
此濾網可吸收塵袋中塵垢的異味。
濾網格柵
如果您想要使用「活性空氣清潔濾網
50」替換「HEPA 空氣清潔濾網 50」,
則需要安裝濾網格柵。
38

所有電力接駁工作,必須由合資格人員
進行,並須嚴格遵守國家及當地的現有
安全規例。(英國 BS 7671)。
吸塵機下方的數據牌載有電壓和頻率。
請確保這些數值與家居中的電源吻合。
保險絲額定值見插頭標籤。
隨吸塵機提供的電源線及倒模插頭,供
接駁至單相 230–240 伏50 赫茲交流
電源。
BS 1363 不可更換電源線插頭
在更換保險絲後,必須重新裝上原有保
險絲蓋。如遺失保險絲蓋,在取得原裝
配件前切勿使用插頭。保險絲蓋配件的
顏色應與插頭底部的顏色相同,或插頭
底部刻字標明的顏色一致(視乎插頭的
設計而定)。
替換的保險絲應當獲 ASTA 認可為符
合
BS
1362 標準且額定值適合。替換
的保險絲和保險絲蓋可向當地電器供應
商購買。
電力接駁(英國)
39

en - Contents
Warning and Safety instructions ....................................41
Caring for our environment ........................................47
Guide to the appliance ............................................48
Preparing for use .................................................50
Using the accessories supplied .....................................51
Use ............................................................52
Unwinding the cable ...............................................52
Switching on and off ...............................................52
Regulating the suction .............................................52
Foot controls .....................................................53
During vacuuming .................................................53
Setting down, transportation and storage.............................53
Maintenance .....................................................54
Purchasing new dustbags and filters ..................................54
Ordering the correct dustbags and filters ...............................54
When to change the dustbag ........................................55
How the dustbag change indicator works...............................55
How to replace the dustbag .........................................55
When to change the dust compartment filter (for motor protection) ...........56
How to change the dust compartment filter .............................56
When to change the HEPA AirClean 50 exhaust filter ......................56
How to change the HEPA AirClean 50 exhaust filter .......................56
Replacing one type of exhaust filter with another .........................57
Maintenance indicator with reset button ................................57
Inserting batteries into the LED handle .................................57
When to change the thread lifters .....................................57
How to replace the thread lifters ......................................57
Cleaning the roller on the AllTeQ floorhead..............................58
Cleaning and care ................................................58
Problem solving guide ............................................58
After sales service ................................................59
Guarantee .......................................................59
Optional accessories..............................................59
Electrical connection for the UK ....................................61
Electrical connection AU, NZ .......................................61
40

en - Warning and Safety instructions
This vacuum cleaner complies with statutory safety
requirements. Improper use can, however, lead to
personal injury and damage to property.
To avoid the risk of accidents and damage to the
vacuum cleaner, please read these instructions carefully
before using it for the first time. They contain important
information on its safety, operation and maintenance.
Keep these instructions in a safe place and ensure that
new users are familiar with the content. Pass them on to
any future owner.
Always disconnect the vacuum cleaner from the mains
supply when you have finished using it, before changing
over accessories, as well as for maintenance work and
cleaning. Switch the vacuum cleaner off at the wall
socket and unplug it.
Correct application
This vacuum cleaner is intended for cleaning flooring in
~
domestic households and similar residential environments.
This vacuum cleaner can be used for all normal cleaning
~
of carpets, rugs and robust hard flooring.
This vacuum cleaner is not intended for outdoor use.
~
41

en - Warning and Safety instructions
The vacuum cleaner must only be used to vacuum dry
~
floor surfaces. Do not use on people and animals. Any
other usage, modification or alteration is not supported by
the manufacturer and could be dangerous.
This vacuum cleaner can only be used by people with
~
reduced physical, sensory or mental capabilities, or lack of
experience or knowledge, if they are supervised whilst
using it or have been shown how to use it in a safe way
and understand and recognise the consequences of
incorrect operation.
Safety with children
Children under 8 years of age must be kept away from
~
the vacuum cleaner unless they are constantly supervised.
Children 8 years and older may only use the vacuum
~
cleaner unsupervised if they have been shown how to use
it safely and recognise and understand the consequences
of incorrect operation.
Children must not be allowed to clean or maintain the
~
vacuum cleaner unsupervised.
Please supervise children in the vicinity of the vacuum
~
cleaner and do not let them play with it.
Keep batteries out of the reach of children.
~
42

en - Warning and Safety instructions
Technical safety
Before using the vacuum cleaner and its accessories,
~
check for any visible signs of damage. Do not use a
damaged appliance.
Ensure that the connection data on the data plate of the
~
vacuum cleaner (voltage and frequency) match the mains
electricity supply exactly.
The mains electrical plug must be fitted with a 13 A fuse
~
(UK).
While the vacuum cleaner is under guarantee, repairs
~
should only be undertaken by a Miele authorised service
technician. Otherwise the guarantee will be invalidated.
Do not pull or carry the vacuum cleaner by the cable,
~
and be careful not to damage the cable when withdrawing
the plug from the socket.
Keep the cable away from sharp edges and do not let it
get squashed, for example, under a door.
Avoid running the vacuum cleaner over the cable. This
could damage the cable, plug or socket.
The appliance must not be used if any of these have
suffered damage.
Do not use the vacuum cleaner if the cable is damaged.
~
If the cable is damaged it must be replaced together with a
complete cable rewind. For safety reasons this work must
be done by the Miele Service Department or a Miele
authorised service technician.
43

en - Warning and Safety instructions
When vacuuming fine dust, e.g. sawdust, sand, plaster,
~
flour, talcum powder etc., electrostatic charges build up
naturally. Under certain conditions these charges will be
released. To avoid the unpleasant effects of these
discharges, a metal inlay has been incorporated into the
underside of the handle. Please make sure that you keep
your hand in constant contact with this metal strip during
vacuuming.
Do not let the vacuum cleaner get wet. Clean only with a
~
dry cloth or slightly damp cloth when disconnected from
the mains supply.
Repairs should only be carried out by a Miele authorised
~
service technician. Repairs and other work by unqualified
persons can cause considerable danger to users.
Correct use
To avoid the risk of damage, do not use the vacuum
~
cleaner without the dustbag, dust compartment filter and
exhaust filter in place.
The dust compartment cover will not close without a
~
dustbag fitted. Do not force it.
Do not vacuum up anything which has been burning or
~
is still glowing e.g. cigarettes, ashes or coal, whether
glowing or apparently extinguished.
Do not use the vacuum cleaner to vacuum up any water,
~
liquid or damp dirt. Wait until any freshly cleaned or
shampooed carpets or floor coverings are completely dry
before attempting to vacuum.
44

en - Warning and Safety instructions
Do not use the vacuum cleaner to vacuum toner dust.
~
Toner, such as that used in printers and photocopiers, can
conduct electricity.
Do not vacuum up any inflammable or combustible
~
liquids or gases and do not vacuum in areas where such
substances are stored.
Floor attachments, accessories and tubes must not be
~
used at head level to avoid the risk of injury, e.g. to eyes
and ears.
Important information on the handling of batteries:
~
Do not short circuit or recharge batteries or throw them
–
into a fire.
–
Disposing of batteries: Remove the batteries from the
LED handle and dispose of them in your recycling bin.
Do not dispose of them with the normal household waste.
45

en - Warning and Safety instructions
Accessories
To avoid the risk of injury when vacuuming with a Miele
~
Turbobrush, do not touch the rotating roller brush.
It is not advisable to vacuum directly with the handle, i.e.
~
without an accessory attached as the rim could get
damaged and you could hurt yourself on sharp edges.
Only use genuine dustbags, filters and accessories with
~
the "Original Miele" logo on them. Otherwise the
manufacturer cannot guarantee the safety of the product.
Miele cannot be held liable for damage caused by
incorrect use or operation or by non-compliance with
these Warning and Safety instructions.
46

en - Caring for our environment
Disposal of packing material
The packaging is designed to protect
the vacuum cleaner from damage
during transportation. The packaging
materials used are selected from
materials which are environmentally
friendly for disposal and should be
recycled.
Recycling the packaging reduces the
use of raw materials in the
manufacturing process and also
reduces the amount of waste in landfill
sites.
Ensure that any plastic wrappings,
bags, etc. are disposed of safely and
kept out of the reach of babies and
young children. Danger of suffocation.
Disposing of the dustbag and
filters
These are made from environmentally
friendly materials. The filters can be
disposed of with the normal household
waste. The dustbag can also be
disposed of in this way if it has been
used exclusively for general household
dust.
Disposing of your old
appliance
Before disposing of your old appliance
remove the dustbag and all the filters
and dispose of them with your normal
household waste.
Electrical and electronic appliances
often contain valuable materials. They
also contain materials which, if handled
or disposed of incorrectly, could be
potentially hazardous to human health
and to the environment. They are,
however, essential for the correct
functioning of your appliance. Please
do not therefore dispose of it with your
household waste.
Please dispose of it at your local
community waste collection/recycling
centre, or contact your dealer for
advice.
Ensure that it presents no danger to
children while being stored for
disposal.
47

en - Guide to the appliance
48

en - Guide to the appliance
a Suction hose
b Release button for accessories compartment
c Dustbag change indicator
d Display
e Foot control for automatic cable rewind
f Parking system for pauses in vacuuming
g On/Off foot control s
h Mains cable
i Castor wheels
j HEPA AirClean 50 filter
k Illuminated parking attachment (on both sides of the vacuum cleaner)
l Dust compartment filter (for motor protection)
m Electrobrush socket cover holder
n Original Miele dustbag
o Carrying handle
p AllTeQ or AirTeQ floorhead
q Release buttons
r Triscopic tube
s Dust compartment release catch
t Release buttons for the triscopic tube
u Socket for Electro brush
v Connection socket
w Battery compartment
x On button for lighting
y LED handle
z Overheating warning light ,
{ Maintenance indicator with reset button
49

en
The illustrations referred to in the text
are shown on the last pages at the end
of these english operating instructions.
Preparing for use
Attaching the suction hose (dia. 1)
Insert the hose connector into the
^
socket on the vacuum cleaner until it
clicks into position. To do this, line up
the guides on the two pieces.
Removing the suction hose (dia. 2)
^ Press the release buttons at the side
of the hose connector and lift the
hose from the socket.
Connecting the handle to the suction
hose (dia. 3)
^ Insert the suction hose into the
handle until it clicks into position.
Connecting the handle to the suction
tube (dia. 4)
^
Insert the handle into the suction tube
until it clicks into position. To do this,
line up the guides on the two pieces.
a Press the release button to release
the lower tube and pull it right out
until it clicks. Press the button again
when you want to retract the tube.
The tube will click into place.
b Press the release button to release
the tubes and adjust to the required
height.
Fitting the floorhead (dia. 6)
Push the suction tube into the
^
floorhead and turn it clockwise or
anti-clockwise until it clicks into
position.
^ To release the floorhead from the
suction tube, press the release
button and pull the suction tube away
from the floorhead.
Fitting the floorhead (dia.7+8)
The floorhead can be used for all
normal cleaning of carpets and rugs.
It can also be used with the brush
protruding to vacuum hard flooring. For
hard flooring, such as stone and
parquet, we recommend using one of
the special Miele floor brushes (see
"Optional accessories").
^
To release the handle from the
suction tube, press the release
button and pull the handle away from
the suction tube.
Adjusting the triscopic suction tube
(dia. 5)
The triscopic tube has three sections.
Two sections are packed together
inside a third outer tube.
50
It is important to observe the flooring
manufacturer's cleaning and care
instructions.
Vacuum carpets and rugs with the
brush retracted:
^
Press the foot control %.
Clean hard flooring which is not
susceptible to scratching with the brush
protruding:
^
Press the foot control ).

Clean flooring which has deep
crevices or grooves with the brush
protruding.
AirTeQ floorhead (dia. 8)
This floorhead has been specially
developed to achieve excellent
cleaning results using low energy. It
has particularly low power consumption
and high suction capability.
Remove the label (dia.12).
^
Press the exhaust filter change indi
^
cator ~ (dia. 13).
After approx. 10 - 15 seconds a thin
^
red stripe will appear in the left hand
side of the strip (dia. 14).
Close the dust compartment lid
^
securely, making sure it clicks into
position. Take care not to trap the
dustbag when doing so.
en
-
Warning: If the suction power of
,
the AirTeQ floorhead seems too
high, reduce the suction until the
floorhead is easier to manouevre
(see "Use - regulating the suction").
Inserting batteries into the LED
handle (dia.9+10)
a Loosen the screws on the cover.
b Press down on both sides of the
cover to remove.
c Take out the battery holder and
insert the three batteries supplied
making sure they are the right way
round.
d Replace the battery holder. Make
sure the arrows on the holder and in
the battery compartment line up in
the same direction.
e Replace the cover and tighten the
screws.
Activating the exhaust filter change
indicator
The exhaust filter change indicator
The exhaust filter change indicator
shows the remaining functional life of
the exhaust filter. After approx. 50
operating hours, or approx. one year of
average use, the strip will be
completely red (dia. 15).
Using the accessories
supplied (dia. 16)
The following accessories are supplied:
a Crevice nozzle
For cleaning in folds, crevices or
corners.
b Dusting brush with natural bristles
(natural bristles only available in se
lected countries) For cleaning skir
ting boards, ornate or carved ob
jects.
The head can be swivelled to adjust
the angle.
c Upholstery nozzle
For cleaning upholstery, mattresses,
cushions, curtains, covers etc.
-
-
-
^
Lift the release catch for the dust
compartment lid and raise the lid as
far as it will go (dia.11).
51

en
Removing the accessories (dia. 17)
Press the release button to open the
^
accessories compartment lid.
The accessories compartment will then
open.
Take out the accessory you require.
^
Press down firmly on the lid to close
^
it.
Floorhead (dia. 18)
For general use and also for vacuuming
stairs.
Warning: For safety reasons
,
when vacuuming stairs it is best to
start at the bottom of the stairs and
move upwards.
Use
Unwinding the cable (dia. 19)
^ Pull the mains cable out to the
required length (max. approx. 7.5 m).
^
Insert the plug in the socket correctly
and switch on.
The parking system lighting on both
sides switches on.
The first time the vacuum cleaner is
used, the lighting switches on after
approx. two minutes.
,
Warning: If vacuuming for longer
than 30 minutes, the mains cable
must be pulled out to its fullest
extent. Otherwise there is a danger
of overheating and damage.
Rewinding the cable (dia. 20)
Switch the vacuum cleaner off at the
^
wall socket and unplug it.
After approx. 30 seconds the parking
system lighting switches off again.
Press the rewind foot switch briefly.
^
The cable will rewind automatically.
Switching on and off (dia. 21)
Press the On/Off foot control s.
^
Regulating the suction
The suction power can be regulated to
suit the type of flooring being cleaned.
Reducing the suction power reduces
the amount of effort required to
manoeuvre the floorhead.
Some models also have symbols on the
controls. The symbols indicate the type
of use the settings are suitable for.
The setting selected will light up yellow.
# - curtains, lightweight fabrics
$ - upholstery, cushions
% - thick pile carpets, rugs and
runners
Auto = suction power is automatically
adjusted for the type of floor
being vacuumed
,
Do not use the "Auto" setting to
vacuum lightweight materials or
curtains. These could be sucked in
and possibly damaged.
* - for daily energy-saving vacuuming
(this setting is also very quiet)
52

en
( - loop-pile carpets
) - hard flooring and for intensive
cleaning of carpets
When using the AirTeQ
,
floorhead, if the suction seems too
high, reduce the suction until the
floorhead is easier to manouevre.
Foot controls (dia. 22 + 23)
The first time the vacuum cleaner is
switched on, the "Auto" power setting
will be selected automatically.
^ Press the + foot control to select a
higher setting.
^ Press the - foot control to select a
lower setting.
After that, the vacuum cleaner will
switch on at the setting which was used
previously.
During vacuuming (dia. 24)
^ When vacuuming, pull the cleaner
behind you on its wheels. You can
stand it upright for vacuuming stairs
and curtains etc.
,
When vacuuming especially fine
dust, e.g. sawdust, sand, plaster,
flour, talcum powder etc.,
electrostatic charges build up
naturally. Under certain conditions
these charges will be released. To
avoid the unpleasant effects of
these discharges, a metal inlay has
been incorporated into the
underside of the handle. Please
make sure that you keep your hand
in constant contact with this metal
strip during vacuuming.
Illuminating the work area (dia. 25)
Your vacuum cleaner is equipped with
an LED on the handle to illuminate the
work area.
Press the I button on the LED
^
handle.
It will switch itself off automatically after
approx. 30 seconds.
Setting down, transportation
and storage
Parking system for pauses in
vacuuming (dia. 26)
(cannot be used with the SEB 234 L
Electro Premium Electrobrush)
A parking system has been designed
for conveniently parking the suction
tube and floorhead during pauses.
^ Slot the floorhead into the parking
attachment at the back of the
vacuum cleaner.
If the vacuum cleaner is on a
sloping surface, e.g. a ramp, retract
the suction tube fully.
Switching on and off with the parking
system
The vacuum cleaner switches off
automatically when the floor head is
slotted into the parking system with the
parking attachment.
When the floorhead is removed from
the parking system the vacuum cleaner
switches back on at the last selected
power level.
53

en
Parking system for storage (dia. 27)
Warning. Always disconnect the
,
vacuum cleaner from the electrical
supply when you have finished
using it. Switch the vacuum cleaner
off at the wall socket and unplug it.
The parking system lighting will switch
off approx. 30 seconds after
disconnecting the vacuum cleaner from
the mains.
Stand the vacuum cleaner upright
^
when it is not being used and when it
is being stored.
Retract the suction tube fully.
^ Slot the floorhead downwards into
one of the illuminated parking
attachments on either side of the
vacuum cleaner (the parking
attachments cannot be used with the
SEB 234 L Electrobrush).
Dustbag
–
Dust compartment filter (for motor
–
protection)
Exhaust filter
–
Only use genuine dustbags, filters,
accessories and optional
accessories with the "Original Miele"
logo on them. Only this will ensure
that the suction power of the
vacuum cleaner is maintained,
giving the best possible cleaning
results.
Warning: The use of dustbags
,
made from paper or paper-based
materials, or dustbags with a
cardboard collar, or dustbags that
do not carry the "Original Miele"
logo, can seriously damage the
vacuum cleaner and invalidate the
warranty.
This makes the vacuum cleaner easier
to carry or store.
Maintenance
,
Warning: Always disconnect the
vacuum cleaner from the electrical
supply for maintenance work and for
cleaning. Switch off at the wall
socket and unplug it.
The Miele filtration system consists of
three filters which must be replaced
from time to time to ensure that your
vacuum cleaner performs efficiently.
54
Purchasing new dustbags and filters
Original Miele dustbags and filters can
be ordered from your Miele retailer,
from Miele or online at:
Ordering the correct dustbags and
filters
Only use original Miele G/N dustbags
with a blue collar. Using any other
dustbags will damage the vacuum
cleaner. Original Miele dustbags are
identified by the "Original Miele" logo on
the packaging or directly on the dustbag.

en
How the dustbag change indicator
works
The dustbag change indicator is set for
normal household dust. This generally
contains a mixture of: dust, hair,
threads, carpet fluff, grit etc.
An Air Clean exhaust filter and a dust
compartment filter are supplied with
every packet of Miele dustbags.
If you wish to purchase original Miele
exhaust filters separately, please quote
the model number of your appliance
when ordering to ensure you get the
correct items.
When to change the dustbag (dia. 28)
Change the dustbag when the colour
marker in the dustbag change indicator
fills the display, or sooner if it is no
longer effective (see possible reasons
for this below).
Miele dustbags are disposable and
designed for single use only.
Dispose of the dustbag when it is
full. Do not attempt to reuse as
suction would be reduced.
Checking the dustbag change
indicator
^
Attach the AllTeQ or AirTeQ floorhead.
^
Switch the vacuum cleaner on and
select the maximum power setting.
^
Lift the floorhead off the floor a little.
However, if the cleaner has been used
to vacuum up fine dust, such as
plaster, brick dust, cement or flour, the
pores of the dustbag will become
blocked very quickly. This affects the
air permeability of the bag, and the
marker will indicate that it is "full" even
when it is not. If this happens you must
still change the dustbag because
suction power will be greatly reduced
by blocked pores in the dustbag.
If, on the other hand, a large amount of
hair and carpet fluff which typically
contains a lot of air is vacuumed up, the
indicator may fail to react even though
the bag is full. You should still change
it. Both these extremes can occur.
How to replace the dustbag (dia. 29 +
30)
^
Lift the release catch for the dust
compartment lid and raise the lid as
far as it will go (dia. 11).
The dustbag has a closing flap which
closes automatically when the dust
compartment lid is raised to prevent
any dust escaping.
^
Pull the dustbag out by the grip on
the collar.
^
Fit the new dustbag into the blue
holder as far as it will go. Leave it
folded up when you take it out of the
box.
55

en
It should be unfolded as far as
^
possible in the dust compartment.
Close the dust compartment lid
^
securely, making sure it clicks into
position. Take care not to trap the
dustbag when doing so.
Warning: The lid will not close without
a dustbag in place. Do not use force.
When to change the dust
compartment filter (for motor
protection)
Replace this filter every time you start a
new packet of dustbags. A dust
compartment filter is supplied with
every packet of Miele dustbags.
How to change the dust
compartment filter (dia. 31)
^ Open the dust compartment lid.
^ Pull the dustbag out by the grip on
the collar.
When to change the HEPA AirClean
50 exhaust filter (dia. 15)
Replace the exhaust filter if the exhaust
filter change indicator is completely
red.
This occurs after approx. 50 operating
hours, or approx. one year of average
use. The vacuum cleaner can still be
used. However, the suction power will
be reduced as will the effectiveness of
the filter if it is not replaced in good
time.
You can replace the HEPA AirClean 50
exhaust filter fitted in the vacuum
cleaner with one of the other Miele
exhaust filters if you wish (see
"Replacing one type of exhaust filter
with another").
How to change the HEPA AirClean 50
exhaust filter (dia. 32 + 33)
Do not use more than one exhaust
filter at a time.
^
Open the blue filter frame and
remove the old filter. Hold by the
clean, unsoiled section to remove it.
^
Replace with a new dust
compartment filter.
^
Close the filter frame.
^
Fit the dustbag into the blue holder
as far as it will go.
^
Close the dust compartment lid
securely, making sure it clicks into
position. Take care not to trap the
dustbag when doing so.
56
^
Open the dust compartment lid.
^
Lift the filter and remove it.
^
Replace with a new filter, and push it
down into place.
^
Press the exhaust filter change
indicator ~ (dia. 13).
^
After approx. 10 - 15 seconds a thin
red stripe will appear in the left hand
side of the strip (dia. 14).
If you wish to use an Air Clean filter,
see "Replacing one type of exhaust
filter with another".
^
Close the dust compartment lid.

en
Replacing one type of exhaust filter
with another
Do not use more than one exhaust
filter at a time.
You can replace the standard HEPA
AirClean 50 filter c with either one of the
following exhaust filters:
a Air Clean
b ActiveAirClean 50.
When replacing the HEPA AirClean
50 filter with an Air Clean filter, plea
se note (dia. 34)
If you wish to replace the HEPA AirClean 50 filter c with an Air Clean filter a,
then it is essential that you also fit the
filter grille (See "Optional accessories").
Maintenance indicator with reset
button (dia. 35)
The indicator lights up after approx.
50 hours of operation, which is
equivalent to about a year of average
use. The level of soiling of the dust
compartment filter and the exhaust filter
must be checked at this point and if the
filters are replaced, the indicator must
be reset. To do this the vacuum cleaner
must be switched on.
-
Inserting batteries into the LED
handle (dia.9+10)
You will need three 1.5 V (AAA) batteries.
a Loosen the screws on the cover.
b Press down on both sides of the
cover to remove.
c Take out the battery holder and
change the three batteries, making
sure they are the right way round.
d Replace the battery holder. in the
direction of the arrows on the holder
and battery compartment, so that
both line up.
e Replace the cover and tighten the
screws.
When to change the thread lifters
The thread lifters on the suction inlet of
the floorhead can be replaced.
Check them from time to time and replace them if the pile has worn down.
How to replace the thread lifters
AllTeQ floorhead (dia. 36)
^
Use a suitable screwdriver to remove
the thread lifters from the slots. There
are two grooves to help you.
^
Fit new thread lifters.
^
Press the reset button.
The maintenance indicator and reset
button will go out and reset to zero.
The indicator can only be reset by
pressing the reset button after the
light has come on. Pressing the
button at any other time will have no
effect.
AirTeQ floorhead (dia. 37)
^
Use a suitable screwdriver to remove
the thread lifters from the slots.
^
Fit new thread lifters.
57

en
Cleaning the roller on the AllTeQ
floorhead (dia. 38)
(Not necessary for the AirTeQ floorhead)
a Release the bearing (with bayonet
fitting) using a coin.
b Press the bearing out, and remove it.
c Take out the roller.
Remove any threads and hair, repla
^
ce the roller and refit the bearing.
Replacement parts are available from
your Miele retailer or from Miele (see
back cover for contact details).
Cleaning and care
Always disconnect the vacuum
,
cleaner from the electrical supply
before cleaning it. Switch off at the
wall socket and unplug it.
Vacuum cleaners with textile velvet
finish
Dust compartment
The dust compartment can, if
necessary, be cleaned using a dry
duster, brush or, if available, a second
vacuum cleaner to vacuum the dust
out.
Warning: Do not let the vacuum
,
cleaner get wet. If moisture gets into
the appliance, there is a risk of
electric shock.
Problem solving guide
The vacuum cleaner switches off
automatically.
The overheating warning light ,
also comes on (dia 39).
A temperature limiter switches the
vacuum cleaner off automatically if it
gets too hot. The overheating warning
light , will then come on to indicate
that it has overheated.
Clean the vacuum cleaner casing with
the dusting brush or a slightly damp
cloth.
Vacuum cleaner and accessories
External surfaces of the vacuum
cleaner and of the accessories can be
cleaned with a proprietary cleaner
suitable for plastic.
,
Do not use abrasive cleaning
agents, glass cleaning agents,
all-purpose cleaners or oil-based
conditioning agents.
58
This can occur if, for instance, large
articles block the suction tube or when
the filter bag is full or contains particles
of fine dust. A heavily soiled dust
compartment or exhaust filter can also
be the cause of overheating. Switch the
vacuum cleaner off immediately using
the On/Off foot control s. Disconnect it
from the electricity supply. Switch it off
at the wall socket and unplug it.
After removing the cause, wait for
approx. 20 - 30 minutes to allow the
vacuum cleaner to cool down. It can
then be switched on again.

en
After sales service
In the event of a fault that you cannot
easily remedy, please contact
your Miele Dealer
–
or
Miele (see back of booklet for contact
–
details). Please note that telephone
calls may be monitored or recorded
for training purposes (UK only).
Guarantee
For information on the appliance
guarantee specific to your country
please contact Miele. See back of booklet for contact details.
In the U.K. your appliance is
guaranteed for 2 years from the date of
purchase. However, you must activate
your cover by calling 0845 365 6640 or
registering online at www.miele.co.uk.
Optional accessories
Please observe the flooring
manufacturer's cleaning and care
instructions.
Electrobrushes
Electrobrush Electro Comfort
(SEB 216-3)
This electrobrush is particularly suitable
for intensive vacuuming of carpets
which are subject to hard wear. It is
very effective at removing deep seated
dirt and preventing areas of frequent
use being trodden into a path.
Electrobrush Electro Premium
(SEB 234-L)
This electrobrush is 60 mm wider than
the SEB 216-3, and is more powerful,
making it ideal for cleaning larger floor
areas. It has the following additional
features compared to the SEB 216-3:
– Adjustable height settings
– LEDs to light up the area being
vacuumed
– A multi-function indicator light
Floorheads / brushes
Classic Allergotec floorhead
(SBDH 285-3)
Miele accessories, including
floorheads, filters and dustbags are
available to order through your Miele
retailer, Miele or online at:
Certain models are supplied as
standard with one or more of the
following accessories:
This floorhead is suitable for daily
hygienic cleaning of all floor surfaces.
The level of cleanliness of the floor
shows in a colour "traffic light" display
when vacuuming.
Turbo Comfort Turbobrush
(STB 205-3)
This turbobrush is ideal for cleaning cut
pile carpet.
59

en
Hard floor brush (SBB 235-3)
This brush is designed for use on hard
flooring such as tiled or stone floors.
Parquet floor brush (SBB Parquet-3)
(only available in selected countries)
This brush has natural bristles and is
designed for use on parquet floors and
other surfaces which are susceptible to
scratching such as laminate flooring.
Hard floor Twister swivel-action floor
brush (SBB 300-3)
This brush is suitable for a variety of
hard floor surfaces and has a swivel
joint enabling it to get into awkward
corners.
Parquet Twister XL swivel-action
floor brush (SBB 400-3)
(only available in selected countries)
This brush is extra wide making it
suitable for large areas of flooring and
has a swivel joint enabling it to get into
awkward corners.
Cat&Dog Set (SCD 10)
Especially for households with pets.
HomeCare Set (SHC 10)
Accessories for cleaning the living
areas of your home.
Hand Turbobrush Turbo Mini
Compact (STB 20)
For cleaning upholstery, mattresses,
car seats etc.
Universal brush (SUB 20)
(only available in selected countries)
For dusting books, shelves, etc.
Radiator brush (SHB 30)
For cleaning radiators, narrow shelves
and crevices.
Mattress nozzle (SMD 10)
For cleaning upholstery, mattresses,
cushions, curtains, covers etc.
Crevice nozzle, 300 mm (SFD 10)
Other accessories
MicroSet (SMC 20)
This set is specially designed for
cleaning small objects and difficult to
reach areas (such as PC keyboards,
stereo equipment, intricately carved
furniture and ornaments, models etc).
CarCare Set (SCC 10)
For valeting the interior of cars.
60
Extra long crevice nozzle for cleaning in
folds, crevices or corners.
Crevice nozzle, 560 mm (SFD 20)
Flexible crevice nozzle for accessing
awkward to reach areas.
Upholstery nozzle, 190 mm (SPD 10)
Extra wide nozzle for cleaning
upholstery, mattresses, car seats etc.

en
Flexible extension hose (SFS 10)
For extending the suction hose by
approx. 1.5 m.
Hygiene seal with active charcoal
Helps prevent dust and odours
escaping when the suction hose has
been removed from the cleaner.
Filters
ActiveAirClean 50 exhaust filter
(SF-AA 50)
This filter absorbs odours from the dirt
collected in the dustbag.
Filter grille
The filter grille is required if you wish to
fit an Air Clean filter instead of an
ActiveAirClean 50 filter or a HEPA AirClean 50 filter.
Electrical connection for the
UK
All electrical work should be carried out
by a suitably qualified and competent
person in strict accordance with current
national and local safety regulations
(BS 7671 in the UK).
The voltage and frequency are given on
the data plate located underneath the
vacuum cleaner. Please ensure that
these match the household mains
supply. The fuse rating is quoted on the
plug.
The appliance is supplied with a cable
and moulded plug ready for connection
to a 230-240 V/50 Hz a.c. single phase
supply.
Non-rewireable plugs BS 1363
The fuse cover must be re-fitted when
changing the fuse, and if the fuse cover
is lost the plug must not be used until a
suitable replacement is obtained. The
colour of the correct replacement cover
is that of the coloured insert in the base
of the plug, or the colour that is
embossed in words on the base of the
plug, (as applicable to the design of
plug fitted).
Replacement fuses should be ASTA
approved to BS1362 and have the
correct rating. Replacement fuses and
fuse covers may be purchased from
your local electrical supplier.
Electrical connection AU, NZ
All work should be carried out by a
suitably qualified and competent
person in strict accordance with
national and local safety regulations.
The voltage and rated load are given
on the data plate located underneath
the vacuum cleaner. Please ensure that
these match the household mains
supply. The fuse rating is quoted on the
plug.
The appliance is supplied with a cable
and moulded plug ready for connection
to a 230V/50Hz AC single phase
supply.
Test Marks Electrical safety
RCM Mark
Electrically suppressed
according to AS/NZS 1044
6162636465


66

67

United Kingdom
A
A
A
A
T
T
T
T
T
Miele Co. Ltd.
Fairacres, Marcham Road
bingdon, Oxon, OX14 1TW
Customer Contact Centre Tel: 0330 160 6600
E-mail: mielecare@miele.co.uk
Internet: www.miele.co.uk
ustralia
Miele Australia Pty. Ltd.
CN 005 635 398
BN 96 005 635 398
1 Gilbert Park Drive, Knoxfield, VIC 3180
el: 1300 464 353
Internet: www.miele.com.au
China
Miele (Shanghai) Trading Ltd.
1-3 Floor, No. 82 Shi Men Yi Road
Jing' an District
200040 Shanghai, PRC
el: +86 21 6157 3500, Fax: +86 21 6157 3511
E-mail: info@miele.cn, Internet: www.miele.cn
Miele (Hong Kong) Limited
41/F - 4101, Manhattan Place
23 Wang Tai Road
Kowloon Bay, Hong Kong
el: (852) 2610 1331, Fax: (852)2610 1013
Email: mielehk@miele.com.hk
India
Miele India Pvt. Ltd.
Ground Floor, Copia Corporate Suites
Plot No. 9, Jasola
New Delhi - 110025
el: 011-46 900 000, Fax: 011-46 900 001
E-mail: customercare@miele.in, Internet: www.miele.in
Ireland
Miele Ireland Ltd.
2024 Bianconi Avenue
Citywest Business Campus, Dublin 24
el: (01) 461 07 10, Fax: (01) 461 07 97
E-Mail: info@miele.ie, Internet: www.miele.ie
Manufacturer:
Carl-Miele-Straße 29, 33332 Gütersloh, Germany
Miele & Cie. KG
Malaysia
Miele Sdn Bhd
Suite 12-2, Level 12
Menara Sapura Kencana Petroleum
Solaris Dutamas No. 1, Jalan Dutamas 1
50480 Kuala Lumpur, Malaysia
Phone: +603-6209-0288
Fax: +603-6205-3768
New Zealand
Miele New Zealand Limited
IRD 98 463 631
Level 2, 10 College Hill
Freemans Bay, Auckland 1011, NZ
Tel: 0800 464 353
Internet: www.miele.co.nz
Singapore
Miele Pte. Ltd.
163 Penang Road
# 04 - 03 Winsland House II
Singapore 238463
Tel: +65 6735 1191, Fax: +65 6735 1161
E-Mail: info@miele.com.sg
Internet: www.miele.sg
South Africa
Miele (Pty) Ltd
63 Peter Place, Bryanston 2194
P.O. Box 69434, Bryanston 2021
Tel: (011) 875 9000, Fax: (011) 875 9035
E-mail: info@miele.co.za
Internet: www.miele.co.za
United Arab Emirates
Miele Appliances Ltd.
P.O. Box 11 47 82
Gold & Diamond Park, Sheikh Zayed Road
Building 6 / Offices Nos. 6-214 to 6-220
Dubai
Tel: +971-4-341 84 44
Fax: +971-4-341 88 52
E-Mail: info@miele.ae
Internet: www.miele.ae
本公司保留修改權利 Complete C3 Brilliant / 4314
Alteration rights reserved
M.-Nr. 10 082 070 / 00
 Loading...