

Page 1
ScanWizard Pro
Q U I C K R E F E R E N C E G U I D E
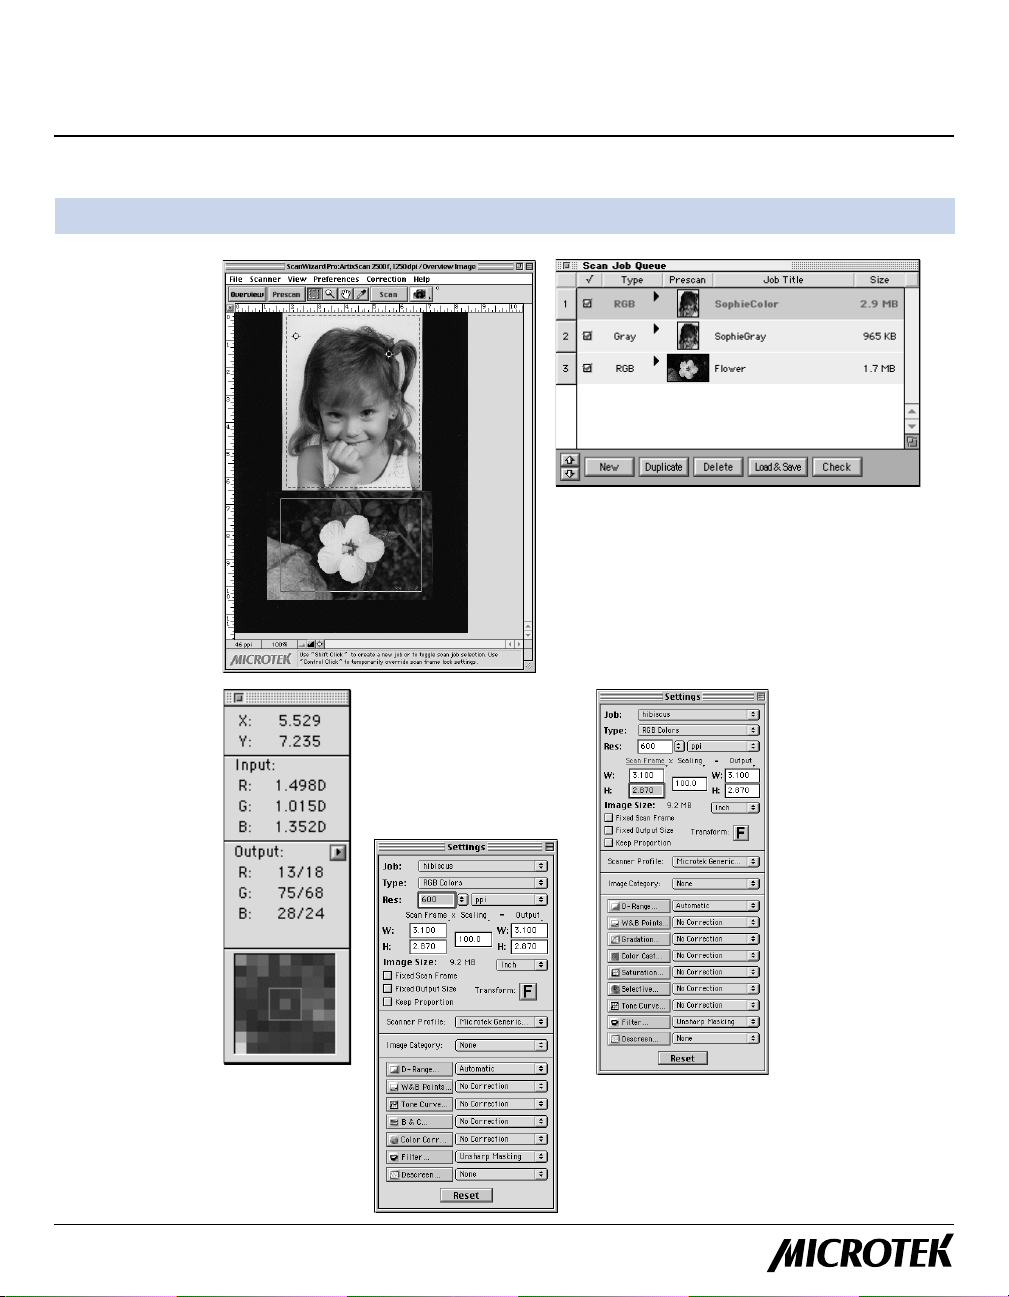
Preview Window
Preview window
displays an
overview scan of
the original and
prescan image(s). It
also provides the
tools for image
cropping/selection
and commands for
scanner control
for Macintosh
Scan Job Queue window
lists all prescans (scan jobs). The scan jobs can
be selected collectively for multiple editing,
final scan, and delivery to a common
destination
Info window shows
the magnified view
of pixels and its
corresponding
values at the
pointer location on
the prescan (output
toggles between
Native and LCH
according to Color
Space Mode in use)
Copyright © 2001 Microtek International, Inc. http://www.microtek.com
I49-003154 A, May 2001
Settings window contains
the scanning parameters
for the output image. It
also provides the advanced
image correction (AIC)
tools for the scan stage
image editing functions.
Settings window
under Native Color
Space Mode
Settings window
under LCH Color
Space Mode
Page 2
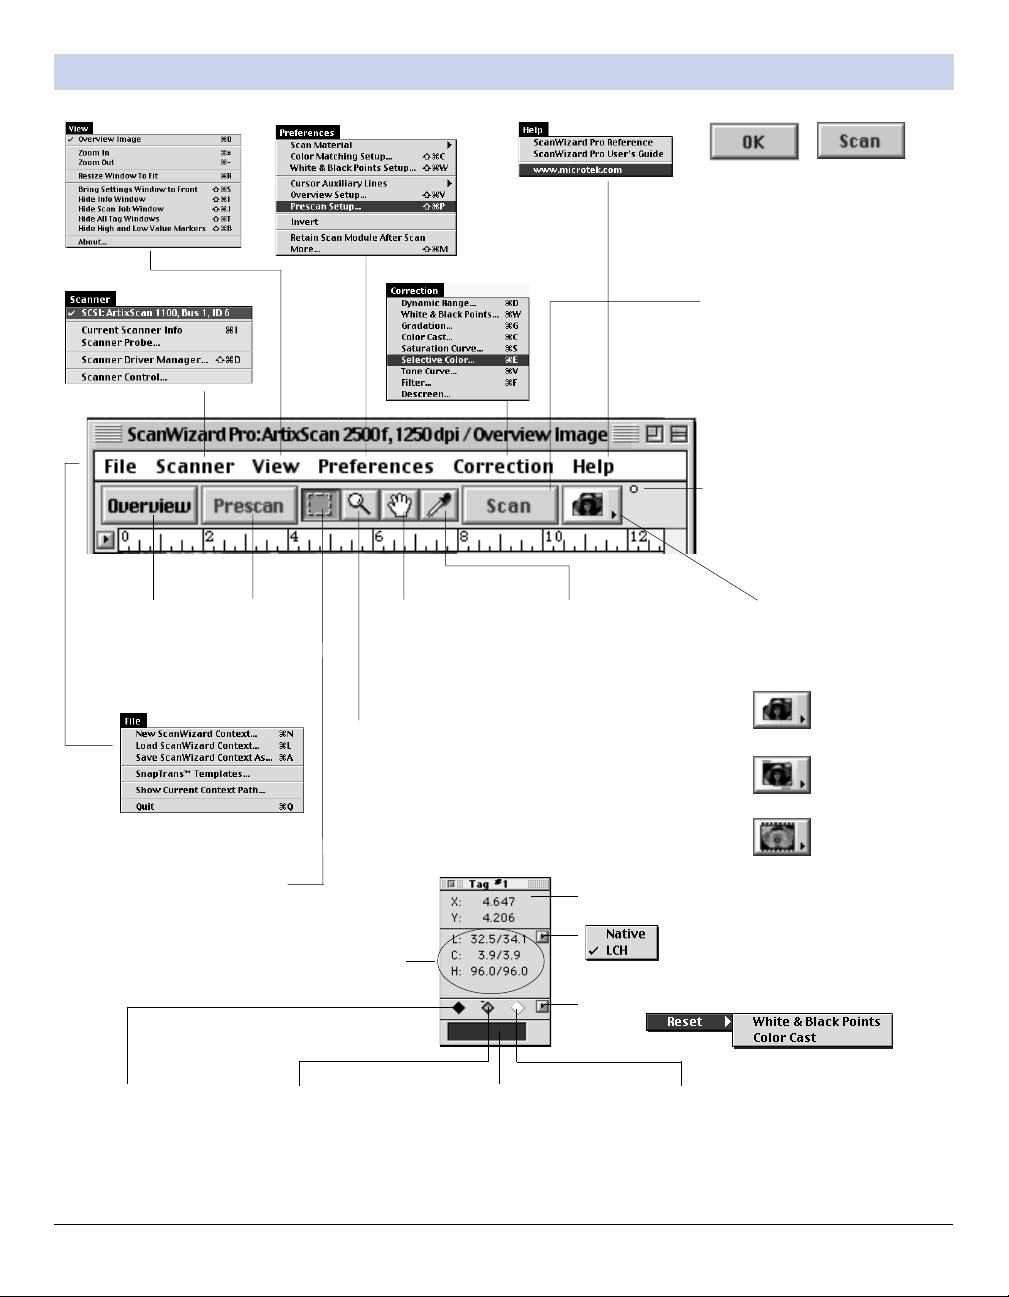
Preview Window Tool Bar and Menu
OK button appears when
ScanWizard Pro is operating
from BatchScan application
(located in Apple menu). The
output image is delivered to
your disk for storage after final
scan. Scan button appears
when ScanWizard Pro is started
from Photoshop or other image
editing or TWAIN compliant
application or from ScanWizard
Pro Applet.
Scan indicator flashes
when the scanner is
active.
Perform a
low-resolution
preview of the
entire scan
bed
Click and use this
Scan Frame tool to
define an area from
the scan material to
be scanned
Click here to
set the
Before value
as Black point
Perform highresolution
preview of the
selected scan
frame
Click on image to
zoom in
(magnify). Press
Option key &
click to zoom out
(reduce)
Before and
After values
Click to remove or add
color cast. Minus sign
(-) is remove. Plus (+)
sign is add. Default is
Minus. Press Alt key
to switch sign to Plus
Click on zoomed
image to drag
hidden area of
the image out to
view
Color strip
showing the
color of the
selected pixel
Tag Window tool is used to
set black (shadow) & white
(highlight) points, and
adding/removing color cast
on the prescan. This a
shortcut for the AIC's
White & Black Points and
Color Cast tools. Click on
the color of the selected
pixel (as viewed from the
Information window) on
prescan, and the following
Tag window displays
Cursor position at X & Y axis of the image
Click to switch display mode color
space
Click to reset either White & Black or Color Cast
setting
Click here to
set the
Before value
as White point
Scan Material icon.
Click to select the icon
appropriate for scan
material in use:
Reflective
Positive Film
Negative film or
filmstrip
2
Page 3

Preview Window Status Bar
Click to change
the unit of
measurement for
the ruler. Default
is inch
Resolution info
(in pixel per inch)
for the
Overview or
Prescan image
on preview
Current image zoom size (in %)
Click to zoom out
Settings Window
High/Low value markers
Tips relating to tool
(Scan Frame; Zoom;
Pane; & Tag Window)
currently in use
Click to flash High/Low value markers
Click to zoom in
Image type of
current Scan Job
Output resolution
(in ppi or lpi)
Scanner profile &
profile info
Image Category
Selections
LCH Color Space Mode
Current selected Scan
Job (same job
highlighted in Scan Job
window)
Output size
control
&corresponding
image memory
size
Options for
fixed/flexible
Scan Frame or
output image
size
AIC Tools
See next page
for details
3
Image type of
current Scan Job
Output resolution
(in ppi or lpi)
Image orientation,
i.e., normal, rotated,
mirrored, etc.
Scanner profile &
profile info
Image Category
Selections is disabled
(dimmed) in Native
mode
Native Color Space Mode
Page 4

Setting Window (AIC Tools)
Color Cast
Adjust gray balance
by removing color
cast or adjust
desired cast by
adding color cast
Selective Color
Manipulate a
specific color
range without
affecting
other colors
Saturation Curve
Adjust image
saturation by
manipulating the
saturation curve
Gradation Curve
Manually or autoadjust midtones of
the Lightness
channel L
LCH Mode AIC Tools
Dynamic Range
Manually or auto
determine image
density range
(darkest tone to
lightest tone)
Native Mode AIC Tools
White & Black
Points
Manually or auto-
adjust shadow and
highlight points
Reset
Resets any or all of
the custom AIC
adjustments to default
settings
Descreen
Required only to remove
moiré patterns from scans
of newspaper/magazine
originals
Unsharp Masking Filter
Adjust the contrast of
edge details and sharpen
focus of blurry image
Brightness & Contrast
Manually adjust
brightness & contrast
of the entire image
Color Correction
Adjust hue &
saturation and
removes color
cast
Tone Curve
Adjust tonal distribution
of each channel of a
CMYK/GRB image
4
Page 5

Scan Job Queue Window
Current Scan output
image type
Indicates the number of scan
jobs which will be scanned
when the Preview Window
Scan button is clicked.
Disable (uncheck) jobs you
wish to exclude from final
scanning.
Change the position of the
selected Scan Job
New
Add a new Scan Job by
creating a default selection
(scan frame) on the overview
image
Duplicate
Copy & paste a selection
(scan frame) of the
highlighted Job Title on the
overview image
Delete
Delete highlighted individual
or range of scan jobs
Load/Save
Click on this button, the Job
Template Manager dialog box
displays
Material
If correct material is not yet
set at the main Preview
window, set the actual scan
(film) material here
To change
image type,
click drop-
down arrow
and choose
new type
Check (or uncheck) scan
job(s) to be included (or
excluded) in the final scan
(individually or in batch)
Highlighted Job Title indicates current scan job on preview in
the Preview window.
To rename, highlight (delayed second click) Job Title & type
over a new name.
Multiple Selections
Multiple selection is supported in performing functions of
Duplicate, Delete, and Check buttons. Click on a single scan
job to select it. Click and drag to select a range of scan jobs
or hold down the Shift key and click on a job to toggle its
selection state.
Thumbnails for prescanned images.
When overview image appears, clicking
on a thumbnail will highlight the
corresponding selection (scan frame) in
the Preview window. Double clicking a
thumbnail will display its corresponding
prescanned image in the Preview
window.
When prescan image appears, click on
a thumbnail to display the
corresponding image in the Preview
window
Check
ADD to apply the saved setting as
template to a new scan job.
Save all image editing
settings of the
highlighted scan job as
template for future scan
job
To rename, double-click
on the Job Title to
display the Scan Job
Title editing dialog box..
SnapTrans Templates
Pre-fab scan frame templates for
transparent scan materials
(accessible from Preview window
File menu). Select the appropriate
template for your film or slides
and click the Create button.
Your overview scan will have your
scan (film) material framed within
the selected template
5
Page 6

The Information Window
Mouse Cursor Position
displays the x,y position of the
mouse cursor on the current
preview image
Color Input Meter Display
shows input (in density values) &
output (in pixel values) relative to
the x,y position at the preview
image
Color Output Meter Options
changes color space display
mode between Native & LCH and
size of the pixel sampling display
area (see window bottom).
Pixel Sampling Display Area
shows a pixelized display of the
specific x,y position of the
preview image. The size of the
sampling area depends on the
selection made in the Color Meter
Options (top right)
Quick Keys
Tool selection (in Preview window)
M Selects scan frame tool
Z Selects zoom tool
H Selects pane tool
D Selects Tag window tool
File menu and Scanner menu
Q Exits ScanWizard Pro
R Resizes Preview window to fit preview image size
N New a context
L Loads context
A Saves context as
I Scanner Info dialog box
D Scanner Driver manager
Show/hide window
S Brings setting window to the front
J Show/hides Scan Job Queue window
I Show/hides Info window
T Show/hides Tag window
B Show/hides high and low value markers
= Zoom in
Zoom out
Color Output Meter Display
shows the output values of the pixel
at x,y position (values should differ
from input after image correction is
complied)
Preferences menu
C CMS Setup dialog box
W White/black point setup dialog box
V Overview setup dialog box
P Prescan Setup dialog box
M More Preferences dialog box
AIC screen (If unspecified, the Native mode is assumed.)
D Dynamic range
W White/black points
V Tone curve
B Brightness and contrast
C Color correction or color cast (LCH)
F Filter
G Gradation (LCH only)
S Saturation curve (LCH only)
E Selective color (LCH)
Overview/Prescan selection
0 Go to Overview image
1 Go to 1st Prescan image
2 Go to 2nd Prescan image
n Go to nth Prescan image
6
 Loading...