

Page 1

M
Getting Started
Microsoft® Optical Desktop with Fingerprint Reader
Page 2

HEALTH WARNING
Use of a keyboard or mouse may be linked to serious injuries or disorders.
When using a computer, as with many activities, you may experience occasional discomfort in your
hands, arms, shoulders, neck, or other parts of your body. However, if you experience symptoms such
as persistent or recurring discomfort, pain, throbbing, aching, tingling, numbness, burning sensation,
or stiffness, DO NOT IGNORE THESE WARNING SIGNS. PROMP TLY SEE A QUALIFIED HEALTH
PROFESSIONAL, even if symptoms occur when you are not working at your computer. Symptoms like
these can be as sociated with painful and sometimes permanently disabling injuries or disorders of the
nerves, muscles, tendons, or other parts of the body. These musculoskeletal disorders (MSDs) include
carpal tunnel syndrome, tendonitis, tenosynovitis, and other conditions.
While researchers are not yet able to answer many questions about MSDs, there is general agreement
that many factors may be linked to their occurrence, including: overall health, stress and how one copes
with it, medical and physical conditions, and how a person positions and uses his or her body during work
and other activities (including use of a keyboard or mouse). The amount of time a person performs an
activity may also be a factor.
Some guidelines that may help you work more comfortably with your computer and possibly reduce
your risk of experiencing an MSD can be found in the “Healthy Computing Guide” installed with this
device’s software. If this device did not come with software, see the “Healthy Computing Guide”
section of the “Getting Star ted” manual. You can also access the “Healthy Computing Guide” at
www.microsoft.com/hardware or (in the United States only) by calling 1 (800) 360 7561 to request
a CD at no charge.
If you have questions about how your own lifestyle, activities, or medical or physical condition may be
related to MSDs, see a qualied health professional.
Warning
To protect against risk of re, bodily injury, electric shock or damage to the equipment:
• Do not immerse any par t of this product in water or other liquid.
• Do not spray liquid on this product or allow excess liquid to drip inside.
• Do not use this product if it has sustained damage, such as a damaged cord or plug.
• Disconnect this product or remove its batteries before cleaning.
Security Disclaimer
The biometric (ngerprint reader) feature in this device is not a security feature and is intended to be
used for convenience only. It should not be used to access corporate networks or to protect sensitive
data, such as nancial information. Instead, you should protect your sensitive data with another method,
such as a strong password that you either memorize or store in a physically secure place. For more
information, see the Security Information topic in the on-screen Help le installed with DigitalPersona
Password Manager software.
About Your Rights and Obligations
This Microsoft® desktop set is comprised of a keyboard, mouse, and receiver and is sold as a single unit
and may not be separated for use on more than one computer. The software with this product is licensed,
not sold. You must either agree to the license contract in the software Setup screens or promptly return
the Microsoft desktop set, comprised of the keyboard, mouse, and receiver, along with the software,
for a refund, excluding the return costs. Af ter you install the software, you may consult the license and
the Limited Warranty for the product at any time by looking in the “Legal Information” section of the onscreen Help les installed with the software. You may also print a copy for your records.
X10-47292bdy.indd 5/19/2004, 3:11 PM1
Page 3
1
Welcome
Congratulations on your purchase of a Microsoft® desktop set, which includes a
keyboard with an integrated ngerprint reader, a wireless mouse, and a receiver. With
the ngerprint reader, you can enjoy the freedom and convenience of logging on to
Microsoft Windows®, Web sites, and programs without having to type a password. The
ngerprint reader is not a security feature. You should not use the ngerprint reader to
access corporate networks or protect sensitive data, such as nancial information.
Install DigitalPersona Password Manager Software First!
Your Microsoft desktop set with ngerprint reader includes two CDs, one with
DigitalPersona® Password Manager software and one with Microsoft IntelliType
Pro keyboard software and Microsoft IntelliPoint mouse software. You must install
DigitalPersona Password Manager software for the ngerprint reader to work.
Important If you want to use your ngerprint to switch between Windows user
accounts, you must turn on the Welcome screen and Fast User Switching before you
install DigitalPersona Password Manager software. For more information, see "Using
Your Fingerprint to Switch Between Windows User Accounts" later in this manual.
To install DigitalPersona Password Manager software
1 Insert the DigitalPersona Password Manager software installation CD (labeled "1")
into your computer’s CD drive.
If the Setup screen does not appear automatically, do the following:
• Click Start, and then click Run.
• Type [drive]:setup. For example, if your CD drive is drive E, type e:setup
2 On the Setup screen, click Next, and then follow the Installation Wizard instructions
on the screen.
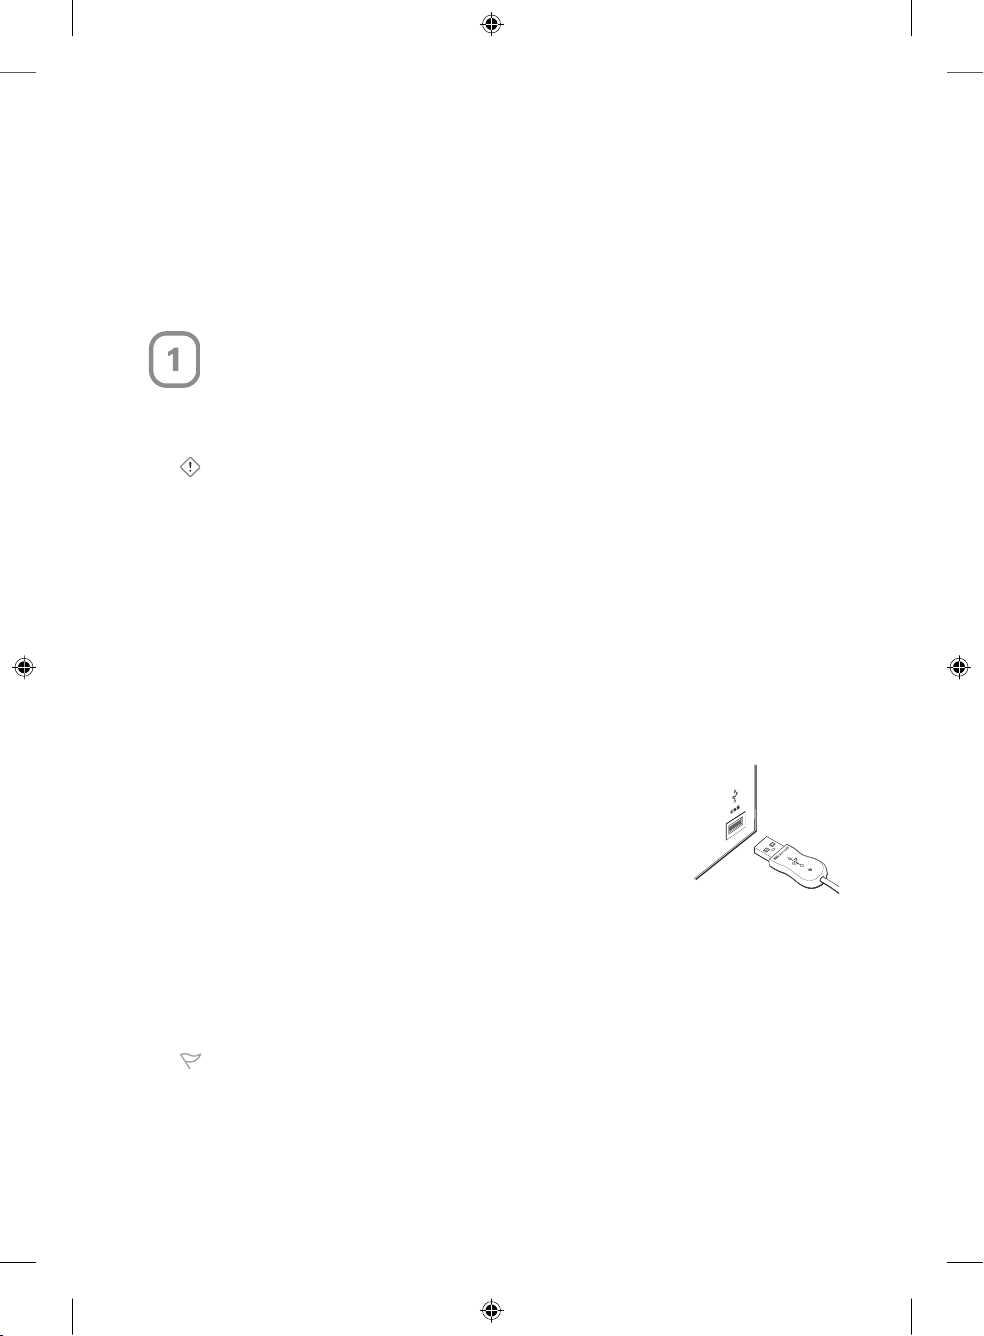
3 During Setup, the Installation Wizard will prompt you to
plug in the device containing the ngerprint reader. Plug the
keyboard’s rectangular universal serial bus (USB) connector
into your computer’s USB port, and then continue following
the on-screen instructions.
Note If the Found New Hardware Wizard is displayed after
you plug in your keyboard, follow the instructions on the
screen.
4 Restart the computer, if prompted to do so.
After you restart your computer and log on to your Windows user account, you
can begin registering ngerprints. For more information, see Step 5, “Register
Fingerprints,” later in this manual.
Caution Before replacing a password with your ngerprint, it’s a good idea to
memorize or store the password in a physically secure place. You will not be able to
access the passwords stored in the software installed with the ngerprint reader.
0504 Part No. X10-47292
X10-47292bdy.indd 5/19/2004, 3:11 PM2
Page 4
2
Install IntelliType Pro Keyboard Software and IntelliPoint
Mouse Software
IntelliType Pro keyboard software enables the unique features of your keyboard and
lets you customize the keyboard to t your working style. IntelliPoint mouse software
lets you reassign each of the mouse buttons to perform a command, like Copy and
Paste, and shows you battery status information for your wireless mouse.
To install IntelliType Pro and IntelliPoint software
1 Insert the Microsoft IntelliType Pro/IntelliPoint software installation CD (labeled "2")
into your computer’s CD drive.
If the Setup screen does not appear automatically, do the following:
• Click Start, and then click Run.
• Type [drive]:setup. For example, if your CD drive is drive E, type e:setup
2 On the Setup screen, click Install, and then follow the Setup Wizard instructions on
the screen.
3 Restart the computer, if prompted to do so.
Set Up the Keyboard
The following procedures will help you set up your keyboard in a way that is
comfortable for you.
Adjust the keyboard legs
The keyboard legs are designed to accommodate various body sizes, chairs, and
desks.
• Pull out or push in the keyboard legs to a position that minimizes bending of your
wrists while typing.
Connect the palm rest
For additional comfort, you can attach the palm rest.
• On a level surface, insert the tabs on the palm rest into the slots on the front of the
keyboard, and then snap them together.
Set Up the Wireless Mouse
To ensure your wireless mouse works properly, follow the procedures in this section in
sequence.
To insert the batteries
The mouse requires two batteries, which are included in the package. Whenever you
insert batteries, always make sure both of them are new. Alkaline batteries provide
maximum battery life.
1 Turn the mouse upside down, and then remove the battery compartment cover.
2 Insert new batteries, making sure to properly orient the positive (+) and negative (–)
ends as specied by the battery compartment labels.
3 Close the battery compartment cover.
2
3
4
X10-47292bdy.indd 5/19/2004, 3:11 PM3
Page 5
3
Important Before boarding any aircraft, remove the batteries from the wireless
mouse. This device can transmit radio frequency (RF) energy, much like a cellular
telephone, whenever batteries are installed and the mouse is activated either by touch
or button press.
Position the mouse and receiver
For optimum performance, position the receiver so that it is at least 8 inches (20 cm)
away from the mouse and any items that might cause interference. Such items include
computer monitors, large metal objects (such as computer cases and metal furniture),
desktop fans, or uorescent lights.
The mouse may work up to 6 feet (1.8 m) away from the receiver. This distance varies
depending on the positioning of the receiver and wireless devices, any nearby items
that cause interference, and other factors.
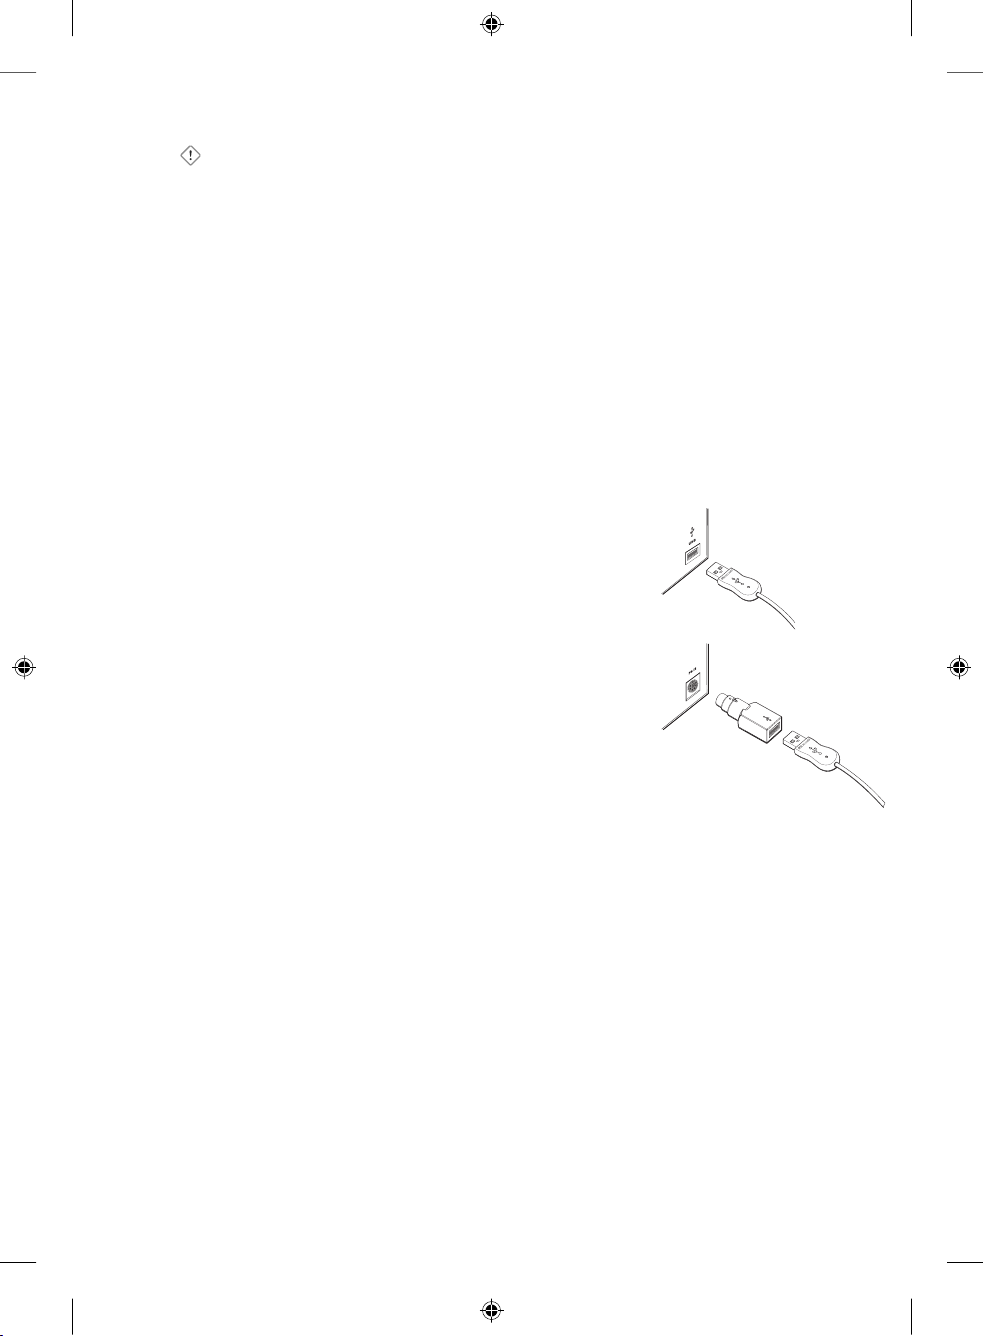
To connect the receiver to the computer
The connection procedure depends on whether you use the USB connector as-is or
attach the USB-to-PS/2 adapter. A USB connection is recommended.
USB connection
• With your computer turned on, plug the rectangular USB
connector into your computer’s rectangular USB port.
PS/2 connection
1 Shut down and turn off the computer.
2 Attach the green USB-to-PS/2 adapter to the USB
connector, and then plug it into the computer’s round
PS/2 mouse port, which may be similarly colored and
labeled with a graphic of a mouse.
Test the mouse
Try using the mouse to make sure that it works. If the mouse does not work as
expected, make sure the procedures specied earlier in this manual have been
completed:
• New batteries are inserted and positioned correctly.
• The receiver is properly connected to the computer.
• The mouse is properly positioned and there are no nearby items that might cause
interference.
If the mouse is still not working, try changing the wireless connection channel.
Changing the wireless connection channel may be helpful if you are experiencing
interference.
To change the wireless connection channel
• Press the button on the bottom of the wireless mouse.
If changing the channel does not solve the problem, you may need to reconnect the
mouse to the receiver.
USB connection
PS/2 connection
X10-47292bdy.indd 5/19/2004, 3:11 PM4
Page 6

4
To reconnect the mouse to the receiver
1 Make sure that the mouse and receiver are positioned as specied earlier in these
instructions.
2 Press the button on the top of the wireless receiver. The receiver lights blink to
indicate that it is connected.
3 Press the button on the bottom of the mouse. The wireless mouse may not work for
a few seconds until the reconnection process is completed.
If reconnecting the mouse to the receiver does not solve the problem, see the Help
le installed with the IntelliPoint software (Mouse Help) for additional troubleshooting
information.
Important Before using this product, read about the potential for radio interference in
the topic titled “Radio and TV interference regulations” in Mouse Help. For information
about accessing Help, see Step 6.
Register Fingerprints
You can use your ngerprint reader to log on to Windows, Web sites, and programs
without having to type a password. If you have the Welcome screen and Fast User
Switching turned on, you can even switch between Windows user accounts without
closing your programs and les—all with the touch of a nger. For information about the
Welcome screen and Fast User Switching, see Windows Help.
If your computer is a member of a domain, you cannot use your ngerprint to log on to
Windows, you must use your password. However, after you have logged on to Windows,
you can use your ngerprint to log on to the Web sites and programs that you have
created ngerprint logons for.
Caution Before replacing a password with your ngerprint, it’s a good idea to
memorize or store the password in a physically secure place. You will not be able to
access the passwords stored in the software installed with the ngerprint reader.
To register a ngerprint
1 Log on to your Windows account.
The rst time you log on to Windows after installing the keyboard with ngerprint
reader, the Fingerprint Registration Wizard is displayed so you can begin registering
ngerprints right away.
If the Fingerprint Registration Wizard does not appear automatically, do the
following:
• Click Start, point to All Programs, point to DigitalPersona Password Manager,
and then click Fingerprint Registration Wizard.
2 Follow the Fingerprint Registration Wizard instructions on the screen.
3 When you are done registering ngerprints, click Finish.
5
X10-47292bdy.indd 5/19/2004, 3:11 PM5
Page 7

5
Now you can log on to Windows, Web sites, and programs and access your
ngerprint reader’s unique features, like the One Touch menu, just by touching the
ngerprint reader with a registered ngerprint. For introductory information about
the ngerprint reader’s features, see “Using Your Keyboard with Fingerprint Reader”
later in this manual. For a complete description of ngerprint reader features and
how-to information, see the Help le installed with the ngerprint reader software
(DigitalPersona Password Manager Help).
Read Help for Your Devices
The Help les installed with the software provide a complete product manual that
contains the following important product information in a searchable format:
• Hardware and software feature descriptions and instructions
• Troubleshooting topics and Product Support Services information
• End-User License Agreement (EULA), Limited Warranty, and regulatory information
• Healthy Computing Guide
• Battery removal and safety information
• Radio interference information
To get more information about using your keyboard and mouse
• Click Start, point to All Programs, point to Microsoft Keyboard or Microsoft
Mouse, and then click Keyboard Help or Mouse Help.
To get more information about using your ngerprint reader
• Click Start, point to All Programs, point to DigitalPersona Password Manager, and
then click Help.
Customize Keyboard, Mouse, and Fingerprint Reader Settings
(optional)
You can customize your devices by using IntelliType Pro keyboard software, IntelliPoint
mouse software, or DigitalPersona Password Manager software for the ngerprint
reader.
By using IntelliType Pro keyboard software, you can:
• Reassign keys to perform commands you use frequently, such as Find, or to open a
program, le, Web page, or shortcut.
• Disable keys you sometimes press accidentally, such as CAPS LOCK.
By using IntelliPoint mouse software, you can:
• Reassign each of the mouse buttons, including the wheel button, to perform a
command, such as Copy.
• Modify mouse settings, such as the wheel scrolling rate.
By using DigitalPersona Password Manager software, you can:
• Show or hide the ngerprint reader icon on the taskbar.
• Specify the type of feedback you receive when you touch the ngerprint reader;
for example, you can enable sounds and/or animation to indicate ngerprint
recognition.
6
7
X10-47292bdy.indd 5/19/2004, 3:11 PM6
Page 8

6
To customize IntelliType Pro or IntelliPoint settings
• Click Start, point to All Programs, point to the Microsoft Keyboard or Microsoft
Mouse folder, and then click Microsoft Keyboard or Microsoft Mouse.
To customize DigitalPersona Password Manager settings
• Click Start, point to All Programs, point to DigitalPersona Password Manager, and
then click Properties.
Logging On to Windows by Using Your Registered Fingerprint
You can use your registered ngerprint to log on to Windows via the Welcome screen
or the One Touch Logon screen, depending on how your computer is congured. For
information about conguring how users log on to Windows, see Windows Help.
To log on to Windows by using your registered ngerprint
• At the Welcome screen or One Touch Logon screen, touch the ngerprint reader with
any registered nger.
Important
• If your computer is a member of a domain, you cannot use your ngerprint to log
on to Windows, you must use your password. However, after you have logged on to
Windows, you can use your ngerprint to log on to any Web sites and programs that
you have created ngerprint logons for.
• If you want to use your ngerprint to switch between Windows user accounts,
you must turn on the Welcome screen and Fast User Switching before you install
DigitalPersona Password Manager software. For more information, see "Using Your
Fingerprint to Switch Between Windows User Accounts" later in this manual.
Logging On to a Web Site by Using Your Registered Fingerprint
After you have created a ngerprint logon for a Web site, you can log on to the Web
site with the touch of a nger. For information about creating ngerprint logons, see
DigitalPersona Password Manager Help.
To log on to a Web site by using your registered ngerprint
• Browse to a Web site that you have created a ngerprint logon for, and then touch
the ngerprint reader with any registered nger.
–or–
• On the One Touch menu, point to Quick Links, and then click the name of the Web
site you want to log on to.
For information about the One Touch menu, see “Using Your Keyboard with
Fingerprint Reader” later in this manual.
X10-47292bdy.indd 5/19/2004, 3:11 PM7
Page 9

7
Using Your Fingerprint to Switch Between Windows User
Accounts
Fast User Switching in Windows XP makes it possible for you to switch between user
accounts without actually logging off from the computer. Multiple users can share
a computer and use it simultaneously, switching back and forth without closing the
programs they are running.
Using your ngerprint reader, you can quickly switch between user accounts by
using your ngerprint, rather than selecting the user account and typing the account
password.
If you want to use your ngerprint to switch between Windows user accounts, you must
turn on the Welcome screen and Fast User Switching before you install DigitalPersona
Password Manager software. Otherwise, you need to uninstall DigitalPersona
Password Manager software, turn on the Welcome screen and Fast User Switching,
and then reinstall the software for this feature to work. For information about the
Welcome screen and turning on Fast User Switching, see Windows Help.
Using Your Keyboard with Fingerprint Reader
This section will help you become familiar with some of the features of your keyboard
with ngerprint reader. For in-depth information about keyboard and ngerprint
reader features, see the Help les installed with the software. For information about
accessing Help, see Step 6.
Keyboard lights
The keyboard lights indicate the status of the toggle keys, such as NUM LOCK or CAPS
LOCK. For example, if NUM LOCK is on, the NUM LOCK light is on; if CAPS LOCK is off,
the CAPS LOCK light is off.
F LOCK key
The F LOCK toggle key gives your keyboard more functionality by providing two
command modes for the top row of keys. When F LOCK is off, the enhanced
commands printed on the top of the keys are enabled. When F LOCK is on, the
standard commands printed on the front of the keys are enabled.
One Touch menu
After you register ngerprints and log on to your Windows user account, you can touch
the ngerprint reader to open the One Touch menu. From the One Touch menu, you
can:
• Create ngerprint logons for Web sites and programs.
• Log on to Web sites with a click of the mouse via Quick Links.
• Get Help about features.
• Customize the ngerprint reader’s settings by using the Properties command.
Note If a logon screen is open for a Web site or program that you have not yet created
a ngerprint logon for and you touch the ngerprint reader, the Create Fingerprint
Logon dialog box is displayed instead of the One Touch menu. If a logon screen is
open that you have created a ngerprint logon for and you touch the ngerprint reader,
your logon information will be entered and the One Touch menu will not be displayed.
X10-47292bdy.indd 5/19/2004, 3:11 PM8
Page 10

8
Fingerprint reader icon menu
If your ngerprint reader is plugged in and ready for use, the ngerprint reader icon
appears in the notication area, to the right of the taskbar buttons. Clicking the
ngerprint reader icon opens a menu that gives you quick access to the Fingerprint
Registration Wizard, ngerprint reader options that you can customize, Help, and more.
Fingerprint Logon Manager
You can use the Fingerprint Logon Manager to add, change, or remove ngerprint
logons for Web sites and programs. To open the Fingerprint Logon Manager, browse
to the Web site or start the program that you want to add, edit, or remove ngerprint
logon information for, and then click the hand icon in the upper-right corner of the
title bar. If you want to create a ngerprint logon for a Web site or program, open
the logon screen for the Web site or program, and then touch the ngerprint reader.
For information about adding, changing, and removing ngerprint logons, see
DigitalPersona Password Manager Help.
Important If you browse to a Web site by using a Quick Link that you have set up
to automatically submit logon credentials, you will bypass the logon screen and the
hand icon will not be displayed on the title bar. To access the logon screen, type its
URL into your browser. After browsing to the logon screen, you will be able access the
Fingerprint Logon Manager by clicking the hand icon on the title bar.
Cleaning the Fingerprint Reader
Proper cleaning and maintenance are critical to the performance of your ngerprint
reader. To capture ngerprint scans, the ngerprint reader must be clean.
To clean the ngerprint reader
• Apply the sticky side of a piece of adhesive cellophane tape to the ngerprint reader
window, and then peel it away.
–or–
• If the ngerprint reader’s window appears cloudy, gently wipe the window with a soft
cloth (not paper) dampened with a mild ammonia-based glass cleaner.
Warning
To protect against risk of damage to the ngerprint reader:
• Do not pour glass cleaner directly on the ngerprint reader window.
• Do not use alcohol-based cleaners.
• Never submerge the reader in liquid.
• Never rub the ngerprint reader window with an abrasive material, including paper.
• Do not poke the window coating with your ngernail or any other item, such as a
pen.
X10-47292bdy.indd 5/19/2004, 3:11 PM9
Page 11

9
Troubleshooting
If you have a question about your keyboard with ngerprint reader or wireless mouse,
try the following options:
• View the Help les, which contain product information and troubleshooting tips. For
information about how to access Help, see Step 6.
• Read Readme.txt on both the Microsoft and the DigitalPersona Password Manager
software installation CDs for late-breaking product information.
• Go to the Microsoft Hardware Web site at:
www.microsoft.com/hardware
for additional product information and software updates.
• See the Product Support Services section of Help, or go to:
http://support.microsoft.com
for information about how to contact Microsoft Product Support Services.
Product Information and Software Updates
For general product information and software updates, go to the Microsoft Hardware
Web site at:
www.microsoft.com/hardware
Patent Information
United States and/or international patents pending.
Regulatory Information
Tested to comply with FCC Standards. For home or ofce use. Not intended for use in machinery, medical or
industrial applications. Any changes or modications not expressly approved by Microsoft could void the user’s
authority to operate this device.
This product is for use with NRTL Listed (UL, CSA, ETL, etc.), and/or IEC/EN 60950 compliant (CE marked)
Information Technology equipment. No serviceable parts included.
This device is rated as a commercial product for operation at +41ºF (+5ºC) to +95ºF (+35ºC).
Note For detailed information on U.S. and Canadian radio interference regulations, search for “regulations” in
the on-screen Help les installed with IntelliType Pro or IntelliPoint software.
This Class B digital apparatus complies with Par t 15 of the U.S. Federal Communications Commission (FCC)
rules, Canadian ICES- 003 and RSS-210. Operation is subject to the following two conditions: (1) this device may
not cause inter ference, and (2) this device must accept any inter ference received, including interference that
may cause undesired operation.
The term “IC:” before the certication/registration number only signies that the Industry Canada technical
specications were met.
Cet appareil numérique de la classe B est conforme aux normes NMB-003 et CNR-210 du Canada. Son
fonctionnement est assujetti aux deux conditions suivantes : (1) Cet appareil ne peut pas provoquer
d’interférences nuisibles et (2) cet appareil doit accepter toute interférence reçue, y compris les interférences
pouvant entraîner un fonctionnement non désiré
L’expression « IC : » avant le numéro d’homologation/enregistrement signie seulement que les spécications
techniques édictées par Industrie Canada ont été respectées.
Microsof t Corporation; One Microsoft Way; Redmond, WA 98052- 6399; U.S.A.
United States: (800) 426-9400 Canada: (800) 933- 4750
RF Technical Specications
RF output power: < 54 dBµV/m at 3 m
Keyboard with two channels: RF frequencies: 27.095MHz (channel 1), 27.195MHz (channel 2)
Keyboard with a single channel: RF frequency: 27.195MHz
Mouse with two channels: RF frequencies: 27.045MHz (channel 1), 27.145MHz (channel 2)
Mouse with a single channel: RF frequency: 27.145MHz
X10-47292bdy.indd 5/19/2004, 3:11 PM10
Page 12

10
Information for Optical Pointing Devices Only
Information for Optical Pointing device Products Only:
Class 1 LED Product
User-observable light is 15 microwatts in normal operation.
This product has been tested to comply with International Standard IEC 60825 -1:1993/A2:2001
This product uses LEDs that are inherently Class 1.
Important Battery Information
Caution Use and replace only with AA (LR6) alkaline batteries.
General Precautions
• Keep batteries out of reach of children.
• Insert the batteries in the proper direction as indicated by the positive (+) and negative (-) markings on the
battery and battery compartment.
• Do not mix old and new batteries or batteries of dif ferent types (for example, carbon and alkaline batteries).
• Always remove old, weak, or worn-out batteries promptly and recycle or dispose of them in accordance with
Local and National Disposal Regulations.
• If a battery leaks, remove all batteries and recycle or dispose of them in accordance with the battery
manufacturer’s instructions and Local and National Disposal Regulations. Before inserting new batteries,
thoroughly clean the battery compartment with a damp paper towel, or follow the battery manufacturer’s
recommendations for cleanup. If uid from the battery comes into contact with skin or clothes, ush skin
with water immediately.
• Remove the batteries if your device is to be stored for an extended period of time without being used.
Special Precautions
The precautions below are to prevent the sudden release of electrolytes, which these prohibited actions can cause:
• Do not install the batteries incorrectly. Carefully obser ve the positive (+) and negative (-) markings on the
battery for proper installation.
• Do not open, puncture, or mutilate the batteries.
• Do not heat batteries.
• Do not use a re to dispose of batteries.
Released battery electrolyte is corrosive, can cause damage to the eyes and skin, and may be toxic if swallowed.
Product Disposal Information
Dispose of this product in accordance with Local and National Disposal Regulations.
X10-47292bdy.indd 5/19/2004, 3:11 PM11
Page 13

Information in this document, including URL and other Internet Web site references, is subjec t to change
without notice. Unless otherwise noted, the example comp anies, organizations, products, domain names,
e-mail addresses, logos, people, places, and events depicted herein are ctitiou s, and no association with any
real company, organization, product, domain name, e-mail address, logo, person, place, or event is intended
or should be inferred. Complying with all applicable copyright laws is the responsibility of the user. Without
limiting the rig hts under copyright, no part of this document may be reproduced, stored in or introduced into a
retrieval system, or transmitted in any form or by any means (electronic, mechanical, photocopying, recording, or
otherwi se), or for any purpose, without the express written permission of Microsoft Corporation.
Microsof t may have patents, patent applications, trademarks, copyrights, or other intellectual property rights
covering subje ct matter in this document. Except as expressly provided in any writ ten license agreement from
Microsof t, the furnishing of this document does not give you any license to these patents, trademarks, copyrights,
or other intellectual proper ty.
© 2004 Microsoft Corporation. All rights reserve d.
Microsof t, IntelliMouse, Natural, and Windows are either registered trademarks or trademarks of Microsoft
Corporation in the United St ates and/or other countries.
DigitalPersona is a registered trademark of DigitalPersona, Inc. in the United Stated and/or other countries.
The names of actual companies and products mentioned herein may be the trademarks of their re spective
owners.
Microsof t Corporation grants the purchaser of this product the right to reproduce one (1) copy of the enclosed
“Getting Started” printed guide for each Hardware Device you purchased in the package.
X10-47292bdy.indd 5/19/2004, 3:11 PM12
Page 14

www.microsoft.com/hardware
M
0504 Part No. X10 -47292
Getting Started
Microsoft
X1047292cvr.indd 5/20/2004, 3:20 PM1
 Loading...