

Page 1

FRONTPAGE 2002 – LEVEL 1
Reference Material
Please Do Not Copy
LESSON 1: CREATING A WEB
A. Planning: Things to Consider Before Creating a Web ......... 2
Webs versus the World Wide Web ....................... 2
The Web Creation Process ............................. 3
Are You a Good Web or a Bad Web? .................... 4
B. Creating an Empty Web ................................. 10
View an Existing Web in FrontPage ...................... 10
FrontPage Templates ................................. 12
CONTENTS
C. Creating a Home Page.................................. 17
What is a Home Page? ................................ 17
D. Adding Text to a Page ................................... 21
E. Applying Text Formatting ................................ 22
LESSON 2: WORKING WITH TABLES
A. Inserting a Table........................................ 26
B. Editing a Table’s Structure ................................ 27
C. Formatting a Table...................................... 28
D. Converting a Text File into a Table ......................... 31
E. Splitting a Table......................................... 32
LESSON 3: CONNECTING PAGES
A. Adding Hyperlinks to Pages .............................. 34
What Is a Hyperlink?................................... 34
B. Creating a Shared Border ................................ 37
C. Adding Pages to a Web’s Navigation Structure .............. 39
Importing a File versus Inserting a File..................... 39
iii
Page 2

CONTENTS
Reference Material
Please Do Not Copy
D. Inserting a Custom Link Bar Web Component ............... 42
E. Removing a Page from a Web’s Navigation Structure ......... 43
LESSON 4: ADDING VISUAL APPEAL TO A WEB
A. Adding a Picture to a Page............................... 46
B. Editing a Picture ........................................ 48
C. Creating an Image Map................................. 50
D. Using the Drawing Tools.................................. 51
E. Adding a Photo Gallery .................................. 52
F. Modifying a Photo Gallery ................................ 56
G. Applying a Theme to an Entire Web ....................... 57
H. Modifying a Theme and Applying It to an Individual Page..... 59
LESSON 5: PREPARING AND PUBLISHING A WEB
A. Creating and Managing Tasks............................ 62
What is a Task? ....................................... 62
B. Organizing Your Web’s Files .............................. 65
C. Viewing FrontPage Reports .............................. 66
D. Correcting a Broken Link Using the Hyperlinks Report......... 68
E. Using Text Editing Tools................................... 70
F. Publishing Your Web to the Personal Web Manager ........... 71
Determining Your Personal Web Manager’s Path .......... 71
G. Creating a Backup Copy of a Web ........................ 75
Index ...................................................... 79
iv
FrontPage 2002 – Level 1
Page 3
ABOUT THIS COURSE
Reference Material
Please Do Not Copy
Microsoft FrontPage 2002 is a desktop software application you can use to create, edit, and
manage web sites, whether for an intranet or for the World Wide Web.
How would you like to save time on the job? Whether you’re a seasoned webmaster or ready
to create your very first web site, who wouldn’t? Because FrontPage is a flexible, WYSIWYG
software application, you don’t have to waste valuable development time learning and applying
the technological, background complexities that go into creating a web site and its pages. (In
fact, FrontPage uses many of the same features as other Microsoft Office applications. So, for
instance, if you know how to bold text in Microsoft Word, you already know how to do it in
FrontPage.) Although FrontPage can and does do most of the “geek” stuff for you, allowing
you to concentrate on shaping your site’s content, it also provides easy access to and integration with higher-end web technologies—sure to satisfy even the most Web-savvy veteran.
ABOUT
THIS
COURSE
FrontPage now also allows web developers to import, edit, and format their own HTML
code.
Course Prerequisites
To ensure your success, we recommend you first take the following New Horizons course or have
equivalent knowledge:
• Windows 2000 - Level 1
• Word 2002 - Level 1
• Word 2002 - Level 2
• Internet Explorer 5.0 - Level 1
A recommendation is that students have experience surfing the World Wide Web. It is also
recommended, but not required, to have taken the following New Horizons course or have
equivalent knowledge:
• HTML 4.01: Web Authoring - Level 1
v
Page 4

ABOUT
Reference Material
Please Do Not Copy
THIS
COURSE
How To Use This Book
As a Learning Guide
Each lesson covers one broad topic or set of related topics. Lessons are arranged in order of
increasing proficiency with FrontPage; skills you acquire in one lesson are used and developed
in subsequent lessons. For this reason you should work through the lessons in sequence.
We organized each lesson into results-oriented topics. Topics include all the relevant and supporting information you need to master FrontPage, activities allow you to apply this
information to practical hands-on examples.
You get to try out each new skill on a specially prepared sample file. This saves you typing
time and allows you to concentrate on the skill at hand. Through the use of sample files,
hands-on activities, illustrations that give you feedback at crucial steps, and supporting background information, this book provides you with the foundation and structure to learn
FrontPage quickly and easily.
As a Review Tool
Any method of instruction is only as effective as the time and effort you are willing to invest
in it. In addition, some of the information that you learn in class may not be important to you
immediately, but it may become important later on. For this reason, we encourage you to
spend some time reviewing the topics and activities after the course. For additional challenge
when reviewing activities, try the “what to do” column before looking at the “how to do it”
column.
As a Reference
The organization and layout of the book makes it easy to use as a learning tool and as an
after-class reference. You can use this book as a first source for definitions of terms, background information on given topics, and summaries of procedures.
Course Objectives
In this course, you will create, edit, and publish web pages that include formatting, FrontPage
components, tables, text, and images.
You will:
• identify site-planning considerations, create a new web, a home page, and add and format
text on the home page.
• create and modify tables.
• connect pages.
• add, edit, and link pictures, as well apply and modify themes.
• prepare a web for publishing.
vi
FrontPage 2002 – Level 1
Page 5

LESSON 1
Reference Material
Please Do Not Copy
Creating a Web
Lesson Objectives:
In this lesson, you will identify site-planning considerations, create a new web, a home page,
and add and format text on the home page.
LESSON 1
Data Files:
none
Lesson Time:
60 minutes
You will:
• identify guidelines in the web creation’s planning stage.
• create an empty web based on the Empty Web template.
• create a home page.
• add text to a page.
• apply character and paragraph formatting to text.
Lesson 1: Creating a Web
1
Page 6

LESSON 1
Reference Material
Please Do Not Copy
Introduction
You’ve been given the assignment to create a web site for your company. You’ve got
Microsoft FrontPage 2002 installed and have some great ideas. You’re ready to launch the
application and begin pounding out web pages! Not so fast! Although your enthusiasm is to be
applauded, and you will be well underway before this lesson is complete, it’s important to take
a moment to step back and look at the big picture. For instance, what is a site? What actually
goes into creating a site? And so on.
Once you understand what typically goes into creating a new web, you will be better prepared
to examine existing webs, as well as create your own. You will be able to avoid unnecessary
pitfalls, and potentially save you and your company embarrassment.
TOPIC A
Planning: Things to Consider Before
Creating a Web
Before doing anything else, the first step to creating a successful web is to put a web plan in
place.
Benjamin Franklin once wrote in Poor Richard’s Almanac “...a little neglect may breed mischief: for want of a nail, the shoe was lost; for want of a shoe the horse was lost; and for want
of a horse, the rider was lost...”
You don’t want your site to become lost in the Web shuffle. A clear understanding of what
goes into creating a good web, coupled with intensive planning before you begin producing
any web content, will help you create a clear reason and plan of attack that could save you
countless hours of damage control later—when excuses won’t matter. Remember, the competition’s site is only a click away.
Webs versus the World Wide Web
The word “web” can be quite vague and it would be best if we cleared up any confusion as to
what we mean by this term and all it entails.
Definition: In the context of FrontPage, a web is a specially designated folder location, or
site, on either your hard drive or on a Web server. Within a web’s folder,
sometimes called the root folder, there can be multiple web pages—documents
written in HyperText Markup Language (HTML) with unique filenames and
locations—a variety of subfolders, and even other webs, called subwebs. In
short, a FrontPage-based web is a container to store and manage related files.
A web is not to be confused with the World Wide Web, or the Web, which is a
system of Internet servers that store, or host, individual webs.
2
FrontPage 2002 – Level 1
Page 7
We will use the terms “site,” “web,” and “web site” synonymously. We will
Reference Material
Please Do Not Copy
also use “web page” and “page” interchangeably.
Example: A good example of a large web is Microsoft’s site. The web is located at:
http://www.microsoft.com/. It contains thousands of subfolders, such as the
FrontPage folder: http://www.microsoft.com/frontpage/, and individual web
pages, like http://www.microsoft.com/frontpage/using.htm. As large as it is,
the Microsoft web is only a small part of the World Wide Web.
Analogy: Think of the World Wide Web as the supreme public library with millions of
books (webs). Each book has its own pages (web pages) that cover a particular
subject. And as you might expect, some books are best sellers and others never
get read.
The Web Creation Process
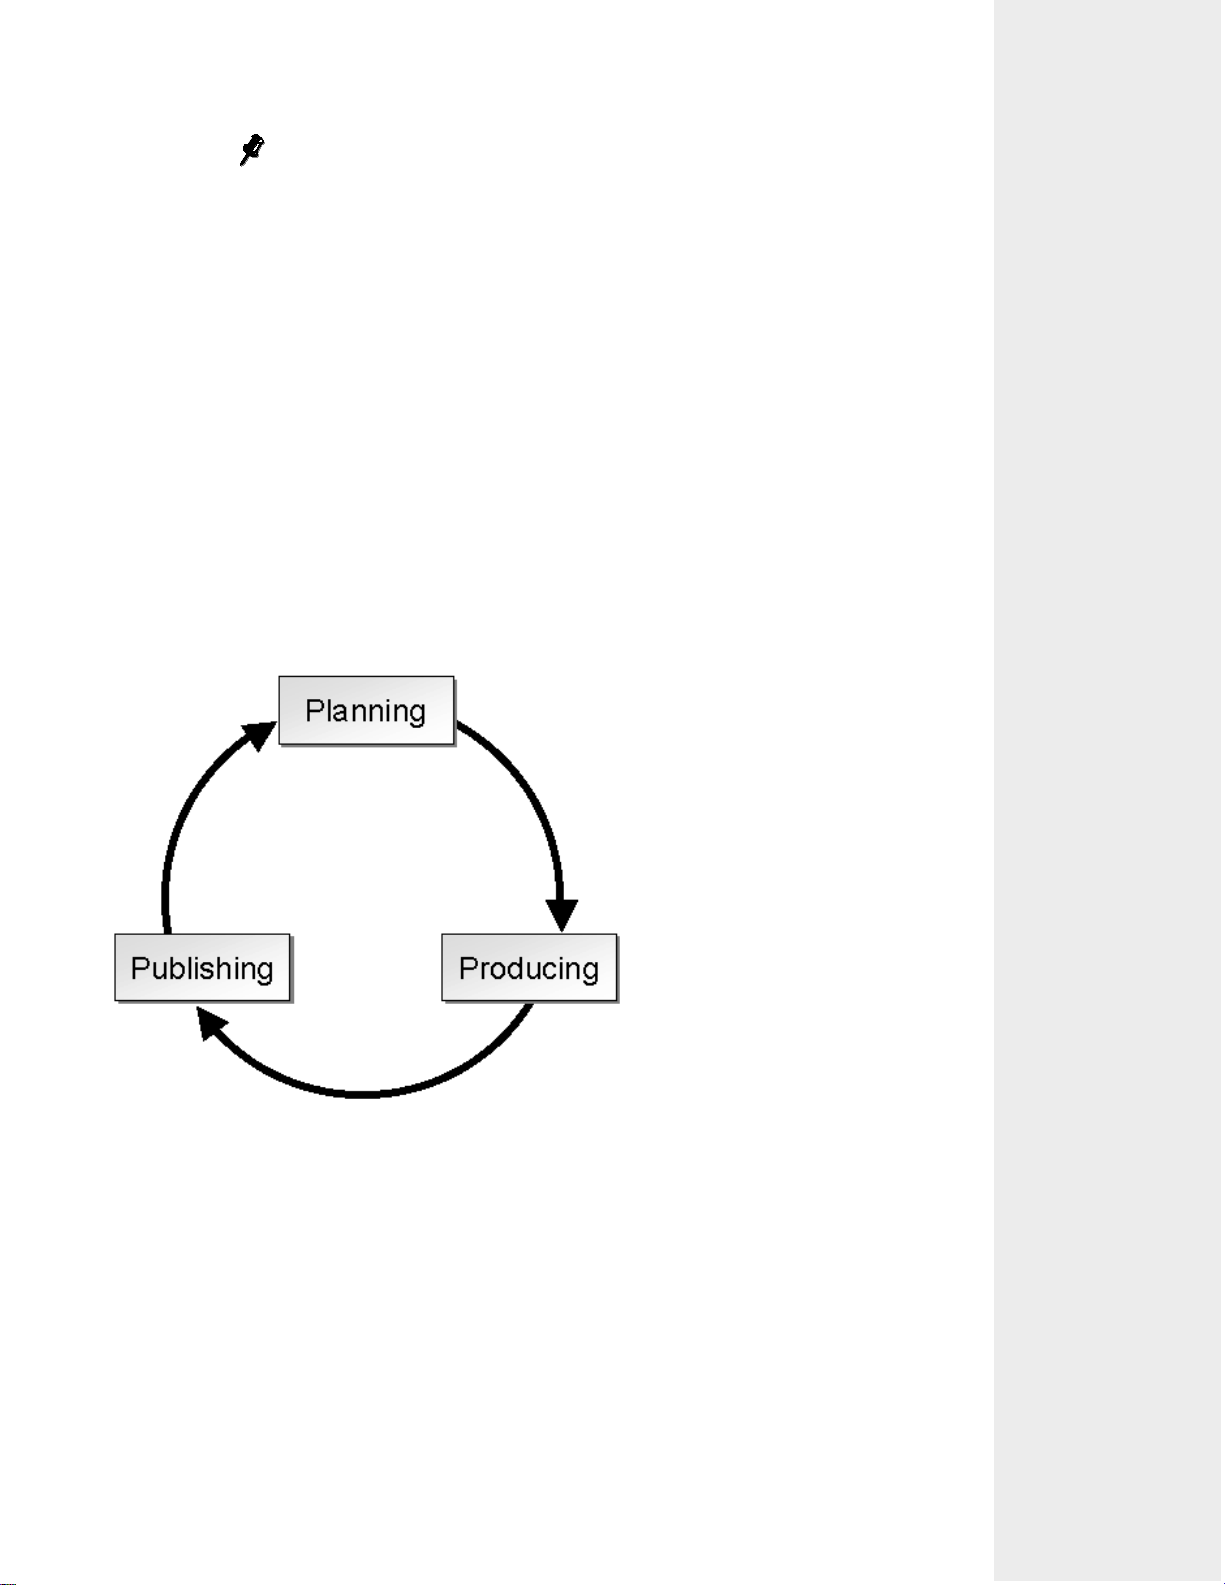
Creating a web can be distilled into the following cyclical process: Planning, Producing, and
Publishing, as shown in Figure 1-1. Although extremely simplified, each stage includes a variety of steps you should take to ensure a site’s success.
LESSON 1
Figure 1-1: The web site creation process.
Planning, which we will get to in a moment, is the most overlooked stage, even though it’s the
first step. Production, which makes up the bulk of this course, includes the actual creation of
the web and its content—the building, connecting, and maintaining of web pages. The last
stage is publishing, which means putting the web somewhere, typically on a Web server, so
that it will be accessible to your audience.
Lesson 1: Creating a Web
3
Page 8

LESSON 1
Reference Material
Please Do Not Copy
In general, the site creation process is a bit of a misnomer because it suggests that once you
create a site, your work is done, when in reality, publishing the site should signal the need to
begin the cycle again. Based on feedback and information you receive from clients or people
who visit your web, you will want to plan, implement, and publish changes and updates for
the life of the web. How you will keep the site updated is part of the planning process.
Are You a Good Web or a Bad Web?
Before we begin, we should mention that distinguishing between good and bad webs is purely
subjective: “beauty is in the eye of the beholder”; however, there are certain things you can do
to your web to make it more usable. In general, you want your web’s organization and graphic
design to support your message—not overpower it! Subtle, yet purposeful, design decisions are
best. To that end, here are two sets of “common-sense” guidelines to help you make those
decisions: organizational and graphical.
It helps to get target audience feedback regarding a web’s usability at every stage of the site
development process.
Guidelines: The following organizational dos and don’ts will help you to create a “good
web” that’s easy to use.
• Place similar page content in the same category. At first this sounds rea-
sonable, doesn’t it? But when the content begins to flow in, you might not
take the time you should when considering where you should place
content.
• Consistent placement of repeating elements (navigation bars, logos, and so
on) by putting these items in the same place on every page. This way,
visitors don’t have to “re-learn” where to look for things on each page in
your site.
• Place the most important page items in the upper-left portion of the
screen. This will help ensure that the item is seen immediately—without
requiring a visitor to scroll around the screen.
• Keep your web structure’s hierarchy relatively flat—not too many layers
of content below the home page—and organized. As you can see in Figure 1-2, try to arrange web pages to be as near to the web’s home page as
possible—between three and five levels is ideal. A common web hierarchy
is home page, category pages, and then detailed pages. If it takes a person
more than a few clicks to get to the information, they will likely give up
and go elsewhere.
• Present generic information in pages residing in a web’s upper levels and
place more specific information on pages at the lower levels. This creates
a “drill-down” effect. Figure 1-2 shows the generic home page above general categories. Those categories have specific pages below them.
• Keep your web lean. Don’t publish superfluous files to your web. Not
only does it waste valuable storage space, but it also slows web
performance. And whenever possible, try to reduce the file sizes for web
pages and graphics. You want fast-loading pages.
4
FrontPage 2002 – Level 1
Page 9
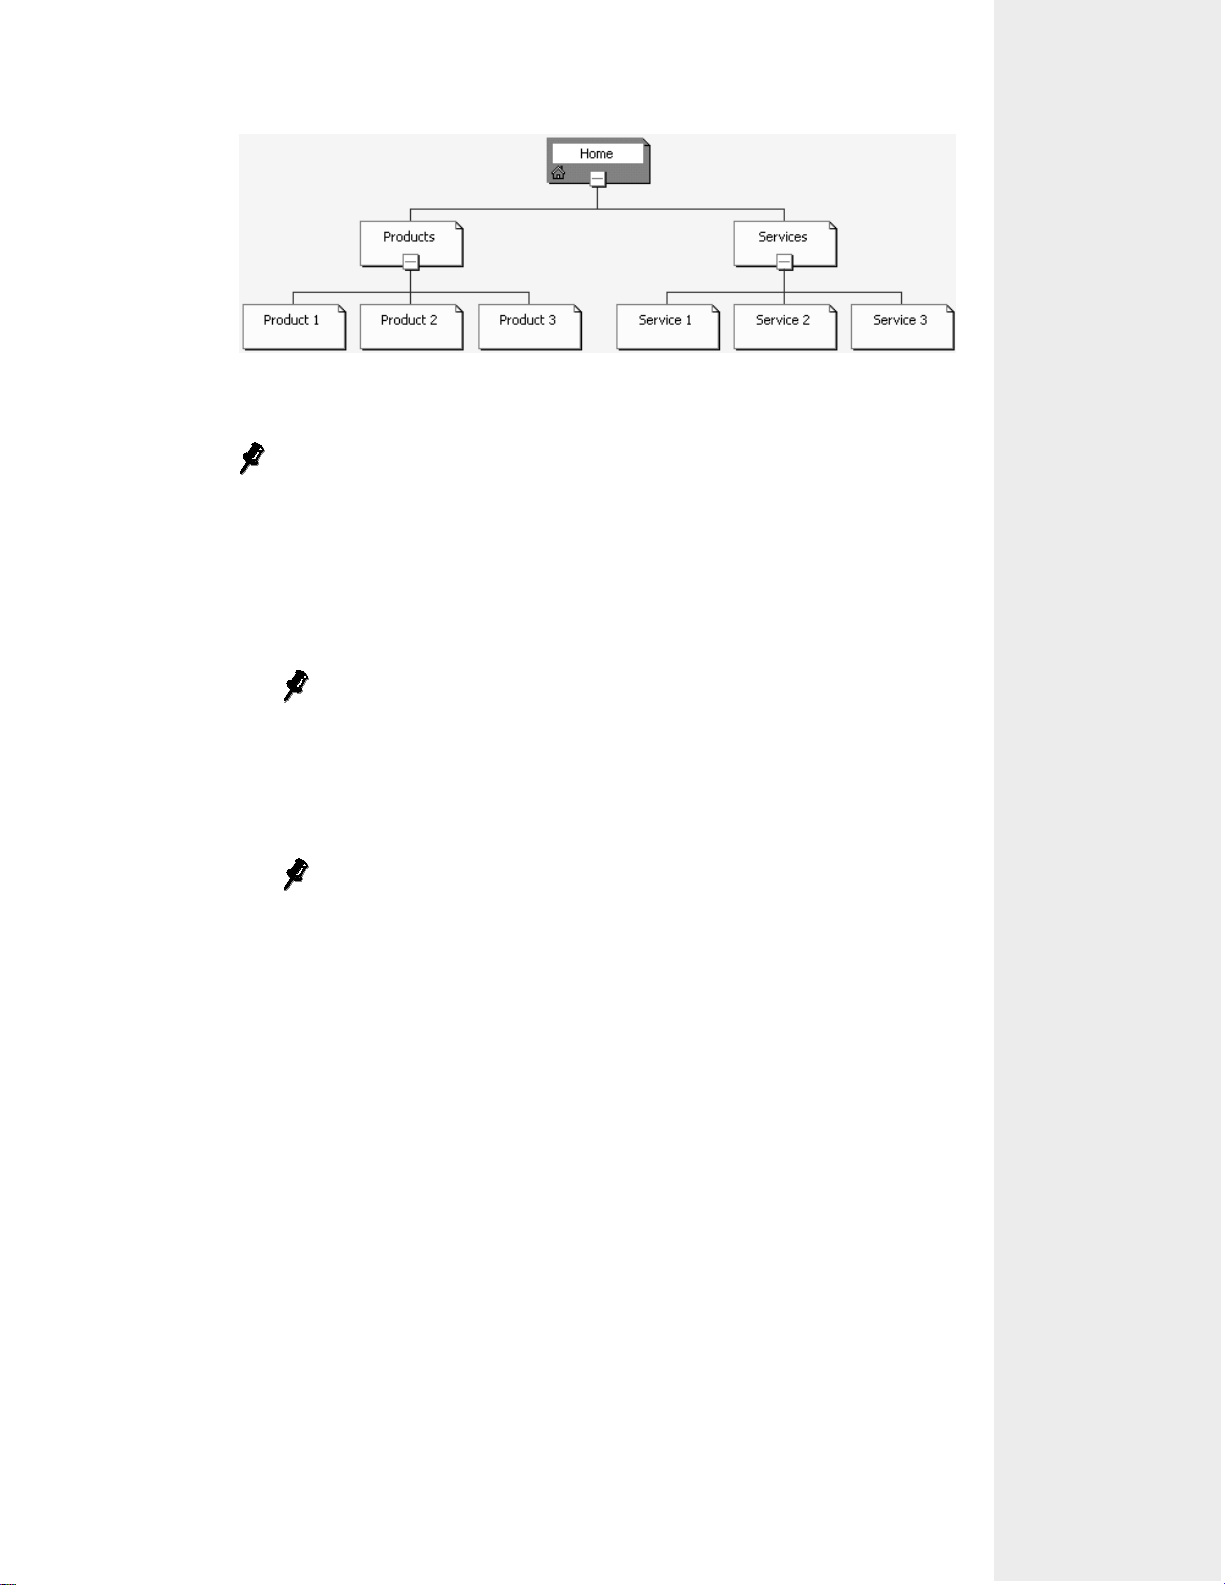
Figure 1-2: A simple, but proper, navigational hierarchy.
Reference Material
Please Do Not Copy
All organizational guidelines can be summed up in one statement: Don’t
make visitors work at using your site; their time is valuable!
These general graphical guidelines will help you to create a “good web” that’s
easy for your target audience to view.
• Provide a comfortable and pleasant “visual” atmosphere for visitors. Don’t
shock them unnecessarily with extreme color contrasts.
LESSON 1
All graphical guidelines can be summed up in one word: understated.
Just because you can use a dozen different formatting options doesn’t
mean you should.
• Use sufficiently contrasting colors and hues. Each web page element
should be easily distinguishable from other elements.
Although contrasting colors are important, don’t go overboard. Stark
contrasts can be as difficult to view as subtle contrasts.
• Selecting contrasting colors goes for text, as well as for graphics. For the
most part, consider putting dark-colored text on a light-colored
background. Remember, there’s nothing wrong with using the old standby,
black text on a white background! Although light text on a dark background is legible, it’s considered kind of amateurish. Avoid light text on
light backgrounds and dark text on dark backgrounds; the lack of contrast
will make it impossible for visitors to read your message.
• Use color consistently and purposefully. Don’t go changing colors for the
sake of change. Repeating colors can foster a visitor’s comfort level. The
more comfortable a person is using your site, the more likely they’ll
return.
• Organize with color. By making related page elements, such as navigation
bars, the same color, you create a visual connection between them.
• Curb your own color preferences. Just because blue is your favorite color
doesn’t mean you should use it all the time.
• Restrict the number of different colors used in a web to a maximum of
three complementary colors.
Lesson 1: Creating a Web
5
Page 10
LESSON 1
Reference Material
Please Do Not Copy
• Anticipate your target audience’s perception of your color choices. Colors
can have psychological and cultural meanings; for instance, white can
symbolize purity in Western cultures, but in Japan, white typically is associated with death. Colors can also have physical implications. If a
significant portion of your target audience has a vision deficiency—such
as poor vision or color blindness—you should consider increasing font
sizes and/or avoid using greens and reds (associated with the most common forms of color blindness).
For more on adding accessibility to your webs, visit W3.org: http://
www.w3.org/WAI/.
• Don’t use color: “After all this, you’re telling me not to use color?” Yes
and no. Not using color, or rather staying with black and white, is in fact
a color decision. Again, let your site’s target audience help you decide.
• Consider the possibility of using appropriate metaphors in your design.
For instance, if your site’s purpose is to tell prospective students about
your college, using a classroom-like setting as a design motif is
applicable. Metaphors can sometimes be tricky, though—especially if your
site is intended to be internationally accepted.
For more on usability, visit Jacob Nielsen’s UseIt.com: http://www.
useit.com/.
Example: To see some good examples of web design, launch your Web browser and
explore the following sites:
• http://www.web100.com/
• http://www.thewebawards.com/
• http://www.projectcool.com/sightings/
NonExample:
To see some examples or poorly done sites, you can explore these sites:
• http://www.worstoftheweb.com/
• http://www.forkinthehead.com/
• http://www.ecotide.com/
Graphical design decisions can be affected by a visitor’s monitor settings; the
choices you make may not appear as you intended. To avoid “surprises,” you
should preview your webs on several operating systems, at different resolutions, using different Web browsers to ensure the best possible results.
6
FrontPage 2002 – Level 1
Page 11

Planning: Things to Consider Before Creating a
Reference Material
Please Do Not Copy
Web
If you buy into the old adage, “Garbage in, garbage out,” then planning is the single most
important stage of the site creation process. It is here that you will set the course and tone for
your web. With that said, unfortunately, it’s the stage most taken for granted. Since people are
often pressed for time at the start of a web project, they assume they can easily plan during
the site’s production. That’s rarely a successful strategy. It’s best to take the time up front to
discuss the following web planning guidelines:
Be sure to record all of your planning somewhere—we recommend keeping a binder for
each web you develop for planning decisions and notes.
LESSON 1
Guidelines:
• Purpose: Why are you making a site at all? What will you and/or your
company gain by having a site? What will people who visit your site
gain? Once you’ve settled on a purpose, write it down and keep it in front
of you at all times. Some web developers like to create a mission statement, because it keeps you and the site focused on the goal. No matter
what the purpose of your web, one goal of every site should be to keep it
fresh. Don’t just publish a web and leave it to rot on the vine. Update the
site regularly.
• Audience: Who’s your target audience? Is your audience made up of
techies or newbies? Are they high-energy teenagers or patient senior citizens? Gather demographic information. Do they use the Microsoft Internet
Explorer or the Netscape Navigator browser to surf? Gather technological
information. Does your audience have vision problems? Consider your
audience’s physical requirements. The more you know about your target
audience, the more you can tailor your site to best meet their requirements, because the production choices you will make should be based on
their needs. (Note that your web audience may differ from your regular
customers, so do as much research as possible. Surveys and questionnaires
of your existing clientele is a great starting point.) Don’t make your site
so generic that it doesn’t serve anyone. By targeting a particular audience,
your web will be more targeted as well.
• Content: What will the site provide? Based on your site’s purpose and
target audience, identify what information or service will meet both those
needs. Will the information be text-heavy or graphically intensive? (Carefully consider the use of graphics on your web. Too many can make a
page download slowly.) You want your site to be appear “fast”; text and
graphics should be used purposefully—if a piece of content is superfluous,
leave it out. Now’s a good time to identify that content that will need to
be updated, such as news items.
• Organization: Take time to identify some general categories of informa-
tion, and then arrange the specific content within those appropriate
categories. For instance, a category might be named “Catalog,” and in that
category, you might put pages for individual products. Try to anticipate
how site visitors might “click through,” or navigate, the content. If a site
is difficult to navigate through, visitors won’t return no matter how good
Lesson 1: Creating a Web
7
Page 12
LESSON 1
Reference Material
Please Do Not Copy
your content is! One way to help you organize a web is to storyboard it.
This can involve creating one 3” x 5” index card for each proposed web
page and arranging them in logical category piles. Then connect the cards
with the string to show how pages will link together. You may prefer to
just sketch ideas on a piece of paper or a white board, too—whatever
works best for you.
As a general rule, you want to keep the number of general content categories between five and 10. Again, the purpose is to make it easy for
a visitor to locate the information or service they want.
• Resources: When you identify resources that will help you with your web,
split them into two groups: people and material. On the people side, who
will supply content? Who will be responsible for maintaining the technical
aspects of the site? Who will supply artwork and design help? Who will
edit and manage the content? Who will test the site and how often? On
the material side, do you have access to existing graphics, stock photos,
clip art, or company logos? Can you re-purpose existing content from
newsletters, annual reports, or event flyers? Do you need other software
besides FrontPage, such as an image editing application, to help you build
your web? Creating a web involves a lot of different disciplines and it’s
unrealistic to think you won’t need help somewhere along the line. Take
time now to identify resources that can assist you when necessary. Assembling a competent team up front will prevent panic later! This is also a
good time to assign “ownership.” Get firm commitments from any and all
potential web contributors.
Legal assistance may also be useful to advise you on Internet-related
laws, such as drafting copyright, privacy, and usage policies.
• Location: Two things here. First, where will you develop the web?
FrontPage webs can either be disk-based or server-based. Disk-based
webs, like the ones you will use in this course, are stored locally on your
hard disk or some other storage device (floppy disk, CD-ROM, network
drive, and so forth). Ordinarily, disk-based webs are used for developing
simple webs because that’s when the focus is on creating and formatting
page content; simple webs rarely require a server’s support.
As your webs become more complex, you will want to develop them on a test
Web server. Logically enough, these are called server-based webs. Though they
can be more complicated to set up and slower to use (because you connect to
the server over an Internet connection), server-based webs can take advantage
of server technologies to provide support for interactive processes like message
boards, data collection and display, and so on. As a result, developing a web
on a Web server will allow the web to behave more “realistically,” as it would
on the World Wide Web.
Disk-based webs are also great for creating a backup copy of a web.
8
FrontPage 2002 – Level 1
Page 13
If you are developing a web on a server other than the one that will ulti-
Reference Material
Please Do Not Copy
mately store, or host, your web, the development Web server should be as
similar to the host server as possible to minimize potential problems.
Secondly, who will ultimately store, or host, the web once you’re ready to publish the web? Will you host your own Web server or will you use an Web
Presence Provider (WPP), sometimes called an Internet Service Provider (ISP)?
Although you will give up some control and money, it’s often more convenient
to use a qualified WPP because they can deal with the technology side of
things—such as securing your web’s domain name—again saving you time to
work on your web. Just be sure the WPP you select will support FrontPage
webs and all the things you need your web to do; include the WPP folks in
every stage of development. Note that if you do decide to host your own site,
you will need to learn about a wide range of server technologies.
It’s never too soon to get your web’s domain name and you don’t need a
site yet to reserve one. Search for the domain name you want at http://
networksolutions.com/.
To find a registered FrontPage WPP, go to http://www.microsoftwpp.com/.
LESSON 1
One other guideline in planning is marketing. This may be outside your scope,
depending on your job role, but planning a marketing strategy early is a very
good idea. Start by asking, how will the site be publicized? Will it be advertised in various media outlets? Will you submit it to search engines on the
Web? In many ways, this is an afterthought that depends on your audience.
Will it be publicized? You may not even want to “tell the world” if the web
will be an intranet, specifically for your employees. (An intranet is typically a
protected web belonging to a particular group or corporation that is accessible
only to authorized users, such as members or employees.) How will you attract
new visitors? Will you provide “free stuff” or will you run contests? How will
you keep returning visitors? Will you create a web community for them so
they can collaborate on issues? Or will you offer them discounts on various
products?
The purpose of an intranet, a protected web belonging to a particular group
accessible only to authorized users, usually differs from that of a web that’s
part of the World Wide Web because the audiences differ.
Example: For the web you will be creating, the planning process has been done for you.
The web is to be a corporate presence (purpose) for people unfamiliar with
Vision Office Products (audience). It will provide visitors with an overview of
the company and its products, as well as necessary contact information
(content). The content will be arranged logically in general categories, introduced by a home page (organization). And although you will primarily be
working alone on this web, other “departments” will have input and provide
some content (resources). The web will be hosted on your company’s server
(location) with advertising to be handled by another department (marketing).
Lesson 1: Creating a Web
9
Page 14
LESSON 1
Reference Material
Please Do Not Copy
TOPIC B
Creating an Empty Web
Using your browser, you’ve seen sites others have created using FrontPage on the World Wide
Web. Next, you will tour an existing web in FrontPage and begin creating your own new web
based on a template.
Sure you can create webs using other software applications, but by creating a web and its
pages in FrontPage, you harness the program’s hidden managerial power. FrontPage keeps
track of every file and/or folder in a web. FrontPage keeps track so you don’t have to give
them a second thought. So when you add, remove, or edit a page in a web, FrontPage looks at
how the page is used by the web and “notifies” you of the potential damage the change might
cause. For instance, if you try to delete your web’s home page, FrontPage asks you confirm
the deletion, but it also warns you of the repercussions.
Besides the practical benefits of making a web in FrontPage, creating your own web from
scratch is an invaluable learning experience. Not only will you go through the ups and downs
all other webbies go through, the urgency of a deadline and satisfaction of completing a web,
but you will also familiarize yourself with all the various hats a webmaster must wear—writer,
editor, graphic designer, manager, and so on.
Throughout this book, we will use a variety of job titles synonymously; web developer,
webmaster, designer, webbie, and webber are some examples. Every organization calls the
person in charge of creating webs something different.
View an Existing Web in FrontPage
Procedure
Reference:
What is
FrontPage
Anyway?
Opening webs in FrontPage is really no different than opening a file in other
Office XP applications. The general steps follow.
Choose File→Open.
1
Locate the web you want to open.
2
Select it and click Open.
3
Before we open a web, let’s first firm up what we are talking about whenever
we mention FrontPage. Most importantly, what is it? Microsoft FrontPage 2002
is a convenient and encompassing web building tool available. Leveraging
what you already know about Microsoft Office applications, FrontPage allows
you to create and manage every aspect of a web—from individual web pages
to complicated, dynamic e-commerce enterprise webs. FrontPage is a great
program for novices and experts alike. Using the latest Web standards,
FrontPage is also open-ended enough to allow for any new technologies that
come down the developer’s pike.
10
FrontPage 2002 – Level 1
Page 15
In a nutshell, it’s a web developer’s Swiss Army Knife. But like any other
Reference Material
Please Do Not Copy
multi-purpose tool, FrontPage may not have all the capabilities you want built
in—for instance, it might not have robust enough image editing tools for you.
You can easily supplement it with other “editor” applications by choosing
Tools→Options→Configure Editors.
LESSON 1
Orientation
to
FrontPage
Views
One of most useful aspects of FrontPage is its variety of different views. In
general, these views let you create and edit pages, as well as check a web’s
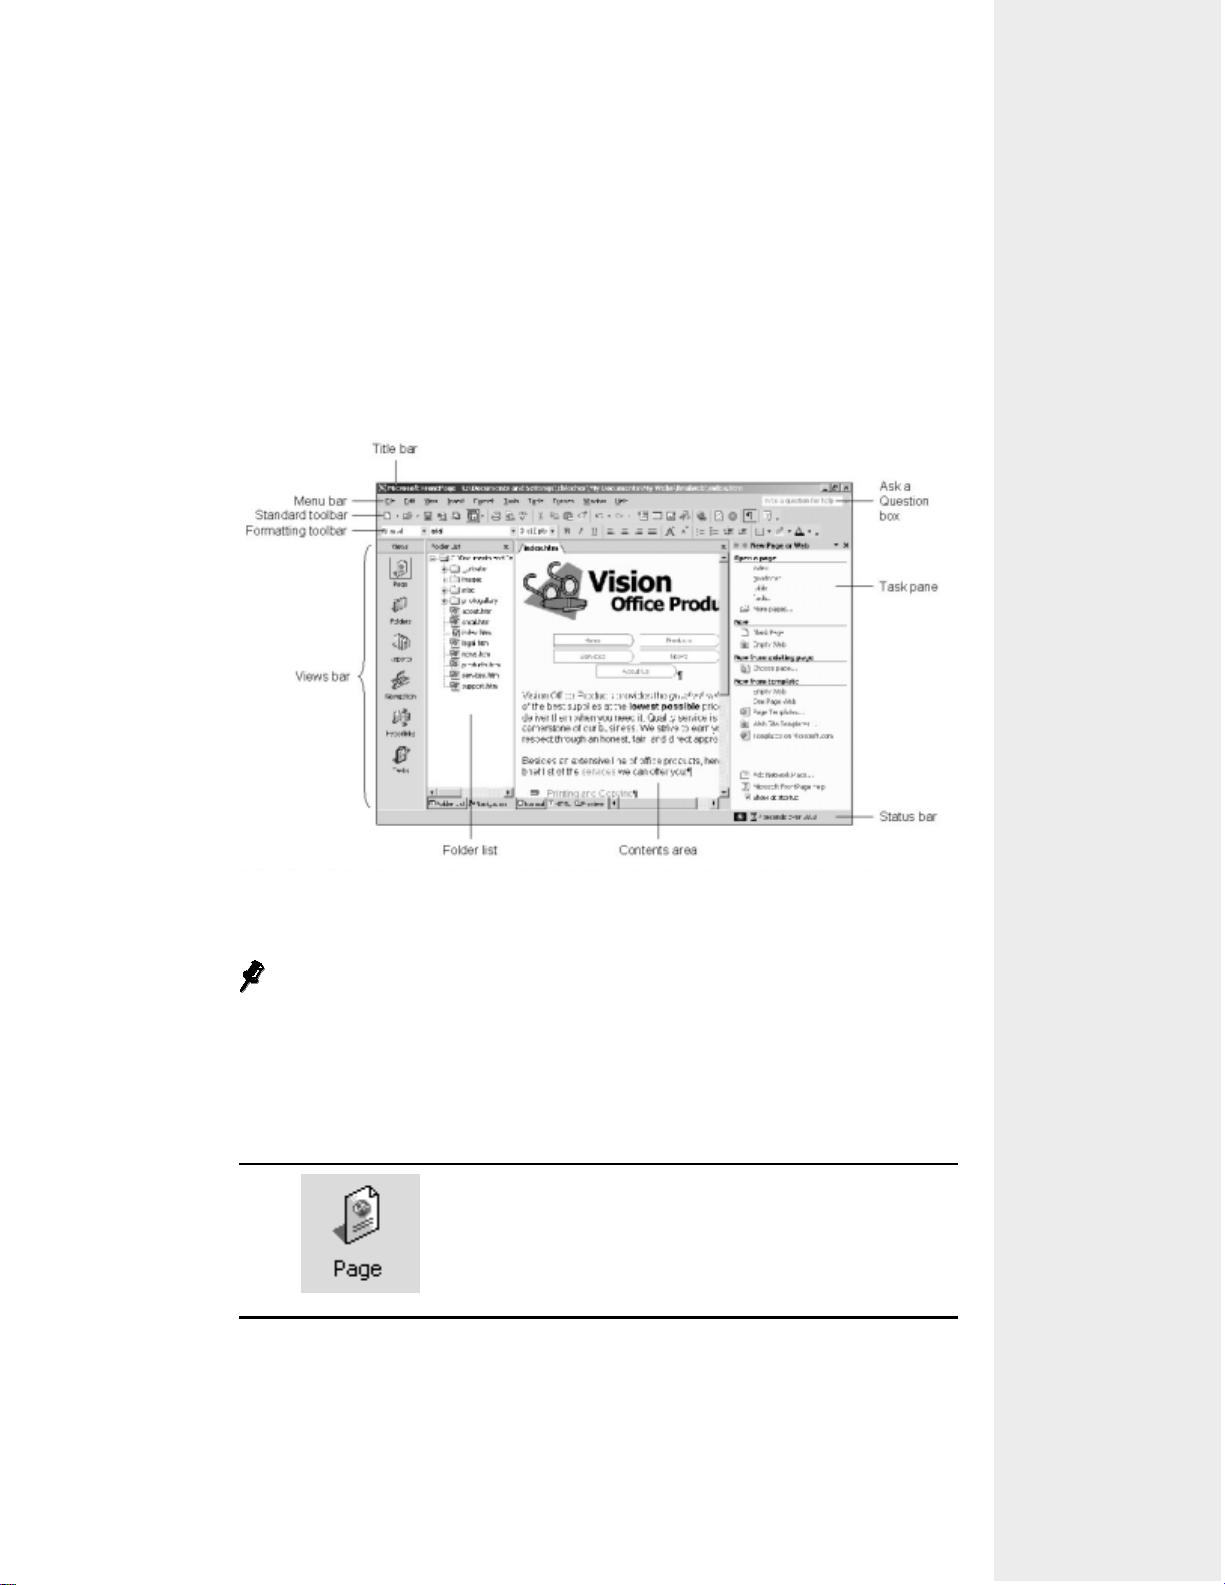
current condition, contents, and structure. As you can see in Figure 1-3, the
Views bar, located on the left of the application window, gives you fast access
to any of the different views shown below. Table 1-1 describes what each view
displays.
Figure 1-3: The FrontPage application window with a web open.
The View menu, not only also gives you access to all views on the Views
bar, but you can also hide or display both the Views bar and the Folder List
to maximize the space of the content area you have inside your application
window.
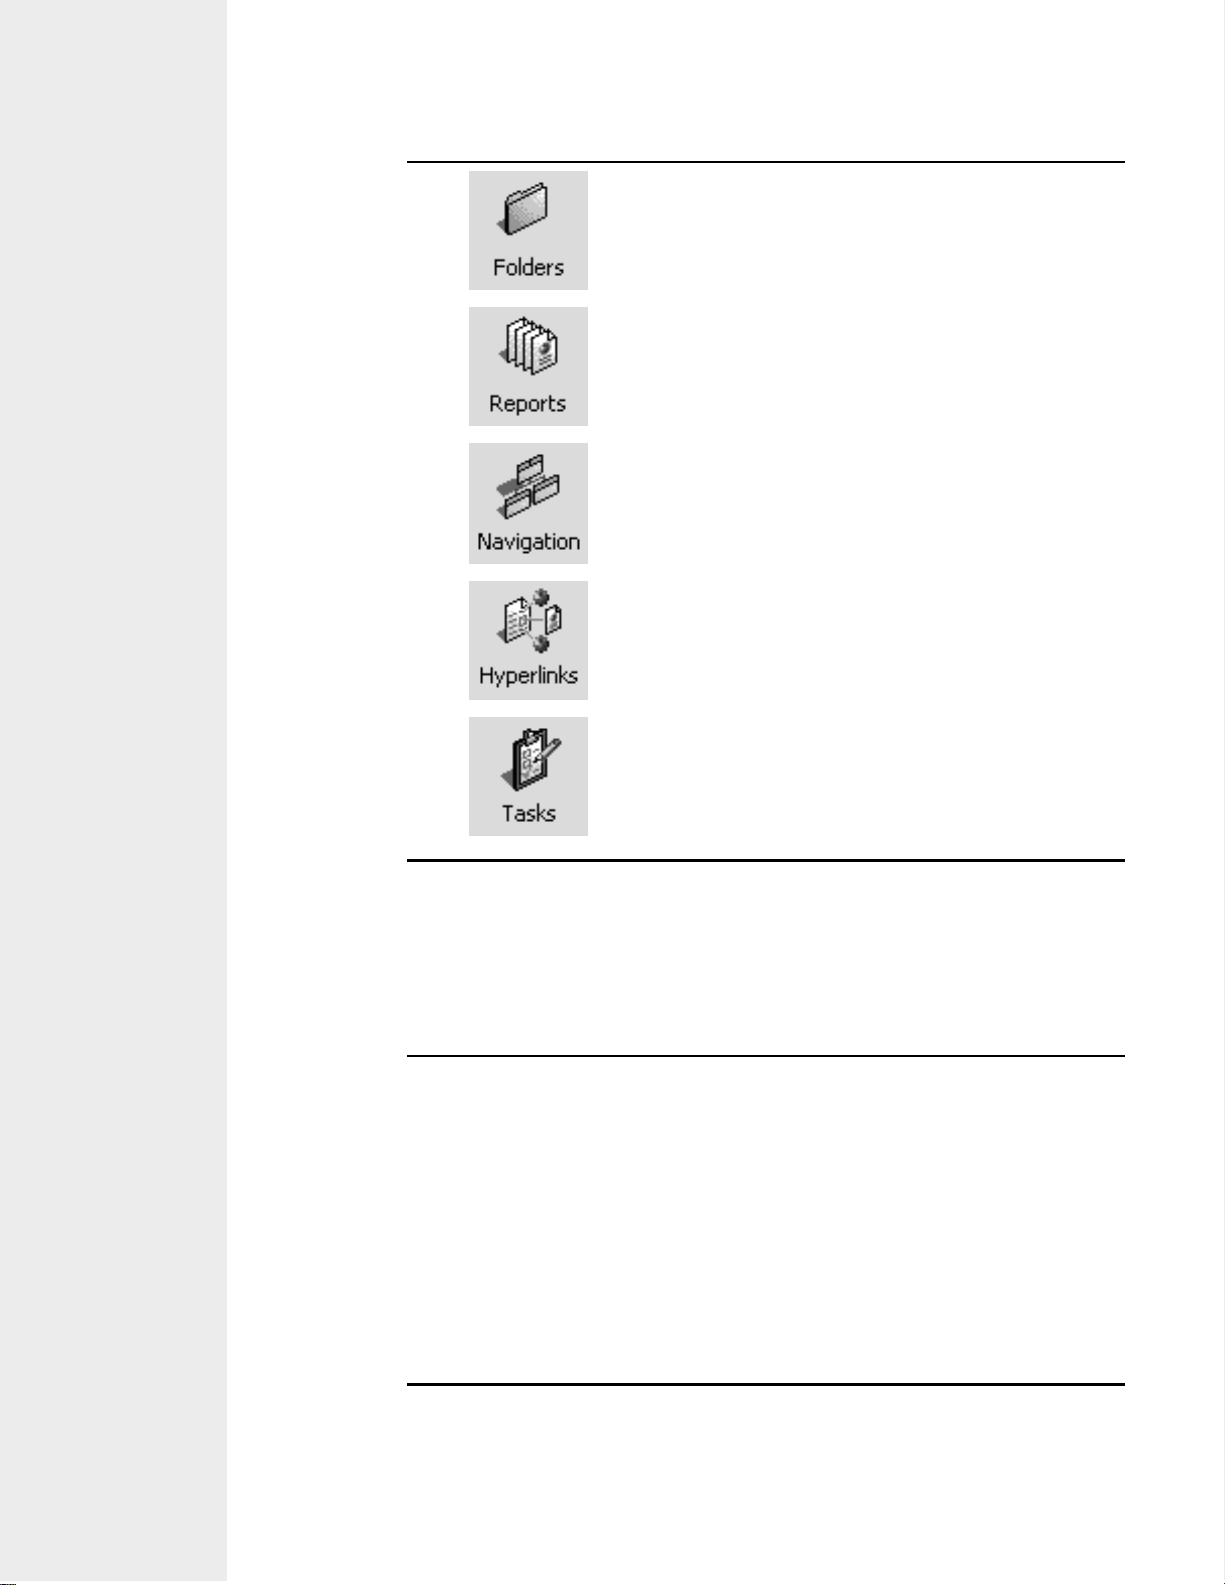
Table 1-1: Views Bar Icons and What They Display
Views Bar Icon Display This View To
Create and edit individual pages within a web. (Sometimes called Page Editor view.)
Lesson 1: Creating a Web
11
Page 16
LESSON 1
Reference Material
Please Do Not Copy
Views Bar Icon Display This View To
Manage a web’s files and folders.
Check the condition of a web.
Manage or review how a web is structured.
See a graphical display of how pages are connected.
Build or review a web’s “to-do” list.
Within each of these views, there may be other ways to display things. For
instance, in Page view’s content area, there are three different panes: Normal,
HTML, and Preview. Each view has its own purpose.
Different Page Views Display This Pane To
Normal Add, format, and position an open page’s content. The
Normal pane is where you will work 90 percent of the
time.
HTML View or modify the opened page’s HTML source code.
The HTML pane is a great way to learn HTML by
example. After you use the WYSIWYG tools in the
Normal pane, you can switch to the HTML pane to see
the code FrontPage created.
Preview See how an open page will appear in Microsoft
Internet Explorer. The Preview pane is best used for
taking quick looks at works-in-progress, to show how a
page or page element will appear in a browser.
12
FrontPage 2002 – Level 1
Page 17
FrontPage Templates
Reference Material
Please Do Not Copy
FrontPage offers a variety of templates to assist in the production stage of the web creation
process. In general, they fall into two categories: page and web site.
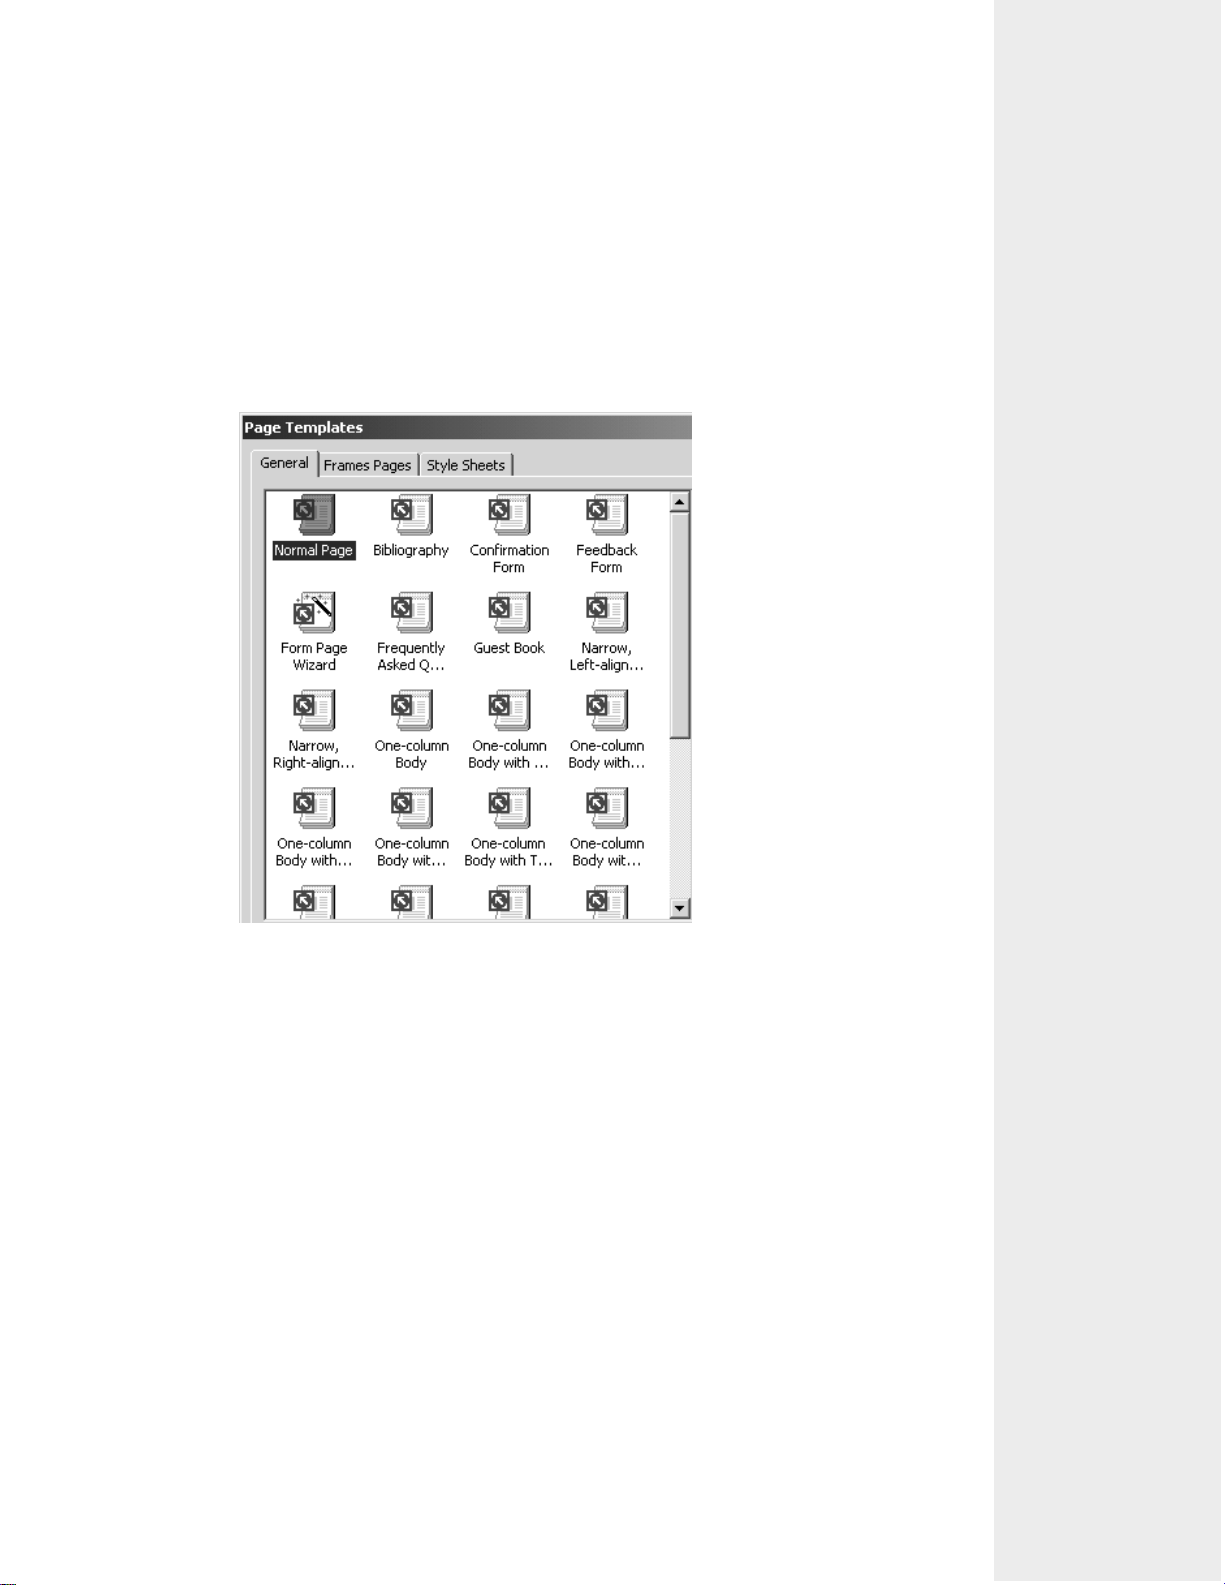
Definition: A page template is a predesigned page that can contain a wide range of page
settings (such as frames and background colors), text formatting, and page elements (such as forms, text, and graphics).
Example: As shown in Figure 1-4, FrontPage provides over 20 general page templates
and several web site templates.
LESSON 1
Figure 1-4: Web page templates.
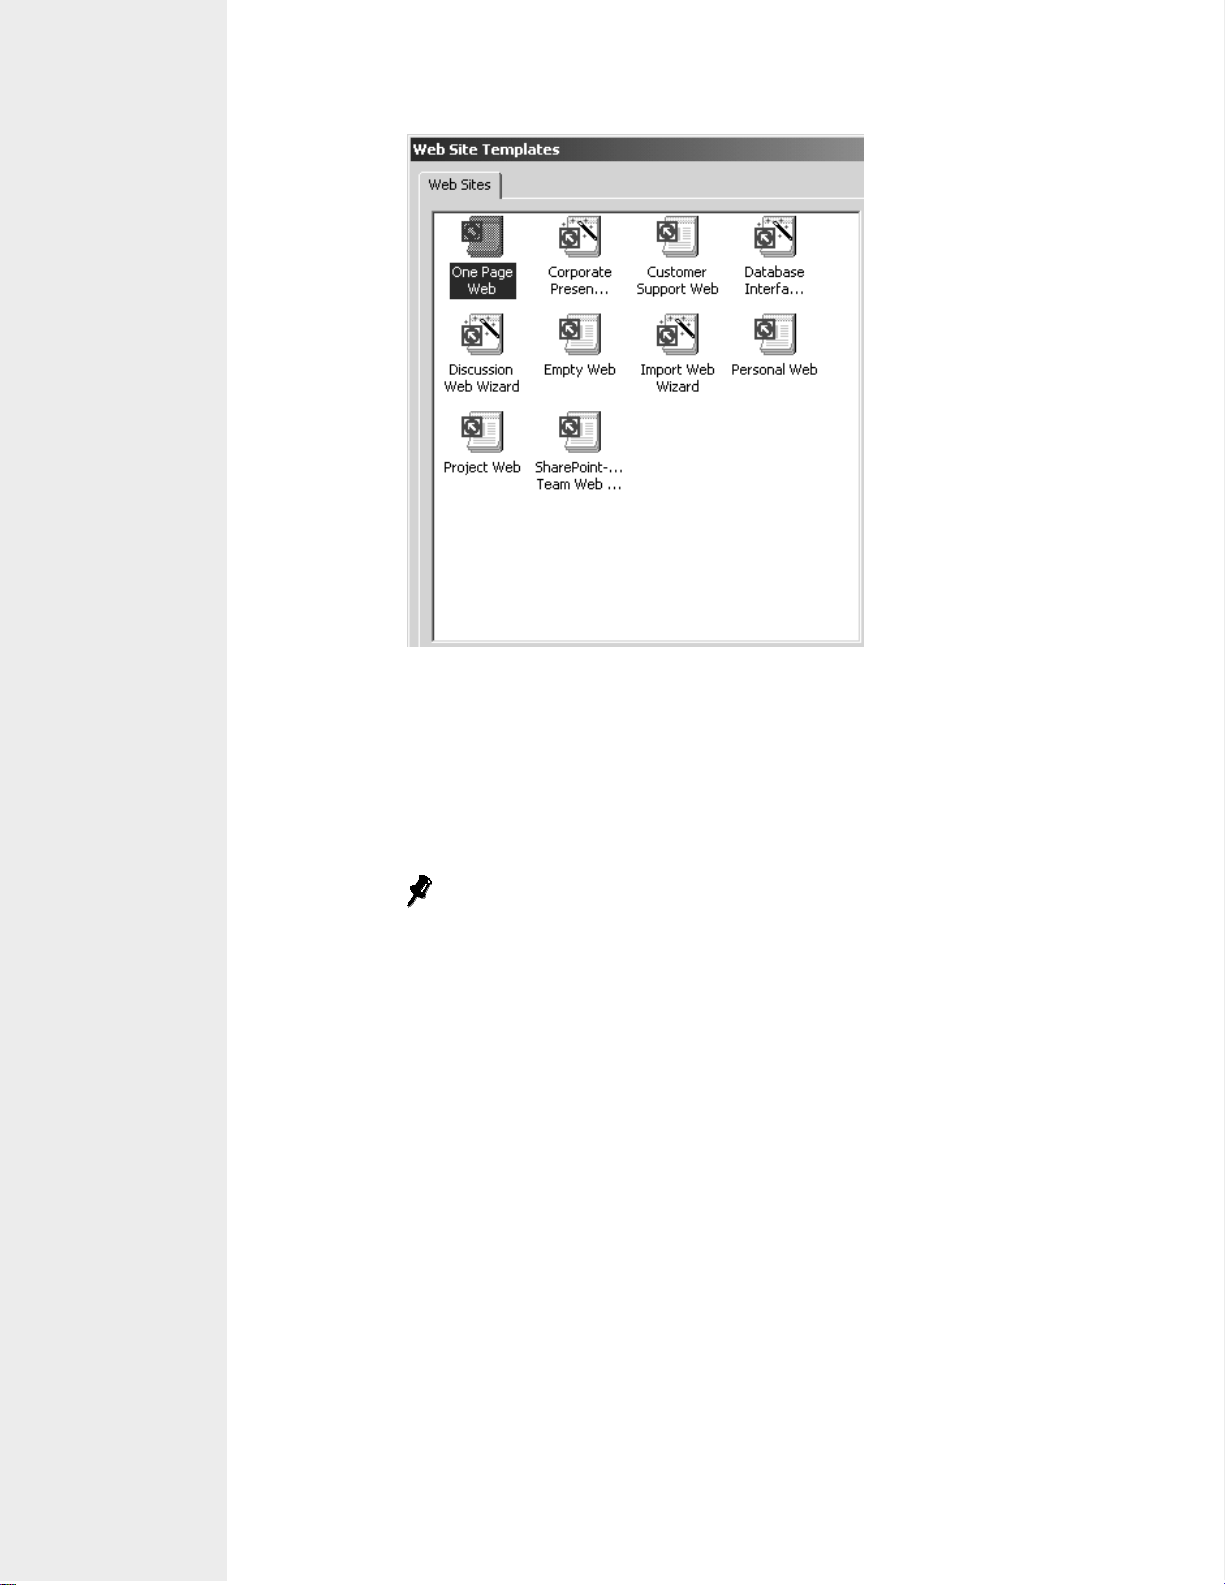
Web site templates are another type of template FrontPage offers. A web site
template is a collection of page templates designed to suit a pre-defined web
purpose, such as customer support or a personal web. As you can see in Figure
1-5, FrontPage provides several site templates as well.
Lesson 1: Creating a Web
13
Page 18
LESSON 1
Reference Material
Please Do Not Copy
Figure 1-5: Web site templates.
To help use these templates, FrontPage occasionally provides a template
wizard—a tool that walks you through a template step-by-step. The wizard,
like a Form Page Wizard or Corporate Presence Wizard, will prompt you to
enter information, like your company name, or to accept or reject certain page
elements, as a page or pages are being created.
In the Page Templates or Web Site Templates dialog box, wizards show a
“magic wand” on their icons.
Templates, because of their predesigned elements, can at times provide you
with a head start when creating webs or web pages. For instance, templates are
great if you only need to show your boss a “quick-n-dirty” feedback form;
however, the templates that come with FrontPage often hinder more than they
help. Frequently, you have to spend a lot of time customizing the results to fit
your site’s purpose—renaming files, changing colors, graphics, text, and so on.
So even though you may think templates will save you time, in fact, they may
slow you down.
Create an Empty Web
Procedure
Reference:
Because templates can slow you down, we’re going to start our web from
scratch. Well, that’s not entirely true. We are going to use a template, the
Empty Web template to be exact, but we’re using this template only because it
contains the bare necessities to get us going. To create a new web based on the
Empty Web template:
14
Choose File→New→Page or Web.
1
FrontPage 2002 – Level 1
Page 19
In the New Page or Web task pane, select Web Site Templates.
Reference Material
Please Do Not Copy
2
Select Empty Web.
3
In the Specify Location Of The New Web text box, type or select a name
4
and location for the web.
Click OK.
5
By definition, the Empty Web template is a web site template. Although it
could contain page templates or predetermined formatting, it doesn’t. Other
than a couple folders, it is as the name implies, empty.
LESSON 1
File Naming
Conventions
Giving a name to a web and its contents may seem like a no-brainer, since
every piece of the web needs a name if it’s to be referenced properly; however, as the number of files or people working on a site grows, the more
complicated it can become to name and manage a web. By following a few
simple naming conventions, and consistently naming webs, folders, and files at
the start of web site development, you can save yourself, collaborators, and
site visitors a lot of time and trouble.
• Keep name lengths as short as possible. You have two choices: short or
long. Short filenames commonly use the “8.3” naming convention,
restricting your file names to eight alphanumeric characters (or less) with
a three-character file extension. Upside: Compatibility with older servers
and DOS-based PCs. Downside: It’s difficult to name hundreds of files
descriptively using only eight characters. Long filenames, in contrast, can
easily be more descriptive. But, since filenames become part of a web
page’s address, long names can be hard for visitors to remember, as well
as cumbersome to type. If you don’t have to use the short “8.3” method,
we recommend using longer file names, but still try to keep them as short
as possible; no more than 20 characters is a good rule to follow.
Although nearly out of favor for naming web pages, the “8.3” naming
convention is still commonly used to name image files.
• Do not use spaces (use hyphens and underscores instead), punctuation
marks (accents, apostrophes, colons and semicolons, commas, exclamation
points, left or right parentheses, and question and quotation marks), or
special characters (ampersands, asterisks, at symbols, backward or forward
slashes, carets, dollar signs, greater or less than symbols, left or right
brackets, percent signs, pipes or vertical marks, plus or pound signs, or
tildes).
• Use lowercase letters. Some servers, like UNIX, are case sensitive, so
“MyFile.htm” is considered different from “myfile.htm.” By making all
your file names lowercase, it just makes life easier for people working on
your site and site visitors. No one has to remember whether or not a letter
was capitalized or not.
• Use only alphanumeric characters (a-z and 0-9). If you start a file name
with a number or put non-alphanumeric characters in a file name, a Web
server may not display the page.
Lesson 1: Creating a Web
15
Page 20
LESSON 1
Reference Material
Please Do Not Copy
• Generally, all pages should have the file extension “.htm” or “.html.”
(Webs and folders don’t have file extensions.) Although there are other
permissible file extensions for pages, these two readily identify a file to a
browser as an HTML document. FrontPage automatically adds the necessary file extension to every page saved, by default.
• Web servers each have their own set of rules when it comes to naming
files—especially home pages. So check with the person in charge of your
Web server to see what those rules are for the server that will host your
site. (For this course, our web’s home page will be named index.htm.)
• Ask around your company to see if there’s already a file naming conven-
tion in use. If so, follow it exactly.
Be sure to let everyone working on a site know what are considered to
be acceptable filenames so they can name files consistently too.
Rename or
Delete a
Web
Hidden
Folders
If you accidentally misname a web, you can easily rename it. In the web’s
Folder List, select the uppermost folder—the web’s root folder—and choose
Tools→Web Settings. In the Web Name text box on the General tab, type a
new name for the web, and then click OK.
If you would rather not rename the web, you can start over by deleting the
web and trying again. Before you do, however, be absolutely certain that you
want to delete it—this cannot be undone! To delete a web, open it in
FrontPage and select the web’s root folder in the Folder List. Right-click on
the web’s root folder and select Delete. In the Confirm Deletion dialog box,
select Delete This Web Entirely and click OK.
Only use FrontPage to delete webs and web content. If you use Windows
Explorer to delete a FrontPage web that contains connections to other webs,
FrontPage will not be able to continue managing those connections. Only
delete webs using Windows Explorer as a last resort.
Not all content in a web is for “public consumption.” For example, for privacy
reasons, you probably don’t want visitors to be able to browse through your
site’s registration information. FrontPage uses special hidden folders to prevent
this from happening. Hidden folders, preceded by an underscore character,
such as the _private folder, prevent visitors from directly browsing a folder’s
contents. To see a web’s hidden folders, choose Tools→Web Settings. Select
the Advanced tab and select Show Hidden Files And Folders.
16
FrontPage 2002 – Level 1
Page 21

TOPIC C
Reference Material
Please Do Not Copy
Creating a Home Page
Your new empty web is the shell that will contain your web’s content. It’s time to start creating that content and that begins with your web’s home page.
We’ve all been told not to judge a book by its cover, but let’s face it, we do make judgements.
Think of your home page as your web’s cover. It’s the first thing people are likely to see, and
like a book cover, your web’s home page will have certain elements that you will see on every
web’s home page, such as a title. There are other things you can do to get your home page off
on the right foot, and you’ll learn about them in this topic.
What is a Home Page?
Definition: We’ve bandied the term about until now. Generally speaking, the home page
serves as a starting point or guide to other content categories in a web. If a
person enters your web’s address in a browser, it’s the first page that will
appear. Typically, a home page will contain standard elements such as a
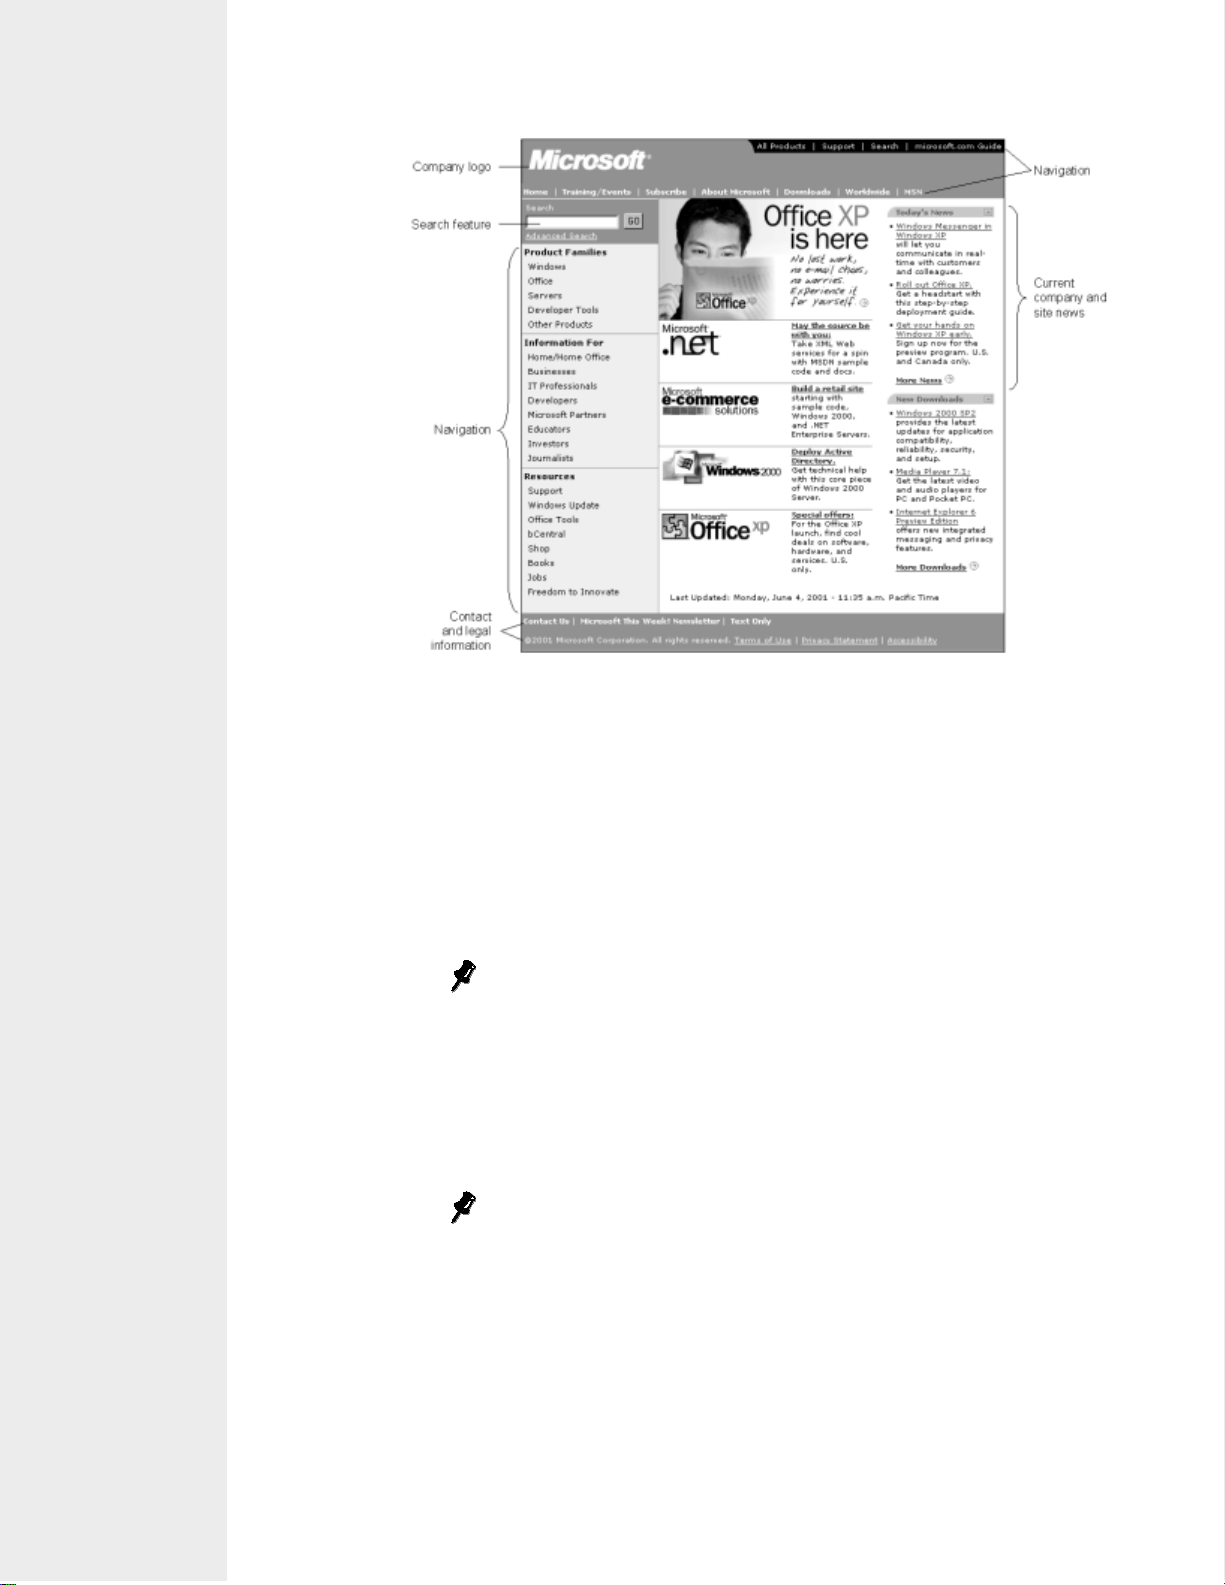
• company logo
• way to navigate to other areas of the site
• notice of current company/site news
• brief statement of a site’s purpose
• search feature
• link to contact and legal information
LESSON 1
Example: As you can see in Figure 1-6, the Microsoft home page is a good example of a
typical home page with many typical elements.
Lesson 1: Creating a Web
17
Page 22
LESSON 1
Reference Material
Please Do Not Copy
Figure 1-6: Common home page elements.
Create a Home Page
Procedure
Reference:
The physical act of creating a home page is relatively simple. The steps you
will need are as follows:
In Navigation view, create a new blank document by clicking the Create
1
A New Normal Page button.
Creating a home page in Navigation view automatically saves the file
with the appropriate default home page filename—index.htm or Default.
htm, for instance.
In Page view, change the page title in the Page Properties dialog box.
2
In the Page Options dialog box. change the home page’s compatibility
3
settings.
Page compatibility settings will apply to all new pages in a web.
Save the changes to the page.
4
18
Page Properties
Every page in a web has its own unique settings called Page Properties. To
display the page properties of a page displayed in Page view, you can either
choose File→Properties or right-click on the page and select Page Properties
from the shortcut menu.
FrontPage 2002 – Level 1
Page 23
Page Names
Reference Material
Please Do Not Copy
A single page can have three different names associated with it—each with its
own purpose: a filename, a page title, and a navigation name. A filename identifies a file to a computer. A page title, which can be set using the General tab
in the Page Properties dialog box, is primarily used to describe a page’s content or purpose to a person, usually in the title bar of a browser or in a
Favorite or Bookmark. (You can also view a page’s title in the HTML pane of
Page view.) A navigation name is the name a page displays in FrontPage’s
Navigation view. This name is displayed in the buttons of navigation elements.
For example, the home page has a filename of index.htm, a page name of
“VOP: Home Page,” and a navigation name of “Home.”
Limit page titles around 50 characters and make them as descriptive as possible, using terms people might use in a search. Unlike filenames, page titles
can include punctuation.
LESSON 1
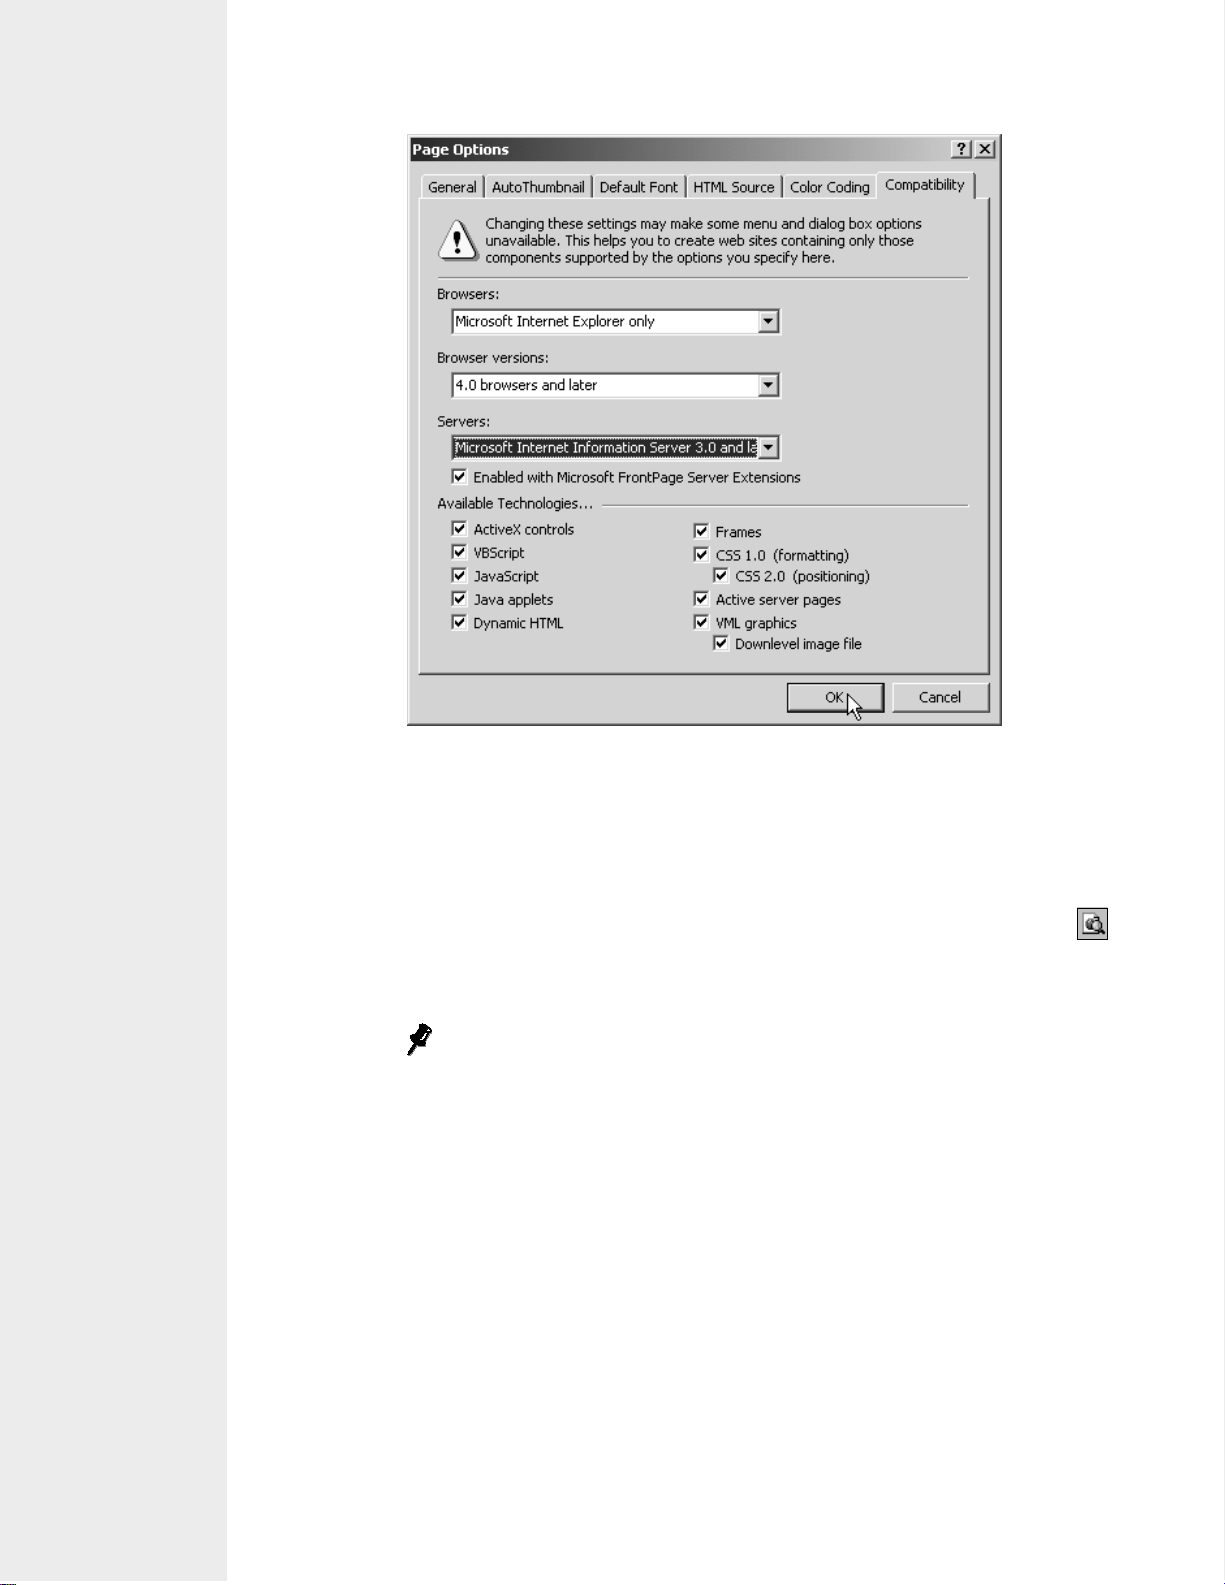
Page Compatibility
Unlike printed material, you don’t have total control over how your pages will
be viewed in a browser. What users see when they look at your site depends
on what browsers they use, their monitors’ screen sizes and resolution settings,
how fast and clean their Internet connections are, how big their browsers’ windows are, and how they’ve configured their browser options. (Some users
might turn off the option to automatically view graphics so that pages load
faster, for example.) Others might use older browsers that can’t interpret tables,
Dynamic HTML, cascading style sheets, or other newer web specifications.
Fortunately, FrontPage addresses many browser-related page design questions
by allowing you to choose which browsers, which versions of browsers, and
which technologies you want to developer for. (See Figure 1-7.) FrontPage
enables or disables certain technologies that may or may not work for the
specified browser based on your choice of browser, version, and server
settings. Observing the technologies that are either unchecked or grayed out
can save you design time because, based on your selections, you will know
which design features will work and which ones won’t before you waste time.
Lesson 1: Creating a Web
19
Page 24
LESSON 1
Reference Material
Please Do Not Copy
The Preview
Pane versus
the Preview
In Browser
Button
Figure 1-7: Page compatibility options.
The Preview pane, as you already know, mimics how a page will appear in
Microsoft Internet Explorer. Occasionally, though, you might need to view a
page in an actual browser—to verify page titles in title bars, for example. In
these cases, you could save the page, launch your browser, and then open the
page. But a more efficient way is to click the Preview In Browser button
on the Standard toolbar. This automatically opens the page in your default preview browser.
You can also preview pages in browsers besides Microsoft Internet Explorer.
To do so, choose File→Preview In Browser. Click the Add button. Name and
locate the browser you want to add and click OK twice. Then whenever you
want to change browsers, just select File→Preview In Browser again, select
the browser from the list, and then click Preview.
20
FrontPage 2002 – Level 1
Page 25

TOPIC D
Reference Material
Please Do Not Copy
Adding Text to a Page
A blank home page just won’t do. Next, you’re going to add some text to the home page using
a few different methods.
Since it’s likely that the home page will be the first page visitors will see in your web, it’s
your best opportunity to create that all-important first impression. And unless your home page
contains some meaningful information, it may also be the last page visitors ever see, because
they may not come back! So be sure to take extraordinary care in deciding what is added to
this page. You want it to be the best page on your entire site.
The fastest way to convey a meaningful message is concise text. For all its glitz and glamour,
the majority of Web content is plain, work-a-day text. Because text is so prevalent, putting all
that text into pages can be time-consuming. Learning the best way to put text on a page is
critical if you want to have extra time for other things.
Add Text to a Page
LESSON 1
Procedure
Reference:
Adding text to a page can be accomplished a variety of ways: typing, copying,
and pasting from other applications, as well as inserting the contents of text
files. To add text:
Place the insertion point where you want the text to begin.
1
Then, depending on the method you will use, you can:
2
• Type the text directly in FrontPage.
• Copy text from another open application and paste it into FrontPage.
• Insert a file’s contents by choosing Insert→File. Then navigate to the
folder containing the file you want, change the Files Of Type dropdown list to All Files, select the file, and then click Open.
When you paste items in Office XP applications, the Paste Options smart tag
button will appear. Smart tags conveniently display a list of context-sensitive
options, such as whether or not to paste text with existing formatting or just
the text.
Lesson 1: Creating a Web
21
Page 26
LESSON 1
Reference Material
Please Do Not Copy
TOPIC E
Applying Text Formatting
Your home page is starting to take shape. Now that you know how to add text to a page, let’s
look at how you can make your text more legible and distinctive by considering various text
formatting options.
Text on pages is unavoidable, but that doesn’t mean it has to be dull-looking or difficult to
read. It’s up to you to make text as legible and attractive as possible. Good text formatting will
ensure that your content gets the attention it deserves.
Apply Text Formatting
Procedure
Reference:
Text formatting in FrontPage is as straightforward as it is in other Office XP
applications, with both character and paragraph formatting. Use character formatting, such as changing fonts, styles, and effects, for a small amount of
text—usually a word or two. Use paragraph formatting, such as changing
alignments, indentations, and spacing, when you want to affect an entire
paragraph. To apply text formatting:
You can also use the FormatPainter tool on the Standard toolbar to
copy formatting from one selection and paste it on another.
Select the text to be formatted. (To apply paragraph formatting, the entire
1
paragraph doesn’t need to be selected. The insertion point just needs to be
in the paragraph to be formatted.)
Either click one of the formatting buttons on the Formatting toolbar or,
2
for more character formatting options,
• Use the Font dialog box (choose Format→Font).
For more paragraph formatting options:
• Use the Paragraph dialog box (choose Format→Paragraph).
From time to time, you may see some peculiar text formatting. To
see where formatting is on a page, you don’t have to switch to the
HTML pane. You can choose View→Reveal Tags.
22
Styles FrontPage supplies some traditional HTML styles listed in the Styles drop-
down list on the Formatting toolbar. (See Figure 1-8.) These styles can be
thought of as text formatting templates because they can contain many different formatting options—both character and paragraph—within one style name.
By default, the Normal style is used until you apply a different style from the
list. Headings (1 being the largest, 6 being the smallest) and lists (especially
bulleted and numbered) are the most commonly used.
FrontPage 2002 – Level 1
Page 27

We recommend using styles whenever possible. FrontPage has an optional
Reference Material
Please Do Not Copy
formatting feature called “themes” which makes changing formatting quite
easy if styles have been applied.
Figure 1-8: Styles drop-down list expanded.
LESSON 1
Lesson 1 Follow-up
In this lesson, you began by identifying the necessary guidelines that are addressed during the
web creation’s planning stage. Then, you used your browser to view sites that have been created using FrontPage, toured an existing web and created your own new web based on the
layout of a default FrontPage web template. Next, you defined the term “home page” and its
key elements (page properties/compatibility) that are contained within. Then, you added text to
a page through typing, copying, and pasting from Word. Finally, you learned how to make
your text more legible and distinctive by considering the various text formatting options and
applying character and paragraph formatting.
1. What goes into creating a new web?
Answers will vary.
2. Do you have any resources available to help you create a web. If so, what are they?
Answers will vary.
Lesson 1: Creating a Web
23
Page 28

NOTES
Reference Material
Please Do Not Copy
24
FrontPage 2002 – Level 1
Page 29

LESSON 2
Reference Material
Please Do Not Copy
Working with Tables
Lesson Objectives:
In this lesson, you will create and modify tables.
LESSON 2
You will:
• insert a table, nest a table, and add text to the tables.
• edit existing tables.
• change a table’s appearance.
• convert a text file into a FrontPage table.
• split an existing table into three distinct tables.
Lesson 2: Working with Tables
25
Page 30
LESSON 2
Reference Material
Please Do Not Copy
Introduction
You have created your web and started your home page by adding and formatting some text.
In addition to text, there are many things you can add to your pages. We’ll start with tables.
Tables will make your life a little easier because of the control they offer. In general, tables are
used to position web elements or contain data. By using tables properly, you can present your
web’s contents in the best possible light and help ensure that your web’s visitors are viewing
the content as you intended it to be displayed.
TOPIC A
Inserting a Table
Inserting a table is the first step to organizing content on a page. With a table in place, content
such as text and pictures, can be added and arranged however you want it.
In the past, you didn’t have much control where elements appeared on a web page. Things are
added from left to right and top to bottom, but you couldn’t easily position items where you
wanted. That’s where tables came in. Tables are nothing more than containers. You can put any
web element in them—text, pictures, or even other tables—controlling where items are positioned and how they are displayed. And although there are now other methods for positioning
page elements, tables still give you the most reliable results in a wider variety of browsers.
Insert a Table
Procedure
Reference:
Tables are a conglomeration of containers called cells, which are grouped horizontally as rows and vertically as columns. Each cell can contain a different
element and have different formatting. Before you can use tables to display and
control web elements though, you must first add one to a page. To do that:
Place the insertion point where the table is to be located.
1
Then to insert a table, you have a couple different options: draw one
2
manually or have FrontPage do it for you. To draw a table, do the
following.
• Choose Table→Draw Table, and then drag the Draw Table tool to
To have FrontPage create a table for you:
• On the Standard toolbar, click the Insert Table button and select the
• Choose Table→Insert→Table. Not only can you select the number of
first create the table’s outer border. Then draw vertical lines in the
table border to create columns and horizontally to create rows.
number of rows and columns, or look for more table options.
rows and columns, but you can also make layout decisions, like setting the new table’s alignment and size.
26
FrontPage 2002 – Level 1
Page 31

Nested
Reference Material
Please Do Not Copy
Tables
As we mentioned briefly, tables can contain other tables. A table within another
table is said to be nested. Nested tables provide another layer of table layout
and formatting options, because each table has its own set of properties. This
can produce effective visual distinctions between page elements.
TOPIC B
Editing a Table’s Structure
Rarely is a table exactly right the first time. In fact, 99 percent of the time, you will need to
make some sort of modification—whether it be adding rows, deleting or merging cells, or adding a caption. In this topic, you will learn how to make these changes to the tables you just
created.
Fortunately, FrontPage’s extensive table tools makes editing tables a snap. For instance, you’ve
got a page with a table showing the quarterly results from the regional sales reps. Every quarter, sales people join and leave the company. Rather than recreate the entire table every
quarter, you can just quickly add and delete rows to reflect these changes.
LESSON 2
Edit Table Elements
Procedure
Reference:
Inserting
Rows and
Columns
Selecting
and Deleting Table
Elements
Tables are wonderfully editable. Other than their boxy shapes, there isn’t much
that can’t be changed. You can add and remove rows and columns, merge
cells, even add a caption to the entire table. This flexibility lets you present
data or other page elements as you want. To edit a table and its elements:
Select the table element you want to edit (the entire table, a row, column,
1
or cell).
Use the Table menu to insert, delete, or merge columns, rows, and indi-
2
vidual cells.
There are several ways to modify the number of rows and columns in a table.
To quickly add a row to the end of a table, just place the insertion point in the
last cell and press [Tab]. For most other occasions, however, we recommend
using the Insert Rows Or Columns dialog box. Not only can you enter the
number of rows or columns to be inserted, but you can also determine where
the row or column will be inserted. For example, you can specify whether you
want the inserted column on the left or the right of the current selection.
As the old adage goes, “If you want to affect it, you have to select it.” Deleting table elements is no exception. Before you can delete a table element, you
must first select it. FrontPage offers a couple ways to select tables and their
parts. You can click and drag the mouse pointer to select adjacent cells, but
that can be tricky at times—especially when dealing with nested tables and
individual cells.
Lesson 2: Working with Tables
27
Page 32
LESSON 2
Reference Material
Please Do Not Copy
If you’re having trouble drag-selecting table elements, use the Table→Select
menu options.)
You can also point and click to select a table element. For instance, to select a
row, position the mouse pointer along the left-most edge of the row. When the
mouse pointer changes to a black arrow, click the mouse button to select the
entire row. At this point, you can drag to select more than one row. Select columns the same way. (To select an individual cell, [Alt]-click it.) Once you’ve
made your selection, regardless of the method you choose, right-click on the
selected element and choose Delete Cells from the shortcut menu.
Filling Cell
Data
FrontPage’s Fill tool on the Tables toolbar allows you to copy data, cell, and
text formatting from one selected table cell to another adjacent selected cell.
For instance, if the first cell in a row contains formatted data, you can repeat
that data and all of its formatting for the rest of the cells in that row. Simply
select the cell that contains the desired data and/or formatting and any adjacent
cells you want to look similar, and click either the Fill Right or Fill down buttons on the Tables toolbar.
TOPIC C
Formatting a Table
With tables created and content in place, the next step is to format the table and its text.
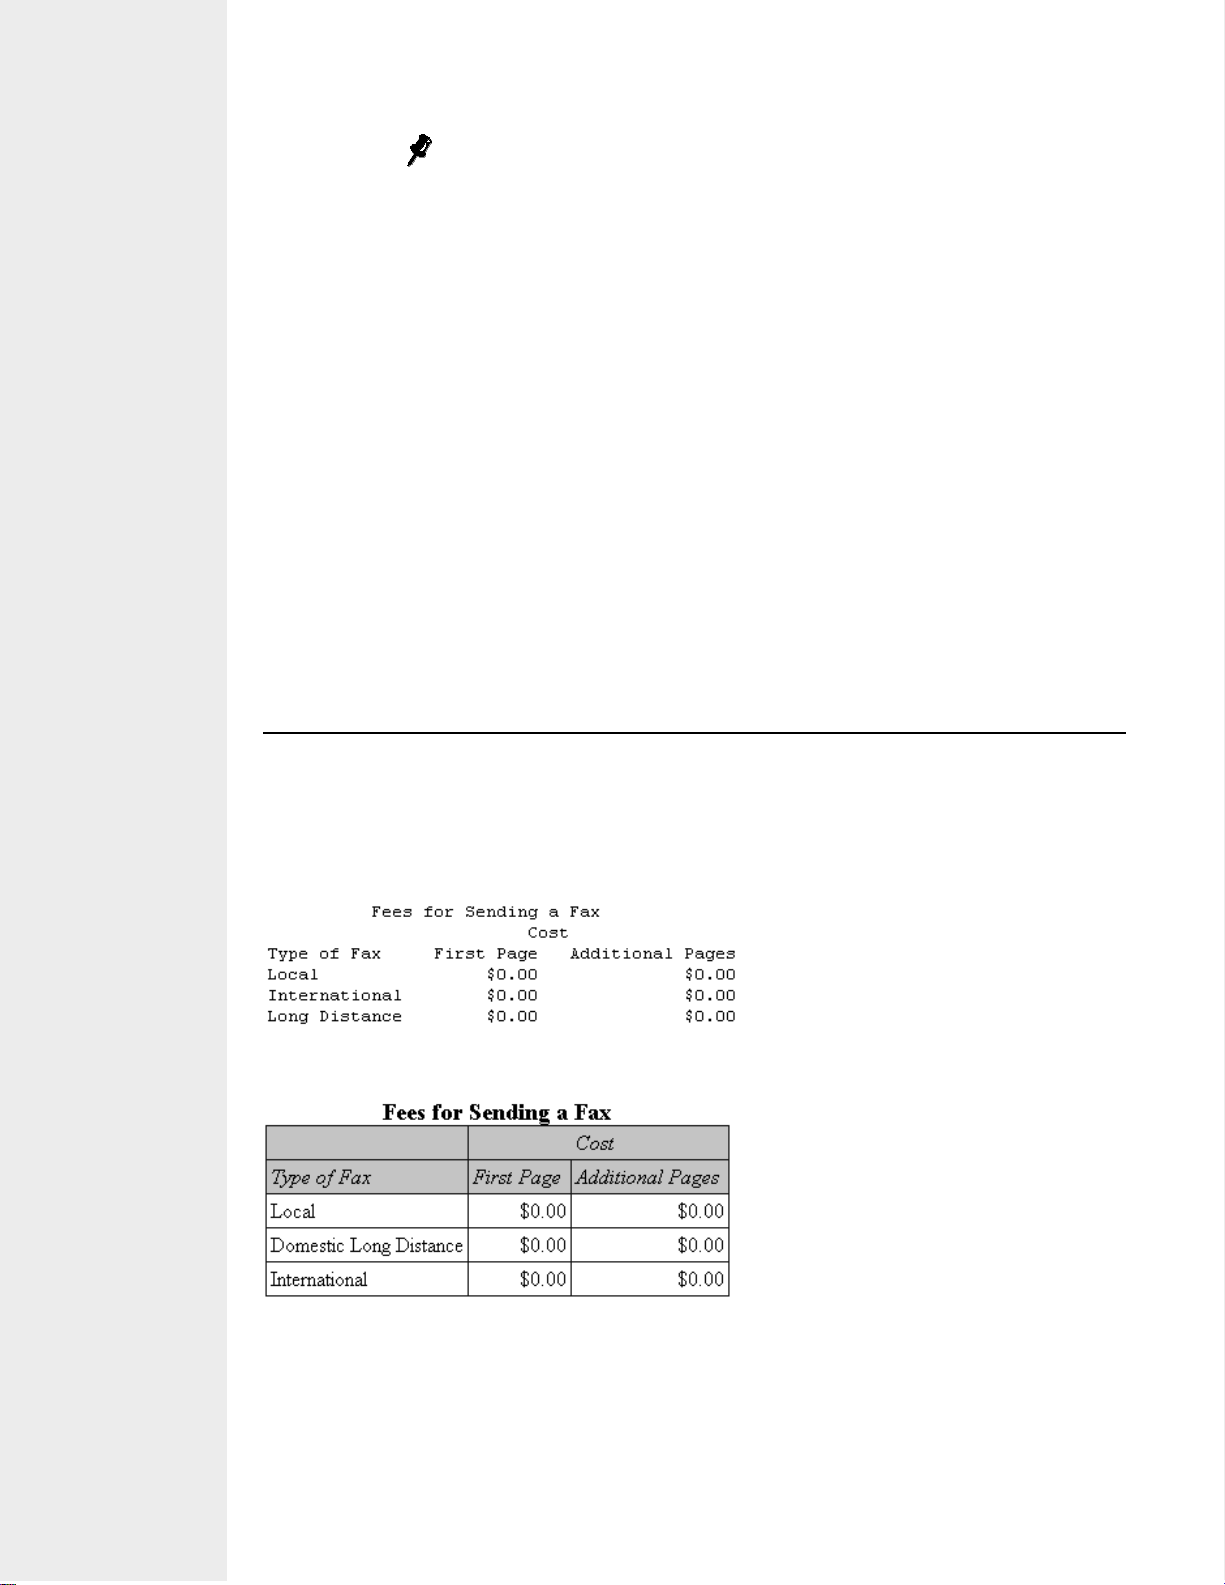
Consider Figure 2-1 and Figure 2-2. Which table would you rather read?
28
Figure 2-1: An example of a table without any formatting.
Figure 2-2: An example of a table with formatting applied.
Both tables are legible, but because the table data are more clearly presented, the formatted
table is much easier to read.
FrontPage 2002 – Level 1
Page 33
Format a Table
Reference Material
Please Do Not Copy
LESSON 2
Procedure
Reference:
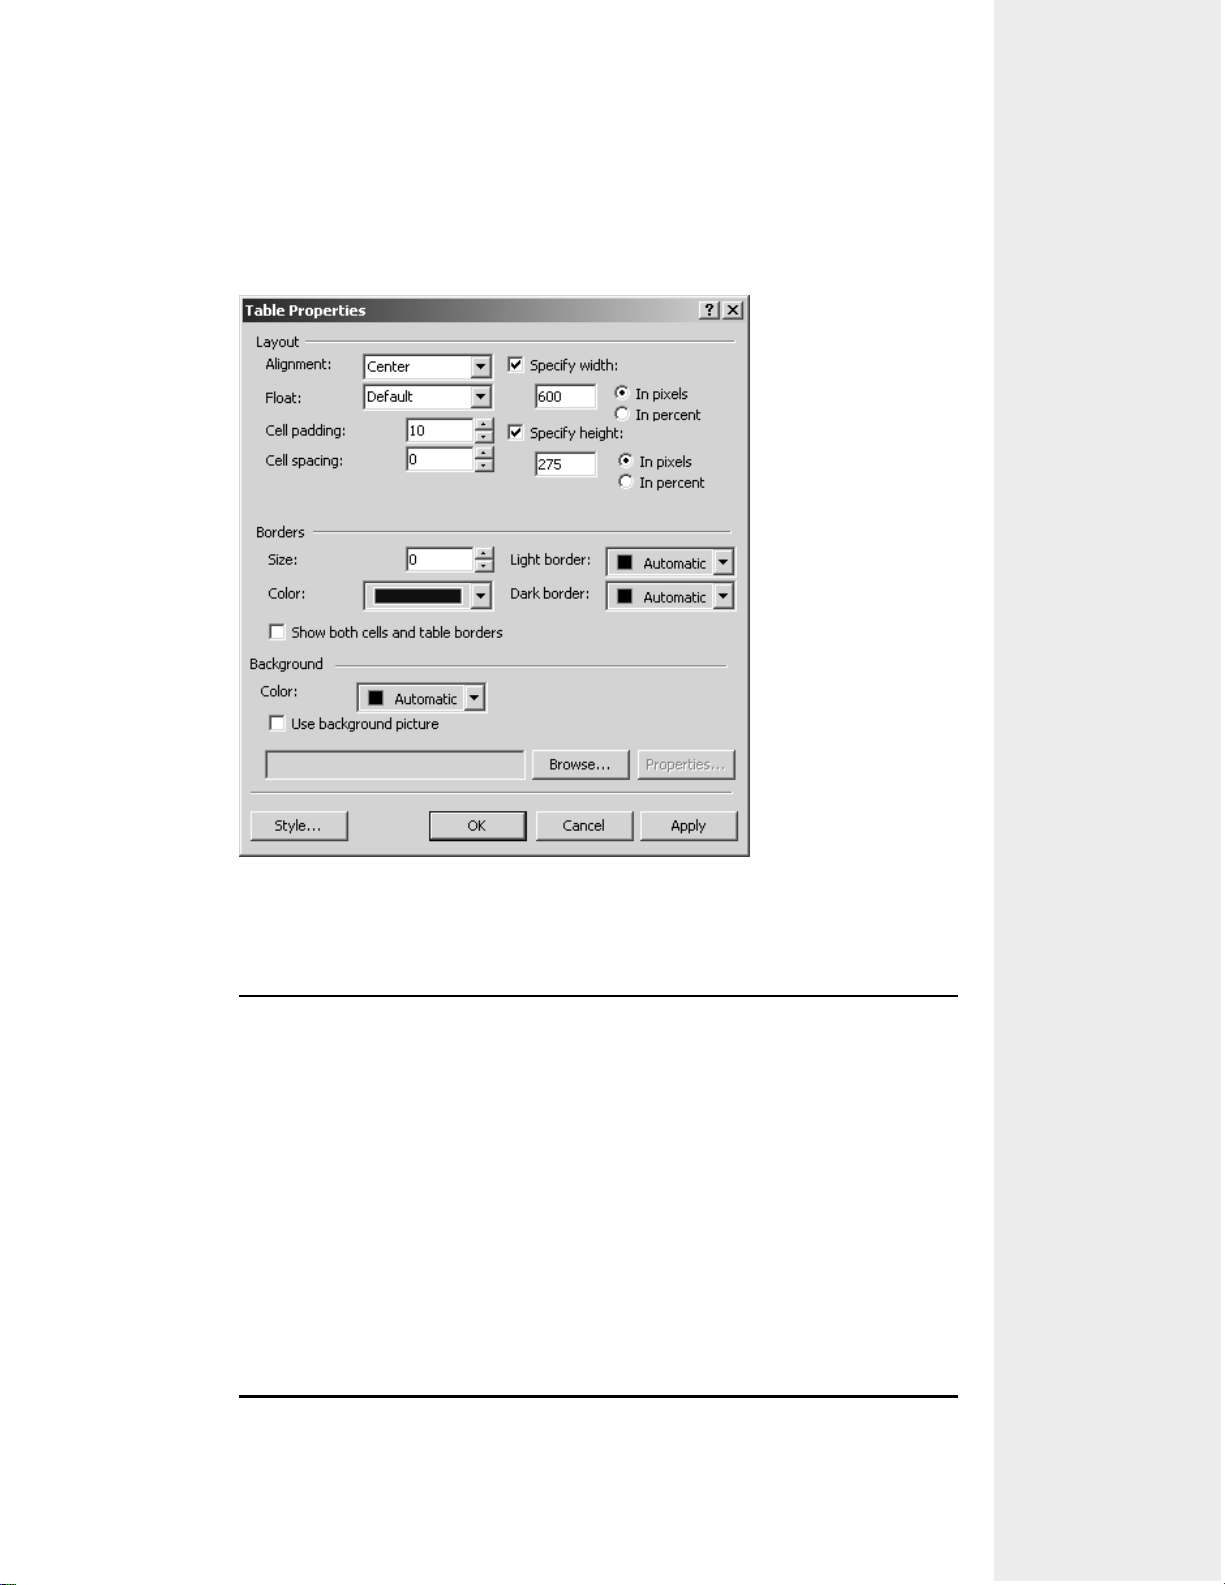
A table and its elements (cells, rows, and columns) can have different
formatting. Using the options in the Table Properties dialog box, as shown in
Figure 2-3, you can make changes that control an entire table and how its contents are presented on a page.
Figure 2-3: The Table Properties dialog box.
Table 2-1: Table Formatting Options
Table Properties Option Function
Alignment Determines a table’s alignment on a page.
Specify Width/Height Determines the width and/or height of a table, mea-
sured either as a percentage of the available screen
width, or as a specific measurement in pixels.
Cell Padding The amount of space inside a cell that separates a
cell’s content and a cell’s border. (A cell’s interior
margins.)
Cell Spacing The amount of space between cells. (Increasing the
cell spacing makes table borders thicker.)
Border Size Determines the thickness (in pixels) of the line
around the outer edges of the table.
Background A table can have a background color or picture
that’s different than the underlying page’s background settings.
Lesson 2: Working with Tables
29
Page 34
LESSON 2
Reference Material
Please Do Not Copy
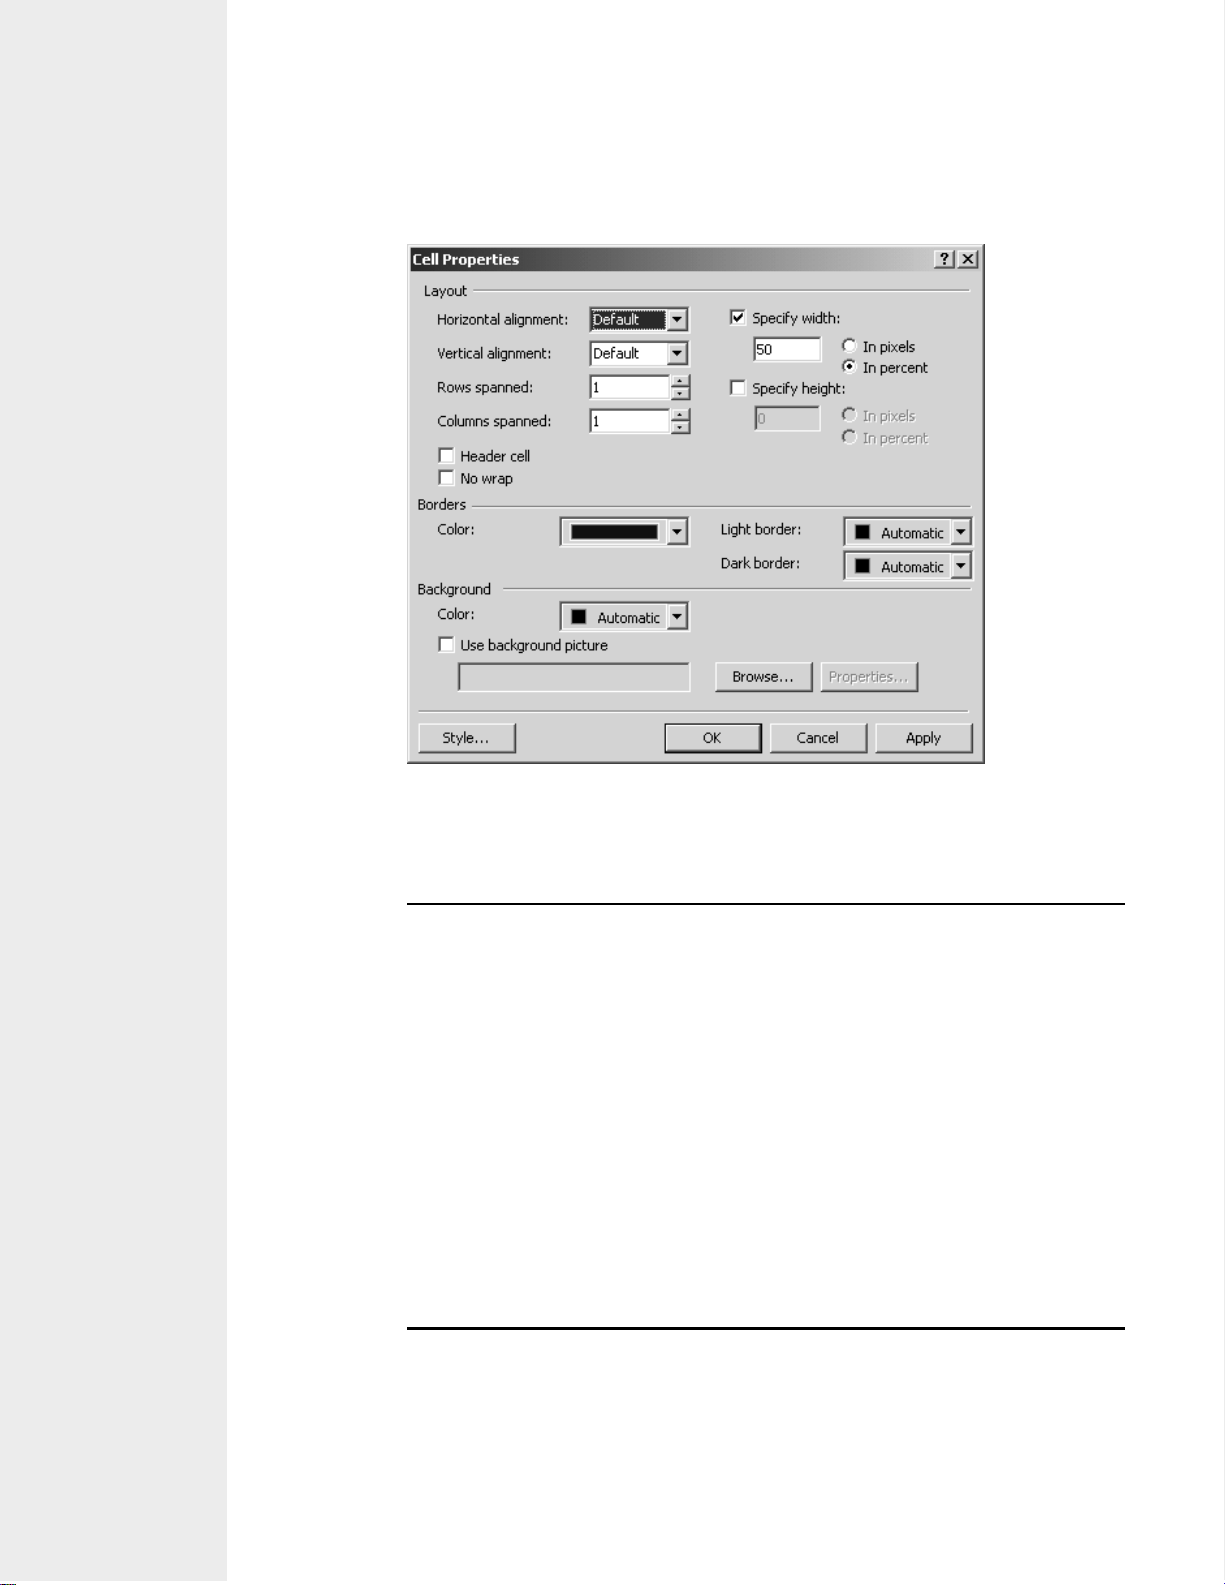
Using the options in the Cell Properties dialog box, as shown in Figure 2-4,
you can make changes that control the appearance of a single cell or a range
of cells, including rows and columns.
Figure 2-4: The Cell Properties dialog box.
Table 2-2: Cell Formatting Options
Cell Properties Option Function
Horizontal and Vertical Alignment
Specify Width/Height Determines the width of a cell in the context of its
Rows/Columns Spanned Adjust the number of rows or columns a cell spans.
Header Cell Apply’s a bold text format and center-aligns a cell’s
No Wrap Prevents a cell’s text from automatically wrapping to
Background A cell can have a background color or picture that’s
To format a table, it’s a good idea to set the Table Properties first and then the
Cell properties—general formatting to specific.
Determines how a cell’s contents are positioned
within a cell.
row, and the height in the context of its column.
Again, measured either as a percentage of the available screen width, or as a specific measurement in
pixels.
contents.
a new line.
different than its table, as well as the underlying
page’s background settings.
30
FrontPage 2002 – Level 1
Page 35

Place the insertion point in the table you want to affect, and then right-
Reference Material
Please Do Not Copy
1
click on the table and select Table Properties. In the Table Properties
dialog box, set the layout, border, and background options.
Once the table options are set, you can address the cell-level formatting.
2
Place the insertion point in the cell you want to affect (or if you want to
format a range of cells, select the range), and then right-click on the
selected cell(s). Select Cell Properties. In the Cell Properties dialog box,
set the layout and background options.
LESSON 2
Sizing a
Table and
Its Elements
A table created by FrontPage usually takes up the entire width of a page
because, by default, a table’s width is set to 100 percent. That isn’t always
desirable, especially if you’re using a table as a page layout tool rather than a
data table. To control the size of a table, you can specify the exact size in pix-
els one of three ways: using the Table Properties dialog box, have FrontPage
AutoFit a table to its contents (choose Table→AutoFit To Contents), or manually drag a table element’s border to the desired size.
TOPIC D
Converting a Text File into a Table
You’ve created tables yourself, and now it’s time to learn how to handle information given to
you into tables.
Let’s face it, not many of us work by ourselves all of the time. It’s quite possible that somewhere along the way someone will be helping us. Part of that assistance might be to contribute
content. It would be unrealistic to expect everyone to give you formatted HTML pages. No,
more likely is the fact that someone will give you a file, such as one that has been exported
from a database, that you will have to work on in order to include its contents in a page.
Convert a Text File into a Table
Procedure
Reference:
FrontPage can convert selected text into a table. The application looks at the
selection for specific text characters to determine where columns will be
created. FrontPage can separate text at paragraphs, tabs, commas, or any other
character that you provide. (It can also put an entire selection into a one-cell
table.)
Select the text to be converted.
1
Choose Table→Convert→Text To Table.
2
Select the character where you want FrontPage to separate the text into
3
columns.
Click OK.
4
FrontPage can also convert an existing table into text.
Lesson 2: Working with Tables
31
Page 36

LESSON 2
Reference Material
Please Do Not Copy
TOPIC E
Splitting a Table
Having converted a text file into a table, you notice that it doesn’t look as good as it could.
The large table would be more effective if it were split into three separate tables. You will
learn how to do that in this topic.
Frequently, tables you will receive are too large for a page or include several different discrete
units of information that would be better served in separate tables. Again, you could create
multiple new tables and re-enter the data yourself, but splitting an existing table will save you
the time and hassle.
Split a Table
Procedure
Reference:
To split one table into two:
Place your insertion point in the row below where you want the split to
1
occur.
Choose Table→Split Table.
2
Repeat steps 1 and 2 as needed.
3
Lesson 2 Follow-up
In this lesson, you began by inserting a table into your web. Then, you nested a table, and
added text to both of the tables. Next, you learned how to edit a table’s contents by adding
and deleting rows, entering text, filling a table’s cells with placeholder data, adding a column,
merging cells, and adding a caption. Then, you formatted tables through specifying width and
height, adjusting cell padding and alignment, moving borders, and changing a cell’s background color. Next, you converted a comma-delimited text file into a table. Then, you learned
how to split a table into three separate tables. Finally, you formatted the end results of the split
by changing fonts, applying background colors, and experimenting with the AutoFormat
feature. Creating, editing, and formatting tables will not only help you organize your information on a page, but these skills will also help you display your content in a more meaningful
and pleasant manner for your audience.
32
1. Based on sites that you have viewed on the Internet in the past, how do other web
designers use tables to present information on their web pages? Also, do you recall if
those tables were well designed, helping you to read the table’s contents?
Answers will vary.
2. How do you plan to use tables in your pages back at work? List your ideas.
Answers will vary.
FrontPage 2002 – Level 1
Page 37

LESSON 3
Reference Material
Please Do Not Copy
Connecting Pages
Lesson Objectives:
In this lesson, you will connect pages.
LESSON 3
You will:
• add text hyperlinks to pages that connect to internal and external pages and as well as
bookmarks within a web.
• add and modify shared borders for an entire web, as well as for a single page.
• create a hierarchical navigation structure by adding existing and new pages beneath the
home page in Navigation view.
• insert a link bar Web component with custom links.
• remove a page from a web’s navigation structure.
Lesson 3: Connecting Pages
33
Page 38

LESSON 3
Reference Material
Please Do Not Copy
Introduction
You are in the early stages of production and have created a web and a couple standalone
pages. Now you are ready to learn how to connect your pages.
Have you ever read a text book that repeatedly referenced other works? You had every intention of looking up those supporting titles, but you never did. Why? Because it wasn’t
convenient. You didn’t remember the reference titles. You didn’t have the time or the
resources. Lots of excuses. Web sites are all about convenience and supplying information
instantly. By connecting pages logically and purposefully, you can provide visitors to your web
with all the information they could ever need.
TOPIC A
Adding Hyperlinks to Pages
You have built a couple unrelated pages and, in and of themselves, their utility is somewhat
limited. In this topic, you will learn how to connect and organize them into a useful web of
information.
Hyperlinks allow you to offer optional and immediate paths through your webs wherever you
think visitors might need them. For instance, you’re creating a page containing product
information. You put in the statement “See the manufacturer’s site for detailed warranty
information.” Why make the person find out the address of that site, and then make them look
for the specific warranty? Why not add a link that points directly to the warranty, saving
everyone time and energy? The visitor will appreciate the effort you made and will remember
that your site is not only informative but helpful as well.
What Is a Hyperlink?
Definition: A hyperlink, or link, is a method for connecting one resource, typically a Web
page, to another target resource. Links can be applied to both text and pictures.
(We will look at how to apply a link to a picture later.) By default, unvisited
text hyperlinks are displayed as underlined blue text, which may or may not
show the resource’s location. (See Table 3-1 for examples.
How links are displayed can be changed in the Page Properties dialog box
on the Background tab.
Within a link is a Uniform Resource Locator (URL), which provides the location of the targeted resource. URLs are generically referred to as Web
addresses and are now sometimes called Uniform Resource Identifiers (URIs).
34
URLs are built like the following:
protocol://servername/foldername/filename
FrontPage 2002 – Level 1
Page 39

When discussing the Web, the protocol is generally HyperText Transfer Proto-
Reference Material
Please Do Not Copy
col (HTTP). The protocol tells your browser how to ask for the file it’s trying
to locate. The rest of the URL tells the browser where to find the file. After the
colon, usually separated by two forward slashes, is the name of the server, or
host, that provides the file. After the server name, separated by one slash (/),
comes the path: usually a folder name and a filename. So in the following
URL, http://microsoft.com/office/default.asp, “http” is the protocol, the server
name is “microsoft.com,” the folder name is “office,” and the file name is
“default.asp.”
Addresses can be either relative or absolute. Relative addresses, for linking
resources that reside within a particular web’s folder structure (internal), use
only the path—omitting the protocol and server name. This saves you from
typing full URLs. For example, images/logo.gif is a relative address. Absolute
references can be used to link internal resources as well, but typically they’re
used to connect to resources outside your web. These URLs must be complete,
including protocol, server location, and file path. The aforementioned Microsoft
URL is an example of an absolute address.
Bookmarks Although a link is ordinarily used for connecting one page to another, a book-
mark link can connect to a specific target location either within the same page
or a target location in a different page within a web. Bookmark links allow
visitors to jump to a specific location on a page rather than requiring them to
scroll around trying to locate the content they want. Bookmarks can come in
handy in long pages that may have several sections. Typically, bookmark links
are relative addresses preceded by a pound sign (#), such as services.htm/
#repairs.
LESSON 3
Example: Text hyperlinks come in several varieties.
Table 3-1: Examples of Hyperlinks
Hyperlink Type Typical Address
Internal marketing/index.htm
Bookmark #top
Mailto mailto:service@somecompany.com
External http://www.microsoft.com/
Add Text Hyperlinks to Pages
Procedure
Reference:
Adding text hyperlinks to pages is what makes the Web go around. They provide depth and just-in-time flexibility to your content by allowing you to
leverage supporting information that’s available internally on your web or
externally on the World Wide Web. The fastest way to add a text hyperlink is
to just type a complete URL in an open page in Page view and let FrontPage
convert it into a link for you; however, for more control, we recommend the
following:
Lesson 3: Connecting Pages
35
Page 40

LESSON 3
Reference Material
Please Do Not Copy
On the rare occasion that you type a URL that contains two forward slashes
(//) in the URL’s path name, at the time this was written, FrontPage displays
the link properly on screen, but changes the URL behind the scenes, eliminating the second slash. You will need to modify the underlying URL
manually if you want it to be correct.
Select existing text for the link or place the insertion point where the new
1
link will be located.
Click the Insert Hyperlink button .
2
Add a ScreenTip to help identify the link.
3
If you don’t select existing text in step 1, you will have to enter the text
to be displayed.
Determine the type of link you want:
4
• Existing File or Web Page. (Link to an internal or external file or
page.)
• Place in This Document (Link to a bookmark.)
• Create a New Document. (Have the link create a new page for you.)
• Email Address.
Enter the address or location of the resource you want to link to and click
5
OK.
You can also drag a file from the folder list (internal) or a link from
your browser (external) and drop it where you want to create a link.
(The link displays the page’s title.) You can create links to files on your
computer, but you shouldn’t. Site visitors may not have access to your
computer, so those links will appear to be broken.
When you create links of any type, it’s a good idea to test, or follow, them as
you go to make sure they connect to the intended target resources. As we mentioned earlier, this can be done in Page view’s Normal pane by [Ctrl]-clicking
the link or right-clicking on the link and choosing Follow Hyperlink from the
shortcut menu. If you don’t want the page opened in Page view, switch to the
Preview pane and click the link. If the link doesn’t perform as you expect, it’s
considered “broken” and you should check to make sure your link is correct
and verify that the resource is still available. If you ever want to edit or
remove a link, simply right-click on the link and select Hyperlink Properties.
Then either change the link’s settings or click the Remove Link button before
clicking OK.
Although FrontPage can help you check links if links are broken (we will
look at how it does that later in this course), it’s not smart enough to tell if
a link’s target is the one you intended.
36
FrontPage 2002 – Level 1
Page 41

TOPIC B
Reference Material
Please Do Not Copy
Creating a Shared Border
With hyperlinks added to our “connecting pages” arsenal, it’s time to turn our attention to connecting page content. In this topic, you will learn how you can have the same content repeated
consistently on pages in your web.
Let’s face it. Many pages include duplicate items—especially when it comes to navigation elements, logos, and boilerplate text, such as legalese and contact information. And more often
than not, repeated information is positioned in the same place on every page. You could manually add the repeating stuff to every page in your web if it were only for a few pages;
however, that’s dull and tedious work, and you may not be consistent as you go. Can you
imagine the time you would waste if your web were 100 pages? FrontPage can streamline this
monotonous task for you by requiring you to enter that information only once.
Add Shared Borders
LESSON 3
Procedure
Reference:
A shared border is a reserved region on one or several pages in a web where
you can add content that will be displayed if the page is formatted with shared
borders. (In Page view, Shared Borders are displayed as dashed lines or boxes
along the edge(s) of a page.) For example, you might want a company logo
displayed at the top of each page, and an email link displayed at the bottom.
Figure 3-1: The Shared Border dialog box.
Shared borders are similar to headers and footers in that they contain consistent information that doesn’t change throughout a web at the top and bottom of
a page. As you can see in Figure 3-1, shared borders can also be added to the
left or right sides of pages. By making a change to a shared border on one
page, you automatically update the shared border on all other pages that use it.
To set shared borders in an open web:
Lesson 3: Connecting Pages
37
Page 42

LESSON 3
Reference Material
Please Do Not Copy
Choose Format→Shared Borders.
1
Select whether you want the borders applied to the current page or the
2
entire web.
The configuration of shared borders can be different for each page in a
web. For instance, just because the home page has a right-shared border doesn’t mean that every other page in the web has to have a rightshared border.
Select where you want the shared border(s) located and, if selecting Top,
3
Left, and/or Right, whether or not to include navigation buttons. (See Figure 3-1.)
If you include navigation buttons in your shared borders, FrontPage
automatically inserts navigation bars for you based on the site’s navigation structure. You will create the navigation structure in a few minutes.
Set border properties. (Each shared border can have a different back-
4
ground color or image.)
Click OK.
5
FrontPage
Components
Shared border content is stored in a hidden folder called _borders. To
see them, choose Tools→Web Settings and select the Advanced tab.
Under Options, check Show Hidden Files And Folders.
If you include navigation buttons in your shared borders, FrontPage automatically inserts a link bar for you based on the site’s navigation structure (which
you will create shortly). If a web’s navigation structure hasn’t been determined, FrontPage will insert a placeholder requesting that the page be added to
the Navigation view; otherwise, you will see a placeholder that prompts you to
edit the link bar’s properties. To modify a link bar’s properties, just doubleclick on it.
FrontPage components, formerly called webbots, are prefabricated elements
that you can easily insert in your pages. They add functionality without requiring you to have an in-depth knowledge of HTML or programming languages.
Some common components are comments, page banners, date and time
stamps, and link bars. In Page view, you can identify an item as a component
by placing the mouse pointer over it. If the mouse pointer icon changes to a
finger pointing at a page
You can also identify a component by looking at a page’s HTML.
, then you’re looking at a component.
38
FrontPage 2002 – Level 1
Page 43

TOPIC C
Reference Material
Please Do Not Copy
Adding Pages to a Web’s Navigation
Structure
You’ve connected pages manually creating hyperlinks between individual pages and you’ve
shared content between pages. Now it’s time to create a navigation structure for your web
which will allow FrontPage to create navigation elements for you.
With the pages in your web starting to add up, you need to start arranging pages in Navigation
view. Doing so not only creates a logical organization for your web, but it also allows
FrontPage to easily monitor the web’s content so that it can not only keep track of which
pages are connected to each other. FrontPage uses this information to create and support some
key Web components automatically. And anything that FrontPage can do to make your job
easier is worthwhile.
Importing a File versus Inserting a File
LESSON 3
Procedure
Reference:
Importing a file is different from inserting a file because, instead of just placing
a file in an open page, importing brings an actual copy of the file into the
web’s Folder List. The imported file then becomes part of the web and can be
added to the web’s structure. (The original file remains outside the web intact.)
To import a file into a FrontPage web:
Select the location where you want the file to be imported.
1
Choose File→Import.
2
Click Add File.
3
FrontPage can import nearly any file type there is, but you can specifically choose web pages, pictures, and Microsoft Office files from the
Files Of Type drop-down list.
Locate the file and select it; you can select multiple files if they are in the
4
same folder.
Click Open to add the file to the list.
5
Click OK to import the file.
6
As we mentioned earlier, the home page provides links to categories of information elsewhere in the web. Those areas might include:
• Products/services. Here’s where you supply descriptions of products and
services, possibly a catalog with prices and/or some way for visitors to
purchase the item.
• News. A news page keeps visitors updated as to what’s going on with
your company and industry events. You might find links to sales
announcements, online publications, and/or press releases on this page.
Lesson 3: Connecting Pages
39
Page 44

LESSON 3
Reference Material
Please Do Not Copy
• About us. Typically, this page relates or links to company histories, con-
tact information, mission statements, and so on.
• Help/support. Many companies use these pages to provide answers to fre-
quently asked questions or to a site map.
• Miscellaneous. These items (job opportunities, locations/driving directions,
legal/copyright/privacy statement, and related links) are typically
downplayed on sites because they are either static or are updated
infrequently.Use these page types to help generate ideas as you develop
your web content.
Add Pages to a Web’s Navigation Structure
Procedure
Reference:
Adding pages to a web’s navigation structure allows FrontPage to help manage
your files and put buttons on your web’s link bars. Depending on the link bar’s
properties, each page in the structure can represent a single button on a link
bar. To add pages to a web’s navigation structure:
If necessary, switch to Navigation view.
1
If you are adding existing pages from the Folder List:
2
a. Select the page in the Folder List.
b. Drag it into the contents area and drop it below the desired page.
If you are adding a new page to the navigation structure,
a. In the Navigation view contents area, select the page that will be
above the new page.
b. Click the Create A New Normal Page button. (The new page will be
added below the selected page.)
Rename the pages’ filenames, Navigation view names, and page titles as
3
needed.
Generally, webs have one of two main structure types: flat or hierarchical.
Similar to books, flat structures, the top structure in Figure 3-2, require visitors
to navigate a site in a linear fashion—usually clicking from left to right, from
one page to the next—with all information treated with equal importance. A
flat structure is very rarely used for an entire web because it lacks the flexibility of hierarchical structures. However, you can use a flat structure if you have
pages that you want visitors to view in order, like a slide show presentation for
instance.
40
FrontPage 2002 – Level 1
Page 45

Figure 3-2: Flat (top) and hierarchical (bottom) navigation structures.
Reference Material
Please Do Not Copy
A hierarchical structure, the bottom one in Figure 3-2, looks like a pyramid,
with general information presented first in upper pages (usually the home page)
and more specific information presented lower in the structure. In a hierarchical structure, an upper page is said to be a parent page to the child pages
below it.
LESSON 3
Changing
Navigation
View
Names
If an imported page already has a page title, when you add it to the web’s
navigation structure, the page title will become the default Navigation view
name. The problem arises when, more often than not, an existing page title is
either inappropriate or too long to be fully displayed by a page’s icon in Navigation view. (See Figure 3-3.) Further compounding the problem is that
Navigation view names are used as labels for page banner components and
buttons in link bars. So if the Navigation view name is long, the labels in
those elements will be truncated!
Figure 3-3: Long page titles are often truncated in Navigation view.
Changing the page’s Navigation view name solves this problem. (To change a
page’s navigation name, select a page in Navigation view, press [F2], type a
new name, and press [Enter].) This does cause a new problem. Because an
existing page’s title becomes the default Navigation view name, changing the
Navigation view name overwrites the page’s original title. So, for example,
changing a page’s default Navigation view name from “VOP: Products” to
“Products” also changes the page’s page title to “Products.”
Fixing Overwritten Page Titles
After a page has been added to Navigation view, you can modify the page’s
properties and enter the old page title without affecting the new Navigation
view name.
Lesson 3: Connecting Pages
41
Page 46

LESSON 3
Reference Material
Please Do Not Copy
TOPIC D
Inserting a Custom Link Bar Web
Component
Based on the web’s navigation structure, FrontPage automatically added hyperlinks to the link
bar that you added the shared borders. This topic will show you how to insert a new link bar
and manually add hyperlinks that you choose.
Link bars based on a web’s navigation structure are very helpful because they make it easy for
folks to find stuff in your web by providing them with a consistent navigation tool; however,
before FrontPage 2002, if you wanted to have a graphical navigation bar that directed someone
to a location outside your web, you had to go through all sorts of geeky gyrations, combining
hyperlinks with images. Those days are over. FrontPage can now create link bars with custom
links, including to those pages outside your web.
Create a Link Bar with Custom Links
Procedure
Reference:
Combining the best of both worlds—text hyperlinks and link bars—you can
mix internal and external links.
Open the page that will contain the link bar and place the insertion point
1
where you want the bar.
Choose Insert→Navigation to display the Insert Web Component dialog
2
box.
From the Choose A Bar Type list, select Bar With Custom Links and click
3
Next.
If desired, choose an appropriate bar style and click Next. (We recom-
4
mend selecting Use Page’s Theme, the default.)
Choose between a horizontal and a vertical orientation and click Finish.
5
Name the new link bar and click OK.
6
Add links to the files you want. (Change the order of the links if desired.)
7
Click OK to insert the custom link bar.
8
You can reuse custom link bars in other pages in the same web by repeating
the steps 1 through 4 above, and when the Link Bar Properties dialog box is
displayed, select the bar you want from the Choose Existing drop-down list.
42
FrontPage 2002 – Level 1
Page 47

TOPIC E
Reference Material
Please Do Not Copy
Removing a Page from a Web’s
Navigation Structure
Now that you have a hierarchical structure and have added link bars, it’s time to learn what to
do when you have to remove pages from that structure. Pages come and pages go, and when
they have to go, it’s important that you send them packing properly. In this topic, you will
learn how to remove a page from a web’s navigation structure without deleting it.
Your company just launched its most important product line in years. You’ve been working on
the related web for weeks and just put the finishing touches on it last night, posting the rebate
page. The site just opened it to the public and the orders are coming in much faster than
expected. A panicked sales manager calls from the road and demands the product’s rebate page
be removed immediately, explaining there’s no way that a $100 product has a $75 rebate. He
goes on to further state that the product shouldn’t even have a rebate because its new. “Delete
the page!” he commands. So you do. No sooner than you delete the page, the sales manager’s
boss calls and explains that the rebate is in fact valid for the first week, to try and boost sales.
She asks the page to be put back, but you just deleted it so you will have to recreate the page.
You should have just removed the page from the web’s structure.
LESSON 3
Remove a Page from a Web’s Navigation
Structure
Procedure
Reference:
What Happens When
You Choose
to Remove
a Page?
Two of the most common reasons for having to remove pages from a web’s
structure are: outdated information (the page is no longer needed so it can be
deleted), or a page needs to be corrected (it only needs to be removed temporarily for editing). As always, you should manage all web files from within
FrontPage.
In Navigation view, select the page that you want to delete.
1
Delete the page.
2
Then in the Delete Page dialog box, select either Remove Page From The
3
Navigation Structure or select Delete This Page From The Web.
Click OK.
4
When you press [Delete], FrontPage gives you an opportunity to think about
what you really want to do with that file. Will you ever need the page again?
If that’s possible, you select Remove Page From The Navigation Structure, and
the page is removed from the hierarchy in Navigation view and any corresponding button on link bars will be removed as well. The thing to remember
is that if you remove a page from the navigation structure, the page’s file is
not deleted; it remains in the Folder List. If you select Delete This Page From
The Web, then the file is gone; it’s gone from the web structure, gone from the
link bars, gone from the file list, and gone from the web. Deleting a file is permanent; it cannot be undone.
Lesson 3: Connecting Pages
43
Page 48

LESSON 3
Reference Material
Please Do Not Copy
Lesson 3 Follow-up
In this lesson, you learned how to create hyperlinks by creating internal and external text links.
Then, you inserted and linked to bookmarks within the same page and to bookmarks that are
located in other pages. Next, you added and modified the properties of shared borders and
applied a prefabricated element to your page (referred to as FrontPage components) in the
form of page banners and comments. Then, you viewed examples of both flat and hierarchical
navigation structures. Also, you created a hierarchical navigation structure by adding existing
and new pages beneath the home page in Navigation view. Next, you inserted a link bar Web
component with custom links into your page. Finally, you learned how to remove a page from
a web’s navigation structure. By connecting pages in a web, you provide your visitors with a
way to find all the content your web has to offer.
1. Some web designers prefer the control of typing internal and external hyperlinks for
their webs. Others prefer letting FrontPage handle the links in its link bars. Which
option do you think you will use? Will you use both?
Answers will vary.
2. What benefits do you think that shared borders can provide for your web? Would you
ever modify the borders? If so, why? If not, why not.
Answers will vary.
44
FrontPage 2002 – Level 1
Page 49

LESSON 4
Reference Material
Please Do Not Copy
Adding Visual Appeal to a
Web
LESSON 4
Lesson Objectives:
In this lesson, you will add, edit, and link pictures, as well apply and modify themes.
You will:
• insert a picture from a file into a page.
• edit a picture using the Pictures toolbar, modify its properties, and save the changes.
• add hotspots to a picture to create an image map.
• create a new drawing by adding and removing pieces of WordArt and AutoShapes before
resizing the canvas.
• insert a Photo Gallery Web component.
• modify a photo gallery by removing a picture, editing a picture, and changing the compo-
nent’s layout.
• apply an existing FrontPage theme to an entire web.
• modify a theme’s colors, save the theme with a new name, and apply the theme to a
single page.
Lesson 4: Adding Visual Appeal to a Web
45
Page 50

LESSON 4
Reference Material
Please Do Not Copy
Introduction
Until now you have been working with tables, text, and connecting pages. This lesson will
teach you how to add more visual appeal to the pages in your web.
As a homework assignment in school, did you ever have to read a book that didn’t have any
pictures in it? And even the pages were stark white with black text? No matter how engaging
the story was, it was probably a chore just to get through it. Webs without visual appeal are
just like that book with one exception. Your web is unlikely to be a required reading! That
means if it doesn’t look good, your visitors will leave without a second thought. Adding
graphical elements can make your web, and in turn, its content, more attractive.
TOPIC A
Adding a Picture to a Page
Now that your pages contain text content, it’s time to dress them up a bit. One of the first
steps to making your web look better is to add pictures to its pages. You will learn how to do
that in this topic.
Pictures are a fantastic ways to add variety and information to your pages. For example, logos
convey a sense of location as visitors click through your site. A picture of an employee can
“put a face to a name” while adding a feeling of familiarity. Pictures deliver a lot of bang for
their buck.
Add a Picture to a Page
Procedure
Reference:
Picture
Types
One reason webs are so popular is that they quickly and easily enable you to
include pictures in web pages. You can import images, or pictures, to your
web, insert them on pages, align them with text, and add hyperlinks to them.
Place the insertion point where you want the picture to be located.
1
Click the Insert Picture From File button on the toolbar. (Or choose
2
Insert→Picture→From File.
Select the name of the picture and click Insert.
3
Pictures used on web pages should be one of two file types: Graphics Interchange Format (GIFs) or Joint Photographic Expert Group (JPEG) format.
Ordinarily, the image file format you will use, GIF or JPEG, will be determined by the purpose of the image. A good general rule for folks new to web
images is to use the GIF image file format for nearly all web images. Because
GIF files can contain only up to 256 colors, producing a relatively small file
size, they are best used when creating small, solid-colored images, such as buttons and icons. When high image quality must be maintained, such as in
photos or images that have gradients and/or shading, use the JPEG image file
format because JPEG files can contain millions of colors, while still maintaining a relatively small file size.
46
FrontPage 2002 – Level 1
Page 51

You can insert other image types, but FrontPage will convert those with 256
Reference Material
Please Do Not Copy
colors or less to GIFs and those with more than 256 colors to JPEGs.
GIFs also support transparent backgrounds (i.e., you can select a color in
the GIF picture that will not be displayed by a browser). This makes it so
the inserted GIF doesn’t obscure any page background settings.
LESSON 4
Estimating
Page
Download
Time
Adding pictures to a page will increase the time it takes the page to download.
On average, you want to keep the download time under 10 seconds; otherwise,
visitors may lose patience and look elsewhere. To help you with this, in the
lower right-hand corner of the FrontPage application window, there is the Estimated Time To Download feature,
As the name implies, it estimates how long the page open in Page view will
take to transfer a file between your server and the visitor’s browser based on a
specified Internet connection speed; a 28.8 KB modem is the default
connection. As you add content to the page, such as pictures, this time will
increase.
You can modify the Estimated Time To Download feature’s connection speed
by clicking on the estimated time and selecting a different speed from the
pop-up list.
.
Lesson 4: Adding Visual Appeal to a Web
47
Page 52

LESSON 4
Reference Material
Please Do Not Copy
TOPIC B
Editing a Picture
You’ve inserted pictures and you may want to modify them once you see them on a page. In
this topic, you will learn how to edit them.
Not every picture you add to your pages will be perfect. Does that mean you can’t use it? Of
course not. FrontPage gives you several image editing tools you can use to get that picture in
shape.
Edit a Picture
Procedure
Reference:
FrontPage provides several useful tools on the Pictures toolbar that can be used
to change how a picture is displayed. The following table shows a few of the
available options.
Tool Options Allow You To
Rotate and Flip Rotate a picture left or right. Flip it hori-
zontally or vertically.
Contrast and Brightness Increase or decrease a picture’s contrast or
brightness.
Trimming and Color Control Cut, or crop, parts of the image you don’t
want, or set a transparent color, allowing
background colors and images to be seen.
As you edit a picture, if at any time you are unsatisfied with a change, you can
either undo it to remove one change at a time or you can click the Restore
button on the Pictures toolbar to restore the picture to its last saved version.
Once a picture has been saved, changes become permanent.
Select the picture to be edited.
1
If necessary, choose View→Toolbars→Pictures to display the Pictures
2
toolbar.
48
Use the tools on the Pictures toolbar to make any changes.
3
Modify the picture’s properties. (Double-click on the picture to display its
4
Picture Properties dialog box.)
Save the page.
5
Picture
Properties
Every picture has its own set of properties that affect its appearance (how text
wraps around it, its alignment and spacing, and size) and control how a
browser and visitor interact with the picture (alternative text and hyperlink).
See Figure 4-1.
FrontPage 2002 – Level 1
Page 53

LESSON 4
Reference Material
Please Do Not Copy
Embedded
Files
Figure 4-1: The Picture Properties dialog box.
If a page contains a picture that currently resides outside a web, a picture that
was converted from a different file format, or an existing picture that was
edited, FrontPage will prompt you to save embedded files when you attempt to
save the page. In the Save Embedded Files dialog box, you can rename a file
(thereby preserving the original), change the folder location where the file will
be stored in the web, set an action (choose to save the file or not), and modify
a picture’s file format options.
Lesson 4: Adding Visual Appeal to a Web
49
Page 54

LESSON 4
Reference Material
Please Do Not Copy
TOPIC C
Creating an Image Map
You’ve added one hyperlink to a single picture making it more functional. But by adding multiple links to a single picture, you can essentially create your own link bar. In this topic, you
will learn how to add multiple hyperlinks to one picture.
There may be times when you want a picture to behave as a link bar, that is, one graphical
element with many links in it. This is especially true when you need a picture to convey more
meaning than a simple button label could. FrontPage allows you to add many hyperlinks to a
single image so that it behaves much the same way as a link bar. This gives you much more
freedom in how you visually present your hyperlinks.
Create an Image Map
Procedure
Reference:
A hotspot is a defined area in a picture that contains a hyperlink. They can be
shaped as a rectangle, circle, or as a polygon. (You can even add text labels to
pictures that can become hotspots.) A picture with one or more hotspots is an
image map. Essentially invisible in a browser, hotspots can be easily identified
because when you place the mouse pointer over a hotspot, it changes from a
pointing arrow to a finger icon. To create hotspots:
Select the picture to contain the hotspot.
1
On the Picture toolbar, select the Rectangular Hotspot tool.
2
Drag the mouse across the picture to draw the area that you want to be
3
the hotspot.
Release the mouse button to display the Create Hyperlink dialog box.
4
Create a ScreenTip and select the page that you want to use as the target
5
for the hyperlink.
Click OK.
6
You can always modify or delete a hotspot by selecting the picture containing the link(s) and then making the appropriate changes.
50
FrontPage 2002 – Level 1
Page 55
TOPIC D
Reference Material
Please Do Not Copy
Using the Drawing Tools
You’ve added pictures that were already created for you. In this topic, you will learn how to
create your own pictures on a page.
Sometimes you are in a hurry and you have an idea of what you want a picture to look like,
but you just don’t have time to wait for the Art department to create a picture for you. What
do you do? Use FrontPage’s drawing tools to create a just-in-time solution.
Use the Drawing Tools
LESSON 4
Procedure
Reference:
FrontPage 2002 now supports drawing tools like the other Microsoft Office
applications, storing your AutoShapes, drawings, and WordArt as a series of
shapes—not as pictures themselves. In fact, you can copy drawings from other
Office XP programs and paste them directly into FrontPage. If you are going to
add drawn objects to add life to a page, we recommend placing the objects
into a drawing canvas. (A drawing canvas is an area that can contain drawn
elements.) The primary benefit of this is simple. A drawing canvas reserves a
resizable area in a page specifically for drawn objects so you can keep all of
them together.
Place the insertion point where you want the drawing canvas to be.
1
Choose Insert→Picture→New Drawing.
2
Use the Drawing toolbar to create and format elements.
3
Use the Drawing Canvas toolbar to size the canvas.
4
Deselect the drawing canvas.
5
A drawing canvas can be formatted like any other object in FrontPage—
double-click on the canvas to change its color and line formatting, size, layout,
and so on.
FrontPage uses Vector Markup Language (VML) to display drawn objects. The
upside is that such a format displays very fast in a browser that supports it.
The downside is, at the time this was written, only Microsoft Internet Explorer
5.0 and later do support it. To accommodate this shortcoming, FrontPage can
save the drawn elements as a GIF; and if the elements are in a drawing canvas, all of them are saved as a single GIF file.
You can draw objects individually outside a drawing canvas; however, if a
browser doesn’t support VML, each object will be displayed as a separate
GIF, increasing the page’s download time.
If some tools on the Drawing toolbar are grayed out, verify that your page
compatibility settings allow VML graphics. (Choose Tools→Page Options and
select the Compatibility tab. Under Available Technologies, check both VML
Graphics and Downlevel Image File.)
Lesson 4: Adding Visual Appeal to a Web
51
Page 56

LESSON 4
Reference Material
Please Do Not Copy
TOPIC E
Adding a Photo Gallery
You’re well on your way to adding visual appeal to your web, and you just learned how to add
WordArt and AutoShapes to a new drawing canvas object. Next up, you will learn how
FrontPage can make the grouping of pictures easier.
When you’re dealing with a lot of related pictures, placing them individually in a table can be
quite time-consuming. Then you would have to size each one, add descriptive text, and if it
doesn’t look good, you will have to rearrange everything until you are satisfied. But what if
you could put a bunch of pictures on a page all at once, and, as an added bonus, have them
nicely arranged and sized? How would you like the ability to quickly add text captions that are
formatted and perfectly aligned? What if you could choose from several different layouts with
just a few button clicks. Sound too good to be true? Not at all, FrontPage can now help you
add photo albums, catalogs, and slide shows to your web pages.
Add a Photo Gallery
Procedure
Reference:
A photo gallery is a Web component that arranges and displays pictures with
captions and descriptions that can be formatted like any other text. (See Figure
4-2.) To add a photo gallery Web component to an existing page:
If you want to create a new page with a photo gallery, you can use the
Photo Gallery page template.
Place the insertion point where you want the photo gallery to be.
1
Choose Insert→Web Component.
2
You can also choose Insert→Picture→New Photo Gallery and select a
layout option later.
From the Component Type drop-down list, select Photo Gallery.
3
Choose a Photo Gallery layout option.
Click Finish.
Add a picture. (You can add more than one picture at a time.)
4
For each picture, add a caption and descriptive text—formatting the text
as needed.
52
Click OK.
FrontPage 2002 – Level 1
Page 57

LESSON 4
Reference Material
Please Do Not Copy
Figure 4-2: An example of a photo gallery.
The photo gallery Web component can display your pictures and arrange in
one of four ways, as shown in Table 4-1: horizontally, vertically, as a montage,
or as a slide show.
Like any other FrontPage component, the photo gallery is a prefabricated
element that you can easily add to a page without having in-depth knowledge of HTML or programming languages.
Lesson 4: Adding Visual Appeal to a Web
53
Page 58

LESSON 4
Reference Material
Please Do Not Copy
Table 4-1: Samples of Photo Gallery Layouts
Layout Example
Horizontal
Montage
54
Slide Show
FrontPage 2002 – Level 1
Page 59

Layout Example
Reference Material
Please Do Not Copy
Vertical
A descriptive text option is unavailable in the montage layout.
LESSON 4
The Photo Gallery Web component automatically creates smaller versions, or
thumbnails, of your pictures. These smaller versions help reduce page download time. Clicking the thumbnail image in a browser will display its
corresponding larger image.
When you save a page containing a photo gallery, FrontPage converts pictures
into GIFs and JPEGs as needed and stores all related files in a new folder
named logically enough, photogallery. In the photogallery folder will be a
subfolder for every photo gallery in the web.
Lesson 4: Adding Visual Appeal to a Web
55
Page 60

LESSON 4
Reference Material
Please Do Not Copy
TOPIC F
Modifying a Photo Gallery
With a photo gallery in place, that doesn’t mean you are done. In fact, like any other Web
component in FrontPage, it’s quite likely that you will need to modify the gallery’s properties
or edit one of its photos. In this topic, you will learn how to do both of those possibilities.
Flexibility and convenience are the two most significant reasons to use a Photo Gallery Web
component. When you manually add, arrange, and edit pictures on a page, unless there’s a
decree from higher up, chances are you won’t want to make any changes. That’s because most
changes—especially layout-related ones—would be too difficult and time-consuming to do.
That’s not the case with the Photo Gallery Web component. With a few simple clicks, you can
make it look just how you want. And on top of that, the component conveniently provides justin-time access to some of the editing tools you would ordinarily find on the Pictures toolbar.
Modify a Photo Gallery
Procedure
Reference:
Cropping a
Picture
The true beauty of a photo gallery is being able to modify an existing one. You
can add, rearrange, and remove pictures. You can control how big FrontPage
will make the thumbnail images. You can even change which layout the component uses.
On top of all that, you can even edit the individual pictures right from within
the Photo Gallery dialog box—change a picture’s size, rotation, and/or eliminate portions of a picture. To modify a photo gallery Web component:
Double-click on the photo gallery you want to modify.
1
Make the desired changes to the gallery or the pictures it contains.
2
Click OK.
3
As we mentioned, the photo gallery Web component provides some picture
editing tools. One of those is the Crop tool. It allows you to display only the
part of a picture you want someone to see, omitting extraneous parts of the
picture.
56
FrontPage 2002 – Level 1
Page 61
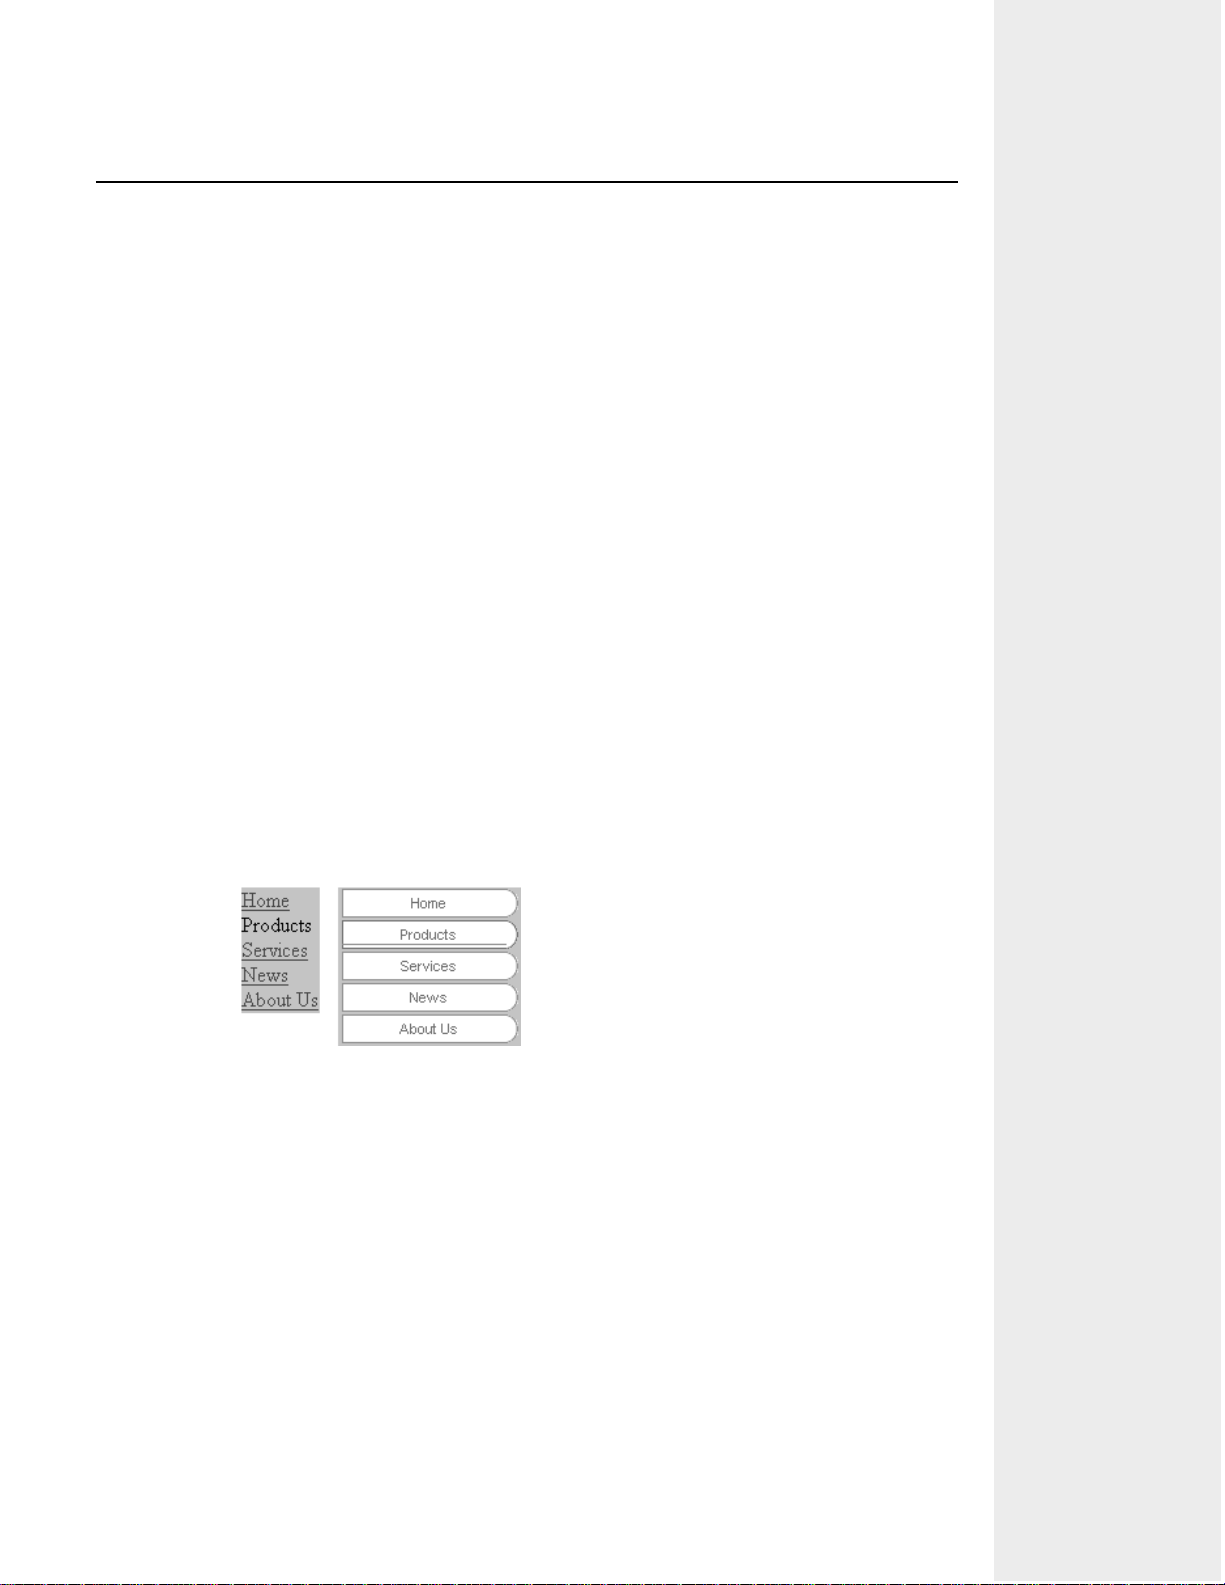
TOPIC G
Reference Material
Please Do Not Copy
Applying a Theme to an Entire Web
Up to this point, you’ve been beautifying your web one step at a time—adding page backgrounds, text formatting, tables, and images. In this topic, you will learn how to apply all of
these at the same time to your entire web, using a set of pre-packaged, predesigned graphical
elements that comes with FrontPage.
Content may be king, but if the emperor isn’t clothed properly, few people will want to look at
him, let alone listen to what he has to say. The same thing goes for your web. You might have
the best content in the world, but if it isn’t presented in an engaging, consistent, and pleasing
manner, people will look elsewhere to find similar information that meets these criteria. But
who are we kidding? It takes a lot of time to dress up your web properly, or does it? Using
FrontPage to enhance the look of your web is like having an interior decorator work on your
house. In both cases, the results are likely to be professional and pleasing to all who see it.
Apply a Theme to an Entire Web
LESSON 4
Procedure
Reference:
A theme is a set of complementary graphical design elements that you can
apply to a web to give it an overall, consistent, and professional look. You can
choose from over 50 themes that come with FrontPage.
Themes can affect colors (text, hyperlinks, table borders, and page backgrounds), graphics (background pictures, bullets, horizontal lines, link bars, and
page banners), and styles (font styles and sizes for heading and text) for either
selected pages or all pages in a web. Figure 4-3 shows how elements, like link
bars, are affected by themes.
Figure 4-3: Link bar without a theme applied (left) and the same link
bar with a theme applied (right).
Applying a theme to your entire web enables you to quickly format each page
at the same time, and develop a consistent appearance without having to alter
each page manually. Note that when you apply a theme, unless you’ve specified otherwise, it overwrites the background formatting that you’ve already
applied and formats the page using the theme’s elements. To apply a theme to
an entire web:
If necessary, open the web to which you want to apply the theme.
1
Choose Format→Theme.
2
In the Themes dialog box, under the Apply Them To option, select All
3
Pages.
Lesson 4: Adding Visual Appeal to a Web
57
Page 62

LESSON 4
Reference Material
Please Do Not Copy
Select a theme from the list.
4
Select (or deselect) any of the following check boxes.
5
• Vivid Colors: Uses bright colors instead of the normal color set.
• Active Graphics: Uses some animated pictures for buttons and page
banners.
Not all themes have active graphics.
• Background Picture: Places a picture “behind” the page elements.
(Covers the page background color.)
• Apply Using CSS: Uses an external file called a Cascading Style
Sheet (CSS) to control the theme, rather than messing with the
page’s HTML code.
If your browser choice in the Page Options dialog box doesn’t
support CSS, this option may be grayed out.
Whether you apply a theme to a web or selected pages, you will be unable to
change the background using the Format→Background menu option because
themes control background properties. Additionally, with a theme applied, the
Background tab will no longer appear in the Page Properties dialog box. To
change the background, you will need to either modify the theme’s background
or remove the theme.
Clarifying
Apply
Theme To
Options
If you don’t like how a theme looks after you apply it, simply display the
Themes dialog box again and select No Theme from the list and click OK. A
theme will no longer be applied.
As we mentioned earlier, FrontPage gives you the option of applying a theme
to All Pages or Selected Page(s). But these options aren’t as clear-cut as they
first appear. Let’s take a closer look at the All Pages option first. It really
doesn’t affect “all pages” because it won’t apply to any page that has had a
theme applied to it individually using the Selected Page(s) option. So if your
web contains pages that have a different theme, you will need to remove the
different theme first and then apply the new theme to all pages. As for the
Selected Page(s) option, yes, you can apply a theme to a page or more at a
time. The option can refer to just the page currently displayed in the Normal
pane of Page view, or a file or files selected in the Folder List.
58
FrontPage 2002 – Level 1
Page 63

TOPIC H
Reference Material
Please Do Not Copy
Modifying a Theme and Applying It
to an Individual Page
With a theme applied to your entire web, you will learn in this topic how you can modify a
theme to suit your needs and then apply your new custom theme to just one page.
Themes supplied by FrontPage are great time savers, but they’re not very particular in how
they affect elements on your pages. For example, see Figure 4-4; one of your pages has a
white callout with black text in it. You apply a theme that has a light-colored normal text.
Because themes don’t affect drawn elements, the callout remains white, but the normal text in
the callout becomes light—making the text nearly impossible to read. The ability to customize
a theme’s colors will help you avoid this problem.
LESSON 4
Figure 4-4: Sometimes themes need to be customized.
Modify an Existing Theme and Apply It to an
Individual Page
Procedure
Reference:
Every item in a theme can be modified. You can change entire color schemes
from other themes or you can modify just the color of an individual element,
such as a theme’s background color. You can change which graphics and label
fonts a theme uses, too, and even the text styles’ colors for the various styles.
To modify a theme:
Display the Themes dialog box.
1
Lesson 4: Adding Visual Appeal to a Web
59
Page 64
LESSON 4
Reference Material
Please Do Not Copy
Select whether to apply the soon-to-be modified theme to all pages or just
2
the selected page.
Select the theme you want to alter.
3
Click the Modify button and make any necessary changes to the colors,
4
graphics, or text.
When you are done making changes, save the color scheme with a new
5
name.
You won’t be able to save the modified theme with the same name
because themes that come with FrontPage are read-only.
Click OK to apply the modified theme.
6
Deleting a
Custom
Theme
Once you have created your newly modified theme, it becomes available to
any other new or existing web; however, if for some reason a custom theme is
no longer needed, you can easily remove it by selecting it in the Themes dialog box and clicking Delete. (You cannot delete the themes that come with
FrontPage.)
Lesson 4 Follow-up
You began this lesson by learning about the two primary picture types used in web pages, GIF
and JPEG, and how they should be used when estimating a page’s download time. Then, you
learned how to edit a picture using the Pictures toolbar, modified its properties, and embedded
the picture into a page. Next, you learned how to add hotspots, which are defined areas within
a picture that contain a hyperlink to a picture to create an image map. An image map is essentially a picture that consists of one or more hyperlinks, or hotspots. Then, you learned how to
create a new drawing that contains a piece of WordArt and an AutoShape. Next, you added a
Photo Gallery Web component, which is used to arrange and display pictures with captions and
descriptions. Each image within a photo gallery contains a thumbnail image automatically, to
increase download time. Then, you modified the Photo Gallery component by removing a picture, editing a picture by cropping, and rearranged pictures to change the component’s layout.
You then viewed various types of themes, which are sets of complementary graphical design
elements that can be applied to a page/web to achieve an overall professional “look.” Then,
you applied a specific theme to an entire web so that each page fits within the same design.
Finally, you learned how to modify the existing theme of an individual page by changing its
background color. This may seem like a lot, but by taking the time and effort to make your
web look good, you help to ensure that visitors will want to return to your site.
60
1. In your opinion, how important do you think it is to add visual appeal to a web? Is it
more or less important than providing engaging content? Or is it about the same?
Answers will vary.
2. What’s more important to you when creating a visual look for your web? Large attractive graphics or page download speed. Why? Is there a way to have both?
Answers will vary.
FrontPage 2002 – Level 1
Page 65

LESSON 5
Reference Material
Please Do Not Copy
Preparing and Publishing a
Web
LESSON 5
Lesson Objectives:
In this lesson, you will prepare a web for publishing.
You will:
• create and complete a task.
• move files from the root directory into their appropriate folders.
• use the Site Summary report to observe a web’s current condition.
• display the Hyperlinks report from the Site Summary report, and then verify and correct a
broken link.
• spell check an entire web and use the Find And Replace command to substitute one
phrase for another.
• publish a completed disk-based web to the Personal Web Manager.
• publish a server-based web to a local folder on your computer, creating a backup copy.
Lesson 5: Preparing and Publishing a Web
61
Page 66

LESSON 5
Reference Material
Please Do Not Copy
Introduction
For all intents and purposes, the web production stage is winding down and it’s time to prepare your web for the third phase of the web creation process—publishing. This lesson will
show you how to get your web ready, as well as how to publish it to a Web server.
We’ve all seen web pages that have spelling errors, hyperlinks that don’t work, and even pages
with missing graphics. These are all signs of a sloppy web. Before you put your web out for
the world to see, you want to make sure it’s as complete and error-free as possible. Again, the
World Wide Web is a very competitive place and if your web has problems, visitors will leave
your site to find what they want elsewhere.
TOPIC A
Creating and Managing Tasks
The first two stages of web creation (planning and production) have been reviewed. In this
topic, we will cover an essential step to prepare your web for publishing—how to keep an
up-to-date list of things you need to do in a web.
It’s crunch time. The deadline looms and it’s nearly time to open your web to the world.
You’ve got dozens of “reminder” sticky notes plastered all around your monitor, a notebook
full of to-do lists, and hundreds of “Did I already do that?” questions bouncing around your
head. “Ah, confusion!” And if you’re working on a web with another person, double that confusion! How can you make sure nothing slips through the cracks? Use FrontPage’s tasks.
What is a Task?
If your cube is covered in notes to yourself, you will appreciate a useful FrontPage called
tasks. But before we can discuss tasks properly, we need to define what a task is and what it
can do.
Definition: In FrontPage terms, a task is simply a web-related chore that needs to be done.
Example: Typical tasks can include:
• Delete unnecessary files.
• Verify hyperlinks.
• Call Marketing for approval on the final language.
Ideally, tasks should be added and completed throughout the entire web creation process; however, at the very least, you should check the Tasks view
when you are putting the final touches on a web. You need to make sure that
all the tasks have been completed or, if not, then figure out if the incomplete
tasks are critical to publishing your web. If they are critical, you should complete them prior to publishing the web.
62
FrontPage 2002 – Level 1
Page 67

Task Details A task can be assigned to an individual or a workgroup, be given a priority,
Reference Material
Please Do Not Copy
and be associated with a particular file. Assigning tasks is best used for collaborative projects. Giving a task a priority of High, Medium, or Low can
denote a level of urgency. Associating a task with a particular page or file will
open the associated file when the task is started.
Tasks View The Tasks view, Figure 5-1, shows a list of all the tasks in the open web. The
view displays the current details for each task in a column format. (See Table
5-1.) Tasks view can be sorted by clicking the various column headings.
Figure 5-1: Tasks view.
Table 5-1: Tasks View Options
Column Heading Description
Status A task can be Not Started, In Progress, or Completed.
Task The name of the task.
Assigned To User name or workgroup that has been assigned to complete the
task.
Priority High, Medium, or Low, depending on how urgent a task is.
(Medium is the default.)
Associated With The name of the file a task is associated with.
Modified Date The date the associated file was last modified.
Description Details of the work that needs to be done.
LESSON 5
Create and Complete Tasks
Procedure
Reference:
Tasks may seem inconvenient at first, but once you begin to use them, you will
quickly appreciate them. Especially nice is the fact that you can create tasks
from pretty much any view. To create a task in FrontPage:
Select the page or file that’s related to the chore you want to complete.
1
This will associate the task with the selected file. (To create tasks not
associated with any file, like “Get new logo,” display the Tasks view.)
Choose Edit→Task→Add Task.
2
Name the task, assign it to a person or workgroup, set the priority, and
3
type a description if desired.
If you are part of a network workgroup, members of your workgroup
will show up in the Assigned To list.
Lesson 5: Preparing and Publishing a Web
63
Page 68

LESSON 5
Reference Material
Please Do Not Copy
4
Click OK.
To modify or delete an existing task, right-click on the task in Tasks
view and either select Edit Task or Delete.
Starting and
Completing
a Task
Show History
Tasks can either be associated with a file or not. To start a task that has a file
associated with it:
1. Display Tasks view.
2. Right-click on a task and select Start Task from the shortcut menu.
If the Start Task option is grayed out, that means that no page was
selected when the task was assigned. You should do the task and then
go back to Tasks view, manually mark the task as completed (rightclick on the task and choose Mark As Completed.
3. Make the changes and save the file.
4. When FrontPage asks if you want to mark the task as completed, click
Yes. (Clicking the No button will mark the task as “In Progress.”)
If a task is associated with a file type other than a web page, such as a
GIF, the associated editor—such as the Microsoft Photo Editor—will
display the file.
FrontPage keeps track of all tasks in a web, even those that have been
completed. But you may want to hide the completed tasks so only the tasks
that still need to be done are shown in the task list. To hide completed tasks,
right-click on a blank area of Tasks view, and uncheck Show History. (At the
time this was written, FrontPage has a quirk in it that may require you to first
check Show History, and then uncheck it again to hide completed tasks.)
64
FrontPage 2002 – Level 1
Page 69

TOPIC B
Reference Material
Please Do Not Copy
Organizing Your Web’s Files
You have created many files in your web and let’s face it, in your rush to put them together,
you weren’t very concerned about where they wound up. Let’s learn how to put them where
they belong.
The boss comes to you and asks you for a document he needs for a meeting in five minutes.
You frantically rummage through your desk looking under piles of papers, stacks of unfiled
folders, and in your recycling bin, but can’t find the document. Your co-worker, sitting next to
you, conveniently opens a folder and hands the boss a copy of the document he requested. He
gets praised, but you get a dirty look. By organizing your files in a meaningful and structured
way, you, your co-workers, and FrontPage can all locate and manage the web’s files quickly
and efficiently.
Organize Files in a Web
LESSON 5
Procedure
Reference:
Creating a
New Folder
Don’t let your web become a junk drawer with all the files strewn about in the
root folder. Similar or related files, like pictures, should be located in the same
subfolder, rather than strewn about in the web’s root folder. This makes managing them easy because they’re all in one place without having to sift through
other file types. When organizing your web’s files, be sure to only use
FrontPage’s Folder List or Folders view. Do not use Windows Explorer.
FrontPage will update links and rename file paths as needed to ensure your
links don’t get broken. If you organize files outside FrontPage, the application
will not be able to manage the files properly and you may wind up with a
“broken” web. To organize files within a web:
In either the Folder List or in Folders view, select the file(s) to be moved.
1
When it comes to moving files, you have a couple choices:
2
• Drag and drop the file(s) into the appropriate subfolder.
• Cut and paste the file(s) in the appropriate subfolder.
Drag and drop the file(s) into the appropriate subfolder.
3
You are not limited to using the folders supplied by FrontPage. To create a
new folder:
1. In either the Folder List or in Folders view, right-click on the folder that
will contain the new folder.
2. From the shortcut menu, select New→Folder.
3. Type a name for the new folder.
If you accidentally deselect the new folder, re-select it and press [F2] to
rename it.
4. Press [Enter] to confirm the name.
Lesson 5: Preparing and Publishing a Web
65
Page 70

LESSON 5
Reference Material
Please Do Not Copy
If you decide you don’t want the new folder, simply select it and press
[Delete] to remove it from the web.
TOPIC C
Viewing FrontPage Reports
With files organized, it’s time to let FrontPage review the web.
We are only human with many distractions—phones ringing, deadline pressures, and co-worker
interruptions. At times, it’s difficult sometimes to remain focused, and we make mistakes. Who
hasn’t said, “How did I misspell that?” or “I thought for sure I did that!” Fortunately,
FrontPage can prevent us from making many of those lack-of-attention errors.
Use FrontPage Reports
Procedure
Reference:
FrontPage reports are web analysis tools that offer a common-sense path to
managing particular aspects of your web so it remains as fast and efficient as
possible. Each report points to site-related matters that may deserve your
attention. The Site Summary report, see Figure 5-2, is where you should start
when it’s time to turn your attention to the overall condition of your site. It
provides a general overview of the most significant reports, helping to identify
possible web-related problems, and often supplies hyperlinks to those reports
for quick access.
Some reports require a live Internet connection. Be sure your connection is
working.
66
Figure 5-2: The Site Summary report.
In addition to the Site Summary report, FrontPage arranges individual reports
in four categories: Files, Problems, Workflow, and Usage. (See Table 5-2.)
Each of these categories contains related reports that provide useful details.
FrontPage 2002 – Level 1
Page 71

Table 5-2: FrontPage Report Categories
Reference Material
Please Do Not Copy
Report Category Description
Files Display a list of all files in a web, recently added or
changed files, as well as older files.
Problems Show a list of unlinked files, slow pages (in terms of down-
load time), broken hyperlinks, and component errors.
Workflow Show where a file is in the production process and whether
or not it will be included when the web is eventually
published.
Usage Display site activity statistics collected by the web’s server.
To view a report:
Choose View→Reports.
1
Select the report you want to view from the appropriate category.
2
You can also click Reports in the Views bar, and then select a report
from the Reports toolbar.
LESSON 5
Recent,
Older, and
Slow Pages
Under the Files report category, there are a few reports that have to do with an
individual file’s size and age. By default, FrontPage considers a file recent if it
was added to a web within 30 days. It considers a file old if it hasn’t been
updated in 20 days. And it calls a page “slow” if it takes longer than 30 seconds to transfer from a server to a visitor’s browser over a 28.8 KB modem
connection. Based upon your own criteria and the typical Internet connection
speed of your target audience, you may want to adjust these settings. Choose
Tools→Options and select the Reports View tab.
Lesson 5: Preparing and Publishing a Web
67
Page 72

LESSON 5
Reference Material
Please Do Not Copy
TOPIC D
Correcting a Broken Link Using the
Hyperlinks Report
The Site Summary report provides a snapshot of the current condition of your web. Within the
Site Summary report, there’s no more important report than the Hyperlinks report.
You’ve taken great pains to ensure that you linked all elements in your web properly. Unfortunately, not everyone is as careful as you are. If you collaborated on the web with others, some
of your web’s internal links may be broken. Additionally, if your web uses external links, you
are going on trust that the target file is still in the same place. For peace of mind, you should
check each link in a web. One problem is that in larger webs, this would take a lot of time. A
solution? Let FrontPage check the links for you.
Correct a Broken Link Using the Hyperlinks Report
Procedure
Reference:
The Hyperlinks report displays good links (ones that connect to items) or bad
(broken because either the URL is wrong or the target file no longer exists in
the expected location). It will also display links FrontPage hasn’t looked at yet;
these are called unverified links. If a link is good, the report shows a green
check mark and an “OK” in the status column. If a link is bad, you will see a
cracked, chain-link icon and the word “Broken.” If a link hasn’t been checked,
or verified, you will see a blue question mark and “Unknown.” (If unknown
links exist, FrontPage will automatically try to verify them when you run the
Hyperlinks report.) If the report does identify a broken link, you can correct it
immediately. To do that:
From the Site Summary report, in the Name column, click on the
1
Hyperlinks link.
If prompted, click Yes to let FrontPage verify unknown hyperlinks.
2
Double-click on the broken hyperlink.
3
You can go directly to the page containing the broken link by clicking
the Edit Page button, but it’s easier to edit the link in the Edit Hyperlink
dialog box.
Change the hyperlink in the Replace Hyperlink With text box. Browse for
4
the correct link, if necessary.
68
Select either Change In All Pages or Change In Selected Pages (if the link
5
exists in more than one page).
Click Replace.
6
Re-verify the edited link by right-clicking on it and selecting Verify
7
Hyperlink.
FrontPage 2002 – Level 1
Page 73

If the link is still broken, you may want to check to make sure your
Reference Material
Please Do Not Copy
Internet connection is working.
LESSON 5
Sorting and
AutoFiltering
Reports
Saving
Reports
When you display an individual report, not available for the Site Summary
report, often you will be given a long list of items. (In the All Files report of a
large web, you may see hundreds of files.) You can sort a report by clicking
the various column headings. For instance, if you wanted an alphabetical listing of items, you would click the Name column heading. You can also filter an
individual report by clicking on the AutoFilter down arrow to the right of a
column heading. Let’s say you were viewing the All Files report and you
wanted to see a list of only those files in the images folder. You would click
the AutoFilter down arrow to the right of the In Folder column heading and
select images. (To clear an AutoFilter, select All from the drop-down list.)
You can also create your own filter by selecting Custom from the AutoFilter
down arrow.
You may want to keep a copy of a particular report, perhaps to show to a
co-worker or your service provider. To create a copy of the report, you can
either:
• Click the Save button to save the report as an HTML page.
Even though the report is saved as an HTML page, the file is associated with Microsoft Excel.
• For more flexibility, right-click anywhere on the report and select Copy
Report, and then paste it in another application that can handle HTML
tables. Save it in that file format.You can then print it and/or email the
copy as needed.
If you want to keep a copy of the Site Summary report, you will either
have to take a screen capture image or print the screen. (For some
reason, FrontPage doesn’t allow you to save the Site Summary report).
Lesson 5: Preparing and Publishing a Web
69
Page 74

LESSON 5
Reference Material
Please Do Not Copy
TOPIC E
Using Text Editing Tools
Your links are intact, and one of the very last things you will do to prepare your web for publishing is to check its page content for editorial mistakes. FrontPage, as in Microsoft Word,
allows you to spell check a page, as well as find and replace text but with a couple
differences—which you will discover in this topic.
It’s crunch time. The web has to be published for internal review in the next hour. You know
your pages are littered with misspellings and you seem to recall that you needed to replace one
term with another, but you can’t remember which page the term was on, or, for that matter,
whether it is on multiple pages. What do you do? Start opening one page at a time to spell
check it and scan for the term? Would FrontPage make you do that? Of course not. Its flexible
text editing tools let you locate and change things over the entire web, saving you a ton of
unnecessary clicking and ensuring that you don’t miss a mistake!
Use Text Editing Tools
Procedure
Reference:
The primary difference between FrontPage’s text editing tools, Spelling and
Find And Replace, and those in Word, is that FrontPage allows you to choose
to scan multiple files for errors all at the same time. In addition to being able
to scan an entire web, you can select pages, or the current page, to speed
things up. To use the text editing tools:
Switch to Folders view.
1
If you want to spell check a file or files, select them.
On the Standard toolbar, click the Spelling button and select either
2
Selected Page(s) or Entire Web .
Press [F7] to start the Spelling tool.
Click Start. FrontPage lists the pages containing misspelled or unrecog-
3
nized words.
To correct the misspellings, double-click on a page to open it in Page
4
view. Use the Spelling dialog box to correct or verify the misspelling, and
when you have reviewed all errors, save and close the page and continue
on to the next page.
If you didn’t have time to correct the misspelled pages right away, you could
add them to a task list to be completed later simply by checking the Add A
Task For Each Page With Misspellings check box available in the Spelling dialog box.
70
Spell
Checking in
Page View
If you are viewing an open page in Page view, clicking the Spelling button
will check only that open page for errors. To spell check selected files or the
entire web in Page view, you can select any file in the Folder List, and then
click the Spelling button.
FrontPage 2002 – Level 1
Page 75

Replacing
Reference Material
Please Do Not Copy
Text
The Replace command in FrontPage behaves almost exactly like it does in
Microsoft Word; however, the FrontPage version is a diluted version. It doesn’t
allow you to look for character formatting, styles, or special characters—like
Word does. One plus is that the Replace command in FrontPage does allow
you to find text in HTML, if you scan multiple pages or the entire web. (The
option is unavailable if you are only looking in the current page open in Page
view.)
TOPIC F
Publishing Your Web to the Personal
Web Manager
You have planned and produced your web, completed all the tasks, and it’s now time for the
last stage of the web creation process, publishing your web.
Publishing is the culminating moment of all your hard work. It’s the opportunity to see the
entire web as visitors will see it. Whether you publish it to a “staging area” for internal review
or open the web to the target audience as if to say “Here it is. What do you think?”, publishing your web for whatever reason is generally a moment of satisfaction.
LESSON 5
Determining Your Personal Web Manager’s Path
Procedure
Reference:
Microsoft’s Personal Web Manager turns your computer into a “virtual” Web
server. This lets you create server-based webs without having to actually publish your work on the Web. Ordinarily, you will use the Personal Web Manager
as a staging area to test webs and their components to make sure everything
works properly. Before you can do any of that, you need to determine the path
to the Personal Web Manager on your computer.
In the system tray on the task bar, double-click on the Personal Web Man-
1
ager icon
Show Tips At Startup and click Close.)
If the icon is not in the task bar, choose Start→Settings→Control
Panel. Double-click on Administrative Tools, and then double-click on
Personal Web Manager. (If Personal Web Manager is not listed, it
wasn’t installed.) You can display the icon by choosing Properties→
Show Tray Icon.
. (If the Tip Of The Day dialog box is displayed, uncheck
Lesson 5: Preparing and Publishing a Web
71
Page 76

LESSON 5
Reference Material
Please Do Not Copy
In the Main screen of the Personal Web Manager, in the Publishing area,
2
it shows that Web publishing is on and that your home page is available
at http://servername. (See Figure 5-3.) That is the path to the virtual
server where you will be publishing your server-based webs. Write down
the path to your Personal Web Manager.
Figure 5-3:
Also, notice the path next to “Your home directory,” generally c:\inetpub\wwwroot.
That’s the local folder on your computer where FrontPage physically stores your webs
published to the Personal Web Manager.
The Personal Web Manager dialog box.
Close the Personal Web Manager dialog box.
3
Publish Your Web to the Personal Web Manager
Procedure
Reference:
In the simplest terms, publishing a web copies files from one location to
another. The Publish Web dialog box, see Figure 5-4, shows the disk-based,
source web on the left and the server-based, destination web on the right.
72
FrontPage 2002 – Level 1
Page 77

Figure 5-4: Publish Web dialog box.
Reference Material
Please Do Not Copy
Choose File→Publish Web.
1
LESSON 5
Publishing
Options
If it’s the first time the web has been published, you will be prompted to
2
enter a publish destination, such as the path to your Personal Web Manager, and a web name like http://servername/webname. (If you are
publishing the web to a new location, FrontPage asks if you want it to
create the web there. Click OK to accept the offer.)
In the Publish Web dialog box, change Options as necessary.
3
Click Publish.
4
Either view the published backup copy, view the publish log, or click
5
Done to return to the original web in FrontPage.
In the Publish Web dialog box, you can do some basic file management tasks
such as renaming and deleting files. You can even determine whether individual files will be published or not. (Files with green check marks next to
them will be published.) Right-click on a file to display its management
options. Also, these options, including the ability to publish an individual file,
are also available in the Folder List and in Folders view.
When you publish a web for the first time, FrontPage automatically places an
exact copy of the entire existing web on the new location that you designate—
maintaining hyperlinks, themes, and the web’s folder structure; however, when
you publish a web to a location that already contains a web, clicking the
Options button in the Publish Web dialog box lets you decide which pages will
be published, how changes are determined, and whether or not to keep a log
file of changes made during publishing. (See Figure 5-5.)
Lesson 5: Preparing and Publishing a Web
73
Page 78

LESSON 5
Reference Material
Please Do Not Copy
Figure 5-5: Publishing options.
Publishing Logs
FrontPage
Server
Extensions
The publish log is a temporary page displayed in a browser that is generated
during each publishing process. It lists all activities that took place, including
when the process started and stopped, what files were created, copied, deleted,
or renamed. It also shows any confirmation or warning messages.
FrontPage server extensions are a set of programs and scripts that support a
FrontPage web’s component elements, adding overall functionality to a web
and the Web server on which they are installed. If your Web server doesn’t
have the FrontPage server extensions installed, certain FrontPage Web components will not work—hit counters and search forms, for example. To find out if
your server has them installed, contact the server administrator.
Not all web presence providers offer complete access to FrontPage server
extensions. Again, check with the server administrator to see what options
are supported.
74
FrontPage 2002 – Level 1
Page 79

TOPIC G
Reference Material
Please Do Not Copy
Creating a Backup Copy of a Web
You planned your web, produced your web, and you have published your web. It’s time to
create a duplicate copy of your server-based web and store it somewhere locally (on your hard
drive, a local area network, or a removable storage media, like a CD or tape).
Having a duplicate copy of your web will provide you with “disaster recovery”—such as the
accidental deletion of webs. The duplicate also gives you roll-back options; if for some reason
you want to return to an earlier version of a web, you can publish the backup copy. In short,
backing up your web is a smart hedge against potential problems. It provides peace of mind.
Create a Backup Copy of Your Web
LESSON 5
Procedure
Reference:
Creating a backup of a server-based web is nearly identical to publishing a
web for the first time. The only difference is that you will need to change the
publishing location. To back up a server-based web,
Open the web you want to backup.
1
Choose File→Publish Web.
2
Change the To option and enter the publish destination that will store the
3
backup copy. (Again, if you are publishing the backup to a new location,
FrontPage asks if you want it to create the web there. Click OK to accept
the offer.)
Change Options, if desired.
4
Click Publish.
5
Either view the published backup copy, view the publish log, or click
6
Done to return to the original web in FrontPage.
Lesson 5 Follow-up
In this lesson, you first learned how to create and complete web-related chores, or tasks, that
need to be done. Then, you learned how to organize files in a web by moving them from the
root directory into each of their appropriate folders. Next, you learned how to use the Site
Summary report to observe a web’s current condition, in order to make adjustments for transfer sizes and to weed out old, unused pages. Then, you learned how to correct a broken link
using FrontPage’s Hyperlinks Report feature. Next, you used FrontPage’s text editing tools to
spell check an entire web and used the Find And Replace command to substitute one phrase
for another. Then, you learned how to publish a completed disk-based web to the Personal
Web Manager. Finally, you learned how to publish a server-based web to a folder (local folder)
on your computer, resulting in having a backup copy of your web made.
1. When organizing a web, would you consider it more important to organize your files as
you go, or after you are finished? Why?
Answers will vary.
Lesson 5: Preparing and Publishing a Web
75
Page 80

LESSON 5
Reference Material
Please Do Not Copy
2. Why might you want to back up your web? Have you ever had an occasion where you
could use another copy?
Answers will vary.
76
FrontPage 2002 – Level 1
Page 81

Course Follow-up
Reference Material
Please Do Not Copy
In this course, you learned how to create, edit, and publish web pages that include text and
pictures to an intranet or to the World Wide Web. Also, you learned how to apply formatting
to the different sections of web pages, incorporate FrontPage’s components into a web, and
create tables, text, and images. Now, when you need to create a web page for business or personal use, you now possess the skills to create a basic web.
1. When planning to create a web, what resources do you currently have available? What
resources would you need in order to successfully create the web?
Answers will vary, but may include: Existing content (brochures, catalogs, flyers, ads,
press releases, logos, photos, and so on), existing talent—support from other departments
(art, marketing, sales, corporate, and so forth), and existing hardware and software
(computers, servers, software licenses, and so on).
2. Consider the type of pictures or images that your web requires. Does FrontPage contain the necessary features and tools necessary to create and edit those graphics? Will
you need other software?
Answers will vary.
3. Considering the amount of content contained within your web, what navigational elements might you use to make it easier for site visitors to navigate the web? What
navigational elements might you choose to avoid? Why?
Answers may include: Link bars based on the web’s navigation structure, link bars containing custom links, and link bars with Next and Back buttons, image maps, and/or
manual (typed) hyperlinks. Reasons to avoid certain navigation elements may include: too
complicated to manage, too much room for error (especially when you enter manual
hyperlinks), and so on.
LESSON 5
4. How do you foresee using tables in your web?
Answers may include: For controlling page and content layout, or as easily formatted data
containers.
5. When you are planning to publish a web, what are some issues that you should consider?
Answers will vary, but may include: Running spell checks, organizing files, generating site
reports, and creating backup copies of a web.
What’s Next?
FrontPage 2002 - Level 1 is the first course in this series. FrontPage 2002 - Level 2, the next
course in this series, teaches students how to use the more complex features of FrontPage
2002. Other courses that may be of interest include: Web Design and Usability Techniques.
Lesson 5: Preparing and Publishing a Web
77
Page 82

NOTES
Reference Material
Please Do Not Copy
78
FrontPage 2002 – Level 1
Page 83

INDEX
Reference Material
Please Do Not Copy
INDEX
A
All Pages option, 58
AutoFilter feature, 69
AutoShapes, 51
B
bookmark links, 35
C
Cell Properties dialog box, 30
cells
formatting, 30
character formatting, 22
columns
inserting, 27
comments, 38
components, 38
custom link bars, 42
D
disk-based webs, 8, 72
drawing canvas, 51
drawing tools, 51
AutoShapes, 51
WordArt, 51
E
editing tools
Find And Replace, 70
Spelling, 70
embedded files, 49
Empty Web template, 14, 15
empty webs, 14
Estimated Time To Download feature, 47
F
files
importing, 39
inserting, 39
Fill tool, 28
Find And Replace editing tool, 70
flat structures, 40
FrontPage server extensions, 74
G
GIF, 46
GIFs, 55
Graphics Interchange Format
See: GIF
H
hidden folders, 16
hierarchical structures, 40, 41
home pages, 17
adding text, 21
creating, 18
defining, 17
formatting text, 22
inserting a table, 26
hotspots, 50
HTML view, 12
hyperlinks, 35
adding, 35, 36
creating, 35, 36
defining, 34
I
image maps
creating, 50
images, 46
adding hotspots, 50
Index
79
Page 84

INDEX
Reference Material
Please Do Not Copy
cropping, 56
editing, 48
intranets, 9
J
Joint Photographic Expert Group format
See: JPEG format
JPEG format, 46, 55
L
link bars, 38
creating, 42
N
Navigation view, 41
nested tables, 27
new folders, 65
Normal view, 12
P
page banners, 38
page compatibility options, 19
page names, 19
Page Properties, 18
page templates, 13
Page view, 70
Preview, 12
page views
HTML, 12
Normal, 12
pages, 2
paragraph formatting, 22
Paste Options smart tag, 21
Personal Web Manager, 71
photo gallery, 52, 53, 55
modifying, 56
Picture Properties dialog box, 48
Pictures toolbar, 48
pixels, 31
Preview In Browser button, 20
Preview pane, 20
Preview view, 12
Publish Web dialog box, 72, 73
publishing, 3
publishing logs, 74
R
Replace command, 71
reports, 66
AutoFiltering, 69
saving, 69
sorting, 69
viewing, 67
rows
inserting, 27
S
Selected Page(s) option, 58
server-based webs, 8, 72, 75
shared borders, 37
Show History feature, 64
Spelling editing tool, 70
styles, 22
T
Table Properties dialog box, 29
tables, 26, 27
deleting elements, 27, 28
editing elements, 27
formatting, 29, 30
selecting elements, 27, 28
sizing, 31
splitting, 32
using selected text, 31
tasks, 62, 63
completing, 64
creating, 63
defining, 62
starting, 64
Tasks view, 62, 63, 64
template wizards, 14
templates, 13, 14
text files
converting to a table, 31
text formatting
on characters, 22
on paragraphs, 22
text hyperlinks, 42
themes
applying to a web, 57, 58, 59
deleting, 60
modifying, 59
80
FrontPage 2002 – Level 1
Page 85

thumbnails, 55
Reference Material
Please Do Not Copy
U
Uniform Resource identifiers
See: URIs
Uniform Resource Locator
See: URL
unverified links, 68
URIs, 34
URL, 34, 35
V
Vector Markup Language
VML, 51
VML
view
Tasks, 64
views, 11
HTML, 12
Navigation, 41
Normal, 12
Page, 70
Preview, 12
Tasks, 62, 63
views bar icons, 11
INDEX
viewing, 10
wizards, 13, 14
WordArt, 51
World Wide Web, 2, 3
W
Web servers, 2
web site template, 15
web site templates, 13, 14
webs, 2, 3, 6
adding a picture, 46
adding pages, 40
applying a theme, 57, 58, 59
creating, 3, 4, 5, 7, 8, 9
creating a backup copy, 75
deleting, 16
editing a picture, 48
modifying a theme, 59
moving files, 65
naming, 15
opening, 10
planning, 7, 8, 9
publishing, 3, 73
removing a page, 43
renaming, 16
Index
81
 Loading...