

Page 1
Microsoft Exchange Titanium
Getting Started Guide
Exchange Documentation Team
Page 2

Page 3
Microsoft Exchange Titanium
Getting Started Guide
Exchange Documentation Team
Page 4

Copyright
This is a preliminary document and may be changed substantially prior to final commercial
release. This document is provided for informational purposes only and Microsoft makes no
warranties, either express or implied, in this document. Information in this document, including
URL and other Internet Web site references, is subject to change without notice. The entire risk
of the use or the results of the use of this document remains with the user. Unless otherwise
noted, the example companies, organizations, products, domain names, e-mail addresses, logos,
people, places and events depicted herein are fictitious, and no association with any real
company, organization, product, domain name, e-mail address, logo, person, place or event is
intended or should be inferred. Complying with all applicable copyright laws is the
responsibility of the user. Without limiting the rights under copyright, no part of this document
may be reproduced, stored in or introduced into a retrieval system, or transmitted in any form or
by any means (electronic, mechanical, photocopying, recording, or otherwise), or for any
purpose, without the express written permission of Microsoft Corporation.
Microsoft may have patents, patent applications, trademarks, copyrights, or other intellectual
property rights covering subject matter in this document. Except as expressly provided in any
written license agreement from Microsoft, the furnishing of this document does not give you any
license to these patents, trademarks, copyrights, or other intellectual property.
2002 Microsoft Corporation. All rights reserved.
Microsoft, Active Directory, ActiveSync, FrontPage, MSN, Outlook, Windows and
Windows NT are either registered trademarks or trademarks of Microsoft Corporation in the
United States and/or other countries.
The names of actual companies and products mentioned herein may be the trademarks of their
respective owners.
Published: December 2002
Applies To: Exchange Titanium Beta
Contributors: Patricia Anderson, Teresa Appelgate, Susan Hill, Jon Hoerlein, Aaron Knopf, Jyoti
Kulkarni, Michele Martin, Joey Masterson, Thom Randolph, John Speare, Randy Treit
Editors: Cathy Anderson, Lindsay Pyfer
Technical Reviewers: Exchange Product Team
Artist: Kristie Smith
Production: Stephanie Schroeder, Sean Pohtilla
Page 5

Table of Contents
Introduction
Introduction .............................................................................. 1
Chapter 1 3
Overview of Exchange Titanium Beta............................................ 3
Supported Use of the Beta........................................................................................ 3
Test Environments for Exchange Titanium............................................................... 4
Operating Systems.............................................................................................. 4
Coexistence and Upgrade from Previous Versions...........................................4
What Has Been Removed.......................................................................................... 5
Real-time Collaboration Features...................................................................... 5
M: Drive ............................................................................................................... 5
Key Management Service ..................................................................................6
Chapter 2
Clients ...................................................................................... 7
Outlook Improvements .............................................................................................. 7
Outlook Cached Mode Protocol and Synchronization Improvements ............. 7
Cached Mode Configuration............................................................................... 8
Kerberos Authentication .................................................................................... 9
Outlook Performance Monitoring....................................................................... 9
RPC over HTTP .................................................................................................. 10
RPC over HTTP Deployment Options ........................................................ 10
System requirements for using RPC over HTTP.......................................12
Deploying RPC over HTTP.......................................................................... 12
Outlook Web Access ................................................................................................ 20
Two Outlook Web Access Versions ..................................................................20
Use of Browser Language .........................................................................25
Logon/Logoff Improvements............................................................................27
Cookie Authentication Timeout.................................................................28
Clearing the Credentials Cache at Logoff.................................................29
Choice of Outlook Web Access Version....................................................29
Browser Support........................................................................................29
New User Interface ...........................................................................................30
Preview Pane .............................................................................................31
Page 6

ii Microsoft Exchange Titanium Getting Started Guide
New Two Line View....................................................................................31
Message Flagging......................................................................................33
Context Menus........................................................................................... 34
Set the number of messages displayed per page...................................35
Deferred Refresh of Views ........................................................................36
Access Search Folders (Saved Searches)................................................36
Notifications...............................................................................................37
Public Folders ............................................................................................37
Logoff .........................................................................................................37
Keyboard Shortcuts...................................................................................37
Right-to-Left Layout...........................................................................................38
Support for Rules..............................................................................................38
Spell Checking ..................................................................................................40
Tasks .................................................................................................................42
Task Requests Not Supported..................................................................43
Delete and Skip Occurrence ..................................................................... 44
Message Signatures.........................................................................................44
View User Properties.........................................................................................45
Easier Removal of Recipients .......................................................................... 46
Add Sender or Recipients to Contacts.............................................................46
Choose a Default Font...................................................................................... 47
Reply Header and Body Not Indented .............................................................47
Junk Mail Beacon Blocking .............................................................................. 47
Attachment Blocking ........................................................................................48
Sensitivity and Reply/Forward Infobar ............................................................ 49
Item Window Size .............................................................................................49
Meeting Requests............................................................................................. 50
Set Reminders ........................................................................................... 50
Forward Meeting Requests.......................................................................50
Compose New Message to Recipient From Address Book ............................ 50
Improved Performance..................................................................................... 51
S/MIME Support ...............................................................................................51
Outlook Web Access S/MIME Architecture..............................................51
Signing and Encrypting Mail......................................................................52
Certificate Validation with Outlook Web Access ...................................... 54
Certificate Enrollment................................................................................56
Configuring Outlook Web Access S/MIME ............................................... 56
Wireless Access to Exchange..................................................................................63
Wireless Synchronization Access.....................................................................63
Configuring Exchange Titanium for Wireless Synchronization Access ... 64
Delivery to User-Specified SMTP Addresses ............................................65
Configuring Devices for Wireless Synchronization Access...................... 66
Wireless Browse Access...................................................................................66
Browsing Exchange with a Supported Wireless Device...........................67
Page 7

Table of Contents iii
Unsupported Devices ................................................................................ 67
Configuring Exchange Titanium Beta to use Outlook Mobile Access .....68
Chapter 3
Administration Features............................................................71
New Mail-Enabled Objects in Recipient Management...........................................73
InetOrgPerson ...................................................................................................73
Creating an InetOrgPerson........................................................................ 74
Added Query-based Distribution Groups ................................................................74
What is a Query-based Distribution Group?....................................................74
How Does a Query-based Distribution Group Work?......................................75
Creating a Query-Based Distribution Group ....................................................76
Modifying Exchange SP3 Servers for Use with Windows 2000 Global Catalog
Servers .......................................................................................................76
Creating Query-based Distribution Groups...............................................76
Combining Multiple Query-based Distribution Groups ...................................78
Guidelines for Creating Query-based Distribution Groups .............................78
Deployment Recommendations for Query-based Distribution Groups..........80
Enhanced Exchange Features on User Properties.................................................81
Move Mailboxes in Exchange System Manager..................................................... 82
Enhancements to Queue Viewer.............................................................................84
Disable Outbound Mail.....................................................................................84
Queue Viewer Refresh Rate Settings...............................................................85
Find Messages..................................................................................................86
View Additional Information about a Queue....................................................87
Hidden Queues Exposed in UI.......................................................................... 88
Improved Public Folder Referral .............................................................................89
Improved Public Folder Interfaces..........................................................................90
Manually Starting Replication .................................................................................92
Microsoft Exchange Public Folder Migration Tool..................................................93
Mailbox Recovery Center......................................................................................... 94
Message Tracking Improvements........................................................................... 96
Enhanced Control of Message Tracking Logs in Exchange System Manager96
Enhanced Message Tracking Capabilities.......................................................98
Exchdump.................................................................................................................98
Chapter 4
Performance and Scalability Features......................................101
Improved Distribution List Member Caching........................................................101
Suppressing the Sending of Out of Office Messages to Individuals Within Distribution
Lists ........................................................................................................................102
Enhanced DNS based Internet mail delivery........................................................102
Improved Outlook synchronization performance.................................................102
Page 8

iv Microsoft Exchange Titanium Getting Started Guide
Improved Outlook Web Access Performance.......................................................103
Outlook Web Access Logon Options Can Improve Performance.........................103
Monitoring Outlook Client Performance ...............................................................105
Link State Improvements ......................................................................................107
Chapter 5
Reliability Features ................................................................ 109
Active/Passive Clustering Recommended ...........................................................109
Improved cluster failover time ..............................................................................110
Clustering Permission Model ................................................................................111
Exchange 2000 Model ...................................................................................111
Titanium Model...............................................................................................112
Kerberos Enabled by Default on Exchange Virtual Servers.................................113
Upgrading an Exchange 2000 Cluster and Exchange Virtual Server to Titanium113
Added Mailbox Recovery Center ...........................................................................114
Recovery Storage Group........................................................................................114
Improved Error Reporting......................................................................................114
Enabling Exchange to Automatically Send Error Service-Related Reports to Microsoft
................................................................................................................................117
Improved Virtual Memory Usage...........................................................................119
Chapter 6
Transport and Message Flow................................................... 123
Link State Improvements ......................................................................................124
Exchange will not change link state if no alternate path exists...................125
Link state improvements for Oscillating Connections..................................125
Configuring Cross-Forest SMTP Authentication ...................................................125
Step 1: Create a User Account in the Destination Forest with Send As Rights
..................................................................................................................127
Step 2: Create the Connector in the Connecting Forest .......................128
Internet Mail Wizard ..............................................................................................131
Configure an Exchange Server to Send Internet Mail...................................132
Configure an Exchange Server to Receive Internet Mail..............................141
Configure an Exchange to Send and Receive Internet Mail.........................149
Configure a Dual-Homed Exchange Server for Internet Mail .......................160
ArchiveSink Supports BCCs...................................................................................172
How ArchiveSink Works..................................................................................173
OnMessageSubmission Event ................................................................173
OnPostCategorize Event..........................................................................173
Turning On Archiving For Bcc Recipients.......................................................174
Step 1: Enable Archiving on an SMTP Virtual Server.............................174
Step 2: Set the SMTP Virtual Server Registry Key .................................175
DSN Diagnostic Logging and DSN Codes.............................................................175
Page 9

Table of Contents v
Configure DSN Diagnostic Logging................................................................175
DSN Codes Available in Exchange Titanium .................................................176
Support for Moving X.400 (MTA) and SMTP Queue Directory Locations............178
Connection Filtering...............................................................................................180
How Connection Filtering Works....................................................................181
How Real-time Black List Providers Match Offending IP Addresses............181
Understanding Black List Providers Response Codes..................................182
Specifying Exceptions to the Connection Filter Rule ....................................183
Enabling Connection Filtering ........................................................................183
Step 1: Create a connection filter...........................................................184
Step 2: Apply the Connection Filter to the Appropriate SMTP Virtual Servers
..................................................................................................................187
Inbound Recipient Filtering ...................................................................................188
Enabling Recipient Filtering ...........................................................................189
Step 1: Create a recipient filter...............................................................189
Step 2: Apply the Recipient Filter to the Appropriate SMTP Virtual Servers
..................................................................................................................191
Improved Ability to Restrict Relaying ....................................................................192
Improved Ability to Restrict Submissions (Restricted Distribution Lists)............193
Chapter 7
Storage Features ....................................................................195
Shadow Copy Backup ............................................................................................195
Using Shadow Copy Backup...........................................................................196
Recovery Storage Group.................................................................................196
Using a Recovery Storage Group ............................................................197
Overriding the Recovery Storage Group.................................................199
Microsoft Exchange Mailbox Merge Wizard .........................................................200
Improved Public Folder Store Replication ............................................................200
Improved Virus Scanning API ................................................................................201
Chapter 8
Development Features............................................................ 203
WMI Providers ........................................................................................................203
Active Directory Classes and Attributes................................................................205
Deprecated Development Technologies...............................................................205
Deprecated MAPI Technologies............................................................................205
Chapter 9
Deploying Exchange Titanium Beta...........................................207
New Features in Exchange Titanium Beta............................................................207
Exchange Server Deployment Tools ..............................................................207
Page 10

vi Microsoft Exchange Titanium Getting Started Guide
ADC Tools ........................................................................................................208
Microsoft Exchange Public Folder Migration Tool.........................................209
Improvements in Exchange Titanium Beta Setup.........................................209
Windows .NET Server 2003 Benefits ............................................................212
Prerequisites ..........................................................................................................212
Hardware Requirements ................................................................................212
File Format Requirements..............................................................................213
Operating System Requirements...................................................................213
Windows 2000 Server.............................................................................213
Windows .NET Server 2003 ....................................................................213
Upgrading Windows 2000 Server to Windows .NET Server..................213
Active Directory........................................................................................214
Permissions .............................................................................................214
Upgrading Front-End Servers .........................................................................215
Upgrading Active Directory Connector...........................................................216
Removing MIS Components...........................................................................216
Components Required for Wireless Support.................................................216
Removing Instant Messaging, Chat and KMS Components ........................216
Third-party Software .......................................................................................217
Installing Exchange Titanium Beta or Upgrading from Exchange 2000.............217
Run ForestPrep...............................................................................................217
Run DomainPrep.............................................................................................218
Install and Enable Required Services............................................................219
Run Exchange Titanium Beta Setup..............................................................222
Upgrading from Exchange 5.5 to Exchange Titanium Beta.................................222
Appendix A
Titanium Beta Schema Changes.............................................. 227
Page 11

i
Introduction
This guide provides important information about using the beta (build 6803.6) release of
Microsoft® Exchange Titanium Server, the latest version of Microsoft Exchange
Server. The purpose of this guide is to outline the new features in the Exchange
Titanium release and provide the basic information necessary to get started trying these
new features. This is not a comprehensive document for Exchange Server, but a guide
for getting started with testing and running this beta release.
This document supplements the release notes document (releasenotes.htm), and should
be read only after reviewing the release notes. The release notes contain critical
information about known issues with this beta release of Exchange Titanium. If you
have not yet read the release notes, you should read them now.
This guide is designed for Exchange administrators who will be testing and deploying
the Exchange Titanium beta. The beta is not supported in a production environment and
should only be deployed in a test lab. The guide assumes that you have an excellent
working knowledge of Exchange 2000. It is structured based on Exchange components
and contains chapters that explain what the new component features are, and how to get
started using them.
E-mail feedback on this document to
mailto:exchdocs@microsoft.com?subject=Feedback: Exchange Titanium Getting Started
Guide.
Page 12

Page 13

1
Overview of Exchange Titanium Beta
Microsoft® Exchange Titanium Server is the next release in the Microsoft Exchange
messaging server line of products. Exchange Titanium builds on the Exchange 2000
code base, providing many new features and improvements in areas such as reliability,
manageability, and security.
Exchange Titanium is the first Exchange release designed to work with Microsoft®
Windows® .NET Server 2003. Running Exchange on Windows .NET Server provides
several benefits, such as improved memory allocation, reduced Microsoft Active
Directory replication traffic, and rollback of Active Directory changes, as well as new
features such as volume shadow copy and cross-forest Kerberos authentication.
Exchange Titanium also runs on Windows 2000 Server.
Exchange Titanium works with Microsoft Outlook® 11 to provide a range of
improvements such as cached mode synchronization, client-side performance
monitoring, and support for RPC over HTTP, allowing users to connect directly to their
Exchange server over the Internet without needing to establish a VPN tunnel.
When combined with Windows .NET Server and Outlook 11, Exchange Titanium
provides a robust, feature-rich end-to-end messaging system that is both scalable and
manageable.
Supported Use of the Beta
The purpose of the Exchange Titanium beta is to give you an opportunity to try the new
Exchange features. You should roll out the beta in a test lab environment. None of the
features in the Titanium beta are supported in a production environment. Do not roll out
the beta in production; deploying the Exchange Titanium beta requires modifications to
Page 14

4 Microsoft Exchange Titanium Getting Started Guide
your Active Directory schema, which are permanent changes.
For information about supported operating system environments, prerequisites, and
other requirements for deploying the Titanium beta, see Chapter 9, "Deploying
Exchange Titanium Beta."
Test Environments for Exchange Titanium
This section explains the test environments that you can use to deploy the Exchange
Titanium beta.
Operating Systems
Exchange Titanium runs on Windows .NET Server 2003 and Windows 2000 Server
SP3 or later. Exchange Titanium has been optimized to run on Windows .NET Server,
and several Titanium features require Windows .NET Server.
Exchange Titanium is supported in all Active Directory forest environments: native
Windows 2000, native Windows .NET Server, or mixed Windows 2000 and Windows
.NET Server forests. When running in an environment with Windows 2000 domain
controllers and global catalog servers, the domain controllers and global catalog servers
that Exchange Titanium uses must all be running Windows 2000 SP3 or later. Exchange
Titanium will not use a Windows 2000 domain controller or global catalog server that is
not running Windows 2000 SP3 or later. This requirement affects both Exchange
Titanium servers and the Titanium version of Active Directory Connector (ADC). ADC
will not work with domain controllers or global catalog servers that are running a
version of Windows 2000 earlier than SP3.
Pre-release (beta) versions of Exchange Titanium are only supported in a test
environment. Exchange Titanium will not be supported on Windows .NET Server in a
production environment until it is released publicly.
Note Although Exchange 2000 SP2 and later is supported in an environment with Windows .NET
Server domain controllers and global catalog servers, Exchange Titanium is the first version of
Exchange that is supported when running on Windows .NET Server. Exchange 2000 is not
supported on Windows .NET Server.
Coexistence and Upgrade from Previous Versions
Exchange Titanium can coexist with Exchange 2000 and, when running in Exchange
mixed mode, with Microsoft Exchange Server 5.5 servers.
For Exchange 2000, Titanium supports in-place upgrades.
Page 15

Chapter 1: Overview of Exchange Titanium Beta 5
In-place upgrades are not supported for Exchange 5.5 servers. To upgrade from
Exchange 5.5 to Titanium, you must join an Exchange Titanium server to the Exchange
5.5 site, then move Exchange resources, such as mailboxes, to the Exchange Titanium
server. Use the Exchange Server Deployment Tools to migrate from Exchange 5.5 to
Exchange Titanium.
Although Exchange 2000 did support in-place upgrade from Exchange 5.5, the moveresources scenario is the recommended Exchange 5.5 to Exchange 2000 upgrade path.
What Has Been Removed
Although the bulk of this document discusses what is new in Exchange Titanium, there
are several features that existed in Exchange 2000 that have either been discontinued or
moved to other product lines. The following features have been removed:
• Real-time Collaboration Features
• M: Drive
• Key Management Service
Real-time Collaboration Features
Exchange 2000 supports numerous real-time collaboration features such as chat, Instant
Messaging, conferencing (using Exchange Conferencing Server), and multimedia
messaging (also known as unified messaging). These features have been removed from
Exchange Titanium. These real-time collaboration features will now be provided by a
new dedicated real-time communications and collaboration server, code-named
Greenwich, which is currently under development.
If you are upgrading from Exchange 2000 to Exchange Titanium, features such as
Instant Messaging will still work, but new deployments should use the Greenwich
server.
M: Drive
The Exchange information store (which uses the \\.\BackOfficeStorage\ namespace) has
traditionally been mapped to the M: drive on an Exchange server. The M: drive
mapping provided file system access to the Exchange store. The M: drive will be
disabled by default in Titanium. You can still interact with the information store using
the file system, but you will need to enter the path directly using the
\\.\BackOfficeStorage\ namespace. For example, to see the contents of the mailbox store
on an Exchange server in the mail.adatum.com domain you would type the following
from a command prompt:
Page 16

6 Microsoft Exchange Titanium Getting Started Guide
dir \\.\BackOfficeStorage\mail.adatum.com\mbx
The reason the M: drive mapping has been removed is that, in some cases, the mailbox
store would become corrupted from file system operations, such as running a file-level
virus scanner on the M: drive, or by running file backup software on the drive. For
Exchange 2000, you should consider disabling the M: drive mapping. See KB article
Q305145 for information about how to disable this feature.
Key Management Service
Exchange 2000 includes the Key Management Service, which works with Windows
2000 Certificate Services to create a public key infrastructure (PKI) for performing
secure messaging. With a PKI infrastructure in place, users can send signed and
encrypted messages to each other. The Key Management Service included with
Exchange 2000 provides a mechanism for enrolling users in Advanced Security, and
handles key archival and recovery functions.
Exchange Titanium no longer includes the Key Management Service. The PKI included
with Windows .NET Server 2003 now handles the key archival and recovery tasks that
were performed by the Key Management Service in Exchange 2000.
Page 17

2
Clients
This chapter focuses on the new features involving how clients access Microsoft®
Exchange. In addition to taking advantage of new Microsoft Outlook® 11 features,
Microsoft Exchange Titanium Server includes a much-improved Microsoft Outlook
Web Access client, as well as new support for mobile device access to Exchange.
Outlook Improvements
Outlook 11 works with Exchange Titanium to offer many enhancements. This section
introduces you to the improvements and new features in Outlook 11.
Outlook Cached Mode Protocol and Synchronization Improvements
Exchange Titanium and Outlook 11 allow users to read e-mail or perform other
messaging tasks in low-bandwidth networks and in situations where network
connectivity is lost. Notifications for requests for information from the Exchange server
will be eliminated on the user's Outlook client, allowing the user to work without
interruption using Outlook in low-bandwidth, high-latency networks.
Exchange Titanium combined with Outlook 11 significantly improves client
performance by reducing remote procedure calls (RPCs) and conversation between the
Outlook client and the Exchange server. This is accomplished in two ways:
• Cached mode. Outlook 11 clients will use the local Exchange mailbox data file
stored on their computer when possible, thus reducing the number of requests to the
server for data and improving performance for items that are stored in the cache.
Page 18

8 Microsoft Exchange Titanium Getting Started Guide
This new functionality eliminates the need to inform users of delays when
requesting information from the Exchange servers.
• Kerberos Authentication. Exchange Titanium allows Outlook 11 clients to
authenticate to Exchange Titanium servers using Kerberos authentication.
• Synchronization Improvements. Exchange Titanium will perform data
compression to reduce the amount of information sent between the Outlook 11
client and the Exchange Titanium servers. Exchange Titanium will also optimize
the communication between the client and the server by reducing the total requests
for information between the client and server.
The combination of Cached mode and the synchronization and optimization
improvements significantly enhances the end user experience associated with using
Outlook as a remote user. Dialog boxes that would display requests for information
from an Exchange server will no longer appear on a user’s Outlook client, because the
user will work from primarily from their local Exchange mailbox data file. More
importantly, when network connectivity is lost between the Outlook client and the
network, Outlook will operate without interruption.
Additionally, because users will work primarily from their local Exchange mailbox data
file, they will request less information from the Exchange servers in total, thus reducing
the total load on your Exchange servers.
Cached Mode Configuration
By default, new installations of Outlook 11 use Cached mode. If you are upgrading
from previous versions of Outlook to Outlook 11, you must configure the Outlook client
manually to use Cached mode by modifying a user's profile to use their local copy of
their Exchange mailbox.
To Enable Cached Mode for Outlook 11 Upgrades
1. On the computer with an upgrade of Outlook 11, click Start, click Control Panel,
and then double-click Mail. If you do not see Mail, you may need to switch to
classic view by clicking Switch to Classic View in the left pane under Control
Panel.
2. On the Mail Setup screen, click the E-mail Accounts button.
3. In the E-mail accounts Wizard, click the option button next to View or change
existing e-mail accounts, and then click Next.
4. On the E-mail Accounts screen, select your account and then click the Change
button.
5. On the Exchange Server Settings page, click the check box under Run Outlook
using a local copy of my Exchange mailbox.
Page 19
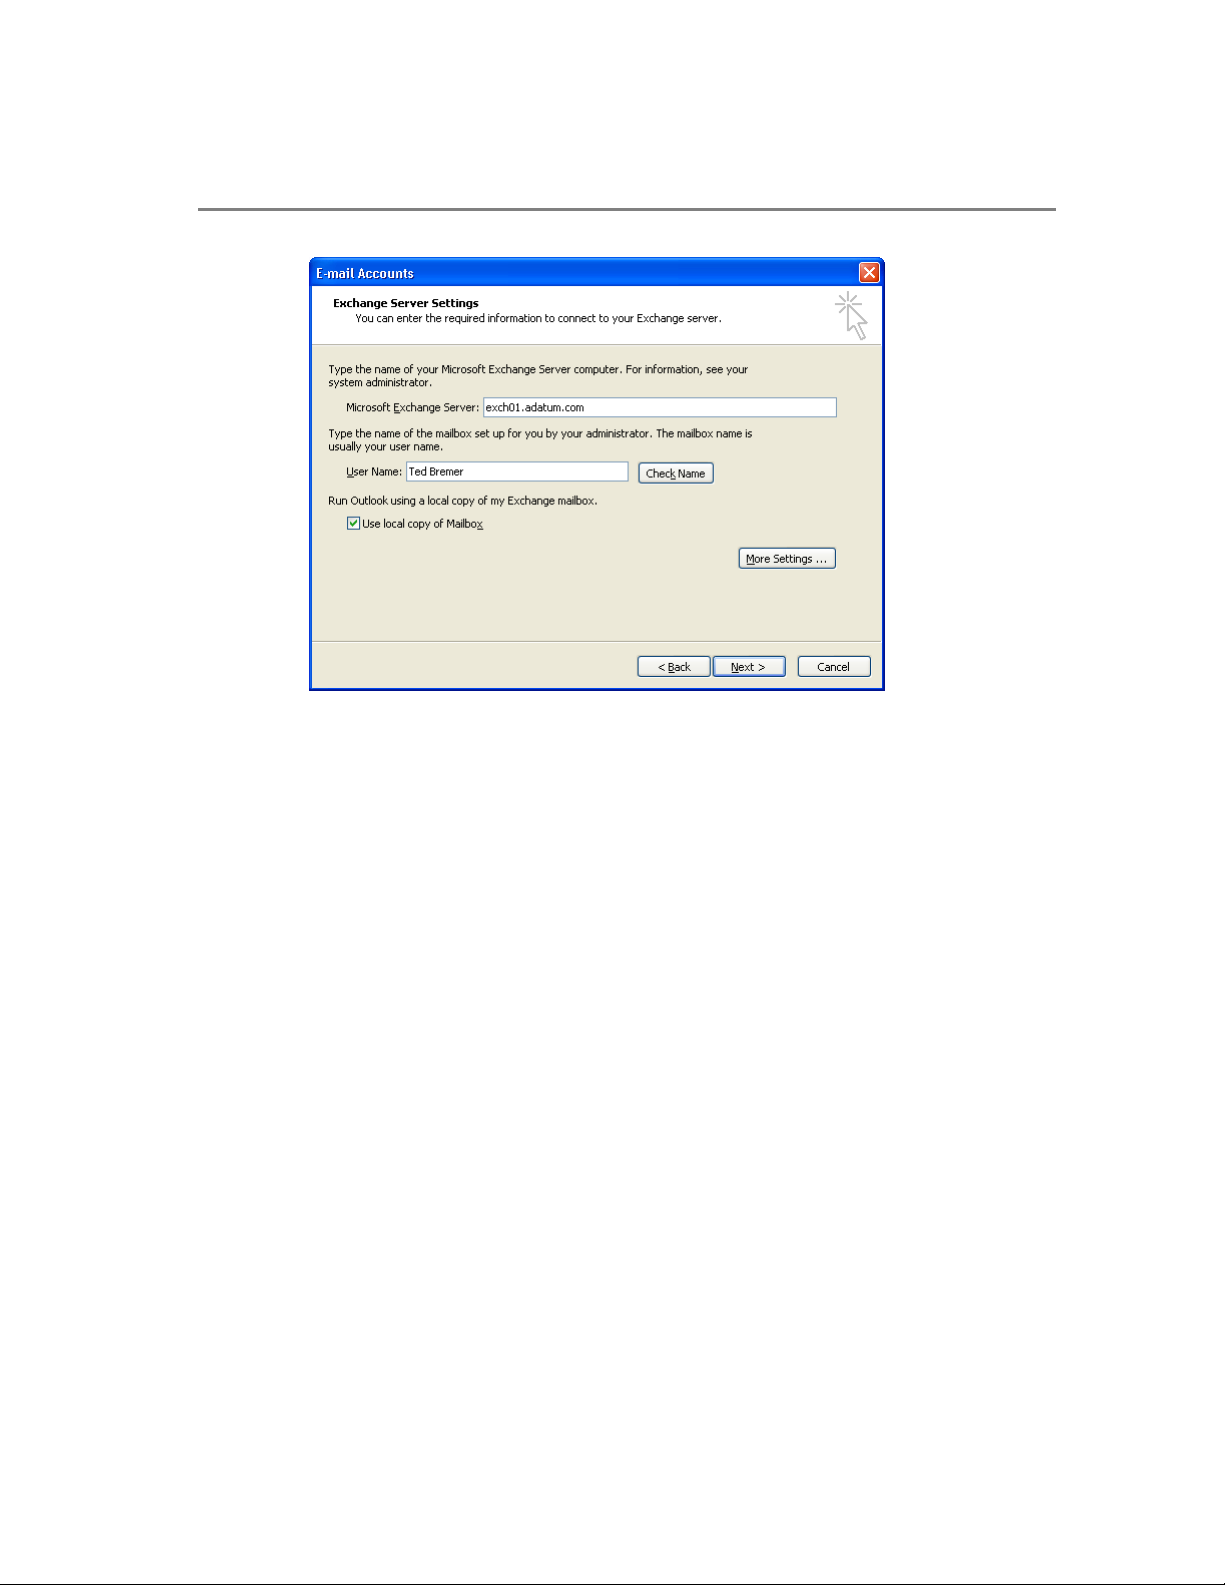
Chapter 2: Clients 9
Figure 2.1 The Exchange Server Settings dialog box
6.
Click Next, and then click Finish to save the changes to your local profile.
Kerberos Authentication
Exchange Titanium and Outlook 11 can now use Kerberos to authenticate users to the
Exchange Titanium servers. If your network uses Microsoft Windows® .NET Server
2003 domain controllers, your users can authenticate cross-forest to the domain
controllers in trusted forests allowing user accounts as well as Exchange servers to exist
in different forests.
Titanium uses Kerberos delegation when sending user credentials between an Exchange
front-end server and the Exchange back-end servers. Previous versions of Exchange
Server used Basic authentication when users used applications such as Microsoft
Outlook Web Access to send their credentials between an Exchange front-end server
and an Exchange back-end server. As a result, companies would need to use a security
mechanism such as IPSec to encrypt information from the Exchange front-end server to
the Exchange back-end servers
Outlook Performance Monitoring
Exchange Titanium now includes the ability to monitor client-side performance with
Outlook 11. For information on how to monitor client-side performance, see Chapter 4
"Performance and Scalability Features" later in this book.
Page 20

10 Microsoft Exchange Titanium Getting Started Guide
RPC over HTTP
Exchange Titanium and Outlook 11 combined with Windows .NET now supports RPC
over HTTP. This eliminates the need for a VPN to access Exchange information; users
running Outlook 11 can connect directly to an Exchange server within a corporate
environment over the Internet using HTTP. RPC over HTTP provides an RPC client
such as Outlook 11 with the ability to securely connect across the Internet to RPC server
programs and execute remote procedure calls. If the client can make an HTTP
connection to a computer on a remote network running IIS, it can connect to any
available server on the remote network and execute remote procedure calls. The RPC
client and server programs can connect across the Internet—even if both are behind
firewalls on different networks.
When you deploy RPC over HTTP, you configure your Exchange front-end server as an
RPC Proxy server. This RPC Proxy server will then specify which ports to use to
communicate with the domain controllers, global catalog servers and all Exchange
servers that the RPC client needs to communicate with.
RPC over HTTP Deployment Options
When you deploy RPC over HTTP in your corporate environment, you have several
deployment options based on where you locate your RPC Proxy server. The
recommended deployment strategy is to deploy Internet Security and Acceleration
(ISA) Server in the perimeter network and to locate your Exchange front-end server
within the corporate network. You can also locate the Exchange Titanium front-end
server acting as an RPC Proxy server in the perimeter network.
Option 1: Locating the RPC Proxy Server in the Corporate Network
By using ISA Server in the perimeter network to route RPC over HTTP requests and
locating the front-end Exchange server in the corporate environment, you eliminate the
need to open the ports that your RPC proxy server will need to communicate with the
computers that it needs. The following figure describes this deployment scenario.
Page 21

Chapter 2: Clients 11
Figure 2.2 Deploying RPC over HTTP with ISA Server 2000 in the perimeter network
By deploying ISA Server in the perimeter network, the ISA server will then be
responsible for routing RPC over HTTP requests to the Exchange front-end server
acting as an RPC Proxy server. When you choose this deployment option, you can then
configure the RPC Proxy server to use all ports within the specified range to
communicate with the servers that are required to use RPC over HTTP.
Option 2: Locating the RPC Proxy Server in the Perimeter Network
You can locate the RPC Proxy server on your Exchange Titanium front-end server
located inside of the perimeter network. In this scenario, it is recommended that you
limit the number of ports that the RPC Proxy server needs to a specific set of ports. The
following figure describes this deployment scenario.
Figure 2.3 Deploying RPC over HTTP on the Exchange front-end server in the
perimeter network
For information about how to configure the outlined deployment options as listed
above, use the steps to configure RPC over HTTP in this section.
Page 22

12 Microsoft Exchange Titanium Getting Started Guide
System requirements for using RPC over HTTP
To use RPC over HTTP, you will need Windows .NET Server as your operating system
on the following servers:
• All Exchange Titanium servers using RPC over HTTP.
• Exchange front-end server acting as the RPC Proxy Server.
• Domain controllers that communicate with the Exchange servers configured to use
RPC over HTTP.
• The global catalog server that the Exchange server configured to use RPC over
HTTP will use.
Exchange Titanium Beta must be installed on all Exchange servers that are used by the
RPC Proxy server. Additionally, client computers running Outlook 11 will need
Microsoft Windows XP Service Pack 1 (SP1) with the following hot fix: Q331320
Deploying RPC over HTTP
The following section describes how to deploy RPC over HTTP in your network
environment. Complete the following steps in the order listed to deploy RPC over
HTTP:
1. Configure your Exchange front-end server as an RPC Proxy server.
2. Configure the RPC virtual directory in Internet Information Services (IIS).
3. Modify the registry on the Exchange server that communicates with the Proxy
server to use a specified number of ports.
4. Open the specific ports on the internal firewall.
5. Create an Outlook Cached Mode profile for your users to use with RPC over HTTP.
After you have completed these steps in order, your users can begin using RPC over
HTTP to access the Exchange front-end server.
Step 1: Configure your Exchange front-end server to use RPC over HTTP
The RPC Proxy server processes the Outlook 11 RPC requests coming in over the
Internet. In order for the RPC Proxy server to know what to do with the RPC over
HTTP requests, you need to install the RPC over HTTP Proxy networking component
on your Exchange Titanium front-end server.
Configure your Exchange front-end server to use RPC over HTTP
1. On the Exchange Titanium front-end server running Windows .NET Server RC2,
click Start, click Control Panel, and then click Add or Remove Programs.
2. Click the Add/Remove Windows Components icon in the left pane of the Add or
Remove Programs page.
Page 23

Chapter 2: Clients 13
3. On the Windows Components screen, highlight Networking Services and then
click the Details button.
4. On the Networking Services component selection screen, select the check box next
to RPC over HTTP Proxy and then click OK.
5. On the Windows Components screen, click Next to install the RPC over HTTP
Proxy Windows component.
Step 2: Configure the RPC virtual directory in Internet Information Services
Now that you have configured your Exchange Titanium front-end server to use RPC
over HTTP, you must now configure the RPC Virtual directory in IIS.
To Configure the RPC virtual directory
1. Click Start, point to All Programs, click Administrative Tools, and then click
Internet Information Services (IIS) Manager.
2. On the Internet Information Services (IIS) Manager screen, expand the Web
Sites folder under your server, expand Default Web Site, right-click the RPC
virtual directory, and then select Properties.
3. On the RPC properties page, on the Connections tab, in the Authentication and
access control pane, click the Edit button.
4. In the Authentication Methods window, disable Anonymous access.
5. In the Authentication Methods window, in the Authentication access pane, select
one of the following:
• If you are have located your RPC Proxy server inside of the perimeter
network, select Basic authentication, and then click OK.
• If you are locating your RPC Proxy with the corporate network, select Basic
authentication, and then click OK
6. Click Apply and then click OK.
Your RPC virtual directory is now disabled for anonymous access and is set to use
Basic authentication. You must now configure your proxy server to use a specific set of
ports to communicate with the Exchange servers.
Step 3, Option 1: Configure the RPC Proxy server with ISA Server in the perimeter
network
If you have deployed ISA Server in the perimeter network and located your Exchange
front-end server acting as the RPC Proxy server in your corporate environment, use the
following procedure to configure the ports that the RPC Proxy server will use to
communicate with the server it uses for RPC over HTTP communication. You will do
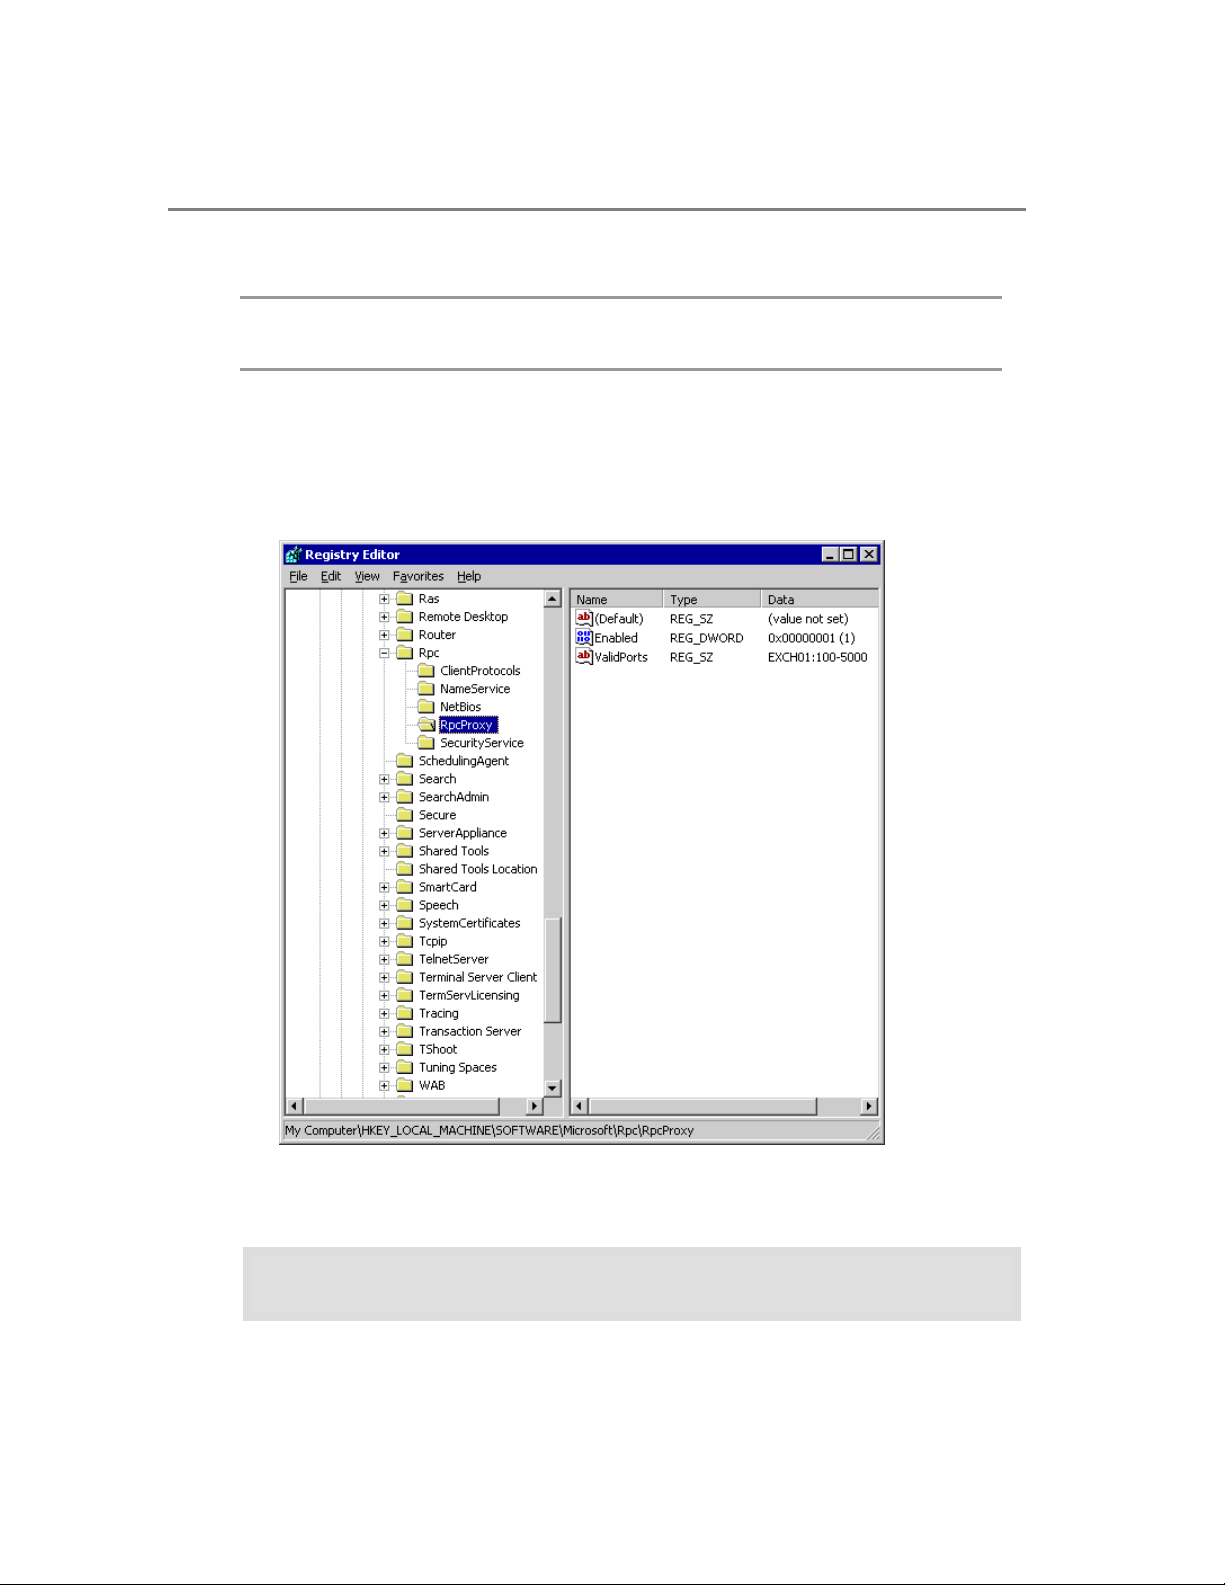
this by setting a registry key in the following location:
HKEY_LOCAL_MACHINE\Software\Microsoft\Rpc\RpcProxy
Page 24
14 Microsoft Exchange Titanium Getting Started Guide
The registry key will specify the ports that will be used with RPC over HTTP.
Warning This section contains information about editing the registry. Before you edit the registry,
make sure you understand how to restore it if a problem occurs. For information about restoring the
registry, see the “Restore the Registry” Help topic in Regedit.exe or Regedt32.exe.
To set the ports for RPC over HTTP for the RPC Proxy server located within the perimeter network
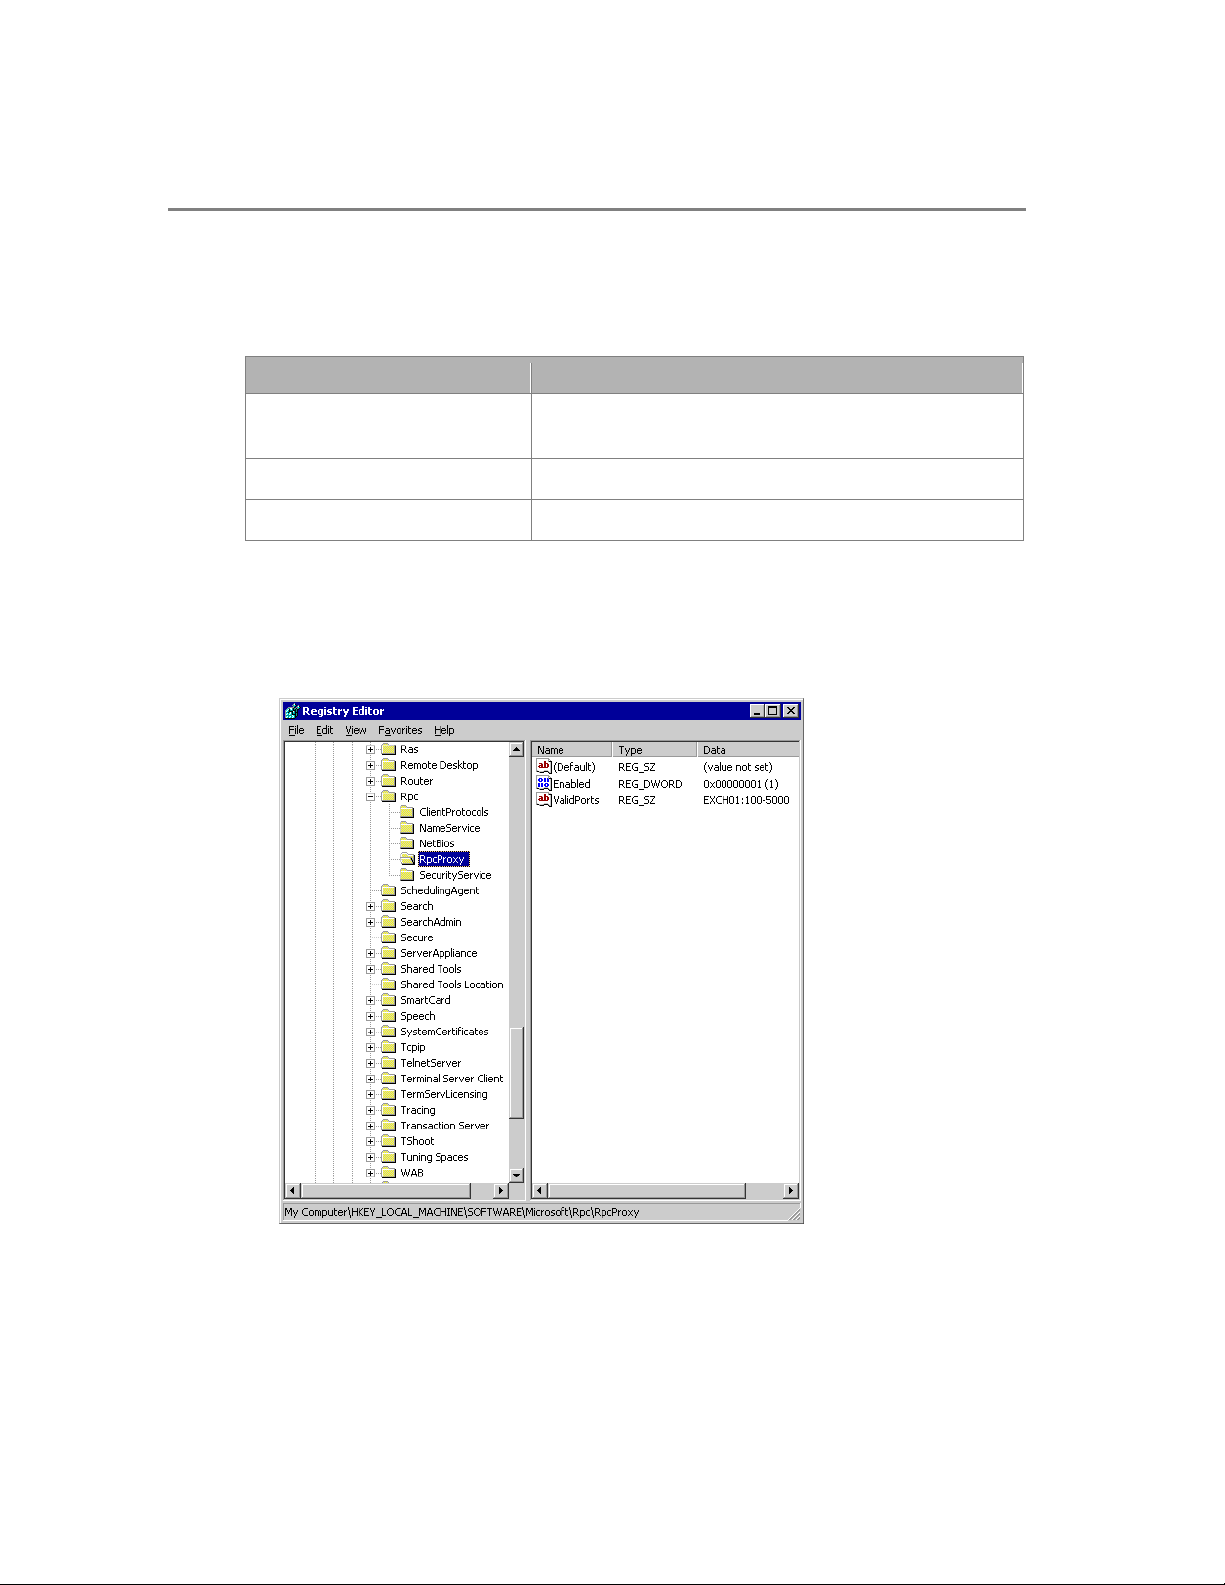
1. Click Start, click Run, and then type Regedit in the box next to Open. Click OK.
2. Navigate to the following registry key:
* HKEY_LOCAL_MACHINE\Software\Microsoft\Rpc\RpcProxy
3. Right-click the Valid Ports registry key and select Modify.
Figure 2.4 The RPCProxy registry settings
4.
In the Edit String window in the box under Value data enter the following
information:
ExchangeServer:593;ExchangeServer:1024-65535;
DomainController:593;DomainController:1024-65535
Page 25
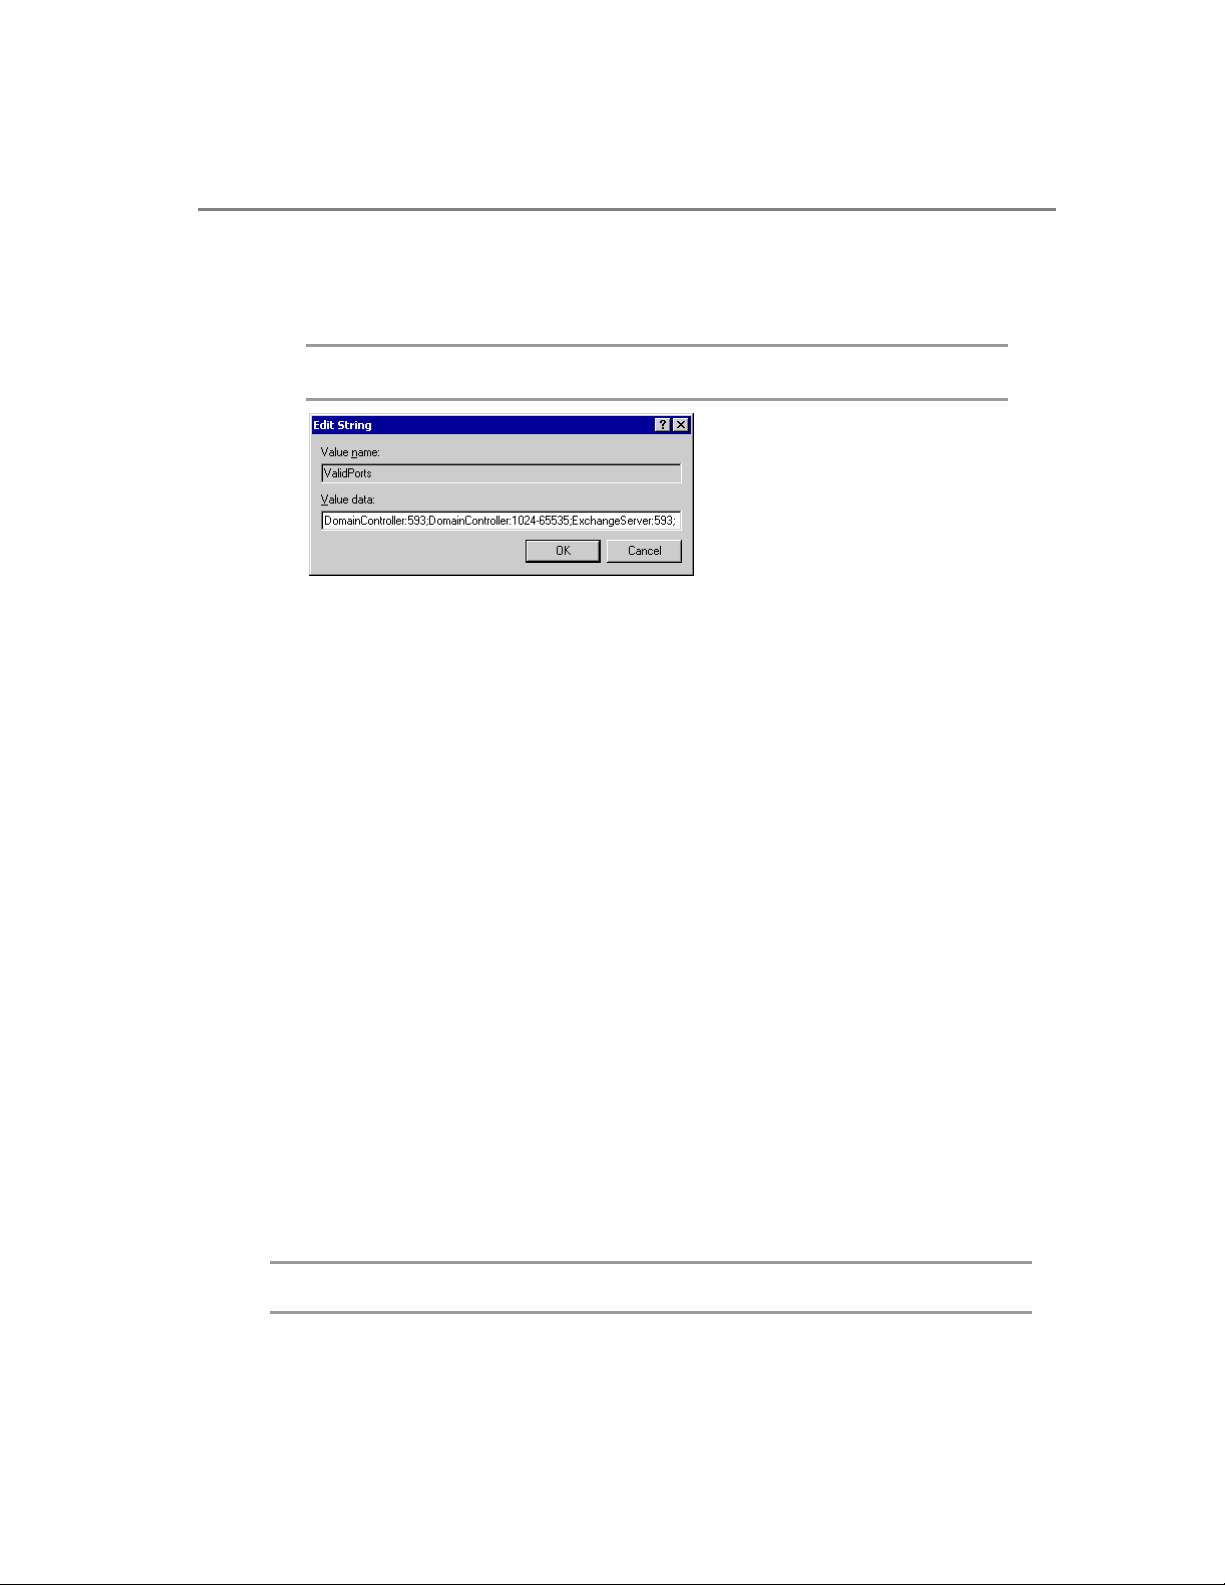
Chapter 2: Clients 15
Where ExchangeServer is the NetBIOS name of your Exchange Titanium server,
and DomainController is the NetBIOS name of your domain controller. Your
values must appear as shown below.
Note You may also use the Fully Qualified Domain Name (FQDN) in place of the NetBIOS
name for your servers, as shown in this example.
Figure 2.5 The value data for the RPC ValidPorts registry key
5.
Click OK.
6. Click File and click Exit.
Your proxy server is now configured to use the specified ports to communicate with
your Exchange Titanium server and your domain controller. Now you must create a
profile for your user to use RPC instead of HTTP.
Step 3, Option 2: Configure the RPC Proxy server to use specific ports (Optional)
If you have located the RPC Proxy server inside of the perimeter network, you can
configure the RPC Proxy server to use a limited number of ports to communicate with
the servers in the corporate network. In this scenario, the RPC proxy server will be
configured to use a specified number of ports and the individual computers that the RPC
Proxy server communicates with will also be configured to use a specified number of
ports when receiving requests from the RPC Proxy server. This step involves three
separate procedures:
1. Configuring the RPC Proxy server to use a specified number of ports for RPC over
HTTP to communicate with servers inside of the corporate network.
2. Configuring the Exchange server to use a specified number of ports for RPC over
HTTP requests to communicate with the RPC Proxy server inside of the perimeter
network.
3. Configuring the domain controllers and global catalog servers to use a specified
number of ports for RPC over HTTP requests to communicate with the RPC Proxy
server inside of the perimeter network.
Complete these steps to configure the servers that will be used for RPC over HTTP.
Note Using this method to specifically limit the number of ports to open for RPC over HTTP
communication is the recommended method of configuring your servers to use RPC over HTTP.
Page 26
16 Microsoft Exchange Titanium Getting Started Guide
To configure the RPC Proxy server to use a specified number of ports for RPC over HTTP
1. For the purposes of this procedure, the following ports will be used as an example.
Table 2.1 Example ports for setting specific ports for RPC over HTTP
Server Ports (Services)
Exchange back-end servers 593 and 6001 and 6002 (DS referral) or 6003 (DS
Proxy). Note that using DS referral is recommended.
Domain controllers 593 and 6004
Global catalog server 593 and 6004
2. On the RPC Proxy server, click Start, click Run, and type Regedit in the box next
to Open. Click OK.
3. Navigate to the following registry key:
* HKEY_LOCAL_MACHINE\Software\Microsoft\Rpc\RpcProxy
4. Right-click the Valid Ports registry key and click Modify.
Figure 2.6 The RPCProxy registry settings
Page 27

Chapter 2: Clients 17
5. In the Edit String window in the box under Value data enter the following
information:
ExchangeServer1:593;ExchangeServer1:6001-6004;
DomainController:593;DomainController:6004;
GlobalCatalogServer:593;GlobalCatalogServer:6004
6. Where ExchangeServer is the NetBIOS name of your Exchange Titanium Server,
DomainController is the NetBIOS name of your Domain Controller and
GlobalCatalogServer is the NetBIOS name of your Global Catalog Server.
7. Continue to list all servers in the registry key for all servers in the corporate network
that the RPC Proxy server will need to communicate with.
Important All servers that the Outlook client will need to access must have the ports set to
communicate with the RPC Proxy server. If a server, such as an Exchange public folder
server has not been configured to use the specified ports for RPC over HTTP
communication, the client will not be able to access the server.
To Configure the Exchange Server to use a specified number of ports for RPC over HTTP
requests
1. On the Exchange Server, click Start, click Run, and type Regedit in the box next
to Open, and then click OK.
2. Navigate to the following key to set the port for DS Proxy:
HKEY_LOCAL_MACHINE\SYSTEM\CurrentControlSet\Services\MSExchangeS
A\Parameters
3. Click Edit, then click New, and then select DWORD value.
4. Create a DWORD value with the name RPC/HTTP NSPI Port.
5. Right-click the RPC/HTTP NSPI Port dword value and choose modify.
6. In the Base window, click the button next to Decimal.
7. In the Value data field, enter the value 6003.
Note The value 6003 was chosen for the purposes of this example. You can, however, use
any value between 1024 and 65535.
8. Navigate to the following key to set the port for DS Referral (recommended):
*HKEY_LOCAL_MACHINE\SYSTEM\CurrentControlSet\Services\MSExchange
SA\Parameters
9. Click Edit, then click New, and then select DWORD value.
10. Create a DWORD value with the name HTTP Port.
11. Right-click the HTTP Port dword value and choose modify.
12. In the Base window, click the button next to Decimal.
Page 28

18 Microsoft Exchange Titanium Getting Started Guide
13. In the Value data field, enter the value 6003.
Note The value 6003 was chosen for the purposes of this example. You can, however, use
any value between 1024 and 65535.
14. Navigate to the following key for the port to use the Exchange Store:
*HKEY_LOCAL_MACHINE\SYSTEM\CurrentControlSet\Services\MSExchange
IS\ParametersSystem
15. Click Edit, then click New, and then select DWORD value.
16. Create a DWORD value with the name RPC/HTTP Port.
17. Right-click the RPC/HTTP Port dword value and choose modify.
18. In the Base window, click the button next to Decimal.
19. In the Value data field, enter the value 6001.
Note The value 6001 was chosen for the purposes of this example. You can, however, use
any value between 1024 and 65535.
Important All servers that the Outlook client will need to access must have the ports set to
communicate with the RPC Proxy server. If a server, such as an Exchange public folder
server, has not been configured to use the specified ports for RPC over HTTP
communication, the client will not be able to access the server.
To configure the domain controllers and global catalog servers to use specified ports for RPC
over HTTP
1. On the domain controller, click Start, click Run, type Regedit in the box next to
Open, and then click OK.
2. Navigate to the following key:
HKEY_LOCAL_MACHINE\SYSTEM\CurrentControlSet\Services\NTDS\Paramet
ers
3. Click Edit, click New, and then select Multi String value.
4. Create a DWORD value with the name NSPI interface protocol sequences.
5. Right-click the NSPI interface protocol sequences multi-string value and choose
modify.
6. In the Value data field, enter: ncacn_http:6004
Step 4: Create an Outlook profile to use with RPC over HTTP
In order for your users to use RPC over HTTP from their client, they will need to create
an Outlook profile that uses the settings necessary for using RPC over HTTP. These
settings enable Secure Sockets Layer (SSL) communication with Basic authentication
that is necessary when using RPC over HTTP.
Page 29
Chapter 2: Clients 19
To create an Outlook profile to use RPC over HTTP
1. Click Start and then click Control Panel.
2. If you are using Category View in Control Panel, click Other Control Panel
Options in the See Also Pane, and then select Mail.
3. If you are using Classic View in Control Panel, select Mail.
4. In the Mail Setup window, in the Mail Profiles pane, click the Show Profiles
button.
5. In the Mail window, click Add.
6. In the New Profile window, enter a name for this profile in the box next to Profile
Name.
7. In the New E-mail Accounts Wizard, click Add a new e-mail account, and then
click Next.
8. On the Server Type page, select Microsoft Exchange Server and then click Next.
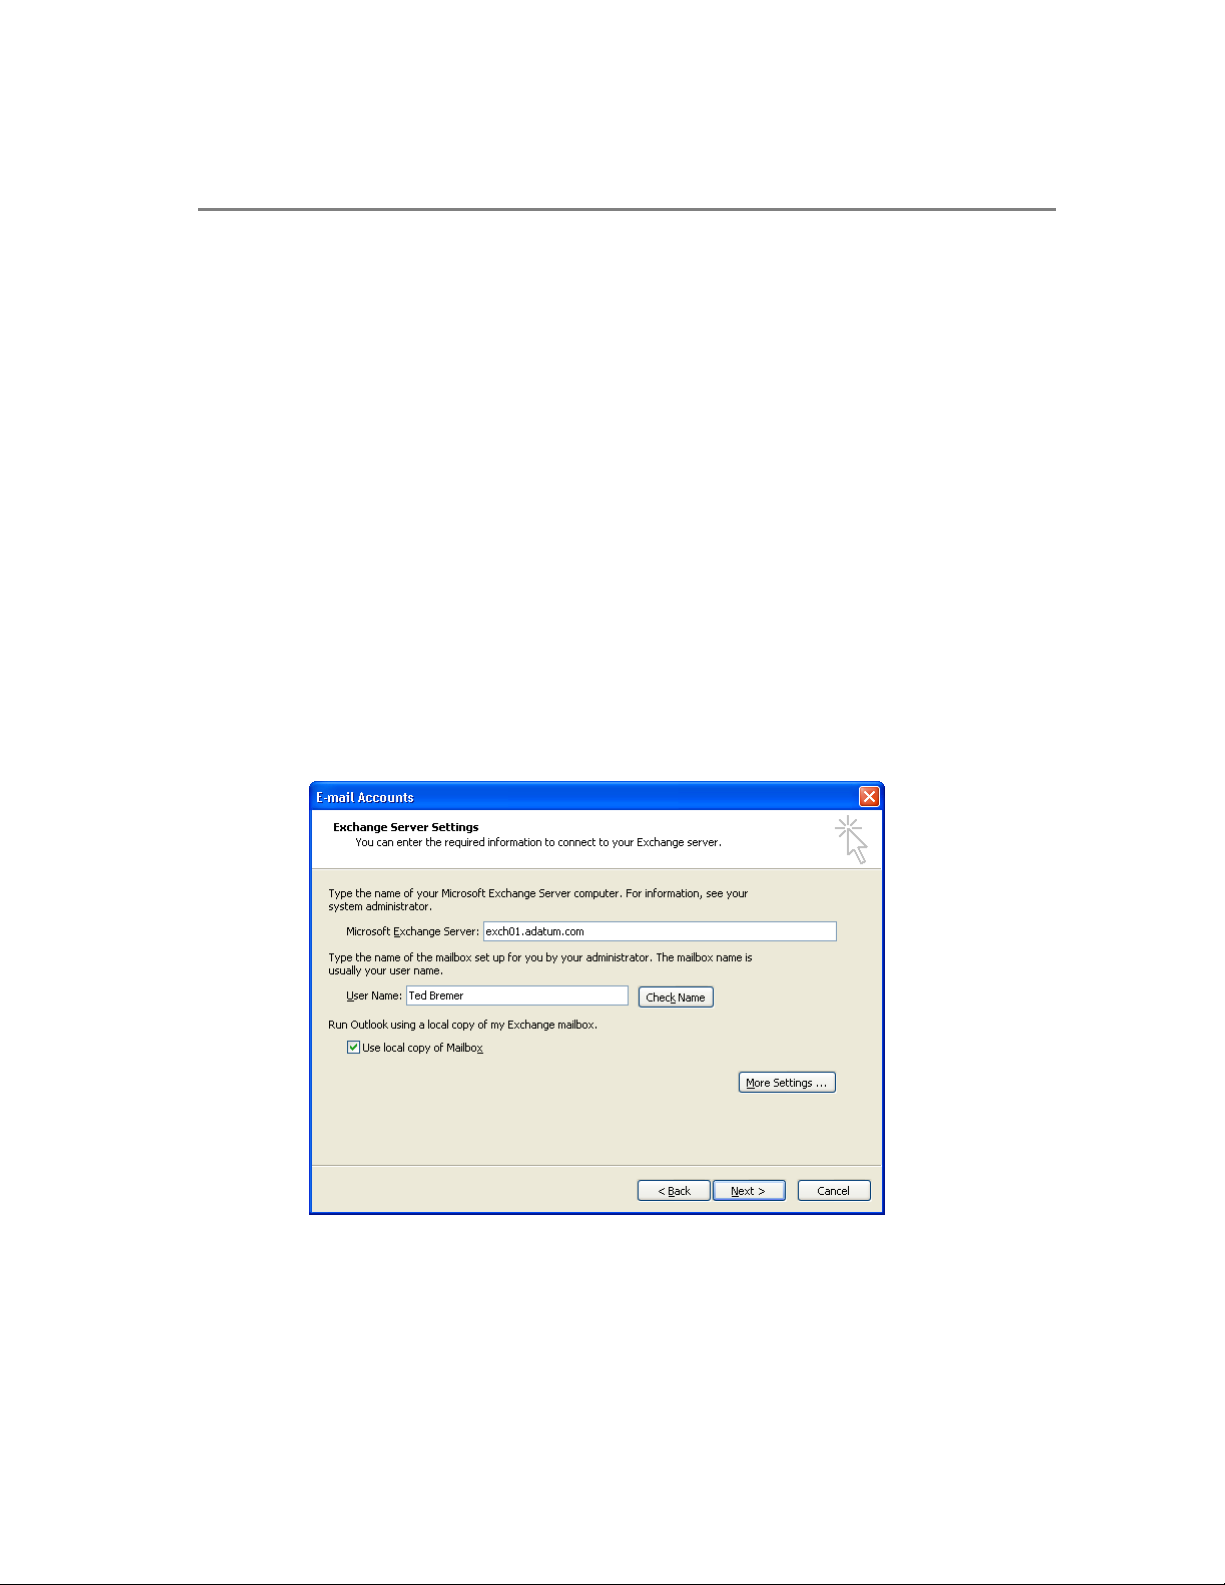
9. On the Exchange Server Settings page:
a. Enter the name of your Exchange Titanium server in the box next to Microsoft
Exchange Server.
b. Enter the user name in the box next to User Name.
c. Select Use local copy of Mailbox.
Figure 2.7 The Exchange Server Settings dialog box
d. Click the More Settings button.
10. On the Connections tab:
Page 30

20 Microsoft Exchange Titanium Getting Started Guide
a. In the Connections pane, click Connect using Internet Explorer’s or a 3rd
party dialer.
b. Select the check box next to Connect to my Exchange mailbox using HTTP.
11. Click the Exchange Proxy Settings button.
12. On the Exchange Proxy Settings page, in the Connections Settings window, do
the following:
a. Enter the Fully Qualified Domain Name (FQDN) of the RPC Proxy server in
the box under Use this URL to connect to my proxy server for Exchange.
b. Select the check box next to Connect using SSL only.
c. Select the check box next to Mutually authenticate the session when connecting
with SSL.
d. Enter the Fully Qualified Domain Name (FQDN) of the RPC Proxy server in the
box under Principle name for proxy server. Use the format: msstd:FQDN of
Server.
13. On the Exchange Proxy Settings page, in the Proxy authentication settings window,
select Basic Authentication from the drop-down menu under Use this
authentication when connecting to my proxy server for Exchange.
14. Click OK
Your users are now configured to use RPC over HTTP.
Outlook Web Access
The new version of Outlook Web Access in Exchange Titanium represents a major
upgrade from Exchange 2000. The new version is truly a full-featured e-mail client,
with support for rules, spell checking, secure messaging, and many other improvements
detailed in the next sections. The interface has also been redesigned to provide an
enhanced user experience similar to that provided with Outlook 11, including a new
right-hand preview pane and improved navigation pane.
The following Outlook Web Access features are new in Exchange Titanium.
Two Outlook Web Access Versions
Exchange Titanium now includes two different versions of Outlook Web Access:
1. Rich Experience Outlook Web Access. The rich experience Outlook Web
Access is for Microsoft Internet Explorer 5 or later and includes all features of
Outlook Web Access including the new enhanced features for Exchange Titanium.
Page 31

Chapter 2: Clients 21
2. Basic Experience Outlook Web Access. The basic experience Outlook Web
Access is for all browsers and provides a subset of the features available in Outlook
Web Access.
The following table summarizes the new Outlook Web Access features and which
version supports them.
Table 2.2 Summary of New Outlook Web Access Features
Feature Description In Outlook Web
Access for
Internet
Explorer 5 or
later (PC)
Logon/Logoff Improvements
Logon page New custom form for logging on to
Outlook
Web Access; includes cookiebased validation where Outlook Web
Access cookie is invalid after user logs
out or is inactive for predefined amount
Yes, with choice
of using Internet
Explorer or basic
Outlook Web
Access
time
Clear credentials
cache on logout
After logout, all credentials in Internet
Explorer 6 Service Pack 1 (SP1)
Yes, in Internet
Explorer 6 SP1
credentials cache are cleared
automatically
General User Interface Improvements
User interface
updates
New color scheme, reorganized toolbars Yes, plus new
View menu,
default user
interface font;
bidirectional
support
Available in
Basic Outlook
Web Access
Yes, but only
allows use of
basic Outlook
Web Access
No
Yes
Item window sizing During an Outlook Web Access session,
item windows open at the last window
size set by the user instead of always
opening at 500x700 pixels
View Improvements
Two-line mail view New view orients message list vertically
instead of horizontally; works well with
Yes No
Yes No
Page 32

22 Microsoft Exchange Titanium Getting Started Guide
Preview pane on right
Preview pane Preview pane can now appear to right of
messages; attachments can be opened
directly in pane
Mark as read/unread Command enables users to mark unread
messages as read or vice versa
Quick Flagging Command enables users to assign follow-
up flag to messages
Context Menu Context Menu available in mail view;
special context menu also available on
quick flag
Keyboard shortcuts Common actions such as new message,
mark as read/unread, reply and forward
are available when focus is in message
list
Items per page Users can determine how many items
appear per page in e-mail, Contacts and
Tasks views
Mail icons Icons display state, type of messages Yes Yes
Deferred view update The view is auto-refreshed only after 20
percent of messages are moved or
deleted from a page, not after each
deletion resulting in increased
performance
Yes No
Yes No
Yes No
Yes No
Yes No
Yes Yes
Yes No
Navigation Improvements
New Navigation pane Unified user interface contains module
shortcuts, full folder tree, customizable
width
Search folders Outlook-created search folders are shown
in folder tree
Notifications New e-mail and reminder notifications
are shown in Navigation pane
Public folders Public folders are shown in new window Yes No
Yes No
Yes No
Yes No
Page 33

Chapter 2: Clients 23
Logoff in toolbar Logoff is moved out of Navigation pane to
the view toolbar
Mail Workflow Improvements
Spell check Spell check is provided for e-mail
messages
New addressing
wells
Global Address List
Properties sheets
Add to Contacts Users can add resolved recipients in
Send mail from Find
Names
New integrated look; easier deletion of
recipients
Properties sheets display name, address
and phone information for resolved
Global Address List (GAL) users
received mail or drafts to main Contacts
folder
Users can send new messages to
addresses found in Find Names when the
dialog box is invoked from View
Yes No
Yes No
Yes No
Yes; available in
received items,
draft items,
Check Names
dialog box, Find
Names dialog
box
Yes, feature in
Properties
sheets
Yes No
Yes; only
available in
received items
and draft items
No
Invoke Find Names
from message
Contacts in Find
Names
Auto signature Users can create a signature that is
Default mail editor
font
“Spam Beacon”
blocking
Users can open Find Names from
message and use it to add new recipients
to a draft message; also used to add
recipients to a contact distribution list
Users can search main Contacts folder in
Find Names
automatically included in e-mail
messages
User-customizable default font provided
for e-mail editor
Users can control options for blocking
external content in e-mail
Already available
in past versions
Yes No
Yes, HTML-
based
formatting; also
on-demand
insertion
Yes No
Yes Yes
Yes
Yes, plain-text
formatting; no
on-demand
insertion
Page 34

24 Microsoft Exchange Titanium Getting Started Guide
Attachment blocking Administrator options restrict access to
some or all attachments in messages
Sensitivity infobar Sensitivity information is displayed in
infobar
Reply/Forward
infobar
Reply/Forward information displayed in
infobar
No indenting replies The reply header and reply body are no
longer indented
Encrypted/signed
mail
Sending and receiving encrypted and/or
signed e-mail is supported
Rules Improvements
Rules Users can create and manage server-
based e-mail-handling rules
Task Improvements
Yes Yes
Yes Yes
Yes Yes
Yes Yes; basic
Outlook Web
Access never
indented
Yes, Internet
No
Explorer 6 on
Microsoft
Windows
2000
or Windows XP
only
Yes No
Personal tasks Users can create and manage personal
tasks and receive reminders for these
Yes Yes, but no
reminders
items
Calendar Improvements
Reply/Forward
Meeting Requests
Users can now reply to senders of
Meeting Requests and/or forward
Yes Yes
Meeting Requests to other users
Attendee reminder Attendees can set own reminder times
Yes No
from received Meeting Requests
View Calendar from
Meeting Request
Attendees can open Calendar from
Meeting Request
Yes No
Performance Improvements
Bytes over the wire Fewer bytes sent over the wire from Yes Yes
Page 35

Chapter 2: Clients 25
server to browser
Use of Browser Language
When accessing Outlook Web Access with Internet Explorer 5 or later, new
installations and upgrades of Exchange Titanium to use the browser' language settings
to determine the character set to encode information such as e-mail messages and
meeting requests. . If you are upgrading an Exchange 2000 Server that has been
modified to use a browser’s language setting, Exchange Titanium will continue to
function in the same manner. The following Table shows the language groups and
respective character sets:
Page 36

26 Microsoft Exchange Titanium Getting Started Guide
Table 2.3 The Language Group and Character Sets for Outlook Web Access
Language Group Character Set
Arabic Windows 1256
Baltic iso-8859-4
Chinese (simplified) Gb2131
Chinese (Traditional) Big5
Cyrillic koi8-r
Eastern European iso-8859-2
Greek iso-8859-7
Hebrew windows-1255
Japanese iso-2022-jp
Korean ks_c_5601-1987
Thai windows-874
Turkish iso-8859-9
Vietnamese windows-1258
Western European iso-8859-1
If you expect users in your organization to send mail frequently, you can choose to have
Internet Explorer 5-and-greater-based Outlook Web Access users send mail using UTF8 by modifying the registry setting for this behavior.
Warning This section contains information about editing the registry. Before you edit the registry,
make sure you understand how to restore it if a problem occurs. For information about restoring the
registry, see the “Restore the Registry” Help topic in Regedit.exe or Regedt32.exe.
To Modify the Default Language Setting for Outlook Web Access
1. Click Start, click Run, type Regedit in the box next to Open and then click OK.
2. Navigate to the following registry location:
HKLM\System\CurrentControlSet\Services\MSExchangeWEB\OWA\UseRegional
Charset
3. Create a DWORD Value called UseRegionalCharset and set the value data to 1.
Page 37

Chapter 2: Clients 27
Logon/Logoff Improvements
You can enable a new logon page for Outlook Web Access that will store the user's user
name and password in a cookie instead of in the browser. When a user closes their
browser, the cookie will be cleared. Additionally, after a period of inactivity, the cookie
will be cleared automatically. The new logon page requires users to enter either their
domain name\alias and password or their full UPN e-mail address and password to
access their e-mail.
Figure 2.8 Outlook Web Access logon page
This logon page represents more than a cosmetic change; it offers several new features.
Page 38

28 Microsoft Exchange Titanium Getting Started Guide
To enable forms-based authentication
1. In Exchange System Manager, expand the Servers node.
2. Expand the Protocols node under the Exchange server for which you wish to enable
forms-based authentication.
3. Expand HTTP, and then right-click the Exchange Virtual Server.
4. On the Exchange Virtual Server properties page, select the check box next to
Enable Forms Based Authentication for Outlook Web Access.
5. Click Apply, and then click OK.
Cookie Authentication Timeout
Outlook Web Access user credentials are now stored in a cookie. When the user logs
out of Outlook Web Access, the cookie is cleared and is no longer valid for
authentication. Additionally, by default the cookie is set to expire automatically after 20
minutes of user inactivity.
The automatic timeout is valuable for keeping a user’s account secure from
unauthorized access. Although this timeout does not completely eliminate the
possibility that an unauthorized user might access an account if an Outlook Web Access
session is accidentally left running on a public computer, it greatly reduces this risk.
Note Cookie Authentication Timeout is available for the rich experience version of Outlook Web
Access only.
The inactivity timeout value can be configured by an administrator to match the security
needs of your organization.
Note The default value for the cookie timeout is 10 minutes. If you want to set this value to
something other than 10 minutes, you must modify the registry settings on the server.
Warning This section contains information about editing the registry. Before you edit the registry,
make sure you understand how to restore it if a problem occurs. For information about restoring the
registry, see the “Restore the Registry” Help topic in Regedit.exe or Regedt32.exe
Page 39

Chapter 2: Clients 29
To set the Outlook Web Access cookie timeout value
1. Click Start, click Run, and type Regedit in the box next to Open. Click OK.
2. Navigate to the following registry key:
*HKey_local_machine\system\CurrentControlSet\Services\MSExchangeWeb\
OWA\
3. Create a new Dword value and name it KeyInterval.
4. Right-click the KeyInterval Dword value and click Modify.
5. In the Base window, click the button next to Decimal.
6. In the Value Data field, enter a value (in minutes) between 1 and 1440.
7. Click OK..
Clearing the Credentials Cache at Logoff
For users who do not access Outlook Web Access through the new logon page, such as
users running Internet Explorer 6 SP1, logoff from Outlook Web Access has been made
more secure. With Internet Explorer 6 SP1, the browser’s credentials cache is cleared
upon logoff from Outlook Web Access. Closing the browser window is no longer
necessary to clear the credentials cache.
Choice of Outlook Web Access Version
Users can choose which version of the Outlook Web Access client to load, the rich
experience version of Outlook Web Access designed for Internet Explorer 5 and later or
the basic experience version of Outlook Web Access that runs in other browser
software.
Because the basic version of Outlook Web Access must work in any browser, it
provides a simple user experience and loads quickly. On a slow network connection, the
basic experience Outlook Web Access client may be the best option for users who want
to accomplish tasks such as checking their Inbox quickly or looking up the time of an
appointment on their Calendar. The basic version however, lacks some useful features
available in the rich experience version of Outlook Web Access.
Browser Support
Outlook Web Access supports any browser that is fully compliant with the HTML 3.2
and European Computer Manufacturers Association (ECMA) script standards.
However, because some browsers are not fully compliant with these standards,
Microsoft recommends using Internet Explorer 5.01 or later or Netscape Navigator 4.7
or later. These browsers have been tested with Outlook Web Access.
In addition, Outlook Web Access has been optimized for screen resolutions of 800x600.
Page 40

30 Microsoft Exchange Titanium Getting Started Guide
Using Pocket Outlook with the ActiveSync application and/or Outlook Mobile Access
is recommended for devices with a small screen size such as the Pocket PC 2002 device.
Using Outlook Mobile Access is recommended for devices such as WAP 2.0 phones.
For more information about Outlook Mobile Access and Wireless Synchronization
access to Exchange, see the Wireless Access to Exchange section later in this chapter.
New User Interface
In addition to both the new "blue" theme and toolbar, users will notice that the user
interface of Outlook Web Access closely matches the Outlook 11 user interface.
Figure 2.9 New Outlook Web Access interface for the rich experience version of Outlook Web
Access
Page 41

Chapter 2: Clients 31
Preview Pane
The new preview pane allows users to view more information by viewing the e-mail
message in the right preview pane. Using this feature, readability is enhanced and more
information is available to users on screen.
Users can easily switch to the classic bottom preview pane or turn the pane off entirely.
Preview Pane options are accessed on the Toolbar by clicking the Show/Hide Preview
Pane button.
Note This feature is not available with the basic experience version of Outlook Web Access.
New Two Line View
Outlook Web Access in Exchange Titanium includes a new view for listing the
messages in a folder. This new Two Line view displays the information about a
message on two different lines, which allows more information to be displayed for each
message without being cut off. This is especially useful when using the new right
preview pane. The following message information is displayed in Two Line view:
• From
• Received
• Subject
• Importance
• Attachments
Outlook Web Access views are selected from the toolbar by clicking the View dropdown list.
Page 42

32 Microsoft Exchange Titanium Getting Started Guide
Figure 2.10 The Two Line view
To select the Two Line view
1. From the Outlook Web Access main page, click the View drop-down list. This list
shows the currently selected view and is located above the Toolbar next to the
folder name.
2. Click Two Line.
Page 43

Chapter 2: Clients 33
Message Flagging
Outlook Web Access now supports flagging messages for follow-up. The new flag
column appears to the right of the message list and allows users to flag a message, mark
a flag as complete, or clear a flag. Six flag colors are supported.
Figure 2.11 Message flagging
You can’t set a reminder on these follow-up flags from Outlook Web Access. These
flags simply provide a visual indicator of which items in the mailbox a user has marked
as needing further action.
Note This feature is not available with the basic experience version of Outlook Web Access.
To flag a message for follow-up
1. Click the flag next to the message you want to flag for follow-up. The flag will turn
to red, indicating that the message has been flagged.
2. To mark a flag as complete, click it again. Alternatively, right-click the flag to
display a context menu with more options.
3. Use the context menu to select a different flag color, clear a flag, or mark a flag as
complete.
Note You must use the context menu to clear a flag.
Page 44

34 Microsoft Exchange Titanium Getting Started Guide
Context Menus
Right-clicking on messages, folders, and other objects now displays a context menu
from which you can select relevant commands.
Note This feature is not available with the basic experience version of Outlook Web Access.
Figure 2.12 Message context menu
Page 45

Chapter 2: Clients 35
The following sections list the other new commands featured in the context menus.
Message Context Menu
When you right-click a message in the message list, the following commands are
available:
• Open
• Reply
• Reply to all
• Forward
• Clear flag
• Follow up
• Flag Complete
• Mark as Unread
• Create Rule
• Delete
• Move/Copy to Folder
Folder Context Menu
When you right-click a folder in the folder list, the following commands are available:
• Update Folder
• Open
• Open in New
• Move/Copy
• Delete
• Rename
• New Folder
Set the number of messages displayed per page
Exchange Titanium Outlook Web Access users can specify how many items are listed
in a view, such as the number of messages listed when viewing a mail folder. By
default, 25 items are listed. You can choose to view from as few as five to as many as
100 items at a time. For users connecting to Outlook Web Access using a dial-up
modem, the number of items should be set to 25 or fewer to maximize performance.
This option also will affect the number of contacts and tasks that display per page when
using contacts or tasks.
Page 46

36 Microsoft Exchange Titanium Getting Started Guide
To set the number of items listed in a view
1. In the console tree of Outlook Web Access, click Options.
2. In the details pane, in Messaging Options, in the Number of items to display per
page drop-down list, select the number of messages that you want to appear in a
view.
3. In the details pane, click Save and Close.
Deferred Refresh of Views
With the version of Outlook Web Access that shipped with Exchange 2000, every time
a user deletes, moves, or copies a message, the server refreshes the entire view. For
example, if a user has 25 messages listed in their Inbox, and the user then deletes a
message, Outlook Web Access deletes the message, and then refreshes the view so that
25 messages are again listed.
With the version of Outlook Web Access that ships with Exchange Titanium, deleted or
moved items are still removed from the message list, but the refresh of the entire list (in
other words, the addition of new items to the view) is deferred until a 20 percent
threshold of changes is reached. The request to refresh the list is a relatively expensive
operation in terms of the amount of information sent across the network, so reducing the
number of requests for a refresh helps to reduce network traffic and enhances the overall
user experience.
The percentage is based on the total number of items set to display per page (as set by
the user in Outlook Web Access Options), not the actual count of messages on a page.
For example, if a user requests 100 messages to display per page, the message list will
not automatically refresh until 21 messages have been deleted.
Note This feature is not available with the basic experience version of Outlook Web Access.
Access Search Folders (Saved Searches)
Outlook 11 makes it possible for you to save any search that you create with the
Advanced Find option. The searches are saved in a folder named Search Folders,
which appears in your Outlook folder list. For example, you can create a search that
finds messages from a particular sender, and then save this search for later use in
Search Folders.
In Outlook Web Access, Search Folders appears in the folder list. Search folders only
show up in Outlook Web Access if a user has created them while running Outlook 11 in
online mode against the Exchange Titanium server. You cannot create search folders in
Outlook Web Access.
Page 47

Chapter 2: Clients 37
Note This feature is not available with the basic experience version of Outlook Web Access.
Notifications
If the Options page setting has been enabled to notify you of new mail or reminders, the
Navigation pane now tells you when new items arrive in your Inbox or active reminders
are waiting to be dismissed or set to snooze.
Note This feature is not available with the basic experience version of Outlook Web Access.
Public Folders
Public Folders are now displayed in their own window. Clicking the Public Folders
button on the Navigation pane launches a new browser window containing only Public
Folders.
Note This feature is not available with the basic experience version of Outlook Web Access.
Logoff
This feature has been moved off of the Navigation pane and onto the far end of the
toolbar.
Keyboard Shortcuts
Keyboard shortcuts are now supported in Outlook Web Access for common actions.
Table 2.3 lists the supported shortcuts.
Note This feature is not available with the basic experience version of Outlook Web Access.
Table 2.3 Keyboard shortcuts for Outlook Web Access
Command Keyboard Shortcut
Inbox View
Open a new message window CTRL+N
Mark selected message as read CTRL+Q
Mark selected message as unread CTRL+U
Reply to selected message CTRL+R
Reply all to selected message CTRL+SHIFT+R
Forward selected message CTRL+SHIFT+F
Page 48

38 Microsoft Exchange Titanium Getting Started Guide
Message Read Form
View the next message in the list CTRL+>
View the previous message in the list CTRL+<
Message Compose Form
Save the message CTRL+S
Send the message CTRL+ENTER
Check spelling F7
Check names CTRL+K or ALT+K in S/MIME
Find names ALT+T or ALT+C or ALT+B
Contacts View
Create a new contacts distribution list CTRL+SHIFT+L
Tasks View
Create a new task CTRL+N
Public Folders View
Create a new post CTRL+N
Reply to a post CTRL+R
Right-to-Left Layout
Outlook Web Access now supports right-to-left layouts in the Arabic and Hebrew
versions of the client. Note that the only browser that supports both Arabic and Hebrew
is Internet Explorer 6 and later.
Note This feature is not available with the basic experience version of Outlook Web Access.
Support for Rules
Outlook Web Access now supports creating server-side mail handling and managing
server-based rules created with Outlook. For example, users can use Outlook Web
Access to create a rule that moves all messages marked with high importance from their
Page 49

Chapter 2: Clients 41
The spell checking feature is available whenever users compose a message. The
following languages are supported for the Exchange Titanium beta:
• English
• English (Canada)
• English (United Kingdom)
• English (Australia)
• French
• German
• Italian
• Korean
• Spanish
Users need to select the language for the spell checker to use. The first time the spell
checker is run, users will be prompted to select the preferred language. The language
can also be configured at any time.
Note This feature is not available with the basic experience version of Outlook Web Access.
To set the spell checking language
1. From the Outlook Web Access main page, click Options on the navigation bar. If
the navigation bar is collapsed, click the Go to options button.
Figure 2.14 The Go to Options button
Page 50

Chapter 2: Clients 39
manager to a designated folder. This is similar to the rules feature found in Microsoft
Outlook.
In addition to creating new rules from scratch, users can choose to create a rule from
within an e-mail message, which will pre-populate the rule parameters with information
from the message, such as the subject and who the message is from. This allows for
much faster creation of rules.
Any rule created in Outlook that cannot be modified in Outlook Web Access is grayed
out in the Outlook Web Access rules interface. Outlook Web Access has a simple rule
editor that is not designed to handle the full range of conditions and criteria available
when creating rules in Outlook. Rather, Outlook Web Access focuses on using rules for
the most common mail-management scenarios, such as moving mail from a particular
sender or with a particular subject to a specific folder.
One or more of the following criteria are used to define the rule:
• Who the message is from
• The message subject
• The importance of the message
• Who the message was sent to
Based on these criteria, the following actions can be specified:
• Move the message to a specified folder
• Copy the message to a specified folder
• Delete the message
• Forward the message to a specified recipient
Outlook Web Access will allow editing of server-side rules created from any version of
Outlook if the rules conform to the actions and criteria available in the Outlook Web
Access Rules interface. If rules created with Outlook are not understood by Outlook
Web Access, they appear disabled in the Outlook Web Access user interface. Although
these rules cannot be edited, they still function.
Warning Because of interoperability limitations with Outlook, Outlook Web Access needs to delete
any rules disabled through Outlook before letting a user create or modify any rules. This will not
happen automatically. When you modify a rule you receive a warning indicating that disabled rules
will be deleted if you proceed.
If you modify rules from Outlook Web Access, the next time you open Outlook, you
may be prompted to choose between client and server-side rules. To retain the rules
created in Outlook Web Access, choose to retain the server-side rules.
Note This feature is not available with the basic experience version of Outlook Web Access.
Page 51

40 Microsoft Exchange Titanium Getting Started Guide
To create a new rule from Outlook Web Access
1. From the Outlook Web Access main page, click Rules on the navigation bar. If the
navigation bar is collapsed, click the Go to rules button.
Figure 2.13 The Go To Rules button
2.
On the Rules page, click New.
3. On the Edit Rule page, fill out the criteria and desired action for the rule.
4. Click Save and Close.
To create a new rule from within a message
1. With a message opened, click Create Rule. Alternatively, right-click a message in
the message list and select Create Rule.
2. On the Edit Rule page, some criteria will be filled in automatically based on the
message contents. Modify the criteria and select a desired action for the rule.
3. Click Save and Close.
Spell Checking
Outlook Web Access now includes support for spell checking. The spelling checker is
built into Exchange Titanium Server, so users do not need to run any client-side code or
download additional software.
Page 52

42 Microsoft Exchange Titanium Getting Started Guide
2. Under Spelling Options, from the Choose the language of the dictionary to use
when checking for spelling: drop-down list, select the preferred language.
3. Click Save and Close.
To check for spelling in a message
1. When composing a message, click the Spelling button.
Figure 2.15 The Spelling button
2.
As with other spell checking software, you will be prompted about words that are
not found in the spell checking dictionary. Choose whether to ignore the word in
question, change it manually, or select from a list of suggested alternatives.
Tasks
The version of Outlook Web Access that shipped with Exchange 2000 did not support
Tasks. Although you could view existing tasks, they were displayed as mail messages
and could not be edited. In Exchange Titanium, Outlook Web Access now supports
Tasks. You can create and manage new tasks or manage tasks that have already been
created using Microsoft Outlook.
Page 53

Chapter 2: Clients 43
Figure 2.16 Outlook Web Access Tasks view
Some of the Task features that are now available include:
• Support for recurring tasks
• Mark tasks complete
• Modify percent complete
• Task status
• Due date
• Attachments
• Priority
• Start date
• Mileage
• Billing information
• Work hours
Task Requests Not Supported
Outlook has a feature for delegating tasks to other users using Task Requests. Outlook
Web Access does not support this feature. Furthermore, in Outlook Web Access users
cannot process Task Requests sent from Outlook or update any delegated tasks they
have already accepted in Outlook.
Page 54

44 Microsoft Exchange Titanium Getting Started Guide
Outlook Web Access does allow you to delete Task Requests or previously accepted
delegated tasks, but the assigner will receive no feedback that the deletion took place.
Delete and Skip Occurrence
In Outlook, when a user attempts to delete a recurring task, the user must choose when
to delete a single occurrence or the entire recurring series.
In Outlook Web Access, the delete command always deletes the entire task series. You
can skip an individual occurrence by clicking the Skip Occurrence button on the Task
toolbar.
To work with Tasks in Outlook Web Access
1. From the Outlook Web Access main page, click Tasks on the navigation bar. If the
navigation bar is collapsed, click the Go to tasks button.
2. Click New to create a new task, or right-click an existing task and click Open.
3. On the task page, edit the desired fields and then click Save and Close.
If you have worked with Tasks in Microsoft Outlook, the new Tasks support in Outlook
Web Access should be very familiar.
Message Signatures
With the version of Outlook Web Access that shipped with Titanium, you can create a
personal signature that can be added to outgoing messages automatically or inserted to
individual messages on demand. You can customize your signature by modifying the
font color, style and alignment.
Note You can only have text for signatures in the basic experience version of Outlook Web Access.
To create your signature
1. From the Outlook Web Access main page, click Options on the navigation bar. If
the navigation bar is collapsed, click the Go to options button.
2. Under Messaging Options, click Edit Signature.
3. On the Signature page, edit the signature text and style.
4. Click Save and Close.
To add your signature to all outgoing messages automatically
1. From the Outlook Web Access main page, click Options on the navigation bar. If
the navigation bar is collapsed, click the Go to options button.
2. Under Messaging Options, select the Automatically include your signature on
outgoing messages check box.
3. Click Save and Close.
Page 55

Chapter 2: Clients 45
To insert your signature into a specific message
• With the desired message open, on the Toolbar, click the Insert Signature button.
View User Properties
Outlook Web Access now allows you to view properties for resolved user names from
the Exchange Global Address List (GAL). The properties displayed are a subset of what
you would normally see using Microsoft Outlook. The following properties are
displayed:
• First Name
• Initials
• Last Name
• Alias
• Address
• City
• State
• Postal Code
• Country/Region
• Title
• Company
• Department
• Office
• Assistant
• Phone
• Whether a valid Digital ID for sending encrypted messages is available (available
when S/MIME is installed).
Simple SMTP addresses or addresses that come from the Contacts folder still show the
same information that was available before: display name and SMTP address.
Properties sheets are now available from more locations than e-mail or meeting
composition forms. They also can be invoked by double-clicking (or right-clicking and
choosing Properties) on the sender or recipients in received e-mail messages.
Additionally, in the rich experience version of Outlook Web Access, there also are
buttons for invoking properties from the Find Names dialog box and from the Check
Names dialog box.
Page 56

46 Microsoft Exchange Titanium Getting Started Guide
To view a resolved user's properties
• Right-click the resolved user name and then click Properties. You can also double-
click the resolved user name. In addition, you can view user properties when
searching for users in the Global Address List using the Find Names dialog box.
Select the user and then click Properties.
Easier Removal of Recipients
In the version of Outlook Web Access that shipped with Exchange 2000, removing a
recipient from an e-mail you were composing required double-clicking the user to bring
up a dialog box, from which you then clicked Remove.
This process has been simplified in Exchange Titanium. You can now simply highlight
the resolved user name and press the Delete key. Alternatively, you can right-click the
resolved user name and click Remove.
Note This feature is not available with the basic experience version of Outlook Web Access.
Add Sender or Recipients to Contacts
Using Outlook Web Access, you can now easily add a sender or recipient of an e-mail
message to your Contacts list. The advantage to using this method is that you do not
need to enter the e-mail address of a new contact manually. For information about
another method of creating contacts, see "Creating New Contacts" in the Outlook Web
Access online Help.
Note This feature is not available with the basic experience version of Outlook Web Access.
To add a sender or recipient listed in an e-mail to your Contacts list.
1. Open an e-mail that contains a sender or recipient that you want to add to your
contacts list.
2. In the upper pane of an e-mail message, right-click the sender's name or recipient
name, and then click Properties.
3. In the E-mail Properties dialog box (if adding an external contact), or Properties
dialog box (if adding an internal contact), right-click the name of the sender or
recipient you want to add, and then click Add to Contacts.
4. On the General tab of the Untitled Contact dialog box, in Last Name and First
Name, type the last name and first name of the new contact. Then, in the other text
boxes, on the General tab and Details tab, type any other information that you want
to include about the contact.
Page 57

Chapter 2: Clients 47
5. Click Save and Close.
6. In the E-mail Properties or Properties dialog box, click Close.
Choose a Default Font
Outlook Web Access allows you to choose the default font, size, and color you want to
use for new e-mail mail messages. By default, Outlook Web Access uses Arial 10 pt. (in
the U.S. user interface) as the font instead of the browser’s default font.
To change the default font for new messages
1. On the Outlook Bar, click the Options icon.
2. Under Messaging Options, click Choose Font.
3. Select the font and any other options you want, and then click OK.
Reply Header and Body Not Indented
Many users have found themselves added to a message that other people already have
sent back and forth many times. They want to understand the history of the issue that is
being discussed, so they scroll through the old contents of the message, working
through all the replies back to the original message. But before they reach the
beginning, it becomes impossible to read any more. The old contents are illegible
because each reply has indented the previous message body, pushing the oldest text
further and further over.
Outlook Web Access will not indent the message on reply any more. (There is no
guarantee of what other e-mail clients will do.) With the version of Outlook Web
Access shipped with Exchange Titanium, the reply header and body will stay at the
same alignment as the original content. Instead of an indent, a horizontal rule offsets the
reply header and body from the new content.
Junk Mail Beacon Blocking
In Exchange Titanium, Outlook Web Access makes it tougher for people who send junk
mail to use beacons to retrieve e-mail addresses. Now an incoming message with any
content that could be used as a beacon, regardless of whether the message actually
contains a beacon, prompts Outlook Web Access to display the following warning
message.
Page 58

48 Microsoft Exchange Titanium Getting Started Guide
Figure 2.17 Junk mail beacon blocking
Users who know the message is legitimate can choose to show the message with all its
content. Users can delete a suspicious message without triggering beacons that tell a
junk mailer, “Hey, send me junk mail.”
This option can be disabled from the Outlook Web Access Options page.
Attachment Blocking
There are a host of new attachment-blocking features in Outlook Web Access that you
can enable.
First, administrators can block Outlook Web Access users who log on through the
Internet from accessing any attachments in messages. This is particularly useful for
keeping users from potentially compromising corporate security by opening attachments
when using Outlook Web Access at public Internet terminals. At the same time,
administrators can allow full intranet access to attachments in messages, so users
working with Outlook Web Access in their offices or connected to the corporate
network from home could open and read attachments.
A warning message in the infobar of the e-mail where attachments have been blocked
will let users know if they are not able to access attachments.
Administrators also can block Outlook Web Access users from sending or receiving
attachments with specific file extensions that could contain viruses. This new Outlook
Web Access feature matches attachment-blocking functionality in Outlook. On received
messages, users will be told via the infobar of any blocked attachments. On sent
messages, Outlook Web Access will not allow users to upload any files with extensions
that appear on the block list.
Warning This section contains information about editing the registry. Before you edit the registry,
make sure you understand how to restore it if a problem occurs. For information about restoring the
registry, see the “Restore the Registry” Help topic in Regedit.exe or Regedt32.exe.
Page 59

Chapter 2: Clients 49
To enable attachment blocking
1. Click Start, click Run, and type Regedit in the box next to Open. Click OK.
2. Navigate to the following registry key:
* Key_local_machine\system\CurrentControlSet\Services\MSExchangeWeb\OWA\
3. Create a new Dword value and name it DisableAttachments.
4. Right-click the DisableAttachments Dword value and choose Modify.
5. In the Base window, click the button next to Decimal.
6. In the Value Data field, enter one of the following numbers:
• 0 Enter the value ‘0’ if you want to allow all attachments.
• 1 Enter the value ‘1’ if you want to disallow all attachments.
• 2 Enter the value ‘2’ if you want to allow attachments only from back-end
servers.
7. Click OK.
Sensitivity and Reply/Forward Infobar
A received message now shows its sensitivity settings, such as Confidential, in the
infobar.
The infobar also indicates the date and time a user replied to or forwarded a received
message.
Item Window Size
The version of Outlook Web Access that shipped with Exchange 2000 always launches
any window, either to read an item or create an item, at the set size of 500x700 pixels. It
didn’t matter if a user resized an item window; the next window would still open at
500x700.
Now, with Exchange Titanium, during a session, Outlook Web Access will remember if
a user resizes the item window and will open all future item windows at that size. The
new window size is not persisted to future Outlook Web Access sessions.
This works for all item windows opened within a session, whether they include e-mail,
Calendar, Contacts, or Tasks.
Note This feature is not available with the basic experience version of Outlook Web Access.
Page 60

50 Microsoft Exchange Titanium Getting Started Guide
Meeting Requests
Outlook Web Access includes several new meeting request features.
Set Reminders
You can now set reminders on meeting requests you have received. With a meeting
request open, select the Reminder check box, select the length of time ahead of the
meeting from the drop-down list, and then click Save and Close. You will be reminded
of the meeting requested at the time you specified.
Forward Meeting Requests
Outlook Web Access now allows you to forward meeting requests. You can also reply
to the meeting organizer, or reply to the meeting organizer and all recipients.
To forward or reply to a meeting request
1. In Outlook Web Access, open the meeting request.
2. Do one of the following:
• To reply to the meeting organizer only, click the Reply icon. The To text box
is preaddressed to the meeting organizer.
• To reply to the meeting organizer and all recipients, click the Reply to all
icon. The To and Cc text boxes are preaddressed to the meeting organizer and
all recipients.
• Click the Forward icon to forward the meeting request. Then fill in the address
fields, just as when you address a new message.
Compose New Message to Recipient From Address Book
Using Outlook Web Access with Exchange Titanium, you can now open the Address
Book, select a recipient, and then start an e-mail message to that person. This option is
helpful if you prefer to search for an e-mail recipient from the Address Book, and then
initiate a new message from there.
Note This feature is not available with the basic experience version of Outlook Web Access.
Page 61

Chapter 2: Clients 51
To create a new e-mail message from the Address Book
1. On the Outlook Web Access toolbar, click the Address Book button.
2. Search for the desired recipient.
3. After you have a list of potential recipients, in the details pane, select the recipient
you want to address an e-mail message to, and then click New Message.
A new message window opens with the name of the recipient you selected in the To
field.
Improved Performance
The speed of Outlook Web Access has been improved by reducing the amount of
information that must travel from the server to the browser.
Overall, even with the enhanced user interface and multitude of new features, Outlook
Web Access should seem faster, especially over slow connections, and appear far more
responsive to user interactions.
S/MIME Support
The Secure Multipurpose Internet Mail Extensions (S/MIME) protocol allows users to
send secure e-mail by digitally signing or encrypting e-mail messages. Signed and
encrypted e-mail was not supported in Outlook Web Access with Exchange 2000. In
Outlook Web Access with Exchange Titanium, users can digitally sign and encrypt email messages using the new Outlook Web Access S/MIME control. The S/MIME
control works in conjunction with a public key infrastructure (PKI) to provide the
signing and encryption capabilities.
Before rolling out S/MIME support with Titanium Outlook Web Access, you should
have a good understanding of cryptography and PKI, for example Windows 2000 or
Windows .NET Server PKI. For a good overview of cryptography and Windows PKI, as
well as links to some other resources, see the following white paper:
http://www.microsoft.com/windows2000/docs/cryptPKI.doc.
Outlook Web Access S/MIME Architecture
When an S/MIME message is handled by Microsoft Outlook Web Access, any number
of public certificates must be retrieved from Microsoft Active Directory or from the
Personal Contacts on the Exchange server. After they are retrieved from Active
Directory, they are parsed and verified against the certificate revocation list (CRL) and
the trust chain. This involves to a lot of back-and-forth traffic between the Outlook Web
Access client and the Public Key Infrastructure (PKI).
Page 62

52 Microsoft Exchange Titanium Getting Started Guide
To reduce the traffic overhead between the PKI and Outlook Web Access, the public
key parsing, CRL look up, and trust chain verification are all done from the Exchange
server. Processing certificate validity on the server makes Internet-based access faster
and more reliable, and can greatly reduce bandwidth requirements.
Figure 2.18 Outlook Web Access architecture
Private Key Handling
Another important consideration in the Outlook Web Access design is security. At no
time does a private key, in any form, get passed between the user's computer and
Exchange server. In fact, the Outlook Web Access S/MIME component running in
Internet Explorer has no direct handling of the private key either. All private key
parsing and handling is performed by the Windows operating system. The Outlook Web
Access S/MIME control hands a message to the operating system and the cryptography
software hands back the encrypted message. This separation and isolation of the private
key is critical to a secure S/MIME solution, especially given the fact that the
communication may span the Internet between the client and the server. It is also
important to note that the public key is used for encryption while the private key is used
for decryption and signing.
Note that the full Outlook client as well as Outlook Express, operates in the same way
with regard to separating and isolating the private key.
Signing and Encrypting Mail
This section explains, at a high level, the process of signing and encrypting mail with
S/MIME. The purpose of this discussion is to illustrate how certificates are used by an
S/MIME client.
Page 63

Chapter 2: Clients 53
Signing
When a message is signed, the content of the message is converted to a MIME message;
this may include encoding the data to make it RFC 822 compliant. After a valid MIME
message is produced, the message headers and body of that MIME are used to generate
a Message Integrity Check (MIC) by applying the appropriate signing algorithm found
on the user’s private key. The result is a comma-separated list of tokens, also referred to
as a digital signature. The message is then sent, typically, with a copy of the sender's
public key embedded in the message.
When the recipient opens the message, an MIC is generated on the content of the
message according to the signing algorithm on the sender’s public key. Tokens are
generated again from this process and are compared with the digital signature. If they
match, the signature is considered valid.
Encrypting
When a message is encrypted, the recipient's public key is used to encrypt the data. The
message is sent as a MIME message with no body and a Public Key Cryptography
Standards #7 (PKCS-7) attachment. PKCS-7, developed by RSA, defines cryptographic
syntax as it applies to messaging.
To send an encrypted message, the sender must be able to retrieve the recipient's public
key; the public key must also be associated with a valid certificate.
When the recipient opens an encrypted message, the recipient's private key (either
stored locally or on a smart card) is used to decrypt the message.
Page 64

54 Microsoft Exchange Titanium Getting Started Guide
Certificate Validation with Outlook Web Access
For some organizations, such as legal entities, the most important feature of S/MIME is
the ability to ensure non-repudiation and authenticity of the sender. To guarantee these
two aspects, the certificate that has signed the recipient’s mail must be proven valid. In
this context, that means the sender's certificate cannot have been revoked; it must still
be temporally valid; and the Exchange server must trust the certificate authority that
issued the sender’s certificate. Note that these same attributes are also important to
validate certificates for encryption.
Certificate Revocation Check
Each certificate may have a “CRL Distribution Point” (CDP) attribute. In some cases,
where the issuer does not revoke certificates, the CDP may not be present on the
certificate. This attribute points to a URL, generally an LDAP string or HTTP path,
where a requesting client needs to query to access the Certificate Revocation List (CRL)
for the given certificate.
Each Certificate Authority (CA) and intermediate CA manages a CRL for its domain.
As the name implies, the CRL of a given CA will contain a list of certificates that have
been revoked by that CA. To ensure that the certificate of the CA itself has not been
revoked, client software will need to query the CRL of the parent CA that originally
issued the given CA’s certificate, and so on, until the Root CA is reached.
Depending on the complexity of the PKI, this process can be time consuming. For this
reason, caching mechanisms are generally used during CRL verification. Outlook and
Outlook Express will cache the CRL until it expires (expiry information is included
with the CRL).
In the case of Outlook Web Access, the Exchange server will cache the CRL on behalf
of the clients for the duration of its validity. Exchange will attempt to authenticate to the
CDP via Integrated Windows authentication using the Exchange server's LocalSystem
account; the CDPs throughout your organization should be configured to allow access
by the appropriate Exchange servers. Alternatively, if you do not want to configure your
CDPs to allow Exchange access via LocalSystem, it may be easier to manage if you just
configure your CDPs to allow anonymous access for Exchange to access the CRL on
behalf of Outlook Web Access users. If Exchange cannot validate the CRL, Outlook
Web Access will display a warning message to the user.
In the case where a given CDP is offline or otherwise inaccessible, Exchange will not
slow incoming requests by checking the inaccessible CDP continually until a specific
time has passed. The interval between retries is a sliding scale that begins at 15 seconds
and increments towards 30 minutes each time a client requests a CRL verification from
the CDP.
Page 65

Chapter 2: Clients 55
Time Validity Verification
When a Certificate Authority creates a certificate, the certificate is marked with a
validity period. The validity period is specified by two attributes on the certificate:
“Valid to” and “Valid from.”
Typically, the mail client will validate these attributes. In the case of Outlook Web
Access, the Exchange server will validate the expiry information. If the certificate has
expired, or the date precedes the “Valid from” attribute, Outlook Web Access displays a
warning message to the client.
Trust Verification
Trust verification refers to the act of determining whether a given public certificate
comes from a trusted source. There are two ways a trust is established between a sender
and a recipient. The first is by virtue of having the certificate issued by the same trusted
root CA. In this scenario, the trust chain, or hierarchy, on the sender’s certificate is
derived from the same root CA as the recipient’s issuing CA. The second way of
establishing trust is via an explicit trust. In this scenario, a user opens a public certificate
and selects an option to trust the issuing CA explicitly.
Outlook and Outlook Express perform trust verification from the user’s desktop.
Outlook Web Access, on the other hand, performs the verification from the Exchange
server. In both cases, the logic is the same. In cases where the trust chain is included in
the mail, on some public certificates, the trust chain, or hierarchy is specified. In cases
where the trust chain is not specified, trust verification is done while traversing the CRL
hierarchy.
Because trust validation is done by Exchange on behalf of Outlook Web Access
S/MIME users, it may be necessary to add the appropriate trusted CAs to the Exchange
server’s machine account certificate store for each CA that users will be interacting with.
You will need to add trusted CAs to the Exchange certificate store if users will be
exchanging S/MIME mail via Outlook Web Access in the following cases:
• Between different Active Directory forests.
• If there are multiple root CAs in your enterprise.
• If S/MIME mail is sent between separate enterprises with different CAs.
If the Exchange server does not trust a given CA, users will receive warnings when
opening signed mail and when attempting to send encrypted mail.
Setting up CA trust must be done on each back-end Exchange mailbox server where
Outlook Web Access S/MIME users reside. Adding the trusted CAs to each Exchange
certificate store can be done manually, or using group policy.
Page 66

56 Microsoft Exchange Titanium Getting Started Guide
Public Key Handling
When sending an encrypted message, Outlook, Outlook Express, and Outlook Web
Access look to either Active Directory or the personal certificate store for a given
recipient’s public certificate. Where the client looks for the certificate is based on user
settings. By default, Outlook and Outlook Web Access search Active Directory first. If
the recipient does not exist in Active Directory, or if the Active Directory user or
contact object does not have a key associated with it, then the sender’s personal contacts
are searched. In the case of Outlook and Outlook Web Access, the personal contacts are
stored on the sender’s Exchange mailbox. Outlook Express stores the contacts locally. If
a public certificate, suitable for encryption, is stored on the contact, then that certificate
may be used for sending the encrypted mail.
Both Outlook and Outlook Express allow the user to specify LDAP directories where
user information (including public certificates) can be accessed. In the case of Outlook,
the default directory where user information is gathered is the local (log on) Active
Directory; additional directories can be specified for each profile. For Outlook Express,
generic LDAP search directories can be specified for each account. Outlook Web
Access uses Exchange to proxy Active Directory searches on its behalf. Outlook Web
Access can only search for recipients and certificates that exist in Active Directory and
user's contacts.
Certificate Enrollment
In order for users to be able to sign or encrypt outgoing messages, they must first be
issued certificates, referred to as digital IDs, which support the signature and encryption
security functions. Both functions may be provided by a single certificate, or each
function may be provided by a separate certificate. The necessary certificates are issued
by a certificate authority, which generates the necessary public and private key pair
needed for encryption and decryption. Using Windows PKI, the public key is stored in
Active Directory, which allows other users to encrypt messages intended for the user,
while the private key is typically stored locally on the user's computer or on a smart card.
The process of obtaining a certificate from a CA is called enrollment.
Configuring Outlook Web Access S/MIME
This section will walk you through the basic steps necessary to roll out Outlook
S/MIME support. The following scenario and steps represent one of the simplest ways
to get S/MIME support up and running. Use these steps as a guide to test out the new
S/MIME functionality. Do not use these steps to deploy a secure messaging
infrastructure in your production environment. Deploying a production PKI and secure
messaging infrastructure requires careful planning and consideration of topics such as
Page 67

Chapter 2: Clients 57
CA topologies, key archival and recovery strategies, auto-enrollment, smart cards, and
so on. These topics are outside the scope of this paper.
Note Several of the following steps also apply to using S/MIME with Microsoft Outlook. If your
users are already using encryption and signing with Outlook, you can skip to the Outlook Web
Access configuration steps.
Existing Topology
This section assumes that you have the following topology configured:
• At least one Windows .NET Server 2003 domain controller
• At least one Exchange Titanium server deployed
Perform the following steps to deploy S/MIME with Outlook Web Access:
1. Install Windows .NET CA
2. Configure the CA as an Enterprise root
3. Have users enroll
4. Install the Outlook Web Access S/MIME control
5. Configure default secure messaging settings
6. Send test messages
Step 1: Install Windows .NET Server Enterprise CA
You will need a certificate authority on your network that can issue the necessary
certificates to users. To provide the greatest ease of deployment, it is recommended that
you deploy a Windows .NET Server CA. Although you could use a Windows 2000
certificate server, Windows .NET Server offers some important additional features, such
as autoenrollment via group policy and key archival and recovery capabilities.
An Enterprise CA (as opposed to a stand-alone CA) facilitates deployment because it
integrates with Active Directory for public key storage. Storing the public keys in
Active Directory allows users to automatically look up another user's public key when
encrypting a message.
To install a Windows .NET Server Enterprise CA
1. On a Windows .NET Server computer, from the Windows Components Wizard,
check Certificate Services, and then click Next.
2. Read the warning about domain membership and then click Yes.
3. Click Next.
4. On the CA Type page, ensure that Enterprise root CA is selected, and then click
Next.
5. On the CA Identifying Information page, in the Common name for this CA box,
enter a name for the CA.
Page 68

58 Microsoft Exchange Titanium Getting Started Guide
6. Finish the remaining steps in the wizard, as directed.
Step 2: Configure the CA
After the CA has been installed, you might want to change the default settings. For Beta
testing purposes you can go ahead and use the default settings, but here are some of the
other configuration settings you might want to change:
• Recovery agents. To archive users' private keys and retrieve them in case they are
lost, you will need to configure a recovery agent. The recovery agent is used to
recover an archived key. To configure a recovery agent you will need to install a
recovery agent certificate on the CA.
• Certificate templates. A number of default Certificate Templates are available
after you install the Enterprise CA. For Outlook Web Access S/MIME purposes the
standard User certificate template is sufficient for message signing and encryption,
because it offers both the encryption and signature functions. However you may
want to require separate certificates for signing and encryption. To do this, create
two new templates, one for signature and one for encryption.
• Request handling. With the default settings on the CA, certificates will be issued
automatically upon request unless the certificate template specifically requires an
administrator to grant the request. The User certificate does not require
administrator approval. If you want an administrator to approve each certificate
request, you can configure Request Handling to require administrator approval
before a certificate is issued.
Step 4: Have users enroll
Once the CA is up and running, users can request the certificate (or certificates)
necessary for message signing and encryption. The following procedure assumes you
are using the standard User certificate template, which offers both signing and
encryption functions. If you configured your own certificate templates, users will need
to issue an advanced certificate request and request the custom certificates.
To request a certificate
1. Browse to http://ca-server/certsrv where "ca-server" is the name of the Windows .NET
Server Enterprise CA.
2. After authenticating (if necessary), click Request a certificate.
3. On the Request a Certificate page, click User Certificate.
4. On the User Certificate - Identifying Information page, click Submit.
5. The CA Web site will request a certificate on your behalf. On the Potential
Scripting Violation dialog box, click Yes.
6. On the Certificate Issued page, click Install this certificate.
Page 69

Chapter 2: Clients 59
7. Click Yes in any further dialog boxes after reading the information.
The certificate is now installed on the local computer from which the user requested the
certificate. This same certificate will need to be installed on any computer from which
the user will use S/MIME in Outlook Web Access. To install the certificate on other
computers, the user will need to export the certificate and then import it on the other
computers.
To export a certificate
Note Key Management Servers (KMS) certificates are commonly used in Outlook for S/MIME.
KMS certificates may only be exported in the Outlook format, thus requiring Outlook to be installed.
1. Open the certificate store on the computer with the certificate installed:
2. Open a Microsoft Management Console (MMC) console.
3. Add the Certificates snap-in to the console. When prompted select My user
account as the account to be managed.
4. In the MMC console, expand Certificates - Current User, expand Personal, and
then click Certificates.
5. Right-click the certificate, point to All Tasks, and then click Export.
Figure 2.19 Exporting the user certificate
6.
On the Welcome to the Certificate Export Wizard page, click Next.
7. On the Export Private Key page, select Yes, export the private key. This is
necessary to read encrypted messages from the computer where the key will be
imported.
Page 70

60 Microsoft Exchange Titanium Getting Started Guide
8. On the Export File Format page, leave the default settings and click Next.
9. On the Password page, enter a password for the private key.
10. On the File to Export page, type the path and name for the exported certificate file.
This is the file that will be imported on other computers.
11. Finish the wizard as directed.
The file will be saved with the name you specified and a PFX extension. The next step
is to import the certificate onto the other computers.
To import a certificate
1. From the computer on which the certificate is to be installed, browse to the PFX file
that was exported, for example on a floppy disk. Right-click the file and then click
Install PFX.
2. On the Welcome to the Certificate Import Wizard page, click Next.
3. On the File to Import page, click Next.
4. On the Password page, in the Password box, enter the password for the private key,
and then click Next. You don't need to choose to make the key exportable, because
you already have an exported copy.
5. On the Certificate Store page, select Automatically select the certificate store
based on the type of certificate, and then click Next.
6. Finish the Wizard as directed.
The certificate is now installed on the new computer.
Step 5: Install the Outlook Web Access S/MIME control
The next step is to install the S/MIME control used by Outlook Web Access to provide
signing and encryption functionality. This step needs to be performed on each computer
from which the user will use Outlook Web Access to encrypt or sign e-mail.
The Outlook Web Access S/MIME control requires Windows 2000 or later and Internet
Explorer 6 or later to be installed.
To install the Outlook Web Access S/MIME control
1. On a computer with Windows 2000 or later and Internet Explorer 6 or later
installed, log on to Outlook Web Access.
2. From the Outlook Web Access main page, click Options on the navigation bar. If
the navigation bar is collapsed, click the Go to options button:
3. Under Secure Messaging, click Download.
4. Ignore any security warnings and click Yes.
The S/MIME control will be downloaded from the Exchange Titanium server to the
local computer.
Page 71

Chapter 2: Clients 61
Step 6: Configure default secure messaging settings
After the S/MIME control is installed, you will see two check boxes on the Options
page under Secure Messaging:
• Encrypt contents and attachments for outgoing messages
• Add digital signature to outgoing messages
These options represent the default settings when a message is composed using Outlook
Web Access. Even if neither default is selected, users can choose to encrypt or sign
individual messages from within the message. Similarly the default options can be
turned off on individual messages.
Figure 2.20 Secure Messaging defaults
To configure the default secure messaging settings
1. Select Encrypt contents and attachments for outgoing messages if you want
encryption turned on by default when composing a message.
2. Select Add digital signature to outgoing messages if you want message signatures
turned on by default when composing a message.
3. Click Save and Close.
Step 7: Test encryption and signing
At this point users should be able to send signed or encrypted messages using Outlook
Web Access. You should send some test messages between two users to verify that both
signing and encryption are working.
To send a signed message
1. Log on to Outlook Web Access with a user who has a certificate and the S/MIME
control installed.
2. Click New to compose a new message.
3. Add a recipient for the test message and fill out the message fields.
4. On the toolbar there will be two new icons: one for encrypting and one for signing.
Make sure the Add digital signature to this message button is selected. Because
you just want to test digital signing this time, make sure that the Encrypt message
contents and attachments button is not selected.
Page 72

62 Microsoft Exchange Titanium Getting Started Guide
Figure 2.21 The digital signature button
5.
Click Send.
6. Log on as the recipient of the test message and open the message. It should be
digitally signed by the sender.
To send an encrypted message
1. Log on to Outlook Web Access with a user who has a certificate and the S/MIME
control installed.
2. Click New to compose a new message.
3. Add a recipient for the test message and fill out the message fields. The recipient's
public key is required to encrypt the message contents. Therefore the recipient will
need to have already enrolled in a certificate that supports encryption.
4. On the toolbar, make sure the Encrypt message contents and attachments button
is selected. Because you just want to test encryption this time, make sure that the
Add digital signature to this message button is not selected.
Page 73

Chapter 2: Clients 63
Figure 2.22 The encryption button
5.
Click Send.
6. Log on as the recipient of the test message. It should be encrypted and only
viewable by the recipient from a computer with the user's encryption certificate
installed.
Wireless Access to Exchange
Exchange Titanium supports wireless synchronization and browse access to Exchange
information using a variety of mobile devices. You can deploy wireless access to
Exchange to provide your users the ability to access their Exchange information from
mobile devices such as the Microsoft Pocket PC 2002 Phone Edition device or a
Wireless Application Protocol (WAP) 2.0 capable phone.
Wireless Synchronization Access
Exchange Titanium now includes the ability to use Pocket PC 2002 devices to
synchronize Exchange data with the Microsoft ActiveSync application. By default,
when you install Exchange Titanium, all of your users are enabled for Wireless
Synchronization.
Page 74

64 Microsoft Exchange Titanium Getting Started Guide
Synchronizing a device to Exchange Titanium Server allows your users to access their
Exchange information without being constantly connected to a wireless network. Users
can use their wireless carrier connection to synchronize their Exchange information to
their Pocket PC Phone Edition or Smartphone device and then access this information
while offline.
Configuring Exchange Titanium for Wireless Synchronization Access
By default, when you install Exchange Titanium beta, Wireless Synchronization access
is enabled by default. You can enable individual users for wireless synchronization
using Exchange system manger. Wireless synchronization access to Exchange Titanium
also includes the following features:
• Always-Up-to-Date Notifications
• Delivery to User Specified SMTP Addresses
Always Up To Date Notifications
Future devices will be able to receive notifications sent to the device that will be able to
initiate synchronization between a user’s device and their Exchange mailbox.
Delivery to User-Specified SMTP Addresses
When the Allow delivery to user entered SMTP addresses feature is enabled in
Exchange Titanium, users can use any wireless carrier with the wireless synchronization
feature of Exchange. This way, when a new message arrives in a user's mailbox,
Always-Up-to-Date will allow a synchronization to occur on a user's device. Enable this
feature if you have users who are using devices to synchronize, and you do not want to
specify the carrier.
The following procedure describes how to configure Wireless Synchronization Access
for your users. To Configure Wireless Synchronization Features for your Users
To Configure Your Organization for Wireless Synchronization Access
1. In Exchange System Manager, expand Global Settings, right-click Wireless
Services, and then click Properties.
Page 75

Chapter 2: Clients 65
Figure 2.23 Wireless Services properties
On the Wireless Settings page, in the Wireless Synchronization pane, choose
2.
from the following:
• Select the check box next to Allow user initiated synchronization to allow
users to use Pocket PC 2002 devices to synchronize their Exchange data.
• Select the check box next to Enable always-up-to-date notifications to allow
users to receive notifications sent from the Exchange server to devices that
will be designed to allow notifications to trigger synchronization on their
device.
• Select the check box next to Allow delivery to user entered SMTP address
to allow users to be able to use their own SMTP carrier for notifications.
3. Click Apply, and then click OK.
Delivery to User-Specified SMTP Addresses
When the Allow delivery to user entered SMTP addresses feature is enabled in
Exchange Titanium, users can use any wireless carrier with the wireless synchronization
feature of Exchange. This way, when a new message arrives in a user's mailbox,
Always-Up-to-Date will allow a synchronization to occur on a user's device. Enable this
Page 76

66 Microsoft Exchange Titanium Getting Started Guide
feature if you have users who are using devices to synchronize, and you do not want to
specify the carrier.
Configuring Devices for Wireless Synchronization Access
The following section describes how to configure your device to use ActiveSync and
how to configure your device to use Always-Up-to-Date Notifications, as well as how to
specify which SMTP carrier option you will use.
To Configure your Pocket PC Phone Edition device to use ActiveSync
1. On your device, from the Today screen, tap Start and then tap ActiveSync.
2. Tap Tools, tap Options, and then tap the Server tab.
3. Select the check box next to each type of information that you want to synchronize
with the server.
4. To configure synchronization options for each type of information, select the type
of information, and then tap Settings.
5. In the Server Name field, enter the address or name of the server to connect to
when synchronizing Exchange data.
6. Tap Advanced.
7. On the Connection tab, enter your user name, password, and domain name.
8. On the Rules tab, select a rule to apply when the data on your device and the data
on your Exchange mailbox do not match.
9. Tap OK to accept the changes you made to ActiveSync
Wireless Browse Access
Exchange Titanium now includes the Outlook Mobile Access application, which allows
users to use mobile devices to access their e-mail, Contacts, Calendar and Tasks. Users
can use Outlook Mobile Access with wireless devices such as a Pocket PC 2002
handheld computer, an iMode device, or any WAP 2.0-compatible phone. You deploy
your Exchange Titanium server that you enable for the use of Outlook Mobile Access in
the same way that you deploy your Exchange Titanium server to use Outlook Web
Access.
The Outlook Mobile Access application is installed by default on Exchange Titanium
server, therefore no additional configuration or installation steps are necessary. When
you install Exchange Titanium, you must select the Windows ASP.NET 1.1 or later
component to be installed on this server in order for Outlook Mobile Access to be
installed. For more information about installing Exchange Titanium, see Chapter 9,
"Deploying Exchange Titanium Beta." Additionally, all users are enabled for Outlook
Page 77

Chapter 2: Clients 67
Mobile Access Browse by default when you install Exchange Titanium if they have
mailboxes on that server.
Browsing Exchange with a Supported Wireless Device
In order for your users to browse their Exchange data with a wireless device using
Outlook Mobile Access, your users must use a device that is supported for Outlook
Mobile Access. The following table shows the devices that are supported for using
Outlook Mobile Access.
Table 2.4 Supported devices for Outlook Mobile Access
Device Network Type Rendering Language
Sony Ericsson T68i GSM xHTML
NEC N503is iMode cHTML
Panasonic P503is iMode cHTML
Panasonic P504i iMode cHTML
Fujistu F504i iMode cHTML
Pocket PC Phone Edition GSM HTML
Sony SO503iS iMode cHTML
Mitsubishi D503iS iMode cHTML
NEC N504i iMode cHTML
Unsupported Devices
Outlook Mobile Access provides mobile access to Exchange Server from devices that
are not supported, such as WAP 1.0 phones. Because these devices are unsupported,
they may behave unexpectedly or fail to work properly. You should tell your users that
using such devices is not officially supported and may have unexpected results when
using Outlook Mobile Access. By default, Exchange Titanium allows for the use of any
unsupported device. You can turn off this functionality if you do not want users
accessing Exchange with unsupported devices.
To configure unsupported device settings
1. In Exchange System Manager, expand Global Settings, and right-click Wireless
Services and then click Properties.
Page 78

68 Microsoft Exchange Titanium Getting Started Guide
Figure 2.25 Wireless Services properties
On the Wireless Settings page, in the Wireless Browse pane, select or clear the
2.
check box next to Allow unsupported devices, click Apply, and then click OK.
Configuring Exchange Titanium Beta to use Outlook Mobile Access
In order for your users to be able to use Outlook Mobile Access to browse their
Exchange information, you need to do the following:
1. Configure your Exchange Titanium front-end server for Wireless Browse.
2. Configure user devices to use a wireless connection.
3. Inform your users how to use Wireless Browse.
After you have completed these steps, your users will be able to use Outlook Mobile
Access to access their e-mail, calendar, tasks, and contacts on their wireless devices.
Step 1: Configure an Exchange Titanium Server for Wireless Browse
Exchange Titanium automatically installs the OMA virtual directory, which allows your
users to access Exchange from a mobile device. This virtual directory has the same
capabilities and configuration settings that you use for the Outlook Web Access virtual
directory. When you configure a server to use Outlook Mobile Access, you should
configure the server in the same way that you configure a server for Outlook Web
Page 79

Chapter 2: Clients 69
Access. For complete details about how to configure your Exchange servers to use
Outlook Web Access, read the Front-End and Back-End Book located at:
http://www.microsoft.com/downloads/release.asp?ReleaseID=43997&area=search&ordinal=24
For additional information about how to set up Exchange Titanium for Wireless Access,
see Chapter 9, “Deploying Exchange Titanium Beta”, later in this book.
Step 2: Configure Users' Devices to Use a Wireless Connection
In order for your users to access Exchange Titanium using Outlook Mobile Access,
They will need a wireless device from a carrier whose mobile network runs on the
GSM/GPRS or Code Division Multiple Access (CDMA) network.
Before your users can connect to Exchange Titanium and use Outlook Mobile Access or
ActiveSync over a wireless connection, you should inform your users on how to
configure their devices to use a wireless network, or provide resources for your users on
how to configure devices to use a wireless network.
Step 3: Inform your Users how to use Wireless Browse
After you have configured Exchange Titanium for Wireless Browse, and your users
have wireless devices that can use a wireless network to access Exchange Titanium,
your users need to know how to access their Exchange server and user Outlook Mobile
Access. The following procedures describe how to use Outlook Mobile Access to access
their Exchange information on both a Pocket PC phone edition device and a Sony
Ericsson T68i device.
To configure a Pocket PC Phone Edition device to use Outlook Mobile Access
1. On your device, from the Today screen, tap Start, then tap Internet Explorer.
2. On the Internet Explorer screen, tap view and then tap address bar to open the
address bar in your browser window.
3. Tap anywhere inside the address bar, and then enter the following URL:
http://ExchangeServerName/oma, where ExchangeServerName is the name of
your Exchange Titanium Outlook Mobile Access Server.
Note If no connection bubble appears, you may have to connect to your GPRS network
manually.
4. At the Network Log On screen, enter your user name, password and domain in the
spaces provided and then tap the OK button.
Outlook Mobile Access opens, and you can select to read, reply, or forward e-mail,
view calendar appointments, and browse or create contacts and tasks.
Page 80

70 Microsoft Exchange Titanium Getting Started Guide
To Configure a Sony T68i to use Outlook Mobile Access
1. On your phone, access the device menu by pressing in on your device joystick.
2. Select the WAP Service option.
3. Enter the server name as https://ExchangeServerName/oma where
ExchangeServerName is the name of your Outlook Mobile Access Server and then
press the Yes button.
Outlook Mobile Access opens, and you can select to read, reply, or forward e-mail,
view calendar appointments, and browse or create contacts and tasks.
Page 81

3
Administration Features
There are several enhancements in Microsoft® Exchange Titanium administration.
Exchange Titanium has been improved to make administration of Exchange easier and
more efficient. This chapter provides information about these enhancements.
There are two new mail-enabled objects in Recipient Management – InetOrgPerson and
Query-based Distribution groups. Exchange Features tab of the User Properties has been
enhanced to include Wireless Services and Protocols. Exchange features provide added
functionality for your mailbox-enabled and mail-enabled users. You can enable or
disable the users’ Wireless Services options (such as Wireless Browse), or Protocols
(such as Microsoft Outlook® Web Access). You can now move multiple mailboxes in
parallel by running multiple instances of the Exchange Task Wizard. Exchange
Titanium also offers an improved Queue Viewer. The Queue Viewer has been improved
to monitor messages queues. You can view both SMTP and X.400 queues from Queue
Viewer rather than from their separate nodes. You can now experience the enhanced
Public Folder Administration with a new HTML interface and search capability to
search all public folders. Public Folders interface has several enhancements and also
search capability has been improved. You now have greater control over your message
tracking log files using Exchange System Manager. And there is a new utility tool
called Exchdump.exe that collects and reports Exchange configuration information from
various sources. This can helpful in troubleshooting or gathering detailed information
regarding your Exchange configuration.
Page 82

72 Microsoft Exchange Titanium Getting Started Guide
The following table provides a snapshot of the features discussed in this chapter.
Table 3.1 Exchange Titanium Administration - Feature Enhancements
Feature Description
Recipient Management • There are two new mail-enabled objects in Recipient
Management – InetOrgPerson and Query-based Distribution
groups.
• Exchange Features tab of the User Properties has been
enhanced to include Wireless Services and Protocols.
• You can now run multiple instances of the Exchange Task
Wizard simultaneously in a single console.
• You can move mailboxes with the Exchange Task Wizard in
Exchange System Manager.
Queue Viewer • Queue Viewer has been improved to monitor messages
queues.
• You can view both SMTP and X.400 queues from Queue
Viewer rather than from their separate nodes.
• You can disable outbound mail from all SMTP queues.
• You can set the refresh rate for Queues.
• Improved Find Messages option to search for messages
within a Queue.
• You can also view additional information regarding a
particular Queue from the Additional Information.
• Hidden queues exposed such as failed message retry
queue.
Public Folders • New and improved Public Folder Administration interface
such as the Status Tab and the Replication tab. And
improved search capability to search all public folders.
• You can create a list of specific servers among which public
folder referrals are allowed.
• Microsoft Exchange Public Folder Migration Tool
(pfMigrate) is a new windows script file (.wfs) that allows
you to create public folder replicas on the new server and,
after the public folders have replicated, remove replicas
from the source server.
Mailbox Recovery Center • Using the new mailbox Recovery Center, you can perform
recovery or export operations on multiple disconnected
Mailboxes at one time.
Page 83

Chapter 3: Administration Features 73
Message Tracking Center • You have greater control over your message tracking log
files using Exchange System Manager.
• You can now track messages after categorization.
Exchdump.exe utility • Exchdump.exe is a command line utility that collects and
reports Exchange configuration information from various
sources such as Microsoft Active Directory®, Registry, and
so on.
New Mail-Enabled Objects in Recipient Management
Recipients are Active Directory objects. Users can either be mailbox-enabled or mailenabled. Contacts, groups, and public folders can only be mail-enabled. These
designations determine what tasks users can perform in Exchange. Exchange Titanium
introduces two new recipient objects – InetOrgPerson and Query-based Distribution
Group. These features are discussed in this section.
InetOrgPerson
An InetOrgPerson object functions like a User object. The InetOrgPerson object is
derived from the user class, and it is an LDAP standard for the user class. The
InetOrgPerson object class is used in several non-Microsoft LDAP and X.500 directory
services to represent people within an organization. Support for InetOrgPerson makes
migrations from other LDAP directories to Active Directory more efficient. The Active
Directory Service now includes InetOrgPerson in queries for users. Active Directory
provides support for the InetOrgPerson object class and its associated attributes defined
in RFC 2798. You can find more information on the RFC in
InetOrgPerson object is derived from the user class and can be used as a security
principal just like the user class.
http://www.ietf.org. The
Note You can create an InetOrgPerson only if you are running a Windows .NET Server domain
controller. InetOrgPerson can be mail-enabled or mailbox-enabled only in a native Titanium
topology.
Page 84

74 Microsoft Exchange Titanium Getting Started Guide
Creating an InetOrgPerson
You can create a mailbox-enabled or mail-enabled an InetOrgPerson object. The
procedures to create a mailbox-enabled or mail-enabled InetOrgPerson are the same as
creating a user object. The following procedure describes how to create an
InetOrgPerson.
To create an InetOrgPerson
1. Click Start, point to All Programs, point to Microsoft Exchange, and then click
Active Directory Users and Computers.
2. In the console pane, navigate to the container where you want to create the
InetOrgPerson, right-click the container, point to New, and then click
InetOrgPerson.
Note The procedure to create an InetOrgPerson account in Active Directory is the same as
to create a user account except in Step 2, click InetOrgPerson instead of User.
Added Query-based Distribution Groups
A query-based distribution group (QDG) is a new type of distribution group introduced
in Exchange Titanium.
how QDGs work and how to create them.
This section explains what a query based distribution group is,
Query-based distribution works reliably in a pure Titanium deployment or in a native
Microsoft Exchange 2000 and Titanium deployment in which all Exchange 2000
versions are running Service Pack 3 with Windows® .NET global catalog servers. If
your global catalog servers are running Windows 2000 server, you can modify a registry
key on your Exchange 2000 SP3 servers to achieve greater reliability. If you are running
versions of Exchange prior to Exchange 2000 SP3 in your environment, query-based
distribution groups will not work reliably.
What is a Query-based Distribution Group?
A query-based distribution group provides the same functionality as a standard
distribution group, but instead of specifying static user memberships, a QDG allows you
to use an LDAP query to dynamically build membership in the distribution group (for
example “All full-time employees in my company”). Using QDG allows for a much
lower administrative cost given the dynamic nature of the distribution group. However,
QDGs require higher performance cost for queries whose outcome produces a large
number of results. This cost
Page 85

Chapter 3: Administration Features 75
is in terms of server resources such as high CPU and increased working set, because
every time an e-mail is sent to a query-based distribution group, an LDAP query is
executed against Active Directory to determine its membership.
Important You cannot view the membership of a query-based distribution group in the global
address list, because it is dynamically generated each time mail is sent.
How Does a Query-based Distribution Group Work?
When a message is submitted to a query-based distribution group, Exchange treats the
message slightly differently than messages destined for other recipients. A query-based
distribution group flows through Exchange to the proper recipients in the following
manner:
1. E-mail is submitted through the Exchange store driver or SMTP to the submission
queue.
2. The categorizer, a transport component responsible for address resolution,
determines that the recipient is a query-based distribution group.
3. The categorizer sends the LDAP query request to the global catalog server.
4. The global catalog server executes the query and returns the set of addresses that
match the query.
5. After receiving the complete set of addresses matching the query, the categorizer
generates a recipient list containing all the users. Note that the categorizer must
have the complete set of recipients before it can submit the e-mail to routing;
therefore if an error occurs during the expansion of the query-based distribution
group to its individual recipients, the categorizer must start the process over.
6. After the categorizer sends the complete, expanded list of recipients to routing, the
standard message delivery process continues and e-mail is delivered to the users’
mailboxes.
The process is slightly different if a dedicated expansion server, a single server
responsible only for expanding distribution groups, is used for query-based distribution
groups. In this case, rather than sending a query to the global catalog server for
expansion in Step 4, the e-mail is first routed to the dedicated expansion server. After
the message arrives at the expansion server, the expansion takes place and the delivery
follows the same process described above.
Note Using query-based distribution groups for delivery restrictions on recipients or SMTP
connectors, dedicated servers are ignored, regardless of whether an expansion server is assigned
to the specific query-based distribution group. In this case, the distribution group expansion is
performed for each hop that the message travels.
Page 86

76 Microsoft Exchange Titanium Getting Started Guide
Creating a Query-Based Distribution Group
Query-based distribution works reliably in a pure Titanium deployment or in a native
Exchange 2000 and Titanium deployment in which all Exchange 2000 versions are
running Service Pack 3 with Windows NET global catalog servers. If your global
catalog servers are running Windows 2000 Server, you can modify a registry key on
your Exchange 2000 SP3 servers to achieve greater reliability, as explained earlier.
There is no need to add this registry key to your Titanium servers, since Titanium
expands QDGs reliably with Windows 2000 and Windows .NET global catalogs by
default. If you are running versions of Exchange prior to Exchange 2000 SP3 in your
environment, query-based distribution groups will not work reliably.
Modifying Exchange SP3 Servers for Use with Windows 2000 Global
Catalog Servers
Use the following procedure to configure an Exchange 2000 SP3 server for improved
reliability in environments where query-based distribution groups will be expanded with
Windows 2000 global catalogs.
To modify your Exchange 2000 SP3 server
1. Start Registry Editor: Click Start, click Run, and then type regedit.
2. Navigate to
HKEY_LOCAL_MACHINE\SYSTEM\CurrentControlSet\Services\SMTPSVC
\Parameters
3. In the details pane, right-click, point to New, and then click DWORD Value.
4. Type DynamicDLPageSize for the name.
5. Right-click DynamicDLPageSize, and then click Modify.
6. Under Base, click Decimal, and then click OK.
7. In Edit DWORD Value, under Value Data, type 31.
Creating Query-based Distribution Groups
You must use an Exchange Titanium version of Exchange System Manager and Active
Directory Users and Computers to create a query-based distribution group. You cannot
create query-based distribution groups without upgrading your administration console.
Use the following procedure to create a query-based distribution group.
Note It is recommended that you upgrade all your administrative consoles to Exchange Titanium
before deploying query-based distribution groups in your environment.
Page 87

Chapter 3: Administration Features 77
To create a query-based distribution group
1. Click Start, point to All Programs, point to Microsoft Exchange, and then click
Active Directory Users and Computers.
2. In Active Directory Users and Computers, click the View menu, and then click
Advanced Features.
3. In the console pane, navigate to the container where you want to create the query-
based distribution group.
4. Right-click the container, point to New, and then click Query-based Distribution
Group.
5. In Query-based Distribution Group name, type a name for the QDG, and then click
Next.
6. Under Apply filter to recipients in, the current server displays. If necessary, click
Change to select another server or a different container.
7. Under Filter, select on of the following options:
• Click Include in this query-based distribution group and click each item
you want to include in the criteria for membership in the query-based
distribution group. The following criteria are pre-defined:
• Users with Exchange mailbox
• Users with external e-mail addresses
• Mail-enabled Groups
• Contacts with external e-mail addresses
• Mail-enabled Public folders
• Click Customize filter and then click Customize to create your own criteria
for the query.
8. Click Next to see a summary of the query-based distribution group you are about to
create.
9. Click Finish to create the query-based distribution group. The new query-based
distribution group displays under the Users container in the details pane of Active
Directory Users and Computers.
10. Right-click the query-based distribution group you just created and click
Properties.
11. Select the Preview tab to view the query results and verify that the correct
recipients are included in the distribution group.
Active Directory Users and Computers provides an easy way to format the LDAP query
using standard attributes, without requiring specific knowledge of LDAP. For example,
you can select all mailboxes under the organizational unit or even customize the query
to select all mailboxes under the organizational unit that exist on a particular server.
Page 88

78 Microsoft Exchange Titanium Getting Started Guide
Additionally, after you construct a query, the Preview feature allows you to ensure your
query works the way you intended it. This feature is useful not only for query
validation, but also in determining how long a query takes to execute. You can use the
preview feature to learn how long a query takes to execute and based on this time, you
can decide whether or not to break up the query into smaller queries for better
performance and faster delivery times.
Combining Multiple Query-based Distribution Groups
In Exchange System Manager, you have the capability to create query-based
distribution groups based on the “AND” operator. To create query-based distribution
groups based on the “OR” operator, create multiple query-based distribution groups and
combine them in a single distribution group or query-based distribution group.
Consider the following example in which you want to create a query-based distribution
group that includes all employees in Marketing or all employees in located in the Paris
office. If you create a query-based distribution group using an LDAP query that
contains all Marketing users and all Paris employees, this query would only return users
that were in both groups, in Marketing and Paris employees, so anyone who is not a
member of both groups is excluded. To achieve “OR” functionality and thereby include
members of either group, you need to create two query-based distribution groups, one
for Marketing and one for Paris employees, and then combine create a new query-based
distribution group with these two groups as members. To do this, you would perform
the following steps:
1. Create a query-based distribution group for all employees in the Marketing
department, called Marketing.
2. Create a query-based distribution group for all employees in the Paris office, called
Paris employees.
3. Create a distribution group or query-based distribution group that includes as
members the query-based distribution groups, Marketing and Paris employees.
Guidelines for Creating Query-based Distribution Groups
Use the following guidelines when creating query-based distribution groups:
• Remember, you can only use query-based distribution groups in a pure Titanium
environment or a native mode environment with Exchange 2000 and Titanium in
which all Exchange 2000 servers are running Service Pack 3.
• Index the attributes used in the query. Indexing greatly improves the performance of
the query and reduces the time required to expand the distribution group and deliver
the e-mail to the intended recipients. For more information, see Microsoft
Knowledge Base article Q313992.
Page 89

Chapter 3: Administration Features 79
• If the filter string contains bad formatting or incorrect LDAP syntax, then the global
catalog server will not execute the query. Using Active Directory Users and
Computers to create your query can help prevent you from constructing an incorrect
query. You can also use the Preview button to view the result of the query; this will
confirm the validity and desired results of the query. If you create a query-based
distribution group based on an incorrect LDAP query, then when a user sends to the
query-based distribution group, the user receives a non-delivery report with the
code 5.2.4 and, if categorizer logging is enabled, one of two events are logged with
event identifiers of 6024 or 6025.
• If the filter string is well formatted but no results are produced, then the sender will
not get an NDR. This is the same behavior that results from sending to an empty
distribution group. As stated earlier, use the Preview button in Active Directory
Users and Computer to confirm the desired result of your query.
• Use Exchange System Manager in a security context that has the same permissions
for reading objects in the Active Directory as the Exchange server. You should note
that Exchange System Manager runs in the security context of the user that is
currently logged in. If an administrator is running with higher security privileges
than the Exchange server, then it may be possible that the query is accessing Active
Directory attributes that are not accessible to the Exchange server, but are accessible
to the administrator. The administrator will see the correct set of results in the query
preview. Because the categorizer will run with the Exchange Server permissions, it
will not be able to retrieve the same set of results and e-mail will not be sent to the
query-based distribution group as the administrator would expect.
• Issues exist when a base DN (distinguished name) is deleted. Query-based
distribution expansion relies on its base DN referring to a valid container in the
directory. If a QDG’s base DN container is deleted, the categorizer cannot execute
the query and the sender receives a non-delivery report with the code 5.2.4. If
categorizer logging is enabled, an event ID of 6024 or 6025 is logged. For example,
suppose you created a sales container within the users container for all sales
employees and built a query-based distribution group using the sales container. If
you deleted the sales container, the query would no longer work.
Page 90

80 Microsoft Exchange Titanium Getting Started Guide
Deployment Recommendations for Query-based Distribution Groups
The time required to expand a query-based distribution group and execute the query
depends on several factors. The following factors influence the amount of time it takes
to expand and execute a query-based distribution group:
• The type of hardware deployed in your organization. The categorizer can require
up to 2 KB of memory for each recipient. This is a conservative metric that you can
use as a baseline. Using this baseline, if you send an e-mail to a query-based
distribution group of 6,000 users (meaning that the query returns 6,000 records),
categorizer requires 12 MB of RAM solely to expand the query-based distribution
group. Similarly sending an e-mail to a larger query-based distribution group of
100,000 users, then the categorizer requires about 200 MB of RAM. The processor
speed and amount of available physical memory will affect how long it will take to
deliver the e-mails after the expansion.
• Global catalog availability affects the expansion and delivery of e-mail sent to
query-based distribution groups. If all global catalog servers are unavailable, the
message will be placed in retry mode in the categorizer, which means that the
complete expansion will start over after one hour.
The general recommendation is to break up large query-based distribution groups
into combinations of query-based distribution groups and assign different expansion
servers for each large query-based distribution group. Consider one of the following
three options for designating and configuring expansion servers and global catalog
servers for expanding distribution groups into individual recipients.
Option 1
Consider designating an Exchange Titanium server with no mailboxes, such as a
public folder replica server or a bridgehead server, as the expansion server for a
large query-based distribution group. Because this server has more bandwidth and
resources to expand the query-based distribution group, expansion and delivery is
more efficient. To maximize efficiency, configure the expansion server to use one
or more global catalog servers that are not used by other Exchange servers in the
organization. You can configure this setting in Exchange System Manager on the
Directory Access tab of the server properties.
Option 2
Create a query-based distribution group for every Exchange server and limit each
query-based distribution group to the mailboxes on that Exchange server. Assigning
this same server as the expansion server optimizes mail delivery. Then, use
aggregate query-based distribution groups or standard distribution groups that
Page 91

Chapter 3: Administration Features 81
contain these query-based distribution groups as members. For example, if you
wanted to create a query-based distribution for all full-time employees, you could
create a query-based distribution group on each server for full-time employees and
name them “Server1 Full Time,” “Server2 Full Time” and then create another
query-based distribution group comprised of these server-based groups. For
example, create a query-based distribution group, named “AllFullTime” and build a
query that includes “Server1 Full Time” and “Server2 Full Time” as the members of
this group. You can also create a normal distribution group and designate “Server1
Full Time” and “Server2 Full Time” as the members of this group.
Option 3
The following example illustrates a third approach for improved handling of large
query based distribution groups:
Suppose you want to create a query-based distribution group called “All
employees” with 100,000 users. Consider dividing the group into the following
smaller query-based distribution groups:
• “All Temps” 10,000 users
• “All Vendors” 5,000 users
• “All Full-Time” 65,000 users
• “All Interns” 2,000 users
• “All Contractors” 18,000 users
In this case “All Full-Time” is a large query-based distribution group, so you may want
to assign a specific expansion server to it. The other query-based distribution groups can
be assigned an expansion server based on how the users distributed across your
Exchange servers. For example, if all the interns reside on one Exchange server you
may want to have the same server as expansion server for “All Interns.” Overall this
proposed approach will perform much better than a single query-based distribution
group with 100,000 recipients.
Enhanced Exchange Features on User Properties
Exchange Features tab of the User Properties has been enhanced to include Wireless
Services and Protocols. Exchange features provide added functionality for your
mailbox-enabled users. You can enable or disable the user’s Wireless Services options
(such as Wireless Browse), or Protocols (such as Outlook Web Access).
To enable or disable Exchange Features for a single user
1. Click Start, point to All Programs, point to Microsoft Exchange, and then click
Active Directory Users and Computers.
Page 92

82 Microsoft Exchange Titanium Getting Started Guide
2. In the console pane, expand the container where you want to enable or disable
Exchange Features, and then click Users.
3. Right-click the user you want to modify, point to Properties, and then click
Exchange Features.
4. On the Exchange Features tab, under Features, select a feature, and then click
Enable or Disable.
Note You can also enable or disable Exchange features for a user by using the Configure
Exchange Features option in the Exchange Task Wizard. To do this, first select the user
for whom you want to enable or disable Exchange features, right-click the user and then
click Exchange Tasks. On the Exchange Task Wizard, in Available Tasks, click Configure
Exchange Features, and then click Next. On the Exchange Features page, under Features,
select a feature, click Enable or Disable, and then click Next. Click Finish on the Task
Summary page to complete the wizard.
To enable or disable Exchange Features for multiple users
You can also enable or disable Exchange features for multiple users by using the
Configure Exchange Features option in the Exchange Task Wizard.
1. Select the users you want to enable or disable Exchange features, right-click the
users and then click Exchange Tasks.
2. On the Exchange Task Wizard, in Available Tasks, click Configure Exchange
Features, and then click Next.
3. On the Exchange Features page, under Features, select a feature, and then click
Enable or Disable, and then click Next.
4. Click Finish on the Task Summary page to complete the wizard.
Move Mailboxes in Exchange System Manager
You can now move multiple mailboxes in parallel by running multiple instances of the
Exchange Task Wizard. You can move multiple mailboxes to a different server or
mailbox store. Moving mailboxes is helpful when you need to adjust server workload as
the number of Exchange users in your organization fluctuates. The ability to move
multiple mailboxes reduces manual workload and time involved in moving each
individual mailbox.
Note The following procedure describes the Move Mailbox procedure from System Manager. You
can also move mailboxes from Active Directory Users and Computers console.
To Move Mailboxes
1. Click Start, point to Programs, point to Microsoft Exchange, and then click
System Manager.
Page 93

Chapter 3: Administration Features 83
2. In System Manager, expand Servers and navigate to the server container where the
mailboxes of the users are located. Expand First Storage Group, expand Mailbox
Store, and then click Mailboxes.
3. In the details pane, select the user or users, right-click your selection, and then click
Exchange Tasks.
4. In Exchange Task Wizard, click Next, select Move Mailbox, and then click Next.
5. To specify the new destination for the mailbox, in the Server drop-down list, select
a server, and then in the Mailbox Store drop-down list, select a mailbox store. Then
click Next.
6. In the final screen of Exchange Task Wizard, verify that the information is correct,
and then click Finish.
Note You can also run multiple instances of the move mailbox option. Right-click each
individual user’s mailbox, click Exchange Tasks, and in the Exchange Tasks Wizard follow
the preceding steps for Move Mailbox.
Page 94

84 Microsoft Exchange Titanium Getting Started Guide
Enhancements to Queue Viewer
Queue Viewer has been enhanced to improve the monitoring of message queues. Now,
you can view X.400 and STMP queues in Queue Viewer rather than from their
respective protocol nodes. You can also set the refresh rate of the queues using the
Settings option. You can view additional information about a particular queue by
clicking the queue. Queue Viewer also includes new options such as Disable Outbound
Mail, which lets you disable the outbound mail from all SMTP queues. The following
graphic shows you the new and improved Queue Viewer.
Figure 3.1 Queue Viewer
Disable Outbound Mail
The Disable Outbound Mail option lets you disable outbound mail from all SMTP
queues. For example, this can be useful if a virus is active in your organization.
Note The Disable Outbound Mail option does not disable the MTA or System queues.
Page 95

Chapter 3: Administration Features 85
To Disable Outbound Mail for all SMTP Queues
1. On the Start menu, point to Programs, point to Microsoft Exchange, and then
click System Manager.
2. Navigate to Queue Viewer by doing one of the following:
• If you do not have routing or administrative groups defined: Expand
Servers, expand the Server you want, and then click Queues.
• If you do not have routing groups defined: Expand Administrative
Groups, Expand <Administrative Group Name>, expand Servers, expand
the Server you want, and then click Queues.
3. In the Queue Viewer, click Disable Outbound Mail to disable mail from all SMTP
queues.
4. In the “Are you sure you want to disable outbound mail” dialog box, click Yes.
Outbound mail is now disabled for all queues. To re-enable SMTP queues that have
been disabled, click the Enable Outbound Mail tab, and then click Yes.
Note If you want to prevent outbound mail from a particular remote queue instead of
disabling all the SMTP queues, you can freeze the messages in that queue. Right-click the
queue, and then click Freeze. This will freeze all the messages in the queue. To unfreeze
the messages, right-click the queue, and then click Unfreeze.
Queue Viewer Refresh Rate Settings
The Settings option allows to you determine the frequency at which the all the queues
are refreshed. The default rate at which the queues are refreshed is every 2 minutes. You
can set the refresh rate to 1 minute, 5 minutes, 10 minutes, or Never refresh.
To modify Queue Viewer refresh rate Settings
1. On the Start menu, point to Programs, point to Microsoft Exchange, and then
click System Manager.
2. Navigate to the Queue Viewer by doing one of the following:
• If you do not have routing or administrative groups defined: Expand
Servers, expand the Server you want, and then click Queues.
• If you do not have routing groups defined: Expand Administrative
Groups, expand <Administrative Group Name>, expand Servers, expand
the Server you want, and then click Queues.
3. Click Settings.
4. In the Refresh queue rate, click the drop-down list, and then click the refresh rate
you want.
5. Click OK.
Page 96

86 Microsoft Exchange Titanium Getting Started Guide
Find Messages
You can use the Find Message option to search for messages by specifying search
criteria such as the sender or recipient, and the message state (such as frozen). You can
also specify the number of messages you want your search to return.
To Find Messages
1. On the Start menu, point to Programs, point to Microsoft Exchange, and then
click System Manager.
2. Navigate to the Queue Viewer by doing one of the following:
• If you do not have routing or administrative groups defined: Expand
Servers, expand the Server you want, and then click Queues.
• If you do not have routing groups defined: Expand Administrative
Groups, expand <Administrative Group Name>, expand Servers, expand the
Server you want, and then click Queues.
3. Click the queue in which you want to search for messages.
4. Click Find Messages.
Page 97

Chapter 3: Administration Features 87
5. Select the search criteria you want:
• To search for a particular sender: Click Sender, type the name of the
sender and then click “Check Names”. This may result in “Multiple Names
Found” from which you can pick a sender. Select the sender you want, and
then click OK.
• To search for a particular recipient: Click Recipient, and select the
recipient from the list or type the name of recipient, and then click OK.
• To specify the number of messages returned by the search: Click the drop-
down list under Number of messages to be listed in the search, and select
the number of messages you want listed in the search.
• To search for messages in a particular state: Click the drop-down list under
Show messages whose state is: and select the state you want to filter the
messages.
• Frozen: This option shows the messages that are in frozen state. A single
message can also be frozen. This does not mean that the queue is frozen.
• Retry: This option shows the messages that awaiting another delivery
attempt. Messages in the retry state have failed one or more delivery
attempts, and the message is waiting for another delivery attempt.
• All Messages: This option shows all the messages regardless of which
state they are in.
6. Click Find Now to begin the search. The results of the search will be displayed in
the Search Results summary.
• Click Stop if you want to stop a search.
• Click New Search to begin a new search. This resets the Find Messages
dialog box to its default settings.
View Additional Information about a Queue
You can view additional information about a particular queue. The Additional Queue
Information may contain troubleshooting or informational information about a
particular queue. Information on e
as the queue not operating properly due to remote server connection problems or the
queue is unable to find the destination via DNS, etc. will be displayed here. The
Additional Queue Information will also indicate if the queue is unavailable. For
example, if the service not started.
rrors returned from Exchange specific extensions to SMTP service such
Page 98

88 Microsoft Exchange Titanium Getting Started Guide
To view additional information about a Queue:
• To view additional information about a Queue, click the particular queue. If there is
additional information, it will be displayed in Additional Queue Information
located next to the Settings option.
Hidden Queues Exposed in UI
Several queues that were hidden in Exchange 2000 are now visible in Exchange System
Manager. You should note that the X.400 queues and the SMTP queues now appear in
Queue Viewer rather than under their respective protocol nodes.
The following table lists the new queues, their descriptions and possible reasons for
message accumulation in each queue.
Table 3.2 New Queues
Queue Name Description Causes for Message
Accumulation
DSN messages pending
submission
Contains delivery status
notifications (DSN), also
known as non-delivery
reports that are ready to be
delivered by Exchange.
Note: The following
operations are unavailable
for this queue:
• Delete All Messages (no
NDR)
• Delete All Messages
(NDR)
Failed message retry queue Contains messages that
Exchange has failed to
delivery, but that the server
will attempt to send again.
Note: The following
operations are unavailable
for this queue:
• Delete All Messages (no
NDR)
• Delete All Messages
(NDR)
Messages can accumulate in
this queue if the store
service is unavailable or not
running, or if the problems
exist with IMAIL Exchange
store component, the store
component that performs
message conversion.
Check the event log for
possible errors with the store
service.
Messages can accumulate in
this queue If a problem
exists with DNS or the SMTP
protocol.
Check the event log to
determine if an SMTP
problem exists. Verify your
DNS configuration using
NSlookup or another utility.
On rare occasions, a corrupt
message can get stuck in
this queue. To determine if a
Page 99

Chapter 3: Administration Features 89
message is corrupt, try to
look at its properties. If some
properties are not
accessible, this can indicate
message corruption.
Messages queued for
deferred delivery
Contains messages queued
for delivery at a later time
including sent by older
Outlook clients. (You can set
this option in Outlook clients)
Messages sent by older
versions of Outlook treat
deferred delivery slightly
differently. Previous versions
of Outlook depend on the
MTA for message delivery,
since SMTP, not the MTA,
now handles message
delivery.
These messages remain in
this queue until their
scheduled delivery time.
Possible causes for message
accumulation are:
Message can be queued
here if a message is sent to
a user’s mailbox while the
mailbox is being moved.
When the user does not yet
have a mailbox created and
no master account SID exists
for the user. For more
information, see the
following KB article
The message may be corrupt
or the recipient may not be
valid.
To determine if a message is
corrupt, check its properties.
If some messages are not
accessible, this can indicate
a corrupt message.
Also check that the recipient
is valid.
Q316047.
Improved Public Folder Referral
In Exchange 2000 Server, you could specify whether or not to allow public folder
referrals among routing groups. Exchange Titanium provides a richer interface, which
you can use to create a list of specific servers among which referrals are allowed.
To specify a list of referral servers
1. Click Start, point to All Programs, point to Microsoft Exchange, and then click
Exchange System Manager.
2. Expand Administrative Groups, expand the appropriate administrative group,
expand Servers, and then click
information
. Right-click the server, and click Properties.
the server for which you want to customize referral
Page 100

90 Microsoft Exchange Titanium Getting Started Guide
3. In the Server Properties dialog box, click the Public Folder Referrals tab.
4. Click the Public folder referral options box, and then click Use custom list.
5. To specify a server for the referral list, click Add and then select a server from the
list of available servers. Click OK to return to the Public Folder Referrals tab.
6. To specify relative costs for servers in the referral list (use costs to prioritize servers
in the referral list) click a server in the list and then click Modify. Specify a cost for
the server, and then click OK to return to the Public Folder Referrals tab.
Improved Public Folder Interfaces
To make public folders easier to manage, Exchange Titanium includes several new
public folder interfaces. These new interfaces are available in the Results pane of
Exchange System Manager when you select a public folder (or in some cases, a public
folder hierarchy) under the Folders node:
• Content Tab. Use this tab to view the content of a public folder in Exchange
System Manager. You no longer have to open a separate client application to view
public folder content.
• Find Tab. Use this tab to search for public folders within the selected public folder
or public folder hierarchy. You can specify a variety of search criteria, such as the
folder name or age.
Note The Find tab is available at the top-level hierarchy level as well as the folder level.
• Status Tab. Use this tab to view the status of a public folder, including information
about servers that have a replica of the folder and the number of items in the folder.
• Replication Tab. Use this tab to view replication information about the folder.
 Loading...