


MD1800
Microcook MD
ENGLISH
FRANÇAIS
DEUTSCH
ESPAÑOL
IMPORT ANT INFORMA TION
READ BEFORE USE
PLEASE SAVE THESE INSTRUCTIONS
INFORMA TIONS IMPORT ANTES
LIRE A V ANT UTILISA TION
INSTRUCTIONS À CONSERVER
WICHTIGE INFORMA TIONEN
VOR ANWENDUNG LESEN
DIESE ANLEITUNG AUFBEWAHREN
INFORMACIÓN IMPORT ANTE LEER
ANTES DE LA UTILIZACIÓN
SEE
PAGE 2
VOIR
PAGE 17
SIEHE
SEITE 32
VÉASE
PÁGINA 47
GUARDE ESTAS INSTRUCCIONES
1

CONTENTS
Safety instructions .............................................3
Electrical supply ................................................3
Precautions .......................................................4
Installation instructions ......................................5
Suitable cooking utensils ...................................6
Introduction ........................................................7
Main features .....................................................8
Control panel .....................................................9
Operating instructions:
Manual mode ...................................................1 0
Programing number pads ...............................12
Running a Program ......................................... 1 3
Daily cleaning ..................................................14
ENGLISH
Problem solving ...............................................15
Technical specification..................................... 15
Service Contact Details ...................................16
PLEASE READ THE FOLLOWING
SAFETY INSTRUCTIONS CAREFULLY
2

IMPORTANT SAFETY INSTRUCTIONS
1. DO NOT operate oven empty, without food or liquid inside the oven, as this will result in overheating and
may cause damage.
2. NEVER remove the outer casework of the oven.
3. NEVER remove any fixed internal parts of the oven.
4. NEVER tamper with the control panel, door, seals, or any other part oven.
5. DO NOT obstruct air vents/filters or steam outlet.
6. NEVER hang tea towels or cloths on any part of the oven.
7. If the door seals are damaged, the oven must be repaired by an approved Engineer.
8. All service and repair work must be carried out by an approved Engineer.
9. If the power cable is damaged in any way it MUST be replaced by an approved Engineer.
10. When handling hot liquids, foods, and containers, care should be taken to avoid scalds and burns.
11. When heating liquids the contents should be stirred prior to heating to avoid eruptive boiling.
12. Feeding bottles and baby food jars should be opened when heating, the contents stirred or shaken and
the temperature checked prior to consumption to avoid burns.
13. Never use the oven to heat alcohol, e.g. brandy, rum etc. Also, food containing alcohol, such as
Christmas pudding, can more easily catch fire if overheated.
14. Never attempt to deep fry in the oven.
ELECTRICAL SUPPLY
WARNING
This appliance must be earthed. Failure to do so may result in electric shock and death.
The oven must be installed by a
qualified and approved electrician.
In order to enable isolation of this
appliance, the mains plug must be
positioned where it is easily
accessible
The installation wiring (hard wired or
socket fitting) must be in accordance
with current IEE regulations and safety
standards. The electrical supply lead
is located at the rear of the oven.
If you are in any doubt about your
electrical supply , seek the advice of a
qualified and approved electrician.
It is essential that the mains supply is
properly installed and earthed. It
should be fed from a cicuit which is
suitable for very high power electrical
appliances and it is important that this
circuit is not overloaded.
All UK models are supplied with a fitted and approved 13Amp
moulded plug. We strongly recommend that this plug is never
removed. However, certain establishments may require a
different plug to be fitted. In this case, the following wiring
instructions should be obseved.
Establishments with standard ( Type ‘B’ ) circuit breakers are sensitive to
‘surges’ which occur on switching on freezers, refridgerators and other
catering equipment, including microwave ovens. Because of this , we
strongly recommend that a separate Type ‘C’ circuit breaker ( designed
specifically for this type of equipment ) is fitted to each oven installation.
SAVE THESE INSTRUCTIONS
3

PRECAUTIONS TO BE OBSERVED
1. Read this manual before using your oven.
2. As with all electrical appliances, it wise to have the electrical connections inspected
periodically.
3. The oven interior, door seals should be cleaned frequently, following the instructions
described in the CLEANING section.
4. There is no need to switch off your oven after each function but remember to switch off at
the end of the day or period of operation.
5. Microwave energy should not be used to dry linen or warm plates.
6. As with any cooking appliance, care should be taken to avoid combustion of the items
within the oven.
If smoke is observed:
Switch off
Isolate from the electrical supply
Keep door the closed to stifle any flames
7. Ensure food is placed centrally in cavity for best results.
8. Cover the food to prevent splashing the walls of the cavity.
9. Eggs and whole hard-boiled eggs should not be heated in a oven micowave as they may
explode.
10. Food with a skin, e.g. potatoes, apples, sausages etc. should be pierced before heating.
11. Food should not be heated in a completely sealed container as the build-up of steam may
cause it to explode.
12. In the event of glass breaking or shattering within the oven, ensure that food is totally free
of glass particles. If in doubt, dispose of any food that was in the oven at the time of the
breakage.
13. DO NOT attempt to operate this oven with: object caught in door, door that does not close
properly or damaged door, hinge, latch, sealing surface or without food in the oven.
4
INSTALLATION
Remove packing material and protective film from the oven.
Check for obvious signs of transit damage. If necessary, inform the
supplier IMMEDIATELY.
LOCATION AND POSITIONING
Choose a site away from major heat sources.
DO NOT position so that hot air is drawn in from fryers, grills, griddles,
etc.
A heat barrier to the height of the oven must be installed if sited next to a
hob, stove or range.
Note:
The air intake is located at
the base of the oven, even
with the clearance specified
below it is important that
airflow is as cool as
possible and not pre-heated
by other appliances such as
fryers, grills and griddles as
this will deteriorate the life
and performance of the
oven.
Note the minimum
recommended
clearance required for
air flow
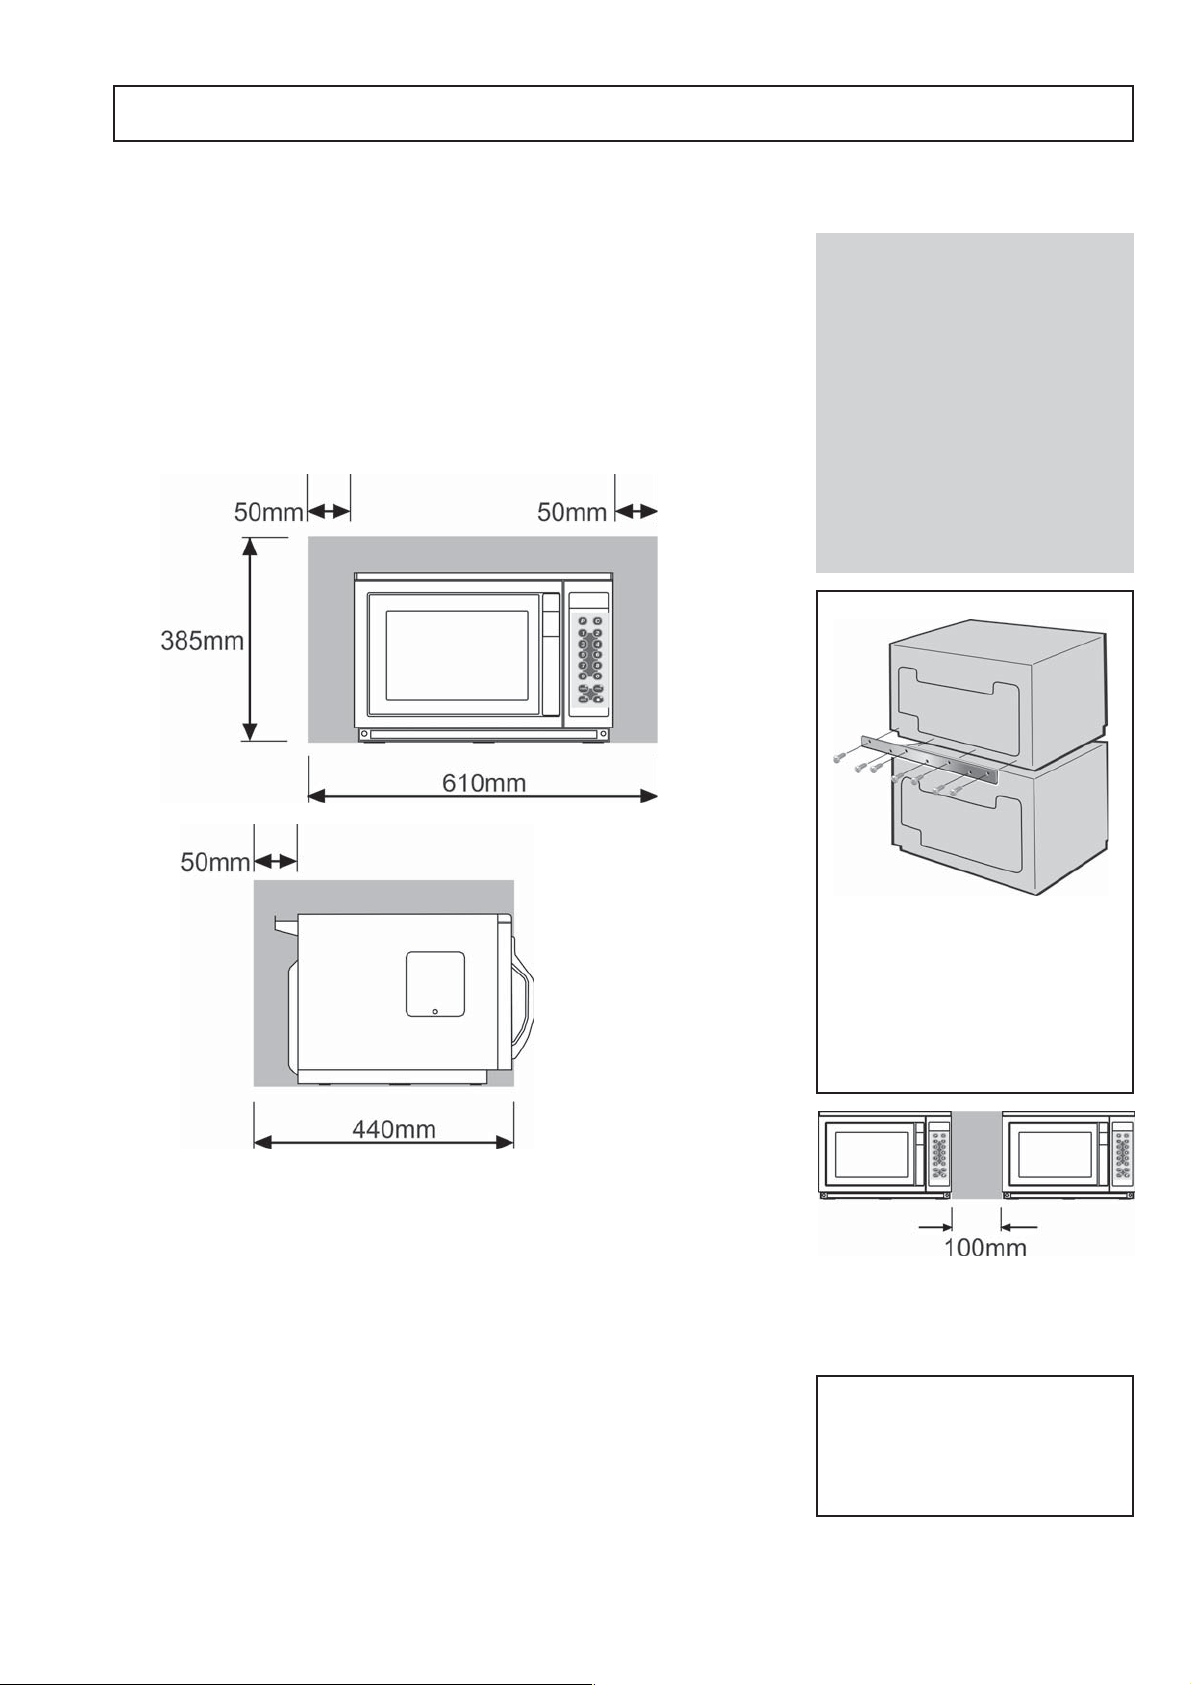
Place the oven on a flat surface that is LEVEL, STRONG and STABLE.
Allow a minimum clearance of 50mm to the rear, top and each side to
allow air to circulate freely for each oven (see diagram).
The air intake is located at the base of the oven, even with the clearance
specified above it is important that airflow is as cool as possible and not
pre heated by other appliances such as fryers, grills or griddles.
Allow a minimum of 50mm clearance above the oven for hot air to
escape.
Allow sufficient clearance, 400mm in front of the oven for the door to
open fully
Do not affix labels/stickers to oven other than those applied by the
manufacturer
Always ensure that ovens are
fixed together as shown using
the fixing plate provided.
THIS OVEN MUST NOT BE
STACKED MORE THAN
THREE HIGH.
Note:100mm clearance is
required between two ovens
side by side
WARNING:
Check that the
AIR FILTER is in place prior
to operation
( see Main Features )
5
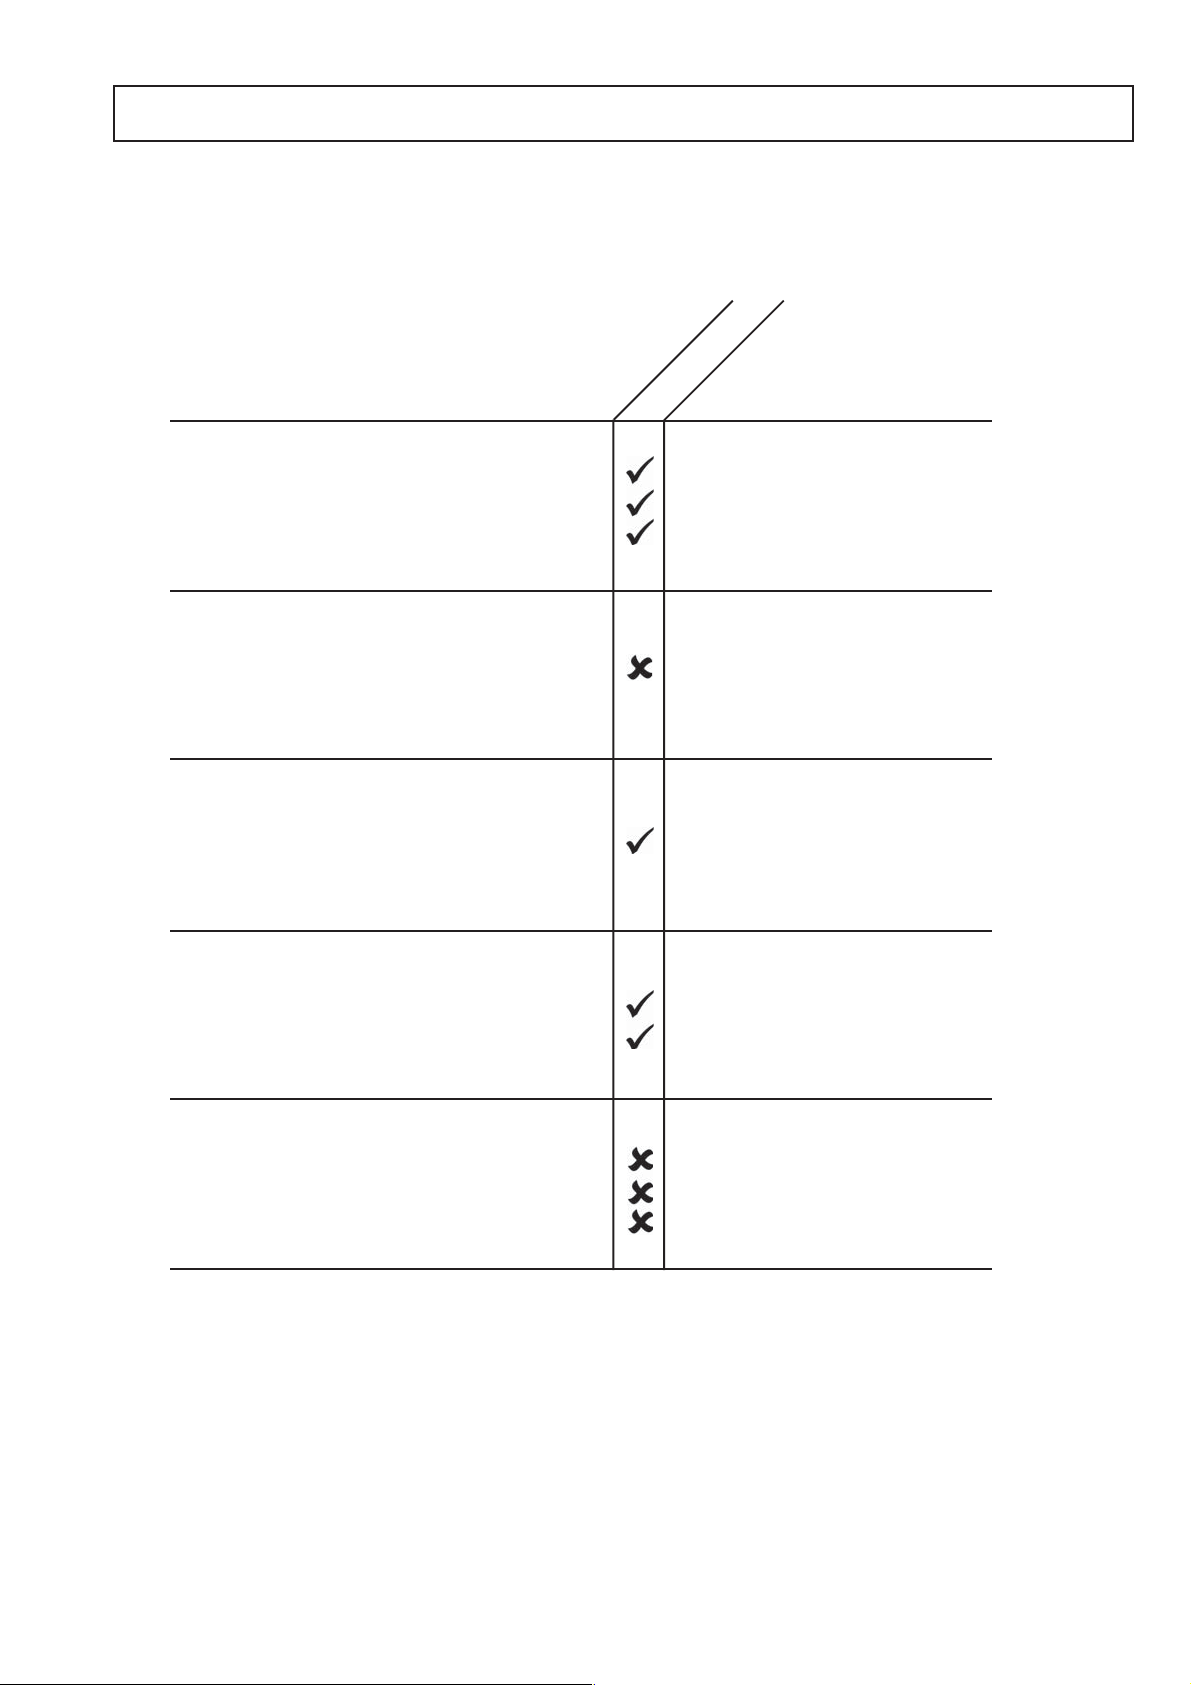
SUIT ABLE COOKING UTENSILS
Manufacturer’s instructions should be checked to determine the suitability of individual
containers or utensils using each of the cooking functions.
The following chart provides general guidelines:
microwave only
Heat resistant containers
T oughened glass
Vitreous ceramics
Earthenware
(porcelain, crockery, china etc.)
Metallic Trays
Plastic containers
Rigid, boilable, plastic
containers
Disposables
Combustibles (paper, card, etc)
Microwave-suitable cling film
Do not use items with metallic
decoration.
Do not use metal items.
Dual-ovenable plastic containers
(up to certain temperatures) are now
available.
Check manufacturer’s instructions
before use
Cling film should not come into
contact with food.
Other utensils
Tie tags
Cutlery
Temperature probes
No kitchen utensil should be left in
food while it is cooking
6
INTRODUCTION
Merrychef Microwave ovens use microwave energy to cook or heat food in a fraction of the
time of conventional ovens.
The microwaves are confined within the sealed metal cavity of the oven and cannot pass
through the reinforced glass window of the door.The door is electrically sealed with three
interlocking safety switches which ensures that the energy stops automatically as soon as
the door moves.
It is important to understand the amount of energy produced inside your oven, known as the
power output ( see TECHNICAL SPECIFICATIONS section ), because this determines the
amount of time rquired to heat an item. Also, with a given amount of energy inside the
cavity, two items will take longer than one.
Just like any other heating method, if food is left cooking in a microwave oven for too long it
will burn and eventually catch fire. If you are unsure about the required heating time it is
safest to underestimate and monitor the items closely but always check that the minimum
core temperature has been achieved.
Once established, precise cooking instructions for selected items may be programmed into
the oven’s memory so that they can be repeated easily and accurately.
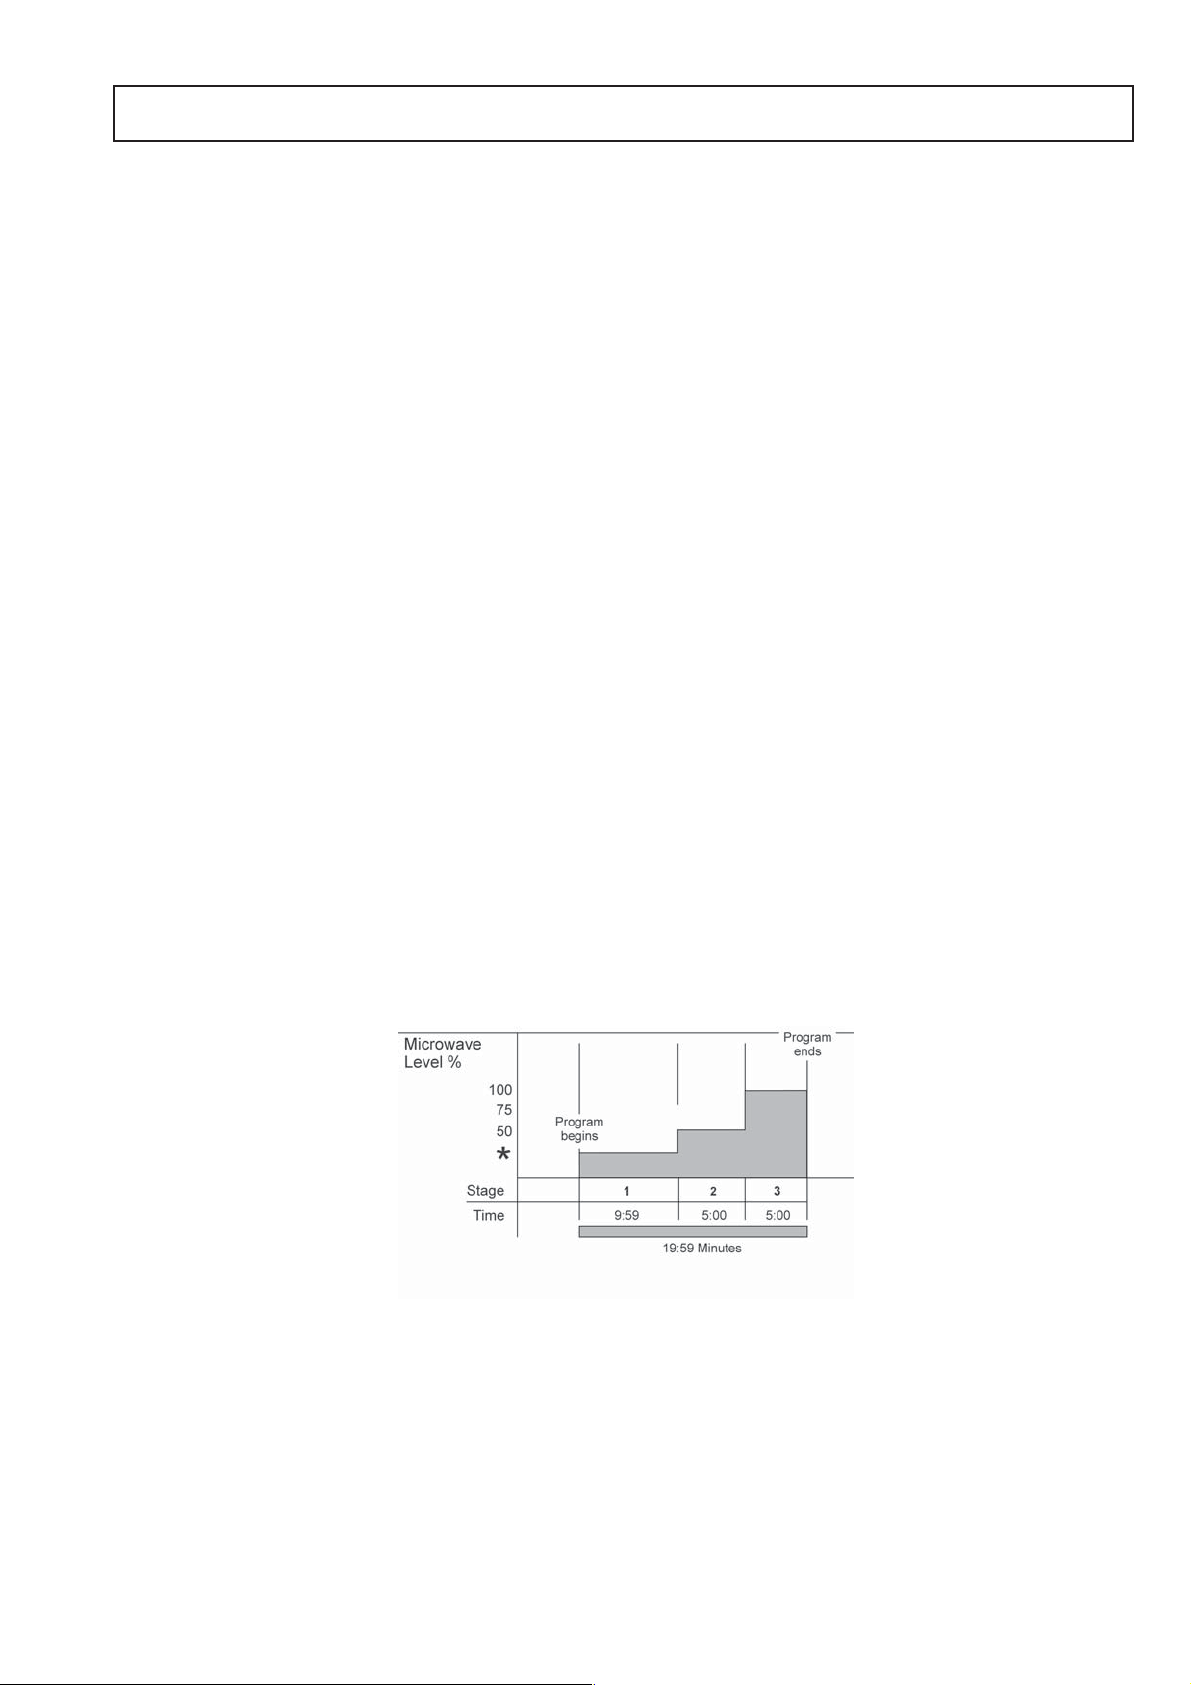
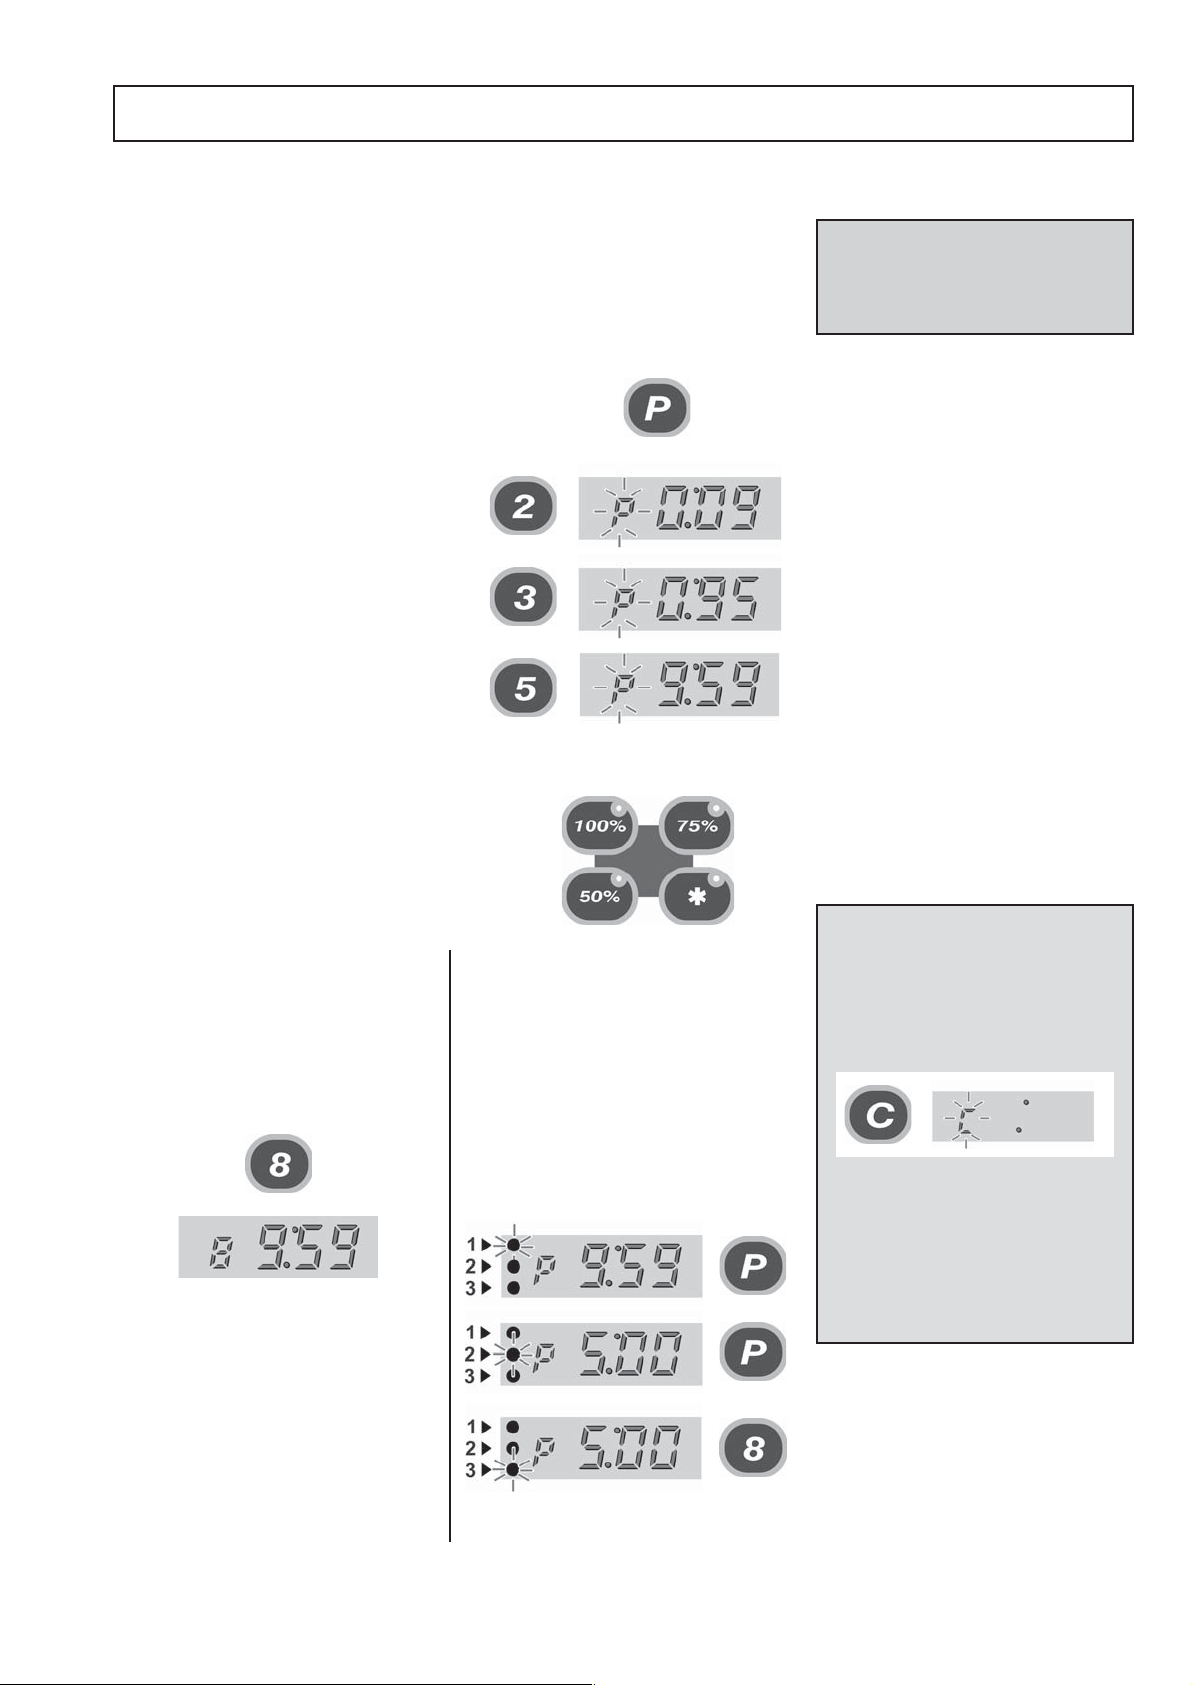
Multi-stage Programming
The Microcook MD Series offers even greater flexibility by allowing multi-stage programming.
This enables the exact conditions required for quality results to be set according to the food
type. Programs can have one, two or three stages.
A typical 3-Stage program is shown below. In stage 1 the item is defrosted for 9 minutes 59
seconds ( by applying a gentle microwave power-*). In stage 2 the microwave power
increases to 50% for 5 minutes and for the final 5 minutes-Stage 3- power is increased to
100%.
This is only one example of a multi-staged program that can be stored.
The instructions outlined in this guide are intended to ensure the safety and long life of
your microwave oven.
It is important that all staff are fully trained before using the oven.
7
MAIN FEA TURES
2
8
4
6
7
1
9
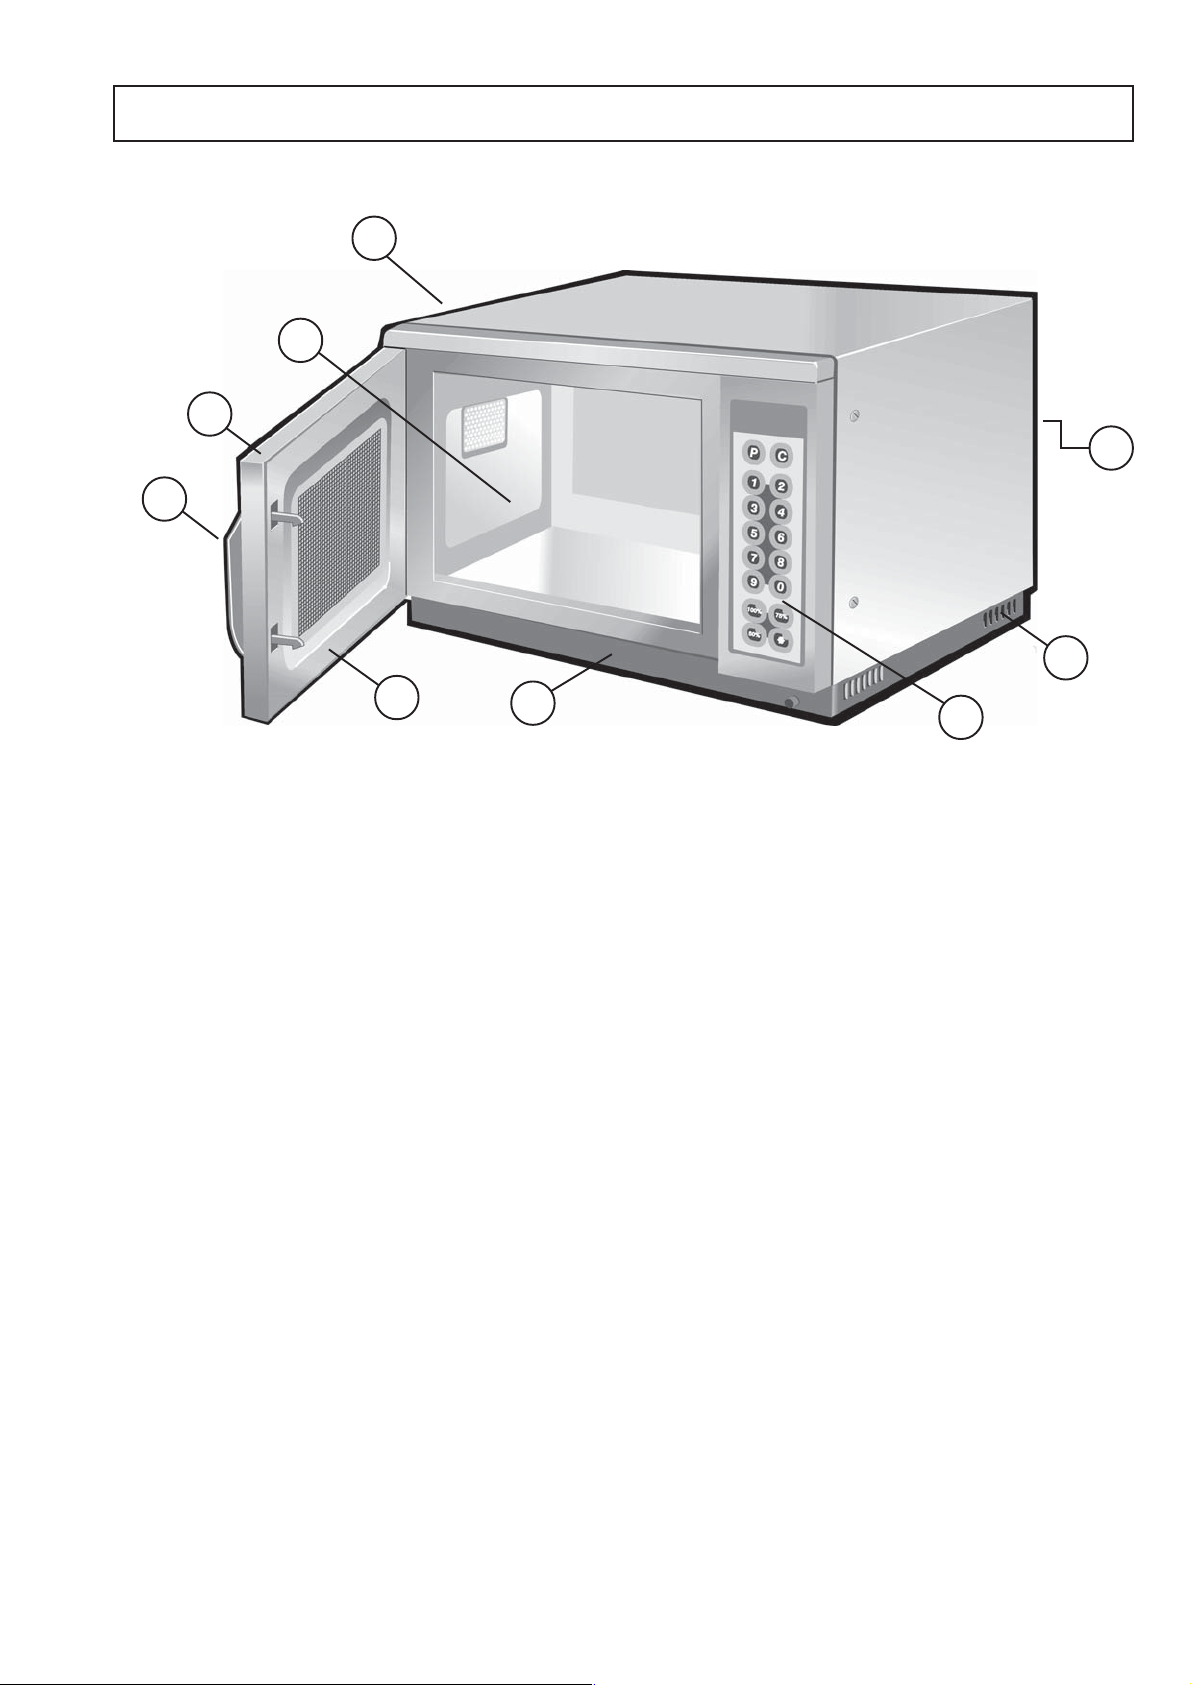
AIR OUTLETS
1
These vents on the side and rear panels enable air
which has been used to cool internal components to
escape. It will not allow microwave energy to escape
into the environment. They must be kept free from
obstruction.
OVEN CAVITY
2
This has a sealed, easy clean floor and stainless
steel floor. It must be kept clean (see CLEANING).
AIR FILTER
3
The air filter is a wire mesh. This is part of the
ventilation system and must be kept free of obstruction, cleaned and refitted on a daily basis.
DOOR HANDLE
4
This is situated at the right hand edge of the door.
CONTROL PANEL
5
See page 9.
3
LIGHT BULB HOUSING
6
This panel allows access to to the interior light bulb
for replacement purposes
RATING PLATE
7
Found on the rear panel, this states the serial
number, model type, electrical specifications and
Merrychef address and telephone number.
DOOR
8
This is a precision-made energy barrier with three
microwave safety interlocks. It must be kept clean
(see CLEANING section ).
9
DOOR CHOKE SECTION
These ensure a tight seal around the door. It should
be kept clean and checked regularly for signs of
damage. At the first sign of wear they should be
replaced by an approved Service engineer.
5
8
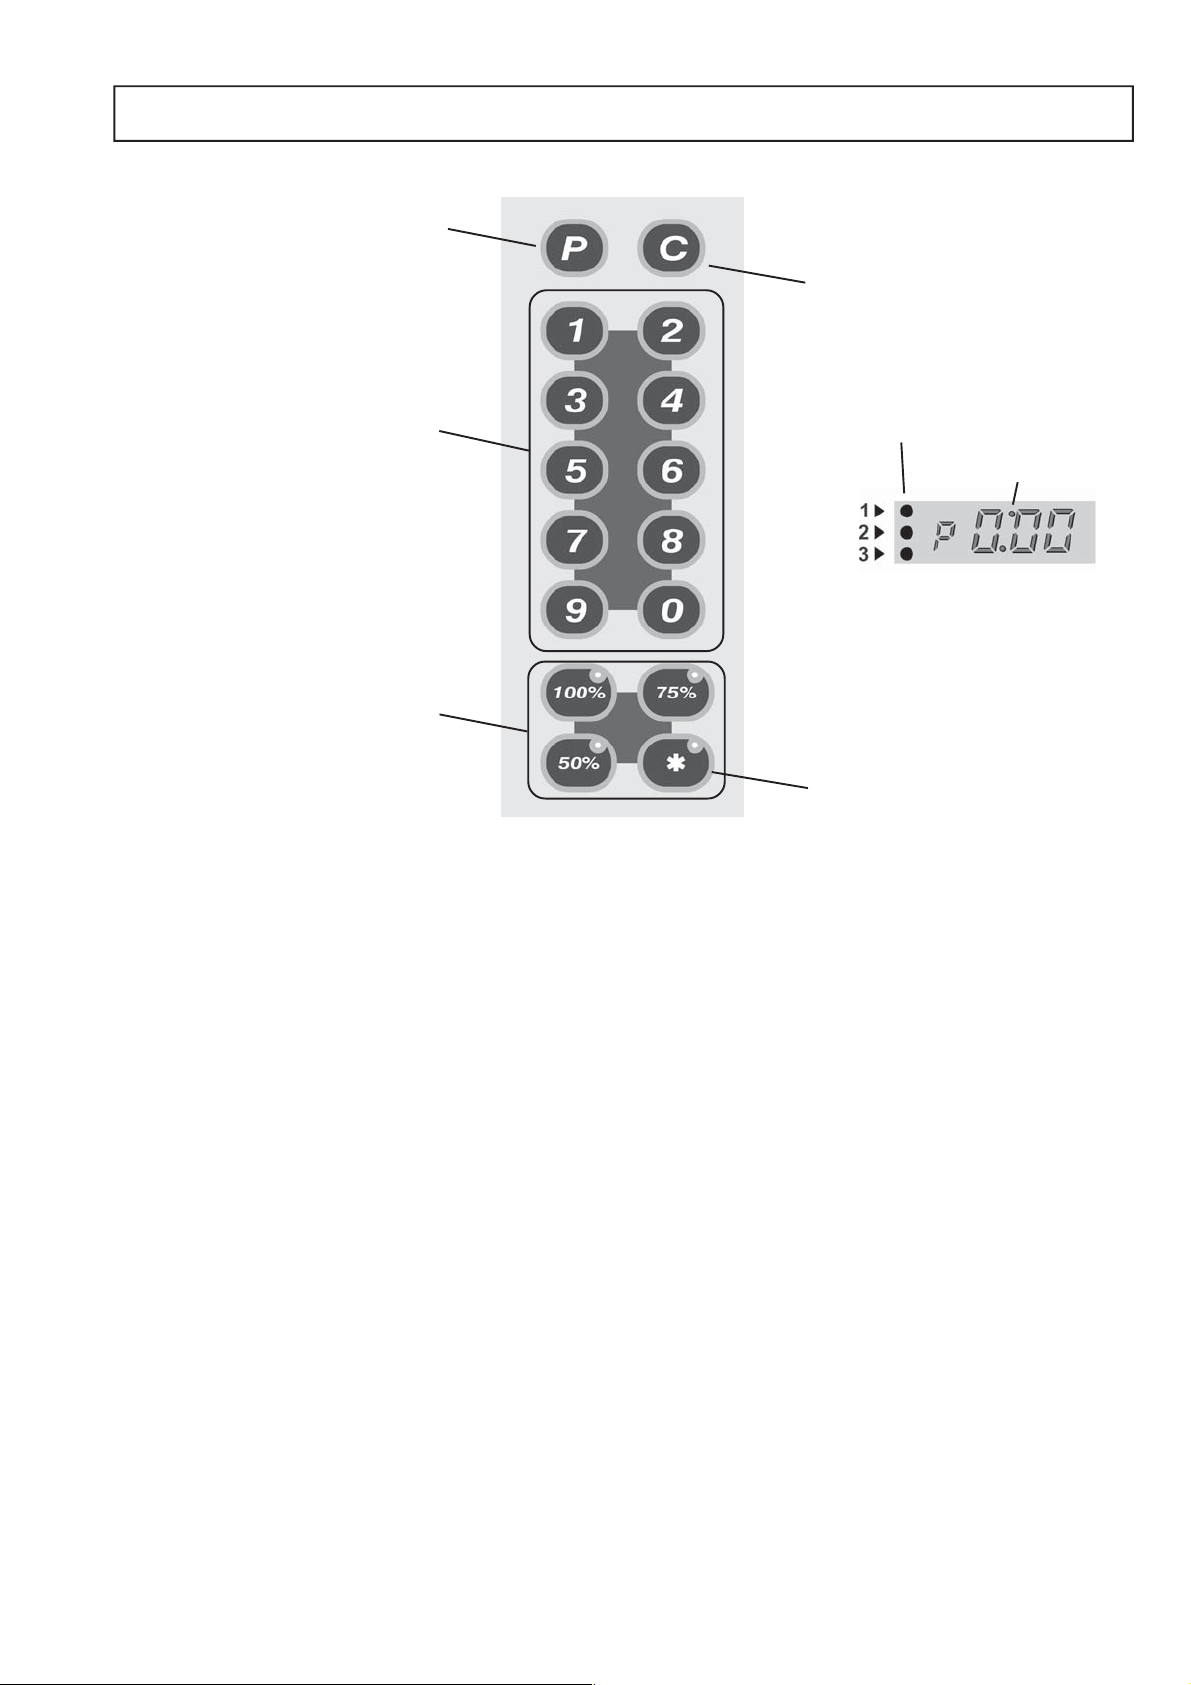
CONTROL PANEL
PROGRAM PAD
CANCEL PAD
TIME/PROGRAM SELECT PADS
POWER PADS
POWER PADS
There are 4 Microwave Power Pads to select from:
DEFROST, 50%, 75%, and 100%. A light will indicate the
one in use.
TIME/PROGRAM SELECT PADS
These pads are used for setting the cooking time in 1
second steps to a maximum of 30 minutes. They are also
used for programmes from 01-10
TIME AND PROGRAM DISPLAY
Shows the time set in minutes and seconds and counts down
in 1 second steps during a cooking
cycle.
The program display indicates the program number
selected. ‘P’ indicates programming.
Also displays ERROR messages. ( See PROBLEM
SOLVING page 15)
.
MULTI-STAGE INDICATOR
COLON
TIME/PROGRAM DISPLAY
DEFROST PAD
CANCEL/ CALLBACK ‘C’ PAD
Cancels all timed cooking cycles, pre-programmed operations
and stop the microwave energy. It does not alter the oven
temperature. This pad will also cancel any incorrect operations. It will not erase programs. It can also be used to view
the details of stored programs.
(see CALL BACK page 12 )
PROGRAM ‘P’ PAD
Activate or set program
MULTI-STAGE INDICATOR
Indicates stage in multi-stage cooking
COLON
When programming the colon will flash to indicate the time
may now be entered.
9
OPERATING INSTRUCTIONS: MANUAL MODE
The oven can be operated in
manual or programmed mode. It is
important to understand manual
mode prior to attempting program
operation.
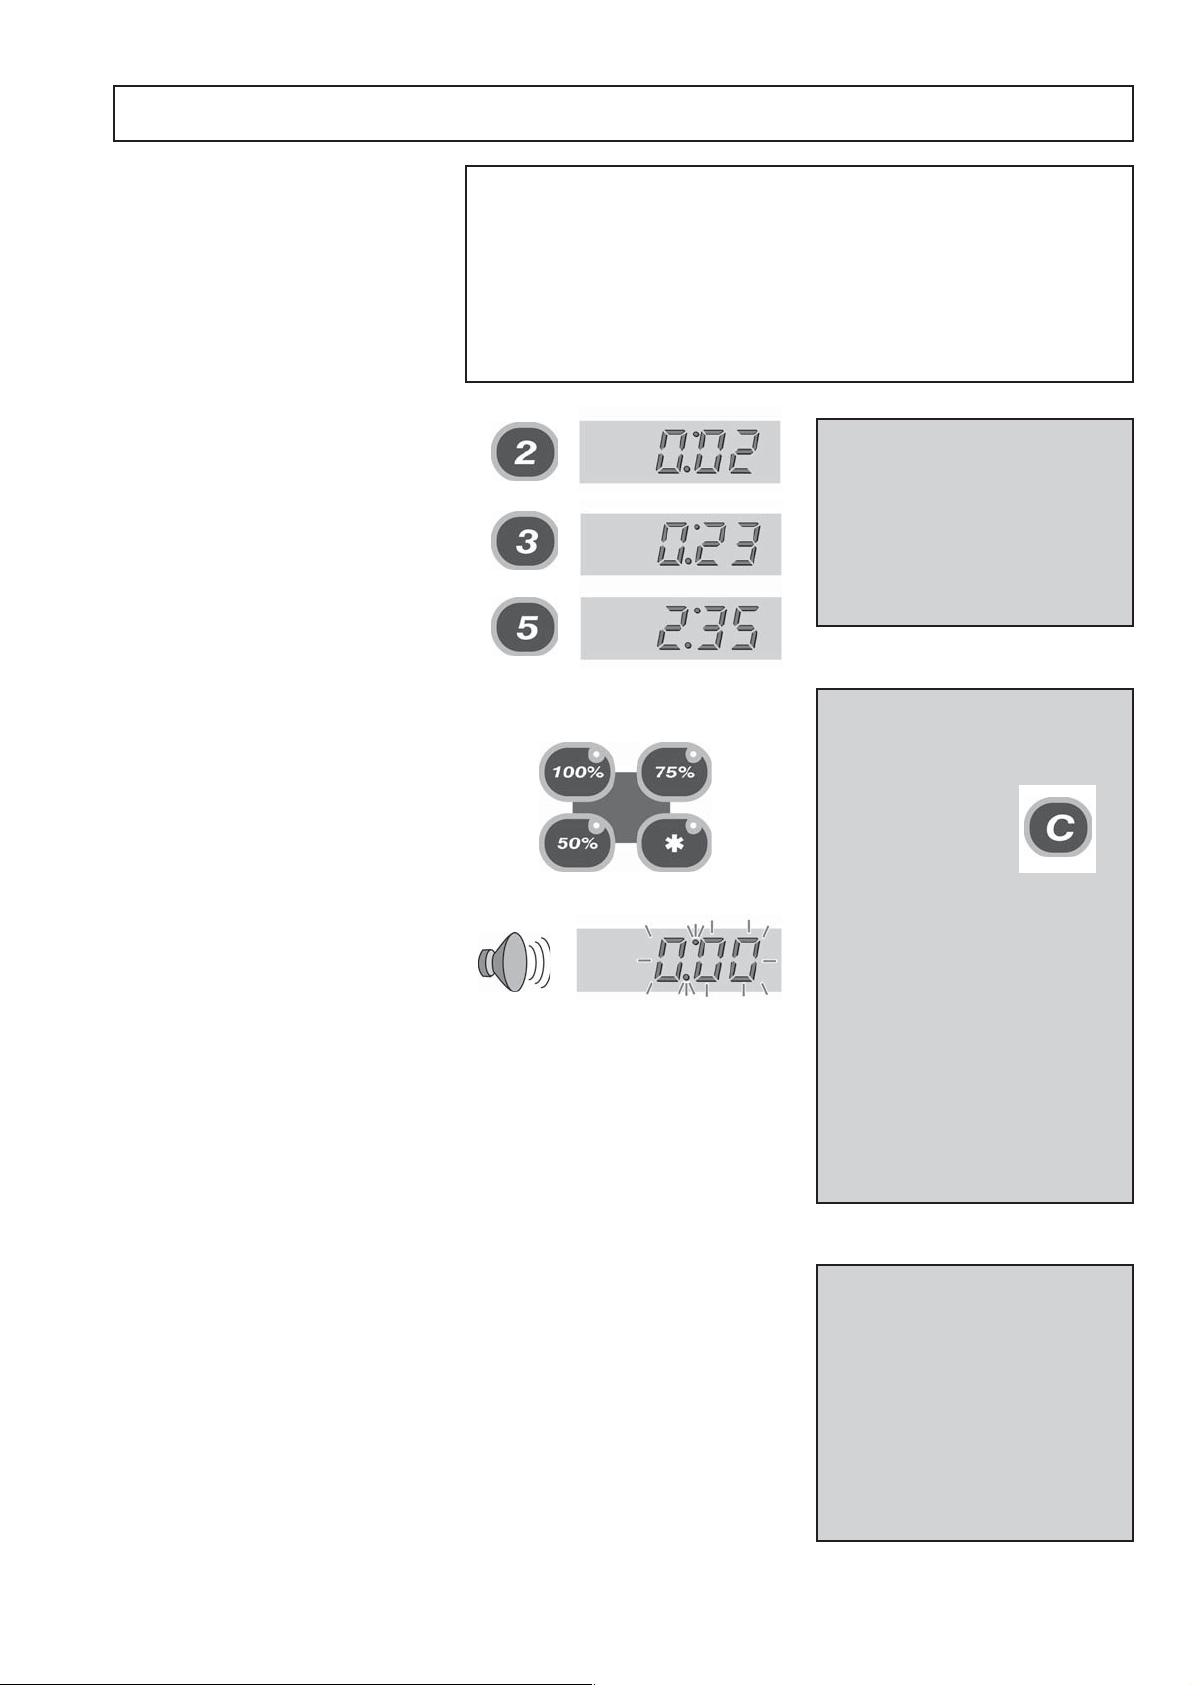
1
Place the food in the oven and
close the door.
Set required cooking time by
2
pressing the numeric TIME
SELECT PADS.
Example: 2 Minutes 35 seconds
Only valid times of Minutes and Seconds
will be accepted.
e.g. 1minute 1 second not 61 secs
3
To cook the food press one of
the POWER PADS either 100%,
75%, 50% or Defrost.
The LED within the selected pad
will light.
4
The timer will now count down.
When the remaining time
reaches zero an audible signal
will be given. Remove the food
from the cavity.
5
To ensure the required core
temperature has been
reached , test the food with a
temperature probe before
serving. Taking normal
precautions to avoid burning
yourself, open the door and
remove the food.
WARNING:
DO NOT APPLY MICROWAVE ENERGY WHEN OVEN IS EMPTY
DO NOT USE THE OVEN WITHOUT A
CLEAN AIR FILTER IN POSITION
To familiarise yourself with the controls place a bowl containing
approximately 1.5 litres of water in the oven prior to operation.
MAXIMUM TIME
The time set cannot exceed 9
minutes 59 seconds
Total cooking for multiple items
cannot exceed 30 minutes.
( If 30 minutes is exceeded error
code E:3 will be dislayed)
TO STOP THE COOK CYCLE
The cycle may be stopped and
cancelled at any time by pressing
the CANCEL PAD
PAUSE
The cycle may interrupted by
opening the oven door.
On opening the door the timer will
be held at this point and the light on
the relevant POWER PAD
(microwave or convection) will flash
to indicate an interrupted cycle.
TO CONTINUE the cycle close the
door, an audible warning sounds
as a reminder to press any power
pad to restart the timer.
10
‘STAND BY’ FACILITY
To conserve energy and extend
the life of components, the oven
will go into ‘standby status if not in
use for approximately 5 minutes.
The interior light will go out, the
fans will stop and the displays will
dim.
Simply touch any pad to restart
the oven
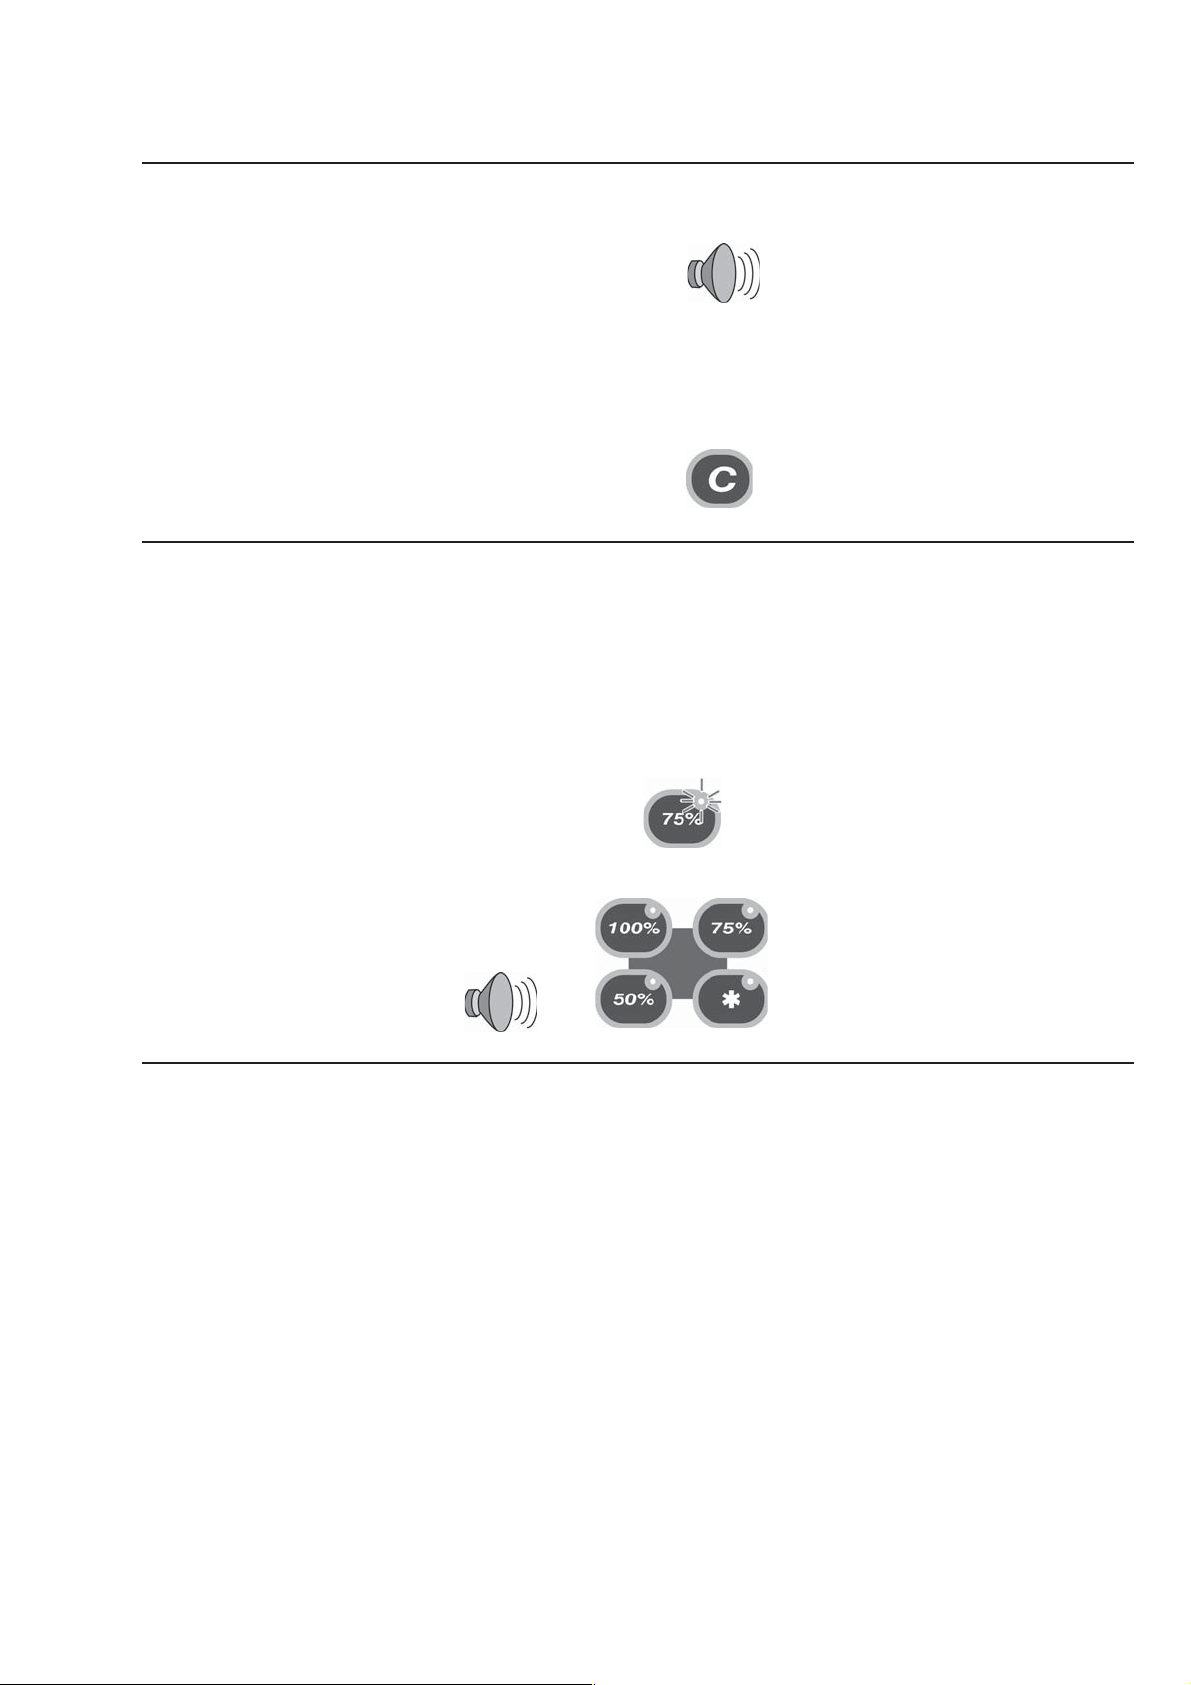
AUDIBLE WARNING
At the end of every timed cycle an audible warning will
sound.
The audible warning stops when the door is opened.
On closing the door after interrupting the cycle the audible
warning sounds as a reminder to start the timer
(see PAUSE FACILITY).
The audible warning can be stopped by touching the
cancel pad.
P AUSE FACILITY
A cooking cycle may be interrupted by opening the door.
This facility is useful when stirring, repositioning or if temperature
readings are required during a heating cycle
On opening the door the timer will be held at this point and the
light on the relevant power pad will illuminate to indicate an
interrupted cycle.
TO CONTINUE
To continue the cycle or program close the door
an audible warning sounds as a reminder to
press any POWER PAD to restart the timer.
MUL TIPLE ITEM COOKING (PROGRAM MODE)
Two and three food items take longer to cook than a single item. The
required cooking time, however, is not simply two or three-fold. A
multiplication factor is used which takes into account the number of
items to be cooked and the level of microwave energy to be applied.
Once the program has been saved for a single item of food, the
MULTIPLE ITEM COOKING facility enables this program to be used for
two and three items of the same food. The items are simply placed in
the oven. The number of items is entered (i.e. 2 or 3 ) the program pad
is touched and the program entered. the length of time required for
cooking is calculated automatically and the cooking cycle begins.
This facility is intended as a guide to multiple item cooking. Always
check that the required core temperature has been reached. If
necessary, return food and cook for a little longer.
11
PROGRAMMING NUMBER P ADS ( 0-9 )
Pre-programming allows repetitive cooking procedures to be stored for ease
of use.
Each program can comprise up to three stages, allowing at each independent
control of Stage time and Microwave power level. However, programs must
be used with caution since if the food to cook varies in weight or density then
good results and more importantly adequately cooked food may not be
achieved. Therefore, it is vital that all food prepared for service should be
checked to ensure that core temperatures have been achieved.
Press and hold PROGRAM PAD
1
until a flashing ‘P’ appears in the
PROGRAM DISPLAY
Enter required cooking time by
2
pressing the TIME SET PADS
(The display colons flash to indicate a time is required).
Only valid times of Minutes and
Seconds will be accepted.
e.g. 1 minute 1 second not 61 secs
An amount of experimentation
will be required to determine
the correct program for a
particular product.
Select the required microwave
3
power level POWER PADS
100%, 75%, 50% or Defrost.
The LED within the selected pad
will light.
To save as a single stage program
Having entered steps 1-3 press the
required number pad to save the
program.
example: stage 1 saved as Program 8
The program details are displayed
momentarily as the program is
saved.
To save a multi-stage program
Follow steps 1– 3 for each stage
of cooking and on completing
press the PROGRAM PAD to
enter a second and third stage of
cooking to the program. Press
the required number pad to save
the program.
example: stage 1, stage 2, stage 3
saved as Program 8
CALL BACK
To review program details
use CALLBACK.
Press and hold CANCEL
until a flashing ‘C’ appears
in the program display
Press the number pad for the
program you wish to check and
the details will be displayed.
We recommend you keep a
note of program instructions for
future reference
The program details are displayed
momentarily as the program is saved
12
RUNNING A PROGRAM
Using number pad keys to run a programme
Programs 0 to 9 can be recalled using the number pad keys.
The following procedure should be used to activate these programs.
Place the food in the oven and
1
close the door
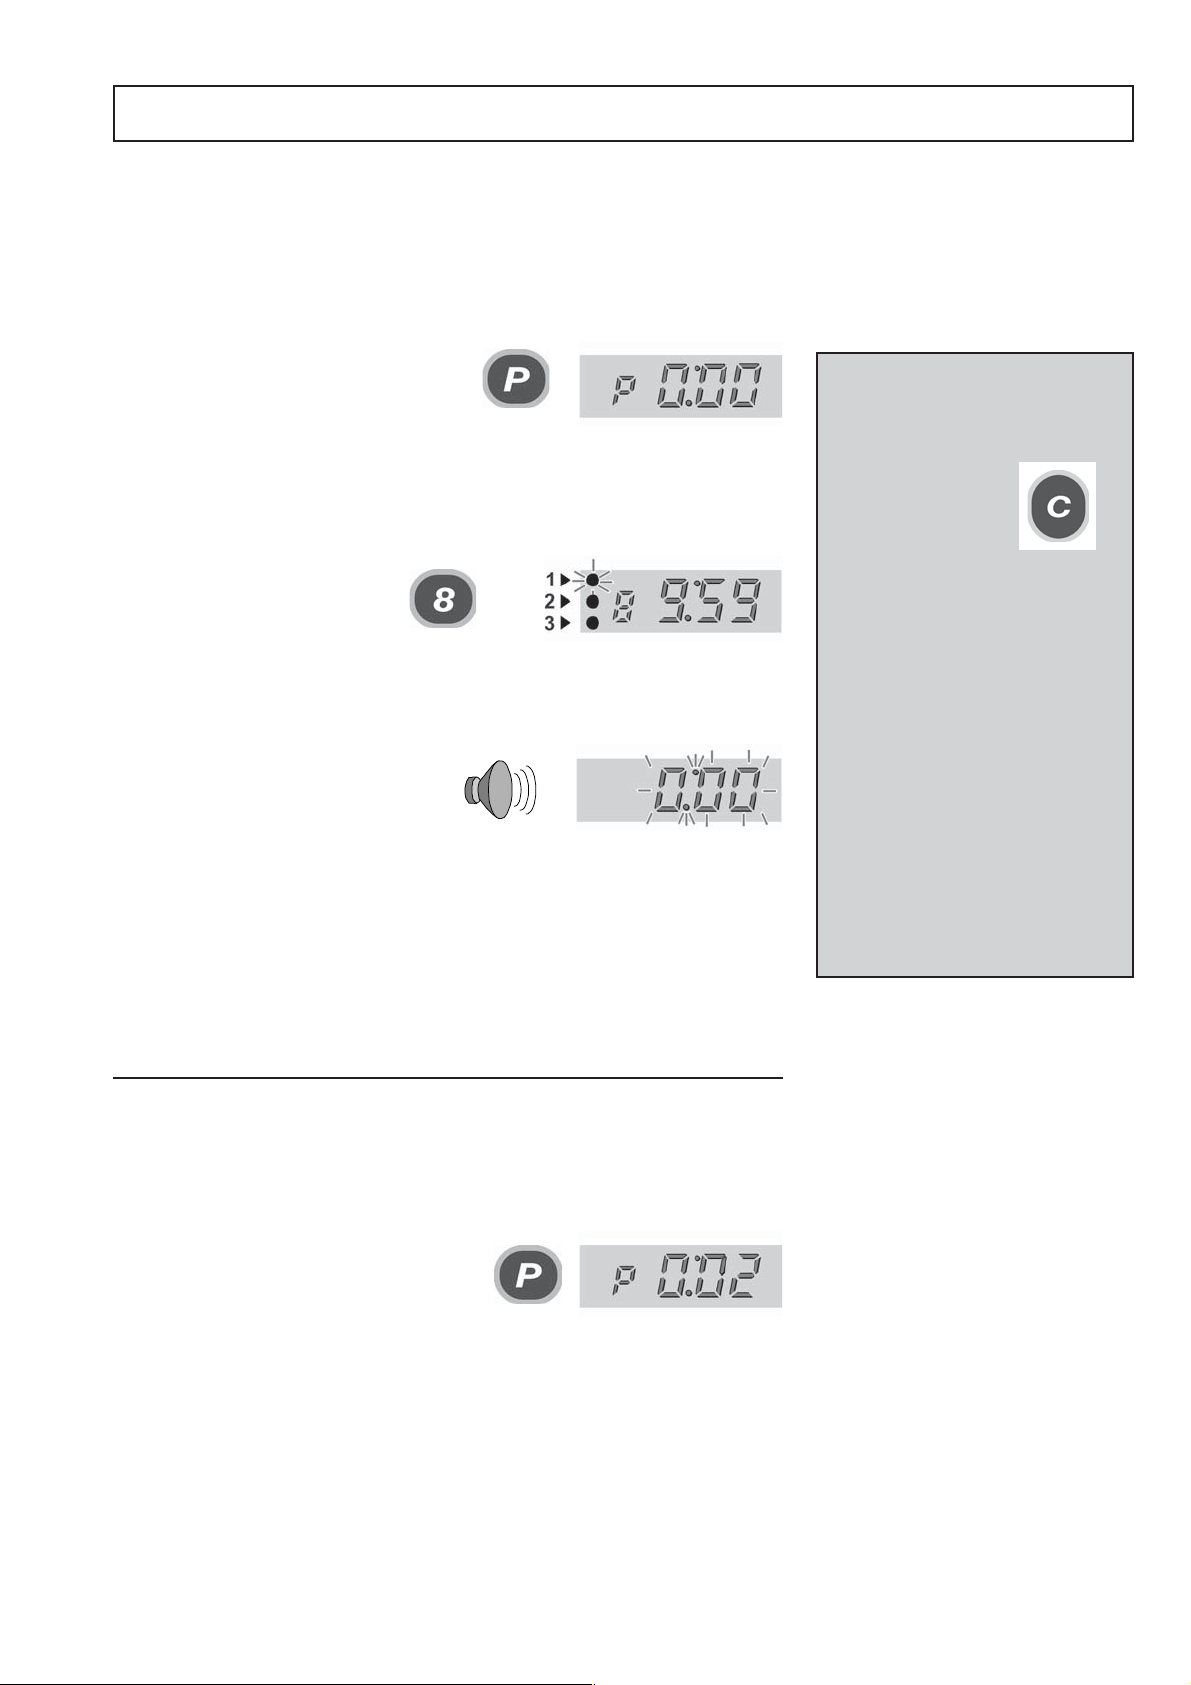
Press the PROGRAM PAD the
2
‘P’ will appear in the PROGRAM
DISPLAY.
3
Press the number pad key you wish to activate (0-9)
The program number and total cooking time appear
on the display and the first stage indicator will light.
TO STOP THE COOK CYCLE
The cycle may be stopped and
cancelled at any time by pressing
the CANCEL PAD.
example: Program 8
The program will now operate
with the total remaining time
counting down on the display.
When the time reaches “0:00”
an audible signal will be given.
Taking normal precautions to avoid burning yourself, open the door
4
and remove the food.
To ensure the required core temperature has been reached , test the
food with a temperature probe before serving. If necessary, repace the
food in the oven and cook for a little longer to achieve the required
core temperature.
MULTIPLE ITEM COOKING
This facility automatically calculates the cooking time required for two or
three food items when using a programmed cook cycle.
PAUSE
The cycle may interrupted by
opening the oven door.
On opening the door the timer will
be held at this point and the light on
the relevant POWER PAD
(microwave or convection) will flash
to indicate an interrupted cycle.
TO CONTINUE the cycle close the
door, an audible warning sounds
as a reminder to press any power
pad to restart the timer.
To review a program use
CALLBACK
1 Enter the number of items to be cooked, i.e. 2 or 3.
2 Touch the program pad, a ‘P’ will
appear in the program display
3 Press the desired program selection pad. The required cooking time is
calculated and the cycle begins.
4 When the cooking cycle has finished, test the food with a temperature
probe before serving. If necessary, replace the food in the oven and
cook for a little longer to achieve the required core temperature.
13
CLEANING
For the oven to operate at peak efficiency, the cavity, door and the air filter must be kept clean.
A daily cleaning routine will ensure that you comply with the required hygiene standards and will help
to maintain and prolong the efficiency of your oven.
Follow the SAFETY INSTRUCTIONS at the beginning of this manual.
• ALWAYS switch off at the electrical supply.
Faults arising from neglect or
• As required, wipe out spillages with disposable paper wipes
• NEVER use steel wool, knives or harsh abrasives on any part of
the oven
As with all electrical appliances, it is wise to have the electrical
connections inspected periodically.
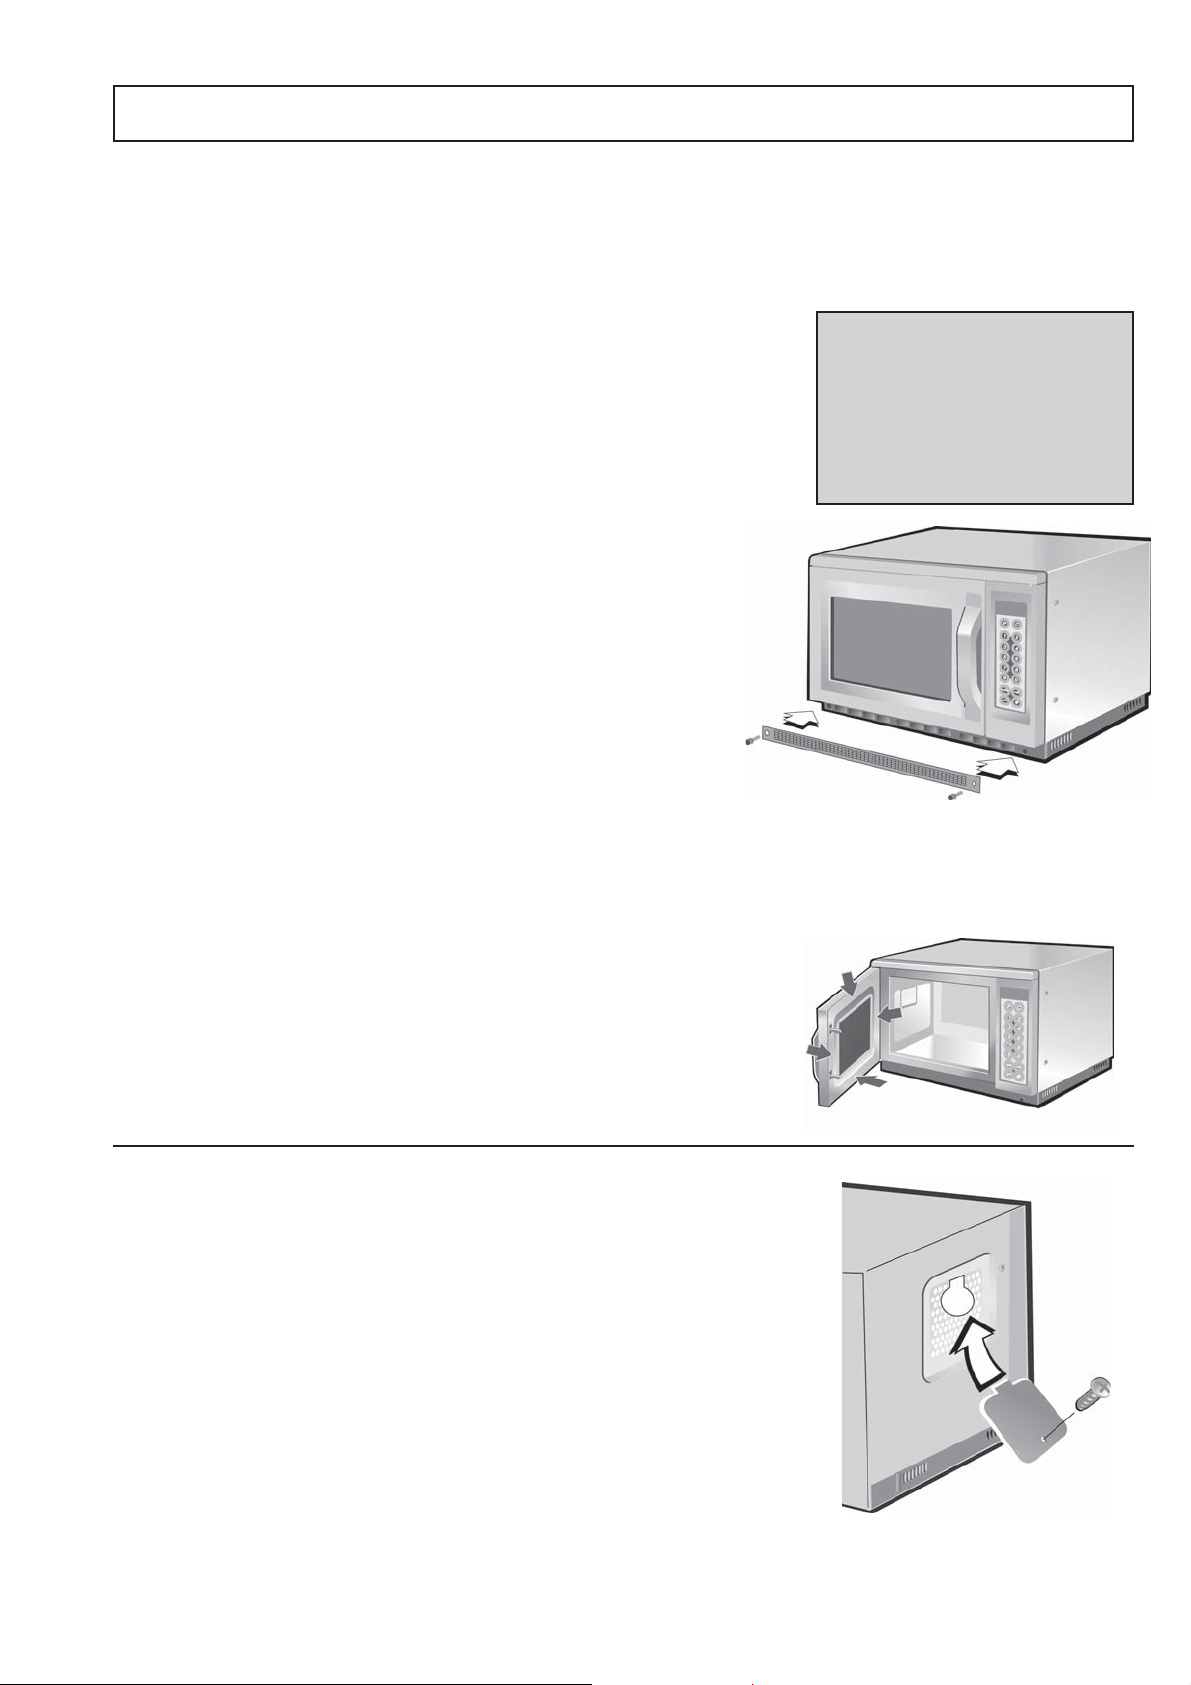
Cleaning the Air filter
1 Remove the air filter from along the lower edge of the oven.
2 Wash in clean, warm soapy water, rinse and pat dry. Put back
into position.
Cleaning the oven cavity and door
misuse including use without
clean filters in place are not
covered by the guarantee.
Service visits as a result of
such faults will be chargeable.
1 Wipe down the sides and floor of the cavity with a damp cloth.
2 Gently wipe the ceiling. Take care not to press upwards as this
could damage the stirrer cover.
Cleaning the control panel and exterior surfaces
Wipe down regularly with a damp cloth.
Hints and Tips for stubborn stains in the oven cavity
1 Place a container of water (1.5 litres) into the centre of the oven
cavity.
2 Set timer to 9 minutes.
3 Set microwave power to 100%.
4 At end of steam cycle wipe out cavity with a clean cloth.
Replacing the Light bulb
WARNING:
Disconnect the oven from the electrical supply before removing the
light bulb cover
1 Undo screw on panel on side of the oven and remove panel
2 Replace light bulb Part No. 33M0038 and replace panel and tighten
screw.
DO NOT USE THE OVEN
WITHOUT A CLEAN AIR FILTER
IN POSITION
NOTE: Light bulbs are not covered by the warranty and can be purchased
by contacting Merrychef Service Department
14
PROBLEM SOL VING
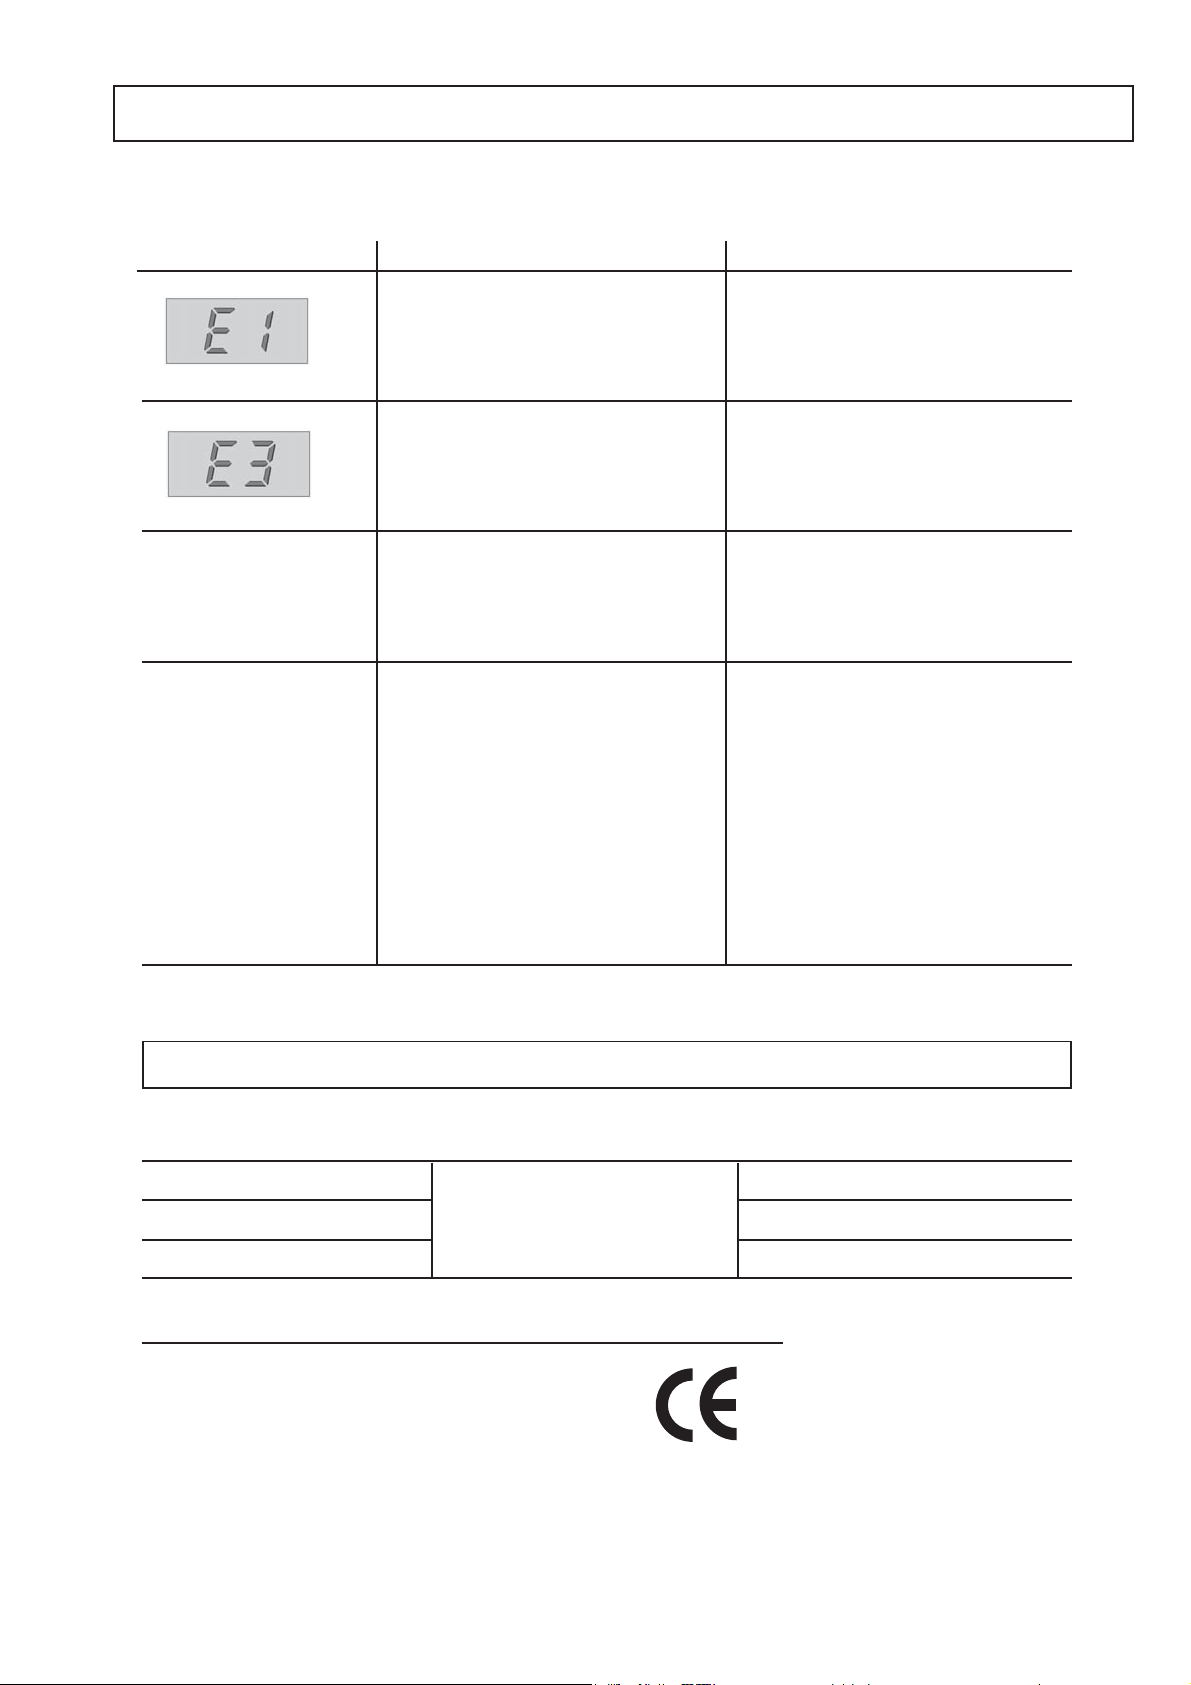
Error code display
The Microcook MD will identify some of the most common problems by flashing an error
message code in the time display window.
Error code display
Fault Recommended action
Door not fully shut.
Possible electrical fault
No time has been set.
Invalid time has been set. e.g. 61secs
The required cooking time for multiple
items exceeds 30minutes
Display shows 0:00 but the cavity light
and cooling fans do not operate
Control panel lights do not operate with
oven connected to mains supply.
Close door fully.
Call Merrychef Service Dept.
Set a time
Set time in correct format 1:01
Oven has gone into ‘stand-by’ mode
normal operation of oven
1. Check oven is connected to electrical
supply
2. Check plug fuse is correct value and in
good order.
3. Oven has overheated. Allow to cool
and check filters are clean
4. Call Merrychef Service Dept.
Please remember - No servicing or repairs should be carried out other than by an approved Service
Engineer
Technical Specifications
Microwave
Height
( mm )
MD 1000
MD 1400
MD 1800
Manufacturers recommended
clearances
Power Supply: See rating plate at rear of oven
This equipment complies with the following EEC directives:
EMC 89/336 EEC
LVD 73/23 EEC
Merrychef reserves the right to alter specifications without prior notice.
Width
( mm )
510335 390
50*50 50
each side
Depth
( mm )
Wt.
Power output
( kgs)
20
30
30
* For 2 ovens side by side clearance is 100mm
( watts )
1000
1400
1800
Pt No. 32Z3326 Issue 05
15

MERRYCHEF SERVICE DEPARTMENT
To register for service visits, please complete and return the SERVICE REGISTRATION CARD enclosed
with this guide. Unless this card is received, the terms of the guarantee will commence from the date of despatch from the
manufacturer and NOT from the date of purchase.
If, after referring to the PROBLEM SOLVING section, you need a service engineer, telephone the Merrychef Service Control
Centre.
MERRYCHEF SERVICE DEPARTMENT
Tel. +44(0)1252 378007 Monday-Friday 8.45am-5.00pm
(24hr Answerphone)
Fax +44(0)1252 371007
Please make a note of the following before you call and for future reference:
Model number
Serial number
Proof of purchase
Oven address
Post code
Telephone number:
Name to contact:
Hours of access:
Y our nearest Merrychef approved engineer will be notified immediately and will endeavor to respond within 24 hours. However ,
ther are certain circumstances when such rapid service may not be possible, e.g. public holidays, weekends, remote areas
etc.
Each engineer is able to carry out repairs and replacements ‘on site’. The oven need not be removed to a workshop unless
access is limited to the engineer, e.g. offshore establishments. On such occasions it is the customer’s responsibility to return
the oven to an authorised service centre for repair.
During the Guarantee period, service calls are chargeable when:
The oven has been incorrectly installed.
The oven has been damaged, whether by accident, neglect, abuse etc.
Incorrect cooking techniques have been used.
A leakage check is requested outside normal service routine.
The light bulb fails.
SERVICE CONTRACTS
Service contracts may be extended at the time of purchase. Contact the Merrychef Service Department for more details.
16

SOMMAIRE
Importantes consignes de sécurité .................18
Alimentation électrique.....................................18
Précautions d’emploi .......................................19
Montage de l’appareil .......................................20
Ustensiles de cuisine transparents ................. 21
Introduction ......................................................22
Fonctions principales.......... .............................23
Panneau de commandes ................................ 24
Directives :
Mode manuel ...................................................25
FRANÇAIS
Pavé numérique de programmation ................ 2 7
Activer un programme .....................................28
Entretien .......................................................... 29
Résolution de problèmes.................................30
Spécifications techniques................................ 30
Le service/ l’assistance technique...................31
VEUILLEZ LIRE ATTENTIVEMENT
LES CONSIGNES DE SÉCURITÉ QUI SUIVENT
17
IMPORTANTES CONSIGNES DE SÉCURITÉ
1. NE PAS faire fonctionner le four à vide, sans nourriture ou liquide à l’intérieur, puisque cela risque de provoquer
une surchauffe et d’endommager l’appareil.
2. NE JAMAIS enlever les panneaux extérieurs du four.
3. NE JAMAIS enlever les composants internes du four.
4. NE JAMAIS toucher au panneau de commandes, à la porte, aux joints ou à tout autre composant du four.
5. NE PAS obstruer les grilles d’aération/filtres à air ou les sorties de vapeur.
6. NE PAS étendre de torchons ou de serviette sur quelque partie du four.
7. Si les joints de la porte sont endommagés, le four doit être réparé par un technicien agréé.
8. Tout service de maintenance et de réparation doit être effectué par un technicien agréé.
9. Si le câble d’alimentation est endommagé d’une manière ou d’une autre, il doit IMPÉRATIVEMENT être remplacé
par un technicien agréé.
10. Pour éviter de s’échauder ou se brûler, manipuler avec précaution les liquides, la nourriture et les plats sortant du
four.
11. Pour éviter qu’un liquide en ébullition ne se projette dans la cavité du four, il est préférable de le mélanger avant de
le chauffer.
12. Ouvrir les biberons et les petits pots pour bébé avant de les chauffer, mélanger ou secouer le contenu et vérifier la
température avant consommation pour éviter les brûlures.
13. Ne jamais utiliser le four pour chauffer de l’alcool (cognac, rhum, etc.). De même, des préparations alcoolisées,
comme le baba au rhum, peuvent prendre feu plus facilement si elles restent trop longtemps dans le four.
14. Ne jamais tenter de faire de la friture dans le four.
ALIMENTATION ÉLECTRIQUE
ATTENTION
Cet appareil électroménager doit être relié à la masse. Si cela n’est pas le cas, il existe un risque
d’électrocution pouvant être mortel.
Le four doit être installé par un
électricien qualifié et agréé.
Pour permettre l’isolation de l’appareil,
la prise du secteur doit être située à
un endroit facile d’accès.
Le câblage (installation des
raccordements fixes ou des prises)
doit être conforme aux
réglementations et normes de
sécurités de l’IEE. Le fil d’alimentation
se trouve à l’arrière du four.
Si vous avez un doute quelconque sur
votre alimentation électrique, veuillez
demander conseil à un électricien
qualifié et agréé.
Il est essentiel que l’alimentation
secteur soit installée correctement et
mise à la masse. Le circuit électrique
qui alimente le secteur doit être adapté
aux appareils électriques à forte
intensité et ne doit surtout pas être
surchargé.
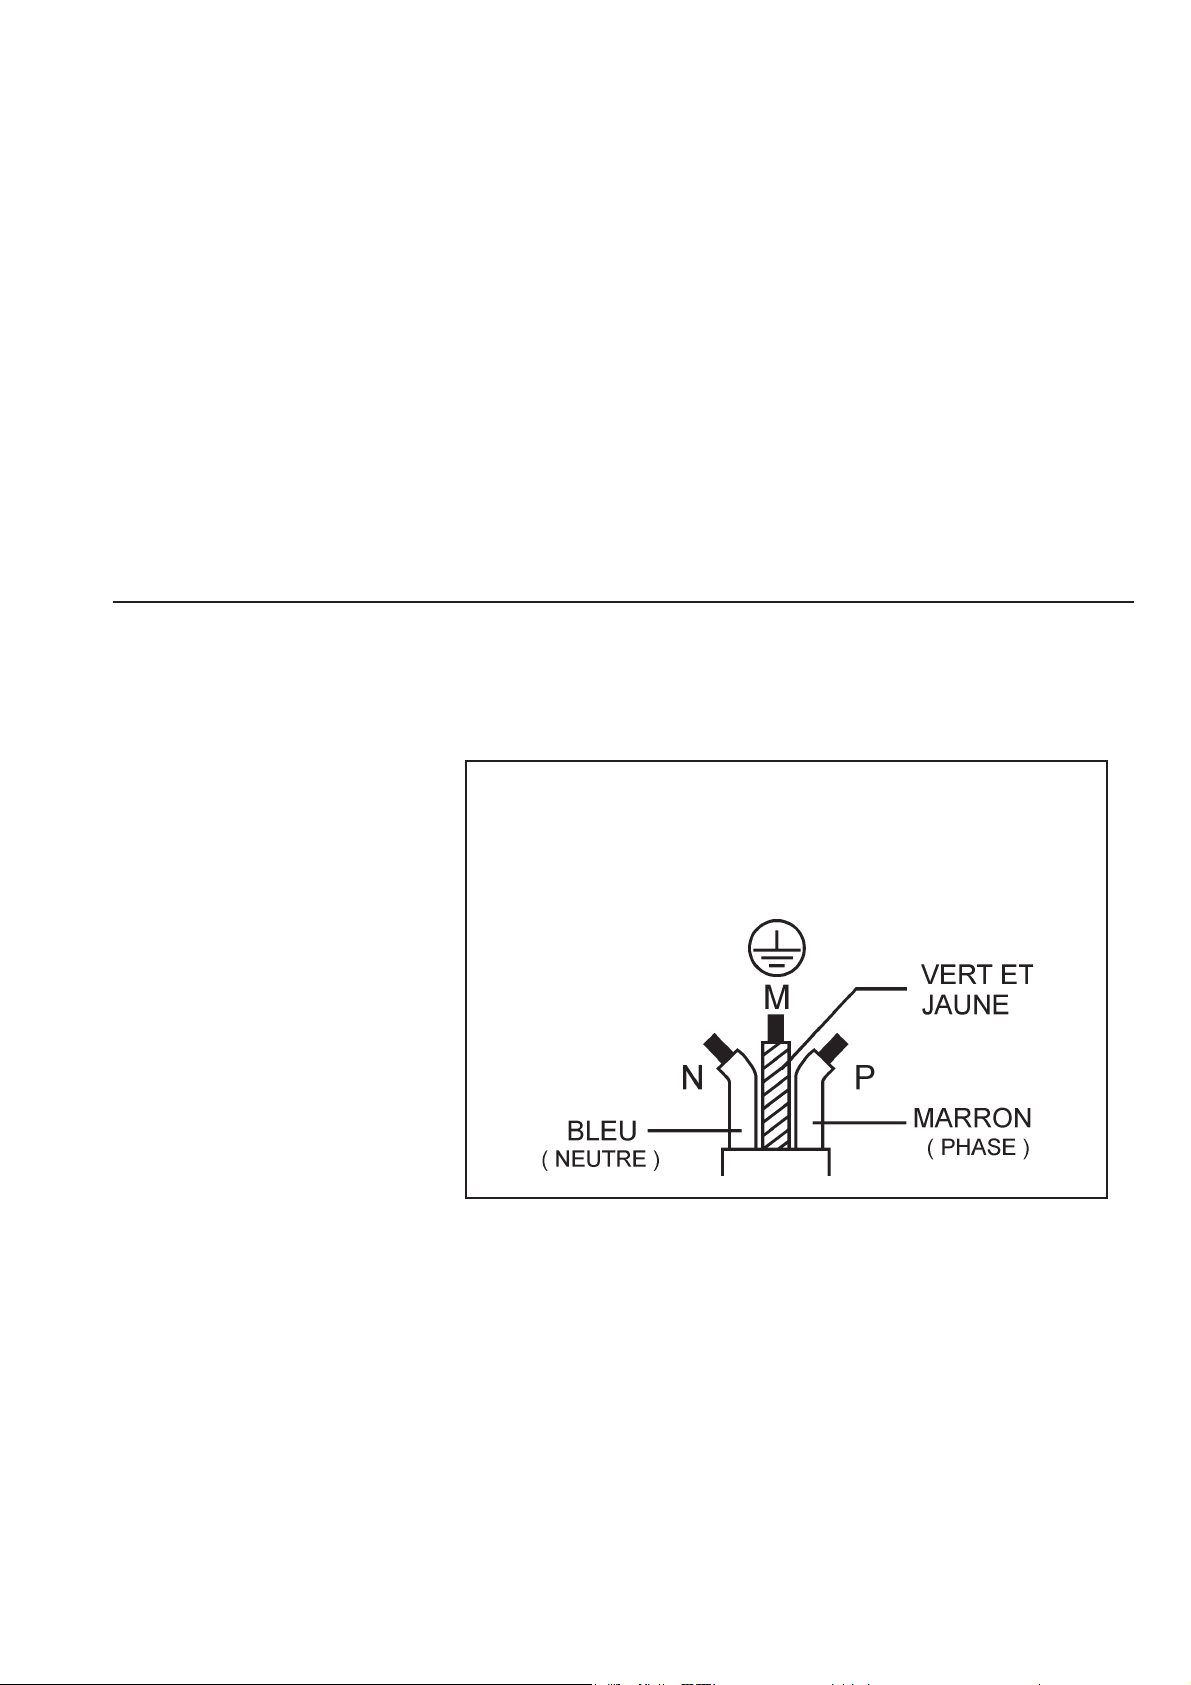
T ous les modèles provenant du Royaume-Uni sont fournis avec
une prise moulée 13 Amp. Nous déconseillons vivement d’enlever
cette prise. Cependant, certains établissements peuvent requérir
l’installation d’une prise différente. Dans ce cas, veuillez suivre
les instructions de câblage ci-dessous.
Les établissements équipés de disjoncteurs standards (Type ‘B’) sont
sensibles aux surtensions transitoires qui surviennent en mettant en marche
les congélateurs, réfrigérateurs et autres appareils de restauration, y compris
les fours à micro-ondes. C’est pour cela que nous recommandons vivement
d’équiper chaque four d’un disjoncteur T ype ‘C’ séparé (conçu spécialement
pour ce type d’appareil).
INSTRUCTIONS À CONSERVER
18

PRECAUTIONS D’EMPLOI
1. Lire ce mode d’emploi avant d’utiliser le four.
2. Il est conseillé de faire vérifier ses branchements électriques régulièrement comme pour tout
appareil électrique.
3. L’intérieur du four et les joints de la porte doivent être souvent nettoyés en suivant les
instructions décrites à la section ENTRETIEN.
4. Il n’est pas nécessaire d’éteindre le four après avoir utilisé une fonction, mais il est
important de le faire à la fin de la journée ou après chaque longue période d’utilisation.
5. L’énergie des micro-ondes ne doit p as être utilisée pour sécher du linge ou réchauffer des
assiettes.
6. Faire attention à ce qu’aucun aliment n’entre en combustion dans le four, comme pour tout
autre appareil de cuisson.
Si de la fumée apparaît :
Eteindre l’appareil
Couper l’alimentation électrique de l’appareil
Laisser la porte fermée pour étouffer
d’éventuelles flammes
7. Pour un fonctionnement optimal, placer la nourriture au centre de la cavité du four.
8. Recouvrir la nourriture pour éviter les éclaboussures sur les parois de la cavité du four.
9. Ne jamais faire cuire des oeufs à la coque ou durs dans un four à micro-ondes puisqu’ils
pourraient exploser.
10. Les aliments recouverts d’une peau, comme les pommes de terre, les pommes, les
saucisses, etc., doivent être percés avant d’être chauffés.
1 1 . Le récipient qui contient les aliments à chauffer ne doit pas être hermétiquement clos
puisque l’accumulation de vapeur risquerait de mettre dangereusement le récipient sous
pression.
12. Si un récipient en verre se casse dans le four, veiller à ce que la nourriture ne contienne
aucun éclat de verre. Si un doute subsiste, jeter tout aliment qui se trouvait dans le four au
moment où le récipient s’est cassé.
13. NE PAS utiliser ce four si : un objet est coincé dans la porte, si la porte ne ferme p as bien,
si la porte, la charnière, le loquet ou la surface d’étanchéité est endommagé, ou encore si le
four ne contient aucune préparation.
19
 Loading...