


 Loading...
eikon e3, e4 & e5
GB Quick Start Guide
IMPORTANT INFORMATION - READ BEFORE USE - FULL GUIDE AVAILABLE FROM THE MERRYCHEF WEBSITE
FR Guide de mise en route rapide
INFORMATIONS IMPORTANTES À LIRE AVANT TOUTE UTILISATION ! GUIDE COMPLET DISPONIBLE SUR LE SITE WEB DE MERRYCHEF.
DE Schnelles Anfangsführer
WICHTIGE INFORMATIONEN - VOR GEBRAUCH GELESEN - VOLLER FÜHRER VERFÜGBAR VON DER MERRYCHEF WEBSITE
ES Guía de inicio rápido
INFORMACIÓN IMPORTANTE - LEER ANTES DE USAR - GUÍA COMPLETA DISPONIBLE EN EL SITIO WEB DE MERRYCHEF
DK Kvik-start Guide
VIGTIG INFORMATION - LÆS FØR ANVENDELSE - DEN FULDE GUIDE ER TIL RÅDIGHED PÅ MERRYCHEFS HJEMMESIDE
FI Pika-aloitusopas
TÄRKEÄÄ TIETOA - LUE ENNEN KÄYTTÖÄ - KOKO OPAS LÖYTYY MERRYCHEFIN INTERNET-SIVUILTA
NL Gids snel starten
BELANGRIJKE INFORMATIE - LEZEN VOOR GEBRUIK - DE VOLLEDIGE HANDLEIDING IS BESCHIKBAAR OP DE MERRYCHEF-WEBSITE
www.merrychef.com

INTRODUCTION
These ovens offer operators the flexibility of combination cooking with additional control over fan speed and microwave power.
Combination cooking enables high quality results to be achieved in a fraction of the time taken by conventional cooking, particularly when baking, browning, roasting and grilling dishes.
Once established, precise instructions for combination or convection cooking of selected items may be programmed into the oven’s memory so that they can be repeated easily and accurately. Up to 1024 programs can be stored and simply recalled.
Multistage Programming
The oven controls offer even greater flexibility by allowing multistage programming. This enables the exact conditions required for quality results to be set according to the food type.
A single cooking program can have up to 6 stages, each stage controlled with its own time, fan speed and microwave power settings, (model dependent).
WARNING:
This is a Class A product. In a domestic environment this product may cause radio interference in which case the user may be required to take adequate measures.
PRECAUTIONS TO AVOID POSSIBLE EXPOSURE TO EXCESSIVE MICROWAVE ENERGY
a)Do not attempt to operate this oven with the door open since open-door operation can result in harmful exposure to microwave energy. It is important not to defeat or tamper with the safety interlocks.
b)Do not place any object between the oven front face and the door or allow soil or cleaner residue to accumulate on sealing surfaces.
c)Do not operate the oven if it is damaged. It is particularly important that the oven door closes properly and that there is no damage to the (1) door (bent) (2) hinges and latches (broken or loosened) (3) door seals and sealing surfaces.
d)The oven should not be adjusted or repaired by anyone except properly qualified service personnel.
The instructions outlined in this guide are intended to ensure the safety and long life of your Merrychef oven.
PLEASE READ THE FOLLOWING SAFETY INSTRUCTIONS CAREFULLY
2 |
Quick Start Guide original instructions. |
Part Number 32Z3801 GB Issue 1 |

CONTENTS
IMPORTANT INFORMATION READ BEFORE USE
Users are cautioned that maintenance and repairs should be performed by a Merrychef authorized service agent using genuine Merrychef replacement parts. Merrychef will have no obligation with respect to any product that has been improperly installed, adjusted, operated or not maintained in accordance with national and local codes or installation instructions provided with the product, or any product that has its serial number defaced, obliterated or removed, or which has been modified or repaired using unauthorized parts or by unauthorized service agents. For a list of authorized service agents, please refer to the back page of this booklet. The information contained herein (including design and parts specifications) may be superseded and is subject to change without notice.
The easyToUCH screen display, layout and icons shown herein, are for guidance purposes only and are not intended to be an exact representation of those supplied with the oven.
This is a Quick Start Guide only. For further information refer to the relevant Installation and Operating instructions available from www.merrychef.com
|
INTRODUCTION |
2 |
|
SAFETY & REGULATIONS |
|
||
|
IMPORTANT SAFETY INSTRUCTIONS |
4 |
|
|
PRECAUTIONS TO BE OBSERVED |
6 |
|
|
SUITABLE COOKING UTENSILS |
7 |
|
PRODUCT DETAILS |
|
||
|
MAIN FEATURES |
8 |
|
|
TECHNICAL SPECIFICATIONS |
10 |
|
|
|
Specifications |
10 |
|
|
Serial Number (Rating Plate): |
11 |
|
|
Compliances: |
11 |
|
INSTALLATION |
12 |
|
|
|
OVEN LOCATION AND POSITIONING |
12 |
OPERATION & CONTROLS |
|
||
|
QUICK START GUIDE: QUICK SERVICE OVEN |
13 |
|
|
|
START UP |
13 |
|
|
USING A COOKING PROGRAM |
14 |
|
OPERATING GUIDE: FULL SERVICE OVEN |
15 |
|
|
|
easyToUCH MAIN MENU & KEYBOARD SCREEN |
15 |
|
|
PRESS & GO |
16 |
|
|
USING A COOKBOOK PROGRAM |
17 |
|
|
CHANGING THE OVEN TEMPERATURE |
18 |
CLEANING & MAINTENANCE |
|
||
|
COOLING THE OVEN DOWN BEFORE CLEANING |
19 |
|
|
|
Oven cool down |
19 |
|
Cold |
Preparing to clean the oven |
19 |
|
oven CLEANING INSTRUCTIONS e3 |
20 |
|
|
Cold oven CLEANING INSTRUCTIONS e4 |
21 |
|
|
Cold oven CLEANING INSTRUCTIONS e5 |
21 |
|
FAULT FINDING |
|
||
|
FAULT FINDING CHART |
24 |
|
Quick Start Guide original instructions. |
3 |
Part Number 32Z3801 GB Issue 1 |
FAULT FINDING CLEANING & OPERATION & PRODUCT DETAILS SAFETY & MAINTENANCE CONTROLS REGULATIONS

SAFETY& REGULATIONS
IMPORTANT SAFETY INSTRUCTIONS
When using electrical appliances basic safety precautions should be followed, including the following:
WARNING To reduce the risk of burns, electric shock, fire, injury to persons, or exposure to excessive microwave energy:
1.Read all instructions before using the appliance.
2.Read and follow the specific “PRECAUTIONS TO AVOID POSSIBLE EXPOSURE TO EXCESSIVE MICROWAVE ENERGY” found on the Introduction page.
3.This appliance must be grounded. Connect only to a properly grounded outlet. See “ELECTRICAL INSTALLATION”.
4.Install or locate this appliance only in accordance with the provided installation instructions.
5.Some products such as whole eggs and sealed containers — for example, closed jars — may explode and should not be heated in this oven.
6.Use this appliance only for its intended use as described in the manual. Do not use corrosive chemicals or vapours in this appliance. This type of oven is specifically designed to heat, cook or dry food. It is not designed for industrial or laboratory use.
7.This appliance should not be used by children.
8.Do not operate this appliance if it has a damaged cord or plug, if it is not working properly, or if it has been damaged or dropped.
9.This appliance should be serviced only by qualified service personnel. Contact the nearest authorized service facility for examination, repair or adjustment.
10 Do not cover or block any openings on the appliance including air vents/filters and steam outlet.
11 Do not store this appliance outdoors. Do not use this product near water —– for example, near a kitchen sink, in a wet basement, or near a swimming pool, and the like.
12.Do not immerse the cord or plug in water.
13.Keep the cord away from heated surfaces.
14.Do not let cord hang over edge of table or counter.
15.Either:
i)When cleaning surfaces of door and oven that come together on closing the door, use only mild non-abrasive soaps, or detergents applied with a sponge or soft cloth.
ii)When separate cleaning instructions are provided, see door surface cleaning instructions.
16. To reduce risk of fire in the cavity:
i)Do not overcook food. Carefully attend appliance if paper, plastic or other combustible materials are placed inside the oven to facilitate cooking.
ii)Remove wire twist-ties from paper or plastic bags before placing bag in oven
iii)If materials inside the oven should ignite, keep oven door closed, turn oven off, and disconnect the power cord , or shut off power at the fuse or circuit breaker panel.
iv)Do not use the cavity for storage purposes. Do not leave paper products, cooking utensils or food in the cavity when not in use.
17. Liquids, such as water, coffee, or tea are able to be overheated beyond the boiling point without appearing to be boiling. Visible bubbling or boiling when the container is removed from the
4 |
Quick Start Guide original instructions. |
Part Number 32Z3801 GB Issue 1 |

microwave oven is not always present. THIS COULD RESULT IN VERY HOT LIQUIDS SUDDENLY BOILING OVER WHEN THE CONTAINER IS DISTURBED OR A UTENSIL IS INSERTED INTO THE LIQUID.
18.DO NOT operate using microwave only or combination function without food or liquid inside the oven as this may result in overheating and may cause damage.
19.NEVER remove the exterior of the oven.
20.NEVER remove any fixed internal parts of the oven.
21.NEVER tamper with the control panel, door, seals, or any other oven part.
22.DO NOT obstruct air vents/filters or steam outlet.
23.NEVER hang dish towels or cloths on any part of the oven.
24.If the door seals are damaged, the oven must be repaired by an approved Service Agent.
25.If the power cable is damaged in any way it MUST be replaced by an approved Service Agent.
26.When handling hot liquids, foods, and containers, care should be taken to avoid scalds and burns.
27.When heating liquids using microwave only or combination function, the contents should be stirred prior to heating to avoid eruptive boiling.
28.Feeding bottles and baby food jars should not be heated with this appliance.
29.Never use the oven to heat alcohol, e.g. Brandy, rum etc. Food containing alcohol can more easily catch fire if overheated, observe caution and do not leave the oven unattended.
30.Never attempt to deep fry in the oven.
31.The appliance is not intended for use by infants, children or infirm persons without supervision.
32.Infants and children should be supervised to ensure that they do not play with the appliance.
SAVE THESE INSTRUCTIONS
SAFETY & REGULATIONS
Quick Start Guide original instructions. |
5 |
Part Number 32Z3801 GB Issue 1 |

SAFETY& REGULATIONS
PRECAUTIONS TO BE OBSERVED
1.Read this manual before using your oven.
2.As with all electrical appliances, it is wise to have the electrical connections inspected at least once a year.
3.The oven interior, door seals should be cleaned frequently, following the instructions described in the cleaning section, failure to do so could possibly result in a hazardous situation.
4.Switch off the oven at the end of all the cooking sessions for that day.
5.The oven should not be used to dry linen.
6.As with any cooking appliance, care should be taken to avoid combustion of the items within the oven.
7.Food in combustible plastic or paper containers should be transferred to a microwave/oven proof containers to avoid the possibility of ignition.
If smoke is observed:
●● Switch off
●● Isolate from the electrical supply
●● Keep the door closed to stifle any flames
8.Items should be unwrapped when using convection and combination functions.
9.Eggs in shells and whole hard-boiled eggs should not be heated in the oven as they may explode.
10.Food with a skin, e.g. Potatoes, apples, sausages etc. should be pierced before heating.
11.Food should not be heated in a completely sealed container as the build-up of steam may cause it to explode.
12.Excess fat should be removed during ‘roasting’ and before lifting heavy containers from the oven.
13.In the event of glass breaking or shattering within the oven, ensure that food is totally free of glass particles. If in doubt, dispose of any food that was in the oven at the time of the breakage.
14.DO NOT attempt to operate the oven with: object caught in door, that does not close properly or damaged door, hinge, latch, sealing surface or without food in the oven.
6 |
Quick Start Guide original instructions. |
Part Number 32Z3801 GB Issue 1 |
SUITABLE COOKING UTENSILS
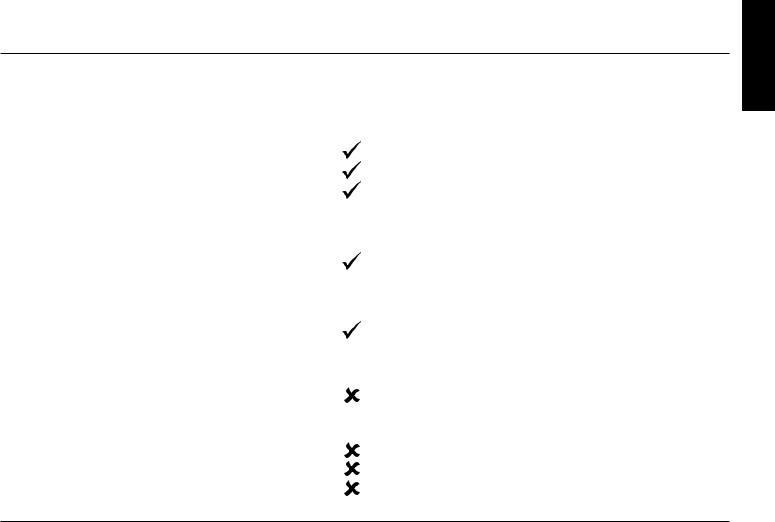
Manufacturer’s instructions should be checked to determine the suitability of individual containers or utensils using each of the cooking functions. The following chart provides general guidelines:
Heat resistant containers |
|
|
Toughened glass |
|
|
Vitreous ceramics |
|
Do not use items with metallic decoration. |
Earthenware |
|
|
|
|
|
(porcelain/crockery/china etc.) |
|
|
|
|
|
Metallic & Foil Trays |
|
|
Metallic trays |
|
Metallic trays may only be used when placed on the |
DO NOT USE ANY OTHER METAL OR FOIL CONTAINERS |
|
VITREOUS RACK in the oven cavity |
|
|
|
Plastic containers |
|
|
Dual-ovenable plastic containers |
|
(up to certain temperatures) are now available. |
|
Check manufacturer’s instructions before use. |
|
|
|
|
|
|
|
Disposables |
|
|
DO NOT USE |
|
|
Combustibles (paper/card etc.) |
|
|
|
|
|
Other utensils |
|
|
Tie tags |
|
No kitchen utensil should be left in food while it is cooking in |
Cutlery |
|
|
|
the oven. |
|
Temperature probes |
|
|
|
|
|
|
|
|
SAFETY & REGULATIONS
Quick Start Guide original instructions. |
7 |
Part Number 32Z3801 GB Issue 1 |

DETAILS RODUCTP
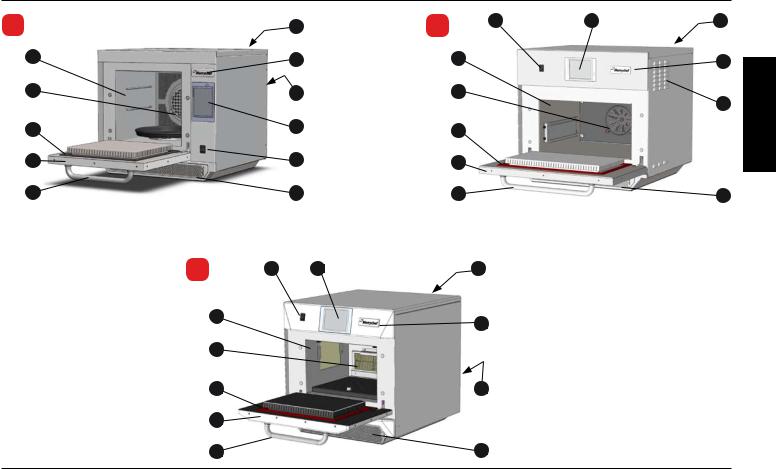
MAIN FEATURES
1 ON/OFF SWITCH |
8 OVEN DOOR |
When switched ON the easyToUCH screen illuminates the oven controls. Note; turning this switch OFF does not isolate the oven from the electricity supply.
2 easyToUCH SCREEN CONTROL PANEL See ‘OPERATION & CONTROLS’ for details.
3 RATING PLATE
Located on the rear panel of the oven states the serial number, model type & electrical specifications.
4 MenuConnect
A USB socket located under the Merrychef logo allows changes to programs stored on the oven (See ‘USB MenuConnect’, Operation & Controls section, for details of updating oven programs).
5 AIR OUTLETS
Air used to cool internal components and steam from the cavity escape through the air outlet vents located on the rear of the oven and side panel of the e5 model. The air outlets must be kept free from obstruction and they will not allow microwave energy to escape into the environment.
6 AIR INLET FILTER
This is a precision-made energy barrier with three microwave safety interlocks. The door must be kept clean (see ‘CLEANING’) and should NOT be used to support heavy objects.
9 DOOR SEALS
These ensure a tight seal around the door. They should be kept clean and checked regularly for signs of damage. At the first sign of wear they should be replaced by a Merrychef approved Service Agent.
10 CONVECTION FAN, GREASE FILTER & CATALYTIC CONVERTOR (model dependant)
The metal grease filter grill covering the convection fan must be kept clean and free of debris. Great care should be taken when cleaning this area of the oven noting the different oven requirements shown under ‘Cleaning & Maintenance’ in this manual.
11 OVEN CAVITY
The oven cavity is constructed from stainless steel and must be kept clean by following the cleaning instructions in the ‘Cleaning & Maintenance’ section of this manual.
The air filter situated at the lower front of the oven is part of the ventilation system and must be kept free of obstruction and cleaned daily as described under ‘Cleaning & Maintenance’. Note, the oven will not operate without the air filter fitted.
7 DOOR HANDLE
This is a rigid bar which is pulled downwards and away from the oven to open.
8 |
Quick Start Guide original instructions. |
Part Number 32Z3801 GB Issue 1 |
e3 |
|
e5 |
|
|
|
|
|
|
|
||||
|
|
|
|
|
|
|
1 |
|
2 |
|
3 |
|
|
|
|
|
3 |
|
|
|
|
||||||
|
|
|
|
|
|
|
|
|
|
|
|
|
|
|
|
|
|
|
|
|
|
|
|
|
|
|
|
11 |
|
|
|
|
|
|
|
|
|
||||
|
|
|
11 |
|
|
|
|
|
|
|
|||
|
|
4 |
|
|
|
|
|||||||
|
|
|
|
|
|
|
|
4 |
|
||||
|
|
|
|
|
|
|
|
|
|||||
|
|
|
|
|
|
|
|
|
|
|
|
|
|
10 |
|
|
|
|
|
|
|
|
|
||||
|
|
|
10 |
|
|
|
|
|
|
|
|
||
|
|
5 |
|
|
|
|
|
|
|
||||
|
|
|
|
|
|
|
|
|
|||||
|
|
|
|
|
|
|
|
|
|
|
|
||
|
|
|
|
|
|
|
|
|
|
|
|
|
|
|
|
|
|
|
|
|
|
|
|
5 |
|
||
|
|
|
|
|
|
|
|
|
|
|
|
|
|
|
|
|
2 |
|
|
|
|
|
|
|
|
|
|
9 |
|
|
|
|
|
|
|
|
|||||
|
|
9 |
|
|
|
|
|
|
|
|
|||
|
|
|
|
|
|
|
|
|
|
||||
|
|
|
|
|
|
|
|
|
|
||||
|
|
|
|
|
|
|
|
|
|
|
|
|
|
|
8 |
|
1 |
|
|
|
|
|
|
|
|
|
|
|
|
8 |
|
|
|
|
|
|
|
|
|||
|
|
|
|
|
|
|
|
|
|
||||
|
|
|
|
|
|
|
|
|
|
|
|
|
|
7 |
|
|
|
|
|
|
|
|
|||||
|
|
6 |
|
|
|
|
|
|
|||||
|
|
7 |
|
|
|
|
|
||||||
|
|
|
|
|
|
|
6 |
|
|||||
|
|
|
|
|
|
|
|
||||||
|
|
|
|
|
|
|
|
|
|
|
|
||
e4 |
1 |
2 |
3 |
|
|||
11 |
|
|
4 |
|
|
|
|
10 |
|
|
|
9 |
|
|
5 |
8 |
|
|
|
7 |
|
|
6 |
PRODUCT DETAILS
Quick Start Guide original instructions. |
9 |
Part Number 32Z3801 GB Issue 1 |

TECHNICAL SPECIFICATIONS
Specifications
|
|
Description |
unit |
e3 |
e4 |
e5 |
RODUCTP |
|
|
|
|
|
|
|
Touch screen controls |
programs |
1024 |
1024 |
1024 |
|
|
|
|
|
|
|
|
|
Ambient operating temperature |
°C |
<40 |
<40 |
<40 |
|
DETAILS |
|
|
|
|
|
|
|
External HxWxD |
mm |
551x598x622 |
591x584x750 |
642x711x705 |
|
|
|
|||||
|
|
|
|
|
|
|
|
|
External HxWxD |
inches |
21.7x23.5x24.5 |
23.3x23.0x29.5 |
25.3x28.0x27.8 |
|
|
|
|
|
|
|
|
|
Internal HxWxD |
mm |
319x332x325 |
218x375x312 |
258.4x495x363.5 |
|
|
|||||
|
|
|
|
|
|
|
|
|
Internal HxWxD |
inches |
12.6x13.1x12.8 |
8.6x14.8x12.3 |
10.17x19.49x14.31 |
|
|
|
|
|
|
|
|
|
Cooking chamber |
Ltr (cu.ins) |
34.4 (2113) |
25.5 (1566) |
44.4 (2730) |
|
|
|
|
|
|
|
|
|
Power output microwave |
Watts |
700/1000 |
1500 |
1400 |
|
|
|
|
|
|
|
|
|
Power output convection |
kW |
3 (3/1.5 EE) |
3.2 |
3.2 |
|
|
|
|
|
|
|
|
|
Power supply |
Hz |
50 & 60 |
50 & 60 |
50 & 60 |
|
|
|
|
|
|
|
|
|
Power supply |
kW |
3(EE) 4.3(XE) 4.7(XX) |
7.0 |
6.2 |
|
|
|
|
|
|
|
|
|
Unpackaged oven weight nett |
Kg (lbs) |
62.5 (138) |
82.5 (182) |
94.0 (207) |
|
|
|
|
|
|
|
|
|
Sound pressure level |
dB(A) |
<70 |
<70 |
<70 |
|
|
|
|
|
|
|
|
|
Stacking (with kit) |
oven |
0 |
1 |
0 |
|
|
|
|
|
|
|
10 |
Quick Start Guide original instructions. |
Part Number 32Z3801 GB Issue 1 |
EC Declaration of Conformity
Manufacturer
1) Merrychef Limited |
2) Viscount Catering Limited |
Station Road West |
Provincial Park |
Ash Vale |
Nether Lane |
Aldershot |
Ecclesfield |
Hampshire |
Sheffield |
GU12 5XA |
S35 9ZX |
United Kingdom |
United Kingdom |
Equipment details |
|
Generic Model Numbers |
eikon e3, eikon e4, eikon e5 |
Description |
Commercial Combination Microwave Oven |
Declaration of Conformity with directives and standards
The manufacturer hereby declares that its commercial combination microwave ovens listed above comply with the following directives and standards.
Compliance with Directives
The commercial combination microwave ovens comply with the relevant provisions of the
following European Directives |
|
|
EMC 2004/108/CE |
LVD 2006/95/EC RoHS 2002/95/EC |
MD 2006/42/EC |
Harmonised Standards Applied
The commercial combination microwave ovens comply with the relevant requirements of the following European standards.
•EN 60335-2-90: 2006
•EN 60335-1: 2002+A11+A1+A12+A2+A13
•EN 62233:2008
•EN 55014-2:1997 inc A2:2008 in accordance with Category IV requirements
|
Electrostatic discharge |
IEC 61000-4-2:1995 |
|
Radiated RF interference |
IEC 61000-4-3:1996 |
|
Fast transient common mode, AC port |
IEC 61000-4-4:1995 |
|
Mains surge, AC port |
IEC 61000-4-5:1995 |
|
RF current, common mode, AC port |
IEC 61000-4-6:1996 |
|
Mains voltage dips & interruptions |
IEC 61000-4-11:1994 |
• |
Flicker |
IEC 61000-3-11:2000 |
•EN 55011:2007 Classification: Class A, Group 2
|
Mains terminal disturbance voltage |
Table 2a |
|
Radiated disturbance, magnetic field* |
Table 5a |
|
Radiated disturbance, electric field |
Table 5a |
|
Radiated disturbance, electric field* |
Tables 6, 7 and 8 |
• |
AS/NZS CISPR 11 |
|
|
Radiated disturbance |
CISPR 11:2003:A1:2004 |
|
Conducted disturbance |
CISPR 11:2003:A1:2004 |
Quality and environmental management
Merrychef Limited and Viscount Catering employ a certified quality management system in accordance with EN ISO 9001:2008 and Viscount Catering employs a certified environmental management system in accordance with EN ISO 14001
Serial Number (Rating
Plate):
Serial number: MM YY SITE SERIAL
i.e. 06 10 2070 12345 |
DETAILS |
|
Oven manufactured in June 2010 at |
||
(0610207012345) |
|
|
Sheffield (UK), production number |
PRODUCT |
|
12345. |
||
|
||
Model Number: MODEL |
|
|
CONVECTION MICROWAVE |
|
|
VOLTAGE HERTZ LEAD PLUG |
|
|
COMMUNICATION VERSION |
|
|
CUSTOMER/ACCESSORY COUNTRY |
|
|
i.e. e4C S V 30 5 H E U 1 GM EU |
|
|
(e4CSV305HEU1GMEU) |
|
|
model e4C, 3200W, 1500W, 230V, |
|
|
50Hz, L+N+E(4mm EU), 3-pin plug, |
|
|
USB, 1, General Market, European. |
|
Compliances:
EU Directives
EMC 2004/108/EC
LVD 2006/95/EC
RoHS 2002/95/EC
MD 2006/42/EC
Quick Start Guide original instructions. |
11 |
Part Number 32Z3801 GB Issue 1 |
DETAILS RODUCTP
INSTALLATION
OVEN LOCATION AND POSITIONING
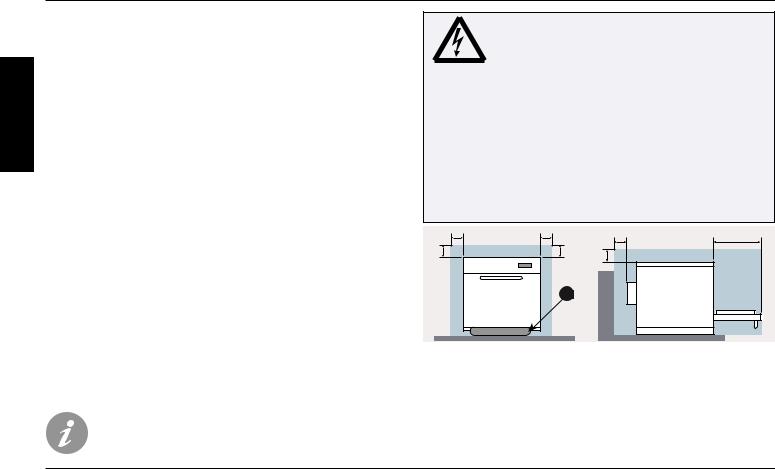
Choose a site away from major heat sources.
DO NOT position so that hot air is drawn in from fryers, grills, griddles, etc.
A heat barrier to the height of the oven must be installed if sited next to a burner, stove or range.
Place the oven on a permanent nonslip/nonflammable flat surface that is LEVEL, STABLE and STRONG enough for the oven and contents.
Allow a minimum clearance (A) of 2 inches (50mm) around the oven for hot air to escape.
Allow sufficient clearance (B), in front of the oven for the door to open fully.
The air intake is located at the lower front of the oven (1) and it is important that the airflow is as cool as possible and not preheated by other appliances such as burners, stoves, ranges, fryers, grills and griddles as this will deteriorate the life and performance of the oven.
Do not affix labels/stickers to oven other than those applied or approved by the manufacturer.
 DANGER!
THIS APPLIANCE MUST BE EARTHED. FAILURE TO DO SO MAY RESULT IN ELECTRIC SHOCK AND DEATH.
The oven must be connected to a separate electrical supply installed by a qualified and approved electrician.
A suitably rated isolating switch with a 3mm contact gap on all poles should be fitted for each oven installed.
If you are in any doubt about your electrical supply, seek the advice of a qualified electrician.
A |
A |
A |
B |
|
|
|
|
|
|
1 |
|
The oven will not operate without the AIR FILTER correctly fitted in place.
HANDLING & STORAGE:
When moving an oven always observe and follow National and local requirements for lifting and moving heavy objects. Do not use the oven door handle to lift oven.
When not in use, electrically disconnect the oven and store safely in a dry cool place, do not stack ovens.
12 |
Quick Start Guide original instructions. |
Part Number 32Z3801 GB Issue 1 |
QUICK START GUIDE: QUICK SERVICE OVEN
START UP |
|
|
|
|
|
|
|
|
|
|
|
|
|
|
|
|
|
|
1 |
|
|
|
|
|
2 |
|
|
3 |
|
|
|
|
|
|
|
||
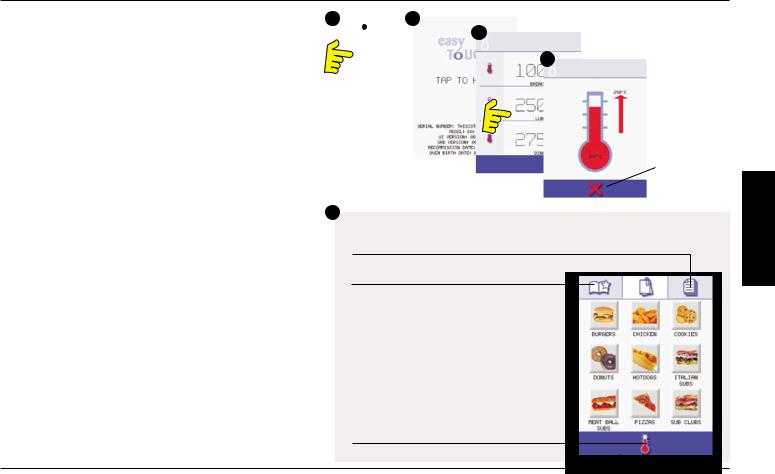
1. Switch the oven on; |
|
|
|
|
|
|
|
|
|
|
|
|
|
|
|
|
|
|
|
|
|
|
|
|
|
|
|
|
|
|
|
|
|
|
|
||
|
|
|
|
|
|
|
|
|
|
|
|
|
|
|
|
|||
Make all the relevant safety checks and ensure the oven is |
|
|
|
|
|
|
|
|
|
|
|
|
|
|
|
4 |
|
|
|
|
|
|
|
|
|
|
|
|
|
|
|
|
|
|
|
||
clean and empty before pressing the oven switch down to |
|
|
|
|
|
|
|
|
|
|
|
|
|
|
|
|
|
|
|
|
|
|
|
|
|
|
|
|
|
|
|
|
|
|
|
|
|
activate the oven. |
|
|
|
|
|
|
|
|
|
|
|
|
|
|
|
|
|
|
2. The easyToUCH screen illuminates with the display briefly |
|
|
|
|
|
|
|
|
|
|
|
|
|
|
|
|
|
|
showing the serial number and oven data. Lightly tap the |
|
|
|
|
|
|
|
|
|
|
|
|
|
|
|
|
|
|
screen once to freeze the display, tap again to continue. |
|
|
|
|
|
|
|
|
|
|
|
|
|
|
|
|
|
|
3. When the oven is setup with two or more preheating |
|
|
|
|
|
|
|
|
|
|
|
|
|
|
|
|
|
|
temperatures a choice is displayed. |
|
|
|
|
|
|
|
|
|
|
|
|
|
|
|
|
|
|
Scroll arrows at the bottom of the screen indicates there |
|
|
|
|
|
|
|
|
|
|
|
|
|
|
|
|
|
|
|
|
|
|
|
|
|
|
|
|
|
|
|
|
|
|
|
|
|
are more temperature choices not shown on screen, if |
|
|
|
|
|
|
|
|
|
|
|
|
|
|
|
|
|
|
necessary, use the scroll arrows, then select the temperature |
|
|
|
|
|
|
|
|
|
|
|
|
|
|
|
|
|
|
5 |
|
COOKBOOK DISPLAY |
|
|
|
|
||||||||||||
required to start preheating the oven. |
|
|
|
|
|
|
||||||||||||
4. During preheating the display shows the progress as the |
DISPLAYS ALL COOKING PROGRAMS (Optional) |
||
oven heats up to the set temperature. (To stop the oven |
|||
SHOWS PROGRAM GROUPS |
|||
heating touch the red ‘X’ symbol.) |
|||
FAVOURITES (Optional) |
|||
5. The oven is ready to use when the ‘COOKBOOK’ is |
|||
|
|
||
displayed. |
PROGRAM GROUP |
|
|
|
|||
|
Each group contains a collection of cooking |
||
|
programs. |
||
CHANGE OVEN TEMPERATURE (Optional)
STOP/CANCEL
CONTROLS
OPERATION &
Quick Start Guide original instructions. |
13 |
Part Number 32Z3801 GB Issue 1 |
& ERATIONP CONTROLS
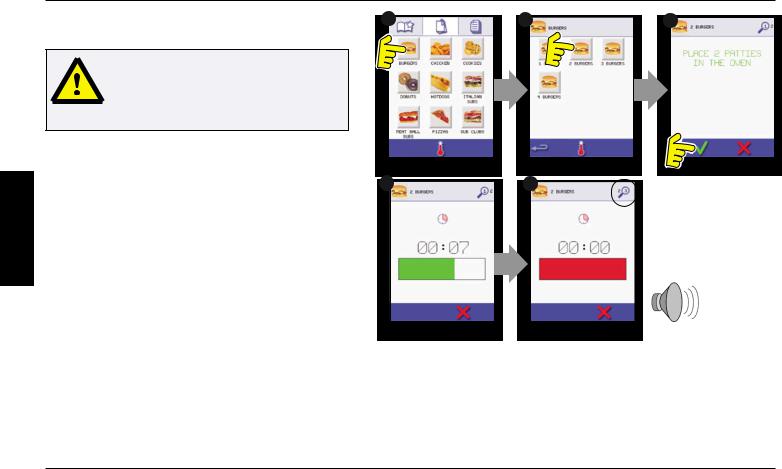
USING A COOKING PROGRAM |
|
|
|
|
|
|
|
1 |
|
|
|||||
|
2 |
|
|||||
|
|
|
3 |
Taking all the necessary precautions to ensure you do not burn yourself, open the oven door to place the food into the hot oven and close the door.
1. Select a program group, for example, ‘BURGERS’ to display the individual cooking programs.
2. Select a cook program to start, for example, 2 BURGERS. |
|
|
|
|
|
|
|
|
4 |
|
|
5 |
|
|
|
PROGRAM STAGE |
|
|
|
|
|
|||||
3. Follow instructions if displayed on the screen. |
|
|
|
|
|
|
|
|
|
|
|
|
|
|
|
||
|
|
|
|
|
|
|
|
|
4. Touch the green tick to cook. |
|
|
|
|
|
|
|
|
The cooking time counts down for each program stage.
5. When the program ends a red bar is displayed usually with an audible sound - open the door or touch the red ‘X’ to return to the cook program.
Note; opening the oven door during cooking stops the cooking program and displays a warning. Closing the door allows the user to continue or cancel the cooking program.
14 |
Quick Start Guide original instructions. |
Part Number 32Z3801 GB Issue 1 |
OPERATING GUIDE: FULL SERVICE OVEN
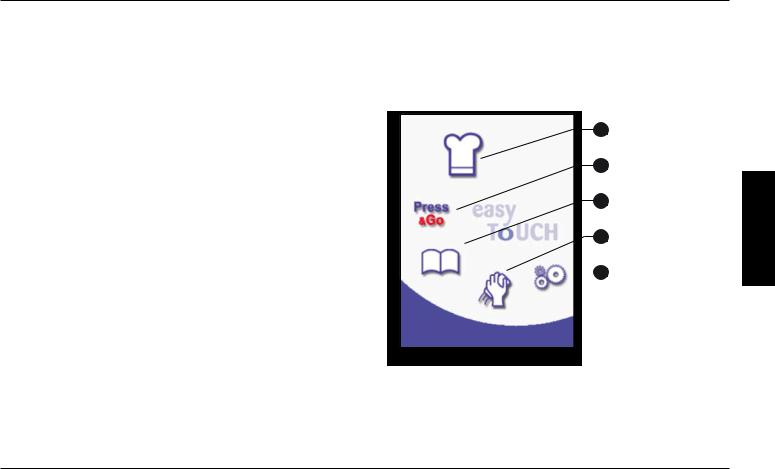
easyToUCH MAIN MENU & KEYBOARD SCREEN
MAIN MENU SCREEN:
1.DEVELOPMENT MODE enables multistage cooking programs to be developed, then stored under a name and symbol for reuse.
2.PRESS & GO allows quick access to use the cooking programs that are already stored.
3.COOKBOOK contains the oven’s cooking programs.
It displays Favourites, Cooking Program Groups and a complete listing of all cooking programs available.
4.CLEANING/TEMP CHANGE allows the oven temperature to be changed and the oven to be prepared for cleaning with reminders displayed to assist during the cleaning process.
5.SETTINGS are used to control the oven settings and functions including time and language, loading cooking programs and for service and maintenance purposes.
6.KEYBOARD SCREEN is used to enter an authorised password to enter data for programs and may restrict operator access to some functions.
1DEVELOPMENT MODE
2MENU SHORTCUT
3COOKBOOK
4CLEANING/TEMP CHANGE
 5 SETTINGS
OPERATION & CONTROLS
Quick Start Guide original instructions. |
15 |
Part Number 32Z3801 GB Issue 1 |
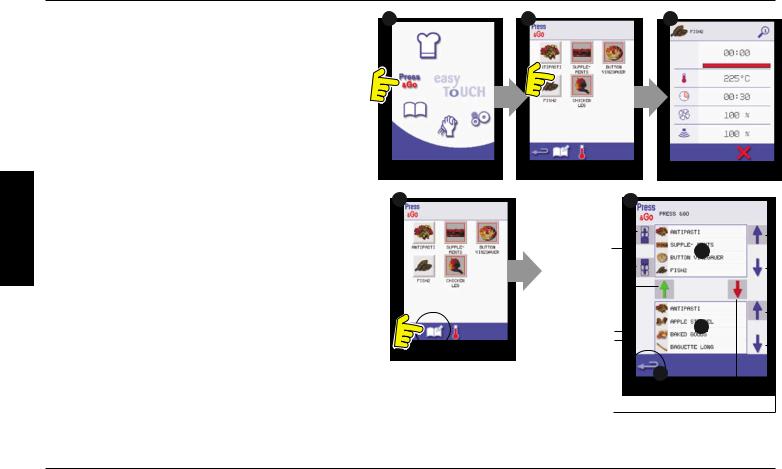
PRESS & GO |
|
1 |
Running a cooking program from the Press & Go menu.
1.Select ‘PRESS & GO’ from the main menu screen.
2.Select the item required to cook.
3.The display shows the temperature, cooking time, microwave power and fan speed while the timer counts down. The timer bar turns red to indicate the cooking cycle has finished.
ERATIONP |
|
|
& CONTROLS |
Choosing which cooking programs are shown in the ‘PRESS |
1 |
|
||
& GO’ menu screen. |
|
|
|
|
1. After selecting ‘PRESS & GO’ from the main menu screen, select the EDIT symbol.
2. Two lists are displayed, the ‘PRESS & GO’ menu items are shown in the upper list and the lower list shows other menu items which are available. Both lists can be scrolled up or down using the arrows on the extreme right.
3. Select an item, then choose whether to change its order within the menu or to remove it into the lower list.
4. Select an item to move into the upper list, making it available in the ‘PRESS & GO’ menu.
5. Select backspace to return to the menu screen when finished.
|
|
|
|
|
|
|
|
||
|
2 |
|
|
|
3 |
|
|
||
|
|
|
|
|
|
|
|
|
|
2
Change the order of a selected item
shown in the 3 Press & Go
screen.
Move a
selected item 4 to or from the
Press & Go screen.
5
Select to scroll a list up or down.
16 |
Quick Start Guide original instructions. |
Part Number 32Z3801 GB Issue 1 |

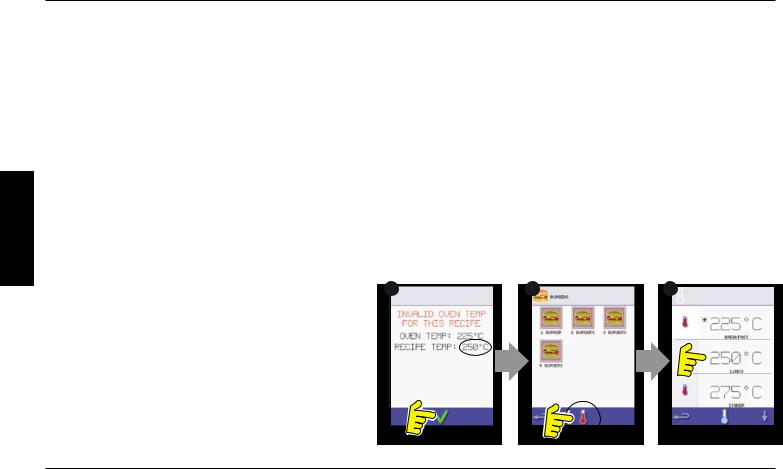
USING A COOKBOOK PROGRAM
WARNING: Ensure there is food product in the oven before starting a cooking program.
To find the required Program in the cookbook.
1.Select ‘COOKBOOK’ from the main menu screen.
2.Select the ALL MENUS symbol.
3.Use scroll up/down arrows to find the program.
NOTE: if an image has a red line around it the oven temperature is set too high or too low for that recipe. See ‘CHANGING THE OVEN TEMPERATURE’.
Taking all the necessary precautions to ensure you do not burn yourself, place the food product into the hot oven cavity and close the door.
WARNING:
Hot surface Hazard
4.Select the required cooking program to start cooking. For example, ‘1 BURGER’.
5.The program either starts immediately displaying a countdown timer, or an instruction is displayed first; follow the stage instruction then select OK to start cooking. If the oven door is not opened within 30 seconds a warning message appears.
1 |
2 |
3 |
|
|
|
|
|
|
|
|
|
|
|||
|
4 |
|
|
5 |
|
|
6 |
|
|
|||
|
|
|
|
|
|
|
|
|
|
|
|
|
OPERATION & CONTROLS
Quick Start Guide original instructions. |
17 |
Part Number 32Z3801 GB Issue 1 |
& ERATIONP CONTROLS
6. The cooking timer counts down to zero and makes a sound to indicate an operator action is required at the end of a cooking stage or the end of a cooking program.
Once the cooking program has finished, opening the oven door to remove the food returns the display to the ‘COOKBOOK’ screen.
Note; opening the oven door during cooking stops the cooking program and displays a warning. Closing the door allows the user to continue or cancel the cooking program.
To check the oven temperature when cooking, lightly tap the temperature displayed, the oven cavity temperature is shown with an asterisk.
|
|
|
|
|
|
|
|
CHANGING THE OVEN TEMPERATURE |
1 |
|
2 |
|
3 |
||
|
|
|
|
|
|
|
1. Take note of the temperature required for the recipe and select OK.
2. Select the temperature symbol.
3. An asterisk next to the number indicates the present oven temperature, select the required oven temperature for the recipe. Once the oven is at the required temperature continue from selecting the ‘COOKBOOK’ in step 1.
18 |
Quick Start Guide original instructions. |
Part Number 32Z3801 GB Issue 1 |
COOLING THE OVEN DOWN BEFORE CLEANING
Oven cool down |
1 |
2 |
|
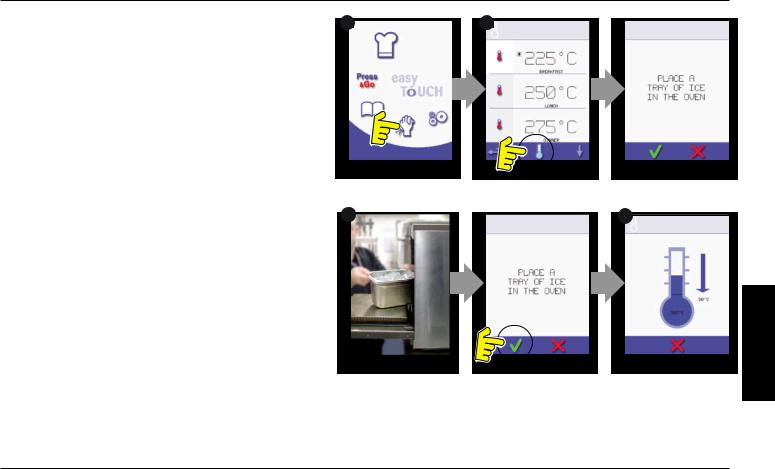
IMPORTANT: the oven must be cooled down before the cleaning processes are carried out.
1.In Full Serve mode, select the CLEANING symbol from the main menu.
2.In Full or Quick Serve mode, select the blue thermometer symbol to disable heating and start the cooling cycle.
3.Taking all necessary precautions place a suitable heaped container of ice, into the hot oven cavity. Select the OK symbol to continue.
4.The cooling progress is displayed and takes approximately 30 minutes.
5. The oven is now ready for cleaning. Select OK on the screen |
|
|
|
|
|
|
3 |
|
|
|
|||
|
|
|
4 |
|||
|
|
|
||||
|
|
|
|
|||
after completing each stage. |
|
|
|
|
|
|
Preparing to clean the oven
For the oven to operate at peak efficiency, the cavity, door, air filter and grease filter must be kept clean.
A daily cleaning routine will ensure that you comply with the required hygiene standards and will help to maintain and prolong the efficiency of your oven.
CLEANING & MAINTENANCE
Quick Start Guide original instructions. |
19 |
Part Number 32Z3801 GB Issue 1 |
& CLEANING MAINTENANCE
Equipment required (not supplied):
Non-caustic proprietary branded oven cleaner, heat proof gloves, protective rubber gloves, non–abrasive nylon scrub pad, cleaning towel and cloths, eye protection and dust mask (optional).
CAUTION: Wear protective rubber gloves when cleaning the oven.
NEVER use sharp implements or harsh abrasives on any part of the oven.
WARNING: DO NOT use caustic cleaners on any part of the oven or oven cavity as it will cause permanent damage to the Catalytic Convertors
Complete COOL DOWN procedure and allow the oven and accessories to cool before commencing cleaning.
DO NOT use tools
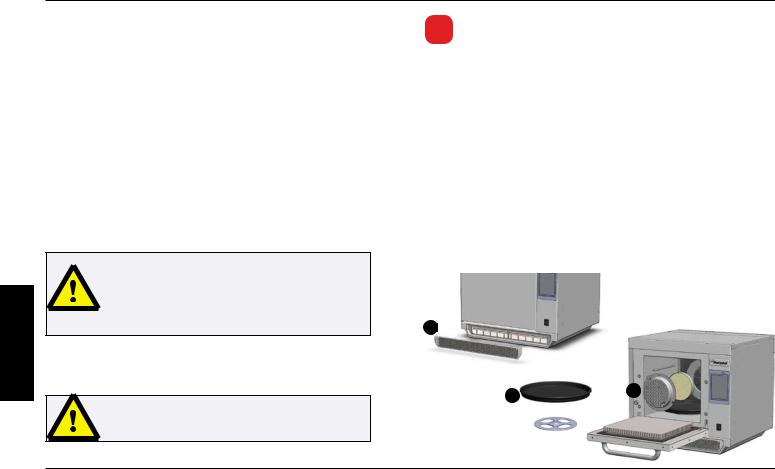
e3 Cold oven CLEANING INSTRUCTIONS e3
REMOVE & CLEAN Oven Parts:
1.Remove the air filter at the base of the oven.
2.Open the oven door and lift out the turntable.
3.For ovens with a catalytic converter; open the oven door and undo fasteners to remove the catalytic convertor when required or at least once a month.
Wash all parts in warm soapy water. Wash off using a clean cloth and plenty of clean, warm water.
Dry using a fresh, clean cloth.
1
|
|
|
|
|
3 |
||
2 |
|||
|
|
20 |
Quick Start Guide original instructions. |
Part Number 32Z3801 GB Issue 1 |
e4 Cold oven CLEANING INSTRUCTIONS e4
REMOVE & CLEAN Oven Parts:
1.Remove the air filter at the base of the oven.
2.Open the oven door, remove the rack, pull the grease filter handle downwards and lift out.
3.Undo the fasteners securing the top impinger plate.
4.Remove top impinger plate and lift out bottom impinger plate.
Wash all parts in warm soapy water. Wash off using a clean cloth and plenty of clean, warm water.
Dry using a fresh, clean cloth.
|
|
|
1 |
2 |
|
|
|
3 |
4 |
e5 Cold oven CLEANING INSTRUCTIONS e5
REMOVE & CLEAN Oven Parts:
1.Remove the air filter at the base of the oven.
2.Open the oven door to remove any cooking trays/rack.
Wash all parts in warm soapy water. Wash off using a clean cloth and plenty of clean, warm water.
Dry using a fresh, clean cloth.
1
2 &MAINTENANCE CLEANING
Quick Start Guide original instructions. |
21 |
Part Number 32Z3801 GB Issue 1 |
& CLEANING MAINTENANCE
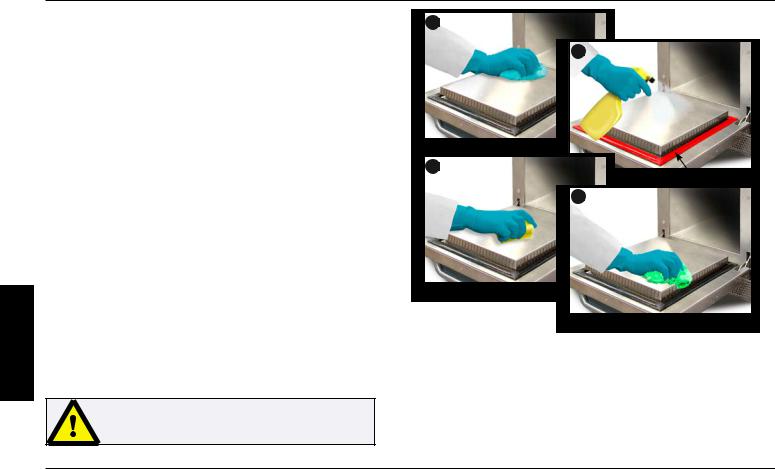
CLEAN THE OVEN:
1. Remove any spillages with disposable paper wipes.
Use a dry clean brush to remove any food particles from between the oven floor and the inside of the front door.
2. Wear protective rubber gloves and protective glasses, carefully spray a non-caustic proprietary branded Oven Cleaner onto all the internal surfaces of the oven except the door seal (A).
DO NOT spray directly into the fan opening at the rear inside of the oven.
3. For difficult areas, leave to soak for 10 minutes with the oven door open.
Use a non–abrasive nylon scrub pad/sponge to clean the cavity, roof and the inside of the door. Do not scrub the door seal or use metallic scourers.
4. Wash off using a clean cloth and plenty of clean warm water and dry using a fresh clean cloth or paper towel.
Replace all the cleaned oven parts.
Close the oven door and wipe the outside of the oven with a damp cloth.
DO NOT use the oven without a clean air filter in place
1
2
3
A
4
22 |
Quick Start Guide original instructions. |
Part Number 32Z3801 GB Issue 1 |
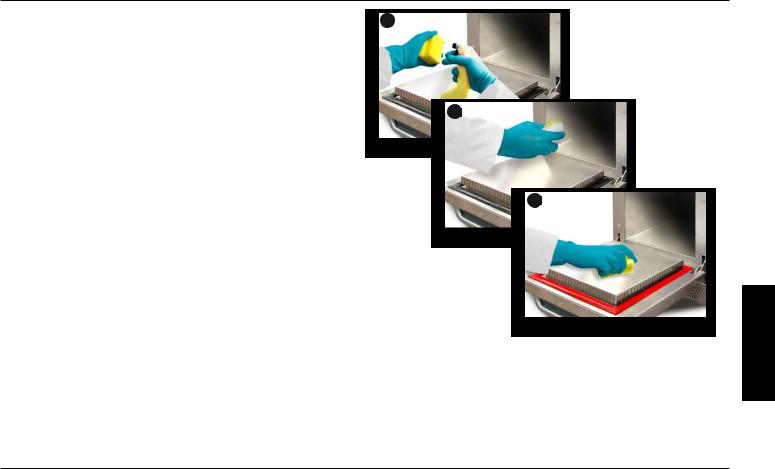
APPLY OVEN PROTECTOR: |
|
1 |
1.Only apply to a clean oven. Spray proprietary branded Oven Protector onto a sponge.
2.Spread Oven Protector lightly onto all internal surfaces of the oven.
3.Spread Oven Protector lightly onto the internal surface of the oven door avoiding the door seal.
Switch on the oven and preheat. When the oven has reached operating temperature it will take about 30mins to cure the Oven Protector.
Note: Oven protector turns light brown when cured.
2
3
MAINTENANCE
CLEANING &
Quick Start Guide original instructions. |
23 |
Part Number 32Z3801 GB Issue 1 |

FAULT FINDING
FAULT FINDING CHART
Although every effort is made to ensure your oven will continue
to perform to a high standard, please check the chart to see if
the problem can be easily resolved before contacting your service agent.
PROBLEM |
POSSIBLE CAUSE |
REMEDY |
|
|
|
|
|
|
|
Check if there is a power cut. |
|
The oven does not work and the display |
The oven has no power |
Check the isolator switch is ON or the oven |
|
screen is blank |
is plugged in correctly. |
||
|
|||
|
|
Check the oven switch is ON. |
|
|
|
|
|
Some screen controls do not work |
Unauthorised access |
Contact the authorised user. |
|
|
|
|
|
Display warning message that the door is |
Oven door not closed |
Remove any restriction and close the oven |
|
open |
door. |
||
|
|||
|
|
|
|
Display warning message that the air filter |
Air filter missing or incorrectly fitted |
Refit air filter correctly. |
|
is removed |
|||
|
|
||
|
|
|
|
|
Oven not clean |
Clean the oven (see cleaning). |
|
|
Food not at correct temperature |
Use the correct cooking program. |
|
The oven does not cook the food correctly |
Modified or wrong program selected |
Unwrap food for non-microwave cooking. |
|
|
Food wrapped |
Check all the cooking stages have been |
|
|
Food removed early |
followed correctly. |
|
|
|
|
|
|
|
Close oven door. |
|
|
Oven door opened |
Refit air filter. |
|
The oven does not finish cooking |
No air filter or incorrectly fitted |
Allow the oven to cool down. |
|
|
Oven overheating |
Check and remove any restrictions around |
|
|
|
the air vents. |
|
|
|
|
|
Display shows an error code |
Oven malfunction |
Note the error code and contact your |
|
Service Agent. |
|||
|
|
||
|
|
|
24 |
Quick Start Guide original instructions. |
Part Number 32Z3801 GB Issue 1 |

Correct disposal of this product (Waste Electrical & Electronic Equipment)
Applicable in the European Union and other European countries with separate collection systems.
This marking shown on the product or its literature indicates that it should not be disposed with other household wastes at the end of its working life. To
prevent possible harm to the environment or human health from uncontrolled waste disposal, please separate this from other types of wastes and recycle it responsibly to promote the sustainable reuse of material resources.
Household users should contact either the retailer where they purchased this product, or their local government office for details of where and how they can take this item for environmentally safe recycling.
Business users should contact their supplier and check the terms and conditions of the purchase contract. This product should not be mixed with other commercial wastes for disposal.
Station Road West
Ash Vale, Aldershot
Hampshire GU12 5XA
United Kingdom
Phone: +44 (0) 1252 371000
Fax: +44 (0) 1252 371007
e -mail: info@merrychef.com
Merrychef reserves the right to change product specifications without notice and accepts no liability for any inaccuracies, errors or ommissions contained herein.
www.merrychef.com
Quick Start Guide original instructions. |
25 |
Part Number 32Z3801 GB Issue 1 |
INTRODUCTION
Ces fours offrent aux utilisateurs la flexibilité de la cuisson combinée avec en plus un contrôle de la vitesse du ventilateur et la fonction micro-ondes.
La cuisson combinée permet d’obtenir des résultats de haute qualité en moins de temps qu’il n’en faut avec la cuisson traditionnelle, notamment pour faire cuire, dorer, rôtir et griller des plats.
Une fois définies, des instructions précises pour la cuisson combinée ou par convection d’aliments spécifiques peuvent être programmées dans la mémoire du four de manière à pouvoir être répétées facilement et avec précision. Jusqu’à 1024 programmes peuvent être sauvegardés et appelés en toute simplicité.
Programmation échelonnée
Les commandes du four offrent une flexibilité accrue en permettant d’effectuer une programmation échelonnée à plusieurs phases. Cela permet de paramétrer les conditions exactes requises pour des résultats de qualité en fonction du type d’aliment.
Un programme de cuisson unique peut compter jusqu’à 6 phases, chacune étant contrôlée avec sa propre durée, sa propre vitesse de ventilateur et ses propres réglages de la puissance des micro-ondes (en fonction du modèle).
ATTENTION :
Cet appareil est un produit de Classe A. Dans un environnement ménager, ce produit peut provoquer des interférences radio ; dans ce cas, l’utilisateur peut devoir prendre des mesures appropriées.
PRÉCAUTIONS À PRENDRE POUR ÉVITER TOUTE EXPOSITION POTENTIELLE À UN EXCÈS D’ÉNERGIE DÉGAGÉE PAR LES
MICRO-ONDES
a)Ne tentez en aucun cas de faire fonctionner ce four lorsque la porte est ouverte : cela pourrait entraîner une exposition nocive à l’énergie dégagée par les micro-ondes. Il est important de ne pas toucher aux dispositifs de sécurité.
b)Ne laissez en aucun cas un objet entre la face avant du four et la porte, et ne laissez jamais de la terre ou des résidus de produits d’entretien s’accumuler au niveau des surfaces d’étanchéité.
c)N’utilisez pas le four s’il est endommagé. Il est particulièrement important que la porte du four ferme correctement et que les éléments suivants ne soient pas endommagés : (1) porte (voilée)
(2) charnières et loquets (cassés ou desserrés) (3) joints et surfaces d’étanchéité des portes.
d)Le four doit être réglé ou réparé exclusivement par des techniciens qualifiés.
Les instructions contenues dans ce guide ont pour but de garantir votre sécurité ainsi qu’une durée de vie élevée de votre four Merrychef.
VEUILLEZ LIRE ATTENTIVEMENT LES CONSIGNES DE SÉCURITÉ SUIVANTES !
26 |
Guide de mise en route rapide. Traduction des instructions originales. |
Partie numéro 32Z3801 FR Édition 1 |

TABLE DES MATIÈRES
INFORMATIONS IMPORTANTES À LIRE AVANT TOUTE UTILISATION
Les utilisateurs sont avisés que l’entretien et les réparations doivent être effectués exclusivement par un réparateur Merrychef agréé et avec des pièces de rechange Merrychef d’origine. Merrychef n’aura aucune obligation vis-à-vis de tout produit installé, réglé ou utilisé de façon non conforme ou bien qui n’aurait pas été entretenu conformément aux directives nationales et locales ou
aux instructions d’installation fournies avec le produit, ou bien vis-à-vis de tout produit dont le numéro de série serait abîmé, effacé ou retiré, ou qui aurait été modifié ou réparé avec des pièces non autorisées ou par des réparateurs non agréés. Pour une liste des réparateurs agréés, veuillez consulter la dernière page de ce manuel. Les informations contenues dans les présentes (y compris les caractéristiques de conception et des pièces) peuvent être remplacées et sont susceptibles d’être modifiées sans préavis.
L’affichage, la disposition et les icônes de l’écran easyToUCH montrés dans ce manuel ont une fonction purement utilitaire et ne constituent en aucun cas une représentation exacte de ceux fournis avec le four.
Ceci est purement un guide de mise en route rapide. Pour de plus amples informations, veuillez vous référer aux consignes d’installation et d’utilisation correspondantes, disponibles sur www.merrychef.com
|
INTRODUCTION |
26 |
|
SÉCURITÉ & DIRECTIVES |
|
||
|
CONSIGNES DE SÉCURITÉ IMPORTANTES |
28 |
|
|
PRÉCAUTIONS À OBSERVER |
30 |
|
|
USTENSILES DE CUISSON APPROPRIÉS |
31 |
|
CARACTÉRISTIQUES DU PRODUIT |
|
||
|
PRINCIPALES FONCTIONNALITÉS |
32 |
|
|
SPÉCIFICATIONS TECHNIQUES |
34 |
|
|
|
Spécifications |
34 |
|
|
Numéro de série (plaque signalétique) : |
35 |
|
|
Prescriptions : |
35 |
|
INSTALLATION |
36 |
|
|
|
EMPLACEMENT ET POSITIONNEMENT DU FOUR |
36 |
FONCTIONNEMENT & COMMANDES |
|
||
|
GUIDE DE MISE EN ROUTE RAPIDE : FOUR À MODE RAPIDE |
37 |
|
|
|
MISE EN ROUTE |
37 |
|
|
UTILISER UN PROGRAMME DE CUISSON |
38 |
|
GUIDE DE FONCTIONNEMENT : FOUR À SERVICE COMPLET |
39 |
|
|
|
MENU PRINCIPAL easyToUCH & ÉCRAN CLAVIER |
39 |
|
|
PRESS & GO |
40 |
|
|
UTILISER UN PROGRAMME DU LIVRE DE RECETTES |
41 |
|
|
CHANGER LA TEMPÉRATURE DU FOUR |
42 |
NETTOYAGE & ENTRETIEN |
|
||
|
REFROIDISSEMENT DU FOUR AVANT NETTOYAGE |
43 |
|
|
|
Refroidissement du four |
43 |
|
|
Préparatifs pour nettoyer le four |
43 |
|
INSTRUCTIONS DE NETTOYAGE du four froid e3 |
44 |
|
|
INSTRUCTIONS DE NETTOYAGE du four froid e4 |
45 |
|
|
INSTRUCTIONS DE NETTOYAGE du four froid e5 |
45 |
|
DÉTECTION D’ERREURS |
|
||
|
TABLEAU DE DÉTECTION DE PANNES |
48 |
|
Guide de mise en route rapide. Traduction des instructions originales. |
27 |
Partie numéro 32Z3801 FR Édition 1 |
NETTOYAGE & FONCTIONNEMENT CARACTÉRISTIQUES SÉCURITÉ & ENTRETIEN & COMMANDES DU PRODUIT DIRECTIVES
DÉTECTION D’ERREURS

CURITSÉ DIRECTI
CONSIGNES DE SÉCURITÉ IMPORTANTES
Lorsque vous utilisez des appareils électriques, des précautions de sécurité de base doivent être observées, notamment :
ATTENTION ! Afin de réduire le risque de brûlures, de décharge électrique, d’incendie, de blessure ou d’exposition à un excès d’énergie dégagée par les micro-ondes :
1.Lisez l’ensemble des instructions avant d’utiliser l’appareil.
2.Lisez et observez les « PRÉCAUTIONS À PRENDRE POUR ÉVITER TOUTE EXPOSITION POTENTIELLE À UN EXCÈS D’ÉNERGIE DÉGAGÉE PAR LES MICRO-ONDES » sur la page d’introduction.
3.Cet appareil doit être mis à la terre. Raccordez-le uniquement à une prise secteur mise à la terre. Cf. « INSTALLATION ÉLECTRIQUE ».
4.Installez ou placez cet appareil uniquement conformément aux instructions d’installation fournies.
5.Certains produits comme les œufs entiers et les récipients hermétiques (par exemple pots en verre fermés) peuvent exploser et ne doivent pas être chauffés dans ce four.
6.Utilisez cet appareil uniquement pour l’utilisation prévue mentionnée dans le manuel. N’utilisez pas de produits chimiques corrosifs ou de vapeurs dans cet appareil. Ce type de four est conçu spécialement pour chauffer, cuire ou sécher des aliments. Il n’est pas conçu pour une utilisation industrielle ou pour être utilisé en laboratoire.
7.Cet appareil ne doit pas être utilisé par des enfants.
8.N’utilisez pas cet appareil si sa prise ou son cordon d’alimentation est endommagé, s’il ne fonctionne pas correctement, s’il a été endommagé ou s’il est tombé.
9.Cet appareil doit être entretenu exclusivement par des réparateurs
qualifiés. Contactez le centre agréé le plus proche de chez vous en vue de le faire examiner, réparer ou régler.
10 Vous ne devez pas couvrir/bloquer les ouvertures de l’appareil, y compris les prises d’air, les filtres et l’orifice d’évacuation de la vapeur.
11 Ne stockez pas cet appareil dehors. N’utilisez pas ce produit à proximité d’une source d’alimentation en eau, par exemple près d’un évier, dans un sous-sol humide ou à proximité d’une piscine, etc.
12.N’immergez pas le cordon ou la prise dans l’eau.
13.Gardez le cordon à l’écart de surfaces chauffées.
14.Ne laissez pas le cordon pendre au-dessus du bord d’une table ou d’un comptoir.
15.Soit :
i)Lorsque vous nettoyez les surfaces de la porte et du four qui entrent en contact lorsque vous fermez la porte, utilisez uniquement des savons ou des détergents doux non abrasifs appliqués avec une éponge ou un tissu doux.
ii)Lorsque des instructions de nettoyage séparées sont fournies, cf. les instructions relatives au nettoyage des surfaces concernées.
16. Afin de réduire le risque d’incendie dans la cavité :
i)Ne laissez pas trop cuire les aliments. Intervenez au niveau de l’appareil si du papier, du plastique ou d’autres matériaux
inflammables sont placés à l’intérieur du four pour faciliter la cuisson.
ii)Retirez les liens torsadés des sacs en papier ou en plastique avant de placer le sac dans le four.
iii)Si des matériaux à l’intérieur du four prennent feu, laissez la porte du four fermée, éteignez-le et débranchez le cordon d’alimentation ou
28 |
Guide de mise en route rapide. Traduction des instructions originales. |
Partie numéro 32Z3801 FR Édition 1 |

coupez le courant au niveau du fusible ou du disjoncteur.
iv) N’utilisez pas la cavité pour ranger des objets. Ne laissez pas de produits en papier, d’ustensiles de cuisine ou d’aliments dans la cavité lorsque vous n’utilisez pas le four.
17.Les liquides tels que l’eau, le café ou le thé risquent de surchauffer au-delà du point d’ébullition sans même sembler bouillir. La formation de bulles ou l’ébullition ne sont pas toujours visibles lorsque le récipient est retiré du micro-ondes. CELA POURRAIT ENTRAÎNER UN DÉBORDEMENT SOUDAIN DE LIQUIDES BOUILLANTS LORSQUE LE RÉCIPIENT EST REMUÉ OU SI UN USTENSILE EST PLONGÉ DANS LE LIQUIDE.
18.N’utilisez EN AUCUN CAS uniquement la fonction micro-ondes ou cuisson combinée sans un aliment ou un liquide à l’intérieur du four, cela risquerait d’entraîner une surchauffe et de provoquer des dégâts.
19.Ne retirez JAMAIS l’extérieur du four.
20.Ne retirez JAMAIS un composant interne fixe du four.
21.Ne trafiquez JAMAIS le panneau de contrôle, la porte, les joints ou toute autre partie du four.
22.Vous ne devez EN AUCUN CAS bloquer les prises d’air, les filtres et l’orifice d’évacuation de la vapeur.
23.Ne suspendez JAMAIS de torchons sur toute partie du four.
24.Si les joints de la porte sont endommagés, le four doit être réparé par un technicien agréé.
25.Si le câble d’alimentation est endommagé de quelque manière que ce soit, il doit IMPÉRATIVEMENT être remplacé par un technicien agréé.
26.Lorsque vous manipulez des liquides, des aliments et des récipients chauds, veillez à ne pas vous ébouillanter ou vous brûler.
27.Lorsque vous réchauffez des liquides en utilisant uniquement la fonction micro-ondes ou cuisson combinée, remuez le contenu avant de le réchauffer afin d’éviter toute ébullition soudaine.
28.N’utilisez EN AUCUN CAS cet appareil pour réchauffer des biberons ou des pots de nourriture pour bébés.
29.N’utilisez EN AUCUN CAS le four pour chauffer de l’alcool, par ex. eau-de-vie, rhum, etc. Les aliments contenant de l’alcool sont plus susceptibles de prendre feu s’ils sont surchauffés ; vous devez donc faire preuve de la plus grande vigilance et ne pas laisser le four sans surveillance.
30.Ne tentez en aucun cas de faire frire des aliments dans le four.
31.L’appareil ne doit en aucun cas être utilisé par des enfants en bas âge, de jeunes enfants ou des infirmes sans surveillance.
32.Les enfants en bas âge et les jeunes enfants doivent être surveillés afin de veiller à ce qu’ils ne jouent pas avec l’appareil.
CONSERVEZ CES INSTRUCTIONS
Guide de mise en route rapide. Traduction des instructions originales. |
29 |
Partie numéro 32Z3801 FR Édition 1 |
SÉCURITÉ & DIRECTIVES

CURITSÉ DIRECTI
PRÉCAUTIONS À OBSERVER
1.Lisez ce manuel avant d’utiliser votre four.
2.Comme pour tous les appareils électriques, il est judicieux de faire vérifier les raccordements électriques au moins une fois par an.
3.L’intérieur du four et les garnitures des portes doivent être nettoyés régulièrement, conformément aux instructions contenues dans
la section Nettoyage ; tout défaut de nettoyage est susceptible d’entraîner des risques.
4.Éteignez le four à la fin des séances de cuisson de la journée.
5.Le four ne doit en aucun cas être utilisé pour sécher du linge.
6.Comme pour tous les appareils de cuisson, veillez à éviter toute combustion des éléments placés à l’intérieur du four.
7.Les aliments conditionnés dans du plastique inflammable ou des emballages en papier doivent être transvidés dans des récipients compatibles avec la cuisson au micro-ondes/au four afin d’éviter tout embrasement potentiel.
Si vous voyez de la fumée :
●● Éteignez
●● Coupez l’alimentation électrique
●● Gardez la porte fermée pour étouffer d’éventuelles flammes
8.Les aliments doivent être déballés lorsque vous utilisez les fonctions convection et cuisson combinée.
9.Les œufs avec leur coquille ainsi que les œufs durs entiers ne doivent pas être chauffés dans le four car ils risqueraient d’exploser.
10.Les aliments avec de la peau, par ex. pommes de terre, pommes, saucisses, etc. doivent être percés avant d’être chauffés.
11.Les aliments ne doivent pas être chauffés dans un récipient totalement hermétique car l’accumulation de vapeur pourrait le faire exploser.
12.Retirer tout excès de matière grasse pendant le « rôtissage » et avant de sortir des récipients lourds du four.
13.En cas de bris de verre dans le four, assurez-vous que les aliments sont totalement exempts de particules de verre. En cas de doute, éliminez tout aliment qui se trouvait dans le four au moment de la casse.
14.Ne tentez EN AUCUN CAS de faire fonctionner le four : lorsque
des objets sont coincés dans la porte, lorsque la porte ne ferme pas correctement ou lorsque vous constatez des dégâts au niveau de la porte, des charnières, du loquet ou de la surface d’étanchéité, ou bien lorsqu’il n’y a pas d’aliments dans le four.
30 |
Guide de mise en route rapide. Traduction des instructions originales. |
Partie numéro 32Z3801 FR Édition 1 |
Loading...