

Page 1

eikon e3, e4 & e5
GB
Quick Start Guide
IMPORTANT INFORMATION - READ BEFORE USE - FULL GUIDE AVAILABLE FROM THE MERRYCHEF WEBSITE
FR
Guide de mise en route rapide
INFORMATIONS IMPORTANTES À LIRE AVANT TOUTE UTILISATION ! GUIDE COMPLET DISPONIBLE SUR LE SITE WEB DE MERRYCHEF.
DE
Schnelles Anfangsführer
WICHTIGE INFORMATIONEN - VOR GEBRAUCH GELESEN - VOLLER FÜHRER VERFÜGBAR VON DER MERRYCHEF WEBSITE
ES
Guía de inicio rápido
INFORMACIÓN IMPORTANTE - LEER ANTES DE USAR - GUÍA COMPLETA DISPONIBLE EN EL SITIO WEB DE MERRYCHEF
DK
Kvik-start Guide
VIGTIG INFORMATION - LÆS FØR ANVENDELSE - DEN FULDE GUIDE ER TIL RÅDIGHED PÅ MERRYCHEFS HJEMMESIDE
FI
Pika-aloitusopas
TÄRKEÄÄ TIETOA - LUE ENNEN KÄYTTÖÄ - KOKO OPAS LÖYTYY MERRYCHEFIN INTERNET-SIVUILTA
NL
Gids snel starten
BELANGRIJKE INFORMATIE - LEZEN VOOR GEBRUIK - DE VOLLEDIGE HANDLEIDING IS BESCHIKBAAR OP DE MERRYCHEF-WEBSITE
www.merrychef.com
Page 2

2
Quick Start Guide original instructions.
Part Number 32Z3801 GB Issue 1
INTRODUCTION
These ovens oer operators the exibility of combination cooking with
additional control over fan speed and microwave power.
Combination cooking enables high quality results to be achieved in a
fraction of the time taken by conventional cooking, particularly when
baking, browning, roasting and grilling dishes.
Once established, precise instructions for combination or convection
cooking of selected items may be programmed into the oven’s memory
so that they can be repeated easily and accurately. Up to 1024 programs
can be stored and simply recalled.
Multistage Programming
The oven controls oer even greater exibility by allowing multistage
programming. This enables the exact conditions required for quality
results to be set according to the food type.
A single cooking program can have up to 6 stages, each stage
controlled with its own time, fan speed and microwave power settings,
(model dependent).
PRECAUTIONS TO AVOID POSSIBLE
EXPOSURE TO EXCESSIVE MICROWAVE
ENERGY
a) Do not attempt to operate this oven with the door open since
open-door operation can result in harmful exposure to microwave
energy. It is important not to defeat or tamper with the safety
interlocks.
b) Do not place any object between the oven front face and the
door or allow soil or cleaner residue to accumulate on sealing
surfaces.
c) Do not operate the oven if it is damaged. It is particularly
important that the oven door closes properly and that there is no
damage to the (1) door (bent) (2) hinges and latches (broken or
loosened) (3) door seals and sealing surfaces.
d) The oven should not be adjusted or repaired by anyone except
properly qualied service personnel.
WARNING:
THIS IS A CLASS A PRODUCT. IN A DOMESTIC
ENVIRONMENT THIS PRODUCT MAY CAUSE RADIO
INTERFERENCE IN WHICH CASE THE USER MAY BE
REQUIRED TO TAKE ADEQUATE MEASURES.
The instructions outlined in this guide are intended to ensure the
safety and long life of your Merrychef oven.
PLEASE READ THE FOLLOWING SAFETY
INSTRUCTIONS CAREFULLY
Page 3

Quick Start Guide original instructions.
Part Number 32Z3801 GB Issue 1
3
CONTENTS
IMPORTANT INFORMATION READ BEFORE USE
Users are cautioned that maintenance and repairs should
be performed by a Merrychef authorized service agent
using genuine Merrychef replacement parts. Merrychef
will have no obligation with respect to any product that
has been improperly installed, adjusted, operated or not
maintained in accordance with national and local codes or
installation instructions provided with the product, or any
product that has its serial number defaced, obliterated or
removed, or which has been modied or repaired using
unauthorized parts or by unauthorized service agents.
For a list of authorized service agents, please refer to the
back page of this booklet. The information contained
herein (including design and parts specications) may be
superseded and is subject to change without notice.
The easyToUCH screen display, layout and icons shown herein,
are for guidance purposes only and are not intended to be an
exact representation of those supplied with the oven.
This is a Quick Start Guide only. For further information
refer to the relevant Installation and Operating instructions
available from www.merrychef.com
INTRODUCTION 2
SAFETY & REGULATIONS
IMPORTANT SAFETY INSTRUCTIONS 4
PRECAUTIONS TO BE OBSERVED 6
SUITABLE COOKING UTENSILS 7
PRODUCT DETAILS
MAIN FEATURES 8
TECHNICAL SPECIFICATIONS 10
Specications 10
Serial Number (Rating Plate): 11
Compliances: 11
INSTALLATION 12
OVEN LOCATION AND POSITIONING 12
OPERATION & CONTROLS
QUICK START GUIDE: QUICK SERVICE OVEN 13
START UP 13
USING A COOKING PROGRAM 14
OPERATING GUIDE: FULL SERVICE OVEN 15
easyToUCH MAIN MENU & KEYBOARD SCREEN 15
PRESS & GO 16
USING A COOKBOOK PROGRAM 17
CHANGING THE OVEN TEMPERATURE 18
CLEANING & MAINTENANCE
COOLING THE OVEN DOWN BEFORE CLEANING 19
Oven cool down 19
Preparing to clean the oven 19
Cold oven CLEANING INSTRUCTIONS e3 20
Cold oven CLEANING INSTRUCTIONS e4 21
Cold oven CLEANING INSTRUCTIONS e5 21
FAULT FINDING
FAULT FINDING CHART 24
SAFETY &
REGULATIONS
PRODUCT DETAILSOPERATION &
CONTROLS
CLEANING &
MAINTENANCE
FAULT FINDING
Page 4

4
Quick Start Guide original instructions.
Part Number 32Z3801 GB Issue 1
SAFETY &
REGULATIONS
IMPORTANT SAFETY INSTRUCTIONS
When using electrical appliances basic safety precautions should be
followed, including the following:
WARNING To reduce the risk of burns, electric shock, re, injury to
persons, or exposure to excessive microwave energy:
1. Read all instructions before using the appliance.
2. Read and follow the specic “PRECAUTIONS TO AVOID POSSIBLE
EXPOSURE TO EXCESSIVE MICROWAVE ENERGY” found on the
Introduction page.
3. This appliance must be grounded. Connect only to a properly
grounded outlet. See “ELECTRICAL INSTALLATION”.
4. Install or locate this appliance only in accordance with the provided
installation instructions.
5. Some products such as whole eggs and sealed containers — for
example, closed jars — may explode and should not be heated in this
oven.
6. Use this appliance only for its intended use as described in the
manual. Do not use corrosive chemicals or vapours in this appliance.
This type of oven is specically designed to heat, cook or dry food. It is
not designed for industrial or laboratory use.
7. This appliance should not be used by children.
8. Do not operate this appliance if it has a damaged cord or plug, if it is
not working properly, or if it has been damaged or dropped.
9. This appliance should be serviced only by qualied service
personnel. Contact the nearest authorized service facility for
examination, repair or adjustment.
10 Do not cover or block any openings on the appliance including air
vents/lters and steam outlet.
11 Do not store this appliance outdoors. Do not use this product near
water —– for example, near a kitchen sink, in a wet basement, or near
a swimming pool, and the like.
12. Do not immerse the cord or plug in water.
13. Keep the cord away from heated surfaces.
14. Do not let cord hang over edge of table or counter.
15. Either:
i) When cleaning surfaces of door and oven that come together on
closing the door, use only mild non-abrasive soaps, or detergents
applied with a sponge or soft cloth.
ii) When separate cleaning instructions are provided, see door surface
cleaning instructions.
16. To reduce risk of re in the cavity:
i) Do not overcook food. Carefully attend appliance if paper, plastic or
other combustible materials are placed inside the oven to facilitate
cooking.
ii) Remove wire twist-ties from paper or plastic bags before placing
bag in oven
iii) If materials inside the oven should ignite, keep oven door closed,
turn oven o, and disconnect the power cord , or shut o power at the
fuse or circuit breaker panel.
iv) Do not use the cavity for storage purposes. Do not leave paper
products, cooking utensils or food in the cavity when not in use.
17. Liquids, such as water, coee, or tea are able to be overheated
beyond the boiling point without appearing to be boiling. Visible
bubbling or boiling when the container is removed from the
Page 5

Quick Start Guide original instructions.
Part Number 32Z3801 GB Issue 1
5
SAFETY &
REGULATIONS
microwave oven is not always present. THIS COULD RESULT IN VERY
HOT LIQUIDS SUDDENLY BOILING OVER WHEN THE CONTAINER IS
DISTURBED OR A UTENSIL IS INSERTED INTO THE LIQUID.
18. DO NOT operate using microwave only or combination function
without food or liquid inside the oven as this may result in overheating
and may cause damage.
19. NEVER remove the exterior of the oven.
20. NEVER remove any xed internal parts of the oven.
21. NEVER tamper with the control panel, door, seals, or any other
oven part.
22. DO NOT obstruct air vents/lters or steam outlet.
23. NEVER hang dish towels or cloths on any part of the oven.
24. If the door seals are damaged, the oven must be repaired by an
approved Service Agent.
25. If the power cable is damaged in any way it MUST be replaced by
an approved Service Agent.
26. When handling hot liquids, foods, and containers, care should be
taken to avoid scalds and burns.
27. When heating liquids using microwave only or combination
function, the contents should be stirred prior to heating to avoid
eruptive boiling.
28. Feeding bottles and baby food jars should not be heated with this
appliance.
29. Never use the oven to heat alcohol, e.g. Brandy, rum etc. Food
containing alcohol can more easily catch re if overheated, observe
caution and do not leave the oven unattended.
30. Never attempt to deep fry in the oven.
31. The appliance is not intended for use by infants, children or inrm
persons without supervision.
32. Infants and children should be supervised to ensure that they do
not play with the appliance.
SAVE THESE INSTRUCTIONS
Page 6
6
Quick Start Guide original instructions.
Part Number 32Z3801 GB Issue 1
SAFETY &
REGULATIONS
PRECAUTIONS TO BE OBSERVED
1. Read this manual before using your oven.
2. As with all electrical appliances, it is wise to have the electrical
connections inspected at least once a year.
3. The oven interior, door seals should be cleaned frequently, following
the instructions described in the cleaning section, failure to do so
could possibly result in a hazardous situation.
4. Switch o the oven at the end of all the cooking sessions for that
day.
5. The oven should not be used to dry linen.
6. As with any cooking appliance, care should be taken to avoid
combustion of the items within the oven.
7. Food in combustible plastic or paper containers should be
transferred to a microwave/oven proof containers to avoid the
possibility of ignition.
If smoke is observed:
Switch o ●
Isolate from the electrical supply ●
Keep the door closed to stie any ames ●
8. Items should be unwrapped when using convection and
combination functions.
9. Eggs in shells and whole hard-boiled eggs should not be heated in
the oven as they may explode.
10. Food with a skin, e.g. Potatoes, apples, sausages etc. should be
pierced before heating.
11. Food should not be heated in a completely sealed container as the
build-up of steam may cause it to explode.
12. Excess fat should be removed during ‘roasting’ and before lifting
heavy containers from the oven.
13. In the event of glass breaking or shattering within the oven, ensure
that food is totally free of glass particles. If in doubt, dispose of any
food that was in the oven at the time of the breakage.
14. DO NOT attempt to operate the oven with: object caught in door,
that does not close properly or damaged door, hinge, latch, sealing
surface or without food in the oven.
Page 7
Quick Start Guide original instructions.
Part Number 32Z3801 GB Issue 1
7
SAFETY &
REGULATIONS
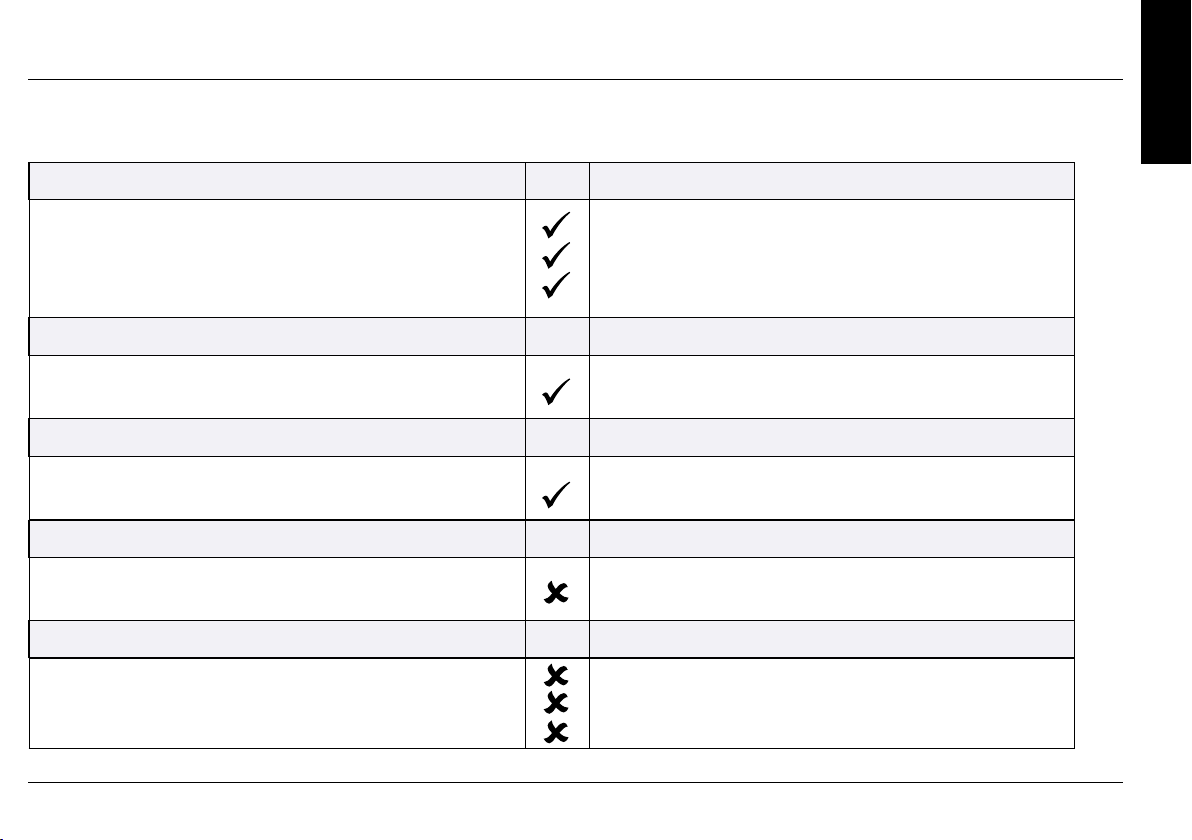
SUITABLE COOKING UTENSILS
Manufacturer’s instructions should be checked to determine the suitability of individual containers or utensils using each of the cooking functions.
The following chart provides general guidelines:
Heat resistant containers
Toughened glass
Vitreous ceramics
Earthenware
(porcelain/crockery/china etc.)
Do not use items with metallic decoration.
Metallic & Foil Trays
Metallic trays
DO NOT USE ANY OTHER METAL OR FOIL CONTAINERS
Metallic trays may only be used when placed on the
VITREOUS RACK in the oven cavity
Plastic containers
Dual-ovenable plastic containers
(up to certain temperatures) are now available.
Check manufacturer’s instructions before use.
Disposables
DO NOT USE
Combustibles (paper/card etc.)
Other utensils
Tie tags
Cutlery
Temperature probes
No kitchen utensil should be left in food while it is cooking in
the oven.
Page 8

8
Quick Start Guide original instructions.
Part Number 32Z3801 GB Issue 1
PRODUCT DETAILS
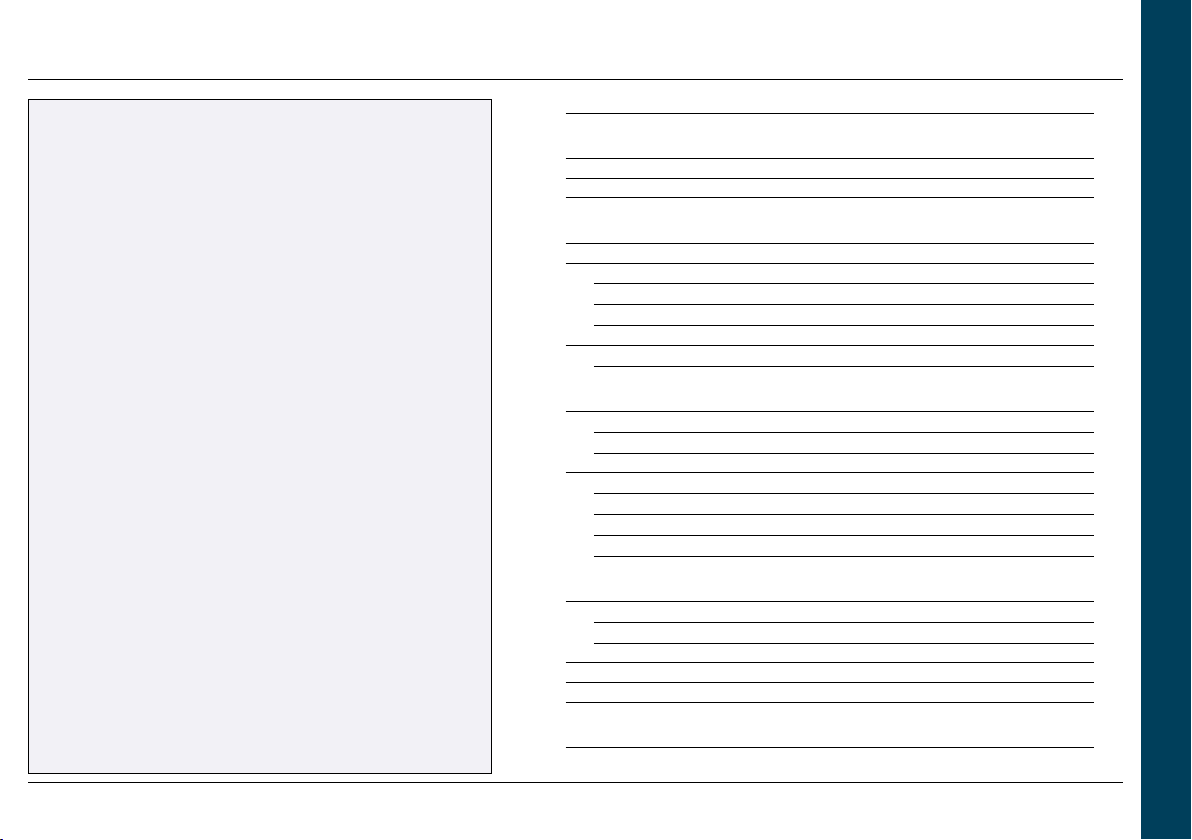
MAIN FEATURES
ON/OFF SWITCH1
When switched ON the easyToUCH screen illuminates the oven
controls. Note; turning this switch OFF does not isolate the oven from
the electricity supply.
2
easyToUCH SCREEN CONTROL PANEL
See ‘OPERATION & CONTROLS’ for details.
3
RATING PLATE
Located on the rear panel of the oven states the serial number, model
type & electrical specications.
4
MenuConnect
A USB socket located under the Merrychef logo allows changes to
programs stored on the oven (See ‘USB MenuConnect’, Operation &
Controls section, for details of updating oven programs).
5
AIR OUTLETS
Air used to cool internal components and steam from the cavity
escape through the air outlet vents located on the rear of the oven
and side panel of the e5 model. The air outlets must be kept free from
obstruction and they will not allow microwave energy to escape into
the environment.
6
AIR INLET FILTER
The air lter situated at the lower front of the oven is part of the
ventilation system and must be kept free of obstruction and cleaned
daily as described under ‘Cleaning & Maintenance’. Note, the oven will
not operate without the air lter tted.
7
DOOR HANDLE
This is a rigid bar which is pulled downwards and away from the oven
to open.
8
OVEN DOOR
This is a precision-made energy barrier with three microwave safety
interlocks. The door must be kept clean (see ‘CLEANING’) and should
NOT be used to support heavy objects.
9
DOOR SEALS
These ensure a tight seal around the door. They should be kept clean
and checked regularly for signs of damage. At the rst sign of wear
they should be replaced by a Merrychef approved Service Agent.
10
CONVECTION FAN, GREASE FILTER & CATALYTIC CONVERTOR
(model dependant)
The metal grease lter grill covering the convection fan must be kept
clean and free of debris. Great care should be taken when cleaning
this area of the oven noting the dierent oven requirements shown
under ‘Cleaning & Maintenance’ in this manual.
11
OVEN CAVITY
The oven cavity is constructed from stainless steel and must be
kept clean by following the cleaning instructions in the ‘Cleaning &
Maintenance’ section of this manual.
Page 9

Quick Start Guide original instructions.
Part Number 32Z3801 GB Issue 1
9
PRODUCT DETAILS
3
e3
e4
e5
1
2 3
11
10
4
5
9
8
7
11
10
9
8
2
1
6
1 2 3
11
10
4
5
9
8
7
4
5
6
7
6
Page 10
10
Quick Start Guide original instructions.
Part Number 32Z3801 GB Issue 1
PRODUCT DETAILS
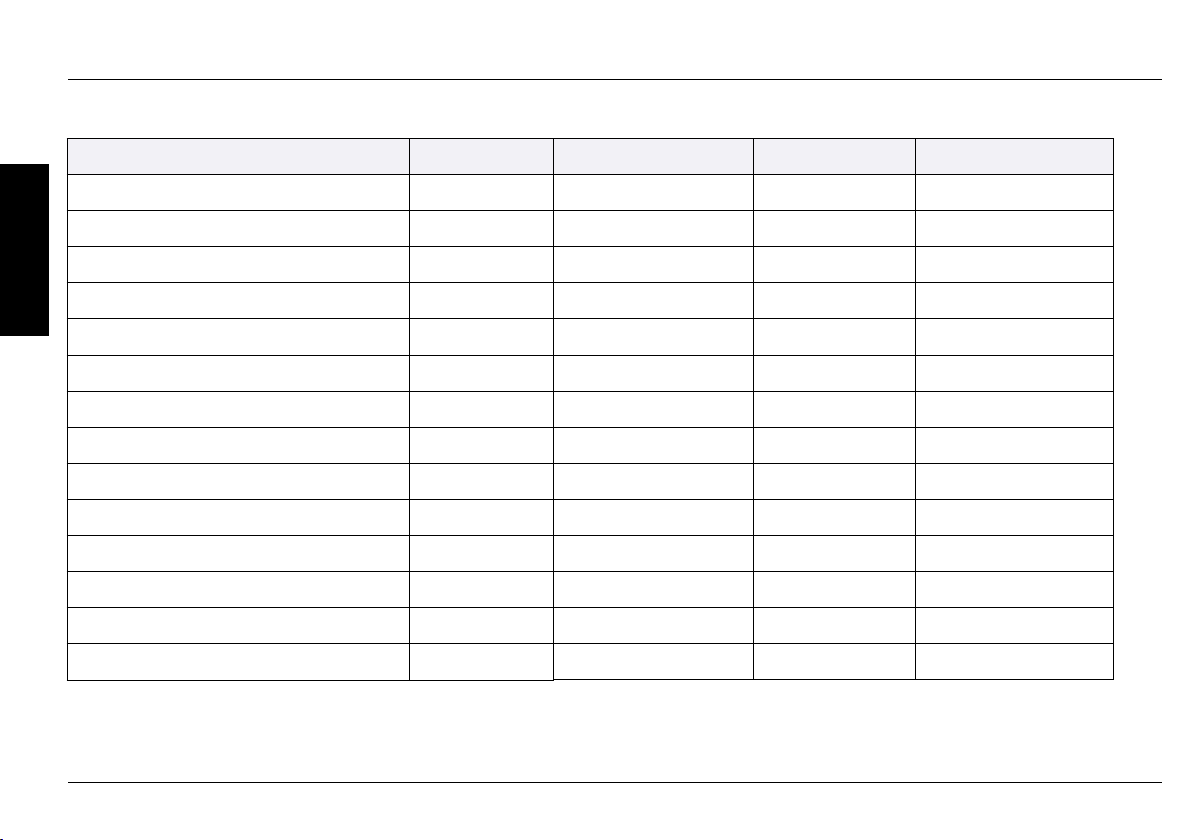
TECHNICAL SPECIFICATIONS
Specications
Description unit
Touch screen controls programs
Ambient operating temperature °C
External HxWxD mm
External HxWxD inches
Internal HxWxD mm
Internal HxWxD inches
Cooking chamber Ltr (cu.ins)
Power output microwave Watts
Power output convection kW
Power supply Hz
Power supply kW
Unpackaged oven weight nett Kg (lbs)
Sound pressure level dB(A)
Stacking (with kit) oven
e3
1024
<40
551x598x622
21.7x23.5x24.5
319x332x325
12.6x13.1x12.8
34.4 (2113)
700/1000
3 (3/1.5 EE)
50 & 60
3(EE) 4.3(XE) 4.7(XX)
62.5 (138)
<70
0
e4
1024
<40
591x584x750
23.3x23.0x29.5
218x375x312
8.6x14.8x12.3
25.5 (1566)
1500
3.2
50 & 60
7.0
82.5 (182)
<70
1
e5
1024
<40
642x711x705
25.3x28.0x27.8
258.4x495x363.5
10.17x19.49x14.31
44.4 (2730)
1400
3.2
50 & 60
6.2
94.0 (207)
<70
0
Page 11

Quick Start Guide original instructions.
Part Number 32Z3801 GB Issue 1
11
PRODUCT DETAILS
EC Declaration of Conformity
Manufacturer
Equipment details
Generic Model Numbers eikon e3, eikon e4, eikon e5
Description Commercial Combination Microwave Oven
Declaration of Conformity with directives and standards
The manufacturer hereby declares that its commercial combination microwave ovens listed
above comply with the following directives and standards.
Compliance with Directives
The commercial combination microwave ovens comply with the relevant provisions of the
following European Directives
EMC 2004/108/CE LVD 2006/95/EC RoHS 2002/95/EC MD 2006/42/EC
Harmonised Standards Applied
The commercial combination microwave ovens comply with the relevant requirements of
the following European standards.
Quality and environmental management
Merrychef Limited and Viscount Catering employ a certied quality management system in
accordance with EN ISO 9001:2008 and Viscount Catering employs a certied environmental
management system in accordance with EN ISO 14001
Merrychef Limited 2)
1)
Station Road West Provincial Park
Ash Vale Nether Lane
Aldershot Eccleseld
Hampshire Sheeld
GU12 5XA S35 9ZX
United Kingdom United Kingdom
EN 60335-2-90: 2006
•
EN 60335-1: 2002+A11+A1+A12+A2+A13
•
EN 62233:2008
•
EN 55014-2:1997 inc A2:2008 in accordance with Category IV requirements
•
Electrostatic discharge IEC 61000-4-2:1995
Radiated RF interference IEC 61000-4-3:1996
Fast transient common mode, AC port IEC 61000-4-4:1995
Mains surge, AC port IEC 61000-4-5:1995
RF current, common mode, AC port IEC 61000-4-6:1996
Mains voltage dips & interruptions IEC 61000-4-11:1994
Flicker IEC 61000-3-11:2000
•
EN 55011:2007 Classication: Class A, Group 2
•
Mains terminal disturbance voltage Table 2a
Radiated disturbance, magnetic eld* Table 5a
Radiated disturbance, electric eld Table 5a
Radiated disturbance, electric eld* Tables 6, 7 and 8
AS/NZS CISPR 11
•
Radiated disturbance CISPR 11:2003:A1:2004
Conducted disturbance CISPR 11:2003:A1:2004
Viscount Catering Limited
Serial Number (Rating Plate):
Serial number: MM YY SITE SERIAL
i.e. 06 10 2070 12345
(0610207012345)
Oven manufactured in June 2010 at
Sheeld (UK), production number
12345.
Model Number: MODEL
CONVECTION MICROWAVE
VOLTAGE HERTZ LEAD PLUG
COMMUNICATION VERSION
CUSTOMER/ACCESSORY COUNTRY
i.e. e4C S V 30 5 H E U 1 GM EU
(e4CSV305HEU1GMEU)
model e4C, 3200W, 1500W, 230V,
50Hz, L+N+E(4mm EU), 3-pin plug,
USB, 1, General Market, European.
Compliances:
EU Directives
EMC 2004/108/EC
LVD 2006/95/EC
RoHS 2002/95/EC
MD 2006/42/EC
Page 12
12
Quick Start Guide original instructions.
Part Number 32Z3801 GB Issue 1
INSTALLATION
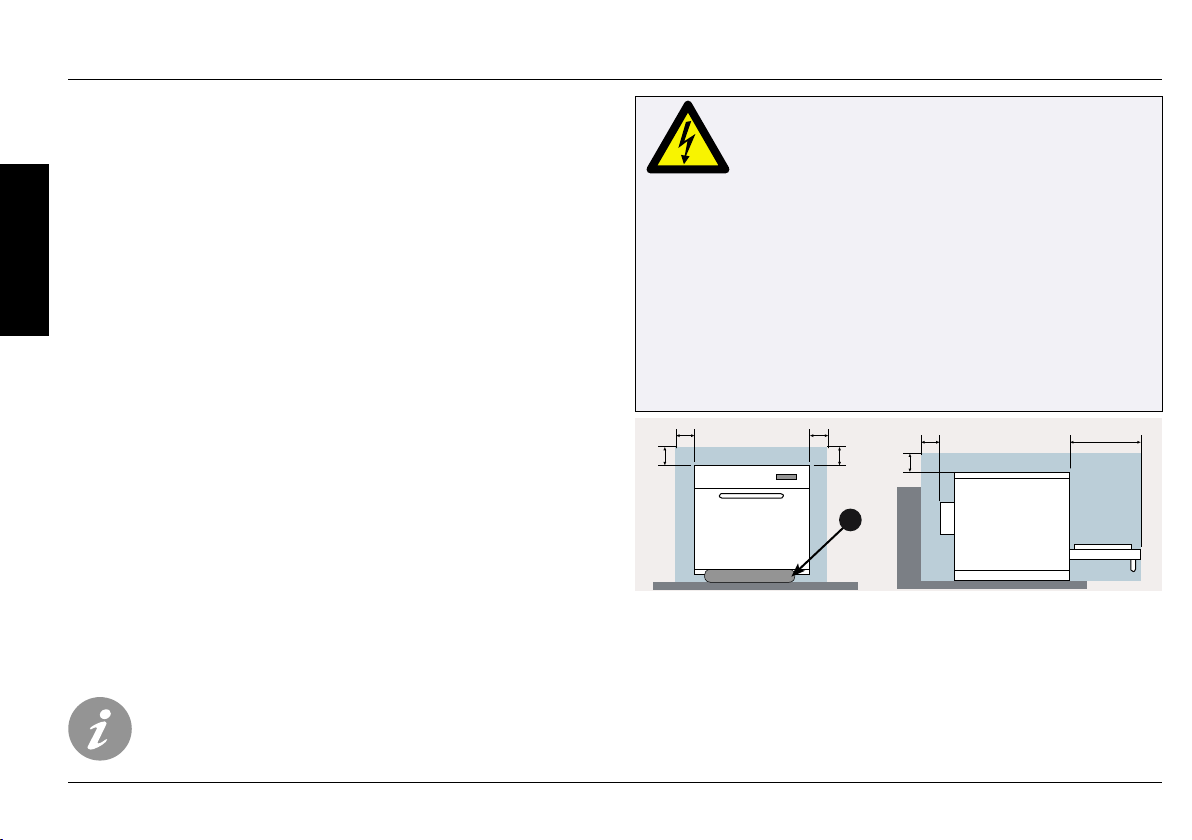
OVEN LOCATION AND POSITIONING
Choose a site away from major heat sources.
DO NOT position so that hot air is drawn in from fryers, grills, griddles,
PRODUCT DETAILS
etc.
A heat barrier to the height of the oven must be installed if sited next
to a burner, stove or range.
Place the oven on a permanent nonslip/nonammable at surface
that is LEVEL, STABLE and STRONG enough for the oven and contents.
Allow a minimum clearance (A) of 2 inches (50mm) around the oven
for hot air to escape.
Allow sucient clearance (B), in front of the oven for the door to open
fully.
The air intake is located at the lower front of the oven (1) and it is
important that the airow is as cool as possible and not preheated
by other appliances such as burners, stoves, ranges, fryers, grills
and griddles as this will deteriorate the life and performance of
the oven.
Do not ax labels/stickers to oven other than those applied or
approved by the manufacturer.
The oven will not operate without the AIR FILTER correctly
tted in place.
DANGER!
THIS APPLIANCE MUST BE EARTHED. FAILURE
TO DO SO MAY RESULT IN ELECTRIC SHOCK AND
DEATH.
The oven must be connected to a separate electrical supply
installed by a qualied and approved electrician.
A suitably rated isolating switch with a 3mm contact gap on all
poles should be tted for each oven installed.
If you are in any doubt about your electrical supply, seek the
advice of a qualied electrician.
A
HANDLING & STORAGE:
When moving an oven always observe and follow National and local
requirements for lifting and moving heavy objects. Do not use the
oven door handle to lift oven.
When not in use, electrically disconnect the oven and store safely in a
dry cool place, do not stack ovens.
A
1
A
B
Page 13
Quick Start Guide original instructions.
Part Number 32Z3801 GB Issue 1
13
QUICK START GUIDE: QUICK SERVICE OVEN
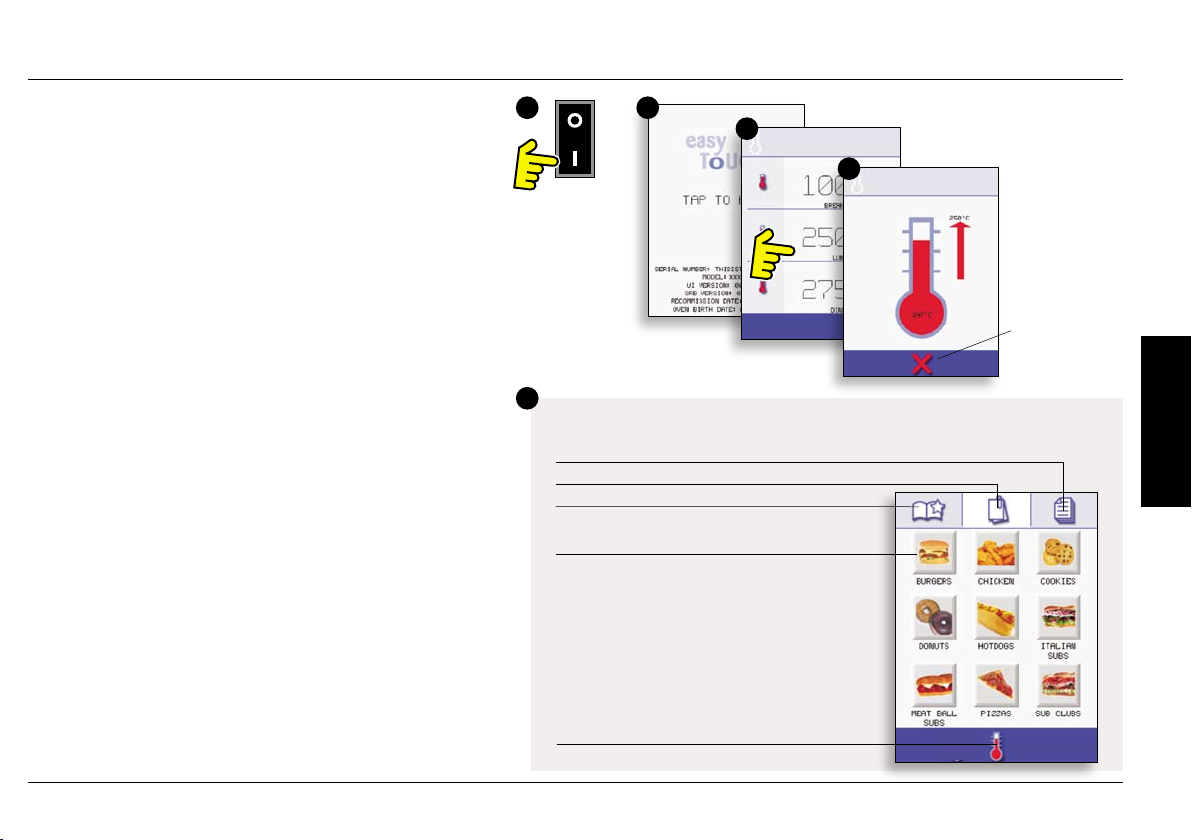
START UP
1. Switch the oven on;
Make all the relevant safety checks and ensure the oven is
clean and empty before pressing the oven switch down to
activate the oven.
2. The easyToUCH screen illuminates with the display briey
showing the serial number and oven data. Lightly tap the
screen once to freeze the display, tap again to continue.
3. When the oven is setup with two or more preheating
temperatures a choice is displayed.
Scroll arrows at the bottom of the screen indicates there
are more temperature choices not shown on screen, if
necessary, use the scroll arrows, then select the temperature
required to start preheating the oven.
4. During preheating the display shows the progress as the
oven heats up to the set temperature. (To stop the oven
heating touch the red ‘X’ symbol.)
5. The oven is ready to use when the ‘COOKBOOK’ is
displayed.
21
3
5
COOKBOOK DISPLAY
DISPLAYS ALL COOKING PROGRAMS (Optional)
SHOWS PROGRAM GROUPS
FAVOURITES (Optional)
PROGRAM GROUP
Each group contains a collection of cooking
programs.
4
STOP/CANCEL
CONTROLS
OPERATION &
CHANGE OVEN TEMPERATURE (Optional)
Page 14
14
Quick Start Guide original instructions.
Part Number 32Z3801 GB Issue 1
OPERATION &
CONTROLS
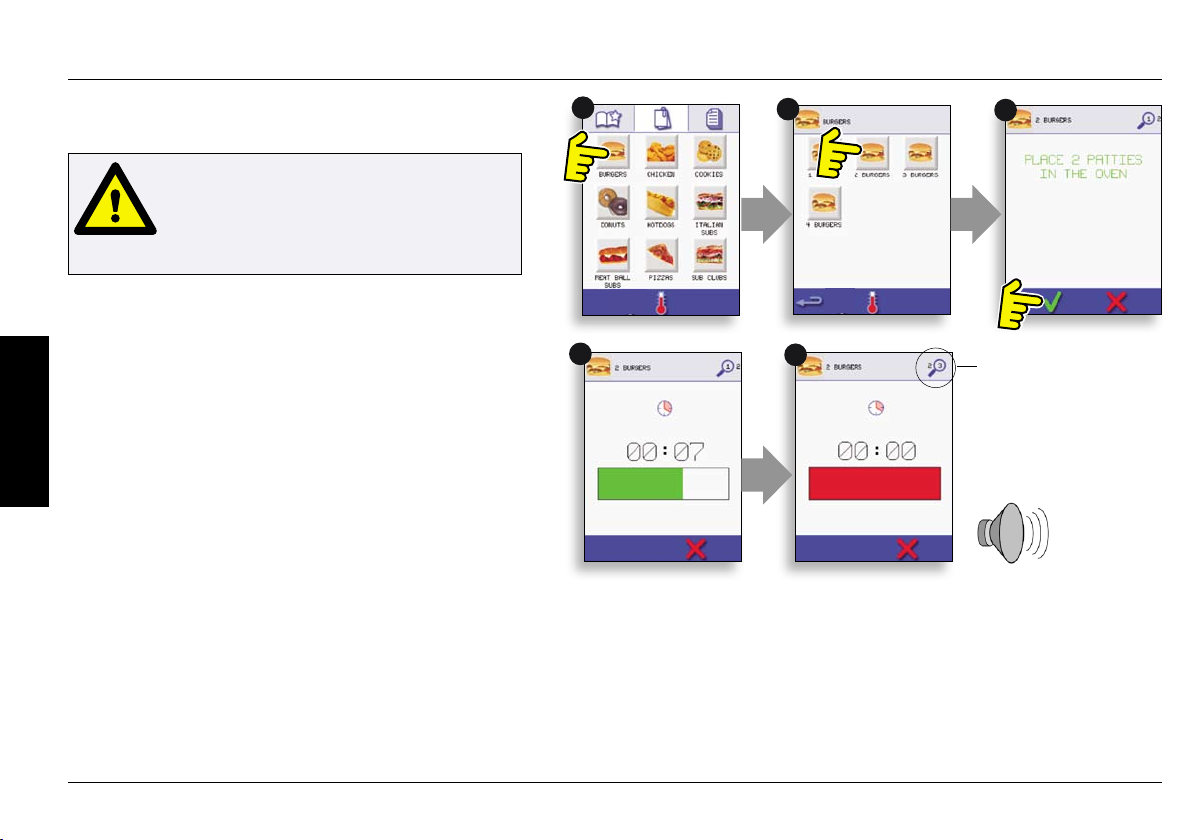
USING A COOKING PROGRAM
Taking all the necessary precautions to
ensure you do not burn yourself, open the
oven door to place the food into the hot
oven and close the door.
1. Select a program group, for example, ‘BURGERS’ to display
the individual cooking programs.
2. Select a cook program to start, for example, 2 BURGERS.
3. Follow instructions if displayed on the screen.
4. Touch the green tick to cook.
The cooking time counts down for each program stage.
5. When the program ends a red bar is displayed usually
with an audible sound - open the door or touch the red ‘X’ to
return to the cook program.
Note; opening the oven door during cooking stops the cooking
program and displays a warning. Closing the door allows the
user to continue or cancel the cooking program.
1
4
2
5
3
PROGRAM STAGE
Page 15

Quick Start Guide original instructions.
Part Number 32Z3801 GB Issue 1
15
OPERATION &
CONTROLS
OPERATING GUIDE: FULL SERVICE OVEN
easyToUCH MAIN MENU & KEYBOARD SCREEN
MAIN MENU SCREEN:
1. DEVELOPMENT MODE enables multistage cooking
programs to be developed, then stored under a name and
symbol for reuse.
2. PRESS & GO allows quick access to use the cooking
programs that are already stored.
3. COOKBOOK contains the oven’s cooking programs.
It displays Favourites, Cooking Program Groups and a
complete listing of all cooking programs available.
4. CLEANING/TEMP CHANGE allows the oven temperature to
be changed and the oven to be prepared for cleaning with
reminders displayed to assist during the cleaning process.
5. SETTINGS are used to control the oven settings and
functions including time and language, loading cooking
programs and for service and maintenance purposes.
6. KEYBOARD SCREEN is used to enter an authorised
password to enter data for programs and may restrict
operator access to some functions.
DEVELOPMENT MODE
1
2
MENU SHORTCUT
3
COOKBOOK
4
CLEANING/TEMP
CHANGE
5
SETTINGS
Page 16
16
Quick Start Guide original instructions.
Part Number 32Z3801 GB Issue 1
OPERATION &
CONTROLS
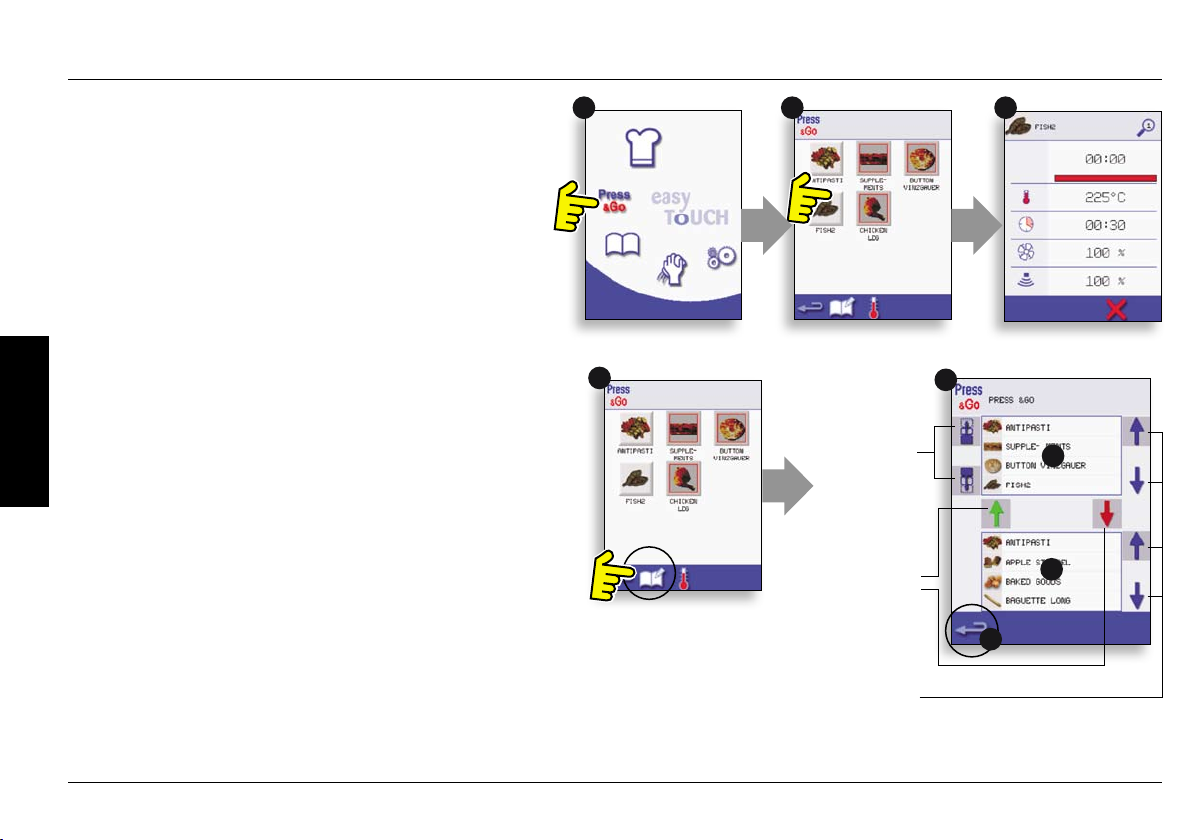
PRESS & GO
Running a cooking program from the Press & Go menu.
1. Select ‘PRESS & GO’ from the main menu screen.
2. Select the item required to cook.
3. The display shows the temperature, cooking time, microwave
power and fan speed while the timer counts down. The timer
bar turns red to indicate the cooking cycle has nished.
Choosing which cooking programs are shown in the ‘PRESS
& GO’ menu screen.
1. After selecting ‘PRESS & GO’ from the main menu screen,
select the EDIT symbol.
2. Two lists are displayed, the ‘PRESS & GO’ menu items are
shown in the upper list and the lower list shows other menu
items which are available. Both lists can be scrolled up or down
using the arrows on the extreme right.
3. Select an item, then choose whether to change its order
within the menu or to remove it into the lower list.
4. Select an item to move into the upper list, making it available
in the ‘PRESS & GO’ menu.
5. Select backspace to return to the menu screen when nished.
1 2 3
1
Change the
order of a
selected item
shown in the
Press & Go
screen.
Move a
selected item
to or from the
Press & Go
screen.
Select to scroll a
list up or down.
2
5
3
4
Page 17

Quick Start Guide original instructions.
Part Number 32Z3801 GB Issue 1
17
OPERATION &
CONTROLS
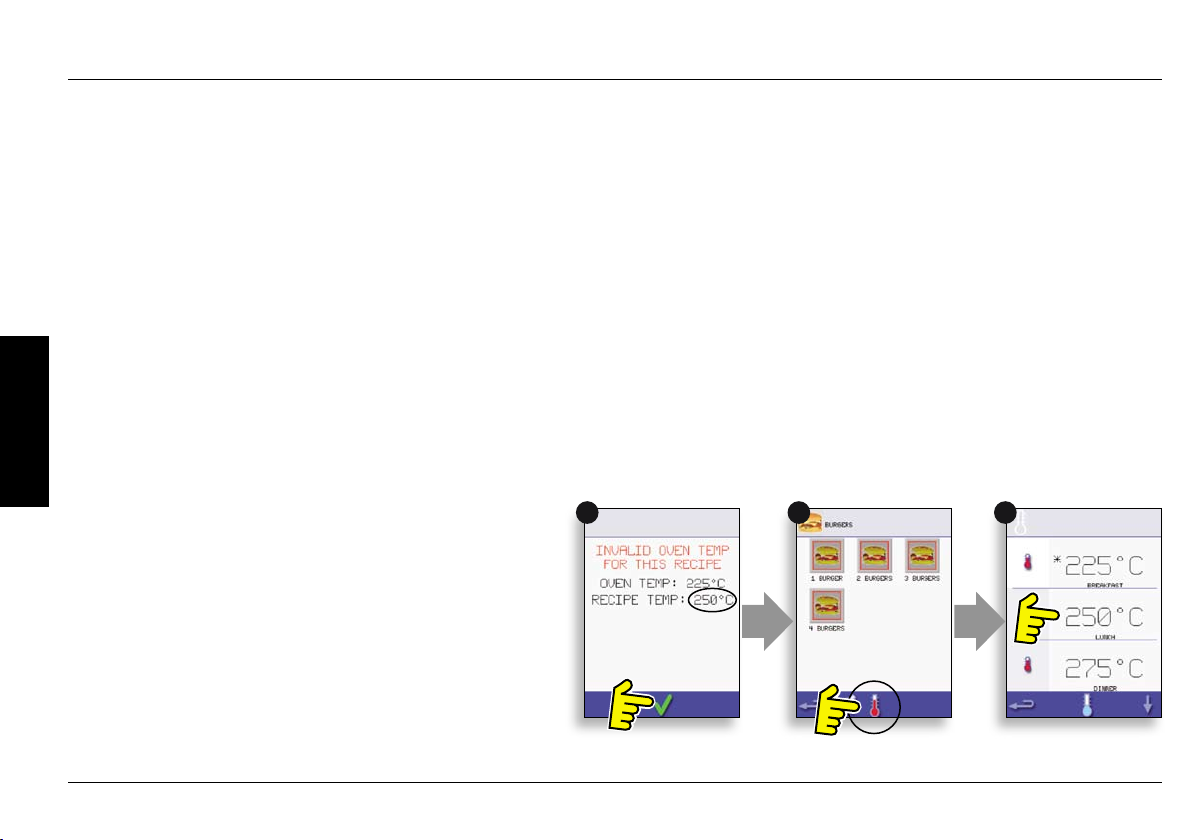
USING A COOKBOOK PROGRAM
WARNING: ENSURE THERE IS FOOD
PRODUCT IN THE OVEN BEFORE
STARTING A COOKING PROGRAM.
To nd the required Program in the cookbook.
1. Select ‘COOKBOOK’ from the main menu screen.
2. Select the ALL MENUS symbol.
3. Use scroll up/down arrows to nd the program.
NOTE: if an image has a red line around it the oven
temperature is set too high or too low for that recipe. See
‘CHANGING THE OVEN TEMPERATURE’.
Taking all the necessary precautions to ensure you do not
burn yourself, place the food product into the hot oven
cavity and close the door.
WARNING:
HOT SURFACE HAZARD
4. Select the required cooking program to start cooking.
For example, ‘1 BURGER’.
5. The program either starts immediately displaying a
countdown timer, or an instruction is displayed rst; follow
the stage instruction then select OK to start cooking. If
the oven door is not opened within 30 seconds a warning
message appears.
1
4
2
5
3
6
Page 18
18
Quick Start Guide original instructions.
Part Number 32Z3801 GB Issue 1
6. The cooking timer counts down to zero and makes a
sound to indicate an operator action is required at the end
of a cooking stage or the end of a cooking program.
Once the cooking program has nished, opening the
oven door to remove the food returns the display to the
‘COOKBOOK’ screen.
Note; opening the oven door during cooking stops the cooking
program and displays a warning. Closing the door allows the
user to continue or cancel the cooking program.
To check the oven temperature when cooking, lightly tap the
temperature displayed, the oven cavity temperature is shown
with an asterisk.
OPERATION &
CONTROLS
CHANGING THE OVEN TEMPERATURE
1. Take note of the temperature required for the recipe and
select OK.
2. Select the temperature symbol.
3. An asterisk next to the number indicates the present
oven temperature, select the required oven temperature
for the recipe. Once the oven is at the required temperature
continue from selecting the ‘COOKBOOK’ in step 1.
1 2 3
Page 19
Quick Start Guide original instructions.
Part Number 32Z3801 GB Issue 1
19
COOLING THE OVEN DOWN BEFORE CLEANING
Oven cool down
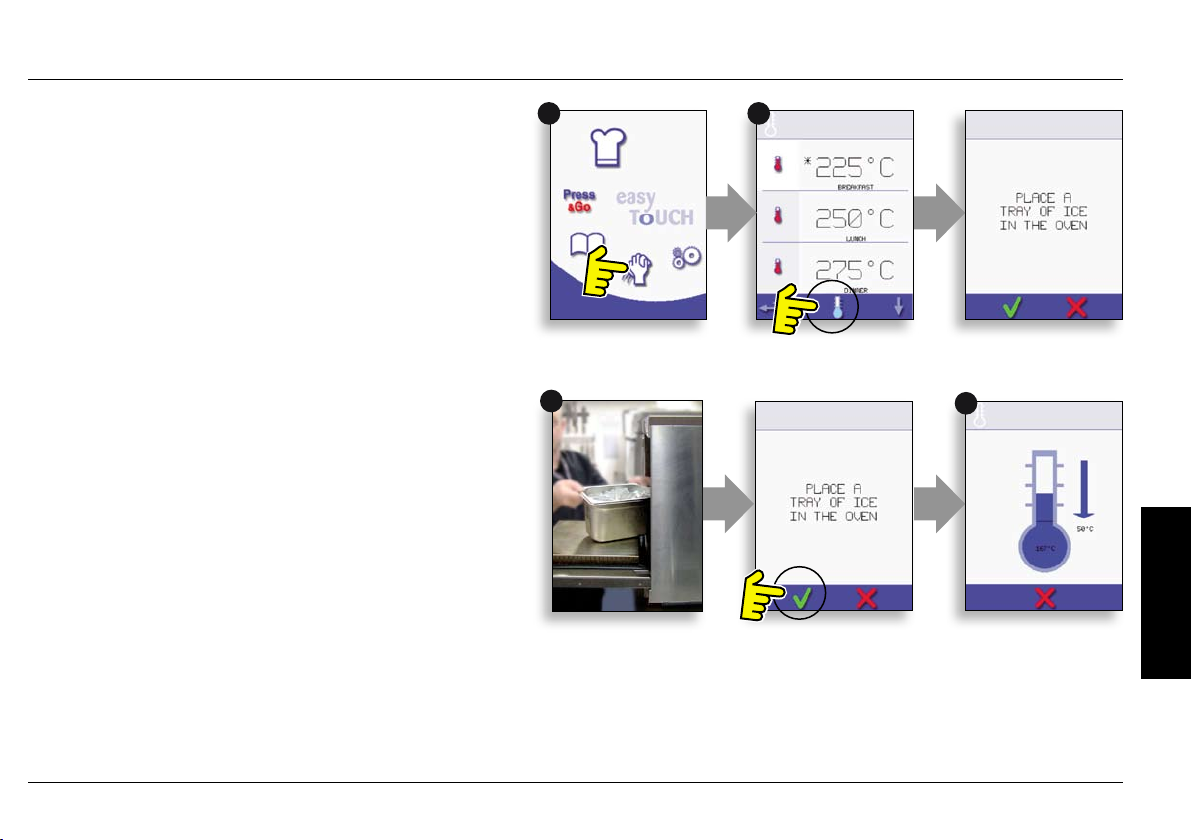
IMPORTANT: the oven must be cooled down before the
cleaning processes are carried out.
1. In Full Serve mode, select the CLEANING symbol from the main
menu.
2. In Full or Quick Serve mode, select the blue thermometer
symbol to disable heating and start the cooling cycle.
3. Taking all necessary precautions place a suitable heaped
container of ice, into the hot oven cavity. Select the OK symbol to
continue.
4. The cooling progress is displayed and takes approximately 30
minutes.
5. The oven is now ready for cleaning. Select OK on the screen
after completing each stage.
Preparing to clean the oven
For the oven to operate at peak eciency, the cavity, door, air
lter and grease lter must be kept clean.
A daily cleaning routine will ensure that you comply with the
required hygiene standards and will help to maintain and prolong
the eciency of your oven.
1 2
3
4
CLEANING &
MAINTENANCE
Page 20

20
Quick Start Guide original instructions.
Part Number 32Z3801 GB Issue 1
CLEANING &
MAINTENANCE
e3
Equipment required (not supplied):
Non-caustic proprietary branded oven cleaner, heat proof gloves,
protective rubber gloves, non–abrasive nylon scrub pad, cleaning
towel and cloths, eye protection and dust mask (optional).
CAUTION: WEAR PROTECTIVE RUBBER GLOVES WHEN
CLEANING THE OVEN.
NEVER use sharp implements or harsh abrasives on any part
of the oven.
WARNING: DO NOT USE CAUSTIC CLEANERS
ON ANY PART OF THE OVEN OR OVEN CAVITY
Complete COOL DOWN procedure and allow the oven and
accessories to cool before commencing cleaning.
AS IT WILL CAUSE PERMANENT DAMAGE TO
THE CATALYTIC CONVERTORS
Cold oven CLEANING INSTRUCTIONS e3
REMOVE & CLEAN Oven Parts:
1. Remove the air lter at the base of the oven.
2. Open the oven door and lift out the turntable.
3. For ovens with a catalytic converter; open the oven door and undo
fasteners to remove the catalytic convertor when required or at least
once a month.
Wash all parts in warm soapy water. Wash o using a clean cloth and
plenty of clean, warm water.
Dry using a fresh, clean cloth.
1
DO NOT USE TOOLS
2
3
Page 21
Quick Start Guide original instructions.
Part Number 32Z3801 GB Issue 1
21
CLEANING &
MAINTENANCE
e4
e5
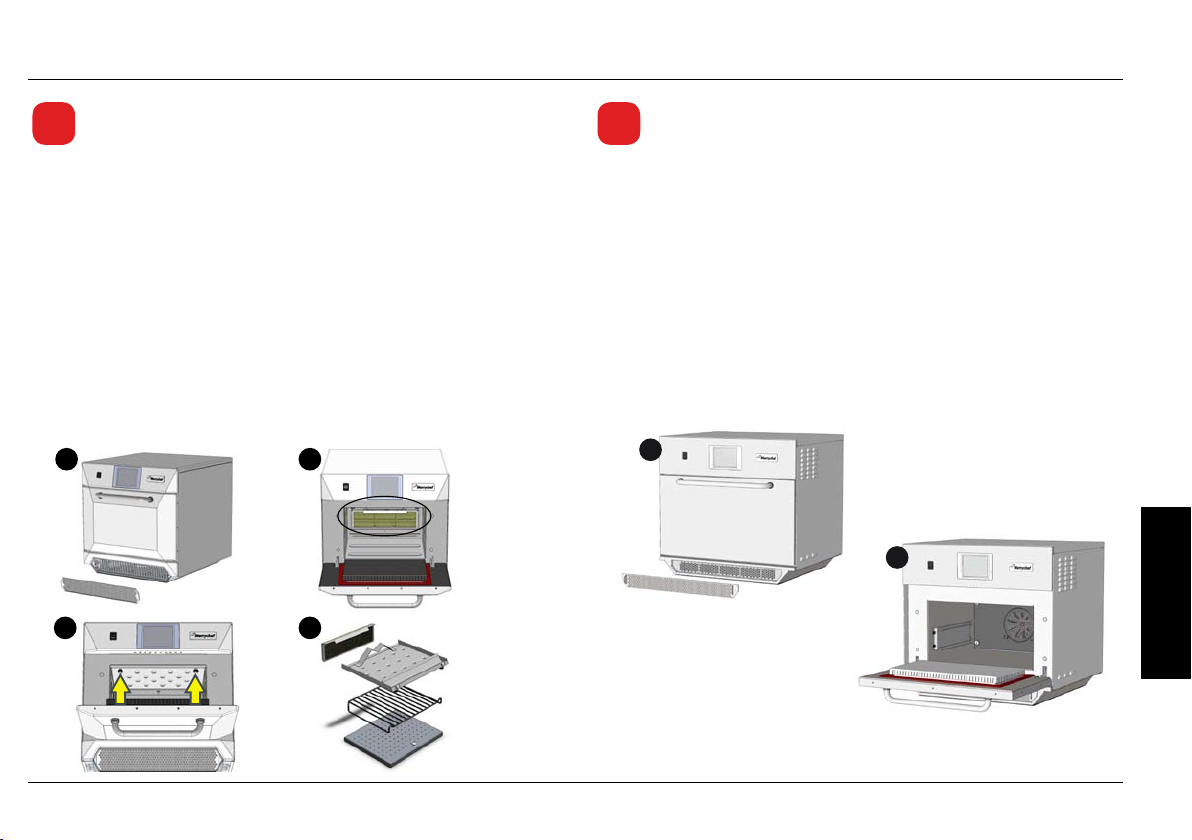
Cold oven CLEANING INSTRUCTIONS e4
Cold oven CLEANING INSTRUCTIONS e5
REMOVE & CLEAN Oven Parts:
1. Remove the air lter at the base of the oven.
2. Open the oven door, remove the rack, pull the grease lter handle
downwards and lift out.
3. Undo the fasteners securing the top impinger plate.
4. Remove top impinger plate and lift out bottom impinger plate.
Wash all parts in warm soapy water. Wash o using a clean cloth and
plenty of clean, warm water.
Dry using a fresh, clean cloth.
1 2
3 4
REMOVE & CLEAN Oven Parts:
1. Remove the air lter at the base of the oven.
2. Open the oven door to remove any cooking trays/rack.
Wash all parts in warm soapy water. Wash o using a clean cloth and
plenty of clean, warm water.
Dry using a fresh, clean cloth.
1
2
Page 22
22
Quick Start Guide original instructions.
Part Number 32Z3801 GB Issue 1
CLEANING &
MAINTENANCE
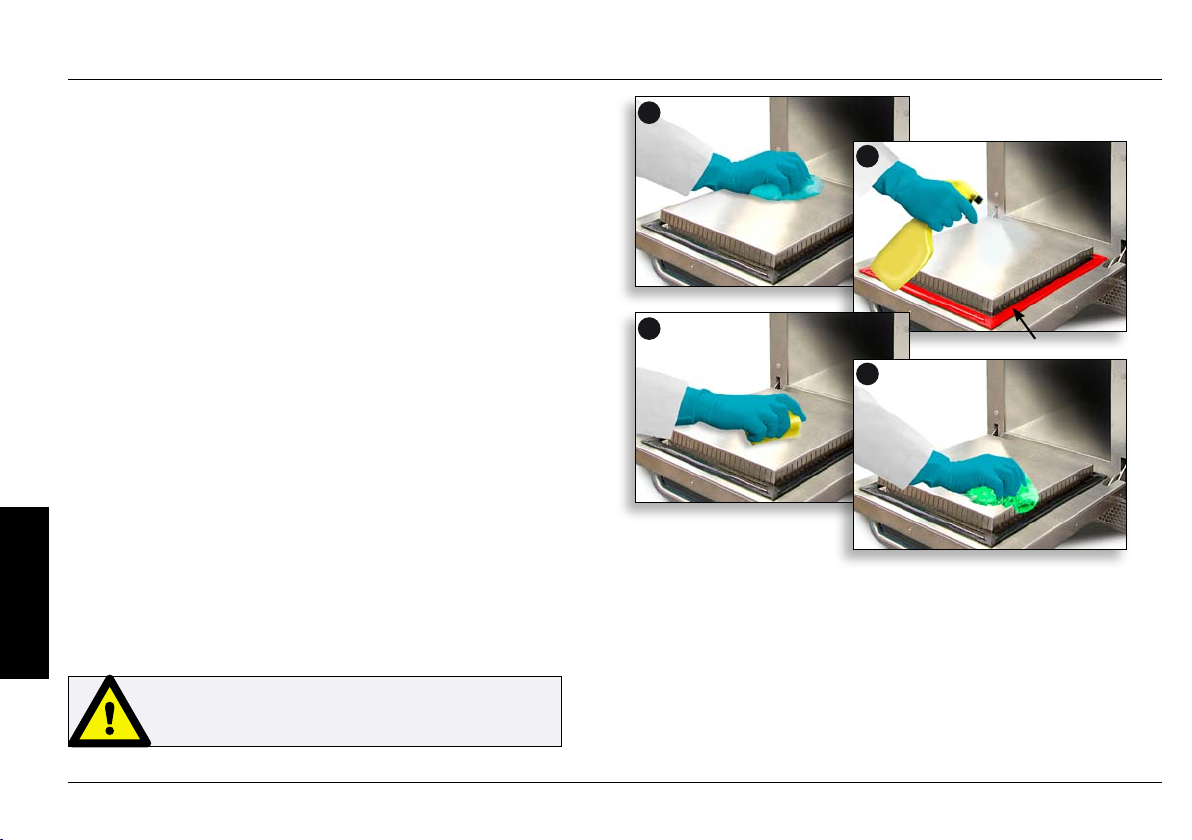
CLEAN THE OVEN:
1. Remove any spillages with disposable paper wipes.
Use a dry clean brush to remove any food particles from between
the oven oor and the inside of the front door.
2. Wear protective rubber gloves and protective glasses, carefully
spray a non-caustic proprietary branded Oven Cleaner onto all
the internal surfaces of the oven except the door seal (A).
DO NOT spray directly into the fan opening at the rear inside
of the oven.
3. For dicult areas, leave to soak for 10 minutes with the oven
door open.
Use a non–abrasive nylon scrub pad/sponge to clean the cavity,
roof and the inside of the door. Do not scrub the door seal or use
metallic scourers.
4. Wash o using a clean cloth and plenty of clean warm water
and dry using a fresh clean cloth or paper towel.
Replace all the cleaned oven parts.
Close the oven door and wipe the outside of the oven with a
damp cloth.
1
2
3
A
4
DO NOT USE THE OVEN WITHOUT A CLEAN AIR
FILTER IN PLACE
Page 23

Quick Start Guide original instructions.
Part Number 32Z3801 GB Issue 1
23
CLEANING &
MAINTENANCE
APPLY OVEN PROTECTOR:
1. Only apply to a clean oven. Spray proprietary branded
Oven Protector onto a sponge.
2. Spread Oven Protector lightly onto all internal surfaces of
the oven.
3. Spread Oven Protector lightly onto the internal surface of
the oven door avoiding the door seal.
Switch on the oven and preheat. When the oven has reached
operating temperature it will take about 30mins to cure the
Oven Protector.
Note: Oven protector turns light brown when cured.
1
2
3
Page 24

24
Quick Start Guide original instructions.
Part Number 32Z3801 GB Issue 1
FAULT FINDING CHART
Although every eort
is made to ensure your
oven will continue
to perform to a high
standard, please check
the chart to see if
the problem can be
easily resolved before
contacting your service
agent.
PROBLEM POSSIBLE CAUSE REMEDY
Check if there is a power cut.
The oven does not work and the display
screen is blank
Some screen controls do not work Unauthorised access Contact the authorised user.
Display warning message that the door is
open
Display warning message that the air lter
is removed
The oven does not cook the food correctly
The oven does not nish cooking
The oven has no power
Oven door not closed
Air lter missing or incorrectly tted Ret air lter correctly.
Oven not clean
Food not at correct temperature
Modied or wrong program selected
Food wrapped
Food removed early
Oven door opened
No air lter or incorrectly tted
Oven overheating
Check the isolator switch is ON or the oven
is plugged in correctly.
Check the oven switch is ON.
Remove any restriction and close the oven
door.
Clean the oven (see cleaning).
Use the correct cooking program.
Unwrap food for non-microwave cooking.
Check all the cooking stages have been
followed correctly.
Close oven door.
Ret air lter.
Allow the oven to cool down.
Check and remove any restrictions around
the air vents.
FAULT FINDING
Display shows an error code Oven malfunction
Note the error code and contact your
Service Agent.
Page 25

Quick Start Guide original instructions.
Part Number 32Z3801 GB Issue 1
25
Correct disposal of this product (Waste Electrical & Electronic
Equipment)
Applicable in the European Union and other
European countries with separate collection
systems.
This marking shown on the product or its literature
indicates that it should not be disposed with other
household wastes at the end of its working life. To
prevent possible harm to the environment or human
health from uncontrolled waste disposal, please separate this from
other types of wastes and recycle it responsibly to promote the
sustainable reuse of material resources.
Household users should contact either the retailer where they
purchased this product, or their local government oce for details
of where and how they can take this item for environmentally safe
recycling.
Business users should contact their supplier and check the terms
and conditions of the purchase contract. This product should not be
mixed with other commercial wastes for disposal.
Station Road West
Ash Vale, Aldershot
Hampshire GU12 5XA
United Kingdom
Phone: +44 (0) 1252 371000
Fax: +44 (0) 1252 371007
Merrychef reserves the right to change product specications without notice and accepts no liability for
any inaccuracies, errors or ommissions contained herein.
e-mail: info@merrychef.com
www.merrychef.com
Page 26
26
Guide de mise en route rapide. Traduction des instructions originales.
Partie numéro 32Z3801 FR Édition 1
INTRODUCTION
Ces fours orent aux utilisateurs la exibilité de la cuisson combinée
avec en plus un contrôle de la vitesse du ventilateur et la fonction
micro-ondes.
La cuisson combinée permet d’obtenir des résultats de haute qualité
en moins de temps qu’il n’en faut avec la cuisson traditionnelle,
notamment pour faire cuire, dorer, rôtir et griller des plats.
Une fois dénies, des instructions précises pour la cuisson combinée ou
par convection d’aliments spéciques peuvent être programmées dans
la mémoire du four de manière à pouvoir être répétées facilement et
avec précision. Jusqu’à 1024 programmes peuvent être sauvegardés et
appelés en toute simplicité.
Programmation échelonnée
Les commandes du four orent une exibilité accrue en permettant
d’eectuer une programmation échelonnée à plusieurs phases. Cela
permet de paramétrer les conditions exactes requises pour des résultats
de qualité en fonction du type d’aliment.
Un programme de cuisson unique peut compter jusqu’à 6 phases,
chacune étant contrôlée avec sa propre durée, sa propre vitesse de
ventilateur et ses propres réglages de la puissance des micro-ondes (en
fonction du modèle).
PRÉCAUTIONS À PRENDRE POUR ÉVITER
TOUTE EXPOSITION POTENTIELLE À UN
EXCÈS D’ÉNERGIE DÉGAGÉE PAR LES
MICROONDES
a) Ne tentez en aucun cas de faire fonctionner ce four lorsque la
porte est ouverte : cela pourrait entraîner une exposition nocive à
l’énergie dégagée par les micro-ondes. Il est important de ne pas
toucher aux dispositifs de sécurité.
b) Ne laissez en aucun cas un objet entre la face avant du four et
la porte, et ne laissez jamais de la terre ou des résidus de produits
d’entretien s’accumuler au niveau des surfaces d’étanchéité.
c) N’utilisez pas le four s’il est endommagé. Il est particulièrement
important que la porte du four ferme correctement et que les
éléments suivants ne soient pas endommagés : (1) porte (voilée)
(2) charnières et loquets (cassés ou desserrés) (3) joints et surfaces
d’étanchéité des portes.
d) Le four doit être réglé ou réparé exclusivement par des
techniciens qualiés.
ATTENTION :
CET APPAREIL EST UN PRODUIT DE CLASSE A. DANS
UN ENVIRONNEMENT MÉNAGER, CE PRODUIT PEUT
PROVOQUER DES INTERFÉRENCES RADIO ; DANS
CE CAS, L’UTILISATEUR PEUT DEVOIR PRENDRE DES
MESURES APPROPRIÉES.
Les instructions contenues dans ce guide ont pour but de garantir
votre sécurité ainsi qu’une durée de vie élevée de votre four
Merrychef.
VEUILLEZ LIRE ATTENTIVEMENT LES CONSIGNES
DE SÉCURITÉ SUIVANTES !
Page 27
Guide de mise en route rapide. Traduction des instructions originales.
Partie numéro 32Z3801 FR Édition 1
27
TABLE DES MATIÈRES
INFORMATIONS IMPORTANTES À LIRE AVANT
TOUTE UTILISATION
Les utilisateurs sont avisés que l’entretien et les réparations
doivent être eectués exclusivement par un réparateur
Merrychef agréé et avec des pièces de rechange
Merrychef d’origine. Merrychef n’aura aucune obligation
vis-à-vis de tout produit installé, réglé ou utilisé de façon
non conforme ou bien qui n’aurait pas été entretenu
conformément aux directives nationales et locales ou
aux instructions d’installation fournies avec le produit,
ou bien vis-à-vis de tout produit dont le numéro de série
serait abîmé, eacé ou retiré, ou qui aurait été modié
ou réparé avec des pièces non autorisées ou par des
réparateurs non agréés. Pour une liste des réparateurs
agréés, veuillez consulter la dernière page de ce manuel.
Les informations contenues dans les présentes (y compris
les caractéristiques de conception et des pièces) peuvent
être remplacées et sont susceptibles d’être modiées sans
préavis.
L’achage, la disposition et les icônes de l’écran easyToUCH
montrés dans ce manuel ont une fonction purement utilitaire
et ne constituent en aucun cas une représentation exacte de
ceux fournis avec le four.
Ceci est purement un guide de mise en route rapide. Pour
de plus amples informations, veuillez vous référer aux
consignes d’installation et d’utilisation correspondantes,
disponibles sur www.merrychef.com
INTRODUCTION 26
SÉCURITÉ & DIRECTIVES
CONSIGNES DE SÉCURITÉ IMPORTANTES 28
PRÉCAUTIONS À OBSERVER 30
USTENSILES DE CUISSON APPROPRIÉS 31
CARACTÉRISTIQUES DU PRODUIT
PRINCIPALES FONCTIONNALITÉS 32
SPÉCIFICATIONS TECHNIQUES 34
Spécications 34
Numéro de série (plaque signalétique) : 35
Prescriptions : 35
INSTALLATION 36
EMPLACEMENT ET POSITIONNEMENT DU FOUR 36
FONCTIONNEMENT & COMMANDES
GUIDE DE MISE EN ROUTE RAPIDE : FOUR À MODE RAPIDE 37
MISE EN ROUTE 37
UTILISER UN PROGRAMME DE CUISSON 38
GUIDE DE FONCTIONNEMENT : FOUR À SERVICE COMPLET 39
MENU PRINCIPAL easyToUCH & ÉCRAN CLAVIER 39
PRESS & GO 40
UTILISER UN PROGRAMME DU LIVRE DE RECETTES 41
CHANGER LA TEMPÉRATURE DU FOUR 42
NETTOYAGE & ENTRETIEN
REFROIDISSEMENT DU FOUR AVANT NETTOYAGE 43
Refroidissement du four 43
Préparatifs pour nettoyer le four 43
INSTRUCTIONS DE NETTOYAGE du four froid e3 44
INSTRUCTIONS DE NETTOYAGE du four froid e4 45
INSTRUCTIONS DE NETTOYAGE du four froid e5 45
DÉTECTION D’ERREURS
TABLEAU DE DÉTECTION DE PANNES 48
SÉCURITÉ &
DIRECTIVES
DU PRODUIT
CARACTÉRISTIQUES
& COMMANDES
FONCTIONNEMENT
ENTRETIEN
NETTOYAGE &
D’ERREURS
DÉTECTION
Page 28

28
Guide de mise en route rapide. Traduction des instructions originales.
Partie numéro 32Z3801 FR Édition 1
SÉCURITÉ &
DIRECTIVES
CONSIGNES DE SÉCURITÉ IMPORTANTES
Lorsque vous utilisez des appareils électriques, des précautions de
sécurité de base doivent être observées, notamment :
ATTENTION ! An de réduire le risque de brûlures, de décharge
électrique, d’incendie, de blessure ou d’exposition à un excès d’énergie
dégagée par les micro-ondes :
1. Lisez l’ensemble des instructions avant d’utiliser l’appareil.
2. Lisez et observez les « PRÉCAUTIONS À PRENDRE POUR ÉVITER
TOUTE EXPOSITION POTENTIELLE À UN EXCÈS D’ÉNERGIE DÉGAGÉE
PAR LES MICRO-ONDES » sur la page d’introduction.
3. Cet appareil doit être mis à la terre. Raccordez-le uniquement à une
prise secteur mise à la terre. Cf. « INSTALLATION ÉLECTRIQUE ».
4. Installez ou placez cet appareil uniquement conformément aux
instructions d’installation fournies.
5. Certains produits comme les œufs entiers et les récipients
hermétiques (par exemple pots en verre fermés) peuvent exploser et
ne doivent pas être chaués dans ce four.
6. Utilisez cet appareil uniquement pour l’utilisation prévue
mentionnée dans le manuel. N’utilisez pas de produits chimiques
corrosifs ou de vapeurs dans cet appareil. Ce type de four est conçu
spécialement pour chauer, cuire ou sécher des aliments. Il n’est
pas conçu pour une utilisation industrielle ou pour être utilisé en
laboratoire.
7. Cet appareil ne doit pas être utilisé par des enfants.
8. N’utilisez pas cet appareil si sa prise ou son cordon d’alimentation
est endommagé, s’il ne fonctionne pas correctement, s’il a été
endommagé ou s’il est tombé.
9. Cet appareil doit être entretenu exclusivement par des réparateurs
qualiés. Contactez le centre agréé le plus proche de chez vous en vue
de le faire examiner, réparer ou régler.
10 Vous ne devez pas couvrir/bloquer les ouvertures de l’appareil, y
compris les prises d’air, les ltres et l’orice d’évacuation de la vapeur.
11 Ne stockez pas cet appareil dehors. N’utilisez pas ce produit à
proximité d’une source d’alimentation en eau, par exemple près d’un
évier, dans un sous-sol humide ou à proximité d’une piscine, etc.
12. N’immergez pas le cordon ou la prise dans l’eau.
13. Gardez le cordon à l’écart de surfaces chauées.
14. Ne laissez pas le cordon pendre au-dessus du bord d’une table ou
d’un comptoir.
15. Soit :
i) Lorsque vous nettoyez les surfaces de la porte et du four qui entrent
en contact lorsque vous fermez la porte, utilisez uniquement des
savons ou des détergents doux non abrasifs appliqués avec une
éponge ou un tissu doux.
ii) Lorsque des instructions de nettoyage séparées sont fournies, cf. les
instructions relatives au nettoyage des surfaces concernées.
16. An de réduire le risque d’incendie dans la cavité :
i) Ne laissez pas trop cuire les aliments. Intervenez au niveau
de l’appareil si du papier, du plastique ou d’autres matériaux
inammables sont placés à l’intérieur du four pour faciliter la cuisson.
ii) Retirez les liens torsadés des sacs en papier ou en plastique avant de
placer le sac dans le four.
iii) Si des matériaux à l’intérieur du four prennent feu, laissez la porte
du four fermée, éteignez-le et débranchez le cordon d’alimentation ou
Page 29

Guide de mise en route rapide. Traduction des instructions originales.
Partie numéro 32Z3801 FR Édition 1
29
SÉCURITÉ &
DIRECTIVES
coupez le courant au niveau du fusible ou du disjoncteur.
iv) N’utilisez pas la cavité pour ranger des objets. Ne laissez pas de
produits en papier, d’ustensiles de cuisine ou d’aliments dans la cavité
lorsque vous n’utilisez pas le four.
17. Les liquides tels que l’eau, le café ou le thé risquent de surchauer
au-delà du point d’ébullition sans même sembler bouillir. La formation
de bulles ou l’ébullition ne sont pas toujours visibles lorsque le
récipient est retiré du micro-ondes. CELA POURRAIT ENTRAÎNER UN
DÉBORDEMENT SOUDAIN DE LIQUIDES BOUILLANTS LORSQUE LE
RÉCIPIENT EST REMUÉ OU SI UN USTENSILE EST PLONGÉ DANS LE
LIQUIDE.
18. N’utilisez EN AUCUN CAS uniquement la fonction micro-ondes ou
cuisson combinée sans un aliment ou un liquide à l’intérieur du four,
cela risquerait d’entraîner une surchaue et de provoquer des dégâts.
19. Ne retirez JAMAIS l’extérieur du four.
20. Ne retirez JAMAIS un composant interne xe du four.
21. Ne traquez JAMAIS le panneau de contrôle, la porte, les joints ou
toute autre partie du four.
22. Vous ne devez EN AUCUN CAS bloquer les prises d’air, les ltres et
l’orice d’évacuation de la vapeur.
23. Ne suspendez JAMAIS de torchons sur toute partie du four.
24. Si les joints de la porte sont endommagés, le four doit être réparé
par un technicien agréé.
25. Si le câble d’alimentation est endommagé de quelque manière que
ce soit, il doit IMPÉRATIVEMENT être remplacé par un technicien agréé.
26. Lorsque vous manipulez des liquides, des aliments et des
récipients chauds, veillez à ne pas vous ébouillanter ou vous brûler.
27. Lorsque vous réchauez des liquides en utilisant uniquement la
fonction micro-ondes ou cuisson combinée, remuez le contenu avant
de le réchauer an d’éviter toute ébullition soudaine.
28. N’utilisez EN AUCUN CAS cet appareil pour réchauer des biberons
ou des pots de nourriture pour bébés.
29. N’utilisez EN AUCUN CAS le four pour chauer de l’alcool, par ex.
eau-de-vie, rhum, etc. Les aliments contenant de l’alcool sont plus
susceptibles de prendre feu s’ils sont surchaués ; vous devez donc
faire preuve de la plus grande vigilance et ne pas laisser le four sans
surveillance.
30. Ne tentez en aucun cas de faire frire des aliments dans le four.
31. L’appareil ne doit en aucun cas être utilisé par des enfants en bas
âge, de jeunes enfants ou des inrmes sans surveillance.
32. Les enfants en bas âge et les jeunes enfants doivent être surveillés
an de veiller à ce qu’ils ne jouent pas avec l’appareil.
CONSERVEZ CES INSTRUCTIONS
Page 30
30
Guide de mise en route rapide. Traduction des instructions originales.
Partie numéro 32Z3801 FR Édition 1
SÉCURITÉ &
DIRECTIVES
PRÉCAUTIONS À OBSERVER
1. Lisez ce manuel avant d’utiliser votre four.
2. Comme pour tous les appareils électriques, il est judicieux de faire
vérier les raccordements électriques au moins une fois par an.
3. L’intérieur du four et les garnitures des portes doivent être nettoyés
régulièrement, conformément aux instructions contenues dans
la section Nettoyage ; tout défaut de nettoyage est susceptible
d’entraîner des risques.
4. Éteignez le four à la n des séances de cuisson de la journée.
5. Le four ne doit en aucun cas être utilisé pour sécher du linge.
6. Comme pour tous les appareils de cuisson, veillez à éviter toute
combustion des éléments placés à l’intérieur du four.
7. Les aliments conditionnés dans du plastique inammable ou des
emballages en papier doivent être transvidés dans des récipients
compatibles avec la cuisson au micro-ondes/au four an d’éviter tout
embrasement potentiel.
Si vous voyez de la fumée :
Éteignez ●
Coupez l’alimentation électrique ●
Gardez la porte fermée pour étouer d’éventuelles ●
ammes
8. Les aliments doivent être déballés lorsque vous utilisez les fonctions
convection et cuisson combinée.
9. Les œufs avec leur coquille ainsi que les œufs durs entiers ne
doivent pas être chaués dans le four car ils risqueraient d’exploser.
10. Les aliments avec de la peau, par ex. pommes de terre, pommes,
saucisses, etc. doivent être percés avant d’être chaués.
11. Les aliments ne doivent pas être chaués dans un récipient
totalement hermétique car l’accumulation de vapeur pourrait le faire
exploser.
12. Retirer tout excès de matière grasse pendant le « rôtissage » et
avant de sortir des récipients lourds du four.
13. En cas de bris de verre dans le four, assurez-vous que les aliments
sont totalement exempts de particules de verre. En cas de doute,
éliminez tout aliment qui se trouvait dans le four au moment de la
casse.
14. Ne tentez EN AUCUN CAS de faire fonctionner le four : lorsque
des objets sont coincés dans la porte, lorsque la porte ne ferme pas
correctement ou lorsque vous constatez des dégâts au niveau de la
porte, des charnières, du loquet ou de la surface d’étanchéité, ou bien
lorsqu’il n’y a pas d’aliments dans le four.
Page 31

Guide de mise en route rapide. Traduction des instructions originales.
Partie numéro 32Z3801 FR Édition 1
31
SÉCURITÉ &
DIRECTIVES
USTENSILES DE CUISSON APPROPRIÉS
Référez-vous aux instructions du fabricant an de déterminer la compatibilité de diérents récipients ou ustensiles avec les diérentes fonctions
de cuisson. Le graphique suivant fournit des directives générales :
Récipients résistants à la chaleur
Verre trempé
Céramique vitriée
Faïence
(vaisselle/porcelaine, etc.)
Ne pas utiliser d’éléments pourvus de décorations métalliques.
Plateaux métalliques et barquettes en aluminium
Plateaux métalliques
N’UTILISEZ AUCUN AUTRE RÉCIPIENT EN MÉTAL OU EN
ALUMINIUM
Les plateaux métalliques ne doivent être utilisés que s’ils sont
placés sur la PLAQUE VITRIFIÉE dans la cavité du four.
Récipients en plastique
Récipients en plastique pour double cuisson (micro-ondes et
four traditionnel)
(jusqu’à certaines températures) maintenant disponibles.
Veuillez vous référer aux instructions du fabricant avant toute
utilisation.
Jetables
NE PAS UTILISER
de produits inammables (papier/carton, etc.)
Autres ustensiles
Liens torsadés
Couverts
Sondes thermiques
Aucun ustensile de cuisine ne doit être laissé dans les aliments
lors de la cuisson dans le four.
Page 32

32
Guide de mise en route rapide. Traduction des instructions originales.
Partie numéro 32Z3801 FR Édition 1
CARACTÉRISTIQUES
DU PRODUIT
PRINCIPALES FONCTIONNALITÉS
INTERRUPTEUR ON/OFF1
Lorsqu’il est allumé, l’écran easyToUCH ache les commandes du four.
NB : éteindre cet interrupteur ne débranche en aucun cas le four de
l’alimentation électrique.
2
PANNEAU DE CONTRÔLE DE L’ÉCRAN easyToUCH
Cf. « FONCTIONNEMENT & COMMANDES » pour de plus amples
informations.
3
PLAQUE SIGNALÉTIQUE
Située au niveau du panneau arrière du four, elle indique le numéro de
série, le modèle et les caractéristiques électriques.
4
MenuConnect
Un port USB situé sous le logo Merrychef permet de modier les
programmes sauvegardés sur le four (cf. « USB MenuConnect », section
Fonctionnement et commandes, pour de plus amples informations
concernant la mise à jour de programmes).
5
SORTIES D’AIR
L’air utilisé pour refroidir les composants internes et la vapeur de
la cavité s’échappent par les orices d’évacuation d’air situés à
l’arrière du four et au niveau du panneau latéral du modèle e5. Les
sorties d’air doivent rester exemptes de toute obstruction et ne
pas laisser l’énergie dégagée par les micro-ondes s’échapper dans
l’environnement.
6
FILTRE D’ADMISSION D’AIR
Le ltre d’admission d’air situé en bas à l’avant du four fait partie du
système de ventilation ; il doit rester exempt de toute obstruction
et être nettoyé quotidiennement comme décrit dans « Nettoyage et
entretien ». NB : le four ne fonctionnera pas si le ltre à air n’est pas
installé.
POIGNÉE DE LA PORTE
7
Il s’agit d’une barre rigide que l’on tire vers le bas en l’éloignant du four
pour ouvrir la porte.
8
PORTE DU FOUR
Il s’agit d’une barrière énergétique de précision avec trois dispositifs
de sécurité contre les micro-ondes. La porte doit rester propre (cf.
« NETTOYAGE ») et ne doit EN AUCUN CAS être utilisée pour suspendre
des objets lourds.
9
GARNITURES DE LA PORTE
Elles assurent une fermeture hermétique de la porte. Elles doivent
rester propres et être vériées régulièrement an de déceler
d’éventuels signes de dégâts. Au premier signe d’usure, elles doivent
être remplacées par un réparateur Merrychef agréé.
10
VENTILATEUR À CONVECTION, FILTRE À GRAISSES ET
CONVERTISSEUR CATALYTIQUE (selon le modèle)
La grille du ltre à graisses métallique couvrant le ventilateur à
convection doit rester propre et exempt de débris. Vous devez faire
tout particulièrement attention lorsque vous nettoyez cette zone du
four et tenir compte des diérentes caractéristiques du four indiquées
dans la section « Nettoyage et entretien » de ce manuel.
11
CAVITÉ DU FOUR
La cavité du four est conçue à base d’acier inoxydable et doit rester
propre : suivez pour cela les consignes de nettoyage gurant dans la
section « Nettoyage et entretien » de ce manuel.
Page 33

Guide de mise en route rapide. Traduction des instructions originales.
Partie numéro 32Z3801 FR Édition 1
33
CARACTÉRISTIQUES
DU PRODUIT
3
e3
e4
e5
1
2 3
11
10
4
5
9
8
7
11
10
9
8
2
1
6
1 2 3
11
10
4
5
9
8
7
4
5
6
7
6
Page 34

34
Guide de mise en route rapide. Traduction des instructions originales.
Partie numéro 32Z3801 FR Édition 1
CARACTÉRISTIQUES
DU PRODUIT
SPÉCIFICATIONS TECHNIQUES
Spécications
Description unité
Commandes tactiles programmes
Température de fonctionnement ambiante
Dimensions externes HxLxP mm
Dimensions externes HxLxP pouces
Dimensions internes HxLxP mm
Dimensions internes HxLxP pouces
Enceinte de cuisson Ltr
Puissance délivrée micro-ondes W
Puissance délivrée convection kW
Alimentation Hz
Alimentation kW
Poids net du four non conditionné Kg (lbs)
Niveau de pression acoustique dB(A)
Gerbage (avec kit) four
°C
(pouces cubiques)
e3
1024
<40
551x598x622
21.7x23.5x24.5
319x332x325
12.6x13.1x12.8
34.4 (2113)
700/1000
3 (3/1.5 EE)
50 & 60
3(EE) 4.3(XE) 4.7(XX)
62.5 (138)
<70
0
e4
1024
<40
591x584x750
23.3x23.0x29.5
218x375x312
8.6x14.8x12.3
25.5 (1566)
1500
3.2
50 & 60
7.0
82.5 (182)
<70
1
e5
1024
<40
642x711x705
25.3x28.0x27.8
258.4x495x363.5
10.17x19.49x14.31
44.4 (2730)
1400
3.2
50 & 60
6.2
94.0 (207)
<70
0
Page 35

Guide de mise en route rapide. Traduction des instructions originales.
Partie numéro 32Z3801 FR Édition 1
35
CARACTÉRISTIQUES
DU PRODUIT
Déclaration de conformité CE
Fabricant
1) Merr ychef Limited 2) Viscount Catering Limited
Station Road West Provincial Park
Ash Vale Nether Lane
Aldershot Eccleseld
Hampshire Sheeld
GU12 5XA S35 9ZX
Détails de l’équipement
Numéros de modèles génériques eikon e3, eikon e4, eikon e5
Description Four à micro-ondes combiné
Déclaration de conformité aux directives et aux normes
Le fabricant déclare par la présente que ses fours à micro-ondes combinés dont la liste est
énumérée ci-dessus sont conformes aux directives et aux normes suivantes :
Conformité aux directives
Les fours à micro-ondes combinés sont conformes aux dispositions en vigueur prévues par les
directives européennes suivantes :
CEM 2004/108/CE DBT 2006/95/CE RoHS 2002/95/CE DM 2006/42/CE
Normes harmonisées en vigueur
Les fours à micro-ondes combinés sont conformes aux exigences pertinentes prévues par les
normes européennes suivantes :
Gestion de la qualité et de l’environnement
Merrychef Limited et Viscount Catering ont recours à un système de gestion de la qualité
certié conformément à la norme EN ISO 9001:2008 et Viscount Catering a recours à un
système de gestion de l’environnement certié conformément à la norme EN ISO 14001.
Royaume-Uni Royaume-Uni
EN 60335-2-90: 2006
•
EN 60335-1: 2002+A11+A1+A12+A2+A13
•
EN 62233:2008
•
EN 55014-2:1997 y compris A2:2008 conformément aux exigences de la Catégorie IV
•
Décharge électrostatique CEI 61000-4-2:1995
Interférence de RF rayonnées CEI 61000-4-3:1996
Mode commun de transitoires rapides, accès CA CEI 61000-4-4:1995
Surtension secteur, accès CA CEI 61000-4-5:1995
Courant RF, mode commun, accès CA CEI 61000-4-6:1996
Creux et coupures de la tension secteur CEI 61000-4-11:1994
Papillotement CEI 61000-3-11:2000
•
Classication EN 55011:2007 : Classe A, Groupe 2
•
Tension perturbatrice aux bornes du réseau Tableau 2a
Perturbation rayonnée, champ magnétique* Tableau 5a
Perturbation rayonnée, champ électrique Tableau 5a
Perturbation rayonnée, champ électrique* Tableaux 6, 7 et 8
AS/NZS CISPR 11
•
Perturbation rayonnée CISPR 11:2003:A1:2004
Perturbation induite CISPR 11:2003:A1:2004
Numéro de série (plaque signalétique) :
Numéro de série : MM / AA / SITE /
N° DE SÉRIE
c.-à-d. 06 10 2070 12345
(0610207012345)
Four fabriqué en juin 2010 à
Sheeld (Royaume-Uni), n° de
fabrication 12345.
Modèle n° : MODÈLE CONVECTION
MICRO-ONDES TENSION HERTZ
PRISE CORDON D’ALIMENTATION
COMMUNICATION VERSION CLIENT/
ACCESSOIRE PAYS
c.-à-d. e4C S V 30 5 H E U 1 GM EU
(e4CSV305HEU1GMEU)
modèle e4C, 3200W, 1500W, 230V,
50Hz, P+N+T (4mm UE), prise 3
broches, USB, 1, marché global,
européen.
Prescriptions :
Directives UE
CEM 2004/108/CE
DBT 2006/95/CE
RoHS 2002/95/CE
DM 2006/42/CE
Page 36

36
Guide de mise en route rapide. Traduction des instructions originales.
Partie numéro 32Z3801 FR Édition 1
INSTALLATION
EMPLACEMENT ET POSITIONNEMENT DU FOUR
Choisissez un endroit éloigné de toute source de chaleur importante.
Ne placez EN AUCUN CAS le four à un endroit où il serait exposé à de
CARACTÉRISTIQUES
l’air chaud provenant de friteuses, de grils, de plaques de cuisson, etc.
DU PRODUIT
Une barrière thermique de la hauteur du four doit être installée si
le four est situé à proximité d’un brûleur, d’une cuisinière ou d’un
fourneau.
Placez le four de façon permanente sur une surface plate
antidérapante/ininammable à la fois PLANE, STABLE et susamment
RÉSISTANTE pour le four et son contenu.
Prévoyez un dégagement minimum (A) de 50 mm autour du four pour
que l’air chaud puisse s’échapper.
Prévoyez un dégagement susant (B) devant le four pour pouvoir
ouvrir complètement la porte.
La prise d’air est située en bas de la partie avant du four (1) et il
est important que le ux d’air soit aussi frais que possible et qu’il
ne soit pas préchaué par d’autres appareils tels que des brûleurs,
des cuisinières, des fourneaux, des friteuses, des grils ou des
plaques de cuisson, car cela réduirait la durée de vie ainsi que les
performances du four.
N’apposez en aucun cas sur le four des étiquettes ou des autocollants
autres que ceux qui y sont déjà apposés ou qui sont approuvés par le
fabricant.
Le four ne fonctionnera pas si le FILTRE À AIR n’est pas
correctement installé.
DANGER !
CET APPAREIL DOIT ÊTRE MIS À LA TERRE. DANS
LE CAS CONTRAIRE, CELA POURRAIT ENTRAÎNER
UN RISQUE DE DÉCHARGE ÉLECTRIQUE, VOIRE LA
MORT.
Le four doit être raccordé à une source d’alimentation
électrique séparée installée par un électricien qualié et agréé.
Un sectionneur avec une capacité nominale appropriée et un
intervalle de contact de 3 mm au niveau de l’ensemble des
pôles doit être mis en place pour chaque four installé.
Si vous avez le moindre doute au sujet de votre alimentation
électrique, demandez l’avis d’un électricien qualié.
A
MANUTENTION & STOCKAGE :
Lorsque vous déplacez un four, observez et conformez-vous
impérativement aux directives nationales et locales applicables au
levage et au déplacement d’objets lourds. N’utilisez en aucun cas la
poignée de la porte du four pour le soulever.
Lorsque vous n’utilisez pas le four, débranchez-le électriquement et
rangez-le dans un endroit sec et frais. Ne gerbez pas des fours.
A
1
A
B
Page 37

Guide de mise en route rapide. Traduction des instructions originales.
Partie numéro 32Z3801 FR Édition 1
37
GUIDE DE MISE EN ROUTE RAPIDE : FOUR À MODE RAPIDE
MISE EN ROUTE
1. Allumez le four.
Eectuez l’ensemble des contrôles de sécurité appropriés et
assurez-vous que le four est propre et vide avant d’appuyer
sur l’interrupteur pour le mettre en marche.
2. L’écran easyToUCH s’allume et ache brièvement le
numéro de série ainsi que les données relatives au four.
Eectuez une légère pression sur l’écran pour geler
l’achage, et une seconde pour continuer.
3. Lorsque le four est paramétré avec au moins deux
températures de préchauage, un choix est aché.
Les èches de délement en bas de l’écran indiquent
qu’il y a d’autres choix de températures qui ne sont pas
achés à l’écran ; en cas de besoin, utilisez les èches, puis
sélectionnez la température requise pour commencer à
préchauer le four.
4. Pendant le préchauage, l’achage montre la progression
du réchauage du four jusqu’à ce que la température réglée
soit atteinte. (Pour arrêter le réchauage du four, touchez le
symbole « X » rouge).
5. Le four est prêt à utiliser lorsque le livre de recettes
s’ache.
21
3
4
5
AFFICHAGE DU LIVRE DE RECETTES
AFFICHE L’ENSEMBLE DES PROGRAMMES DE CUISSON (optionnel)
AFFICHE LES GROUPES DE PROGRAMMES
FAVORIS (optionnel)
GROUPE DE PROGRAMMES
Chaque groupe contient une série de
programmes de cuisson.
ARRÊTER/
ANNULER
& COMMANDES
FONCTIONNEMENT
CHANGER LA TEMPÉRATURE DU FOUR (optionnel)
Page 38

38
Guide de mise en route rapide. Traduction des instructions originales.
Partie numéro 32Z3801 FR Édition 1
FONCTIONNEMENT
& COMMANDES
UTILISER UN PROGRAMME DE CUISSON
En prenant toutes les précautions
nécessaires pour veiller à ne pas vous
brûler, ouvrez la porte du four pour placer
les aliments dans le four chaud puis
refermez la porte.
1. Sélectionnez un groupe de programmes (par exemple
« BURGERS ») pour acher les diérents programmes de
cuisson.
2. Sélectionnez un programme de cuisson pour démarrer,
par exemple « 2 BURGERS ».
3. Suivez les instructions qui s’achent à l’écran, le cas
échéant.
4. Touchez la coche verte pour lancer la cuisson.
Le temps de cuisson commence un compte à rebours pour
chaque étape du programme.
5. Lorsque le programme se termine, une barre rouge
s’ache généralement en émettant un son ; ouvrez la porte
ou touchez le « X » rouge pour revenir au programme de
cuisson.
NB : ouvrir la porte du four pendant la cuisson interrompt le
programme de cuisson et ache un message d’alerte. Fermer
la porte permet à l’utilisateur de continuer ou d’annuler le
programme de cuisson.
1
4
2
5
3
ÉTAPE DU PROGRAMME
Page 39

Guide de mise en route rapide. Traduction des instructions originales.
Partie numéro 32Z3801 FR Édition 1
39
FONCTIONNEMENT
& COMMANDES
GUIDE DE FONCTIONNEMENT : FOUR À SERVICE COMPLET
MENU PRINCIPAL easyToUCH & ÉCRAN CLAVIER
ÉCRAN MENU PRINCIPAL :
1. Le MODE DÉVELOPPEMENT permet de développer des
programmes de cuisson échelonnés, puis de les sauvegarder
en leur attribuant un nom et un symbole an de pouvoir les
réutiliser ultérieurement.
2. PRESS & GO permet un accès rapide pour utiliser les
programmes de cuisson déjà sauvegardés.
3. Le livre de recettes contient les programmes de cuisson
du four. Il permet d’acher les favoris, les groupes de
programmes de cuisson et une liste complète de l’ensemble
des programmes de cuisson disponibles.
4. Permet de modier la température du four et de préparer
le four en vue d’un nettoyage avec achage de rappels
pendant le processus de nettoyage.
5. Permet de contrôler les réglages et les fonctions du four,
y compris l’heure et la langue, de charger des programmes
de cuisson et d’eectuer des opérations d’entretien et de
maintenance.
6. Est utilisé pour entrer un mot de passe autorisé pour
accéder aux données relatives aux programmes et peut
restreindre l’accès de l’opérateur à certaines fonctions.
MODE DÉVELOPPEMENT
1
2
RACCOURCI MENU
3
LIVRE DE RECETTES
4
NETTOYAGE/
CHANGEMENT DE TEMP.
5
RÉGLAGES
Page 40

40
Guide de mise en route rapide. Traduction des instructions originales.
Partie numéro 32Z3801 FR Édition 1
FONCTIONNEMENT
& COMMANDES
PRESS & GO
Lancer un programme de cuisson à partir du menu
Press & Go.
1. Sélectionnez « PRESS & GO » à partir de l’écran du menu
principal.
2. Sélectionnez l’élément à cuire.
3. L’achage indique la température, le temps de cuisson, la
puissance du micro-ondes et la vitesse du ventilateur pendant
que le minuteur fait le compte à rebours. La barre du minuteur
devient rouge pour indiquer la n du cycle de cuisson.
Choisir quels programmes de cuisson sont achés sur
l’écran du menu « PRESS & GO ».
1. Après avoir sélectionné « PRESS & GO » à partir de l’écran du
menu principal, sélectionnez le symbole EDIT.
2. Deux listes s’achent : la liste supérieure indique les éléments
du menu « PRESS & GO » et la liste inférieure ache les autres
éléments disponibles du menu. Vous pouvez faire déler les
deux listes vers le haut ou vers le bas à l’aide des èches tout à
droite.
3. Sélectionnez un élément, puis choisissez de changer sa
position dans le menu ou de le déplacer dans la liste inférieure.
4. Sélectionnez un élément à déplacer dans la liste supérieure, le
rendant disponible dans le menu « PRESS & GO ».
5. Sélectionnez Retour pour revenir à l’écran du menu une fois
terminé.
1 2 3
1
Changez l’ordre
d’un élément
sélectionné
indiqué à
l’écran Press
& Go.
Déplacez
un élément
sélectionné
vers ou à partir
de l’écran Press
& Go.
Sélectionnez
pour faire
déler une liste
vers le haut ou
vers le bas.
2
5
3
4
Page 41

Guide de mise en route rapide. Traduction des instructions originales.
Partie numéro 32Z3801 FR Édition 1
41
FONCTIONNEMENT
& COMMANDES
UTILISER UN PROGRAMME DU LIVRE DE
ATTENTION : VEILLEZ À CE QU’IL Y AIT
DES ALIMENTS DANS LE FOUR AVANT DE
LANCER UN PROGRAMME DE CUISSON.
RECETTES
Pour trouver le programme requis dans le livre de recettes.
1. Sélectionnez sur l’écran du menu principal.
2. Sélectionnez le symbole TOUS LES MENUS.
3. Utilisez les èches de délement haut/bas pour trouver le
programme.
NB : si une image est entourée d’une ligne rouge, la
température du four est trop élevée ou trop basse pour
cette recette. Cf. « CHANGER LA TEMPÉRATURE DU FOUR ».
En prenant l’ensemble des précautions nécessaires pour
veiller à ne pas vous brûler, placez les aliments dans la
cavité du four chaud et fermez la porte.
ATTENTION :
SURFACE CHAUDE, DANGER !
4. Sélectionnez le programme de cuisson requis pour
démarrer la cuisson.
Par exemple « 1 BIFTECK HACHÉ ».
5. Le programme débute immédiatement en achant un
compte à rebours, ou une instruction s’ache d’abord ;
1
4
2
5
3
6
Page 42

42
Guide de mise en route rapide. Traduction des instructions originales.
Partie numéro 32Z3801 FR Édition 1
suivez les instructions spéciques à cette étape, puis
sélectionnez OK pour démarrer la cuisson. Si la porte du four
n’est pas ouverte dans un délai de 30 secondes, un message
d’alerte s’ache.
6. Le minuteur de cuisson fait le compte à rebours jusqu’à
zéro et fait retentir un son pour indiquer qu’une action
de l’opérateur est requise à la n d’une phase ou d’un
programme de cuisson.
À la n du programme de cuisson, ouvrir la porte du four
pour retirer les aliments fait revenir l’achage à l’écran
« LIVRE DE RECETTES ».
FONCTIONNEMENT
NB : ouvrir la porte du four pendant la cuisson arête le
& COMMANDES
programme de cuisson et ache un message d’alerte. Fermer
la porte permet à l’utilisateur de poursuivre ou d’annuler le
programme de cuisson.
Pour vérier la température du four pendant la cuisson,
eectuez une légère pression sur la température achée,
la température de la cavité du four s’ache alors avec un
astérisque.
CHANGER LA TEMPÉRATURE DU FOUR
1. Notez la température requise pour la recette et
sélectionnez OK.
2. Sélectionnez le symbole température.
3. Un astérisque à côté du nombre indique la température
actuelle du four, sélectionnez la température requise du
four pour la recette. Lorsque le four a atteint la température
requise, continuez à partir de la sélection du « LIVRE DE
RECETTES » à l’étape 1.
1 2 3
Page 43

Guide de mise en route rapide. Traduction des instructions originales.
Partie numéro 32Z3801 FR Édition 1
43
REFROIDISSEMENT DU FOUR AVANT NETTOYAGE
Refroidissement du four
IMPORTANT : vous devez laisser refroidir le four avant
d’eectuer des processus de nettoyage.
1. En mode Full Serve, sélectionnez le symbole NETTOYAGE à
partir du menu principal.
2. En mode Full ou Quick Serve, sélectionnez le symbole du
thermomètre bleu pour désactiver le chauage et démarrer le
cycle de refroidissement.
3. En prenant l’ensemble des précautions nécessaires, placez un
récipient approprié rempli de glace dans la cavité du four chaud.
Sélectionnez le symbole OK pour continuer.
4. La progression du refroidissement est achée et dure environ
30 minutes.
5. Le four est à présent prêt en vue d’être nettoyé. Sélectionnez
OK sur l’écran après avoir eectué chaque étape.
Préparatifs pour nettoyer le four
Pour optimiser l’ecacité du four, la cavité, la porte, le ltre à air et
le ltre à graisses doivent être gardés propres.
Une routine de nettoyage quotidienne veillera à ce que vous vous
conformiez aux normes d’hygiène en vigueur et vous aidera à
entretenir et à prolonger l’ecacité de votre four.
1 2
3
4
ENTRETIEN
NETTOYAGE &
Page 44

44
Guide de mise en route rapide. Traduction des instructions originales.
Partie numéro 32Z3801 FR Édition 1
NETTOYAGE &
ENTRETIEN
e3
Équipement requis (non fourni) :
Produit d’entretien non caustique de marque déposée, gants
résistants à la chaleur, gants de protection en caoutchouc,
tampon à récurer non abrasif en nylon, torchons, protection
oculaire et masque à poussière (optionnel).
ATTENTION : VOUS DEVEZ IMPÉRATIVEMENT PORTER DES
GANTS DE PROTECTION EN CAOUTCHOUC LORSQUE VOUS
NETTOYEZ LE FOUR.
N’utilisez JAMAIS d’ustensiles tranchants ou de produits très
abrasifs sur toute partie du four.
ATTENTION : N’UTILISEZ EN AUCUN CAS
DES PRODUITS D’ENTRETIEN CAUSTIQUES
SUR TOUTE PARTIE DU FOUR OU DANS LA
Lancez la procédure de REFROIDISSEMENT et laissez refroidir le
four et les accessoires avant de commencer le nettoyage.
CAVITÉ DU FOUR, CELA ENDOMMAGERAIT DE
FAÇON PERMANENTE LES CONVERTISSEURS
CATALYTIQUES !
INSTRUCTIONS DE NETTOYAGE du four froid e3
RETIREZ ET NETTOYEZ les composants du four :
1. Retirez le ltre à air situé à la base du four.
2. Ouvrez la porte du four et retirez le plateau tournant.
3. Pour les fours équipés d’un convertisseur catalytique : ouvrez
la porte du four et desserrez les xations de manière à retirer le
convertisseur catalytique en cas de besoin ou au moins une fois par
mois.
Nettoyez l’ensemble des composants dans de l’eau chaude
savonneuse. Nettoyez avec un chion propre et de l’eau propre et
chaude en abondance.
Séchez à l’aide d’un torchon propre et frais.
1
N’UTILISEZ EN AUCUN CAS DES OUTILS !
2
3
Page 45

Guide de mise en route rapide. Traduction des instructions originales.
Partie numéro 32Z3801 FR Édition 1
45
NETTOYAGE &
ENTRETIEN
e4
e5
INSTRUCTIONS DE NETTOYAGE du four froid e4
INSTRUCTIONS DE NETTOYAGE du four froid e5
RETIREZ ET NETTOYEZ les composants du four :
1. Retirez le ltre à air situé à la base du four.
2. Ouvrez la porte du four, retirez la grille, tirez la poignée du ltre à
graisses vers le bas et retirez-le.
3. Desserrez les xations assurant la plaque d’impact supérieure.
4. Retirez la plaque d’impact supérieure et retirez la plaque d’impact
inférieure.
Nettoyez l’ensemble des composants dans de l’eau chaude
savonneuse. Nettoyez à l’aide d’un chion propre et de l’eau propre et
chaude en abondance.
Séchez à l’aide d’un torchon frais et propre.
1 2
3 4
RETIREZ ET NETTOYEZ les composants du four :
1. Retirez le ltre à air situé à la base du four.
2. Ouvrez la porte du four pour retirer tout plateau/grille de cuisson.
Nettoyez l’ensemble des composants dans de l’eau chaude
savonneuse. Nettoyez avec un chion propre et de l’eau chaude
propre en abondance.
Séchez à l’aide d’un torchon propre et frais.
1
2
Page 46

46
Guide de mise en route rapide. Traduction des instructions originales.
Partie numéro 32Z3801 FR Édition 1
NETTOYAGE &
ENTRETIEN
NETTOYER LE FOUR :
1. Retirez tout liquide ou aliment renversé à l’aide de lingettes en
papier jetables.
Utilisez une brosse de nettoyage à sec pour retirer toute particule
alimentaire restée entre le fond du four et l’intérieur de la porte
avant.
2. Portez des gants de protection en caoutchouc ainsi que des
lunettes de protection. Vaporisez soigneusement un produit
d’entretien non caustique de marque déposée sur l’ensemble des
surfaces internes du four, à l’exception de la garniture de la porte
(A).
Ne vaporisez JAMAIS directement dans l’ouverture du
ventilateur à l’arrière de l’intérieur du four.
3. Pour les zones diciles, laissez tremper pendant 10 minutes
avec la porte du four ouverte.
Utilisez un tampon ou une éponge à récurer non abrasive en
nylon pour nettoyer la cavité, le haut et l’intérieur de la porte. Ne
récurez pas la garniture de la porte et n’utilisez pas de tampons à
récurer métalliques.
4. Nettoyez avec un chion propre et de l’eau chaude et propre
en abondance, et séchez avec un torchon propre et frais ou de
l’essuie-tout.
Remettez en place l’ensemble des composants nettoyés du four.
Fermez la porte du four et essuyez l’extérieur du four à l’aide d’un
chion humide.
1
2
3
A
4
N’UTILISEZ EN AUCUN CAS LE FOUR SANS
QU’UN FILTRE À AIR PROPRE SOIT INSTALLÉ !
Page 47

Guide de mise en route rapide. Traduction des instructions originales.
Partie numéro 32Z3801 FR Édition 1
47
NETTOYAGE &
ENTRETIEN
APPLICATION D’UN AGENT PROTECTEUR :
1. À appliquer uniquement sur un four propre. Vaporisez un
agent protecteur de marque déposée sur une éponge.
2. Étalez le produit légèrement sur l’ensemble des surfaces
internes du four.
3. Étalez le produit légèrement sur la surface interne de la
porte du four en évitant la garniture de la porte.
Allumez le four et préchauez-le. Lorsque le four aura
atteint sa température de fonctionnement, il faudra compter
environ 30 mn pour que le produit fasse eet.
NB : L’agent protecteur devient marron clair lorsqu’il a
fait eet.
1
2
3
Page 48

48
Guide de mise en route rapide. Traduction des instructions originales.
Partie numéro 32Z3801 FR Édition 1
TABLEAU DE DÉTECTION DE PANNES
Bien que tous les
eorts soient mis en
œuvre pour veiller
à ce que votre four
continue à fournir
des performances
élevées, veuillez
consulter le tableau
an de déterminer si
le problème peut être
facilement résolu avant
de contacter votre
réparateur.
PROBLÈME CAUSE POSSIBLE SOLUTION
Assurez-vous qu’il n’y a pas de coupure de
courant.
Le four ne fonctionne pas et l’écran
d’achage est vide
Certaines commandes de l’écran ne
fonctionnent pas
Un message d’alerte s’ache, signalant que
la porte est ouverte
Un message d’alerte s’ache, signalant que
le ltre à air a été retiré
Le four ne cuit pas correctement les
aliments
Le four ne termine pas la cuisson
L’écran ache un code d’erreur Dysfonctionnement du four
Le four n’est pas alimenté
Accès non autorisé Contactez l’utilisateur autorisé.
La porte du four n’est pas fermée
Filtre à air manquant ou mal installé Réinstallez correctement le ltre à air.
Le four n’est pas propre
Les aliments ne sont pas à la bonne
température
Programme modié ou mauvais
programme sélectionné
Aliments emballés
Aliments retirés trop tôt
Porte du four ouverte
Filtre à air absent ou mal installé
Surchaue du four
Assurez-vous que le sectionneur est sur ON
ou que le four est branché correctement.
Assurez-vous que l’interrupteur du four est
sur ON.
Retirez toute obstruction et fermez la porte
du four.
Nettoyez le four (cf. nettoyage).
Utilisez le programme de cuisson
approprié.
Déballez les aliments pour une cuisson
sans micro-ondes.
Assurez-vous que toutes les étapes de
cuisson ont été correctement suivies.
Fermez la porte du four.
Réinstallez le ltre à air.
Laissez refroidir le four.
Vériez et retirez toute obstruction autour
des prises d’air.
Notez le code d’erreur et contactez votre
réparateur.
D’ERREURS
DÉTECTION
Page 49

Guide de mise en route rapide. Traduction des instructions originales.
Partie numéro 32Z3801 FR Édition 1
49
Élimination appropriée de ce produit (politique d’élimination
des équipements électriques et électroniques)
Applicable au sein de l’Union européenne et
dans d’autres pays d’Europe avec des systèmes
d’enlèvement séparés.
Ce marquage sur le produit ou dans la documentation
de ce dernier indique qu’il ne doit pas être éliminé avec
les autres déchets ménagers à la n de sa durée de vie.
An d’éviter toute dégradation de l’environnement
ou de la santé de l’homme suite à une élimination non conforme des
déchets, veuillez éliminer ce produit séparément d’autres types de
déchets et le recycler de manière responsable an de promouvoir la
valorisation durable des ressources matérielles.
Les particuliers sont invités à contacter le détaillant qui leur a vendu
ce produit ou leur service administratif local pour de plus amples
informations concernant le lieu et la méthode d’élimination de cet
article en vue d’un recyclage respectueux de l’environnement.
Les professionnels sont invités à contacter leur fournisseur et à se
référer aux conditions générales du contrat d’achat. Ce produit ne
doit en aucun cas être mélangé avec d’autres déchets commerciaux
destinés à être éliminés.
Station Road West
Ash Vale, Aldershot
Hampshire GU12 5XA
Royaume -U ni
Tél. : +44 (0) 1252 371000
Fax : +44 (0) 1252 371007
Merrychef se réserve le droit de modier les caractéristiques du produit sans préavis et ne saurait en
aucun cas être tenu responsable pour toute inexactitude, erreur ou omission dans les présentes.
e-mail : info@merrychef.com
www.merrychef.com
Page 50

50
Übersetzung der originalen Schnelles Anfangsführer
Teilenummer 32Z3801 DE AUSGABE 1
EINLEITUNG
Diese Öfen bieten den Benutzern die Möglichkeit zur exiblen
Kombination von Garvorgängen mit zusätzlicher Regelung der
Lüfterdrehzahl und der Mikrowellenleistung.
Die Kombination von Garvorgängen ermöglicht hochqualitative
Ergebnisse, die in einem Bruchteil der Zeit erreicht werden können im
Vergleich zum herkömmlichen Garen, besonders bei Back-, Bräun-, Röstand Grillgerichten.
Einmal eingerichtet, können genaue Anweisungen zur Kombination
oder zum Umluftgaren ausgewählter Gerichte in den Ofenspeicher
eingegeben werden, sodass sie einfach und präzise wiederverwendet
werden können. Bis zu 1024 Programme können gespeichert und
einfach wiederaufgerufen werden.
Mehrstuge Programmierung Der Ofen bietet noch wesentlich größere
Flexibilität durch die mehrstuge Programmierung. Dadurch werden
genaue Bedingungen geschaen, die für hochqualitative Ergebnisse
erforderlich sind und für bestimmte Speisen eingestellt werden können.
Ein einzelnes Garprogramm kann bis zu 6 Stufen umfassen, jede
Stufe wird durch die jeweilige Zeiteinstellung, Lüfterdrehzahl und
Mikrowellenleistungseinstellungen geregelt, (modellabhängig).
VORSICHTSMASSNAHMEN ZUR
VERMEIDUNG EINER BELASTUNG DURCH
ÜBERMÄSSIGE MIKROWELLENENERGIE
a) Versuchen Sie nicht, diesen Ofen mit geöneter Tür in
Betrieb zu setzen. Der Betrieb mit oener Tür kann zu einer
schädlichen Belastung durch Mikrowellen-Energie führen.
Die Sicherungsverriegelungen der Tür dürfen auf keinen Fall
funktionsunfähig gemacht, bzw. manipuliert werden.
b) Stellen Sie keine Gegenstände zwischen die oene Vorderseite
des Ofens und die Tür und vermeiden Sie unbedingt die
Ablagerung von Verschmutzungen oder Reinigungsmittelresten
auf den Oberächen der Dichtungen.
c) Betreiben Sie den Ofen nicht, wenn dieser beschädigt ist. Es
ist besonders wichtig, dass die Ofentür richtig schließt und dass
keine Beschädigungen der (1) Tür (verbogen) (2) Scharniere und
Verriegelungen (zerbrochen oder locker) (3) Türdichtungen und
Dichtungsoberächen vorliegen.
d) Der Ofen darf nur von Wartungstechnikern mit ausreichender
Qualikation nachreguliert oder repariert werden.
WARNUNG:
DIES IST EIN PRODUKT DER KLASSE A. IM
PRIVATHAUSHALT KANN DIESES PRODUKT ZU
FUNKSTÖRUNGEN FÜHREN. IN DIESEM FALLE
MUSS DER BENUTZER UNTER UMSTÄNDEN
ENTSPRECHENDE MASSNAHMEN ERGREIFEN.
Die Anleitungen in diesem Handbuch sollen die sichere Benutzung
und eine lange Lebensdauer Ihres Merrychef-Ofens gewährleisten.
BITTE LESEN SIE DIE FOLGENDEN
SICHERHEITSANWEISUNGEN SORGFÄLTIG
Page 51

Übersetzung der originalen Schnelles Anfangsführer
Teilenummer 32Z3801 DE AUSGABE 1
51
INHALT
WICHTIGE INFORMATIONEN VOR GEBRAUCH LESEN
Benutzer sollten alle Wartungs- und Reparaturarbeiten von
einem befugten Merrychef-Kundendienstmitarbeiter und
mit Ersatzteilen von Merrychef ausführen lassen. Merrychef
übernimmt keinerlei Verpichtungen bezüglich jeglicher
Produkte, welche nicht gemäß den nationalen oder
regionalen Bestimmungen bzw. den Anweisungen auf
dem Produkt ordnungsgemäß angeschlossen, eingestellt,
bedient oder gewartet oder für jegliche Produkte, deren
Seriennummer unlesbar, überdeckt oder entfernt wurde,
oder Produkte, die unter Verwendung nicht autorisierter
Teile, bzw. von unbefugten Kundendiensttechnikern
modiziert oder repariert wurden. Eine Liste der befugten
Kundendiensttechniker nden Sie auf der Rückseite
dieses Handbuchs. Die hierin enthaltenen Informationen
(einschließlich Design und Teile-Spezikationen) können
durch andere ersetzt und ohne Benachrichtigung geändert
werden.
Die easyToUCH-Bildschirmanzeige, auf der Layout
und Zeichen angezeigt werden, dient lediglich zu
Orientierungszwecken und muss nicht exakt mit dem
Lieferumfang übereinstimmen.
Dieses ist nur ein schnelles Anfangsführer. Beziehen Sie für
weitere Informationen sich die auf relevanten Installationsund Bedienungsanleitungen, die von www.merrychef.com
verfügbar sind.
EINLEITUNG 50
SICHERHEIT & RICHTLINIEN
WICHTIGE SICHERHEITSHINWEISE 52
ZU BEACHTENDE VORSICHTSMASSNAHMEN 54
GEEIGNETE GARUTENSILIEN 55
PRODUKT-BESCHREIBUNGEN
HAUPTMERKMALE 56
TECHNISCHE SPEZIFIKATIONEN 58
Spezikationen 58
Seriennummer (Tyenschild): 59
Erfüllung: 59
INSTALLATION 60
STANDORT UND AUFSTELLUNG DES OFENS 60
BEDIENUNG & STEUERUNG
SCHNELLSTARTANLEITUNG: SCHNELLSERVICE OFEN 61
IN BETRIEB NEHMEN 61
EIN GARPROGRAMM VERWENDEN 62
BETRIEBSLEITFADEN: VOLLSTÄNDIGER SERVICEMODUS 63
easyToUCH HAUPTMENÜ & TASTATURBILDSCHIRM 63
DRÜCKEN & LOS 64
VERWENDEN EINES KOCHBUCH-PROGRAMMS 65
ÄNDERUNG DER OFENTEMPERATUR 66
REINIGUNG & WARTUNG
KÜHLEN SIE DEN OFEN AB, BEVOR SIE IHN REINIGEN 67
Ofen abkühlen 67
Vor der Ofenreinigung 67
REINIGUNGSANWEISUNGEN bei kaltem Ofen, Modell e3 68
REINIGUNGSANWEISUNGEN bei kaltem Ofen, Modell e4 69
REINIGUNGSANWEISUNGEN bei kaltem Ofen, Modell e5 69
STÖRUNGSSUCHE
MÖGLICHE STÖRUNGEN 72
RICHTLINIEN
SICHERHEIT &
PRODUKT-
BESCHREIBUNGEN
STEUERUNG
BEDIENUNG &
WARTUNG
REINIGUNG &
STÖRUNGSSUCHE
Page 52

52
Übersetzung der originalen Schnelles Anfangsführer
Teilenummer 32Z3801 DE AUSGABE 1
SICHERHEIT &
RICHTLINIEN
WICHTIGE SICHERHEITSHINWEISE
Beim Einsatz von Elektrogeräten sollten einige Grundmaßnahmen zur
Sicherheit befolgt werden, einschließlich der folgenden:
WARNUNG Zur Reduzierung des Risikos von Verbrennungen,
Elektroschock, Feuer, Verletzungen oder der Belastung durch
übermäßige Mikrowellen-Energie:
1. Lesen Sie die Anweisungen vollständig durch, bevor Sie das Gerät
benutzen.
2. Lesen und befolgen Sie die speziellen Anweisungen auf der
Einleitungsseite: “VORSICHTSMASSNAHMEN ZUR VERMEIDUNG EINER
MÖGLICHEN BELASTUNG DURCH ÜBERMÄSSIGE MIKROWELLENENERGIE”.
3. Dieses Gerät muss geerdet werden. Es muss mit einem
ordnungsgemäß geerdeten Anschluss verbunden werden. Siehe
“ELEKTROINSTALLATION”.
4. Befolgen Sie bei der Installation oder Aufstellung dieses Geräts stets
der mitgelieferten Installationsanleitung.
5. Einige Produkte wie ganze Eier und verschlossene Behälter — zum
Beispiel Gläser mit Drehverschluss — können explodieren und dürfen
in diesem Ofen nicht erhitzt werden.
6. Benutzen Sie dieses Gerät ausschließlich für seinen ausgewiesenen
Zweck, wie im Handbuch beschrieben. Verwenden Sie keine ätzenden
Chemikalien oder Dämpfe in diesem Gerät. Dieser Ofentyp wurde
speziell zum Erhitzen, Garen oder Trocknen von Speisen konzipiert.
Er wurde nicht für die Verwendung in der Industrie oder im Labor
entwickelt.
7. Dieses Gerät darf nicht von Kindern benutzt werden.
8. Dieses Gerät darf nicht benutzt werden, wenn ein Kabel oder ein
Stecker beschädigt ist, wenn es nicht ordnungsgemäß funktioniert
oder beschädigt wurde, bzw. zu Boden gefallen ist.
9. Dieses Gerät darf nur von einem qualizierten
Kundendiensttechniker gewartet werden. Wenden Sie sich an eine
befugte Fachhandlung in ihrer Nähe, um Ihr Gerät untersuchen,
reparieren oder nachregeln zu lassen.
10 Die Önungen des Geräts dürfen nicht verdeckt oder blockiert
werden, einschließlich der Lüftungsönungen/-lterlters und des
Dampfauslasses.
11 Lagern Sie dieses Gerät nicht im Außenbereich. Verwenden Sie
das Gerät niemals in der Nähe von Wasser – zum Beispiel neben einer
Spüle, in einem feuchten Keller, neben einem Schwimmbecken oder
dergleichen.
12. Das Kabel oder der Stecker dürfen niemals von Wasser bedeckt
werden.
13. Halten Sie das Kabel von erhitzten Oberächen fern.
14. Lassen Sie das Kabel nicht über die Ecke eines Tisches oder einer
Theke hängen.
15. Entweder:
i) Bei der Reinigung von Oberächen von Tür und Ofen, die beim
Schließen der Tür aufeinander treen, nutzen Sie ausschließlich milde,
nicht scheuernde Seifen oder Reinigungsmittel mit einem Schwamm
oder einem weichen Tuch.
ii) Wenn separate Anleitungen zur Reinigung existieren, siehe die
Anleitungen zur Reinigung der Türoberäche.
16. Zur Reduzierung der Brandgefahr im Garraum:
i) Speisen nicht übergaren. Überwachen Sie das Gerät gewissenhaft,
wenn sich Karton, Kunststo oder sonstige brennbare Materialien im
Page 53

Übersetzung der originalen Schnelles Anfangsführer
Teilenummer 32Z3801 DE AUSGABE 1
53
SICHERHEIT &
RICHTLINIEN
Garraum benden, um das Garen zu erleichtern.
ii) Entfernen Sie Bindedraht von Papier- oder Plastikhüllen, bevor Sie
diese in den Ofen setzen.
iii) Falls Materialien sich im Ofen entzünden, halten Sie die Tür
geschlossen, schalten Sie den Ofen aus und trennen Sie das Netzkabel
vom Stromnetz, oder drehen Sie die Sicherung heraus, bzw. trennen
die Stromversorgung mit dem Trennschalter.
iv) Benutzen Sie den Garraum nicht zur Aufbewahrung von
Gegenständen. Lassen Sie keine Papier- oder Kartonprodukte,
Garutensilien oder Speisen im Garraum, wenn das Gerät nicht in
Betrieb ist.
17. Flüssigkeiten wie Wasser, Kaee oder Tee können bis über den
Siedepunkt erhitzt werden, auch wenn dies nicht unbedingt sichtbar
wird. Nicht immer ist bei der Entnahme des Behälters aus dem Gerät
sichtbares Sprudeln oder Kochen der Flüssigkeit zu sehen DIES KANN
ZU SEHR HEISSEN FLÜSSIGKEITEN FÜHREN, DIE ÜBERKOCHEN, WENN
DER BEHÄLTER BERÜHRT WIRD ODER WENN EIN KÜCHENUTENSIL IN
DIE FLÜSSIGKEIT EINGETAUCHT WIRD.
18. BETREIBEN SIE DAS GERÄT NICHT mit der reinen
Mikrowellenfunktion oder der Kombifunktion, wenn sich keine
Speisen oder Flüssigkeiten im Ofen benden. Dies kann zu
Überhitzung führen und Schäden verursachen.
19. Entfernen Sie NIEMALS das Gehäuse des Ofens.
20. Entfernen Sie NIEMALS feste Teile aus dem Innenraum des Ofens.
21. Manipulieren Sie NIEMALS das Bedienfeld, die Tür, die Dichtungen
oder andere Ofenteile.
22. Blockieren Sie NIEMALS die Belüftungsönungen/-lter oder den
Dampfauslass.
23. Hängen Sie NIEMALS Geschirrtücher oder andere Tücher über
irgendein Teil des Ofens.
24. Wenn die Türdichtungen beschädigt werden, muss der Ofen von
einem befugten Kundendiensttechniker repariert werden.
25. Wenn das Netzkabel in irgendeiner Weise beschädigt wird, MUSS
es von einem befugten Kundendiensttechniker ersetzt werden.
26. Beim Umgang mit heißen Flüssigkeiten, Speisen und Behältern ist
höchste Vorsicht angebracht, um Verbrühungen und Verbrennungen
zu vermeiden.
27. Beim Erhitzen von Flüssigkeiten mit der Mikrowellenfunktion allein
oder mit der Kombifunktion sollte der Inhalt vor dem Erhitzen gerührt
werden, um ein plötzliches Hochkochen zu vermeiden.
28. Babyaschen und -gläschen sollten nicht mit diesem Gerät erhitzt
werden.
29. Benutzen Sie den Ofen niemals zum Erhitzen von Alkohol, z.B.
Brandy, Rum usw. Bei Lebensmittel und Getränke, die Alkohol
enthalten, besteht bei Überhitzung eine höhere Brandgefahr. Seien Sie
stets vorsichtig und lassen Sie den Ofen nie unbeaufsichtigt.
30. Versuchen Sie niemals, den Ofen zum Frittieren zu verwenden.
31. Das Gerät ist nicht zur Benutzung durch Kleinkinder, Kinder oder
gebrechliche Menschen gedacht, es sei denn, die Benutzung des
Geräts wird überwacht.
32. Kleinkinder und Kinder sollten beaufsichtigt werden, so dass diese
auf keinen Fall mit dem Gerät spielen.
DIESE ANLEITUNG SPEICHERN
Page 54

54
Übersetzung der originalen Schnelles Anfangsführer
Teilenummer 32Z3801 DE AUSGABE 1
SICHERHEIT &
RICHTLINIEN
ZU BEACHTENDE VORSICHTSMASSNAHMEN
1. Lesen Sie diese Anleitung, bevor Sie Ihren Ofen benutzen.
2. Wie bei allen Elektrogeräten sollten die Elektroanschlüsse
mindestens einmal pro Jahr überprüft werden.
3. Der Innenraum des Ofens sowie die Türdichtungen sollten häug
gereinigt werden. Dabei sind die Anleitungen im Abschnitt Reinigung
zu befolgen, sonst können Gefahrensituationen entstehen.
4. Schalten Sie den Ofen aus, nachdem alle Garvorgänge für diesen
Tag abgeschlossen sind.
5. Der Ofen darf nicht zum Trocknen von Wäsche benutzt werden.
6. Wie bei jedem Gerät zum Garen von Speisen sollte darauf geachtet
werden, dass die Gegenstände im Ofen kein Feuer fangen.
7. Speisen in brennbaren Kunststobehältern oder Kartons sollten in
mikrowellen-/ backofengeeignete Behältnisse gegeben werden, um
die Gefahr der Entzündung auszuschließen.
Wenn Rauch zu sehen ist:
Schalten Sie das Gerät ab ●
Trennen Sie es von der Stromversorgung ●
Halten Sie die Tür geschlossen, um die Flammen zu ●
ersticken.
8. Die Verpackungen sollten entfernt werden, wenn Umluft- oder
Kombi-Funktionen genutzt werden.
9. Eier in der Schale und ganze hartgekochte Eier dürfen nicht im Ofen
erhitzt werden. Sie könnten explodieren.
10. Lebensmittel in der Schale, z.B. Kartoeln, Äpfel, Würste usw.
sollten vor dem Erhitzen eingestochen werden.
11. Lebensmittel dürfen nicht in einem völlig geschlossenen Behälter
erhitzt werden, da dieser durch die Dampfentwicklung explodieren
kann.
12. Überschüssiges Fatt sollte während des Röstens [roasting] und vor
dem Heben von schweren Behältern aus dem Ofen entfernt werden.
13. Im Falle von Glasbruch oder -zersplitterung im Ofen überprüfen Sie
mit größter Sorgfalt, ob die Speisen völlig frei von Glasteilchen sind.
Wenn irgendein Zweifel besteht, entsorgen Sie bitte jegliche Speisen,
die sich zur Zeit des Glasbruches im Ofen befanden.
14. Der Ofen darf NIEMALS BENUTZT WERDEN, wenn: sich
ein Gegenstand in der Tür verfangen hat, die Tür nicht richtig
schließt oder beschädigt ist, wenn Scharnier, Verriegelung oder
Dichtungsoberäche beschädigt sind oder wenn sich keine Speisen
im Ofen benden.
Page 55

Übersetzung der originalen Schnelles Anfangsführer
Teilenummer 32Z3801 DE AUSGABE 1
55
SICHERHEIT &
RICHTLINIEN
GEEIGNETE GARUTENSILIEN
Die Anweisungen des Herstellers sollten überprüft werden, um bei jedem Garvorgang die Tauglichkeit von einzelnen Behältern und anderen
Utensilien zu bestimmen. Die folgende Auistung gibt eine umfassende Leitlinie:
Hitzebeständige Behälter
Gehärtetes Glas
Glasemaille
Töpferware
(Porzellan/ Steingut usw.)
Benutzen Sie keine Gegenstände mit Metalldekoration.
Metall- und Folienbleche
Metallbleche
BENUTZEN SIE KEINE BEHÄLTER AUS METALL ODER FOLIE
Metallbleche dürfen nur benutzt werden, wenn diese auf die
FORM AUS GLASEMAILLE im Garraum gesetzt werden.
Kunststobehälter
(bis zu bestimmten Temperaturen) sind jetzt erhältlich.
Kunststobehälter für Backofen/Mikrowelle
Konsultieren Sie vor der Benutzung die Anleitung des
Herstellers.
Einwegartikel
VERWENDEN SIE KEINE
Entammbaren Gegenstände (Papier, Karton usw.)
Sonstige Utensilien
Plastikverschlussbänder
Besteck
Temperatursonden
Kein Küchenutensil darf in der Speise verbleiben, wenn diese
im Ofen gegart wird.
Page 56

56
Übersetzung der originalen Schnelles Anfangsführer
Teilenummer 32Z3801 DE AUSGABE 1
PRODUKT-
BESCHREIBUNGEN
HAUPTMERKMALE
AN/AUS1
Durch Anschalten wird die leuchtende easyToUCH-Bildschirmanzeige
zur Bedienung des Ofens eingeschaltet. Hinweis: durch Drücken der
AUS-Taste wird der Ofen nicht von der Stromversorgung getrennt.
2
easyToUCH-BILSCHIRMSTEUERUNG
Für weitere Angaben gehen Sie auf ‘BETRIEB & STEUERUNG’.
3
TYPENSCHILD
Das Typenschild bendet sich auf der Rückseite des Ofens und gibt die
Seriennummer, Modell & Leistungsdaten an.
4
Verbindungsmenü
Unter dem Merrychef-Logo bendet sich ein USB-Anschluss, mit dem
die im Ofen gespeicherten Programme geändert werden können (Für
zusätzliche Informationen zur Aktualisierung der Ofenprogramme
siehe unter ‘USB MenuConnect’, Abschnitt Betrieb & Steuerung).
5
LÜFTUNGSÖFFNUNGEN
Die Luft zur Kühlung der inneren Bestandteile und der Dampf aus
dem Garraum werden durch Lüftungsönungen auf der Rückseite
des Ofens und der Seitenwand beim Modell e5 ausgeleitet. Die
Lüftungsönungen dürfen nicht verstopft sein und sie verhindern den
Austritt von Mikrowellenenergie nach außen.
6
LUFTEINLASSFILTER
Der Luftlter bendet sich auf der unteren Vorderseite des Ofens
und ist Teil des Belüftungssystems. Er darf nicht verstopft sein und
muss täglich gesäubert werden, wie unter ‘Reinigung & Wartung’
beschrieben. Hinweis: Der Ofen arbeitet nur mit eingesetztem Filter.
7
TÜRGRIFF
Zum Önen des Ofens muss der starre Hebelgri nach unten und vom
Ofen weg gezogen werden.
8
OFENTÜR
Diese präzisionsgefertigte Energiesperrschicht besteht aus drei
Mikrowellen-Sicherheitsverriegelungen. Die Tür muss sauber gehalten
werden (siehe ‘REINIGUNG’) und darf nicht als Auage für schwere
Gegenstände genutzt werden.
9
TÜRABDICHTUNGEN
Die Abdichtungen garantieren eine vollständige Isolierung
der Tür nach außen. Die Dichtungen müssen sauber gehalten
werden und regelmäßig auf Schäden untersucht werden. Sobald
Verschleißerscheinungen auftreten, sollten sie durch einen von
Merrychef zugelassenen Kundendiensttechniker ausgetauscht
werden.
10
UMLUFTGEBLÄSE, FETTFILTER & KATALYSATOR (modellabhängig)
Der metallische Grillfettlter, der das Umlaufgebläse abdeckt, muss
von Verschmutzungen jeglicher Art sauber gehalten werden. Mit
besonderer Sorgfalt sollte die Säuberung dieses Ofenbereiches
erfolgen, unter Berücksichtigung der unterschiedlichen
Ofenanforderungen, die in dieser Bedienungsanleitung im Abschnitt
‘Reinigung & Wartung’ erläutert werden.
11
OFENGARRAUM
Der Ofengarraum ist aus Edelstahl und muss gemäß den
Reinigungsanweisungen im Abschnitt ‘Reinigung & Wartung’ sauber
gehalten werden.
Page 57

Übersetzung der originalen Schnelles Anfangsführer
Teilenummer 32Z3801 DE AUSGABE 1
57
PRODUKT-
BESCHREIBUNGEN
3
e3
e4
e5
1
2 3
11
10
4
5
9
8
7
11
10
9
8
2
1
6
1 2 3
11
10
4
5
9
8
7
4
5
6
7
6
Page 58

58
Übersetzung der originalen Schnelles Anfangsführer
Teilenummer 32Z3801 DE AUSGABE 1
PRODUKT-
BESCHREIBUNGEN
TECHNISCHE SPEZIFIKATIONEN
Spezikationen
Beschreibung Einheit
Touchscreensteuerungen Programme
Umgebungstemperatur °C
Außenmaße HxBxT mm
Außenmaße HxBxT Zoll
Innenmaße HxBxT mm
Innenmaße HxBxT Zoll
Garraum Liter
Mikrowellenausgangsleistung Watt
Umluftausgangsleistung kW
Stromversorgung Hz
Stromversorgung kW
Ofenleergewicht kg
Geräuschpegel dB
Stapeln (mit Ausrüstung) Ofen
e3
1024
<40
551x598x622
21.7x23.5x24.5
319x332x325
12.6x13.1x12.8
34.4 (2113)
700/1000
3 (3/1.5 EE)
50 & 60
3(EE) 4.3(XE) 4.7(XX)
62.5 (138)
<70
0
e4
1024
<40
591x584x750
23.3x23.0x29.5
218x375x312
8.6x14.8x12.3
25.5 (1566)
1500
3.2
50 & 60
7.0
82.5 (182)
<70
1
e5
1024
<40
642x711x705
25.3x28.0x27.8
258.4x495x363.5
10.17x19.49x14.31
44.4 (2730)
1400
3.2
50 & 60
6.2
94.0 (207)
<70
0
Page 59

Übersetzung der originalen Schnelles Anfangsführer
Teilenummer 32Z3801 DE AUSGABE 1
59
PRODUKT-
BESCHREIBUNGEN
EG-Konformitätserklärung
Hersteller
1) Merr ychef Limited, 2) Viscount Catering Limited
Station Road West, Provincial Park
Ash Vale Nether Lane
Aldershot Eccleseld
Hampshire Sheeld
GU12 5XA S35 9ZX
Angaben zur Ausstattung
Generische Modellnummern eikon e3, eikon e4, eikon e5
Beschreibung Mikrowellen-Kombigerät für die gewerbliche Nutzung
Erklärung der Konformität mit Richtlinien und Normen
Der Hersteller erklärt hiermit, dass seine oben aufgelisteten Mikrowellen-Kombigeräte für
die gewerbliche Nutzung den folgenden Richtlinien und Normen entsprechen.
Konformität mit den Richtlinien
Die Mikrowellen-Kombigeräte für die gewerbliche Nutzung erfüllen die relevanten
Bestimmungen der folgenden europäischen Richtlinien
EWG 2004/108/EG LVD 2006/95/EG RoHS 2002/95/EG MD 2006/42/EG
Erfüllte harmonisierte Normen
Die Mikrowellen-Kombigeräte für die gewerbliche Nutzung erfüllen die relevanten
Bestimmungen der folgenden europäischen Richtlinien
Qualitätssicherung und Umweltschutz
Merrychef Limited und Viscount Catering wenden ein zertiziertes
Qualitätssicherungssystem gemäß EN ISO 9001:2008 an und Viscount Catering wendet ein
zertiziertes Umweltschutzprogramm gemäß EN ISO 14001 an.
Großbritannien Großbritannien
EN 60335-2-90: 2006
•
EN 60335-1: 2002+A11+A1+A12+A2+A13
•
EN 62233:2008
•
EN 55014-2:1997 einschl. A2:2008 gemäß den Anforderungen von Kategorie IV
•
Elektrostatische Entladung IEC 61000-4-2:1995
Abgestrahlte HF-Interferenz IEC 61000-4-3:1996
Schnelle Transienten/ Gleichtakt AC-Anschluss IEC 61000-4-4:1995
Stoßspannung, AC-Anschluss IEC 61000-4-5:1995
HF-Strom/ Gleichtakt AC-Anschluss IEC 61000-4-6:1996
Netzseitige Spannungsumbrüche & -unterbrechungen IEC 61000-4-11:1994
Flackern IEC 61000-3-11:2000
•
EN 55011:2007 Klassizierung: Klasse A, Gruppe 2
•
Leitungsgeführte Störspannung Tabelle 2a
Abgestrahlte Störung, magnetisches Feld* Tabelle 5a
Abgestrahlte Störung, elektrisches Feld Tabelle 5a
Abgestrahlte Störung, elektrisches Feld* Tabellen 6, 7 und 8
AS/NZS CISPR 11
•
Abgestrahlte Störung CISPR 11:2003:A1:2004
Leitungsgeführte Störung CISPR 11:2003:A1:2004
Seriennummer (Tyenschild):
Seriennummer: MM JJ SITE SERIAL
d.h. 06 10 2070 12345
(0610207012345)
Ofen wurde hergestellt im
Juni 2010 in Sheeld (UK),
Produktionsnummer 12345.
Modell-Nummer: MODELL
UMLUFT MIKROWELLE SPANNUNG
HERTZ LEITUNG STECKER
KOMMUNIKATION VERSION KUNDE/
ZUBEHÖR LAND
i.e. e4C S V 30 5 H E U 1 GM EU
(e4CSV305HEU1GMEU)
Modell e4C, 3200W, 1500W, 230V,
50Hz, L+N+E(4mm EU), 3-poliger
Stecker, USB, 1, Allgemeiner Markt,
Europäisch.
Erfüllung:
EU-Richtlinien
EMC 2004/108/EG
LVD 2006/95/EG
RoHS 2002/95/EG
MD 2006/42/EG
Page 60

60
Übersetzung der originalen Schnelles Anfangsführer
Teilenummer 32Z3801 DE AUSGABE 1
INSTALLATION
STANDORT UND AUFSTELLUNG DES OFENS
Wählen Sie einen Standort in ausreichender Entfernung von großen
Wärmequellen.
BESCHREIBUNGEN
Stellen Sie das Gerät NIEMALS SO AUF, dass heiße Luft von Fritteusen,
Grills, Brätern usw eindringen kann.
PRODUKT-
Wenn das Gerät neben einer Heizplatte oder einem Herd aufgestellt
wird, muss eine Hitzbarriere in Höhe des Ofens errichtet werden.
Stellen Sie den Ofen auf eine dauerhaft rutschfeste/nichtentammbare ache Oberäche, die EBEN, STABIL und STARK genug
ist, um den Ofen mit Inhalt zu tragen.
Schaen Sie einen Mindestabstand (A) von 50mm um den Ofen
herum, so dass die heiße Luft entweichen kann.
Sorgen Sie für ausreichend Spielraum (B), vor dem Ofen, um die Tür
weit önen zu können.
Der Lufteinzug bendet sich unten auf der Vorderseite des
Ofens (1) und es ist wichtig, dass die Luftströmung so kalt wie
möglich und nicht von anderen Geräten wie Heizplatten, Herden,
Fritteusen, Grills und Brätern aufgeheizt wird. Dies wirkt sich
nachteilig auf Lebensdauer und Leistung des Ofens aus.
Bringen Sie keine Aufkleber/Kennzeichnungen am Ofen an, außer den
vom Hersteller angebrachten oder zugelassenen.
Der Ofen funktioniert erst, wenn der LUFTFILTER
ordnungsgemäß eingesetzt wurde.
GEFAHR!
DIESES GERÄT MUSS GEERDET WERDEN.
GESCHIEHT DIES NICHT, BESTEHT
ELEKTROSCHOCK ODER TODESGEFAHR.
Der Ofen muss mit einem seperaten elektrischen Anschluss
verbunden werden, der von einem qualizierten und
zugelassenen Elektriker eingerichtet wurde.
Für jeden installierten Ofen muss ein geeigneter Trennschalter
zur Verfügung stehen, der an beiden Polen über ein
Kontaktspiel von 3mm verfügt.
Wenn Sie nicht genau über ihre Stromversorgung Bescheid
wissen, wenden Sie sich bitte an einen qualizierten Elektriker.
A
HANDHABUNG & LAGERUNG:
Befolgen Sie beim Wechseln des Standorts des Ofens stets die
nationalen und lokalen Bestimmungen zum Heben und Bewegen
schwerer Gegenstände. Benutzen Sie nicht den Ofen-Türgri, um Ofen
anzuheben.
Wenn der Ofen nicht benutzt wird, trennen Sie das Gerät vom
Stromnetz und bewahren Sie den Ofen an einem trockenen kühlen
Ort auf. Die Öfen dürfen nicht aufeinander gestapelt werden.
A
1
A
B
Page 61

Übersetzung der originalen Schnelles Anfangsführer
Teilenummer 32Z3801 DE AUSGABE 1
61
SCHNELLSTARTANLEITUNG: SCHNELLSERVICE OFEN
IN BETRIEB NEHMEN
1. Schalten Sie den Ofen an;
Führen Sie alle betreenden Sicherheitsprüfungen durch
und vergewissern Sie sich, dass der Ofen sauber und leer ist,
bevor Sie die Einschalttaste am Ofen betätigen.
2. Der easyToUCH-Bildschirm leuchtet auf und zeigt kurz die
Seriennummer und die Ofenkenndaten an. Berühren Sie den
Bildschirm einmal leicht, um die Anzeige zu halten, berühren
Sie ihn nochmals, um fortzufahren.
3. Wenn der Ofen zwei oder mehrere voreingestellte
Vorheiztemperaturen besitzt, wird die Wahlmöglichkeit
angezeigt.
Pfeile zum Scrollen am unteren Bildschirmrand zeigen, dass
mehrere Temperaturauswahlmöglichkeiten existieren, die
nicht alle auf dem Bildschirm angezeigt werden. Nutzen Sie
diese Pfeile, Wenn erforderlich, und wählen Sie dann die
nötige Temperatur aus, um den Ofen vorzuheizen.
4. Während des Vorheizens wird auf dem Bildschirm der
Fortschritt angezeigt, der sich zum Aufheizen des Ofens auf
die festgelegte Temperatur vollzieht. (Zum Anhalten der
Ofenvorheizung drücken Sie auf das rote ‘X’-symbol.)
5. Der Ofen ist bereits einsatzbereit, wenn das ‘KOCHBUCH’
angezeigt wird.
21
3
5
KOCHBUCH ANZEIGE
ANZEIGEN ALLER GARPROGRAMME (Optional)
ZEIGT PROGRAMMGRUPPEN AN
FAVORITEN (Optional)
PROGRAMMGRUPPE
Jede Gruppe enthält eine Reihe von
Garprogrammen.
4
HALT/CANCEL
STEUERUNG
BEDIENUNG &
OFENTEMPERATUR ÄNDERN (Optional)
Page 62

62
Übersetzung der originalen Schnelles Anfangsführer
Teilenummer 32Z3801 DE AUSGABE 1
BEDIENUNG &
STEUERUNG
EIN GARPROGRAMM VERWENDEN
Wenden Sie alle notwendigen
Vorsichtsmaßnahmen an, um sich nicht zu
verbrennen und önen Sie die Ofentür, um
die Speise in den heißen Ofen zu stellen
und schließen Sie die Tür.
1. Wählen Sie eine Programmgruppe aus, z. B. ‘BURGERS’, um
die einzelnen Garprogramme anzuzeigen zu lassen.
2. Wählen Sie ein Garprogramm, um den Vorgang zu
beginnen, z. B. 2 BURGERS.
3. Folgen Sie den Anweisungen auf dem Bildschirm.
4. Berühren Sie das grüne Häkchen um den Garvorgang zu
starten.
Die Garzeitschaltuhr zählt bei jeder Programmstufe runter.
5. Wenn das Programm endet wird normalerweise ein roter
Balken angezeigt und es ertönt ein Ton - önen Sie die
Ofentür oder drücken Sie das rote ‘X’, um zum Garprogramm
zurückzukehren.
Hinweis; durch das Önen der Ofentür während des
Garprogramms wird der Vorgang gestoppt und eine Warnung
angezeigt. Durch Schließen der Ofentür kann der Benutzer das
Garprogramm fortsetzen oder abbrechen.
1
4
2
5
3
PROGRAMMSTUFE
Page 63

Übersetzung der originalen Schnelles Anfangsführer
Teilenummer 32Z3801 DE AUSGABE 1
63
BEDIENUNG &
STEUERUNG
BETRIEBSLEITFADEN: VOLLSTÄNDIGER SERVICEMODUS
easyToUCH HAUPTMENÜ & TASTATURBILDSCHIRM
HAUPTMENÜBILDSCHIRM:
1. Der ENTWICKLUNGSMODUS ermöglicht mehrstuge
Garprogramme einzugeben, das dann unter einem
bestimmten Namen und Symbol abgespeichert und
wiederverwendet werden kann.
2. DRÜCKEN & LOS ermöglicht den schnellen Zugri auf
bereits abgespeicherte Garprogramme.
3. KOCHBUCH beinhaltet Ofengarprogramme. Es zeigt
Favoriten, Garprogrammgruppen und eine vollständige Liste
aller verfügbaren Garprogramme an.
4. REINIGUNG/TEMPERATUR ÄNDERN ermöglicht eine
Änderung der Ofentemperatur und die Vorbereitung
des Ofens zur Reinigung mit zusätzlich angezeigten
Hilfestellungen, die durch den Reinigungsvorgang führen.
5. EINSTELLUNGEN Hier können Ofeneinstellungen
und -funktionen vorgenommen, Zeit und Sprache
eingestellt, Garprogramme geladen sowie Service- und
Wartungszwecke genutzt werden.
6. TASTATURBILDSCHIRM dient zur Eingabe eines Passworts,
um Programmdaten einzupegen und beschränkt u.U. den
Benutzerzugang zu einigen Funktionen.
ENTWICKLUNGSMODUS
1
2
MENÜ-SHORTCUT
3
KOCHBUCH
4
REINIGUNG/TEMPERATUR
ÄNDERN
5
EINSTELLUNGEN
Page 64

64
Übersetzung der originalen Schnelles Anfangsführer
Teilenummer 32Z3801 DE AUSGABE 1
BEDIENUNG &
STEUERUNG
DRÜCKEN & LOS
Starten eines Kochprogramms im “Drücken & Los”
Menü.
1. Wählen Sie ‘DRÜCKEN & LOS’ im Hauptmenü aus.
2. Wählen Sie die zum Garen benötigte Komponente.
3. Auf dem Bildschirm erscheint die Temperatur, die Gardauer,
die Mikrowellenleistung und die Lüfterdrehzahl, während die
Zeitschaltuhr rückwärts läuft. Die Leiste mit der Zeitschaltuhr
wird rot, wenn der Garvorgang abgeschlossen ist.
Eines der im ‘DRÜCKEN & LOS’ Menü angezeigten
Kochprogramme auswählen.
1. Nachdem Sie im Hauptmenü ‘DRÜCKEN & LOS’gedrückt
haben, wählen Sie nun das Symbol Bearbeiten.
2. Zwei Listen werden angezeigt, die ‘DRÜCKEN & LOS’
Menükomponenten werden in der oberen Liste angezeigt
und in der unteren Liste werden andere auswählbare
Menükomponenten angezeigt. Mit den Pfeilen auf der rechten
Seite des Bildschirms kann man in beiden Listen hoch- und
runterscrollen.
3. Wählen Sie eine Komponente aus und entscheiden Sie, ob Sie
die Reihenfolge im Menü ändern oder ob Sie die Komponente
in die untere Liste verschieben möchten.
4. Wählen Sie eine Komponente aus, die Sie in die obere Liste
verschieben und somit im “DRÜCKEN & LOS” Menü sichtbar
machen.
5. Wenn Sie fertig sind, drücken Sie die Rückstelltaste, um
wieder ins Hauptmenü zu gelangen.
1 2 3
1
Ändern der
Reihenfolge der
ausgewählten
Komponente
in dem
“Drücken & Los”
Anzeigebildschirm.
Bewegen Sie
eine ausgewählte
Komponente
zum bzw. weg
vom “Drücken &
Los” Bildschirm.
Scrollen Sie die
Liste nach oben
oder unten.
2
5
3
4
Page 65

Übersetzung der originalen Schnelles Anfangsführer
Teilenummer 32Z3801 DE AUSGABE 1
65
BEDIENUNG &
STEUERUNG
VERWENDEN EINES KOCHBUCH-PROGRAMMS
WARNUNG: VERGEWISSERN SIE SICH,
DASS SICH EIN SPEISEPRODUKT
IM OFEN BEFINDET, BEVOR SIE EIN
GARPROGRAMM STARTEN.
Finden des gewünschten Programms im Kochbuch.
1. Wählen Sie ‘KOCHBUCH’ im Hauptmenü.
2. Drücken Sie das Symbol ALLE MENÜS.
3. Scrollen mit den Pfeilen nach unten/oben, um das
entsprechende Programm zu nden.
HINWEIS: Wenn ein Bild rot umrahmt ist, ist die
Ofentemperatur zu hoch bzw. zu niedrig für das
jeweilige Rezept eingestellt. Schauen Sie dafür unter
‘OFENTEMPERATUR ÄNDERN’.
Nachdem Sie alle nötigen Vorkehrungen getroen haben,
um Brandverletzungen auszuschließen, stellen Sie die
Speise in den heißen Ofengarraum und schließen Sie die
Ofentür.
WARNUNG:
GEFAHRENQUELLE DURCH HEISSE
OBERFLÄCHE
4. Wählen Sie das entsprechende Garprogramm aus, um mit
dem Garvorgang zu beginnen.
Für das Beispiel ‘1 BURGER’.
5. Entweder beginnt das Programm sofort und zeigt
die Countdown-Zeitschaltuhr an, oder es wird erst eine
1
4
2
5
3
6
Page 66

66
Übersetzung der originalen Schnelles Anfangsführer
Teilenummer 32Z3801 DE AUSGABE 1
Anweisung angezeigt; folgen Sie der Answeisung und
drücken Sie dann auf OK, um den Garvorgang zu beginnen.
Wenn die Ofentür nicht innerhalb von 30 Sekunden geönet
wird, erscheint eine Warnmeldung.
6. Die Garzeitschaltuhr zählt auf Null herunter und es ertönt
ein Signal, damit der Benutzer am Ende der Garstufe bzw.
des Garprogramms wieder eingreift.
Sobald der Garvorgang abgeschlossen ist, önen Sie die
Ofentür, um das Essen herauszunehmen und die Anzeige
kehrt auf den ‘KOCHBUCH’ Bildschirm zurück.
Hinweis; Wird während des Garvorgangs die Ofentür
geönet, wird das Garprogramm gestoppt und eine Warnung
BEDIENUNG &
STEUERUNG
angezeigt. Nach Schließen der Ofentür kann der Benutzer das
Garprogramm fortsetzen oder abbrechen.
Um die Ofentemperatur während des Garens zu überprüfen,
tippen Sie leicht auf die angezeigte Temperatur und es wird die
Ofengarraumtemperatur mit einem Sternchen angezeigt.
ÄNDERUNG DER OFENTEMPERATUR
1. Notieren Sie sich die erforderliche Temperatur für das
Rezept und wählen Sie OK.
2. Wählen Sie das Temperatursymbol.
3. Ein Sternchen neben der Zahl zeigt die momentane
Ofentemperatur an, wählen Sie die erforderliche Temperatur
für das Rezept. Wenn der Ofen die erforderliche Temperatur
erreicht hat, fahren Sie mit der Auswahl des ‘KOCHBUCHS’ in
Schritt 1 fort.
1 2 3
Page 67

Übersetzung der originalen Schnelles Anfangsführer
Teilenummer 32Z3801 DE AUSGABE 1
67
KÜHLEN SIE DEN OFEN AB, BEVOR SIE IHN REINIGEN
Ofen abkühlen
WICHTIG: der Ofen muss unten abgekühlt werden, bevor die
Reinigungsprozesse durchgeführt werden.
1. Wählen Sie im Vollständigen Servicemodus das Symbol
REINIGUNG aus dem Hauptmenü.
2. Wählen Sie im Vollständigen Servicemodus oder im Schnellen
Servicemodus das blaue Thermometersymbol aus, um die
Heizung abzuschalten und die Kühlung zu starten.
3. Nachdem alle nötigen Vorkehrungen durchgeführt sind, stellen
Sie einen passenden vollen Behälter mit Eis in den Ofengarraum.
Wählen Sie das Symbol OK, um fortzufahren.
4. Der Kühlprozess wird angezeigt und dauert etwa 30 Minuten.
5. Nun ist der Ofen bereit zur Reinigung. Drücken Sie OK auf dem
Bildschirm nach Beendigung jedes Schrittes.
Vor der Ofenreinigung
Damit der Ofen mit Höchstleistung arbeitet, müssen der Garraum,
die Tür, der Türlter und der Fettlter sauber gehalten werden.
Durch die tägliche Reingiung werden die erforderlichen
Hygienestandards sichergestellt und es wird für eine lange
Haltbarkeit sowie Leistungsfähigkeit des Ofens gesorgt.
1 2
3
4
WARTUNG
REINIGUNG &
Page 68

68
Übersetzung der originalen Schnelles Anfangsführer
Teilenummer 32Z3801 DE AUSGABE 1
REINIGUNG &
WARTUNG
e3
Erforderliche Ausrüstung (nicht im Lieferumfang enthalten):
nicht-ätzender, markengeschützter Ofenreiniger, hitzebeständige
Handschuhe, Gummischutzhandschuhe, nichtscheuernder
Scheuerlappen aus Nylon, Reinigungstücher, Augenschutz und
Staubmaske (optional).
ACHTUNG: TRAGEN SIE BEI DER REINIGUNG DES OFENS
SCHUTZHANDSCHUHE.
Benutzen Sie NIEMALS scharfe Gegenstände oder aggressive
Scheuermittel zur Reinigung irgendeines Teils des Ofens.
WARNUNG: VERWENDEN SIE KEINE
ÄTZENDEN REINIGUNGSMITTEL AUF
IRGENDEINEM TEIL DES OFENS ODER DES
Beginnen Sie die Reinigung erst, wenn der ABKÜHLPROZESS
beendet ist und der Ofen und alle Bestandteile abgekühlt sind.
GARRAUMS. DIES FÜHRT ZU PERMANENTEN
BESCHÄDIGUNGEN DER KATALYSATOREN
REINIGUNGSANWEISUNGEN bei kaltem Ofen, Modell e3
ENTFERNEN & REINIGEN der Ofenteile:
1. Entfernen Sie den Luftlter im unteren Teil des Ofens.
2. Önen Sie die Ofentür und heben Sie den Drehtisch heraus.
3. Bei Öfen mit Katalysator: Önen Sie die Ofentür und lösen Sie die
Spannverschlüsse, um den Katalysator bei Bedarf bzw. mindestens
einmal im Monat zu entnehmen.
Waschen Sie alle Teile in warmen Seifenwasser. Verwenden Sie dabei
ein sauberes Tuch und ausreichend sauberes und warmes Wasser.
Trocknen Sie danach alle Teile mit einem frischen, sauberen Tuch.
1
BENUTZEN SIE KEINE WERKZEUGE
2
3
Page 69

Übersetzung der originalen Schnelles Anfangsführer
Teilenummer 32Z3801 DE AUSGABE 1
69
REINIGUNG &
WARTUNG
e4
e5
REINIGUNGSANWEISUNGEN bei kaltem Ofen, Modell e4
REINIGUNGSANWEISUNGEN bei kaltem Ofen, Modell e5
ENTFERNEN & REINIGEN der Ofenteile:
1. Entfernen Sie den Luftlter im unteren Teil des Ofens.
2. Önen Sie die Ofentür, entnehmen Sie die Garform, ziehen Sie den
Fettlter mit dem Gri nach unten und nehmen Sie ihn heraus.
3. Lösen Sie die Spannverschlüsse und sichern Sie dabei die obere
Impinger-Platte.
4. Entfernen Sie Spitzenimpinger Platte und heben Sie untere
impinger Platte heraus.
Waschen Sie alle Teile in warmen Seifenwasser. Verwenden Sie dabei
ein sauberes Tuch und ausreichend sauberes und warmes Wasser.
Trocknen Sie danach alle Teile mit einem frischen, sauberen Tuch.
1 2
3 4
ENTFERNEN & REINIGEN der Ofenteile:
1. Entfernen Sie den Luftlter im unteren Teil des Ofens.
2. Önen Sie die Ofentür, um alle Garbleche und -formen
herauszunehmen.
Waschen Sie alle Teile in warmen Seifenwasser. Verwenden Sie dabei
ein sauberes Tuch und ausreichend sauberes und warmes Wasser.
Trocknen Sie danach alle Teile mit einem frischen, sauberen Tuch.
1
2
Page 70

70
Übersetzung der originalen Schnelles Anfangsführer
Teilenummer 32Z3801 DE AUSGABE 1
REINIGUNG &
WARTUNG
REINIGUNG DES OFENs:
1. Entfernen Sie Garrückstände mit wegwerfbaren
Papierwischtüchern.
Verwenden Sie eine trockene Bürste, um Essensreste zwischen
dem Ofenboden und die Innenseite der Ofentür zu entfernen.
2. Tragen Sie Gummischutzhandschuhe und eine
Schutzbrille, sprühen Sie vorsichtig einen nicht-ätzenden und
markengeschützten Ofenreiniger auf alle Innenoberächen des
Ofens außer der Türabdichtung (A).
Sprühen Sie NICHT direkt in die Lüfterönung auf der
Rückinnenwandseite des Ofens.
3. Bei schwer zugänglichen Stellen lassen Sie den Reiniger bei
geöneter Ofentür 10 Minuten einwirken.
Benutzen Sie ein abriebsfestes Nylon scheuern Auage/
Schwamm, um den Hohlraum, Dach und das Innere der Tür zu
säubern. Scheuern Sie nicht die Proldichtung oder verwenden
Sie metallische Reinigungsapparate.
4. Waschen Sie alle Teile mit einem sauberen Tuch und in warmen,
sauberen Seifenwasser ab und trocknen Sie danach alle Teile mit
einem frischen, sauberen Tuch oder Handtuch.
Setzen Sie alle gesäuberten Ofenteile wieder ein.
Schließen Sie die Ofentür und wischen Sie die Außenseite des
Ofens mit einem feuchten Lappen ab.
1
2
3
A
4
BENUTZEN SIE DEN OFEN NICHT OHNE
EINGEBAUTEN SAUBEREN LUFTFILTER.
Page 71

Übersetzung der originalen Schnelles Anfangsführer
Teilenummer 32Z3801 DE AUSGABE 1
71
REINIGUNG &
WARTUNG
ANWENDEN DES OFENSCHUTZMITTELS:
1. Nur bei sauberen Ofen anwenden. Den
markengeschützten Ofenschutz auf einen Schwamm
aufsprühen.
2. Tragen Sie den Ofenschutz dünn auf alle
Innenoberächen des Ofens auf.
3. Tragen Sie den Ofenschutz dünn auf die Innenoberäche
der Ofentür, aber nicht auf die Türdichtung auf.
Schalten Sie den Ofen ein und wärmen Sie ihn vor. Sobald
der Ofen die Betriebstemperatur erreicht hat, dauert es noch
etwa 30 Minuten, bis der Ofenschutz getrocknet ist.
Hinweis: Der Ofenschutz wird hellbraun, wenn er
ausgehärtet ist.
1
2
3
Page 72

72
Übersetzung der originalen Schnelles Anfangsführer
Teilenummer 32Z3801 DE AUSGABE 1
MÖGLICHE STÖRUNGEN
Auch wenn wir alles
unternehmen, damit
Ihr Ofen weiterhin
absolut einwandfrei
funktioniert, gehen
Sie die nachstehende
Liste an Störfällen
zur Lösungsndung
durch, bevor Sie Ihren
Kundendiensttechniker
kontaktieren.
PROBLEM MÖGLICHE URSACHE LÖSUNG
Überprüfen Sie, ob ein Stromausfall, bzw.
eine Stromunterbrechung vorliegt.
Der Ofen funktioniert nicht und der
Anzeigebildschirm ist leer.
Einige Bildschirm-Steuerungsfunktionen
arbeiten nicht korrekt.
Warnmeldung zeigt an, dass die Tür
geönet ist.
Warnmeldung zeigt an, dass der Luftlter
entfernt wurde.
Der Ofen gart die Speisen nicht richtig.
Der Ofen beendet den Garvorgang
vorzeitig.
Anzeige zeigt Fehlercode. Fehlfunktion des Ofens
Der Ofen ist nicht an die Stromversorgung
angeschlossen.
Unbefugter Zugang Wenden Sie sich an den befugten Benutzer.
Ofentür nicht geschlossen
Luftlter fehlt oder wurde nicht
ordnungsgemäß eingesetzt
Ofen ist nicht sauber
Nahrung nicht bei der korrekten
Temperatur
Modiziertes oder falsches Programm
Speisen eingewickelt
Speise zu früh entnommen
Ofentür geönet
Kein Luftlter oder falsch eingesetzter
Luftlter
Überhitzung des Ofens
Überprüfen Sie, ob der Trennschalter
eingeschaltet ist und ob der Ofen
ordnungsgemäß mit der Stromversorgung
verbunden ist.
Überprüfen Sie, ob der Ofen eingeschaltet
ist.
Entfernen Sie jegliche Hindernisse und
schließen Sie die Ofentür.
Setzen Sie den Luftlter korrekt ein.
Reinigen Sie den Ofen (siehe Reinigung).
Nutzen Sie das richtige Garprogramm.
Entpacken Sie die Speisen zum Garen in
der Mikrowelle
Überprüfen Sie, ob all Garstufen
ordnungsgemäß ausgeführt wurden.
Schließen Sie die Ofentür.
Setzen Sie den Luftlter korrekt ein.
Lassen Sie den Ofen abkühlen.
Überprüfen Sie die Lüftungsönungen auf
Verstopfungen und entfernen Sie diese
nötigenfalls.
Notieren Sie sich den Fehlercode
und wenden Sie sich an Ihren
Kundendiensttechniker.
STÖRUNGSSUCHE
Page 73

Übersetzung der originalen Schnelles Anfangsführer
Teilenummer 32Z3801 DE AUSGABE 1
73
Ordnungsgemäße Entsorgung dieses Produkts (Waste
Electrical & Electronic Equipment)
Dies gilt für die Europäische Union und andere
Länder in Europa mit Mülltrennungssystemen.
Diese Kennzeichnung auf dem Produkt oder der
Produktbeschreibung zeigt, dass es nicht am Ende
seiner Lebensdauer nicht mit dem Hausmüll entsorgt
werden darf. Um einer möglichen Schädigung der
Umwelt oder der menschlichen Gesundheit aufgrund
von unkontrollierter Müllentsorgung vorzubeugen, trennen Sie das
Produkt bitte von anderen Müllarten. Handeln Sie verantwortlich
und geben Sie das Produkt ins Recycling, um die nachhaltige
Wiederverwendung von Materialressourcen zu fördern.
Private Nutzer sollten sich entweder an den Einzelhändler wenden,
bei dem sie das Produkt gekauft haben oder ihre örtlichen Behörden,
um zu erfahren, wo und wie dieses Produkt dem umweltfreundlichen
Recycling zugeführt werden kann.
Gewerbliche Nutzer sollten sich an ihren Lieferanten wenden und
die Geschäftsbedingungen dieses Kaufvertrags konsultieren. Dieses
Produkt sollte nicht mit anderen gewerblichen Abfällen entsorgt
werden.
Station Road West
Ash Vale, Aldershot
Hampshire GU12 5XA
Großbritannien
Telefon: +44 (0) 1252 371000
Fax: +44 (0) 1252 371007
Merrychef behält sich das Recht vor, ohne vorherige Benachrichtigung Produktspezikationen zu ändern
und übernimmt keine Haftung für jegliche Nichtübereinstimmungen, Fehler oder Auslassungen in
diesem Dokument.
E-Mail: info@merrychef.com
www.merrychef.com
Page 74

74
Guía de inicio rápido. Traducción de las instrucciones originales.
Número de pieza 32Z3801 ES 1a edición
INTRODUCCIÓN
Estos hornos ofrecen a los operarios la exibilidad de cocina combinada
con un control adicional sobre la velocidad del ventilador y la potencia
del microondas.
La cocina combinada permite conseguir resultados de alta calidad en
una fracción del tiempo que tarda la cocina convencional, sobre todo a
la hora de hornear, dorar, asar y gratinar platos.
Una vez colocado, se pueden programar instrucciones precisas para la
cocina combinada o por convección de artículos seleccionados en la
memoria del horno de manera que se puedan repetir con facilidad y de
manera precisa. Se pueden almacenar hasta 1024 programas que podrá
recuperar con sencillez.
Programación multietapa
Los controles del horno ofrecen incluso una mayor exibilidad
permitiendo la programación multietapa. Esto permite ajustar las
condiciones exactas necesarias para conseguir resultados de calidad de
acuerdo con el tipo de comida.
Un programa de cocinado puede tener hasta 6 etapas, cada etapa
controlada con su propio tiempo, velocidad de ventilado y ajustes de
potencia del microondas (según el modelo).
PRECAUCIONES PARA EVITAR UNA
POSIBLE EXPOSICIÓN A UNA ENERGÍA
MICROONDAS EXCESIVA
a) No intente hacer funcionar el horno con la puerta abierta ya que
el funcionamiento a puerta abierta puede dar como resultado la
exposición dañina a energía microondas. Es importante no violar o
manipular los enclavamientos de seguridad.
b) No coloque ningún objeto entre la cara frontal del horno y
la puerta ni permita que se acumule suciedad o residuos en las
supercies de sellado.
c) No haga funcionar el horno si está dañado. Es de particular
importancia que la puerta del horno se cierre adecuadamente y
que no haya daños en la (1) puerta (curvada) (2) bisagras y cierres
(rotos o ojos) (3) juntas de la puerta y supercies de sellado.
d) Solamente el personal de servicio cualicado adecuadamente
debe reparar o ajustar el horno.
ADVERTENCIA:
ESTE ES UN PRODUCTO DE CLASE A. EN
UN ENTORNO DOMÉSTICO PUEDE CAUSAR
INTERFERENCIAS DE RADIO EN CUYO CASO
EL USUARIO PUEDE QUE DEBA ADOPTAR LAS
MEDIDAS CORRESPONDIENTES.
Las instrucciones que se resumen en esta guía tienen como n la
seguridad y una larga vida de servicio para su horno Merrychef.
LEA LAS SIGUIENTES INSTRUCCIONES DE
SEGURIDAD ATENTAMENTE.
Page 75

Guía de inicio rápido. Traducción de las instrucciones originales.
Número de pieza 32Z3801 ES 1a edición
75
CONTENIDO
INFORMACIÓN IMPORTANTE, LEER ANTES DE
UTILIZAR
Se advierte a los usuarios que el mantenimiento y las
reparaciones las debe realizar un agente de servicio
autorizado por Merrychef utilizando piezas de repuesto
auténticas de Merrychef. Merrychef no tendrá ninguna
obligación respecto a cualquier producto que haya
sido instalado, ajustado, funcionado o mantenido
incorrectamente de acuerdo con los códigos nacionales y
locales o las instrucciones de instalación proporcionadas
con el producto, o cualquier producto que tenga su
número de serie desgastado, borrado o eliminado, o que
haya sido modicado o reparado utilizando piezas no
autorizadas o por agentes de servicio no autorizados. Para
obtener una lista de los agentes de servicio autorizados,
consulte la última página de este folleto. La información
que se incluye en este documento (incluyendo el diseño
y las especicaciones de piezas) puede ser reemplazada y
está sujeta a cambios sin previo aviso.
El diseño, disposición e iconos de la pantalla easyToUCH
que se muestran aquí son meramente con nes de guía y
no pretenden ser una representación exacta de los que se
suministra con el horno.
Esto es exclusivamente una Guía de inicio rápido. Para
obtener más información consulte las instrucciones de
instalación y de funcionamiento pertinentes disponibles
en www.merrychef.com
INTRODUCCIÓN 74
SEGURIDAD Y REGULACIONES
INTRUCCIONES DE SEGURIDAD IMPORTANTES 76
PRECAUCIONES A SEGUIR 78
UTENSILIOS DE COCINA ADECUADOS 79
DETALLES DEL PRODUCTO
CARACTERÍSTICAS PRINCIPALES 80
ESPECIFICACIONES TÉCNICAS 82
Especicaciones 82
Número de serie (placa de datos): 83
Cumplimientos: 83
INSTALACIÓN 84
UBICACIÓN Y COLOCACIÓN DEL HORNO 84
FUNCIONAMIENTO Y CONTROLES
GUÍA DE INICIO RÁPIDO: HORNO QUICK SERVICE 85
ARRANQUE 85
UTILIZACIÓN DE UN PROGRAMA DE COCINADO 86
GUÍA DE FUNCIONAMIENTO: HORNO FULL SERVICE 87
MENÚ PRINCIPAL easyToUCH Y PANTALLA DEL TECLADO 87
PRESS & GO [PULSAR Y LISTO] 88
UTILIZACIÓN DE UN PROGRAMA DEL LIBRO DE COCINA 89
CAMBIO DE LA TEMPERATURA DEL HORNO 90
LIMPIEZA Y MANTENIMIENTO
ENFRIADO DEL HORNO ANTES DE SU LIMPIEZA 91
Enfriado del horno 91
Preparación para limpiar el horno 91
INSTRUCCIONES DE LIMPIEZA horno frío e3 92
INSTRUCCIONES DE LIMPIEZA horno frío e4 93
INSTRUCCIONES DE LIMPIEZA horno frío e5 93
BÚSQUEDA DE FALLOS
GRÁFICO DE BÚSQUEDA DE FALLOS 96
SEGURIDAD Y
REGULACIONES
PRODUCTO
DETALLES DEL
CONTROLES
FUNCIONAMIENTO Y
LIMPIEZA Y
MANTENIMIENTO
FALLOS
BÚSQUEDA DE
Page 76

76
Guía de inicio rápido. Traducción de las instrucciones originales.
Número de pieza 32Z3801 ES 1a edición
SEGURIDAD Y
REGULACIONES
INTRUCCIONES DE SEGURIDAD IMPORTANTES
Al utilizar dispositivos eléctricos se deben seguir unas precauciones de
seguridad básicas, incluyendo las siguientes:
ADVERTENCIA Para reducir el riesgo de quemaduras, descargas
eléctricas, incendios, lesiones a personas o la exposición a energía
microondas excesiva:
1. Lea todas las instrucciones antes de utilizar el dispositivo.
2. Lea y siga “PRECAUCIONES PARA EVITAR UNA POSIBLE EXPOSICIÓN
A UNA ENERGÍA MICROONDAS EXCESIVA” que se encuentra en la
página de Introducción.
3. Este dispositivo debe tener conexión a tierra. Conéctelo solamente
a una salida con una toma de tierra adecuada. Consulte “INSTALACIÓN
ELÉCTRICA”.
4. Instale o coloque este dispositivo exclusivamente siguiendo las
instrucciones de instalación proporcionadas.
5. Algunos productos como los huevos enteros y los contenedores
sellados, por ejemplo tarros cerrados, puede explotar y no se deben
calentar en este horno.
6. Utilice este dispositivo exclusivamente para su uso previsto según
se describe en el manual. No utilice elementos químicos o vapores
corrosivos en este dispositivo. Este tipo de horno está diseñado
especícamente para calentar, cocinar o secar comida. No está
diseñado para un uso industrial o de laboratorio.
7. Este dispositivo no debe ser utilizado por niños.
8. No haga funcionar este dispositivo si tiene un cable o conector
dañado, si no funciona correctamente o si se ha dañado o caído.
9. Las labores de servicio de este dispositivo las debe realizar
exclusivamente el personal de servicio cualicado. Póngase en
contacto con las instalaciones de servicio autorizado más cercanas
para realizar un examen, una reparación o un ajuste.
10 No cubra o bloquee ninguna abertura del dispositivo incluyendo
respiraderos/ltros y salida de vapor.
11 No almacene este dispositivo al aire libre. No utilice este producto
cerca de agua, por ejemplo cerca del fregadero de una cocina, en un
sótano húmedo, o cerca de una piscina y situaciones similares.
12. No sumerja el cable o el conector en agua.
13. Mantenga el cable separado de supercies calientes.
14. No deje que el cable cuelgue por el borde de una mesa o encimera.
15. Además:
i) Cuando limpie las supercies de la puerta y del horno que se
juntan al cerrar la puerta, utilice solamente jabones no abrasivos o
detergentes aplicados con una esponja o paño suave.
ii) Cuando se proporcionan instrucciones de limpieza por separado
consulte las instrucciones de limpieza de supercies de la puerta.
16. Para reducir el riesgo de incendio en la cavidad:
i) No cocine en exceso la comida. Esté pendiente del dispositivo si
se coloca papel, plástico u otros materiales combustibles dentro del
horno para facilitar el cocinado.
ii) Retire los cierres de alambre de las bolsas de papel o de plástico
antes de colocarlas en el horno.
iii) Si los materiales del interior del horno se prendieran fuego,
mantenga la puerta cerrada, apague el horno, desconecte el cable de
alimentación, o desconecte la alimentación en el fusible o en el panel
del interruptor.
Page 77

Guía de inicio rápido. Traducción de las instrucciones originales.
Número de pieza 32Z3801 ES 1a edición
77
SEGURIDAD Y
REGULACIONES
iv) No use la cavidad con nes de almacenamiento. No deje productos
de papel, utensilios de cocina o comida en la cavidad cuando no esté
en uso.
17. Los líquidos, como el agua, café o té puede sobrecalentarse por
encima del punto de ebullición sin que parezca que están hirviendo.
Al sacar el contenedor del microondas no siempre es posible ver
burbujas o ebullición. ESTO PODRÍA DAR COMO RESULTADO QUE
LÍQUIDOS MUY CALIENTES SE SALGAN AL HERVIR DE REPENTE
CUANDO SE MANIPULA EL CONTENEDOR O CUANDO SE INSERTA UN
UTENSILIO EN EL LÍQUIDO.
18. NO haga funcionar el horno utilizando el microondas solamente
o la función de combinación sin tener comida o líquido dentro del
horno ya que esto puede causar un sobrecalentamiento y producir
daños.
19. NUNCA retire el exterior del horno.
20. NUNCA retire ninguna pieza interna ja del horno.
21. NUNCA manipule el panel de control, la puerta, las juntas o
cualquier otra pieza del horno.
22. NO obstruya los respiraderos/ltros o salida de vapor.
23. NUNCA cuelgue paños o trapos en ninguna parte del horno.
24. Si las juntas de la puerta están dañadas, el horno debe ser
reparado por un agente de servicio aprobado.
25. Si el cable de alimentación está dañado de cualquier manera DEBE
ser reemplazado por un agente de servicio aprobado.
26. Al manejar líquidos, comidas y contenedores calientes debe tener
cuidado para evitar escaldaduras y quemaduras.
27. Al calentar líquidos utilizando el microondas solamente o la
función de combinación, se deben revolver los contenidos antes de
calentar para evitar que hierva en erupción.
28. No se debe calentar en este dispositivo ni biberones ni tarros de
comida para bebés.
29. Nunca utilice el horno para calentar alcohol p. ej. brandy, ron etc.
Las comidas que contienen alcohol tienen más probabilidades de
incendiarse si se calientan en exceso, tenga precaución y no deje el
horno desatendido.
30. Nunca intente freír en abundante aceite en el horno.
31. El dispositivo no está diseñado para que sea utilizado por bebés,
niños o personas enfermas sin supervisión.
32. Los bebés y los niños deben estar supervisados para asegurarse de
que no juegan con el dispositivo.
GUARDE ESTAS INSTRUCCIONES
Page 78

78
Guía de inicio rápido. Traducción de las instrucciones originales.
Número de pieza 32Z3801 ES 1a edición
SEGURIDAD Y
REGULACIONES
PRECAUCIONES A SEGUIR
1. Lea este manual antes de utilizar su horno.
2. Como sucede con todos sus dispositivos eléctricos, es
recomendable inspeccionar las conexiones eléctricas al menos una
vez al año.
3. Debe limpiarse con frecuencia el interior del horno y las juntas de
la puerta, siguiendo las instrucciones que se describen en la sección
de limpieza; el no hacerlo podría dar como resultado posible una
situación peligrosa.
4. Desconecte el horno al nal de todas las sesiones de cocinado del
día.
5. No se debe utilizar el horno para secar mantelería.
6. Como sucede con cualquier dispositivo de cocina, se debe prestar
atención para evitar la combustión de los artículos que se encuentran
dentro del horno.
7. La comida en contenedores de plástico o de papel combustible se
debe transferir a contenedores aptos para microondas/horno para
evitar la posibilidad de que se incendien.
Si se aprecia humo:
Apagar ●
Aislar del suministro eléctrico ●
Mantenga la puerta cerrada para sofocar cualquier llama ●
8. Se debe desenvolver los artículos cuando se utilicen las funciones
de convección y de combinación.
9. Los huevos con cáscara y los huevos cocidos enteros no se deben
calentar en el horno ya que pueden explotar.
10. Es necesario pinchar la comida que tenga piel, p. ej. patatas,
manzanas, salchichas etc. antes de calentarla.
11. No se debe calentar la comida en un contenedor completamente
cerrado ya que la acumulación de vapor puede hacer que explote.
12. Se debe retirar el exceso de grasa durante el ‘asado’ y antes de
levantar contenedores pesados del horno.
13. Si un cristal se rompe o se hace añicos dentro del horno, asegúrese
de que la comida esté totalmente libre de partículas de cristal. Si tiene
dudas, deseche la comida que estaba en el horno en el momento de
la rotura.
14. NO intente hacer funcionar el horno con un objeto atrapado en
la puerta, que hace que no se cierre bien o con una puerta, bisagra,
cierre o supercie de sellado dañada o sin comida en el horno.
Page 79

Guía de inicio rápido. Traducción de las instrucciones originales.
Número de pieza 32Z3801 ES 1a edición
79
SEGURIDAD Y
REGULACIONES
UTENSILIOS DE COCINA ADECUADOS
Se deben comprobar las instrucciones del fabricante para determinar la idoneidad de contenedores o utensilios concretos utilizando cada una de
las funciones de cocinado. El siguiente gráco proporciona unas directrices generales:
Contenedores resistentes al calor
Vidrio templado
Cerámica esmaltada
Loza
(porcelana/vajilla/porcelana china etc.)
No utilice artículos con decoraciones metálicas.
Bandejas metálicas y de papel de aluminio
Bandejas metálicas
NO UTILICE NINGÚN OTRO CONTENEDOR DE METAL O DE
PAPEL DE ALUMINIO
Las bandejas metálicas solamente se pueden utilizar cuando
se colocan en la REJILLA ESMALTADA en la cavidad del horno.
Contenedores de plástico
Contenedores de plástico para uso común y para microondas
(hasta ciertas temperaturas) ahora disponibles.
Compruebe las instrucciones del fabricante antes del uso.
Desechables
NO UTILIZAR
Combustibles (papel/cartón etc.)
Otros utensilios
Cierres
Cubertería
Sondas de temperatura
No se debe dejar ningún utensilio de cocina en la comida
mientras se está cocinando en el horno.
Page 80

80
Guía de inicio rápido. Traducción de las instrucciones originales.
Número de pieza 32Z3801 ES 1a edición
DETALLES DEL
PRODUCTO
CARACTERÍSTICAS PRINCIPALES
INTERRUPTOR ON/OFF 1
Cuando se enciende (ON) la pantalla easyToUCH ilumina los controles
del horno. Tenga en cuenta que al apagarlo (OFF) no se aísla el horno
del suministro eléctrico.
2
PANEL DE CONTROL DE LA PANTALLA easyToUCH
Consulte ‘FUNCIONAMIENTO Y CONTROLES’ para obtener más detalles.
3
PLACA DE CARACTERÍSTICAS
Situada en el panel trasero del horno especica el número de serie,
tipo de modelo y especicaciones eléctricas.
4
MenuConnect
Una toma USB situada bajo el logotipo de Merrychef permite realizar
cambios a los programas almacenados en el horno (Consulte la
sección “USB MenuConnect”, “Funcionamiento y controles” para
obtener detalles de cómo actualizar los programas del horno).
5
SALIDAS DE AIRE
El aire utilizado para enfriar los componentes internos y el vapor de
la cavidad escapa por los respiraderos de salida de aire situados en la
parte posterior del horno y el panel lateral en el modelo e5. Las salidas
de aire deben mantenerse sin obstrucciones y no permiten que la
energía microondas se escape al entorno.
6
FILTRO DE ENTRADA DE AIRE
El ltro de aire situado en la parte frontal inferior del horno es parte
del sistema de ventilación y debe mantenerse sin obstrucciones y
debe limpiarse a diario según se indica en ‘Limpieza y mantenimiento’.
Tenga en cuenta que el horno no funcionará sin un ltro de aire.
7
MANILLA DE LA PUERTA
Es una barra rígida de la que se tira hacia abajo alejándola del horno
para abrirlo.
8
PUERTA DEL HORNO
Se trata de una barrera de energía hecha con precisión con tres
enclavamientos de seguridad microondas. Hay que mantener la
puerta limpia (consulte ‘LIMPIEZA’) y NO se debe utilizar para sujetar
objetos pesados.
9
JUNTAS DE LA PUERTA
Aseguran que haya un cierre hermético alrededor de la puerta. Deben
mantenerse limpias y deben comprobarse con regularidad si tienen
signos de daños. A la primera señal de daño un agente de servicio
aprobado Merrychef debe reemplazarlas.
10
VENTILADOR DE CONVECCIÓN, FILTRO DE GRASA Y
CONVERTIDOR CATALÍTICO (según modelo)
La rejilla de ltro de grasa metálica que cubre el ventilador de
convección debe mantenerse limpia. Debe prestarse especial
cuidado a la hora de limpiar esta zona del horno teniendo en cuenta
los distintos requisitos del horno que aparecen en ‘Limpieza y
mantenimiento’ en este manual.
11
CAVIDAD DEL HORNO
La cavidad del horno está fabricada con acero inoxidable y se debe
mantener limpia siguiendo las instrucciones de limpieza de la sección
‘Limpieza y mantenimiento’ de este manual.
Page 81

Guía de inicio rápido. Traducción de las instrucciones originales.
Número de pieza 32Z3801 ES 1a edición
81
DETALLES DEL
PRODUCTO
3
e3
e4
e5
1
2 3
11
10
4
5
9
8
7
11
10
9
8
2
1
6
1 2 3
11
10
4
5
9
8
7
4
5
6
7
6
Page 82

82
Guía de inicio rápido. Traducción de las instrucciones originales.
Número de pieza 32Z3801 ES 1a edición
DETALLES DEL
PRODUCTO
ESPECIFICACIONES TÉCNICAS
Especicaciones
Descripción Unidad
Controles de la pantalla táctil programas
Temperatura ambiente de funcionamiento
Al x An x Prof externas mm
Al x An x Prof externas pulgadas
Al x An x Prof internas mm
Al x An x Prof internas pulgadas
Cámara de cocinado l (pulgadas cúbicas)
Salida de potencia microondas Vatios
Salida de potencia convección kW
Alimentación Hz
Alimentación kW
Peso neto del horno sin embalar Kg (lbs)
Nivel de presión del sonido dB (A)
Apilado (con kit) horno
°C
e3
1024
<40
551x598x622
21.7x23.5x24.5
319x332x325
12.6x13.1x12.8
34.4 (2113)
700/1000
3 (3/1.5 EE)
50 & 60
3(EE) 4.3(XE) 4.7(XX)
62.5 (138)
<70
0
e4
1024
<40
591x584x750
23.3x23.0x29.5
218x375x312
8.6x14.8x12.3
25.5 (1566)
1500
3.2
50 & 60
7.0
82.5 (182)
<70
1
e5
1024
<40
642x711x705
25.3x28.0x27.8
258.4x495x363.5
10.17x19.49x14.31
44.4 (2730)
1400
3.2
50 & 60
6.2
94.0 (207)
<70
0
Page 83

Guía de inicio rápido. Traducción de las instrucciones originales.
Número de pieza 32Z3801 ES 1a edición
83
DETALLES DEL
PRODUCTO
Declaración de conformidad CE
Fabricante
Detalles de los equipos
Números de modelo genéricos eikon e3, eikon e4, eikon e5
Descripción Horno de microondas combinación comercial
Declaración de conformidad con directivas y normas
Por este medio el fabricante declara que sus hornos de microondas combinación
comerciales que se listan arriba cumplen con las siguientes directivas y normas.
Cumplimiento con directivas
Los hornos de microondas combinación comerciales cumplen con las estipulaciones
relevantes de las siguientes directivas europeas
EMC 2004/108/CE
LVD 2006/95/CE
RoHS 2002/95/CE
MD 2006/42/CE
Normas armonizadas aplicadas
Los hornos de microondas combinación comerciales cumplen con los requisitos
relevantes de las siguientes normas europeas.
Gestión de la calidad y medioambiental
Merrychef Limited y Viscount Catering emplean un sistema de gestión de la calidad
certicado de acuerdo con EN ISO 9001:2008 y Viscount Catering emplea un sistema de
gestión medioambiental certicado de acuerdo con EN ISO 14001
Merrychef Limited 2)
1)
Station Road West Provincial Park
Ash Vale Nether Lane
Aldershot Eccleseld
Hampshire Sheeld
GU12 5XA S35 9ZX
Reino Unido Reino Unido
(directiva sobre compatibilidad electromagnética)
(directiva de baja tensión)
(restricción en el uso de ciertas sustancias peligrosas)
(directiva sobre maquinaria)
EN 60335-2-90: 2006
•
EN 60335-1: 2002+A11+A1+A12+A2+A13
•
EN 62233:2008
•
EN 55014-2:1997 incluyendo A2:2008 de acuerdo con los requisitos de la
•
categoría IV
Descargas electrostáticas IEC 61000-4-2:1995
Interferencias RF de radiación IEC 61000-4-3:1996
Modo común de transitorios rápidos, puerto CA IEC 61000-4-4:1995
Sobretensión de la red, puerto CA IEC 61000-4-5:1995
Intensidad RF, modo común, puerto CA IEC 61000-4-6:1996
Caídas e interrupción de la tensión de la red IEC 61000-4-11:1994
Flicker IEC 61000-3-11:2000
•
EN 55011:2007 Clasicación: Clase A, Grupo 2
•
Tensión de perturbación de la terminal de la red Tabla 2a
Perturbación de radiación, campo magnético* Tabla 5a
Perturbación de radiación, campo eléctrico Tabla 5a
Perturbación de radiación, campo eléctrico* Tablas 6, 7 y 8
AS/NZS CISPR 11
•
Perturbación de radiación CISPR 11:2003:A1:2004
Perturbación por conducción CISPR 11:2003:A1:2004
Viscount Catering Limited
Número de serie (placa de datos):
Número de serie: MM AA LUGAR SERIE
p. ej. 06 10 2070 12345 (0610207012345)
Horno fabricado en junio de 2010 en
Sheeld (Reino Unido), número de
producción 12345.
Número de modelo: MODELO CONVECCIÓN
MICROONDAS TENSIÓN HERCIOS
CONDUCTOR CONECTOR COMUNICACIÓN
VERSIÓN CLIENTE/ACCESORIO PAÍS
p. ej. e4C S V 30 5 H E U 1 GM EU
(e4CSV305HEU1GMEU)
modelo e4C, 3200 W, 1500 W, 230 V, 50 Hz,
L+N+E (4 mm EU), conector de 3 clavijas,
USB, 1, mercado general, europeo.
Cumplimientos:
Directivas UE
EMC 2004/108/CE (directiva sobre
compatibilidad electromagnética)
LVD 2006/95/CE (directiva de baja tensión)
RoHS 2002/95/CE (restricción en el uso de
ciertas sustancias peligrosas)
MD 2006/42/CE (directiva
sobre maquinaria)
Page 84

84
Guía de inicio rápido. Traducción de las instrucciones originales.
Número de pieza 32Z3801 ES 1a edición
INSTALACIÓN
UBICACIÓN Y COLOCACIÓN DEL HORNO
Elija un lugar alejado de fuentes de calor.
NO lo coloque de manera que se atraiga aire caliente de freidoras,
parrillas, planchas, etc.
DETALLES DEL
PRODUCTO
Se debe instalar una barrera de calor a la altura del horno si este se
coloca al lado de un quemador, estufa o cocina.
Coloque el horno en una supercie plana permanente que no
resbale ni sea inamable y que esté NIVELADA, sea ESTABLE y lo
sucientemente RESISTENTE para el horno y sus contenidos.
Deje un espacio libre mínimo (A) de 50 mm alrededor del horno para
que el aire caliente pueda escapar.
Deje suciente espacio libre (B) delante del horno para que la puerta
se pueda abrir completamente.
La toma de aire está ubicada en la parte frontal inferior del horno
(1) y es importante que el ujo de aire sea tan fresco como sea
posible y que no esté precalentado por otros dispositivos como
quemadores, estufas, cocinas, freidoras, parrillas y planchas ya
que se deteriorará la vida y el rendimiento del horno.
No coloque etiquetas/pegatinas en el horno excepto las aplicadas o
aprobadas por el fabricante.
El horno no funcionará sin que el FILTRO DE AIRE este
colocado correctamente.
PELIGRO!
ESTE APARATO DEBE TENER CONEXIÓN A TIERRA.
SI NO LA TIENE PUEDE CAUSAR DESCARGAS
ELÉCTRICAS Y LA MUERTE.
El horno debe estar conectado a un suministro eléctrico
separado instalado por un electricista cualicado y aprobado.
Se debe colocar en cada horno instalado un seccionador
dimensionado adecuadamente con un hueco de contacto de 3
mm en todos los polos.
Si tiene alguna duda sobre su alimentación eléctrica, consulte
a un electricista cualicado.
A
MANEJO Y ALMACENAMIENTO:
Al mover un horno respete siempre los requisitos nacionales y locales
para el levantamiento y movimiento de objetos pesados. No utilice la
manilla de la puerta del horno para levantarlo.
Cuando no esté en uso, desconecte eléctricamente el horno y
almacénelo de manera segura en un lugar seco y fresco, sin apilar
hornos.
A
1
A
B
Page 85

Guía de inicio rápido. Traducción de las instrucciones originales.
Número de pieza 32Z3801 ES 1a edición
85
GUÍA DE INICIO RÁPIDO: HORNO QUICK SERVICE
ARRANQUE
1. Encienda el horno;
Realice todas las comprobaciones de seguridad pertinentes
y asegúrese de que el horno esté limpio y vacío antes de
pulsar el interruptor para activar el horno.
2. La pantalla easyToUCH se ilumina mostrando brevemente
el número de serie y los datos del horno. Toque ligeramente
la pantalla una vez para congelarla, vuelva a tocarla para
continuar.
3. Cuando el horno se ha ajustado con dos o más
temperaturas de precalentamiento se muestra la opción.
Las echas de desplazamiento en la parte inferior de la
pantalla indican que hay más opciones de temperatura que
no se muestran en la pantalla. Si fuese necesario utilice las
echas de desplazamiento y a continuación seleccionar
la temperatura necesaria para comenzar a precalentar el
horno.
4. Durante el precalentamiento la pantalla muestra
el progreso según se va calentando el horno hasta la
temperatura ajustada. (Para que el horno deje de calentarse
toque el símbolo rojo ‘X’.)
5. El horno está listo para utilizarse cuando se muestra
‘COOKBOOK’ [LIBRO DE COCINA].
21
3
4
5
PANTALLA COOKBOOK
MUESTRA TODOS LOS PROGRAMAS DE COCINADO (Opcional)
MUESTRA LOS GRUPOS DE PROGRAMAS
FAVORITOS (Opcional)
GRUPO DE PROGRAMAS
Cada grupo contiene un conjunto de
programas de cocinado.
PARAR/
CANCELAR
CONTROLES
FUNCIONAMIENTO Y
CAMBIAR LA TEMPERATURA DEL HORNO
(Opcional)
Page 86

86
Guía de inicio rápido. Traducción de las instrucciones originales.
Número de pieza 32Z3801 ES 1a edición
FUNCIONAMIENTO Y
CONTROLES
UTILIZACIÓN DE UN PROGRAMA DE COCINADO
Tomando todas las precauciones necesarias
para asegurar que no se quema, abra la
puerta del horno para colocar la comida
dentro del horno caliente y cierre la puerta.
1. Seleccione un grupo de programas, por ejemplo,
‘BURGERS’ [HAMBURGUESAS] para mostrar los programas de
cocinado individuales.
2. Seleccione un programa de cocinado para que comience,
por ejemplo 2 BURGERS [2 HAMBURGUESAS].
3. Siga las instrucciones si se muestran en pantalla.
4. Toque la marca de vericación verde para cocinar.
El tiempo de cocinado hace una cuenta atrás para cada
etapa del programa.
5. Cuando termina el programa se muestra una barra roja
normalmente con un sonido - abra la puerta o toque la ‘X’
roja para volver al programa de cocinado.
Tenga en cuenta que al abrir la puerta del horno durante el
cocinado detiene el programa de cocinado y muestra una
advertencia. Al cerrar la puerta el usuario puede continuar o
cancelar el programa.
1
4
2
5
3
ETAPA DE PROGRAMA
Page 87

Guía de inicio rápido. Traducción de las instrucciones originales.
Número de pieza 32Z3801 ES 1a edición
87
FUNCIONAMIENTO Y
CONTROLES
GUÍA DE FUNCIONAMIENTO: HORNO FULL SERVICE
MENÚ PRINCIPAL easyToUCH Y PANTALLA DEL TECLADO
PANTALLA DEL MENÚ PRINCIPAL:
1. MODO DE DESARROLLO permite desarrollar programas de
cocinado multietapa y almacenarlos bajo un nombre y un
símbolo para volver a utilizarlos.
2. PULSAR Y LISTO permite un acceso rápido para utilizar los
programas de cocinado que ya están almacenados.
3. LIBRO DE COCINA contiene los programas de cocinado del
horno. Muestra Favoritos, Grupos de programas de cocinado
y un listado completo de todos los programas de cocinado
disponibles.
4. LIMPIEZA/CAMBIO DE TEMPERATURA permite cambiar
la temperatura del horno y que el horno se prepare para la
limpieza con recordatorios como ayuda durante el proceso
de limpieza.
5. AJUSTES se utiliza para controlar los ajustes y funciones
del horno incluyendo la hora y el idioma, la carga
de programas de cocinado y para nes de servicio y
mantenimiento.
6. PANTALLA DE TECLADO se utiliza para introducir una
contraseña autorizada y datos para los programas y puede
restringir el acceso del operario a algunas funciones.
MODO DESARROLLO
1
2
ACCESO DIRECTO AL
MENÚ
3
LIBRO DE COCINA
4
LIMPIEZA/CAMBIO DE
TEMPERATURA
5
AJUSTES
Page 88

88
Guía de inicio rápido. Traducción de las instrucciones originales.
Número de pieza 32Z3801 ES 1a edición
FUNCIONAMIENTO Y
CONTROLES
PRESS & GO [PULSAR Y LISTO]
Ejecución de un programa de cocinado desde el menú
PULSAR Y LISTO.
1. Seleccione PULSAR Y LISTO en la pantalla del menú principal.
2. Seleccione el elemento que va a cocinar.
3. La pantalla muestra la temperatura, tiempo de cocción,
potencia microondas y velocidad del ventilador mientras
el temporizador realiza una cuenta atrás. La barra del
temporizador se vuelve roja para indicar que el ciclo de
cocinado ha terminado.
Elección de qué programas de cocinado se muestran en el
menú PULSAR Y LISTO.
1. Después de seleccionar PULSAR Y LISTO de la pantalla del
menú principal, seleccione el símbolo EDITAR.
2. Se muestran dos listas, los elementos del menú PULSAR Y
LISTO se muestran en la lista superior y la lista inferior muestra
otros elementos de menú que están disponibles. Se puede
desplazar hacia arriba y abajo por ambas listas utilizando las
echas del extremo derecho.
3. Seleccione un elemento, a continuación elija si cambia su
orden dentro del menú o mandarlo a la lista inferior.
4. Seleccione un elemento para moverlo a la lista superior,
haciendo que esté disponible en el menú PULSAR Y LISTO.
5. Seleccione la tecla de retorno para volver a la pantalla de
menú cuando termine.
1 2 3
1
Cambiar el
orden de
un artículo
seleccionado
mostrado en la
pantalla Pulsar
y listo.
Mover un
artículo
seleccionado
a o desde la
pantalla Pulsar
y listo.
Seleccionar
para
desplazarse por
una lista arriba
y abajo.
2
5
3
4
Page 89

Guía de inicio rápido. Traducción de las instrucciones originales.
Número de pieza 32Z3801 ES 1a edición
89
FUNCIONAMIENTO Y
CONTROLES
UTILIZACIÓN DE UN PROGRAMA DEL LIBRO
ADVERTENCIA: ASEGÚRESE DE QUE HAYA
UN PRODUCTO DE COMIDA EN EL HORNO
ANTES DE COMENZAR UN PROGRAMA DE
COCINADO.
DE COCINA
Para encontrar el programa deseado en el libro de cocina.
1. Seleccione LIBRO DE COCINA en la pantalla del menú
principal.
2. Seleccione el símbolo TODOS LOS MENÚS.
3. Utilice las echas de desplazamiento arriba/abajo para
encontrar el programa.
TENGA EN CUENTA QUE: Si una imagen tiene una línea
roja alrededor el horno está ajustado demasiado alto o
demasiado bajo para esa receta. Consulte ‘CAMBIO DE LA
TEMPERATURA DEL HORNO’.
Tomando todas las precauciones necesarias para asegurar
que no se quema, coloque la comida en la cavidad del
horno caliente y cierre la puerta.
ADVERTENCIA:
PELIGRO DE SUPERFICIE CALIENTE
4. Seleccione el programa de cocinado deseado para
empezar a cocinar.
Por ejemplo, 1 HAMBURGUESA.
5. El programa arranca inmediatamente mostrando
1
4
2
5
3
6
Page 90

90
Guía de inicio rápido. Traducción de las instrucciones originales.
Número de pieza 32Z3801 ES 1a edición
una temporizador con una cuenta atrás o se muestra una
instrucción primero; siga las instrucciones en etapas y a
continuación seleccione OK para comenzar a cocinar. Si la
puerta del horno no se abre en 30 segundos aparece un
mensaje de advertencia.
6. El temporizador de cocinado cuenta hasta cero y produce un
sonido para indicar que es necesaria la acción de un operario
al nal de una etapa de cocinado o el nal de un programa de
cocinado.
Cuando el programa de cocina haya terminado, al abrir la
puerta del horno para retirar la comida devuelve la pantalla a la
FUNCIONAMIENTO Y
pantalla LIBRO DE COCINA.
CONTROLES
Tenga en cuenta que al abrir la puerta del horno durante el
cocinado se detiene el programa de cocinado y se muestra una
advertencia. Al cerrar la puerta se permite que el usuario pueda
continuar o cancele el programa de cocinado.
Para comprobar la temperatura del horno al cocina, toque
ligeramente la temperatura que se muestra, se muestra la
temperatura de la cavidad con un asterisco.
CAMBIO DE LA TEMPERATURA DEL HORNO
1. Tome nota de la temperatura necesaria para la receta y
seleccione OK.
2. Seleccione el símbolo de temperatura.
3. Un asterisco al lado del número indica la temperatura
actual del horno, seleccione la temperatura requerida para
la receta. Cuando el horno esté a la temperatura necesaria
continúe seleccionando del LIBRO DE COCINA en la etapa 1.
1 2 3
Page 91

Guía de inicio rápido. Traducción de las instrucciones originales.
Número de pieza 32Z3801 ES 1a edición
91
ENFRIADO DEL HORNO ANTES DE SU LIMPIEZA
Enfriado del horno
IMPORTANTE: es necesario enfriar el horno antes de realizar
los procesos de limpieza.
1. En modo Full Serve, seleccione el símbolo de LIMPIEZA del
menú principal.
2. En el modo Full o Quick Serve, seleccione el símbolo del
termómetro azul para desactivar el calentamiento y comenzar el
ciclo de enfriado.
3. Tomando todas las precauciones necesarias coloque un
contenedor con el hielo adecuado en la cavidad caliente del
horno. Seleccione el símbolo OK para seguir.
4. Se muestra el progreso del enfriado y dura aproximadamente
30 minutos.
5. El horno ya está listo para la limpieza. Seleccione OK en la
pantalla después de completar cada fase.
Preparación para limpiar el horno
Para que el horno funcione a su mejor eciencia, la cavidad, la
puerta, el ltro de aire y el ltro de grasa deben estar limpios.
Una rutina de limpieza diaria asegurará que cumple todas las
normas de higiene necesarias y ayudará a mantener y prolongar
la eciencia de su horno.
1 2
3
4
LIMPIEZA Y
MANTENIMIENTO
Page 92

92
Guía de inicio rápido. Traducción de las instrucciones originales.
Número de pieza 32Z3801 ES 1a edición
LIMPIEZA Y
MANTENIMIENTO
e3
Equipo necesario (no provisto):
Limpiador para horno de marca comercial no cáustico, guantes
resistentes al calor, guantes de goma protectores, estropajo de
nylon no abrasivo, toallita limpiadora y paños, protección para
los ojos y mascarilla (opcional).
PRECAUCIÓN: LLEVE GUANTES DE GOMA PROTECTORES
CUANDO LIMPIE EL HORNO.
NUNCA utilice herramientas aladas o abrasivos fuertes en
ninguna parte del horno.
ADVERTENCIA: NO UTILICE LIMPIADORES
CÁUSTICOS EN NINGUNA ZONA DEL HORNO
Complete el procedimiento de ENFRIADO y deje que el horno y
los accesorios se enfríen antes de comenzar la limpieza.
O DE LA CAVIDAD DEL HORNO YA QUE
CAUSARÁ DAÑOS PERMANENTES EN LOS
CONVERTIDORES CATALÍTICOS
INSTRUCCIONES DE LIMPIEZA horno frío e3
RETIRE Y LIMPIE las piezas del horno:
1. Retire el ltro de aire de la base del horno.
2. Abra la puerta del horno y levante el plato giratorio.
3. Para hornos con un convertidor catalítico, abra la puerta del horno
y abra los cierres para sacar el convertidor catalítico cuando sea
necesario o al menos una vez al mes.
Lave todas las piezas en agua jabonosa templada. Aclárelas con un
paño limpio y mucha agua templada limpia.
Séquelas utilizando otro paño limpio.
1
NO UTILICE HERRAMIENTAS
2
3
Page 93

Guía de inicio rápido. Traducción de las instrucciones originales.
Número de pieza 32Z3801 ES 1a edición
93
LIMPIEZA Y
MANTENIMIENTO
e4
e5
INSTRUCCIONES DE LIMPIEZA horno frío e4
INSTRUCCIONES DE LIMPIEZA horno frío e5
RETIRE Y LIMPIE las piezas del horno:
1. Retire el ltro de aire de la base del horno.
2. Abra la puerta del horno, retire la rejilla, tire del asa del ltro de
grasa hacia abajo y sáquelo.
3. Suelte los cierres que aseguran la placa del impactor superior.
4. Retire la placa del impactor superior y levante la placa del impactor
inferior.
Lave todas las piezas en agua jabonosa templada. Aclárelas con un
paño limpio y mucha agua templada limpia.
Séquelas utilizando otro paño limpio.
1 2
3 4
RETIRE Y LIMPIE las piezas del horno:
1. Retire el ltro de aire de la base del horno.
2. Abra la puerta del horno para sacar cualquier bandeja/rejilla.
Lave todas las piezas en agua jabonosa templada. Aclárelas con un
paño limpio y mucha agua templada limpia.
Séquelas utilizando otro paño limpio.
1
2
Page 94

94
Guía de inicio rápido. Traducción de las instrucciones originales.
Número de pieza 32Z3801 ES 1a edición
LIMPIEZA Y
MANTENIMIENTO
LIMPIE EL HORNO:
1. Retire cualquier derrame con paños de papel desechables.
Utilice un cepillo limpio seco para eliminar cualquier partícula
de comida de entre el suelo del horno y el interior de la puerta
frontal.
2. Lleve guantes de goma y gafas protectoras, pulverice con
cuidado un limpiador de horno no cáustico de una marca
comercial por todas las supercies internas del horno excepto por
la junta de la puerta (A).
NO pulverice directamente sobre la abertura del ventilador en
la parte trasera del interior del horno.
3. Para las zonas difíciles, deje empapar durante 10 minutos con la
puerta del horno abierta.
Utilice un estropajo/esponja de nylon no abrasivo para limpiar la
cavidad, el techo y el interior de la puerta. No restriegue la junta
de la puerta ni utilice estropajos metálicos.
4. Aclárelo utilizando un paño limpio y mucha agua limpia y
séquelo utilizando otro paño limpio o una toallita de papel.
Vuelva a colocar todas las piezas del horno limpias.
1
2
3
A
4
NO UTILICE EL HORNO SIN UN FILTRO DE AIRE
LIMPIO
Page 95

Guía de inicio rápido. Traducción de las instrucciones originales.
Número de pieza 32Z3801 ES 1a edición
95
LIMPIEZA Y
MANTENIMIENTO
Cierre la puerta del horno y limpie el exterior del horno con
un paño húmedo.
APLIQUE PROTECTOR DE HORNO:
1. Aplicar solamente cuando el horno está limpio. Pulverice
un protector de horno de marca comercial en una esponja.
2. Extienda el protector de horno ligeramente por todas las
supercies internas del horno.
3. Extienda el protector de horno ligeramente por la
supercie interna de la puerta del horno evitando la junta
de la puerta.
Encienda el horno y precaliéntelo. Cuando el horno haya
alcanzado la temperatura de funcionamiento el protector
del horno tardará 30 minutos en endurecerse.
Tenga en cuenta que el protector de horno se vuelve
marrón claro cuando está duro.
1
2
3
Page 96

96
Guía de inicio rápido. Traducción de las instrucciones originales.
Número de pieza 32Z3801 ES 1a edición
GRÁFICO DE BÚSQUEDA DE FALLOS
Aunque se realizan
todos los esfuerzos
posibles para asegurar
que su horno continúe
funcionando a un alto
nivel, compruebe el
gráco para ver si el
problema se puede
resolver con facilidad
antes de ponerse en
contacto con su agente
de servicio.
PROBLEMA CAUSA POSIBLE REMEDIO
Compruebe si hay un corte de la
alimentación.
El horno no funciona y la pantalla está vacía El horno no tiene alimentación
Algunos controles de la pantalla no
funcionan
Mensaje de error en la pantalla, puerta
abierta
Mensaje de error en la pantalla, falta el
ltro de aire
El horno no cocina la comida
correctamente
El horno no termina de cocinar
La pantalla muestra un código de error Mal funcionamiento del horno
Acceso no autorizado
La puerta del horno no está cerrada
Falta el ltro de aire o está colocado
incorrectamente
El horno no está limpio
La comida no está a la temperatura
correcta
Se seleccionó un programa modicado o
incorrecto
La comida está envuelta
La comida se retiró antes de tiempo
Puerta del horno abierta
No hay un ltro de aire o está colocado
incorrectamente
Sobrecalentamiento del horno
Compruebe que el seccionador esté
ACTIVADO o que el horno esté conectado
correctamente.
Compruebe que el interruptor del horno
esté ACTIVADO.
Póngase en contacto con el usuario
autorizado.
Retire cualquier restricción y cierre la
puerta del horno.
Vuelva a colocar correctamente el ltro de
aire.
Limpie el horno (consulte la sección de
Limpieza).
Utilice el programa de cocinado correcto.
Desenvuelva la comida para cocinarla sin
microondas.
Compruebe que se han seguido
correctamente todas las etapas de
cocinado.
Cierre la puerta del horno.
Vuelva a colocar el ltro de aire.
Deje que el horno se enfríe.
Compruebe si hay y retire cualquier
restricción en las salidas de aire.
Tome nota del código de error y póngase
en contacto con el agente de servicio.
FALLOS
BÚSQUEDA DE
Page 97

Guía de inicio rápido. Traducción de las instrucciones originales.
Número de pieza 32Z3801 ES 1a edición
97
Correct disposal of this product (Waste Electrical & Electronic
Equipment)
To prevent possible harm to the environment or
human health from uncontrolled waste disposal,
please separate this from other types of wastes and
recycle it responsibly to promote the sustainable reuse
of material resources.
Household users should contact either the retailer
where they purchased this product, or their local
government oce for details of where and how they can take this
item for environmentally safe recycling.
Business users should contact their supplier and check the terms
and conditions of the purchase contract. This product should not be
mixed with other commercial wastes for disposal.
Station Road West
Ash Vale, Aldershot
Hampshire GU12 5XA
Reino Unido
Tel.: +44 (0) 1252 371000
Fax: +44 (0) 1252 371007
Merrychef se reserva el derecho de cambiar las especicaciones del producto sin previo aviso y no acepta
responsabilidad por cualquier imprecisión, errores u omisiones contenidos en este documento.
Correo elect.: info@merrychef.com
www.merrychef.com
Page 98

98
Kvik-Start Guide. Oversættelse af de originale vejledninger.
Del nummer 32Z3801 DK Udgave 1
INTRODUKTION
Disse typer ovn giver operatøren eksibiliteten ved
kombinationskogning med supplerende kontrol over
ventilatorhastighed og mikrobølgestyrke.
Kombinationsmadlavning gør det muligt at opnå højkvalitetsresultater
på en brøkdel af den tid, der kræves ved konventionel madlavning, især
ved bagning, bruning, stegning, grilning af retter.
Efter etablering kan præcise vejledninger for kombinations- eller
konvektionsmadlavning af udvalgte emner programmeres i ovnens
hukommelse, så de kan gentages hurtigt og akkurat. Der kan gemmes
op til 1024 programmer, som enkelt kan genkaldes.
Flertrins programmering
Ovnstyringen giver endnu større eksibilitet ved at gøre ertrins
programmering mulig. Dette muliggør nøjagtigt de forhold, der kræves
til indstilling af kvalitetsresultater for hver madtype.
Et enkelt madlavningsprogram kan have op til 6 etaper, hvor hver etape
styres med sin egen tid, ventilatorhastighed og mikrobølgeindstillinger
(afhængigt af model).
FORHOLDSREGLER TIL AT UNDGÅ
MULIG EKSPONERING AF OVERDREVEN
MIKROBØLGEENERGI
a) Forsøg ikke at køre denne ovn med åben låge, da åben-låge drift
kan resultere i skadelig eksponering af mikrobølgeenergi. Det er
vigtigt ikke at overvinde eller pille ved sikkerhedsaåsningerne.
b) Placer ikke genstande mellem ovnforsiden og døren, eller lade
smuds eller rengøringsrester samle sig på forseglingsoverader.
c) Arbejd ikke med ovnen, hvis den er beskadiget. Det er især
vigtigt, at ovnlågen lukker ordentligt, og at der ikke er skader
på (1) lågen (bøjet) (2) hængsler og låse (itu eller løse) (3)
lågeforseglinger og forseglingsoverader.
d) Ovnen bør ikke justeres eller repareres af andre end faglærte
servicepersonale.
ADVARSEL:
DETTE ER ET KLASSE A PRODUKT. I ET
HJEMMEMILJØ KAN DETTE PRODUKT SKABE
RADIOSTØJ. I SÅ TILFÆLDE KAN BRUGEREN
VÆRE NØDT TIL AT TRÆFFE PASSENDE
FORANSTALTNINGER.
Vejledningerne, der beskrives i denne vejledning, har til hensigt at
sikre sikkerhed og lang levetid for din Merrychef ovn.
LÆS VENLIGST FØLGENDE
SIKKERHEDSINSTRUKSER OMHYGGELIGT
Page 99

Kvik-Start Guide. Oversættelse af de originale vejledninger.
Del nummer 32Z3801 DK Udgave 1
99
INDHOLD
VIGTIG INFORMATION LÆS FØR ANVENDELSE
Brugere advares om, at vedligehold og reparation bør
udføres af en af Merrychef autoriseret servicetekniker, der
bruger originale Merrychef udskiftningsdele. Merrychef
påtager sig ikke noget ansvar, hvad angår et produkt,
der er blevet forkert installeret, justeret, betjent eller
ikke vedligeholdt i overensstemmelse med nationale og
lokale normer eller installationsinstrukser, der leveres
med produktet, eller et produkt, der har et ulæseligt,
manglende eller ernet serienummer, eller som er blevet
ændret eller repareret med uautoriserede dele eller af
uautoriserede serviceteknikere. Der henvises til sidste side i
dette hæfte for en liste over autoriserede serviceteknikere.
Den information, der er indeholdt heri (incl. design og del
specikationer) kan blive erstattet og kan ændres uden
varsel.
Den easyToUCH skærmdisplay, layout og ikoner vist heri er
kun til vejledning og er ikke en nøjagtig repræsentation af
dem, der leveres med ovnen.
Dette er kun en Kvik-start guide. Der henvises til relevante
installations- og driftsvejledninger på www.merrychef.com
for yderligere oplysninger.
INTRODUKTION 98
SIKKERHED & FORSKRIFTER
VIGTIGE SIKKERHEDSVEJLEDNINGER 100
SIKKERHEDSFORANSTALTNINGER, DER SKAL OVERHOLDES 102
EGNEDE MADLAVNINGSREDSKABER 103
PRODUKTDETALJER
HOVEDTRÆK 104
TEKNISKE SPECIFIKATIONER 106
Specikationer 106
Serienummer (Ydelsesskilt): 107
Compliances: 107
INSTALLATION 108
PLACERING OG ANBRINGELSE AF OVNEN 108
DRIFT & STYRING
KVIK-START GUIDE: KVIK-SERVICE OVN 109
OPSTART 109
ANVENDELSE AF MADLAVNINGSPROGRAM 110
DRIFTSGUIDE: FULD SERVICE OVN 111
easyToUCH HOVEDMENU & TASTATURSKÆRM 111
TRYK & GO 112
BRUG AF KOGEBOGSPROGRAM 113
ÆNDRING AF OVNTEMPERATUR 114
RENGØRING & VEDLIGEHOLDELSE
NEDKØLING AF OVNEN FØR RENGØRING 115
Ovnnedkøling 115
Klargøring til ovnrengøring 115
Kold ovn RENGØRINGSVEJLEDNING e3 116
Kold ovn RENGØRINGSVEJLEDNING e4 117
Kold ovn RENGØRINGSVEJLEDNING e5 117
FEJLFINDING
FEJLFINDINGSSKEMA 120
SIKKERHED &
FORSKRIFTER
PRODUKTDETALJERDRIFT & STYRINGRENGØRING &
VEDLIGEHOLDELSE
FEJLFINDING
Page 100

100
Kvik-Start Guide. Oversættelse af de originale vejledninger.
Del nummer 32Z3801 DK Udgave 1
SIKKERHED &
FORSKRIFTER
VIGTIGE SIKKERHEDSVEJLEDNINGER
Når der anvendes elektriske apparater, bør grundlæggende
sikkerhedsforanstaltninger følges, inklusive følgende:
ADVARSEL For at reducere risikoen for forbrænding, stød, brand,
personskade, eller påvirkning af for megen mikrobølgeenergi:
1. Læs alle vejledninger før apparatet tages i anvendelse.
2. Læs og følg de specikke “FORHOLDSREGLER TIL AT UNDGÅ MULIG
PÅVIRKNING AF FOR MEGEN MIKROBØLGEENERGI”, som ndes på
Introduktions-siden.
3. Dette apparat skal forbindes til jord. Forbind kun til et korrekt jordet
stik. Se “EL-INSTALLATION”.
4. Installer eller placere kun dette apparat i overensstemmelse med de
leverede installationsvejledninger.
5. Nogle produkter, såsom hele æg og forseglede beholdere - for
eksempel lukkede krukker - kan eksplodere og bør ikke opvarmes i
denne ovn.
6. Anvend kun dette apparat til dets anvendelsesformål som
beskrevet i manualen. Anvend ikke korrosive kemikalier eller dampe
i dette apparat. Denne type ovn er specielt designet til opvarmning,
stegning eller tørring af mad. Den er ikke designet til industriel eller
laboratorieanvendelse.
7. Dette apparat bør ikke anvendes af børn.
8. Arbejd ikke med dette apparat, hvis det har en beskadiget ledning
eller stik, hvis det ikke arbejder korrekt, eller hvis det er blevet
beskadiget eller tabt.
9. Dette apparat bør kun serviceres af uddannet servicepersonale.
Kontakt nærmeste autoriserede servicetjeneste for undersøgelse,
reparation eller justering.
10 Dæk eller bloker ikke åbninger på apparatet, inklusive
udluftningsrør/ltre og dampåbninger.
11 Opbevar ikke dette apparat udendørs. Anvend ikke dette produkt
nær vand - for eksempel i nærheden af en køkkenvask, en våd kælder
eller nær et svømmebassin, og lignende.
12. Neddyp ikke ledningen eller stikket i vand.
13. Hold ledningen borte fra opvarmede overader.
14. Lad ikke ledningen hænge over kanten af et bord eller disk.
15. Enten:
i) Når låge- og ovnoverader, der mødes, når lågen lukkes,
rengøres, må der kun anvendes milde ikke-slibende sæber, eller
rengøringsmidler, der applikeres med svamp eller en blød klud.
ii) Når der ndes separate rengøringsvejledninger, se
rengøringsvejledninger for døroverade.
16. For at reducere risikoen for brand i ovnrummet:
i) Overkog ikke maden. Overvåg omhyggeligt apparatet, hvis
der placeres papir, plastik eller andre brændbare materialer i ovnen for
at lette madlavningen.
ii) Fjern ståltrådslukker fra papir- eller plastikposer, før de
placeres i ovnen.
iii) Hvis materialer i ovnen antændes, hold ovnlågen lukket,
sluk for ovnen, og afbryd strømledningen, eller luk for strømmen ved
sikringen eller strømafbryderpanelet.
iv) Anvend ikke ovnrummet til opbevaringsformål. Efterlad
ikke papirprodukter, madlavningsredskaber eller mad i ovnrummet,
når det ikke er i brug.
 Loading...