

Bild in der Größe
215x70 mm einfügen
S-Class
Owner’s Manual

Symbols
* Optional equipment
G
Warning
H
Environmental note
!
Possible vehicle damage
i
Tip
Action required
Continuation symbol
Warning note continuation symbol
page Page reference
“Display” Displays in the multi-function display and
COMAND display

Thank you for choo sin g
Mercedes-Benz.
Before you driv e off, familiarise yourself
with your Mercedes-Benz and read this
Owner’s Manual. This will help you to obtain the maximum pleasure from your vehicle and to avoid endangering yourself and
others.
Items of optional equipment are marked
with an asterisk *. The equipment in your
vehicle may vary, depending on the model,
country specifications and availability.
Mercedes-Benz is constantly updating its
vehicles to the state of the art and therefore reserves the right to introduce changes in design, equipment and technical
features at any time.
You cannot, therefore, base any claims on
the data, illustratio ns or descriptions i n
this Owner’s Manual.
The Owner’s Manual, brief instructions and
the “Service” booklet belong to the vehicle. You should always keep them in the
vehicle and pass them on to the new owner
if you sell the vehicle.
Please consult a Mercedes-Benz Service
Centre if you have any questions.
The technical documentation team at
DaimlerChrysler AG wishes you safe a nd
pleasant motoring.
i You can also get to know the important fea-
tures of your S-Class in the interactive Owner’s
Manual on the Internet at:
www.mercedes-benz.de/betriebsanleitung

Contents
Introduction . . . . . . . . . . . . . . . . . . . . . 1
At a glance . . . . . . . . . . . . . . . . . . . . . . 5
Safety . . . . . . . . . . . . . . . . . . . . . . . . . 31
Operating systems . . . . . . . . . . . . . . 59
Controls . . . . . . . . . . . . . . . . . . . . . . 249
Operation . . . . . . . . . . . . . . . . . . . . . 389
Practical advice . . . . . . . . . . . . . . . . 423
Technical data . . . . . . . . . . . . . . . . . 533
Technical terms . . . . . . . . . . . . . . . . 559

3
Index
A
ABC . . . . . . . . . . . . . . . . . . . . . . . . . . 328
Definition . . . . . . . . . . . . . . . . . . . . 559
Display message . . . . . . . . . . 438, 444
Oil level . . . . . . . . . . . . . . . . . . . . . 397
Suspension tuning . . . . . . . . . . . . . 328
Vehicle level . . . . . . . . . . . . . . . . . . 328
ABS . . . . . . . . . . . . . . . . . . . . . . . . . . . 53
Definition . . . . . . . . . . . . . . . . . . . . 559
Display message . . . . . . . . . . . . . . 439
Malfunction . . . . . . . . . . . . . . . . . . 470
Warning lamp . . . . . . . . . . . . . . . . . 470
Acceleration . . . . . . . . . . . . . . . . . . 539
Accelerator p edal position . . . . . . . 296
Active Body Control – see ABC . . . 328
Active Light System
Display message . . . . . . . . . . . . . . 456
ADAPTIVE BRAKE . . . . . . . . . . . . . . . 56
Definition . . . . . . . . . . . . . . . . . . . . 559
Adaptive brake lamps . . . . . . . . . . . . 54
Address book
Calling up . . . . . . . . . . . . . . . . . . . . 190
Changing an entry . . . . . . . . . . . . . 194
Creating an entry . . . . . . . . . . . . . . 190
Deleting an entry . . . . . . . . . . . . . . 193
Details about an entry . . . . . . . . . . 1 93
Details from an entry in the phone
book on the mobile phone . . . . . . . 194
Importing data . . . . . . . . . . . . . . . . 198
Making a call . . . . . . . . . . . . . . . . . 195
Menu overview . . . . . . . . . . . . . . . . 190
Searching for an entry . . . . . . . . . . 191
Starting route guidanc e . . . . . . . . . 196
Voice entry . . . . . . . . . . . . . . . . . . . 197
Writing an SMS . . . . . . . . . . . . . . . 196
ADS
Definition . . . . . . . . . . . . . . . . . . . . 559
Air cleaner
Display messag e . . . . . . . . . . . . . . 443
Air pressures – see Tyre pressures
Air pump, electric . . . . . . . . . . . . . . 425
Airbags . . . . . . . . . . . . . . . . . . . . . . . . 37
Activating . . . . . . . . . . . . . . . . . . . . . 35
Control unit . . . . . . . . . . . . . . . . . . . 35
Front . . . . . . . . . . . . . . . . . . . . . . . . 39
Front-passenger . . . . . . . . . . . . . . . . 39
PASS AIR BAG OFF warning
lamp . . . . . . . . . . . . . . . . . . . . . 48, 466
Sidebags . . . . . . . . . . . . . . . . . . . . . 40
Windowbags . . . . . . . . . . . . . . . . . . . 41
Air-conditioning system in the
rear compartment
Controlling . . . . . . . . . . . . . . . . . . . 218
Airmatic . . . . . . . . . . . . . . . . . . . . . . 326
Definition . . . . . . . . . . . . . . . . . . . . 559
Vehicle level . . . . . . . . . . . . . . . . . . 326
Air-recirculation mode . . . . . . . . . . 347
Alarm
Switching off . . . . . . . . . . . . . . . . . . 57
Ambient lighting . . . . . . . . . . . . . . . 282
Setting (COMAND) . . . . . . . . . . . . . 210
Anti-lock braking system – see ABS
Anti-theft alarm system . . . . . . . . . . 57
Warning signal . . . . . . . . . . . . . . . . 475
Anti-theft systems . . . . . . . . . . . . . . 57
Ashtray . . . . . . . . . . . . . . . . . . . . . . . 3 78
ASR
Definition . . . . . . . . . . . . . . . . . . . . 559
ASSYST PLUS . . . . . . . . . . . . . . . . . . 415
Calling up (instrument cluster) . . . . 246
Definition . . . . . . . . . . . . . . . . . . . . 559
Audio (COMAND) . . . . . . . . . . . . . . . . 79
AUX mode . . . . . . . . . . . . . . . . . . . . 89
CD mode . . . . . . . . . . . . . . . . . . . . . 86
DVD mode . . . . . . . . . . . . . . . . . . . . 86
MP3 mode . . . . . . . . . . . . . . . . . . . . 86
Rear compartment . . . . . . . . . . . . . . 90

4
Index
Automatic air conditioning . . . . . . 342
COMAND . . . . . . . . . . . . . . . . . . . . 214
Operating notes . . . . . . . . . . . . . . . 345
Overview . . . . . . . . . . . . . . . . . . . . 342
Rear-compartment control . . . . . . . 349
Switching on/off . . . . . . . . . . . . . . 345
Automatic car wash . . . . . . . . . . . . 417
Automatic headlamp mode . . . . . . 278
Automatic transmission . . . . . . . . . 292
Drive program . . . . . . . . . . . . . . . . 2 98
Driving tips . . . . . . . . . . . . . . . . . . . 296
Hill pull-away aid . . . . . . . . . . . . . . 297
Kickdown . . . . . . . . . . . . . . . . . . . . 297
Oil level . . . . . . . . . . . . . . . . . . . . . 397
Program selector button . . . . . . . . 298
Shift ranges . . . . . . . . . . . . . . . . . . 296
Steering wheel ge arshift
buttons . . . . . . . . . . . . . . . . . . . . . . 295
Trailer towing . . . . . . . . . . . . . . . . . 298
AUX
Audio . . . . . . . . . . . . . . . . . . . . . . . . 89
Rear Seat Entertainment
System . . . . . . . . . . . . . . . . . . . . . . 229
Video . . . . . . . . . . . . . . . . . . . . . . . 108
Auxiliary heating . . . . . . . . . . . . . . . 351
Changing the remote control
battery . . . . . . . . . . . . . . . . . . . . . . 50 0
Heater booster system . . . . . . . . . . 354
Malfunction . . . . . . . . . . . . . . . . . . 493
Remote control . . . . . . . . . . . . . . . 352
Setting (COMAND) . . . . . . . . . . . . . 219
Auxiliary ventilation . . . . . . . . . . . . 351
B
Back button
COMAND . . . . . . . . . . . . . . . . . . . . . 68
Multi-function steering wheel . . . . . 235
Rear Seat Entertainmen t
System . . . . . . . . . . . . . . . . . . . . . . 228
Ball coupling
Folding in . . . . . . . . . . . . . . . . . . . . 413
Folding out . . . . . . . . . . . . . . . . . . . 411
BAS . . . . . . . . . . . . . . . . . . . . . . . . . . . 54
Definition . . . . . . . . . . . . . . . . . . . . 559
BAS Plus . . . . . . . . . . . . . . . . . . . . . . . 54
Definition . . . . . . . . . . . . . . . . . . . . 559
Battery
Changing (auxilia ry heating
remote control) . . . . . . . . . . . . . . . 500
Changing (key) . . . . . . . . . . . . . . . . 499
Charging (vehicle battery) . . . . . . . 523
Check lamp (key) . . . . . . . . . . . . . . 251
Check lamp (KEYLESS GO key) . . . 254
Checking (key) . . . . . . . . . . . . . . . . 251
Checking (KEYLESS GO key) . . . . . 254
Disconnecting the starter
battery . . . . . . . . . . . . . . . . . . . . . . 522
Fitting the starter battery . . . . . . . . 524
Reconnecting the starter
battery . . . . . . . . . . . . . . . . . . . . . . 524
Removing the starter battery . . . . . 522
Switching off the internal functions
of the vehicle network . . . . . . . . . . 522
Belt force limiters . . . . . . . . . . . . . . . 35
Belt height adjustment . . . . . . . . . . 276
Belt tens ioners . . . . . . . . . . . . . . . . . 35
Bluetooth
Definition . . . . . . . . . . . . . . . . . . . . 560
Receiver . . . . . . . . . . . . . . . . . . . . . 385
Settings . . . . . . . . . . . . . . . . . . . . . 204
Bonnet . . . . . . . . . . . . . . . . . . . . . . . 394
Display message . . . . . . . . . . . . . . 445

5
Index
Boot
Emergency release . . . . . . . . . . . . 496
Key . . . . . . . . . . . . . . . . . . . . . . . . . 250
Locking and unlo cking
separately . . . . . . . . . . . . . . . . . . . 355
Locking button (KEYLESS GO ) . . . . 253
Power closing . . . . . . . . . . . . . . . . . 255
Remote closing . . . . . . . . . . . . . . . 253
Storage space . . . . . . . . . . . . . . . . 376
Boot lid
Closing switch . . . . . . . . . . . . . . . . 356
Display message . . . . . . . . . . . . . . 445
Opening limiter . . . . . . . . . . . . . . . 358
Opening/closing . . . . . . . . . . . . . . 355
Boot lid opening limiter . . . . . 213, 358
Brake Assist – see BAS
Brake Assist Plus – see BAS Plus
Brake fluid . . . . . . . . . . . . . . . . . . . . 554
Display message . . . . . . . . . . . . . . 445
Brake lamps
Display message . . . . . . . . . . . . . . 460
Overview . . . . . . . . . . . . . . . . . . . . 502
Brake pads/linings
Display message . . . . . . . . . . . . . . 446
Brake system
Display messag e . . . . . . . . . . . . . . 446
Driving tips . . . . . . . . . . . . . . . . . . . 408
Electric parking brake . . . . . . . . . . 289
Warning lamp . . . . . . . . . . . . . . . . . 472
Bulbs
Changing . . . . . . . . . . . . . . . . . . . . 501
Front . . . . . . . . . . . . . . . . . . . . . . . 502
Rear . . . . . . . . . . . . . . . . . . . . . . . . 502
C
Capacities . . . . . . . . . . . . . . . . . . . . 548
Care
Automatic car wash . . . . . . . . . . . . 417
Distronic . . . . . . . . . . . . . . . . . . . . 419
Distronic Plus . . . . . . . . . . . . . . . . . 419
Headlamps . . . . . . . . . . . . . . . . . . . 419
High-pressure cleane rs . . . . . . . . . 418
Nightview system . . . . . . . . . . . . . . 421
Park Assist . . . . . . . . . . . . . . . . . . . 420
Parktronic . . . . . . . . . . . . . . . . . . . 420
Reversing camera . . . . . . . . . . . . . 420
Trailer tow hitch . . . . . . . . . . . . . . . 421
Windows . . . . . . . . . . . . . . . . . . . . 418
Windscreen . . . . . . . . . . . . . . . . . . 4 18
Wiper blades . . . . . . . . . . . . . . . . . 418
CD . . . . . . . . . . . . . . . . . . . . . . . . . . . . 79
Charging . . . . . . . . . . . . . . . . . . . . . . 81
Ejecting . . . . . . . . . . . . . . . . . . . . . . 83
Menu overview . . . . . . . . . . . . . . . . . 85
Playback options . . . . . . . . . . . . . . . 89
Selecting a medium . . . . . . . . . . . . . 87
Selecting a track . . . . . . . . . . . . . . . 88
CD changer
Operating (instrument cluster) . . . . 242
CD player
Operating (instrument cluster) . . . . 242
Central locking
Button . . . . . . . . . . . . . . . . . . . . . . 256
From the boot (outside) . . . . . . . . . 253
Key . . . . . . . . . . . . . . . . . . . . . . . . . 251
KEYLESS GO . . . . . . . . . . . . . . . . . 253
Switching on/off (COMAND) . . . . . 212
Centre console
Overview, lower section . . . . . . . . . . 19
Overview, upper section . . . . . . . . . . 18
Change of direction . . . . . . . . . 171, 240
Changing a wheel – see Flat tyre
Chassis number . . . . . . . . . . . . . . . 537

6
Index
Child seat
Automatic recognition . . . . . . . . . . . 48
Display message . . . . . . . . . . . . . . 433
Forward-facing . . . . . . . . . . . . . . . . . 49
ISOFIX . . . . . . . . . . . . . . . . . . . . . . . 49
Position . . . . . . . . . . . . . . . . . . . . . . 46
Rearward-facing . . . . . . . . . . . . . . . . 48
Recommendations . . . . . . . . . . . . . . 47
Child-proof locks . . . . . . . . . . . . . . . . 51
Children
Automatic child seat
recognition . . . . . . . . . . . . . . . . . . . . 48
In the vehicle . . . . . . . . . . . . . . . . . . 43
Restraint systems . . . . . . . . . . . . . . 44
Cigarette lighte r . . . . . . . . . . . . . . . 379
Cleaning – see Care
Cockpit . . . . . . . . . . . . . . . . . . . . . . . . . 8
COMAND
Back button . . . . . . . . . . . . . . . . . . . 68
Basic functions . . . . . . . . . . . . . . . . . 69
Components . . . . . . . . . . . . . . . . . . . 61
Controller . . . . . . . . . . . . . . . . . . . . . 61
Definition . . . . . . . . . . . . . . . . . . . . 560
Display . . . . . . . . . . . . . . . . . . . . . . . 61
Function buttons . . . . . . . . . . . . . . . 64
Linguatronic settings . . . . . . . . . . . 202
Menu overview . . . . . . . . . . . . . . . . . 65
Operating examp le . . . . . . . . . . . . . . 68
Operating system . . . . . . . . . . . . . . 236
Phone book . . . . . . . . . . . . . . . . . . 120
Switching cooling on/off . . . . . . . . 216
Vehicle . . . . . . . . . . . . . . . . . . . . . . 207
COMAND controller . . . . . . . . . . . . . . 61
Operation . . . . . . . . . . . . . . . . . . . . . 63
COMAND display . . . . . . . . . . . . . . . . 61
COMAND menu
Automatic air conditioni ng . . . . . . . 214
Navigation system . . . . . . . . . . . . . 133
Overview . . . . . . . . . . . . . . . . . . . . . 65
SMS messages . . . . . . . . . . . . . . . . 125
System settings . . . . . . . . . . . . . . . 200
Telephone . . . . . . . . . . . . . . . . . . . . 109
TV . . . . . . . . . . . . . . . . . . . . . . . . . . . 99
Vehicle . . . . . . . . . . . . . . . . . . . . . . 207
Video . . . . . . . . . . . . . . . . . . . . . . . . 91
Combination switch . . . . . . . . . . . . 279
Consumption . . . . . . . . . . . . . . . . . . 550
Consumption statistic s . . . . . . . . . 238
Convenience opening/closing
feature . . . . . . . . . . . . . . . . . . . . . . . 366
Air-recirculation mode . . . . . . . . . . 348
Coolant . . . . . . . . . . . . . . . . . . 397, 552
Checking the level . . . . . . . . . . . . . 398
Display message . . . . . . . . . . . . . . 454
Temperature gauge . . . . . . . . . . . . 302
Coolbox . . . . . . . . . . . . . . . . . . . . . . . 381
Cornering light function . . . . . . . . . 279
Changing the bulbs . . . . . . . . . . . . 506
Overview . . . . . . . . . . . . . . . . . . . . . 502
Cruise control . . . . . . . . . . . . . . . . . 303
Display (instrument clu ster) . . . . . . 305
Display message . . . . . . . . . . . . . . 436
Cup holder . . . . . . . . . . . . . . . . . . . . 375
D
Date
Setting (COMAND) . . . . . . . . . . . . . 201
Daytime driving lights . . . . . . . . . . 27 7
Setting (instrument cluster) . . . . . . 247
Delayed switch-off
Exterior lighting (COMAND) . . . . . . 209
Interior lighting (COMAND) . . . . . . 210

7
Index
Demisting . . . . . . . . . . . . . . . . . . . . 346
Destination entry . . . . . . . . . . . . . . 147
Destination memory . . . . . . . . . . . . 185
Diesel
Winter driving . . . . . . . . . . . . . . . . . 393
Digital TV . . . . . . . . . . . . . . . . . . . . . 104
Dimensions . . . . . . . . . . . . . . . . . . . 544
Dipped-beam headlamps
Changing the bulbs . . . . . . . . . . . . 5 04
Display message . . . . . . . . . . . . . . 456
Driving abroad . . . . . . . . . . . . . . . . 410
Overview . . . . . . . . . . . . . . . . . . . . 502
Switching on/off . . . . . . . . . . . . . . 277
Symmetrical . . . . . . . . . . . . . . . . . . 410
Direction of rotation (tyr es) . . . . . . 401
Display message . . . . . . . . . . . . . . . 428
Distance recorder
Resetting (instrument cluster) . . . . 239
Distance warning function
Distronic . . . . . . . . . . . . . . . . . . . . 309
Distronic Plus . . . . . . . . . . . . . . . . . 317
Distronic . . . . . . . . . . . . . . . . . . . . . 306
Cleaning the sensors . . . . . . . . . . . 419
Cover . . . . . . . . . . . . . . . . . . . . . . . 419
Definition . . . . . . . . . . . . . . . . . . . . 560
Display messag e . . . . . . . . . . . . . . 429
Distance warning function . . . . . . . 309
Driving tips . . . . . . . . . . . . . . . . . . . 312
Menu (instrument cluster) . . . . . . . 310
Warning lamp . . . . . . . . . . . . . . . . . 471
Distronic Plus . . . . . . . . . . . . . . . . . 313
Cleaning the sensors . . . . . . . . . . . 419
Cover . . . . . . . . . . . . . . . . . . . . . . . 419
Definition . . . . . . . . . . . . . . . . . . . . 560
Display messag e . . . . . . . . . . . . . . 431
Distance warning function . . . . . . . 317
Driving tips . . . . . . . . . . . . . . . . . . . 321
Menu (instrument cluster) . . . . . . . 319
Warning lamp . . . . . . . . . . . . . . . . . 471
Door
Automatic locking . . . . . . . . . . . . . 2 56
Display messag e . . . . . . . . . . . . . . 445
Locking/unlocking . . . . . . . . . . . . . 250
Power closing . . . . . . . . . . . . . . . . . 255
Door control panel . . . . . . . . . . . . . . 24
Drinks holder – see Cup holder
Drive program . . . . . . . . . . . . . . . . . 298
Driving abroad . . . . . . . . . . . . . . . . . 410
Driving on flooded roads . . . . . . . . 409
Driving safety system . . . . . . . . . . . . 53
ABS . . . . . . . . . . . . . . . . . . . . . . . . . 53
ADAPTIVE BRAKE . . . . . . . . . . . . . . . 56
Adaptive brake lamps . . . . . . . . . . . 54
BAS . . . . . . . . . . . . . . . . . . . . . . . . . 54
BAS Plus . . . . . . . . . . . . . . . . . . . . . . 54
EBV . . . . . . . . . . . . . . . . . . . . . . . . . . 56
ESP . . . . . . . . . . . . . . . . . . . . . . . . . . 54
Driving system . . . . . . . . . . . . 303, 331
Airmatic . . . . . . . . . . . . . . . . . . . . . 326
Cruise control . . . . . . . . . . . . . . . . 303
Distronic . . . . . . . . . . . . . . . . . . . . . 3 06
Distronic Plus . . . . . . . . . . . . . . . . . 313
HOLD . . . . . . . . . . . . . . . . . . . . . . . 325
Nightview system . . . . . . . . . . . . . . 339
Parktronic . . . . . . . . . . . . . . . . . . . 329
Reversing camera . . . . . . . . . . . . . 334
Speedtronic . . . . . . . . . . . . . . . . . . 323
Driving tip . . . . . . . . . . . . . . . . . . . . 408
Automatic transmission . . . . . . . . . 296
Braking . . . . . . . . . . . . . . . . . . . . . . 408
Distronic . . . . . . . . . . . . . . . . . . . . . 3 12
Distronic Plus . . . . . . . . . . . . . . . . . 321

8
Index
Driving abroad . . . . . . . . . . . . . . . . 410
Driving on flooded roads . . . . . . . . 409
Driving on wet roads . . . . . . . . . . . 409
Trailer towing . . . . . . . . . . . . . . . . . 412
Winter . . . . . . . . . . . . . . . . . . . . . . . 407
DVB-T . . . . . . . . . . . . . . . . . . . . . . . . . 99
DVD
Audio . . . . . . . . . . . . . . . . . . . . . . . . 79
Ejecting . . . . . . . . . . . . . . . . . . . . . . 83
Loading . . . . . . . . . . . . . . . . . . . . . . 81
Menu . . . . . . . . . . . . . . . . . . . . . . . . 96
Operating (instrument cluster) . . . . 242
Playback options . . . . . . . . . . . . . . . 89
Selecting a medium . . . . . . . . . . . . . 87
Selecting a track . . . . . . . . . . . . . . . 88
Setting the audio format . . . . . . . . . 89
Video . . . . . . . . . . . . . . . . . . . . . . . . 91
DVD audio
Fast forward/rewind . . . . . . . . . . . . 88
Menu overview . . . . . . . . . . . . . . . . . 85
Pause function . . . . . . . . . . . . . . . . . 87
Stop function . . . . . . . . . . . . . . . . . . 87
DVD video . . . . . . . . . . . . . . . . . . . . . 91
Fast forward/rewind . . . . . . . . . . . . 94
Menu overview . . . . . . . . . . . . . . . . . 93
Operating (instrument cluster) . . . . 242
Operation . . . . . . . . . . . . . . . . . . . . . 94
Pause function . . . . . . . . . . . . . . . . . 95
Picture settings . . . . . . . . . . . . . . . . 95
Selecting a film/track . . . . . . . . . . . 95
Selecting a mediu m . . . . . . . . . . . . . 94
Selecting a scene/chapter . . . . . . . . 95
Setting the audio format . . . . . . . . . 97
Setting the language . . . . . . . . . . . . 97
Stop function . . . . . . . . . . . . . . . . . . 95
Video game . . . . . . . . . . . . . . . . . . . 9 8
Dynamic driving seat . . . . . . . . . . . 261
Dynamic route guidan ce
(COMAND) . . . . . . . . . . . . . . . . . . . . 180
E
Easy-entry feature . . . . . . . . . . . . . . 263
Activating (COMAND) . . . . . . . . . . . 208
Easy-exit feature . . . . . . . . . . . . . . . 263
Activating (COMAND) . . . . . . . . . . . 208
EBV . . . . . . . . . . . . . . . . . . . . . . . . . . . 56
Definition . . . . . . . . . . . . . . . . . . . . 560
Electric blind
Panorama sliding sunroof . . . . . . . . 361
Rear side window . . . . . . . . . . . . . . 286
Rear window . . . . . . . . . . . . . . . . . . 378
Electrical system
Fuse box . . . . . . . . . . . . . . . . . . . . . 531
Electrical/electronic equipment
Retrofitting . . . . . . . . . . . . . . . . . . . 535
Electroni c brake-power distributi on –
see EBV
Electronic Stability Program – see ESP
e-mark . . . . . . . . . . . . . . . . . . . . . . . 535
Definition . . . . . . . . . . . . . . . . . . . . 560
Emergency braking . . . . . . . . . . . . . 290
Emergency locking . . . . . . . . . . . . . 496
Emergency mode
Automatic transmission . . . . . . . . . 483
Emergency release
Boot . . . . . . . . . . . . . . . . . . . . . . . . 496
Electric parking brake . . . . . . . . . . 497
Vehicle . . . . . . . . . . . . . . . . . . . . . . 495
Emergency spare wheel . . . . . . . . . 426
Engine
Misfiring . . . . . . . . . . . . . . . . . . . . . 481
Starting problems . . . . . . . . . . . . . . 480
Starting the engine with
KEYLESS GO . . . . . . . . . . . . . . . . . . 287
Starting the engine with the key . . 287
Stopping with KEYLESS GO . . . . . . 290
Stopping with the key . . . . . . . . . . . 290
Technical data . . . . . . . . . . . . . . . . 538
Engine compartment . . . . . . . . . . . 394

9
Index
Engine electronics . . . . . . . . . . . . . 535
Malfunction . . . . . . . . . . . . . . . . . . 480
Engine number . . . . . . . . . . . . . . . . 537
Engine oil
Capacity . . . . . . . . . . . . . . . . . . . . . 551
Checking the engine oil level . . . . . 395
Consumption . . . . . . . . . . . . . . . . . 395
Display messag e . . . . . . 396, 462, 463
Entering c haracters (COMAND) . . . . 67
ESP . . . . . . . . . . . . . . . . . . . . . . . . . . . 54
Activating/deactivatin g . . . . . . . . . . 55
Definition . . . . . . . . . . . . . . . . . . . . 560
Display message . . . . . . . . . . . . . . 440
Warning lamp . . . . . . . . . . . . . . 54, 468
ESP trailer stabilisation . . . . . . . . . . 55
Exterior lighting
Delayed switch-off (COMAND) . . . . 209
Overview . . . . . . . . . . . . . . . . . . . . 502
See also Brake lamps
See also Cornering light function
See also Dipped-beam headlamps
See also Exterior lighting
See also Front foglamps
See also Licence plate lighting
See also Parking lamps
See also Reversing lamps
See also Side lamps
See also Third brake lamp
See also Turn signals
Exterior mirror parking position
Adjusting (COMAND) . . . . . . . . . . . 207
Storing . . . . . . . . . . . . . . . . . . . . . . 270
Exterior mirrors
Adjusting . . . . . . . . . . . . . . . . . . . . 269
Anti-dazzle mode (automatic) . . . . 270
Convenience settings . . . . . . . . . . . 207
Folding in/out (a utomatically) . . . . 2 69
Parking position . . . . . . . . . . . . . . . 270
Extractor f or fuses . . . . . . . . . . . . . 530
F
Favourite (COMAND) . . . . . . . . . . . 203
Fire extinguisher . . . . . . . . . . . . . . . 425
First-aid kit . . . . . . . . . . . . . . . . . . . 424
Flat tyre . . . . . . . . . . . . . . . . . . . . . . 510
MOExtended run-flat system* . . . . 517
Spare wheel . . . . . . . . . . . . . . . . . . 514
TIREFIT kit . . . . . . . . . . . . . . . . . . . 510
Vehicle tool kit . . . . . . . . . . . . . . . . 425
Folding table . . . . . . . . . . . . . . . . . . 373
Frequencies
Garage door opener . . . . . . . . . . . . 555
Mobile phone . . . . . . . . . . . . . . . . . 536
Front airbags . . . . . . . . . . . . . . . . . . . 39
Front bulbs . . . . . . . . . . . . . . . . . . . . 502
Front foglamps . . . . . . . . . . . . . . . . 278
Display messag e . . . . . . . . . . . . . . 459
Overview . . . . . . . . . . . . . . . . . . . . 502
Front-passenger front airbag . . . . . . 39
Front-passenger seat
Adjusting from the driver’s
seat . . . . . . . . . . . . . . . . . . . . . . . . 262
Adjusting from the rear . . . . . . . . . 266
Fuel . . . . . . . . . . . . . . . . . . . . . . . . . . 548
Consumption . . . . . . . . . . . . . . . . . 549
Diesel . . . . . . . . . . . . . . . . . . . . . . . 392
Losing . . . . . . . . . . . . . . . . . . 477, 478
Petrol . . . . . . . . . . . . . . . . . . . . . . . 391
Fuel filler flap
Opening/closing . . . . . . . . . . . . . . 391
Fuel filter
Display messag e . . . . . . . . . . . . . . 451
Function buttons (COMAND) . . . . . . 64

10
Index
Fuse box
Dashboard . . . . . . . . . . . . . . . . . . . 532
Engine compartment . . . . . . . . . . . 531
Rear compartment . . . . . . . . . . . . . 531
Fuses . . . . . . . . . . . . . . . . . . . . . . . . 530
G
Garage door opener . . . . . . . . . . . . 385
Frequencies . . . . . . . . . . . . . . . . . . 555
Glove compartment . . . . . . . . . . . . 371
GPS
Definition . . . . . . . . . . . . . . . . . . . . 561
Reception . . . . . . . . . . . . . . . . . . . . 138
GSM . . . . . . . . . . . . . . . . . . . . . . . . . 1 09
Definition . . . . . . . . . . . . . . . . . . . . 561
H
Handbrake – see Parking brake
(electric)
Hands-free mode . . . . . . . . . . . . . . . 383
Hazard warning lamps . . . . . . . . . . 280
Head restraint
Adjusting NECK-PRO comfort
head restraints . . . . . . . . . . . . . . . . 260
Adjusting the angle . . . . . . . . . . . . 260
Adjusting the comfort head
restraints . . . . . . . . . . . . . . . . . . . . 265
Rear compartment . . . . . . . . . . . . . 264
Resetting NECK-PRO comfort
head restraints . . . . . . . . . . . . . . . . 519
Headlamp flasher . . . . . . . . . . . . . . 279
Headlamps
Cleaning . . . . . . . . . . . . . . . . . . . . . 419
Cleaning system . . . . . . . . . . 279, 398
Misting up . . . . . . . . . . . . . . . . . . . 484
Topping up the washer fl uid . . . . . . 398
Heater
Air-recirculation mode . . . . . . . . . . 347
Auxiliary heating . . . . . . . . . . . . . . . 351
Demisting . . . . . . . . . . . . . . . . . . . . 346
Overview . . . . . . . . . . . . . . . . . . . . 344
Rear window . . . . . . . . . . . . . . . . . . 347
Seat heating . . . . . . . . . . . . . . . . . . 262
Steering wheel heating . . . . . . . . . . 268
Windows misted up . . . . . . . . . . . . 347
Heater booster system . . . . . . . . . . 354
High-pressure cleaners . . . . . . . . . 418
Hill pull- away aid . . . . . . . . . . . . . . . 297
HOLD . . . . . . . . . . . . . . . . . . . . . . . . 325
Definition . . . . . . . . . . . . . . . . . . . . 561
Display message . . . . . . . . . . . . . . 443
I
Ignition . . . . . . . . . . . . . . . . . . . . . . . 257
Immobiliser . . . . . . . . . . . . . . . . . . . . 57
Incandescent bulbs – see Bulbs
Indicator and warning lamp
ABS warning lamp . . . . . . . . . . . . . 470
Battery check lamp
(on the key) . . . . . . . . . . . . . . . . . . 489
Brake system warning lamp . . . . . . 472
Distance warning system lamp* . . 471
Electric parking brake indicator
lamp . . . . . . . . . . . . . . . . . . . . . . . . 471
Electric parking brake warning
lamp . . . . . . . . . . . . . . . . . . . . . . . . 471
Engine diagnostics warning
lamp . . . . . . . . . . . . . . . . . . . . . . . . 473
ESP warning lamp . . . . . . . . . . 54, 468
Main-beam indicator lamp . . . . . 13, 15
PASS AIR BAG OFF warning
lamp . . . . . . . . . . . . . . . . . . . . 48, 466
Pre-glow indicator lamp . . . . . . . . . 287
Seat belt warning lamp . . . . . . . . . . 474
SRS warning lamp . . . . . . . . . 34, 472
Turn signal indicator lamp . . . . . 13, 15
Tyre pressure warning lam p . . . . . . 474

11
Index
Indicator lamp – see Indicator and
warning lamp
Instrument cluster . . . . . . . . . . 12, 301
Assistance menu . . . . . . . . . . . . . . 245
Audio menu . . . . . . . . . . . . . . . . . . 242
Malfunction memory . . . . . . . . . . . 246
Navi menu . . . . . . . . . . . . . . . . . . . 240
Overview . . . . . . . . . . . . . . . . . . . . . 12
Selecting the language
(COMAND) . . . . . . . . . . . . . . . . . . . 203
Service menu . . . . . . . . . . . . . . . . . 246
Settings menu . . . . . . . . . . . . . . . . 247
Telephone menu . . . . . . . . . . . . . . 243
Trip menu . . . . . . . . . . . . . . . . . . . . 238
Instrument cluster menu
Assistance . . . . . . . . . . . . . . . . . . . 245
Audio . . . . . . . . . . . . . . . . . . . . . . . 242
Navi . . . . . . . . . . . . . . . . . . . . . . . . 240
Overview . . . . . . . . . . . . . . . . . . . . 236
Service . . . . . . . . . . . . . . . . . . . . . . 246
Settings . . . . . . . . . . . . . . . . . . . . . 247
Telephone . . . . . . . . . . . . . . . . . . . 243
Trip . . . . . . . . . . . . . . . . . . . . . . . . . 238
Instrument cluster operating
system . . . . . . . . . . . . . . . . . . . . . . . 234
Definition . . . . . . . . . . . . . . . . . . . . 561
Display messag es . . . . . . . . . . . . . 428
Overview . . . . . . . . . . . . . . . . . . . . 236
Instrument lighting . . . . . . . . . . . . . 301
Interior lighting . . . . . . . . . . . . . . . . 281
Ambient lighting . . . . . . . . . . . . . . . 282
Ambient lighting (COM AND) . . . . . 210
Control unit . . . . . . . . . . . . . . 281, 282
Instruments . . . . . . . . . . . . . . . . . . 301
Interior lighting . . . . . . . . . . . . . . . . 210
Reading lamp . . . . . . . . . . . . . . . . . 282
Interior motion sensor . . . . . . . . . . . 58
Intermittent wipe . . . . . . . . . . . . . . 283
IR emitter
Changing . . . . . . . . . . . . . . . . . . . . 506
ISOFIX child seat securing
system . . . . . . . . . . . . . . . . . . . . . . . . 49
J
Jack . . . . . . . . . . . . . . . . . . . . . . . . . . 425
Jump-starting . . . . . . . . . . . . . . . . . . 525
K
Key
Battery check lamp . . . . . . . . . . . . 251
Changing the battery . . . . . . . . . . . 499
Convenience closing . . . . . . . . . . . 366
Factory setting . . . . . . . . . . . . . . . . 250
Locking/unlocking centrally . . . . . 250
Losing . . . . . . . . . . . . . . . . . . . . . . 489
Modifying the programming . . . . . . 251
Positions in the ignition lock . . . . . 257
Starting the engine . . . . . . . . . . . . . 287
Stopping the engine . . . . . . . . . . . . 290
Key positions . . . . . . . . . . . . . . . . . . 257
KEYLESS GO . . . . . . . . . . . . . . . . . . . 251
Button . . . . . . . . . . . . . . . . . . . . . . 257
Checking the battery . . . . . . . . . . . 254
Convenience closing . . . . . . . . . . . 367
Display messag e . . . . . . . . . . . . . . 452
Key . . . . . . . . . . . . . . . . . . . . . . . . . 251
Key positions . . . . . . . . . . . . . . . . . 257
Locking . . . . . . . . . . . . . . . . . . . . . 253
Malfunction . . . . . . . . . . . . . . . . . . 491
Modifying the programming . . . . . . 254
Starting the engine . . . . . . . . . . . . . 287
Stopping the engine . . . . . . . . . . . . 290
Unlocking . . . . . . . . . . . . . . . . . . . . 2 51

12
Index
Kickdown . . . . . . . . . . . . . . . . . 297, 299
Definition . . . . . . . . . . . . . . . . . . . . 561
L
Lane recommendation . . . . . . . . . . 173
Language . . . . . . . . . . . . . . . . . . . . . 203
Licence plate lighting
Display message . . . . . . . . . . . . . . 458
Overview . . . . . . . . . . . . . . . . . . . . 502
Light switch . . . . . . . . . . . . . . . . . . . 277
Lighting . . . . . . . . . . . . . . . . . . . . . . 277
Changing the bulbs . . . . . . . . . . . . 501
See also Exterior lighting
See also Interior lighting
Lights
Changing the bulbs . . . . . . . . . . . . 501
See also Exterior lighti ng . . . . . . . . 277
See also Interior lighting . . . . . . . . 2 77
Linguatronic . . . . . . . . . . . . . . . . . . . 202
Locator lighting
Setting (COMAND) . . . . . . . . . . . . . 211
Locking
Automatic . . . . . . . . . . . . . . . . . . . . 256
Setting automatic (COMAND) . . . . 212
Locking button
Boot (KEYLESS GO) . . . . . . . . . . . . 253
Inside (central locking) . . . . . . . . . . 256
LOGIC7 . . . . . . . . . . . . . . . . . . . . . . . . 71
Definition . . . . . . . . . . . . . . . . . . . . 561
Lumbar support . . . . . . . . . . . . . . . . 261
COMAND . . . . . . . . . . . . . . . . . . . . 221
M
Main-beam headlamps
Changing . . . . . . . . . . . . . . . . . . . . 505
Display message . . . . . . . . . . . . . . 458
Switching on/off . . . . . . . . . . . . . . 279
Malfunction memory . . . . . . . . . . . . 246
Malfunction message – see Display
message
Manual release
Electric parking brake . . . . . . . . . . 497
Massage function . . . . . . . . . . . . . . 224
Maximum drawbar
noseweight . . . . . . . . . . . . . . . . . . . 545
Maximum permissible
axle load . . . . . . . . . . . . . . . . . . . . . . 546
Maximum permissible gross
vehicle weight . . . . . . . . . . . . . . . . . 546
Maximum roof load . . . . . . . . . . . . . 546
Memory function . . . . . . . . . . . . . . . 272
Messages – see Display message
Minispare . . . . . . . . . . . . . . . . . . . . . 426
Mirrors
See Exterior mirrors or Rear-view mirror
Misfiring . . . . . . . . . . . . . . . . . . . . . . 481
Mobile phone
Hands-free mode . . . . . . . . . . . . . . 383
Inserting into the bracket . . . . . . . . 383
Removing from the bra cket . . . . . . 384
Run-on time . . . . . . . . . . . . . . . . . . 384
Second receiver . . . . . . . . . . . . . . . 385
MOExtended run-flat
system* . . . . . . . . . . . . . . . . . 401, 517
MON
Definition . . . . . . . . . . . . . . . . . . . . 562
MP3 . . . . . . . . . . . . . . . . . . . . . . . . . . . 79
Menu overview . . . . . . . . . . . . . . . . . 85
Operating (instrument cluster) . . . . 242
Operation . . . . . . . . . . . . . . . . . . . . . 86
Playback options . . . . . . . . . . . . . . . 89
Selecting a folder . . . . . . . . . . . . . . . 88
Selecting a mediu m . . . . . . . . . . . . . 87
Selecting a track . . . . . . . . . . . . . . . 88
Multi-contour dynam ic drivin g se at
COMAND . . . . . . . . . . . . . . . . . . . . 224

13
Index
Multi-contour seat
Front . . . . . . . . . . . . . . . . . . . 221, 261
Rear compartmen t . . . . . . . . . . . . . 266
Multi-function display . . . . . . . . . . 234
Multi-function steering wheel
Buttons . . . . . . . . . . . . . . . . . . . . . 235
N
Navigation system . . . . . . . . . . . . . 133
Basic settings . . . . . . . . . . . . . . . . . 143
Change of direction . . . . . . . . 171, 240
Destination entry . . . . . . . . . . . . . . 147
Destination memory . . . . . . . . . . . 185
Hiding/showing the menu
system . . . . . . . . . . . . . . . . . . . . . . 141
Instrument cluster . . . . . . . . . . . . . 240
Lane recommendation . . . . . . . . . . 173
Map display . . . . . . . . . . . . . . . . . . 141
Menu overview . . . . . . . . . . . . . . . . 140
Operation . . . . . . . . . . . . . . . . . . . . 141
Previous destinations . . . . . . . . . . . 189
Route guidance . . . . . . . . . . . . . . . 171
Special destination entry . . . . . . . . 163
Traffic jam function . . . . . . . . . . . . 179
Traffic reports (RDS-TMC) . . . . . . . 180
NECK-PRO . . . . . . . . . . . . . . . . . . . . . 43
Resetting comfort head
restraints . . . . . . . . . . . . . . . . . . . . 519
Nightview system . . . . . . . . . . . . . . 339
Changing the IR emitter . . . . . . . . . 506
Display messag e . . . . . . . . . . . . . . 461
Malfunction . . . . . . . . . . . . . . . . . . 494
O
Oil – see Engine oil
On-board voltage . . . . . . . . . . . . . . . 490
Outside temperature display . . . . . 302
Overhead control panel
Overview . . . . . . . . . . . . . . . . . . . . . 23
P
Paint no. . . . . . . . . . . . . . . . . . . . . . . 537
Panorama sliding sunroof
Opening/closing . . . . . . . . . . . . . . 363
Operating manually . . . . . . . . . . . . 4 98
Raising/lowering . . . . . . . . . . . . . . 364
Resetting . . . . . . . . . . . . . . . . . . . . 364
Roller sunblind . . . . . . . . . . . . . . . . 361
Park Assist . . . . . . . . . . . . . . . . . . . . 331
Activating/deactivating . . . . . . . . . 334
Definition . . . . . . . . . . . . . . . . . . . . 562
Display messag e . . . . . . . . . . . . . . 434
Range . . . . . . . . . . . . . . . . . . . . . . . 332
Trailer towing . . . . . . . . . . . . . . . . . 334
Warning display . . . . . . . . . . . . . . . 333
Parking . . . . . . . . . . . . . . . . . . . . . . . 289
Parking aid . . . . . . . . . . . . . . . . . . . . 329
Parking brake (elect ric) . . . . . . . . . 289
Display messag e . . . . . . . . . . . . . . 447
Emergency braking . . . . . . . . . . . . 290
Indicator lamp . . . . . . . . . . . . . . . . 471
Manual release . . . . . . . . . . . . . . . . 497
Warning lamp . . . . . . . . . . . . . . . . . 471
Parking lamps . . . . . . . . . . . . . . . . . 502
Display messag e . . . . . . . . . . . . . . 460
Parking position
Exterior mirrors . . . . . . . . . . . . . . . 270
Exterior mirrors (COMAND) . . . . . . 207
Parktronic . . . . . . . . . . . . . . . . . . . . 329
Activating/deactivating . . . . . . . . . 3 31
Cleaning the sensors . . . . . . . . . . . 420
Definition . . . . . . . . . . . . . . . . . . . . 562
Malfunction . . . . . . . . . . . . . . . . . . 467
Minimum distance . . . . . . . . . . . . . 330
Parking aid . . . . . . . . . . . . . . . . . . . 329
Range . . . . . . . . . . . . . . . . . . . . . . . 330
Trailer towing . . . . . . . . . . . . . . . . . 331
Warning display . . . . . . . . . . . . . . . 330

14
Index
PCMCIA card
Ejecting . . . . . . . . . . . . . . . . . . . . . . 84
Loading . . . . . . . . . . . . . . . . . . . . . . 82
Performance . . . . . . . . . . . . . . . . . . 539
Permanent curre nt
Connection . . . . . . . . . . . . . . . . . . . 414
Permanent Speedtronic . . . . . . . . . 324
Petrol
Minimum quality . . . . . . . . . . . . . . 391
Petrol – see Fuel
Phone book
COMAND . . . . . . . . . . . . . . . . . . . . 120
Dialling a number
(instrument cluster) . . . . . . . . . . . . 244
PIN . . . . . . . . . . . . . . . . . . . . . . . . . . 243
Power closing . . . . . . . . . . . . . . . . . 255
Power windows – see Side window
PRE-SAFE . . . . . . . . . . . . . . . . . . . . . . 42
Display message . . . . . . . . . . . . . . 434
Preventive occupant safety . . . . . . . 42
Program selector butto n . . . . . . . . 298
Programmable button . . . . . . . . . . 203
PULSE – see Massage functio n
R
Radio
Menu overview . . . . . . . . . . . . . . . . . 74
Operation . . . . . . . . . . . . . . . . . . . . . 74
RDS . . . . . . . . . . . . . . . . . . . . . . . . . 78
RDS frequency diversi t y . . . . . . . . . . 77
Storing stations . . . . . . . . . . . . . . . . 76
Switching waveband . . . . . . . . . . . . 75
Tuning in a station (COMAND) . . . . . 75
Tuning in a station (instrument
cluster) . . . . . . . . . . . . . . . . . . . . . . 242
Radio type-approval number . . . . . 555
Radio-controlled equipment . . . . . . 385
Rain closing feature (sliding/tilting
sunroof) . . . . . . . . . . . . . . . . . . . . . . 360
Rain sensor . . . . . . . . . . . . . . . . . . . 28 3
Range
Calling up (instrument cluster) . . . . 239
RDK
Definition . . . . . . . . . . . . . . . . . . . . 562
Warning lamp . . . . . . . . . . . . . . . . . 474
RDS . . . . . . . . . . . . . . . . . . . . . . . . 77, 78
Definition . . . . . . . . . . . . . . . . . . . . 562
Rear bulbs . . . . . . . . . . . . . . . . . . . . 502
Rear compar tment
Adjusting the front-passenger
seat . . . . . . . . . . . . . . . . . . . . . . . . 266
Cup holder . . . . . . . . . . . . . . . . . . . 375
Head restraints . . . . . . . . . . . . . . . . 264
Multi-contour seat . . . . . . . . . . . . . 266
Seats . . . . . . . . . . . . . . . . . . . . . . . 264
Second receiver . . . . . . . . . . . . . . . 385
Rear foglamp . . . . . . . . . . . . . . . . . . 278
Display message . . . . . . . . . . . . . . 459
Overview . . . . . . . . . . . . . . . . . . . . . 502
Rear seat . . . . . . . . . . . . . . . . . . . . . 264
Rear Seat En tertainmen t
System . . . . . . . . . . . . . . . . . . . . . . . 22 6
AUX menu . . . . . . . . . . . . . . . . . . . 231
Back button . . . . . . . . . . . . . . . . . . 228
CD menu . . . . . . . . . . . . . . . . . . . . 229
COMAND controller . . . . . . . . . . . . 228
Control elements . . . . . . . . . . . . . . 226
DVD-V menu . . . . . . . . . . . . . . . . . . 230
Several users . . . . . . . . . . . . . . . . . 232
System settings . . . . . . . . . . . . . . . 232
TV menu . . . . . . . . . . . . . . . . . . . . . 231

15
Index
Rear window blind . . . . . . . . . . . . . 378
Rear window heating . . . . . . . . . . . 347
Malfunction . . . . . . . . . . . . . . . . . . 466
Rear-compartment air conditioning
Controlling . . . . . . . . . . . . . . . . . . . 346
Overview . . . . . . . . . . . . . . . . . . . . 349
Rear-view mirror
Anti-dazzle mode (automati c) . . . . 270
Remote control (garage door
opener) . . . . . . . . . . . . . . . . . . . . . 385
Refuelling . . . . . . . . . . . . . . . . . . . . . 391
Region code . . . . . . . . . . . . . . . . . . . . 92
Release button
Boot . . . . . . . . . . . . . . . . . . . . . . . . 250
Inside (central loc king) . . . . . . . . . 256
Remote control
Auxiliary heating . . . . . . . . . . . . . . 352
Garage door opener . . . . . . . . . . . . 385
Key . . . . . . . . . . . . . . . . . . . . . . . . . 250
Replacement parts . . . . . . . . . . . . . 534
Reset (COMAND) . . . . . . . . . . . . . . . 206
Residual heat . . . . . . . . . . . . . . . . . . 348
Restraint system . . . . . . . . . . . . . . . . 32
Airbags . . . . . . . . . . . . . . . . . . . . . . . 34
Belt force limiters . . . . . . . . . . . . . . . 35
Belt tensioners . . . . . . . . . . . . . . . . . 35
Children . . . . . . . . . . . . . . . . . . . . . . 44
Display messag e . . . . . . . . . . . . . . 451
Malfunction . . . . . . . . . . . . . . . . . . 472
Seat belt . . . . . . . . . . . . . . . . . . . . . . 33
SRS . . . . . . . . . . . . . . . . . . . . . . . . . 34
Rev counter . . . . . . . . . . . . . . . . . . . 302
Reversing camera . . . . . . . . . . . . . . 334
Cleaning . . . . . . . . . . . . . . . . . . . . . 420
Reversing lamps
Display messag e . . . . . . . . . . . . . . 460
Overview . . . . . . . . . . . . . . . . . . . . 502
Roller sunblind (side windows) . . . 286
Roller sunblind (sliding
sunroof) . . . . . . . . . . . . . . . . . . . . . . 361
Roof rack . . . . . . . . . . . . . . . . . . . . . 368
Route guidance . . . . . . . . . . . . . . . . 171
Ruffled pocket . . . . . . . . . . . . . . . . . 373
Run-on time (mobile phone) . . . . . . 384
S
Seat
Adjusting from the rear . . . . . . . . . 266
Adjusting the front seat . . . . . . . . . 259
Dynamic driving seat . . . . . . . . . . . 261
Front multi-contour seat . . . . . . . . 261
Lumbar support . . . . . . . . . . . . . . . 261
Multi-contour seat in the rear
compartment . . . . . . . . . . . . . . . . . 266
Storing settings . . . . . . . . . . . . . . . 272
Seat belt . . . . . . . . . . . . . . . . . . . . . . . 33
Adjusting the height . . . . . . . . . . . . 276
Seat heating . . . . . . . . . . . . . . . . . . . 262
Malfunction . . . . . . . . . . . . . . . . . . 465
Seat ventilation
Malfunction . . . . . . . . . . . . . . . . . . 465
Service . . . . . . . . . . . . . . . . . . . . . . . 415
Service products . . . . . . . . . . . . . . . 548
Setting the airflow
COMAND . . . . . . . . . . . . . . . . . . . . 215
Front . . . . . . . . . . . . . . . . . . . . . . . 346
Rear . . . . . . . . . . . . . . . . . . . . . . . . 3 50
Settings
Calling up a stored setting . . . . . . . 272
Factory (key) . . . . . . . . . . . . . . . . . 250
Factory (KEYLESS GO) . . . . . . . . . . 252
Resetting (COMAND) . . . . . . . . . . . 238

16
Index
Shift range
Automatic transmission . . . . . . . . . 296
Side lamps . . . . . . . . . . . . . . . . . . . . 502
Side window
Malfunction . . . . . . . . . . . . . . . . . . 486
Opening/closing . . . . . . . . . . . . . . 284
Sidebags . . . . . . . . . . . . . . . . . . . . . . . 40
Skibag . . . . . . . . . . . . . . . . . . . . . . . . 368
Sliding/tilting sunroof . . . . . . . . . . 359
Operating manual ly . . . . . . . . . . . . 498
Rain closing feature . . . . . . . . . . . . 360
Resetting . . . . . . . . . . . . . . . . . . . . 361
SMS messages
Definition . . . . . . . . . . . . . . . . . . . . 562
Folder structure . . . . . . . . . . . . . . . 127
Menu overview . . . . . . . . . . . . . . . . 127
Reading . . . . . . . . . . . . . . . . . . . . . 128
Sending . . . . . . . . . . . . . . . . . . . . . 132
Text modules . . . . . . . . . . . . . . . . . 132
Writing . . . . . . . . . . . . . . . . . . . . . . 130
Snow chains . . . . . . . . . . . . . . . . . . 406
Socket . . . . . . . . . . . . . . . . . . . . . . . 380
Sound
Setting (COMAND) . . . . . . . . . . . . . . 70
Surround sound . . . . . . . . . . . . . . . . 71
Switching on/off (COMAND) . . . . . . 69
Spare fuses . . . . . . . . . . . . . . . . . . . 53 0
Spare wheel . . . . . . . . . . . . . . 426, 514
Special destinations . . . . . . . . . . . . 163
Speed limiter
Flat tyre . . . . . . . . . . . . . . . . . . . . . 513
Speedtronic . . . . . . . . . . . . . . . . . . 323
Speedometer . . . . . . . . . . . . . . . . . . . 12
Digital . . . . . . . . . . . . . . . . . . . . . . . 239
Speedtronic . . . . . . . . . . . . . . . . . . . 323
Permanent . . . . . . . . . . . . . . . . . . . 324
Variable . . . . . . . . . . . . . . . . . . . . . 323
SRS . . . . . . . . . . . . . . . . . . . . . . . . . . . 34
Definition . . . . . . . . . . . . . . . . . . . . 562
Warning lamp . . . . . . . . . . . . . . 34, 472
Starting – see Engine, Starting the
engine
Steering wheel . . . . . . . . . . . . . . . . . 268
Buttons (instrument cluster) . . . . . 235
Easy-entry feature . . . . . . . . . . . . . 263
Storing settings . . . . . . . . . . . . . . . 272
Steering wheel gearshift
buttons . . . . . . . . . . . . . . . . . . . . . . . 295
Steering wheel heating . . . . . . . . . . 268
Stowage compartments
Cup holder . . . . . . . . . . . . . . . . . . . 375
Driver’s seat . . . . . . . . . . . . . . . . . . 37 2
Folding table . . . . . . . . . . . . . . . . . . 373
Glove compartmen t . . . . . . . . . . . . 371
Overview . . . . . . . . . . . . . . . . . . . . . . 28
Rear seat armrest . . . . . . . . . . . . . . 373
Ruffled pocket . . . . . . . . . . . . . . . . 373
Spectacles compartment . . . . . . . . 371
Stowage box . . . . . . . . . . . . . . . . . . 374
Stowage tray . . . . . . . . . . . . . . . . . 372
Telephone compart ment . . . . . . . . 372
Summer opening . . . . . . . . . . . . . . . 365
Sun visor . . . . . . . . . . . . . . . . . . . . . 378
Supplemental Restraint System – see
SRS
Surround sound . . . . . . . . . . . . . . . . . 71
Suspension tuning
ABC . . . . . . . . . . . . . . . . . . . . . . . . 328
Airmatic . . . . . . . . . . . . . . . . . . . . . 327
System settings (COMAND)
Bluetooth settings . . . . . . . . . . . . . 204
Display . . . . . . . . . . . . . . . . . . . . . . 200
Linguatronic settings . . . . . . . . . . . 202

17
Index
Menu overview . . . . . . . . . . . . . . . . 200
Programmable button . . . . . . . . . . 203
Reset . . . . . . . . . . . . . . . . . . . . . . . 206
Setting the system language . . . . . 203
Text reader settings . . . . . . . . . . . . 202
Time settings . . . . . . . . . . . . . . . . . 200
T
Tank capacity . . . . . . . . . . . . . . . . . 548
Calling up the range
(instrument cluster) . . . . . . . . . . . . 239
Display . . . . . . . . . . . . . . . . . . . . 1 3, 15
Technical da ta
Acceleration . . . . . . . . . . . . . . . . . . 539
Coolant . . . . . . . . . . . . . . . . . . . . . 552
Engine . . . . . . . . . . . . . . . . . . . . . . 538
Frequencies (garag e door
opener) . . . . . . . . . . . . . . . . . . . . . 555
Fuel consumption . . . . . . . . . . . . . 550
Speed . . . . . . . . . . . . . . . . . . . . . . . 539
Trailer load . . . . . . . . . . . . . . . . . . . 545
Tyres . . . . . . . . . . . . . . . . . . . . . . . 540
Vehicle dimensio ns . . . . . . . . . . . . 544
Vehicle weight . . . . . . . . . . . . . . . . 546
Wheels . . . . . . . . . . . . . . . . . . . . . . 540
Telephone
“112” emergency ca ll . . . . . . . . . . 111
Accepting/ending a call
(COMAND) . . . . . . . . . . . . . . . . . . . 115
Accepting/ending a call
(instrument cluster) . . . . . . . . . . . . 244
Call lists . . . . . . . . . . . . . . . . . . . . . 113
Conference functions . . . . . . . . . . . 119
Entering the PIN (COMAND) . . . . . 111
Entering the PIN (instrument
cluster) . . . . . . . . . . . . . . . . . . . . . . 243
Entering the telephone
number . . . . . . . . . . . . . . . . . . . . . . 116
Keypad . . . . . . . . . . . . . . . . . . . . . . . 64
Menu overview . . . . . . . . . . . . . . . . 113
Operation . . . . . . . . . . . . . . . . . . . . 109
Redial (COMAND) . . . . . . . . . . . . . 116
Redialling (instrument cluster) . . . . 245
Single call connection . . . . . . . . . . 117
Switching on/off . . . . . . . . . . . . . . 110
Transferring a call . . . . . . . . . . . . . 119
Two calls . . . . . . . . . . . . . . . . . . . . 1 18
Unlock code . . . . . . . . . . . . . . . . . . 112
Telephone compartment . . . . . . . . 372
Teletext . . . . . . . . . . . . . . . . . . . . . . 107
Television – see TV
Temperature
Adjusting . . . . . . . . . . . . . . . . . . . . 346
Outside display . . . . . . . . . . . . . . . 302
Setting (COMAND) . . . . . . . . . . . . . 214
Tyres . . . . . . . . . . . . . . . . . . . . . . . 401
Text reader (COMAND) . . . . . . . . . . 202
Third brake lamp
Display messag e . . . . . . . . . . . . . . 456
Overview . . . . . . . . . . . . . . . . . . . . 502
Tightening torque . . . . . . . . . . . . . . 517
Definition . . . . . . . . . . . . . . . . . . . . 563
Time
Setting (COMAND) . . . . . . . . . . . . . 200
TIREFIT kit
Definition . . . . . . . . . . . . . . . . . . . . 563
Storage location . . . . . . . . . . . . . . . 425
Using . . . . . . . . . . . . . . . . . . . . . . . 510
TMC (COMAND) . . . . . . . . . . . . . . . . 180
Tow-away protection . . . . . . . . . . . . 58
Towing eye . . . . . . . . . . . . . . . . . . . . 528
Traction
Definition . . . . . . . . . . . . . . . . . . . . 563

18
Index
Trailer . . . . . . . . . . . . . . . . . . . . . . . . 411
Automatic transmission . . . . . . . . . 298
Coupling . . . . . . . . . . . . . . . . . . . . . 412
Display message . . . . . . . . . . . . . . 443
Driving tips . . . . . . . . . . . . . . . . . . . 412
Park Assist . . . . . . . . . . . . . . . . . . . 334
Parktronic . . . . . . . . . . . . . . . . . . . 331
Permanent current . . . . . . . . . . . . . 414
Trailer load . . . . . . . . . . . . . . . . . . . . 545
Trailer tow hitch
Care note . . . . . . . . . . . . . . . . . . . . 421
Folding in the ball coupling . . . . . . 413
Folding out the ball coupling . . . . . 411
Transmission
Display message . . . . . . . . . . . . . . 436
Emergency mode . . . . . . . . . . . . . . 483
Faulty gear shifts . . . . . . . . . . . . . . 483
Transport (vehicle) . . . . . . . . . . . . . 529
Trip computer (instrument
cluster) . . . . . . . . . . . . . . . . . . . . . . . 238
Trip meter
Resetting (instrument cluster) . . . . 239
Turn signals . . . . . . . . . . . . . . . . . . . 288
Display message . . . . . . . . . . . . . . 457
Misting up . . . . . . . . . . . . . . . . . . . 4 84
Overview . . . . . . . . . . . . . . . . . . . . 502
TV . . . . . . . . . . . . . . . . . . . . . . . . . . . . 99
Basic settings . . . . . . . . . . . . . . . . . 105
Hiding/showing the menu
system . . . . . . . . . . . . . . . . . . . . . . 101
Hiding/showing the navigation
menu . . . . . . . . . . . . . . . . . . . . . . . 101
Information about the current
programme . . . . . . . . . . . . . . . . . . . 10 4
Menu overview . . . . . . . . . . . . . . . . 100
Operating (instrument clus ter) . . . . 243
Operation . . . . . . . . . . . . . . . . . . . . 101
Picture settings . . . . . . . . . . . . . . . 105
Programme . . . . . . . . . . . . . . . . . . . 103
Programme preview . . . . . . . . . . . . 104
Teletext . . . . . . . . . . . . . . . . . . . . . 107
Tuning in a TV channel . . . . . . . . . . 102
Tyre grip . . . . . . . . . . . . . . . . . . . . . . 405
Tyre pressure
Monitor . . . . . . . . . . . . . . . . . . . . . . 404
Tyre pressure loss warning
system . . . . . . . . . . . . . . . . . . . . . . . 401
Tyre pressure monitor
Tyre pressures . . . . . . . . . . . . . . . . . 401
Checking (instrument cluster) . . . . 403
Display message . . . . . . . . . 435, 463
Table . . . . . . . . . . . . . . . . . . . . . . . 540
Tyres . . . . . . . . . . . . . . . . . . . . . . . . . 400
Direction of rotation . . . . . . . . . . . . 401
Display message . . . . . . . . . 435, 463
MOExtended run-flat system* . . . . 401
Pressure . . . . . . . . . . . . . . . . . . . . . 401
Spare wheel . . . . . . . . . . . . . . . . . . 514
Technical data . . . . . . . . . . . . . . . . 540
Temperature . . . . . . . . . . . . . . . . . . 401
Tightening torque . . . . . . . . . . . . . . 517
Tread depth . . . . . . . . . . . . . . . . . . 406
U
Unladen weight . . . . . . . . . . . . . . . . 546
Using the telephone
COMAND . . . . . . . . . . . . . . . . . . . . 115
Instrument cluster . . . . . . . . . . . . . 243
Steering wheel buttons . . . . . . . . . 235
V
Vanity mirror . . . . . . . . . . . . . . . . . . 381
Variable Speedtronic . . . . . . . . . . . 323
Vehicle
Leaving parked up . . . . . . . . . . . . . 493
Locking (central loc k ing
button) . . . . . . . . . . . . . . . . . . . . . . 251
Locking (key) . . . . . . . . . . . . . . . . . 250

19
Index
Locking in an emergency . . . . . . . . 496
Menu overview (COMAND) . . . . . . 207
Setting individually . . . . . . . . . . . . . 247
Transporting . . . . . . . . . . . . . . . . . . 529
Unlocking (central unlocking
button) . . . . . . . . . . . . . . . . . . . . . . 250
Unlocking (key) . . . . . . . . . . . . . . . 250
Unlocking in an emergency . . . . . . 495
Vehicle dimensions . . . . . . . . . . . . 544
Vehicle electronics . . . . . . . . . . . . . 535
Vehicle height . . . . . . . . . . . . . . . . . 544
Setting (ABC) . . . . . . . . . . . . . . . . . 328
Setting (Airmatic) . . . . . . . . . . . . . . 327
Vehicle identification number . . . . 537
Vehicle level
ABC . . . . . . . . . . . . . . . . . . . . . . . . 328
Airmatic . . . . . . . . . . . . . . . . . . . . . 326
Display message . . . . . . . . . . . . . . 444
Vehicle tool kit . . . . . . . . . . . . . . . . 425
Vehicle weight . . . . . . . . . . . . . . . . . 546
Video
AUX mode . . . . . . . . . . . . . . . . . . . 108
DVD mode . . . . . . . . . . . . . . . . . . . . 91
Viscosity
Definition . . . . . . . . . . . . . . . . . . . . 560
Volume
Adjusting (COMAND) . . . . . . . . . . . . 70
Adjusting (multi-function
steering wheel) . . . . . . . . . . . . . . . 235
W
Warning triangle . . . . . . . . . . . . . . . 424
Washer fluid
Display messag e . . . . . . . . . . . . . . 464
Topping up . . . . . . . . . . . . . . . . . . . 398
Washer fluid . . . . . . . . . . . . . . . . . . 554
Wheel bolts . . . . . . . . . . . . . . . . . . . 516
Tightening torque . . . . . . . . . . . . . . 517
Wheel chock . . . . . . . . . . . . . . . . . . 426
Wheels . . . . . . . . . . . . . . . . . . . . . . . 400
Interchanging . . . . . . . . . . . . . . . . . 404
Technical data . . . . . . . . . . . . . . . . 540
Windowbags . . . . . . . . . . . . . . . . . . . 41
Windows
Automatic car wash . . . . . . . . . . . . 398
Cleaning the windscreen . . . . . . . . 418
Misting up . . . . . . . . . . . . . . . . . . . 3 47
Side windows . . . . . . . . . . . . . . . . . 284
Windscreen
Cleaning . . . . . . . . . . . . . . . . . . . . . 418
Infrared reflective . . . . . . . . . . . . . . 385
Windscreen washer
system . . . . . . . . . . . . . . . . . . . 283, 398
Removing/fitting the reservoir . . . . 503
Washer fluid . . . . . . . . . . . . . . . . . . 554
Windscreen wipers . . . . . . . . . . . . . 283
Cleaning . . . . . . . . . . . . . . . . . . . . . 418
Intermittent wipe . . . . . . . . . . . . . . 283
Malfunction . . . . . . . . . . . . . . . . . . 485
Rain sensor . . . . . . . . . . . . . . . . . . 283
Replacing the wiper blades . . . . . . 5 08
Winter diesel . . . . . . . . . . . . . . . . . . 393
Winter driving . . . . . . . . . . . . . . . . . 406
Winter tyres . . . . . . . . . . . . . . . . . . . 406
Limiting the vehicle speed
(instrument cluster) . . . . . . . . 247, 324
Wiper blades . . . . . . . . . . . . . . . . . . 508
X
Xenon headlamps
Definition . . . . . . . . . . . . . . . . . . . . 563
Overview . . . . . . . . . . . . . . . . . . . . 502

20

1
Protection of the environment
Introduction
Protection of the environment
H Environmental note
DaimlerChrysler’s declared policy is one of
integrated envi ronmental protec t ion .
The objectives are for the natural resources
which form the b asis of our existe nce on this
planet to be used sparingly and in a manner
which takes the requirements of both nature
and humanity into account.
You too can help to protect the e nvironment
by operating your vehicle in an environmentally-responsible manner.
Fuel consumption and the rate of engine,
transmission, brake and tyre wear depend
on the followin g factors:
앫 Operating conditions of your vehicle
앫 Your personal driving style
You can influe n ce both factors.
Therefore, p lease bear t he follow ing in min d:
Operating con ditions
앫 Avoid shor t trips as these in crease fuel
consumption.
앫 Make sure that the tyre pressures are a l-
ways correct.
앫 Do not carry any unnecessary weight in
the vehicle.
앫 Keep an eye on the vehicle’s fuel con-
sumption.
앫 Remove roof racks once you no longer
need them.
앫 A regularly serviced vehicl e wi ll contr ib -
ute to environmental protection. You
should therefore adhere to t he service
intervals.
앫 Always have maintenance work carried
out at a qualified specialist workshop,
e.g. a Mercedes-Benz Service Centre .
Personal driving style
앫 Do not depres s the accelerator pedal
when starting the engine.
앫 Do not warm up the engine with the ve-
hicle stationary.
앫 Drive carefully and maintain a safe dis-
tance from the vehicle in front.
앫 Avoid frequent, sudden acceleration.
앫 Change gear in good time and use each
gear only up to 2/3 of its maximum engine speed.
앫 Switch of f the engine in stationary traf-
fic.
Returning used vehicles
If you wish to return your Mercedes-Benz to
be disposed of in an environmentallyresponsible m anner, please conta ct
Mercedes-Benz on the following numbers:
앫 Germany:
00800 1 777 7777
앫 International:
+49 69 95 30 72 77

2
Introduction
Operating safety
Operating safety
G Risk of accident
If work on electronic equipment and its software is carried out incorrectly, this equipment could stop functionin g. The elect ronic
systems are networked via interfaces. T ampering with these electronic systems could
cause malfunctions in systems which have
not been modified. Such malfunctions can
seriously jeopardise the vehicle ’s ope ra ting
safety and your own safety as well.
Other work or modifications incorrectly carried out on the vehicle could also jeopardise
operating safety.
Some safety systems onl y function when the
engine is running. Therefore, do not switch
off the engine when driving.
G Risk of accident
Always have maintenance work carried out
at a qualified specialist workshop which has
the necessary specialis t knowledge and
tools to carry out the work required.
Mercedes-Benz recommends that you use a
Mercedes-Benz Service Centre for this purpose.
In particular, work relevant to safety or on
safety-related systems must be carried out
at a qualified specialist workshop.
G Risk of accident
A heavy impact to the vehicle underb ody,
tyres or wheels (e .g. botto ming out in rough
terrain or when driving over an obstacle at
high speed) can damage the vehicle. This
also applies to vehicles wh ic h ar e equipped
with underbody protection.
In such cases, have your vehicle checke d at
a qualified specialist workshop which has
the necessary specialist knowledge and
tools to carry out the work requir ed .
Mercedes-Benz recommends that you use a
Mercedes-Benz Service Centre for this purpose.
In particular, work relevant to safety or on
safety-related systems must be carried out
at a qualified specialist workshop.

3
Introduction
Operating safety
Mercedes-Benz may instruct its Service
Centres to carry out technical inspections
on certain vehicles to improve their qual ity
or safety.
If you did not purchase your vehicle from
an authorised dealership and your vehicle
has not yet been inspected at a
Mercedes-Benz Service Centre, there is a
possibility that your vehicle may not have
been registered in your name with
Mercedes-Benz. Mercedes-Benz will only
be able to infor m you ab out v ehicle inspe ctions if Mercedes-Benz is in possession of
your registration data.
It is advisable to have your vehicle registered at a Mercedes-Benz Service Centre.
Inform Merc edes-Be nz as soo n as pos sible
if your address has changed or there has
been a change of vehicle owner.
Observe the following information when
driving your vehicle:
앫 The safety notes in this manual
앫 The “Technical data” section in this
manual
앫 National road traffic regulations
앫 National road traffic licensing reg ula -
tions
Vehicle registration Correct use
G Risk of injury
There are var ious warn ing sticker s affixed t o
your vehicle. Their purpose is to draw your
attention, and t he attentio n of other s, to various dangers. Ther efor e, do not remo ve any
warning stickers unless the sticker clearly
states that you may do so.
If you remove any warning stickers, you or
others could fail to recognise certain dangers and be injured.

4

5
At a glance
Exterior view . . . . . . . . . . . . . . . . . 6
Cockpit . . . . . . . . . . . . . . . . . . . . . 8
Instrument cluster . . . . . . . . . . . 12
Operating systems . . . . . . . . . . . 16
Centre console . . . . . . . . . . . . . . 18
Automatic air conditioning . . . . 20
Overhead control panel . . . . . . . 23
Door control panel . . . . . . . . . . . 2 4
Rear seats . . . . . . . . . . . . . . . . . . 26
Stowage compartments . . . . . . 28

6
At a glance
Exterior view
Exterior view
P00.00-3803-31

7
At a glance
Exterior view
Function Page
1 Boot
Locking and unlocking
Opening and closing
Spare wheel
Vehicle tool kit
355
355
514
425
2 Rear lights 502
3 Rear window heating 347
4 Fuel filler flap
Fuel
391
391
5 Doors
Locking and unlocking
Opening and closing
250
250
Function Page
6 E xterior mirrors
Parking position
269
270
7 Towing eye
General information
528
527
8 Tyres and wheels
Checking the tyre
pressure electronically*
General information
Flat tyre
Vehicle tool kit for vehicles
with
앫 TIREFIT kit
앫 “Minispare” emergency
spare wheel*
앫 Spare wheel*
400
403
400
510
425
426
426
Function Page
9 Opens the bonnet
Engine oil
Coolant
394
395
397
a Headlamp cleaning system* 279
b Front lights 502
c Windscreen wipers
Replacing the wiper blades
Cleaning the wiper blades
283
508
418
d Cleans the windows 418
e Sliding sunroof 359
8
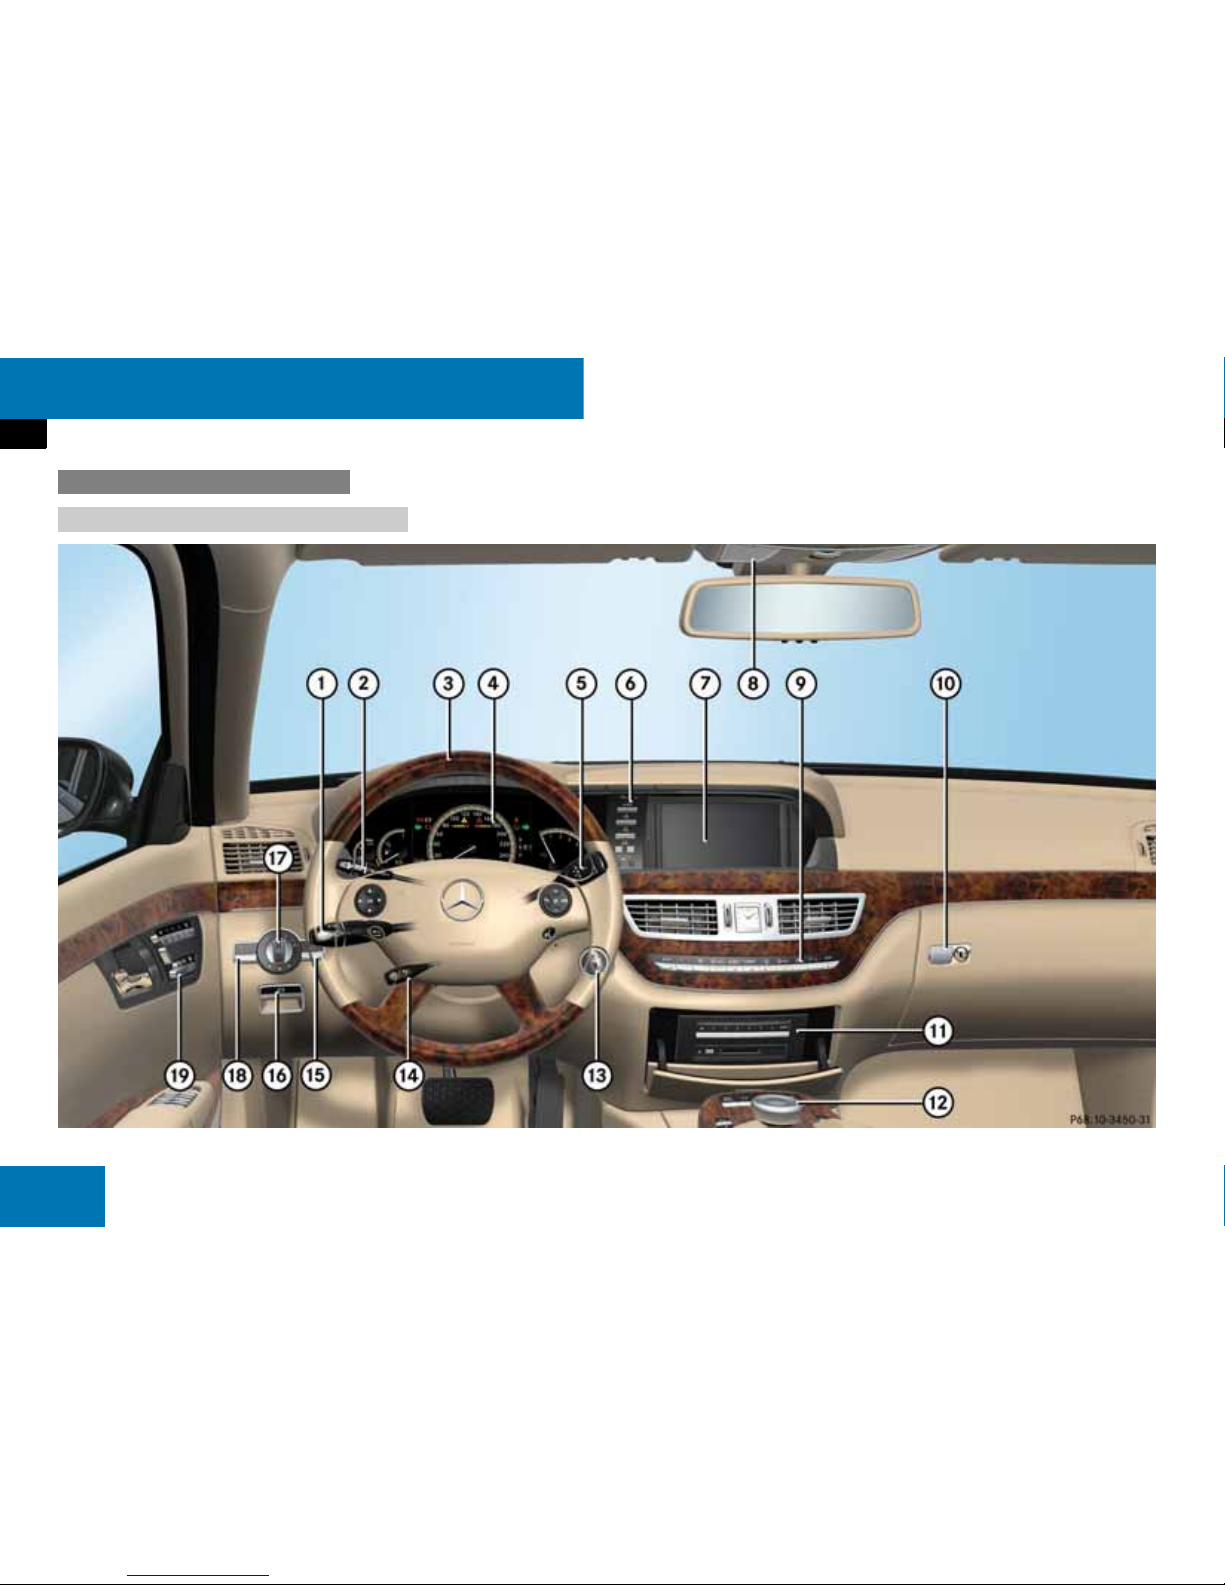
At a glance
Cockpit
Cockpit
Left-hand-drive vehicles
P68.10-3450-31

9
At a glance
Cockpit
Function Page
1 Combination switch
앫 Main-beam headlamps
앫 Turn signals
앫 Windscreen wipers
279
288
283
2 Cruise control lever
앫 Cruise control
앫 Variable Speedtronic
앫 Distronic*
앫 Distronic Plus*
303
323
306
313
3 Multi-function steering
wheel
235
4 Instrumen t cluster 301
5 Selector lever 292
6 Control panel with
buttons and rotary
controls for
Vehicle level 326
328
ESP
®
55
Parktronic system*/
Park Assist*
329
Swivelling the COMAND
display
61
Setting the brightness of the
COMAND display/
instrument cluster
301
7 COMAND display 61
8 Overhead control panel 281
9 Automatic air conditioning
Centre console, upper
section
342
18
Function Page
Function Page
a Locks the glove
compartment
371
b CD and DVD player/
changer*
79
c Centre console, lower sec-
tion
19
d Ignition lock/
KEYLESS GO* button
257
e Adjusts the steering wheel
Steering wheel hea t in g*
268
268
f Headlamp cleaning
system*
279
g Electric parking brake 289
h Light switch 277
j Nightview sy st e m* 339
k Door control panel 24

10
At a glance
Cockpit
Right-hand-drive vehicles
P68.10-3450-31

11
At a glance
Cockpit
Function Page
1 Locks the glove
compartment
371
2 Automatic air conditioning
Centre console, upper
section
342
18
3 Overhead control panel 281
4 COMAND display 61
5 Control panel with
buttons and rotary
controls for
Vehicle level 326
328
ESP
®
55
Parktronic system*/
Park Assist*
329
Swivelling the COMAND
display
61
Setting the brightness of the
COMAND display/
instrument cluster
301
Function Page
6 Combination switch
앫 Main-beam headlamps
앫 Turn signals
앫 Windscreen wipers
279
288
283
7 Cruise control le ver
앫 Cruise control
앫 Variable Speedtronic
앫 Distronic*
앫 Distronic Plus*
303
323
306
313
8 Multi-function steering
wheel
235
9 Instrument cluster 301
a Selector lever 292
b Light switch 277
c Door control panel 24
d Headlamp cleaning sys-
tem*
279
Function Page
e Electric parking brake 289
f Nightview sy st e m* 339
g Adjusts the steering wheel
Steering wheel hea t in g*
268
268
h Ignition lock/
KEYLESS GO* button
257
j Centre console, lower
section
19
k CD and DVD player/
changer*
79
12
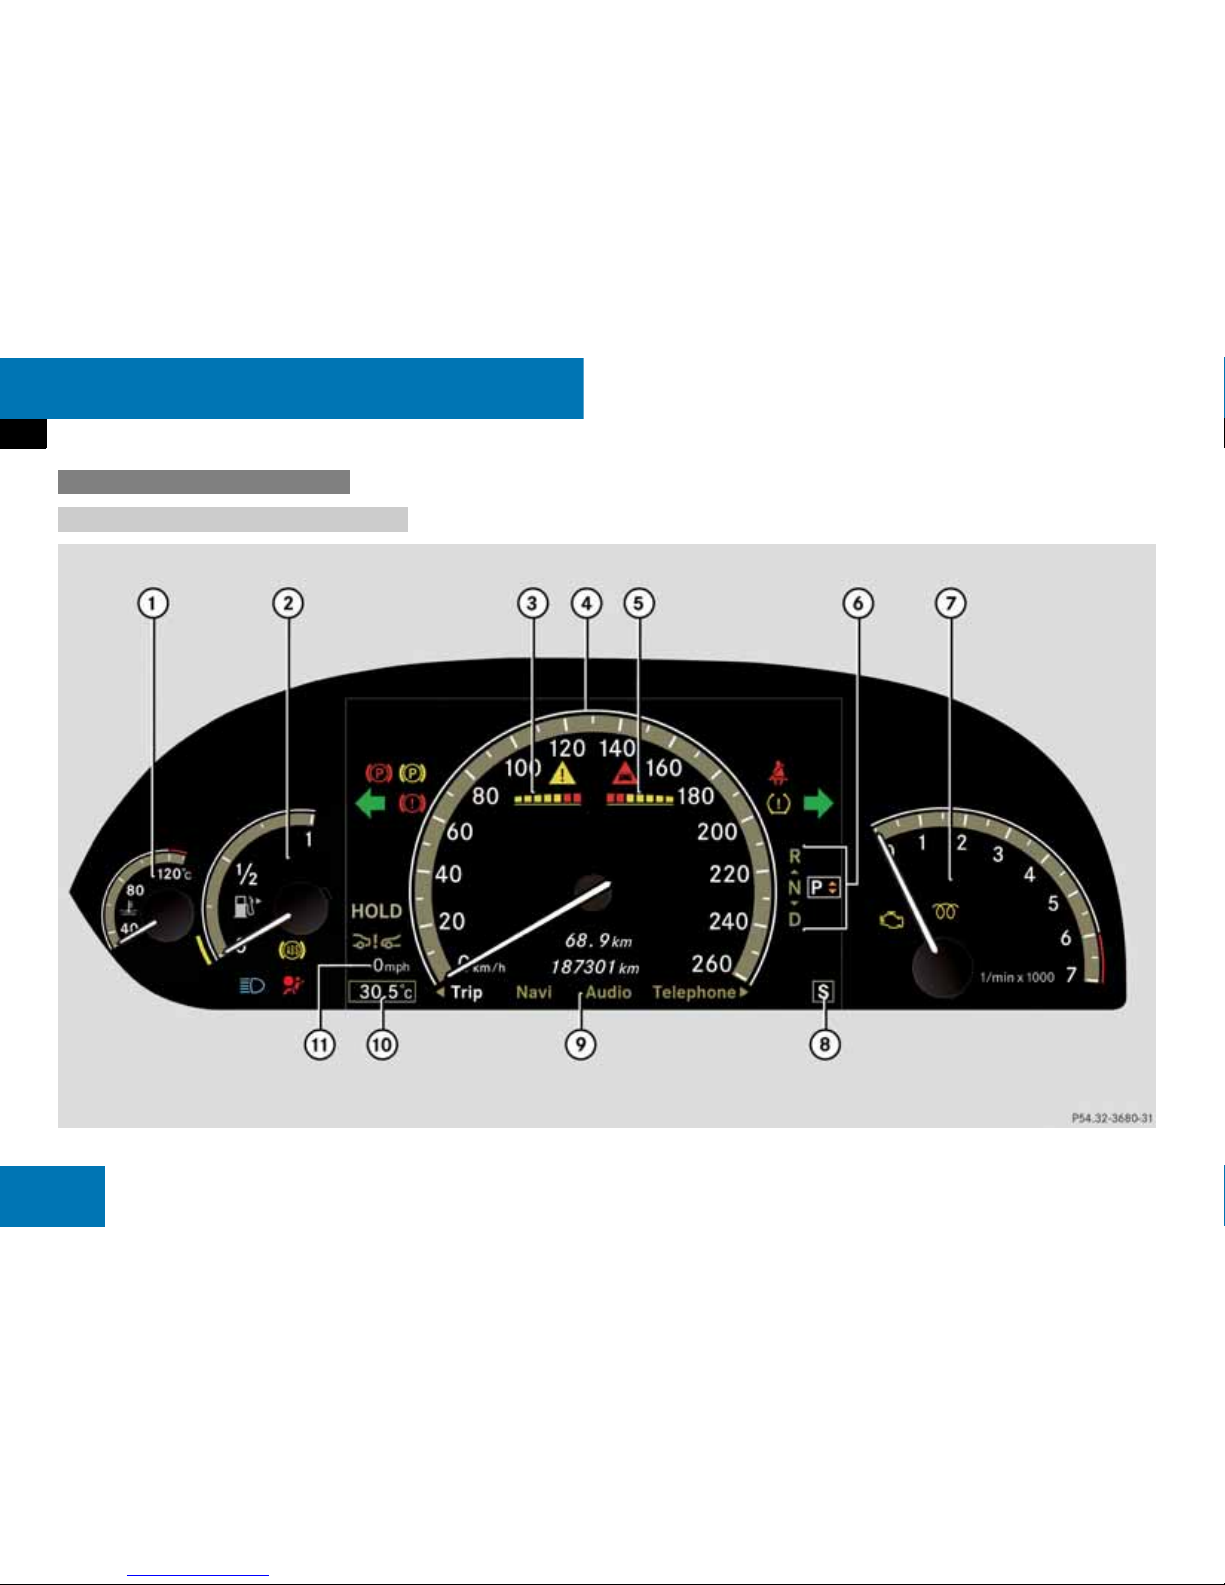
At a glance
Instrument cluster
Instrument cluster
With kilometres display
_
_
P54.32-3680-31

13
At a glance
Instrument cluster
Function Page
1 Coolant temperature gauge
2 Fuel gauge with:
Reserve fuel gauge 474
A Main-beam indicato r
lamp
279
- ABS warning lamp 470
= SRS warning lam p 34
3 Display for Parktronic*/
Park Assist*, left-hand side
329
331
Function Page
4 Multi-function display
with:
Speedometer
! Electric parking brake
indicator and warning lamp
471
— Brake system warning lamp
472
< Seat belt warning
lamp
474
X Tyre pressure warning lamp*
474
L K Turn signal indicator lamps
5 Display for Parktronic*/
Park Assist*, right-hand
side
329
331
Function Page
6 Transmission position
display
294
7 Rev counter with:
± Engine diagnostics
warning lamp
473
q Diesel engine:
pre-glow indicator lamp
287
8 Drive program display 298
9 Basic menu for the
operating system
236
a Outside temp er ature
b Displays for:
Additional speedometer 247
HOLD 325
Distance warning system* 309
317

14
At a glance
Instrument cluster
With miles display
_
_
P54.32-3713-31

15
At a glance
Instrument cluster
Function Page
1 Coolant temperature gauge
2 Fuel gauge with:
Reserve fuel gauge 474
A Main-beam indicato r
lamp
279
- ABS warning lamp 470
= SRS warning lam p 34
3 Display for Parktronic*/
Park Assist*, left-hand side
329
331
Function Page
4 Multi-function display
with:
Speedometer
! Electric parking brake
indicator and warning lamp
471
— Brake system
warning lamp
472
< Seat belt warning
lamp
474
X Tyre pressure
warning lamp*
474
L K Turn signal
indicator lamps
5 Display for Parktronic*/
Park Assist*, right-hand
side
329
331
Function Page
6 Transmission position
display
294
7 Rev counter with:
± Engine diagnostics
warning lamp
473
q Diesel engine:
pre-glow indicator lamp
287
8 Drive program display 298
9 Basic menu for the
operating system
236
a Outside temp er ature
b Displays for:
Additional speedometer 247
HOLD 325
Distance warning system* 309
317

16
At a glance
Operating systems
Operating systems
P54.32-3568-31

17
At a glance
Operating systems
Function Page
1 L Back/switches off
voice control*
2 $ Scro lls up
% Scrolls down
& Moves right
( Moves left
# Confirms a
selection
3 Multi-function display 234
4 s Accepts a call*
t Ends a call*
æ Increases the
volume
ç Decreases the
volume
o Mute
244
244
Function Page
5 ! Voice control
(Linguatronic)*
see the separate
Operating
Instructions
6 Sets the brightness of the
multi-function display
301
7 Swivels the CO MAND
display
61
8 Sets the brightness of the
COMAND display
301
9 COMAND display 61
a CD and DVD player /
changer*
81
b COMAND controller and
COMAND function buttons
61

18
At a glance
Centre console
Centre console
Upper section
P68.20-3482-31
Function Page
1 Automatic mode,
left-ha n d si de
346
2 Temperature, left-hand
side
346
3 Demisting 346
4 Thumbwheel, left-hand
side
5 Residual heat
Switches automatic air
conditioning on and off
348
345
6 Thumbwheel, right-hand
side
7 Rear window heating 347
8 Temperature, right-hand
side
346
9 Automatic mode,
right-hand side
346
Function Page
a Airflow, right-hand side 346
b Auxiliary heating*
Heater booster system*
351
354
c Air-recirculation mode 347
d Airflow, left-hand side 346
e Cover for CD and
DVD player/changer*
79
f Compartment for
ashtray*
or
Stowage compartment
378
372
g Compartment for cup
holder*
or
Stowage compartment
371

19
At a glance
Centre console
Lower section
P68.20-3452-31
Function Page
1 Programmable button 203
2 Folds down or folds up the
head restraints in the rear
compartment*
264
3 Sets the drive program 298
4 Function button for
radio and CD/DVD
5 Back button 68
6 Hazard warning lamps 280
7 Lumbar support/
multi-conto ur seat*
221
8 Function button for
telephone* and navigation
system*
9 COMAND controller 61
a On/off button for
COMAND
b Volume control 70
c On/off button for the
sound
d Telephone keypad 110

20
At a glance
Automatic air conditioning
Automatic air conditioning
Overview
P83.00-2183-31

21
At a glance
Automatic air conditioning
Function Page
1 Demister vent, left-hand
side
2 Swivelling side air vent,
left-hand side
3 Swivelling centre air vent,
left-hand side
4 Centre air vent
thumbwheel, left-hand side
5 Centre air vent
thumbwheel, right-hand
side
6 Swivelling centre air vent,
right-hand side
7 Demister vent, right-hand
side
8 Swivelling side air vent,
right-hand side
Function Page
9 Automatic air conditioning
control panel
a Thumbwheel for airflow,
left-hand side
350
b Slider for centre air vent,
left-hand side
350
c Slider for centre air vent,
right-hand side
350
d Thumbwheel for airflow,
right-hand side
350
e Control panel for the air
conditioning in the rear
compartment*
349
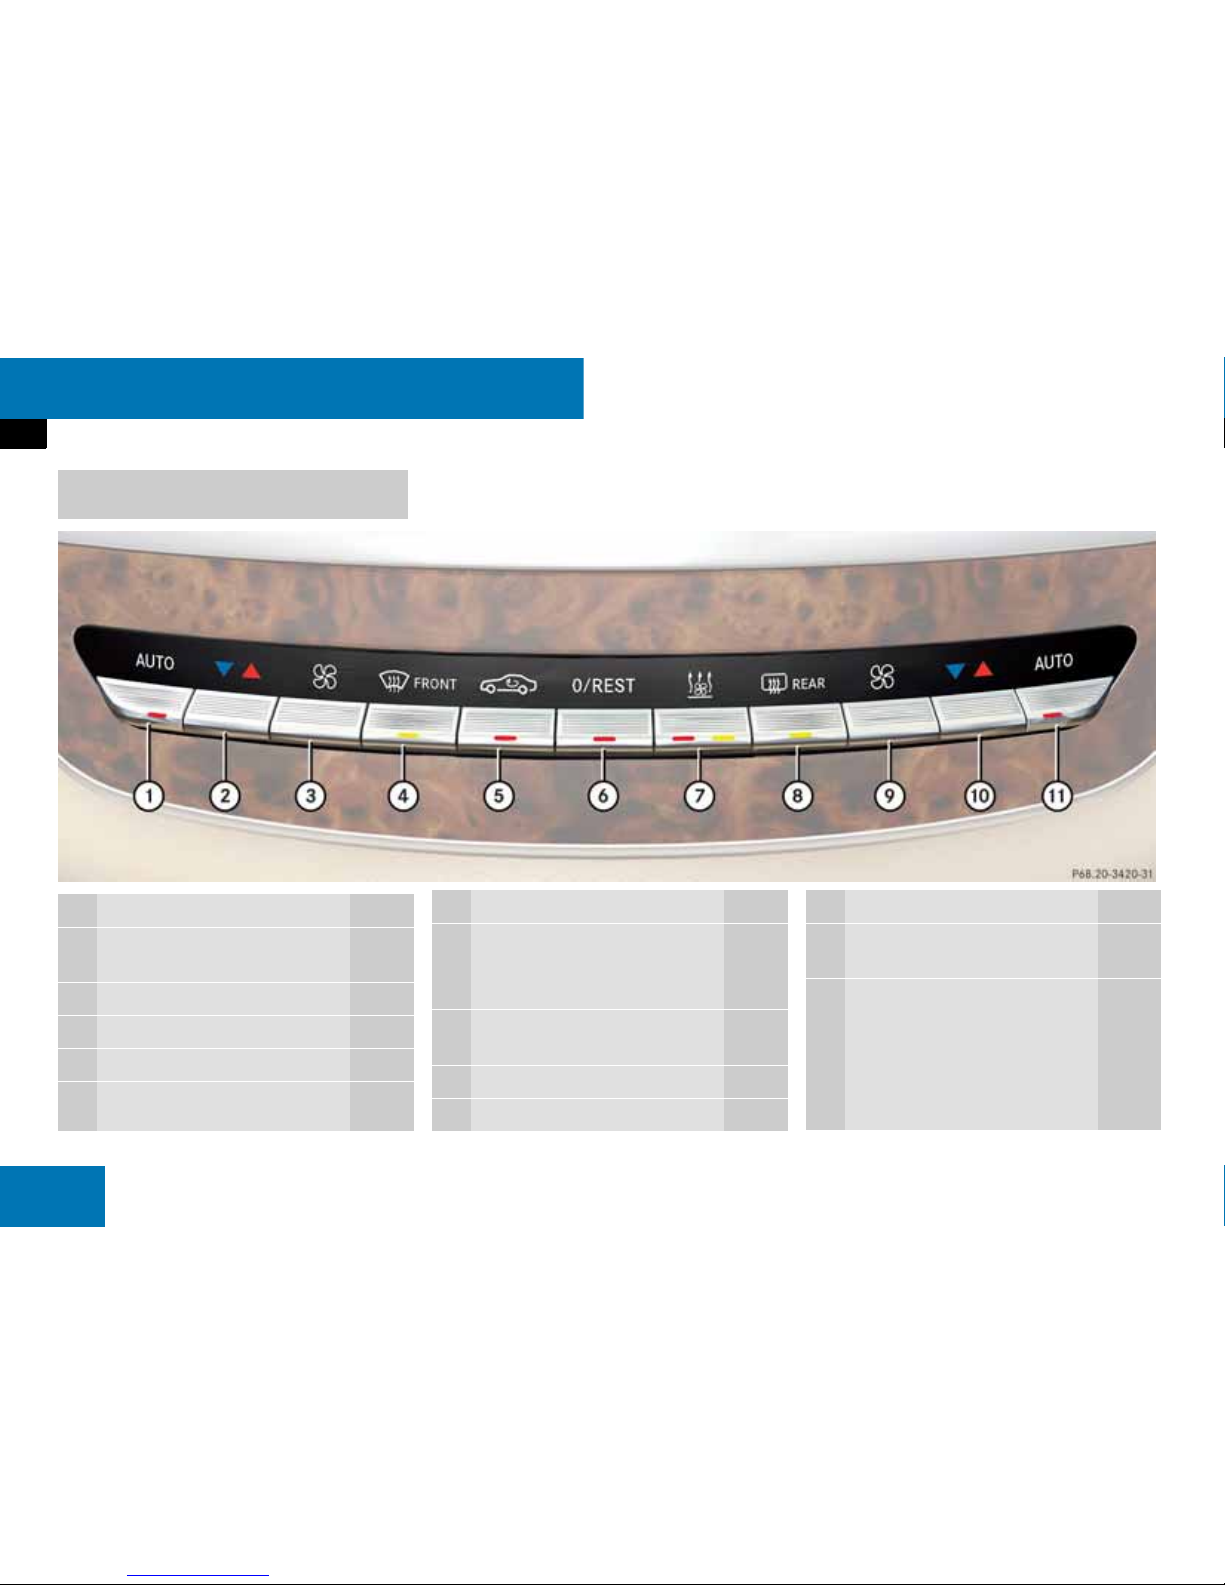
22
At a glance
Automatic air conditioning
Automatic air conditioning control
panel
P68.20-3420-31
Function Page
1 Automatic mode, left-hand
side
346
2 Temperature, left-hand side 346
3 Airflow, left-hand side 346
4 Demisting 346
5 Air-recirculation mode 347
6 Automatic air conditioning
on/off
Residual heat on/off
345
348
7 Auxiliary heating*/heater
booster system*
351
354
8 Rear window heating 347
9 Airflow, right-hand side 346
Function Page
a Temperature, right-hand
side
346
b Automatic mode, right-hand
side
346
Function Page

23
At a glance
Overhead control panel
Overhead control panel
P82.00-2417-31
Function Page
1 Spectacles compartment 371
2 Switches the left-hand
reading lamp on and off
282
3 Switches the rear interior
lighting on and off
282
4 Switches the f ront interi or
lighting on and off
282
5 Opens and clos es the
sliding/tilting sunroof*
or
Opens and closes the
panorama sliding
sunroof*
359
361
6 Controls the automatic
interior lighting
281
7 Opens and clos es the
sunroof roller blind* in the
rear compartment
361
8 Switches the right-hand
reading lamp on and off
282
9 Rear-view mirror 270
a Transmitter buttons for
the garage door opener*
385

24
At a glance
Door control panel
Door control panel
Front
P72.10-3252-31
Function Page
1 Opens the door 255
2 Unlocks the vehicle 256
3 Stores settings for the
seat, exterior mirrors and
steering wheel
Switches to frontpassenger seat
272
262
4 Sets the seat heating*
and seat ventilation*
262
261
5 Adjusts the exterior
mirrors
269
6 Opens and closes the side
windows
Opens and closes the
electric blind* in the rear
side windows
284
286
Function Page
7 Boot lid remote unlocking
feature
Boot lid remote opening
switch* for opening a nd
closing the boot lid
357
8 Disables controls in the
rear compartment
52
9 Locks the vehicle 256
a Adjusts the seat
electrically
259

25
At a glance
Door control panel
Rear
P72.10-3251-31
Function Page
1 Adjusts the front-
passenger seat from the
rear compartment*
262
2 Stores seat settings* 272
3 Opens the door 255
4 Operates the rear roller
sunblind* from the rear
compartment
362
5 Rear window blind* 378
6 Opens and closes the side
windows
Opens and closes the
electric blind* in the rear
side windows
284
286
7 Adjusts the seat
electrically*
264
8 Sets the seat heating*
and seat ventilation*
262
261

26
Rear seats
Function Page
1 DVD drive of the Rear Seat
Entertainment System*
228
2 Multi-contour s eat in the
rear compartment*
266
3 Control elements for the
Rear Seat Entertainment
System*
227
4 Stowage compartment
under the rear seat
armrest
374
5 Cover for skibag*
or
Coolbox*
368
381
P91.12-2883-31

27
At a glance
Rear Seat Entertainment System*
Rear Seat Entertainment Syste m *
Controls below the screen
Function Page
1 To switch on and off 227
2 Reduces brightness of
screen
227
3 Increases brightness of
screen
227
4 Decreases the v olume 227
5 Increases the volume 227
6 Headphone socket 227
P82.86-5152-31
Controls on the rear seat armrest
Function Page
1 Selects the screen 228
2 COMAND controller
for the Rear Seat
Entertainment System
3 Back button 228
P82.86-5173-31

28
At a glance
Stowage compartments
Stowage compartments
P68.00-4203.31

29
At a glance
Stowage compartments
Function Page
1 Glove compartment 371
2 Card clip on t he sun visor 378
3 Front-passenger door
stowage compartment
4 Ruffled pocket
Folding table*
373
373
5 Stowage compartment
Ashtray in the rear
compartment*
379
6 Side stowage compart-
ment in the boot
Retainer for the Owner’s
Manual wallet
377
7 Storage space beneath the
boot floor
376
8 Side stowage compart-
ment in the boot
9 Stowage compartment
Ashtray in the rear
compartment*
379
Function Page
a Ruffled pock et
Folding table*
373
373
b Driver’s door stowage
compartment
c Card clip on the sun visor 378
d Stowage compartment in
front of the centre armrest
Ashtray/cigarette lighter*
372
378
e Spectacles compartment
in the overhea d control
panel
371
f Luggage net in the front-
passenger footwell
g Stowage compartment
with first-aid kit under the
front-pa ss en g e r se at
424
h Stowage compartments
under the centre armrest
372
Function Page
j Cup holder in the rear seat
armrest
Cup holder under the
centre rear seat*
375
376
k Stowage compartment
under the rear seat armrest
Stowage compartment
between the rear seats*
373
374
l Stowage box in th e re ar
compartment
374
m Stowage compartment in
front of the centre armrest
Cup holder*
371
375
n Stowage compartment
under the driver’s seat
Fire extinguisher*
372
425

30

31
Safety
Occupant safety . . . . . . . . . . . . . 32
Driving safety systems . . . . . . . 53
Anti-theft systems . . . . . . . . . . . 57

32
Safety
Occupant safety
This section will familiarise you with the
most important features of the restr aint
systems in your vehicle. In the event of an
accident, your vehicle may collide with
another object, e.g. another vehicle. This
may cause your vehicle to accelerate or
decelerate extremely quickly. During this
acceleration or deceleration, the vehicle
occupants will be propelled in the opposite
direction to the force of the impact. This
means that the vehicle occupants risk being injured on the vehicle interior or on
parts of the vehicle. The purpose of complementary restraint systems, i.e. principally the seat belts supplemented by belt
tensioners, belt force limiters and airbags
where necessary, is to minimise this risk of
injury. However, seat belts and airbags are
generally unable to prevent injuries caused
by objects penetrating the vehicle from the
outside.
The most important restraint systems are:
앫 Seat belts
앫 Restraint systems for children,
as they are the most effective means to
restrict occupant movement in the
event of an accident
Additional protection is provided by:
앫 SRS system (Su pplemental Restraint
System) consisting of:
앫 Belt tensioners
앫 Belt force limiters
앫 Airbags
앫 Preventive occupant safety (PRE-
SAFE
®
)
i Airbags increase the protection of vehicle
occupants wearing a seat belt. However, airbags
are only an additional restraint sy stem which
complements, but does not replace, the seat
belt. All vehicle occupants must wear their seat
belt correctly at all times, even if the vehicle is
equipped with airbags. This is because on the
one hand, airbags are not deployed in all types of
accident, as in some situations airbag deployment would not increase the protection afforded
to vehicle occupants, provided they are wearing
the seat belts correctly.
On the other hand, airbag deployment only provides increased protection if the seat belt is worn
correctly, because:
앫 the seat belt helps to keep the vehicle occu-
pant in the b est p ositi on in r elation to th e air bag
앫 for example, in a head-on collision, the seat
belt can to a large extent prevent the occupant from being propelled towards the force
of the impact, and is thus better suited to
prevent injury
Thus, in accident situations where an airbag is
deployed, it only provides additional protection
to that provided by the seat belt if the seat belt is
worn correctly.
Occupant safety
Restraint systems

33
Safety
Occupant safety
The most important restraint systems in
the vehicle are the seat belts and restraint
systems for children. In the event of a co llision, they are the most effective means of
restraining the movement of vehicle occupants towards the impact force and thus
reducing the danger of them hitting pa rts
of the vehicle interior.
G Risk of injury
Modifications to or work performed incorrectly on restraint systems (seat bel ts, anchorages, belt ten sioners, belt force limit ers
or airbags) or t heir wiring, as well as wo rk on
other networked electronic systems, may
prevent the restrain t sy ste m s fr om working
correctly. Airbags and belt tensioners could
fail, e.g. in the e vent of an accident in whic h
the decelera tion f orc es ar e suf fic ien t to trig ger the systems, or they could be triggered
unintentionally. Never carry out any modifications on the restraint systems. Never
tamper with electronic components and
their software.
G Risk of injury
Airbags provide additional protection, but
are not, however, replacement for the seat
belts. To reduce the risk of serious or fatal
injuries, make sure that all occupants – in
particular, pregnant women – wear their
seat belt correctly at all times and have
adopted a normal sitting posi tion, and that
their seat is positioned as close to the vertical as possible.
Seat belts
G Risk of injury
A seat belt whic h i s no t w orn, w hich i s worn
incorrectly, or which has not been engaged
in the seat belt buckle correctly, canno t perform its inten ded protecti ve functio n. Under
certain circumstan ces this could even ca use
severe or fat al injuries. Make sure that all
vehicle occupants – in particular, pregnant
women – wear their se at belt correct ly at all
times.
You must make sure that the belt:
앫 is routed as low as possible acro ss your
pelvic area, i.e. across your hip joints
and not across your abdomen
앫 fits closely
앫 is not twisted
앫 is routed across the middle of your
shoulder
앫 is not routed across your neck or under
your arm
앫 fits closely across your pelvic area, by
pulling upwards on the shoulder sect ion
of the belt
Do not secure any objects with a se at belt if
the seat belt is being used by one of the vehicle’s occupants.
Avoid wearing bulky clothing, e.g. a winter
coat.
Do not route the belt strap across sharpedged or fragile objects, especially if these
are on or in your clothing, e.g. spectacles,
pens, keys, etc. The seat belt strap could be
damaged and you could be injured.
Only one person should use each seat belt
at any one time.
On no account should children travel in the
vehicle while sitt ing on the lap of another occupant. It would not be possible to restrain
the child, and the child and other vehicle occupants could be injured seriously in the
event of abrupt braking or even fatally in the
event of an acci dent.
컄컄

34
Safety
Occupant safety
i In many countries there are laws concerning
the use of seat belts and child restraint systems.
The SRS (Supplemental Restraint System)
consists of:
앫 = warning lamp
앫 Belt tensioners
앫 Belt force limiters
앫 Airbag system with:
앫 Airbag control unit
앫 Airbags
Warning lamp =
The SRS performs a self -test at regular intervals when the ignition is switched on
and the engine is running. Malfunctions
can therefore be detected in good time.
The = warning lamp in the instrument
cluster (
컄 page 12) lights up when you
switch on the ignition and goes out a few
seconds after the engine is started.
Persons under 1.50 m tall or under twelve
years of age cannot wear the seat belts
properly. They therefore require additional
suitable restraint systems fitte d on appropriate seats for protection in an accident. Always follow the manufacturer’s installation
instructions when fitting a child seat.
G Risk of injury
A seat belt only offers its intended degree of
protection if the backrest is positioned as
close to the vertical as possible and the occupant is sitting upright. Avoid seat positions that do no t allow the seat belt to be
routed correctly. Position the backrest as
close to the vertic al as possible. Do not driv e
with the backres t reclined too fa r b ack.
Otherwise, you could be seriously or even
fatally injured in the eve nt of an ac cident or
sudden braking.
G Risk of injury
The seat belt cannot function correctly if the
belt or buckle is dirty or damaged. Keep the
belt and buckle clean, otherwise the belt
tongue cannot engage correctly.
Regularly check the seat belts to make sure
that they:
앫 are not damaged
앫 are not routed over sh arp edges
앫 are not trapped
Otherwise, the belt could tear in the event of
an accident. You or others could be s eriously or fatally in jured.
Have seat belts which have been damaged
or subjected to heavy loads in an accident
replaced and have their anchorages
checked.
Mercedes-Benz re commends that, for safety
reasons, you only use seat belts whic h have
been specially approved for your vehicle by
Mercedes-Benz.
SRS (Supplemental Restraint
System)

35
Safety
Occupant safety
Triggering belt tensioners, belt force
limiters and airbags
In the event of a collision, the sensor in the
airbag control unit evaluates important
physical data such as duration, direction
and rate of vehicle decelera tion or accele ration. Based on the evaluation of this data
and depending on the vehicle’s rate of longitudinal deceleration in a collis ion, at the
first level, the airbag control unit pr e-emptively triggers the belt tensione rs.
The front airbags are only then deployed if
there is a higher degree of vehicle deceleration in a longitu d inal direction.
Since your vehicle is fitted with adaptive
dual-stage front airbags, the front airbag is
filled with enough gas to reduce the risk of
injuries at the first deployment thr es hol d.
The front airbag is only fully i nflated if a
second threshold is reached within a fe w
milliseconds due to the control unit having
detected further deceleration.
i The front-passenger front airbag is only de-
ployed if the front-passenger seat occupancy
recognition system recognises that the seat is
occupied.
The front belt tensioners can only be triggered if
the belt tongue is correctly engaged in the seat
belt buckle.
Activation of belt tensioner s and airbags
In the first stages of a collision, the airbag
control unit evaluates physical data, such
as duration and direction of vehicle deceleration or acceleration in order to determine whether it is necessary to trigger the
belt tensioners or deploy the airbags.
The belt tensioner and airbag deployment
thresholds are var iable and are ad apted to
the degree of deceleration of the vehicle.
This process is pre-emptive in nature as
the airbag must be deployed during – and
not after – the collision.
G Risk of injury
A malfunction has occurred if the =
warning lamp:
앫 does not li ght up when you start the ig-
nition
앫 does not go out a few seconds after the
engine has started
앫 lights up again
Some systems could be triggered unintentionally or might not be triggered at all in the
event of an accident with high deceleration.
Have the restraint systems checked and repaired immediately at a qualified specialist
workshop which has the necessary specialist knowledge and tools to carry out the
work required. Mercedes-Benz recommends
that you use a Mercedes-Benz Service Centre for this purpose. In particular, work relevant to safety or on safety-related systems
must be carried out at a qualified specialist
workshop.

36
Safety
Occupant safety
i Airbags are not deployed in all types of acci-
dent. They are controlled by complex sensor
technology and evaluation logic. This process is
pre-emptive in nature as airbag deployment
must take place during the impact and must be
adapted to provide calculated, additional protection for the vehicle occupants. Not all airbags are
deployed in an accident.
The different airbag systems work independently
of each other. However, the deployment of each
individual system depends on the type of accident determined by the control system in the
first stages of the collision (head-on collision,
side impact and overturn) and the extent of the
accident (in particular, vehicle’s rate of deceleration or acceleration).
The vehicle deceleration or acceleration
and the direction of the force are basically
determined by:
앫 the distribution of forces during the col-
lision
앫 the collision angle
앫 the deformation characteristics of the
vehicle
앫 the characteristics of the object with
which the vehicle has coll ided, e. g. the
other vehicle
Factors which can only be seen and meas ured after the collision has taken place do
not play a decisive role in the deployment
of an airbag, nor do they provide an indication of it.
The vehicle may be considerably deforme d
without an airbag being deployed, if, for example, only ea sily deformable parts, such
as the bonnet or front wing, have been hit
and the necessary degree of deceleration
has not been reached. It is also possible
that airbags may be deployed even though
the vehicle is o nly sli ght ly d efo rmed , if , fo r
example, very rigid vehicle parts such as
the longitudinal members are affected in
an accident and the degree of deceleration
is sufficient .
Belt tensioners and belt force limiters
The front seat belts and the outer seat
belts in the rear are equipped with belt tensioners.
! Do not engage the seat belt tongue on the
front passenger seat if the seat is not occupied.
The belt tensioners could otherwise be activated
in an accident.
The load exerted by the seat belt is reduced if the seat belt is also equipped with
a belt force limiter.
The automatic comfort-fit feature reduces
the retraction force of the seat belts. This
results in the seat belt being more comfortable.
Only vehicles which ha ve a rear bench seat
with electrically-adjustable outer se ats *
have the automatic comfort-fit feature on
the seat belts in the rear compartment.
Belt tensioners tighten the seat belts in an
accident, pulling them close against the
body.
i Belt tensioners do not correct an incorrect
seat position or incorrectly worn seat belts.
Belt tensioners do not pull occupants back to-
wards the backrest.
The belt force li miters are fine-tu ned to the
front airbags, which take over from the
seat belt a part of the restraining fo rces,
thus spreading the forces exerted by them
on the occupant over a greater area.

37
Safety
Occupant safety
When the ignition is switched on, the belt
tensioners are activated:
앫 only when the restraint systems are op-
erational (the = warning lamp ligh ts
up after the ignition is switched on and
goes out once the engine is running)
(
컄 page 34)
앫 for each seat belt when the belt to ngue
is engaged in the buckle
앫 and triggered in the event of a head-on
or rear-end coll ision if the vehicle decelerates or ac celerates rapidly in a
longitudinal d irection during the initial
stages of the collision
앫 and triggered in certain situations if the
vehicle overturns, if additional prote ction can be provided
앫 and triggered in a serious head-on col-
lision, i.e. if the vehicle decelerates or
accelerates ex tremely quickly in a lon gitudinal direction at the start of an impact
When the belt tensioners are triggered,
you will hear a bang, which is not harmful
to your hearing, and a small amount of
powder may also be released. Th e =
warning lamp comes on.
Airbag system
G Risk of injury
Have belt tensioners which have been triggered replaced at a qualified specialist
workshop which has the necessary specialist knowledge and tools to carry out the
work required. Mercedes-Benz recommends
that you use a Mercedes-Benz Service Centre for this purpose.
In particular, work relevant to safety or on
safety-related systems must be carried out
at a qualified specialist workshop.
Comply with safety regulations when disposing of belt tensioners. Any
Mercedes-Benz Service Centre can provide
details of these regulations.
G Risk of injury
To reduce the risk of serious or fatal injuries
in the event of an accident or similar situation with a high rate of deceleration, e.g. injuries caused by an airbag inflating within
milliseconds or sudden braking, please observe the following points:
앫 All vehicle occupants must s elect a seat
position that allows the seat belt to be
worn correctl y and that is as far away
from the airbag a s possibl e. The driv er’s
seat position must allow the vehicle to
be driven safely. The driver’s arms must
be slightly bent when holding the steer-
ing wheel. The driver must maintain a
distance from the pedals that allows
him/her to depress them fully.
앫 All vehicle occupants should always
wear their seat belt correctly and posi-
tion their backrest as close to the verti-
cal as possible. The head restraint
should support the back of your head at
about eye level.
컄컄

38
Safety
Occupant safety
Your vehicle is equipped with the following
airbags:
앫 Driver’s front airbag, located in the
steering wheel
앫 Front-passenger front airbag above the
glove compartment
앫 Sidebags on the outer side of the front
seats
앫 Sidebags near the outer sides of the
seats in the rear compartment
앫 Windowbags in the edge of the roof
frame
Airbag deployment
The airbags inflate within milliseconds. The
= warning lamp comes on.
i If the airbags are deployed, you will hear a
bang and a small amount of powder may also be
released. The bang is not harmful to your hearing
and the powder is not hazardous to your health.
Airbag depl o y ment slows down an d re stricts the movement of the vehicle occupant.
When the vehicle occupant makes contact
with the front and side airbags, hot gas
flows out of the airbags. This reduces the
force acting on the occupant’s head and
chest. The airbags are thus deflated after
the accident.
앫 Move the front-passenger seat as far
back as possible, especially if a child is
sitting on this seat or if a child is secured
in a restraint system on this seat.
앫 Rearward-facing child restrai nt systems
must not be fitted to th e front-passenger seat unless the front-passenger
front airbag has been disabled. The
front-passenger f r ont air b ag i s au tomatically disabled in Mercedes-Benz vehicles if a child restraint system with
automatic chil d seat recognit ion is fitted
to the front-pass e nger seat of a vehicle
equipped with automatic child seat recognition and the 9 warning
lamp is lit.
앫 If you fit a forward-facing child restraint
system to the front-pass enger seat, you
must move the front-passenger seat as
far back as possible. Even with the seat
in this position, the belt must be routed
forwards in the direction of travel and
pulled tight.
앫 Do not lean forwards, e.g. over the pad-
ded boss of the steering wheel, particularly when the vehicle is in motion.
앫 Do not put your feet on the dashboard.
앫 Only hold the steering wheel by the rim.
This allows the airbag to depl oy full y .
You could be injured if the airbag is deployed and you are hold ing th e insi de of
the steering wheel.
앫 Do not lean on the doors from inside th e
vehicle.
앫 Do not place any objects on the airbag s
or between the airbags and the vehicle’s
occupants.
앫 Do not place any objects between the
seat backrests and the doors.
앫 Do not hang any hard objects, e.g. coat
hangers, on the grab handles or coat
hooks.
It is not possible to rule out the risk of injuries caused by an airbag due to the high
speed with which the airbag is required to
deploy.

39
Safety
Occupant safety
Front airbags
The front ai rba gs a re d esi gn ed to incr ea se
protection to the driver’s and front-passenger’s head and chest. The driver’s front airbag and the front-passenger front air bag
are deployed:
앫 at the start of an accident wit h high ve-
hicle acceleration or deceleration in a
longitudinal direction
앫 if the system determines that ai rbag
deployment can offer additional protection to that provided by the seat belt
앫 depending on whether the seat belt is
in use
앫 independently of other airbags in the
vehicle
앫 Front airbags are not deployed if the
vehicle overturns, unless the system
detects high vehicle deceleration in a
longitudinal direction.
Front airbags
1 Driver’s front airbag
2 Front-passenge r fr ont air bag
The driver’s front airbag deploys in front of
the steering wheel; the front-passenger
front airbag deploys in front of and above
the glove compartment.
The front-passenger front airbag 2 is only
deployed if:
앫 the front-passenger sea t is occupied
G Risk of injury
After an airbag has been deployed:
앫 airbag parts are hot. Do not touch them,
or you could be burned.
앫 it must be replaced at a qualified spe-
cialist workshop which has the necessary specialist knowledge and tools to
carry out the wo rk required.
Mercedes-Benz recommends that you
use a Mercedes-Benz Service Centre for
this purpose. In particular, work relevant
to safety or on safety-related syste ms
must be carried out at a qualified specialist workshop.
G Risk of injury
A small amoun t of po wder is rele ased when
an airbag is deployed. This powder is not
hazardous to health and does not indicate
that there is a fire in the v ehicle. The powder
could cause short-term breathing difficulties
in people with asthma or breathing problems.
To prevent these brea thing difficulties, y ou
should either:
앫 leave the vehicle as soon as it is safe to
do so
or
앫 open the window to allow fresh air to en-
ter the interior
P91.60-3095-31

40
Safety
Occupant safety
앫 the 9 warning lamp next to
the instrument cluster is not lit
(
컄 page 48)
This means that a c hild restraint system with automatic child seat recognition is either not fitted or is fitted
incorrectly.
! D o not place heavy objects on the front-pas-
senger seat. The system might erroneously interpret this as a person occupying the seat and the
restraint systems on the front-passenger seat
may then be triggered in the event of an accident
and would have to be replaced.
Sidebags
G Risk of injury
For safety reasons, Mercedes-Benz recommends that you use seat covers that have
been tested for use i n M ercedes-Benz vehicles and that have a special tea r sea m fo r
sidebags. Otherwise, a sidebag may not deploy correctly and could fail to provide the
intended protection in the event of an accident. You can obtain these cov er s fro m a
Mercedes-Benz Service Centre, for ex ample.
G Risk of injury
To reduce the risk of injury when a sidebag
is deployed, make sure that:
앫 there are no other persons, animals or
objects between the vehicle occupants
and the deployment range of the sidebags
앫 no accessories, e.g. drinks ca n hol d ers,
are attached to the doors
앫 only light clothing is hung on the coat
hooks in the vehicle
앫 there are no heavy or sharp objects in
the pockets of the c lothing on the coa t
hooks
G Risk of injury
Observe the following notes to reduce the
risk of serious or fatal injury if a sidebag is
deployed:
앫 Vehicle occupants – in particular, chil-
dren – must not le an their head on the
area of the window in which a sidebag is
deployed.
앫 Vehicle occupants must always wear
their seat belt correctly and position
their backrest as close to the vertical as
possible.
앫 Always secure children less th an 1.50 m
tall or under 12 years of age in suitable
child restraint systems.
G Risk of injury
The sensors for controlling the airbags are
located in the doors. Do not make any
changes to the doors or door trim, such as
the retrofitting of loudspeakers. If the doors
are damaged, the function of the sidebags
may be impaired. Have work carried out on
the doors only at a qualified specialist workshop which has the necessary speciali st
knowledge and tools to carry out the work
required. Mercedes-Benz recommends that
you use a Mercedes-Benz Service Centre for
this purpose. In particular , work relevant to
safety or on safety-r elated syst ems must be
carried out at a qualified specialist workshop.

41
Safety
Occupant safety
The purpose of sidebag deployment i s to
enhance the level of protection for the thorax (but not the head, neck or arms) of the
vehicle occupants on the side of the vehicle on which the impact occurs.
The sidebags are located in the outer sides
of the front seats and on the outsides of
the rear compartment next to the seats.
You can recognise the places where sidebags are fitted in your vehicle by the
AIRBAG symbol.
1 Front sidebag
2 Rear sidebag
The sidebag deploys nex t to the backrest
side cushions.
Sidebags 1 and 2 are deployed:
앫 on the side on which an impact occurs
앫 at the start of an accident with a high
rate of lateral vehicle deceleration or
acceleration, e.g. in a side impact
앫 independently of the front airbags
앫 independently of the belt te nsioners
앫 Sidebags are not deployed if the vehi-
cle overturns, unless the system detects high vehicle deceleration in a
lateral direction.
i In the event of an impact to the front-pas-
senger side, the front-passenger sidebag is only
deployed if the front-passenger seat occupancy
recognition syste m dete cts that the s eat is o ccupied or if the seat belt is engaged in the buckle.
i You can find further information about how
the airbags work on (
컄 page 38).
You can find further information abo ut belt tensioners and belt force limiters on (컄 page 35).
Windowbags
The purpose of the windowbags is to enhance the level of pro tection for the head
(but not chest or arms) of the vehicle occupants on the side of th e vehicle on which
the impact occurs. The windowbags are integrated into the side of the roof frame and
deploy in the area from the front door
(A-pillar) to the re ar door (C-pillar).
P91.60-2990-31
G Risk of injury
In order for the windowbag to provide its intended level of protection, make sure that
there are no objects between the vehicle occupants and the deployment range of the
windowbags.
G Risk of injury
Observe the following notes to reduce the
risk of serious or fatal injury if the windowbag is deployed:
앫 Vehicle occupants – in particular, chil-
dren – must not le an their head on the
area of the wi ndow in whic h the windo w-
bag is deployed.
앫 Vehicle occupants must always have
their seat belts fastened correct l y.
앫 Always secure children less than 1.50 m
tall or under 12 years of age in suitable
child restraint systems.

42
Safety
Occupant safety
1 Windowbag
Windowbags 1 are deployed:
앫 at the start of an accident with hi gh ve-
hicle acceleration or deceleration in a
lateral direction
앫 on the side on which an impact occurs
앫 independently of the front airbags
앫 regardless of whether th e front-pas-
senger seat is occupied
앫 if the vehicle overturns on both sides
and the system determines that windowbag deployment can offer additional protection to that provided by the
seat belt
i You can find further information about how
the airbags work on (컄 page 38).
You can find further information about belt tensioners and belt force limiters on (
컄 page 35).
Preventive occupant safety (PRE-SAFE®)
initiates preven t ive measures in certain
hazardous situations for your safety.
PRE-SAFE
®
intervenes in:
앫 emergency braking situations, e.g. if
Brake Assist BAS (
컄 page 54) is acti-
vated or Brake Assist BAS Plus*
(
컄 page 54) intervenes powerfully
앫 critical driving situations, e.g. w here
the vehicle un dersteers or overst eers
because it has e xceeded phys ical limits
In these cases, PRE-SAFE
®
initiates the following measures if you are dr iving faster
than 30 km/h:
앫 it tensions the front seat belts
앫 it adjusts the seats to a better position
(
컄 page 259) if the front-passenger
seat or the electrical ly adjustable outer
seats in the rear compartment* are in
an unfavourable position
앫 it increases the air pressure in the air
chambers (side bolste rs of the seat
cushion and backrest) of the mul ti-contour* (
컄 page 221) or dynamic driving
seats* (
컄 page 224)
앫 if the vehicl e understeers or ove rs-
teers, the sliding/tilting sunroof*
(
컄 page359) and the side wind ows
(
컄 page284) also close automatically
to leave a specific gap
If the hazardous situation passes without
resulting in an accident, PRE-SAFE
®
slackens the belt pretensioning and reduces the
pressure in the air chambers of the multicontour seats or dynamic driving seats*. It
is possible to undo all the adjustments initiated by PRE-SAFE
®
.
P91.60-2991-31
Preventive occupant safety
(PRE-SAFE
®
)

43
Safety
Occupant safety
If the belts do not loosen:
왘 Move the backrest back slightly until
the belt tension is reduced.
The lock is released.
! Make sure that there are no objects in the
footwell or behind the seats when adjusting the
seats. You could otherwise damage the seats
and the objects.
NECK-PRO comfort head restraints are designed to increase protection of the driver’s and fron t- pa ssen ge r’s hea d and n eck .
To this end, the NECK-PRO head restraints
on the driver’s an d front-passenger sea t
are moved fo rwards in t he direc tion of tr avel in the event of a rear-end collision. This
provides better head support.
If the NECK-PRO comfort head restraints
are triggered in an accident, you must reset the head restraints on the driver’s and
front-passenger seat (
컄 page 519). Other-
wise, the additional protection will not be
available in the event of another coll ision.
i Have the NECK- PRO comfort he ad re-
straints reset at a qualified specialist workshop.
Mercedes-Benz recommends that you use a
Mercedes-Benz Service Centre for this purpose.
If a child is travelling in the vehicle:
앫 secure the child (preferably on a suita-
ble rear seat) using a child restraint
system which is appropriate to his/her
age and size and which has been approved for Mercede s- Benz vehicles
앫 make sure that the child is strapped in
throughout the trip
You can obtain information about the correct child restraint system from any
Mercedes-Benz Service Centre.
i It is advisable to use Mercedes-Benz care
products for cleaning child restraint systems.
You can obtain information about this from any
Mercedes-Benz Service Centre.
NECK-PRO comfort head restraints*
G Risk of injury
If you use head restraint cove rs,
Mercedes-Benz recommends for safety
reasons that you only use hea d restraint
covers that have been tested for use in
Mercedes-Benz vehicles and that ar e suitable for NECK-PRO. Otherwise, NECK-PRO
may not be triggered correctly and could fail
to provide the intended protection in the
event of an acci d ent. You can obtain these
covers from a Merce des - B en z Se rv i c e Centre, for example.
Children in the vehicle

44
Safety
Occupant safety
Child restraint systems
Mercedes-Benz recommends that you only
use the child restra int systems listed on
(
컄 page 47).
G Risk of injury
Do not leave children unsupervised in the
vehicle, even if th ey are secured in a child
restraint system. The children could:
앫 injure themselve s on parts o f the vehic le
앫 be severely or ev en fatally harmed by
prolonged exposure to intense heat or
cold
Do not position the child restraint system in
direct sunlight. The metallic parts of the
child restraint syste m cou ld he at up , for example, and the child could burn him/herself
on the hot parts.
If the children open a door, they could:
앫 injure other people
앫 get out of the vehicle and thereby injure
themselves or be injured by a passing
vehicle
Do not carry heavy and hard objects in the
vehicle interior if they are unsecured. You
will find further information in the “Controls”
section under “Loading and stowing”
(
컄 page 368) and “Features” (컄 page 378).
An unsecured or incorrectly pos itioned lo ad
increases t he risk of injur y for the child in
the event of:
앫 sharp braking
앫 a sudden change of direction
앫 an accident
Also observe the notes on HOLD
(
컄 page 325).
G Risk of injury
To reduce the risk of serious or fatal injury to
a child in the event of an accident, braking
or sudden change in direction:
앫 always secure children less than 1 .50 m
tall or under 12 y ears of age in special
child restraint systems on a suitable
seat in the vehicle because the seat
belts are not designed for persons of
this size
앫 do not allow children under 12 years of
age to sit on the front-passenger seat
unless they are secured in a child restraint system with aut omatic chil d seat
recognition in a vehicle equipped with
automatic child seat recognition on the
front-passenger sea t (if the vehicle is
equipped with automatic child seat recognition, there will be a 9
warning lamp on the dashboard).

45
Safety
Occupant safety
“Universal” category child restraint systems are recognisable by an orange approval label o n the re st r a i n t sys t em itself.
Example of an approval label on th e
child restraint system
Warning symbol on a rearward-fa cing child
restraint system
앫 never allow children to tr avel in the ve hi-
cle while sittin g on the lap of another o ccupant. It would not be possible to
restrain the child due to the forces occurring in the event of an accident,
heavy braking or sudden change in direction. They may be thrown against
parts of the vehicle interior and be seriously or fatally injured
앫 all vehicle occupants must always have
their seat belts fastened correctly
앫 if you fit a child restraint system to the
front-passenger seat, you must move
the front-passenger seat as far back as
possible
G Risk of injury
If the child restra int system is not f it ted cor rectly to a suitable seat, the child may not be
secured in the event of an accident or sudden braking and may be seriously or fatally
injured. Theref or e, whe n fi tt ing a child restraint system, you must observe the manufacturer’s installation instructions for the
child restraint system.
Child restraint systems sh ould preferably be
fitted to the rear seats. The child is generally
better protec ted there.
Never place objects, e.g. cushions, under
the child restraint system. The entire base of
the child restraint system must always be
resting on the seat cushion.
A child restraint system must not be used
without the genuine cover designed for it.
Only replace damaged covers with genuine
covers.
On the rear seats, only use child restraint
systems that have been recommended for
use in Mercedes-B enz vehicles.
P92.00-2184-31
P00.00-3185-31

46
Safety
Occupant safety
Suitable seats
1
Only use child restraint systems with automatic
child seat recognition.
2
Move the front-passenger seat to its rearmost and
uppermost position. Move the head restraint to its
uppermost position.
3
Unsuitable for electrically adjustable rear seats*.
Weight and ag e categories Child rest raint syst em o n th e
front-passenger seat
Child restraint system on the
left and right rear sea t
Child restraint system on the
middle rear seat
Category 0+:
up to 13 kg
up to approximately 18 months
as recommended
1, 2
Universal3 or
as recommended
Unsuitable
Category I:
9 to 18 kg
between approximately
8months and 4 years
Universal2 or
as recommended
Universal3 or
as recommended
Unsuitable
Category II/III:
15 kg to 36 kg
between approximately 3½ and
12 years
Universal2 or
as recommended
Universal3 or
as recommended
Unsuitable

47
Safety
Occupant safety
Recommended child restraint systems
1
Move the front-passenger seat to it s rearmost and
uppermost position. Move the head restraint to its
uppermost position.
2
Electrically adjustable rear seats*: Move the outer
backrests in the rear compartment to their most
upright position and the outer seat cushions to
their rearmost and lowermost position.
Weight and age
categories
Manufacturer Type Approval
number
DaimlerChrysler
order number
Automatic
child seat
recognition
Installation
on frontpassenger
seat
Installation
on outer
rear seat
Installation
on middle
rear seat
Category 0+:
up to 13 kg
up to approximately 18 months
Britax Römer BABY SAFE
PLUS
E1 03 30 1146 B6 6 86 8212 Yes
1 2
Not
permissible
B6 6 86 8213 No Not permis-
sible
2
Not
permissible
Category I:
9 to 18 kg
between approximately 8 months
and 4 years
Britax Römer DU O PLUS E1 03 30 1133 B6 6 86 8217 Yes
1 2
Not
permissible
B6 6 86 8218 No
1 2
Not
permissible
Category II/III:
15 to 36 kg
between approximately 3½ and
12 years
Britax Römer KID E1 03 30 1148 B6 6 86 8308 No
1 2
Not
permissible
B6 6 86 8309 Yes
1 2
Not
permissible
B6 6 86 8302 No
1 2
Not
permissible
B6 6 86 8303 Yes
1 2
Not
permissible

48
Safety
Occupant safety
Warning stickers
Automatic child seat recognition
1 9 warning lamp
The front-passenger seat sensor sy stem
automatically detects whether a sp ecial
Mercedes-Benz rearward-facing child seat
with automatic child seat recognition has
been fitted. The 9 warning lamp
G Risk of injury
On the front-passenger seat, only use child
restraint systems with automatic child seat
recognition whi ch have bee n recommen ded
for Mercedes-Benz. You can obtain information about thi s from any Mercedes-Benz
Service Centre.
If you use a rearward-facing child restraint
system on the front-passenger sea t, it must
be a special Mercedes- Benz rearward-fac ing
child seat with aut omati c ch ild se at r ecogn ition.
P68.60-2111-31
If you use any other type of rearward-facing
child restraint system on the front-passenger seat, the front-passenger front airbag
will not be disabled and the child could be
seriously or fatally injured by the deployment of the airb ag. To draw at tention to this
danger, there is an appropriate warning
sticker on the dashb oard a s we ll as on both
sides of the sun visor o n the pass enger side .
If you use a forward-fa cing child restraint
system without autom at ic child seat recognition on the f ront-passenger seat, you mu st
move the front-passenger seat to its rearmost position.
Do not leave childr en unsupervised in the
vehicle, even if they are secured in a child
restraint system.
앫 They would be unable to rescue them-
selves if danger threatened, e.g . excessive heat.
앫 They could be injured on moving parts in
the vehicle, e.g. seats.
앫 They could open the do ors and thereby
endanger themselv es and others.
Do not place any objects under the child restraint system, e.g. a cushion. The entire
base of the child restraint system must always be resting on the vehicle seat cushion.
An incorrectly fitted child restraint system
cannot perform its protective function in the
event of an accident, and could even lead to
injuries.
P68.10-3383-31

49
Safety
Occupant safety
next to the instrument cluster will be lit if
this is the case. The front-passenger front
airbag is disabled.
i The windowbag, the sidebag and the belt
tensioner on the front-passenger side are still active even if the front-passenger front airbag is
disabled.
ISOFIX child seat secu r i ng system* in
the rear
ISOFIX is a standardised securing system
for special child seats in the rear. Ther e are
securing rings for two child restraint systems between the seat cushion and the
backrest on the left and right-hand sides of
the outer rear seats.
G Risk of injury
If the 9 warning lamp does not light
up when the child restraint system is fitted,
the front-passenger fron t airbag has not
been disabled. The child could suffer lifethreatening inj ur ie s if th efront-passe ng er
front airbag deploys. If the warning lamp
does not light up, proceed as follows:
앫 Do not use a rearward-facing child re -
straint system on the front-passenger
seat.
앫 Fit a rearward-facing child restraint sys-
tem on a suitable rear seat.
or
앫 Only use a forward-facing child seat on
the front-passenger seat and move the
front-passenger seat to its rear mo st position.
앫 Have the auto matic child seat recogni-
tion checked at a qualified specialist
workshop which has the necessary
specialist knowledge and tools to carry
out the work required. Mercedes-Benz
recommends that you use a
Mercedes-Benz Service Centre for this
purpose. In particular, work relevant to
safety or on safety-related syste ms
must be carried out at a qualified specialist workshop.
To ensure that the automatic child seat recognition system functions correctly, never
place objects (e.g. a cushion) under the
child restraint system. The entire base of the
child restraint system must always be resting on the vehicle seat cushion. An incorrectly fitted child restraint syste m cann ot
perform its protective function in the event
of an accident, and could even lead to injuries.
G Risk of injury
A child restraint system secured by the
ISOFIX child seat securing syste m does not
provide suf f icient protec tion for children
weighing more than 22 kg. For this reason,
do not secure children weighing more than
22 kg in a chil d rest rain t s ystem secu red b y
the ISOFIX child se at securing sy stem. If the
child weighs more than 22 kg, secure the
child restraint syste m us ing a lap-shoulder
belt.

50
Safety
Occupant safety
! When fitting the child restraint system,
make sure that the seat belt for the middle seat
is not trapped.
1 Securing ring
2 Upholster ed fitting
3 Ins t allation device
왘 Fold upholstered fitting 2 upwards.
왘 Turn installation device 3 vertically so
that upholstered fitting 2 does not
fold downwards.
왘 Fit the child seat on the two securing
rings 1. Follow the manufacturer’s installation instructions when fitting the
child seat.
G Risk of injury
If the child restraint system is not fitted correctly to a suitabl e seat, the child may not be
secured in the event o f an accident or sudden braking and may be seriously or fatally
injured. Therefore, follow the manufacturer’s installati on instructions when fitting th e
child restraint system.
On the rear seats, only use child restraint
systems with an ISOFIX child seat securing
system which have been recommended for
use in Mercedes-Benz veh ic les.
An incorrectly fitted child restraint system
could come loose and fatally in jure the child
or other vehicle occ upants. When fit ting the
child restraint system, make sure that it is
engaged in the securing rings on bot h sides.
G Risk of injury
If the child restraint system or its securing
system, e.g. the ISOFIX child seat securing
system, is damaged or subjected to a load in
an accident, the child secured in the restraint system may be seri ously or fata lly injured in the event of an accident, heavy
braking or sudden change in direction.
You must therefore have child restraint systems that are damaged or have been subjected to a heavy load in an accident
checked immediately along with their
mountings at a qualified specialist workshop
and replaced i f neces sary. T his will have the
necessary specialist knowle dge and tools to
carry out the w ork requi red. Merc edes-Benz
recommends that you use a Mercedes-Benz
Service Centre for this purpose. In particular, work relevant to safe ty or on saf et yrelated systems must be carried out at a
qualified specialist workshop.
P91.12-2805-31

51
Safety
Occupant safety
Child-proof locks
If children are t ravell ing in the vehicle, you
can activate the child-proof locks for the
rear.
Child-proof locks for the rear doors
The child-proof locks on the rear doors enable you to secure each door individually. If
a door has been secured:
앫 you will not be able to open it from the
inside
앫 you will be ab le t o op en it f rom t he out-
side, provided the vehic le is not loc ked
(the locking knobs in the doors are up)
1 Latch
왘 To activate or deactivate: slide latch
1 upwards or downwards.
왘 Make sure tha t the chi ld-proof locks
are working properly.
i You can deactivate the child-proof locks on
the rear doors for a short time. The child-proof
locks on the rear doors are deactivated for a
short time if you press the Œ central unlocking button on the driver’s or front-passenger
door (
컄 page 256).
G Risk of injury
Do not leave chil dren unsupervised in th e
vehicle, even if they are secured in a child
restraint system. They could :
앫 injure themselves on parts of t he vehicle
앫 be severely or even fatally harmed by
prolonged exposure to intense heat
G Risk of ac ci d e n t
Activate the child-proof locks for the rear
doors and rear compart ment whe n child ren
are travelling in the vehicle. The children
could otherwise, for example, open doors or
windows, adjust seats or operate the cigarette lighter while the vehicle is in motion
and thereby injure themselves and others.
P54.25-4718-31
G Risk of accident
If the child-proof locks are deactivated by
the Πcentral locking button being
pressed, both rear doors are unlocked and
can be opened.
If the children open th e door, they could:
앫 injure other people
앫 get out of the vehicle and thereby injure
themselves or be injured by a passing
vehicle
Do not leave children unsupervised in the
vehicle; they could press the central unl ocking button or open a door, thereby endangering themselves and others.

52
Safety
Occupant safety
Child-proof lock for controls in the rear
It is possible to disable the controls in the
rear for the:
앫 rear side win dows
앫 rear cigarette lighter
앫 adjustment of the front-passenger seat
from the rear*
앫 electric blinds* in the roof, rea r and in
the rear side wind o ws
1 Button
2 Indicator lamp
왘 To activate or deactivate: pres s but-
ton 1.
Indicator lamp 2 in the button lights
up. The child-proof locks in the rear
passenger compartment are activated.
i If the child-proof locks are activated, it is still
possible to open the rear side windows using the
switches on the driver’s door.
P54.25-4719-31

53
Safety
Driving safety systems
In this section, you will find in formation
about the adaptive brake lamps and the
following driving safety systems:
앫 ABS (Anti-lock Braking System)
앫 BAS (Brake ASsist)
앫 BAS Plus* (Brake ASsi st Plu s)
앫 ESP
®
(Electronic Stability Program)
앫 EBV (electronic brake-power distribu-
tion)
앫 ADAPTIVE BRAKE
i In wintry driving conditions, you will only
achieve the maximum effect of ABS, BAS, ESP
®
and ADAPTIVE BRAKE if winter tyres (M+S) are
used, with snow chains if necessary.
ABS adjusts the brake pressure in such a
way that the wheels do not lock when you
brake. This allows you to continue steering
the vehicle when braking.
ABS works from a speed of about 8 km/h
upwards, regardless of road-surface conditions.
ABS works on slippery surfaces, even
when you only brake gently.
Braking
You will feel the bra ke pedal p ulsate if ABS
intervenes when braking.
If ABS intervenes:
왘 Continue to depre ss the brake pedal
with force until the braking situation is
over.
For full braking application:
왘 Depress the brake pedal with maxi-
mum force.
Driving safety systems
G Risk of ac ci d e n t
The risk of an accident increases if you:
앫 drive too fast, particularly when corner-
ing and on wet or slippery roads
앫 drive too close to the vehicle in front
The driving safety systems described in this
section are unable to reduce this risk or
override the laws of p hysi c s.
You should therefore always adapt your driving style to suit the prevailing road and
weather conditions and maintain a sufficient
distance from other r oad us er s and obje ct s
on the road.
ABS
G Risk of ac ci dent
Do not depress the brake pedal several
times in quick succession (pumping). Depress the brake fir m ly and ev en ly. Pu m p ing
the brake pedal reduces the braking effect.
G Risk of accident
You should always adapt your driv ing style
to suit the pre v ailing road and weather conditions and maintain a suf f icient distance
from other road users and objects on t he
road.
The wheels ma y lock whe n bra kin g if ABS is
faulty. This limits the steerability of the vehicle when braking and the braking distance
may increase.
If ABS is deactivated due to a malfunction,
then BAS and BAS Plus* are also deactivated.

54
Safety
Driving safety systems
BAS operates in emergency brakin g situations. If you depress the brake pedal quickly, BAS automatically boosts the braking
force and thus shortens the stopping distance.
왘 Keep the brake pedal depressed firmly
until the emergency braking situation is
over.
ABS prevents the wheels from lockin g.
The brakes will function as usual once you
release the brake pedal. BAS is deactivated.
BAS Plus interv enes in emergen cy bra king
situations and uses radar sensor technology to assess the traffic situation.
If the driver depresses the brake pedal rapidly in an emergency braking situatio n,
BAS Plus automatically adjusts the brake
pressure to a level suitable for the traffic
situation.
PRE-SAFE
®
is activated simultaneously if
BAS Plus requests a particularly high braking pressure.
왘 Keep the brake pedal depressed until
the emergency situation is over.
ABS prevents the wheels from locking .
The brakes will function as usual again
once you release the brake pedal or if
there is no longer a risk of a frontal collision. BAS Plus is deactivated.
When braking, the brake lamps flash rapidly to warn followin g traffic if:
앫 you brake heavily from a speed of more
than 50 km/h
앫 BAS or BAS Plus* intervene to support
your braking man o euvre
The hazard warning lamps switch on au tomatically if the v ehicle is braked to halt
from a speed of more than 70 km/h in this
way. The brake lamps then stay lit constantly while t he v eh icle is stationary. Th e
hazard warning lamps switch off again
when you exceed a speed of 10 km/h.
ESP
®
monitors the driving stability and the
traction, i.e. transfer of power from the
tyres to the road surface.
ESP
®
detects whe n a wheel spins or th e vehicle enters a skid. ESP
®
stabilises the vehicle by brakin g i ndiv idu al wh eels , li mitin g
the engine power output, and assi sts you
when pulling away on a wet or slippery
road surface. ESP
®
also stabilise s the vehi -
cle when brak ing.
When ESP
®
intervenes, the v warning
lamp flashes i n the instrument cluster.
BAS
G Risk of accident
If BAS is faulty, the braking sy stem r emains
available with full brake boosting effect.
However, braking force is not automatically
increased in emergency braking situations
and the stopping distance may increase.
BAS Plus*
Adaptive brake lamps
ESP®

55
Safety
Driving safety systems
! The ignition must be switched off (key in po-
sition 0 or 1 in the ignition lock) if the vehicle is
to be towed with the fron t or rear axle ra ised. Application of the brakes by ESP
®
could otherwise
destroy the braking system on the front/rear axle.
ESP® trailer stabilisation
If your trailer starts to sway, you can only
stabilise the vehicle/trailer combinati on
by depressing the brake s f irmly.
ESP
®
supports you in these situations and
recognises when the trailer starts to sway.
ESP
®
reduces the road speed by braking
and limiting the engine output in order to
stabilise the vehicle/trailer combinati on.
Trailer stabilisation is activated at s p eeds
of over approximately 65 km/h.
i If ESP
®
is deactivated or switched off due to
a malfunction, trailer stabilisation does not function.
Electronic traction control system
(ETS)
The traction control system is a component of ESP
®
.
The traction control system brakes the
drive wheels individually if they start to
spin. You can therefore pull aw a y o r acce lerate on slippery surfaces, e.g. on roads
that are slippery on one side.
The traction con trol sy stem is st ill act ive if
you deactivate ESP
®
.
Deactivating/activating ESP
®
ESP® is activated automatically when the
ignition is switched on.
It may be best to deactivate ES P
®
in the
following situa t ions:
앫 if snow chains are being used
앫 in deep snow
앫 on sand or gravel
G Risk of ac ci d e n t
If the v warning lamp flashes in the instrument cluster, proceed as follows:
앫 Under no circumstances should you de-
activate ESP
®
.
앫 Only depress the accelerator pedal as
far as necessary when pulling away.
앫 Adapt your driving style to suit the pre-
vailing road and weather conditions.
Otherwise, the vehicle could begin to skid.
ESP® cannot reduce the risk of an accident
if you drive too fast. ESP® cannot override
the laws of physics.
G Risk of ac ci dent
In poor road and we ather conditions, trailer
stabilisation cannot prevent the vehicle/
trailer combination from swaying and cannot therefore reduce the risk of an accident.
Trailers with a h igh ce ntre of gra vity m ay t ip
over before ESP
®
can intervene.
G Risk of accident
The traction control system cannot reduce
the risk of an accident if you drive too fast.
The traction control system cannot override
the laws of physics.

56
Safety
Driving safety systems
When you deactivate ESP®:
앫 ESP
®
no longer improves driving stabil-
ity
앫 the engine’s torque is then no longer
limited and the drive wheels could spin.
This results in a cutting action of the
spinning wheels for better grip.
앫 traction control is still activated
앫 you can still brake with support f rom
ESP
®
i If ESP
®
is deactivated and one or more of
the wheels are spinning, the v warning lamp
in the instrument cluster flashes. ESP
®
does not
then stabilise the vehicle.
1 To deactivate/activate ESP
®
왘 To deactivate/activate: press button
1.
The v warning lamp in the instru -
ment cluster comes on or goes out.
EBV monitors and controls the brake pressure at the rear wheels to improve driving
stability when braking.
ADAPTIVE BRAKE improves braking safety
and enhances braking comfort. In addition
to the braking function, ADAPTIVE BRAKE
also offers the HOLD convenience function
(
컄 page 325).
G Risk of accident
Activate ESP® as soon as the situations described above no longer apply. ESP® will
otherwise not be able to stabilise the vehicle
if the vehicle starts to skid or when a wheel
is spinning.
G Risk of accident
If the v warning lamp in the instrument
cluster lights up continuously when the engine is running, ESP
®
has been deactivated
or is unavailable due to a malfunction. The
risk of your vehicle skidding is then increased in certain situations.
Always adapt your driving style to suit the
prevailing road and weather conditions.
P42.45-2531-31
Electronic brake-power distribution
(EBV)
G Risk of accident
If EBV is faul ty, the braking s y st em re m ains
available wi th full brake boo sting effect.
However, the wheels could lock, for instance, in the event of a full brake application. You could lose control of the vehicle
and cause an accident. Adapt your driving
style to the change in handling characteristics.
ADAPTIVE BRAKE

57
Safety
Anti-theft systems
The immobiliser prevents your vehicle from
being started by an unauthor i sed person.
Activating the immobiliser
왘 With the key: remove the key from the
ignition lock.
왘 With KEYLESS GO*: press the
KEYLESS GO button.
The engine switches off.
Deactivating the immobiliser
왘 With the key: switch on the ignition.
왘 With KEYLESS GO*: press the
KEYLESS GO button twice without depressing the brake.
i The immobiliser is always deactivated when
you start the engine.
A visual and audible alarm is triggered if
the alarm syste m i s p r i med and you open:
앫 a door
앫 the boot lid
앫 the bonnet
The alarm is a lso triggered if a doo r is
opened using the emergency key element.
i The alarm is not switched off even if you
close an open door again.
1 Indicator lamp
왘 To prime: lock the vehicle using the
key.
The alarm system is primed. Indicator
lamp 1 flashes. It will be possible for
the alarm of the anti-theft alarm system to be triggered after approximately
30 seconds.
왘 To deactivate: unlock the vehicle us-
ing the key.
i You can assign the following functions to the
programmable button in the centre console
(
컄 page 203):
앫 Interior motion detection
앫 Tow-away protection
앫 Interior motion detection and tow-away pro-
tection
You can activate or deactivate the functions by
pressing the programmable button.
Switching off the alarm
왘 With the key: insert the key into the ig-
nition lock.
or
왘 Press the Œ or ‹ button on the
key.
Anti-theft systems
Immobiliser
Anti-theft alarm system*
P80.20-2784-31

58
Safety
Anti-theft systems
왘 With KEYLESS GO*: pull the outside
of the door handle.
The key must be outside the vehicle.
or
왘 Press the KEYLESS GO* button.
The key must be inside the vehicle.
A visual and au dible alarm is act ivated if
your vehicle’s angle of i nclination ch anges
while tow-away pro tection is primed .
Deactivate tow-away protection if your vehicle:
앫 is being transported
앫 is to be carried on another vehicle, e.g.
a ferry
앫 is parked on a moving surface, e.g. a
car transporter
This will prevent false alarms.
i The tow-away protection alarm is triggered
if the vehicle is jacked up on one side, for example.
왘 To prime or deactivate: (컄 page 213).
i Tow-away protection is automatically deac-
tivated when you unlock your vehicle. Tow-away
protection re mains deactivate d until you lock t he
vehicle again.
A visual and audible alarm is triggered if
your vehicle is locked and movement is detected inside, e.g. if:
앫 somebody smashes one of the side
windows
앫 somebody reaches i n side the vehicle
Deactivate the interior motion sensor if
you lock your v e hicle and:
앫 people or animals remain in the vehicle
앫 the windows remain open
앫 the sliding/tilt ing sunroof*/ pa no-
rama sliding sun roof* remains open
This will prevent false alarms.
왘 To prime or deactivate: (컄 page212).
i The interior motion sensor remains deacti-
vated until you lock the vehicle again.
i The interior motion sensor can only function
correctly if the windows and the sliding/tilting
sunroof*/panorama sliding sunroof* are
closed.
i Do not leave anything, e.g. mascots, hang-
ing on the rear-view mirror or on the grab handles on the roof lining. These could otherwise
trigger false alarms.
Tow-away protection*
Interior motion sensor*
G Risk of injury
Do not leave children unsupervised in the
vehicle. They could open the doors, release
the electric parkin g b rake or injure themselves on moving parts, thus endangering
themselves and others.

59
Operating systems
COMAND introduction . . . . . . . . 60
COMAND radio . . . . . . . . . . . . . . 74
COMAND audio CD/audio DVD*
and MP3 . . . . . . . . . . . . . . . . . . . 79
COMAND DVD video . . . . . . . . . 91
COMAND TV* . . . . . . . . . . . . . . . 99
COMAND telephone* . . . . . . . . 109
COMAND navigation syst em*
(introduction) . . . . . . . . . . . . . . 133
COMAND navigation syst em*
(entering a destination) . . . . . 147
COMAND navigation
system*(special destination
entry) . . . . . . . . . . . . . . . . . . . . . 163
COMAND navigation syst em*
(route guidance) . . . . . . . . . . . . 171
COMAND navigation syst em*
(during route guidance) . . . . . 178
COMAND navigation system*
(dynamic route guidance with
RDS-TMC) . . . . . . . . . . . . . . . . . 180
COMAND navigation system*
(destination memory) . . . . . . . 185
COMAND navigation system*
(previous destinations) . . . . . . 189
COMAND address book . . . . . . 190
COMAND system settings . . . 200
COMAND vehicle . . . . . . . . . . . 207
COMAND automatic air
conditioning . . . . . . . . . . . . . . . 214
COMAND seats . . . . . . . . . . . . . 221
Rear Seat Entertainment
System* . . . . . . . . . . . . . . . . . . 226
Instrument cluster operating
system . . . . . . . . . . . . . . . . . . . 234

60
Operating systems
COMAND introduction
Dear radio user,
This radio can be operated by an yone in ac-
cordance with the relevant EC Directive.
The equipment corresponds to the current
European and harmonised national standards.
This guarantees that the equipment con forms to the releva n t specifications re garding electromagnetic compatibi lity.
This means that interference caused by
your equipment in other electrical/
elec-
tronic equipment and interference in your
equipment caused by other electrical/
electronic equipment can be prevented to
a large exten t .
The equipment is a pproved by the vehicle
manufacturer in accordance with European Automotive EMC Directive 95/54/EC.
This means that correct operation of the
equipment in your vehicle is autho r ised.
The equipment does not require certification.
The equipment conforms to the relevant
equipment-spec ific EMC specifica t ions in
accordance with the following European
standards:
앫 EN 55013
앫 EN 55020
The equipmen t is also approved by the vehicle manufacturer in accordance with
European Automotive EMC Directive
95/54/EC.
This means that correct operation of the
equipment in your vehicle can be guaranteed. The equipment does not require certification.
For safety reasons, some COMAND func tions are restricted or unavailable when
the vehicle is being driv en. You will notice
this, for example , because you will either
not be able to select certain menu items or
because COMAND will display a message
to that effect.
COMAND introduction
Operating safety
G Risk of accident
Your attention must always be focussed on
the traffic conditions.
Only use COMAND or the telephone* when
the road and traffic conditions permit.
Bear in min d that, at a speed of only
50 km /h, your vehicle is covering a distance of nearly 14 m per second. The navigation system* will not provide you with
information about stop signs, give-way
signs, traffic regulations or road safety features. It is up to you to pay attention to these
while driving the vehicle. Only enter a new
destination when the vehicle is stationary.
Function restrictions when the
vehicle is being driven

61
Operating systems
COMAND introduction
You can use COMAND to operate the following in your vehicle:
앫 The audio functions
앫 The navigation system*
앫 The telepho ne* and communicatio n
functions (SMS*)
앫 DVD video and TV*
앫 Various vehicle settings
COMAND consists of:
앫 the COMAND display
앫 the COMAND controller
앫 the COMAND function buttons
앫 the telephone* keypad
COMAND display
The COMAND display shows the function
currently select ed and its associat ed menus. The COMAND display is divided into
several areas.
1 Status line
2 Main functions
3 Main area
4 Submenus
5 Air-conditioning function line
The active area is highlighted in white.
Once you have selected a main function,
the main area is a ctive.
i The layout of the menus may vary depending
on the equipment in the vehicle. The menus for a
fully-equipped vehicle are shown in these instructions.
Swivelling the COMAND display
You can swive l the COMAND display to the
left or to the right. The buttons are located
to the right of the instrument cluster.
1 To swivel the display to the lef t
2 To swive l the display to the right
COMAND controller
You can use the COMAND controller to select the menu functions in the COMAND
display.
1 COMAND controller
Components of COMAND
P82.86-5174-31
P54.25-4731-31
P68.20-3456-31

62
Operating systems
COMAND introduction
The COMAND controller can be:
앫 pressed briefly or pressed and held
앫 turned clockwise or anti-clockwise
앫 slid to the left, to the right, up, down or
diagonally
This allows you to move within a menu, to
select a menu item or to exit a menu.
You can also move within a menu by turning or sliding the controller.
Operation of the COMAND controller
P68.20-3454-31

63
Operating systems
COMAND introduction
Symbol COMAND
controller operation
Function
n
Press briefly 앫 Selects a menu item
앫 Exits the full screen view (e.g. for navigation system, TV or video)
Press and hold until the selected
action is carried out
앫 Stores a channel/station
앫 Accepts a destination for navigation
ymz
Turn 앫 Scrolls through vertical or horizontal menus
앫 Scrolls through tex t
앫 Makes settings
qmr
Slide 앫 Scrolls through a vertical menu
앫 Exits a horizontal menu
Slide and hold 앫 Moves in the navigation map
omp
Slide 앫 Scrolls through a horizontal menu
앫 Exits a vertical menu
Slide and hold 앫 Quicker fast-forward or rewind during CD or DVD playback
앫 Moves in the navigation map
wmx
Slide and hold 앫 Moves in the navigation map

64
Operating systems
COMAND introduction
COMAND function buttons
The COMAND function buttons allow you
to select a main function directly.
1 Programmable butt on (
컄 page 203)
2 Function button for radio and CD/DVD
3 Back button
4 Lumbar support/multi-contour seat*
5 Function button for tele ph one* and
navigation system*
6 On/off button for COMAND
7 Volume control
8 On/of f button for the soun d
Example:
왘 To select the radio or CD menu di-
rectly: press M button 2 once or
twice.
Telephone keypad
1 Telepho ne keypad*
2 Folding cover
P68.20-3455-31
P68.20-3469-31

65
Operating systems
COMAND introduction
Menu overview
Below is the layout of the main functions and their basic menus .
Each main fu nction has a basic menu. Each menu item has sever al submenu item s.
Operating COMAND
Commands/basic menus
Navigation* Audio Telephone* Video Vehicle
Map display Radio Telephone* TV* Rear window blind*
Mode CD Address book* DVD video Exterior mirror conven-
ience settings
Audio DVD* Messages* Video off Easy-entry/exit feature
MP3 Telephone off* Exterior lighting
delayed switch-off
Rear compartment* Interior lighting delayed
switch-off
Audio off Ambient light*
Locator lighting
Automatic locking
Interior motion sensor*
Tow-away protection*
Boot lid opening limiter
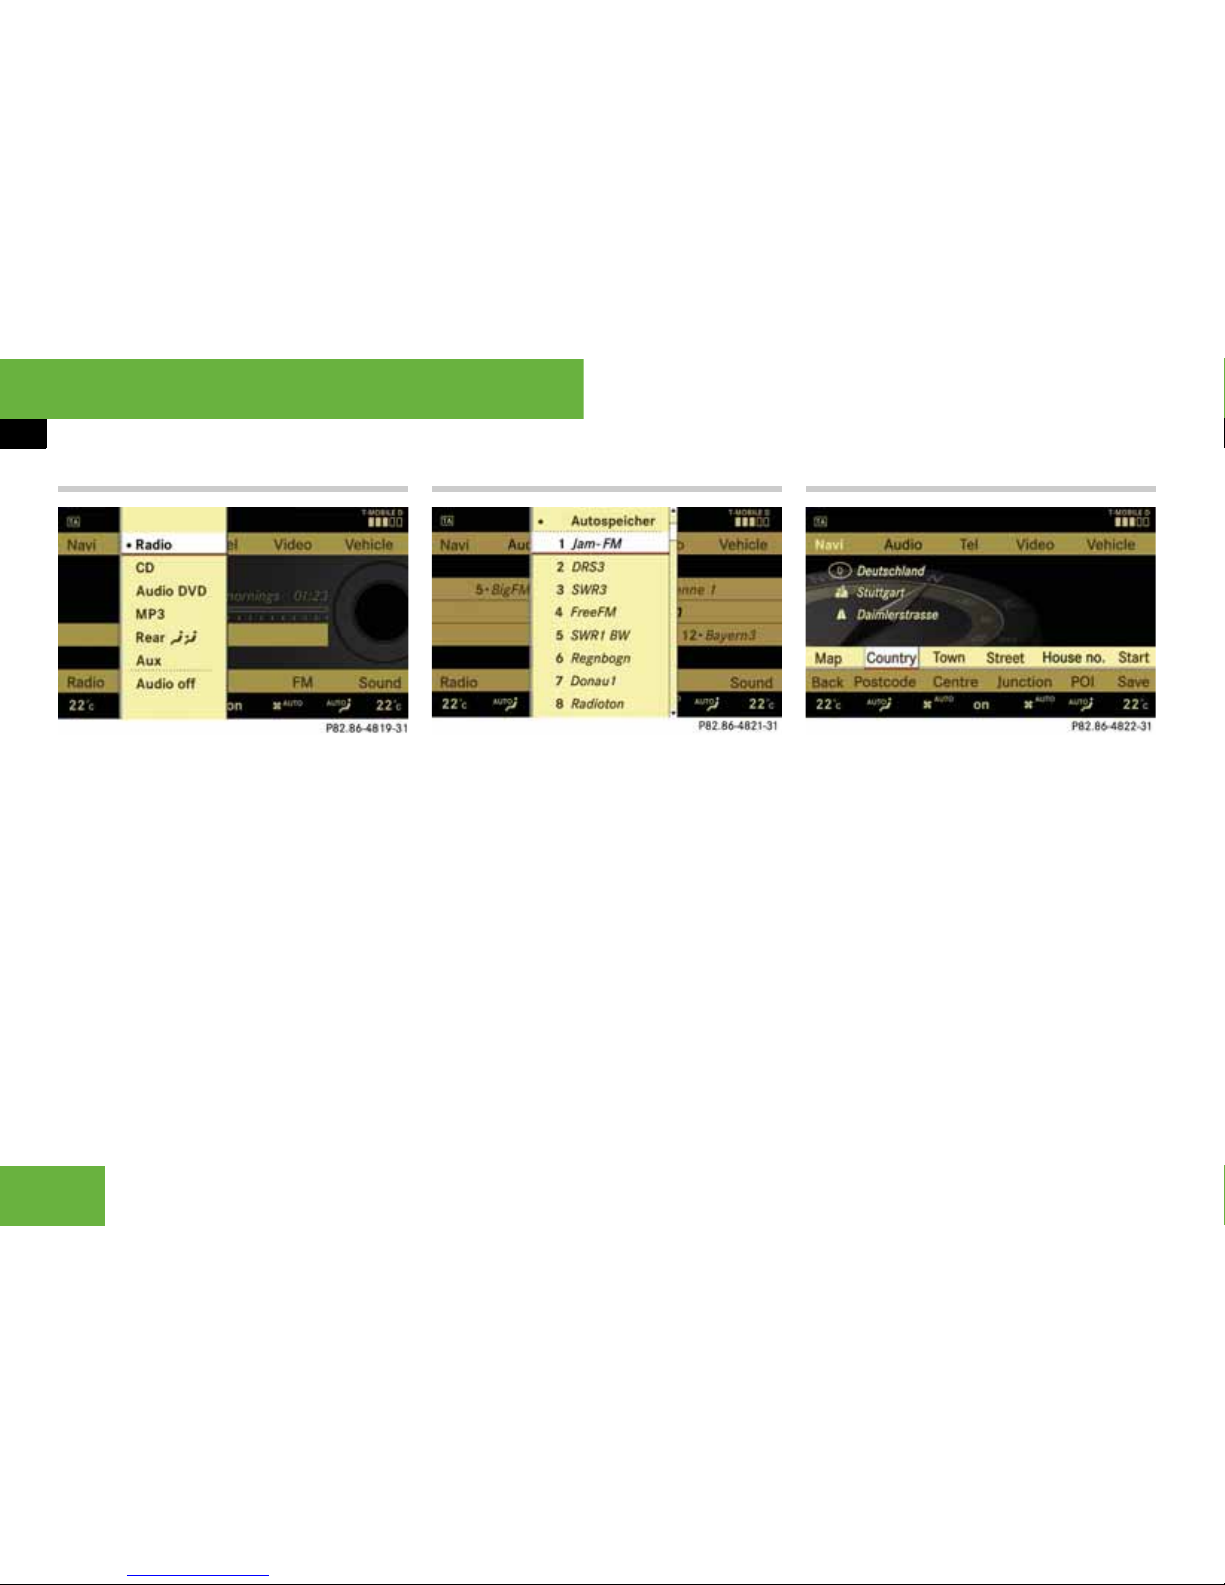
66
Operating systems
COMAND introduction
Calling up the basic menu
Audio basic menu
The basic menu for a main functi on can be
called up as follows:
왘 To move to the top line: slide qm.
왘 To select a main function: slide omp
or turn ymz.
왘 To confirm the selection: press n.
Vertical menus
Moving within a menu
왘 Slide qmr or turn ymz.
Selecting a menu item
왘 Press n.
Exiting a menu without making a selection
왘 Slide omp in the opposite dire ction to
the direction of the list
Horizontal menus
Moving within a menu
왘 Slide omp or turn ymz.
Selecting a menu item
왘 Press n.
Exiting a menu without maki ng a selection
왘 Slide qmr in the opposite direction to
the dir ection of the l ist.
P82.86-4819-31
P82.86-4821-31
P82.86-4822-31

67
Operating systems
COMAND introduction
Entering characters
Entering a navigation destination
Selecting characte r s
왘 Slide omp or turn ymz.
왘 To confirm the select ion: press n.
Deleting individual char ac te r s
왘 Select ) in the bottom line and press
the controller.
Deleting an entire word or number
왘 Select ) in the bottom line and press
and hold the controller until the word or
number has been deleted.
Exiting character entry
왘 Press “Back” in the bottom line.
or
왘 Press the L back button.
Switching to the list
왘 Slide qm.
or
왘 Press ? in the second to bottom line.
Accepting th e first entry
왘 Press and hold n until you exit charac-
ter entry mode.
COMAND completes the entry as soon as
it can be clearly identified. If this is the
case, the view does not switch to the list.
Selecting a list item
List of locations in the navigation system
1 Icon for more selection options
왘 To select the line: slide qmr or turn
ymz.
왘 To confirm the selection: press n.
There are more selection options for
list entries with icon 1. For example, if
icon 1 is next to a town, there may be
more than one town with the same
name in the sele cte d coun try. Conf irming one of these list entries will take
you to a further sub-selec tion.
P82.86-4823-31
P82.86-5201-31

68
Operating systems
COMAND introduction
Back button
1 Back button
왘 To select one menu higher: press
back button 1 briefly.
COMAND changes to the next menu
level up in the c ur r ent o p er at ing mode.
왘 To select the basic menu: press and
hold “Back” button 1.
COMAND changes to the basic menu of
the current operating mode.
Example of how to operate COMAND
The paths to the individual menu items are
always described starting from the main
function.
Example:
“Audio” “Audio” “Radio” “Radio”
“Save station”
i You will see the previously called up sub-
menu for each basic menu in the COMAND display.
If you can already see one of the submenus
on the screen (e.g. the “Audio” “Audio”
“Radio” submenu), the first steps are
not required.
The following section describes the steps
for the example above.
왘 To move to the top line: slide qm.
왘 To select the “Audio” main function:
slide omp or turn ymz.
왘 To confirm the selection: press n.
The previously set audio operating
mode appears.
왘 To select “Audio” in the basic menu:
slide qm.
왘 To confirm the selection: press n.
A selection list containing the functions
appears in the “Audio” basic menu.
P68.20-3457-31
P82.86-4836-31
P82.86-4819-31

69
Operating systems
COMAND introduction
왘 To select “Radio”: slide qm or turn
ymz.
왘 To confirm the select ion: press n.
The basic radio menu appe ars.
왘 To select “Radio”: slide mr or turn
ymz.
왘 To confirm the select ion: press n.
The radio menu appears.
왘 Select “Save station” from the selec-
tion list.
왘 Select the desired preset position.
왘 To confirm the select ion: press n.
The set station is stored in the selected
preset position.
i The components and operating principles of
COMAND can be found on (
컄 page 61).
Switching COMAND on or off
왘 Press the o button.
COMAND calls up the prev iously selected menu.
i If you switch off COMAND, playback of the
current audio or video source will also be
switched off. You cannot switch off COMAND
during a telephone conversation.
Sound
왘 To switch on or off: press the F
button.
The sound from the respective audio or
video source is switched on or off.
i Wh en the sound is switched off, you will see
the F icon in the status line.
If you change the audio or video source, the
sound is automatically switched on.
You will still hear traffic announcements and navigation system announcements, even if the
sound is switched off.
P82.86-4837-31
P82.86-4838-31
P82.86-4839-31
Basic functions of COMAND

70
Operating systems
COMAND introduction
Switching off the radio data system and
navigation announcements completely
왘 Radio data system: press and hold
the o button until “TA” disappears
from the display.
왘 Navigation announcements: press
and hold the o button during an announcement until the announcement is
switched off.
i The announcements remain switched off
even if you start a new route guidance or if
COMAND is switched off and on with the o
button.
If you switch COMAND off by removing the key
from the ignition lock and then switch the ignition back on after more than 3 minutes, the announcements are automatically switched back
on.
Adjusting the volume
왘 To adjust: turn thumbwheel 1.
The volume of the audio source currently selected ch ang e s.
Volume of traffic and navigation announcements
You can adjust the volume of traffic and
navigation announcements independently
of the volume of the audio source.
왘 Turn thumbwheel1 during a traffic or
navigation announcement.
Adjusting the volume for telephone calls
You can adj ust the volume for hands-f ree
mode during a telephone call.
왘 Turn thum bwheel 1 during a tele-
phone call.
or
왘 Press the æ or ç button on the
multi-functio n steering wheel du ring a
telephone call.
Making sound settings
You can make various sound setting s fo r
the differ ent a udio an d vide o sou rces . You
can reach the respective sound menu via
the submenu in which you wish to make
the settings.
Example:
“Audio” “Audio” “Radio” “Sound”
P68.20-3458-31
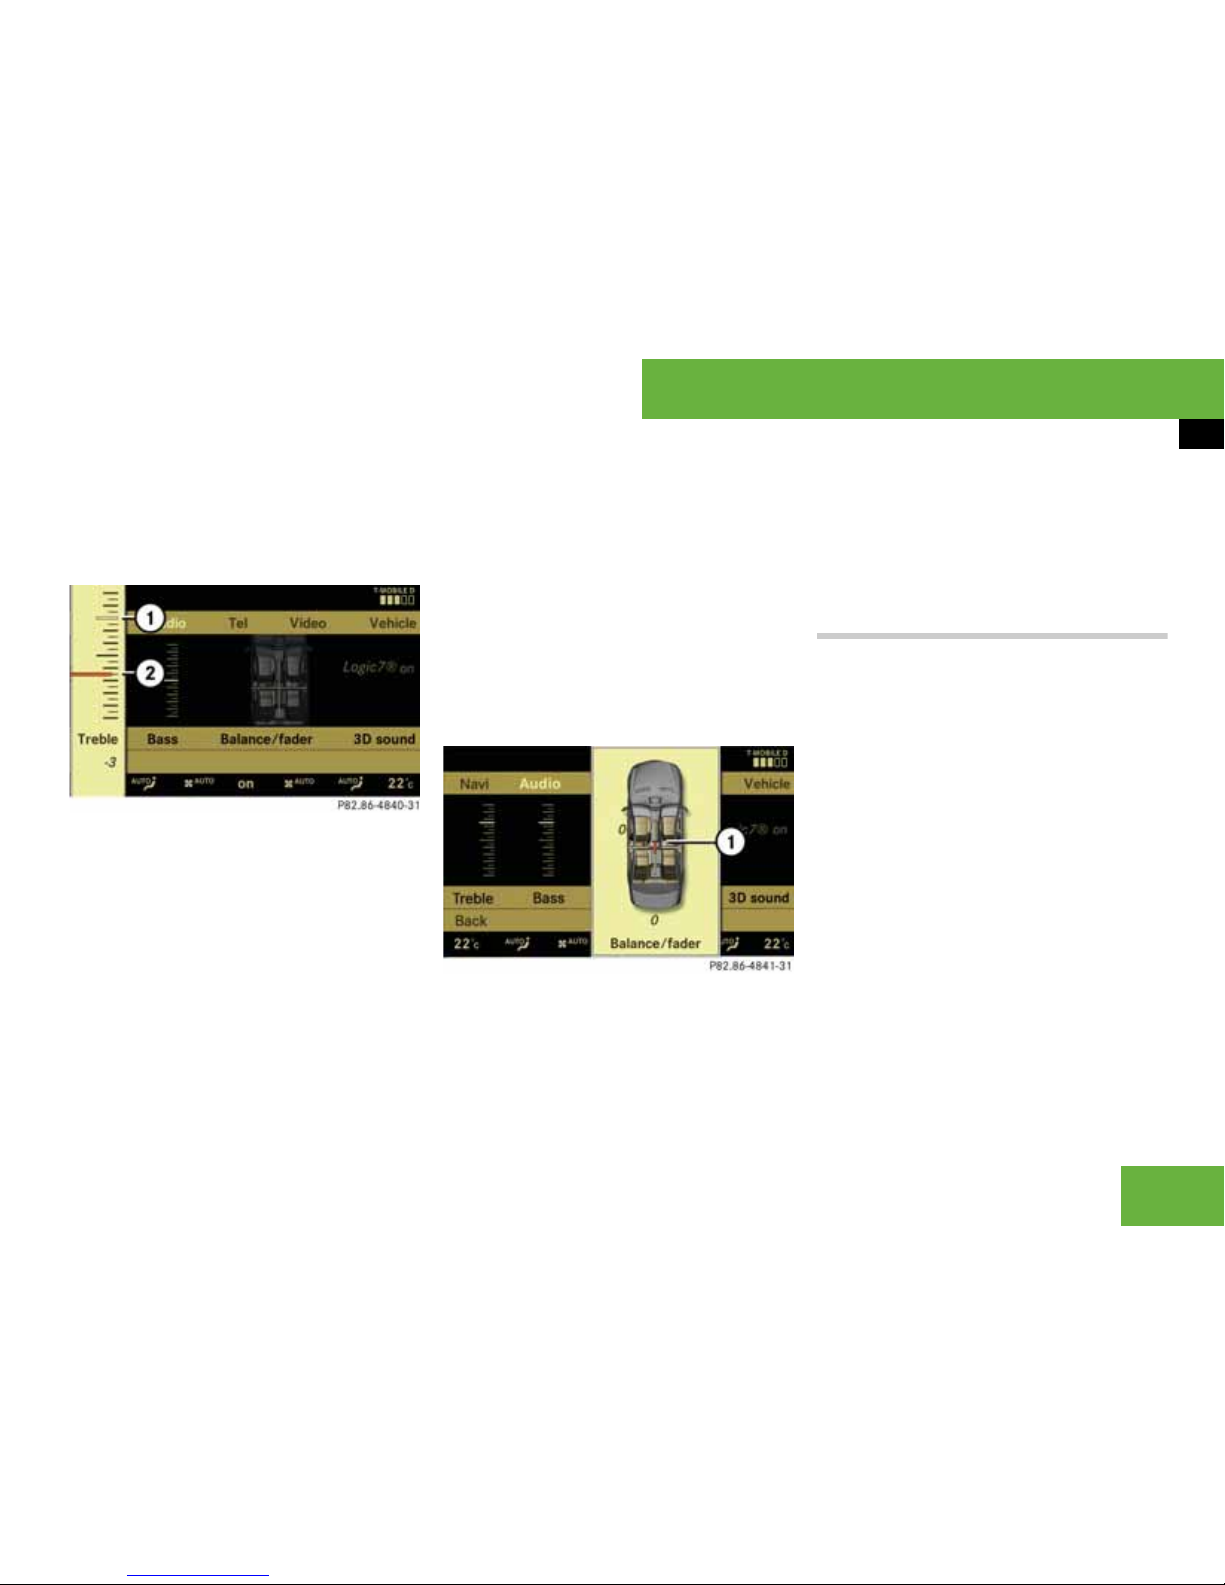
71
Operating systems
COMAND introduction
Adjusting the treble or bass
왘 Select “Sound” “Treble” or “Bass”.
The previously selected setting is indicated by an empty bar .
Adjusting the treble and bass
1 Last se tting made
2 Current setting
왘 To change the setting: slide qmr or
turn ymz until the desired treble or
bass setting is reached.
왘 To store the setting: press n.
The setting is sto r ed and you exit the
menu.
왘 To exit the menu without storing:
press the L back button or slide
omp.
Adjusting the balance or fade
With the balance you can set whether the
sound is louder in the driver’s or front-passenger side.
Wit the fade you can set whether the sound
is louder at the front or rear of the vehicle.
왘 Select “Sound” “Balance/fader”.
Adjusting the balance and fade
1 Current setting
왘 To change the setting: slide qmr or
slide omp
until the desired balanc e/
fader setting is reached.
왘 To store the setting: press n.
The setting is stored and you exit the
menu.
왘 To exit the menu without storing:
press the L back button.
Surround sound*
If your vehicle is equipped with the
harman/kardon LOGIC7
®
Surround
Sound system, yo u can select
“LOGIC7
®
on” and “LOGIC7®off”.
Harman/kardon LOGIC7
®
Surround
Sound is available for the following operating modes:
앫 Audio DVD* (MLP, DTS, PCM and Dolby
Digital audio formats)
앫 Video DVD (PCM, DTS and Dolby Digit-
al audio formats)
앫 Audio CD
앫 MP3
앫 Radio
앫 PCMCIA
앫 Aux
P82.86-4840-31
P82.86-4841-31

72
Operating systems
COMAND introduction
i Because many DVDs contain both stereo
and multi-channel audio formats, it may be necessary to set the audio format (
컄 page 89) and
(
컄 page 97).
i The “LOGIC7
®
on” function of the harman/
kardon LOGIC7
®
Surround Sound system allows
playback of discrete 5.1 and stereo recordings
with an optimum surround soundstage for each
passenger. It enables optimum playback of music and films on a CD or audio and video DVDs
with high-resolution surround formats, such as
MLP, DTS or Dolby Digital.
For ideal sound perception from all seats,
LOGIC7
®
distributes the 5.1 surround information over the 13-channel architecture. This results in sound characteristics like those intended
by the sound engineer when the original was recorded.
Harman/kardon LOGIC7
®
converts each twochannel stereo sound source into multi-channel
surround sound. LOGIC7
®
reads the surround information stored during the original recording
and distributes it over the 13 channels. This does
not create any special effects; you can simply
hear what was always there.
In addition, harman/kardon LOGIC7
®
moves
the perceived sound source away from the loudspeakers and thereby generates a natural 360°
soundstage for every passenger.
i If you select “LOGIC7
®
off”, playback of all
playable formats is as it is on the medium. Optimum sound effects are not guaranteed at all
seats due to the spatial characteristics of the vehicle.
Setting surround sound*
You can sele ct “LOGIC7
®
on” and
“LOGIC7
®
off” in surround sound mode.
왘 Select “Sound” “3D sound”.
Setting the surround sound
1 Current setting
왘 To make the setting: slide qmr or
turn ymz.
왘 To store the setting: press n.
The setting is stored and you exit the
menu.
To exit the menu without storing:
press the L back button or slide
omp.
i Please bear the following in mind:
앫 For an optimum sound effect for all seats
when LOGIC7
®
is switched on, the balance
and fade should be set to the centre of the
passenger compartment.
앫 You will achieve the best sound results by
playing high-quality audio and video DVDs.
앫 The bit rate should be at least 128 kbps for
MP3 tracks.
앫 Surround-sound playback does not work for
mono signal sources, such as the medium
waveband in radio mode.
앫 If the radio reception is poor, e.g. in a tunnel,
you should sw i t c h of f L OG I C7
®
because it
may otherwise switch automatically between stereo and mono and therefore cause
temporary distortions in the sound.
앫 On some stereo recordings, the sound char-
acteristics may differ from conven tional
stereo playback.
P82.86-4842-31

73
Operating systems
COMAND introduction
Switching off an audio/video* source
i If you insert a CD or DVD, the audio/video
source is automatically activated.
Switching an active audio source on and
off
왘 To switch off: select “Audio”
“Audio” “Audio off”.
The audio source is switche d off,
“Audio off” appears in the display.
왘 To switch on: select “Audio”, then se-
lect the desired au dio source.
or
왘 Load a CD/DVD (컄 page81) or PCM-
CIA card (
컄 page 82).
Switching an active video* source on
and off
왘 To switch off: select “Video”
“Video” “Video off”.
The video* so urce is switched off,
“Video off” appears in th e di sp la y.
왘 To switch on: select “Video”, then se-
lect the desired video so urce.
or
왘 Load a DVD (컄 page 81).

74
Operating systems
COMAND radio
i The components and operating principles of
COMAND can be found on (
컄 page 61).
COMAND radio
Menu overview
Radio Presets FM (MW, LW, SW) Sound
Station list
(in FM waveband only)
Autostore FM Treble
Save station Station presets MW Bass
Frequency input LW Balance/fader
Frequency fix
(in FM waveband only)
SW 3D sound*
TA (in FM waveband only)

75
Operating systems
COMAND radio
왘 Select “Audio” “Audio” “Radio”.
or
왘 Press the M function button once or
twice.
The radio display appears once you
have switched to radio mode. You will
hear the previously set station on the
previousl y se t wav e band.
i The number of times you hav e to press the
function button depends on the operating mode
currently selected.
Radio operation
1 Main area showing station and fre-
quency
2 Preset position of the selected station
3 Name of the selected station
4 Sound settings
5 To display/switch waveband
6 Preset options
7 Radio options
You can switch the radio between the FM,
MW, LW and SW wavebands.
왘 Select “Audio” “Audio” “Radio”
waveband display 5.
왘 Select the desired waveband.
You will hear the previously set station
on the selected waveband.
i In the MW, LW and SW wavebands,
COMAND shows the station frequency instead
of the station name.
You can t une in stations from the station
list or by manually entering the frequency.
Tuning in stations using the station list
i The station list is only available in the FM
waveband. It contains all the stations that can
currently be received and is sorted alphabetically. For stations without a programming service,
the list shows the frequency instead of the
name.
Switching to radio mode
P82.86-5063-31
Switching wavebands
Tuning in stations

76
Operating systems
COMAND radio
왘 Slide omp or turn ymz when the main
area is selected.
or
왘 Select “Audio” “Audio” “Radio”
“Radio” “Station list”.
The station list appears. TheR dot in
front of a list entry indicates the currently selected station. A number in
front of the list entry indicates the preset position in the station preset memory.
왘 Select a statio n.
Tuning in stations using manual tuning
i Manual tuning is only available in the MW,
LW and SW wavebands.
왘 Slide omp or turn ymz when the main
area is selected.
Station search scans up or down and
stops at the next station that the radio
can receive.
Tuning in stations using stat ion presets
왘 Select “Audio” “Audio” “Radio”
“Presets”.
or
왘 Press n when the main area is select-
ed.
The preset menu appears. The R dot
in front of a preset position indicates
that the currently selected station is
stored there.
왘 Select the station preset and briefly
press n.
Tuning in stations by entering the frequency manually
왘 Select “Audio” “Audio” “Radio”
“Radio” “Frequency input”.
왘 To increase or decrease the
number: slide qmr or turn ymz.
i You can only tune in to currently permitted
numbers.
왘 To select the next number: slide
omp.
왘 To set the frequency: press n.
COMAND tunes in to the frequency entered.
i If you enter a frequency in the medium
waveband which is outside the frequency range,
COMAND tunes in to the next lowest frequency.
Twenty stations can be stored in each
waveband.
Storing stations manually
왘 Select “Audio” “Audio” “Radio”
“Radio” “Save station”.
or
왘 Press n when the main area is select-
ed.
or
왘 Select “Audio” “Audio” “Radio”
“Presets”.
All three of these will bring up a selection list. The R dot in front of a preset
position indicates that the currently selected station is stored there .
Storing stations

77
Operating systems
COMAND radio
왘 To select a preset position: slide
qmr or turn ymz.
Storing the station to the selected preset position
If you have called up the station preset display using “Save station”:
왘 Press n briefly.
In the two other cases:
왘 Press and hold n until you hear a sig-
nal.
The station is stored.
Storing using autostore
i This function automatically stores stations
which can be received in order of their reception
quality. Any stations stored manually in the preset memory will be lost if COMAND finds 20 stations. If COMAND finds fewer th an 20 stations,
for example 9, then the stations stored in preset
positions 1 – 9 will be lost.
왘 Press n when the main area is select-
ed.
왘 Select “Autostore”.
or
왘 Select “Audio” “Audio” “Radio”
“Presets” “Autostore”.
or
왘 Select “Audio” “Audio” “Radio”
“Radio” “Save station” “Auto-
store”.
COMAND searches for stations which
can be received. The available stations
are automatically stored in the preset
positions.
COMAND is equipped with an RDS frequency diversity system i n the FM waveband. The system consists of a listening
receiver and a searching receiver.
The searching receiver constantly scans
the FM waveband and collects data from
all the stations which can be received, e.g.
reception quality and RDS data such as
programme name and alternative frequencies. COMAND stores the data and constantly updates the preset memory. The
listening receiver is therefore able to
switch instantaneousl y to an alt e rn at ive
frequency with a better signal.
i The frequency diversity system only func-
tions for stations which transmit RDS data.
Switching RDS frequency diversity on
or off
i You can prevent COMAND from switching
between different regional frequencies for the
same station by switching off RDS frequ ency diversity.
P82.86-4839-31
RDS frequency diversity

78
Operating systems
COMAND radio
왘 Select “Audio” “Audio” “Radio”
“Radio”.
The tick next to “Frequency fix” in dicates that the function is switched on.
왘 Select “Frequency fix”.
The function is switched on or off depending on the pr e v io u s st at us.
Many FM stations transmit traffic announcements (TA).
You can switch announ cements on and off
or interrupt a current announcement.
Switching announcements on or off
왘 First option: select “Audio” “Audio”
“Radio “Radio” “TA”.
The tick next to “TA” indicates that the
function is switched on.
왘 Second option: press and hold the
o button until “TA” appears in the
display or disappears from the display.
You have switched the function on or
off. If the function is switched on, you
will see the TA symbol in the status
line.
Once traffic announcements have been
switched on, COMAND selects an RDS station. The traffic ann ouncements a re played
from:
앫 the currently selected FM station
앫 an RDS station from the programme
service of the currently selected FM
station
앫 the RDS station with the best reception
quality
When traffic announcements are swi tched
on, a traffic announcement will interrupt
the audio signal from the currently activated audio or video source.
i Telephone conversations and navigation an-
nouncements are not interrupted.
A display message appears in the display
in every audio operating mode.
Interrupting a traffic announcement
왘 Briefly press the o button during
the traffic announcement.
COMAND switches back to the audio
source before you have heard the announcement. Subsequent announcements will interrupt the audio source
again.
Switching off RDS completely
왘 Press and hold the o button until
“TA” disappears from the display.
RDS
P82.86-5062-31
P82.86-5111-31
 Loading...