

Mercedes-Benz Wallbox
Instruction Manual

Important addresses
Contact
In case of technical questions, please contact your local Mercedes-Benz technical support.
Daimler AG
Mercedesstraße 137
70327 Stuttgart, Germany
This manual, in its entirety or in parts, must not be reproduced, stored electronically or otherwise transmitted electronically,
electrically, mechanically, optically, chemically, by photocopy or as an audio recording without express written permission.
Version: 1.2, MB-UM-Wallbox-2019-05-10
ii
Article No. 0301480

Contents
Important addresses ii
Important information 1
About this manual 1
Safety notices in this manual 1
Safety notices on the device 1
General safety information 2
General product information 2
User information 3
Introduction 4
Introducing the product 4
Unpacking and components
included 4
Identifying your model variant 5
Charging procedure 6
Charging procedure using the
Mercedes-Benz Wallbox 6
Resolving errors 8
Disruptions to the operation of
the wallbox and solutions 8
Error codes and solutions 8
Taking the product out of and
back into operation 11
Frequently asked questions 12
Appendix 13
Technical specifications 13
Scale drawings and dimensions 14
Standards & guidelines 15
CE certification and declaration
of compliance 16
Maintenance 16
Cleaning and care 16
Trademarks 17
Intellectual Property & Copyright 17
Disposal advice 17
Mercedes-Benz Wallbox
iii

iv

Important information
About this manual
This manual is delivered as an original component of your Mercedes-Benz Wallbox and documents the steps and options
necessary for set up and operation of your wallbox. For quick and easy reference, certain sections of this manual are specially
formatted.
• Descriptions listing equally valid options (as is the case here) are indicated by bullet points.
• Descriptions that describe performing a function are shown in the form of numerical lists indicating the order of the indi-
vidual working steps.
Please make sure you read this manual, as it contains important information for use of the wallbox with your Mercedes-Benz
vehicle. Please especially follow all operational and safety notices that are printed in this manual.
Keep this manual in a safe place for future reference. In case the wallbox is operated by several users, the contents of this
manual, and the safety notices in particular, must in all cases be passed on to each individual user or made available to them.
All measurements in this manual are in millimeters. Where necessary, the scale is indicated for different illustrations.
Please note that all technical details, specifications and design characteristics of the product may be changed without prior
notice.
Safety notices in this manual
In particular, the warnings and safety measures in this manual that are marked as follows must be adhered to. The symbols
carry the following meanings:
DANGER!
Sections marked with this symbol draw attention to electrical voltages that represent a danger to life and limb: Actions
contrary to these safety notices may lead to severe injury and death. Actions marked with this symbol must not be carried
out under any circumstances.
CAUTION!
Sections marked with this symbol draw attention to further hazards that may lead to damage to the wallbox itself or to
other electric devices. Actions marked with this symbol must be carried out with special care.
PLEASE NOTE!
Sections marked with this symbol draw attention to further important information and special features that are necessary
for the reliable operation of the device. Actions marked with this symbol should be carried out as required.
Safety notices on the device
Further operational and safety notices are provided on the outside of the housing and on the electronic components cover
inside the wallbox. These symbols carry the following meanings:
WARNING!
Please ensure that you first read the instruction manual (this document), especially before you open the housing cover of
your Mercedes-Benz Wallbox.
Mercedes-Benz Wallbox | Important information
1

WARNING!
After opening the housing, dangerous electrical voltages may be present inside the wallbox.
General safety information
Please pay attention to the following points:
• Read this manual carefully.
• Heed all warnings.
• Follow all instructions.
• The wallbox must be installed, connected and approved for operation according to local rules and regulations by a qualified
specialist electrical contractor.
• Please ensure that a minimum distance of 50cm to the wallbox is kept on all sides after installation.
• Never remove the cover of the electronic components inside the Mercedes-Benz Wallbox housing door: Cleaning or mainte-
nance of components behind this cover is not necessary, and must under no circumstances be performed by the user.
• The Mercedes-Benz Wallbox must only be operated with the housing cover closed and locked: Before charging, ensure that
the housing cover is closed and lock it using the triangular key supplied.
• Only use accessories intended and sold for the device by Mercedes-Benz.
• Do not operate this wallbox in close vicinity to running water or water jets. However, the Mercedes-Benz Wallbox is suffi-
ciently protected against water splashes and sprays according to the respective protection degrees.
• The Mercedes-Benz Wallbox must not be installed in areas subject to flooding.
• The Mercedes-Benz Wallbox must not be installed in explosive atmosphere areas (EX areas).
• The Mercedes-Benz Wallbox must not be covered with stickers or other objects or materials so that sufficient air circulation
is ensured at all times.
• No liquids, or objects or receptacles containing liquids, must be placed on the housing.
• Please note that operating a radio transmitter in the immediate vicinity (< 20 cm) of the wallbox may lead to malfunctions
and should therefore be avoided.
• This device is not intended to be used by persons with limited physical, sensory or mental abilities (including children) and/
or lacking knowledge, unless they are supervised by someone responsible for their safety or have received instructions
from such a person on how to use the device.
• Children must be supervised so that they do not play with the device.
• Please note that the Mercedes-Benz Wallbox may be installed and operated at elevations of max. 2,000 meters AMSL
(above mean sea level).
General product information
This Mercedes-Benz Wallbox represents the current state of technology and fulfills all current technical safety requirements,
guidelines and standards. The safety information provided in this manual serves to ensure the proper and safe operation of
the device. Disregard of or actions contrary to the safety information and instructions contained in this manual may lead
to electric shock, fire and/or severe injury. Malfunctions affecting the safety of persons, connected electric devices or the
device itself must be repaired by a specialist electrical contractor.
Should a malfunction occur with the wallbox, please always contact the company that carried out the installation first. If the
malfunction can still not be resolved, please contact your local Mercedes-Benz technical support.
2

Always contact Mercedes-Benz technical support if:
• the housing has been damaged mechanically,
• the housing cover has been removed or can no longer be closed or locked,
• sufficient protection against splashing water and/or foreign objects is obviously no longer evident,
• there is functional or visible damage to the charging socket or external charging cable
• or the wallbox does not function properly or has been otherwise damaged.
DANGER!
Should you detect damage to the housing, charging socket or charging cable, you must take the wallbox out of operation
immediately via the upstream fuse(s) in your domestic power distribution box: No further use of the wallbox is permitted in
this case! Please contact your local Mercedes-Benz technical support!
User information
To operate your wallbox, please note these instructions:
• The device must always be connected to the protective earth conductor of your electricity supply. The protective earth con-
nection will be made and checked by the installing contractor. After installation, only qualified specialist electrical contractors may make changes.
• The wallbox should not be installed in areas of high pedestrian traffic. Installation along thoroughfares and marked escape
routes should be especially avoided.
• When there is no charging procedure under way, the charging cable should always be unplugged and stored (model variants
with charging socket) or inserted into the compartment on the side of the wallbox (model variants with fixed charging cable)
to avoid trip hazards.
• Ensure that the rated voltage and rated current of the device comply with the parameters of your local electricity grid and
that the rated output is not exceeded during the charging procedure.
• At all times comply with local safety regulations for the country in which you operate the wallbox.
• To disconnect the wallbox completely from the power grid, the power supply must be interrupted using the upstream fuse(s)
and the external residual current circuit breaker (RCCB).
• Never operate the wallbox in a confined space. In particular, you must ensure that the vehicle can be parked at a suitable
distance from the wallbox and connected without any strain on the charging cable.
• A parking spot for the vehicle must be planned for in the area in front of the wallbox. The distance between vehicle and
wallbox should be at least 50 cm and no more than 5 m.
• Make sure that the cover of the wallbox housing is always closed and locked when in use. Keep the triangular key for un-
locking the door in a place that is only accessible to authorized users.
• Under no circumstances remove the protective cover for electronic components located behind the housing cover of the
wallbox.
• You must not under any circumstances make any changes to the housing or the internal wiring of the wallbox: Any disre-
gard of this instruction represents a safety risk, fundamentally breaches the guarantee provisions and may void the warranty with immediate effect.
• Only have qualified, specialist personnel install and/or repair the device. No parts to be maintained by the user are located
inside the device.
Mercedes-Benz Wallbox | Important information
3

Introduction
Thank you for choosing this wallbox to charge your Mercedes Benz electric vehicle. With this Mercedes-Benz Wallbox, you
have decided on an innovative and future proof solution.
eMobility helps save natural resources and protect the environment sustainably – e.g. with Electric Drive models by Mercedes-Benz. The Mercedes-Benz Wallbox combines progressive and pleasing design with intuitive functionality: According to
their requirements, users may select from models with charging socket or fixed charging cable, which are designed for domestic and also for semi-public applications.
Mercedes-Benz Wallboxes are manufactured in Germany and comply with the regulations and norms for the charging of electric vehicles applicable throughout Europe according to IEC 61851-1, Mode 3. Please refer also to the section on “Standards
& guidelines” on page 15.
Introducing the product
Your Mercedes-Benz Wallbox allows you to comfortably and safely charge electric vehicles according to IEC 61851-1, Mode 3
and is designed for the shortest possible charging times.
We place the highest value on user safety in all our products. For this purpose, your wallbox offers integrated DC fault current
detection which, in combination with the protective measures of your domestic power supply and your electric vehicle effectively protects from short circuit, electric shock and other operational hazards.
The wallbox is especially easy to operate during everyday use: Three LED lights in the lower part of the housing cover allow
you to check the current operating status at any time. Should a malfunction occur, you can identify the cause by its specific
LED error code without having to open the housing. Aer being taken into operation by a specialist contractor, the MercedesBenz Wallbox is ready for charging at any time, while each charging process must be separately authorized via the integrated
key switch.
A common characteristic of all wallboxes is the space-saving housing, which effectively protects the internal electric circuits
against environmental influences and unauthorized access. In principle, all model variants of the wallbox must be installed and
taken into operation by a specialist electrical contractor. Please contact your local Mercedes-Benz partner with any queries
you may have.
Unpacking and components included
Your Mercedes-Benz Wallbox is delivered in an extremely sturdy carton, including a range of accessory components required
for proper operation. Therefore, please check immediately aer unpacking whether the following components are included:
Component Quantity Description
Wallbox 1 Charging station, consisting of plastic housing with lockable cover and separate mounting plate.
Quick start guide 1 Quick start guide including safety notices in printed form
Installation kit 1
Set of fixings for wall mounting, consisting of 2 x 4 screws as well as matching wall plugs, triangular key, key for the key
switch (2 pcs), strain relief including screws (2 pcs), sealing grommets for openings at the back of the housing (3 pcs)
Should one or more components be missing aer unpacking, please contact your local Mercedes-Benz distributor immediately.
PLEASE NOTE!
The carton in which the Mercedes-Benz Wallbox is delivered offers optimal protection against external influences during
transport and storage. If possible, keep this carton and use it to pack the Mercedes-Benz Wallbox, should you need to
send it to the manufacturer or otherwise transport it because of a malfunction or similar.
4

Identifying your model variant
The Mercedes-Benz Wallbox series comprises several model variants, which are mechanically and electrically adapted to
different usage profiles. A product sticker with the specific Mercedes-Benz product identification number is located on the
underside of the wallbox. Please check the product sticker to ensure that the model variant you have installed is the one
described in this manual.
For identification, the model code (A000 906 XX XX) as well as the power
supply ratings (voltage, frequency, current) indicated below it are especially
relevant.
The following wallboxes are described in this manual:
Model Grid connection Model Variant
A0009060407 see product sticker Fixed charging cable according to IEC 62196-2 Type 2, ca. 6 m; charging output 11 kW
A0009060507 see product sticker
For information about Mode 3 charging cables, please contact your local Mercedes-Benz distributor.
CAUTION!
The information and technical specifications contained in this manual relate exclusively to the model variants mentioned
in this manual and must not be transferred to other wallbox models. These variants include specific instruction manuals
where necessary.
Integrated charging socket according to IEC 62196-2, Type 2 for separately available Mode 3 charging
cable; charging output 22kW
Mercedes-Benz Wallbox | Introduction
5

Charging procedure
The mechanical and electrical installation of the Mercedes-Benz Wallbox model variants described in this manual must always
be carried out by qualified specialist personnel: Preparation of the domestic power supply, and electrical connection to your
domestic power supply in particular, must be carried out by a specialist electrical contractor, and subsequently inspected and
approved as part of the process of taking the device into operation. Please contact a specialist electrical contractor or your
local Mercedes-Benz partner, who will be pleased to assist you with any questions regarding the installation and operation of
your wallbox.
Installation itself is described in the a separate installation manual. That manual contains important information regarding mechanical and electrical installation as well as regarding the subsequent functional inspection, approval and taking into operation of the wallbox. It is advisable that you are present when the device is taken into operation for the first time by a qualified
electric contractor to ensure that you are able to easily carry out charging procedures with your Mercedes-Benz Wallbox.
The current operating status is indicated by the three color LEDs on the front of the housing. Each LED may ...
... be illuminated
(continuous ON)
You can find further information about operating states on the following pages.
... flash
... be extinguished
(continuous OFF).
Charging procedure using the Mercedes-Benz Wallbox
The wallbox is engineered for the fastest possible charging procedure of your Mercedes-Benz vehicle according to IEC
61851-1, Mode 3. Actual charging time depends on the battery installed in the vehicle and its remaining level of charge at the
beginning of the charging procedure.
The Mercedes-Benz Wallbox is available in model variants with fixed charging cable and
with Type 2 charging socket. The A0009060407 model variant, however, includes a charging cable with Type 2 charging connector. Here, the charging connector is kept in a matching charging connector compartment on the right side of the wallbox housing and is only
removed for the charging procedure.
The A0009060507 Model variant features a charging socket for which you will need the
separately available Mode 3 charging cable in order to connect your Mercedes-Benz
vehicle. This model variant has an electromechanical locking mechanism, which secures
Type 2 connector
the charging connector to the wallbox as soon as the charging cable is connected to both
wallbox and vehicle. You can obtain information about charging cables from your local
Mercedes-Benz distributor.
CAUTION!
The Mercedes-Benz Wallbox must only be operated with the housing cover closed and locked: Before charging, ensure that
the housing cover is closed and locked using the triangular key included.
Please follow these steps to charge your Mercedes-Benz vehicle using the wallbox:
1. Park your vehicle so that the vehicle charging socket can be easily reached with the charging connector of the charging
cable: The charging cable must not be stretched tight or placed under strain during the charging procedure.
2. Open the vehicle charging socket as described in the vehicle's instruction manual.
3. Check the LED indicators at the front of the wallbox: When the wallbox is ready for operation, the blue LED indicator
will flash every 5 seconds, while the two other LEDs will be OFF.
6

4. Remove the charging connector from the charging connector compartment (model variant A0009060407) or connect
the separately available Mode 3 charging cable to the charging socket on the right side of the wallbox (model variant
A0009060507).
5. Insert the charging connector of the charging cable all the way into the vehicle’s charging socket.
6. If necessary, unblock the charging procedure using the key switch on the right side of the housing.
• Key switch in horizontal position: The next charging procedure is blocked.
• Key switch in vertical position: Charging procedure unblocked.
PLEASE NOTE!
Unblocking is only required to start the charging procedure: The key switch may be returned to the horizontal position immediately aerwards and this will not interrupt the charging procedure. However, aer separating the connection with the
vehicle, the next charging procedure is again blocked by the wallbox.
The operating status is shown by the LED indicators on the front of the wallbox as follows:
LED display Description
The blue LED flashes every 5 seconds, the green LED and the red LED
are not illuminated. The vehicle may now be connected.
The blue LED is illuminated permanently when the vehicle has been connected
and detected but the charging procedure has not yet been unblocked using the key
switch.
The blue LED goes out and the green LED is illuminated permanently when
the vehicle is connected and the charging procedure has been unblocked using the
key switch: In this state, the wallbox is waiting for the vehicle to initiate the charging
procedure.
The green LED flashes during the actual charging procedure. The charging procedure can be manually interrupted at the vehicle and is automatically terminated
by the vehicle when charging is complete.
When the charging procedure is paused or completed, the green LED is again
continuously ON.
PLEASE NOTE!
In principle, the charging procedure is always terminated by the vehicle, not by the wallbox. An illuminated green LED
indicates, on the basis of communication with the vehicle, that the charging procedure has been either paused or completed: Distinguishing these two operating states is only possible by checking the battery charge indicator inside the vehicle.
Should the vehicle not be fully charged after a sufficiently long charging process, please contact your local Mercedes-Benz
partner.
Aer the charging procedure has been completed, please remove the cable from the vehicle socket and store it appropriately
in readiness for the next charging procedure.
Mercedes-Benz Wallbox | Charging procedure
7

Resolving errors
Your Mercedes-Benz Wallbox is engineered for maximum operational safety and the highest possible charging reliability.
Should a malfunction occur in practice, this is shown by the indicator LEDs front of the wallbox as an error code. The following
chapter describes how you recognize error codes and which measures you must take to resolve them.
Disruptions to the operation of the wallbox and solutions
For secure operation, the Mercedes-Benz Wallbox must be protected during operation by (an) upstream fuse(s) and an external residual current circuit breaker. To take suitable measures and restore operation in case of malfunction, you must first
clearly identify the type of error.
The following errors may occur:
Type of error Possible cause Suggested solution
The power supply is interrupted within the domestic electrical infrastructure: Check the upstream
MCB(s) and RCCB and switch them back on if required. If the error repeats or occurs permanently,
contact your local Mercedes-Benz technical support.
LEDs are not functioning.
The wallbox does not have a
power supply.
An internal fault has occurred in the wallbox.
The electric vehicle is not
recognized.
The indicator LEDs show an
error message.
PLEASE NOTE!
Should the power supply be faulty, please take the wallbox out of operation (see page 11) and contact your local
Mercedes-Benz technical support.
The charging cable is not
properly plugged into the
vehicle or the wallbox.
The Mercedes-Benz Wallbox
detects a malfunction.
The wallbox must be replaced. In this case, please always contact your local Mercedes-Benz technical
support.
Remove the charging connectors from the vehicle and the wallbox and plug them back in: Should
the error persist, check the Mode 3 charging cable and contact your local Mercedes-Benz technical
support.
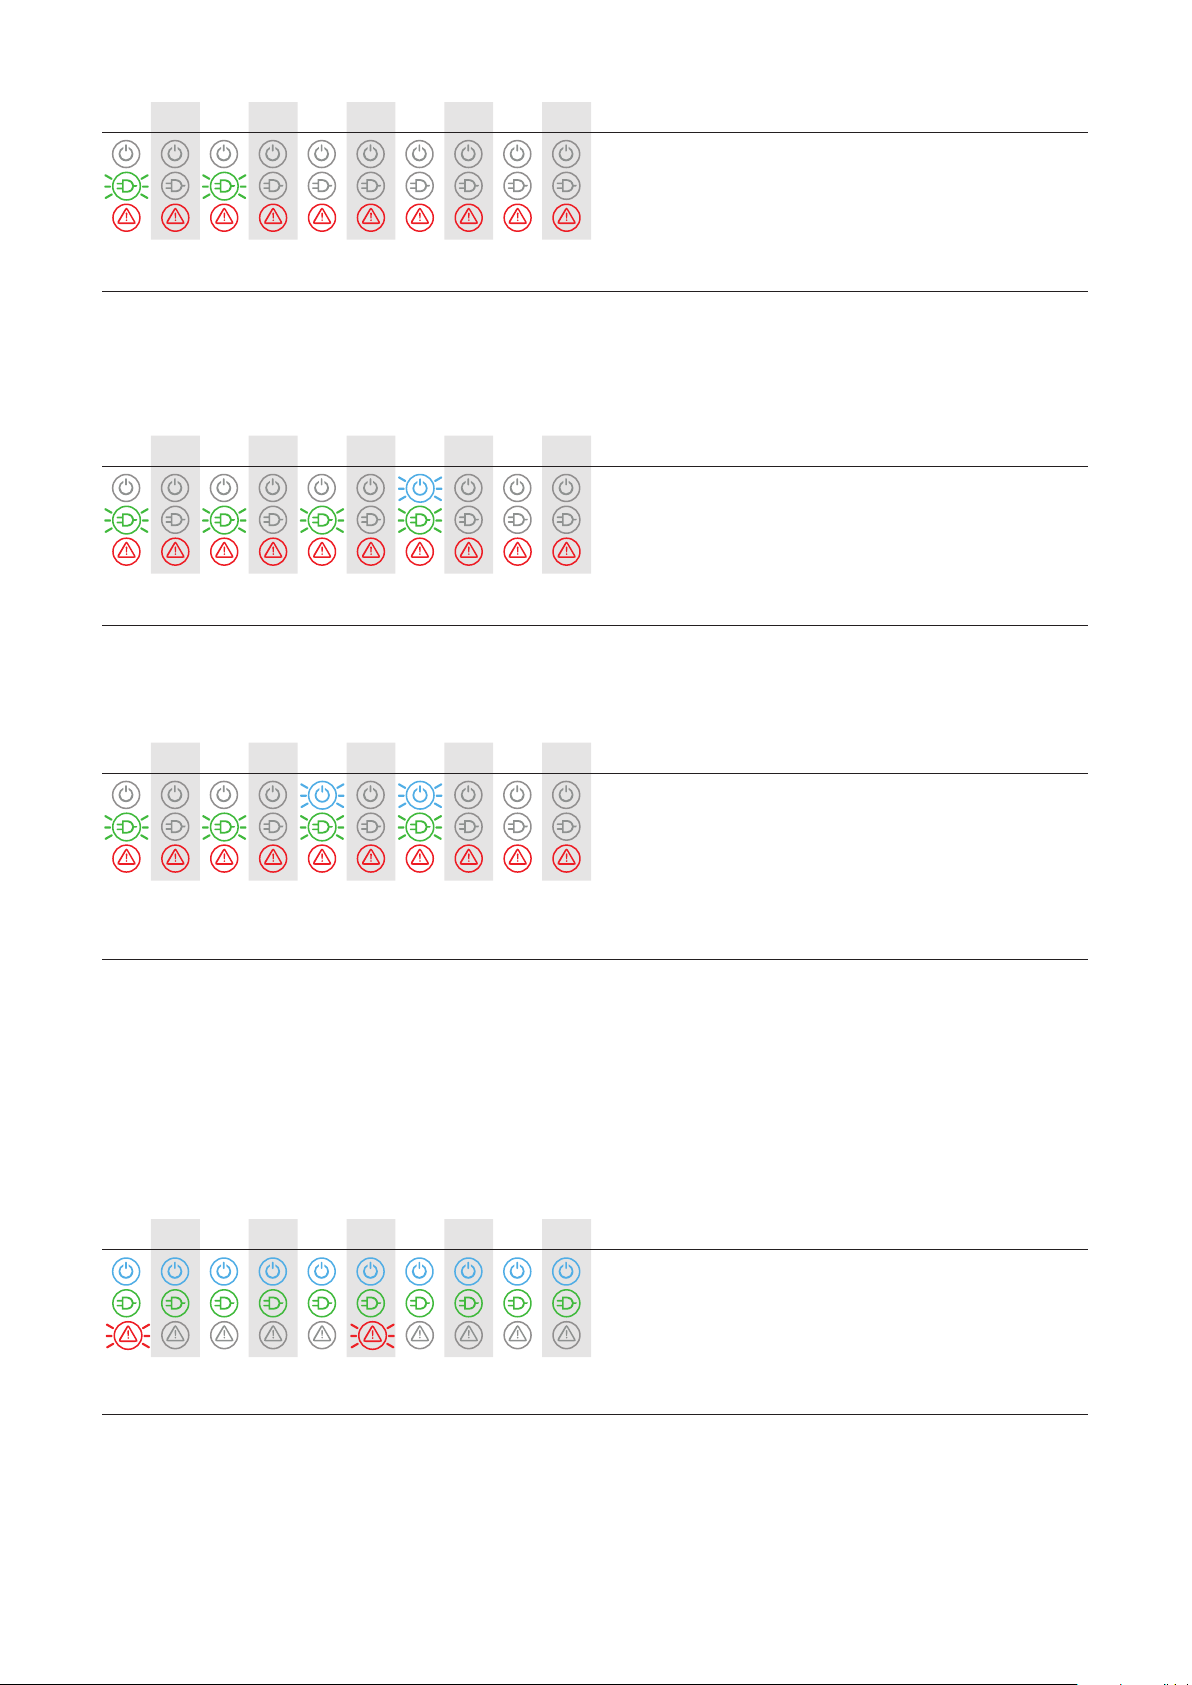
To represent certain errors, the indicator LEDs will illuminate and flash in a specific, repeating pattern.
Error codes F1 to F10 are displayed at 200 ms intervals: LEDs may be illuminated or extinguished
permanently, or may flash for 200 ms. You can find the correlations between visual display and errors
in the following list.
Error codes and solutions
200 ms 200 ms 200 ms 200 ms 200 ms 200 ms 200 ms 200 ms 200 ms 200 ms
Description
Error F1: The main contactor of the wallbox does not open.
The green LED flashes four times, the blue LED is OFF, the
red LED is continuously ON.
The green LED flashes three times, then the blue LED flashes
once, the red LED is continuously ON.
8
Error F2: The firmware has detected a disallowed operating
state during the initial or periodic self-test.

Solution: In both cases, switch the power supply off and then back on again. If the error continues to occur, take the wallbox
out of operation (see “Taking the product out of and back into operation” on page 11) and contact your local MercedesBenz technical support.
200 ms 200 ms 200 ms 200 ms 200 ms 200 ms 200 ms 200 ms 200 ms 200 ms
Description
Error F3: The internal DC fault current module has detected
a DC fault current.
The green and blue LEDs alternately flash twice each, the
red LED is continuously ON.
Solution: If the error occurs for the first time, the charging procedure is interrupted for 30 seconds and then restarted
automatically. If the error occurs again immediately, the charging procedure is terminated: a new charging procedure is only
possible aer disconnecting the vehicle from the wallbox.
There is possibly an electrical fault in the charging system of the vehicle. Do not charge the vehicle and immediately contact a
qualified specialist repairer. In addition, always consider the notices provided in the operating manual of the vehicle.
200 ms 200 ms 200 ms 200 ms 200 ms 200 ms 200 ms 200 ms 200 ms 200 ms
Description
Error F5: This error is only relevant for model variants with
charging socket (A0009060507) and indicates that the
connector of the Mode 3 charging cable could not be locked
The blue LED flashes four times, the green LED is OFF, the
inside the charging socket of the wallbox.
red LED is continuously ON.
Error F6: This error is only relevant for model variants with
charging socket (A0009060507) and indicates that the elec-
The green LED flashes twice, then the blue LED flashes
trical current coding of the Mode 3 charging cable is faulty.
twice, the red LED is continuously ON.
Solution: The wallbox automatically reinitiates the charging procedure every 60 seconds: Should the error continue to occur,
check the position of the connector in the charging socket or unplug it and plug it back in. If the error continues to occur,
check the Mode 3 charging cable itself. If the cable itself does not show signs of damage, the wallbox might have to be replaced: Please contact your local Mercedes-Benz technical support.
200 ms 200 ms 200 ms 200 ms 200 ms 200 ms 200 ms 200 ms 200 ms 200 ms
Description
Error F7: The vehicle demands a charging procedure with
ventilation.
The blue LED flashes twice, the green LED is OFF, the red
LED is continuously ON.
Solution: The wallbox automatically reinitiates the charging procedure every 60 seconds: If the error continued to occur,
please contact your local Mercedes-Benz technical support. Charging vehicles that require ventilation during the charging
procedure is not possible with the Mercedes-Benz Wallbox.
Mercedes-Benz Wallbox | Resolving errors
9
200 ms 200 ms 200 ms 200 ms 200 ms 200 ms 200 ms 200 ms 200 ms 200 ms
Description
Error F8: A short circuit has been detected between the
pilot contact CP and the protective earth PE or the commu-
The green LED flashes twice, the blue LED is OFF, the red
nication interface of the vehicle is faulty.
LED is continuously ON.
Solution: The wallbox automatically reinitiates the charging procedure every 60 seconds: If the error continues to occur,
check the Mode 3 charging cable. If the cable does not show signs of damage, the vehicle must be checked: Please contact a
qualified specialist repairer.
200 ms 200 ms 200 ms 200 ms 200 ms 200 ms 200 ms 200 ms 200 ms 200 ms
Description
Error F9: The electrical current monitoring module has
detected that the charging current is exceeding the preset
The green LED flashes four times, every fourth time the blue
maximum current.
LED also flashes, the red LED is continuously ON.
Solution: The wallbox automatically reinitiates the charging procedure every 60 seconds: If the error continues to occur, the
Mode 3 charging cable or the vehicle must be checked: Please contact a qualified specialist repairer.
200 ms 200 ms 200 ms 200 ms 200 ms 200 ms 200 ms 200 ms 200 ms 200 ms
Description
Error F10: The temperature monitor has detected a tem-
perature above 80° Celsius inside the housing.
The green LED flashes four times, the blue LED also flashes
every third and fourth time and the red LED is continuously
ON.
Solution: The temperature monitor interrupts the charging procedure.
• After 10minutes, the charging procedure is automatically reinitiated if the temperature inside the housing has fallen to
below 70°Celsius.
• The charging procedure is reinitiated immediately as soon as the temperature inside the housing falls to below 60° Celsius.
If the error repeats or persists, the wallbox must be cooled and/or shaded more effectively at the installation site. If the error
continues to occur, the vehicle must be checked: Please contact a qualified specialist repairer.
200 ms 200 ms 200 ms 200 ms 200 ms 200 ms 200 ms 200 ms 200 ms 200 ms
Description
Error F16: Data transfer to the integrated electrical current
monitor is disrupted. The maximum charging current is
The blue and the green LED are continuously ON, the red
limited to 10A while this error occurs.
LED flashes twice.
Solution: Charging operations can continue, but the charging output will be reduced. If the error repeats or occurs permanently, take the wallbox out of operation (see “Taking the product out of and back into operation” on page 11) and contact
your local Mercedes-Benz technical support.
10

200 ms 200 ms 200 ms 200 ms 200 ms 200 ms 200 ms 200 ms 200 ms 200 ms
The blue and the green LED are continuously ON, the red
LED flashes twice.
Solution: Charging operations can continue, but the charging output will be reduced. If the error repeats or persists, the wallbox must be cooled and/or shaded more effectively at the installation site. If the error continues to occur, the vehicle must be
checked: Please contact a qualified specialist repairer.
CAUTION!
If the wallbox continues to or permanently displays error messages, take the wallbox out of operation (see “Taking the
product out of and back into operation”) and contact your local Mercedes-Benz technical support. Repairs may have to be
carried out before charging procedures can resume.
Description
Error F17: The temperature monitor has detected a temper-
ature above 60° Celsius inside the housing. The maximum
charging current will be limited to 6A.
Taking the product out of and back into operation
If required, you can take your Mercedes-Benz Wallbox out of operation. To take the wallbox out of operation, please proceed
as follows:
1. Switch of the external residual current circuit breaker (RCCB), thus disconnecting the wallbox from the power grid.
2. In addition, switch off any upstream fuse(s).
3. Now, the Mercedes-Benz Wallbox can no longer be used for charging.
4. To take the wallbox back into operation at a later time, please proceed as follows:
5. Switch on any upstream fuse(s).
6. In addition, switch the external residual current circuit breaker (RCCB) on, thus connecting the wallbox to the power grid.
When the Mercedes-Benz Wallbox is reconnected to the power grid, it will reinitiate the start-up procedure: This includes an
internal test of the electronics to ensure correct functioning. The internal check routine is indicated by the LEDs on the front
of the Mercedes-Benz Wallbox as follows.
LED display Description
All three LEDs flash once …
... and then go out.
Then, the blue LED and the green LED flash to indicate the current version
of the soware (not relevant for operation).
On completion the blue LED
now be connected for charging.
flashes every 5 seconds, the green LED and the red LED go out. The vehicle can
Mercedes-Benz Wallbox | Resolving errors
11

Frequently asked questions
A few frequently asked questions regarding installation and operation of your Mercedes-Benz Wallbox are listed here. Please
always read this section first before you contact your local technical support: Your question may already be answered here.
Can I install the Mercedes-Benz Wallbox myself?
• No, the mechanical, and especially the electrical installation of the Mercedes-Benz Wallbox must always be carried out by a
specialist electrical contractor. Only then can electrically safe operation be guaranteed.
• Installing the Mercedes-Benz Wallbox yourself can lead to a breach of warranty provisions and voids the warranty protec-
tion for operating the wallbox.
How must the Mercedes-Benz Wallbox be protected electrically?
• The Mercedes-Benz Wallbox must be protected in the domestic power supply for each phase as well as with one residual
current circuit breaker (at least Type A). Always consider all local provisions for the operation of electrical devices, which
may prescribe a different RCCB (e.g. Type B).
Can the Mercedes-Benz Wallbox be operated on a single phase power supply?
• Yes, in principle all model variants of the Mercedes-Benz Wallbox can be operated on a single phase power supply.
The Mercedes-Benz Wallbox is out of order (no LED indicators). How do I investigate the cause?
• If no vehicle is connected to the wallbox, the blue LED indicator on the front of the wallbox should flash every 5 seconds.
Should this not be the case, please check the following:
1. The upstream fuse(s)
2. The external residual current circuit breaker (RCCB)
Should these protection devices not show any sign of malfunction, please contact your local Mercedes-Benz technical support.
The charging output of the Mercedes-Benz Wallbox is lower than expected. What may be the cause?
• In some error scenarios, the internal safety circuits of the Mercedes-Benz Wallbox are triggered so that the internal current
of the wallbox will be limited: In this case, the red LED will flash every 10 seconds. However, charging continues to be possible. Should the internal safety features be activated repeatedly or permanently, please take the wallbox out of operation
(see page 11) and contact your local Mercedes-Benz technical support.
The key for opening the housing or for unblocking the charging procedure has been lost. Can I order a replacement
key?
• One triangular key for the housing cover ins included with the Mercedes-Benz Wallbox. Two keys for the key switch on the
side of the box, which is used to unblock the charging procedure, are also included. If both keys to the key switch have
been lost and the key switch on the right side of the housing is in the horizontal position, the wallbox is blocked for charging operations and no further charging procedures are possible. Contact the dealer from whom you have purchased the
wallbox to order replacement keys for housing or key switch.
Where can I order spare parts for the wallbox?
• Should you need spare parts for your wallbox, please contact your local Mercedes-Benz technical support.
12

Appendix
Technical specifications
Model Variant A0009060407 A0009060507
Compliance IEC 61851-1 / 61439-7
Grid connection for supply cable sizes of max. 5 x 16 mm²
Rated voltage see product sticker
Rated current 16A, 3-phase 32 A, 3-phase
Rated frequency 50 Hz
Max. output 11 kW 22 kW
Charging outlet Type 2 charging cable, ca. 6 m Type 2 charging socket
Circuit-protection devices DC-RCM electronic DC fault current detector, I
Control / Customization internal RS485 interface (no user/installer access)
Operating temperature -30°C to 50°C
Storage temperature -30°C to 85°C
Relative humidity 5 to 95% (no condensation)
Class of protection I
Overvoltage category III
Degree of pollution 3
Degree of protection (housing) IP54 IP44
Impact strength IK08
Dimensions incl. mounting plate 492 x 400 x 194 mm (H x W x D)
Dimensions w/o mounting plate 492 x 400 x 162 mm (H x W x D)
Mounting plate dimensions 477.9 x 376.4 x 32 mm (H x W x D)
Maximum elevation ≤ 2,000 m AMSL (above mean sea level)
Weight per unit incl. mounting plate ca. 14 kg ca. 5.7 kg
Weight per unit w/o mounting plate ca. 13 kg ca. 4.7 kg
Δn d.c.
≥ 6 mA
Mercedes-Benz Wallbox | Appendix
13

Scale drawings and dimensions
The Mercedes-Benz Wallbox is delivered fully assembled and checked. All dimensions are indicated in the scale drawings
below.
Wallbox with fixed charging cable
Plan and elevation (all dimensions in mm)
492
194
394
134
143
14

394
143
492
134
194
Wallbox with charging socket
Plan and elevation (all dimensions in mm)
492
134
194
400
Standards & guidelines
The Mercedes-Benz Wallbox complies with the following standards and protection ratings:
General guidelines
Guideline Explanation
2014/30/EU EMC Guideline
2011/65/EU RoHS 2 guideline
2012/19/EU WEEE Guideline
2014/35/EU Low voltage directive
ElektroG Electrical and Electronic Device Statute
Device safety standards
Standard Explanation
IEC 61851-1 Ed 2.0:2010 Conductive charging systems for electric vehicles – Part 1: General requirements
IEC/TS 61439-7:2014 Part 7: Switching device combinations for specific applications such as marinas, campgrounds, market squa-
res, charging stations for electric vehicles
DIN EN 61851-1: 2012-01 Conductive charging systems for electric vehicles – Part 1: General requirements
E DIN EN 61851-22:2011-04 Conductive charging systems for electric vehicles – Part 22: AC charging station for electric vehicles
HD 60364-7-722:2012 Low voltage installations – Part 7-722: Power supply for electric vehicles
Mercedes-Benz Wallbox | Appendix
15

Classes of protection & Degrees of protection
Class of protection /
Degree of protection
IP 44
IP 54
Explanation
The device complies with IEC protection class 1.
Degree of protection of the device: Protection against the intrusion of solid particles more than 1 mm in diameter and against splashing water (model variant: A0009060507).
Degree of protection of the device: Protection against touch, dust in harmful quantities and protection from
splashing water (model variant: A0009060407)
CE certification and declaration of compliance
The Mercedes-Benz Wallbox carries the CE mark. The associated compliance declaration is available for
download in electronic format at www.yourwallbox.de.
Maintenance
Aer installation, your Mercedes-Benz Wallbox is mostly maintenance-free. However, because the Mercedes-Benz Wallbox
internally processes high electrical voltages, it is recommended to conduct a visual inspection of the housing and check the
externally accessible components and accessories at certain intervals (e.g. biannually).
DANGER!
Never remove the internal cover of the Mercedes-Benz Wallbox: Cleaning or maintenance of components is not necessary,
or may not under any circumstances be performed by the user.
• Conduct a visual inspection of the housing surfaces as well as the charging socket(s) and check for damage.
• Conduct a visual inspection of the charging cable and ensure that the cable does not show any visual damage or deforma-
tion.
Should you find any obvious damage during the above-mentioned checks, please contact your local Mercedes-Benz technical
support.
Have all damage repaired before continuing to operate the wallbox. Until then, take the wallbox out of operation as described
in section “Taking the product out of and back into operation” on page 11.
• The Mercedes-Benz Wallbox does not have a dedicated ON/OFF switch: If you want to take the wallbox out of operation,
you must always switch the upstream fuse(s) and the domestic RCCB to the 0 (OFF) position.
• The proper functioning of the external RCCB must be checked biannually to ensure it functions correctly during operation.
Cleaning and care
• The surface of the Mercedes-Benz Wallbox can be cleaned with a dry cloth.
• Do not use aggressive cleaning agents, waxes or solvents (such as cleaning fluid or paint thinner) because they can dull the
housing and the displays on the device.
• Do not use abrasive cleaning agents or sponges as these can scratch the surface of the housing cover.
16

DANGER!
The Mercedes-Benz Wallbox must under no circumstances be cleaned with a pressure cleaner or any similar device where
liquids or steam could enter the openings in the housing because of high pressure.
Trademarks
All trademarks mentioned in this manual including those that may be protected by third parties are, without restriction,
subject to the regulations of the respectively applicable trademark law and the property rights of the respective registered
owners.
All trademarks, trading names or company names marked here as such are or may be trademarks or registered trademarks of
their respective owners. All rights not explicitly granted here are reserved.
The absence of explicit identification of trademarks used in this manual must not lead to the conclusion that a name is free
from the rights of third parties.
Intellectual Property & Copyright
Copyright © 2019
Version 1.2, MB-UM-Wallbox-2019-05-10
All rights reserved.
Any information in this manual may be changed without prior notice and does not represent any obligation on the part of the
manufacturer.
Illustrations in this manual may show designs different from the delivered product and do not represent any obligation on the
part of the manufacturer.
The manufacturer does not take responsibility for any loss and/or damages that occur because of the data or possible misinformation contained in these instructions.
This manual, in its entirety or in parts, must not be reproduced, stored electronically or otherwise transmitted electronically,
electrically, mechanically, optically, chemically, by photocopy or as an audio recording without the written permission of the
manufacturer.
Disposal advice
For the preservation and protection of the environment, the prevention of pollution and in order to
improve the recycling of resources, the European Commission has issued a guideline (WEEE-Guideline
2002/96/EC and EAG-VO) according to which electrical and electronic devices are taken back by the
manufacturer in order to have them properly disposed of or recycled.
Therefore, devices marked with this symbol may not be disposed of as part of unsorted domestic
waste inside the European Union: Please inquire with your local authorities regarding proper disposal.
The materials are recyclable as marked. By re-using, recycling or through other forms of processing
obsolete devices, you make an important contribution to environmental protection.
Mercedes-Benz Wallbox | Appendix
17

The manufacturer may have made minor technical modifications to the product aer publication of this instruction manual. This may also have led to minor discrepancies in the appearance of the product. Any color differences are a result of the printing process.
Daimler AG, Mercedesstr. 137, 70327 Stuttgart, Germany
 Loading...