

Page 1
McIntosh Laboratory, Inc. 2 Chambers Street Binghamton, New York 13903-2699 Phone: 607-723-3512 www mcintoshlabs.com
McAire
Integrated Audio System
Owner’s Manual
Page 2

The lightning ash with arrowhead, within an equilateral
triangle, is intended to alert the user to the presence of
uninsulated “dangerous voltage” within the product’s enclosure that may be of sufcient magnitude to constitute
a risk of electric shock to persons.
The exclamation point within an equilateral triangle is
intended to alert the user to the presence of important
operating and maintenance (servicing) instructions in the
literature accompanying the appliance.
WARNING - TO REDUCE RISK
OF FIRE OR ELECTRICAL
SHOCK, DO NOT EXPOSE
THIS EQUIPMENT TO RAIN OR
MOISTURE.
IMPORTANT SAFETY
INSTRUCTIONS!
PLEASE READ THEM BEFORE
OPERATING THIS EQUIPMENT.
1. Read these instructions.
2. Keep these instructions.
3. Heed all warnings.
4. Follow all instructions.
5. Do not use this apparatus near water.
6. Clean only with a dry cloth.
7. Do not block any ventilation openings. Install
in accordance with the manufacturer’s instructions.
8. Do not install near any heat sources such as
radiators, heat registers, stoves, or other appa-
ratus (including ampliers) that produce heat.
9. Do not defeat the safety purpose of the polarized or grounding-type plug. A polarized plug
has two blades with one wider than the other.
A grounding type plug has two blades and a
NO USER-SERVICEABLE PARTS
INSIDE. REFER SERVICING TO
QUALIFIED PERSONNEL.
third grounding prong. The wide blade or the
third prong are provided for your safety. If
the provided plug does not t into your outlet,
consult an electrician for replacement of the
obsolete outlet.
10. Protect the power cord from being walked on
or pinched particularly at plugs, convenience
receptacles, and the point where they exit
from the apparatus.
11. Only use attachments/accessories specied by
the manufacturer.
12. Use only with the cart, stand, tripod, bracket,
or table specied by the manu-
facturer, or sold with the apparatus. When a cart is used, use
caution when moving the cart/
apparatus combination to avoid
injury from tip-over.
13. Unplug this apparatus during lightning storms
or when unused for long periods of time.
14. Refer all servicing to qualied service personnel. Servicing is required when the apparatus
has been damaged in any way, such as power-
To prevent the risk of electric
shock, do not remove cover or
back. No user-serviceable parts
inside.
supply cord or plug is damaged, liquid has
been spilled or objects have fallen into the
apparatus, the apparatus has been exposed to
rain or moisture, does not operate normally, or
has been dropped.
15. Do not expose this equipment to dripping or
splashing and ensure that no objects lled
with liquids, such as vases, are placed on the
equipment.
16. To completely disconnect this equipment from
the a.c. mains, disconnect the power supply
cord plug from the a.c. receptacle.
17. The mains plug of the power supply cord shall
remain readily operable.
18. Do not expose batteries to excessive heat such
as sunshine, re or the like.
19. Connect mains power supply cord only to a
mains socket outlet with a protective earthing
connection.
20. Warning: The Ethernet connector of this
equipment must not be directly connected
to a public network. Connection is to be
made only by way of a modem or router approved for this purpose.
2
Page 3

Trademark and License Information
FCC INFORMATION (For US and Canada Customers)
a) User Information acc. to FCC15.21 as following:
Changes or modications not expressly approved by the party re-
sponsible for compliance could void the user’s authority to operate
the equipment.
b) Statement for Class B digital device acc. to FCC 15.105 as
following:
NOTE: This equipment has been tested and found to comply with
the limits for a Class A/B digital device, pursuant to
part 15 of the FCC Rules. These limits are designed
to provide reasonable protection against harmful
interference in a residential installation. This equipment
generates, uses and can radiate radio frequency energy
and, if not installed and used in accordance with the
instructions, may cause harmful interference to radio
communications. However, there is no guarantee that
interference will not occur in a particular installation. If
this equipment does cause harmful interference to radio
or television reception, which can be determined by
turning the equipment off and on, the user is encouraged
to try to correct the interference by one or more of the
following measures:
—Reorient or relocate the receiving antenna.
—Increase the separation between the equipment and
receiver.
—Connect the equipment into an outlet on a circuit
different from that to which the receiver is connected.
—Consult the dealer or an experienced radio/ TV
technician for help.
—This device complies with Industry Canada
licence-exempt RSS standard(s). Operation is
subject to the following two conditions: (1) this
device may not cause interference, and (2) this
device must accept any interference, including
interference that may cause undesired operation of
the device.
Le présent appareil est conforme aux CNR
d’Industrie Canada applicables aux appareils radio
exempts de licence. L’exploitation est autorisée
aux deux conditions suivantes : (1) l’appareil ne
doit pas produire de brouillage, et (2) l’utilisateur
de l’appareil doit accepter tout brouillage
radioélectrique subi, même si le brouillage est
susceptible d’en compromettre le fonctionnement.
c) The device must be kept more than 20 cm from all persons.
Trademark and License Information
The McIntosh McAire incorporates copyright protected technology that is protected by U.S. patents and
Trademark Logo License Information
AirPlay®, the AirPlay logo, iPhone®, iPod®, iPod classic®, iPod nano®, iPod shufe®, iPod touch® and iPad
are trademarks of Apple Inc., registered in the U.S.
and other countries.
“Made for iPod” and “Made for iPhone” mean that
an electronic accessory has been designed to connect
specically to iPod or iPhone, respectively, and
has been certied by the developer to meet Apple
performance standards.
Apple is not responsible for the operation of this
device or its compliance with safety and regulatory
standards. Please note that the use of this accessory
with iPod, or iPhone, may affect wireless performance.
AirPlay, the AirPlay logo, iPad, iPhone, iPod, iPod
classic, iPod nano, iPod shufe and iPod touch are
trademarks of Apple Inc., registered in the U.S. and
other countries.
•Individual users are permitted to use iPhone, iPod,
iPod classic, iPod nano, iPod shufe, and iPod touch
for private copy and playback of non-copyrighted
contents and contents whose copy and playback
is permitted by law. Copyright infringement is
prohibited by law.
The Wi-Fi CERTIFIED Logo is a certication
mark of the Wi-Fi Alliance.
other intellectual property rights. The McAire uses the
following Technologies:
®
3
Page 4

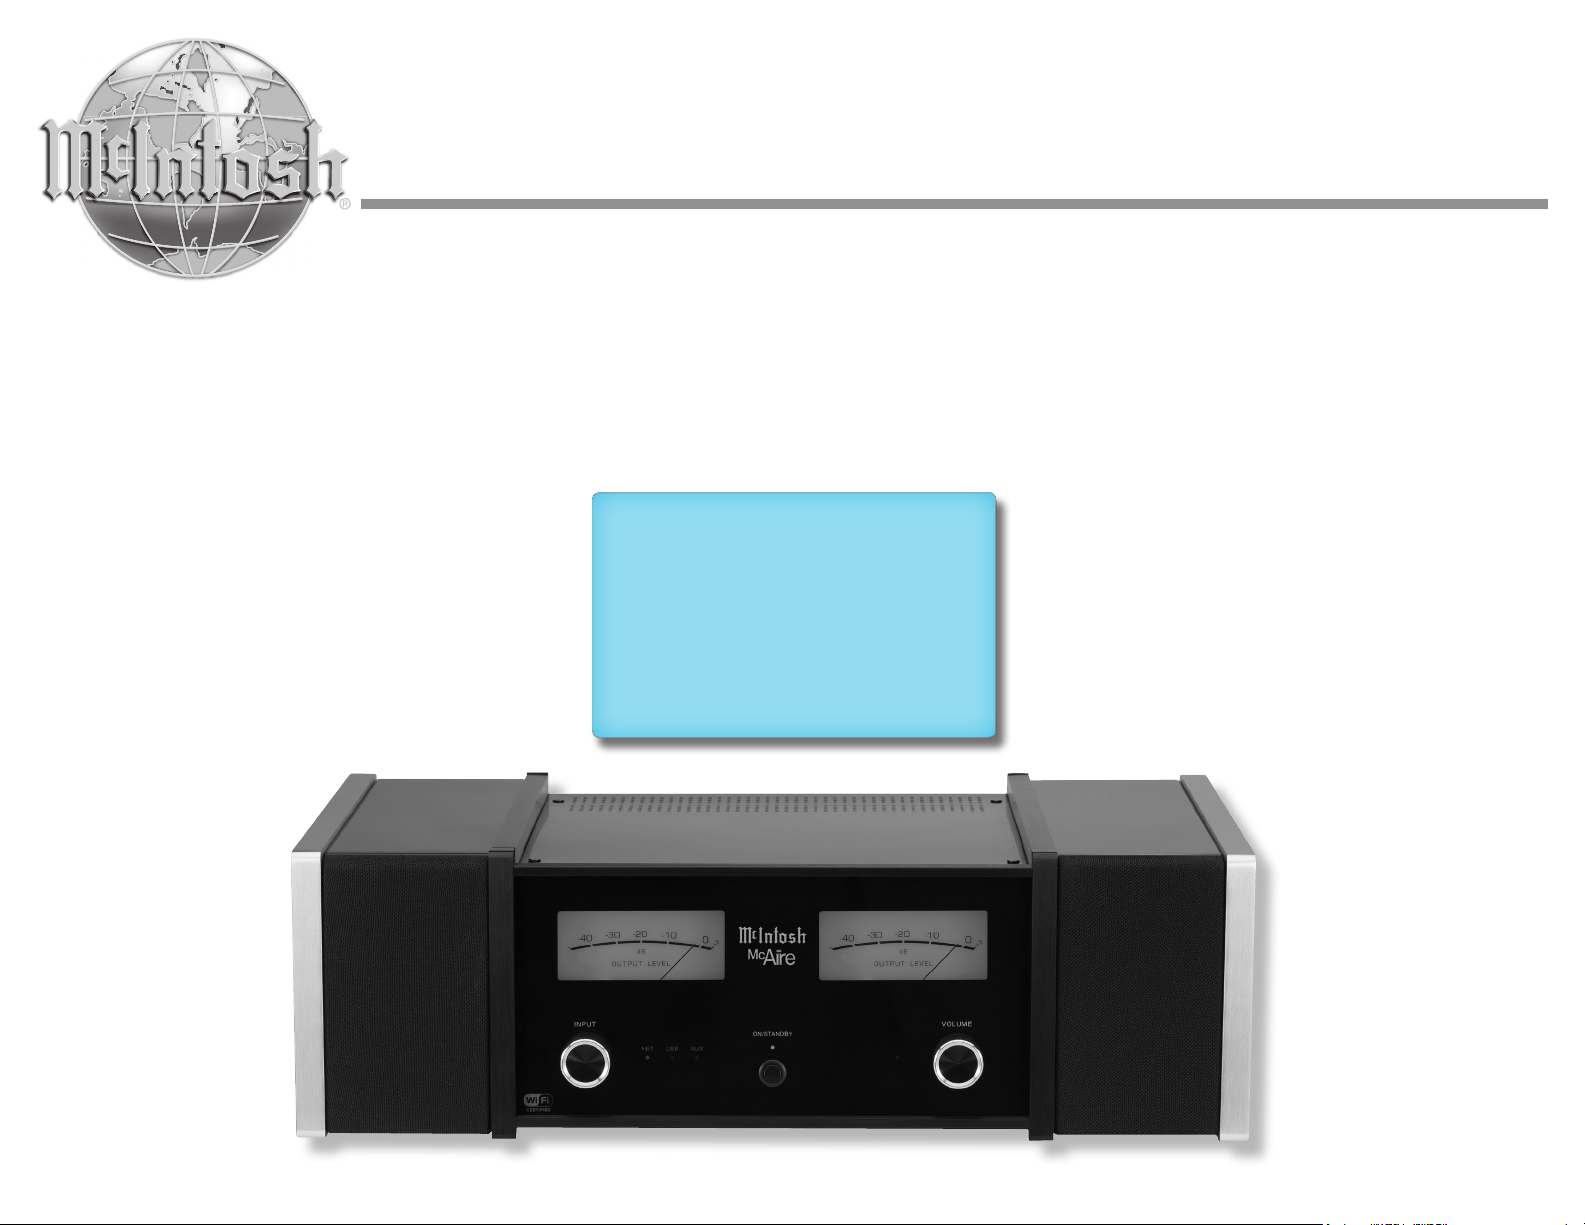
Thank You
Your decision to own this McIntosh McAire Integrated Audio System ranks you at the very top among
discriminating music listeners. You now have “The
Best.” The McIntosh dedication to “Quality,” is assurance that you will receive many years of musical
enjoyment from this unit.
Please take a short time to read the information in
this manual. We want you to be as familiar as possible with all the features and functions of your new
McIntosh.
Please Take A Moment
The serial number, purchase date and McIntosh Dealer
name are important to you for possible insurance
claim or future service. The spaces below have been
provided for you to record that information:
Serial Number: _______________________________
Purchase Date: _______________________________
Dealer Name: ________________________________
Technical Assistance
If at any time you have questions about your McIntosh
product, contact your McIntosh Dealer who is familiar
with your McIntosh equipment and any other brands
that may be part of your system. If you or your Dealer
wish additional help concerning a suspected problem,
you can receive technical assistance for all McIntosh
products at:
McIntosh Laboratory, Inc.
2 Chambers Street
Binghamton, New York 13903
Phone: 607-723-3512
Fax: 607-724-0549
Customer Service
If it is determined that your McIntosh product is in
need of repair, you can return it to your Dealer. You
can also return it to the McIntosh Laboratory Service
Department. For assistance on factory repair return
procedure, contact the McIntosh Service Department
at:
McIntosh Laboratory, Inc.
2 Chambers Street
Binghamton, New York 13903
Phone: 607-723-3515
Fax: 607-723-1917
Table of Contents
Safety Instructions ...................................................... 2
Trademarks and License Information ......................... 3
Thank You and Please Take a Moment ....................... 4
Technical Assistance and Customer Service .............. 4
Table of Contents ........................................................ 4
General Information ................................................... 5
Connector and Cable Information .............................. 5
Introduction ................................................................. 5
Performance Features ................................................. 5
Dimensions .............................................................. 6 -7
Installation .................................................................. 8
Rear Panel Connections .............................................. 9
Connections
Connecting the McAire ....................................... 10 -11
Remote Control
Remote Control Push-buttons ................................... 12
How to use the Remote Control ................................ 13
Front Panel Functions
Front Panel Displays, Controls, and
Push-button ............................................................... 14
Setup Mode
How to Setup the McAire for AirPlay
and a Network Connection ................................ 15-19
Operation
How to Operate the McAire................................. 20 -21
Additional Information
Specifications ............................................................ 22
Packing Instructions ................................................. 23
Copyright 2012 © by McIntosh Laboratory, Inc.
4
Page 5

General Information
1. For additional connection information, refer to the
owner’s manual(s) for any component(s) connected
to the McAire Integrated Audio System.
2. The Main AC Power going to the McAire should
not be applied until instructed to do so. Failure
to do so could result in malfunctioning of normal
operations. When the McAire and other McIntosh
Components are in their Standby Power Off Mode,
the Microprocessor’s Circuitry inside each component is active and communication is occurring
between them.
3. Sound Intensity is measured in units called Decibels and “dB” is the abbreviation.
4. When discarding the unit, comply with local rules
or regulations. Batteries should never be
thrown away or incinerated but disposed
of in accordance with the local regulations
concerning battery disposal.
5. Periodically, check the McIntosh Web Site at www.
mcintoshlabs.com for the latest information on the
McAire and other McIntosh Products.
6. The Remote Control Supplied with the McAire In-
tegrated Audio System is capable of operating other
McIntosh Components thru the Data Port.
7. The McAire is compatible with the following Apple
Mobile Devices with the latest version of the Apple
OS Software installed:
AirPlay Connection or USB Connection
iPod touch (4th generation)
iPod touch (3rd generation)
iPhone 4S
iPhone 4
iPhone 3GS
General Information, Connector Information, Introduction and Performance Features
AirPlay Connection only USB Connection only
iPad iPod classic
iPad 2 iPod nano (6th generation)
iPad New iPod nano (5th generation)
Connector and Cable Information
Power Control Connector
The McAire Power Control Output Jack sends a Power
On/Off Signal (12V) when connected to other McIntosh Components.
A 1/8 inch stereo mini phone plug
is used for connection to the Power
Power
Control
N/C
Ground
Control Output on the McAire.
Data Output
The McAire Data Out sends Remote
Control Signals to McIntosh Source
Components. A 1/8 inch stereo mini
phone plug is used for connection.
IR Data
Control
N/C
Ground
Introduction
Now you can take advantage of traditional McIntosh
standards of excellence in the McAire Integrated
Audio System.
The McAire provides superior spaciousness sound
reproduction with unusual sound stage depth. The
McIntosh Sound is “The Sound of the Music Itself.”
Performance Features
• Illuminated Output Level Meters
The Illuminated Peak Responding Output Level
Meters on the McAire are calibrated in Decibels and
respond to 95% of a full scale reading to a single cycle
tone burst at 2,000 Hz signal.
• AirPlay
Listen to music from an iPod or iPhone thru wireless
or wired home networks.
• Amplifier with Multiple Inputs
The McAire accommodates Multiple Inputs. This
includes a (Wireless [AirPlay] or Wired) Network Device, a mobile device with an USB Cable Connection
or an Analog Source Component. The Amplifier uses
noiseless and reliable Electronic Input Switching and
is designed to drive the built-in McIntosh Loudspeak-
ers to a high level of performance.
• Power Control and Data Port
The Power Control Output connection provides conve-
nient Turn-On/Off of McIntosh Source Components.
The Data Port allows for basic control of McIntosh
Source Components.
• Remote Control
The Custom Designed Remote Control provides control of McAire Functions and basic control of Source
Components connected to the McAire System.
• Integrated Loudspeaker Design
The McAire Integrated Loudspeaker Design incorporates separate Woofers, Midranges, Tweeters and
Crossover Networks in a custom designed enclosure.
The Loudspeaker Drivers together with built-in pas-
sive and active DSP Equalization achieves a level of
sonic performance usually associated with a much
larger component.
• Fiber Optic Solid State Front Panel Illumination
The even illumination of the glass Front Panel is accomplished by the combination of custom designed
Fiber Optic Light Diffusers and extra long life Light
Emitting Diodes (LEDs).
®
5
Page 6
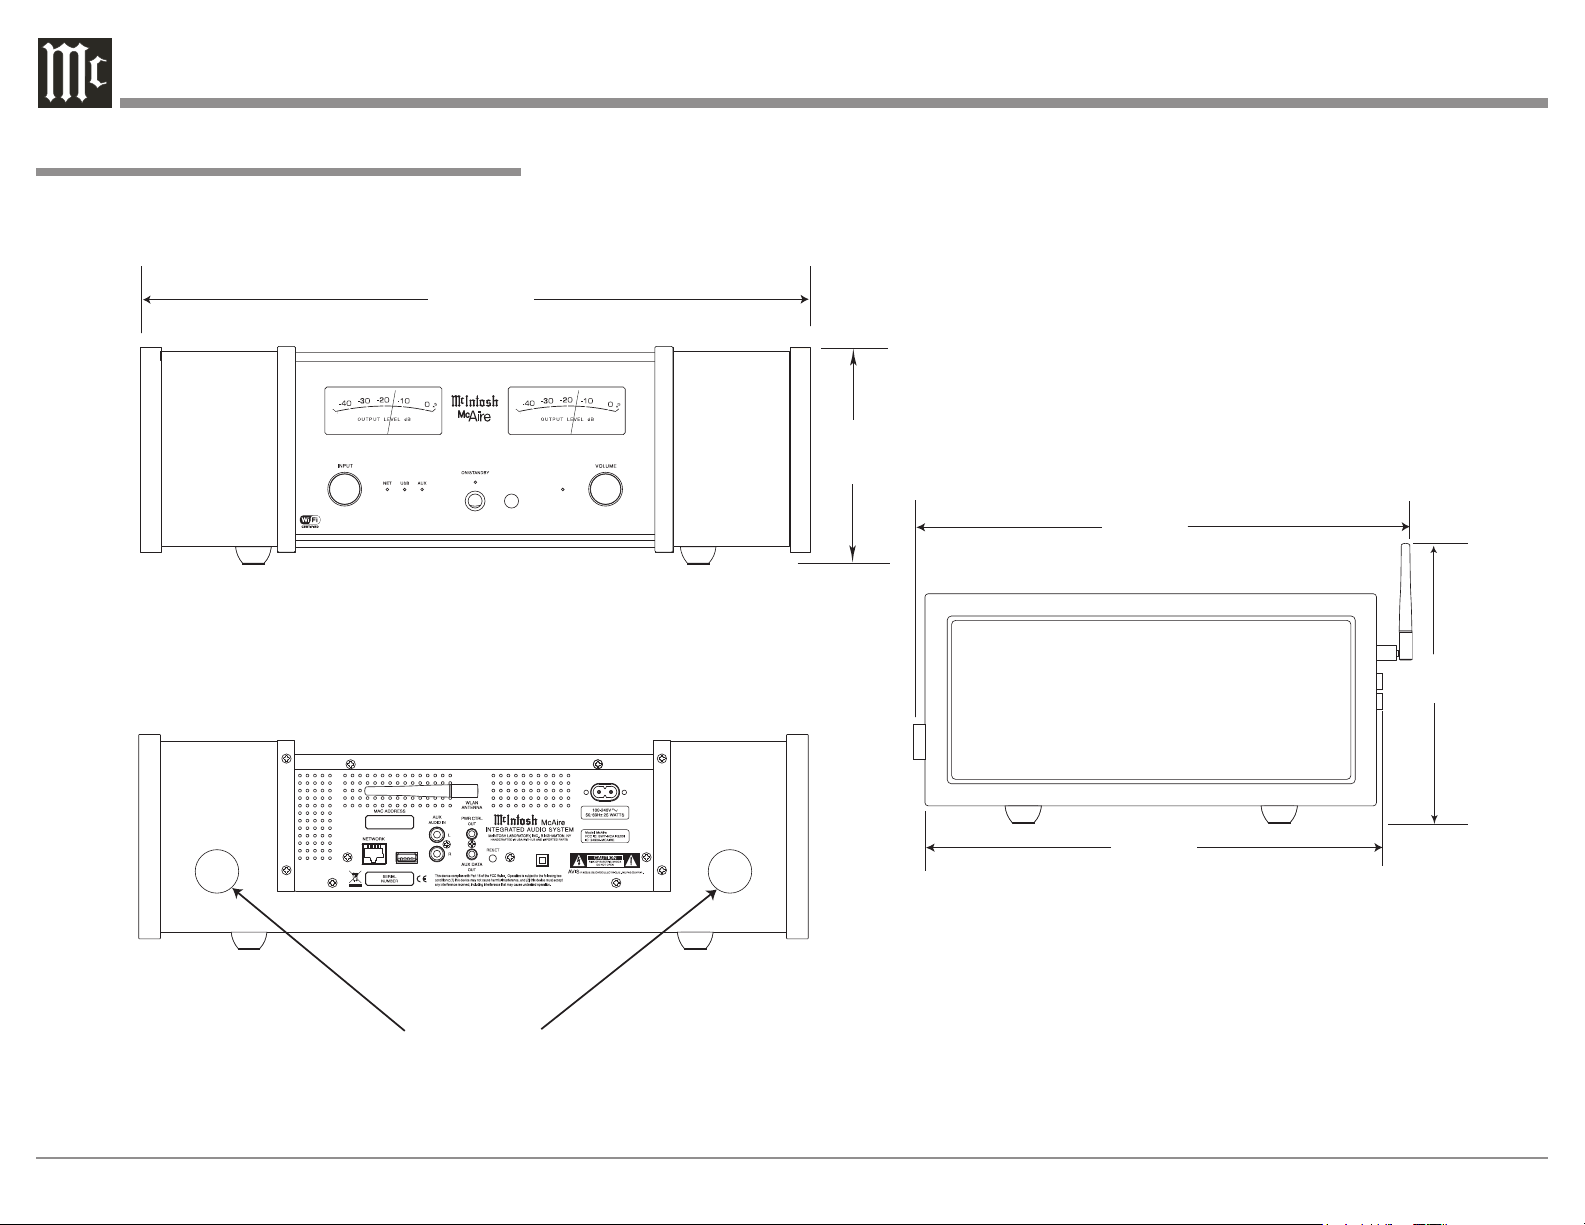
Dimensions
The following dimensions can assist in determining
the best location for your McAire.
Front View of the McAire
19-3/8"
49.2cm
Rear View of the McAire
1/4"
6-
15.9cm
Side View of the McAire
14-7/16"
36.7cm
8"
20.3cm
12-15/16"
32.8cm
Secondary Low Frequency
Acoustic Openings
Note: For proper Low Frequency
Performance do not block
the Acoustic Opening.
6
Page 7

Front and Inside View of the McAire with the Loudspeaker
Grilles removed and the internal Woofers shown
Dimensions
Bottom View of the McAire
Foot
Primary Low Frequency
Acoustic Opening
Note: For proper Low Frequency
Performance do not block
the Acoustic Opening,
remove or change the four
feet on the bottom of the
McAire.
7
Page 8

Installation
The McAire is designed to be placed upright on a table
or shelf with a reflective surface. For proper Low Frequency performance do not block the Acoustic Open-
ing, remove or change the four feet on the bottom of
the McAire. Refer to the illustration on the previous
page for additional information. The ventilation requirements are as illustrated on this page.
Always provide adequate ventilation for your
McAire. Cool operation ensures the longest possible
operating life for any electronic instrument. Do not
install the McAire directly above a heat generating
device. Allow at least 6 inches (15.24cm) above the
top, 7/16 inches (1.11cm) below the bottom, 1 inch
(2.54cm) on each side of the McAire so that airf low is
not obstructed.
Also allow 17 inches (43.18cm) of depth so that
airf low is not obstructed and proper Low Frequency
performance is achieved.
Dimensions and Installation
6"
15.24cm
McAire Front View
17"
43.2cm
McAire Side View
8
Page 9

Rear Panel Connections
WLAN (Wireless Local Area Network) ANTENNA
for receiving AirPlay and WiFi signals
MAC ADDRESS is the unique Network
Identification Number for this McAire unit
Connect the McAire power cord to a live AC
outlet. Refer to information on the back panel of
your McAire to determine the correct voltage for
your unit
PWR CTRL (Power Control) OUTput sends
a turn-on signal to a McIntosh Component
when the McAire is On
NETWORK Connector for connecting the
McAire to a Broadband Ethernet Network
iPOD/USB input for wired connnection
to an iPod or iPhone mobile device
AUX AUDIO INput accepts high
level program source signals
AUX DATA OUT sends control signals to a compatible
source component allowing remote control operation
RESET restores the McAire
to factory default settings
9
Page 10

Connecting the Antenna
For proper wireless connectivity with the Wireless
Network Router, it is important install the supplied
WiFi Signal Antenna to the McAire. Follow the steps
below:
1. Locate the supplied WiFi Antenna, AC Cord and
Remote Control in the Accessory Pack Sleeves
from the McAire inner carton. Refer to page 23 in
this Owner’s Manual.
2. Referring to figure A, carefully line up the machine threads of
the WLAN Connector, located
on the Rear Panel
of the McAire,
with the knurled
end of the WiFi
Antenna internal
machine threads.
3. Slowly rotate
the knurled end
of the Antenna
clockwise onto
the WLAN Con-
nector (if you feel any resistance stop and remove
the Antenna and repeat step 2). Finger tighten
until it feels snug (about 4 turns).
4. Refer to figure B, grasp the Antenna at the hinge
point and rotate the
Hinge Point
Antenna to a vertical
position.
Note: When
rotating the
Antenna it
is advisable
to go in a
clockwise direction.
5. Proceed to “Connecting the McAire”.
Figu re A
Figure B
Connecting the McAire
Caution: The supplied AC Power Cord should not
be connected to the Rear Panel of the
McAire Integrated Audio System until
instructed to do so.
McAire’s built-in WiFi (wireless connectivity) provides fast access to your music stored on a compatible
Apple Mobile Device via Apple’s AirPlay Technology.
Note: The McAire requires use of a Network Wire-
less Router for Apple’s AirPlay Operation.
The McAire also provides for a direct wired con-
nection to compatible Apple’s Mobile Devices via the
USB Input. A computer attached via a Network Router
(as part of a home network) to the McAire Rear Panel
NETWORK connector, provides streaming of music
via the iTunes Program1. A Stereo Analog Input is
also located on the Rear Panel of the McAire allowing
connection of source components such as Tuners and
Disc Players. Associated with the Stereo Analog Input
is McIntosh’s Power Control and Data Port Connec-
tions. They provide the ability to automatically switch
power On/Off to a McIntosh Source Component and
to control the basic operation of component function
via the supplied McAire Remote Control.
These connection instructions together with the
Connection Diagram on the next page is an example
of optional connections to the McAire Audio System.
Your McAire connections may vary from this, however the actual components would be connected in a
similar manner. For additional information refer to
“Connector and Cable Information” on page 5.
1
The iTunes Program for use on a PC Computer or Ma-
cintosh Computer is available for download from the
Apple Web Site at http://www.apple.com.
Wired Connection for Apple Mobile Device:
1. Using the Apple Dock Connector to USB Cable
supplied with Apple iPod or iPhone, attach the
Dock Connector to the bottom of the mobile
device and connect the USB Plug in the iPod/USB
input on the Rear Panel of the McAire.
Network Connections:
2. Using a CAT 5/6 Ethernet Cable, connect the
cable from the Router to the NETWORK connector on the Rear Panel of the McAire.
3. Optionally, Connect another CAT 5/6 Ethernet
Cable from the Computer (Network Connector) to
the Router.
Note: For additional information on Networks and
Network Connections refer to the documentation supplied with the Router and Computer.
Optional Component Connections:
4. Connect a Control Cable from the Tuner (or Disc
Player) Control Out jack to the McAire PWR
CTRL (Power Control) OUT Jack.
5. Connect a Control Cable from the McAire AUX
DATA OUT Jack to the Tuner (or Disc Player)
Data In jack.
6. Connect an Audio Cable from the McAire AUX
AUDIO IN Jacks to the Tuner (or Disc Player)
Fixed Audio Output Unbalanced Jacks.
AC Power Cords Connections:
7. Connect the optional components’ AC Power Cord
to a live AC outlet as illustrated.
10
Page 11

Apple iPod or iPhone
Connecting the McAire
Connect to AC Outlet when
instructed to do so
Optional Computer
Network Router
(Wireless or Wired)
Refer to page 15 for
additional information
Optional Tuner or Disc Player
30
Connect to
AC Outlet
11
Page 12

Tunes Up the Dial with optional
McIntosh Tuner connected to the
McAire
Press and hold to switch the meter
illumination On or Off. Also used
for other functions
Decreases the volume level
Selects the desired INPUT
Use to move through the available choices
up, down, left, right; of menu items with an
optional McIntosh Disc Player connected
to the McAire
Remote Control Push-Buttons
Tunes Down the Dial with optional
McIntosh Tuner connected to the
McAire
Increases the volume level
LED illuminates during the time a remote
command is sent to the McAire
Mutes and unmutes the audio
Selects the PREVIOUS 9 track. Also
goes Downwards through the Station
Presets with optional McIntosh Tuner
connected to the McAire
STOPs ■ playback of a track
Powers the McAire ON or OFF
Activates the PLAYBACK ► of a track
Selects the NEXT : track. Also goes Upwards
through the Station Presets with optional McIntosh
Tuner connected to the McAire
Used to PAUSE Playback of the track
12
Page 13

How to use the Remote Control
The supplied Remote Control performs the various
Operating Functions for the McAire Integrated Audio
System.
Note: Refer to the “How to Operate” Section of this
manual for additional information.
Input Source Selection
Press the Push-button → to select the desired program
source.
Volume
Press the + or - Push-buttons to increase or decrease the listening level.
Mute
Press the (Mute) Push-button to mute the audio.
The White LED indicator to the left of the Front Panel
VOLUME Control will flash during the time audio is
muted. Press the MUTE Push-button a second time to
resume listening.
How to use the Remote Control
Pause
Press the PAUSE Push-button to temporarily stop
playback of the music.
Back and Next
Press the : (Next) Push-button to move forward one
track or the 9 (Back) Push-button to move back
to the beginning of the current track playing. Press
and hold either Push-button to rapidly skip tracks.
When an optional McIntosh Tuner is connected to the
McAire, the 9 and : Push-buttons allow stepping
thru Station Presets.
Note: If the 9 Push-button is pressed during playback
of the first three seconds of the track, the McAire
will start playing back the previous track from the
beginning.
13
Page 14

Front Panel Displays, Controls and Push-button
Meter indicates the Left Channel
Output of the amplifier
Select from one of the various Input
Sources available for listening
Indicates when the McAire is in
standby mode and operational status
Meter indicates the Right Channel
Output of the amplifier
VOLUME Control adjusts the
listening level for both channels
14
Indicates the current INPUT Selection
and operational status
ON/STANDBY Push-button
switches the McAire ON or
OFF (Standby)
Indicates when the VOLUME Control is set to
minimum or maximum loudness. Also indicates when the sound is Muted
IR Sensor receives commands
from a Remote Control
Page 15

Introduction to Setting Up the McAire
Your McIntosh McAire is factory configured for
immediate enjoyment of superb audio from an iPod
Touch or iPhone (Mobile Device). Just connect it to
the McAire iPod/USB Rear Panel Connector using
your Apple Dock Connector to USB Cable. Refer to
page 20 “How to Operate the McAire” for additional
information using the USB Input.
If you wish to use AirPlay® between an Apple Mobile Device and the McAire, a Wireless Network Router (WiFi) will be required. Figures 1, 2 and 3 are just a
few examples of the many possible Network Setups.
Wireless Home Network
McAire Rear Panel
Optional Computer
(With Wireless
Network Connection)
Network
Router
(Wireless)
Figu re 1
Wired Home Network
Optional Computer
Network
Router
Figu re 2
(Partial View)
McAire Rear Panel
(Partial View)
How to Setup the McAire for AirPlay® and a Network Connection
Wired Home Network
with Wireless Router
Optional Computer
(With Wired
Network Connection)
Wireless Network Router
(with wired connections)
Figu re 3
Notes: 1. When the McAire is connected to a router
(and your computer is also connected to the
router) the McAire has the ability to playback
music via the Apple iTunes Program on the
Computer.
2. When your McAire is connected to a Wired
Network and you are only interested in playing music via Apple iTunes AirPlay from your
computer, then proceed to page 20 “How to
Operate the McAire”, as no setup is required.
The purpose of setting up the McAire is to estab-
lish which Wireless Network Router the McAire will
be communicating with (WiFi). The instructions supplied with the Wireless Network Router and its current
settings (including its MAC Address or unique name)
will be helpful.
It is highly recommended to contact your McIntosh
Dealer and/or Computer Dealer for assistance in the
installation and configuring a Network Router and/
or a Home Computer Network. Your Dealer has the
necessary knowledge to properly set up the McAire as
part of your Home Network wired or wireless.
There are several different methods for setting up
the McAire for AirPlay®. Choose the method which is
most appropriate for your installation. The following
is a description of the three methods:
McAire Rear Panel
(Partial View)
Method Description
1 WiFi Setup using a Computer with Network Cable
Connection.
2 WiFi Setup using the McAire and the Mobile
Device with wireless connection.
3 WiFi Setup using the McAire and Apple Mobile
Device with Apple Dock Connector to USB
Cable.
Method Number 1
Temporarily connect the McAire, Network Router
and Computer together with RJ45 network cables
as illustrated in figure 3. Refer to the Users Guides
supplied with the Network Router and Computer for
information on the specific connections to be used and
any installation program(s) needed to be run. Verify,
communications between the Network Router and
Computer before proceeding with the following steps:
1. Switch power On to Router and after it has booted
up, then switch power On to the Computer and
McAire.
2. Select the NET (Network) input using the Front
Panel Control INPUT Control on the McAire.
Note: It is normal for the NET Indicating LED to
change from magenta in color to an alternating flashing green color during the time
a network connection is trying to be established.
3. Launch the Computer WEB Browser and type on
the address line the following:
http://mcaire- _ _ _ _ _ _.local/index.asp
Note: This McAire is identified by the MAC Ad-
dress and is located on the Rear Panel of the
McAire. Insert the last six digits (unique for
each McAire) of the MAC Address, into the
address line above.
15
Page 16

Method Number 1, con’t
4. Press the ENTER on the keyboard. After several minutes the McIntosh McAire Setup Screen
will appear in the web browser window. Refer to
figure 3.
Figu re 3
5. Referring to figure 3, select “Your Router” (MAC
Address) from the choices appearing in the SSID
pull down window. Refer
to figure 4.
Note: The Router is
identified by the
MAC Address
(unique number for each Router) and is on
a label usually located on the Router. If you
assigned a unique name to indentify the
Router, please select the name instead of the
MAC Address.
6. Press the APPLY button On-Screen to accept the
desired Router. Refer to figure 4.
7. Referring to figure 5, press the OK button OnScreen to continue.
8. Referring to figure 6, press the OK button On-
Screen and disconnect the RJ45 network cable
between the Network Router and the McAire.
Figu re 4
Figu re 5 Figu re 6
9. Activate the Apple Mobile Device and select the
Settings Icon. Refer to figure 7.
10. From the Settings
Menu select the Wi-Fi
Icon. Refer to figure
8.
11. From the “Choose
a Network” options
select the MAC Ad-
dress of the Network
Router (same address
as selected in step 5).
Refer to figure 9.
Touch the “Your
Router” a second time
to activate the wireless connection and
Figu re 7
a check mark will appear to the left of the MAC
Address or the unique name of the Router. Refer
to figure 10.
12. Return to the main screen and select the Music
Icon. Refer to figure 7.
13. Select the desired music for listening (in this
example “ABBA Gold” is chosen). Refer to
f i g u re 11.
Figu re 8
14. Touch the ►Icon
to start playback of
the music followed
by touching the
Icon (Apple AirPlay).
Refer to figure 11.
15. Referring to figure 12
select the McAire-_ _
_ _ _ _ touch button.
Within about five seconds
the Apple Mobile Device
internal speaker will
switch Off and sound will
now be comming from the
McIntosh McAire through
the AirPlay Wireless Connection.
Figu re 9
Fig u re 10
16
Page 17

Fi g u re 11
Figu re 12
Method Number 2
Unlike Setup Method #1, this method uses the McAire
(instead of a computer) to establish communications
with a Wireless Router using your Apple Mobile Device. After setup up is completed, a Wireless Router
will still be needed to stream music from your Apple
Mobile Device to the McAire via AirPlay. Perform the
following setup steps:
1. Switch power On to Router and after it has booted
up, then switch power On to the Computer and
McAire.
Note: If the McAire had been previously setup and/
or been in use for some time, it is important
to first reset the McAire to factory default
settings before proceeding. Refer to page 21
on how to reset the McAire.
2. Using the INPUT Control on the Front Panel of
the McAire, select the NET (Network) Input on
the McAire.
Note: It is normal for the NET indicating LED to
change from magenta in color to an alternating flashing green color during the time
How to Setup the McAire for AirPlay and a Network, con’t
a network connection is trying to be established.
3. Activate the Apple Mobile Device and select the
Settings Icon. Refer to figure 7 on page 16.
4. From the Settings Menu select the Wi-Fi Icon.
Refer to figures 8 and 9 on page 16.
5. After about 60 seconds the Apple Mobile Device
Wi-Fi Networks
Menu will indicate
“McAire_Setup_7...”.
Refer to figure 13.
6. Referring to figure
7 launch the Safari
WEB Browser and
type in on the address line the follow-
ing:
http://mcaire- _ _ _
_ _ _.local/
Note: This McAire
is identified
by the MAC
Address
(unique number for each McAire) and is
located on the Rear Panel of the McAire.
Insert the MAC Address of this unit into
the address line above where the six blank
spaces are.
7. Touch the “Enter Key” on the On-Screen keyboard. After several minutes the McIntosh
McAire Setup Screen will appear in the web
browser window. Refer to figure 14.
8. Referring to figure 14, from the choices appear-
ing in the SSID pull down window select “Your
Router” (MAC Address). Refer to figures 15 and
16.
Note: The Router is identified by the MAC Address
(unique number for each Router) and is on
Figure 13
Figure 14
Fig ure 15
Figure 16
a label usually located on the Router. If you
assigned a unique name to indentify the
Router, please select that name instead of
the MAC Address.
9. Touch the Done button On-Screen to accept the
desired Router. Refer to figure 16.
17
Page 18

Method Number 2, con’t
10. Referring to figure 17, touch the APPLY button
On-Screen to continue.
Within about five seconds the Apple Mobile Device
internal speaker will switch Off and sound will now
becoming from the McIntosh McAire through the
AirPlay Wireless Connection.
Fig u r e 17
11. From the Settings Menu select the Wi-Fi Icon.
Refer to figure 18A.
12. From the “Choose
a Network” options
select the MAC Ad-
dress of the Network
Router (same address
as selected in step 8
on page 17). Refer to
figure 18B.
Touch the “Your
Router” a second time
to activate the wireless
connection and a check
mark will appear to the
left of the MAC Ad-
Figure 18A
dress or unique Router name. Refer to figure 18B.
13. Return to the main screen and select the Music
Icon. Refer to figure 19.
14. Select the desired music for listening (in this
Figure 18B
Figure 19
example “ABBA Gold” is chosen). Refer to figure
20.
15. Touch the ►Icon to start playback of the music
followed by touching Icon (Apple AirPlay).
Refer to figure 20.
16. Referring to figure 21 select the McAire-_ _ _ _ _
_ touch button.
Figu re 20
Fig u r e 21
18
Page 19

Method Number 3
This method uses the McAire, your Apple Mobile
Device and Apple Dock Connector to USB Cable.
Perform the following setup steps:
1. Switch power On to the Router and locate the
MAC Address (on a label usually located on the
Router) or the unique Router name as it will be
needed in step 4.
2. Activate the Apple Mobile Device and select the
Settings Icon. Refer to figure 19 on page 18.
3. From the Settings Menu select the Wi-Fi Icon.
Refer to figure 18A on page 18.
4. From the “Choose a Network” options select the
MAC Address or the unique name of the Network
Router. Refer to figure 18B.
Note: It might be necesssary to touch the “Your
Router” menu selection a second time to
activate the wireless connection if a check
mark doesn’t appear to the left of the MAC
Address or the unique Router name.
5. Switch power On to the McAire.
6. Using the INPUT Control on the Front Panel of
the McAire, select the USB Input on the McAire.
7. Using the McAire Remote Control enter the Net-
work Setup Mode by press the following pushbutton sequence:
A: The ▲ push-button.
B: The ► push-button.
C: The ▼ push-button.
D: The ◄ push-button.
How to Setup the McAire for AirPlay and a Network, con’t
Looking at your Apple Mobile Device Screen a
window will appear asking to share Wi-Fi Set-
tings. Refer to figure 22.
8. Touch the ALLOW On-Screen Button and when
the McAire switches to the NET Input with a
steady magenta indicating LED, remove the
Apple Dock Connector to USB Cable from the
Apple Mobile Device.
9. Select the Music Icon from the main screen of the
Apple Mobile Device. Refer to figure 19.
10. Select the desired music for listening (in this
example “ABBA Gold” is chosen). Refer to figure
20.
11. Touch the ►Icon to start playback of the music
followed by touching the Icon (Apple AirPlay). Refer to figure 20.
12. Referring to figure 21 select the McAire-_ _ _ _ _
_ touch button.
Within about five seconds the Apple Mobile Device
internal speaker will switch Off and sound will now
becoming from the McIntosh McAire through the
AirPlay Wireless Connection.
Figu re 22
19
Page 20

How to Operate the McAire
Your McIntosh McAire is factory configured for
immediate enjoyment of superb audio from an iPod
Touch or iPhone (Mobile Device). Just connect it to
the McAire iPod/USB Rear Panel Connector using the
Apple Dock Connector to USB Cable.
If you wish to make an AirPlay wireless connec-
tion between the Mobile Device and the McAire,
please refer to “How to Setup the McAire” on page 15
for additional information.
Power On
Press the ON/STANDBY Push-button on the Front
Panel of the McAire or press the Power Push-button on the Remote Control to switch On the McAire.
Refer to figures 30 and 37.
Notes: 1. With the McAire in the Standby Mode and
when an Apple Mobile Device is connected
to the iPod/USB Input, the McAire will automatically switch On.
2. An optional Source Component will also
switch On/Off with the McAire, such as a
McIntosh Tuner, when there is a Power Control Connection made between the units.
3. The McAire will automatically switch OFF
approximately 30 minutes after the music
has stopped playing when the McAire is set
to either the NET or USB Input.
4. By pressing and holding in the ON/STANDBY Push-button for 5 seconds, the McAire
will go into STANDBY Mode (it will consume
less power, however when switched back On
the Network Connections will take slightly
longer to re-establish).
Standby Indicator Color Operation Mode
Red Standby (Factory Default)
Orange Sleep Mode
Source Selection
To select the desired audio source, rotate the INPUT
Control clockwise/counterclockwise or press the →
(Input) Push-button on the Remote Control to select
the desired source. Refer to figures 30 and 37.
McAire Inputs
Music Source Indicator Color
NET - Apple Mobile Device
NET - iTunes over the Network
USB - Cable connection to an
iPod or iPhone
AUX - Optional Source such as a
McIntosh Tuner
Magenta
(also Green or Light Blue
during Setup Mode)
Blue
Green
Note: The Apple Mobile Device will pause the cur-
rent track playing when switching to another
Input Source on the McAire.
Volume Control
To increase the Volume, rotate the Front Panel VOLUME Control clockwise and release the control
when the desired listening level has been reached. To
decrease the Volume, rotate the Front Panel VOLUME
Control counterclockwise and release the control when
the desired listening level has been reached. Refer to
figure 30.
The listening level may also be changed by pressing the + or - Push-buttons on the McAire Remote
Control. Refer to figure 32.
Note: The White LED Indicator, located to the left of
the Front Panel Volume Control, flashes rapidly
when the minimum or maximum volume level
setting is reached. The LED stays On continuously while the volume level is being changed.
Mute
Press the Mute Push-button on the Remote Control
to Mute the sound. The White Volume LED Indicator
will flash slowly while the McAire is muted.
Pressing the Mute Push-button a second time or
adjusting the Volume (either the Front Panel Volume
Control or Volume Push-buttons on the Remote Con-
trol) un-mutes the McAire.
20
Figu re 30
Output Level Meters
The McAire Output Level Meters indicate the relative
output level in Decibels. Refer to figure 31.
The meters respond to the
peaks contained in the
musical information being
reproduced by the McAire.
Fig u r e 31
Page 21

How to Operate the McAire
Streaming music from Apple Mobile Device
To stream music stored in the Apple Mobile Device
directly to the McAire, perform the following:
1. Touch the AirPlay Icon on the Music App. Refer
to figure 32.
2. From the list appearing on the Apple Mobile Device select the McAire. Refer to figure 33.
McAire
Cancel
Figure 32
Note: It might be necessary to change position of
the McAire Antenna and/or Wireless Router to
reduce possible WiFi Signal Drop Outs.
Figure 33
Streaming Music from iTunes on your Computer
Before proceeding, download and install the latest version of iTunes (version 10.6 or later) on the computer
connected to the same network as the McAire. Also
update your Apple Mobile Device to OS 5 or later.
Note: Use the Apple Remote App for your Apple Mobile
Device to control iTunes from any room in your
home. The app is available as a free download
from the App Store. The App does require a Wireless Router to be part of the Computer Network.
To steam music from iTunes on your computer to the
McAire perform the following:
1. Switch On the McAire.
2. Launch iTunes and click the AirPlay icon displayed in the
AirPlay icon
lower right of the
window and then
select McAire
from the list. Refer
to figure 34.
Figure 34
3. Choose a song and
click play in iTunes. The music will stream to the
McAire.
4. Click the AirPlay Icon in iTunes and then select
“Multiple Speak-
ers” from the list.
Refer to figure 35.
5. From the list appearing in iTunes
Master Volume
My Computer
This Computer
McAire
AirPlay Device
Multiple Speakers
Figure 35
select McAire.
To control music playback from iTunes using the
McAire Remote Control perform the following:
6. With iTunes
running,
select “Edit”,
then “Preferences”. Refer
to figure 36.
7. Select the
“Devices”
icon, then
check “Allow iTunes
audio control
from remote
Figu re 36
speakers”.
Notes: 1. The McAire will switch to the “NET”
Input when AirPlay playback is started.
2. The screen may differ depending on the
OS and software versions.
3. For information about how to use iTunes,
click on Help.
Reset of Microprocessors
In the unlikely event the controls of the McAire stop
functioning, the internal microprocessors can be reset
by performing the following:
1. Disconnect the McAire AC Power Cord from the
AC Power Outlet.
2. Wait at least 30 seconds, then reconnect the
McAire AC Power Cord to the AC Power Outlet.
3. Press the Front Panel ON/STANDBY Push-button
or the On/Off Push-button on the Remote Control to resume listening.
Resetting to Factory Default Settings
If it becomes desirable to reset all of the McAire settings to the factory default values, perform the follow-
ing steps:
1. With the McAire On, press the RESET Pushbutton (recessed and located on the Rear Panel of
the McAire) until the McAire
switches Off and the Front
Front Panel ON/STANDBY
LED changes in color from
Orange to Red.
2. Press the ON/STANDBY
Push-button and the McAire
will resume operation.
Figure 37
21
Page 22

Network Input
Wired RJ45, 10/100 Base-T
Wireless 802.11, WPA
Apple AirPlay
USB Input
Type A Connector with Host Mode
Music Streaming
1Amp Charging for iPhone and iPod
AUX Input
Input Sensitivity - 200mVRMS nominal
Maximum Input Signal - 2.2VRMS
Stereo RCA Connectors
The McAire is compatible with the following Apple
Mobile Devices with the latest version of the Apple
OS Software installed:
AirPlay Connection or USB Connection
iPod touch (4th generation)
iPod touch (3rd generation)
iPhone 4S
iPhone 4
iPhone 3GS
AirPlay Connection only USB Connection only
iPad iPod classic
iPad 2 iPod nano (6th generation)
iPad New iPod nano (5th generation)
Loudspeaker Specifications General SpecificationsElectronic Specifications
System Driver Complement
Two 4 inch Woofers (dual acoustic ports)
Two 2 inch Inverted Dome Midranges
Two 3/4 inch Dome Tweeters
Frequency Response
60Hz - 45kHz
Crossover Frequency
250Hz
4,500Hz
Enclosure Finish
High Gloss Black
Grille Finish
Black Knit Cloth
Grille Attachment
Magnetic
Specifications
Power Requirements
Field AC Voltage conversion of the McAire is not
possible. The McAire is factory configured for one
of the following AC Voltages:
100V ~ 50/60Hz at 25 watts
110V ~ 50/60Hz at 25 watts
120V ~ 50/60Hz at 25 watts
220V ~ 50/60Hz at 25 watts
230V ~ 50/60Hz at 25 watts
240V ~ 50/60Hz at 25 watts
Standby: Less than 0.5 watt
Note: Refer to the rear panel of the McAire for the cor-
rect voltage.
Overall Dimensions
Width is 19-3/8 inches (49.2cm)
Height is 8 inches (20.3cm) including antenna in the
vertical position
Depth is 17 inches (43.2cm) including connectors and
antenna
Weight
31 pounds (14 Kg) net, 44 pounds (19.9 Kg) in ship-
ping carton
Shipping Carton Dimensions
Width is 27-3/8 inches (69.5cm)
Height is 19-1/8 inches (48.6cm)
Depth is 10-1/4 inches (26cm)
22
Page 23

Packing Instructions
Packing Instructions
In the event it is necessary to repack the equipment for
shipment, the equipment must be packed exactly as
shown below. Failure to do this will result in shipping
damage.
Use the original shipping carton and interior parts
only if they are all in good serviceable condition. If
a shipping carton or any of the interior part(s) are
needed, please call or write Customer Service Depart-
ment of McIntosh Laboratory. Refer to page 4. Please
see the Part List for the correct part numbers.
Quantity Part Number Description
1 03454000 Shipping Carton
8 03454100 Foam Corner Caps
1 03454200 Inside Carton
2 03454300 Foam End Caps
2 03454400 Accessory Pack Sleeve
1 03362600 Plastic Protective cover
1 310505SP Fabric Protective cover
FOAM
CORNER
CAPS
INSIDE
CARTON
FOAM
END
CAP
ACCESSORY
PACK
SLEEVE
PLASTIC
PROTECTIVE
COVER
FABRIC
PROTECTIVE
COVER
ACCESSORY
PACK
SLEEVE
FOAM
END
CAP
FOAM
CORNER
CAPS
SHIPPING
CARTON
23
Page 24

McIntosh Laboratory, Inc.
2 Chambers Street
Binghamton, NY 13903
www.mcintoshlabs.com
The continuous improvement of its products is the
policy of McIntosh Laboratory Incorporated who
reserve the right to improve design without notice.
Printed in the U.S.A.
McIntosh Part No. 04131801
 Loading...