


Model:
PRO 7000X
Deutsch
English
Art.Nr.: 313412_Ver3
Français
Nederlands
1

2

Benutzerhandbuch -
Multimedia Notebook Computer
3

Inhaltsverzeichnis
HINWEIS.................................................................................................. 5
WICHTIGE SICHERHEITSHINWEISE ...................................................... 8
Wireless LAN ................................................................................................ 10
Zusätzliche Sicherheitshinweise für Geräte mit Wireless LAN ....................... 11
CE-Kennzeichnung für Geräte mit Wireless LAN....................................... 12
Einschränkungen ........................................................................................... 13
Funkfrequenzen für Geräte mit Wireless LAN ................................................ 13
Funkfrequenzen für Geräte mit Wireless LAN ................................................ 14
Gesetzliche Bestimmungen - Ausschlussklauseln ........................................ 15
LIEFERUMFANG ..................................................................................... 16
DIE VORBEREITUNG .............................................................................. 17
Einsetzen des Akkus .................................................................................... 18
Entnehmen des Akkus .................................................................................. 18
Stromversorgung ........................................................................................... 19
Einschalten des Computers .......................................................................... 20
Powermanagement ....................................................................................... 21
SYSTEMÜBERBLICK ............................................................................. 22
Linke und rechte Seite................................................................................... 22
Rückansicht .................................................................................................. 23
Unterseite ..................................................................................................... 23
Erläuterung der LED Anzeigen ....................................................................... 24
Hot Keys ....................................................................................................... 25
Die Quick Launch Tasten ............................................................................... 26
Die Tastatur ................................................................................................... 27
Das TouchPad................................................................................................ 28
Das CD-Rom /DVD Laufwerk ........................................................................ 29
Audio - CD Kontrollen .................................................................................... 30
Lautstärkeregelung................................................................................... 30
Der PC - Karten Slot ...................................................................................... 31
Der Memory Stick/ SD/ MMC -Slot ............................................................... 31
Das Daten / Fax Modem ............................................................................... 32
Der Netzwerk- Anschluss.............................................................................. 32
INSTALLATIONSHINWEISE .................................................................. 33
Wiederherstellung der Treiber ......................................................................... 33
Windows 2000 / WINDOWS XP ................................................................... 33
Einstellung der Auflösung ......................................................................... 34
SPEZIFIKATIONEN................................................................................. 35
FEHLERSUCHE UND - BEHEBUNG ..................................................... 38
INDEX .................................................................................................... 41
4

HINWEIS
Die Firma behält sich das Recht vor, unangekündigt Änderungen an diesem
Dokument vorzunehmen. Hierin enthaltene Informationen dienen ausschließlich
Referenzzwecken und stellen keine Grundlage zum Geltendmachen von Verpflichtungen seitens des Herstellers oder Zwischenhändlers dar. Weder Hersteller noch
Zwischenhändler übernehmen Haftung für möglicherweise in diesem Dokument
enthaltene Fehler oder Ungenauigkeiten. Auch für Schäden bzw. Einbußen, die aus
der falschen Anwendung dieses Handbuchs entstehen, wird keine Haftung übernommen. Kein Teil dieses Dokuments und der dazugehörigen Software darf ohne
vorherige Erlaubnis des Fachhändlers, Herstellers oder der Autoren kopiert,
übersetzt oder verbreitet werden. Ausgenommen von dieser Regelung sind
Sicherheitskopien für den eigenen Gebrauch. Die Verwendung der Warenzeichen
dieses Produkts unterliegt den Bedingungen, die im erweiterten Servicehandbuch
auf der Gerätetreiber & Hilfsprogramme-CD-ROM aufgeführt sind. In diesem
Dokument erwähnte Marken- oder Produktnamen sind möglicherweise urheberrechtlich geschützte Namen oder eingetragene Warenzeichen von Fremdfirmen.
Diese werden lediglich aus Kennzeichnungsgründen erwähnt und haben keinen
empfehlenden Charakter bezüglich des Produkts oder Herstellers.
© Maxdata 2003
Rechtliche Hinweise
Weitere rechtliche Hinweise und Bestimmungen finden Sie im erweiterten
Servicehandbuch auf der Gerätetreiber & Hilfsprogramme-CD-ROM (Utility-CD).
Acrobat und das Acrobat-Logo sind Warenzeichen von Adobe Systems
Incorporated oder seinen Tochtergesellschaften. In bestimmten Gerichtsbarkeiten
sind die Warenzeichen möglicherweise eingetragen.
Intel und Pentium sind eingetragene Warenzeichen der Intel Corporation. MS-DOS,
Windows, Windows 95, Windows 98 , Windows Me, Windows 2000, Windows
XP und Windows NT sind eingetragene Warenzeichen von Microsoft.
Verwendung & Referenzen
Dieses Benutzerhandbuch bietet eine Einführung und dient als Anleitung für die
ersten Schritte mit Ihrem neuen Computer.
Tiefergehende Informationen für Spezialisten entnehmen Sie bitte dem
englischsprachigen erweiterten Servicehandbuch.
Alle Referenzen beziehen sich auf die beigefügte Gerätetreiber und Hilfsprogramme-CD-ROM, die das erweiterte Servicehandbuch (im Adobe AcrobatFormat), Treiber und spezielle Hilfsprogramme für Ihr Notebook enthält. Wenn Sie
ein in diesen Dokumenten nicht erwähntes Betriebssystem einsetzen möchten,
entnehmen Sie die entsprechenden Informationen den auf der CD-ROM befindli-
5

chen „ReadMe“-Dateien. Wenden Sie sich zudem an den Fachhändler, um sicherzustellen, dass das gewünschte Betriebssystem auf Ihrem Notebook einsetzbar
ist. Das Betriebssystem ist nicht auf der Gerätetreiber und Hilfsprogramme-CDROM enthalten.
Hinweis: Einige oder alle Systemkonfigurationen wurden möglicherweise bereits
durchgeführt. Falls dies nicht zutrifft bzw. Teile des Systems neu konfiguriert
werden müssen, entnehmen Sie die hierfür nötigen Hinweise dem erweiterten
Servicehandbuch auf der Gerätetreiber und Hilfsprogramme-CD-ROM.
Erklärung:
Dieses Gerät entspricht der Produktnorm für Störemission EN 55022, der Grundnorm für Störbeeinflussung EN 50082-1 und der Norm EN 60950 der
Niederspannungsrichtlinie.
Bei einer nicht mit dem Hersteller abgestimmten Änderung des Gerätes ist die
Einhaltung dieser Normen nicht mehr gewährleistet.
Zur Sicherstellung der Elektromagnetischen Verträglichkeit (EMV) beachten Sie
bitte die im Handbuch erwähnten Hinweise.
Schallleistungspegel
Der Arbeitsplatz bezogene Schallleistungspegel ist kleiner als 55dB A
Anmerkung der Federal Communications Commisson (FCC)
Dieses Gerät wurde getestet und mit den Auflagen für ein Digitalgerät der Klasse
B entsprechend Teil 15 der FCC-Vorschriften in Übereinstimmung befunden.
Garantie
Die Garantiezeit für das Gerät beträgt 36 Monate. Im Schadensfall außerhalb der
Garantie ist für mindestens 5 Jahre (ab Produktionseinstellung) die kostenpflichtige Reparatur der Geräte durch Originalersatzteile oder Baugruppentausch oder
Gerätetausch vorgesehen.
Betreiberhinweis:
Dieses Gerät wurde funktechnisch sorgfältig entstört und geprüft. Jedoch sollten
Sie bei externen Datenkabeln folgendes beachten:
Sollte ein Austausch der vom Hersteller spezifizierten Datenkabel nötig werden,
muss der Betreiber für eine einwandfreie Funkentstörung sicherstellen, dass
Austauschkabel und Abschirmqualität dem Originalkabel entsprechen.
Verwenden Sie nur abgeschirmte Leitungen und nur externe Geräte die vom
Sicherheitsniveau und dem EMV Verhalten mit dem vorliegenden Produkt iden-
6

tisch sind.
Bei Nichtbeachtung ist die Entsprechung der o.g. Normen nicht mehr gewährleistet!
CD- ROM - Laufwerk:
Bei dem eingebauten CD- ROM Laufwerk handelt es sich um ein Laserprodukt
der Klasse 1. Öffnen Sie das Gerät nicht und schauen Sie nicht in den Strahl, auch
nicht mit optischen Instrumenten.
Ist das Laufwerk nicht ausdrücklich für die gleichzeitige Verwendung von mehreren CDs ausgewiesen, so legen Sie bitte nur immer eine CD ein.
Rücknahme des Gerätes/ des Akkus
Wir nehmen alle unsere Produkte nach deren Gebrauch
zurück, wenn der Zustand dem üblichen bestimmungsgemäßen Gebrauch entspricht. Zurückgenommene Geräte
werden entweder einer Weiterverwendung zugeführt oder
umweltgerecht zerlegt und verwertet. Die Rücknahme
erfolgt über Ihren Fachhändler.
Schwermetallhaltige Batterien und Akkumulatoren gehören nicht in den Hausmüll.
Sie werden vom Hersteller, Händler oder deren Beauftragten kostenlos zurückgenommen, um sie einer Verwertung bzw. Entsorgung zuzuführen.
Der Umkarton und alle Kartoninnenteile können zur Entsorgung dem Altpapier
beigelegt werden.
7
Sicherheitshinweise
WICHTIGE SICHERHEITSHINWEISE
Das Notebook ist zwar sehr robust, dennoch können Beschädigungen
auftreten. Um dies zu verhindern, sollten Sie die folgenden Hinweise
beachten:
• Vermeiden Sie starke Erschütterungen des Notebooks.
• Halten Sie es von großer Hitze fern (Heizkörper, direkte Sonnen
strahlung).
• Schützen Sie das Notebook vor elektromagnetischen
Interferenzen. Sie vermeiden hierdurch auch mögliche Daten
verluste.
• Setzen Sie es keiner Feuchtigkeit aus. Es handelt sich um ein
elektrisches Gerät!
• Achten Sie auf die korrekte Stromversorgung.
WARNUNG
Ziehen Sie beim Trennen der Stromversorgung keinesfalls am Kabel,
sondern nur am Stecker.
Trennen Sie die externe Stromversorgung (Netzteil oder Autoadapter),
bevor Sie den Computer reinigen.
Das verwendete Netzteil muss zugelassen sein.
Das Netzteil benötigt eine schwankungs- und unterbrechungsfreie Stromversorgung. Bei Fragen wenden Sie
sich an Ihr lokales Stromversorgungsunternehmen.
Das Netzteil muss mit einem geerdeten Stecker ausgestattet sein.
ACHTUNG
Bewahren Sie beschädigte Akkus kindersicher auf, und entsorgen Sie sie
schnellstmöglich. Gehen Sie hierbei behutsam vor. Akkus können explodieren, wenn sie Feuer ausgesetzt oder unsachgemäß gehandhabt bzw.
entsorgt werden.
8
• Hinweise zur Verwendung der Akkus
Verwenden Sie ausschließlich für diesen Computer
vorgesehene Akkus.
Laden Sie die Akkus über das Notebook auf.
Versuchen Sie nicht, defekte Akkus eigenständig zu
reparieren. Lassen Sie eine Reparatur von Ihrem Fachhändler oder qualifiziertem Fachpersonal durchführen.
Sicherheitshinweise
Das von Ihnen erworbene Gerät ist mit einem Akku ausgestattet. Der
Akku ist recyclebar. Es ist nicht gestattet, den Akku im normalen Hausmüll zu entsorgen. Bei Fragen zur sachgerechten Entsorgung wenden Sie
sich an Ihren Fachhändler.
• Hinweis zur Systemuhr-Batterie
Vorsicht: Bei unsachgemäßem Austausch der Batterie
WARNUNG
besteht Explosionsgefahr. Ersetzen Sie die Batterie nur
durch eine vom Hersteller empfohlene Batterie bzw. durch
eine Batterie gleicher Bauart. Entsorgen Sie die Batterie
gemäß den Anweisungen des Herstellers.
• Wartung
Warten Sie Ihren Computer nicht eigenständig! Sie könnten Ihre
Garantierechte einbüßen und setzen sich und das Gerät der Gefahr
eines elektrischen Schlags aus. Bei Wartungsbedarf wenden Sie sich an
qualifiziertes Fachpersonal. Trennen Sie den Computer von der Netzversorgung. Bei folgenden Problemen wenden Sie sich an qualifiziertes
Fachpersonal:
WARNUNG
- Netzteil oder Netzkabel ist beschädigt bzw. ausgefranst.
- Flüssigkeit ist in den Computer eingedrungen.
- Der Computer funktioniert trotz sachgemäßer Bedienung
nicht ordnungsgemäß.
- Der Computer wurde fallengelassen oder beschädigt.
• Reinigung
Wenden Sie keinen Reiniger direkt auf dem Computer an. Benutzen Sie
nur ein weiches sauberes Tuch. Verwenden Sie keine flüchtigen
(Petroleumdistillate) oder scheuernde Reiniger
9

WIRELESS LAN
(drahtloses Netzwerk - kurz WLAN)
In Ihrem Notebook ist ein Wireless LAN Modul vom Typ „Intel® Pro
Wireless Mini PCI“ eingebaut. Dieses Modul ermöglicht Ihnen, ein auf
Funk basierendes Netzwerk aufzubauen, bzw. sich mit einem vorhandenen Funknetzwerk zu verbinden. Es arbeitet mit dem IEEE802.11b Standard.
Mit WLAN-Technologien können Benutzer drahtlose Verbindungen innerhalb eines lokalen Bereichs herstellen (z. B. in einem Firmen- oder
Campusgebäude oder einem öffentlichen Gebäude, z. B. einem Flughafen). Verwendet werden können WLANs in nur temporär genutzten
Büros, an Standorten, an denen umfangreiche Kabelinstallationen nicht
möglich sind, oder zur Erweiterung eines vorhandenen LANs, so dass
Benutzer an verschiedenen Standorten in einem Gebäude zu unterschiedlichen Zeiten arbeiten können.
Für den Betrieb von WLANs gibt es zwei unterschiedliche Methoden.
Bei fest installierten WLANs stellen drahtlose Stationen (Geräte mit
Funknetzwerkkarten oder externen Modems) Verbindungen mit drahtlosen Zugriffspunkten her, die Brücken zwischen den Stationen und dem
vorhandenen Netzwerkbackbone bilden. Bei Peer-to-Peer (ad hoc)
WLANS können mehrere Benutzer ohne die Verwendung von Zugriffspunkten innerhalb eines begrenzten Bereichs, z. B. einem Konferenzraum, ein temporäres Netzwerk bilden, wenn kein Zugriff auf Netzwerkressourcen erforderlich ist.
1997 bestätigte das IEEE den Standard 802.11 für WLANs, der eine
Datenübertragungsrate von 1 bis 2 Mbit/s (Megabit pro Sekunde) festlegt. Unter 802.11b, dem neuen gültigen Standard, beträgt die maximale
Datenübertragungsrate 11 Mbit/s über ein Frequenzband von 2,4 GHz
(Gigahertz).
10

ZUSÄTZLICHE SICHERHEITSHINWEISE FÜR GERÄTE MIT
WIRELESS LAN
In Ihrem Notebook ist eine Wireless LAN-Komponente
integriert, deshalb müssen Sie beim Umgang mit
Ihrem Notebook folgende Sicherheitshinweise unbedingt beachten:
• Schalten Sie das Notebook aus, wenn Sie sich in
einem Flugzeug befinden oder mit dem Auto
fahren.
• Wenn Sie sich in einem Krankenhaus, einem
Operationssaal oder in der Nähe eines
medizinischen Elektroniksystems befinden,
schalten Sie die Funkkomponente am Notebook
aus! Die übertragenen Funkwellen können die
medizinischen Geräte in ihrer Funktion
beeinträchtigen.
ACHTUNG
• Halten Sie das Notebook mindestens 20 cm von
einem Herzschrittmacher fern, da sonst die
ordnungsgemäßen Funktionen des
Herzschrittmachers durch Funkwellen
beeinträchtigt werden können.
• Die übertragenen Funkwellen können
Störgeräusche in Hörgeräten verursachen.
• Bringen Sie das Notebook nicht mit
eingeschalteter Funkkomponente in die Nähe
entflammbarer Gase oder in eine
explosionsgefährdete Umgebung (z. B.
Lackiererei), da die übertragenen Funkwellen eine
Explosion oder ein Feuer auslösen können.
• Die Reichweite der Funkverbindung ist abhängig
von Umwelt- und Umgebungsbedingungen.
• Bei Datenverkehr über eine drahtlose Verbindung
ist es auch unberechtigten Dritten möglich, Daten
zu empfangen.
11
Die MAXDATA Computer AG ist nicht für Funk- oder Fernsehstörungen
verantwortlich, die durch unerlaubte Änderungen an diesem Gerät verursacht wurden. MAXDATA übernimmt ferner keine Verantwortung für den
Ersatz bzw. den Austausch von Anschlussleitungen und Geräten, die
nicht von der MAXDATA Computer AG angegeben wurden. Für die Behebung von Störungen, die durch eine derartige unerlaubte Änderung
hervorgerufen wurden, und für den Ersatz bzw. den Austausch der
Geräte ist allein der Benutzer verantwortlich.
CE-KENNZEICHNUNG FÜR GERÄTE MIT WIRELESS LAN
Dieses Gerät erfüllt in der ausgelieferten Ausführung die Anforderungen
der Richtlinie 1999/5/EG des Europäischen Parlamentes und des Rates
vom 9. März 1999 über Funkanlagen und Telekommunikationsendeinrichtungen und die gegenseitige Anerkennung der Konformität.
Dieses Notebook darf in Belgien, Dänemark, Deutschland, Finnland,
Frankreich,Griechenland, Großbritannien, Irland, Italien, Luxemburg,
Niederlanden,Österreich, Portugal, Schweden, Schweiz, Spanien, Island,
Liechtenstein und Norwegen verwendet werden.
Aktuelle Information über eventuelle Einschränkungen im Betrieb finden
Sie bei der entsprechenden Behörde des jeweiligen Landes. Wenn Ihr
Land nicht in der Aufzählung dabei ist, dann wenden Sie sich bitte an die
entsprechende Aufsichtsbehörde, ob die Nutzung dieses Produkts in
Ihrem Land erlaubt ist.
Belgien - www.bipt.be,
Dänemark - www.tst.dk,
Deutschland - www.regtp.de,
Finnland - www.ficora.fi,
Frankreich - www.art-telecom.fr,
Griechenland - www.eett.gr,
England - www.oftel.gov.uk,
Irland - www.comreg.ie,
Italien - www.agcom.it,
Luxembourg - www.etat.lu/ILT,
12
Niederlande - www.opta.nl,
Österreich - www.rtr.at,
Portugal - www.urt.gov.pt,
Schweden - www.pts.se,
Schweiz - www.bakom.ch,
Spanien - www.cmt.es,
Island - www.pta.is,
Liechtenstein - www.ak.li
Norwegen - www.npt.no

EINSCHRÄNKUNGEN
FRANKREICH
Eingeschränkter Frequenzbereich: nur die Kanäle 10 bis 11 (2457 MHz
beziehungsweise 2462 MHz) dürfen in Frankreich verwendet werden. Es
ist untersagt, das Gerät ausserhalb geschlossener Räume zu verwenden.
Info: www.art-telecom.fr
ITALIEN
Eine ministerielle Genehmigung ist auch für den Gebrauch im Innenbereich notwendig. Setzen Sie sich wegen der diesbezüglichen
Verfahrensweise mit dem Verkäufer in Verbindung.
Es ist untersagt, das Gerät ausserhalb geschlossener Räume zu verwenden.
Info: www.agcom.it
NIEDERLANDE
Für den Gebrauch im Freien ist eine Lizenz vorgeschrieben. Setzen Sie
sich wegen derdiesbezüglichen Verfahrensweise mit dem Verkäufer in
Verbindung.
Info: www.opta.nl
13
FUNKFREQUENZEN FÜR GERÄTE MIT WIRELESS LAN
Die folgende Information entspricht dem Stand Januar 2002. Aktuelle
Information finden Sie bei der entsprechenden Behörde Ihres Landes
(z.B. www.regtp.de).
FREQUENZEN
Funknetzwerkkarten und -adapter sind gemäß dem IEEE-Standard
802.11b für den Betrieb im ISM Frequenzband (Industrial, Scientific,
Medical) zwischen 2.4 und 2.4835 GHz vorgesehen. Weil jeder der 11
verwendbaren Funkkanäle durch das DSSS-Verfahren (Direct Sequence
Spread Spectrum) eine Breite von 22 MHz beansprucht, stehen maximal drei voneinander unabhängige Kanäle (z. B. 3, 8 und 11) zur Verfügung. In der folgenden Tabellen finden Sie die in Ihrem Land zulässigen
Kanäle:
Kanal MHz Europa, R&TTE Frankreich, R&TTE
1 2412 X
2 2417 X
3 2422 X
4 2427 X
5 2432 X
6 2437 X
7 2442 X
8 2447 X
9 2452 X
10 2457 X X
11 2462 X X
14

GESETZLICHE BESTIMMUNGEN - AUSSCHLUSSKLAUSELN
AUSSCHLUSSKLAUSELN FÜR GERÄTE MIT WIRELESS LAN
Die Installation und der Einsatz eines Wireless LAN-Geräts darf nur in
Übereinstimmung mit den Anweisungen, die in der Benutzerdokumentation enthalten sind, erfolgen. Die Benutzerdokumentation ist
im Lieferumfang des Produkts enthalten. Alle an diesem Gerät vorgenommenen Änderungen oder Modifikationen, die nicht ausdrücklich vom
Hersteller genehmigt sind, können die Berechtigung des Benutzers für
den Betrieb des Geräts außer Kraft setzen. Der Hersteller haftet nicht für
Funkstörungen beim Radio- und Fernsehempfang, die auf nicht autorisierte Veränderungen des Geräts bzw. den Austausch oder die Anbringung
von Kabeln und Zubehör zurückzuführen sind, wenn diese nicht den
Herstellerempfehlungen entsprechen. Es liegt in der Verantwortung des
Benutzers, alle auftretenden Störungen zu beheben, die aus den genannten nicht autorisierten Veränderungen, dem Austausch oder der
Anbringung von Bauteilen resultieren. Der Hersteller sowie dessen
autorisierte Fach- und Großhändler sind nicht haftbar für Schäden oder
Verstöße gegen gesetzliche Verordnungen, die sich aus der Verletzung
dieser Richtlinien ergeben.
15

Lieferumfang
LIEFERUMFANG
Bevor Sie mit der Installation Ihres Notebooks beginnen, sollten Sie sich
vergewissern, dass alle Teile vorhanden sind.
Sollte etwas vom hier aufgeführten Lieferumfang bei Ihrem Computerpaket fehlen, so wenden Sie sich bitte umgehend an Ihren Fachhändler.
• Notebook
• Akku
• Utility CD
• Netzteil
• Netzkabel
• Handbuch
• CD-/ Combo- oder DVD/DVD-RW/- ROM Laufwerk (eingebaut)
• Modemkabel
Falls Sie das Gerät zur Reparatur oder zum Aufrüsten einschicken müssen, sollten Sie die Originalverpackung verwenden. Bewahren Sie deshalb die Verpackung gut auf.
16
Die Vorbereitung
DIE VORBEREITUNG
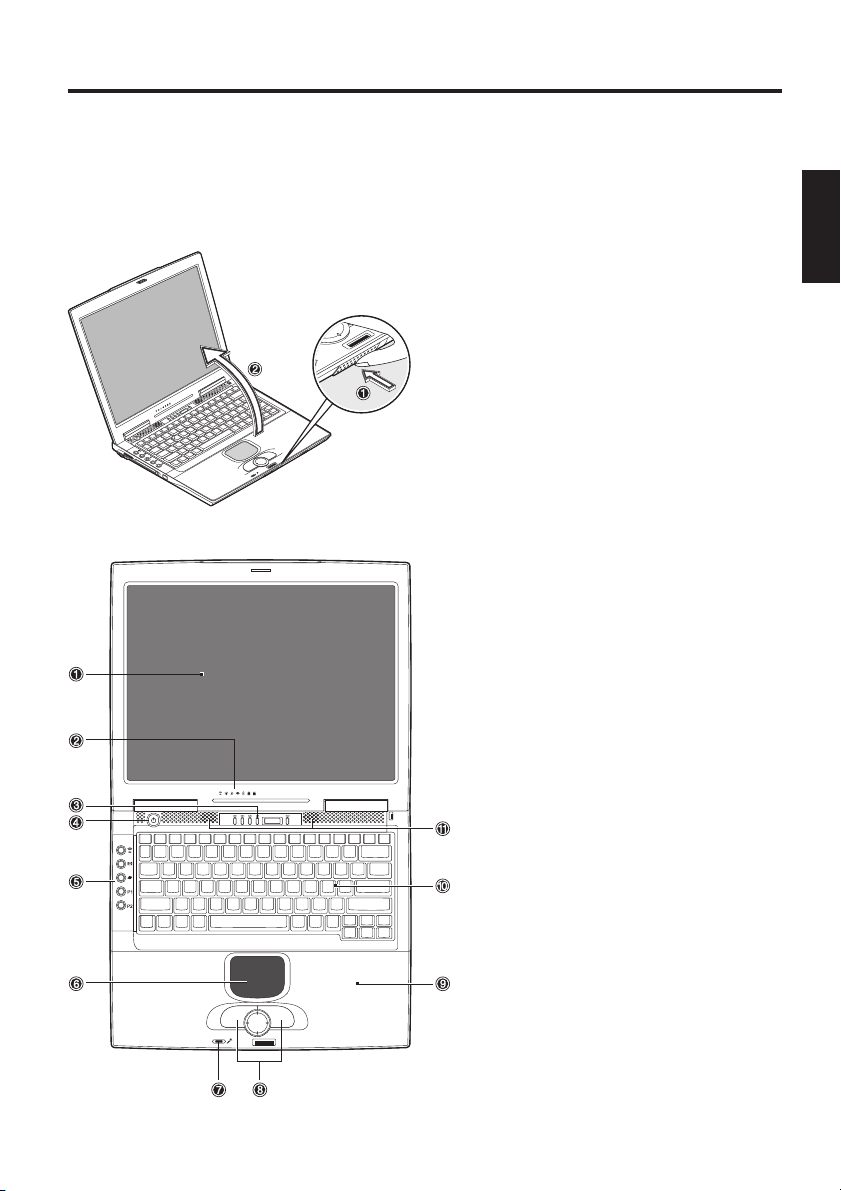
Vor der ersten Inbetriebnahme sollten Sie sich mit den einzelnen Komponenten Ihres Systems vertraut machen.
Drücken Sie die Entriegelung (1) und öffnen Sie das Display (2).
(1) Entriegelung drücken
(2) Display aufklappen
Abbildung 1
(1) LCD- Display
(2) Status -LEDs
(3) CD-Player Bedienung
(4) Einschaltknopf
(5) Quick Launch Tasten
(6) TouchPad
(7) Eingebautes Mikrofon
(8) Tasten und Scroll Pad
(9) Handauflage
(10) Tastatur
(11) Lautsprecher
Abbildung 2
17
Die Vorbereitung
EINSETZEN DES AKKUS
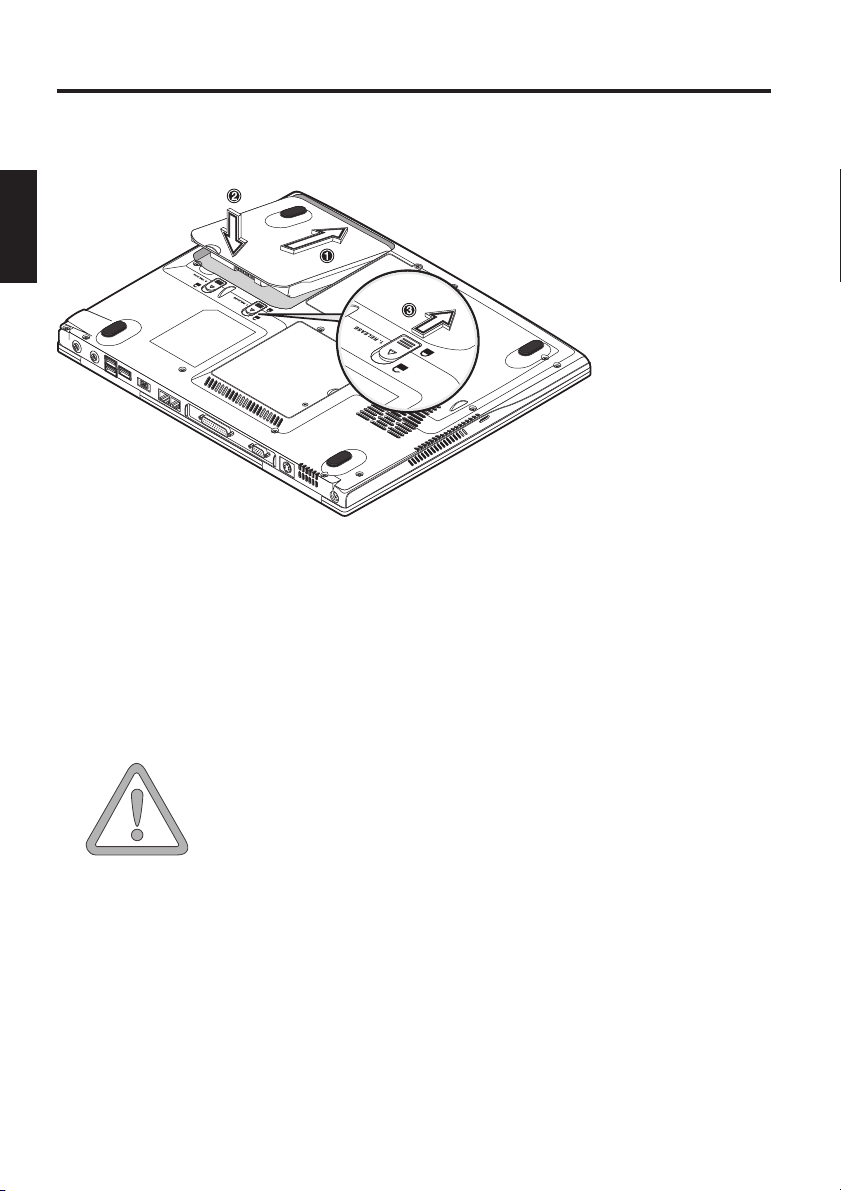
Im Lieferumfang des Notebooks ist der Akku enthalten. Dieser Akku ist
nur teilgeladen.
Abbildung 3
(1) Setzen Sie den Akku in Pfeilrichtung in den Akkuschacht
(2) Drücken Sie leicht auf den Akku bis er hörbar einrastet.
(3) Arretieren Sie den Akku mit den Verriegelungen.
Der Akku kann nun geladen werden.
Beachten Sie, dass die Ladezeiten des Akkus im ausgeschalteten Zustand zwei Stunden, bei eingeschaltetem
Gerät vier Stunden betragen!
ACHTUNG
Es ist unbedingt erforderlich, dass der Akku bei der
ersten Inbetriebnahme vollständig geladen wird! Trennen Sie das Notebook nicht vom Netzteil, bis dies geschehen ist.
ENTNEHMEN DES AKKUS
Schieben Sie die Entriegelungen (3)+(4) nach hinten. Der Akku rastet aus.
Schieben Sie den Akku aus der Halterung und heben ihn nach oben aus
dem Akkuschacht.
Das Notebook kann jetzt nur mit dem Netzteil betrieben werden!
18
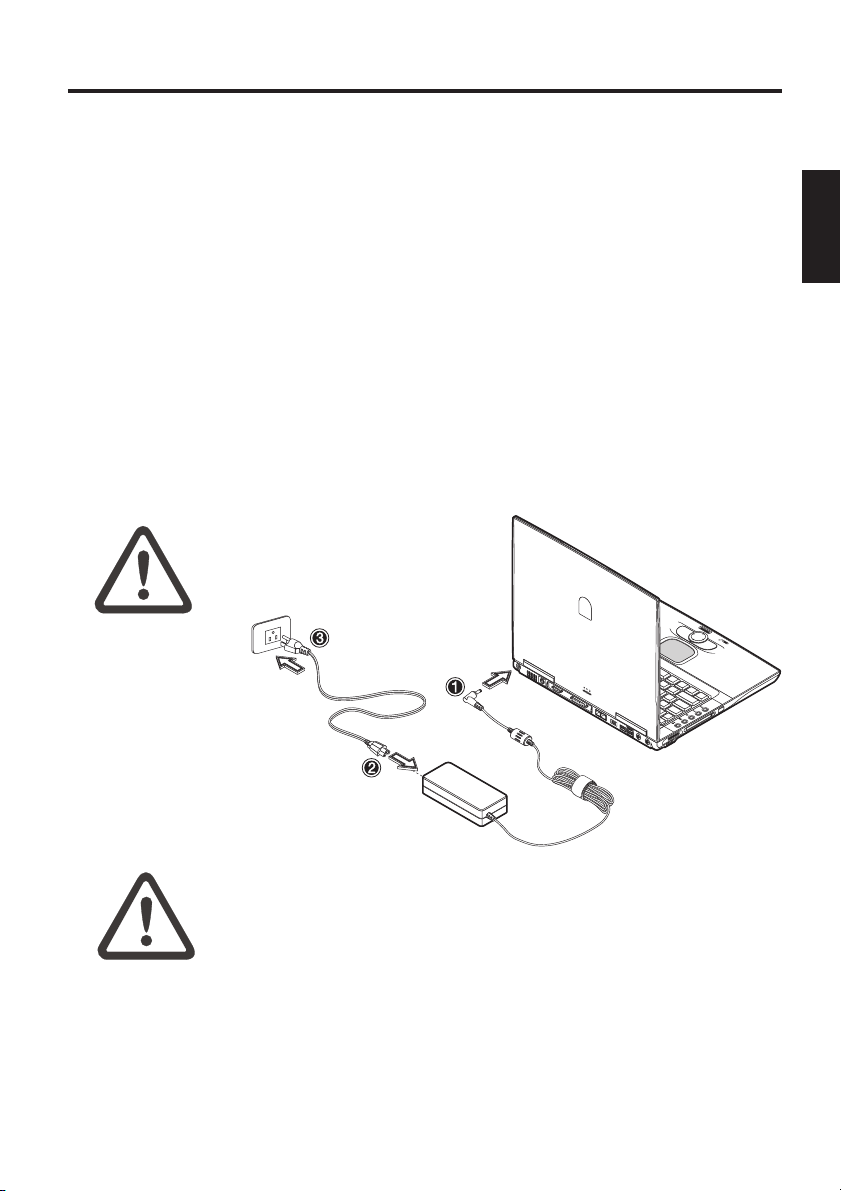
STROMVERSORGUNG
Die Vorbereitung
Das Notebook kann
wahlweise über
Akku- oder Netzstrom betrieben
werden.
Der Erstbetrieb
findet mit dem
Netzteil statt.
Verwenden Sie nur
das mitgelieferte
Netzteil. Ein falsches
Netzteil kann zu
Beschädigungen des
Computers führen.
WARNUNG
Das Netzteil enthält
keine zu wartenden
Teile.
NETZTEIL AUF
KEINEN FALL
ÖFFNEN !
Das Notebook ist mit einem Netzkabel sowie
einem universalen, selbstanpassenden Netzteil
ausgestattet. Das Netzteil kann mit einer beliebigen konstanten Spannung zwischen 100 und 240
Volt betrieben werden.
So verwenden Sie das Netzteil:
1. Verbinden Sie das Netzteil mit dem DC IN
Anschluss auf der Computerseite.
2. Verbinden Sie das Netzkabel mit dem Netzteil.
3. Verbinden Sie das Netzkabel mit einer Steckdose.
WARNUNG
LEBENSGEFAHR !
Abbildung 4
19
Die Vorbereitung
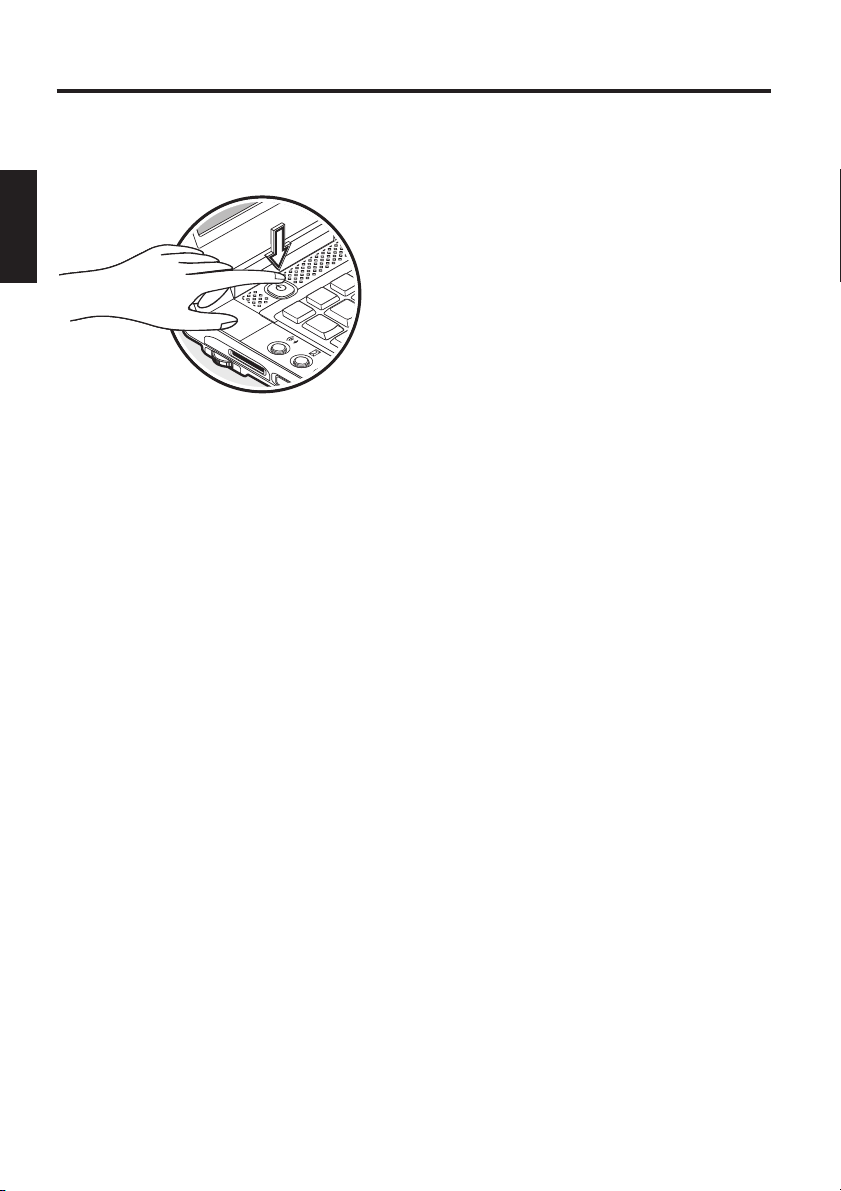
EINSCHALTEN DES COMPUTERS
Die Vorbereitungen sind somit
abgeschlossen. Betätigen Sie jetzt den
Ein / Aus- Taster um das Notebook
einzuschalten.
Bei eingeschaltetem Computer kann
der Ein/Aus Taster in Abhängigkeit der
Energieeinstellungen mehrere
Funktionen erfüllen.
Betätigen Sie ihn erneut, wird in der
Standardeinstellung der Rechner
ausgeschaltet.
Abbildung 5
Hinweis:
Bitte beachten Sie, dass Sie den
Rechner bei Windows- Systemen
immer folgendermaßen ausschalten:
„Start“ -Button anklicken
„Beenden“ auswählen
„Ok“ anklicken.
Dies vermeidet Festplatten- bzw
Betriebssystem - Probleme.
Tipp:
Bei einem Programm- oder Systemabsturz
betätigen Sie die
Tasten : Strg + Alt + Entf. Hiermit wird im
günstigsten Fall nur der abgestürzte Task
beendet, bzw. der Rechner neu gestartet.
(Warmstart). Sollte dies nicht funktionieren,
betätigen Sie den Ein/Aus Taster länger als vier
Sekunden - der Rechner wird ausgeschaltet.
Nun können Sie ihn wieder normal starten
(Kaltstart).
Nach dem ersten Einschalten wird das Betriebssystem installiert. Folgen
Sie hier bitte den entsprechenden Anweisungen.
Nach der Installation und Neustart ist der Computer einsatzbereit.
Sie können in den Grafik- Grundfunktionen die Auflösung, die Farbtiefe
und das Erscheinungsbild des Desktops ändern.
Nähere Informationen hierzu erhalten Sie in den Installationshinweisen.
20

POWERMANAGEMENT
Ihr System ist mit APM und dem neueren (und
effizienteren) ACPI-Stromsparsystem kompatibel.
Powermanagement
Hinweis zur PC-Karte
Entnehmen Sie niemals
eine PC-Karte, während
sich das System im Saveto-Disk-Modus befindet.
Dadurch wird der
Steckplatz deaktiviert
und durch eine veränderte Systemkonfiguration
könnten beim nächsten
Hochfahren des Computers Probleme auftreten
ACHTUNG
HARDWARE (Akkustatus & Warnungen)
Nach Abschluss des POST (Selbsttest nach
Systemstart), zeigt die Akku-Statusanzeige den
Ladestand des Akkus an. Ist der Ladestand niedrig, blinkt das Symbol. Speichern Sie umgehend
Ihre Dateien und schließen Sie das Netztteil an.
Niedriger Ladestand & SUSPEND
Im Falle eines niedrigen Akkuladestands (ohne
angeschlossenes Netzteil) wird automatisch eine
dieser beiden Schutzfunktionen aktiviert:
Ohne Ruhezustand
Wenn auf Ihrem System keine Save-to-Disk-Datei
oder -Partition eingerichtet ist, werden aktuelle
Daten im RAM-Speicher abgelegt, und das System
wechselt automatisch in den Suspend-Modus.
Mit Ruhezustand
Daten werden in der dafür vorgesehenen Datei
bzw. Partition auf der Festplatte abgelegt. Anschließend schaltet sich der Computer automatisch aus.
Ist eine Save-to-Disk-Datei oder -Partition nicht
verfügbar, wechselt das System zum SuspendModus.
Durch Ausschalten des Notebooks und Trennung
vom Netz (ziehen des Netzsteckers des Netzteiles) kann jeglicher Energieverbrauch verhindert
werden.
21

Systemüberblick
SYSTEMÜBERBLICK
LINKE UND RECHTE SEITE
Abbildung 6
(1) Lautstärke Regler
(2) Memory Stick-, Secure Digital- oder Multi Media Karten Steckplatz
(3) PC - Karten Steckplatz
(4) PC - Karten - Entriegelung
(5) Infrarot Sender/ Empfänger
Abbildung 7
(1) Kensington Lock - Diebstahlsicherung
(2) Lüftungsöffnungen
ACHTUNG
22
Sämtliche Be- und
Entlüftungsöffnungen müssen
unter allen Umständen
freigehalten werden. Eine
Überhitzung des Gerätes
wäre die Folge.
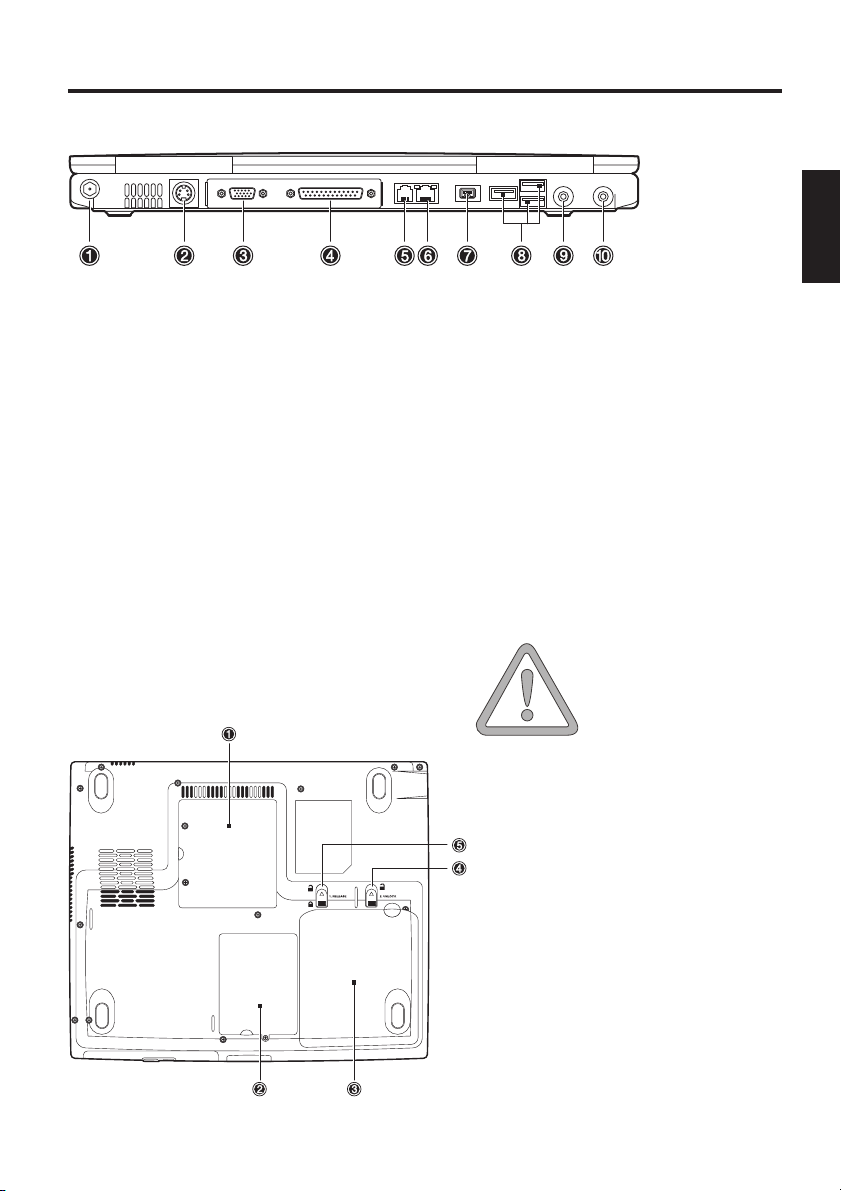
RÜCKANSICHT
ACHTUNG
(1) Anschluss für das Netzteil
(2) S-Video TV Ausgang
(3) Anschluss für externen Monitor
(4) Drucker Anschluss
(5) Modem Anschluss
(6) Netzwerk (LAN) Anschluss
(7) IEEE 1394 Anschluss
(8) USB Anschluss (universeller seriel
ler Bus)
(9) Lautsprecher/ Kopfhörer Anschluss
unterstützt S/PDIF
(10) LINE IN / Mikrofon Anschluss
UNTERSEITE
Systemüberblick
Systemüberblick
Abbildung 8
* Sämtliche Be- und
Entlüftungsöffnungen
müssen unter allen
Umständen freigehalten werden. Eine
Überhitzung des
Gerätes wäre die
Folge.
Abbildung 9
(1) Abdeckung des Arbeits
speichers
(2) Festplattenschacht
(3) Akkuschacht
(4) Akkuentriegelung (mit
Feder)
(5) Akkuentriegelung (mit
Raste)
23
Systemüberblick
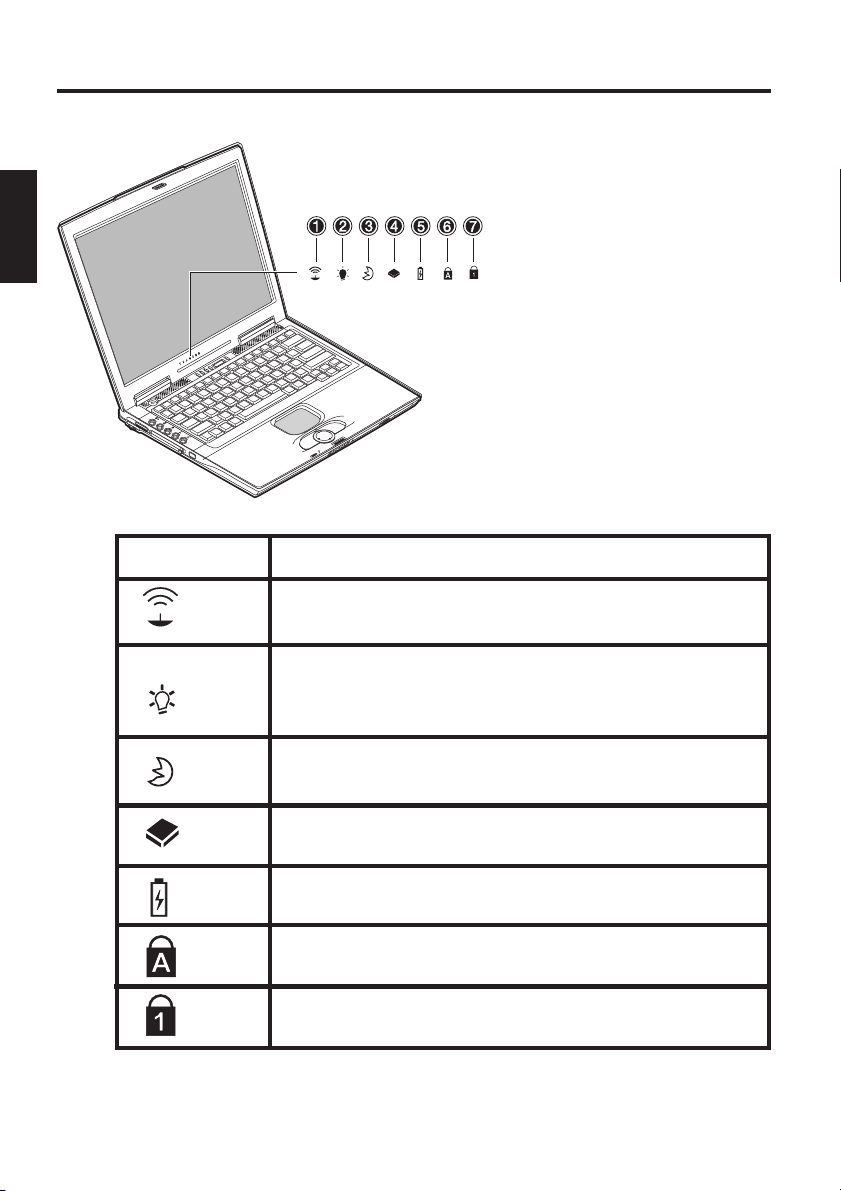
ERLÄUTERUNG DER LED ANZEIGEN
Abbildung 10
(1) Drahtloses Netz werk (wireless LAN)
(2) Power
(3) Standby
(4) Laufwerkszugriff
(5) Akku
(6) Caps Lock
(7) Num Lock
Tabelle 1
24
Symbol
Bedeutung
Leuchtet, wenn das Drahtlose Netzwerk (wireless
LAN) aktiviert ist.
Leuchtet, wenn der Rechner eingeschaltet ist.
Blinkt, wenn der Akku einen niedrigen Ladezustand erreicht hat.
Leuchtet, wenn der Rechner im Stromsparmodus
ist
Es wird auf die Festplatte oder das CD- Rom
Laufwerk zugegriffen.
Leuchtet, wenn der Akku geladen wird.
Leuchtet, wenn Caps Lock aktiviert ist.
Leuchtet, wenn Num Lock aktiviert ist.
Systemüberblick
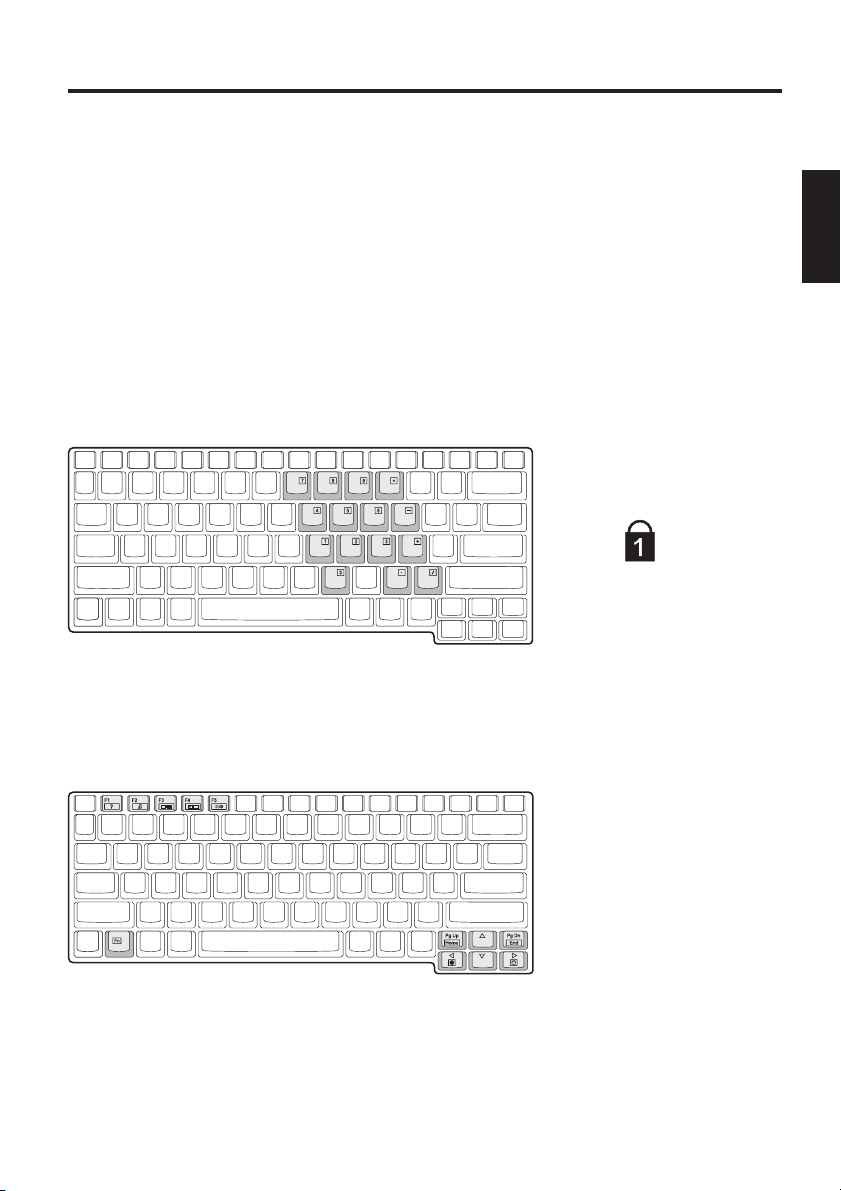
HOT KEYS
(Kurz- Tastenkombinationen mit besonderer Bedeutung)
Zum Aktivieren der Hotkeys halten Sie die Fn- Taste gedrückt und betätigen anschließend die gewünschte Zusatztaste. Für einige Funktionen
kann es notwendig werden , den Launchmanager zu installieren. Weitere
Informationen hierzu auf der nächsten Seite.
BedeutungTasten
Fn + F1
Fn + F2
Fn + F3
Fn + F4
Fn + F5
Fn +Bild
Fn + Bild
Fn +
Fn +
Fn + F11
Fn + F12
Hot Key - Hilfe - zeigt eine Liste der Hot Keys
Wechselt in den Stromsparmodus
Wechselt zwischen LCD-Display / Monitor / beides
Schaltet das LCD-Display schwarz (Energie sparend)
Schaltet den Lautsprecher aus / an
Funktion wie Pos1 - Taste
Funktion wie Ende - Taste
Erhöht die LCD Helligkeit
Senkt die LCD Helligkeit
Schaltet den Num Lock aus / an
Schaltet den Scroll Lock aus / an
Tabelle 2
25
Systemüberblick
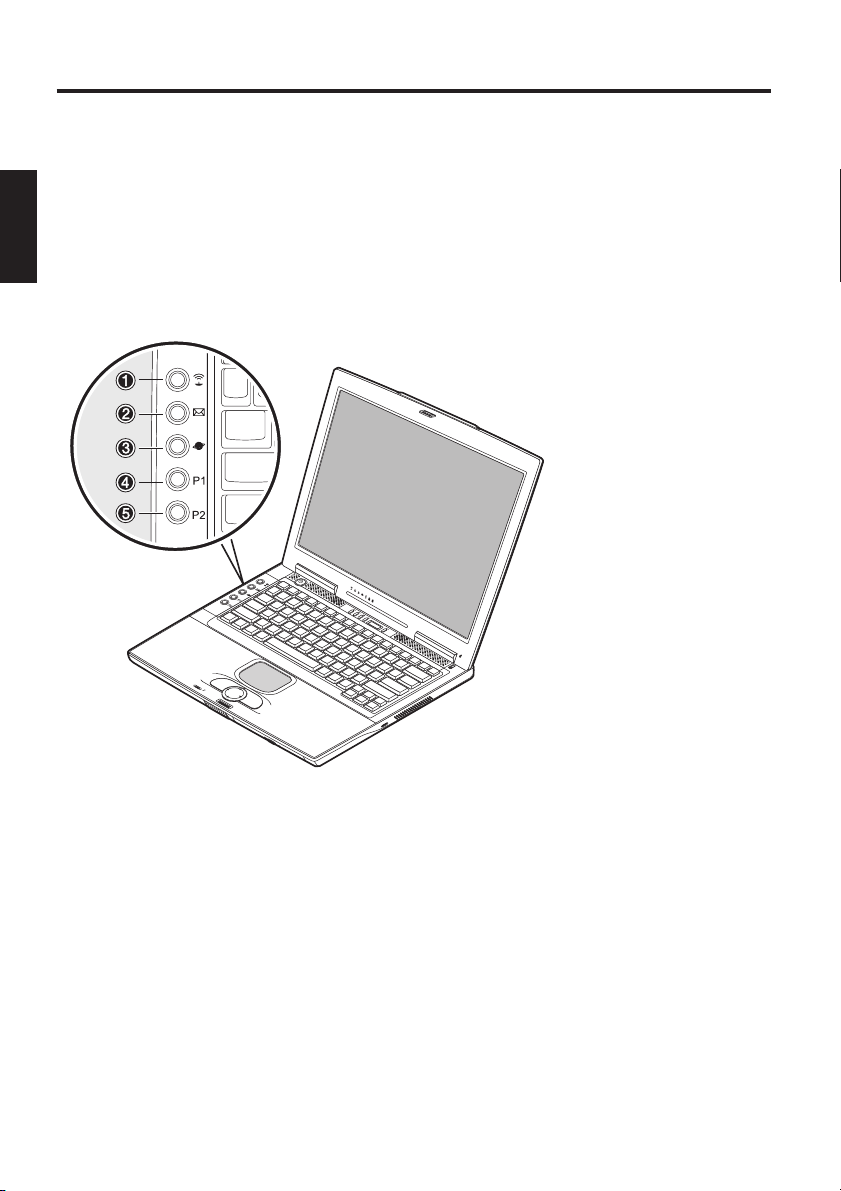
DIE QUICK LAUNCH TASTEN
Links der Tastatur befinden sich fünf Quick Launch Tasten. Diese können
zur Aktivierung häufig verwendeter Anwendungen benutzt werden.
Sollten die Tasten nicht belegt sein, finden Sie den Treiber zum Aktivieren
auf der Utility CD. Im Pfad Drivers\Betriebssystem\LAUNMGR.
Z.B.: D:\DRIVERS\WINXP\LAUNMGR\setup.exe
Abbildung 11
(1) Drahtloses Netzwerk - aktiviert das drahtlose Netzwerk
(2) E- Mail - startet das Mail - Programm
(3) Internet - startet den Internet Browser
(4) Frei programmierbar - über den Launch Manager frei belegbar
(5) Frei programmierbar - über den Launch Manager frei belegbar
26
DIE TASTATUR
Schreibmaschine -
Funktionstasten -
Sondertasten -
Systemüberblick
Die Tastatur Ihres Notebooks besitzt alle Funktionen einer normalen AT-kompatiblen Tastatur sowie
einige Extras:
Diese Tasten entsprechen denen einer Schreibmaschine.
In vielen Betriebssystemen (und Anwendungen)
können über diese Tasten besondere Funktionen
aufgerufen werden. Nähere Informationen hierzu
finden Sie in den entsprechenden Handbüchern.
Über diese Tasten (und Tastenkombinationen)
werden manche Hardwarefunktionen gesteuert.
Drücken Sie Fn+ Num
Lock um dieses Feld zu
aktivieren
Die LED leuchtet
Abbildung 12
Abbildung 13
Hot Keys:
Funktionen siehe
Tabelle 2 - Hot Keys
27
Systemüberblick
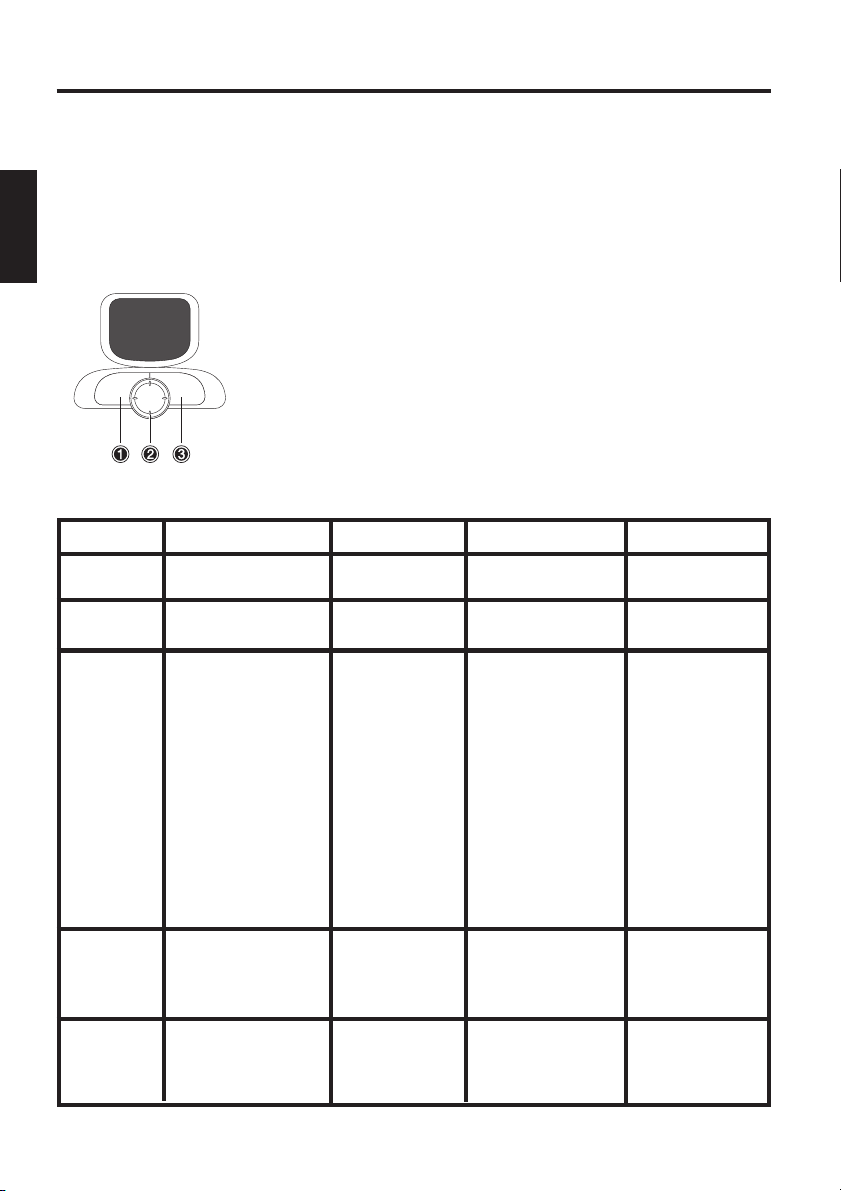
DAS TOUCHPAD
Das System richtet das integrierte TouchPad automatisch ein. Sofern Sie
Windows verwenden, müssen für die Grundfunktionen keine Treiber
installiert werden.Möchten Sie die erweiterten Funktionen nutzen, finden
Sie den Treiber zum Aktivieren auf der Utility CD im Pfad
\drivers\Betriebssystem\Touchpad.
Z.B.: D:\Drivers\WinXP\Touchpad\setup.exe.
Unter dem Sensorfeld finden Sie:
(1) Linke ‚Maus‘-Taste
(2) Scrolltaste - funktioniert wie ein Mausrad
(3) Rechte ‚Maus‘-Taste
Hinweis für Linkshänder: Die meisten Betriebssysteme gestatten eine Umbelegung der
Maustasten.
Abbildung 14
Funktion
Ausführen
Auswählen
Nehmen Halten Loslassen
(Drag´n
Drop)
Kontext
Menü
öffnen
Scrollen Klicken Sie nach
28
Linke Taste Rechte Taste
Doppelklick
Einfachklick
Klicken und halten,
dann mit dem
Finger auf dem
Pad in die
gewünschte
Position bringen.
Alles loslassen.
Einfachklick
Scrolltaste
oben / unten /
rechts / links
Sensorfeld
Doppeltipp
Einfachtipp
Doppeltipp,
halten Sie
beim 2. Tipp
den Finger auf
dem Pad und
bewegen Sie
ihn an die gewünschte
Position. Finger
vom Pad lösen

Systemüberblick
Halten Sie beim Gebrauch des Touchpad Ihre Finger und das Pad trocken
und sauber. Das Touchpad reagiert auf Fingerbewegungen. Je leichter die
Berührung, desto besser wird es reagieren. Feste Bewegungen werden
keine Erhöhung der Genauigkeit erzielen.
DAS CD-ROM /DVD LAUFWERK
Zum Einlegen einer CD, betätigen Sie den Entriegelungsknopf auf der
Vorderseite des Laufwerks.
Abbildung 15
Die CD wird mit dem Label nach oben auf die Spindel gelegt und mit
leichtem Druck arretiert.
Drücken Sie den CD - Schlitten wieder zurück, bis er einrastet. Die CD
kann nun gelesen werden.
Einige CDs sind mit einem Autostart versehen, d.h. Installationen oder
auch Musik CDs werden automatisch nach dem Einlegen gestartet.
Abbildung 16
29
Systemüberblick
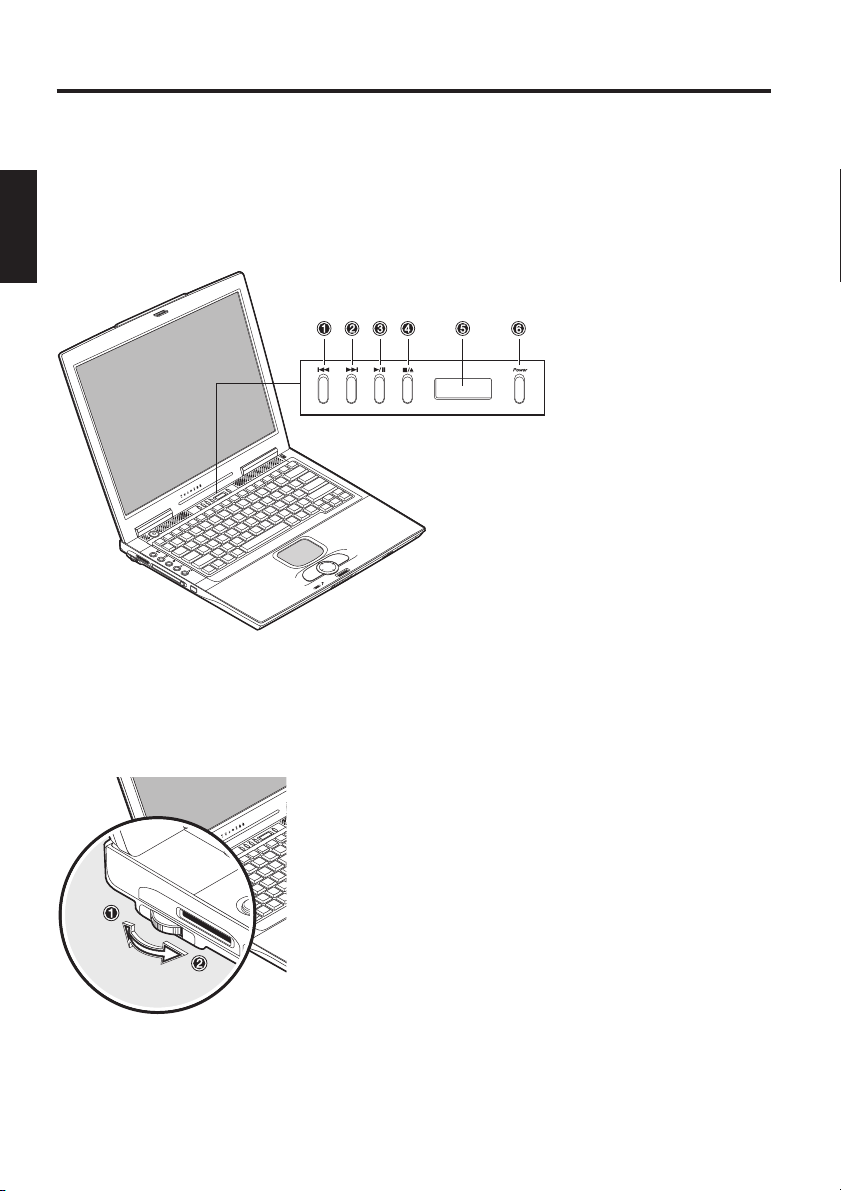
AUDIO - CD KONTROLLEN
Mit den Audio CD Kontrollen können Sie Audio CDs abzuspielen, ohne
den Computer zu starten.
(1) Vorheriger Titel
(2) Nächster Titel
(3) Wiedergabe / Pause
(4) Stop / CD auswerfen
(5) Status Anzeige
(6) Power - Schaltet den
CD- Player an/aus
Abbildung 17
LAUTSTÄRKEREGELUNG
Abbildung 18
30
(1) Leiser
(2) Lauter

Systemüberblick
DER PC - KARTEN SLOT
Der Computer ist mit einem PC Karten Slot ausgeführt. Dies ist ein
PCMCIA 3,3V / 5V Steckplatz vom Typ II.
Zum Einsetzen einer PC Karte schieben Sie diese in
den Slot, bis sie einrastet. Stellen Sie die gewünschten
Verbindungen her (z.B. Netzwerk)
Konsultieren Sie auch die Dokumentation zu der entsprechenden Karte.
Abbildung 19
Zum Entfernen drücken Sie auf den
Eject Knopf neben dem Slot. Dieser
springt heraus und wirft bei nochmaligem Druck die PC- Karte aus.
Abbildung 20
DER MEMORY STICK/ SD/ MMC -SLOT
Der Computer ist mit einem Kombi - Steckplatz ausgerüstet. Dieser
Steckplatz ist in der Lage Memory Sticks, SD (Secure Digital) und MMC
(MultimediaCard) Karten aufzunehmen.
Diese Karten werden mit der bedruckten Seite nach
oben in den Slot gedrückt. Nachdem sie fühlbar eingerastet ist, können Sie auf die Daten zugreifen.
Zum Entfernen drücken Sie erneut auf die Karte und
sie wird entriegelt. Danach kann die Karte aus dem
Steckplatz herausgezogen werden.
Entfernen Sie die Karte nie, während Daten darauf
geschrieben oder gelesen werden!
Sollten Sie nicht auf die Karte zugreifen können, finden Sie den Treiber
zum Aktivieren auf der Utility CD im Pfad Drivers\Betriebssystem\
\Cardread. z.B. D:\Drivers\WINXP\Cardread\setup.exe
Abbildung 21
31

Systemüberblick
DAS DATEN / FAX MODEM
Das System richtet das integrierte analoge Modem automatisch ein.
Zum Benutzen der Modemfunktionen verbinden Sie die Modembuchse
über das Telefonkabel mit einer analogen Telefonbuchse (kein ISDN).
Bestimmungsgemäßer Gebrauch:
Das Modem kann an alle analogen Anschlüsse (TBR 21) innerhalb
Europas angeschlossen werden.
Der Verwendungszweck ist ausschließlich Datenkommunikation vorbehalten.
ACHTUNG
Versuchen Sie nicht, das Modem
mit einer ISDN Telefonbuchse zu verbinden! Dies würde zu einer Zerstörung des Gerätes führen.
Abbildung 22
DER NETZWERK- ANSCHLUSS
Der eingebaute Netzwerkadapter bietet die
Möglichkeit, Ihren Computer mit einem 10/100
Mbps Netzwerk bzw. DSL - Internet zu verbinden.
Die Verbindung erfolgt über ein EthernetNetzwerkkabel mit RJ45 Steckern. Diese werden
in die Rückseite des Computers und an einen
vorhandenen Netzwerk- Hub bzw. eine DSL Steckdose einsteckt.
Verwechseln Sie auf keinen Fall den RJ45 Stecker einer Netzwerkleitung mit einem ISDN Stecker! Versuchen Sie NIE, den Netzwerk Adapter mit einer ISDN Telefonbuchse zu verbinden !
Dies würde zu einer Zerstörung des Gerätes führen.
32
Abbildung 22
ACHTUNG

Software
INSTALLATIONSHINWEISE
WIEDERHERSTELLUNG DER TREIBER
Ihr System ist im Auslieferungszustand mit einem Preload versehen.
Das heißt: Alle für das System notwendigen, bzw. benötigten Daten und
Treiber sind auf der Festplatte enthalten. Für den Fall, dass Sie Ihre
Festplatte gelöscht und/oder formatiert haben, sind auf der mitgelieferten
Utility CD die benötigten Treiber gespeichert. Nach einer Neuinstallation
des Betriebssystems (z. B. mit der Recovery CD) können Sie somit Ihr
Notebook wieder in einen einsatzfähigen Zustand versetzen.
WINDOWS 2000 / WINDOWS XP
DRIVERS
Windows 2000
WIN2K INTELINF Intel Chipset INF Driver 4.30.1006
WIN2K VGA
WIN2K AUDIO
WIN2K TOUCHPAD Synaptics TouchPad Driver 7.2.0
WIN2K MODEM
WIN2K LAN
WIN2K WIRELESS Intel Wireless LAN Driver
WIN2K CARDREAD Winbond Card Reader Driver 1.8.2002.0424
WIN2K USB2.0
WIN2K WIRELEAP Intel Wireless AP
WIN2K SPDSTEP SpeedStep utility
WIN2K LAUNMGR Wistron Launch Manager
WIN2K IRSUPLT
WIN2K AVMGR
Windows XP
WINXP HOTFIXCPU Hot Fix(Centrino CPU Driver) Q332179
WINXP INTELINF Intel Chipset INF Driver 4.30.1006
WINXP VGA
WINXP AUDIO
WINXP TOUCHPAD Synaptics TouchPad Driver 7.2.0
WINXP MODEM
WINXP LAN
WINXP WIRELESS Intel Wireless LAN Driver
WINXP CARDREAD Winbond Card Reader Driver 1.8.2002.0424
WINXP LAUNMGR Wistron Launch Manager
WINXP IRSUPLT
WINXP AVMGR
Intel VGA Driver
Cirrus Audio Driver 6.13.10.6101
6.13.01.3460
Agere Modem Driver
Broadcom LAN Driver
2.1.25
3.51.0.0
1.1.5.0
USB 2.0 Driver
Wistron IR Supplement
Wistron AV Manager
1.00
7.0.0.0
3.0
1.0.8
1.02
1.0.1.6
Intel VGA Driver
Cirrus Audio Driver 6.13.10.6101
6.13.01.3460
Agere Modem Driver
Broadcom LAN Driver
2.1.25
3.51.0.0
1.0.28.2
1.0.8
Wistron IR Supplement
Wistron AV Manager
1.02
1.0.1.6
33

Software
Führen Sie in den Verzeichnissen jeweils die Datei „setup.exe“ aus.
Wir empfehlen Ihnen, zuerst den Chipsatz -Treiber zu installieren.
Danach den Grafiktreiber (VGA). Damit wird das Erscheinungsbild der
Arbeitsoberfläche verbessert.
Die weitere Reihenfolge der Installation ist unerheblich.
EINSTELLUNG DER AUFLÖSUNG
Nach Installation der Grafiktreiber sollten Sie die Auflösung auf
1024 x 768 einstellen.
Dies geschieht folgendermaßen:
Rechtsklick auf einem freien Bereich des Desktop
<Eigenschaften> auswählen
Im Fenster „Eigenschaften von Anzeige“ das Register „Einstellung“
wählen
Hier können Sie den Schieberegler auf 1024 x 768 stellen.
Mit <Übernehmen> legen Sie die Auflösung fest.
34

Anhang A - Spezifikationen
SPEZIFIKATIONEN
Prozessor
● Intel® Pentium® M Prozessor
Arbeitsspeicher
● Hauptspeicher erweiterbar bis zu 1 GB DDR SDRAM
(Hauptspeicher nur von qualifiziertem Fachpersonal erweitern
lassen)
● Zwei PC2100 (DDR-266) soDIMM Sockel
Display und Video
● 15,0-Zoll XGA- TFT- Anzeige. Unterstützte Auflösung 1024x768
mit bis zu 16,7 Mio. Farben
● Intel® 855 Grafik Kontroller - AGP 4X Unterstützung
● Simultan LCD/externer Monitor
● Externer Monitor:
Unterstützung bis 1280 x 1024, 16,7 Mio Farben, 85 Hz
oder
1600x 1200, 16,7 Mio Farben, 60 Hz
● S- Video Ausgang
Speicherkapazität
● Ein externes USB Diskettenlaufwerk (3.5", 1.44 MB) (optional
erhältlich)
● Eine E-IDE Festplatte (2.5", 9.5mm)
● Ein internes CD- oder DVD- oder DVD-RW/ Combo Laufwerk
● Ein Memory Stick/ Secure Digital Combo Steckplatz
Audio
● Sond Blaster Pro und Windows Sound System kompatibel
● Eingebaute Lautsprecher und Mikrofon
● LINE IN und LINE OUT (unterstützt S/PDIF)
35

Anhang A - Spezifikationen
Modem
● High-speed 56Kbps V.92 Fax/ Daten Software Modem
LAN
● Fast Ethernet-Funktion für 10Base-T und 100Base-TX Netz-
werkstandards.
● 802.11b drahtloses LAN
Eingabegeräte
● 84-/ 85-/ 88- Tasten Windows Tastatur
● Ergonomisch angebrachtes Touchpad mit Scroll Taste
● Quick Launch Tasten
● Audio CD Kontroll Tasten
Anschlüsse
● Ein 15-poliger VGA-Anschluss
● Eine Stereo Ausgangsbuchse mit S/PDIF
● Eine Mikrofoneingangsbuchse
● Infrarot-Anschluss (FIR)
● Drei USB-Anschlüsse
● Eine Standardtelefonbuchse (RJ-11)
● Ein Standardnetzwerkanschluss (RJ-45)
● Ein Gleichstromeingangs-Anschluss
● Ein S-Video OUT -Anschluss
● Ein IEEE1394 i.Link- Anschluss
● Ein Typ II / I PC - Karten Steckplatz
● Ein Parallelport (ECP) Druckeranschluss
Stromversorgung
● Hauptbatterie Li-Ion 65 Watt
● Wechselstrom-Adapter 100-240V, AC 50-60Hz, 70W.
● Wiederaufladen System AUS : 2 Std. (95%)
System EIN : 4 Std. (95%)
● Batteriestrom wenig-Warnung
● Suspend-/ Wiedereinsetzen-Fähigkeit
36

Betriebssystem
● O/S Microsoft Windows 2000 / XP
Sonstige Daten
● 270(T) x 327 (B) x 29,8 (H) mm
● Gewicht 2,7 kg (je nach Ausführung)
● Betriebstemperatur: 5 bis 35°C
● Betriebsfeuchtigkeit: 20 bis 80 % RH
● Lagertemperatur: -10 bis 65 °C
Anhang A - Spezifikationen
37

Anhang B - Fehlersuche
FEHLERSUCHE UND - BEHEBUNG
Wenn bei der Arbeit mit Ihrem Computer ein Problem auftritt, versuchen
Sie zuerst, den Fehler mit Hilfe der nachfolgenden Informationen zu
beheben. Wenn sich das Problem damit nicht lösen lässt, erhalten Sie im
erweiterten Servicehandbuch (auf der Gerätetreiber & HilfsprogrammeCD-ROM) weitere Hinweise. Besteht das Problem weiterhin, schalten
Sie zunächst das System für einige Minuten aus und fahren Sie es anschließend wieder hoch. Alle ungesicherten Daten gehen zwar verloren,
aber möglicherweise funktioniert das System wieder. Wenden Sie sich
anschließend an Ihren Händler oder Kundendienstbeauftragten.
Trotz Betätigen des Betriebsschalters bleibt der Computer ausgeschaltet.
Mögliches Problem: Der Akku fehlt oder ist fehlerhaft installiert
Hinweis: Die Betriebsanzeige leuchtet nicht auf.
Problembehebung:
o Stellen Sie sicher, dass sich der Akku im Akkufach befindet und
ordnungsgemäß eingelegt ist.
o Vergewissern Sie sich, dass die Akkukontakte direkt anliegen.
o Verbinden Sie das Notebook mit dem Netzteil, damit der Akku (falls
vorhanden) aufgeladen wird.
Mögliches Problem: Niedriger Akkuladestand
Hinweis: Die Akkuanzeige blinkt.
Problembehebung:
Betreiben Sie den Computer über das Netzteil. Wenn das System nicht
sofort hochfährt, schalten Sie den Computer aus und führen Sie anschließend einen Neustart durch.
38

Anhang B - Fehlersuche
Die Bildschirmanzeige funktioniert nicht.
Mögliches Problem: Der Energiesparmodus ist aktiviert.
Hinweis: Die Suspend-Anzeige leuchtet.
Problembehebung:
o Betätigen Sie den Ein- Aus Taster.
Mögliches Problem: Der Bildschirm ist nicht korrekt justiert.
Problembehebung:
o Drücken Sie die Leertaste, eventuell mehrfach
o Ist ein externer Monitor angeschlossen, schalten Sie diesen ein.
Mögliches Problem: Im System ist ein anderer als der vorhandene
Bildschirmtyp eingestellt.
Problembehebung:
o Drücken Sie die Tastenkombination Fn + F3.
o Ist ein externer Monitor angeschlossen, verbinden Sie diesen mit
einer Stromquelle, und schalten Sie ihn ein. Überprüfen Sie
ebenfalls die Einstellungen für Helligkeit und Kontrast (Weiterge
hende Hinweise zu diesem Thema finden Sie im erweiterten
Servicehandbuch).
Das System arbeitet nicht weiter.
Mögliches Problem: Eine Energiesparfunktion wurde ausgelöst.
Hinweis: Der Bildschirm schaltet sich aus.
Problembehebung:
Drücken Sie eine Taste, oder drücken Sie die Betriebstaste, falls alle
Statusanzeigen erloschen sind.
39

Anhang B - Fehlersuche
Mögliches Problem: Ein Softwarefehler hat einen Systemabsturz verursacht.
Problembehebung:
o Im Handbuch des Betriebssystems erhalten Sie weitere Hinweise.
o Lässt sich das Problem nicht beheben, führen Sie einen System
neustart durch. Dadurch gehen jedoch alle ungespeicherten Daten
verloren! Funktioniert auch dies nicht, schalten Sie den Computer
kurz aus und anschließend wieder ein.
Warnungen
Bei jedem Systemstart wird ein Selbsttest (POST) durchgeführt. Tritt ein
Fehler auf, erscheint eine Fehlermeldung, die das Problem kurz beschreibt. Informationen zur weiteren Vorgehensweise entnehmen Sie
dem erweiterten Servicehandbuch.
40

Index
A
Akku 24
Akkuentriegelung 23
Akkus 8
Akkuschacht 18, 23
aktiviert 24
Anweisungen 20
Anwendungen 26
Arbeitstspeicher 23
Arretieren 18
Audio CDs 30
Auflösung 20, 34
Auslieferungszustand 33
auswerfen 30
automatisch 29
Autostart 29
B
Berührung 29
beschädigte Akkus 8
Betriebssystem 20
Betriebssystemen 27
Browser 26
C
Caps Lock 24
CD 29
CD - Schlitten 29
CD-Player 17
D
Datenkommunikation 32
Desktops 20
Diebstahlsicherung 22
Display 17
Doppelklick 28
Doppeltipp 28
Drag´n Drop 28
drahtlos 10
drahtlose Netzwerk 26
Drahtloses LAN 24
Drucker 23
DSL - Internet 32
E
Ein / Aus- Taster 20
Einfachklick 28
Einfachtipp 28
Eingebautes Mikrofon 17
einrastet 18
Einschaltknopf 17
einzuschalten 20
Eject 31
elektrischer Schlag 9
Energieeinsparung 25
Energieeinstellungen 20
Entfernen 31
Entriegelung 17
Entriegelungsknopf 29
entsorgen 8, 9
Entsorgung 9
Erscheinungsbild 20
Erschütterungen 8
erweiterten 28
explodieren 8
Explosionsgefahr 9
F
Fachhändler 8
Fachpersonal 8
fallengelassen 9
Farbtiefe 20
Festplatte 24, 33
Festplattenschacht 23
Feuchtigkeit 8
Fingerbewegungen 29
Flüssigkeit 9
Fn- Taste 25
G
Garantierechte 9
geladen 18
Grafik- Grundfunktionen
20
Grafiktreiber 34
Grundfunktionen 28
H
Halterung 18
Handauflage 17
Hausmüll 9
Helligkeit 25
Hitze 8
Hotkeys 25
I
Inbetriebnahme 17, 18
Informationen 20
Infrarot Sender/ Empfän-
ger 22
Installation 16
Installationen 29
Installationshinweisen 20
Internet 26
ISDN 32
K
Kabel 8
Kaltstart 20
Kombi - Steckplatz 31
Komponenten 17
Kopfhörer 23
L
Label 29
Laden 8
Ladestand 21
Ladezeiten 18
Laufwerkszugriff 24
Launchmanager 25
Lautsprecher 17, 23
Lautstärke Regler 22
Lautstärkeregelung 30
LCD 25
Lieferumfang 16
LINE IN 23
Linkshänder 28
Lüftungsöffnungen 22
41

M
Mail 26
Mausrad 28
Memory Stick 22, 31
Mikrofon 23
Modem 23, 32
Modembuchse 32
Monitor 23, 25
MultimediaCard 31
N
Netzkabel 19
Netzteil 8, 19, 23
Netzwerk 23, 26, 31, 32
Netzwerk- Hub 32
Netzwerkadapter 32
Netzwerkkabel 32
Neustart 20
Num Lock 24
O
Originalverpackung 16
P
Ruhezustand 21
S
S-Video TV Ausgang 23
sauberes 9
Schreibmaschine. 27
Schutzfunktionen 21
Scroll Pad 17
Scrolltaste 28
Secure Digital 31
Slot 31
Spannung 19
Speichern 21
Spindel 29
Standardeinstellung 20
Standby 24
Statusanzeige 21
Steck 19
Stecker 8
Strg + Alt + Entf. 20
Stromsparmodus 24, 25
Stromsparsystem 21
Stromversorgung 8
Suspend-Modus 21
Systemuhr-Batterie 9
W
Warmstart 20
Wartungsbedarf 9
Wiedergabe 30
Wiederherstellung 33
Wireless LAN 10
WLAN 10
Z
Zusatztaste 25
Pause 30
PC - Karten 31
PC - Karten - Entriegelung
22
PC - Karten Steckplatz 22
PCMCIA 31
Power 24
Q
qualifiziertes Fachpersonal
9
Quick Launch Tasten
17, 26
R
Recovery CD 33
reinigen 8
Reiniger 9
Reparatur 16
42
T
Tastatur 17
Tastenkombinationen 27
teilgeladen 18
Telefonbuchse 32
Telefonkabel 32
TouchPad 17, 28
Treiber 26
U
Überhitzung 22
unsachgemäß 8
USB 23
V
Verpackung 16
Verriegelungen 18
vollständig 18

434445


User Guide
Multimedia Notebook Computer

46

Contents
NOTE...................................................................................................... 49
IMPORTANT SAFETY INFORMATION .................................................. 52
Wireless LAN................................................................................................ 54
Additional safety notes for units with wireless LAN ...................................... 55
CE-labelling for units with wireless LAN ....................................................... 56
Restrictions................................................................................................... 57
Radio frequencies for units with wireless LAN .............................................. 58
Frequencies.............................................................................................. 58
Legal requirements - exception clauses for units with Wireless LAN ............ 59
SHIPPING CONTENTS .......................................................................... 60
PREPARATION....................................................................................... 61
INSERTING THE BATTERY ............................................................................ 62
REMOVING THE BATTERY ............................................................................ 62
POWER SUPPLY ........................................................................................... 63
Switching the Computer On .......................................................................... 64
Powermanagement ....................................................................................... 65
SYSTEM OVERVIEW .............................................................................. 66
LEFT AND RIGHT SIDES ............................................................................... 66
REAR VIEW .................................................................................................. 67
UNDERSIDE.................................................................................................. 67
EXPLANATION OF LED DISPLAYS ................................................................ 68
Hot Keys ....................................................................................................... 69
THE Quick Launch KEYS ............................................................................... 70
The Keyboard ................................................................................................ 71
THE TouchPad ............................................................................................... 72
THE CD-ROM/DVD DRIVE ............................................................................ 73
Audio - CD CONTROLS .................................................................................. 74
VOLUME ...................................................................................................74
THE PC - CARD Slot ..................................................................................... 75
THE Memory Stick/ SD/ MMC -Slot .............................................................. 75
THE DATA / Fax Modem ............................................................................... 76
THE LAN-Port ................................................................................................ 76
INSTALLATION INSTRUCTIONS ........................................................... 77
Restoring the drivers ..................................................................................... 77
Windows 2000 / XP ...................................................................................... 77
Setting the Resolution .............................................................................. 78
SPECIFICATIONS................................................................................... 79
FAULT DIAGNOSIS AND TROUBLESHOOTING ................................... 83
47

48

NOTE
The company reserves the right to make unadvertised modifications to
this document. Information contained in this document is intended solely
for reference purposes and in no way constitutes a basis for asserting
obligations on the part of the manufacturer or vendor. Neither the
manufacturer nor the vendor accept liability for any errors or inaccuracies
that this document may contain. Nor is liability accepted for damages or
losses that arise from the incorrect application of this guide. No part of
this document and the accompanying software may be copied, translated,
or distributed without the prior permission of the dealer, manufacturer, or
authors. Archive copies for private use are excepted from this rule. The
use of this product’s trademarks is subject to the conditions listed in the
advanced service handbook on the device drivers and utilities CD-ROM.
Brand or product names mentioned in this document may be names
protected by copyright law or registered trademarks of other companies.
These are mentioned only for identification purposes and have no
recommendatory character in respect of the product or manufacturer.
© Maxdata 2003
Legal Information
You can find additional legal information and conditions in the advanced
service handbook on the device drivers and utilities CD-ROM (Utility CD).
Acrobat and the Acrobat logo are trademarks of Adobe Systems
Incorporated or its subsidiaries. In certain jurisdictions these trademarks
may be registered.
Intel and Pentium are registered trademarks of Intel Corporation. MS-DOS,
Windows, Windows 95, Windows 98, Windows Me, Windows 2000,
Windows XP, and Windows NT are registered trademarks of Microsoft.
Application & References
This user guide offers an introduction and is intended to provide instructions
for your first steps with your new computer. For more in-depth specialist
information, please consult the advanced service handbook.
All references refer to the accompanying device drivers and utilities CDROM, which contains the advanced service handbook (in Adobe Acrobat
format), drivers, and special utilities for your notebook. If you wish to use
an operating system that is not mentioned in these documents, consult
49

the ReadMe files on the CD-ROM for the relevant information. Please
also consult your dealer to make sure that it is possible to run your chosen
operating system on your notebook. The operating system is not contained
on the device drivers and utilities CD-ROM.
Note: Some or all system configurations may have been made already. If
this is not the case or if parts of the system need to be reconfigured,
please consult the advanced service handbook on the device drivers and
utilities CD-ROM for instructions on how to do this.
Declaration:
This device meets the EN 55022 product standard for interference
emissions, the EN 50082-1 basic standard for interference, and the
EN 60950 low voltage directive standard.
If any modification that has not been agreed with the manufacturer is
made to the device, adherence to these standards can no longer be
guaranteed.
To ensure electromagnetic compatibility (EMC), please observe the
information given in the handbook.
Sound Power Level
The workplace-based sound power level is less than 55 dB A.
Federal Communications Commission (FCC) Note
This device has been tested and found to comply with the limits for a
Class B digital device, pursuant to Part 15 of the FCC Rules.
50

Operator Note:
This device has been carefully RF suppressed and tested to avoid radio
interference. However, please pay attention to the following concerning
external data cables:
If it becomes necessary to replace a data cable specified by the
manufacturer, then for correct radio interference suppression the operator
must ensure that replacement cables match the original cable also as
pertains to screening quality.
Use only screened cables and external devices that are identical with this
product in safety level and EMC behavior.
In case of non-observance, compliance with the standards mentioned
above is no longer guaranteed!
CD-ROM Drive:
The built-in CD-ROM drive is a Class 1 laser product. Do not open the
device and do not look into the beam, not even with optical instruments.
Unless the drive is expressly designated for the simultaneous use of more
than one CD, never insert more than one CD into the drive.
Returning the Device
We offer a return guarantee: We use materials
that allow professional reprocessing or disposal.
This means that your notebook is fully recyclable.
The outside packaging and all inner parts of the
box can be disposed of as waste paper.
51

Safety Information
IMPORTANT SAFETY INFORMATION
Although the notebook is highly robust, it is not indestructible. To prevent
damage from occurring, please pay attention to the following:
• Avoid exposing the notebook to strong shocks or vibrations.
• Keep it away from intense heat (radiators, direct sunlight).
• Protect the notebook from electromagnetic interference.
This will also prevent data loss.
• Do not expose it to moisture. This is an electrical device!
• Be sure to use the correct power supply.
Always use an approved power adapter.
The power adapter requires a fluctuation-free and
uninterrupted power supply. If you have any questions,
consult your local electricity supply company.
The power adapter must be fitted with a grounded
(earthed) plug.
Never pull the cable to unplug the power supply – always
pull the plug itself.
Disconnect the external power supply (power adapter or car adapter)
before cleaning the computer.
• Notes on Using Batteries
Only ever use batteries designed for use with this computer.
Recharge batteries via the notebook.
Do not attempt to repair faulty batteries yourself. Entrust
repairs to your dealer or qualified service personnel.
Keep damaged batteries away from children and dispose
of them properly as soon as possible. Exercise caution in
handling damaged batteries. Batteries may explode if
exposed to fire or improperly handled or disposed of.
The notebook is provided with a battery. The battery is recyclable. It is
prohibited by law to dispose of the battery in ordinary household waste. If
you have questions concerning proper disposal, consult your garbage
collection service.
52

Safety Information
• Note on the System Clock Battery
Caution: There is a risk of explosion if batteries are installed incorrectly.
Replace the battery only with a battery recommended by
the manufacturer or with a battery of the same type.
Dispose of the battery according to the manufacturer’s
instructions.
• Servicing
Do Not Service Your Computer Yourself! You could invalidate your
warranty rights and expose yourself and the device to the risk of
electrical shock. If servicing is required, consult qualified service
personnel. Disconnect the computer from the power supply. If the
following problems occur, consult qualified service personnel:
- Power adapter or power cable is damaged or frayed.
- Liquid has entered the computer.
- Despite operating it correctly, the computer is not
functioning properly.
- The computer has been dropped or damaged.
• Cleaning
Never apply cleaning agents directly to the computer. Use only a soft, lintfree cloth. Never use volatile (petroleum distillates) or scouring cleaning
agents.
53

WIRELESS LAN
(wireless network- abbreviation = WLAN)
Your Notebook contains a Wireless LAN module of the type „Intel® Pro
Wireless Mini PCI“. This module allows you to set up a wireless-based
network, and to connect with an existing wireless network. It works
according to the IEEE802.11b standard.
WLAN technology allows users to set up wireless connections inside a
local area (e.g. in a company or campus building, or in a public building
such as an airport). WLANs can be used in temporary offices, in
locations where it is not possible to set up extensive cable installations,
or to extend an existing LAN so that users in different parts of a building
can work at different times.
There are two different ways to operate a WLAN.
In fixed WLANs, wireless stations (devices with radio network cards or
external modems) set up connections with wireless access points,
which act as bridges between the stations and the existing network
backbone. In Peer-to-Peer (ad hoc) WLANs several users can set up a
temporary network within a limited area such as a conference room,
without using access points, and providing there is no need to use
network resources.
In 1997 the IEEE confirmed the standard 802.11 for WLANs; this set a
data transfer rate of from 1 to 2 Mbit/s (Megabits per second). With
802.11b, the new governing standard, the maximum data transfer rate is
11 Mbit/s over a frequency band of 2.4 GHz (Gigahertz).
54

ADDITIONAL SAFETY NOTES FOR UNITS WITH WIRELESS LAN
A wireless LAN component is integrated into your
Notebook. For this reason you must make sure that
you comply with the following notes on safety:
• Switch off the Notebook when you are in an
aircraft or while driving a car.
• If you are in a hospital, an operating room or
close to an electronic medical system, switch
off the wireless components in the Notebook!
The radio waves which are transmitted could
disrupt the working of the medical equipment.
• Keep the Notebook at least 20 cm away from a
heart pacemaker, otherwise there is a risk that
the radio waves could disrupt the normal
working of the pacemaker.
• The radio waves which are transmitted could
give rise to interference noise in hearing aids.
• When its radio components are switched on, do
not place the Notebook close to inflammable
gases or in an environment which could be at
risk of explosion (e.g. paint shop), since the
radio waves which are trans mitted could set
of a fire or an explosion.
• The range of the wireless connection depends
on the environmental and other ambient
conditions.
• When transferring data over a wireless
connection, unauthorized Third Parties can also
receive the data.
55

MAXDATA Computer AG is not responsible for disruptions to radio or
television reception which are caused by unauthorized alterations to this
unit. MAXDATA also accepts no responsibility for the replacement or
the exchange of connecting cables and units which were not specified
by MAXDATA Computer AG. The user alone is responsible for the
elimination of disruptions caused by this type of unauthorized alteration;
he is also responsible for the replacement or the exchange of the units.
CE-LABELLING FOR UNITS WITH WIRELESS LAN
As delivered, this device complies with the requirements of the
Guideline 1999/5/EG of the European Parliament and of the Council
dated the 9. March 1999 concerning radio equipment and
telecommunications facilities, and the mutual recognition of conformity.
This Notebook may be used in Belgium, Denmark, Germany, Finland,
France, Greece, Great Britain, Ireland, Italy, Luxembourg, the
Netherlands, Austria, Portugal, Sweden, Switzerland, Spain, Iceland,
Liechtenstein and Norway.
Current information on any possible restrictions in its operation can be
obtained from the appropriate authorities in each country. If your
country is not included in the above list, then please contact the
appropriate supervising authority, in order to check whether the use of
this product is permitted in your country.
Belgium - www.bipt.be,
Denmark - www.tst.dk,
Germany - www.regtp.de,
Finland - www.ficora.fi,
France - www.art-telecom.fr,
Greece - www.eett.gr,
England - www.oftel.gov.uk,
Ireland - www.comreg.ie,
Italy - www.agcom.it,
Luxembourg - www.etat.lu/ILT,
56
Netherlands - www.opta.nl,
Austria - www.rtr.at,
Portugal - www.urt.gov.pt,
Sweden - www.pts.se,
Switzerland - www.bakom.ch,
Spain - www.cmt.es,
Iceland - www.pta.is,
Liechtenstein - www.ak.li
Norway - www.npt.no

RESTRICTIONS
• FRANCE
Restricted frequency range: In France, you may only use channels 10 to
11 (2457 MHz or 2462 MHz). It is forbidden to use the unit outside of
enclosed areas.
Info: www.art-telecom.fr
•ITALY
An official authorization is also required to use the unit in internal areas.
For more detailed information about the necessary procedure to do this,
please contact your provider.
It is forbidden to use the unit outside of enclosed areas.
Info: www.agcom.it
• NETHERLANDS
A licence is required to use the unit in the open. For more detailed
information about the procedure to be followed for this, please contact
your provider.
Info: www.opta.nl
57

RADIO FREQUENCIES FOR UNITS WITH WIRELESS LAN
The following information was correct at January 2002. You can obtain
current information from the appropriate authorities in your country (e. g.
www.regtp.de).
FREQUENCIES
Radio network cards and adapters are designed in accordance with
IEEE-Standard 802.11b for use in the ISM frequency band (Industrial,
Scientific, Medical) between 2.4 and 2.4835 GHz. Because of the DSSSprocedure (Direct Sequence Spread Spectrum), each of the 11 usable
radio channels takes up a width of 22 MHz; this means that up to three,
independent channels are available (e.g. 3, 8 and 11). The following table
lists the authorised channels in your country:
Channel MHz Europe, R&TTE France, R&TTE
1 2412 X
2 2417 X
3 2422 X
4 2427 X
5 2432 X
6 2437 X
7 2442 X
8 2447 X
9 2452 X
10 2457 X X
11 2462 X X
58

LEGAL REQUIREMENTS - EXCEPTION CLAUSES FOR UNITS
WITH WIRELESS LAN
The installation and use of an unit with Wireless LAN may only take
place when in accordance with the instructions contained in the user
documents. The user documents are included in the material supplied
with the product. All alterations or modifications made to this unit which
are not expressly authorised by the manufacturer may lead to
cancellation of the right of the user to operate the unit. The manufacturer
is not liable for radio disruptions during the reception of radio and
television signals which are due to non-authorised alterations to the unit
or to the exchange or connection of cables and accessories, where
these are not in accordance with the recommendations of the
manufacturer. It is the responsibility of the user to remove any
interference which may arise as a result of any non-authorised
alterations, or the addition or replacement of components. Neither the
manufacturer nor his authorised dealer and wholesaler are liable for
damages or breaches of legal regulations which result from an
infringement of these guidelines.
59

Shipping Contents
SHIPPING CONTENTS
Before you begin installing your notebook, make sure that all
components are present.
If any item listed in the shipping contents is missing from your
computer package, please contact your dealer immediately.
• Notebook
• Battery
• Utility CD
• Power adapter
• Power cable
• User guide
• CD- or DVD/DVD-RW- ROM or Combo- drive (built in)
• Modem cable
Please retain the original packaging in case you need to send the device
for repairs or upgrades. Please store the packaging safely.
60

Preparation
PREPARATION
Before first using the computer, make sure you are familiar with the
individual components of your system.
Press the release catch (1) and open the display (2).
(1) Press release catch
(2) Open the display
Fig. 1
Fig. 2
(1) LCD display
(2) Status LEDs
(3) CD player controls
(4) Power button
(5) Quick launch keys
(6) TouchPad
(7) Built-in microphone
(8) Keys and scroll pad
(9) Hand rest
(10) Keyboard
(11) Loudspeaker
61

Preparation
INSERTING THE BATTERY
(The battery is included in the notebook’s shipping contents. This battery
is only partially charged.
Fig. 3
(1) Insert the battery into the battery slot in the direction of the arrow.
(2) Gently push the battery until it locks into place.
(3) Lock the battery into position.
The battery can now be charged up.
Make sure that you allow the battery to charge for
TWO hours if the computer is switched off, or for FOUR
hours if the computer is switched on!
It is absolutely essential that the first time you charge the
battery you fully charge it! Do not unplug the notebook
from the power adapter until the battery is fully charged.
REMOVING THE BATTERY
Slide the catches (3)+(4) backwards. The battery is released.
Slide the battery out of the holder and lift it upwards out of the battery
slot.
You can now run the notebook with the power adapter alone!
62

POWER SUPPLY
Preparation
You can choose to
run the notebook via
battery or power
supply.
The first time you
use the computer,
you need to use the
power adapter. Use
only the supplied
power adapter.
Using the wrong
power adapter can
cause damage to
the computer.
The power adapter
contains no
serviceable parts.
NEVER OPEN THE
POWER ADAPTER !
The notebook is supplied with a power cable and
a universal, self-adjusting power adapter. The
power adapter can operate with any constant
voltage between 100 and 240 volts.
To use the power adapter:
1. Connect the power adapter to the DC IN
socket on the computer.
2. Connect the power cable to the power
adapter.
3. Connect the power cable to a power outlet.
DANGER OF
DEATH !
Fig. 4
63

Preparation
SWITCHING THE COMPUTER ON
You’ve completed the preparation.
Now operate the on/off button to
switch the notebook on.
Once the computer is switched on, the
on/off switch can perform several
functions depending on the energy
settings.
In the standard settings, pressing it
again will switch off the computer.
Tip:
Fig. 5
Note:
Please note that with the Windows
operating systems you should always
switch off the computer as follows:
Click the Start button
Select Shut Down
Click OK
This avoids any problems with the
hard disk and operating system.
If you experience a program or system catch,
press the buttons: Ctrl + Alt + Del. If you’re
fortunate this will enable you to end only the
task that has crashed and/or restart the
computer.
(Warm start). If this does not work, hold down
the on/off button for more than four seconds –
this will switch off the computer. You can now
start up the computer as normal (cold start).
The operating system is installed the first time you switch on the
computer. Please follow the operating system’s installation instructions
here.
After installation and restarting, the computer is ready to use.
The basic graphics functions allow you to modify the resolution, color
depth, and desktop appearance.
You can find more detailed information on this point in the installation
instructions.
64

POWERMANAGEMENT
Your system is compatible with APM and the
newer (and more efficient) ACPI energy saving
system.
Note on PC Cards
Never unplug a PC card
while the system is in
save-to-disk mode. This
would deactivate the
slot and problems could
occur with a modified
system configuration
the next time you start
up the computer
HARDWARE (Battery Status & Warnings)
After completing the POST (power-on self-test),
the battery status display shows the charge state
of the battery. The symbol flashes when the
battery charge is low. Save your data immediately
and connect the power adapter.
Low charge level & SUSPEND
When the battery runs low (without the power
adapter connected), one of these two protective
functions is automatically activated:
Without hibernate
If there is no save-to-disk file or partition set up on
your system, then current data will be stored in
RAM and the system automatically switches into
suspend mode.
Powermanagement
With hibernate
Data is saved in the special file or partition on the
hard disk reserved for this purpose. The computer
then automatically switches off. If there is no
save-to-disk file or partition available, the system
switches into suspend mode.
65

System Overview
SYSTEM OVERVIEW
LEFT AND RIGHT SIDES
Fig. 6
(1) Volume control
(2) Memory Stick, Secure Digital and MultiMedia card slot
(3) PC card slot
(4) PC card release catch
(5) Infrared sender/ receiver
Fig. 7
(1) Kensington lock - anti-theft device
(2) Ventilation opening
All air intake and ventilation
openings must be kept free
from obstructions at all
times. If not, the device is
liable to overheat.
66

REAR VIEW
(1) Power in socket
(2) S-Video TV output
(3) Connector for external monitor
(4) Printer port
(5) Modem port
(6) Network port
(7) IEEE 1394 port
(8) USB port
(9) Loudspeaker/ headphones socket
supports S/PDIF output
(10) LINE IN / microphone socket
UNDERSIDE
System Overview
Fig. 8
* All air intake and
ventilation openings
must be kept free
from obstructions at
all times. If not, the
device is liable to
overheat.
Fig. 9
(1) RAM cover
(2) Hard disk slot
(3) Battery slot
(4) Battery release (spring-
loaded)
(5) Battery release (with
lock)
67

System Overview
EXPLANATION OF LED DISPLAYS
Fig. 10
(1) Wireless LAN
(2) Power
(3) Standby
(4) Drive access
(5) Battery
(6) Caps Lock
(7) Num Lock
Table 1
68
Symbol
Meaning
Lights when the wireless LAN properties are
activated.
Lights when the computer is switched on.
Flashes when the battery reaches a low charge
condition.
Lights when the computer is in power saving
mode
Hard disk or CD-ROM drive is being accessed.
Lights when the battery is charging.
Lights when Caps Lock is on.
Lights when Num Lock is on.

System Overview
HOT KEYS
(Shortcut key combinations with special functions)
To activate the hot keys, press and hold down the Fn key and then
press the desired additional key. For certain functions it may be
necessary to install the Launch Manager. You can find additional
information on this on the next page.
MeaningKeys
Fn + F1
Fn + F2
Fn + F3
Fn + F4
Fn + F5
Fn + PgUp
Fn + PgDn
Fn +
Fn +
Fn + F11
Fn + F12
Hot Key Help shows a list of hot keys
Switches to power saving mode
Switches between LCD / monitor / both
Switches the LCD to black to save energy
Switches the loudspeaker off / on
Same operation as the Home key
Same operation as the End key
Increases LCD brightness
Reduces LCD brightness
Switches Num Lock off / on
Switches Scroll Lock off / on
Table 2
69

System Overview
THE QUICK LAUNCH KEYS
There are five quick launch keys on the left of the keyboard. You can use
these to launch frequently used applications.
If the keys are not assigned to any functions, you can find the drivers to
activate the keys on the Utility CD.
The path is: Drivers\Operating System\Launch Manager.
e.g.: D:\Drivers\WinXP\LAUNMGR\setup.exe
Fig. 11
(1) Wireless LAN - activates a wireless network
(2) E-mail – starts the e-mail program
(3) Internet – starts the Internet browser
(4) Customizable – can be assigned to any application using the Launch
Manager
(5) Customizable – can be assigned to any application using the Launch
Manager
70

THE KEYBOARD
Typewriter -
Function keys
Special keys -
-
System Overview
Your notebook’s keyboard has all the functions of
a normal AT-compatible keyboard plus some
extras:
These keys correspond to a typewriter’s keys.
In many operating systems (and applications),
special functions are available via these keys. You
can find more detailed information on this in the
relevant handbooks.
These keys (and key combinations) are used for
controlling various hardware functions.
Press Fn + Num Lock
to activate this field
The LED lights up
Fig. 12
Fig. 13
Hot Keys:
For the functions, see
table 2 – Hot Keys
71

System Overview
THE TOUCHPAD
The system automatically sets up the integrated TouchPad. Provided
you are using Windows, you do not need to install any drivers for the
basic functions. If you wish to use the advanced functions, you can find
the drivers to activate the keys on the Utility CD. The path is Operating
System\Touchpad. e.g.: D:\WinXP\Touchpad\setup.exe.
You will find the following under the sensor field:
(1) Left „mouse“ button
(2) Scroll button – works like a mouse wheel
(3) Right „mouse“ button
Note for left-handers: Most operating systems
enable reversal of the mouse buttons.
Fig. 14
Function Left button Right button Scroll button
Run
Select
Drag and
Drop
Open
short-cut
menu
Scroll
Double-click
Single-click
Click and hold
down the button,
then move the
cursor to the
position you want,
using the pad.
Let go.
Single-click
Click at the top /
bottom / right / left
Sensor field
Double-touch
Single-touch
Double-touch,
and on the
2nd touch keep
your finger on
the pad and
move it to the
position you
want. Lift
finger from
pad
72

System Overview
When using the TouchPad make sure your finger is clean and dry. The
TouchPad reacts to finger movements. The lighter it is touched, the
better it reacts. Pressing hard will not increase its accuracy.
THE CD-ROM/DVD DRIVE
To insert a CD, press the eject button
on the front side of the drive.
Fig. 15
Fig. 16
Place a CD onto the spindle with the label side facing up and push it
gently down onto the spindle.
Push the CD tray back in until it locks into place. The CD is now ready to
read.
Some CDs have an autostart function. This means that installation
programs or music CDs automatically run after you place them in the
drive.
73

SYSTEM OVERVIEW
AUDIO - CD CONTROLS
You can play audio CDs using the Audio CD controls without having to
start your computer.
(1) Previous track
(2) Next track
(3) Play / Pause
(4) Stop / Eject
(5) Status display
(6) Power – Switches the
CD player on/off
Fig. 17
VOLUME
Fig. 18
74
(1) Volume down
(2) Volume up

SYSTEM OVERVIEW
THE PC - CARD SLOT
The computer is provided with a PC card slot. This is a PCMCIA 3.3 V/
5 V slot, Type II.
To insert a PC card, push it into the slot until it locks
into place. Set the connection you require (e.g.
network connection).
You can also consult the documents for the relevant
card.
Fig. 19
To remove the card, push the eject
button next to the slot. The button
will pop outwards. Pressing the slot
again releases the PC card.
Fig. 20
THE MEMORY STICK/ SD/ MMC -SLOT
The computer is provided with a combination slot. This slot accepts
Memory Sticks, SD (Secure Digital) and MMC (Multimedia card) cards.
Insert these cards into the slot holding the printed
side upwards. Once it has locked into position
completely, you can access information on the card.
To remove the card press it again. It will be unlocked.
You can then remove the card from the slot.
Never remove the card while data is being read from
or written to the card!
If you cannot access the card, you can find the drivers to activate the
cards on the Utility CD.
The path is: Drivers\Operating System\CARDREAD.
Fig. 21
75

SYSTEM OVERVIEW
THE DATA / FAX MODEM
The system automatically sets up the integrated analog modem. To use
the modem functions, connect the modem socket to an analog
telephone socket (not ISDN) using the telephone cable.
Proper Use:
The modem can be connected to all analog sockets (TBR 21) in Europe.
It is to be used solely for data communication purposes.
Do not attempt to connect the
modem to an ISDN telephone
socket! This would result in serious
damage to the device.
Fig. 22
THE LAN-PORT
The built-in network adapter enables your
computer to connect to the Internet via a 10/100
Mbps network or DSL.
The connection is made via an Ethernet network
cable and RJ45 connectors. These are inserted
on the back of the computer and into an available
network hub or DSL socket.
Under no circumstances should you confuse a network cable RJ45
connector with an ISDN connector! NEVER attempt to connect the
LAN adapter to an ISDN telephone socket!
This would result in serious damage to the device.
76
Fig.22

Software
INSTALLATION INSTRUCTIONS
RESTORING THE DRIVERS
Your system is supplied in a preloaded condition. This means that all the
data and drivers that the system requires are already on the hard disk.
In case you erase and/or format your hard disk drive, the system
drivers are stored on the Utility CD supplied with the computer.
After reinstalling the operating system (for example, with the Recovery
CD), this allows you to restore your notebook to a usable condition.
WINDOWS 2000 / XP
77

Software
Run the „setup.exe“ file in each of the directories indicated.
We recommend that you first install the Chipset driver. And then the
graphics driver (VGA). This will improve the appearance of the desktop
environment.
It doesn’t matter which order you complete the installation in.
SETTING THE RESOLUTION
After installing the graphics drivers, set the resolution to 1024 x 768
pixels.
You do this in the following way:
Right-click on any free area of the desktop
Select <Properties>
In the Display Properties window, click the Settings tab.
Here you can set the slider to 1024 x 768.
Click <Apply> to set the resolution.
78

Appendix A -
Specifications
SPECIFICATIONS
Processor
• Intel® Pentium® M Prozessor
RAM
• Main memory expandable up to 1 GB DDR SDRAM
• Two PC2100 (DDR-266) soDIMM sockets
Display and Video
• 15.0 inch XGA TFT display. Supported resolution 1024 x 768
with up to 16.7 million colors
• Intel® 855 Graphics Controller - AGP 4X support
• Simultaneous LCD/external monitor
• External monitor:
Supports up to 1280 x 1024, 16.7 million colors, 85 Hz
or
1600 x 1200, 16.7 million colors, 60 Hz
• S-Video output
Storage Capacity
• One external USB floppy disk drive (3.5", 1.44 MB) (optionally
available)
• One E-IDE hard disk drive (2.5", 9.5 mm)
• One internal CD- or DVD- or DVD-RW/ combo drive
One Memory Stick / Secure Digital combo slot
Audio
• Sound Blaster Pro and Windows Sound System compatible
• Built-in loudspeaker and microphone
• LINE IN and LINE OUT (supports S/PDIF)
Modem
• High-speed 56 Kbps V.90 fax/data software modem
79

Appendix A - Specifications
LAN
• Fast Ethernet for 10Base-T and 100Base-TX network
standards
• 802.11b wireless LAN
Input Devices
• 84/85/88-key Windows keyboard
• Ergonomically positioned TouchPad with scroll button
• Quick launch keys
• Audio CD control buttons
Ports
• One 15-pin VGA connector
• One stereo output socket with S/PDIF
• One microphone input socket
• Infrared port (FIR)
• Three USB ports
• One standard telephone socket (RJ-11)
• One standard network port (RJ-45)
• One DC IN socket
• One S-Video OUT port
• One IEEE1394 i.Link port
• One Type II/I PC card slot
• One parallel port (ECP) printer port
Power Supply
• Main battery Li-Ion 65 W
• AC power adapter 100-240 V AV, 50-60 Hz, 70 W.
• RechargingSystem OFF: 2 hours (95%)
System ON: 4 hours (95%)
• Battery power low warning
• Suspend/restore capability
Operating System
• O/S Microsoft Windows 2000 / XP
80

Appendix A - Specifications
Other Data
• Dimensions 270 (D) x 327 (W) x 29.8 (H) mm
• Weight 2.7 kg (depending on model)
• Operating temperature: 5 to 35°C
• Operating humidity: 20 to 80 % RH
• Storage temperature: -10 to 65 °C
81

Appendix A - Specifications
82

Appendix B - Troubleshooting
FAULT DIAGNOSIS AND TROUBLESHOOTING
If a problem occurs while working with your computer, first of all try
using the following information to solve the problem. If the problem
cannot be solved in this way, you can find additional information in the
advanced service handbook (on the device drivers and utilities CDROM). If the problem persists, switch off the system for several
minutes and then restart it. You will lose all unsaved data, but the
system may work properly again. Subsequently contact your dealer or
customer support agent.
Although I’m pressing the power switch the computer stays
switched off.
Possible cause of the problem: The battery is missing or is incorrectly
installed.
Note: The power on LED is not lit.
Troubleshooting:
o Make sure that the battery is in the battery compartment and
installed properly.
o Check that the battery terminals are making direct contact.
o Connect your notebook to the power adapter so that the battery
(if present) can recharge.
Possible cause of the problem: Battery level low.
Note: The battery display LED flashes.
Troubleshooting:
Operate the computer using the power adapter. If the system does not
immediately start up, switch off the computer and then restart it.
83

Appendix B - Troubleshooting
The screen is not working.
Possible cause of the problem: The energy saving mode is activated.
Note: The suspend LED flashes.
Troubleshooting:
o Operate the on/off button.
Possible cause of the problem: The screen settings are incorrect.
Troubleshooting:
o Press the spacebar, several times if necessary.
o If an external monitor is connected, switch it on.
Possible cause of the problem: In the system settings, a different
screen type to the existing one is set.
Troubleshooting:
o Press the Fn + F3 key combination.
o If an external monitor is connected, connect it to a
power supply and switch it on. Also check the brightness and
contrast settings (you can find additional information on
this topic in the advanced service handbook).
The system stops working.
Possible cause of the problem: An energy saving function has been
activated.
Note: The screen switches itself off.
Troubleshooting:
Press any key, or press the on/off button if none of the status LEDs are
lit.
84

Appendix B - Troubleshooting
Possible cause of the problem: A software error has caused a system
crash.
Troubleshooting:
o Additional information is available in the operating system
handbook.
o If you cannot remedy the problem, then restart the system. You
will lose any unsaved data! If this doesn’t work either, briefly
switch off the computer and then switch it back on again.
Warnings
Each time the system starts, it carries out a self-test (POST). If an error
occurs, an error message appears, briefly describing the problem. You
can find information on what to do next in the advanced service
handbook.
85

86

Manuel d’utilisation -
Ordinateur portable multimédia
87

88

Table des matières
MANUEL D’UTILISATION - .................................................................... 87
REMARQUE .......................................................................................... 91
CONSIGNES DE SÉCURITÉ IMPORTANTES ........................................ 94
Réseau local sans fil .................................................................................................. 96
e sécurité supplémentaires applicables aux appareils à réseau local sans fil
(Wireless LAN) ..................................................................................................... 97
Homologation européenne CE applicable aux appareils à réseau local sans fil . 98
trictions ...................................................................................................................... 99
io-fréquences des appareils à réseau local sans fil ................................................. 100
Fréquences .............................................................................................................. 100
Dispositions légales : clauses de non-responsabilité applicables à des appareils à
réseau local sans fil ............................................................................................ 101
ÉQUIPEMENT....................................................................................... 102
LA PRÉPARATION ................................................................................103
Installation de la batterie .......................................................................................... 104
Retrait de la batterie ................................................................................................. 104
Alimentation ............................................................................................................ 105
Mise sous tension de l’ordinateur ........................................................................... 106
Gestion de l’alimentation ........................................................................................ 107
APERÇU DU SYSTEME ........................................................................108
Vues de gauche et de droite .................................................................................... 108
Vue arrière ................................................................................................................ 109
Vue de dessous ....................................................................................................... 109
Explication des voyants DEL.................................................................................... 110
Touches de raccourci ............................................................................................... 111
Touches d’accès direct............................................................................................. 112
Clavier ...................................................................................................................... 113
Pavé tactile ............................................................................................................... 114
Lecteur de CD-Rom / DVD ....................................................................................... 115
Commandes CD audio ....................................................................................... 116
Commande audio de gain .................................................................................. 116
Fente d’insertion de la carte PC .............................................................................. 117
Fente d’insertion de la barrette mémoire et des cartes SD / MMC ........................ 117
Modem de données / Fax ........................................................................................ 118
Raccordement au réseau LAN................................................................................. 118
CONSIGNES D’INSTALLATION ............................................................ 119
RESTAURATION DES PILOTES ....................................................................119
Windows 2000 / XP ............................................................................................ 119
Configuration de la résolution ........................................................................... 120
CARACTÉRISTIQUES TECHNIQUES....................................................121
LOCALISATION DES PANNES ET RÉPARATION ................................ 125
89

90

REMARQUE
La société se réserve le droit de modifier le présent document sans préavis.
Les informations qui y sont contenues servent uniquement de référence
et ne peuvent servir de base en vue d’invoquer les obligations du fabricant
ou de l’intermédiaire. Le fabricant et l’intermédiaire n’encourent aucune
responsabilité pour les erreurs ou imprécisions éventuelles contenues dans
le présent document. La responsabilité est également nulle en cas de
dommages ou de pertes lié(e)s à l’usage incorrect du présent manuel.
Aucune partie de ce document et des logiciels correspondants ne doit
être copiée, traduite ou diffusée sans l’autorisation préalable du revendeur
spécialisé, du fabricant ou des auteurs. A l’exception de ce règlement, les
copies de sécurité sont destinées à un usage personnel. L’utilisation des
marques de ce produit est soumise aux conditions stipulées dans le manuel
d’entretien qui figure sur le CD-ROM des pilotes et des utilitaires. Les
noms de marque et de produit mentionnés dans le présent document
peuvent être des noms et des marques déposés par des sociétés externes
faisant l’objet d’un droit de propriété. Ils sont mentionnés uniquement à
titre indicatif et n’ont aucun caractère de recommandation en ce qui
concerne le produit ou le fabricant.
© Maxdata 2003
Remarques d’ordre juridique
Vous trouverez des remarques et des dispositions juridiques
complémentaires dans le manuel d’entretien du CD-ROM des pilotes et
des utilitaires (Utility-CD).
Acrobat et le logo Acrobat sont des marques de fabrique de Adobe Systems
Incorporated ou de ses filiales. Dans certaines juridictions, les marques
peuvent être déposées.
Intel et Pentium sont des marques déposées de Intel Corporation. MSDOS, Windows, Windows 95, Windows 98, Windows Me, Windows 2000,
Windows XP et Windows NT sont des marques déposées de Microsoft.
Utilisation et références
Ce manuel d’utilisation vous présente et vous initie aux premières
étapes d’utilisation de votre nouvel ordinateur. Vous trouverez des
91

informations plus approfondies destinées aux spécialistes dans le
manuel d’entretien en anglais.
Toutes les références se rapportent au CD-ROM des pilotes et des
utilitaires joint qui contient le manuel d’entretien (au format Adobe Acrobat),
les pilotes et les programmes utilitaires spéciaux pour votre portable. Si
vous souhaitez utiliser un système d’exploitation qui n’est pas mentionné
dans ce document, veuillez vous reporter aux informations concernées
dans les fichiers « ReadMe » qui se trouvent sur le CD-ROM. Veuillez vous
adresser en outre au revendeur spécialisé afin de vous assurer que le
système d’exploitation souhaité peut être utilisé sur votre portable. Le
système d’exploitation ne se trouve pas sur le CD-ROM des pilotes et
des utilitaires.
Remarque : Toutes les configurations système ou une partie de celles-ci
au moins ont déjà été réalisées. Si tel n’est pas le cas ou si des parties du
système doivent être de nouveau configurées, veuillez vous reporter aux
remarques requises à cet effet dans le manuel d’entretien développé
figurant sur le CD-ROM des pilotes et des utilitaires.
Explication :
Cet appareil est conforme à la norme des produits sur les émissions
parasites EN 55022, à la norme de base sur les influences des parasites
EN 50082-1 et à la norme EN 60950 relative à la directive sur les basses
tensions.
En cas de modification de l’appareil non agréée par le fabricant, le respect
de ces normes n’est plus garanti.
Afin de garantir la compatibilité électromagnétique (CEM), veuillez observer
les instructions qui figurent dans le manuel.
Niveau sonore
Le niveau sonore relatif au poste de travail est inférieur à 55dB A
Remarque relative à la Federal Communications Commission
(FCC)
Cet appareil a été testé et déclaré conforme aux conditions d’un appareil
92

numérique de la classe B conformément à la section 15 des directives
FCC.
Remarque à l’attention de l’utilisateur :
Cet appareil a été soigneusement déparasité et contrôlé du point de vue
des réceptions radio-électriques. Vous devez cependant observer les points
suivants en cas de câble externe de données :
si le câble de données spécifié par le fabricant doit être remplacé,
l’exploitant doit veiller à un antiparasitage sans défaut, de sorte que le
câble de rechange et la qualité de l’antiparasitage correspondent au câble
d’origine.
Utilisez uniquement des lignes blindées et des périphériques externes
identiques au produit fourni en terme de niveau de sécurité et de
comportement CEM.
En cas de non-respect, la conformité aux normes susmentionnées n’est
plus garantie !
Le lecteur de CD- ROM :
le lecteur de CD- ROM intégré correspond à un produit laser de classe 1.
N’ouvrez pas l’appareil et ne regardez pas le rayon, même à l’aide
d’instruments optiques.
Si le lecteur n’est pas expressément déclaré apte pour une utilisation
simultanée de plusieurs CD, veuillez par conséquent
toujours insérer un seul CD.
Reprise de l’appareil
Nous accordons une garantie de reprise : En raison
des matériaux utilisés, un retraitement ou une mise
au rebut conforme est indiquée, cela signifie que votre
portable est entièrement recyclable. La caisse en
carton et toutes les parties intérieures en carton peuvent être jointes au
papier de recyclage afin d’être éliminées.
93

Consignes de sécurité
CONSIGNES DE SÉCURITÉ IMPORTANTES
Le portable est certes très robuste, cependant, des dommages peuvent
se produire. Pour éviter cela, veuillez respecter les instructions
suivantes :
• Ne pas exposer le portable à des vibrations élevées.
• L’éloigner de toute source de chaleur importante
(émetteurs de chaleur, rayonnement direct du soleil).
• Le protéger des interférences électromagnétiques.
Vous éviterez ainsi également toute perte éventuelle de données.
• Eviter toute exposition à l’humidité.
Il s’agit d’un appareil électrique !
• Utiliser une alimentation électrique adaptée.
Le bloc d’alimentation utilisé doit être agréé.
Le bloc d’alimentation requiert une alimentation électrique
précise et sans coupure. Pour toute question, veuillez
vous adresser à l’entreprise de distribution d’électricité
locale.
Le bloc d’alimentation doit être équipé d’une prise mise à
la masse.
Ne tirer en aucun cas sur le câble mais uniquement sur la prise pour
couper l’alimentation électrique.
Débrancher l’alimentation électrique externe (bloc d’alimentation ou
adaptateur automatique) avant de nettoyer l’ordinateur.
• Informations relatives à l’utilisation de la batterie
Utiliser exclusivement les batteries prévues pour cet
ordinateur.
Recharger les batteries par le biais du portable.
Ne pas essayer de réparer vous-même des batteries
défectueuses. Faire effectuer la réparation par votre
revendeur spécialisé ou une personne qualifiée.
Tenir les batteries endommagées hors de portée des enfants et les
éliminer le plus rapidement possible. Observer des précautions
d’usage à cet égard. Les batteries peuvent exploser si elles sont
exposées au feu ou si elles ne sont pas manipulées ou éliminées
de manière adéquate.
94

Consignes de sécurité
WARNUNG
L’appareil que vous avez acquis est équipé d’une batterie. La batterie est
recyclable. Il est interdit d’éliminer la batterie avec les ordures
ménagères normales. Pour toute question éventuelle concernant
l’élimination conforme, veuillez vous adresser à l’organisme de collecte
des déchets.
• Remarque relative à la batterie de l’horloge du
système
Attention : en cas de remplacement non conforme de la
batterie, il y a un risque d’explosion. Remplacer la batterie
uniquement par une batterie recommandée par le
fabricant ou par une batterie du même type de fabrication.
Eliminer la batterie conformément aux instructions du
fabricant.
• Maintenance
Ne procédez pas à la maintenance de votre ordinateur vous-même
! Vous pourriez porter atteinte à vos droits de garantie et vous risquez
de vous exposer ainsi que votre appareil à un risque de choc électrique.
Si une maintenance est requise, veuillez vous adresser à une personne
qualifiée. Débranchez l’ordinateur de l’alimentation réseau. Si les
problèmes suivants surviennent, veuillez vous adresser à
une personne qualifiée.
- l’ordinateur ne fonctionne pas correctement, malgré une utilisation
conforme aux instructions.
- l’ordinateur est tombé ou a été endommagé.
• Nettoyage
N’appliquer aucun produit de nettoyage directement sur l’ordinateur.
Utiliser uniquement un chiffon propre et doux. N’utiliser aucun produit de
nettoyage volatil (distillat de pétrole) ou abrasifs
- le bloc d’alimentation ou le câble secteur est
endommagé ou élimé.
- du liquide a pénétré dans l’ordinateur.
95

RÉSEAU LOCAL SANS FIL
(réseau local sans fil : WLAN en abrégé)
Un module de réseau local sans fil du type « Pro Wireless Mini PCI
d’Intel® » est incorporé à votre bloc-notes. Ce module vous permet de
vous relier à un réseau qui fonctionne par l’émission d’ondes radio ou à
un réseau hertzien déjà existant. Il est exploité conformément à la
norme IEEE802.11b.
Les techniques de communication WLAN permettent aux utilisateurs
d’établir des liaisons sans fil à l’intérieur d’une zone locale (par ex. dans
l’enceinte d’un campus universitaire, d’une entreprise ou d’un
établissement public tel qu’un aéroport). Ces installations WLAN sont
utilisables dans des bureaux qui ne sont occupés que temporairement,
sur des sites où la pose de vastes gaines de câblage n’est pas
réalisable ou pour étendre le réseau local existant de manière à ce que
des utilisateurs puissent travailler à divers postes dans un bâtiment et à
des horaires variés.
Deux méthodes différentes servent à exploiter les systèmes WLAN.
Si les installations WLAN sont fixes, des stations sans fil (appareils à
carte de réseau radio ou modems externes) créent des liaisons avec
des points d’accès sans fil qui leur servent ainsi de passerelles avec la
structure de réseau existante. En cas d’installations WLAN (ad hoc) de
poste à poste, plusieurs utilisateurs peuvent former un réseau
temporaire au sein d’une zone circonscrite (par ex. une salle de
conférence) sans recourir à des points d’accès lorsque l’exploitation de
ressources du réseau ne s’impose pas.
C’est en 1997 que l’organisme IEEE (Institute of Electrical and
Electronics Engineers) a entériné la norme 802.11 qui est applicable aux
installations WLAN et stipule un débit de transmission de données de 1
à 2 Mbit/s (Mégabits par seconde). En vertu de la nouvelle norme
802.11b en vigueur, le débit maximal de transmission de données atteint
11 Mbit/s sur une bande de fréquences de 2,4 GHz (Gigahertz).
96

E SÉCURITÉ SUPPLÉMENTAIRES APPLICABLES AUX
APPAREILS À RÉSEAU LOCAL SANS FIL (WIRELESS LAN)
Des composants à réseau local sans fil sont intégrés
à votre bloc-notes. Vous devez donc vous en servir en
respectant impérativement les recommandations de
sécurité suivantes :
• Si vous voyagez en avion ou en voiture,
désactivez le bloc-notes.
• Si vous vous trouvez dans un hôpital, dans une
salle d’opération ou à proximité d’un système
électronique à usage médical, veillez à désactiver
les faisceaux hertziens utilisés par le bloc-notes !
Les ondes radio transmises risquent en effet de
perturber le bon fonc- tionnement des appareils
médicaux.
• Maintenez le bloc-notes éloigné d’au moins 20
cm d’un stimulateur cardiaque afin de ne pas en
altérer le fonctionnement sous l’effet des ondes
radio diffusées, source d’interférences.
• Les ondes radio transmises risquent
d’occasionner des bruits parasites dans les
prothèses auditives.
• Ne pas placer un bloc-notes dont les faisceauxs
hertziens sont activés à proximité de gaz
inflammables ni dans un milieu explosif (par ex.
un atelier de peinture), vu que les ondes radio
émises risquent de déclencher un incendie ou
une déflagration.
• La portée de la liaison radio dépend des
conditions ambiantes et environnementales.
• Il est aussi possible que des tiers non habilités
puissent capter des données transférées par une
communication sans fil.
97

La société MAXDATA Computer AG décline toute responsabilité en cas
de défaillances dans la réception radio ou télévisuelle qui sont
imputables à des modifications non autorisées effectuées sur cet
appareil. La société MAXDATA Computer AG ne saurait non plus se
porter garant du remplacement ou de l’échange de lignes de connexion
et d’appareils qui n’ont pas été indiqués par ses soins. Seul l’utilisateur
est tenu alors de remédier aux perturbations consécutives à de telles
modifications et de remplacer ou d’échanger les appareils.
HOMOLOGATION EUROPÉENNE CE APPLICABLE AUX
APPAREILS À RÉSEAU LOCAL SANS FIL
Tel qu’il se présente à la livraison, l’appareil remplit les exigences de la
directive 1999/5/CE que le Parlement européen et le Conseil ont adoptée
le 9 mars 1999 et qui concerne les équipements hertziens et les
terminaux de télécommunications, ainsi que la reconnaissance mutuelle
de leur conformité.
L’emploi de ce bloc-notes est autorisé en Belgique, au Danemark, en
Allemagne, en Finlande, en France, en Grèce, en Grande-Bretagne, en
Irlande, en Italie, au Luxembourg, aux Pays-Bas, en Autriche, au Portugal, en Suède, en Suisse, en Espagne, en Islande, au Liechtenstein et en
Norvège.
Vous pouvez obtenir des informations actualisées sur d’éventuelles
restrictions d’exploitation auprès des autorités compétentes en la
matière dans le pays d’utilisation respectif. Si votre pays ne figure pas
parmi ceux énumérés, veuillez alors vous adresser à l’instance de
contrôle compétent pour savoir si l’usage de ce produit y est autorisé.
Belgique - www.bipt.be,
Danemark - www.tst.dk,
Allemagne - www.regtp.de,
Finlande - www.ficora.fi,
France - www.art-telecom.fr,
Grèce - www.eett.gr,
Angleterre - www.oftel.gov.uk,
Irlande - www.comreg.ie,
Italie - www.agcom.it,
Luxembourg - www.etat.lu/ILT,
98
Pays-Bas - www.opta.nl,
Autriche - www.rtr.at,
Portugal - www.urt.gov.pt,
Suède - www.pts.se,
Suisse - www.bakom.ch,
Espagne - www.cmt.es,
Islande - www.pta.is,
Liechtenstein - www.ak.li
Norvège - www.npt.no

TRICTIONS
• FRANCE
Plage de fréquences limitée : seuls les canaux 10 et 11 (soit 2457 MHz
et 2462 MHz) peuvent être exploités en France. Il est interdit d’utiliser
l’appareil à l’extérieur de locaux clos.
Pour de plus amples renseignements : www.art-telecom.fr
ITALIE
•
L’emploi à l’intérieur d’un bâtiment est également asujetti à une
autorisation ministérielle. Veuillez contacter le vendeur du produit pour
recevoir des précisions sur la procédure à suivre à cet effet.
Il est interdit d’utiliser l’appareil à l’extérieur de locaux clos.
Pour de plus amples renseignements : www.agcom.it
PAYS-BAS
•
Une licence est nécessaire pour employer l’appareil en plein air. Veuillez
contacter le vendeur du produit pour recevoir des précisions sur la
procédure à suivre à cet effet.
Pour de plus amples renseignements : www.opta.nl
99

IO-FRÉQUENCES DES APPAREILS À RÉSEAU LOCAL SANS FIL
L’information suivante a été établie sur la base des connaissances
acquises en janvier 2002. Des renseignements actualisés sont disponibles auprès des autorités compétentes en la matière de votre pays (par
ex. www.regtp.de).
FRÉQUENCES
Des adaptateurs et des cartes de réseau radio sont prévus en vertu de
la norme IEEE-Standard 802.11b relative à l’exploitation de la bande de
fréquences ISM (industrielle, scientifique, médicale) située entre 2,4 et
2,4835 GHz. Etant donné que chacun des 11 canaux hertziens sollicite
une largeur de 22 MHz en appliquant le procédé DSSS d’étalement de
spectre à séquence directe (Direct Sequence Spread Spectrum), trois
canaux indépendants les uns des autres (par ex. 3, 8 et 11) sont disponibles au maximum. Les tableaux présentés ci-après spécifient les
canaux autorisés dans votre pays:
Canal MHz Europe, R&TTE France, R&TTE
1 2412 X
2 2417 X
3 2422 X
4 2427 X
5 2432 X
6 2437 X
7 2442 X
8 2447 X
9 2452 X
10 2457 X X
11 2462 X X
100
 Loading...