

Page 1

User Guide
English ( 3 – 11 )
Guía del usuario
Español ( 12– 20 )
Guide d'utilisation
Français ( 21 – 29 )
Guida per l'uso
Italiano ( 30 – 38 )
Benutzerhandbuch
Deutsch ( 39 – 48 )
Appendix
English ( 49 – 50 )
Page 2

2
Page 3
VOLUME
ON/OFF
POWER
D
User Guide (English)
Introduction
Congratulations on purchasing the M-Audio Keystation 88 keyboard. The 88 key velocity-sensitive USB
keyboard is designed to easily integrate with your PC or Macintosh computer. Keystation 88 offers semiweighted keys that
creation and education applications, Keystation 88 offers a pitch bend wheel, directional and transport
buttons for software control, plus an assignable modulation wheel and a slider for hands-on control. Though
Keystation 88
Vista, Windows 7, Windows 8, and Mac OS X, we recommend that you spend a few
manual to learn about proper operation, advanced functionality, and programmability.
Box Contents
Keystation 88, USB Cable, Software Download Card, User Guide, Safety & Warranty Manual
Support
For the latest information about this product (system requirements, compatibility information, etc.) and
product registration, visit m-audio.com.
For additional product support, visit m-audio.com/support.
Quick Start
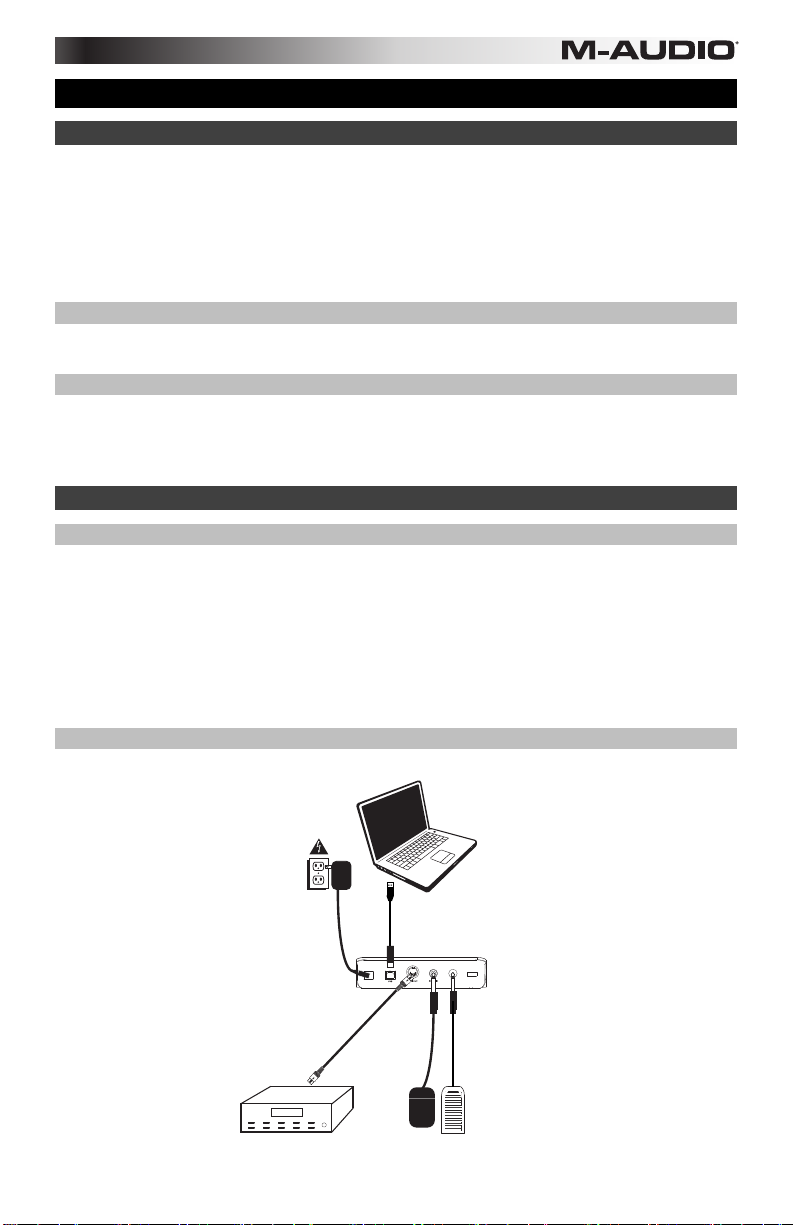
Connecting Your Keyboard
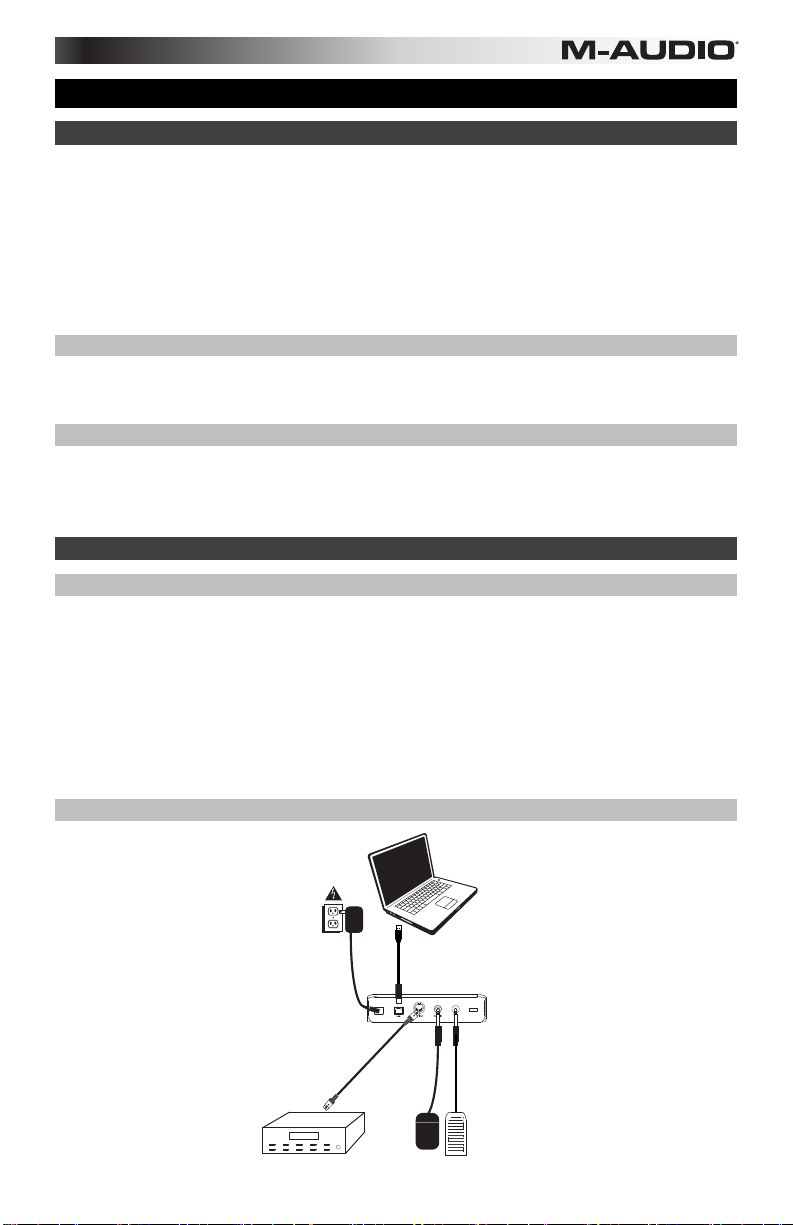
You can power the keyboard either via a powered USB port or a third-party power supply. The Keystations
are low-power devices and an external power supply should not be necessary. It is recommended that you
connect the Keystation to an onboard USB port or to a powered USB hub. Use a USB cable to power
Keystation when connecting to a computer to trigger software synths.
You can also use Keystation 88 with your iPad to control supported music creation apps.
Connecting your Keystation 88 to an iPad requires the iPad Camera Connection Kit, which is available from
the Apple Store.
Connection Diagram
give you the feel of a piano in a compact MIDI controller. Ideal for a multitude of music
is class compliant and features true plug-and-play operation under Windows XP, Windows
minutes reviewing this
COMPUTER*
POWER
ADAPTER*
*SOL
ON/OFF
VOLUME
POWER
SEPARATELY
SOUND MODULE*
SUSTAIN
PEDAL*
EXPRESSION
PEDAL*
3
Page 4

Recommended Installations
Software: We've included Pro Tools | First M-Audio Edition and Ableton Live Lite with your Keystation 88 so
you can get started making music with professional software right out of the box. For Pro Tools | First
M-Audio Edition, register your Keystation 88 on m-audio.com, and follow the Pro Tools | First M-Audio
Edition install instructions in your User Account. For installing Ableton Live Lite, follow the instructions on the
included Ableton Live Lite software download card. Also, visit ableton.com to check for any available
software updates.
Virtual Instruments: Follow the instructions on the software download card for installing the included virtual
instrument plugins. After installation, most DAWs will not load virtual instrument plugins automatically. In
order to access the virtual instrument plugins with Pro Tools | First M-Audio Edition and Ableton Live Lite, you
will need to choose the plugin folder for the software to scan:
Pro Tools | First M-Audio Edition/AAX plugin folders:
Ableton/VST Plugins:
Windows (32-bit):
C:\Program Files (x86)\Common Files\Avid\Audio\Plug-Ins
Windows (64-bit):
C:\Program Files\Common Files\Avid\Audio\Plug-Ins
Mac:
Macintosh HD/Library/Application Support/Avid/Audio/Plug-Ins
Windows (32-bit):
C:\Program Files (x86)\VSTplugins
Windows (64-bit):
C:\Program Files\VSTplugins
Mac:
Macintosh HD\Library\Audio\Plugins\VST
To set your plugin folder in Ableton Live Lite:
1. Go to the Preferences menu.
2. Select the File Folder tab. Under Plug-In Sources click Browse and select the appropriate plugin
folder.
3. After making your selection, the Use VST Custom Plug-In Folder button should be ON. If it is not,
click the button to turn it on.
4. Exit the Preferences menu.
Getting Started
Please note that when you press a key on the keyboard, you will not hear any sound. This is because
pressing a key causes the keyboard to send out MIDI data. MIDI data gives instructions on how a sound
should play, but in order to actually hear that sound you need to configure your music software to read the
MIDI data being sent from the Keystation 88 and play the sound back accordingly. This setup will more than
likely entail going into an Options or Device Setup menu in your music software application and selecting the
appropriate device. The Keystation 88 should appear under the name “Keystation 88” in the MIDI devices
section of your music software application. Please consult the manual that came with your software for the
proper setup procedure.
4
Page 5

Ableton Live Lite Setup
1. First, connect Keystation 88 to an available USB port on your computer using the supplied USB cable,
and launch Ableton Live Lite.
2. Next, open the Ableton Live Lite Preferences window. Choose your Audio Device in the Audio tab.
This will be dependent upon the audio interface that you are using.
MAC: Select Live > Preferences
3. Select the MIDI / Sync tab. Within the MIDI Ports section, adjust the settings as seen below:
4. Close the Preferences window.
5. To add an instrument or plugin to Ableton Live Lite in order to generate sound,
6. In the Name column just to the right of the Categories column, locate the Instrument or Plug-in of your
PC: Select Options > Preferences
Next to Input: Keystation 88, toggle the On button in the Track and Remote columns.
Next to Output: Keystation 88, toggle the On button in the Track and Remote columns.
in the Categories column, choose Instruments or Plug-ins.
choice. Click-and-drag the instrument to a MIDI track in Ableton Live Lite to load the instrument.
The Instrument can now be triggered with Keystation 88.
Pro Tools | First M-Audio Edition Setup
1. Connect Keystation 88 to an available USB port on your computer using the supplied USB cable, and
launch Pro Tools | First M-Audio Edition.
2. Open or Create a Project.
3. Select the Setup pulldown menu and open MIDI Input Devices. Enable MIDI Input from the
Keystation 88 by clicking the box next to the Keystation 88.
4. Select the Setup pulldown menu and open Playback Engine. Choose your audio device from the
Playback Engine pulldown menu.
5. To create a new Instrument track, select the Track pulldown menu and select New.
6. In the New pulldown menu, select Stereo, and then Instrument Track.
7. In the newly created track, add an Insert to your track by clicking in your track's Inserts A-E and
selecting Multichannel Plugin > Instrument and select the instrument you would like to use, such as
Xpand!2 (Stereo). The plugin can now be triggered with Keystation 88.
Note: Windows users will need either an external soundcard (such as the M-Track 2X2) or a low-latency
ASIO driver.
Features
Top Panel
Keyboard
Most of the white keys and black keys on the Keystation are labeled with names. When in the Advanced
menu, pressing any of the labeled keys will allow for special operations such as adjusting the MIDI channel,
transposing, and sending program change messages.
Octave Buttons
If you press the octave “+” button once, the LED above the octave “-” button will turn off, indicating the
keyboard’s octave is now shifted up. If you press the octave “+” key again, you will shift one more octave up,
and so on. It is possible to shift the keyboard up 3 octaves or down 3 octaves from 0 octave shift.
To shift the octave down, press the octave “-” button and notice that the LED above the octave “+” turns off. If
only the LED above the octave “-” key is lit, the octave is shifted down and, if only the LED above the octave
“+” key is lit, the octave is shifted up. The octave “+” and octave “-” LEDs will change color when moving up
or down more than one octave.
To return the octave shift to 0, press both the octave “+” and “-” keys together. Both LEDs will light, indicating
that the octave shift has returned to 0.
5
Page 6
Volume Slider
The Volume Slider sends a MIDI message that controls the volume of the notes you are playing. The Volume
Slider can also be assigned to different effects such as pan (balance), attack, reverb, chorus and many more.
(See Advanced Functions for more information.)
Pitch Bend Wheel
As the name indicates, the pitch bend wheel is primarily used to bend the notes played on the keyboard up or
down. This allows you to play phrases not normally associated with keyboard playing, such as guitar-style
riffs. Your sound source determines how far you can bend the note. The usual setting is two semitones, but it
can be up to two octaves up or down.
Modulation Wheel
The modulation wheel is typically used for modulation of the sound you are playing. This type of real-time
controller was originally introduced on electronic keyboard instruments to give the performer options such as
adding vibrato, just like players of acoustic instruments do. The modulation wheel is fully MIDI-assignable.
Advanced Functions Button
The Advanced Functions button is used to access all the advanced functions of the keyboard.
When the Advanced Functions button is pressed, the keyboard goes into “Edit Mode.” In Edit Mode, the keys
on the keyboard are used for selecting functions and entering data.
The LED above the Advanced Functions button indicates whether or not Edit Mode is engaged. In Edit Mode,
the black keys on the keyboard are used for selecting functions, while the white keys are used for data entry
and channel selection.
Your keyboard will slip out of Edit Mode as soon as a function is selected, or the Advanced button, CANCEL
or ENTER key is pressed (the LED above the Advanced Functions button will turn off). The keyboard can
then be used to play notes again.
Note: Refer to the Advanced Functions section for more information.
Directional Buttons
These buttons can use the Mackie Control® or HUI® protocols to control certain functions in software that
support them. Please see the Directional Buttons and Transport Buttons section of the Advanced
Functions chapter for more information.
Transport Buttons
These buttons can use the Mackie Control or HUI protocols to control certain functions in software that
support them. Please see the Directional Buttons and Transport Buttons section of the Advanced
Functions chapter for more information.
6
Page 7
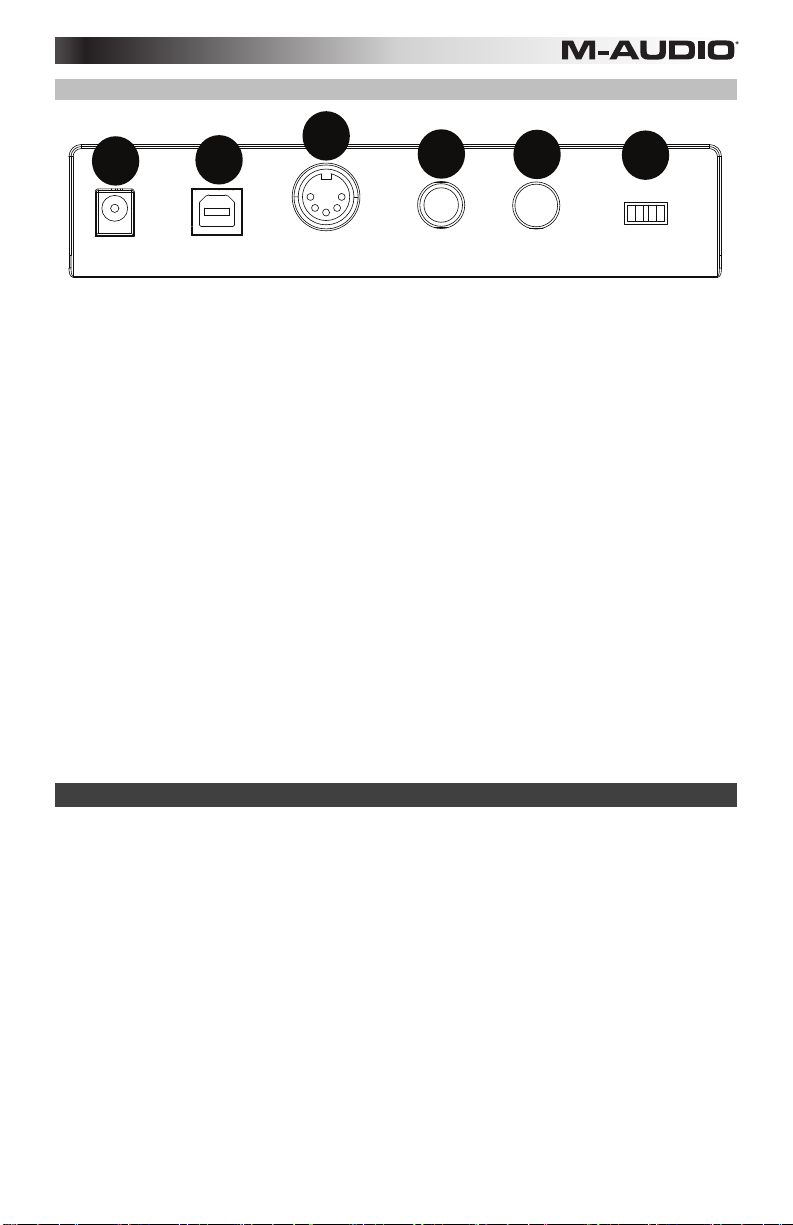
Rear Panel
3
1
1. DC Power Adapter Input: If you do not wish to power Keystation through the USB connection and are
using the MIDI connector to trigger an external sound module, connect a 9V DC, 200mA, center-positive
power adapter (sold separately) here.
2. USB Port: The USB port delivers power to the keyboard and transmits MIDI data when connected to a
computer to trigger a software synth or MIDI sequencer.
3. MIDI Out: Use a five-pin MIDI cable (sold separately) to connect this jack to the MIDI IN of an external
sound module or to the MIDI In of a synthesizer.
4. Sustain Pedal Input: This socket accepts a momentary-contact foot pedal (sold separately). When
pressed, this pedal will sustain the sound you are playing without having to keep your fingers pressed
down on the keys.
NOTE: The polarity of the sustain pedal is determined by the keyboard upon startup. When Keystation is
powering up, the sustain pedal is assumed to be in the "up" (Off) position. It is important that the sustain
pedal is not pressed during startup, otherwise the pedal will reverse its operation, and notes will sustain
when the pedal is not pressed.
NOTE: A foot pedal can be used for sustaining the sound that you are playing, without having to keep
your hands on the keyboard (just like the sustain pedal on a piano).
You can plug a foot pedal of any polarity, sold separately, into the foot pedal input on your M-Audio
keyboard. The keyboard will automatically detect the correct polarity when powering up. If you want to
reverse the polarity, simply depress the pedal when you switch on your keyboard.
5. Expression Pedal Input: Connect a 1/4" TRS expression pedal (sold separately) to this input for
adjusting the volume vibrato, or reverb depth of an instrument patch.
6. On/Off Switch: Use this switch to power the device on or off.
Advanced Functions
In addition to setting an octave shift, the two octave “+” and “-” buttons discussed earlier in the manual under
the section “Octave Buttons” can also be used to control one of six MIDI functions.
The first 6 labeled black keys are used to select the function of the octave buttons. Some of the functions that
these keys can be used for cannot send out a value less than 0. When used to control these functions, both
LEDs above the buttons will remain on, regardless of the current setting of that function.
To select an alternate function:
1. Press the Advanced Functions button, putting the keyboard into Edit Mode.
2. Press the black key that represents the function you want. Edit Mode will finish as soon as you have
selected the function and you will be able to play notes again.
2
USB
4
SUSTAINMIDI OUT
5
VOLUME POWER
6
ON/OFF
7
Page 8

Octave Shift
Another method of shifting the Keystation octaves is with the use of the keys labeled “Octave +” and “Octave
-”. After the Advanced Function button has been pressed, placing the keyboard in Edit Mode, pressing these
keys will shift the keyboard’s pitch up or down one or more octaves (one for each time pressed). The default
octave shift designation is “0” and will be the octave setting each time you power up the keyboard. The lights
above the octave buttons indicate that 0 octave shift is set when both are on.
To assign the “+” and “-” keys to control the octave:
1. Press the Advanced Functions button to get the keyboard into Edit Mode.
2. Press the black key representing “OCTAVE”. Edit Mode will finish as soon as OCTAVE has been
pressed.
There is also a method of performing a quick octave change, which can be useful when using the octave
buttons to control another MIDI function. This is accomplished as follows:
1. Press the Advanced Functions button to put the keyboard in Edit Mode.
2. Press the black key representing “OCTAVE +”, increasing the octave by 1 (you may press it again to
increase the octave by 2, and so on). Press the black key representing “OCTAVE -”, decreasing the
octave by 1 (you may press it again to decrease the octave by 2, and so on). Press the black key
representing "OCTAVE 0" to reset the octave shift to 0.
3. When you have chosen your octave shift press “ENTER,” to select your Octave and leave Edit Mode.
Selecting Cancel or Advanced will cancel the selection, and exit from Advanced mode.
Transposition
In some cases it may be useful to reduce or increase the pitch by a number of semitones rather than an
entire octave. For example, if you are playing a song with a singer that is having difficulty hitting the top
notes, you may want to reduce the pitch by one or two semitones. This is achieved using a MIDI function
called “Transpose.”
Transpose works in the same way as Octave Shift above, except the shift can be up to +/- 12 semitones. As
with Octave Shift, there are two ways of transposing the keyboard. You can use the Octave “+” and “-”
buttons, or the black keys “TRANSPOSE -,” “TRANSPOSE 0” and “TRANSPOSE +,” respectively.
To assign the Octave “+” and “-” buttons to transpose:
1. Press the Advanced Functions button to engage Edit Mode.
2. Press the black key representing “TRANSPOSE.” (Edit Mode will disengage as soon as
“TRANSPOSE” has been pressed.)
3. Press the “+” key and you will hear the pitch of the note you play go up.
4. Press both “+” and “-” together to cancel transpose.
MIDI Channel
MIDI data from the keyboard can be sent on any of 16 MIDI Channels. However, certain MIDI devices and
MIDI software applications require the keyboard to send data on a specified channel. If this is the case, you
can change the channel the data is sent using the following method:
1. Press the Advanced Functions button to engage Edit Mode.
2. Press one of the 16 Channel keys, according to the Channel that you need.
For example, if a device specifies that you need to send data on Channel 10, press the Advanced Functions
button, and select Channel 10. The Channel can also be assigned to the Octave “+” and “-” buttons. Once
assigned, pressing “+” or “-” will increase or decrease the channel incrementally.
When Channel 16 is reached and “+” is pressed, Channel 1 will be selected. If the Octave “+” and “-” keys
are selected to vary the Channel, the LEDs above the buttons will not change, since it is not possible to have
a Channel with a negative value. Pressing both the “+” and “-” buttons together will recall Channel 1.
8
Page 9

Program Change
Program Changes are used to change the instrument or voice you are using. For the sake of example, we
will change the instrument to a bass sound. To do this we need to send a program change of 32. There are
two ways to send a program change:
Incremental/Decremental Program Change:
1. Press the Advanced Functions button.
2. Press the black key representing PGM CHANGE.
3. Now the Octave “+” and “-” keys can be used to change the program.
4. Press “+” and continue to play notes until you find the instrument you want.
This method is useful if you want to cycle through different instruments to see which sounds best in your
song.
Quick Select Program Change:
1. Press the Advanced Functions button.
2. Press the black key representing “PGM #.”
3. Press keys “3,” “2,” “ENTER.” Now the keyboard will play a bass sound: Number 32.
This method is useful if you want to select a specific number, as is the case here.
If the Octave “+” and “-” keys are selected to vary the Program number (Method 1), the LEDs above the
buttons will not change, since it is not possible to have a Program with a negative value. Pressing both the
“+” and “-” buttons together will recall Program 0, which selects a grand piano sound.
Bank LSB and Bank MSB
Program Changes are most commonly used to change instruments and voices. However, the number of
instruments accessible via Program Changes is limited to 128. Some devices have more than 128 voices
and require a different method to access these extra voices. Generally, these devices use Bank LSB and
Bank MSB messages.
Incremental/Decremental Bank LSB and Bank MSB Changes:
1. Press the Advanced Functions button.
2. Press the black key representing “BANK LSB” or “Bank MSB”, respectively.
3. Now the Octave “+” and “-” keys can be used to change the Bank LSB.
4. Press “+” and continue to play notes until you find the instrument you want.
Using the Quick Select Method:
1. Press the Advanced Functions button.
2. Press the black key representing “Bank LSB” or “Bank MSB,” respectively.
3. Press keys “3,” “2,” “ENTER.”
As with Program Change, if the Octave “+” and “-” keys are selected to vary the Bank LSB or MSB number
(Method 1), the LEDs above the buttons will not change, since it is not possible to have a Bank with a
negative value. Pressing both the “+” and “-” buttons together will recall Bank 0.
Volume Slider Assignment
To assign the Volume Slider to an effect:
1. Press the Advanced Functions button to engage Edit Mode.
2. Press the black key representing “FADER.”
3. Use the Numerical Data Entry keys to enter the number of the effect you want to assign to the
Volume Slider.
Alternatively, you can use the “+” and “-” buttons to change the value:
1. Press the Advanced Functions button to engage Edit Mode.
2. Press the black key representing “FADER.”
3. Use the “+” and “-” buttons to change the value.
4. Press the ENTER key.
5. Move the Volume Slider upwards to increase the value of the effect.
If you have made an error while entering the numerical data value, you can press the “CANCEL” key to exit
Edit Mode without changing the effect assigned to the Volume Slider.
Note that each time the keyboard is turned off, the data assigned to the Volume Slider will be lost. Each time
the keyboard is powered up, the Volume Slider will be assigned to volume (effect number 07) by default.
9
Page 10

Modulation Wheel Assignment
It is possible to assign MIDI effects to the Modulation Wheel. Some useful effects are: MIDI CC 01
(Modulation), MIDI CC 07 (Volume), MIDI CC 10 (Pan), and MIDI CC 05 (Portamento).
There are 132 effects in total. However, for these effects to have any affect on the sound, the receiving MIDI
device must be able to read and respond to these MIDI effect messages. Most devices will at least respond
to volume, modulation, and pan data.
To assign an effect to the Modulation Wheel:
1. Press the Advanced Functions button to engage Edit Mode.
2. Press the black key representing “WHEEL.”
3. Use the Numerical Data Entry keys to enter the number of the effect you want to assign to the
Modulation Wheel.
Instead of entering in the value number, you can cycle through each effect one at a time using the “+” and “-”
buttons. Once the correct value has been selected, press the ENTER key.
If you have made an error while entering the numerical data value, you can press the CANCEL key to exit
Edit Mode without changing the effect assigned to the Modulation Wheel.
Note that each time the keyboard is turned off, the data assigned to the Modulation Wheel will be lost. Each
time the keyboard is powered up, the Modulation Wheel will be assigned to modulation (effect number 01) by
default.
For the sake of example, we will assign effect number 10 (pan, or balance) to the Modulation Wheel.
1. Press the Advanced Functions button to engage Edit Mode.
2. Press the black key representing “WHEEL.”
3. Press “1.”
4. Press “0” so you have entered “10.”
5. Press “ENTER.”
Directional Buttons and Transport Controls
The directional buttons and transport buttons use the Mackie Control or HUI protocols to control certain
functions in software that support them.
To select which protocol these buttons use to communicate with your software:
1. Press the Advanced Functions button to get the keyboard into Edit Mode.
2. Press the key representing MACKIE/HUI.
Note: "+" and "-" LEDs will be lit green when in Mackie mode, or red when in HUI mode.
3. Press Enter.
Note: Your software must also be set to receive commands from an external device (i.e.,
Keystation) using the Mackie Control or HUI protocol. Mackie and HUI controls are sent on Virtual
Port 2.
10
Page 11
Troubleshooting
General
Here are answers to common questions you may have, using your Keystation keyboard:
Problem 1: My M-Audio hardware suddenly stopped working after having performed fine since installation.
Solution 1: Switch off the unit and let it sit for 10 seconds. Then restart your computer and try again. If the problem
persists you may have to reinstall drivers for the unit.
Problem 2: I have plugged a sustain pedal into my M-Audio keyboard, but it works the wrong way around.
Solution 2: The polarity of the sustain pedal is calculated by the keyboard when it is powered up. On power up, the
sustain pedal is assumed to be in the OFF position. So if you want the sustain pedal to be off when it is not
depressed, make sure the pedal is not depressed when you power up.
Problem 3: When I press a key, there is a delay before I hear any sound.
Solution 3: This delay is known as latency. Latency with MIDI signals is due to the software application you are
using. MIDI data is simply control data. The MIDI data is read by your software. The software then completes a large
number of complex calculations in order to produce the sound you hear—all this takes time.
We strongly recommend a proper audio interface. Refer to m-audio.com for a selection of options. If you already
have an adequate audio interface, try reinstalling the latest drivers for the audio interface, or try reducing the buffer
sizes of the audio drivers.
MIDI Functionality
The Keystation keyboards have been designed to make working with MIDI on your computer as simple as possible.
Nonetheless, you may still experience some difficulties. In many cases, the keyboard is not at fault; the problem lies
with the receiving device. To counter this, there are two useful MIDI functions: All Notes Off and Reset All
Controllers.
All Notes Off
If you find there are hanging notes that you cannot stop playing, send an “All Notes Off” MIDI message by performing
the following:
1. Press the Advanced Functions button to engage Edit Mode.
2. Press the black key representing “ALL OFF.”
3. Edit Mode will disengage, eliminating any hanging notes.
Reset All Controllers
If you find there is an effect on a voice that you do not want, rather than having to isolate and identify that effect, you
can send a “Reset All Controllers” MIDI message by performing the following:
1. Press the Advanced Functions button to engage Edit Mode.
2. Press the black key representing “RESET.”
3. Edit Mode will disengage, eliminating all effects.
Factory Reset
1. Power off Keystation.
2. Hold down the buttons "ADVANCED", "OCT+", and "OCT-" simultaneously, until step 4.
3. Power on Keystation.
4. Release the three buttons.
The Keyboard is now back to the factory default settings.
MIDI Out
The MIDI Out port is located on the back of the keyboard, and can be used to connect the keyboard to an external
sound module or MIDI keyboard.
By default (when you switch the unit on), all controller data is sent out via the MIDI output as well as the USB out. If
you want the MIDI output to act like a traditional USB-to-MIDI interface, engage “MIDI Out” mode by carrying out the
following:
1. Press the Advanced Functions button to engage Edit Mode.
2. Press the black key representing “MIDI OUT.”
3. Edit Mode will disengage.
4. The keyboard is now able to send data received from the computer via its MIDI OUT jack to whatever device
is connected.
In order to use the MIDI output, select the Keystation USB MIDI Out as the MIDI output device in your sequencer.
11
Page 12

VOLUME
ON/OFF
POWER
Guía del usuario (Español)
Introducción
Felicitaciones por la compra de su teclado M-Audio Keystation 88. Este teclado USB sensible a la velocidad
de 88
teclas está diseñado para integrarse fácilmente con su PC o computadora Macintosh. El Keystation
88 ofrece teclas semicontrapesadas que
Ideal para una multitud de aplicaciones de creación de música y educación, el Keystation 88 ofrece una
rueda de inflexión de pitch, botones direccionales y de transporte para control de software, más una rueda
de modulación asignable y un deslizador para control manual. A pesar de que el Keystation 88
especificaciones de clase y ofrece una operación plug and play con Windows XP, Windows Vista, Windows
7, Windows 8 y Mac OS X, le recomendamos que se tome unos
acerca del funcionamiento correcto, la funcionalidad avanzada y programabilidad.
Contenido de la caja
Keystation 88, Cable USB, Tarjetas de descarga de software, Guía del usuario, Manual sobre la seguridad y
garantía
Soporte
Para obtener la información más completa acerca de este product (los requisitos del sistema, compatibilidad,
etc) y registro del producto, visite m-audio.com.
Para soporte adicional del producto, visite m-audio.com/support.
Inicio rápido
Conexión del teclado
Puede alimentar el teclado a través del bus USB o mediante una fuente de alimentación externa opcional.
Los teclados Keystation son dispositivos de bajo consumo, por lo que el uso de un alimentador externo no
es en general necesario. Le recomendamos conectar el Keystation a un puerto USB nativo o a un
concentrador USB alimentado. Use un cable USB para alimentar el Keystation cuando lo conecta a una
computadora para disparar sintetizadores de software.
También puede utilizar el Keystation 88 con su iPad para controlar las aplicaciones de creación de música
compatibles.
La conexión del Keystation 88 con un iPad requiere el iPad Camera Connection Kit, que está disponible en
Apple Store.
Diagrama de conexión
ADAPTADOR DE
ALIMENTACIÓN*
MÓDULO DE
SONIDO*
le dan la sensación de un piano en un controlador MIDI compacto.
cumple
minutos para leer este manual y aprender
COMPUTADORA*
PEDAL DE
SOSTENIDO*
12
ON/OFF
VOLUME
POWER
* Se vende por separado
PEDAL DE
EXPRESIÓN*
Page 13

Instalación recomendada
Software: Hemos incluido Pro Tools | First M-Audio Edition y Ableton Live Lite con su Keystation 88 de
modo que puede comenzar a hacer música con software profesional en cuanto lo saca de la caja. Para Pro
Tools | First M-Audio Edition, registre su Keystation 88 en m-audio.com
instalación de Pro Tools | First M-Audio Edition en su Cuenta de usuario. Para la instalación del Ableton Live
Lite, siga las instrucciones incluidas en la tarjeta de descarga de software del Ableton Live Lite. Visite
también ableton.com para comprobar si hay actualizaciones de software disponibles.
Instrumentos virtuales: Siga las instrucciones de la tarjeta de descarga de software para instalar los
plugins de instrumentos virtuales incluidos. Tras la instalación, muchos DAW no cargarán plugins de
instrumentos virtuales de forma automática. A fin de acceder a los plugins de instrumentos virtuales con Pro
Tools | First M-Audio Edition y Ableton Live Lite, deberá seleccionar la carpeta con plugins para que el
software explore:
Carpetas de plugins de Pro Tools | First M-Audio Edition/AAX:
Plugins de Ableton/VST:
Windows (32-bit):
C:\Program Files (x86)\Common Files\Avid\Audio\Plug-Ins
Windows (64-bit):
C:\Program Files\Common Files\Avid\Audio\Plug-Ins
Mac:
Macintosh HD/Library/Application Support/Avid/Audio/Plug-Ins
Windows (32-bit):
C:\Program Files (x86)\VSTplugins
Windows (64-bit):
C:\Program Files\VSTplugins
Mac:
Macintosh HD\Library\Audio\Plugins\VST
y siga las instrucciones de
Para establecer su carpeta de plugins en Ableton Live Lite:
1. Vaya al menú Preferences (Preferencias).
2. Seleccione la pestaña File Folder (Carpeta de archivos). Bajo Plug-In Sources (Fuentes de plugin)
haga clic en Browse (Explorar) y seleccione la carpeta de plugins apropiada.
3. Después de hacer su selección, el botón Use VST Custom Plug-In Folder (Usar carpeta de plugins
personalizada) debe estar en ON (encendido). Si no lo está, haga clic en el botón para encenderlo.
4. Salga del menú Preferences (Preferencias).
Para comenzar
Sírvase observar que cuando pulse una tecla en el teclado, no escuchará ningún sonido. Esto se debe a que
pulsar una tecla hace que el teclado envíe datos MIDI. Los datos MIDI brindan instrucciones acerca de cómo
debe reproducirse un sonido, pero para realmente escuchar ese sonido deberá configurar su software de
música para que lean los datos MIDI que se envían desde el Keystation 88 y reproducir el sonido de manera
acorde. Es probable que esta configuración implique entrar en un menú de opciones o de configuración del
dispositivo en su aplicación de software de música y seleccionar el dispositivo apropiado. El Keystation 88
debería aparecer con el nombre "Keystation 88" en la sección de dispositivos MIDI de su aplicación de
software de música. Sírvase consultar el procedimiento de configuración apropiado en el manual que viene
con su software.
13
Page 14
Configuración de Ableton Live Lite
1. Primero, conecte el Keystation 88 a un puerto USB disponible en su ordenador utilizando el cable USB
suministrado y ejecute Ableton Live Lite.
2. A continuación, abra la ventana Preferences (Preferencias) de su Ableton Live Lite. Seleccione su
dispositivo de audio en la pestaña Audio. Esto dependerá de la interfaz de audio que esté utilizando.
MAC: Seleccione Live > Preferences
3. Seleccione la pestaña MIDI / Sync (MIDI / Sincronización). Dentro de la sección MIDI Ports (puertos
4. Cierre la ventana Preferences (Preferencias).
5. Para agregar un instrumento o plugin a Ableton Live Lite a fin de generar sonido, en la columna
6. En la columna Name (Nombre) justo a la derecha de la columna Categorías, localice el Instrumento o
PC: Seleccione Options > Preferences
MIDI), ajuste la configuración como se muestra a continuación:
Junto a Input: (Entrada) Keystation 88, conmute el botón On en las columnas Track y Remote (pista
y remoto).
Junto a Output: (Salida) Keystation 88, conmute el botón On en las columnas Track y Remote (pista
y remoto).
Categories (Categorías), seleccione Instruments (Instrumentos) Plug-ins.
Plugin de su elección. Haga clic y arrastre el instrumento sobre una pista MIDI en Ableton Live Lite
para cargarlo.
El instrumento ahora puede dispararse desde Keystation 88.
Configuración del Pro Tools | First M-Audio Edition
1. Conecte el Keystation 88 a un puerto USB disponible en su ordenador utilizando el cable USB
suministrado y abra Pro Tools | First M-Audio Edition.
2. Abra o cree un proyecto.
3. Seleccione el menú desplegable Setup y abra MIDI Input Devices. Active MIDI Input desde el
Keystation 88 haciendo clic en la casilla junto al Keystation 88.
4. Seleccione el menú desplegable Setup y abra Playback Engine. Seleccione su dispositivo de audio
en el menú desplegable Playback Engine.
5. Para crear una pista de un instrumento nuevo, seleccione el menú desplegable Track y seleccione New.
6. En el menú desplegable New, seleccione Stereo y luego Instrument Track.
7. En la pista recientemente creada, añada un inserto en su pista haciendo clic en los insertos A-E de su
pista y seleccionando Multichannel Plugin > Instrument y seleccione el instrumento que desea
utilizar, como por ejemplo Xpand!2 (Stereo). El plugin ahora puede dispararse desde del Keystation 88.
Nota: Los usuarios de Windows necesitarán una tarjeta de sonido externa (como por ejemplo la M-Track
2X2) o un controlador ASIO de baja latencia.
14
Page 15

Características
Panel superior
Teclado
La mayoría de las teclas blancas y negras del Keystation tienen rótulos con nombres. Dentro del menú Advanced (Funciones
avanzadas), presionar las teclas rotuladas permitirá realizar operaciones especiales tales como ajustar el canal MIDI,
transponer enviar mensajes de cambio de programa.
Octave Buttons
Si oprime el botón OCT (octava) “+” una vez, el LED que está arriba del botón de octava “-” se apagará, indicando que la
octava del teclado está desplazada hacia arriba. Si pulsa de nuevo el botón de octava “+”, el rango del teclado aumentará en
dos octavas, y así sucesivamente. Puede modificar el rango del teclado hasta 3 octavas hacia arriba o hacia abajo partiendo
de la posición predeterminada.
Para desplazar la octava hacia abajo, oprima el botón OCT “-” y note que el LED que está arriba del botón de octava “+” se
apaga. Si sólo permanece iluminada la tecla de octava “-”, el rango de octavas está desplazado hacia abajo; Si sólo
permanence iluminada la tecla de octava “+”, el rango de octavas está desplazado hacia arriba. Los LED de octava “+” y
octava “-” cambiarán de color cuando se desplace hacia arriba o hacia abajo más de una octava.
Para regresar al rango normal 0, pulse ambas teclas de octava (“+” y “-”) al mismo tiempo. Ambos LEDs se iluminarán para
indicar que el rango de octava se encuentra de nuevo en “0”.
Deslizador volumen
El deslizador de volumen envía un mensaje MIDI que controla el volumen de las notas que está tocando.
También puede asignarlo a diferentes efectos, como por ejemplo el panorama (balance), ataque, reverberación o chorus, entre
otros. Para más información, consulte la sección Funciones avanzadas.
Rueda de pitch bend
La rueda de pitch bend se usa generalmente para alterar el tono de las notas tocadas en el teclado hacia arriba o hacia abajo,
lo cual le permite tocar frases que no se asocian normalmente con un instrumento de teclado, por ejemplo un fraseo de
guitarra. Su fuente de sonido determina el rango en que la rueda de pitch bend altera el tono. El ajuste más común es dos
semitonos, aunque puede ser de hasta dos octavas hacia arriba o hacia abajo.
Rueda de modulación
La rueda de modulación se usa normalmente para modular el sonido que está tocando. Este tipo de controlador en tiempo real
se incorporó originalmente en los teclados electrónicos para ofrecer al instrumentista opciones como las de agregar vibrato, tal
como lo hace un músico al tocar un instrumento acústico. La rueda de modulación es totalmente asignable vía MIDI.
Advanced Functions botón
El botón Advanced Functions permite acceder a las funciones avanzadas del teclado.
Al pulsar este botón, el teclado entra en modo de programación. Mientras se encuentre en este modo, las teclas del teclado
permiten seleccionar funciones e introducir datos.
El LED situado sobre el botón Advanced Functions indica si el teclado está o no en modo de programación. Cuando está en
modo de programación, las teclas negras permiten seleccionar funciones, mientras que las blancas se usan para introducir
datos y seleccionar canales.
Su teclado saldrá del modo Edit (Edición) cuando se seleccione una función o se pulse el botón Advanced, las teclas CANCEL
(Cancelar) o ENTER (se encenderá el LED que está arriba del botón Advanced Functions [Funciones avanzadas]). Entonces
podrá volver a utilizar el teclado para tocar notas.
Nota: Para más información, consulte la sección Funciones avanzadas.
Botones direccionales
Estos botones pueden usar los protocolos Mackie Control® o HUI® para controlar ciertas funciones del software que los
soporta. Para más información, consulte la sección Botones direccionales y botones de transporte del capítulo Funciones
avanzadas.
Botones de transporte
Estos botones pueden usar los protocolos Mackie Control o HUI para controlar ciertas funciones del software que los soporta.
Para más información, consulte la sección Botones direccionales y botones de transporte del capítulo Funciones
avanzadas.
15
Page 16

Panel trasero
3
1
1. Entrada Del Adaptador de Alimentación de CC: Si no desea alimentar el Keystation por la conexión
USB y está usando el conector MIDI para disparar un módulo de sonido externo, conecte aquí un
adaptador de 9 V CC, 200 mA, centro positivo (que se vende por separado).
2. Puerto USB: El puerto USB suministra alimentación al teclado y transmite datos MIDI cuando se
conecta a una computadora para disparar un secuenciador MIDI o sintetizador de software.
3. Salida MIDI: Use un cable MIDI de cinco pines (que se vende por separado) para conectar este
conector hembra a la entrada MIDI de un módulo de sonido externo o a la entrada MIDI de un
sintetizador.
4. Entrada para pedal de sustain: Esta toma permite conectar un pedal (se vende por separado).
Cuando se presiona, este pedal sostiene el sonido que está reproduciendo sin necesidad de tener
pulsadas las teclas con los dedos.
ATENCIÓN: El teclado detecta la polaridad del pedal de sustain en el momento de su puesta en
marcha. Al poner en marcha un teclado Keystation, se asume que el pedal de sustain está en posición
"inactiva" (Off). Es importante no pulsar el pedal de sustain durante el arranque de la unidad; de lo
contrario, el pedal invertirá su funcionamiento y las notas se reproducirán en sostenido cuando no se
pulse el pedal.
ATENCIÓN: El pedal se usa normalmente para sostener el sonido sin necesidad de mantener las
manos sobre el teclado, tal como sucede con un piano acústico. Puede conectar un pedal (no
suministrado) de cualquier polaridad en la entrada para pedal del teclado. Al ponerse en
funcionamiento, el teclado detectará automáticamente la polaridad del pedal conectado. Si desea
invertir la polaridad, mantenga el pedal pulsado al poner el teclado en funcionamiento.
5. Entrada de Pedal de Expresión : Conecte este entrada a un pedal de expresión TRS de 1/4 (pulg.)
(que se vende por separado) para ajustar el vibrato del volumen o la profundidad de reverberación de
un parche de instrumento.
6. Conmutador On/Off: Este conmutador enciende y apaga la unidad.
Funciones avanzadas
Además de determinar el cambio de octava, los botones de octava “+” y “-” mencionados anteriormente en la
sección “Botones de octava” también pueden usarse para controlar una de las 6 funciones MIDI disponibles.
Las 6 primeras teclas etiquetadas negras se usan para seleccionar la función de los botones de octava.
Algunas de las funciones asignadas a estas teclas no admiten valores inferiores a 0. Si usa los botones de
octava para controlar dichas funciones, se iluminarán los indicadores situados sobre ambos botones, con
independencia del ajuste actual de la función.
Selección de una función alternativa.
1. Pulse el botón Advanced Functions para acceder al modo de programación.
2. Pulse la tecla negra correspondiente a la función deseada. Una vez seleccionada la función el
teclado abandonará el modo de programación y sus teclas funcionarán de nuevo con normalidad.
2
USB
4
SUSTAINMIDI OUT
5
VOLUME POWER
6
ON/OFF
16
Page 17

Cambio de octava: Los botones de octava “+” y “-”
Otro método para cambiar el rango de octavas del teclado consiste en usar las teclas etiquetadas como
“Octava +” y “Octava-”. Después de pulsar el botón Advanced Functions y haber entrado en modo de
programación, pulsando estas teclas podrá cambiar el rango de octavas una o más octavas hacia arriba o
abajo (una octava por pulsación). El ajuste de rango de octavas predeterminado es “0”. Éste es también el
ajuste que encontrará cada vez que ponga el teclado en funcionamiento Cuando los indicadores situados
sobre los botones de octava están ambos iluminados ello significa que el teclado usa el ajuste
predeterminado (“0”).
Para asignar los botones “+” y “-” al control del rango de octavas:
1. Pulse el botón Advanced Functions para acceder al modo de programación.
2. Pulse la tecla negra que representa “OCTAVE”. El teclado abandonará el modo de programación en
cuanto pulse OCTAVE.
También existe otro método para cambiar rápidamente el rango de octavas que puede ser útil si usa los
botones de octava para controlar otra función. Haga lo siguiente:
1. Pulse el botón Advanced Functions para acceder al modo de programación.
2. Pulse la tecla negra representa “OCTAVA +”, desplazando el rango de octava hacia arriba (si la
pulsa dos veces, lo desplazará dos octavas, y así sucesivamente). Pulse la tecla negra representa
“OCTAVA -”, desplazando el rango de octava hacia abajo; si la pulsa dos veces lo desplazará
octavas, etc.). Pulse la tecla negra que representa la "OCTAVA 0" para reiniciar el desplazamiento
de octavas a 0.
3. Cuando haya elegido su desplazamiento de octavas, pulse “ENTER” para seleccionar su octava y
salga del modo de edición. Al seleccionar Cancel o Advanced se cancela la selección y se sale del
modo Advanced.
Transposición
En algunos casos resulta práctico subir o bajar el tono del teclado en un determinado número de semitonos,
más que en octavas completas. Por ejemplo, puede que esté tocando una canción con un cantante que
tiene dificultades con las notas más altas. En este caso, baje el tono en uno o dos semitones usando la
función MIDI llamada “Transpose”. Para hacerlo, use la función MIDI llamada “Transpose” (Transposición).
La transposición funciona de la misma manera que el desplazamiento de octavas arriba explicado, excepto
que el desplazamiento puede ser de hasta +/- 12 semitonos. Al igual que sucede con el desplazamiento de
octava, existen dos métodos para transportar el tono del teclado. Puede usar los botones de octava “+” y “-”,
o las teclas negras “TRANSPOSE -,” “TRANSPOSE 0” y “TRANSPOSE +,” respectivamente.
Asignación de los botones “+” y “-” a la función de transposición:
1. Pulse el botón Advanced Functions para acceder al modo de programación.
2. Pulse la tecla negra representa “TRANSPOSE”. El teclado abandonará el modo de programación
en cuanto pulse “TRANSPOSE”.
3. Pulse la tecla “+” para escuchar como sube el tono del teclado.
4. Pulse “+” y “-” al mismo tiempo para cancelar la transposición.
Canal
Los datos MIDI del teclado pueden enviarse a través de cualquiera de los 16 canales MIDI. Sin embargo,
ciertos dispositivos y programas MIDI requieren que los datos sean enviados por un canal específico. En
este caso, cambie el canal a través del cual el teclado envía los datos siguiendo este método:
1. Pulse el botón Advanced Functions para acceder al modo de programación.
2. Pulse una de las 16 teclas de canal (toque la tecla que corresponda al canal deseado).
Por ejemplo, si trabaja con un dispositivo que debe recibir datos a través del canal 10, pulse el botón
Advanced Functions y a continuación toque la para seleccionar el canal 10. También puede asignar la
selección de canal a los botones Octave “+” y “-”. Una vez asignado, pulsando “+” o “-” aumentará o reducirá
el canal.
Si pulsa el botón “+” una vez alcanzado el canal 16, se seleccionará el canal 1. Si los botones de octava “+”
y “-” están asignados al cambio de canal, los indicadores situados sobre los mismos no cambiarán de
estado, ya que no es posible seleccionar un canal con valor negativo. Pulsando simultáneamente los
botones “+” y “-” seleccionará el canal 1.
17
Page 18

Cambios de programa
Los mensajes de cambio de programa permiten seleccionar el instrumento o “programa” en uso. Por
ejemplo, vamos a cambiar el instrument a un sonido de bajo. Para ello deberemos enviar un mensaje de
cambio de programa con un valor de 32, lo cual seleccionará el sonido de bajo acústico. Hay dos maneras
de enviar un cambio de programa:
Cambio de programa +/-:
1. Pulse el botón Advanced Functions.
2. Pulse la tecla negra representa PGM CHANGE.
3. Ahora puede utilizar los botones Octave “+” y “-” para cambiar el programa.
4. Pulse “+” y a continuación toque algunas notas; repita la operación hasta encontrar el instrumento
que busca.
Este método es útil si desea recorrer distintos instrumentos para ver cuál suena mejor en su tema.
Selección rápida de cambio de programa:
1. Pulse el botón Advanced Functions.
2. Pulse la tecla negra que representa “PGM #”.
3. Pulse sucesivamente las teclas “3”, “2”, y “ENTER”. Ahora, el teclado esta ajustado para reproducir
el sonido de bajo nº 32.
Este método es útil si desea seleccionar un número específico, como en este caso.
Si los botones de octava “+” y “-” están asignados al cambio de programa (método 1), los indicadores
situados sobre los mismos no cambiarán de estado, ya que no es posible seleccionar un programa con valor
negativo. Si pulsa simultáneamente los botones “+” y “-” seleccionará el programa 0 (sonido de piano de
cola).
Banco LSB y Banco MSB
Los cambios de programa son los mensajes que más se utilizan para seleccionar instrumentos y voces. Sin
embargo, el número de instrumentos disponibles mediante cambios de programa está limitado a 128. Dado
que algunos dispositivos ofrecen más de 128 voces, la selección de estas voces adicionales requiere el uso
de un método distinto. Generalmente, dichos dispositivos utilizan mensajes de Banco LSB y Banco MSB.
Cambio de Banco LSB y Banco MSB +/-:
1. Pulse el botón Advanced Functions.
2. Pulse la tecla negra representan “Banco LSB” y “Banco MSB”, respectivamente.
3. Ahora puede utilizar los botones Octave “+” y “-” para cambiar el Banco LSB.
4. Pulse “+” y a continuación toque algunas notas; repita la operación hasta encontrar el instrumento
que busca.
Método de selección rápida:
1. Pulse el botón Advanced Functions.
2. Pulse la tecla negra que representan “BANCO LSB” y “BANCO MSB” respectivamente.
3. Pulse sucesivamente las teclas “3,” “2,” “ENTER.”
Al igual que ocurre con los cambios de programa, si los botones de octava “+” y “-” están asignados al
cambio de número de Banco LSB o MSB (método 1), los indicadores situados sobre los mismos no
cambiarán de estado, ya que no es posible seleccionar un banco con valor negativo. Si pulsa
simultáneamente los botones “+” y “-” seleccionará el banco 0.
18
Page 19

Deslizador de volumen
Para asignar el deslizador de volumen a un efecto:
1. Pulse el botón Advanced Functions para acceder al modo de programación.
2. Pulse la tecla negra que representa “FADER”.
3. Utilice las teclas de introducción de datos numéricos para introducir el número del efecto que desee
asignar al deslizador de volumen.
Como alternativa, también puede utilizar los botones “+” y “-” para cambiar el valor.
1. Pulse el botón Advanced Functions para activar el modo de edición.
2. Pulse la tecla negra que representa el “FADER”.
3. Use los botones “+” y “-” para cambiar el valor.
4. Pulse la tecla ENTER.
5. Mueva el cursor Volume (Volumen) hacia arriba para aumentar el valor del efecto.
Si comete un error al introducir el valor numérico, pulse la tecla CANCEL (C1) para salir del modo de
programación sin modificar el efecto asignado al deslizador de volumen. Recuerde que cada vez que
apague el teclado, la asignación del deslizador de volumen se perderá. Cada vez que ponga el teclado en
marcha, el deslizador de volumen estará asignado por defecto al efecto número 07 Volumen.
Rueda de modulación
Es posible asignar efectos MIDI a la rueda de modulación. Algunos efectos muy útiles son: MIDI CC 01
(Modulación), MIDI CC 07 (Volumen), MIDI CC 10 (Pan), y MIDI CC 05 (Portamento).
Existen en total 132 efectos. No obstante, para que estos efectos tengan alguna incidencia sobre el sonido,
el dispositivo MIDI receptor deberá ser capaz de interpretar dichos mensajes MIDI y responder a ellos. La
mayoría de dispositivos responden como mínimo a los datos de volumen, modulación y panorama.
Cómo asignar un efecto a la rueda de modulación:
1. Pulse el botón Advanced Functions para acceder al modo de programación.
2. Pulse la tecla negra que representa “WHEEL”.
3. Utilice las teclas de introducción de datos numéricos para introducir el número del efecto que desee
asignar a la rueda de modulación.
En lugar de ingresar el número del valor, puede recorrer los efectos de a uno por vez usando los botones “+”
y “-”. Una vez seleccionado el valor correcto, pulse la tecla ENTER.
Si comete un error al introducir el valor numérico, pulse la tecla CANCEL para salir del modo de
programación sin modificar la asignación de efecto.
Recuerde que cada vez que apague el teclado, la asignación de la rueda de modulación se perderá. Cada
vez que encienda el teclado, la rueda de modulación estará asignada por defecto al efecto número 01
Modulación.)
Por ejemplo, vamos a asignar el efecto número 10 (pan o balance) a la rueda de modulación.
1. Pulse el botón Advanced Functions para acceder al modo de programación.
2. Pulse la tecla negra que representa “WHEEL”.
3. Pulse “1”.
4. Pulse “0” de manera que el valor final sea “10”.
5. Pulse “ENTER”.
Botones direccionales y controles de transporte
Los botones direccionales y los botones de transporte usan los protocolos Mackie Control o HUI para
controlar ciertas funciones del software que los soporta.
Para seleccionar el protocolo a usar por estos botones para comunicarse con su software:
1. Pulse el botón Advanced Functions para poner el teclado el modo de edición.
2. Pulse la tecla que representa MACKIE/HUI.
Nota: Los LED "+" y "-" se encienden con luz verde en modo Mackie o con luz roja en modo HUI.
3. Pulse ENTER.
Nota: Su software debe estar también configurado para recibir comandos desde un dispositivo
externo (como el Keystation) usando el protocolo Mackie Control o HUI. Los controles Mackie y HUI
se envían por el puerto virtual 2.
19
Page 20
Resolución de problemas
General
He aquí las respuestas a algunas preguntas frecuentes relacionadas con su teclado Keystation:
Problema 1: Mi hardware M-Audio ha dejado de funcionar de repente, cuando hasta ahora lo he estado
utilizando sin problemas.
Solución 1: Apague la unidad durante unos 10 segundos. A continuación, reinicie la computadora e inténtelo de
nuevo. Si el problema persiste, quizá deberá reinstalar los controladores de la unidad.
Problema 2: He conectado un pedal de sustain a mi teclado pero funciona al revés de como yo esperaba.
Solución 2: El teclado detecta la polaridad del pedal de sustain en el momento de su puesta en marcha, asumiendo
que el pedal está en posición OFF. Por lo tanto, si desea que el pedal de sustain permanezca desactivado cuando
no esté pulsado, asegúrese de que no está pulsado en el momento de poner el teclado en marcha.
Problema 3: Existe un retardo entre el momento en que toco una tecla y el momento en que escucho el
sonido.
Solución 3: Este retardo se conoce como latencia. En las señales MIDI, la latencia se debe al software que esté
usando. Los datos MIDI son simplemente datos de control. Los datos MIDI son leídos por el software. A
continuación, la aplicación musical realiza una gran cantidad de complejos cálculos para generar el sonido que usted
escucha, y estas operaciones necesitan algún tiempo.
Es altamente recomendable utilizar una buena interfaz de audio. Visite m-audio.com para encontrar una selección
de tarjeta. Si ya dispone de una interfaz de audio adecuada, intente reinstalar la última versión de los controladores o
reduzca los tamaños de búfer de los controladores de audio.
Funciones MIDI
Los teclados Keystation han sido diseñados para que pueda trabajar con MIDI en su computadora de la forma más
fácil posible. Pero ello no elimina totalmente la posibilidad de que surja algún problema. En muchos casos el
problema no estará en el teclado sino en el dispositivo receptor. Para solucionarlo, dispone de dos útiles funciones
MIDI: All Notes Off y Reset All Controllers.
All Notes Off (Desactivación de todas las notas)
Si quedan notas “colgadas” que no dejan de sonar, envíe un mensaje MIDI “All Notes Off”. Para ello:
1. Pulse el botón Advanced Functions para acceder al modo de programación.
2. Pulse la tecla negra que representa “ALL OFF”.
3. Al hacerlo saldrá del modo de programación y todas las notas dejarán de sonar.
Reset All Controllers (Reinicio de todos los controladores)
Si advierte un efecto no deseado sobre una voz, en lugar de preocuparse de buscar el efecto, puede enviar un
mensaje MIDI “Reset All Controllers”:
1. Pulse el botón Advanced Functions para acceder al modo de programación.
2. Pulse la tecla negra que representa “RESET”.
3. Al hacerlo saldrá del modo de programación y se anularán todos los efectos.
Factory Reset (Restablecimiento de los Valores Predeterminados de Fábrica)
1. Apague el Keystation.
2. Mantenga pulsados los botones "ADVANCED", "OCT+", y "OCT-" simultáneamente, hasta el paso 4.
3. Encienda el Keystation.
4. Suelte los tres botones.
El teclado tiene ahora nuevamente la configuración predeterminada de fábrica.
Salida MIDI
El puerto de salida MIDI se encuentra en la parte trasera del teclado. Úselo para conectar el teclado a un módulo de
sonido o teclado MIDI externo. Cuando ponga el teclado en funcionamiento, todos los datos de controlador serán
enviados por defecto a través de la salida MIDI y de la salida USB. Si desea que la salida MIDI funcione como una
interfaz USB-MIDI convencional, active el modo “MIDI Out”. Para ello, siga estas instrucciones:
1. Pulse el botón Advanced Functions para acceder al modo de programación.
2. Pulse la tecla negra representa “MIDI OUT FROM USB”.
3. Al hacerlo abandonará el modo de programación.
4. Ahora, el teclado podrá enviar datos procedentes de la computadora a cualquier dispositivo conectado a
través del jack MIDI OUT.
Para usar la salida MIDI, seleccione “Keystation USB MIDI” como dispositivo de salida MIDI en su secuenciador.
20
Page 21
VOLUME
ON/OFF
POWER
Guide d'utilisation (Français)
Présentation
Nous vous félicitons d’avoir fait l'acquisition du clavier Keystation 88 de M-Audio, un clavier USB dynamique
de 88 touches conçu pour une intégration facile avec votre ordinateur PC ou Macintosh.
Keystation 88 offre des touches semi-lourdes qui vous donnent la sensation d'un piano dans un contrôleur
MIDI compact. Idéal pour de très nombreuses applications de création musicales et éducatives, le Keystation
88 propose une molette de modulation tonale, des touches de déplacement et de lecture pour la commande
logiciel, plus une molette de modulation et un curseur assignables pour un contrôle à portée de main. Bien
que le Keystation 88e soit nativement compatible et offre un fonctionnement réellement prêt à l’utilisation
sous Windows XP, Windows Vista, Windows 7, Windows 8 et Mac OS X, nous vous recommandons de
consacrer quelques minutes à l’examen de ce guide pour apprendre comment utiliser correctement le
clavier, ses fonctions évoluées, et sa programmation.
Contenu de la boîte
Keystation 88, Un câble USB, Cartes de téléchargement de logiciel, Guide d'utilisation, Consignes de
sécurité et informations concernant la garantie
Assistance
Pour les dernières informations concernant ce produit (la configuration système minimale requise, la
compatibilité, etc) et l’enregistrement du produit, veuillez visiter m-audio.com.
Pour toute assistance supplémentaire, veuillez visiter m-audio.com/support.
Utilisation rapide
Connexion de votre clavier
Vous pouvez alimenter votre clavier soit par un port USB alimenté, soit par un bloc d’alimentation externe en
option. Cependant, les Keystation sont des appareils à faible consommation et un bloc d’alimentation externe
ne devrait pas être nécessaire. Il est recommandé de relier le Keystation à un port USB de votre ordinateur
ou à un concentrateur USB alimenté. Utilisez un câble USB afin d’alimenter le Keystation lors de la
connexion à un ordinateur pour déclencher des synthétiseurs logiciels.
Vous pouvez également utiliser le Keystation 88 avec votre iPad pour commander les applications de
création musicale supportées.
Afin d'utiliser le Keystation 88 avec votre iPad, vous devez vous procurer le Kit de connexion d'appareil photo
iPad offerte à la boutique Apple Store.
Schéma de connexion
MODULE DE SON*
21
ADAPTATEUR DE
ALIMENTATION*
PÉDALE DE
SUSTAIN*
ORDINATEUR*
VOLUME
ON/OFF
*VENDU SÉPARÉMENT
POWER
PÉDALE
D’EXPRESSION*
Page 22

Installations recommandées
Logiciel : Nous avons inclus l’application Pro Tools | First M-Audio Edition et Ableton Live Lite avec le
Keystation 88 afin que vous puissiez commencer à créer de la musique avec un logiciel de qualité
professionnelle aussitôt que vous le sortez de la boîte. Pour installer Pro Tools | First M-Audio Edition, veuillez
enregistrer le Keystation 88 sur le site m-audio.com et suivre les instructions d’installation à partir de votre
compte utilisateur. Pour installer Ableton Live Lite, veuillez suivre les instructions sur la carte de
téléchargement de logiciel fournie. Veuillez également visiter le site ableton.com afin de vérifier s’il y a des
mises à jour disponibles pour votre logiciel.
Instruments virtuels : Veuillez suivre les instructions sur la carte de téléchargement de logiciel afin
d’installer les plug-ins d'instruments virtuels. La plupart des logiciels audionumériques ne chargent pas
automatiquement les plug-ins d'instruments virtuels après l’installation. Afin d’accéder aux plug-ins
d'instruments virtuels à partir de Pro Tools | First M-Audio Edition et Ableton Live Lite, vous devez
sélectionner le dossier des plug-ins afin que le logiciel puisse y accéder :
Dossiers des plug-ins Pro Tools | First M-Audio Edition/AAX :
Plug-ins Ableton/VST :
Windows (32 bits) :
C:\Fichiers de programme (x86)\Fichiers communs\Avid\Audio\Plug-ins
Windows (64 bits) :
C:\Fichiers de programme\Fichiers communs\Avid\Audio\Plug-ins
Mac :
Macintosh HD/Bibliothèque/Application Support/Avid/Audio/Plug-ins
Windows (32 bits) :
C:\Fichiers de programme (x86)\VSTplugins
Windows (64 bits) :
C:\Fichiers de programme\VSTplugins
Mac :
Macintosh HD\Bibliothèque\Audio\Plugins\VST
Pour définir le dossier de plug-ins dans Ableton Live Lite :
1. Allez dans le menu Preferences.
2. Cliquez sur l’onglet File Folder. Sous Plug-In Sources, cliquez sur Browse et sélectionnez le dossier
des plug-ins approprié.
3. Après avoir effectué votre sélection, le bouton Use VST Custom Plug-In Folder devrait être activé. Si
ce n’est pas le cas, cliquez sur le bouton pour l’activer.
4. Quittez le menu Preferences.
Mise en route
Veuillez noter que vous n’entendrez aucun bruit lorsque vous appuierez sur les touches du clavier. C'est
parce que les touches permettent au clavier de transmettre des données MIDI. Les données MIDI
contiennent des instructions sur quand et comment une note doit être jouée. Pour entendre le son, vous
devez configurer votre logiciel audionumérique afin qu’il lise les données MIDI transmises par le Keystation
88 et qu’il reproduise le son en conséquence. Cette configuration nécessite d’accéder au menu Options ou
Configuration des périphériques de votre logiciel audionumérique et en sélectionnant le périphérique
approprié. Le Keystation 88 devrait apparaître comme « Keystation 88 » dans la section des périphériques
MIDI de votre logiciel audionumérique. Veuillez consulter le guide d’utilisation fourni avec votre logiciel pour
connaître la procédure d’installation.
22
Page 23

Installation de Ableton Live Lite
1. Utilisez le câble USB fourni pour brancher le Keystation 88 au port USB d’un ordinateur, puis lancez
Ableton Live Lite.
2. Ouvrez ensuite la fenêtre Preferences dans Ableton Live Lite. Sélectionnez le périphérique audio
dans l'onglet Audio. Cela dépend de l'interface audio que vous utilisez.
MAC : Sélectionnez Live > Preferences
3. Cliquez sur l’onglet MIDI/Sync. Dans la section MIDI Ports, réglez les paramètres comme indiqué
4. Fermez la fenêtre Preferences.
5. Pour ajouter un instrument ou un plug-in à Ableton Live Lite afin de générer un son, dans la colonne
6. Dans la colonne Name à droite de la colonne Categories, recherchez l'instrument ou le plug-in de
PC : Sélectionnez Options > Preferences
ci-dessous :
À côté de Input : Keystation 88, basculez le bouton On dans les colonnes Track et Remote.
À côté de Output : Keystation 88, basculez le bouton On dans les colonnes Track et Remote.
Categories, sélectionnez Instruments ou Plug-ins.
votre choix. Cliquez et glissez l'instrument sur une piste MIDI dans Ableton Live Lite pour charger
l'instrument.
L'instrument peut maintenant être déclenché par le Keystation 88.
Installation Pro Tools | First M-Audio Edition
1. Utilisez le câble USB fourni pour brancher le Keystation 88 au port USB d’un ordinateur, puis lancez
Pro Tools | First M-Audio Edition.
2. Ouvrir ou créer un projet.
3. À partir du menu déroulant Setup, sélectionnez l’option MIDI Input Devices. Activez MIDI Input du
Keystation 88 en cochant la case à côté de Keystation 88.
4. À partir du menu déroulant Setup, sélectionnez l’option Playback Engine. Sélectionnez votre appareil
audio à partir du menu déroulant Playback Engine.
5. Pour créer une nouvelle piste d'instrument, sélectionnez l’option New à partir du menu déroulant Track.
6. À partir du menu déroulant New, sélectionnez l’option Stereo, puis Instrument Track.
7. Dans la nouvelle piste, ajoutez un insert en cliquant sur les Inserts A-E de la piste et en sélectionnant
l’option Multichannel Plugin > Instrument et l’instrument que vous souhaitez utiliser, comme Xpand!2
(Stereo). Le plug-in peut maintenant être déclenché par le Keystation 88.
Remarque : Les utilisateurs Windows ont besoin d'une carte son externe (tel que M-Track 2X2) ou d'un
pilote ASIO à faible latence.
23
Page 24

Caractéristiques
Panneau supérieur
Clavier
La plupart des touches blanches et noires du Keystation sont étiquetées avec des noms. À partir du menu Advanced, les
touches étiquetées permettent d’effectuer des opérations spéciales telles que le réglage du canal MIDI, la transposition, et la
transmission de messages de changement de programme.
Octave Boutons
Si vous appuyez une fois sur la touche de décalage d’octave « + », la DEL au-dessus de la touche de décalage d’octave « - »
s'éteindra, indiquant que l’octave du clavier joue maintenant une octave plus haut.
Si vous appuyez encore sur le bouton d’octaves “+”, vous monterez encore d’une octave, et ainsi de suite. Il est possible de
faire monter ou descendre le clavier de 3 octaves à partir de l’octave de départ 0.
Pour décaler l'octave vers le bas, appuyez sur la touche de décalage d’octave « - » et notez que la DEL au-dessus de l'octave
« + » s'éteindra. Si seule la DEL située au-dessus du bouton d’octaves “-” est allumée, cela signifie que l’octave est décalée
vers le bas. Au contraire, si seule la DEL située au-dessus du bouton d’octaves “+” est allumée, cela signifie que l’octave est
décalée vers le haut. Les DEL des touches de décalage d’octave « + » et « - » changent de couleur lorsque le clavier est
décalé de plus d'une octave vers le haut ou vers le bas.
Pour retourner à l’octave 0, appuyez en même temps sur les deux boutons d’octaves “+” et “-”. Les deux témoins lumineux
s’allumeront, ce qui indique que l’octave est revenue à 0.
Curseur de volume
Le curseur de volume envoie un message MIDI qui contrôle le volume des notes que vous jouez. Le curseur de volume peut
aussi être assigné à la création de divers effets tels que le panoramique (balance), l’attaque, la reverb, le chorus et bien
d’autres. (Reportez-vous au chapitre Fonctions avancées pour de plus amples informations.)
Molette de pitch-bend
Comme son nom l’indique, la molette de pitch-bend est principalement utilisée pour modifier la hauteur tonale des notes jouées
sur le clavier. Ceci vous permet de jouer des phrases musicales qui ne sont pas normalement associées au son d’un clavier;
par exemple, des riffs de guitare. C’est votre source sonore qui détermine jusqu’à quel point vous pouvez modifier la hauteur
tonale de la note. Le réglage habituel est de deux demi-tons, mais il peut aller jusqu’à deux octaves monter ou descendre.
Molette de modulation
La molette de modulation est généralement utilisée pour moduler le son que vous jouez. Ce type de contrôleur en temps réel a
d’abord été implanté sur les claviers électroniques pour offrir au musicien des options telles que l’ajout de vibrato, qui permet
d’imiter le travail effectué avec des instruments acoustiques. La molette de modulation est entièrement programmable par
MIDI.
Fonctions avancées bouton
Le bouton «Advanced Functions» (fonctions avancées) est utilisé pour l’accès à toutes les fonctions avancées du clavier.
Quand vous appuyez sur le bouton «Advanced Functions», le clavier se met en mode de programmation. Dans ce mode, les
touches sont utilisées pour sélectionner des fonctions et entrer des données.
Le LED situé au-dessus du bouton «Advanced Functions» indique si le clavier se trouve en mode de programmation. Dans le
mode de programmation, les touches noires du clavier sont utilisées pour la sélection de fonctions et les touches blanches pour
l’entrée de données et le choix des canaux.
Le clavier quitte le mode Edit aussitôt qu'une fonction est sélectionnée, ou que la touche Advanced, CANCEL ou ENTER est
enfoncée (la DEL au-dessus de la touche Advanced Functions s'éteindra).
Le clavier peut donc être à nouveau utilisé pour produire des notes.
Remarque : Veuillez consulter la section Fonctions évoluées pour plus d'informations.
Touches de déplacement
Ces touches peuvent utiliser les protocoles Mackie Control® ou HUI® afin de commander certaines fonctions des logiciels
audionumériques. Veuillez consulter le paragraphe Touches de déplacement et de lecture sous la section Fonctions
évoluées pour plus d'informations.
Touches de lecture
Ces touches peuvent utiliser les protocoles Mackie Control ou HUI afin de commander certaines fonctions des logiciels
audionumériques. Veuillez consulter le paragraphe Touches de déplacement et de lecture sous la section Fonctions
évoluées pour plus d'informations.
24
Page 25

Panneau arrière
3
1
1. Entrée d’Alimentation CC (9V DC) : Si vous ne désirez pas alimenter le Keystation via la connexion
USB et que vous utilisez un connecteur MIDI afin de déclencher un module de son externe, branchez
un adaptateur 9 V c.c. 200 mA à centre positif (vendu séparément).
2. Port USB : Le port USB permet d’alimenter le clavier et de transmettre des données MIDI lorsqu’il est
branché à un ordinateur pour déclencher un synthétiseur ou séquenceur MIDI logiciel.
3. MIDI OUT : Branchez un câble MIDI à cinq broches (non inclus) à cette sortie et à l’entrée MIDI IN d’un
module de son ou d’un synthétiseur externe.
4. Entrée pour pédale sustain : Cette prise accepte une pédale momentanée (vendu séparément).
Lorsque cette pédale est enfoncée, le son joué sera maintenu sans avoir à garder les doigts sur les
touches.
REMARQUE : La polarité de la pédale de sustain est calculée par le clavier quand il est allumé. Quand
vous allumez le clavier, celui-ci fait l'hypothèse que la pédale est en position "inactive". Il est important
que la pédale de sustain ne soit pas pressée lors du démarrage, pour éviter que son fonctionnement
soit inversé et que les notes soient soutenues lorsqu'elle n'est pas pressée.
REMARQUE : Vous pouvez utiliser une pédale pour prolonger le son que vous jouez sans avoir à
garder les mains sur le clavier (exactement comme la pédale forte (sustain) d’un piano). Vous pouvez
brancher une pédale (vendue séparément) de n’importe quelle polarité dans l’entrée pour pédale de
votre clavier M-Audio. Le clavier détectera automatiquement la polarité correcte lors de la mise en
marche. Si vous voulez inverser la polarité, appuyez simplement sur la pédale lorsque vous allumez
votre clavier.
5. Entrée Pour Pédale d’Expression : Brancher une pédale d'expression TRS 6,35 mm (¼ po)(vendu
séparément) à cette entrée pour le réglage du volume du vibrato ou de la profondeur de réverbération
d’un patch d'instrument.
6. Interrupteur on/off : Utilisez cet interrupteur pour allumer ou éteindre le dispositif.
Les fonctions avancées
En plus de pouvoir décaler les octaves, les deux boutons d’octaves “+” et “-” que nous avons décrits plus
haut dans ce manuel peuvent aussi être utilisés pour commander l’une des 6 fonctions MIDI.
Que les six premières libellees touches sont utilisées pour sélectionner la fonction désirée des boutons
d’octaves. Certaines des fonctions correspondant à ces touches ne peuvent pas envoyer de valeur plus
petite que 0. Quand les boutons d’octaves sont utilisés pour commander ces fonctions, les deux témoins
lumineux situés audessus restent allumés, peu importe la configuration actuelle de cette fonction.
Pour sélectionner une fonction alternative :
1. Appuyez sur le bouton «Advanced Functions» pour mettre votre clavier en mode de programmation.
2. Appuyez sur la touche noire qui représente la fonction désirée. Le clavier sortira du mode de
programmation dès que vous aurez sélectionné une fonction et vous pourrez à nouveau produire
des notes.
2
USB
4
SUSTAINMIDI OUT
5
VOLUME POWER
6
ON/OFF
25
Page 26

Décalage d’octaves : Les touches de décalage d’octaves “+” et “-”
L’autre méthode pour le décalage des octaves du Keystation est l’utilisation des touches libellées “Octave +”
et “Octave -”. Une fois que vous avez appuyé sur le bouton «Advanced Function», ce qui met le clavier en
mode de programmation, le fait d’appuyer sur ces boutons fera monter ou descendre la hauteur tonale du
clavier d’une ou de plusieurs octaves (une par pression). Le décalage d’octave par défaut est “0”, et vous le
retrouverez chaque fois que vous allumerez votre clavier. Quand les deux témoins lumineux situés audessus des boutons d’octaves sont allumés, ils indiquent que le décalage d’octaves est de «0».
Pour programmer les touches “+” et “-” afin qu’elles commandent l’octave :
1. Appuyez sur le bouton «Advanced Functions» pour mettre votre clavier en mode de programmation.
2. Appuyez sur la touche noire libellée “OCTAVE”. Le clavier quittera le mode de programmation dès
que vous aurez appuyé sur OCTAVE.
Il y a une autre méthode pour procéder à un changement rapide d’octave, ce qui peut être utile quand vous
utilisez les boutons d’octaves pour la commande d’une autre fonction MIDI.
Pour cela, suivez les instructions ci-dessous :
1. Appuyez sur le bouton «Advanced Functions» pour mettre votre clavier en mode de programmation.
2. Enfoncez la touche noire représente “OCTAVE +”, et augmente l’octave d’une unité (vous pouvez
appuyer dessus une nouvelle fois pour l’augmenter de 2, et ainsi de suite).
Enfoncez la touche noire représente “OCTAVE -” et diminue l’octave d’une unité (vous pouvez
appuyer dessus une nouvelle fois pour la diminuer de 2, et ainsi de suite). Enfoncez la touche noire
représentant « OCTAVE 0 » afin de réinitialiser le décalage d’octave à 0.
3. Lorsque vous avez choisi le décalage d’octave, appuyez sur « ENTER » pour sélectionner l’octave
et quitter le mode Edit. Sélectionnez Cancel ou Advanced afin d’annuler la sélection et quitter le
mode Advanced.
Transposition
Il est parfois préférable d’augmenter ou de réduire la hauteur tonale de plusieurs demi-tons plutôt que d’une
octave entière. Par exemple, si vous accompagnez un chanteur qui rencontre des difficultés à produire les
notes les plus hautes, vous pourriez souhaiter réduire la hauteur tonale d’un ou deux demi-tons. Cela est
possible par l’utilisation d’une fonction MIDI appelée “Transpose.”
La fonction de transposition fonctionne de la même façon que le décalage d’octave décrit ci-dessus, à ceci
près que le décalage est de +/- 12 demi-tons.
Comme avec le décalage d’octaves, il y a deux manières de
transposer votre clavier. Vous pouvez utiliser les boutons d’octaves “+” et “-” ou les touches noires
“TRANSPOSE -,” “TRANSPOSE 0” et “TRANSPOSE +”.
Pour assigner les boutons d’octaves “+” et “-” à transpose :
1. Appuyez sur le bouton «Advanced Functions» pour mettre votre clavier en mode de programmation.
2. Appuyez sur la touche noire libellée “TRANSPOSE”. (Le clavier quittera le mode de programmation
dès que vous aurez appuyé sur “TRANSPOSE”.)
3. Appuyez sur la touche “+” et vous entendrez monter la hauteur tonale de la note que vous jouez.
4. Appuyez en même temps sur “+” et “-” pour annuler transpose.
Canal
Les données MIDI en provenance du clavier peuvent être envoyées sur n’importe lequel des 16 canaux MIDI.
Cependant, certains périphériques ou logiciels MIDI ont besoin que le clavier envoie les données sur un canal précis.
Si c’est le cas, vous pouvez changer le canal par lequel les données sont envoyées en suivant les instructions cidessous :
1. Appuyez sur le bouton «Advanced Functions» pour mettre votre clavier en mode de programmation.
2. Enfoncez l’une des 16 touches selon le canal dont vous avez besoin.
Par exemple, si un périphérique précise que vous devez envoyer les données sur le canal 10, appuyez sur le
bouton «Advanced Functions» et sur la sélectionner le canal 10. Le canal peut aussi être assigné aux boutons
d’octaves “+” et “-”. Une fois assigné, le fait d’appuyer sur “+” ou “-” sélectionnera le canal précédent ou le canal
suivant.
Si vous appuyez sur «+» lorsque vous avez déjà atteint le canal 16, le canal 1 sera sélectionné. Si les touches
d’octaves “+” et “-” sont sélectionnées pour le changement de canal, les témoins lumineux ne changeront pas, car
un canal ne peut pas avoir une valeur négative. Si vous appuyez en même temps sur les boutons “+” et “-”, le
canal 1 sera à nouveau sélectionné.
26
Page 27

Changement de programme
Les changements de programme (Program Changes) servent à changer l’instrument ou la voix que vous utilisez. Par
exemple, changeons un instrument et passons en son de basse. Pour cela, nous devons envoyer un changement de
programme de valeur 32, qui sélectionnera un son de basse acoustique. Il y a deux méthodes pour envoyer un
changement de programme :
Changement de programme +/-
1. Appuyez sur le bouton «Advanced Functions».
2. Appuyez sur la touche noire libellée “PGM CHANGE”.
3. Les touches d’octaves “+” et “-” peuvent maintenant servir au changement de programme.
4. Appuyez sur “+” et continuez à jouer des notes jusqu’à ce que vous trouviez l’instrument que vous désirez.
Cette méthode est utile si vous voulez faire défiler différents instruments afin de déterminer laquelle est plus
appropriée pour votre chanson.
Changement de programme en sélection rapide :
1. Appuyez sur le bouton «Advanced Functions».
2. Appuyez sur la touche noire libellée «PGM #».
3. Appuyez sur les touches “3,” “2,” “ENTER.” Maintenant, le clavier jouera un son de basse : numéro 32.
Elle est également utile lorsque vous souhaitez sélectionner un numéro spécifique, comme c'est le cas ici.
Si les touches d’octaves “+” et “-” sont sélectionnées pour le changement de programme (première méthode), les
témoins lumineux ne changeront pas, car un programme ne peut pas avoir une valeur négative. Si vous appuyez en
même temps sur les boutons “+” et “-”, le programme 0 (son de piano) sera à nouveau sélectionné.
Bank LSB et Bank MSB
Les changements de programme sont le plus souvent utilisés pour changer les instruments et les voix. Cependant, le
nombre d’instruments accessibles par changement de programme est limité à 128. Quelques dispositifs ont plus de
128 voix et nécessitent une méthode différente pour accéder à ces voix supplémentaires. En général, ces dispositifs
ont recours aux messages Bank LSB et Bank MSB.
Changements Bank LSB et Bank MSB +/- :
1. Appuyez sur le bouton «Advanced Functions».
2. Appuyez sur la touche noire libellée respectivement “Bank LSB” ou “Bank MSB”.
3. Les touches d’octaves “+” et “-” peuvent maintenant servir au changement de Bank LSB.
4. Appuyez sur “+” et continuez à jouer des notes jusqu’à ce que vous trouviez l’instrument que vous désirez.
Sélection rapide :
1. Appuyez sur le bouton «Advanced Functions».
2. Appuyez sur les touches noires libellées respectivement “Bank LSB” ou “Bank MSB”.
3. Appuyez sur les touches “3,” “2,” “ENTER”.
Comme pour le changement de programme, si les touches d’octaves “+” et “-” sont sélectionnées pour changer le
numéro Bank LSB ou MSB (méthode 1), les témoins lumineux ne changeront pas, car Bank ne peut pas avoir une
valeur négative. Si vous appuyez en même temps sur les boutons “+” et “-”, Bank 0 sera à nouveau sélectionné.
Le curseur de volume
Pour assigner le curseur de volume à un effet :
1. Appuyez sur le bouton «Advanced Functions» pour mettre votre clavier en mode de programmation.
2. Appuyez sur la touche noire libellée “FADER”.
3. Utilisez les touches de saisie numérique pour entrer le numéro de l’effet que vous souhaitez
assigner au curseur de volume.
Vous pouvez aussi utiliser les boutons “+” et “-” pour changer la valeur.
1. Appuyez sur la touche Advanced Functions pour activer le mode Edit.
2. Appuyez sur la touche noire représentant « FADER ».
3. Utilisez les touches « + » et « - » pour modifier la valeur.
4. Appuyez sur la touche ENTER.
5. Déplacez le curseur du volume vers le haut pour augmenter la valeur de l'effet.
Si vous avez commis une erreur lors de la saisie de la valeur numérique, enfoncez la touche CANCEL pour
quitter le mode de programmation sans changer l’effet assigné au curseur de volume.
Veuillez noter que chaque fois que vous éteindrez votre clavier, les données assignées au curseur de
volume seront perdues. Chaque fois que vous allumerez votre clavier, le curseur de volume reprendra son
assignation par défaut : effet numéro 07, Volume.
27
Page 28

La molette de modulation
Il est possible d’affecter des effets MIDI à la molette de modulation. Quelques effets utiles : MIDI CC 01
(Modulation), MIDI CC 07 (Volume), MIDI CC 10 (Pan), et de MIDI CC 05 (Portamento).
Il y a 132 effets au total. Cependant, pour que ces effets affectent le son, le dispositif MIDI récepteur doit
pouvoir lire et interpréter ces messages d’effet MIDI. La majorité des dispositifs interprétera au moins les
données de volume, de modulation et de panoramique (pan). (La liste complète des effets se trouve au dos
de ce manuel.)
Pour assigner un effet à la molette de modulation :
1. Appuyez sur le bouton «Advanced Functions» pour mettre votre clavier en mode de programmation.
2. Enfoncez la touche noire libellée “WHEEL”.
3. Utilisez les touches de saisie numérique pour entrer le numéro de l’effet que vous souhaitez
assigner à la molette de modulation.
Au lieu d'entrer la valeur en nombre, vous pouvez faire défiler chaque effet un à la fois en utilisant les
touches « + » et « - ». Une fois la valeur sélectionnée, appuyez sur la touche ENTER.
Si vous avez commis une erreur lors de la saisie de la valeur numérique, enfoncez la touche CANCEL pour
quitter le mode de programmation sans changer l’effet assigné à la molette de modulation.
Veuillez noter que chaque fois que vous éteindrez votre clavier, les données assignées à la molette de
modulation seront perdues. Chaque fois que vous allumerez votre clavier, la molette de modulation
reprendra son assignation par défaut : effet numéro 01, Modulation.
Par exemple, nous allons assigner l’effet numéro 10 (panoramique, ou balance) à la molette de modulation.
1. Appuyez sur le bouton «Advanced Functions» pour mettre votre clavier en mode de programmation.
2. Enfoncez la touche noire libellée “WHEEL”.
3. Appuyez “1”.
4. Appuyez “0”. Vous avez ainsi saisi “10”.
5. Appuyez “ENTER”.
Touches de déplacement et de lecture
Les touches de déplacement et de lecture utilisent les protocoles Mackie Control ou HUI afin de commander
certaines fonctions des logiciels audionumériques.
Pour sélectionner le protocole qu'utiliseront ces touches afin de communiquer avec votre logiciel :
1. Appuyez sur la touche Advanced Functions afin de mettre le clavier en mode Edit.
2. Appuyez sur la touche représentant MACKIE/HUI.
Remarque : Les DEL « + » et « - » s’allumeront en vert en mode Mackie et en rouge en mode HUI.
3. Appuyez sur la touche ENTER.
Remarque : Votre logiciel audionumérique doit également être réglé pour recevoir les commandes
d'un dispositif externe (p. ex., le Keystation) à l'aide du protocole Mackie Control ou HUI. Les
commandes Mackie et HUI sont transmis sur Virtual Port 2.
28
Page 29
Dépannage
General
Voici les solutions aux problèmes les plus fréquents, lors de l’utilisation d’un clavier Keystation :
Problème 1 : Mon matériel M-Audio a soudainement cessé de fonctionner après un fonctionnement sans
problème depuis l’installation.
Solution 1 : Eteignez-le et laissez-le reposer pendant 10 secondes. Puis, redémarrez votre ordinateur et essayez à
nouveau. Si le problem persiste, il se peut que vous deviez réinstaller les pilotes de l’appareil.
Problème 2 : J’ai branché une pédale à mon clavier M-Audio, mais elle fonctionne à l’envers.
Solution 2 : La polarité de la pédale est calculée par le clavier lors de la mise en marche. Lors de la mise en marche,
le clavier suppose que la pédale est en position «inactive». Ainsi, si vous souhaitez que la pédale soit inactive quand
elle est relâchée, assurez-vous qu’elle est relâchée quand vous allumez le clavier.
Problème 3 : Quand j’enfonce une touche, il y a un délai avant que j’entende un son.
Solution 3 : Ce délai est plus connu sous le nom de «latence». La latence avec les signaux MIDI est due au logiciel
que vous utilisez. Les données MIDI sont juste des données de contrôle. Les données MIDI sont lues par votre
logiciel. Le logiciel effectue de nombreux calculs compliqués pour produire le son que vous entendez et ces calculs
prennent du temps. Nous vous recommandons fortement de vous procurer une carte son appropriée.
Consultez m-audio.com pour découvrir toute une sélection de Interface audio. Si vous avez déjà une Interface audio
adéquate, essayez de réinstaller les derniers pilotes pour la Interface audio, ou essayez de réduire la taille de la
mémoire tampon des pilotes audio.
MIDI : en dernier recours
Les claviers Keystation ont été conçus pour rendre le travail avec MIDI sur votre ordinateur aussi simple que
possible. Il est toutefois possible que vous rencontriez des difficultés. Dans de nombreux cas, les problèmes ne
viennent pas du clavier mais plutôt du dispositif récepteur. Pour résoudre ces problèmes, il existe deux fonctions
MIDI très utiles : All Notes Off et Reset All Controllers.
All Notes Off
Si des notes sont bloquées et ne peuvent pas être arrêtées, envoyez le message MIDI “All Notes Off” en suivant les
instructions ci-dessous :
1. Appuyez sur le bouton «Advanced Functions» pour mettre votre clavier en mode de programmation.
2. Appuyez sur la touche noire libellée “ALL OFF”.
3. Le clavier quittera le mode de programmation et annulera toutes les notes bloquées.
Reset All Controllers
Si vous entendez un effet indésiré sur une voix, vous pouvez envoyer un message MIDI «Reset All Controllers»
(réinitialiser tous les contrôleurs) plutôt que de devoir isoler et identifier cet effet. Pour cela, suivez les instructions cidessous :
1. Appuyez sur le bouton «Advanced Functions» pour mettre votre clavier en mode de programmation.
2. Appuyez sur la touche noire libellée “RESET”.
3. Le clavier quittera le mode de programmation en enlevant tous les effets.
Factory Reset
1. Mettez le Keystation hors tension.
2. Maintenez les touches « ADVANCED », « OCT+ », et « OCT- » enfoncées en même temps, jusqu’à
l’étape 4.
3. Mettez le Keystation sous tension.
4. Relâchez les touches.
Les paramètres d’usine du clavier sont maintenant réinitialisés.
MIDI Out
Le port de sortie MIDI se trouve sur la face arrière du clavier, et peut être utilisé pour relier le clavier à un module de
son externe ou à un clavier MIDI. Par défaut (quand vous allumez l’appareil), toutes les données du contrôleur sont
envoyées par la sortie MIDI et la sortie USB.
Si vous voulez que la sortie MIDI fonctionne comme une interface classique «USB vers MIDI», entrez dans le mode
“MIDI Out” (sortie MIDI à partir de l’USB) en suivant les instructions ci-dessous :
1. Appuyez sur le bouton «Advanced Functions» pour mettre votre clavier en mode de programmation.
2. Appuyez sur la touche noire libellée “MIDI OUT.”
3. Le clavier quittera le mode de programmation.
4. Le clavier peut maintenant envoyer les données en provenance de l’ordinateur sur sa sortie MIDI (MIDI Out)
en direction de n’importe quel périphérique qui y serait connecté.
Vous devez sélectionner la sortie USB MIDI de votre Keystation en tant que dispositif de sortie MIDI dans votre
séquenceur pour utiliser la sortie MIDI.
29
Page 30

VOLUME
ON/OFF
POWER
O
Guida per l'uso (Italiano)
Introduzione
Congratulazioni per aver acquistato la tastiera Keystation 88 di M-Audio. Questa tastiera USB a 88 tasti
sensibili alla velocità è stata concepita per integrarsi facilmente con il vostro PC o Macintosh. Il Keystation 88
presenta tasti semi-pesati che offrono la sensazione di un pianoforte in un controller MIDI compatto. Ideale
per tutta una serie di creazioni musicali e applicazioni educative, il Keystation 88 offre una rotella di bend del
pitch, tasti direzionali e di trasporto per il controllo del software, nonché una rotella di modulazione
assegnabile ed un cursore per il controllo diretto. Sebbene il Keystation 88
funzionalità plug-and-play in Windows XP, Windows Vista, Windows 7, Windows 8, e Mac OS X, si consiglia
di dedicare alcuni minuti ad analizzare il presente manuale per saperne di più in merito a un utilizzo
adeguato, alle funzioni avanzate e alla possibilità di programmazione.
Contenuti della confezione
Keystation 88, Cavo USB, Schede di download del software, Guida per l'uso, Istruzioni di sicurezza e
garanzia
Assistenza
Per conoscere le ultime informazioni in merito a questo prodotto (i requisiti di sistema complete,
compatibilità, ecc) e per la registrazione del prodotto, recarsi alla pagina m-audio.com.
Per ulteriore assistenza, recarsi alla pagina m-audio.com/support.
Inizio rapido
Collegamento della tastiera
È possibile alimentare la tastiera tramite porta USB o mediante un alimentatore esterno opzionale. In ogni
caso, le tastiere Keystation sono dispositivi a bassissimo consumo e l’alimentazione esterna non dovrebbe
essere necessaria. Si consiglia di collegare la Keystation alla porta USB del computer o a un hub USB
alimentato. Servirsi di un cavo USB per alimentare la Keystation quando la si collega a un computer per
attivare sintetizzatori software.
Si può inoltre utilizzare la Keystation 88 con l'iPad per controllare le app di creazione musicale supportate.
Per collegare la Keystation 88 a un iPad occorre l'iPad Camera Connection Kit, disponibile presso l'Apple
Store.
Schema dei collegamenti
ADATTATORE DI
ALIMENTAZIONE*
MODULO AUDIO
ESTERNO*
PEDALE
SUSTAIN*
COMPUTER*
ON/OFF
VOLUME
POWER
PEDALE
DI
ESPRESSIONE*
sia compatibile e sia dotato di
*VENDUT
SEPARATAMENTE
30
Page 31

Installazioni consigliate
Software: Con l’ Keystation 88 abbiamo incluso il Pro Tools | First M-Audio Edition Ableton Live Lite in modo
da consentirvi di iniziare immediatamente a fare musica con software professionale. Per utilizzare Pro Tools |
First M-Audio Edition, registrare l’Keystation 88 su m-audio.com, e seguire le istruzioni di installazione di
Pro Tools | First M-Audio Edition nel proprio Account utente. Per installare Ableton Live Lite, seguire le
istruzioni presenti sulla scheda di download del software Ableton Live Lite. Inoltre, recarsi alla pagina
ableton.com
Virtual Instruments: seguire le istruzioni presenti nella scheda di download del software per installare i
plugin Virtual Instrument in dotazione. Dopo l’installazione, la maggior parte dei DAW non caricherà i plugin
Virtual Instrument automaticamente. Per accedere ai plugin Virtual Instrument con Pro Tools | First M-Audio
Edition e Ableton Live Lite, bisogna scegliere la cartella plugin per il software da scansionare:
Pro Tools | First M-Audio Edition/AAX cartelle plugin:
Plugin Ableton/VST:
Per configurare la cartella plugin in Ableton Live Lite:
1. Recarsi al menu Preferences (preferiti).
2. Selezionare la scheda File Folder (cartella file). Sotto Plug-In Sources (fonti plugin) cliccare su
3. Dopo aver effettuato la scelta, il tasto Use VST Custom Plug-In Folder dovrebbe essere acceso
4. Uscire dal menu Preferences (preferiti).
Primi passi
Va notato che quando si preme un tasto sulla tastiera non si sente alcun suono. Questo perché la pressione
di un tasto fa sì che la tastiera invii dati MIDI. I dati MIDI forniscono istruzioni su come dovrebbe suonare un
suono, ma per sentire effettivamente tale suono occorre configurare il proprio software musicale in modo che
legga i dati MIDI inviati dall’Keystation 88 e riproduca il suono di conseguenza. Questa configurazione molto
probabilmente richiederà di andare nel menù “Opzioni” o “Configurazione dispositivo” nell’applicazione
software musicale e selezionare il dispositivo adeguato. L’Keystation 88 dovrebbe apparire sotto il nome
“Keystation 88” nella sezione dispositivi MIDI dell’applicazione software musicale. Consultare il manuale in
dotazione con il software per conoscere l'adeguata procedura di configurazione.
per verificare l’eventuale presenza di aggiornamenti del software.
Windows (32-bit):
C:\Program Files (x86)\Common Files\Avid\Audio\Plug-Ins
Windows (64-bit):
C:\Program Files\Common Files\Avid\Audio\Plug-Ins
Mac:
Macintosh HD/Library/Application Support/Avid/Audio/Plug-Ins
Windows (32-bit):
C:\Program Files (x86)\VSTplugins
Windows (64-bit):
C:\Program Files\VSTplugins
Mac:
Macintosh HD\Library\Audio\Plugins\VST
Browse e selezionare la giusta cartella dei plugin.
(ON). Se non lo è, cliccare sul tasto per accenderlo.
31
Page 32

Configurazione Ableton Live Lite
1. Innanzitutto, collegare l’Keystation 88 a una porta USB disponibile del computer servendosi del cavo
USB in dotazione e lanciare l’Ableton Live Lite.
2. Quindi aprire la finestra Preferiti dell’Ableton Live. Scegliere il Dispositivo audio nella scheda Audio.
Questo dipenderà dall’interfaccia audio che si utilizza.
MAC: Selezionare Live > Preferiti
3. Selezionare la scheda MIDI / Sync. Nella sezione Porte MIDI, regolare le impostazioni come illustrato
4. Chiudere la finestra Preferiti .
5. Per aggiungere uno strumento o un plugin all’Ableton Live Lite per generare suoni, nella colonna
6. Nella colonna Nome subito a destra della colonna Categorie, individuare lo Strumento o il Plugin
Configurazione Pro Tools | First M-Audio Edition
1. Collegare l’Keystation 88 a una porta USB disponibile del computer servendosi del cavo USB in
2. Aprire o creare un progetto.
3. Selezionare il menu a discesa Setup e aprire MIDI Input Devices. Abilitare l’ingresso MIDI Input
4. Selezionare il menu a discesa Setup e aprire Playback Engine. Scegliere il dispositivo audio dal menu
5. Per creare una nuova traccia strumentale, selezionare il menu a discesa Track e selezionare New.
6. Nel menu a discesa New selezionare Stereo, e quindi Instrument Track.
7. Nella nuova traccia creata, aggiungere un Inserimento alla traccia facendo clic sugli inserti A-E e
Nota bene: gli utenti Windows avranno bisogno di una scheda audio esterna (ad es. M-Track 2X2) o di un
driver ASIO a bassa latenza.
Guida introduttiva
Una volta terminata l’installazione, è necessario configurare l’applicazione per poter utilizzare Keystation.
Infatti, se si preme qualsiasi tasto della tastiera, non si udirà alcun suono. Ciò è dovuto al fatto che la
pressione del tasto determina l’invio da parte della tastiera di dati MIDI. Questi forniscono le istruzioni su
come riprodurre il suono, ma per udire effettivamente tale suono, occorre configurare il programma musicale
per la lettura dei dati MIDI inviati dalla Keystation e per la relative riproduzione. Per effettuare questa
impostazione, è sufficiente accedere al menu Opzioni o Impostazione periferica dell’applicazione e
selezionare la periferica adeguata. La Keystation dovrebbe apparire come “Periferica audio USB” in
Windows XP, Windows Vista, Windows 7 o come “Keystation 88” negli altri sistemi operativi nella sezione
delle periferiche MIDI del programma musicale. Per la corretta procedura di impostazione, consultare il
manuale in dotazione al programma.
PC: Selezionare Opzioni > Preferiti
di seguito:
Accanto a Input: Keystation 88, commutare il tasto On nelle colonne Track e Remote.
Accanto a Output: Keystation 88, commutare il tasto On nelle colonne Track e Remote.
Categorie scegliere Strumenti o Plug-in.
preferito. Cliccare e trascinare lo strumento su una traccia MIDI in Ableton Live Lite per caricare lo
strumento.
Lo strumento può ora essere attivato con l’Keystation 88.
dotazione e lanciare Pro Tools | First M-Audio Edition.
dell’Keystation 88 facendo clic sulla casella a fianco a Keystation 88.
a discesa Playback Engine.
selezionando Multichannel Plugin > Instrument e selezionando lo strumento che si desidera
utilizzare, come l’Xpand!2 (Stereo). Il plugin può essere ora ttivato con l’Keystation 88.
32
Page 33

Caratteristiche
Pannello superiore
Tastiera
La maggior parte dei tasti bianchi e neri del Keystation è contrassegnata da nomi. Quando ci si trova nel
menù Advanced (Avanzate), premendo uno qualsiasi dei tasti contrassegnati sarà possibile effettuare
operazioni speciali quali regolare il canale MIDI, trasporre e inviare messaggi di modifica di programma.
Pulsanti delle ottave
Se si preme una volta il tasto ottava “+”, il LED al di sopra del tasto ottava “-” si spegne, indicando che le
ottave della tastiera sono ora salite. Se si preme nuovamente il pulsante di ottava “+”, la tastiera verrà
spostata di 2 ottave più in alto. È possibile spostare la tastiera in su o in giù di 3 ottave partendo dallo
spostamento di ottava 0.
Per far scendere l'ottava, premere il tasto ottava “-”: il LED al di sopra dell'ottava “+” si spegne. Se solo il LED
soprastante il tasto di ottava “-” è illuminato, la ottava è spostata in giù; se solo il LED soprastante il tasto di
ottava “+” è illuminato, la ottava è spostata in su. I LED ottava “+” e ottava “-” cambieranno colore quando ci
si muove, verso l'alto o verso il basso, di più di un'ottava.
Per tornare allo spostamento di ottava 0, premere insieme i pulsanti “+” e “-”. Entrambi i LED si illuminano, a
indicare che lo spostamento di ottava è tornato a 0.
Ruota Pitch Bend
Come indicato dal nome, questa ruota viene generalmente utilizzata per modificare il tono delle note
riprodotte dalla tastiera verso l’alto o verso il basso. Ciò consente di suonare fraseggi normalmente non
associati alla tastiera, tra cui i riff di chitarra. La sorgente del suono determina l’entità dell’estensione del tono
della nota. L’impostazione normale è di due semitoni ma può essere spinta fino a due ottave in su o in giù di.
Ruota Modulation
Questa ruota viene generalmente utilizzata per la modulazione del suono in esecuzione. Questo tipo di
controller in tempo reale è stato originariamente introdotto sugli strumenti a tastiera elettronici per offrire al
musicista l’effetto vibrato, tipicamente disponibile con gli strumenti acustici. La ruota modulation è
completamente assegnabile via MIDI.
Slider Volume
Lo slider Volume invia un messaggio MIDI che controlla il volume delle note in esecuzione. Tale slider può
anche essere assegnato a effetti diversi, quali pan (bilanciamento), attack, reverb, chorus e molti altri. Per
ulteriori informazioni, consultare la sezione di installazione di questo manuale.
Il pulsante Advanced Functions
Il pulsante Advanced Functions viene utilizzato per accedere a tutte le funzioni avanzate della tastiera.
Una volta premuto, la tastiera passa in “modalità di programmazione”. Durante questa modalità, i tasti
possono essere utilizzati per selezionare funzioni e immettere dati.
La LED soprastante il pulsante Advanced Functions indica se la tastiera si trova o meno nella modalità di
programmazione. In modalità di programmazione, i tasti neri vengono utilizzati per la selezione delle funzioni,
mentre quelli bianchi per l’immissione dei dati e la selezione dei canali.
La tastiera scivola fuori dalla modalità Edit non appena una funzione viene selezionata o il tasto Advanced
(avanzata), CANCEL (annulla) o ENTER (invio) viene premuto (il LED presente sopra il tasto Advanced
Functions - funzioni avanzate - si spegne). La tastiera può essere nuovamente utilizzata per suonare.
Nota bene: Fare riferimento al paragrafo Funzioni avanzate per maggiori informazioni.
33
Page 34
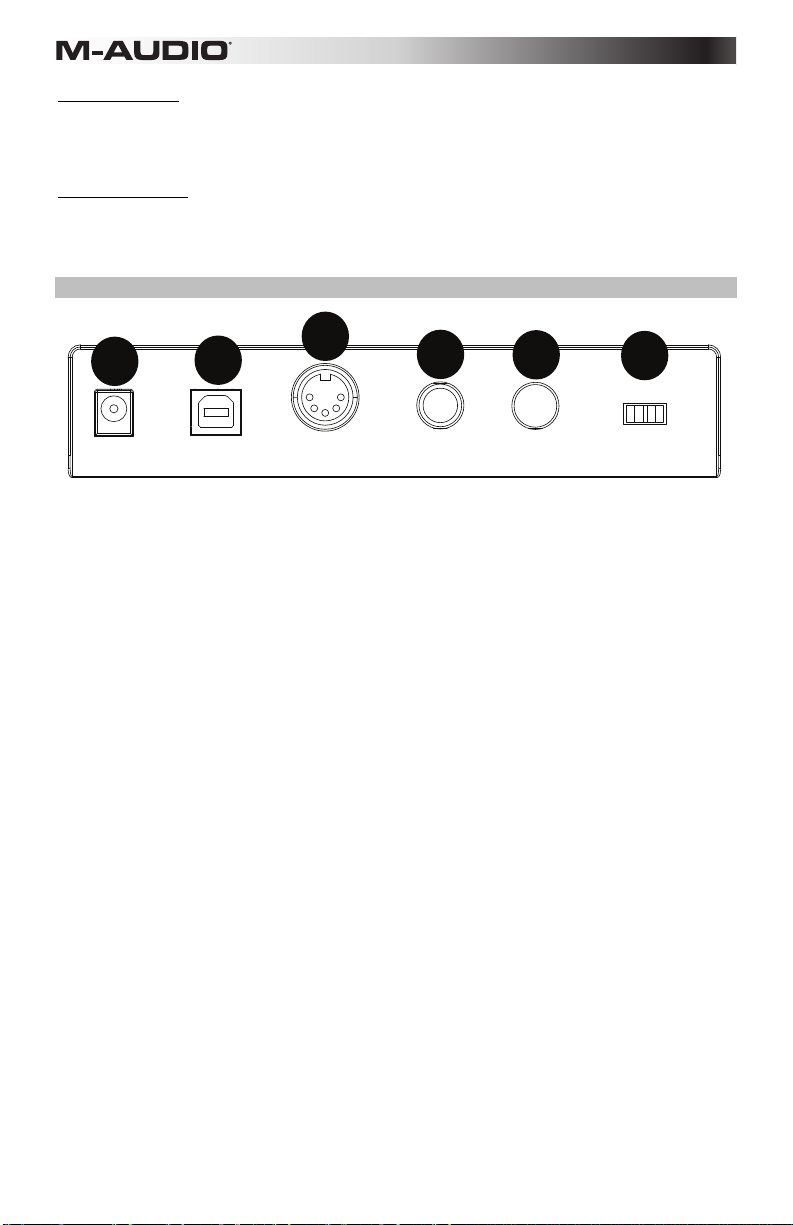
Tasti direzionali
Questi tasti possono impiegare i protocolli Mackie Control® o HUI® per controllare determinate funzioni del
software che li supportano. Consultare la sezione Tasti direzionali e tasti di trasporto del capitolo
Funzioni avanzate per maggiori informazioni.
Tasti di trasporto
Questi tasti possono impiegare i protocolli Mackie Control o HUI per controllare determinate funzioni del
software che li supportano. Consultare la sezione Tasti direzionali e tasti di trasporto del capitolo
Funzioni avanzate per maggiori informazioni.
Pannello posteriore
3
1
1. Ingresso adattatore di Alimentazione CC: Se non si desidera alimentare il Keystation tramite il
collegamento USB e si utilizza il connettore MIDI per attivare un modulo audio esterno, collegare un
adattatore di alimentazione da 9V CC, 200mA, centro-positivo (venduto separatamente) a questo
livello.
2. Porta USB: la porta USB fornisce alimentazione alla tastiera e trasmette dati MIDI quando è collegata
3. MIDI OUT (USCITA MIDI): Servirsi di un cavo MIDI a cinque poli (venduto separatamente) per
4. Ingresso per pedale sustain: Questa presa accetta un pedale a contatto momentaneo (venduto
5. Ingresso per pedale di Espressione: Collegare un pedale di espressione TRS da 1/4" (venduto
6. Interruttore di accensione/spegnimento: Utilizzare questo interruttore per alimentare o spegnere il
a un computer per attivare un sintetizzatore software o un sequenziatore MIDI.
collegare questo jack all'ingresso MIDI di un modulo audio esterno o all'ingresso MIDI di un
sintetizzatore.
separatamente).
continuare a premere i tasti con le dita.
NOTA: La polarità del pedale sustain viene determinata dalla tastiera al momento dell'accensione.
Quando la tastiera Keystation viene alimentata, il pedale sustain viene ritenuto in posizione “sollevata”
(ossia, disattivato). È importante che il pedale sustain non sia premuto durante l'avvio, altrimenti viene
invertito il funzionamento del pedale e le note verranno sostenute quando esso non è premuto.
NOTA: Il pedale viene normalmente usato per sostenere il suono in esecuzione senza dover tenere le
mani sulla tastiera, esattamente come accade con il pianoforte. È possibile collegare un pedale (non
incluso) con qualsiasi polarità nell’ingresso “foot switch” della tastiera M-Audio. La tastiera sarà in
grado di rilevare la corretta polarità al momento dell’accensione. Se si desidera invertire la polarità, è
sufficiente tenere premuto il pedale al momento dell’accensione della tastiera.
separatamente) a questo ingresso per regolare il vibrato del volume, o la profondità del riverbero di una
patch strumentale.
dispositivo.
2
USB
Quando premuto, questo pedale sostiene il suono riprodotto senza dover
4
SUSTAINMIDI OUT
5
VOLUME POWER
6
ON/OFF
34
Page 35

Funzioni avanzate
Oltre che per l’impostazione dello spostamento di ottava, i due pulsanti di ottava “+” e “-” illustrati in
precedenza alla sezione “Pulsanti di ottava” servono per controllare una delle 6 funzioni MIDI disponibili.
I primi 6 contrassegnati tasti vengono utilizzati per selezionare la funzione dei pulsanti di ottava. Alcune
funzioni per le quali è possibile usare questi tasti non possono inviare un valore inferior a 0. Se utilizzati per
controllare queste funzioni, entrambe le spie soprastanti i pulsanti resteranno accese, a prescindere
dall’impostazione corrente di tale funzione.
Per selezionare una funzione alternativa:
1. Premere il pulsante Advanced Functions, portando la tastiera nella modalità di programmazione.
2. Premere il tasto nero che rappresenta la funzione desiderata. La tastiera esce dalla modalità di
programmazione non appena si seleziona la funzione e si è quindi in grado di suonare nuovamente.
Spostamento di ottava
I tasti di ottava “Octave +” e “Octave -” Un altro metodo per lo spostamento delle ottave della Keystation è
con l’uso dei tasti contrassegnati come ottava “+” e “-”. Dopo che il pulsante Advanced Functions è stato
premuto, ponendo quindi la tastiera in modalità di programmazione, la pressione di questi tasti estende il
pitch in su o in giù di una o più ottave (un’ottava per ogni pressione). L’impostazione di ottava predefinita è
“0” e sarà l’impostazione a ogni accensione della tastiera. Se le spie soprastanti i pulsanti di ottava sono
entrambe accese, significa che l’ottava è impostata a 0.
Per assegnare i tasti “+” e “-” al controllo delle ottave:
1. Premere il pulsante Advanced Functions per portare la tastiera nella modalità di programmazione.
2. Premere il tasto rappresenta “OCTAVE”. La tastiera esce dalla modalità di programmazione non
appena si preme il tasto OCTAVE.
È inoltre disponibile un metodo per la modifica ‘rapida’ dell’ottava, che può essere utile quando si utilizzano i
pulsanti di ottava per il controllo di un’altra funzione MIDI. Per fare ciò:
1. Premere il pulsante Advanced Functions per porre la tastiera in modalità di programmazione.
2. Premere il tasto nero rappresenta “OTTAVA +”, aumentando l’ottava di 1 (premendolo nuovamente
si aumenta l’ottava di 2 e così via).
Premere il tasto nero rappresenta “OTTAVA -”, diminuendo l’ottava di 1 (premendolo nuovamente si
diminuisce l’ottava di 2 e così via). Premere il tasto nero che rappresenta "OCTAVE 0" (ottava 0) per
riportare le ottave a 0.
3. Una volta scelto lo spostamento dell'ottava, premere “INVIO” per selezionare l'ottava stessa e
lasciare la modalità Edit. Selezionando Cancel o Advanced si cancella la selezione e si esce dalla
modalità avanzata.
Trasposizione
In alcuni casi è utile ridurre o aumentare il pitch di diversi semitoni invece che di un’intera ottava. Se ad
esempio si sta suonando una canzone con un interprete che presenta difficoltà a raggiungere note elevate, è
opportuno ridurre il pitch di uno o due semitoni. Questo si ottiene mediante la funzione MIDI denominata
“Trasposizione.”
Transpose (trasponi) funziona come la funzione Octave Shift di cui sopra, ma lo spostamento può arrivare a
+/- 12 semitoni. Come nel caso dello spostamento di ottava, sono disponibili due modi per eseguire la
trasposizione della tastiera. È possibile utilizzare I pulsanti di ottava “+” e “-” o i tasti neri “TRASPOSIZIONE ,” “TRASPOSIZIONE 0” e “TRASPOSIZIONE +”.
Per assegnare i pulsanti di ottava “+” e “-”alla trasposizione:
1. Premere il pulsante Advanced Functions per portare la tastiera nella modalità di programmazione.
2. Premere il tasto nero rappresenta “TRANSPOSE” (la pressione del tasto TRANSPOSE termina la
modalità di programmazione).
3. Premere il tasto “+” per sentire che il pitch della nota si alza.
4. Premere insieme i tasti “+” e “-” per annullare la trasposizione.
35
Page 36

Canale
I dati MIDI provenienti dalla tastiera possono essere inviati a uno qualsiasi dei 16 canali MIDI. Tuttavia,
determinate periferiche MIDI e programmi MIDI richiedono che la tastiera invii i dati su un canale specifico. In
questo caso, è possibile cambiare il canale di invio dei dati mediante il seguente metodo:
1. Premere il pulsante Advanced Functions per portare la tastiera nella modalità di programmazione.
2. Premere uno dei 16 tasti di canale qualunque sia quello che rappresenta il canale richiesto.
Ad esempio, se la periferica indica che occorre inviare i dati sul canale 10, premere il pulsante Funzione
avanzate, quindi il per selezionare il canale 10.
Il canale può essere inoltre assegnato ai pulsanti di ottava “+” e “-”. Una volta assegnato, premendo “+” o “-”
si aumenta o diminuisce il canale in modo incrementale. Quando viene raggiunto il canale 16 e si preme
nuovamente il tasto “+”, viene selezionato il canale 1. Se si selezionano i pulsanti di ottava “+” e “-” per la
variazione del canale, le spie soprastanti i pulsanti non cambiano, poiché non è possibile avere un canale
con valore negativo. Premendo insieme i pulsanti “+” e “-” viene richiamato il canale 1.
Cambio di programma
I cambi di programma vengono utilizzati per cambiare lo strumento o la voce in uso. A titolo di esempio,
viene cambiato lo strumento in un suono di basso. Per fare questo occorre un cambio di programma 32, che
selezionerà il suono di un basso acustico. Per inviare il cambio di programma sono disponibili due metodi:
Cambio di programma incrementale e decrementale:
1. Premere il pulsante Advanced Functions.
2. Premere il tasto nero rappresenta PGM CHANGE.
3. Ora i tasti di ottava “+” e “-” possono essere usati per cambiare il programma.
4. Premere “+” e continuare a suonare note finché non si trova lo strumento desiderato.
Questo metodo è utile se si desidera passare da uno strumento all'altro per vedere quale suona meglio nella
propria canzone.
Selezione rapida del cambio di programma:
1. Premere il pulsante Advanced Functions.
2. Premere il tasto nero sopra F4 (denominato F#4), che rappresenta “Program”.
3. Premere i tasti “3,” “2,” “ENTER.” A questo punto la tastiera è impostata per suonare il suono basso
GM 32.
Questo metodo è utile se si desidera selezionare un numero specifico, come in questo caso.
Se sono selezionati i tasti di ottava “+” e “-” per cambiare il numero di programma (metodo 1), le spie
soprastanti i pulsanti non cambiano, poiché non è possibile avere un programma con valore negativo.
Premendo insieme i pulsanti “+” e “-” viene richiamato il programma 0, che seleziona il suono di un gran
piano.
Banco LSB e Banco MSB
I cambi di programma sono i messaggi più comunemente usati per cambiare strumenti e voci. Tuttavia, il
numero di strumenti accessibili usando i cambi di programma è limitato a 128. Poiché alcune periferiche
hanno più di 128 voci, queste richiedono un metodo diverso per accedere alle voci supplementari.
Generalmente, questi dispositivi usano messaggi del banco LSB e del banco MSB.
Cambio banco LSB e banco MSB incrementale e decrementale:
1. Premere il pulsante Advanced Functions.
2. Premere il tasto nero rappresenta rispettivamente il “Banco LSB” o il “Banco MSB”.
3. Ora i tasti di ottava “+” e “-” possono essere usati per cambiare il Bank LSB.
4. Premere “+” e continuare a suonare note finché non si trova lo strumento desiderato.
Uso del metodo di selezione rapida:
1. Premere il pulsante Advanced Functions.
2. Premere il tasto nero rappresentano rispettivamente il “Banco LSB” o il “Banco MSB”.
3. Premere i tasti “3,” “2,” “ENTER.”
Come nel caso del cambio di programma, se sono selezionati i tasti di ottava “+” e “-” per cambiare il numero
del banco LSB o MSB (metodo 1), le spie soprastanti i pulsanti non cambiano, poiché non è possibile avere
un banco con valore negativo. Premendo insieme i pulsanti “+” e “-” si richiama il banco 0.
36
Page 37

Slider Volume
Per assegnare lo slider Volume a un effetto:
1. Premere il pulsante Advanced Functions per portare la tastiera nella modalità di programmazione.
2. Premere il tasto nero “FADER.”
3. Usare i tasti di immissione dei dati numerici per immettere il numero dell’effetto che si desidera assegnare
allo slider Volume.
In alternativa, è possibile utilizzare i pulsanti “+” e “-” per cambiare il valore.
1. Premere il tasto Advanced Functions (funzioni avanzate) per attivare la modalità Edit.
2. Premere il tasto nero che rappresenta il “FADER”.
3. Servirsi dei tasti “+” e “-” per modificare il valore.
4. Premere il tasto INVIO.
5. Spostare il cursore del volume verso l'alto per aumentare il valore dell'effetto.
Se si commette un errore durante l’immissione del valore dei dati numerici, è possibile premere il tasto “CANCEL” per
uscire dalla modalità di programmazione senza cambiare l’effetto assegnato allo slider Volume.
Notare che ogni volta che la tastiera viene spenta, i dati assegnati allo slider Volume andranno persi. Ogni volta che
la tastiera viene accesa, lo slider Volume verrà assegnato al valore predefinito Volume, (numero di effetto 07).
Ruota Modulation
È possibile assegnare effetti MIDI alla ruota Modulation. Alcune effetti utili sono: MIDI CC 01 (Modulation), MIDI CC
07 (Volume), MIDI CC 10 (Pan), e MIDI CC 05 (Portamento).
In totale sono presenti 132 effetti. In ogni caso, affinché essi influiscano sul suono, la periferica MIDI di ricezione deve
essere in grado di leggere e rispondere ai messaggi degli stessi. La maggior parte delle periferiche risponderà
almeno ai dati di volume, modulation e pan.
Per assegnare un effetto alla ruota Modulation:
1. Premere il pulsante Advanced Functions per portare la tastiera nella modalità di programmazione.
2. Premere il tasto nero rappresenta “WHEEL.”
3. Usare i tasti di immissione dei dati numerici per immettere il numero di effetti che si desidera assegnare alla
ruota Modulation.
Anziché inserire il valore numerico è possibile scorrere da un effetto all'altro servendosi dei tasti “+” e “-”. Una volta
selezionato il valore corretto, premere il tasto INVIO.
Se si commette un errore durante l’immissione del valore dei dati numerici, è possibile premere il tasto CANCEL per
uscire dalla modalità di programmazione senza cambiare l’effetto assegnato alla ruota Modulation.
Notare che ogni volta che la tastiera viene spenta, i dati assegnati alla ruota Modulation andranno persi. Ogni volta
che la tastiera viene accesa, la ruota verrà assegnata al valore predefinito Modulation, (numero di effetto 01.)
A titolo di esempio, viene assegnato il numero di effetto 10 (pan o balance) alla ruota modulation.
1. Premere il pulsante Advanced Functions per portare la tastiera nella modalità di programmazione.
2. Premere il tasto nero rappresenta “WHEEL.”
3. Premere “1.”
4. Premere “0” (così facendo si immette “10”).
5. Premere “ENTER.”
Tasti direzionali e di trasporto
I tasti direzionali e di trasporto impiegano i protocolli Mackie Control o HUI per controllare determinate funzioni del
software che li supportano.
Per selezionare quale protocollo utilizzano i tasti per comunicare con il software:
1. Premere il tasto Advanced Functions (funzioni avanzate) per mandare la tastiera in modalità Edit.
2. Premere il tasto che rappresenta MACKIE/HUI.
Nota bene: i LED "+" e "-" LED saranno accesi di colore verde se si trovano in modalità Mackie e di colore
rosso se in modalità HUI.
3. Premere invio.
Nota bene: il software deve anche essere impostato per ricevere i comandi da un dispositivo esterno (ossia
il Keystation) servendosi del protocollo Mackie Control o HUI. I comandi Mackie e HUI sono inviati sulla
Porta Virtuale 2.
37
Page 38

Risoluzione dei problemi
Generali
Di seguito sono riportate risposte relative a problemi comuni che si possono riscontrare nell’uso delle tastiere
Keystation:
Problema 1: l’hardware M-Audio smette improvvisamente di funzionare dopo un normale funzionamento
successivo all’installazione.
Soluzione 1: spegnere l’unità e lasciarla spenta per 10 secondi. Quindi riavviare il computer e riprovare. Se il
problema persiste, potrebbe essere necessario reinstallare i driver dell’unità.
Problema 2: è stato collegato il pedale sustain nella tastiera M-Audio, ma questo funziona in modo scorretto.
Soluzione 2: la polarità del pedale sustain viene determinata dalla tastiera al momento dell’accensione.
All’accensione, si presume che il pedale sustain si trovi nella posizione OFF. Quindi, se si desidera che il pedale
sustain sia spento quando non è premuto, accertarsi che sia in questa posizione al momento dell’accensione.
Problema 3: quando si preme un tasto, è presente un ritardo prima di poter sentire qualsiasi suono.
Soluzione 3: questo ritardo è noto come latenza. La latenza relativa ai segnali MIDI è dovuta al software in uso. I dati
MIDI sono semplici dati di controllo. I dati MIDI vengono letti dal software. Il software esegue quindi un grande
numero di calcoli complessi per la creazione del suono emesso: tale operazione richiede tempo.
Si consiglia un’ interfaccia audio. Consultare il sito m-audio.com per una selezione di schede interfaccia audio. Se
invece si dispone di una scheda audio adeguata, provare a installare nuovamente i driver più recenti o ridurre le
dimensioni dei buffer dei driver audio.
Risoluzione dei problemi MIDI
Le tastiere Keystation sono state progettate per funzionare con il MIDI sul computer nel modo più semplice possibile.
Ciononostante, è possibile che si verifichino alcune difficoltà. In molti casi, la tastiera non è guasta; il problema risiede
nella periferica ricevente. Per evitare questo problema, sono presenti due utili funzioni MIDI: All Notes Off e Reset
All Controllers.
All Notes Off (Tutte le note spente)
Utilizzare questa funzione se si riscontrano note bloccate che non smettono di suonare.
1. Premere il pulsante Advanced Functions per portare la tastiera nella modalità di programmazione.
2. Premere il tasto nero rappresenta “ALL OFF.”
3. La modalità di programmazione si disattiva, eliminando qualsiasi nota bloccata.
Reset All Controllers (Reimposta tutti i controller)
Se si riscontra un effetto indesiderato su una voce, invece di tentare di scoprire di quale effetto si tratta, è possibile
inviare un messaggio MIDI “Reset All Controllers” per impostare tutti gli effetti a 0.
1. Premere il pulsante Advanced Functions per portare la tastiera nella modalità di programmazione.
2. Premere il tasto nero rappresenta “RESET.”
3. La modalità di programmazione si disattiva, eliminando tutti gli effetti.
Factory Reset (Reset ai Valori Predefiniti di Fabbrica)
1. Spegnere il Keystation.
2. Tenere premuti i tasti "ADVANCED", "OCT+" e "OCT-" contemporaneamente, fino alla fase 4.
3. Accendere il Keystation.
4. Rilasciare i tre tasti.
La tastiera presenta ora nuovamente le configurazioni di fabbrica.
MIDI Out (Uscita MIDI)
La porta MIDI Out è situata sul retro della tastiera e può essere utilizzata per connettere la tastiera a un modulo
sonoro esterno o a una tastiera MIDI. Come impostazione predefinita (quando si accende l’unità), tutti i dati del
controller vengono inviati tramite l’uscita MIDI e tramite l’uscita USB.
Se si desidera che l’uscita MIDI agisca come un’interfaccia tradizionale USB-MIDI, attivare la modalità “MIDI Out from
USB (Uscita MIDI)” eseguendo le seguenti istruzioni:
1. Premere il pulsante Advanced Functions per portare la tastiera nella modalità di programmazione.
2. Premere il tasto nero rappresenta “MIDI OUT.”
3. La modalità di programmazione si disattiva.
4. La tastiera è ora in grado di inviare i dati ricevuti dal computer attraverso il jack MIDI OUT verso qualsiasi
periferica connessa.
Per utilizzare l’uscita MIDI, selezionare Keystation USB MIDI Out come dispositivo MIDI di uscita nel sequencer.
38
Page 39
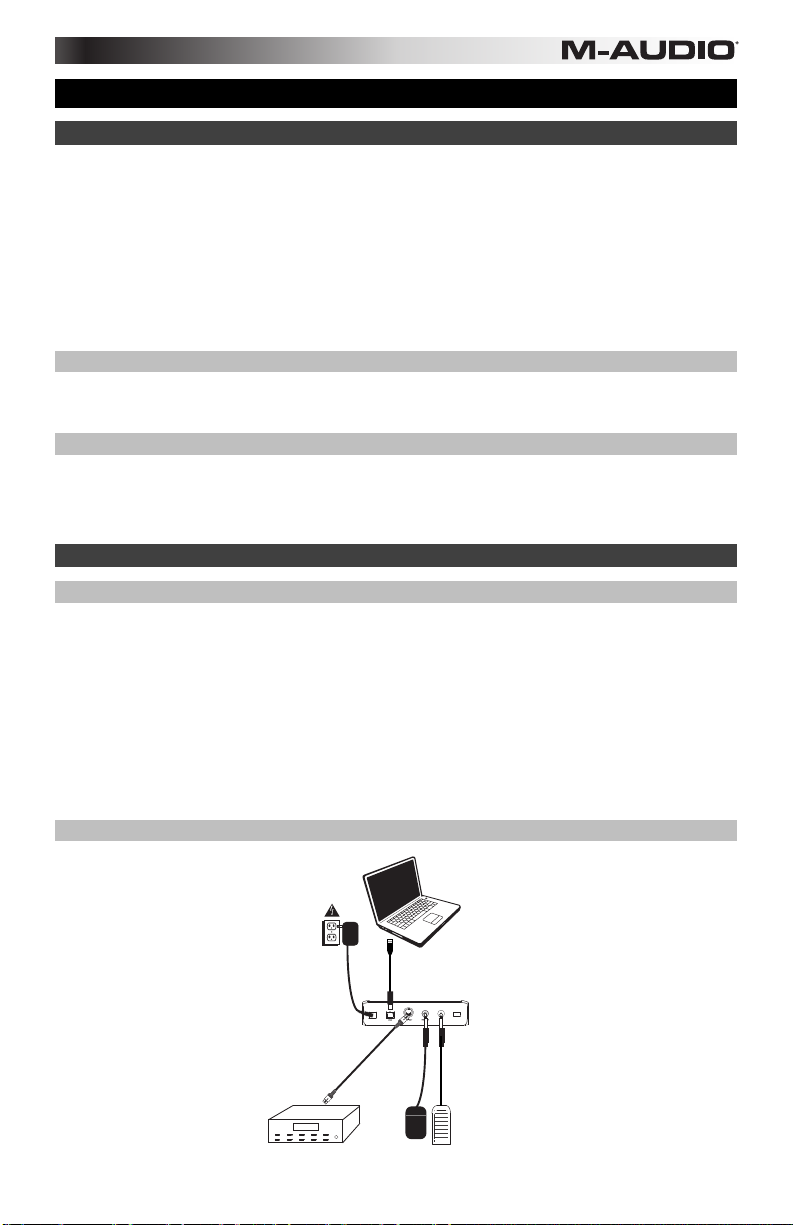
VOLUME
ON/OFF
POWER
Benutzerhandbuch (Deutsch)
Einleitung
Herzlichen Glückwunsch zum Kauf des M-Audio Keystation 88 Keyboard. Dieses USB-Keyboard mit 88
anschlagdynamischen Tasten wurde designt, um eine möglichst einfache Integration mit Ihrem PC oder
Macintosh-Computer zu ermöglichen. Keystation 88 ist mit halbgewichteten Tasten ausgestattet, die
das Spielgefühl eines Klaviers verleihen - alles in einem kompakten MIDI-Controller. Die Keystation 88 eignet
sich ideal für verschiedenste Musikproduktionen, pädagogische Anwendungen und bietet darüber hinaus
eine Pitch-Bend-Rad, Richtungs- und Transport-Tasten zur Steuerung von Softwares sowie ein zuweisbares
Modulationsrad und einen Schieberegler für die praktische Steuerung. Obwohl die Keystation 88
klassenkompatibel ist und über einen tatsächlichen Plug-and-Play-Betrieb unter Windows XP, Windows
Vista, Windows 7, Windows 8 und Mac OS X verfügt, empfehlen wir, dass Sie sich ein paar Minuten Zeit
nehmen und
Programmierbarkeit zu erfahren.
dieses Handbuch lesen, um mehr über die richtige Bedienung, erweiterte Funktionalität und
Lieferumfang
Keystation 88, USB-Kabel, Software-Download-Karten, Benutzerhandbuch, Sicherheitshinweise und
Garantieinformationen
Kundendienst
Die neuesten Informationen zu diesem Produkt (Systemanforderungen, Kompatibilitätsinformationen usw.)
und die Registrierung Ihres Produkts finden Sie auf: m-audio.com.
Für zusätzlichen Produkt-Support besuchen Sie m-audio.com/support.
Schnellstart
Anschluss des Keyboards
Sie können das Keyboard entweder über den USB-Anschluss Ihres Computers oder über ein externes
Netzteil mit Strom versorgen. Da die Keystation-Keyboards für einen geringen Strom- und
Spannungsverbrauch ausgelegt sind, ist die Verwendung eines externen Netzteils nahezu überflüssig. Wir
empfehlen Ihnen, Ihr Keystation-Keyboard an den USB-Anschluss Ihres Computers bzw. an einen USB-Hub
anzustecken. Verwenden Sie ein USB-Kabel, um die Keystation mit Strom zu versorgen, wenn Sie sie mit
einem Computer verbinden, um Software-Synthesizer anzusteuern.
Sie können die Keystation 88 auch mit Ihrem iPad verwenden, um unterstützte Musikproduktions-Apps zu
steuern.
Um Ihre Keystation 88 mit einem iPad zu verbinden, ist ein iPad Camera Connection Kit erforderlich, das im
Apple Store verfügbar ist.
Anschlussübersicht
NETZTEIL*
EXTERNES SOUND-
MODUL*
SUSTAIN-
PEDAL*
39
COMPUTER*
ON/OFF
VOLUME
POWER
EXPRESSIONPEDAL*
*SEPARAT
ERHÄLTLICH
Ihnen
Page 40

Empfohlene Installationen
Software: Wir liefern Keystation 88 mit Pro Tools | M-Audio Edition und Ableton Live Lite aus, damit Sie Ihre
Musikproduktion gleich mit professioneller Software starten können. Für Pro Tools | First M-Audio Edition
registrieren Sie Ihren Keystation 88 zuerst auf m-audio.com und folgen den Installationsanweisungen von
Pro Tools | First M-Audio Edition in Ihrem Benutzerkonto. Befolgen Sie die Anweisungen auf der
mitgelieferten Ableton Live Lite-Download-Karte für die Installation von Ableton Live Lite. Besuchen Sie
außerdem ableton.com, um festzustellen, ob Software-Updates verfügbar sind.
Virtuelle Instrumente: Folgen Sie den Anweisungen auf der Software-Download-Karte für die Installation
der mitgelieferten Virtual Instrument Plugins. Nach der Installation werden die meisten DAWs die Virtual
Instrument Plugins nicht automatisch laden. Um über Pro Tools | First M-Audio Edition und Ableton Live Lite
auf die Virtual Instrument Plugins zuzugreifen, müssen Sie den Plugin-Ordner für die zu scannende Software
auswählen:
Pro Tools | First M-Audio Edition/AAX Plugin-Ordner:
Windows (32-bit):
C:\Programme (x86)\Gemeinsame Dateien\Avid\Audio\Plug-Ins
Windows (64-bit):
C:\Programme\Gemeinsame Dateien\Avid\Audio\Plug-Ins
Mac:
Macintosh HD/Library/Application Support/Avid/Audio/Plug-Ins
Ableton/VST Plugins:
Windows (32-bit):
C:\Programme (x86)\VSTplugins
Windows (64-bit):
C:\Programme\VSTplugins
Mac:
Macintosh HD\Library\Audio\Plugins\VST
So legen Sie Ihren Plugin-Ordner in Ableton Live Lite fest:
1. Navigieren Sie in das Menü Einstellungen.
2. Wählen Sie die Registerkarte Dateiordner. Klicken Sie unter Plug-In-Quellen auf Durchsuchen und
wählen den entsprechenden Plugin-Ordner aus.
3. Nach der Auswahl muss die Schaltfläche VST Custom Plug-In Folder verwenden AKTIVIERT sein.
Wenn dies nicht der Fall ist, klicken Sie zur Aktivierung auf die Schaltfläche.
4. Verlassen Sie das Menü Einstellungen.
Erste Schritte
Bitte beachten Sie, dass beim Drücken einer Keyboard-Taste kein Ton zu hören ist. Dies liegt daran, dass
beim Drücken einer Taste über das Keyboard MIDI-Daten gesendet werden. MIDI-Daten geben Befehle, wie
ein Ton abgespielt werden soll. Um diesen Ton jedoch tatsächlich zu hören, müssen Sie Ihre Musiksoftware
so konfigurieren, dass sie die vom Keystation 88 gesendeten MIDI-Daten liest und den Sound entsprechend
wiedergibt. Bei diesem Setup müssen Sie wahrscheinlich zum Options- oder Geräte-Setup-Menü Ihrer
Musik-Software navigieren und das entsprechende Gerät auswählen. Der Keystation 88 sollte unter dem
Namen „Keystation 88“ im Bereich MIDI-Geräte Ihrer Musiksoftware aufscheinen. Bitte lesen Sie das
Handbuch, das mit Ihrer Software geliefert wurde, um das richtige Setup-Verfahren durchzuführen.
40
Page 41
Ableton Live Lite Setup
1. Verbinden Sie zuerst den Keystation 88 über das mitgelieferte USB-Kabel mit einem freien USB-Port
Ihres Computers und starten Sie Ableton Live Lite.
2. Öffnen Sie danach das Einstellungen-Fenster in Ableton Live Lite. Wählen Sie Ihr Audio-Gerät in der
Registerkarte Audio. Dies hängt von der verwendeten Audio-Schnittstelle ab.
MAC: Wählen Sie Live > Einstellungen
3. Wählen Sie die Registerkarte MIDI / Sync. Nehmen Sie im Abschnitt MIDI-Ports die Einstellungen wie
4. Schließen Sie das Eigenschaften-Fenster.
5. Um ein Instrument oder Plugin zu Ableton Live Lite hinzuzufügen, um einen Ton zu erzeugen, wählen
6. Suchen Sie in der Spalte Name rechts neben der Spalte Kategorien das Instrument oder das Plug-In
PC: Wählen Sie Optionen > Einstellungen
folgt vor:
Neben Eingang: Keystation 88, aktivieren Sie die Taste Ein in den Spalten Track und Remote.
Neben Ausgang: Keystation 88, aktivieren Sie die Taste Ein in den Spalten Track und Remote.
Sie Instrumente oder Plug-ins in der Spalte Kategorien.
Ihrer Wahl. Klicken und ziehen Sie das Instrument auf eine MIDI-Spur in Ableton Live Lite, um das
Instrument zu laden.
Das Instrument kann nun mit Keystation 88 getriggert werden.
Pro Tools | First M-Audio Edition Setup
1. Verbinden Sie zuerst den Keystation 88 über das mitgelieferte USB-Kabel mit einem freien USB-Port
Ihres Computers und starten Sie Pro Tools | First M-Audio Edition.
2. Öffnen oder erstellen Sie ein Projekt.
3. Wählen Sie das Setup-Pulldown-Menü und öffnen Sie MIDI-Eingabegeräte. Aktivieren Sie die MIDI-
Eingabe vom Keystation 88, indem Sie auf das Kästchen neben Keystation 88 klicken.
4. Wählen Sie das Setup-Pulldown-Menü und öffnen Sie Playback Engine. Wählen Sie Ihr Audiogerät
aus dem Playback Engine-Pulldown-Menü.
5. Um eine neue Instrumentenspur zu erstellen, wählen Sie das Pulldown-Menü Track und wählen Sie
New.
6. Wählen Sie im Pulldown-Menü New die Option Stereo und dann Instrument Track.
7. Fügen Sie dem neu erstellten Track ein Insert hinzu, indem Sie in die Inserts A-E Ihres Tracks klicken
und Multichannel Plugin> Instrument auswählen und das Instrument auswählen, das Sie verwenden
möchten, z. B. Xpand! 2 (Stereo). Das Plugin kann jetzt mit Keystation 88 getriggert werden.
Hinweis: Windows-Benutzer benötigen entweder eine externe Soundkarte (z. B. M-Track 2X2) oder einen
ASIO-Treiber mit niedriger Latenz.
Erste Schritte
Nach der Installation der Gerätetreiber müssen Sie Ihre MIDI-Software für Keystation konfigurieren. Bitte
beachten Sie, dass Sie nach der Treiberinstallation bei Tastendruck noch keinen Sound hören werden, da
über Keystation lediglich MIDI-Daten übertragen werden. MIDI-Daten beinhalten Informationen zur Art und
Weise der Wiedergabe. Für die tatsächliche Soundwiedergabe müssen Sie Ihre Audiosoftware entsprechend
konfigurieren. Im folgenden Abschnitt geben wir Ihnen ausführliche Hinweise zu den Konfigurationsoptionen,
die Sie in Ihrer Audiosoftware vornehmen müssen. Im Abschnitt “MIDI-Geräte” Ihrer Audioanwendung sollte
Keystation unter der Bezeichnung “USB Audio Device” (Windows XP, Windows Vista, Windows 7) bzw. unter
der Bezeichnung “Keystation 88” (sonstige Betriebssysteme) ausgewiesen sein. Genauere Hinweise zur
Konfiguration entnehmen Sie bitte dem Benutzerhandbuch Ihrer Audioanwendung.
41
Page 42

Funktionen
Oberseite
Keyboard
Die meisten weißen und schwarzen Tasten auf der Keystation sind beschriftet. Wenn Sie sich im Menü
Erweitert befinden, können Sie durch Drücken einer der beschrifteten Tasten Sonderfunktionen aktivieren
und so den MIDI-Kanal einstellen, transponieren und Programmwechsel senden.
Oktavtasten
Wenn Sie die Oktaventaste "+" einmal drücken, erlischt die LED oberhalb der Oktaventaste "-", was anzeigt,
dass die Oktave der Tastatur nun nach oben verschoben wurde. Bei erneutem Drücken der Octave UpTaste (“+”) werden die Noten zwei Oktaven höher gesetzt, usw. Mit den Octave Up & Down-Tasten können
Sie das Keyboard insgesamt 3 Oktaven nach oben oder unten transponieren.
Um die Oktave nach unten zu verschieben, drücken Sie die Oktaventaste "-". Sie werden feststellen, dass
die LED oberhalb der Oktave "+" erlischt. Wenn nur die LED über der Octave Down-Taste (“-”) leuchtet,
werden alle Noten eine Oktave niedriger wiedergegeben. Wenn nur die LED über der Octave Up-Taste (“+”)
leuchtet, werden alle Noten eine Oktave höher wiedergegeben. Die LEDs der Oktaventasten "+" und "-"
ändern die Farbe, wenn Sie mehr als eine Oktave nach oben oder nach unten springen.
Über gleichzeitiges Drücken der Octave Up & Down-Tasten setzen Sie das Keyboard auf die urprüngliche
Oktavlage zurück. In diesem Falle leuchten beide LEDs.
Pitchrad
Mit dem Pitchrad können Sie die Tonhöhe einzelner Noten während des Spielens verändern. So können Sie
Sounds erzeugen, die normalerweise nicht mit Keyboard-Klängen assoziiert werden — zum Beispiel
Gitarrenriffs. In welchem Umfang Sie die Tonhöhe verändern können, hängt von Ihrer Soundquelle ab.
Normalerweise wird der Bereich von zwei Halbtönen beansprucht; potentiell sind jedoch Tonerweiterungen
bis zu zwei Oktaven höher oder niedriger möglich.
Modulationsrad
Mit dem Modulationsrad können Sie den Klang während des Spielens in Echtzeit modulieren. Diese Funktion
wurde ursprünglich für elektronische Keyboardinstrumente entwickelt, um den Performern die Möglichkeit der
Einführung von akustischen Effekten wie zum Beispiel Vibratos zu geben. Das Modulationsrad ist absolut
MIDI-fähig.
Lautstärke-Slider
Über den Lautstärke-Slider werden normalerweise MIDI-Befehle zur Regelung der Tonlautstärke gesendet.
Sie können dem Slider allerdings auch für andere Kontrollfunktionen wie Pan (Balance), Attack, Reverb,
Chorus, uvm. programmieren. Weitere Informationen hierzu entnehmen Sie bitte dem Abschnitt Erweiterte
Funktionen.
Funktionstaste
Über die Funktionstaste erhalten Sie Zugriff auf die erweiterten Funktionen Ihres Keystation-Keyboards.
Durch Drücken der Taste setzen Sie das Keyboard in den Edit-Modus. Danach können Sie die gewünschten
Funktionen auswählen und die entsprechenden Daten eingeben.
Die LED über dem Taster zeigt an, ob der Edit-Modus aktiviert oder deaktiviert ist. Im Edit-Modus werden die
Funktionen über die schwarzen Tasten des Keyboards ausgewählt.
Die Tastatur wird den Modus Bearbeiten verlassen, sobald eine Funktion ausgewählt oder wenn die Taste
Erweitert, ABBRECHEN oder ENTER gedrückt wird (die LED oberhalb der Funktionstaste erlischt). Nach
Verlassen des Edit-Modus steht die Tastatur wieder für die Tonerzeugung zur Verfügung.
Hinweis: Lesen Sie den Abschnitt Erweiterte Funktionen für weitere Informationen.
42
Page 43
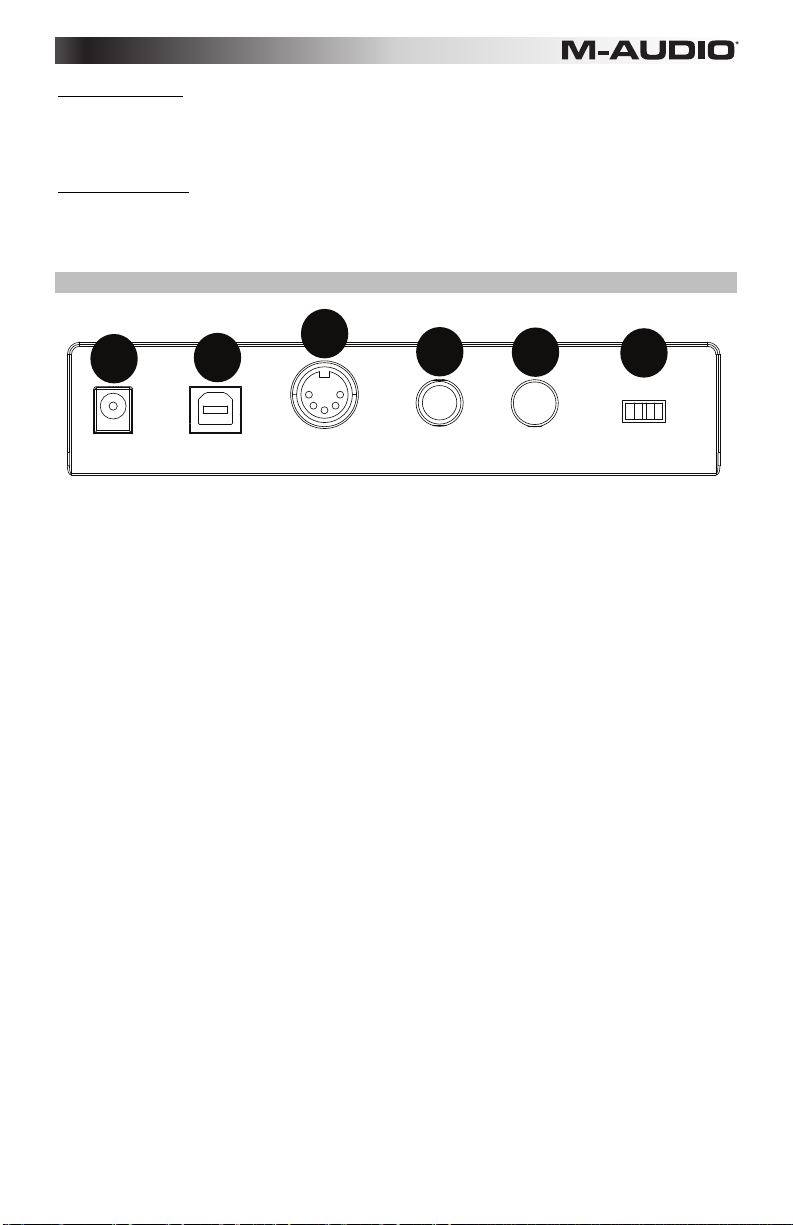
Richtungstasten
Diese Tasten können die Protokolle von Mackie Control® oder HUI® verwenden, um bestimmte Funktionen in
Softwares zu steuern, die diese unterstützen. Bitte beachten Sie den Abschnitt Richtungstasten und
Transport-Tasten im Kapitel Erweiterte Funktionen für nähere Informationen.
Transport-Tasten
Diese Tasten können die Protokolle von Mackie Control oder HUI verwenden, um bestimmte Funktionen in
Softwares zu steuern, die diese unterstützen. Bitte beachten Sie den Abschnitt Richtungstasten und
Transport-Tasten im Kapitel Erweiterte Funktionen für nähere Informationen.
Rückseite
3
1
1. DC Power Adapter Input: Schließen Sie ein (separat erhältliches) 9V DC, 200mA Netzteil (mittlerer
Pin mit positiver Polarität) an, wenn Sie die Keystation nicht über die USB-Verbindung mit Strom
versorgen möchten und den MIDI-Anschluss zum Triggern eines externen Sound-Moduls verwenden.
2. Ein-/Ausschalter: Der USB-Anschluss versorgt das Keyboard mit Strom und übermittelt MIDI-Daten,
wenn es mit einem Computer verbunden ist, um einen Software-Synthesizer oder MIDI-Sequenzer zu
triggern.
3. MIDI Out: Verwenden Sie ein fünf-poliges MIDI-Kabel (separat erhältlich), um diese Buchse mit dem
MIDI IN eines externen Sound-Moduls oder dem MIDI In eines Synthesizers zu verbinden.
4. Anschluss für Sustain-Pedal: Dieser Anschluss ist für ein Sustain-Pedal vorgesehen (separat
erhältlich). Wird das Pedal betätigt, so wird es den von Ihnen gespielten Ton halten, ohne dass Sie die
Tasten gedrückt halten müssen.
HINWEIS: Die Polarität des Sustain-Pedals wird automatisch ermittelt, sobald Keystation eingeschaltet
wird. Standardmäßig wird davon ausgegangen, dass das Sustain-Pedal auf "AUS" (nicht gedrückt)
steht. Deshalb sollten Sie das Pedal beim Einschalten des Keyboards nicht betätigen, denn andernfalls
wird es verkehrt betrieben, was zur Folge hat, dass die Noten gehalten werden, wenn das Pedal nicht
gedrückt wird.
HINWEIS: Mit der Pedalfunktion können Sie, wie beim Klavier, die Länge des gespielten Tons
verändern, ohne dass Ihre Hände zum Einsatz kommen. Wenn Sie mit einem Fußpedal (nicht im
Lieferumfang enthalten) arbeiten möchten, können Sie dieses an den für Fußpedale vorgesehenen
Anschluss anstecken. Pedalfunktion und Polarität werden automatisch beim Einschalten des
Keyboards erkannt. Wenn Sie Polarität und Funktion verändern wollen, halten Sie das Pedal beim
Einschalten des Keyboards einfach in der gewünschten Funktion (mit oder ohne aufgesetztem Fuß).
5. Expression-Pedaleingang: Schließen Sie ein 1/4" TRS Expression-Pedal an diesen Eingang an
(separat erhältlich), um Lautstärke, Vibrato oder Hallanteil eines Instruments einzustellen.
6. Netzschalter - Schaltet Keystation ein oder aus.
2
USB
4
SUSTAINMIDI OUT
5
VOLUME POWER
6
ON/OFF
43
Page 44

Erweiterte Funktionen
Die beiden Up & Down-Tasten für die Veränderung der Oktavlage (siehe Abschnitt “Oktavtasten”) können
zusätzlich für die Steuerung der MIDI-Funktionen genutzt werden.
Über Die ersten 6 etikettiert schwarzen Tasten können sie die gewünschte Spezialfunktion für die Octave Up
& Down-Tasten auswählen. Für manche dieser Funktionen können allerdings keine Werte unter 0 gesendet
werden. Unabhängig von der zugewiesenen Funktion bleiben die beiden über den Tasten befindlichen LEDs
erleuchtet.
Wenn Sie die Funktion umprogrammieren wollen gehen Sie wie folgt vor:
1. Drücken Sie die Funktionstaste, um den Edit-Modus zu aktivieren.
2. Drücken Sie dann diejenige schwarze Taste, deren Funktion Sie auswählen wollen. Sobald die
Funktion per Tastendruck ausgewählt ist, wird der Edit-Modus beendet und Sie können das
Keyboard erneut zur Tonwiedergabe nutzen.
Octave Shift Up & Down-Tasten
Drücken Sie die Funktionstaste, um den Edit-Modus zu aktivieren. Drücken Sie dann entweder die Octave
Up-Taste (“+”), um die Töne eine Oktave höher wiederzugeben oder die Octave Down-Taste (“-”), um den
Oktavbereich nach unten hin zu erweitern. Mit jedem Tastendruck wird die Tonhöhe um eine Oktave
verändert. Die Standardeinstellung der Oktavhöhe ist “0”. Sie wird aktiviert, sobald Sie das Keyboard
einschalten. In dieser Einstellung sind die beiden über den Tasten befindlichen LEDs erleuchtet.
Um die Up & Down-Tasten für eine andere Funktion zu programmieren, gehen Sie wie folgt vor:
1. Drücken Sie die Funktionstaste, um den Edit-Modus zu aktivieren.
2. Drücken Sie die schwarze Taste “OCTAVE”. Damit wird der Edit-Modus deaktiviert. Hier ein Tipp,
wie Sie den Oktavbereich einfacher verändern können, zum Beispiel, wenn die Up & Down-Tasten
bereits mit anderen MIDIFunktionen belegt sind.
So geht’s:
1. Drücken Sie die Funktionstaste, um den Edit-Modus zu aktivieren.
2. Zur Einstellung eines höheren Oktavbereichs drücken Sie die schwarze Taste OCTAVE +. Im EditModus entspricht diese Taste der Funktion “OCTAVE +”, d.h. der Tonbereich wird eine Oktave
erhöht. Drücken Sie die Taste so oft, wie der Oktavbereich erhöht werden soll (bis zu 3 Mal). Zur
Einstellung eines niedrigeren Oktavbereichs drücken Sie die schwarze Taste entspricht OCTAVE -.
Im Edit-Modus entspricht diese Taste der Funktion “OCTAVE -”, d.h. der Tonbereich wird eine
Oktave herabgesetzt. Drücken Sie die schwarze Taste, die für "OKTAVE 0" steht, um die
Verschiebung der Oktaven auf 0 zurückzusetzen.
3. Wenn Sie Ihre Oktaventransponierung gewählt haben, drücken Sie "ENTER", um Ihre Oktave
auszuwählen und den Modus Bearbeiten zu verlassen. Wenn Sie Abbrechen oder Erweitert
auswählen, wird die Auswahl verworfen und der Modus Erweitert beendet.
Transponierung
In bestimmten Fällen werden Sie die Höhe der am Keyboard generierten Töne nur um ein paar Halbtöne
verändern wollen. Hierzu können Sie die Pitch-Funktion des Keystation-Keyboards nutzen — zum Beispiel,
wenn Ihr begleitender Sänger Schwierigkeiten mit den hohen Tönen hat.
Das Transponieren funktioniert genau wie das Verändern einer Oktave, beim Transponieren können die
Töne jedoch um +/- 12 Halbtöne verschoben werden. Sie kann wie folgt aktiviert werden: entweder über die
Octave Up & Down-Tasten oder über die schwarzen Keyboardtasten “TRANSPOSE -”, “TRANSPOSE 0” und
“TRANSPOSE +” entsprechen.
Wenn Sie die Octave Up & Down-Tasten für die Transponierung verwenden wollen, gehen Sie wie folgt vor:
1. Drücken Sie die Funktionstaste, um den Edit-Modus zu aktivieren.
2. Drücken Sie dann die schwarze Taste TRASPOSE, welche für die Funktion “TRANSPOSE”
programmiert ist. Danach wird der Edit-Modus beendet.
3. Wenn Sie nun die Octave Up-Taste (“+”) drücken, können Sie hören, wie der Ton transponiert wird.
4. Wenn Sie die Funktion aufheben wollen, drücken Sie einfach die Octave Up & Down-Tasten
gleichzeitig.
44
Page 45

Kanal
Mit Keystation verfügen Sie über 16 MIDI-Kanäle für das Senden von MIDI-Daten. Bitte beachten Sie jedoch, dass
einige MIDI-Geräte und MIDI-Anwendungen die MIDI-Daten des Keyboards nur über einen bestimmten Kanal
empfangen können.
In diesem Fall können Sie den Sendekanal wie folgt einstellen:
1. Drücken Sie die Funktionstaste, um den Edit-Modus zu aktivieren.
2. Drücken Sie die dem zugeordneten Kanal (1 - 16) entsprechende Taste.
Wenn ein MIDI-Gerät zum Beispiel nur auf Kanal 10 empfangen kann, drücken Sie die Funktionstaste und
anschließend Kanal 10 auszuwählen. Sie können den Sendekanal auch den Octave Up & Down-Tasten (“+” oder “-”)
zuweisen.
Nach der Programmierung des Sendekanals können Sie die Kanaleinstellung über die Octave Up & Down-Tasten
(“+” oder “-”) schrittweise ändern. Sobald Kanal 16 erreicht ist, wird durch erneutes Drücken der Octave Up-Taste
wieder Kanal 1 ausgewählt. Wenn Sie den Sendekanal über die Oktav-Tasten auswählen, ändert sich die
Leuchtanzeige über den Tasten nicht, da es nicht möglich ist, Kanäle mit negativem Wert auszuwählen. Um die
Auswahl auf Kanal 1 zurückzusetzen, drücken Sie einfach die Octave Up & Down-Tasten gleichzeitig.
Program Change
Mittels Program Change-Befehlen können Sie zwischen verschiedenen Instrumenten und Stimmen wechseln. Hier
ein Beispiel: Sie wollen Ihr aktuelles Instrument durch einen Bass ersetzen. Hierzu können Sie den Program ChangeBefehl “32” senden, der aus der General MIDI Instrumentenliste einen Acoustic-Bass-Sound. Es gibt zwei Methoden,
Program Change-Befehle auszuwählen:
Aufsteigender / Absteigender Program Change:
1. Drücken Sie die Funktionstaste, um den Edit-Modus zu aktivieren.
2. Drücken Sie die schwarze Taste entspricht der PGM CHANGE.
3. Jetzt können Sie das Programm über die Octave Up & Down-Tasten ändern.
4. Drücken Sie Octave Up-Taste und spielen Sie die Tastatur, bis Sie das gewünschte Instrument gefunden
haben.
Diese Methode ist nützlich, wenn Sie durch die verschiedenen Instrumente blättern, um herauszufinden, welcher
Sound klanglich am besten zu Ihrem Song passt.
Direkter Program Change:
1. Drücken Sie die Funktionstaste, um den Edit-Modus zu aktivieren.
2. Drücken Sie die schwarze Taste entspricht der PGM CHANGE.
3. Drücken Sie nacheinander die Tasten “3”, “2”, und “ENTER” ein. Ihr Keyboard ist nun eingerichtet, den
Bass-Sound 32.
Diese Methode ist nützlich, wenn Sie - wie in diesem Fall - eine bestimmte Nummer auswählen möchten.
Wenn Sie den Program Change über die Octave Up & Down-Tasten veranlassen, ändert sich die Leuchtanzeige über
den Tasten nicht, da es nicht möglich ist, Programme mit negativem Wert auszuwählen. Durch gleichzeitiges
Drücken der Octave Up & Down-Tasten wird das Keyboard auf Programm “0” (Konzertflügel) zurückgesetzt.
Bank LSB und Bank MSB
Program Change ist der am häufigsten verwendete Befehl zur Auswahl von Instrumenten und Stimmen. Allerdings ist
die Anzahl der mittels Program Change auszuwählenden Instrumente auf 128 beschränkt. Wenn Sie Geräte mit mehr
als 128 Stimmen anzapfen wollen, müssen Sie mit Bank LSB und Bank MSB-Meldungen arbeiten.
Aufsteigender / Absteigender Bankwechsel:
1. Drücken Sie die Funktionstaste, um den Edit-Modus zu aktivieren.
2. Drücken Sie die schwarze Taste entspricht “Bank LSB” bzw. “Bank MSB”.
3. Jetzt können Sie das Bank LSB über die Octave Up & Down-Tasten ändern.
4. Drücken Sie Octave Up-Taste und spielen Sie die Tastatur, bis Sie das gewünschte Instrument gefunden
haben.
Direktauswahl:
1. Drücken Sie die Funktionstaste, um den Edit-Modus zu aktivieren.
2. Drücken Sie die schwarze Taste entspricht “Bank LSB” bzw. “Bank MSB”.
3. Drücken Sie nacheinander die Tasten “3”, “2”, und “ENTER” ein.
Wenn Sie den Bank Change über die Octave Up & Down-Tasten veranlassen, ändert sich die Leuchtanzeige über
den Tasten nicht, da es nicht möglich ist, eine Bank mit negativem Wert auszuwählen. Durch gleichzeitiges Drücken
der Octave Up & Down-Tasten wird das Keyboard auf Bank “0” zurückgesetzt.
45
Page 46

Lautstärke-Slider
Gehen sie wie hierzu wie folgt vor:
1. Drücken Sie die Funktionstaste, um den Edit-Modus zu aktivieren.
2. Drücken Sie die schwarze Taste entspricht der Funktion “FADER”.
3. Drücken Sie die für die Eingabe nummerischer Daten vorgesehenen Tasten um die Nummer des
gewünschten Effektes zu programmieren.
Alternativ können Sie den Wert über die Octave Up & Down-Tasten verändern.
1. Drücken Sie die Taste Erweiterte Funktionen, um den Modus Bearbeiten zu aktivieren.
2. Drücken Sie die schwarze Taste, die für "FADER" steht.
3. Verwenden Sie die Tasten "+" und "-", um den Wert zu ändern.
4. Drücken Sie die ENTER-Taste.
5. Bewegen Sie den Lautstärkeregler nach oben, um den Wert des Effekts zu erhöhen.
Falls Sie einen falschen Zahlenwert eingegeben haben, können Sie den Edit-Modus mit der CANCEL-Taste
(C1) verlassen, ohne den programmierten Effekt zu verändern. (Beachten Sie bitte, dass der dem
Lautstärke-Slider zugewiesene Effekt nicht gespeichert wird, wenn Sie das Keyboard ausschalten. Wenn das
Keyboard erneut angeschaltet wird, wird dem Slider der Standardeffekt “07” (Lautstärke) zugewiesen.
Modulationsrad
Sie können dem Modulationsrad MIDI-Effekte zuweisen. Folgende Effekte sind denkbar: MIDI CC 01
(Modulation), MIDI CC 07 (Lautstärke), MIDI CC 10 (Pan), und MIDI CC 05 (Portamento).
Insgesamt stehen Ihnen 132 Effekte zur Verfügung. Damit diese Effekte auch eingespielt werden können,
muss sichergestellt sein, dass das MIDI-Empfängergerät die entsprechenden MIDI-Effekt-Befehle lesen und
verarbeiten kann. Die meisten Geräte reagieren auf Befehle für Lautstärke, Modulation und Balance. (Die
komplette Liste aller Effekte finden Sie weiter hinten in diesem Handbuch.)
Und so weisen Sie die Effekte zu:
1. Drücken Sie die Funktionstaste, um den Edit-Modus zu aktivieren.
2. Drücken Sie die schwarze Taste entspricht der Funktion “WHEEL”.
3. Drücken Sie die für die Eingabe nummerischer Daten vorgesehenen Tasten um die Nummer des
gewünschten Effektes zu programmieren.
Anstatt die Werte einzugeben, können Sie mit den Tasten "+" und
"-" auch einzeln durch jeden Effekt blättern. Sobald der richtige Wert ausgewählt wurde, drücken Sie die
Taste ENTER.
Falls Sie einen falschen Zahlenwert eingegeben haben, können Sie den Edit-Modus mit der CANCEL-Taste
verlassen, ohne den programmierten Effekt zu verändern.
Bitte beachten Sie, dass der dem Modulationsrad zugewiesene Effekt nicht gespeichert wird, wenn Sie das
Keyboard ausschalten. Wenn das Keyboard erneut angeschaltet wird, wird dem Modulationsrad der
Standardeffekt “1” (Modulation) zugewiesen.
Ein Beispiel: Sie wollen das Modulationsrad für den Effekt 10 (Pan bzw. Balance) programmieren.
1. Drücken Sie die Funktionstaste, um den Edit-Modus zu aktivieren.
2. Drücken Sie die schwarze Taste entspricht der Funktion “WHEEL”.
3. Drücken “1”.
4. Drücken “0”. Damit haben Sie “10” eingegeben.
5. Drücken Sie ENTER.
Richtungstasten und Transportsteuerungen
Die Richtungstasten und Transport-Tasten verwenden die Protokolle von Mackie Control oder HUI, um
bestimmte Funktionen in Softwares zu steuern, die diese unterstützen.
Um auszuwählen, welches Protokoll diese Tasten verwenden, um mit der Software zu kommunizieren,
gehen Sie wie folgt vor:
1. Drücken Sie die Taste Erweiterte Funktionen, um in den Modus Bearbeiten zu gelangen.
2. Drücken Sie die Taste für MACKIE/HUI.
Hinweis: Im Mackie-Modus leuchten die "+" und "-" LEDs grün, im HUI-Modus rot.
3. Drücken Sie Enter.
Hinweis: Ihre Software muss außerdem bereit sein, Befehle von einem externen Gerät (d.h.
Keystation) unter Verwendung des Mackie Control- oder HUI-Protokolls empfangen zu können. Die
Mackie- und HUI-Bedienelemente werden über die virtuelle Schnittstelle 2 gesendet.
46
Page 47

Fehlerbehebung
Allgemeine
Hier finden Sie Antworten auf häufig gestellte Fragen zur Fehlerbehebung bei den Keyboards der KeystationSerie.
Problem 1: Mein M-Audio-Gerät funktioniert plötzlich nicht mehr, obwohl es seit der Installation
problemlos in Betrieb war.
Lösung 1: Schalten Sie das Gerät für 10 Sekunden aus. Starten Sie Ihren Computer neu. Sollte das
Problem weiter bestehen, müssen Sie eventuell die Gerätetreiber neu installieren.
Problem 2: Ich habe ein Haltepedal an mein Keystation-Keyboard angeschlossen, aber es es
funktioniert irgendwie “falsch herum”...
Lösung 2: Das Keyboard errechnet die Polarität des Haltepedals, wenn es eingeschaltet wird.
Wahrscheinlich ist das Pedal so eingestellt, dass es beim Einschalten auf AUS steht. Wenn Sie möchten,
dass das Pedal “richtig herum” funktioniert, halten Sie es nicht gedrückt, wenn Sie das Keyboard einschalten.
Problem 3: Wenn ich eine Keyboardtaste drücke, gibt es eine kurze Verzögerung, bevor ich den
Sound höre.
Lösung 3: Diese Verzögerung nennt man Latenzzeit. Die Latenzzeit bei der Übertragung von MIDI-Signalen
ist von der von Ihnen verwendeten Synthesizer-Software abhängig. Bei MIDI-Daten handelt es sich lediglich
um Befehlsdaten, die von Ihrer Synthesizer-Software empfangen werden. Bevor der auf diese Befehlsdaten
bezogene Sound ausgegeben werden kann, müssen komplexe Berechnungen erfolgen, woraus sich die
zeitliche Verzögerung bei der Soundwiedergabe ergibt.
Um diesem Problem zu begegnen, empfehlen wir Ihnen, eine richtig gute Audio-Schnittstelle einzusetzen.
Auf unserer Webseite m-audio.com erhalten sie Informationen zu einer Auswahl von. Falls Sie bereits über
eine leistungsstarke Audio-Schnittstelle verfügen, sollten Sie die neuesten Treiber installieren oder die
Buffergröße der Audio-Treiber heruntersetzen.
47
Page 48
MIDI-Funktionen
Die Keystation-Keyboards wurden so konstruiert, dass die MIDI-Verarbeitung mit ihrem Computer so einfach
wie möglich wird. Nichtsdestotrotz können unter Umständen Schwierigkeiten mit den MIDI-Funktionen
auftreten. Oft liegt der Fehler in diesen Fällen nicht am Keyboard, sondern am Empfängergerät. Hier können
Ihnen zwei MIDI-Befehle weiterhelfen: All Notes Off und Reset All Controllers.
All Notes Off
Senden Sie diesen Befehl, wenn ein Sound “hängen” bleibt, und Sie ihn nicht stoppen können.
1. Drücken Sie die Funktionstaste, um den Edit-Modus zu aktivieren.
2. Drücken Sie die schwarze Taste “ALL OFF”.
3. Der Edit-Modus wird nun beendet und die hängenden Noten werden gestoppt.
Controller-Reset
Wenn Sie mit einem der zugewiesenen Effekte nicht zufrieden sind, aber nicht lange herrumrätseln wollen,
welcher Effekt es genau sein könnte, können Sie den MIDI-Befehl “Reset All Controllers” senden und
sämtliche Effekte auf 0 zurücksetzen.
1. Drücken Sie die Funktionstaste, um den Edit-Modus zu aktivieren.
2. Drücken Sie die schwarze Taste “RESET”.
3. Der Edit-Modus wird nun beendet und die Effekte werden zurückgesetzt.
Factory Reset
1. Schalten Sie die Keystation aus.
2. Halten Sie die Tasten "ERWEITERT", "OCT+" und "OCT-" bis Schritt 4 gleichzeitig gedrückt.
3. Schalten Sie die Keystation ein.
4. Lassen Sie die drei Tasten los.
Das Keyboard wurde nun wieder auf die Werkseinstellungen zurückgesetzt.
MIDI-Ausgang
Über den MIDI-Ausgang an der Rückseite des Keyboards können Sie Ihr Keystation an ein externes
Soundmodul oder ein MIDI-Keyboard anschließen. Beim Einschalten des Keyboards werden sämtliche
Controller-Daten standardmäßig über den MIDI-Ausgang sowie den USBAusgang ausgegeben.
Wenn Sie den MIDI-Ausgang wie ein herkömmliches USB-MIDI Interface einsetzen möchten, können Sie
den “MIDI Out”-Modus aktivieren. Gehen Sie hierbei wie folgt vor:
1. Drücken Sie die Funktionstaste, um den Edit-Modus zu aktivieren.
2. Drücken Sie die schwarze Taste “MIDI OUT”.
3. Damit verlassen Sie den Edit-Modus.
4. Das Keyboard kann nun die vom Computer empfangenen Daten über den MIDI-Ausgang an jedes
angeschlossene MIDI-Gerät senden.
Sie sollten allerdings nicht vergessen, in Ihrem Sequenzer “Keystation USB MIDI Out” als MIDIAusgabegerät zu konfigurieren.
48
Page 49

Appendix (English)
Wheel and Fader User Assignments
00 Bank Select 38 Data Entry LSB 112 Controller 112
01 Modulation 39 Channel Volume LSB 113 Controller 113
02 Breath Control 40 Balance LSB 114 Controller 114
03 Controller 3 41 Controller 41 115 Controller 115
04 Foot Control 42 Pan LSB 116 Controller 116
05 Porta Time 43 Expression LSB 117 Controller 117
06 Data Entry 44 Controller 44 118 Controller 118
07 Channel Volume 45 Controller 45 119 Controller 119
08 Balance 46 Controller 46
09 Controller 9 47 Controller 47 120 All Sound off
10 Pan 48 Gen Purpose 1 LSB 121 Reset all Controllers
11 Expression 49 Gen Purpose 2 LSB 122 Local Control
12 Effects Controller 1 50 Gen Purpose 3 LSB 123 All Notes Off
13 Effects Controller 2 51 Gen Purpose 4 LSB 124 Omni Off
14 Controller 14 52 Controller 52 125 Omni On
15 Controller 15 53 Controller 53 126 Mono On (Poly Off)
16 Gen Purpose 1 54 Controller 54 127 Poly On (Mono Off)
17 Gen Purpose 2 55 Controller 55
18 Gen Purpose 3 56 Controller 56 128 Pitch Bend sensitivity
19 Gen Purpose 4 57 Controller 57 129 Fine Tune
20 Controller 20 58 Controller 58 130 Coarse Tune
21 Controller 21 59 Controller 59 131 Channel Pressure
22 Controller 22 60 Controller 60
23 Controller 23 61 Controller 61
24 Controller 24 62 Controller 62
25 Controller 25 63 Controller 63
26 Controller 26 64 Sustain Pedal
27 Controller 27 65 Portamento
28 Controller 28 66 Sostenuto
29 Controller 29 67 Soft Pedal
30 Controller 30 68 Legato Pedal
31 Controller 31 69 Hold 2
32 Bank Select LSB 70 Sound Variation
33 Modulation LSB 71 Resonance
34 Breath Control LSB 72 Release Time
35 Controller 35 73 Attack Time
36 Foot Control LSB 74 Cut- off Frequency
37 Porta Time LSB 75 Controller 75
38 Data Entry LSB 76 Controller76
39 Channel Volume LSB 77 Controller 77
40 Balance LSB 78 Controller 78
41 Controller 41 79 Controller 79
42 Pan LSB 80 Gen Purpose 5
Channel Mode Messages:
Extra RPN Messages:
49
Page 50

Technical Specifications
Power
Size (width x depth x height)
Weight
via USB or 9V DC 200mA center-positive power supply (sold
separately)
9.8" x 3.6" x 53.9"
250 mm x 92 mm x 1368 mm
17 lbs.
7.7 kg
Specifications are subject to change without notice.
Trademarks and Licenses
M-Audio is a trademark of inMusic Brands, Inc., registered in the U.S. and other countries.
Mackie Control and HUI are trademarks or registered trademarks of LOUD Technologies Inc.
iPad, Mac, and OS X are trademarks or service marks of Apple Inc., registered in the U.S. and
other countries.
Windows is a registered trademark of Microsoft Corporation in the United States and other
countries.
All other product or company names are trademarks or registered trademarks of their
respective owners.
50
Page 51

51
Page 52

m-audio.com
Manual Version 1.2
 Loading...