

Page 1

English
Introduction
iControl
Congratulations on your purchase of the M-Audio iControl for GarageBand, a control interface
designed for use with Apple’s GarageBand music software. With iControl, you will be able to
control all the various aspects of GarageBand from an intuitive control surface, maximizing your
working speed. While the operation of the iControl is very simple, we recommend that you read
once through this manual to familiarize yourself with all of the controls and functions available to
you.
What’s In the Box
Inside your iControl package, you will find:
< The iControl controller
< Printed Quick Start Guide
< Six foot USB cable
Product Features
< Eight endless rotary encoders
< Master Volume slider
< Six Transport buttons
< Select, Mute, Solo, and Record Enable buttons
< Jog wheel
< Powered from USB bus
< Fully configured—no additional setup is necessary
Minimum System Requirements
English
NOTE: The below requirements are necessary to obtain MIDI communication between iControl
and the computer. These requirements do not reflect the additional or higher requirements of
GarageBand software.
< GarageBand 2.0.1 or later
< Mac OS X 10.3.4 or higher
< Available USB port
About This Manual
This manual is broken down into sections to cover the various aspects of iControl. Installation is
covered first, followed by an overview of the controls. Last is an in-depth look at the operation of
iControl.
3
Page 2
Installation Procedure
Basic Installation
Because it is a class-compliant device, installing iControl on your Mac OS X computer is simple
and straightforward:
< Use the supplied USB cable to connect iControl to a USB port on your computer and you’ll
be ready to go. You can do this while the computer is on or off, and no driver installation is
necessary.
Using iControl With GarageBand
iControl was designed to work exclusively with Apple’s GarageBand software version 2.0.1 or
higher. Once you connect iControl to your computer, GarageBand will identify it and make it active.
There are no additional preferences to change.
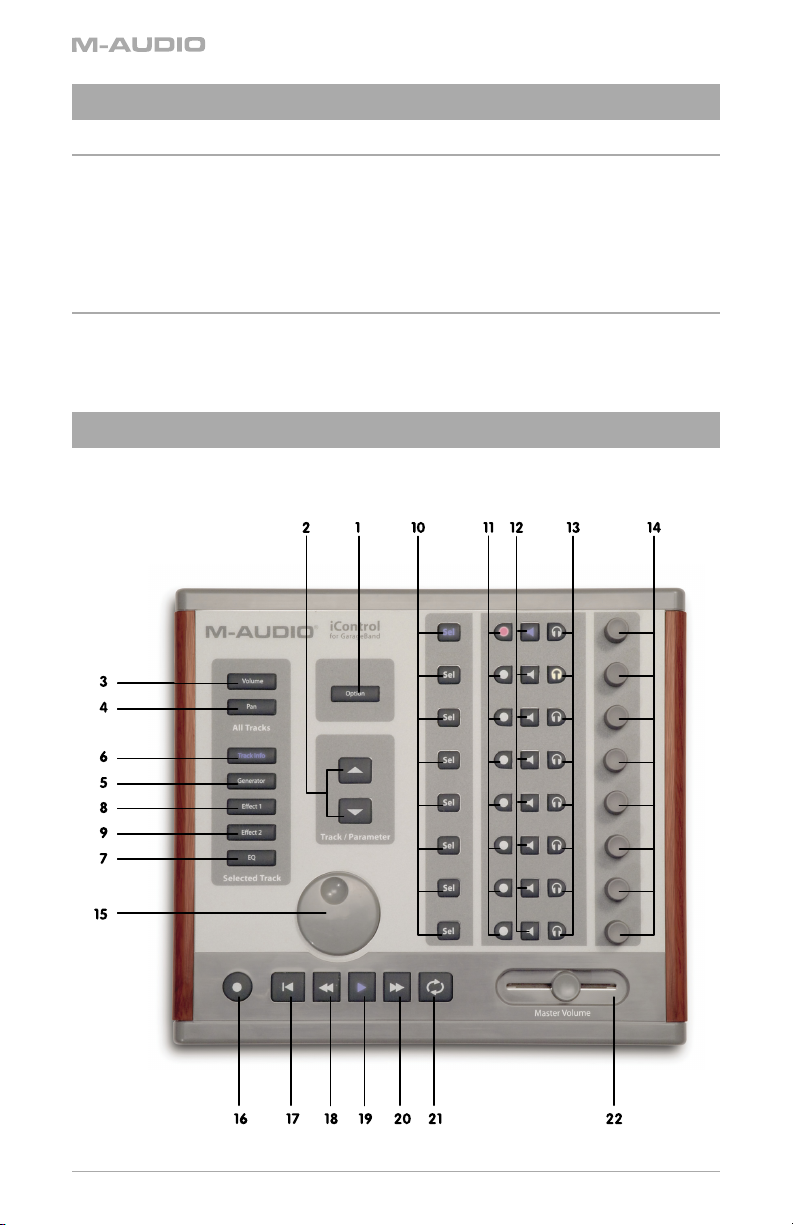
Hardware Controls and Indicators
This section will familiarize you with the interface of iControl. Please reference the image below
when reading about each control.
4
Page 3

iControl
1. Option Button: This button changes the functionality of other iControl buttons. All modified
iControl commands are covered in each function’s description.
2. Track/Parameter Buttons: When working on All Tracks (either Volume or Pan is selected),
these buttons will move up or down through the tracks in GarageBand eight at a time,
allowing you to control other tracks from iControl. When working on a single track (i.e. to edit
an effect), these buttons will move the rotary encoder assignments by eight parameters.
Lastly, with the Track Info Button pressed, the Track/Parameter Buttons will be inactive.
3. Volume Button: Pressing this button will make the rotary encoders adjust the volumes of
the selected tracks.
4. Pan Button: When active, the eight rotary encoders will control the pan position of the
selected tracks.
5. Generator Button: Pressing this button allows for parameter editing of the selected Track’s
Generator, via the iControl’s rotary encoders.
6. Track Info: Pressing this button allows for parameter editing of the selected Track’s
instrument via the iControl’s rotary encoders.
7. EQ Button: Pressing this button allows for parameter editing of the selected Track’s Equalizer,
via the iControl’s rotary encoders. Pressing the EQ button while holding down the Option
button will enable or disable the EQ for this track.
8. Effect 1 Button: Pressing this button allows for parameter editing of the selected Track’s first
insert effect, via the iControl’s rotary encoders. Pressing the Effect 1 button while holding
down the Option button will enable or disable the Effect 1 for this track.
9. Effect 2 Button: Pressing this button allows for parameter editing of the selected Track’s
second insert effect, via the iControl’s rotary encoders. Pressing the Effect 2 button while
holding down the Option button will enable or disable the Effect 2 for this track.
10. Select Buttons: These buttons are used to select the track you wish to edit. When in Track
Info mode, the select buttons are used to turn specific functions of the selected track on and
off. These are from top to bottom:
< SEL 1—enables or disables the Noise Gate (if it is a Real Instrument track)
< SEL 2—enables or disables the Compressor
< SEL 3—enables or disables the first effect
< SEL 4—enables or disables the second effect
< SEL 5—enables or disables the EQ
< SEL 6—enables or disables Echo
< SEL 7—enables or disables Reverb
< SEL 8—not assigned
11. Record Enable Buttons: Pressing this button will enable the corresponding track for
recording. Pressing any Record Enable button while holding down the Option button will
disable recording for all tracks.
12. Mute Buttons: Use this button to turn the output of the corresponding track on and off.
Pressing any Mute button while holding down the Option button will unmute all tracks.
13. Solo Buttons: When pressed, you will listen to the track (and other soloed tracks) exclusively.
Pressing any Solo button while holding down the Option button will disable Solo for all
tracks.
English
5
Page 4

14. Rotary Encoders: These endless knobs are used to adjust parameters of GarageBand
depending on the current mode selected (i.e. Volume, Pan, EQ, Channel Strip, etc.). When
holding down the Option button while turning an encoder, the according parameter’s value
is set to the minimum or maximum, depending on whether you increase/decrease it. When
in Track Info mode, the encoders are used to control specific functions of the selected track.
These are from top to bottom:
< ENCODER 1—controls the Noise Gate (if it is a Real Instrument track)
< ENCODER 2—controls the Compressor
< ENCODER 3,4— not assigned
< ENCODER 5—edits Pan
< ENCODER 6—edits Echo level
< ENCODER 7—edits Reverb level
< ENCODER 8—edits Volume
15. Jog Wheel: Use this knob to move the playhead forward and backward. Turning the Jog
Wheel clockwise while holding down the Cycle button will enable the cycle, set the left edge
of the cycle region to the current playhead position and then move the playhead as well as
the right edge of the cycle region.
16. Record Button: Mirrors the Record Button in GarageBand and engages a new recording
session
Rewind to Start Button: Moves the playhead to the beginning of the song.
17.
18. Rewind Button: Moves the playhead backwards in the timeline. Pressing the Rewind button
while holding down the Cycle button will enable the cycle and set the left edge of the cycle
region to the current playhead position.
19. Play Button: Press this button to start playback in GarageBand.
20. Fast Forward Button: Moves the playhead forwards in the timeline. Pressing the Fast
Forward button while holding down the Cycle button will enable the cycle and set the right
edge of the cycle region to the current playhead position.
21. Cycle Button: When on, GarageBand will cycle playback of the currently selected area of
the song.
22. Master Volume Slider: This slider adjusts the output volume of GarageBand.
Operational Overview
iControl is used to control various aspects of GarageBand including transport and track parameters.
iControl is designed to control eight tracks simultaneously, but can be used with songs over eight
tracks in size. When controlling a song with more than eight tracks, you’ll need to use the Track/
Parameter buttons to select the tracks you wish to control. Furthermore, when editing specific
parameters, such as certain generators and effects, you may have more than eight parameters
to control, and in this situation, you will use the Track/Parameter buttons to select the parameters
you want to change. Below is a simple walk-through of how to use iControl:
Working with All Tracks
When pressing the Volume or Pan button, iControl will be in All Tracks mode. In this mode, each
horizontal row of controls on iControl corresponds to a horizontal track in GarageBand. You will be
able to use the rotary encoders to change the Volume or Pan of the tracks, depending on whether
you’ve pressed the Volume or Pan buttons.
If you have more than eight tracks in your song, you can move up and down through the tracks
using the Track/Parameter buttons. You will see the selector graphic in GarageBand move to the
appropriate tracks as you press these buttons. Once you’ve changed your selection, the horizontal
rows of iControl will control these new tracks.
6
Page 5

iControl
Working with Selected Tracks
Thankfully, GarageBand gives you more control over your music besides volume and pan. You
also have access to, e.g., EQ and effects. These additional functions are accessed through iControl
one track at a time. The five buttons—Generator, Track Info, EQ, Effect 1, and Effect 2—compose
the Selected Track’s functions. That is, you will use the eight rotary encoders to control multiple
parameters of the currently selected track.
In this mode, you will use Track/Parameter buttons to select a group of eight parameters to work
on, and you will use the Select Buttons to select the specific track you want to edit. For example,
press the Select Button on track 2, then press the Effect 1 button. The Effect 1 for track 2 will be
shown on screen. Now, the rotary encoders will be used to adjust the various effect parameters.
You can also use the Track/Parameter buttons to select additional parameters, if the effect has
more than eight parameters.
Please note: in the Track Info mode the Track/Parameter buttons are not assigned. The Select
buttons are used to turn specific functionalities of the selected track on or off.
Master Controls
The Transport buttons, Jog wheel, and Master Volume control all work regardless of what track(s)
are selected. The Transport buttons and Master Volume behave exactly like those in GarageBand.
The Jog Wheel can be used to move through your song.
Troubleshooting
While iControl is a simple device with few connections, you may run across problems from time to
time. If your iControl is not behaving as expected, please try the procedure detailed below. It may
save you from having to contact Technical Support.
: My iControl is not turning on.
Problem
Reason: iControl is not receiving power.
Solution: iControl is powered from the USB bus. If you are using a hub, make sure it is a powered
hub. A non-powered hub will not provide enough power to iControl. If you are not using a hub,
try replacing the USB cable.
English
Technical Support
If you are having trouble with your iControl and the procedures in the Troubleshooting section do
not solve your problem, you may call M-Audio Tech Support for further assistance. Before you
call, be sure to be in front of your computer with it turned on, and be ready to tell the Support
Representative what type of computer you’re using (i.e. Mac G5 1GHz), the operating system
installed (i.e. Mac OS X 10.3.5), and the version number of GarageBand.
M-Audio Tech Support is open from 7am to 7pm PST, Monday through Friday, and can be reached at
(626) 633-9055. You can also submit an e-mail request through the M-Audio website.
7
Page 6

Contacting M-Audio
If you have any questions, comments or suggestions about this or any M-Audio product, we invite
you to contact us by using the following information:
M-AUDIO U.S. -
5795 Martin Road, Ir windale, CA 91706-6211, U.S.A.
Sales I nformatio n: . . . . . . . . . . . . . . . . . . 626-633-9050
Sales ( fax): . . . . . . . . . . . . . . . . . . . . . . . . 626-633-9070
Sales I nformatio n (email): . . . . . . . . . . . info@m -audio.com
Tech Suppo rt (email ): . . . . . . . . . . . . . . . techsu pt@m-au dio.com
Tech Suppo rt (fax): . . . . . . . . . . . . . . . . . 626-633-90 60
Inter net Home Page : . . . . . . . . . . . . . . . http://www.m -audio.com
M-AUDIO U.K. -
Floor 6, Gresham House, 53 Clarendon Road, Watford,
WD17 1LA, United Kingdom
Sales I nformatio n (phone): . . . . . . . . . . 44 ( 0) 1923 204010
Sales I nformatio n (fax): . . . . . . . . . . . . . 44 (0) 1923 20 4039
Sales I nformatio n (email): . . . . . . . . . . . info@m audio.co.uk
Technica l Support ( PC): . . . . . . . . . . . . . 44 (0 ) 1309 671301
Technica l Support (M ac): . . . . . . . . . . . . 44 (0) 1765 650072
Technica l Support (e mail): . . . . . . . . . . sup port@ma udio.co.uk
Inter net Home Page : . . . . . . . . . . . . . . . http://www.m audio.co.uk
M-AUDIO France -
Floor 6, G resham House, 53 Clarendon Road, Wat ford,
WD17 1LA, United Kingdom
Assis tance Techniq ue (aucune qu estions rel iées aux vente s)
courri el (assist ance PC): . . . . . . . . . . . . support @m-audio -france.com
courri el (assist ance Mac): . . . . . . . . . . . mac@m- audio-fran ce.com
télép hone (assi stance PC): . . . . . . . . . . 0820 000 731
(0,12 Euros par m inute)
télép hone (assi stance Mac): . . . . . . . . 0820 391 191
(0,12 Euros par m inute)
téléco pieur/fax: . . . . . . . . . . . . . . . . . . . 01 72 72 90 52
Ventes ( aucun appel s d’assistanc e technique )
télép hone: . . . . . . . . . . . . . . . . . . . . . . . 0810 001 105 ( Numero Azur )
courri el: . . . . . . . . . . . . . . . . . . . . . . . . . info@m- audio-fra nce.com
téléco pieur/fax: . . . . . . . . . . . . . . . . . . . 01 72 72 90 52
M-AUDIO Deutschland (Germany) -
Kuhallmand 34, D-74613 Ohringen, Germany
Sales I nformatio n: . . . . . . . . . . . . . . . . . . +49 (0)7941 987000
Sales I nformatio n (email): . . . . . . . . . . . info@m -audio.de
Technica l Support: . . . . . . . . . . . . . . . . . . +49 (0 )7941 9870030
Technica l Support (e mail): . . . . . . . . . . . sup port@m- audio.de
Technica l Support (f ax): . . . . . . . . . . . . . +49 ( 0)7941 98 70070
Inter net Home Page : . . . . . . . . . . . . . . . http://www.m -audio.de
M-AUDIO Canada -
1400 St-Je an Baptiste Ave. #150,
Quebec City, Quebec G2E 5 B7, Canada
Technica l Support (e -mail): . . . . . . . . . . techcana da@m-au dio.com
Technica l Support ( PC): . . . . . . . . . . . . . (418) 872-044 4
Technica l Support (M ac): . . . . . . . . . . . . 1-80 0-638-2120
Technica l Support (f ax): . . . . . . . . . . . . . (418) 872-0 034
Sales ( e-mail): . . . . . . . . . . . . . . . . . . . . . infocanada @m-audio.co m
Sales ( phone): . . . . . . . . . . . . . . . . . . . . . (866) 872-0444
Sales ( fax): . . . . . . . . . . . . . . . . . . . . . . . . (514) 396-7102
Inter net Home Page . . . . . . . . . . . . . . . . http://www.m -audio.ca
M-AUDIO Japan -
(株式 会社エムオーディオジャパン)
古屋市中区丸の内
テクニカルサポート :....................
テクニカルサポート
(Maci ntosh):
テクニカルサポート
(Wind ows):
Fax:...............................
ホームページ : ...............
2-18-10
..............
................
460-0 002
愛知県 名
052-218-0859
mac-supp ort@m- audio.co.jp
win-s upport@ m-audio.co.jp
052-218-0875
http: //w ww.m-audio.co.j p
8
Page 7

Technical Info
MP12-076A0_iControl_UG-EN01
iControl
Caution: Electro Static Discharge, Electrical Fast Transient and Conducted RF interference may
cause the unit malfunctioning. In such case, unplug the unit and plug it in again to restore normal
operation.
Note: Your M-Audio product has been tested to comply with FCC Standards FOR HOME OR OFFICE
USE. Modifications not authorized by the manufacturer may void users authority to operate this
device.
Note: This equipment has been tested and found to comply with the limits for a Class B digital
device, pursuant to Part 15 of the FCC Rules. These limits are designed to provide reasonable
protection against harmful interference in a residential installation. This equipment generates,
uses and can radiate radio frequency energy and, if not installed and used in accordance with
the instructions, may cause harmful interference to radio communications. However, there is no
guarantee that interference will not occur in a particular installation. If this equipment does cause
harmful interference to radio or television reception, which can be determined by turning the
equipment off and on, the user is encouraged to try to correct the interference by one or more of
the following measures:
< Re-orient or relocate the receiving antenna.
< Increase the separation between the equipment and receiver.
< Connect the equipment to an outlet on a circuit different from that to which the receiver is
connected.
< Consult the dealer or an experienced radio/ TV technician for help.
iControl
Tested to comply with
FCC standards
FOR HOME OR STUDIO USE
English
Warranty Terms and Registration
Warranty Terms - M-Audio warrants products to be free from defects in materials and workmanship,
under normal use and provided that the product is owned by the original, registered user. Visit
www.m-audio.com/warranty for terms and limitations applying to your specific product.
Warranty Registration - Thank you for registering your new M-Audio product. Doing so immediately
both entitles you to full warranty coverage and helps M-Audio develop and manufacture the finest
quality products available. Register online at www.m-audio.com/register to receive FREE product
updates and for the chance to win FREE M-Audio gear.
9
 Loading...