

Page 1

Model SC-7S1 User Guide
Stereo Control Amplifier
Page 2
CAUTION
RISK OF ELECTRIC SHOCK
DO NOT OPEN
CAUTION: TO REDUCE THE RISK OF ELECTRIC SHOCK,
DO NOT REMOVE THE COVER (OR BACK)
NO USER-SERVICEABLE PARTS ARE INSIDE
REFER SERVICING TO QUALIFIED SERVICE PERSONNEL
The lightning flash with arrowhead symbol
within an equilateral triangle is intended to
alert the user to the presence of
uninsulated “dangerous voltage” within the
product’s enclosure that may be of
sufficient magnitude to constitute a risk of
electric shock to persons.
The exclamation point within an equilateral
triangle is intended to alert the user to the
presence of important operating and
maintenance (servicing) instructions in the
literature accompanying the product.
WARNING
TO REDUCE THE RISK OF FIRE OR ELECTRIC SHOCK,
DO NOT EXPOSE THIS PRODUCT TO RAIN OR MOISTURE.
CAUTION:
WIDE BLADE OF THE PLUG TO THE WIDE SLOT, AND
FULLY INSERT.
TO PREVENT ELECTRIC SHOCK, MATCH THE
Page 3
IMPORTANT SAFETY
INSTRUCTIONS
READ BEFORE OPERATING EQUIPMENT
This product was designed and manufactured to meet strict quality and safety
standards. There are, however, some installation and operation precautions
which you should be particularly aware of.
1. Read Instructions – All the safety and operating instructions should be read
before the product is operated.
2. Retain Instructions – The safety and operating instructions should be retained
for future reference.
3. Heed Warnings – All warnings on the product and in the operating
instructions should be adhered to.
4. Follow Instructions – All operating and use instructions should be followed.
5. Cleaning – Unplug this product from the wall outlet before cleaning. Do not
use liquid cleaners or aerosol cleaners. Use a damp cloth for cleaning.
6. Attachments – Do not use attachments not recommended by the product
manufacturer as they may cause hazards.
7. Water and Moisture – Do not use this product near water-for example, near a
bath tub, wash bowl, kitchen sink, or laundry tub, in a wet basement, or near
a swimming pool, and the like.
8. Accessories – Do not place this product on an unstable cart, stand, tripod,
bracket, or table. The product may fall, causing serious injury to a child or
adult, and serious damage to the product. Use only with a cart, stand, tripod,
bracket, or table recommended by the manufacturer, or sold with the product.
Any mounting of the product should follow the manufacturer’s instructions,
and should use a mounting accessory recommended by the manufacturer.
9. A product and cart combination should be moved with care. Quick stops,
excessive force, and uneven surfaces may cause the product and cart
combination to overturn.
10. Ventilation – Slots and openings in the cabinet are provided for ventilation
and to ensure reliable operation of the product and to protect it from
overheating, and these openings must not be blocked or covered. The
openings should never be blocked by placing the product on a bed, sofa, rug,
or other similar surface. This product should not be placed in a built-in
installation such as a bookcase or rack unless proper ventilation is provided
or the manufacturer’s instructions have been adhered to.
11. Power Sources – This product should be operated only from the type of power
source indicated on the marking label. If you are not sure of the type of power
supply in your home, consult your product dealer or local power company. For
products intended to operate from battery power, or other sources, refer to
the operating instructions.
12. Do not defeat the safety purpose of the polarized or grounding-type plug. A
polarized plug has two blades with one wider than the other. A grounding type
plug has two blades and a third grounding prong. The wide blade of the third
prong is provided for your safety. If the provided plug does not fit into your
outlet, consult an electrician for replacement of the obsolete outlet.
14. Protective Attachment Plug – The product is equipped with an attachment plug
having overload protection. This is a safety feature. See the Instruction Manual
for replacement or resetting of the protective device. If replacement of the plug is
required, be sure the service technician has used a replacement plug specified by
the manufacturer that has the same overload protection as the original plug.
15. Outdoor Antenna Grounding – If an outside antenna or cable system is
connected to the product, be sure the antenna or cable system is grounded so as
to provide some protection against voltage surges and built-up static charges.
Article 810 of the National Electrical Code, ANSI/NFPA 70, provides information
with regard to proper grounding of the mast and supporting structure, grounding
of the lead-in wire to an antenna discharge unit, size of grounding conductors,
location of antenna-discharge unit, connection to grounding electrodes, and
requirements for the grounding electrode. See Figure 1.
16. Lightning – For added protection for this product during a lightning storm, or when
it is left unattended and unused for long periods of time, unplug it from the wall
outlet and disconnect the antenna or cable system. This will prevent damage to
the product due to lightning and power-line surges.
17. Power Lines – An outside antenna system should not be located in the vicinity of
overhead power lines or other electric light or power circuits, or where it can fall
into such power lines or circuits. When installing an outside antenna system,
extreme care should be taken to keep from touching such power lines or circuits
as contact with them might be fatal.
18. Overloading – Do not overload wall outlets, extension cords, or integral
convenience receptacles as this can result in a risk of fire or electric shock.
19. Object and Liquid Entry – Never push objects of any kind into this product
through openings as they may touch dangerous voltage points or short-out parts
that could result in a fire or electric shock. Never spill liquid of any kind on the
product.
20. Servicing – Do not attempt to service this product yourself as opening or
removing covers may expose you to dangerous voltage or other hazards. Refer
all servicing to qualified service personnel.
21. Damage Requiring Service – Unplug this product from the wall outlet and refer
servicing to qualified service personnel under the following conditions:
a. When the power-supply cord or plug is damaged.
b. If liquid has been spilled, or objects have fallen into the product.
c. If the product has been exposed to rain or water.
d. If the product does not operate normally by following the operating instructions.
Adjust only those controls that are covered by the operating instructions as an
improper adjustment of other controls may result in damage and will often require
extensive work by a qualified technician to restore the product to its normal
operation.
e. If the product has been dropped or damaged in any way, and
f. When the product exhibits a distinct change in performance – this indicates a
need for service.
22. Replacement Parts – When replacement parts are required, be sure the service
technician has used replacement parts specified by the manufacturer or have the
same characteristics as the original part. Unauthorized substitutions may result in
fire, electric shock, or other hazards.
23. Safety Check – Upon completion of any service or repairs to this product, ask the
service technician to perform safety checks to determine that the product is in
proper operating condition.
24. Wall or Ceiling Mounting – The product should be mounted to a wall or ceiling
only as recommended by the manufacturer.
25. Heat – The product should be situated away from heat sources such as radiators,
heat registers, stoves, or other products (including amplifiers) that produce heat.
AC POLARIZED PLUG
13. Power-Cord Protection – Power-supply cords should be routed so that they
are not likely to be walked on or pinched by items placed upon or against
them, paying particular attention to cords at plugs, convenience receptacles,
and the point where they exit from the product.
Page 4

Table of Contents
1. Instruction for use................................................................................................................. 2
Foreword .................................................................................................................................................................................2
Equipment mains setting ........................................................................................................................................................... 2
Copyright .................................................................................................................................................................................. 2
Precautions ............................................................................................................................................................................... 2
How to use batteries. ................................................................................................................................................................ 2
2. Accessories ........................................................................................................................... 2
3. Main features of this product ............................................................................................... 3
4. Connections........................................................................................................................... 4
Connection 1 Stereo connection ....................................................................................................................................... 4
Balanced terminal ............................................................................................................................................................... 5
Connection 2 Bi-Amp Connection
(Speaker system needs to comply with Bi-Amp connection) ............................................................................................ 6
Bi-Amp (Connection)..........................................................................................................................................................7
Connection 3 Complete Bi-Amp Connection
(Speaker system needs to comply with Bi-Amp connection) ............................................................................................ 8
Complete Bi-Amp connection............................................................................................................................................9
Installing the SACD multi-channel audio speakers........................................................................................................... 10
Connection 4 5.1ch multi-channel connection ............................................................................................................... 11
5. Name and function .............................................................................................................. 12
For use of Remote control ....................................................................................................................................................... 14
6. Standard operation ............................................................................................................. 15
How to Play .......................................................................................................................................................................... 1 5
How to record...................................................................................................................................................................... 1 5
7. How to operate functions and how to set up.................................................................... 16
Attenuate function ............................................................................................................................................................. 1 6
How to set up attenuation level ....................................................................................................................................... 1 6
Trim adjustment function .................................................................................................................................................. 1 7
8. Specification ........................................................................................................................ 19
Specification ........................................................................................................................................................................ 1 9
Dimensions ........................................................................................................................................................................... 1 9
9. Block diagram...................................................................................................................... 19
10.
Trouble shooting ................................................................................................................. 20
11.
Maintenance ........................................................................................................................ 20
1
Page 5
1. Instruction for use
■ Forew ord
This section must be read before any connection is made
to the mains supply.
■ Equipment mains setting
Your Marantz product has been prepared to comply with
the household power and safety requirements that exist
in your area.
“SC7S1/N1G” version product can be powered by 230
V AC only.
“SC7S1/U1G” version product can be powered by 120
V AC only.
■ Copyright
Recording and playback of any material may require consent. For further information refer to the following:
— Copyright Act 1956
— Dramatic and Musical Performers Act 1958
— Performers Protection Acts 1963 and 1972
— any subsequent statutory enactments and orders
■ Precautions
The following precautions should be taken when operating the equipment.
■ How to use batteries
Improper use of batteries may cause the risk of fluid
leakage or explosion.
Be especially careful in the following points.
햲 Insert the batteries with the correct and polarity as indi-
cated inside the battery case.
햳 Do not use a brand-new battery and used battery together.
햴 Dry cell batteries may produce different voltages even when
their shapes are the same. Do not use different types of
batteries together.
햵 Some batteries are rechargeable and some are not. Be sure
to read the caution and instructions described on each battery.
햶 Used batteries should be disposed of in compliance with
the treatment method specified for your local area.
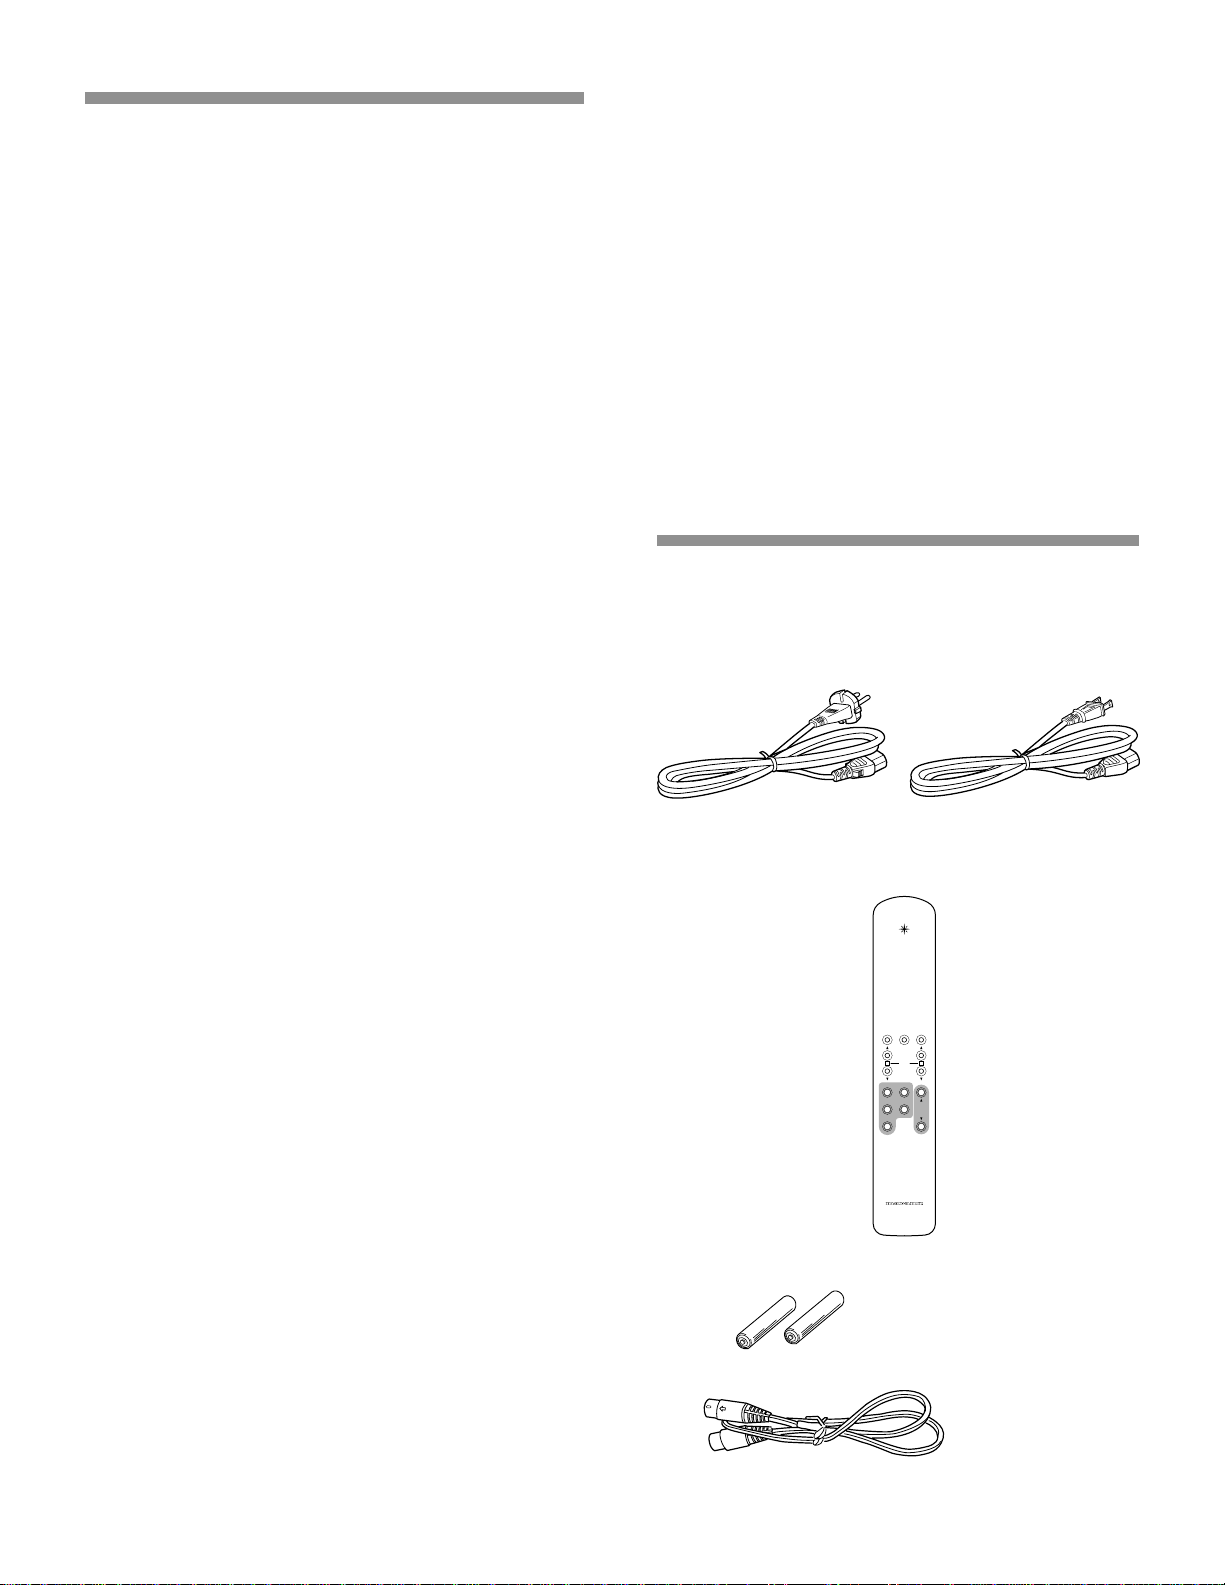
2. Accessories
After opening the cover of the packing box, check that
the following accessories are included.
●
AC Power Cable
●
General Precautions
When installing the equipment ensure that:
— the ventilation holes are not covered;
— air is allowed to circulate freely around the equipment
— it is on a vibration free-surface;
— it will not be exposed to interference from an external
source;
— it will not be exposed to excessive heat, cold, mois
ture or dust;
— it will not be exposed to direct sunlight;
— it will not be exposed to electrostatic discharges
Never place heavy objects on the equipment.
If a foreign body or water does enter the equipment,
contact your nearest dealer or service center.
Do not pull out the plug by pulling on the mains lead, pull from
the plug itself.
It is advisable when leaving the house, or during a thunderstorm,
to disconnect the equipment from the mains supply.
(Model SC7S1/N1G) (Model SC7S1/U1G)
●
Remote Control RC-7S1SC
ATTEXITTRIM MODE
BA
TRIM
BALANCED
SACD/CD
LINE 1 LINE 2
VOLUME
TAPE
RC-7S1SC
●
AAA (R03) Batteries
●
Remote Cable
●
Instruction Manual (this Copy)
2
Page 6

3. Main features of this product
●
The concept: channel separation for super
wide range & dynamic audio
We think it’s of the utmost importance to extend high
frequency response as well as channel separation so you
can hear the true meaning of “Super Audio.”
This is why we have designed the input and output circuitry, volume control section, and power supply circuits
according to this philosophy.
The result: an astonishing channel separation of over
100dB at 20kHz.
●
Fully balanced control amp with an linear
volume control
The SC-7S1 is a full balanced, two-channel control amp
providing the channel separation you need for Super
Audio. Based on our own high quality four-gang active
volume control we have developed an even better linear
control volume that reduces gang errors from 0 to 100dB,
±0.5dB. By adding an additional HDAM SA (High Definition Amplifier Module), we improved the Common Mode
Reject Ratio (CMRR) dramatically, attaining an incredible
ultra-wide frequency band of 150kHz and succeeded in
producing the perfect control amplifier for Super Audio
CD.
●
HDAM SA
The feedback impedance of the Current Feedback circuit was reduced to its minimum to make it faster. We
developed a new High Definition Amplifier Modules
(HDAM), a separeted module operating as a buffer for
the amplifier. The SC-7S1 has four HDAM SAs on each inputoutput buffer and another four units on the V/I converter.
●
Choke input system
In the power supply section, the choke input topology
was adopted to drastically reduce rectifier harmonic noise.
This system is especially suitable for a control amplifier
in which very small signal amplification occurs.
●
Floating control bus system
We make it possible to synchronously drive two or more
control amps by using a floating control bus system connected to as many as 6 sets of control amplifiers. We
also enable you to trim levels using the remote control,
making it easy to set up the optimal sound field on a
multi-channel configuration. The highest achievable stereo performance can be accomplished when a system
configured with two sets of SC-7S1 and four sets of MA9S1 are connected in a bi-amped mode.
You will experience superb sound with unbelievable channel separation.
3
Page 7
ATTENUATOR
dB
UNBALANCED
BALANCED
INPUT
SPEAKERS
ATTENUATOR
UNBALANCED
BALANCED
INPUT
SPEAKERS
12
12
REMOTE
CONTROL
PRE OUT
INPUT
REC
OUT
BIAMP
MODE
BI-AMP
STEREO
ID NO.
BI-AMP
STEREO
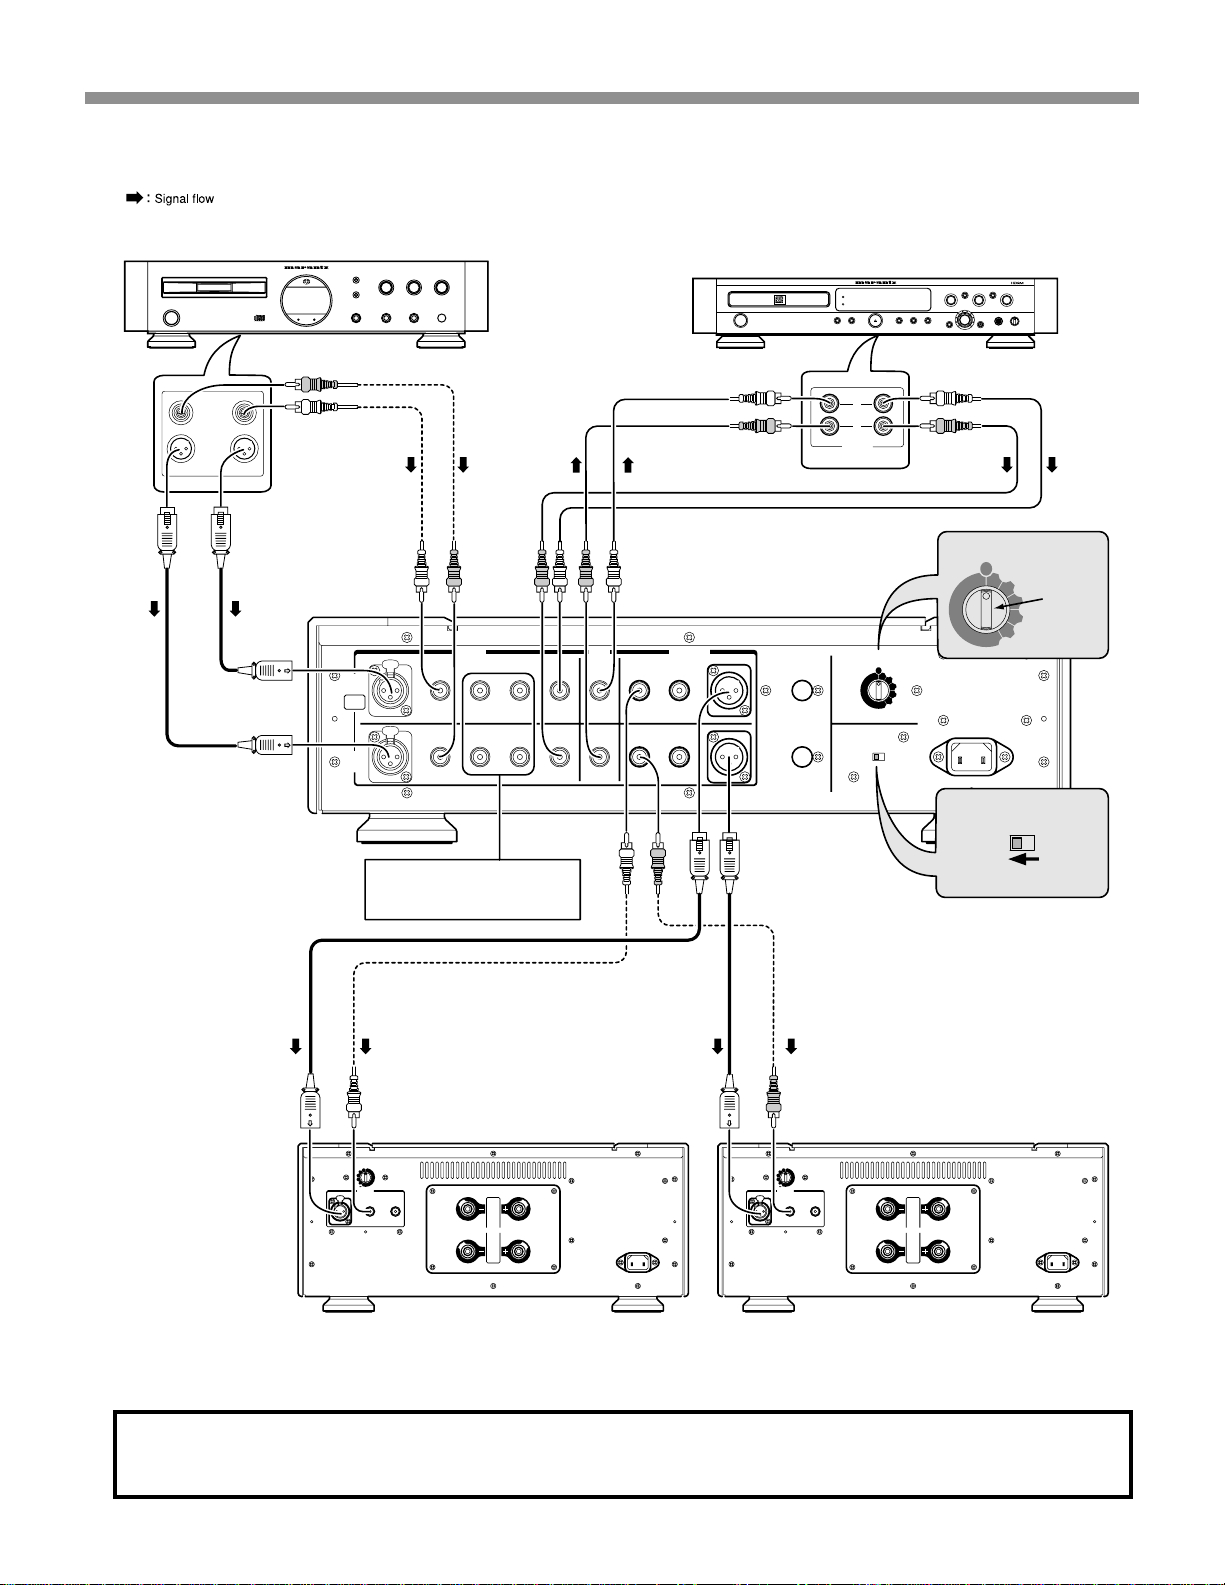
4. Connections
Connection 1 Stereo connection
RIGHT
ANALOG
OUTPUTS
UNBALANCED
BALANCED
1 1
SACD Player / CD Player
LEFT
or
SC-7S1
SACD/CD
INPUT
1 LINE 2
BIAMP
BALANCED
PUSH
PUSH
A
CH
PUSH
PUSH
B
CH
To connect analog output of
FM tuner, VCR.
TAPE
CD Recorder / Tape Deck
5
4
6
3
7
2
8
1
9
10
POWER
L
R
OUTPUT
INPUT
ANALOG
0
ID NO.
1
2
3
Setting 1
4
5
REC
OUT
UNBALANCED
PRE OUT
21
BALANCED
REMOTE
CONTROL
OUT
ID NO.
IN
2
3
4
5
6
MODE
BI-AMP
STEREO
6
MODE
STEREO
Setting STEREO
BI-AMP
or
MA-9S1
or
For L ch For R ch
(
)
-
ATTENUATOR
dB
0
-
3
-
6
-
9
-
12
-
INPUT
BALANCED
UNBALANCED
PUSH PUSH
1 2
1
SPEAKERS
2
This connection can have options i.e. You may connect the units using either balanced or unbalanced
cables to connect your SA CD/CD and control Amp, as well as the SC-7S1 with MA-9S1s. But y ou can not
BALANCED
ATTENUATOR
-
6
-
9
-
12
(
)
-
dB
0
-
3
-
INPUT
UNBALANCED
1 2
1
SPEAKERS
2
inter match.
4
MA-9S1
Page 8
Connection 1–4 are recommended by Marantz for SC-7S1 with Marantz MA-9S1.
If using the MA-9S1s, Please read the instruction manual for the MA-9S1.
Name and Function → P13
Standard set-up in using Marantz Monaural Power Amp
MA-9S1.
Please refer to this connection in the event of using other Power
Amps also.
●
SC-7S1 doesn't have a Phono equalizer. So in the event of
using a turn table, please use a Phono equalizer to connect
with the SC-7S1.
●
In the event that stereo L ch signal has been wired with A
ch input, the signal will come out of the pre-out of the A ch.
Please pay attention to L ch, R ch if SC-7S1 is connected
with other equipment.
4. Connections
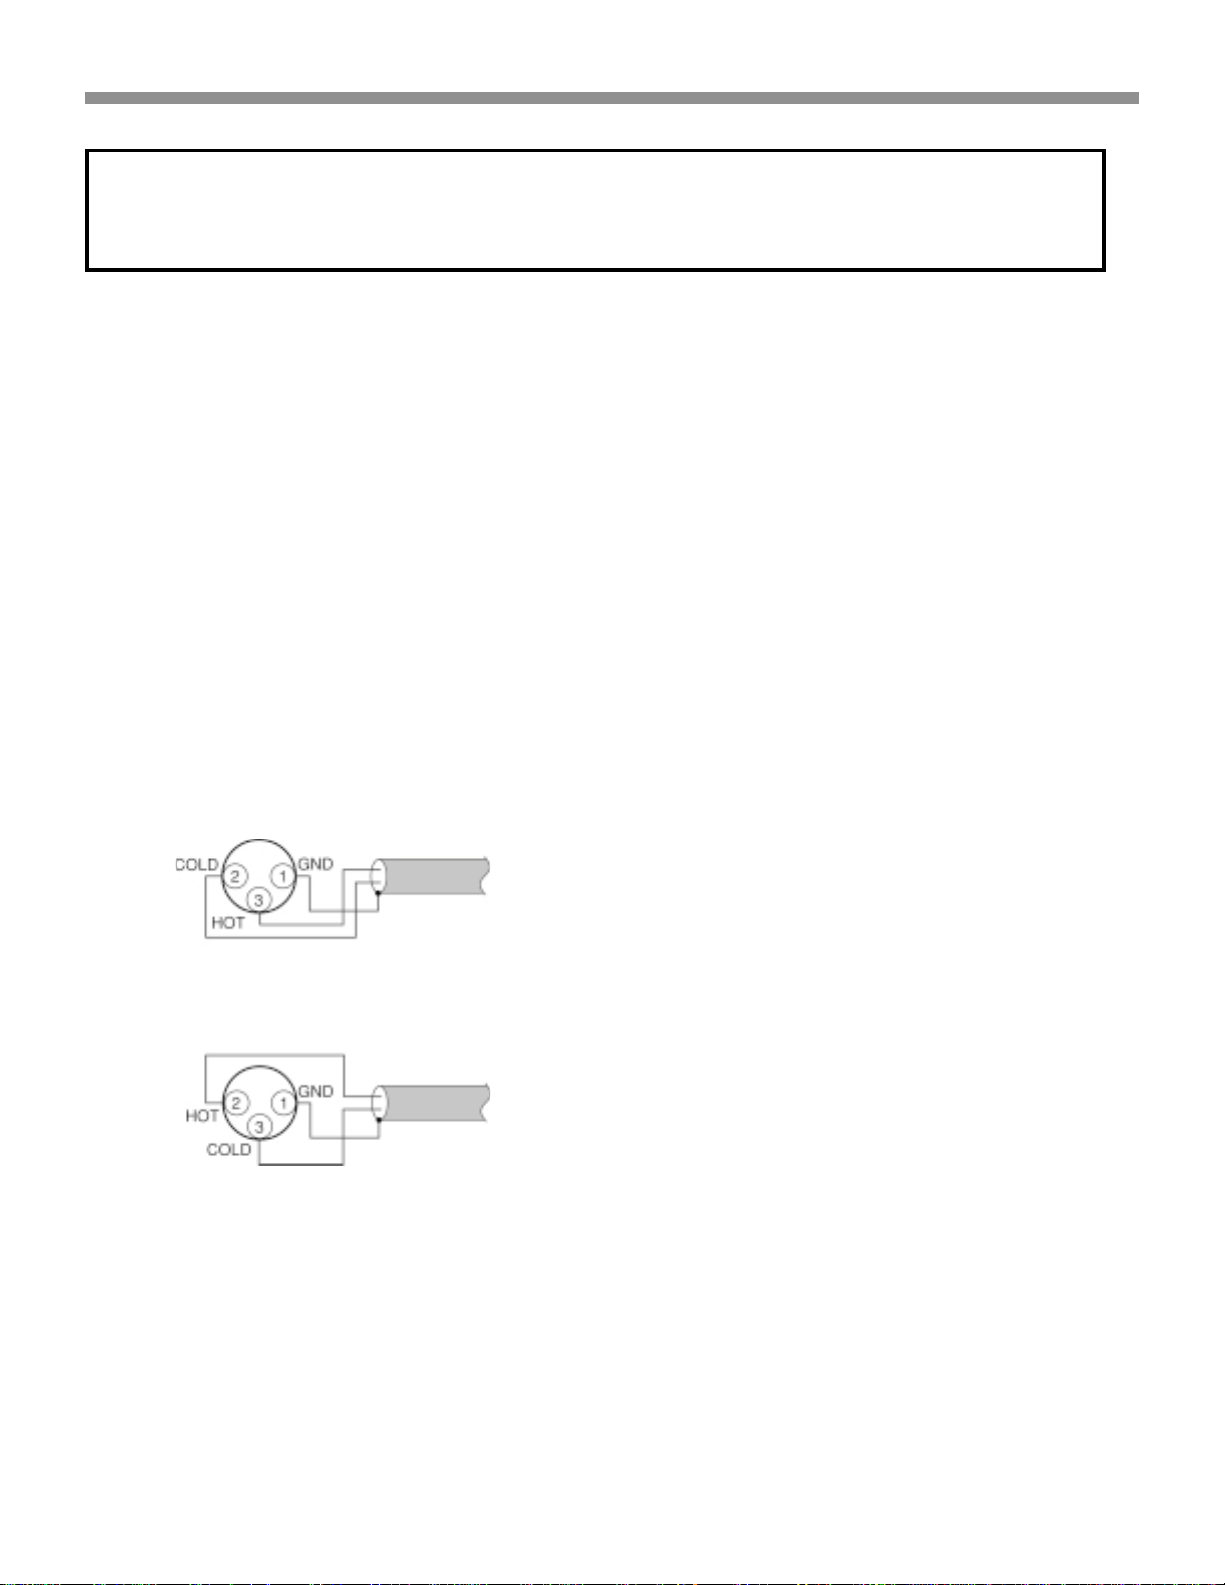
■ Balanced terminal
햲 The balanced output connector uses a XLR connector.
햳 The XLR connector is internally wired in either of the follow-
ing two systems.
1. USA system (Pin 2 = COLD, Pin 3 = HOT)
2. European system (Pin 2 = HOT, Pin 3 = COLD)
햴 The SC-7S1 uses the USA system of 1.
When a preamp or main amplifier adopting the European system is connected using a cable with XLR
balanced connectors, the reproduced signal may be
inverted of phase.
In this case, correct the wiring of one of the XLR connectors on the extremities of the cable to the USA system by
exchanging the connections of pins 2 and 3. This will make
it possible to play the signal with the correct phase.
5
Page 9

ATTENUATOR
UNBALANCED
BALANCED
INPUT
SPEAKERS
ATTENUATOR
UNBALANCED
BALANCED
INPUT
SPEAKERS
12
12
ATTENUATOR
UNBALANCED
BALANCED
INPUT
SPEAKERS
ATTENUATOR
UNBALANCED
BALANCED
INPUT
SPEAKERS
12
12
REMOTE
CONTROL
PRE OUT
INPUT
REC
OUT
BIAMP
OUT
MODE
BI-AMP
STEREO
ID NO.
BI-AMP
STEREO
4. Connections
Connection 2 Bi-Amp connection
(Make sure your speakers are designed for Bi-Amp capabilities)
RIGHT
ANALOG
OUTPUTS
UNBALANCED
BALANCED
1 1
SACD Player / CD Player
LEFT
or
SC-7S1
SACD/CD
INPUT
1 LINE 2
BIAMP
BALANCED
PUSH
PUSH
A
CH
PUSH
PUSH
B
CH
To connect analog output of
FM tuner, VCR.
TAPE
CD Recorder / Tape Deck
5
4
6
3
7
2
8
1
9
10
POWER
0
L
R
OUTPUT
INPUT
ANALOG
ID NO.
1
2
3
Setting 1
4
5
REC
OUT
UNBALANCED
PRE OUT
REMOTE
BALANCED
21
CONTROL
IN
OUT
STEREO
ID NO.
MODE
2
6
BI-AMP
3
4
5
6
MODE
STEREO
Setting STEREO
BI-AMP
MA-9S1 MA-9S1
For L ch MF/HF For R ch MF/HF
(
)
-
ATTENUATOR
dB
0
-
3
-
6
-
9
-
12
-
INPUT
BALANCED
UNBALANCED
PUSH PUSH
1 2
SPEAKERS
1
2
BALANCED
ATTENUATOR
-
6
-
9
-
12
-
3
-
INPUT
0
UNBALANCED
1 2
(
)
-
dB
1
SPEAKERS
2
MA-9S1 MA-9S1
For L ch For R ch
)
(
-
ATTENUATOR
dB
0
-
3
-
6
-
9
-
12
-
INPUT
BALANCED
UNBALANCED
PUSH PUSH
1 2
SPEAKERS
1
2
BALANCED
ATTENUATOR
-
6
-
9
-
12
-
3
-
INPUT
0
UNBALANCED
1 2
)
(
-
dB
1
SPEAKERS
2
6
Page 10

4. Connections
This connection can have options i.e. You may connect the units using either balanced or unbalanced
cables to connect your SACD/CD and control Amp. But you can not inter match.
Please select either way of connection.
Enhance the connection 1 to Bi-Amp connection, and
drive the Bass speaker and Mid/High speakers with separate
power Amplifiers.
■ Bi-Amp (connection)
The benefits of Bi-Wiring; drive the Bass speaker and Mid/High
speakers with separate power Amplifiers. Bi-Amping will lessen
the burden of Power Amp impedance, so that back electromotive force between the Low and Mid/High signal can be lessened. We can expect drastic improvement of sound quality.
Caution
If the Mode switch on the S C-7S1 is set to stereo, then the
unbalanced connections must be used.
7
Page 11

ATTENUATOR
dB
UNBALANCED
BALANCED
INPUT
12
ATTENUATOR
dB
UNBALANCED
BALANCED
INPUT
12
REMOTE
CONTROL
PRE OUT
INPUT
BALANCED
REC
OUT
TAPE
LINE
SACD/CD
BALANCED
AMP
UNBALANCED
IN
OUT
MODE
BI-AMP
STEREO
ID NO.
ATTENUATOR
dB
UNBALANCED
BALANCED
INPUT
12
ATTENUATOR
dB
UNBALANCED
BALANCED
INPUT
12
REMOTE
CONTROL
PRE OUT
INPUT
BALANCED
REC
OUT
TAPE
LINE
SACD/CD
BALANCED
AMP
UNBALANCED
IN
OUT
MODE
BI-AMP
STEREO
ID NO.
MODE
BI-AMP
STEREO
ID NO.
ID NO.
MODE
BI-AMP
STEREO
4. Connections
Connection 3 Complete Bi-Amp connection
(Make sure your speakers are designed for Bi-Amp capabilities)
SACD Player / CD Player
POWER
ANALOG
OUTPUTS
UNBALANCED
LEFT
RIGHT
CD Recorder / Tape Deck
5
4
6
3
7
2
8
1
9
10
0
L
BALANCED
1 1
To connect analog output
Lch of FM tuner, VCR.
To connect analog output
Rch of FM tuner, VCR.
INPUT
ANALOG
R
OUTPUT
ID NO.
ID NO.
1
REMOTE
CONTROL
IN
OUT
STEREO
STEREO
2
3
Setting 1
4
5
6
ID NO.
1
2
3
4
5
6
MODE
BI-AMP
MODE
BI-AMP
Setting BI-AMP
REC
INPUT
BALANCED
1 LINE
2
SACD/CD
PUSH
PUSH
A
CH
BIAMP
PUSH
PUSH
B
CH
FOR R ch
SC-7S1
Bch can't
be used.
TAPE
PRE OUT
OUT
UNBALANCED
21
REMOTE
BALANCED
CONTROL
IN
OUT
STEREO
or or
REC
INPUT
BALANCED
A
CH
BIAMP
B
CH
SC-7S1
For L ch
SACD/CD
PUSH
PUSH
PUSH
PUSH
Bch can't
be used.
1 LINE
2
TAPE
PRE OUT
OUT
UNBALANCED
BALANCED
21
1
Setting 2
ID NO.
1
2
3
4
5
6
MODE
BI-AMP
STEREO
MODE
Setting BI-AMP
2
3
5
6
BI-AMP
4
oror
MA-9S1 MA-9S1
For L ch MF/HF For R ch MF/HF
(
)
-
ATTENUATOR
dB
0
-
3
-
6
-
9
-
12
-
INPUT
BALANCED
UNBALANCED
PUSH
1 2
SPEAKERS
1
2
BALANCED
(
)
-
ATTENUATOR
dB
0
-
3
-
6
-
9
-
12
-
INPUT
UNBALANCED
PUSH
1 2
1
SPEAKERS
2
or or
MA-9S1 MA-9S1
For L ch For R ch
(
)
-
ATTENUATOR
dB
0
-
3
-
6
-
9
-
12
-
INPUT
BALANCED
UNBALANCED
PUSH
1 2
SPEAKERS
1
2
BALANCED
(
)
-
ATTENUATOR
dB
0
-
3
-
6
-
9
-
12
-
INPUT
UNBALANCED
PUSH
1 2
1
SPEAKERS
2
8
Page 12

4. Connections
This connection can have options i.e. You may connect the units using either balanced or unbalanced
cables to connect your SACD/CD and control Amp. But you can not inter match. Your Control Amp &
Power Amp can also be wired the same way. Please select either way of connection.
■ Complete Bi-Amp connection
Enhance connection 2, by having one more control Amp. SC7S1, this is a wiring which separates Mid/High signal and Low
signal from the Pre-Amp section. In this event, the SC-7S1 is
used as Monaural Pre-Amps. And separate Left/Right channels from the output terminal of CD player. As a result, influences between L channel and R channel Mid/High signal and
Low signal will be eliminated.
By connection with the remote cable, a maximum of 6 SC-71s
can be operated together.
Caution
In the event of setting the mode switch as <Bi-Amp>, B
channel input can't be used.
9
Page 13

4. Connections
■ Installing the SACD multi-channel
audio speakers
In order to enjoy SACD multi-channel sound with the best
possible acoustics, it is recommended that the speaker
systems be laid out in compliance with the ITU-R BS.7751 recommendation which is a standard formulated by
the International Telecommunication Union (ITU).
SACD multi-channel discs are recorded and mixed in such
a way that they will achieve the optimum effects when
the speaker systems are laid out as per the ITU-R BS.7751 recommendation.
• On SACD multi-channel discs, the music signals are basically recorded using 5 channels (or 3, 4 or 6 channels in
some cases). In some instances, however, LFE (for the sub
woofer) is recorded as a sixth channel.
Each disc indicates how many channels have been recorded
on it.
• The basic settings are 3 speakers for front and 2 for back
since multi-channel discs have basically 5 channels
The 2-front, 1-center, and 2-surround speakers should be
set on the circle from the listening point as shown below.
When you use different sizes of speakers, please adjust the
volume balances.
• The location of the sub-woofer in the picture is just an example. The Sub-woofer can be located any place in your
room. (See the users manual of your sub-woofer.)
Front speaker
Rear speaker
(Left Surround)
Sub-woofer
(Left)
approx. 110° approx. 110°
Center
speaker
60°
Reference listening
position
Front speaker
(Right)
Rear speaker
(Right Surround)
10
Page 14

4. Connections
Connection 4 5.1ch multi-channel connection This Connection is standard for Multi-channel sound source. This will enable you to experience the high quality sound acoustic for the
professional Home theatre and pure multi channel SACD. The complete system is controlled using 3 SC-7S1 Stereo Control Amplifiers.
The system can be enhanced to
●
<3 SC-7S1s + 10 MA-9S1s + Active sub-woofer>
●
<6 SC-7S1s + 10 MA-9S1s + Active sub-woofer>
Caution
●
If you use an Active (powered) sub-woofer for LFE, please refer to the User’s manual of the Active sub-woofer for set-up instructions.
LFE (Low frequency Effect) is the channel for Low Frequency only.
●
In case you use a Passive sub-woofer for LFE, a Monaural power Amp such as the MA-9S1 can be used to drive it.
This connection style can have options i.e. You may connect the units using either
balanced or unbalanced cables. But you can not intermatch.
Select either way of connection.
11
Page 15

5. Name and function
Front panel
햲 Power switch
The switch is used to Power the unit ON and or OFF. Once the
unit is powered On, the indicator of the Input Selector will illuminate for the source selected. The SC-7S1 will be ready in approximately 8 seconds.
햳 Remote control sensor
This is the IR (Infra Red) window which receives IR control signals being sent from the remote control.
How to use remote control → p.14
햴 Input selector knob
The input Selector Knob will determine what source is being
played as well as well as able to be recorded. When the Source
is selected, the Blue indicator will be illuminated to verify the
source selected. When the unit is powered down, the last selected source will be held in memory. When the unit is powered
on again, the last selected source will be selected. When tape is
selected, there will be no signal output, to the record output.
햵 Display section
Displays the settings & volume level.
햶 Volume knob
The Volume knob is used to increase & decrease the overall
volume level. By turning the Volume Knob clockwise, the volume will be increased. By turning the Volume Knob counter clockwise, the volume will decrease. When powering the unit off, the
last volume setting will be memorized.
햷 ATT (Attenuation) button, indicator
The ATT button is used to reduce the volume quickly, with just
one touch. Once the button is pressed, the volume will be decreased. The Volume Display will begin blinking & the Volume
Indicator above the ATT button will illuminate. If you press the
ATT button again, the Volume Display will stop blinking & display the Volume level. You can decrease the volume by 20dB,
40dB & 60dB. Please refer to page 16 for further information
regarding Attenuation functions.
햸 Display button, indicator
This button is to turn off the Volume Indicator & the Light for the
Volume Indicator. If the volume Indicator & light are on, and you
press this button, they will both be turned off. Also, the light
above this button will be illuminated. If you make any adjustment the Volume Indicator & Light will come on for 3 seconds,
then shut off again. If you press this button again, the Volume
Indicator & Light will be turned on and the light above this button, will shut off.
Display section
I Power indicator
This Indicator is to show if the power is on. When power is on,
the blue light will be illuminated.
II Volume indicator
This will display the volume level and changes made to the volume with either the Remote Control or the Volume Knob on the
face of the unit. After 3 seconds of being powered on, the ID
number will be displayed. The ID number is changed by the ID
Turn the volume knob clock-
wise or press volume ▲
button of the Remote Control.
Turn the volume knob
counterclockwise or press
volume ▼ button of the Re-
mote Control.
switch on the rear panel of the unit. If the attenuate function or
trim adjustment is being used, the levels will also be indicated. If
using several SC-7S1s, and they are not connected properly,
and error code will be indicated.
Error message → p20
III A/B CH Indicator
During trim adjustment, the indicator lights will be illuminated in
accordance to the adjustments.
See Trim adjustment → p17
IV SYNC (Synchronized) Indicator
The indicator will be illuminated in accordance with the ID number setting.
●
Green color illuminated:
ID No. is set up <1>.
●
Red illuminated:
ID No. is set up 2–6 (several SC-7S1 are connected)
In this state, the unit can not be operated via the remote
control, or by the unit itself.
●
Light off:
There is an error in the remote connections.
●
Green or Red color will be flashing:
While trim is being adjusted.
When you use the remote control, please face it towards the
SC-7S1.
12
Page 16

Rear panel
5. Name and function
1 Input Balanced terminal
This terminal is to connect the components which have balanced outputs i.e. SACD, CD Player.
When Bi-Amping, terminal B can not be used.
Balanced terminal → p5
2 Input SACD/CD , Line 1, Line 2, Tape (Un-
balanced) terminal
This terminal is to connect the unbalanced terminals of components., i.e. SACD, CD etc.
When Bi-Amping, terminal B can not be used.
3 REC out terminal
The terminal connects to the Input of Recording equipment i.e.
CD Recorders, DAT etc.
When Bi-Amping, the signal being input to channel A, will be
output to both A & B channels.
4 Pre out Unbalanced 1,2 terminal
This connects to the un balanced inputs of a Power Amp. When
Bi-Amping, the signal being input to channel A, will be output to
both A & B channels.
5 Pre out Balanced terminal
This terminal is connected to the Balanced input of the Power
Amplifier. When Bi-Amping, the signal being input to channel A,
will be output to both A & B channels.
6 Remote control In/Out terminals
These terminals are for connecting one or more SC-7S1s to
each other. The IN is for receiving control signals. The OUT is for
sending Control signals.
7 ID No. switch
Whilst several SC-7S1 are connected, to set up respective ID
No. to distinguish each products.
When only 1 unit is used, the No. will be set 1. Initial
setting is <1>.
This switch is to give ID numbers to each SC-7S1, when two or
more are used. When using only 1, SC-7S1 the ID switch is set
to 1. Factory setting is 1.
Trim adjustment in case of several units of SC-7S1 → p18
If using 2 or more SC-7S1s, you can use the trim Adjustment.
See page 18.
8 Mode switch
The switch to change Stereo mode and Bi-Amp mode.
Initial setting is <stereo>.
●
In case the SC-7S1 is used for normal 2 channel.
Setting <Stereo> mode.
●
In case of complete Bi-Amp connection with 2 units of SC7S1.
Setting <Bi-Amp> mode.
In case of <Bi-Amp> mode, the signal input from A
channel will be out to both of A/B channels through the
Pre-out terminal and REC out terminal.
Then, the input terminal on B channel can not be used.
This switch is to switch between Stereo & Bi-Amp Mode. Factory setting is Stereo. Stereo is used for using only 1 SC-7S1. If
using 2 or more SC-7S1s, you will set the switch to Bi-Amp
Mode. When Bi-Amping, the signal being input to channel A,
will be outputted to both A & B channels through the Pre-out &
REC out terminals. The B input terminal can not be used in BiAmp Mode.
9 AC IN socket
Connect to a household power outlet with supplied AC CORD.
13
Page 17

5. Name and function
Remote controller
■ For using the Remote Control
●
Loading batteries
Before using the supplied remote control for the first time,
load the batteries in the remote control. The batteries provided are used only to verify the operations of the remote
control.
1 Remove the battery cover which is found on the back side
of the remote control.
2 Load the two new size “AAA” batteries inside the
battery compartment while taking care to align their
polarities correctly with the polarity markings ( with
and with ).
(1) Trim Mode
Button to switch to Trim mode for trim adjustment.
(2) Exit button
Button to finish Trim mode after Trim adjustment.
(3) ATT (Attenuation) button
Button to attenuate at one touch.
(4) Trim-A ▲/▼
(Trim A Channel up/down) button
Button to fine-tune the output level of the A ch by Trim adjustment.
(5) Trim-B ▲/▼
(Trim B Channel up/down) button
Button to fine-tune the output level of the B ch by Trim adjustment.
(6) Input selector button
Button to select input source.
(7) Volume ▲/▼
(Volume up/down button)
Button to adjust volume.
3 Push the cover on the back side in the direction of
the arrow to close.
●
Operatable range of the Remote control
Operate the remote control unit (RC-7S1SC) within a distance of approx. 5 m from the infrared signal reception window (remote sensor) on the front of the SC-7S1.
Remote control operation may not be possible if the remote
control unit’s transmitter is not pointing in the direction of
the remote sensor or if there is an obstruction between the
transmitter and the remote sensor.
Approx. 5m
60°
●
Caution
Do not allow direct sunlight, an inverter fluorescent light or
other strong source of light to shine onto the player’s infrared
signal reception window (remote sensor). Otherwise, the
operation of the remote control unit may be disabled.
Bear in mind that operating the remote control unit may cause
other devices operated by infrared rays to be operated by
mistake.
The remote control unit cannot be operated if the space between the controller and the player’s remote sensor is obstructed.
Do not place any objects on top of the remote control unit.
Doing so may cause one or more buttons to be held down
which will cause the batteries to run down.
14
Page 18

input
selector
power
stereo
control
amplifier
sc
7s1
volume
input
selector
power
stereo
control
amplifier
sc
7s1
volume
6. Standard operation
■ How to Play
BALANCED
SACD
/
CD
LINE 1
LINE 2
TAPE
input
selector
stereo
control
A
BALANCED
SACD/CD
LINE 1 LINE 2
TAPE
Power on the SC-7S1. In case you have several SC-7S1s
connected, please power on from the smaller No. of ID to
the larger No.
-
amplifier
sc
7s1
Once the power is on, the Front display and input indicator
for the currently selected source will be illuminated.
SYNC B
ATT
power
DISPLAY
volume
ATTEXITTRIM MODE
POWER
Indicator
SYNC B
A
Input Source
Indicator
BALANCED
TAPE
SACD
/
CD
LINE 1
LINE 2
Upon initial turn on, the sound will be muted, for approxi-
TRIM
BA
mately 8 seconds.
Select the input source by the input selector button or the
Input select button on the Remote control.
It is recommended to turn the volume down to the mini-
mum level after each use, before Powering the unit off.
Play music by operating equipments such as CD Players.
VOLUME
Adjust the volume by the buttons ▲/▼ of SC-7S1 or the
Remote control.
If the display button is pressed, the volume indicator will be
turned off.
■ How to record
BALANCED
SACD
/
CD
LINE 1
LINE 2
TAPE
input
selector
BALANCED
LINE 1 LINE 2
TAPE
stereo
control
TRIM
SACD/CD
Power on SC-7S1.
Select the source you want to record via the Input selector
on the SC-7S1, or The Remote Control. Prepare for Play-
-
amplifier
sc
7s1
back of the selected source. Make sure your recording unit,
is connected to the REC output terminal. Perform opera-
SYNC B
A
ATT
power
DISPLAY
volume
tions on your recording device to begin recording. If (Tape)
is selected, for your input source, you will not be able to
record, Because there is no analog output to the REC out.
ATTEXITTRIM MODE
BA
VOLUME
15
Page 19

7. How to operate function and how to set up
■ Attenuate function
With one touch, the volume can be decreased, instantly. The
ATT button on the SC-7S1 or the Remote Control, is used for
this function.
Unit
The volume will be indicated in the display window & the indicator above the ATT button will be illuminated.
Remote Controller
ATTEXIT
or
Light
Press the ATT button, the attenuation level will be changed
with every press.
Attenuate function level Setting
Press ATT button
Unless the button is pressed within 2 seconds, the attenu-
ation level will be fixed. Once the level is fixed, the display
will turn back to the volume indication.
Factory setting is -20dB. But this can be changed to -40dB, or
-60dB.
■ How to set up the attenuation le vel
Press ATT button for more than 2 seconds.
The Indicator above the ATT button will begin to flash, the
volume indication will be changed to the attenuation level
setting.
Flash
The setting will be memorized.
16
Page 20

7. How to operate function and how to set up
stereo
control
amplifier
sc
7s1
■ Trim adjustment function
You can adjust the output level within -6.0dB–+6.0dB (0.5dB
step) for each channel.
●
How to adjust Trim setting
In case of 1 unit
Press the Trim mode button on the Remote control.
Then A ch indicator on the Front display will illuminate red,
the Green colored Sync indicator will begin flashing. The
Volume indicator will show the Trim adjustment level on the
A ch.
stereo
control
A
Light Red
Once the Trim-A button ▲ on Remote control is pressed,
The Trim adjustment level will be increased by 0.5 dB step,
and the output level on the A ch will be increased.
stereo control amplifier sc-7s1
A TRIM
SYNC B
A
-
amplifier
sc
SYNC B
Flash Green
7s1
Once the Trim-B button ▲ or ▼ on Remote control is
pressed, Indicator on the A ch will be turned off, the indica-
tor on the B ch will be illuminated. Then Sync indicator
remains flashing Green.
stereo control amplifier sc-7s1
BTRIM
SYNC B
A
Flash Green
Light Red
The Volume indicator will show the Trim level on the B ch.
Once the Trim-B button ▲ on the Remote control is pressed,
the Trim adjustment level will be increased by 0.5 dB step,
the output level on the B ch will be increased.
stereo control amplifier sc-7s1
B
RIM
Flash Green
SYNC B
A
Light Red
Once the Trim-B button ▼ on the Remote control is pressed,
the Trim adjustment level will be decreased by 0.5 dB step,
the output level on the B ch will be decreased.
Light Red
Flash Green
Once Trim-A button ▼ on Remote control is pressed, the
Trim adjustment level will be decreased by 0.5 dB step, and
the output level on the A ch will be decreased.
stereo control amplifier sc-7s1
A TRIM
SYNC B
A
Flash Green
SACD/CD
BALANCED
Light Red
stereo control amplifier sc-7s1
B
IM
SYNC B
D/CD
Flash Green
A
Light Red
Once you have completed the trim adjustment, press the
Exit Button on the remote control. This concludes the ad-
justments and memorized them.
17
Page 21

7. How to operate function and how to set up
AC IN
If using more than 1 SC-7S1
Set up the ID numbers to the respective SC-7S1s to identify
each of the SC-7S1s.
Set up the ID No. switch <1> for the main unit of the SC-
7S1 to control others, which is called <Master> unit.
The ID No. set up will be indicated in the display window for
3 seconds when the unit is powered on.
stereo control amplifier sc-7s1
SYNC B
A
Light Green
Set up the other SC-7S1s <2>–<6> which will be controlled
by the Master.
They are called <Slave> units.
The ID No. set up will be indicated in the display window for
3 seconds when the unit is powered on.
stereo control amplifier sc-7s1
ID NO.
1
2
3
4
5
6
SYNC B
A
Please refer to p.17 for Trim adjustment .
If the whole system consist of more than 3 units, please
repeat the same procedure and set up the remaining units.
Make sure to change the ID # in the SC-7S1 to match the
ID # of the amplifier being adjusted.
Once you have completed the trim adjustment, press the
Exit button on the remote control. This concludes the adjustments and memorizes them.
Light RED
The Trim adjustment set by the Master, will be the same for
all Slave SC-7S1s.
Once the set up for the Trim has been finished, press the
Trim mode button on the Remote control.
The trim adjustment will move from Master to Slave.
Then the indicator on the Front display of the Slave will illuminate Red, the Sync indicator will flash Red.
stereo control amplifier sc-7s1
SYNC B
A
Light Red
Flash Red
18
Page 22

8. Specification
■ Specification
Maximum output voltage (20Hz-20kHz).... 13.5V (BALANCED)
13.5V (UNBALANCED)
Total harmonic distortion (20Hz-20kHz)0.0015% (BALANCED)
0.003% (UNBALANCED)
Frequency response (+0/-3dB) ........ 3Hz–150kHz (BALANCED)
3Hz–150kHz (UNBALANCED)
Input sensitivity/Input impedance .............. 420mV/20kΩ (BALANCED)
420mV/20kΩ (UNBALANCED)
Output impedance ................................................. 220Ω (BALANCED)
220Ω (UNBALANCED)
S/N (IHF-A) .......................................................... 103dB (BALANCED)
105dB (UNBALANCED)
Channel separation (20kHz) ................................. 100dB (BALANCED)
100dB (UNBALANCED)
Volume adjustment range......................... -∞, -100–0dB (0.5dB STEP)
Trim level adjustment range ................................... ±6dB (0.5dB STEP)
Attenuator setting level .......................................... -20, -40, -60, -∞dB
Supply voltage (SC7S1/N1G) .................................... AC 230 V 50Hz
(SC7S1/U1G) ..................................... AC 120 V 60Hz
Power consumption (SC7S1/N1G) ................................... 22W (0.1 A)
(SC7S1/U1G) ................................... 22W (0.2 A)
Dimensions ......................................................................... W 459mm
H 136mm
D 441mm
Weight ......................................................................................... 21kg
■ Dimensions Unit: mm
* All specifications, dimensions and weights are subject to change without notice.
9. Block diagram
19
Page 23

10. T rouble shooting
11. Maintenance
Should faults occur, in many cases it is not necessary to
consult your dealer or a Marantz technical service department.
On the basis of the following checks you will be able to rectify a
number of faults yourself without difficulty. If the fault cannot be
remedied after the following checks, please consult your dealer
or nearest Marantz service agent.
The unit does not turn ON
1. Is the power cable securely connected to both the connection terminal of this unit and an AC outlet?
Sound is not coming from the speakers
1. Has the wrong input source been selected with the
INPUT SELECTOR on the front panel?
2. Is the ATTENUATOR feature set to -∞ and has it been en-
gaged?
3. Is the SYNC indicator on the front panel lit? Has the wrong
ID No. been set? Is the remote cable wrongly connected?
4. Are connections cables correctly connected between the
unit and player or power amplifier?
5. Is the power amplifier or input source wrongly set?
6. Are speaker cables properly connected between the power
amplifier and the speaker system?
7. Are you using the player in the wrong way?
Stereo sound is not coming from the speakers
1 . Is the MODE switch on the rear panel set to “BI-AMP”?
The section describes the care and maintenance tasks
that must be performed to optimize the operation of
your Marantz equipment.
●
Cleaning of equipment external surfaces
The exterior finish of your unit will last indefinitely with
proper care and cleaning, Never use scouring pads, steel
wool, scourging powders or harsh chemical agents (e.g.,
lye solution), alcohol, thinner, benzene, insecticide or other volatile
substances as these will mar the finish of the equipment. Likewise, never use cloths containing chemical substances. If the
equipment gets dirty, wipe the external surfaces with a soft, lintfree cloth.
If the equipment becomes heavily soiled:
• dilute some liquid soap in water, in a ratio of one part detergent to six parts water.
• dip a soft, lint free cloth in the solution and wring it until it is
damp.
• wipe the equipment with the damp cloth.
• dry the equipment by wiping it with a dry cloth.
■ About Error Codes
If any of the error codes shown in the below table appear on the display on the front panel while using multiple SC-7S1s, there is something wrong with either the
ID No. setting or the remote cable connection.
In such case, shut OFF power to the power amplifier,
then shut OFF power to all SC-7S1s and check the ID No.
setting and remote cable connection as explained in the
What to do column below.
Error
code
1 E02
2 E03
3 E04
4 E05
5 E06
6 E11
7 E12
Meaning
ID No. 2 has been set
for multiple units.
ID No. 3 has been set
for multiple units.
ID No. 4 has been set
for multiple units.
ID No. 5 has been set
for multiple units.
ID No. 6 has been set
for multiple units.
Communication is not
possible between ID
No. 1 (master) and ID
Nos. 2 ~ 6 (slaves).
ID No. 1 (master) has
been set for multiple
units.
What to do
Set the ID No. switch so
that multiple units do not
share the same ID No.
Is power to ID No. 1 ON?
Check the IN/OUT connections of the remote
cable and properly connect as necessary.
Set the ID No. switch so
that multiple units do not
share the same ID No.
●
Repairs
Only the most competent and qualified service technicians should be allowed to service your Marantz Equipment.
The factory-trained warranty station personnel have the knowledge and special facilities needed for repair and calibration of
this precision equipment. After the warranty period has expired,
repairs will be performed for a charge if the equipment can be
returned to normal operation.
In the event of difficulty, refer to your dealer or write
directly to the nearest location to you that is listed on
the Marantz Authorized Service Station list. If writing,
please include the model and serial number of the equipment together with a full description of what you think
is abnormal about the equipment's behavior.
20
Page 24

WARRANTY
For warranty information, contact your local Marantz distributor.
RETAIN YOUR PURCHASE RECEIPT
Your purchase receipt is your permanent record of a valuable purchase. It should be kept in a safe place to be referred to as
necessary for insurance purposes or when corresponding with Marantz.
IMPORTANT
When seeking warranty service, it is the responsibility of the consumer to establish proof and date of purchase. Your purchase
receipt or invoice is adequate for such proof.
FOR U.K. ONLY
This undertaking is in addition to a consumer's statutory rights and does not affect those rights in any way.
CE MARKING
The SC7S1/N1G is in conformity with the EMC directive and low-voltage directive.
– Do not expose the equipment to rain or moisture.
– Do not remove the cover from the equipment.
– Do not insert anything into the equipment through the ventilation holes.
– Do not handle the mains lead with wet hands.
– Do not cover the ventilation with any items such as tablecloths, newspapers, curtains, etc.
– No naked flame sources, such as lighted candles, should be placed on the equipment.
– When disposing of used batteries, please comply with governmental regulations or environmental public instruction’s rules that apply in your
country or area.
– Do not place anything about 1 meter above the top panel.
– Make a space of about 0.2 meter around the unit.
WARNINGS
Page 25

www.marantz.com
You can find your nearest authorized distributor or dealer on our website.
U.S.A. Marantz America, Inc. 1100 Maplewood Drive, Itasca, IL 60143, U.S.A.
is a registered trademark.
 Loading...