

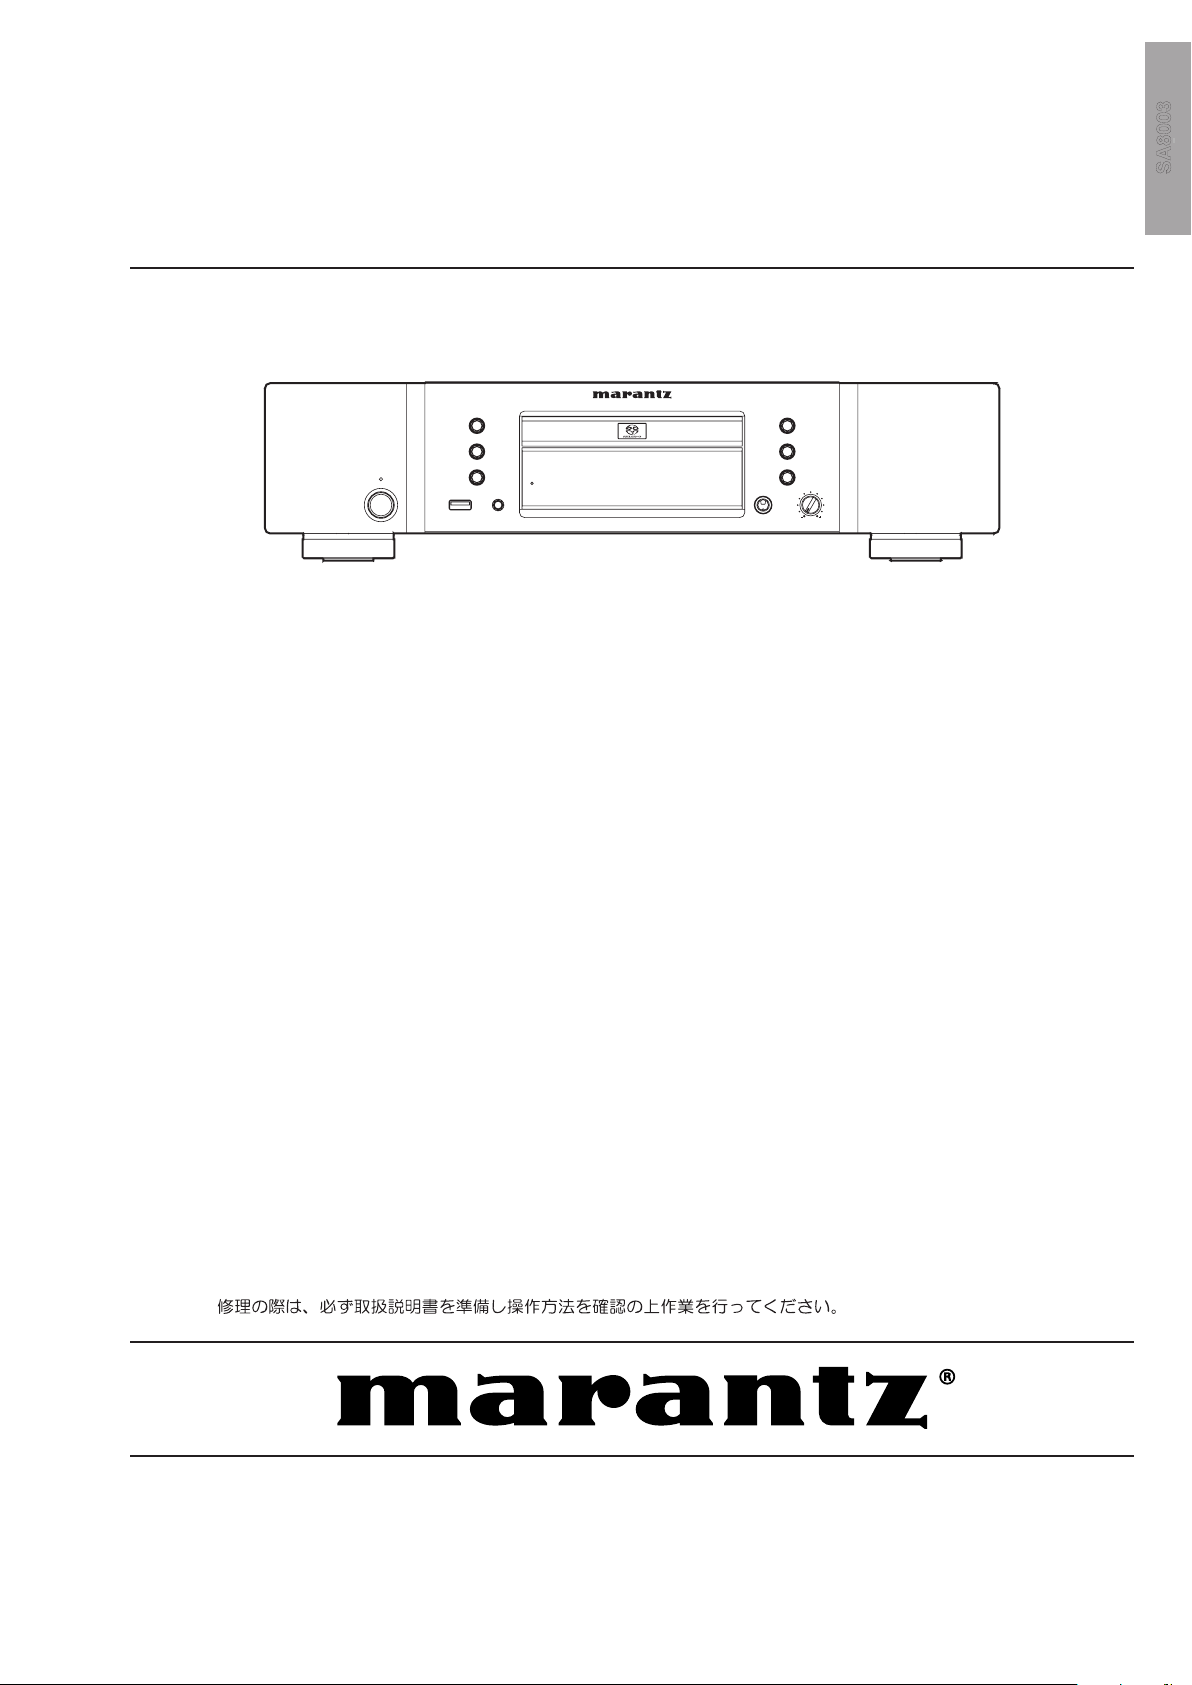
Marantz SA-8003 Service Manual
Service
SA8003
DISPLAY
OFF
SUPER AUDIO CD PLAYER SA8003
DISC MEDIA/USBUSB
PHONES LEVEL
–
+
STANDBY
ON/STANDBY
POWER
A
B
C
F
g / i
j / h
SA8003 /
F N/K1SG/N1B/N1SG
/U1B
Manual
SECTION PAGE
1. TECHNICAL SPECIFICATIONS ........................................................................................... 1
2. SERVICE HINTS AND TOOLS ............................................................................................. 4
3. WARNING AND LASER SAFETY INSTRUCTIONS ............................................................ 5
4. CAUTIONS ........................................................................................................................... 6
5. UPDATA FIRMWARE PROCEDURE .................................................................................... 7
6. SERVICE MODE ..................................................................................................................14
7. HOW TO THE RESET OF PLAYBACK TIME ......................................................................16
8. ERROR MESSAGE .............................................................................................................17
[A] The mode to check the last error message etc. .............................................................17
[B] Other Error Message page .............................................................................................21
[C] Error Messages special to USB .....................................................................................24
9. TROUBLESHOOTING ....................................................................................................... 34
10. WARNING DIAGRAM ..........................................................................................................37
11. BLOCK DIAGRAM .............................................................................................................. 39
12. SCHEMATIC DIAGRAM ......................................................................................................41
13. PARTS LOCATION ............................................................................................................. 49
14. EXPLODED VIEW AND PARTS LISTA .............................................................................. 59
15. MICROPROCESSOR AND IC DAT .................................................................................... 64
16. ELECTRICAL PARTS LIST ................................................................................................ 69
17. ABOUT REPLACE THE MICROPROCESSOR WITH A NEW ONE ...............................80
Super Audio CD player
TABLE OF CONTENTS
Please use this service manual with referring to the user guide ( D.F.U. ) without fail.
SA8003
Part no. 90M34AK855010
First Issue 2008.08
MZ
MARANTZ DESIGN AND SERVICE
USA
MARANTZ AMERICA, INC
100 CORPORATE DRIVE
MAHWAH, NEW JERSEY 07430
USA
EUROPE / TRADING
D&M EUROPE B. V.
P. O. BOX 8744, BUILDING SILVERPOINT
BEEMDSTRAAT 11, 5653 MA EINDHOVEN
THE NETHERLANDS
PHONE : +31 - 40 - 2507844
FAX : +31 - 40 - 2507860
KOREA
D&M SALES AND MARKETING KOREA LTD.
CHUNG JIN B/D., #1001,
53-5, WONHYORO 3 GA, YONGSAN-GU,
SEOUL, 140-719, KOREA
PHONE : +82 - 2 - 323 - 2155
FAX : +82 - 2 - 323 - 2154
CANADA
D&M Canada Inc.
5-505 APPLE CREEK BLVD.
MARKHAM, ONTARIO L3R 5B1
CANADA
PHONE : 905 - 415 - 9292
FAX : 905 - 475 - 4159
JAPAN
D&M BUILDING, 2-1 NISSHIN-CHO,
KAWASAKI-KU, KAWASAKI-SHI,
KANAGAWA, 210-8569 JAPAN
D&M Holdings Inc.
CHINA
D&M SALES AND MARKETING SHANGHAI LTD.
ROOM.808 SHANGHAI AIRPORT CITY TERMINAL
NO.1600 NANJING (WEST) ROAD, SHANGHAI,
CHINA. 200040
TEL : 021 - 6248 - 5151
FAX : 021 - 6248 - 4434
Using superior design and selected high grade components,
Only original
MARANTZ
parts can insure that your
MARANTZ
MARANTZ
product will continue to perform to the specifications for which
company has created the ultimate in stereo sound.
it is famous.
Parts for your
MARANTZ
ORDERING PARTS :
equipment are generally available to our National Marantz Subsidiary or Agent.
Parts can be ordered either by mail or by Fax.. In both cases, the correct part number has to be specified.
The following information must be supplied to eliminate delays in processing your order :
1. Complete address
2. Complete part numbers and quantities required
3. Description of parts
4. Model number for which part is required
5. Way of shipment
6. Signature : any order form or Fax. must be signed, otherwise such part order will be considered as null and void.
NOTE ON SAFETY :
Symbol Fire or electrical shock hazard. Only original parts should be used to replaced any part marked with symbol .
Any other component substitution (other than original type), may increase risk of fire or electrical shock hazard.
安全上の注意:
がついている部品は、安全上重要な部品です。必ず指定されている部品番号のものを使用して下さい。
SHOCK, FIRE HAZARD SERVICE TEST :
CAUTION : After servicing this appliance and prior to returning to customer, measure the resistance between either primary AC
cord connector pins ( with unit NOT connected to AC mains and its Power switch ON ), and the face or Front Panel of product
and controls and chassis bottom.
Any resistance measurement less than 1 Megohms should cause unit to be repaired or corrected before AC power is applied,
and verified before it is return to the user/customer.
Ref. UL Standard No. 60065.
In case of difficulties, do not hesitate to contact the Technical
Department at above mentioned address.
080702MZ
1. TECHNICAL SPECIFICATIONS
NAMES AND
FUNCTIONS
BASIC
CONNECTION
BASIC
OPERATION
ENGLISH
OTHERS
13 9/16inch
(343.5mm)
7/16inch
(10mm)
1 3/8inch
(33.5mm)
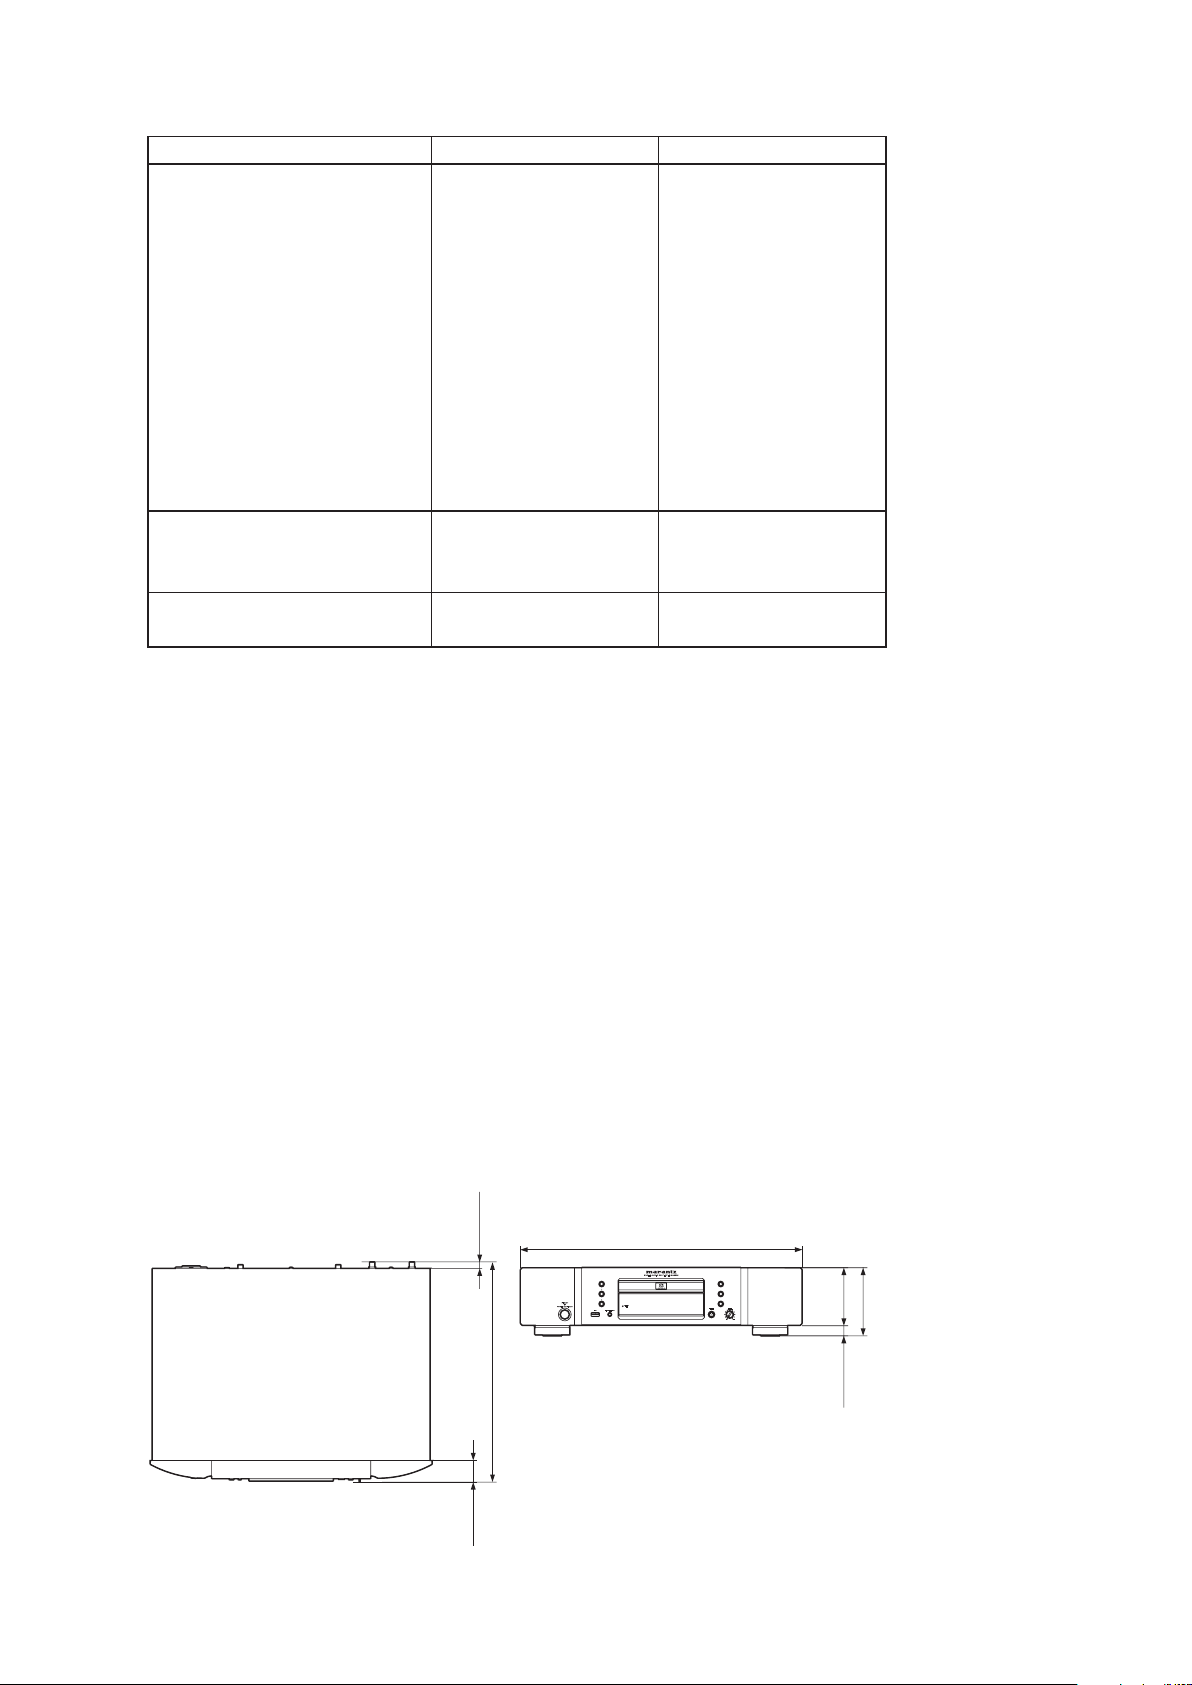
DIMENSIONS (UNIT: INCH (MM))
NAMES AND
FUNCTIONS
BASIC
CONNECTION
BASIC
OPERATION
ADVANCED
CONNECTIONS
ENGLISH
OTHERS
4 5/16inch
(108.5mm)
3 5/8inch
(92mm)
11/16inch
(16.5mm)
17 3/8inch (440mm)
2
7
8
13 9/16inch
(343.5mm)
7/16inch
(10mm)
1 3/8inch
(33.5mm)
DIMENSIONS (UNIT: INCH (MM))
Audio Characteristics
Analog output
Channels 2channels 2channels
Frequency range 2 Hz — 100 kHz 2 Hz — 20 kHz
Frequency characteristics 2 Hz — 50 kHz (-3 dB) 2 Hz — 20 kHz
Dynamic range
S/N Ratio (A-weighted)
THD (1kHz) 0.0020 % 0.0020 %
Wow & Flutter Precision of quartz Precision of quartz
Output level 2.3 V RMS stereo 2.3 V RMS stereo
Digital output
Output level (Cinch JACK) — 0.5 Vp-p (75 Ω)
Output level (Optical) — -19 dBm
Optical Readout System
Laser AlGaAs AlGaAs
Wave length 650 nm 780 nm
Signal format 1-bit DSD 16-bit linear PCM
Sampling frequency 2.8224 MHz 44.1 kHz
POWER SUPPLY
Input Voltage, Frequency [F] ...................................................................AC 100 V 50/60 Hz
[K] ........................................................................AC 220 V 50 Hz
[N] ........................................................................AC 230 V 50 Hz
[U] ........................................................................AC 120 V 60 Hz
Power Consumption ...................................................................................................... 25 W
Power consumption in standby mode .......................................................................... 0.5 W
CABINET, ETC.
Dimensions (Width × Height × Depth) ...............................17 3/8 × 4 5/16 × 13 9/16 inches
Net weight ....................................................................................................17.21 lb (7.8 kg)
Operating temperatures ................................................................................ +5 °C ~ +35 °C
Operating humidity ............................................................................5 ~ 90 % (without dew)
ACCESSORIES
• Remote control unit (RC002SA) ........................................................................................1
Net weight ................................................................................................... 0.2 lb (110 g)
• AAA (R03) Batteries ..........................................................................................................2
• AC Power cord ...................................................................................................................1
• Audio cable ........................................................................................................................1
• Remote connection Cable ................................................................................................1
• User’s Guide ......................................................................................................................1
DIMENSIONS
Super Audio CD CD
112 dB
110 dB
100 dB
110 dB
(440 × 108.5 × 343.5mm)
1
2
APPLICABLE DISCS TO THE UNIT
1. HjeZg6jY^d89
The Super Audio standard is based on Direct Stream
Digital (DSD) technology. This new direct-stream
digital format comprises a 1-bit system that has a
digital sampling frequency that is 64 times higher
than that of conventional audio CD. The results are
spectacular: a frequency response of over 100k Hz
and a 120 dB dynamic range over the entire audible
spectrum. Mixed with as many of the original
frequencies as possible, the audio information
audible for human ears sounds much more natural.
All audible frequencies are, after all, embedded
in the frequency range as emitted by the sound
source. A better reproduction does not exist! For
the first time your ears will relive reality.
There are three types of Super Audio CDs.
s Single-layer Disc
s Dual-layer Disc
s Hybrid-layer Disc
Disc Types
Single-layer Disc
Dual-layer Disc
Hybrid-layer Disc
HD layer HD layer CD layer HD layer
And each type may contain two areas of recorded
information.
s High quality stereo area
s High quality multi-channel area**
s Single Layer Disc
It can contain both high quality stereo area and
high quality multi-channel area** information.
s Dual Layer Disc
It can contain both high quality stereo area and
high quality multi-channel area** information.
And a double amount of information can be
stored on the disc thanks to the second layer.
s Hybrid Layer Disc
Not only does this disc contain bot
h high sound
quality stereo area and high sound quality multi-
channel area** information, it also has a CD layer
in the second layer, so it can be played on a CD
player.
Hybrid Super Audio CD Disc
1 CD layer that plays on any of your
existing CD players
High-Density layer containing:
2 - High sound quality stereo
3 - High sound quality multi-channel**
The number of tracks recorded may vary per layer. It
will be shown on the display window of the unit.
**This unit is a stereo-only player, and so it
cannot play high-quality multi-channel audio
areas. (It does not recognize multi-channel
areas.)
2. 6jY^d898996
Audio CDs contain music tracks only.
3. 89"G$89"GL
This unit can play back the CD-RW (ReWritable)
discs as well as ordinary Audio CD and CD-R
(Recordable) discs.
s The CD-R and CD-RW discs should contain
properly-recorded TOC* information so that they
can be played back. In CD recorders, the task of
writing TOC information is referred to as finalizing
the disc. Discs that are not finalized cannot be
properly recognized as an Audio CD and played
back by regular CD players and Super Audio CD
players. For details, please read the instruction
manual provided with a CD recorder.
* TOC stands for Table Of Contents and contains
information such as the total number of tracks
and total playing time of the disc.
s As the playback of a CD-RW disc necessitates
partial change of the player setup, it may tak
e
longer time for reading the TOC information than
when an Audio CD or CD-R disc is played.
s Single Layer Disc
It can contain both high quality stereo area and
high quality multi-channel area** information.
s Dual Layer Disc
It can contain both high quality stereo area and
high quality multi-channel area** information.
And a double amount of information can be
stored on the disc thanks to the second layer.
s Hybrid Layer Disc
Not only does this disc contain bot
h high sound
quality stereo area and high sound quality multichannel area** information, it also has a CD layer
in the second layer, so it can be played on a CD
player.
Hybrid Super Audio CD Disc
1 CD layer that plays on any of your
existing CD players
High-Density layer containing:
2 - High sound quality stereo
3 - High sound quality multi-channel**
The number of tracks recorded may vary per layer. It
will be shown on the display window of the unit.
**This unit is a stereo-only player, and so it
cannot play high-quality multi-channel audio
areas. (It does not recognize multi-channel
areas.)
2. 6jY^d898996
Audio CDs contain music tracks only.
3. 89"G$89"GL
This unit can play back the CD-RW (ReWritable)
discs as well as ordinary Audio CD and CD-R
(Recordable) discs.
s The CD-R and CD-RW discs should contain
properly-recorded TOC* information so that they
can be played back. In CD recorders, the task of
writing TOC information is referred to as finalizing
the disc. Discs that are not finalized cannot be
properly recognized as an Audio CD and played
back by regular CD players and Super Audio CD
players. For details, please read the instruction
manual provided with a CD recorder.
* TOC stands for Table Of Contents and contains
information such as the total number of tracks
and total playing time of the disc.
s As the playback of a CD-RW disc necessitates
partial change of the player setup, it may tak
e
longer time for reading the TOC information than
when an Audio CD or CD-R disc is played.

3
本機で再生できるディスクについて
1.スーパーオーディオCD
スーパーオーディオ CD 規格はダイレクト・スト
リーム・デジタル(Direct Stream Digital)(DSD)技
術に基づいています。
このダイレクト・ストリーム・デジタル・フォーマッ
トは、従来のオーディオ CD よりも 64 倍のサンプ
リング周波 数を有する 1 ビットシステムから構 成
されています。
それによって、100kHz 以上におよぶ周波数範囲及
び可聴周波 数帯全域でダイナミックレンジ 120dB
の素晴らしいサウンドが生まれます。
可能な限り多くの周 波数分布をミックスすること
により、可聴域のオーディオ情報がよりいっそう自
然に聞こえるようになります。
つまり、すべての可 聴周波数は音源から発せられ
る周波数範囲内に組み込まれます。
これによって、リアリティーのある音場が再現され
ます。
スーパーオーディオ CD には、以下の 3 つのタイ
プがあります。
• シングルレイヤー・ディスク
• デュアルレイヤー・ディスク
• ハイブリッドレイヤー・ディスク
ディスクタイプ
シングルレイヤー
ディスク
デュアルレイヤー
ディスク
ハイブリッドレイヤー
ディスク
HDレイヤー HDレイヤー HDレイヤー
CDレイヤー
また、各々のタイプは、情報が記録される 2 つの
領域、
• 高音質ステレオエリア
• 高音質マルチチャンネルエリア**
を持つことができます。
• シングルレイヤー・ディスク
高音質ステレオと高音質マルチチャンネル ** の
両方の情報エリアを持つことができます。
• デュアルレイヤー・ディスク
高音質ステレオと高音質マルチチャンネル ** の
両方の情報エリアを持つことができますが、第二
レイヤーの存在によって 2 倍の情報量をディスク
に記憶することができます。
• ハイブリッドレイヤー・ディスク
高音質ステレオと高音質マルチチャンネル ** の
両方の情報エリアを持てるだけでなく、第二レイ
ヤーにはCD レイヤーも持てるため、CDプレー
ヤーでの再生が可能となります。
1 既存のCDプレーヤーで
再生可能なCDレイヤー
HybridSuperAudioCDディスク
高密度レイヤーは次の内容で構成されます。
2 - 高音質ステレオ
3 - 高音質マルチチャンネル
**
記録されるトラック数は、 レイヤーによって違うこ
とがあります。これは本体の表示窓に表示されます。
**本機はステレオ専 用プレーヤーですので高音質
マルチチャンネルエリアは再生できません。(マ
ルチチャンネルエリアは認識しません)
2.オーディオ(音楽)CD(CDDA)
オーディオ CD はミュージックトラックのみで構成
されています。
3.CD-R / CD-RW
• CD -R やCD-RW の再生では必ず TOC* が正しく
記録されていることが必要です。CDレコーダー
ではTOC 情 報を書き込むことをファイナライ
ズ(Finalize)といい、この作業が正常に完了して
いないディスクは、普通の CD プレーヤーやスー
パーオーディオCD プレーヤーではオーディオ
CDとして正しく認識されず再生することができ
ませんので十分ご注意ください。詳しくは CD レ
コーダーの取扱説明書をご覧ください。
* TOC(トック)とは Table Of Contents の略で、ディスク
の総曲数や総再生時間などの目次情報のことです。
• CD -R W ディスクを再生する場合、プレーヤーの
設定を一部変更するため、オーディオ CD や CD-R
に比べ TOC の読み込みに若干時間がかかること
があります。
• シングルレイヤー・ディスク
高音質ステレオと高音質マルチチャンネル ** の
両方の情報エリアを持つことができます。
• デュアルレイヤー・ディスク
高音質ステレオと高音質マルチチャンネル ** の
両方の情報エリアを持つことができますが、第二
レイヤーの存在によって 2 倍の情報量をディスク
に記憶することができます。
2.オーディオ(音楽)CD(CDDA)
オーディオ CD はミュージックトラックのみで構成
されています。
• シングルレイヤー・ディスク
高音質ステレオと高音質マルチチャンネル ** の
両方の情報エリアを持つことができます。
• デュアルレイヤー・ディスク
高音質ステレオと高音質マルチチャンネル ** の
両方の情報エリアを持つことができますが、第二
レイヤーの存在によって 2 倍の情報量をディスク
に記憶することができます。
• ハイブリッドレイヤー・ディスク
高音質ステレオと高音質マルチチャンネル ** の
両方の情報エリアを持てるだけでなく、第二レイ
ヤーにはCD レイヤーも持てるため、CDプレー
ヤーでの再生が可能となります。
1 既存のCDプレーヤーで
再生可能なCDレイヤー
HybridSuperAudioCDディスク
高密度レイヤーは次の内容で構成されます。
2 - 高音質ステレオ
3 - 高音質マルチチャンネル
**
記録されるトラック数は、 レイヤーによって違うこ
とがあります。これは本体の表示窓に表示されます。
**本機はステレオ専 用プレーヤーですので高音質
マルチチャンネルエリアは再生できません。(マ
ルチチャンネルエリアは認識しません)
2.オーディオ(音楽)CD(CDDA)
オーディオ CD はミュージックトラックのみで構成
されています。
3.CD-R / CD-RW
• CD -R やCD-RW の再生では必ず TOC* が正しく
記録されていることが必要です。CDレコーダー
ではTOC 情 報を書き込むことをファイナライ
ズ(Finalize)といい、この作業が正常に完了して
いないディスクは、普通の CD プレーヤーやスー
パーオーディオCD プレーヤーではオーディオ
CDとして正しく認識されず再生することができ
ませんので十分ご注意ください。詳しくは CD レ
コーダーの取扱説明書をご覧ください。
* TOC(トック)とは Table Of Contents の略で、ディスク
の総曲数や総再生時間などの目次情報のことです。
• CD -R W ディスクを再生する場合、プレーヤーの
設定を一部変更するため、オーディオ CD や CD-R
に比べ TOC の読み込みに若干時間がかかること
があります。
4
2. SERVICE HINTS AND TOOLS
DVD test disc (NTSC) ALMEDIO TDV-540
SERVICE TOOLS
Audio signals disc 4822 397 30184 or TCD-784
Disc without errors +
Disc with DO errors, black spots and fingerprints 4822 397 30245 (SBC444A) or TCD-726
Disc (65 min 1kHz) without no pause 4822 397 30155
Max. diameter disc (58.0 mm) 4822 397 60141
Torx screwdrivers
Set (straight) 4822 395 50145
Set (square) 4822 395 50132
13th order filter 4822 395 30204
DVD test disc (PAL) 4822 397 10131
SERVICE HIN
TS
070703MZ
5
3. WARNING AND LASER SAFETY INSTRUCTIONS
F
ATTENTION
Tous les IC et beaucoup d’autres semiconducteurs sont sensibles aux décharges
statiques (ESD).
Leur longévité pourrait être considérablement
écourtée par le fait qu’aucune précaution
n’est prise a leur manipulation.
Lors de réparations, s’assurer de bien être
relié au même potentiel que la masse de
l’appareil et enfiler le bracelet serti d’une
résistance de sécurité.
Veiller a ce que les composa
nts ainsi que les
outils que l’on utilise soient également a ce
potentiel.
D
WARNUNG
Alle IC und viele andere Halbleiter sind
empfindlich gegen elektrostatische
Entladungen (ESD).
Unsorgfältige Behandlung bei der Reparatur
kann die Lebensdauer drastisch vermindern.
Sorgen sie dafür, das Sie im Reparaturfall
über ein Pulsarmband mit Widerstand mit
dem Massepotential des Gerätes verbunden
sind.
Halten Sie Bauteile und Hilfsmittel ebenfalls
auf diesem Potential.
WAARSCHUWING
Alle IC’s en vele andere halfgeleiders zijn
gevoelig voor elektrostatische ontladingen
(ESD).
Onzorgvuldig behandelen tijdens reparatie
kan de levensduur drastisch doen
verminderen.
Zorg ervoor dat u tijdens reparatie via een
polsband met weerstand verbonden bent met
hetzelfde potentiaal als de massa van het
apparaat.
Houd componenten en hulpmiddelen ook op
ditzelfde potentiaal.
AVVERTIMENTO
Tutti IC e parecchi semi-conduttori sono
sensibili alle scariche statiche (ESD).
La loro longevita potrebbe essere fortemente
ridatta in caso di non osservazione della piu
grande cauzione alla loro manipolazione.
Durante le riparazioni occorre quindi essere
collegato allo stesso potenziale che quello
della massa dell’apparecchio tramite un
braccialetto a resistenza.
Assicurarsi che i componenti e anche gli
utensili con quali si lavora s
iano anche a
questo potenziale.
All ICs and many other semi-conductors are
susceptible to electrostatic discharges (ESD).
Careless handling during repair can reduce
life drastically.
When repairing, make sure that you are
connected with the same potential as the
mass of the set via a wrist wrap with
resistance.
Keep components and tools also at this
potential.
WARNING
Safety regulations require that the set be restored to its original condition
and that parts which are identical with those specified be used.
Veiligheidsbepalingen vereisen, dat het apparaat in zijn oorspronkelijke
toestand wordt terug gebracht en dat onderdelen, identiek aan de
gespecifieerde worden toegepast.
Bei jeder Reparatur sind die geltenden Sicherheitsvorschriften zu beachten.
Der Originalzustand des Gerats darf nicht verandert werden
.
Fur Reparaturen sind Original-Ersatzteile zu verwenden.
Le norme di sicurezza esigono che l’apparecchio venga rimesso nelle
condizioni originali e che siano utilizzati pezzi di ricambiago idetici a quelli
specificati.
Les normes de sécurité exigent que l’appareil soit remis a l’état d’origine et
que soient utilisées les pièces de rechange identiques à celles spécifiées.
“Pour votre sécurité, ces documents
doivent être utilisés par des
spécialistes agrées, seu ls habilités à
réparer votre appareil en panne.”
GB
NL
I
D
I
F
GB
NL
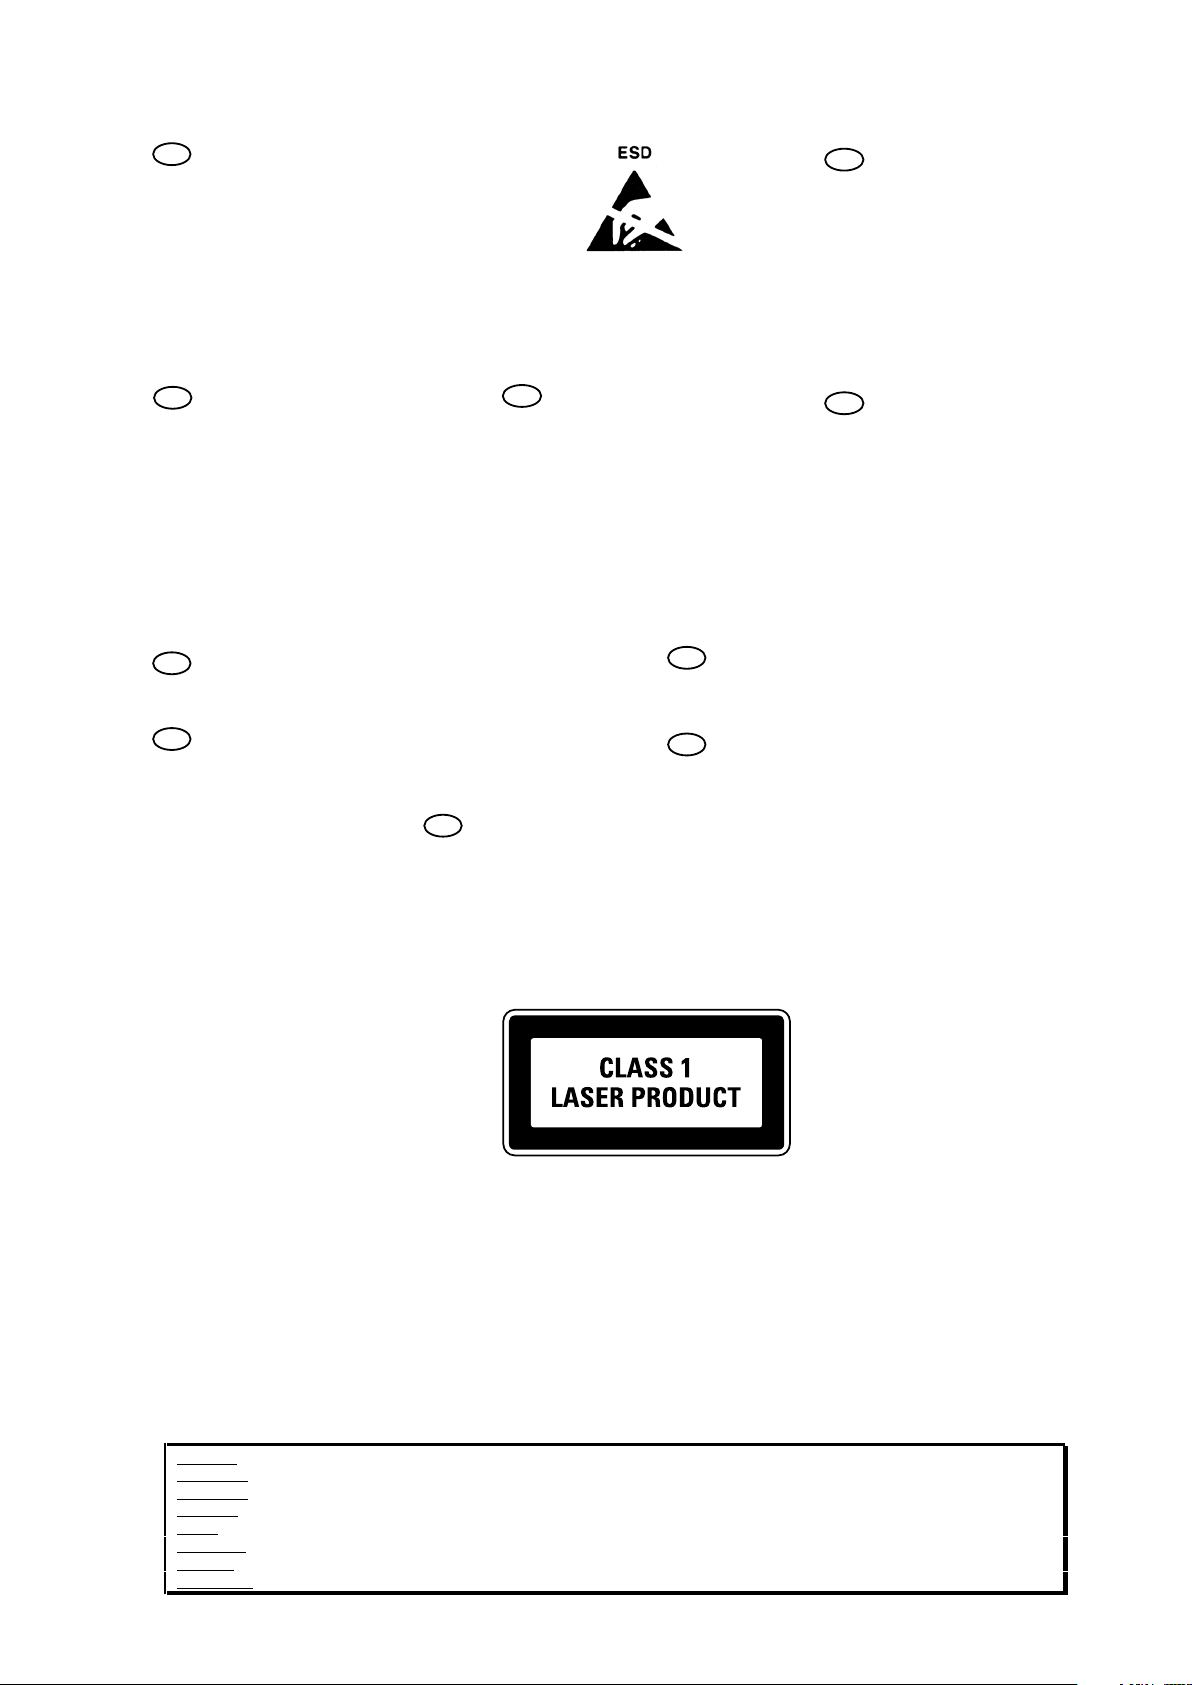
LASER SAFETY
CAUTION VISIBLE AND INVISIBLE LASER RADIATION WHEN OPEN AVOID EXPOSURE TO BEAM
ADVARSEL SYNLIG OG USYNLIG LASERSTRÅLING VED ÅBNING UNDGÅ UDS
Æ
TTELSE FOR STRÅLING
ADVARSEL SYNLIG OG USYNLIG LASERSTRÅLING NÅR DEKSEL Å PNES UNNGÅ EKSPONERING FOR STRÅLEN
VARNING SYNLIG OCH OSYNLIG LASERSTRÅLNING NÄR DENNA DEL ÄR ÖPPNAD BETRAKTA EJ STRÅLEN
VARO! AVATT AESSA OLET ALTTIINA NÄKYVÄLLE JA NÄKYMÄTTÖMÄLLE LASER SÄ
TEILYLLE. ÄLÄ KATSO SÄTEESEEN
VORSICHT SICHTBARE UND UNSICHTBARE LASERSTRAHLUNG WENN ABDECKUNG GEÖFFNET NICHT DEM STRAHL AUSSETSEN
DANGER VISIBLE AND INVISIBLE LASER RADIATION WHEN OPEN AVOID DIRECT EXPOSURE TO BEAM
ATTENTION RAYONNEMENT LASER VISIBLE ET INVISIBLE EN CAS D'OUVERTURE EXPOSITION DANGEREUSE AU FAISCEAU
USE OF CONTROLS OR ADJUSTMENTS OR PERFORMANCE OF PROCEDURE OTHER THAN THOSE
SPECIFIED H
EREIN MAY RESULT IN HAZARDOUS RADIATION EXPOSURE.
AVOID DIRECT EXPOSURE TO BEAM
WARNING
The use of optical instruments with this product will increase eye hazard.
Repair handling should take place as much as possible with a disc loaded inside the player
WARNING LOCATION: INSIDE ON LASER COVERSHIELD
This unit employs a laser. Only a qualified service person should remove the cover or attempt to service t
his
device, due to possible eye injury.
030804ecm
6
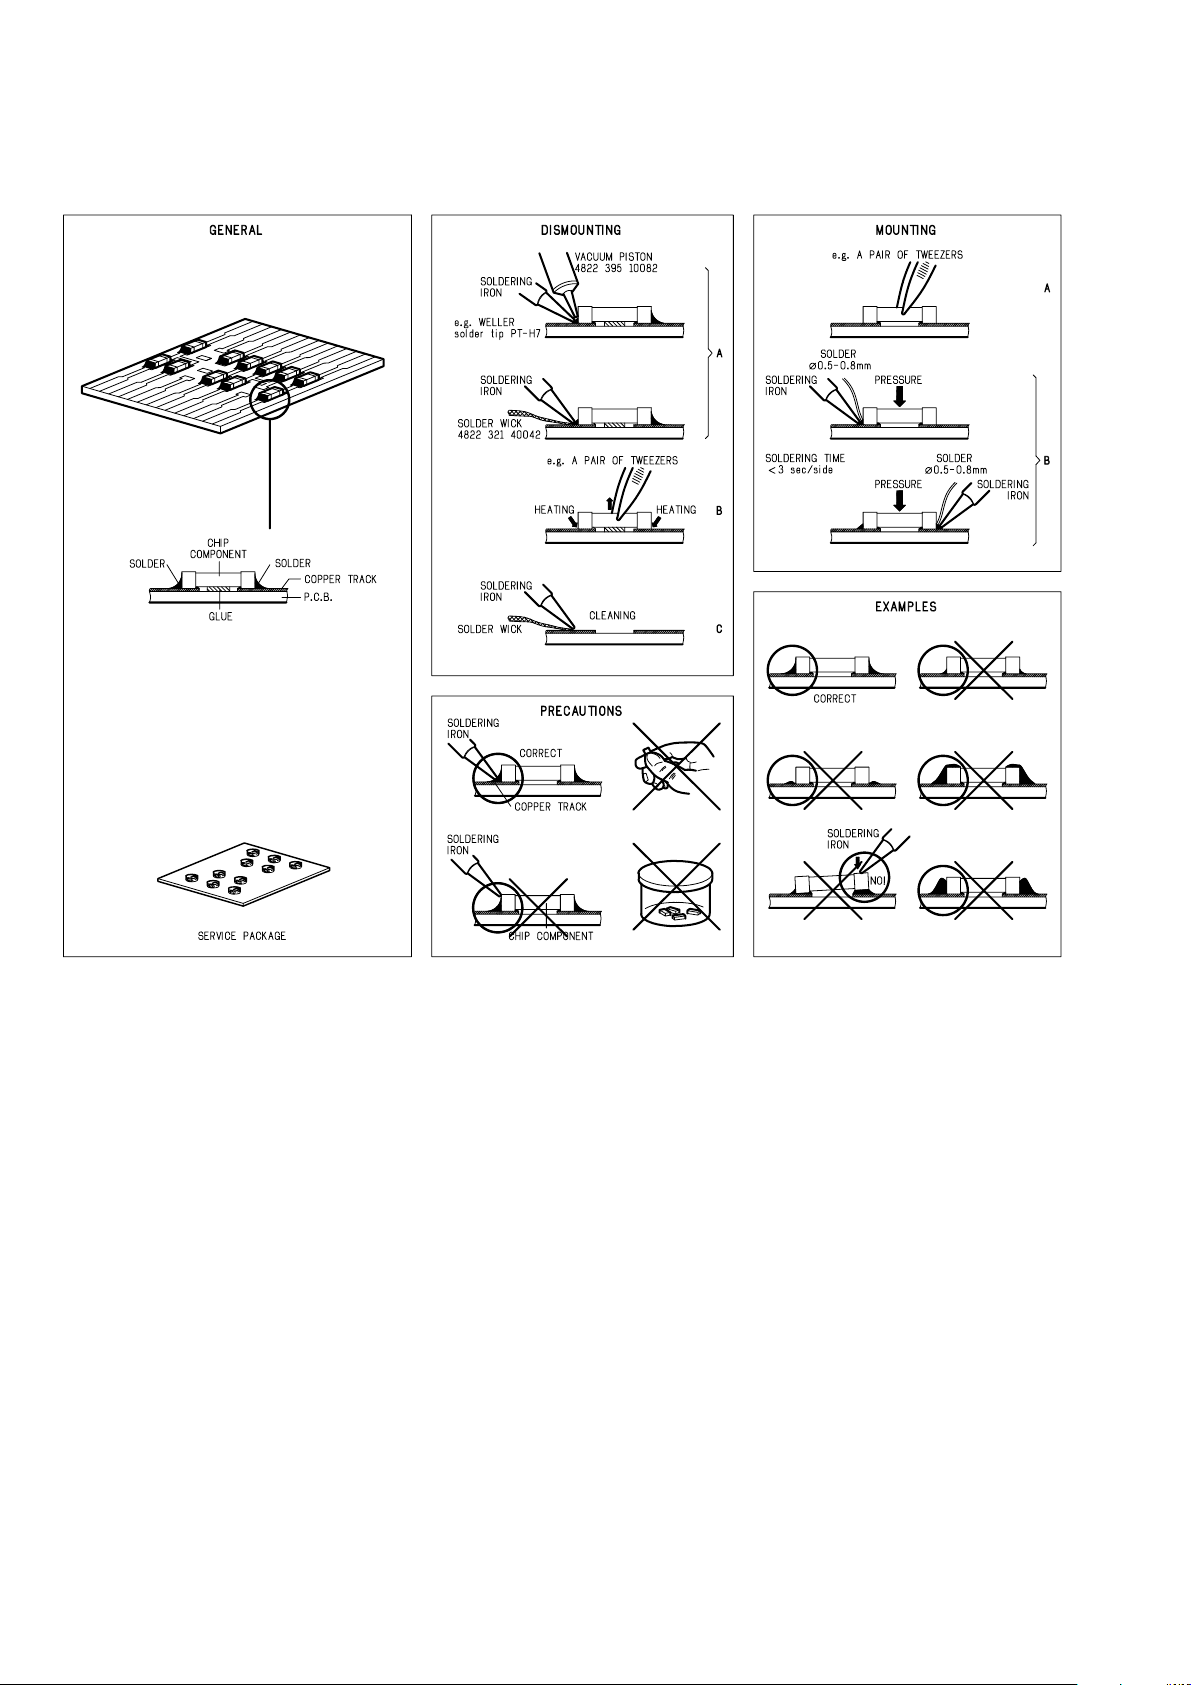
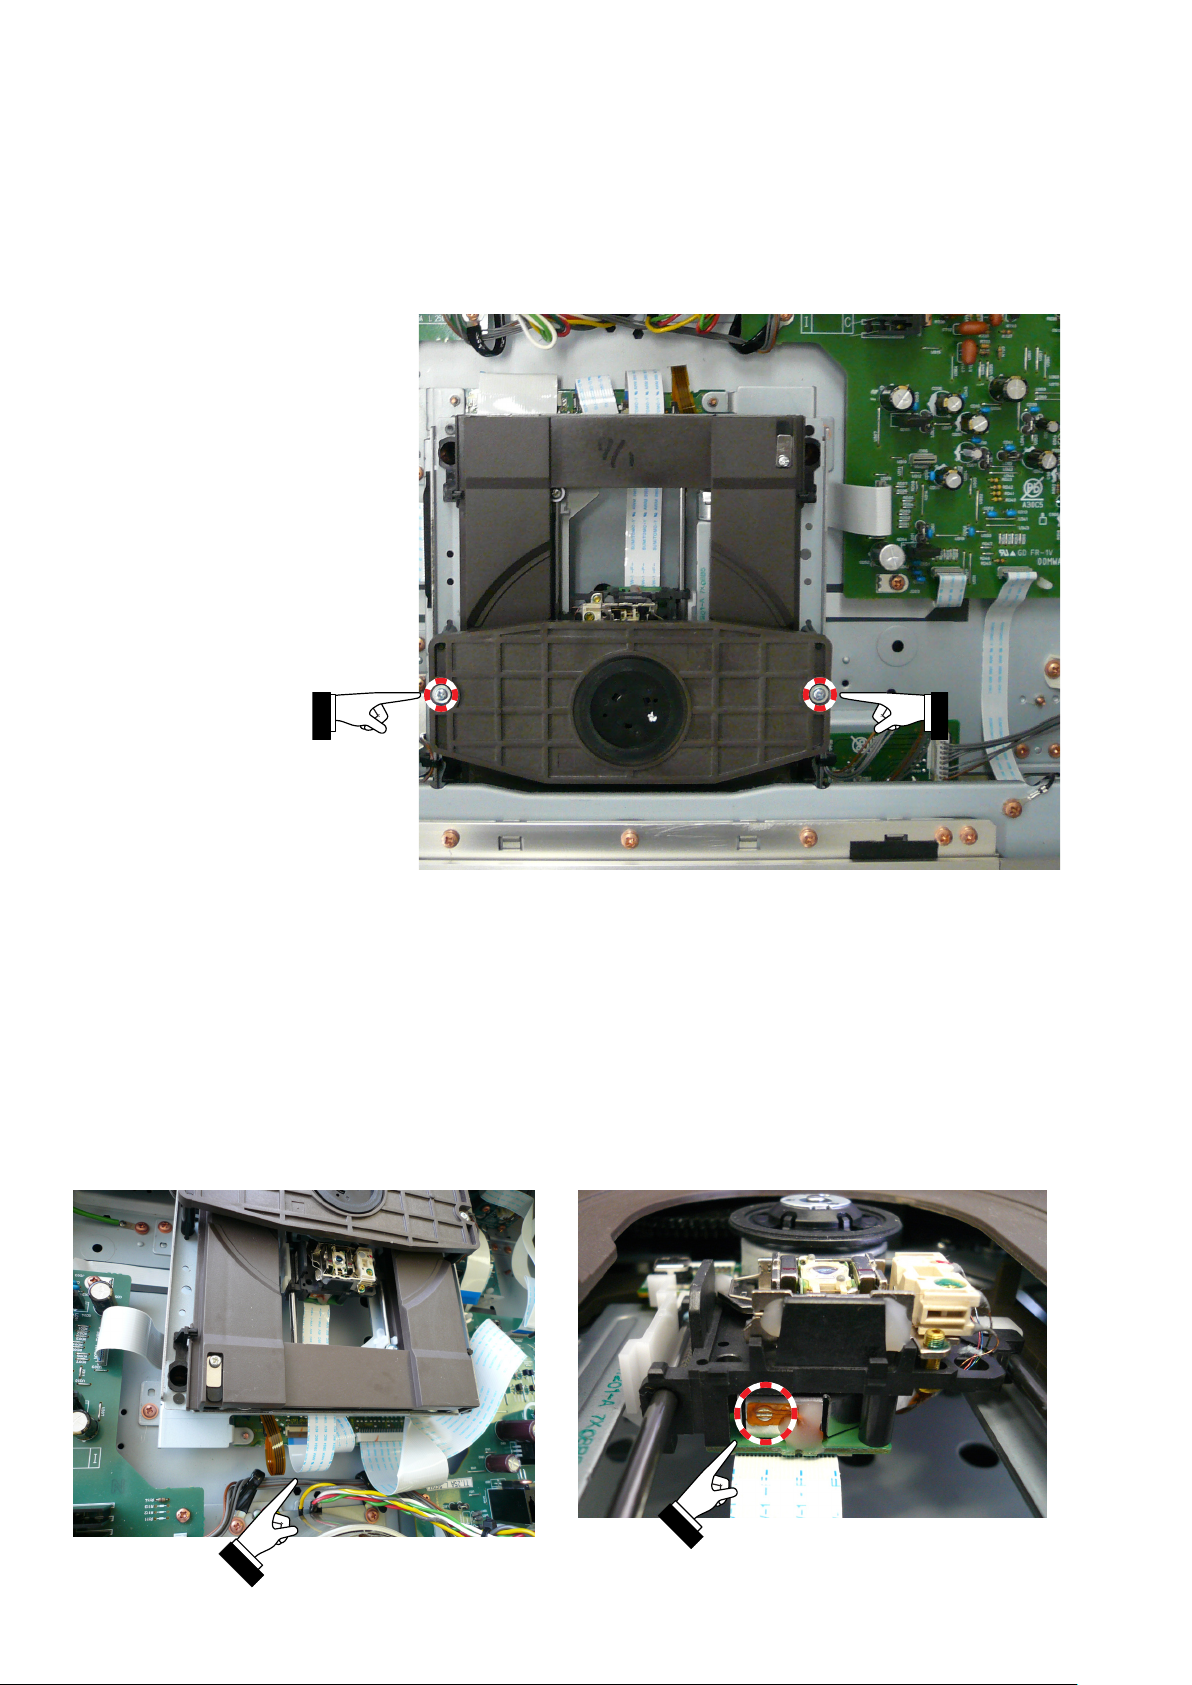
4. CAUTIONS
[A] TAKING THE DISC OUT OF EMERGENCY
Remove the top cover of the player.1.
Remove 2 screws shown in the picture follows.2.
Remove the disc clamper.3.
Now you can remove the disc.4.
[B] CAUTIONS IN ASSEMBLING AND
DISASSEMBLING (M002)
When removing the FFC (flexible flat cable), connecting
the optical pick up and the Super Audio CD PWB, short
the short three lands pointed by the arrow with solder.
Otherwise the laser diode may be damaged by static
electricity
[B] 取り外し、組み立て時の注意 (M002)
ピックアップ(レーザーダイオード)の静電破壊による損傷を
避けるため下記の作業を行ってください。
FFCケーブルを外す前に、ピックアップ基板の3つのショー1.
トランド(矢印)を半田でショートします。
FFCケーブルを接続後、ショートランドの半田を取り除き2.
ます。
FFC
Short the three short lands by soldering
3つのショートランド(矢印)を半田でショートします
7
5. UPDATE FIRMWARE PROCEDURE
[A] Update Front CPU's software to internal Flash-
ROM.
• This mode is to update the software for Front CPU’s.
• The target devise is internal flash ROM of Front CPU’s
(QF06) on FTD/U-COM PWB (PF16).
• The updating of software takes about 1 minute.
5. UPDATE FIRMWARE PROCEDURE
[A] Update Front CPU's software to internal Flash-
ROM.
• このモードはフロントマイコンの更新用です。
• FTD/U-COM PWB (PF16) のQF06のマイコン内部のフラ
ッシュROMに書き込みます。
• 書き込みにかかる時間は約1分です。
Necessary Equipment
The following items are required for updating.
• Windows PC (OS: Windows2000 or WindowsXP) with
Serial port.
• RS-232C Dsub-9 pin cable (female to female/straight
type)
• Update software to CPU. (FlashSta.exe, SACD_
yymmddvv.mot and SACD_yymmddvv.id in Front CPU
(SA7003) folder)
• DATA UPDATE KIT (part no. 90M-SR4001JIG)
Use DATA UPDATE KIT to connect PC and JU01 (FFC
connector) in rear panel of the unit, when updating Front
CPU
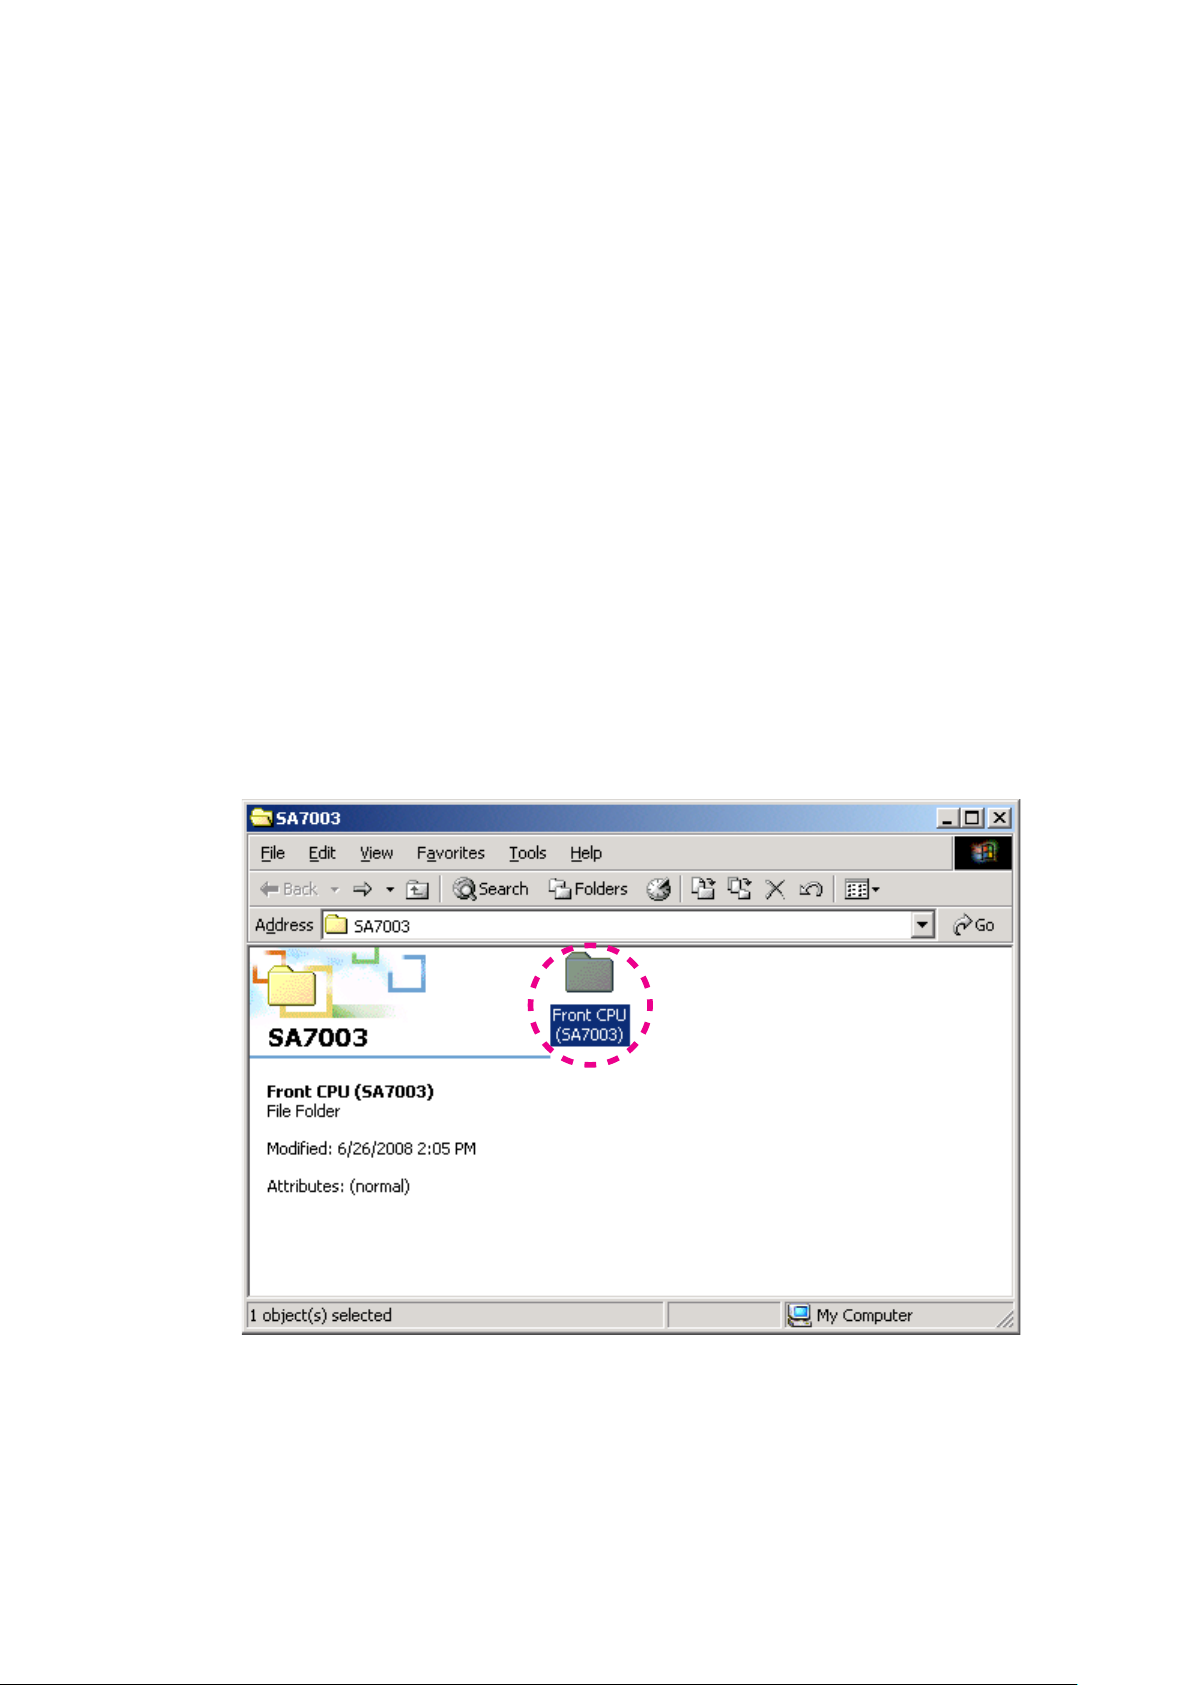
Update Software for Front CPU
Put the "Front CPU (SA7003)" folder into anywhere on 1.
your PC's hard disc.
必要機器
下記は更新に必要な機器です。
• Windows PC (OS : Windows2000 またはWindowsXP) で
Serial ポートのあるもの
• RS-232C ストレートケーブル(9Pin メス-9Pin メス)
• マイコン用書き込みソフトウェア(Front CPU (SA7003)
フォルダ内FlashSta.exeおよびSACD_yymmddvv.mot,
SACD_yymmddvv.id)
• DATA UPDATE KIT (part no. 90M-SR4001JIG)
マイコンのファームウェアを更新する場合、DATA UPDATE
KITを使用しPCと本機のリアパネル内にあるJU01とを接続し
ます。
Update Software for Front CPU
1. Front CPU (SA7003)フォルダをPCの任意のフォルダに1.
コピーします。
Connect PC and DATA UPDATE KIT with the RS-232C 2.
cable.
DATA UPDATE KITとPCとをRS-232Cケーブルで接続し2.
ます。
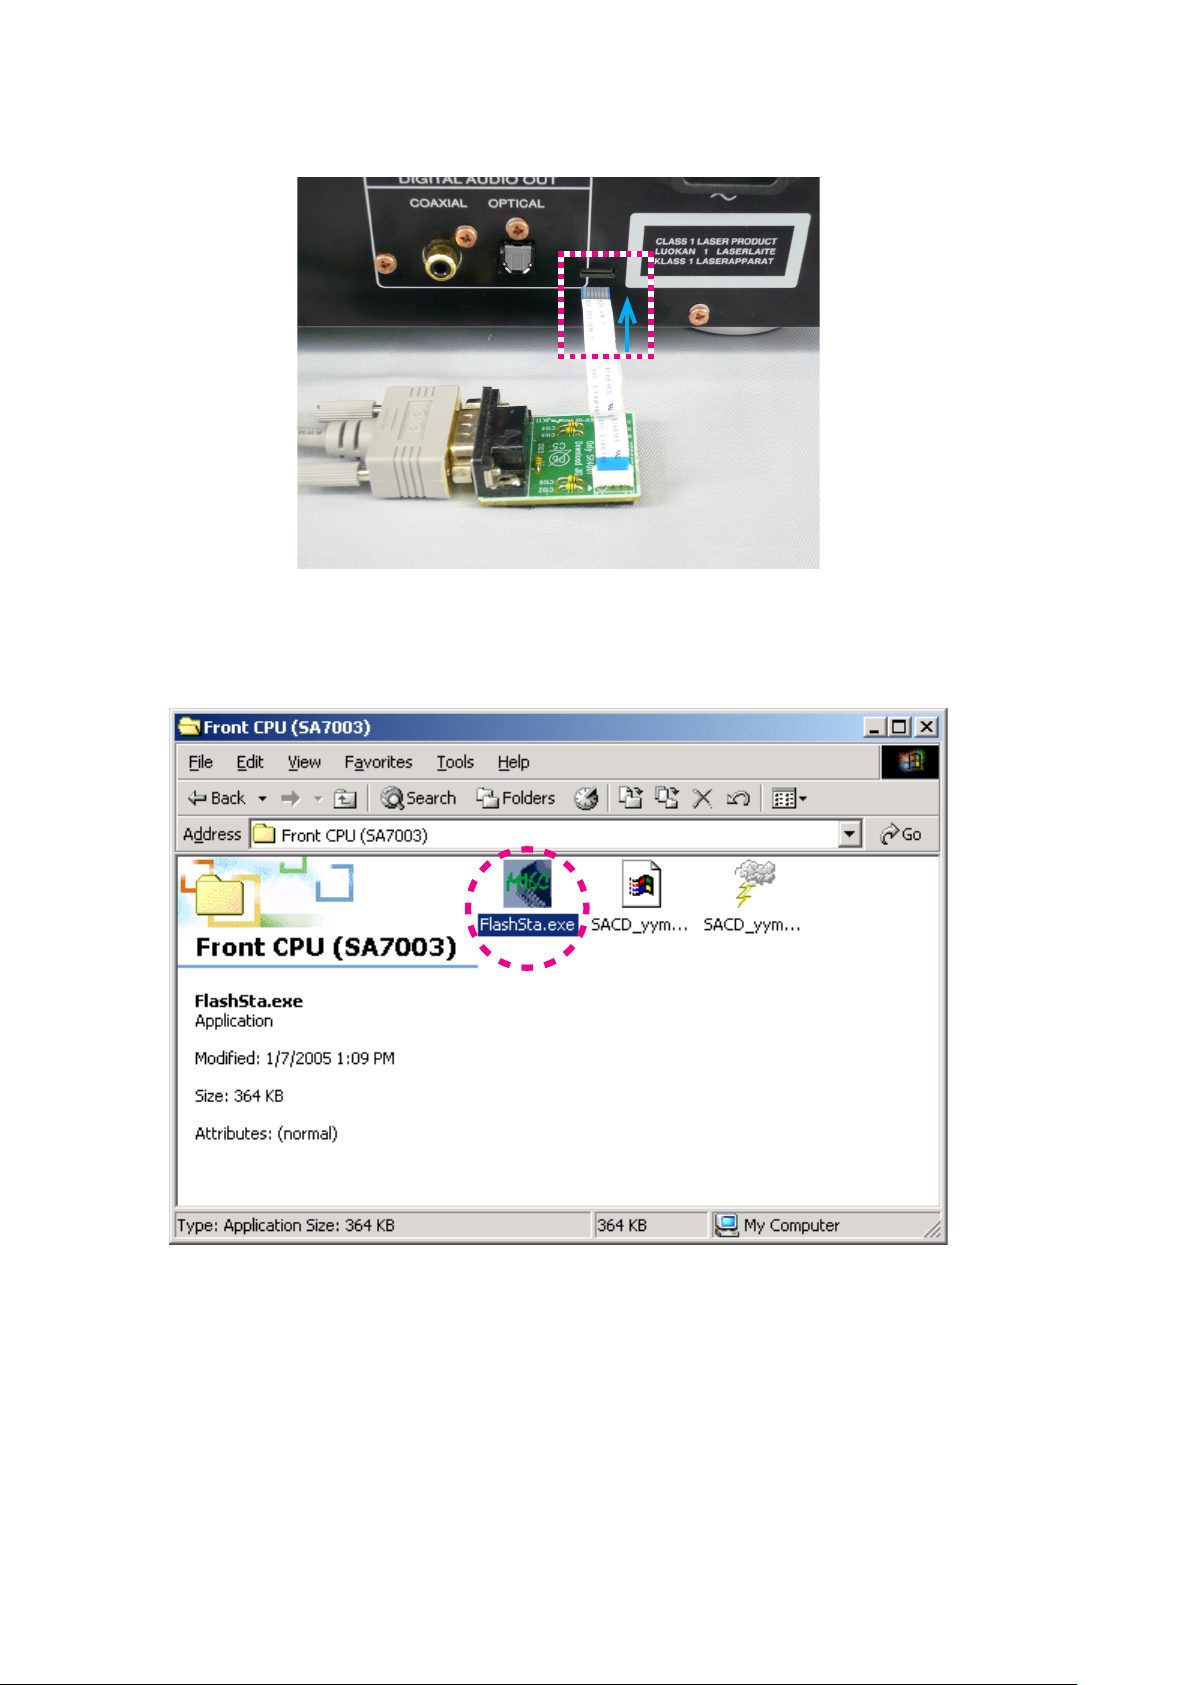
8
Connect FPC (upside contact) to the rear panel of the 3.
unit from DATA UPDATE KIT
DATA UPDATE KITのFFCを接点を上にして、本機のリア3.
パネルに接続します。
Connect the mains cord into the unit.4.
Double click the FlashSta.exe. And launch the M16 Flash 5.
Start.
本機に電源ケーブルを接続します。4.
FlashSta.exeをダブルクリックし、Flash Startを起動しま5.
す。
9
Check the 6. Internal flash memory in the Select Program.
Choose the COM Port number.
And click the OK.
Select Programの6. Internal flash memoryにチェックをし
て下さい。
使用するCOMポート番号を選択します。
OKをクリックします。
Click the 7. Refer....
Refer...7. をクリックします。
10
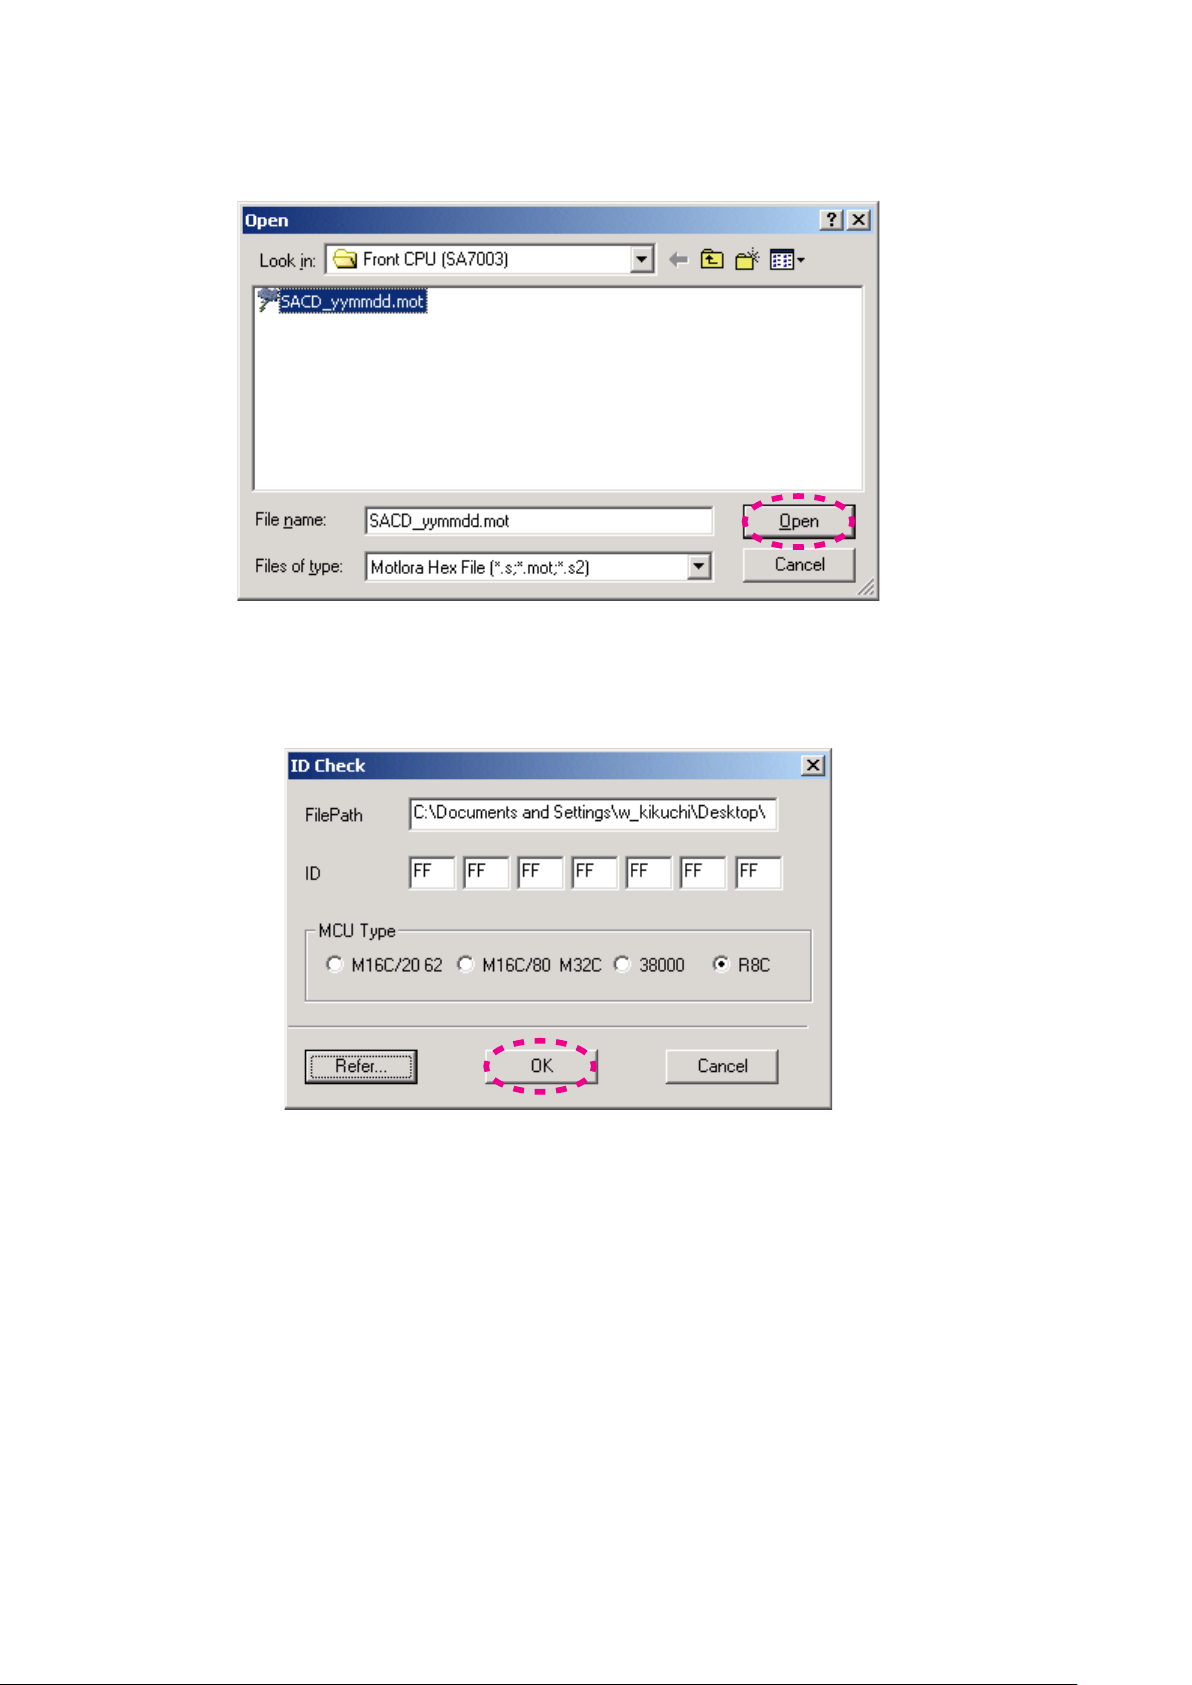
Choose the SACD_yymmdd.mot. And click the 8. Open.
NOTE : The yy is two digits of year. The mm is month. The
dd is date.
SACD_yymmdd.motを選択し、8. Openをクリックします。
注意 : yyは年の下二桁、mmは月、ddは日
The FilePath and ID are inputted automatically, and the 9.
MCU Type is selected to R8C automatically.
Click the OK.
FilePathとIDは自動的に記入され、MCU TypeはR8Cが選9.
ばれます。
OKをクリックします。
11
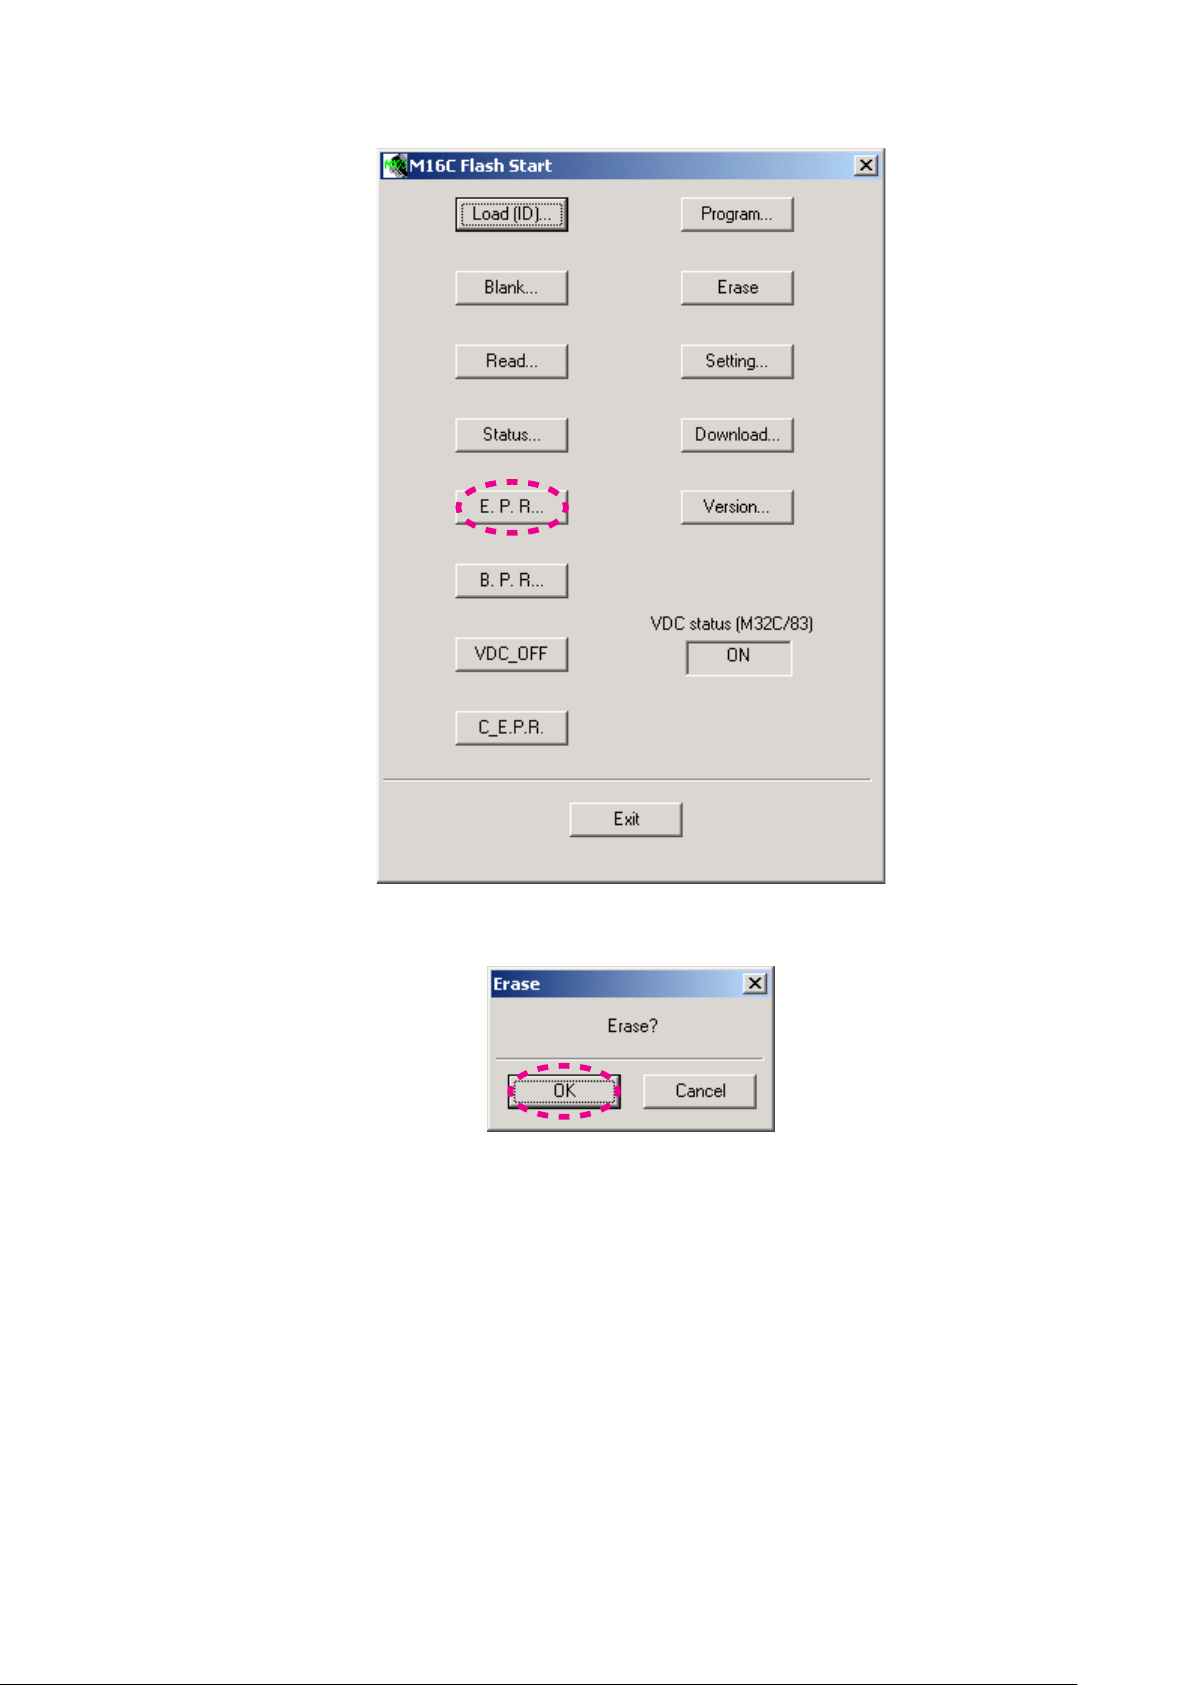
Click the 10. E.P.R....
E.P.R...10. をクリックします。
Click the 11. OK.
OK11. をクリックします。
12
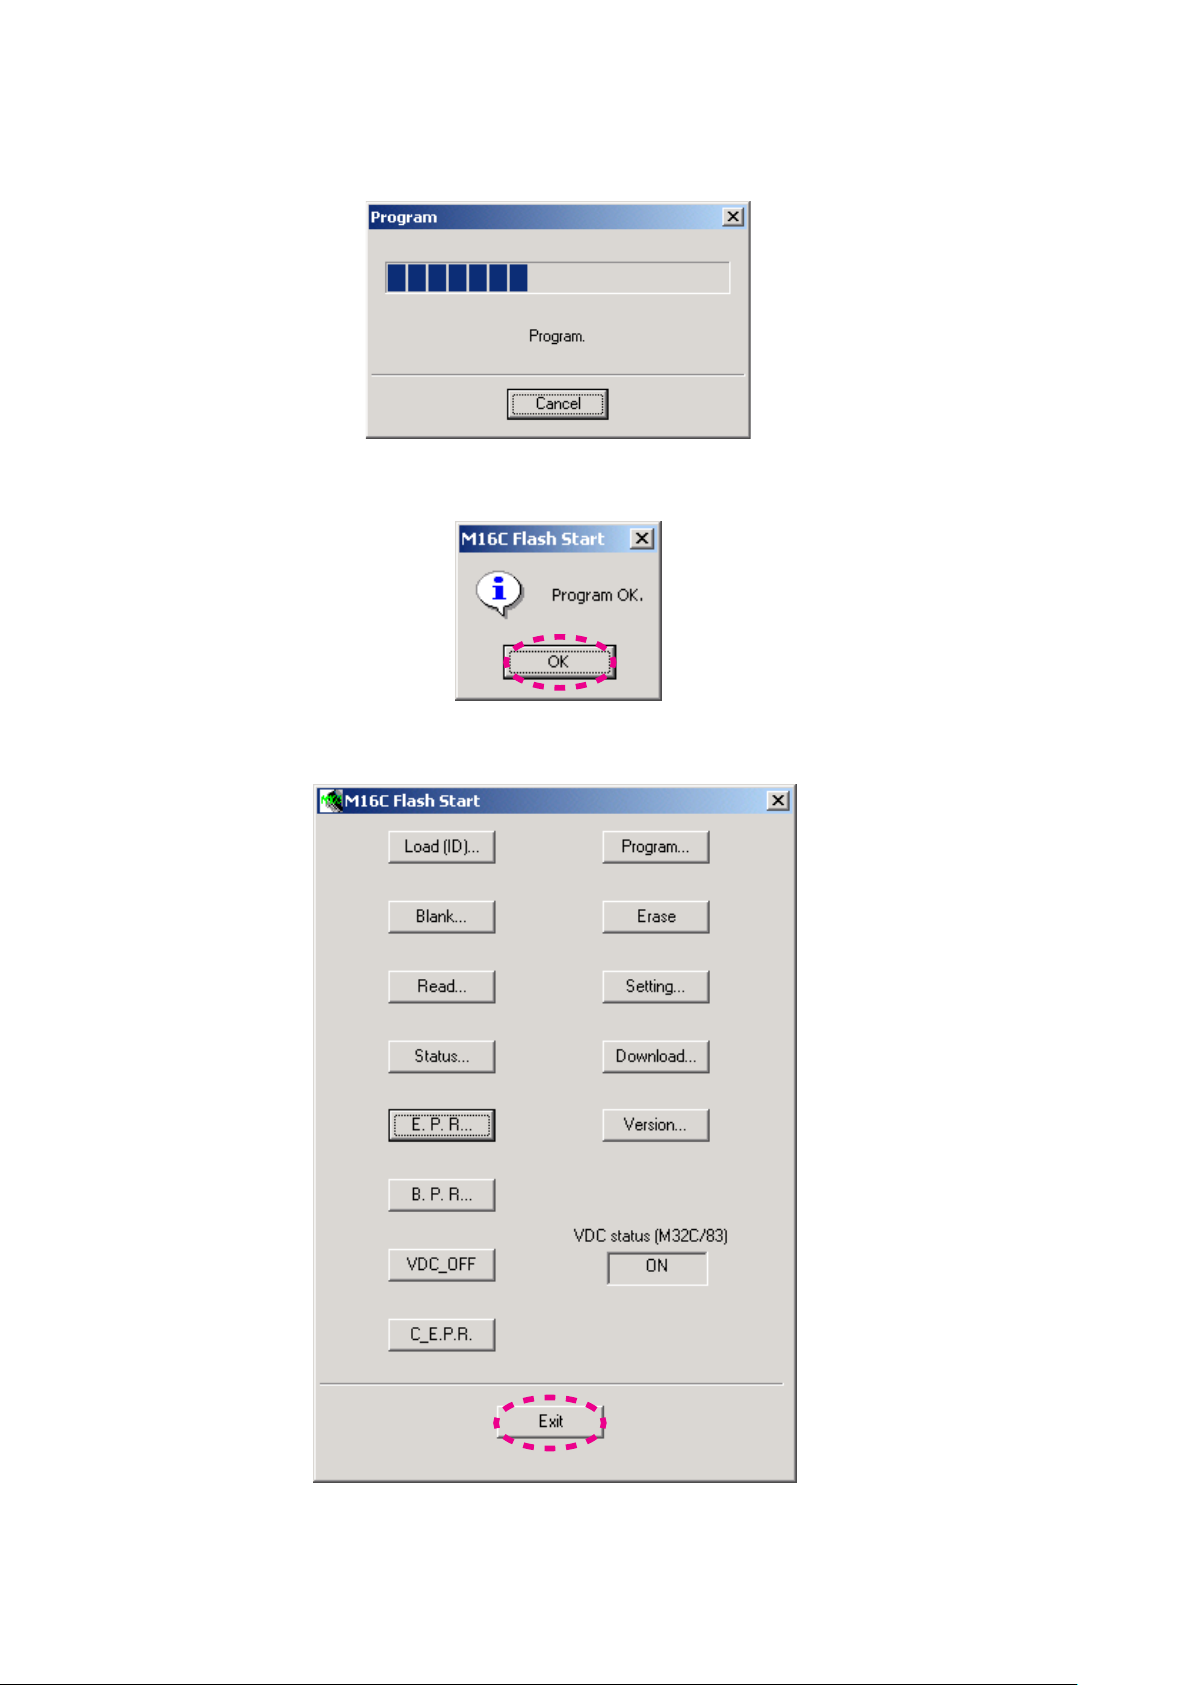
Software is written into the internal Flash-ROM of Front 12.
CPU.
The writing of software takes about 1 minute.
Click the 13. OK.
ソフトウェアがFront CPUの内部フラッシュROMに書き込12.
まれます。
書き込みにかかる時間は約1分です。
OK13. をクリックします。
Click the 14. Exit.
Exit14. をクリックします。
Disconnect the mains cord.15.
Disconnect the FFC of DATA UPDATE KIT from the unit.16.
本機から電源コードを外します。15.
本機からDATA UPDATE KITのFFCを抜きます。16.

13
[B] UPDATE FIRMWARE FOR Super Audio CD
MODULE
[B] UPDATE FIRMWARE FOR Super Audio CD
MODULE
NECESSARY EQUIPMENT
• Update Disc (90M-SA7003CDR)
WRITING PROCEDURE
Connect the mains cord into the unit.1.
Turn on the unit.2.
Press the 3. OPEN/CLOSE button to open the tray.
Insert the Update Disc.4.
Press the 5. OPEN/CLOSE button to close the tray.
"Upgrade?" is displayed on the front display. Then Press 6.
PLAY button.
Remove the update disc from the tray, when the tray is 7.
opened automatically. At that time ""Upgrade" is blinking
on the front display.
When update succeeded, the tray is closed automatically.8.
And "No Disc" is displayed on the front display.9.
Turn off the unit.10.
Disconnect the mains cord from the unit.11.
NECESSARY EQUIPMENT
• Update Disc (90M-SA7003CDR)
WRITING PROCEDURE
本機に電源コードを接続します。1.
本機の電源を入れます。2.
OPEN/CLOSE3. ボタンを押しトレイを開きます。
Update Discをトレイに乗せます。4.
OPEN/CLOSE5. ボタンを押しトレイを閉じます。
フロントディスプレイに6. "Upgrade?"が表示された
ら、PLAYボタンを押します。
トレイが自動的に開いたらUpdate Discをトレイから取り出7.
します。このときフロントディスプレイに"Upgrade"と表示
され点滅します。
アップデートが完了すると自動的にトレイが閉じます。8.
フロントディスプレイに9. "No Disc"と表示されます。
本機の電源を切ります。10.
本機から電源コードを外します。11.
14
6. SERVICE MODE
1
RPT RNDM PROG TRK
CD CD FILE USB DOFF REMAIN TTLM
SA
6. SERVICE MODE
Insert mains cable plug in the outlet. (The Unit is standby 1.
mode.)
Press the 2. POWER ON/STANDBY button While pressing
g/i and STOP button.
Model name is displayed.
SAxxxx
Press 3. g/i button Press j/h button
Version of FRONT microprocessor is displayed.
FR2008070701
Press 4. g/i button Press j/h button
Number of SA-CD module ROM is displayed.
SROM : AYW7162
Press 5. g/i button Press j/h button
Version of SA-CD module ROM is displayed.
SVer : 1.06
電源コードを接続します。( STANDBY モードにします)1.
2. g/iボタンとSTOPボタンを押しながらPOWER ON/
STANDBYボタンを押します。(以下、表示例は英文項の
図を参照)
DISPLAYに機種名が表示されます。
3. g/iボタンを押します。戻るには j/hボタンを
押します。
DISPLAYにFRNOT Micro-Processor Versionが表示されま
す。
4. g/iボタンを押します。戻るには j/hボタンを
押します。
DISPLAYにSA-CDモジュールのROM 番号が表示されま
す。
5. g/iボタンを押します。戻るには j/hボタンを
押します。
DISPLAYにSA-CDモジュールのROM Versionが表示され
ます。
Press 6. g/i button Press j/h button
(SA8003 Only)
Revision of USB module LSI is displayed.
uPD63901_301
Press 7. g/i button Press j/h button
(SA8003 Only)
Version of USB module LSI is displayed.
UVer : V.102
Press 8. g/i button Press j/h button
The segment of the character aria and the label are in
FLD light on and off each other.
Press 9. g/i button Press j/h button
Turn off all FL segments.
6. g/iボタンを押します。戻るには j/hボタンを
押します。
DISPLAYにUSBモジュールのLSI リビジョンが表示されま
す。
7. g/iボタンを押します。戻るには j/hボタンを
押します。。
DISPLAYにUSBモジュールのLSI Versionが表示されま
す。
8. g/iボタンを押します。戻るには j/hボタンを
押します。
ICON部と文字表示部が交互に点灯します。
9. g/iボタンを押します。戻るには j/hボタンを
押します。
FLDが全消灯します。
Press 10. g/i button Press j/h button
10. g/iボタンを押します。戻るには j/hボタンを
押します。
15
Serial number is displayed.
CD CD FILE USB DOFF REMAIN TTLM
SA
CD CD FILE USB DOFF REMAIN TTLM
SA
00_000000000
DISPLAYにSERIAL NOが表示されます。
Press 11. g/i button Press j/h button
[A] DISPLAYにDISC 再生時間(総合計)が表示されます。
11. g/iボタンを押します。戻るには j/hボタンを
押します。
[B] SA-CDのバックアップされた時間が表示されます。
[A] SA-CD payback time is displayed. [B] SA-CD backup time is displayed.
Press PLAY button
PTime : 00021h
PTime : 00021h
Press PAUSE button
Press 12. g/i button Press j/h button
[A] DISPLAYにCD再生時間(総合計)が表示されます。
12. g/iボタンを押します。戻るには j/hボタンを
押します。
[B] CDのバックアップされた時間が表示されます。
[A] CD playback time is displayed. [B] CD backup time is displayed.
Press PLAY button
BTime : 00021h
BTime : 00021h
Press PAUSE button
Backup time (BTime) :
When replacing SA-CD module and reset playback times
(total), the software is available that automatically backs
up (saves) playback times (total). You can check the
information before replacing SA-CD module.
バックアップ時間 (BTime):
SA-CDモジュールを交換した際、再生時間(総合計)のク
リア作業を行いますが、その時に交換する前のSA-CDモジ
ュールの再生時間(総合計)がメモリにバックアップされ
ます。その情報を確認することが出来ます。
Press the POWER ON button to quit Service Mode.
Factory Mode
To reset the back up memory of the unit into the default
status, follow the procedure below.
Turn on the unit and press 1. STOP and POWER ON/
STANDBY button simultaneously more than 3 seconds.
"Reset2. " is displayed, after "Reset OK" displayed on the
display, and EEPROM is cleared to the default status,
microprocessor is reset and unit returns to the normal
status.
電源を切るとSERVCICE モードが解除されます。
初期状態にするには(リセット)
セットの電源を入れます。1. STOPとPOWER ON/
STANDBYボタンを同時に約3秒以上押します。
ディスプレイに2. "Reset"が表示され、その後"Reset OK"が
表示され通常状態の表示に戻り、初期化が終了します。

16
7. HOW TO THE RESET OF PLAYBACK TIME
7. DISC再生時間のリセット(初期化)方法
When replacing CD MECHANISM [ 001M or M002 ]
(TRAVERSE Block), please reset Playback time (total) in the
following procedure.
Procedure 11, 12 of SERVICE MODE, Playback time 1.
(total) is displayed.
PTime : 10051h
The display is a time unit. (Example: "10050 hours, 0
minute, 1 second" is 10051h)
The maximum Playback time is 65536h.
Press 2. C (STOP) Button 3 seconds and more.
PTime Clear? is displayed.
PTime Clear?
Press 3. B (PLAY) Button.
Done is displayed after PTime:00000h is displayed.
Play back time (total) was reset.
新しいCD MECHANISM [ 001M or M002 ] (TRAVERSE部)
に交換した場合、次の手順でDISC再生時間をリセット(初期
化)してください。
SERVICE MODE の手順11, 12でDISPLAYにDISC 再生時1.
間(合計)が表示されます。
表示は時間単位です。(例:10050時間0分1秒は10051h
となります)
最大表示は、65536hまでです。
2. C (STOP)ボタンを3秒以上押します。
DISPLAYにPTime Clear?と表示されます。
3. B (PLAY)ボタンを押します。
DISPLAYにDoneと表示され、その後、PTime : 00000hと
なります。
DISC再生時間がリセット(初期化)されました。
Done : xxx PTime : 00000h
When the j/h (PREVIOUS) button is pushed during
a "PTime:00000h" display, it will return to the beginning
(Model name is displayed) in service mode.
Press the POWER ON button to quit Service Mode.
"PTime : 00000h"表示中に j/h (PREVIOUS)ボタン
を押すと、サービスモードの最初(機種名表示)に戻りま
す。
電源を切るとSERVCICE モードが解除されます。
17
8. ERROR MESSAGE
Display
Off
RPT RNDM PROG TRK
SA-CD
CD M FILE
USB
STRG D OFF REMAIN TTL
ErD A N o r r o r C C
A- B 1
Error Rate
エラーレート
Play
Play
Model name is displayed
モデル名表示
SA7003/SA8003/SA-13S2/SA-15S2
"Stop" + "NEXT" + "Power On"
Previous j/h
j/h
j/h
j/h
STOP
Previous
Previous
Next
Error Rate Average
エラーレート アベレージ
Perform
実行
Perform
実行
Tray Speed Test
トレイスピードテスト
Next
Last Error Message
ラストエラーメッセージ
PreviousNext
C
g/i
g/i
g/i
Clear
STOP(3s)
This test mode is common to all models.
[A] The mode to check the last error message etc.
8. エラーメッセージ
エラーメッセージ(各モデル共通)には、ラストエラーメッセ
ージとその他のエラーメッセージがあります。
[A] ラストエラーメッセージなどを確認するモード
Here is the indication and specification of each function.
1) Last Error Message
This function enables the users to check error messages
at a later time when an error has occurred between the
front microprocessor and each device.
However, it does not display all errors. For more
information about what messages can be displayed, refer
to the [B] Other Error Message page.
When no error has ever occurred, it displays the
following.
Hold the STOP button for 3 seconds while the last error
message is being displayed, and the last error message
will be cleared. After the last error message is cleared,
the model identification returns to the display.
以下に、それぞれの表示及び仕様を示します。
1) ラストエラーメッセージ
フロントマイコンと各デバイス間の通信エラーなどが生じ
但し、全てのエラー表示を記録するわけではありません。
尚、エラー情報がない場合は、以下の表示を行います。
ラストエラーメッセージを表示中に、STOPボタンーを3秒
このとき、ラストエラーメッセージ情報のクリアが完了す
た際のエラー表示を、後からでも確認できる機能です。
表示が可能なエラー情報は[B] その他のエラーメッセージの
項を参照ください。
間押し続けるとラストエラーメッセージ情報をクリアする
ことができます。
るとモデル名表示に自動的に戻り。
18
2) Error Rate
Display
Off
RPT RNDM PROG TRK
SA-CD
CD M FILE
USB
STRG D OFF REMAIN TTL
RrE r r o a t e D A v
A- B 1
Display
Off
RPT RNDM PROG TRK
SA-CD
CD M FILE
USB
STRG D OFF REMAIN TTL
##E r r # E - # D = >
A- B 1
Display
Off
RPT RNDM PROG TRK
SA-CD
CD M FILE
USB
STRG D OFF REMAIN TTL
RrE r r o a t e D = >
A- B 1
This function determines the CD error rate. For SA-CDs,
it only displays reference values.
The buttons that function while this message is being
displayed are OPEN/CLOSE and PLAY.
(NEXT/PREVIOUS is functional too but switches to
another service mode.)
Press the OPEN/CLOSE, put in a disc to determine
and press PLAY to start playback. When the playback
has begun, the display message will be switched to the
following:
2) エラーレート
CDのエラーレートを測定します。SA-CDに関しては、参考
値となります。
この表示中に有効な操作は、OPEN/CLOSEとPLAYになり
ます。
OPEN/CLOSEにて測定するディスクを挿入し、PLAYで再
生を開始してください。
再生を開始すると以下の表示に切り替わります。
A current error rate will be displayed for approximately 3
seconds.
The above message "###E-#" will, for example, be
"173E-4" in case of 1.73 / 10000 (173ppm).
If the displayed value will not change, the processing
may have failed. Please take out the disc and repeat the
procedure again. Using the same disc will not always
means that the same value will be displayed.
3) Error Rate Average
This function determines the CD error rate and displays
an average value of the first several rates.
For SA-CDs, it only displays reference values.
The buttons that function while this message is being
displayed are OPEN/CLOSE and PLAY.
(NEXT/PREVIOUS is functional too but switches to
another service mode.)
Press the OPEN/CLOSE, put in a disc to determine
and press PLAY to start playback. When the playback
has begun, the display message will be switched to the
following:
およそ3秒単位で現在のエラーレートを表示します。
尚、表示中の"###E-#"に関しては、実際に表示されている
数字が例えば"173E-4"の場合、1.73 / 10000 (173ppm)とな
ります。
尚、表示の数値が変化しない場合、処理に失敗した可能性
があります。その場合、一旦ディスクを排出してから再度
実行してください。又、同じディスクを使用しても同じ値
が出るとは限りません。
3) エラーレートアベレージ
CDのエラーレートを測定し最初の数回の平均値を表示しま
す。SA-CDに関しては、参考値となります。
この表示中に有効な操作は、OPEN/CLOSEとPLAYになり
ます。
OPEN/CLOSEにて測定するディスクを挿入し、PLAYで再
生を開始してください。
再生を開始すると以下の表示に切り替わります。
19
A current error rate will be displayed for approximately 3
Display
Off
RPT RNDM PROG TRK
SA-CD
CD M FILE
USB
STRG D OFF REMAIN TTL
SST R A Y P E E D = >
A- B 1
Display
Off
RPT RNDM PROG TRK
SA-CD
CD M FILE
USB
STRG D OFF REMAIN TTL
E#E r # # - # O K = >
A- B 1
Display
Off
RPT RNDM PROG TRK
SA-CD
CD M FILE
USB
STRG D OFF REMAIN TTL
E#E r # # - # % % = >
A- B 1
seconds.
The above message "###E-#" will, for example, be
"173E-4" in case of 1.73 / 10000 (173ppm).
If the displayed value will not change, the processing
may have failed. Please take out the disc and repeat the
procedure again. Using the same disc will not always
means that the same value will be displayed.
When an average has been calculated after a
predetermined number of times of measurement, the
displayed message will be switched to the following:
およそ3秒単位で現在のエラーレートを表示します。
尚、表示中の"###E-#"に関しては、実際に表示されている
数字が例えば"173E-4"の場合、1.73 / 10000 (173ppm)とな
ります。尚、表示の数値が変化しない場合、処理に失敗し
た可能性があります。その場合、一旦ディスクを排出して
から再度実行してください。又、同じディスクを使用して
も同じ値が出るとは限りません。
所定の回数を終了して平均値が算出されると以下の表示に
変わります。
4) Tray Speed Test
This function allows the OPEN/CLOSE speed of the tray
to be variable. It can be changed at a 1% step to the
default values. Here are default values:
1 2 3 4 5
Time 0-500ms 500ms-1s 1s-1.5s 1.5s-2s
TRY_OPN 85 % 65 % 55 % 55 % 55 %
TRY_CLS 65 % 70 % 75 % 85 % 100 %
Once into the test mode, it will display the following
message:
Press the STOP button, and it will enable the number
after Open to be variable (between 0 and 500ms).
4) トレイスピードテスト
トレイのオープン・クローズ時のスピードコントロールを
変更することが可能です。デフォルトの値に対して1%ステ
ップで変更することができます。デフォルトの値は以下の
通りです。
2s~
当テストモードに入ると以下の表示を行います。
STOPボタンが押されると、Open側の1の部分(0〜500ms
の区間)の変更が可能になります。
 Loading...