

Marantz CD-110 Owners Manual
R
Model CD110 User Guide
CD Player
CLASS 1 LASER PRODUCT
KLASSE 1 LASER PRODUKT
I.H.T. IEC 825

ENGLISH
WARRANTY
For warranty information, contact your local Marantz distributor.
RETAIN YOUR PURCHASE RECEIPT
Your purchase receipt is your permanent record of a valuable purchase. It
should be kept in a safe place to be referred to as necessary for insurance
purposes or when corresponding with Marantz.
IMPORTANT
When seeking warranty service, it is the responsibility of the consumer to
establish proof and date of purchase. Your purchase receipt or invoice is
adequate for such proof.
FOR U.K. ONLY
This undertaking is in addition to a consumer's statutory rights and does not
affect those rights in any way.
FRANÇAIS
GARANTIE
Pour des informations sur la garantie, contacter le distributeur local Marantz.
CONSERVER L'ATTESTATION D'ACHAT
L'attestation d'achat est la preuve permanente d'un achat de valeur. La
conserver en lieu sur pour s'y reporter aux fins d'obtention d'une couverture
d'assurance ou dans le cadre de correspondances avec Marantz.
IMPORTANT
Pour l'obtention d'un service couvert par la garantie, il incombe au client
d'établir la preuve de l'achat et d'en corroborer la date. Le reçu ou la facture
constituent des preuves suffisantes.
DEUTSCH
GARANTIE
Bei Garantiefragen wenden Sie sich bitte an Ihren Marantz-Händler.
HEBEN SIE IHRE QUITTING GUT AUF
Die Quittung dient Ihnen als bleibende Unterlage für Ihren wertvollen Einkauf
Das Aufbewahren der Quittung ist wichtig, da die darin enthaltenen Angaben
für Versicherungswecke oder bei Korrespondenz mit Marantz angeführt
werden müssen.
WICHTIG!
Bei Garantiefragen muß der Kunde eine Kaufunterlage mit Kaufdatum
vorlegen. Ihren Quittung oder Rechnung ist als Unterlage ausreichend.
NEDERLANDS
GARANTIE
Voor inlichtingen omtrent garantie dient u zich tot uw plaatselijke Marantz.
UW KWITANTIE, KASSABON E.D. BEWAREN
Uw kwitantie, kassabon e.d. vormen uw bewijs van aankoop van een
waardevol artikel en dienen op een veilige plaats bewaard te worden voor
evt, verwijzing bijv, in verbend met verzekering of bij correspondentie met
Marantz.
BELANGRIJK
Bij een evt, beroep op de garantie is het de verantwoordelijkheid van de
consument een gedateerd bewijs van aankoop te tonen. Uw kassabon of
factuurzijn voldoende bewijs.
ESPAÑOL
GARANTIA
Para obtener información acerca de la garantia póngase en contacto con su
distribuidor Marantz.
GUARDE SU RECIBO DE COMPRA
Su recibo de compra es su prueba permanente de haber adquirido un
aparato de valor, Este recibo deberá guardarlo en un lugar seguro y utilizarlo
como referencia cuando tenga que hacer uso del seguro o se ponga en
contacto con Marantz.
IMPORTANTE
Cuando solicite el servicio otorgado por la garantia el usuario tiene la
responsabilidad de demonstrar cuándo efectuó la compra. En este caso, su
recibo de compra será la prueba apropiada.
ITALIANO
CONDIZIONI DI GARANZIA
L'apparecchio e' garantito per 365 giorni dalla data di acquisto comprovata
da un documento attestante il nominativo del rivenditore e la data di vendita.
La garanzia sara' prestata con la sostituzione o riparazione gratuita delle
parti difettose.
Non sono coperti da garanzia difetti derivanti da uso improprio, errata
installazione, manutenzione effettuata da personale non autorizzato o,
comunque, da circostanze che non possano riferirsi a difetti di
tunzionamento dell'apparecchio. Sono inoltre esclusi dalla garanzia gli
interventi inerenti l'installazione e l'allacciamento agli impianti di
alimentazione.
Gli apparecchi verranno riparati presso i nostri Centri di Assistenza. Le spese ed i
rischi di trasporto sono a carico del cliente.
La casa costruttrice declina ogni responsabilita' per danni diretti o indiretti provocati
dalla inosservanza delle prescrizioni di installazione, uso e manutenzione dettagliate
nel presente manuale.
Per informazioni sull'abbonamento al Servizio Assistenza postgaranzia e per
conoscere l'indirizzo dei Centri Assistenza Marantz rivolgetevi al nostro
servizio consumatori (telefono 1678-20026 - numero verde).
PORTUGUÊS
GARANTIA
Para informações sobre a garantia, contactar o distribuidor Marantz local.
GUARDAR O RECIBO DE COMPRA
O recibo é o registo permanente da compra que fez. Deve ser guardado num
local seguro, para ser apresentado em questões relacionadas com o seguro
ou para quando tiver de contactar a Marantz.
IMPORTANTE
Quando procurar assisténcia técnica ao abrigo da garantia, é da
responsabilidade do consumidor estabelecer a prova e data de compra. O
recibe é prova adequada.
SVENSKA
GARANTI
För information om garantin, kontakta Marantz lokalagent.
SPAR KVITTOT
Kvittot är ett inköpsbevis på en värdefull vara. Det skall förvaras säkert och
hänvisas till vid försäkringsfall eller vidkorrespondens mod Marantz.
VIKTIGT
Fö att garantin skall gälla är det kundens sak att framställa bevis och datum
om köpet. Kvitto eller faktura är tillräokligt bevis fö detta.
DANSK
GARANTI
Henvend dem til Deres MARANTZ-forhandler angående inrformation om
garantien.
GEM DERES KVITTERING
Deres købskvittering er Deres varige bevis på et dyrt køb. Den bør gemmes
godt og anvendes som bevis, hvis De vil tegne en forsikring, eller hvis De
kommunikerer med Marantz.
VIGTIGT
Det påhviler forbrugeren at skaffe bevis for købet og købsdatoen, hvis han
eller hun ønsker garantiservice. Deres købskvittering eller faktura er et
fuldgyldigt bevis herpå.
i

CE MARKING
English
The CD110 is in conformity with the EMC directive and low-voltage directive.
Français
Le CD110 est conforme à la directive EMC et à la directive sur les basses tensions.
Deutsch
Das Modell CD110 entspricht den EMC-Richtlinien und den Richtlinien für Niederspannungsgeräte.
Nederlands
De CD110 voldoet aan de EMC eisen en de vereisten voor laag-voltage.
Español
El CD110 está de acuerdo con las normas EMC y las relacionadas con baja tensión.
Italiano
Il CD110 è conforme alle direttive CEE ed a quelle per i bassi voltaggi.
Português
O CD110 conforma com as diretrizes EMC e de baixa voltagem.
Svenska
CD110 är tillverkad i enlighet med EMC direktiven och direktiven för lågvoltsutrusning.
Dansk
Model CD110 er i overensstemmelse med EMC-direktiveet og direktivet om lavspænding.
ENGLISH:
CAUTION – USE OF CONTROLS OR ADJUSTMENTS OR PERFORMANCE OF PROCEDURES
OTHER THAN THOSE SPECIFIED HEREIN MAY RESULT IN HAZARDOUS RADIATION
EXPOSURE.
FINNISH:
VAROITUS! Laitteen käyttäminen muulla kuin tässä käyttöohjeessa mainitulla tavalla saattaa
SWEDISH:
VARNING! Om apparaten används påannat sätt än vad som beskrivs 1 denna bruksanvisning kan
altistaa käyttäjän turvallisuusluokan 1 ylittävuälle näkymättömälle lasersäteilylle.
användaren utsättas för osynlig laserstrålning som overskrider gränsen för laserklass 1 .
WARNINGS FOR LASER RADIATION
CAUTION : INVISIBLE LASER RADIATION WHEN OPEN. DO NOT STARE INTO BEAM.
DANGER : INVISIBLE LASER RADIATION WHEN OPEN. AVOID DIRECT EXPOSURE TO BEAM.
VARO! : AVATTAESSA JA SUOJALUKITUS OHITETTAESSA OLET ALTTIINANAKYMÄTTÖMÄALLE
LASERSÄTEILYLLE. ÄLÄ KATSO SÄTEESEEN.
VARNING! : OSYNLIG LASERSTRÅLNING NÄR DENNA DEL ÄR ÖPPNAD OCH SPÄRREN ÄR
URKOPPLAD. BETRAKTA EJ STRALEN.
ii
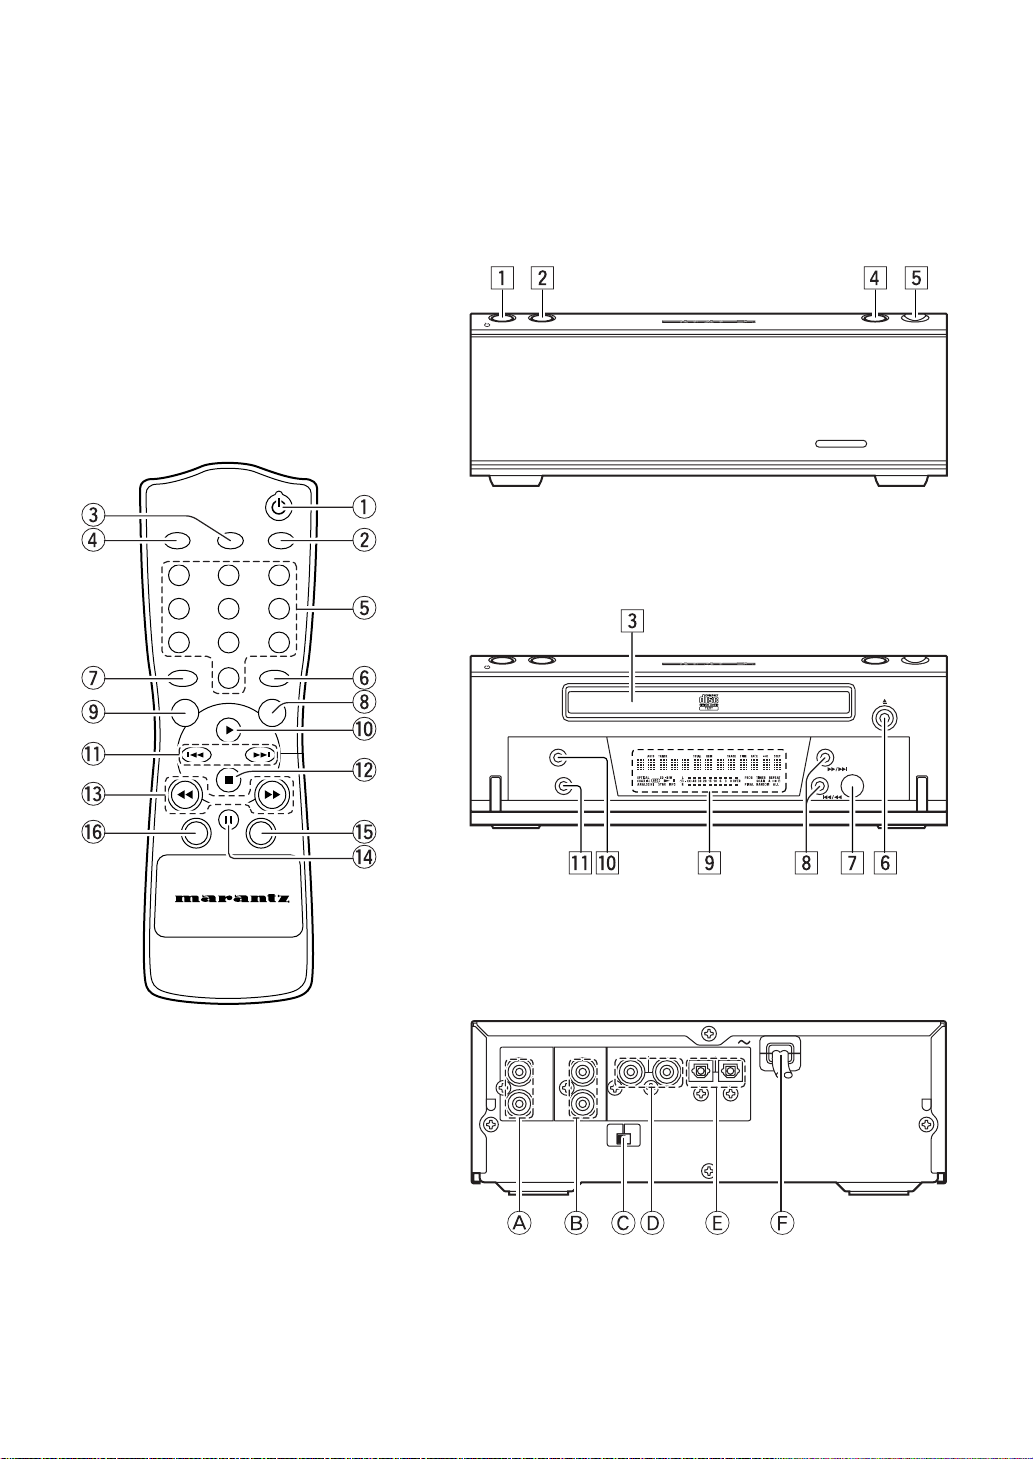
MAIN UNIT (FRONT - CLOSED)
zx vb
STANDBY 7 6 OPEN
REMOTE CONTROL UNIT
e
AMS
SCROLL
r
2
1
5
4
8
7
RANDOM
u
0
CD TEXT TIMER
o
!1
!3
!6
CANCEL
REMOTE CONTROLLER
RC110CD
DISPLAY
REPEAT
3
6
9
PROG.
q
w
t
y
i
!0
!2
!5
!4
MAIN UNIT (FRONT - OPENED)
c
STANDBY 7 6 OPEN
REPEAT
DISPLAY
Ú0
MAIN UNIT (REAR)
.mnÚ1
,
CD110
ANALOG OUT
REMOTE CONTROL
LEFT
IN
RIGHT OUT
REMOTE
CONTROL
SELECTOR
COAX.— — OPT.
EXT.
INT.
ACDEFB
DIGITAL OUT
iii

FOREWORD
This section must be read carefully before any connection is
made to the mains supply.
WARNINGS
Do not expose the equipment to rain or moisture.
Do not remove the cover from the equipment.
Do not insert anything into the equipment through the
ventilation holes.
Do not handle the mains lead with wet hands.
EQUIPMENT MAINS WORKING SETTING
Your Marantz product complies with the household power and
safety requirements in your area.
CD110 can be powered by 230 V AC only.
IMPORTANT: (FOR UK VERSION)
This apparatus is fitted with an approved moulded 13 Amp plug.
To change a fuse in this type of plug proceed as follows:
1. Remove fuse cover and fuse.
2. Fix new fuse which should be a BS1362 5A, A.S.T.A. or
BSI approved type.
3. Refit the fuse cover.
If the fitted plug is not suitable for your socket outlets, it should
be cut off and an appropriate plug fitted in its place.
If the mains plug contains a fuse, this should have a value of
5A. If a plug without a fuse is used, the fuse at the distribution
board should not be greater than 5A.
Note:
The severed plug must be destroyed to avoid a possible
shock hazard should it be inserted into a 13A socket
elsewhere.
ABOUT THIS USER GUIDE
Refer to the figures on page iv of this user guide. The numbers
on the figures correspond to those in the text. All references to
the connections and controls that are printed in BOLD type are
as they appear on the unit.
ENGLISH
PRECAUTIONS
The following precautions should be taken when operating the
equipment.
GENERAL PRECAUTIONS
When installing the equipment ensure that:
– the ventilation holes are not covered.
– air is allowed to circulate freely around the equipment.
– it is placed on a vibration-free surface.
– it will not be exposed to excessive heat, cold, moisture or
dust.
– it will not be exposed to direct sunlight.
– it will not be exposed to electrostatic discharges.
In addition, never place heavy objects on the equipment.
If a foreign object or water does enter the equipment, contact
your nearest dealer or service center.
Do not pull out the plug by pulling on the mains lead; grasp the
plug.
It is advisable when leaving the house, or during a
thunderstorm, to disconnect the equipment from the mains
supply.
HOW TO CONNECT A PLUG
The wires in the mains lead are coloured in accordance with the
following code:
BLUE—”NEUTRAL” (“N”)
BROWN—”LIVE” (“L”)
1. The BLUE wire must be connected to the terminal which is
marked with the letter “N” or coloured BLACK.
2. The BROWN wire must be connected to the terminal which
is marked with the letter “L” or coloured RED.
3. Do not connect either wires to the earth terminal in the plug
which is marked by the letter “E” or by the safety earth
symbol or coloured green or green-and-yellow.
Before replacing the plug cover, make certain that the cord grip
is clamped over the sheath of the lead — not simply over the
two wires.
COPYRIGHT
Recording and playback of some material may require
permission. For further information refer to the following:
– Copyright Act 1956
– Dramatic and Musical Performers Act 1958
– Performers Protection Acts 1963, and 1972
– Any subsequent statutory enactments and orders
1
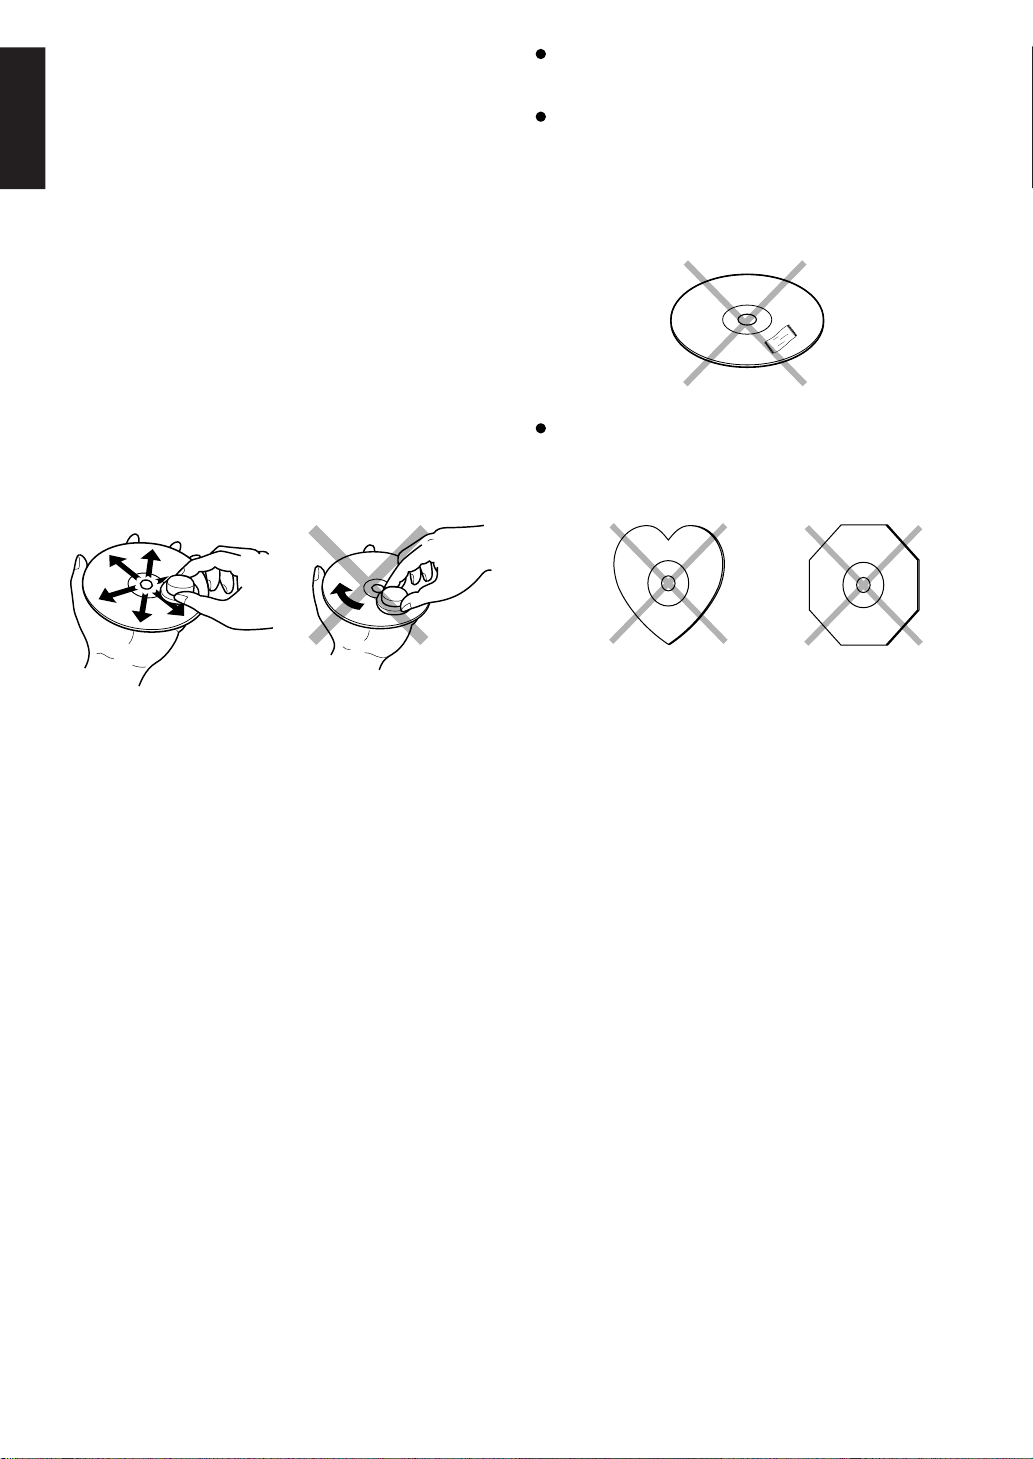
COMPACT DISCS
ENGLISH
The glossy side shining like a rainbow is the front side of the
disc, and the side on which the label is printed is the back.
Unlike conventional turntables for playing analog discs, the
CD110 Compact Disc Player reads the information recorded
on the disc from underneath without contacting it using a beam
of laser light. Therefore, the performance of a compact disc will
not degrade like conventional analog records.
Handle discs carefully so as not to damage or scratch the front
side.
To protect the disc, avoid placing it in the following locations:
– In direct sunlight or near a source of heat like a heater.
– In a place which is damp or dirty.
– In a place which could be exposed to rain, such as near a
window.
Always keep the disc surface clean.
Up to six billion data units are recorded on the front side of the
disc. When cleaning the disc surface, always be sure to use a
special compact disc cleaner and wipe as shown below.
Do not use conventional record cleaner for analog records,
as this will adversely affect the disc surface.
Store discs properly by placing them in their disc cases.
Do not attach a piece of paper or sticker on the label side of
disc.
When a disc has a piece of plastic tape or rental CD label
with paste protruded from the edge or when a disc has a
trace of such a sticky object, do not attempt to play the disc. If
such a disc is played on the CD player, impossibility of taking
out the disc or other malfunction may result.
Do not use a disc with a special shape.
Do not attempt to play a disc with a special shape such as a
heart-shaped disc or octagonal disc. Otherwise the
equipment malfunction may result.
Wipe in a radial direction. Do not wipe in circumferential
direction.
2

REMOTE CONTROL UNIT
q (Standby) button
Press to turn the unit's power on or set it to the standby mode.
(Operation is not possible if the unit is connected to the SR110,
the SR110's rear switch is set to SYSTEM and the CD110's
REMOTE CONTROL SELECTOR EXT/INT switch is at EXT.)
w DISPLAY button
Press to change what is shown on the display from the disc
information to the clock display, etc. (The clock display appears
only when the unit is used on its own.)
e SCROLL button
Press to scroll the text display of discs that support text.
!1 4, ¢ buttons
4 : Press to play from the start of the track now playing. When
they are pressed again within 1 second after it was
pressed the first time, play starts from the track before.
¢ : When pressed once, play starts from the next track.
!2 7 (Stop) button
Press to stop disc play.
!3 1, ¡ buttons
1 : Press to forward-search through the track now playing.
¡ : Press to reverse-search through the track now playing.
These buttons cannot be used during MP3 disc play.
ENGLISH
r AMS button
Press to play the first 10 seconds of all the tracks on the disc in
sequence starting with the first track.
t Numeric buttons
Press to specify track numbers directly. These buttons cannot be
used with MP3 discs.
y REPEAT button
Press for repeat play. Each time the button is pressed, the mode
changes in the following sequence:
All track repeat fi 1-track repeat fi clear.
u RANDOM button
Press for random play to play the tracks in a random sequence.
i TIMER button
Press to set the timer and clock. (These settings can be performed
only when the unit is used on its own.)
o CD TEXT button
Press to switch what is shown on the display from disc information
to text when a CD-TEXT compatible disc is used.
!0 3 (Play) button
Press to start play.
!4 8 (Pause) button
Press to stop disc play temporarily.
!5 PROG. button
Press for program play.
This button cannot be used with MP3 discs.
!6 CANCEL button
Press to cancel a programmed track.
3
 Loading...