

V-Cube™
Floor-by-floor, Vertical Self-contained System
Installation, Operation and Maintenance Instructions Manual
Capacities: 9–150 tons
©2012 Venmar CES Inc.

Table of Contents
Nomenclature ......................................................................................................................................................................3
Safety Considerations .........................................................................................................................................................4
General Information ...........................................................................................................................................................4
Recommended Spare Parts ........................................................................................................................................... 4
Unit Inspection on Arrival.............................................................................................................................................5
Unit Application Limitations ........................................................................................................................................5
Installation ...........................................................................................................................................................................5
Unit Location Requirements .........................................................................................................................................5
Rigging, Lifting and Assembling .................................................................................................................................. 6
Suspended Unit Installation .......................................................................................................................................11
Field Fabricated Ductwork..........................................................................................................................................11
Electrical Connections ................................................................................................................................................. 11
Coil or Water Cooled Condenser (WCC) Piping Connections ................................................................................... 13
Condensate Drain Trap and Lines ..............................................................................................................................13
Start-up .............................................................................................................................................................................. 14
Pre Start-up Check.......................................................................................................................................................14
Start-up Procedure ...................................................................................................................................................... 15
Airflow Balancing........................................................................................................................................................16
Maintenance ......................................................................................................................................................................16
Long-term Storage Maintenance Procedures ............................................................................................................16
Maintenance Summary Chart .....................................................................................................................................16
Refrigerant Systems ....................................................................................................................................................17
Dampers .......................................................................................................................................................................18
Belt Driven Fans...........................................................................................................................................................18
FANWALL® Array .........................................................................................................................................................21
Motors..........................................................................................................................................................................26
Filters............................................................................................................................................................................26
Coils ..............................................................................................................................................................................26
Controls........................................................................................................................................................................27
Troubleshooting ..........................................................................................................................................................27
Appendix A: Water Cooled Condenser (WCC) Piping Installation, Maintenance and Troubleshooting .....................28
Appendix B: Positive and Negative Pressure Trapping ................................................................................................... 32
Appendix C: V-Cube™ Start-up Report and Checklist ....................................................................................................33
Appendix D: HEPA Filter Installation ...............................................................................................................................40
Appendix E: Electric Heating Coil and Controls Information .........................................................................................42
Appendix F: Extended Dormant Unit Maintenance Procedure ......................................................................................44
Appendix G: V-Cube™ Maintenance Summary Chart ....................................................................................................45
Appendix H: Measuring and Adjusting V-belt Tension ..................................................................................................46
Appendix I: FANWALL® Inlet Cone Alignment ................................................................................................................47
Appendix J: Filter Resistance and Latches .......................................................................................................................48
Appendix K: Troubleshooting ..........................................................................................................................................49
Manufacturer reserves the right to discontinue or change specifications or designs without notice or obligation.
VCES-V-CUBE-IOM-1A
2
Nomenclature
VV Y
GSM
000 0
L
Model Indicator
ol Panel Location
V − V-Cube
Volume Control
V − Variable air volume C − Constant air volume
Condenser
N − No cooling X − Dx without WiSE coil W − Dx with WiSE coil
Y − Chilled water cooling Z – Remote condenser A − Airside economizer
Nominal Tonnage
Number of Compressors
0 − Air handler T − Tandem compressors H − Heat pump
Voltage
F − 208-230/3/60 L − 220-240/3/60 G − 460-480/3/60
K − 575/3/60 J − 380-415/3/50
Heating Type
E − Electric H − Hot water
S − Steam X − No heat
Frame Size
S − Small M − Medium
L − Large T − Tall
Contr
L – Left handed unit
R – Right handed unit
CES Group, LLC d/b/a Venmar CES furnishes equipment pursuant to its then-current Terms and Conditions of Sale and Limited Warranty, copies of which can be found under the Terms & Conditions of Sale and Warranty link at www.ces-group.com.
Extended warranties, if any, shall be as offered and acknowledged in writing by Venmar CES.
VCES-V-CUBE-IOM-1A
3
Safety Considerations
!
!
Warning, Caution and Important notes appear throughout this manual in specific and appropriate locations to
alert Installing Contractors and maintenance or service
personnel of potential safety hazards, possible equipment
damage or to alert personnel of special procedures or instructions that must be followed as outlined below.
WARNING
Identifies an instruction which if not followed, might cause
serious personal injuries including possibility of death.
CAUTION
Identifies an instruction which if not followed, might severely damage the unit, its components, the assembly or
final installation.
IMPORTANT
Indicates supplementary information needed to fully
complete an instruction or installation.
General Information
This manual is designed to provide general information
on the common operation of all standard and optional
components that may have been installed in the unit. Note
that some sections of this manual may not apply to your
unit. This manual has been designed for a general purpose
and describes all options offered by Venmar CES Inc. that
could be included in the unit. Consult the manual from
the component manufacturer if more detailed technical
information about a specific component is required.
All documentation that was specifically designed for your
unit has been included in the pocket of the control panel,
including (and if applicable):
Hazards may exist within this equipment because it contains electrical and powerful moving components. Only
qualified service personnel should install or service this
equipment. Untrained personnel can perform basic maintenance such as maintaining filters. Observe precautions
marked in literature and on labels attached to the unit.
Follow all safety codes.
WARNING
Disconnect the main power switch to the unit before performing service or maintenance. Electric shock can cause
personal injury or death.
• Warranties
• Mechanical drawings
• Unit nomenclature
• Electrical schematics
• Sequence of control
• DDC controller documentation (when supplied)
– Controller user’s manual
– Communication protocol documentation
– Hardware documentation
– Keypad documentation
Recommended Spare Parts
Spare parts should be ordered at the time the installation is accepted by the owner. Spare parts will reduce
the down time in the event of a failure. The list of spare
parts outlined below is considered minimal. Installation in
remote locations or when the operation of heating equipment is essential may require more spare parts than listed.
Please contact the service department at Venmar CES for
recommendations.
VCES-V-CUBE-IOM-1A
Minimum spare parts include:
• One matching set of fan belts (belt driven fans only)
• One set of filters
• One set of shell and tube condenser head gaskets
per condenser (water cooled units only)
4

Unit Inspection on Arrival
Inspect the equipment exterior and interior for any damage that may have occurred during unit shipment and for
shipped loose parts. Ensure there is no damage to any
protruding exterior components such as door handles,
disconnect switch handle, etc. or to internal components
such as fans, motors, heat exchanger, dampers and drains.
Unit Application Limitations
CAUTION
Venmar CES equipment is not designed to be used for
temporary heating, cooling and/or ventilation during construction.
Using Venmar CES units for temporary ventilation during construction is subject to the unit warranty terms and
should be reviewed carefully before proceeding, as this
may void the standard warranty conditions.
Installation
Unit Location Requirements
File a claim with the shipping company if the unit is damaged. Check the packing slip against all items received. If
any items are missing sign the carrier’s bill of landing with
the notation “Shipment Received Less Item #_____.” Contact the factory immediately if damage is found. No return
shipment will be accepted without authorization.
Fine dust, larger particulate matter, solvents, varnishes and
other chemicals may cause filter clogging and elevated
cabinet pressures, higher power consumption and possible
irreparable damage to a variety of other key components
that may be present in the system. Potential damages include, but are not limited to, these examples.
Consult local building codes and electrical codes for special installation requirements and note additional requirements listed in this manual. In choosing the installation
location of the unit, consider the following factors:
• The unit should be installed to allow easy access for
maintenance and for systems operation.
• Clearance around the unit should be per the recommended clearances indicated on the mechanical/submittal drawings (varies per unit frame size) in order
to allow easy access for maintenance and for system
operation. For clearances to remove specific components, please consult factory.
• Locate the unit in an area requiring the least amount
of ductwork and direction changes to allow optimum
performance, to reduce pressure loss and to use less
electricity to achieve proper ventilation. Ductwork
must be in accordance with ducting mechanical rules
to prevent sound issues and system effects.
• The unit should be mounted on a level foundation
to allow condensation to flow into internal drains.
The foundation must provide adequate continuous
support to the full perimeter of the base and all cross
members requiring support to minimize deflection
of the unit base frame to not more than 1/16” [1.6
mm] over the entire length and width. In addition to
these recommendations, a Structural Engineer must
be involved to properly size supporting structural elements.
• Once the unit is in place within the mechanical
equipment room, mount the unit on a housekeeping
pad of sufficient height in order to allow for drain
trap height and condensate lines to slope toward the
building drain; install condensate pumps to reduce
height of the housekeeping pads or drill holes in the
concrete pad or mechanical room floor for sufficient
trap height.
VCES-V-CUBE-IOM-1A
5
Rigging, Lifting and Assembling
IMPORTANT
• Carefully read all the instructions contained herein.
Before proceeding with any work, correlate these
instructions with the information provided on the
curb and equipment shop drawing for the specific
project.
• These instructions outline the suggested method of
rigging, lifting and installing a Venmar CES unit. All
local codes and fire regulations must be verified and
adhered to by the Installing Contractor.
• Before assembling, hoisting or setting any pieces of
the supporting curbs or units, verify that the proper
unit is being directed to the correct location, as designated by the architectural and engineering design
drawings.
• Safety first: Ensure that all safety practices recommended by local safety associations are continuously in use.
• If any questions arise during the installation procedure, please contact the factory.
• The Installing Contractor is responsible for the unit
being air and water-tight including all section joints
on the unit.
• All holes that have been made by the Installing or
Electrical Contractor after receiving and installing
the unit must be well sealed to prevent air and/or
water infiltration.
All rigging equipment and labor (as applicable) is provided
by the Installing Contractor as detailed below. It is highly
recommended that extra quantities of all items listed be
on hand. The rigging procedure and/or equipment used to
lift the unit may differ depending on the physical dimensions of the unit, its location, the jobsite, the Installing
Contractor and Crane Operator preferences.
• Lifting crane of the appropriate capacity.
• Adjustable spreader bars.
• Cables (cables, chains or straps).
• All tools required to pull the sections together
(chains, chain blocks, chain type come alongs, etc.).
• All construction equipment and labor required to
complete the work according to local codes.
• Condensate and/or P-trap piping hardware.
• All tools and materials required for level unit installation.
Installation and Assembly Materials for
Multisection (Modular) Units
• Polyvinyl gasket with adhesive strip (½” x 1½” [13 x
38 mm] x required length) applied between unit sections (for split section joints and duct opening connections).
• 3/8” x 2½” Grade 5 full thread zinc plated bolts,
with two washers and one nut each (to secure sections together).
• Adseal 1800 series (from Adchem Adhesives) clear
silicone based sealant or equivalent (for side and top
joints).
Rigging, Lifting and Assembling Instructions
Depending on size, the unit or unit sections of a multi-section (modular) unit will arrive at the jobsite on a standard
flatbed or special low bed trailer. Each unit or unit section
is identified with labels, as per the mechanical drawings.
At ground level, ensure that any crating used for shipping
purposes is removed if there is a possibility that it will interfere with the placing or assembling of the unit or unit
sections on the structural steel or housekeeping pad.
Unit or unit sections shall be lifted by cables attached to all
the lifting lugs. Consult the mechanical drawings located
in the pocket of the control panel for the number of lifting lugs, number of sections and unit weight. For multisection (modular) unit check for additional lugs located
between split sections. Lifting lugs are factory bolted to
the unit or unit section base.
CAUTION
All lifting lugs provided must be used when rigging units
or unit sections. Rigging and lifting unit or unit sections
without using all lifting lugs provided will compromise
the structural integrity of the unit or unit section. Never
lift, rig or ceiling suspend from the top of the unit or unit
sections. Using a forklift or similar device for moving,
lifting or rigging unit or unit sections is prohibited. The
use of a forklift or other similar device is only allowed for
modular unit sections that are mounted on wooden skids
within the factory prior to shipment. The sections must
be forklifted individually along its longest side only.
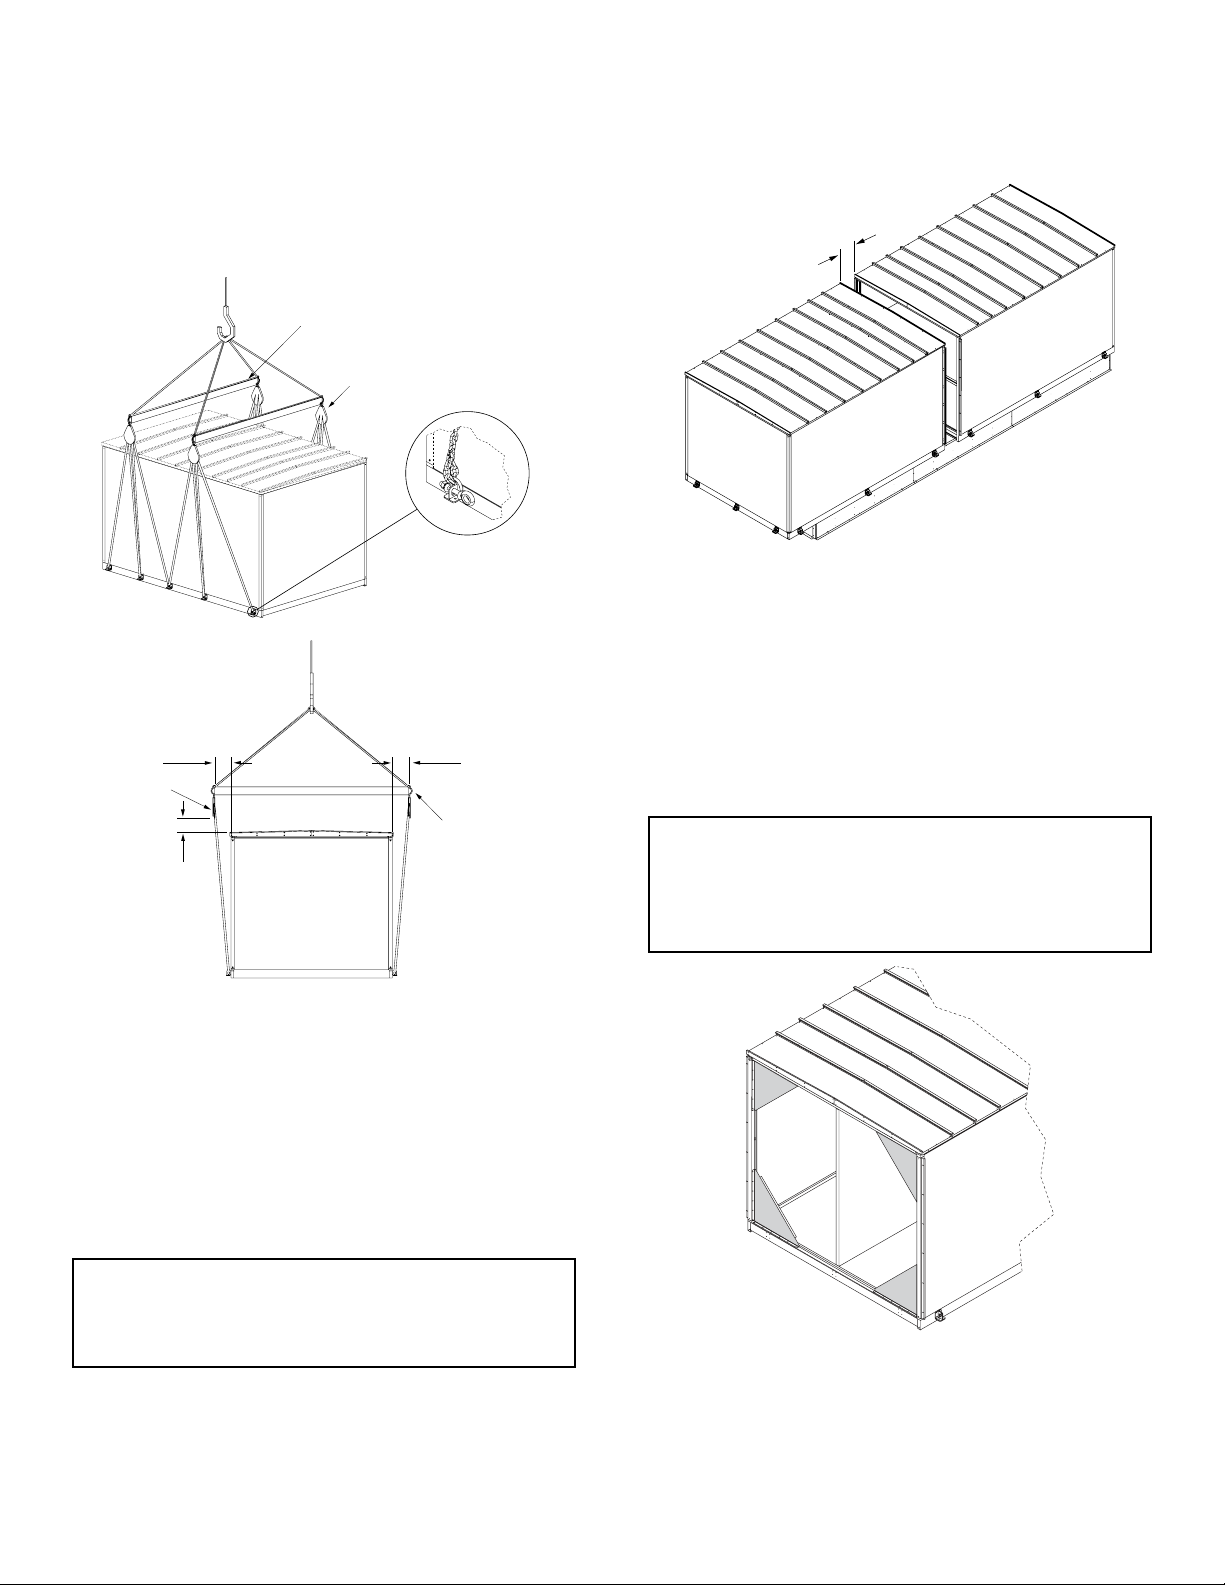
When lifting the unit or unit sections, use adjustable
spreader bars, pulleys, cables (straps or chains) in order
to properly distribute the load, applying an even vertical
lifting force only at all the lifting lugs to prevent structural
damage to the unit or unit section or prevent cables from
rubbing against the cabinet (see Figure 1). Provide additional blocking and coverings (as required) to prevent
damage to the unit finish and/or components. The adjustable spreader bars are required to maintain a clearance
between the cables and the unit or unit section of at least
12” [305 mm] beyond the sides. Venmar CES will not be
responsible for any damage caused to the unit casing during the lifting process. Main areas where damage may
occur are: electrical panels, filter gauges, roofing corners,
door handles and paint finish. The lifting point must be at
the center of gravity to ensure that the unit or unit section
is level during hoisting and prior to setting. When commencing to hoist, take up the slack in the hoisting cables
slowly and gradually increase the cable tension until the
full unit or unit section weight is suspended. Avoid sudden, jerking movements. Do not permit the unit or unit
VCES-V-CUBE-IOM-1A
6
section to be suspended by the lifting lugs for an extended
See Detail A
period of time. Once the unit or unit section leaves the
trailer, ensure it is level at all times.
Adjustable
spreader bars (typ.)
Pulleys (typ.)
Detail A
Use clevis and
clevis pin to attach
cable to lifting lugs.
12” 12”
Pulleys
Adjustable
spreader bars
12” min.
6” max.
Figure 2: Set the next section approximately 6” [152 mm]
from the first section.
3. Corner reinforcement brackets or angle bars may
have been used to support multi-section (modular)
unit walls during transportation, rigging and lifting
at the split. The brackets shown in Figure 3 are for
larger units. Simple angle bars are used for smaller
units (not shown). The corner reinforcement brackets
or angle bars are no longer required after rigging and
lifting and must be removed.
IMPORTANT
After the corner reinforcement brackets or angle bars
have been removed from the split section, set the screws
along with the rubber washers that were holding the
brackets or angle bars back in place for water-tightness.
Figure 1: Use adjustable spreader bars, pulleys and cables
attached to all lifting lugs to apply an even lifting force.
Assembling a Multi-section (Modular) Unit
Special attention must be taken to ensure that a multisection (modular) unit has an air and water-tight seal at
every section split. Follow the next set of instructions for
assembling a multi-section (modular) unit.
1. Remove the yellow lifting lugs located on the section
joint (if any) once the first section is set in place.
IMPORTANT
Yellow lifting lugs located on the section joint (if any)
must be removed once the first section is set in place to
allow the next section to be pulled to the first.
2. Set the second section approximately 6” [152 mm]
from the first section (see Figure 2). Remove the
yellow lifting lugs located on the section joints (if
any) from the second section to allow sections to be
pulled together.
VCES-V-CUBE-IOM-1A
Figure 3: Corner reinforcement brackets or angle bars to
be removed from the split section. Reset the screws with
rubber washer in place for water-tightness.
4. Verify that these two sections are aligned square at
the joint in all three directions.
7
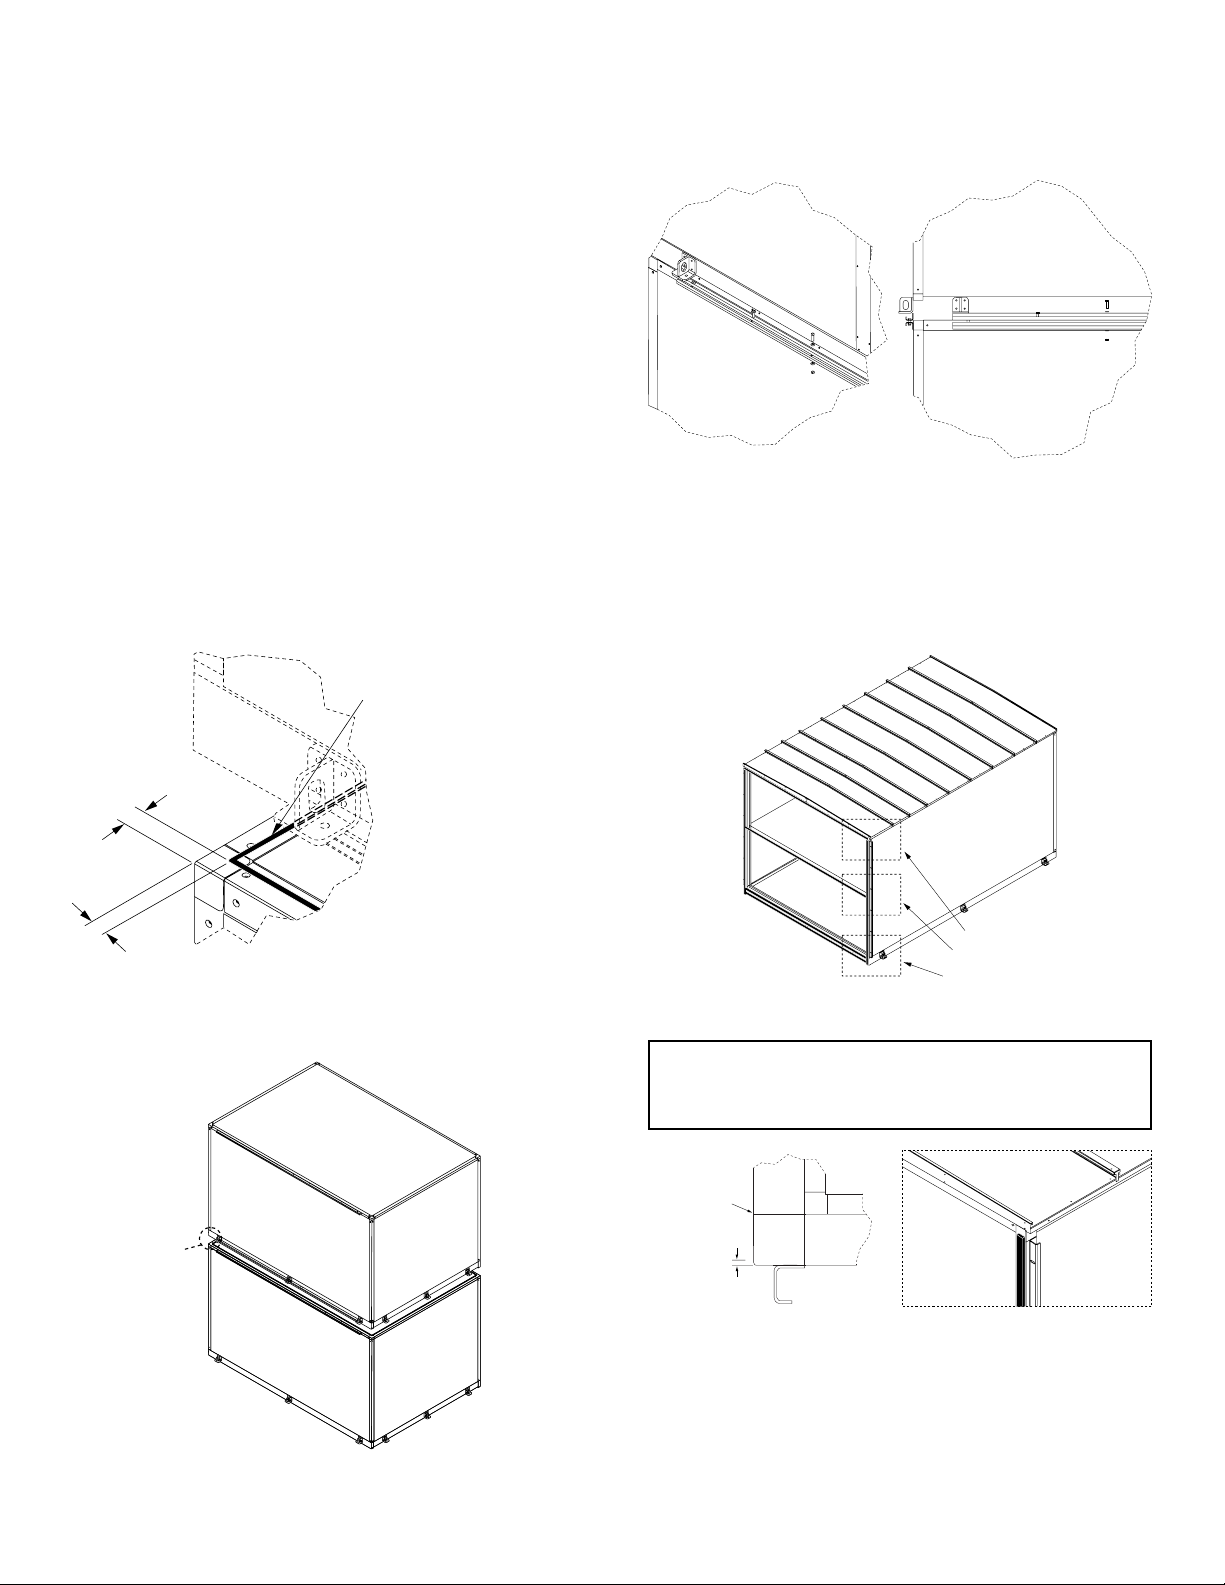
5. For modular integrated water cooled units, the
acoustical butyl sealant
1½”
Detail at A
5b
½” x 1½”
polyvinyl gasket
compressor/condenser section should first be mated
to the coil section as outlined in Figure 2 prior to
mounting the fan section. The internal water and refrigerant piping must then be completed in the field
by the Installing Contractor. Once the field piping
is complete a bead of Adcoustik butyl sealer should
be applied to the top of the condenser/compressor
section as illustrated in Figure 4a. The fan/blower assembly should then be gently lowered on top of the
compressor/condenser section as shown in Figure 4b.
Finally the top and bottom sections should be joined
together with bolts, nuts and washers as per Figure
4c. After reassembly, the unit will require pump
down (evacuation) and refrigerant charging. Factory
shall provide dry nitrogen “holding” charge only. Refrigerant, additional copper piping and insulation for
field connections shall be supplied by others. Filter
drier shall be shipped loose for field installation.
½” [13 mm] bead of
ADBOND 1465
Figure 4c: Secure the top and bottom sections together
with bolts, nuts and washers. Do not over tighten.
6. Install the ½” x 1½” [13 x 38 mm] 6. polyvinyl gasket
with adhesive strip directly on one side of the split
section perimeter frames and middle interior partitions as shown in Figure 5a through Figure 5d.
Figure 4a: Apply a ½” bead of Adcoustik butyl sealer atop
of the condenser/compressor section prior to placing the
fan/blower section above it.
Figure 4b: Gently lower the fan/blower section atop of the
compressor/condenser section.
1½”
A
5a & 5c
5d
Figure 5: General gasket layout
IMPORTANT
Make sure to have full contact between strips wherever a
discontinuity is present, for air- and water-tightness.
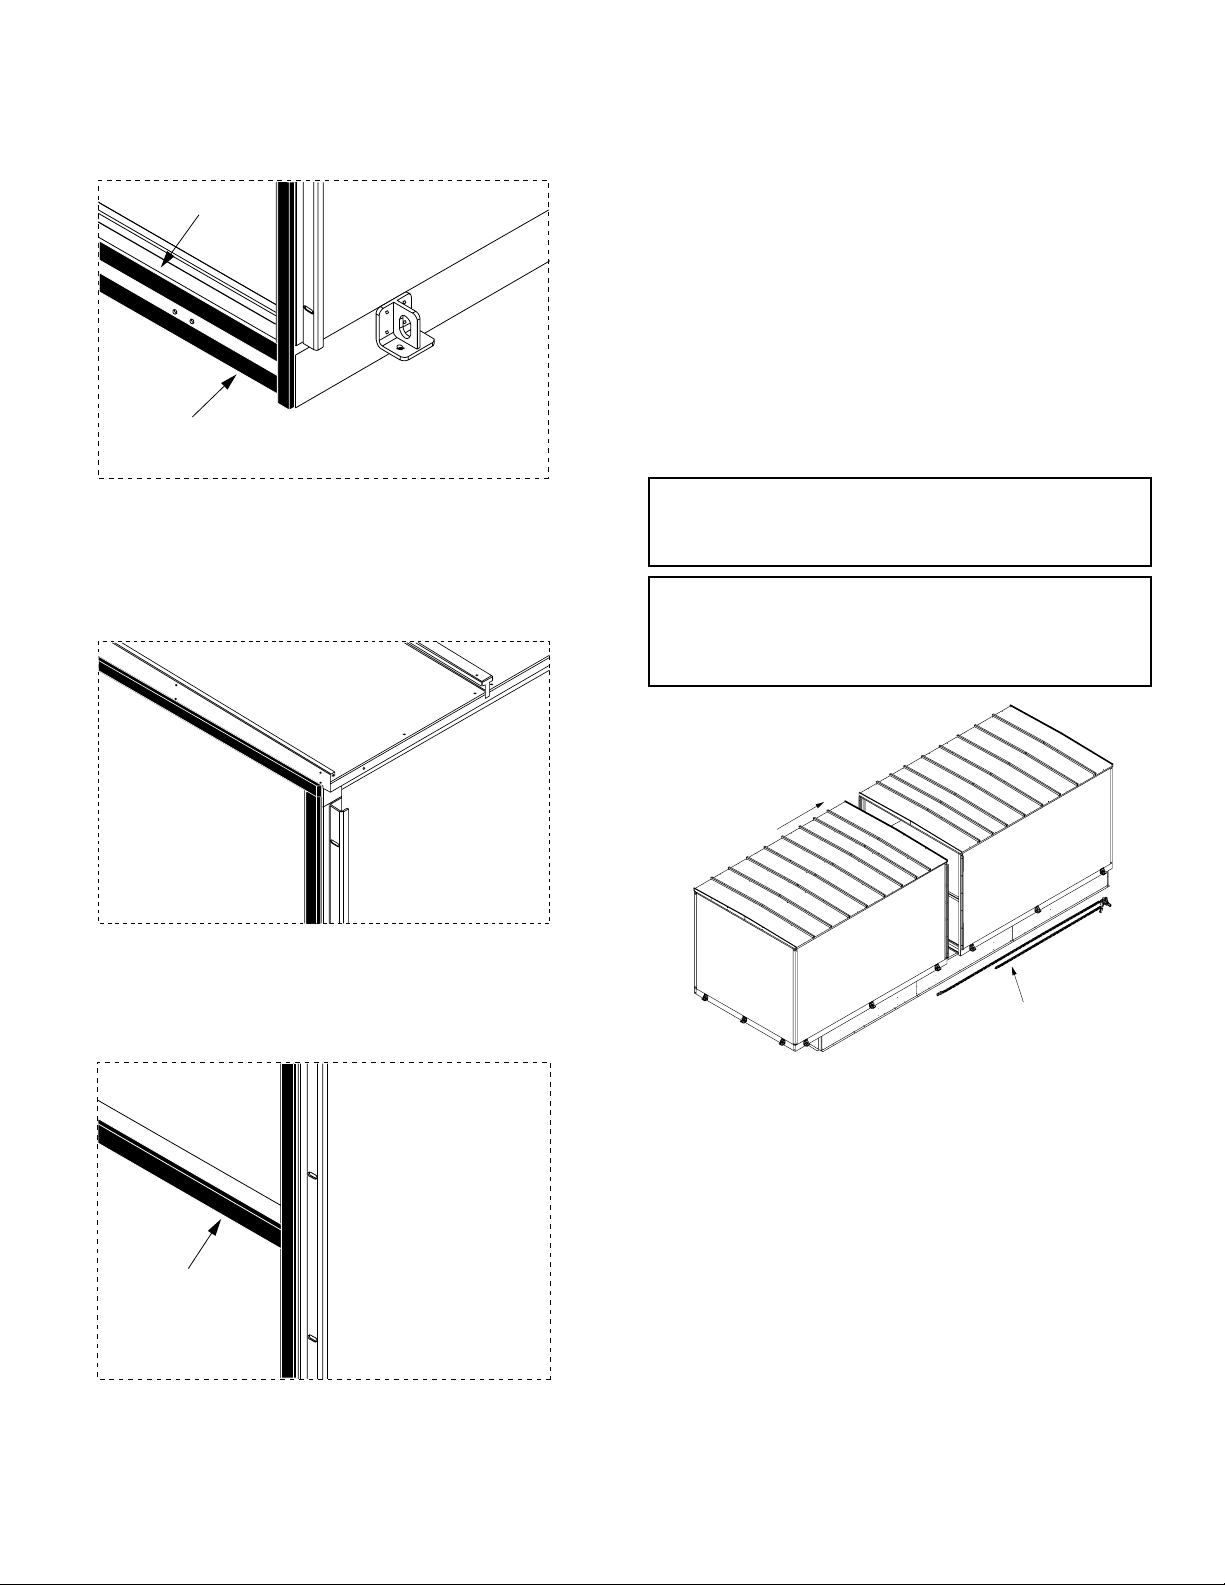
¼”
Figure 5a: Install a polyvinyl gasket strip on each vertical
outside wall ¼” [6.4 mm] from the outside side edge from
top to bottom of the side joint. When compressed, a small
gap will remain which will allow the Adseal 1800 series
silicone based sealant or equivalent to seal the vertical side
edges (explained in Figure 8).
VCES-V-CUBE-IOM-1A
8
Bottom
of frame
Top of
frame
7. Use tools (chains, chain blocks, 7. chain type come
along, etc.) connected to the side lifting lugs (attached to the base) on both sides of the unit to pull
the second or next section to the first end section
evenly until both sections are ¼” [6.4 mm] apart on
the full joint perimeter as in Figure 6. Remove any
yellow side lifting lugs that interfere with the chains
for pulling sections together. When joining sections
together, always apply the pulling force to the lifting
lugs attached to the unit structural base, never to the
corner posts and pull uniformly from both sides of
the unit section.
Figure 5b: Install two horizontal polyvinyl gasket strips
along the base frame, one at the top and one at the
bottom of the base frame between the two vertical side
gasket strips so there is full contact between gasket strips
for air- and water-tightness.
Figure 5c: Install one horizontal polyvinyl gasket strip
along the top frame between the two vertical side gasket
strips so there is full contact between gasket strips for airand water-tightness.
IMPORTANT
Unit sections must be drawn together using the lifting
lugs attached to the unit structural base only.
CAUTION
Do not use the vertical side casing framing or bolt holes
to pull sections together as this may cause the corner
posts to warp and break their air- and water-tight seal.
Displacement
Tools supplied
by others
Figure 6: Use tools (chains, chain blocks, chain type come
along, etc.) hooked to the unit lifting lugs attached to the
structural base on both sides of the unit to pull the second
or next section to the first section evenly.
Middle
internal
partition(s)/divider(s)
Figure 5d: Where two or more internal air tunnels/corridors are present, install the gasket strips on the middle
internal horizontal and/or vertical partition(s)/divider(s),
between the perimeter gasket strips so there is full contact
between gasket strips for air- and water-tightness.
VCES-V-CUBE-IOM-1A
8. With the sections pulled together, use the 3/8” x
2½” bolts, nuts and washers to secure the sections
together along the sides as in Figure 7. Start at the
bottom and gradually tighten all bolts to apply an
even load along both sides and along the top (not
at one place) until sections or gasket is compressed
within ¼” [6.4 mm].
9
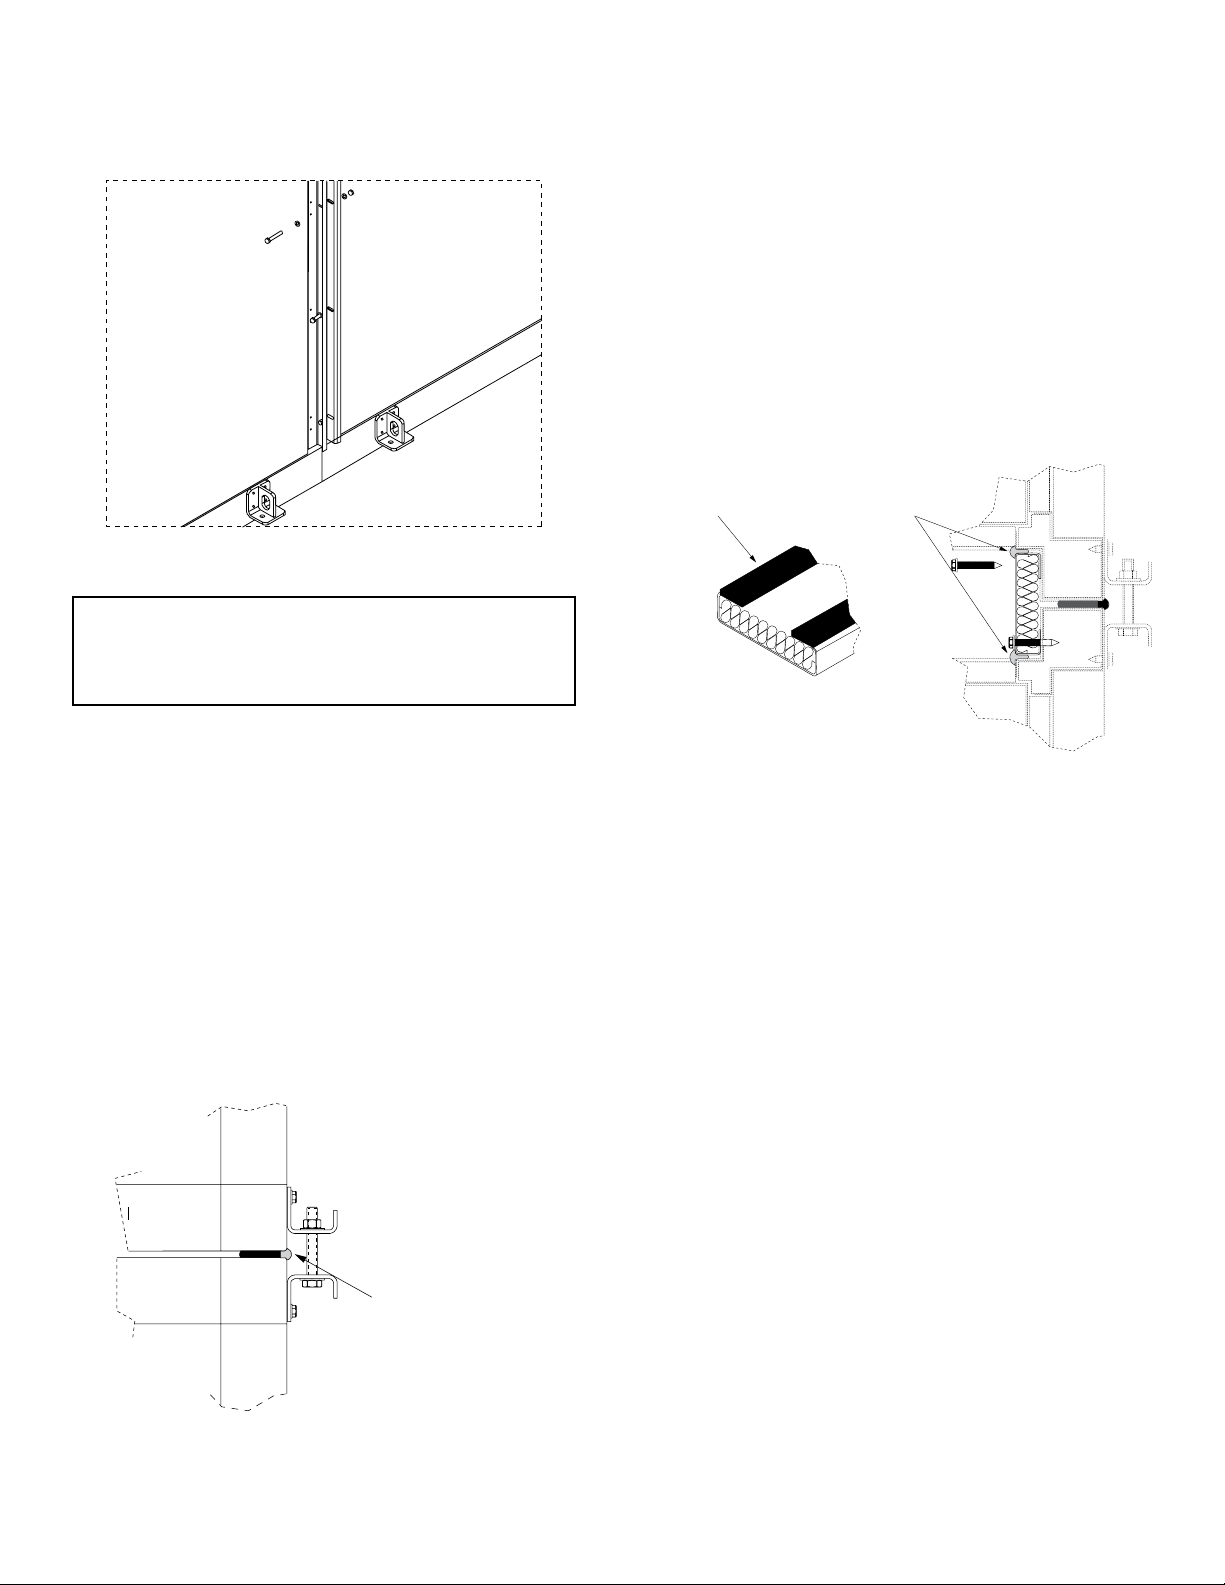
Figure 7: Secure the sections pulled together with bolts,
1/8” x 1” neoprene
SOFT SEAL gasket
nuts and washers. Do not over tighten.
CAUTION
Do not over tighten the side bolts as this may cause the
corner posts to warp and break their air- and water-tight
seal.
9. After two sections are assembled, verify that the
assembly is level and square. If an adjustment is required, make certain to address it immediately, not at
the end of the final assembly.
10. If multi-section unit has more than two sections follow Steps 1 through 9 for each additional section,
always pulling the next section from the first end section.
11. Apply a generous bead of Adseal 1800 series clear
silicone based sealant (or equivalent) to the exterior
side frame joint seams to completely cover the section split gasket and in such a way that the silicone
bead meets with both frames as in Figure 8. The
bead of clear silicone based sealant should fill the ¼”
gap, as shown in Figure 8.
12. All lifting lugs removed on the exterior of the base
for pulling sections together must be returned or if
not desired the bolts must be set back in place. Once
removed the bolts must be returned and sealed with
clear silicone based sealant for water-tightness. All
other lifting lugs from the unit base may be removed
if desired or left in place. When removing lifting lugs
on the exterior of the base, set the bolts back in
place and seal with clear silicone based sealant for
water-tightness.
Bead of Adseal 1800
clear silicone based
sealant
Figure 9: a) Install the gasket strips on the inside edges
of the inside caps; b) Install caps in place with self-drilling
screws; c) Apply a continuous bead of Adseal 1800 clear
silicone based sealant (or equivalent) to the inside cap
seams and partition(s)/divider(s).
Figure 8: Apply a continuous bead of Adseal 1800 clear
silicone based sealant (or equivalent) to the exterior side
frame joints and for indoor units along the top frame
joints.
VCES-V-CUBE-IOM-1A
¼” bead Adseal
1800 clear silicone
based sealant
10

Suspended Unit Installation
min.
!
To install units that will be permanently suspended, the
units must be set on structural steel beams that are supported by vertical rods. Venmar CES recommends beams
under the full perimeter and all cross members requiring
support. In addition to these recommendations, a Structural Engineer must be involved to properly size the supporting structural elements. Note that the locations of the
beams shall be coordinated with the location of access
doors to prevent any interference (see Figure 10). Single
section unit shown; for multi-sectional unit suspension,
consult factory.
Field Fabricated Ductwork
Anchor
40”
Figure 10: Indoor suspended installation
40”
min.
On indoor or indoor vertical duct connections, make connections to the casing by applying Adseal 1800 silicone
based sealant or equivalent around the connection and
screwing flanged ducts directly to the casing and/or flange
with self-drilling sheet metal screws. It is important to seal
all duct connections to prevent air leakage and system
performance problems. Ductwork must be supported by
the building structure.
For duct connection sizes, see the mechanical drawings.
Insulate and weatherproof all external ductwork, joints
and roof openings with counter-flashing and mastic in
accordance with applicable codes. Ductwork running
Electrical Connections
WARNING
When installed, the unit must be electrically grounded in
accordance with local codes or, in the absence of local
codes, with the National Electrical Code, ANSI/NFPA70,
and/or the Canadian Electrical Code CSA C22.1. Unit
cabinet must have an uninterrupted, unbroken electrical
ground to minimize the possibility of personal injury if an
electrical fault should occur. Failure to follow this warning
could result in the installer being liable for personal injury
of others.
The unit is factory wired (unless otherwise specified)
except for power connections, shipping split locations,
shipped loose sensors/items or remote control options
as indicated in the electrical schematics and sequence of
control. The unit may or may not have an optional factory
installed door interlocking disconnect in the control panel.
through roof decks must comply with local fire codes.
Ducts passing through unconditioned spaces must be insulated and covered with a vapor barrier.
The ventilation system should be designed according to
maximum airflow needs. To minimize noise level and loss
of pressure, ducts should be designed for a maximum air
velocity of 1,200 feet per minute, keeping the direction
and transition changes to a minimum. To further reduce
noise transmission, line the first 15 feet [4,572 mm] of
duct with acoustic insulation. Elbows with a turning radius
equal to or greater than 1, or 90º elbows with turning
vvanes, should also be used.
If the unit control panel disconnect is not supplied the
Electrical Contractor must provide and install disconnect
outside of the unit as per local electrical codes and run the
power supply wiring to the control panel.
• For multi-section (modular) units, the Electrical Contractor must join the low voltage wiring between unit
sections using quick connections supplied by Venmar
CES and join the high voltage wiring between sections at the junction boxes or extend coiled wiring.
• Check nameplate for correct power supply requirements.
• See electrical schematics and sequence of control lo
cated in the control panel pocket for field wiring of
power connections, shipped loose sensors, items or
remote control interlocks. The Electrical Contractor
must locate, install and wire sensors, items or remote
VCES-V-CUBE-IOM-1A
11
control interlocks as per electrical schematics and sequence of control.
• Numbered terminals strips are included in the control
panel for ease of connection and service.
• All field wiring and components must comply with
NEC and local requirements. In Canada, electrical
connections must be in accordance with CSA C22.1
Canadian Electrical Code Part One.
• Install copper wiring of proper size to handle current
load.
• Mounting of field provided components in the control panel is allowed as long as their space was considered during the submittal process. Non considered
electrical components are not allowed in the control
panel. It is the responsibility of the Control Contractor to provide his own power source(s) for any field
added electrical components. The control panel
mounted transformers are not rated for external
components power supply unless otherwise listed on
the electrical schematics.
Electrical Field Connections
Shipped loose sensors, items or remote control wiring
can be located next to the power feed cable provided it
is inserted in shielded cable that will protect it from electromechanical interference. Ensure the power feed cable
ground is securely connected to the terminals located in
the control panel.
Electrical Contractor must provide wiring for controls that
are supplied optionally and shipped loose or field supplied. Mark the electrical schematic with the connections
completed and leave them with the unit for start-up and
service.
CAUTION
High voltage power lines, shipped loose sensors, items
or remote control option field wiring entry points may
only be field extended through the cabinet within designated areas. The unit cabinet and/or floor must be
wisely penetrated in order to keep their integrity. Access
openings in the floor can only be cut or drilled for piping
and wiring (high and low voltage) in the designated rectangular areas within an upturned 1” [25.4 mm] flange
as provided during the submittal process and located on
the mechanical drawings. Access openings must be sized,
field cut or drilled by the Installing Contractor within the
rectangular flanged area then sealed air- and water-tight.
If insulation was removed to create floor access openings,
insulation must be put back in place to avoid condensation. Do not cut or drill holes through floor of unit in non
designated areas without consulting the factory first. The
structural integrity of the floor may be compromised and
possible leaks develop.
VCES-V-CUBE-IOM-1A
12

Coil or Water Cooled Condenser (WCC) Piping Connections
CAUTION
Internal coil (water, steam or non-integrated direct expansion), WCC piping connections within the unit may
only be field extended through the cabinet within designated areas. Connections to the unit coil (water, steam
or nonintegrated direct expansion, WCC) are by others.
External supply and return piping connection, provision,
design and all other safety (such as dielectric couplings
or other), freeze protection or electrical control requirements for system operation are the sole responsibility of
the Installing Contractor and/or Design Engineer. Refer to
ASHRAE handbooks and local building codes for correct
piping and electrical control for proper installations. Refer
to the mechanical drawings for coil performance design
information.
Connections to the unit coil (water, steam or non-integrated direct expansion, WCC or humidifier) are by others.
Refer to the mechanical drawings and the instructions
on the casing for correct orientation of external piping.
External supply and return piping connection, provision,
design and all other safety, freeze protection or electrical
control requirements for system operation are the sole
responsibility of the Installing Contractor and/or Design
Engineer. Refer to ASHRAE handbooks and local building
codes for correct piping and electrical control for proper
installations. Refer to the mechanical drawings for coil performance design information.
For WCC units, see Appendix A. See the piping schematics
for optional piping components and sequence of operation for electrical control options or interlocks supplied
with the unit.
CAUTION
A water and glycol mixture is used for factory tests and
to prevent any possibility of freezing during transit and/
or storage. In units that include factory installed water
piping, some glycol may remain in the system. Flush the
system in the field, prior to installation, if no glycol traces
are desired. In low temperature applications, the water
supply line and return line should be insulated to prevent
condensate and an antifreeze solution should be used to
protect water-to-refrigerant heat exchanger from freezing damage.
IMPORTANT
A hydrostatic test must be performed in the field by the
Installing Contractor at 1.25 times the operating pressure
on all equipment involving piping connections to verify
that the installed unit and its connections to the network
are free of leaks prior to the unit being set in operation.
This test shall be performed after the unit is completely
piped to the network and shall cover the connections
between the unit and the network, as well as all internal
components of the unit.
Condensate Drain Trap and Lines
Cooling coils, humidifiers or other options that can produce condensation are provided with a drain pan with a
1¼” [32 mm] MPT (Male Pipe Thread) drain connection.
A drain trap and condensate line of equal size must be
field provided by the Installing Contractor on the drain
connections and coupled to the building drainage system
to prevent air or sewer gases from being pulled into the
unit caused by the negative (suction) pressure and forcing
water out of the pan into the unit or from air escaping
into the drain caused by positive pressure. See Appendix
B for illustrations and dimensional information on positive
and negative pressure trapping height. Slope the drain
lines downward in direction of flow not less than 1/8” per
foot toward the building drainage system; otherwise, use
a condensate pump. Refer to local codes for proper drainage requirements. Installing a plug for cleaning of the trap
is recommended. Fill the P-traps with water before starting
the unit. Check and clear drains annually at start of cooling season. Drainage problems can occur should drains be
inactive and dry out or due to reduced water flow caused
by buildup of algae. Regular maintenance will prevent
these from occurring.
VCES-V-CUBE-IOM-1A
13

Start-up
Pre Start-up Check
Before requesting start-up, check that the installation is
complete and unit is ready. Complete the pre start-up
below (if items are applicable) and the checklist in Appen-
dix C for each unit. For torque values on set screws, belt
tension, etc. check under Operation and Maintenance.
1. Check the electrical disconnect is in 1. the ‘Off’ position.
2. Check the split section joints are properly installed on
multi-section units.
3. Check that all holes that have been made by the
Installing Contractor after receiving the unit in the
casing, partitions or floor have been well sealed to
prevent air and/or water infiltration.
4. Check the unit for obstructive packaging, objects
near or in fans, dampers, etc.
5. Remove all retaining bolts on fan bases.
a. Check that the fan impellers are rotating freely.
b. Check fan impeller and drive set screws. Tighten
if required.
c. Check the fan bearing set screws or locking col-
lars. Tighten if required.
d. Check fan belt alignment and tension.
6. Check that the air filters are installed and clean.
Replace if necessary. See Appendix D for optional
downstream high efficiency HEPA filter installation (if
supplied).
a. Check all face-mounted filters are attached with
four clips each.
b. Check each sliding filter has a retainer at the end
track and well attached blank-offs.
c. Check that the filter pressure differential gauges,
switches or sensors are free of dirt and set at a
value satisfactory to the end user to trigger a filter change.
7. Check coils if fins have been damaged in shipping,
installation or building construction and are clean.
Straighten fins with fin comb and clean coil if required.
a. Check all pipe connections are tight and that no
damage has occurred during shipping or installation.
b. Check that the piping to the coils and WCC have
been completed, piping lines have been flushed,
filled, vented and tested at 1.25 times the operating pressure.
c. Refer to Appendix A for WCC piping installation
and check that it is complete.
8. Scroll compressor RIS vibration isolator bolts are factory tightened to the correct torque setting for operation and do not require field adjustment.
a. Check that refrigerant components and piping
are in good condition and have no damage or
leaks from shipping or installation.
b. Check that the clearance around the water
cooled condenser (WCC) is in accordance with
minimum recommended clearances.
9. Check motorized damper control arms, control rods
and shafts for tightness.
a. Check that non motorized dampers rotate freely.
10. Check that ductwork is connected, complete and
free of obstructions.
11. Check that condensate drain connections have been
trapped, installed correctly and filled.
12. Check that all shipped loose or field supplied components have been correctly installed and wired.
13. Check that the wiring diagram has been marked up
accordingly and left with the unit.
14. Check that all power supplies and control wiring
have been inspected and approved by the Local Authorities having jurisdiction.
15. Check all factory and field wiring connections for
tightness. Tighten if necessary.
16. Check that all fuses are properly installed in holders.
17. Check the voltage at the disconnect switch against
the nameplate and against phase-to-phase readings
on three-phase. If the voltage is not within 10% of
rated or 2% of phase-to-phase, have the condition
corrected before continuing start-up.
18. Check that all field piping and venting installation
and connections for the heating and cooling options
have been completed and tested.
19. Set the heating and cooling enable switches to the
‘Off’ position.
VCES-V-CUBE-IOM-1A
14
Start-up Procedure
!
To ensure proper operation of each unit, qualified personnel should perform the start-up as outlined below (based
on options included with unit) and complete the Start-up
Report and Checklist in Appendix C for permanent record.
A completed report and checklist will provide valuable information for personnel performing future maintenance.
IMPORTANT
• A completed copy of the Start-up Report and
Checklist must be sent back to the factory for warranty validation and for factory assistance.
• General information on the factory installed and
programmed DDC control system regarding the
navigation and monitoring of the unit with the
standard keypad are provided in separate documents. For more specific information regarding the
sequence of control, the different options of control
or network communications, see these documents
included with the unit in the control panel pocket.
• If units are equipped with compressors, power must
be turned on for 24 hours prior to a call for cooling,
for the compressor crankcase heaters to be energizing to prevent possible damage.
WARNING
• Electric shock can cause personal injury or death.
• Only qualified service personnel should install and
service this equipment.
• The keypad must be used to check operation according to sequence and to adjust setpoints while
power is on for start-up and while performing service.
• All units are factory run tested. Fans, compressors
and condenser fans (if equipped and refrigerant piping is not split for shipment) are set up to run correct
when power is connected. If any one fan is running
backwards or compressor is making loud noises, disconnect power and switch two leads (on three-phase
power) to ensure proper rotation and avoid damage.
With multi-section units with split wiring connections
check rotation of fans, compressors and condenser
fans for correct rotation to ensure wiring connections
are correct.
7. Recheck the voltage at the disconnect switch against
the nameplate and against phase-to-phase readings
on three-phase with all fans operating. If the voltage
is not within 10% of rated or 2% of phase-to-phase
have the condition corrected before continuing startup.
8. Check amperage draw to each motor on each phase
against motor nameplate FLA. If significantly different check ductwork static and/or take corrective action.
9. Feel the compressor crankcases. They should be
warm if the disconnect has been on for at least 24
hours. This will assure that no refrigerant liquid is
present in the crankcase which could cause compressor damage or failure to occur on start-up.
10. Before activating the compressor(s), ensure that any
water shut-off valves are open and that water is
circulating through the water-to-refrigerant heat exchanger. Check the incoming line water pressure to
ensure it is within design and acceptable limits.
11. Enable cooling and check that compressors and condenser fans are rotating in the correct direction.
12. Check if the sound of the compressor is normal or if
there is excessive vibration.
13. Check all field and factory refrigerant and water piping connections for leaks and correct.
14. Check the operation of the control options provided
on the unit.
15. Check the reference setpoints on the keypad operation guide against the sequence of operation, adjust
and record changes as required.
16. When unit has achieved steady state take measurements and complete the readings section of the
start-up report in Appendix C.
17. Set the keypad to each mode of operation and check
the operation according to sequence.
18. For recirculation scheduling mode the outside air and
exhaust air dampers must be adjusted during start-up
to achieve the required outside and exhaust air volumes. See Airflow Balancing for further information.
19. Send copy of the completed start-up reports to Venmar CES to validate warranty. Maintain a copy of the
reports at the unit for future reference.
1. Before proceeding complete the Pre 1. Start-up
Checklist.
2. Check that all access panels or doors are closed.
3. Open the access door to the main control panel to
access the keypad interface device.
4. Bump-start the unit to verify that the fan wheel(s) are
rotating in the correct direction.
5. Set the keypad to occupied mode with heating and
cooling disabled and fan(s) enabled.
6. Check that dampers are operating properly.
VCES-V-CUBE-IOM-1A
15
Airflow Balancing
!
IMPORTANT
Before measuring supply and exhaust flows, the building
must be in its normal state:
• Hermetically close doors and windows.
• Shut down hot air generators and combustion
water heaters.
• Install all ventilation system components: filters,
grilles, diffusers, etc.
For proper performance the unit must operate at the specified supply and exhaust flow rates as shown in the mechanical drawings. Unit fan speed(s) and damper positions
are theoretically set at the factory based on the ductwork
static pressures and flow rates specified in the mechanical
drawings. If conditions change or verification is required,
airflow measurements should be taken using AMCA suggested methods. This would normally be a velocity traverse
measurement or flow measuring station (FMS) installed in
the ducts. Where space is limited in the outdoor air and
exhaust air, pressure drop readings can be taken across
the energy recovery heat exchanger (with economizer heat
recovery bypass dampers closed, if equipped) and com-
pared to the submittal documents. Heat recovery performance is tested in accordance to AHRI Standard 1060 and
is accurate to within +/− 5% if there is no dirt buildup in
the heat recovery heat exchanger. Should flow rates need
to be reset, adjust the outside air, exhaust air or mixed air
dampers, variable speed sheaves, VFD fan speed setpoint
positions or change the sheaves.
Flow measuring stations (FMS) and magnahelic gauges can
also be used to measure supply and exhaust flow. It is important to locate the FMS in the “warm side” ductwork to
minimize the effect of differences in air density, especially
when balancing during extremely cold outside conditions
or to take temperature readings and make the necessary
corrections if installed in the “cold side” ductwork. Air
density variations can affect the FMS by more than 15%.
The FMS should be located downstream in straight sections of duct and not immediately after fans or obstructions that will cause turbulent flow.
If the unit has been in operation before the air balancing,
ensure the unit filters are clean or include pressure drop
readings across the filter banks with the report.
Maintenance
Long-term Storage Maintenance Procedures
WARNING
Many of the following steps need to be performed with
the unit powered off and locked out. Disconnect the
main power switch to the unit before performing service
and maintenance procedures.
Maintenance Summary Chart
Please refer to Appendix G for a recommended list of
routine maintenance items and time intervals. A more detailed description of maintenance items follows.
Please refer to Appendix F: Extended Dormant Unit Maintenance Procedure and Checklist, for maintenance instructions to follow if the unit is to be stored for a period of
time exceeding one month. Following the instructions in
this appendix will assist in preventing potential unit damage that may result from an extended storage period.
VCES-V-CUBE-IOM-1A
16

Refrigerant Systems
!
Distributor
application (optional)
Bulb clamp
WARNING
Many of the following steps need to be performed with
the unit powered off and locked out. Disconnect the
main power switch to the unit before performing service
and maintenance procedures.
Compressors
Scroll-type compressors are the most common type of
compressor used by Venmar CES. Other types of compressors are available upon request, if required. Maintenance
and service on compressors must be completed by a licensed service mechanic. Provincial or state regulations
frequently require such qualifications for compressor maintenance. If a compressor cycles, leaks or has any defects,
contact Venmar CES as soon as possible.
Water Cooled Condensers
Shell and Tube Condensers
Most integrated water cooled units contain shell and
tube condensers. Periodically, water tubes should be
mechanically cleaned to ensure optimum condenser efficiency. Frequency of cleaning will depend on individual
water conditions, so a suitable cleaning schedule should
be arranged based on experience and knowledge of the
building or local water supply loop. Cleaning brushes are
available from most refrigeration supply outlets. For better
results, always remove both heads before cleaning water
tubes.
Note that head gaskets do not require renewing at every
maintenance operation. However, if the head gasket is
physically disfigured or deteriorated in any way, the system
will require new gaskets in order to retain the water-tight
seal required for correct system operation.
Evaporator Section
The direct expansion coil is constructed of seamless copper tubing expanded into full collared aluminum fins. The
tubes are arranged for a counter flow circuit and staggered to provide maximum heat transfer. A pressure type
distributor with hot gas inlet port and a heavy duty copper
suction header are included. Additional refrigerant circuit
components include thermostatic expansion valves with
external equalizer and hot gas bypass valves on the full
face of the leaving side of the direct expansion coil (HGBP
option is removed when optional digital scroll compressors
are utilized).
Liquid line
Hot gas bypass line
Suction line
Expansion valve
Check valve on remote condensing
Evaporator coil
Figure 11: Direct expansion (Dx) coil
Thermostatic Expansion Valve
The thermostatic expansion valve (TXV) is a precision device designed to meter the flow of refrigerant into the
evaporator, thereby preventing the return of liquid refrigerant to the compressor. By being responsive to the temperature of the refrigerant gas leaving the evaporator and
the pressure in the evaporator, the thermostatic expansion
valve can control the refrigerant gas leaving the evaporator at a predetermined superheat. Three forces that govern the operation of the TXV are:
1. The pressure created by the remote bulb and power
assembly (P1).
2. The evaporator pressure (P2).
3. The equivalent pressure of the superheat spring (P3).
Remote clamp
P
1
Diaphram
P
2
P
3
Figure 12: Thermostatic expansion valve (TXV)
External
equilizer
port
Components of a Direct Expansion (Dx)
System
The evaporator is that part of the low pressure side of the
refrigerant system in which the liquid refrigerant boils or
evaporates, absorbing heat as it changes into a vapor.
VCES-V-CUBE-IOM-1A
17

Dampers
!
WARNING
Many of the following steps need to be performed with
the unit powered off and locked out. Disconnect the
main power switch to the unit before performing service
and maintenance procedures.
Units from Venmar CES may or may not incorporate the
use of dampers. If dampers are present within the unit,
the following maintenance should occur in order to prevent the unit from working under too much pressure and
to prevent any other issues.
Dampers must be kept free of foreign matter that might
impede normal free movement. Bearings between blades
and frames are made of polymer and require no maintenance. Note that the damper shafts do not need lubrica-
Belt Driven Fans
Belt driven fan, motor and drive assemblies should be
checked and inspected at regular intervals per the inspection list and procedures below. Listen for vibrations or
unusual sounds. Severe damage, premature failure and
loss of airflow can be avoided by regular inspection and
maintenance.
1. Check the fan, motor and bearing mounting bolts for
tightness according to the bolt torque chart in Table
1 below at time of start-up, after 24 hours, then
every three months.
Table 1: Minimum head bolt torque in lb-ft (Grade 5 bolts)
Size (Inches) Thread Designation Minimum Torque
1/4 –20
1/4–28
5/16–18
5/16–24
3/8–16
3/8–24
7/16–14
7/16–20
1/2–13
1/2–20
9/16–12
9/16–18
5/8–11
5/8–18
3/4–10
3/4–16
7/8–9
7/8–14
1–8
1–14
Soft metric conversions are not acceptable for screw and hex sizes.
UNC
UNF
UNC
UNF
UNC
UNF
UNC
UNF
UNC
UNF
UNC
UNF
UNC
UNF
UNC
UNF
UNC
UNF
UNC
UNF
6
7
14
16
24
28
42
45
69
83
99
118
150
176
254
301
358
422
500
602
tion. All Venmar CES dampers and linkages are assembled
with non lubricating bearings.
• Attachment mechanism linking motors to dampers
should be checked for tightness.
• Damper jackshafts (if provided) are fitted with grease
nipples and should be lubricated once a year. Use a
premium quality lithium based grease conforming
to NLGI Grade 2 or 3 (examples are: Mobil Mobilith
AW2, Chevron Amolith #2, Texaco Premium RB or
Shell Alvania #2).
• Dampers should be inspected for dirt; check the
shaft, arms, bars and controls rod every three
months.
• Inspect the seals to ensure none have pulled loose or
deteriorated. If a seal has been damaged, repair or
replace it with the same seal or same seal material.
Contact Venmar CES for replacement parts.
2. Check the fan wheel hub, bearings and drive sheave
set screws for tightness according to the set screw
torque chart in Table 2 below at time of start-up,
after 24 hours of operation, monthly for the initial
three months then every three months thereafter.
If wheel or bearing set screws have worked loose,
check the wheel for any signs of movement (inlet
space clearance between the fan wheel and housing)
or loose blades. If Loctite was used on any set screws
that have come loose, the set screws must be removed and cleaned before re-tightening and Loctite
must be re-applied.
Table 2: Wheel set screw torque in lb-ft
Set Screw Size
Diameter (Inches)
1/4 75 6.2
5/16 144 12.0
3/8 252 21.0
7/16 396 33.0
1/2 600 50.0
5/8 1,164 97.0
3/4 2,016 168.0
7/8 3,204 267.0
1 4,800 400.0
*Stainless steel set screws are not hardened and should not be
tightened to more than half the values shown.
Carbon Steel Set Screw Torque*
lb-in lb-ft
VCES-V-CUBE-IOM-1A
18

!
WARNING
Lines must
Center lines
sheave
Many of the following steps need to be performed with
the unit powered off and locked out. Disconnect the
main power switch to the unit before performing service
and maintenance procedures.
Table 3: Bearing set screw torque in lb-in
Set Screw
Diameter
Link
Belt
#10 40 — 35 35 —
1/4 90 65 50 85 —
5/16 185 125 165 165 160
3/8 325 230 290 290 275
7/16 460 350 350 — —
1/2 680 500 620 — 600
5/8 1,350 1,100 1,325 — 1,200
3/4 2,350 — — — 2,000
Split pillow block bearings are fixed to the shaft with tapered
sleeves and generally do not have set screws.
3. Check each V-belt tension and adjust 3. the motor
base for correct amount according to the deflection
outlined in the Measuring Belt Tension procedure
below and in Appendix H for type of belt at time of
start-up, daily for the first week until they should
acquire their permanent set, then monthly. All belts
should have approximately the same amount of deflection. Be aware of mismatched or worn belt sets.
If a belt must be changed, ensure to change all belts
on the same drive at the same time. Never replace
just one belt within a set.
Measuring Belt Tension
a. Measure the belt span with a span scale.
b. Divide the belt span by 64 to determine the belt
deflection needed to check tension.
c. Set the O-ring on the span scale to the required
deflection value.
d. Set the small O-ring at zero on the force scale.
e. Place the scale end of the tension checker
squarely on one belt at the center of the belt
span. Apply force on the plunger until the bot-
tom of the large O-ring is even with the top of
the next belt or until it is even with a straight
edge laid across the sheaves.
f. Read the force scale under the small O-ring to
determine the force required to give the needed
deflection.
g. Compare the force scale reading in Step F above
with the correct value for the belt style and cross
section. The force scale reading should be be-
tween the minimum and maximum values shown
in Appendix H.
Manufacturer
Sealmaster SKF McGill Dodge
h. If the deflection value is below the minimum,
tighten the belts. If the deflection value is above
the maximum, loosen the belts. The tension on
new belts should be checked during the first day
of operation, at the end of the first week and
monthly thereafter.
4. Check the fan and motor sheave alignment using a
straight edge along the outside edges of the sheaves
for equal sized fixed sheaves as shown in Figure 13
and Figure 14 at time of start-up, after 24 hours
of operation, monthly for the initial three months,
then every three months thereafter. When properly
aligned the straight edge should touch the full face
of both sheaves. With one adjustable and one fixed
sheave with unequal sizes, use a string placed at the
center grove of both sheaves pulled tight to check
alignment. Adjust sheaves for proper alignment and
set screws to proper torque.
Figure 13: Equal sheave
size alignment
must coincide
Fixed
sheave
Adjustable
Figure 14: Unequal sheave
size alignment
be parallel
Straight
edge
5. Belt driven fan bearings are fitted with grease nipples
for lubrication. The grease quantity and lubrication
interval depends on bearing (fan size) and rpm and
are indicated in Tables 4 and 5. Use a premium quality lithium based grease conforming to NLGI Grade
2 or 3 (examples are: Mobil Mobilith AW2, Chevron
Amolith #2, Texaco Premium RB, Shell Alvania #2
or Esso Beacon #325). Clean the grease nipple first,
then rotate the fan shaft slowly by hand while adding grease. The lubrication intervals are theoretical
and will depend on site conditions, hours of operation and temperature. It is recommended to make
periodic inspections of the bearings before these
theoretical intervals.
VCES-V-CUBE-IOM-1A
19

!
WARNING
Many of the following steps need to be performed with
the unit powered off and locked out. Disconnect the
main power switch to the unit before performing service
and maintenance procedures.
Table 4: Recommended Grease Quantity
Shaft Size
Inches Millimeters Ounces Kilograms
0.500–0.750 13–19 0.125 0.004
0.875–1.187 25–31 0.375 0.011
1.250–1.500 32–38 0.625 0.018
1.687–1.937 43–49 0.875 0.025
2.000–2.437 51–62 1.250 0.035
2.500–2.937 63–75 2.000 0.056
3.000–3.437 76–87 3.500 0.098
3.500–4.000 89–102 6.000 0.168
4.187–4.937 106–125 10.000 0.280
Maximum Grease Capacity
of Bearing Chamber
6. Fan, wheels, housings and drive assemblies 6. should
be checked for dirt buildup annually and cleaned
if necessary to keep them from becoming unbalanced and to prevent loss of airflow. Clean with
compressed air to reduce any dirt, dust, lint or larger
particulates that have bonded to the fan impeller
housing or drive assembly. Block dirt from entering
the unit and ductwork if necessary or remove fan
assembly from unit. Alternatively use low pressure
steam, a degreaser and rag. If a sheave requires
cleaning, detergent and water can also be used. Ensure the belt is dry before starting up the unit.
IMPORTANT
Be careful not to remove or dislodge balancing clips on
the fan blades while cleaning.
Table 5: Generally Recommended Relubrication Frequency in Months
Operating
Speed (RPM)
up to 500 6 6 6 6 5 4
500–1,000 6 6 6 5 4 3
1,000–1,500 5 5 5 4 3 3
1,500–2,000 5 4 4 3 2 1
2,000–2,500 4 4 3 2 1 —
2,500–3,000 4 3 2 1 2 —
3,000–3,500 3 2 2 2 — —
3,500–4,000 3 2 1 — — —
4,000–4,500 2 1 1 — — —
4,500–5,000 2 1 — — — —
0.500–1.000”
[13–35 mm]
1.125–1.500”
[28–38 mm]
1.625–1.937”
[41–49 mm]
2.000–2.500”
[50–63 mm]
2.687–3.187”
[68–81 mm]
3.437–3.937”
[87–100 mm]
VCES-V-CUBE-IOM-1A
20

FANWALL® Array
!
WARNING
Many of the following steps need to be performed with
the unit powered off and locked out. Disconnect the
main power switch to the unit before performing service
and maintenance procedures.
Maintenance Schedule
FANWALL array of multiple direct driven plenum fan and
motor “cubes” are equipped with permanently sealed
bearings and do not require lubrication. The following
maintenance schedule is recommended.
1. Monthly
a. Check the fan wheel to inlet cone alignment for
possible noise from the wheel rubbing against
the inlet cone. See Fan Wheel/Cone Alignment
below for instructions.
2. Every six months
a. Check motor bearings for possible binding noise
or overheating.
b. Check fan wheels for dirt and grease accumula-
tion. Clean as necessary. Do not use any caustic
cleaning solutions.
3. Annually
a. Lightly lubricate damper and linkage bushings on
backdraft dampers (if equipped).
4. Every two years
a. Examine fan housings and motor pedestal for
corrosion. Clean and touch up with paint as necessary.
Figure 16: Remove safety screen on motor end
3. Disconnect the four-wire electrical cable from the
motor junction box. Make note of wire locations for
reinstallation later (see Figure 17).
Figure 17: Remove electrical cable
4. Mark motor pedestal location on the motor pedestal
mounting angles (both sides), then loosen and remove (four) ½” bolts that retain the motor pedestal
to the mounting angles (see Figure 18).
Figure 15: FANWALL array
Fan Wheel and Motor Removal
1. Disconnect power to the fan array control panel
before maintenance. Follow all lockout and tag out
procedures.
2. Remove the optional safety screen (if provided) on
the motor end only of the cube in question by removing all four hex screws from the holding flange
that retains the safety screen (see Figure 16).
VCES-V-CUBE-IOM-1A
Figure 18: Remove motor pedestal retaining bolts
21

!
WARNING
Many of the following steps need to be performed with
the unit powered off and locked out. Disconnect the
main power switch to the unit before performing service
and maintenance procedures.
5. After removing the motor pedestal 5. retaining bolts,
slide the motor/fan/pedestal assembly out to the
point where the motor lifting ring is clear of the cube
frame enough to use. If a mechanical device is available for use, attach it to the motor lifting ring. Lift
and remove the motor pedestal with motor and fan
wheel from the cube. The motor pedestal with motor
and fan wheel can be turned 180º and slid back into
the cube on the pedestal mounting angles or removed from unit for further disassembly.
6. Mark the location of the trans-torque bushing on the
shaft and the fan. To remove the fan wheel from the
motor shaft, remove the trans-torque bushing retaining hex nut using a 1” socket with a 12” extension by
turning counter clockwise. Loosen progressively until
the bushing is free from wheel hub and motor shaft.
Remove fan wheel/hub assembly (see Figure 19).
Figure 19: Mark location and remove trans-torque bushing
and fan wheel from motor.
7. If needed, the motor may now be removed for service by removing all (four) 3/8” motor retaining nuts
and bolts. Be sure to mark the motor base pattern
and bolt holes used on the motor pedestal. Rubber
isolator pads between the motor base and the pedestal are optional and if supplied be sure not to lose
them (see Figure 20). If the motor is to be replaced,
make sure to remove the shaft grounding ring off
the front of the motor that is being replaced. Install
the shaft grounding ring onto the new motor by drilling and taping mounting holes. Use a 7/64” or a #35
drill bit and #6-32 tap. Clean away any chips and
shavings before installing the shaft grounding ring.
Figure 20: Remove motor retaining bolts; do not lose rubber isolator pads (if provided).
8. To reinstall the motor, fan wheel and fan wheel/
motor/pedestal assembly back into the cube, reverse
the steps above noting the following:
a. Insert the (four) 3/8” motor retaining bolts into
the holes in the motor pedestal from the underside, make sure to use a standard washer on the
bolt side, install the rubber isolator pads (if supplied) between the pedestal and motor base and
only a locknut is required on the motor side.
b. Square the motor on the pedestal according to
markings and tighten the bolts. With rubber isolator pads tighten the bolts to 20 ft-lbs. Without
rubber isolator pads tighten the bolts to 40 ft-lbs.
c. Install the fan wheel on the motor shaft with the
hub facing towards you. Line up the markings on
the hub/trans-torque bushing/shaft. Make sure
that the trans-torque bushing nut is flush to the
hub. Tighten the bushing nut progressively to 80
ft-lbs turning clockwise.
9. Lift the motor pedestal with motor and fan wheel
(turn 180º if placed on the pedestal mounting angles
for disassembly) with the fan wheel inlet toward the
inlet cone. Place motor pedestal into the cube on
the pedestal mounting angles and slide the pedestal
forward to the line that you previously marked. Line
the four pedestal bolt holes up with the bolt holes on
the mounting angles. Insert (four) ½” bolts into the
holes, make sure to use a standard washer on the
bolt side and a standard washer and lock washer on
the nut side. Hand tighten the bolts for now.
10. Check the inlet cone alignment to the fan wheel. Fan
wheel should not be rubbing against the fan inlet
cone when rotated by hand. The fan wheel to inlet
cone clearance should be approximately 1/16” gap
and the overlap should be as indicated in Appendix
I for the fan wheel size. Adjust the overlap of the
wheel and cone by moving the motor pedestal for-
VCES-V-CUBE-IOM-1A
22

!
WARNING
Many of the following steps need to be performed with
the unit powered off and locked out. Disconnect the
main power switch to the unit before performing service
and maintenance procedures.
ward or backward. Fan wheel should not be rubbing
on the inlet cone. If cone alignment is required see
instructions for Fan Wheel/Cone Alignment below.
Once alignment and overlap are correct tighten the
(four) ½” pedestal mounting bolts to 90 ft-lbs.
sembly can be performed. Note the directions of the
damper blades are running vertical. The damper is
installed directly onto the FANWALL® cube inlet side
panel and over the optional airflow straightener (if
supplied).
Figure 22: Fan wheel/cone alignment – Step 2a
Figure 21: Check fan wheel/cone alignment and overlap.
11. Reconnect the four-wire electrical 11. cable from
the motor junction box. Before operation, start the
motor slowly to ensure the fan rotation is correct.
If the fan wheel is not rotating correctly, check the
motor leads for proper installation.
a. Drive side – Clockwise rotation when looking at
motor end.
b. Inlet side – Counter clockwise rotation looking at
fan inlet.
IMPORTANT
Before restarting, re-balance the fan wheel once the
motor rotation and alignment have been corrected before placing the unit in operation.
Fan Wheel/Cone Alignment
1. To align fan wheel/cone, first disconnect power to
the fan array control panel. Follow all lockout and
tag out procedures.
2. If the optional backdraft damper is furnished on the
inlet side of the fan it must be removed first. Remove
all tek screws on all sides attaching the damper
frame to the inlet side panel and remove it from the
cube. The purpose of the damper is so that maintenance staff can block the intake of a single fan to
prevent back flow until service on an inoperative as-
Figure 23: Fan wheel/cone alignment – Step 2b
3. If the optional airflow straighteners are furnished on
the inlet side of the fan it must be removed next. Remove all tek screws on the airflow straightener panel
frame and remove it from the cube.
Figure 24: Fan wheel/cone alignment – Step 3
VCES-V-CUBE-IOM-1A
23

!
WARNING
Many of the following steps need to be performed with
the unit powered off and locked out. Disconnect the
main power switch to the unit before performing service
and maintenance procedures.
4. Gently rotate the fan wheel to verify location of adjustment required.
Figure 25: Fan wheel/cone alignment – Step 4
5. To make adjustment, loosen (do not remove) all the
cone retaining fasteners.
7. Gently rotate the fan wheel to verify cone adjustment for proper clearance from wheel.
Figure 28: Fan wheel/cone alignment – Step 7a and Step 9a
Figure 26: Fan wheel/cone alignment – Step 5
6. Using a rubber mallet, gently tap around the cone
until desired clearance is acquired between fan wheel
and inlet cone.
Figure 29: Fan wheel/cone alignment – Step 7b and Step 9b
8. Tighten all the cone retaining fasteners.
Figure 30: Fan wheel/cone alignment – Step 8
9. Once again gently rotate the fan wheel to verify cone
alignment.
10. To install the optional airflow straightener or backdraft damper reverse the steps above.
Figure 27: Fan wheel/cone alignment – Step 6
VCES-V-CUBE-IOM-1A
24

!
WARNING
Many of the following steps need to be performed with
the unit powered off and locked out. Disconnect the
main power switch to the unit before performing service
and maintenance procedures.
Blank-off Plate (if applicable)
1. Optional blank-off plate(s) are available so that maintenance staff can block the intake of a single fan to
prevent back flow until service on an inoperative as
sembly can be performed or it can be mounted on
spare FANWALL® cube(s) until they are required to be
put into service.
2. First disconnect power to the fan array control panel.
Follow all lockout and tag out procedures.
3. The blank-off plate is fitted to the inlet side of the
FANWALL cube on the optional airflow straightener panel frame (if supplied) or onto a matching
“Z” frame. There are 12 pre-drilled holes which are
located in the corners and middle of the airflow
straightener panel frame or “Z” frame matching
predrilled holes in the blank-off plate for fastening
together with tek screws.
4. Place the blank-off plate over the optional airflow
straightener panel frame (if supplied) or onto the
matching “Z” frame and pre-drilled holes and fasten
together with or remove tek screws.
Figure 32: Blank-off plate – Step 4
Figure 31: Blank-off plate – Step 3
VCES-V-CUBE-IOM-1A
25

Motors
!
WARNING
Many of the following steps need to be performed with
the unit powered off and locked out. Disconnect the
main power switch to the unit before performing service
and maintenance procedures.
Motors will operate effectively for years if they are kept
clean, dry and properly lubricated. An excessive running
current is a good indication of the overall condition of the
motor. Check the following items every six months (unless
otherwise indicated) for proper performance:
• Motors must be cleaned with moderate air pressure
(around 25 to 30 psi). Dirt must be blown away from
vent fins and all other accessible areas. All areas surrounding the motor must be kept clear so air can
circulate freely to cool the motor.
• Ensure all connections are secure. Look for loose
wires and loose contacts. Repair and tighten any defective connection.
• Ensure the motor is operating at the current indicated on the nameplate. If not, a physical or electrical
restriction is working against the motor and it must
be repaired.
• Ensure the motor is not vibrating too much. A significant vibration can come from a loose mounting bolt
or an unbalanced impeller. If significant vibration has
occurred, be sure to repair it and inspect the mounting base and the flexible duct connection for any
damage.
• Motor lubrication must occur once a year when
grease nipples are provided with a premium quality
lithium based grease conforming to NLGI Grade 2 or
3 (examples are Mobil Mobilith AW2, Chevron Amolith#2, Texaco Premium RB, Shell Alvania #2 or Esso
Beacon #325). Clean the grease nipple first, then
rotate the motor shaft slowly by hand while adding
grease with a low pressure grease gun. Do not over
lubricate!
Filters
Standard 2” [51 mm] and 4” [102 mm] prefilters are disposable and should be replaced every three months or
sooner if the pressure drop across the filters is too great.
High efficiency filters (optional) should be replaced when
dirty. Venmar CES recommends that they be used only in
combination with 2” [51 mm] or 4” [102 mm] prefilters
in order to protect them from premature clogging and to
increase their effective lifespan. The tables in Appendix J
provide data relative to the pressure drop across clean fil-
Dirt on the surface of the coil reduces its ability to transfer
heat which lowers the efficiency of the unit, resulting in
poor air quality and expensive operating costs. Because of
the condensate on the coil, the dirt often becomes wet
and contributes to the growth of microbial organisms.
Negligence in maintenance may result in serious health
related indoor air quality problems. The coil should be
kept clean for maximum performance. To achieve maximum efficiency, clean the coil often during periods of high
demand or when dirty conditions prevail. Venmar CES
recommends cleaning the coil a minimum of once per year
to prevent dirt buildup in the coil fins where it may not be
visible.
ters and indicate the type of reading that should be given
on the magnahelic gauge. The data relative to accurate
pressure drop across the filters is available in the submittal. If the system is equipped with both prefilters and final
filters, it is recommended that prefilters be changed twice
as often as final filters. Running a unit with dirty and inefficient filters will lower the airflow and thus lower the air
quality of the area.
Coils
CAUTION
Do not use acidic chemical coil cleaners. Do not use alkaline chemical coil cleaners with a PH value greater than
8.5 or lower than 6 (after mixing) without using an aluminum corrosion inhibitor in the cleaning solution. Using
these types of cleaners may result in unit damage. Coil
fins can be cleaned by using steam with detergent, hot
water spray or a commercial chemical coil cleaner. After
cleaning the coil, be sure to rinse thoroughly.
VCES-V-CUBE-IOM-1A
26

!
WARNING
Many of the following steps need to be performed with
the unit powered off and locked out. Disconnect the
main power switch to the unit before performing service
and maintenance procedures.
Cleaning Procedure
1. Shut down the unit by closing the main disconnect at
the power inlet.
2. Open panels or doors to gain access to both sides of
the coil section.
3. Remove soft debris from both sides of the coil with a
soft brush.
4. Using a steam cleaning machine, clean the leaving
air side of the coil first (going downward) then clean
the entering air side. Use a block-off to prevent the
steam from penetrating a dry section of the unit.
5. Allow the unit to dry thoroughly before restoring
power.
6. Damaged coil fins should be straightened by using a
fin comb.
7. Close all panels and doors once the coil is dry.
8. Restore electrical power to the unit.
Controls
General controls information regarding the navigation and
monitoring of your unit with the standard keypad, DDC
points list, ladder diagram and specific sequence of operation or required network communication is included in the
Troubleshooting
See Appendix K for trouble shooting information.
documentation that is contained in the control panel of
your unit. Please contact the factory if this information is
missing or has been lost.
VCES-V-CUBE-IOM-1A
27

Appendix A: Water Cooled Condenser (WCC) Piping Installation,
Maintenance and Troubleshooting
Units have the WCC supply and return line internally
coupled (manifold) and piped to the unit exterior. The
WCC connections shall have copper IPS connections. See
the submittal drawings for size, location, flow rate, type of
fluid, pressure drop information and components included
and factory installed for the supply and return connections.
Optional Water Piping Components
The following components may or may not be included
and factory installed depending on the water conditions
and/or options selected.
1. A two-way or three-way modulating 1. head pressure
control valve may be included in the compressor or
coil compartment to maintain stable operation of the
refrigeration systems when operated on ground loop
or cooler water systems when the design inlet water
temperature is below 70ºF in the cooling mode. A refrigerant pressure transducer is also included and factory installed in the compressor compartment on the
compressor discharge, which will modulate the water
flow to the condenser using a 2 to 10 VDC signal to
prevent the compressor discharge pressure from falling below the compressor operating limit. The regulating valve may be factory installed or shipped loose
for field installation depending on the unit configuration and/or options selected
2. A flow switch on the water return or leaving side of
the condenser is factory provided and installed in the
compressor or coil compartment to monitor the presence or absence of flow, which will shut down the
compressor operation if no flow is detected.
3. A water temperature sensor on the water supply or
entering side of the condenser is factory provided
and installed in the compressor or coil compartment
to monitor the water temperature, which will shut
down/disable the compressors if the entering water
temperature drops below 70ºF. For units with waterside economizer coils (WiSE), the entering water
temperature sensor shall be utilized to compare the
unit entering water temperature to the unit entering
air temperature and enable WiSE operation when applicable.
4. A waterside economizer coil (WiSE) along with dual
two-way modulating water economizer valves and a
temperature sensor shall be supplied with the unit.
The water temperature sensor is input to the DDC
control system, which determines when to divert
water to the economizer coil for energy conservation
in cooling mode.
Water Piping Components Not Included
Water piping vibration eliminators, manual or automatic
shut-off valves, pressure and temperature gauges, water
strainer, vent valves or air vents, flow measuring and
balancing valves, pressure relief valves or other safety or
control piping requirements are not available and must be
field provided and installed outside of the unit.
IMPORTANT
WCC external water supply and return piping shall be in
accordance with National and Local Codes. Line sizing,
pressure limiting devices, backflow preventers, strainers,
valves, flow temperature and pressure measuring, freeze
protection, all other safety or control piping requirements
for system operation are the sole responsibility of the
Installing Contractor and/or Design Engineer. The water
supply must be sized for the maximum flow as indicated
on the submittals.
Recommended Piping, Components and
Installation
Recommended and required WCC water line piping and
components with a detailed functional description are outlined below:
1. All WCC should be connected to supply and return
piping in a two-pipe reverse return configuration. A
reverse return system is inherently self-balancing and
requires only trim balancing where multiple quantities of heat pumps with different flow and pressure
drop characteristics exist in the same loop.
2. The water line piping may be steel, copper or PVC.
Avoid dissimilar metal fittings as they may corrode.
The piping should be installed with a minimum
number of bends and elevation changes for best performances. Size piping to minimize system pressure
drop.
3. Water line piping should contain:
a. Short sections of high pressure flexible hose or vi-
bration eliminators to reduce vibration and noise
transmission .One end of the hose should have
a swivel fitting to facilitate removal for service.
Hard piping connections are not recommended
due to the possibility of vibration that could damage piping connections, joints or transmit noise.
Where hard piping is used unions should be
provided in the supply and return lines for service
and removal.
b. Manual shut-off valves in supply and return
water lines for isolation and service.
c. Pressure and temperature gauge connections in
the supply and return water lines to aid in startup and service.
d. A water strainer (16–20 mesh minimum) or some
means of removing foreign matter from the
water.
e. Manual vent valves and/or automatic air vents at
the high points of the system in the supply and
return water lines to discharge non-condensable
VCES-V-CUBE-IOM-1A
28

air in order to avoid unexpected high head pres-
!
sure and poor cooling/heating performance.
f. A flow balancing valve in the return water line to
set the required flow rate.
g. A flow measuring valve or pressure gauge/con-
nections in the return water line to measure the
required flow rate.
h. A two-way motorized on/off water shut-off valve
to isolate water flowing through both the economizer coil (if equipped) and water-to-refrigerant
condenser for conservation when the unit is off.
The motorized water valve must open 90 seconds
prior to compressor start-up and remain open
five seconds after the compressor is shut off.
i. A relief valve in the water supply or inlet line if
the maximum pressure of components is less
than the water supply pressure to prevent damage, injury or death due to instantaneous release
of high pressure water.
WARNING
To prevent injury or death due to instantaneous release of
high pressure water, provide relief valves on system water
piping. This will also help prevent water pump damage or
stoppage due to excessive system pressure.
4. WCC should not be connected to the incoming supply and return piping until the water supply system
has been cleaned and flushed completely. After the
cleaning and flushing has taken place, the initial connection should have all valves wide open in preparation for the water system flushing.
5. Automatic flow controlled devices must not be installed prior to system cleaning and flushing.
Cleaning and Flushing
1. Prior to first operation of the WCC, the water circulation system must be cleaned and flushed of all construction dirt and debris by the Installing Contractor.
2. Short circuit connect the incoming supply line to the
outgoing return line, prior to the factory installed
piping at each connection point, before flushing to
prevent the introduction of dirt into the unit from the
supply line completed on site. This will prevent the
introduction of dirt into the unit.
3. Fill the system at the city water makeup connection
with all air vents open. After filling, close all air vents.
4. Start the main circulator with the pressure reducing
valve open. Check vents in sequence to bleed off any
trapped air to provide circulation through all components of the system.
5. While circulating water, check and repair any leaks
in the piping. Drains at the lowest point(s) in the system should be opened for the initial flush and blow
down, making sure city water fill valves are set to
make up water at the same rate. Check the pressure
gauge at the pump suction and manually adjust the
makeup to hold the same positive steady pressure
both before and after opening the drain valves. Flush
should continue for at least two hours or longer until
clean drain water is visible.
6. Shut off the circulator pump and open all drains and
vents to completely drain down the system. Short
circuited supply and return lines coming to the unit
should now be removed and supply and return lines
connected to the unit supply and return connections.
Do not use sealers at the swivel flare connections of
the hose(s).
7. Install any automatic flow controlled devices that
were removed for flushing.
8. Refill the system with clean water. Test the water
using litmus paper for acidity, and treat as required
to leave the water slightly alkaline (pH 7.5 to 8.5).
The specified percentage of antifreeze may also be
added at this time. Use commercial grade antifreeze
designed for HVAC systems only. Do not use automotive grade antifreeze.
9. Once the system has been filled with clean water and
antifreeze (if used), precaution should be taken to
protect the system for dirty water conditions. Dirty
water will result in system wide degradation of performance and solids may clog valves, strainers, flow
regulators, etc. Additionally, the heat exchangers
may become clogged which reduces compressor service life or causes premature failure.
10. Start the circulation pumps. After full flow has been
established through all components, air vented, lines
checked for leaks and loop temperatures stabilized,
the WCC will be ready for check, start-up and water
a. balancing.
General Maintenance
Recording of performance measurements of volts, amps,
and water temperature difference (both heating and cooling) is recommended. A comparison of logged data with
start-up and other annual data is useful as an indicator of
general equipment condition.
Periodic lockouts almost always are caused by air or water
problems. The lockout (shut-down) of the unit is a normal
protective result. Check for dirt in the water system, water
flow rates, water temperatures, airflow rates (may be dirty
filters), and air temperatures. If the lockout occurs in the
morning following a return from the night setback, entering air below machine limits may be the cause.
Water treatment is important for proper condenser operation. More frequent cleaning will be necessary if water is
not properly treated. For water treatment instruction, consult your local water treatment specialist.
VCES-V-CUBE-IOM-1A
29

Monthly
!
• Check water cooled condensers for scaling and proceed with brushing and cleansing if necessary.
Quarterly
• Check oil level in compressor (half site glass).
Semi-annually
• Check operation of crankcase heaters.
• Check for broken or loose pipe clamps.
• Check moisture indicator of refrigerant site glass. A
“Caution” or “Wet” condition requires changing filter drier. If “Wet” condition does not improve, it will
be necessary to evacuate system.
Yearly
• Look for any sign of oil on all refrigeration components including coils, compressors, controls, tubing,
etc. Oil would indicate a refrigerant leak.
• Check water lines for leaks.
• Check expansion valve bulb (properly attached to
suction line, properly isolated).
• Check the condensate drain pan and clean and flush
as required.
Troubleshooting
Lubrication
R410a should be used only with polyolester (POE) oil. The
HFC refrigerant components in R410a will not be compatible with mineral oil or alkylbenzene lubricants. R410a
systems will be charged with the OEM recommended lubricant, ready for use with R410a.
Charging
Due to the zeotropic nature of R410a, it should be
charged as a liquid. In situations where vapor is normally
charged into a system, a valve should be installed in the
charging line to flash the liquid to vapor while charging.
CAUTION
It is very important to make certain that the recycle or recovery equipment used is designed for R410a. The pressure of R410a refrigerant is approximately 60% greater
than that of R22. Pressure gauges require a range up to
800 psig high side and 250 psig low side. Recovery cylinders require a 400 psig rating.
IMPORTANT
Filter driers must be replaced each time a system is open
to atmosphere (ex.: for a defective component replacement, refrigerant leak, etc.).
Compressor Burnout
When a motor burnout occurs in a compressor, the resulting high temperature arc causes a portion of the refrigerant/oil mixture to break down into carbonaceous sludge,
corrosive acid, and water. Such contamination resulting
from a burnout can result in repeat failures if the contaminants are allowed to reach and remain in the crankcase
of the replacement compressor. This situation can be
prevented by following proper cleanup procedures after a
burnout.
To determine if a compressor burnout has actually occurred, run the proper electrical tests. This requires an accurate VOM Meter.
1. With all wires removed from the compressor terminals, measure resistance from each terminal to the
compressor casing. If any terminal shows a direct
ground (zero resistance), a failure has occurred. If
not, continue.
2. With all wires removed from the compressor terminals,
measure resistance from each compressor terminal.
They should read the same. If two or more terminals
show zero resistance between them, the compressor
motor has failed (for actual resistance value, refer to
the respective compressor manual or contact the Customer service Department at Venmar CES).
3. If steps 1 and 2 have not clearly identified a compressor failure, it will be necessary to meg the compressor motor (refer to the respective compressor manual
or contact the Customer service Department at Venmar CES).
Compressor Burnout – System Cleanup
Any maintenance requiring refrigerant evacuation must be
performed using proper recovery procedures.
1. In order to avoid losing refrigerant to the atmosphere, recover refrigerant using standard recovery
procedures and equipment. Remove the inoperative
compressor, and install the replacement.
2. Since the normal color of refrigerant oil varies from
oil to oil, take a sample of oil from the replacement
compressor and seal in a small glass bottle for comparison purposes after the cleaning operation is complete. Suitable two ounce bottles are available at any
drug store.
WARNING
Acid burns to the skin can result from touching the sludge
in the burned out compressor. Rubber gloves should be
worn when handling contaminated parts.
3. Inspect all system controls such as expansion valves,
solenoid valves, check valves, reversing valves, contactors, etc. Clean or replace if necessary, remove all
installed filter driers.
IMPORTANT
Before starting the new compressor, replace any questionable components.
VCES-V-CUBE-IOM-1A
30

4. Install the recommended size suction 4. line filter
drier and new size liquid line filter drier. Evacuate system using the triple evacuation method. Re-charge
the system with new refrigerant (do not use the recovered refrigerant). See unit’s nameplate for proper
refrigerant charge.
5. Start the compressor and put the system in operation. As the contaminants in the system are filtered
out, the pressure drop across the suction line filter
drier will increase. Observe the differential across the
filter drier for a minimum of two hours. If the pressure drop exceeds the maximum limits for a temporary installation, replace the filter drier and restart the
system (see literature from filter drier’s manufacturer
for pressure drop maximum limits.)
6. After the completion of Step 5, allow the unit to operate for 48 hours. Check the odor (warning – smell
cautiously) and compare the color of the oil with
the sample taken in Step 2. Use of an Acid Test Kit
is recommended to test for acid content. If the oil is
discolored, has an acid odor, is acidic or if the moisture indicator indicates a high moisture content in
the system, change the filter driers. The compressor
oil can be changed if considered desirable. Allow the
system to operate for an additional four hours, and
recheck as before. Repeat until the oil remains clean,
odor and acid free and the color approaches that of
the original sample.
7. Replace the liquid line filter drier with one of the
normally recommended size. Remove the suction line
filter drier.
8. After the cleaning procedure is completed, recheck in
approximately two weeks to ensure that the system
condition and operation is completely satisfactory.
VCES-V-CUBE-IOM-1A
31

Appendix B: Positive and Negative Pressure Trapping
L = H + K + pipe diameter + insulation − X
L = H + J + pipe diameter + insulation − X
Positive Pressure Trapping
Removable plug
Cleanout
K = Minimum 0.5” [13 mm]
H = 0.5” [13 mm] + maximum total static pressure
X = 3.9375” [100 mm] if unit has a 6” [152 mm] tubular steel base
Negative Pressure Trapping
X
L
K
H
H = 1” [36 mm] (for each 1“ [25 mm] of maximum negative static pressure) + 1” [25 mm]
J = Half of H
X = 3.9375” [100 mm] if unit has a 6” [152 mm] tubular steel base
VCES-V-CUBE-IOM-1A
Removable plug
Cleanout
X
L
H
J
32

Appendix C: V-Cube™ Start-up Report and Checklist
IMPORTANT
• Complete this form for each unit and email, fax or
mail to Venmar CES immediately after start-up to
validate warranty and to provide valuable information for personnel performing future maintenance
or for factory assistance to address below.
• Read the Installation, Operation and Maintenance
Instructions Manual and the EPiC™ System Keypad
Operation Guide and the Sequence of Operation
before proceeding.
• Leave a copy of this report with the owner and at
the unit for future reference and permanent record.
• To ensure proper operation of each unit, qualified
personnel should perform the start-up, complete
the checklist and report.
• All units are functionally tested except when
shipped in multiple pieces. Start-up adjustments
may be required. If the unit is shipped as a single
piece, blowers and compressors (if equipped) are set
up to run correctly when power is connected. If any
blower is running backwards or compressor is making loud noises, disconnect power and switch two
leads (on three-phase power) to ensure proper rotation and avoid damage.
• If units are equipped with compressors, power must
be turned on for 24 hours prior to a call for cooling,
for the compressor crankcase heaters to be energizing to prevent possible damage.
• The Bacview keypad located at the control panel
will allow for manual override for start-up, mode
of operation selection and includes an internal time
clock if remote interlocks are not provided.
Venmar CES Inc.
200 Rue Carter
St.-Léonard-d’Aston, QC
Canada J0C 1M0
Email to tech support: venmarservice@venmarces.com
Fax: 899-319-2612
Phone: 1-866-4-VENMAR
Unit Identification Information
Project ____________________________________________
Job Name _________________________________________
Job Address _______________________________________
Model Number _____________________________________
Serial Number ______________________________________
Tag ______________________________________________
Jobsite Contact ____________________________________
Email _____________________________________________
Telephone _________________________________________
Table C1: Pre Start-up Checklist
Checklist Item Yes N/A
1 Is the electrical disconnect set to the ‘Off’ position?
2 Have the split section joints been properly installed on multi-sectional units?
Have all holes made by the Installing Contractor in the casing, partitions or floor been well sealed
3
to prevent air and/or water infiltration?
Have obstructive packaging, objects near or in fans, dampers, etc. been removed?
4
a. Has the inside of the unit been cleaned of all debris?
Have all retaining bolts on fan bases been removed?
a. Do all the fan impellers rotate freely?
b. Are all fan impellers and drive set screws tight?
5
c. Are all the fan bearing set screws or locking collars tight?
d. Are all fan belts aligned and have proper tension?
e. Are the fan flexible joint connections well attached?
Are all air filters installed and clean?
a. Are all face-mounted filters attached with four clips each?
6
b. Do all sliding filters have a retainer at the end track and well attached blank-offs?
c. Are the filter pressure differential gauges, switches or sensors free of dirt and set at a value
satisfactory to the end user to trigger a filter change?
VCES-V-CUBE-IOM-1A
33

Serial Number: _____________________________________
Table C1: Pre Start-up Checklist
Checklist Item Yes N/A
Have coils been checked for fin damage and dirt, straightened with a fin comb and cleaned?
a. Are all pipe connections tight and have they been checked for damage that may have occurred dur-
7
ing shipping or installation?
b. Has the piping to the coils and WSHP/WCC been completed and have the piping lines been
flushed, filled, vented and tested at 1.2 times the operating pressure?
Scroll compressor RIS vibration isolator bolts are factory tightened to the correct torque setting for
operation and do not require field adjustment.
a. Are the refrigerant components and piping in good condition and have no damage or leaks
from shipping or installation?
b. Are the refrigerant lines spaced at least 1” apart and from the compressor after shipping and
8
installation?
c. Are the refrigerant line clamps still secure and have their rubber lining?
d. Is the clearance around the air cooled condenser within minimum clearance and the discharge
clear from blockage?
Are all motorized damper control arms, control rods and shafts tight?
9
a. Do all non motorized dampers rotate freely?
10 Is the ductwork connected, complete and free of obstructions?
11 Have all condensate drain connections been trapped, installed correctly and filled?
12 Are all shipped loose or field supplied components correctly installed and wired?
13 Has the wiring diagram been marked up accordingly and left with the unit?
14 Has the power supply and control wiring been inspected and approved by the Local Authorities?
15 Have factory and field wiring connections been checked and tightened?
Is voltage at the disconnect switch within 10% of nameplate and are phase-to-phase readings
16
within 2% of nameplate?
Have field piping and venting installation, connections for heating and cooling options been com17
pleted and tested?
18 Are heating and cooling enable switches set to the ‘Off’ position?
19 Has the electric coil installation and pre start-up checks been completed per Appendix E?
20 Have all safety switches, overloads or other devices that are manual reset been checked and reset?
If units are equipped with compressors, has power been turned on for 24 hours prior to a call for
21
cooling?
VCES-V-CUBE-IOM-1A
34

Serial Number: _____________________________________
Table C2: Start-up Checklist
Checklist Item Yes N/A
1 Before proceeding, complete the Pre Start-up Checklist.
2 Close all access panels or doors.
3 Turn the main disconnect to the ‘On’ position.
The unit can be started by using the keypad and selecting the mode of operation from the Keypad
Operation Guide and the Sequence of Operation. Run through the complete sequence of operation
4
of the unit, adjusting setpoints and documenting as required. Once completed, return the unit to the
correct mode of operation and adjust the time clock if required.
5 Are dampers operating properly?
6 Are fans rotating in the correct direction?
7 Adjust the supply air fan motor VFD to the correct supply air.
For occupied recirculation mode, adjust outside air and exhaust air damper positioner to achieve
8
the required air volumes.
Check amperage draw to each motor on each phase against motor nameplate FLA. If significantly
9
different, check ductwork static and/or take corrective action.
Recheck the voltage at the disconnect switch against the nameplate and against phase-to-phase
10
readings on three-phase with all blowers operating. If the voltage is not within 10% of rated or 2%
of phase-to-phase, have the condition corrected before continuing start-up.
Feel the compressor crankcases. They should be warm if the disconnect has been on for at least
11
24 hours. This will assure that no refrigerant liquid is present in the crankcase which could cause
compressor damage or failure to occur on start-up.
Before activating the compressor on WSHP units, are water shut-off valves open and is water circu-
12
lating through the water-to-refrigerant heat exchanger? Check the incoming line water pressure to
ensure it is within design and acceptable limits.
13 Enable cooling and check if the sound of the compressor is normal or if there is excessive vibration.
14 Check all field and factory refrigerant and water piping connections for leaks and correct.
On units with WSHP, after a few minutes of operation:
a. Check the supply discharge temperature status on the keypad for cooling air delivery. Mea-
sure the temperature difference between entering and leaving water. In cooling mode, the
temperature difference should be approximately 1.5 times greater than the heating mode
temperature difference. For example, if the cooling temperature difference is 15ºF [8.3ºC], the
heating temperature difference should be approximately 7ºF to 10ºF [3.9ºC to 5.6ºC]. Adjust
the combination shut-off/balancing valve in the return line to a water flow rate which will
15
16
17
18 Enable heating options; see Start-up and check instructions in Appendix E for electric coil and complete.
19
20 Check the operation of the control options provided on the unit.
21 Check the setpoints on the DDC Points Reference, adjust and record changes as required.
22 Has air balancing been completed for both occupied and unoccupied operation?
23
VCES-V-CUBE-IOM-1A
result in the 7ºF to 10ºF [3.9ºC to 5.6ºC] difference. Alternatively, if a flow measuring valve or
pressure gauge connections are included, take the flow reading or pressure drop compared to
the submittal information and adjust the shut-off/balancing valve in the return line to the correct flow/pressure drop reading.
b. Measure the temperature difference between entering and leaving air and entering and leav-
ing water. With entering water of 60ºF to 80ºF [15.6ºC to 26.7ºC], leaving temperature should
rise through the unit (should not exceed 35ºF [19.4ºC]). If the air temperature exceeds 35ºF
[19.4ºC], then the water flow rate is inadequate or the airflow rate may be low and a second
check may be required after airflow balancing.
On units with integrated air cooled condensers, check condenser fans are rotating in the correct
direction. Measure the temperature difference between entering and leaving air.
On units with electric heating coils, check supply air proving interlock switch setting to ensure minimum supply airflow prior to operation.
For electric heating coil option, check the amp draw on each stage, the operation of the sequence
or SCR controller and the coil for any hot spots.
When unit has achieved steady state, take measurements and complete readings section of start-up
report!
35

Serial Number: _____________________________________
Nameplate voltage
Input voltage L1–L2 L2–L3 L1–L3
Table C3: Start-up Readings – Supply Fans
Fan 1
Fan 2
Fan 3
Fan 4
Fan 5
Fan 6
Fan 7
Fan 8
Fan 9
Fan 10
Fan 11
Fan 12
Rotation
Correct
Nameplate
Amps
Amp Draw
L1 L2 L3
Full
Load
Amps
O/L
Amp
Setting
RPM
Min.
Hertz
O/L Set
at Min.
Hertz
Max.
Hertz
O/L Set
at Min.
Hertz
Table C4: Start-up Readings – Exhaust Fans
Amp Draw
L1 L2 L3
Fan 1
Fan 2
Fan 3
Fan 4
Fan 5
Fan 6
Fan 7
Fan 8
Fan 9
Fan 10
Fan 11
Fan 12
Rotation
Correct
Nameplate
Amps
Full
Load
Amps
O/L
Amp
Setting
RPM
Min.
Hertz
O/L Set
at Min.
Hertz
Max.
Hertz
O/L Set
at Min.
Hertz
VCES-V-CUBE-IOM-1A
36

Table C5: Start-up Readings – Condenser Fans
Rotation
Correct
Fan 1
Fan 2
Fan 3
Fan 4
Fan 5
Fan 6
Fan 7
Fan 8
Fan 9
Fan 10
Fan 11
Fan 12
Fan 13
Fan 14
Fan 15
Fan 16
Nameplate
Amps
Serial Number: _____________________________________
Amp Draw
L1 L2 L3
Full Load Amps
O/L Amp
Setting
Table C6: Start-up Readings – Compressors
Amp Draw
Nameplate
Amps
Compressor 1
Compressor 2
Compressor 3
Compressor 4
Compressor 5
Compressor 6
Compressor 7
Compressor 8
Compressor 9
Compressor 10
Compressor 11
Compressor 12
Compressor 13
Compressor 14
Compressor 15
Compressor 16
L1 L2 L3
Full
Load
Amps
After compressor has been running for 15 minutes, check for the
Suction
Pressure
Discharge
Pressure
Super-
heat
following:
Liquid
Subcooling
Hot Gas
Bypass
Functioning
Outdoor
Ambient
Temperature
During AC
Cooling
Start-up
(°F/°C)
VCES-V-CUBE-IOM-1A
37

Serial Number: _____________________________________
Table C7: Start-up Readings – Water Source Heat Pump (WSHP)/Water Cooled Condenser (WCC)
Waterside Cooling Mode Waterside Heating Mode
Entering
Temperature
(°F/°C)
Condenser 1
Condenser 2
Condenser 3
Condenser 4
Condenser 5
Condenser 6
Condenser 7
Condenser 8
Condenser 9
Condenser 10
Condenser 11
Condenser 12
Condenser 13
Condenser 14
Condenser 15
Condenser 16
Leaving
Temperature
(°F/°C)
Temperature
Difference
(°F/°C)
Table C8: Start-up Readings – Electric Heating Coil
Stage L1 Amps L2 Amps L3 Amps Check for Hot Pots
1
2
3
4
5
6
Entering
Temperature
(°F/°C)
Leaving
Temperature
(°F/°C)
Temperature
Difference
(°F/°C)
Entering
Pressure
(PSI)
Leaving
Pressure
(PSI)
US GPM
Item Description Yes No
Is the unit stored indoors in a clean, dry environment?
1
2
3
Recommend Has a desiccant pouch been placed in the control panel?
VCES-V-CUBE-IOM-1A
Is the indoor storage facility temperature regulated to within 50ºF to 75ºF?
Is the indoor storage facility humidity regulated to within 10% to 50% RH?
Is the unit mounted on a level surface along the perimeter of the base with weight evenly
distributed?
Has the plastic wrapping been removed from the unit to perform inspection and maintenance?
Has the plastic wrapping been saved for future use?
Has the plastic wrapping been re-applied to the unit when the unit has been shipped to
jobsite?
38

Serial Number: _____________________________________
Item Description Inspection Date/Reading
Refrigerant pressure at
storage
Compressor #1
Compressor #2
4
5
6
Compressor #3
Compressor #4
Compressor #5
Compressor #6
Compressor #7
Compressor #8
Refrigerant pressure
every 3 months
Compressor #1
Compressor #2
Compressor #3
Compressor #4
Compressor #5
Compressor #6
Compressor #7
Compressor #8
Rotate blower impellers
every 2 months
Supply
Exhaust
Other
Grease fan bearings as
required
Supply
Exhaust
Other
Date PSIG
Date PSIG Date PSIG Date PSIG
Date Date Date Date Date Date
This unit has been checked out and started according with
the above procedures and completed forms and is operating satisfactorily. After 24 hours of satisfactory operation shut-down the unit and check all foundation bolts,
shaft bearings, drive set screws, valve train and terminals.
Tighten where required.
Additional Comments: ______________________________
__________________________________________________
__________________________________________________
__________________________________________________
__________________________________________________
__________________________________________________
__________________________________________________
VCES-V-CUBE-IOM-1A
Start-up
By _______________________________________________
Company Name ___________________________________
Date _____________________________________________
Email ____________________________________________
Telephone ________________________________________
Email to tech support: venmarservice@venmarces.com or
Fax to: 819-399-2612.
39

Appendix D: HEPA Filter Installation
These instructions are for installing AAF HEPA filters (11½”
depth) into AAF HEPA holding frames. The holding frames
are available in multiple sizes and materials, but include
the PN series of 30619XX-XXX, where the X’s vary with
frame size and material. All frames, latches, extension
legs and filters are sold separately. Please read the entire
installation instructions before beginning the installation
process.
Install filters into the HEPA holding frames only after the
frames have been securely installed into existing ductwork
or housing. Frames should be bolted or pop riveted together into the permanent structure through the predrilled
holes around the outside perimeter of the frames. Frames
should be sufficiently caulked and sealed to prevent any
air bypass or leakage.
Required tools for filter installation:
• T-handle Hexkey, size 5/32”
Framing Components Required:
• AAF HEPA holding frames – PN 30619XXXXX
• Leg extensions, four per frame – PN 3061991- 00X
• Latches, four per frame – PN 3062007-00X
Figure D3: Frame with leg extensions installed
Step 2
Insert the HEPA filter into the HEPA holding frame. The
HEPA should be installed with the gasket side of the filter
facing the frame. Insert the filter as far into the frame
as possible, so that the gasket material is contacting the
frame (see Figure D4 below).
Figure D1: Leg extensions and latches
Step 1
At the inside corner of each frame are four tabs, two per
side. Place a leg extension over the four tabs as shown in
Figure D2 below, then pull back on the leg extension locking it into place.
Figure D2: Place leg extensions over the frame tabs, then
pull back to lock the leg extension into place
Repeat Step 1 with each of the four corners. The frame
with leg extensions should look like Figure D3.
VCES-V-CUBE-IOM-1A
Figure D4: Insert HEPA filter into frame, until the gasket
comes in contact with the holding frame
The filter should now be resting inside of the holding
frame as shown to the left. When installing the filters into
40

a frame bank of multiple frames, install the lower filters
first so that the upper filters can rest on the lower filters.
Figure D5: Filter placed inside of frame
Step 3
Place a latch so that it overlaps the leg extension, as
shown below in Figure D6. Align the latch’s cap screw
with the threaded coupling on the end of the leg extension and tighten using the hexkey. Tighten the cap screw
until there is an approximately ¼” gap between the latch
and the leg extension coupling as shown below in Figure
D7. Repeat this step with all four corners.
Step 4
Once all four corner latches have been tightened within
¼” of the leg extension coupling, complete the installation
by tightening each corner until the latch and leg extension
coupling meet, as illustrated in Figure D8.
Figure D8: Tighten until latch and coupling meet
Once all four corners have been tightened, the filter
should now be properly seated and sealed.
Figure D6: Latch overlapping leg extension
Figure D7: Tighten cap screw to ¼” of the coupling
VCES-V-CUBE-IOM-1A
Figure D9: Properly installed filter
Repeat the process with all remaining filters working from
the bottom to the top.
41

Appendix E: Electric Heating Coil and Controls Information
This electric heating coil module covered by this appendix is a component of a “Listed” product, subject to the
guidelines of application as designated by the Certifying
Agency and outlined in the appliance Manufacturer’s Installation and Operation Instructions.
The information provided in this appendix applies to the
electric heating coil module, installed in the appliance and
to its operation, maintenance and service. Refer to the appliance manufacturer’s instructions for information related
to all other components.
1 – Mechanical Installation of Electric Coil
Heaters
1.1 – Handling
1.1.1 Remove the shipping covers just before installation.
1.1.2 Inspect the heater carefully and report any damage to the manufacturer.
Do not install a damaged heater.
1.2 – Installation
Heater Position
1.2.1 The axis of the duct must always be perpendicular
to the face of the heater.
1.2.2 The heating elements must always be installed
horizontally.
Model SC or ST (Slip-in Type)
1.2.3 Cut an opening in the side of the duct.
1.2.4 Slip the heater into the duct until the hole is completely covered by flanges around the heater.
1.2.5 Fasten the heater to the duct with sheet metal
screws and seal openings with a suitable sealing
compound.
1.2.6 If the heater is heavy, use additional hangers to
support the heater.
Model FC or FT (Flanged Type)
1.2.7 Flange both ends of the duct outwards on three
sides to match the heater’s flanges.
1.2.8 Fasten the heater to the duct with sheet metal
screws (for heavy heaters, use nuts and bolts and
additional hangers to support the heater).
1.2.9 Seal openings with a suitable sealing compound.
IMPORTANT
• Do not install spray humidifiers upstream of duct.
Install it downstream instead.
• Do not cover the control box with thermal insulating materials.
• Use special air intake louvers of weatherproof construction for preheat duct heaters to avoid intake of
water or snow particles.
• Make sure that motorized damper blades are not
blocked with snow or dirt. Inspect the dampers
regularly to ensure a suitable airflow.
2 – Electrical Installation of Electric Coil
Heaters
2.1 Disconnect all power sources before opening
the control box and working within.
2.2 Read the nameplate carefully and consult
wiring diagram before starting to wire.
2.3 – Supply Wires
Use only wires suitable for 167ºF [75ºC]. Wires shall be
sized according to the Canadian Electrical Code requirements. All wires must be brought in through knock-outs.
2.4 – Disconnecting Means
Install a disconnect switch close to the heater according
to the code unless a disconnect switch is already built into
the heater.
2.5 – Control Circuit Wiring
Use Class II wiring for control circuit connections to the
duct heater.
2.6 – Magnetic Contactors
If magnetic contactors are mounted outside of the duct
heater, use only contactors approved for:
• 250,000 operations when controlled by auto-reset
thermal cut-out (A) and by other switching devices in
series with this cut-out (thermostat, step controller,
airflow switch, etc.).
• 100,000 operations when controlled by auto-reset
thermal cut-out (A) alone.
• 100,000 operations when controlled by auto-reset
thermal cut-out (A) plus manual reset cut-out in series (A and M).
• 6,000 operations when controlled by manual reset
cutout (M) alone.
2.7 – External Controls Ratings
Rating of external control devices shall be suitable for handling the VA ratings as marked on the nameplate; otherwise, a backup relay must be used.
2.8 – Airflow Interlock
Heaters are generally supplied with one extra terminal
marked for fan interlock or air sensing device connection.
Remove jumper between terminals I and C before connecting the fan interlock. Select a suitable airflow sensing
device of the differential pressure sensing type, with snap
acting contacts. A slow make, slow brake device may
cause undue cycling and in some instances chattering of
the contactors. When fresh air dampers are used, make
sure the heater is properly interlocked to prevent it from
being energized before the damper is fully open.
VCES-V-CUBE-IOM-1A
42

3 – Operating Electric Coil Heaters
3.1 – Minimum Airflow
Ensure that sufficient airflow as marked on the nameplate
is passing through the heater. Airflow should be evenly
distributed across the entire face of the heater. Use air
turning vane at duct elbows and splitter damper at duct
branchoffs to streamline the airflow in the heater. Use
suitable airflow sensing device or interlock the heater with
fan. An insufficient airflow will lead to the opening of the
autoreset thermal cut-out or damage to the heating elements.
3.2 – Warning
The air flowing through the duct where the heater is installed shall not contain any combustible particles, nor any
flammable vapor or gas.
3.3 – Air Temperature
The air temperature should not exceed 120ºF [49ºC] at the
heater outlet.
3.4 – Minimum Static Pressure and Air Direction
The heater is protected by a differential pressure switch.
To keep the contact of this switch closed, it is necessary to
maintain a minimum total pressure of 0.07” of water for a
constant flow.
3.5 – Manual Reset Thermal Cut-out
This protection device is standard on all heaters of less
than 300 volt and 30 kW and is optional on all other heaters. Please check the auto-reset thermal cut-out before
resetting the manual thermal cut-out. If any defect has
been detected in the auto-reset thermal cut-out, it will be
necessary to replace it before resetting the manual reset
thermal cut-out.
4.2 – Electrical Inspection
Two weeks after start-up, all electric connections to contactors should be checked and tightened up. Before each
heating season, check the resistance between the heating
elements and ground. It is also recommended to check
the electrical connections to heating elements, magnetic
contactors and main power lugs. This inspection is recommended monthly during the first four months of operation. After that, two inspections per heating season are
sufficient.
4.3 – Checkpoints
• Check all fuses.
• Check the resistance to ground for each circuit.
• Check the resistance phase-to-phase for each circuit.
• Check the tightening of connections at all contactors
and heating elements.
• Check all contactors.
4.4 – Off-season Maintenance
Where tubular heating elements are used, it is strongly
recommended that you start the heating system from time
to time. This precaution will prevent moisture from percolating through the terminal gaskets into the heating element and accumulating in the insulating powder. Should
a heater be shut off for a long period, we recommend
that you check carefully the resistance to ground for each
circuit. It is important not to power a heater when too low
a resistance to ground has been measured. It is also recommended to pay attention to any other heater operating
in normal conditions. Control components such as step
controllers or modulating valves (SCR) should be maintained and checked according to respective manufacturers
instructions. Any defective components should be replaced
only with identical original parts.
4 – Maintenance
All electric coil heaters have been designed to operate
long term without problems. Those responsible for equipment and maintenance should be aware of the following
suggestions.
4.1 – Visual Inspection
It is strongly recommended to complete a periodic inspection. This precautionary step will help to keep your installations operating well. Note these eventual first signs of
problems:
• Accumulation of dust on the heating elements.
• Signs of overheating on the heater frame.
• Traces of water or rust on the control box.
VCES-V-CUBE-IOM-1A
43

Appendix F: Extended Dormant Unit Maintenance Procedure
The following procedures must be applied to any unit
which is stored for a period exceeding one month, which
are required in order to maintain our warranty. Failure to
comply with the procedures outlined below may result in
damage and will void unit warranty.
1. Unit must be stored indoors in a clean, dry and tempered environment, heated in the winter and air
cooled in the summer. Ambient air conditions should
be from 50ºF to 75ºF with percentage RH from 10%
to 50%. The unit needs to be stored in a warehouse
(or some type of enclosure). Note that storing units
outdoors is contraindicated and will void our warranty.
2. Unit must be stored on a level surface with the
weight of the equipment evenly distributed through
its base. The unit location must be free from excessive vibration and accidental impacts.
3. Once the unit has been unloaded in its resting location, the plastic wrapping must be removed from the
unit by cutting along the corner edges in order to
perform proper inspections and maintenance on the
equipment. The plastic wrapping should be kept and
re-applied to the unit when the unit will finally be
shipped to the jobsite.
4. If applicable, a certified/qualified refrigeration technician should record refrigerant pressures on all compressors at time of storage. Each compressor must
maintain refrigerant pressure in the system.
5. If applicable, a certified/qualified refrigeration technician should check refrigerant pressure in each
compressor every three months. Refrigerant pressure
must be maintained in the system. If zero pressure
is found, this indicates a leak in the system. Leak(s)
must be identified and repaired. A holding pressure
must then be reinstalled.
6. Rotate blower impellers by hand every two months;
grease fan bearings as required following proper
practices. Do not over grease the bearings as this
may rupture the seals and lead to premature bearing
failure during operation.
7. Ensure that all unit doors are kept closed.
8. Continue above maintenance schedule until unit
start-up.
For all checks listed above please complete the Extended
Dormant Unit Maintenance Checklist below and send
a copy to the Venmar CES service department every six
months and when unit is put into service.
If the unit has been dormant for an extended period after
initial start-up, all start-up checks should be repeated before operating the unit. Refer to the V-Cube™ Start-up
Report and Checklist in Appendix C and complete these
checks. Failure to comply with the above recommendations may result in component failure and surface corrosion on the interior and exterior of the unit.
Please note that if the unit is being stored outdoors or
remains dormant for an extended period after initial
startup, this may result in condensation within the unit
which could result in premature degradation of the unit
and potential issues within the control panel. In this event,
the installation of a desiccant pouch in the control cabinet
is highly recommended, all ventilation ducts should be
capped/covered to prevent chimney effect, all liquid pipes
(water or glycol mixture) should be drained or capped
off if necessary and all peripheral electrical penetrations
should be properly sealed.
VCES-V-CUBE-IOM-1A
44

Appendix G: V-Cube™ Maintenance Summary Chart
Table G1: Maintenance Summary Chart – V-Cube
Item No. Description Monthly Quarterly
1 Inspect the general condition of the unit. x
General
Fans
Dampers
Air filters
Coils
Electric
Condenser
fans
Cooling
section
2 Remove any dirt or debris. x
3 Check for unusual noise or vibration. x
4 Lubricate the door latch mechanisms. x
5 Clean fans with stream of water. x
6 Align or replace belts and drives. x
7 Adjust belt tension. x
8 Check motor voltage and current. x
9 Lubricate the motor and shaft bearings. x
10 Lubricate motor base adjusting screws. x
11 Visual inspection for dirt or leakage. x
12 Lubricate damper linkage. x
13 Clean and replace prefilters. x
14 Clean and replace final filters. x
15 Inspect holding frames/sliding rack. x
16 Clean the coils. x
17 Winterize the water coil. x
34 Verify all electrical connections; tighten if necessary. x
35 Verify all fuse holders. x
36 Verify all motor overload settings. x
37 Inspect fan blades for cracks. x
38 Inspect for wear and tension. x
Look for oil on all refrigeration components (including coils,
39
compressors, etc.) to indicate a refrigerant leak.
40 Verify for proper superheat. x
Verify each circuit refrigerant site glass when the circuit is
41
operating under steady state, full load conditions. It should be full
and clear. If not, look for refrigerant leaks.
x
x
Semi-
annually
Annually
VCES-V-CUBE-IOM-1A
45

Appendix H: Measuring and Adjusting V-belt Tension
Table H1: Measuring V-belt Tension
V-belt Cross Section
A
B
C
D
E
AX
BX
CX
3V
5V
8V
3VX
5VX
Small Sheave Diameter
Range (Inches)
3.00 to 3.40
3.60 to 4.20
4.60 to 6.00
4.60 to 5.40
5.60 to 7.40
8.60 to 9.40
7.00 to 8.50
9.00 to 12.00
13.00 to 16.00
12.00 to 15.50
16.00 to 18.00
22.00 to 27.00
17.70 to 23.60
23.70 to 31.50
31.60 to 39.60
2.10 to 3.40
3.60 to 4.20
4.60 to 6.00
3.70 to 5.40
5.60 to 7.40
8.60 to 9.40
5.80 to 8.50
9.00 to 12.00
13.00 to 16.00
2.65 to 3.35
3.65 to 4.12
4.50 to 5.60
6.00 to 10.60
7.10 to 8.50
9.00 to 11.80
12.50 to 16.00
12.50 to 16.00
17.00 to 20.00
21.00 to 24.80
2.20 to 3.35
3.65 to 4.12
4.50 to 5.60
6.00 to 10.60
4.40 to 8.50
9.00 to 11.80
12.50 to 16.00
Initial Installation
3.3
3.5
3.7
6.0
6.3
6.6
13.2
13.9
14.6
26.5
27.8
29.1
39.7
41.7
43.7
4.4
4.6
4.9
7.7
8.2
8.6
17.2
18.1
19.0
5.5
6.4
7.5
8.6
19.2
23.3
27.3
50.9
57.1
61.3
5.5
6.4
7.5
8.6
19.2
23.3
27.3
Recommended Deflection Force (lbs)
Retensioned
Maximum Minimum
2.9
3.1
3.3
5.1
5.5
5.7
11.5
12.1
12.6
22.9
24.3
25.6
34.4
36.2
37.9
3.7
4.0
4.2
6.6
7.1
7.5
15.0
15.7
16.5
4.8
5.7
6.6
7.5
16.7
20.3
23.8
44.3
49.8
53.3
4.8
5.7
6.6
7.5
16.7
20.3
23.8
2.2
2.4
2.5
4.0
4.2
4.4
8.8
9.3
9.7
17.6
18.7
19.6
26.5
27.8
29.1
2.9
3.1
3.3
5.1
5.5
5.7
11.5
12.1
12.8
3.9
4.4
5.1
5.7
13.0
15.6
18.5
34.4
38.6
41.4
3.9
4.4
5.0
5.7
13.0
15.6
18.5
Plunger with
deflection force scale (lbs)
Small O-ring Large O-ring
Figure H1: Belt tension adjustment
VCES-V-CUBE-IOM-1A
Body with deflection
distance scale (inches)
Belt Span
Deflection
Force
46

Appendix I: FANWALL® Inlet Cone Alignment
Table I1: FANWALL Wheel/Cone Alignment Dimensions (Inches)
Wheel Size Backplate OD Blade Width Backplate Extension Wheel/Cone Overlap
10 10.375 3.495 0.700 0.250
12 12.500 4.280 0.700 0.250
14 13.750 4.720 0.700 0.250
16 16.750 5.760 0.700 0.250
20 20.451 6.990 0.700 0.400
22 22.701 7.780 0.700 0.400
Blade width
(100% wide)
Backplate
extension
Figure I1: FANWALL inlet cone alignment
Wheel/cone
overlap
Backplate OD
VCES-V-CUBE-IOM-1A
47

Appendix J: Filter Resistance and Latches
Table J1: Prefilters (MERV 8)
Depth Nominal Size
2” [51 mm]
4” [102 mm]
12” x 24” x 2” [305 x 610 x 51 mm]
24” x 24” x 2” [610 x 610 x 51 mm]
12” x 24” x 4” [305 x 610 x 102 mm]
24” x 24” x 4” [610 x 610 x 102 mm]
Table J2: 4” [102 mm] Final Filters
Filter Efficiency MERV Rating Nominal Size Capacities (CFM)
60–65% MERV 11
80–85% MERV 14
90–95% MERV 15
12” x 24” x 4” [305 x 610 x 102 mm]
24” x 24” x 4” [610 x 610 x 102 mm]
12” x 24” x 4” [305 x 610 x 102 mm]
24” x 24” x 4” [610 x 610 x 102 mm]
12” x 24” x 4” [305 x 610 x 102 mm]
24” x 24” x 4” [610 x 610 x 102 mm]
Table J3: 12” [305 mm] Final Filters
Filter Efficiency MERV Rating Nominal Size Capacities (CFM)
60–65% MERV 11
80–85% MERV 14
90–95% MERV 15
12” x 24” x 12” [305 x 610 x 305 mm]
24” x 24” x 12” [610 x 610 x 305 mm]
12” x 24” x 12” [305 x 610 x 305 mm]
24” x 24” x 12” [610 x 610 x 305 mm]
12” x 24” x 12” [305 x 610 x 305 mm]
24” x 24” x 12” [610 x 610 x 305 mm]
Capacities (CFM) Resistance @ Capacity (in. w.g.)
Medium High Medium High Final
600
1,250
600
1,200
1,000
2,000
1,200
2,400
0.12
0.12
0.12
0.12
1,000
2,000
1,000
2,000
1,000
2,000
1,000
2,000
1,000
2,000
1,000
2,000
0.23
0.23
0.27
0.27
Resistance (in. w.g.)
Initial Final
0.45 1.50
0.65 1.50
0.75 1.50
Resistance (in. w.g.)
Initial Final
0.39 1.50
0.53 1.50
0.58 1.50
1.00
1.00
1.00
1.00
Table J4: Filter Latches for Front Loading/Access
Final Filter Prefilter Latch Venmar PN
None 2” C-70 207312240
4” C-86 19516104
None C-86 19516104
4” nominal
12” HEPA
12” double header
2” Knock-on (4” + 2”) 500026048
4” Knock-on (4” + 4”) 500026049
None — HEPA frame
2” VP-2 208290023
4” VP-4 19516310
None C-80 19516103
2” C-80/VP-2 19516103 / 208290023
4” C-80/VP-4 19516103 / 19516310
VCES-V-CUBE-IOM-1A
48

Appendix K: Troubleshooting
Table K1: Troubleshooting – V-Cube™
Symptom Possible Cause Corrective Action
General
Check filters and enthalpy wheel for blockage. Balance flow
Air supply too cold. Supply and exhaust air are unbalanced.
Blower wheel is rubbing on other parts. Adjust wheel or replace defective part.
Blower wheel is out of alignment. Remove the motor/blower assembly. Adjust the blower wheel.
Sheaves are out of alignment. Verify wheel alignment. Align belt using a straight edge.
Noisy unit.
Bearings wear down
too quickly.
Poor airflow.
Fan motor overload.
Exhaust fan not
working.
Filters are out of filter
rack.
Water carryover from
wet cooling coil onto
the floor, motor or fan
housing.
Water inside the unit.
Drain pan not properly
draining.
Excessive belt tension causes bearings to screech. Adjust belt tension.
Low belt tension causes belts to squeal. Adjust belt tension.
Ducts are vibrating. Install flexible connections.
Unit is too close to occupants. Install a silencer.
Excessive vibration. Replace shaft and bearings. Verify wheel alignment.
Belt too tight. Adjust belt tension.
Fan wheel is turning the wrong direction.
Rotation speed is too low.
Filters are blocked. Replace filters.
Air leakage. Seal all leaks in ducts and unit walls.
Fan belt is slipping. Adjust belt tension.
Low static pressure.
Electric tension of motor is too low/high. Adjust tension.
Excessive fan speed. Reduce blower speed.
Low motor power. Install more powerful motors.
Unit equipped with recirculation defrost system is in
defrost mode.
A wire is disconnected. Connect the wire.
Filters are too dirty and have been sucked into the
unit.
Filters are wet.
Filter rack is damaged. Repair filter racks and reinstall filters.
Some filter clips are missing. Order new clips from Venmar CES.
Airflow is too high. Lower airflow by adjusting the drive.
Drain pan not properly draining.
Coil bulkhead penetration. Be sure any field penetrations are sealed.
Missing or improper intermediate drain pan. Install or clean the intermediate drain pan.
Unit was not properly sealed when installed.
Electrical or piping conduits not properly sealed.
Trap is not properly installed. Revise trap installation and dimensions.
Unit is not installed on level. Revise the level of curbs.
Pressure exceeds the design.
Water Issues
of supply and exhaust air so that exhaust air is equal or
greater than supply air. Install a post-heat module.
Reverse rotation or motor so that wheel turns in the
direction of the arrows shown on the fan.
Increase speed by increasing the diameter of motor sheave
or installing a smaller fan sheave.
Verify presence of filters and other duct components. Set
balancing damper so that it reduces the passage of air.
Wait until the defrost cycle is over.
Clean or change the filters and consider revising
maintenance schedule.
Water infiltration or condensation. See Water Issues section
below.
Clean drain pan and ensure suction into the unit is not too
high.
Seal all section joints. Sections under negative pressure
require special attention to sealing.
Inspect and seal any holes made for electrical wires or
piping conduits.
Verify design pressure versus unit pressure and check the
segment which houses the drain pan.
VCES-V-CUBE-IOM-1A
49

Table K1: Troubleshooting – V-Cube™
Symptom Possible Cause Corrective Action
Prefilter is wet.
Solenoid valve does
not open.
Too much refrigerant
is being fed to the
evaporator and the
superheat is too low
(cannot be adjusted).
Compressors lockout
on high head pressure
or run at higher than
design head pressure.
Condenser fan(s) short
cycling.
Outside air hood is shipped loose and was not well
sealed when installed.
Airflow exceeds design conditions and sucks water
into the unit.
Refrigerant Issues
No power to coil. Check circuit connections.
Defective solenoid coil. Replace solenoid coil.
Dirt or foreign material lodged in thermostatic
expansion valve.
Defective thermostatic expansion valve. Replace thermostatic expansion valve.
Insufficient fluid flow across condenser coil.
Condenser fan failure.
High pressure control. Check for proper setting.
Service valve failure. Discharge valve fully back sealed.
Refrigerant overcharge.
Supply water temperature may be too high.
Water control valves not operating properly. Verify and repair water control valves.
Improperly set sequencing control. Set for correct pressure and differential.
Reinstall hood, ensuring the flange is properly sealed.
Redesign the hood or lower the cfm of the unit.
Disassemble valve, remove dirt and re-verify superheat.
Clean dirty condenser coil. Comb damaged fin surface with
fin comb. Tighten loose fan belt(s).
Verify fan rotation. Verify fan rpm. Check fuses. Verify
overload. Check fan controls. Check for motor burnout.
Verify condenser subcooling (15ºF [−9ºC]). If above 15ºF
[−9ºC], adjust charge based on maintaining suction
pressure.
Verify water temperature rise entering and leaving unit to
determine if adequate water is flowing.
VCES-V-CUBE-IOM-1A
50

VCES-V-CUBE-IOM-1A
51

info@venmarces.com
www.venmarces.com
Venmar CES Inc. has a policy of continuous improvement and reserves the right
to change design and specifications without notice. FANWALL TECHNOLOGY
and FANWALL® are trademarks of Huntair, Inc. Products in this literature are
covered by one or more of the patents listed on www.ces-group.com/patents.
®
©2014 Venmar CES Inc.
VCES-V-CUBE-IOM-1A
February 2014
 Loading...