


MANTHER
QUICKSTART GUIDE
814 SE 14TH AVENUE
PORTLAND OR 97214
USA
Version 1.0

SAFETY, MAINTENANCE & OVERVIEW
WARNING
To reduce the risk of electrical shock do not expose to water, rain or any moisture.
Do not use in direct sunlight.
Do not open the enclosure. If you require servicing, please contact Malekko directly.
Use only the 9V power AC adaptor provided with Manther.
Do not use around heat (stoves, furnaces etc.).
Do not use abrasive chemicals to clean your unit or LCD screen.
Do not apply unnecessary pressure to the LCD screen.
MANTHER is a full featured, tabletop monosynth with an analog signal path, an advanced 64-step
digital sequencer and onboard delay. The heart of this beast is a coveted CEM3340 based VCO IC chip.
The analog filter is based on an SSM2044 chip. The Source Mixer allows for total control over the
Square, Triangle, Saw, Tri Shape, Noise and Sub Oscillator levels with individual wave outputs. Dial
everything from heavy basslines to screaming leads to stomping kicks. Manther growls like no other.
Automation recording is available for parameters of the LFO, VCO, SOURCE MIXER, VCF, VCA,
ENVELOPE as well as GLIDE and DELAY. Once automation is recorded it can be saved within a total of
64 presets. This allows for recall of intricate sound sculpting and numerous animated creations. Easily
build songs by simply selecting presets to play in any order. Program notes quickly using the keyboard.
Utilize the Repeat and Probability functions per step for a unique and inspiring approach to gate pattern
formation. Even route the LFO to modulate the Delay time.
The intuitive menu offers additional control and setup of the more complex features: Sub Semitones,
ADSR envelope, Sequence direction (FWD, REVERSE, PENDULUM and RANDOM), Sequence division
and multiplication, LFO phase, additional Delay features, Clock settings and more.
INS and OUTS include: CV, MIDI, CLOCK, GATE and LFO and pairs brilliantly with Eurorack.
Features include:
• 64-step sequencer
• Keyboard with octave transpose controls
• Onboard Delay with Time, Mix, Regenerate and Sync controls
• Individual Outputs for Square, Saw and Triangle waveforms
• Mixer for Square, Triangle, Saw, Sub Osc and Noise
• Audio Input
• 4 banks of 16 presets each
• Song Mode
• Record automation of features per step for: LFO, VCO, DELAY, VCF, ADSR Envelope and
GLIDE
• Gate Probability, Gate Repeat, Gate Delay and Accent per step
• Morph control over automation
• Route LFO to modulate delay time
• LFO Sync
• Assign modulation of Pulsewidth to LFO, Manual or Envelope
• Glide control per step
• FWD, REV, PENDULUM and RANDOMIZE sequence directions
• Tempo control
• Switches for LFO shape
• Switches for Envelope direction and VCA control
• Range switch
• Gate inputs and outputs
• LFO output
• CV inputs for VCO, VCF and VCA
• MIDI in and out
• Headphone Output
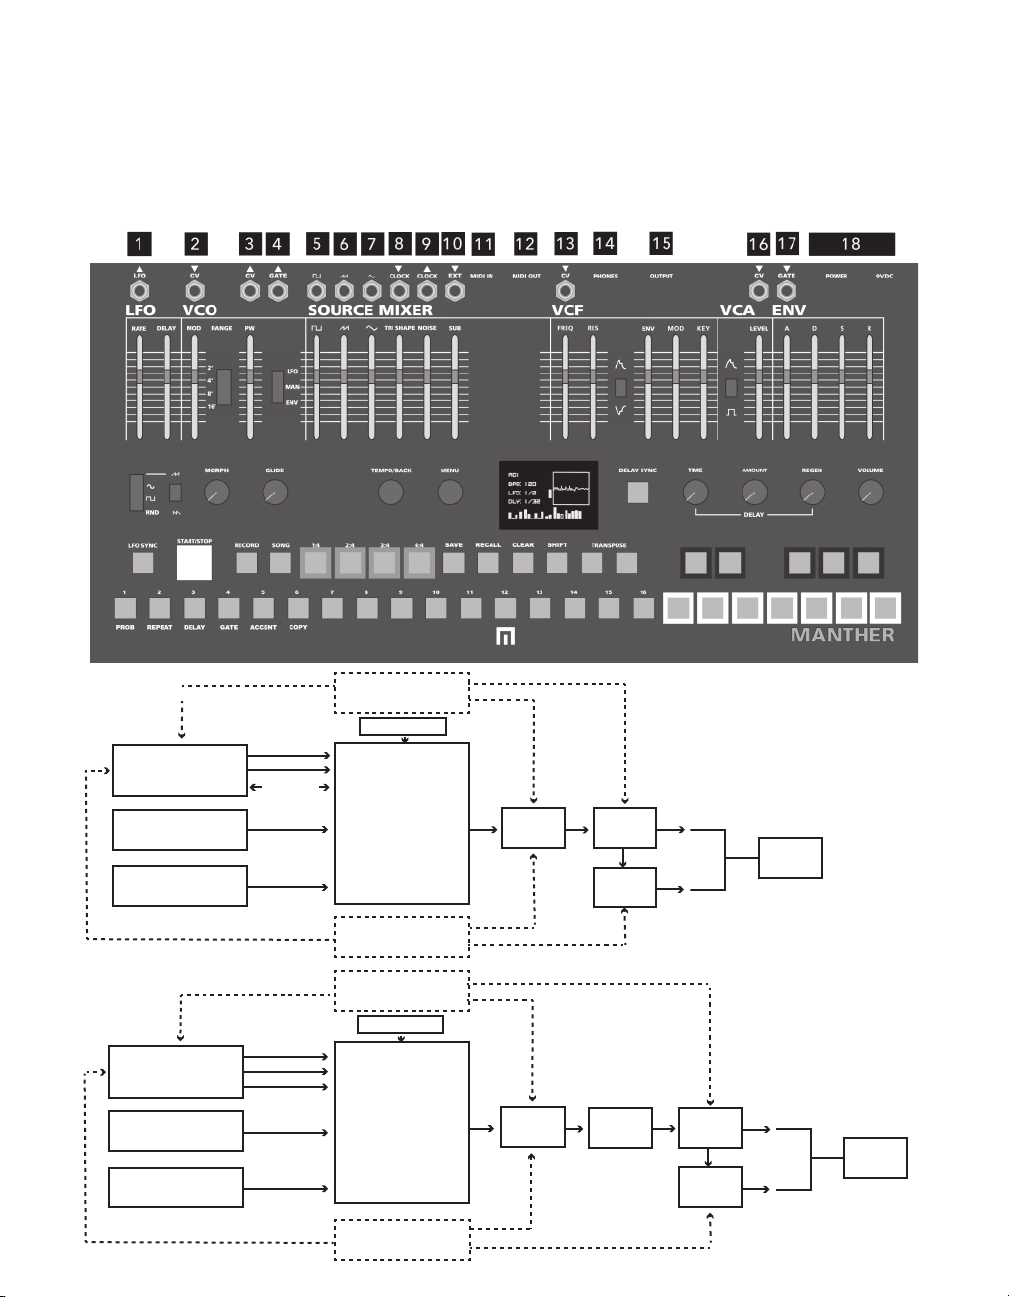
INPUTS, OUTPUTS AND ROUTING
1 LFO (Low Frequency Oscillator) OUTPUT
2 VCO (Voltage Controlled Oscillator) CV INPUT
3 SEQUENCER CV OUTPUT
4 SEQUENCER GATE OUTPUT
5 INDIVIDUAL SQUARE WAVE OUTPUT
6 INDIVIDUAL SAW WAVE OUTPUT
7 INDIVIDUAL TRIANGLE WAVE OUTPUT
8 ANALOG CLOCK INPUT
9 ANALOG CLOCK OUTPUT
10 EXTERNAL AUDIO INPUT (routes to VCF)
11 MIDI INPUT
12 MIDI OUTPUT
13 VCF (Voltage Controlled Filter) CV INPUT
14 HEADPHONE OUTPUT
15 MAIN OUTPUT
16 VCA (Voltage Controlled Amplifier) CV INPUT
17 ENVELOPE GATE INPUT
18 POWER IN and POWER ON/OFF BUTTON
TRI FOLD
SQUARE
CEM3340
SAW
TRI
NOISE
SUB
SHAPER
FOLD ALL (see MENU)
SQUARE
SAW
TRI
NOISE
SUB
ENVELOPE
EXT INPUT
SOURCE
MIXER
LFO
ENVELOPE
EXT INPUT
SOURCE
MIXER
LFO
VCF
VCF
VCA
DELAY
SHAPER
all
OUTPUT
VCAwavefold
OUTPUT
DELAY

FIRST STEPS
FIRST:
1. POWER UP YOUR UNIT. It will take a few seconds for Manther to initialize and recall your memory settings.
LED screen will show the following info for settings:
• PRESET INDICATOR: A (BANK A) and 01 (preset number 1)
• BPM
• LFO SETTING (sync or not synced and rate)
• DELAY SETTING
• BAR GRAPH DISPLAY OF FADER/CONTROL POSITIONS
• OUTPUT WAVEFORM
PRESS THE START/STOP BUTTON. You will now see a blue light moving across each step button indicating
playback.
MANTHER ships with some already programmed presets. To recall these presets, hold the RECALL button while
selecting one of the sequencer/step buttons. If you want to clear a preset, simply select SHIFT and then CLEAR.
You can save a now empty sequence by holding SAVE and one of the step buttons/preset slots.
THERE ARE TWO WAYS YOU CAN START RECORDING NOTES ON STEPS:
1. You can press the RECORD button and play the keyboard - every time you press a key, a note will record on a step.
2. You can program steps on or off on the sequencer and then hold those lit buttons/steps while selecting notes on
the keyboard.
• Once you have programmed some steps with notes, adjust the fader/control settings for the LFO, the VCO, the
SOURCE MIXER, the VCF, VCA and ENVELOPE.
• Save your preset: HOLD SAVE, then select one of the sequencer buttons 1-16 to save to a slot.
• To expand your sequence to 32 steps, hold the 2:4 button and then select the 16th step button. The sequence you
programmed into 1:4 will now automatically copy to 2:4.
• To record automation of fader changes, hold RECORD while moving faders. You will see the LED of the fader
with automation recording is now lit red. To clear pre-recorded fader/control automation, hold the CLEAR
button while moving automated fader or knob. You can automate all of the faders as well as GLIDE and DELAY
controls.
FIND THE FULL MANTHER MANUAL ON MALEKKOHEAVYINDUSTRY.COM

LFO, VCO & SOURCE MIXER
LFO
1 LFO RATE CONTROL
Controls LFO speed from minimum to maximum speed.
2 LFO DELAY CONTROL
When LFO SYNC BUTTON (#5) is set to ON, the DELAY
SLIDER will control the amount of time between a note or a
key press and when the LFO ramps up to its full amplitude.
When SYNC is OFF, delay range is approximately 30-500
milliseconds.
3 LFO WAVEFORM SWITCH
Selects the LFO waveform shape. RAMP wave, SINE wave,
SQUARE wave, and RANDOM are all available as modulation
shapes. Additionally, there is a switch to invert the ramp wave
into a sawtooth wave.
4 INVERT LFO RAMP SWITCH (SAWTOOTH)
Set #3 swith to the top setting, then adjust this RAMP
switch(#4) .
5 LFO SYNC ON/OFF
When lit LFO will sync to BPM.
VCO
6 VCO FREQUENCY MODULATION
Turning the VCO MODULATION SLIDER up increases the
amount of LFO modulation applied to the VCO’s frequency for
vibrato effect for instance.
7 VCO OCTAVE RANGE SWITCH
16’ tracks with SEQUENCER and MIDI notes, 8’ is an octave
above, 4’ is two octaves above, and 2’ is three octaves above.
8 VCO PULSEWIDTH SLIDER
When PWM SOURCE SWITCH (#9) is set to MANUAL, the PW
AMOUNT SLIDER varies the SQUARE wave’s pulsewidth.
When the PWM SOURCE SWITCH is set to LFO or ENV, the PW
AMOUNT SLIDER acts as an attenuator for pulsewidth
modulation.
9 VCO PULSEWDITH MODULATION SWITCH
Switch between LFO, MANUAL or ENVELOPE to control
pulsewidth of the SQUARE WAVE. See #8 above for additional
info.
SOURCE MIXER
The VCO waveform outputs are available for mixing and combining
with the NOISE and SUB OSCILLATOR.
10 SQUARE WAVE LEVEL
11 SAW WAVE LEVEL
12 TRIANGLE WAVE LEVEL
13 TRIANGLE SHAPE / WAVEFOLD CONTROL
14 NOISE LEVEL
15 SUB OSC LEVEL
Note: External Input is unity level

VCF, VCA, ENVELOPE & SEQUENCER
VCF
16 VCF CUTOFF FREQUENCY SLIDER
Manual control of filter cutoff frequency. Sums with VCF
modulation mixer (ENV, MOD, KEY) and VCF CV IN input.
17 VCF RESONANCE CONTROL
Sets filter resonance.
18 VCF/ENVELOPE MODULATION SWITCH
Switch the ENVELOPE to either positively or negatively
modulate the VCF (UP position is postive).
19 VCF/ENVELOPE MODULATION CONTROL
Controls the amount of modulation applied to filter frequency
cutoff from the envelope generated by the ENVELOPE
section.
20 LFO TO VCF MODULATION CONTROL
Controls the amount of modulation applied to filter frequency
cutoff from the LFO.
21 VCF KEYTRACKING CONTROL
Controls the amount of pitch CV applied to VCF.
VCA
22 VCA ENVELOPE/GATE MODE SWITCH
Switches VCA control between ENV and GATE mode. In ENV
mode the ENV section’s ADSR controls the amplitude of the
VCA. In GATE mode, a gate signal is generated whenever a
key is pressed or a sequencer note is played, bringing the VCA
to maximum amplitude.
23 VCA LEVEL CONTROL
Down position for full attenuation and up position for no
attentuation.
ENVELOPE
24 ADSR ENVELOPE CONTROL
Control over Attack, Decay, Sustain and Release. For instance,
Attack in down position for the shortest attack.
SEQUENCER
25 START/STOP
Starts and stops sequencer.
26 STEP AND PRESET BUTTONS
Turning these buttons on and off will activate notes/steps.
HOLDING SAVE while selecting one of these buttons also saves
all settings as a preset (there are 64 total presets available).
27 SEQUENCE ACCESS (1:4,2:4,3:4,4:4) AND PRESET
BANK ACCESS
Select these buttons to access different sequence sections for a
total of 64 steps. These buttons are also used to access BANKS
of presets by holding SHIFT and then 1:4, 2:4 and so on for 64
total preset slots.
28 KEYBOARD
Play to program notes per step.
29 TRANSPOSE OCTAVE
Select these buttons to change the keyboard octave up or
down.
30 MORPH CONTROL
Control over global skew. Use this to slowly morph through
recorded automation.
31 GLIDE CONTROL
“Global” GLIDE or each step can be programmed with an
individual GLIDE amount by holding a step button while
adjusting the GLIDE control.
32 TEMPO/BACK
Turn to change tempo/BPM. Also pressing this button while in
MENU mode will EXIT MENU.
33 PROBABLITY MODE
SHIFT + PROBABILITY button will access menu for program-
ming the probability that a particular step will fire.
34 REPEAT MODE
SHIFT + REPEAT button will access menu for programming
amount of repeats per step.
35 GATE DELAY MODE
SHIFT + DELAY button will access menu for programming
amount of gate delay per step.
36 GATE MODE
SHIFT + GATE button will access menu for programming gates
and gate time per step. By default, gates are ON for each step.
37 ACCENT MODE
SHIFT + ACCENT button to program an ACCENT to a step.
• Hold Shift and Button 33-37 to enter the above modes, turn
the MENU button to change the parameter and then select a
step button you wish to apply the new parameter setting to.
38 COPY
Hold SHIFT + COPY to enter COPY mode, then hold the step
you want to copy while pressing the step you want to copy to.

MENU, PRESETS, SONG MODE & DELAY
MENU
42 OLED / MENU
Press the MENU button to enter main MENU. Turn the MENU
knob to scroll through the menu list. Press the MENU button to
select feature option. Press TEMPO/BACK to EXIT menu.
RECORD
Change UPDATE from ALL to NOTE specifically (default is set
to ALL). This will switch automation recording from every step
to just steps with active notes.
MIDI
Set MIDI channels.
DELAY
Sets DELAY maximum milliseconds.
LFO>DELAY (set LFO to modulate delay time).
MIXER
WAVEFOLDER TRI is default and can be changed to VCF where
wavefolder folds signal after VCF (fold all).
SUB SHAPE changes sine to square.
SEMITONE changes semitones of SUB OSC.
CENTS changes semitones of SUB OSC in cents (fine tuning).
LFO
PHASE adjust phase of the LFO.
KEY SYNC change key sync of LFO to ON. OFF is default.
SEQUENCE
SEQUENCE LENGTH: Change from 1-64 steps.
DIRECTION: Sequence direction options are FWD, REVERSE,
PENDULUM and RANDOM.
DIVIDE: Divide sequence time.
MULTIPLY: Multiply sequence time.
CLOCK
Change clock from INT default, to MIDI CLOCK, ANA (analog).
AUTOMATION / PRESETS / SONG
MODE
43 RECORD MODE
Hold the RECORD button while adjusting sliders and
control knobs for DELAY, MORPH and GLIDE to record
live automation. To record changes to the keyboard
simply press once (RECORD will be lit) and then play.
44 SONG MODE
Press SONG and then select PRESET buttons to include
these presets in your song/automated playback. Once
you have selected the presets you want to play in your
song, select the SONG button again (it will be illuminated).
45 SAVE PRESET
To save a set of steps and automation, hold the SAVE
button while selecting buttons 1-16. To save to a new
BANK, hold SAVE then select the bank (1:4, 2:4, 3:4, 4:4)
and then a preset slot. Presets save: AUTOMATION and
settings of all fader and controls, all sequencer information, and all menu settings with the exception of octave
range switch settings.
46 RECALL PRESET
To recall a preset, hold RECALL while selecting saved
presets on buttons 1-16. To recall from another BANK,
hold RECALL then select the bank (1:4, 2:4, 3:4, 4:4) and
then the preset slot/button.
47 CLEAR
To clear a step, hold CLEAR while selecting a step. To
clear a PRESET, hold SHIFT+CLEAR. To clear automation,
hold CLEAR and move the fader or control with automation or CLEAR + RECORD to clear all automation.
48 SHIFT
Hold SHIFT to access PROBABILITY, REPEAT, DELAY,
GATE and ACCENT programming.
DELAY
49 DELAY SYNC
Press the DELAY SYNC button to sync the DELAY to clock.
50 DELAY TIME
Adjusts the DELAY TIME in divisions of clock when
DELAY SYNC is on. If not synced, simply adds delay in
milliseconds.
51 DELAY AMOUNT
Adjust to change the amount of delay in signal out.
52 DELAY REGENERATION
Adjust to change amount the delay regenerates. Great
for creating feedback.
53 MAIN VOLUME
Adjust to change the main volume output for MAIN and
HEADPHONES.

WARRANTY
This product is covered by the Malekko Heavy Industry warranty for one year following the
date of purchase. This warranty covers any defect in the manufacturing of this product. This
warranty does not cover any damage or malfunction caused by incorrect use such as, but
not limited to the use of incorrect power supplies, excessive voltage levels, or exposure to
extreme temperature or moisture levels. The warranty covers replacement or repair, as
decided by Malekko Heavy Industry.
Please visit our website malekkoheavyindustry.com to obtain full warranty information
and to register your product for coverage.
 Loading...