

Makita RBC420, RBC421, RBC420E Instruction Manual

GB
Brush Cutter String Trimmer
D Motorsense Motorsense
PL
Wykaszarka Wykaszarka
HU
Bozótvágó Szegélynyíró
RO
Motocoasă pentru tufişuri Motocoasă cu fir
SK
Krovinorez Strunová kosačka
CZ
Křovinořez Strunová sekačka
UA
Кущоріз Кордова газонокосарка
RBC420E
ORIGINAL INSTRUCTION MANUAL
ORIGINLBEDIENUNGSANLEITUNG
ORYGINALNA INSTRUKCJA OBSŁUGI
EREDETI HASZNÁLATI ÚTMUTATÓ
MANUAL DE INSTRUCŢIUNI ORIGINAL
PÔVODNÝ NÁVOD NA OBSLUHU
ORIGINÁLNÍ NÁVOD K OBSLUZE
ОРИГІНАЛЬНІ ІНСТРУКЦІЇ З ЕКСПЛУАТАЦІЇ
RBC420 RBC421

2
Warning
Read this instruction manual carefully before putting the Brush Cutter or the Grass Trimmer into operation and strictly
observe the safety regulations! Preserve instruction manual carefully!
Attenzione
Lesen Sie diese Betriebsanleitung vor der Inbetriebnahme der Motorsense bsw. des Rasentrimmers aufmerksam durch und
halten Sie die Sicherheitsvorschriften genau ein! Bewahren Sie diese Betriebsanleitung sorgfältig auf!
Ostrzeżenie
Przeczytać uważnie niniejszą instrukcję obsługi przed uruchomieniem wykaszarki i ściśle przestrzegać przepisów
dotyczących bezpieczeństwa! Przechowywać niniejszy podręcznik z należytą starannością!
Figyelem
A bozótvágó/szegélyvágó üzembe helyezése előtt figyelmesen olvassa át ezt a használati utasítást, és szigorúan tartsa be
a biztonsági előírásokat! Gondosan őrizze meg a használati utasítást!
Avertisment
Citiţi cu atenţie acest manual de instrucţiuni înainte de a pune în funcţiune motocoasa pentru tufişuri/motocoasa pentru iarbă
şi respectaţi cu stricteţe reglementările privind siguranţa! Păstraţi cu atenţie manualul de instrucţiuni!
Výstraha
Pred uvedením krovinorezu alebo strunovej kosačky do prevádzky si pozorne prečítajte tento návod na obsluhu a striktne
dodržiavajte bezpečnostné nariadenia! Tento návod na obsluhu starostlivo uschovajte!
Varování
Před uvedením křovinořezu či sekačky na trávu do provozu si pečlivě prostudujte tento návod k obsluze a pečlivě dodržujte
bezpečnostní směrnice! Návod k obsluze pečlivě uschovejte!
Увага
Уважно прочитайте цю інструкцію перед роботою з кущорізом або кордовою газонокосаркою та строго дотримуйтесь
правил безпеки! Зберігайте цю інструкцію!

3
ENGLISH (Original instructions)
Thank you very much for selecting the MAKITA Brush Cutter or String
Trimmer. We are pleased to be able to offer you the MAKITA Brush
Cutter or String Trimmer which is the result of a long development
programme and many years of knowledge and experience.
Please read, understand and follow this booklet which refers in detail
to the various points that will demonstrate its outstanding
performance. This will assist you to safely obtain the best
possible results from your MAKlTA Brush Cutter or String
Trimmer.
Table of Contents Page
Symbols............................................................................................. 3
Safety instructions .............................................................................4
Technical data ...................................................................................8
Designation of parts...........................................................................9
Assembly instructions ...................................................................... 10
Assembly of engine and drive shaft ..........................................10
Mounting of handle....................................................................11
Assembly of throttle wire and ignition wire ................................11
Mounting of guard .....................................................................12
Mounting of cutter blade............................................................14
Mounting of nylon cutting head .................................................14
Fuels/Refuelling ............................................................................... 15
Proper handling of machine.............................................................16
Brush cutter operation .....................................................................16
Idle adjustment ................................................................................18
Resharpening the cutter blade......................................................... 18
Maintenance ....................................................................................21
Maintenance schedule ..............................................................23
Storage ............................................................................................ 23
Troubleshooting procedures............................................................ 23
Symbols
It is very important to understand the following symbols when reading this instructions manual.
WARNING/DANGER
Wear Eye and Ear Protection
(for String Trimmer)
Read, Understand and Follow Instruction
Manual
Wear Protective Helmet, Eye and Ear
Protection
(for Brush Cutter)
Forbidden
Do Not Use Metal Blades
(for String Trimmer)
Keep Away Distance Maximum Safe Tool Speed
Flying Object Hazard Engine-manual Start
No Smoking Emergency Stop
No Open Flame First Aid
Protective Gloves must be Worn Recycling
Kickback ON/START
Keep the Area of Operation Clear of All
Persons and Pets
OFF/STOP
Fuel and Oil Mixture CE-mark

4
SAFETY INSTRUCTIONS
General instructions
- To ensure correct and safe operation, the user must read, understand and follow
this instruction manual to assure familiarity with the handling of the brush cutter or
the string trimmer. Users insufficiently informed will risk danger to themselves as
well as others due to improper handling.
- It is recommended only to loan the brush cutter or the grass trimmer to people who
have proven to be experienced with them. Always hand over the instruction
manual. Use brush cutter only with all guards in place.
- First-time users should ask the dealer for basic instructions to familiarize oneself
with the handling of an engine powered cutter.
- Children and young persons aged under 18 years must not be allowed to operate
the brush cutter or the string trimmer. Persons over the age of 16 years may
however use the tool for the purpose of being trained only while under the direct
supervision of a qualified trainer.
- Use brush cutters or string trimmers with the utmost care and attention.
- Operate the brush cutter or the string trimmer only if you are in good physical
condition. Perform all work conscientiously and carefully. The user has to accept
responsibility for others.
- Never use the brush cutter or the string trimmer while under the influence of
alcohol or drugs.
- Do not use the unit when you are tired.
- Save these instructions for future referral.
- National regulation can restrict the use of the machine.
Personal protective equipment
- The clothing worn should be functional and appropriate, i. e. it should be tightfitting but not cause a hindrance. Do not wear jewelry, clothing or long hair which
could become entangled with bushes or shrubs.
- In order to avoid head-, eye-, hand- or foot injuries as well as to protect your
hearing the following protective equipment and protective clothing must be used
during operation of the brush cutter or the string trimmer.
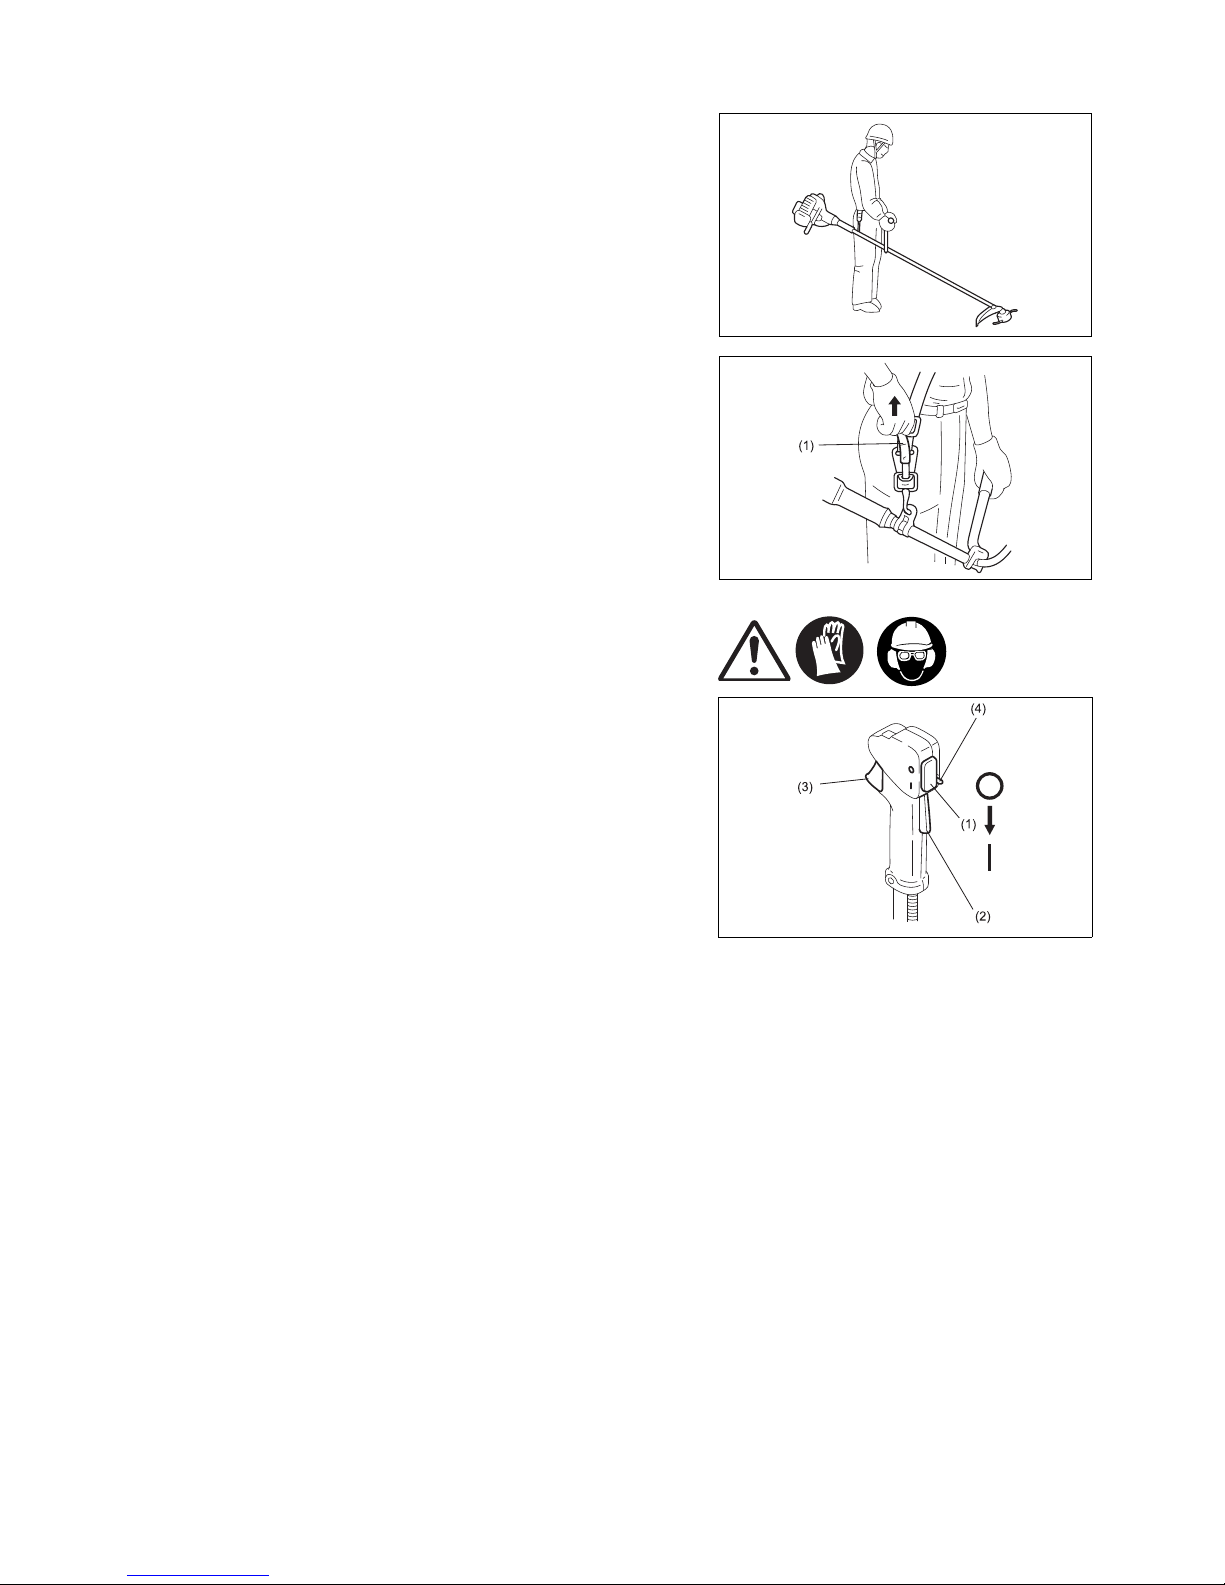
- Always wear a helmet when working in the forest. The protective helmet (1) is to
be checked at regular intervals for damage and is to be replaced at least every
5 years. Use only approved protective helmets.
- The visor (2) of the helmet (or approved goggles) protects the face from flying
sticks, stones or other objects. During operation of the brush cutter or the string
trimmer always wear goggles, or a visor to prevent eye injuries.
- Wear adequate noise protection equipment to avoid hearing impairment (ear
muffs (3),ear plugs etc.), especially during extended work periods.
- The work overalls (4) protect against flying stones and splinters. We strongly
recommend that the user wear work overalls.
- Special gloves (5) made of thick leather are part of the prescribed equipment and
must always be worn during operation of the brush cutter or the string trimmer.
- When using the brush cutter or the string trimmer, always wear sturdy shoes (6)
with a non-slip sole. This protects against injuries and ensures good footing.
Starting up the brush cutter or the string trimmer
- Please make sure that there are no children or other people within a working
range of 50 ft. or 15 meters, also pay attention to any animals in the working
vicinity.
- Before operating, always check that the brush cutter or the string trimmer is
safe for operation:
Check the security of the cutter blade. Be sure the blade mounting nut is firmly
secured. The throttle lever should be checked for smooth and easy action. Check
for proper functioning of the throttle lever lock. The cutter blade must not rotate
during idling. Consult idle adjustment instructions on page 19. Check for clean and
dry handles and test the function of the stop switch. Keep handles free of oil and
fuel.
- Before operation, check and follow local regulations concerning sound level and
hours of operations.
Diagrammatic figure
15 meters
50 feet
5
Start the brush cutter or the string trimmer only in accordance with the instructions.
Do not use any other methods for starting the engine!
- Use the brush cutter or the string trimmer and the tools supplied only for
applications specified.
- Start the brush cutter or the string trimmer engine only after the entire tool has
been assembled. Operation of the tool is permitted only after all the appropriate
accessories are attached!
- Before starting, make sure that the cutter blade will not contact any objects such
as branches, stones, etc.
- The engine is to be stopped immediately if there are any engine problems.
- Should the cutter blade hit stones or any other objects immediately stop the
engine and inspect the cutter blade.
- Inspect the cutter blade at frequent regular intervals for damage (detect hairline
cracks by means of a tapping-noise test).
- A familiar ringing sound should be heard.
- Operate the brush cutter or the string trimmer only with the shoulder strap
attached. It should be properly adjusted before putting the brush cutter or the
string trimmer into operation. It is essential to adjust the shoulder strap to the
user’s size to prevent fatigue occurring during use or loss of control of the tool.
Never hold the tool with one hand during use.
- During operation always hold the brush cutter or the string trimmer with both
hands. Always ensure a safe, well-balanced footing.
- Operate the brush cutter or the string trimmer in such a manner as to avoid
inhalation of the exhaust gases. Never run the engine in enclosed rooms (risk of
suffocation and gas poisoning). Carbon monoxide is an odorless gas. Always
ensure there is adequate ventilation.
- Stop the engine when resting and when leaving the brush cutter or the string
trimmer unattended. Place it in a safe location to prevent danger to others, setting
fire to combustible materials, or damage to the machine.
- Never lay down the hot brush cutter or the string trimmer onto dry grass or onto
any combustible materials.
- The cutter blade must be used with its appropriate guard. Never run the tool
without this guard!
- All protective parts and guards supplied with the machine must be used during
operation.
- Never operate the engine with a faulty exhaust muffler.
- Stop the engine during transport.
- During transport over long distances the tool protection included with the
equipment must always be used.
- When transporting the brush cutter or the grass trimmer, ensure that the fuel tank
is completely empty, to avoid fuel leakage. Put the brush cutter or string trimmer in
upright position and fix it during car or truck transportation to avoid damage.
Refuelling
- To reduce the risk of fire and burn injury, handle fuel with care it is highly
flammable, the engine during.
- Stop the engine during refuelling, keep well away from open flame and do not
smoke.
- Avoid skin contact with petroleum products. Do not inhale fuel vapor. Always wear
protective gloves during refuelling. Change and clean protective clothing at regular
intervals.
- Take care not to spill either fuel or oil. Always wipe unit dry before starting engine.
Allow wet cloths to dry before disposing in proper, covered container to prevent
spontaneous combustion.
- Avoid any fuel contact with your clothing. Change your clothing immediately if fuel
has been spilled on it (danger hazard).
- Inspect the fuel cap at regular intervals making sure that it stays securely
fastened.
- Carefully tighten the locking screw of the fuel tank. Change locations to start the
engine (at least 10 ft. or 3 meters away from the place of refuelling).
- Never refuel in closed rooms. Fuel vapors accumulate at ground level (risk of
explosions).
- Only transport and store fuel in approved containers. Make sure stored fuel is not
accessible to children.
- Do not attempt to refuel a hot or a running engine.
- When mixing gasoline with two-stroke engine oil, use only gasoline which contains
no ethanol or methanol (types of alcohol). This will help to prevent damage to fuel
lines and other engine parts.
• Resting
• Transport
• Refuelling
• Maintenance
• Tool Replacement
3meters
6
Method of operation
- Use the brush cutter or the grass trimmer only in good light and visibility. During
cold seasons beware of slippery or wet areas, ice and snow (risk of slipping).
Always ensure a safe footing.
- Do not overreach. Keep proper footing, balance and hand control of the unit at all
times.
- Never cut above waist level.
- Never stand on a ladder while running the brush cutter or the grass trimmer.
- Never climb up into trees to perform any cutting operation with the brush cutter or
the grass trimmer.
- Never work on unstable surfaces or steep terrain.
- Remove all objects such as stones, nails, broken glass, wire etc. found within the
working area. Foreign articles may damage the cutting tool, can cause dangerous
kickbacks, or could be thrown about dangerously.
- Before commencing cutting, the cutting tool must have reached full working
speed.
- Never operate this tool while it is turned upside-down or when it is at an extreme
angle.
- WARNING! – The cutter area is still dangerous while the machine is coasting
to a stop.
Kickback
- When operating the brush cutter, uncontrolled kickback can occur.
- This particularly is the case when attempting to cut within a blade segment
between 12 and 2 o’clock as viewed from the operator’s position.
- Never touch this segment of the brush cutter to solid objects, such as bushes,
stumps, trees, etc., with a diameter greater than 3 cm.
- The brush cutter will then be deflected at great force and speed with the potential
risk of serious injuries.
- Never operate the brush cutter using the blade segment between the 12 and
2 o’clock position.
Kickback prevention
To avoid kickbacks, observe the following:
- Operation within the blade segment between 12 and 2 o’clock can cause serious
potential hazards, especially when using metal cutting blades.
Use of this brush cutter utilizing blade segment positions from 11 to 12 o’clock and
2 to 5 o’clock can still cause a likely potential for some kickback.
- Cutting operations attempted within the blade segments between 11 and 12
o’clock, and between 2 and 5 o’clock, should only be performed by trained and
experienced operators, and only at their own risk. Smooth and easy cutting with
almost no kickback is possible using the blade segment between 8 and 11 o’clock.
Cutting Tools
Use only the correct cutting tool for the specific job in hand.
Nylon cutting head:
Exclusively designed for cutting along walls, fences, grass edges, trees, posts, etc.
(supplementing a lawn mower). Perform this cutting work by swinging the grass
trimmer evenly in semi-circles from right to left.
Star blade
For cutting thick materials, such as weeds, tall grass, bushes, shrubs, underbrush,
thickets, etc. (max. 2 cm dia. thickness). Perform this cutting work by swinging the
brush cutter evenly in semi-circles from right to left (similar to using a scythe).
Maintenance instructions
- The condition of the cutter, in particular of the cutter blade, guard and of the
shoulder strap must be checked before commencing work. Particular attention is
to be paid to the cutting blades which must be correctly sharpened.
- Turn off the engine and remove spark plug connectors when replacing or
sharpening cutting blade, and also when cleaning the cutter or cutting tool.
Caution: Kickback
Diagrammatic figure
Diagrammatic figure

7
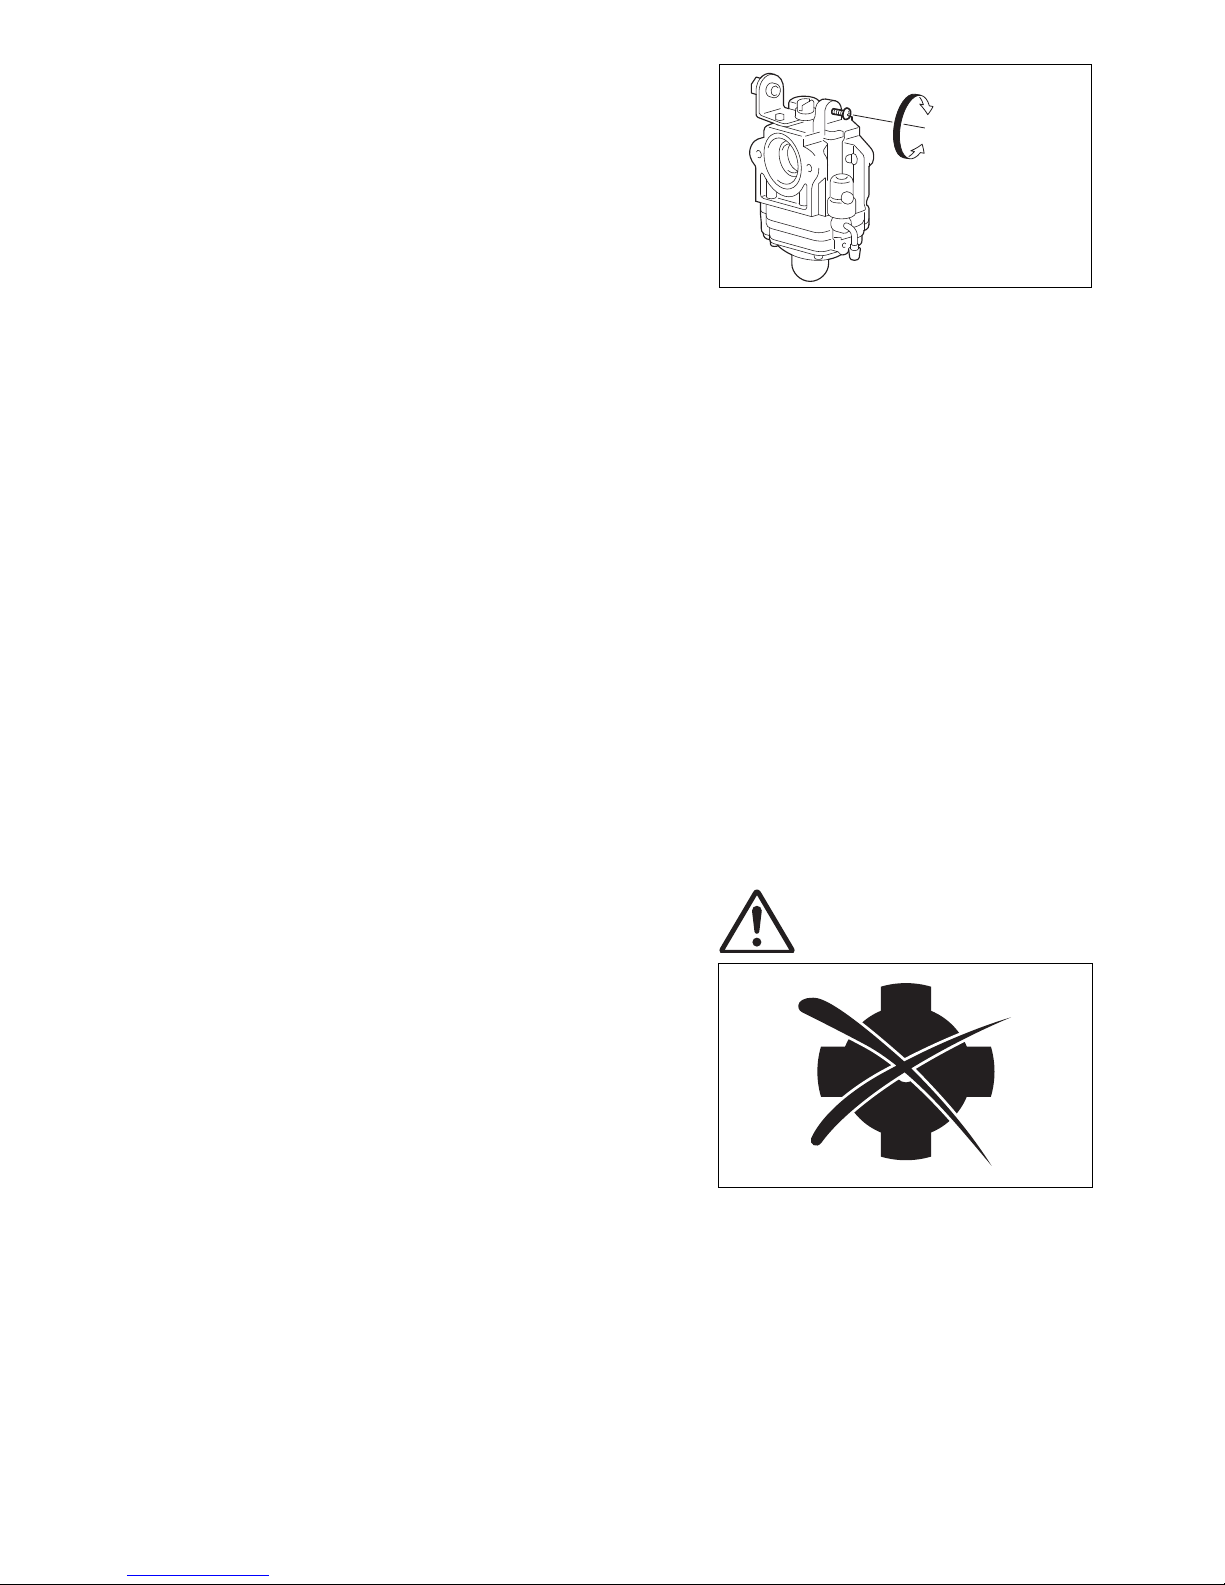
Never straighten or weld damaged cutting blades
- Be kind to the environment. Operate the brush cutter or string trimmer with as little
noise and pollution as possible. In particular check the correct adjustment of the
carburetor.
- Clean the brush cutter or string trimmer at regular intervals and check that all
screws and nuts are securely tightened.
- Never service or store the brush cutter or string trimmer in the vicinity of open
flames, sparks, etc.
- Always store the brush cutter or string trimmer in a well-ventilated locked room
and with an emptied fuel tank.
Observe and follow all relevant accident prevention instructions issued by the
trade associations and by insurance companies. Do not perform any
modifications to the brush cutter as this will risk your safety.
The performance of maintenance or repair work by the user is limited to those
activities as described in this instruction manual. All other work is to be done by
Authorized Service Agents.
Use only genuine spare parts and accessories supplied by MAKITA.
Use of non-approved accessories and tools means increased risk of accidents and
injuries. MAKITA will not accept any liability for accidents or damage caused by the
use of any non-approved cutting tools attachments or accessories.
First Aid
In case of accident make sure that a well-stocked first-aid kit is available in the
vicinity of the cutting operations. Immediately replace any item taken from the first
aid box.
When asking for help, please give the following information:
- Place of accident
- What happened
- Number of injured persons
- Extent of injuries
- Your name
Packaging
The MAKlTA brush cutter and string trimmer delivered in two protective cardboard
boxes to prevent shipping damage. Cardboard is a basic raw material and is
therefore consequently reusable or suitable for recycling (waste paper recycling).
EC-DECLARATION OF CONFORMITY
We declare under our sole responsibility that this product is in compliance with the
following Directives, 2000/14/EC, 2006/42/EC.
The most important standards applied to properly meet the requirements or the
above Directives were: EN11806.
Measured Sound Power: 115 dB (A)
Guarantee Sound Power: 118 dB (A)
These sound power levels wear measured in accordance with Council Directive,
2000/14/EC.
Conformity assessment procedure: Annex V.
3rd. NOV. 2009
Tomoyasu Kato
Director
Responsible Manufacturer:
Makita Corporation
3-11-8, Sumiyoshi-cho, Anjo, Aichi, JAPAN
Authorized Representative in Europe:
Makita International Europe Ltd.
Michigan Drive, Tongwell, Milton Keynes, Bucks MK15 8JD, ENGLAND
Brush cutter: model RBC420, RBC420E, RBC421 (See TECHNICAL DATA for
the specifications)

8
Technical data
RBC420, RBC420E, RBC421
Model RBC420 RBC420E RBC421
U handle E handle J handle
Dimensions: length x width x height
(without cutting blade) mm
1,770 x 570 x 390 1,770 x 570 x 410 1,770 x 340 x 310
Mass
(without plastic guard and cutting blade) kg
7.3 7.8 7.2
Volume (fuel tank) cm
3
960
Engine displacement cm
3
40.2
Maximum engine performance kw 1.40
Engine speed at recommended max. spindle speed rpm 8,500
Maximum spindle speed (corresponding) rpm 7,000
Fuel consumption kg/h 0.89
Specific fuel consumption g/kWh 635
Idling speed rpm 2,600
Clutch engagement speed rpm 3,600
Carburetor (Diaphragm-carburetor) type WALBRO WYJ
Ignition system type Solid state ignition
Spark plug type NGK BPMR7A
Electrode gap mm 0.6 – 0.7
Vibration per
ISO 22867
Right handle
(Rear grip)
a
hv eq
m/s
2
4.9 3.0 4.8
Uncertainty K m/s
2
0.4 0.8 0.4
Left handle
(Front grip)
a
hv eq
m/s
2
4.7 4.2 5.4
Uncertainty K m/s
2
0.6 0.8 0.6
Sound pressure level average to
ISO 22868
L
PA e q
dBA
90.9 90.9 97.5
Uncertainty K dBA 2.2 2.2 2.6
Sound power level average to
ISO 22868
L
WA eq
dBA
103.9 103.9 110.3
Uncertainty K dBA 2.8 2.8 1.8
Mixture ratio (Fuel: MAKITA 2-stroke oil) 25:1
Gear ratio 14/17

9
Designation of parts
U handle type
J handle typeE handle type
DESIGNATION OF PARTS DESIGNATION OF PARTS DESIGNATION OF PARTS DESIGNATION OF PARTS
1 Fuel Tank 7 Holder Case 13 Guard 19 Rear Rest Grip
2 Recoil Starter 8 Hanger 14 Gear Case 20 Fuel Filler Cap
3 Air Cleaner 9 Handle 15 Handle Joint 21 Starter Knob
4 Stop Switch 10 Throttle Lever 16 Cutter Blade 22 Choke Lever
5 Spark Plug 11 Throttle Wire 17 Nylon Cutting Head 23 Exhaust Pipe
6 Muffler 12 Drive Shaft 18 Waist Pad 24 Shoulder Strap
10
Assembly instructions
Assembly of engine and drive shaft
CAUTION: Before performing any work on the brush cutter or the string
trimmer, always switch off the motor and pull the spark plug
connectors off the spark plug.
Beware of hot engine parts and sharp blade edges.
Always wear protective gloves!
CAUTION: Start the brush cutter or the string trimmer only after having assembled it
completely.
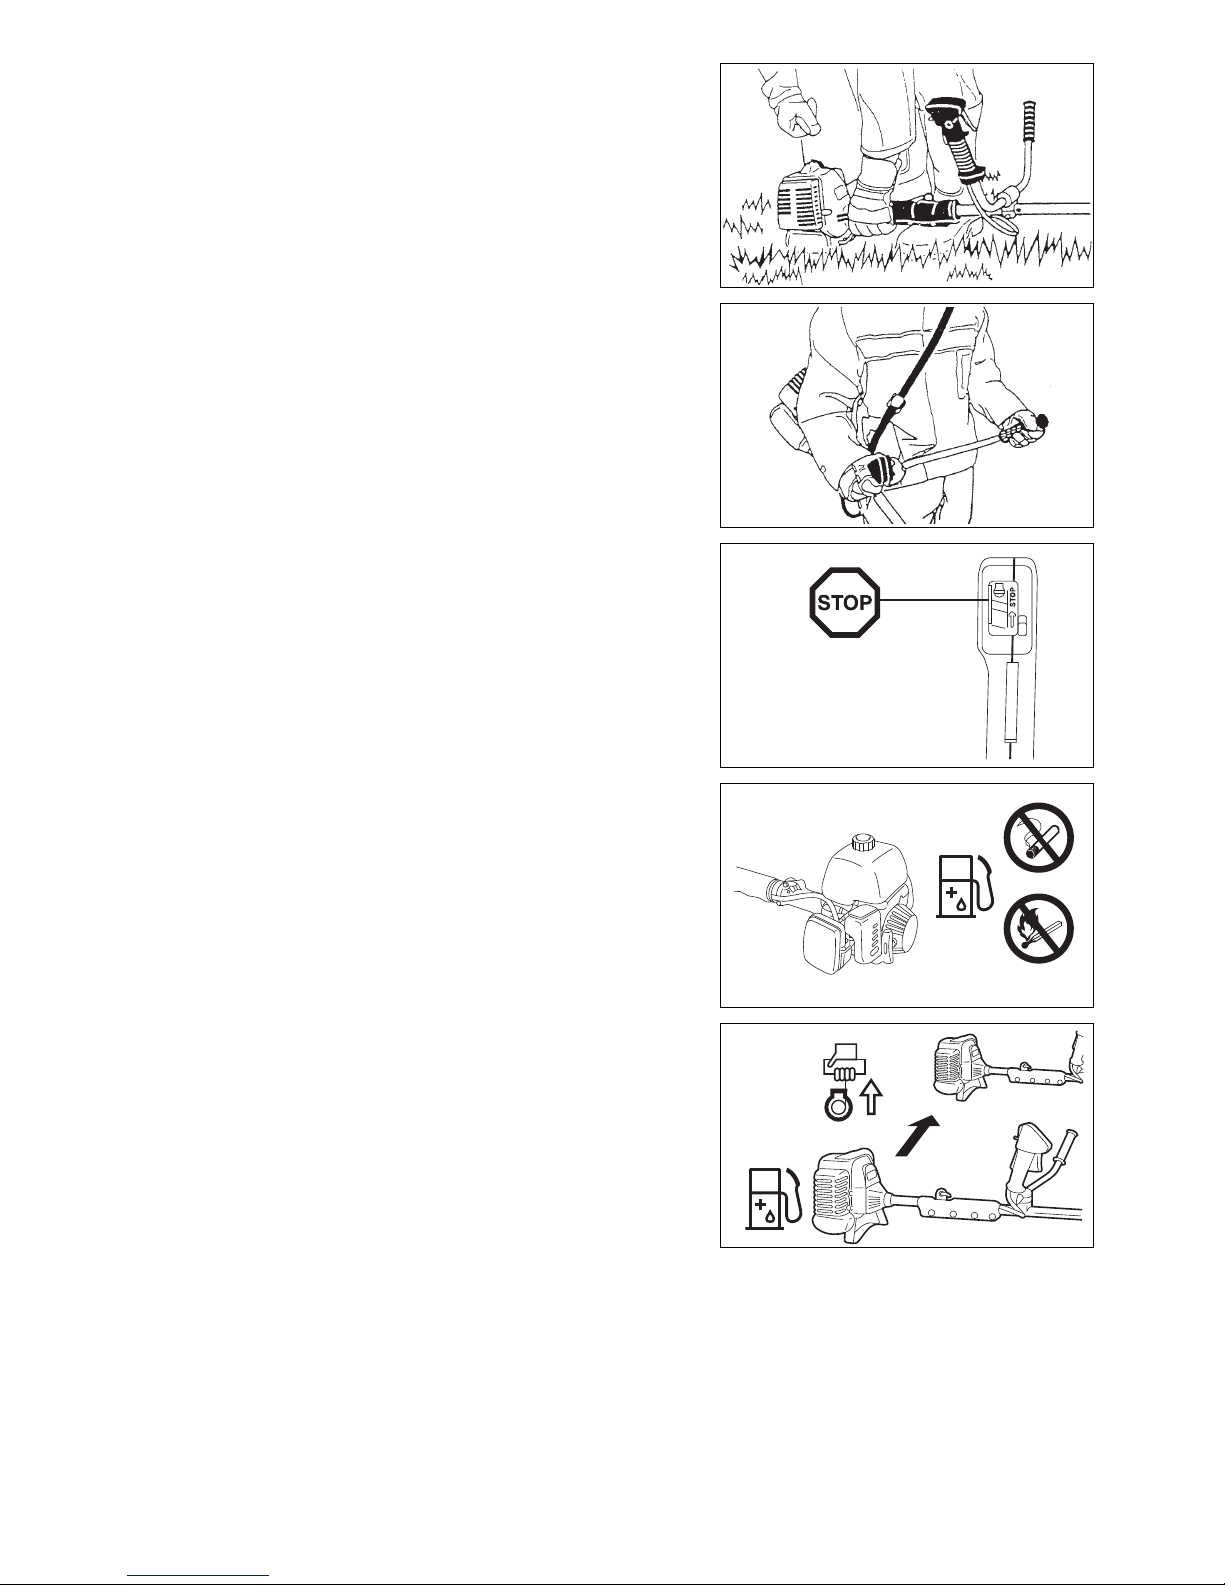
For RBC420 and RBC420E
- Mount the waist pad (1). When the waist pad is mounted, be sure to confirm that
the wires do not move horizontally.
- Avoid any tendency of the throttle wire to loop at the handle bar.
- After checking the parts, fasten the drive shaft to the engine with four bolts M6 x
18 (2). At this time, fasten also the earth terminal of the stop cord to the engine.
- Attach stand to engine with two bolts M6 x 14 (3).
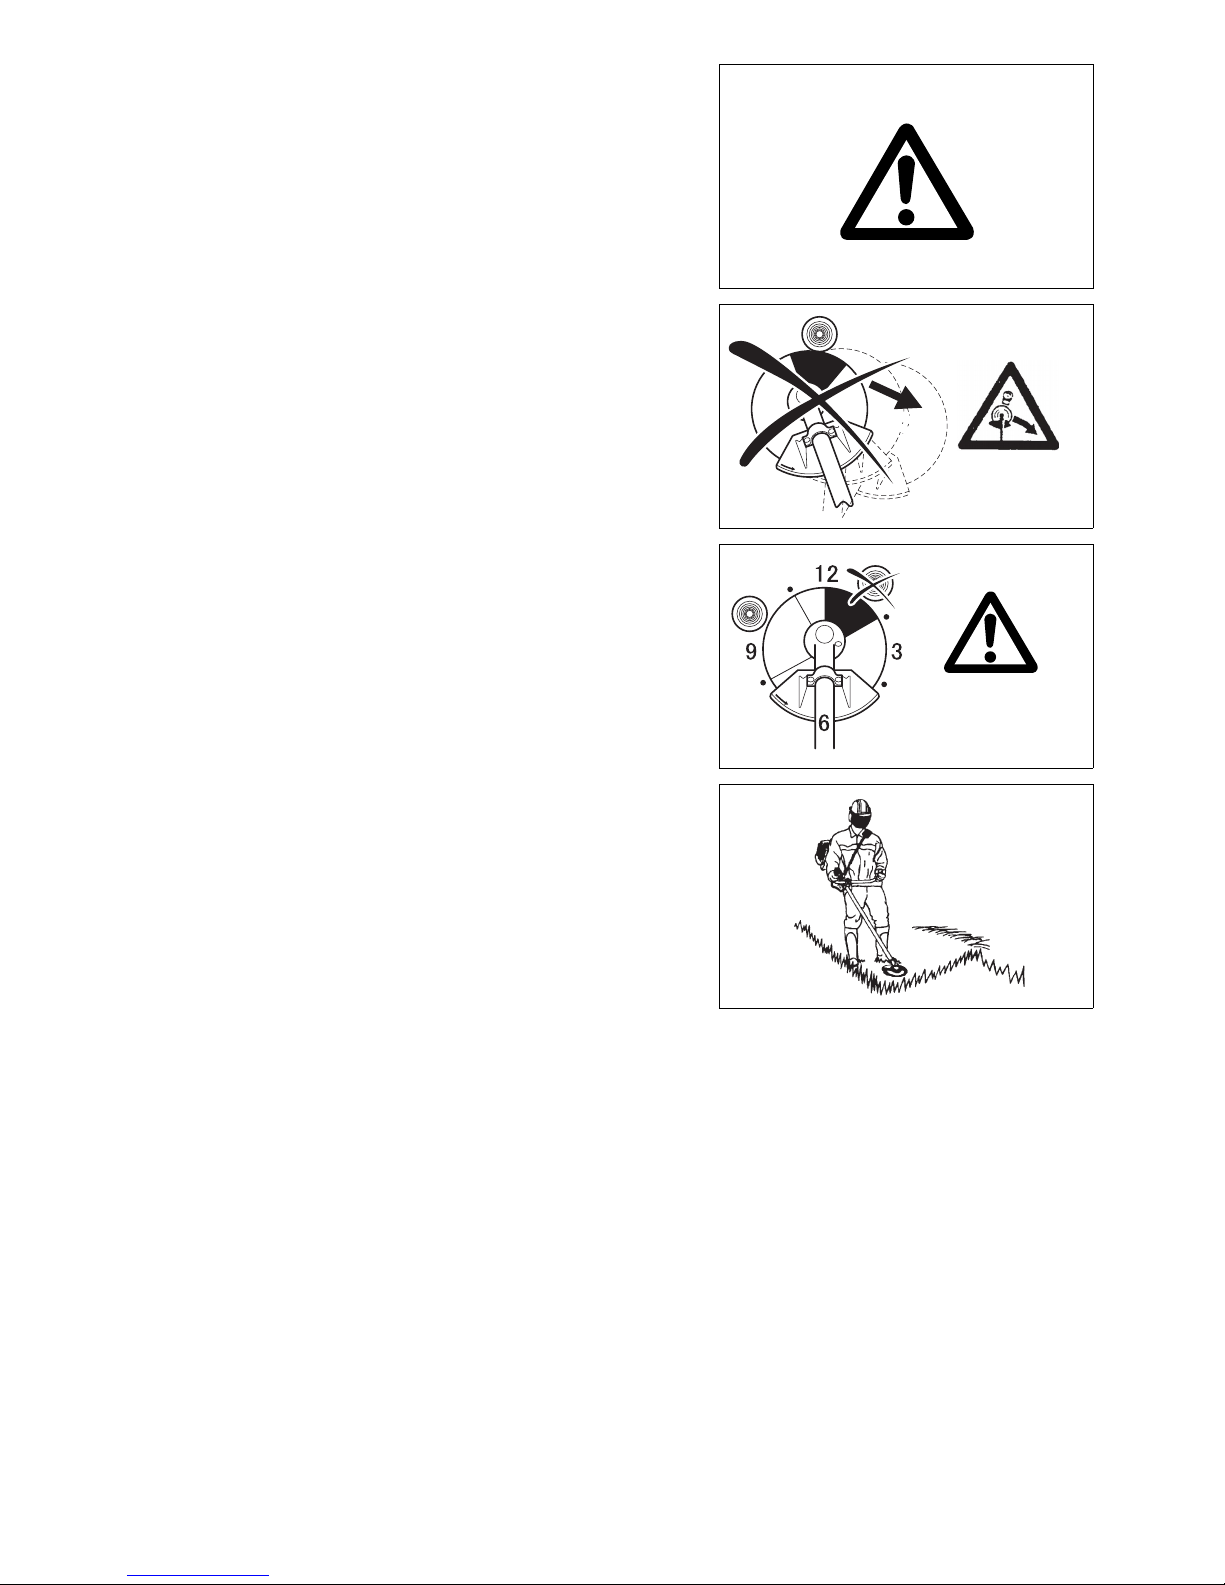
For RBC 421
- Pass the throttle wire (5) through the rear grip (4) and insert the tube (6) in the
throttle wire (5).
- After checking the parts, fasten the drive shaft to the engine with four bolts M6 x
18 (1). At this time, fasten also the earth terminal of the stop cord to the engine.
- Attach stand to engine with two bolts M6 x 14 (2).
Hanger
Throttle wire
11
Mounting of handle
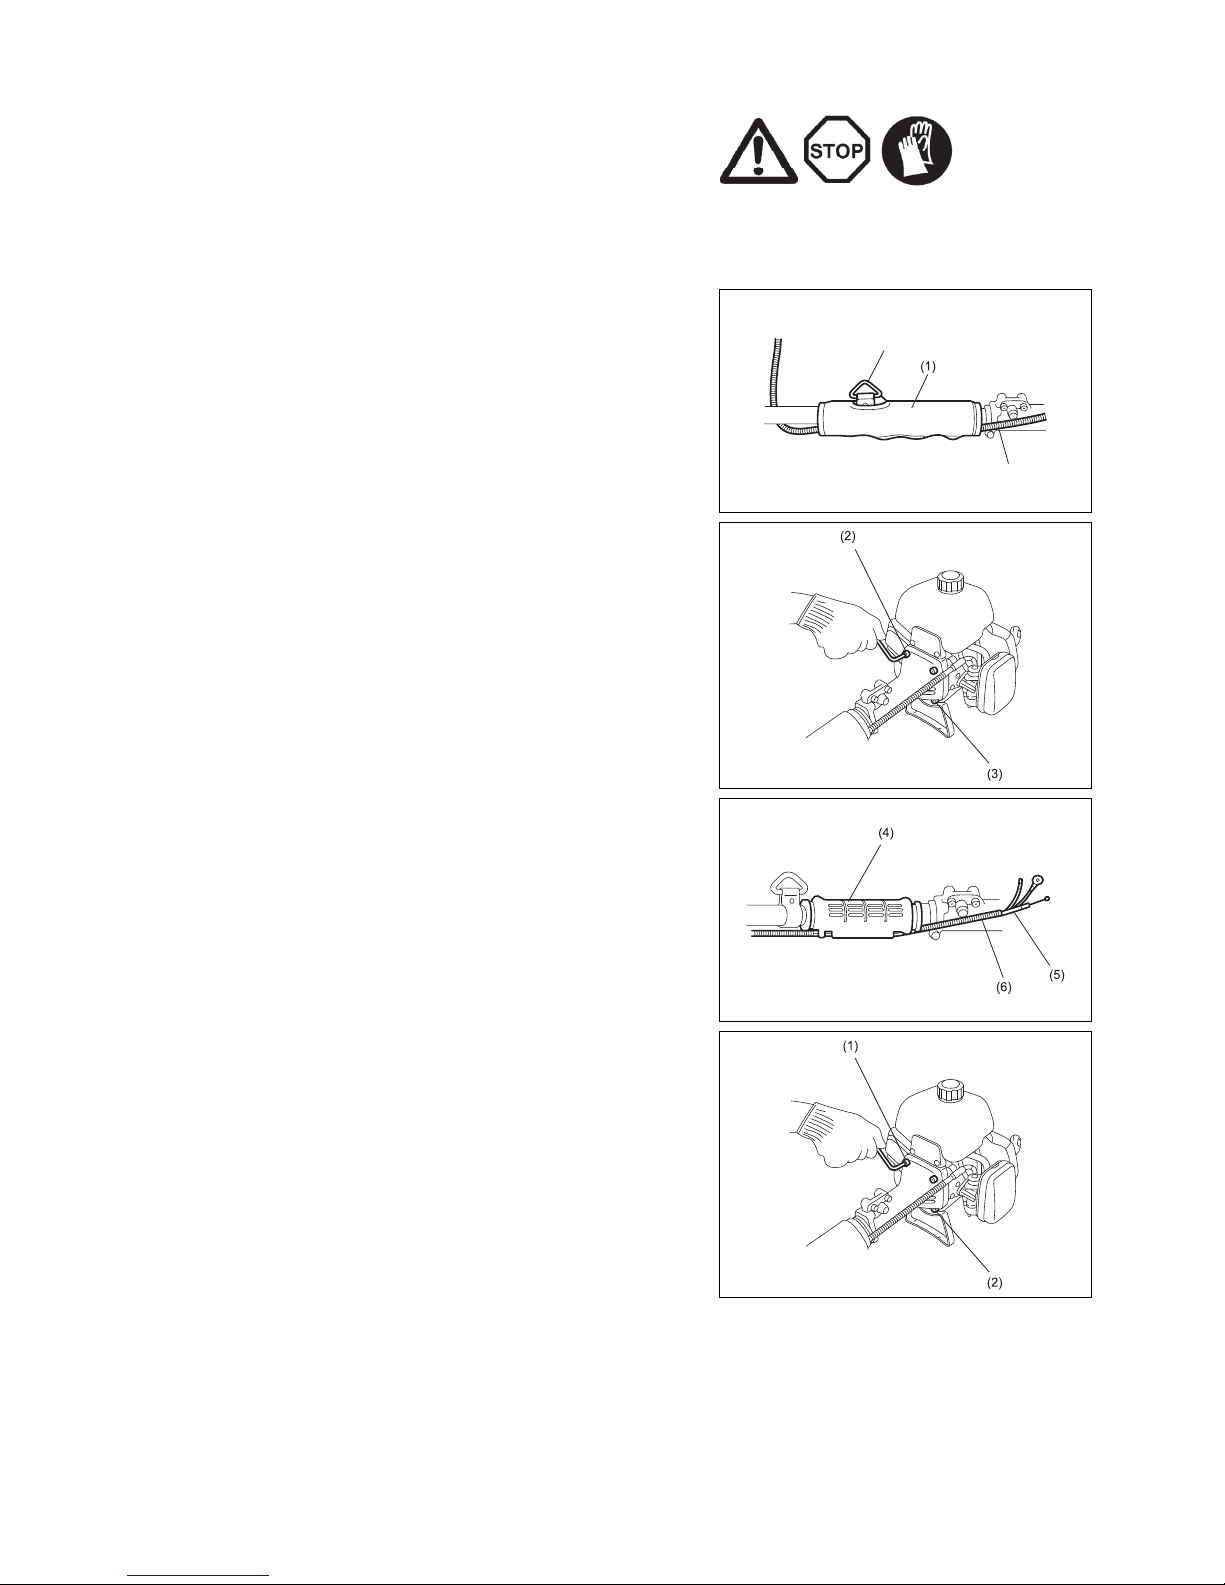
For RBC420
- Fasten the handle to the drive shaft with four bolts M5 x 25 (1).
- Fit the control capable (together with the earth cord) to the handle with a clip.
For RBC420E
- Temporarily assemble four M5 x 25 socket head bolts (4) on the handle joint (3) so
that the handle (2) with a control lever will come to your right hand side.
- Adjust the handle to an easy-to-handle position and tighten the socket head bolts
(4) with even pressure applied on all of them.
For RBC421
- Match the protrusions on the handle joint (5) to the holes in the underside of the
handle (6). Tighten the four socket head bolts M5 (7) evenly to secure the handle.
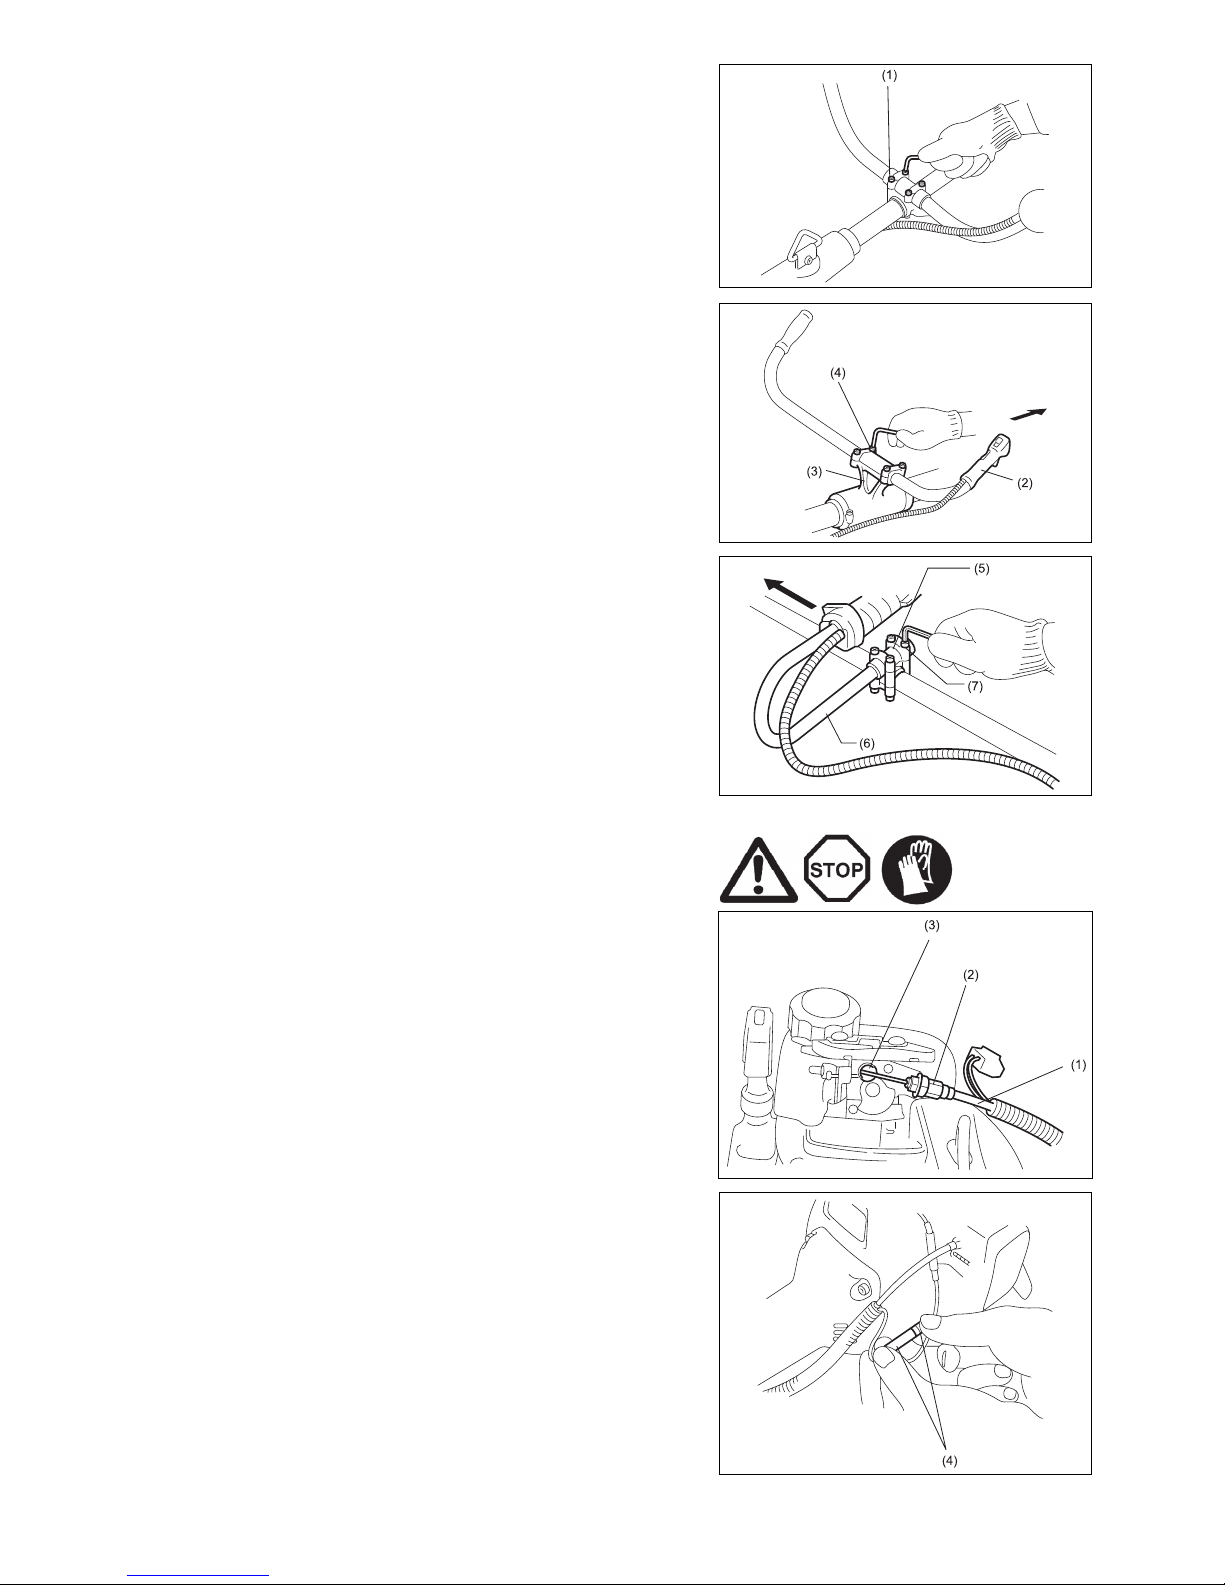
Assembly of throttle wire and ignition wire
- Remove the air cleaner cover from the carburetor.
- Insert throttle wire (1) through adjusting screw (2) and fit the nipple of the throttle
wire into swivel (3) of the carburetor.
- Adjust the adjusting screw to take up free play of the throttle wire ensuring the
throttle is fully opened when the throttle lever is in high speed position and
2 – 3 mm (0.079” – 0.118”) free play when in low speed position.
- Connect the female and male bullet connectors (4) from the throttle assembly to
the male and female bullet connectors coming from engine.
- Install the air cleaner cover.
Gear case
Gear case
12
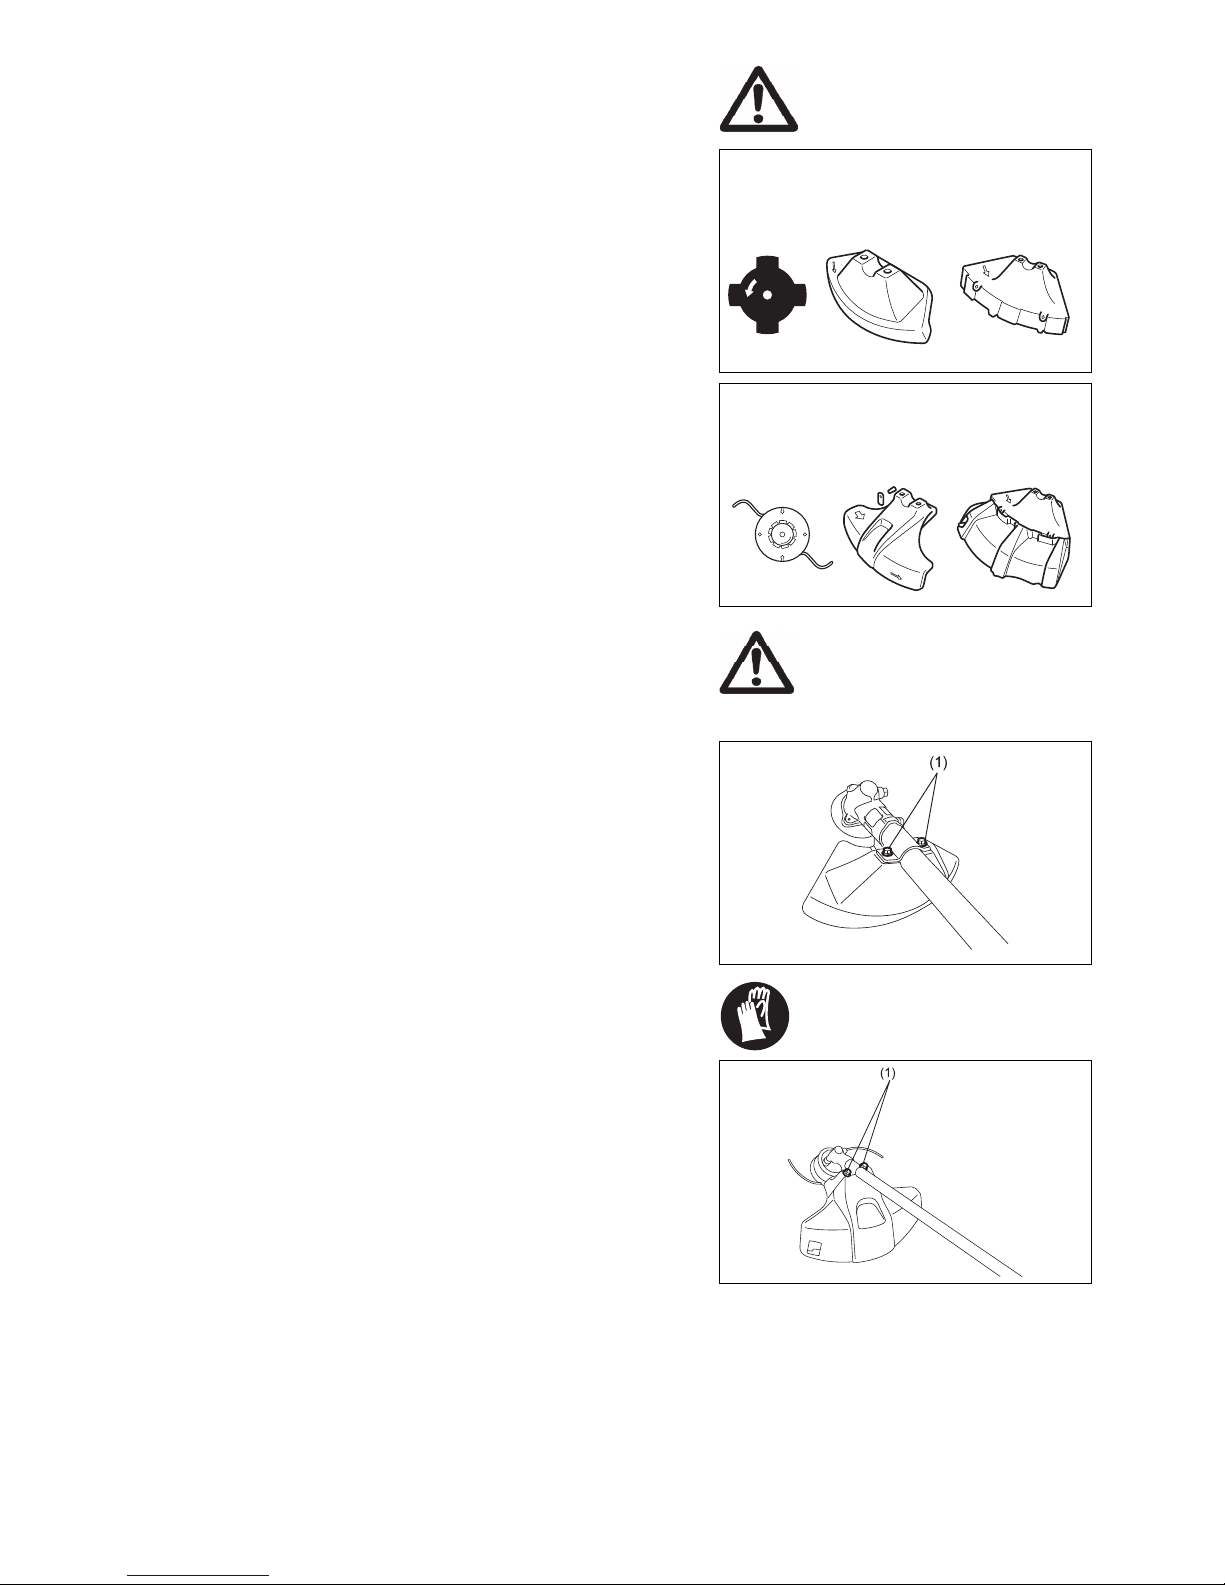
Mounting of guard
To meet the applicable safety provisions, only the tool/guard combinations as
indicated In the table must be used. Failure to do so may result in serious injury or
death to user or bystanders.
Be sure to use genuine MAKITA cutter blade or nylon cutting head.
- The cutter blade must be well clean, sharp and free of cracks or breakage.
If the cutter blade contacts any hard objects or stones during operation, stop the
engine and check the blade immediately.
- Clean and sharpen or replace the cutter blade at least every three hours of
operation.
- The outside diameter of the cutter blade must not exceed 255 mm (10 – 1/32”).
Never use any blades surpassing 255 mm (10 – 1/32”) in outside diameter.
CAUTION: The appropriate guard must always be installed, for your own
safety and in order to comply with accident-prevention regulations.
Operation of the equipment without the guard being properly in
place must never be attempted.
For Metal Cutter Blade
- Install the clamp on the drive shaft so that the projection of the clamp is inserted
into the opening between the gear case and the drive shaft.
Secure the guard with the installation bolts M6 x 30 (1).
For Nylon Cutting Head
- Install the clamp on the drive shaft so that the projection of the clamp is inserted
into the opening between the gear case and the drive shaft.
Secure the guard with the installation bolts M6 x 30 (1).
Star Blade Guard for Metal
Cutter Blade
Guard for metal blade
(Guard specifications
for both metal blade
and cord cutter)
Nylon Cutting
Head
Guard for Nylon
Cutting Head
Guard for Nylon
Cutting Head (Guard
specifications for both
metal blade and cord
cutter)
13
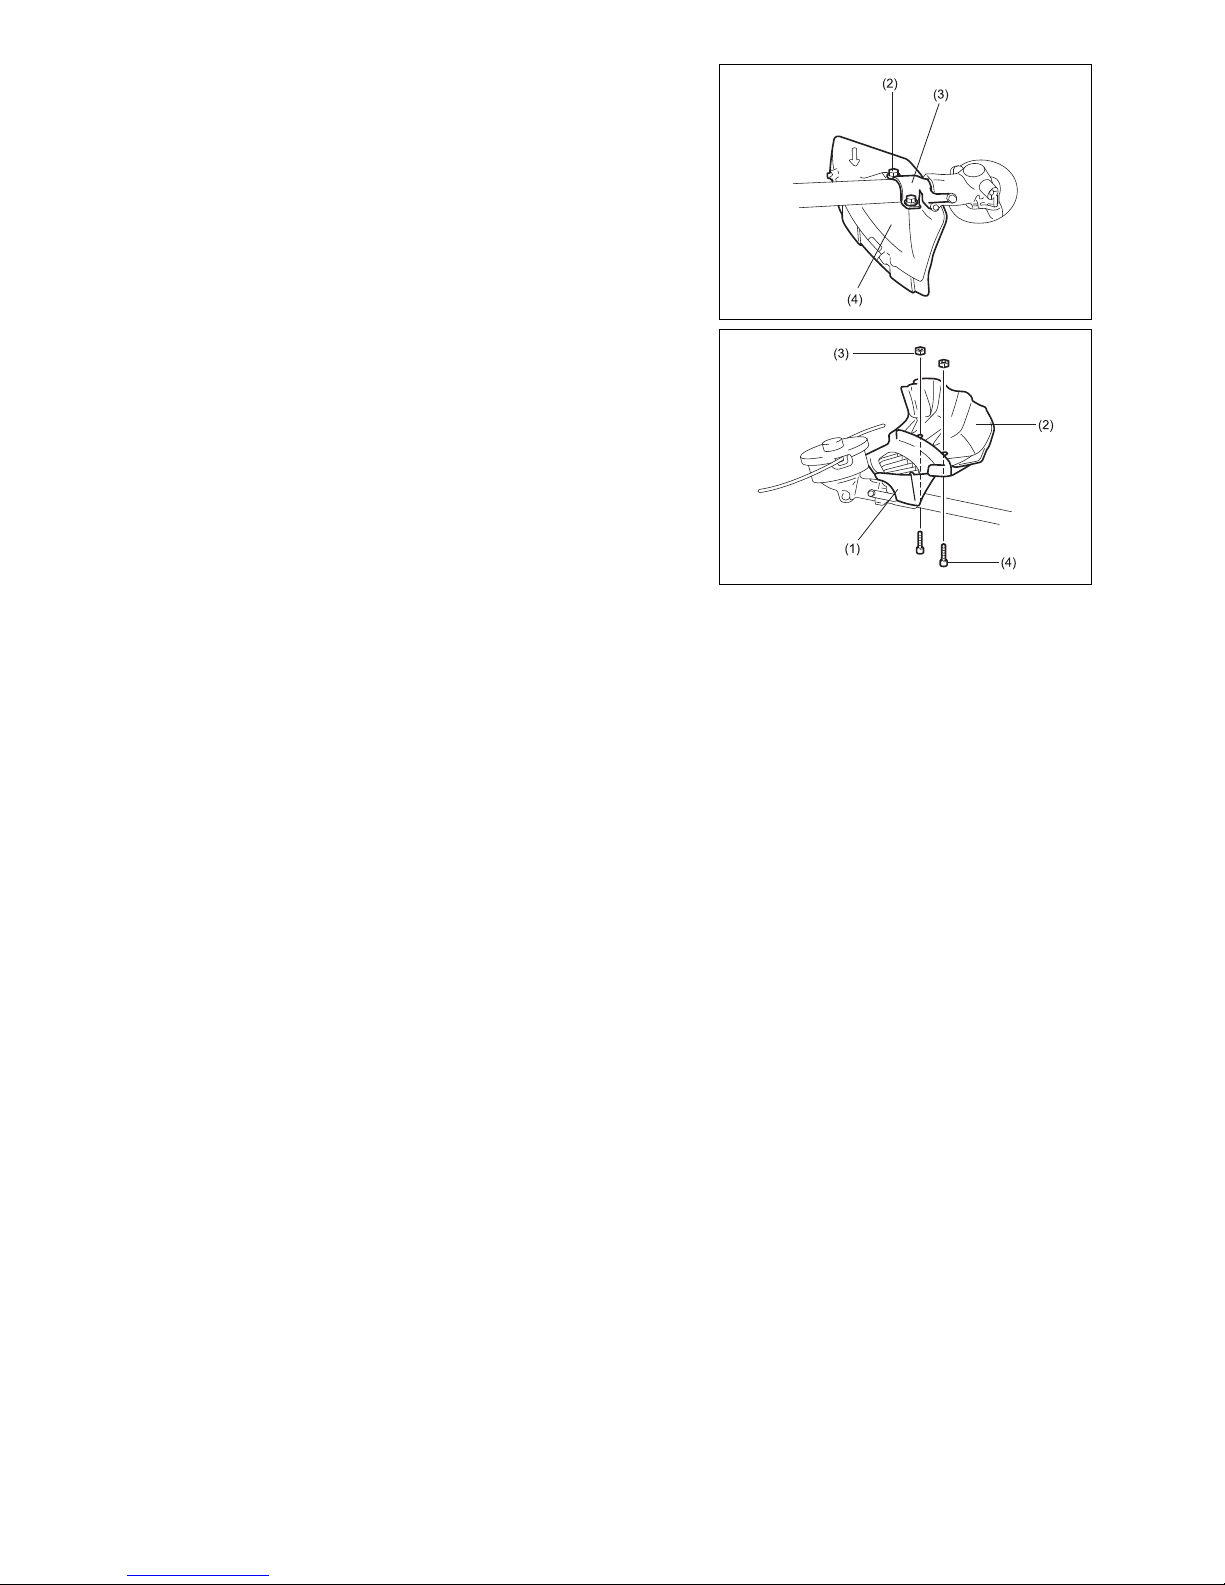
In case of guard specifications for both metal blade and
cord cutter
- When using the metal blade, install the protector (4) onto the clamp (3) with two
M6 x 30 bolts (2).
Note: Tighten the right and left bolts evenly so that the gap between the clamp (3)
and the protector (4) will be constant.
Otherwise, the protector sometimes may not function as specified.
- When using the cord cutter, insert the protector (2) into the protector (1), and
tighten with two screws (4) and two nuts (3).
14
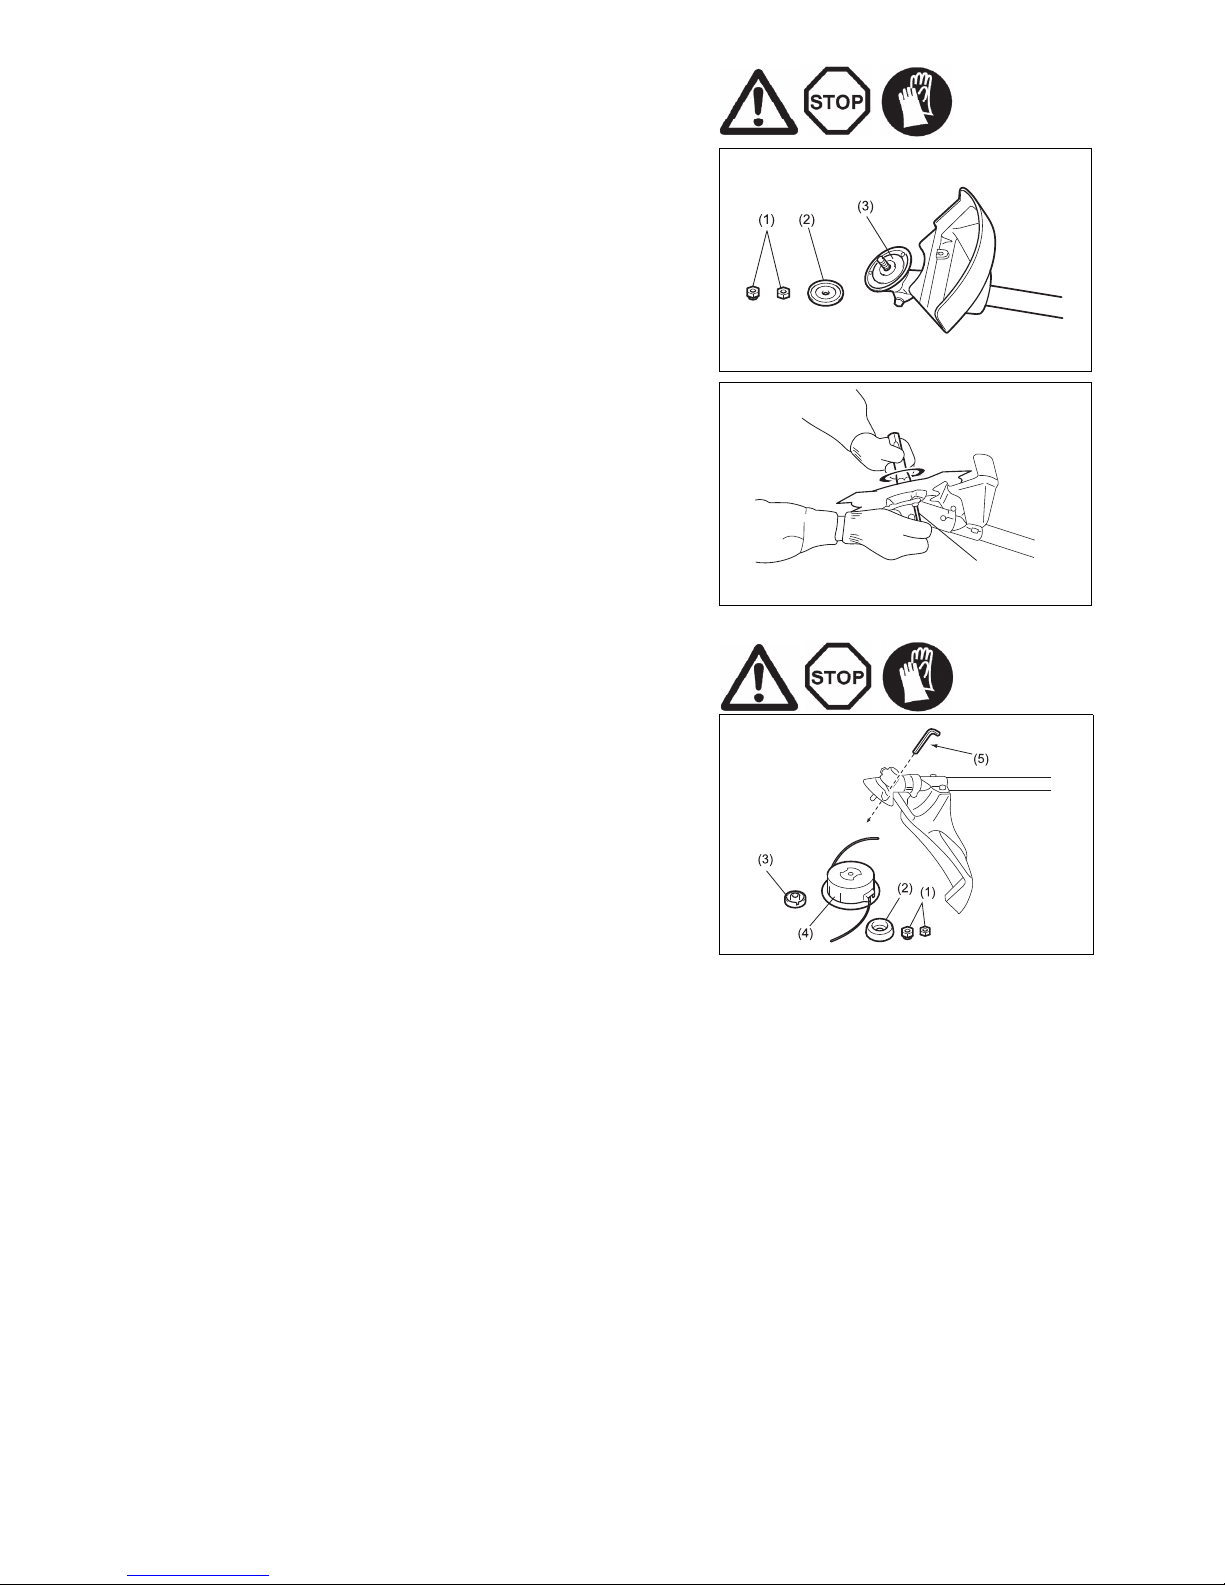
Mounting of cutter blade
Turn the machine upside down, and you can replace the cutter blade easily.
- Insert the hex wrench through the hole in the gear case and turn the support
washer (3) until the hex wrench locks the support washer.
- Loosen the nuts (1) (left-hand thread) by turning clockwise with the socket wrench.
Remove the nuts, and tightening washer (2).
- Mount the cutter blade onto the shaft so that the guide on the support washer fits
in the arbor hole of the cutter blade. Install the tightening washer and secure the
cutter blade with the nuts.
[Tightening torque: 280 – 480 kg·cm]
NOTE: Always wear gloves when handling the cutter blade.
Mounting of nylon cutting head
- Insert the hex wrench (5) through the hole in the gear case and turn the support
washer (3) until the hex wrench locks the support washer.
- Loosen the nuts (1) (left-hand thread) by turning clockwise with the socket wrench.
Remove the nuts and tightening washer (2).
- Screw the nylon cutting head (4) onto the shaft by turning it counter-clockwise.
- Remove the hex wrench.
Tighten
Loosen
Hex wrench
15
Fuels/Refuelling
Handling petroleum products
Utmost care is required when handling fuel. Fuel may contain substances similar to
solvents. Refuel either in a well ventilated area or outdoors. Do not inhale fuel
vapors, avoid any contact of fuel or oil with your skin.
Mineral oil products degrease your skin. If your skin comes in contact with these
substances repeatedly or for an extended period of time, various skin diseases may
result. In addition, allergic reactions are known to occur. Eyes can be irritated by
contact with oil, fuel etc. If oil comes into your eyes, immediately wash them with
clear water. If your eyes are still irritated, see a doctor immediately!
Fuel and oil mixture
The engine of the brush cutter or the string trimmer is a high- efficiency two-stroke
engine. It is run with a mixture of fuel and two- stroke engine. The engine is designed
to use unleaded regular fuel and with a min. octane value of 91 RON. Regular
unleaded. If no such fuel is available, you can use fuel with a higher octane value.
This will not affect the engine, but may cause poor operating behavior.
Optimum engine performance and to protect your health and the environment, only
unleaded fuel should be used!
For engine lubrication use a two-stroke engine oil (quality grade: TSC-3), which is
added to the fuel. The engine has been designed to use MAKlTA two-stroke engine
oil at mixture ratio of 25:1 to protect the environment. In addition, a long service life
and reliable operation with a minimum emission of exhaust gasses is assured. It is
absolutely essential to observe a mixture ratio of 25:1 MAKITA 2-stroke engine oil.
Otherwise reliable function of the brush cutter or the string trimmer cannot be
guaranteed.
The correct mixture ratio:
25 parts gasoline with 1 part MAKITA genuine 2-stroke engine oil (see table on right).
NOTE: For preparing the fuel-oil mixture first mix the entire oil quantity with
half of the fuel required in an approved can which meets or exceeds all
local code standards, then add the remaining fuel. Thoroughly shake
the mixture before filling it into the brush cutter or the grass trimmer
tank. It is not wise to add more engine oil than specified to ensure safe
operation. This will only result in a higher production of combustion
residues which will pollute the environment and clog the exhaust
channel in the cylinder, the spark plugs as well as the muffler. In
addition, fuel consumption will rise and the performance will be
decreased.
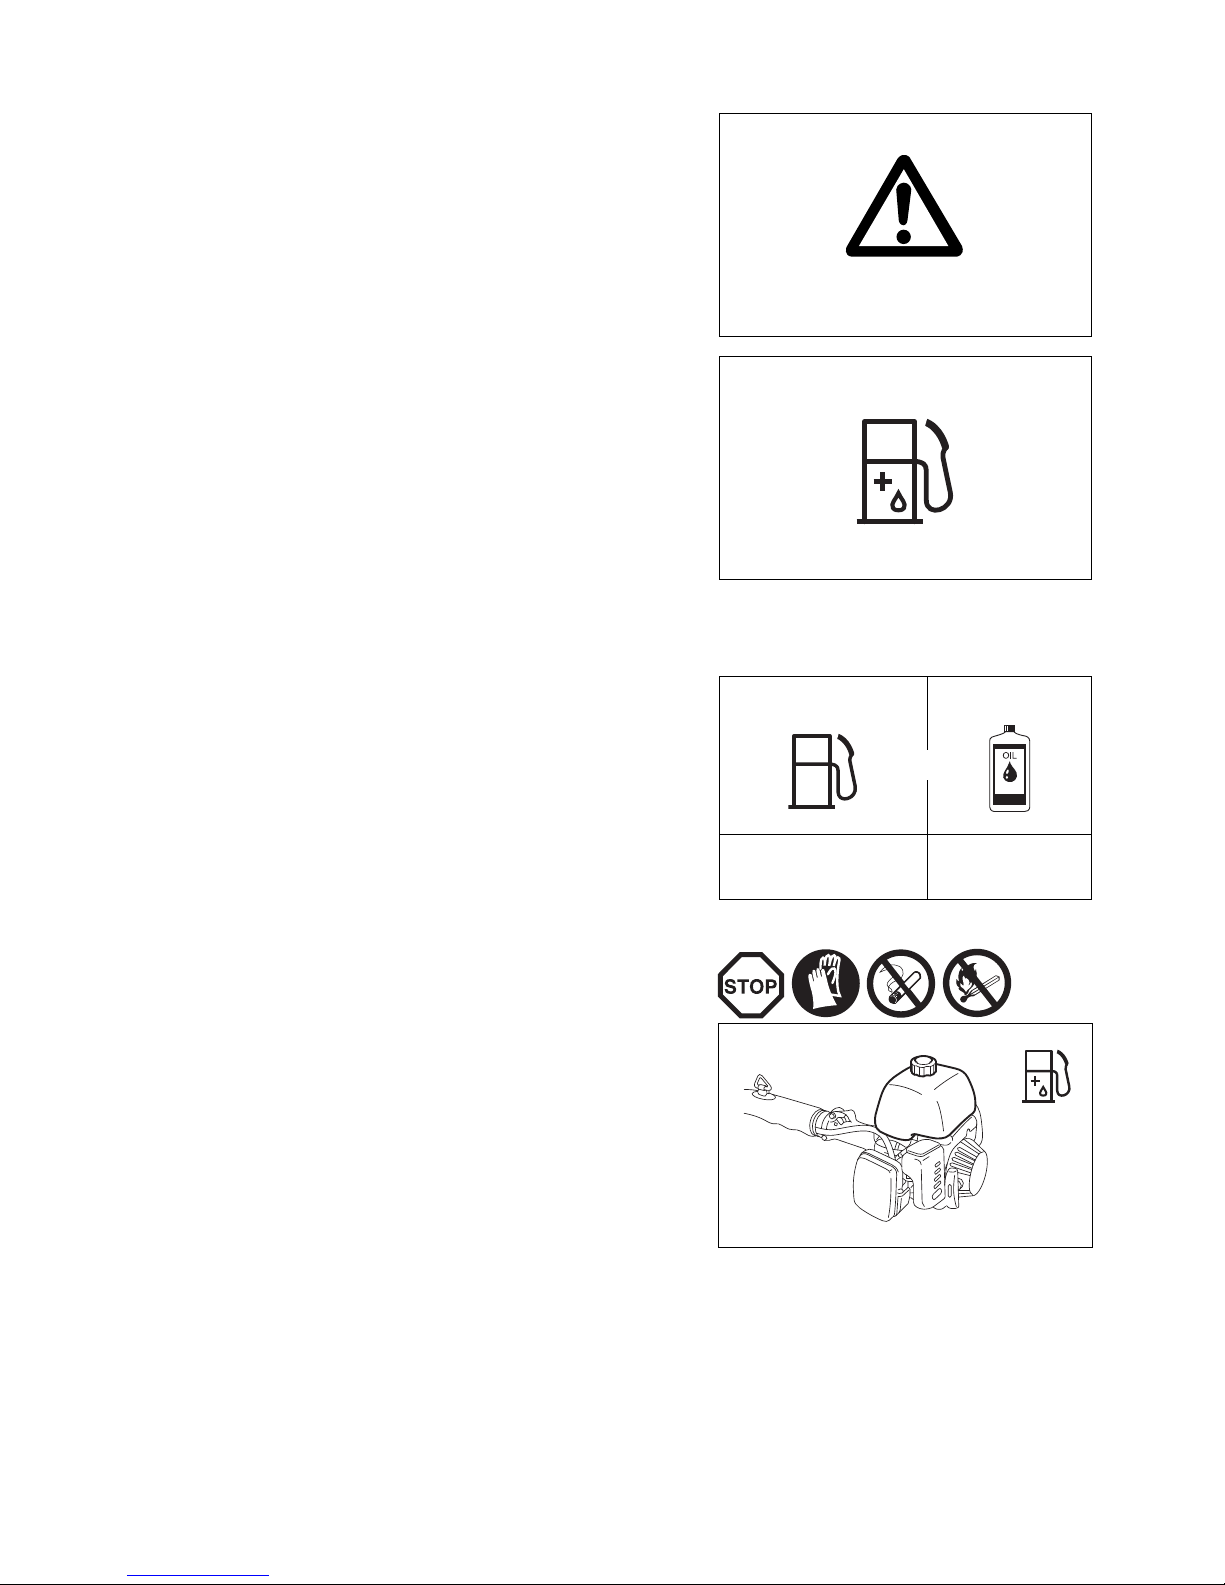
Refuelling
Never perform refuelling operations in a closed, unventilated area.
The engine must be switched off!
- Thoroughly clean the area around the gas cap, to prevent dirt from getting into the
fuel tank.
- Unscrew the gas cap, and fill the tank with fuel.
- Never fill the fuel tank to the very top.
- Securely screw on the gas cap.
- Wipe the gas cap and tank with an absorbent after refuelling. Allow cloths to dry
and discard in a proper container.
Storage of fuel
Fuel cannot be stored for an unlimited period of time. Purchase only the quantity
required for a 4 week operating period. Only use approved fuel storage containers.
WARNING: Gasoline is an extremely flammable fuel. Use extreme caution
when handling gasoline or fuel mix. Do not smoke or bring any fire
or flame near the fuel.
Observe the Safety Instructions on
page 5.
Gasoline
(premium unleaded)
25:1
1,000 cm
3
(1 liter)
5,000 cm
3
(5 liters)
10,000 cm
3
(10 liters)
+
40 cm
3
200 cm
3
400 cm
3
16
Proper handling of machine
Attachment of shoulder strap
- Adjust the strap length so that the cutter blade will be kept parallel with the ground.
Detachment
- In an emergency, pull the release belt (1) strongly upward, and you can quickly
detach the machine from the shoulder strap. Be extremely cautious to maintain
control of the machine at this time. Do not allow the machine to be deflected
toward you or any one In the work vicinity.
WARNING: Failure to maintain complete control of the machine at all times
could result in serious bodily injury or DEATH.
Brush cutter operation
Observe all applicable accident prevention regulations!
Starting
Select bare ground for fuelling and move at least 10 feet (3 m) from fueling spot
before starting the engine. Place the brush cutter on an open area of ground taking
care that the cutting tool does not come into contact with the ground or any other
objects. Make sure that the area is clear of combustible materials.
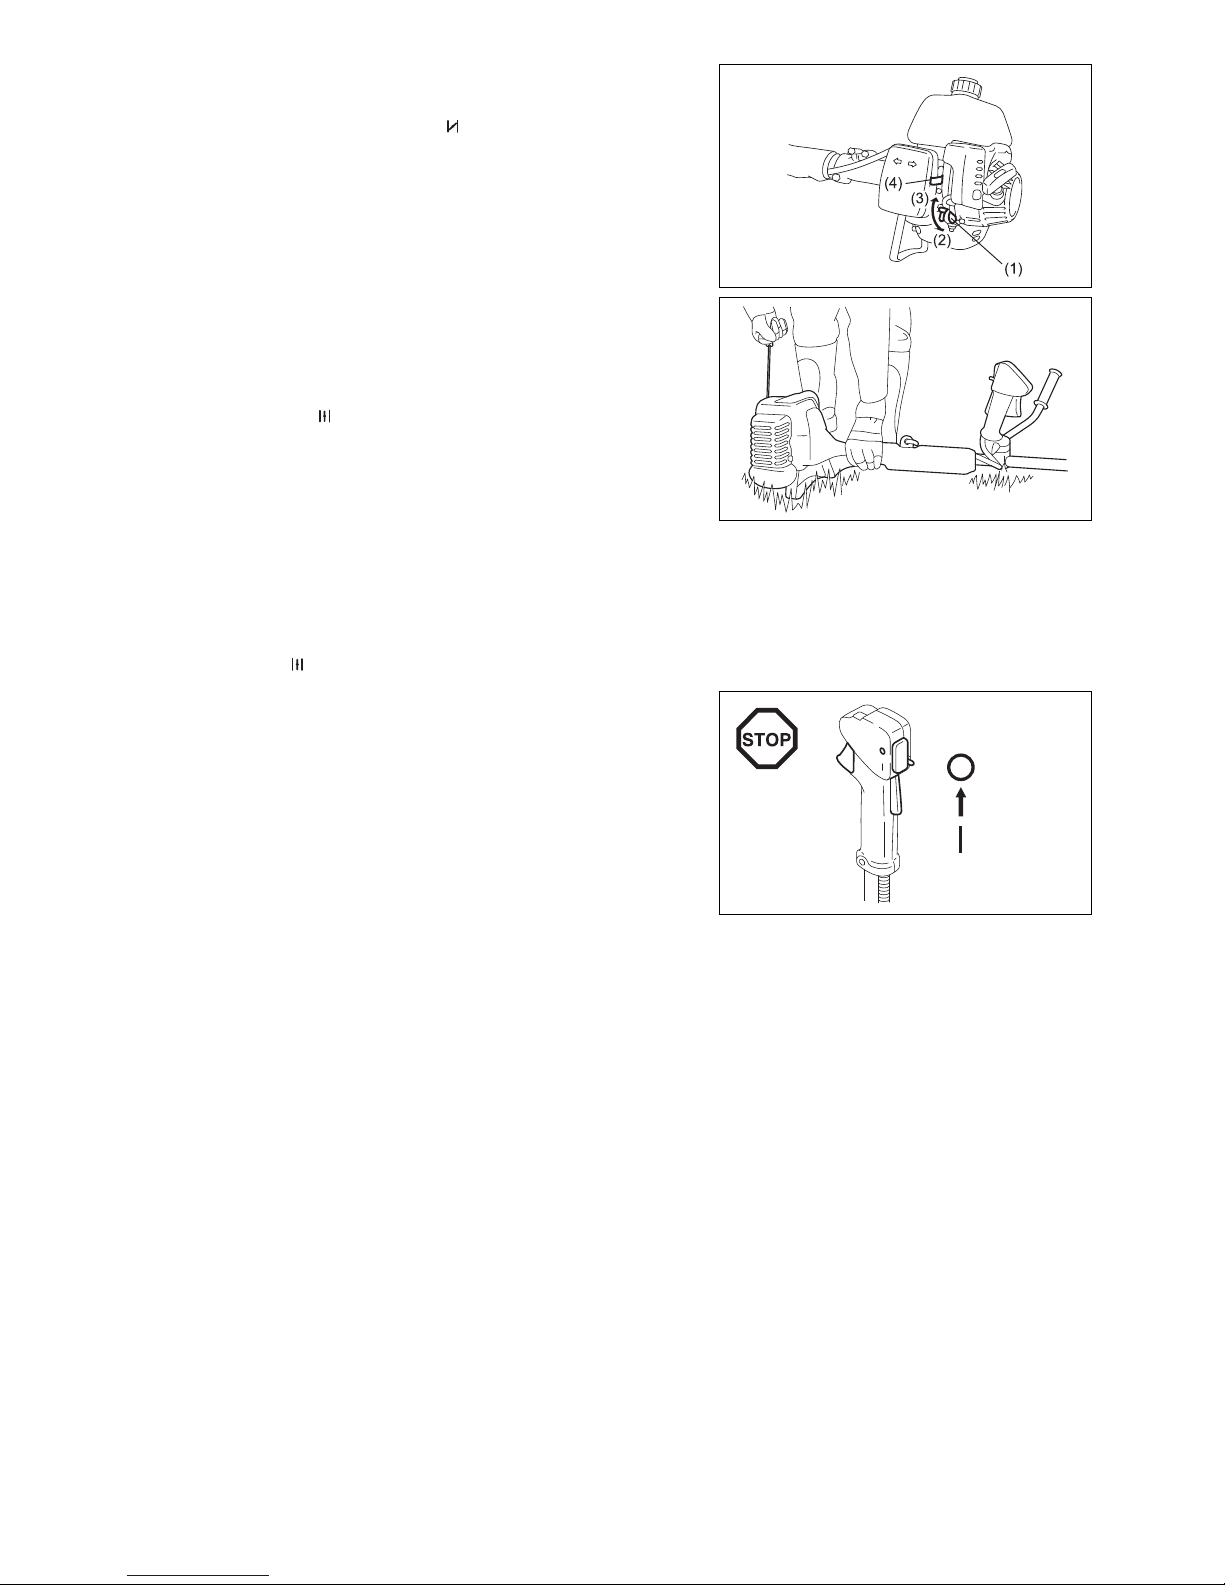
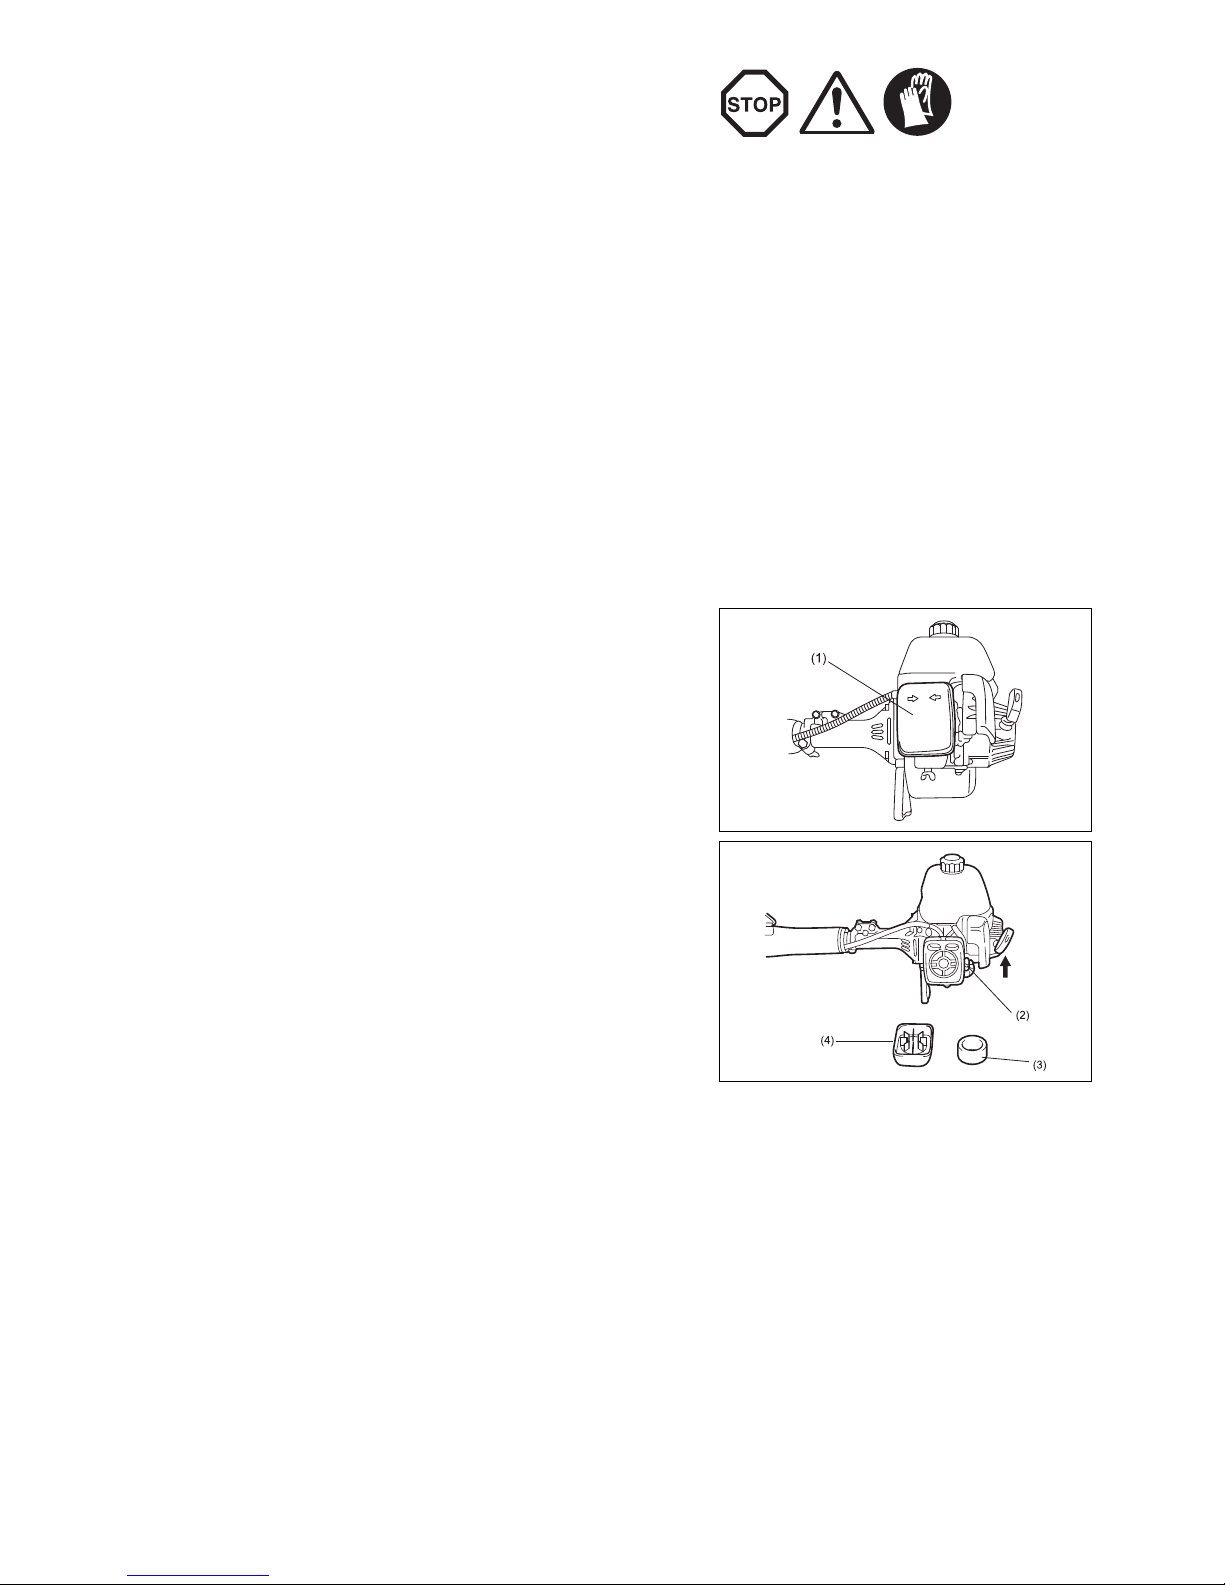
Cold start
- Push the ON-OFF switch (1) in the direction shown by the arrow.
- Grasp the handle (hand pressure activates the safety lock-off lever (2)).
- Press the throttle lever (3) and hold it down.
- Press the lock button (4) and release the throttle lever. Then release the lock
button (the lock button holds the throttle lever at the proper start-up position).
17
- First place the machine on the ground.
- Give a gentle push on the primer pump (1) repeatedly (7 – 10 times) until fuel
enters the primer pump.
- Move the choke lever (2) to the top position ( ).
- Firmly hold the clutch case with your left hand, as illustrated at right.
- Slowly withdraw the starter grip until resistance is felt and continue with a rapid
pull.
- Do not pull the starter rope to its full extent and do not allow the starter handle to
be retracted uncontrolled, but ensure that it is retracted slowly.
- Repeat the starting operation until initial engine ignition are heard.
- Depress the choke lever ( ) and pull the starter rope again until the engine starts.
- As soon as the engine starts, immediately squeeze and release the throttle, thus
releasing the lock button so that the engine can run at idle.
- Run the engine for approximately one-two minutes at a moderate speed to
allow warm-up before applying full throttle.
Caution during operation:
If the throttle lever is opened fully in a no-load operation, the engine rotation is
increased to 10,000 rpm or more. Never operate the engine at a higher speed than is
required (at an approximate speed of 6,000 – 8,000 rpm).
Starting the warm engine
- As described above, except without moving the choke lever (choke lever remains
in the down position ( )).
Stopping
- Release the throttle lever fully, and when the engine rpm has lowered, push the
stop switch to “ ○ ” position. Engine will stop.
18
Idle adjustment
- Never attempt to make engine adjustments while the unit is running and strapped
to the operator. Always make engine adjustments with the unit resting on a flat,
clear surface.
The cutter blade or the nylon cutting head should not run when the throttle lever is
fully released. If necessary, adjust the idle rpm using the idle adjusting screw.
Checking the idle speed
- Idle speed should be set to 2,600 rpm.
If necessary correct it by means of the Idle adjustment screw (the blade or the
nylon cutting head must not turn when the engine is at Idle.)
Turning the screw clockwise will cause an increase in the engine speed, whereas
turning the screw counterclockwise will reduce the engine speed.
Carburetor setting
NOTE: Do not adjust carburetor unless necessary.
If you have trouble with carburetor, see your dealer. Always adjust
carburetor with pipes assembled to the machine.
NOTE: The low speed adjustment and the high speed adjustment screw have
a sharp point. To avoid carburetor damage, do not use excessive force
when seating needle in body.
- The low (L) speed adjustment screw controls the volume of fuel/oil mixture at low
engine speed. It also controls the supplementary fuel required to obtain smooth
progression from idling to high speed.
- The high (H) speed adjustment screw controls the volume of fuel/oil mixture at full
throttle.
- If you use your machine at high altitudes (mountains) or at sea level, it may be
necessary to change the carburetor setting in the range of the adjustment.
Carry out the correction at the two adjusting screws (L and H) as follows: Turn
clockwise (leaner) for high altitude operation or counter-clockwise (richer) for
operation at sea level.
CAUTION: Adjustment of the high speed adjusting screw not only affects the
power output but also the maximum off-load engine speed. If the
setting is too leave (screw turned too for clockwise), the maximum
permissible engine speed will be exceeded. This can cause engine
damage, brought about by lack of lubrication and overheating in
particular.
Resharpening the cutter blade
CAUTION: The cutter blades mentioned below must only be resharpened by
an authorized facility. Manual resharpening will result in
imbalances of the cutting tool causing potentially dangerous
vibrations and damage to the equipment.
- Cutter blade (star blade (4 teeth), eddy blade (8 teeth))
An expert resharpening and balancing service is provided by Authorized Service
Agent.
NOTE: To increase the service life of the cutter blade (star blade, eddy blade) it
may be turned over once, until both cutting edges have become dull.
Never continue to use a dull blade or kickback and serious injury may
result.
Increase
Reduce
Idle adjusting
screw
19
Nylon cutting head
The nylon cutting head is a dual string trimmer head capable of both automatic and
bump & feed mechanisms.
The nylon cutting head will automatically feed out the proper length of nylon cord by
the changes in centrifugal force caused by increasing or decreasing rpms. However,
to cut soft grass more efficiently, bump the nylon cutting head against the ground to
feed out extra cord as indicated under operation section.
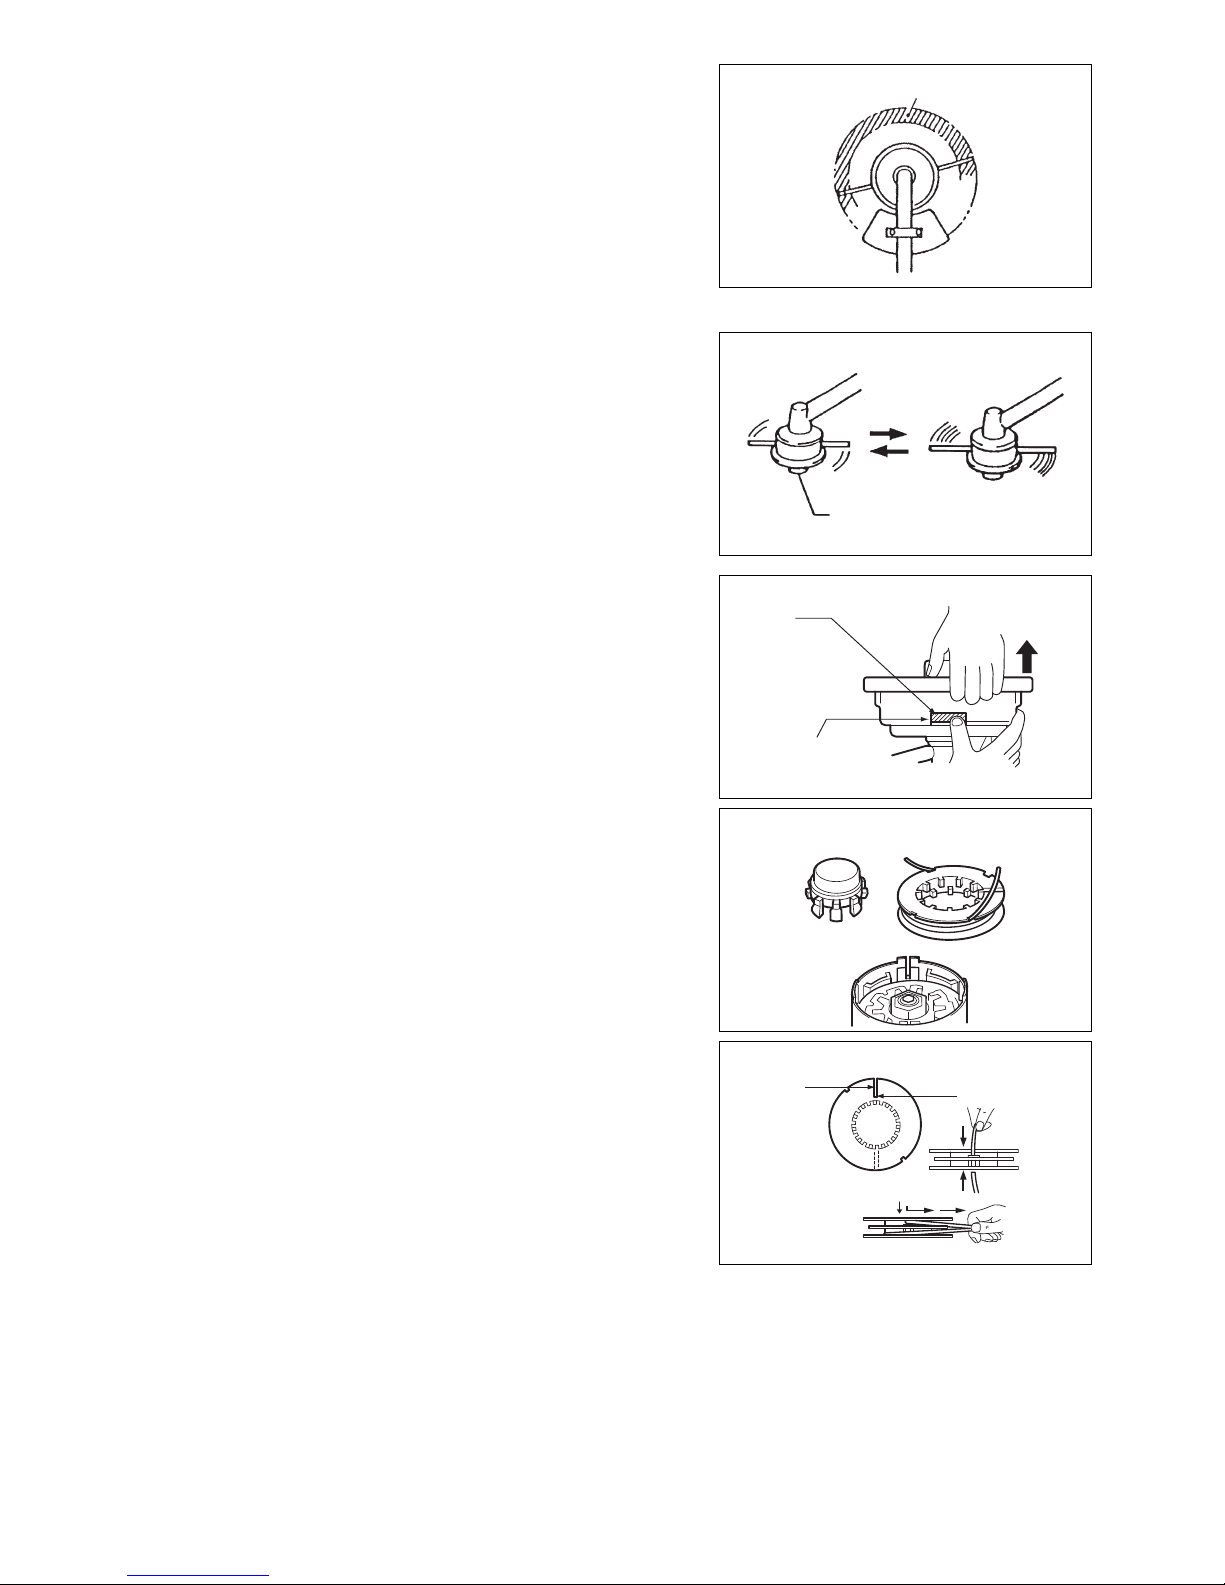
Operation
- Increase the nylon cutting head speed to approx. 6,000 rpm. Low speed (under
4,800 rpm) is not suitable, the nylon cord will not feed out properly at low speed.
- The most effective cutting area is shown by the shaded area.
If the nylon cord does not feed out automatically, proceed as follows:
1. Release the throttle lever to run the engine idle and then squeeze the throttle
lever fully. Repeat this procedure until the nylon cord feeds out to the proper
length.
2. If the nylon cord is too short to feed out automatically with the above procedure,
bump the knob of the nylon cutting head against the ground to feed out the
nylon cord.
3. If the nylon cord does not feed out with procedure 2, rewind/replace the nylon
cord by following the procedures described under “Replacing the nylon cord”.
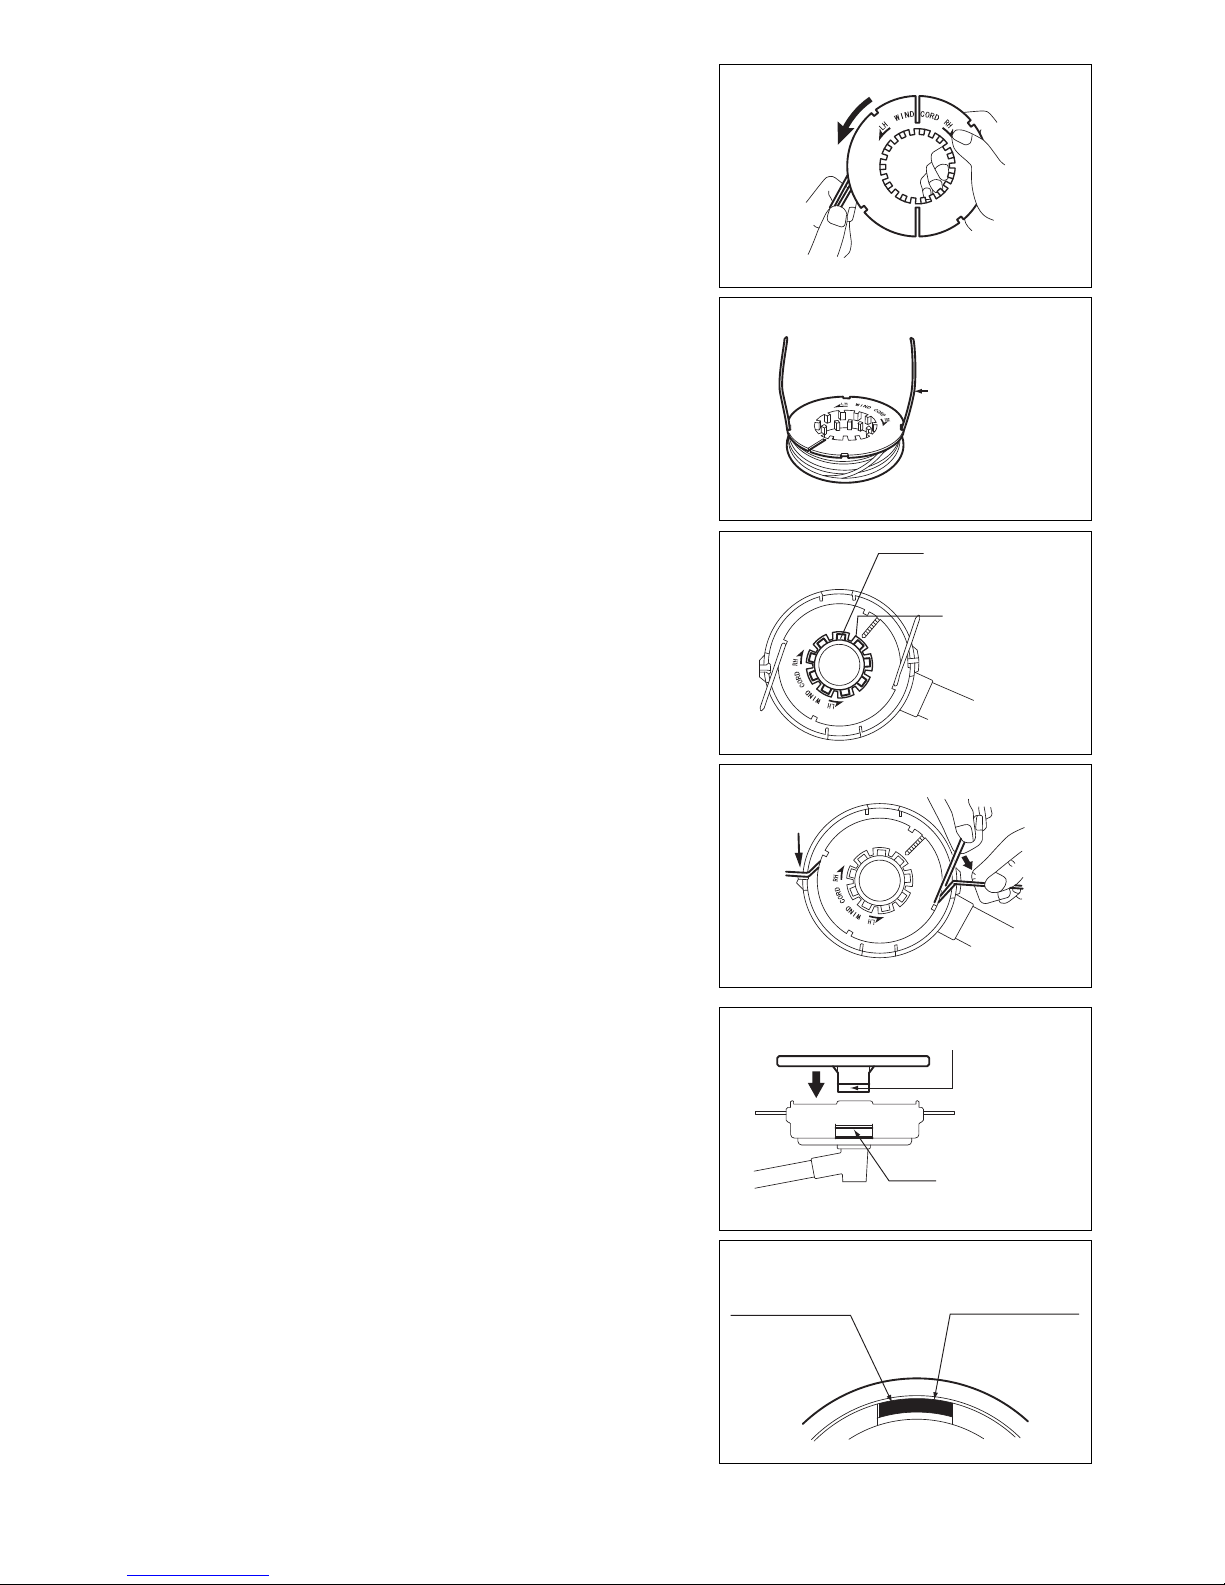
Replacing the nylon cord
1. Put off cover from housing, pressing two cover locking tabs located oppositely
on side of the housing.
2. Take off tap knob and spool from the housing.
3. Put each one end of two cutting lines into each holes at inner most of the slot on
one of spool outer flanges. Put the lines into spool gutters through each slit on
the flanges.
Most effective cutting area
Idle speed
Full speed
Tap knob
Pull up
Cover
Locking Tab
Housing Window
Tab knob
Spool
There is a hole inner
most of the slit.
Slit
20
4. Wind the lines up firmly to the direction shown by left-hand (LH) arrow on the
flange. Do not cross the lines.
5. Wind all but about 100 mm of the cords, leaving the ends temporarily hooked
through a notch on the side of the spool.
6. Put tap knob onto the housing hub, positioning it can freely move up and down
against spring tension. Put the spool into the housing, aligning the teeth on
spool and tap knob alternately like gears.
7. Put in the cutting lines through the slot of eyelets.
8. Put the cover onto the housing, aligning the tabs on cover and the windows on
housing. Make sure the cover is secured exactly to the housing. Outer edge of
cover locking tab and outer surface of the housing should be on same
circumference.
to “LH” direction
Wind tightly
100 – 150 mm
from notches
Tab knob’s Teeth
Spool’s Teeth
Cover Locking Tab
Housing Window
Outer Edge of
Cover Locking Tab
Outer surface of
Housing
21
Maintenance
CAUTION: Before doing any work on the machine always switch off the motor
and pull the plug caps off the spark plugs (see “Checking the spark
plugs” on page 22).
Always wear protective gloves!
To ensure a long service life and to avoid any damage to the equipment, the
following servicing operations should be performed at regular intervals.
Daily checkup and maintenance
- Before operation, check the machine for loose screws or missing parts. Pay
particular attention to the tightness of the cutter blade.
- Before operation, always check for clogging of the cooling air passage and the
cylinder fins.
Clean them if necessary.
- Perform the following maintenance daily after use:
• Clean the brush cutter externally and inspect for damage.
• Clean the air filter. When working under extremely dusty conditions, clean the
filter and blow out the cooling air passage and cylinder fins several times a day.
• Check the blade for damage and dullness and make sure it is firmly mounted.
• Check that there is sufficient difference between idling and engagement speed
to ensure that the cutting tool is at a standstill while the engine is idling (if
necessary reduce idling speed).
If under idling conditions the tool should still continue to run, consult your
nearest Authorized Service Agent before further use of the tool.
- Check for proper functioning of the stop switch, the lock-off lever, the throttle lever,
and the lock button.
Cleaning of air cleaner
- Raise the lock lever (1) of the air cleaner cover and release the lock.
- Hold the right and left sides of the air cleaner cover, press it to the inside and then
remove it.
- Push the choke lever (2) up (arrow), to prevent dirt particles from entering the
carburetor.
- Remove the sponge element (3).
Wash it with lukewarm water and then dry it thoroughly.
- After cleaning, put back the sponge element and install the air cleaner cover (4)
and tighten the screw to secure.
NOTE: If there is excessive dust or dirt adhering to the air cleaner, clean it
every day. A clogged air cleaner may make it difficult or impossible to
start or run the engine at proper rotational speeds.
22
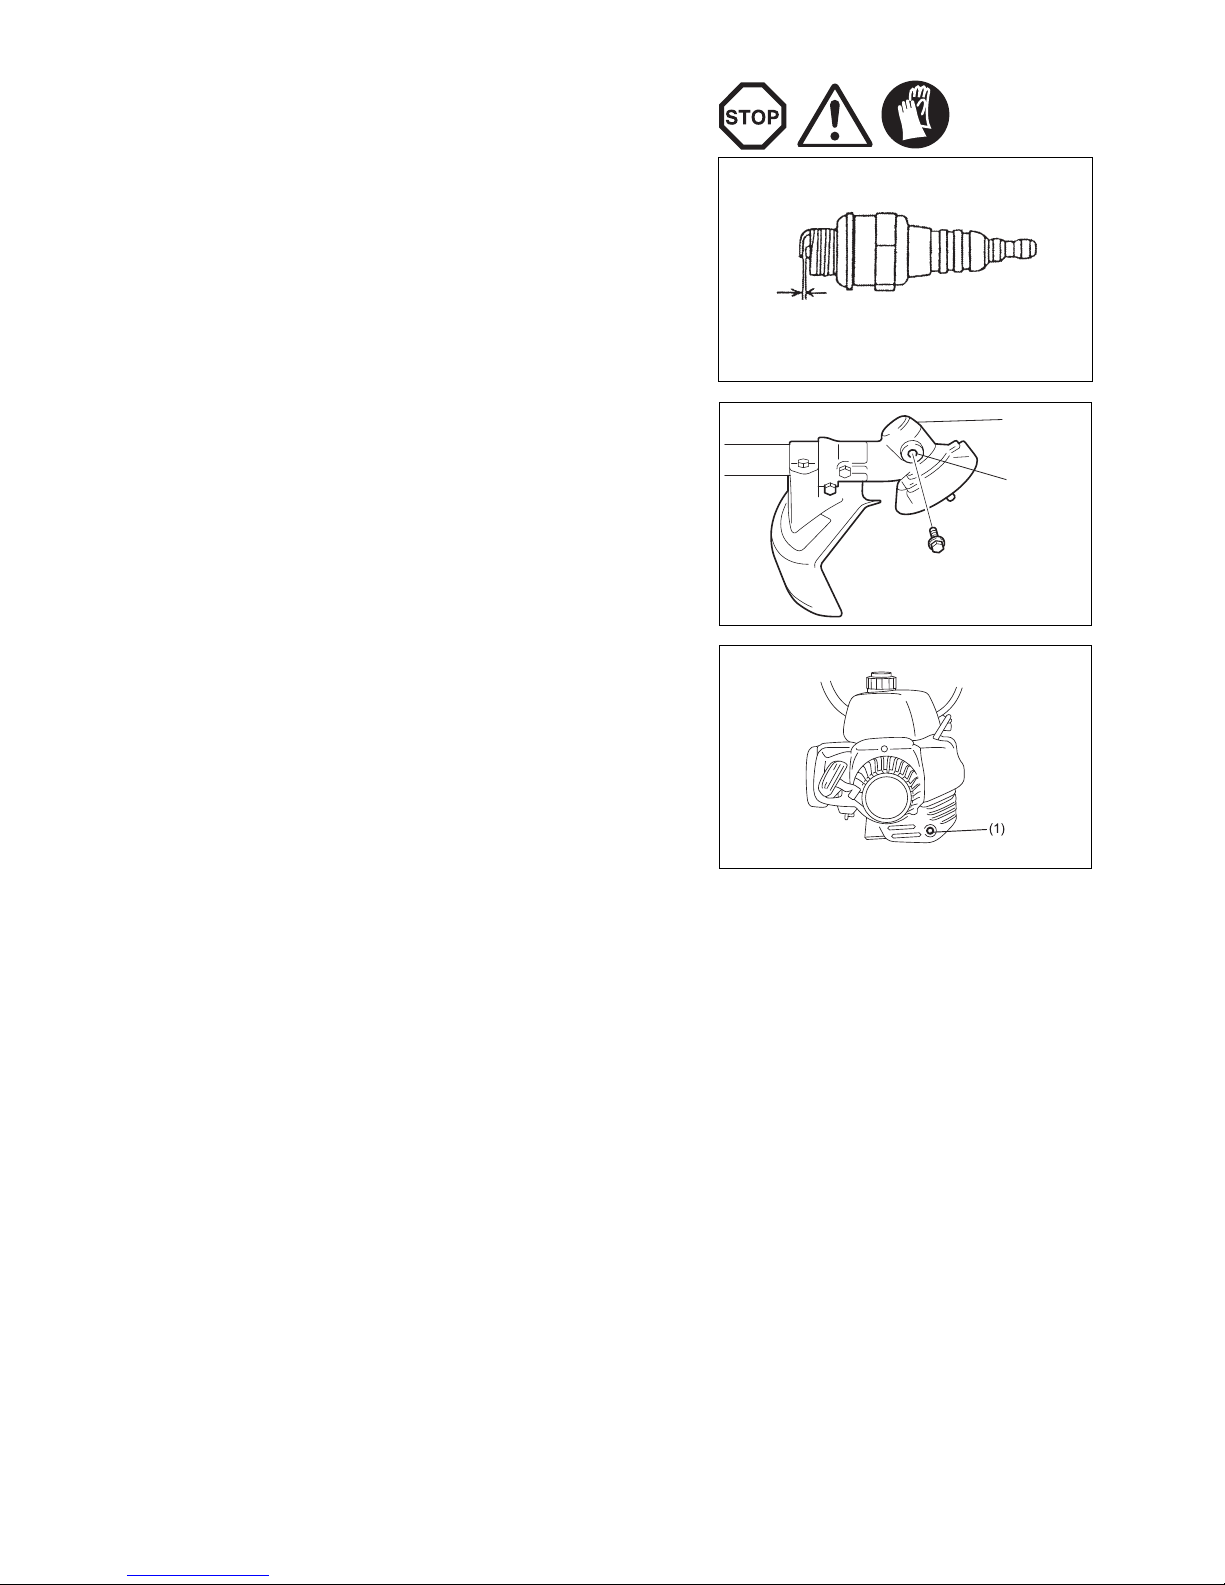
Checking the spark plugs
- Use only the supplied socket wrench to remove or install the spark plug.
- The gap between the two electrodes of the spark plug should be 0.6 – 0.7 mm
(0.024” – 0.028”). If the gap is too wide or too narrow, adjust it. If the spark plug is
clogged with carbon or fouled, clean it thoroughly or replace it.
Use only identical replacement parts.
CAUTION: Never touch the spark plug connector while engine is running
(danger of high voltage electric shock).
Supply of grease to gear case
- Supply grease to the gear case through the grease hole every 30 hours of
operation. (Genuine MAKITA grease may be purchased from your MAKITA
dealer.)
Cleaning of muffler exhaust port
- Check muffler exhaust port (1) regularly.
- If it is clogged with carbon deposits, carefully scrape the deposits out with a
suitable tool.
Any maintenance or adjustment work that has not been included and described in this manual is only to be performed by Authorized Service
Agent.
0.6 mm – 0.7 mm
(0.024” – 0.028”)
Gear case
Grease hole

23
Maintenance schedule
Storage
- When keeping the machine in storage for a long time, drain fuel from the fuel tank
and carburetor, as follows: Drain all fuel from the fuel tank. Dispose of properly
and in accordance with all local laws.
- Remove the spark plugs and add a few drops of oil into each spark plug hole.
Then, pull the starter gently. Confirm that oil film covers the engine inside and
tighten the spark plugs.
- Clear dirt or dust from the cutter blade and outside of engine, wipe them with an
oil-immersed cloth and keep the machine locked in a dry, well ventilated location.
Out of reach of children.
- Do not store in a closed area where fuel vapors can reach an open flame from hot
water heaters, furnaces etc.
Troubleshooting procedures
General Engine assembly, screws and nuts Visual inspection for damage and tightness
Check for general condition and security
After each refuelling Throttle lever Functional check
Safety lock key Functional check
Stop switch Functional check
Daily Sponge element (air filter) To be checked and cleaned if necessary
Cooling air duct To be cleaned
Cutting blade Check for damage and sharpness
Idling speed Inspection (cutting tool must not move)
Weekly Spark plug Inspection, replace i f necessary
Muffler Check and if necessary clean the opening
Quarterly Suction head (gas line filter) To be replaced
Fuel tank To be cleaned
Storage Fuel tank Empty fuel tank
Carburetor Operate until engine runs out of fuel
Drain fuel
Humidity
Problem System Observation Possible causes
Engine not starting or
starts with difficulty
Ignition system Ignition spark is present Faulty fuel supply or compression system, mechanical
defect
No ignition spark Stop switch operated, wiring fault or short circuit, spark plug
or connector defective, ignition module faulty
Fuel supply Fuel tank filled Incorrect choke position, carburetor defective, fuel supply
line bent or interrupted
Compression Inside of engine Cylinder bottom gasket defective, crankshaft seals
damaged, cylinder or piston rings defective
Outside of engine Improper sealing of spark plug
Mechanical fault Starter not engaging Broken starter spring, broken parts inside of the engine
Warm start problems Tank filled Choke in incorrect position
Ignition spark existing Carburetor contaminated, have it cleaned
Engine starts but dies
immediately
Fuel supply Tank filled Incorrect idling adjustment, carburetor contaminated
Fuel tank cap defective, fuel supply line interrupted, cable or
stop switch faulty
Insufficient performance Several systems may
simultaneously be
affected
Engine idling Air filter contaminated, carburetor contaminated, muffler
clogged, exhaust duct in the cylinder clogged

24
DEUTSCH (Originalanweisungen)
Wir danken Ihnen für Ihre Kaufentscheidung zugunsten der
Motorsense oder des Fadentrimmers von MAKITA. Die MAKITA
Motorsense bzw. der Rasentrimmer ist das Resultat eines langen
Entwicklungsprogramms und unserer jahrelangen Erfahrung auf
diesem Gebiet.
Um sich mit dem Gerät vertraut zu machen und alle Anweisungen
richtig auszuführen, lesen Sie bitte dieses Heft aufmerksam durch.
Es enthält ausführliche Beschreibungen der zahlreichen
Funktionen dieses Gerätes, und soll Ihnen dabei helfen, die
hervorragende Leistung Ihrer Motorsense bsw. Ihres
Fadentrimmers von MAKITA voll auszuschöpfen.
Inhaltsverzeichnis Seite
Symbole...........................................................................................24
Sicherheitsvorschriften ....................................................................25
Technische Daten............................................................................29
Bezeichnung der Teile ..................................................................... 30
Montageanweisungen...................................................................... 31
Montage des Motors.................................................................. 31
Montage des Griffes .................................................................. 32
Anschluß von Gaszug und Zündkabel ......................................32
Montage der Schutzhaube ........................................................33
Montage des Schlagmessers .................................................... 35
Montage des Nylonfaden-Schneidkopfes.................................. 35
Kraftstoffe/Auftanken ....................................................................... 36
Vorschriftsmäßige Handhabung der Maschine................................ 37
Inbetriebnahme................................................................................37
Leerlaufeinstellung........................................................................... 39
Nachschärfen des Schlagmessers ..................................................39
Wartung ........................................................................................... 42
Wartungsplan ............................................................................44
Lagerung.......................................................................................... 44
Fehlersuche ..................................................................................... 44
Symbole
Beim Durchlesen dieser Betriebsanleitung werden Sie den folgenden Symbolen begegnen.
WARNUNG/GEFAHR
Augen- und Ohrenschutz tragen
(für Fadentrimmer)
Betriebsanleitung lesen, verstehen und
befolgen
Schutzhelm, Augen und Ohrenschutz
tragen (für Fadentrimmer)
Verboten
Keine Metall-Schlagmesser verwenden
(für Rasentrimmer)
Abstand halten Höchstzulässige Messerdrehzahl
Gefahr von fliegenden Objekten Motor – Manuelles Starten
Nicht rauchen Notstopp
Keine offenen Flammen Erste Hilfe
Schutzhandschuhe tragen Recycling
Rückschlag EIN/START
Arbeitsbereich von Personen und Tieren
freihalten
AUS/STOPP
Kraftstoff-Öl-Gemisch CE-Marke

25
SICHERHEITSVORSCHRIFTEN
Allgemeine Vorschriften
- Um sich mit der Handhabung der Motorsense bzw. des Fadentrimmers vertraut zu
machen und korrekten Betrieb zu gewährleisten, muß der Benutzer diese
Betriebsanleitung durchlesen und die darin enthaltenen Anweisungen verstehen
und befolgen. Ungenügend informierte Benutzer gefährden sich selbst und andere
durch unsachgemäße Handhabung.
- Die Motorsense bzw. der Fadentrimmer sollte nur an Personen verliehen werden,
die nachweislich Erfahrung im Umgang mit solchen haben. Händigen Sie mit dem
Gerät auch stets die Betriebsanleitung aus. Motorsense bzw. des Fadentrimmers
nicht erlaubt werden.
- Erstbenutzer sollten sich vom Händler die grundsätzliche Bedienung erklären
lassen, um sich mit der Handhabung einer motorgetriebenen Sense vertraut zu
machen.
- Kindern und Jugendlichen unter 18 Jahren darf der Betrieb der Motorsense bzw.
des Rasentrimmers nicht erlaubt werden. Personen über 16 Jahre dürfen das
Gerät jedoch zu Übungszwecken benutzen, während sie unter der Aufsicht eines
qualifizierten Ausbilders sind.
- Lassen Sie bei der Benutzung von Motorsensen oder Fadentrimmern äußerste
Vorsicht und Aufmerksamkeit walten.
- Betreiben Sie die Motorsense bzw. den Fadentrimmer nur bei gutem
Gesundheitszustand. Führen Sie alle Arbeiten gewissenhaft und sorgfältig aus.
Der Benutzer muß die Haftung für andere übernehmen.
- Benutzen Sie die Motorsense bzw. den Fadentrimmer niemals unter dem Einfluß
von Alkohol oder Drogen.
- Benutzen Sie das Gerät nicht, wenn Sie müde sind.
- Bewahren Sie diese Vorschriften für spätere Bezugnahme auf.
- Nationale Bestimmungen können die Verwendung der Machine beschränken.
Persönliche Schutzausrüstung
- Die Kleidung sollte funktionell und passend sein, d.h. sie sollte eng anliegen, aber
nicht hinderlich sein. Tragen Sie keinen Schmuck, Kleidung oder lange Haare, die
an Büschen oder Sträuchern hängenbleiben könnten.
- Um Kopf-, Augen-, Hand- oder Fußverletzungen zu verhüten und Ihr Gehör zu
schützen, muß die folgende Schutzausrüstung und Schutzkleidung während des
Betriebs der Motorsense bzw. des Fadentrimmers verwendet werden.
- Tragen Sie beim Arbeiten im Wald stets einen Helm. Der Schutzhelm (1) muß
regelmäßig auf Beschädigung überprüft und spätestens nach 5 Jahren ersetzt
werden. Verwenden Sie nur zugelassene Schutzhelme.
-Das Visier (2) des Helms (oder wahlweise eine Schutzbrille) schützt das Gesicht
vor hochgeschleuderten Ästen, Steinen oder anderen Objekten.
Tragen Sie während des Betriebs der Motorsense bzw. des Fadentrimmers stets
eine Schutzbrille oder ein Visier, um Augenverletzungen zu verhüten.
- Tragen Sie insbesondere bei längeren Arbeitszeiten geeignete
Lärmschutzvorrichtungen (Kapselgehörschützer (3), Ohropax usw.), um
Schwerhörigkeit vorzubeugen.
-Ein Arbeitsoverall (4) schützt vor hochgeschleuderten Steinen und Splittern.
Daher ist das Tragen eines Arbeitsoveralls wärmstens zu empfehlen.
- Spezialhandschuhe (5) aus dickem Leder sind ebenfalls ein Teil der
vorgeschriebenen Ausrüstung und müssen stets während des Betriebs der
Motorsense bzw. des Fadentrimmers getragen werden.
- Tragen Sie bei der Benutzung der Motorsense bsw. des Fadentrimmers stets
stabile Schuhe (6) mit rutschfester Sohle. Diese schützen vor Verletzungen und
gewährleisten guten Halt.
Starten der Motorsense oder des Fadentrimmers
- Vergewissern Sie sich bitte, daß sich keine Kinder oder andere Personen
innerhalb eines Arbeitsbereiches von 15 m befinden, und achten Sie auch auf
Tiere in der Nähe des Arbeitsplatzes.
- Vergewissern Sie sich vor der Benutzung stets, daß sich die Motorsense
bzw. der Fadentrimmer in betriebssicherem Zustand befindet:
Überprüfen Sie das Schlagmesser auf sichere Befestigung. Vergewissern Sie
sich, daß die Befestigungsmutter des Schlagmessers fest angezogen ist.
Überprüfen Sie den Gashebel auf Leichtgängigkeit und die Gashebelarretierung
auf einwandfreies Funktionieren. Das Schlagmesser darf sich bei
Leerlaufdrehzahl nicht drehen. Lesen Sie die Anweisungen zur
Leerlaufeinstellung auf Seite 40 durch. Vergewissern Sie sich, daß die Griffe
sauber und trocken sind, und überprüfen Sie die Funktion des Stop-Schalters.
Halten Sie die Griffe von Öl und Kraftstoff frei.
- Vergewissern Sie sich vor dem Betrieb von den lokalen Vorschriften über
Lärmpegel und Betriebsstunden und befolgen Sie diese.
Schematische Darstellung
15 Meter
50 Fu
ß

26
Gehen Sie zum Starten der Motorsense bzw. des Fadentrimmers genau nach den
Anweisungen in der Betriebsanleitung vor.
Benutzen Sie keine anderen Methoden zum Starten des Motors!
- Benutzen Sie die Motorsense bzw. den Fadentrimmer und die Werkzeuge nur für
die angegebenen Verwendungszwecke.
- Lassen Sie den Motor erst nach vollständigem Zusammenbau der Motorsense
bzw. des Fadentrimmers an. Der Betrieb des Gerätes ist nur dann zulässig, wenn
alle dazugehörigen Teile angebracht worden sind!
- Vergewissern Sie sich vor dem Starten, daß das Schlagmesser keinen Kontakt mit
harten Gegenständen (z.B. Äste, Steine, usw.) hat.
- Im Falle von Motorstörungen ist der Motor unverzüglich anzuhalten.
- Sollte das Schlagmesser auf Steine oder andere harte Gegenstände treffen, ist
der Motor unverzüglich anzuhalten und das Schlagmesser zu überprüfen.
- Überprüfen Sie das Schlagmesser in regelmäßigen, kurzen Abständen auf
Beschädigung (Untersuchung auf Haarrisse durch Abklopfprüfung).
- Ein vetraut klingender Ton muß zu hören sein.
- Betreiben Sie die Motorsense bzw. den Fadentrimmer nur mit angebrachtem
Tragegurt, der vor der Inbetriebnahme der Motorsense bzw. des Fadentrimmers
auf die passende Länge einzustellen ist. Es ist wichtig, den Tragegurt auf die
Größe des Benutzers einzustellen, um Ermüdung während des Betriebs oder
Verlust der Kontrolle über das Gerät zu vermeiden. Halten Sie die Motorsense
bzw. den Rasentrimmer während des Betriebs niemals nur mit einer Hand.
- Halten Sie die Motorsense bzw. den Fadentrimmer während des Betriebs stets mit
beiden Händen. Achten Sie stets auf sicheren, ausgeglichenen Stand.
- Betreiben Sie die Motorsense bzw. den Fadentrimmer so, daß das Einatmen der
Abgase vermieden wird. Lassen Sie den Motor niemals in einem geschlossenen
Raum laufen (Gefahr der Gasvergiftung). Kohlenmonoxid ist ein geruchloses Gas.
Vergewissern Sie sich stets, daß ausreichende Belüftung vorhanden ist.
- Halten Sie stets den Motor an, wenn Sie eine Pause einlegen und die Motorsense
bzw. den Fadentrimmer unbeaufsichtigt lassen. Bewahren Sie sie an einem
sicheren Ort auf, um Gefährdung anderer Personen, Entzündung brennbarer
Materialien oder Beschädigung der Maschine zu vermeiden.
- Legen Sie die Motorsense bzw. den Fadentrimmer in heißem Zustand niemals auf
trockenes Gras oder andere brennbare Materialien.
- Das Schlagmesser muß stets mit der vorgeschriebenen Schutzhaube abgedeckt
werden. Betreiben Sie die Motorsense bzw. den Rasentrimmer niemals ohne
diese Schutzhaube!
- Alle mit der Maschine gelieferten Schutzeinrichtungen und Abdeckungen müssen
während des Betriebs angebracht sein.
- Betreiben Sie den Motor niemals mit defektem Auspuffschalldämpfer.
- Transportieren Sie die Motorsense bzw. den Fadentrimmer nur mit angehaltenem Motor.
- Beim Transport über größere Entfernungen muß stets der mitgelieferte
Messerschutz angebracht werden.
- Vergewissern Sie sich vor dem Transport der Motorsense bzw. des
Rasentrimmers, daß der Kraftstofftank vollkommen leer ist, um Auslaufen von
Kraftstoff zu vermeiden. Positionieren Sie die Motorsense bzw. den Rasentrimmer
für den Transport in einem Auto oder auf einem Lastwagen in aufrechter Stellung
und fixieren Sie die Maschine, um Beschädigungen zu vermeiden.
Auftanken
- Handhaben Sie Kraftstoff vorsichtig, um das Risiko von Feuer und Vebrennungen
zu verringern. Kraftstoff ist sehr leicht entflammbar.
- Beim Auftanken den Motor anhalten, von offenen Flammen fernbleiben und nicht rauchen.
- Hautkontakt mit Mineralölprodukten vermeiden. Keine Kraftstoffdämpfe einatmen.
Beim Auftanken stets Schutzhandschuhe tragen. Schutzkleidung in regelmäßigen
Abständen wechseln und reinigen.
- Achten Sie darauf, daß Sie weder Kraftstoff noch Öl verschütten. Lassen Sie
nasse Kleidung trocknen, bevor Sie sie in geeignete, abdeckbare Behälter legen,
um Selbstentzündung zu vermeiden. Wischen Sie das Gerät immer trocken, bevor
Sie den Motor starten.
- Achten Sie darauf, daß Ihre Kleidung nicht mit Kraftstoff in Kontakt kommt. Wechseln Sie
die Kleidung unverzüglich, falls Kraftstoff darüber verschüttet worden ist (Lebensgefahr).
- Überprüfen Sie den Tankverschluß in regelmäßigen Abständen, um sich zu
vergewissern, daß er einwandfrei befestigt werden kann.
- Ziehen Sie die Sicherungsschraube des Kraftstofftanks sorgfältig fest. Wechseln Sie
den Ort, um den Motor anzulassen (mindestens 3m Abstand vom Betankungsort).
- Tanken Sie niemals in geschlossenen Räumen auf. Kraftstoffdämpfe können sich
in Bodennähe sammeln (Explosionsgefahr).
- Kraftstoff darf nur in zugelassenen Behältern transportiert und gelagert werden.
Lagern Sie Kraftstoff an einem für Kinder unzugänglichen Ort.
- Unterlassen Sie das Auftanken der Motorsense bzw. des Rasentrimmers bei noch
heißem oder laufendem Motor.
- Verwenden Sie für das Kraftstoff-Öl-Gemisch nur Benzin, das weder Ethanol noch
Methanol (Alkohol) enthält, um Beschädigung von Kraftstoffleitungen und anderen
Motorteilen zu vermeiden.
• Arbeitspause
• Transport
• Auftanken
• Wartung
• Werkzeugwechsel
3 Meters

27
Vorsichtsmaßnahmen beim Betrieb
- Benutzen Sie die Motorsense bzw. den Rasentrimmer nur bei guten Licht- und
Sichtverhältnissen. Hüten Sie sich während der kalten Jahreszeit vor schlüpfrigem
oder nassem Untergrund, Eis und Schnee (Rutschgefahr). Achten Sie stets auf
sicheren Stand.
- Übernehmen Sie sich nicht. Achten Sie stets auf einwandfreien Stand, Balance
und Handführung des Gerätes.
- Mähen Sie niemals höher als Hüfthöhe.
- Betreiben Sie die Motorsense bzw. den Rasentrimmer niemals auf einer Leiter
stehend.
- Klettern Sie niemals auf Bäume, um Schneidarbeiten mit der Motorsense bzw.
dem Rasentrimmer auszuführen.
- Arbeiten Sie niemals auf unstabilen Oberflächen oder steilem Gelände.
- Räumen Sie den Arbeitsbereich vor dem Mähen von allen Gegenständen wie
Steine, Nägel, Glassplitter, Draht usw. Fremdkörper können das Schneidwerkzeug
beschädigen, gefährliche Rückschläge verursachen oder auf gefährliche Weise
umhergeschleudert werden.
- Beginnen Sie erst mit dem Mähen, nachdem das Schlagmesser seine volle
Arbeitsdrehzahl erreicht hat.
- Betreiben Sie dieses Gerät niemals umgedreht oder in extremer Schräglage.
- WARNUNG! – Das Schlagmesser stellt auch noch beim Auslaufen des
Motors bis zum Stillstand eine Gefahr dar.
Rückschläge
- Während des Betriebs der Motorsense können unkontrollierte Rückschläge
auftreten.
- Dies ist besonders dann der Fall, wenn Sie versuchen, innerhalb des
Messersegments zwischen der 12- und 2-Uhr-Stellung (vom Bediener aus
gesehen) zu mähen.
- Setzen Sie dieses Segment des Schlagmessers niemals an feste Objekte, wie
Büsche, Stümpfe, Bäume und dergleichen an, die einen Durchmesser von mehr
als 3 cm aufweisen.
- Die Motorsense wird dann mit großer Wucht und Geschwindigkeit abgelenkt, was
schwere Verletzungen des Benutzers zur Folge haben kann.
- Setzen Sie die Motorsense niemals in dem Bereich zwischen der 12- und 2-
Uhr-Stellung an.
Verhütung von Rückschlägen
Um Rückschläge zu verhüten, beachten Sie folgendes:
- Der Betrieb innerhalb des Messersegments zwischen der 12- und 2-Uhr-Stellung
stellt eine eindeutige Gefahr dar, insbesondere bei Verwendung von MetallSchlagmessern. Selbst bei Benutzung dieser Motorsense innerhalb der
Messersegmente zwischen der 11- und 12-Uhr-Stellung sowie der 2- und 5-UhrStellung besteht die potentielle Gefahr von Rückschlägen.
- Schneidarbeiten innerhalb der Messersegmente zwischen der 11- und 12-UhrStellung sowie der 2- und 5-Uhr-Stellung dürfen nur von geübten und erfahrenen
Personen ausgeführt werden, und dann auch nur auf eigenes Risiko.
Problemloses Mähen ohne nennenswerte Rückschläge ist innerhalb des
Messersegments zwischen der 8- und 11-Uhr-Stellung möglich.
Schneidwerkzeuge
Verwenden Sie stets das korrekte Schneidwerkzeug für die anstehende Arbeit.
Nylonfaden-Schneidkopf:
Dieser Schneidkopf ist speziell für das Mähen entlang von Mauern, Zäunen,
Rasenkanten, Bäumen, Pfosten usw. vorgesehen (Ergänzung des Rasenmähers).
Führen Sie diese Schneidarbeit aus, indem Sie den Rasentrimmer in gleichmäßigen
Halbkreisen von rechts nach links schwenken.
Kreuzmesser
Dieses Messer dient zum Mähen dicker Materialien, wie Unkraut, hohes Gras,
Büsche, Sträucher, Unterholz, Dickicht usw. (max. 2 cm Durchmesser). Führen Sie
diese Schneidarbeit aus, indem Sie die Motorsense in gleichmäßigen Halbkreisen
von rechts nach links schwenken (ähnlich wie eine Sense).
Wartungsvorschriften
- Der Zustand der Motorsense, insbesondere des Schlagmessers, der
Schutzeinrichtungen und auch des Tragegurtes muß vor Beginn der Arbeit
überprüft werden. Besondere Aufmerksamkeit ist den Schlagmessern zu
schenken, die vorschriftsmäßig geschärft werden müssen.
- Zum Auswechseln oder Schärfen des Schlagmessers und auch zum Reinigen der
Motorsense oder des Schneidwerkzeugs stets den Motor abstellen und den
Zündkerzenstecker abziehen.
Vorsicht: Rückschlag
Schematische
Darstellung
Schematische Darstellung

28
Niemals beschädigte Schlagmesser geraderichten oder schweißen.
- Arbeiten Sie umweltbewußt. Betreiben Sie die Motorsense bzw. den
Fadentrimmer mit möglichst wenig Lärm und Umweltverschmutzung. Achten Sie
besonders auf eine korrekte Vergasereinstellung.
- Reinigen Sie die Motorsense bzw. den Fadentrimmer in regelmäßigen Abständen,
und vergewissern Sie sich, daß alle Schrauben und Muttern einwandfrei
angezogen sind.
- Die Motorsense bzw. der Fadentrimmer darf auf keinen Fall in der Nähe von
offenen Flammen, Funken usw. gewartet oder gelagert werden.
- Lagern Sie die Motorsense, bzw. den Fadentrimmer immer in einem gut belüfteten
und abschließbaren Raum.
Beachten Sie die von den entsprechenden Berufsgenossenschaften und
Versicherungsgesellschaften herausgegebenen relevanten
Unfallverhütungsvorschriften. Nehmen Sie keine Änderungen an der
Motorsense vor, weil dadurch Ihre Sicherheit gefährdet wird.
Die Durchführung von Wartungs- oder Reparaturarbeiten durch den Benutzer
beschränkt sich auf die in dieser Betriebsanleitung beschriebenen Arbeiten. Alle
übrigen Arbeiten sind von einer Vertragswerkstatt auszuführen.
Benutzen Sie nur von MAKITA gelieferte Original- Ersatz- und –Zubehörteile. Die
Verwendung nicht zugelassener Zubehörteile und Werkzeuge bedeutet erhöhte
Unfall- und Verletzungsgefahr. MAKITA übernimmt keine Haftung für Unfälle oder
Schäden, die durch die Verwendung nicht zugelassener Schlagmesser,
Befestigungsteile von Schlagmessern oder Zubehörteile verursacht wurden.
Erste Hilfe
Sorgen Sie dafür, daß für den Fall eines Unfalls ein voll ausgestatteter
Verbandskasten in der Nähe des Arbeitsplatzes vorhanden ist. Aus dem
Verbandskasten entnommene Gegenstände sich sofort durch neue zu ersetzen.
Wenn Sie einen Unfall melden, machen Sie bitte folgende Angaben:
- Ort des Unfalls
- Hergang des Unfalls
- Anzahl der verletzten Personen
- Art der Verletzungen
-Ihr Name
Verpackung
Die MAKITA Motorsense bzw. der Fadentrimmer wird in zwei Schutzkartons
geliefert, um Beschädigung während des Transports zu vermeiden. Karton ist ein
Grundrohstoff und kann daher wiederverwendet oder wiederaufbereitet werden
(Altpapier-Recycling).
EG-KONFORMITÄTSERKLÄRUNG
Wir erklären unter unserer alleinigen Verantwortlichkeit, dass sich dieses Produkt in
Übereinstimmung mit den folgenden EG-Richtlinien befindet: 2000/14/EG, 2006/42/EG.
Die wichtigsten geltenden Standards zur Erfüllung der oben genannten Vorschriften
sind: EN11806.
Gemessene Schallleistung: 115 dB (A)
Garantierte Schallleistung: 118 dB (A)
Diese Schallleistungspegel wurden in Übereinstimmung mit den Ratsverordnungen
2000/14/EG gemessen.
Verfahren zur Konformitätsbewertung Anhang V.
3. November 2009
Tomoyasu Kato
Direktor
Verantwortlicher Hersteller:
Makita Corporation
3-11-8, Sumiyoshi-cho, Anjo, Aichi, JAPAN
Autorisierte Vertretung in Europa:
Makita International Europe Ltd.
Michigan Drive, Tongwell, Milton Keynes, Bucks MK15 8JD, ENGLAND
Motorsense: Modell; RBC420, RBC420E, RBC421 (Technische Angaben
finden Sie unter TECHNISCHE DATEN)

29
Technische Daten
RBC420, RBC420E, RBC421
Modell RBC420 RBC420E RBC421
U-HandGriff E-HandGriff J-HandGriff
Abmessungen: Länge x Breite x Höhe
(ohne Schlagmesser) mm
1.770 x 570 x 390 1.770 x 570 x 410 1.770 x 340 x 310
Gewicht
(ohne Plastikhaube und Schlagmesser) kg
7,3 7,8 7,2
Füllmenge (Kraftstofftank) cm
3
960
Hubraum cm
3
40,2
Maximale Motorleistung kw 1,40
Motordrehzahl bei empfohlener max. Spindeldrehzahl U/min 8.500
Maximale Spindeldrehzahl (entsprechend) U/min 7.000
Kraftstoffverbrauch kg/h 0,89
Spezifischer Kraftstoffverbrauch g/kWh 635
Leerlaufdrehzahl U/min 2.600
Kupplungseinrückdrehzahl U/min 3.600
Vergaser (Membranvergaser) Typ WALBRO WYK
Zündsystem Typ Transistorzündung
Zündkerze Typ NGK BPM7A
Elektrodenabstand mm 0,6 – 0,7
Schwingung nach
ISO 22867
Rechter Griff
(Hinterer Griff)
a
hv eq
m/s
2
4,9 3,0 4,8
Unsicherheit K m/s
2
0,4 0,8 0,4
Linker Griff
(Vorderer Griff)
a
hv eq
m/s
2
4,7 4,2 5,4
Unsicherheit K m/s
2
0,6 0,8 0,6
Durchschnittlicher Schalldruckpegel
nach ISO 22868
L
PA eq
dBA
90,9 90,9 97,5
Unsicherheit K dBA 2,2 2,2 2,6
Durchschnittlicher Schalldruckpegel
nach ISO 22868
L
WA eq
dBA
103,9 103,9 110,3
Unsicherheit K dBA 2,8 2,8 1,8
Mischungsverhältnis (Krahtstoff: MAKITA 2-Takt-Öl) 25:1
Übersetzung 14/17

30
Bezeichnung der Teile
Typ mit U-Handgriff
Typ mit J-HandgriffTyp mit E-Handgriff
BEZEICHNUNG DER TEILE BEZEICHNUNG DER TEILE BEZEICHNUNG DER TEILE BEZEICHNUNG DER TEILE
1 Kraftstofftank 7 Motorgehäuse 13 Schutzhaube 19 Hinterer Griff
2 Rücklaufstarter 8 Gurthalterung 14 Getriebegehäuse 20 Kraftstofftankverschluß
3 Luftfilter 9 Griff 15 Griffhalter 21 Startergriff
4 STOP-Schalter 10 Gashebel 16 Schlagmesser 22 Chokehebel
5 Zündkerze 11 Gaszug 17
Nylonfaden-Schneidkopf
23 Auspuffrohr
6 Schalldämpfer 12 Antriebswelle 18 Hüftpolster 24 Tragegurt
 Loading...