

1
INSTRUCTION MANUAL
MANUEL D'INSTRUCTION
MANUAL DE INSTRUCCIONES
IMPORTANT: Read Before Using.
IMPORTANT: Lire avant usage.
IMPORTANTE: Leer antes de usar.
Cordless Cleaner
Aspirateur sans Fil
Aspiradora Inalámbrica
CL105D
014722

2
ENGLISH (Original instructions)
SPECIFICATIONS
Model CL105D
500 mL (for dust bag)
Capacity
330 mL (for paper pack)
3 (Turbo) Approx. 7 min
2 (High) Approx. 10 min
Continuous use
1 (Low) Approx. 20 min
Without nozzle 446 mm (17-1/2")
Overall length
With nozzle 983 mm (38-3/4")
Net weight 1.1 kg (2.3 lbs)
Rated voltage D.C. 10.8 V / 12 V max
• Due to our continuing program of research and development, the specifications herein are subject to change without notice.
• Specifications and battery cartridge may differ from country to country.
• Weight, with battery cartridge, according to EPTA-Procedure 01/2003
USA021-1
IMPORTANT
SAFETY
INSTRUCTIONS
When using an electrical appliance,
basic precautions should always be
followed, including the following:
READ ALL
INSTRUCTIONS
BEFORE USING
THIS APPLIANCE.
WARNING
- To reduce the risk of fire, electric
shock or injury:
1. Do not leave appliance when
battery fitted. Remove battery from
appliance when not in use and
before servicing.
2. Do not use outdoors or on wet
surfaces.
3. Do not allow to be used as a toy.
Close attention is necessary when
used by or near children.
4. Use only as described in this
manual. Use only manufacturer's
recommended attachments.
5. Do not use with damaged battery. If
appliance is not working as it
should, has been dropped,
damaged, left outdoors, or dropped
into water, return it to a service
center.
6. Do not handle appliance with wet
hands.
7. Do not put any object into openings.
Do not use with any opening
blocked; keep free of dust, lint, hair,
and anything that may reduce air
flow.
8. Keep hair, loose clothing, fingers,
and all parts of body away from
openings and moving parts.
9. Turn off all controls before
removing the battery cartridge.
10. Use extra care when cleaning on
stairs.
11. Do not use to pick up flammable or
combustible liquids, such as
gasoline, or use in areas where
they may be present.
12. Use only the charger supplied by
the manufacturer to recharge.

3
13. Do not pick up anything that is
burning or smoking, such as
cigarettes, matches, or hot ashes.
14. Do not use without dust bag and
filters in place.
15. Do not charge the battery outdoors.
SAVE THESE
INSTRUCTIONS.
This appliance is intended for
household use.
USB062-3
ADDITIONAL
SAFETY RULES
1. Read this instruction manual and
the charger instruction manual
carefully before use.
2. Do not pick up the following
materials:
− Hot materials such as lit
cigarettes or spark/metal dust
generated by grinding/cutting
metal
− Flammable materials such as
gasoline, thinner, benzine,
kerosene or paint
− Explosive materials like
nitroglycerin
− Ignitable materials such as
Aluminum, zinc, magnesium,
titanium, phosphorus or
celluloid
− Wet dirt, water, oil or the like
− Hard pieces with sharp edges,
such as wood chips, metals,
stones, glasses, nails, pins or
razors
− Powder to clot such as cement
or toner
− Conductive dust such as metal
or carbon
− Fine particle like concrete dust
Such action may cause fire, injury
and/or property damage.
3. Stop operation immediately if you
notice anything abnormal.
4. If you drop or strike the cleaner,
check it carefully for cracks or
damage before operation.
5. Do not bring close to stoves or
other heat sources.
6. Do not block the intake hole or vent
holes.
SAVE THESE
INSTRUCTIONS.
USD305-1
Symbols
The followings show the symbols used for
tool.
・ volts
・ direct current
ENC010-1
IMPORTANT
SAFETY
INSTRUCTIONS
FOR BUILT-IN
BATTERY
1. Before using built-in battery, read
all instructions and cautionary
markings on (1) battery charger, (2)
battery, and (3) product using
battery.
2. Do not disassemble built-in battery.
3. If operating time has become
excessively shorter, stop operating
immediately. It may result in a risk
of overheating, possible burns and
even an explosion.
4. If electrolyte gets into your eyes,
rinse them out with clear water and
seek medical attention right away. It
4
may result in loss of your eyesight.
5. Do not short the built-in battery:
(1) Do not touch the terminals with
any conductive material.
(2) Avoid storing built-in battery in
a container with other metal
objects such as nails, coins, etc.
(3)
Do not expose built-in battery to
water or rain.
A battery short can cause a
large current flow, overheating,
possible burns and even a
breakdown.
6. Do not store the tool and built-in
battery in locations where the
temperature may reach or exceed
50 ゚ C (122 ゚ F).
7. Do not incinerate the built-in
battery even if it is severely
damaged or is completely worn out.
The built-in battery can explode in a
fire.
8. Be careful not to drop or strike
battery.
SAVE THESE
INSTRUCTIONS.
Tips for maintaining maximum
battery life
1. Charge the built-in battery before
completely discharged.
Always stop tool operation and
charge the built-in battery when
you notice less tool power.
2. Never recharge a fully charged
built-in battery.
Overcharging shortens the battery
service life.
3. Charge the built-in battery with
room temperature at 10 ゚ C - 40 ゚ C
(50 ゚ F - 104 ゚ F). Let a hot built-in
battery cool down before charging
it.
4. Charge the battery cartridge once
in every six months if you do not
use it for a long period of time.
FUNCTIONAL
DESCRIPTION
CAUTION:
• Always be sure that the tool is switched
off before adjusting or checking
function on the tool.
Charging the built-in battery
CAUTION:
• Do not operate the cleaner during
charging. It may be damaged.
• Always disconnect the charging plug
from the cleaner after charging.
•
When you charge a new cleaner or a
cleaner which has been left uncharged for
a long time, it may not accept a full charge.
This is a normal condition and does not
indicate a problem. You can recharge the
cleaner fully after discharging it completely
a couple of times.
1
014724
1
014723
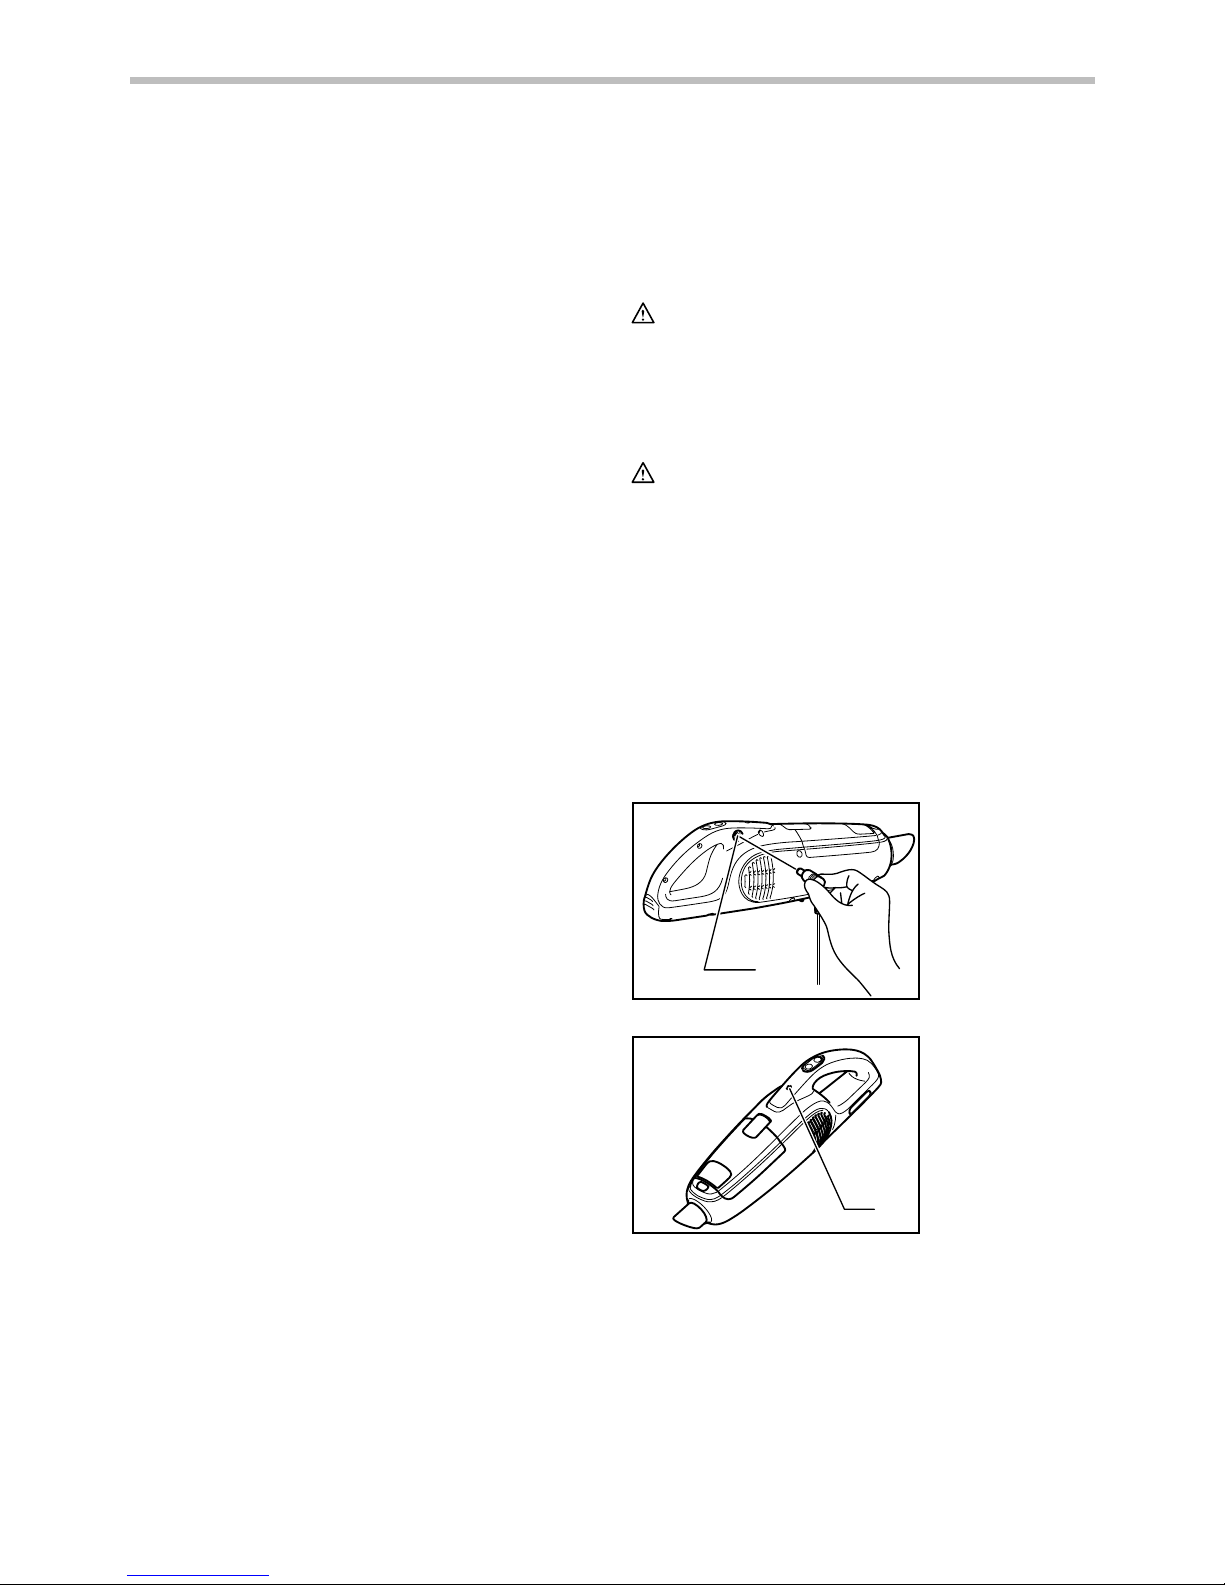
Use only the Makita charger DC1001 to
charge this cleaner. Use of the other type
chargers may cause the battery to burst,
result in personal injury and damage.
Charge the cleaner when using it for the
first time or uncharged for a long time.
Connect the charging plug to the charging
connector, then plug in the charger to the
1. Battery power
lamp
1. Charging
connector
5
power receptacle. The battery power lamp
lights up and start charging. Charging takes
approximately 3 hours. The light goes out
after the charging is complete. For more
details, refer to the instruction manual of
battery charger.
Switch action
CAUTION:
• Always be sure that the dust bag or
paper pack is installed properly in the
cleaner before use. Improper
installation may allow dust to enter the
motor, resulting in malfunction of the
cleaner.
• Always switch off the cleaner after
each use to prevent damage to the
cleaner and to extend the service life of
the batteries.
1
014725
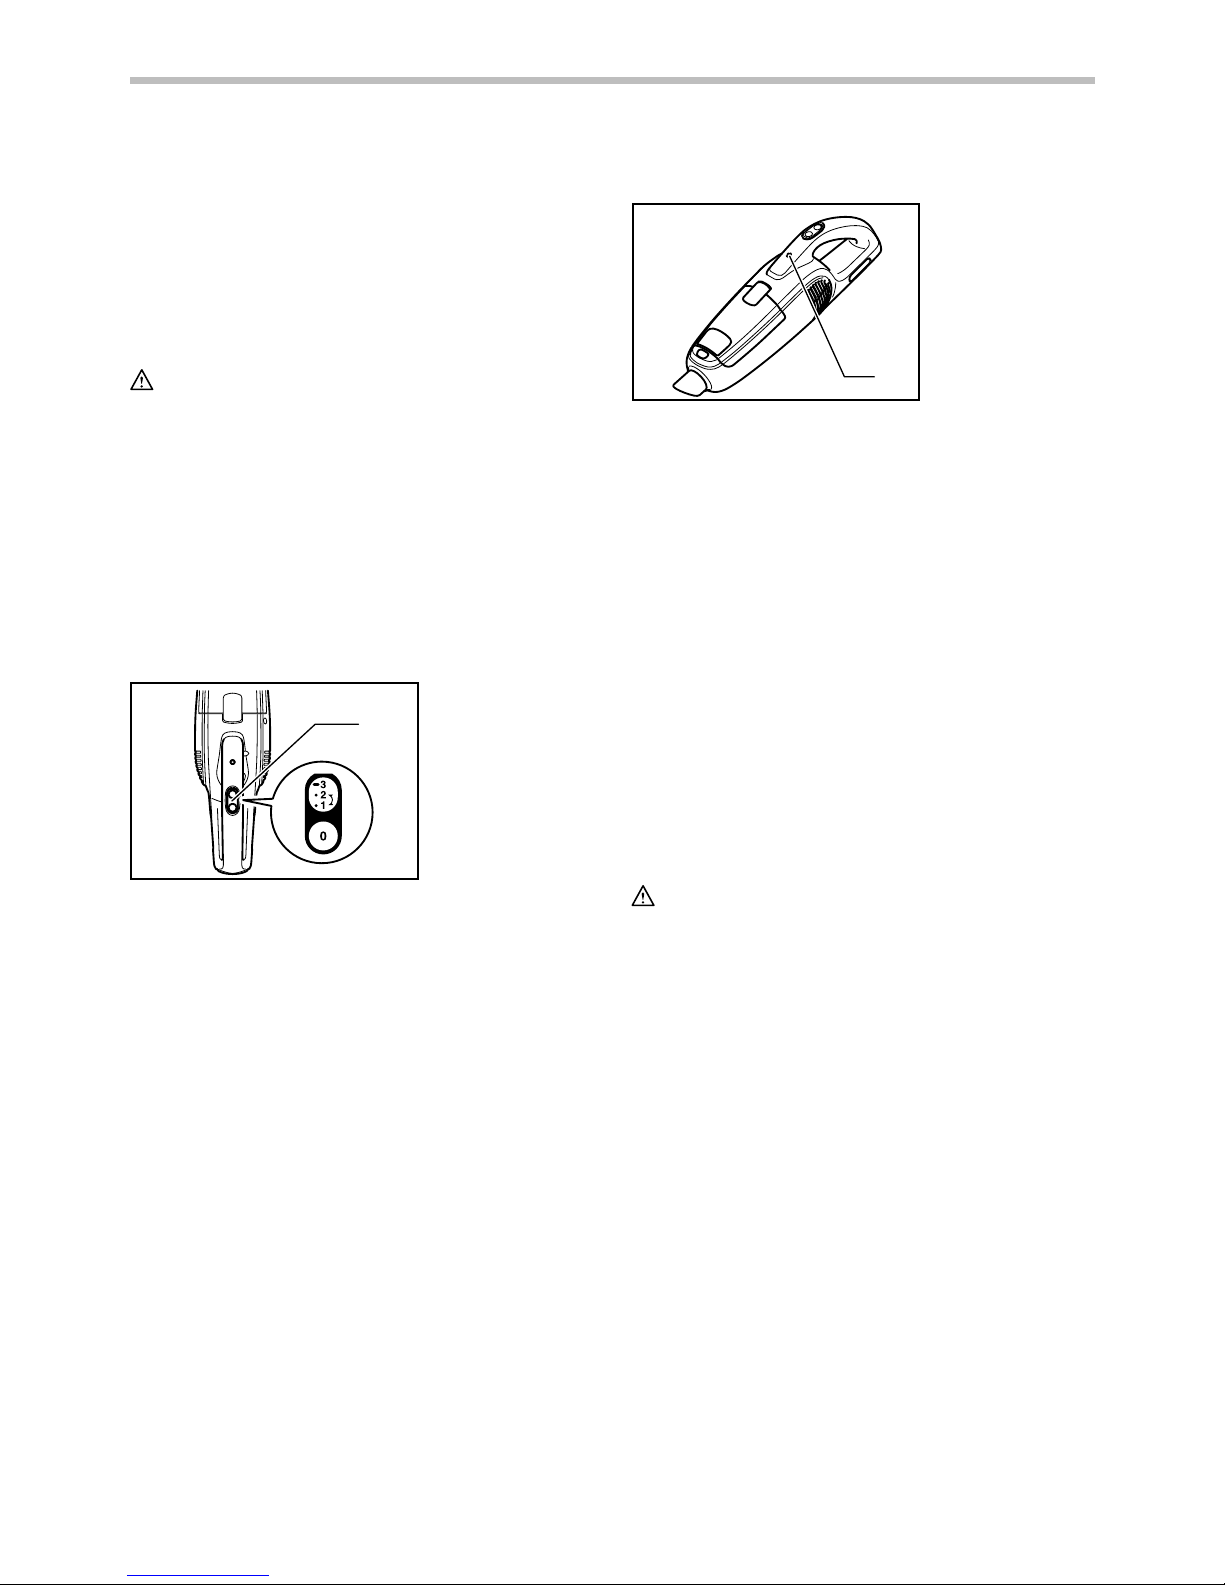
To start the cleaner, simply press the
"1/2/3" button. To switch off, press the "0"
button. To change the cleaner speed, press
the "1/2/3" button. The first press on this
button is for high speed and the second
press for low speed. Each press on this
button repeats the high/low speed cycle
alternatively.
While pressing the "1/2/3" button, this
cleaner works with turbo. This mode is
appropriate to clean especially dusty area.
Battery power lamp
1
014723
When the remaining battery capacity gets
low, the battery power lamp blinks.
When the remaining battery capacity gets
much lower, the tool stops and the battery
power lamp lights up about 10 seconds. At
this time, charge the cleaner.
NOTE:
• The time at which the battery power
lamp start blinking or lighting up
depends on the temperature at work
place and the battery cartridge
conditions.
ASSEMBLY
Disposing of Dust
CAUTION:
• Empty the cleaner before it becomes
too full, or the suction force weakens.
• Be sure to empty out the dust inside
the cleaner itself. Failure to do so may
cause the sponge filter to be clogged
or the motor to be damaged.
• Never throw away the dust stopper
because it should be used whenever
either the dust bag or the dust pack is
used.
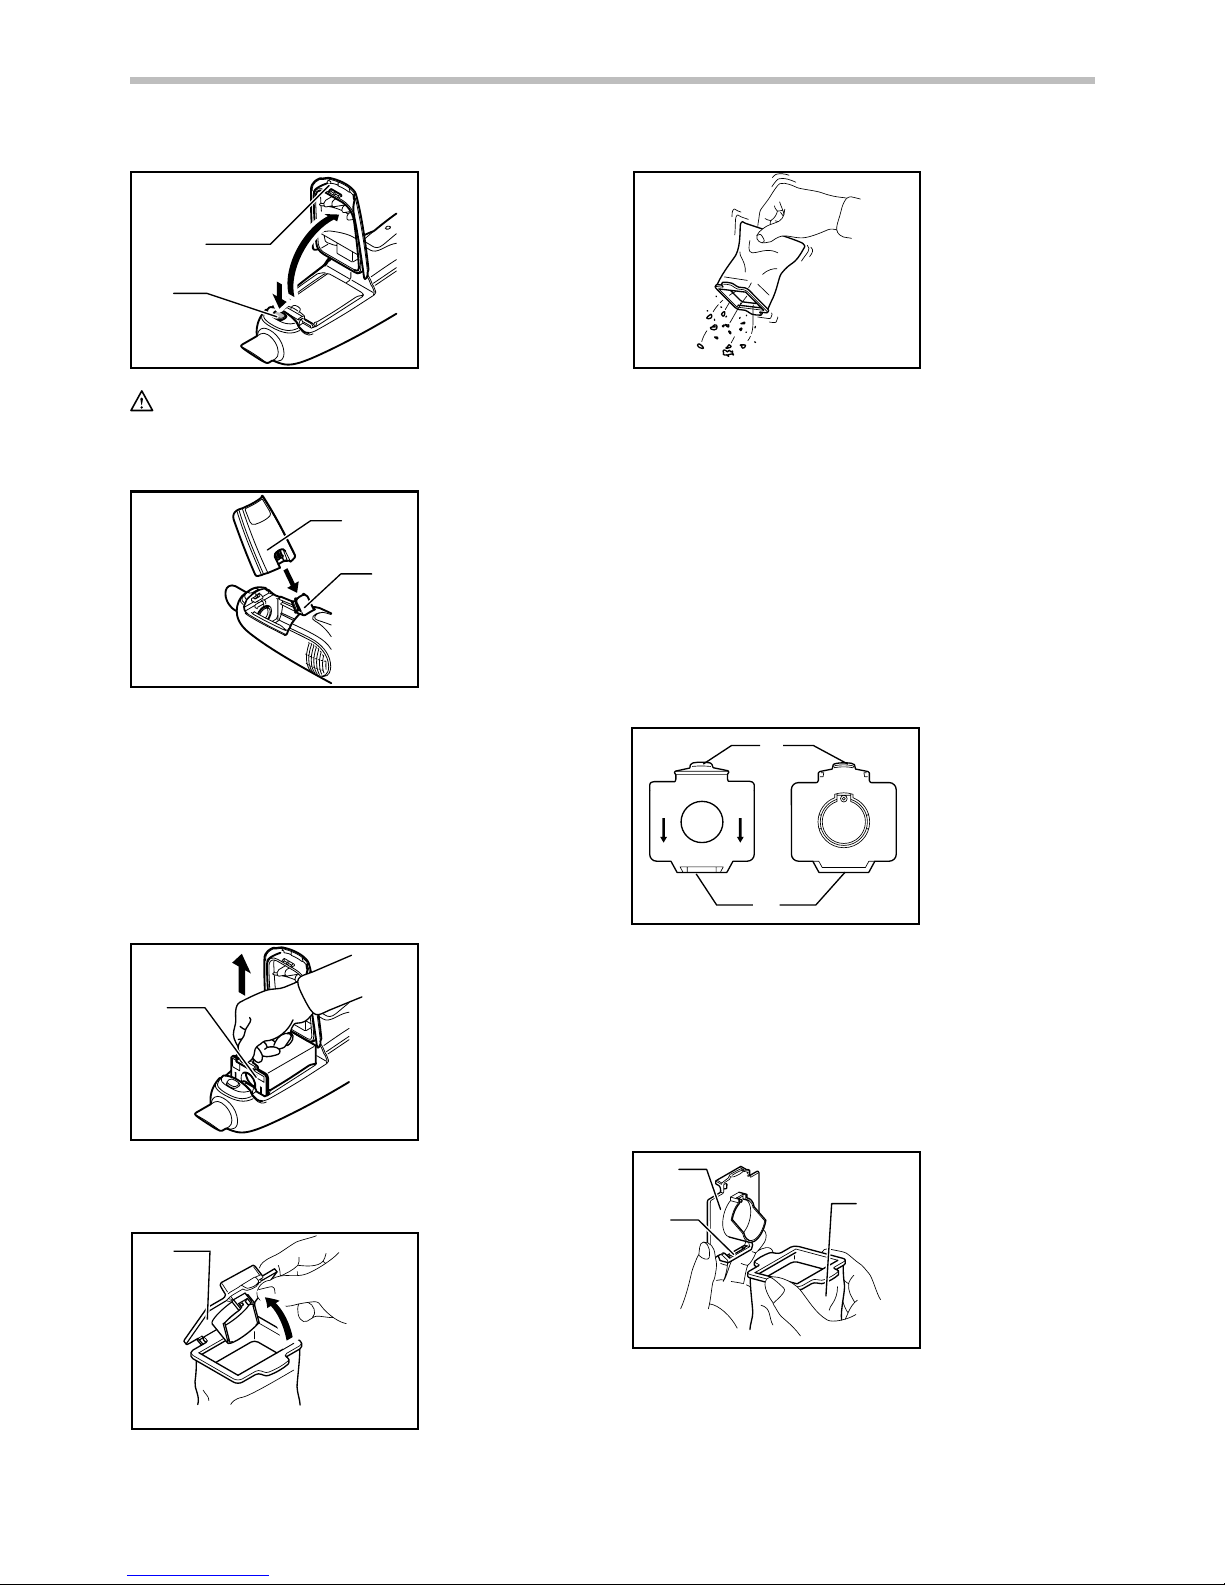
1. Push the button to open the front
cover. Opening it until a click is heard
allows a positive stop at that position.
1. Battery power
lamp
1. Switch buttons
6
1
2
014730
CAUTION:
• When closing the front cover, be
careful not to pinch your fingers.
1
2
014731
NOTE:
• The front cover comes off when trying
to open the front cover more than 90°.
If the front cover comes off, install it
into the front cover joint in place.
2. Pull out both the orange-colored dust
stopper and dust bag together at the
same time.
1
014732
3. Remove the dust stopper and empty
the cleaner.
1
008920
008921
Dust bag and paper pack
Install either dust bag or paper pack before
using cleaner.
Use the dust stopper when installing either
dust bag or paper pack.
Dust bag are usable many times repeatedly
by cleaning it out.
Paper pack is a throw-away type. Throw
away the entire paper pack without
emptying when it has become full.
Installing dust bag
1
2
008930
Use the dust stopper when installing dust
bag. Be careful not to take the upper side
for the lower side by mistake because they
are different each other.
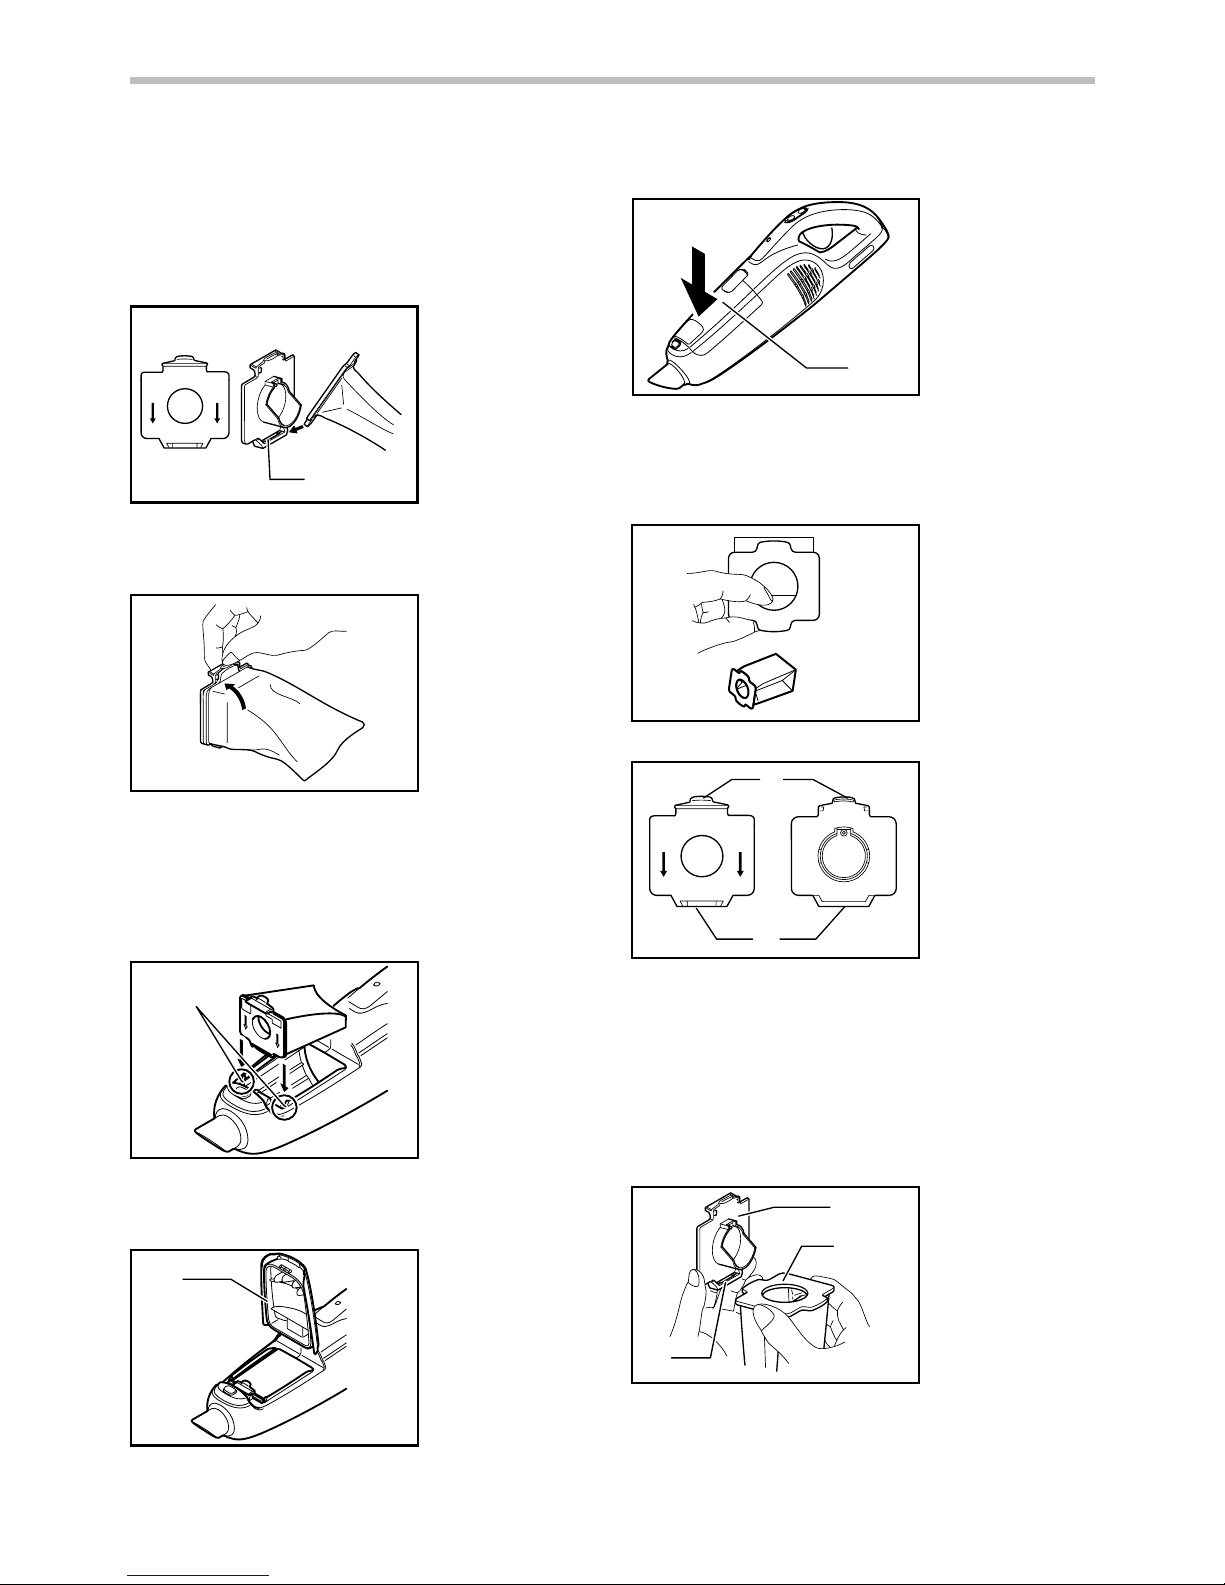
1. Insert the protrusion of the dust bag
into the groove in the dust stopper as
shown in the figure.
1
2
3
008935
1. Dust stopper
2. Groove
3. Dust bag
1. Upper side of
dust stopper
2. Lower side of
dust stopper
1. Dust stopper
1. Dust stopper
1. Front cover
2. Front cover joint
1. Front cover
2. Button
7
2. There is no distinction between the
upper and lower sides of the dust bag.
You may insert its protrusion of any
side into the lower groove of the dust
stopper.
1
008932
3. Overlap the frame of dust stopper with
that of the dust bag.
014733
4. Place the dust stopper and the dust
bag together into the cleaner cavity in
the same direction of arrow on the
dust stopper. Insert them all the way
into the slots in the cleaner cavity.
1
014734
5. Place the entire cloth part of the dust
bag inside the tool itself.
1
014737
6. Close the front cover completely.
1
014735
Installing the paper pack
1. Unfold the entrance of the paper pack
before setting it on the dust stopper.
008928
1
2
008930
Use the dust stopper also when installing
dust pack. Be careful not to take the upper
side for the lower side by mistake because
they are different each other.
2. Insert the protrusion of the dust pack
into the groove in the dust stopper as
shown in the figure.
1
2
3
008931
3. There is no distinction between the
upper and lower sides of the dust pack.
1. Dust stopper
2. Dust pack
3. Groove
1. Upper side of
dust stopper
2. Lower side of
dust stopper
1. Front cover
1. Front cover
1. Cleaner cavity
1. Lower groove

8
You may insert its protrusion of any
side into the lower groove of the dust
stopper.
1
008932
4. Overlap the frame of dust stopper with
that of the dust pack.
008933
5. Place the dust stopper and the dust
pack together into the cleaner cavity in
the same direction of arrow on the
dust stopper. Insert them all the way
into the slots in the cleaner cavity.
1
014736
6. Place the entire container part of the
dust pack inside the tool itself.
1
014737
7. Close the front cover completely.
CAUTION:
• Install the dust stopper with the dust
bag or dust pack properly. Tool
operation without proper installation of
them, or using broken or ripped one, it
may allow dust to get into the motor.
This may result in motor failure.
• Do not fold the cardboard at its
opening when installing the paper pack.
• Never throw away the dust stopper
because it needs to be used repeatedly
whenever either the dust bag or the
dust pack is used.
• The paper pack for the cleaner is an
important component for maintaining
the tool performance. If you use the
other genuine paper pack, it may cause
smokes or ignition.
OPERATION
014743
To connect attachments, such as nozzle,
twist and insert them to ensure secure
connection during use. To disconnect
attachments, twist and remove them.
Cleaning (Suction)
Nozzle
1
014726
Attach the nozzle to clean off tables, desks,
furniture, etc. Nozzle slips on easily.
1. Nozzle
1. Front cover
1. Cleaner cavity
1. Lower groove
9
Nozzle + Extension wand (Straight pipe)
1
2
014727
The extension wand fits in between the
nozzle and the cleaner itself. This
arrangement is convenient for cleaning a
floor while standing erect.
Corner nozzle
1
014728
Fit on the corner nozzle for cleaning
corners and crevices of a car or furniture.
Corner nozzle +Extension wand
(Straight pipe)
1
2
014729
In tight quarters where the cleaner itself
cannot squeeze in, or in high places hard to
reach, use this arrangement.
MAINTENANCE
CAUTION:
• Always be sure that the tool is switched
off before attempting to perform
inspection or maintenance.
After use
015596
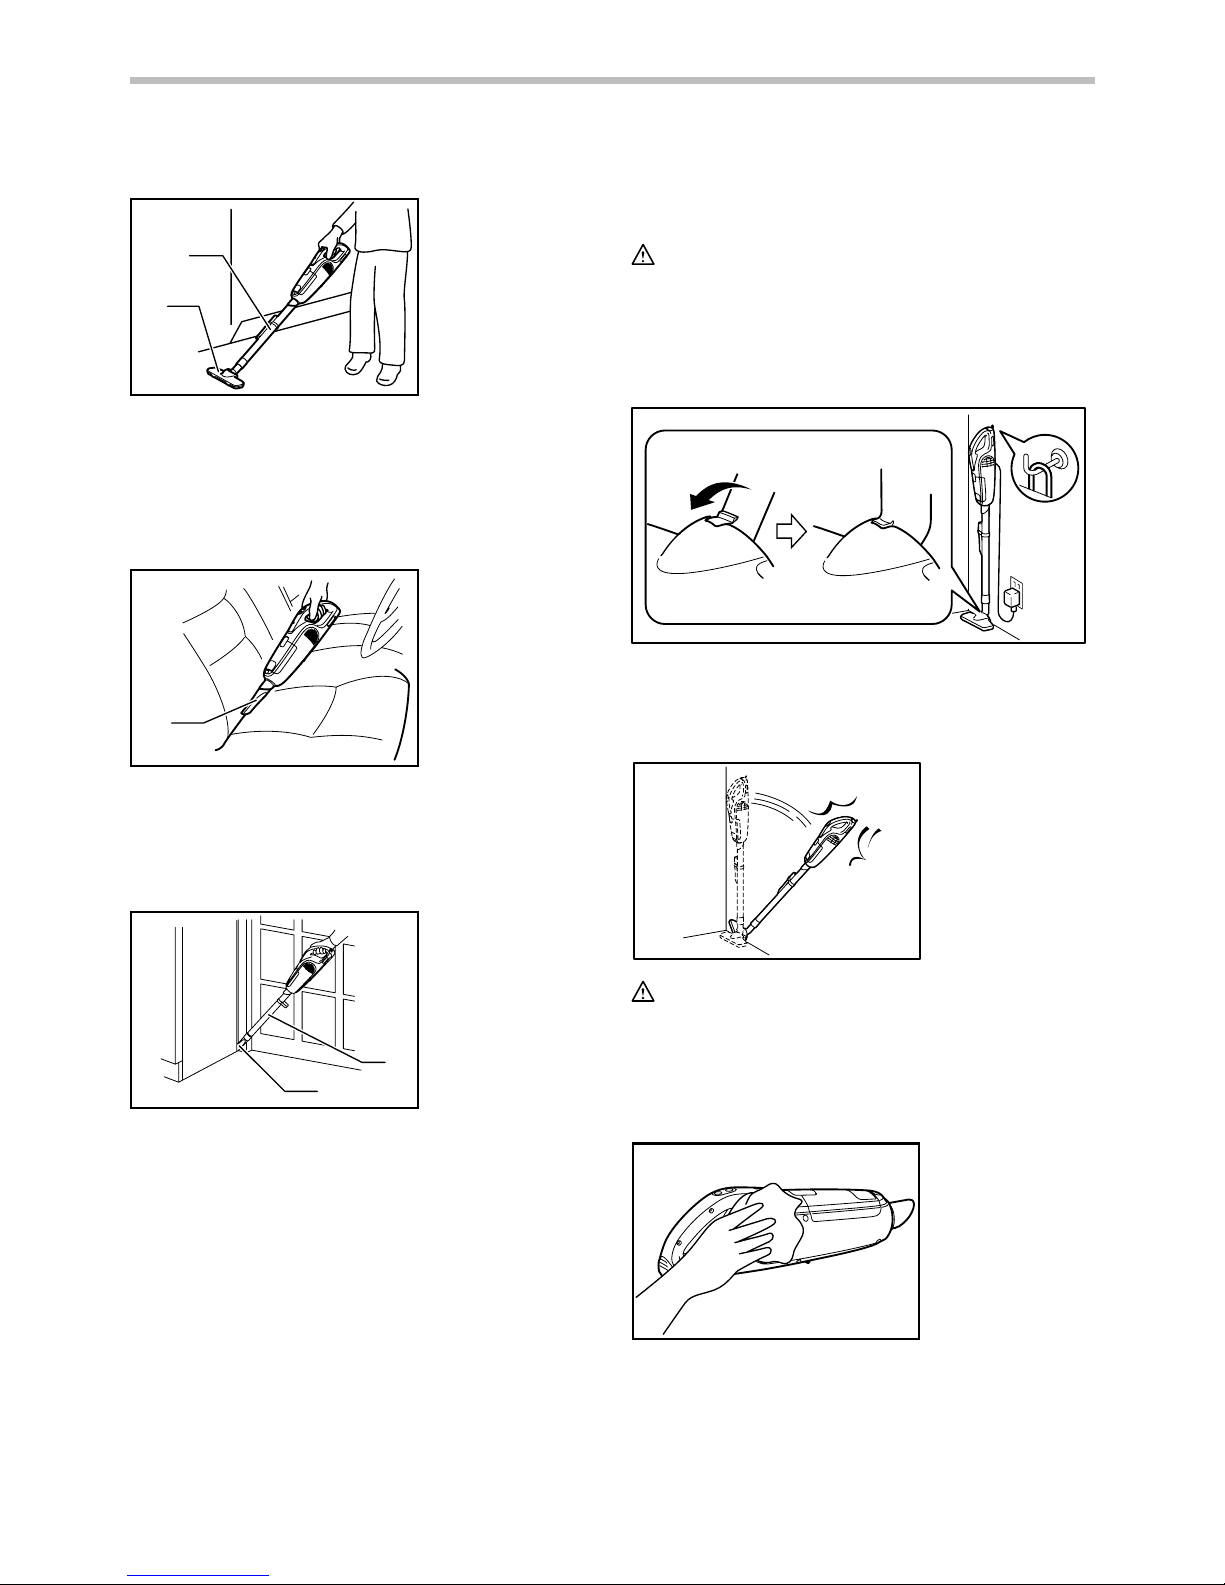
When storing or charging the cleaner, lock
the nozzle head, and hang it from a hook
available in the market.
015597
CAUTION:
• Putting the cleaner against the wall
without a hook may cause the cleaner
to fall down and be damaged.
Cleaning
014739
From time to time wipe off the outside
(cleaner body) of the cleaner using a cloth
dampened in soapy water.
1. Corner nozzle
2. Extension wand
1. Corner nozzle
1. Nozzle
2. Extension wand

10
Clean out also the suction opening, dust
bag/dust pack mounting area and the dust
stopper.
CAUTION:
• Never use gasoline, benzine, thinner,
alcohol or the like. Discoloration,
deformation or cracks may result.
008934
Wash the dust bag in soapy water when it
is clogged with dust and the cleaner power
becomes small. Dry it out thoroughly before
use. An insufficiently dried bag may cause
poor suction and shorten the service life of
the motor.
NOTE:
• Dust pack is a throw-away type.
When the sponge filter is clogged with dust,
remove it from the cleaner and then wipe it
off or wash in water.
Removing and installing the sponge
filter
1
014741
To remove the sponge filter, remove the
dust bag or dust pack and then pinch and
take it out.
1
2
014742
Press in the whole edge of the sponge filter
against the recessed wall inside the dust
bag/dust pack mounting area.
CAUTION:
• After cleaning sponge filter, be sure to
install it on the cleaner. If washed in
water, dry it up before installing. An
insufficiently dried sponge filter may
shorten the service life of the motor.
1. Sponge
2. Recessed wall
1. Sponge filter
11
TROUBLE SHOOTING
Before asking for repairs, conduct your own
inspection first. If you find a problem that is
not explained in the manual, do not attempt
to dismantle the tool. Instead, ask Makita
Authorized Service Centers, always using
Makita replacement parts for repairs.
Symptom
Weak suction
power
Not working
Area to be investigated
Is battery cartridge exhausted ?
Fixing method
Empty dust bag or paper pack.
Dust down or wash the dust
bag.
Replace paper pack.
Charge the battery.
Charge the battery.
Is dust bag or paper pack full of dust ?
Is battery cartridge exhausted ?
Is dust bag clogged ?
Is paper pack clogged ?
014744
NOTE:
• Do not attempt to repair cleaner by
yourself.
Disposing cleaner
A Li-ion battery is built into this cleaner.
Always remove it before disposing of the
cleaner.
Removing built-in battery
CAUTION:
•
Never remove the built-in battery from
the cleaner except when disposing of the
cleaner. The battery will be damaged or
a battery short-circuit could result.
• Do not touch the terminals with any
conductive material.
• Avoid storing battery unit in a container
with other metal objects such as nails,
coins, etc.
•
Do not expose battery unit to water or rain.
• Do not disassemble or alter battery unit.
• The cleaner must be removed from the
supply mains when removing the
battery.
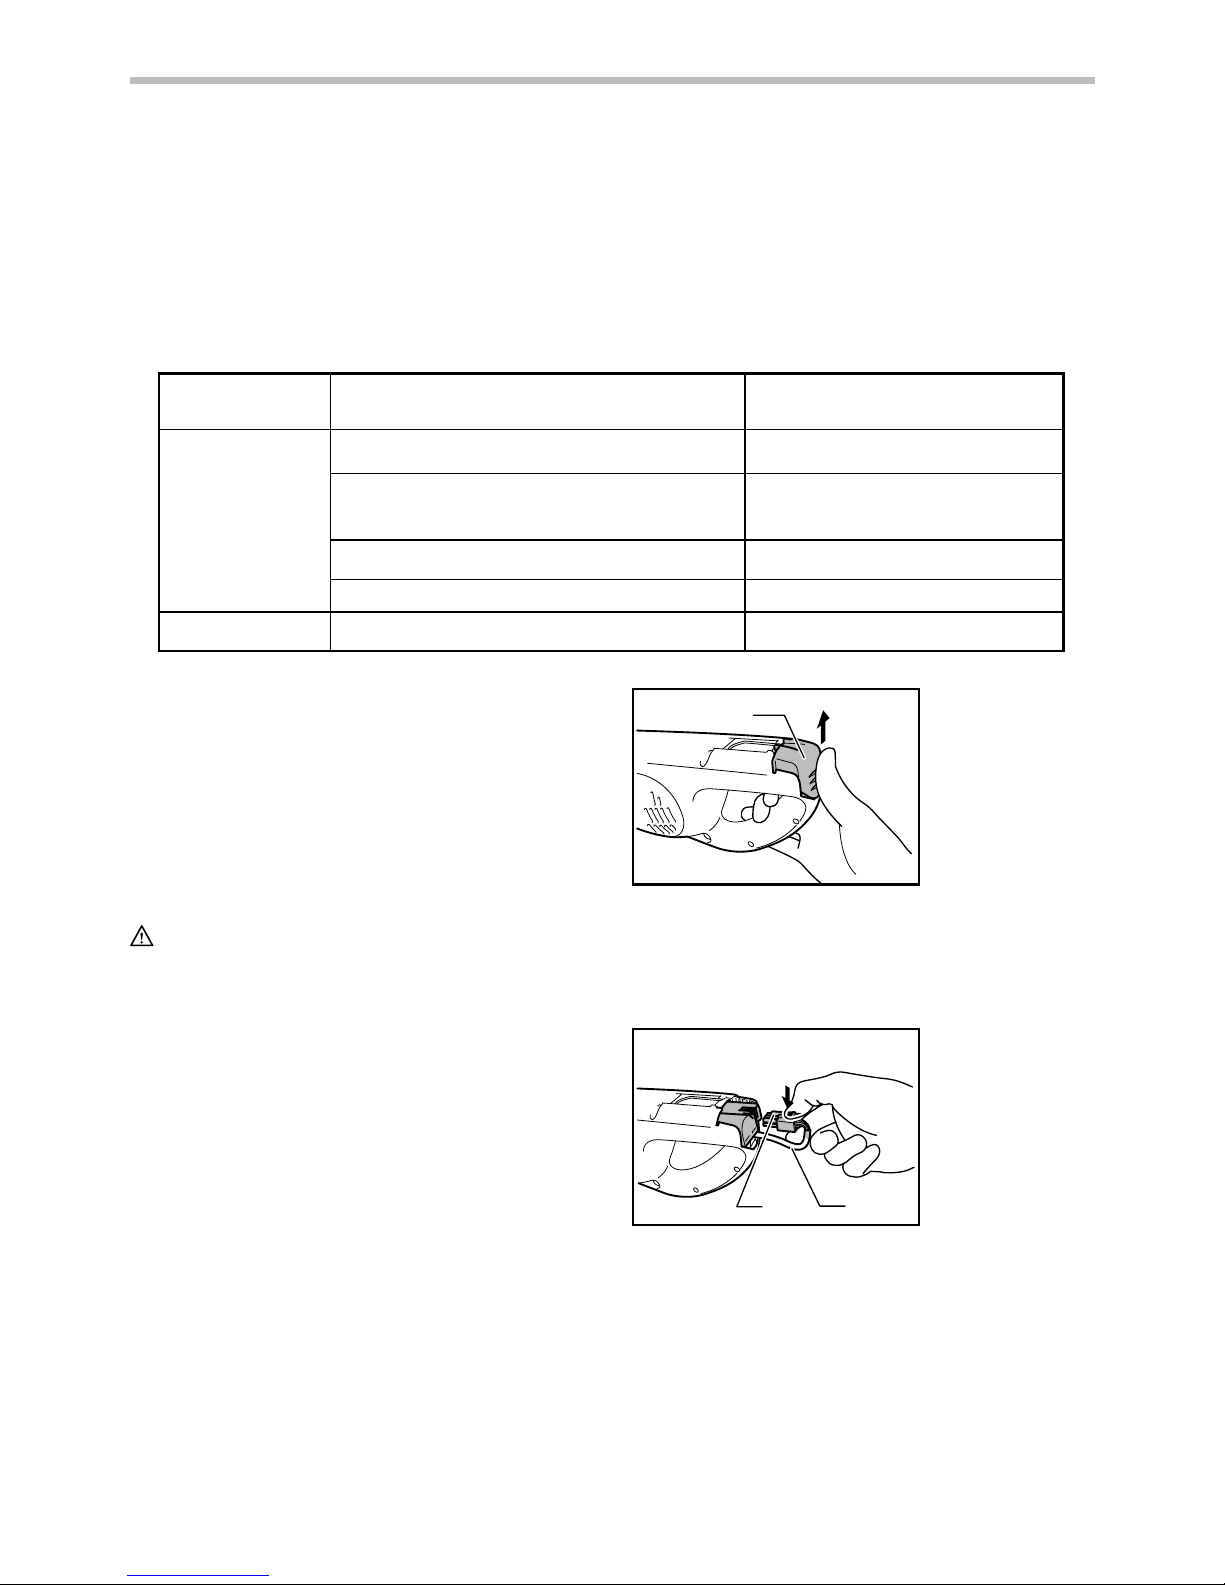
1. To remove the rear cover, push it in
the direction of the arrow.
1
014815
2.
Slide the built-in battery halfway.
Disconnect the lead wires from the
battery by pressing the connector in the
direction of arrow shown in the figure.
1
2
014816
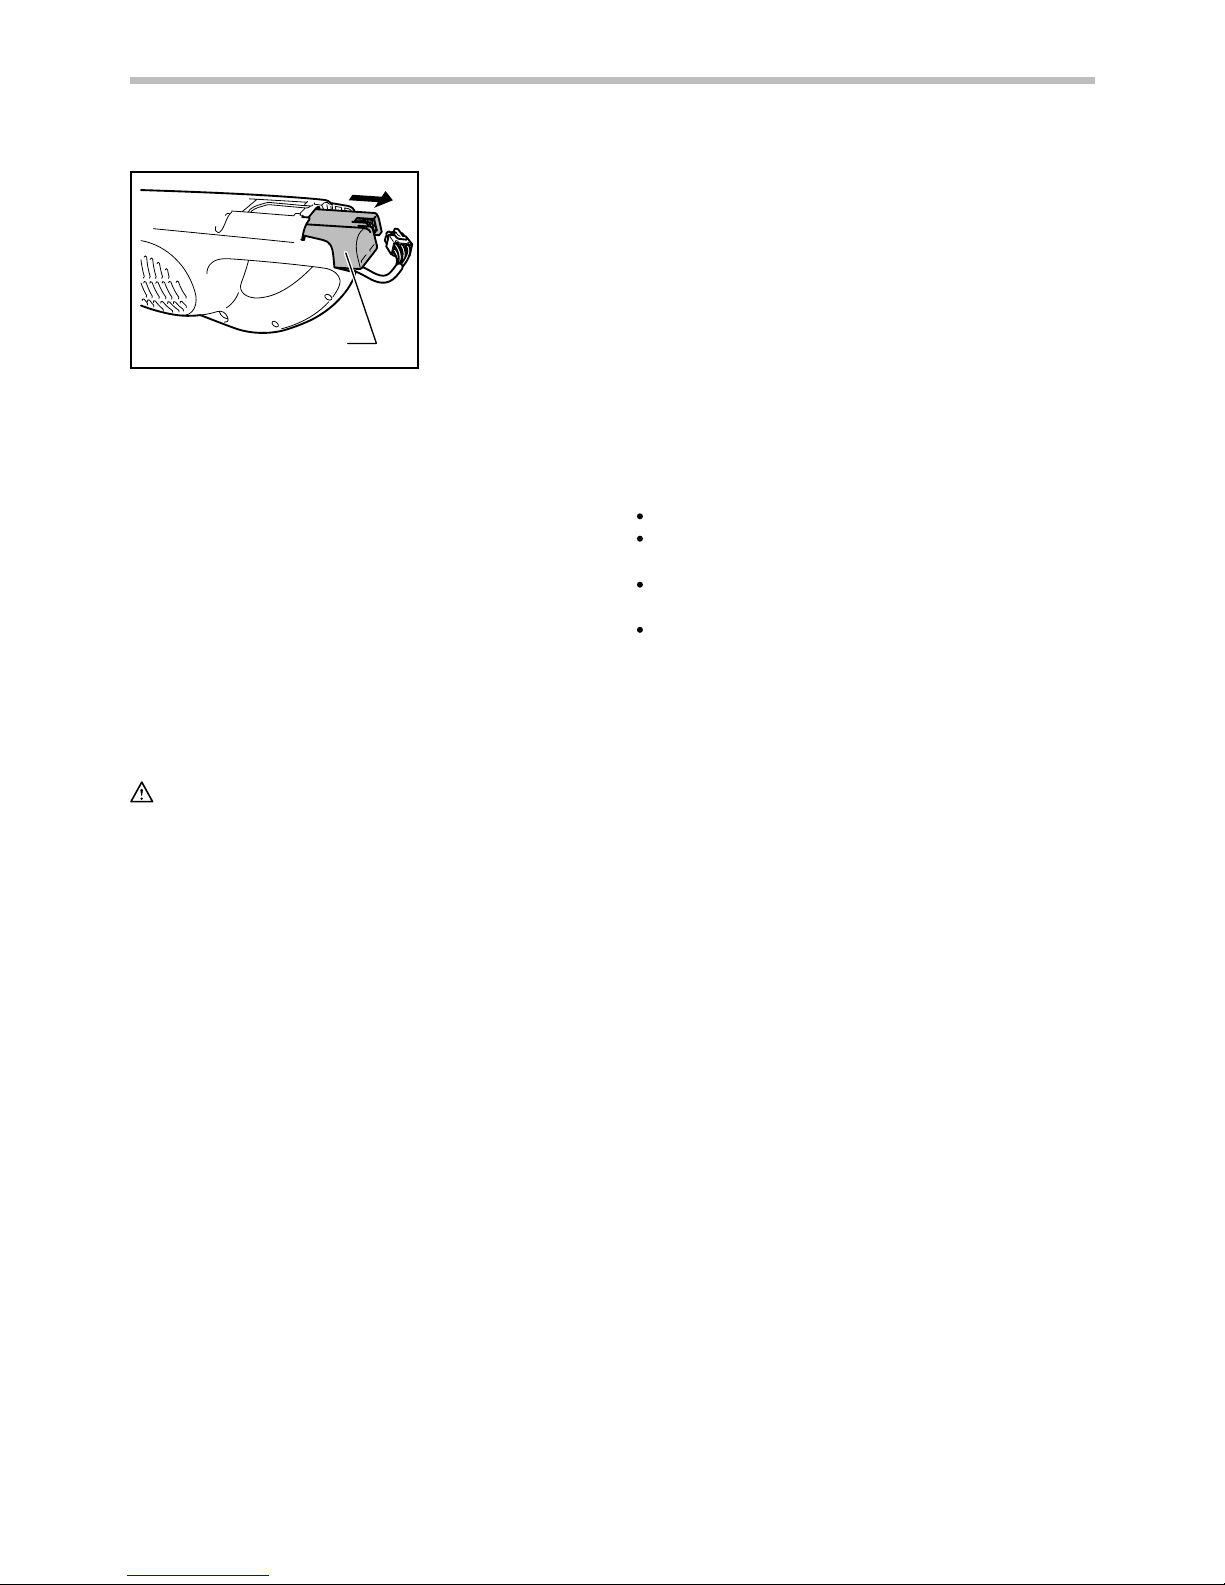
3. Then slide the battery unit completely.
1. Connector
2. Lead wires
1. Rear cover
12
1
014817
4. Put the removed battery unit in a
plastic bag so that it is not circuitshorted.
To maintain product SAFETY and
RELIABILITY, repairs, any other
maintenance or adjustment should be
performed by Makita Authorized or Factory
Service Centers, always using Makita
replacement parts.
OPTIONAL
ACCESSORIES
CAUTION:
•
These accessories or attachments are
recommended for use with your Makita
cleaner specified in this manual. The use of
any other accessories or attachments might
present a risk of injury to persons. Only use
accessory or attachment for its stated
purpose.
If you need any assistance for more details
regarding these accessories, ask your local
Makita Service Center.
• Shelf brush
• Flexible hose
NOTE:
• Some items in the list may be included
in the tool package as standard
accessories. They may differ from
country to country.
MAKITA LIMITED ONE YEAR WARRANTY
Warranty Policy
Every Makita tool is thoroughly inspected and tested
before leaving the factory. It is warranted to be free of
defects from workmanship and materials for the period
of ONE YEAR from the date of original purchase.
Should any trouble develop during this one year period,
return the COMPLETE tool, freight prepaid, to one of
Makita’s Factory or Authorized Service Centers. If
inspection shows the trouble is caused by defective
workmanship or material, Makita will repair (or at our
option, replace) without charge.
This Warranty does not apply where:
IN NO EVENT SHALL MAKITA BE LIABLE FOR ANY
INDIRECT, INCIDENTAL OR CONSEQUENTIAL
DAMAGES FROM THE SALE OR USE OF THE
PRODUCT. THIS DISCLAIMER APPLIES BOTH
DURING AND AFTER THE TERM OF THIS
WARRANTY.
MAKITA DISCLAIMS LIABILITY FOR ANY IMPLIED
WARRANTIES, INCLUDING IMPLIED WARRANTIES
OF "MERCHANTABILITY" AND "FITNESS FOR A
SPECIFIC PURPOSE," AFTER THE ONE YEAR TERM
OF THIS WARRANTY.
This Warranty gives you specific legal rights, and you
may also have other rights which vary from state to
state. Some states do not allow the exclusion or
limitation of incidental or consequential damages, so
the above limitation or exclusion may not apply to you.
Some states do not allow limitation on how long an
implied warranty lasts, so the above limitation may not
apply to you.
repairs have been made or attempted by others:
repairs are required because of normal wear and
tear:
the tool has been abused, misused or improperly
maintained:
alterations have been made to the tool.
EN0006-1
1. Battery unit
 Loading...