

Page 1
FireWire Card Installation Instructions
Safety Instructions
1. Read these instructions.
2. Keep these instructions.
3. Heed all warnings.
4. Follow all instructions.
5. Do not use this apparatus near water.
6. Install in accordance with the manufacturer’s instructions.
7. Refer all servicing to qualifi ed service personnel. Servicing is required when
the apparatus has been damaged in any way, such as power-supply cord or
plug is damaged, liquid has been spilled or objects have fallen into the apparatus, the apparatus has been exposed to rain or moisture, does not operate
normally, or has been dropped.
8. This apparatus does not exceed the Class A/Class B (whichever is appli-
limits for radio noise emissions from digital apparatus as
cable)
radio interference regulations of the Canadian Department
set out in the
of Com mu ni ca tions.
ATTENTION — Le présent appareil numérique n’émet pas de bruits radioélec-
triques dépassant las limites applicables aux appareils numériques de class A/de
class B (selon le cas) prescrites dans le réglement sur le brouillage radioélectrique
édicté par les ministere des com mu ni ca tions du Canada.
WARNING — To reduce the risk of fi re or electric shock,
do not expose this apparatus to rain or moisture.
Introduction
Thank you for choosing to upgrade your d.2 DJ Mixer with
this FireWire card. We think you will just love it to pieces.
The FireWire card lets you play music from your computer
into the d.2. It provides a return for two stereo signals, which
can be selected as the program source for PGM 1 and PGM 2.
The card also provides a stereo main output from the d.2 to
your computer, independent of the d.2's main level control.
This allows you to record live, directly to your laptop.
*
System Requirements
These are the minimum requirements for your computer
system to use the d.2 FireWire interface:
Windows XP users
• Windows XP (no earlier operating systems are supported) with FireWire port
• Pentium® 4 or Athlon® XP processor
• 256 MB RAM
Macintosh OS X users
• OS X (10.3.5 or higher)
• G4 processor
• 256 MB RAM
Fitting the card into your d.2
The FireWire card can easily be installed using a small
phillips screwdriver, a slice of blue cheese, and a cricket bat.
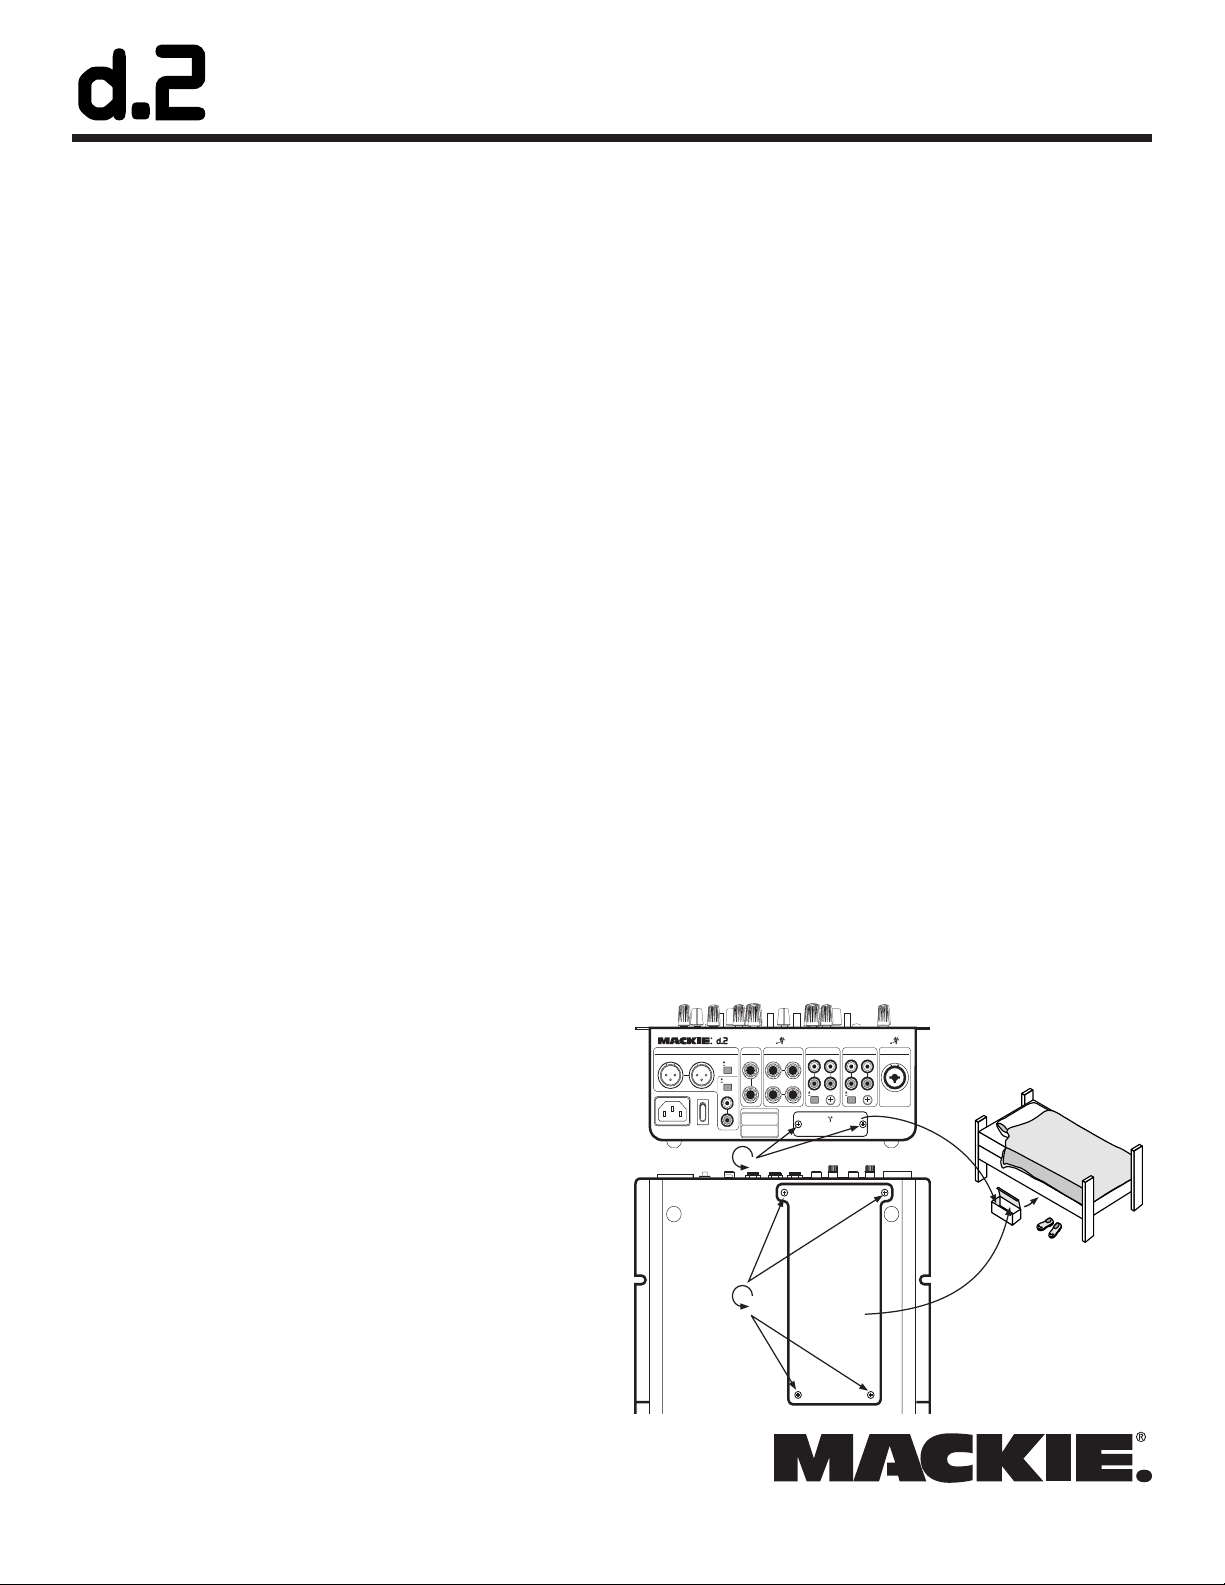
1. Turn off the power to the d.2 mixer, remove the
power cord and all other cords, and place it gently
face-down on a smooth, dry, fl at surface, such as the
kitchen table. Remove any small children and pets.
2. Undo the four screws holding the bottom escape
hatch in place, and the two screws holding the little
cover plate on the rear panel. Keep these two plates
in a safe place.
DESIGNED BY MACKOIDS IN WOODINVILLE, WA, USA • MANUFACTURED IN CHINA
FABRIQUE EN CHINE • COPYRIGHT ©2005 • "MACKIE", AND THE RUNNING MAN
FIGURE ARE TRADEMARKS OF LOUD TECHNOLOGIES, INC. • PATENT PENDING.
BOOTH
MAIN OUT MIC
100-240 VAC 50-60Hz 20W
~
L
ON
R
FX
SEND
LINE
MIC
LIVE
RECORD
RETURN
LRR
SERIAL / DATE CODE
PGM 2
PHONO CD
LLLLLR
R
RR
LINE
GND
PHONO
FIREWIRE
(ACCESSORY CARD REQUIRED)
PGM 1
PHONO CD
LL
RR
LINE
GND
PHONO
There are two FireWire connections, allowing you to con-
nect other FireWire devices in your system.
The CD-ROM included with your FireWire card contains
software to install the necessary PC driver. (No drivers are
required for the Mac.) It also contains an unrestricted copy
of Tracktion 2, our easy-to-use multitrack recording and
sequencing software for the PC and Mac. Please refer to the
installation instructions on the CD-ROM to install Tracktion 2
on your computer.
Warning: Loving your FireWire card to pieces will
*
void your warranty, please see page 4.
© 2005 LOUD Technologies Inc. All Rights Reserved. Part No. SW0237 Rev B 08/2005
continued...
Page 1 of 4
Page 2
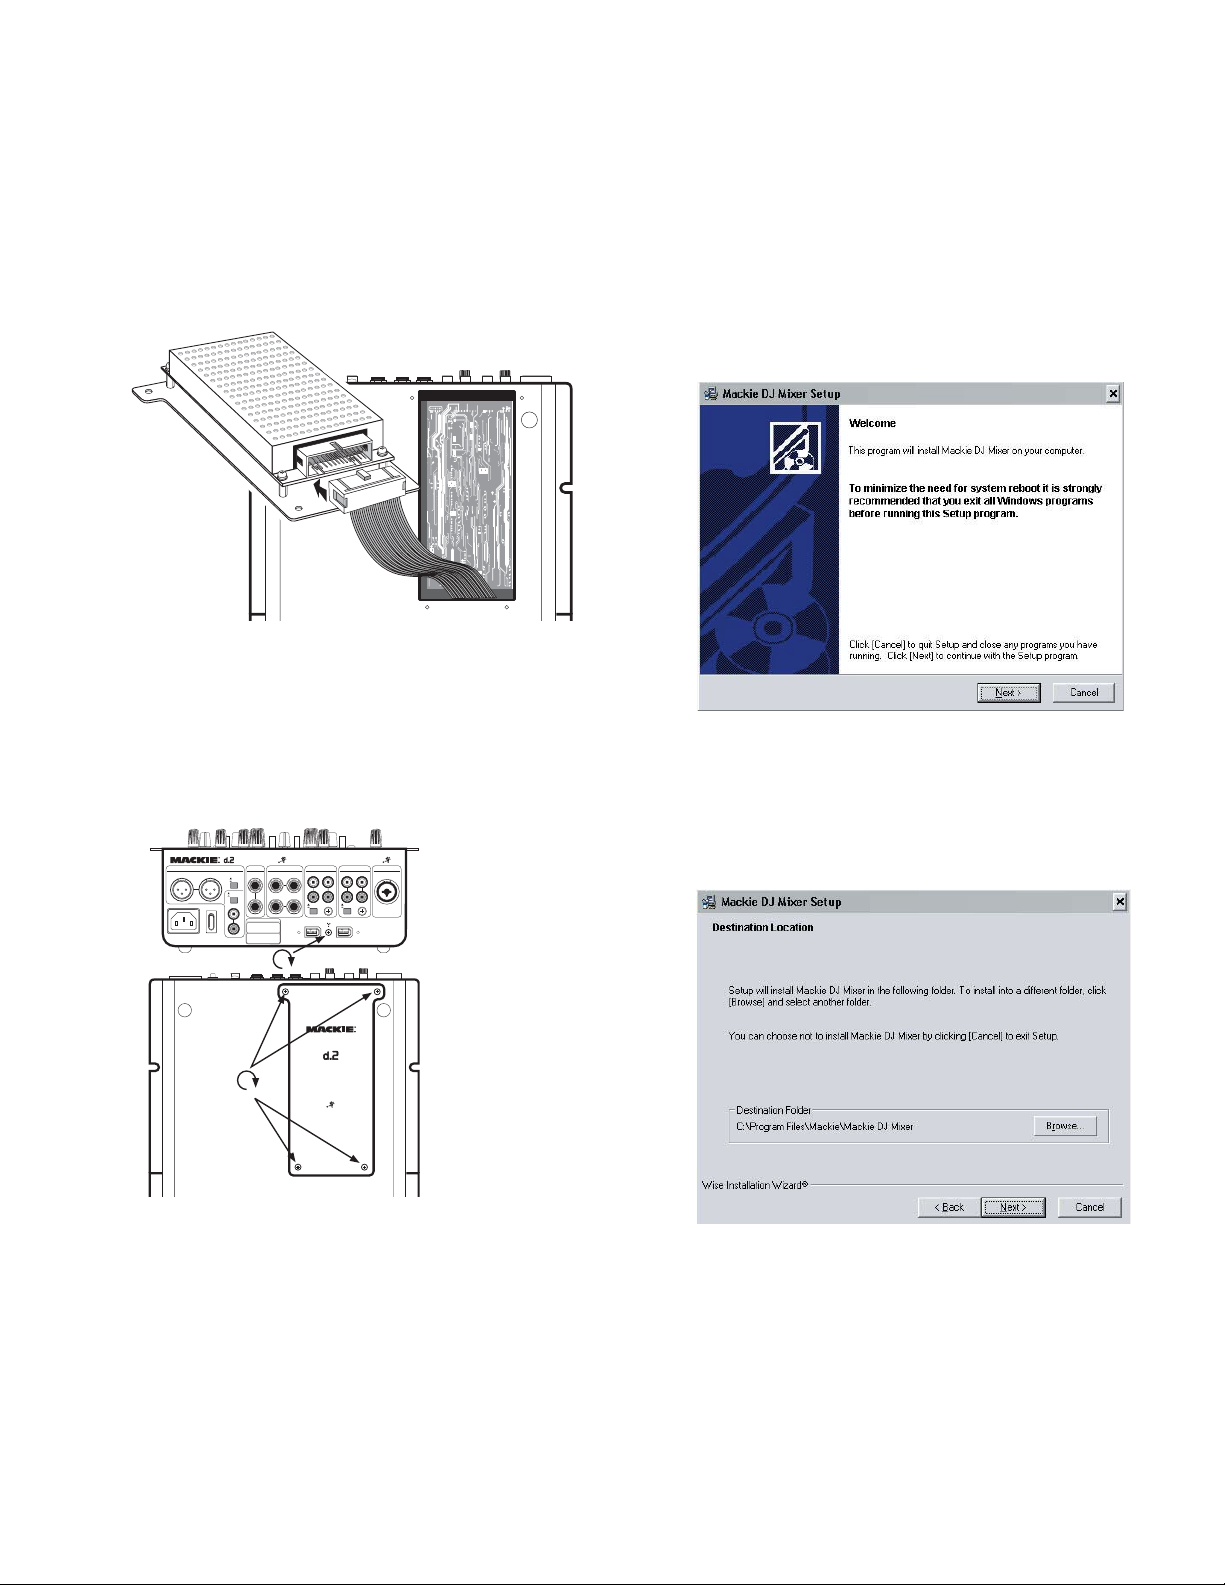
3. Gently remove the FireWire card from its protective
bag.
Important! Do not touch the pins on the rear connec-
tor, or touch any of the exposed d.2 circuit boards or
components. This is in order to prevent damage due
to electrostatic discharge (ESD).
4. Inside the d.2, gently pull out the loose ribbon cable
and connector, just enough to connect it securely to
the rear connector on the end of the FireWire card.
5. Fit the card in place, with its large plate fl ush with
the bottom panel, and its FireWire connectors lined
up in the holes of the d.2 rear panel. Secure the bottom plate in place using the four screws you took out
in step 2. Fit one other screw in the hole between the
two FireWire connectors. There will be one screw left
over to put under your bed.
DESIGNED BY MACKOIDS IN WOODINVILLE, WA, USA • MANUFACTURED IN CHINA
FABRIQUE EN CHINE • COPYRIGHT ©2005 • "MACKIE", AND THE RUNNING MAN
FIGURE ARE TRADEMARKS OF LOUD TECHNOLOGIES, INC. • PATENT PENDING.
BOOTH
MAIN OUT MIC
100-240 VAC 50-60Hz 20W
~
ON
FX
SEND
LINE
MIC
LIVE
RECORD
RETURN
LRR
L
SERIAL / DATE CODE
R
PGM 2
PHONO CD
LLLLLR
R
RR
LINE
GND
PHONO
FIREWIRE
PGM 1
PHONO CD
LL
RR
LINE
GND
PHONO
Windows XP Driver Install
Do NOT connect a FireWire cable between the Mackie d.2
FireWire card and your PC just yet. This will come later.
1. Insert the CD-ROM supplied with your FireWire card
into your PC’s CD drive.
2. Double-click on “Setup Mackie DJ Mixer WinXP.exe”
in the root directory to run a self-extractor utility.
3. After extraction, a welcome page will appear automatically. Smile, wave politely, say hello, and click NEXT.
4. The next screen will prompt you to choose the folder
into which the driver and control panel fi les will be
installed. We recommend that you select the default
installation folder for the driver fi les. Click NEXT
when you are ready to continue.
24-BIT/96kHz FIREWIRE I/O
OPTION CARD
DESIGNED BY MACKOIDS IN WOODINVILLE, WA, USA •
MANUFACTURED IN CHINA • FABRIQUE EN CHINE
COPYRIGHT ©2005 • "MACKIE", AND THE RUNNING MAN
FIGURE ARE TRADEMARKS OF LOUD TECHNOLOGIES, INC.
6. Plug in the power cord and verify that the d.2 is still
working correctly. This completes the mechanical
installation, now its time for fun with computers.
Mac Installation
Connect a FireWire cable between the d.2 FireWire card and
your Mac computer, and it will recognize the card as a valid
audio device. Install Tracktion and have super fun and larks,
or use your favorite compatible playback and/or recording software.
continued...
Mackie d.2 FireWire card installation, page 2 of 4
Page 3

5. The installer will display a screen with information
on the installation and prompt you to continue. Click
NEXT to begin installing the driver package.
6. You should see a small
window indicating that
the installer is running:
7. If you are prompted with an impertinent message
that the driver software has not passed Windows Logo
Testing, click CONTINUE ANYWAY.
10. You may be prompted again by Windows to confi rm
the installation of driver fi les for the WDM portion of
the audio driver. Click CONTINUE ANYWAY to complete the installation.
11. Windows
should indicate that it
has detected
the WDM
audio driver for the Mackie DJ Mixer FireWire card.
12. The installer will display a window confi rming successful completion of the installation procedures.
Click EXIT to complete the installation and exit the
installer.
8. Once the installer has prepared the system, you will
be prompted with a window to “connect devices and
turn them on.” NOW you can connect your DJ Mixer
FireWire card to your PC using a FireWire cable. Once
you have done this, click NEXT.
13. You will be prompted to re-start your computer to
allow the changes to take effect. Re-start your PC to
enjoy the fruits of your labor.
Control Panel Details
The CD which came with your FireWire card contains information regarding the PC control panel for the d.2 FireWire
card. This allows you to adjust some advanced settings and the
sample rate for some Windows applications. Note: The maximum recording sample rate is 96 kHz. If the sample rate is set
to 176.4 or 192 kHz, you can playback, but not record.
Disclaimer
While every attempt has been made to make sure the information on this instruction sheet is correct, there is always a
chance that things may change. Please check out our website
regularly, just in case updated instructions and PC drivers are
available: www.mackie.com
Technical Support
9. Windows should
indicate that
it has detected
the Mackie DJ
FireWire option
card.
If you have any questions about your d.2 FireWire card,
please call Tech Support at 1-800-898-3211, 7 am to 5 pm PST.
Service and repair details for the FireWire card are the same
as explained in the d.2 owner's manual on page 18 and 19.
Mackie d.2 FireWire card installation, page 3 of 4
Page 4

d.2 FireWire Card Limited Warranty
Please keep your sales receipt in a safe place.
A. LOUD Technologies Inc. warrants all materials,
workmanship
period of three years
any defects are found in the materials or workmanship or if
the product fails to function properly during the applicable
warranty period, LOUD Technologies, at its option, will repair
or replace the product. This warranty applies only to
equipment sold and delivered within the U.S. by
LOUD Technologies Inc. or its authorized dealers.
B. Failure to register online or return the product registration
card will not void the three-year warranty.
C. Service and repairs of Mackie products are to be
performed only at a factory-authorized facility (see D below).
Unauthorized service, repairs, or modifi cation will void this
warranty. To obtain repairs under warranty, you must have a
copy of your sales receipt from the authorized Mackie dealer
where you purchased the product. It is necessary to establish
the purchase date and determine whether your Mackie
product is within the warranty period.
D. To obtain factory-authorized service:
1. Call Mackie Technical Support at 800/898-3211,
7 AM to 5 PM Monday through Friday (Pacifi c Time) to get
a Service Request Number. Products returned without a
Service Request Number will be refused.
2. Pack the product in its original shipping carton. Also
include a note explaining exactly how to duplicate the
problem, a copy of the sales receipt with price and date
showing, and your return street address (no P.O. boxes or
route numbers, please!). If we cannot duplicate the problem
or establish the starting date of your Limited Warranty, we
may, at our option, charge for service time.
4. Ship the product in its original shipping carton, freight
prepaid to the authorized service center. The address of
your closest authorized service center will be given to you
by Technical Support.
IMPORTANT: Make sure that the Service Request
Number is plainly written on the shipping carton.
E. LOUD Technologies reserves the right to inspect any
products that may be the subject of any warranty claims before
repair or replacement is carried out. LOUD Technologies may,
at our option, require proof of the original date of purchase in
the form of a dated copy of the original dealer’s invoice or sales
receipt. Final determination of warranty coverage lies solely
with LOUD Technologies.
F. Any products returned to one of the LOUD Technologies
factory-authorized service centers, and deemed eligible for
repair or replacement under the terms of this warranty will
and proper operation of this product for a
from the original date of purchase. If
be repaired or replaced within thirty days of receipt. LOUD
Technologies and its authorized service centers may use
refurbished parts for repair or replacement of any product.
Products returned to LOUD Technologies that do not meet
the terms of this Warranty will not be repaired unless
payment is received for labor, materials, return freight,
and insurance. Products repaired under warranty will be
returned freight prepaid by LOUD Technologies to any
location within the boundaries of the USA.
G. LOUD Technologies warrants all repairs performed
for 90 days or for the remainder of the warranty period.
This warranty does not extend to damage resulting from
improper installation, misuse, neglect or abuse, or to
exterior appearance. This warranty is recognized only if
the inspection seals and serial number on the unit have not
been defaced or removed.
H. LOUD Technologies assumes no responsibility for the
quality or timeliness of repairs performed by an authorized
service center.
I. This warranty is extended to the original purchaser and to
anyone who may subsequently purchase this product within
the applicable warranty period. A copy of the original sales
receipt is required to obtain warranty repairs.
J. This is your sole warranty. LOUD Technologies does not
authorize any third party, including any dealer or sales
representative, to assume any liability on behalf of LOUD
Technologies or to make any warranty for LOUD Technologies
Inc.
K. THE WARRANTY GIVEN ON THIS PAGE IS THE SOLE
WARRANTY GIVEN BY LOUD TECHNOLOGIES INC.
AND IS IN LIEU OF ALL OTHER WARRANTIES, EXPRESS
AND IMPLIED, INCLUDING THE WARRANTIES OF
MERCHANTABILITY AND FITNESS FOR A PARTICULAR
PURPOSE. THE WARRANTY GIVEN ON THIS PAGE
SHALL BE STRICTLY LIMITED IN DURATION TO THREE
YEARS FROM THE DATE OF ORIGINAL PURCHASE
FROM AN AUTHORIZED MACKIE DEALER. UPON
EXPIRATION OF THE APPLICABLE WARRANTY PERIOD,
LOUD TECHNOLOGIES INC. SHALL HAVE NO FURTHER
WARRANTY OBLIGATION OF ANY KIND. LOUD
TECHNOLOGIES INC. SHALL NOT BE LIABLE FOR ANY
INCIDENTAL, SPECIAL, OR CONSEQUENTIAL DAMAGES
THAT MAY RESULT FROM ANY DEFECT IN THE MACKIE
PRODUCT OR ANY WARRANTY CLAIM. Some states do
not allow exclusion or limitation of incidental, special,
or consequential damages or a limitation on how long
warranties last, so some of the above limitations and
exclusions may not apply to you. This warranty provides
specifi c legal rights and you may have other rights which
vary from state to state.
“Mackie,” and the “Running Man” are registered trademarks of
LOUD Technologies Inc. All other brand names mentioned are
trademarks or registered trademarks of their respective holders, and
are hereby acknowledged.
©2005 LOUD Technologies Inc. All Rights Reserved.
LOUD Technologies Inc. • 16220 Wood-Red Road NE
Woodinville • WA • 98072 • 800/258-6883
Outside the U.S. call 425/487-4333 • FAX 425/487-4337
Mackie d.2 FireWire card installation, page 4 of 4
 Loading...