

Page 1

Page 2
DL806 and DL1608 Owner’s Manual
Important Safety Instructions
1. Read these instructions.
2.
Keep these instructions.
3.
Heed all warnings.
4.
Follow all instructions.
5.
Do not use this apparatus near water.
6.
Clean only with a dry cloth.
7.
Do not block any ventilation openings. Install in accordance with the manufacturer’s
instructions.
8.
Do not install near any heat sources such as radiators, heat registers, stoves, or other
apparatus (including amplifiers) that produce heat.
9.
Do not defeat the safety purpose of the polarized or grounding-type plug. A polarized
plug has two blades with one wider than the other. A grounding-type plug has two
blades and a third grounding prong. The wide blade or the third prong are provided for
your safety. If the provided plug does not fit into your outlet, consult an electrician for
replacement of the obsolete outlet.
10.
Protect the power cord from being walked on or pinched particularly at plugs, convenience
receptacles, and the point where they exit from the apparatus.
11.
Only use attachments/accessories specified by the manufacturer.
12.
Use only with a cart, stand, tripod, bracket, or table specified
by the manufacturer, or sold with the apparatus. When a cart
is used, use caution when moving the cart/apparatus combination to avoid injury from tip-over.
13.
Unplug this apparatus during lightning storms or when unused
for long periods of time.
14.
Refer all servicing to qualified service personnel. Servicing is
required when the apparatus has been damaged in any way, such as power-supply cord
or plug is damaged, liquid has been spilled or objects have fallen into the apparatus, the
apparatus has been exposed to rain or moisture, does not operate normally, or has been
dropped.
15.
This apparatus shall not be exposed to dripping or splashing, and no object filled with
liquids, such as vases or beer glasses, shall be placed on the apparatus.
CAUTION
RISK OF ELECTRIC SHOCK! DO NOT OPEN!
CAUTION: TO REDUCE THE RISK OF ELECTRIC SHOCK DO
NOT REMOVE COVER (OR BACK). NO USER-SERVICEABLE
PARTS INSIDE. REFER SERVICING TO QUALIFIED PERSONNEL.
The lightning flash with arrowhead symbol within an
equilateral triangle is intended to alert the user to the
prescence of uninsulated “dangerous voltage” within the
product’s enclosure, that may be of significant magnitude
to constitute a risk of electric shock to persons.
The exclamation point within an equilateral triangle is
intended to alert the user of the prescence of important
operating and maintaining (servicing) instructions in the
literature accompanying the appliance.
Laite on liitettävä suojakoskettimilla varustettuun pistorasiaan.
Apparatet må tilkoples jordet stikkontakt.
Apparaten skall anslutas till jordat uttag.
PORTABLE CART
WARNING
16.
Do not overload wall outlets and extension cords as this can result in a risk of fire or
electric shock.
17.
The MAINS plug or an appliance coupler is used as the disconnect device, so the disconnect device shall remain readily operable.
18. NOTE: This equipment has been tested and found to comply with the limits for a Class
B digital device, pursuant to part 15 of the FCC Rules. These limits are designed to
provide reasonable protection against harmful interference in a residential installation.
This equipment generates, uses, and can radiate radio frequency energy and, if not
installed and used in accordance with the instructions, may cause harmful interference
to radio communications. However, there is no guarantee that interference will not
occur in a particular installation.
If this equipment does cause harmful interference to radio or television reception,
which can be determined by turning the equipment off and on, the user is encouraged
to try to correct the interference by one or more of the following measures:
• Reorient or relocate the receiving antenna.
• Increase the separation between the equipment and the receiver.
• Connect the equipment into an outlet on a circuit different from that to which the
receiver is connected.
• Consult the dealer or an experienced radio/TV technician for help.
CAUTION: Changes or modifications to this device not expressly approved by LOUD
Technologies Inc. could void the user's authority to operate the equipment under FCC
rules.
19. This apparatus does not exceed the Class A/Class B (whichever is applicable)
for radio noise emissions from digital apparatus as
regulations of the Canadian Department
ATTENTION
20.
According to OSHA, any exposure in excess of these permissible limits could result in
—
sant las limites applicables aux appareils numériques de class A/de class B (selon le cas)
prescrites dans le réglement sur le brouillage radioélectrique édicté par les ministere des
communications du Canada.
Le présent appareil numérique n’émet pas de bruits radioélectriques dépas-
Exposure to extremely high noise levels may cause permanent hearing loss. Individuals
vary considerably in susceptibility to noise-induced hearing loss, but nearly everyone will
lose some hearing if exposed to sufficiently intense noise for a period of time. The U.S.
Government’s Occupational Safety and Health Administration (OSHA) has specified the
permissible noise level exposures shown in the following chart.
some hearing loss. To ensure against potentially dangerous exposure to high sound
pressure levels, it is recommended that all persons exposed to equipment capable of
producing high sound pressure levels use hearing protectors while the equipment is in
operation. Ear plugs or protectors in the ear canals or over the ears must be worn when
operating the equipment in order to prevent permanent hearing loss if exposure is in
excess of the limits set forth here:
Duration, per
day in hours
8 90 Duo in small club
6 92
4 95 Subway Train
3 97
2 100 Very loud classical music
1.5 102
1 105 Ben screaming at Troy about deadlines
0.5 110
0.25 or less 115 Loudest parts at a rock concert
Sound Level dBA,
Slow Response
of Communications.
set out in the radio interference
Typical Example
limits
WARNING — To reduce the risk of fire or electric shock,
do not expose this apparatus to rain or moisture.
Correct Disposal of this product: This symbol indicates that this product should not be disposed of with your household waste, according to the WEEE Directive
(2012/19/EU) and your national law. This product should be handed over to an authorized collection site for recycling waste electrical and electronic equipment (EEE). Improper handling
of this type of waste could have a possible negative impact on the environment and human health due to potentially hazardous substances that are generally associated with EEE. At the
same time, your cooperation in the correct disposal of this product will contribute to the effective usage of natural resources. For more information about where you can drop off your waste
equipment for recycling, please contact your local city office, waste authority, or your household waste disposal service.
2
Page 3

DL806 and DL1608 Owner’s Manual
Table of Contents
Important Safety Instructions ...................................................................................................... 2
Table Of Contents .......................................................................................................................... 3
Chapter 1 : Welcome ...................................................................................................................... 4
Chapter 2 : Mixer Hardware – DL Series : Front Panel ................................................................. 5
Introduction ................................................................................................................................................. 5
iPad Dock Connector ................................................................................................................................... 5
iPad Tray and Tray Inserts ........................................................................................................................... 6
PadLock™ .................................................................................................................................................... 10
Front Panel Introduction........................................................................................................................... 11
Gain Knobs ................................................................................................................................................. 11
Sig / OL LEDs .............................................................................................................................................. 11
Phones Output Jack................................................................................................................................... 12
Phones Knob .............................................................................................................................................. 12
Chapter 3 : Mixer Hardware – DL Series : Rear Panel ................................................................ 13
Rear Panel Introduction ............................................................................................................................ 13
Power Connector ....................................................................................................................................... 13
Power Switch / Power LED ......................................................................................................................... 14
Phantom Power Switch ............................................................................................................................. 14
Phantom Power LED .................................................................................................................................. 15
XLR and 1/4” Inputs ................................................................................................................................... 15
L/R Main Outs ............................................................................................................................................. 16
Aux Sends ................................................................................................................................................... 16
Kensington Lock ........................................................................................................................................ 17
Network Connector ................................................................................................................................... 17
Force Update Button ................................................................................................................................. 18
Appendix A : Hookup Diagrams ................................................................................................. 19
Appendix B : Technical Information ........................................................................................... 25
Specications ............................................................................................................................................. 25
Dimensions ................................................................................................................................................ 29
Appendix C : Service Information .............................................................................................. 35
Appendix D : Glossary Of Terms ................................................................................................. 37
Warranty Statement / GPL Statement ........................................................................................ 45
3
Page 4
DL806 and DL1608 Owner’s Manual
Chapter 1 : Welcome
Hello everyone! This is the DL806 and DL1608 Owner’s Manual...we hope you like it!
Instead of one massive document containing detailed information about the hardware and software,
we have divided them into separate manuals. Simply decide if you need assistance with the hardware
or software and dive on in. The water here is warm and crystal clear.
The following pages describe the hardware side of things and should remain relatively unchanged
throughout the life of your product. The software, though, is another story. The Master Fader app is
always being updated...even right now this very minute! This means frequent updates to the Reference
Guide, rmware and more. With each major release comes an updated Reference Guide.
So there you have it. Again, we hope you like it. If you have any questions or comments about this Owner’s
Manual, please contact us at: www.mackie.com/support
About This Guide
This guide is designed to be accessible, with subsections as complete as practical to minimize having to
electronically leaf back and forth looking for the whole story. This guide provides the following resources:
• A general overview of the DL806 and DL1608’s facilities and features.
• Dissection-by-dissection description of each input and output.
• Hookup diagrams depicting some of the more common setups.
As the saying goes, “a picture tells a 1000 words”. With that thought in mind, we added quite
a few illustrations, screen shots and other images throughout to accompany the text.
This icon marks information that is critically important or unique! For your own good, read
and remember them...it is a good idea to pay special attention to these areas in the Owner’s
Manual marked with the “VERY IMPORTANT” hand icon.
There’s an illustration of a microscope, so, of course, you’re going to get more detailed
information when you see this little guy. There are explanations of features and practical
tips listed here.
It’s a good idea to pay attention to text displayed next to a note icon, as this icon draws
attention to certain features and functions relating to the usage of the mixer.
This seems like as good a place as any to have our rst note together (and I will cherish
this moment forever)! Whether you have a DL806 or a DL1608 mixer, this is THE place
to be! This Owner’s Manual covers the hardware of both mixers. The dierences between
the two are noted throughout. If not specically noted, operation is the same for both mixers.
4
Page 5
DL806 and DL1608 Owner’s Manual
Chapter 2 : Mixer Hardware – DL Series : Front Panel
Introduction
We’re going to start things o with a look at the front panel of the mixer: its features, how and where
to make connections and signal ow. Let’s kick o our front panel hardware discussion with the iPad
dock connector.
iPad Dock Connector
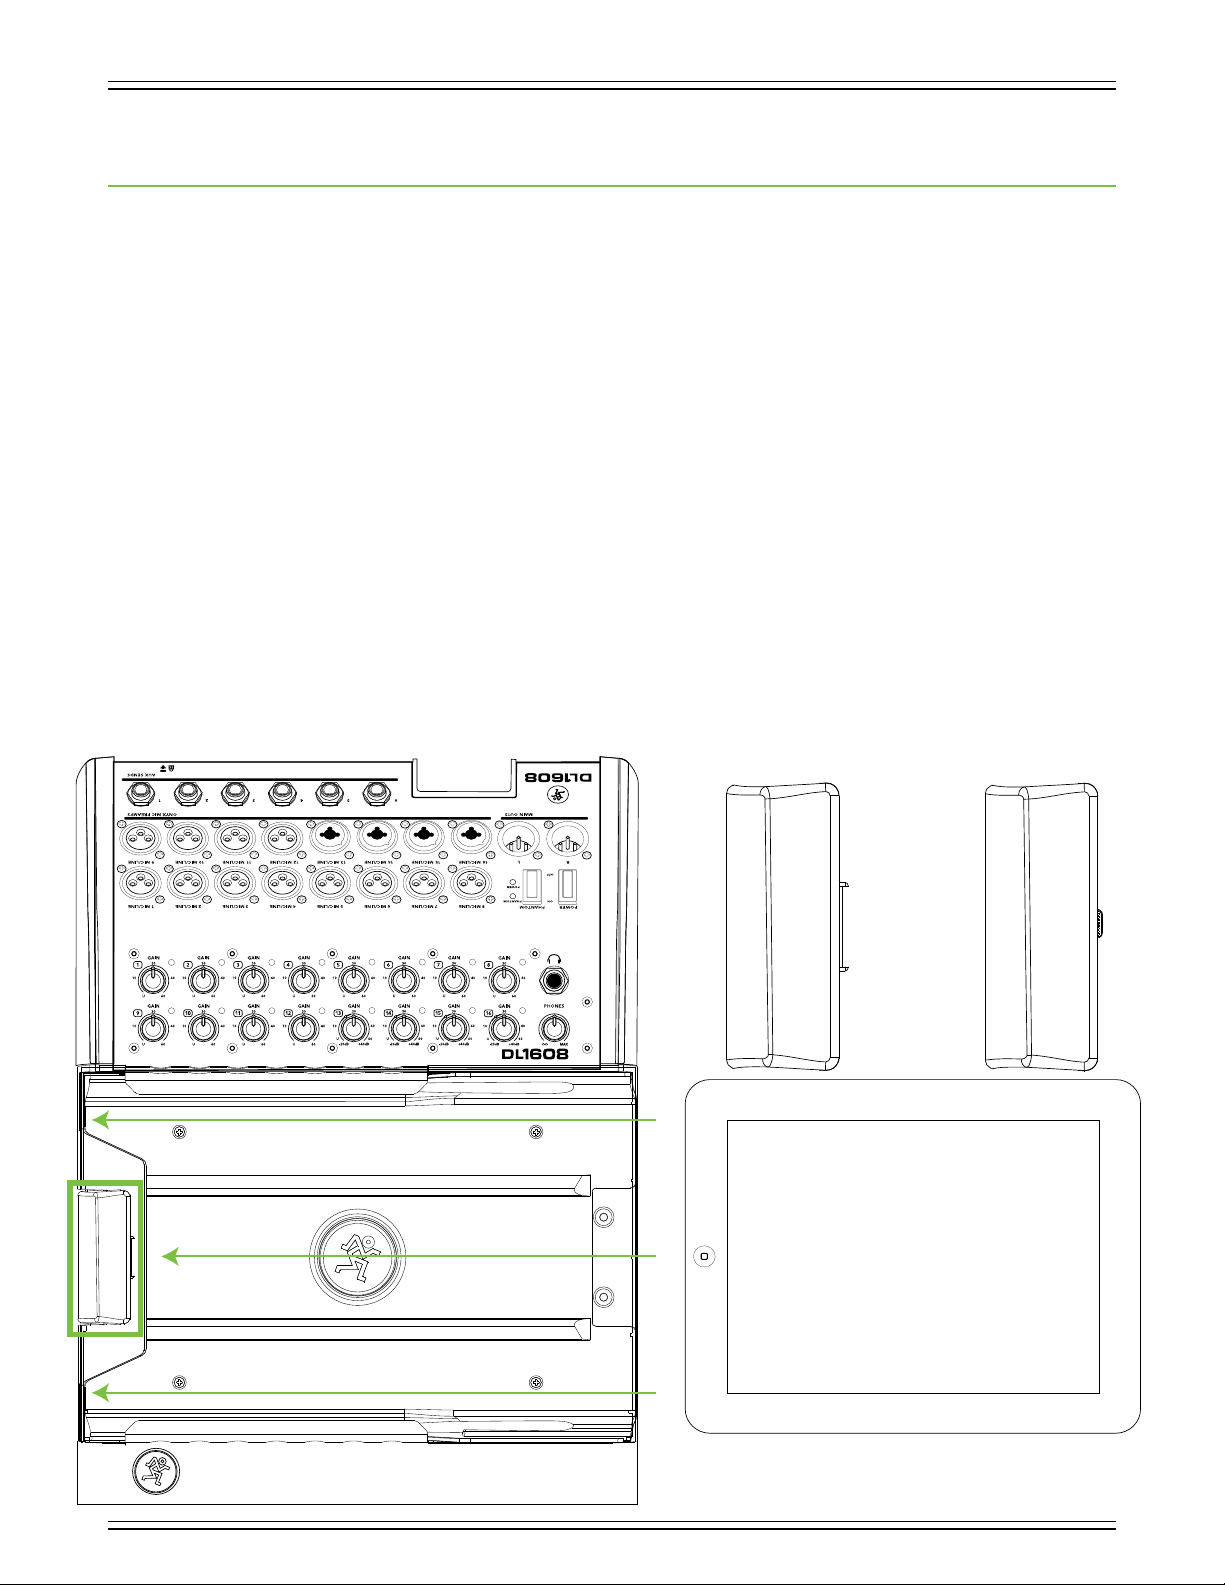
On the far left of the mixer (outlined by the vertical green rectangle below) is the iPad dock connector.
DL series mixers with Lightning dock support wired control from iPad (4th generation), iPad mini,
iPad mini 2, iPad mini 3 and iPad mini 4 (requires optional iPad mini tray accessory) and iPad Air
and iPad Air 2 (requires optional iPad Air tray accessory). DL series mixers with 30-pin dock support
wired control from iPad 2 and iPad (3rd generation).
If using an iPad 2, iPad (3rd generation) or iPad (4th generation), slide the iPad right to left, face up, home
button on the left until it mates with the iPad dock connector. If using a mini iPad or iPad Air, the tray insert
will need to be removed rst. See the next three pages which explain the iPad tray and tray inserts.
This connection serves multiple purposes. For one, recording and playback are possible when an iPad
is connected to the mixer. [Recording and playback are detailed in the Master Fader Reference Guide].
For another, as long as the mixer is plugged in and turned on, the iPad will charge. And most importantly,
Master Fader works sans wireless router when docked. Plus, it just looks cool when the two are married
together, connected as one. Perfection. Bliss. Do it and you’ll see what we mean.
30-pin Dock Connector Lightning Dock Connector
5
Page 6
DL806 and DL1608 Owner’s Manual
iPad Tray and Tray Inserts
The largest area on the mixer is the iPad tray with the dock to its left. The iPad tray is a part of the DL Series
mixer and cannot be removed. The iPad slides into the tray and mates with the dock connector on the mixer.
One of the really cool things about these mixers is that it seamlessly transitions from wired to wireless
operation. Therefore, the tray is highly-durable to withstand repetitive insertion and removal of an iPad.
It does this by using a tray and insert design.
It needs to not only accommodate the current iPad designs, but also be ready for future variations.
Tray inserts are added to t the iPad 2, iPad (3rd generation), iPad (4th generation), iPad mini, iPad mini 2,
iPad mini 3, iPad mini 4, iPad Air and iPad Air 2. The amazing t is achieved by utilizing two center rails
and curved supports on the sides. There are also two guides above the iPad creating the perfect alignment
needed for docking.
The result is that all current iPad versions are supported. Additionally, it is ready for any new iPad design
with just the addition of a new tray insert. Having said that, we can’t predict the future; if we could
we would all be retired zillionaires, traveling the world over. We do our best to plan for all possiblities,
but there are no guarantees.
DL Series mixers come equipped with a standard iPad tray insert already installed and screwed down.
The following is a list of all current iPad models and what insert (if any) is needed to dock it:
iPad 2, iPad (3rd generation), iPad (4th generation) – standard tray insert (included with mixer).
iPad mini, iPad mini 2, iPad mini 3, iPad mini 4 – iPad mini tray insert (sold separately).
The included iPad tray insert needs to removed and replaced with an iPad mini tray insert.
[See directions on the next page].
iPad Air and iPad Air 2 – iPad Air tray insert (sold separately). The included iPad tray insert
needs to removed and replaced with an iPad Air tray insert. [See directions on page 9].
The tray insert is not necessarily dependent on what type of connector the iPad has.
In other words, while an iPad 2 and iPad (3rd generation) [both 30-pin connectors]
and iPad (4th generation) [Lightning connector] have dierent connectors, all three
models require the included standard tray insert. Having said that, all iPad minis
and iPad Airs have a Lightning connector and require that the included tray insert
be removed and replaced with a tray insert for that model.
6
Page 7
DL806 and DL1608 Owner’s Manual
With dierent dimensions than the other iPads, the iPad mini, iPad mini 2, iPad mini 3 and iPad mini 4
don’t t the included iPad tray...it’s too small! Don’t fret, though; we’ve got you covered. As mentioned
on the previous page, an iPad mini may be docked to a DL Series mixer with a Lightning connector,
but it requires a mini tray insert (sold separately).
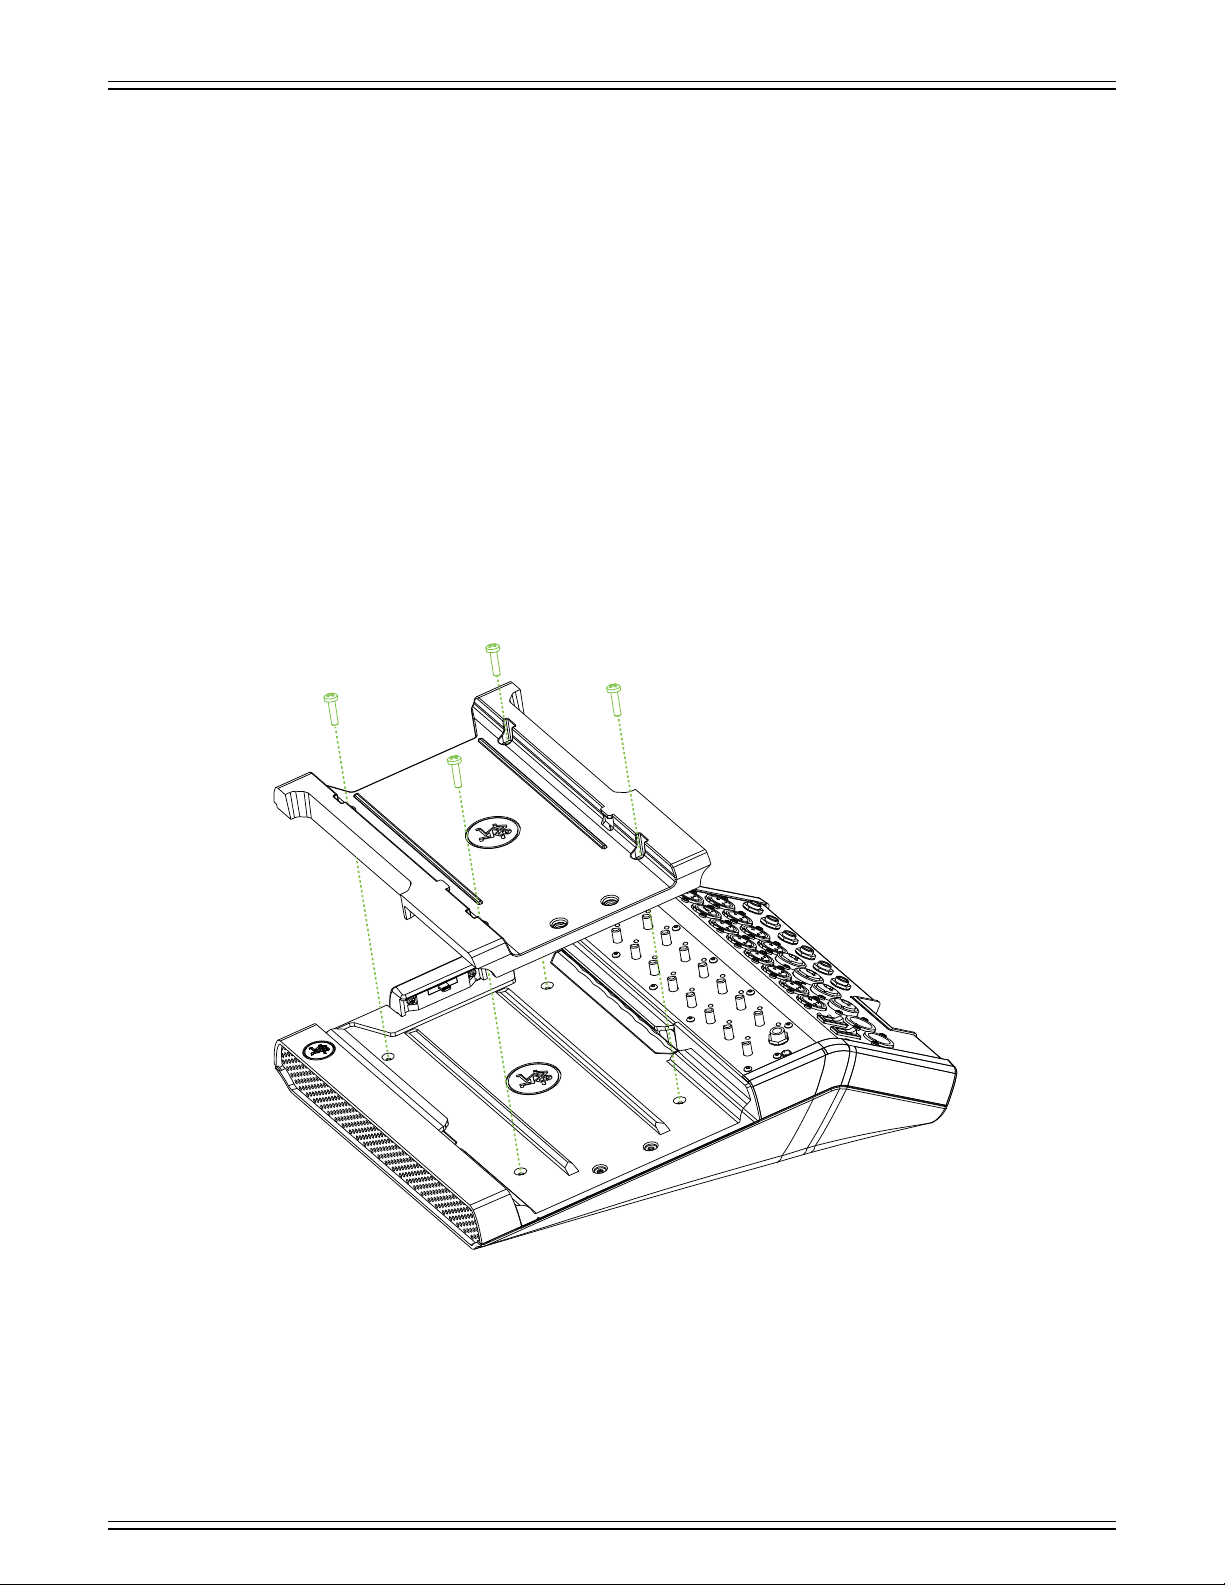
Here’s how to install the iPad mini tray:
(1) remove the four screws from the mixer, as seen in the illustration below.
(2) If applicable, slide the tray insert out from the mixer and SAVE IT SOMEWHERE SAFE! Should you decide
to dock an iPad 2, iPad (3rd generation), or iPad (4th generation) to the mixer, the tray will be necessary.
(3) place the iPad mini tray insert on top of the mixer, making sure to line up the sides and the screw holes.
(4) put the screws back into the mixer from where you just removed them (as displayed below) to hold
the iPad mini tray insert into place.
(5) for the complete iPad mini tray kit installation instructions, click here!
iPad mini tray kit
7
Page 8
DL806 and DL1608 Owner’s Manual
The iPad Air and iPad Air 2 also do not t the included iPad tray. Again, though; we’ve got you covered.
As mentioned two pages ago, an iPad Air may be docked to a DL Series mixer with a Lightning
connector, but it requires an Air tray insert (sold separately).
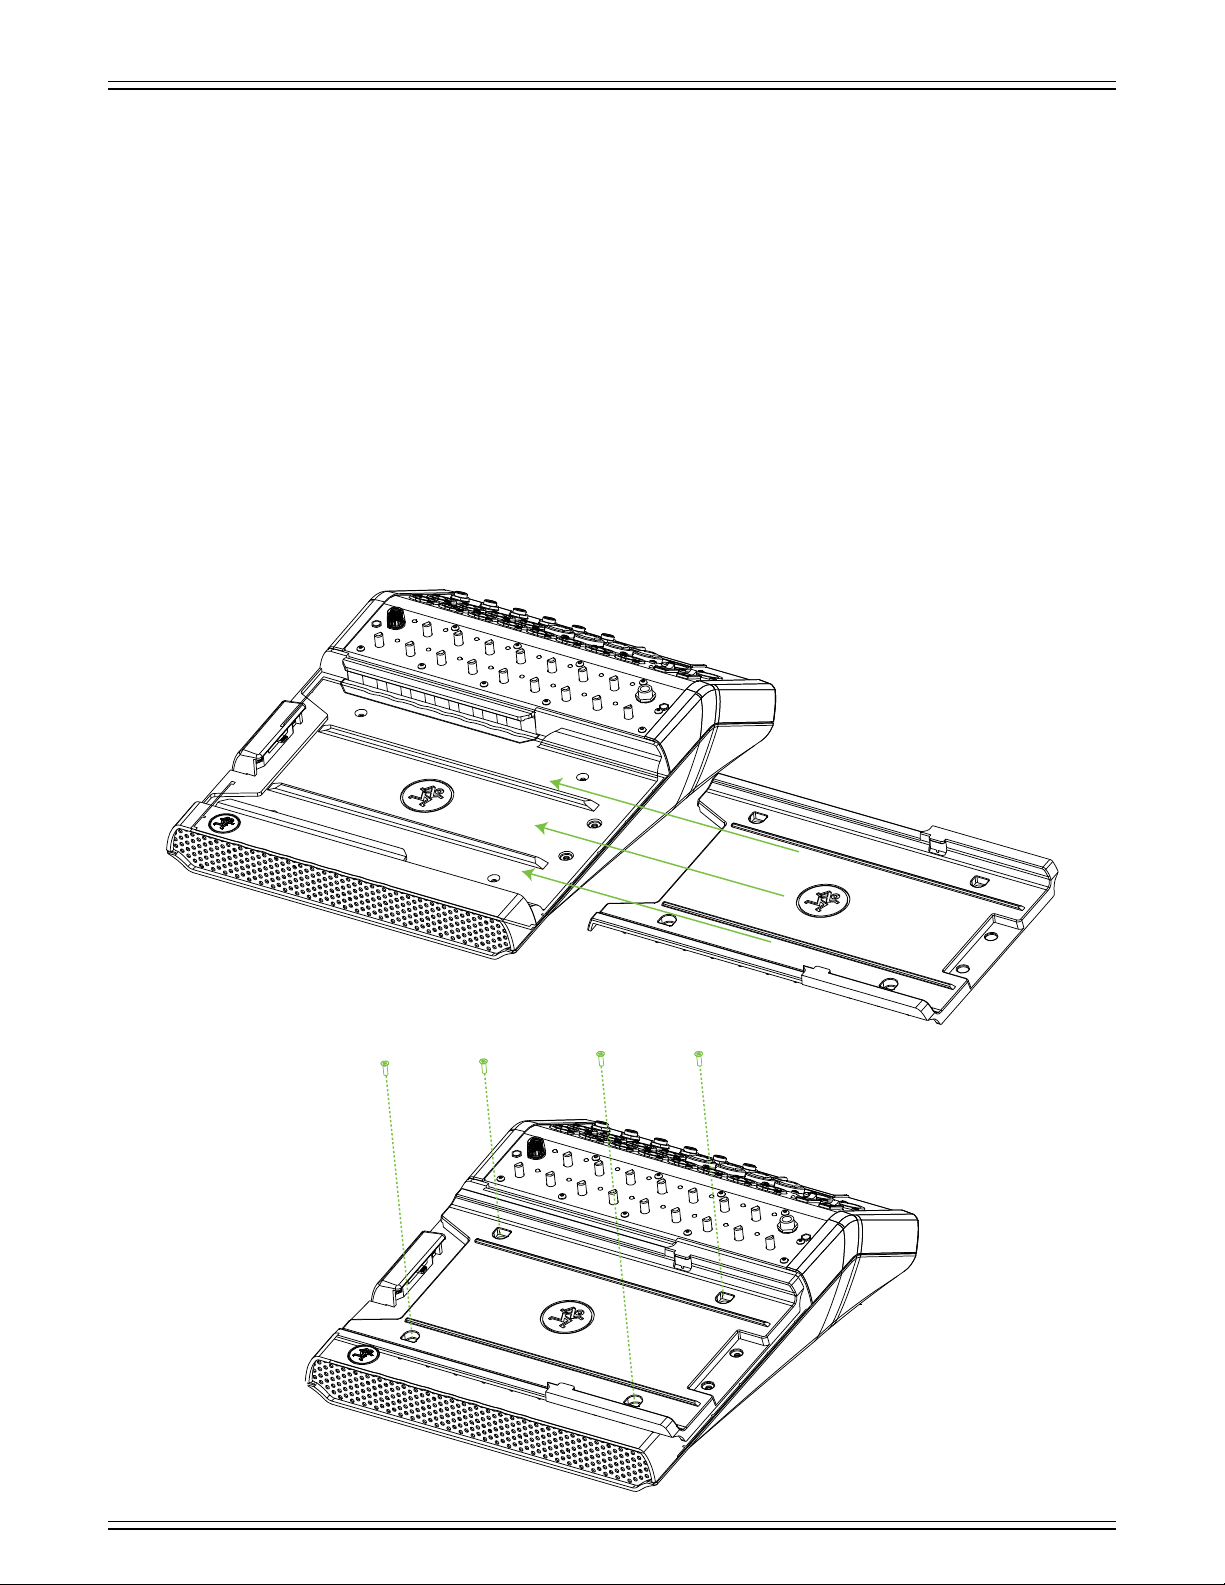
Here’s how to install the iPad Air tray:
(1) remove the four screws from the mixer, as seen in the illustration on the previous page.
(2) If applicable, slide the tray insert out from the mixer and SAVE IT SOMEWHERE SAFE! Should you decide
to dock an iPad 2, iPad (3rd generation), or iPad (4th generation) to the mixer, the tray will be necessary.
(3) slide the iPad Air tray right to left, making sure to line up the sides and the screw holes (Figure A below).
(4) put the screws back into the mixer from where you just removed them to hold the iPad Air tray insert
into place (Figure B below).
(5) for the complete iPad Air tray kit installation instructions, click here!
iPad Air tray kit
Figure A
Figure B
8
Page 9

DL806 and DL1608 Owner’s Manual
If you had been mixing with an iPad mini, iPad mini 2, iPad mini 3, iPad mini 4, iPad Air or iPad Air 2,
but would rather use an iPad 2, iPad (3rd generation) or iPad (4th generation), the included iPad tray
will need to be reinstalled. The iPad tray insert only needs to be reinstalled if you are mixing with
the iPad 2, iPad (3rd generation) or iPad (4th generation). Here’s how to reinstall the iPad tray:
(1) remove the four screws from the mixer, numbered 1 to 4 in the illustration below.
(2) remove the iPad mini (or iPad Air) tray insert (if applicable).
(3) slide the included standard tray insert into the mixer as displayed below.
(4) put the screws back into the mixer from where you just removed them to hold the tray insert into place.
2
1
2
1
4
3
Tray
3
Tray Insert
The iPad tray insert doesn’t need to be locked down If switching regularly between iPads.
Instead, hand-tighten the screws to the mixer before sliding the tray insert back in.
they can’t get lost and you’re still able to slide the tray insert in and out as needed.
4
This way
9
Page 10
DL806 and DL1608 Owner’s Manual
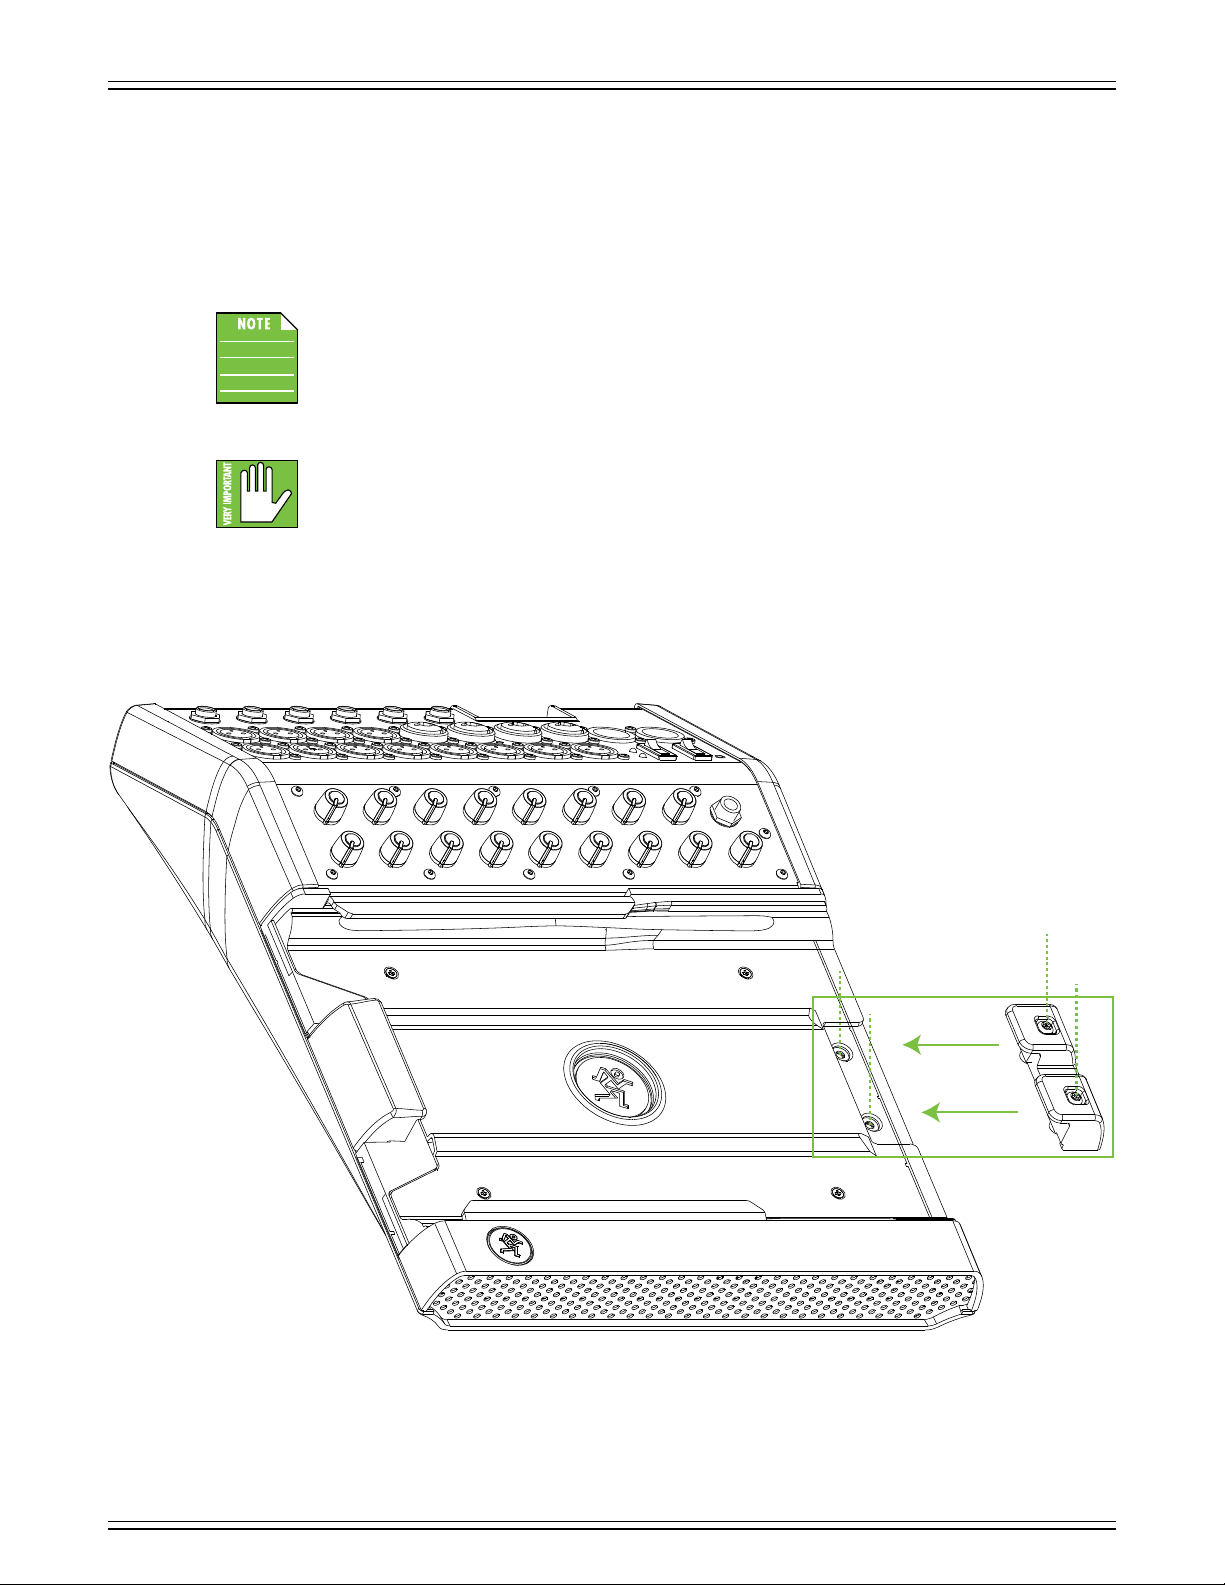
PadLock™
Also included with the mixer is a PadLock. This is used to lock the iPad into place on the mixer.
One might use this for xed installs where a dedicated iPad is used and (Pad)locked to the mixer.
Or leave the PadLock o so the iPad may be conveniently transferred in and out of the mixer.
After docking the iPad (not shown), the PadLock needs to be attached by moving it right
to left [horizontal green arrows], NOT downward. This ensures that the foam compresses
against the iPad and holds it solidly in place. Then hand-tighten each of the two security
screws down [vertical green dotted lines] using the supplied wrench.
While the PadLock provides some level of security, it is NOT foolproof or guaranteed
protection. LOUD Technologies Inc. is not responsible for the loss, theft, damage or
destruction of your DL Series mixer or iPad whether a PadLock has been used or not.
10
Page 11
Front Panel Introduction
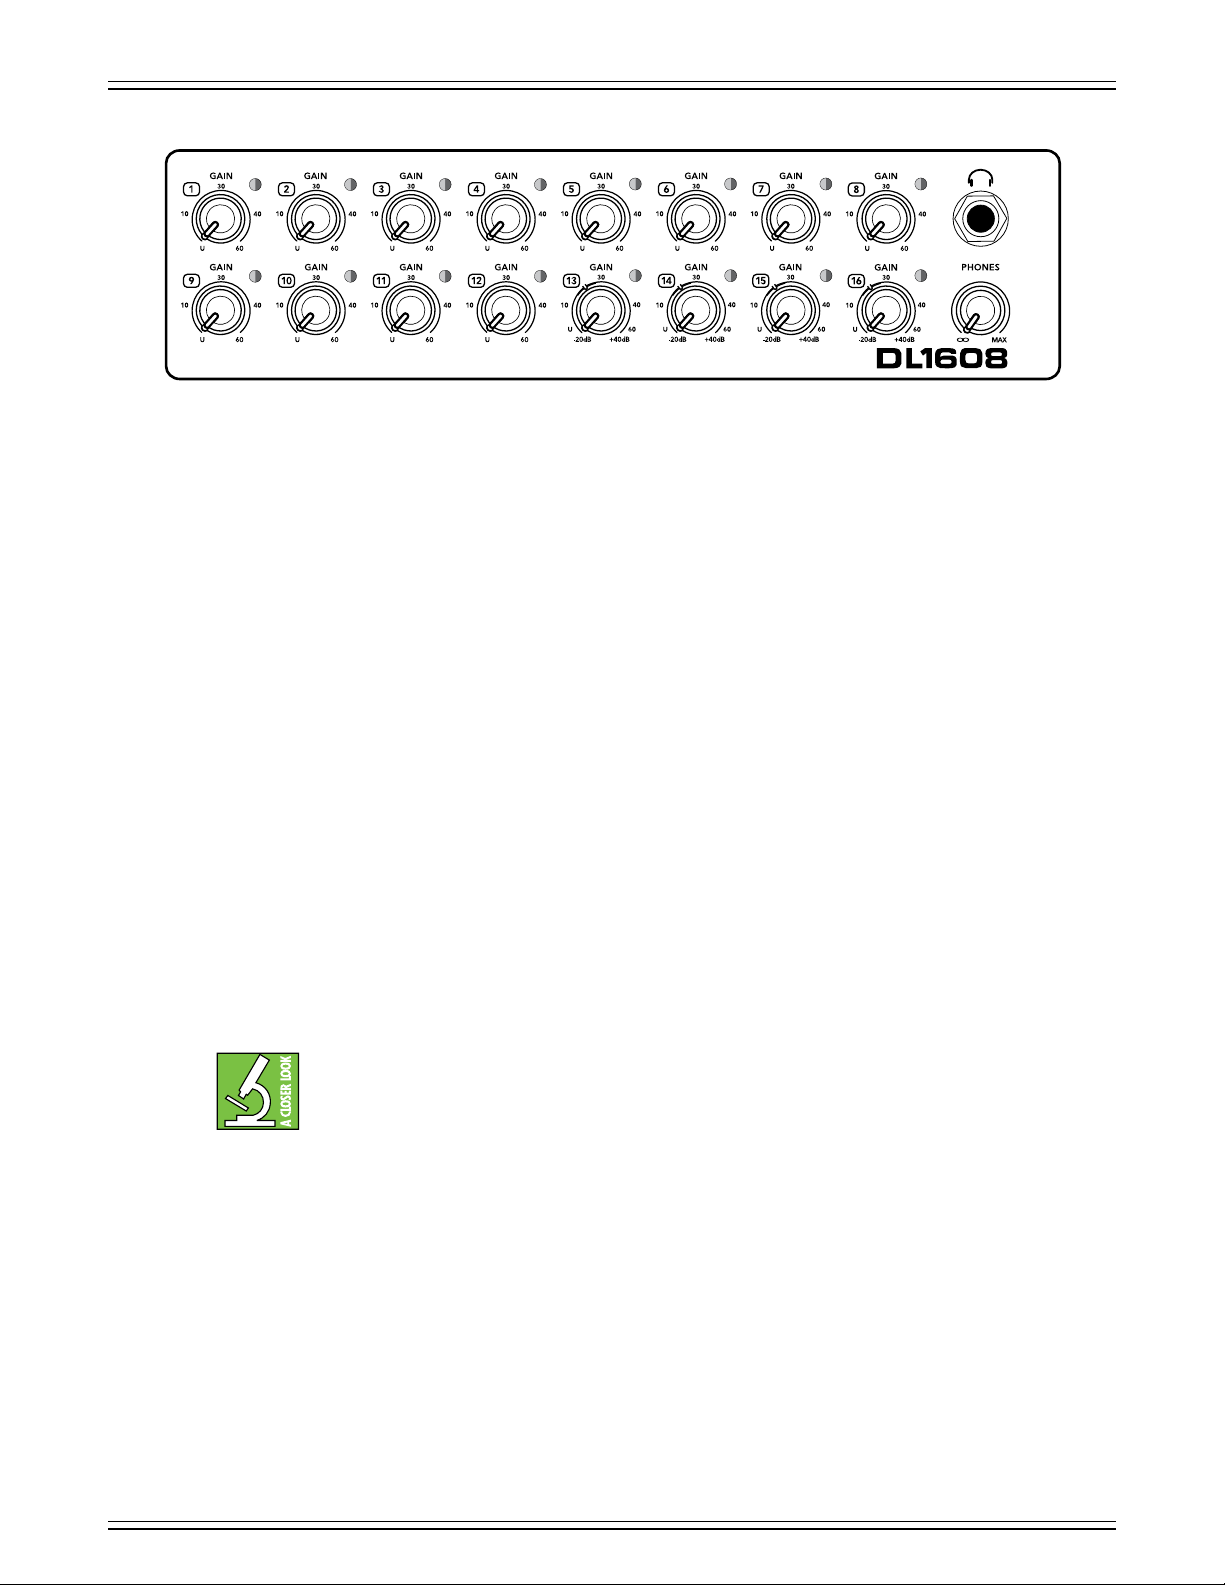
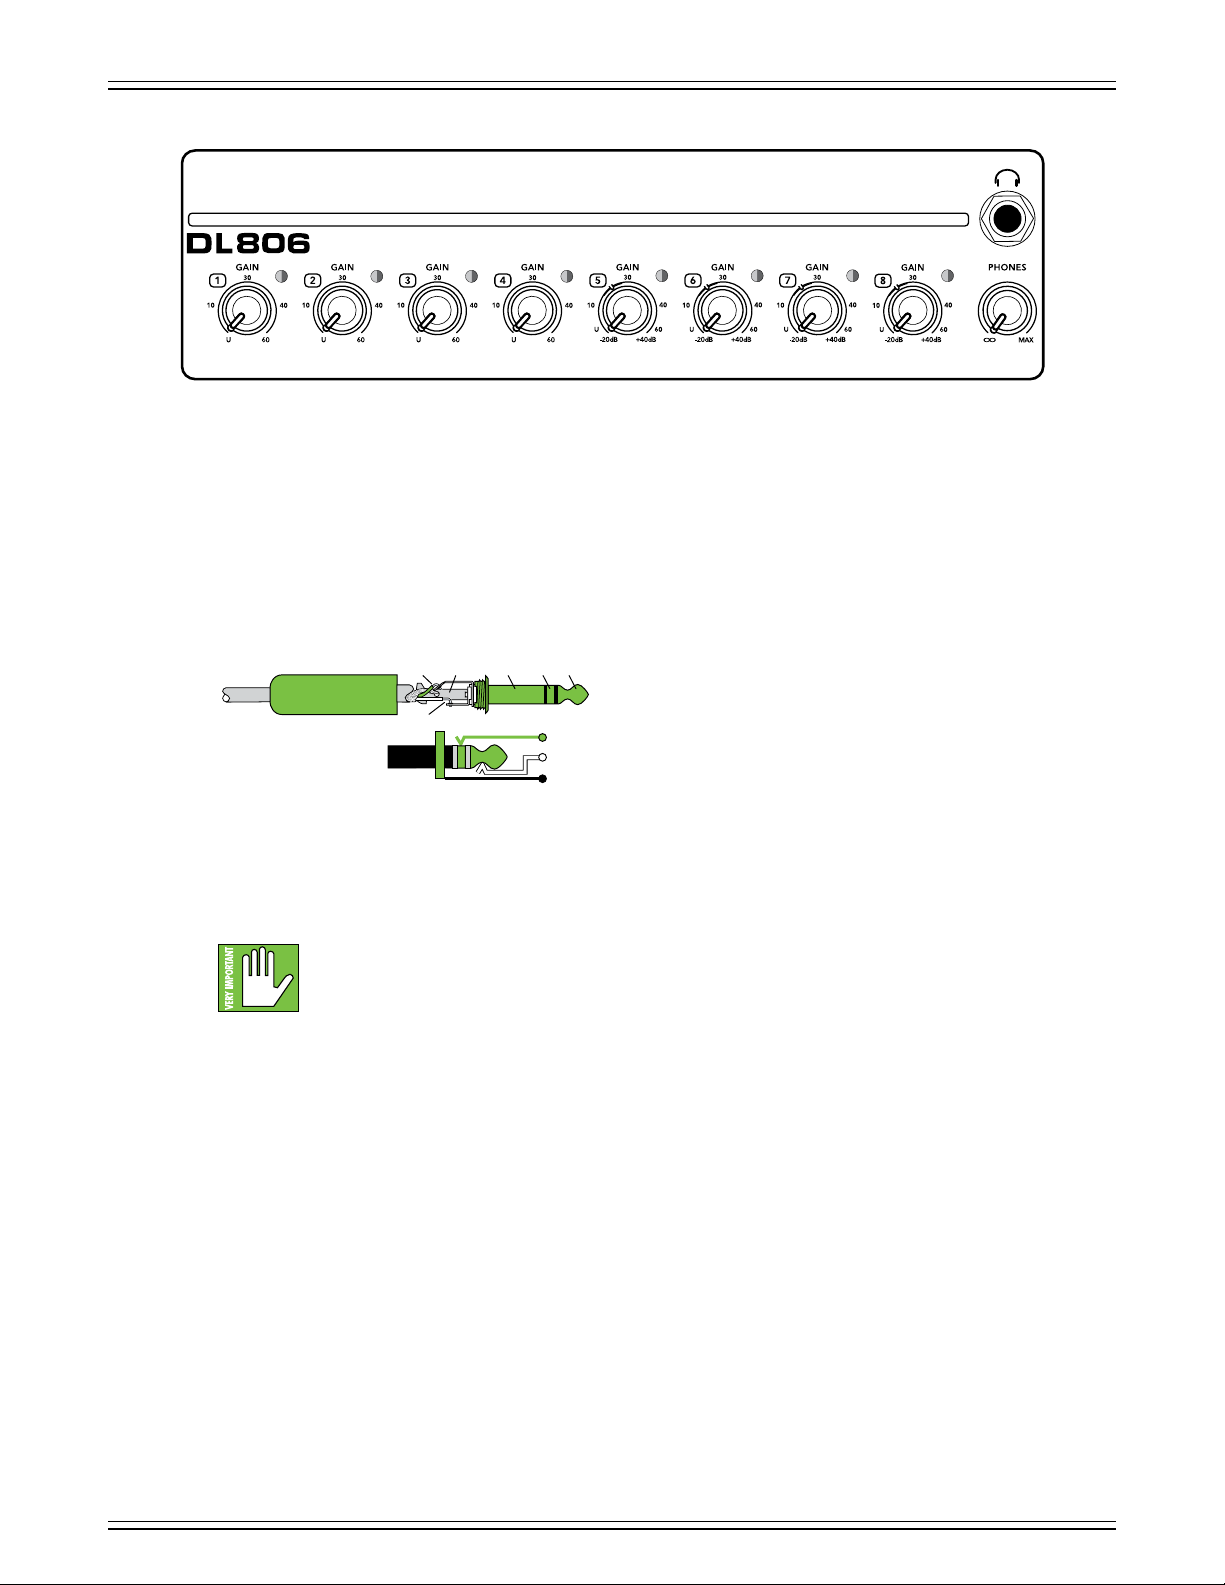
Each DL1608 mixer is outtted with 16 gain knobs, 16 sig / OL LEDs, one phones output jack and one
phones knob. Each DL806 mixer is outtted with eight gain knobs, eight sig / OL LEDs, one phones output
jack and one phones knob. Let’s take a look at each of these features, starting with the gain knobs.
DL806 and DL1608 Owner’s Manual
DL1608 Front Panel
Gain Knobs
The gain knobs adjust the input sensitivity of the mic and mic/line inputs. This allows signals
from the outside world to be adjusted to run through each channel at optimal internal operating
levels.
channels 13-16
The gain knobs are analog controls, and are therefore NOT recallable.
If a balanced mic or line-level signal is connected to any channel, there is 0 dB of gain with the knob fully
down, ramping up to 60 dB of gain fully up.
If a 1/4" line-level signal is connected, there is 20 dB of attenuation with the knob fully down and 40 dB
of gain fully up, with unity gain “U” at 10:00
This 20 dB of attenuation can be very handy when inserting a hot signal from a line-level source. Without
this “virtual pad,” there is more chance of channel clipping.
Sig / OL LEDs
This dual-colored LED will illuminate green when the channel’s input signal is present, indicating signal.
It will remain lit so long as there is signal above –20 dBu present in that channel.
All channels may accept a balanced mic or line-level signal using an XLR connector, while
[on the DL1608;
Because of the low-noise, high-headroom Onyx mic preamps, it is possible to use the mixer
strictly as a wireless system and store the mixer away (in an equipment room, for example).
Just make sure to LOWER the gain knobs a touch to gain extra headroom before clipping.
channels 5-8
on the DL806]
also accept 1/4" line-level signals.
This dual-colored LED will illuminate red when the channel’s input signal is too high, indicating a signal
overload. This should be avoided, as distortion will occur. If the OL LED comes on regularly, check that
the gain knob is set correctly for the input device. The signal is at –3 dB before hard clip begins.
11
Page 12
DL806 and DL1608 Owner’s Manual
Phones Output Jack
This 1/4" TRS connector supplies the output to stereo headphones. The volume is controlled with the
phones knob located right below the output jack.
The phones output follows standard conventions:
DL806 Front Panel
Phones Knob
This knob is used to adjust the volume from the phones output jack, from o to maximum gain (max).
The phones knob is an analog control, and is therefore NOT recallable.
a channel or doing anything new that may aect the headphone volume. Then turn it up slowly as
you listen carefully.
TIPSLEEVE
SLEEVERING
RING
Tip = Left channel
Ring = Right channel
TIP
RING
TIP
SLEEVE
Sleeve = Ground
Warning: The headphone amp is loud and could cause permanent hearing damage.
Even intermediate levels may be painfully loud with some headphones. BE CAREFUL!
Always turn the phones knob all the way down before connecting headphones, soloing
12
Page 13
DL806 and DL1608 Owner’s Manual
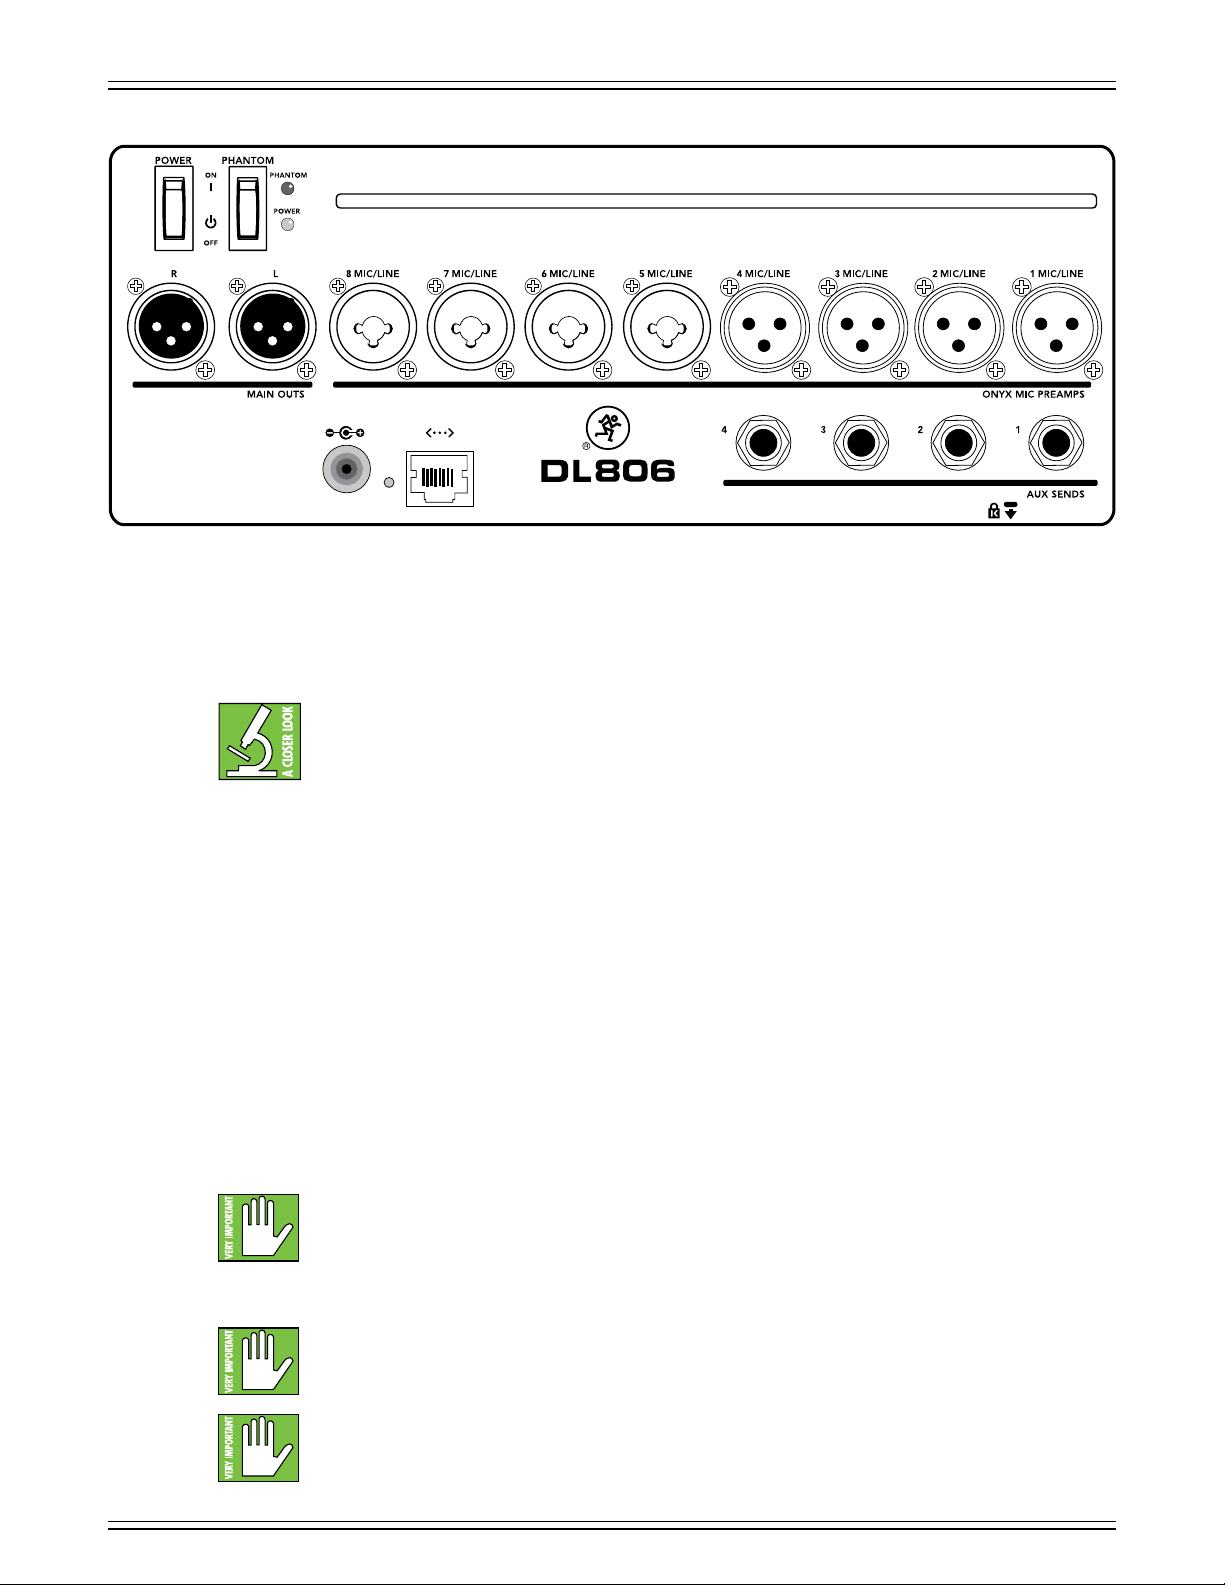
Chapter 3 : Mixer Hardware – DL Series : Rear Panel
DL1608 Rear Panel
Barrel Connector
Locking Outer Ring
Rear Panel Introduction
The
Power
Block
Each DL Series mixer is outtted with a power connector, a power switch
(and corresponding LED), a phantom power switch (and corresponding LED),
L/R XLR main output jacks, a Kensington lock, a network connector and a force
update button. In fact, the only functional dierence between the two is that the
DL1608 has 16 input jacks and six aux sends jacks, whereas the DL806 has eight
input jacks and four aux send jacks. Even though those numbers may vary slightly,
their function is the same. Let’s take a look, shall we?
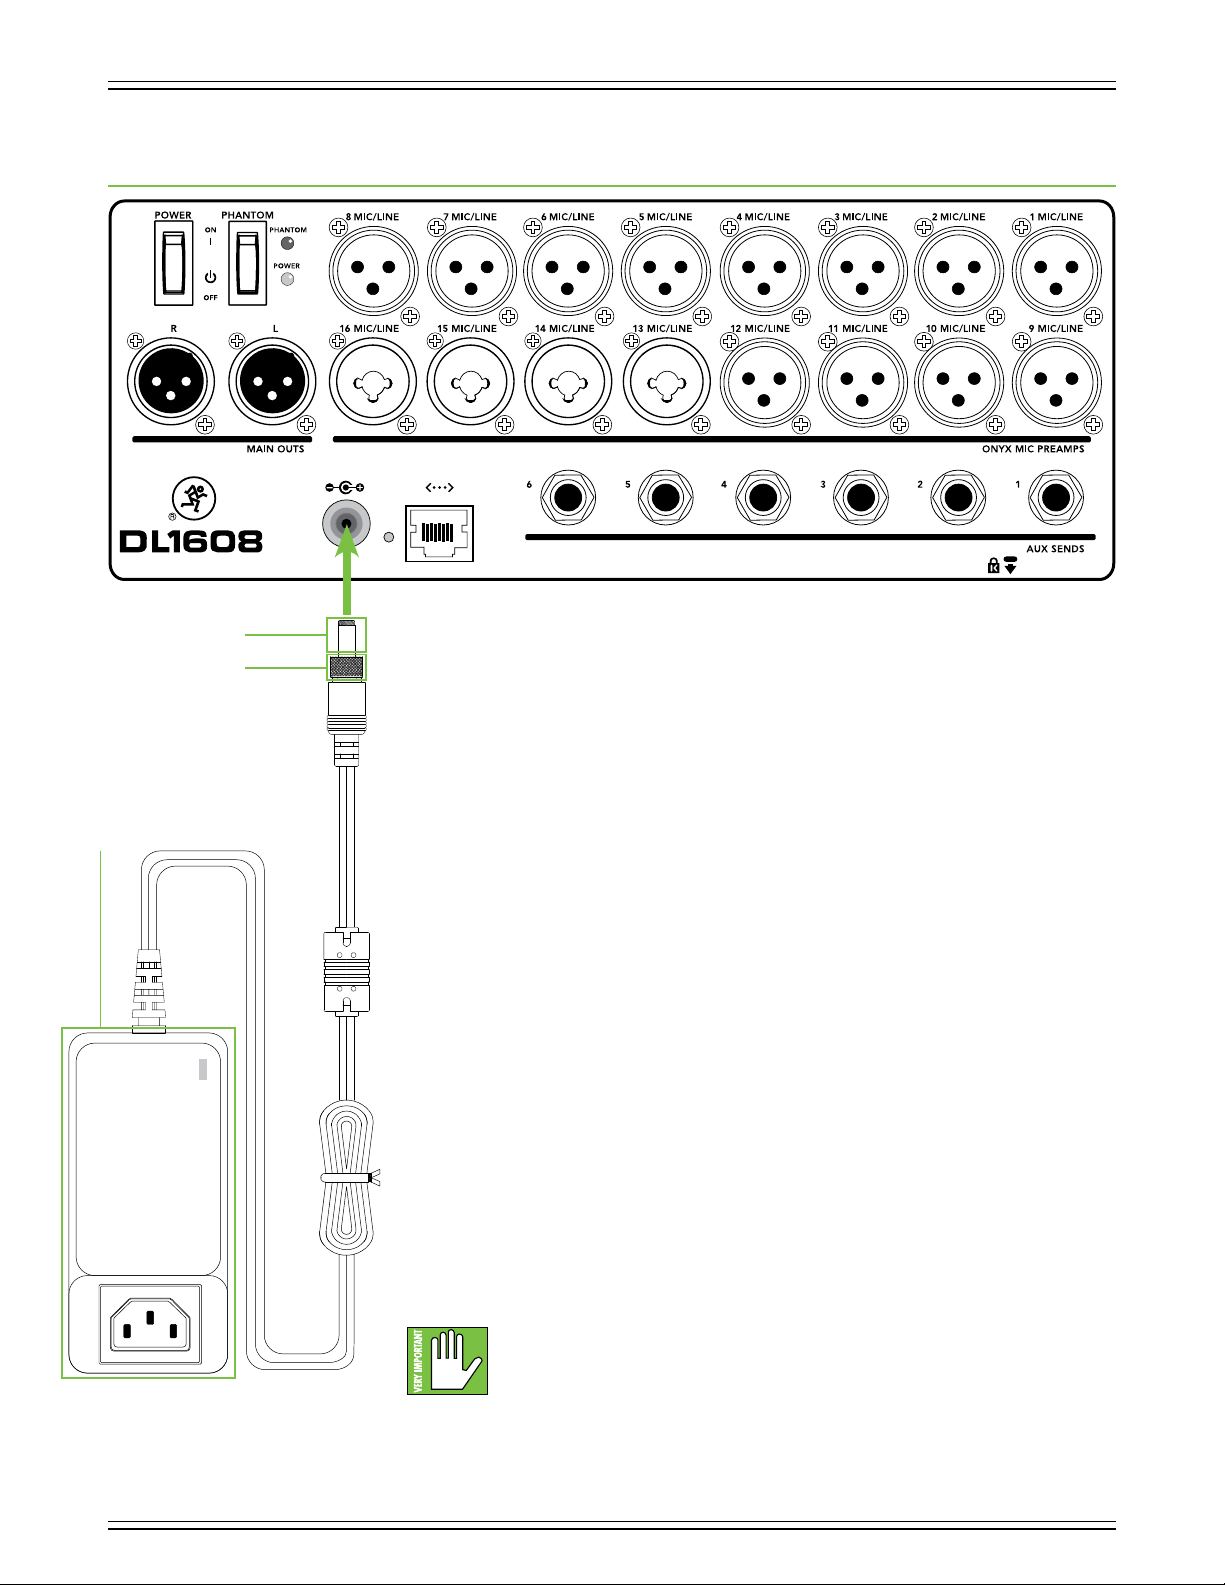
Power Connector
DL Series mixers have a universal external power supply that accepts any AC voltage
ranging from 100 VAC to 240 VAC. No need for voltage select switches. It will work
virtually anywhere in the world. That’s why we call it a “Planet Earth” power supply!
It is less susceptible to voltage sags or spikes compared to conventional power
supplies, and provides greater electromagnetic isolation and better protection
against AC line noise.
An external 12V DC
with the mixer. A locking barrel connector resides at the end of the cord attached to
The Power Block. Attach it to the power connector on the mixer and rotate the
outer ring clockwise to lock. Do not over-tighten! Screw until there is resistance, then
stop. Connect the female end of the line cord to The Power Block and plug the male
end into a live grounded AC outlet. An LED on The Power Block will illuminate green
to indicate success (whether the mixer is powered on or not).
power supply [aka The Power Block] and a line cord are included
Warning: Disconnecting the plug’s ground pin is dangerous. Don’t do it!
In fact, it’s a bad idea to remove anything from (or add anything to)
The Power Block or line cord. Again, don’t do it!
13
Page 14
DL806 and DL1608 Owner’s Manual
Power Switch
DL806 Rear Panel
Press the top of this rocker switch in to turn the mixer on and
mixer o.
As a general guide, the mixer should be turned on rst, before any external power ampliers
or powered speakers. As such, it should also be turned o last. This will reduce the possibility
of any turn-on or turn-o thumps in the PA.
Power LED
This LED will illuminate green when the mixer is turned on
Block and line cord are connected correctly (to each other, the mixer and the AC outlet), the local AC mains
supply is active and that the power switch is on.
Phantom Power Switch
Press the top of this rocker switch in if any microphone requires phantom power. (Always check the position
of this switch before connecting microphones.) This is a global switch that aects all mic channels’ XLR jacks
at once.
Most modern professional condenser mics require 48V phantom power which lets the mixer send
low-current DC voltage to the mic’s electronics through the same wires that carry audio. (Semi-pro
condenser mics often have batteries to accomplish the same thing.) “Phantom” owes its name to an
ability to be “unseen” by dynamic mics [Shure SM57 / SM58, for example], which do not need external
power and are not aected by it, anyway.
Press the bottom of this switch in to turn the phantom power o.
Never plug single-ended (unbalanced) or ribbon microphones into the mic input jacks
when phantom power is on. Do not plug instrument outputs into the mic XLR input jacks
with phantom power on unless you know for certain that it is safe to do. When phantom
power is engaged, be sure that the master fader is down when connecting microphones
to the mic inputs to prevent pops from getting through the PA.
press the bottom of this switch to turn the
. If it does not turn on, conrm that The Power
It is not a good idea to enable the phantom power unless it is actually needed. Line-level
sources may be particularly unhappy when they are subjected to 48V phantom powering.
Many musical instrument amps and keyboards with “direct outputs” t this description.
It takes approximately 15 seconds for the phantom power to shut o completely.
Do not add or remove any inputs until the phantom power LED is completely o
or mics could be ruined.
14
Page 15

Phantom Power LED
DL806 and DL1608 Owner’s Manual
This LED will illuminate red when phantom power is engaged
phantom power switch is on, that The Power Block and line cord are connected correctly (to each other,
the mixer and the AC outlet), the local AC mains supply is active and that the power switch is on.
XLR and 1/4" Inputs
All channels may accept a balanced mic or line-level signal using an XLR connector.
They are wired as follows, according to standards specied by the AES (Audio Engineering Society).
In addition to accepting balanced mic or line-level signals using an XLR connector, channels 13-16
[on the DL1608;
or unbalanced sources.
. If it does not turn on, conrm that the
It takes approximately 15 seconds for the phantom power to shut o completely.
Do not add or remove any inputs until the phantom power LED is completely o
or mics could be ruined.
SHIELD
2
HOT
XLR Balanced Wiring:
Pin 1 = Shield (ground)
Pin 2 = Positive (+ or hot)
1
3
channels 5-8
COLD
1
3
2
SHIELD
COLD
HOT
on the DL806] may also accept 1/4" line-level signals driven by balanced
Pin 3 = Negative (– or cold)
To connect balanced lines to these inputs, use a 1/4" Tip-Ring-Sleeve (TRS) plug. “TRS” stands for
Tip-Ring-Sleeve, the three connection points available on a stereo 1/4" or balanced phone jack or plug.
TRS jacks and plugs are used for balanced signals and stereo headphones and are wired as follows:
TIPSLEEVE
SLEEVERING
RING
1/4" TRS Balanced Mono Wiring:
Sleeve = Shield
TIP
RING
TIP
SLEEVE
Tip = Hot (+)
Ring = Cold (–)
To connect unbalanced lines to these inputs, use a 1/4" mono (TS) phone plug, wired as follows:
SLEEVE
TIPSLEEVE
1/4" TS Unbalanced Mono Wiring:
Sleeve = Shield
TIP
TIP
SLEEVE
Tip = Hot (+)
15
Page 16

DL806 and DL1608 Owner’s Manual
L/R Main Outs
The male XLR connectors provide a balanced line-level signal that represent the end of the mixer, where
the fully mixed stereo signal enters the real world. Connect these to the left and right line-level inputs of
powered speakers or to the left and right line-level inputs of an amplier (with speakers already attached).
Aux Sends
SHIELD
1
XLR Balanced Wiring:
Pin 1 = Shield (ground)
COLD
3
HOT
1
2
3
2
SHIELD
COLD
HOT
Pin 2 = Positive (+ or hot)
Pin 3 = Negative (– or cold)
These 1/4" connectors allow you to send balanced and unbalanced line-level outputs to external eects
devices, headphone ampliers, or stage monitors. These could either be passive stage monitors powered
by an external amplier, or powered stage monitors with built-in power ampliers. You may run separate
aux mixes since all aux sends are independent of each other. There are four aux sends on a DL806 mixer
and six aux sends on a DL1608 mixer.
To connect balanced lines to these inputs, use a 1/4" Tip-Ring-Sleeve (TRS) plug. “TRS” stands for
Tip-Ring-Sleeve, the three connection points available on a stereo 1/4" or balanced phone jack or plug.
TRS jacks and plugs are used for balanced signals and stereo headphones and are wired as follows:
TIPSLEEVE
SLEEVERING
RING
1/4" TRS Balanced Mono Wiring:
Sleeve = Shield
TIP
RING
TIP
SLEEVE
Tip = Hot (+)
Ring = Cold (–)
To connect unbalanced lines to these inputs, use a 1/4" mono (TS) phone plug, wired as follows:
SLEEVE
TIP
TIPSLEEVE
TIP
SLEEVE
Unbalanced cables can be noisy. If the input of the next device in the chain supports
balanced cables, we highly recommend using those instead of unbalanced cables
to connect gear.
1/4" TS Unbalanced Mono Wiring:
Sleeve = Shield
Tip = Hot (+)
16
Page 17

Kensington Lock
An optional Kensington Lock provides an extra level of security should the mixer be left alone,
unwatched. There are a wide variety of cable apparatuses to choose from to secure your mixer
via the Kensington Lock security slot. Feel free to decide on what type works best for you by
perusing the Kensington website: http://www.kensington.com/
DL806 and DL1608 Owner’s Manual
Network Connector
While the Kensington cable and lock provide some level of security, it is NOT foolproof or
guaranteed protection. LOUD Technologies Inc. is not responsible for the loss, theft, damage
or destruction of your mixer or iPad whether a Kensington Lock has been used or not.
The 100MB network connector is conveniently located next to the power
connector. Its purpose in life is to connect the mixer to a Wi-Fi router via
CAT5 Ethernet cable, thus enabling wireless control.
Plug one end of the CAT5 Ethernet cable into the mixer’s network connector
and the other end of the CAT5 Ethernet cable into a LAN port on the router,
NOT a WAN port. Most routers allow the use of either a straight-wired cable
or crossover cable, but If you have a choice, a straight-wired CAT5 Ethernet
cable is the way to go to ensure smooth operation with any router.
Complete directions for setting up the router may be found in the Master Fader Reference
Guide.
17
Page 18

DL806 and DL1608 Owner’s Manual
Force Update Button
The force update button is tucked in right between the power connector and network connector.
In a perfect world, this button would just sit there without a care in the world, umbrella drink in hand,
beach, surf and sun on a daily basis. In all likelihood, this button will live his / her dream out, while the
rest of us can only dream of such a life.
The DL Series mixers and Master Fader app do a great job at letting you know when either (or both)
the software and rmware need updating, but this button here forces a complete rmware update
if the need ever arrives.
Here’s how to force a rmware update: rst, turn the mixer o. Now, with a bent paperclip, poke the force
update button, then power up the mixer with the button depressed. The mixer will boot and you will be
prompted with an update bubble the next time an iPad with the Master Fader app is connected to the mixer.
Now that you know how to force an update, here’s a friendly reminder that you should let
the button remain peaceful, calm and tranquil, only forcing a rmware update if instructed
by Tech Support. Thank you for listening!
Save any current show to your iPad before forcing an update or you may lose it.
The show and your sanity!
18
Page 19

Appendix A : Hookup Diagrams
Live Sound: House Engineer
SRM450v3 Powered Monitors
Microphones
Transmitters
for in-ear
monitors
DL806 and DL1608 Owner’s Manual
Wireless
Router
(Wi-Fi)
Headphones
Keyboard
Mackie DLM12
powered loudspeaker
Mackie DLM12S
powered subwoofer
Drums
Mackie DLM12
powered loudspeaker
Mackie DLM12S
powered subwoofer
Here’s a pretty common setup utilizing the DL1608. Drums are mic’d up and sent to input channels 1-7.
An additional seven mics are connected to input channels 8-14. These may be used to mic guitar and
bass cabinets, acoustic guitar, lead and background vocals, a horn section, etc. A keyboard is connected
to channels 15-16 via 1/4" input jacks.
The L/R main outs of the DL1608 connect directly to a pair of DLM12S powered subwoofers which are connected to a pair of DLM12 powered loudspeakers. Aux sends 1-4 are sent to four separate SRM450v3 powered
loudspeakers set up as monitors for the band. Aux sends 5-6 are sent to transmitters for in-ear monitors.
The house engineer’s iPad is connected (but not locked) to the DL1608 where he/she will set the LR main
mix, as well as get the 2-track recording of the band’s live show.
19
Page 20

DL806 and DL1608 Owner’s Manual
Mackie DLM8
Mackie DLM8
Live Sound: Coee Shop
powered loudspeaker
Mackie DLM8 Powered Monitors
Wireless
Router
(Wi-Fi)
powered loudspeaker
Headphones
Keyboard
Now the band wants to pare down to play the local cafe. Because the venue size is much smaller, there is no
need to crank up a big PA, nor do you need to mic the drum set, bass cabinet or guitar cabinets. Those are
loud enough on their own!
What we’ve got lined up in this example is the lead vocal mic connected to the channel one input and his
acoustic guitar is mic’d up and connected to the channel two input. The keyboard player sings backup vocals;
her vocal mic is connected to the channel three input and her keyboard is connected to channels 7-8 via
1/4" input jacks. Channels four, ve and six are available to use for additional backup vocals, mic’ing another
acoustic guitar, mic’ing a horn section, bongos, xylophone, oud, etc...unlimited possibilities!
The L/R main outs of the DL806 connect directly to a pair of DLM8 powered loudspeakers. Aux sends 1-2
are sent to two separate DLM8 powered loudspeakers set up as monitors for the band. Or use one (or more)
aux sends to send signal to transmitters for in-ear monitors.
The house engineer’s iPad is connected (but not locked) to the DL806 where he/she will set the LR main
mix, as well as get the 2-track recording of the band’s live show.
20
Page 21

Live Sound: Self-Engineered
Vocalist Guitarist
Wireless
Router
(Wi-Fi)
Engineer’s
Headphones
DL806 and DL1608 Owner’s Manual
Keyboardist Bassist
Drummist DJist
Here’s a setup for all the musicians out there who whine for “more me” in the mix. Set up and connect each
musician’s instrument, the PA and monitors just like they would be in any other live situation.
The house engineer’s iPad is connected and locked to the mixer where he/she will set the LR main mix,
as well as get the 2-track recording of the band’s live show.
Up to 20 iOS devices may be connected to the DL Series mixer wirelessly. As such, each band member may
control their own mix from their own “station”. As seen in the illustration above, the vocalist, guitarist, bassist,
keyboardist, drummist and DJist each have an iPad. Six musicians, six iPads, six auxes. Coincidence? We think
not. Whining problem solved!
21
Page 22

DL806 and DL1608 Owner’s Manual
Live Sound: Two Mixers, One iPad
Mackie SRM650
Loudspeaker
and SRM1850
Subwoofer
POWER CONSUMPTION 200W
Mackie SRM550 (for monitors)
POWER CONSUMPTION 200W
Mackie SRM650
Loudspeaker
and SRM1850
Subwoofer
POWER CONSUMPTION 200W
Monitor Mixer
Wireless
Router
(Wi-Fi)
Headphones
So you say you have a snake. We prefer dogs, cats or sh for pets, but snakes are cool, too.
How about an analog snake; do you have one of those in your arsenal? The snake is a
great tool for cutting down on cable spaghetti.
This setup is ideal for clubs utilizing one mixer for FOH and one mixer for monitors.
Connect all inputs and outputs from the FOH and monitor mixers to the snake.
FOH Mixer
Next, connect all of the drum, guitar cabinet and vocal mics, DI box, etc, TO the snake.
The main PA and monitors receive input FROM the snake.
Also notice that there is only one iPad in this illustration. It only takes one engineer and one iPad to run
both mains and monitors at this particular venue.
The last thing to notice is the crowd...they’re going crazy for this band! This must be some weird,
underground, cult club since no one there [band or fans] has any feet or hands, not to mention hair,
facial features, etc. There may be a lot missing, but what’s not missing is the energy...the place is rockin’!
22
Page 23

Live Sound: Two Mixers Linked
DL806 and DL1608 Owner’s Manual
So the club down the street is running sound through a DL Series mixer and you want to one-up them?
That’s easy! How about running sound through TWO DL Series mixers?! No, it won’t be twice as loud,
but you will have nearly twice as many inputs which means you’ll probably have twice the talent playing
at your venue in no time.
Start by setting up and connecting each musician’s instrument just like they would be in any other
live situation. When you run out of inputs on the rst mixer, start using inputs on the second mixer.
All you need to do is leave eight inputs open on the second mixer. Then make the connection from
the outputs and auxes of mixer #1 to the inputs of mixer #2. The outputs of mixer #2 are then sent
to the inputs of the PA.
An iPad is connected and locked to each mixer, while a third (wireless) iPad is available for wandering
the venue and creating an awesome mix.
23
Page 24

DL806 and DL1608 Owner’s Manual
Rack Mounted
Wireless Headphones
Wireless Router
Wireless
Headphones
This hookup diagram illustrates that the mixer doesn’t just have to eat up desk space...rack mount
it instead! Before doing so, though, it would be a good idea to review the Rack Mount Kit Installation
Instructions that were included with the Rack Mount Kit. The dog ate them, you say? Likely story, actually.
You know why? The mixers have actually been ready to be unleashed to the world for eons, but my
girlfriend’s dogs kept eating copies of the Owner’s Manual. Anyway, back to the Rack Mount Kit Installation
Instructions. Click here to retrieve them.
24
Page 25

DL806 and DL1608 Owner’s Manual
Appendix B : Technical Information
Specications
General Digital
Sample Rate: .................................................................................................................................................................................................48 kHz
A/D/A Bit Depth: .......................................................................................................................................................................................... 24-bit
System Latency: .......................................................................................................................................................................................... 1.5 ms
Frequency Response
All inputs to all outputs: .................................................................................................................................... ±0, –1 dB, 20 Hz to 20 kHz
Distortion
THD (mic input to main output, 1 kHz, –1 dBFS): ....................................................................................................................... <0.005%
Noise / Dynamic Range / Signal-to-Noise Ratio
EIN (150 termination): ..................................................................................................................................................................... –128 dBu
Mic input to Main Output (A–weighted)
Channel and main faders at unity: .......................................................................................................................................–79 dBu
Faders down: ................................................................................................................................................................................–90 dBu
Crosstalk (adjacent inputs): ............................................................................................................................................... <–120 dB @1 kHz
Crosstalk (outputs): .............................................................................................................................................................. <–105 dB @1 kHz
Phones level pot feedthrough @ minimum travel: .................................................................................................................... <–75 dB
Signal-to-Noise Ratio (ref +4 dBu, one channel and main fader at unity, A–weighted): ....................................................92 dB
Dynamic Range (One channel and main fader at unity, A–weighted): .................................................................................. 109 dB
CMRR: .................................................................................................................................................................... >70 dB @1 kHz (60 dB gain)
25
Page 26

DL806 and DL1608 Owner’s Manual
Specications Continued...
Analog Inputs
Connectors: ..................................................................................1-12: XLR Balanced, 13-16: Combo XLR / TRS Balanced [DL1608]
1-4: XLR Balanced, 5-8: Combo XLR / TRS Balanced [DL806]
XLR Mic Pre: .....................................................................................................................................................................................................Onyx
Input Impedance: ............................................................................... 1-12: 3k , 13-16: 3 k mic [XLR], 30 k line [1/4"] [DL1608]
1-4: 3k , 5-8: 3 k mic [XLR], 30 k line [1/4"] [DL806]
Max Input Level: .............................................................................................................................................................................XLR: +21 dBu
1/4": +30 dBu
Gain: ............................................................................................................................................................................................. XLR: 0 to 60 dB
1/4": –20 to 40 dB
48V Phantom Power (XLR): .............................................48 VDC, 10 mA max per mic, with up to eight simultaneously [both]
5 mA max per mic, with up to 16 simultaneously [DL1608]
Analog Main Out L/R
Connectors: ..................................................................................................................................................................................... XLR Balanced
Output Impedance: .....................................................................................................................................................................................600
Max Output Level: .................................................................................................................................................................................. +21 dBu
Analog Aux Sends
Connectors: .................................................................................................................................................... 1/4" TRS Impedance Balanced
(Supports balanced / unbalanced operation)
Output Impedance: ........................................................................................................................ 240 Balanced, 120 Unbalanced
Max Output Level: .................................................................................................................................................................................. +21 dBu
Analog Headphone Out
Connector: ....................................................................................................................................................................................1/4" TRS Stereo
Max Output Level: ......................................................................................................................................................... +18.0 dBu into 600
+19.5 dBu max into 100 k
26
Page 27

DL806 and DL1608 Owner’s Manual
Specications Continued...
Networking
Connector: .................................................................................................................................................................................100 MB Ethernet
Control: .................................................................................................................................................................................................... Complete
Simultaneous Control: ..............................................................................................................................................................20 iOS Devices
Supported Devices
Version Requirement: ............................................................................................................................................................iOS 8.0 or higher
DL Series mixer with Lightning Connector
Wired iPad: ..........................................................................................................................................................iPad (4th generation),
iPad mini, iPad mini 2, iPad mini 3, iPad mini 4
(requires optional iPad mini tray accessory),
iPad Air, iPad Air 2 (requires optional iPad Air tray accessory)
Wireless iPad: ............................................................................................................. All iPad models (except the original iPad),
Future iPad devices
DL Series mixer 30-pin Connector
Wired iPad: .....................................................................................................................................iPad 2 and iPad (3rd generation)
Wireless iPad: .............................................................................................................. All iPad models (except the original iPad)
iPhone / iPod touch
Wireless ......................................................................................................................... iPhone 4, iPhone 4S, iPhone 5, iPhone 5s,
iPhone 5c, iPhone 6, iPhone 6s, iPhone 6 Plus,
iPhone 6s Plus, iPod touch (5th generation)
Control Application: ..................................................................................................................................................................... Master Fader App2
[Master Fader 4.0 or greater required]
1
DSP
Input Channel Processing: ........................................................................................................................................... HPF, EQ, Comp, Gate
Output Channel Processing: .....................................................PEQ + HPF/LPF, GEQ, Comp/Limiter, Alignment Delay and RTA
FX: ................................................................................................................................................................................................Reverb, Delay
Power
External Supply
Power Requirements: ................................................................................................ 100-240 VAC, 50-60 Hz, Universal Supply
Output Voltage:..............................................................................................................................................................................12 VDC
Current: ......................................................................................................................................................................................................4A
DC Connector: ............................................................................................................ 5.5 mm x 2.5 mm barrel with locking ring
Line Cord: ...........................................................................................................................................................................User-replaceable IEC
Power Consumption: ...........................................................................................................................................................................48 W max
1
This assumes, of course, that future iOS devices do not communicate via infrared, radiation, television, sparklers, hoagies, frickin’ laser beams,
or some other crazy, fandangled new contraption. Even then, we’ll still give it the ‘ol college try. After all, we do have sharks at the ready.
2
https://itunes.apple.com/us/app/mackie-master-fader/id511500747?mt=8
27
Page 28

DL806 and DL1608 Owner’s Manual
Specications Continued...
Dimensions
Width: ..........................................................................................................................................................................................11.5 in / 291 mm
Height (Front): ...............................................................................................................................................................................1.6 in / 40 mm
Height (Rear): ................................................................................................................................................................................3.7 in / 95 mm
Depth: .........................................................................................................................................................................................15.4 in / 391 mm
Weight: .......................................................................................................................................................................... 7.9 lb / 3.6 kg [DL1608]
6.9 lb / 3.1 kg [DL806]
Rack: ........................................................................................................................................................................................ Nine Rack Spaces
[Needs an additional space or two above to allow for connections]
Environment
Operating Temperature [extended ambient temperature]:.................................................................................................. 32-104 ˚F
0- 40 ˚C
Accessories
Rackmount Kit: ............................................................................................................................................................................. Part #2036840
Mixer Bag: ................................................................................................................................................................................Part #2036809-16
Mixer Cover: ............................................................................................................................................................................Part #2036809-17
About
Part Number, Rev and Date: ................................................................................................................. SW1079, Rev C, November 2015
©2015 LOUD Technologies Inc. All rights reserved. Apple, iPad, iPhone and iPod touch are trademarks of Apple Inc., registered in the U.S.
and other countries. All other marks are Registered Trademarks, or Trademarks, of LOUD Technologies in the United States and other countries.
DL806 and DL1608 Patent Pending.
“Made for iPad” means that an electronic accessory has been designed to connect specically to iPad and has been certied by the developer to
meet Apple performance standards. Apple is not responsible for the operation of this device or its compliance with safety and regulatory standards.
Please note that the use of this accessory with iPad may aect wireless performance.
LOUD Technologies Inc. is always striving to improve our products by incorporating new and improved materials, components, and manufacturing
methods. Therefore, we reserve the right to change these specications at any time without notice.
Please check our website for any updates to this Owner’s Manual: www.mackie.com.
28
Page 29

DL806 Lightning Dimensions
DL806 and DL1608 Owner’s Manual
Weight
6.9 lb / 3.1 kg
1.6
[40]
15.4
[391]
11.5
[291]
3.7
[95]
29
1.5 in /
38 mm
2.1 in /
53 mm
4.5 in / 115 mm59.1 in / 1500 mm
Page 30

DL806 and DL1608 Owner’s Manual
DL1608 Lightning Dimensions
Weight
7.9 lb / 3.6 kg
1.6 in /
40 mm
15.4 in / 391 mm
11.5 in / 291 mm
3.7 in /
95 mm
30
1.5 in /
38 mm
2.1 in /
53 mm
4.5 in / 115 mm59.1 in / 1500 mm
Page 31

DL806 30-pin Dimensions
DL806 and DL1608 Owner’s Manual
Weight
6.9 lb / 3.1 kg
1.6
[40]
15.4
[391]
11.5
[291]
3.7
[95]
31
1.5 in /
38 mm
2.1 in /
53 mm
4.5 in / 115 mm59.1 in / 1500 mm
Page 32

DL806 and DL1608 Owner’s Manual
DL1608 30-pin Dimensions
Weight
7.9 lb / 3.6 kg
1.6 in /
40 mm
15.4 in / 391 mm
11.5 in / 291 mm
3.7 in /
95 mm
32
1.5 in /
38 mm
2.1 in /
53 mm
4.5 in / 115 mm59.1 in / 1500 mm
Page 33

DL806 and DL1608 Dimensions Continued...
15.6 in / 395 mm
DL806 and DL1608 Owner’s Manual
0.354 in / 9 mm [iPad 1 bottom]
0.520 in / 13.2 mm [iPad 2 bottom]
0.535 in / 13.6 mm [iPad 3 bottom]
0.6 in / 16 mm
Nine rack spaces
19.0 in / 483 mm
1.5 in / 39 mm
3.0 in / 77 mm
33
Page 34

DL806 and DL1608 Owner’s Manual
DL806 and DL1608 Dimensions Continued...
2.0 in / 52 mm
9.0 in / 228 mm
11.9 in / 302 mm
1.5 in / 37 mm
1.3 in / 32 mm
1.3 in / 32 mm
34
Page 35

Appendix C : Service Information
Troubleshooting
If you think your DL Series mixer has a problem, please check out the following troubleshooting
tips and do your best to conrm the problem. Visit the Support section of our website
(www.mackie.com/support) to get some ideas or contact our technical support heroes.
You may nd the answer to the problem without having to send your DL Series mixer away.
Here are three useful tips that could correct any of the issues outlined below (or possibly any other issue
that we haven’t yet discovered):
(1) — Restart the iPad. Don’t just restart the Master Fader app. Restart the iPad! Completely power it
down, then power it back up.
(2) — Restart the mixer. This is especially useful after rmware and software updates where the mixer
and iPad aren’t quite on the same page. A simple reboot can sometimes work great wonders.
(3) — Restart the router. Internet disconnectivity got you down? Unplug and re-plug the router.
This may resolve any connection issues.
There are no user serviceable parts. If none of these tips work, please refer to “Repair” on the next page to
nd out how to proceed.
DL806 and DL1608 Owner’s Manual
No Power
No Sound
• Our favorite question. Is it plugged in? Make sure that the female end of the line cord is securely
seated in the IEC socket of The Power Block and the male end plugged all the way into a live
grounded AC outlet. Make sure the locking barrel connector at the end of the cord attached to The
Power Block is attached to the power connector on the mixer and securely tightened. An LED
on The Power Block will illuminate green to indicate success (whether the mixer is powered on or not).
• Our second favorite question. Is the rear panel power switch in the ON position?
• Are all the lights out in town? If so, contact the local power company to get power restored.
• Are all the connections good and sound? Make sure all of the connecting cables work and are
securely connected at both ends. Try the same source signal in another channel, set up exactly
like the suspect channel.
• Is the signal source powered on? Is it working (and making union scale)?
35
Page 36

DL806 and DL1608 Owner’s Manual
Noise / Hum
• Are all the connections good and sound? Make sure all of the connecting cables work and are
securely connected at both ends. Try the same source signal in another channel, set up exactly
like the suspect channel.
• Are you using unbalanced cables? Swap them out with balanced cables to see if that xes the problem.
• Turn the input gains down one-by-one. If the oending noise disappears, it’s either that input or
whatever is plugged into it. If you unplug the whatever-is-plugged-into-it and turn the input gain
back up and the noise is gone, it’s from your whatever.
• Is phantom power required for the microphone?
• Sometimes it helps to plug all the audio equipment into the same AC circuit so they share a
common ground. Make it so.
• Has the band been together long?
No Interwebs
• Read the chapter titled “Wireless Setup” in the Master Fader Reference Guide.
This section is very important and reading it cover-to-cover is the best troubleshooting.
Repair
• Is your iPad connected to the correct wireless network? Go to iPad Settings > Wi-Fi and ensure that
it didn’t hop onto to a dierent wireless network.
• Did you select the wireless DL806 or DL1608 from the tools > devices screen?
• Are you running the latest and greatest master fader and DL Series rmware? Go to the App Store
and check for an update.
• Did you connect the Ethernet cable to the correct port on the router? Be sure to use the LAN port
and not the WAN port.
• Did you connect and then power on the Wi-Fi router BEFORE turning on the mixer?
• Leave the Master Fader and then return by pressing the Home button on the iPad.
• Force quit the Master Fader app.
• Try another Ethernet cable.
• Try another Wi-Fi router.
For warranty service, refer to the warranty information on page 45.
Non-warranty service for our products is available at a factory-authorized service center. To locate
the nearest service center, visit www.mackie.com/support. Service for LOUD products living outside
the United States can be obtained through local dealers or distributors.
If you do not have access to our website, you can call our Tech Support department at 1-800-898-3211,
Monday-Friday during normal business hours, Pacic Time, to explain the problem. Tech Support will tell
you where the nearest factory-authorized service center is located in your area.
36
Page 37

Appendix D: Glossary Of Terms
The glossary contains brief denitions of many of the audio and electronic terms and acronyms used in
discussions of sound mixing and recording. If you would like more information, we recommend the following:
The Audio Dictionary — Glenn White
Tech Terms — Peterson & Oppenheimer
Handbook For Sound Engineers — Glen Ballou
One Louder Magazine — Troy Monteforte
Pro Audio Reference — Dennis Bohn
Sound Reinforcement Handbook — Gary Davis
DL806 and DL1608 Owner’s Manual
A/D Converter
digital form.
AFL — An acronym for After Fade Listen, which is another way of saying post-fader solo function.
Attenuate — To reduce or make quieter.
Aux — Short for auxiliary.
Auxiliary — Long for aux. In sound mixers, supplemental equipment or features that provide additional
capabilities to the basic system.
Aux Send — A mixer bus output designed to send a signal to an auxiliary processor or monitor system.
Balanced Input — An input consists of two leads, neither of which is common to the circuit ground.
This is a “dierential pair”, where the signal consists of the
Balanced input circuits can oer excellent rejection of common-mode noise induced into the line.
Balanced Output — In a classic balanced audio circuit, the output is carried on two leads (high or + and
low or –) which are isolated from the circuit ground by exactly the same impedance.
A symmetrical balanced output carries the same signal at exactly the same level but of opposite polarity
with respect to ground.
A special case of a balanced output carries the signal on only one lead, with the other lead being at
zero voltage with respect to ground, but at the same impedance as the signal-carrying lead. This is
sometimes called
Bandwidth — The band of frequencies that pass through a device with a loss of less than 3 dB, expressed
in Hertz [Hz] or in musical octaves. Also see Q.
— Analog-to-digital converter. A device that transforms incoming analog signals into
impedance balanced
dierence
.
in voltage between the two leads.
Channel — A functional path in an audio circuit: an input channel, an output channel, the iPad channel,
an FX channel and so on.
Channel Strip — An audio channel consisting of a long, vertical strip.
Clipping — A form of severe audio distortion that results from peaks of the audio signal attempting
to rise above the capabilities of the amplier circuit. Seen on an oscilloscope, the audio peaks appear
clipped o. To avoid clipping, reduce the system gain in or before the gain stage in which the clipping
occurs. Also see headroom.
Compressor — This is a dynamic processor used to smooth out any large transient peaks in an audio
signal that might otherwise overload your system or cause distortion. The amplitude threshold and
other parameters such as attack time, release time, and tire pressure are adjustable.
37
Page 38

DL806 and DL1608 Owner’s Manual
Glossary Of Terms Continued...
Condenser — Another term for the electronic component generally known as a capacitor. In audio,
condenser often refers to a type of microphone that uses a capacitor as the sound pickup element.
Condenser microphones require electrical power to run internal ampliers and maintain an electrical
charge on the capacitor. They are typically powered by internal batteries or phantom power supplied
by the mixer.
Console — Another term for mixer. DL1608 mixer = DL1608 console.
D/A Converter
analog form.
dB
— See decibel.
dBu
— A unit of measurement of audio signal voltage in an electrical circuit, expressed in decibels
referenced to 0.775 VRMS into any impedance. Commonly used to describe signal levels within a
modern audio system.
Decibel (dB)
Many audio system parameters measure over such a large range of values that the dB is used to
simplify the numbers. A ratio of 1000:1 = 60 dB. Since dB is a unitless quantity, it doesn’t matter if it’s
volts or dollars. (Just try asking the chief engineer for a 3 dB raise). When one of the terms in the ratio
is an agreed upon standard value, such as 1.23 V, 1 V or 1 mw, the ratio becomes an absolute value.
For example, +4 dBu, –10 dBV or 0 dBm.
Delay
— Delay “delays” the audio signal for a short period of time. Delay can refer to one short repeat,
a series of repeats or the complex interactions of delay used in chorusing or reverb.
Dipping
response curve. A dip in an EQ curve looks like a valley, or a dip. Dipping with an equalizer reduces
a range of frequencies. (See guacamole).
Doubling
copy of itself. When used carefully, this eect can simulate double-tracking [recording a voice or
instrument twice].
— Digital-to-analog converter. A device that transforms incoming digital signals into
— The dB is a ratio of quantities measured in similar terms using a logarithmic scale.
— The opposite of peaking, of course, used in audio to describe the shape of a frequency
— A delay eect where the original signal is mixed with a medium (20 to 50 ms) delayed
Dry
— Dry means without eects. It is just the signal alone; no reverb, no delay, etc.
DSP
— Digital Signal Processing accomplishes the same functions found in analog signal processors,
but performs them mathematically in the digital domain, with more precision and accuracy than its
analog counterpart. Since DSP is a software-based process, parameters and processing functions are
easily changed and updated be revising the Master Fader app.
Dynamic Microphone
of a coil in a magnetic eld. Dynamic microphones are rugged, relatively inexpensive, capable of very
good performance and do not require external power.
Dynamics Processor
(sometimes as a function of its frequency content), such as a gate, compressor, or limiter.
Dynamic Range
can handle. It is usually expressed in decibels as the dierence between the level at peak clipping and
the level of the noise oor.
Echo
— The reection of sound from a surface such as a wall or oor. Reverberation and echo are terms
that are often used interchangeably, but in audio parlance a distinction is usually made: echo is considered
to be a distinct, recognizable repetition (or series of repetitions) of a word, note, phrase or sound, whereas
reverberation is a diuse, continuously smooth decay of sound.
— The class of microphones that generate electrical signals by the movement
— A type of processor that only aects the overall amplitude level of the signal
— The range between the maximum and minimum sound levels that a sound system
38
Page 39

Glossary Of Terms Continued...
EIN
— Equivalent Input Noise. A specication that helps measure the “quietness” of a gain stage by
deriving the equivalent input noise voltage necessary to obtain a given preamp’s output noise.
Numerically, it’s the output noise at a given gain setting minus the gain. EIN is usually measured
at a maximum gain and typically ranges from -125 to -130 dBu.
EQ
— Short for equalization.
DL806 and DL1608 Owner’s Manual
EQ Curve
amplitude (level) on the y (vertical) axis. Equalizer types and eects are often named after the shape
of the graphed response curve, such as peak, dip, bell and shelf.
Equalization
of a circuit, sometimes to correct for previous unequal response (hence the term, equalization), and
more often to boost or cut the level at certain frequencies for sound enhancement, to remove extraneous
sounds, or to create completely new and dierent sounds.
A lot of how we refer to equalization has to do with what a graph of the frequency response looks like.
A at response (no EQ) is a straight line; a peak looks like a hill, a dip is a valley, a notch is a really skinny
valley, and a shelf looks like a plateau (or shelf). The slope is the grade of the hill on the graph.
Fader
Filter
attenuates frequencies below its cuto frequency.
FOH
because there’s never enough time to drink beer.
Frequency
the time period for audio frequencies is one second, and frequency is measured in cycles per second,
abbreviated Hz, honoring Dr. Heinrich Hertz (who did not invent the rental car company). One Hz is
one cycle per second. One kHz (kilohertz) is 1000 cycles per second.
The audio frequency range is generally considered to be 20 Hz to 20,000 Hz (or 20 kHz). This covers
the fundamental pitch and most overtones of musical instruments.
— A graph of the response of an equalizer, with frequency on the x (horizontal) axis and
— Long for EQ. Equalization refers to purposefully changing the frequency response
— Another name for an audio level control.
— A simple equalizer designed to remove certain ranges of frequencies. The high-pass lter
— Front Of House. See house and main (house) speakers. No engineer ever goes to the BOH
— The number of times an event repeats itself in a given period of time. Generally,
Gain
— The measure of how much a circuit amplies a signal. Gain may be stated as a ratio of input
to output voltage, current or power, such as a voltage gain of 4, or a power gain of 1.5, or it may be
expressed in decibels, such as a line amplier with a gain of 10 dB.
Gain Stage
Overall system gain is distributed between the various gain stages.
Gate
level. This can reduce the overall noise level of your mix by turning o inputs when they are not in use.
Threshold, attack time, hold, and release time are some of the adjustable gate parameters.
Graphic EQ
evenly spaced through the audio spectrum. In a perfect world, a line drawn through the centers of the
control shafts would form a graph of the frequency response curve. Or, the positions of the sliders give
a graphic representation of boost or cut levels across the frequency spectrum.
— An amplication point in a signal path, either within a system or a single device.
— A dynamics processor that automatically turns o an input signal when it drops below a certain
— The graphic equalizer uses sliders for its boost / cut controls, with its operating frequencies
39
Page 40

DL806 and DL1608 Owner’s Manual
Glossary Of Terms Continued...
Ground
the reference point from which all other voltages are measured.
In electrical power systems, ground connections are used for safety purposes, to keep equipment
chassis and controls at zero voltage and to provide a safe path for errant currents. This is called a
safety ground. Maintaining a good safety ground is essential to preventing electrical shock. Follow
manufacturer’s suggestions and good electrical practices to ensure a safely grounded system. Never
remove or disable the grounding pin on the power cord.
In sensitive electronic equipment, tiny currents and voltages riding on the ground (so it’s not truly zero
volts) can cause noise in the circuits and hamper operation. Often a ground separate from the power
ground is used as the reference point for the electronics, isolating the sensitive electronics from the dirty
power ground. This is called a technical ground.
Quality audio equipment is designed to maintain a good technical ground and also operate safely with
a good safety ground.
Ground Loop
to the safety ground at more than one place. This forms a loop around which unwanted current ows,
causing noise in the audio system. Never disable the safety ground in an attempt to solve hum problems.
Guacamole
Hertz
House
sound reinforcement in a given venue. Hence, we have the house mixer or house engineer, the house mix,
house mix amps, main house speakers, etc.
— Also called earth. Ground is dened as the point of zero voltage in a circuit or system,
— A ground loop occurs when the technical ground within an audio system is connected
— A delicious dip comprised mostly of avocados. Speaking of dips, refer to dipping.
— The unit of frequency, equal to 1 cycle per second. 1000 Hz equals 1 kHz.
— In audio-land, the house refers to the systems (and even persons) responsible for the primary
Hz
— Short for Hertz.
Impedance
In audio circuits (and other AC circuits) the impedance in ohms may often be much dierent from the circuit
resistance as measured by a DC ohmmeter.
Maintaining proper circuit impedance relationships is important to avoid distortion and minimize added
noise. Our input and output impedances are set to work well with the vast majority of audio equipment.
Knee
Level
classied according to their level. Commonly used levels are: microphone level (–40 dBu or lower),
instrument level (–20 to –10 dBu), and line level (–10 to +30 dBu).
Line Level
Main (House) Speakers
the largest and loudest loudspeakers, positioned facing the audience; the sound is typically delivered
from the stage. This is also called the PA.
Mains
Master
fader. It aects the total level of the selected output in which one or more signals are mixed together.
— The A.C. resistance, capacitance, and inductance in an electrical circuit, measured in ohms [ ].
— A knee is a sharp bend in a compressor gain curve, not unlike a sharp bend in your leg.
— Another word for signal, voltage, power, strength or volume. Audio signals are sometimes
— A signal whose level falls between –10 dBu and +30 dBu.
— The main loudspeakers for a sound reinforcement system. These are usually
— Short for main or house speakers in a sound reinforcement system.
— Me. I am your master. Obey! The master on the Master Fader app, though, refers to the master
40
Page 41

Glossary Of Terms Continued...
DL806 and DL1608 Owner’s Manual
Mic Amp
Mic Level
always – coming from a microphone) is generally lower than –30 dBu. With a very quiet source
[a pin dropping?] the signal may be –70 dBu or lower.
Some microphones, notably vintage or vintage-style condenser mics, deliver a higher signal level
than this for the same sound pressure level. A “hot” mic output level isn’t necessarily a measure of
the microphone’s quality; it’s just an option that the designer(s) chose.
Mic Pre
Mic Preamp
microphone level signal up to line level, or in the case of a mic preamp built into a mixer, the mixer’s
internal operating level [approximately 0 dBu].
Mic preamps often have their own volume control, called gain, to properly set the gain for a particular
source. Setting the mic preamp gain correctly is an essential step in establishing good signal-to-noise
ratio and sucient headroom. The DL Series mixers are outtted with Onyx mic preamps.
Mixer
Dierent from a blender, which combines various fruits and alcohol into a common libation.
Monaural
In the audio eld, monaural describes a signal or system which carries audio information on a single
channel with the intent of reproducing it from a single source. One microphone is a mono source;
many microphones mixed to one channel is a mono mix; a stereo (or – to be picky – a two-channel)
mix of many microphones panned left and right is a stereo mix of mono sources.
— See Mic Preamp.
— The typical level of a signal from a microphone. A mic level signal (usually – but not
— Short for Mic Preamp.
— Short for microphone preamplier. An amplier whose job is to bring the very low
— An electronic device used to combine various audio signals into a common output.
— Long for mono. Literally, pertaining to or having the use of only one ear.
Monaural listening, and therefore mono compatibility of a stereo mix, is more important than you
might realize. Most people hear television audio and clock radios in mono.
Monitor
used by performers to hear themselves. In the video and broadcast world, monitor speakers are often
called foldback speakers. In recording, the monitors speakers are those used by the engineer and
production sta to listen to the recording as it progresses. In zoology, the monitor lizard is the lizard
that observes the production sta as the recording progresses. Keep the lizard out of the mixer.
Mono
Mute Groups
outputs with a single tap. There are a multitude of possibilities in which to assign and enable mute
groups: productions featuring a rotating cast of musicians, theater productions, a house of worship
and more. It is also great for muting all inputs during song breaks or in-between sets. You may create
as many as four separate mute groups with Master Fader.
Noise
hash, or your neighbor’s stereo; or it could be white noise, pink noise or brown noise. It’s also how your
parents describe your band. After all, it’s what they don’t want to hear.
Noise Floor
mixers), the noise oor will be a quiet hiss, which is the thermal noise generated by electrons bouncing
around in resistors and semiconductor junctions. The lower the noise oor and the higher the headroom,
the more usable dynamic range a system has.
— In sound reinforcement, monitor speakers [or monitor headphones or in-ear monitors] are
— Short for monaural (and mononucleosis for that matter).
— Mute groups allow you to quickly mute (and unmute) multiple channels and/or
— Whatever you don’t want to hear. This could be hum, buzz or hiss; or it could be crosstalk, digital
— The residual level of noise in any system. In a well-designed mixer (such as the DL Series
41
Page 42

DL806 and DL1608 Owner’s Manual
Glossary Of Terms Continued...
Nyquist Sampling Theorem
signal, it must be sampled at a frequency that is at least twice the highest audio frequency present in the
analog signal. If the audio frequency should exceed one-half the sampling frequency, aliasing may result.
Thus, if an analog-to-digital converter is sampling at 44.1 kHz, the audio signal should not exceed 22.05 kHz.
PA
— Acronym for Public Address. Today, people who work with PA systems like to say they’re working in
“sound reinforcement”. See SR.
Pan
— Pan sliders are used to position (or even dynamically move) a monaural sound source in a stereo
mixing eld by adjusting the source’s volume between the left and right channels. Our brains sense stereo
position by hearing this dierence in loudness when the sound strikes each ear, taking into account time
delay, spectrum, ambient reverberation and other cues.
Peaking
an equalizer amplies a band of frequencies.
PFL
a channel with the fader down.
Phantom Power
electronic pickup devices) from the microphone input jack. The system is called phantom because
the power is carried on a standard microphone audio wiring in a way that is “invisible” to ordinary
dynamic microphones. The DL Series mixers use a standard +48 volt DC power, switchable on or o.
Generally, phantom power is safe to use with non-condenser microphones, as well, especially dynamic
microphones. However, unbalanced microphones, some electronic equipment (such as some wireless
microphone receivers) and some ribbon microphones can short out the phantom power and be severely
damaged.
— The opposite of dipping. A peak is an EQ curve that looks like a hill, or a peak. Peaking with
— An acronym for Pre-Fade Listen. Broadcasters call it cueing. Sound folks call it being able to solo
— A system of providing electrical power for condenser microphones (and some
— This theorem states that, when an analog signal is converted to a digital
Phase
— The time relationship between two signals, expressed in degrees around a circle. 0˚ and 360˚
represent an in-phase relationship. Both signals change in the same way at the same time. Anything else
is out of phase.
180˚ out-of-phase is a special case which, for a continuous waveform, means that at any given time the
two signals have the same amplitude but are opposite in polarity. The two legs of a dierential output
are 180˚ out-of-phase. The polarity invert button (found in the EQ view) reverses the signal polarity.
When out-of-phase signals are mixed, there will be some cancellation at certain frequencies, the frequencies
and the degree of cancellation being a function of the amount of phase shift and the relative amplitude of
the signals. Attention to mic placement and careful listening will allow you to use this eect creatively.
Post Fader
by the setting of the associated channel fader. Sends connected this way are typically (but not always) used
for eects. A post-fader output from a mixer channel is usually post-EQ.
Pre DSP
eects in the main mix, but not the monitors. Pre DSP is available in all auxes, but not the FX.
Pre Fader
aected by the setting of the associated channel fader. Sends connected this way are typically (but not
always) used for monitors.
Q
— A way of stating the bandwidth of a lter or equalizer section. An EQ with a Q of .75 is broad and
smooth, while a Q of 10 gives a narrow, pointed response curve. To calculate the value of Q, you must
know the center frequency of the EQ section and the frequencies at which the upper and lower skirts
fall 3 dB below the level of the center frequency. Q equals the center frequency divided by the dierence
between the upper and lower 3 dB-down frequencies. A peaking EQ centered at 10 kHz whose –3 dB
points are 7.5 kHz and 12.5 kHz has a Q of 2.
— A term used to describe an aux send (or other output) that is connected so that it is aected
— Pre DSP is ideal when using the auxes for monitor mixes and you want compression and other
— A term used to describe an aux send (or other output) that is connected so that it is not
42
Page 43

Glossary Of Terms Continued...
Reverberation, Reverb — The sound remaining in a room after the source of sound is stopped.
It’s what you hear in a large tiled room immediately after you’ve clapped your hands.
Reverberation and echo are terms that are often used interchangeably, but in audio parlance, a distinction
is usually made: reverberation is considered to be a diuse, continuously smooth decay of sound, whereas
echo is one or more distinct, recognizable repetitions of a word, note, phrase or sound which decreases in
amplitude with every repeat.
Highly reverberant rooms are called live; rooms with very little reverberation are called dead. A sound
source without added reverb is dry; one with reverb added is wet.
RFI — Radio Frequency Interference. High frequency radiation that often results from sparking circuits.
This may be manifested in a number of ways in audio systems, but is usually evident as a high-frequency
buzz or harsh sound.
RMS — An acronym for root mean square, a conventional way to measure the eective average value
of an audio signal or other AC voltage. Most AC voltmeters are calibrated to read RMS volts, though
on many meters that calibration is accurate only if the waveform is sinusoidal.
Sampling Frequency — This is the rate at which an analog signal is sampled during the analog-to-digital
conversion process. The sampling rate used for CDs is 44.1 kHz, but professional recordings are often
sampled at higher sample rates.
DL806 and DL1608 Owner’s Manual
Send — A term used to describe the output of a secondary mix of the input signals, typically used for
monitors, headphone amp or eects devices. These are the aux sends on the DL Series mixers.
Shelving — A term used to describe the shape of an equalizer’s frequency response. A shelving equalizer’s
response begins to rise (or fall) at some frequency and continues to rise (or fall) until it reaches the shelf
frequency, at which point the response curve attens out and remains at to the limits of audibility.
If you were to graph the response, it would look like a shelf. Or more like a shelf than a hiking boot.
See also peaking and dipping.
Signal-to-Noise (S/N) — This is a specication that describes how much noise an audio component
has compared to the signal. It is usually expressed in dB below a given output level. The S/N of the
DL Series mixers is 92 dB.
Solo — Italian for alone. Solo allows you to listen to individual channels singly or in combination with
other soloed signals.
Sound Reinforcement — A system of amplifying acoustic and electronic sounds from a performance
or speech so that a large audience can hear clearly. Or, in popular music, so that a (hopefully) large audience
can be excited, stunned, or even partially deafened by the tremendous amplication. Sound reinforcement
means essentially the same thing as PA [Public Address].
Spaghetti — That mess of wires and cables in the back of your rack and/or console. You really can tame
this beast.
SR — An acronym for Sound Reinforcement, which refers to the process (or a system for) amplifying
acoustic and electronic sounds from a performance or speech so that a large audience can hear clearly.
Or, in popular music, so that a (hopefully) large audience can be excited, stunned, or even partially
deafened by the tremendous amplication. Sound reinforcement means essentially the same thing
as PA [Public Address].
43
Page 44

DL806 and DL1608 Owner’s Manual
Glossary Of Terms Continued...
Stereo — Believe it or not, stereo comes from a Greek word that means solid. We use stereo or stereophony
to describe the illusion of a continuous, spacious sound eld that is seemingly spread around the listener
by two or more related audio signals. In practice, stereo often is taken to simply mean two channels.
Tinnitus — The ringing in the ears that often results from prolonged exposure to very loud sound levels.
TRS — Acronym for Tip-Ring-Sleeve, the three parts of a two conductor (plus shield) phone plug.
Since the plug or jack can carry two signals and a common ground, TRS connectors are often referred
to as stereo or balanced plugs or jacks.
TS — Acronym for Tip-Sleeve, the two parts of a single conductor (plus shield) phone plug. TS connectors
are sometimes called mono or unbalanced plugs or jacks. A ¼" TS phone plug or jack is also called a standard
phone plug or jack.
Unbalanced — An electrical circuit in which the two legs of the circuit do not have the identical
impedance to ground. Often one leg is also at ground potential. Unbalanced circuit connections
require only two conductors (signal “hot” and ground). Unbalanced audio circuitry is less expensive
to build, but under certain circumstances is more susceptible to noise pickup.
View Groups — View groups allow you to see only the channels that you want to view, hiding the rest.
This improves organization and allows for faster navigation. You may create and assign as many as four
separate view groups with Master Fader.
Volume — The sound level in an audio system. Perhaps the only thing that some bands have too much of.
VRMS — Acronym for Volts Root Mean Square. See RMS.
Wet — A signal with added reverberation or other eect like echo, delay or chorusing.
XLR Connector — Three-pin connectors now universally used for balanced microphone connections.
Also known as Cannon, as Cannon was the original manufacturer of this type of connector. In sound work,
a Cannon connector is taken to mean a Cannon XLR-3 connector or any compatible connector. You can tell
who the audio geezers are when they refer to XLR connectors as Cannon connectors.
Z — The electrical symbol for impedance.
Zymurgy — The science of brewing, an important part of our technology and history since we are located
less than one mile from the Red Hook brewery. Besides, we need something other than just a plain ‘ol “Z”
to end the glossary.
44
Page 45

Warranty Statement
This Limited Product Warranty (“Product Warranty”) is provided by LOUD Technologies Inc. (“LOUD”)
and is applicable to products purchased in the United States or Canada through a LOUD-authorized
reseller or dealer. The Product Warranty will not extend to anyone other than the original purchaser of
the product (hereinafter, “Customer,” “you” or “your”).
For products purchased outside the U.S. or Canada, please visit www.mackie.com/warranty to find
contact information for your local distributor, and information on any warranty coverage provided by the
distributor in your local market.
LOUD warrants to Customer that the product will be free from defects in materials and workmanship
under normal use during the Warranty Period. If the product fails to conform to the warranty then LOUD
or its authorized service representative will at its option, either repair or replace any such nonconforming
product, provided that Customer gives notice of the noncompliance within the Warranty Period to the
Company at: www.mackie.com/support or by calling LOUD technical support at 1.800.898.3211
(toll-free in the U.S. and Canada) during normal business hours Pacific Time, excluding weekends or
LOUD holidays. Please retain the original dated sales receipt as evidence of the date of purchase. You will
need it to obtain any warranty service.
DL806 and DL1608 Owner’s Manual
Please keep your sales receipt in a safe place.
For full terms and conditions, as well as the specific duration of the Warranty for this product, please visit
www.mackie.com/warranty.
The Product Warranty, together with your invoice or receipt, and the terms and conditions located
at www.mackie.com/warranty constitutes the entire agreement, and supersedes any and all prior
agreements between LOUD and Customer related to the subject matter hereof. No amendment,
modification or waiver of any of the provisions of this Product Warranty will be valid unless set forth in a
written instrument signed by the party to be bound thereby.
GPL Statement
This LOUD Technologies Inc. product includes software code developed by third parties, including
software code subject to the GNU General Public License (“GPL”) Version 2. Where such specific license
terms entitle you to the source code of such software, LOUD Technologies Inc. will provide upon written
request via email or traditional paper mail the applicable GPL source code files via CD-ROM for a nominal
cost to cover media, shipping and handling charges as allowed under the GPL.
The GPL code used in this product is distributed WITHOUT ANY WARRANTY and is subject to the
copyrights of one or more authors. For details, see the GPL code and the terms of the GPL. For a copy
of the GPL please write to the Free Software Foundation, Inc., 51 Franklin Street, Fifth Floor, Boston, MA
02110-1301, USA.
Please direct all GPL Source Requests to the following email/address.
Attn: GPL Source Request
LOUD Technologies Inc.
16220 Woodinville-Redmond Rd. N.E.
Woodinville, WA 98072
or
techmail@loudtechinc.com
45
Page 46

 Loading...