

Page 1

Applications
Chapter 4
D8B Manual • Chapter 4 • page 87
Page 2
Setting Up for a Session
This section of the Digital 8•Bus Owner’s
Manual provides very application-specific descriptions of some common usages. Follow the checklist format to help ensure everything is set just
right for your configuration.
As your skills and knowledge increase, try
new techniques. Build a system that’s optimized
for your specific application.
Channel Configuration/Planning
This actually has a lot to do with how well any
audio experience unfolds. If you know where
you’re headed with track expectations and instrumentation, you’ll be able to make better choices
along the way. Plan; plan again; think about it;
then, plan some more.
Devise a mock up of the final track sheet
before you begin recording. You’ll know more
about how to get where you want to be.
Listening Environment
Power-up Procedure
In any serious recording or live audio situation, the listening environment is one of the most
important considerations. In a recording application, be sure the Digital 8•Bus is connected to
excellent reference monitors, like the Mackie
HR824’s. In addition, set up the system in an
acoustically controlled and balanced environment.
Avoid a control room with identical dimensions in
any direction and set it up with a good mixture of
absorption and reflection.
In a live-sound setting, place the console out
in the house at a good visual and auditory vantage
point. If you’re mixing in mono, it’s okay to sit in
line with one of the speaker clusters. When
mixing in stereo or surround, select the best
location—typically called the “sweet spot”—to
critically assess the entire mix. Eliminate guess
work. Maximize efficiency.
A well-thought-out power-up procedure saves
wear and tear on all your gear. This procedure
helps minimize the opportunity for equipment
damage while maximizing the chance of success.
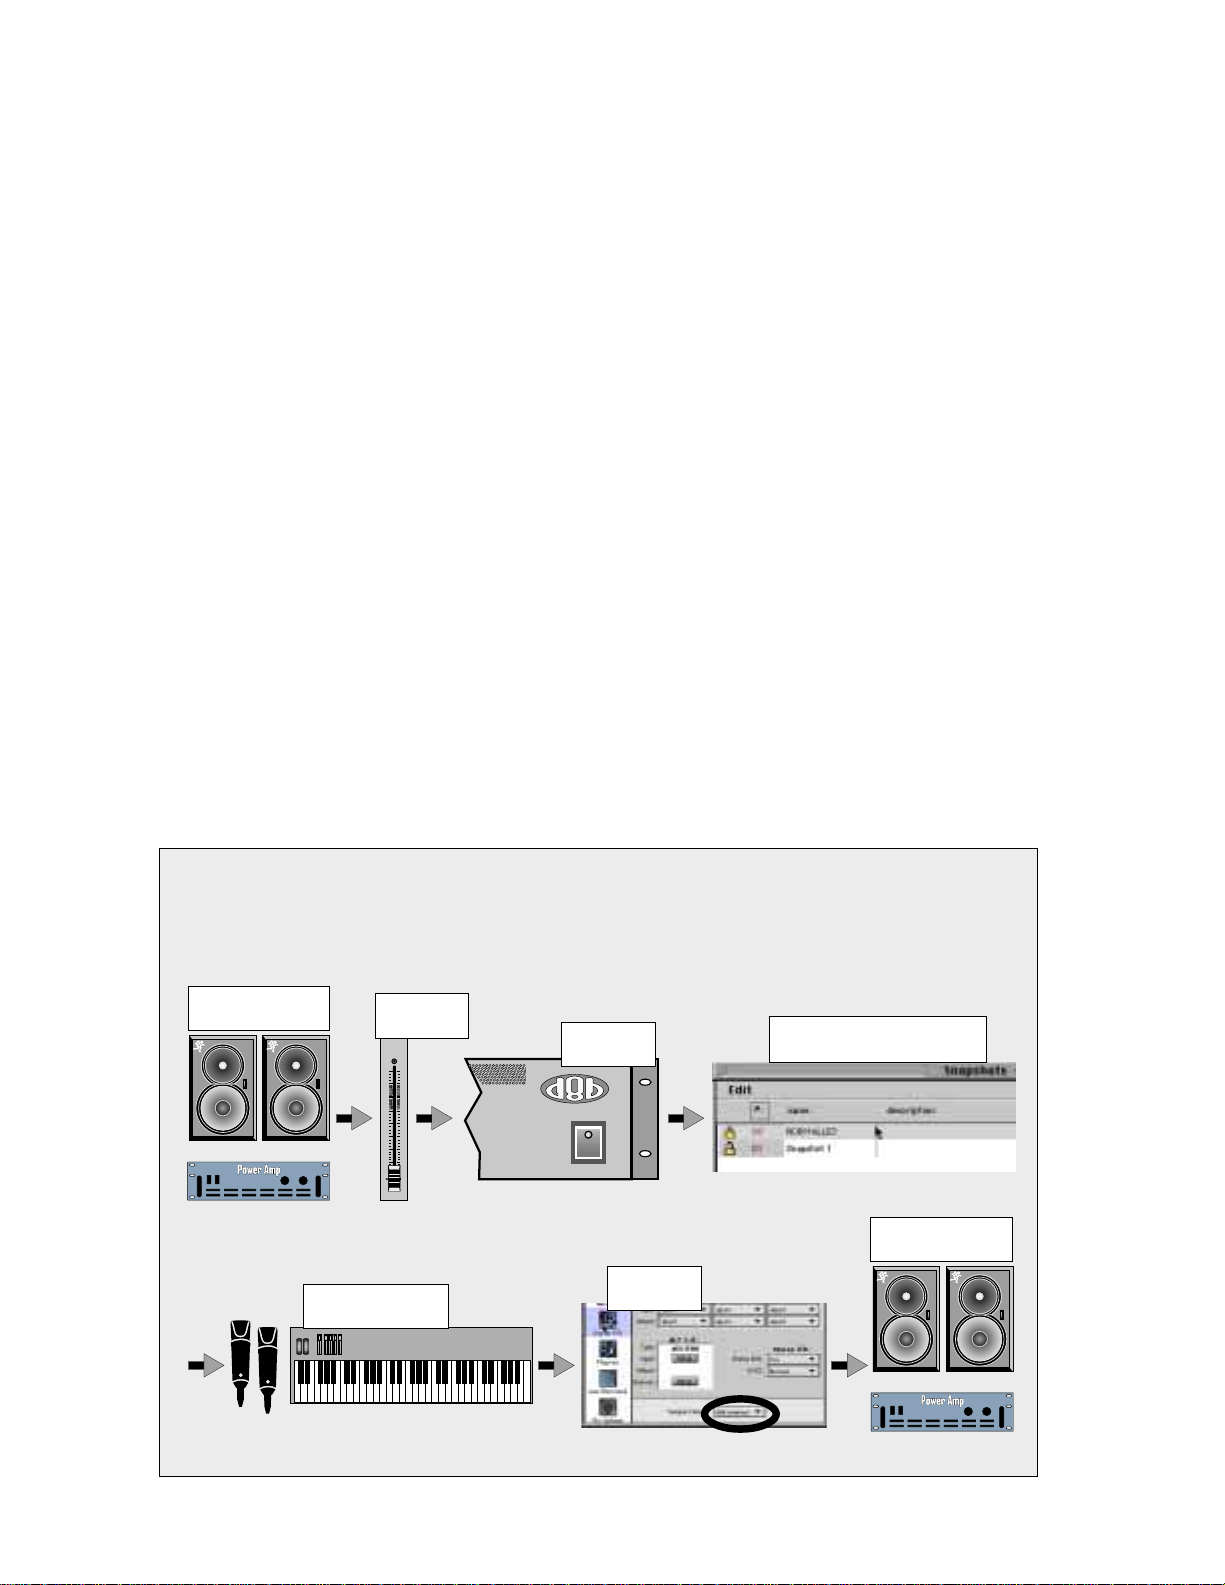
Refer to Figure 4-1 for a Fast Track Graphic
representation of this procedure.
❏ Amplification system off: power amps or
powered monitors
❏ Master Fader down
❏ Switch Console Power on
• The D8B will create a Startup file with default
settings if the User-Set Template has not yet
been specified.
❏ Open and load a snapshot or a session (optional)
Figure 4-1 Power-up Procedure
Follow this procedure for a safe and sure startup routine. Deliberate, well-thought-out procedures help eliminate
uncomfortable pauses in a session. They make recording a more enjoyable experience.
Amp or Powered
Monitors Off
OR
Master L/R
Fader Down
MASTER
L/R
dB
10
5
U
5
10
20
30
40
50
60
Connect Instruments
and Microphones
Synth
D8B Manual • Chapter 4 • page 88
Console
Power On
Set Sample
Select A starting Snapshot or
Open Your Master Template
Amp or Powered
Monitors On
Clock
OR
Page 3
• It’s a good idea to keep a snapshot of each
working configuration as a starting point:
tracking, overdubs, symphony, grunge band, etc.
❏ Connect all mics and instruments
• Be sure all channel faders are down.
• Turn Master Fader down.
• Turn Speaker level down.
❏ Set up sample clock
• Verify consistent sample rate settings
throughout all digital multitrack recording
devices.
• Word clock and digital data transfer
connections are very important to the
efficiency and functionality of any digital
system. Verify them.
• Most systems work best when the D8B is the
Master word clock source. Use the Apogee
Clock I/O card to send word clock to slave
devices.
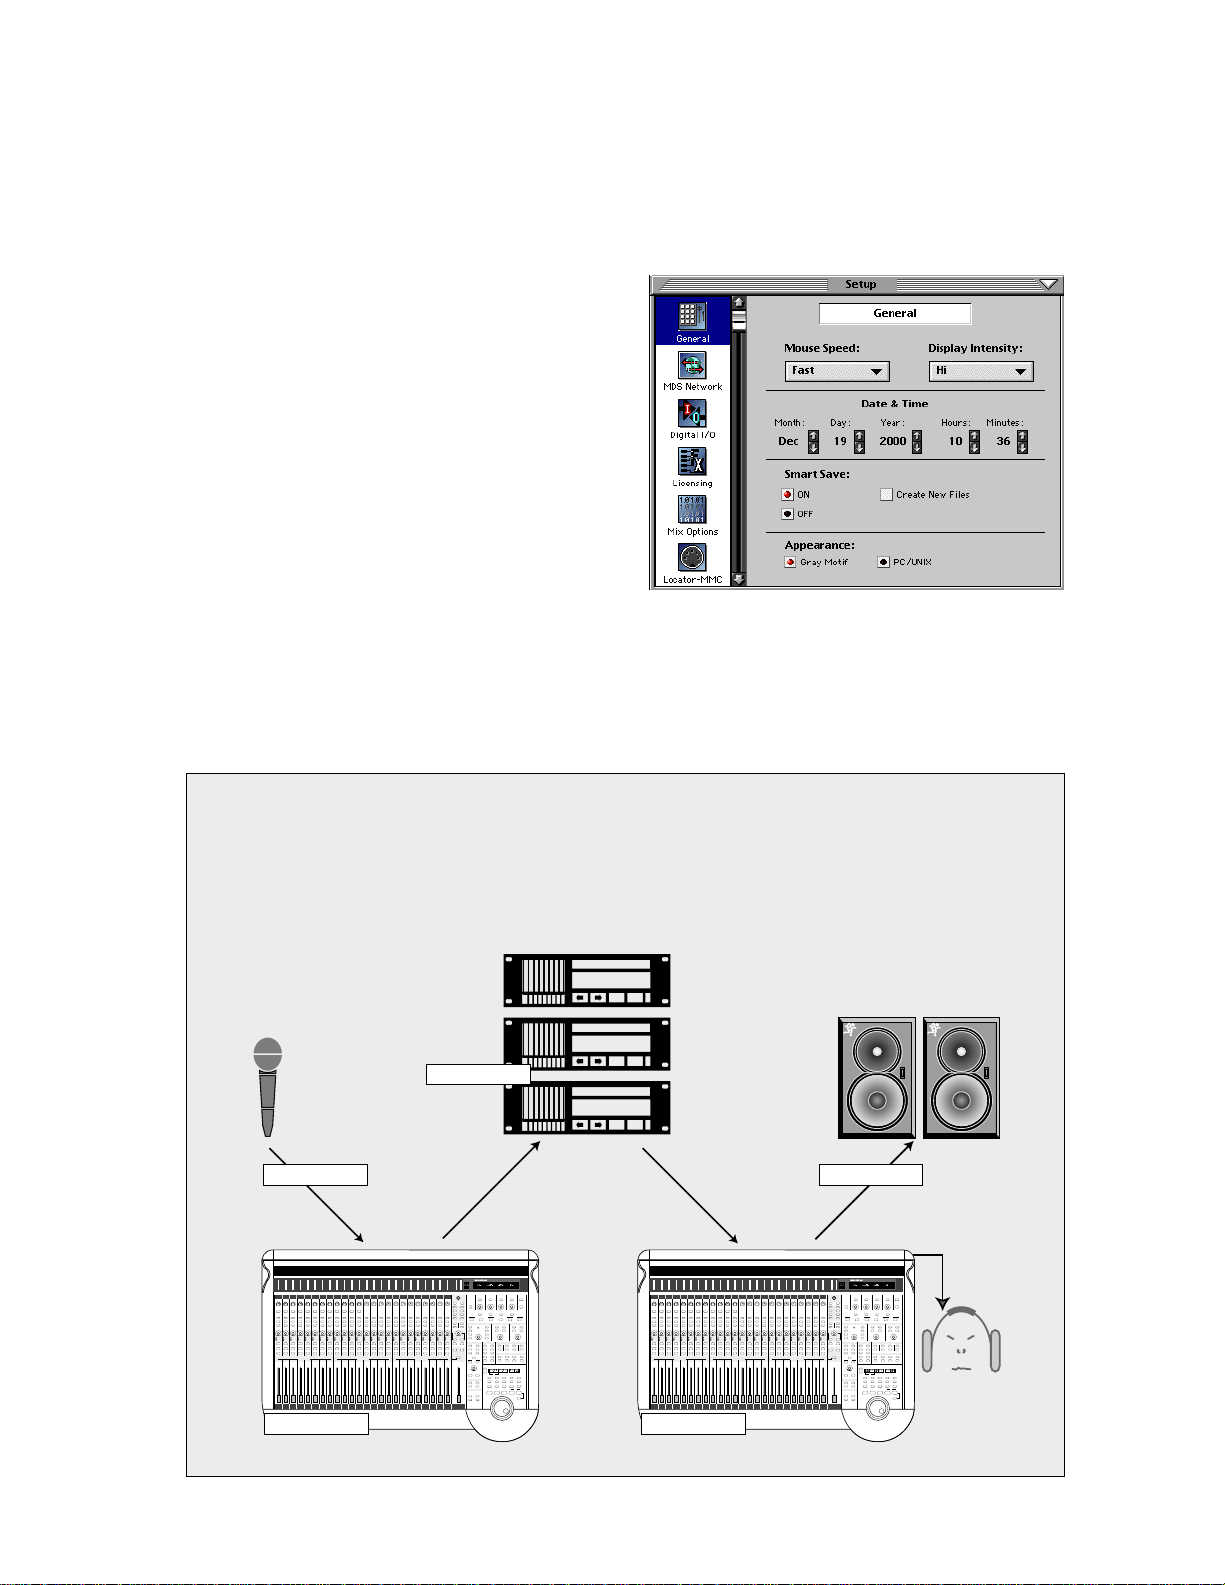
Setup Window
The Setup Window is very important to the
functionality of the Digital 8•Bus. Its settings
determine how the console functions within its
own architecture as well as how it interfaces with
other digital equipment.
❏ Turn amplification system on
• Wait until all other gear is powered up before
turning on the monitor system.
❏ Enjoy the creative process
Follow the checklist on the next page to verify
that each Setup Window parameter is intentionally
set. For specific recommendations for various
parameter settings, refer to “The Setup Window” on
page 64.
Figure 4-2 Basic Connection for Multitrack Recording
This diagram represents the fundamental connections in a D8B-based multitrack system. Sound sources
feed Fader Bank 1 (MIC/LINE); Fader Bank 1 feeds the multitrack inputs via the AIO•8, DIO•8, or ADAT card
outputs; the multitrack outputs feed Fader Bank 2 (TAPE) via the AIO•8, DIO•8, or ADAT card inputs; the mix
output feeds the control room monitor system, master 2-track recorder, headphones, etc.
Multitracks
Audio Source
To Monitors
Fader Bank 1 Fader Bank 2
D8B Manual • Chapter 4 • page 89
Page 4

Setup Window settings are automatically stored
and are recalled in subsequent boot ups.
General
❏
• Mouse Speed
• Display Intensity
• Date and Time
• Smart Save selection
• Appearance style
Mackie Digital Systems (MDS) Network
❏
• Network Channel
• Mixer Name
• Alt I/O 1–8 assignments
• Link Options across the digital network
(connected Digital 8•Bus consoles)
Digital I/O (Tape 1–24)
❏
• Sample rate
• Apogee Clock status: Internal/Word Clock
• Alt 1–8 Type, Inputs, and Outputs
• Stereo I/O settings
Licensing
❏
• Displays authorization status (locked or
unlocked) of D8B plug-ins
• Enables installation and authorization of
plug-ins
• Displays mixer serial number
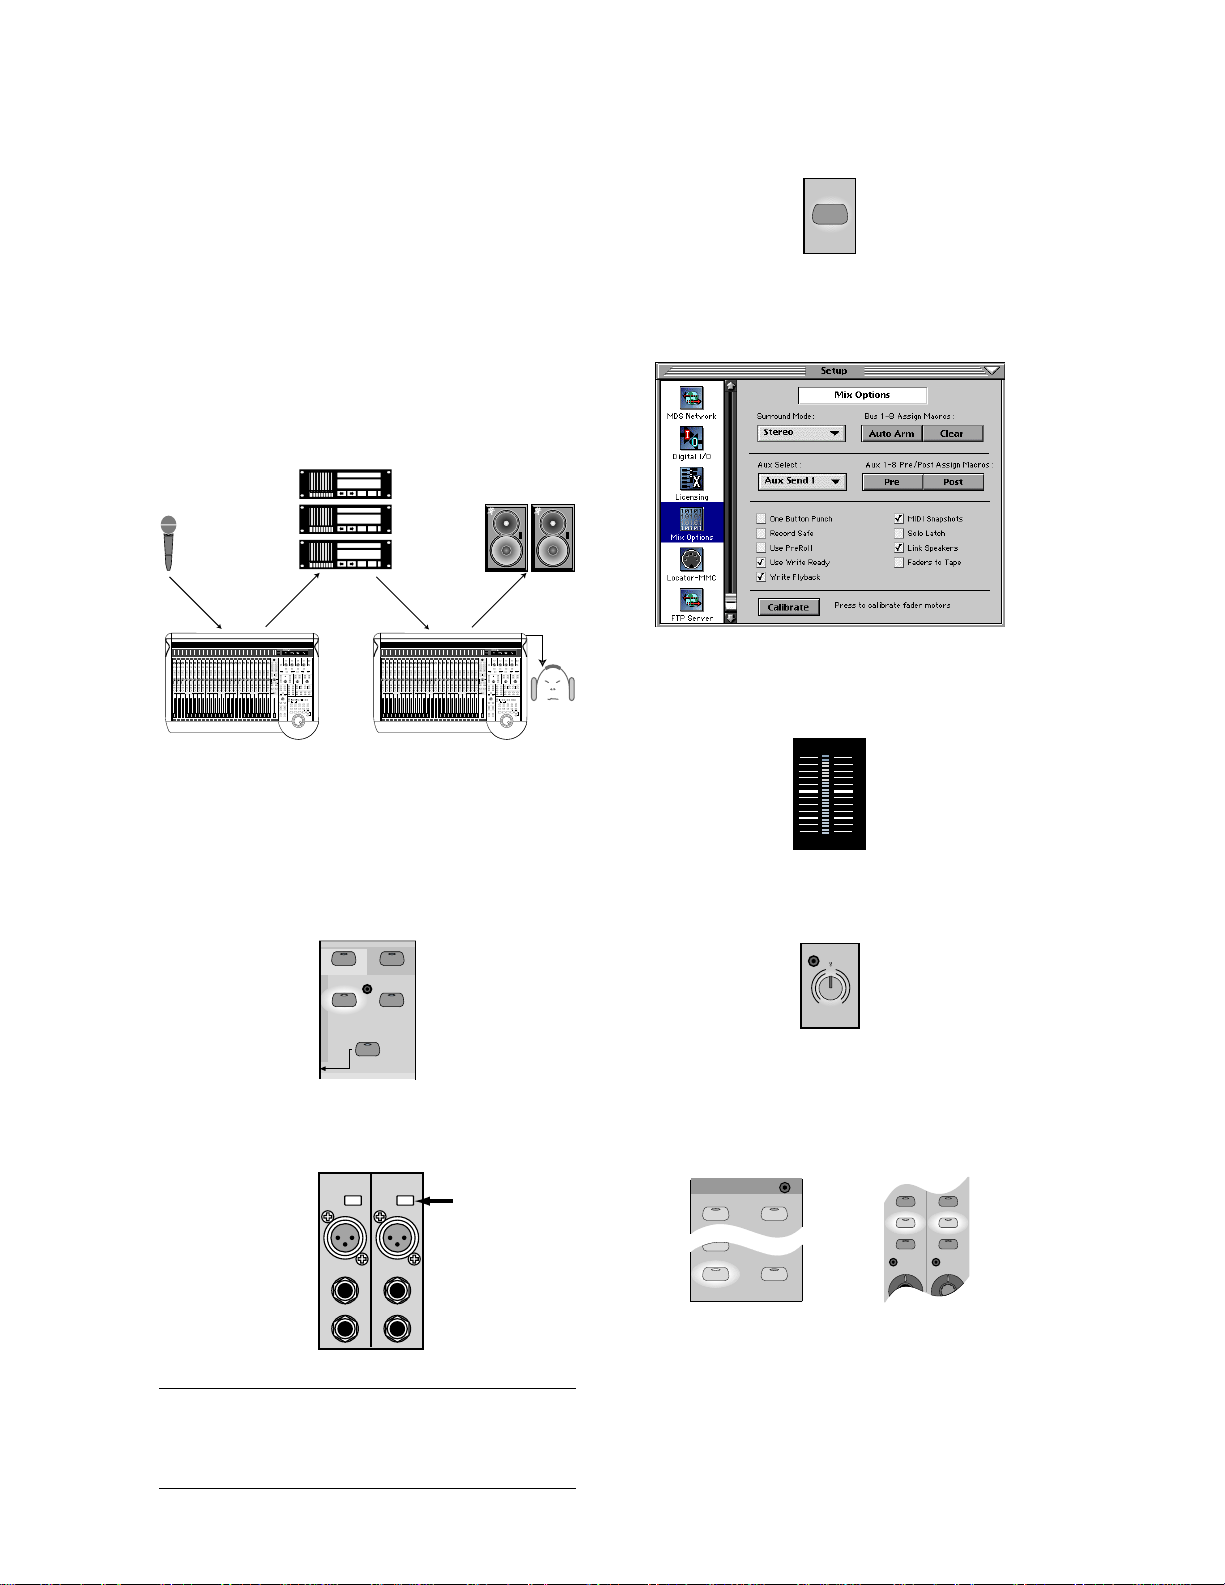
Mix Options
❏
• Surround Mode selection and Bus arming
• Aux 1–8 global Pre/Post selection
• Selection of One Button Punch, Record
Safe, Use PreRoll, Use Write Ready, Write
Flyback, MIDI Snapshots, Solo Latch, Link
Speakers, and Faders to Tape
• Fader Calibration
Locator-MMC
❏
• MIDI File Tempo Map loading and resetting
• Default Tempo setting
• Device ID selection
• Song Offset
• Pre-Roll time
FTP Server
❏
• Choose to allow FTP client
• Set IP Address, Subnet, and Gateway
D8B Manual • Chapter 4 • page 90
Page 5

Installation and Connection of
Optional I/O and Effects Cards
The Input/Output cards are an essential part
of the D8B multitrack system. These cards
provided up to 24 tape outputs and inputs for use
with any common analog and digital formats.
Since the I/O cards are optional and interchangeable, you probably need to install them before you
begin creating hit recordings. If you install multiple
types of I/O cards, note which slots they’re installed
in. Making a note of each I/O card type and its exact
slot will help avoid subsequent problems.
There are several optional cards available for
the Digital 8•Bus which you can install into the
card cage in the rear panel of the console. These
cards provide additional inputs and outputs for
specific applications, or additional digital signal
processing power for effects.
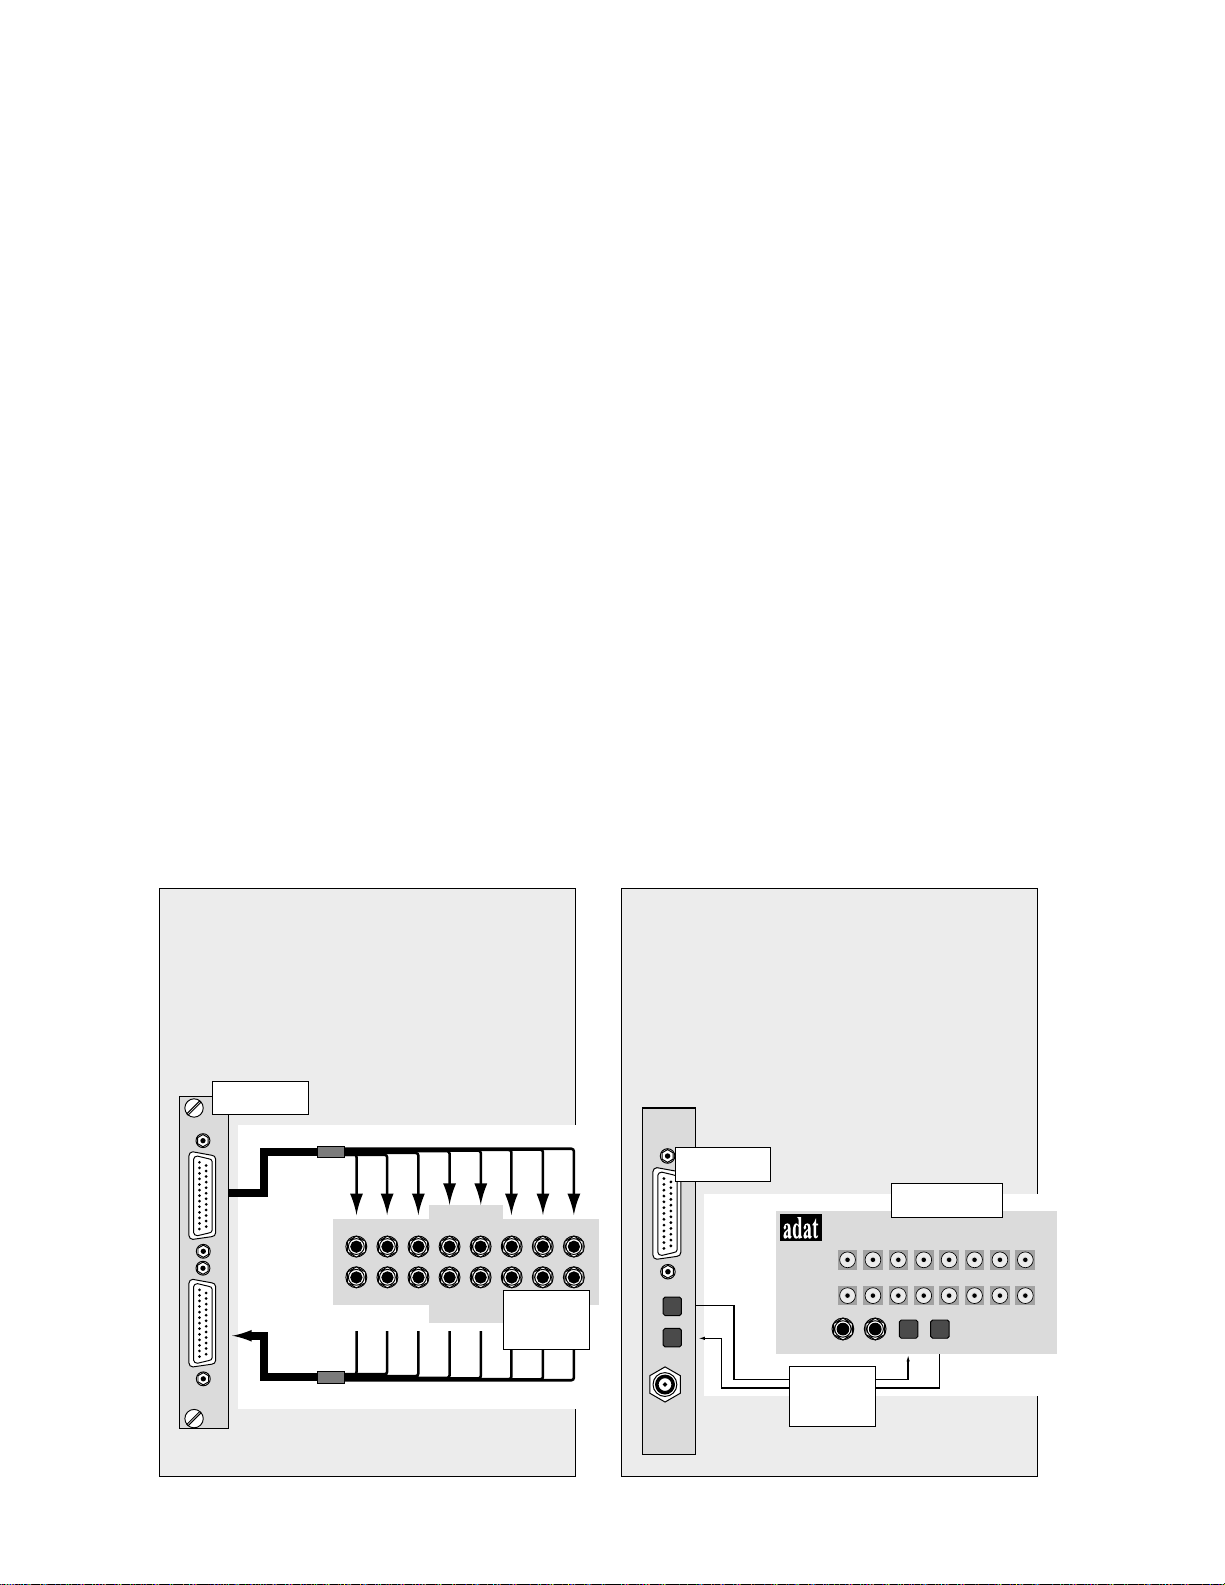
OPT•8 Card (ADAT Optical)
The inexpensive ADAT optical card functions
with any device incorporating the ADAT format
digital optical lightpipe. The OPT•8 card configures
itself automatically; it doesn’t need to be adjusted
in the Setup>Digital I/O window. Lightpipe connections between the D8B and the connected record/
playback device are clean and efficient.
PDI•8 Card (AES/EBU)
This card provides 8 digital inputs and 8 digital
outputs in the AES/EBU standard format.
Connection is made through a 25-pin D-Sub
connector. You can install this card in any of the Tape
In/Out slots, or in the ALT I/O slot.
AES/EBU is a standard two-channel digital
protocol used for long balanced cable applications.
Thus, each conductor actually transmits two
channels of digital audio data.
AIO•8 (Analog Hookup)
This card provides 8 analog line-level inputs
and outputs. Connections are made through two
25-pin D-Sub connectors. You can install this card
in any of the Tape In/Out slots, or in the ALT I/O
slot.
DIO•8 (Digital Hookup)
This card provides 8 digital inputs and 8 digital
outputs. Connections are provided in both ADAT
Multichannel Optical Interface and Tascam T/DIF-1
formats. You can install this card in any of the Tape
In/Out slots, or in the ALT I/O slot. You can mix any
combination of the AIO•8 and DIO•8 cards in the
Tape I/O slots to suit your particular application. You
can configure the card in the GUI (Setup>Digital I/O)
and select the I/O connector you wish to use.
Connections for ADAT
The connection for ADAT is made with a fiber
optic cable, sometimes referred to as “lightpipe.”
This connection provides 8 channels of digital audio.
You can purchase this cable from your Alesis dealer,
Monster Cable, Hosa, or other cable manufacturer.
Connections for DA-88
The connection for T/DIF-1 is made with a 25-pin
D-Sub connector. This connection provides 8 channels
of bidirectional digital audio. This connection requires
a 25-pin D-sub cable (Tascam Part Number PW-88D).
MFX Effects Card
This card provides two additional DSP engines for running internal effects. The Digital
8•Bus is shipped with one MFX card installed in
Slot A. You can install up to three more MFX
cards in Slots B, C, and D.
UFX Effects Card
This card provides up to four additional DSP
engines for running internal effects. The UFX
architecture provides access to the newest and
coolest third-party plug-ins, as well as an array of
groovy new Mackie plug-ins. The D8B effects card
slots accommodate any combination of UFX and
MFX cards.
D8B Manual • Chapter 4 • page 91
Page 6
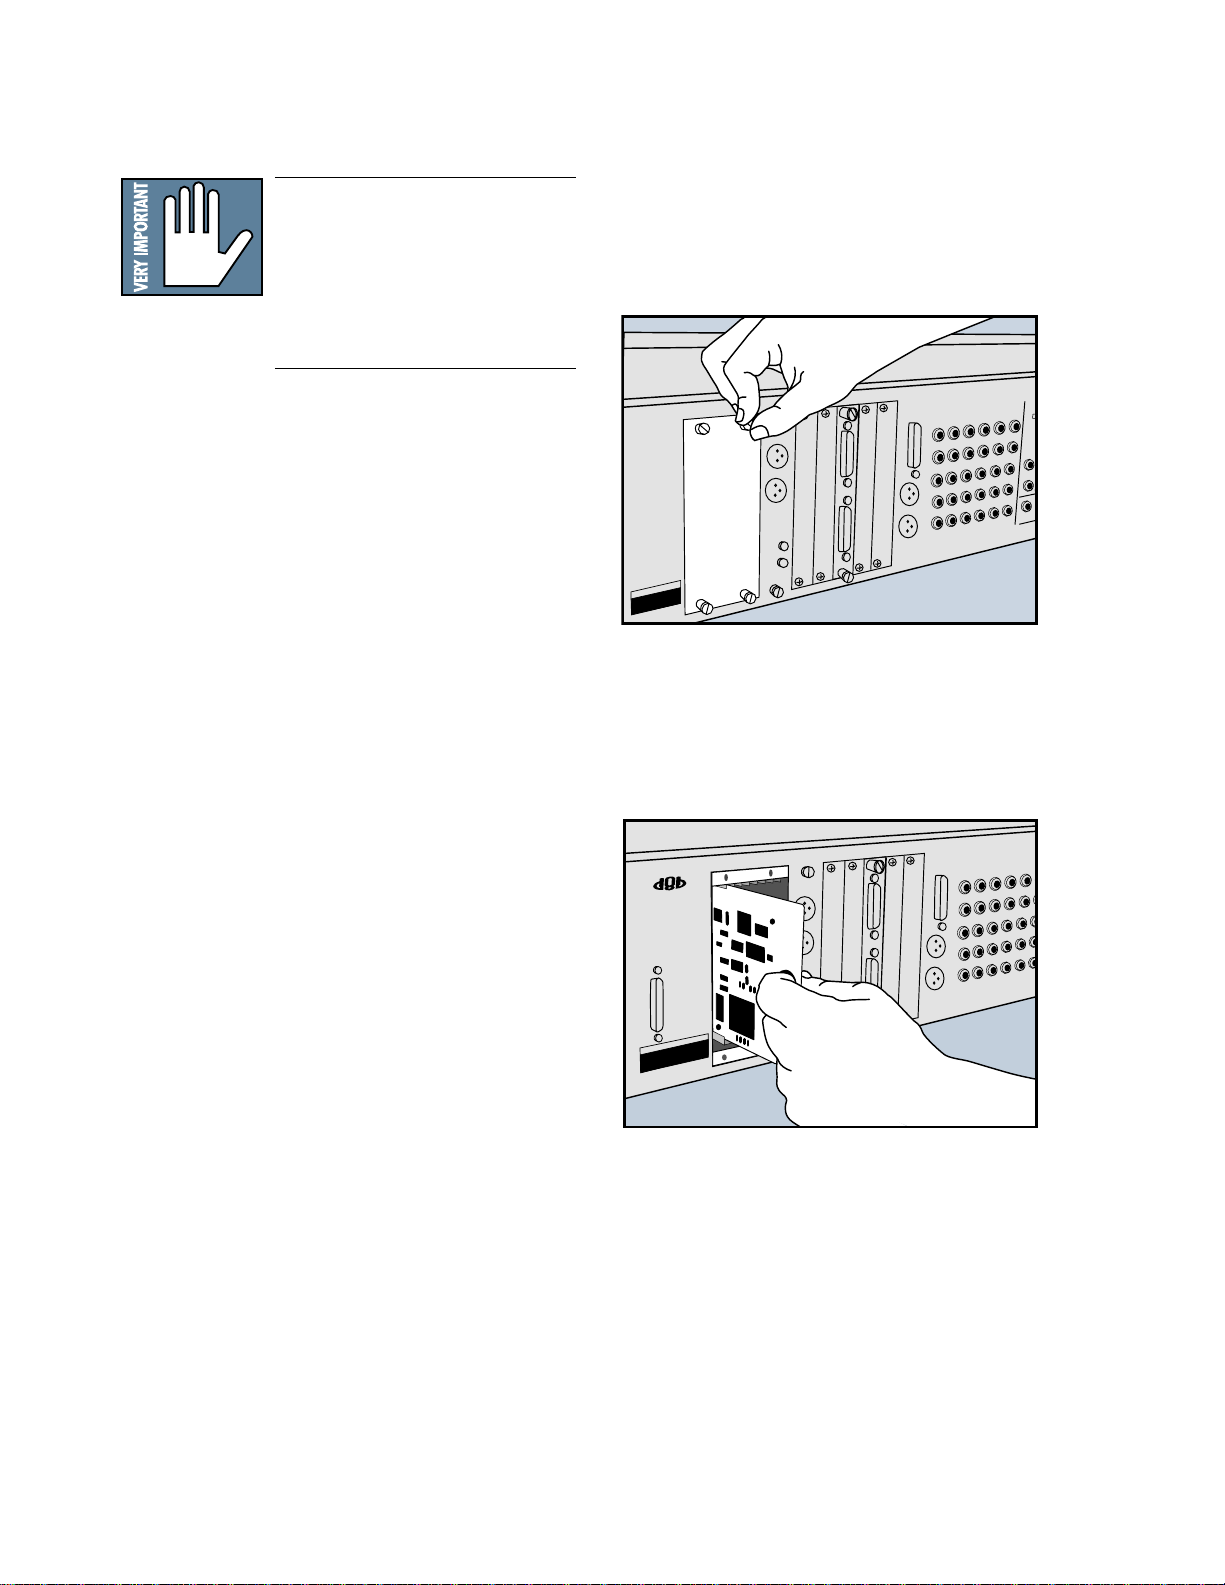
Installation of FX Cards
IMPORTANT: Shut off power to the
Digital 8•Bus’ Remote CPU before
installing or removing cards. Also,
install your FX cards in order. For
example, put your first FX card in the
slot marked “A,” your second FX card
in slot “B,” etc.
1. Loosen the four spring-loaded screws on the blank
cover plate to the FX card slot you want to fill.
FX Card Cover Plate Removal
2. With your finger in the hole on the FX card (and
the components on the circuit board facing to the
left), push the card firmly into the white connector
slots so it fits snugly. Do not touch any of the
circuit board components or solder joints.
3. Replace the cover plate and tighten the screws
securely using a slotted screwdriver. DO NOT
OVERTIGHTEN THE SCREWS, or you run the
risk of stripping the threads in the D8B.
FX Card Installation
D8B Manual • Chapter 4 • page 92
Page 7
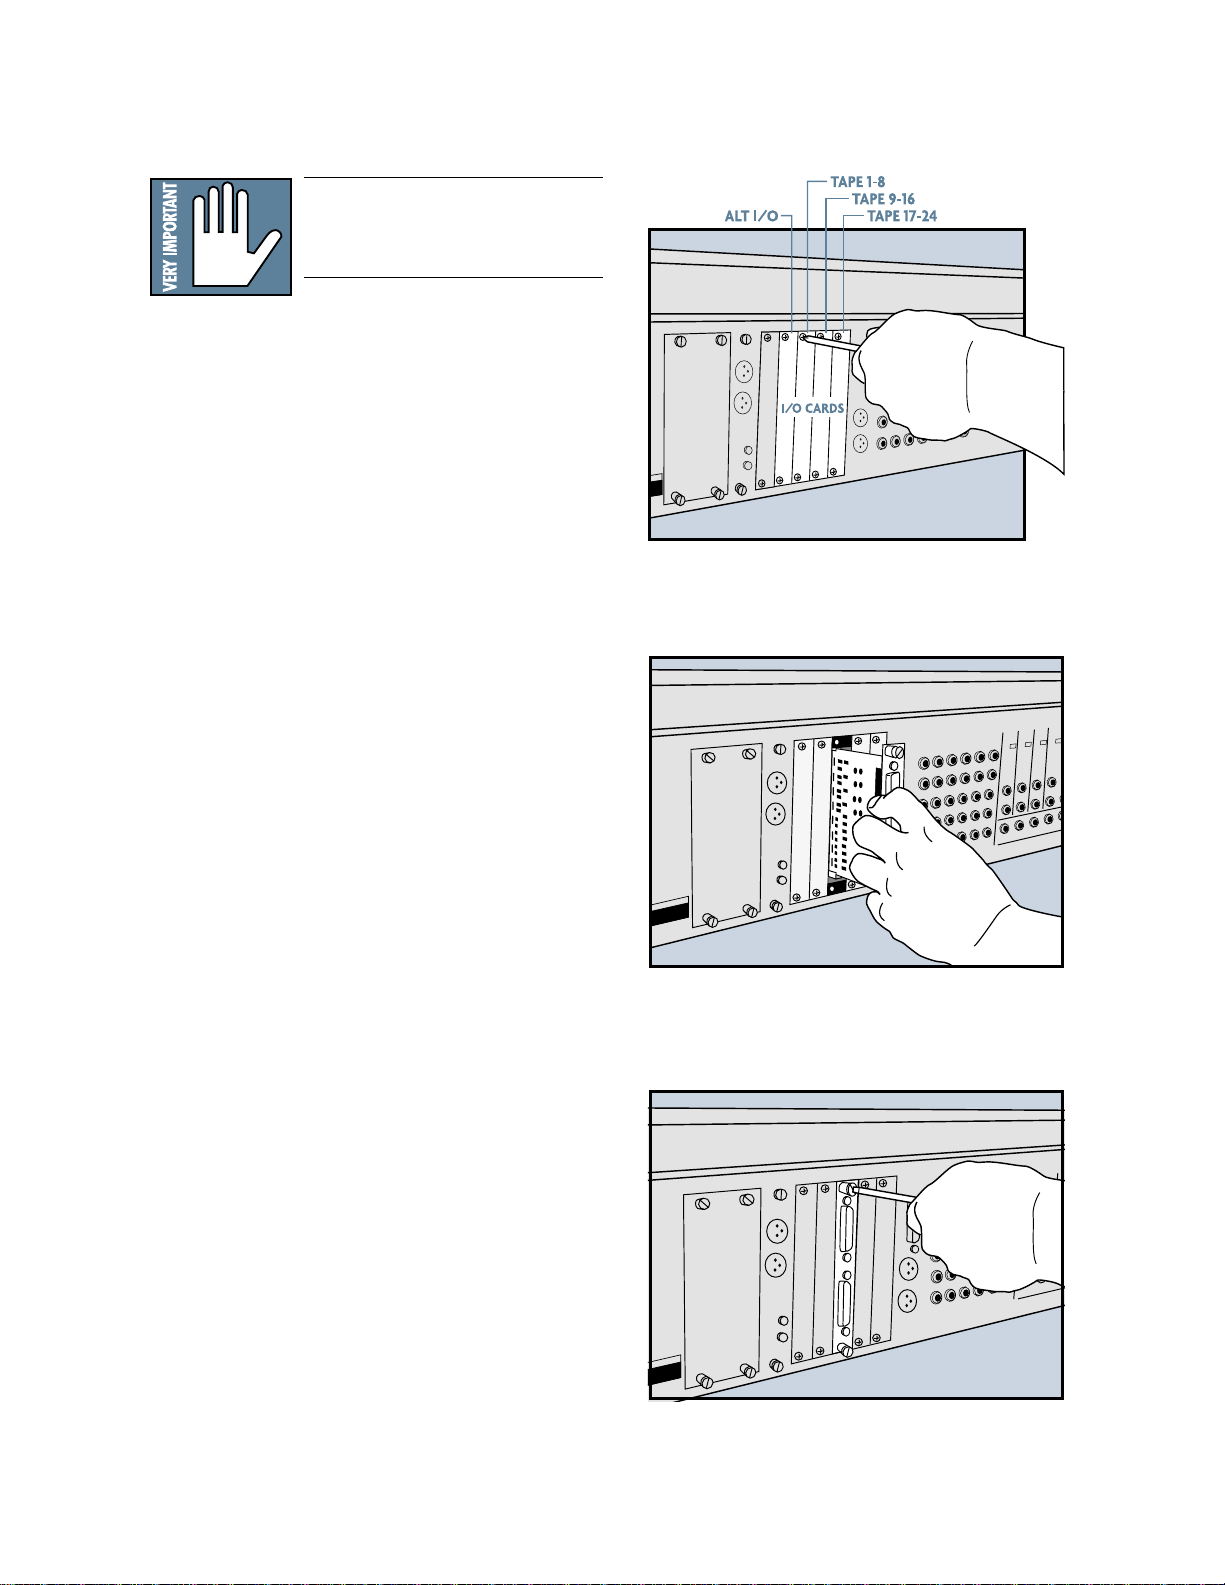
Installation of I/O Cards
IMPORTANT: Shut off power to the
Digital 8•Bus’ Remote CPU before
installing or removing cards.
1. Using a #2 Philips screwdriver, unscrew the blank
cover plate corresponding to the I/O card slot you
want to fill.
2. Holding the I/O card so that the components on
the green circuit board face to the left (see
diagram), line up the card so the top and bottom
edges fit into the white guide slots. Do not touch
any of the circuit board components or solder joints.
Remove Cover Plate for Tape I/O Card
3. Be sure to push the card in all the way—until the
front of the I/O card is flush with the back panel of
the D8B. This may require a good, solid push, so
don’t be shy.
4. Tighten the spring-loaded screws on the
I/O card securely using a slotted screwdriver. DO
NOT OVERTIGHTEN THE SCREWS, or you run
the risk of stripping the threads in the D8B.
Installing a T ape I/O Card
Tighten Screws on Tape I/O Card
D8B Manual • Chapter 4 • page 93
Page 8
Checklist for Basic
Operational Functionality
Basic system functionality depends greatly on
the accurate selection of a few key items. Work
through this checklist to verify console settings.
The previous chapters provide an explanation of
each item. This checklist simply provides a mental
road map to verify proper functionality.
Control Room selection correct
❏
Monitor Speaker selection correct
❏
Input source
Mic/DI
❏
Line/Instrument
❏
The Fat Channel
EQ
❏
Compression
❏
Gate
❏
Busing/Routing
❏
Signal Routing
To L/R
❏
To Tape
❏
To Bus
❏
Connecting Analog Multitrack(s)
❏ Install AIO•8 card(s) into one or more of the D8B
TAPE CARD slots. This provides up to 32 tracks of
I/O (including the ALT I/O card).
❏ Using the appropriate cable, connect 25-pin D-sub
TAPE OUT connector to the multitrack inputs.
❏ Using the appropriate cable, connect the multi-
track outputs to the 25-pin D-sub TAPE INPUT
connector.
❏ Make sure all connections are tightly secured.
Connecting ADAT (Lightpipe)
Multitrack(s)
❏ Install DIO•8 or OPT•8 card into one or more of
the D8B TAPE CARD slots.
❏ Using a fiber-optic lightpipe cable, connect the
D8B Optical output to the ADAT Digital input connector.
❏ Using a fiber-optic lightpipe cable, connect the
ADAT Digital output connector to the D8B optical
input.
❏ If the D8B is to be the slave, the sync source
should be connected to the sync card BNC Word
Clock input.
Connecting the
Analog Multitrack
Simply connect the AIO•8 outputs to an analog
console’s inputs for up to 32 channels (8 channels
per card) of flexible and assignable audio routing,
(including the ALT I/O).
AIO•8 Card
ANALOG I/O
INPUTS
INPUT OUTPUT
OUTPUTS
Analog
Multitrack
Connecting ADAT Lightpipe
Using two fiber-optic lightpipe cables, simply
connect the DIO•8 digital outputs the ADAT
lightpipe inputs, and the ADAT outputs to the
DIO•8 inputs, for up to 32 tracks (8 channels per
card) of flexible and assignable digital audio
(including the ALT I/O).
APOGEE
DIGITAL I/O
DIO•8 Card
8-track ADAT
ADAT OPTICAL
IN OUT
ADAT OPTICAL
TDIF
IN OUT
SYNC
rear panel
Fiber-optic
Lightpipe
D8B Manual • Chapter 4 • page 94
Page 9
Connecting TASCAM (TDIF)
Multitrack(s)
❏ Install DIO•8 card into one or more of the D8B
TAPE card slots.
❏ Using a 25-pin D-sub digital cable (TDIF), connect
the D8B Digital I/O connector to the TASCAM
MDM (e.g., DA-88) Digital I/O connector.
❏ Install BNC clock cable and make sure all connec-
tions are tightly secured.
❏ If the D8B is to be the slave, the sync source
should be connected to the sync card BNC Word
Clock input and the D8B Apogee Clock should be
set to External in the Setup>Digital I/O window.
Connecting TDIF Digital
Use a 25-pin D-sub digital cable (TDIF) to connect
the D8B Digital I/O connector to the TASCAM
MDM (e.g., DA-88) Digital I/O connector, for up
to 32 tracks (8 channels per card) of flexible and
assignable digital audio, including the ALT I/O.
In addition, connect the Sync output from the
DIO•8 card to the Word Sync input of the DA-88.
This connection indicates use of a DIO•8 Card
with firmware version 127v2.
APOGEE
DIGITAL I/O
ADAT OPTICAL
DIO•8 Card
TDIF
IN OUT
SYNC
Tascam
DA-98
REMOTE INSYNC IN
(FROM RC848/DA-88)
TDIF Interconnect Cable
Sync Cable
rear panel
SYNC OUT
(TO DA-88)
METER UNIT DIGITAL I/O
WORD SYNC
IN OUT
TDIF - 1
D8B Manual • Chapter 4 • page 95
Page 10
Multitrack Recording
Multitrack recording involves a continuous
assessment of signal flow. If you follow a wellplanned thought process from the beginning of the
signal path to the end, you’ll succeed in each
audio task.
When multitrack recording using the D8B, it’s
helpful to visualize the basic signal flow between
fader banks. For any multitrack setup, it’s important to keep track of the signal path from the
console to the multitrack, then from the multitrack back into the console. The illustration below
is a review demonstrating an important signal
flow concept.
❏ Press Mic button on channels using microphone
inputs.
MIC
❏ Configure Auxes for desired Pre/Post status, se-
lect Surround Mode, set Mix Options.
❏ Test each instrument and mic to verify sufficient
level at console input meter.
MIC/LINE Bank TAPE IN Bank
Work your way though this checklist for
multitrack recording.
❏ Connect multitrack ins and outs to D8B.
❏ Follow basic power-up procedure.
❏ Select Mic/Line fader bank.
SHIFT
MASTERS
1-24
25-48
MIC/LINE
TAPE IN
(TRACK) (MONITOR)
49-72
EFFECTS
BANK SELECT
❏ Press phantom power button on the rear of the
console for necessary mic inputs. .
11
12
+48V
+48V
PH
PH
MIC MIC
LINE IN
LINE IN
INSERT
INSERT
1
OL
2
4
7
10
15
20
25
30
40
50
60
25
❏ Adjust input trim for a reading around –15 on the
meter.
TRIM
N
E
I
L
C
I
M
060
-
20dB +40dB
1
❏ Select L/R in the ASSIGNMENT section to confirm
Assign lights on for all desired channels, or look
on-screen to verify that all necessary channels
have L/R button highlighted in Bus Assign section.
ASSIGNMENT
ASSIGN ASSIGN
ASSIGN
BUS 7
ASSIGN ASSIGN
BUS 2
BUS 8
L-R
ROUTE TO
TAPE
REC/RDY REC/RDY
ASSIGN
WRITE
ASSIGN
WRITE
Note: Condenser mics and active DIs use phantom
power. Moving coil mics, ribbon mics, and most
electronic instruments don’t need phantom power.
D8B Manual • Chapter 4 • page 96
Page 11
Multitrack Tracking Checklist
❏ Connect multitrack ins and outs to D8B.
❏ Follow basic power-up procedure.
❏ Select Mic/Line fader bank.
❏ Press phantom power button on the rear of
the console for necessary mic inputs.
❏ Press Mic button on channels using
microphone inputs.
❏ Set pre-fader auxes in Setup Window for
monitor use.
❏ Test each instrument and mic to verify
sufficient level at console input meter.
❏ Adjust input trim for a reading around –15 on
the meter.
❏ Press L/R in the ASSIGNMENT section to
confirm Assign lights on for all desired
channels. Or, look onscreen to verify all
necessary channels have L/R button
highlighted in Bus Assign section.
❏ Set Master Fader to Unity position.
❏ Turn channel faders up to hear instrument
or mic.
❏ As each channel is verified and audible, press
channel mute.
❏ Assign Fader Bank 1 channels to desired
tape track inputs.
❏ Place tape inputs in
record/ready to verify
signal at machine. It’s
F
T
RACK
AST
typically best to monitor
signal from the multitrack rather than from
the channel input.
❏ If levels on the multitrack appear too hot or
cold, adjust level with the LEVEL TO TAPE
control. Select TRACKING LEVEL. This sets
the channel V-Pots to adjust the D8B output
level to tape.
❏ Remove Fader Bank 1 from the L/R mix.
❏ Adjust control room monitor mix from Tape
return in Fader Bank 2.
❏ Set levels in headphone system for
musicians.
❏ Adjust headphone monitor volume in the
PHONES/CUE MIX section.
❏ Adjust channel aux levels to onboard or
outboard effects from Fader Bank 2.
❏ Verify that Master Output is connected to
the mixdown machine.
❏ Record a pass on the multitrack.
❏ Play multitrack back.
❏ Set Master Fader to Unity position.
MASTER
L/R
dB
10
5
U
5
10
20
30
40
50
60
❏ Turn channel faders up to hear instrument or mic.
GROUP 1
FX 1
1
25
dB
10
5
U
5
10
20
30
40
50
60
❏ Once each channel is verified and audible, press
channel mute.
SELECT
SELECT
SELECT
SOLO
SOLO
SOLO
MUTE
MUTE
MUTE
BUS 5
BUS 6
RET 5
2145224623
dB
10
5
U
5
10
20
30
40
50
60
BUS 7
RET 6
RET 7
47
dB
dB
10
10
5
5
U
U
5
5
10
10
20
20
30
30
40
40
50
50
60
60
D8B Manual • Chapter 4 • page 97
Page 12
❏ Assign MIC/LINE bank channels to desired tape
tracks.
❏ Place tape inputs in record/ready to verify signal
at machine.
It’s typically best to monitor signal from the
multitrack rather than from the channel input.
❏ If you want to monitor from the multitrack,
remove the MIC/LINE Bank from the L/R mix.
This has no effect on the output to tape.
❏ Adjust control room monitor mix from TAPE IN
Bank. Verify channel assignment to the L/R bus.
Modular Digital Multitrack
TAPE IN Bank
Record Ready Buttons
❏ If levels on the multitrack appear too hot or cold,
adjust level with the LEVEL TO TAPE control.
Select TRACKING LEVEL. This sets the channel
V-Pots to adjust the D8B output level to tape.
❏ Set levels in headphone system for musicians.
Aux 9/10 and 11/12 are perfect for stereo
headphone sends. It’s often convenient for the
musicians to, at first, monitor the L/R mix in the cue
section (PHONES/CUE MIX 1 and 2). Once the initial
L/R mix is established, copy it to the appropriate
cue, then customize for individual monitoring needs.
D8B Manual • Chapter 4 • page 98
Page 13

❏ Adjust headphone monitor volume in the
PHONES/CUE MIX section.
PHONES/CUE MIX 1
COPY MIX TO CUEAUX 9-10
AUX 11-12
CONTROL ROOM
LEVEL
PHONES/CUE MIX 2
AUX 9-10
AUX 11-12
COPY MIX TO CUE
CONTROL ROOM
LEVEL
❏ Adjust channel aux levels to onboard or outboard
effects from Fader Bank 2 (TAPE IN).
❏ Verify that Master Output is connected to the
mixdown machine.
The mix should be arriving at the mixdown
recorder. It’s good to check this as part of your
tracking process. At the conclusion of a session the
artist will probably want to take a rough mix for
evaluation—you’ll look better if it’s already set to go.
BUS OUT 1-8
&
SURROUND OUT
MASTER OUT
LR
CR
MAIN
L
R
MASTER OUT
LR
CR
NEAR FIELD
LR
❏ Record a pass on the multitrack
Play multitrack back—playback should sound
identical to tracking and you’re ready to print a
rough mix.
D8B Manual • Chapter 4 • page 99
Page 14

Sample Tracking Setup
This diagram shows a typical hookup for tracking.
Four microphones are connected to channels 1–4 for
vocals. Two of them are condenser mics, which
require phantom power, so the +48V PH switch is
pushed in on those channels. A vocal enhancer is
connected to the channel 1 INSERT jack to add a
special effect to the lead vocal.
Note: During tracking, dynamics control, like
compression and limiting, are often included (insert or
onboard) at the beginning of a signal path. Effects, like
reverb, delay, and chorus are best left for adjustment
during mixdown, or during tracking for monitor use
only.
Various instruments are connected to the line inputs
of channels 11–14, either directly from their line-level
outputs or through effects boxes or direct boxes.
Each input from channels 1–24 is assigned to a
tape output, which can be connected to an 8-, 16-, or
24-track recorder—simply use the appropriate I/O
card for your setup. You can assign any input (1–48),
any return (FX 1–16, RET 1–8), and Bus 1–8 to any
unused tape out using the ROUTE TO TAPE button
in the Bus Assignment Section (refer to Chapter 2
for review).
Monitoring
Connect the outputs from the recorders to the
TAPE Inputs on the Digital 8•Bus. This allows you
to monitor the signal as it’s being recorded
(assuming your recorder has that capability).
To do this:
• Assign channels 25–48 (or whatever channels are
being used for tape returns) to the L-R bus.
• In the Control Room Section, assign MASTER
L-R as the Control Room Source.
The configuration shown has two external effects
devices connected for monitoring. Aux 8 send goes
to a digital reverb, which has stereo outputs that
feed into the line inputs of channels 19 and 20.
Aux 11–12 goes out to a multi-effects stereo
processor, which then comes back to the Digital
8•Bus through the line inputs of channels 23 and 24.
In addition, Aux 1 and 2 are routed to the internal
FX Card, which processes the signal with whatever
plug-in has been downloaded to it. The processed
signal is returned to the L-R bus via the FX 1–4
channel strips in Fader Bank 3.
The signal at the CR MAIN, CR NEAR FIELD,
and the STUDIO OUT is determined by the Control
Room Source selection in the Control Room Section.
You can connect a pair of headphones to the
PHONES 1 or 2 jack and monitor the signal there as
well. Select CONTROL ROOM as the source in the
PHONES/CUE MIX 1 or 2 Section.
D8B Manual • Chapter 4 • page 100
Page 15

Vocal Enhancer
LINE IN
INSERT
AUX 2
2
LINE IN
INSERT
AUX 3
3
LINE IN
INSERT
AUX 4
4
LINE IN
INSERT
AUX 5
5
LINE IN
INSERT
AUX 6
6
LINE IN
INSERT
AUX 7
7
LINE IN
INSERT
AUX 8
8
LINE IN
INSERT
AUX 9
9
LINE IN
INSERT
AUX 10
10
LINE IN
INSERT
AUX 11
11
LINE IN
INSERT
AUX 12
12
LINE IN
MASTER
OUT
CR
MAIN
CR
NEAR FIELD
2 TRACK A
2 TRACK B
2 TRACK C
STUDIO OUT
PHNS 1 PHNS 2
PNCH I/0 TLKBK
1
LINE IN
INSERT
AUX 1
13
19
14
20
15
21
16
22
17
23
18
24
ANALOG
I/O
BUS OUT 1-8
&
SURROUND OUT
MASTER OUT
L
R
ANALOG
I/O
ANALOG
I/O
TO TAPEFROM TAPE
TO TAPEFROM TAPE
TO TAPEFROM TAPE
Sync Interface
Powered near-field
monitor speakers
MIDI IN/OUT
(Rear of Remote CPU)
Optional
AIO•8
Cards
Direct Box
Internal
Digital Audio
Signal P a th
FX Card 1
To FX Return
1 and 2
(Fader
Bank 3)
To FX Return
3 and 4
(Fader
Bank 3)
audio out
audio in
digital control signal
internal digital send
internal digital return
Reverb
Stereo Effects
Procesor
2-inch
24 track
D8B Manual • Chapter 4 • page 101
Digital 8•Bus Analog Recording/Tracking Hookup Example
Page 16

Mixdown Setup
2 TRACK A
DIGITAL IN 1
2 TRACK B
DIGITAL IN 2
2 TRACK C
MASTER
L-R
NEAR FIELD
MAIN
CONTROL ROOM
SPEAKER LEVEL
MONO
SPEAKER S
This simple checklist will help get the mix started.
Notice that, each time, we follow the signal path
from its source to its destination.
❏ Be sure the multitrack recorder is connected
properly to the Tape In card(s).
❏ Roll tape to verify signal at TAPE IN Fader Bank.
❏ If any track reads excessively hot or cold on the
D8B meter bridge, adjust the Digital Trim for a
reading around -15 with no peaks (OL).
Pressing DIGITAL TRIM activates the channel
V-Pots as digital input trim adjustments.
Digital clipping could occur if a signal going
into the D8B is too hot. Noise could occur if the
signal is too low. Even though the D8B has plenty
of headroom and very little noise, it’s still a good
idea to verify optimum levels.
❏ Select Master L/R in the Control Room section
and adjust the speaker level to a moderately conservative level (about 9:00).
❏ It’s often recommended that you monitor from
the output of the mixdown recorder.
If the outputs from the mixdown recorder are
patched into the D8B 2-track or Digital inputs,
simply select the mixdown recorder in the Control
Room Section (Digital 1, Digital 2, 2 Tracks A–C).
❏ Adjust the channel faders, dynamics, pan, effects,
and EQ for an excellent mix.
❏ Record the mix and enjoy the mind-boggling
capabilities of the Mackie Digital 8•Bus.
❏ With channel faders off, set the Master Fader at
Unity.
D8B Manual • Chapter 4 • page 102
Page 17

Sample Mixdown Setup
LINE IN
INSERT
AUX 2
2
LINE IN
INSERT
AUX 3
3
LINE IN
INSERT
AUX 4
4
LINE IN
INSERT
AUX 5
5
LINE IN
INSERT
AUX 6
6
LINE IN
INSERT
AUX 7
7
LINE IN
INSERT
AUX 8
8
LINE IN
INSERT
AUX 9
9
LINE IN
INSERT
AUX 10
10
LINE IN
INSERT
AUX 11
11
LINE IN
INSERT
AUX 12
12
LINE IN
MASTER
OUT
CR
MAIN
CR
NEAR FIELD
2 TRACK A
2 TRACK B
2 TRACK C
STUDIO OUT
PHNS 1 PHNS 2
PNCH I/0 TLKBK
1
LINE IN
INSERT
AUX 1
13
19
14
20
15
21
16
22
17
23
18
24
BUS OUT 1-8
&
SURROUND OUT
MASTER OUT
L
R
ANALOG
I/O
ANALOG
I/O
ANALOG
I/O
TO TAPEFROM TAPE
TO TAPEFROM TAPE
TO TAPEFROM TAPE
2-Track Recor der
2-inch
24 track
Sync Interface
Optional AIO•8 Cards
MIDI I/O
(rear of D8B
Remote CPU
)
In
Out
OUT
Digital I/O
AES/EBU
IN
audio out
audio in
digital control signal
Digital Delay
Stereo
Reverb
Near-field Powered
Monitors
Control Room Monitors
2-Track D AT
This sample mixdown setup helps provide ideas for how your mixdown setup might look. Each setup is
unique in many ways, yet predictable in many ways.
D8B Manual • Chapter 4 • page 103
Digital 8•Bus Analog Recording/Mixdown Hookup Example
Page 18

Effects/Plug-ins
MFX/UFX
Before we look at more setup
examples, lets cover some quick tips on
efficient use of the Digital 8•Bus plugins. Follow these easy steps to use the
Digital 8•Bus internal plug-ins.
1. Open the Plugin Configuration
window (click Plugins in the upper menu
bar and select Plugins, or Crtl+P) and
select the Mode (Stereo/Mono), Plugin,
and Input that suits your needs for each
available slot.
Note: In the plug-in windows, clicking directly on the
Effects patch name displays a large pop-up menu of
Factory or User patch names, which points to available
patches in your working directory’s Presets folder.
Always save your custom presets to the User Presets
folder. Presets saved to the Factory Presets folder could
be written over by future plug-in updates. It is still
possible to use the up/down arrows to scroll through
the patch names.
2. Click the red 1/4" connector on
the lower menu bar to reveal the plug-in
selector buttons.
3. Select the plug-in you want to
adjust by clicking on its button.
4. Plug-ins are organized in the
order of the aux buses they correspond to.
5. Click on the AUX button in the V-Pot
Select Section that corresponds to the plugin you
want to use.
D8B Manual • Chapter 4 • page 104
Page 19

6. Use the channel V-Pots to set individual
channel send to the selected aux bus.
Note: Alternately, you can click and drag on the
horizontal bar in the auxes section at the top of the
channel strip to adjust the aux send level.
7. Click and drag on the Master V-Pot to adjust the
overall aux send level to the selected effect. You
can click on the SOLO button in the Master
V-Pot Section to monitor the aux send signal.
8. Click on the EFFECTS button to select Fader
Bank 3. Click and drag, or physically move, the
FX return fader(s) corresponding to the selected
effect, to control the amount of processed signal
returning to the left and right bus.
Note: Currently the D8B OS doesn’t store effects or
any DSP module names. If you create some effects
that you really like, we suggest that you name them
and store them to disk. For ease of retrieval and
organization, create a dedicated effects folder and keep
all your working effects patches there.
Don’t forget to use the EQ portion of the effects
module during patch creation. It certainly can
enhance the sound of any given patch.
Note: The default setting for each Aux Master level is
0.0 dB. This typically provides sufficient send level and
doesn’t usually require adjustment.
Setting Up Plug-ins
• Press Ctrl+P on the keyboard (or click
Plugins in the upper menu bar and select
Plugins) to open the Plugins Configuration
window.
• Adjust aux send levels from any applicable
bank channels.
• For MFX Plug-ins, each card utilizes two
separate mono sends, which are monitored as
two separate stereo returns from the MFX
plug-in.
• UFX Plug-ins reside in groups of four on each
card (2 stereo, 4 mono, or 1 stereo and 2
mono).
• Select the EFFECTS bank to adjust effects
return levels at the appropriate faders.
• Pan effects returns left and right in pairs.
• Listen to playback.
• When tracking, it’s best to monitor the tape
returns.
Note: See the Plug-ins Manuals for specifics on
individual plug-in functionality.
D8B Manual • Chapter 4 • page 105
Page 20

Dynamics and EQ Applications
Dynamics and equalization are typically applied in
one of three ways:
1. Processing Dynamics and EQ Before Tape
• Select Fader Bank 1 (MIC/LINE).
• Double-click SELECT on the desired channel
to open the on-screen Fat Channel.
• Set compression, EQ, or gate.
Since Fader Bank 1 (MIC/LINE) feeds the
multitrack inputs, any changes made from that bank
are printed to tape.
2. Processing Dynamics and EQ After Tape
• Choose Fader Bank 2 (TAPE IN).
• Double-click SELECT button on the desired
channel to open the on-screen Fat Channel.
• Adjust compression, EQ, or gate.
Since TAPE IN Bank receives its feed from the
multitrack, Fat Channel changes made here don’t
affect what is printed to tape.
3. Analog inserts
• Using an insert cable, connect the channel
send to the input of an external EQ or
dynamics processor.
• Connect the insert cable return side to the
external device output.
All channel level adjustments past the insert are
dependent on the external device control settings,
since the entire channel signal passes through the
device.
Dynamic and EQ control should occur only once in
any given signal path. Avoid subjecting any signal
path to multiple stages of dynamics or EQ
processing. As a rule, fewer circuits almost always
result in more pristine and accurate audio—even
though the D8B signal path is incredibly accurate
and transparent.
Many engineers prefer to save all EQ for
mixdown, so as to include the least audio
manipulation for a more pure sound. Many recordists
rough the sound in when recording, using whatever
EQ and dynamics they feel the sound needs, then
they perfect the audio during mixdown. Many
excellent recordings have been the result of these
techniques and more. Experiment, and let your ears
determine what works best for you.
D8B Manual • Chapter 4 • page 106
Page 21

MIDI and the D8B
MIDI Basics
Your Digital 8•Bus works very well when
incorporated in a MIDI network, utilizing a computer
referenced to time code.
Be sure to connect the D8B MIDI jacks to your
MIDI interface. Within your computer-based MIDI
sequencer, set the MIDI channel connected to the
D8B to transmit MIDI Time Code (MTC). This is
necessary to run automation from a Digital Audio
Workstation (DAW).
MIDI
OUT
MIDI
IN
MIDI Interface
SYNC
BRC
MIDI SYNC
Digital 8•Bus
Modular Digital Multitrack
Modular Digital Multitrack
The Digital 8•Bus provides control over some key
MIDI parameters. These parameters affect your
system’s ease of use and efficiency, and should be
verified:
• MMC DEVICE ID: Some 8-track digital recorders
require that you define the device ID numbers
used for each recorder in the MIDI Machine
Controller. Typically, tracks 1–8 are device 0,
tracks 9–16 are device 1, and tracks 17–24 are
device 2, so these are the default settings.
• ONE BUTTON PUNCH: You can also select
whether to press the PLAY and RECORD buttons
to enter record mode, or just press the RECORD
button (One Button Punch).
When you don’t include a computer in your setup,
you need a device like the Alesis BRC to transmit
MTC to the D8B for time reference when performing
dynamic and snapshot automation.
Note: We recommend leaving One Button Punch off to
provide an extra measure of safety in case you
inadvertently press the RECORD button in the
Transport Section.
• MTC OFFSET: MIDI File Offset can be used to
indicate the starting time deviation of a Standard
MIDI File (SMF), referenced to absolute time code.
• TEMPO MAP: If you use a sequencer in your
recording process, you can create a standard
MIDI file from the song(s) you’ve recorded. Copy
the tempo map from the SMF to the Digital 8•Bus
and “synchronize” the D8B display to the
Bars:Beats:Ticks of the sequenced program.
SMFs are loaded from the floppy disk drive.
D8B Manual • Chapter 4 • page 107
Page 22
MIDI Snapshots
Once you’ve developed several snapshots for a
mix, they can be recorded into a sequencer for
consistent playback.
This feature is set in the Mix Options window,
under Setup in the lower menu bar. When enabled:
1) Incoming MIDI program changes (received on
any MIDI channel) can recall Snapshots numbered
0–127 on the console.
2) The D8B sends MIDI Program changes on
MIDI channel 1 when snapshots are recalled on the
console, either via the dynamic automation snapshot
track or by manually recalling a snapshot from either
the snapshot window or via the front panel.
3) Place the sequencer in record on the D8B MIDI
channel and cable. While the mix plays, select
snapshots at the appropriate time. Each snapshot
change is stored as data in the sequence and
therefore can be shifted, cut, copied, pasted, etc.
See “The Snapshot Window” on page 69 for
information on how to set the program change
MIDI channel.
Word Clock and the D8B —
The Kitchen Sync
In order for all digital components to function
together in unity, they must all move together,
sample-by-sample, through the digital data stream.
Word clock is an incredibly important part of
digital recording! The concept is simple: If multiple
devices are synchronized together via word clock,
they progress together through the digital data
stream, one sample at a time. This is called sampleaccurate sync.
Each system works in reference to one master
device. Forty-eight thousand times a second (or
whatever the common sample rate is) digital slaves
keep track of the word clock status of the master
device; they only output the next sample when the
master device outputs the next sample.
This type of system provides very accurate
synchronization. Incorporating a time reference, like
MTC, along with sample accurate sync enables time
stamping of data changes, like start-stop time,
snapshot placements, real-time automation data, etc.
Hence, ultimately flexible and way cool automation
capabilities of virtually every control on the Digital
8•Bus! Yahoo!
The optional Clock I/O card for your Digital 8•Bus
provides a means to send and receive digital word clock.
This card is necessary:
• When digitally combining the Digital 8•Bus with a
computer-based DAW, MDMs, video recorders, etc.
• When the D8B must send or receive word clock
other than through ADAT lightpipe or AES/EBU
connections.
Sync data can transmit directly through ADAT
Lightpipe and AES/EBU connections. However, a
complete sync system needs two main ingredients:
• Word clock, sample-accurate sync. This is
provided through the Digital 8•Bus optical or
AES/EBU connections, and through the optional
Clock I/O card.
• Time reference to stamp automation data for
accurate playback. This is typically provided
through MIDI Time Code (MTC).
D8B Manual • Chapter 4 • page 108
Page 23

Proper Sync Connection
Computer
Computer
Every digital system needs a master sync source.
The D8B prefers to be the master source but will
function as a master or slave. Follow these simple
steps to help assure a successful digital setup:
• Determine which piece of gear is the master. The
master must be able to generate proper word
clock that can be read by all other digital equipment.
• Set all digital equipment to the exact same word
clock rate—typically 44.1 or 48kHz.
• Connect the word clock output from the master
device to the word clock input of the slave
devices. Each digital device connected to the
digital audio chain must receive a common word
clock source, either directly or from a slave.
• It is common procedure to chain word clock
through digital devices. The D8B can provide
master word clock to a central word clock hub,
then the hub can send to multiple digital slaves
(DAWs, MDMs, digital effects, etc.).
• Set every slave device to respond to external
word clock.
• Draw a digital word clock flow chart for your
system. This will help you verify a logical
connection scheme. One piece of equipment
connected incorrectly can mess up your entire
system. Rats!
The following illustration shows a common sync
setup, using the Digital 8•Bus as the master word
clock source and a hub to distribute to other digitally
connected devices.
Here are two more sample setups that include the
D8B and other digital devices which depend on
accurate and solid word sync.
Word Clock
PCI-324
9-pin IN
INPUT
Control
Track IN
Word Clock
INPUT
9-pin
OUT
9-pin
IN
MIDIINMIDI
OUT
From PCI 324
9-pin
OUT
Control
Track 1
Word Clock
OUTPUT
MIDIINMIDI
OUT
DTP
Word Clock
OUTPUT
MIDIINMIDI
OUT
Word Clock
INPUT
Word Clock
OUTPUT
Computer
Word Clock
INPUT
Digital 8•Bus
Master Word Clock
Out From D8B
Sync Hub
Modular Digital Multitrack
Modular Digital Multitrack
OUT
MIDI
IN
MIDI
Computer
PCI 324
card output
Word Clock
2408
OUTPUT
Use expensive, properly impedance-matched
cabling! It’s worth it!
Note: When using the D8B as the master sync source,
always power it up before other digitally connected
gear. You’ll have a much better day.
D8B Manual • Chapter 4 • page 109
Page 24

Verifying Word Clock Sync Between Devices
and the Digital 8•Bus
You probably have a bad word clock sync
connection if:
• When the D8B is set to “Internal” in the Apogee
Clock pop-up window, it generates word clock as
a master device. All other devices must be
connected as slaves.
• If the D8B is slaved properly to a master word
clock source, “Locked.” is displayed in the
Setup>Digital I/O window next to the Apogee
Clock pop-up window and an asterisk (*) flashes in
the right-most portion of the control surface VFD.
• If the D8B is improperly connected as a slave to
the digital network, “Lock Error.” is displayed in
the Setup>Digital I/O window next to the Apogee
Clock pop-up window and a question mark (?)
flashes in the right-most portion of the control
surface VFD.
• You hear audio but it cuts in and out at regular
intervals.
• There is no audio signal at the input of the D8B
even though everything seems to be connected
properly.
• All meters are full on and you hear a very ugly
grating, grinding, static sound.
• When the record/playback device transport is
engaged, you see a question mark flashing in the
right-most portion of the control surface VFD.
Troubleshooting Word Clock Problems
• Troubleshoot through the system from the master
through the slaves. Connect the first two devices
and verify their functionality. Once they’re up and
running, add the next device, and so on. This is
the most efficient manner to check out a system.
• Verify connection, integrity, and quality of all sync
cables.
• Verify a consistent sample rate setting on all
connected sync devices (all set to the same
sample rate—44.1, 48k, etc.)
• Verify that the master sync source word clock
output is connected to the word clock input of the
slave, and that additional slaves also receive word
clock. Slaves can either receive word clock
directly from the master device or daisy-chained
through connected slaves. Patch word clock out of
a connected slave into the word clock input of any
other slave.
• Verify that the master device word clock status is
set to INTERNAL.
• Verify that all slave devices are set to follow
EXTERNAL word clock.
• If the system doesn’t seem to work correctly, you
might have an intermittent or broken sync cable.
Always use high-quality 75Ω BNC word clock
cables.
D8B Manual • Chapter 4 • page 110
Page 25

Dither - To UV22 or Not to UV22:
That Is the Question
Digital audio’s weakness is its ability to accurately
reproduce extremely low-level signals. As the
amplitude decreases, there are fewer and fewer
bits available to accurately represent the audio wave.
In an analog system the audio simply sinks into
the noise floor. Even when covered by noise, the
waveform is still audibly intact. In a digital system,
low level audio simply becomes inaccurate and
sounds really bad. A few bits at the bottom of the
amplitude range aren’t capable of faithfully
converting the analog information to digital, let alone
reinterpreting the digital data into analog variations
in air pressure.
Dither is a low-level noise that combines with
your pristine audio at low levels to help keep enough
digital bits active to replicate an accurate waveform
throughout the conversion process from digital to
analog to digital—go figure that it takes noise to
make a system work that has no noise.
UV22 is a very good-sounding type of dither that
makes a way for more accurate reconstruction of
this low-level audio. The frequency of the UV22
dither noise is lower than the conventional process
and therefore provides a more transparent
reconstruction.
As a practical application, if your music is to be
mastered by someone else in a professional
mastering facility, you might not need to use the
UV22 process—too much dither can accumulate too
much noise. If you’re seeing the project through to
the end you have three primary options:
• Don’t dither. If your music is always loud—loud,
loud, loud—you might not need to worry about
dither because dither really only helps audio
quality at low levels. However, if there is a fade
out in your song, then of course everything isn’t
always loud and you’ll want to take advantage of
the UV22 process to feather the fade out with
excellent audio clarity.
• Dither once. The conventional approach has been
to avoid dithering until the final version is
mastered (prepared for duplication). In this case,
wait until the final mix is printed to the replication
master, then use a Normal UV22 setting on the
Stereo I/O in the Setup window. Dither only once
on Normal setting; dither noise is cumulative so
too much dither equates to senseless noise.
• Dither twice. If your music contains a wide
dynamic range, you might not be able to resist the
urge to use dither as you record to the multitrack.
In this case, plan to use the UV22 process twice:
use it once on the multitrack tracks—on the
“Low” setting; use it again on the final printing of
the master take—on the “Low” setting. If you use
the UV22 process twice, using it on Low setting
both times will closely equate to the dither noise
resulting from using it once in “Normal” position.
If your music contains only a few low-level
passages try using the “Low” setting on the
Stereo I/O. “Low” equates to a lower level of noise
and, though it might not provide as much
smoothing of low-level audio, it might be quite
sufficient—and less noise just seems like a better
choice wherever appropriate.
D8B Manual • Chapter 4 • page 111
Page 26

D8B–HDR24/96 Setup
Hookups
This section shows how the D8B is connected
to the Mackie HDR24/96. These examples assume
that the rest of your studio equipment (monitors,
sound sources, outboard processing, etc.) is
already connected.
Before you begin, note how the three eightchannel I/O cards are arranged on the HDR24/96
rear panel: 1-8 is on the left, 9-16 is in the center,
and 17-24 is on the right. Labeling cables before
you begin will make connecting the HDR24/96 to
your D8B easier.
The specific hookups for each D8B and
HDR24/96 I/O card are shown below.
Analog Hookup to HDR24/96 (AIO•8)
This example describes the analog hookup for
the D8B–HDR24/96 combination.
Cables & Hardware
(3) AIO•8 cards for HDR24/96
(3) AIO•8 cards for D8B
(6) DB25 to DB25 analog snakes
2. Connect three snakes between the
HDR24/96 Outputs (top connector)
and the corresponding D8B Tape
Inputs (bottom connector).
HDR24/96 Settings
1. Set the Sample Clock to Internal.
2. Set the Sample Rate and Bit Depth
according to your preference. It is not
necessary to set the D8B and
HDR24/96 to the same Sample Rate
since, with analog connections, the
sample clocks on the two units are not
synchronized.
Console Settings
1. Set the D8B Sample Rate to 44.1kHz
or 48kHz, and set the Apogee Clock
to Internal (in the Digital I/O Setup
window).
Hookup
1. Connect three snakes between the
HDR24/96 Inputs (bottom connector)
and the corresponding D8B Tape
Outputs (top connector).
This example describes the hookup for the D8B console equipped for analog I/O.
HDR 24/96
AIO•8 Cards
Note:Note:
Note: Some older
Note:Note:
AIO•8 cards have the
Input jack labeled as
“From Tape” and the
Output jack labeled
as “To Tape.” Otherwise, they operate
identically. Sigh ...
long story.
ANALOG I/O ANALOG I/O ANALOG I/O
INPUT OUTPUT
INPUT OUTPUT
TAPE IN/OUTS
INPUT OUTPUT
(6) DB25 to
DB25 Analog
Snakes
Digital 8•Bus
ANALOG I/O ANALOG I/O ANALOG I/O
INPUT OUTPUT
INPUT OUTPUT
TAPE IN/OUTS
AIO•8 Cards
INPUT OUTPUT
D8B Manual • Chapter 4 • page 112
Page 27

TDIF Hookup to HDR24/96 (DIO•8)
APOGEE
DIGITAL I/O
SYNC
IN OUT
TDIF
ADAT OPTICAL
APOGEE
DIGITAL I/O
SYNC
IN OUT
TDIF
ADAT OPTICAL
APOGEE
DIGITAL I/O
SYNC
IN OUT
TDIF
ADAT OPTICAL
Cables & Hardware
(3) DIO•8 cards for HDR24/96
(3) DIO•8 cards for D8B
(1) Clock I/O card for D8B
(3) TDIF cables
(1) 75 Ω BNC word clock cable
Hookup
1. Connect the three TDIF cables
between the corresponding TDIF jacks
on the HDR24/96 and D8B.
2. When TDIF is used, the D8B must
have a Clock I/O card installed. To
make the D8B the clock master,
connect its Word Clock Out (not
Apogee
Clock I/O
Card
Word
Clock Out
DIO•8 Sync out) to the HDR24/96
Word Clock In. To make the HDR24/96
the clock master, connect its Word
Clock Out to the D8B Word Clock In.
HDR24/96 Settings
1. Set the Tape Input format for each
DIO•8 card to TDIF, and the Tape
Output format to TDIF.
2. If the HDR24/96 is the clock master,
set the Sample Clock to Internal; if it
is a clock slave, set it to Word Clock
and depress the 75 Ω termination
switch on the Sync card.
3. Set the Sample Rate to 44.1kHz or
48kHz according to your preference.
TDIF Hookup with DIO•8
APOGEE
SYNC
DIGITAL I/O
APOGEE
APOGEE
DIGITAL I/O
DIO•8 Cards
TDIF Connection
Out
Word
(HDR24/96
as Master)
Depress the
Termination
button if the
Word
Clock Out
Word
Clock In
Word
Clock
Out
(D8B as
Master)
Use
one
only
HDR
Sync
Card
Clock
APOGEE
In
Word
Clock
ADAT OPTICAL
APOGEE
DIGITAL I/O
TDIF
IN OUT
SYNC
TDIF
ADAT OPTICAL
TDIF
IN OUT
SYNC
TDIF Cables
(DB25)
TDIF Connection
Digital 8
•Bus
HDR 24/96
HDR24/96 is
set to Slave
ADAT OPTICAL
IN OUT
DIO•8 Cards
Word
Clock In
Word
Clock Out
SYNC
D8B Manual • Chapter 4 • page 113
Page 28

Console Settings
1. Set the Tape Input and Tape Output
format for each DIO•8 card to TDIF.
2. If the D8B is the clock master, set the
Sample Rate to either 44.1kHz or
48kHz, and set the Apogee Clock to
Internal (in the Digital I/O Setup
window). If it is a clock slave, set the
Apogee Clock to Word Clock. Set the
Sample Rate to match the Sample
Rate selected on the HDR24/96.
ADAT Optical Hookup to HDR24/96
(DIO•8 or OPT•8)
Cables & Hardware
(3) DIO•8 or OPT•8 cards for HDR24/96
(3) DIO•8 or OPT•8 cards for D8B
(1) Clock I/O card for D8B
(6) ADAT Optical cables
(1) 75Ω BNC word clock cable
Hookup
1. Connect three ADAT Optical cables
from the HDR24/96 Optical Outputs to
the Optical Inputs on the
corresponding D8B I/O cards.
2. Connect three ADAT Optical cables
from the HDR24/96 Optical Inputs to
the Optical Outputs on the
corresponding D8B I/O cards.
3. When ADAT Optical is used, the D8B
must have a Clock I/O card installed.
To make the D8B the clock master,
connect its Word Clock Out to the
HDR24/96 Word Clock In. To make
the HDR24/96 the clock master,
connect its Word Clock Out to the D8B
Word Clock In.
HDR24/96 Settings
1. If you have DIO•8 cards installed, set
the Tape Input and Tape Output
format for each card to ADAT. OPT•8
cards need no configuration.
2. If the HDR24/96 is the clock master,
set the Sample Clock to Internal. If
the HDR24/96 is a clock slave, set the
Sample Clock to Word Clock and
depress the 75Ω termination button
on the Sync card.
3. Set the Sample Rate to 44.1kHz or
48kHz according to your preference.
D8B Manual • Chapter 4 • page 114
Page 29
Console Settings
1. If you have DIO•8 cards installed, set
the Tape Input and Tape Output
format for each card to ADAT. OPT
cards need no configuration.
2. If the D8B is the clock master, set the
Sample Rate to either 44.1kHz or
48kHz, and set the Apogee Clock to
Internal (in the Digital I/O Setup
window). If it is a clock slave, then set
the Apogee Clock to Word Clock. Set
the Sample Rate to match the Sample
Rate selected on the HDR24/96.
ADAT Optical Hookup with OPT•8
•8
Clock Out
(HDR24/96
as Master)
Depress the
Termination
button if the
HDR24/96 is set
to Slave
Word
Apogee
Clock I/O
Card
Word
Clock Out
Word
Clock In
Clock Out
(D8B as
Master)
Use
one
only
Word
APOGEE
SYNC
HDR
Sync
Card
Out
Word
Clock
APOGEE
Word
Clock
OPT•8 Cards
ADAT Optical Out
Digital•8 Bus
ADAT Optical In
In
ADAT Optical Out
HDR 24/96
Word
Clock In
Word
Clock Out
ADAT Optical In
OPT•8 Cards
D8B Manual • Chapter 4 • page 115
Page 30
AES/EBU Hookup to HDR24/96 (PDI•8)
PDI•8
AES/EBU I/O
Cables & Hardware
(3) PDI•8 cards for HDR24/96
(3) PDI•8 cards for D8B
(1) Clock I/O card for D8B
(3) DB25 to DB25 AES/EBU snakes
(1) 75Ω BNC word clock cable
Hookup
1. Connect the three AES/EBU cables
between the corresponding AES/EBU
connectors on the HDR24/96 and D8B.
2. When AES/EBU is used, the D8B
must have a Clock I/O card installed.
To make the D8B the clock master,
connect its Word Clock Out to the
HDR24/96 Word Clock In. To make
the HDR24/96 the master, connect its
Word Clock Out to the D8B Word
Clock In.
AES/EBU Hookup with PDI•8
HDR24/96 Settings
1. If the HDR24/96 is the clock master,
set the Sample Clock to Internal; if it
is a clock slave, set the Sample Clock
to Word Clock and depress the 75Ω
termination switch on the Sync card.
2. Set the Sample Rate to 44.1kHz or
48kHz according to your preference.
Console Settings
1. If the D8B is the clock master, set the
Sample Rate to either 44.1kHz or
48kHz, and set the Apogee Clock to
Internal (in the Digital I/O Setup
window). If it is a clock slave, then set
the Apogee Clock to Word Clock. Set
the Sample Rate to match the Sample
Rate selected on the HDR24/96.
Clock Out
(HDR24/96
as Master)
Depress the
Termination
button if the
HDR24/96 is
set to Slave
Word
Apogee
Clock I/O
Card
Word
Clock
Out
Word
Clock In
Word
Clock Out
(D8B as
Master)
Use
one
only
APOGEE
SYNC
Word
HDR
Sync
Card
Clock
APOGEE
Word
Clock
PDI•8 I/O Cards
PDI•8
PDI•8
PDI•8
Out
Digital 8•Bus
AES/EBU I/O
AES/EBU I/O
AES/EBU I/O
In
AES/EBU
Cables
(DB25)
PDI•8
PDI•8
HDR 24/96
AES/EBU I/O
AES/EBU I/O
D8B Manual • Chapter 4 • page 116
Word
Clock In
Word
Clock
Out
PDI•8
I/O Cards
Page 31

OK, so we fibbed a little. You can
use PDI•8 cards in the D8B
without a Clock I/O card
installed, but doing so requires
that you enable sample rate
conversion on both the D8B and
the HDR24/96 in lieu of word clock synchronization.
Sample rate conversion results in a 4-bit loss in
sample resolution that may degrade the quality of
the sound slightly. On the positive side, you don’t
need a Clock I/O card!
Using the Digital 8•Bus with ADATs
This is a simple setup. It works well and is easy
to configure. However, it has some limitations.
Without a MTC sync source there’s no way for the
Digital 8•Bus to time-reference snapshot or dynamic
automation. As long as automation isn’t a
consideration, this setup is clean and efficient.
Cabling and Hookup
1. Connect a fiber optic cable between the ADAT’s
lightpipe output and the D8B’s lightpipe input.
Likewise, connect the D8B’s lightpipe output to
the ADAT’s lightpipe input. (A DIO•8 or OPT•8
lightpipe card must be installed in the D8B to gain
access to the ADAT digital tape inputs and outputs.)
2. When using multiple ADATs, connect SYNC OUT
from the master ADAT to SYNC IN of the first
slave, then from SYNC OUT of the first slave to
SYNC IN of the second slave, and so on.
4. Set “Samplerate” to match the sample rate of
the formatted ADAT tapes (typically 48kHz or
44.1kHz).
ADATs
1. Select DIGITAL IN on the ADAT front panel.
Modular Digital Multitrack
CLOCK
EXT
48K
INPUT MON
INPUT
DIGITAL
INPUT MONITORINPUT SELECT
DIGITAL
INPUT
TRACK
COPY
ALL
INPUT
AUTO
INPUT
Settings
D8B
1. Open the Setup window.
2. Click on “Digital I/O” to open the Digital I/O
dialog box.
3. Click on each Tape Input and Output box and
select ADAT for each DIO•8 card installed.
Note: When powering up, turn the Digital 8•Bus on
first, then turn the ADATs on.
D8B Manual • Chapter 4 • page 117
Page 32

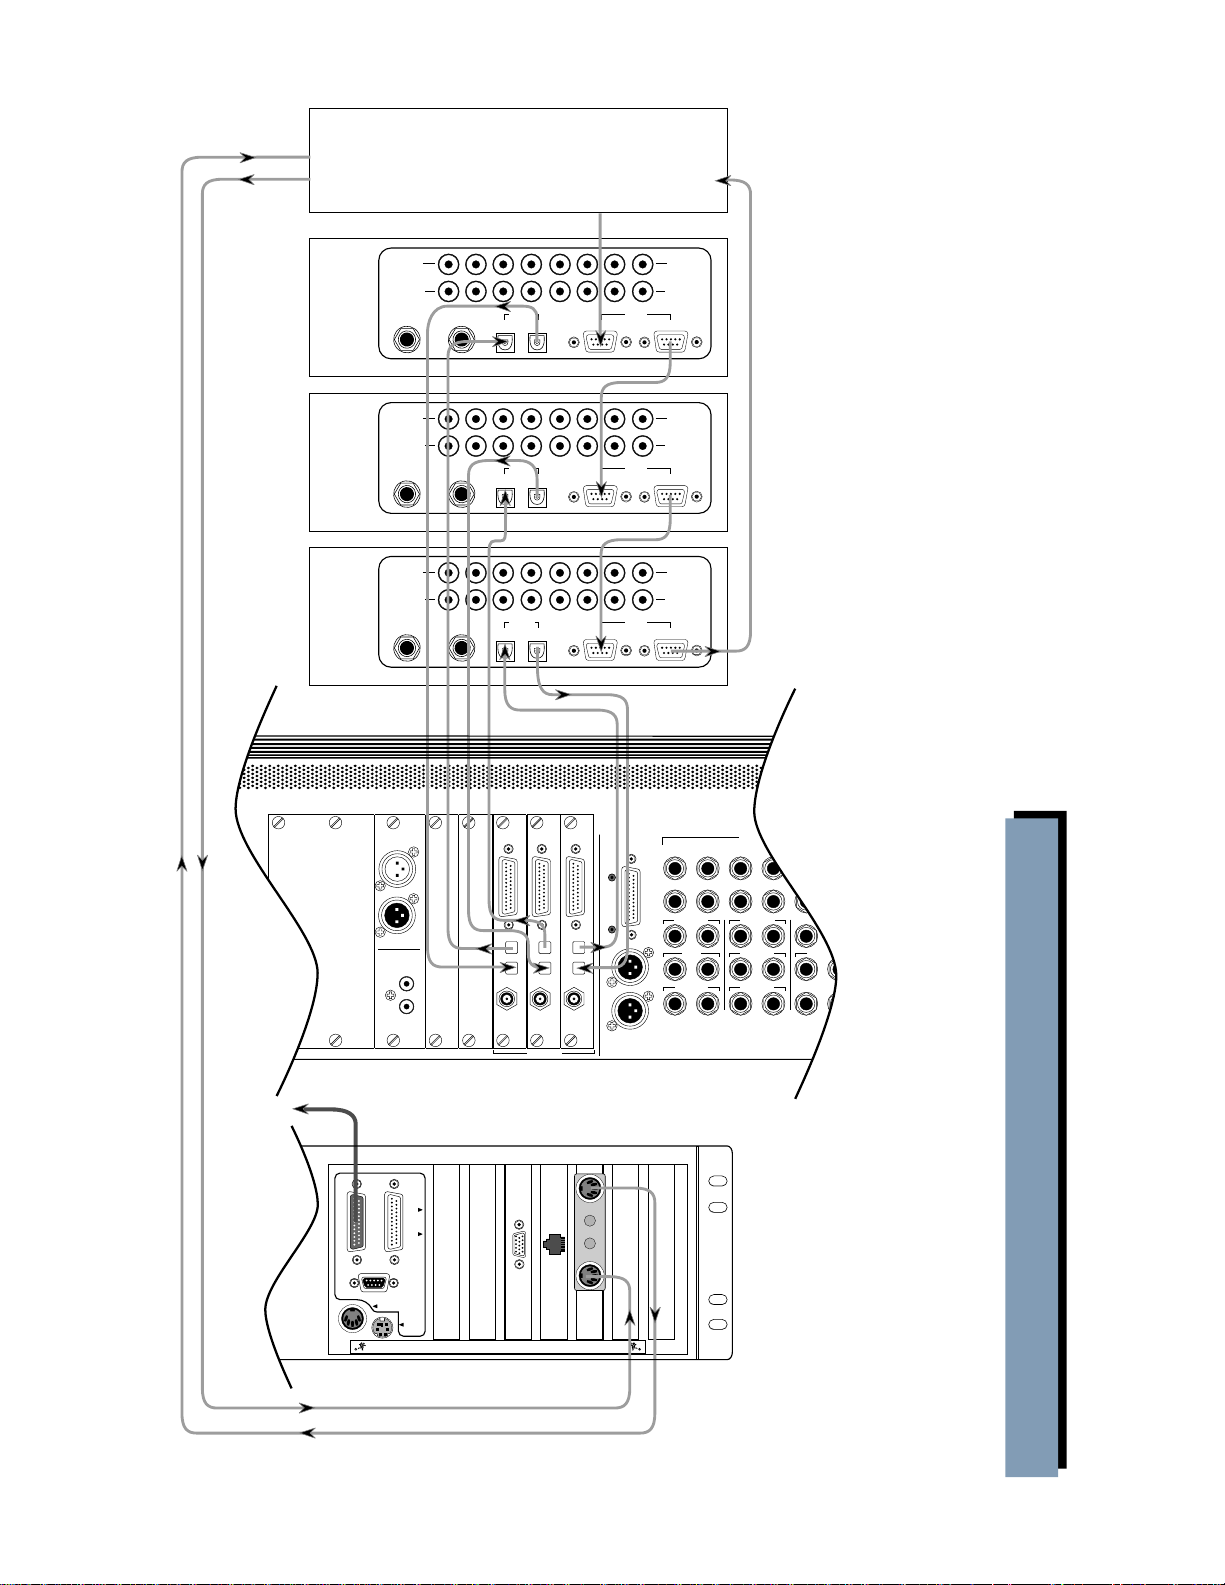
Connecting the Digital 8•Bus to a
BRC and ADATs
The inclusion of a BRC controller or, for that
matter, any other sync controller box with word
clock and MTC, vastly increases the capabilities of
the Digital 8•Bus. With centralized controls,
common sync reference, and MIDI Time Code
communication established, the digital system works
together as one unit. Automation is achieved,
referenced to MTC, and digital devices work
together, sample-by-sample to make the most of your
recordings. (See Figure on next page.)
Settings
Graphics in the previous section will help you
locate these controls.
D8B
1. Click the “Setup” button in the bottom menu bar
of the SVGA monitor to open the General Setup
window.
2. Click the “Digital I/O” icon on the left side of the
window to open the Digital I/O dialog box.
3. Click each Tape Input and Output box and select
ADAT for each DIO•8 card installed.
4. Set the “Samplerate” to 48kHz.
Cabling and Hookup
1. Connect a fiber optic cable between the ADAT’s
lightpipe output and the D8B’s lightpipe input.
Likewise, connect the D8B’s lightpipe output to
the ADAT’s lightpipe input. (A DIO•8 or OPT•8
lightpipe card must be installed in the D8B to
gain access to the digital tape inputs and outputs.)
2. Connect a BNC cable from the Clock I/O card’s
WORD CLOCK OUT connector to the 48kHz IN
connector on the BRC.
Note: It is necessary to terminate this connection with
a 50 ohm termination at the BRC end of the cable. You
will need a BNC “T” connector (Radio Shack part
number 278-112; male-female-female configuration)
and a 50 ohm BNC terminator (Radio Shack part
number 278-270). Connect the “T” connector to the
48kHz IN jack on the BRC. Then connect the BNC cable
from the DIO•8 card to one side of the “T” and connect
the 50 ohm terminator to the other side of the “T.”
3. Connect the 9-pin D-sub sync cables between the
BRC (REMOTE OUT TO ADAT) and the first
ADAT’s SYNC IN connector. Then connect the
sync cables in a daisy-chain fashion between the
remaining ADATs.
4. Connect MIDI cables between the MIDI OUT
connector on the Digital 8•Bus’ Remote CPU
and the MIDI IN connector on the BRC, and
between the MIDI IN connector on the Digital
8•Bus’ Remote CPU and the MIDI OUT
connector on the BRC.
ADATs
1. On the front panel of the ADAT, select DIGITAL IN.
BRC
1. Set the External Sync parameters to the
following:
a) Press the EDIT button.
b) Set the Clock Source to “48KHz Input.”
c) Set the Locate Reference to “Internal.”
d) Press the EDIT button to exit the “Edit
External Sync” page.
e) Make sure the EXT SYNC button is still lit.
2. Press the EDIT button and the GEN SYNC
button twice to bring up the MIDI page.
Set the parameter to MTC. Press the EDIT
button to exit out of the “Edit Generate Sync”
page. Leave the GENERATE SYNC button lit.
Notes:
1. You must turn on the Digital 8•Bus first,
then turn on the ADATs.
2. Make sure the DIGITAL I/O button on the BRC
is not lit.
3. Under the MIDI/UTIL button on the BRC, make
sure #1 MIDI Echo is off and #8 Output Rew/FF
is off. This is so the faders don’t run at high
speed when shuttling around on your ADATs.
D8B Manual • Chapter 4 • page 118
Page 33

MIDI IN
MIDI OUT
BRC
REMOTE OUT
TO ADAT
48 KHz IN
with 50Ω
termination
INPUT
OUTPUT
1 2 3 4 5 6 7 8
LOCATE/PLAY
LRC REMOTE
LOCATE/PLAY
LRC REMOTE
LOCATE/PLAY
LRC REMOTE
A B C D
DIGITAL I/O
AES/EBU
DIGITAL I/O
S/PDIF
IN
OUT
DIGITAL EFFECTS CARDS DIGITAL I/O SYNC ALT I/O TAPE IN/OUTS
PUNCH
IN/OUT
INPUT
OUTPUT
1 2 3 4 5 6 7 8
PUNCH
IN/OUT
INPUT
OUTPUT
1 2 3 4 5 6 7 8
PUNCH
IN/OUT
1
APOGEE
CLOCK I/O
IN
OUT
WORD
CLOCK
OUT
2
IN
WORD
CLOCK
DIGITAL
IN OUT
DIGITAL
IN OUT
DIGITAL
IN OUT
TAPE 1-8 TAPE 9-16 TAPE 17-24
APOGEE
DIGITAL I/O
ADAT OPTICAL
APOGEE
DIGITAL I/O
TDIF
IN OUT
SYNC
ADAT OPTICAL
TDIF
IN OUT
SYNC
APOGEE
DIGITAL I/O
ADAT OPTICAL
INPUT
OUTPUT
SYNC
IN OUT
INPUT
OUTPUT
SYNC
IN OUT
INPUT
OUTPUT
SYNC
IN OUT
BUS OUT 1-8
&
SURROUND OUT
TDIF
L
IN OUT
SYNC
R
MASTER OUT
THIS DEVICE COMPLIES WITH PART 15 OF THE FCC RULES. OPERATION IS SUBJECT TO THE FOLLOWING TWO CONDITIONS:
172418
23
MASTER OUT
LR
CR
MAIN
LR
CR
NEAR FIELD
LR
1) THIS DEVICE MAY NOT CAUSE HARMFUL INTERFERENCE AND
2) THIS DEVICE MUST ACCEPT ANY INTERFERENCE RECEIVED THAT MAY CAUSE UNDESIRED OPERATION
AD AT XT
MASTER DECK
(TRACKS 1-8)
AD AT XT
SLAVE DECK
(TRACKS 9-16)
AD AT XT
SLAVE DECK
(TRACKS 17-24)
LINE INPUTS
(BAL/UNBAL)
MACKIE DESIGNS
16
2 TRACK IN A
2 TRACK IN B
2 TRACK IN C
LR
LR
LR
DIGITAL 8•BUS
2014211522
PHONES 1
PHONES 2
STUDIO OUT
LR
TALKBACK
PUNCH I/O
13
19
DAT A C ABLE
(to Console)
VIDEO
PARALLEL
CONSOLE DATA
SERIAL
KEYBOARD
MOUSE
CONCEIVED, DESIGNED, AND MANUFACTURED BY MACKIE DESIGNS INC • WOODINVILLE • WA • USA • MADE IN USA • FABRIQUE AU USA • COPYRIGHT ©1997 •
THE FOLLOWING ARE TRADEMARKS OR REGISTERED TRADEMARKS OF MACKIE DESIGN INC.: "MACKIE", "DIGITAL SYSTEMS", D8B AND THE "RUNNING MAN" FIGURE •
MIDI IN MIDI OUT
REMOTE CPU
Connecting the Digital 8•Bus to a BRC and ADATs
D8B Manual • Chapter 4 • page 119
Page 34

Connecting the Digital 8•Bus to
ADATs Using an External Sync Box
Cabling and Hookup
1. Connect a fiber optic cable between the ADAT’s
lightpipe output and the D8B’s lightpipe input.
Likewise, connect the D8B’s lightpipe output to
the ADAT’s lightpipe input. (A DIO•8 or OPT•8
lightpipe card must be installed in the D8B to
gain access to the digital tape inputs and outputs.)
2. Connect the 9-pin D-sub sync cables between the
Sync Box (SYNC OUT) and the first ADAT’s
SYNC IN connector. Then connect the sync
cables in a daisy-chain fashion between the
remaining ADATs. Connect the SYNC OUT on
the last ADAT to the SYNC IN on the Sync Box
to complete the loop.
3. Connect MIDI cables between the MIDI OUT
connector on the Digital 8•Bus’ Remote CPU
and the MIDI IN connector on the Sync Box, and
between the MIDI IN connector on the Digital
8•Bus’ Remote CPU and the MIDI OUT
connector on the Sync Box.
4. Set “Samplerate” to match the sample rate of
the formatted ADAT tapes (typically 48kHz or
44.1kHz).
ADATs
1. Select DIGITAL IN on the ADAT front panel.
Settings
D8B
1. Open the Setup window by pressing Ctrl+1 or
Setup in the bottom menu bar on-screen.
2. Click “Digital I/O” to open the Digital I/O
dialog box.
3. Click each Tape Input and Output box and select
ADAT for each DIO•8 card installed.
DIGITAL
INPUT
TRACK
COPY
Modular Digital Multitrack
CLOCK
EXT
48K
INPUT MON
INPUT
DIGITAL
INPUT MONITORINPUT SELECT
ALL
INPUT
AUTO
INPUT
D8B Manual • Chapter 4 • page 120
Notes:
• When powering up, turn the Digital 8•Bus on first,
then turn the ADATs on.
• Make sure MMC and MTC are lit on the sync box.
Page 35
MIDI IN
MIDI OUT
SYNC BOX
(Examples:
JLCooper dataSYNC or
Steinberg ACI)
SYNC
OUT
SYNC
IN
INPUT
OUTPUT
1 2 3 4 5 6 7 8
LOCATE/PLAY
LRC REMOTE
LOCATE/PLAY
LRC REMOTE
LOCATE/PLAY
LRC REMOTE
A B C D
DIGITAL I/O
AES/EBU
DIGITAL I/O
IN
OUT
DIGITAL EFFECTS CARDS DIGITAL I/O SYNC ALT I/O TAPE IN/OUTS
PUNCH
IN/OUT
INPUT
OUTPUT
1 2 3 4 5 6 7 8
PUNCH
IN/OUT
INPUT
OUTPUT
1 2 3 4 5 6 7 8
PUNCH
IN/OUT
1
IN
OUT
2
S/PDIF
DIGITAL
IN OUT
DIGITAL
IN OUT
DIGITAL
IN OUT
TAPE 1-8 TAPE 9-16 TAPE 17-24
APOGEE
DIGITAL I/O
ADAT OPTICAL
DIGITAL I/O
TDIF
IN OUT
SYNC
APOGEE
ADAT OPTICAL
APOGEE
DIGITAL I/O
TDIF
IN OUT
SYNC
ADAT OPTICAL
INPUT
OUTPUT
SYNC
IN OUT
INPUT
OUTPUT
SYNC
IN OUT
INPUT
OUTPUT
SYNC
IN OUT
BUS OUT 1-8
&
SURROUND OUT
TDIF
L
IN OUT
SYNC
R
MASTER OUT
THIS DEVICE COMPLIES WITH PART 15 OF THE FCC RULES. OPERATION IS SUBJECT TO THE FOLLOWING TWO CONDITIONS:
172418
23
MASTER OUT
LR
CR
MAIN
LR
CR
NEAR FIELD
LR
1) THIS DEVICE MAY NOT CAUSE HARMFUL INTERFERENCE AND
2) THIS DEVICE MUST ACCEPT ANY INTERFERENCE RECEIVED THAT MAY CAUSE UNDESIRED OPERATION
AD AT XT
MASTER DECK
(TRACKS 1-8)
AD AT XT
SLAVE DECK
(TRACKS 9-16)
AD AT XT
SLAVE DECK
(TRACKS 17-24)
LINE INPUTS
(BAL/UNBAL)
MACKIE DESIGNS
16
2 TRACK IN A
2 TRACK IN B
2 TRACK IN C
LR
LR
LR
DIGIT AL 8•BUS
2014211522
PHONES 1
PHONES 2
STUDIO OUT
LR
TALKBACK
PUNCH I/O
13
19
DAT A CABLE
(to Console)
VIDEO
PARALLEL
CONSOLE DATA
SERIAL
KEYBOARD
MOUSE
CONCEIVED, DESIGNED, AND MANUFACTURED BY MACKIE DESIGNS INC • WOODINVILLE • WA • USA • MADE IN USA • FABRIQUE AU USA • COPYRIGHT ©1997 •
THE FOLLOWING ARE TRADEMARKS OR REGISTERED TRADEMARKS OF MACKIE DESIGN INC.: "MACKIE", "DIGITAL SYSTEMS", D8B AND THE "RUNNING MAN" FIGURE •
MIDI IN MIDI OUT
REMOTE CPU
Connecting the D8B to ADATs Using an External Sync Box
D8B Manual • Chapter 4 • page 121
Page 36

Connecting the D8B to TASCAM MDMs
Cabling and Hookup
1. Connect the digital cables between the TASCAM tape
decks and the DIO•8 cards in the Digital 8•Bus.
Note: You must use the special dubbing cables provided
by TASCAM, part number PW-88D (1 meter) or PW-88DL
(5 meters). These cables are reverse wired. Do not use
a standard DB25 computer cable, which is wired
straight through pin-to-pin.
2. Connect the sync cables (TASCAM part number
PW-88S) between the master deck and the slaves
in a daisy-chain fashion. Make sure the last deck
has a Termination Plug connected to its SYNC
OUT connector.
For the DA-38:
An MMC-38 MIDI Machine Control interface must be
used prior to the SYNC IN connector on the master
deck to implement MMC transport commands and
track arming for up to three DA-38 machines.
For the DA-88:
You must have an SY-88 card installed in each
DA-88 to implement MMC transport commands
and track arming for up to three DA-88 machines.
The SY-88 cards also provide SMPTE chase lock
operation. Alternately, an MMC-38 MIDI Machine
Control interface may be used prior to the SYNC
IN connector on the master deck to implement
MMC transport commands and track arming for
up to three DA-88 machines.
3. Connect a BNC cable from the first DIO•8 (Tape
1–8) card’s SYNC connector to the WORD SYNC
IN connector on the master deck.
4. Connect MIDI cables between the MIDI OUT
connector on the Digital 8•Bus Remote CPU and
the MIDI IN connector on the MMC-38 (or SY-88
on the master deck), and between the MIDI IN
connector on the Digital 8•Bus’ Remote CPU and
the MIDI OUT connector on the MMC-38 (or SY-88).
Settings
MMC-38
1. Set SW2 DIP switches 6 and 7 to the up
position. All other switches should be in the
down position.
SY-88
1. DIP switches on the SY-88 are set internally.
The DIP switches labeled S2 assign the device
ID numbers (see the TASCAM SY-88 Owner’s
Manual for ID setup information).
3. Set the Machine ID on each recorder, with the
first deck (master) having the lowest number and
the last deck having the highest number. DA-88s
start with ID #0 and DA-38s start with ID #1.
DA-88 DA-38
Deck 1 0 1
Deck 2 1 2
Deck 3 2 3
Note: If using a DA-88 as the master and a DA-38 as a
slave, assign the DA-88 ID #0, and the DA-38 ID #2.
D8B
1. Click the “Setup” button in the bottom menu bar of
the SVGA monitor to open the General Setup window.
2. Click the “Digital I/O” icon on the left side of the
window to open the Digital I/O dialog box.
3. Click each Tape Input and Output box and select
TDIF for each DIO•8 card installed.
4. Select the appropriate sample rate in the Digital
I/O Setup window.
For DA-38s with the MMC-38:
a. Click the “Locator-MC” icon on the left side
of the Setup window.
b. Set all Device IDs to 1 (all D8B Device IDs
must be set to 1 in order to arm tracks from
the console).
For DA-88s with the SY-88s:
a. Click the “Locator-MC” icon on the left side
of the Setup window.
b. Set all Device IDs to one digit less than the
DIP switch settings (S2) on the SY-88 cards
for their respective machines. For example:
SY-88 D8B
Deck 1 1 0
Deck 2 2 1
Deck 3 3 2
TASCAM DA-38/DA-88
1. On the front panel of the TASCAM, select
WORD CLOCK as the clock source.
2. Also on the front panel, turn on the DIGITAL IN.
D8B Manual • Chapter 4 • page 122
Page 37

MIDI IN
REMOTE IN/SYNC IN
(FROM RC-848/DA-88)
METER UNIT
MODE RS-422 VIDEOINTHRUTIME CODE
1 2 3 4 5 6 7 8
IN OUT
SYNC OUT
(TO DA-88)
WORD SYNC
IN
REMOTE IN MACHINE ID
OUT
(FROM RC-808)
DIGITAL I/0
MIDI
IN OUT THRU
REMOTE
PUNCHIN/OUT
TDIF-1
SYS
SYS
DA -88
DSP
DSP
MASTER DECK
(TRACKS 1-8)
SYNC
SYNC
MIDI OUT
REMOTE IN/SYNC IN
(FROM RC-848/DA-88)
SYNC OUT
WORD SYNC
(TO DA-88)
IN
METER UNIT DIGITAL I/0
REMOTE IN MACHINE ID
REMOTE
OUT
PUNCHIN/OUT
(FROM RC-808)
TDIF-1
SYS
SYS
DSP
DSP
DA -88
SLAVE DECK
MODE RS-422 VIDEOINTHRUTIME CODE
1 2 3 4 5 6 7 8
IN OUT
TERMINATION PLUG
Other Notes
1. You must turn on
the Digital 8•Bus
first, then turn on
the Tascam
recorders.
2. Make sure the
MODE DIP
switches on the
SY-88 have the 2nd
REMOTE IN/SYNC IN
(FROM RC-848/DA-88)
MODE RS-422 VIDEOINTHRUTIME CODE
1 2 3 4 5 6 7 8
A B C D
DIGITAL EFFECTS CARDS DIGITAL I/O SYNC ALT I/O TAPE IN/OUTS
DIGITAL I/O
DIGITAL I/O
DATA CABLE
(to Console)
SYNC OUT
(TO DA-88)
METER UNIT DIGITAL I/0
IN OUT
1
AES/EBU
IN
OUT
2
S/PDIF
IN
OUT
DIP switch in the
up position and all
the rest of the
switches down.
This selects the
MIDI input.
3. The MMC-38
should have firmware version 1.05.
CONSOLE DATA
VIDEO
PARALLEL
SERIAL
KEYBOARD
MOUSE
CONCEIVED, DESIGNED, AND MANUFACTURED BY MACKIE DESIGNS INC • WOODINVILLE • WA • USA • MADE IN USA • FABRIQUE AU USA • COPYRIGHT ©1997 •
THE FOLLOWING ARE TRADEMARKS OR REGISTERED TRADEMARKS OF MACKIE DESIGN INC.: "MACKIE", "DIGITAL SYSTEMS", D8B AND THE "RUNNING MAN" FIGURE •
The SY-88 should
have firmware
version 4.01.
The DA-88 should have firmware version 4.01.
To determine the firmware version:
MMC-38: Internally marked on EPROM.
DA-88: Hold down the STOP/PLAY/REC buttons while powering up the DA-88 to display the
DA-88 ROM version.
SY-88: Hold down the PLAY/REC/FF buttons while powering up the DA-88 to display the
SY-88 ROM version.
4. If using any of the newer 24-bit DTRS machines, you should have version 2.1 EPROMs
installed in the DIO•8 cards (DIO•8 cards shipped after 7/2000 have version 2.1 EPROMs
installed). If the label on the socketed IC (located on the bottom left corner of the DIO•8 card,
near the edge connector) has anything but “v2.1” printed on it, you should get the free upgrade
by contacting our parts department at 800-258-6883.
MIDI
WORD SYNC
IN
MIDI
TAPE 1-8 TAPE 9-16 TAPE 17-24
APOGEE
APOGEE
DIGITAL I/O
DIGITAL I/O
DIGITAL I/O
TDIF
TDIF
IN OUT
IN OUT
ADAT OPTICAL
ADAT OPTICAL
SYNC
SYNC
MIDI IN
IN OUT THRU
REMOTE IN MACHINE ID
REMOTE
OUT
PUNCHIN/OUT
(FROM RC-808)
TDIF-1
IN OUT THRU
APOGEE
BUS OUT 1-8
&
SURROUND OUT
TDIF
L
IN OUT
ADAT OPTICAL
SYNC
R
MASTER OUT
THIS DEVICE COMPLIES WITH PART 15 OF THE FCC RULES. OPERATION IS SUBJECT TO THE FOLLOWING TWO CONDITIONS:
2) THIS DEVICE MUST ACCEPT ANY INTERFERENCE RECEIVED THAT MAY CAUSE UNDESIRED OPERATION
SYNC
SYS
DSP
SYNC
172418
23
MASTER OUT
LR
CR
MAIN
LR
CR
NEAR FIELD
LR
1) THIS DEVICE MAY NOT CAUSE HARMFUL INTERFERENCE AND
MIDI OUT
SYNC
(TRACKS 9-16)
SYS
DSP
DA -88
SLAVE DECK
SYNC
(TRACKS 17-24)
LINE INPUTS
(BAL/UNBAL)
16
2 TRACK IN A
LR
2 TRACK IN B
LR
2 TRACK IN C
LR
MACKIE DESIGNS
REMOTE CPU
D8B Manual • Chapter 4 • page 123
13
DIGIT AL 8•BUS
19
2014211522
PHONES 1
PHONES 2
STUDIO OUT
LR
TALKBACK
PUNCH I/O
Connecting the Digital 8•Bus to Tascam MDMs
Page 38

Digital Audio Workstation Setup
Connecting the Digital 8•Bus to a Digital Audio
Workstation (Digital Performer, Studio Vision Pro,
Cakewalk Pro, etc.) shares considerations with the
ADAT and TASCAM hookups. Word clock synchronization must be addressed; the master and slaves
must be established; the clock rate must be consistent throughout; and the audio path into the
console must be intelligently configured.
Note: A Pro Tools system works best when referenced
to Superclock sync source, or when connected to a
PDI•8 card through AES/EBU with SRC engaged.
Let’s consider a common computer-based
setup utilizing:
• A combination digital audio/MIDI software
package
• A MIDI interface
• A digital audio interface with lightpipe audio
connections
Cabling and Hookup
computer’s sample rate (typically 48kHz or
44.1kHz). Selecting “Internal” in the Apogee
Clock pull-down establishes the D8B as the
master. Everything else in the digital chain must
be capable of slaving to the Digital 8•Bus.
DAW
1. Set the digital audio interface to follow ADAT
optical at the interface input (from the D8B
lightpipe output).
2. Connect the DAWs MIDI/digital audio interface
to the Digital 8•Bus inputs and outputs.
1. Connect the Digital 8•Bus lightpipe output, from
the DIO•8 or OPT•8 card, to the digital audio
interface lightpipe input. Likewise, connect the
lightpipe output from the digital audio interface
to the D8Bs lightpipe input.
2. Connect the digital audio interface to the
computer per the manufacturer’s specifications.
Settings
D8B
1. Open the Setup window.
2. Click “Digital I/O” to open the Digital I/O
dialog box.
3. Click each Tape Input and Output box and select
the appropriate setting for each card installed.
Note: Be sure to turn on the D8B before any of the
other digital components. In addition, if your setup uses
TDIF connections, refer to the previous setup scenario
for TASCAM-specific settings.
4. Set the Digital 8•Bus “Samplerate” to match the
D8B Manual • Chapter 4 • page 124
Page 39

MIDI IN
MIDI OUT
MIDI Interface
Software-based
Digital Audio
Workstation
5 6 7 8
A B C D
DIGITAL EFFECTS CARDS DIGITAL I/O SYNC ALT I/O TAPE IN/OUTS
INPUT
OUTPUT
COMPUTER
DIGITAL I/O 1
DIGITAL I/O
OUT
BANK A
TDIF
ADAT OPTICAL
IN OUT
AES/EBU
IN
OUT
2
S/PDIF
IN
DAT A C ABLE
(to Console)
BANK B
TDIF
ADAT OPTICAL
IN OUT
TAPE 1-8 TAPE 9-16 TAPE 17-24
APOGEE
APOGEE
DIGITAL I/O
TDIF
IN OUT
SYNC
ADAT OPTICAL
APOGEE
DIGITAL I/O
TDIF
IN OUT
SYNC
DIGITAL I/O
ADAT OPTICAL
ADAT OPTICAL
BANK C
TDIF
ADAT OPTICAL
IN OUT
BUS OUT 1-8
&
SURROUND OUT
TDIF
L
IN OUT
SYNC
R
MASTER OUT
THIS DEVICE COMPLIES WITH PART 15 OF THE FCC RULES. OPERATION IS SUBJECT TO THE FOLLOWING TWO CONDITIONS:
172418
23
MASTER OUT
LR
CR
MAIN
LR
CR
NEAR FIELD
LR
1) THIS DEVICE MAY NOT CAUSE HARMFUL INTERFERENCE AND
2) THIS DEVICE MUST ACCEPT ANY INTERFERENCE RECEIVED THAT MAY CAUSE UNDESIRED OPERATION
D AW Digital
Interface
DIGITAL 8•BUS
LINE INPUTS
(BAL/UNBAL)
16
2014211522
PHONES 1
2 TRACK IN A
LR
2 TRACK IN B
2 TRACK IN C
MACKIE DESIGNS
STUDIO OUT
LR
LR
LR
PUNCH I/O
13
19
PHONES 2
TALKBACK
PARALLEL
CONSOLE DATA
KEYBOARD
MOUSE
DATA AND SYNCHRONIZATION I/O
CONCEIVED, DESIGNED, AND MANUFACTURED BY MACKIE DESIGNS INC • WOODINVILLE • WA • USA • MADE IN USA • FABRIQUE AU USA • COPYRIGHT ©1997 •
THE FOLLOWING ARE TRADEMARKS OR REGISTERED TRADEMARKS OF MACKIE DESIGN INC.: "MACKIE", "DIGITAL SYSTEMS", D8B AND THE "RUNNING MAN" FIGURE •
REMOTE CPU
MIDI OUT
MIDI IN
Connecting the Digital 8•Bus to A Digital Audio Workstation
D8B Manual • Chapter 4 • page 125
Page 40

Live Sound/Live Recording Setup
In a live sound/recording application the
console fader banks are chained together to form
one large console. With the addition of up to 24
more mic preamplifiers, the tape inputs can be
used to receive signal from any mic-level or linelevel source.
The setups for live concert recording and live
sound are similar. Each involves mixing everything
as you go—moving faders, or setting and selecting
snapshots. Whereas the live concert mix sends the
final audio to the monitors and house sound system,
the live recording mix sends the final audio to the 2track recorder and the headphones.
Follow this simple procedure to set up for a live
session.
Power amps off
❏
❏ Console power on
❏ Select a starting snapshot
❏ Turn Master Fader down
❏ Connect all mics and instruments
❏ Setup sample clock
❏ Set up a quick mix using level, pan, EQ, dynamics,
effects
❏ Adjust mix to the cue (headphone) buses.
❏ Store and label snapshot(s)
Live Application Tip #2: Don’t forget the Snapshot
filters. If you find a parameter setting that you want to
keep throughout the performance (EQ, plugin,
compressor, etc.), simply filter that parameter out of
your saved set of snapshots. All your changes will still
happen on cue as you scroll through snapshots, but
your updated parameters will remain constant.
❏ Power amps on
❏ Select Mic/Line fader bank
❏ Press Mic button on channels using microphone
inputs
❏ Set Pre-Fader auxes in Setup Window for monitor
use
❏ Test each instrument and mic to verify level at
console input meter
❏ Adjust input trim for a reading around 15 on the
meter
❏ Press L/R in the ASSIGNMENT section to confirm
Assign lights on for all desired channels. Or, look
on-screen to verify all channels have L/R button
highlighted in Bus Assign section
Live Application Tip #1: Buses 1–8 don’t sum to L/R
Mix internally. Therefore, to utilize buses as masters,
route the bus (sub) out the Alt I/O then back into any
channel or Alt I/O input. Or, simply use the virtual
groups as level and mute masters.
❏
Set Master Fader to Unity position
❏ Turn channel faders up to hear instrument or mic.
❏ Once the appropriate level is achieved, press the
channel mute button.
D8B Manual • Chapter 4 • page 126
Page 41

LINE IN
INSERT
AUX 2
2
LINE IN
INSERT
AUX 3
3
LINE IN
INSERT
AUX 4
4
LINE IN
INSERT
AUX 5
5
LINE IN
INSERT
AUX 6
6
LINE IN
INSERT
AUX 7
7
LINE IN
INSERT
AUX 8
8
LINE IN
INSERT
AUX 9
9
LINE IN
INSERT
AUX 10
10
LINE IN
INSERT
AUX 11
11
LINE IN
INSERT
AUX 12
12
LINE IN
ANALOG
I/O
MASTER
OUT
CR
MAIN
CR
NEAR FIELD
2 TRACK A
2 TRACK B
2 TRACK C
STUDIO OUT
PHNS 1 PHNS 2
PNCH I/0 TLKBK
1
LINE IN
INSERT
AUX 1
13
19
14
20
15
21
16
22
17
23
18
24
BUS OUT 1-8
&
SURROUND OUT
MASTER OUT
L
R
ANALOG
I/O
ANALOG
I/O
TO TAPEFROM TAPE
TO TAPEFROM TAPE
TO TAPEFROM TAPE
OUT
Digital I/O
AES/EBU
IN
Optional AIO•8 Cards
Mic Preamps
CR1604-VLZ
Backup Vocals
Percussion Mics Horn Section Mics
Drum Mics
Lead Vocals
Stereo Pr ocessor
Processor
internal digital audio
signal path
FX Card 1
To FX Return
3 and 4
(Fader
Bank 3)
To FX Return
1 and 2
(Fader
Bank 3)
Cassette Deck
2-Track DAT
8 Track Analog
Recorder
audio out
audio in
audio insert
internal digital send
internal digital return
Stage Monitors
Stereo Monitors for
Finicky Keyboard Player
Power Amp
mono mode
Separate Mix for
Live Broadcast F eed
Vocal Enhancer
Digital Delay
Stereo Reverb
FOH Speakers
Connecting the Digital 8•Bus for Live Sound/Live Recording
D8B Manual • Chapter 4 • page 127
Page 42
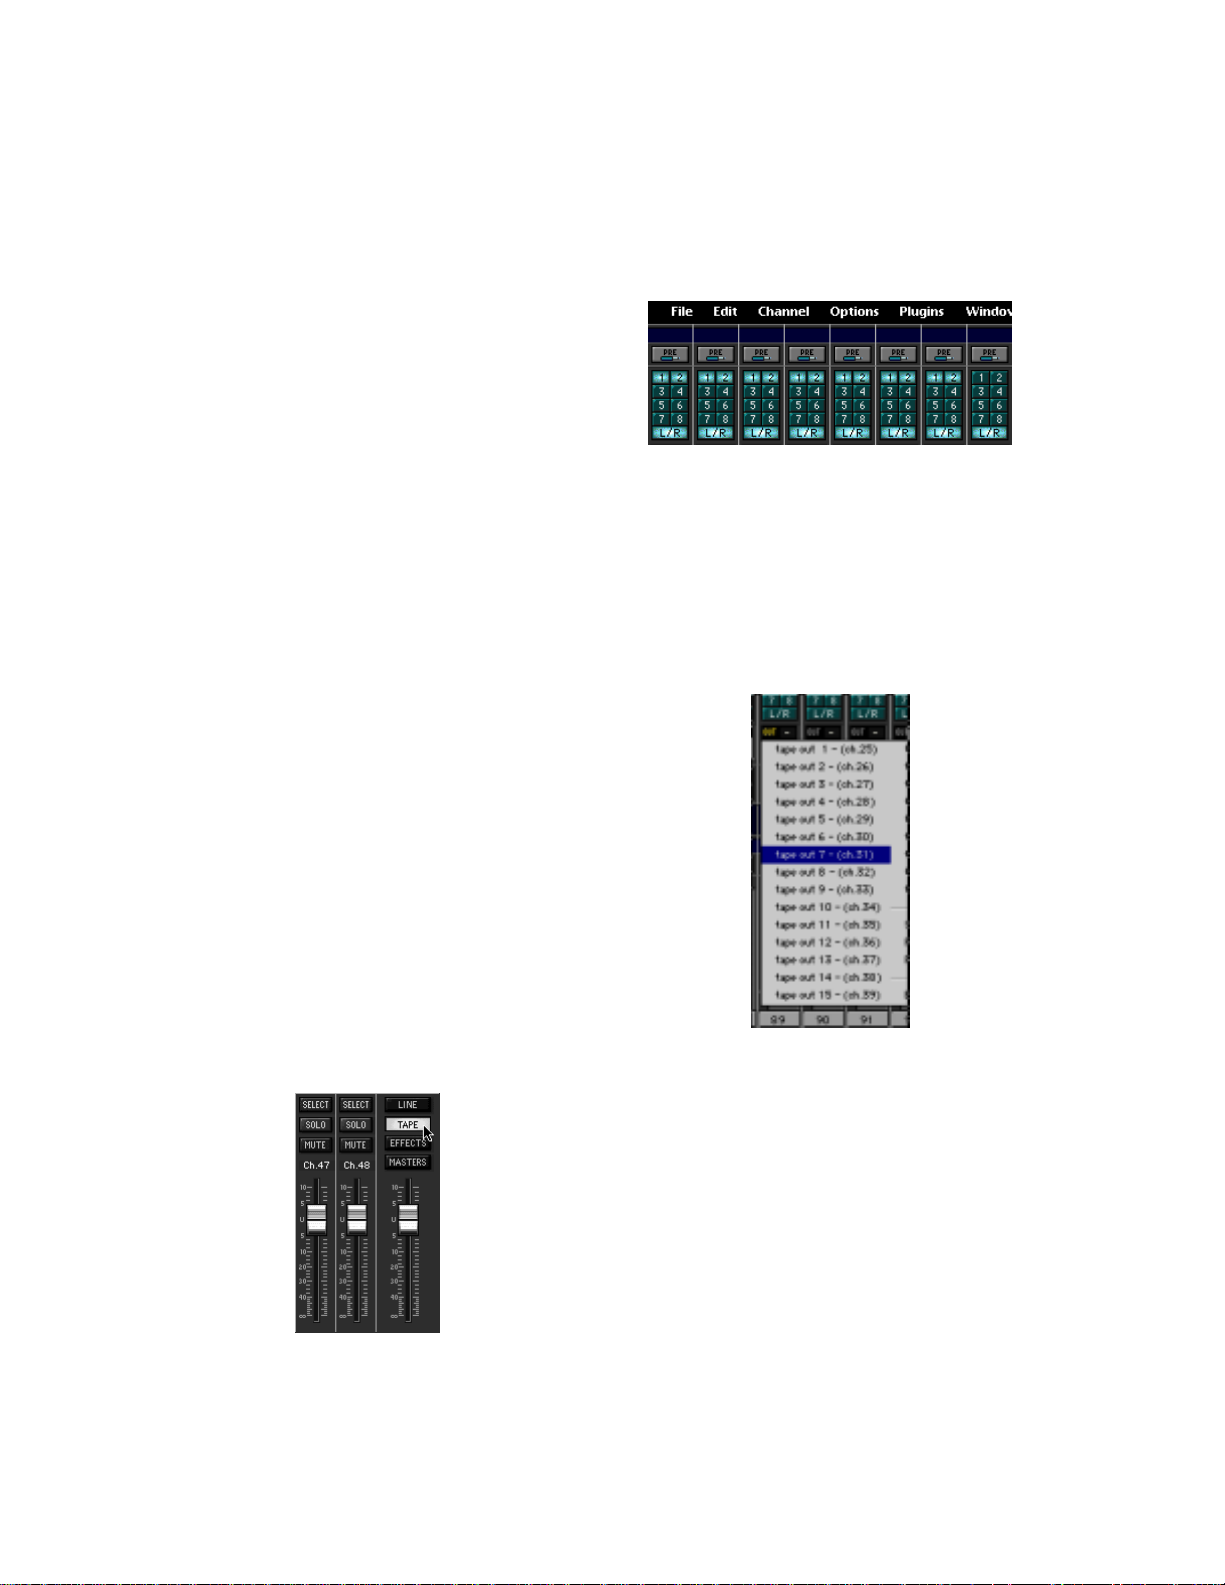
Post-Production Setup
The Digital 8•Bus is an amazing tool, no
matter what the setup. However, the more complex the setup, the more amazing the D8B becomes. Post-production provides potential for any
tracks, effects, snapshots, automation moves, and
general madness mayhem.
Most post-production facilities use house sync
to lock all video equipment together. The same
piece of gear that generates house sync can
provide the D8B and all connected audio gear with
the necessary word clock to get everything
functioning properly together.
In order for the D8B to follow external word
clock, an Apogee Clock I/O card is required. With
the Clock I/O card installed, the available sample
clock options increase. The D8B will slave to most
any clock source from 32kHz to 48kHz.
This is also the type of setup that might be
found in a home studio that incorporates a central
sync generator.
Bouncing/Summing Using Bus Outs
You may find that you need to free up some more
tracks to get everything to fit. You can do a submix
and combine several tracks into one (or two) using
the BUS 1–8 Submasters.
Maybe you have six separate tracks for the kick
drum, snare drum, cymbals left, cymbals right, tom
1, and tom 2. You can free up five extra tracks by
bouncing these down to one track, or free up four
extra tracks if you want to bounce them down to a
stereo pair of tracks.
The following steps show an example of how to
bounce tracks 1–6 down to tracks 7 and 8 by using
Bus 1 and 2. By using Buses 1 and 2, whatever pan
positioning you’ve set up is retained.
1. Select Fader Bank 2 by clicking the TAPE
button next to the Master Fader.
3. Click and hold on the “1” button at the top of
channel 1. Sweep across to channel 6 to assign
channels 1–6 to Bus 1.
4. Click and hold on the “2” button at the top of
channel 6. Sweep across to channel 1 to assign
channels 1–6 to Bus 2.
5. Click the MASTERS button next to the Master
Fader to select Fader Bank 4.
6. Click and hold on the OUT box at the top of BUS
1 (channel 89). Drag down to “Tape Out 7” to
assign Bus 1 to the multitrack record device
track number 7.
2. Turn off the L-R assignments for channels 25–
30 (tracks 1–6 returns). Turn off the L-R
assignments for any other channels you don’t
want to monitor while bouncing down.
D8B Manual • Chapter 4 • page 128
7. Click and hold on the OUT box at the top of BUS
2 (channel 90). Drag down to “Tape Out 8” to
assign Bus 2 to the multitrack record device
track number 8.
8. On the recording device, select record ready on
the tracks 7 and 8.
9. Play the song while recording tracks onto the
multitrack.
10. With the original 6 channels muted, monitor the
bounced track on the D8B TAPE IN bank
(channels 31 and 32).
Page 43

Using Basic Automation
What Type of Data Can Be Automated
Virtually all of the D8B channel parameters
are available for automation. However, there are a
few exceptions—some obvious and some not so
obvious. All D8B channel parameters can be
automated except:
• Analog Trims on channels 1–12
• Tape Output selection
• Pre and Post insert selections
• Plug-in Configuration selections—even
though plug-in parameters can be automated
• Channel reconfigurations
Two Types of Automation
Automation moves are divided into two basic
types: snapshot and dynamic. Snapshot auto-
mation makes it possible to instantly reset all
automated console settings to a predetermined
fixed (static) position with a single command
(snapshot recall). Dynamic automation allows you
to record and play back any parameter changes,
like fader positions or mute toggles, in real time
while locked into time code.
The Digital 8•Bus is powered by Mackie’s Real
Time OS™ automation software. Upon initial powerup, the console Automation Section is bypassed.
Snapshot Automation
As described in Chapters 2 and 3 of this
manual, snapshots are simple and painless to
store on the D8B.
Snapshot automation refers to simply scrolling through various snapshots at the appropriate
time and place. (Recalling snapshots in the proper
order and position can be accomplished through
connection to a MIDI sequencer, or by placing
snapshot events in the Event Automation Track.)
Your MIDI sequencer sees a snapshot selection as a simple patch change, which can be
recorded as part of the same sequence that might
contain all or a portion of your music.
• Set the sequencer to receive and record MIDI
patch change data from the D8B MIDI channel
and cable.
• Select “MIDI Snapshots” in the Setup>Mix
Options window.
• Run the sequence with the D8B receiving MTC
from the sequencer.
• Place the sequencer in record mode on the D8B
channel as you scroll through snapshots. Each of
these snapshot changes record into the sequence.
• Play the sequence back with the D8B receiving
MIDI playback at its MIDI input.
• Snapshots will playback in the same time and
order that you selected them.
• To fine-tune snapshot placement, open the
sequence track and adjust the time position in
the MIDI sequence.
Dynamic Automation
Dynamic automation is a function of the D8B
automation system. The power and flexibility
offered by the D8B is awesome. This one tool can
revolutionize the way you do music.
Each new automation pass helps mold and
shape the music into a brilliant work of art.
Dynamic automation involves real-time crafting of
the mix with the assistance of a computer processor.
Where Do I Start?
Automation is somewhat intimidating at first.
Fortunately, it doesn’t need to be. The power,
flexibility, and ease of use provided by the Mackie
designers makes the D8B painless and intuitive.
If you’ve used other automation systems, you
have a definite advantage. The concepts involved,
as they apply to the D8B, are similar to most
automation systems. The advantage the D8B
offers over most other automation systems is its
mind-boggling ability to automate virtually every
parameter on the console.
The following is a step-by-step, streamlined
procedure to help get you automating. To clarify
terminology and basic layout, refer to Chapter 2
of this manual.
Automation In Bypass
• Begin by setting up a basic mix with automation
off. Select BYPASS in the Automation section of
the control surface in the Options/Automation
window, or in the on-screen Locator window.
Clear Automation
• To avoid errant data, select all channels and
clear all types of automation data.
• Select Mic/Line bank, then Select All
(Control+A).
• Select Fader bank, then Select All (Control+A).
• Select Effects bank, then Select All (Control+A).
• Select Masters bank, then Select All
(Control+A).
• Choose Clear Automation… from the Edit Menu.
Check all types of data, then OK.
Save Session As…
• Name your Mixes in a manner that is easy to
reference consecutive revisions: For example,
“BigBadBob Mix 1,” or “BigBadBob rev 1.0.”
• Using “rev 1.x,” “rev 2.x,” etc. provides an
easy way to indicate major conceptual
changes (1.0, 2.0, 3.0, etc.) from minor
refinements (1.0, 1.1, 1.2, etc.)
Setup Rough Mix
• Build the basic sound of the mix. Include
fundamental EQ, Pan, Surround, Dynamics,
Groups, etc.
• Save frequently, or set the D8B for SMART
SAVES at regular intervals.
D8B Manual • Chapter 4 • page 129
Page 44

Save Snapshot For Safety
As you build the mix, save snapshots as soon
as the music begins to reveal itself. Label the
snapshots for your own reference. Sometimes these
basic mixes, which are derived from your initial
“gut” reaction to the music, are the most powerful.
Basic dynamic automation does not require
these snapshot saves, but they’re often useful as
the mix comes together, even if only as a crossreference. If you develop a string of snapshots that
are very powerful, they can be strung together
during automation. However, the procedure we’re
outlining here highlights dynamic automation.
Time Code From Playback Device
Route MTC
The D8B requires MIDI Time Code (MTC) at
the MIDI input to operate automation along with
the record/playback device.
• Connect the MIDI output of your computer,
sequencers, MIDI interface, or transport control
to the MIDI input of the D8B.
• Most sequencers or other record/playback
devices that transmit MTC need to be configured
to route to a specific MIDI channel, cable, or
device. Consult your MTC source operator’s
manual to confirm accurate and verifiable
routing to the D8B.
Verify MTC at D8B Transport SMPTE Window
• When your sequencer or other record/playback
device is running and MTC is transmitted, the
D8B control surface position readout window will
scroll MTC. You will see a continuous increase of
Hours, Minutes, Seconds, and Frames. If you see
this scrolling time code in the D8B POSITION
display, it’s almost automation time!
• MTC also displays in the on-screen Locator
window.
• If SMPTE VIEW is not selected, the readout will
display Bars/Beats/Ticks (BBT). Press the SMPTE
VIEW button at the left of the control surface
readout to toggle between SMPTE and BBT.
you’ll be tweaking the mix to perfection anyway.
• Verify that all channels are selected by choosing
each of the four fader banks and confirming that
all SELECT buttons are highlighted.
• Select Set Default Levels… from the Edit Menu.
• Respond “Yes” to complete the task.
• If you need to recall your static mix at any point,
you can save or update snapshots at any time.
Exit Bypass Mode
Once the default levels have been set, it’s time
to exit BYPASS mode. From this point on, any
parameter change can be written into automation.
Select Parameters
Choose the parameters you’d like to record as
automation data on the first pass. This is typically
a great time to ride basic fader, mute, and pan
settings. However, there is no problem with
selecting Faders, Mutes, Pan, and ALL so no
matter what moves you make, they can be recorded and recalled by the automation processor.
Any Combination of Faders, Mutes, and Pans on
First Pass
• Choose automation parameters by selecting
them in the control surface AUTOMATION
section, in the on-screen locator window, or the
Options/Automation menu.
• The D8B shows no favoritism to any or all
parameter writing during automation. You’ll
discover the process that works best for you.
Note: Faders, Mutes, and Pan all apply individually to the
one parameter they name. ALL applies to all automation
parameters other than Faders, Mutes, and Pan.
Safety Net: You can undo any automation record pass
or series of record passes using the History List. You
can also redo your undo. Or undo your redo. Or undo
your hairdo.
Auto Touch Mode
Set Default Levels…
Once your ducks are in a row, you’re ready to
begin the automation process! The Set Default
Levels…” command determines the starting point
for the entire mix. Fader levels can be written
from the beginning of time code (00:00:00:00) to
the end (23:59:59:30).
If you don’t set default levels to your preference, levels will jump to any previously selected
automation settings as soon as MTC begins. This
can be very frustrating, but if you’ve religiously
saved snapshots of your mix status, you won’t be
far from repair.
• Determine that your mix is solid enough that
you’d like to have all parameters written as
defaults. Don’t get too freaked out about this—
D8B Manual • Chapter 4 • page 130
Auto Touch mode offers great flexibility and
ease of use. When AUTO TOUCH is selected,
automation data is recorded instantaneously for
any parameter as soon as you change its setting.
Select AUTO TOUCH by highlighting the control
surface AUTO TOUCH button, clicking AUTO
TOUCH in the on-screen Locator window, or selecting Auto Touch in the Options/Automation menu.
You’ll know you’ve succeeded in writing
automation data when you see the yellow light
illuminate the control surface WRITE button or
the on-screen channel WRITE icon.
Start playback device
• Verify MTC in the Locator position readout.
• Verify selection of desired automation
parameters—for now select FADERS, MUTES,
PAN, and ALL.
Page 45

Move a channel fader
• As soon as the fader moves, the WRITE button
illuminates, indicating automation data is being
recorded.
Exit Record and Rewind to Beginning of Track
• Stop playback or press the WRITE button on the
active channels to exit automation record mode.
Rewind playback/Record device to the beginning
of the automation pass.
Start Playback from Beginning of Track
• If you’ve followed these directions thoroughly
you’ll see the fader move that you recorded
playback automatically.
• Welcome to the wonderful world of D8B
automation!
Repeat this Action for More Parameters
• Be sure you’ve selected the desired parameter
before attempting the automation pass.
• Each time you perform a new automation pass,
new data combines with the old in a seamless
manner. Continue building the mix until
everything is just right.
Note: Auto Touch mode does not require any channel
selection for automation to record! Simply move
virtually any parameter on any channel to activate the
record status for that channel on that automation
parameter.
Write Ready Mode
It’s possible to build an entire mix using Auto
Touch mode. It is easy to use, easy to build on,
and it offers incredible creative flexibility. However, there are instances where Write Ready mode
provides the perfect mode for a particular task.
Write Ready Mode is very useful when several
channels must be placed into automation record
mode at the same time.
Toggle the AUTO TOUCH button off
Activate the Desired Automation Parameters
• Engage FADERS, MUTES, PAN, and/or ALL
in the same manner as previously described.
Select Write Ready Mode
• This option is located in the Setup>Mix Options
window as “Use Write Ready” and in the
Options/Automation Menu as “Write Ready
Mode.”
• In this mode, the Transport RECORD button is
necessary for completing an automation pass.
Press WRITE on All Desired Automation Channels
• The yellow light or icon blinks, indicating
record-ready status.
Start the Playback Device
• Even when the playback device starts, the
automation system remains in ready status
(yellow lights blinking) until the RECORD button
is pressed in the control surface Transport section
or the on-screen Locator window.
Press the D8B Record Button
• Press the RECORD button on the control
surface in the transport control section or in the
on-screen Locator window.
• Once record status has been achieved, the
blinking yellow lights remain solid until the
transport stops or the WRITE button is pressed.
• For the write-ready channels, fader, mute, and
pan automation data is written as soon as record
is pressed.
• For all other parameters (other than fader, mute,
and pan), even though RECORD is pressed,
automation data isn’t actually recorded until a
parameter change is made.
Note: Operation characteristics of the Transport
RECORD button are determined by the settings in the
Setup>Mix Options window. Select “One Button Punch”
to enable record status by simply pressing the RECORD
button alone. If “One Button Punch” is not selected
the user must hold PLAY while pressing RECORD to
enter record mode. Press Play or Stop to punch out of
record.
Exit Record and Rewind to Beginning of Track
Start Playback from Beginning of Track
Repeat this Action for More Parameters
Write Punch-in Mode
This mode functions in a very similar fashion
to Write Ready mode. However, in this mode the
Transport RECORD button is not needed.
Exit AUTO TOUCH Mode
Deselect Write Ready Mode
• This option is available in the Setup>Mix
Options Menu and in the Setup>Mix Options
window
Start Playback Device, then Press the Write
Button(s) on the Desired Channels
• In this mode, pressing the channel WRITE
buttons immediately places the channels into
automation record mode.
• Pressing an active WRITE button (yellow light
solidly on) immediately punches out of
automation record mode for that channel.
Adjust Automation Parameters on the WRITEEnabled Channels
• It’s always important to verify the correct
selection of intended automation parameters.
Exit Record and Rewind to Beginning of Track
Start Playback from Beginning of Track
Repeat this Action for More Parameters
Trim Levels
This mode is perfect for updating sections of a
mix. If you’ve worked and toiled over a track
throughout a mix, adjusting the levels frequently, try
TRIM mode. This valuable mode simply adds or
D8B Manual • Chapter 4 • page 131
Page 46
subtracts the same amount from a previously
adjusted automation track. For example, when used
for faders, all moves are maintained but the overall
volume changes.
Press TRIM LEVELS
• Press TRIM LEVELS in the control surface
Automation section, on-screen Locator window,
or in the Options>Automation menu. Notice that
the faders all snap to unity position.
Choose Automation Mode
Even though TRIM LEVELS is selected and
the faders all move to unity position, the automation modes still retain their operational character.
Use Channel Faders to Boost or Cut Previously
Automated Channel Data
• The faders automatically set at unity so they can
be easily used to boost or cut the previously
adjusted track content.
• This is an excellent mode to globally adjust
channel levels.
• Simply raise or lower the fader level to boost or
cut the sum of your previous adjustments for the
selected channel.
Auto Touch, Write Punch-in, and Write Ready
Modes Function in TRIM mode, also
Automate EQ, Dynamics, and Effects
Automation of EQ, dynamics, and effects is simple.
• Select automation mode (ALL).
• Start the playback/record device.
• Activate automation record command.
• Make changes.
In order for these parameters to record, ALL
must be selected in the control surface AUTOMATION section, on-screen Locator window, or in the
Options/Automation window.
Automation Start-up Procedure
❏ Automation In Bypass
❏ Clear Automation
❏ Save Session As…
❏ Set Up Rough Mix
❏ Save Snapshot For Safety
❏ Route Time Code (MTC) From Playback Device to
D8B MIDI Input
❏ Verify MTC at D8B Transport SMPTE Window
❏
❏ Set Default Levels…
❏ Exit Bypass Mode
❏ Select Parameters
❏ Any Combination of Faders, Mutes, Pans, and All
Auto Touch Summary Checklist
❏ Enter Auto Touch Mode
❏ Start Playback Device
❏ Move a Channel Fader
❏ Exit Record and Rewind to Beginning of Track
❏ Start Playback from Beginning of Track
❏ Repeat this Action for More Parameters
Write Ready Summary Checklist
❏ Exit the AUTO TOUCH and/or TRIM LEVELS Mode
❏ Activate the Desired Automation Parameters
❏ Select Write Ready mode in Options>Automation
❏ Press WRITE on All Desired Automation Channels
❏ Start the Playback Device
❏ Press the D8B Record Button
❏ Adjust faders, mutes, or any selected parameters
on the WRITE enabled channels
❏ Exit Record and Rewind to Beginning of Track
❏ Start Playback from Beginning of Track
❏ Repeat this Action for more channels and
Parameters
Automation Procedural Checklists
These checklists are designed as skeletal
reminders of the processes previously described. If
you follow them and have a basic understanding of
the D8B automation system, they’ll help instill an
efficient automation procedure.
D8B Manual • Chapter 4 • page 132
Write Punch-in Summary Checklist
❏ Exit AUTO TOUCH and/or TRIM LEVELS Mode
❏ Exit Write Ready mode in the Options>Automation
Menu
❏ Start Playback/Record Device and Verify MTC
❏ Press the Write Button(s) on the Desired Channels
❏ Adjust Automation Parameters on the WRITE-
Enabled Channels
❏ Exit Record and Rewind to Beginning of Track
❏ Start Playback from Beginning of Track
❏ Repeat this Action for More Parameters
Trim Levels Summary Checklist
❏ Press TRIM LEVELS
❏ Choose Automation Mode (All Modes Function as
Expected)
❏ Start Playback/Record Device and Verify MTC
❏ Use Channel Faders to Boost or Cut Previously
Automated Channel Data
❏ Exit Record and Rewind to Beginning of Track
❏ Start Playback from Beginning of Track
❏ Repeat this Action for More Parameters
❏ Exit Trim Levels to Return Faders to Normal Mode
 Loading...