

Mackie Control Universal,Control Extender, Control Universal, Control Extender Quick Start Manual
Page 1
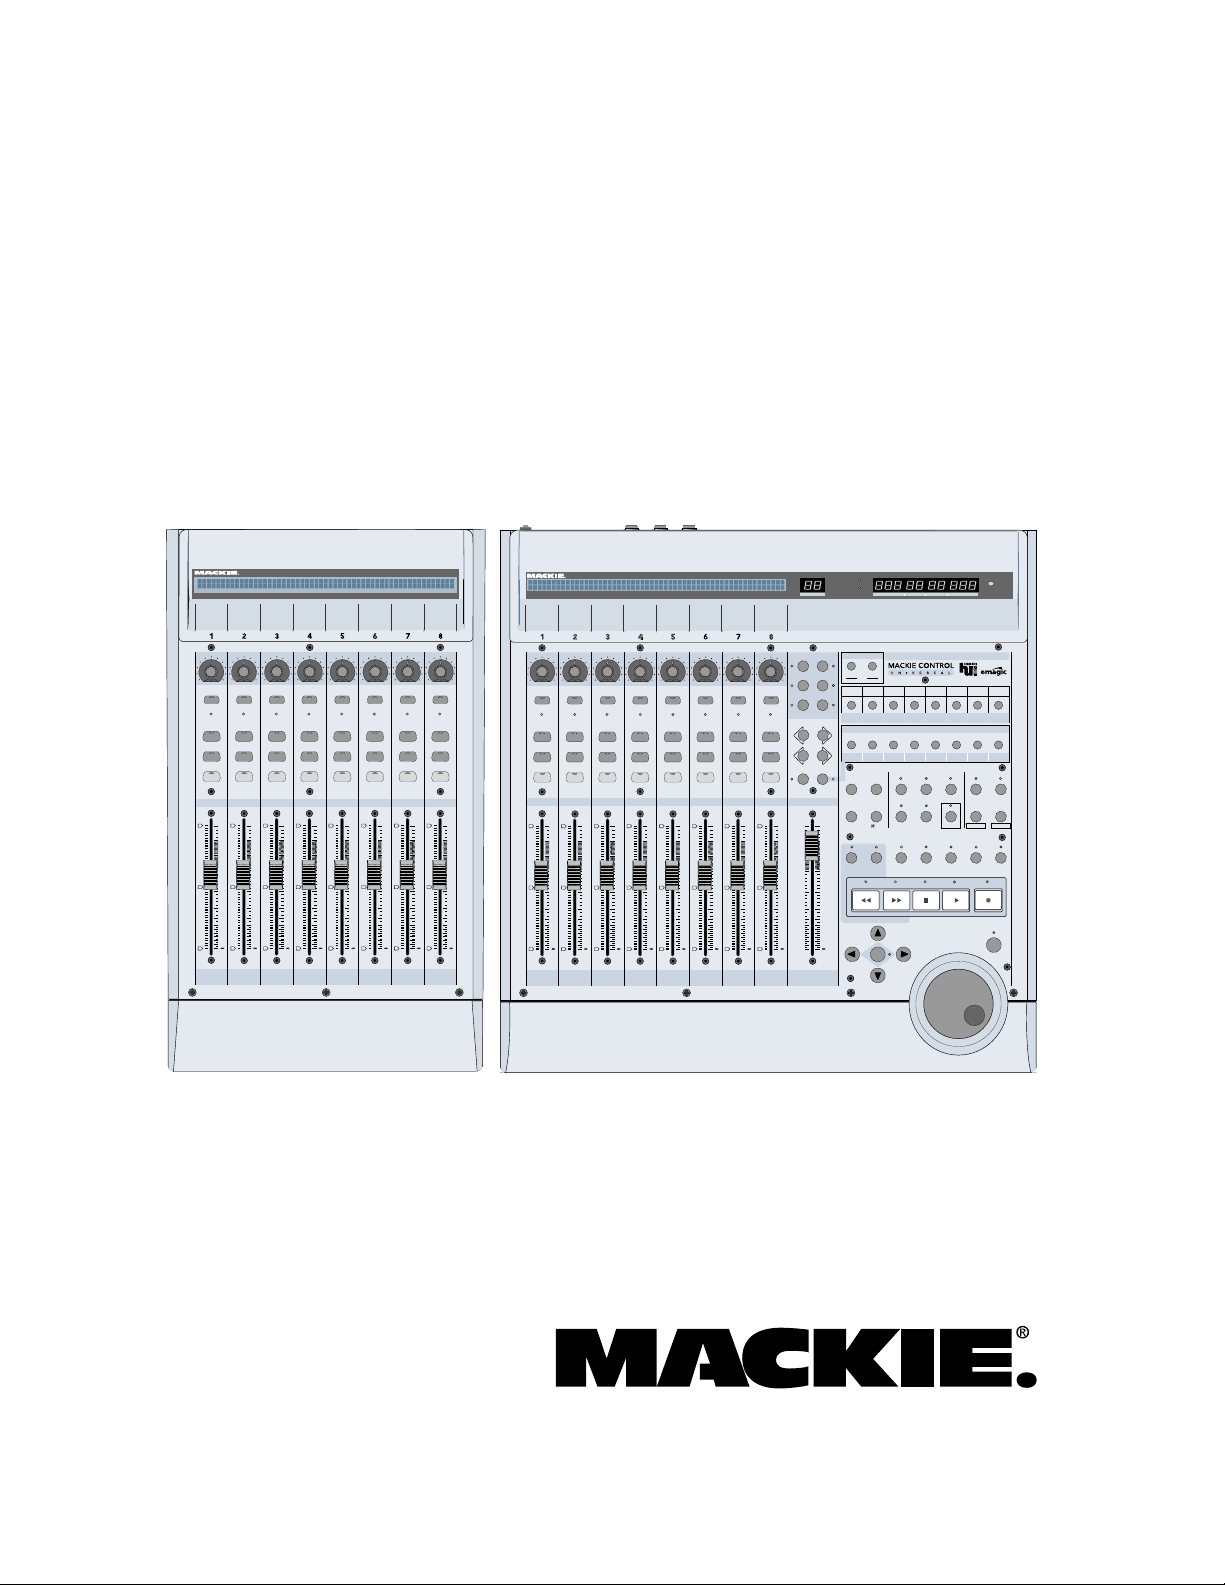
Mackie Control Universal
Mackie Control Extender
Quick-Start Guide
MACKIE FADER PACK VERSION 1.0
REC
REC
REC
REC
REC
REC
SIGNAL SIGNAL SIGNAL SIGNAL SIGNAL SIGNAL SIGNAL SIGNAL
SOLO
SOLO
SOLO
SOLO
SOLO
MUTE
MUTE
MUTE
MUTE
MUTE
SELECT
SELECT
SELECT
SELECT
SELECT
dB
dB
dB
+
+
10
10
5
5
U
U
5
5
0
0
10
10
20
20
30
30
40
40
50
50
60
60
–
–
dB
+
+
+
10
10
5
5
U
U
5
5
0
0
0
10
10
20
20
30
30
40
40
50
50
60
60
–
–
–
REC
SOLO
SOLO
MUTE
MUTE
SELECT
SELECT
dB
dB
+
+
10
10
5
5
U
U
5
5
0
0
10
10
20
20
30
30
40
40
50
50
60
60
–
–
HOURS MINUTES SECONDS FRAMES
MACKIE FADER PACK VERSION 1.0
REC
SOLO
MUTE
SELECT
87654321
dB
dB
+
10
10
5
5
U
U
5
5
0
10
10
20
20
30
30
40
40
50
50
60
60
–
REC REC REC REC REC REC REC REC
SIGNAL SIGNAL SIGNAL SIGNAL SIGNAL SIGNAL SIGNAL SIGNAL
SOLO SOLO SOLO SOLO SOLO SOLO SOLO SOLO
MUTE MUTE MUTE MUTE MUTE MUTE MUTE MUTE
SELECT SELECT SELECT SELECT SELECT SELECT SELECT SELECT
1
dB
dB
dB
dB
dB
+
+
+
10
5
U
5
0
0
10
20
30
40
50
60
–
–
+
10
10
5
U
5
10
20
30
40
50
60
10
5
5
U
U
5
5
0
0
10
10
20
20
30
30
40
40
50
50
60
60
–
–
dB
+
+
+
10
10
5
5
U
U
5
5
0
0
0
10
10
20
20
30
30
40
40
50
50
60
60
–
–
–
8765432
dB
dB
+
10
10
5
5
U
U
5
5
0
10
10
20
20
30
30
40
40
50
50
60
60
–
SMPTE
BEATS
ASSIGNMENT
DISPLAY
ASSIGNMENT
TRACK
SEND
SMPTE
NAME
BEATS
VALUE
F1 F2 F3 F4 F5 F6 F7 F8
PAN/SURROUND
PLUG-IN
EQ INSTRUMENT
FADER B ANK S
BANK
MIDI
INPUTS AUDIO
TRACKS
CHANNEL
MODIFIERS
FLIP
GLOBAL
VIEW
MASTER
dB
CONTROL
10
5
U
MARKER NUDGE
5
REWIND
10
20
30
40
50
60
BARS BEATS SUB DIVISION TICKS
GLOBAL VIEW
AUDIO
TRACKS
INSTRUMENT
AUTOMATION UTILITIES
OPTIONSHIFT
TOUCH
/
ALT
CYCLE DROP REPLACE CLICK
FAST FWD
ZOOM
WRITEREAD/OFF
STOP
AUX BUSSES OUTPUTS USER
SAVETRIM
CANCEL
GROUPLATCH
PLAY
RECORD
RUDE
SOLO
UNDO
ENTER
SOLO
SCRUB
Eight Channel Master Control Surface
and Eight Channel Extender for Digital Audio Workstations
Page 2
Mackie Control Universal
CAUTION AVIS
RISK OF ELECTRIC
DO NOT OPEN
RISQUE DE
NE PAS OUVRIR
CAUTION: TO REDUCE THE RISK OF ELECTRIC SHOCK
DO NOT REMOVE COVER (OR BACK)
NO USER-SERVICEABLE PARTS INSIDE
REFER SERVICING TO QUALIFIED PERSONNEL
ATTENTION: POUR EVITER LES RISQUES DE CHOC
ELECTRIQUE, NE PAS ENLEVER LE COUVERCLE. AUCUN
ENTRETIEN DE PIECES INTERIEURES PAR L’USAGER. CONFIER
L’ENTRETIEN AU PERSONNEL QUALIFIE.
AVIS: POUR EVITER LES RISQUES D’INCENDIE OU
D’ELECTROCUTION, N’EXPOSEZ PAS CET ARTICLE
A LA PLUIE OU A L’HUMIDITE
The lightning flash with arrowhead symbol within an equilateral
triangle is intended to alert the user to the presence of uninsulated
"dangerous voltage" within the product’s enclosure, that may be
of sufficient magnitude to constitute a risk of electric shock to persons.
Le symbole clair avec point de fl che l’int rieur d’un triangle
quilat ral est utilis pour alerter l’utilisateur de la pr sence
l’int rieur du coffret de "voltage dangereux" non isol d’ampleur
suffisante pour constituer un risque d’ l ctrocution.
The exclamation point within an equilateral triangle is intended to
alert the user of the presence of important operating and maintenance
(servicing) instructions in the literature accompanying the appliance.
Le point d’exclamation l’int rieur d’un triangle quilat ral est
employ pour alerter les utilisateurs de la pr sence d’instructions
importantes pour le fonctionnement et l’entretien (service) dans le
livret d’instruction accompagnant l’appareil.
CHOC
SHOCK
ELECTRIQUE
Important Safety Instructions
1. Read instuctions — Read, understand and follow all safety and
operating instructions before using this Mackie product.
2. Retain Instructions — Keep these safety and operating
instructions for future reference.
3. Heed Warnings — Follow all warnings on this Mackie product
and in these operating instructions.
4. Water and Moisture — Do not use this Mackie product near
water – for example, near a bathtub, kitchen sink, garden hose,
incontinent poodle, sweaty drummer, etc. – or when condensation has formed on the unit.
5. Cleaning — Clean only with a dry cloth.
6. Heat and Ventilation — Locate this Mackie product away from
heat sources such as radiators, campfires, compost pits, heliarc
welders, magma flows, etc. Do not block the ventilation
openings or install in spaces that prevent adequate air circulation
to the unit.
7. Power Sources — Connect this Mackie product only to a power
source of the type described in these operating instructions or as
marked on the product.
8. Power Cord Protection — Route power supply cords so that they
are not likely to be walked upon, tripped over, or abraded by
items placed upon or against them. Pay particular attention to
cords at plugs, convenience receptacles, and the point where
they exit the product.
9. Object and Liquid Entry — Do not drop objects or spill liquids
into this Mackie product. Clean only with a damp cloth; do not
clean with liquid or aerosol cleaners.
10. Attachments — Use this Mackie product with only the
accessories specified in this manual.
11. Damage Requiring Service — This Mackie product should be
serviced only by qualified service personnel when:
A. The power supply cord or the plug has been damaged; or
B. Objects have fallen onto, or liquid has spilled into the unit; or
C. The unit has been exposed to rain or water; or
D. The unit does not appear to operate normally or exhibits a
marked change in performance; or
E. The unit has been dropped, or its chassis damaged.
12. Servicing — Do not attempt to service this Mackie product. All
servicing should be referred to the Mackie Service Department.
13. Lightning — Unplug the product during lightning storms or
when unused for long periods of time. Note that this Mackie
product is not completely disconnected from the AC mains
service when the power switch is in the OFF position.
14. Grounding and Polarization — To prevent electric shock, do not
use the polarized plug with an extension cord, receptacle or
other outlet unless the blades can be fully inserted to prevent
blade exposure. Do not defeat the grounding by plugging into an
ungrounded receptacle or ground lift adapter.
This apparatus does not exceed the Class A/Class B (whichever is
applicable) limits for radio noise emissions from digital apparatus as
set out in the radio interference regulations of the Canadian
Department of Communications.
ATTENTION — Le présent appareil numérique n’émet pas de bruits
radioélectriques dépassant las limites applicables aux appareils
numériques de class A/de class B (selon le cas) prescrites dans le
réglement sur le brouillage radioélectrique édicté par les ministere
des communications du Canada.
FCC Information
NOTE: This equipment has been tested and found to comply
with the limits for Class B digital devices, pursuant to Part 15 of
the FCC Rules. These limits are designed to provide reasonable
protection against harmful interference when the equipment is
operated in a commercial installation. This equipment generates,
uses, and can radiate radio frequency energy and, if not installed
and used in accordance with the instruction manual, may cause
harmful interference to radio communications. Operation of this
equipment in a residential area is likely to cause harmful
interference in which case the user will be required to correct
the interference at his own expense.
This product has been tested and complies
with the following standards and directives
as set forth by the European Union:
* EN 55022 Radiated and Conducted Emissions
* EN 55024 Electromagnetic Immunity
* EN 61000-4-2 Electrostatic Discharge Immunity
* EN 61000-4-3 RF Electromagnetic Fields Immunity
* EN 61000-4-4 Electrical Fast Transient/Burst Immunity
* EN 60950/IEC 950 Electrical Safety Requirements
WARNING — To reduce the risk of fire or electric shock, do
not expose this appliance to rain or moisture.
Part No. 0003943-90 Rev. B 10/03
© 2003 LOUD Technologies Inc. All Rights Reserved.
2
Mackie Control Universal
Page 3
Introduction
Quick-Start Guide
Installation
Thank you for choosing Mackie Designs for your
Digital Audio Workstation (DAW) control solution.
Mackie Control Universal and Mackie Control
Extender provide the familiar feel of analog-style
mixing to your DAW environment. But they also
deliver the most complete feature set and software
compatibility of any control surface available today.
The labels for the buttons and controls are
specific to Emagic Logic. Custom lexan overlays are
available for other supported DAWs (see the Overlay
Request Card included in the box). These overlays fit
over the right-hand side of the control surface and
correctly label the buttons for the functionality
supported by the DAW you are using.
Software User’s Guides
Consult the CD included in the box with your
Mackie Control Universal, which contains additional
manuals in PDF file format for all the currently
supported platforms. Be sure to visit our website at
www.mackie.com to obtain the latest manuals and
marketing literature for all your Mackie products.
Changing Modes
Mackie Control Universal has three different
modes of operation:
1. Mackie Control (use with APB Tools TH-S,
Cakewalk Sonar, Magix Samplitude and
Sequoia, MOTU Digital Performer, RML Labs
Saw Studio, Steinberg Nuendo and Cubase SX,
and Adobe Audition [previously Syntrillium
Cool Edit Pro]).
2. Logic Control (use with Emagic Logic).
3. HUI (use with Digidesign Pro Tools).
When you first turn on Mackie Control Universal,
the display prompts you to select a mode of
operation:
• Press Ch. 1 V-Pot to select Mackie Control.
• Press Ch. 4 V-Pot to select HUI.
• Press Ch. 8 V-Pot to select Logic Control.
Once you’ve made your selection, Mackie Control
Universal will automatically boot into your selected
mode each time you turn it on.
• Connect the Mackie Control Universal to your
MIDI interface via two MIDI cables (IN and OUT).
• Connect one end of the external power supply
to the Mackie Control Universal, and the other
end to an AC power source between 90 VAC
and 264 VAC (50–60 Hz).
• Turn on the Mackie Control Universal POWER
switch.
• Launch your software program of choice.
• Select your software’s console or surface
manager set up window.
• Select the Mackie Control MIDI Mapping. If it is
not included in the version of software you are
using, go to the software company’s website or to
www.mackie.com/mackiecontrol and download
the MIDI map for your particular application.
• Once the appropriate MIDI map is selected
within your software’s preferences, the unit(s)
will be recognized automatically.
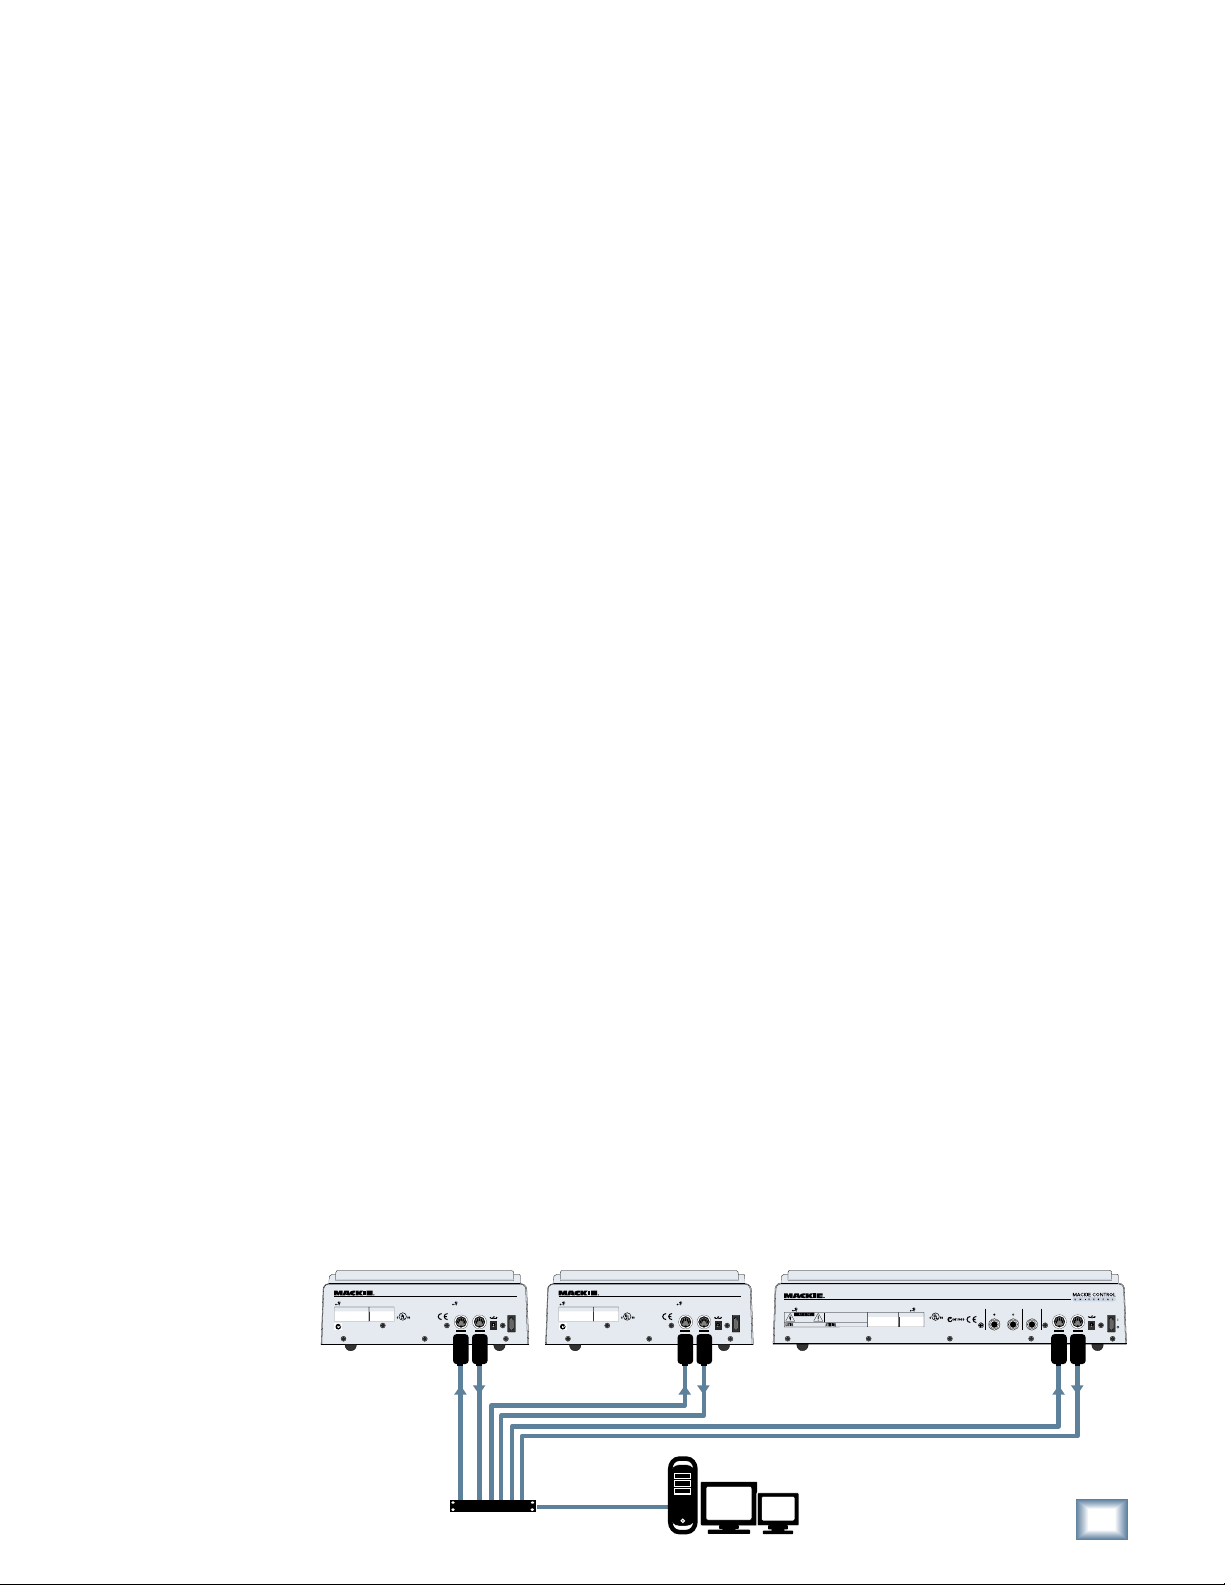
• Mackie Control Universal/Mackie Control
Extender units can function as a single large
console — a “Control Surface Group.”
• Each Control Surface Group can be configured
independently. As an example, you can control
volume and pan settings with one unit while
editing plug-in settings with the second unit
(if the software that you are running will
accept these parameters).
To connect one or more Mackie Control Universal and
Mackie Control Extenders:
1. Connect the MIDI OUT jack on your computer’s
MIDI interface to the MIDI IN jack of the Mackie
Control Universal or Mackie Control Extender.
2. Connect the MIDI IN jack on your computer’s
MIDI interface to the MIDI OUT jack of the
Mackie Control Universal or Mackie Control
Extender.
3. You need to have separate MIDI IN and OUT
jacks on the MIDI interface for each Mackie
Control Universal and Mackie Control
Extender (see illustration below).
To change the mode of operation:
1. Turn off
the Mackie
Control.
2. Hold down
Mackie Control Extender
THE FOLLOWING ARE TRADEMARKS OR REGISTERED TRADEMARKS OF MACKIE DESIGNS INC "MACKIE" AND THE "RUNNING MAN" FIGURE
MANUFACTURING DATE
SERIAL NUMBER
DESIGNED BY MACKOIDS IN WOODINVILLE, WA • USA • COPYRIGHT ©2001
both the
Ch. 1 and
Ch. 2 SELECT buttons
while turning on the
Mackie Control.
3. The display once again
prompts you to select a
mode of operation.
LISTED INFORMATION
TECHNOLOGY EQUIPMENT
59BJ
MIDI
IN MIDI
IN
MIDI Interface
CONTROL EXTENDER
EXTERNAL
OUT
POWER
–
+
MIDI
OUT
Multiport
POWER
Computer Serial or
Mackie Control Extender
THE FOLLOWING ARE TRADEMARKS OR REGISTERED TRADEMARKS OF MACKIE DESIGNS INC "MACKIE" AND THE "RUNNING MAN" FIGURE
MANUFACTURING DATE
SERIAL NUMBER
USB Connection
LISTED INFORMATION
TECHNOLOGY EQUIPMENT
DESIGNED BY MACKOIDS IN WOODINVILLE, WA • USA • COPYRIGHT ©2001
59BJ
CONTROL EXTENDER
IN MIDI
OUT
MIDI
IN
Digital Audio Workstation
EXTERNAL
POWER
–
MIDI
OUT
Mackie Control Universal
POWER
+
THE FOLLOWING ARE TRADEMARKS OR REGISTERED TRADEMARKS OF MACKIE DESIGNS INC "MACKIE" AND THE "RUNNING MAN" FIGURE
RISK OF ELECTRIC SHOCK
DO NOT OPEN
REPLACE WITH THE SAME TYPE FUSE AND RATING.
DISCONNECT SUPPLY CORD BEFORE CHANGING FUSE
WARNING:
TO REDUCE THE RISK OF FIRE OR ELECTRIC SHOCK, DO NOT
EXPOSE THIS EQUIPMENT TO RAIN OR MOISTURE. DO NOT REMOVE COVER.
NO USER SERVICEABLE PARTS INSIDE. REFER SERVICING TO QUALIFIED PERSONNEL.
AVIS:
RISQUE DE CHOC ELECTRIQUE — NE PAS OUVRIR
UTILISE UN FUSIBLE DE RECHANGE DE MÊME TYPE.
DEBRANCHER AVANT DE REMPLACER LE FUSIBLE
DESIGNED BY MACKOIDS IN WOODINVILLE, WA • USA • COPYRIGHT ©2001
SERIAL NUMBER
MANUFACTURING DATE
LISTED INFORMATION
TECHNOLOGY EQUIPMENT
59BJ
USER SWITCH
Quick-Start Guide
EXTERNAL
CONTROL
MIDI
IN
MIDI
IN
OUT
POWER
EXTERNAL
POWER
–
+
MIDI
OUT
3
Page 4

Mackie Control Universal
Upgrading the Software
From time to time, software updates for the
Mackie Control Universal may become available to
download from our website. Register your product to
be notified when updates are available, or check our
website at www.mackie.com. You can register online
at www.mackie.com (click on Product Registration).
To install a software update:
1. Download the software update from our
website at www.mackie.com. This is delivered
in the form of a MIDI file.
2. Make sure your Mackie Control Universal is
plugged into the computer via MIDI and
communicating with your preferred audio
software application (DAW).
3. Disable the Mackie Control as a MIDI
controller device in the control surface setup
section of your audio software application.
4. Disable MTC, MMC, MIDI Clock, MIDI
Metronome, or any other MIDI signals being
sent by your DAW.
5. Import the MIDI file you just downloaded
from the Mackie web site into your audio
software application, and make sure the
Mackie Control is the target MIDI device on
channel one.
6. Turn off the power on the Mackie Control.
7. Hold down the REC RDY buttons on channels
1 and 2 and the SELECT button on channel 1
as you turn the power on. This will put the
Mackie Control into the Boot Loader Mode.
8. Once in the Boot Loader Mode, simply play
back the MIDI file in its entirety from your
audio software application. While the MIDI
file is playing, you should see a series of dots
parade across the display. If you do not see
the dancing dots, restart at step 1.
9. Once the MIDI file has played through to the
end (you'll know when), hit STOP in your
audio software application. The controller will
restart automatically.
10. Select the desired mode of operation (Mackie
Control, Logic Control, or HUI), as described
in the “Changing Modes” section on page 3.
11. Re-enable the controllers and MIDI options
that you disabled in steps 3 and 4.
12. Apply the appropriate overlay to the master
section and you’re done.
Service
If you think your Mackie Control Universal or
Mackie Control Extender has a problem, please do
everything you can to confirm it before calling for
service. If the problem is related to setting up and using
Mackie Control with your DAW software, contact your
software manufacturer’s technical support.
If you are absolutely, positively sure it is a
hardware related problem, then go to the repair
section next for further instructions.
Repair
Service for Mackie Control Universal and Mackie
Control Extender units purchased in the USA is
available only from one of our authorized domestic
service stations. It is also available at the factory,
located in sunny Woodinville, Washington. (Service
for Mackie products living outside the United States
can be obtained through local dealers or
distributors.) If your Mackie Control needs service,
and it lives in the United States, follow these
instructions:
1. Call Tech Support at 1-800-258-6883, 7 AM to
5 PM PST, to explain the problem and request
an RA (Return Authorization) number. Have
your Mackie Control’s serial number ready.
You must have an RA number before you can
obtain service at the factory or an authorized
service center.
2. Keep this quick-start guide. We don’t need it
to repair the controller.
3. Pack the controller in its original package,
including endcaps and box. This is very
important. When you call for the RA number,
please let Tech Support know if you need new
packaging. Mackie is not responsible for any
damage that occurs due to non-factory
packaging.
4. Include a legible note stating your name,
shipping address (no P.O. boxes), daytime
phone number, RA number, and a detailed
description of the problem, including how we
can duplicate it.
Need Help?
Contact our Technical Support staff at 1-800-258-6883, Monday to Friday, from
7 AM to 5 PM PST. After hours, visit www.mackie.com and look under Support,
or email us at techmail@mackie.com.
4
Mackie Control Universal
Page 5

5. Write the RA number in BIG PRINT on top of
the box.
6. Ship the controller to us. We suggest insurance
for all forms of cartage. Ship to this address:
MACKIE
SERVICE DEPARTMENT
16220 Wood-Red Rd. NE
Woodinville, WA 98072
7. We’ll try to fix the controller within five
business days. Ask Tech Support for current
turn-around times when you call for your RA
number. We normally send everything back
prepaid using three-day air. However, if you
rush your controller to us by next day air,
we’ll treat it in kind by shipping it back to you
the same way in which it was received. This
paragraph does not necessarily apply to nonwarranty service.
Please read the warranty information on page 7,
Quick-Start Guide
then either register online at www.mackie.com or
complete and return the Product Registration card
included with your Mackie Control or Mackie
Control Extender.
“Mackie.,” the “Running Man” figure, “Mackie
Control Universal,” and “Mackie Control Extender”
are trademarks or registered trademarks of LOUD
Technologies Inc. All other brand names mentioned
are trademarks or registered trademarks of their
respective holders, and are hereby acknowledged.
© 2003 LOUD Technologies Inc.
All Rights Reserved.
3.8 in/
9.6 cm
MACKIE FADER PACK VERSION 1.0
REC
REC
REC
SIGNAL
SOLO
MUTE
SELECT
1
+
0
–
REC
SIGNAL
SIGNAL
SIGNAL
SOLO
SOLO
SOLO
MUTE
MUTE
MUTE
SELECT
SELECT
SELECT
dB
dB
dB
+
+
+
10
10
10
5
5
5
U
U
U
5
5
5
0
0
0
10
10
10
20
20
20
30
30
30
40
40
40
50
50
50
60
60
60
–
–
–
17.4 in/44.1 cm
REC
REC
SIGNAL
SIGNAL
SOLO
SOLO
MUTE
MUTE
SELECT
SELECT
dB
dB
dB
+
+
+
10
10
10
5
5
5
U
U
U
5
5
5
0
0
0
10
10
10
20
20
20
30
30
30
40
40
40
50
50
50
60
60
60
–
–
–
ASSIGNMENT
ASSIGNMENT
TRACK
SEND
PAN/SURROUND
PLUG-IN
REC
REC
EQ INSTRUMENT
SIGNAL
SIGNAL
FADER B ANK S
SOLO
SOLO
BANK
MUTE
MUTE
CHANNEL
SELECT
SELECT
FLIP
GLOBAL
VIEW
8765432
MASTER
dB
dB
dB
+
10
10
10
5
5
5
U
U
U
5
5
5
0
10
10
10
20
20
20
30
30
30
40
40
40
50
50
50
60
60
60
–
10.0 in/25.4 cm
MACKIE FADER PACK VERSION 1.0
HOURS MINUTES SECONDS FRAMES
SMPTE
BEATS
BARS BEATS SUB DIVISION TICKS
DISPLAY
SMPTE
NAME
BEATS
VALUE
F1 F2 F3 F4 F5 F6 F7 F8
GLOBAL VIEW
MIDI
INPUTS AUDIO
AUDIO
AUX BUSSES OUTPUTS USER
TRACKS
TRACKS
INSTRUMENT
MODIFIERS
AUTOMATION UTILITIES
OPTIONSHIFT
WRITEREAD/OFF
CONTROL
TOUCH
GROUPLATCH
/
ALT
MARKER NUDGE
CYCLE DROP REPLACE CLICK
PLAY
REWIND
FAST FWD
STOP
ZOOM
MACKIE CONTROL
RUDE
SOLO
SAVETRIM
UNDO
CANCEL
ENTER
SOLO
RECORD
17.5 in/44.4 cm
SCRUB
UNIVERSAL WEIGHT
11.8 lbs/
5.4 kg
3.8 in/
9.6 cm
MACKIE
CONTROL EXTENDER
WEIGHT
6.9 lbs/
3.1 kg
REC
REC
REC
REC
REC
REC
REC
SIGNAL
SIGNAL
SIGNAL
SIGNAL
SOLO
SOLO
MUTE
MUTE
SELECT
SELECT
dB
+
+
10
5
U
5
0
0
10
20
30
40
50
60
–
–
SIGNAL
SOLO
SOLO
SOLO
MUTE
MUTE
MUTE
SELECT
SELECT
SELECT
dB
dB
dB
+
+
+
10
10
10
5
5
5
U
U
U
5
5
5
0
0
0
10
10
10
20
20
20
30
30
30
40
40
40
50
50
50
60
60
60
–
–
–
REC
SIGNAL
SIGNAL
SIGNAL
SOLO
SOLO
SOLO
MUTE
MUTE
MUTE
SELECT
SELECT
SELECT
87654321
dB
dB
dB
dB
+
+
+
10
10
10
5
U
5
10
20
30
40
50
60
10
5
5
5
U
U
U
5
5
5
10
20
30
40
50
60
17.5 in/44.4 cm
Quick-Start Guide
5
0
0
0
10
10
20
20
30
30
40
40
50
50
60
60
–
–
–
Page 6

Mackie Control Universal
MACKIE FADER PACK VERSION 1.0
REC
REC
REC
SIGNAL
SIGNAL
SOLO
SOLO
MUTE
MUTE
SELECT
SELECT
dB
+
+
10
5
U
5
0
0
10
20
30
40
50
60
–
–
REC
SIGNAL
SIGNAL
SOLO
SOLO
MUTE
MUTE
SELECT
SELECT
dB
dB
+
+
10
10
5
5
U
U
5
5
0
0
10
10
20
20
30
30
40
40
50
50
60
60
–
–
HOURS MINUTES SECONDS FRAMES
MACKIE FADER PACK VERSION 1.0
REC
REC
REC
SIGNAL
SIGNAL
SOLO
SOLO
MUTE
MUTE
SELECT
SELECT
REC
SIGNAL
SIGNAL
SOLO
SOLO
MUTE
MUTE
SELECT
SELECT
87654321
dB
dB
dB
dB
+
+
10
10
5
U
5
10
20
30
40
50
60
10
5
5
U
U
5
5
0
0
10
10
20
20
30
30
40
40
50
50
60
60
–
–
dB
+
+
10
10
5
5
U
U
5
5
0
0
10
10
20
20
30
30
40
40
50
50
60
60
–
–
REC
REC
REC
REC
REC
REC
REC
SIGNAL
SIGNAL
SIGNAL
SIGNAL
SIGNAL
SOLO
SOLO
SOLO
SOLO
MUTE
MUTE
MUTE
MUTE
SELECT
SELECT
SELECT
SELECT
SIGNAL
SOLO
SOLO
MUTE
MUTE
SELECT
SELECT
1
dB
dB
dB
dB
+
+
+
10
10
5
U
5
0
10
20
30
40
50
60
–
10
5
5
U
U
5
5
0
0
10
10
20
20
30
30
40
40
50
50
60
60
–
–
dB
+
+
+
10
10
5
5
U
U
5
5
0
0
0
10
10
20
20
30
30
40
40
50
50
60
60
–
–
–
REC
SIGNAL
SIGNAL
SOLO
SOLO
MUTE
MUTE
SELECT
SELECT
8765432
dB
dB
dB
+
+
10
10
5
U
5
10
20
30
40
50
60
10
5
5
U
U
5
5
0
0
10
10
20
20
30
30
40
40
50
50
60
60
–
–
SMPTE
BEATS
ASSIGNMENT
DISPLAY
ASSIGNMENT
TRACK
SEND
SMPTE
NAME
BEATS
VALUE
F1 F2 F3 F4 F5 F6 F7 F8
PAN/SURROUND
PLUG-IN
EQ INSTRUMENT
FADER B ANK S
BANK
MIDI
INPUTS AUDIO
TRACKS
CHANNEL
MODIFIERS
FLIP
GLOBAL
VIEW
MASTER
dB
CONTROL
10
5
U
MARKER NUDGE
5
REWIND
10
20
30
40
50
60
BARS BEATS SUB DIVISION TICKS
GLOBAL VIEW
AUDIO
TRACKS
INSTRUMENT
AUTOMATION UTILITIES
OPTIONSHIFT
TOUCH
/
ALT
CYCLE DROP REPLACE CLICK
FAST FWD
ZOOM
WRITEREAD/OFF
STOP
AUX BUSSES OUTPUTS USER
SAVETRIM
CANCEL
GROUPLATCH
PLAY
RECORD
RUDE
SOLO
UNDO
ENTER
SOLO
SCRUB
6
Mackie Control Universal
Page 7

MACKIE CONTROL UNIVERSAL and MACKIE CONTROL EXTENDER
LIMITED WARRANTY
Please keep your sales receipt in a safe place.
Quick-Start Guide
A. LOUD Technologies Inc. warrants all materials,
workmanship and proper operation of this product
for a period of two years from the original date of
purchase. If any defects are found in the materials or
workmanship or if the product fails to function
properly during the applicable warranty period,
LOUD Technologies, at its option, will repair or
replace the product. This warranty applies only to
equipment sold and delivered within the U.S. by
LOUD Technologies Inc. or its authorized dealers.
B. Failure to register online or return the product
registration card will not void the two-year warranty.
C. Service and repairs of Mackie products are to be
performed only at an Authorized Mackie Service
Center (see D below). Unauthorized service, repairs, or
modifications will void this warranty.
D. To obtain factory-authorized service:
1. Call LOUD Technologies at 800/258-6883,
7 AM to 5 PM Monday through Friday (Pacific
Time) to get a Return Authorization (RA). Products
returned without an RA number will be refused.
2. Pack the product in its original shipping
carton. If you do not have the carton, just ask for
one when you get your RA number, and we'll
send a shipping carton out promptly. Also include
a note explaining exactly how to duplicate the
problem, a copy of the sales receipt with price
and date showing, and your return street address
(no P.O. boxes or route numbers, please!). If we
cannot duplicate the problem at the Authorized
Mackie Service Center or establish the starting
date of your Limited Warranty, we may, at our
option, charge for service time.
3. Ship the product to the Authorized Mackie
Service Center recommended by Tech Support
in its original shipping carton, freight prepaid.
If returning it to the factory, ship it to:
MACKIE SERVICE DEPARTMENT
16220 Wood-Red Rd. NE
Woodinville, WA, 98072, USA
IMPORTANT: Make sure that the RA number is
plainly written on the shipping carton.
E. LOUD Technologies and Authorized Mackie
Service Centers reserve the right to inspect any
products which may be the subject of any warranty
claims before repair or replacement is carried out.
LOUD Technologies and Authorized Mackie Service
Centers may, at their option, require proof of the
original date of purchase in the form of a dated copy
of the original dealer’s invoice or sales receipt. Final
determination of warranty coverage lies solely with
LOUD Technologies or its Authorized Service Centers.
F. Any Mackie product returned to LOUD Technologies
and deemed eligible for repair or replacement under the
terms of this warranty will be repaired or replaced
within thirty days of receipt by LOUD Technologies.
LOUD Technologies may use refurbished parts for
repair or replacement of any product. Products returned
to LOUD Technologies that do not meet the terms of
this Warranty will be repaired and returned C.O.D. with
billing for labor, materials, return freight and insurance.
Products repaired under warranty at the factory will be
returned freight prepaid by LOUD Technologies to any
location within the boundaries of the USA.
G. LOUD Technologies warrants all repairs performed
for 90 days or for the remainder of the original
warranty period. LOUD Technologies assumes no
responsibility for the quality or timeliness of repairs
performed by Authorized Mackie Service Centers.
H. This warranty is extended to the original purchaser
and to anyone who may subsequently purchase this
product within the applicable warranty period.
I. This is your sole warranty. LOUD Technologies
does not authorize any third party, including any
dealer or sales representative, to assume any
liability on behalf of LOUD Technologies or to make
any warranty for LOUD Technologies Inc.
J. THE WARRANTY GIVEN ON THIS PAGE IS THE
SOLE WARRANTY GIVEN BY LOUD TECHNOLOGIES
INC. AND IS IN LIEU OF ALL OTHER WARRANTIES
EXPRESS AND IMPLIED, INCLUDING THE
WARRANTIES OF MERCHANTABILITY AND
FITNESS FOR A PARTICULAR PURPOSE. THE
WARRANTY GIVEN ON THIS PAGE SHALL BE
STRICTLY LIMITED IN DURATION TO TWO YEARS
FROM THE DATE OF ORIGINAL PURCHASE
FROM AN AUTHORIZED MACKIE DEALER. UPON
EXPIRATION OF THE APPLICABLE WARRANTY
PERIOD, LOUD TECHNOLOGIES INC. SHALL
HAVE NO FURTHER WARRANTY OBLIGATION OF
ANY KIND. LOUD TECHNOLOGIES INC. SHALL
NOT BE LIABLE FOR ANY INCIDENTAL,
SPECIAL, OR CONSEQUENTIAL DAMAGES THAT
MAY RESULT FROM ANY DEFECT IN THE
MACKIE PRODUCT OR ANY WARRANTY CLAIM.
Some states do not allow exclusion or limitation of
incidental, special, or consequential damages or a
limitation on how long warranties last, so some of
the above limitations and exclusions may not apply
to you. This warranty provides specific legal rights
and you may have other rights which vary from state
to state.
Notice: All software products are covered solely by
the warranty contained in the terms and conditions
of the Mackie Designs Software License.
Quick-Start Guide
7
Page 8

LOUD Technologies Inc.
16220 Wood-Red Road NE • Woodinville, WA 98072 • USA
US and Canada: 800.898.3211
Europe, Asia, Central and South America: 425.487.4333
Middle East and Africa: 31.20.654.4000
Fax: 425.487.4337 • www.mackie.com
E-mail: sales@mackie.com
 Loading...