

Page 1

Document #: 555–660–124
Comcode: 108196247
Issue 1, February 1998
MERLIN LEGEND
®
Communications System
MLX-5® and MLX-10® Nondisplay Telephones
User’s Guide
Contents
Your MLX-10 Nondisplay Telephone ............................................... Inside Front
Describes the phone buttons
Understanding Your Telephone ................................................................ 1–2
Line Buttons, Line Button Lights .............................................................. 1
Tones, Rings ...................................................................................... 2
Feature Finder .................................................................................... 3–4
Use to choose the right feature for the activity you want to perform.
Headsets .............................................................................................. 5
Headpieces, Headset Features
Call Handling......................................................................................... 6
Making & Answering Calls, Transfer, Hold, Conference
Messaging ......................................................................................... 7–8
Leaving Messages, Receiving Messages .................................................... 7
Posting Messages, Signaling & Notify ....................................................... 8
Using Features ....................................................................................... 9
Activating Features, Feature Codes
Often-Used Features .......................................................................... 10–16
Account Codes, Authorization Codes ....................................................... 10
Auto Dial, Callback & Line Request ......................................................... 11
Call Waiting, Camp On, Coverage ........................................................... 12
Direct Voice Mail, Do Not Disturb, Forward & Follow Me ............................... 13
Last Number Dial, Night Service, Paging .................................................. .14
Park & Paging, Personal Speed Dial, Pickup, Privacy .................................. 15
Reminders, Saved Number Dial, System Speed Dial, Voice Announce ................ 16
Programming Buttons & Settings .......................................................... 17–18
Programming Buttons, Programming Settings ............................................ 17
Programming Codes ............................................................................ 18
Page 2
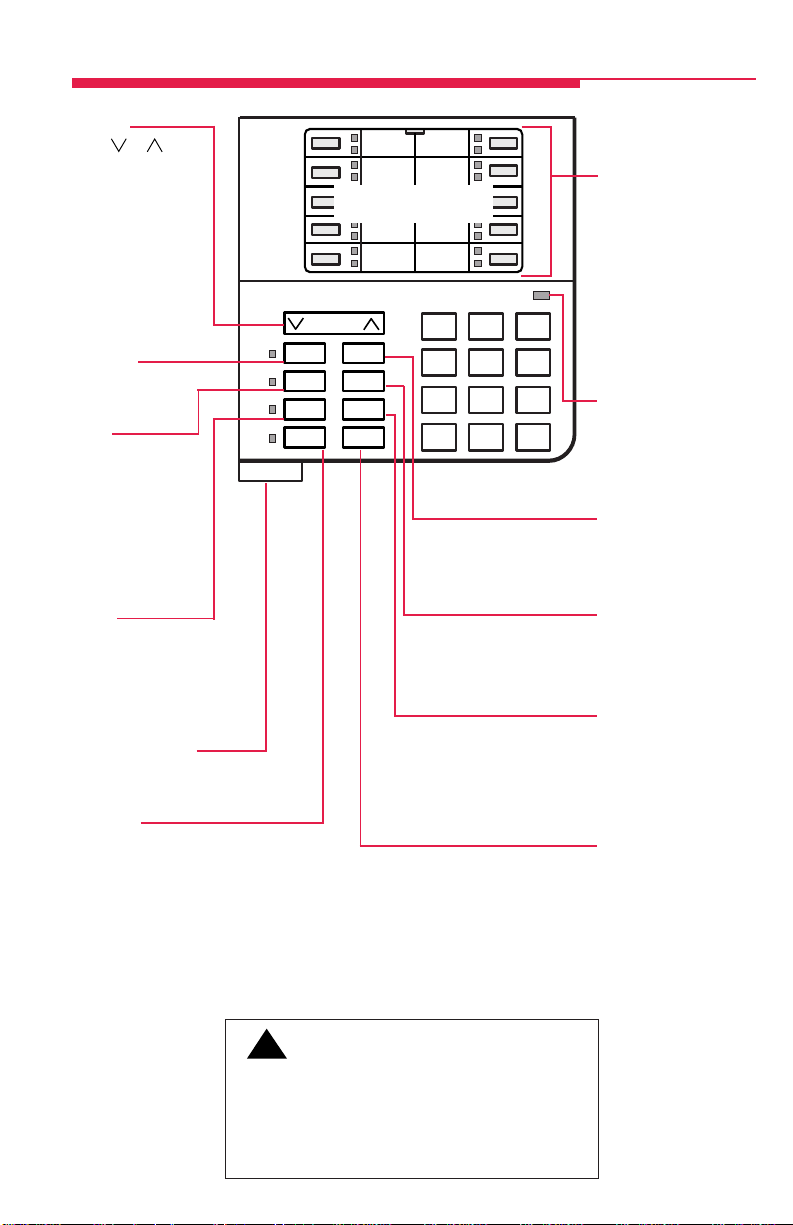
Your MLX Nondisplay Telephone
Volume
or to
Press
change ringer loudness while the phone
is ringing, handset
volume while you’re
using the handset,
or speaker volume
while you’re using the
speakerphone.
Feature
Press to activate
features.
HFAI
(Hands Free Answer
on Intercom) Press
before calls come
in to answer
voice-announced
calls without lifting
the handset.
Line Buttons
Volume
Feature Transfer
HFAI Conf
Mute Drop
Speaker Hold
Message
ABC DEF
123
JKLGHI MNO
456
PQRS WXYZ
TUV
789
OPER
#
0
*
Line Buttons
Outside, Pool, SA,
and ICOM buttons
(see p. 1); blank line
buttons can be
programmed with
features (see p. 17).
■
MLX-10 has 10
line buttons
■
MLX-5 has 5
line buttons
Message Light
The red LED is lit to
indicate a waiting
message (see pp. 7–8).
Transfer
Press to send a call
to another phone
(see p. 6).
Mute
Press to turn
speakerphone
microphone on or off so
that you can or cannot
be heard by the caller.
User Card Tray
Pull out for quick
reference.
Speaker
Press to turn the speakerphone on/off for
hands-free conversation
during a call or when
a call rings; or press to
hang up a speakerphone
call.
!
CAUTION:
To clean your phone, unplug it from the wall jack and
use a
slightly
dampened cloth. To prevent permanent
damage, do not immerse the phone in water or any
liquid and do not use liquid or aerosol cleaners directly
on the telephone.
Conf
Press to add a person
to a conference call
(see p. 6).
Drop
Press Drop and the line
button to disconnect a
person from a conference
call (see p. 6).
Hold
Press to put a call on
hold (see p. 6).
Page 3
Understanding Your Telephone
-Line Buttons-
All Telephones
NNN-XXXX
Telephones with ICOM Buttons
ICOM Ring Make/receive inside ringing
ICOM Voice Make inside voice-an-
ICOM Make (not receive) inside
Originate Only
Make/receive outside calls
only.
calls and receive inside
voice-announced calls.
nounced
calls and receive inside
ringing and voice-announced
calls.
calls only.
Telephones with System Access (SA) Buttons
SA buttons give you access to inside or outside
lines for making and/or receiving calls. To make
an outside call on an SA button, first dial the
dial-out code (usually 9) that your system
manager supplies. No dial-out code is necessary
when you call another extension.
SA Ring Make/receive inside/outside
SA Voice Make/receive outside calls,
SA Originate Make (not receive) inside and
Only outside calls.
Shared SA Make/answer calls for
(SSA)
Pool Make/receive outside calls
ringing calls and receive inside voice-announced calls.
receive inside ringing and
voice-announced calls, make
inside voice-announced calls.
co-workers or join conversations. One person has an SA
button that is shared with one
or more others who have SSA
buttons corresponding to it.
See Rings (p. 2) for information about how calls ring
at these buttons.
only. Use the dial-out code
supplied by your system
manager.
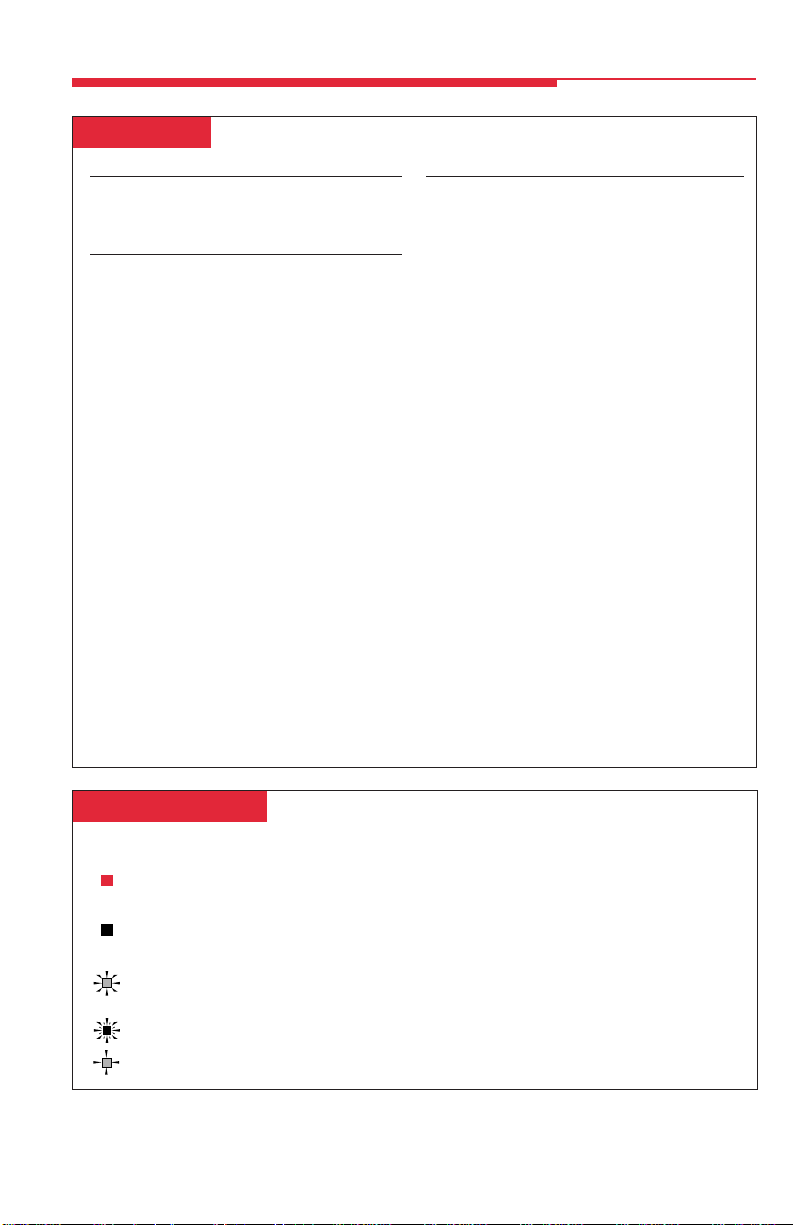
-Line Button Lights-
Light Meaning
Steady red The line you are using or will use when you lift the
handset or press the Speaker button.
Steady green The line is in use, or the feature programmed onto the line
button is on.
Flashing green An incoming call is ringing on this line button or a call you
transferred is returning to this line button (see p. 6).
Fast-flashing green You have put a call on hold on this line button.
Slow-flashing green Someone else has put a call on hold on this line button.
1
Page 4
Understanding Your Telephone
-Tones-
Tone Meaning
Dial tone (steady) You can make a call.
Busy (slow repeating tone) The phone you are calling is busy.
Fast busy (fast repeating tone) No lines are available.
Error (alternating high-low tones) You dialed a number or used a feature incorrectly.
Confirmation (double break in You used a feature correctly.
dial tone followed by steady tone)
Callback (5 short beeps) This call is receiving Callback treatment (see p. 11).
Call Waiting (1 or 2 beeps) You have an inside (1 beep) or an outside
(2 beeps) call waiting (see p. 12).
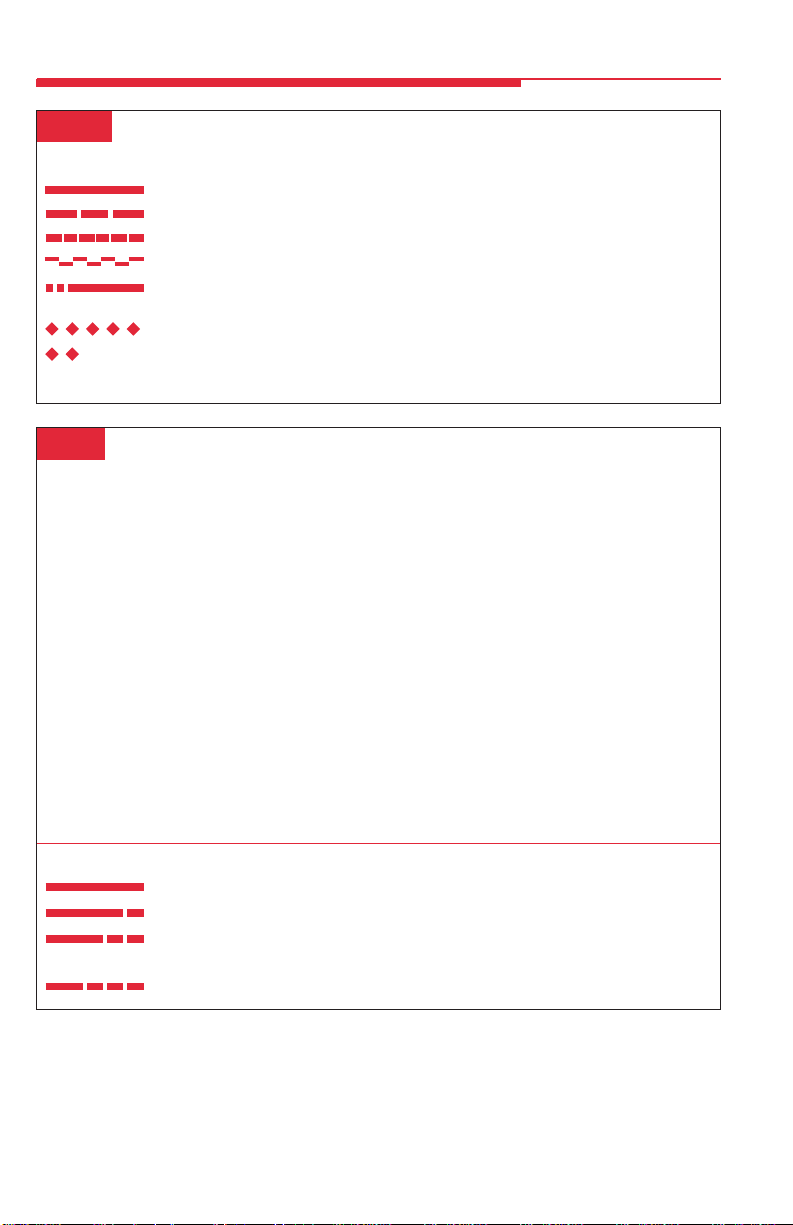
Rings-
The table below helps you identify the different types of ringing. You can also personalize ringing at
your telephone or adjust ring timing for the line buttons where calls arrive. Programming Buttons
& Settings, p. 16, tells you how to change the settings. Listed below are your options:
• Personalized Ring. Allows you to give calls ringing at your phone one of 8 distinctive rings.
• Abbreviated Ring. When you are on a call and another call arrives at your phone, you can
use this feature to give the second call a short ring.
• Immediate Ring. Calls ring immediately on line buttons set this way.
• Delay Ring. This setting causes calls to ring at your phone after a delay. If your calls are
being covered, this allows time for another person to answer a call before you do.
• No Ring. Calls do not ring (except for returning transferred and Callback calls). Calls on lines
set for No Ring do not receive coverage (p. 12).
• Send Ring. Usually, when a call comes in on an SA button, it rings there immediately and
rings at the corresponding SSA buttons after a delay, giving the person with the SA button
time to answer before the call is picked up by someone with a corresponding SSA button.
When busy on another call, the person with the SA button can use the Send Ring setting to
make calls arriving at other SA buttons ring
instead of after a delay.
immediately
on corresponding SSA buttons
Ring Meaning
1 long ring Inside call
1 long ring and 1 short ring Outside call
1 long ring and 2 short rings Priority ring; outside call transferred to you or
returning camped-on call (see p. 12)
1 long ring and 3 short rings Returning Callback call (see p. 11)
2
Page 5
Feature Finder
This table shows where to look for information about performing specific telephone activities. Any features
that do not have detailed instructions can be used by following the directions in Using Features (p. 9) or
programmed by following the instructions in Programming Buttons & Settings (p. 17).
Calling
If you want to ... Then
Dial numbers with the touch of a button. See Auto Dial, p. 11.
Program codes for numbers you dial often. See Personal Speed Dial, p. 15.
Quickly dial numbers your company has programmed. See System Speed Dial, p. 16.
Make a voice-announced call to 1 or more co-workers. See Line Buttons, p. 1, and Paging, p. 14.
Broadcast over the company’s loudspeaker system. See Paging, p. 14.
Make a call after office hours. See Night Service, p. 14.
Make and answer calls with no hands. See HFAI button, inside front cover, to answer
Automatically redial a number you dialed before. See Last Number Dial, p. 14, and Saved
Connect to an extension or outside line when it’s free. See Callback & Line Request, p. 11.
Enter an account code before or during a call. See Account Codes, p. 10.
Make a call from another extension, using your own See Authorization Codes, p. 10.
calling privileges.
Set up a conference with as many as 4 others. See Conference, p. 6.
Transfer a call. See Transfer, p. 6, and Park & Paging, p. 15.
Know if someone is calling you when all your other See Call Waiting, p. 12.
lines are in use.
Reach a voice mailbox without calling the person. See Direct Voice Mail, p. 13.
Put a call on hold. See Hold, p. 6.
inside calls hands-free. For information about
headsets, see p. 5.
Number Dial, p. 16.
Customizing Your Phone
Program a feature on an unused line button. See Programming Buttons & Settings, p. 17.
Adjust volume of the speaker, handset, or ringer. Use the Volume button, inside front cover.
Give your phone its own distinctive ring. See Rings, p. 2.
Delay or remove the ring from an outside, SA, or See Rings, p. 2, and Coverage, p. 12.
ICOM line button.
3
Page 6
Feature Finder
Covering Calls
If you want to ... Then
Have a co-worker answer your calls. See Coverage, p. 12, and Line Buttons, p. 1.
Answer all of a co-worker’s calls from your telephone.
Stop your calls from being covered by others.
Stop your outside calls from going to your company’s See Coverage, p. 12.
voice mail system (or send your calls to voice mail).
Forward your calls to another telephone. See Forward & Follow Me, p. 13.
Answer your calls from another extension.
Answer a call ringing at a co-worker’s extension. See Pickup, p. 15.
Answer a call on a line that’s not on your phone.
Hold a call when you’re trying to transfer it or when If your phone system doesn't have voice mail, try
your co-worker doesn’t answer. Camp-On, p. 12.
Hold a call when you’re trying to transfer or when your See Park & Paging, p. 15.
co-worker doesn’t answer; page your co-worker while
the call waits.
Messaging
Let a co-worker know you called. See Messaging, pp. 7–8.
Find out if you have a voice mail message, fax, or
other message.
Signal a co-worker to contact you.
Choose a message to leave for co-workers
who have display phones.
Reach a voice mailbox without calling the person. See Direct Voice Mail, p. 13.
Privacy
Prevent interruptions by blocking calls to your phone. See Do Not Disturb, p. 13.
Prevent co-workers from joining your calls. See Privacy, p. 15.
Prevent others on a call from hearing you speak to Use the Mute button (inside front cover). If you
someone in your office. have a headset, use the Headset/Handset Mute
Receive or not receive voice-announced calls. See Voice Announce, p. 16.
feature, p. 5.
Timekeeping
Remind yourself of meetings or appointments. See Reminders, p. 16.
4
Page 7
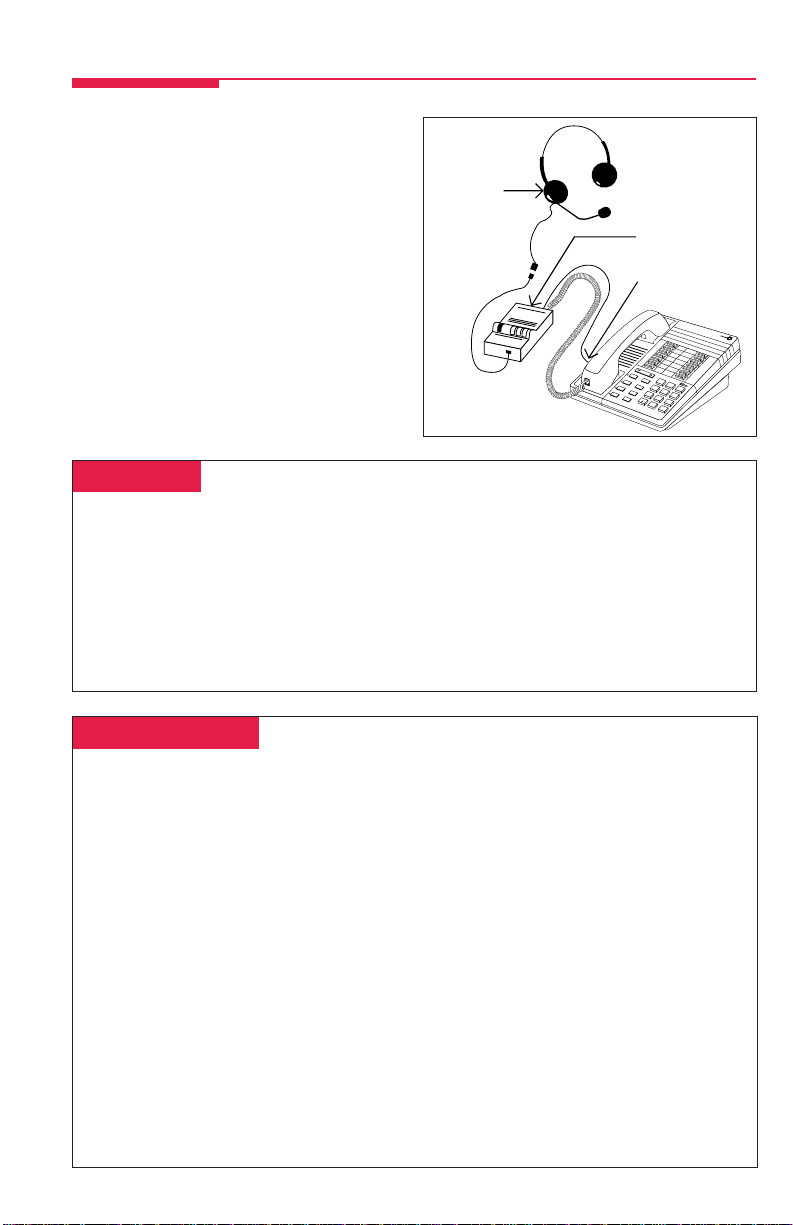
Headsets
Headsets for MLX telephones allow one-touch
operation, hands-free. Touch a button to answer a
call then touch it again to disconnect. Use the
features below to control headset operation.
Headsets consist of a headpiece and modular base
unit. The base unit plugs into the handset jack.
A calling group agent using a headset must press
the Headset Hang Up button to complete a call in
order to update the supervisor’s Agent button.
Headpieces-
Mirage®. Receiver fits over either ear. Not for noisy environments.
StarSet®. Eartip fits in ear canal.
®
Monaural. Adjustable headband and soft ear cushion.
Supra
Supra Monaural Noise-Canceling (NC). Same as above with noise-canceling microphone that
reduces background noise transmission by up to 75%.
Supra Binaural. Sound in both ears.
Supra Binaural Noise-Canceling (NC). Same as above with noise-canceling microphone on
flexible boom; features windscreen and reduces background noise transmission by up to 75%.
Headpiece
Modular
Base Unit
Handset Jack
V
o
F
e
a
t
u
r
e
T
H
F
A
I
C
o
n
f
M
u
t
e
D
r
o
p
S
p
e
a
k
e
r
H
o
l
d
M
L
X
1
0
l
u
m
e
r
a
n
s
f
er
1
A
2
G
H
I
4
J
K
L
5
P
Q
R
S
7
T
U
V
8
W
XY
O
9
pe
r
0
#
B
C
D
EF
3
MN
O
6
Z
Headset Features-
To program:
See Programming Buttons & Settings, p. 17.
There are 4 features used with headsets: Headset Hang Up, Headset Status, Headset Auto Answer, and
Headset/Handset Mute. All must be programmed on buttons. The Headset Hang Up button
(required) is programmed by your system manager and activates headset operation at your phone.
To use Headset Hang Up:
Press the programmed button to disconnect a call, even if the caller hangs up. Unless you have
programmed a Headset Status button, headset operation is always on.
To use Headset Status:
Press the programmed button to switch between headset and handset operation; when headset
operation is on, the green light is on.
To use Headset Auto Answer:
Connects you automatically to ringing calls during headset operation. When you press the button to
activate the feature, the green light goes on; to turn off Headset Auto Answer operation, press the
button again.
To use Headset/Handset Mute:
Lets you turn off the microphone in the headset or handset, so that a caller cannot hear your
conversation. The red light goes on when the headset (during headset operation) or the handset
(during handset operation) microphone is off.
5
Page 8

Call Handling
-Making & Answering Calls-
First, review the first three pages of this book
to find out about the buttons, lights, tones,
and rings on your telephone. In this guide,
instructions for using features may not include
all the possible ways you can make a call.
To make a call
press the Speaker button. The line button
with the steady red light is automatically
selected for you. To make a call on a specific
line (for example, an SA or ICOM Voice line
for a voice-announced call), select an unlit line
button and press it before lifting the handset or
pressing the Speaker button. When using a
headset (see p. 5), select a line button first.
To answer a ringing or voice-announced call
lift handset or press the Speaker button.
, lift handset, use a headset, or
-Transfer-
To transfer:
1. Press the Transfer button. The system
selects an ICOM or SA button and puts the
call on hold.
2. Dial the extension or outside number.
3. Announce the call if desired.
4. Press the Transfer button and hang up.
To cancel the transfer or return to the call on
hold, press the flashing ICOM, SA, or line
button.
To one-touch manual transfer:
1. Press the programmed Auto Dial button
(p. 11) for the number where you want to
transfer the call.
2. Announce the call.
3. Press the Transfer button and hang up.
To cancel the transfer or return to the call on
hold, press the flashing button.
To one-touch auto transfer:
Press the programmed Auto Dial button.
-Hold-
-Conference-
,
When you have a call or conference on hold,
your phone beeps once each minute.
1. Press the Hold button to put a call on hold.
not
press the Drop button to end a
(Do
conference while the call is on hold.)
2. To return to the call or conference, press the
flashing ICOM, SA, or line button that is
holding the call.
A conference call can have up to 3 inside
participants, including yourself, and up to 2
outside participants.
1. Dial the first outside number or extension.
Announce the call.
2. Press the Conf button to put the call on
hold.
3. Select an ICOM, SA, or numbered line button.
4. Dial the next number or extension.
5. Announce the call and press the Conf button.
6. Repeat Steps 2–5 for each participant.
• Press the Drop button and line button to
drop any participant added.
• Press the Hold button to temporarily
leave the conference. Then press any
participant’s line to rejoin the conference.
7. To end the conference, hang up.
!
SECURITY ALERT:
If the system selects an SA Voice button when
you add a conference participant, you hear a
beep instead of ringing after you dial the
extension. If the call is not answered and you
press the Conf button to complete the call,
your conversation with other conference
participants is broadcast on the extension’s
speakerphone. To prevent this, be sure to drop
an unanswered extension that you’ve called on
an SA Voice button.
6
Page 9

Messaging
Your phone system has several features that allow you to leave messages for others in your office. If you
use Leave Message or Posted Messages, a message appears on the telephone display of the person you
are calling. If you wish to leave a message for a person who does not have a display telephone, leave a
voice mail message, if possible, or ask the system operator to take a message for the person. Here are
some guidelines for different messaging features:
• Leave Message. This feature simply lets a co-worker know you have called. The message shows
your name and the date and time of your call. If you leave one message and then another, the second
message replaces the first.
• Posted Messages. If you post a message at your telephone, inside callers with display phones see
the posted message you have selected. As many as 20 messages may be available for posting.
When a message is waiting for you, your red Message light is lit. The descriptions below explain how to
read, cancel, and delete messages you have sent or received.
If your company has voice mail, ask your system manager for details about using the voice mail system.
For information about having your phone covered by the voice mail system, see Coverage, p. 12.
If you frequently communicate with a small number of people, for example, as a receptionist for a few
co-workers, there are two features you can use, both of which require programming a button. These are
Signaling and Notify, described on the next page.
␣ Leaving Messages␣
To program:
See Programming Buttons & Settings, p. 17.
To leave a message at a busy or unanswered
extension you are calling:
• Press the Leave Message button you
have programmed,
OR
Press the Feature button and dial 25.
• To leave a voice mail message (if your
company has such a system), press the
Feature button and dial 56 (see Direct
Voice Mail, p. 13, for details).
If you cannot leave a message (for example,
because the phone has no display), you hear a
beep. Leave a message with the operator.
To leave a message without calling:
1. Press the Feature button and dial 53.
2. Dial the extension.
To cancel a message:
1. Press the Feature button and dial ✻53.
2. Dial the extension.
␣ Receiving Messages␣
When your Message light is on, you have a
message from the system operator, or, if
programmed for your phone, from a fax
machine or voice messaging system. Call the
operator or ask your system manager how to
retrieve a voice mail message.
To turn your Message light off:
Press the Feature button and dial 54.
7
Page 10

Messaging
␣ Posting Messages␣
To program:
See Programming Buttons & Settings, p. 17.
To post messages, you must program a Posted Messages button. A posted message appears
on the display of any inside caller who tries to reach you as long as that person has a display
phone. There may be as many as 20 messages available to you for posting. Message 1 is always
DO NOT DISTURB
changed by your system manager. The remaining 10 messages are created by your system
manager, whom you should ask for details.
To post a message:
Press the programmed Posted Messages button and dial the 2-digit code for the message
(01–20).
To cancel a posted message:
Press the programmed Posted Messages and dial 00.
* If you use the Do Not Disturb feature (p. 13) and have a programmed Posted Messages button, the appropriate
message is posted. When you turn off the Do Not Disturb feature, the posted message is canceled, too. However,
posting or canceling the message does not activate or deactivate the feature.
*; 9 other messages, listed below, come with the system, but these can be
Code Message Code Message
01 DO NOT DISTURB 06 IN CONFERENCE
02 OUT TO LUNCH 07 WITH A CLIENT
03 AT HOME 08 WITH A CUSTOMER
04 OUT SICK 09 AWAY FROM DESK
05 IN A MEETING 10 OUT ALL DAY
-Signaling & Notify-
To program:
See Programming Buttons & Settings, p. 17.
Signaling. Program a button that will cause a co-worker’s phone to beep. The other person can then
call you in response to the beep. You must program a different line button for each extension you wish
to contact. To beep the recipient’s phone, just press the button, and the other phone beeps for as long
as you hold down the button. A programmed Signaling button also acts as an Auto Dial button (see
p. 11). To dial the extension, lift the handset or press the Speaker button; then press the Signaling
button.
Notify. This feature simply lights a line button on the recipient’s phone, providing a silent message
light that alerts the other party to call you. To use this feature, you must program a Notify Send
button (labeled, for example, Notify Mary) on your phone and the recipient must program a Notify
Receive button (labeled, for example, Call Jim) on his or her phone. Communication is one-way
only, and buttons must be programmed for each extension you notify.
8
Page 11

Using Features
There are two ways to activate a feature:
• Directly, as explained below
• By pressing a line button you programmed with the feature (see Programming Buttons &
Settings, p. 17)
␣ Activating Features␣
To use a feature:
1. Press the Feature button.
2. Dial the feature code from the Feature Codes list.
Note: Certain features require more instructions (see Often-Used Features, pp. 10–16).
Feature Codes
Account Code Entry 82 + code + #
Authorization Code Entry ■ 80 + code + #
Callback 55
Call Waiting
pick up call waiting call 87
Camp-On 57
Direct Voice Mail
Follow Me 34 + extension
Forward
inside 33 + extension
outside 33 + dial-out code
Forward and Follow Me
cancel from all extensions ✻ 34 ✻
cancel from one extension ✻ 34 + extension
cancel from your phone 33 + your
Last Number Dial 84
■ 56
+ number + #
extension
Messaging
cancel message ✻ 53 + extension
leave message 25
leave message 53 + extension
without calling
turn message light off 54
Paging loudspeaker 9 + line number +
zone
Personal Speed Dial code (01–24)
Pickup
group pickup 88
inside 9 + extension
outside 9 + line number
Privacy
off ✻ 31
on 31
Recall 775
Reminders
set reminder 81 + time + 2 or 7
cancel reminder ✻ 81
System Speed Dial code (600–729)
■ Release 3.0 and later systems only.
9
Page 12

Often-Used Features
␣ Account Codes␣
To program:
See Programming Buttons & Settings, p. 17.
In some companies you enter an account code
before or during a call to indicate client billing
information. You may be required to enter
an account code for all outside calls, or an
account code may be optional for incoming
and outgoing calls. Check with your system
manager for account code operation and
account codes.
You can program a button for this feature and
label it Acct. See also Auto Dial (p. 11) to
program an account code on an outside
Auto Dial button.
To enter an account code:
1. Press the button you have programmed,
OR
Press the Feature button and dial 82.
2. Dial the account code and #.
3. Lift the handset or press the Speaker
button to make a call. (If necessary, press an
outside line, Pool, or SA button.)
4. Dial the outside number (including dial-out
code, if required.)
To enter or change an account code during a
call (the other party cannot hear your entry)
follow Steps 1 and 2. If you enter an account
code for an incoming call before it arrives, you
cannot change that code during the call.
␣ Authorization Codes*
To program:
See Programming Buttons & Settings, p. 17.
If your system manager has given you an
authorization code, you can pick up someone
else’s telephone, enter your authorization
code, and make an outside call with your own
calling privileges. You must activate the
feature and enter your code for each call you
make, even when you are adding people to a
conference. It is not necessary to use your
authorization code for inside calls. Using an
authorization code does not affect the button
assignments on your own phone or the phone
where you enter the code.
Security Alert
Compromise of authorization codes
could lead to toll fraud or unauthorized
charges.
Memorize your authorization code, and do not
share it with anyone.
The way you activate the Authorization Code
feature depends upon the type of telephone
you are using to make the call.
•
If the telephone has a programmed
Authorization Code
it. The system selects a line and
automatically activates the Speaker
button (an available line button is
selected for you); then continue with
Step 3 below.
•
On an MLX display telephone
Feature button, then select
[
Auth
] from the display or dial 80; then
continue with Step 3 below.
To enter an authorization code at any type of
phone (except a QCC):
1. Lift the handset or press the Speaker
button. (You may first select an ICOM, SA,
or SSA button.)
2. Dial #80.
3. Dial your authorization code, followed by #.
4. Dial the dial-out code (usually a 9) for an
outside call and then dial the phone
number.
5. To make another call, repeat Steps 1–4.
* Release 3.0 and later systems only.
button
, press
, press the
AuthCode
10
Page 13

Often-Used Features
␣ Auto Dial␣
This feature must be programmed on a line
button; it dials an inside or outside number.
Use inside Auto Dial buttons to:
• Dial other extensions or groups.
• Page groups (see Paging, p. 14).
Use outside Auto Dial buttons to:
• Dial outside phone numbers (with dialout codes but without account codes).
• Enter account codes automatically (when
programming, include # at the end).
• Dial access codes for long-distance
companies.
• Dial emergency contact numbers.
Note that you can also use other features to
automate dialing: Last Number Dial (p. 14)
Personal Speed Dial (p. 15), Saved Number
Dial (p. 16), and System Speed Dial (p. 16).
When programming Auto Dial, use the
Special Characters table on the back
cover, if necessary. Include the complete
dialing sequence for the call.
To program on a button:
1. Label a button.
2. Press the Feature button and dial 00.
3. Press the labeled button.
4. Dial ✻22 for an inside extension number,
OR
Dial ✻21 for an outside number.
5. Dial the extension, group page, or outside
number, including the dial-out code (if
necessary) and complete number.
6. Repeat Steps 1 and 3–5 to program
additional buttons.
7. Press the Feature button and dial ✻00.
To use an
1. To make a ringing call to an inside or
2. The call is dialed automatically. If it’s a
Auto Dial
outside number, press the
programmed Auto Dial button,
OR
To make an inside voice-announced call,
press an ICOM Voice or SA Voice
button and then press the inside
Auto Dial button.
voice-announced call, talk after the beep.
button:
␣ Callback & Line Request␣
Your system has two features that you can
use when an outside line or extension is
busy. These features give you access to the
line or extension when it becomes available.
On phones with SA buttons, use Callback to
reach:
• Busy outside lines on Pool or SA
buttons, when you dial the dial-out code
and hear the fast busy signal.
• Busy extensions, when you dial and hear
the busy signal.
On phones with ICOM buttons, use:
• Line Request to reach a busy outside line
when you lift the handset or press the
Speaker button and do not hear the dial
tone.
• Callback for busy extensions.
To use Callback when you hear the busy
(extension) or fast busy (outside line) signal:
1. Press the button you have programmed,
OR
Press the Feature button and dial 55.
2. If you are trying to reach an outside line,
dial the outside telephone number.
3. After you hear 5 short beeps, hang up.
When the line or extension is free, you hear
a long ring and 3 short rings.
4. Lift the handset or press the Speaker
button. You hear dial tone, and the system
dials the call.
To cancel a Callback request:
1. Press the same line button you pressed
when you tried to make the call.
2. Lift the handset and press the Drop button.
3. Press the same line button again.
To use Line Request:
1. When outside lines are busy, hang up and
press the line button you want to use. Do
not lift handset or press the Speaker
button.
2. When a line is available, the phone beeps.
Lift the handset or press the Speaker
button.
3. Dial the outside number.
11
Page 14

Often-Used Features
␣ Call Waiting␣
If Call Waiting is on, you hear a call-waiting
tone when a call comes in and all your lines
are in use. This feature works only on SA and
ICOM buttons, not on line buttons labeled with
phone numbers.
When a call is waiting, you hear a single beep
(inside call) or 2 beeps (outside call).
To complete a call and answer a waiting call:
1. When you hear the call-waiting tone,
hang up.
2. When the phone rings, lift the handset or
press the Speaker button.
To put a call on hold and pick up a waiting call:
1. Press the Hold button.
2. Press an ICOM Originate Only or SA
Originate Only button. (You must have
one of these buttons available to pick up the
call.)
3. Press the Feature button and dial 87.
4. To return to the call on hold, press the
button with the fast-flashing green light.
To turn Call Waiting on or off:
1. Press the Feature button and dial 00.
2. Press any ICOM or SA button.
3. Dial ✻11 to turn Call Waiting on,
OR
Dial ✻✻11 to turn Call Waiting off.
4. Press the Feature button and dial ✻00.
Camp-On ␣
To program:
See Programming Buttons & Settings, p. 17.
To camp on a busy extension so the call will ring
at the extension when your co-worker is
available:
1. Press the Feature button.
2. Select
Camp-On [Camp
OR
Dial 57.
NOTE: Do not use the Camp-On feature if your
system is equipped with a voice-mail
system.
] from the display.
␣ Coverage␣
To program:
See Programming Buttons & Settings, p. 17.
Coverage allows calls to your extension to ring
elsewhere, so that they can be handled by
someone else. If your system has voice mail,
your calls can also be covered that way. There
are three types of coverage:
• Primary Coverage. If your calls are
covered this way, they ring immediately
at the covering phone.
• Secondary Coverage. The covering
phone rings after a delay of 2 rings, giving
you a chance to answer first.
• Group Coverage. Calls for a group of
people (coverage group) may be covered
by one or more people. Your system
manager can tell you how this works at
your office.
Covering phones are programmed with Cover
buttons used to answer calls for others. Delay
Ring on the covering phone can add a longer
delay before your calls ring there. If line
buttons on your phone are set to No Ring,
however, calls on those lines are not covered.
(See Rings, p. 2.)
To control coverage of inside calls, use these
programmable settings: Coverage Inside On
allows all your inside calls to ring elsewhere;
Coverage Inside Off turns inside coverage off.
You can also program buttons for these
features:
• Use a Coverage VMS button to prevent
or allow coverage of your outside calls by
a voice mail system. These calls may still
be covered by a person at another
extension.
• Use a Coverage Off button to turn off or
on all coverage of your calls.
12
Page 15

Often-Used Features
␣ Direct Voice Mail*
To program:
See Programming Buttons & Settings, p. 17.
Direct Voice Mail allows an inside caller to call
directly or transfer a call to another user’s voice
mail. You can also use the feature
dialed the extension; just do Step 1 below.
To call directly to another user’s voice mail or
transfer a call directly to another user’s voice
mail:
1. Press the programmed Direct Voice Mail
button,
OR
Press the Feature button and dial 56.
2. Dial the extension whose voice mail you
want to call or transfer a call to; you can
use a programmed Auto Dial button
(see p. 11).
Note: If you are transferring a call to an
extension that does not have voice mail, you
hear an error tone and the call returns to you
after a time interval.
* Release 3.0 and later systems only.
after
you have
␣ Do Not Disturb␣
Must be programmed on a button. To program:
See Programming Buttons & Settings, p. 17.
This feature prevents calls from ringing at your
extension, although outside calls at line
buttons cause the green lights to flash. If you
have coverage, your calls are covered. If you
have programmed a Posted Messages
button (p. 8), inside callers with display
phones see
to call you. A system operator or the person
providing individual coverage for you can still
call you. Callback calls and returning transfers
ring at your phone.
To use:
Press the programmed button to turn on or off.
When the feature is on, the green light is on.
Do Not Disturb
when they attempt
␣ Forward & Follow Me␣
To program:
See Programming Buttons & Settings, p. 17.
Forward and Follow Me send calls to another
phone when you are busy and need your calls
covered or when you are not working at your
desk. Turn either off from your extension or the
one you are visiting.
• If you want your calls handled at another
extension or at an outside number, turn on
Forward from your extension.
• If you are working away from your phone,
turn on Follow Me at the phone where
you are.
If Delayed Call Forwarding is turned on
through centralized telephone programming,
calls ring at the forwarding extension for the
programmed number of rings (0–9) before
being forwarded. To change the Delayed Call
Forwarding setting, contact your system
manager.
To forward calls to another extension:
1. Press the button you have programmed,
OR
Press the Feature button and dial 33.
2. Dial the extension.
To forward calls to an outside number (if enabled):
1. Press the button you have programmed,
OR
Press the Feature button and dial 33.
2. Dial the dial-out code, outside number, and #.
To set up Follow Me and receive calls at
another extension:
1. Press the Feature button and dial 34.
2. Dial your extension.
To cancel Forward and Follow Me:
• To cancel forwarding or following of your
own calls: at your extension, press the
Feature button, dial 33 and your
extension.
• To cancel all extensions forwarded or
followed to yours: at your extension,
press the Feature button, dial ✻34✻.
• To cancel one extension forwarded or
followed to yours: at your extension, press
the Feature button, dial ✻34 and that
extension.
13
Page 16
Often-Used Features
␣ Last Number Dial␣
To program:
See Programming Buttons & Settings, p. 17.
This feature automatically redials the last
number you called. You should program Last
Number Dial on a button.
To use:
1. Press the same type of line button used to
place the first call (for example, ICOM or SA).
2. Press the programmed Last Number Dial button,
OR
Press the Feature button and dial 84.
␣ Night Service␣
Your company may use Night Service to treat
calls differently after hours. If Night Service is
on, you may not be able to make outside calls,
or you may need a password to do so. See
your system manager for a password and/or
emergency numbers you can dial without a
password.
To make an outside call and override Night
Service, press the Hold button and dial the
password. Then lift the handset or press the
Speaker button and dial the call.
␣ Paging␣
To program:
See Programming Buttons & Settings, p. 17.
You can page an individual at his or her phone
by using an ICOM Voice or SA Voice button
(see Line Buttons, p. 1). Or you may be able
to page all speakerphones or groups of
speakerphones, depending upon how your
system is set up. If your company has a
loudspeaker paging system, use it to page the
whole company or just people in a certain zone.
To program or use Speakerphone Paging,
check with your system manager for Group
Paging or Page All numbers, then:
1. Press any ICOM or SA button and lift the
handset.
2. Dial a Group Paging or Page All number,
OR
Press the button you programmed for Group
Paging or Page All.
3. After the beep, make the announcement and
hang up.
Ask your system manager whether Loudspeaker
Paging is available and if there is a list of
paging zones. To use:
1. Press any ICOM or SA button and lift the
handset.
2. Press the Feature button, dial 9 and the
loudspeaker paging line number, plus the
zone if necessary.
3. Make the announcement and hang up.
To use when a button is programmed:
1. Lift the handset, press the programmed
button, and dial the zone, if necessary.
2. Make the announcement and hang up.
14
Page 17
Often-Used Features
␣ Park & Paging␣
To program:
See Programming Buttons & Settings, p. 17.
Park puts a call on a special kind of hold so
that it can be answered from any phone in the
system. While a call is parked, use Paging to
summon the co-worker who should answer.
The person picks up the call using Pickup
(p. 15) and dialing your extension.
To use Park and Paging:
1. Park the call.
• Press the Park button you programmed,
OR
• Press the Transfer button, dial your
extension, and press Transfer again.
2. Set up the page:
•
For Speakerphone Paging:
a) Press the appropriate Group Page or
Page All button, OR
Press any ICOM or SA button and dial
the Group Page or Page All extension.
b) Announce the call and give your extension.
•
For Loudspeaker Paging:
a) Press the programmed Loudspeaker
Paging button, OR
Press the Feature button and dial 9
and the loudspeaker paging line
number. If necessary, dial the zone.
b) Announce the call and give your extension.
3. Hang up.
␣ Pickup␣
Pickup lets you pick up calls that are not ringing at your phone. Using Pickup, you can answer a parked call, a call ringing at a specific extension, or a call ringing on a specific line. If you are part of a Pickup group, you can pick up a call anywhere in the group. Program a general Pickup button that activates the feature or a specific Pickup button to take a call for a group (example: Pickup Sales) or at a specific line or extension (example: Pickup Maria).
To program:
1. Label an unused button.
2. Press the Feature button and dial 00.
3. Press the labeled button.
4. Dial ✻9; if the button is for a specific line or
extension, dial it, OR
Dial ✻88 for Group Pickup.
5. Press the Feature button and dial ✻00.
To use:
• Press the programmed button or press the
Feature button and dial 9. For a specific
line or extension, dial the extension or line
number.
• You can also use Group Pickup by pressing
the Feature button and dialing 88.
␣ Privacy␣
␣ Personal Speed Dial␣
Use Personal Speed Dial to dial frequently used
phone numbers, account codes, access codes,
and area codes. Include the complete dialing
sequences and press and release the Hold
button to enter a pause. You can program up to
24 2-digit codes. You cannot program an
account code together with a phone number in a
Personal Speed Dial code.
To program a Personal Speed Dial code:
1. Press the Feature button and dial 00.
2. Dial #, a 2-digit code (01–24), and then ✻21.
3. Dial the dial-out code and number. See
Special Characters, back cover.
4. Repeat Steps 2 and 3 for additional codes.
5. Press the Feature button and dial ✻00.
To use:
1. Select an SA, ICOM, or line button.
2. Press the Feature button.
3. Dial the 2-digit code (01–24).
To program:
See Programming Buttons & Settings, p.16.
Privacy prevents co-workers who share a line
with you from joining your calls. Turn the
feature on before or during a call; it remains on
until you turn it off. A call on hold is not
protected by Privacy. You should program
Privacy on a button so that you will have a green
light to remind you when the feature is on.
15
Page 18
Often-Used Features
␣ Reminders␣
To program:
See Programming Buttons & Settings, p. 17.
Use Reminders to set a time when your phone
will ring like an alarm clock. You can set only
one reminder, and it must be for the day you
set it. After the reminder rings at your phone or
if you cancel it, you can set another reminder.
To set a reminder:
1. Press the programmed Reminder Set
button,
OR
Press the Feature button and dial 81.
2. Dial a 4-digit time from 0100 to 1259.
3. Dial 2 for a.m. or 7 for p.m.
4. Hang up.
To cancel a reminder:
Press the Reminder Cancel button you have
programmed,
OR
Press the Feature button and dial ✻81.
␣ Saved Number Dial␣
Must be programmed on a button. To program:
See Programming Buttons & Settings, p. 17.
Use this feature to redial a busy or unavailable
number that you want to try later.
To use:
1. Before hanging up, press the programmed Saved Number Dial button.
2. Press the same type of button used to place
the call (for example, ICOM, Pool, or SA).
3. To redial, press the programmed Saved
Number Dial button.
␣ System Speed Dial␣
To program:
See Programming Buttons & Settings, p. 17.
Ask your system manager for your company’s
list of 3-digit codes for phone numbers people
dial often. You can program these codes onto
line buttons, one code per button.
To use a System Speed Dial code:
Press the button programmed with the code.
OR
Lift the handset, press the Feature button,
and dial the 3-digit code (600-729).
␣ Voice Announce␣
To program:
See Programming Buttons & Settings, p. 17.
Make voice-announced calls from ICOM
Voice or SA Voice buttons on your phone
(see Line Buttons, p. 1) or use Paging
(p. 14). The Voice Announce feature allows
you to prevent voice announcements and
paging calls from interrupting you. Instead,
the calls ring. Voice Announce is a setting that
you can turn on or off. If you have a data
station at your extension and Voice Announce
is on, you should turn Voice Announce off.
16
Page 19

Programming Buttons & Settings
If you use a feature often, you can program it onto an unused line button for easy access. If you use a
feature occasionally, see Using Features, p. 9. Keep these facts in mind when setting up your telephone:
must
• Some features
with a
◆ on the Programming Codes list.)
• Other features (marked with • on the Programming Codes list) are settings that affect the way your
phone works. Some settings, such as Personalized Ring, affect all the lines on your phone. During
programming, you still have to select a line button, but it can be
Others, such as Delay Ring for a single line, are settings that affect a specific line and require you to
press it during programming (these features are noted on the Programming Codes list). Settings
remain active until you program them again.
␣ Programming Buttons␣
To program a feature or an unused line button:
1. Label a button for the feature.
2. Press the Feature button and dial 00.
3. Press the labeled button.
4. Select the code from the Programming Codes list and dial if. If additional numbers (such as
an extension number) are needed, dial them, too.
5. To program another feature, repeat Steps 1, 3, and 4. (Label the button first.) To stop
programming, press the Feature button and dial ✻00.
␣ Programming Settings␣
1. Press the Feature button and dial 00.
2. Either press the specific line button required or press any line button that the feature affects.
3. Select the code from the Programming Codes list and dial it. If additional numbers (such as
an extension number) are needed, dial them, too.
4. To program another setting, repeat Steps 2 and 3.
5. To stop programming, press the Feature button and dial ✻00.
be programmed on a button or they can’t be used. (These features are marked
any
line button the feature affects.
Security Alert
Your Responsibility for Your System’s Security␣
Toll fraud, the unauthorized use of your telecommunications system by an unauthorized party (for example, persons
other than your company’s employees, agents, subcontractors, or persons working on your company’s behalf) can
result in substantial additional charges for your telecommunications services. You are responsible for the security
of your system. There may be a risk of toll fraud associated with your telecommunications system. Your system
administrator should read all installation, instruction, and system administration documents provided with this
product to fully understand the features that can introduce the risk of toll fraud and the steps that can be taken to
reduce that risk. Lucent Technologies does not warrant that this product is immune from or will prevent unauthorized use of common-carrier telecommunication services or facilities accessed through or connected to it. Lucent
Technologies will not be responsible for any charges that result from such unauthorized use.
Copyright © 1998, Lucent Technologies. MERLIN LEGEND, MLX-5, and MLX-10 are registered trademarks of Lucent
Technologies. Mirage, StarSet, and Supra are registered trademarks of Plantronics, Inc.
17
Page 20

Programming Codes
Account Code Entry ✻ 82
Authorization Code Entry
Auto Dial♦
inside ✻ 22 + extension
outside ✻ 21 + number
Callback
automatic callback off•
automatic callback on•
selective callback ✻ 55
Call Waiting•
off ✻✻11
on ✻ 11
Camp-On
▲ ✻ 57
Coverage
Coverage inside on• ✻ 48
Coverage inside off• ✻✻ 48
Buttons for covering calls♦␣
Primary Cover ✻ 40 + sender’s
Secondary Cover ✻ 41 + sender’s
Group Cover ✻ 42 + sender’s
Buttons for sending calls♦
Coverage Off ✻ 49
Coverage VMS Off ✻ 46
(outside calls only)
Direct Voice Mail
Do Not Disturb♦␣ ✻ 47
Forward ✻ 33
Headset Auto Answer♦✻ 780
Headset Hangup ✻ 781
Headset/Handset Mute♦␣ ✻ 783
Headset Status♦✻ 782
Last Number Dial ✻ 84
Messaging
leave message ✻ 25
posted message♦✻ 751
Paging group or all ✻ 22 + group
Paging loudspeaker ✻ 9 + line number
■ ✻ 80
▲ ✻✻ 12
▲ ✻ 12
extension number
extension number
group number
■ ✻ 56
extension
Park ✻ 86
Personal Speed Dial # + (01– 24) +
✻ 21 + phone
number + #
# + (01– 24) +
✻ 21 + dial-out
code + phone
number + # #
Pickup
general ✻ 9
group ✻ 88
inside ✻ 9 + extension
outside ✻ 9 + line number
Privacy ✻ 31
Recall ✻ 775
Reminders
set reminder ✻ 81
cancel reminder ✻✻ 81
Ringing Options•
abbreviated on ✻ 341
abbreviated off ✻ 342
delayed all lines ✻ 346
delayed one line ✻ 36
immediate all lines ✻ 347
immediate one line ✻ 37
no ring all lines ✻ 345
no ring one line ✻ 35
personalized ring ✻ 32 + ring (1–8)
send ring on ✻ 15
send ring off ✻✻ 15
Saved Number Dial♦␣ ✻ 85
Signaling and Notify♦
signaling ✻ 23 + extension
notify receive␣ ✻ 758 + extension
notify send␣ ✻ 757 + extension
System Speed Dial ✻ 24 + code
(600–729)
Voice Announce•
on ✻ 10
off ✻✻ 10
◆ Must be programmed onto a line button.
• Sets up how your phone works. Use a line button to program (turn on or off). The setting is not programmed
onto a line button.
▲ See your system manager for details.
■ Release 3.0 and later systems only.
18
Page 21

For releases prior to R5.0:
The MERLIN LEGEND Control Unit recognizes the MLX-5 telephone as an MLX-10:
■ When an MLX-5 telephone is installed, all line and feature buttons beyond the first 5 physical buttons
must be removed by the System Manager using system programming. This is important so that
“phantom” buttons and lines are not inadvertently placed on the MLX-5 telephone. For example, you
may have a line programmed on what would be Button 6 of an MLX-10 telephone. If it is not deleted,
calls will continue to ring on this line but there will be no call appearance on the MLX-5 telephone.
■ The
Extension Information Report
telephone.
will show “MLX-10” as the “Type” for an extension with an MLX-5
Page 22

Feature Codes
Account Code Entry 82 + code + #
Authorization Code Entry
Callback 55
Call Waiting
pick up call waiting call 87
Camp-On 57
Direct Voice Mail
Follow Me 34 + extension
Forward
inside 33 + extension
outside 33 + dial-out code
Forward and Follow Me
cancel from all extensions ✻ 34 ✻
cancel from one extension ✻ 34 + extension
cancel from your phone 33 + your
Last Number Dial 84
■ Release 3.0 and later systems only.
■ 80 + code + #
■ 56
+ number + #
extension
Special Characters
Messaging
cancel message ✻ 53 + extension
leave message 25
leave message 53 + extension
without calling
turn message light off 54
Personal Speed Dial code (01–24)
Paging loudspeaker 9 + line number +
zone
Pickup
group pickup 88
inside 9 + extension
outside 9 + line number
Privacy
off ✻ 31
on 31
Recall 775
Reminders
set reminder 81 + time + 2 or 7
cancel reminder ✻ 81
System Speed Dial code (600–729)
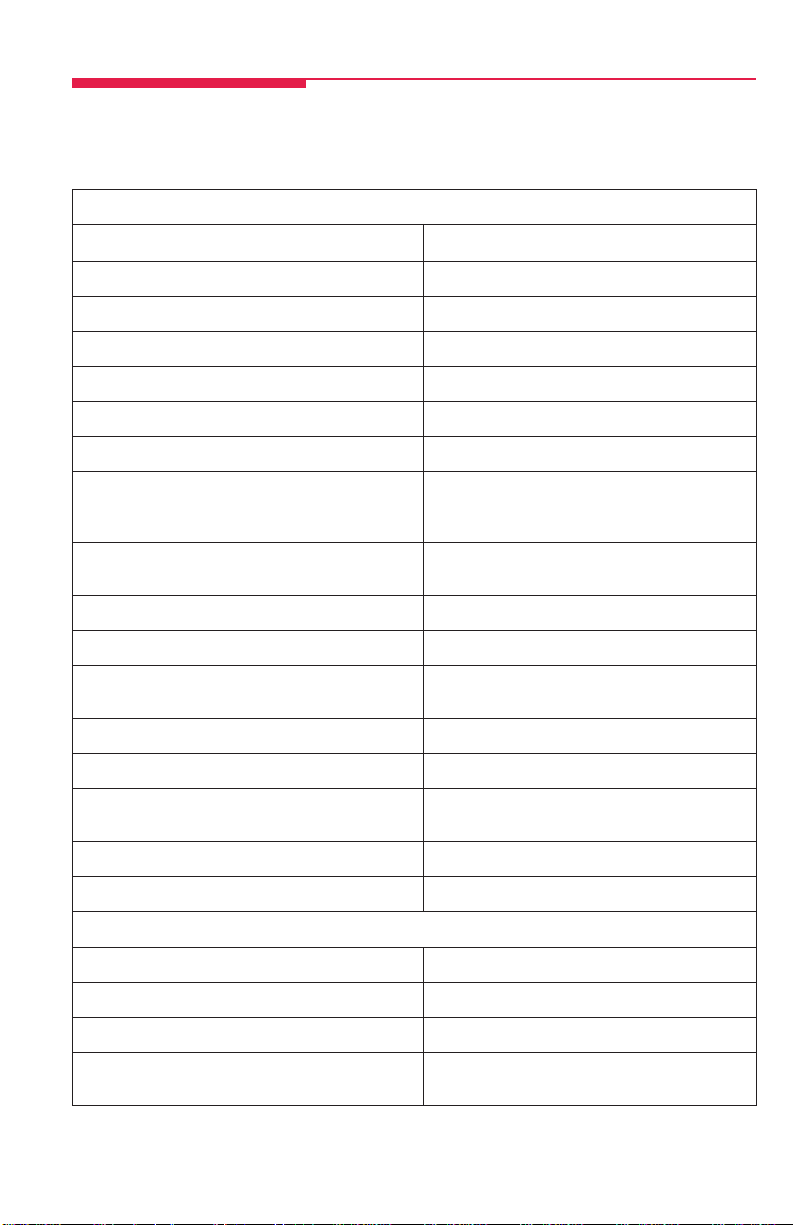
Features that dial numbers automatically may need special characters to allow for correct dialing or
system response.
Press... See... Means...
Drop s Stop. Halts dialing sequence to allow for system response.
Hold p Pause. Inserts 1.5-sec. pause in dial sequence. Multiple consecutive
Conf f Flash. Sends switchhook flash. Must be first entry in sequence.
## # For Extension Programming only: End of Dialing. Use to signal end of
##End of Dialing. Use to signal end of dialing sequence or to separate grouped
pauses allowed.
dialing sequence or to separate grouped digits.
digits.
 Loading...