

Lowrance HDS Gen3 Polaris Operator's Manual
HDS Gen3 Polaris
Operator Manual
ENGLISH
by Lowrance
polaris.com


Preface
Trademarks
Polaris® is a registered trademark of Polaris Industries, Inc.
Lowrance® and Navico® are registered trademarks of Navico.
NMEA 2000® is a registered trademark of the National Marine
Electronics Association.
SiriusXM® is a registered trademark of Sirius XM Radio Inc.
FUSION-Link™ Marine Entertainment Standard™ is a registered
trademark of FUSION Electronics Ltd.
SD™ and microSD™ are trademarks or registered trademarks of
SD-3C, LLC in the United States, other countries or both.
Additional mapping data: Copyright© 2012 NSI, Inc.: Copyright©
2012 by Richardson’s Maptech.
Copyright
Copyright © 2015 Navico Holding AS.
Warranty
The warranty card is supplied as a separate document.
In case of any queries, refer to polaris.com.
Regulatory statements
The HDS Gen3 Polaris complies with:
• CE under R&TTE directive 1999/5/EC
• The requirements of level 2 devices of the
Radiocommunications (Electromagnetic Compatibility)
standard 2008
About this manual
The manual assumes that the user has basic knowledge of
navigation terminology and practices.
Important text that requires special attention from the reader is
emphasized as follows:
Ú
Preface | HDS Gen3 Polaris Operator Manual
Note: Used to draw the reader’s attention to a comment or
some important information.
3
Warning: Used when it is necessary to warn
personnel that they should proceed carefully to
prevent risk of injury and/or damage to equipment/
personnel.
Manual version
This manual is written for the HDS Gen3 Polaris software version 1.5.
Viewing the manual on the screen
The pdf viewer included in the HDS Gen3 Polaris makes it possible
to read the manuals and other pdf files on the screen. .
The pdf files can be read from a card inserted in the card reader or
copied to the unit’s internal memory.
Use the menu options or the keys and on-screen buttons to
maneuver in the pdf file as described below:
Search, Goto
page, Page Up
and Down
4
Preface | HDS Gen3 Polaris Operator Manual
Select the relevant panel button.
Scroll pages Touch operation: Drag finger on the screen in
any direction.
Key operation: Use the Cursor keys.
Panning on the
page
Zoom In/Out Select the relevant panel button.
Exit the pdf
viewer
Touch operation: Drag finger on the screen in
any direction.
Key operation: Use the Cursor keys.
Touch operation: Use pinch or spread gestures.
Key operation: Use the + and - keys
Touch operation: Select the X in the upper right
corner of the panel.
Key operation: Press the X key.
The Software version
The software version currently on this unit can be found in the
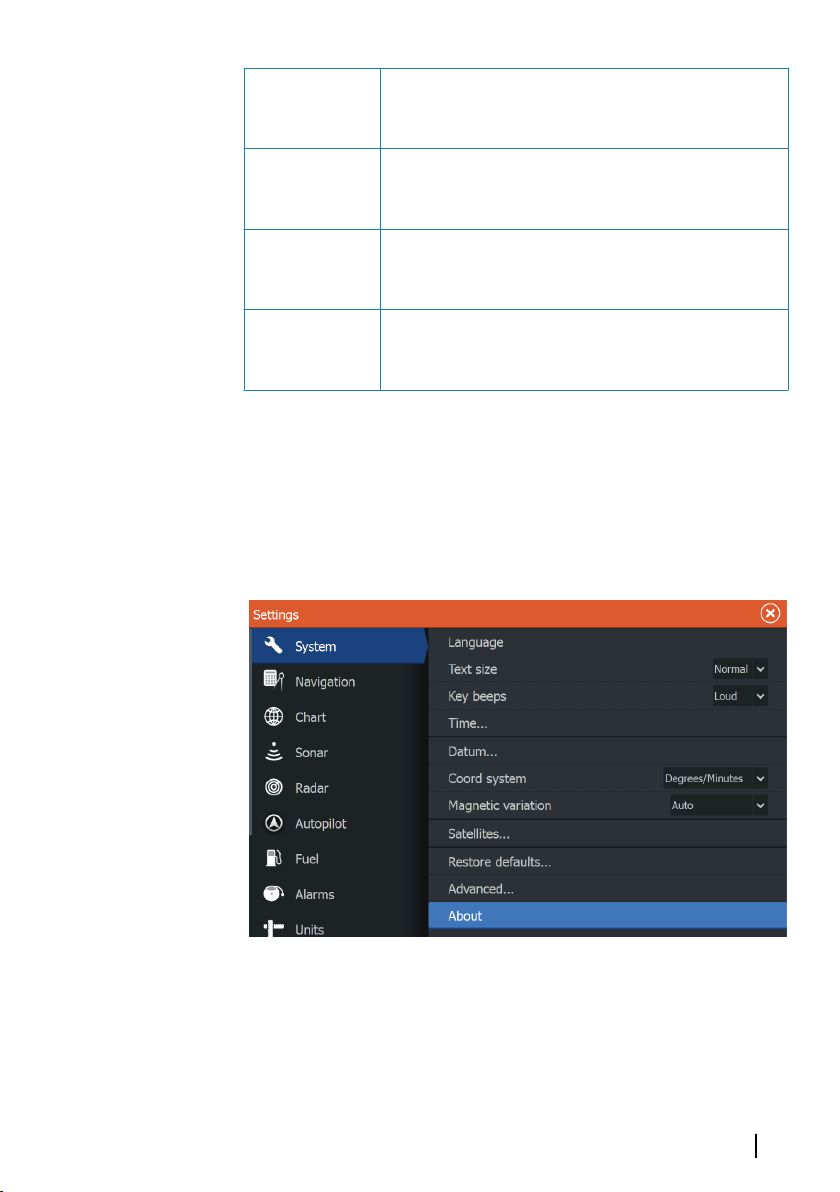
About dialog. The About dialog is available in the System Settings.
For more information, refer to "About" on page 75. For upgrading
your software, refer to "Software upgrades" on page 82.
Preface | HDS Gen3 Polaris Operator Manual
5

6
Preface | HDS Gen3 Polaris Operator Manual

Contents
11 Introduction
11 Operating the system
12 The front panel and keys
14 The Home page
15 Application pages
17 Integration of 3rd party devices
18 Basic operation
18 Systems Controls dialog
18 Turning the system on and off
19 Display illumination
19 Locking the touchscreen
20 Using menus and dialogs
21 Selecting pages and panels
21 Using the cursor on the panel
23 Creating a Man Overboard waypoint
24 Screen capture
25 Customizing your system
25 Customizing the Home page wallpaper
25 Adjusting panel size
26 Data Overlay
27 Adding new favorite pages
27 Edit favorite pages
28 Charts
28 The Chart panel
29 Chart data
29 Showing dual chart types
30 Vehicle symbol
30 Chart scale
30 Panning the chart
31 Positioning the vehicle on the chart panel
32 Displaying information about chart and chart objects
32 Using the cursor on the chart panel
32 Creating routes
33 Find objects on chart panels
33 3D charts
Contents | HDS Gen3 Polaris Operator Manual
7

34 Chart overlay
35 Insight specific chart options
35 Insight view options
35 Chart settings
38 Waypoints, Routes and Trails
38 Waypoints, Routes, and Trails dialogs
39 Waypoints
41 Routes
43 Trails
45 Navigating
45 Steer panel
46 Navigate to cursor position
46 Navigate a route
48 Navigation settings
50 Info panels
50 Dashboards
50 Customizing the Instrument panel
52 Video
52 The Video panel
52 Setting up the video panel
53 Simulator
53 Demo mode
54 Simulator source files
54 Advanced simulator settings
56 Audio
56 Enabling audio
57 The Media bar
58 Setting up the audio system
59 Audio controls
59 Device explorer
60 Audio options
60 Audio mixer
60 Auxiliary sources
8
Contents | HDS Gen3 Polaris Operator Manual

61 Radio
63 DVD video
64 SiriusXM weather
64 Sirius status panel
65 Sirius weather display
67 Sirius view options
68 Weather icons
68 Marine zones
68 Tropical statements
69 Sirius Weather - Adjusting color codes
69 Animating Sirius weather graphics
69 Weather alarms
70 Wireless connection
70 Connect and disconnect from a wireless hotspot
70 GoFree Shop
71 GoFree Controller & Viewer
71 Wireless settings
73 Tools
73 Waypoints/routes/trails
73 Tides
73 Alarms
73 Settings
76 Sun/Moon
76 Trip calculator
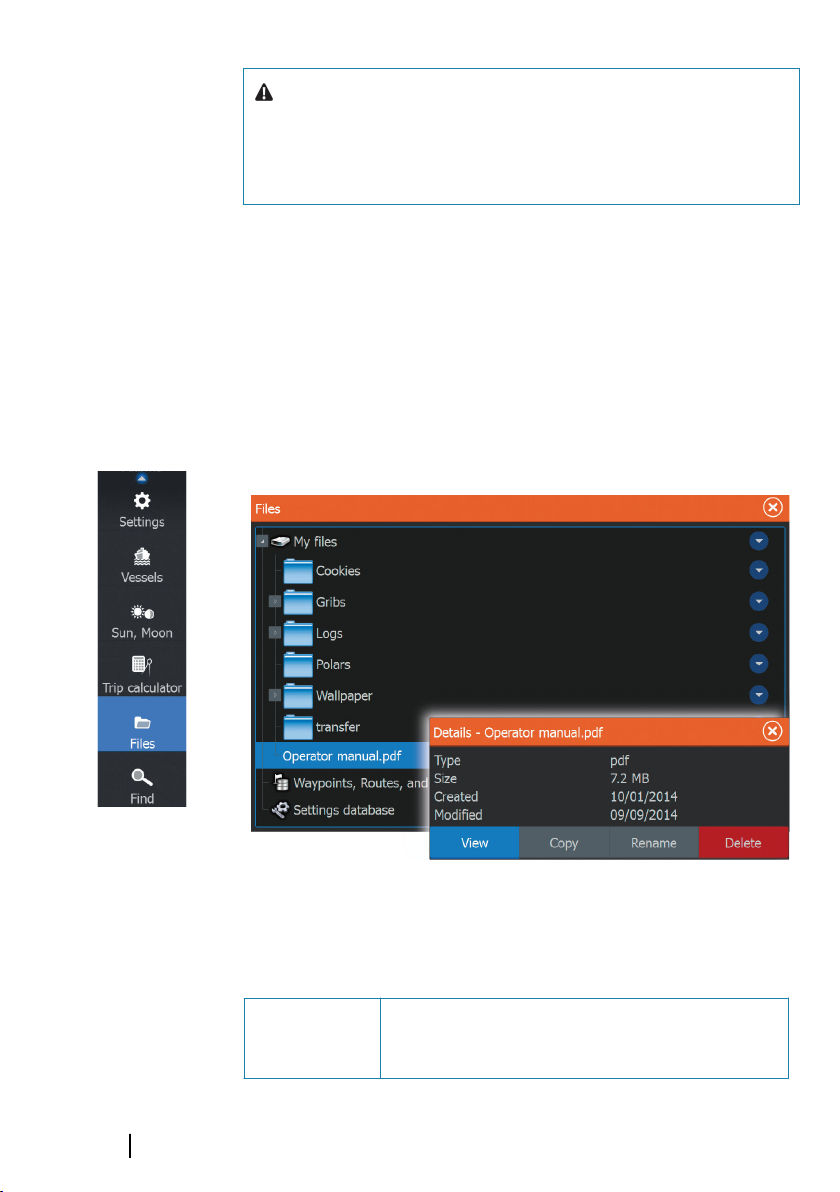
76 Files
77 Find
78 Alarms
78 Alarm system
78 Type of messages
78 Single alarms
79 Multiple alarms
79 Acknowledging a message
79 Alarms dialog
Contents | HDS Gen3 Polaris Operator Manual
9

81 Maintenance
81 Preventive maintenance
81 Checking the connectors
81 Touchscreen Calibration
81 NMEA Data logging
82 Software upgrades
83 Backing up your system data
86 Touchscreen operation
10
Contents | HDS Gen3 Polaris Operator Manual

1
Introduction
Operating the system
You can use both the keys and the touchscreen to operate the HDS
Gen3 Polaris.
This manual uses the following general terminology to describe
operating the unit.
Term Touch Key
Select Tap the panel Use the cursor keys to select, then
confirm by pressing the Enter key
Press
and
hold
Drag Drag an item to a
Press and hold on
the screen
new position
Use the cursor keys to select, then
press and hold the Enter key
Use the cursor keys to select an item,
confirm by pressing the Enter key.
Use the cursor keys to select a new
position, and then press the Enter
key again to confirm the new
position.
Introduction | HDS Gen3 Polaris Operator Manual
11
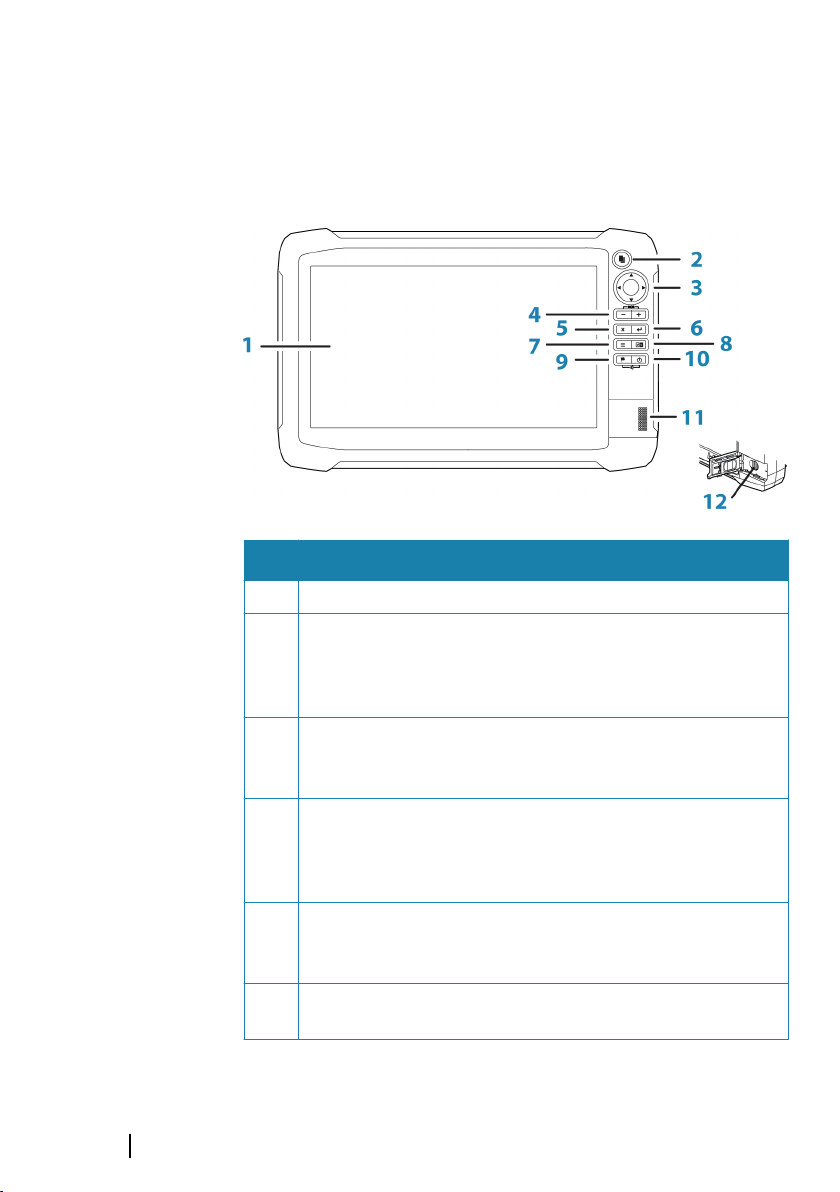
The front panel and keys
Key Description
1 Touchscreen
2 Pages key
Press once to activate the Home page. Repeat short
presses to cycle the favorite buttons. Press and hold from
an active page to go to the last used page.
3 Cursor keys
Press arrows to move through menu items, to adjust a
value, and to move the cursor on a panel.
4 Zoom Out / Zoom In keys and MOB key
Zoom keys for panels and images. Simultaneous pressing
both keys saves a Man Overboard (MOB) waypoint at the
current vehicle position.
5 Exit (X) key
Press to exit a dialog, to return to previous menu level, and
to remove the cursor from the panel.
6 Enter key
Press to select or save your settings.
12
Introduction | HDS Gen3 Polaris Operator Manual

Key Description
7 Menu key
A single press displays the menu for the active panel/
overlay. Press and hold to hide or show the menu. A quick
double-press displays the settings menu.
8 Panel key
Used on multiple-panel pages. A short press switches
between the panels, a long press expands active panel to a
full page panel and back again.
9 Waypoint key
Press to display the dialog for saving new waypoints. Press
twice to quick save a waypoint. Press and hold to access the
Find menu.
10 Power key
Press once to display the System Controls dialog. Repeat
short presses to cycle the backlight brightness. Press and
hold to turn the unit ON/OFF.
11 Card reader door
12 microSD Card readers
Introduction | HDS Gen3 Polaris Operator Manual
13
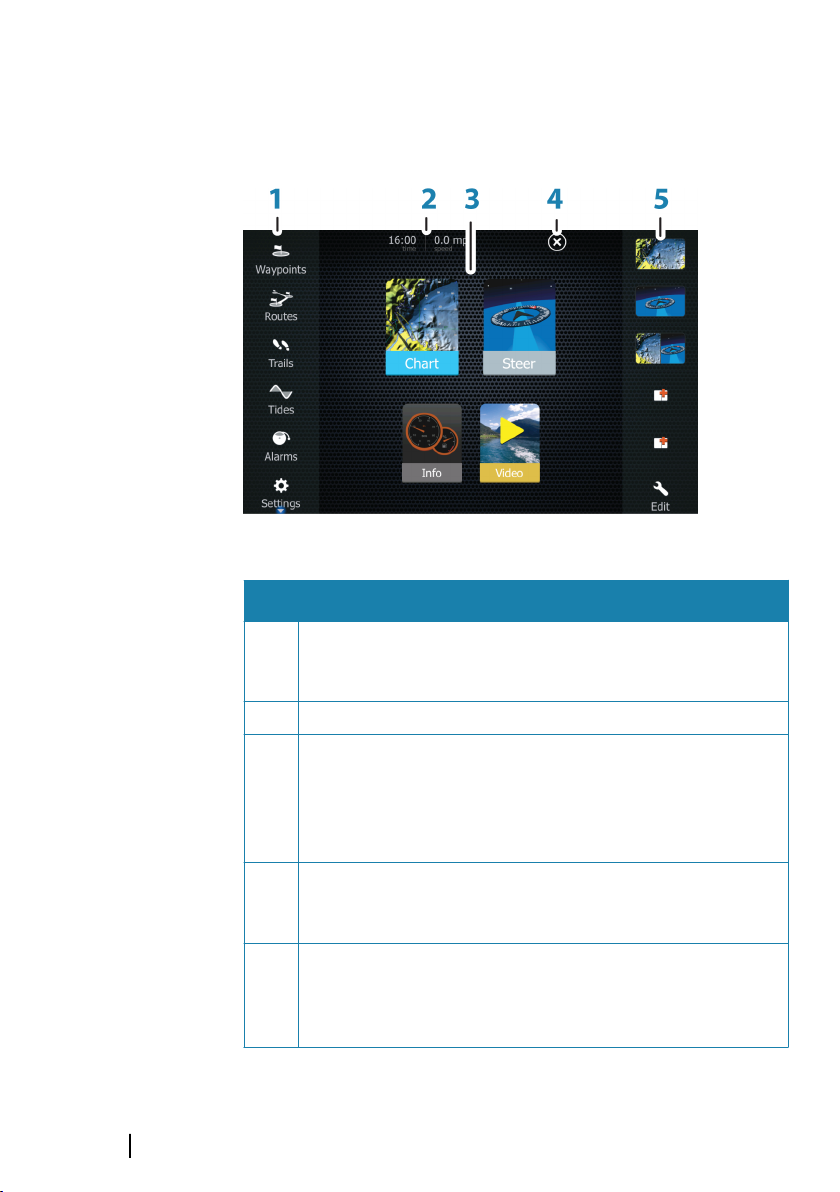
The Home page
The Home page is accessed from any operation by a short press on
the Pages key.
Key Description
1 Tools
Select a button to access dialogs used for carrying out a
task, or for browsing stored information.
2 Time and Speed
3 Applications
Select a button to display the application as a full page
panel.
Press and hold a button to display pre-configured split
page options for the application.
4 Close button
Select to exit the Home page and return to the previous
active page.
5 Favorites
Select a button to display the panel combination.
Press and hold a favorite button to enter edit mode for the
Favorites panel.
14
Introduction | HDS Gen3 Polaris Operator Manual

Application pages
Each application connected to the system is presented on panels.
The application can be presented as a full page, or in combination
with other panels in a multiple panel page.
All pages are accessed from the Home page.
Key Description
1 Application panel
2 Menu
Panel specific menu.
3 System Controls dialog
Quick access to basic system settings. Display the dialog by
a short press on the Power key.
4 Dialog
Information to or input from the user.
5 Alarm message
Displayed if dangerous situations or system faults occur.
Introduction | HDS Gen3 Polaris Operator Manual
15
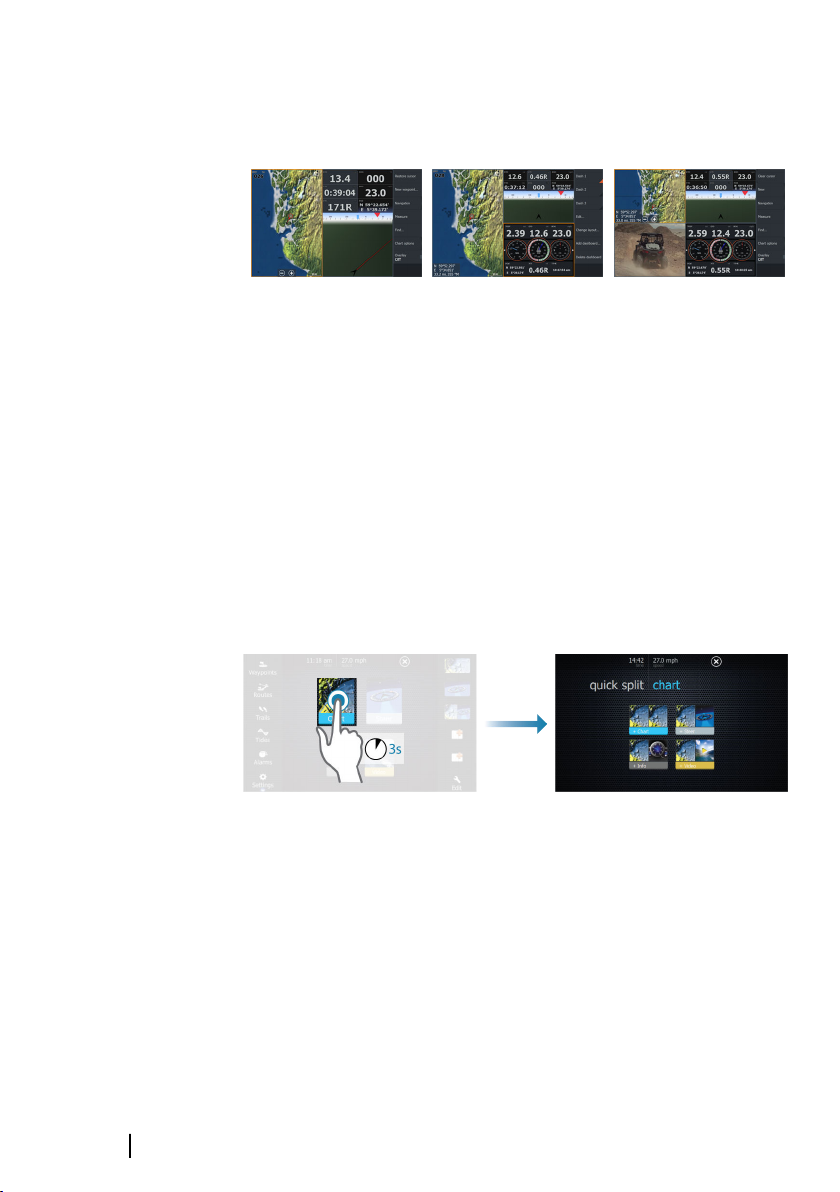
Split pages
You can have up to 4 panels on each page.
2 panels page 3 panels page 4 panels page
Panel sizes in a split page can be adjusted from the System
Controls dialog.
Quick split pages
Each full screen application has several pre-configured quick split
pages, featuring the selected application combined with each of
the other panels.
Ú
Access a quick split page by pressing and holding the application
button on the Home page.
Note: The number of quick split pages cannot be changed,
and the pages cannot be customized or deleted.
Favorite pages
All preconfigured favorite pages can be modified and deleted, and
you can create your own. You can have a total of 12 favorite pages.
For more information, refer to "Adding new favorite pages" on page 27.
16
Introduction | HDS Gen3 Polaris Operator Manual

Integration of 3rd party devices
A device connected to the NMEA 2000 network should
automatically be identified by the system. If not, enable the feature
from the advanced option in the System settings dialog.
The 3rd party device is operated by using menus and dialogs as on
other panels.
This manual does not include specific operation instructions for any
3rd party device. For features and functionality, refer to the
documentation included with the 3rd party device.
FUSION-Link Integration
FUSION-Link devices connected to the NMEA 2000 network can be
controlled from the system.
The FUSION-Link devices appear as additional sources when using
the audio function. No additional icons are available.
Refer to "Audio" on page 56 for more information.
Introduction | HDS Gen3 Polaris Operator Manual
17
2
Basic operation
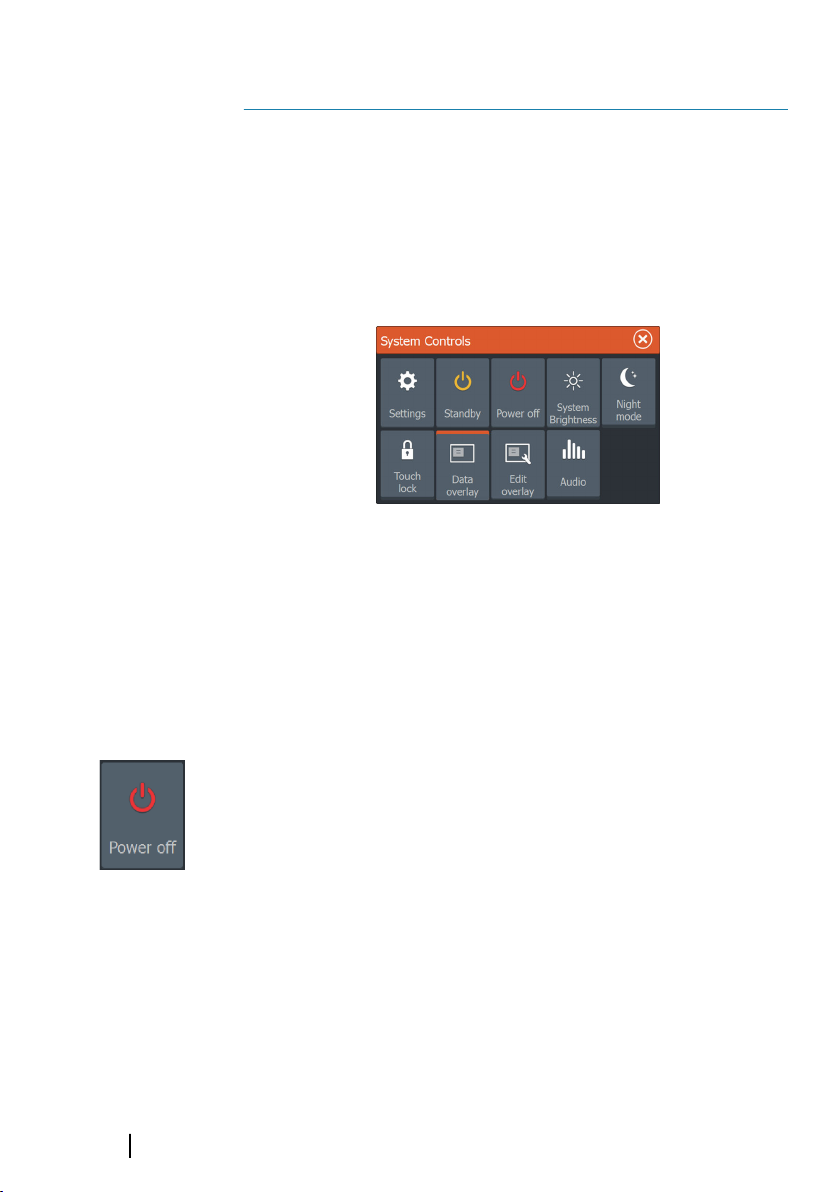
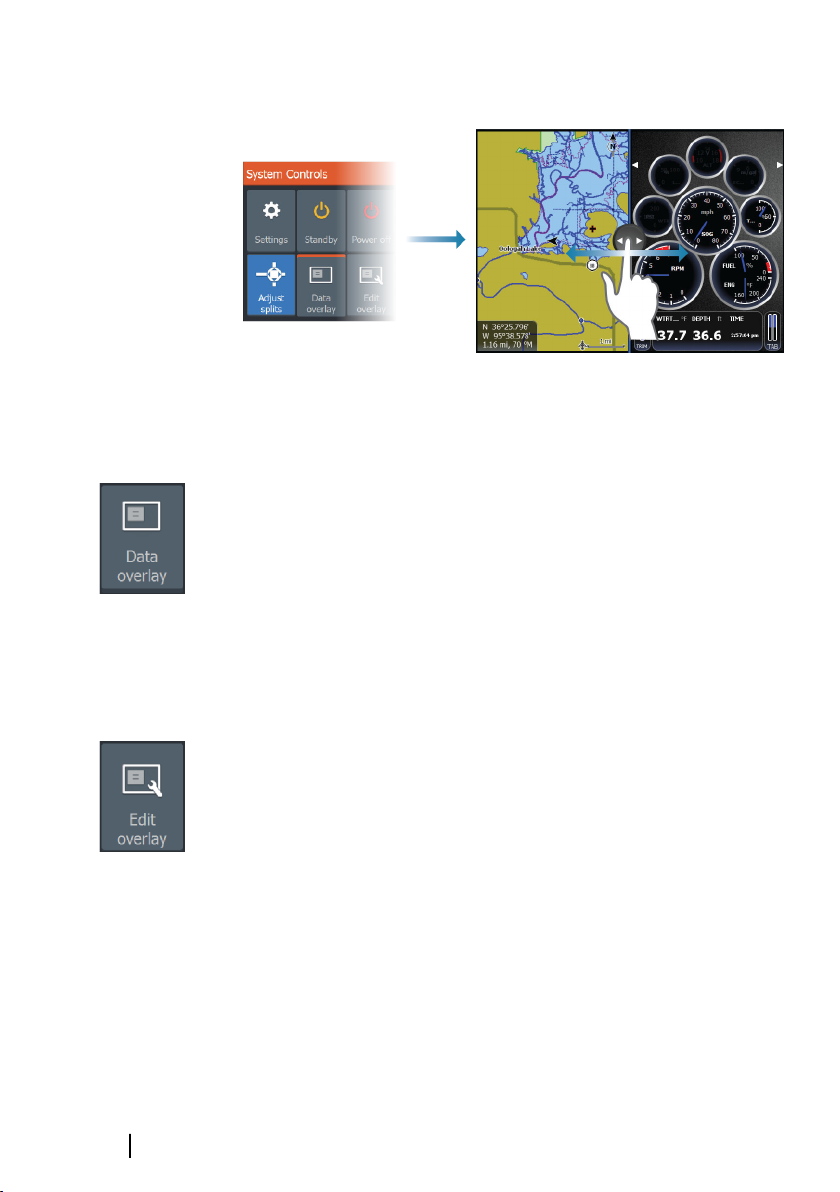
Systems Controls dialog
The Systems Controls dialog provides quick access to basic system
settings. You display the dialog by making a short press on the
Power key. The icons displayed on the dialog can vary. For example,
the adjust splits option is only available if you are viewing a split
page when you open the System Controls dialog.
Activating functions
Select the icon of the function you want to set or toggle on or off.
For those functions that toggle on and off, an orange bar across the
top of the icon indicates the function is activated, as shown in the
Data Overlay icon above.
18
Turning the system on and off
You turn the system on and off by pressing and holding the Power
key. You can also turn the unit off from the System Controls
dialog.
If the Power key is released before the shut-down is completed, the
power off process is cancelled.
Basic operation | HDS Gen3 Polaris Operator Manual
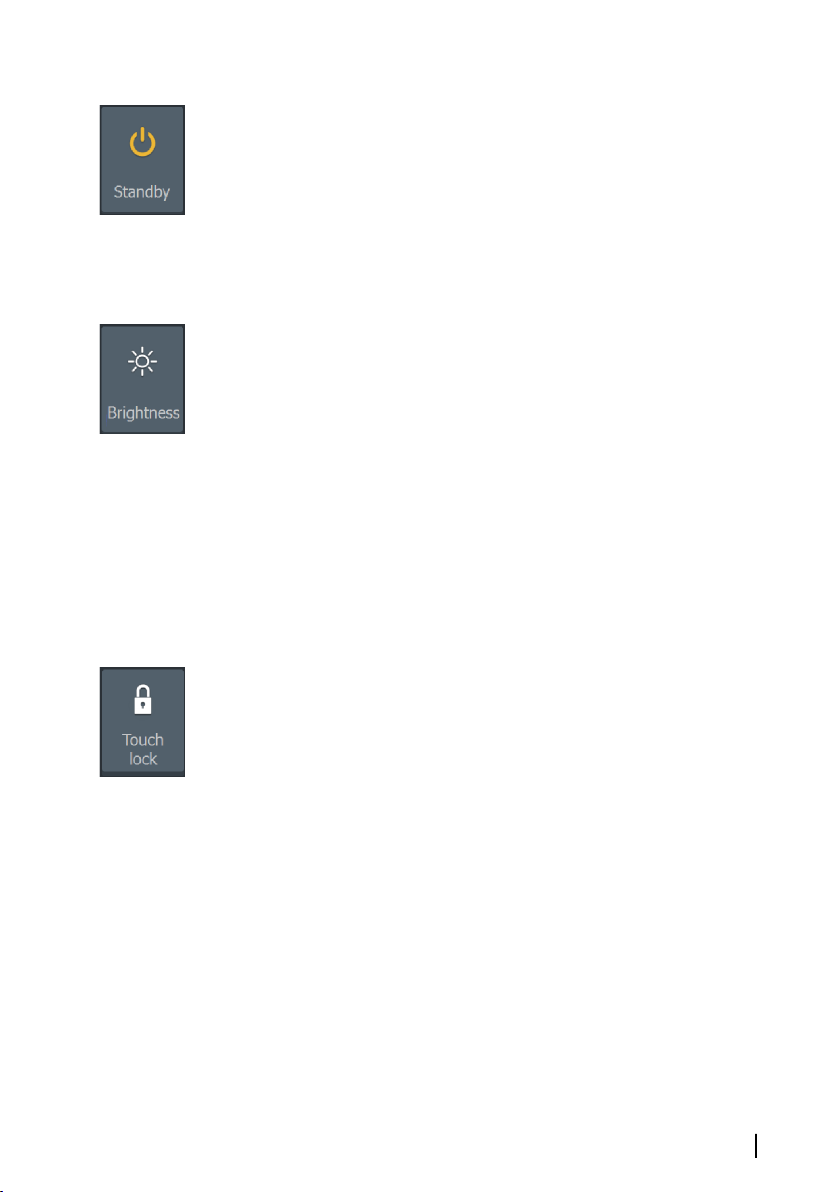
Standby mode
In Standby mode the backlight for screen and keys are turned off to
save power. The system continues to run in the background.
You select Standby mode from the System Controls dialog.
Switch from Standby mode to normal operation by a short press on
the Power key.
Display illumination
Brightness
The display backlighting can be adjusted at any time from the
System Controls dialog. You can also cycle the preset backlight
levels by short presses on the Power key.
Night mode
The night mode option optimizes the color palette and backlight for
low light conditions.
Ú
Note: Details on the chart may be less visible when the
Night mode is selected!
Locking the touchscreen
You can temporarily lock a touchscreen to prevent accidental
operation of the system. Lock the touchscreen when it is
undesirable to interact with the touchscreen, such as operation at
high speeds and over rough terrain. This feature is also useful when
cleaning the screen while the unit is turned on.
When the touch lock is active you can only operate the unit from
the keys.
Ú
You lock the touchscreen from the System Controls dialog.
You remove the lock function by a short press on the Power key.
Note: To prevent false touchscreen activation, the
touchscreen will automatically lock when it detects a
significant amount of water on the screen.
Basic operation | HDS Gen3 Polaris Operator Manual
19

Using menus and dialogs
Menus
The menu is used to operate the system and to adjust settings.
• Activate a menu item and toggle on/off an option by selecting
it
• Adjust a slide bar value by either:
• dragging the slide bar
• selecting the + or - icons
Select the Back menu option or the X key to return to the previous
menu level, and then exit.
Page menus can be hidden to allow pages to be a full screen view.
To hide the menu, drag the menu to the right, or press and hold the
Menu key.
When you hide a menu on one page, the menu on other pages is
also hidden. To display the menu again, select the menu option, or
press the Menu key.
20
The status of the cursor (active vs. inactive) changes the menu
options.
Dialog boxes
Numeric and alphanumeric keyboards are automatically displayed
when required for entering user information in dialogs.
A dialog is closed by saving or cancelling the entry.
A dialog can also be closed by selecting the X in the dialog's upper
right corner or by pressing the X key.
Basic operation | HDS Gen3 Polaris Operator Manual

Selecting pages and panels
Selecting a page
• Select a full page panel by selecting the relevant application
button on the Home page
• Select a favorite page by selecting the relevant favorite button
• Select a predefined split panel by pressing and holding the
relevant application icon
Select active panel
In a multiple panel page, only one panel can be active at a time. The
active panel is outlined with a border.
You can only access the page menu of an active panel.
You activate a panel by:
• Touch operation: tapping the panel
• Key operation: pressing the Panel key
Using the cursor on the panel
The cursor can be used to measure a distance, to mark a position,
and to select items.
Position the cursor by tapping the desired location on the screen or
by using the Cursor keys to move the cursor.
By default, the cursor is not shown on the panel.
When the cursor is active, the cursor position window is displayed.
To remove the cursor and cursor elements from the panel, press the
X key or select the Clear cursor option.
GoTo cursor
You can navigate to a selected position on the image by positioning
the cursor on the panel, then using the Goto Cursor option in the
menu.
The Cursor assist function
The cursor assist function allows for fine tuning and precision
placement of the cursor without covering details with your finger.
Press and hold your finger on the screen to switch the cursor
symbol to a selection circle, appearing above your finger.
Basic operation | HDS Gen3 Polaris Operator Manual
21
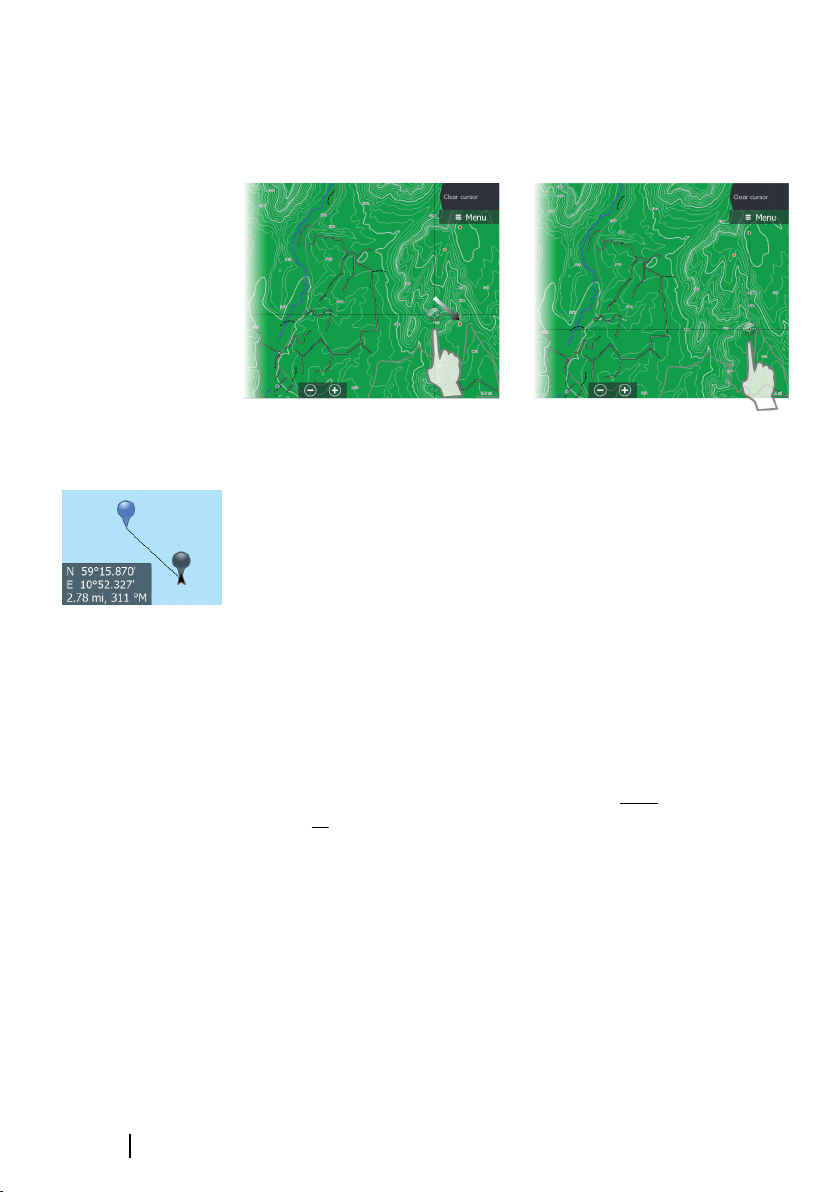
Without removing your finger from the screen, drag the selection
circle over the desired item to display item information.
When you remove your finger from the screen the cursor reverts to
normal cursor operation.
Measuring distance
The cursor can be used to measure the distance between your
vehicle and a selected position, or between 2 points on the chart
panel.
1. Position the cursor on the point from where you want to
measure the distance.
2. Start the measure function from the menu.
- The measuring icons appear with a line drawn from the
vehicle center to the cursor position, and the distance is listed
in the cursor information window.
3. You can reposition the measuring points by dragging either
icon as long as the measuring function is active.
22
Ú
You can also start the measuring function without an active cursor.
Both measuring icons are then initially located at the vehicle
position. The grey icon follows the vehicle as the vehicle moves,
while the blue icon remains at the position given when you
activated the function.
You terminate the measuring function by selecting the Finish
measuring menu option.
Basic operation | HDS Gen3 Polaris Operator Manual
Note: The bearing is always measured from the grey icon
to the blue icon.
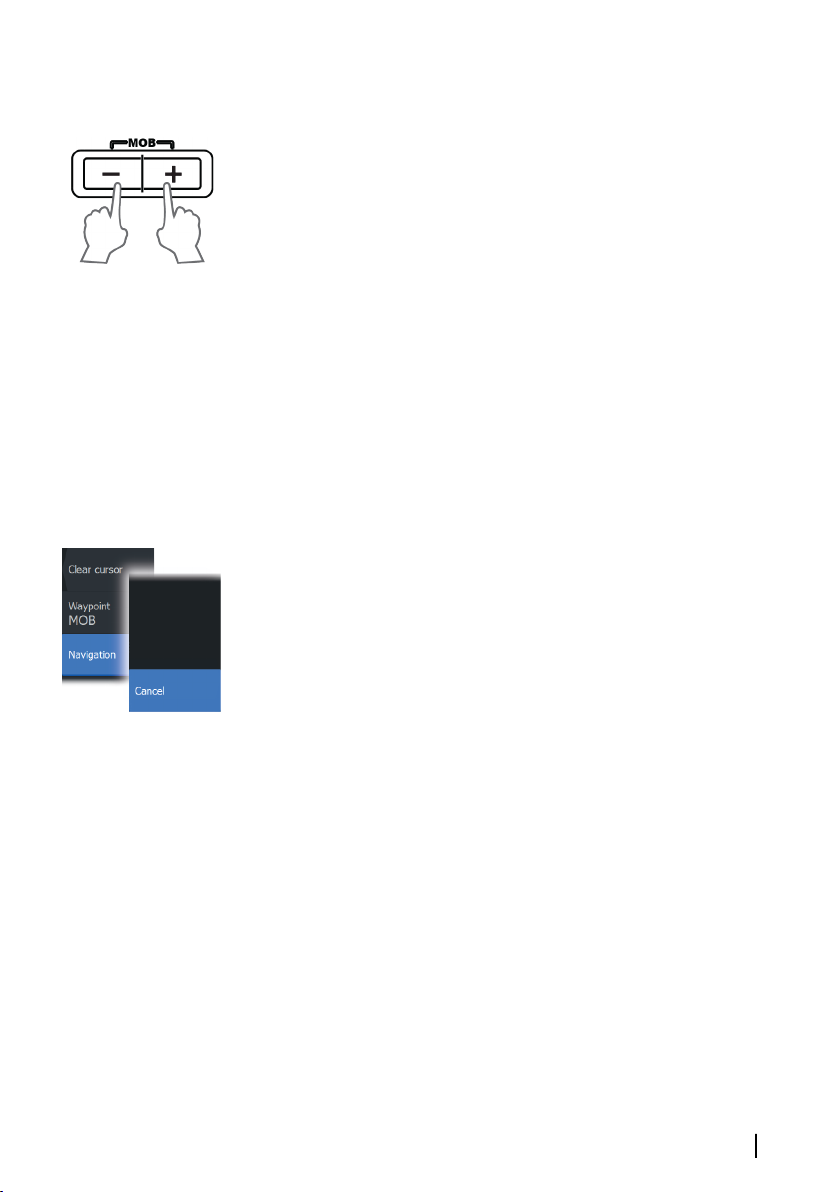
Creating a Man Overboard waypoint
If an emergency situation should occur, you can save a Man
Overboard (MOB) waypoint at the vehicle’s current position by
pressing the Zoom In (+) and Zoom out (-) keys simultaneously.
When you activate the MOB function the following actions are
automatically performed:
• a MOB waypoint is positioned at the vehicle’s position
• the display switches to a zoomed chart panel, centered on the
vehicle's position
• the system displays navigation information back to the MOB
waypoint
Multiple MOB waypoints are saved by repeatedly pressing the MOB
buttons. The vehicle continues to show navigation information to
the initial MOB waypoint. Navigation to subsequent MOB waypoints
needs to be done manually.
Cancel navigation to MOB
The system continues to display navigational information towards
the MOB waypoint until you cancel the navigation from the menu.
Display MOB waypoint information
You can display MOB information by selecting the MOB waypoint
and then the MOB waypoint pop-up.
Basic operation | HDS Gen3 Polaris Operator Manual
23
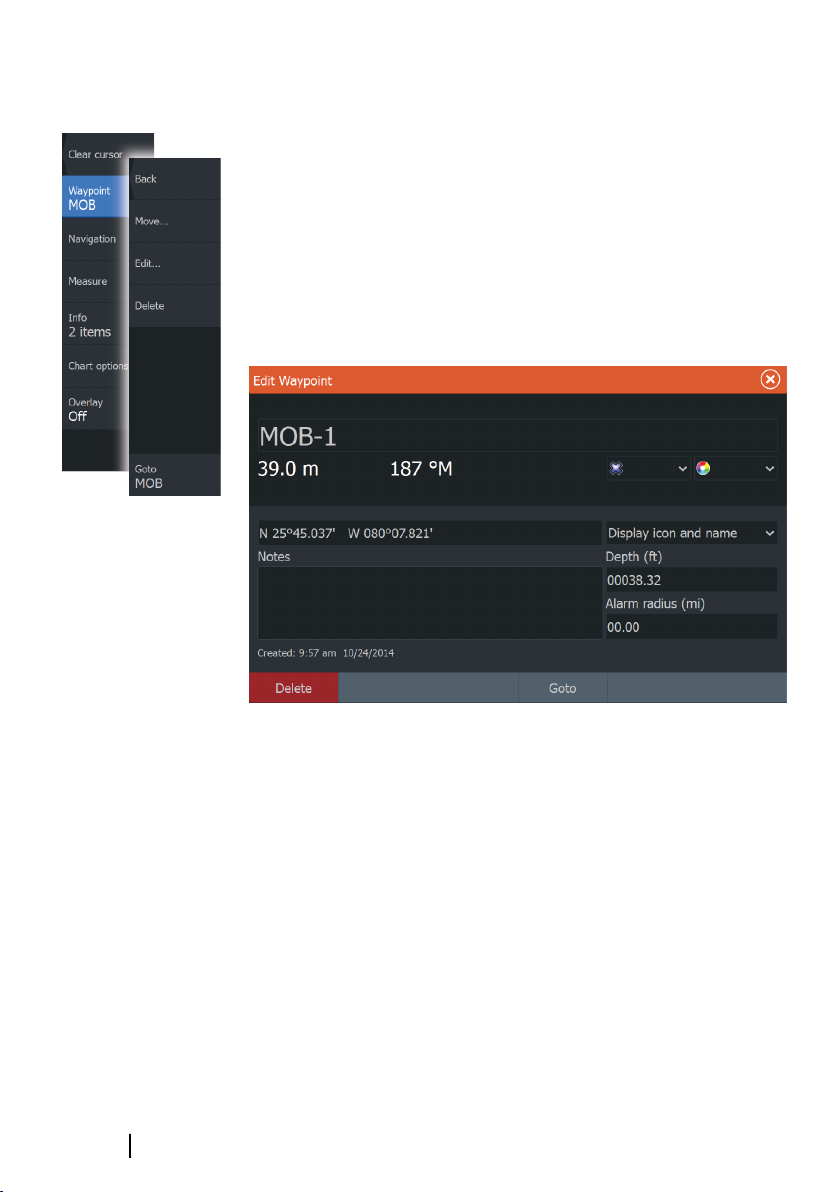
The MOB waypoint menu option
When a MOB waypoint is activated, you can use the Waypoint
MOB menu option to:
• Move it on the panel
• Edit its attributes
• Delete it
• Goto it
When you select the Edit menu option the Edit Waypoint dialog
opens.
24
Screen capture
Simultaneously press the Pages and Power keys to take a screen
capture. Screen captures are saved to internal memory.
Refer to "Tools" on page 73 for how to view files.
Basic operation | HDS Gen3 Polaris Operator Manual
3
Customizing your system
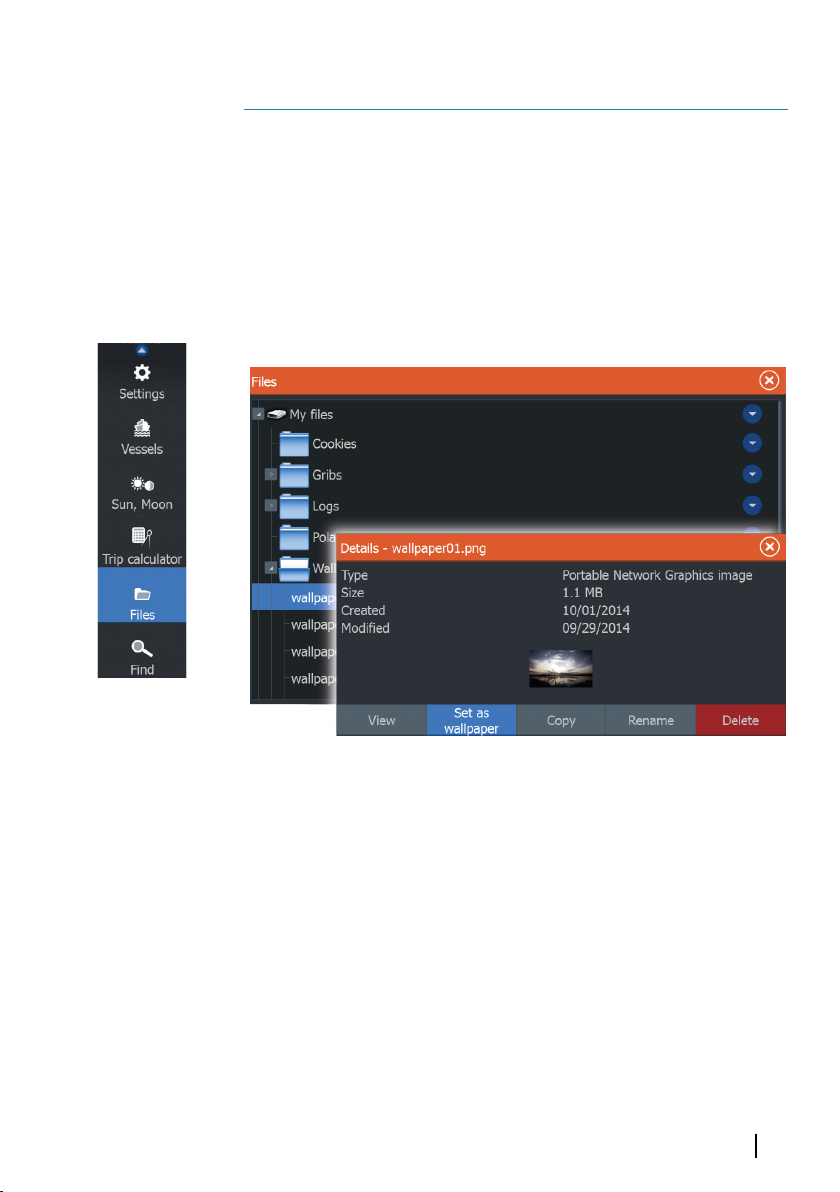
Customizing the Home page wallpaper
The Home page's wallpaper can be customized. You can select one
of the pictures included with the system, or you can use your own
picture in .jpg or .png format.
The images can be available on any location that can be seen in the
files browser. When a picture is chosen as the wallpaper, it is
automatically copied to the Wallpaper folder.
Adjusting panel size
You can change the panel size for an active split page. The panel
size can be adjusted for both favorite pages and for predefined split
pages.
1. Activate the System Controls dialog
2. Select the adjust splits option in the dialog
3. Adjust the panel size by:
- Touch operation: dragging the adjustment icon
- Key operation: using the Cursor keys to move the adjustment
icon
Customizing your system | HDS Gen3 Polaris Operator Manual
25
4. Confirm your changes by tapping one of the panels, selecting
the save option in the menu, or by pressing the Enter key.
The changes are saved to the active favorite or split page.
Data Overlay
You can have data information as overlay on a page. The
information can be any data available on the network.
Turning Data overlay on and off
You can turn overlay data on or off for any active page by selecting
the Data overlay icon on the System Controls dialog. When Data
overlay is on, an orange bar appears above the icon.
26
Edit overlay data
Use the Edit overlay option on the System Controls dialog to
access edit menu options to:
• Add a new data overlay to the active panel.
• Delete a selected data overlay.
• Change a selected data overlay to display different data.
• Configure a selected data overlay appearance (digital or analog,
size, and so on).
• Re-locate an item by selecting and moving it.
Customizing your system | HDS Gen3 Polaris Operator Manual
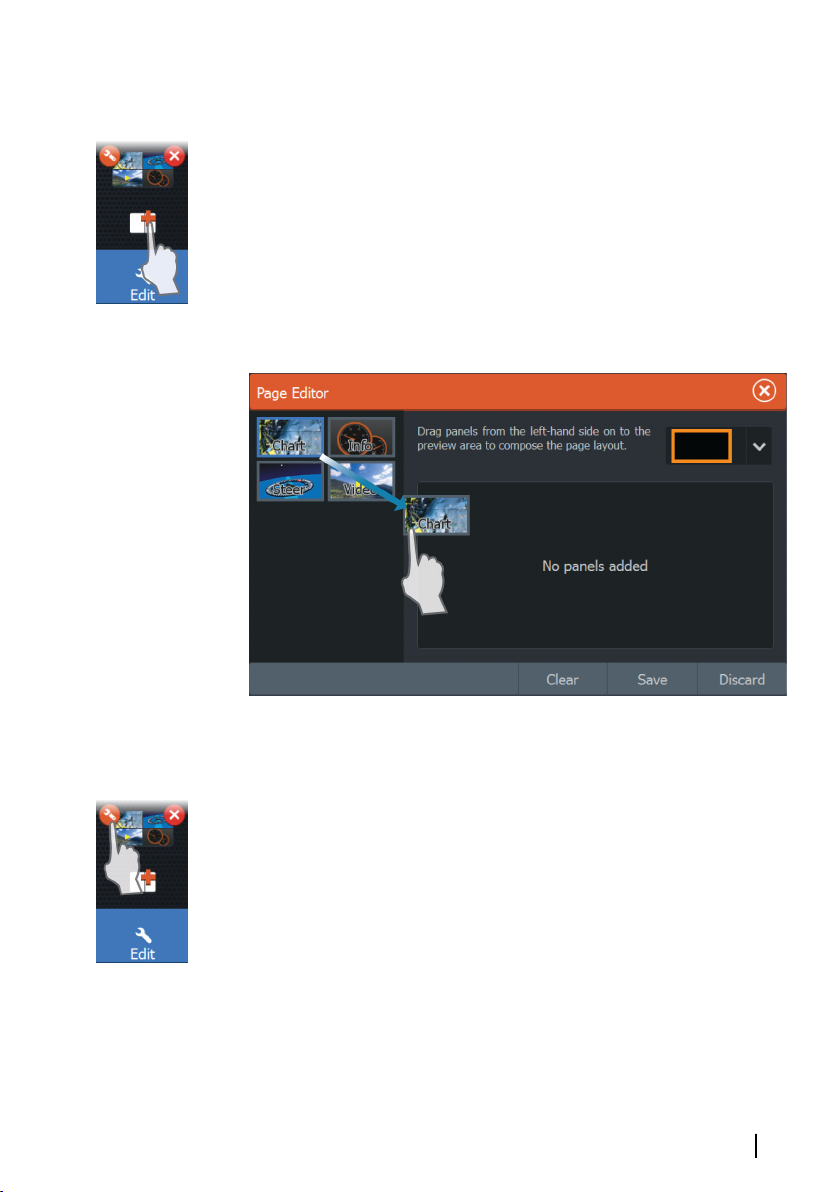
Adding new favorite pages
1. Select the New icon in the favorite panel on the Home page to
open the page editor dialog
2. Drag and drop page icons to set up a new page
3. Change the panel arrangement (only possible for 2 or 3 panels),
if required.
4. Save the page layout
The system displays the new favorite page, and the new page is
included in the list of favorite pages on the Home page.
Edit favorite pages
1. Select the edit icon for a favorite icon to enter edit mode
- Select the X icon to remove the page
- Select the tool icon to display the page editor dialog
2. Add or remove panels in the page editor dialog.
3. Save or discard your changes to leave the favorite edit mode.
Customizing your system | HDS Gen3 Polaris Operator Manual
27
4
Charts
The chart function displays your vehicle’s position relative to land
and other chart objects. On the chart panel you can plan and
navigate routes, place waypoints and display AIS targets. You can
overlay a radar image, a StructureScan image or weather
information.
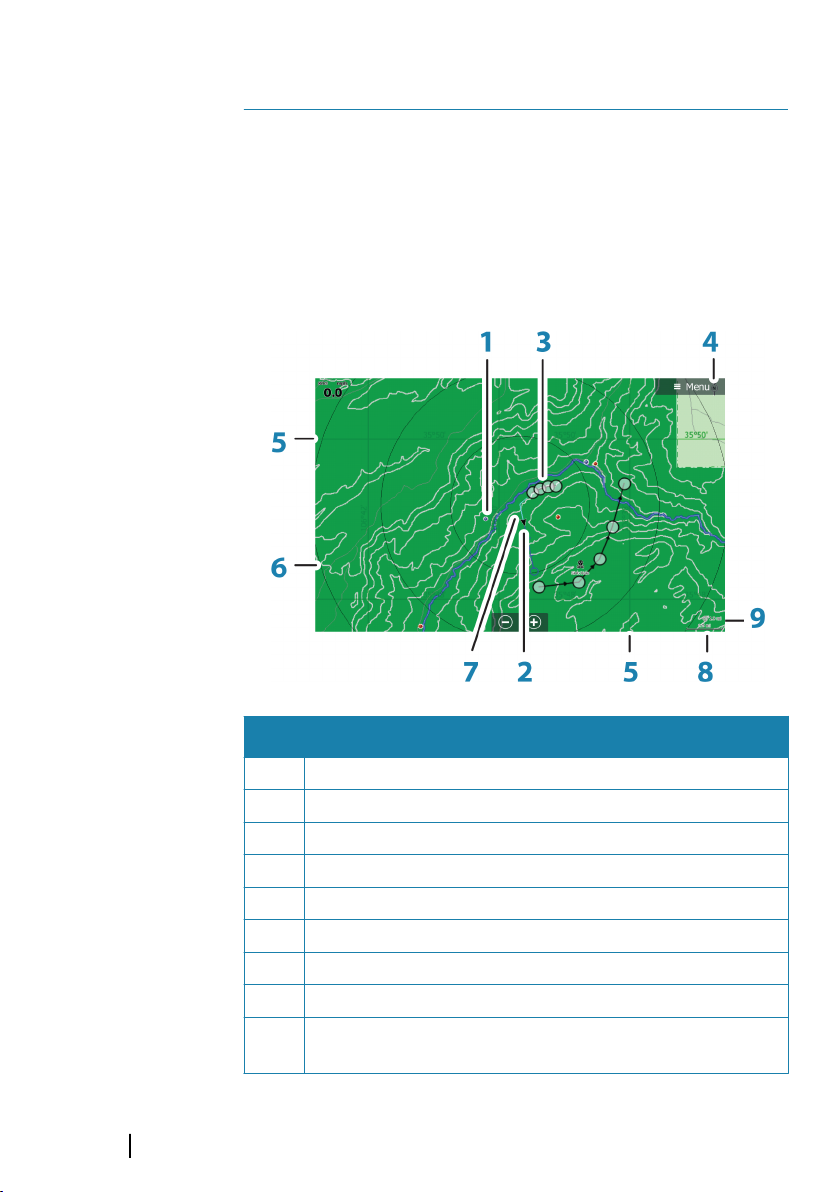
The Chart panel
28
Key Description
1 Waypoint*
2 Vechile with extension line (extension line is optional)
3 Route*
4 North indicator
5 Grid lines*
6 Range rings*
7 Trail*
8 Chart range scale
9 Range rings interval (only displayed when Range rings are
turned on)
Charts | HDS Gen3 Polaris Operator Manual

* Optional chart items
Ú
Note: You turn the optional images on/off individually. For
more information, see "Chart settings" on page 35.
Chart data
The system is delivered with different embedded cartography
depending on region.
All units support Polaris HD Imagery cards and Insight charts from
Navico including Insight Genesis. The system also supports
Navionics Gold, Platinum+ and Navionics+, C-MAP MAX-N/MAX-N+
by Jeppesen as well as content created by variety of third party
mapping providers in the AT5 format. For a full selection of available
charts please visit insightstore.navico.com, c-map.jeppesen.com or
navionics.com.
Ú
Charts on chart cards are shared over the Ethernet network, so only
one chart card per vehicle is required.
Ú
Note: Insight charts are referred to as Lowrance in the
menu.
Note: The system does not automatically switch to
embedded cartography if the chart card is removed. A lowresolution chart will be displayed until you re-insert the
card or manually switch back to the embedded
cartography.
Showing dual chart types
If you have different chart types available - embedded, in the card
slot, or on the Ethernet network - you can show two different chart
types simultaneously on a page with two chart panels.
You can select a dual chart panel by pressing and holding the Chart
application button on the Home page, or by creating a favorite
page with two chart panels.
Charts | HDS Gen3 Polaris Operator Manual
29
 Loading...