

Lowrance HDS Carbon Quick Start Manual
HDS Carbon
Quick Start Guide
Overview
2
3
4
5
1
6
7
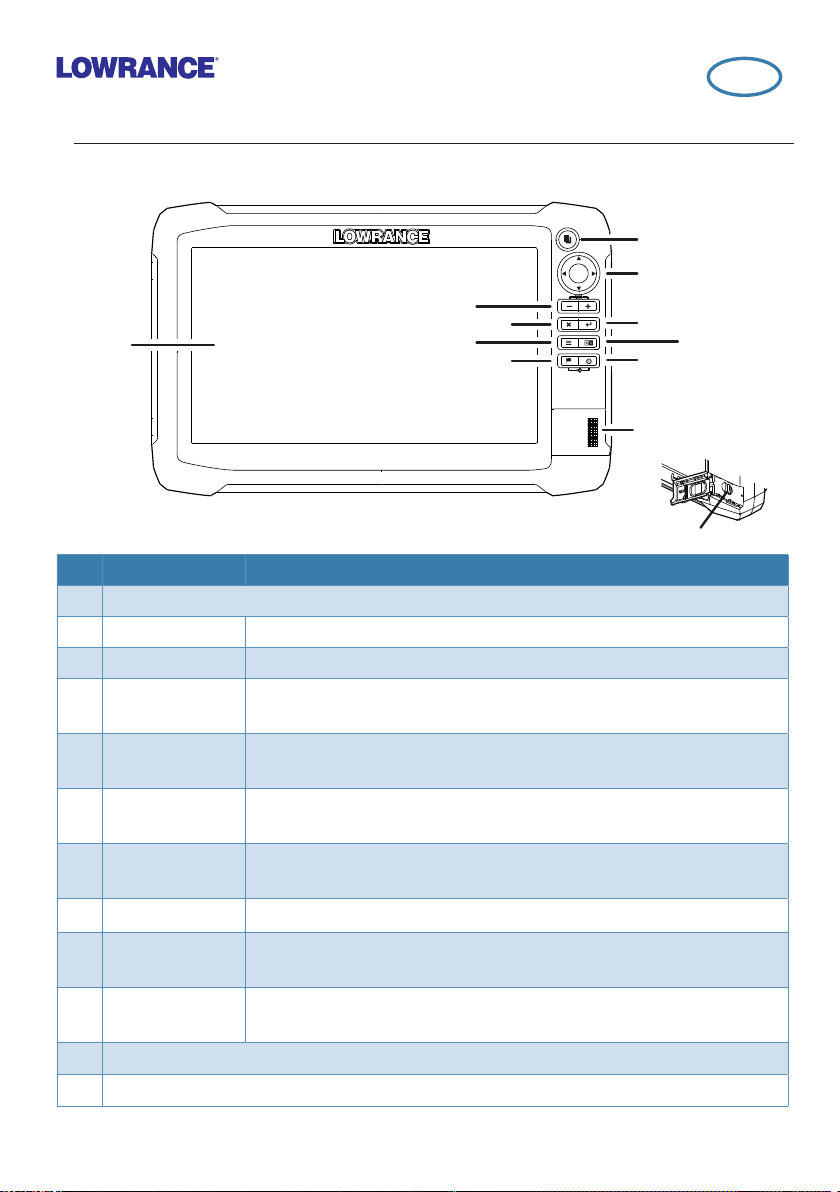
No. Key Function
1 Touchscreen
2 Pages key Activates the home page
3 Cursor keys Pans the cursor, moves through menu items and adjusts values
Zoom out/
4
Zoom in keys
5 Exit (X) key
6 Menu key
7 Waypoint key
8 Enter key
9 Panel key
10 Power key
Card reader door
11
microSD card readers
12
988-11255-001 EN 1/4
Zooms the screen; press keys simultaneously to save a Man
Overboard (MOB) waypoint
Exits dialogs, returns user to the previous menu level and removes
the cursor from the screen
Activates the panel menu; press twice to access the Settings
menu; press and hold to hide the panel menu
Opens the new waypoint dialog; press twice to save a waypoint;
press and hold to access the Find menu
Confirms selections and saves settings
Switches the active panel on a multiple-panel display; press and
hold to expand the active panel to a full-page panel
Opens the System Controls dialog, adjusts the backlight level and
powers the unit on/off
HDS Carbon | Quick Start Guide - EN
8
9
10
11
12
EN
|
1
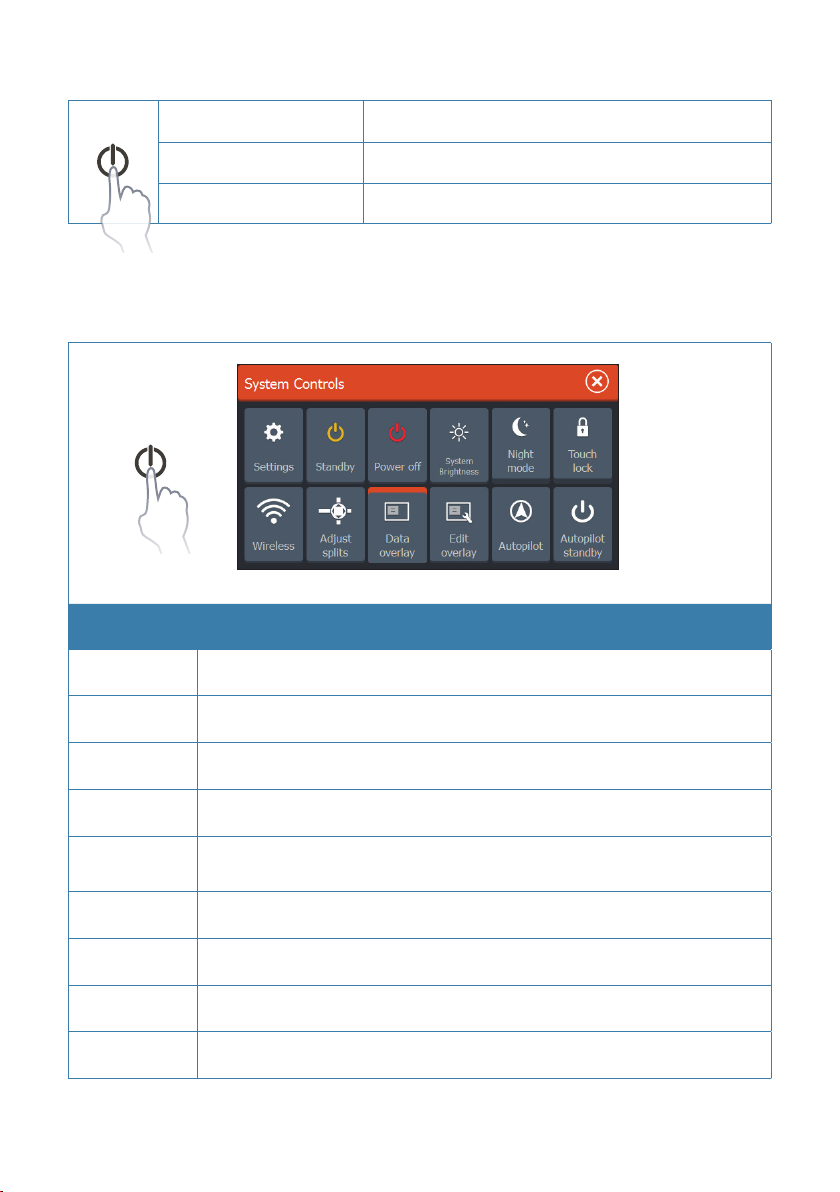
Power key
• Press and hold: Powers the unit on/off
• Single press: Opens the System Controls dialog
• Repeated presses: Changes brightness level
System controls dialog
Function Description
Settings Opens the settings menu
Standby Turns off the screen and switches unit into a low-power mode
Power off Turns off unit
Brightness Opens backlight adjustment slider
Night mode
Touch lock Disables the touchscreen
Adjust splits Allows user to adjust panel size when multiple panels are displayed
Data overlay Turns on/off data overlay display
Edit overlay Allows editing of the size, position and content of overlay data
2 |
HDS Carbon | Quick Start Guide - EN
Dims the backlight and displays a palette designed for low-light
conditions
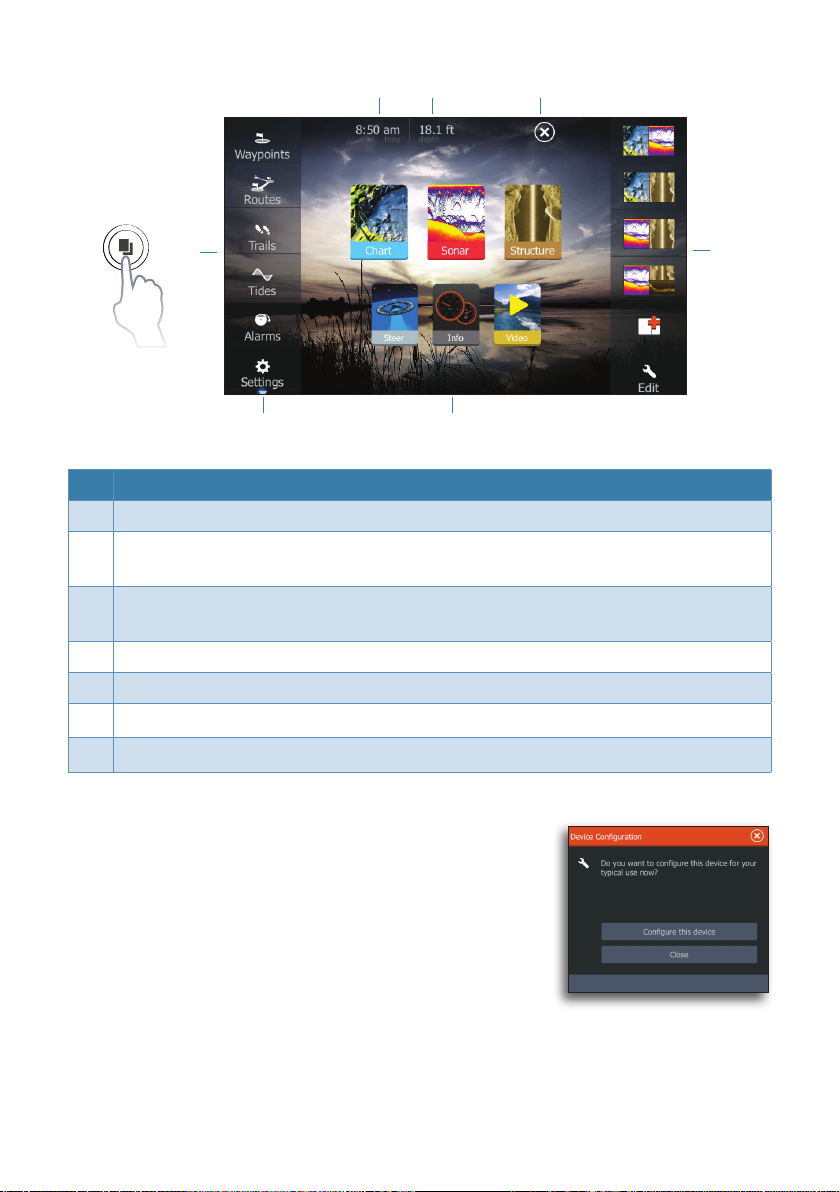
Home page
76
5
1
4
No. Description
1 Tools panel. Select an icon to access menu options.
2 Favorites panel. You can display, create, edit and delete Favorite pages.
Repeatedly tapping the Pages key will cycle through saved favorite pages.
3 Applications. Select an icon to view a page full screen. Press and hold an icon to
view quick split page options.
4 Scroll up/down to view all menu items.
5 Select Exit to return to the previous active page.
6 Local time.
7 Water depth.
3
2
Device conguration
When you start up the unit for the first time, or after
restoring defaults, the configuration dialog appears.
Select Configure this device to use the configuration
wizard to configure the unit and other networked devices.
Select Close to manually configure settings.
HDS Carbon | Quick Start Guide - EN
|
3
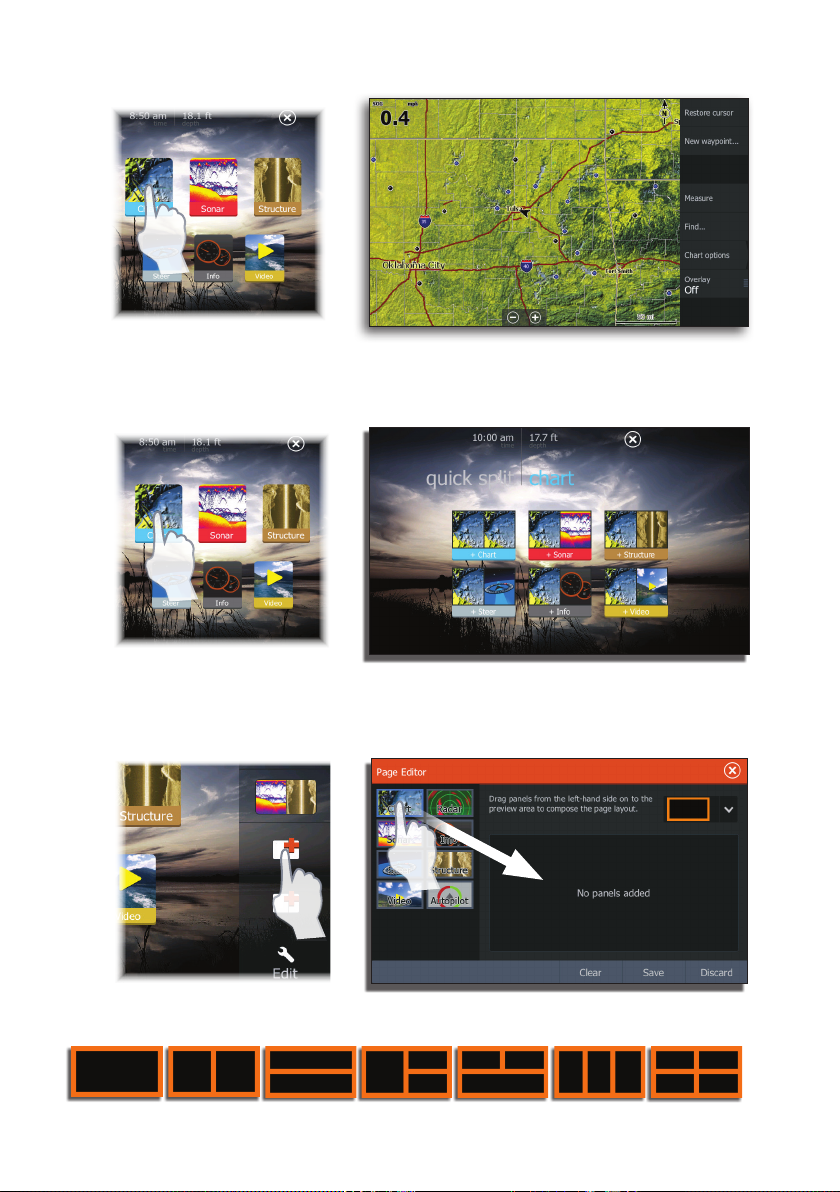
Selecting pages
Tap the page icon
Accessing quick splitscreen pages (quick splits)
Press and hold the page icon
Customizing favorite pages
Several panel configurations are available:
4 |
HDS Carbon | Quick Start Guide - EN

Menus
Hiding the page menu
To hide a page menu, drag it to the right
¼ Note: You can also press and hold the Menu key for three seconds to hide a page
menu. The menu is restored by pressing the Menu key.
Restoring a page menu
Settings menu
Data overlay
HDS Carbon | Quick Start Guide - EN
|
5
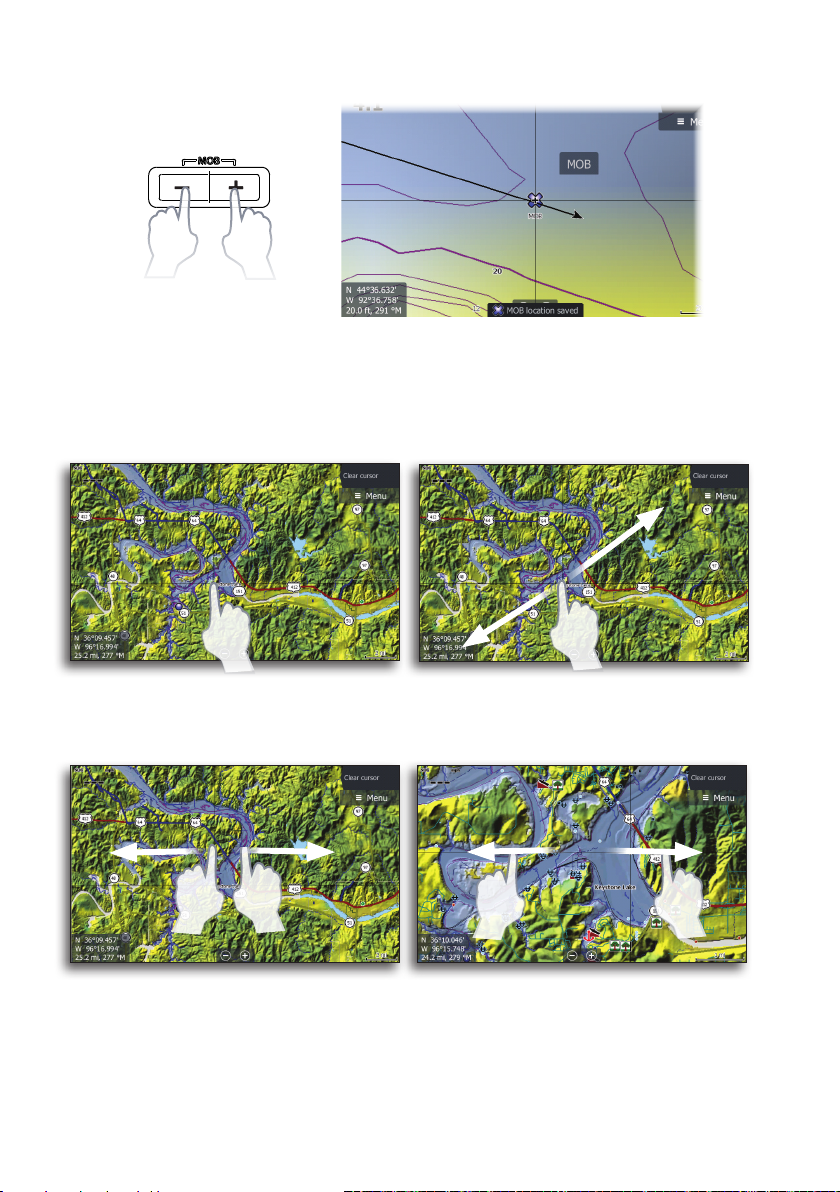
Saving a Man Overboard (MOB) waypoint
Using the cursor
Tap the screen or press the Cursor keys to activate the cursor. Drag your finger in any
direction to pan the screen. Select Clear Cursor or press the Exit key to remove the
cursor from the page.
Multi-touch zooming
6 |
HDS Carbon | Quick Start Guide - EN
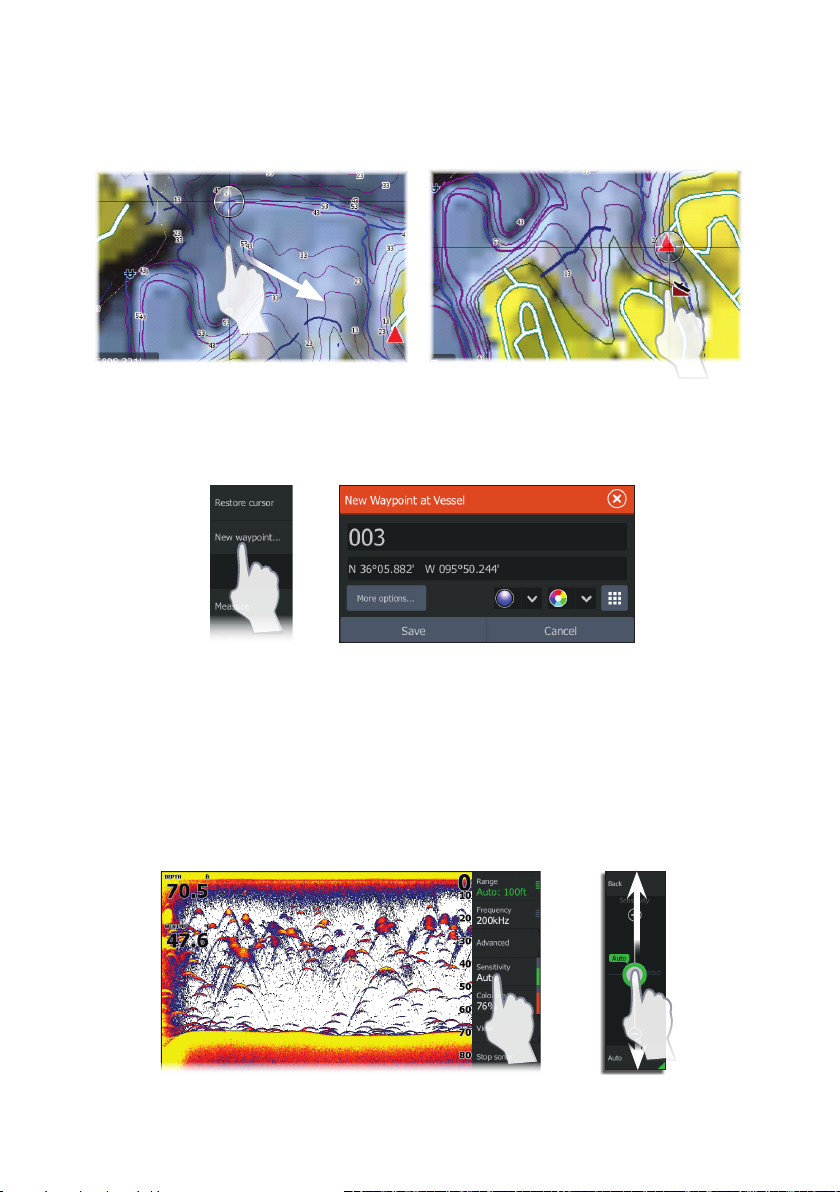
Cursor assist mode
Press and hold your finger on the screen to switch the cursor to cursor assist mode. The
selection tool will appear above your finger. Drag the selection tool over the desired
item.
Creating a waypoint
The waypoint will be positioned at the cursor when the cursor is active. When the cursor
is not active, the waypoint will be positioned at your current location.
¼ Note: Press the dedicated waypoint key twice to quickly save a waypoint.
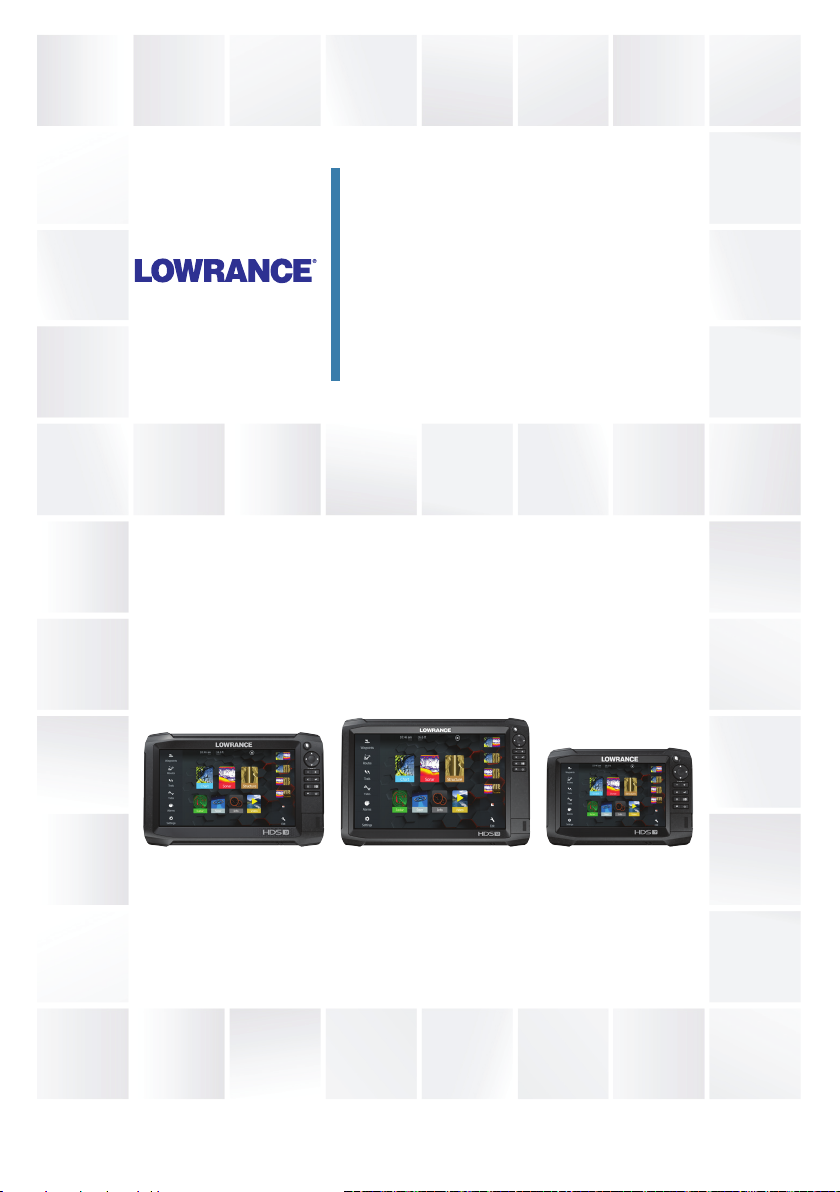
Sonar
Adjusting sonar settings
Sensitivity and Colorline are adjusted by dragging the slide bar vertically. The slide bar is
accessed by tapping Sensitivity or Colorline on the Sonar menu.
HDS Carbon | Quick Start Guide - EN
|
7

Fishing modes
Consists of preset packages of sonar settings designed for specific fishing conditions.
¼ Note: Use fresh water fishing mode when fishing in less than 60 feet of water.
Viewing sonar history
Sonar history can be viewed by dragging your finger horizontally across the screen, or
across the history preview bar, at the top of the screen.
Selecting a sonar frequency
¼ Note: StructureScan® frequencies (800 kHz and 455 kHz) are selected from the
Structure page frequency menu.
8 |
HDS Carbon | Quick Start Guide - EN
HDS Carbon
Operator Manual
ENGLISH
www.lowrance.com


Preface
Disclaimer
As Navico is continuously improving this product, we retain the
right to make changes to the product at any time which may not be
reflected in this version of the manual. Please contact your nearest
distributor if you require any further assistance.
It is the owner’s sole responsibility to install and use the equipment
in a manner that will not cause accidents, personal injury or
property damage. The user of this product is solely responsible for
observing safe boating practices.
NAVICO HOLDING AS AND ITS SUBSIDIARIES, BRANCHES AND
AFFILIATES DISCLAIM ALL LIABILITY FOR ANY USE OF THIS PRODUCT
IN A WAY THAT MAY CAUSE ACCIDENTS, DAMAGE OR THAT MAY
VIOLATE THE LAW.
Governing Language: This statement, any instruction manuals, user
guides and other information relating to the product
(Documentation) may be translated to, or has been translated from,
another language (Translation). In the event of any conflict between
any Translation of the Documentation, the English language version
of the Documentation will be the official version of the
Documentation.
This manual represents the product as at the time of printing.
Navico Holding AS and its subsidiaries, branches and affiliates
reserve the right to make changes to specifications without notice.
Trademarks
Lowrance® and Navico® are registered trademarks of Navico.
Navionics® is a registered trademark of Navionics, Inc.
NMEA® and NMEA 2000® are registered trademarks of the National
Marine Electronics Association.
SiriusXM® is a registered trademark of Sirius XM Radio Inc.
Fishing Hot Spots® is a registered trademark of Fishing Hot Spots Inc.
Copyright© 2012 Fishing Hot Spots.
FUSION-Link™ Marine Entertainment Standard™ is a registered
trademark of FUSION Electronics Ltd.
C-MAP® is a registered trademark of C-MAP.
FLIR® is a registered trademark of FLIR.
Preface | HDS Carbon Operator Manual
3

Mercury® is a registered trademark of Mercury.
SmartCraft VesselView® is a registered trademark of Mercury.
Suzuki® is a registered trademark of Suzuki.
SD™ and microSD™ are trademarks or registered trademarks of
SD-3C, LLC in the United States, other countries or both.
Wi-Fi® is a registered trademark of the Wi-Fi Alliance®.
Additional mapping data: Copyright© 2012 NSI, Inc.: Copyright©
2012 by Richardson’s Maptech.
Bluetooth® is a registered trademark of Bluetooth SIG, Inc.
Power-Pole® is a registered trademark of JL Marine Systems, Inc.
C-Monster™ is a trademark of JL Marine Systems, Inc.
Navico product references
This manual can refer to the following Navico products:
• Broadband Radar™ (Broadband Radar)
• Broadband 3G™ Radar (Broadband 3G Radar)
• Broadband 4G™ Radar (Broadband 4G Radar)
• Broadband Sounder™ (Broadband Sounder)
• DownScan Imaging™ (DownScan)
• DownScan Overlay™ (Overlay)
• GoFree™ (GoFree)
• INSIGHT GENESIS® (Insight Genesis)
• SmartSteer™ (SmartSteer)
• SonicHub® (SonicHub)
• StructureMap™ (StructureMap)
• StructureScan® (StructureScan)
• StructureScan® HD (StructureScan HD)
Copyright
Copyright © 2016 Navico Holding AS.
Warranty
The warranty card is supplied as a separate document.
In case of any queries, refer to the brand website of your display or
system: www.lowrance.com.
4
Preface | HDS Carbon Operator Manual

Compliance statements
This equipment complies with:
• CE under 2014/53/EU Directive
• The requirements of level 2 devices of the Radio communications
(Electromagnetic Compatibility) standard 2008
• Part 15 of the FCC Rules. Operation is subject to the following
two conditions: (1) this device may not cause harmful
interference, and (2) this device must accept any interference
received, including interference that may cause undesired
operation.
The relevant Declaration of conformity is available in the product's
section at the following website: www.lowrance.com.
Internet usage
Some features in this product use an internet connection to
perform data downloads and uploads. Internet usage via a
connected mobile/cell phone internet connection or a pay-per-MB
type internet connection may require large data usage. Your service
provider may charge you based on the amount of data you transfer.
If you are unsure, contact your service provider to confirm rates and
restrictions.
About this manual
This manual is a reference guide for operating the HDS Carbon. It
assumes that all equipment is installed and configured, and that the
system is ready to use.
The manual assumes that the user has basic knowledge of
navigation, nautical terminology and practices.
Important text that requires special attention from the reader is
emphasized as follows:
Note: Used to draw the reader’s attention to a comment or
Ú
some important information.
Preface | HDS Carbon Operator Manual
5

Warning: Used when it is necessary to warn
personnel that they should proceed carefully to
prevent risk of injury and/or damage to equipment/
personnel.
Manual version
This manual is written for software version 1.0. The manual is
continually updated to match new software releases. The latest
available manual version can be downloaded from
www.lowrance.com.
Viewing the manual on the screen
The PDF viewer included in the unit makes it possible to read the
manuals and other PDF files on the screen. Manuals can be
downloaded from www.lowrance.com.
The manuals can be read from a card inserted in the card reader or
copied to the unit’s internal memory.
Use the menu options or the keys and on-screen buttons to
maneuver in the PDF file as described below:
• Search, Goto page, Page Up and Down
6
Preface | HDS Carbon Operator Manual
Select the relevant panel button.
• Scroll pages
Touch operation: Drag finger on the screen in any direction.
Key operation: Use the Cursor keys.
• Panning on the page
Touch operation: Drag finger on the screen in any direction.
Key operation: Use the arrow keys.
• Zoom In/Out
Select the relevant panel button.
Touch operation: Use pinch or spread gestures.
Key operation: Use the + and - keys.
• Exit the PDF viewer
Touch operation: Select the X in the upper right corner of the
panel.
Key operation: Press the X key.
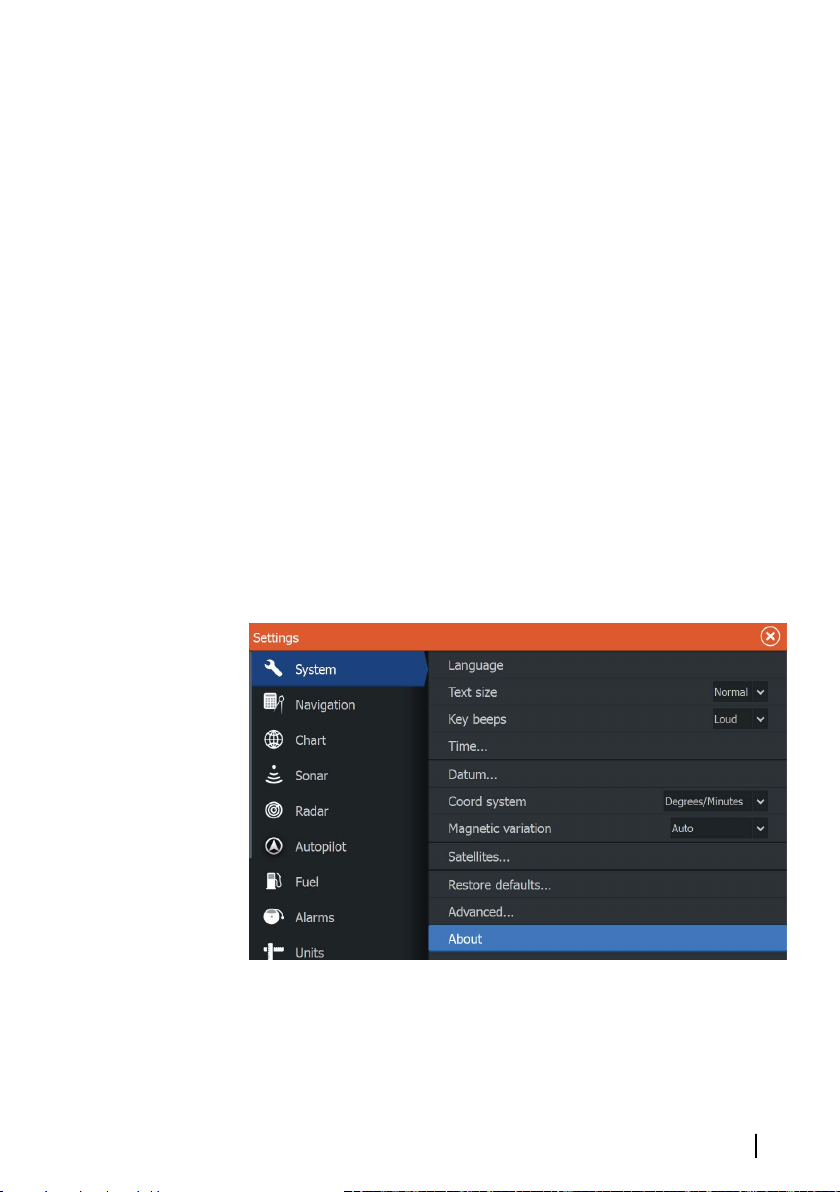
The Software version
The software version currently on this unit can be found in the
About dialog. The About dialog is available in the System Settings.
For more information, refer to "About" on page 172. For upgrading
your software, refer to "Software upgrades" on page 180.
Preface | HDS Carbon Operator Manual
7

8
Preface | HDS Carbon Operator Manual

Contents
15 Introduction
Operating the system
15
16 The front panel and keys
18 The Home page
19 Application pages
21 Integration of 3rd party devices
25 Basic operation
25 System Controls dialog
25 Turning the system on and off
26 Display illumination
26 Locking the touchscreen
26 Using menus and dialogs
27 Selecting pages and panels
28 Using the cursor on the panel
29 Creating a Man Overboard waypoint
30 Screen capture
31 Customizing your system
31 Customizing the Home page wallpaper
31 Adjusting panel size
32 Data Overlay
32 Adding new favorite pages
33 Edit favorite pages
34 Charts
34 The Chart panel
35 Chart data
35 Showing dual chart types
36 Panning the chart
36 Vessel symbol
36 Chart scale
37 Positioning the vessel on the chart panel
37 Displaying information about chart items
38 Using the cursor on the chart panel
38 Creating routes
39 Find objects on chart panels
39 3D charts
Contents | HDS Carbon Operator Manual
9

40 Chart overlay
40
Insight and C-MAP charts
45 Navionics charts
51 Chart settings
54 Waypoints, Routes, and Trails
54 Waypoints, Routes, and Trails dialogs
54 Waypoints
57 Routes
61 Trails
63 Navigating
63 Steer panel
64 Navigate to cursor position
64 Navigate a route
65 Navigating with the autopilot
66 Navigation settings
68 Sonar
68 The Sonar image
69 Multiple Sonar
69 Zooming the image
69 Using the cursor on the image
69 Viewing history
70 Setting up the image
72 Stop sonar
72 Advanced options
73 Start recording log data
74 Stop recording log data
75 Viewing the recorded sounder data
76 Sonar view options
78 Sonar settings
10
82 StructureScan
82 The StructureScan image
83 Zooming the StructureScan image
83 Using the cursor on the StructureScan panel
84 Viewing StructureScan history
85 Setting up the StructureScan image
86 Stop sonar
Contents | HDS Carbon Operator Manual

86 Advanced StructureScan settings
88
SpotlightScan
88 The SpotlightScan image
89 SpotlightScan setup
90 SpotlightScan options
91 SpotlightScan operation tips
93 StructureMap
93 The StructureMap image
93 Activating Structure overlay
94 StructureMap sources
95 StructureMap tips
95 Recording StructureScan data
96 Using StructureMap with mapping cards
97 Structure options
99 Info panels
99 Dashboards
99 Customizing the Info panel
101 Video
101 The Video panel
101 Setting up the video panel
102 Simulator
102 Demo mode
102 Simulator source files
103 Advanced simulator settings
104 Trolling motor autopilot
104 Safe operation with the autopilot
104 Switching from automatic navigation to standby mode
105 Autopilot interface
106 Autopilot control of the trolling motor
109 Autopilot settings
112 Outboard motor autopilot
112 Safe operation with the autopilot
Contents | HDS Carbon Operator Manual
11

112 Autopilot control of the outboard motor(s)
112
Mode overview
121 Autopilot settings
123 Wireless connection
123 Connect and disconnect from a wireless hotspot
124 GoFree Shop
124 GoFree Link
126 Uploading log files to Insight Genesis
126 Bluetooth wireless technology
127 Wireless settings
130 Radar
130 The Radar panel
131 Dual radar
131 Radar overlay
132 Radar operational modes
132 Radar Range
133 Using the cursor on a radar panel
133 Adjusting the radar image
135 Advanced radar options
136 Radar view options
138 EBL/VRM markers
139 Setting a guard zone around your vessel
140 MARPA targets
142 Recording radar data
143 Radar settings
12
145 AIS
145 AIS target symbols
146 Searching for AIS items
146 Viewing information about single AIS targets
147 AIS information on radar panels
147 Calling an AIS vessel
148 AIS SART
149 Vessel alarms
150 Vessel settings
153 Audio
153 Enabling audio
Contents | HDS Carbon Operator Manual

154 SonicHub 2
157
The Media bar
158 Setting up the audio system
158 Audio controls
158 Device explorer
159 Audio options
159 Audio mixer
160 Auxiliary sources
160 Radio
162 DVD video
163 SiriusXM weather
163 Sirius status panel
163 Sirius weather display
165 Sirius view options
166 Weather icons
167 Local weather
167 Marine zones
168 Tropical statements
168 Adjusting color codes
168 Animating Sirius weather graphics
168 Weather alarms
170 Tools
170 Waypoints/routes/trails
170 Tides
170 Alarms
170 Settings
174 Vessels
174 Sun, Moon
174 Trip calculator
174 Files
174 Find
175 GoFree Shop
176 Alarms
176 Alarm system
176 Type of messages
176 Single alarms
176 Multiple alarms
Contents | HDS Carbon Operator Manual
13

177 Acknowledging a message
177
Alarms dialog
179 Maintenance
179 Preventive maintenance
179 Checking the connectors
179 Touchscreen calibration
179 NMEA Data logging
180 Software upgrades
182 Backing up your system data
185 Touchscreen operation
14
Contents | HDS Carbon Operator Manual

1
Introduction
Operating the system
You can use both the keys and the touchscreen to operate the HDS
Carbon.
This manual uses the following general terminology to describe
operating the unit:
Select
• Touch: Tap the panel
• Key: Use the cursor keys to select, then confirm by pressing the
Enter key
Press and hold
• Touch: Press and hold on the screen
• Key: Use the cursor keys to select, then press and hold the Enter
key
Drag
• Touch: Drag an item to a new position
• Key: Use the cursor keys to select an item, confirm by pressing
the Enter key. Use the cursor keys to select a new position, and
then press the Enter key again to confirm the new position.
Introduction | HDS Carbon Operator Manual
15
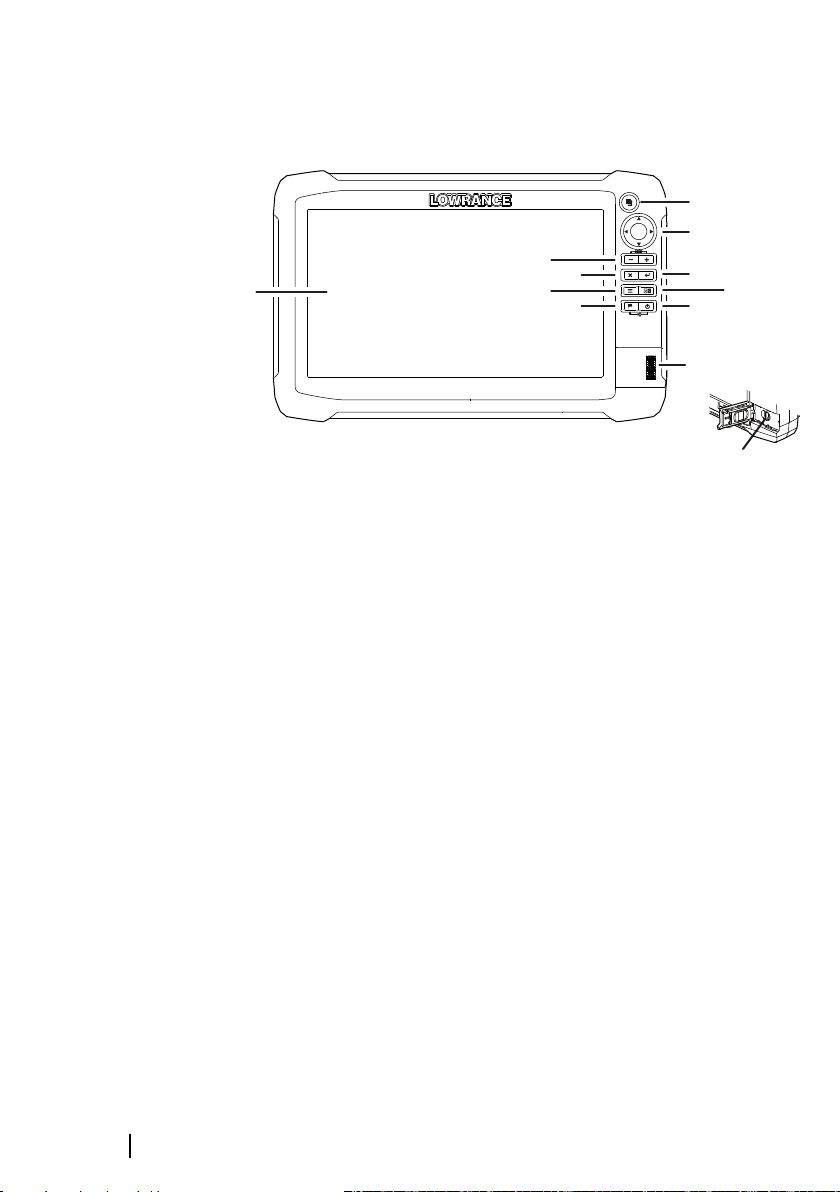
The front panel and keys
11
5
2
4
7
6
8
9
10
1
3
12
1 Touchscreen
2 Pages key
Press once to activate the Home page. Repeat short
presses to cycle the favorite buttons. Press and hold from
an active page to go to the last used page.
3 Cursor keys
Press arrows to move through menu items, to adjust a
value, and to move the cursor on a panel.
4 Zoom Out / Zoom In keys and MOB key
Zoom keys for panels and images. Simultaneous pressing
both keys saves a Man Overboard (MOB) waypoint at the
current vessel position.
5 Exit (X) key
Press to exit a dialog, to return to previous menu level, and
to remove the cursor from the panel.
6 Menu key
A single press displays the menu for the active panel/
overlay. Press and hold to hide or show the menu. A quick
double-press displays the settings menu.
16
Introduction | HDS Carbon Operator Manual

7 Waypoint key
Press to display the dialog for saving new waypoints. Press
twice to quick save a waypoint. Press and hold to access the
Find menu.
8 Enter key
Press to select or save your settings.
9 Panel key
Used on multiple-panel pages. A short press switches
between the panels, a long press expands active panel to a
full page panel and back again.
10 Power key
Press once to display the System Controls dialog. Repeat
short presses to cycle the backlight brightness. Press and
hold to turn the unit ON/OFF.
11 Card reader door
12 microSD Card readers
Introduction | HDS Carbon Operator Manual
17

The Home page
The Home page is accessed from any operation by a short press on
the Pages key.
1 Tools
Select a button to access dialogs used for carrying out a
task, or for browsing stored information.
2 Local time and Water depth
3 Applications
Select a button to display the application as a full page
panel.
Press and hold a button to display pre-configured split
page options for the application.
4 Close button
Select to exit the Home page and return to the previous
active page.
5 Favorites
Select a button to display the panel combination.
Press and hold a favorite button to enter edit mode for the
Favorites panel.
18
Introduction | HDS Carbon Operator Manual
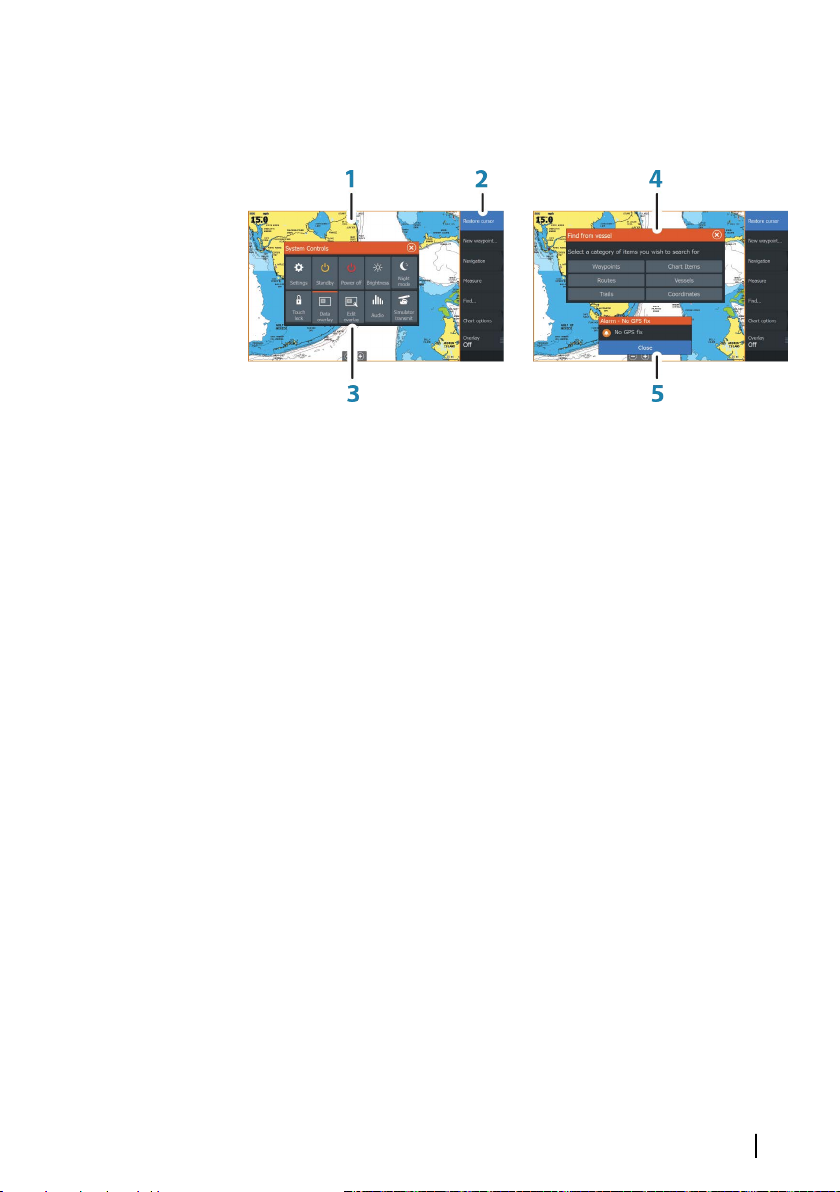
Application pages
Each application connected to the system is presented on panels.
The application can be presented as a full page, or in combination
with other panels in a multiple panel page.
All application pages are accessed from the Home page.
1 Application panel
2 Menu
Panel specific menu.
3 System Controls dialog
Quick access to basic system settings. Display the dialog by
a short press on the Power key.
4 Dialog
Information to or input from the user.
5 Alarm message
Displayed if dangerous situations or system faults occur.
Split pages
You can have up to 4 panels on each page.
Introduction | HDS Carbon Operator Manual
19
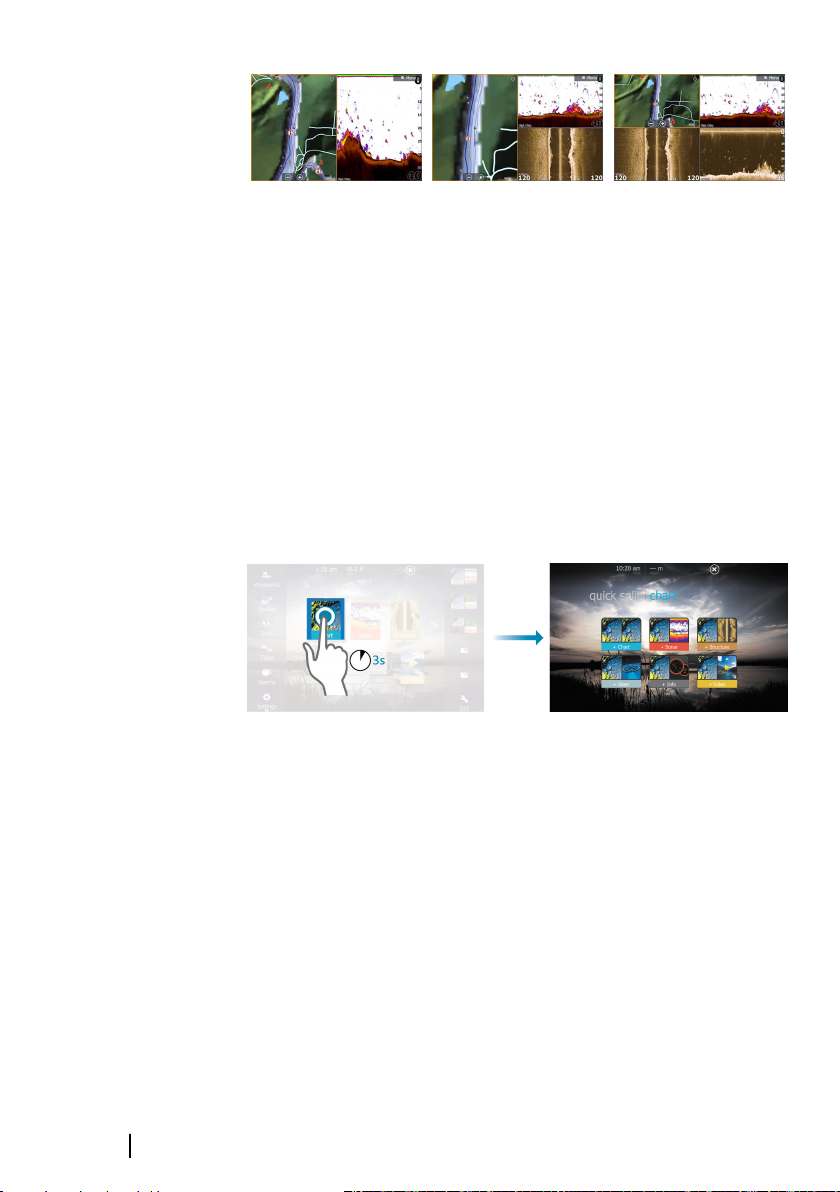
2 panels page 3 panels page 4 panels page
Panel sizes in a split page can be adjusted from the System
Controls dialog.
Quick split pages
Each full screen application has several pre-configured quick split
pages, featuring the selected application combined with each of
the other panels.
Note: The number of quick split pages cannot be changed, and
Ú
the pages cannot be customized or deleted.
Access a quick split page by pressing and holding the application
button on the Home page.
20
Favorite pages
All preconfigured favorite pages can be modified and deleted, and
you can create your own. You can have a total of 12 favorite pages.
For more information, refer to "Adding new favorite pages" on page 32.
Introduction | HDS Carbon Operator Manual
Integration of 3rd party devices
Several 3rd party devices can be connected to the HDS Carbon. The
applications are displayed on separate panels or integrated with
other panels.
A device connected to the NMEA 2000 network should
automatically be identified by the system. If not, enable the feature
from the advanced option in the System settings dialog.
The 3rd party device is operated by using menus and dialogs as on
other panels.
This manual does not include specific operation instructions for any
3rd party device. For features and functionality, refer to the
documentation included with the 3rd party device.
SmartCraft VesselView integration
SmartCraft data can be displayed and interaction are enabled
through the unit when a Mercury VesselView® 4, 7, 403, 502, 702,
703, or Link is present on the network.
When the features are enabled, the display may prompt the user for
some basic configuration information. Refer to the VesselView®
manual or engine supplier for further information.
The engine supplier icon appears on the Home page when a
device is available.
Suzuki Engine panel
If a Suzuki C10 gauge is available on the network, a Suzuki engine
icon is added to the Home page. An icon is also added to the Page
editor. You can select to display the Suzuki engine panel as a full
page panel or as part of a multi-panel page.
The layout and content of the engine panel depends on selected
panel size. The digital gauges can be customized, refer to "Customizing
the panel" on page 99.
FUSION-Link integration
FUSION-Link devices connected to the NMEA 2000 network can be
controlled from the HDS Carbon system.
The FUSION-Link devices appear as additional sources when using
the audio function. No additional icons are available.
Introduction | HDS Carbon Operator Manual
21
Refer to "Audio" on page 153 for more information.
BEP CZone integration
The HDS Carbon integrates with BEP’s CZone system used for
controlling and monitoring a distributed power system on your
vessel.
The CZone icon is available in the Tools panel on the Home page
when a CZone system is available on the network.
A separate manual is provided with your CZone system. Refer to this
documentation and to the HDS Carbon Installation manual for how
to install and configure the CZone system.
CZone dashboard
When the CZone is installed and configured, an additional CZone
dashboard is added to the Info panels.
You switch between a panel’s dashboards by selecting the left and
right arrow symbols or by selecting the dashboard from the menu.
Editing a CZone dashboard
You can customize a CZone dashboard by changing the data for
each of the gauges. Available editing options depend on the type of
gauge and which data sources that are connected to your system.
For more information, refer to "Info panels" on page 99.
22
Power-Pole anchors
Power-Pole anchors, which can be controlled by the C-Monster
Control System installed on your boat, can be controlled from the
HDS Carbon. To control the Power-Poles, you pair the Power-Poles
with the HDS Carbon using Bluetooth wireless technology available
in both products.
Power-Pole controls
When Power-Poles are paired with the HDS Carbon, the Power-Pole
button becomes available in the System Controls dialog. Select it to
display the Power-Pole controller.
For pairing Bluetooth devices, refer to "Pairing Bluetooth devices" on page
126. If you are pairing dual Power-Poles, also review "Pairing with dual
Power-Poles" on page 127.
Introduction | HDS Carbon Operator Manual
 Loading...