

Page 1
LH310 Series Quick Setup Guide - English - R1
1 x EDGE DIGITAL VIDEO RECORDER WITH PRE-INSTALLED HDD*
1 x USB MOUSE
1 x POWER ADAPTOR
1 x DVI/VGA ADAPTOR (8/16-channel only)
1 x FLEX IR EXTENDER
1 x REMOTE CONTROL**
1 x ETHERNET CABLE
1 x MOUNTING KIT
1 x INSTRUCTION MANUAL
1 x QUICK START GUIDE
1 x DOCUMENTATION CD
PACKAGE CONTENTS:
Network Ready, H.264 High Performance Digtial Video
Surveillance Recorder
ATTENTION:
• * Channel/ Por t configuration an d HDD (hard disk drive) c apacity may
vary by model . Check your packag e for specific content inf ormation.
• **Remote control in cluded with the sys tem may vary depe nding on model.
• Monitor and Camer as are not included.
• Broadband Router a nd Computer are requ ired for local and
remote monitorin g (not included).
• For detailed setup a nd software in formation, pleas e refer to
your printed User ’s manual (included).
Information in th is document is subj ect to change wi thout notice. A s our product s are subject
to continuous im provement , Lorex Techno logy INC. an d our subsidi aries res erve the r ight to
modify p roduct design, specific ations and pri ces, wi thout n otice and withou t incur ring an y
obligation. E &OE © 2009 LO REX. All r ights res erved.
LH310 Series Edge DVR
Quick Setup Guide
under 30 minutesunder 15 minutes under 60 minutes
Hand Tools Hardware
Hi Speed
over 60 minutes
Skill Level
Time
under 30 minutesunder 15 minutes under 60 minutes
Hand Tools Hardware
Router
Hi Speed
over 60 minutes
Time: 20 Minutes
Hand Tools Skills - Easy
BAS IC I NST ALL AT ION G UI DE
BASIC SETUP
STEP 1
NAVIGATION AND CONTROLS
STEP 2
Skill Level
Time
under 30 minutesunder 15 minutes under 60 minutes
Hand Tools Hardware
Router
Hi Speed
over 60 minutes
Time: 20 Minutes
Skills - Easy
BAS IC I NST ALL AT ION G UI DE
1
2
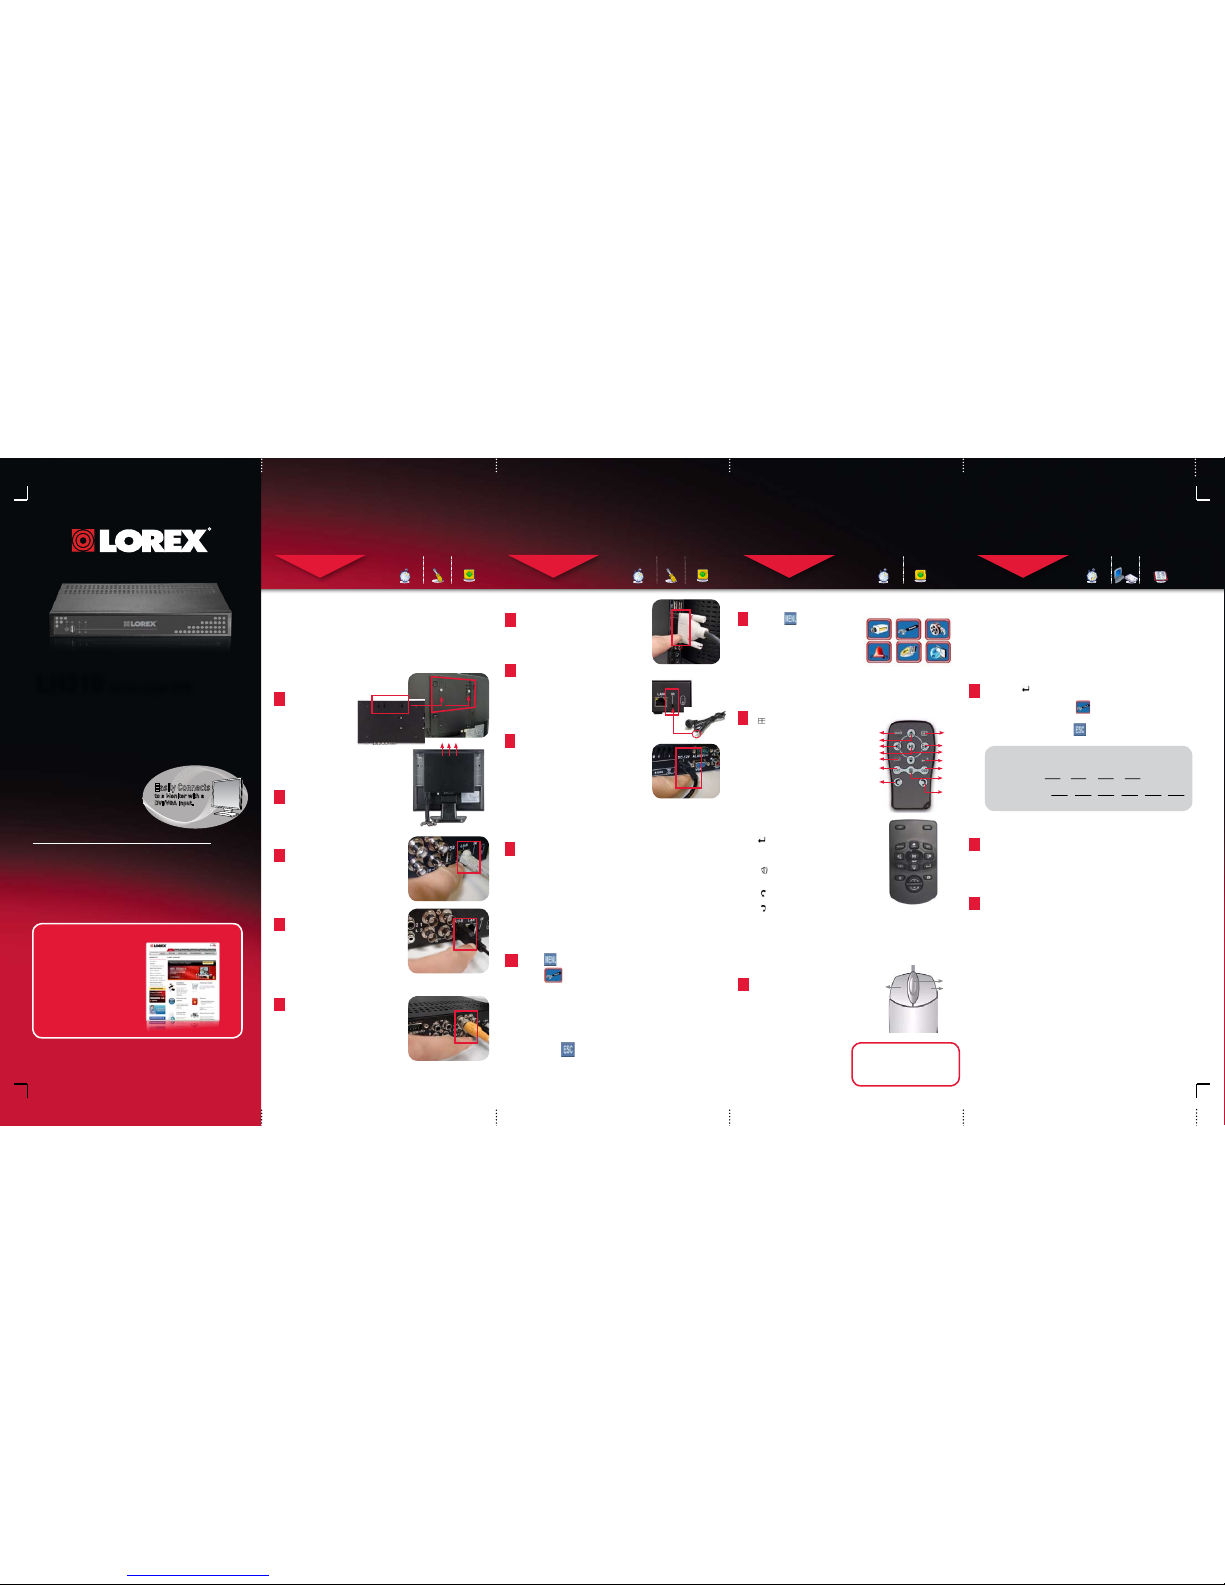
Mounting the Edge DVR
The LH310 Series Edge DVR is designed to mount securely
to the back of LCD monitors with a VESA mount. However, if
desired, you can also leave the DVR in a standard horizontal
position.
ATTENTION: YOU CAN ONLY MOUNT THE EDGE DVR TO AN
LCD MONITOR WITH A VESA MOUNT AND AN INDEPENDENT
STAND.
Screw the provided
mounting screws
into the two top
holes in the rear
panel of your LCD
monitor. Make sure
the screws are only
3/4 of the way in; this
will allow sufficient
clearance to hang
the Edge DVR.
Carefully place the Edge DVR
(front panel facing up) over the
screws and slide down into
place.
4
Connecting the USB Mouse
Connect a USB mouse to the
USB port on the rear panel of
the Edge DVR.
8
Powering ON the Edge DVR
Connect the power cable to the
DC 12V port on the rear panel of
the DVR. At startup, the system
performs a basic system check and
runs an initial loading sequence.
After a few moments, the system
loads a live display view.
Managing Passwords
The system has the following user authorities:
• ID 1—normal user: Has full control of the system, but cannot
change passwords or enable/disable password checking.
Default password: 1111
• ID 2—administrator: Has full control of the system but can
change both administrator and user passwords and enable/
disable password checking. Default password: 2222
By default, when you first startup your system, you will be
logged in as ID 2.
Setting the Date & Time
1. Click to open the Main Menu.
2. Click to open the Setup menu.
3. Click Date/Time Setup and configure the following options:
• Date Mode: Use the scroll wheel to select Y/M/D, D/M/Y, or
M/Y/D.
• Date: Use the scroll wheel to manually enter the date.
• Time: Use the scroll wheel to manually enter the time.
4. Click Exit/Update. The new date and time are saved; the
system returns to the Setup menu.
5. Right click to exit until all menus are closed. The date
and time will appear on the bottom-left corner of the screen.
SET-UP LOCAL VIEWING ON YOUR PC
STEP 3
Using the Main Menu
Press the button on the remote
control to open the Main Menu.
1. MENU: Opens the system main menu.
2. : Press to open the Split-Screen
Selection menu (8 / 16-channel only).
From full-screen single channel view,
changes display view to Quad
split-screen (4-channel model only).
3. /CH+: Move cursor in menus up;
Channel Up.
4. /FWD: Move cursor in menus right;
during playback, increase forward
playback speed (5X, 15X, 60X).
5. /REW: Move cursor in menus left;
during playback, increase reverse
playback speed (5X, 15X, 60X)
6. / II: Start/pause forward playback.
7. /CH-: Move cursor in menus down;
Channel down.
8. :Confirm menu selections.
9. ESC: Go back / exit menus.
10. OSD: Show/hide the on-screen display.
11. LIST: Open the Event List menu.
12. : While in Event List menu, press to
delete a selected event (no confirm or
undo).
13. : Decrease value of selected menu
option.
14. : Increase value of selected menu
option.
Using the Remote Control**
3
Using a Mouse
• Left-Button: Click to select a menu option;
while in Quad mode (Live View or
Playback), click on channels 1, 2, 3, or 4 to
view the selected channel in full-screen.
• Right-Button: Click to return to previous
menu; exit menus/modes.
• Scroll-Wheel: Scroll up/down to change
values in selected menu options; position
markers in playback bar.
1
2
3
1
2
3
Connecting the Ethernet Cable
Connect one end of the Ethernet
cable (for remote monitoring) to
one of the router’s (not included)
LAN ports and the other end to
the DVR’s Network Port.
5
Connecting the Cameras (not included)
Connect BNC cameras to the BNC
ports on the rear panel.
9
Congratulations! You have completed
STEP 1 & 2 successfully. Your DVR is now
ready to use. Refer to the owner’s manual
to learn how to record, playback, use the
search features and all other features
available with this DVR.
This step relates to remote viewing over the LAN (local area network)
by using a pc located on the same network as that of the DVR.
under 30 minutesunder 15 minutes under 60 minutes
Hand Tools Hardware
Hi Speed
over 60 minutes
Skill Level
Time
under 30 minutesunder 15 minutes under 60 minutes
Hand Tools Hardware
Router
Hi Speed
over 60 minutes
Time: 20 Minutes
Hand Tools Skills - Easy
BAS IC I NST ALL AT ION G UI DE
BASIC SETUP
STEP 1
CONTINUED
LOC AL VI EW IN G I NS TAL LAT IO N GUI DE
Time: 30 Minutes
Skills - IntermediateHardware
PC/Router
Router
Hi Speed
over 60 minutes
Hi Speed
over 60 minutes
It’s all on the Web
www.lorexcctv.com
For detailed setup
information, please
refer to your included
User’s Manual. For
additional information,
please visit our website
www.lorexcctv.com
6
Connecting a Monitor (not included)
Connect the VGA / DVI cable (not included)
from your LCD monitor to the VGA port (4
CH) / DVI port (8/16 CH only) on the rear
panel of the system.
*NOTE: Make sure all cameras and
cables are properly connected prior to
powering on the system.
10
2
4
6
8
10
12
14
1
3
5
7
9
11
13
1. Camera, 2. Setup, 3. Record, 4. Alarm
5. Backup, 6. LAN
1 2 3
4 5 6
TIP: When navigating menus: Left
mouse button: Click to select menu
options. Scroll-Wheel: Scroll up/down
to change values for selected options.
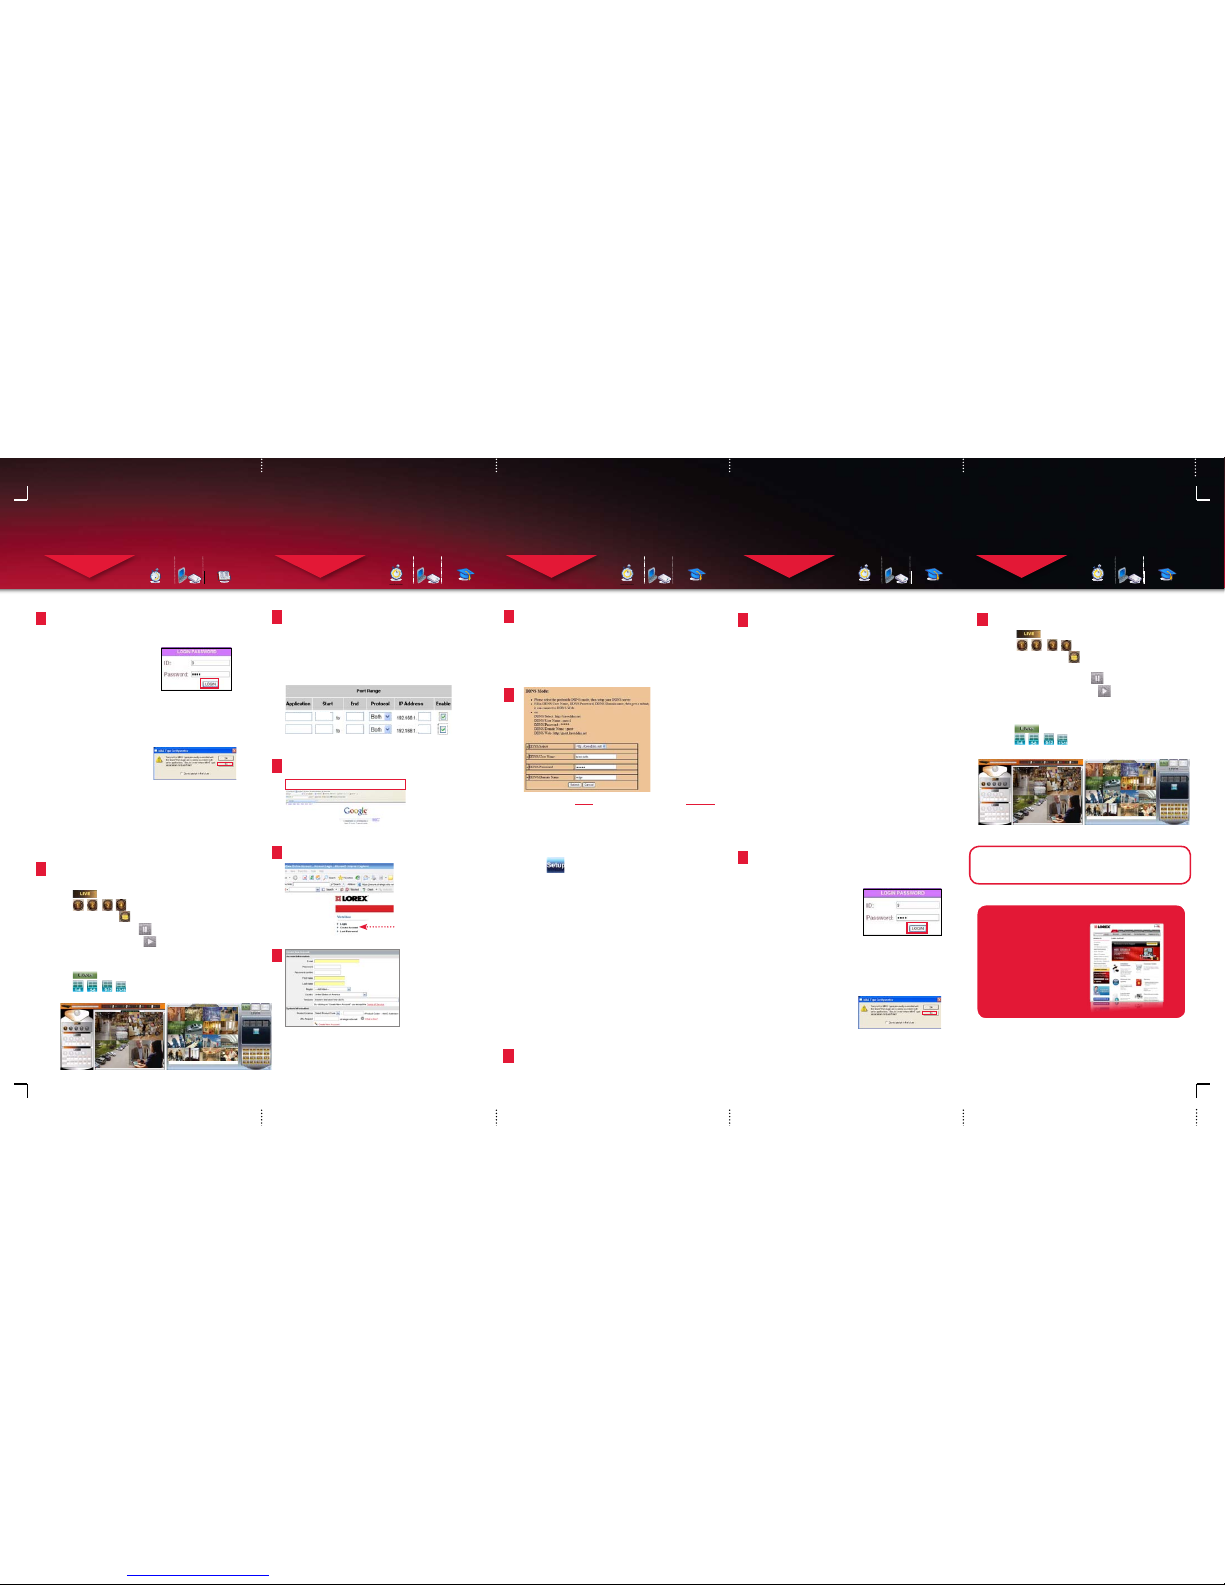
Record the IP and MAC Addresses in the section below:
IP ADDRESS : . . .
MAC ADDRESS : : : : : :
(Required for DDNS regist ration)
Retrieve the DVR Information
1.Press the button twice on the remote control.
OR
1. From the main Menu, click , and then click Information.
Your IP address and MAC address are under LAN.
2. To exit, right-click or click until you return to the main screen.
1
2
3
7
Connecting the Flex-IR Extender
Connect the Flex-IR extender to the
port on the rear panel of the DVR.
Position the Flex-IR extender near the
front of your monitor, or where it will
receive a clear signal from the remote
control.
Getting Started (on your local computer):
Before using DVR Netviewer, you must configure settings in
QuickTime® (4-channel only). QuickTime is required for DVR
Netviewer to function properly. If not already installed on your
system, download QuickTime from www.apple.com/quicktime
NOTE: It might be necessary to change the IP address of the DVR to
match the IP address of your local network. For more details, please
see Appendix B: Setting up Local and Remote Viewing in the LH310
Instruction Manual.
You must configure QuickTime prior to using DVR Netviewer for the
first time (4-channel only).
To configure QuickTime:
1. With QuickTime installed on your system, open QuickTime
by double-clicking the QuickTime icon on your desktop or
selecting Start>Programs>QuickTime>QuickTime Player.
2. From the QuickTime Player main window, select Edit>
Preferences>QuickTime Preferences.
3. From the QuickTime Preferences window, click the Advanced
tab.
4. Under Transport Setup, select Custom. The Streaming
Transport window opens.
5. Under Transport Protocol, select HTTP.
6. Under Port ID, select 80 and click OK. The Streaming
Transport window closes.
7. From the Preferences window, click Apply, and then click OK.
Configuring QuickTime (on your local computer):
**Remote control included with the system
may vary depending on model.
Easi
ly Connects
to a Monitor with a
DVI/VGA Input.
HDMI Compatible*
DVI TO HDMI CONV ERTER CABLE REQU IRED. (NOT INCLUDE D)
Page 2
LH310 Series Quick Setup Guide - English - R1
SET-UP LOCAL VIEWING ON YOUR PC
STEP 3
CONTINUED
4
1. Launch Internet Explorer.
2. In the address bar, enter the IP address of your DVR
(recorded in Step 3-1).
3. In the ID and password fields, enter your network user ID
and password and click LOGIN.
4. 4 Channel DVR: If necessary, select your MIME type
configuration. DVR Netviewer uses Quicktime for live video
streaming. Select No to maintain your MIME type association
with your default media Player. If you select Yes, the MIME
types will be associated with QuickTime. Check the box
to avoid seeing the MIME type prompt in the future.
SET-UP INTERNET REMOTE SECURITY
MONITORING
STEP 4
Port Forward your Router:
1
Port forward your router first before proceeding with the set-up.
You must forward • 80 (HTTP port), • 8090 (QuickTime Port - 4
channel only)
All routers are different. To port forward your router, please refer
to your router’s user manual.
A router configuration guide featuring the most commonly used
routers in the market is available on www.lorexcctv.com/support
in the Consumer’s Guide Section. An example of a port forwarding
screen is shown for illustration purposes.
System
System
8090 8090
80 80
12
12
EXAMPLE
2
Open your web browser (Internet Explorer by default) and enter
http://www.lorexddns.net in the address bar.
DDNS (Dynamic Domain Name System) Set-up:
http://www.lorexddns.net
Create Account
3
Open your web browser (Internet Explorer by default) and enter
http://www.lorexddns.net in the address bar.
Create Account:
1. FOR PRODUCT LICENSE select the LH310 Series option
from the drop down menu.
2. FOR PRODUCT CODE enter the Monitor’s MAC address
(recorded in step 3, section 1).
3. FOR URL REQUEST enter a unique URL name (e.g.
tomsmith). Note: URL name should not be more than 15 characters.
Complete New Account Information:
1
2
3
4
An automated REGISTRATION CONFIRMATION EMAIL will be
sent to your email. Print and Save this confirmation. You will
need this information to access your System remotely.
Registration Email:
Service Provider: dns1.lorexddns.net
Domain Name: tomsmith.lorexddns.net
User ID: tomsmith
Password: (your password)
5
SET-UP INTERNET REMOTE SECURITY
MONITORING
STEP 4
CONTINUED
Enter DDNS Set-up on your DVR:
6
1. Open Internet Explorer (version 6 or above) and enter the IP
address of your DVR in the address bar (i.e. 192.168.xxx.89).
DVR Netviewer opens.
2. Login using your LAN user ID and password (by default, ID 9;
password 3333).
3. Click . The Setup menu opens.
4. Under Network, click DDNS.
NOTE: By default, your DDNS service is http://www.lorexddns.net
5. In the corresponding text fields, enter your DDNS username
and password.
NOTE: Obtain this information from the confirmation email after
registering for the free Lorex DDNS service.
6. Under DDNS Domain Name, enter only the first portion of your
DDNS domain from the confirmation email. For example, if
your domain name is tomsmith@lorexddns.net, you only need
to enter tomsmith in the text field.
7. Click Submit to save your settings or click Cancel to exit
without saving.
SET-UP INTERNET REMOTE SECURITY
MONITORING
STEP 4
CONTINUED
SET-UP INTERNET REMOTE SECURITY
MONITORING
STEP 4
CONTINUED
Congratulations! You have completed Step 3 & 4 successfully. You can now
view, playback images on your Local Computer via LAN (local area network)
and Remotely control the system on your Remote computer over
the Internet (Wide Area Network).
LOC AL VI EW IN G I NS TAL LAT IO N GUI DE
Time: 30 Minutes
Skills - IntermediateHardware
PC/Router
Router
Hi Speed
over 60 minutes
Hi Speed
over 60 minutes
Hi Speed
over 60 minutes
REMOT E VIE WING INSTA LLATIO N GUI DE
Time: 60 Minutes
Skills - AdvancedHardware
PC/Router
Hi Speed
over 60 minutes
Hi Speed
over 60 minutes
REMOT E VIE WING INSTA LLATIO N GUI DE
Time: 60 Minutes
Skills - AdvancedHardware
PC/Router
Hi Speed
over 60 minutes
Hi Speed
over 60 minutes
REMOT E VIE WING INSTA LLATIO N GUI DE
Time: 60 Minutes
Skills - AdvancedHardware
PC/Router
Hi Speed
over 60 minutes
Hi Speed
over 60 minutes
REMOT E VIE WING INSTA LLATIO N GUI DE
Time: 60 Minutes
Skills - AdvancedHardware
PC/Router
Hi Speed
over 60 minutes
Local Live Viewing using DVR Netviewer (on your local
computer):
By default, DVR Netviewer launches in Live Viewing mode.
5
To use Live Viewing (4 channel DVR):
1. Click .
2. Click , , , , to view individual selected channels
in full-screen, or click to view channels in quad split-screen mode.
3. To pause the live image, click in the bottom-left corner
of the QuickTime window. Click to resume live streaming.
LOCAL LIVE SITE- 4 CH
Logging In to DVR Netviewer (on your local computer):
NOTE: Once you have added
and connected to a DVR, you
can monitor and control the
system in real time.
7
8
Adding a DVR (on your remote computer):
Getting Started (on your remote computer):
4 Channel DVR: Before using DVR Netviewer, you must configure
settings in QuickTime. QuickTime is required for DVR Netviewer to
function properly. If not already installed on your system, download
QuickTime from www.apple.com/quicktime
NOTE: Make sure you have connected your DVR to your network
prior to using DVR Netviewer.
4 Channel DVR: You must configure QuickTime prior to using DVR
Netviewer for the first time.
To configure QuickTime:
1. With QuickTime installed on your system, launch QuickTime
by double-clicking the QuickTime icon on your desktop or
selecting Start>Programs>QuickTime >QuickTime Player.
2. From the QuickTime Player main window, select Edit>
Preferences>QuickTime Preferences.
3. From the QuickTime Preferences window, click the Advanced
tab.
4. Under Transport Setup, select Custom. The Streaming
Transport window opens.
5. Under Transport Protocol, select HTTP.
6. Under Port ID, select 80 and click OK. The Streaming Transport
window closes.
7. From the Preferences window, click Apply, and then click OK.
Configuring QuickTime (on your remote computer):
1. Launch Internet Explorer.
2. In the address bar, enter the DDNS DOMAIN NAME
(e.g. tomsmith) from the Registration Email sent to you.
3. In the ID and password fields, enter your network user ID
and password and click LOGIN.
4. 4 Channel DVR: If necessary, select your MIME type
configuration. DVR Netviewer uses Quicktime for live
video streaming. Select No to maintain your MIME type
association with your default media Player. If you select
Yes, the MIME types will be associated with QuickTime.
Check the box to avoid seeing the MIME type prompt in the
future.
Logging In to DVR Netviewer (on your remote computer):
NOTE: Once you have added
and connected to a DVR, you
can monitor and control the
system in real time.
Remote Live Viewing using DVR Netviewer:
By default, DVR Netviewer launches in Live Viewing mode.
6
To use Live Viewing (4 channel DVR):
1. Click .
2. Click , , , , to view individual selected channels
in full-screen, or click to view channels in quad
split-screen mode.
3. To pause the live image, click in the bottom-left corner
of the QuickTime window. Click to resume live
streaming.
It’s all on the Web
www.lorexcctv.com
For detailed setup
information, please
refer to your included
User’s Manual. For
additional information,
please visit our website
www.lorexcctv.com
NOTE: Once you have saved your DDNS settings, you must reset your system
in order for the changes to take effect. Disconnect and reconnect the power
cable from the rear panel to reset. Please allow 10-15 minutes for the DDNS
servers to update with your new DDNS address.
9
ATTENTION: You MUST enter your DDNS information LOCALLY
before attempting remote access.
NOTE:
For added security, we highly recommend changing HTTP
port 80 on the system to any desired port -- the port must not
be blocked by your Internet service provider. For more details on
changing ports, please see Appendix C: Changing ports on Your
System in the LH310 Instruction Manual.
Login using your LAN user
ID and password (by default,
ID 9; password 3333).
5. 8/16 Channel DVR: You must install the ActiveX® plug-in for
DVR Netviewer to function. Click the attention bar at the top
of the main page and select Install ActiveX Control. DVR
Netviewer will reset.
6. Log in with your LAN user name and password. From the
security window, click Install.
To use Live Viewing (8/16 channel DVRs):
1. Click .
2. Click , , , , to view in Quad or 16-split.
3. Click the Channel buttons to view channels in full-screen
LOCAL LIVE SITE- 16 CH
5. 8/16 Channel DVR: You must install the ActiveX® plug-in for
DVR Netviewer to function. Click the attention bar at the top
of the main page and select Install ActiveX Control. DVR
Netviewer will reset.
6. Log in with your LAN user name and password. From the
security window, click Install.
REMOTE LIVE SITE- 4 CH REMOTE LIVE SITE- 16 CH
To use Live Viewing (8/16 channel DVRs):
1. Click .
2. Click , , , , to view in Quad or 16-split.
3. Click the Channel buttons to view channels in full-screen
 Loading...