

Page 1

G923
Racing Wheel and Pedals For PlayStation® 4
Volant de course et pédales pour PlayStation® 4
SETUP GUIDE | GUIDE D’INSTALLATION
Page 2
ENGLISH . . . . . . . . . . . . . . . . . . . . . . . . .3
620-008913.002
FRANÇAIS . . . . . . . . . . . . . . . . . . . . . . . 14
ESPAÑOL . . . . . . . . . . . . . . . . . . . . . . . .25
PORTUGUÊS . . . . . . . . . . . . . . . . . . . . . . 36
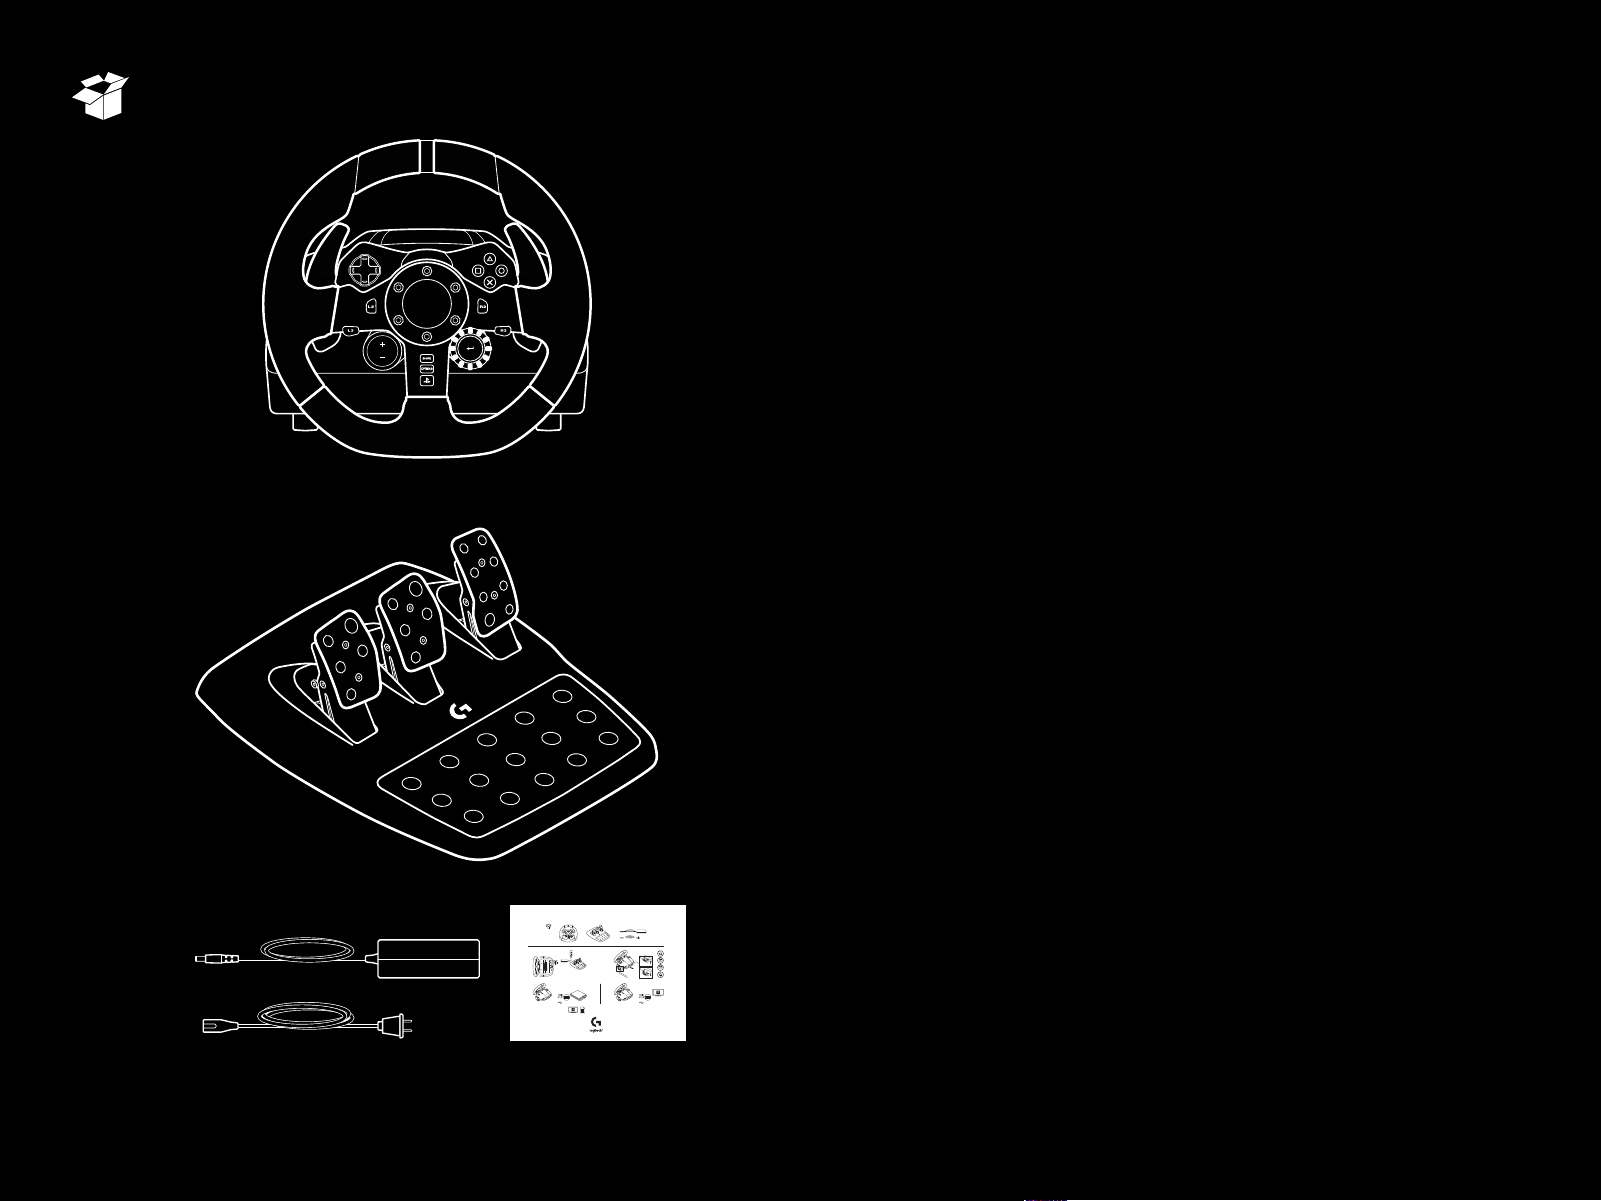
G923 RACING WHEEL AND PEDALS FOR PLAYSTATION®4
1
3
2
™
PS4
USB
logitechG.com/support/g923-ps4
PC
USB
Page 3
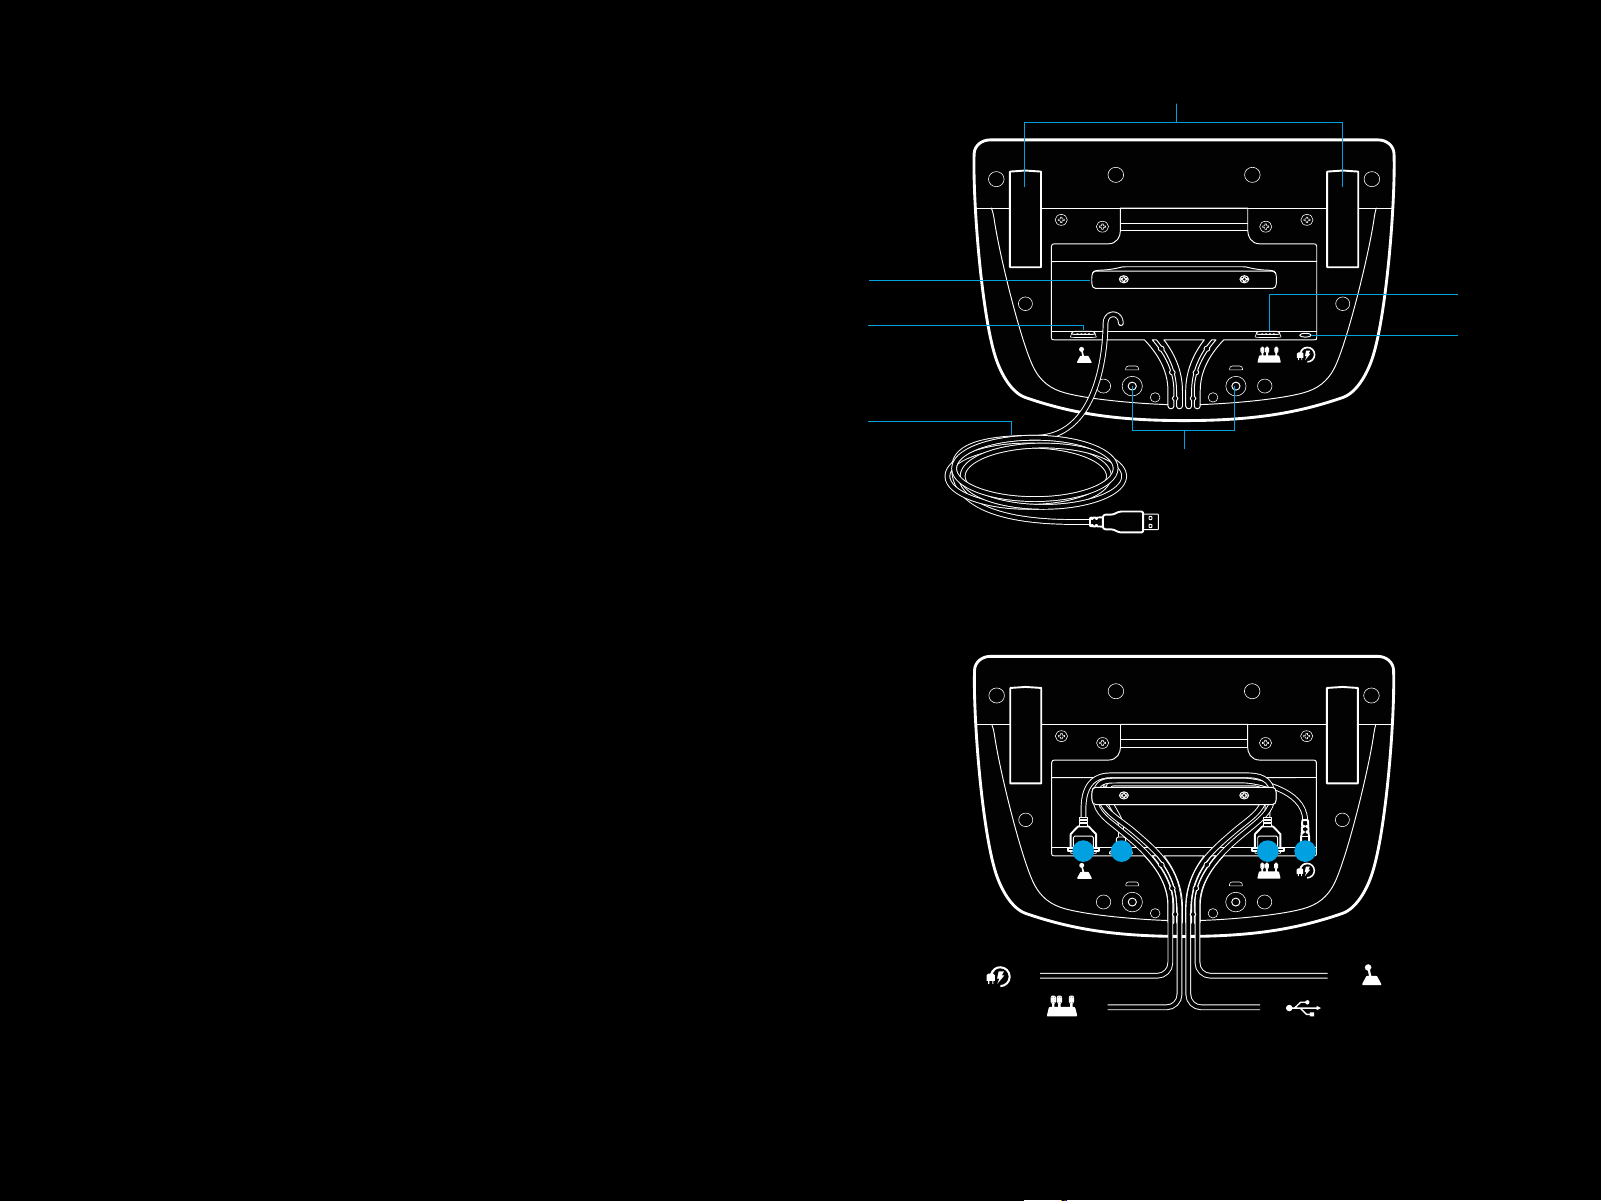
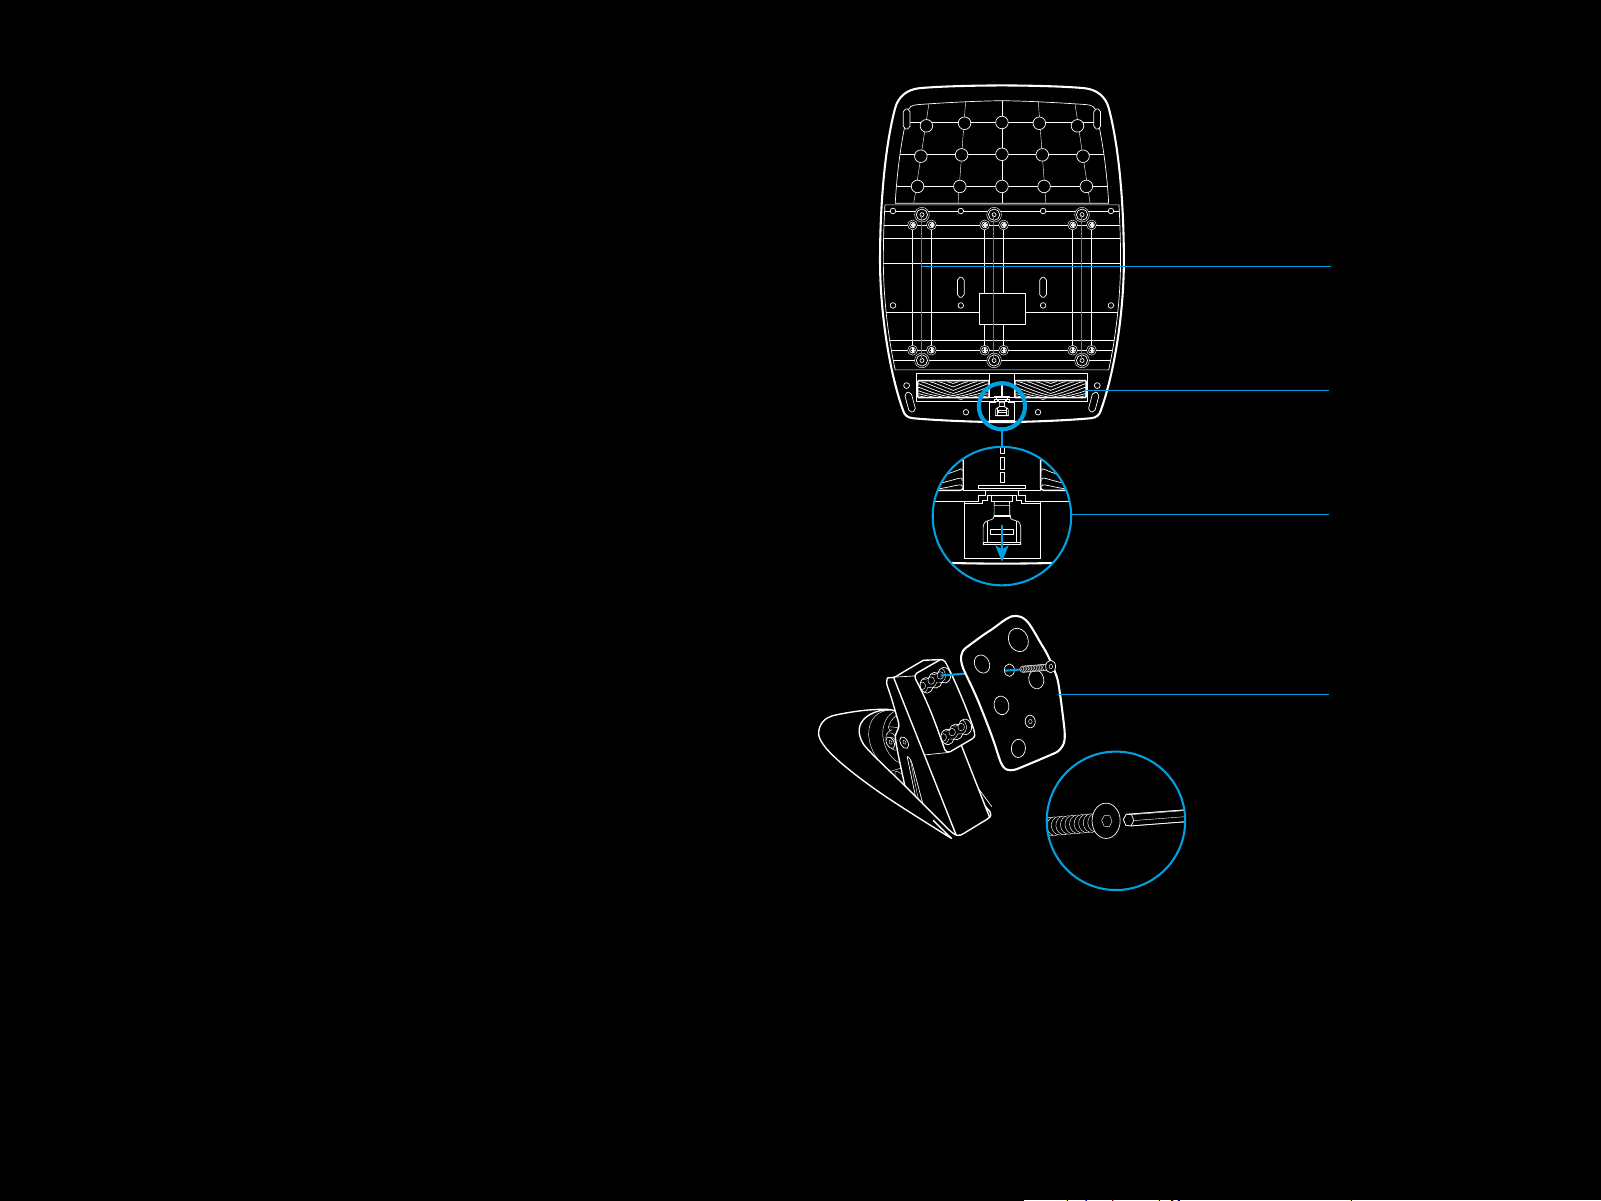
CONNECTIONS AND MOUNT POINTS
1 Mounting clamps
2 Cable management cleat
3 Optional shifter connection (DB-9 male)
4 USB cable
5 Pedal unit connection (DB-9 female)
6 Power connection
7 Bolt mounting points (uses M6X1 bolts)
1
2
3
4
7
5
6
OPTIMAL CABLE ROUTING
USB and pedal cables (1, 2) should be routed
throughinnerchannels.
Power and optional shifter cables (3, 4) should be routed
throughouter channels.
Cables may be wrapped multiple times around cable
management cleat to take in slack.
3 ENGLISH
3
14 2 3
2
4
1
Page 4

INSTALLATION — PS4
™
— PC
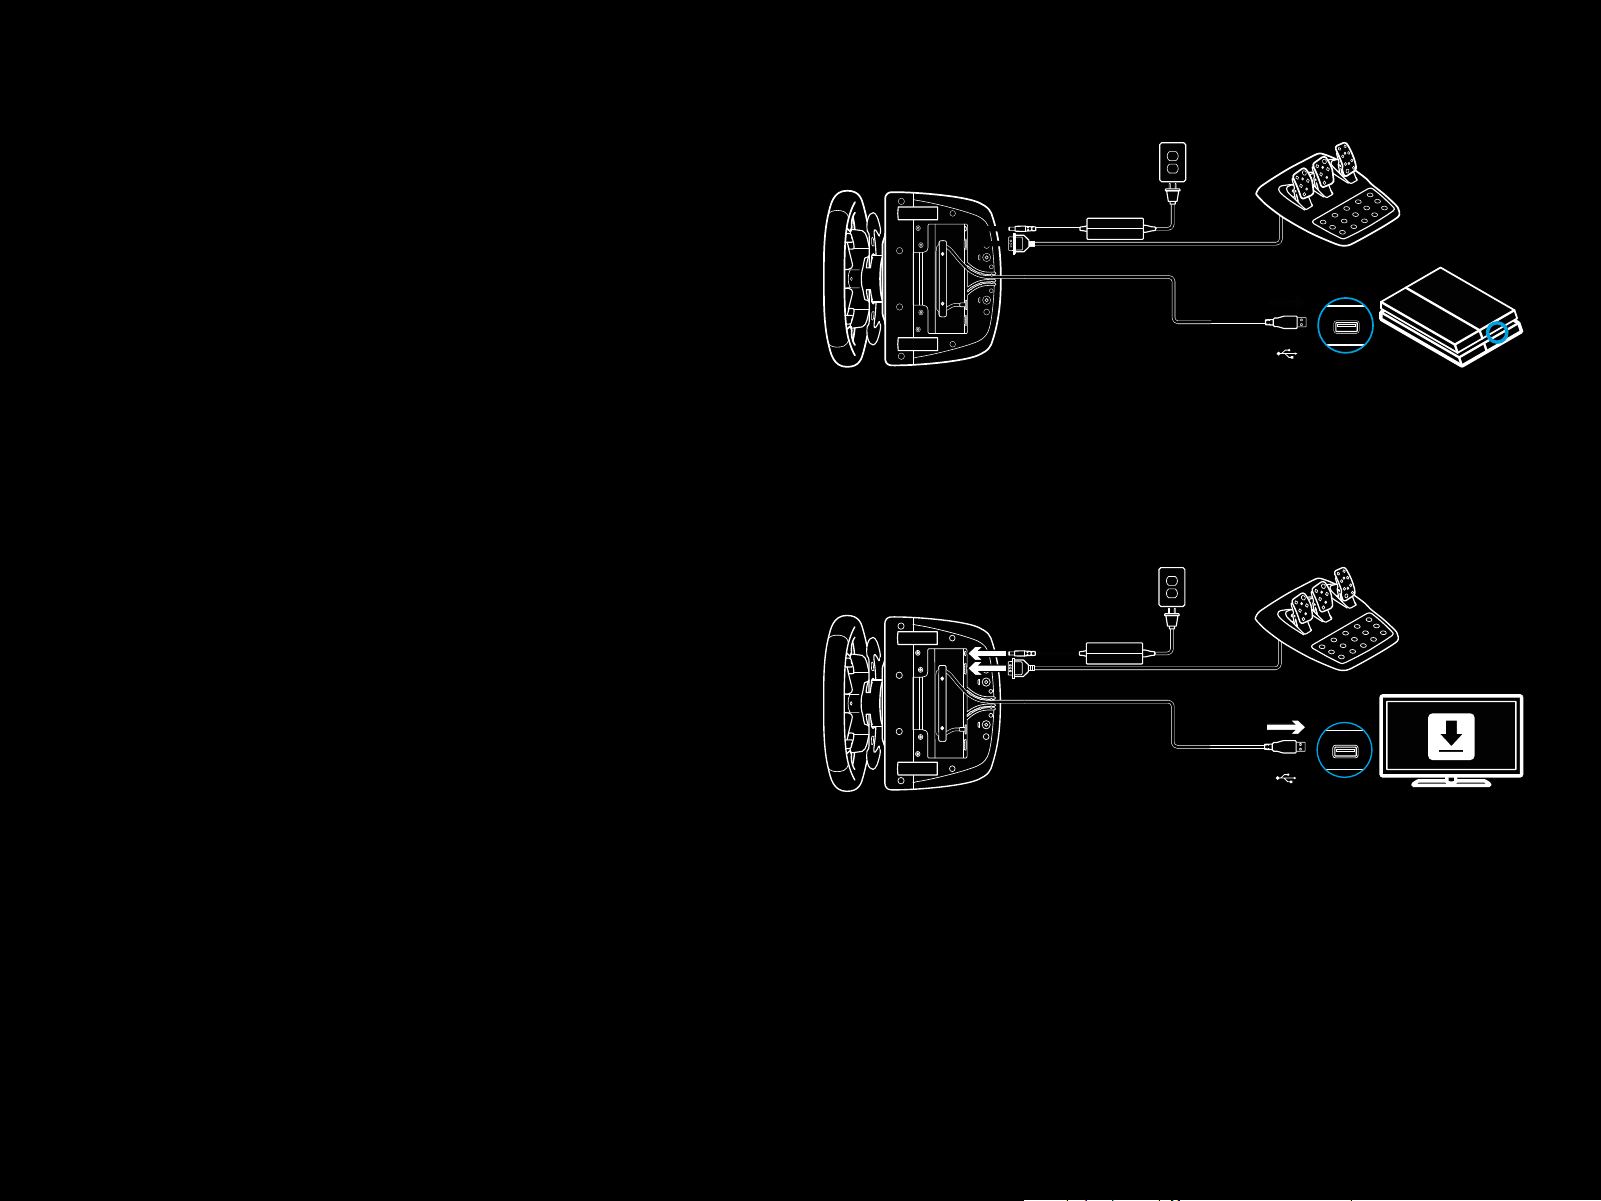
Attach power adapter and USB cables as shown.
Every time your racing wheel connects with your system,
itwillrotate fully to each side and then to the center to calibrate.
Your wheel will be ready once this calibration is completed.
For PC to enable the force feedback and RPM LED features
onyour G923 Wheel and Pedals you must install the Logitech
G HUB software. This can be found at logitechG.com/
support/g923-ps4.
TRUEFORCE and advanced features require game integration.
Visit logitechG.com/support/G923-ps4 for a complete list
ofsupported games.
PS4
USB
PC
USB
4 ENGLISH
Page 5
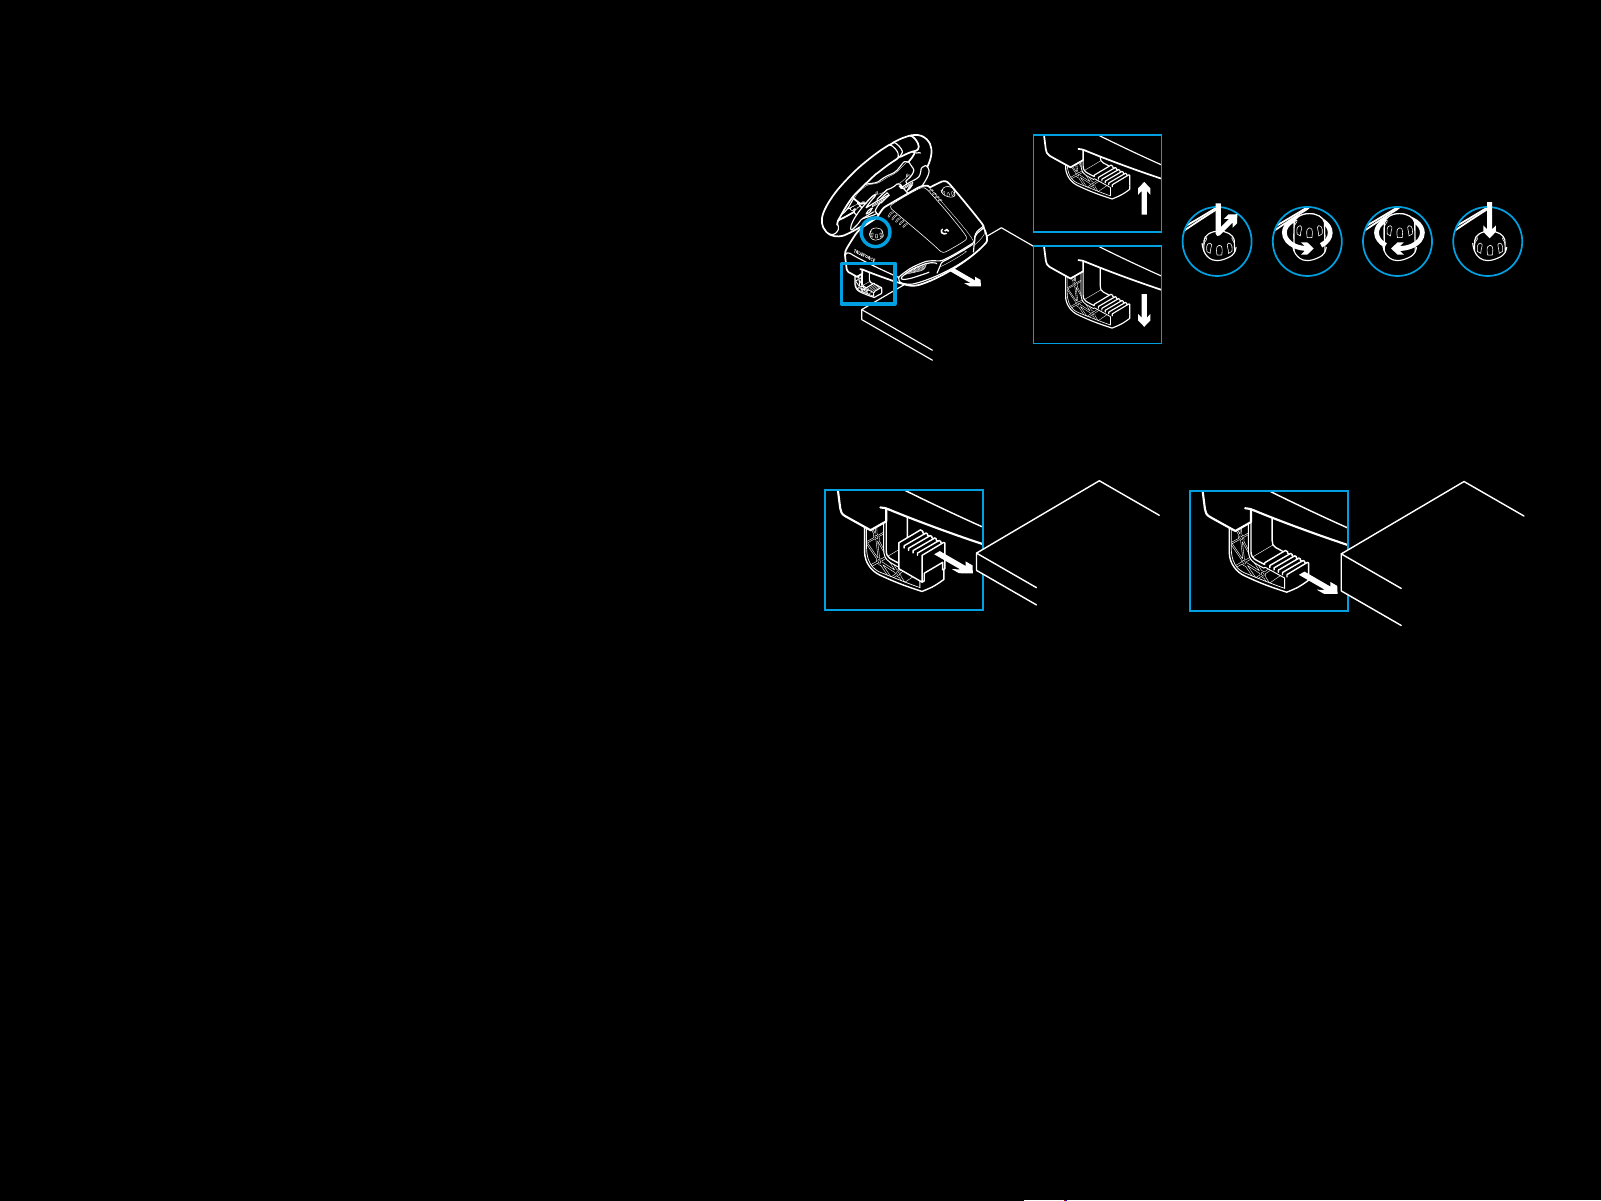
MOUNTING CLAMPS
G923 Racing Wheel is equipped with
a built in clamping system for mounting to a table.
Push down and rotate clamp knobs to lock or unlock.
Rotate clamp knobs to tighten or loosen clamps.
Note:
Clamp extenders should be removed for attachment
tothickertables.
5 ENGLISH
Page 6

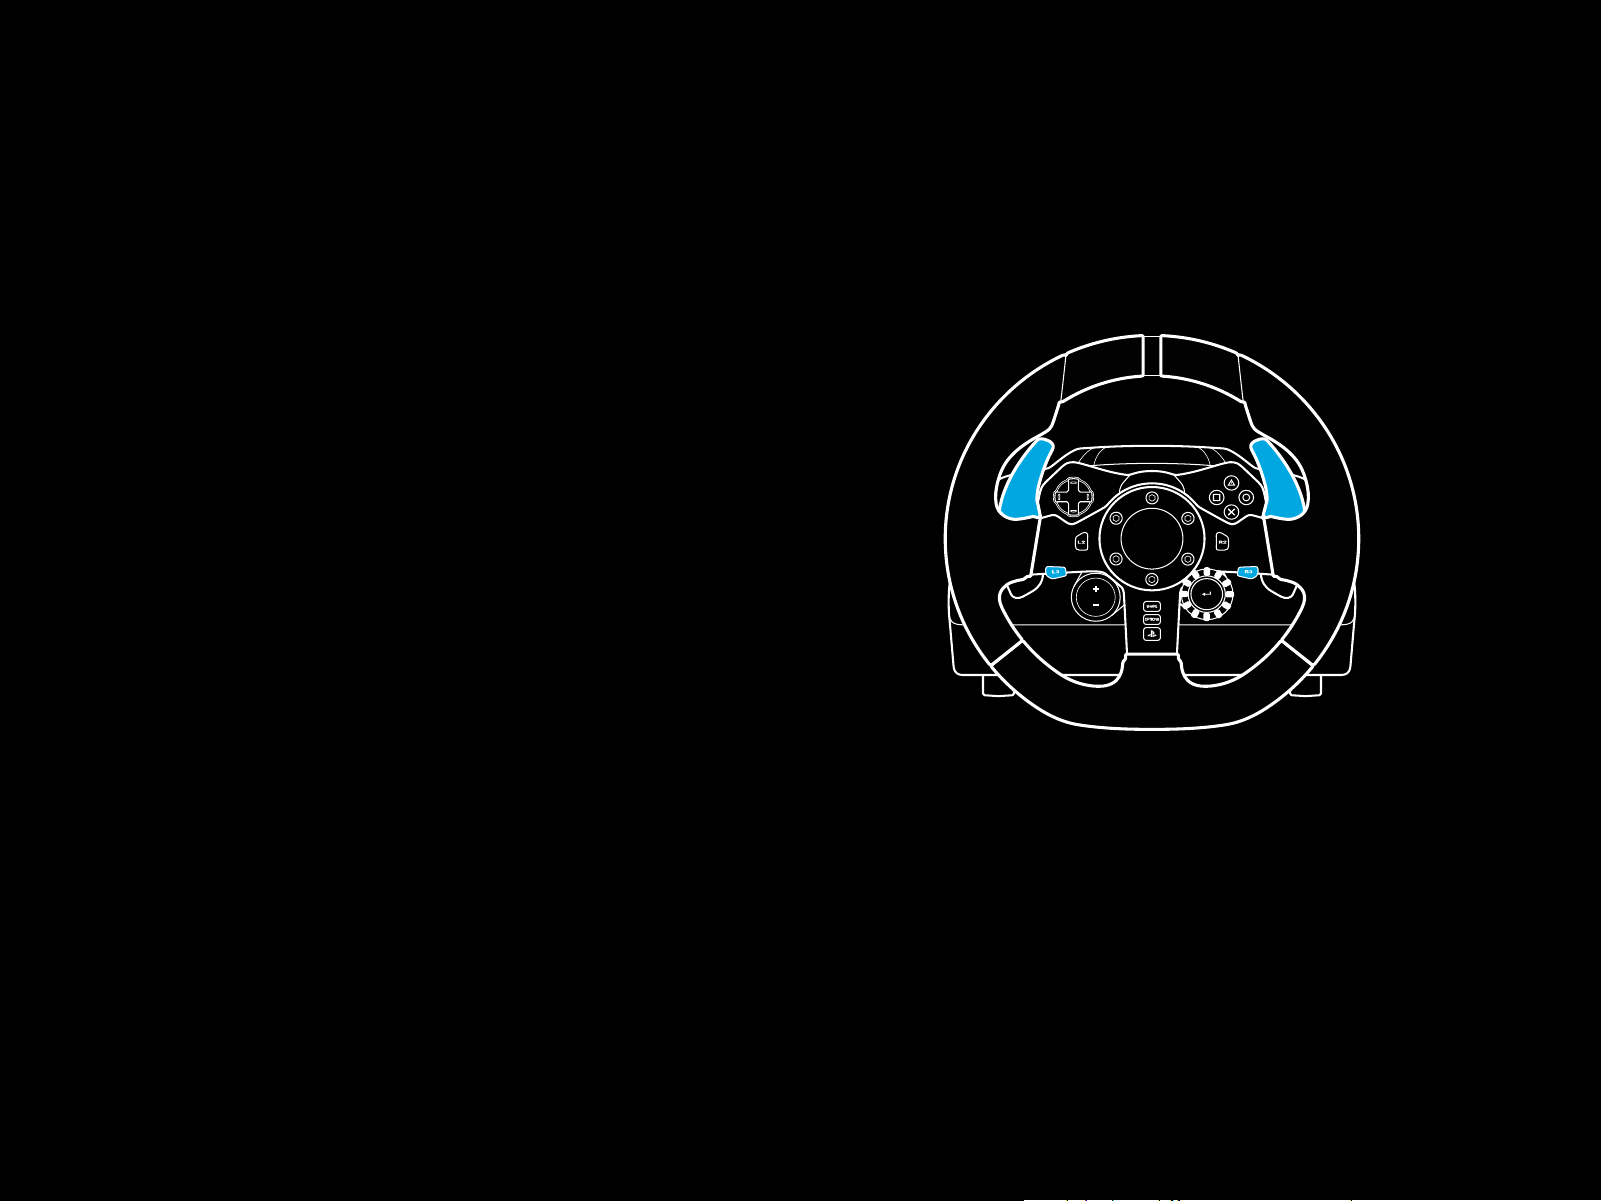
BUTTONS
1 Left bumper
2 Directional pad
3 View button
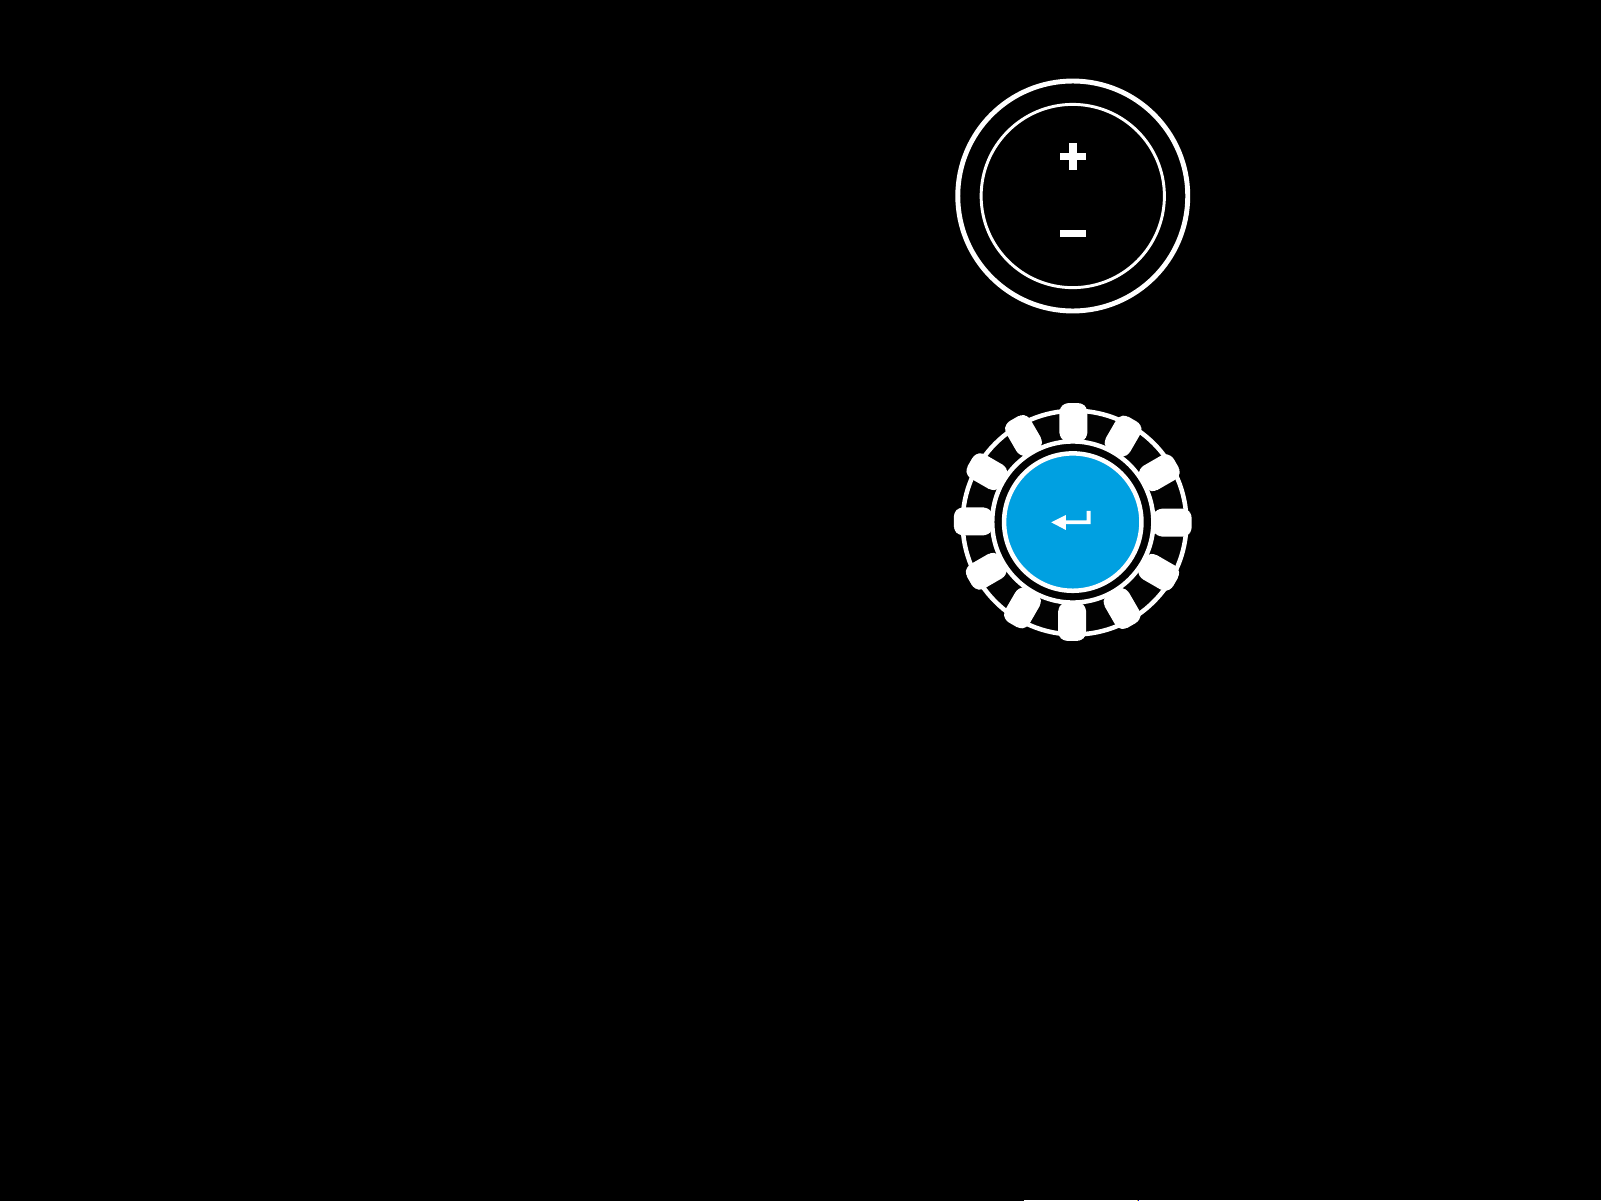
4 L3 button*
5 +/- Setting Adjustment buttons*
6 Right bumper
1 6
2
7
7 X, ¡, o, r buttons
8 OPTIONS button
9 R3 button*
10 Setting Selection Dial and Select button*
11 PS button
* Requires supported games on PS4. Assignable in any game on PC using either
in game assignment or Logitech G HUB software.
3
4
5
8
9
10
11
6 ENGLISH
Page 7

FORCE FEEDBACK
Your Racing Wheel contains dual motors that will provide
forcefeedback with supported games and systems.
In supported titles you will also experience our next generation
approach to force feedback: TRUEFORCE.
TRUEFORCE integrates directly with game physics and audio
to unlock high-denition, real-time force feedback. Tire grip,
suspension, weight, horsepower—even unique engine sound
resonance—are immediately and accurately felt through
thewheel.
Supported titles on PlayStation® 4 and PC may implement
TRUEFORCE high-denition force feedback. For a list of
supported titles visit logitechG.com/support/g923-ps4
Note:
Your Racing Wheel has an overheat protection circuit safeguard
to protect it under high-temperature operating conditions.
Inrare instances, force feedback features may shut down
duringuse while controls continue to operate.
If this occurs, allow the wheel to cool down and power
itdownbyunplugging it. If this occurs frequently,
contactproduct support.
7 ENGLISH
Page 8
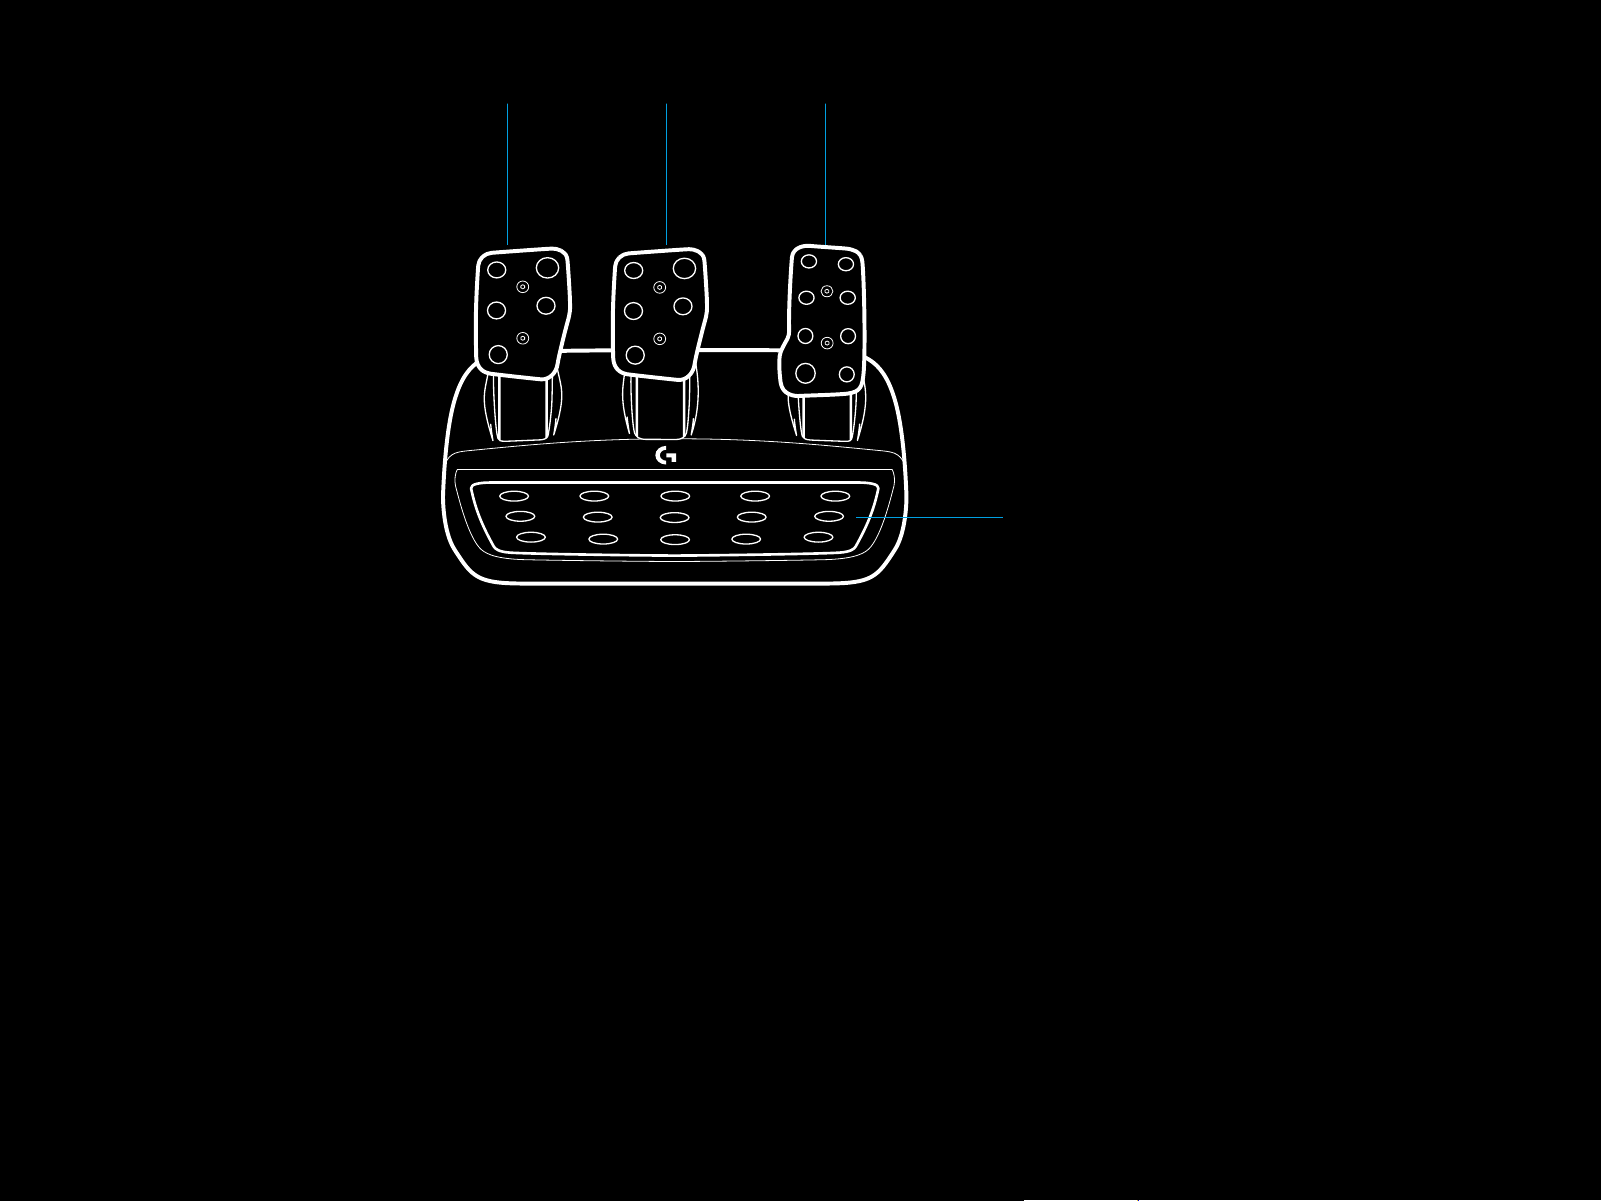
FEATURES
1 Clutch pedal
2 Brake pedal
3 Throttle pedal
4 Textured heel rest
1 2 3
4
8 ENGLISH
Page 9

5 Bolt mounting points (uses M6X1 bolts)
6 Patented carpet grip system
7 Carpet grip release clip
Push towards rear of pedal unit to release
8 Change pedal face position (requires 2.5mm hex key)
5
6
7
9 ENGLISH
8
Page 10

USING THE DUAL CLUTCH IN-GAME
SETTING UP THE DUAL CLUTCH SYSTEM
Using a dual clutch system from a grid start in a race enables
you to achieve maximum traction without the need to nd the
bite point of your clutch pedal - this can give you a signicant
advantage at the start of a race.
To use the dual clutch system in-game:
1 At race start, fully depress the clutch pedal and the button
assigned to the dual clutch function (see next section
forsetting instructions).
2 Select rst gear using the Gear Up Paddle and fully depress
the gas pedal.
3 As soon as you get the green light for race start, immediately
release the Dual Clutch button. The car should start moving
as the bite point of the clutch is engaged.
4 Smoothly release your foot from the clutch pedal in order
toachieve maximum traction. It’s worth practicing this last
step and modifying the bite point setting several times
to nd amethod that works for you. Once you have it
perfected, thisfeature can help make up several places on
the grid.
1 Press and hold the left and right gear paddle L3
andR3buttons together for two seconds to enter
dualclutchsettingmode. The RPM LEDs will illuminate blue
and ashslowly:
Note:
Support for the dual clutch function is not possible in some
games. A list of games that support the dual clutch feature
canbe found at logitechG.com/support/g923-ps4
Note:
Whilst in the Dual Clutch setting mode the RPM LEDs will not
respond to the game/SDK
10 ENGLISH
Page 11
2 Press the button you want to set as the dual clutch button.
The only valid buttons for this are the L3 and R3 buttons.
TheRPM LEDs will ash red to show that you’re in clutch
position setting mode.
3 While in your chosen simulation or game with the car
still ona track, fully depress the clutch and gas pedals.
Engagerst gear and keep pressing the minus button
down until the car begins to move in-game. You can adjust
theprecise bite point of the clutch by using the plus and
minus buttons until youare happy with the setting.
4 At this point you may test the dual clutch without leaving the
setting mode. It is recommended you attempt a race start,
stop the car and adjust the bite point and then try again until
you are satised with the performance of the dual clutch.
5 Press the Select button in the middle of the dial on the wheel
to exit dual clutch setting mode. The RPM LEDs will ash
ina sequence from green to blue to show that the setting
issaved. The RPM LEDs will then go out and begin responding
again to RPM output from supported games.
11 ENGLISH
Page 12

RESETTING DUAL CLUTCH SYSTEM
G HUB WHEEL SETTINGS
Press and hold the left gear shift, right gear shift, and square
button for two seconds.
The RPM LEDs will all ash four times and then extinguish
toindicate that the Dual Clutch system has been reset.
The button assigned to the Dual Clutch system (L3 or R3)
willrevert to its normal function.
USING LOGITECH G HUB
Logitech G HUB enables the following features on the G923:
• Button programming with proles that can be linked to
games.
• Adjustment of wheel settings, such as Rotation Angle and
TRUEFORCE strength.
Sensitivity
Alters the output response of the wheel to be more or less
sensitive. Leaving this slider at 50% will provide a linear 1:1
output. Between 51% and 100% will make the wheel increasingly
more sensitive around the centre movement of the wheel.
Between 0% and 49% will make the wheel decreasingly sensitive
around the centre movement of the wheel.
Operating Range
The G923 is capable of up to 900 degrees of rotation.
Reducingthis setting will change the point at which
thewheelwill reach full steering lock. This is especially useful
if you’re driving a car with a smaller actual steering lock angle,
suchasaFormula 1 orGT3 car.
Centering Spring (for games without force feedback)
Most games that support force feedback already model
thecorrect return to center function of the G923 based on
thevirtual car. It is recommended that the Centering Spring
option be turned o for these games.
• Testing of the various buttons, wheel and pedal functions.
Enabling the Centering Spring option will allow you to override
the game features and adjust the strength of the return
tocenter force using the provided slider.
Torque
Only available for TRUEFORCE supported games. Torque controls
the overall force feedback strength for your G923.
12 ENGLISH
Page 13

Audio Eects
TESTING YOUR WHEEL AND PEDALS
Only available for TRUEFORCE supported games.
Controlstheoverall strength of the audio-related eects
(enginenote, rumble strips etc.) when using TrueForcecompatible titles.
If you are using your G923 in older titles that do not support
TRUEFORCE then adjustment of the force feedback can be
performed from the settings menus of the game title.
G HUB PEDALS SETTINGS
Sensitivity
Alters the output response of the pedals to be more or
lesssensitive. Leaving this slider at 50% will provide a linear
1:1output. Between 51% and 100% will make the pedal
increasingly more sensitive around the initial movement
of thepedal. Between 0% and 49% will make the pedal
decreasingly sensitive around the initial movement of the Pedal.
On the wheel and pedals screens in G HUB you can check
everybutton and axis on your G923 in order to ensure everything
is functioning correctly. For the wheel you can also see the eect
of altering the Operating range.
QUESTIONS?
Please visit logitechG.com/support/g923-ps4 for more
information or to get in touch with a customer representative.
Combined Pedals
If checked, this will set the gas and brake pedals to become
twohalves of a single axis. This will help the pedals operate
correctly in older racing titles that do not support separate axes
for pedals.
Note: if left checked then the pedals will not behave correctly
in modern racing titles. If you nd that just one of your pedals
is functioning by accelerating when pressed and braking
whenreleased then you should make sure that this option is
notchecked.
13 ENGLISH
Page 14

CONNEXIONS ET POINTS DE MONTAGE
1 Fixations de montage
2 Taquet de rangement des câbles
3 Connexion de levier en option (DB-9 mâle)
4 Câble USB
5 Connexion de l'unité de pédale (DB-9 femelle)
6 Alimentation secteur
7 Points de montage de boulon (boulons M6X1)
1
2
3
4
7
5
6
SYSTÈME DE PASSAGE DE CÂBLE OPTIMAL
Le câble USB et le câble de la pédale (1, 2) doivent passer par
lesglissières intérieures.
Les câbles d'alimentation et câbles de levier en option (3, 4)
doivent passer par les glissières extérieures.
Les câbles peuvent être enroulés plusieurs fois autour du taquet
de rangement des câbles pour éviter qu'il y ait du jeu dans
lescâbles.
14 FRANÇAIS
3
14 2 3
2
4
1
Page 15
INSTALLATION — PS4
™
— PC
Installez l'adaptateur secteur et les câbles USB comme indiqué.
À chaque fois que votre volant de course se connecte
àvotresystème, il tourne entièrement de chaque côté,
puisserepositionne au centre pour le calibrage. Votre volant
estprêt une fois le calibrage terminé.
Pour que le PC active les fonctions de retour de force et
dutémoin lumineux indiquant le nombre de tours par minute
sur votre volant et pédales G923, vous devez installer le logiciel
Logitech G HUB. Il est disponible à l'adresse logitechG.com/
support/g923-ps4.
TRUEFORCE et les fonctions avancées nécessitent l'intégration
du jeu. Rendez-vous sur logitechG.com/support/G923-ps4 pour
connaître la liste complète des jeux pris en charge.
PS4
USB
PC
USB
15 FRANÇAIS
Page 16

FIXATIONS DE MONTAGE
Le volant de course G923 Driving Force Racing Wheel est équipé
d'un système de xation intégré pour le montage sur une table.
Poussez vers le bas et faites tourner les boutons de xation
pourverrouiller ou déverrouiller.
Faites tourner les boutons de xation pour serrer ou desserrer
lesxations.
Remarque:
Pour xer le volant sur des tables plus épaisses, vous devez retirer
les extenseurs de xation.
16 FRANÇAIS
Page 17

BOUTONS
1 Gâchette haute gauche
2 Pavé directionnel
3 Bouton Vue
4 Bouton L3*
5 Paramétrage des boutons de réglage +/-*
6 Gâchette haute droite
1 6
2
7
7 Boutons X, ¡, o, r
8 Bouton OPTIONS
9 Bouton R3*
10 Molette de paramétrage de la sélection
etboutonde sélection*
11 Bouton PS
* Nécessite des jeux PS4 compatibles. Aectation possible dans tous
lesjeuxPC utilisant soit l'aectation en jeu, soit le logiciel Logitech G HUB.
3
4
5
8
9
10
11
17 FRANÇAIS
Page 18

RETOUR DE FORCE
Votre volant de course contient deux moteurs qui fournissent
leretour de force sur les jeux et systèmes pris en charge.
Vous découvrirez également notre approche nouvelle génération
du retour de force dans les titres compatibles: TRUEFORCE.
TRUEFORCE s'intègre directement à la physique et au son dujeu
pour produire un retour de force haute dénition en temps réel.
L'adhérence des pneus, la suspension, le poids, la puissance
du moteur, même la résonance du son du moteur, sont
immédiatement et précisément ressentis via le volant.
Les titres PlayStation® 4 et PC compatibles peuvent intégrer
leretour de force haute dénition TRUEFORCE. Pour connaître
la liste des jeux compatibles, rendez-vous sur logitechG.com/
support/g923-ps4
Remarque:
Votre volant de course dispose d'un circuit de protection
contre la surchaue pour le protéger dans les conditions
defonctionnement à haute température. Il arrive parfois que
lesfonctions de retour de force s'éteignent en cours d'utilisation
bien que les commandes fonctionnent toujours.
Si cela se produit, laissez le volant refroidir et mettez-le hors
tension en le débranchant. Si cela se produit fréquemment,
contactez le support produit.
18 FRANÇAIS
Page 19

CARACTÉRISTIQUES
1 Pédale d'embrayage
2 Pédale de frein
3 Pédale de gaz
4 Repose talon texturé
1 2 3
4
19 FRANÇAIS
Page 20

5 Points de montage de boulon (boulons M6X1)
6 Système antidérapant breveté
7 Attache antidérapante
Poussez vers l'arrière ou sur la pédale pour détacher
8 Changement de position de la face de la pédale
(clé Allen de 2,5 mm requise)
5
6
7
20 FRANÇAIS
8
Page 21

UTILISER LE DOUBLE EMBRAYAGE EN JEU
PARAMÉTRAGE DU SYSTÈME À DOUBLE
L'utilisation d'un système à double embrayage sur la grille
de départ d'une course vous permet d'obtenir une traction
maximale sans avoir à trouver le point de patinage de
votrepédale d'embrayage - ce qui peut vous donner un avantage
considérable au début d'une course.
Pour utiliser le système à double embrayage en jeu:
1 Au départ de la course, appuyez à fond sur la pédale
d'embrayage et sur le bouton correspondant à la fonction de
double embrayage (voir section suivante pour les instructions
de paramétrage).
2 Sélectionnez la première vitesse à l'aide de la palette
de rapport de vitesse et appuyez à fond sur la pédale
d'accélérateur.
3 Dès que vous avez le feu vert pour le début de la course,
relâchez immédiatement le bouton du double embrayage.
La voiture devrait commencer à avancer dès que le point
depatinage de l'embrayage est enclenché.
4 Relâchez doucement le pied de la pédale d'embrayage an
d'obtenir une traction maximale. Nous vous conseillons de
vous entraîner à cette dernière étape et de modier le point
de patinage jusqu'à trouver une méthode qui vous convient.
Une fois que vous l'avez perfectionnée, cette fonctionnalité
peut vous aider à gagner plusieurs places au classement.
Remarque:
EMBRAYAGE
1 Appuyez et maintenez enfoncées les palettes de changement
de vitesses gauche et droite et les boutons L3 et R3
simultanément pendant deux secondes pour passer en mode
paramétrage du double embrayage. Les témoins lumineux
indiquant le nombre de tours par minute s'allument en bleu
etclignotent lentement:
Remarque:
La fonction de double embrayage n'est pas compatible
aveccertains jeux. Vous trouverez une liste des jeux compatibles
avec la fonctionnalité de double embrayage à l'adresse
logitechG.com/support/g923-ps4
21 FRANÇAIS
En mode paramétrage du double embrayage, les témoins
lumineux indiquant le nombre de tours par minute ne répondent
pas au jeu/au SDK
Page 22

2 Appuyez sur le bouton que vous souhaitez dénir comme
bouton de double embrayage. Les seuls boutons valides
pour cela sont les boutons L3 et R3. Les témoins lumineux
indiquant le nombre de tours par minute clignotent en rouge
pour indiquer que vous êtes en mode de réglage de la position
d'embrayage.
3 Lorsque vous êtes dans la simulation ou le jeu de votre
choix avec la voiture sur la piste, appuyez à fond sur les
pédales d'embrayage et d'accélérateur. Engagez la première
vitesse etmaintenez le bouton moins enfoncé jusqu'à ce
que lavoiture commence à avancer en jeu. Vous pouvez
régler avec précision le point de patinage de l'embrayage en
utilisant les boutons plus et moins jusqu'à ce que vous soyez
satisfait du réglage.
4 À ce stade, vous pouvez tester le double embrayage sans
quitter le mode paramétrage. Il est recommandé d'essayer
de lancer une course, d'arrêter la voiture, d'ajuster le point
depatinage, puis de réessayer jusqu'à ce que vous soyez
satisfait des performances du double embrayage.
5 Appuyez sur le bouton de sélection situé au milieu de
lamolette du volant pour quitter le mode paramétrage
du double embrayage. Les témoins lumineux indiquant
lenombre de tours par minute clignotent du vert au bleu
pour indiquer que le paramétrage est enregistré. Les témoins
lumineux indiquant le nombre de tours par minute s'éteignent
et retrouvent leur fonction d'indicateur du nombre de tours
par minute sur les jeux compatibles.
22 FRANÇAIS
Page 23

RÉINITIALISATION DU SYSTÈME
PARAMÈTRES DU VOLANT SOUS G HUB
DE DOUBLE D'EMBRAYAGE
Appuyez et maintenez enfoncés les boutons de changement
devitesse gauche et droit, ainsi que le bouton carré pendant
deux secondes.
Les témoins lumineux indiquant le nombre de tours par minute
clignotent tous quatre fois, puis s'éteignent pour indiquer que
lesystème de double embrayage a été réinitialisé.
Le bouton aecté au système de double embrayage (L3 ou R3)
reprendra sa fonction normale.
UTILISER LOGITECH G HUB
Logitech G HUB permet d'activer les fonctionnalités suivantes
surle volant G923:
• Programmation de boutons avec des prols pouvant être liés
à des jeux.
• Réglage des paramètres du volant, tels que l'angle de rotation
et la force TRUEFORCE.
• Test des diérentes fonctions des boutons, des molettes
etdes pédales.
Sensibilité
Modie la réponse de sortie du volant pour qu'il soit plus
oumoins sensible. En laissant ce curseur à 50%, vous obtiendrez
une sortie linéaire 1:1. Entre 51% et 100%, le volant deviendra
de plus en plus sensible au mouvement central du volant.
Entre0%et 49%, le volant deviendra de moins en moins sensible
au mouvement central du volant.
Plage de fonctionnement
Le volant G923 peut atteindre jusqu'à 900 degrés de rotation.
Réduire ce paramètre modiera le point auquel le volant atteint
le blocage complet de la direction. C'est particulièrement utile
sivous conduisez une voiture avec un angle de braquage réel
pluspetit, comme une Formule 1 ou une GT3.
Centrage du ressort (pour les jeux sans retour de force)
La plupart des jeux compatibles avec le retour de force
modélisent déjà correctement la fonction de retour de force
du G923 basée sur la voiture virtuelle. Il est recommandé
dedésactiver l'option Centrage du ressort pour ces jeux.
L'activation de l'option Centrage du ressort vous permet
deremplacer les fonctionnalités du jeu et d'ajuster la puissance
du retour de force avec le curseur.
Couple
Uniquement disponible pour les jeux compatibles
avecTRUEFORCE. Le couple contrôle la puissance globale
duretour deforce de votre volant G923.
23 FRANÇAIS
Page 24

Eets audio
TESTER VOTRE VOLANT ET VOS PÉDALES
Uniquement disponible pour les jeux compatibles avec
TRUEFORCE. Contrôle la force globale des eets liés au son
(bruitdu moteur, bandes rugueuses, etc.) lors de l'utilisation
dejeux compatibles avec TrueForce.
Si vous utilisez votre G923 dans des jeux plus anciens qui ne sont
pas compatibles avec TRUEFORCE, le réglage du retour de force
peut être eectué depuis les menus de paramètres du jeu.
PARAMÉTRAGE DES PÉDALES SOUS G HUB
Sensibilité
Modie la réponse de sortie des pédales pour qu'elles soient plus
ou moins sensibles. En laissant ce curseur à 50%, vous obtiendrez
une sortie linéaire 1:1. Entre 51% et 100%, la pédale deviendra
deplus en plus sensible au mouvement initial de la pédale.
Entre0% et 49%, la pédale deviendra de moins en moins sensible
au mouvement initial de la pédale.
Sur les écrans du volant et des pédales de G HUB, vous pouvez
vérier chaque bouton et chaque axe de votre volant G923 an
de vous assurer que tout fonctionne correctement. Pour levolant,
vous pouvez également voir l'eet de la modication de la plage
de fonctionnement.
DES QUESTIONS?
Veuillez visiter logitechG.com/support/g923-ps4 pour plus
d'informations ou pour contacter un représentant client.
Pédales combinées
Si cette case est cochée, les pédales d'accélérateur et de frein
deviendront deux moitiés d'un même axe. Les pédales pourront
ainsi fonctionner correctement dans les jeux de course plus
anciens qui ne prennent pas en charge des axes distincts pour
lespédales.
Remarque: si cette case est cochée, les pédales ne
secomporteront pas correctement dans les jeux de course
modernes. Si vous constatez qu'une seule de vos pédales
fonctionne en accélérant lorsque vous appuyez et en freinant
lorsque vous relâchez, vous devez vous assurer que cette option
n'est pas cochée.
24 FRANÇAIS
Page 25

PUNTOS DE MONTAJE Y CONEXIONES
1 Mordazas de montaje
2 Pieza de retención para la distribución de cables
3 Conexión de cambio opcional (DB-9 macho)
4 Cable USB
5 Conexión de la unidad de pedales (DB-9 hembra)
6 Conexión de alimentación
7 Puntos de montaje de los tornillos (tornillos M6x1)
1
2
3
4
7
5
6
SISTEMA ÓPTIMO DE DISTRIBUCIÓN
DECABLES
Los cables del pedal y USB (1, 2) deben dirigirse por
loscanalesinteriores.
Los cables de cambio opcional y de corriente (3, 4)
debendirigirse por los canales exteriores.
Puedes pasar los cables alrededor de la pieza de retención
paradistribuirlos de manera que no queden sueltos.
25 ESPAÑOL
3
14 2 3
2
4
1
Page 26

INSTALACIÓN — PS4
™
— PC
Acopla el adaptador de alimentación y los cables USB como
semuestra en la imagen.
Cada vez que el volante de carreras se conecte al sistema,
realizará una rotación completa hacia cada lado y después
volverá al centro para calibrarse. Una vez terminada
lacalibración, el volante estará listo para su uso.
Para poder activar en la PC las funciones de Force Feedback
y LED de RPM del volante y los pedales G923, debes instalar
elsoftware Logitech G HUB. Lo encontrarás en logitechG.com/
support/g923-ps4.
TRUEFORCE y las funciones avanzadas requieren la integración
en el juego. Visita logitechG.com/support/G923-ps4 para obtener
una lista completa de los juegos compatibles.
PS4
USB
PC
USB
26 ESPAÑOL
Page 27

MORDAZAS DE MONTAJE
El volante de carreras G923 cuenta con un sistema de sujeción
integrado para jarlo a la mesa.
Presiona y gira los pernos para bloquear o desbloquear.
Gira los pernos para apretar o aojar las mordazas.
Nota:
Si la mesa es gruesa, quita los extensores de las mordazas.
27 ESPAÑOL
Page 28

BOTONES
1 Botón superior izquierdo
2 Control de dirección
3 Botón de vista
4 Botón L3*
5 Botones de ajuste +/-*
6 Botón superior derecho
1 6
2
7
7 Botones X, ¡, o, r
8 BOTÓN OPTIONS
9 Botón R3*
10 Control giratorio y botón de selección de ajuste*
11 Botón de PS
* Requiere juegos compatibles en PS4. Asignable en cualquier juego
dePCutilizando la función de asignación dentro del juego o el software
Logitech G HUB.
3
4
5
8
9
10
11
28 ESPAÑOL
Page 29

FORCE FEEDBACK
Tu volante de carreras contiene dos motores con Force Feedback
para los juegos y sistemas compatibles.
Con juegos compatibles, también experimentarás nuestra
concepción de Force Feedback de próxima generación:
TRUEFORCE.
TRUEFORCE se integra directamente con la física y el audio
del juego para permitir el efecto de Force Feedback de alta
denición en tiempo real. El agarre de los neumáticos,
lasuspensión, el peso, la potencia, incluso la exclusiva
resonancia del motor se sienten de forma inmediata y precisa
através del volante..
Los juegos compatibles en PlayStation® 4 y PC pueden
implementar Force Feedback TRUEFORCE de alta denición.
Encontrarás una lista de juegos compatibles en logitechG.com/
support/g923-ps4
Nota:
Tu volante de carreras cuenta con un sistema de protección para
evitar cortocircuitos en condiciones de uso a temperaturas altas.
Aunque es poco frecuente, es posible que las funciones de Force
Feedback se apaguen durante el uso y que los controles sigan
disponibles.
En tal caso, deja que el volante se enfríe y apágalo mediante
la desconexión del cable. Si sucediera con frecuencia, ponte en
contacto con el servicio de asistencia al producto.
29 ESPAÑOL
Page 30

CARACTERÍSTICAS
1 Pedal del embrague
2 Pedal del freno
3 Pedal del acelerador
4 Reposatalón con textura
1 2 3
4
30 ESPAÑOL
Page 31
5 Puntos de montaje de los tornillos (tornillos M6x1)
6 Sistema de alfombrilla antideslizante patentado
7 Clip para extraer la alfombrilla antideslizante
Presiona hacia la parte posterior de la unidad de pedales
paraextraerla
8 Cambio de posición de la cara del pedal (requiere llave
allende 2,5mm)
5
6
7
31 ESPAÑOL
8
Page 32
USAR EL DOBLE EMBRAGUE EN EL JUEGO
CONFIGURAR EL SISTEMA DE DOBLE
El uso de un sistema de doble embrague en la parrilla de salida
de una carrera permite lograr la máxima tracción sin tener que
encontrar el punto de agarre del pedal del embrague: esto te
puede dar una ventaja signicativa al comienzo de una carrera.
Para usar el sistema de doble embrague en el juego:
1 Al inicio de la carrera, pisa a fondo el pedal del embrague
yelbotón asignado a la función de doble embrague
(consulta la siguiente sección para ver las instrucciones
deconguración).
2 Selecciona la primera marcha con la palanca de incremento
de marcha y pisa a fondo el pedal del acelerador.
3 En cuanto se dé la señal de salida, suelta inmediatamente
el botón de doble embrague. El coche debería empezar
a moverse a medida que se active el punto de agarre
delembrague.
4 Para lograr la máxima tracción, separa gradualmente elpie
del pedal del embrague. Merece la pena practicar este
último paso y modicar la conguración del punto de agarre
varias veces para encontrar el método adecuado en tu caso.
Cuando lo tengas, esta función te puede ayudar a avanzar
varias posiciones en la parrilla de salida.
EMBRAGUE
1 Presiona a la vez durante dos segundos las palancas
decambio izquierda L3 y derecha R3 para activar el modo
de conguración de doble embrague. Los LED de RPM
seiluminarán en azul y emitirán destellos lentos:
Nota:
En algunos juegos no existe compatibilidad con la función
de doble embrague. En logitechG.com/support/g923-ps4
encontrarás una lista de juegos en los que se puede usar
lafunción de doble embrague
Nota:
Mientras estés en el modo de conguración de doble embrague,
los LED de RPM no responderán al juego/SDK
32 ESPAÑOL
Page 33

2 Presiona el botón al que quieras asignar la función de doble
embrague. Los únicos botones aptos para esa función son
el botón de palanca izquierda (L3) y el botón de palanca
derecha (R3). Los LED de RPM emitirán destellos rojos para
indicar que está activo el modo de conguración de posición
de embrague.
3 Mientras estés en una simulación o un juego con el coche
aúnen una pista, pisa a fondo el embrague y el acelerador.
Mete la primera marcha y sigue presionando el botón
"menos" hasta que el coche empiece a moverse en el juego.
Puedes congurar el punto de agarre preciso del embrague
usando los botones "más" y "menos" hasta conseguir el ajuste
deseado.
4 En este punto, puedes probar el doble embrague sin
salir delmodo de conguración. Es aconsejable iniciar
unacarrera, detener el coche y ajustar el punto de agarre,
yrepetir esospasos hasta que el doble embrague responda
tal ycomoquieres.
5 Presiona el botón de selección en el centro del control
giratorio en el volante para salir del modo de conguración
de doble embrague. Los LED de RPM emitirán destellos en una
secuencia de verde a azul para indicar que la conguración
se ha guardado. A continuación los LED de RPM se apagarán
y empezarán a responder nuevamente al valor de RPM de
losjuegos compatibles.
33 ESPAÑOL
Page 34

RESTABLECER EL SISTEMA
CONFIGURACIÓN DE VOLANTE
DE DOBLE EMBRAGUE
Presiona durante 2 segundos el cambio de marcha izquierdo,
elderecho y el botón X.
Todos los LED de RPM emitirán cuatro destellos y luego
seapagarán para indicar que el sistema de doble embrague
serestableció.
El botón asignado al sistema de doble embrague (L3 o R3)
recuperará su función normal.
USAR LOGITECH G HUB
Logitech G HUB habilita las siguientes funciones en G923:
• Programación de botones con perles que pueden
vincularsea juegos.
CON G HUB
Sensibilidad
Altera la respuesta de la acción del volante para aumentar
oreducir la sensibilidad. Si el control deslizante se
mantiene enuna posición de 50%, se obtiene un valor
lineal de 1:1. Entre51% y 100%, aumentará la sensibilidad
del volante alrededor del movimiento central. Entre 0%
y49%, disminuirálasensibilidad del volante alrededor
delmovimientocentral.
Radio de acción de funcionamiento
G923 es capaz de realizar giros de 900 grados. Al reducir elvalor
cambiará el punto en el que el volante alcanza el bloqueo
dedirección completo. Esto es especialmente útil al conducir
coches como Formula 1 o GT3, con un ángulo menor de bloqueo
de dirección real.
Sistema de centrado (para juegos sin Force Feedback)
• Ajuste de la conguración del volante (p. ej. el ángulo
degiroy la intensidad de TRUEFORCE).
• Prueba de las funciones de botones, volante y pedales.
La mayoría de los juegos que admiten Force Feedback ya
reproducen el regreso correcto al centro del G923 según el coche
virtual. Se recomienda desactivar la opción Sistema de centrado
para estos juegos.
Si la opción Sistema de centrado está activada, podrás anular
lasfunciones del juego y ajustar la intensidad del regreso
alcentro mediante el control deslizante suministrado.
Par motor
Sólo disponible para juegos compatibles con TRUEFORCE.
Controla la intensidad de Force Feedback total para G923.
34 ESPAÑOL
Page 35

Efectos de audio
PROBAR EL VOLANTE Y LOS PEDALES
Sólo disponible para juegos compatibles con TRUEFORCE.
Controla la intensidad general de los efectos relacionados con
el audio (motor, bandas sonoras, etc.) en juegos que admiten
TrueForce.
Si utilizas G923 con juegos antiguos que no son compatibles
conTRUEFORCE, el ajuste de Force Feedback se puede realizar
enlos menús de conguración del propio juego.
CONFIGURACIÓN DE PEDALES CON G HUB
Sensibilidad
Altera la respuesta de la acción de los pedales para aumentar
o reducir la sensibilidad. Si el control deslizante se mantiene en
una posición de 50%, se obtiene un valor lineal de 1:1. Entre51%
y 100%, aumentará la sensibilidad del pedal alrededor del
movimiento inicial. Entre 0% y 49%, disminuirá la sensibilidad
delpedal alrededor del movimiento inicial.
En las pantallas del volante y los pedales en GHUB puedes
vericar cada botón y eje del G923 para asegurarte de que todo
funciona correctamente. Para el volante también puedes ver
elefecto de alterar el radio de acción de funcionamiento.
¿PREGUNTAS?
Visita logitechG.com/support/g923-ps4 para obtener
másinformación o para ponerte en contacto con el servicio
deatención al cliente.
Pedales en modo combinado
Si está seleccionada, esta opción hará que los pedales de freno
yaceleración sean dos mitades con un mismo eje. Esto ayudará
a que los pedales funcionen correctamente en juegos de carreras
menos recientes, que no admitan pedales con ejes separados.
Nota: si se mantiene seleccionada, los pedales no se
comportarán correctamente en los juegos de carreras modernos.
Si notas que sólo uno de los pedales funciona acelerando
alpisarlo y frenando al soltarlo, asegúrate de que la opción
noesté marcada.
35 ESPAÑOL
Page 36

CONEXÕES E PONTOS DE FIXAÇÃO
1 Braçadeiras de xação
2 Gancho de gerenciamento de cabos
3 Conexão opcional de câmbio (DB-9 macho)
4 Cabo USB
5 Conexão da unidade de pedais (DB-9 fêmea)
6 Conexão de força
7 Ponto de xação do Bolt (usa parafusos M6X1)
1
2
3
4
7
5
6
GERENCIAMENTO DE CABO OTIMIZADO
Cabos de USB e de pedal (1, 2) devem ser gerenciados através
decanais internos.
Cabos de força e cabos opcionais de câmbio (3, 4) devem ser
gerenciados através de canais externos.
Os cabos podem ser enrolados diversas vezes no gerenciador
decabos para controlar a folga.
36 PORTUGUÊS
3
14 2 3
2
4
1
Page 37

INSTALAÇÃO — PS4
™
— PC
Conecte o plug de energia e os cabos USB conforme
mostradoabaixo.
Toda vez que o volante de corrida se conecta com seu sistema,
ele faz um giro completo para cada lado e retorna ao centro
para ser calibrado. Seu volante estará pronto para ser usado
após a conclusão da calibração.
Para que o PC habilite os recursos de force feedback e LED
deRPM no G923 Wheel e Pedals, você deve instalar o software
Logitech G HUB. Isso pode ser encontrado em logitechG.com/
support/g923-ps4.
TRUEFORCE e recursos avançados exigem integração comjogos.
Visite logitechG.com/support/G923-ps4 para obter uma lista
completa dos jogos suportados.
PS4
USB
PC
USB
37 PORTUGUÊS
Page 38

BRAÇADEIRAS DE FIXAÇÃO
O G923 Racing Wheel possui um sistema de xação integrado
para ser xado à mesa.
Pressione e gire as braçadeiras de xação para trancar
oudestrancar.
Gire os botões de xação para apertar ou afrouxar
asbraçadeiras.
Observação:
As extensões de braçadeira devem ser removidas para serem
anexadas a mesas mais grossas.
38 PORTUGUÊS
Page 39

BOTÕES
1 Borboleta esquerda
2 Controle direcional
3 Botão de visualização
4 Botão L3*
5 +/- Congurando botões de ajuste*
6 Borboleta direita
1 6
2
7
7 Botões X, ¡, o, r
8 Botão OPÇÕES
9 Botão R3*
10 Denir Seletor e o botão de Seleção*
11 Botão PS
* Requer jogos suportados no PS4. Atribuível em qualquer jogo no PC,
usandoaatribuição de jogos ou o software Logitech G HUB.
3
4
5
8
9
10
11
39 PORTUGUÊS
Page 40

REORIENTAÇÃO DE FORÇA
Seu Volante de corrida contém motores duplos que aplicam
força contrária nos jogos e sistemas compatíveis.
Nos títulos suportados, você também experimentará nossa
abordagem de última geração para force feedback: TRUEFORCE.
O TRUEFORCE se integra diretamente com a física e o áudio
do jogo para permitir force feedback em tempo real de alta
denição. Aderência, suspensão, peso e potência - atémesmo
a ressonância sonora única do motor - são imediata
eprecisamente sentidas pelo volante.
Os títulos suportados no PlayStation® 4 e no PC podem
implementar force feedback TRUEFORCE de alta denição.
Paraobter uma lista de títulos compatíveis, visite logitechG.com/
support/g923-ps4
Observação:
Seu volante de corrida possui um sistema de proteção contra
superaquecimento para suportar temperaturas elevadas.
Em raras situações, o recurso de força contrária pode ser
interrompido durante o uso mesmo que outros controles
continuem a funcionar normalmente.
Se isso ocorrer, aguarde o resfriamento do volante e desligue-o
através da desconexão. Se isso ocorrer com frequência,
entreemcontato com o suporte a produtos.
40 PORTUGUÊS
Page 41

RECURSOS
1 Pedal de embreagem
2 Pedal de freio
3 Pedal acelerador
4 Apoio texturizado
paracalcanhar
1 2 3
4
41 PORTUGUÊS
Page 42

5 Ponto de xação de parafusos (usa parafusos M6X1)
6 Sistema antiderrapante patenteado
7 Clipe para xação em tapetes
Empurre para trás ou em direção à unidade de pedal
parasoltar
8 Trocar a posição da face do pedal
(chave hexagonal de 2,5 mm)
5
6
7
42 PORTUGUÊS
8
Page 43

USANDO O JOGO DUAL CLUTCH
CONFIGURANDO O SISTEMA
NOJOGO
A utilização de um sistema de dupla embreagem a partir de
umalargarda numa corrida permite-lhe alcançar a tração
máxima sem necessidade de encontrar o ponto de aderência
doseu pedal da embreagem - isto pode dar-lhe uma vantagem
signicativa no início de uma corrida.
Para usar o sistema de embreagem dupla no jogo:
1 No início da corrida, pressione totalmente o pedal
daembreagem e o botão atribuído à função
deduplaembreagem (consulte a próxima seção
paraobterinstruções).
2 Selecione a primeira marcha usando a marcha para cima
epressione totalmente o acelerador.
3 Assim que você conseguir a luz verde para o início dacorrida,
solte imediatamente o botão de embreagem dupla.
Ocarrodeve começar a se mover quando o ponto de mordida
da embreagem estiver engatado.
4 Solte suavemente o pé do pedal da embreagem para
obter a máxima tração. Vale a pena praticar este último
passo emodicar a conguração do ponto de ação várias
vezes para encontrar um método que funcione para você.
Depoisde aperfeiçoá-lo, esse recurso pode ajudar a melhorar
sua posição.
DEEMBREAGEM DUPLA
1 Pressione e segure as alavancas de marcha esquerda e direita
e os botões L3 e R3 juntos por dois segundos para entrar
no modo de ajuste de dupla embreagem. Os LEDs de RPM
acenderão em azul e piscarão lentamente:
Observação:
O suporte para a função de dupla embreagem não existe em
alguns jogos. Uma lista de jogos que suportam o recurso de
dupla embreagem pode ser encontrada em logitechG.com/
support/g923-ps4
43 PORTUGUÊS
Observação:
No modo de conguração de embreagem dupla, os LEDs de RPM
não responderão ao jogo/SDK
Page 44

2 Pressione o botão que você deseja denir como o botão
dedupla embreagem. Os únicos botões válidos para isso são
os botões L3 e R3. Os LEDs de RPM piscarão em vermelho
para mostrar que você está no modo de ajuste da posição
daembreagem.
3 Enquanto estiver na sua simulação ou jogo escolhido com
ocarro ainda em uma pista, pressione totalmente os pedais
da embreagem e acelerador. Acione a primeira marcha
e mantenha pressionado o botão menos até que o carro
comece a se mover no jogo. Você pode ajustar o ponto
deação preciso da embreagem usando os botões mais
emenos até car satisfeito com a conguração.
4 Neste ponto, você pode testar a embreagem dupla sem
sair do modo de conguração. É recomendável que você
tente iniciar uma corrida, pare o carro e ajuste o ponto
deação etente novamente até que esteja satisfeito com
odesempenho da embreagem dupla.
5 Pressione o botão Selecionar no meio do dial no volante para
sair do modo de ajuste da embreagem dupla. Os LEDs de RPM
piscarão em uma sequência de verde a azul para mostrar
que a conguração foi salva. Os LEDs de RPM, em seguida,
apagarão e começarão a responder novamente à saída
deRPM dos jogos suportados.
44 PORTUGUÊS
Page 45

REINICIALIZANDO O SISTEMA
CONFIGURAÇÕES DO VOLANTE G HUB
DEEMBREAGEM DUPLA
Pressione e mantenha pressionado o câmbio de marchas
esquerdo, o câmbio de marchas direito e o botão quadrado
pordois segundos.
Os LEDs de RPM piscarão quatro vezes e apagarão para indicar
que o sistema de Embreagem Dupla foi reinicializado.
O botão atribuído ao sistema de embreagem dupla (L3 ou R3)
retornará à sua função normal.
USANDO O LOGITECH G HUB
O Logitech G HUB permite os seguintes recursos no G923:
• Programação de botões com pers que podem ser vinculados
a jogos.
• Ajuste das congurações da roda, como Ângulo de Rotação
eforça do TRUEFORCE.
Sensibilidade
Altera a resposta de saída do volante para ser mais ou menos
sensível. Deixar este controle deslizante em 50% fornecerá
umasaída linear de 1:1. Entre 51% e 100% fará com que o volante
que cada vez mais sensível em torno do movimento central do
volante. O volante entre 0% e 49% ca cada vez menos sensível
em torno do movimento central do volante.
Limite operacional
O G923 possui uma rotação de até 900º graus. Reduzir essa
conguração mudará o ponto em que a roda atingirá a trava
completa da direção. Isso é especialmente útil se você estiver
dirigindo um carro com um ângulo de travamento da direção
real menor, como um carro de Fórmula 1 ou GT3.
Centralização de mola (para jogos sem force feedback)
A maioria dos jogos que suportam force feedback já modelam
oretorno correto para a função central do G923 no carrovirtual.
Recomenda-se que a opção centralização de mola seja
desativada para esses jogos.
• Teste dos vários botões, volante e funções do pedal.
Habilitar a opção centralização de mola permitirá que você
substitua os recursos do jogo e ajuste a força do retorno à força
central usando o controle deslizante fornecido.
Torque
Disponível apenas para jogos suportados pelo TRUEFORCE.
Otorque controla a força geral do force feedback para
oseuG923.
45 PORTUGUÊS
Page 46

Efeitos de áudio
TESTANDO VOLANTE E PEDAIS
Disponível apenas para jogos suportados pelo TRUEFORCE.
Controla a intensidade geral dos efeitos relacionados ao áudio
(nota do motor, faixas de tom de voz, etc.) ao usar títulos
compatíveis com TrueForce.
Se você estiver usando seu G923 em títulos mais antigos que não
suportam TRUEFORCE, o ajuste do force feedback pode ser feito
nos menus de congurações do título do jogo.
CONFIGURAÇÕES DE PEDAIS DO G HUB
Sensibilidade
Altera a resposta de saída dos pedais para ser mais ou menos
sensível. Deixar este controle deslizante em 50% fornecerá uma
saída linear de 1:1. Entre 51% e 100% fará com que o pedal que
cada vez mais sensível em torno do movimento inicial do pedal.
Entre 0% e 49% fará com que o pedal que cada vez menos
sensível em torno do movimento inicial do pedal.
Nas telas de roda e pedais no G HUB, você pode vericar todos
os botões e eixos do seu G923 para garantir que tudo esteja
funcionando corretamente. Para a roda, você também pode ver
o efeito de alterar a faixa operacional.
DÚVIDAS?
Visite logitechG.com/support/g923-ps4 para obter
maisinformações ou entrar em contato com um representante
docliente.
Pedais combinados
Se selecionado, isso denirá os pedais de acelerador e freio
para se tornarem duas metades de um eixo único. Isso ajudará
os pedais a operarem corretamente em títulos de corrida mais
antigos que não suportam eixos separados para pedais.
Nota: se for deixado selecionado, os pedais não se comportarão
corretamente nos títulos de corrida modernos. Se você achar que
apenas um de seus pedais está funcionando quando pressionado
e freando quando liberado, então você deve se certicar de que
esta opção não está selecionada.
46 PORTUGUÊS
Page 47
©2020 Logitech. Logitech, Logitech G, Logi, TRUEFORCE and other Logitech marks are trademarks or registered trademarks
ofLogitech Europe S.A. and/or its aliates in the U.S. and other countries. “ ”, “ Play Stati on”, “ ”, and “ ”
are all registered trademarks of Sony Interactive Entertainment Inc. All rights reserved. All other trademarks are the property
oftheir respective owners.
©2020 Logitech. Logitech, Logitech G, Logi, TRUEFORCE et les autres marques Logitech sont des marques commerciales
oudéposées de Logitech Europe S.A. et/ou de ses sociétés aliées aux États-Unis et dans d’autres pays. « », «PlayStation»,
« », et « » sont toutes des marques déposées de Sony Interactive Entertainment Inc. Tous droits réservés.
Toutes les autres marques déposées sont la propriété exclusive de leurs détenteurs respectifs.
WEB-621-001210.002
 Loading...