

Page 1

Rev: 08.29.2014
Page 1
Solera® Power Awning Owner's Manual
Page 2

TABLE OF CONTENTS
Operation 2
Extending the Awning 2
Adjusting Pitch 3
Fabric Care 3
Manual Override 4
Solera Power® Awning Assembly Webpage 5
Solera Power® Awning Components Webpage 6
Variant Code Information 6
Ordering Replacement Fabric 9
Operation
Extending the Awning
1. Verify the battery is fully charged and connected to the electrical system.
2. Locate the locking latch (Fig. 1), if equipped, on the drive side awning arm and unlock the latch (Fig. 2).
NOTE: This latch is optional and may not be installed.
3. Press and hold EXTEND (Fig. 3A) until the awning is extended completely.
NOTE: Extension is considered complete when the awning valance seam reaches the leading edge of the
awning tube (Fig. 4).
Over extending the awning will roll the awning back up the wrong way and could damage the system
and will void the Limited Warranty.
Tying the roll bar down once extended will not allow the free floating support arms to work as designed
and may cause damage to the awning or RV.
Fig. 1 Fig. 4
Fig. 3
Fabric
A
Rev: 08.29.2014
Fig. 2
B
Page 2
Fabric
Tube
Valance
Solera® Power Awning Owner's Manual
Page 3
Retracting the Awning
1. Verify the battery is fully charged and connected to the electrical system.
2. Press and hold RETRACT (Fig. 2B) until the awning is retracted completely.
3. Locate the locking latch (Fig. 2), if equipped, on the drive side awning arm and lock the latch to secure
the awning in place (Fig. 1).
NOTE: This latch is optional. If not installed, awning is secured and ready for transportation.
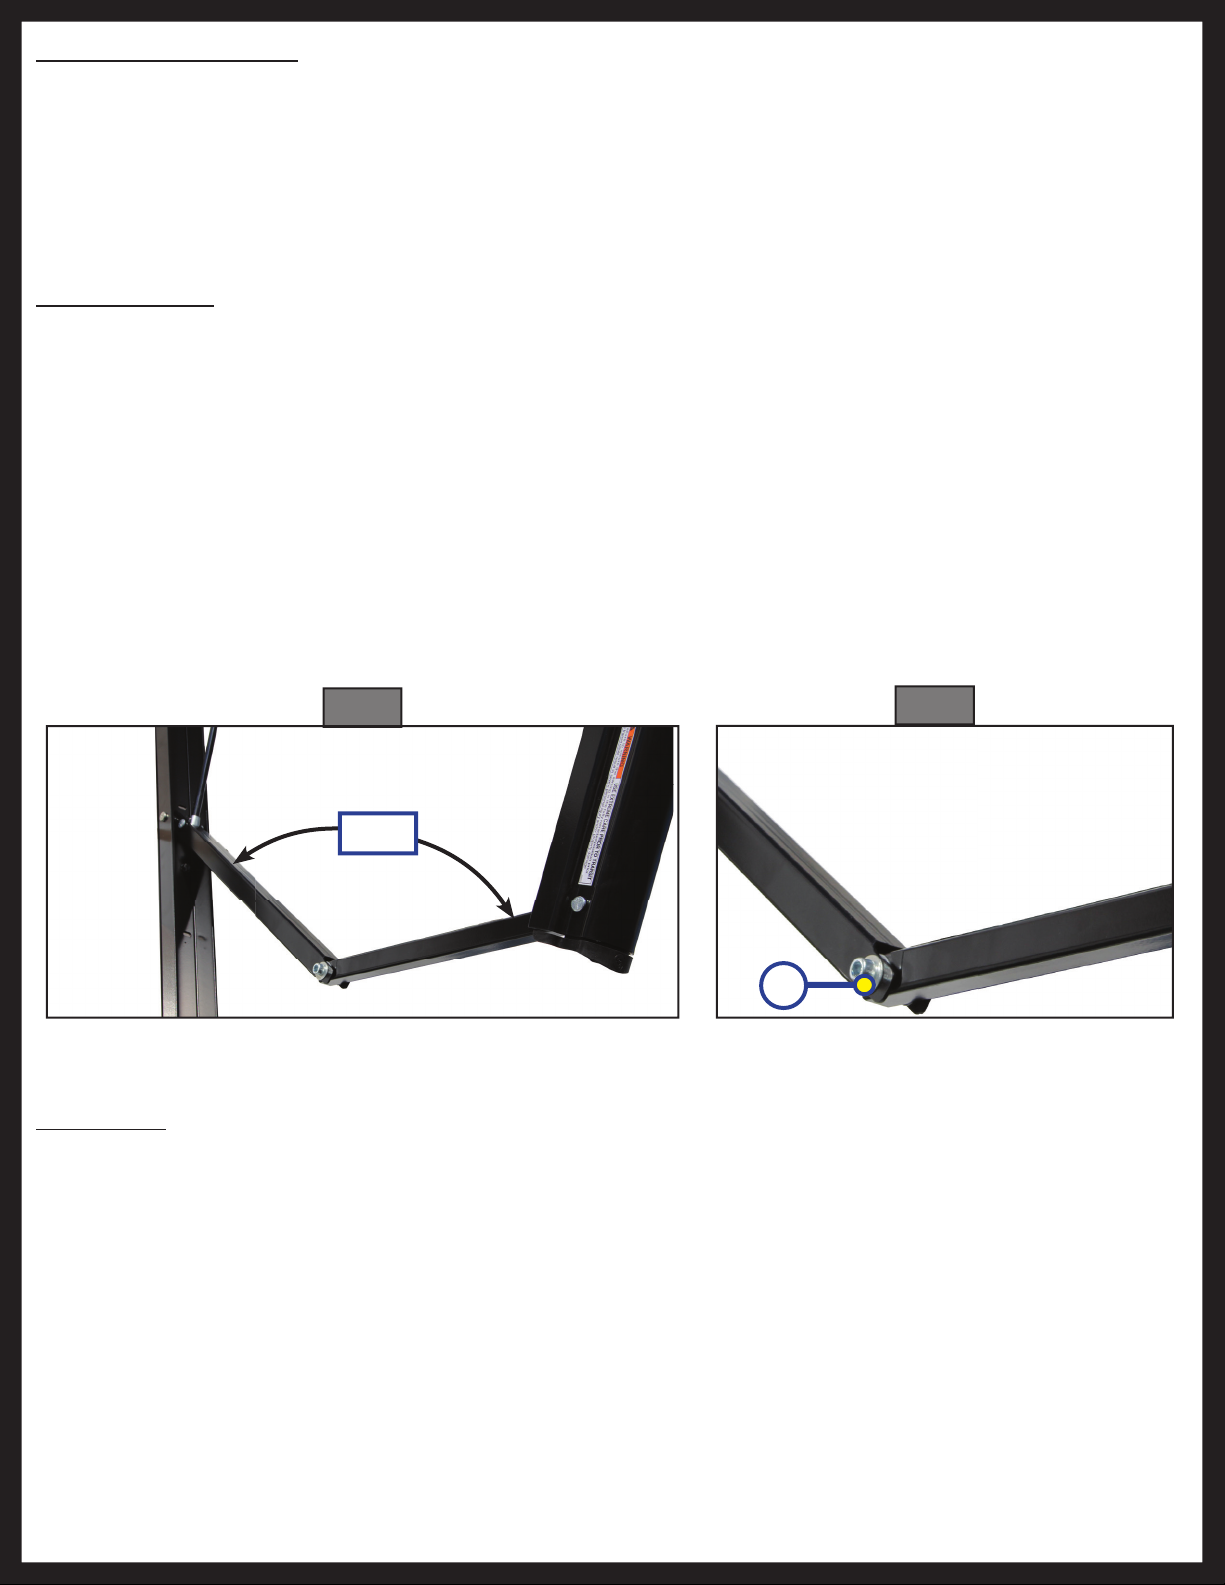
Adjusting Pitch
NOTE: Without manually setting pitch to the awning, the awning will pitch itself to purge excessive water
pooling in one location and may dump a significant amount of water to either end of the awning
without notice.
1. Pitch can be set manually by adjusting the articulating arm to tip one side of the awning to allow water
runoff.
2. Extend awning to desired location.
3. Choose the side of the awning for optimum or convenient water runoff. Pull downward on the joint of the
articulating arm (Fig. 5) until pitch is set to allow for water runoff. Do not push the articulating arm past
straight. This will put tension on the gas strut and can break it. The Belleville washers and bolt allow for the
joint (Fig. 6A) to remain in the position set by the operator.
Fig. 5
Fig. 6
Pitch
A
Fabric Care
If the awning is rolled up while wet, roll it out and let it dry as soon as conditions allow before rolling it up
again. This will help prevent the formation of mildew and add greatly to the life of the awning. Mildew does
not form on the fabric itself, but on the accumulated dust, dirt and grime. Periodically clean vinyl or woven
acrylic fabric using a mixture of ¼ cup of dish soap mixed with 5 gallons of warm water. Liberally slosh the
mixture on the top of the fabric and roll the awning up for 5 minutes. This will apply the mixture to the
bottom as well. Roll it out and hose off with fresh water. Repeat if necessary. Allow to dry before rolling up.
Rev: 08.29.2014
Page 3
Solera® Power Awning Owner's Manual
Page 4

Manual Override
In the event of power loss or motor failure, the awning can be extended and retracted manually. Perform the
following procedure to manually retract the awning.
1. Remove rubber plug from the power head assembly exposing the manual override nut on the motor
(Fig. 7A).
NOTE: The power head is always located on the right side of the awning as it is viewed from outside of the
coach.
2. Using a ⁄” nut driver and power drill, spin the manual override nut counterclockwise to retract the
awning (Fig. 8). A ⁄” socket and ratchet can be used if a drill is not available, however it will take much
longer to retract the awning.
NOTE: Use caution when retracting manually as the use of a step stool or ladder may be required to
completely retract the awning.
3. When awning is completely retracted, remove socket or drive device and replace rubber plug in power
head assembly.
NOTE: The motor’s internal drive system prevents the awning from moving (extend or retract) on its own.
If the motor is damaged or disabled, be sure to secure the awning in the retracted position with
straps before the override nut is released.
During incidents of high wind, heavy rain or extended time away from the unit, it is advisable to retract
the awning completely to prevent damage to the awning and the RV.
Fig. 7 Fig. 8
A
Rev: 08.29.2014
Page 4
Solera® Power Awning Owner's Manual
Page 5

SOLERA® POWER AWNING ASSEMBLY WEBPAGE
AWNINGS
End Cap
Wax Screw
Idler Head
Assembly
Rubber
Grommet
Roll Bar
Drive Head
Assembly
Motor
Power
Feed Cable
Rev: 08.29.2014
Center Support
Assembly
(Ships Loose)
Support Arm
Assembly
Page 5
Gas Strut
Solera® Power Awning Owner's Manual
Page 6

SOLERA® POWER AWNING COMPONENTS WEBPAGE
Variant Code Information
The variant code on Lippert products can assist LCI customers in obtaining additional information about the
product and its components. For replacement part information, locate the variant code as outlined below and
call LCI customer service at 574-537-8900.
Roll bar
Variant Code
A
B
C
D
Callout White Part # Black Part # Description
A 266147 273479 Idler Head Assembly
B 289563 289566 Idler Head Front Cover
C 289564 289567 Idler Head Rear Cover
D 266146 273478 Drive Head Assembly
E 289557 289560 Drive Head Front Cover
F 289558 289561 Drive Head Rear Cover
Rev: 08.29.2014
Page 6
F
E
Solera® Power Awning Owner's Manual
Page 7

G
H
L
I
J
K
M
N O
Callout Part # Description
G 266156 #6 X ½ ZN Screw (fastener for head covers, 6 per cover)
H 299630 #8 End Cap Wax Screw (head to rollbar)
I 118043 Nut ⁄-18 Nylock ZN ST (head to arm)
J 266148 Screw ⁄- 18 X 2 - ¼ (head to arm)
K 266155 Screw #8-32 x ½ PH PNH MACHG ZN FTHD (back cover to mount)
L 275071 Rubber Grommet (around manual override on drive head)
M
N 299419 Screw - # 8 - 15 X ½ PNH ZN SQ A ST (Endcap to Rollbar)
O 178231 #10 x ¾ " Hex, Tek Screw (Cord to Rollbar)
Drive Head Gear Kit Qty. Part# - Description
P
2661301 End Cap for power heads (White)
2661302 End Cap for power heads (Black)
1 266133 - .873" 20 PA 16 DP, D SLOT GEAR
1 266134 - .442" 20 PA 16 DP, CLR ZN GEAR
Rev: 08.29.2014
353964
P
(Only available
as a kit)
1 266136 - .500" 20 PA 16 DP, CLR ZN GEAR
2 266142 - Bushing
1 266143 - Bushing
1 281828 - Bushing
2 266137 - E-Clip ½ "
2 276160 - E-Clip ⁄"
Page 7
Solera® Power Awning Owner's Manual
Page 8

A
B
C
E
Callout White Part # Black Part # Description
295742 295743 Support Arm Assembly (Short, 61") (One Arm)
A
260294 266169 Support Arm Assembly (Pitched, 66 ⁄") (One Arm)
281152 281154 Support Arm Assembly (Flat, 69") (One Arm)
B
280343 Gas Strut; 26"; 124 LBS (for Short and Flat Arm assemblies)
260282 Gas Strut; 124 - 144 LBS (for Pitched Arm assemblies)
C 286576 Screw - #14 - 10 x 1 ½ (arms to coach)
D 282484 Star Washer (for Gas Strut)
E 289373 289374
Awning Center Support Assembly
NOTE: Only required for Solera Awnings greater than 21' in length
D
Awning Fabric and Roll Bar Replacement
To order replacement awning fabric and roll bar for your awning, locate the awning label on the roll bar. Locate the
variant code at the bottom of the label. Call LCI Customer Service at 574-537-8900 and provide the variant code.
Roll bar
Variant Code
Rev: 08.29.2014
Page 8
Solera® Power Awning Owner's Manual
Page 9

A
B
C
D
E
F
Callout White Part # Black Part # Description
A 266149 Motor
B 266132 Screw ¼ - 20 x ¼ IHWH 2N SLF ST (motor to mount)
285499 285500 Switch Kit (Switch, Plate, and Harness)
C
280565 280567 Switch Plate Only
280570 Wire Harness Only
280564 280566 Switch Only
D 285079 285077 Bezel Spacer
E 273007 Power Feed Wires
275070157 2750701692 Wire Cover; 9.75"; Narrow
275070353 2750701888 Wire Cover; 22"; Narrow
F
266138481 2661382017 Wire Cover; 30"; Narrow
266139337 2661391872 Wire Cover; 21"; Wide
266139429 2661391964 Wire Cover; 26.75"; Wide
Rev: 08.29.2014
Page 9
Solera® Power Awning Owner's Manual
Page 10

The contents of this manual are proprietary and copyright protected by Lippert Components, Inc. (“LCI”).
LCI prohibits the copying or dissemination of portions of this manual unless prior written consent from an
authorized LCI representative has been provided. Any unauthorized use shall void any applicable warranty.
The information contained in this manual is subject to change without notice and at the sole discretion of LCI.
Revised editions are available for free download from www.lci1.com.
Please recycle all obsolete materials.
For all concerns or questions, please contact
Lippert Components, Inc.
Ph: (574) 537-8900 | Web: www.lci1.com | Email: warranty@lci1.com
Rev: 08.29.2014
Page 10
Solera Power Awning Owners Manual
 Loading...