

Page 1

User
Guide
RE4100W
Page 2

Introduction
This User Guide can help you connect the extender to your network and solve common setup
issues. You can find more help from our award-winning, 24/7 customer support at
Linksys.com/support.
Contents
Overview . . . . . . . . . . . . . . . . . . . . . . . . . . . . . . . . . . . . . . . . 1
How to install the range extender................ 2
How to access the browser-based utility .......... 5
Using range extender settings …………… X
Using Wi-Fi Protected Setup..................... 7
How to use Site Survey.................. ........ 9
Troubleshooting................................ 10
Specifications.................................. 13
Page 3
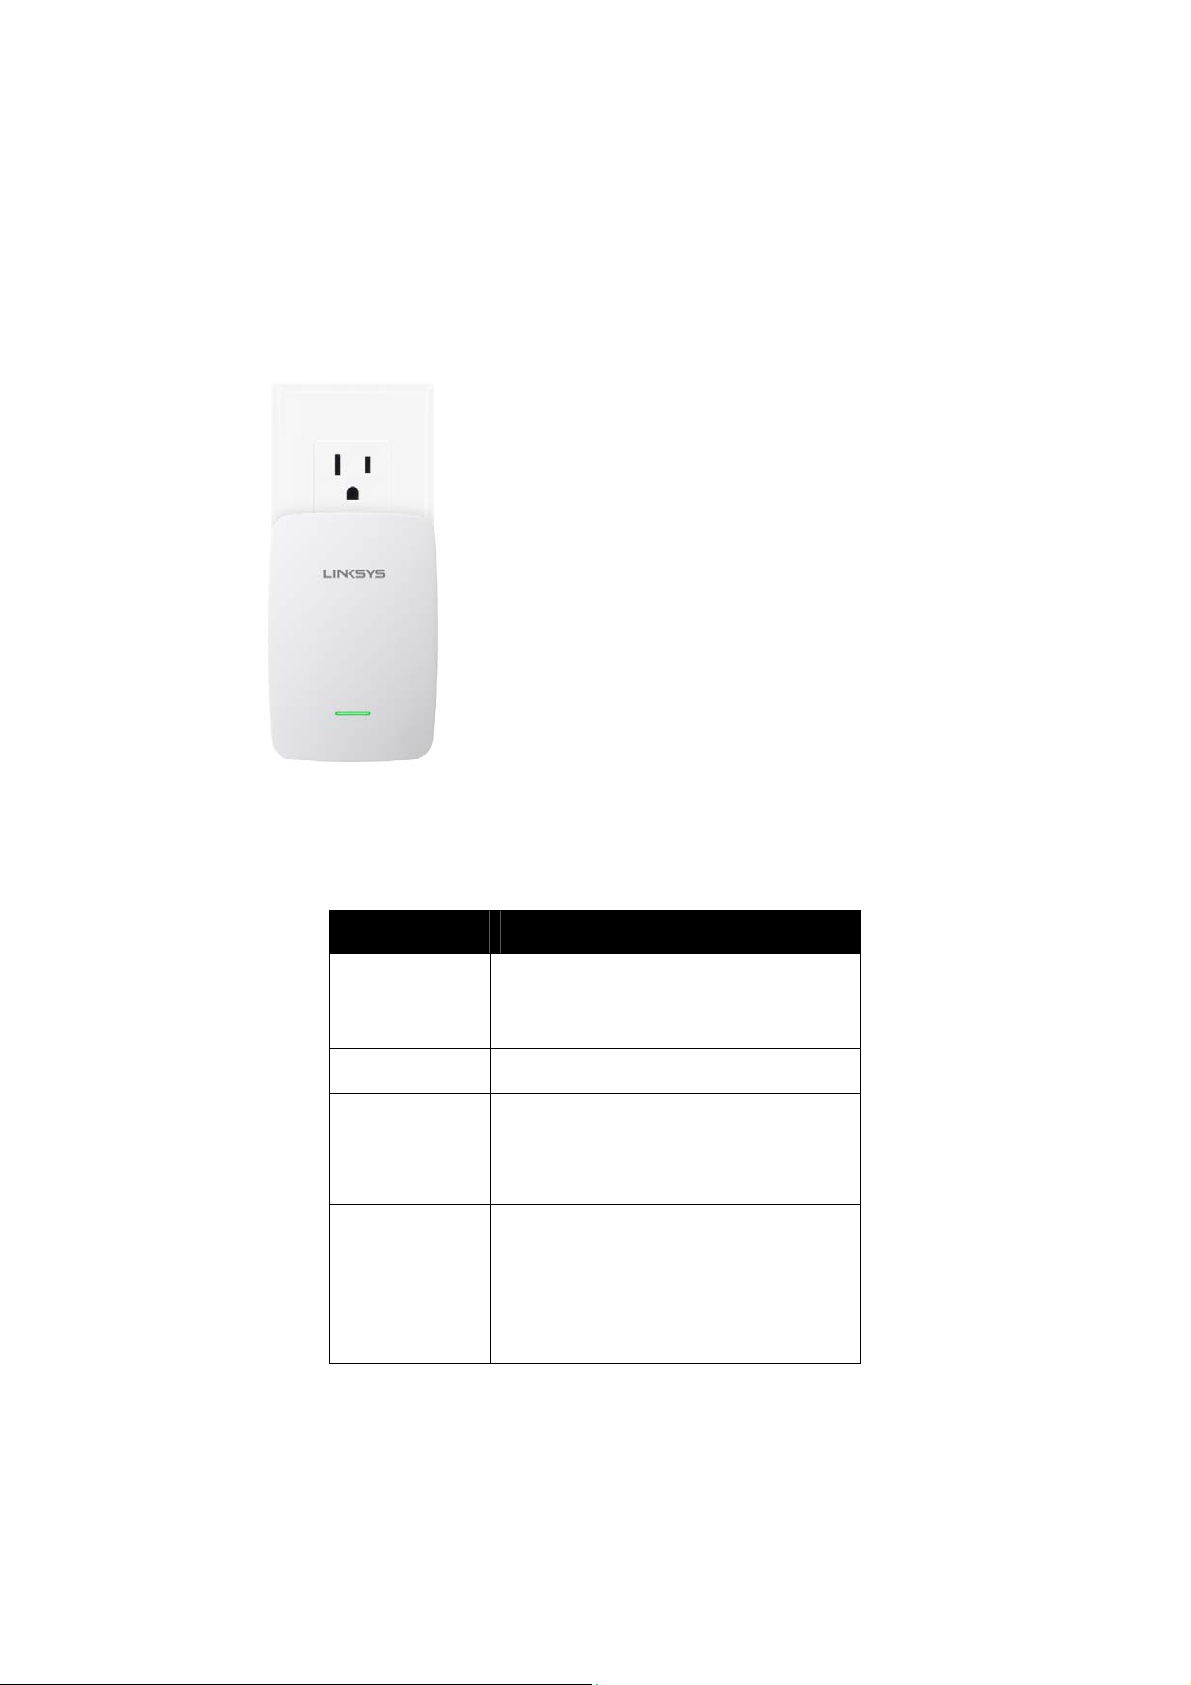
Overview
•
•
•
•
Front
The light on the front of the range extender gives you information about power and Wi-Fi
Protected Setup. Use Wi-Fi Protected Setup to automatically and securely connect compatible
wireless devices such as wireless printers.
Power Light Status/ description
Blinking Green
Solid Green
Solid amber
Blinking Orange
Powered on
• Resetting to factory defaults
• Upgrading its firmware
Ready to use
Weak connection with the router
Fix: Unplug the extender, and move
it closer to the router
Cannot establish a connection
• Other error
Fix: Unplug the extender, plug it back
in, wait two seconds, reconnect to your
network
Page 4
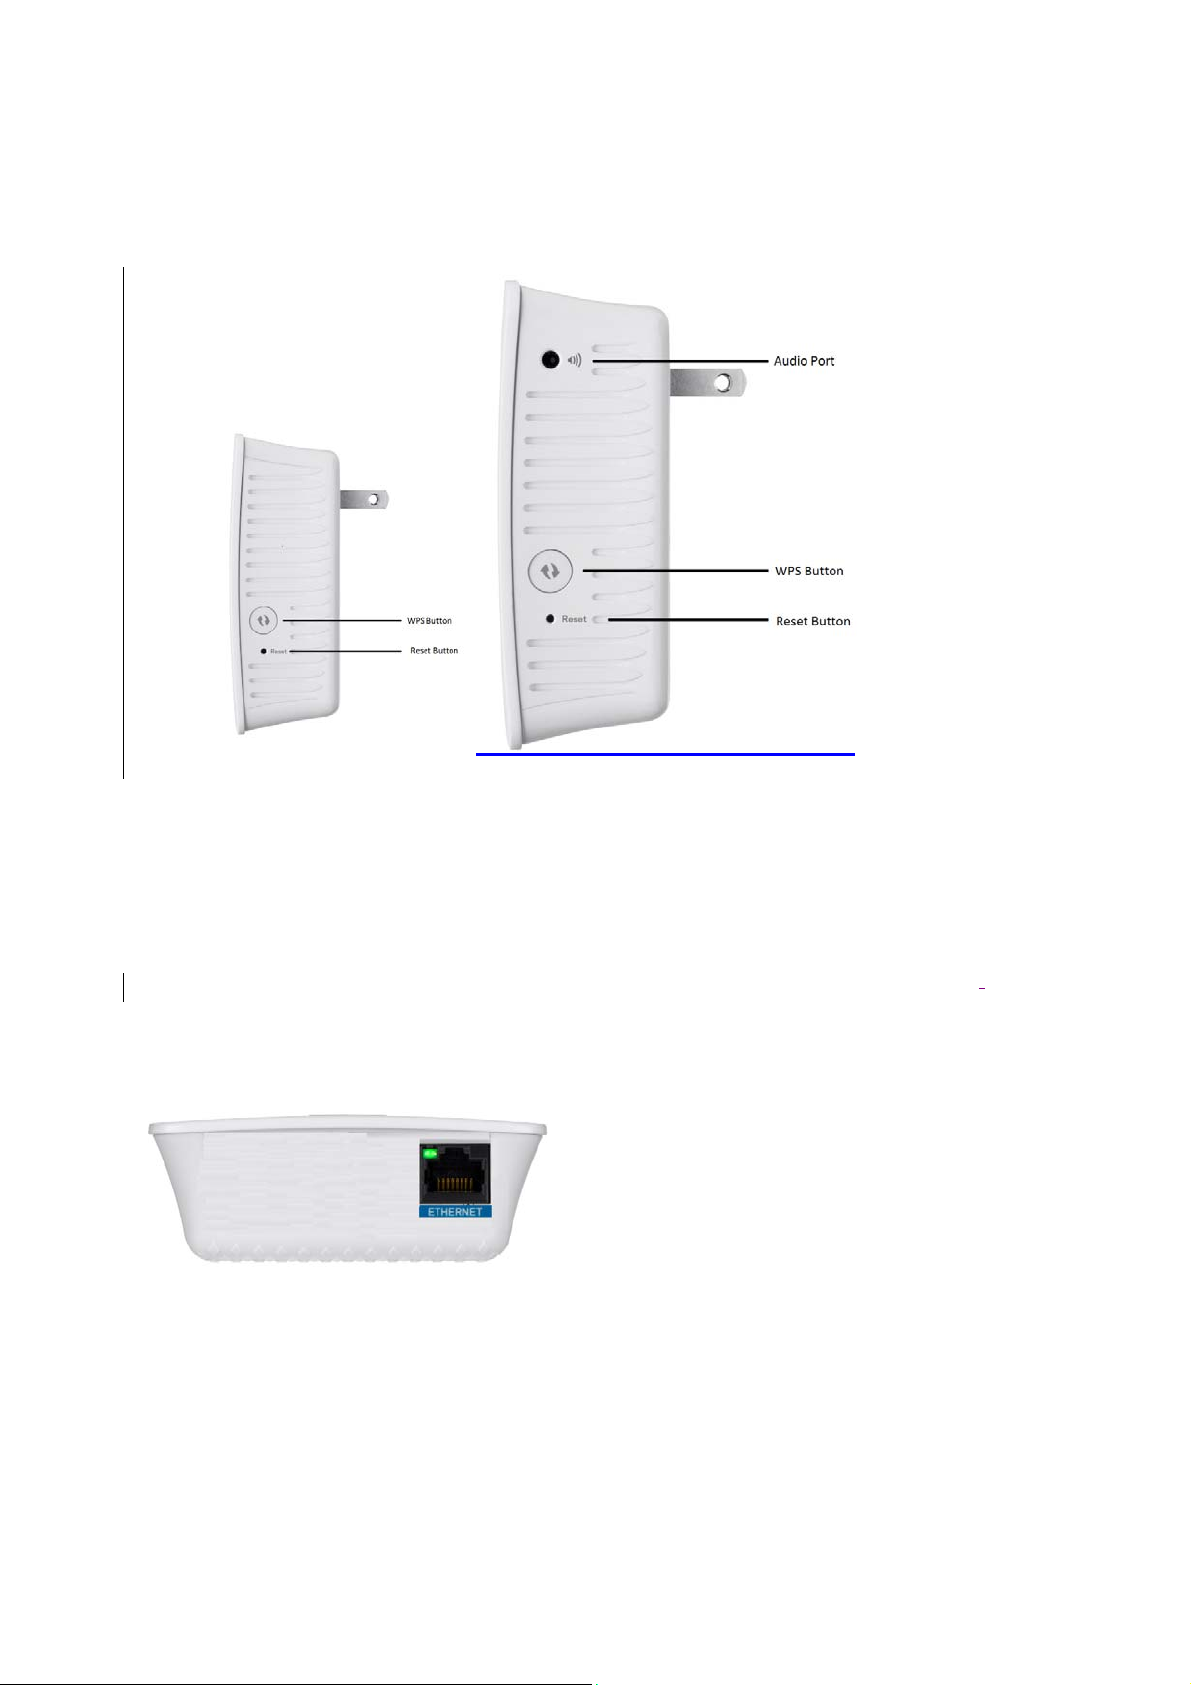
Side
Power Switch European versions only.
Audio Port Connect the extender to your speaker.
Wi-Fi Protected Setup Button Use Wi-Fi Protected Setup to automatically and securely add
compatible wireless devices to your network. Refer to Using Wi-Fi Protected Setup on page 7.
Reset Press and hold for about five seconds to reset to factory defaults. You can also restore
the defaults from the Administration > Factory Defaults screen in the extender’s browser-
utility.
based
Bottom
Ethernet (blue) Connect wired devices to your wireless network with Ethernet (network) cables.
The green light turns on when an Ethernet device is connected and active on this port. The light
blinks when the extender is sending or receiving data over the Ethernet port.
Page 5

How to install the range extender
Beforesetup,unplugordisconnectanyrangeextendersonthenetwork.
1. Plug in the range extender midway between your router and the area without Wi-Fi.
Be sure you have at least 50% of your router’s Wi-Fi signal at that point on the device
you will use for setup. The setup software will help you find the best spot if you have
trouble.
2. Wait for a solid light on the cover of the range extender. It could take up to two minutes.
On a computer, phone or tablet, connect to the Wi-Fi network “Linksys Extender Setup.”
• Windows 7 and Windows 8 will ask you, “Do you want to set up your network?” Click
the link, “Connect to network without setting it up.”
3. If setup doesn’t start automatically, open a browser to http://extender.linksys.com
TIP
You can also connect the range extender by using Wi-Fi Protected Setup. For more
information, see “Using Wi-Fi Protected Setup” on page 7.
How to access the browser-based utility
After setting up the extender use the extender’s browser-based utility to change any
settings.
Windows XP:
TIP
To follow these instructions, enable UPnP:
1. Click Start, Control Panel, Add or Remove Program, then click Add/Remove
Windows Components.
2. Select Network Services, then click Details.
3. Select UPnP User Interface, then click OK.
1. Open Windows Explorer. Click My Network Places on the left panel.
2. Look for the RE4100W icon on the right panel. (You might be required to change the firewall
settings to allow the display of networked computers. Refer to your operating system’s help
for instructions.)
3. Double-click the RE4100W icon. A web browser will open and prompt you to enter your User
name and Password.
4. Leave the User name field blank, and enter the default password “admin.”
5. Click OK.
Windows 8, Windows 7, or Vista:
Page 6

1. Open Wind ows Explorer (File Explorer in Window s 8). Cl ick Network. Look for the RE4100W
icon on the right panel. (You might be required to change the firewall settings to allow the
display of networked computers. Refer to your operating system’s help for instructions.)
2. Right-click the RE4100W icon. Click Properties. Click on the address link in Device
webpage. A web browser will open and prompt you to enter a User name and Password.
3. Leave the User name blank, and enter the default password “admin.”
4. Click OK.
Mac OS X:
1. Open Safari. Click the book icon. Click Bonjour on the left panel. Look for the RE4100W
icon on the bottom right panel.
2. Double-click the RE4100W icon.
3. Leave the User name blank, and enter the default password “admin.”
4. Click OK.
Using range extender settings
Click Help on the right side of the screen for additional information on the screen’s
options.
Changes to settings will not be effective until you click Save Settings at the bottom of
the screen. You also can click Cancel Changes to clear any changes.
Page 7

Page 8

Using Wi-Fi Protected Setup
Wi-Fi Protected Setup™ makes it easy to connect your extender to your network, and
connect other devices to your network through the extender.
Wi-Fi Protected Setup light activity
WPS Light Status/ description
Blinking
Green
Solid Green
Blinking
amber for two
minutes
• When WPS connection is in
process
• When WPS connection is
successful
• When WPS cannot establish
connection or encounters a
problem
Fix: wait a few seconds after LED
stops blinking and try again
Connecting the extender to an existing access point
If your access point or router supports it, you can use Wi-Fi Protected Setup to connect
the range extender to the access point or router. Choose from the setup methods
below to connect the extender.
NOTE
If you have an access point or a router that does not support Wi-Fi Protected Setup,
note the wireless settings, and then manually configure the extender.
Page 9

Connecting with the Wi-Fi Protected Setup Button
Use this method if your router or access point has a Wi-Fi Protected Setup button.
1. Press the Wi-Fi Protected Setup button on the extender.
2. Click the Wi-Fi Protected Setup button on the router’s Wi-Fi Protected Setup
screen (if available), OR press and hold the Wi-Fi Protected Setup button on the
router for one second. When the connection is complete, the Wi-Fi Protected Setup
light on the extender will be solid.
3. If you used the extender’s Wi-Fi Protected Setup screen, click OK in that screen
within two minutes.
NOTE
If you have a dual-band router and wish to connect to both bands, you will have to
perform the WPS setup twice. The first connection will be on the 2.4 GHz band.
Page 10

Connecting with the range extender’s PIN
The Wi-Fi Protected Setup PIN (Personal Identification Number) can be found on the
product label on the back of the extender. You can use this method only if your router’s
administration utility has a Wi-Fi Protected Setup menu.
1. Enter the extender’s PIN into the appropriate field on the router’s Wi- Fi Protected
Setup screen. Click Register. When the connection is complete, the Wi-Fi Protected
Setup light on the extender will be solid.
2. Click OK.
Connecting devices to your network through the extender
Choose from the methods below to connect devices that support Wi-Fi Protected Setup
to your network.
NOTE
Repeat the instructions for each client device that supports Wi-Fi Protected Setup.
Page 11

Conn
e
s
k
e
n
i
u
s
c
e
k
n
k
h
s
h
e
n
k
w
a
w
o
s
e
h
e
w
w
b
r
o
o
e
r
w
e
s
o
e
e
a
e
W
i
S
S
d
W
r
F
c
n
e
s
e
e
s
S
o
o
o
P
o
i
d
v
n
F
t
e
’
s
t
t
t
e
y
h
S
x
S
s
e
o
n
p
x
e
h
p
e
u
W
n
r
t
d
e
h
N
W
h
h
a
o
t
e
P
O
t
r
n
c
r
n
s
t
i
i
o
Us
ecting
this meth
ith the
d if your cl
i-Fi Pr
ent device
tected
has a Wi-F
etup B
i Protected
tton
Setup butt
n.
1. Pre
2. Clic
scre
exte
Setu
3. If us
min
Conn
Use thi
Identifi
1. Ent
Setu
2. Clic
con
3. Clic
will
s the Wi-Fi
the Wi-Fi
n, OR pre
der for on
p light on t
ng the ext
tes or you
ecting
method if
ation Num
r the PIN f
p screen.
Register
ection is c
OK on th
ave to sta
Protected
Protected
s and hol
second.
e extende
nder’s Wi-
ill have to
ith the
your client
er).
om the clie
n the exte
mplete, th
extender’
t over.
etup butt
etup butt
the Wi-Fi
hen the c
will be sol
i Protecte
start over.
lient de
device has
nt device i
der’s Wi Wi-Fi Pro
Wi-Fi Prot
n on the cli
n on the e
rotected
nnection i
d.
Setup scr
ice’s PI
a Wi-Fi Pr
the field o
i Protected
ected Setu
cted Setu
ent device.
tender’s
etup butto
complete,
en, be su
N
tected Se
the exten
Setup scr
p light on t
screen wi
i-Fi Protec
on the sid
the Wi-Fi
e to click
up PIN (Pe
er’s Wi-Fi
en. When
e extende
thin two mi
ed Setup
e panel of
rotected
K within tw
rsonal
Protected
he
will be sol
utes or yo
he
d.
u
Conn
Use thi
1. On t
2. Clic
Ho
Site Su
within r
scre
con
ecting
method if
e client d
n. (It is al
ection is c
OK on th
to us
rvey gives
nge of th
ith the
your client
vice, enter
o listed on
mplete, th
extender’
Site
snapshot
extender.
xtender
device ask
the PIN lis
the produc
Wi-Fi Pro
Wi-Fi Prot
urve
of all neig
s PIN
for the e
ed on the
label on t
ected Setu
cted Setu
boring acc
tender’s PI
xtender’s
e back of t
p light on t
screen wi
ss points
.
i-Fi Prote
e extende
e extende
thin two mi
nd wireles
ted Setup
r.) When th
will be sol
utes.
routers
e
d.
Page 12

To open the Site Survey page:
1. Log in to the browser-based utility (see “How to access the browser- based utility”
on page 5).
2. Click the Wireless tab. Click the Site Survey page.
3. Select—To connect to a wireless network, click the button next to the wireless
network name (SSID) in the Select column, and click Connect.
4. SSID—Displays the name of neighboring wireless networks.
5. GHz—Displays the radio band (in GHz) of the neighboring wireless networks
6. Signal Strength—Displays the relative position of the neighboring access points
by indicating the power of the wireless signal received: 1 bar= 20%,2 bars=40%, 3
bars=60%, 4 bars=80%, 5 bars=100%. If no bar is displayed, the extender is located
too far away from the upstream access point. Try to keep the signal strength
between 60% and 100% for optimum performance.
7. Security—Displays the mode of security in use by the neighboring APs. If a network
supports Wi-Fi Protected Setup, the Wi-Fi Protected Setup icon is also displayed.
To connect your extender with an access point or router in Site Survey, you will
need to know the password or passphrase of the network on that device.
1. Select the network name (SSID) that you want to repeat with your extender by
clicking the corresponding button in the Select column.
Page 13

2. Click Connect. When prompted, enter the password or passphrase used to secure
your wireless network. The type of security information required in this screen must
match your access point or router’s wireless security settings.
3. Click Save. Your extender wireless parameters should be configured. The wireless
interface will restart, and the extender will connect to the access point or router you
have chosen.
6.Cross-Band
Cross-Band is the simultaneous use of both bands for high-speed data transfer and
uninterrupted streaming and gaming.
7.Wireless Music Playback
Page 14

The extender allows you to stream music on your network and play on speakers
through the audio port. This list of supported media players is subject to change with the
release of new software or mobile apps.
• Windows users can stream music with Windows Media Player12.
• Mac users can stream music with proprietary software or the SofaPlay app..
• Android users can stream music with MediaHouse, UPnPlay, Skifita, ArkMC,
BubbleUPnP, Pixel Media, and 2Player 2.0.
• IOS devices including iPhone, iPad or iPod can stream music with proprietary
software or other apps such as, , ArkMC, Smartstor Fusion, , Mconnect, and DK
UPnP/DLNA.
• The extender supports MP3, FLAC, WAV, WMA and AAC file formats, as long as
those formats are supported by the device and app doing the streaming.
The 3.5mm stereo port supports earphones and powered speakers
8. Troubleshooting
NOTE Your RE4100W works on 2.4GHz network.
You cannot get your extender connected
Check the position of your router and extender
• For first-time setup, you may need to place the extender closer to the router.
After you’ve set up your extender, you can unplug it and move it to the final
location.
• To reduce signal obstructions, try alternate locations for the router and extender.
• Avoid placing the router and extender near metal objects, masonry walls,
and reflective surfaces such as glass or mirrors.
Page 15

•
r
i
a
c
n
a
t
c
n
e
a
v
n
o
m
W
m
w
u
e
u
r
c
r
n
s
a
T
e
e
r
x
e
m
a
w
p
p
c
n
o
e
c
m
o
e
e
n
e
o
c
e
e
l
o
o
m
m
v
x
o
h
t
a
n
a
n
e
W
d
d
e
.
r
t
Avoid pla
cause sig
ing the ro
al interfe
ter and e
ence.
tender n
ar other e
ectronics
hat may
If you’
Setup
You c
To ac
you cu
accide
For M
To fix
1.
2.
e using W
ndicator s
nnot acc
ess your r
rrently ha
tally con
c instructi
he proble
On your
The icon
you are ru
Click Vie
i-Fi Prote
tops blinki
ss your
nge exte
e wireles
ected to
ns, see “
on Wind
indows d
ight look
nning.
Available
ted Setup
ng before
ange ext
der, you
Internet
different
o fix the
ows com
sktop, rig
different d
Wireless
to conne
trying to
nder
ust be c
ccess, th
ireless n
roblem o
uters:
ht-click th
epending
Networks.
t, wait unti
ake the c
nnected t
problem
twork.
Mac co
wireless
n which
l the Wi-Fi
nnection
your ow
ay be th
puters:” o
icon in th
ersion of
Protecte
gain.
network.
t you hav
page 12
system t
indows
If
ay.
Select yo
3.
computer
The nam
r network
was conn
of the co
name. Cli
cted to a
rect netw
k Conne
other wir
rk, Bronz
t. In the e
less netw
Eagle in t
ample be
rk name
is examp
low, the
JimsRou
le, is
er.
selected.
Page 16

t
h
a
t
m
n
o
a
g
r
k
m
r
a
c
o
s
w
s
n
n
n
c
s
p
c
m
a
a
e
p
e
n
a
r
g
o
d
S
x
o
y
n
d
s
u
b
o
w
n
e
e
o
i
e
d
s
k
d
4.
If you are
Key) into
prompted
he Netwo
to enter a
k key and
network k
Confirm
y, type y
etwork ke
ur passw
fields. Cl
rd (Secur
ick Conn
ty
ct.
You shoul
d now be
ble to ac
ess the r
nge exten
der’s bro
ser-base
utility.
To fix
1.
2.
3.
he proble
In the me
Linksys C
In the exa
network n
BronzeEa
Select the
Type you
field. Clic
on Mac
u bar acr
nnect ha
mple belo
med Jim
le in this
wireless
wireless
OK.
omputer
ss the to
automati
, the co
Router. T
example, i
etwork n
etwork p
:
of the sc
ally assi
puter was
he name
s selecte
me of the
ssword (
een, click
ned your
connecte
f the Link
.
router yo
ecurity Ke
the Wi-Fi i
etwork a
to anoth
ys E-Seri
want to c
y) into the
con.
ame.
r wireles
s networ
nnect to.
Passwor
,
You s
ould now
be able to
access th
range e
tender’s
rowser-ba
sed setup
utility
You h
ve inter
ittent co
nection
roblems
Page 17

Plug in the range extender midway between your router and the area without Wi-Fi. Be
sure you have at least 50% of your router’s Wi-Fi signal at that point on the device you
used for setup.
9.Specifications
RE4100W
Model Name Linksys RE4100W
Model Description Dual-band Wireless-N Range Extender
Model Number RE4100W
Standards IEEE , 802.11a, 802.11n, 802.11g, 802.11b,
802.3u
Ports Fast Ethernet,
Buttons Reset, Wi-Fi Protected Setup™, Power
(European model only)
LEDs Power/Wi-Fi Protected Setup, Ethernet (link,
activity)
Antennas 2 internal
Detachable (y/n) No
Wireless Security Wi-Fi Protected Access™ 2 (WPA2), Wi-Fi
Protected Access™ (WPA), WEP
Security Key Bits Up to 128-bit encryption
Environmental
Dimensions 2.64” x 1.49” x 4.13” (67 x 38 x 105 mm)
Weight 5.12 oz (145 g)
Power Internal AC/DC power supply 100-240V,
50/60Hz. 2.0A
Certification FCC, ICES-003, RSS210, CE, Wi-Fi (IEEE
802.11a/b/g/n), WPA2™, WMM®, Wi-Fi
Protected Setup™
Operating Temperature 32 to 104°F (0 to 40°C)
Page 18

Storage Temperature -4 to 140°F (-20 to 60°C)
Operating Humidity 10 to 80% noncondensing
Storage Humidity 5 to 90% noncondensing
Specifications are subject to change without notice.
Visit linksys.com/support for award-winning 24/7 technical support
BELKIN, LINKSYS and many product names and logos are trademarks of the Belkin
group of companies. Third-party trademarks mentioned are the property of their
respective owners. Licenses and notices for third party software used in this product may be
viewed here: http://support.linksys.com/en-us/license
http://support.linksys.com/en‐us/gplcodecenterforquestionsorGPLsourcecoderequests.
. Please contact
© 2014 Belkin International, Inc. and/or its affiliates. All rights reserved.
LNKPG‐00125A00
 Loading...